1. Introduction
The noise and vibration from train operations create noise pollution for residents living near rail tracks, gradually deforms rail track structures, and increase maintenance costs. Therefore, accurate measurement of railway noise provides the essential data needed to analyze and predict such noise and helps to monitor and preventively manage track conditions.
Railway noise can be classified into traction, rolling, and aerodynamic noise. While aerodynamic noise is generated by friction of the front head, body, pantograph, and space between cars with air during high-speed operation, traction noise is caused by a power source such as an engine, traction motor, colling fans, and equipment installed under the car body [
1]. Rolling noise is generated by unevenness of the wheel/rail running surface. Rolling noise is also the most important source of noise at the speed domain of 30–250 km/h, which is the typical operating speed of urban train [
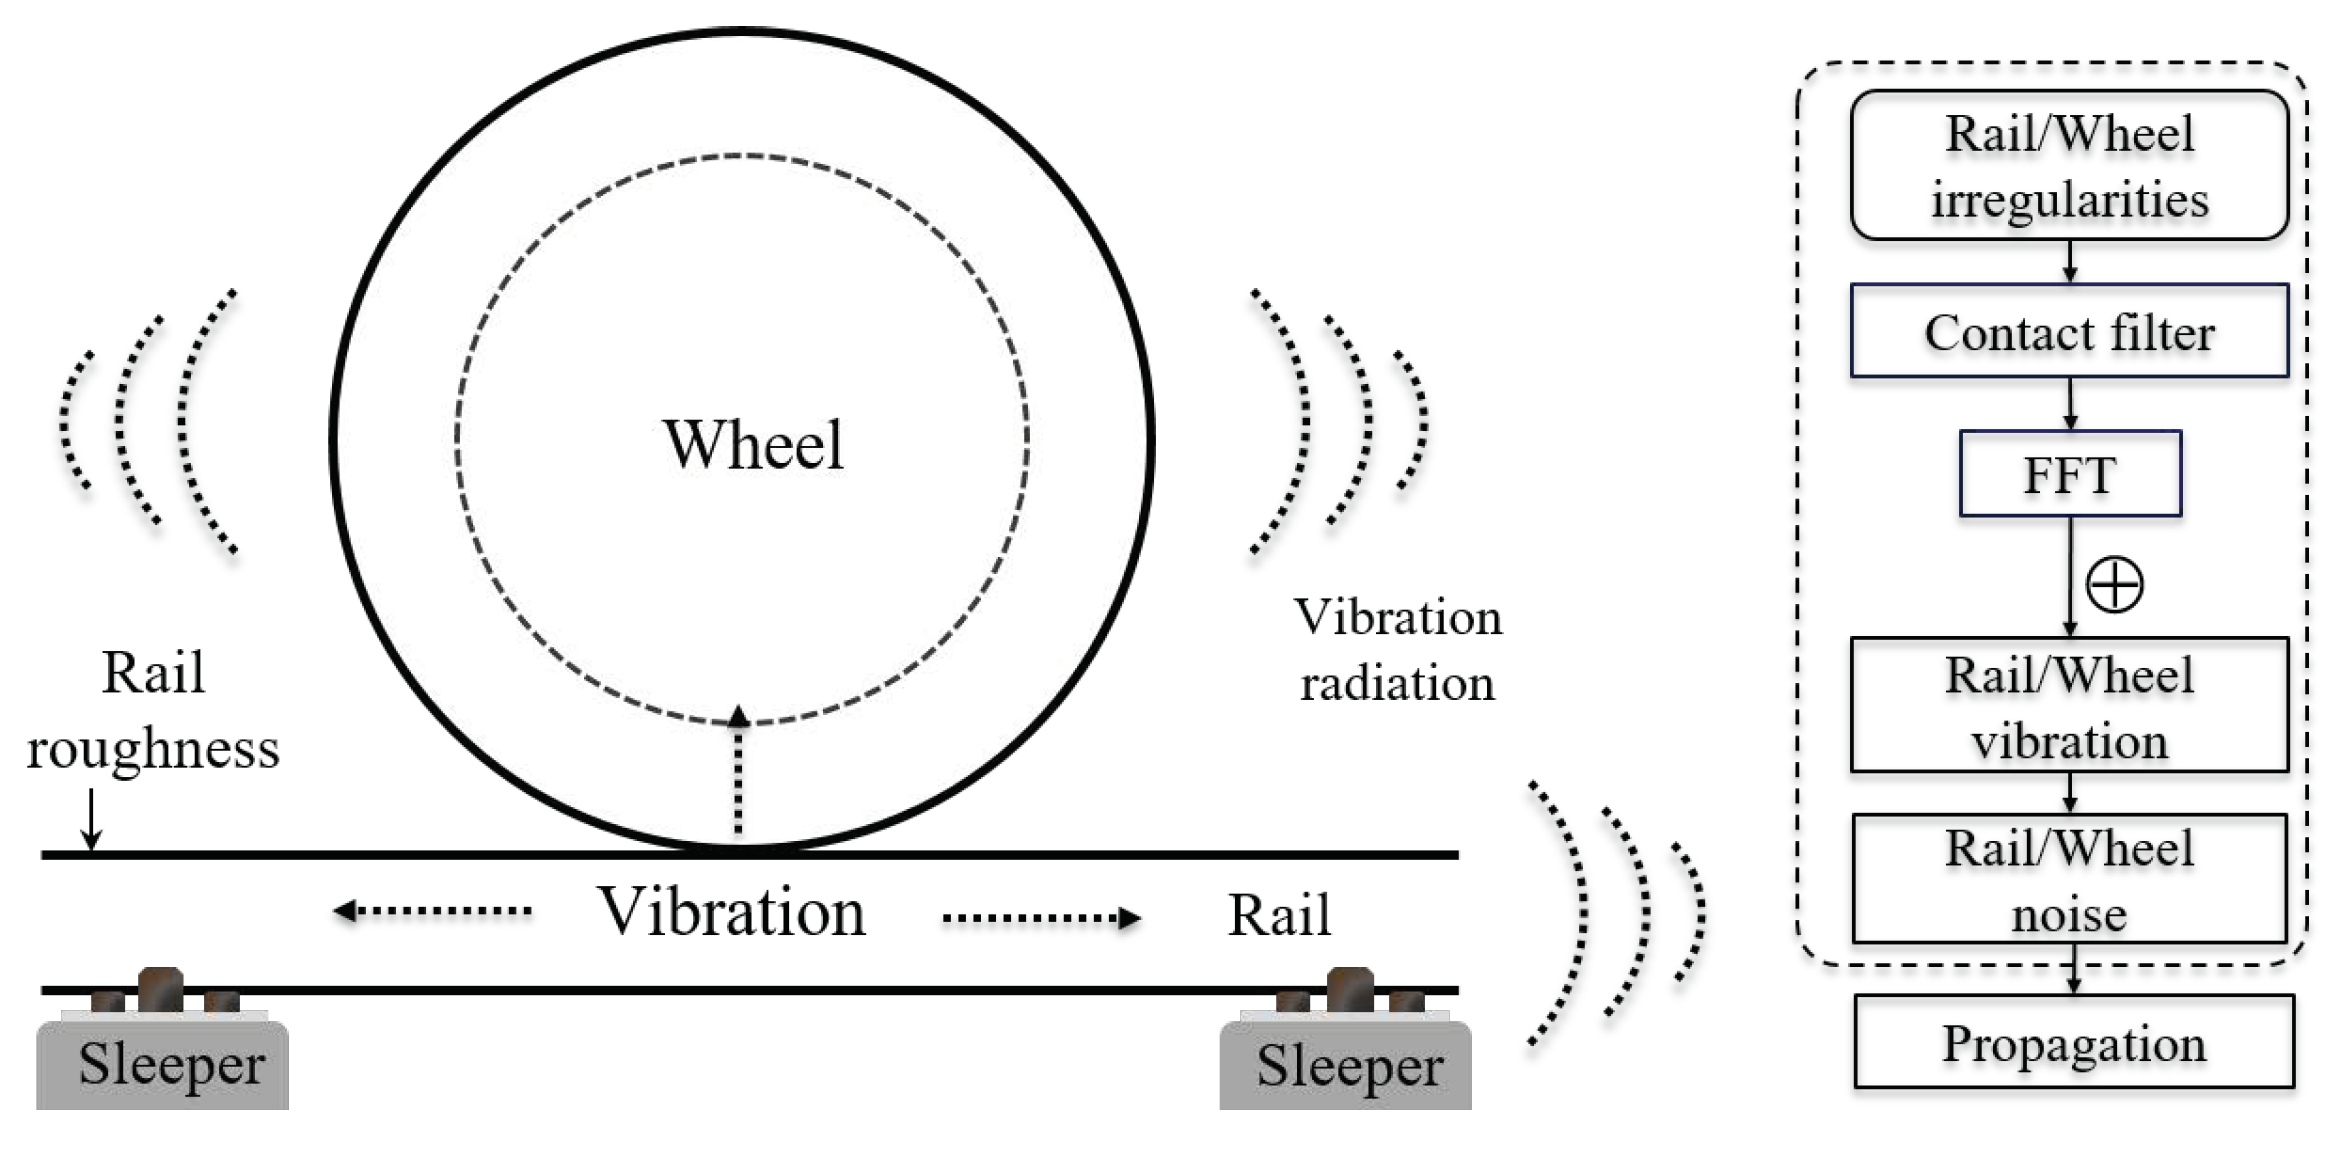
2]. Relatively, the impact of traction noise is greatest at low speeds while the impact of aerodynamic noise becoming greatest at higher speeds. As shown in the TWINS model [
3,
4] in
Figure 1, rolling noise is based on the theory that irregularities of the wheel and rail running surfaces cause the wheel and rail to vibrate relative to one another; these vibrations are transmitted through the structures and thereby, radiate noise [
4,
5,
6,
7]. As such, measuring, analyzing, and predicting rolling noise caused by contact surface irregularity is critical to managing railway noise related to train operations [
8,
9]. In this, the accurate measurement system is critical and also main focus of this paper.
The surface irregularities (“roughness”) of a railway track can be expressed as a function of wavelength, with each wavelength related to the frequency generated by the noise according to speed. Irregularities with a wavelength
(in m) produce excitation at a frequency
, where V is the train speed in m/s. Therefore, for a frequency range 100–5000 Hz, and normal train speeds (50–160 km/h), roughness with wavelengths approximately 3–450 mm needs to be measured [
3].
The wavelength of acoustic roughness related to rolling noise increases with the speed of the train on the rail. A rail surface with a long wavelength generates dynamic stress and causes structure-born noise (0 Hz–100 Hz), while the relatively short wavelength on the rail surface, defined by rail surface irregularity or acoustic roughness of the rail is the main cause of air-born noise (30 Hz–5 kHz) transmitted from a high-frequency domain to the air [
10]. The purpose of this paper was to measure acoustic roughness amplitude (0.1–100 µm) at the frequency band of 500–2000 Hz for general urban train operational speeds (50–120 km/h) and their wavelength of 7–70 mm. International standards specify the wavelength ranges used in measurement of acoustic roughness and prediction of rolling noise to be 3.15–630 mm (EN ISO 3095) [
11], 3.15–250 mm (EN 15610) [
12], and 10–1000 mm (EN 13231-3) [
13].
Various mobile measurement systems are available to measure acoustic roughness and analyze rolling noise. Measurement of rail surface roughness uses an acceleration sensor installed on a mobile platform [
14] or displacement sensor fixed on a platform, which is generally mounted on a trolley-type mobile measurement system [
15]. Other methods include a fixed system installed on a rail to move non-contact sensors, such as a laser displacement sensor. The recently developed method using a displacement sensor in contact with rail surface measures relative displacement from upper platform to rail surface to observe displacement fluctuations caused by surface unevenness when the measurement system platform moves while maintaining a specific height from the surface and converting those fluctuations into rail surface roughness. However, such a moving platform results in inaccurate amplitude and phase of the measured values since the reference position for measurement is not fixed and the sensor can be inclined. Therefore, new ways like the chord offset synchronizing method, which assumes that the rail surface is a sinusoidal wave consisting of various wavelengths and uses multiple sensors so that each one compensates for the measured values of the others, have been proposed and used to make up for the structural shortcomings of mobile measuring systems equipped with displacement sensors [
16,
17].
This paper proposes reducing deviation and increasing precision in measuring acoustic roughness of rail surfaces with only two sensors, thereby improving the three-sensor chord offset synchronizing method. In particular, only with two sensor-based algrorithms, we have verified that the proposed algorthm can sucessfully reduce the overamplication problem of specific wavelengh which is related to the eccentricity of wheel center in the mobile platform. The proposed algorithm was also validated through a field test of railway operation track.
2. Measurement of Rail Acoustic Roughness and Method
The methods of longitudinal measurement of rail surface roughness using a mobile trolley-type device include indirect calculation of displacement between the platform and the rail surface by double integration using an acceleration sensor and direct calculation of surface displacement using a displacement sensor [
14,
15,
18]. Although accelerometer-based measuring systems using an acceleration sensor do not require reference data to measure rail surface and can thus be easily applied to a mobile measurement platform, they are sensitive to vibration of the measurement system itself and thus, additional means are needed for dynamic isolation of the acceleration sensor and the fixed platform [
19]. The resulting values are also very sensitive to measurement speed during manual measurement. Moreover, using double integration to calculate displacement value from measured acceleration value is the main cause of reduced accuracy and numerical error [
20]. Therefore, mobile measuring systems using displacement sensors have recently seen wider use.
2.1. Chord Offset-Based Measurement
Although a measurement system using a displacement sensor can directly measure the displacement of a rail surface, the measured value differs from actual rail surface roughness since the sensor only measures the relative displacement while fixed on a moving platform. The system compensates for these errors by assuming the rail surface is a sinusoidal wave with amplitude Y and wavelength
, defining the ratio of the length of the measurement system (chord length, L) to the sensor position, and calculating the transfer function of rail roughness and the measured value [
21]. However, specific wavelengths of rail surface can be unmeasureable or overamplified depending on the position of sensor on the platform. When considering that rolling noise has an important wavelength
mm, an analytical method reflecting the measurement wavelength range is needed for accurate analysis of rail acoustic roughness.
Therefore, the multi-sensor chord offset method, using the compensating method with multiple sensor’s measurement, has been used in the analysis of acoustic rail roughness to get around being confined to measuring a specific wavelength range in a compact mobile measurement system [
22]. While the conventional chord offset method is able to analyze measured values in the sinusoidal form, it has a limited correctable wavelength domain and lower measurement accuracy if there are irregular spikes or pits on the rail surface. Additionally, the multi-sensor chord offset method requires at least three sensors to measure the acoustic roughness of the rail surface correctly.
A sliding surface contact method may be used for the platform instead of a drive wheel to reduce data distortion caused by movement of the mobile measurement system platform [
23], but it is difficult to automate, and the measured value may vary greatly by user. Moreover, this increases the platform size rendering it more difficult to manufacture. The recently proposed chord offset synchronizing method has the design of a mobile measurement system that uses at least three sensors to increase data accuracy and reduce external disturbances from the driving wheel at the same time by mutually compensating for the amplitude and phase of the measurement value [
17]. This paper proposes to increase the accuracy and reliability of acoustic roughness measurement through mutual compensation using only two displacement sensors in the mobile rail surface measurement system.
2.2. Chord Offset Synchronizing
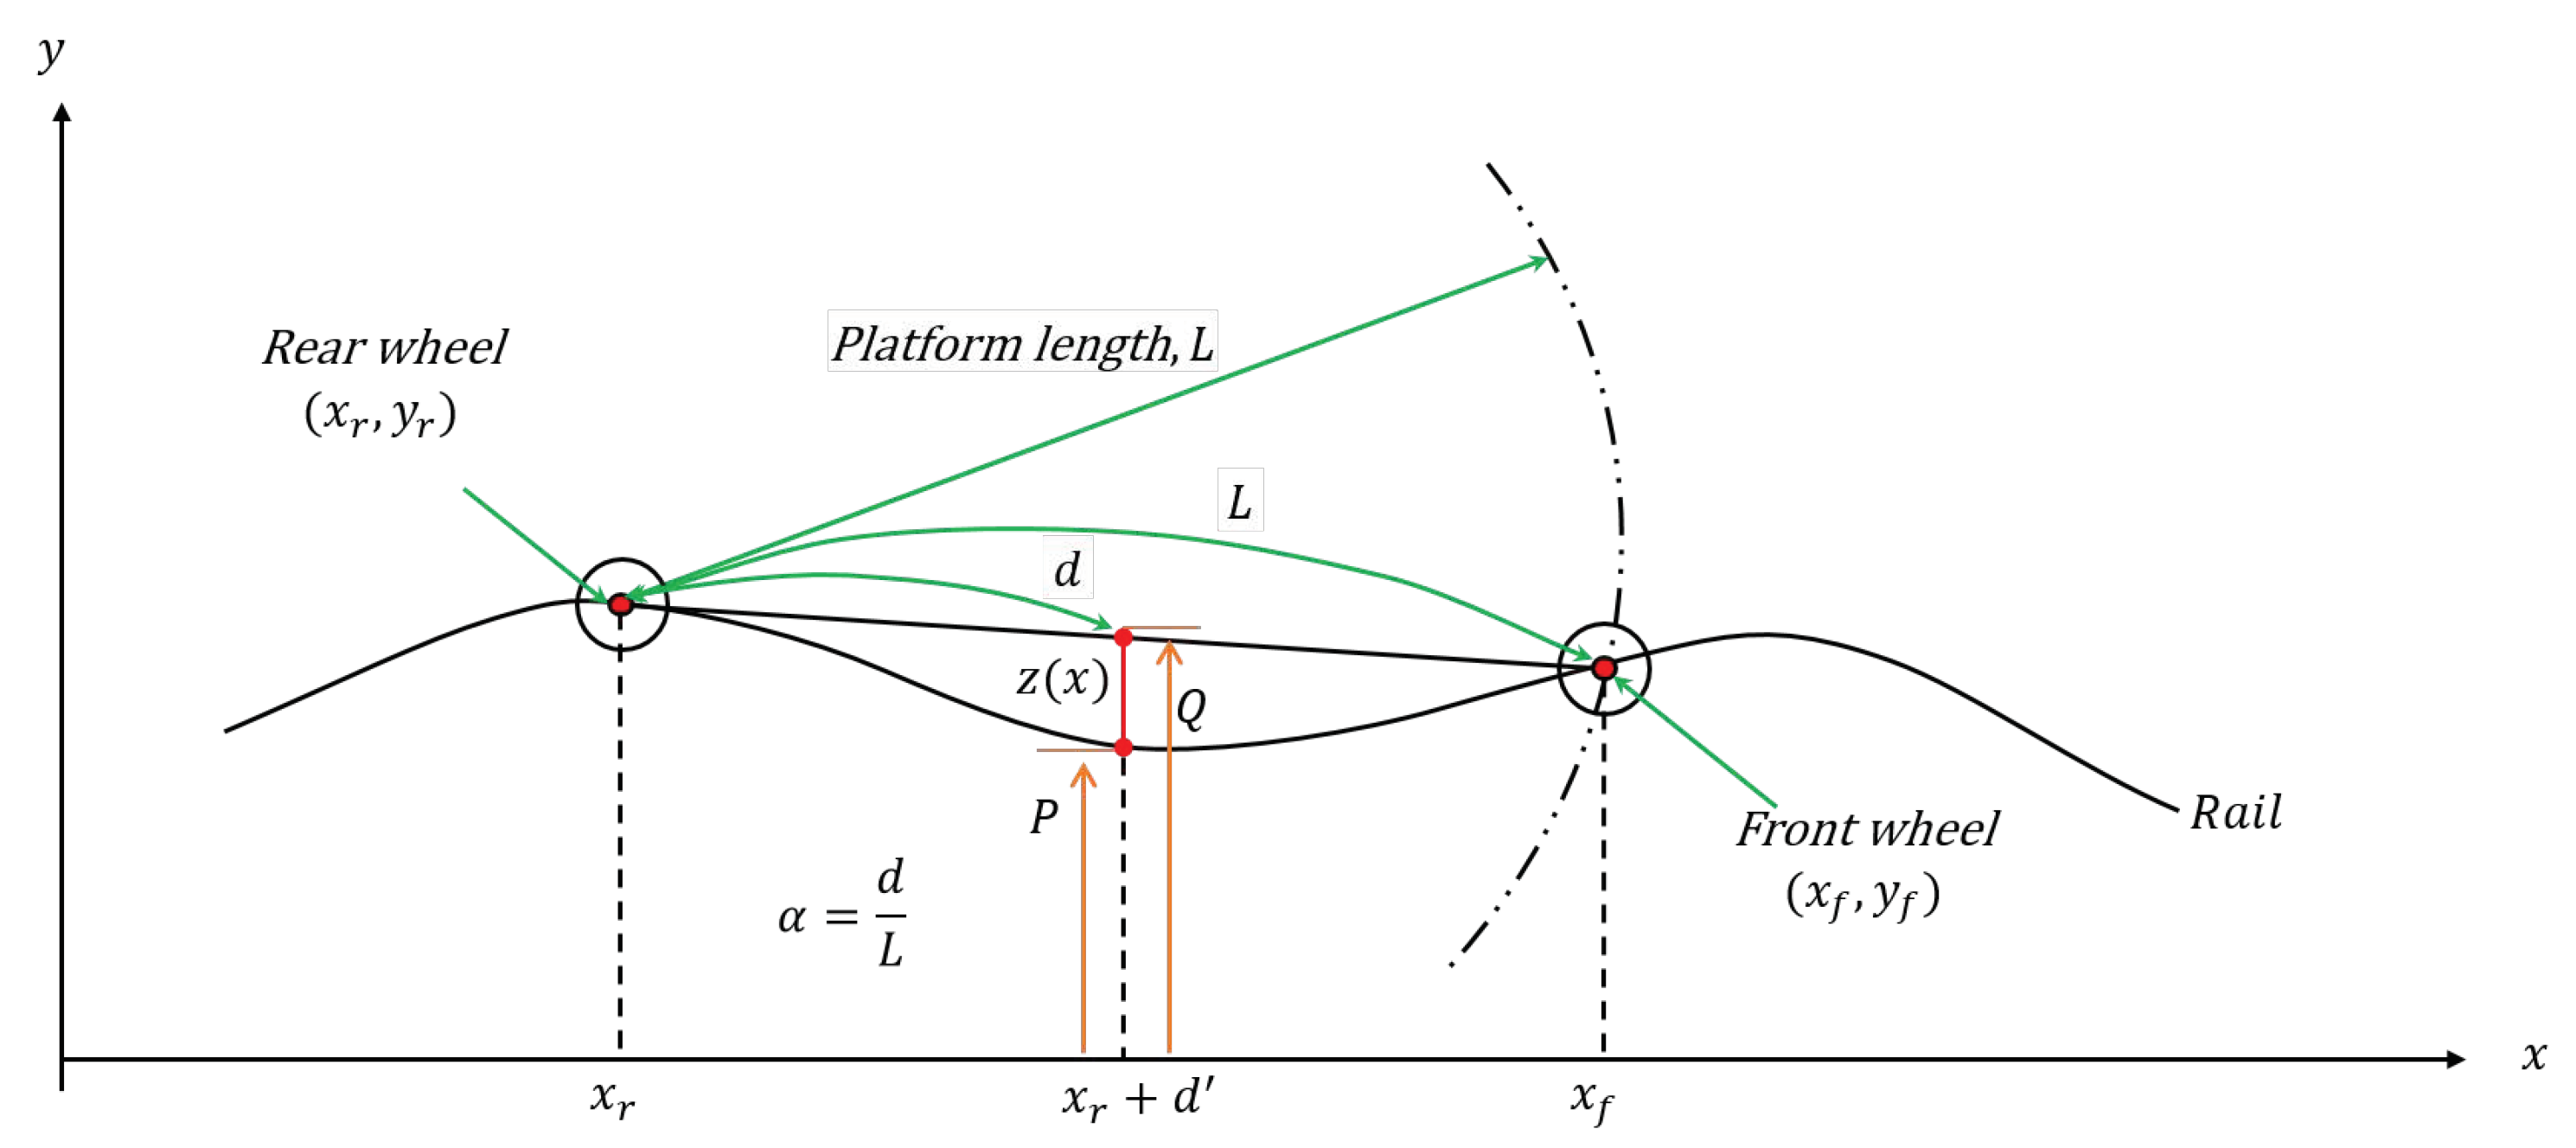
As depicted in
Figure 2, the chord offset synchronizing method assumes that the measurement system, whose chord length is L and sensor position is d, moves on the rail in sinusoidal form
and has a random wavelength. Equations (
1) and (
2) show the coordinates of two wheels in contact with the rail.
Here, Y is the amplitude of the sinusoidal rail, while k is
. Based on the Equations (
1) and (
2), and the structure of
Figure 2, the sensor position on the rail (P in
Figure 2) and the sensor position on the platform (Q in
Figure 2) can be calcuated as shown below.
where
,
is the projecton of
d to the
x-axis, P and Q are
y-axis coordinate of the sensor position on rail and platform respectively. Since the actual value
z(
x) measured by the sensor is the actual distance between the sensor position on the platform and the vertical rail waveform, it can be expressed as follows:
where
from the Equations (
1) and (
2).
Therefore, amplitude
and phase
can be obtained from the sensor measurement and the transfer function of the measured value for the rail surface roughness can be defined as follows:
The transfer function in Equation (
6) can calculate the relative amplitude and phase angle of the measured rail surface value and can predict amplification of the measured sensor value and the change in phase angle according to sensor position. When measuring rail surface roughness using a sensor, the measured value can differ from actual value due to amplification or attenuation according to wavelength (
), equipment length (L), and sensor position (d) even when analyzing the measured value by reflecting platform inclination. Moreover, it is difficult to compensate for the built-in measurement error of the conventional trolley-type mobile measurement system. Therefore, the recently proposed chord offset synchronization method uses multiple sensors with consideration given to actual platform length (L) and measured wavelength range, mutually compensating for amplification or attenuation to reduce measured value errors [
17]. This has the advantage of a compensated value that differs according to relative distance between the sensors, more accurate measurement than the existing analysis method throughout the various wavelength ranges on the rail surface when using optimal sensor layout, and analysis of rail cracks or irregularities. However, to increase measurement accuracy, the method requires at least three sensors in various positions to be synchronized to the measurement from the same position.
Figure 3 shows the multi-sensor-based chord offset synchronizing model that calculates the measurement value and phase difference using two or more sensors. Calculating batch positions for three sensors on the platform with wheelbase (L = 716 mm) and wheel diameter (D = 100 mm) using this model results in
= 222 mm,
= 327 mm, and
= 432 mm. Here, di is the distance between the rear wheel and the
sensor [
17].
2.3. Chord Offset Synchronizing with Two Sensors
Although using multiple sensors can increase measured value accuracy and minimize the impact of external disturbances on the platform wheel, as shown in the spectrum analysis of rail surface roughness (see Figures 10 and 12 at later field test), at least three sensors are needed on the platform. Therefore, we sought the same accuracy of three sensors even when using two sensors on a platform in the case that the wavelength range to be measured has a limitation.
First, it was assumed the wheelbase between the front and rear wheels of the platform to be 716 mm and specified the wavelength related to rolling noise of the rail surface to be 5–500 mm. The following equation is obtained when calculating the transfer function of the sensor measurement to the rail surface roughness value
for each sensor position change and calculating the sum of squared residuals (SSR) using the residual,
, when the amplification ratio is 1.
where
is the observed response value at the
measured point and
is the fitted response value at the
measurement. The fitted response becomes one when input and output is coincident. To minimize amplification ratio of the measured value, we can calculate the sensor position that minimizes SSR obtained above.
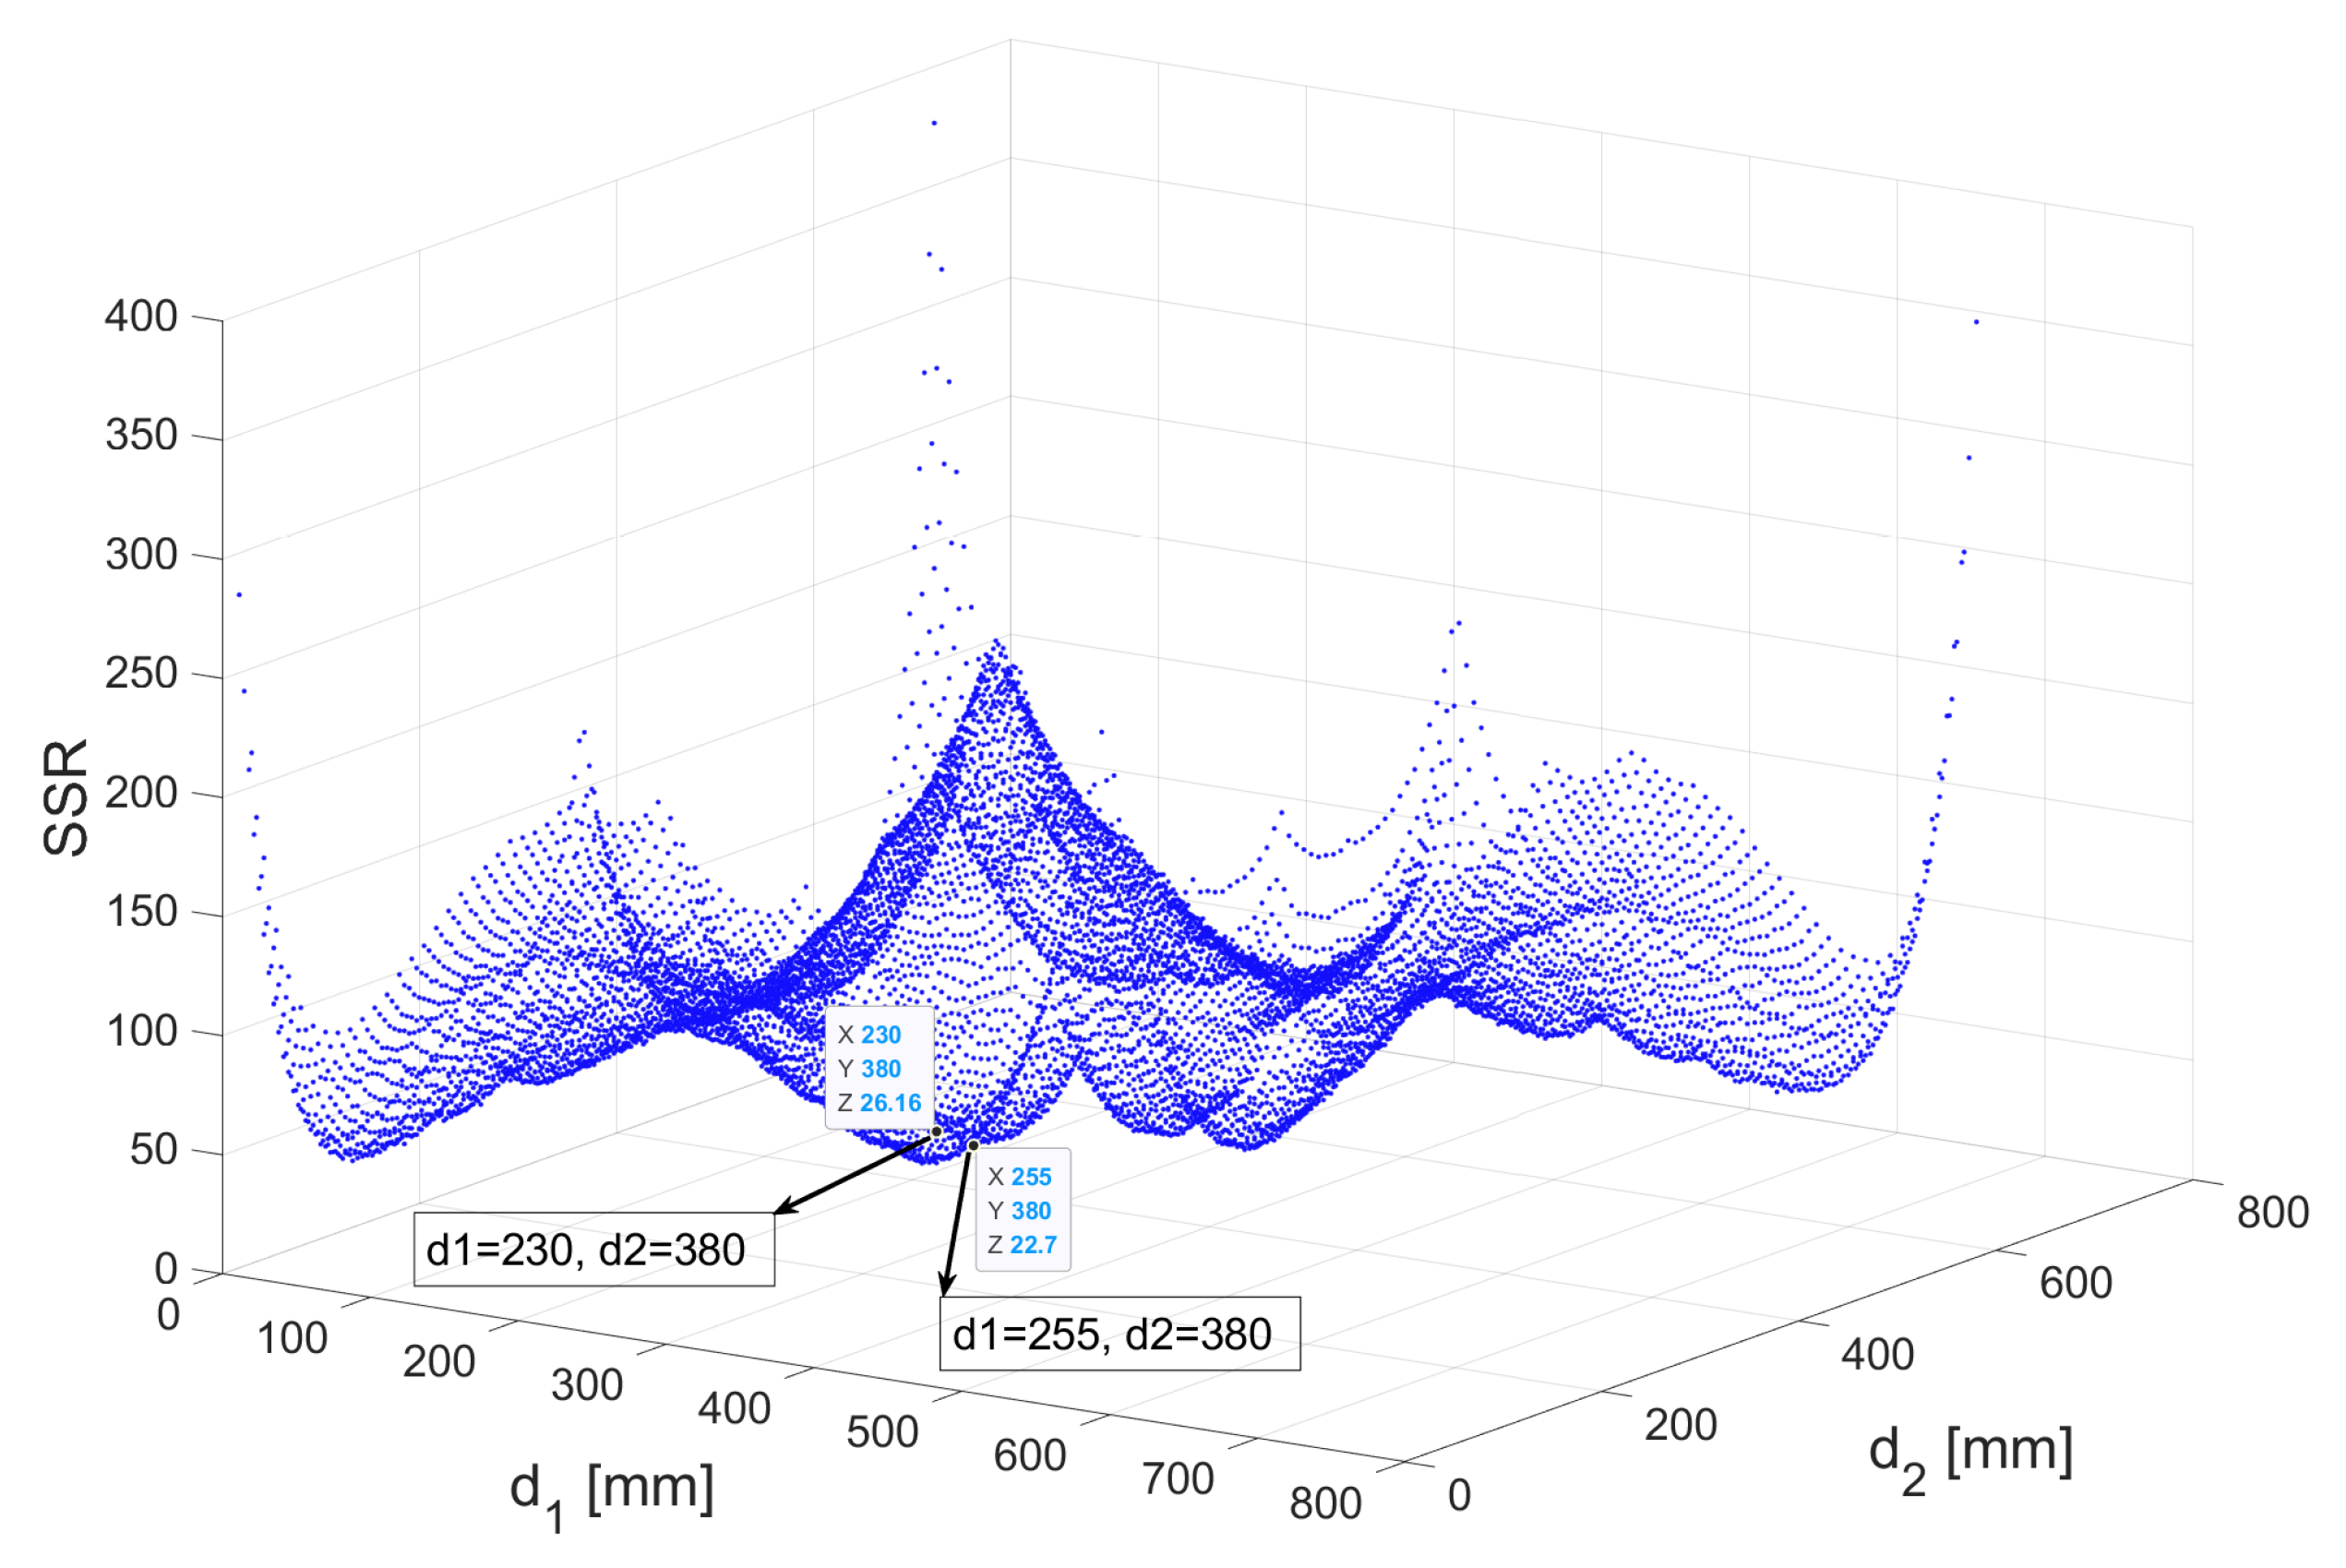
Figure 4 shows the results of SSR calculation by changing the sensor position for two sensors (
and
) on the above platform. The results show that the positions of the two sensors with minimum SSR at the critical wavelength range (5–500 mm) where the rolling noise occurs are
= 255 mm and
= 380 mm from the rear wheel.
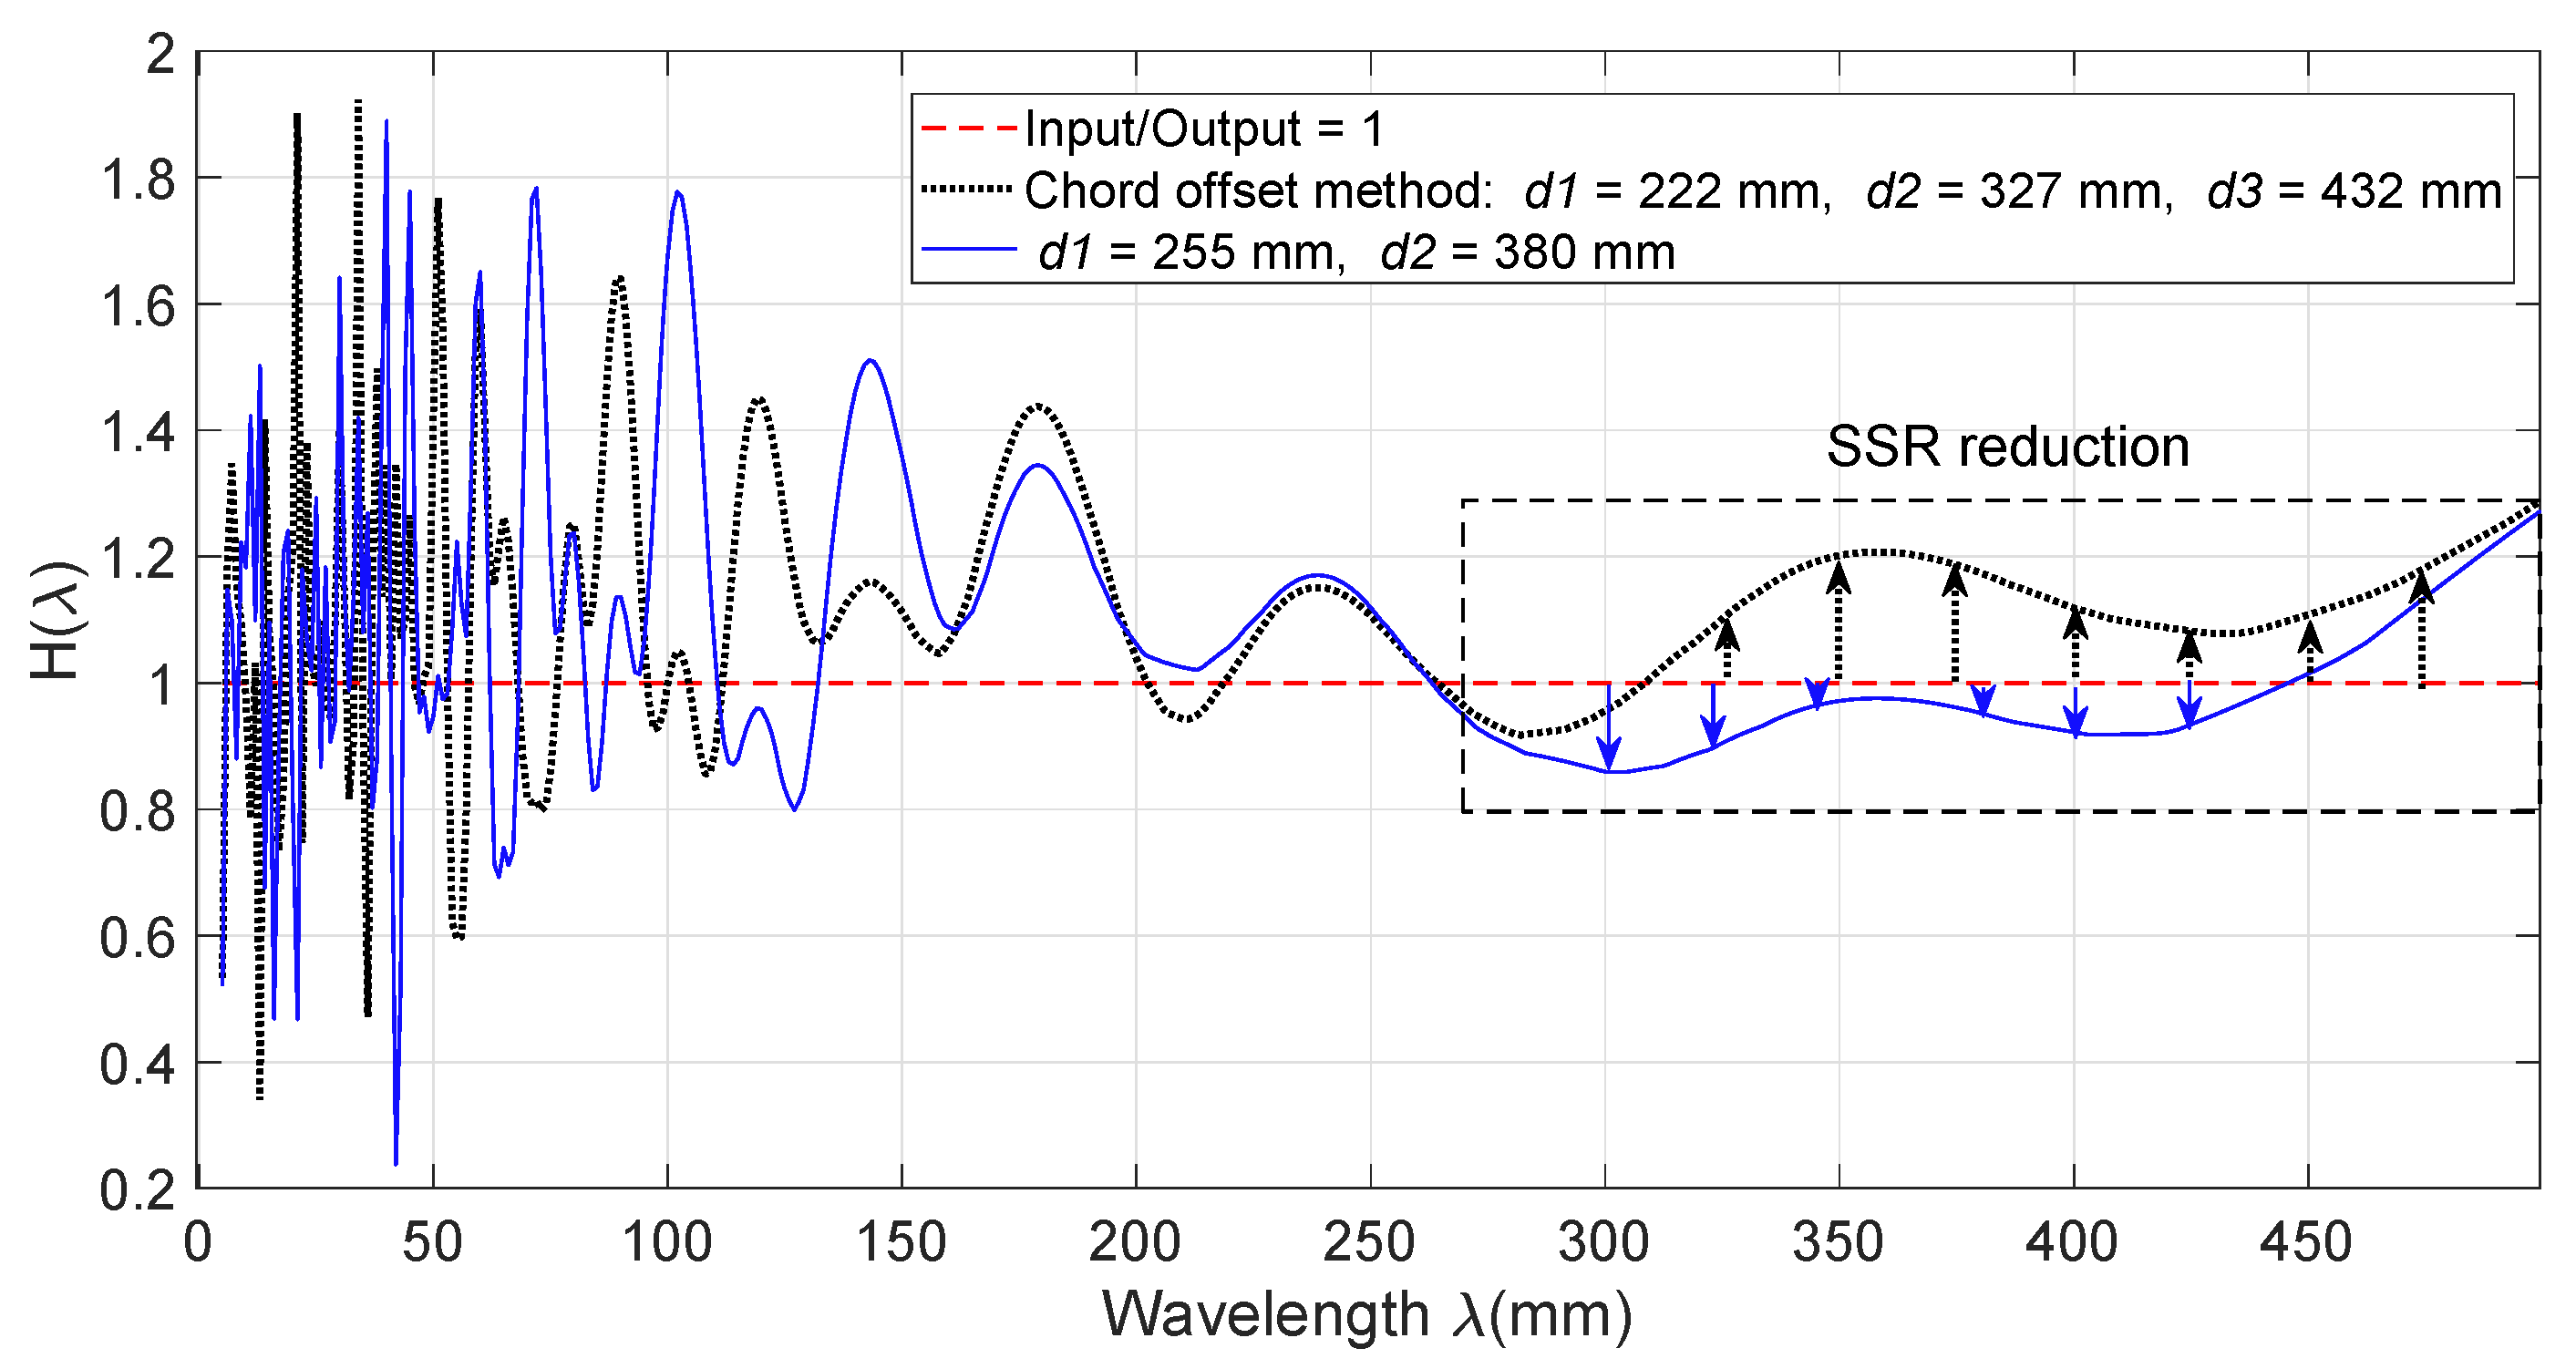
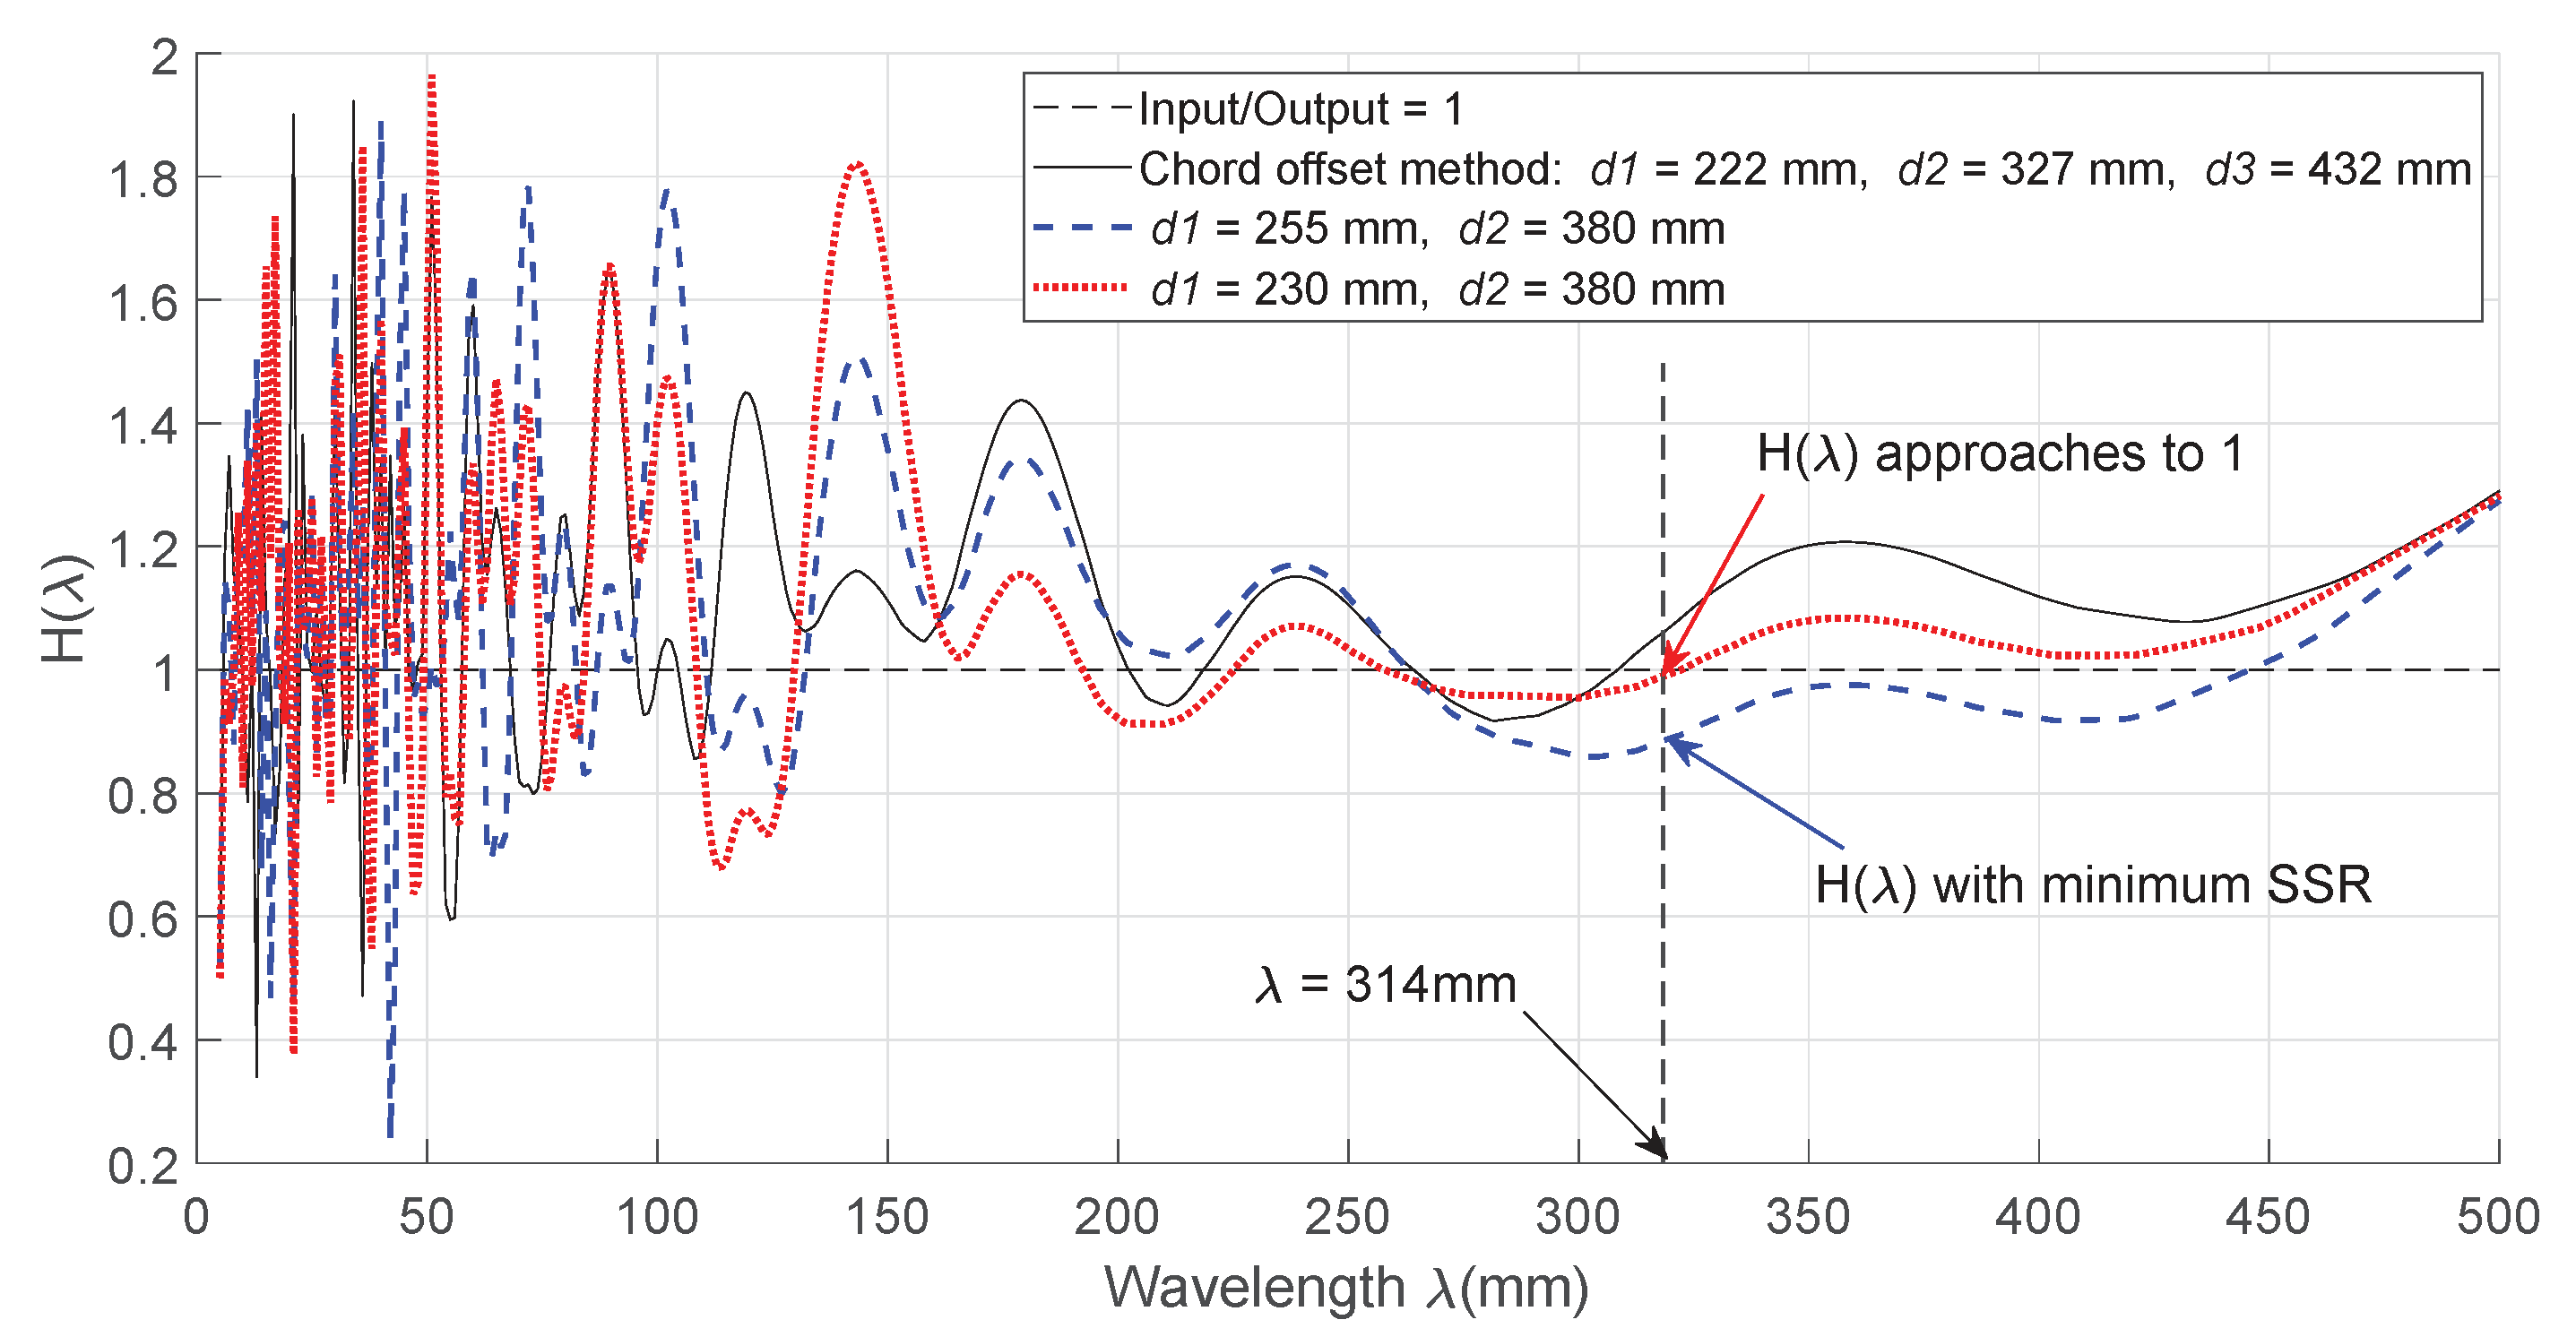
Figure 5 shows a comparison of the transfer function values of the chord offset synchronization method using three sensors and that of the two sensors with the minimum SSR. As shown in the graph, the total SSR with the two sensors has much less value at the 300 mm or higher wavelength band which is the main interest, although the SSR values of the transfer function at lower wavelength are irregular.
However, applying the optimized two sensor positions to the measurement platform with the drive wheel (wheel diameter of 100 mm) can affect the measured value significantly in the frequency distortion (
mm) associated with drive wheel eccentricity. Therefore, we determined the sensors whose residual calculation in
= 314 mm converged to 0 first and then calculated the final positions to minimize the SSR in the wavelength range of the total rolling noise. The calculated positions of the two sensors are
= 230 mm and
= 380 mm, and the SSR value, in that case, is 26.16.
Figure 6 shows a comparison of these results with the transfer functions values of the existing sensor positions. Since the amplitude of the transfer function using recalculated two sensors approaches to 1 as shown in the red line of
Figure 6, the overamplified spectrum respond at a wavelength of 314 mm can be reduced in comparison with that of two sensors with a minimum SSR. These analytical results will be verified through field experiment.
3. Field Test and Results
We conducted a measurement test of a field track using the calculated optimal sensor positions to verify the results. The test measured acoustic roughness of the operating rail track surface using constant speed control with the ARCer [
24] shown in
Figure 7. The new ARCer featured a real-time operating system, speed controller, rotary encoder to measure distance, and wireless data communication. ARCer had a wheelbase of 716 mm, front and rear drive wheels 100 mm in diameter, a maximum driving speed of 4 m/s, a measurement speed of 0.5 m/s, and the capability for up to three sensors in adjustable positions (see
Figure 7). Measurement and analysis of the longitudinal rail surface roughness conformed to the standard presented in EN 15610:2019 [
12].
The first field test was conducted on a track inside tunnel “Y” that had abrasion wear and corrugation in some track sections (see
Figure 8). We measured every 10 m of two sections of the track in the tunnel using ARCer. The first section A as shown in
Figure 8b has a corrugated railhead surface of 65 mm wavelengh. The first section A as shown in
Figure 8c has a normal worn railhead surface. The positions of the sensors attached to the measurement system were
= 222 mm,
= 327 mm, and
= 432 mm for three sensors and
= 255 mm and
= 380 mm for two sensors. The positions of the two sensors did not mitigate the wavelength level at
= 0.314 m associated with wheel diameter of the measurement system.
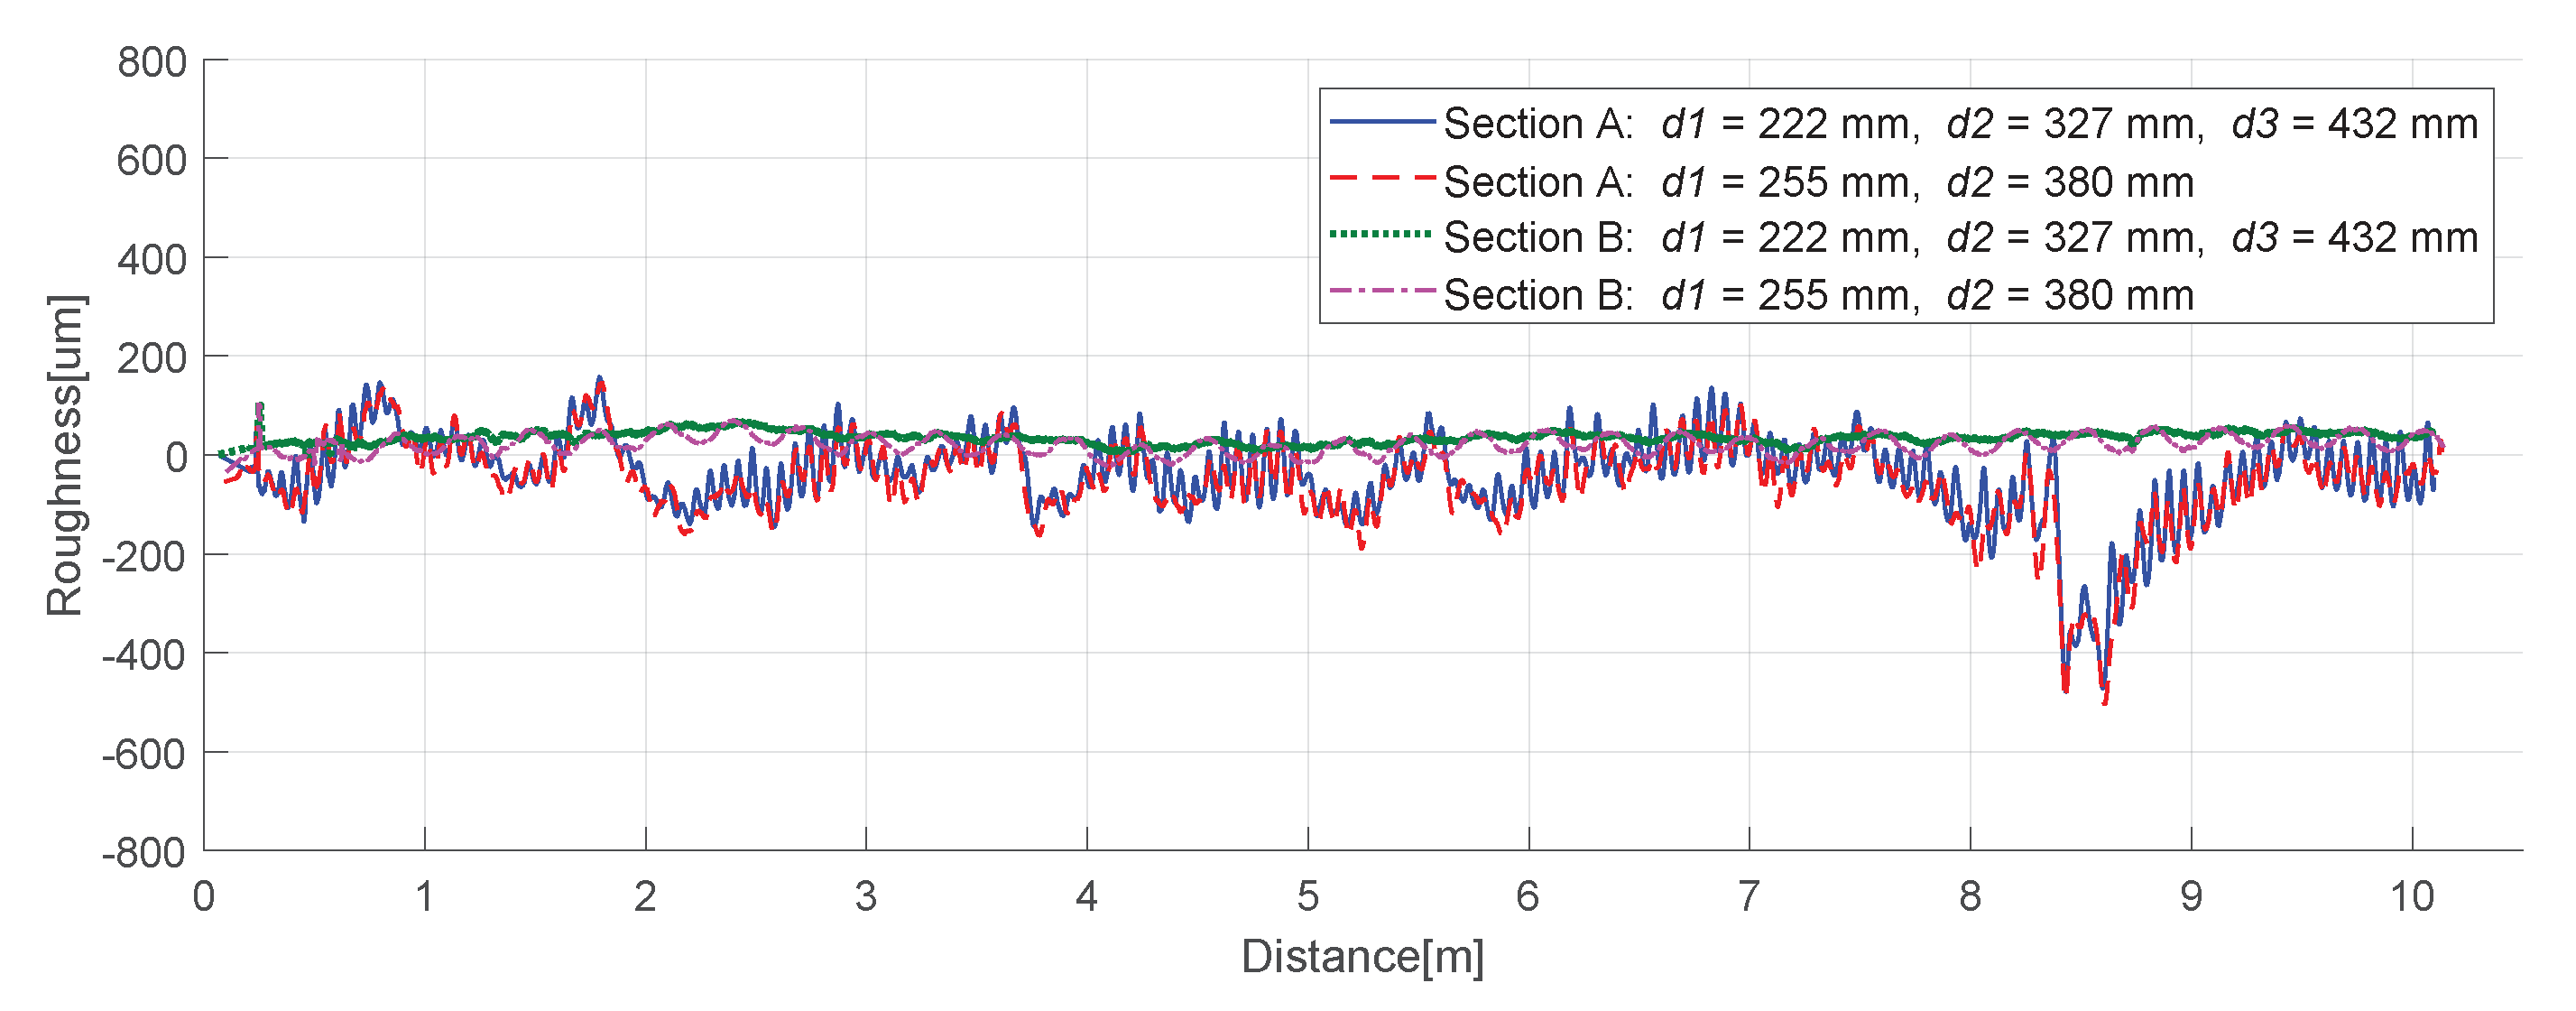
Figure 9 show the logitudinal rail surface roughness of the track “Y” for the two track sections, which are illustrated in
Figure 8b,c. The section A shows larger deviation in measured roughness because of the developed corrugation.
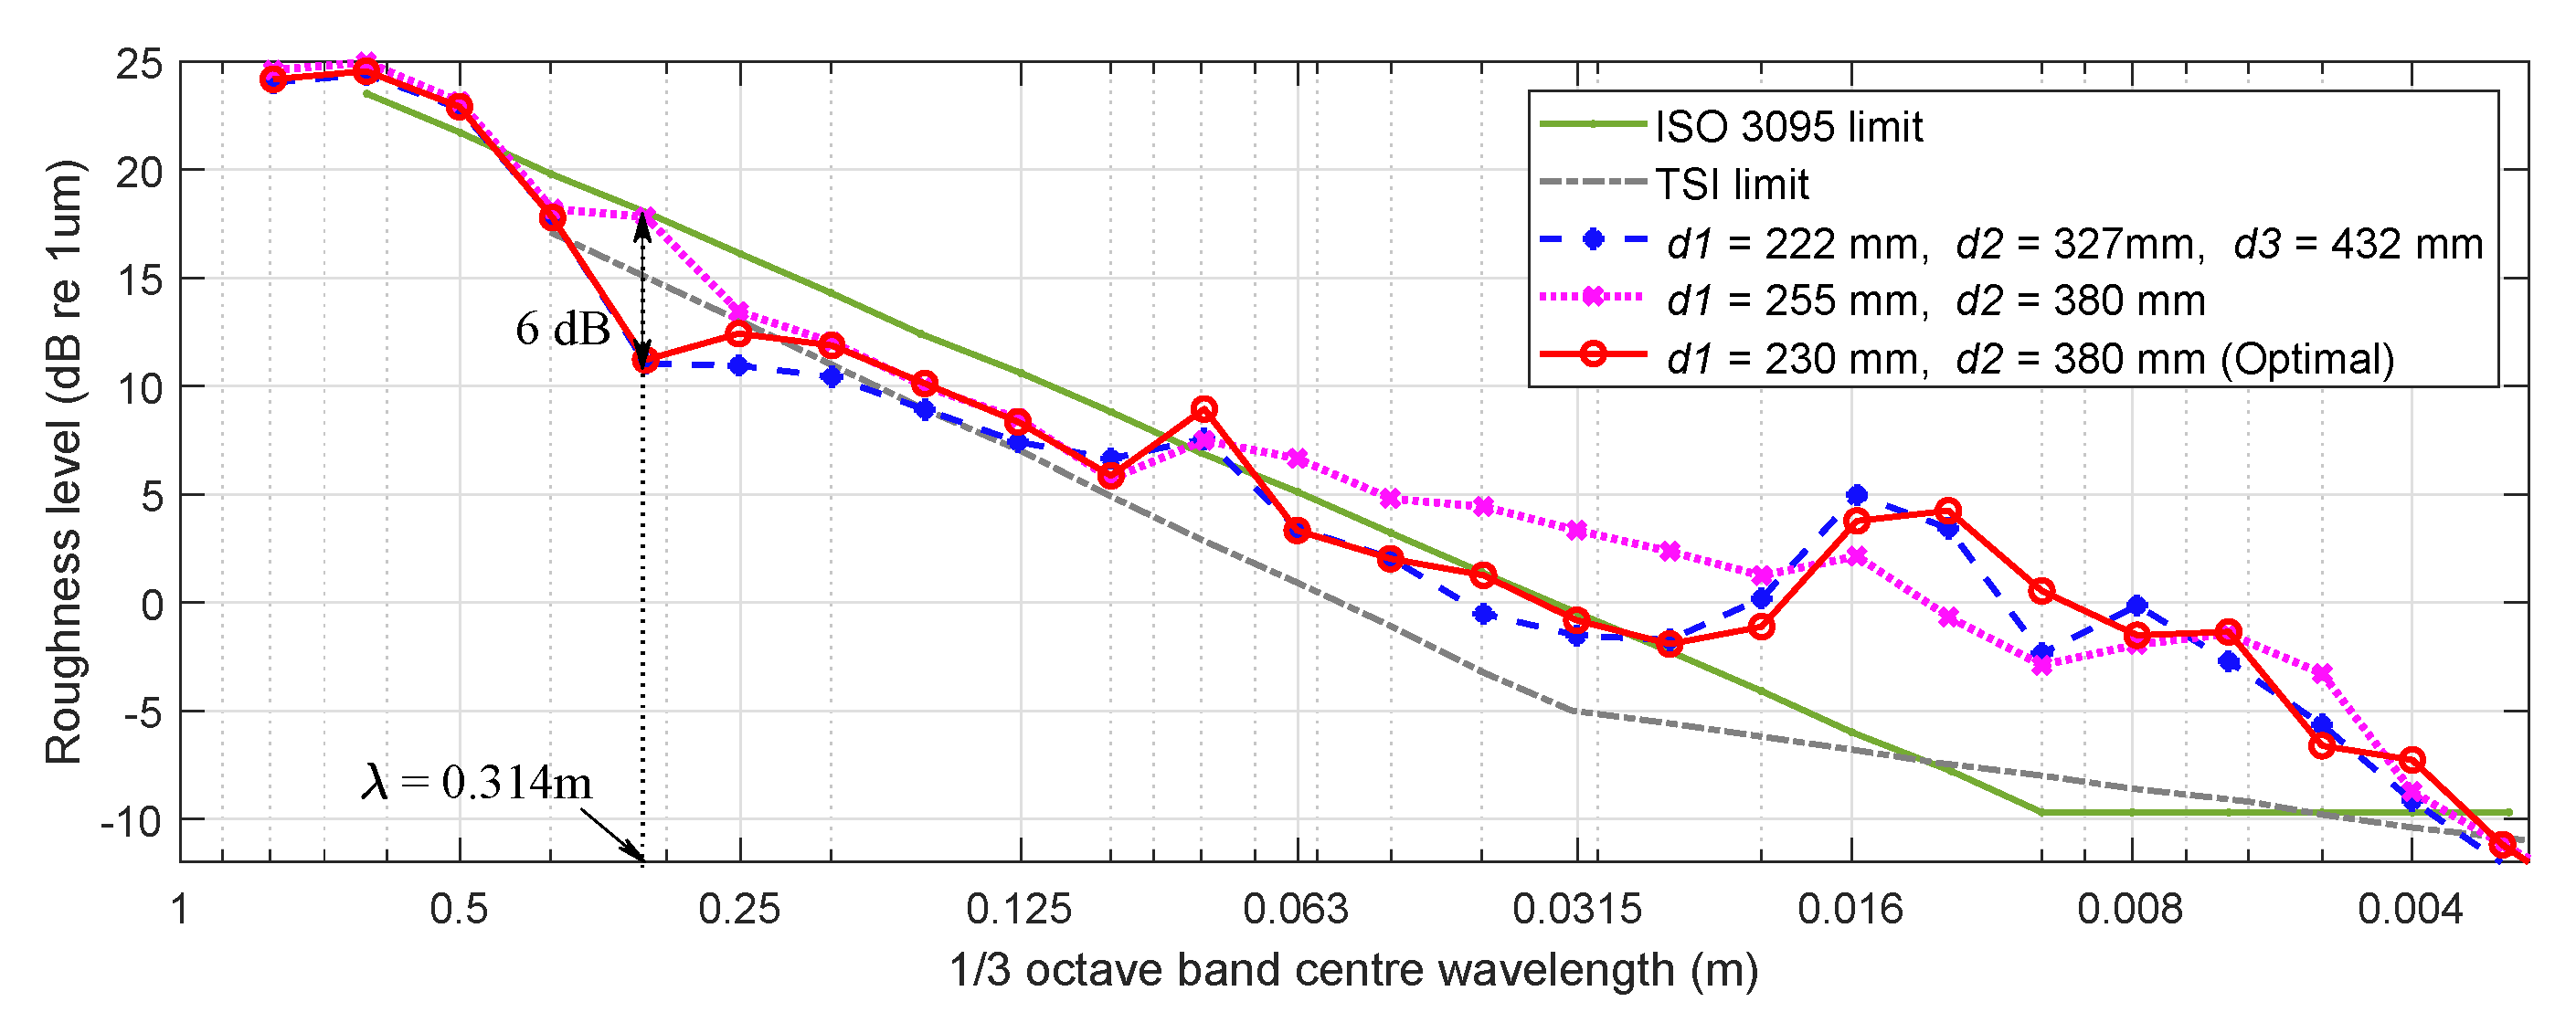
Figure 10 shows the spectrum of acoustic roughness of the rail surface obtained through the acoustic roughness values measured by the two and three sensors and the frequency analysis. While there is high peak at the corrugated wavelength of 0.065 m in
Figure 10a, there is no peak at the smooth railhead surface in
Figure 10b except the wheel diameter related wavelength of 0.314 m. Although the field measurements of the two track sections match in most rolling noise wavelengths, the acoustic roughness value showed a gap of more than 6 dB at the wavelength
= 0.314 m associated with wheel diameter. To compensate for the measurement error at this wavelength, we used new sensor positions to verify the results.
We also conducted a field test on the second track (“Z” track), which had no abrasion wear or corrugation, to directly check the measured value of the wheel and verify the measurement results of the proposed optimal two sensors. The test used the same two- and three-sensor positions as in the previous test and used an additional two optimum sensor positions (
= 230 mm and
= 380 mm) to compare.
Figure 11 shows the measured section and rail, while
Figure 12 shows the results of the spectrum analysis of acoustic roughness using three different algorithms. As shown in
Figure 12, when the optimization algorithm is used, the spectrum level at
= 0.314 m, the wavelength associated with wheel diameter, converged in the same way as the three sensor-based algorithm.
The results of the field tests of these two sections verified that the proposed batch algorithm using two sensors could generate the same level of measurement accuracy as using three sensors.
