Article

Experimental Study of the Volumetric Error Effect on the Resulting Working Accuracy—Roundness

1
Faculty of Mechanical Engineering, Brno University of Technology, CZ 601 90 Brno, Czech Republic
2
Faculty of Mechanical Engineering, Czech Technical University in Prague, CZ 166 36 Prague, Czech Republic
3
KOVOSVIT MAS Machine Tools, 391 02 Sezimovo Usti, Czech Republic
*
Author to whom correspondence should be addressed.
Appl. Sci. 2020, 10(18), 6233; https://doi.org/10.3390/app10186233
Submission received: 4 August 2020 / Revised: 3 September 2020 / Accepted: 4 September 2020 / Published: 8 September 2020
(This article belongs to the Section Applied Industrial Technologies)

Abstract

:
Currently, various types of software compensations are applied to machine tools. Their aim is to increase the working accuracy of the tools. The improvement in working accuracy is then further assessed according to the increase in the dimensional and shape accuracy or the surface quality of the workpiece. This publication describes the effects of the volumetric accuracy of a machine tool on the working accuracy of a workpiece, where total roundness (RONt) is evaluated in multiple cuts. In the experiment, two test workpieces are manufactured on a three-axis milling machining centre. The first is made using a standard machine setup while the second with activated volumetric compensation. The LaserTRACER self-tracking laser interferometer is used to compensate for volumetric accuracy. In the second part, verification measurements are performed with a Ballbar, where roundness error is evaluated according to ISO 230-4. Then two test workpieces are machined, and, in the last part, measurement is performed on Talyrond 595S roundness measuring equipment. Finally, the results are analysed and the dependence between the volumetric accuracy, the circularity error of the machine and the working accuracy of the CNC machine tool is established, represented by the RONt of the workpiece. This paper presents new and unpublished relations between the volumetric accuracy of the machine tool and the RONt of the workpiece.

1. Introduction

The increase of the production accuracy of machine tools is a continuous process with the involvement of all manufacturers. Production accuracy is a machine feature that is also an indicator of competitiveness; its continuous improvement is also required by the machine users themselves.
The percentage of quasi-static errors and the resulting accuracy of the three-axis machine tool was described in 2000 by Ramesh [1]. Here, the percentage was 60–70%. Subsequently, Ibaraki expanded this hypothesis in his 2010 publication [2] with up to 80% for five-axis machine tools. The increase in the proportion of quasi-static errors is caused by the kinematic pair of rotary axes of five-axis machines.
There are two options to ensure high geometric accuracy. The time-consuming and more expensive option uses a mechanically adjusted machine, i.e., no software compensation. This option is offered by machine manufacturers, especially for their special machines, which are supplied to industries with extremely high requirements for long-term dimensional stability. Another option is the use of software compensation, eliminating the basic sources of machine tool errors. These sources include geometric, thermal, dynamic and tool wear errors. [3]. Quasi-static errors are defined as errors in the relative position of the tool centre point (TCP) and the workpiece; these change slowly over time. They are directly related to the structure of the machine tool itself and can be divided into geometric, kinematic and thermal errors.
There are several ways of achieving the goal of increasing production accuracy or assessing machine accuracy. These include the use of commercially available software compensations for CNC machine tools, supplemented by new, more effective methodical procedures for measurement and evaluation and the deployment of new measurement technologies. The robustness of a compensation method, with respect to the human factor, is presented in reference [4]. In reference [5], the effect of volumetric compensation on the improvement of the geometric accuracy of a small machining centre, by up to 60%, is presented. The increase of the volumetric accuracy of a five-axis machining centre using a reconfigurable artefact is presented in [6]. The use of tracking interferometers to assess 2D geometric errors influenced by temperature change is described in [7]. The utilisation of manufacturing accuracy data for rotational error assessment is presented in [8], linear axis compensation procedures in publications [9,10], the use of the Ballbar for machine tool error assessment and compensation in [11], a comprehensive assessment of measurement methods, overexertion and their effects on large machines in [12] and the use of on-machine tool measurement in [13]. When assessing the effects of machine geometric errors on a future workpiece, it is necessary to consider all effects that increase measurement uncertainty and those that minimise these uncertainties.
Another group is the development of new mathematical models that describe the geometry of the machine, which specifies the position of the TCP [8]. Publication [14] describes the principle of weighted multilateration and its influence on the positioning of a point in the machine’s working space, including its application to the small machining centre presented in [15]. The data obtained from the measurement can then be used as compensation values sent for further processing of the CNC program from the CAM. A compensation algorithm for reducing geometric errors by changing the CNC program is published in [16]. These are mostly designed for basic measuring devices that are commonly available on the market and have already been established in the field of machine inspection and diagnostics.
The same is true of temperature models of machine tools and their compensations [17], where the thermo-elastic behaviour of machine tool structures and their influence on TCP is described in [18]. This area also includes temperature measurements of machine tools [19]. From publication [20], it is obvious that it is necessary to ensure correct positioning of the temperature sensors in order to obtain valid data for correction of the measured data. Here, this information was used to verify machine stability and to correct the thermal expansion of machine components.
Individual measuring devices can also be categorised according to the size of the machine tools. This classification is divided into small, medium and large CNC machine tools according to the size of the working space and the loading of the machine from the workpiece [21]. Not all machine tool sizes can be used with all devices and they should be selected according to the accuracy of the measuring equipment.
Geometric accuracy is assessed according to ISO 230. These procedures are usually part of verification when deploying new methods of compensation of machine tools or models to predict machine accuracy [22]. It is based on the basic methods of compensating for the geometric errors of the tillage machines summarised in publication [23]. Another standard that can be used to verify the accuracy of a machine is the tests based on ISO 230-4 that mostly use the Ballbar. Publication [24] presents a methodology for predicting component accuracy based on circular interpolation and the FE model. The use of the Ballbar, a measuring device and the circular interpolation test for the diagnosis of three-axis machine tools is described in [25] and the use of circular interpolation for measuring the geometric errors of five-axis machines is described in publication [26]. Roundness error has not been improved.
The working accuracy of a machine can be verified using ISO 10791-7 of the standardised component [27]. This workpiece is specified to verify the production accuracy of three-axis kinematics with the option of assessing several dimensional and shape deviations. Publications [22,28] describe the effect of machine load on the position of the rotary axis, as well as the resulting orientation errors. When assessing the geometric errors of the machine, it is necessary to consider the machining forces and heat dissipation in the machine.
This publication is focused on describing the dependence between the volumetric accuracy of the machine and the resulting working accuracy, assessed on the error of workpiece roundness under finishing conditions of machining. The dependence between volumetric accuracy and roundness error is described in publication [29], according to ISO 230-4.
The presented experiment focuses on the verification of the correlation between the volumetric accuracy of machines and production accuracy. In this case, geometric accuracy is represented by volumetric accuracy. The measurements of volumetric accuracy are based on the indirect method, using the self-guiding laser interferometer LaserTRACER. This method is described, for example, in [3]. In order to assess the influence of volumetric accuracy on the resulting working accuracy, it is important to observe constant ambient conditions due to the repeatability of the production of test workpieces. The negative effect of temperature on the change in volumetric accuracy is described in [30]. Production accuracy is represented in a test workpiece designed to verify roundness error. This is then verified by the Talyrond 595S measuring device. The roundness results of the workpiece are then compared to those obtained with the circular interpolation test, according to ISO 230-4. The measuring device used is the Ballbar QC20-w.

2. Experimental Setup

2.1. The Strategy of the Experiment

The experiment setup is shown in Figure 1. The experiment was divided into two parts. In the first part, a three-axis machine tool was measured with its basic setup, i.e., without software compensation of the geometric errors of the machine. In the second setup, volumetric accuracy was compensated for; no other geometric error compensations were used. It is necessary to monitor the surrounding environment throughout the measurement process. Monitoring was carried out according to the procedure described in [20].
In both parts of the experiment, circular interpolation measurements were performed with the Ballbar QC20-w, RENISHAW (DBB) for machining without DBB1 compensations and for machining with DBB2 volumetric compensations, according to ISO 230-4 [31]. Volumetric accuracy was measured with the LaserTRACER, ETALON (LTc) without LTc1 (Figure 1—part of the calibration) compensations and with LTc2 (Figure 1—part of the cerification) volumetric compensations activated. The next step was the machining of the test workpiece (WP) without software WP1 geometric compensations and with WP2 volumetric compensations activated. In the last step of each cycle, an inspection of shape accuracy (roundness) was performed using the Talyrond 595S from Taylor Hobson (TH), again for the workpiece without activated software TH1 compensations and with TH2 volumetric compensations activated.

2.2. The CNC Machine Tool

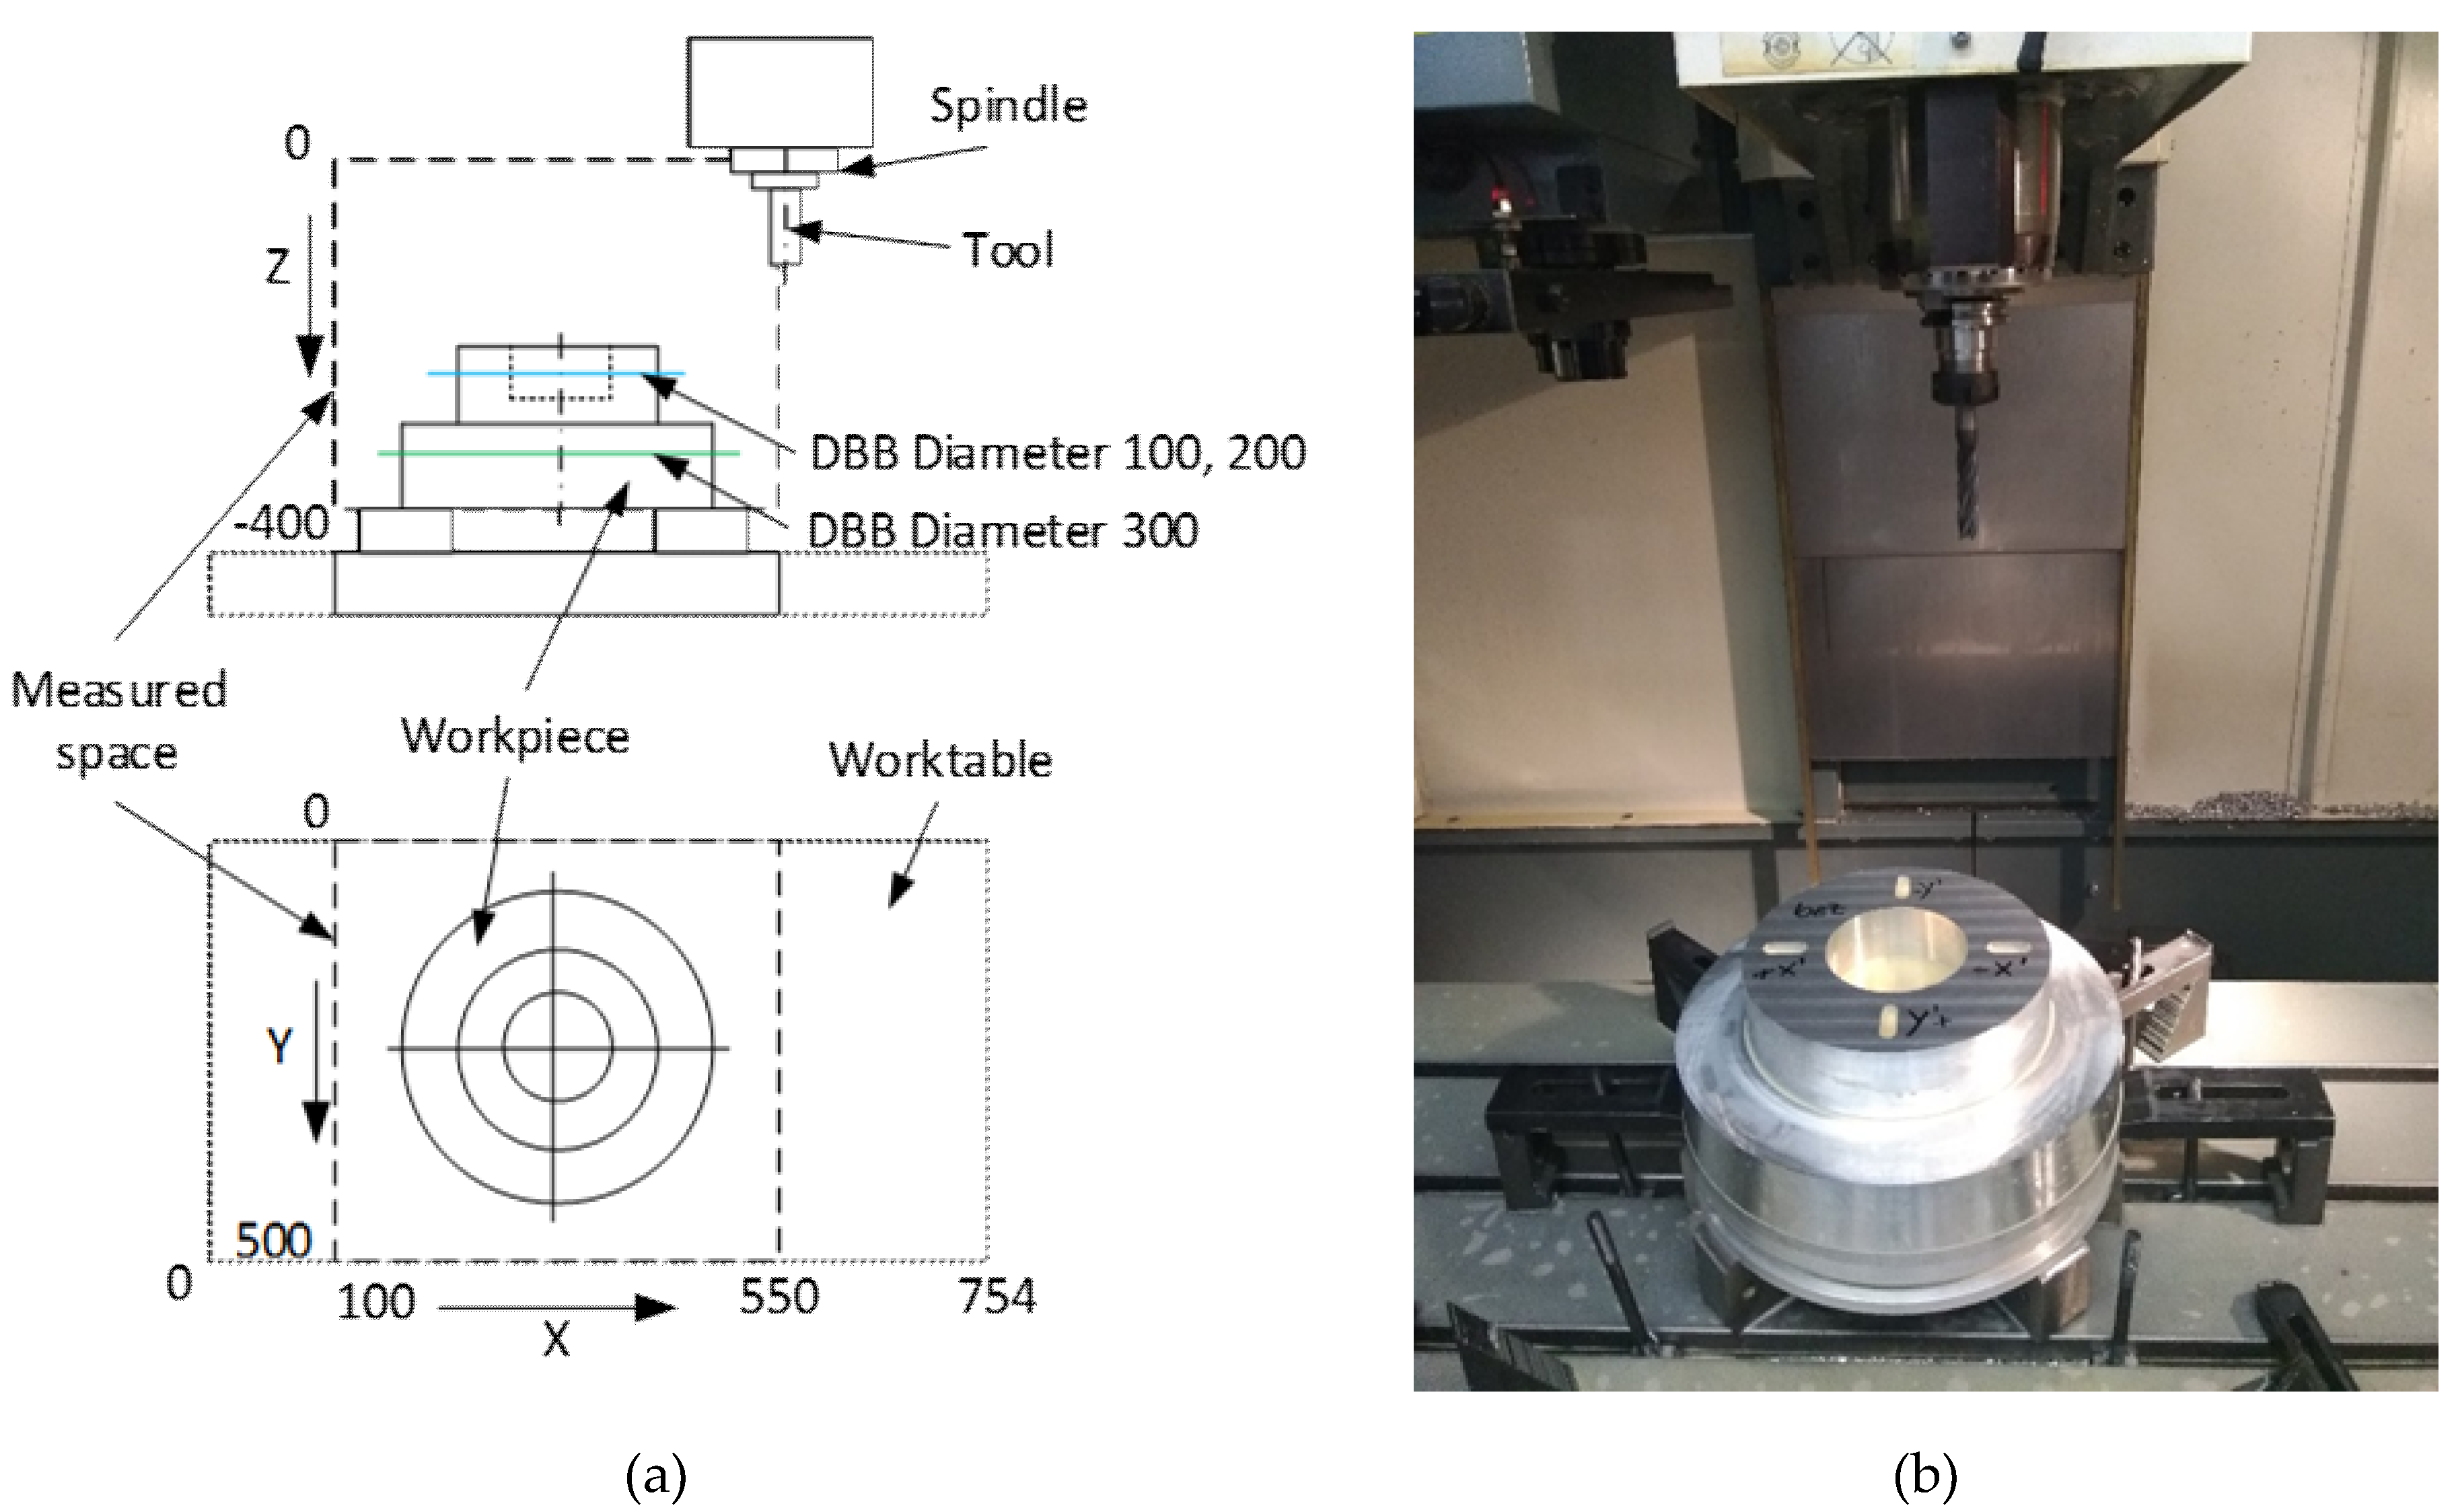
The machining of test workpieces was carried out on the three-axis vertical machine tools MCV 754QUICK and KOVOSVIT MAS and the SIEMENS Sinumerik 840D sl control system with the VCS A3 option (a volumetric compensation system for three-axis machine tools).
Figure 2 is a schematic diagram of the experiment setup on a machine tool showing the workpiece location in the machine workspace, the position of the measuring devices, the range of circular interpolation test and the compensated workspace of the machine.
The workspace of the machine and the measured space are defined in Table 1:

2.3. The Workpiece

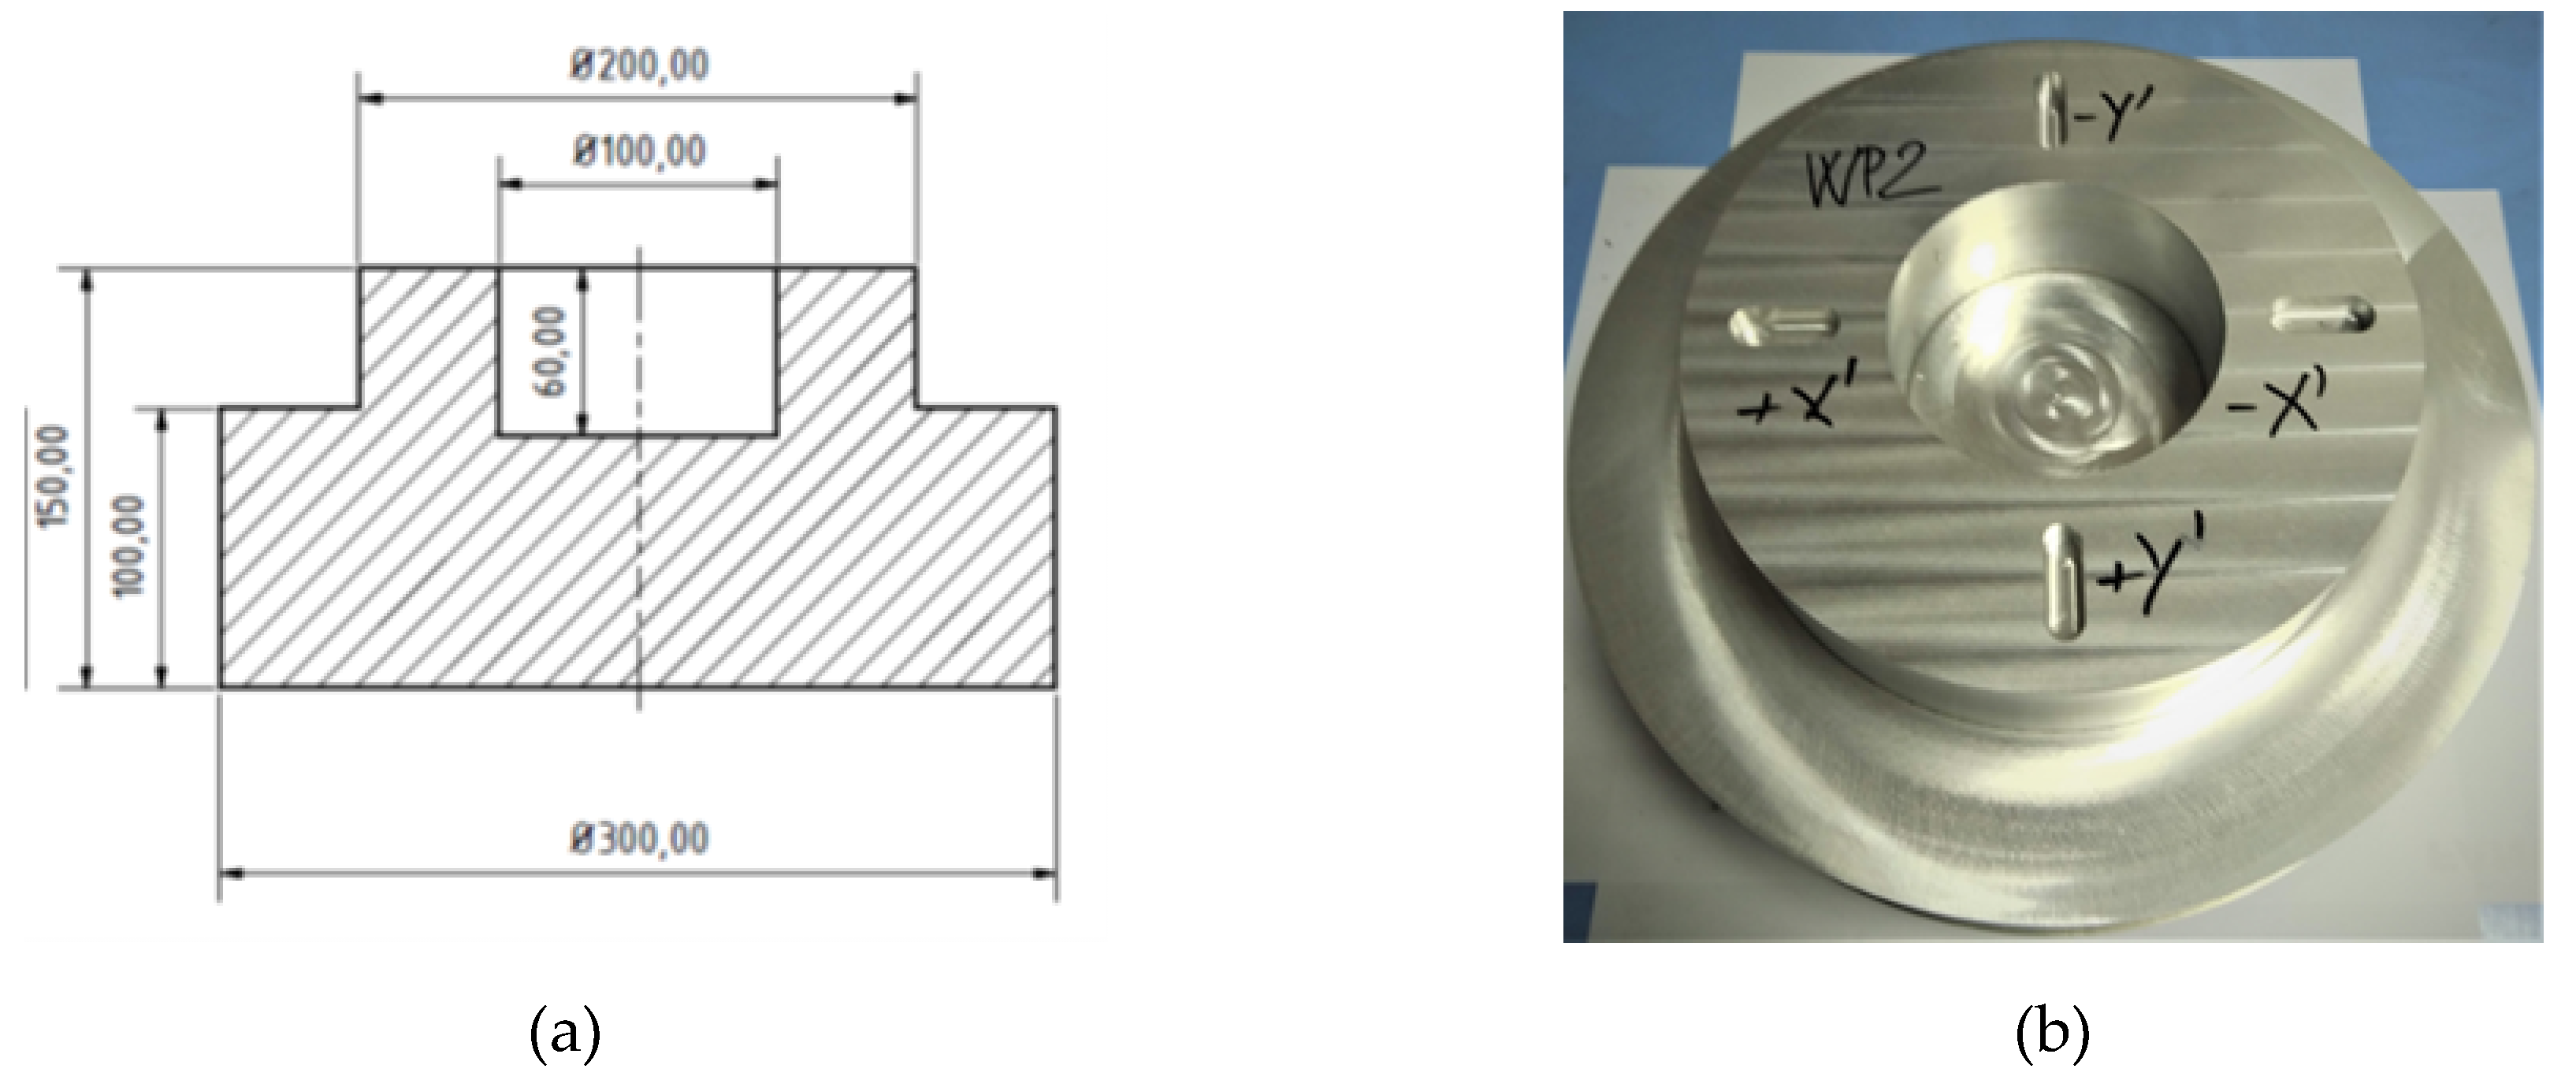
The shape and dimensions of the workpiece were chosen to be as consistent as possible with the parameters of the test, according to ISO 230-4, for the circular interpolation of two linear axes. Three diameters, 100, 200 and 300 mm, are inspected on the workpiece.
The machining technology, workpiece material, machining position and clamping method are identical for both parts. The dimensions of the workpiece and its shape after machining are shown in Figure 3. The machining parameters are described in Table 2.

2.4. Measurement Setting

The following subsections provide basic information about the measuring device used in the experiment.

2.4.1. Circularity Tests

Two circularity tests were performed based on the principle of circular interpolation, according to ISO 230-4. The first one for the calibration cycle referred to as DBB 1 and the other for the verification cycle referred to as DBB 2.
The feed rates were chosen so that dynamic errors from the drives of the machine could not affect the results of the circularity errors.
In publication [32], the effects of dynamic errors in the workpiece are presented. Specifically, the effect of the reversal spikes on the Y-axis, which was approximately 120 µm out of a total circularity error of 143 µm, is described in detail. In this case, other errors are negligible with respect to this error.
Table 3 shows the technical specifications of the Ballbar QC20-w.
The measurement was performed in the centre of the expected machining of the workpiece at a feed rate equal to the feed rate during machining, i.e., 400 mm/min. Based on the results of the measurement, the uncertainty values of measuring were then determined for individual diameters. When entered into the relationship for calculation of measuring uncertainty for 300 mm diameter DBB1, measuring uncertainty was 0.8 µm, and for DBB2, it was 0.7 µm.

2.4.2. Volumetric Accuracy

The volumetric accuracy of the machine was verified for the calibration cycle (LTc1) and the verification cycle (LTc2) according to the procedure described in [5]. Intermediate rigid body type 3 (IRB3) was chosen as a kinematic model. During the measurement, 1112 points in measured space are measured, including reversal measurement. The feed rate of the machine axes was chosen to be 6000 mm/min in order to minimise measurement time. From the calibration measurement, a compensation file (volumetric compensation systems (VCS), Siemens) was also obtained and activated in the machine tool.
Table 4 shows the technical specifications of the measuring device LaserTRACER.
Ambient conditions were monitored during calibration and the verification measurements. These are listed in Table 5 and Table 6. In the calibration measurements, temperature change on the X-axis did not exceed 0.3 °C, 0.2 °C on the Y-axis and 0.6 °C on the Z-axis. These conditions can be considered stable for calibration measurements LTc1 (see Section 3.1). The principle of measuring and determining LaserTRACER positions (P1, P2, P3 and P4) is described in publications [4,5].
In the verification measurements, temperature change on the X-axis did not exceed 0.3 °C, 0.6 °C on the Y-axis and 1.0 °C on the Z-axis. These conditions can be determined as an evaluation of the verification measurement LTc2 of the volumetric accuracy of the machine tool (see Section 3.1).

2.4.3. Roundness Measurement

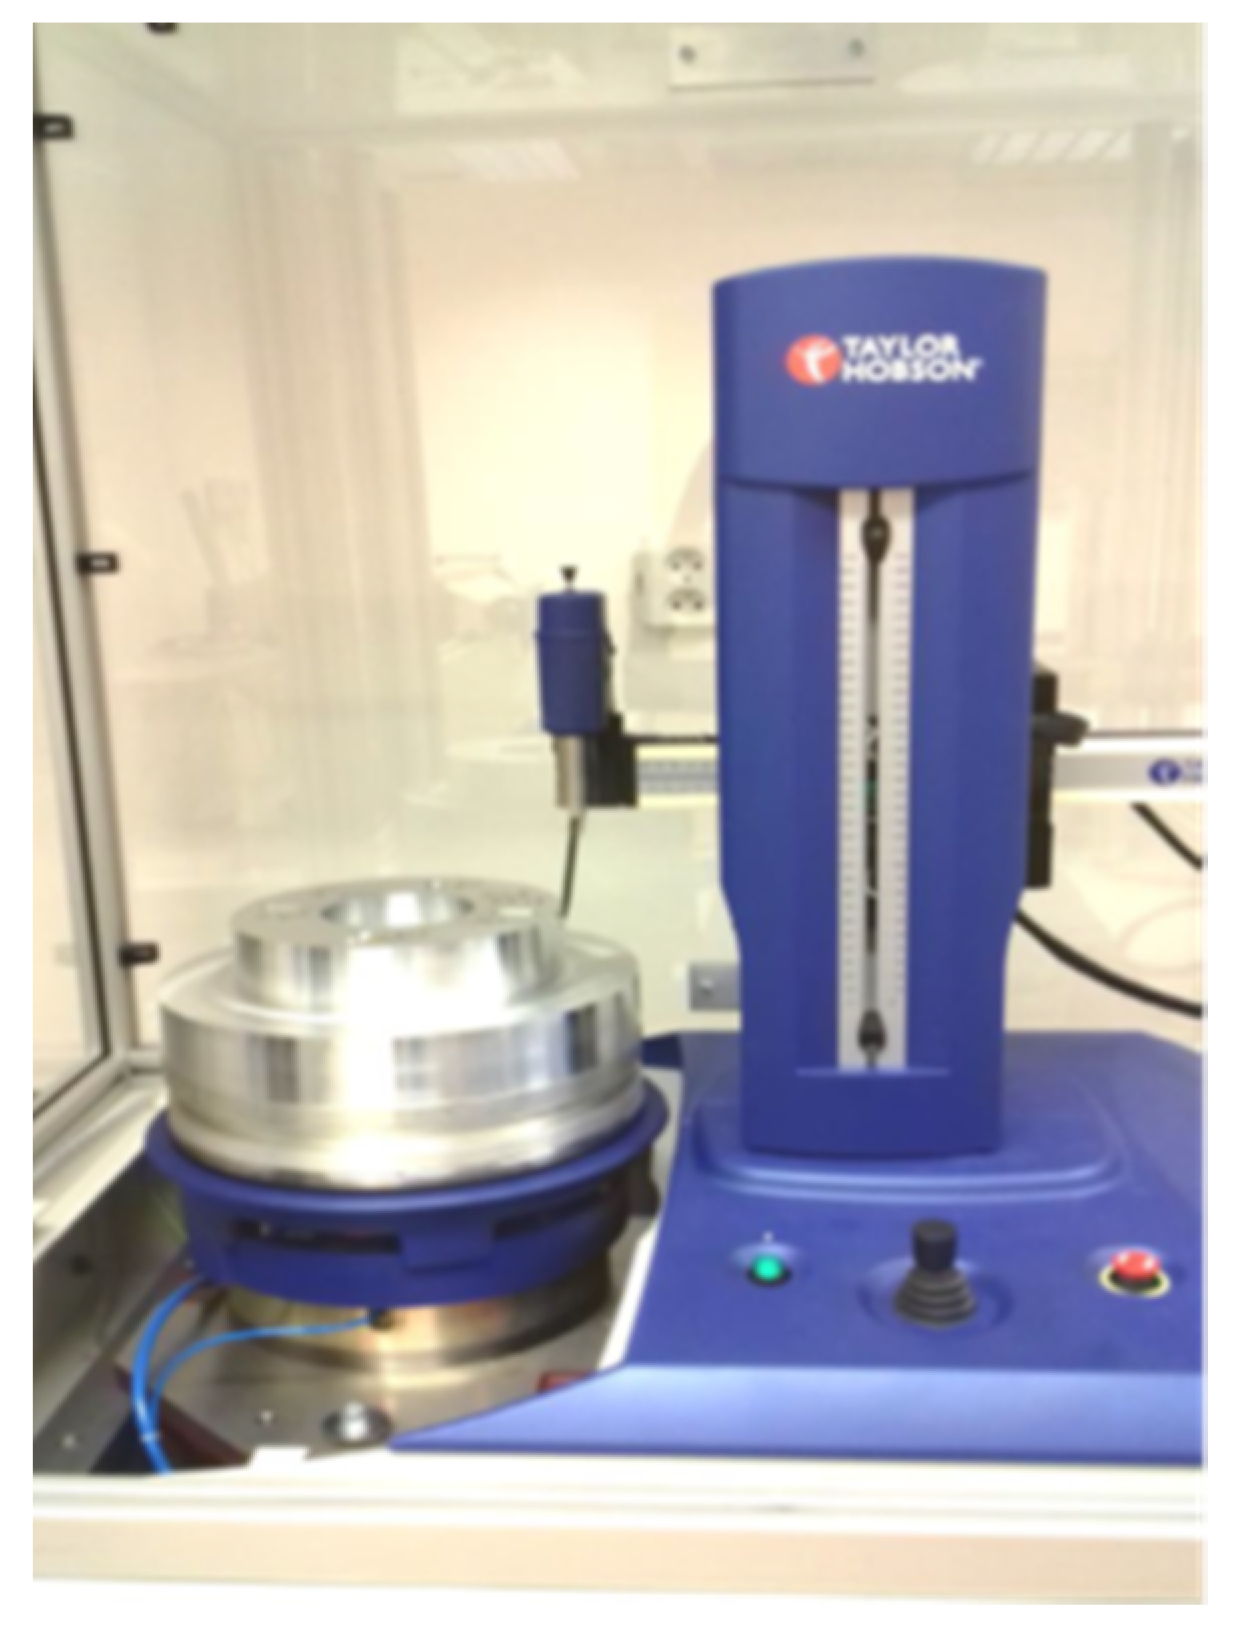
Verification of production accuracy was performed on the Taylor Hobson Talyrond 595S roundness measuring instrument (Figure 4), which can be found in the laboratories of the Czech Metrology Institute (CMI). The technical specifications of the instrument are given in Table 7.

3. Experiment Results

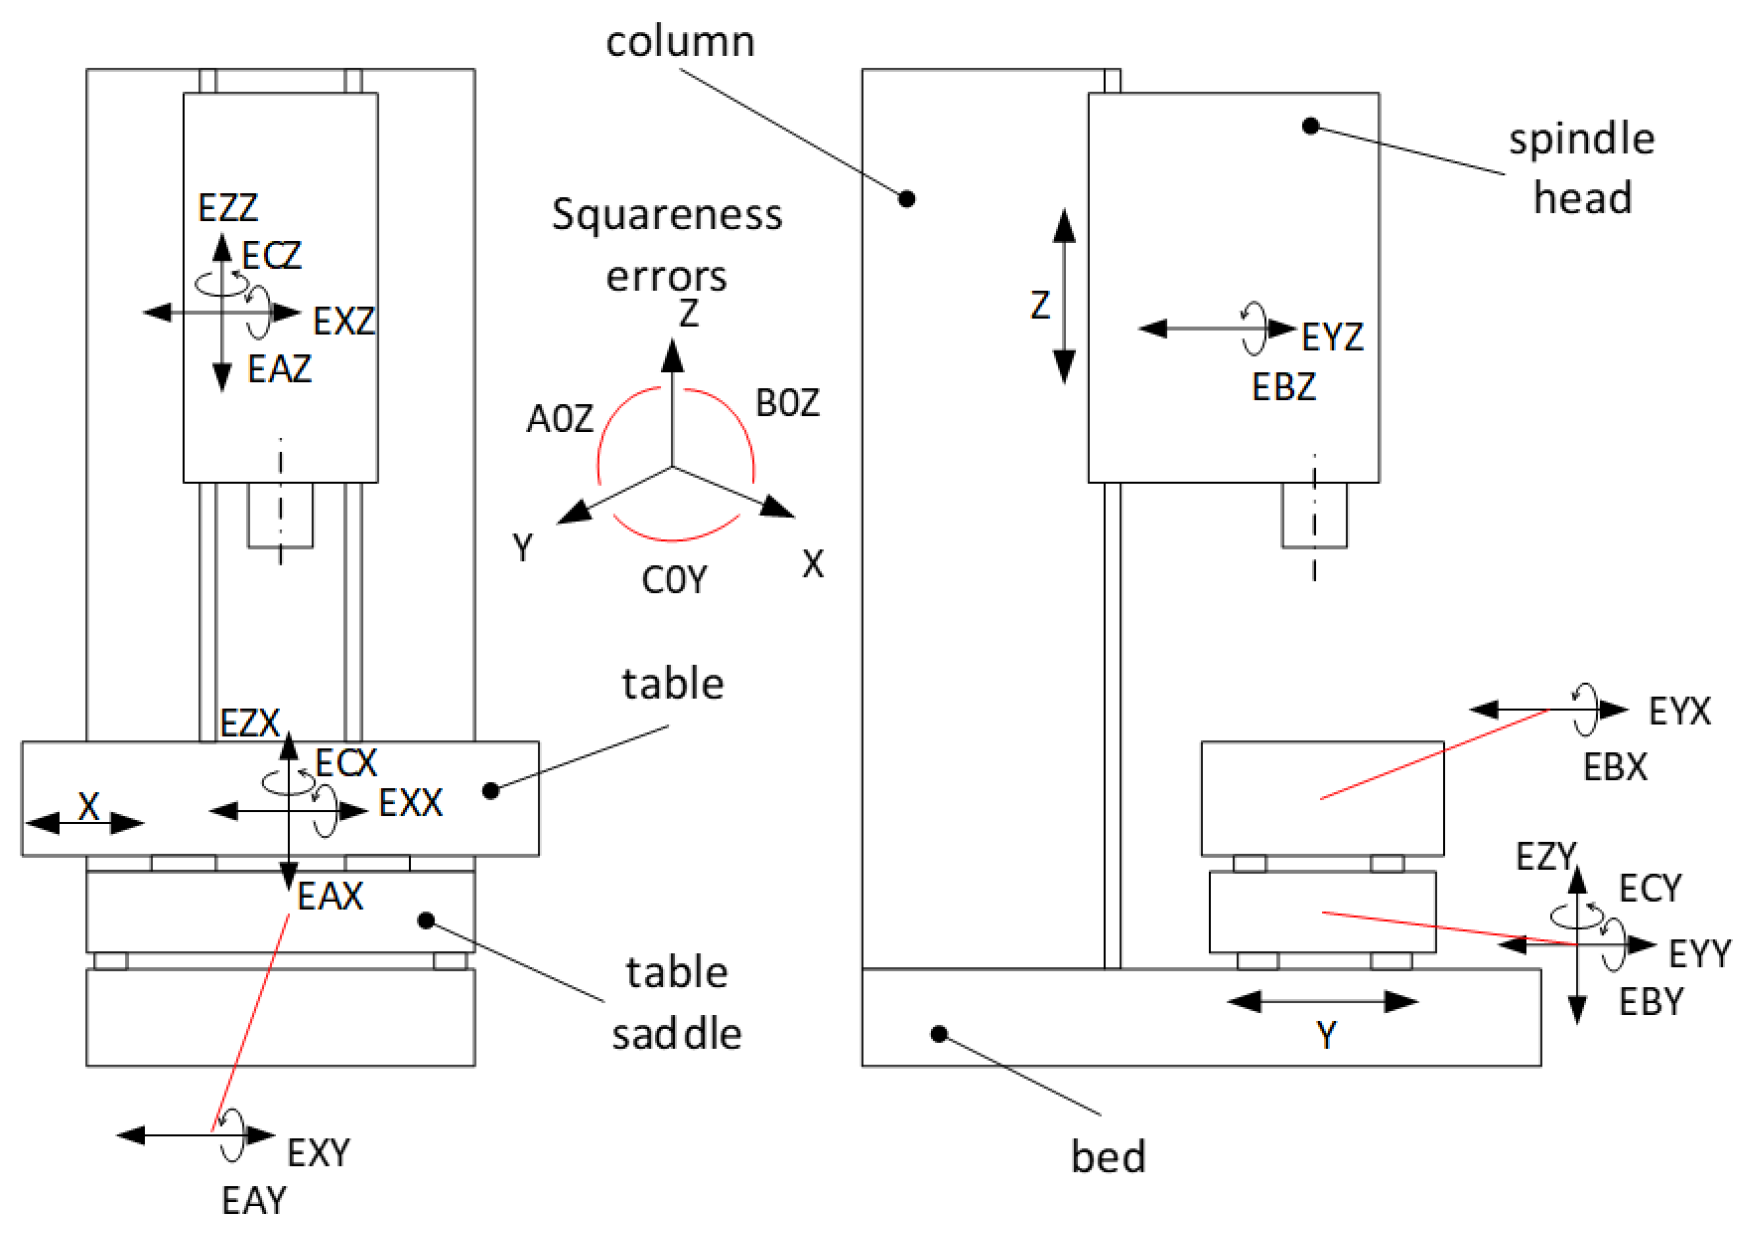
This section describes the results obtained by measuring the volumetric and geometric accuracy of the CNC machine tool and the roundness error of the workpieces. We can describe up to 21 geometric errors of the three-axis machine tool—the geometric error description is shown in Figure 5. The experiment was carried out according to the procedure shown in Figure 1.

3.1. Volumetric Accuracy of the Machine Tool

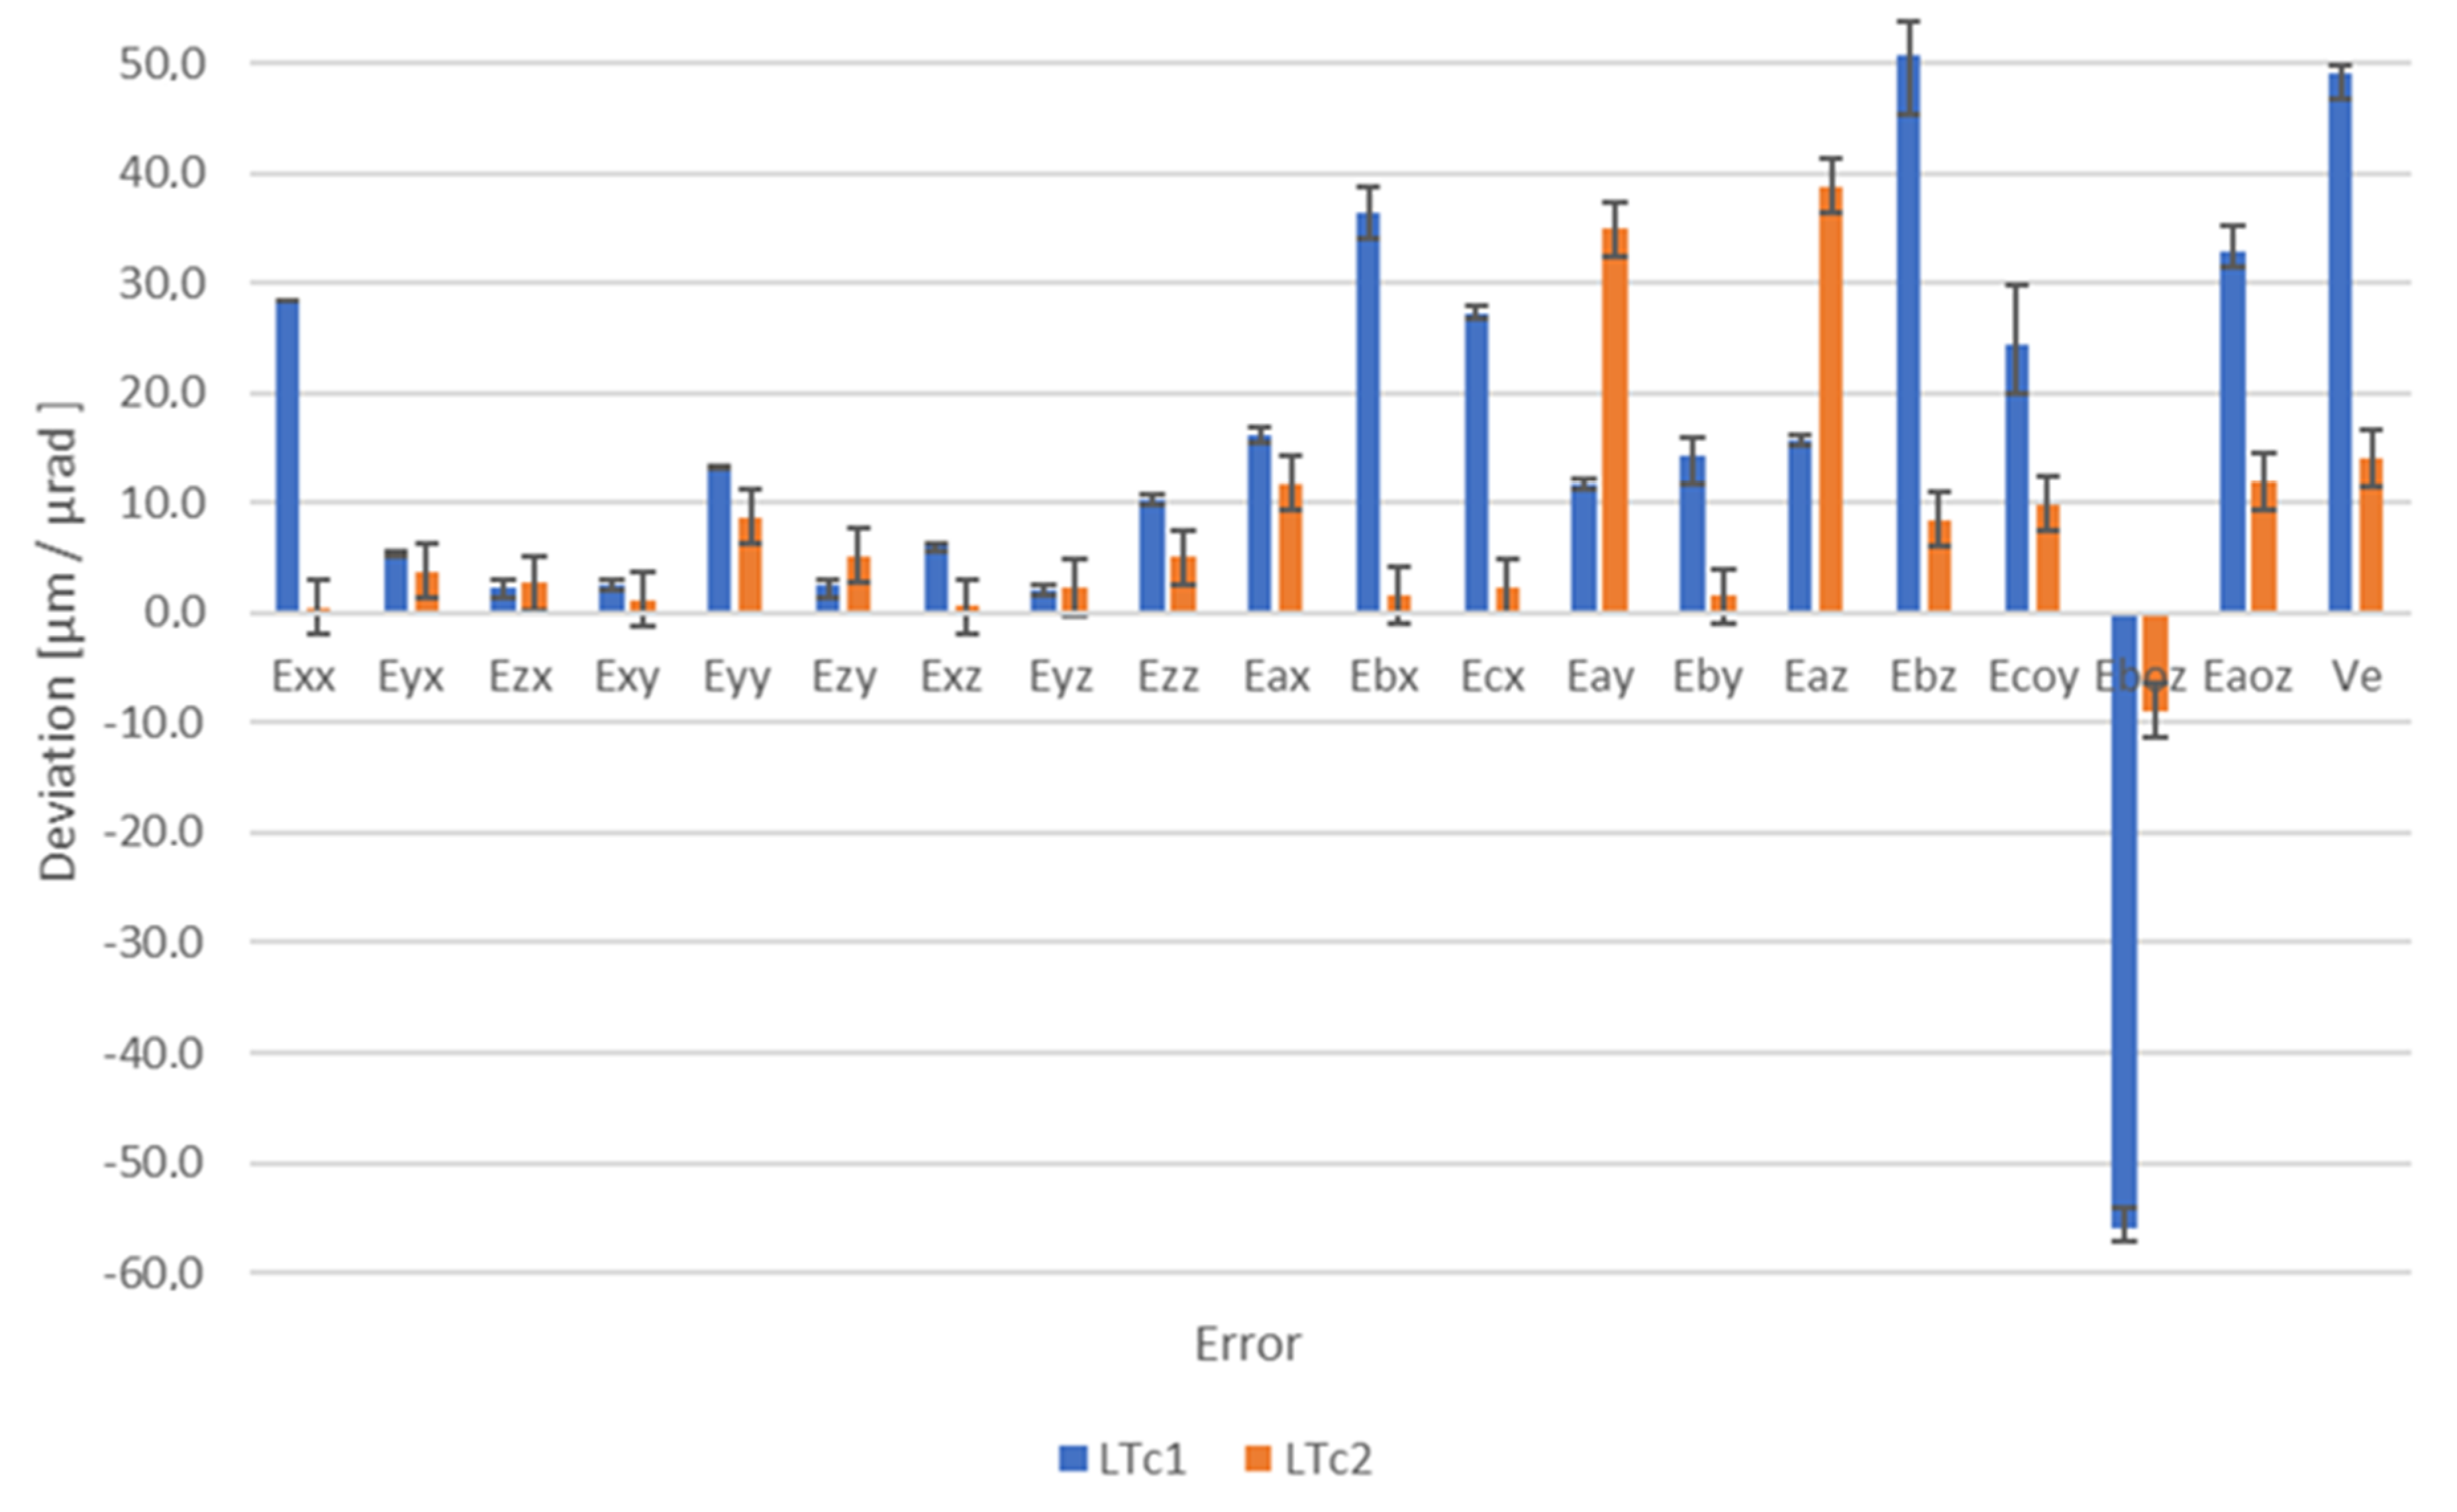
The volumetric accuracy of the machine is evaluated for LTc1 calibration and LTc2 verification. Within the framework of the performed experiment, geometric errors and volumetric errors (ve) were found. Figure 6 shows the errors of both the calibration and verification measurements of the machine workspace obtained with the LaserTRACER. These errors are described according to ISO 230-1 conventions.
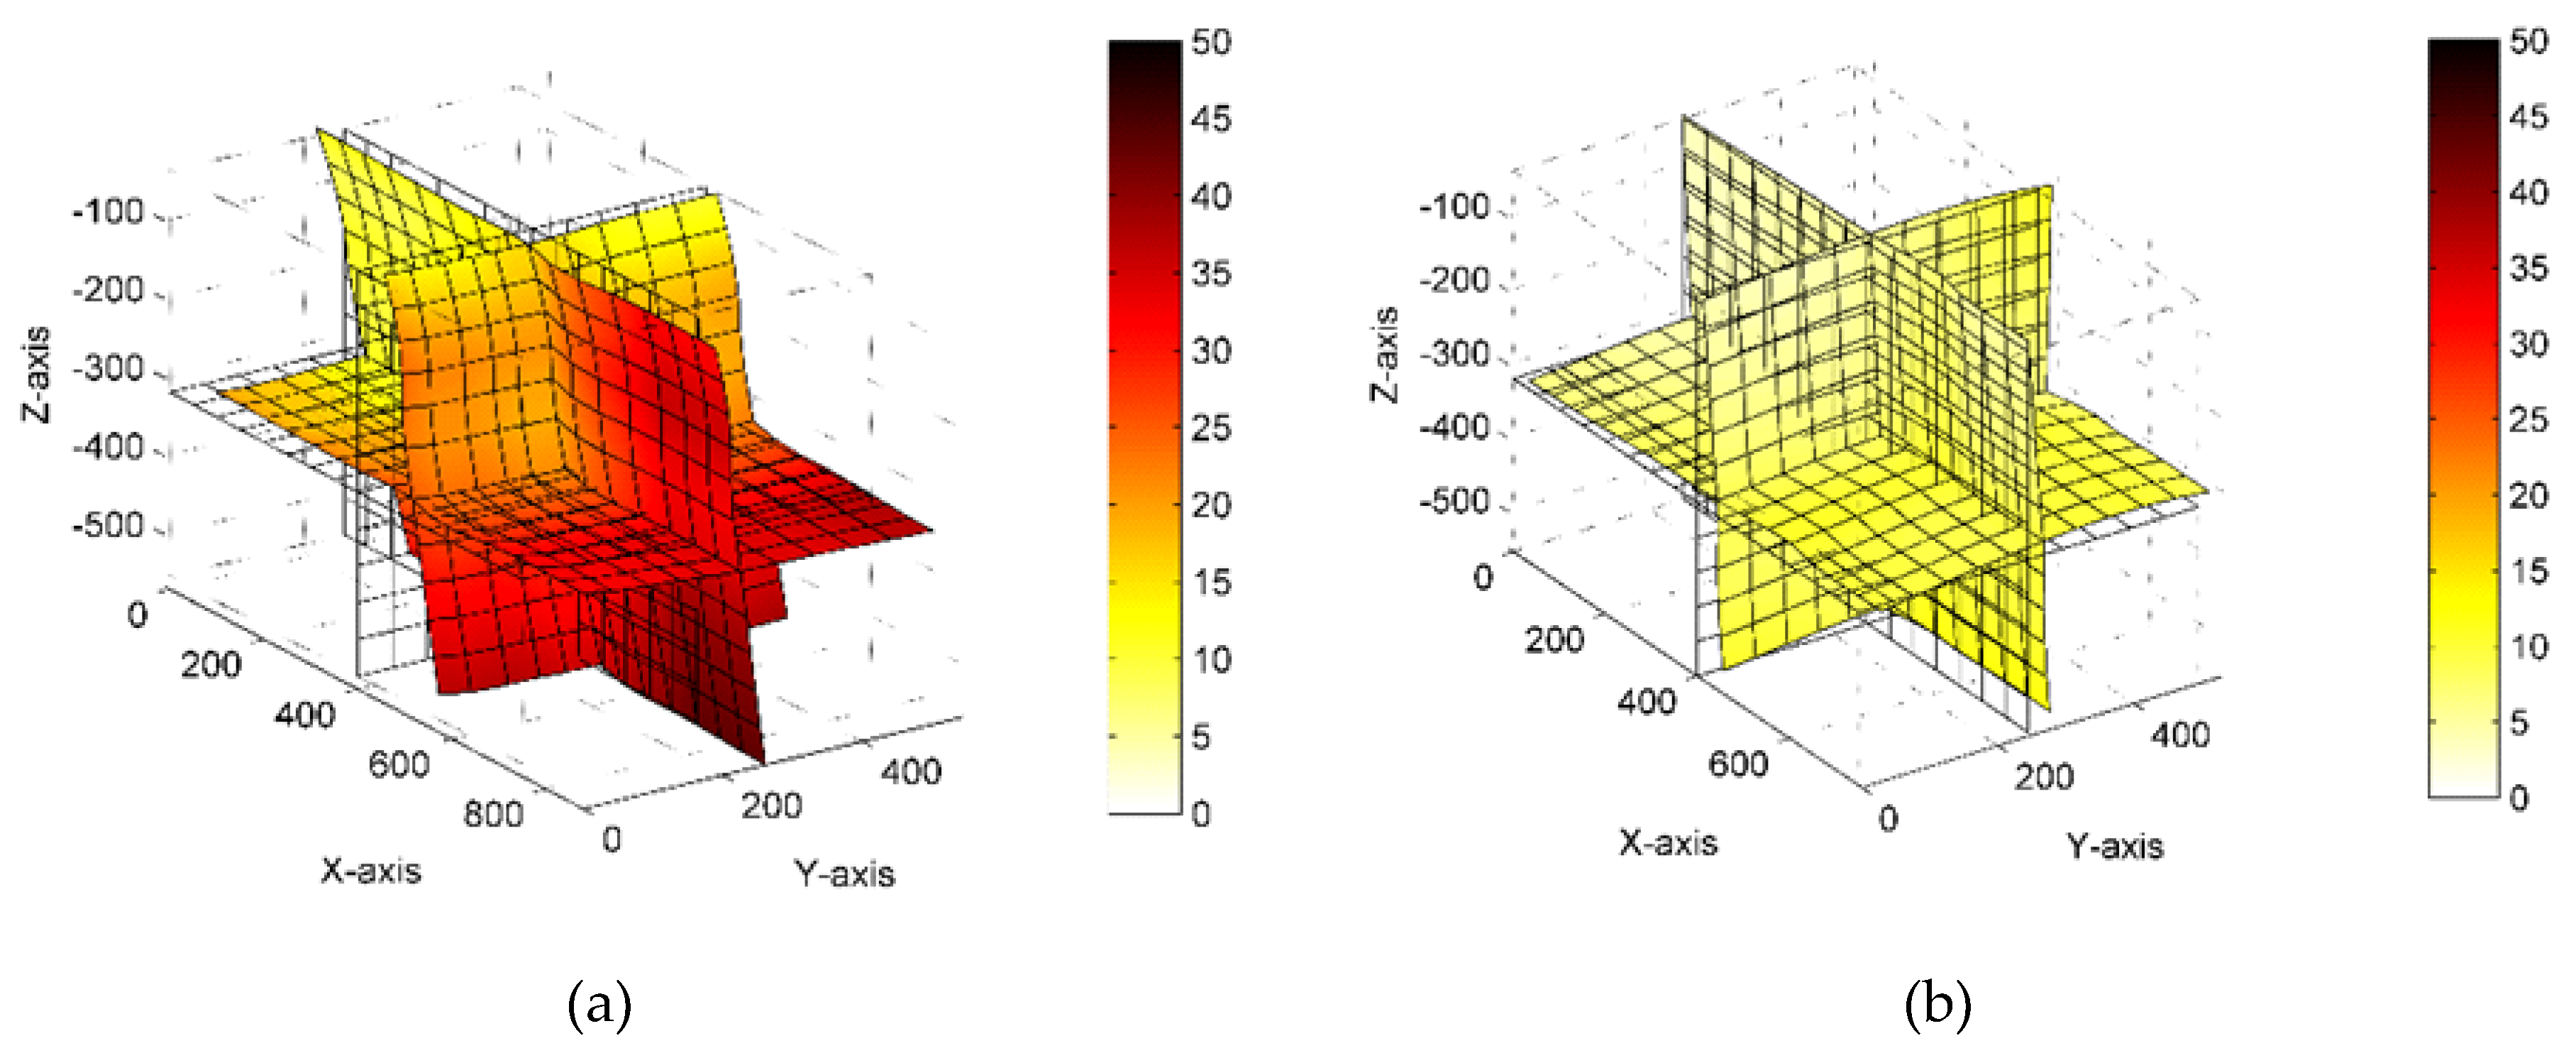
Figure 7 is a graphical representation of volumetric error distribution in the machine workspace. The results show that volumetric error (ve) decreased significantly, from 49 µm to 14 µm. Furthermore, the positioning errors on the EXX, EYY and EZZ axes were reduced and the squareness errors of relative axes EC0Y, EB0Z and EA0Z were significantly reduced. These errors were also reduced in the results obtained from the circular interpolation test, according to ISO 230-4 (see Section 3.2).

3.2. Geometric Accuracy

The geometric accuracy of the machine tool was determined by the circular interpolation test, according to ISO 230-4. The evaluation of individual machine errors was carried out using the software provided with the Ballbar QC20-w.
In the performed test, geometric accuracy was always evaluated without DBB1 volumetric compensation but with DBB2 volumetric compensation.
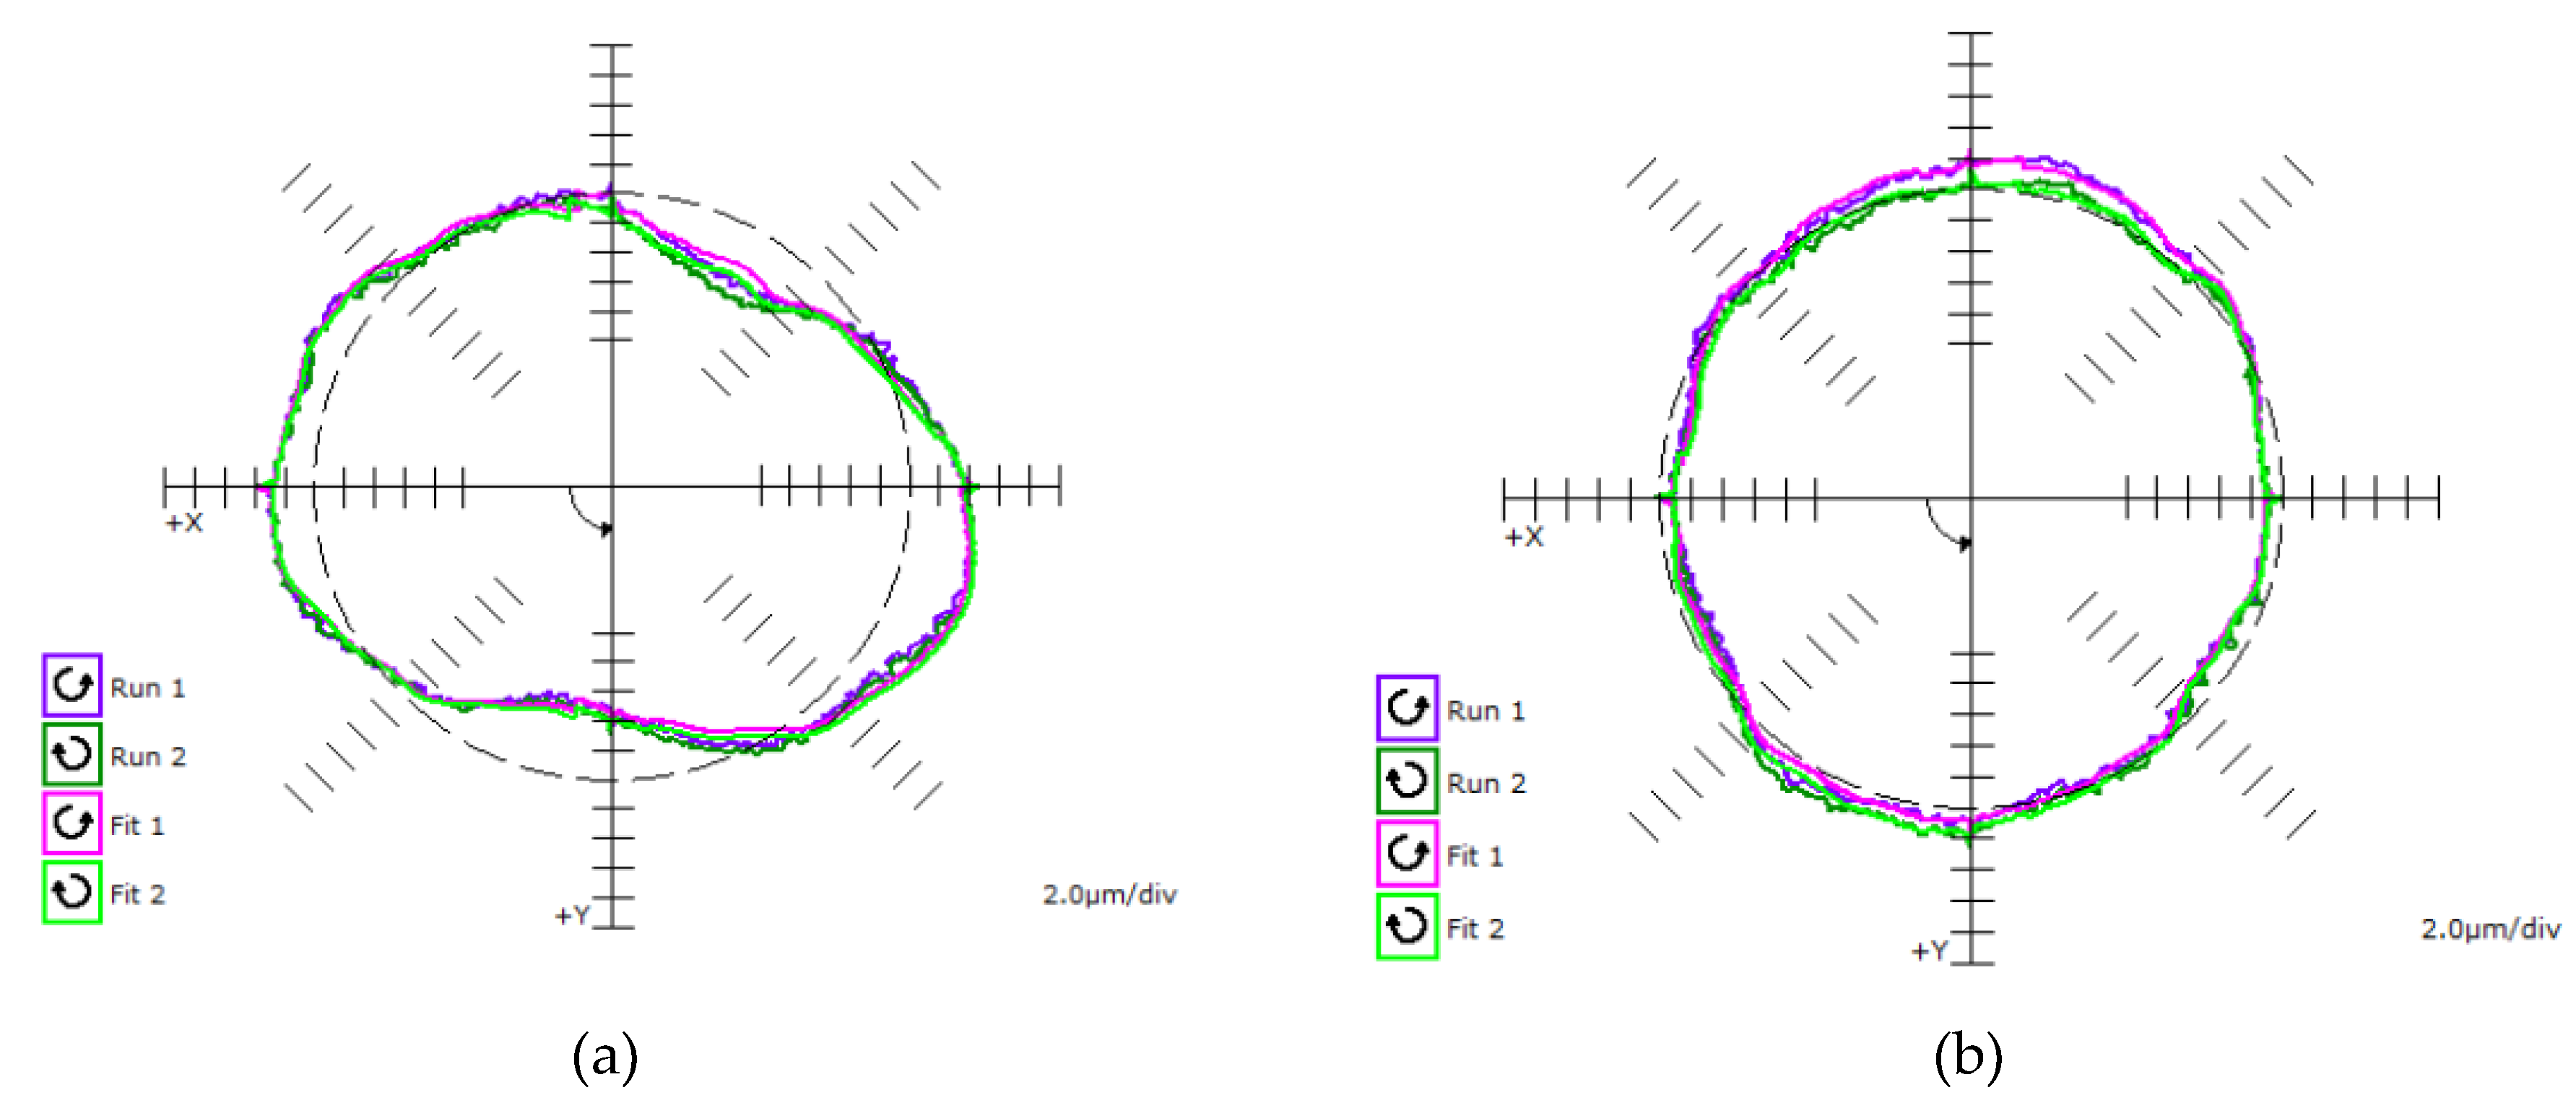
Figure 8 shows the results of the circular interpolation measurements in the XY-plane with a diameter of 300 mm and a feed rate of 400 mm/min, and Table 8 shows the selected parameters of the circularity test for DBB1 and DBB2.
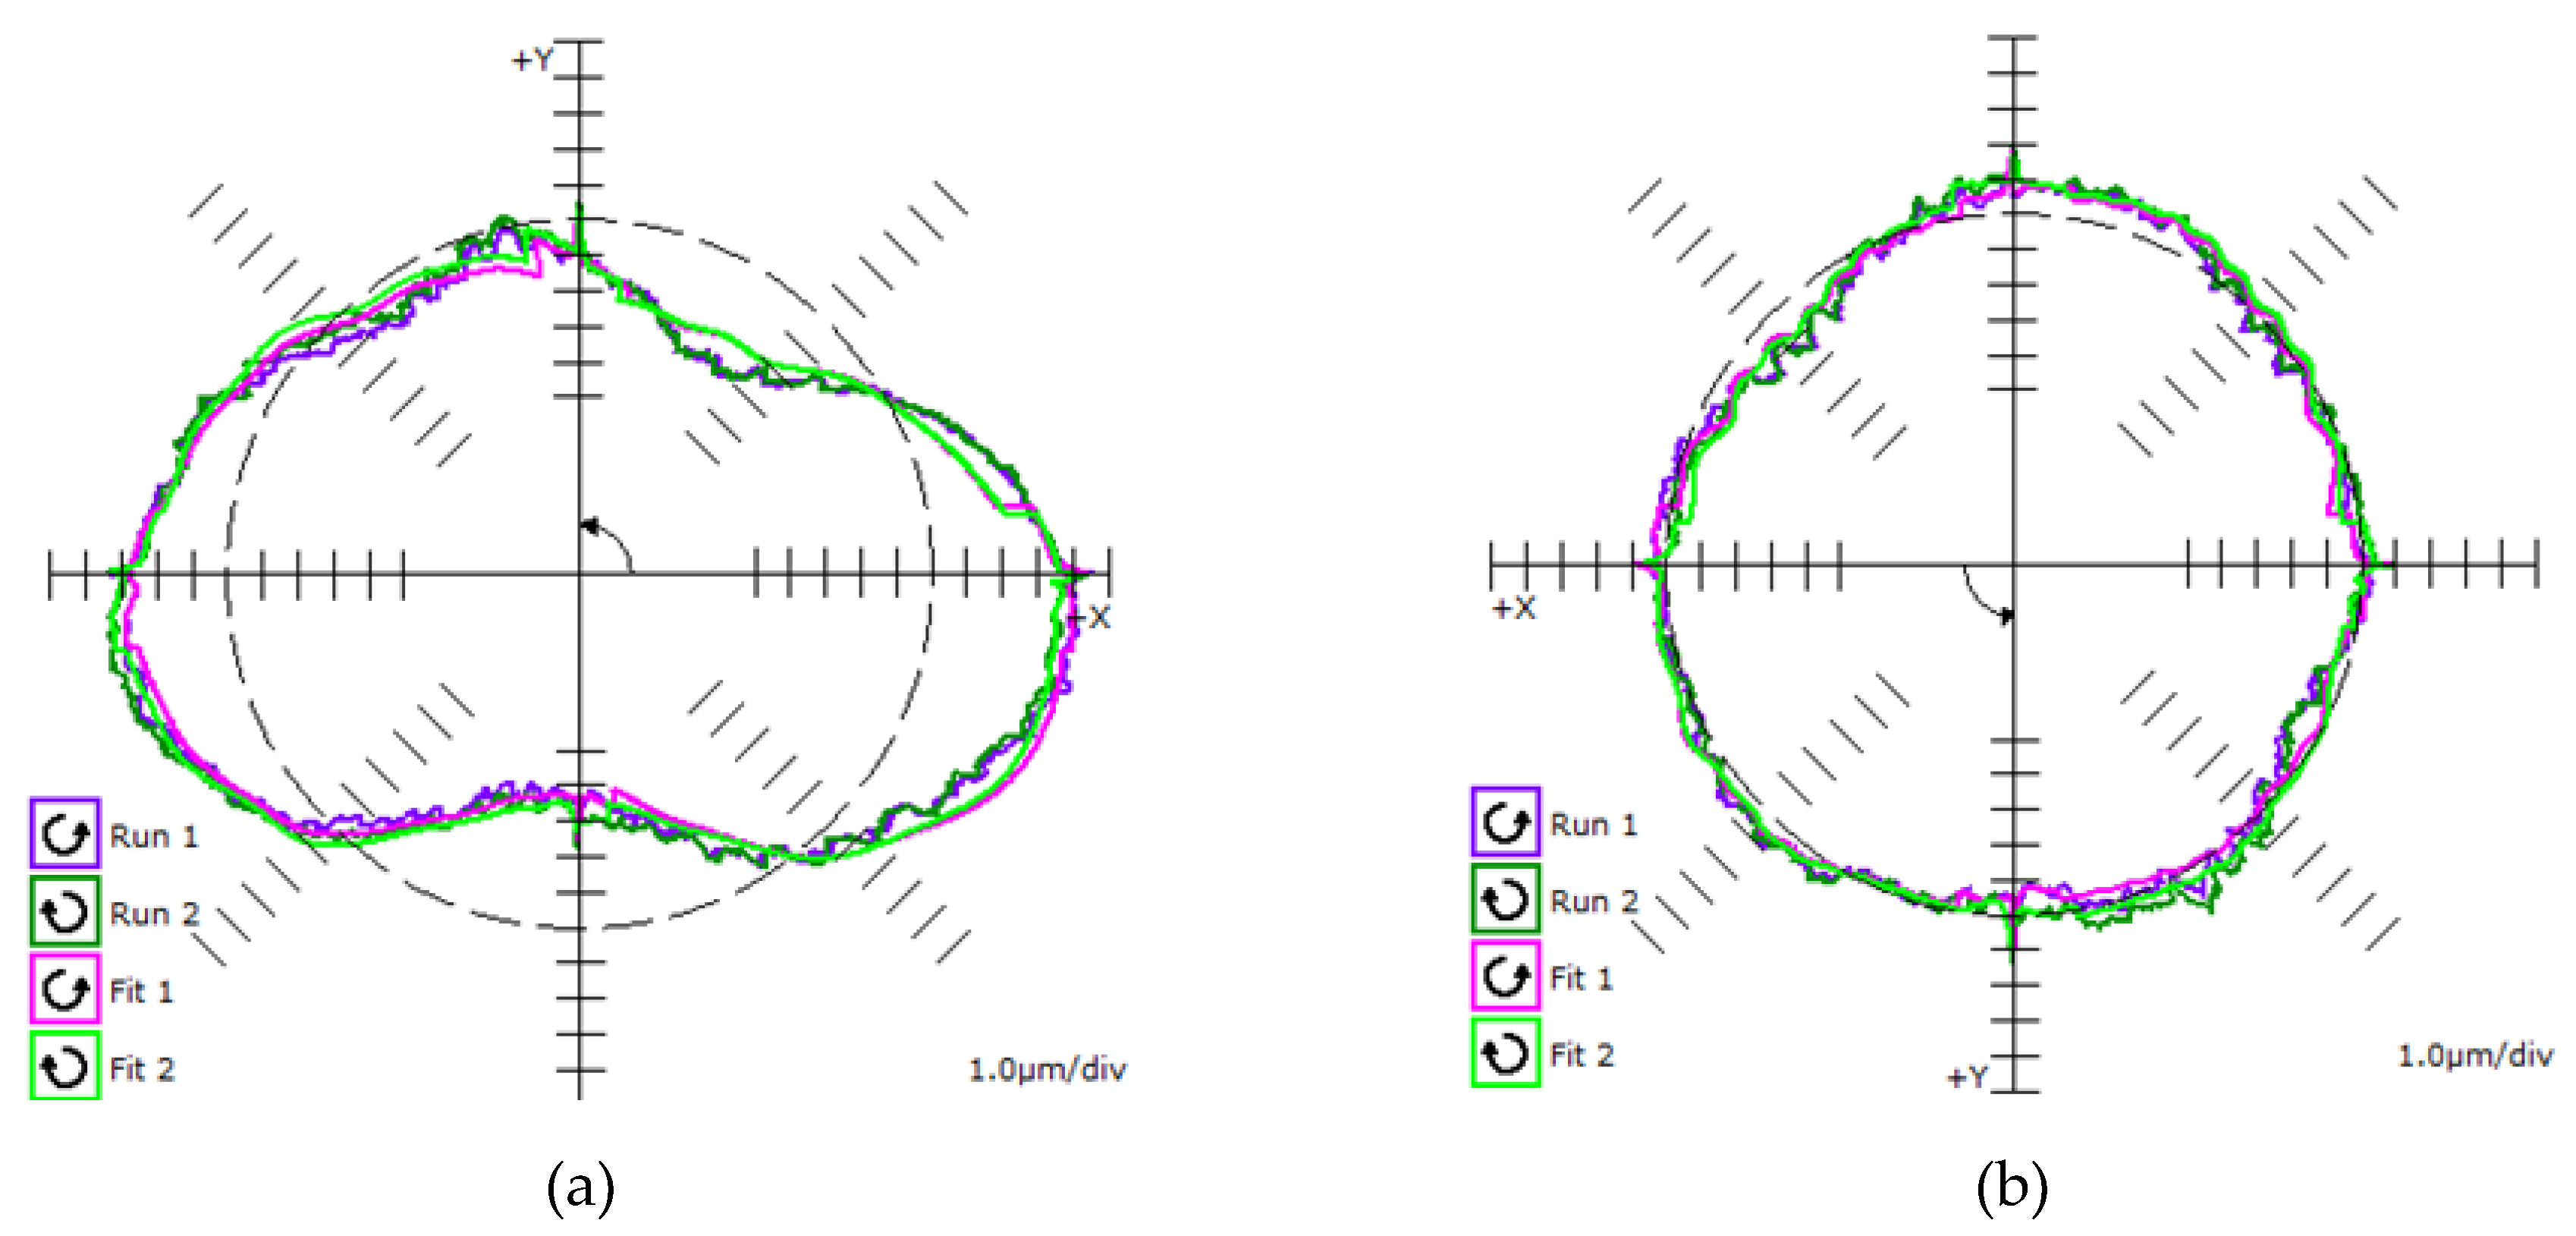
Figure 9 shows the results of the circular interpolation measurements in the XY-plane with a diameter of 200 mm and a feed rate of 400 mm/min. Table 9 shows the individual test parameters.
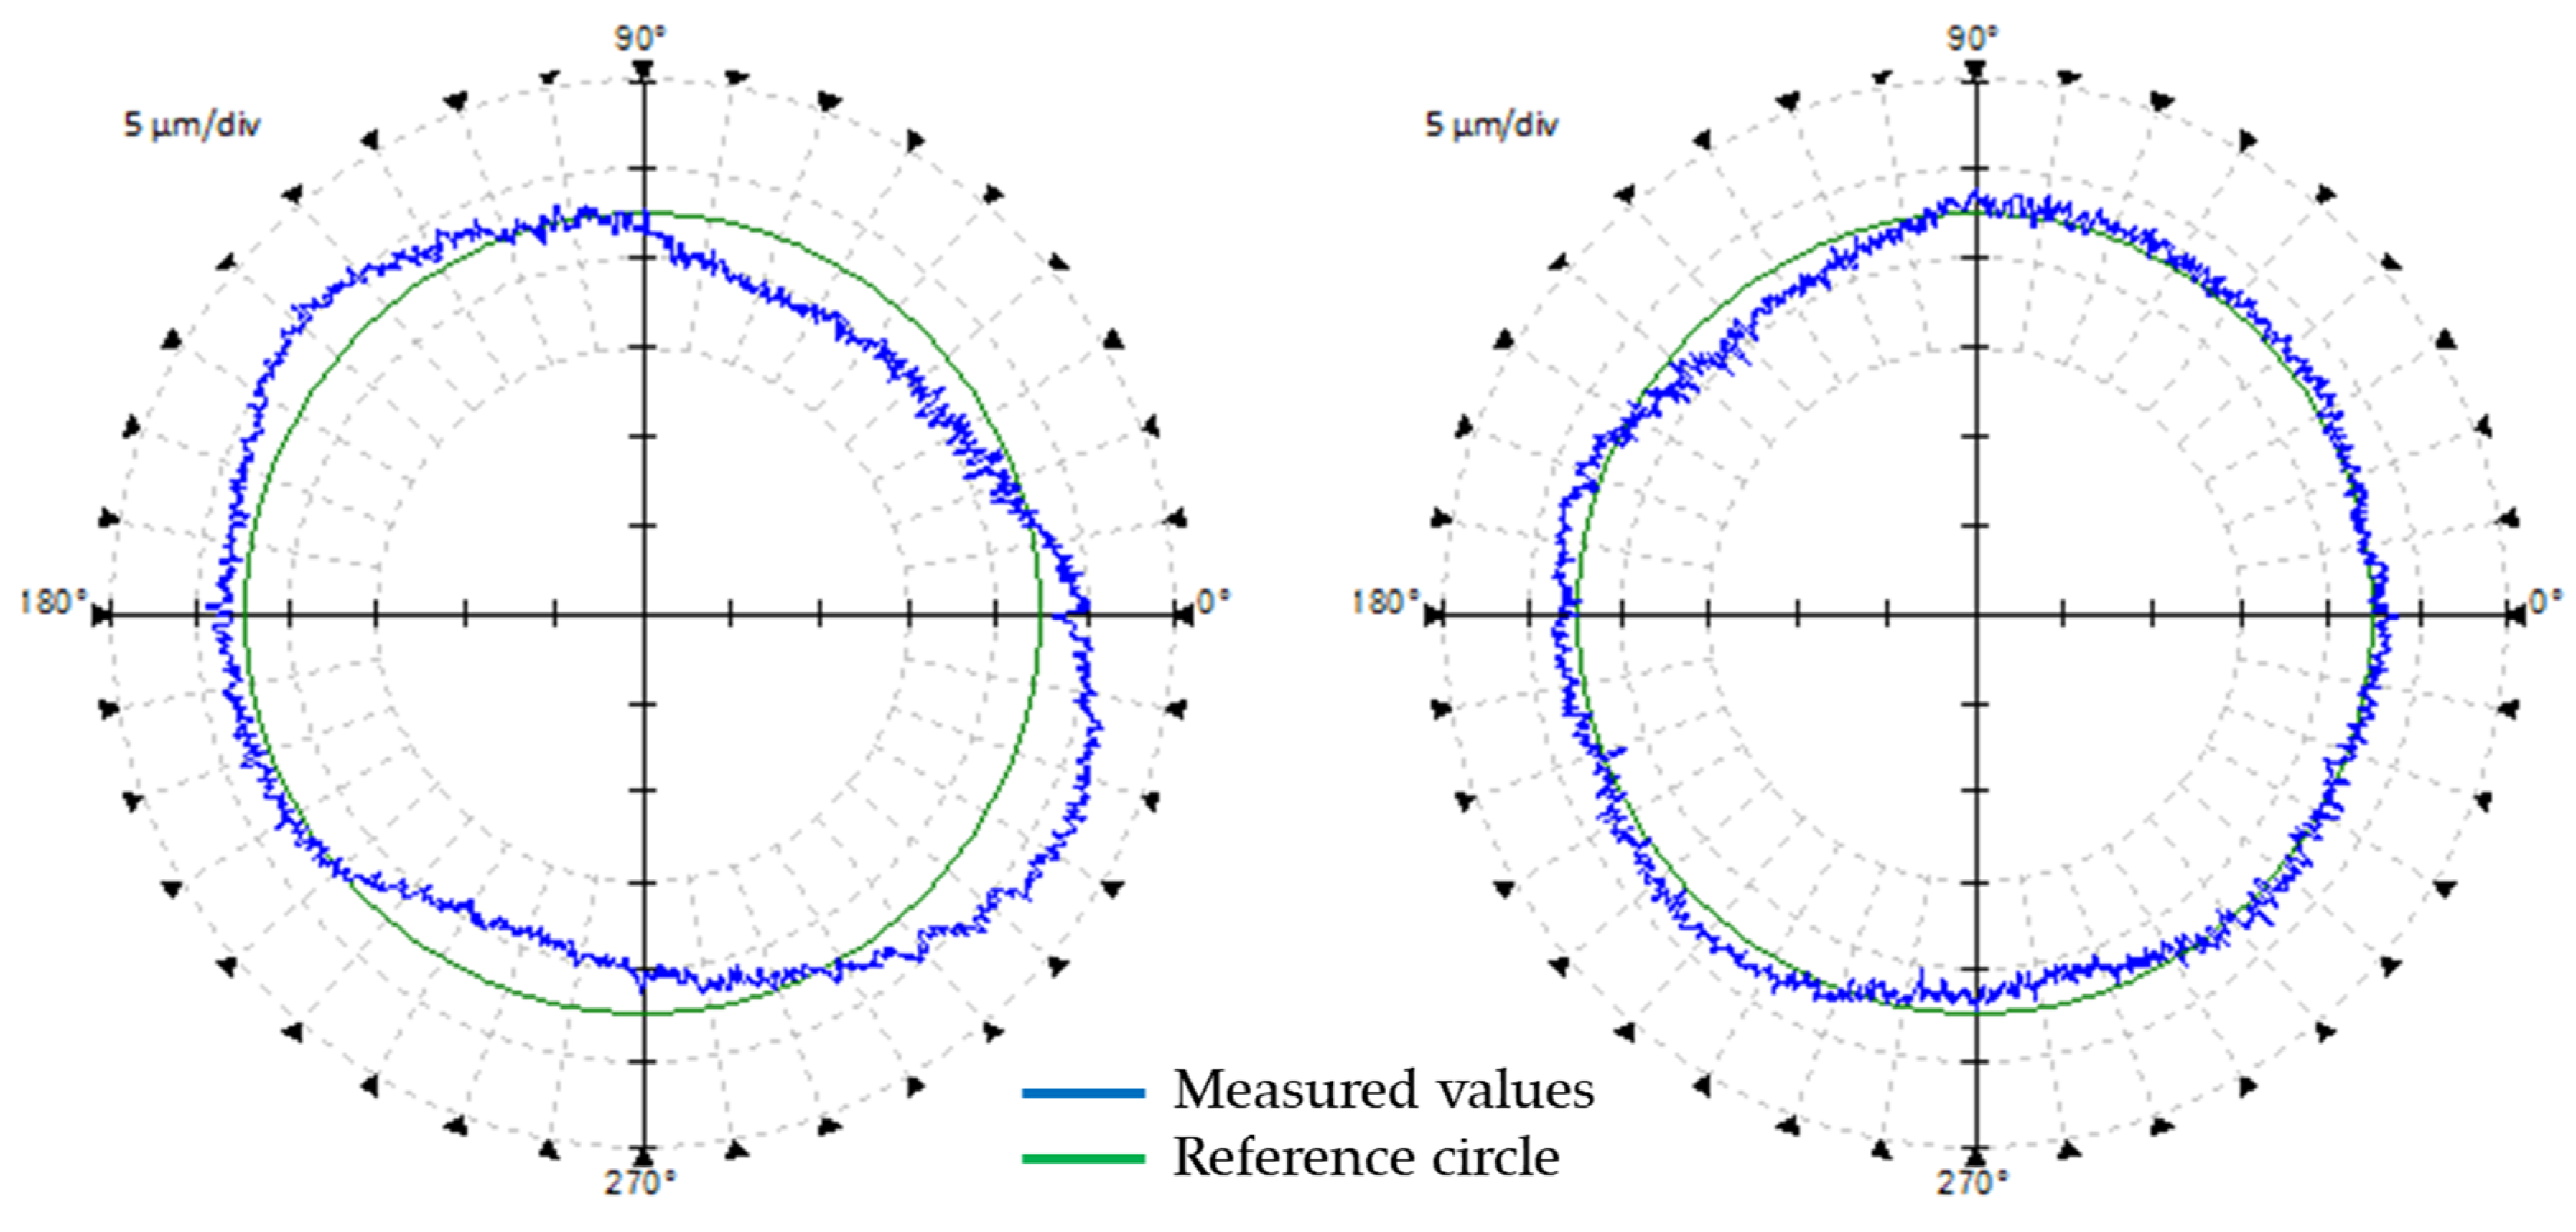
Figure 10 shows the results of the circular interpolation measurements in the XY-plane with a diameter of 100 mm and a feed rate of 400 mm/min. Table 10 shows the individual test parameters.
It can be seen that volumetric compensation is a significant concern when increasing the geometric accuracy of a machine. Circularity error at a diameter of 300 mm in the XY-plane decreased from 10.5 µm to 4.5 µm. The results shown in Figure 8, Figure 9 and Figure 10 show that shape accuracy also improved. However, the above results were realised under unloaded conditions, i.e., without the gravity of the workpiece and machining forces.

3.3. Workpiece Accuracy

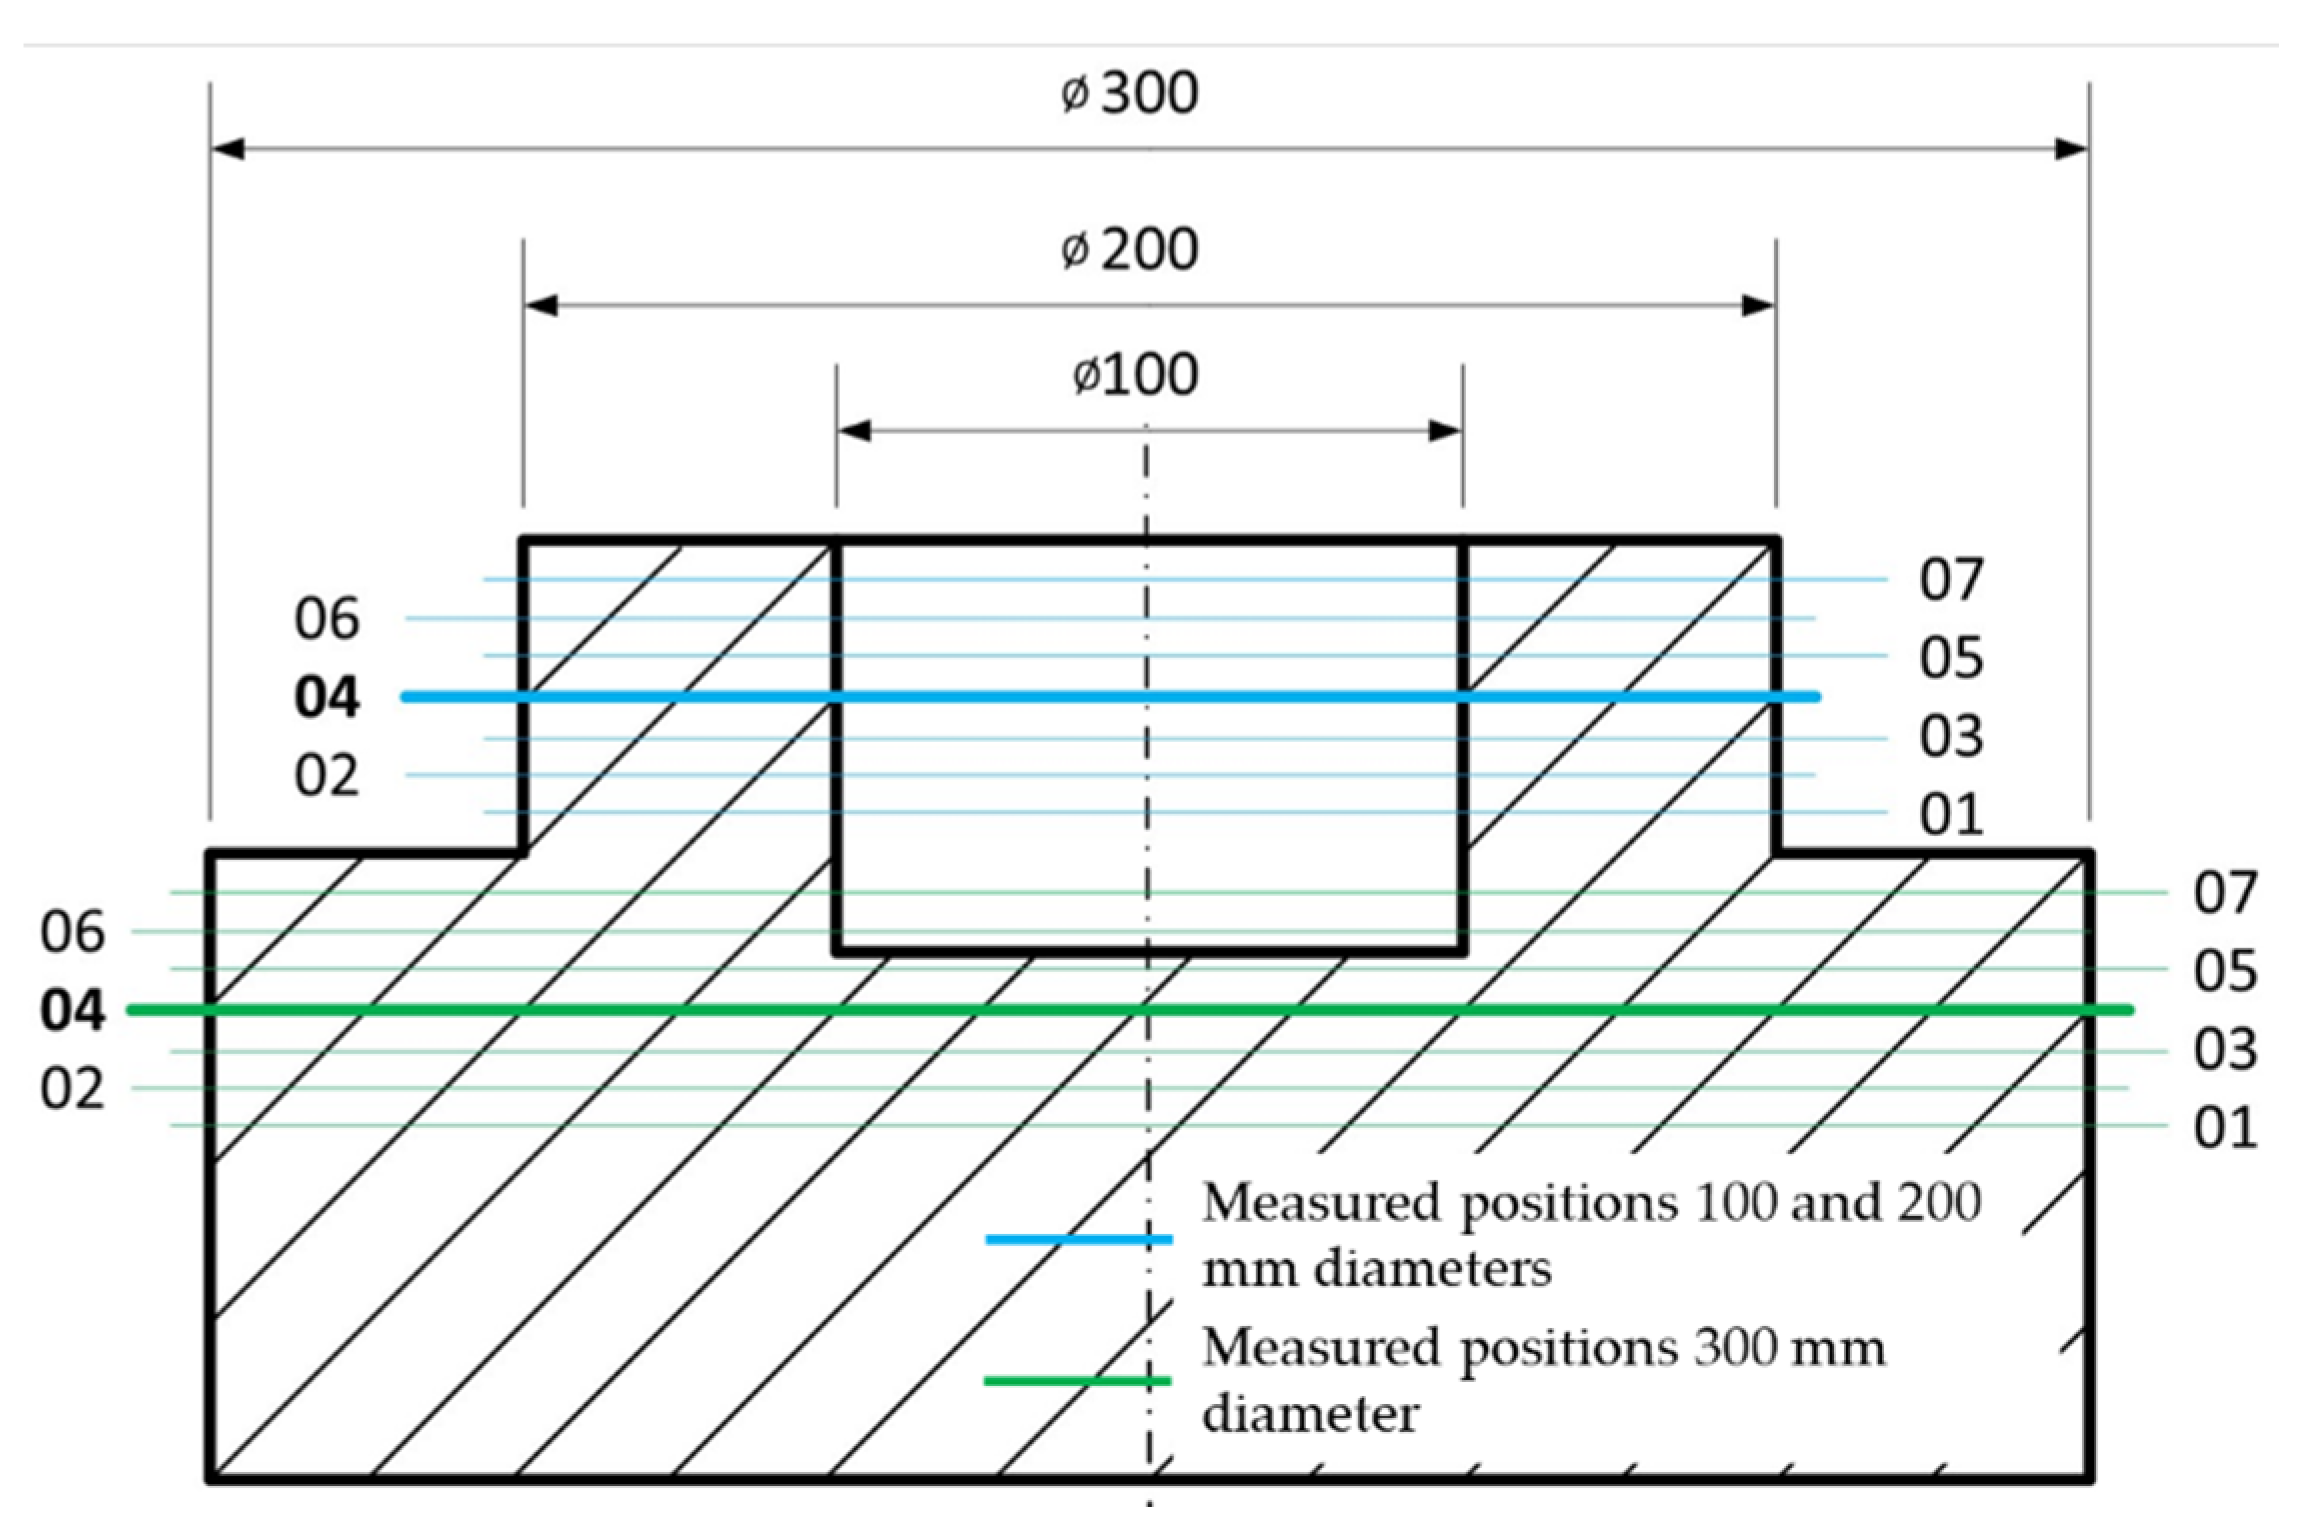
The workpieces were inspected on a Taylrond 595S. They were always measured in seven cuts (positions), spaced 5 mm apart. A diagram of the measured positions is shown in Figure 11. The positions of the 100 and 200 mm diameters are identical and marked in blue. The positions of the measured points on the 300 mm diameter are marked in green. Position 04 of the measured diameters is representative, and these results are further shown as shapes of the measured RONt.
The results in Table 11, Table 12 and Table 13 show the measured values according to the above diagram. The arithmetic averages for workpieces WP1 and WP2 are calculated to evaluate workpiece RONt and to allow for comparison with Ballbar results.
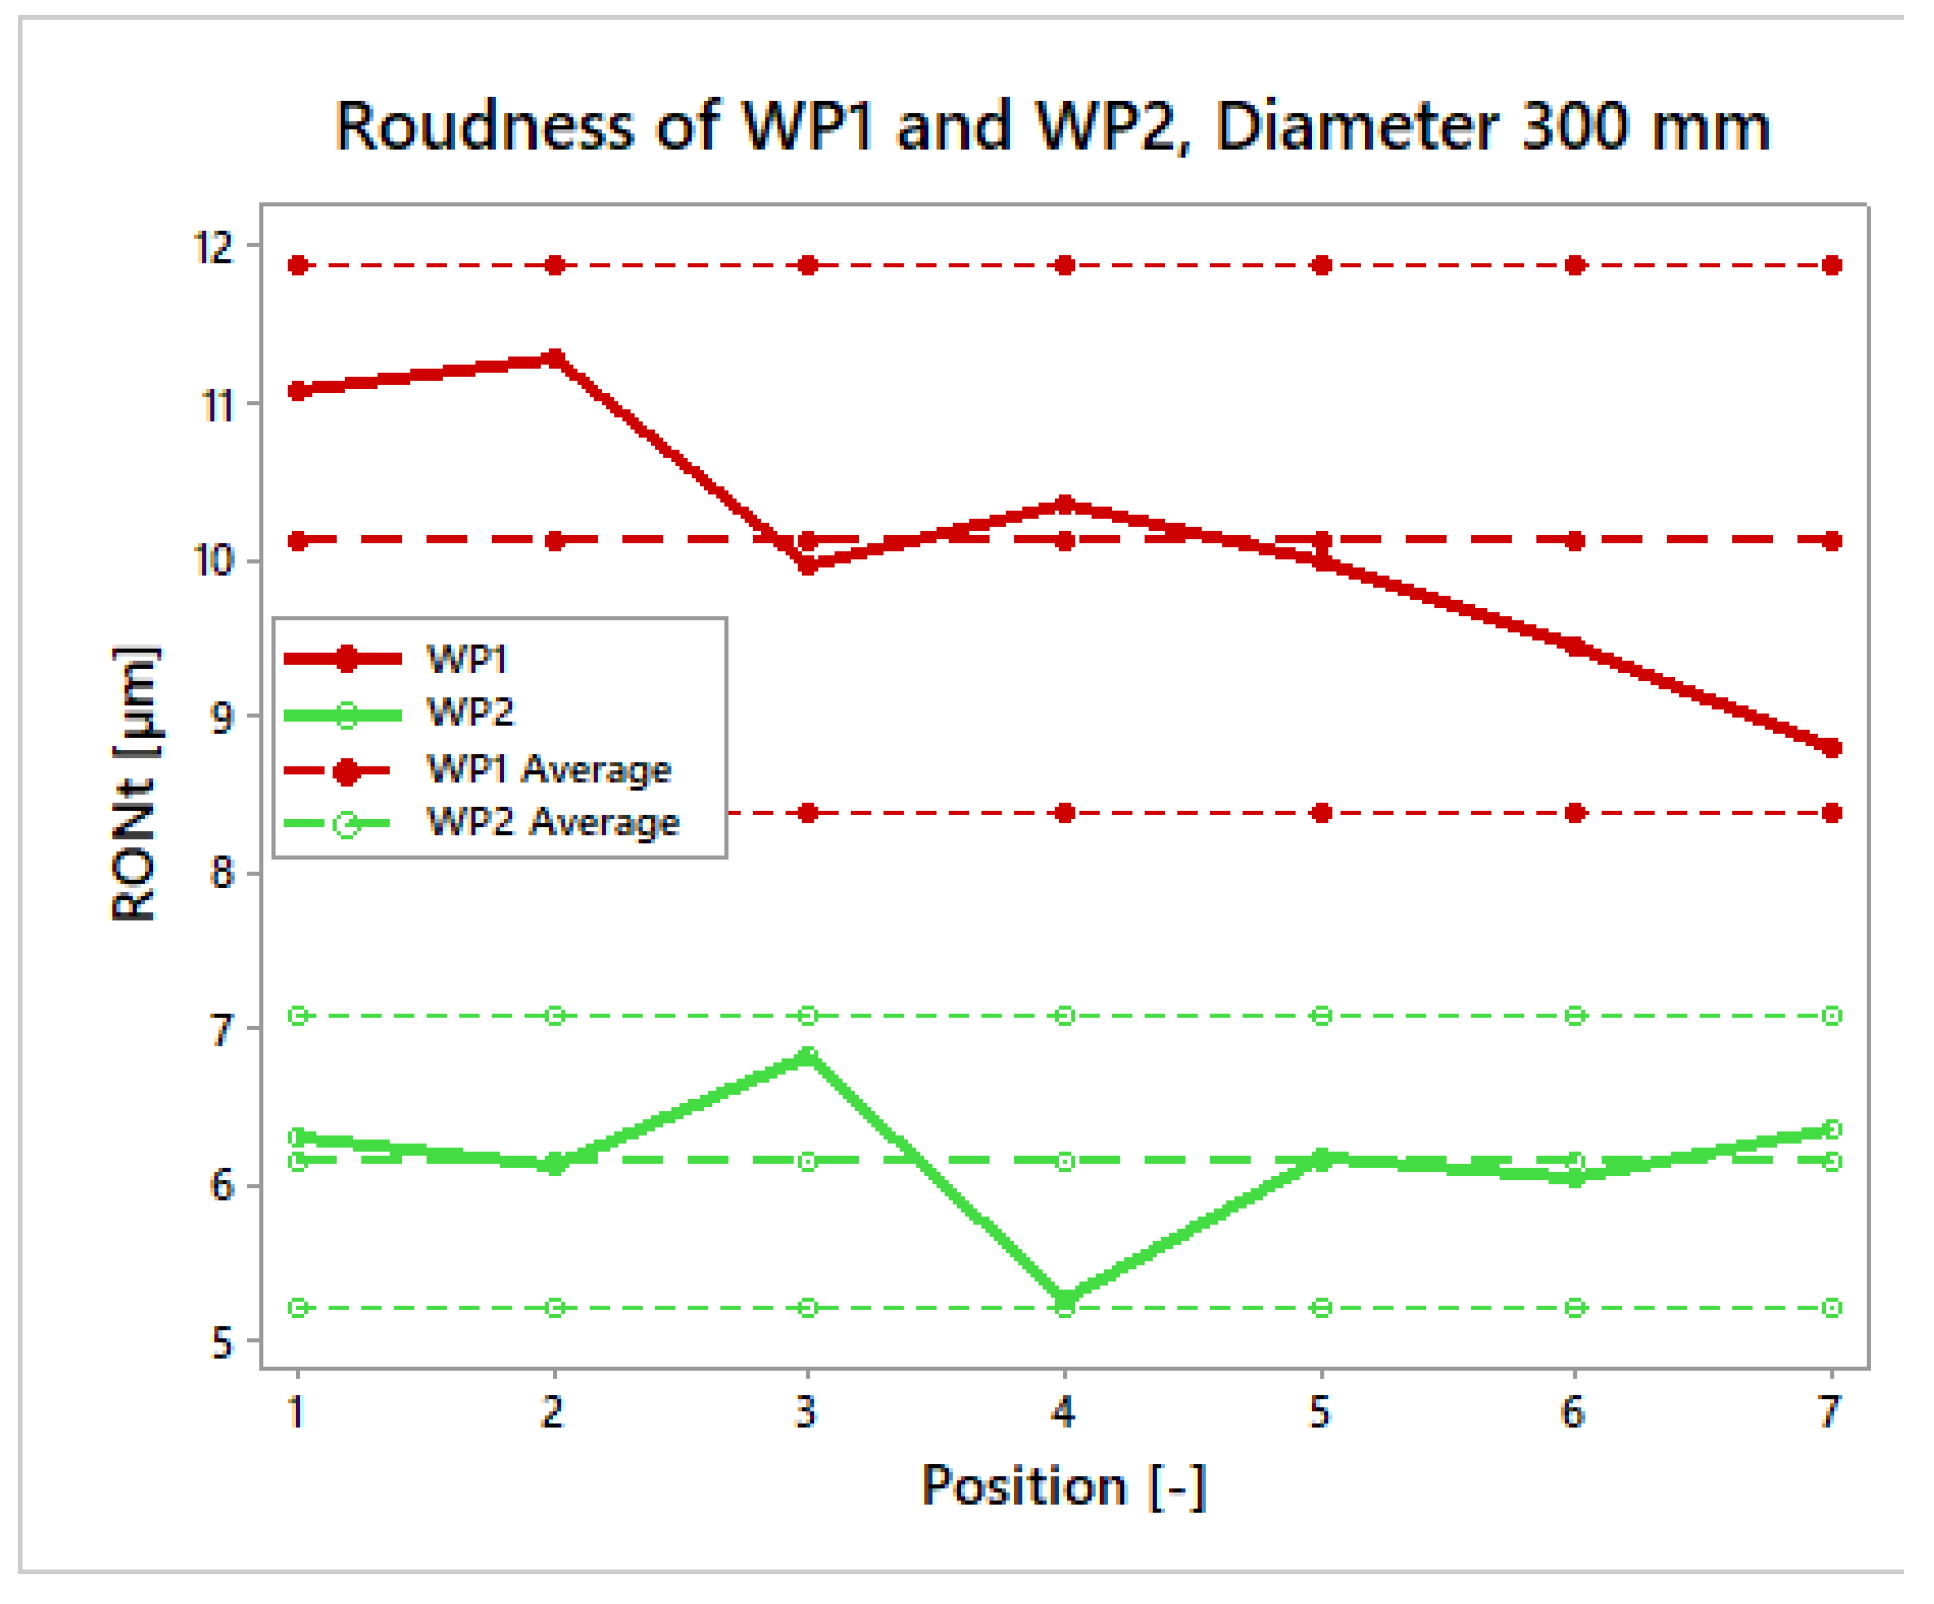
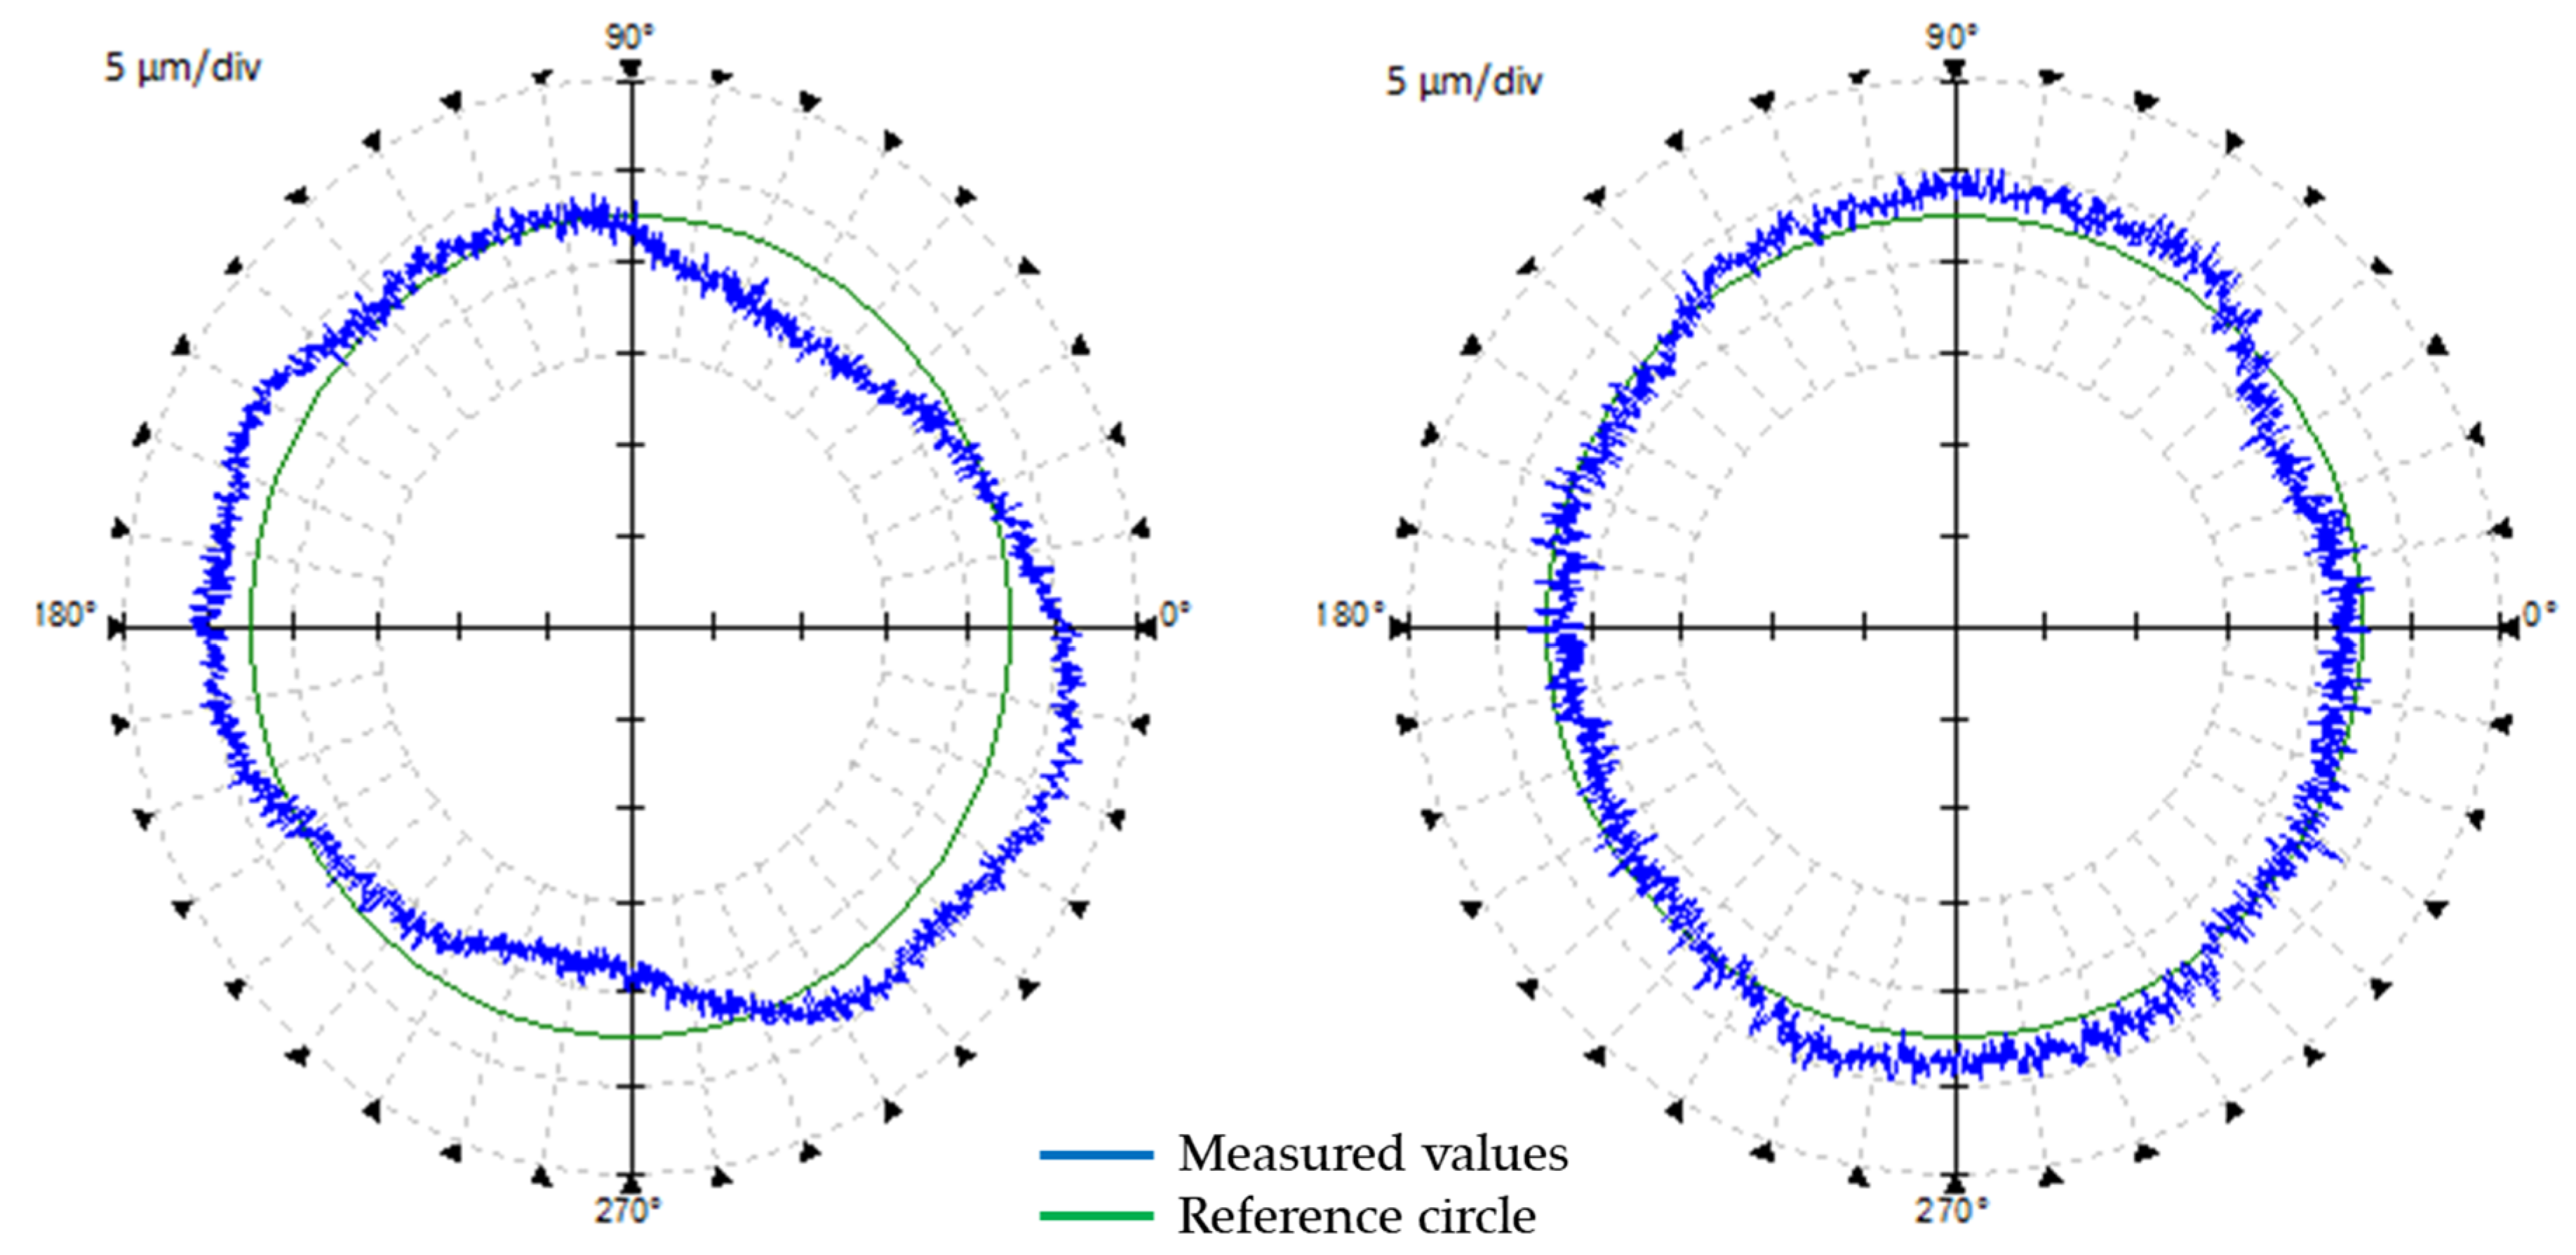
Figure 12 shows the roundness of the 300 mm outer diameter. Here, the average roundness improved from 10.13 µm to 6.16 µm. Figure 13 shows the measurement result at position 04, according to Table 11 and Figure 11.
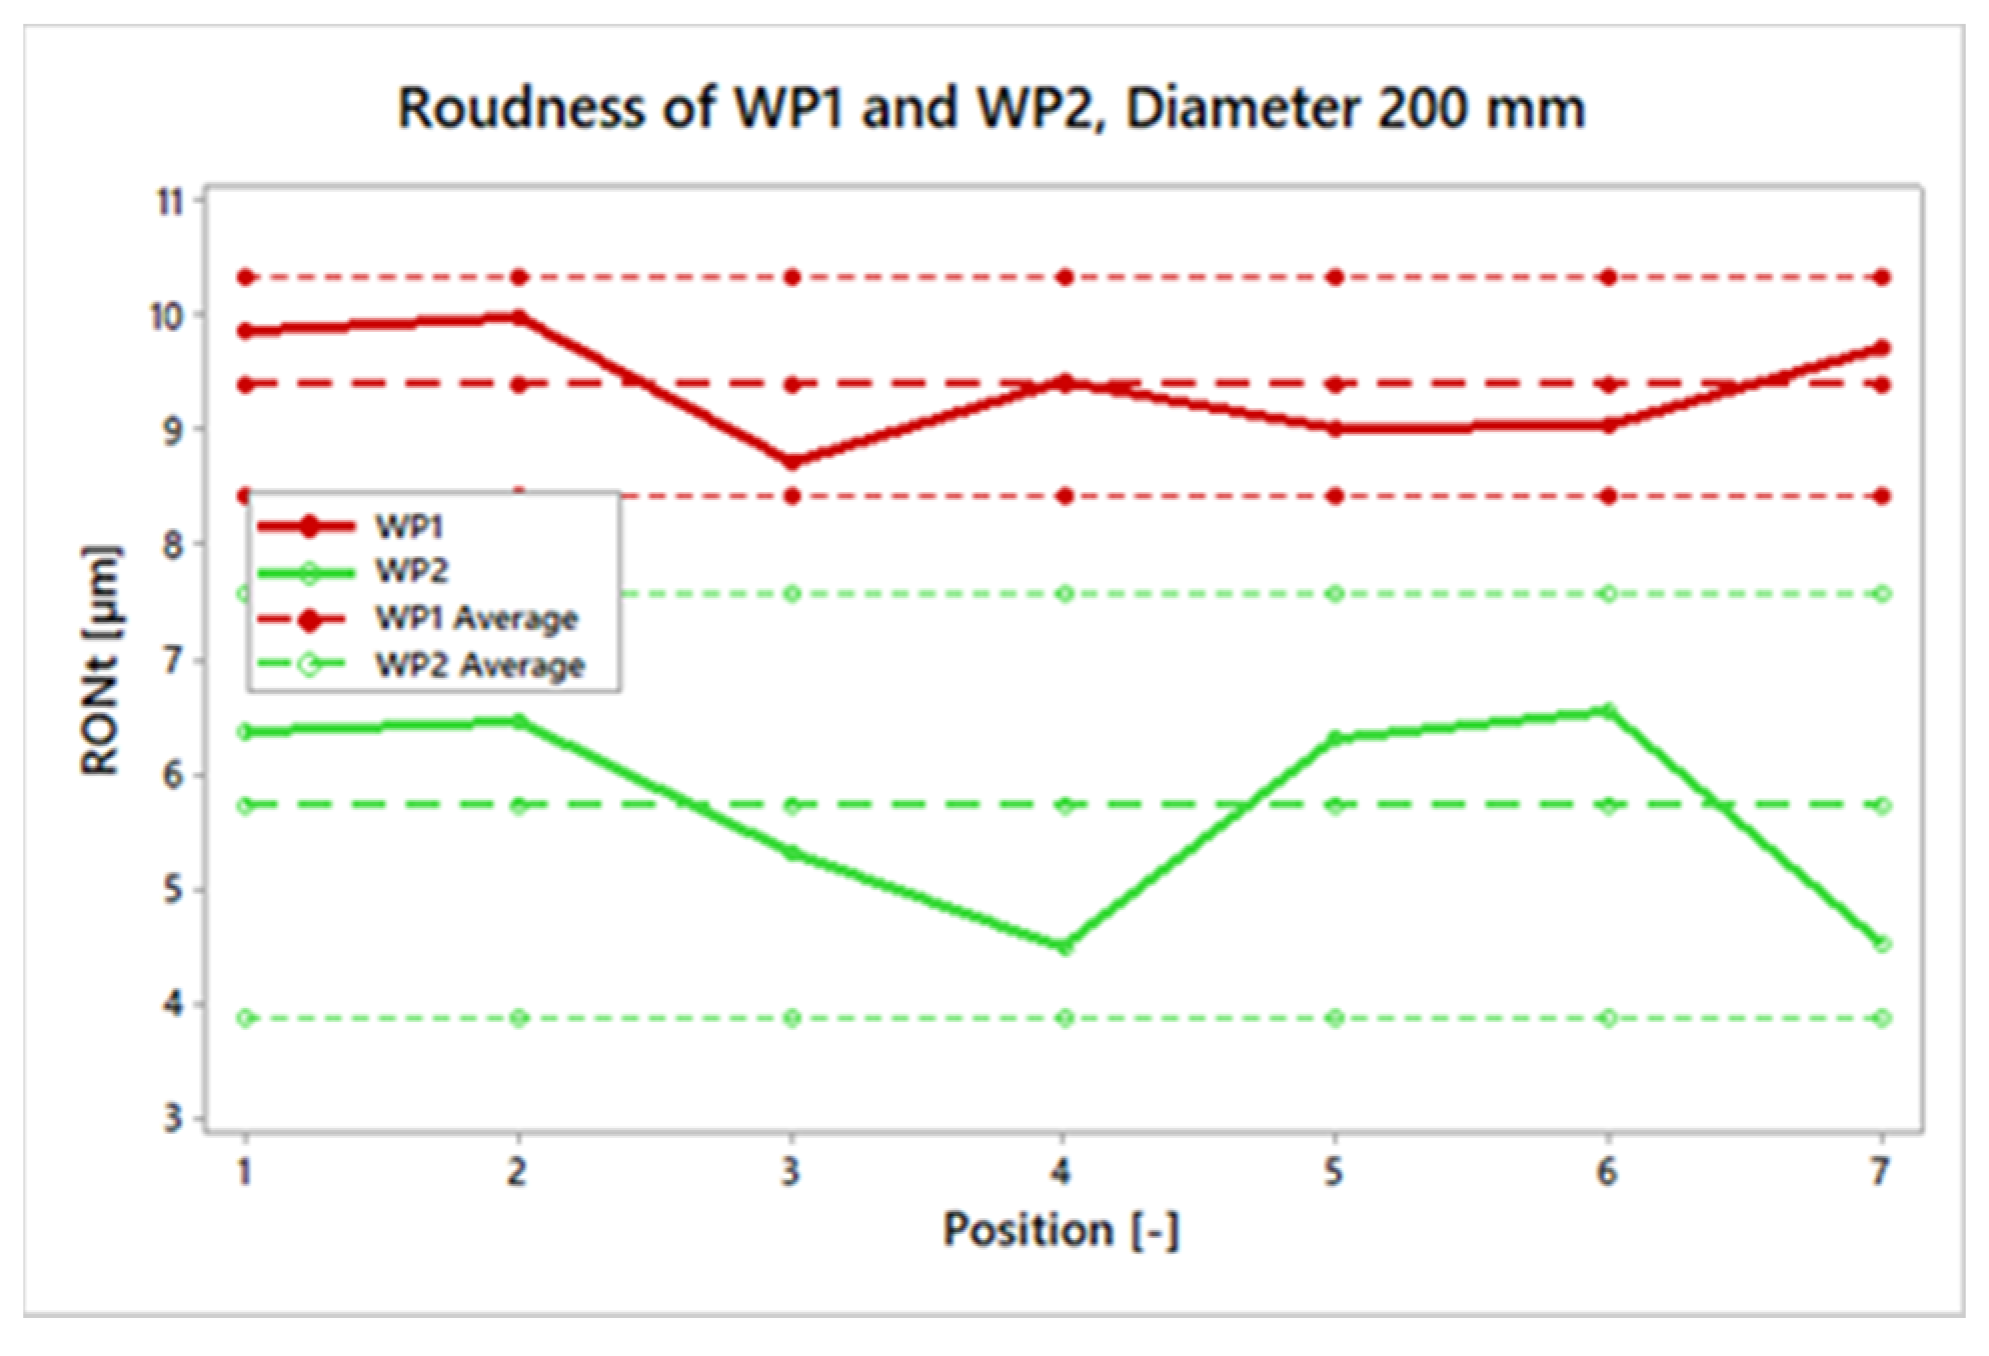
Figure 14 shows the roundness of the 200 mm outer diameter. Here, roundness improved from 9.39 µm to 5.71 µm. Figure 15 shows the measurement result at position 04, according to Table 12 and Figure 11.
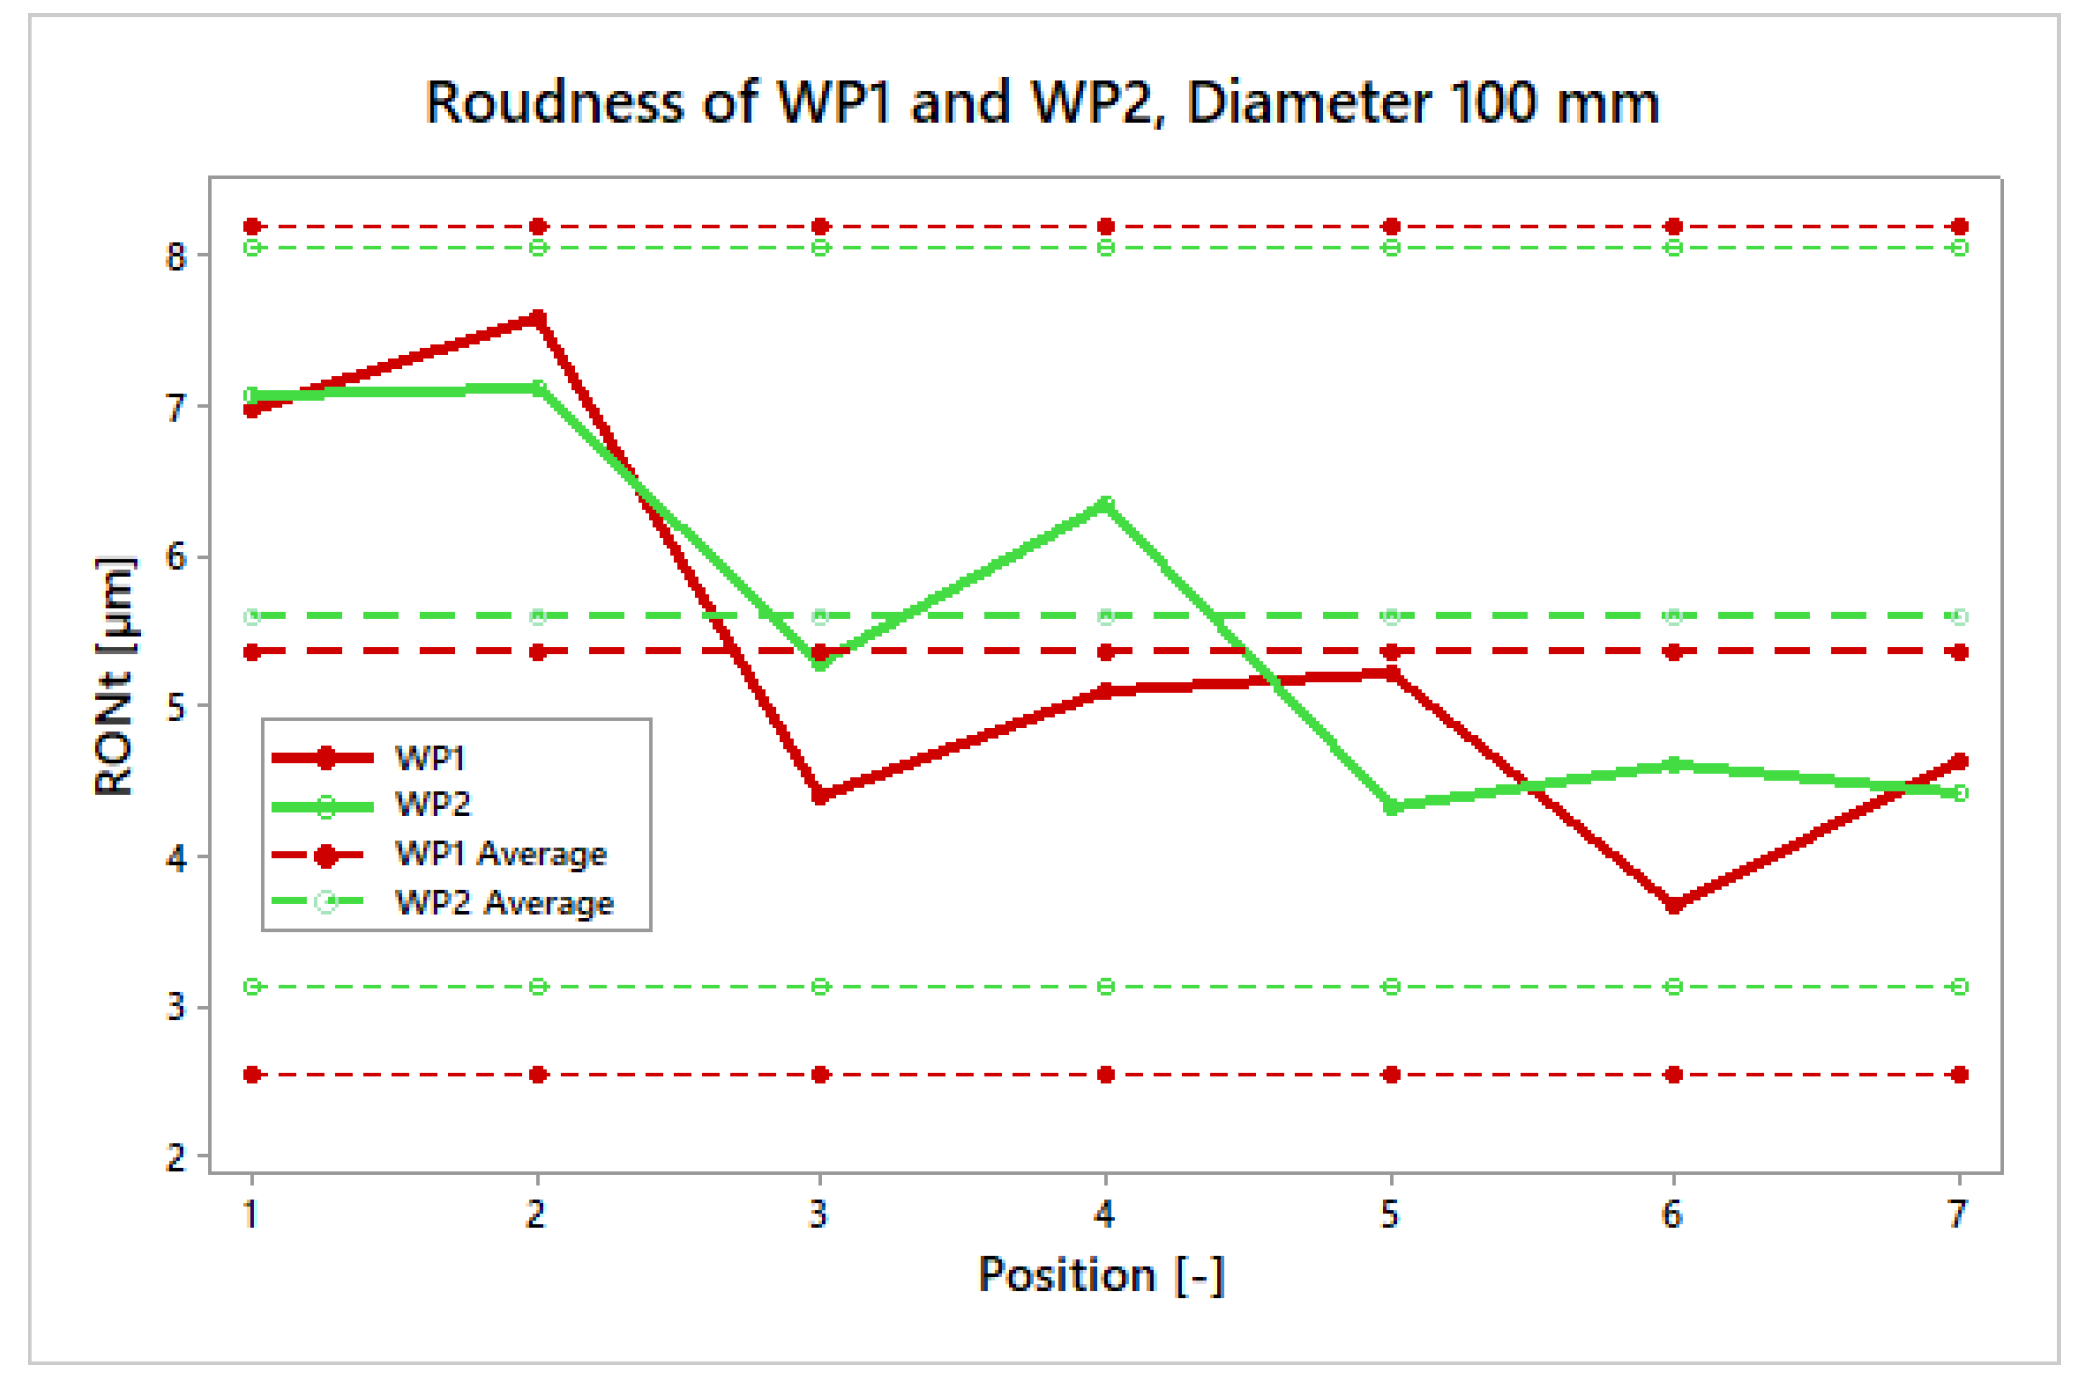
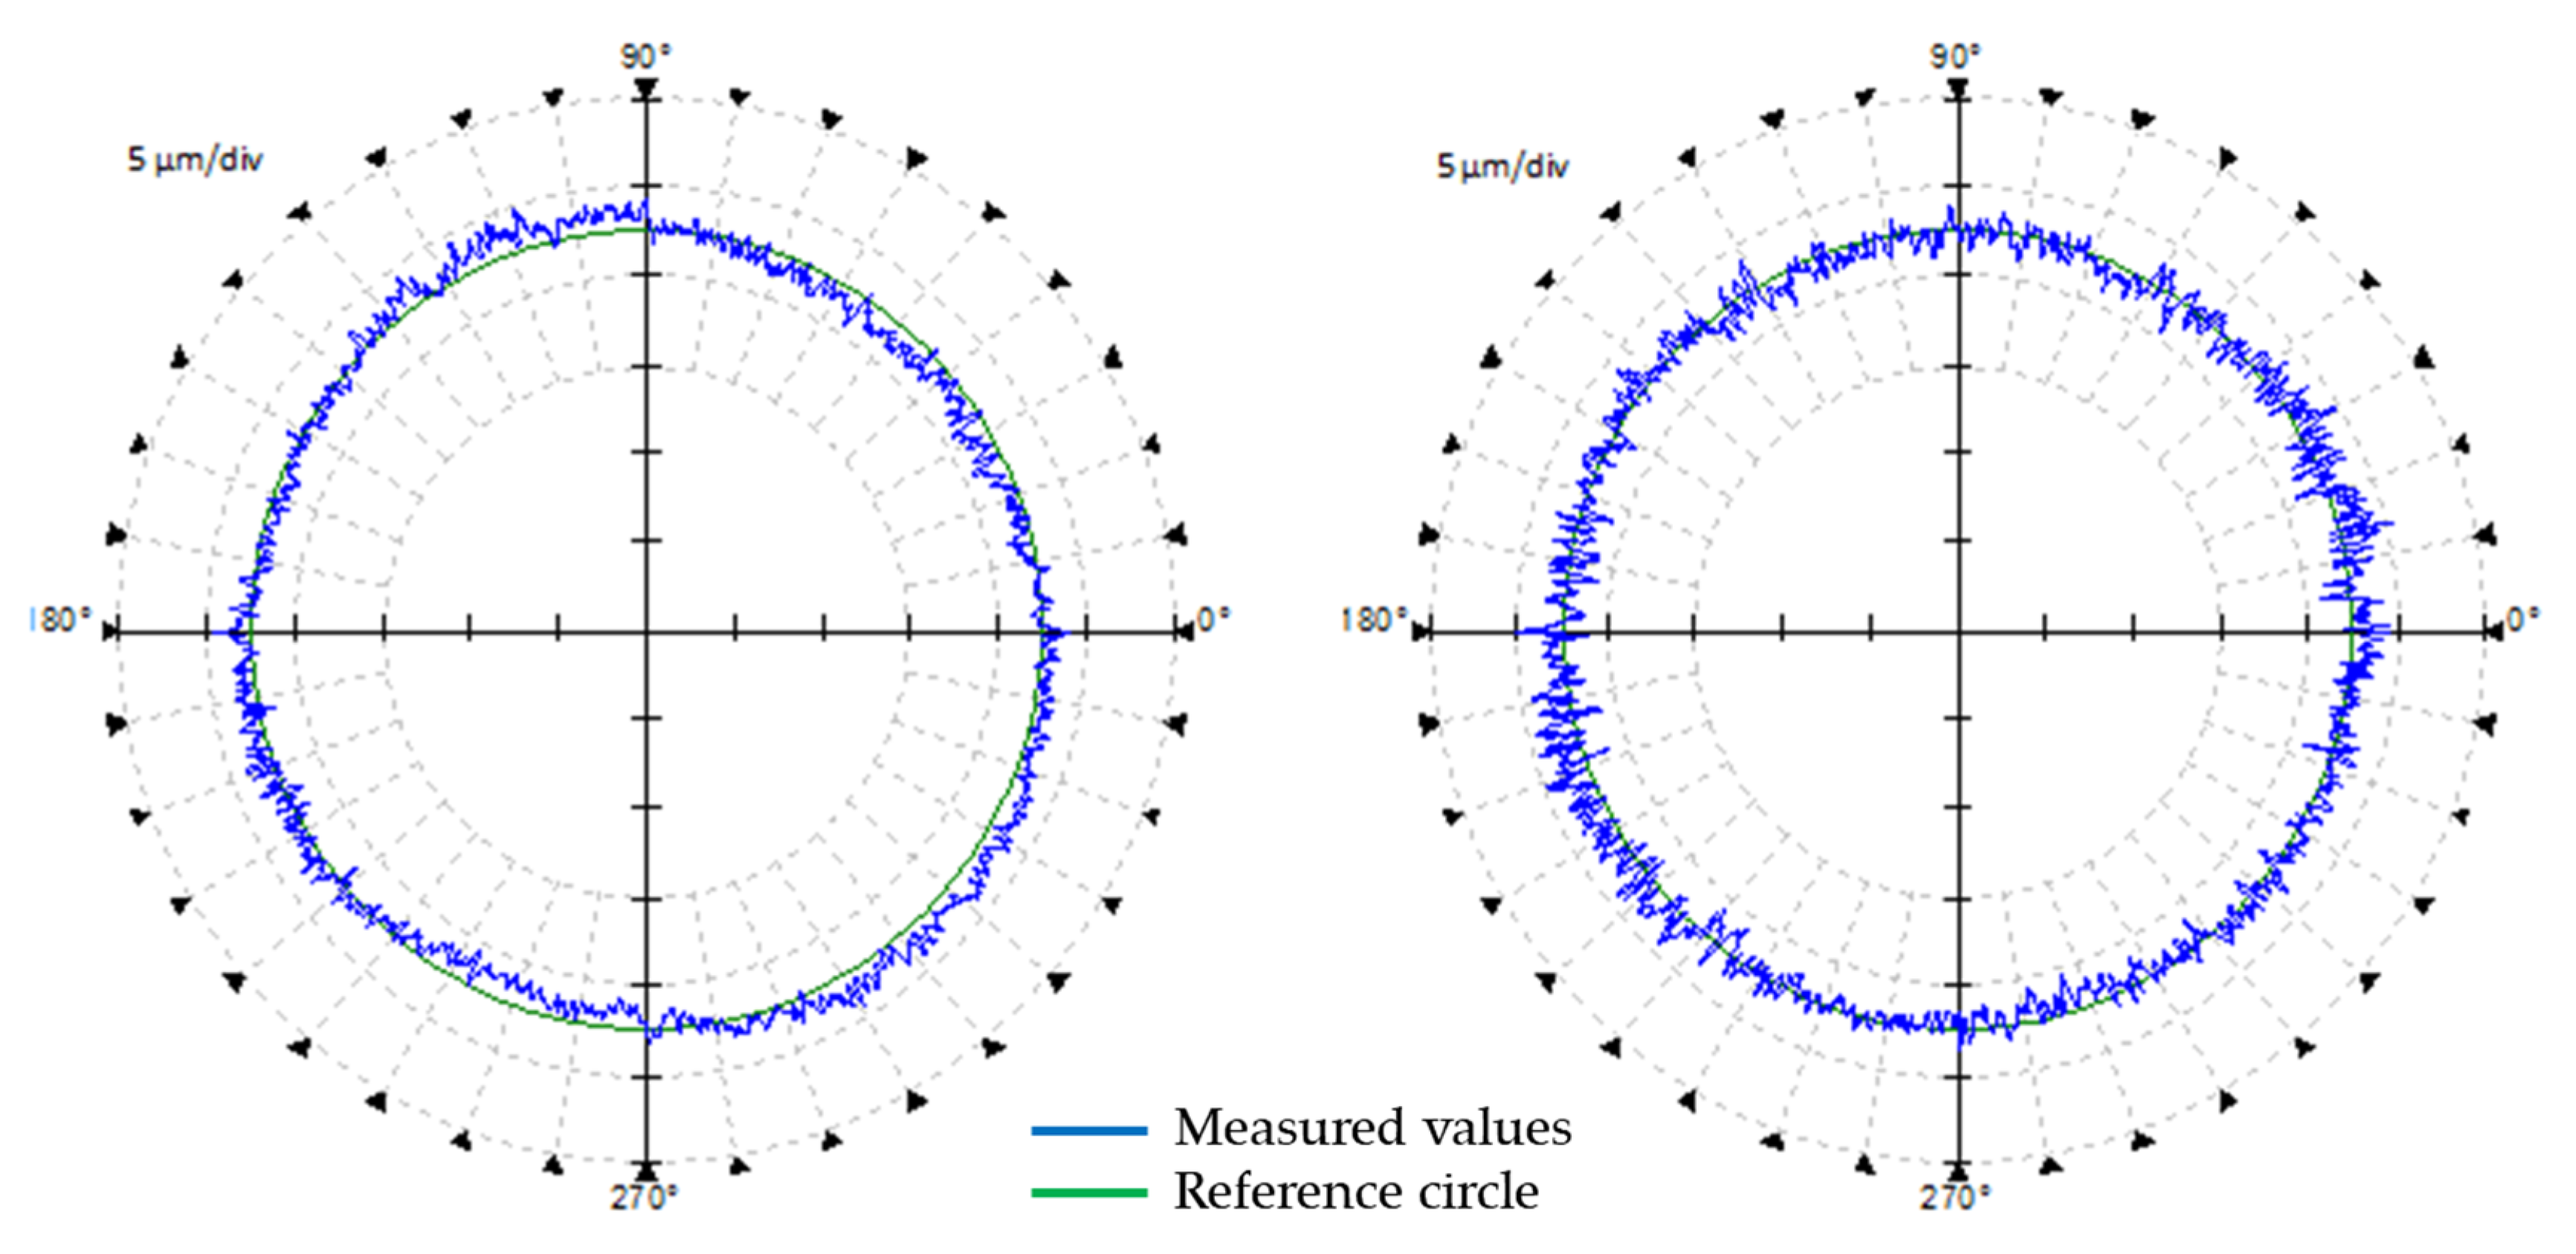
Figure 16 shows the roundness of the 100 mm inner diameter. There was no improvement; however, the result deteriorated negligibly, from 5.37 µm to 5.59 µm. Figure 17 shows the measurement results at position 04, according to Table 13 and Figure 11.
Table 14 summarises the measured results on a machine without load by means of the circular interpolation test, according to ISO 230-4, and the RONt results measured on a Talyrond 595S instrument.
The comparison of results is also used to determine the ratio between the geometric, volumetric and working accuracy of the machine. The individual dependencies between the respective parameters are described in the next chapter.

4. Discussion

In Figure 18, a dependence can be seen between the roundness error of the workpiece and the machined diameter for machining circular parts (Figure 18a). Furthermore, with WP2, a relatively constant value of roundness can be observed for all inspected diameters. With WP1, an improvement in RONt can be seen with the decrease of machining diameter. Circularity errors DBB1 and DBB2 then show a linear relationship between the size of the error and the machined diameter. The size of the circularity error increases with the increase in machined diameter.
Figure 18b shows a graph of the improvement in percentage versus the volumetric accuracy (VA), circularity (DBB) and roundness (WP) before the volumetric compensation and after the volumetric compensation of the machine. With outside milling technology and diameters of 300 and 200 mm, a strong linear relationship can be seen between WP–DBB–VA with determination indexes I2 equal to 0.9998 (300 mm) and 0.992 (200 mm), respectively. On the 100 mm diameter, even a 4% deterioration of roundness can be seen. This deterioration can be attributed to another type of machining technology and clearance specification due to system stiffness. A description of this behaviour will be the subject of further research.
Figure 19 shows the dependence between the squareness measured in the XY machining plane without load from the Ballbar device (DBB1 and DBB2) and the RONt obtained from workpiece measurement (TH1 and TH2). A higher correlation rate can be seen for DBB1and TH1. This can be attributed to a higher squareness error value, which also results in a higher rate on the workpiece. In contrast, the squareness error of DBB2 was reduced by 72% compared to DBB1. Here, squareness error does not have such a dominant effect on the resulting RONt, which is also reflected by the correlation between DBB2 and TH2. The difference between DBB2 and TH2 may be due to the fact that, with less geometric error, the proportion of the error wedged from the cutting forces increases.
The acquired knowledge about the behaviour of machine tools in terms of geometric accuracy can be further used to predict the dimensional and shape errors of workpieces. The results are applicable to finishing technologies where machining forces are negligible and do not burden the machine with deformation from static compliance.

5. Conclusions

This paper describes a new, complex approach for verifying the dependence between the geometric, volumetric and working accuracy of CNC machine tools. The conclusions of this work serve further research in the dimensional and form deviation prediction of workpieces. The experiment proves that the resolution of the method corresponds to the requirements for precise production, where deviations are in the dimension range from 5 to 10 µm.
An improvement in the volumetric accuracy of a small three-axis machine tool by 70% results in an up to 58% improvement in circularity in an unloaded state, measured according to ISO 230-4, and a 40% improvement in the RONt of the workpiece under finishing conditions of machining.
It is also evident from the results of the experiment that circularity error is significantly affected by the squareness error of two relative axes in the machining plane, both in the circular interpolation test of two linear axes according to ISO 230-4 and the impact on the workpiece RONt.
In a small CNC machine tool, including MCV754QUICK, a 40% improvement in RONt can be achieved through the activation of volumetric compensation. Here, the net measurement time was 50 min. The time it took to position the LaserTRACER, implement the compensations and verify using the Ballbar QC20-w was approximately 125 min. This is a highly effective way of increasing production accuracy in terms of machine measurement time, implementation of compensation tables and verification.
Further research in this area will be focused on the verification of dimensional accuracy under various machining conditions.
These results have the potential to further streamline compensations, leading to an increase in production accuracy, and can be used to predict the geometric, volumetric and production accuracy of machine tools, based on the principle described, for example, in [34,35].

Author Contributions

Conceptualisation, M.H.; methodology, M.H.; formal analysis, M.H. and R.J.; investigation, M.H., J.V. and J.S. (Jan Sramek), resources, M.H. and R.J.; data curation, M.H. and R.J.; writing—original draft preparation, M.H.; writing—review and editing, R.J.; visualisation, M.H. and R.J.; supervision, P.B., J.S. (Jan Smolik) and P.H.; project administration, M.H.; funding acquisition, P.B. and J.S. (Jan Smolik). All authors have read and agreed to the published version of the manuscript.

Funding

This research was funded by Czech Ministry of Education, Youth and Sports, grant number CZ.02.1.01/0.0/0.0/16_026/0008404—Manufacturing engineering and Precision Engineering.

Acknowledgments

The authors would like to acknowledge funding support from the Czech Ministry of Education, Youth and Sports under the project CZ.02.1.01/0.0/0.0/16_026/0008404 “ Manufacturing engineering and Precision Engineering” financed by the OP RDE (ERDF). The project is also co-financed by the European Union.

Conflicts of Interest

The authors declare no conflict of interest.

References

  1. Ramesh, R.; Mannan, M.; Poo, A. Error compensation in machine tools—A review: Geometric, cutting-force induced and fixture-dependent errors. Int. J. Mach. Tools Manuf. 2000, 40, 1235–1256. [Google Scholar] [CrossRef]
  2. Ibaraki, S.; Sawada, M.; Matsubara, A.; Matsushita, T. Machining tests to identify kinematic errors on five-axis machine tools. Precis. Eng. 2010, 34, 387–398. [Google Scholar] [CrossRef] [Green Version]
  3. Schwenke, H.; Knapp, W.; Haitjema, H.; Weckenmann, A.; Schmitt, R.; Delbressine, F. Geometric error measurement and compensation of machines—An update. CIRP Ann. Manuf. Technol. 2008, 57, 660–675. [Google Scholar] [CrossRef]
  4. Linares, J.-M.; Chaves-Jacob, J.; Schwenke, H.; Longstaff, A.; Fletcher, S.; Flore, J.; Uhlmann, E.; Wintering, J. Impact of measurement procedure when error mapping and compensating a small CNC machine using a multilateration laser interferometer. Precis. Eng. 2014, 38, 578–588. [Google Scholar] [CrossRef]
  5. Holub, M.; Blecha, P.; Bradac, F.; Kana, R. Volumetric compensation of three axis vertical machining centre. MM Sci. J. 2015, 2015, 677–681. [Google Scholar] [CrossRef]
  6. Erkan, T.; Mayer, J.R.R.; Dupont, Y. Volumetric distortion assessment of a five-axis machine by probing a 3D reconfigurable uncalibrated master ball artefact. Precis. Eng. 2011, 35, 116–125. [Google Scholar] [CrossRef]
  7. Ibaraki, S.; Blaser, P.; Shimoike, M.; Takayama, N.; Nakaminami, M.; Ido, Y. Measurement of thermal influence on a two-dimensional motion trajectory using a tracking interferometer. CIRP Ann. 2016, 65, 483–486. [Google Scholar] [CrossRef]
  8. Ibaraki, S.; Yoshida, I.; Asano, T. A machining test to identify rotary axis geometric errors on a five-axis machine tool with a swiveling rotary table for turning operations. Precis. Eng. 2019, 55, 22–32. [Google Scholar] [CrossRef]
  9. Marek, J.; Blecha, P. Compensation of axes at vertical lathes. In Recent Advances in Mechatronics 2008–2009; Springer: Berlin, Germany, 2009; pp. 371–376. [Google Scholar]
  10. Wei, X.; Su, Z.; Yang, X.; Lv, Z.; Yang, Z.; Zhang, H.; Li, X.; Fang, F. A novel method for the measurement of geometric errors in the linear motion of CNC machine Tools. Appl. Sci. 2019, 9, 3357. [Google Scholar] [CrossRef] [Green Version]
  11. Marek, T.; Berthold, J.; Holub, M.; Regel, J. A quasi-online geometric errors compensation method on CNC machine tool. In Proceedings of the 2018 18th International Conference Mechatronics—Mechatronika, Brno, Czeck Republic, 5–7 December 2018; Maga, D., Stefek, A., Brezina, T., Eds.; Institute of Electrical and Electronics Engineers Inc.: Piscataway, NJ, USA, 2018. [Google Scholar]
  12. Uriarte, L.; Zatarain, M.; Axinte, D.; Yagüe-Fabra, J.; Ihlenfeldt, S.; Eguia, J.; Olarra, A. Machine tools for large parts. CIRP Ann. Manuf. Technol. 2013. [Google Scholar] [CrossRef]
  13. Mutilba, U.; Gomez-Acedo, A.; Sandá, A.; Vega, I.; Yagüe-Fabra, J.A. Uncertainty assessment for on-machine tool measurement: An alternative approach to the ISO 15530-3 technical specification. Precis. Eng. 2019. [Google Scholar] [CrossRef] [Green Version]
  14. Navratilova, B. Weighted multilateration in volumetry of CNC machine tools. In Recent Advances in Soft Computing. MENDEL 2017. Advances in Intelligent Systems and Computing; Springer: New York, NY, USA, 2019; Volume 837, pp. 290–298. [Google Scholar] [CrossRef]
  15. Navratilova, B.; Hrdina, J. Multilateration in volumetry: Case study on demonstrator MCV 754 quick. Mendel J. Ser. 2016, 2016, 295–300. [Google Scholar]
  16. Wu, B.; Yin, Y.; Zhang, Y.; Luo, M. A new approach to geometric error modeling and compensation for a three-axis machine tool. Int. J. Adv. Manuf. Technol. 2018. [Google Scholar] [CrossRef]
  17. Mayr, J.; Jedrzejewski, J.; Uhlmann, W.; Alkan Donmez, M.; Knapp, W.; Härtig, F.; Wendt, K.; Moriwaki, T.; Shore, P.; Schmitt, R.; et al. Thermal issues in machine tools. CIRP Ann. Manuf. Technol. 2012, 61, 771–791. [Google Scholar] [CrossRef] [Green Version]
  18. Brecher, C.; Hirsch, P.; Weck, M. Compensation of thermo-elastic machine tool deformation based on control internal data. CIRP Ann. 2004, 53, 299–304. [Google Scholar] [CrossRef]
  19. Schmitt, R.; Peterek, M. Traceable measurements on machine tools—Thermal influences on machine tool structure and measurement uncertainty. Procedia CIRP 2015, 33, 576–580. [Google Scholar] [CrossRef] [Green Version]
  20. Holub, M.; Andrs, O.; Kovar, J.; Vetiska, J. Effect of position of temperature sensors on the resulting volumetric accuracy of the machine tool. Measurement 2019, 107074. [Google Scholar] [CrossRef]
  21. Holub, M. Geometric error compensation of machine tools. In Des CNC Machine Tools IV; MM Publishing, s.r.o.: Prague, Czech Republic, 2018; p. 428. [Google Scholar]
  22. Wiessner, M.; Blaser, P.; Böhl, S.; Mayr, J.; Knapp, W.; Wegener, K. Thermal test piece for 5-axis machine tools. Precis. Eng. 2018. [Google Scholar] [CrossRef]
  23. Holub, M. Geometric accuracy of machine tools. In Measurement in Machining and Tribology. Materials Forming, Machining and Tribology; Springer: New York, NY, USA, 2019; pp. 89–112. [Google Scholar] [CrossRef]
  24. Archenti, A. Prediction of machined part accuracy from machining system capability. CIRP Ann. 2014, 63, 505–508. [Google Scholar] [CrossRef]
  25. Holub, M.; Bradac, F.; Pokorny, Z.; Jelinek, A. Application of a Ballbar for diagnostic of CNC machine tools. MM Sci. J. 2018, 12, 2601–2605. [Google Scholar] [CrossRef]
  26. Tsutsumi, M.; Tone, S.; Kato, N.; Sato, R. Enhancement of geometric accuracy of five-axis machining centers based on identification and compensation of geometric deviations. Int. J. Mach. Tools Manuf. 2013, 68, 11–20. [Google Scholar] [CrossRef]
  27. ISO. Test Conditions for Machining Centers—Part 7, Accuracy of a Finished Test Piece; ISO 10791-7; ISO: Geneva, Switzerland, 2012. [Google Scholar]
  28. Blaser, P.; Mayr, J.; Wegener, K. Long-term thermal compensation of 5-axis machine tools due to thermal adaptive learning control. MM Sci. J. 2019, 3164–3171. [Google Scholar] [CrossRef] [Green Version]
  29. Holub, M.; Blecha, P.; Bradac, F.; Marek, T.; Zak, Z. Geometric errors compensation of CNC machine tool. MM Sci. J. 2016, 2016, 1602–1607. [Google Scholar] [CrossRef]
  30. Groos, L.; Held, C.; Keller, F.; Wendt, K.; Franke, M.; Gerwien, N. Mapping and compensation of geometric errors of a machine tool at different constant ambient temperatures. Precis. Eng. 2020, 63, 10–17. [Google Scholar] [CrossRef]
  31. ISO. Test Code for Machine Tools—Part 4: Circular Tests for Numerically Controlled Machine Tools; ISO 230-4; ISO: Geneva, Switzerland, 2005. [Google Scholar]
  32. Usop, Z.; Sarhan, A.A.D.; Mardi, N.A.; Wahab, M.N.A. Measuring of positioning, circularity and static errors of a CNC vertical machining centre for validating the machining accuracy. Measurement 2015, 61, 39–50. [Google Scholar] [CrossRef]
  33. Renishaw, QC20-W Error Budget & Uncertainty Calculations. 2013. Available online: https://resources.renishaw.com/details/Error+budget+and+uncertainty+calculations:+QC20-W+ballbar(155841)(48057) (accessed on 1 April 2019).
  34. Armendia, M.; Alzaga, A.; Peysson, F.; Fuertjes, T.; Cugnon, F.; Ozturk, E.; Flum, D. Machine tool: From the digital twin to the cyber-physical systems. In Twin-Control; Springer International Publishing: Cham, Switzerland, 2019; pp. 3–21. [Google Scholar] [CrossRef]
  35. Blecha, P.; Durakbasa, N.; Holub, M. Digitized production—Its potentials and hazards. In Proceedings of the International Symposium for Production Research 2018; Springer International Publishing: Cham, Switzerland, 2019; pp. 402–411. [Google Scholar] [CrossRef]
Figure 1. Experiment setup.
Applsci 10 06233 g001
Figure 2. Machining of the test workpiece. (a) Position of the workpiece in the machine; (b) workpiece machining.
Applsci 10 06233 g002
Figure 3. (a) Workpiece diagram and (b) representation.
Applsci 10 06233 g003
Figure 4. Talyrond 595S, workpiece measurement.
Applsci 10 06233 g004
Figure 5. Geometric errors of the three-axis vertical machining centre [5].
Applsci 10 06233 g005
Figure 6. Geometric errors calculated with the help of volumetric accuracy measurements.
Applsci 10 06233 g006
Figure 7. Graphical representation of the volumetric errors in the machine workspace: (a) without volumetric compensation of 49 µm—calibration; (b) with volumetric compensation of 14 µm—verification.
Applsci 10 06233 g007
Figure 8. Circularity test—300 mm diameter: (a) without volumetric compensation; (b) with volumetric compensation.
Applsci 10 06233 g008
Figure 9. Circularity test—200 mm diameter: (a) without volumetric compensation; (b) with volumetric compensation.
Applsci 10 06233 g009
Figure 10. Circularity test—100 mm diameter: (a) without volumetric compensation; (b) with volumetric compensation.
Applsci 10 06233 g010
Figure 11. Diagram of the measured points on the 100, 200 and 300 mm diameters.
Applsci 10 06233 g011
Figure 12. Evaluation of total roundness (RONt), 300 mm diameter.
Applsci 10 06233 g012
Figure 13. 300 mm outer diameter for TH1 and TH2 in position 04.
Applsci 10 06233 g013
Figure 14. Evaluation of RONt, 200 mm diameter.
Applsci 10 06233 g014
Figure 15. 200 mm outer diameter for TH1 and TH2 in position 04.
Applsci 10 06233 g015
Figure 16. Evaluation of RONt, 100 mm diameter.
Applsci 10 06233 g016
Figure 17. 100 mm outer diameter for TH1 and TH2 in position 04.
Applsci 10 06233 g017
Figure 18. (a) Diagrams of the dependence between machine circularity error and (b) workpiece roundness error.
Applsci 10 06233 g018
Figure 19. Description of roundness and squareness errors by machined diameter size.
Applsci 10 06233 g019
Table 1. Measurement range of the MCV 754QUICK machine tool.
AxisStart Axis WS/Start Measure MS [mm]End Axis WS/End Measure MS [mm]Length [mm]
X0/100754/550450
Y0/0500/500500
Z−550/−4000/0400
Table 2. Cutting test parameters.
Cutting ParameterSpeed200 m/min
Feed0.1 mm/tooth
Depth0.02 mm
Width50 mm
Cutting Tool Spec.MaterialSolid carbon
TypeEndmill
No. of flutes4
Diameter16 mm
HolderISO40 ER25
Material Spec.MaterialEN AW-2007
Dimensionϕ300–150 mm
Table 3. Ballbar QC20-w specifications [33].
ItemSpecificationUnits
Sensor accuracy (at 20 °C)±0.5µm
Sensor resolution0.1µm
System accuracy±1.25µm
Measuring uncertainty (k = 2)0.7 + 0.003 × Lµm
Maximum sampling rate1000Hz
Table 4. LaserTRACER specifications.
ItemSpecificationUnits
Resolution0.001µm
Measuring uncertainty (k = 2)0.2 + 0.3 × Lµm
Measuring range0.2–18m
Table 5. Conditions of calibration measurement.
Position of MeasurementTime of Measurement [Min]X-Axis Temperature [°C]Y-Axis Temperature [°C]Z-Axis Temperature [°C]
P11619.819.520.6
P21319.719.520.4
P3919.719.520.3
P41219.619.420.1
Table 6. Conditions of verification measurement.
Position of MeasurementTime of Measurement [Min]X-Axis Temperature [°C]Y-Axis Temperature [°C]Z-Axis Temperature [°C]
P11220.920.222.3
P21121.020.322.4
P3821.020.422.6
P41121.120.721.6
Table 7. Talyrond 595S specifications [32].
ItemSpecificationUnits
Maximum component diameter400mm
Maximum component weight40kg
Radial limit of error
L [mm]
+/− (0.0075 + 0.0002 × L)µm
Axial limit of error
R [mm]
+/− (0.0015 + 0.0002 × R)µm
Expanded uncertainty (k = 2) for a sensor range of 0.4 mm U0.40.063µm
Table 8. Results of the circularity test—300 mm diameter.
XY–300Circularity [µm]Squareness [µm/m]Scaling Mismatch [µm]Positional Tolerance [µm]Uncertainty (k = 2) [µm]
DBB110.522.412.327.60.8
DBB24.5−6.2−4.08.40.7
Table 9. Results of the circularity test—200 mm diameter.
XY–300Circularity [µm]Squareness [µm/m]Scaling Mismatch [µm]Positional Tolerance [µm]Uncertainty (k = 2) [µm]
DBB18.310.59.620.00.7
DBB23.5−6.3−0.94.80.7
Table 10. Results of the circularity test—100 mm diameter.
XY–300Circularity [µm]Squareness [µm/m]Scaling Mismatch [µm]Positional Tolerance [µm]Uncertainty (k = 2) [µm]
DBB15.713.87.612.20.7
DBB22.74.8−0.74.60.7
Table 11. RONt results [µm]—300 mm diameter.
300 mm DiameterPosition [–]RONt [µm]—WP1RONt [µm]—WP2
0111.096.30
0211.286.12
039.976.83
0410.365.28
059.986.19
069.446.04
078.816.37
Average 10.136.16
Table 12. RONt results [µm]—200 mm diameter.
200 mm DiameterPosition [–]RONt [µm]—WP1RONt [µm]—WP2
019.876.36
029.976.45
038.735.30
049.434.49
059.016.31
069.036.55
079.716.51
Average 9.395.71
Table 13. RONt results [µm]—100 mm diameter.
100 mm DiameterPosition [–]RONt [µm]—WP1RONt [µm]—WP2
016.977.07
027.597.11
034.395.29
045.106.34
055.224.33
063.684.60
074.644.41
Average 5.375.59
Table 14. Circularity and RONt results.
Diameter [mm]DBB1/TH1 [µm]DBB2/TH2 [µm]
30010.5/10.134.5/6.16
2008.3/9.393.5/5.71
1005.7/5.372.7/5.59