Article

A Noncontact Method for Calibrating the Angle and Position of the Composite Module Array

State Key Laboratory of Precision Measuring Technology and Instruments, Tianjin University, Tianjin 300072, China
*
Author to whom correspondence should be addressed.
Appl. Sci. 2020, 10(12), 4358; https://doi.org/10.3390/app10124358
Submission received: 11 June 2020 / Revised: 22 June 2020 / Accepted: 23 June 2020 / Published: 25 June 2020
(This article belongs to the Section Optics and Lasers)

Abstract

:
Freeform surface is one of the research focuses in the measurement field. A composite module is composed of a plane and rotating paraboloid. The composite module array can identify 21 geometric errors of the machine tool in a wide range, which is composed of several composite modules. Eliminating the error of the array itself is of great significance for improving measurement accuracy. For this reason, this paper proposed a noncontact method for calibrating the angle and position of the composite module array. This paper used a self-developed angle sensor to access corresponding information and established the mathematical model according to the freeform surface’s geometric characteristics to achieve calibration. In addition, the influence of array placement error on calibration was analyzed. The experimental results showed that the angle repeatability was within 0.4″ around the X-axis and within 0.3″ around the Y-axis, and the position repeatability was within 0.4 µm in the X direction and within 0.7 µm in the Y direction. The measurement comparison experiments with high-precision laser interferometer and uncalibrated array verified the correctness of the experimental results. This method provides an important reference for practical application and freeform surface array calibration, and creates conditions for the implementation of machine tool error detection.

1. Introduction

With the rapid development of computer and manufacturing technology, freeform surfaces are playing an increasingly important role in the fields of bionics, optics, precision machining, and measurement [1,2,3,4]. J Lai et al. [5] developed a construction iteration optimization method to design a double freeform surface lens for point sources, as well as extended sources to achieve uniform illuminance. Gao et al. [6] utilized a double-sinusoidal freeform surface to achieve 2-D displacement and angle measurement of machine tools. Lv et al. [7] achieved 2-D microdisplacement measurement on the elliptical paraboloid. Wan et al. [8] designed a 3-D displacement measurement system based on an optical freeform surface for a multiaxis system. Tsai et al. [9] employed sinusoidal-groove linear reflective grating to measure the rotation angle, linear displacement, and vertical straightness.
In view of the limitations of the application of single freeform surfaces in large range scenarios, some scholars used arrays to meet the application. Lv et al. [10] proposed a 2-D displacement measurement method based on the rotating parabolic array, which extended the measurement range of the system in a discrete manner. Yang et al. [11] formed freeform surfaces into an L-shaped array and established an error identification model to identify 21 geometric errors of the machine tool. Li et al. [12] used an LED array and photoelectric detection sensor array to measure dust concentrations in different areas. Lin et al. [13] designed a kind of light emitting diode (LED) freeform lens array based on optical freeform surfaces and adjustable Cartesian candela distributions to achieve uniform illumination.
The calibration of the array is a means to enhance accuracy. Zhang et al. [14] proposed a novel method for adaptive calibration of the electrode array shifts by improving the robustness of control systems. Liu et al. [15] developed a refined coordinates mapping method to achieve camera array intrinsic and extrinsic calibration, which can improve measurement accuracy. Lv et al. [16] proposed a self-calibration method for the vertex distance of an elliptical parabolic array. The system error of the displacement measurement after calibration was reduced from 100 to 3 µm. An et al. [17] presented a calibration method for the camera array in a spherical arrangement, which can solve the problem that the camera with opposite features was invisible at opposite positions. Guenther et al. [18] described a self-calibration method for a ball plate that can be extended to calibrate not only the pitch position of the balls, but also the radial and height position on the circular ball plate.
The composite module studied in this paper is composed of a plane and a rotating paraboloid. Yang and Lv have introduced the application of the composite module array in displacement measurement and 21 geometric errors of the machine tool detection, showing the broad prospect of the composite module array [10,11]. Owing to the existence of installation error, the relative angle and position of each composite module deviate from the theoretical value, which creates a huge error in the application of composite module arrays in measurement and other fields. Designing an appropriate calibration method is a necessary prerequisite for measurement. Therefore, a reliable method is urgently needed to calibrate the angle and position of the composite module array to ensure the high precision of the measurement. At the same time, in order to meet the high-precision measurement requirements of the array, each composite module adopts a higher processing accuracy, while the contact measurement makes it easy to destroy its surface characteristics. Moreover, the special geometric features of the rotating paraboloid make it difficult for contact measurement to adopt a uniform measurement standard for all composite modules. Therefore, the use of a high-precision, noncontact calibration method has extensive applicability.
In view of these problems, this paper proposes a self-developed angle sensor based on the principle of optical self-collimation to achieve noncontact calibration. The method uses an angle sensor to scan the surface of the composite module to obtain relevant information, and proposes the concept of feature points according to the geometric characteristics of the rotating paraboloid. Finally, a mathematical model is established to actualize the calibration of the angle and position. The influence of array placement error on calibration is also analyzed. A series of experiments showed that the method has high repeatability and reliability. The principle of this method is simple—it can solve the benchmark problem in practical application, offer a new idea for noncontact measurement, and provide a reference method for freeform surface array calibration.

2. Calibration System

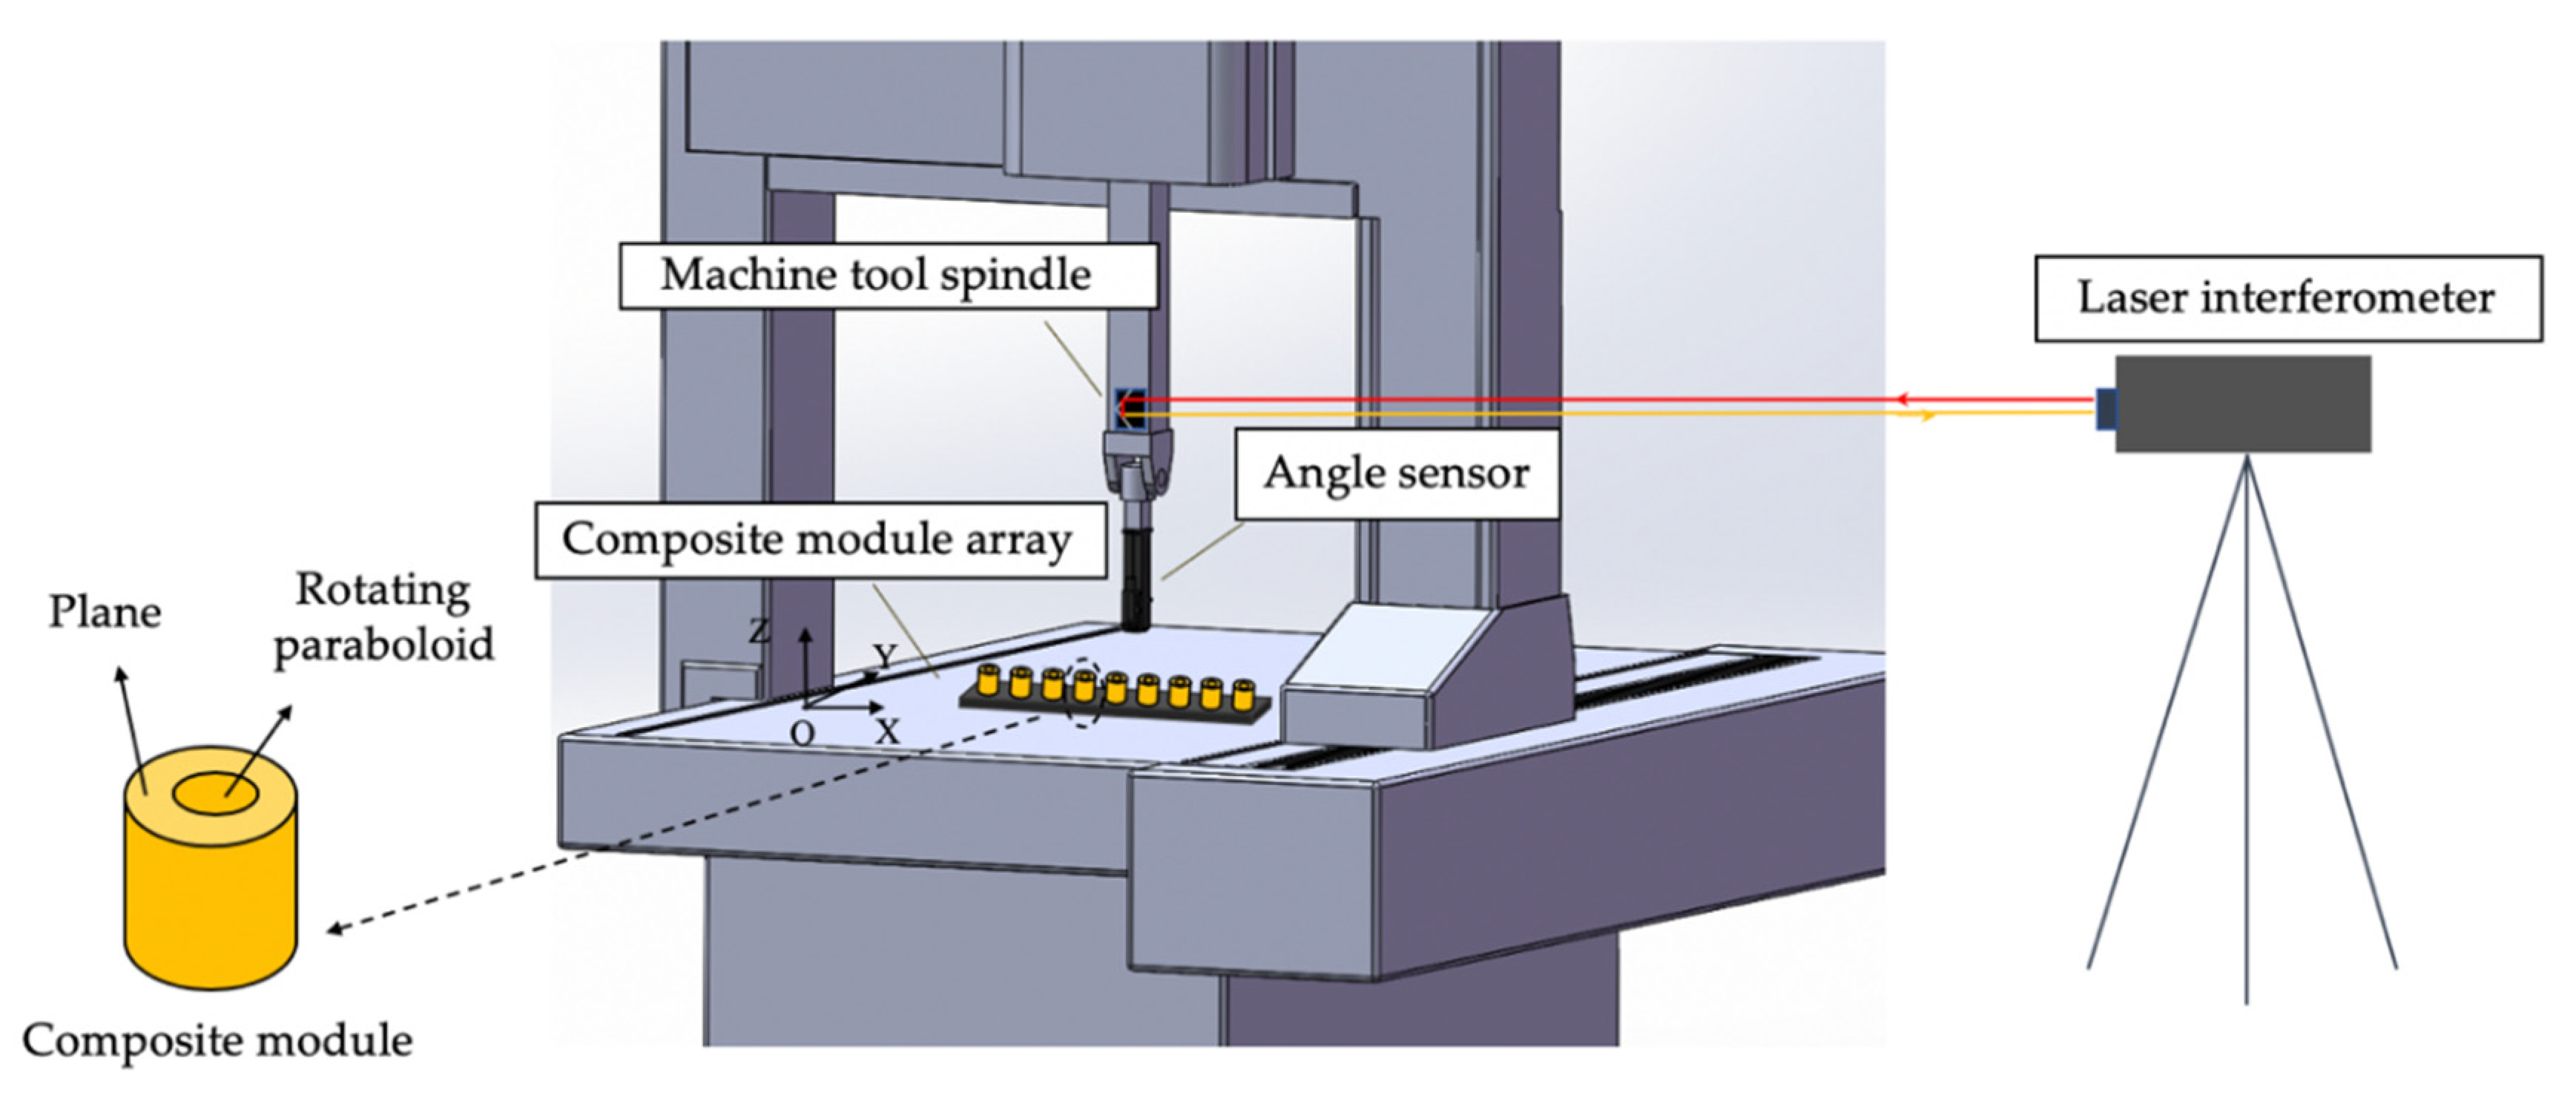
The composite module array is composed of a number of composite modules. Each composite module provides different geometric information through a plane and rotating paraboloid. The self-developed angle sensor is based on the principle of optical self-collimation. Figure 1 shows the calibration system, including the machine tool spindle, angle sensor, composite module array, and laser interferometer.
Yang [11] introduced the measurement mechanism of using the angle sensor and the composite module to realize the four degrees of freedom information of the moving spindle, including the 2-D angle and 2-D displacement. Using this mechanism, the machine tool spindle drives the angle sensor to scan the composite module array. Through the image processing of the spot on the angle sensor, the relative 2-D position information between the composite module can be obtained from the rotating paraboloid, and the relative 2-D angle information between the composite module can be obtained from the plane. The laser interferometer is used to obtain the relevant parameters during the movement of the spindle.

3. Calibration Method

Ideally, the relative angle of each composite module in the array is 0″. The center position of the adjacent composite module is 50 mm in the X direction and 0 mm in the Y direction. In fact, due to the installation error and other factors, the actual value deviates from the theoretical value, and there will be deviations in relative angle and position. In order to ensure that the deviation does not affect the accuracy of the composite module array in the measurement, it is necessary to calibrate the angle and position of the composite module accurately.

3.1. Calibration of Composite Module Array

3.1.1. Angle Calibration

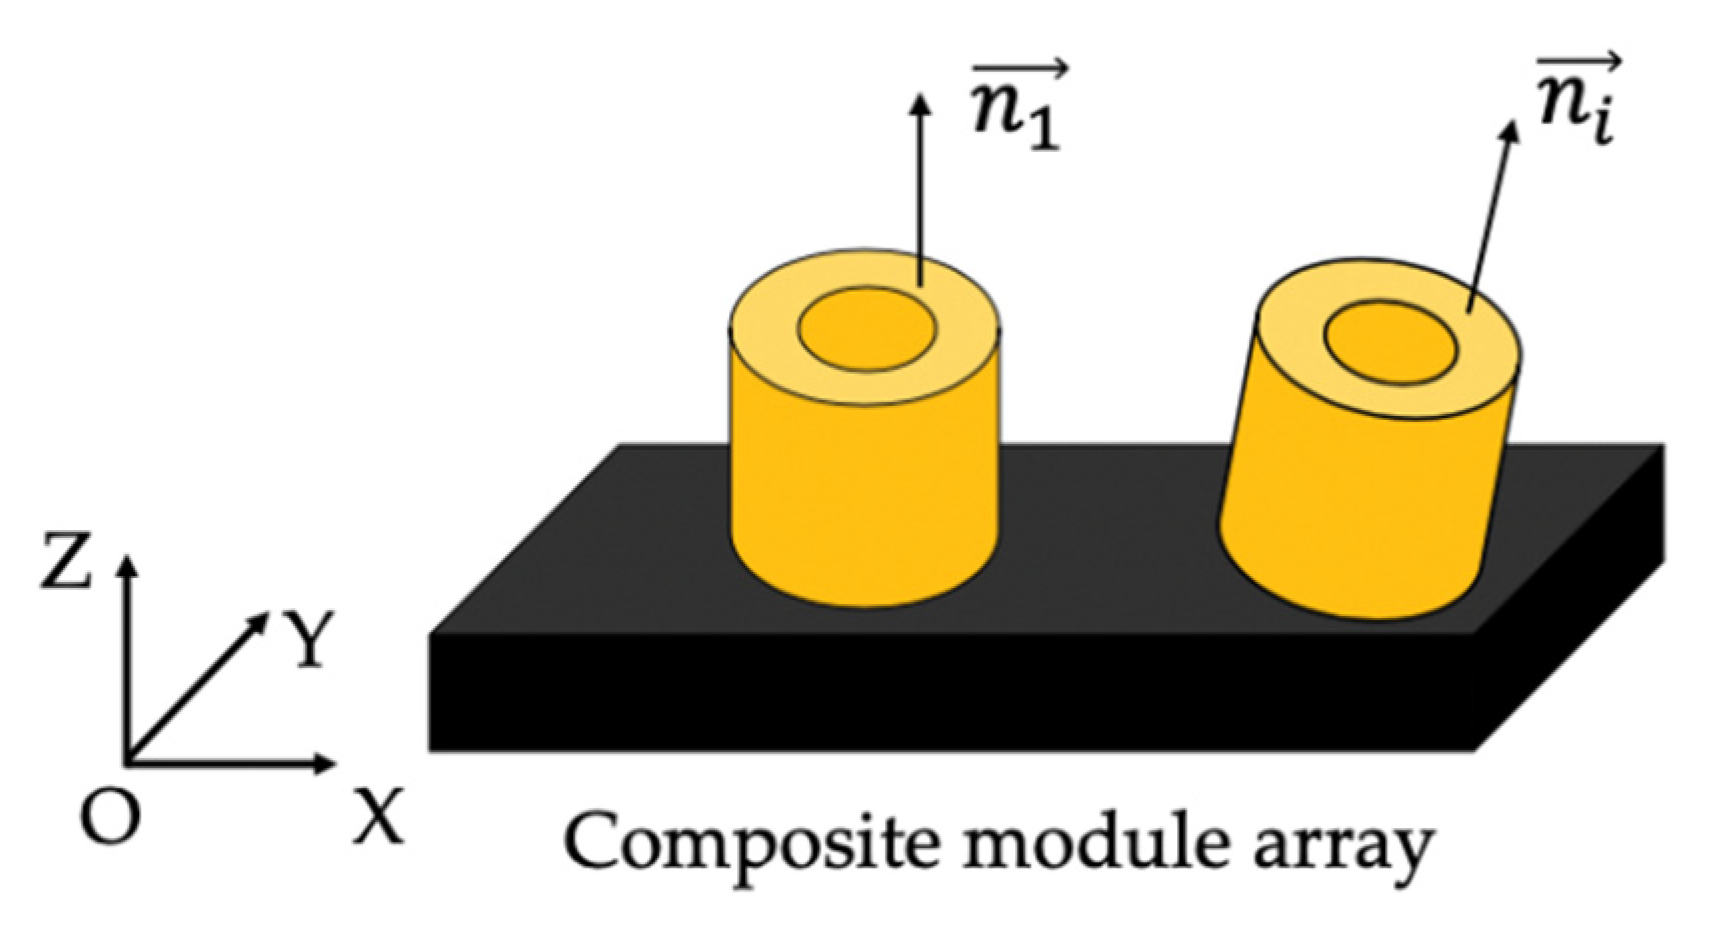
As shown in Figure 2, there is a 2-D angle difference between the planes of each composite module.
The first composite module is selected as the reference composite module. When the angle sensor scans the plane of the composite module in turn, the coordinates of the center spot ( x i   ,   y i ) of the composite module i (i = 1…n, n is the total number of composite module) on the angle sensor is affected by the angle of the measured plane and the angle error of the machine tool spindle. Therefore, the relative 2-D angle of each composite module can be obtained:
{ θ x i = k ( x i x 1 ) ε x ( x ) θ y i = k ( y i y 1 ) ε y ( x )
where parameter k is the angle coefficient. Parameters ( θ x i , θ y i ) are the relative 2-D angle of each composite module. Parameters ( x 1   ,   y 1 ) and ( x i   ,   y i ) are the coordinates of the center spot of the reference composite module and the composite module i on the angle sensor, respectively. Parameters ε x ( x ) and ε y ( x ) are the roll angle error and pitch angle error, respectively, of the machine tool spindle between two plane measurement points.

3.1.2. Position Calibration

Generally, the geometric center of the rotating paraboloid is used to measure the position between the composite modules. Due to the shape characteristics of the rotating paraboloid, it is difficult to directly obtain the geometric center coordinates of the rotating paraboloid to calibrate the relative position. Therefore, the calibration of the relative position of each composite module is achieved by introducing the definition of feature point.
Under the condition that the curvature of the rotating parabola is continuous, there is a point on the surface where the tangent plane at that point is parallel to the composite module plane. The point is defined as the feature point corresponding to the composite module as shown in Figure 3. The reflected ray at the feature point is parallel to the reflected ray on the plane, and the coordinates of the center spot at the two places are the same on the angle sensor. Based on these properties, the relative position between the feature points is used to evaluate the relative 2-D position information of the composite module
The composite module array is placed along the X direction of the machine, and the machine tool spindle drives the angle sensor to move along the X direction. As shown in Figure 4,   N 1 , N i are the measuring points projected by the angle sensor onto two rotating paraboloids. If M 1 ,   M i are the feature points of two rotating paraboloids, then the relative positions between the two feature points are:
{ X M i = ( X N 1 X M 1 ) + l X N 1 X N i + ( X M i X N i )   Y M i = (   Y N 1 Y M 1   ) + l Y N 1 Y N i + (   Y M i Y N i )
where parameters ( X M i   , Y M i ) and (   X M 1   , Y M 1 ) are the coordinates of the feature points. Parameters ( X N i   , Y N i ) and (   X N 1   , Y N 1 ) are the coordinates of the measurement points. Parameters   l X N 1 X N i and l Y N 1 Y N i are the displacement between the N 1 and   N i detected by the laser interferometer.
According to the principle of displacement measurement, it can be transformed as follows:
{     X N 1 X M 1 = q ( x N 1 x M 1 )             Y N 1 Y M 1 = q ( y N 1 y M 1 )      
{     X M i X N i = q ( x M i x N i   )             Y M i Y N i   = q ( y M i y N i   )      
where parameter q is the displacement coefficient. Parameters ( x N 1   , y N 1 ) and ( x N i   , y N i ) are the spot center coordinates of the measurement points on the angle sensor. Parameters ( x M 1   , y M 1 ) and ( x M i   , y M i ) are the spot center coordinates of the feature points on the angle sensor. Based on the characteristics of the feature points, parameters ( x M 1   , y M 1 ) and ( x M i   , y M i ) are the spot center coordinates obtained when the angle sensor measures the planes.
The relative positions of the feature points of each composite module can be expressed as:
{   X M i = q ( x N 1 x M 1 ) + l X N 1 X N i + q ( x M i x N i   )     Y M i   = q ( y N 1 y M 1 ) + l Y N 1 Y N i + q ( y M i y N i   )
Considering the relative angle between the composite modules and the angle error of the machine tool spindle, the calibration formula of the relative position is:
{   X M i   = q ( x N 1 x M 1 ) + l X N 1 X N i + q ( x M i x N i ) q k ( ε y ( x ) + θ x i ) Y M i   = q ( y N 1 y M 1 ) + l Y N 1 Y N i + q ( y M i y N i ) q k ( ε x ( x ) + θ y i )  
where ε y ( x ) and ε x ( x ) are the pitch angle error and roll angle error, respectively, of the machine tool spindle between the two feature points.

3.2. Influence of Array Placement Error on Calibration

During the calibration process, the composite module array needs to be placed along the X direction of the machine tool. If the array cannot be placed to the ideal position due to the array placement error, as shown in Figure 5, the calibration data at this time will produce errors. Therefore, it is necessary to analyze the influence of array placement errors on the calibration.

3.2.1. Influence of Array Placement Error on Angle Calibration

The plane normal vector relationship of the composite module is shown in Figure 6. Assuming that the plane normal vector n 1 of the reference composite module when the array is placed along the X direction of the machine tool is   n 1 = ( 0 , 0 , 1 ) T , then the 2-D angle between the composite module i and the reference composite module is ( θ x i , θ y i ). The plane normal vector n i of the composite module i is then:
n i = ( cos θ x i sin θ y i , sin θ x i cos θ y i , cos θ x i cos θ y i ) T
The influence of different array placement error angles is discussed below.
1.
The placement error angle of the composite module array around the Z-axis is γ .
Therefore, the plane normal vector of each composite module is:
n 1 = ( cos γ sin γ 0 sin γ cos γ 0 0 0 1 ) ( 0 0 1 ) = ( 0 0 1 )
n i = ( cos γ sin γ 0 sin γ cos γ 0 0 0 1 ) ( cos θ x i sin θ y i sin θ x i cos θ y i cos θ x i cos θ y i ) = (   cos γ cos θ x i sin θ y i sin γ sin θ x i cos θ y i   sin γ cos θ x i sin θ y i + cos γ sin θ x i cos θ y i cos θ x i cos θ y i )
Furthermore, the projection vectors n 1 x , n 1 y of n 1 on the YOZ and XOZ planes can be calculated as follows:
n 1 x = n 1 y = ( 0 , 0 , 1 ) T
Similarly, the projection vectors n i x , n i y  of   n i on the YOZ and XOZ planes are
n i x = ( 0   sin γ cos θ x i sin θ y i + cos γ sin θ x i cos θ y i cos θ x i cos θ y i )
n i y = (   cos γ cos θ x i sin θ y i sin γ sin θ x i cos θ y i 0 cos θ x i cos θ y i )
At this time, the cosine values of the relative angles around the X-axis and Y-axis between the plane normal vectors of each composite module are
cos θ x i = cos   n 1 x , n i x = cos θ x i cos θ y i cos 2 θ x i cos 2 θ y i + ( cos θ y i sin θ x i cos γ + cos θ x i sin θ y i sin γ ) 2
cos θ y i = cos n 1 y , n i y = cos θ x i cos θ y i cos 2 θ x i cos 2 θ y i + ( cos θ x i sin θ y i cos γ + cos θ y i sin θ x i sin γ ) 2
where parameters ( θ x i , θ y i ) are the relative 2-D angle of each composite module when the array placement error is γ .
According to the Equations (13) and (14), the relative angle ( θ x i ,   θ y i ) can be solved when the placement error angle is γ .
At this time, the angle calibration error introduced can be calculated as:
Δ x = θ x i θ x i
Δ y = θ y i θ y i
where parameter Δ x is the angle calibration error around the X-axis. Parameter Δ y is the angle calibration error around the Y-axis.
Table 1, Table 2 and Table 3 show the angle calibration errors calculated according to the Equations (15) and (16) when γ is 180″, 360″, 720″, θ x i   and   θ y i (to simplify the calculation, θ x i = θ y i ) are 50″, 100″, 150″, 200″, 300″, 500″, 800″, respectively.
2.
The placement error angle of the composite module array around the X-axis is β .
At present, the plane normal vector of each composite module is
n 1 = ( 1 0 0 0 cos β sin β 0 sin β cos β ) ( 0 0 1 ) = ( 0 sin β cos β )
n i = ( 1 0 0 0 cos β sin β 0 sin β cos β ) ( cos θ x i sin θ y i sin θ x i cos θ y i cos θ x i cos θ y i ) = ( cos θ x i sin θ y i   cos β sin θ x i cos θ y i sin β cos θ x i cos θ y i   sin β sin θ x i cos θ y i + cos β cos θ x i cos θ y i )
Similar to the above steps, the projection vectors n 1 x , n 1 y , n i x , n i y of n 1 and n i on the YOZ and XOZ planes can be calculated. Finally, the cosine values of the relative angles around the X-axis and Y-axis between the plane normal vectors of each composite module are
  cos θ x i = cos   n 1 x , n i x = cos θ x i
cos θ y i = cos n 1 y , n i y = cos ( θ x i β ) cos θ y i cos 2 ( θ x i β ) cos 2 θ y i + cos 2 θ x i cos 2 θ y i
According to the Equations (19) and (20), the relative angle ( θ x i ,   θ y i ) can be solved when the placement error angle is β . Then the angle calibration error can be calculated as:
Δ x = 0
Δ y = θ y i θ y i
Table 4, Table 5 and Table 6 show the angle calibration errors calculated according to the Equations (21) and (22) when β is 180″, 360″, 720″, θ x i   and   θ y i (to simplify the calculation, θ x i = θ y i ) are 50″, 100″, 150″, 200″, 300″, 500″, 800″, respectively.
3.
The placement error angle of the composite module array around the Y-axis is α .
At present, the plane normal vector of each composite module is
n 1 = ( cos α 0 sin α 0 1 0 sin α 0 cos α ) ( 0 0 1 ) = ( sin α 0 cos α )
n i = ( cos α 0 sin α 0 1 0 sin α 0 cos α ) ( cos θ x i sin θ y i sin θ x i cos θ y i cos θ x i cos θ y i ) = (   cos α cos θ x i sin θ y i + sin α cos θ x i cos θ y i sin θ x i cos θ y i sin α cos θ x i sin θ y i + cos α cos θ x i cos θ y i )
Similarly, the projection vectors n 1 x , n 1 y , n i x ,   n i y of n 1 and n i on the YOZ and XOZ planes can be calculated. Finally, the cosine values of the relative angles around the X-axis and Y-axis between the plane normal vectors of each composite module are
cos θ x i = cos   n 1 x , n i x = cos ( θ y i + α ) cos θ x i cos 2 ( θ y i + α ) cos 2 θ x i + sin 2 θ x i cos 2 θ y i
cos θ y i = cos n 1 y , n i y = cos θ y i
According to the Equations (25) and (26), the relative angle ( θ x i ,   θ y i ) can be solved when the placement error angle is α . Therefore, the angle calibration error can be obtained.
Δ x = θ x i θ xi
Δ y = 0
Table 7, Table 8 and Table 9 show the angle calibration errors calculated according to the Equations (27) and (28) when α is 180″, 360″, 720″, θ x i   and   θ y i (to simplify the calculation, θ x i = θ y i ) are 50″, 100″, 150″, 200″, 300″, 500″, 800″, respectively.
From Table 1, Table 2, Table 3, Table 4, Table 5, Table 6, Table 7, Table 8 and Table 9, note that when the placement error angle ( γ , β , α ) of the composite module array is fixed, the larger the relative angles ( θ x i , θ y i ) between the composite module give larger angle calibration errors. Meanwhile, when the relative angles between the composite module are fixed, the calibration angle error introduced by the array placement error angle γ is the largest. However, the calibration angle errors introduced by β and α are both less than 6 × 10 3 arcsec, which has little effect on the calibration results and can be ignored.
In order to ensure the accuracy of the calibration, it is essential to ensure that the 2-D relative angle between the plane normal vectors of each composite module is not more than 300″ in the calibration state, and the placement error angle of the array around the Z-axis of the machine tool should be controlled within ±180″. Calculation of the uncertainty of the relative angle calibration data between the composite module at this time is within ±0.262″, and the calibration data can be considered to be credible. Therefore, in order to ensure that the 2-D relative angle between the composite module does not exceed 300 , it is proposed that each module be supported by three fine threads and fixed by one ordinary thread. The design of the composite module array base is shown in Figure 7. By tightening or loosening the fine threads, the deflection angle of the composite module in the corresponding direction is adjusted.

3.2.2. Influence of Array Placement Error on Position Calibration

It is known from Section 3.2.1 that in each placement error angle of the composite module array,   γ is the main factor affecting the calibration accuracy. Since the essence of the calibration system is angle measurement, the effect of γ on the calibration of the position is analyzed as follows.
Assume that the relative position between the composite module i and the reference composite module when the array is placed along the X direction of the machine tool is ( x , y ) T . When the placement error angle of the composite module array around the Z-axis is γ , the relative position between the composite module at this time ( x , y ) T is
( x y ) = ( cos γ sin γ sin γ cos γ ) ( x y ) = ( x cos γ y sin γ x sin γ + y cos γ )
The introduced position calibration error is
Δ x = ( 1 cos γ ) x + y sin γ
Δ y = ( 1 cos γ ) y x sin γ
where Δ x is the position calibration error along the X direction and Δ y is the position calibration error along the Y direction.
Table 10, Table 11 and Table 12 show the position calibration errors calculated according to the Equations (30) and (31) when γ is 100″, 200″, 300″, and ( x , y )   is ( 50 , 0 ) , ( 100 , 0 ) , ( 150 , 0 ) , ( 200 , 0 ) , ( 250 , 0 ) , ( 300 , 0 ) , ( 350 , 0 ) mm, respectively, ( y   = 0 to simplify the calculation).
It can be seen that the influence of the placement error angle of the composite module array on the calibration data of the relative position cannot be ignored. The calibration data can be compensated by Equation (29) to eliminate the influence of array placement error angle.
4. Experiment

The experimental system consists of the angle sensor, the composite module array, the laser interferometer, and the coordinate measuring machine (CMM) (Hexagon, Stockholm, Sweden), as shown in Figure 8.

4.1. Angle Calibration Experiments

The experiments were performed on the CMM, and the composite module array was placed along the X direction of the CMM. The angle sensor was installed on the spindle of the CMM and moved along the X direction of the CMM. At the same time, the Renishaw laser interferometer was used to compensate the spindle angle error. Calibration experiments were performed five times in total, and the results are shown in Figure 9.
The standard deviation of the data was calculated according to the Bessel formula, and the calculation results are shown in Table 13. Standard deviation was used to evaluate repeatability error. Therefore, the angle repeatability error was within 0.4″ around the X-axis and within 0.3″ around the Y-axis.
The average of five experimental results was used as the final calibration result in Table 14. It can be seen that due to the effect of the three fine threaded threads, the relative angle of each composite module was within ±180″.

4.2. Position Calibration Experiments

The spindle of the CMM drove the angle sensor to move according to the predetermined path, and the laser interferometer was used to monitor the precise displacement between the measurement points. Figure 10 shows the results of five repeated calibration experiments. The standard deviation for the results of each composite module is shown in Table 15.
The repeatability of the data in five tests was fine, and the maximum error was within 0.4 µm in the X direction and within 0.7 µm in the Y direction. In order to eliminate the influence of the error caused by the single measurement, the average of the five calibration values was used as the final result, as shown in Table 16.
Since the rotating paraboloid is turned on the metal surface of the processed plane part, the plane of the composite module may have a surface shape error owing to the limitation of the processing technology. Based on the feature point calibration scheme, the separation of the rotating paraboloid from the plane can be considered in the future, which is of great significance for improving the measurement accuracy.

4.3. Verification Experiments

Based on the characteristics of the composite module array that can be used to measure the four degrees of freedom error of the machine tool, we used the uncalibrated and calibrated composite module array to measure the CMM spindle’s angle error and position error to verify the correctness of the calibration results. The CMM spindle drove the angle sensor to move along the X direction to scan the composite module array on the workbench, in which each composite module selected four measurement positions. At the same time, the laser interferometer was used to monitor the movement of the spindle. Comparing the two measurement results of the angle sensor and the laser interferometer, the error curve can be obtained, as shown in Figure 11 and Figure 12.
Root mean square (RMS) error was used to evaluate measurement accuracy. Compared with the uncalibrated array, the RMS error of the angle measurement around the X-axis of the calibrated array was reduced from 45.25″ to 0.43″, the RMS error of the angle measurement around the Y-axis was reduced from 26.22″ to 0.33″, and the total RMS error was reduced from 52.30″ to 0.54″. Meanwhile, the RMS error of the position measurement in the X direction was reduced from 93.95 to 0.34 µm, the RMS error of the position measurement in the Y direction was reduced from 36.05 to 0.55 µm, and the total RMS error was reduced from 100.63 to 0.65 µm.
Verification experiments satisfied the accuracy requirements of machine tool error measurement and eliminated the errors caused by the uncalibrated array. Therefore, it can be considered that the calibration data were reliable and guaranteed the accuracy of the composite reference array application. The measurement error of the calibrated composite module array mainly consisted of two aspects:
  • Since the composite reference piece was made of metal, there was an oxidation problem with an extended time of use, which affected the surface shape of the composite reference piece.
  • The measurement with higher accuracy put forward higher requirements on the quality of the light source and other optical components of the angle sensor.

5. Conclusions

The present study proposed a noncontact method for calibrating the angle and position of the composite module array. This method mainly used the self-developed angle sensor based on the principle of optical self-collimation and the established mathematical model to complete the calibration of the angle and position of the composite module array. In addition, the influence of array placement error on the calibration data was analyzed. With the help of laser interferometer, CMM and angle sensor, a series of experiments were completed which showed that the angle repeatability was within 0.4″ around the X-axis and within 0.3″ around the Y-axis, and the position repeatability was within 0.4 µm in the X direction and within 0.7 µm in the Y direction, exhibiting high repeatability. Through comparison experiments with a high-precision laser interferometer and uncalibrated array, the total RMS of angle measurement was 0.55″ and the total RMS of position measurement was 0.65 µm, thus verifying the reliability of the calibration data, and indicating that the calibration array can greatly reduce measurement error. The composite module array has great potential in the field of freeform surface measurement and is of great significance for its calibration. This study contributes important reference data for the application of composite module arrays in practice and provides reference significance for the calibration of freeform surface arrays.

Author Contributions

F.F. and X.L. proposed the method and modified the paper; J.L. (Jue Li) designed the experiments and wrote the paper; X.Y. and X.W. developed system software and designed optical structure; Z.S., J.L. (Jiaqi Liang), and Z.Y. helped J.L. (Jue Li) perform the experiments. All authors have read and agreed to the published version of the manuscript.

Funding

This research was financially supported by the National Natural Science Foundation of China (NSFC) (No.51775378), the National Key R&D Program of China (No.2017YFF0108102), and the Natural Science Foundation of Shanxi Province, China (Grant No. 201801D121180).

Conflicts of Interest

The authors declare no conflict of interest.

References

  1. Kong, L.; Ma, Y.; Ren, M.; Xu, M.; Cheung, C. Generation and characterization of ultra-precision compound freeform surfaces. Sci. Prog. 2019, 103, 1–21. [Google Scholar] [CrossRef] [PubMed] [Green Version]
  2. Yu, H.-H.; Tianz, Z.-H.; Su, D.-Q.; Gao, S.-T.; Suiy, Y.-X.; Yang, H.-J. Multi-fields Optimization Iterative Design Method for Freeform Surface in Ultra-short-focus Projection System. Acta Photon. Sin. 2019, 48, 0322001. [Google Scholar] [CrossRef]
  3. Zhu, L.; Gao, Y.; Hu, X.; Ma, Z.; Zhang, W. Progress in femtosecond laser fabrication of artificial compound eye. Chin. Sci. Bull. 2019, 64, 1254–1267. [Google Scholar] [CrossRef] [Green Version]
  4. Duan, Y.; Vo, Q.; Zhang, X.; Wang, Y.; Huang, S.; Fang, F. Novel method of measuring optical freeform surface based on laser focusing probe without calibrating focus error signal. Measurement 2019, 148, 106961. [Google Scholar] [CrossRef]
  5. Lai, J.; Li, X.; Ge, P. Designing double freeform surfaces for point source and extended sources using a construction, iteration and optimization process. Light. Res. Technol. 2018, 51, 1118–1127. [Google Scholar] [CrossRef]
  6. Gao, W.; Dejima, S.; Shimizu, Y.; Kiyono, S.; Yoshikawa, H. Precision Measurement of Two-Axis Positions and Tilt Motions Using a Surface Encoder. CIRP Ann. 2003, 52, 435–438. [Google Scholar] [CrossRef]
  7. Lv, Z.; Li, X.; Su, Z.; Zhang, D.; Yang, X.; Li, H.; Li, J.; Fang, F. A Novel 2D Micro-Displacement Measurement Method Based on the Elliptical Paraboloid. Appl. Sci. 2019, 9, 2517. [Google Scholar] [CrossRef] [Green Version]
  8. Fang, F.Z.; Wan, Y.; Zhu, P.Z.; Cheng, Y. Three-Dimensional Displacement Measurement System Based on Optical Free-Form Surface. J. Tianjin Univ. 2014, 47, 934–942. [Google Scholar]
  9. Tsai, H.-A.; Lo, Y.-L. An Approach to Measure Tilt Motion, Straightness and Position of Precision Linear Stage with a 3D Sinusoidal-Groove Linear Reflective Grating and Triangular Wave-Based Subdivision Method. Sensors 2019, 19, 2816. [Google Scholar] [CrossRef] [PubMed] [Green Version]
  10. Lv, Z.; Su, Z.; Zhang, D.; Yang, Z.; Yang, X.; Wei, X.; Li, J.; Fang, F.; Zhang, H.; Li, X. Displacement Measurement Method Based on the Rotating Paraboloid Array. Appl. Sci. 2019, 9, 3315. [Google Scholar] [CrossRef] [Green Version]
  11. Li, X.; Yang, X.; Gao, L.; Su, Z.; Wei, X.; Lv, Z.; Liang, J.; Fang, F.; Li, X.; Li, H.; et al. Rapid Measurement and Identification Method for the Geometric Errors of CNC Machine Tools. Appl. Sci. 2019, 9, 2701. [Google Scholar] [CrossRef] [Green Version]
  12. Li, H.; Sang, X. LED array light source illuminance distribution and photoelectric detection performance analysis in dust concentration testing system. Sensors Actuators A Phys. 2018, 271, 111–117. [Google Scholar] [CrossRef]
  13. Lin, S.; Yu, J.; Cai, J.; Chen, E.; Xu, S.; Ye, Y.; Guo, T. Design of a freeform lens array based on an adjustable Cartesian candela distribution. J. Mod. Opt. 2019, 66, 2015–2024. [Google Scholar] [CrossRef]
  14. Zhang, X.; Wu, L.; Yu, B.; Chen, X.; Chen, X. Adaptive Calibration of Electrode Array Shifts Enables Robust Myoelectric Control. IEEE Trans. Biomed. Eng. 2019, 1. [Google Scholar] [CrossRef] [PubMed]
  15. Liu, C.; He, X.; Liu, X.; Xu, Z. High-precision and flexible calibration method of non-overlapping array cameras. Appl. Opt. 2019, 58, 9251–9258. [Google Scholar] [CrossRef] [PubMed]
  16. Lv, Z.; Su, Z.; Zhang, D.; Gao, L.; Yang, Z.; Fang, F.; Zhang, H.; Li, X. The Self-Calibration Method for the Vertex Distance of the Elliptical Paraboloid Array. Appl. Sci. 2019, 9, 3485. [Google Scholar] [CrossRef] [Green Version]
  17. An, P.; Liu, Q.; Abedi, F.; Yang, Y. Novel calibration method for camera array in spherical arrangement. Signal Process. Image Commun. 2020, 80, 115682. [Google Scholar] [CrossRef]
  18. Guenther, A.; Stöbener, D.; Goch, G. Self-Calibration Method for a Ball Plate Artefact on a CMM. CIRP Ann. 2016, 65, 503–506. [Google Scholar] [CrossRef]
Figure 1. Calibration system.
Applsci 10 04358 g001
Figure 2. Diagram of the 2-D angle composite module.
Applsci 10 04358 g002
Figure 3. Feature point diagram.
Applsci 10 04358 g003
Figure 4. Calibration of the position.
Applsci 10 04358 g004
Figure 5. Array placement error.
Applsci 10 04358 g005
Figure 6. Schematic diagram of the plane normal vector.
Applsci 10 04358 g006
Figure 7. The composite module array base.
Applsci 10 04358 g007
Figure 8. Experimental system.
Applsci 10 04358 g008
Figure 9. Repeatability of the calibration experiment: (a) angle around the X-axis; (b) angle around the Y-axis.
Applsci 10 04358 g009
Figure 10. Repeatability of the calibration experiment.
Applsci 10 04358 g010
Figure 11. Verification experiments with the uncalibrated composite module array: (a) comparison experiments for the angle; (b) comparison experiments for the position.
Applsci 10 04358 g011
Figure 12. Verification experiments with calibrated composite module array: (a) comparison experiments for the angle; (b) comparison experiments for the position.
Applsci 10 04358 g012
Table 1. Angle calibration error when γ is 180″.
γ /arcsec θ x i = θ y i /arcsec Δ x = Δ y /arcsec
180500.044
1801000.087
1801500.131
1802000.174
1803000.262
1805000.436
1808000.698
Table 2. Angle calibration error when γ is 360″.
γ /arcsec θ x i = θ y i /arcsec Δ x = Δ y /arcsec
360500.087
3601000.174
3601500.262
3602000.349
3603000.523
3605000.872
3608001.395
Table 3. Angle calibration error when γ is 720″.
γ /arcsec θ x i = θ y i /arcsec Δ x = Δ y /arcsec
720500.174
7201000.348
7201500.523
7202000.697
7203001.045
7205001.742
7208002.788
Table 4. Angle calibration error when β is 180″.
γ /arcsec θ x i = θ y i /arcsec Δ y /arcsec
180508.00 × 10 6
1801004.00 × 10 6
1801503.70 × 10 5
1802009.30 × 10 5
1803002.67 × 10 4
1805008.67 × 10 4
1808002.40 × 10 3
Table 5. Angle calibration error when β is 360″.
γ /arcsec θ x i = θ y i /arcsec Δ y /arcsec
360505.50 × 10 5
3601006.70 × 10 5
3601503.80 × 10 5
3602003.40 × 10 5
3603003.05 × 10 4
3605001.35 × 10 3
3608004.20 × 10 3
Table 6. Angle calibration error when β is 720″.
γ /arcsec θ x i = θ y i /arcsec Δ y /arcsec
720502.66 × 10 4
7201004.40 × 10 4
7201505.33 × 10 4
7202005.42 × 10 4
7203003.05 × 10 4
7205001.18 × 10 3
7208005.96 × 10 3
Table 7. Angle calibration error when α is 180″.
γ /arcsec θ x i = θ y i /arcsec Δ x /arcsec
180504.00 × 10 6
1801002.10 × 10 5
1801504.20 × 10 5
1802006.70 × 10 5
1803009.30 × 10 5
1805002.94 × 10 4
1808005.71 × 10 4
Table 8. Angle calibration error when α is 360″.
γ /arcsec θ x i = θ y i /arcsec Δ x /arcsec
360501.50 × 10 5
3601007.80 × 10 5
3601501.60 × 10 5
3602002.47 × 10 4
3603003.38 × 10 4
3605009.67 × 10 4
3608001.75 × 10 3
Table 9. Angle calibration error when α is 720″.
γ /arcsec θ x i = θ y i /arcsec Δ x /arcsec
720506.10 × 10 5
7201003.08 × 10 4
7201506.03 × 10 5
7202009.51 × 10 4
7203001.28 × 10 3
7205003.46 × 10 3
7208005.94 × 10 3
Table 10. Position calibration error when γ is 100″.
γ /arcsec (x, y)/mm (   Δ x ,   Δ y   ) /mm
100 ( 50 , 0 ) ( 5.88 × 10 6 , 2.42 × 10 2 )
100 ( 100 , 0 ) ( 1.18 × 10 5 , 4.85 × 10 2 )
100 ( 150 , 0 ) ( 1.76 × 10 5 , 7.27 × 10 2 )
100 ( 200 , 0 ) ( 2.35 × 10 5 , 9.70 × 10 2 )
100 ( 250 , 0 ) ( 2.94 × 10 5 , 1.21 × 10 1 )
100 ( 300 , 0 ) ( 3.53 × 10 5 , 1.45 × 10 1 )
100 ( 350 , 0 ) ( 4.11 × 10 5 , 1.70 × 10 1 )
Table 11. Position calibration error when γ is 200″.
γ /arcsec (x, y)/mm (   Δ x ,   Δ y   ) /mm
200 ( 50 , 0 ) ( 2.35 × 10 5 , 4.84 × 10 2 )
200 ( 100 , 0 ) ( 4.70 × 10 5 , 9.70 × 10 2 )
200 ( 150 , 0 ) ( 7.05 × 10 5 , 1.45 × 10 1 )
233 ( 200 , 0 ) ( 9.40 × 10 5 , 1.94 × 10 1 )
200 ( 250 , 0 ) ( 1.18 × 10 4 , 2.42 × 10 1 )
200 ( 300 , 0 ) ( 1.41 × 10 4 , 2091 × 10 1 )
200 ( 350 , 0 ) ( 1.65 × 10 4 , 3.39 × 10 1 )
Table 12. Position calibration error when γ is 300″.
γ (x, y)/mm (   Δ x ,   Δ y   ) /mm
300 ( 50 , 0 ) ( 5.29 × 10 5 , 7.27 × 10 2 )
300 ( 100 , 0 ) ( 1.06 × 10 4 , 1.45 × 10 1 )
300 ( 150 , 0 ) ( 1.59 × 10 4 , 2.18 × 10 1 )
300 ( 200 , 0 ) ( 2.12 × 10 4 , 2.91 × 10 1 )
300 ( 250 , 0 ) ( 2.64 × 10 4 , 3.64 × 10 1 )
300 ( 300 , 0 ) ( 3.17 × 10 4 , 4.36 × 10 1 )
300 ( 350 , 0 ) ( 3.70 × 10 4 , 5.09 × 10 1 )
Table 13. The standard deviation of the relative angle.
Composite ModuleStandard Deviation of the Angle around the X-axis /arcsecStandard Deviation of the Angle around the Y-axis /arcsec
100
20.280.25
30.320.13
40.270.19
50.280.14
60.240.28
70.210.15
80.280.16
90.150.25
Table 14. Calibration results of the relative angle.
Composite ModuleAngle around the X-axis /arcsecAngle around the Y-axis /arcsec
100
235.535.28
356.27−50.69
445.66−22.78
529.48−37.01
658.176.40
744.61−16.44
843.01−27.25
941.08−3.26
Table 15. The standard deviation of the relative position.
Composite ModuleStandard Deviation of the Position in the X Direction /µmStandard Deviation of the Position in the Y Direction /µm
100
20.280.49
30.290.61
40.400.59
50.310.48
60.350.58
70.300.52
80.360.52
90.350.54
Table 16. Calibration results of the relative position.
Composite ModulePosition in the X Direction /mmPosition in the Y Direction /mm
100
250.0972−0.0421
3100.02940.0484
4149.97850.0374
5199.96030.0261
6250.01250.0424
7299.9843−0.0393
8349.98310.008
9399.9664−0.0281