Article

Design and Experimental Verification of a Compact Robot for Large-Curvature Surface Drilling

1
School of Mechanical Engineering and Automation, Beihang University, Beijing 100191, China
2
Institute of Bionic and Micro-Nano Systems, Beihang University, Beijing 100191, China
3
AVIC Chengdu Aircraft Industrial (Group) Co., Ltd., Chengdu 610031, China
*
Author to whom correspondence should be addressed.
Actuators 2026, 15(1), 24; https://doi.org/10.3390/act15010024 (registering DOI)
Submission received: 21 November 2025 / Revised: 16 December 2025 / Accepted: 17 December 2025 / Published: 1 January 2026

Abstract

Automated precision drilling is essential for aircraft skin manufacturing, yet current robotic systems face dual challenges: chatter-induced inaccuracies in hole quality and limited access to confined spaces such as air inlets. To overcome these limitations, this paper develops a compact drilling robot for drilling large-curvature skins of aircraft air inlets. Targeting the precision drilling requirements for complex-curvature aircraft air inlets, we present the robot’s overall design scheme, detailing each module’s composition to ensure precision drilling. In-depth analysis of the robot’s large-curvature adaptability precisely calculates the wheel assembly dimensions. To ensure high-precision drilling bit entry into guide mechanisms, a flexible drilling spindle mechanism is designed, with calculated and verified elastic ranges. An integrated intelligent control system is developed, combining vision recognition, real-time pose adjustment, and automated drilling workflow planning. Finally, traversability and drilling capabilities are validated using a simplified air inlet model. Test results confirm successful traversal on R200 mm curvature skins and automated drilling of Carbon Fiber-Reinforced Polymer (CFRP)/7075 aluminum stacks with a diameter of Φ4–Φ6 mm, achieving dimensional errors of less than 0.05 mm and normal direction errors of less than 0.65°.

1. Introduction

With the rapid advancements in computer control, network communication, and robotics technologies, aircraft assembly drilling techniques have progressively evolved toward automation and flexibility [1,2,3]. Modern aircraft manufacturing has seen the emergence of advanced machining processes [4,5,6,7,8], with manufacturing equipment advancing toward intelligence. The pivotal role of robotic systems in modern industrial manufacturing lies in their ability to enhance autonomy, flexibility, and precision beyond traditional manual or fixed automation [9]. Industrial robot drilling and wall-climbing robot drilling represent the two dominant existing approaches, with numerous well-developed systems available. For example, Electroimpact Inc. (EI) developed the once robotic drilling system [10], utilizing a KUKA KR350 industrial robot as the primary unit. Its end-effector-mounted multi-function end effector enables automated drilling, countersinking, and inspection of hole diameter accuracy and countersink depth [11]. However, the system still exhibits suboptimal hole quality. Subsequently, in 2009, EI introduced the second-generation TEDS aerospace drilling robot [12], enhancing the once system with a vision recognition unit to improve drilling precision, although normal direction recognition errors persist. Frommknecht et al. [13] developed a system using a KUKA KR210 industrial robot equipped with an end effector. By integrating vision measurement, normal detection, and accuracy compensation functions, they improved hole positional accuracy and normal direction accuracy. However, the drilled holes still exhibited suboptimal quality. Sun et al. [14] proposed a new 5-DOF robot, whose key innovation is its mechanical arm, which adopts a parallelogram frame structure driven by electric cylinders along the diagonal, significantly enhancing overall stiffness and improving machining accuracy. Bi et al. [15] developed a robotic drilling system for panel components, integrating cameras and normal direction sensors onto the end effector, enabling identification and correction of the machining datum and drilling normal direction prior to operation, achieving superior normal accuracy control. Wang et al. [16] designed a drilling end effector that significantly improved the vertical accuracy of robotic automatic drilling systems and achieved automatic orientation of the base coordinate system, thus enhancing machining efficiency and assembly quality for aircraft parts.
Due to the inherent rigidity limitations of industrial robots and the high machining difficulty of stack-up materials, industrial robot drilling systems are highly susceptible to machining chatter during operations. This severely impedes drilling quality and efficiency, compounded by the substantial workspace requirements of industrial robots. As a result, researchers have turned to wall-climbing robot drilling for operations in confined spaces. EI and Boeing jointly developed a 5-axis drilling end effector for machining fuselage section joining holes on large passenger aircraft, featuring normal direction detection and calibration [17]. Advanced Integration Technology created a flexible rail drilling/riveting system with four degrees of freedom, primarily used for drilling and riveting operations on wings and horizontal tail panels of medium-to-large aircraft [18]. Alema’s crawling drilling robot, developed in France, employs vacuum cup adhesion, eliminating Y-axis normal adjustments during machining to enhance efficiency on large aircraft surfaces [19]. Spain’s M. Torres developed a wall-climbing drilling robot called the Torres Lantaron Drill, which is equipped with a 5-axis controlled multi-function end effector for fuselage sections of medium-to-large passenger aircraft [20]. Hou et al. [21,22] designed a robotic drilling system for mid-fuselage joining sections of passenger aircraft, capable of drilling single materials and stacked materials. Bing et al. [23] researched a flexible guide rail drilling robot mechanism, utilizing a Programmable Multi-Axis Controller as the core to achieve multi-axis servo motion control through integration of hardware systems and human–machine interface software. Han et al. [24] developed a wall-climbing drilling robot that employs laser displacement sensors to detect the normal direction of passenger aircraft skin surfaces, achieving drilled hole circularity of 0.0025 mm. Liu et al. [25] analyzed a guide rail robot through kinematic modeling, proposing a product of exponentials method for serial robot kinematic modeling to address the special motion structure of annular guide rails. Kang et al. [26] developed a crawling drilling robot with fast system response and high computational accuracy. Compared to industrial robots, existing wall-climbing drilling robots are significantly smaller but predominantly applied to low-curvature, relatively open spaces, such as passenger aircraft fuselages.
In summary, significant breakthroughs have been achieved both domestically and internationally in robotic skin drilling. However, current research predominantly targets low-curvature, regular-shaped skins, such as cylindrical sections of civil aircraft fuselages. These systems remain bulky and require relatively open workspaces. In contrast, next-generation aircraft components exhibit continuous large-curvature variations in both chordwise and spanwise directions, featuring complex internal frames and poor accessibility [27], along with multi-material stack-up manufacturing. Existing automated drilling equipment lacks adaptive designs for precision drilling on complex-curvature components in confined spaces. Many existing auxiliary machining methods provide a foundation for achieving precision machining of surfaces of complex components and offer reference ideas for the design of the robot in this paper [28]. Therefore, to address drilling requirements for complex-curvature skins in confined aircraft air inlets, this paper proposes a compact precision drilling robot system. The wheel structure and chassis were analyzed to determine the required dimensions for smooth skin traversal. A flexible drilling spindle mechanism was designed to ensure high-precision bit entry into guide mechanisms, with its elastic range calculated and verified. An intelligent control system and specific drilling workflow were developed. Experimental validation on an air inlet mock-up confirmed the robot’s adaptability and precision machining capability for complex-curvature components in confined spaces, while verifying structural rationality and theoretical accuracy.

2. Functional Requirements and Technical Specifications

Due to the confined operational space within the aircraft air inlets (Figure 1), conventional industrial robots, wall-climbing drilling robots, and machine tools are unable to access the interior for machining operations. As a result, manual drilling by personnel is required, which presents challenges such as high labor intensity and poor machining quality. To address these challenges, the drilling robot designed in this study must meet the following requirements in order to perform automated drilling operations within the complex-profile, spatially constrained environment of the air inlets:
(1)
Compact size: To enable operation within confined spaces and ensure navigation through various scenarios, the robot must possess a compact form factor.
(2)
Mobility on large-curvature skins: Given that confined spaces such as air inlets often feature large-curvature surfaces, the robot must achieve omnidirectional movement on skins—particularly enabling flexible traversal across highly curved surfaces—to ensure unobstructed drilling operations.
(3)
To achieve high-quality drilling, the robot must ensure precise hole diameter and perpendicularity. Maintaining these tolerances is critical, as any deviation would compromise hole integrity and directly impact aircraft performance.
Additionally, the robot’s design must ensure precise normal positioning and incorporate modular construction to meet engineering and production demands. Detailed technical specifications are provided in Table 1. The requirements listed in the table are determined by factors such as the scenarios at the aircraft assembly site, the spatial constraints of the air inlet ducts, machining efficiency, and the workload intensity for operators. They are designed to provide a more reliable and efficient machining solution for existing aircraft skin drilling processes, with the aim of reducing manual involvement.

3. Principle Design of the Adaptive Compact Drilling Robot

3.1. Integrated Design of the Adaptive Compact Drilling Robot

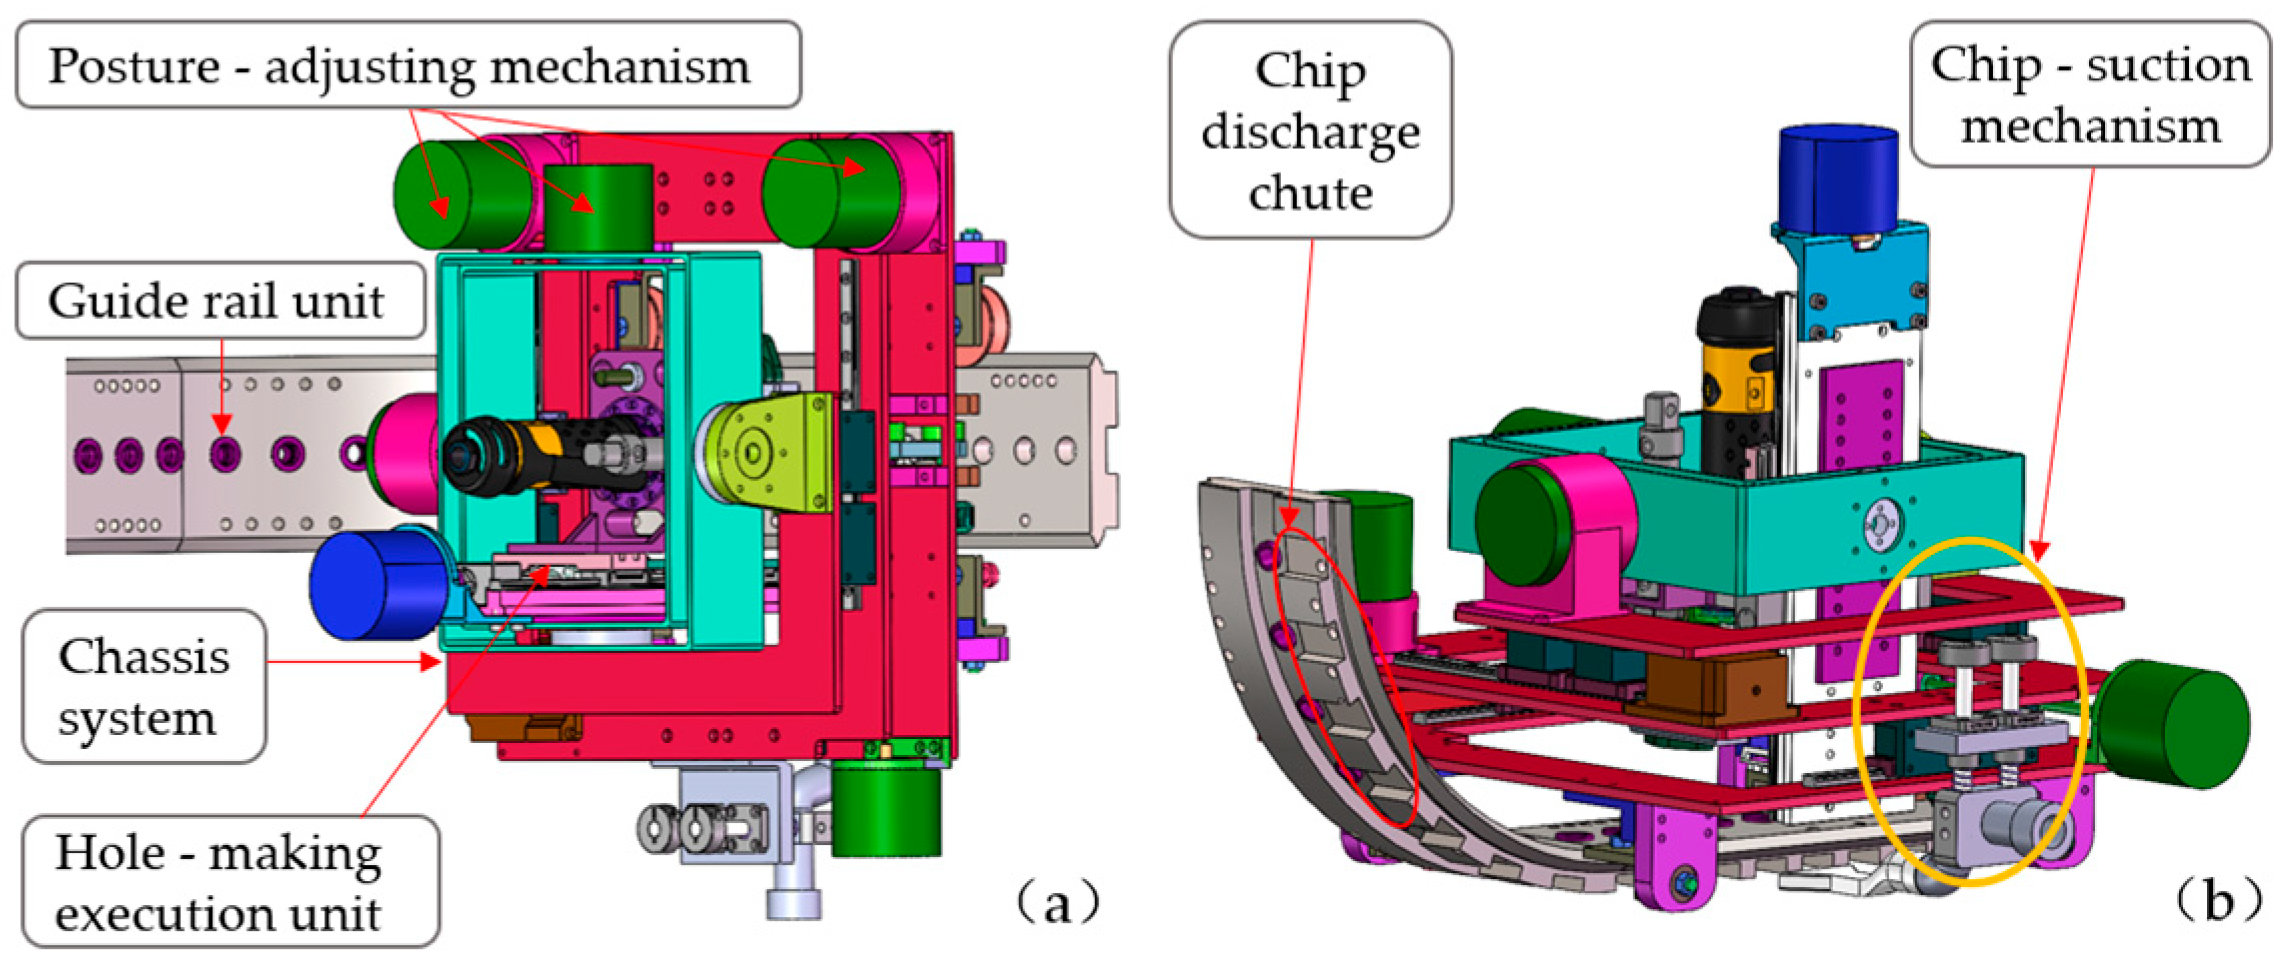
The robot utilizes a guide rail positioning system to enable automated movement on the aircraft air inlet skin. During the design process, methods such as Computer-Aided Design and knowledge management technologies were referred to, and the optimal design of the robot structure was conducted [29]. Its modules are designed in a serial configuration, comprising the posture adjustment mechanism, drilling execution unit, electrical control system, and guide rail unit (Figure 2). Positioning holes on the guide rail correspond precisely to target drilling locations on the skin, allowing the robot to align with pre-machined holes on the rail for skin processing. Meanwhile, a vacuum chip extraction unit evacuates drilling-generated debris through integrated chip removal chutes.
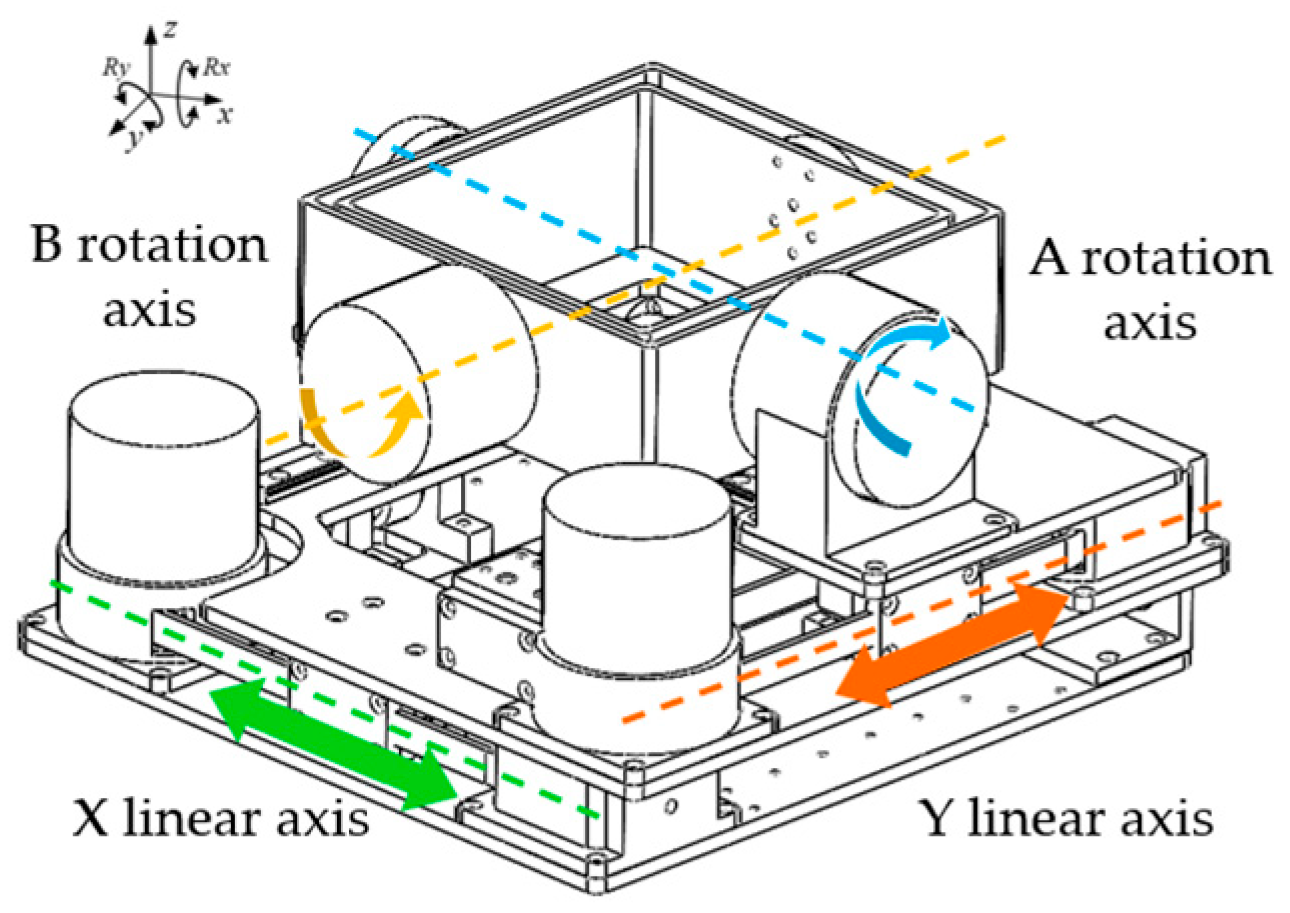
The drilling robot achieves movement across the skin through the collaborative engagement of its driving module and guide rail unit. The posture adjustment mechanism provides four degrees of freedom: linear translation along the X- and Y-axes, and rotational movement about the A- and B-axes. Its kinematic schematic is illustrated in Figure 3. Once alignment is complete, the drilling execution unit locates and clamps onto the base sleeve of the guide rail unit using an expansion sleeve. Drilling operations begin after finalizing all preparatory steps.

3.2. Drilling Execution Unit

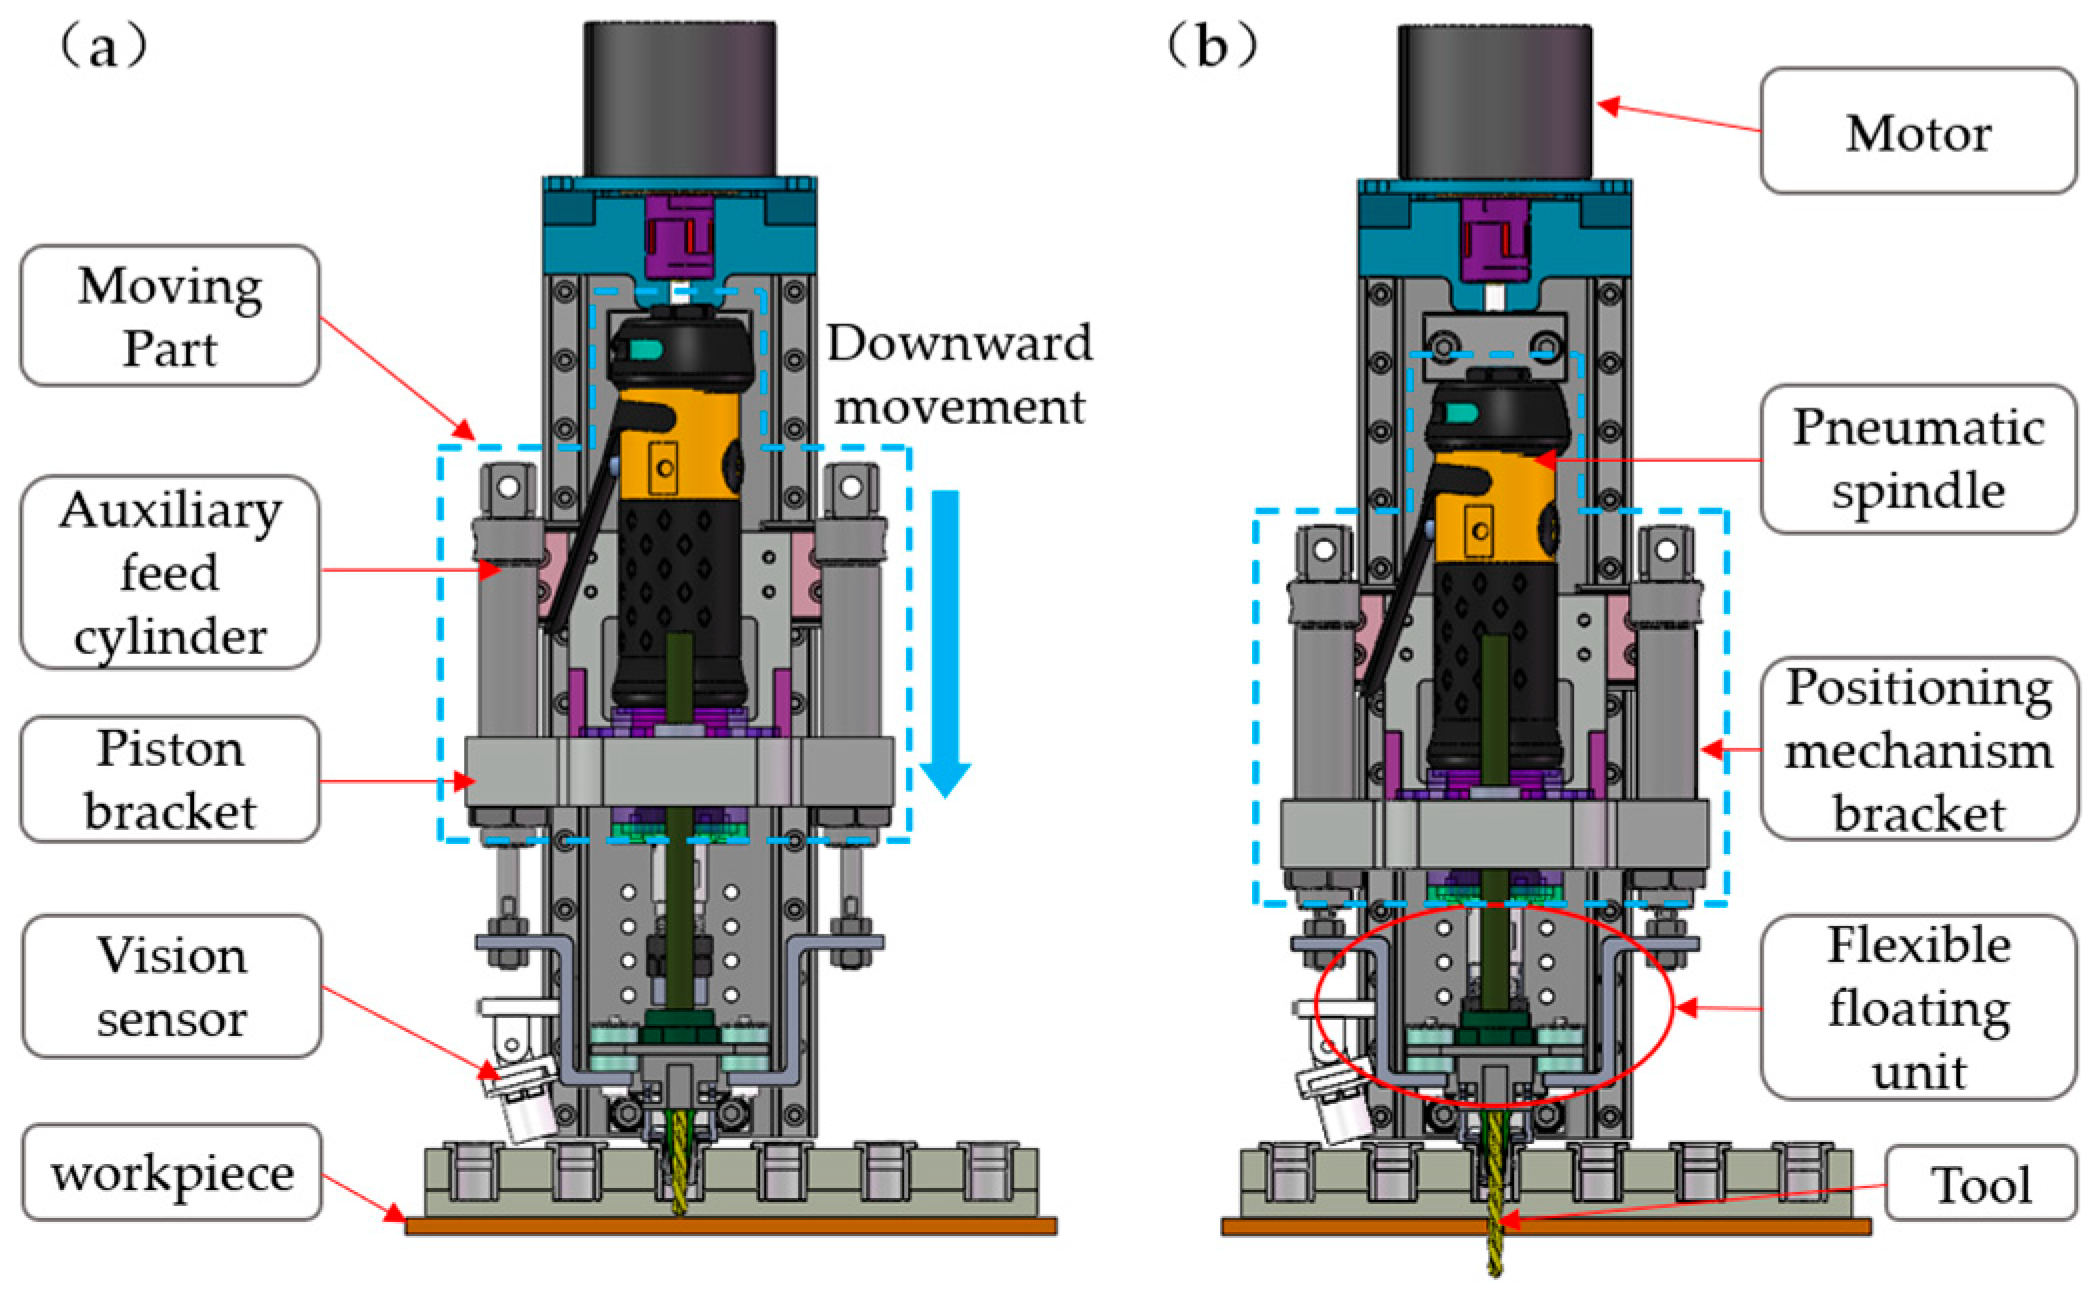
The drilling execution unit consists of key components, including a feed screw-nut assembly, an auxiliary feed cylinder, a flexible floating unit, an expansion positioning mechanism, a vision sensor, and a pneumatic spindle (Figure 4). Its operational principle involves the feed screw-nut assembly driving the spindle forward, while the pneumatic spindle performs the drilling operation, enabling coordinated skin machining. The workflow follows these steps: The feed screw-nut assembly advances the expansion positioning mechanism to the base sleeve of the guide rail unit, where rigid coupling between the expansion positioning mechanism and the guide rail enhances the machining stiffness of the drilling robot.

3.3. Expansion Positioning Mechanism Design

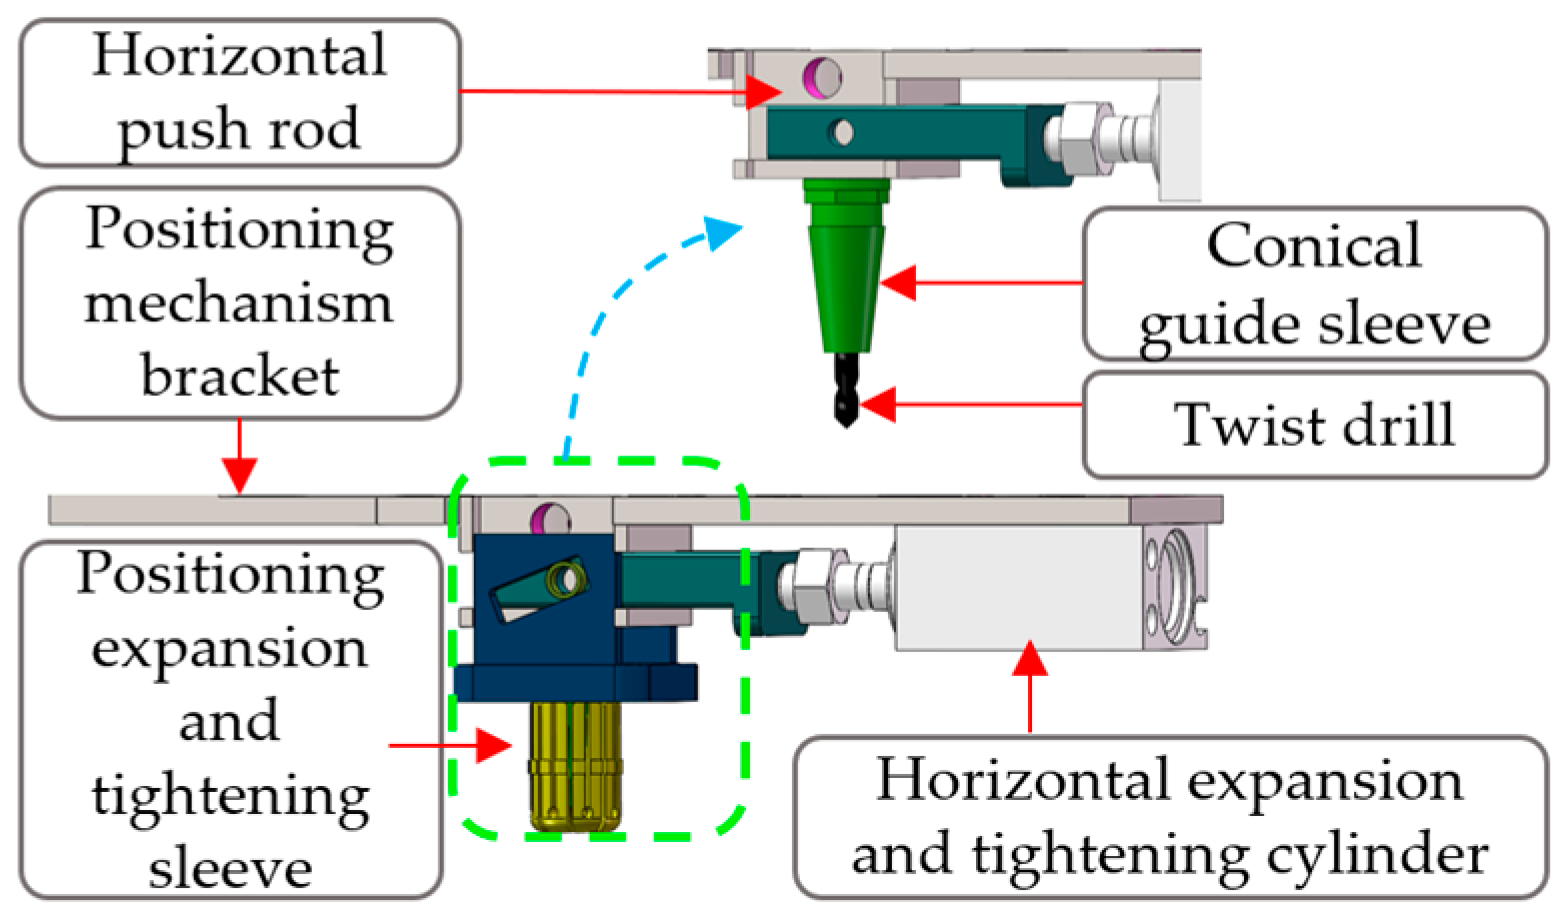
The expansion positioning mechanism at the front end of the actuator (Figure 5) serves to establish a rigid connection between the drilling robot and the guide rail unit mounted on the skin, ensuring high precision and stability during drilling operations [30,31].
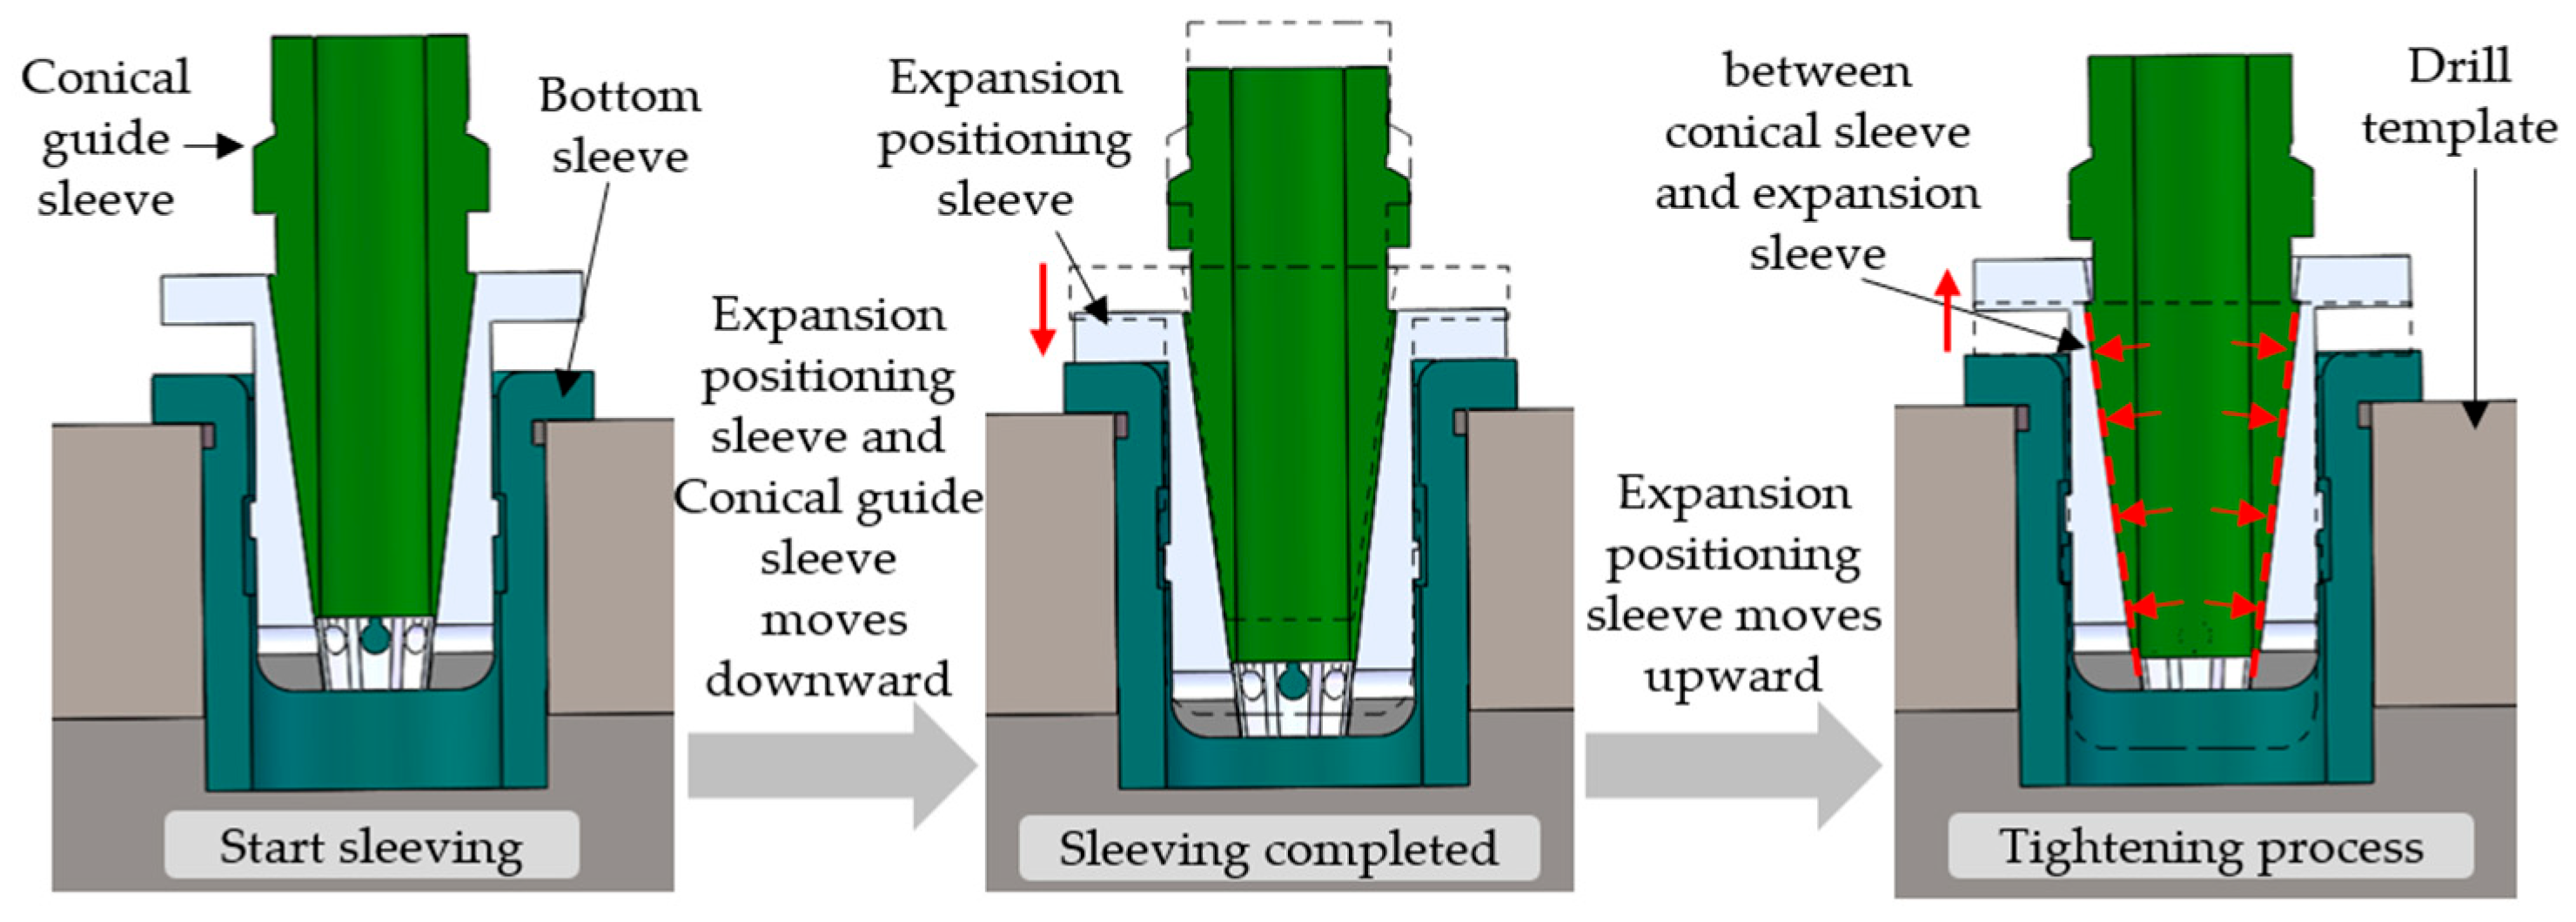
The expansion drilling sleeve features excellent elasticity, capable of generating radial elastic deformation exceeding 0.5 mm. Figure 6 illustrates its actuation principle during operation, which involves three stages:
(1)
Insertion Phase: The flexible floating unit initiates insertion, with the expansion positioning sleeve entering the base sleeve.
(2)
Positioning Phase: Once fully inserted, the expansion positioning sleeve reaches its operational position.
(3)
Expansion Locking Phase: The horizontal cylinder extends, driving the upward motion of the expansion positioning sleeve. Relative sliding between the tapered guide sleeve and the expansion sleeve induces radial elastic deformation, achieving external and internal bore positioning and clamping with the base sleeve.
Once expansion locking is completed at the floating spindle’s terminus, the expansion positioning sleeve is fully pressed against the jig plate’s base sleeve, constraining the drilling actuator’s degrees of freedom in the plane perpendicular to the feed direction. Axial drilling forces are channeled through the base sleeve into the guide rail unit, forming a rigid robot-rail closed-loop force transmission system, ensuring high-precision drilling operations and guaranteeing hole quality.

4. Kinematic Analysis of Large-Curvature Surface Adaptive Motion for the Robot Chassis

4.1. Guide Wheel Diameter Determinable via Curvature Radius Analysis

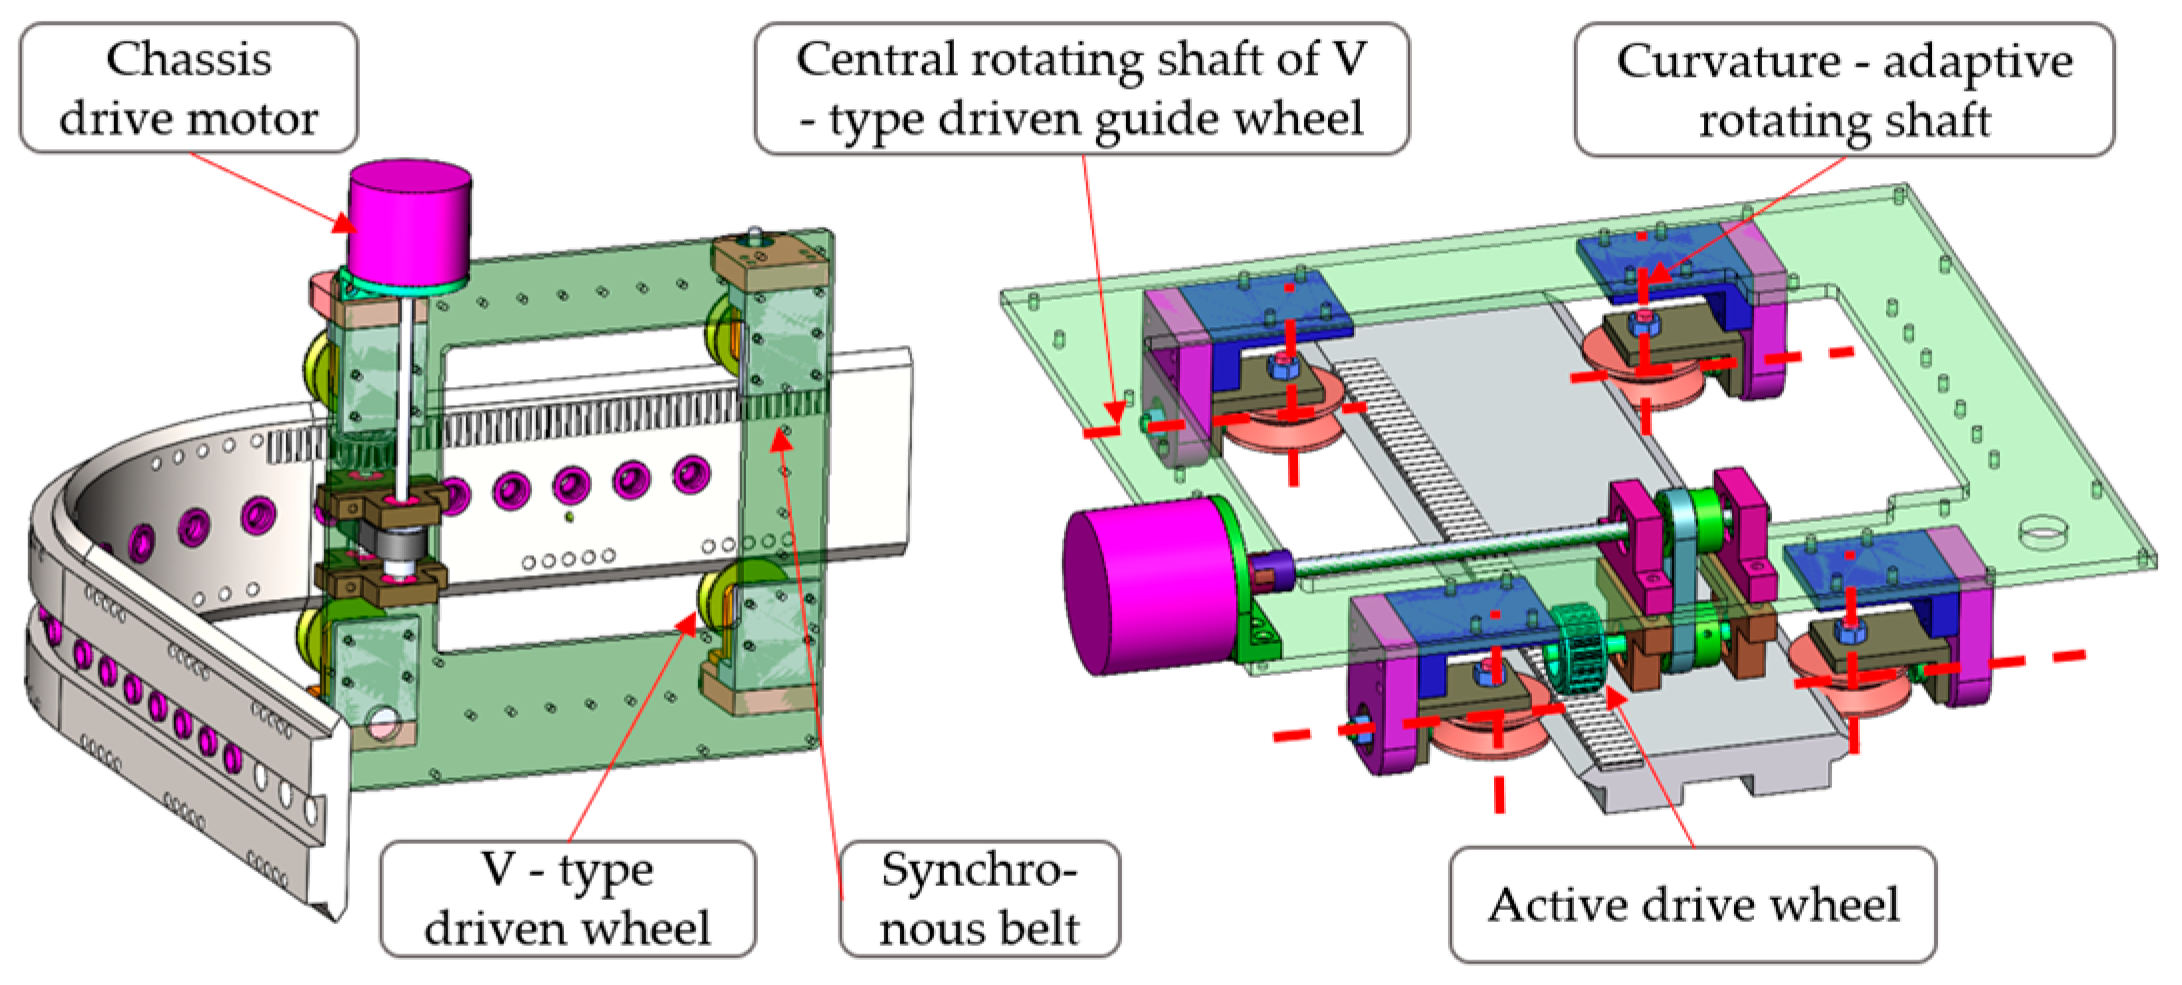
The robot chassis integrates one actively driven wheel and four passive guide wheels (Figure 7). The V-grooved passive guide wheels are symmetrically arranged on both sides of the chassis, engaging with V-grooved surfaces along the guide rail. A motor-driven actively timed pulley is mounted at the front of the chassis. The V-grooved passive wheels possess two degrees of freedom: rotation about their central axes and adaptive pivoting around the guide rail, which enables curvature compliance.
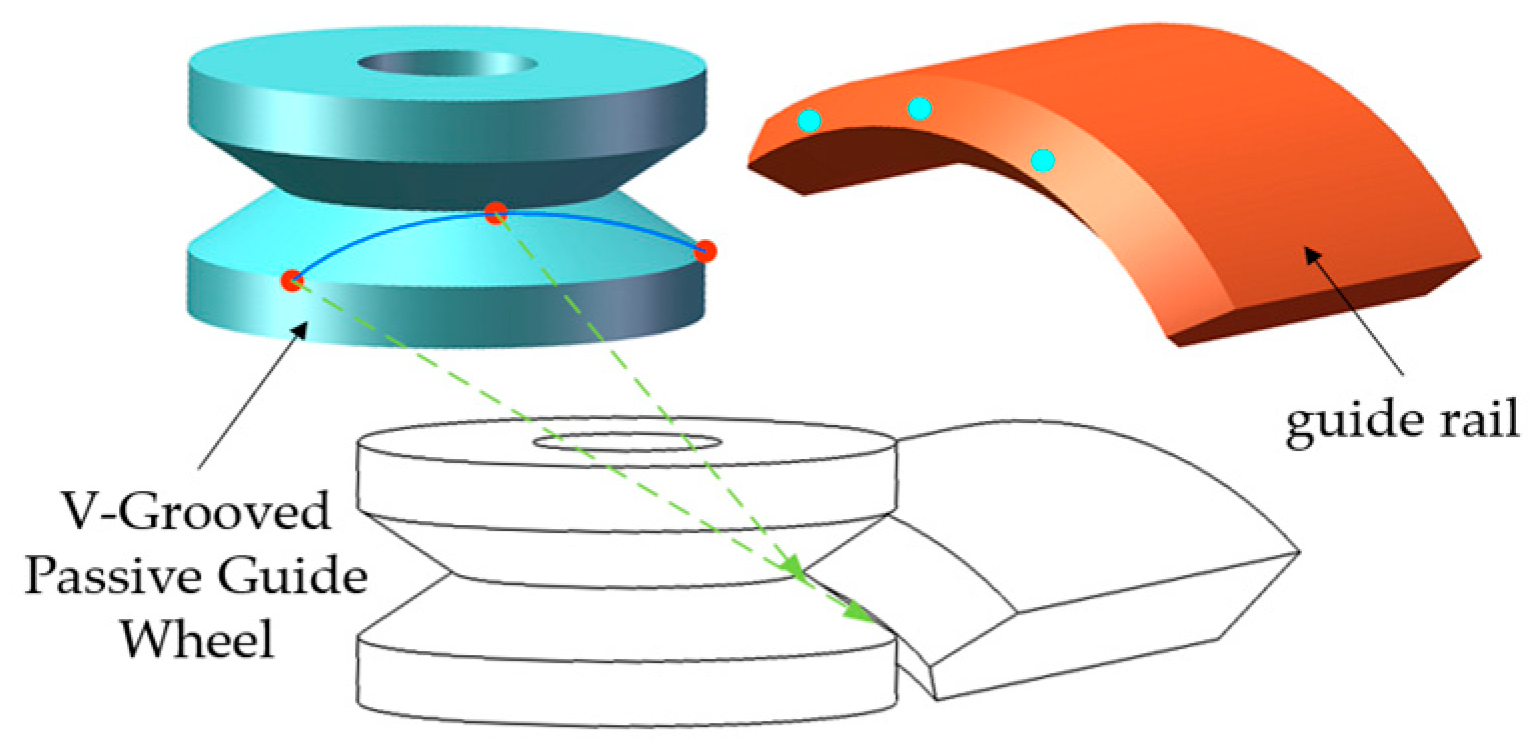
To analyze the traversability of a single V-grooved wheel, we consider the minimum traversable curvature of the guide rail. When the V-grooved wheel operates on the guide rail with a minimum curvature, its conical surface maintains tangency with the V-grooved rail surface. The wheel axis coincides with the normal direction at the contact point on the curved rail. The plane containing the rail’s V-groove apex curve is tangent to the wheel’s apex circumference, and the planes containing the upper and lower V-groove curves of the rail are tangent to the wheel’s perimeter circumference. The intersection between the rail’s V-groove apex curve and the wheel’s perimeter circumference is illustrated in Figure 8. The contact geometry defined by the intersection of the wheel circumference and the rail’s V-groove apex (Figure 8) provides the basis for calculating the dimensional parameters that limit the guide rail’s minimum traversable curvature.
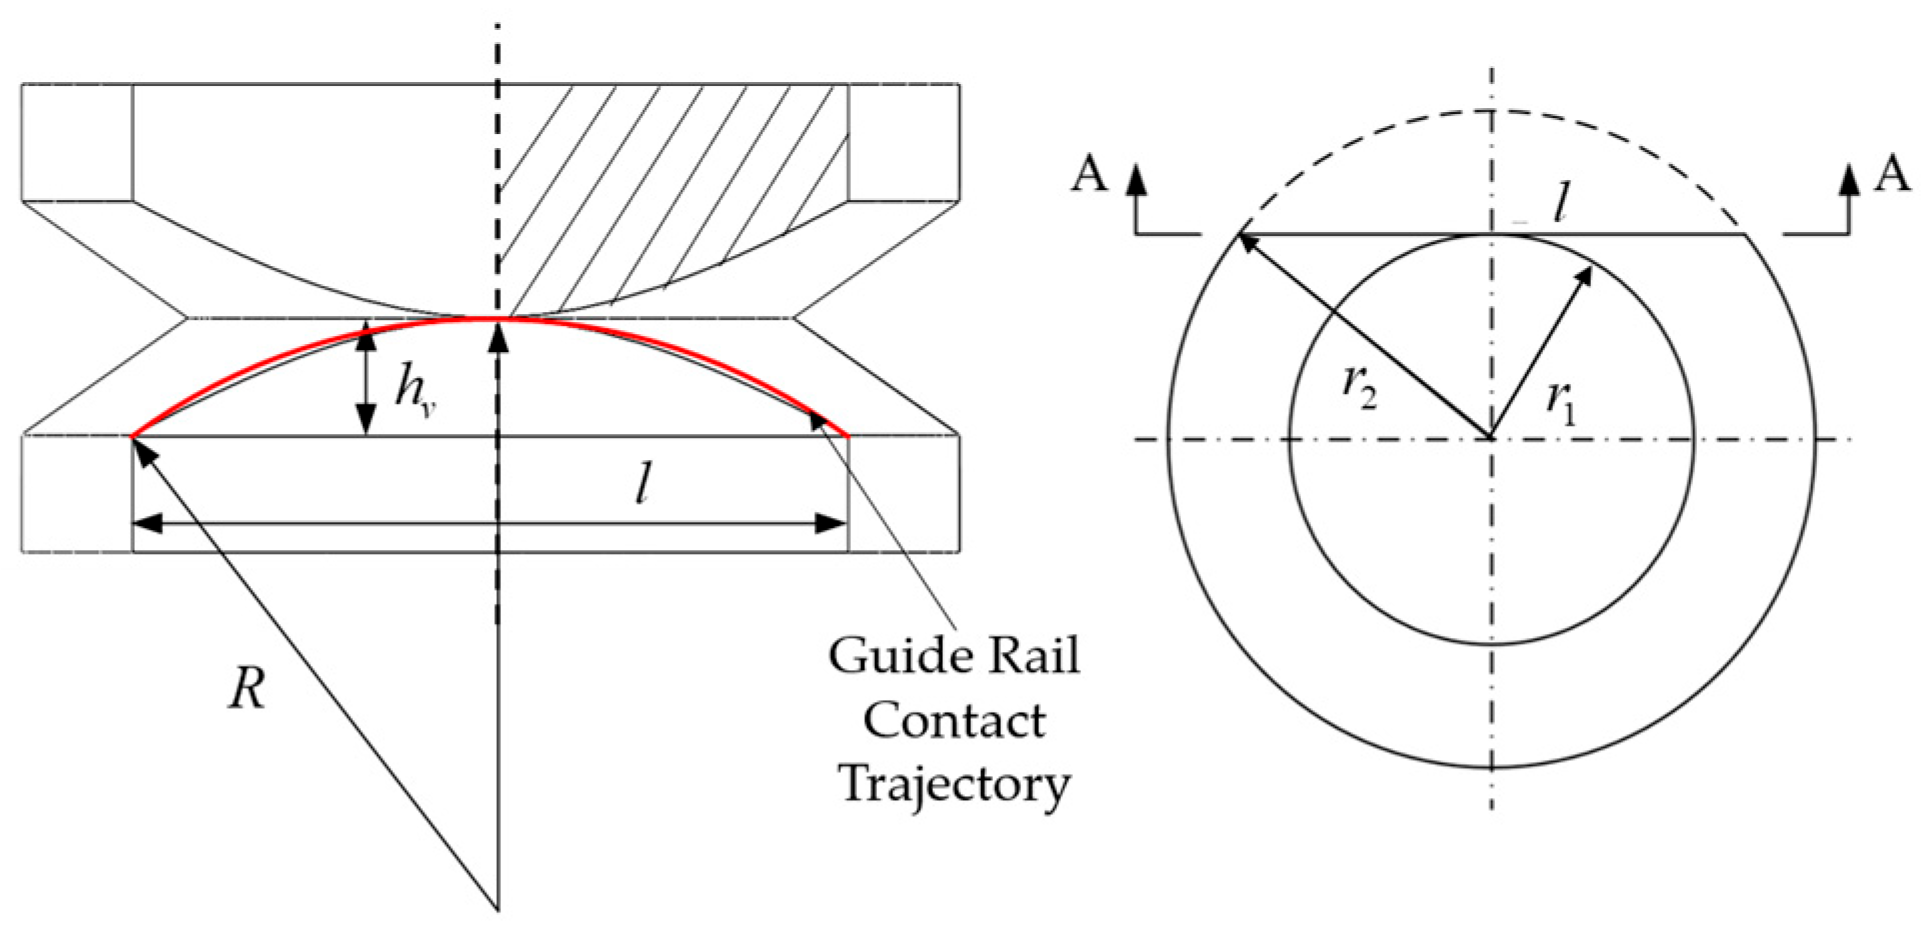
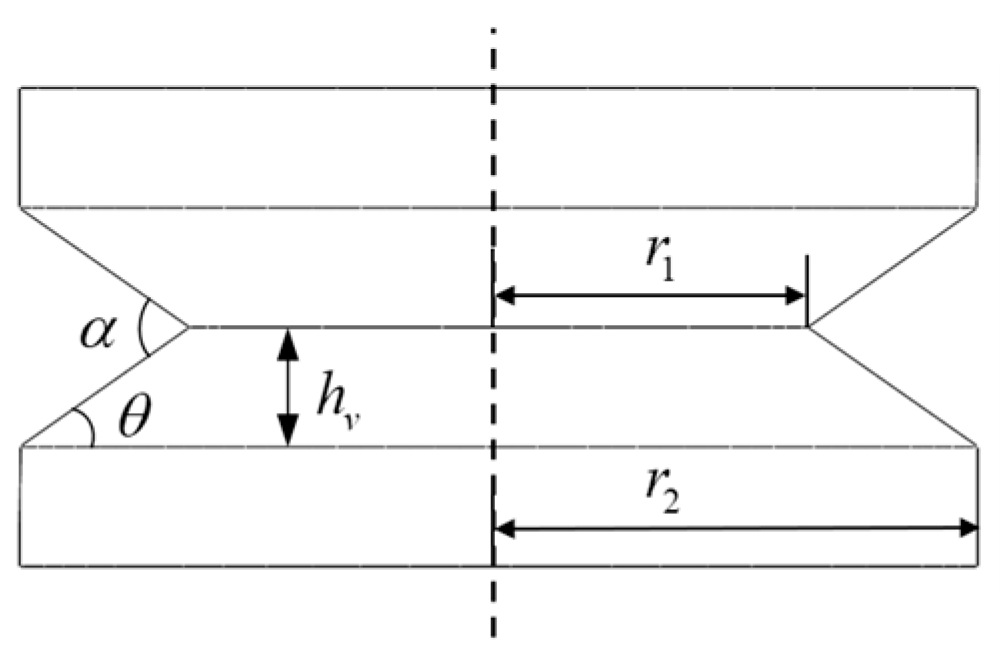
To determine the dimensional parameters for the minimum traversable curvature radius R, the length of the contact line in the top view direction (Figure 9) is first determined. The relevant equations are as follows:
l 2 = 4 ( r 2 2 r 1 2 )
where
l: chord length of the contact line on the large-curvature adaptive guide rail
r1: radius of the minimum positioning circle for the V-grooved wheel
r2: radius of the maximum positioning circle for the V-grooved wheel
And:
R 2 = R h v 2 + l 2 4
where
R: Minimum curvature radius the V-grooved wheel can adapt to
hv: Half of the V-groove engagement height
Then, we can get that:
R = h v 2 + l 2 8 h v
As shown in Figure 10:
r 2 = r 1 + h v tan θ
where
θ : Half of the V-groove angle
hv: Half of the V-groove engagement height
Substituting Equation (4) into Equation (2) yields:
l 2 = 4 2 r 2 h v tan θ h v 2 tan 2 θ
Substituting Equation (5) into Equation (3) yields:
R = h v 2 + r 2 tan θ h v 2 tan 2 θ
Analysis of the V-grooved wheel’s contact state with the guide rail at limiting curvature reveals that the primary parameters influencing curvature adaptability are the V-groove angle, wheel height h v , and outer diameter r 2 . Substituting the chassis V-grooved wheel parameters of the wall-climbing drilling robot into the equation yields the minimum curvature radius achievable by a single wheel.
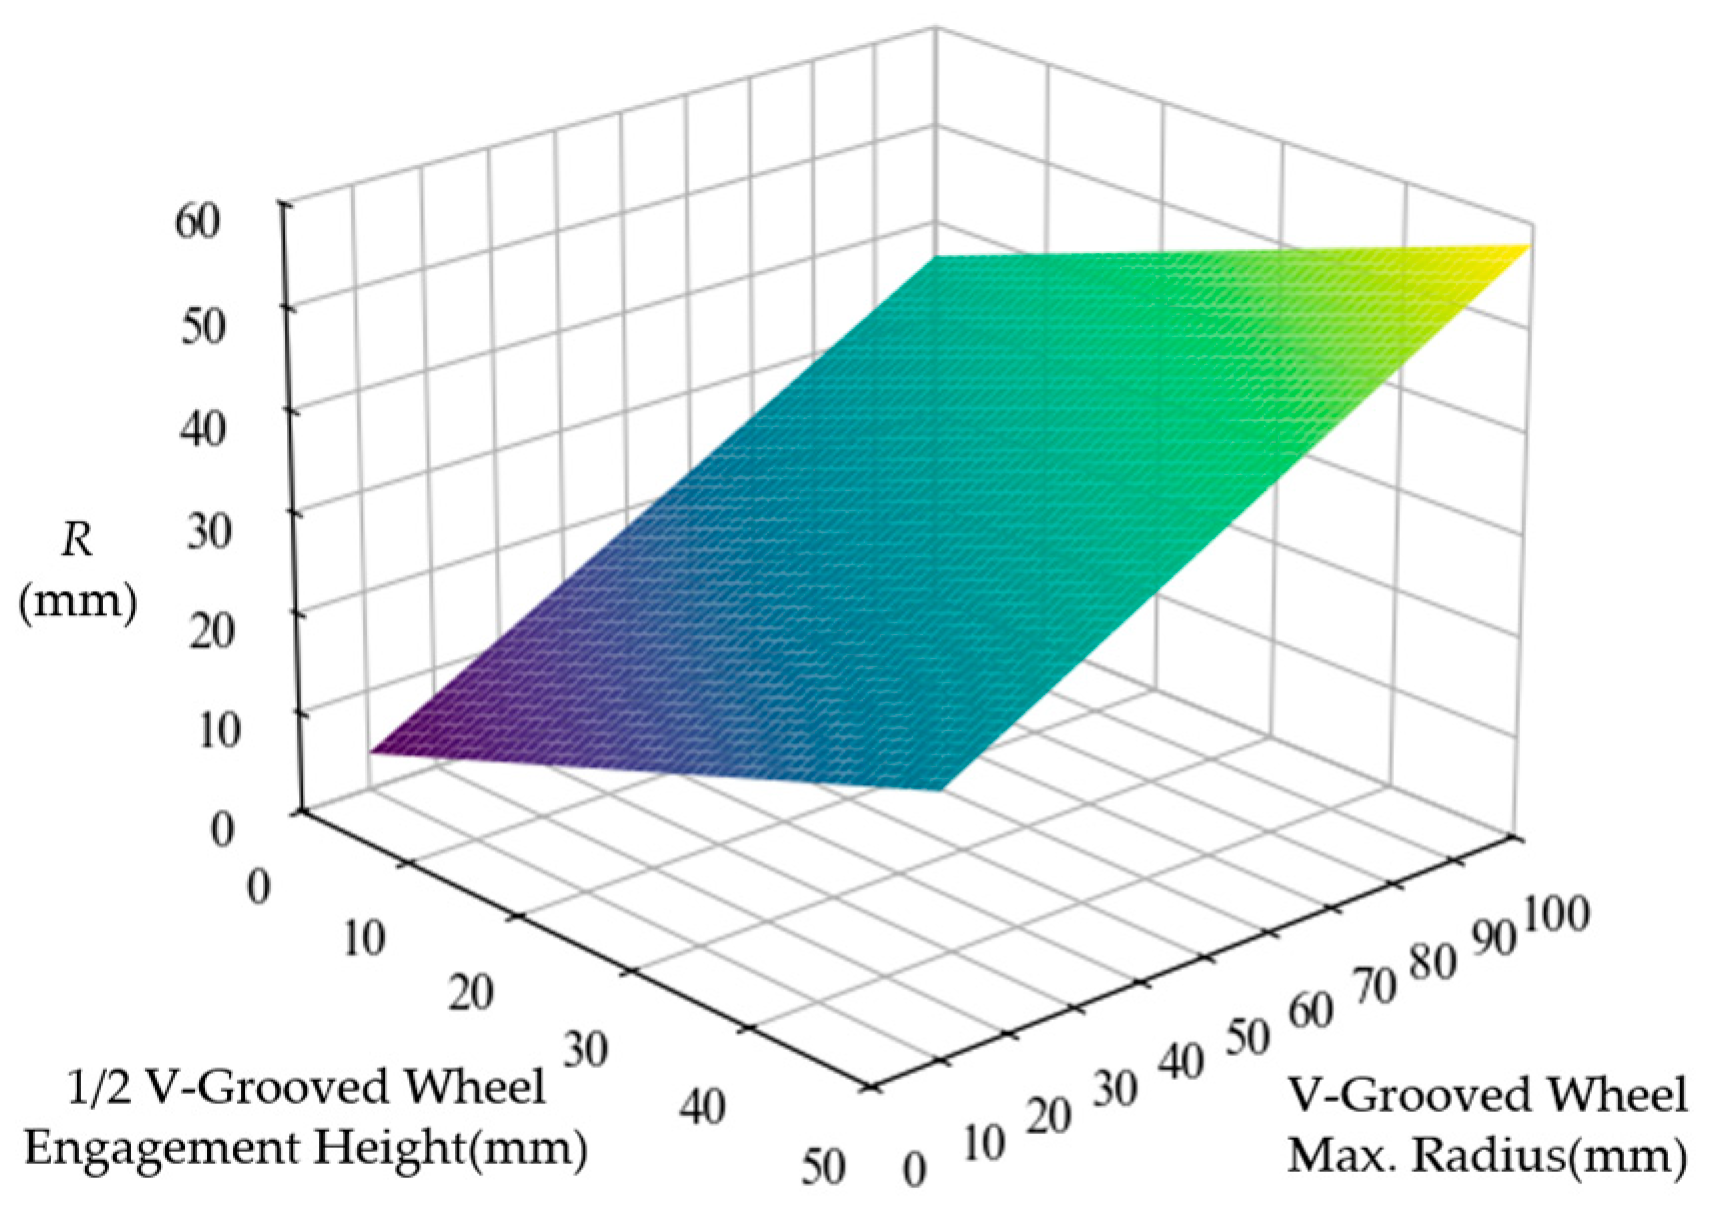
Considering comprehensive factors including strength and contact area, a V-groove angle of 70° was selected. Thus, r 2 (outer diameter) and h v (engagement height) become the dominant variables affecting R (minimum curvature radius). As depicted in the analytical curve (Figure 11), R exhibits proportionality to both h v and r 2 . As illustrated in the figure, it can be observed that the arc radius and the height of the V-grooved wheel are proportional to the required maximum diameter of the V-grooved wheel. The blue area represents a smaller V-grooved wheel size, while the transition from blue to yellow indicates a gradual increase in the gear size.

4.2. Traversable Curvature Radius Verification for Robot Chassis

We have completed the traversability analysis for individual V-grooved wheels, the robot chassis employs a four-wheel cooperative drive system. Thus, an integrated motion characteristic analysis is essential.
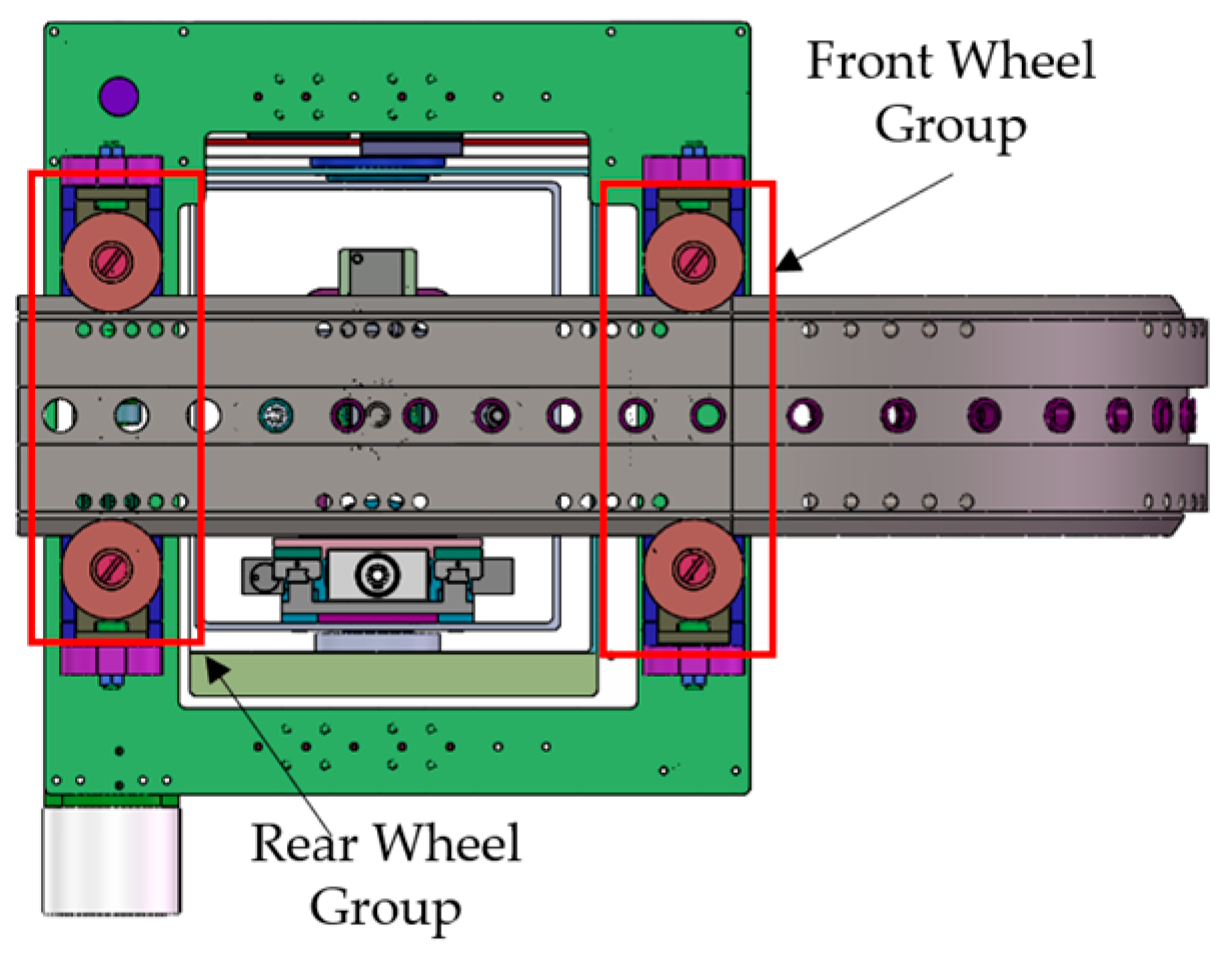
During operation in the intake duct, the robot is mounted perpendicularly to the skin surface. By leveraging motion symmetry, the V-grooved wheels are categorized into front and rear wheel groups. As illustrated in Figure 12, when traversing a single-curvature guide rail, both wheels within the same group undergo synchronized angular variation. This allows the system to be equivalently analyzed using a unilateral wheel-group model, thereby simplifying the kinematic and interference computations.
Such an analytical approach is built upon two core simplifying assumptions: the use of fully symmetric V-groove guide wheels (reducing the system to a “unilateral wheel set” for trajectory analysis and interference checking) and the idealization of a continuous guide rail. While we acknowledge that practical factors such as uneven loads, gravitational effects, and joint deviations from segmented rail splicing may increase motion resistance, they do not affect the core conclusion that the robot is capable of successfully navigating an R200 arc surface.
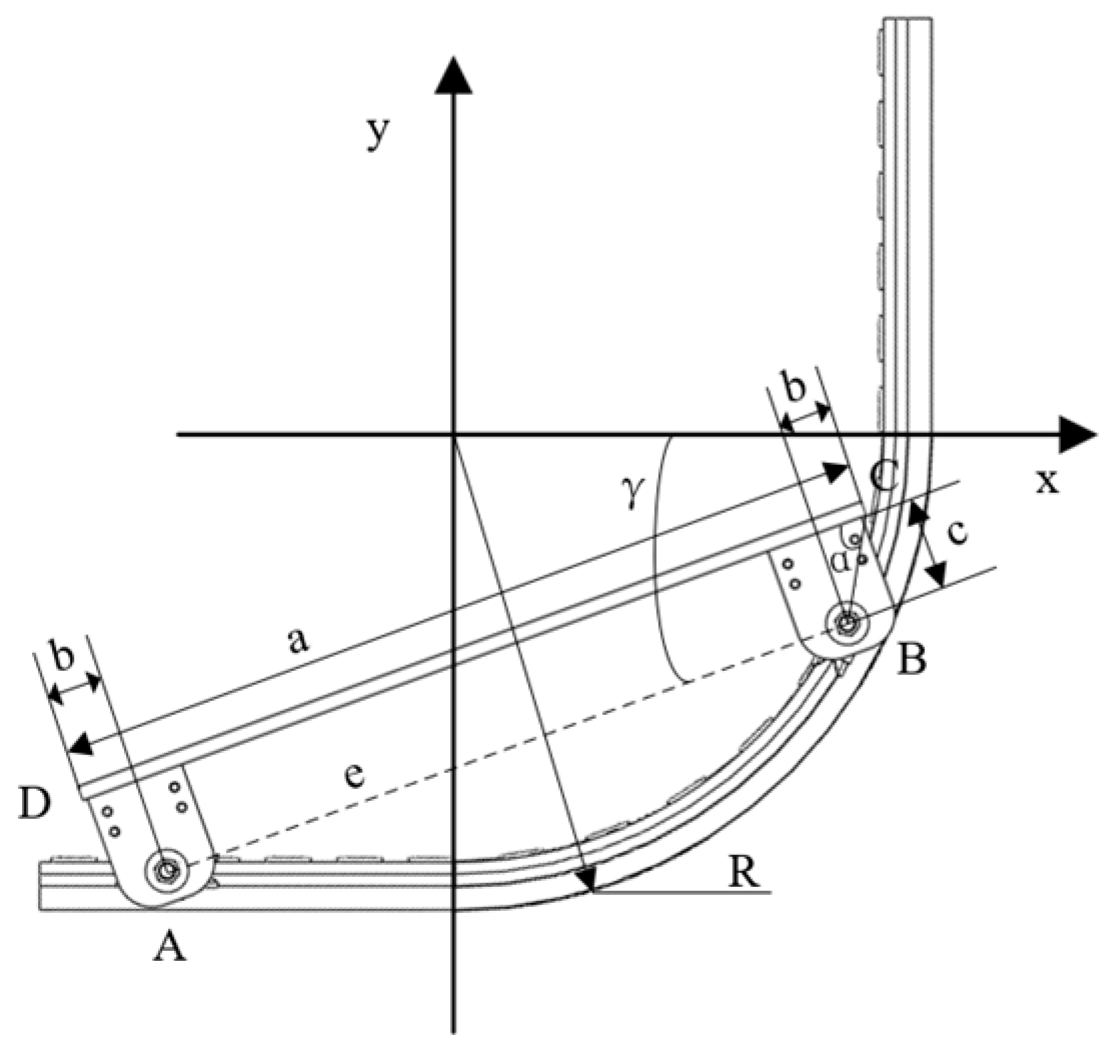
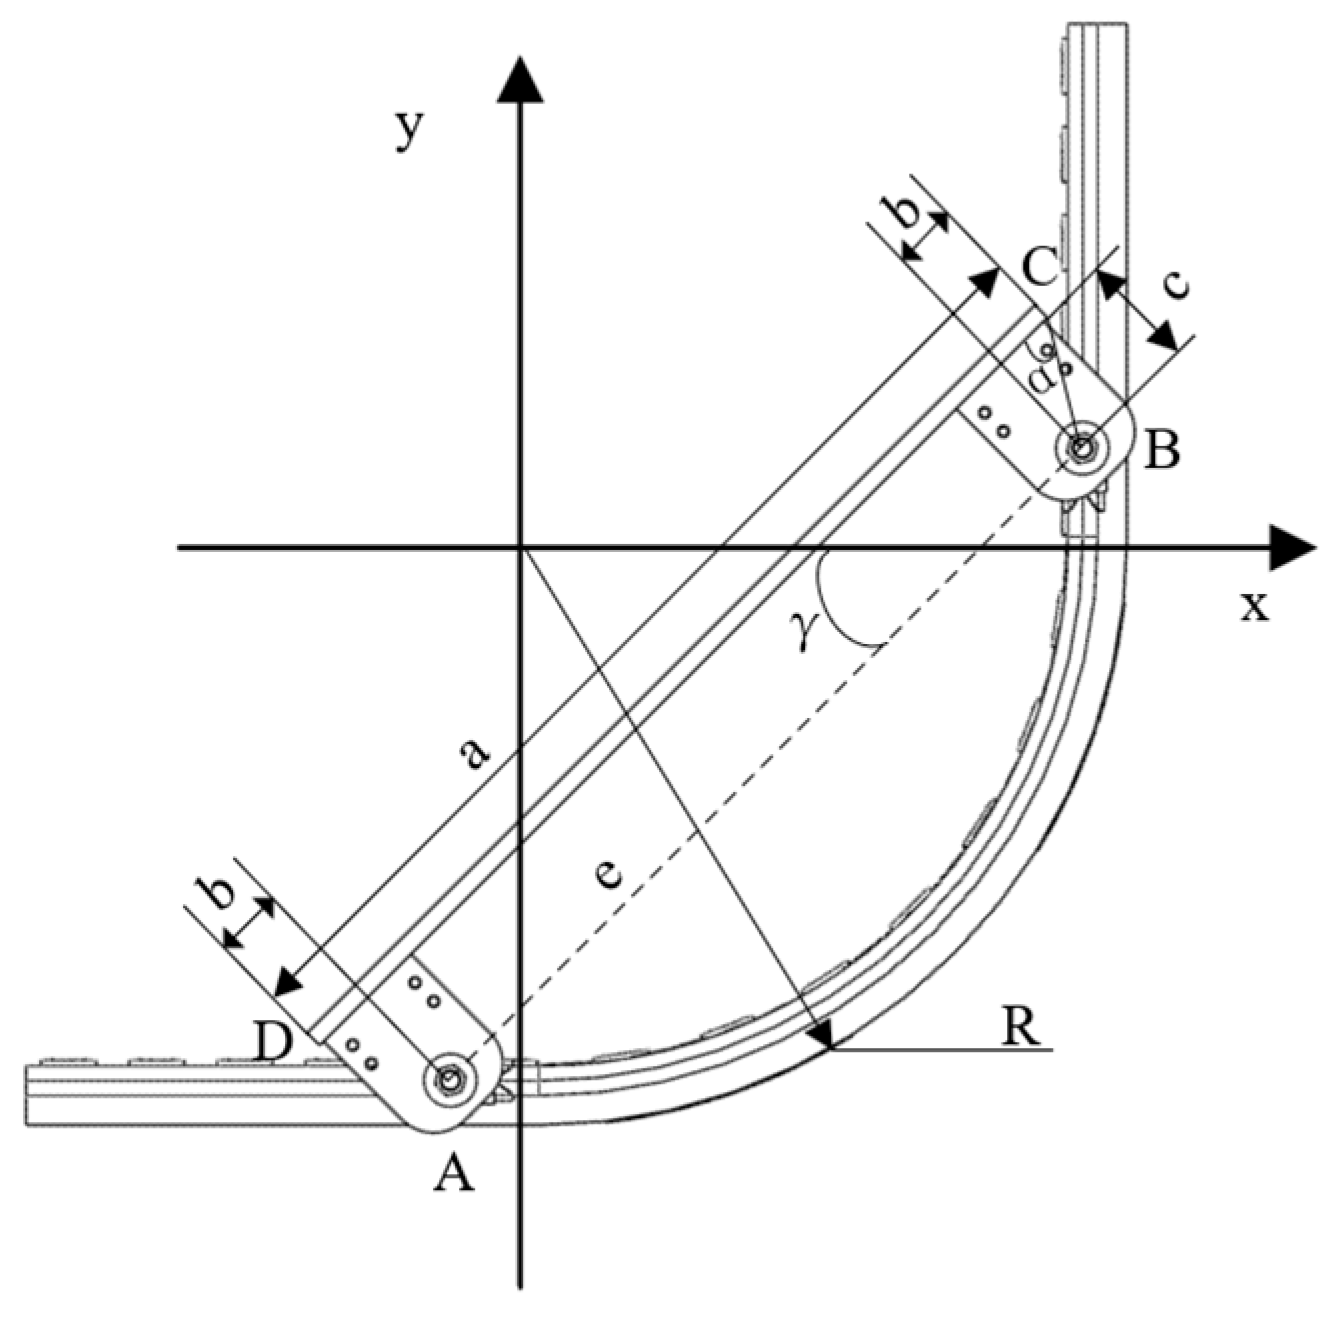
The schematic diagram of the robot chassis is annotated in Figure 13. Establishing a Cartesian coordinate system with the center of the circular guide rail as the origin and the forward direction as the positive X and Y axes, point A denotes the center of the rear wheel group, point B the center of the front wheel group, point C the foremost extremity of the chassis body, and point D the rearmost extremity of the chassis body. This configuration enables analytical calculation of the minimum traversable curvature radius for the robot chassis.
In Figure 13,we can see that:
a: Maximum length of the robot
b: Distance from robot front/rear to V-grooved wheel center of front/rear wheel group
c: Distance from V-grooved wheel rotation axis to base plate
e: Distance between front and rear wheel group centers
α : Angle between form the front wheel group center point to chassis front end BC and chassis body length DC
γ : Angle between front-rear wheel group center distance (AB) and x-axis
To ensure successful traversal, the foremost point C and rearmost point D must avoid interference with the guide rail surface. Observation reveals trajectories of points C and D are symmetric about line y = −x on the rail, implying equivalent behavior during forward and reverse motion. Thus, analysis focuses on point C, comprising two phases:
Phase 1: Point B moves along the circular arc
Phase 2: Point B moves along the straight section
Analysis of Phase 1 (B on circular arc):
Point A moves along the x-axis with initial position ( x 0 , −R). During motion, its coordinates are ( x a , −R), satisfying the rear wheel’s linear motion equation:
x a = x 0 + v t
where v is the robot’s constant motion velocity and t is time.
Let the coordinates of point B be ( x b , y b ). Given that point B moves along a circular arc, it satisfies the following equation:
x b 2 + y b 2 = R 2
As shown in Figure 13, the included angle γ between the chassis body and the X-axis satisfies:
tan γ = ( y b + R ) / ( x b x a )
Let the coordinates of the chassis foremost point C be ( x c , y c ). As shown in the figure, the angle between BC and the X-axis is α + γ ; thus, the trajectory equation for point C is:
x c = x b + | BC | cos ( α + γ ) y c = y b + | BC | sin ( α + γ )
The coordinates of point B relate to time t as follows:
x b =   2 m n ± 64 R 6 + 16 n 2 R 4 16 R 2 m 2 2 4 R 2 + n 2  
where
m = a 2 b 2 2 R 2 x 0 + v t 2  
n = 2 ( x 0 + v t )
y b = ( ( a 2 b ) 2 2 R 2 ( x 0 + v t ) 2 + 2 ( x 0 + v t ) x b ) 2 R
Finally, substituting into Equation (10) yields the final trajectory equation for point C:
x c = x b + b 2 + c 2 cos ( arctan ( ( y b + R ) / ( x b x a ) ) + arctan ( c / b ) ) y c = y b + b 2 + c 2 sin ( arctan ( ( y b + R ) / ( x b x a ) ) + arctan ( c / b ) )
To ensure successful robot traversal, the coordinates of point C must satisfy the following equation:
x b 2 + y b 2 ( R 20 ) 2 < 0
Empirically set v = 10 mm/s. Due to tool length constraints, c = 35 mm. According to design specifications requiring traversal of skins with minimum curvature radius 200 mm, R = 200 mm is selected. Since longer chassis reduces traversability, a takes the limit value 400 mm. Calculation yields b ≤ 21.48 mm under these conditions.
Next, analyze the state when point B moves along the straight section:
As previously stated, the trajectories of points C and D on the guide rail are symmetric about the line y = −x. Thus, only the case where point B is on the straight section and point A is also on the straight section needs analysis, as shown in Figure 14.
The overall calculation process is largely consistent with the previous state where point B moved along the circular arc, with the following differences:
Here, B moves from the arc to the vertical guide section. Let the coordinates of point B be (R, y b ), satisfying the equation:
y b = v t
Point A has coordinates ( x a , −R), where is unknown. Thus, from the derivation process, we obtain:
x a = R ( a 2 b ) 2 ( v t + R ) 2
Let the coordinates of the chassis foremost point C be ( x c , y c ). As shown in the figure, the angle between BC and the X-axis is α + γ . Therefore, the trajectory equation for point C is:
x c = R + | BC | sin ( α + γ 90 ° ) y c = y b + | BC | cos ( α + γ 90 ° )
Thus, the final trajectory equation for point C is:
x c = R + b 2 + c 2 cos ( arctan ( ( y b + R ) / ( R x a ) ) + arctan ( ( c / b ) 90 ° ) y c = y b + b 2 + c 2 sin ( arctan ( ( y b + R ) / ( R x a ) ) + arctan ( ( c / b ) 90 ° )
Similarly, to ensure successful robot traversal, point C must satisfy the following equation:
x c R 20
Substituting a = 400 mm, c = 35 mm, v = 10 mm/s, R = 200 mm yields b ≤ 24.21 mm.
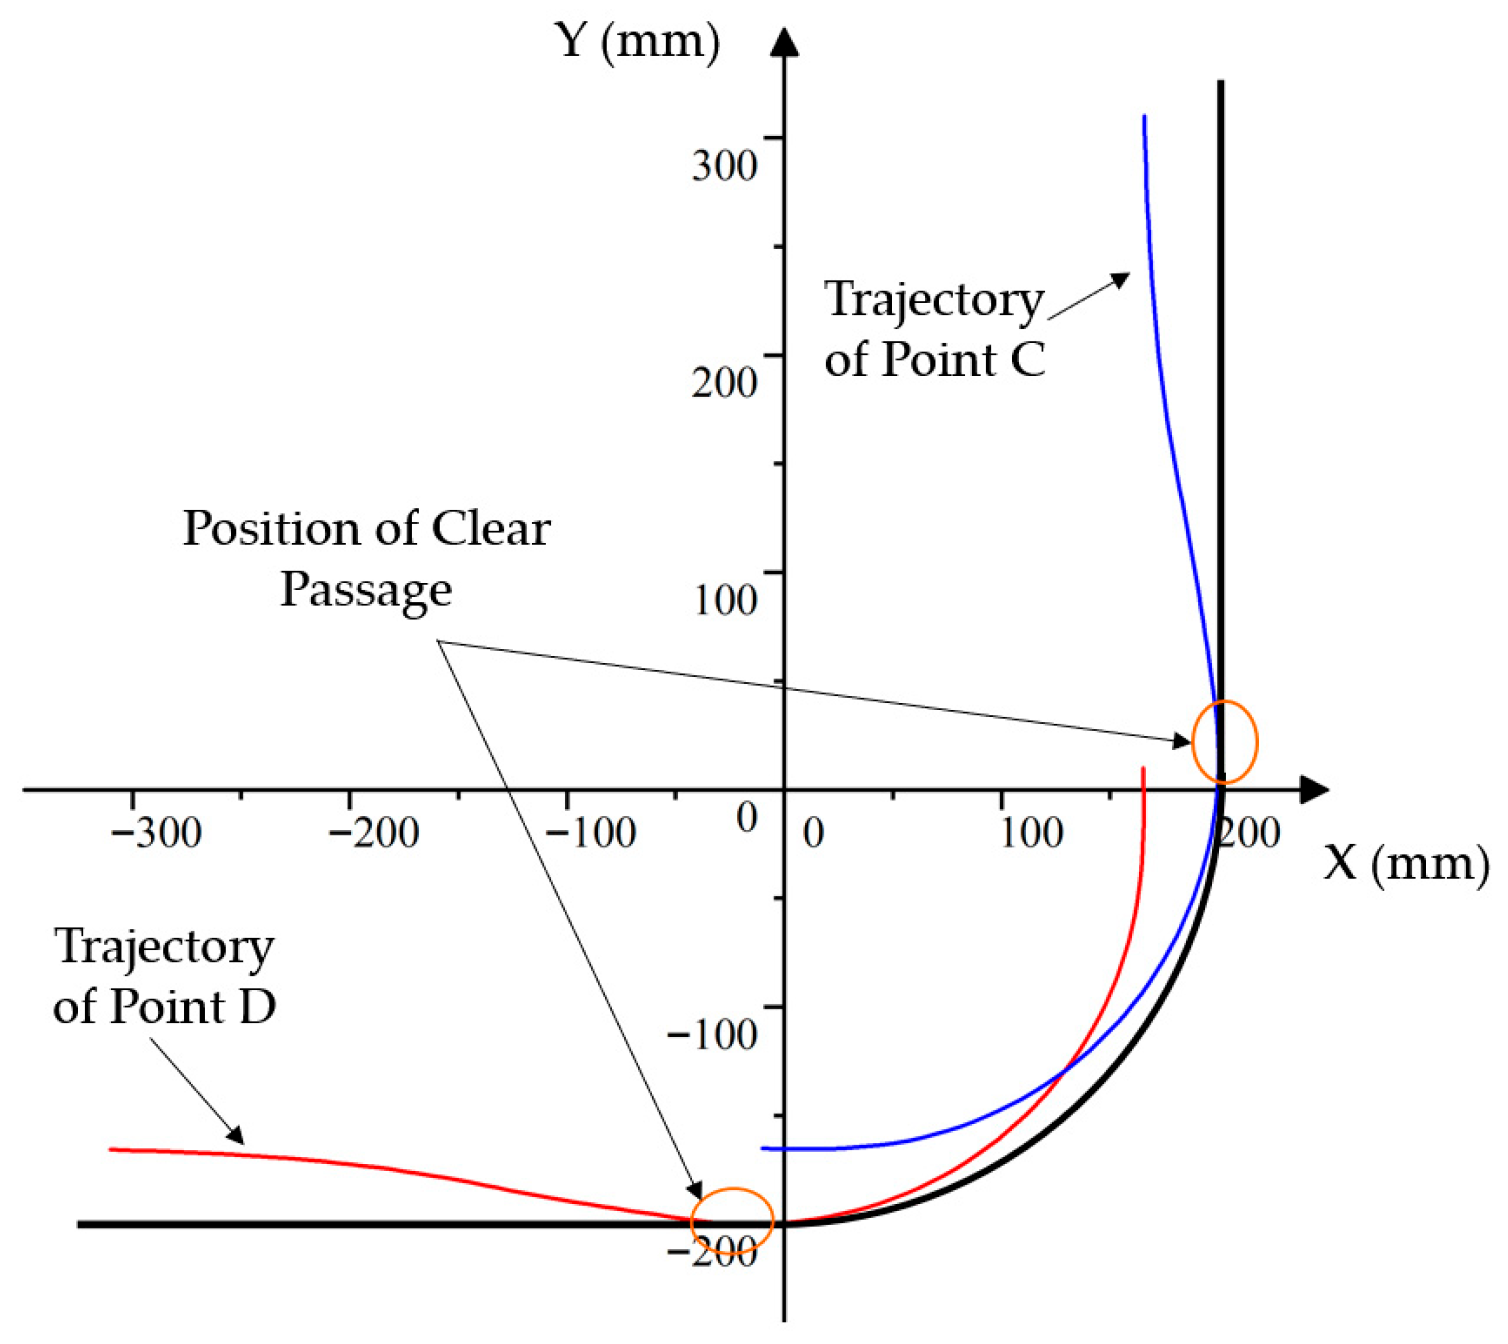
In summary, b must be ≤21.48 mm. When b = 21.48 mm, the motion trajectories of points C and D are shown in Figure 15, demonstrating successful clearance during movement. Considering reserved space for mounting holes, the V-grooved wheel radius is set to 20 mm. Based on this theoretical analysis, the structural parameters of the chassis V-grooved wheels are specified in Table 2: radius = 20 mm, height = 5 mm, V-angle = 70°.

5. Elastic Engagement Kinematics Analysis for Drilling End

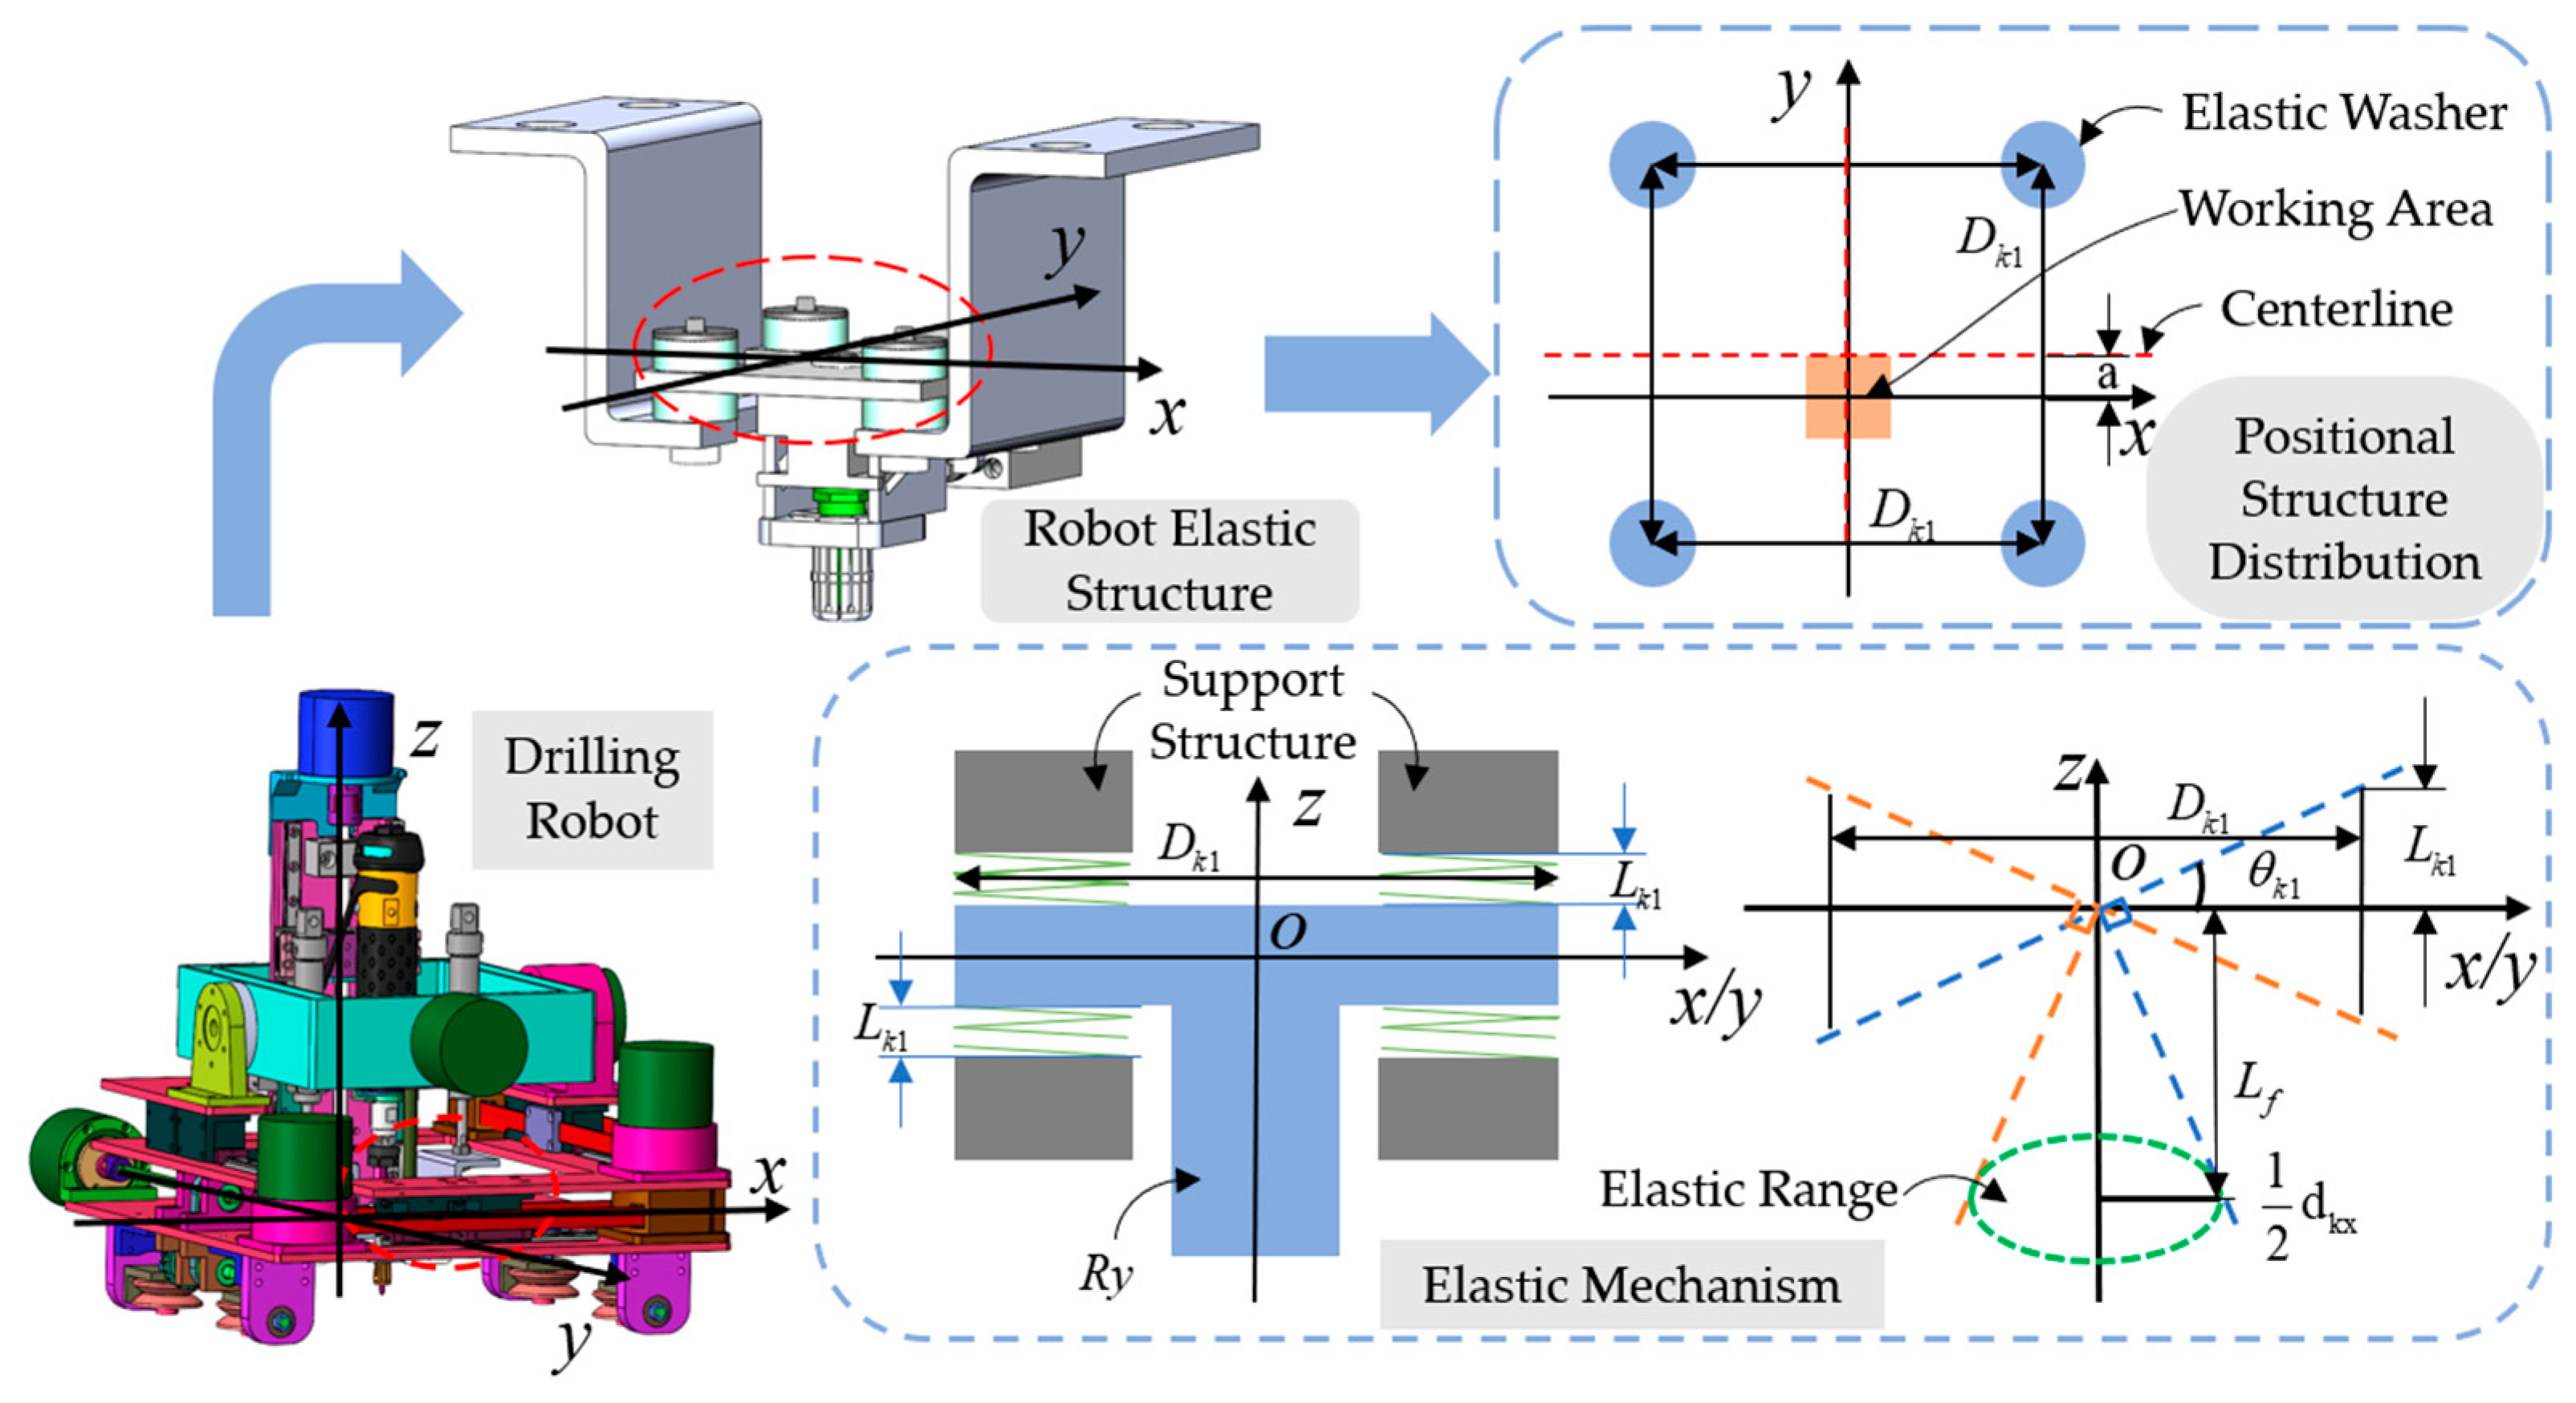
The drilling solution utilizes an expansion sleeve at the drilling end, which is inserted into a base sleeve to establish a rigid connection between the robot and the guide rail, ensuring high stiffness during machining. A floating mechanism guarantees precise engagement of the expansion sleeve into the base sleeve of the guide rail. The elastic range of the floating mechanism is derived from the robot’s geometric features. Mounted at the spindle end, this mechanism allows micro-motion along the z-axis, as well as rotation about the x- and y-axes. The elastic ranges in the x, y, and z directions are illustrated in Figure 16. The dash lines in the figure denote the maximum yaw position acceptable for the robot end-effector, which helps visualize the motion range of the robot end-effector more intuitively.
Deformation primarily occurs at four elastic washers, which displace the operational zone. The analysis treats these displacements as projections: individual directional displacements in the x-z plane, plus those in the y-z plane, are summed to determine the total position achievable by the robot’s end expansion sleeve. The analysis follows these steps:
(1)
In the x-z plane:
d k 1 = 2 L f tan θ k 1 = 4 L f L k 1 D k 1
L x 1 = ± 1 2 L k 1 L z 1 = ± 1 2 d k 1 = ± 2 L f L k 1 D k 1
where L x 1 , L z 1 are fluctuation values of the elastic structure along the x and z axes.
(2)
In the y-z plane:
The calculated elastic range from the schematic represents values at the centerline. Since the operational zone deviates from the centerline in the y-z plane but correlates by ratio 2 a / D k , multiply centerline values by this coefficient.
L z 1 = ± 1 2 L k 1 2 a D k = ± a L k 1 D k 1 L y 1 = ± 1 2 d k 1 2 a D k = ± 4 a L f L k 1 D k 1 2
where L y 1 , L z 1 are fluctuation values of the elastic structure along the y and z axes.
This analysis shows the floating mechanism releases multiple target positions in different directions, forming a multi-axis elastic range for the front-end actuator. Calculations reveal differing z-axis displacements in the y-z and x-z planes due to lost mutual constraints when considered separately. Since displacements exceeding the y-z plane z-axis range cannot occur in practice, the final elastic range is defined as:
L x 1 = ± 1 2 L k 1 L y 1 = ± 1 2 d k 1 2 a D k = ± 4 a L f L k 1 D k 1 2 L z 1 = ± 1 2 L k 1 2 a D k = ± a L k 1 D k 1
Symbol definitions identical to above.
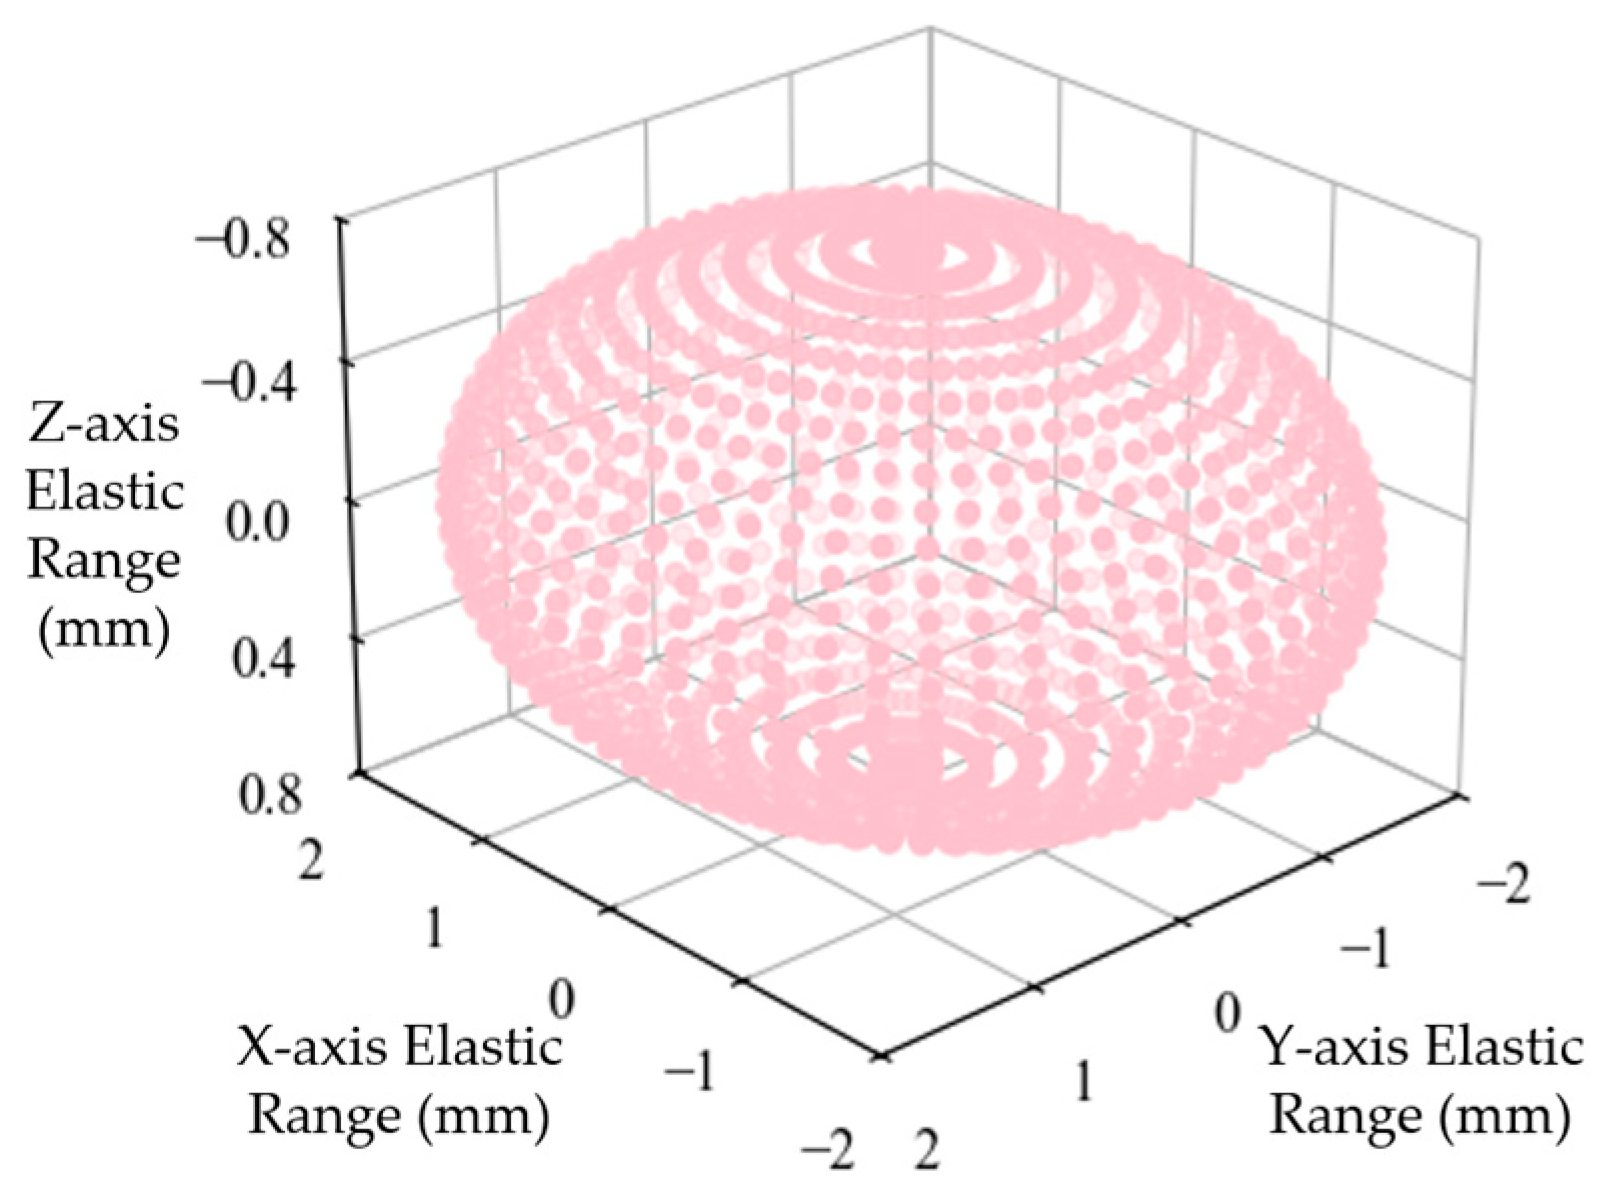
The engagement-compatible elastic range of the end expansion mechanism was plotted (Figure 17) by inputting calculated formulas into software with L f = 40 mm,   L k 1 = 5 mm, D k 1 = 54 mm, a = 8 mm. The posture adjustment mechanism’s error is <0.2 mm in all directions, while the end-effector’s elastic range exceeds 0.2 mm in all directions. Thus, this floating spindle ensures stable robot engagement.

6. Control System Assembly

6.1. Integrated Control System Design

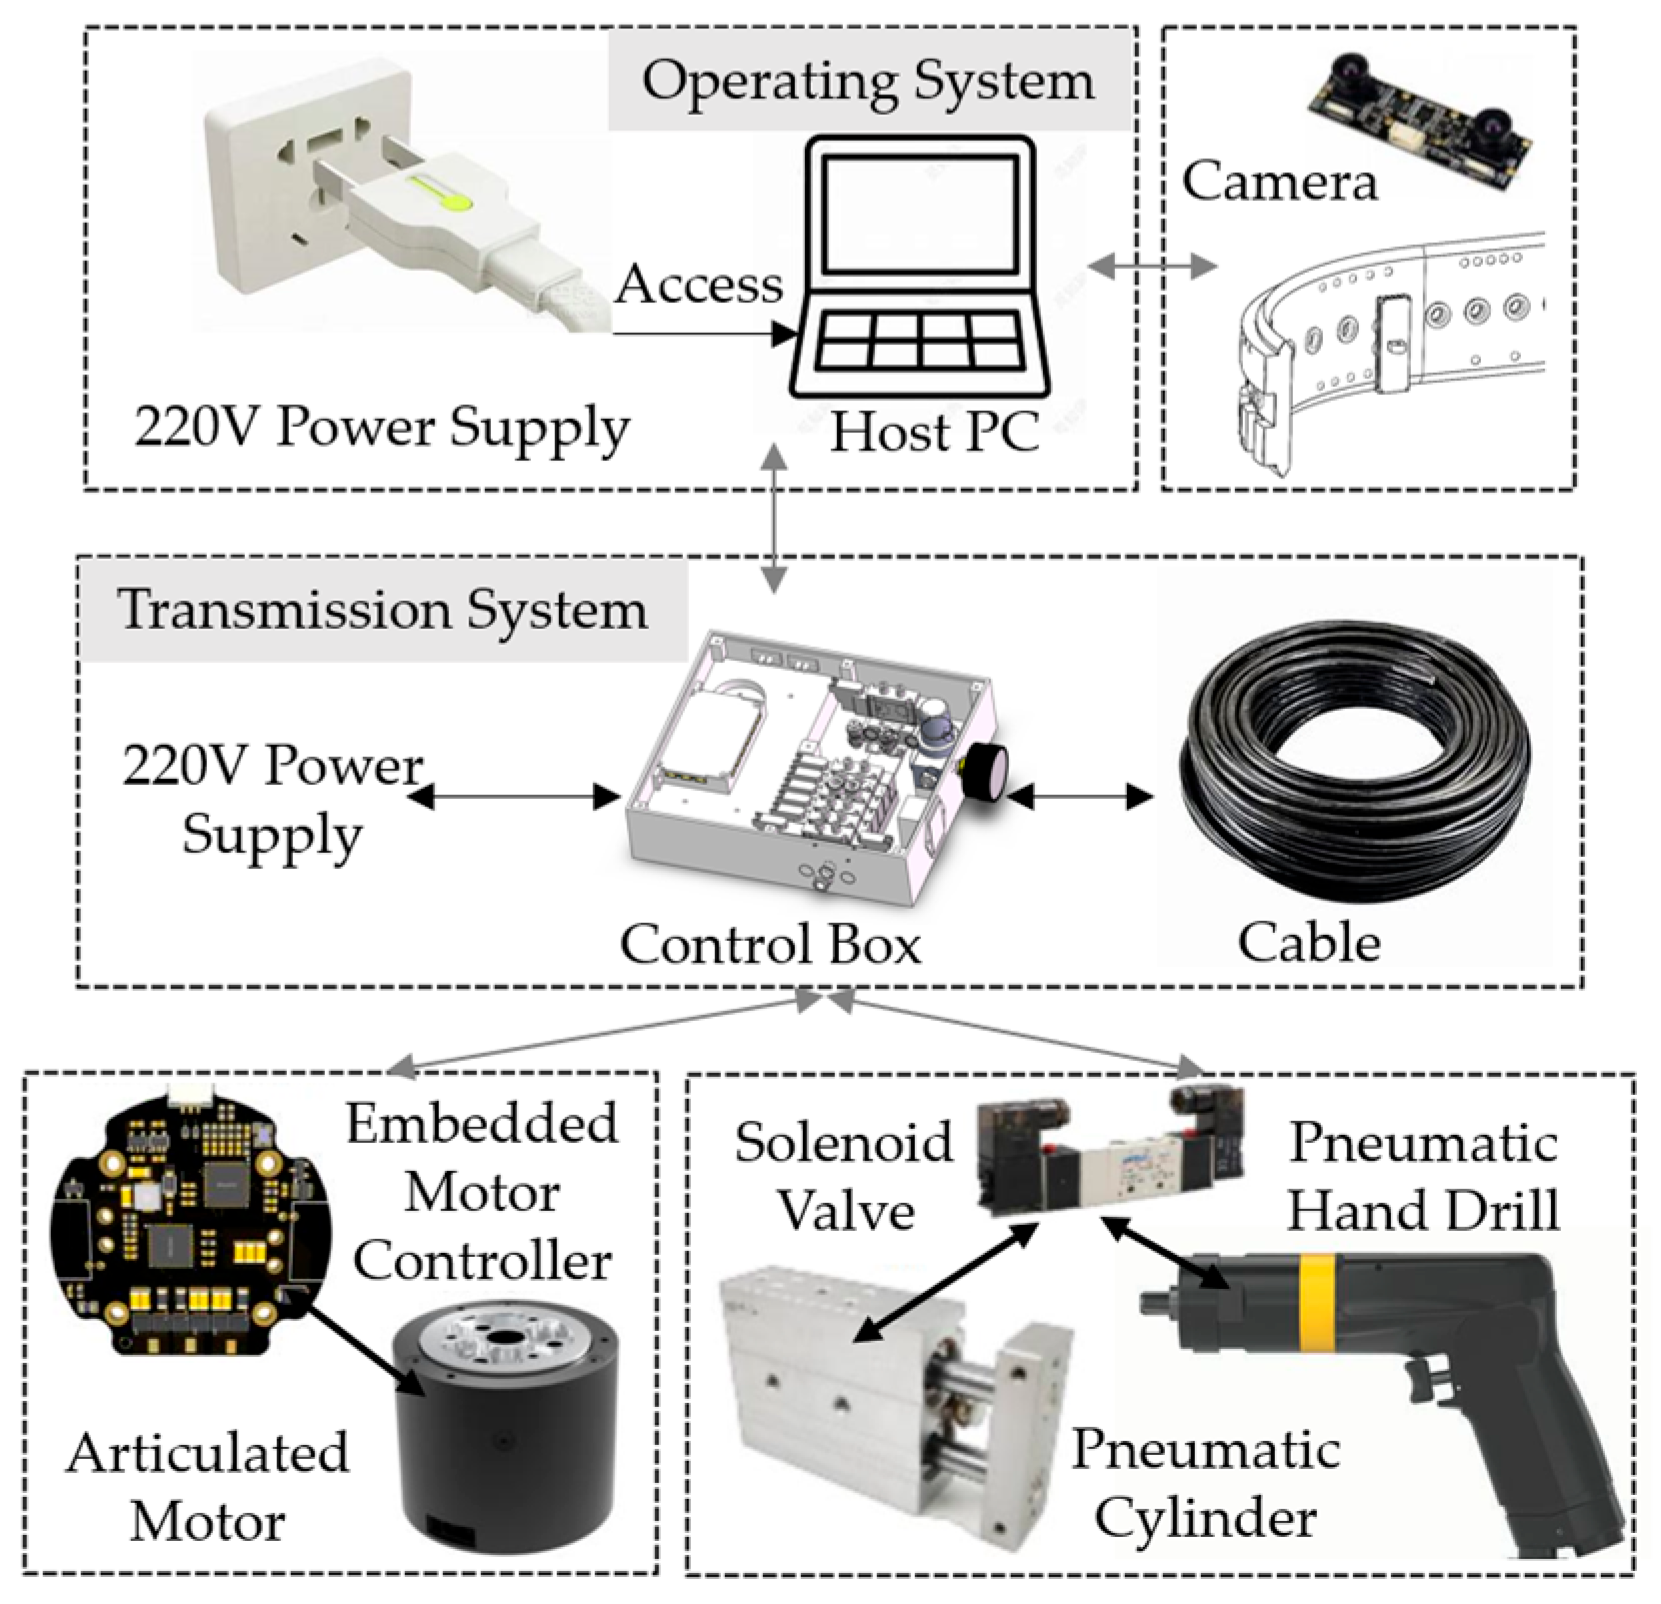
The drilling control system primarily manages pneumatic cylinders, pneumatic spindles, motors, and binocular vision modules. APC host sends control commands to an electrical control box, which interprets the instructions and actuates solenoid valves, forwarding motor commands via bus to dedicated motor controllers. These controllers execute closed-loop motor control using embedded code. The vision module directly interfaces with the PC host, processing image data to identify deviations in the end-effector’s pose, which are then corrected by posture-adjustment motors.
The control system prioritizes miniaturization while maintaining full functionality. Traditional robot control cabinets housing PLCs and pneumatic valves are replaced by a self-developed, compact control box that integrates power supplies, solenoid valves, and controllers. For motor control miniaturization, embedded motor drivers are combined with motors using a dual-connector design, enabling motor daisy-chaining. This significantly reduces the volume of the system and simplifies wiring. Additionally, a compact binocular vision module replaces conventional laser displacement sensors for normal direction detection. Algorithmic enhancements compensate for limitations in computational speed and accuracy (Figure 18).

6.2. Wall-Climbing Robot Control Flow Design

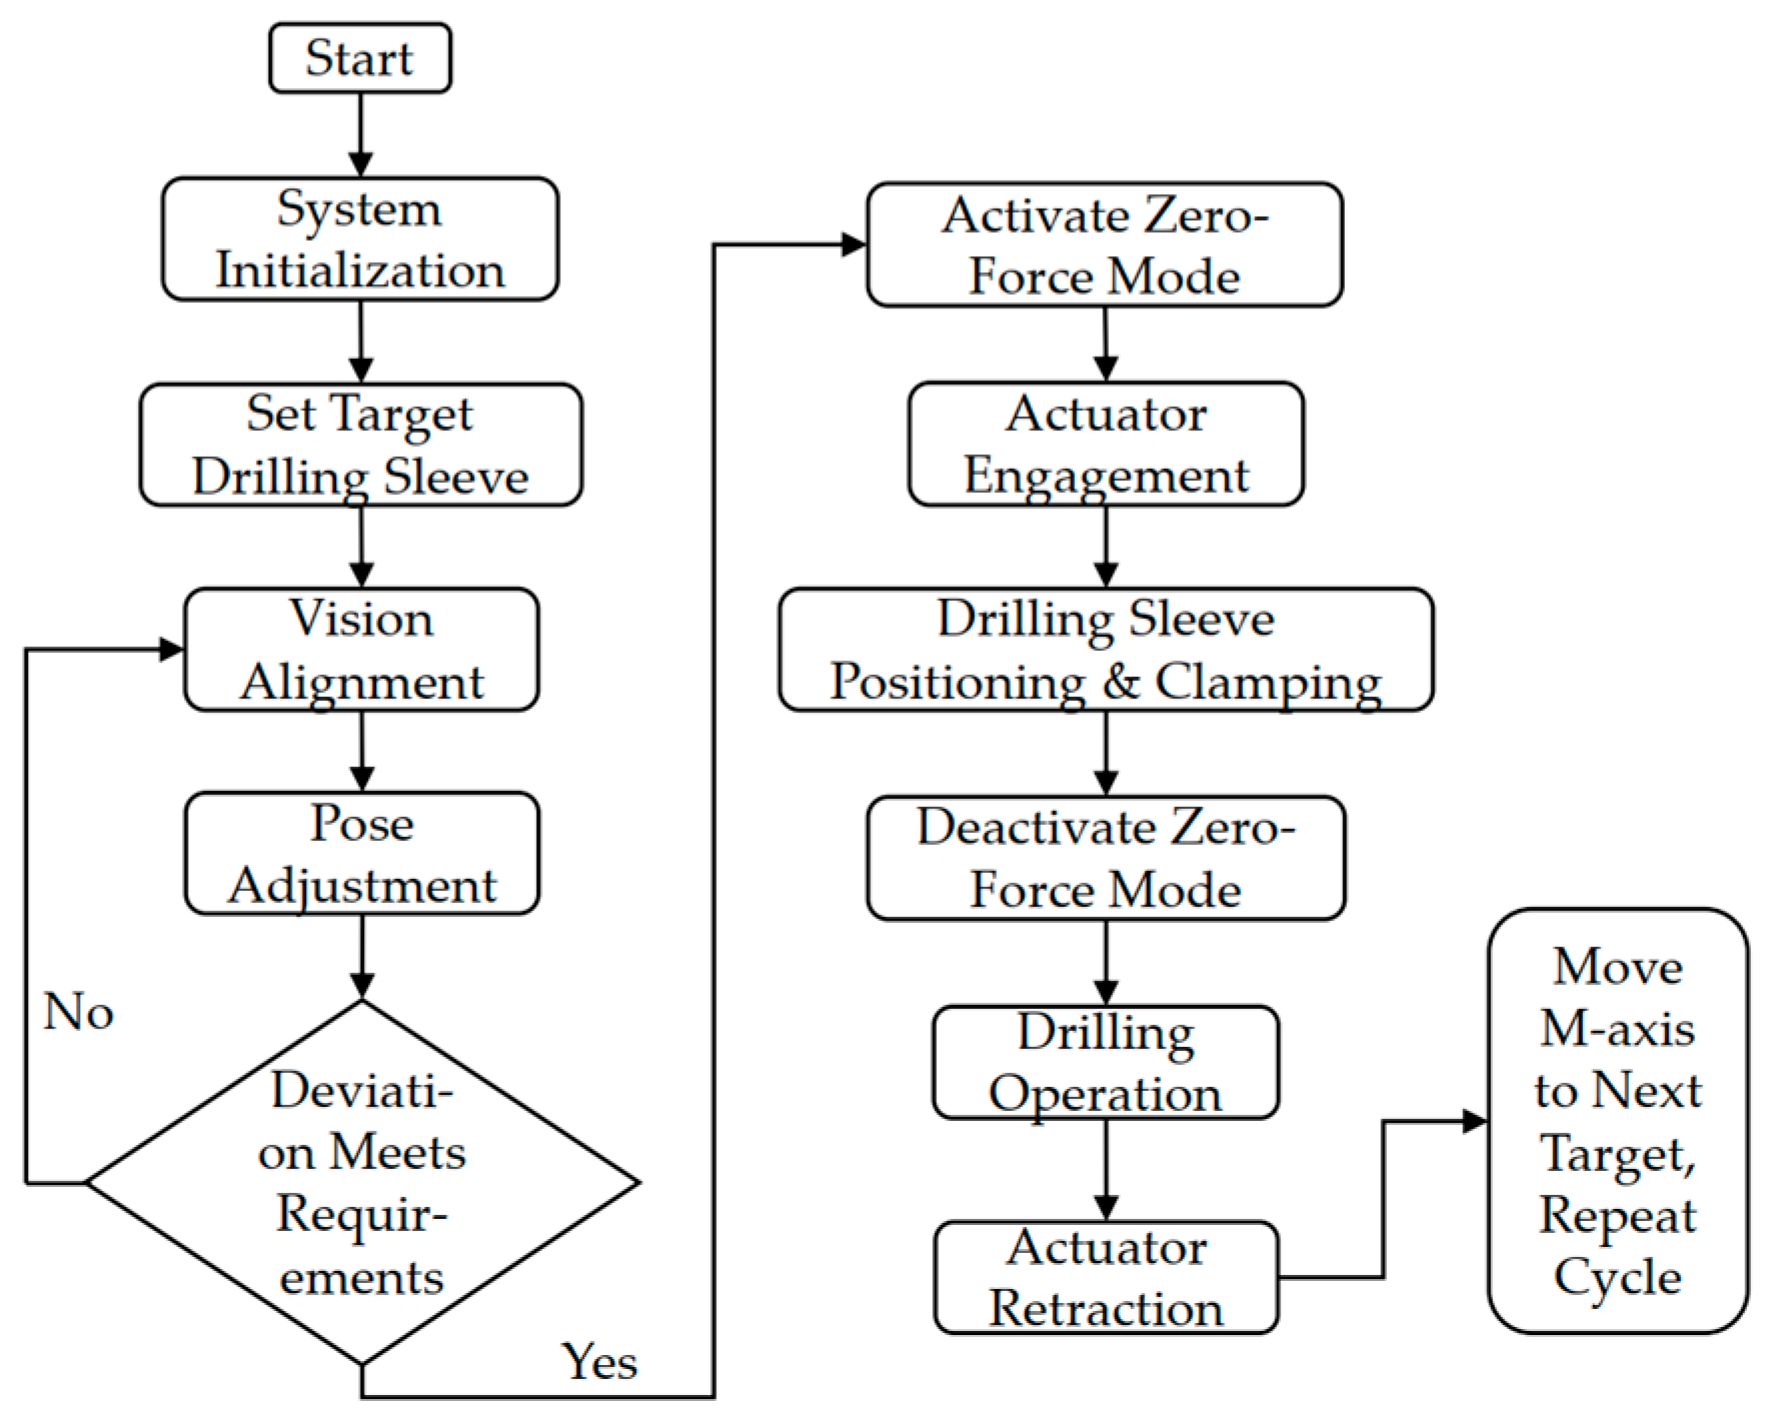
The automated drilling workflow for the drilling robot is illustrated in Figure 19. Upon power-on, the drilling sequence begins with vision recognition, followed by pose adjustment and feed drilling. For continuous operation, G-code programs loop single-drilling cycles based on the required hole count.

7. Compact Wall-Climbing Robot Experimental Tests

7.1. Traversability Verification Test

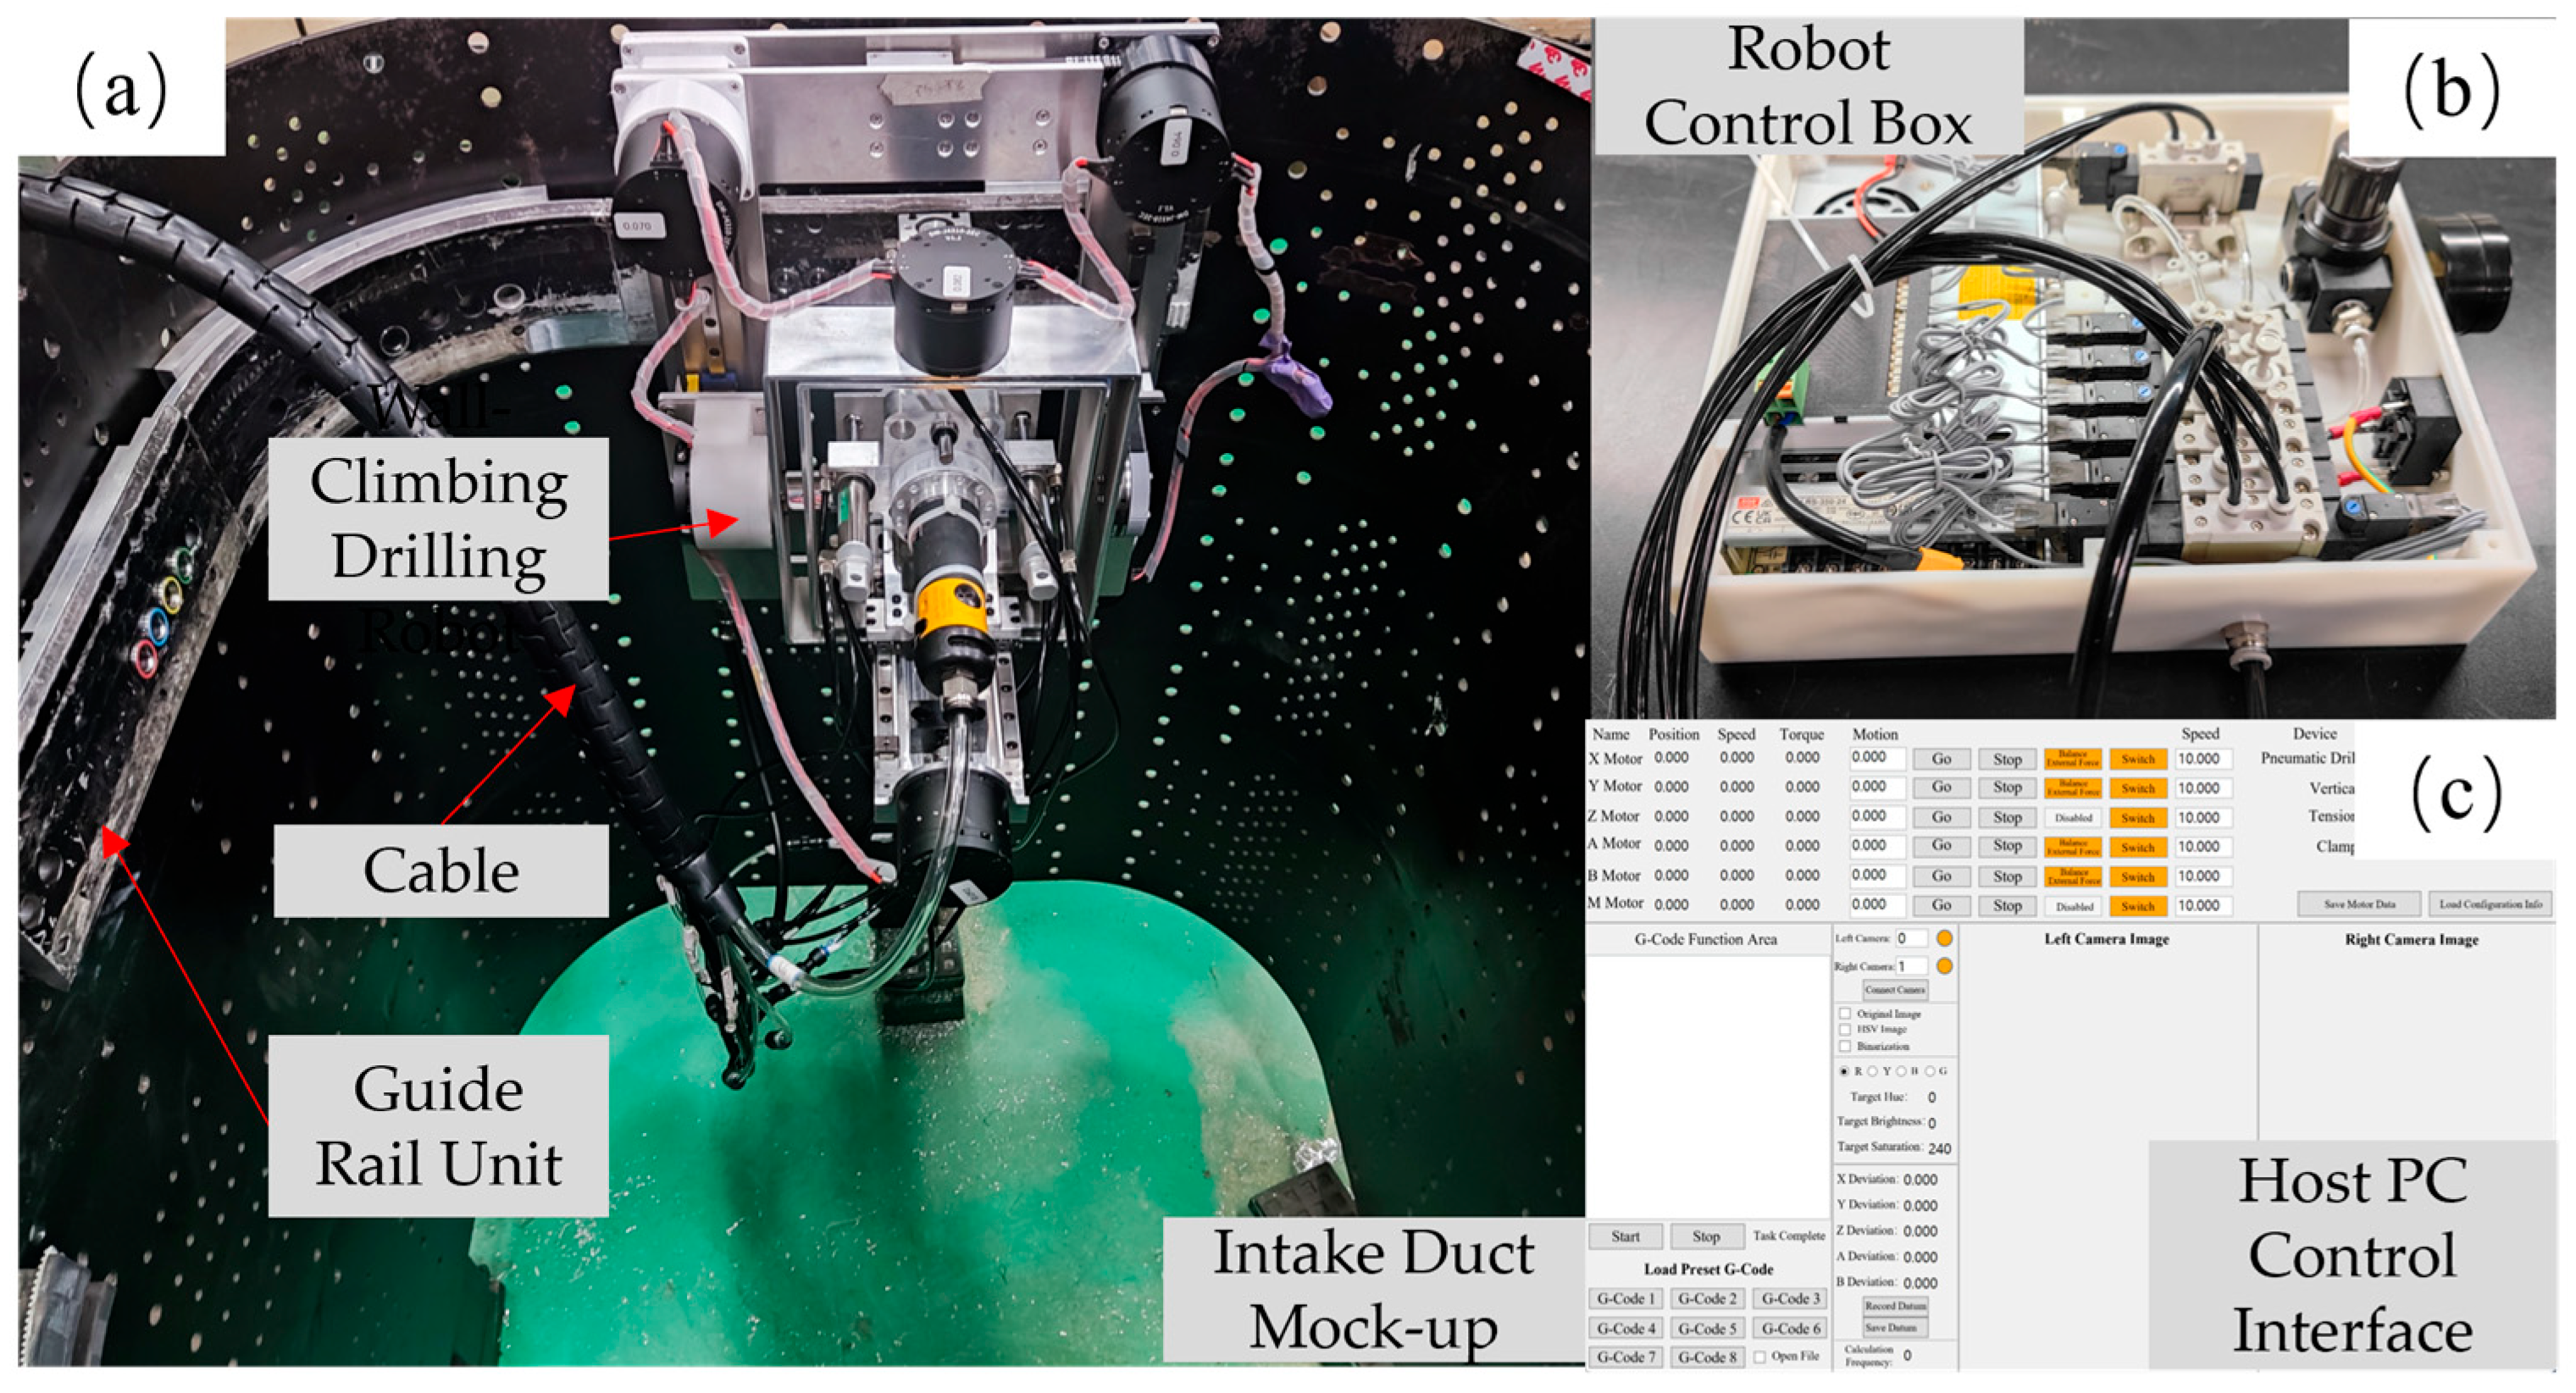
The system (Figure 20) includes: robot, guide rail unit, host PC, control box, and cables. Robot specifications in Table 3.
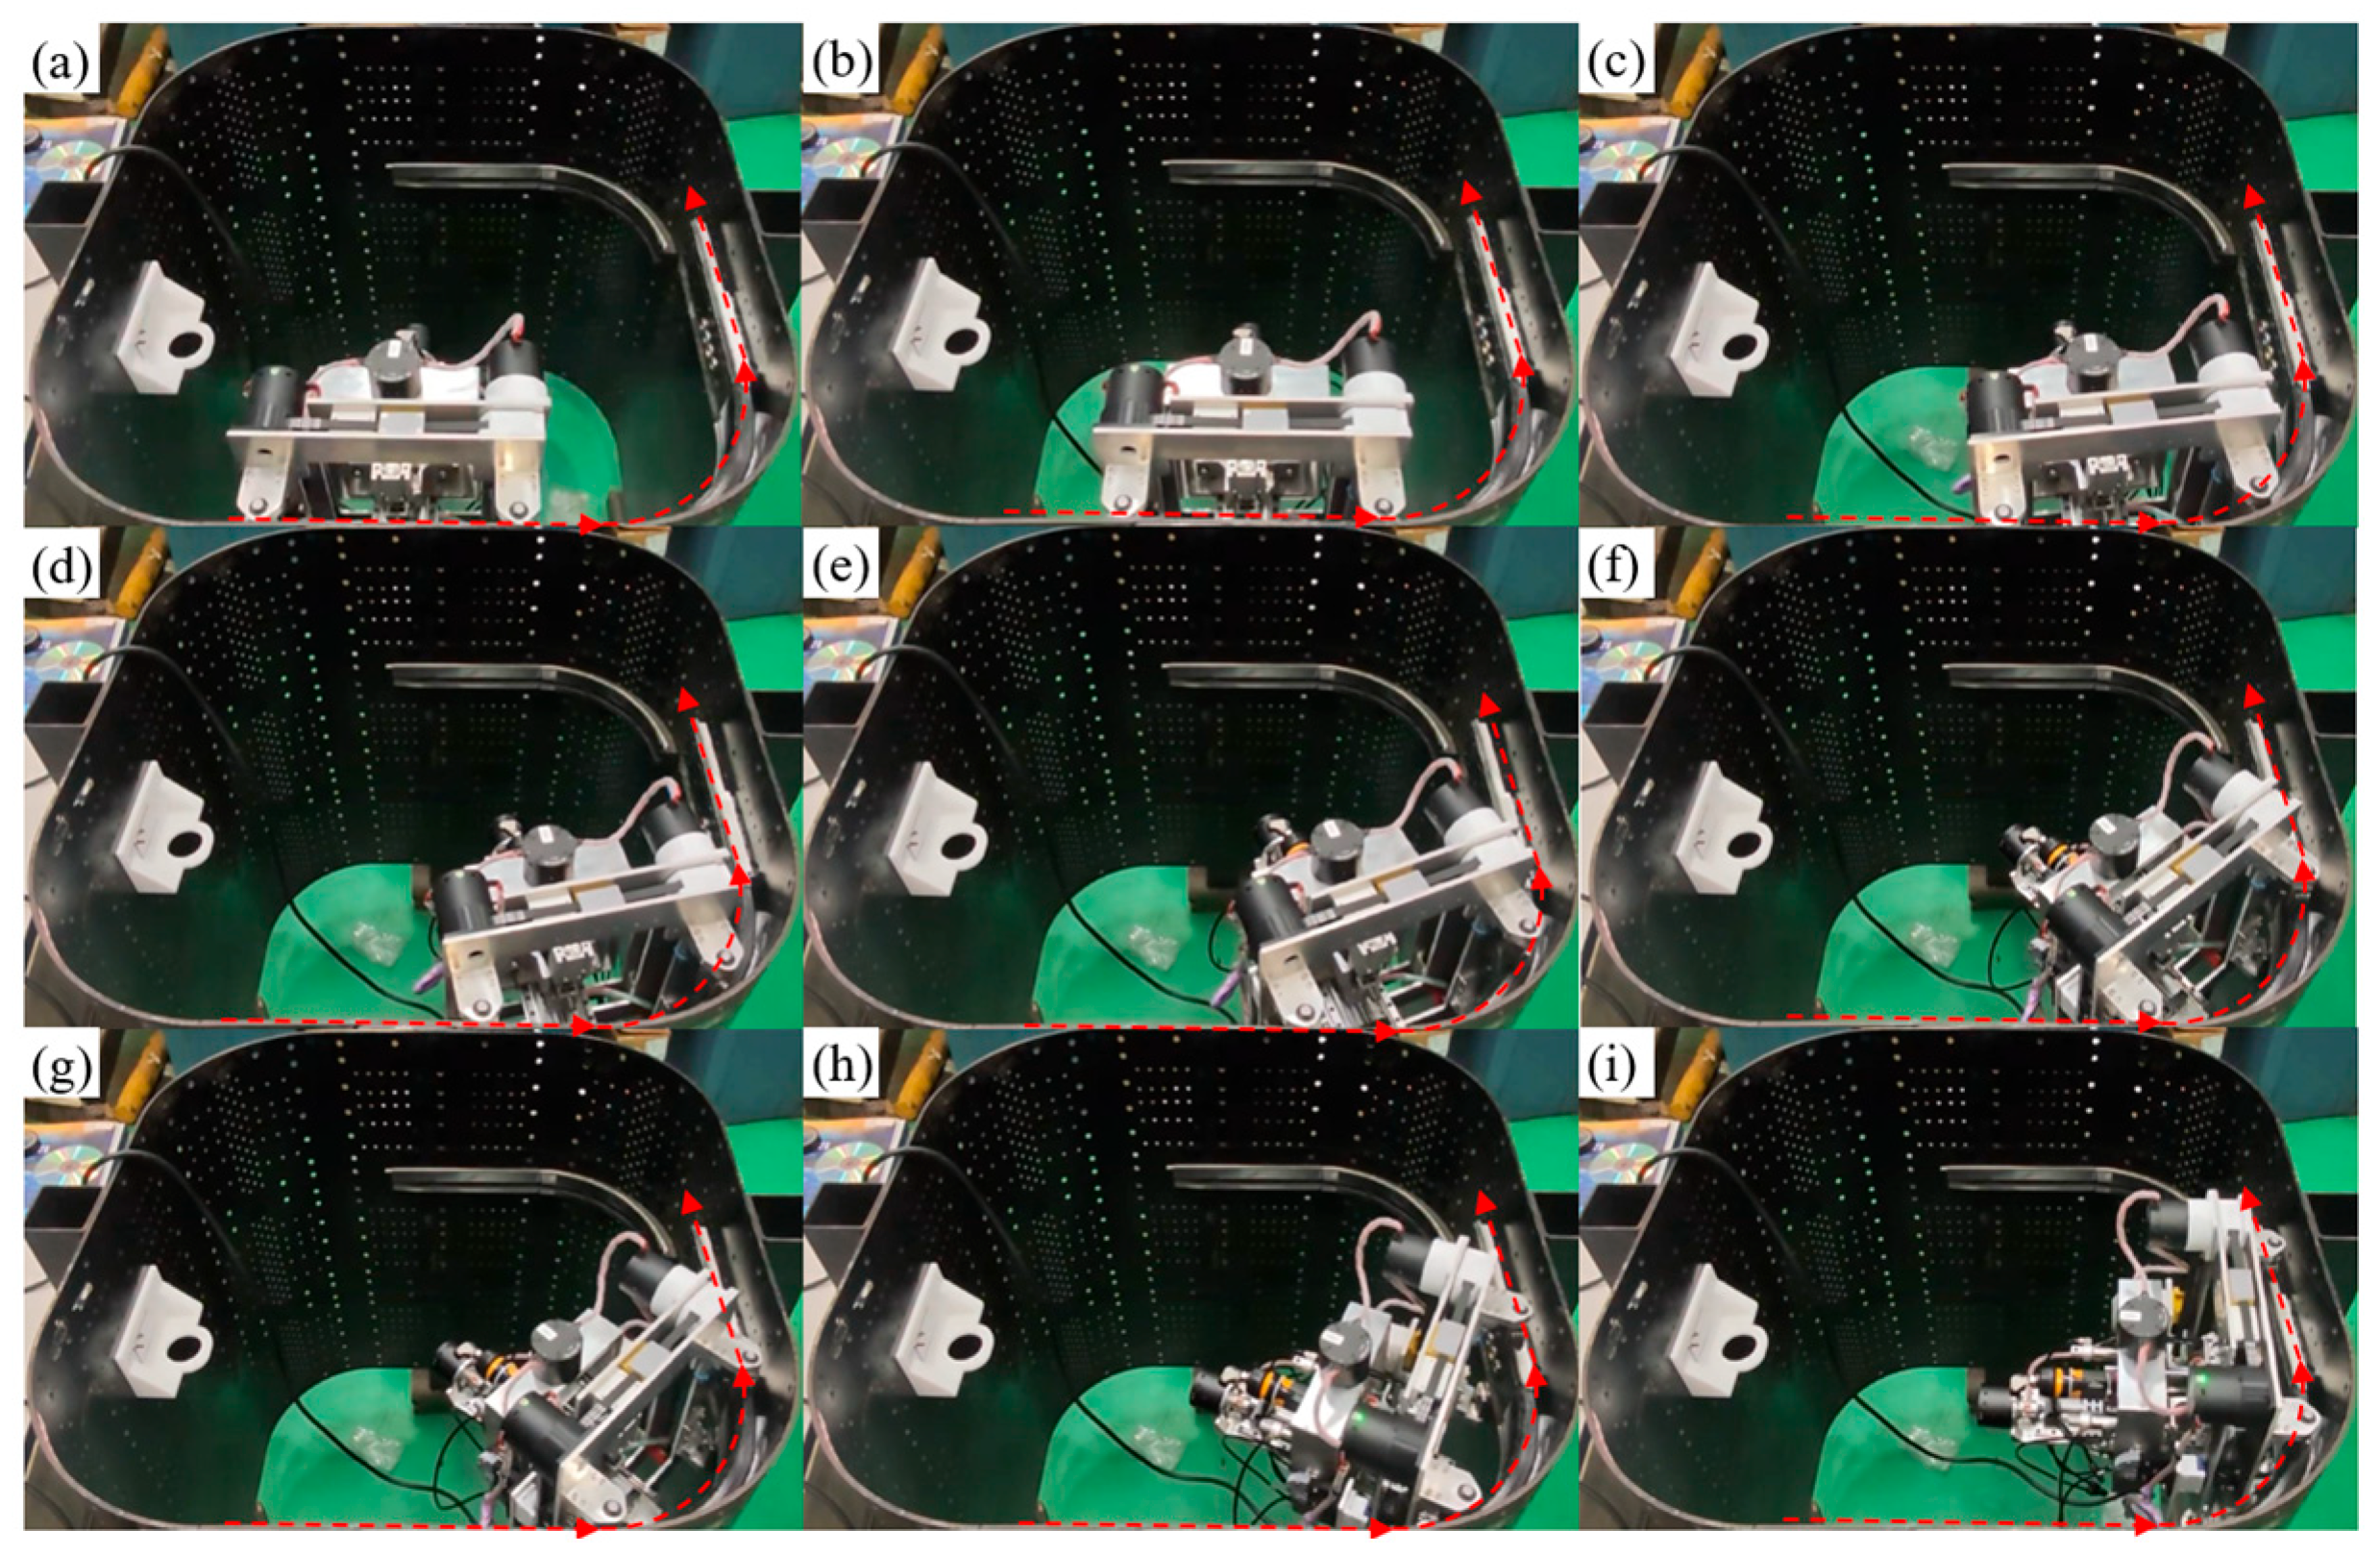
The tests were conducted on an air inlet mock-up measuring 3000 × 3000 × 6000 mm with an R200 mm fillet radius. During drilling operations in confined spaces like air inlets, the robot faces challenges in traversing large-curvature skins. The structural design of the robot must address this issue. In the traversability test, the robot was required to navigate R200 mm curvature skins. The arc section of the mock-up was designed with a 200 mm curvature radius. As shown in Figure 21, the robot successfully traversed the R200 mm curvature. The results confirm stable navigation at a R200 mm curvature, meeting the technical specifications.

7.2. Robot Drilling Capability

The drilling capability was evaluated based on hole diameter, positional accuracy, normal direction accuracy, and efficiency. The tests were performed using the air inlet mock-up, where panels were mounted via pre-drilled holes, and the robot drilled CFRP/7075 aluminum stacks. The parameters are specified in Table 4.
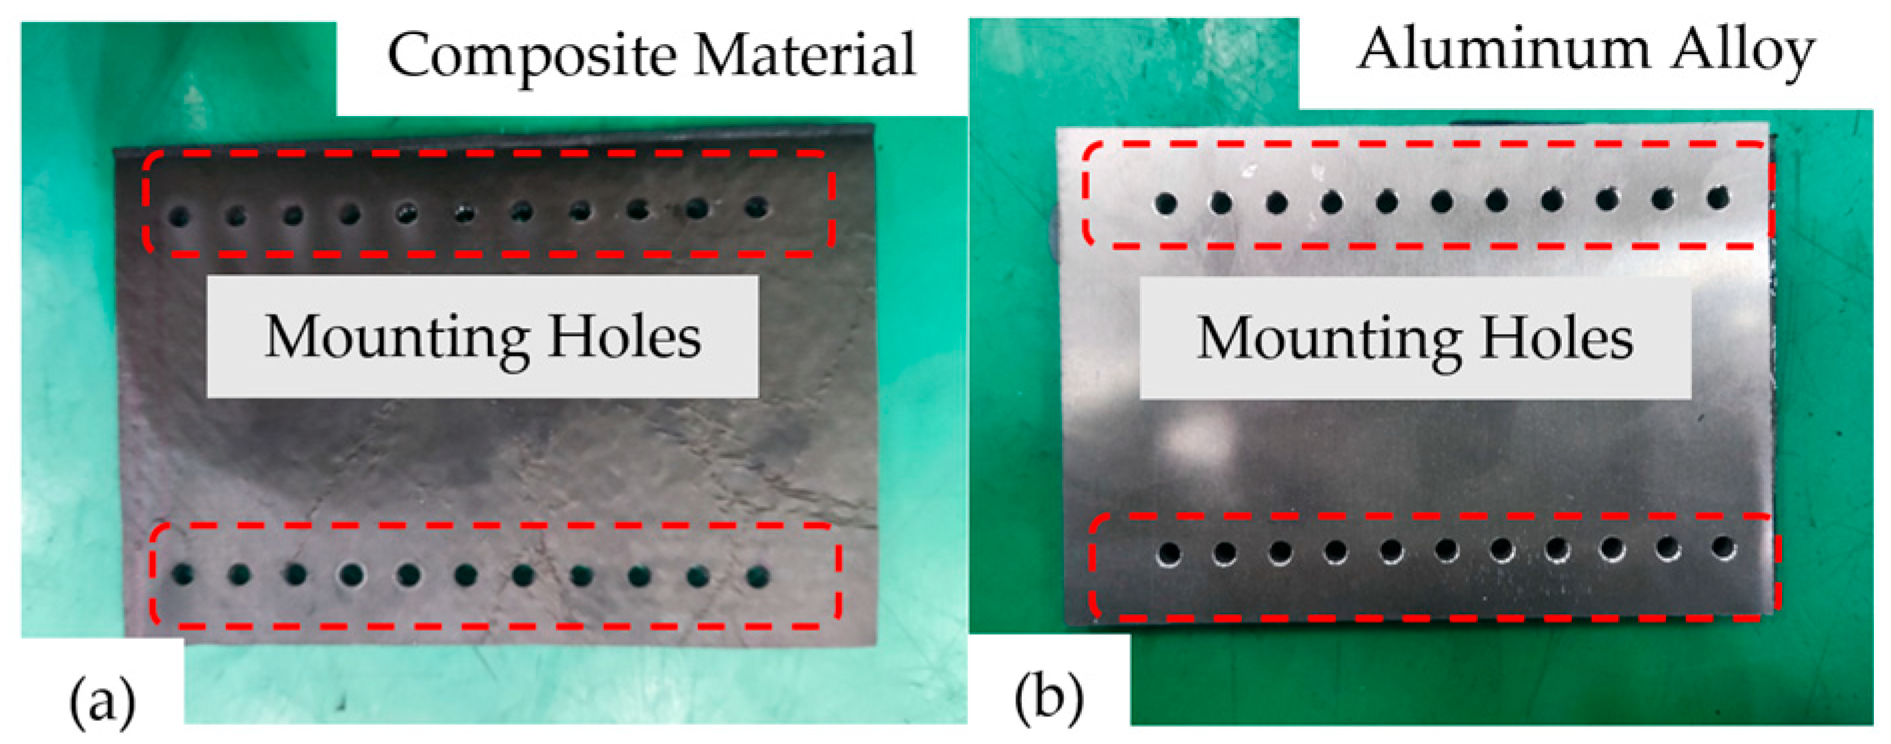
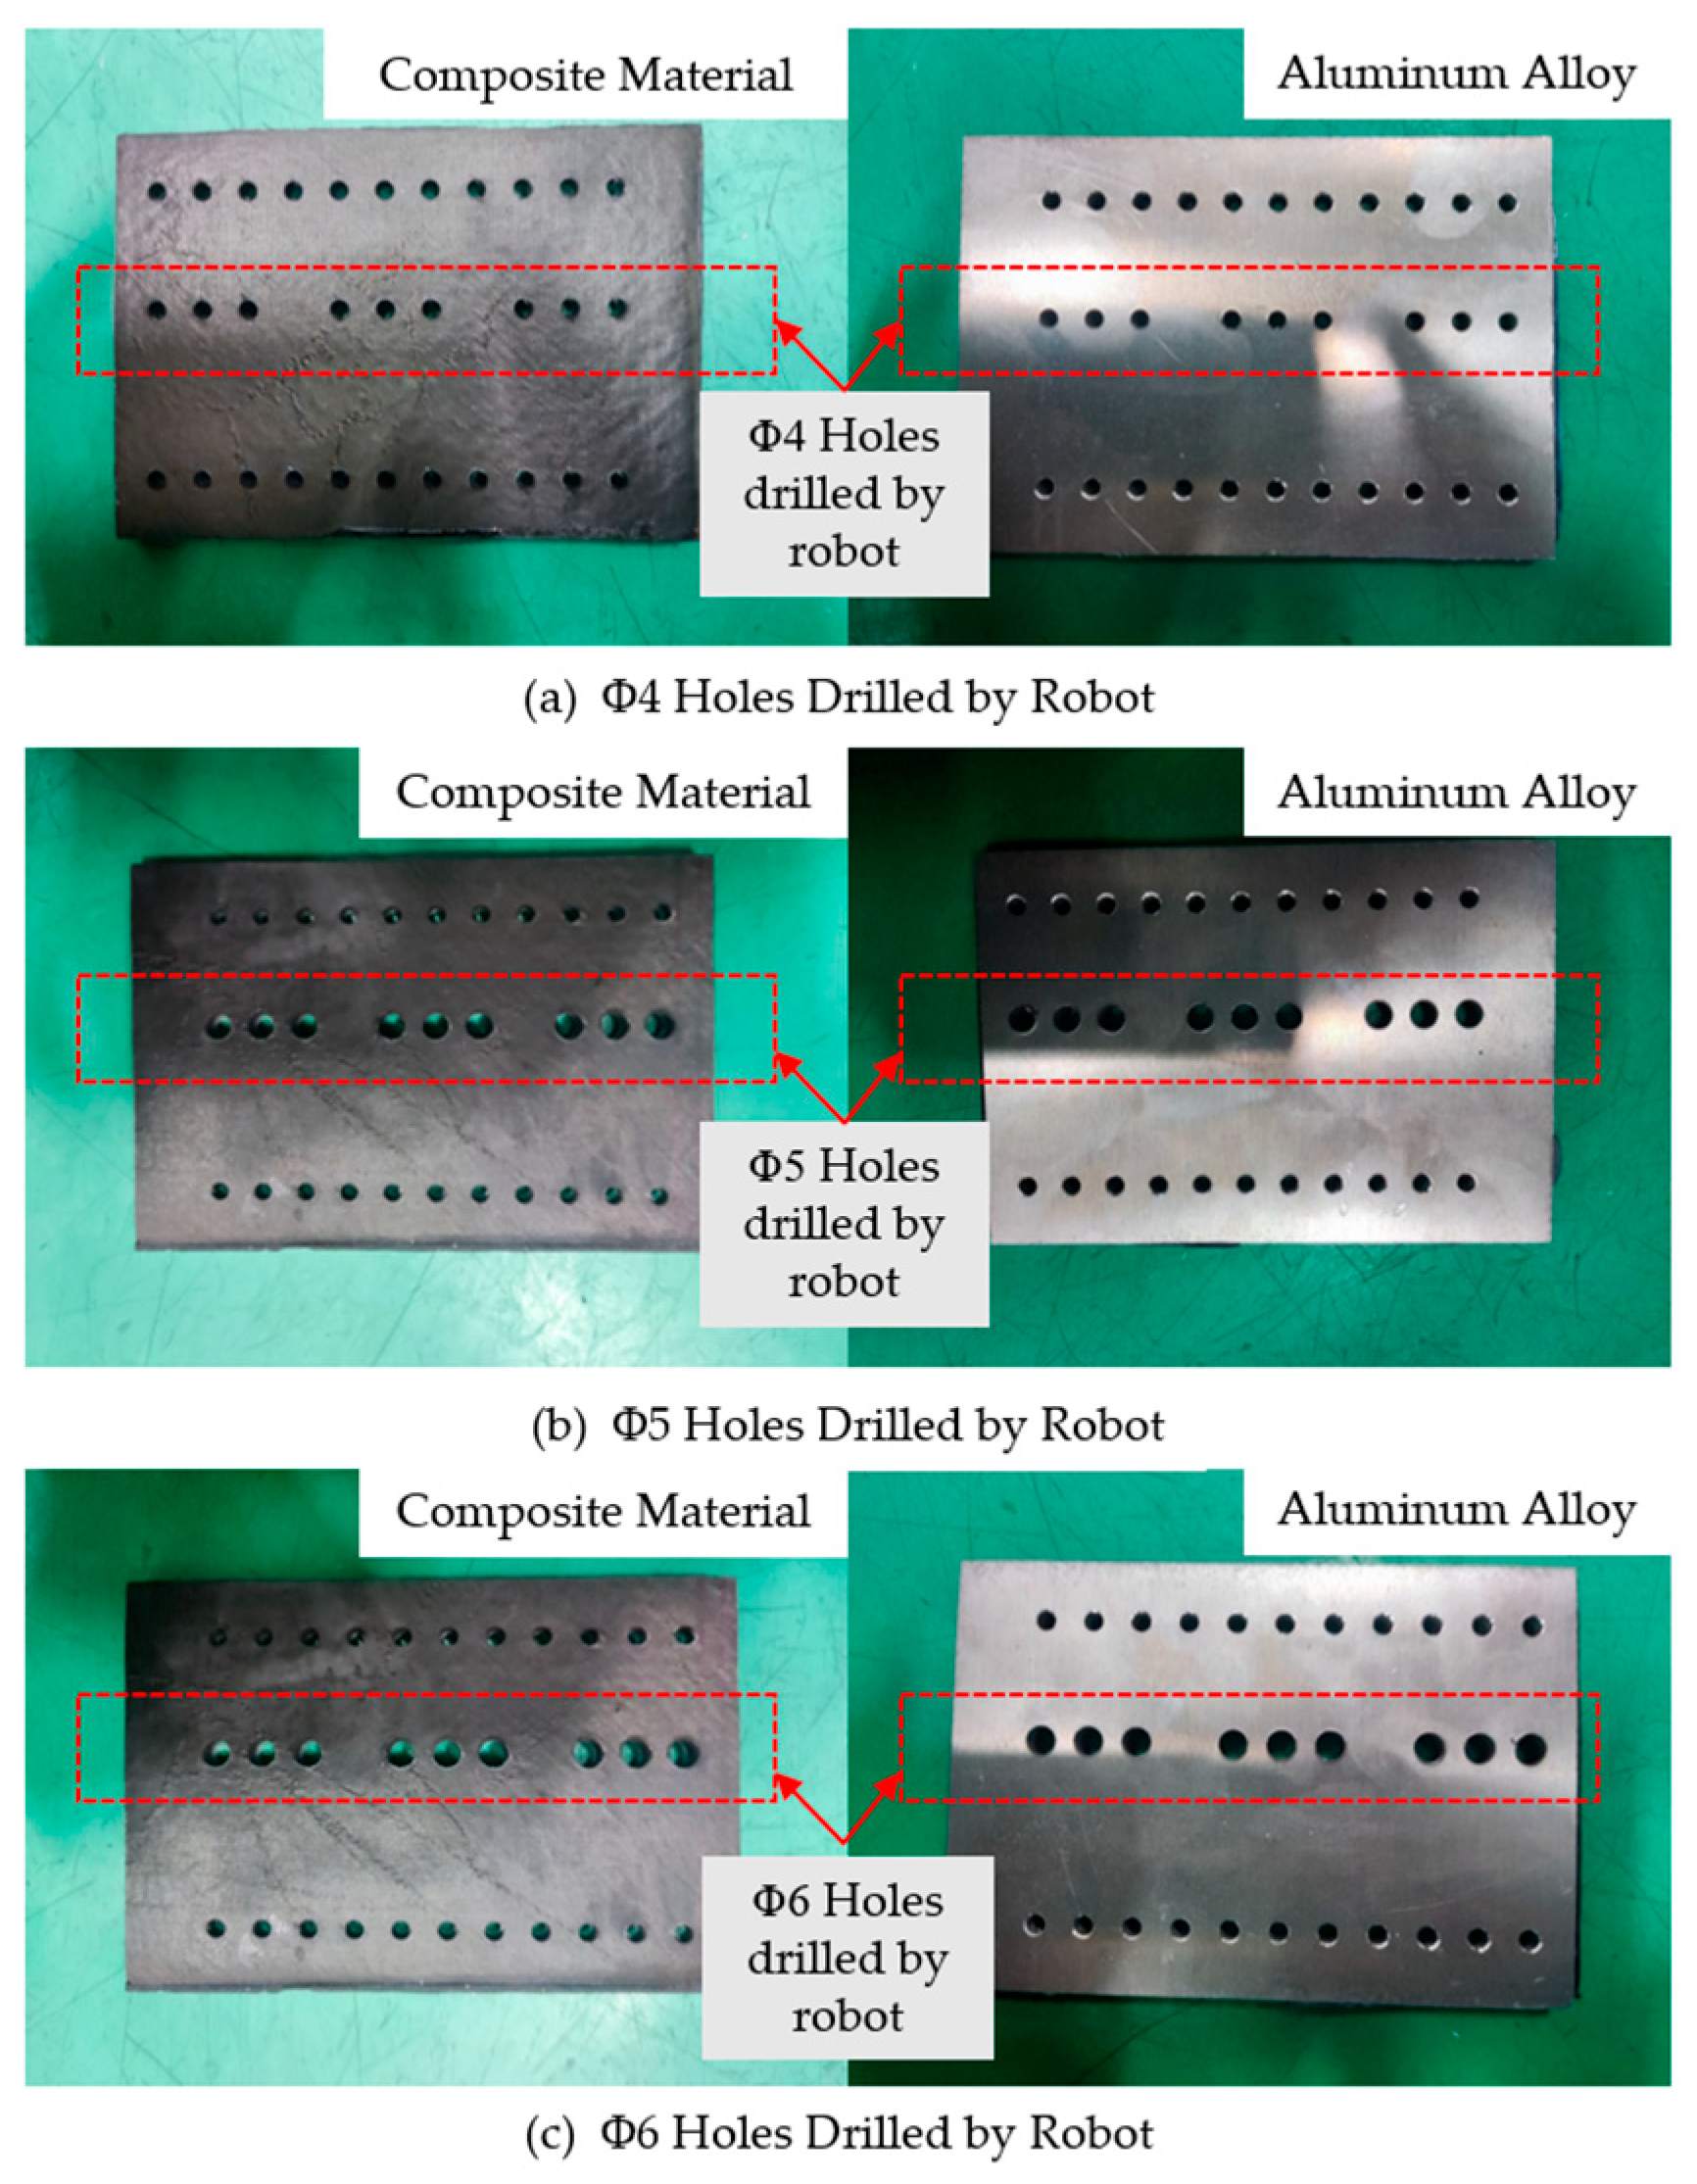
The robot drilled holes with diameters of 4.0 mm, 5.0 mm, and 6.0 mm in CFRP/7075 aluminum stacks, as shown in Figure 22. The aluminum and composite layers were bonded with epoxy, and the panels were mounted using pre-drilled holes. Multiple drilling operations were conducted by repositioning the panels, with different hole sizes achieved by replacing the panels. Twist drills were used for hole making. Drill parameters are detailed in Table 5.
Figure 23 shows the drilled panels: Figure 23a displays Φ4 mm holes, Figure 23b shows Φ5 mm holes, and Figure 23c presents Φ6 mm holes, with nine holes per row in each case. The total drilling time was measured using a stopwatch for each drilling cycle. The total process time was recorded to calculate the drilling efficiency.
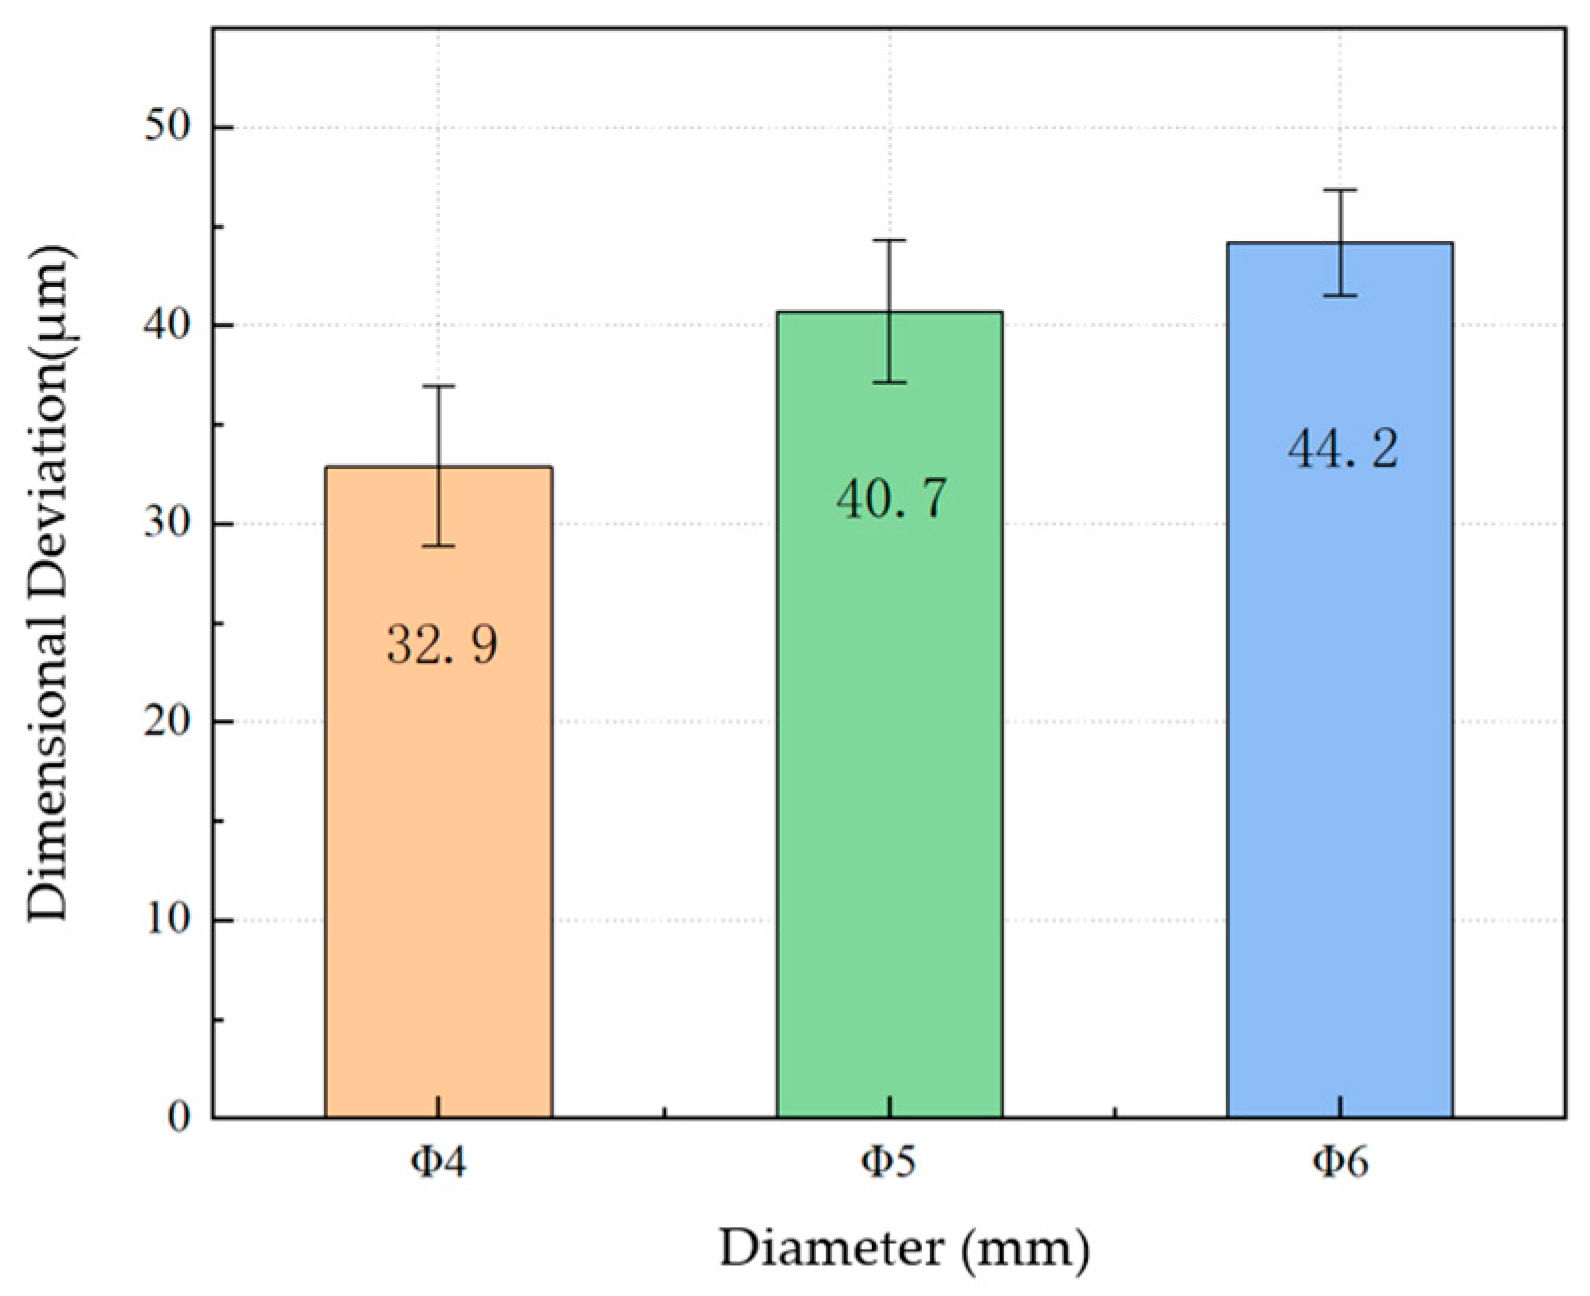
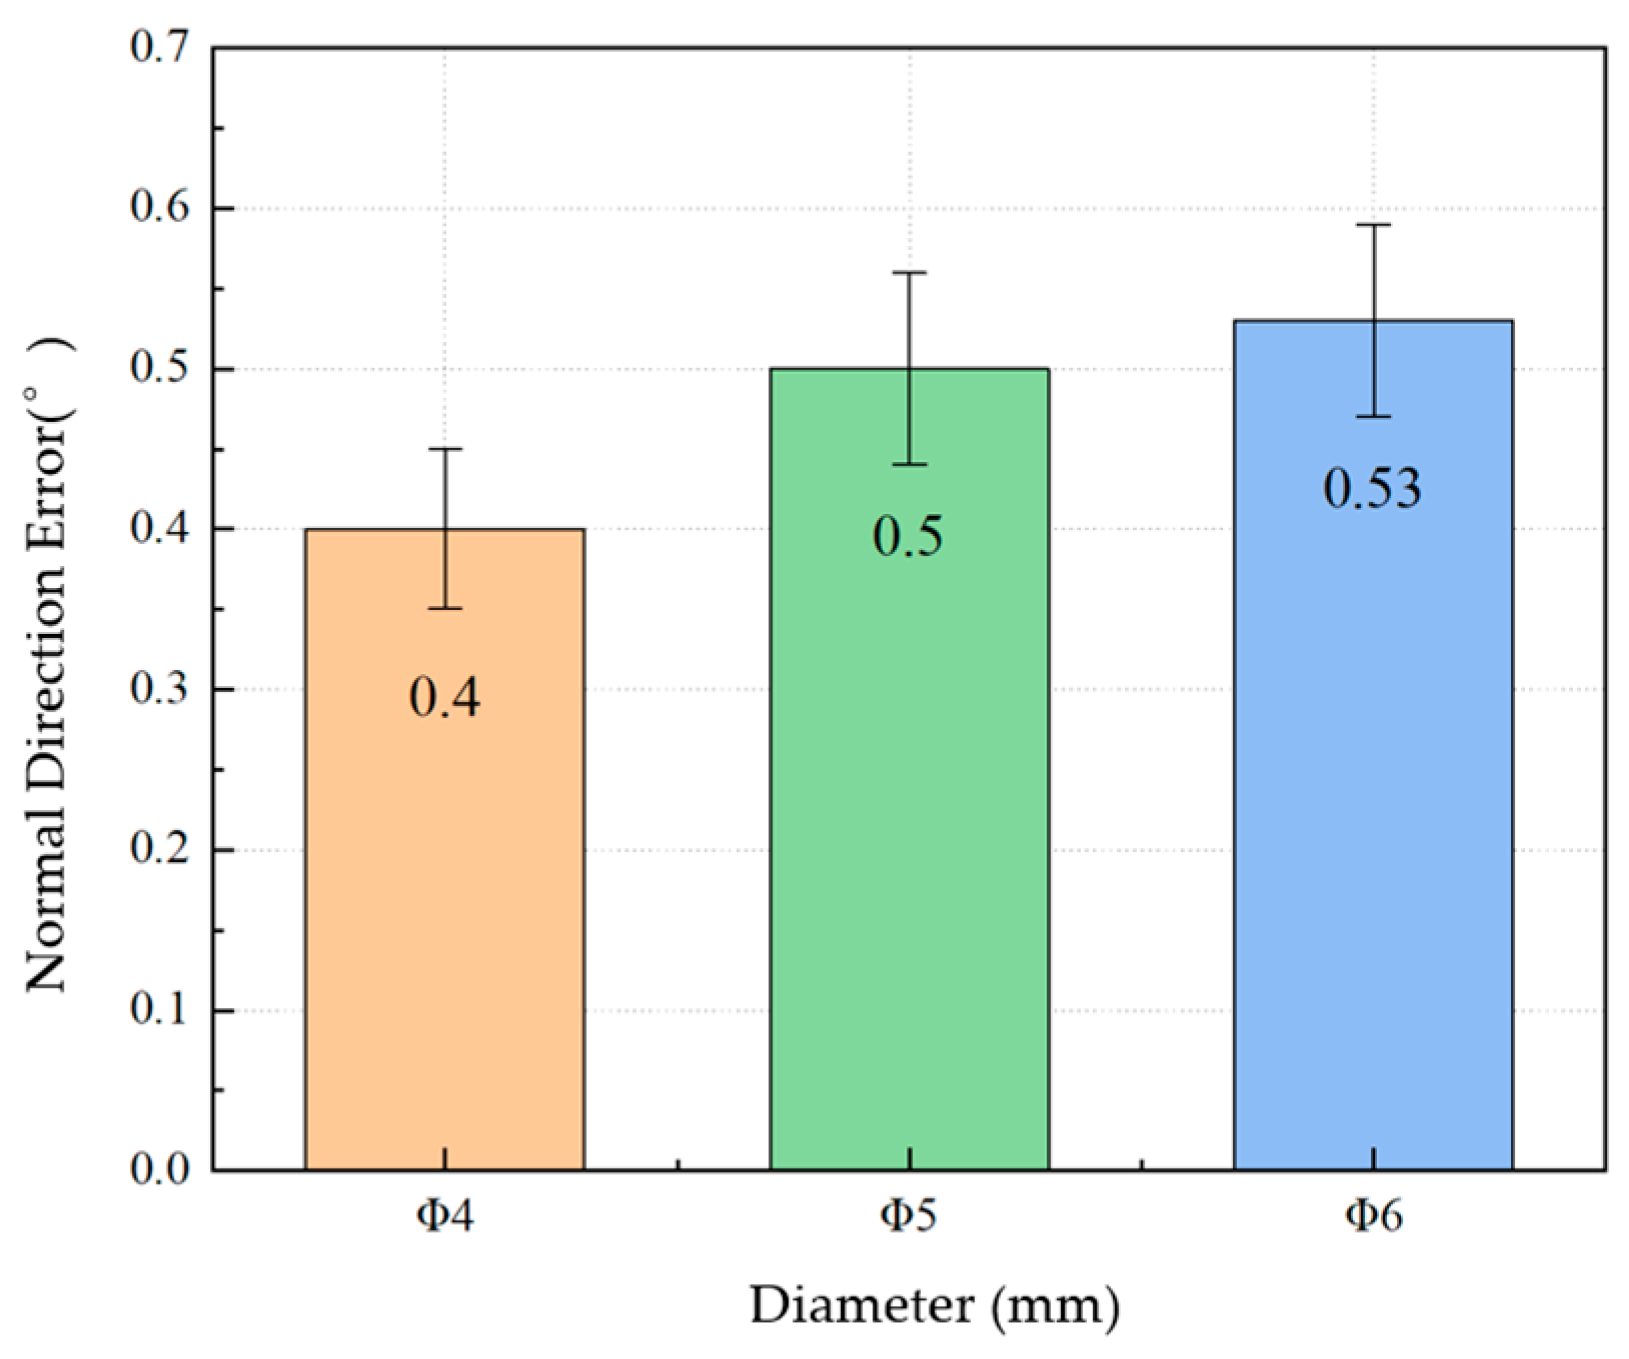
The robot achieved an average drilling efficiency of 2.1 holes per minute. The drilled holes were inspected using a Coordinate Measuring Machine, as shown in Figure 24. A set of 30 holes was drilled for each diameter category. The size and normal direction deviations of all holes were recorded, and the results are presented in Figure 25 and Figure 26.
Hole diameter deviations increased with larger hole sizes: Φ4 mm holes showed deviations of 0.026–0.042 mm, Φ5 mm holes showed deviations of 0.035–0.046 mm, and Φ6 mm holes showed deviations of 0.039–0.048 mm. This increase is due to the rise in axial drilling forces with the hole diameter, while robot stiffness remains constant, adversely affecting hole quality. Normal direction errors were consistent across all hole sizes, with all values ≤ 1°.
Considering the integration of the robot’s overall structural design and the drilling outcomes, the closed-loop force transmission design adopted in the robot structure significantly enhances system stiffness and suppresses chatter, ensuring minimal dimensional deviation of the drilled holes—less than 0.05 mm. The floating mechanism at the spindle end provides multi-directional elastic tolerance, compensating for pose deviations during the robot’s entry into the sleeve and ensuring precise alignment of the drill bit into the guide mechanism, thereby achieving low normal direction errors (<0.65°). Furthermore, the modularly integrated posture adjustment, vision recognition, and control units enable real-time feedback and pose correction, ensuring repeatable accuracy and operational efficiency (2.1 holes/min) throughout the drilling process. In summary, the achieved dimensional accuracy and high normal precision are direct results of the coordinated design that emphasizes compactness, curvature adaptability, high-stiffness closed-loop structure, and intelligent control.

8. Conclusions

This study proposes a compact drilling robot designed for automated high-precision drilling of complex large-curvature skins, such as those found in aircraft air inlets. The key innovations and conclusions of this paper are summarized as follows:
(1)
Compact Design: The developed compact drilling robot, with overall dimensions less than 400 × 400 × 400 mm and a mass under 15 kg, successfully addresses the challenges of spatial accessibility faced by existing industrial robots and traditional drilling equipment.
(2)
Large-Curvature Surface Adaptive Mobility: The robot achieves large-curvature surface adaptive mobility through the design of novel actively driven wheels and passive V-grooved guide wheels. Precise calculation of wheel parameters, such as a V-groove angle of 70° and a wheel diameter of 20 mm, enables stable traversal and precise positioning on skins with a minimum curvature radius of R200 mm, overcoming the limitations of commercial drilling robots that are confined to low-curvature, open spaces.
(3)
High-Stiffness Precision Drilling Mechanism: The robot’s high-stiffness precision drilling mechanism, verified through experiments, incorporates a floating spindle mechanism that provides an elastic movement range of 0.2 mm in all directions. This ensures that the drill bit enters the guide mechanism with high precision. As a result, closed-loop force transmission between the twist drill and the guide rail is achieved, significantly enhancing machining stiffness and chatter resistance during the drilling process.
(4)
Experimental Validation: Experimental results demonstrate the robot’s ability to traverse skins with an R200 mm curvature and perform automated drilling of Φ4–Φ6 mm fastener holes in CFRP/7075 aluminum stacks. The dimensional accuracy of the drilled holes was maintained, with size errors of less than 0.05 mm, and normal direction errors of less than 0.65°, meeting the design requirements. The average drilling rate was 2.1 holes per minute, indicating the robot’s satisfactory performance in terms of drilling efficiency.
(5)
In the future, we will focus on two key directions: first, developing an intelligent drilling system with autonomous path planning and real-time parameter optimization to enhance intelligence and autonomy; second, conducting long-term reliability tests and exploring multi-robot collaborative operation modes for large-scale components, thereby promoting the engineering application of this technology in automated assembly of complex aerospace structures.

Author Contributions

Conceptualization, D.G. and S.R.; methodology, S.R. and D.G.; software, X.L.; validation, H.X., S.R. and Z.S.; formal analysis, S.R. and D.Z.; investigation, S.R. and J.F.; resources, S.R. and X.L.; data curation, S.R.; writing—original draft preparation, S.R.; writing—review and editing, S.R.; visualization, S.R.; supervision, X.L. All authors have read and agreed to the published version of the manuscript.

Funding

This work was supported by Natural Science Foundation of Beijing Municipality (No. Z230004), National Natural Science Foundation of China (52375399) and Aeronautical Science Foundation of China (2022Z045051001).

Institutional Review Board Statement

Not applicable.

Informed Consent Statement

Not applicable.

Data Availability Statement

The original contributions presented in the study are included in the article; further inquiries can be directed to the corresponding authors upon reasonable request.

Conflicts of Interest

Author Jianchao Fu was employed by the company AVIC Chengdu Aircraft Industrial (Group) Co., Ltd. The remaining authors declare that the research was conducted in the absence of any commercial or financial relationships that could be construed as a potential conflict of interest.

References

  1. Mei, Z.; Maropoulos, P.G. Review of the application of flexible, measurement-assisted assembly technology in aircraft manufacturing. Proc. Inst. Mech. Eng. Part B J. Eng. Manuf. 2014, 228, 1185–1197. [Google Scholar] [CrossRef]
  2. Duan, J.; Zhuang, L.; Zhang, Q.; Zhou, Y.; Qin, J. Multimodal perception-fusion-control and human–robot collaboration in manufacturing: A review. Int. J. Adv. Manuf. Technol. 2024, 132, 1071–1093. [Google Scholar] [CrossRef]
  3. Tao, C.; Li, C.; Hui, X.; Zhu, Z.; Wang, G. A review of digital twin intelligent assembly technology and application for complex mechanical products. Int. J. Adv. Manuf. Technol. 2023, 127, 4013–4033. [Google Scholar] [CrossRef]
  4. Sun, Z.; Liu, Y.; Geng, D.; Zhang, D.; Ying, E.; Liu, R.; Jiang, X. Cutting performance and surface integrity during rotary ultrasonic elliptical milling of cast Ni-based superalloy. J. Mater. Res. Technol. 2025, 35, 980–994. [Google Scholar] [CrossRef]
  5. Liu, L.; Jiang, X.; Ying, E.; Sun, Z.; Geng, D.; Zhang, D. High-performance milling of Ti-6Al-4V through rotary ultrasonic elliptical milling with anticlockwise elliptical vibration. J. Zhejiang Univ.-Sci. A 2025, 26, 707–722. [Google Scholar] [CrossRef]
  6. Liu, H.; Zhang, D.; Geng, D. Design of a self-excited vibration tool bar for cutting difficult-to-machine alloys. Int. J. Mech. Sci. 2025, 300, 110456. [Google Scholar] [CrossRef]
  7. Sun, Z.; Geng, D.; Zheng, W.; Liu, Y.; Liu, L.; Ying, E.; Jiang, X.; Zhang, D. An innovative study on high-performance milling of carbon fiber reinforced plastic by combining ultrasonic vibration assistance and optimized tool structures. J. Mater. Res. Technol. 2023, 22, 2131–2146. [Google Scholar] [CrossRef]
  8. Li, Z.; Zhang, J.; Zheng, Z.; Feng, P.; Yu, D.; Wang, J. Elliptical vibration chiseling: A novel process for texturing ultra-high-aspect-ratio microstructures on the metallic surface. Int. J. Extrem. Manuf. 2024, 6, 025102. [Google Scholar] [CrossRef]
  9. Islam, R.U.; Iqbal, J.; Manzoor, S.; Khalid, A.; Khan, S. An autonomous image-guided robotic system simulating industrial applications. In Proceedings of the 2012 7th International Conference on System of Systems Engineering (SoSE), Genova, Italy, 16–19 July 2012; pp. 344–349. [Google Scholar]
  10. Russ, D.; Sitton, K.; Feikert, E. Once (One Sided Cell End Effector) Robotic Drilling System; SAE Technical Papers 2002-01-2626; SAE: Warrendale, PA, USA, 2002. [Google Scholar]
  11. Liu, J.; Shao, X.J.; Liu, Y.J.; Liu, Y.S.; Yue, Z.F. The effect of holes quality on fatigue life of open hole. Mater. Sci. Eng. A 2007, 467, 8–14. [Google Scholar] [CrossRef]
  12. DeVlieg, R. Robotic Trailing Edge Flap Drilling System; SAE Technical Papers; SAE: Warrendale, PA, USA, 2009. [Google Scholar]
  13. Frommknecht, A.; Kuehnle, J.; Effenberger, I.; Pidan, S. Multi-sensor measurement system for robotic drilling. Robot. Comput. Integr. Manuf. 2017, 47, 4–10. [Google Scholar] [CrossRef]
  14. Sun, L.; Liang, F.; Fang, L. Design and performance analysis of an industrial robot arm for robotic drilling process. Ind. Robot. Int. J. Robot. Res. Appl. 2019, 46, 7–16. [Google Scholar] [CrossRef]
  15. Bi, S.; Liang, J. Robotic drilling system for titanium structures. Int. J. Adv. Manuf. Technol. 2010, 54, 767–774. [Google Scholar] [CrossRef]
  16. Wang, Z.; Qin, X.; Bai, J.; Tan, X.; Li, J. Design and Implementation of Multifunctional Automatic Drilling End Effector. IOP Conf. Ser. Mater. Sci. Eng. 2017, 187, 012032. [Google Scholar] [CrossRef]
  17. Oberoi, H.; Draper, A.; Thompson, P. Production Implementation of a Multi Spindle Flexible Drilling System for Circumferential Splice Drilling Applications on the 777 Airplane; SAE Technical Papers; SAE: Warrendale, PA, USA, 2009. [Google Scholar]
  18. Reid, E. Development of Portable and Flexible Track Positioning System for Aircraft Manufacturing Processes; SAE Technical Papers; SAE: Warrendale, PA, USA, 2007. [Google Scholar]
  19. Marguet, B.; Cibiel, C.; De Francisco, Ó.; Felip, B.; Bernal, J.; Del Pozo, J.; Val, J.; Pujantell, D. Crawler Robots for Drilling and Fastener Installation: An Innovative Breakthrough in Aerospace Automation; SAE Technical Papers; SAE: Warrendale, PA, USA, 2008. [Google Scholar]
  20. Wang, M.; Chen, W.; Zhang, D. Light-weight automatic driling system and key technology for aircraft. Aeronaut. Manuf. Technol. 2012, 19, 40–43. [Google Scholar] [CrossRef]
  21. Hou, Z.; Liu, J.; Xue, G.; Xu, S. Control Technology of Flexible Track Automatic Drilling Machine. Aeronaut. Manuf. Technol. 2009, 24, 59–64. [Google Scholar] [CrossRef]
  22. Chen, B.; Liu, H.; Yong, B.; Xue, G.; Liu, J. Research on Drilling Experiment of Flexible Track Automatic Drilling Equipment. Assem. Process. 2011, 22, 78–80. [Google Scholar] [CrossRef]
  23. Bing, F.; Hu, Y.; Yao, Z. Research on PMAC-Based Control System for Flexible Track Drilling Machine. Aeronaut. Manuf. Technol. 2013, 5, 78–83. [Google Scholar] [CrossRef]
  24. Tao, Y.; Yuan, P.; Wang, T. The aeronautical drilling robot based on flexible track. In Proceedings of the 32nd Chinese Control Conference, Xi’an, China, 26–28 July 2013; pp. 5728–5733. [Google Scholar]
  25. Liu, H.; Zhu, W.; Dong, H.; Ke, Y. An improved kinematic model for serial robot calibration based on local POE formula using position measurement. Ind. Robot. Int. J. 2018, 45, 573–584. [Google Scholar] [CrossRef]
  26. Kang, R.; Hu, J.; Shi, Z.; Zhang, J.; Li, Z.; Li, Z.; Tian, W. A high-precision digital twin modeling approach for the serial-parallel hybrid drilling robot in aircraft assembly. Robot. Comput.-Integr. Manuf. 2025, 94, 102986. [Google Scholar] [CrossRef]
  27. Li, X.; Huang, T.; Zhao, H.; Zhang, X.; Yan, S.; Dai, X.; Ding, H. A review of recent advances in machining techniques of complex surfaces. Sci. China Technol. Sci. 2022, 65, 1915–1939. [Google Scholar] [CrossRef]
  28. Jiang, X.; Sun, N.; Ren, F.; Liu, X.; Guo, W.; Guo, M.; Fan, X.; Zhou, J. Multi-process aerospace components: Residual stress modeling and deformation optimization. Int. J. Mech. Sci. 2026, 309, 111077. [Google Scholar] [CrossRef]
  29. Baizid, K.; Ćuković, S.; Iqbal, J.; Yousnadj, A.; Chellali, R.; Meddahi, A.; Devedžić, G.; Ghionea, I. IRoSim: Industrial Robotics Simulation Design Planning and Optimization platform based on CAD and knowledgeware technologies. Robot. Comput.-Integr. Manuf. 2016, 42, 121–134. [Google Scholar] [CrossRef]
  30. Xu, H.; Geng, D.; Jiang, X.; Xue, J.; Guo, G.; Zhang, D. An innovative normal self-positioning method with gravity and friction compensation for wall-climbing drilling robot in aircraft assembly. Int. J. Adv. Manuf. Technol. 2025, 138, 3687–3704. [Google Scholar] [CrossRef]
  31. Xu, H.; Xue, J.; Guo, G.; Liu, Y.; Liu, M.; Zhang, D. Stiffness Optimization of a Robotic Drilling System for Enhanced Accuracy in Aerospace Assembly. Actuators 2025, 14, 86. [Google Scholar] [CrossRef]
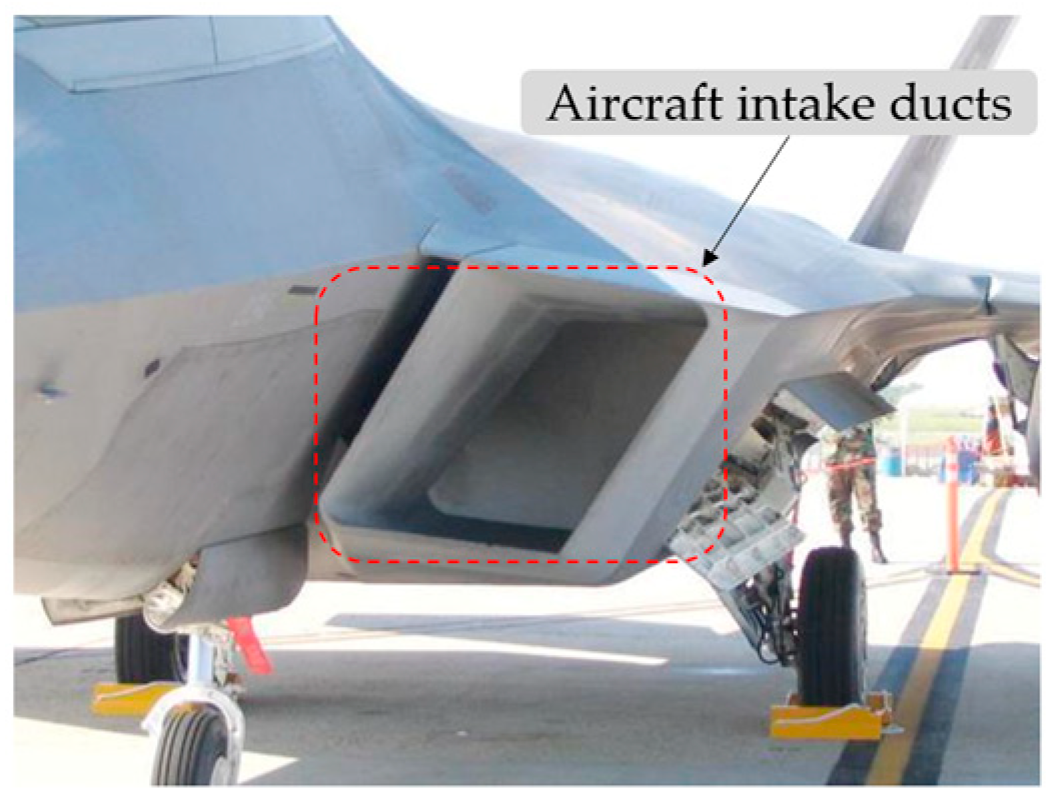
Figure 1. Aircraft Intake Duct.
Actuators 15 00024 g001
Figure 2. Overall Design Scheme of the Drilling Robot. (a) Primary Components of the Robot; (b) Chip-suction mechanism of the Robot.
Actuators 15 00024 g002
Figure 3. Schematic Diagram of the Posture Adjustment Mechanism for the Drilling Robot.
Actuators 15 00024 g003
Figure 4. The hole-making process of the Drilling Execution Unit. (a) Pre-drilling Status; (b) Post-drilling condition.
Actuators 15 00024 g004
Figure 5. Structural display of the expansion positioning mechanism.
Actuators 15 00024 g005
Figure 6. Expansion Locking and Positioning Process of the Drilling Sleeve.
Actuators 15 00024 g006
Figure 7. Design Schematic of the Large-Curvature Adaptive Chassis.
Actuators 15 00024 g007
Figure 8. Contact Characteristics of V-Grooved Wheels.
Actuators 15 00024 g008
Figure 9. Geometric Analysis of Curvature Adaptation for V-Grooved Wheels.
Actuators 15 00024 g009
Figure 10. V-Grooved Wheel Design Parameters.
Actuators 15 00024 g010
Figure 11. Analytical curve.
Actuators 15 00024 g011
Figure 12. Front and Rear Wheel Groups.
Actuators 15 00024 g012
Figure 13. Annotated Schematic Diagram of the Chassis.
Actuators 15 00024 g013
Figure 14. Points A and B both move along straight sections.
Actuators 15 00024 g014
Figure 15. Motion Trajectory Diagram of Points C and D.
Actuators 15 00024 g015
Figure 16. Schematic Diagram of Elastic Mechanism Range for Drilling End.
Actuators 15 00024 g016
Figure 17. Elastic Mechanism Range.
Actuators 15 00024 g017
Figure 18. Drilling Robot Control System.
Actuators 15 00024 g018
Figure 19. Robot Drilling Process.
Actuators 15 00024 g019
Figure 20. Wall-Climbing Drilling Robot System. (a) Robot Drilling Operation Demonstration; (b) Robot Control Box; (c) Host PC Control Interface.
Actuators 15 00024 g020
Figure 21. Large-Curvature Traversal Test for Wall-Climbing Drilling Robot. (a) Initial Position; (b) Entering Arc Path; (c) Initial Arc Motion Phase; (d) Mid-Arc Stable Motion; (e) Arc Midpoint; (f) Approaching Arc End; (g) Arc Motion Termination; (h) Exiting Arc Path; (i) Motion Stopped.
Actuators 15 00024 g021
Figure 22. CFRP/7075 aluminum stacks. (a) Composite Material Mounting Holes; (b) Aluminum Alloy Mounting Holes.
Actuators 15 00024 g022
Figure 23. Panels after robot drilling.
Actuators 15 00024 g023
Figure 24. Inspection Platform.
Actuators 15 00024 g024
Figure 25. Hole Size Deviation.
Actuators 15 00024 g025
Figure 26. Hole Normal Deviation.
Actuators 15 00024 g026
Table 1. Quantitative Technical Specifications for the Compact drilling Robot.
ParameterRequirement
Dimensions (L × W × H, mm)≤400 × 400 × 400
Robot Mass (kg)≤15
Drilling Diameter Range (mm)≥Φ4
Min. Traversable Curvature Radius (mm)R200
Drilling Normal Direction Error (°)≤1
Drilling Efficiency (holes quantity/min)≥2
Table 2. Parameters of V-Grooved Wheels for Compact Wall-Climbing Robot Chassis.
ParameterRequirement
V-Groove Angle (°)70
Half-Height of V-Grooved Wheel (mm)5
Radius of V-Grooved Wheel (mm)20
Table 3. Measured Robot Body Parameters.
ParameterSpecification
Dimensions (Length/mm × Width/mm × Height/mm)386 × 317 × 312.5
Robot Mass (kg)13.2
Table 4. Parameter Settings.
ParameterNumerical Value
Drilling Diameter (mm)4.0/5.0/6.0
Drilling Depth (mm)7
Spindle Speed (rpm)3200
Feed Speed (mm/r)0.25
Table 5. Twist Drill Parameters.
ParameterNumerical Value
Drilling Diameter (mm)4/5/6
Drilling Depth (mm)100
Spindle Speed (rpm)118
Disclaimer/Publisher’s Note: The statements, opinions and data contained in all publications are solely those of the individual author(s) and contributor(s) and not of MDPI and/or the editor(s). MDPI and/or the editor(s) disclaim responsibility for any injury to people or property resulting from any ideas, methods, instructions or products referred to in the content.