Article

About the Possible Limitations in the Usage of the Non-Destructive Ultrasonic Pulse Velocity Method for Assessment of Cracks in Reinforced Concrete Structures, Subjected to Direct Environmental Exposure

1
Department Reinforced Concrete Structures, Faculty of Structural Engineering, University of Architecture, Civil Engineering and Geodesy (UACEG), 1164 Sofia, Bulgaria
2
Department Building Structures, Faculty of Construction, University of Structural Engineering &Architecture, 1373 Sofia, Bulgaria
*
Author to whom correspondence should be addressed.
Buildings 2019, 9(9), 202; https://doi.org/10.3390/buildings9090202
Submission received: 29 June 2019 / Revised: 15 August 2019 / Accepted: 29 August 2019 / Published: 11 September 2019

Abstract

:
Failures occur in the structures of reinforced concrete buildings and facilities during their continuous exploitation, without being overloaded or exposed to extreme impacts, the most common being cracks. Their detection and change in time are related to the assessment of the state of the structures, their safety, and reliability during their construction and especially for their safety exploitation. This paper describes the results of the experimental studies conducted by authors aiming to verify the possibility of using the non-destructive ultrasonic pulse velocity method (NDUPVM) for detection and evaluation of cracks. Results of an experimental study of 12 reinforced concrete beams are presented. In previous experiments, some of them were subjected to bending until the maximum crack width of 0.3 mm was reached and others until yielding of the longitudinal reinforcement. The results obtained from the measurements of the depths of the normal cracks with different widths with NDUPVM were compared with the visually measured ones. In the present research cracks with the same width and with a similar depth were chosen. The influence of extreme external conditions to the accuracy of the measured crack depths by the NDUPVM was investigated. Non-destructive ultrasonic research was done by a portable device Proceq TICO.

1. Introduction

As a result of improper and/or continuous operation, inevitable aging, poor maintenance, making unregulated reconstructions, fatigue in materials and structures, overload, temperature changes, shrinkage, action of aggressive chemical environments, change in humidity, fire damages, and other factors in the structures of reinforced concrete buildings and facilities damages occur [1,2,3]. Some of the most common in reinforced concrete buildings and facilities are cracks. They worsen the service properties and durability of structures. The crack width for elements, subjected to bending has to be limited for ensuring the durability of the structures (reinforcement protection), the acceptable appearance of the elements, and the stiffness of the elements. Cracks in concrete are a natural result of its low tensile strength. Tensile stresses can occur in different situations, at different times in the structural members or in their separate sections. Even under proper operation and maintenance most reinforced concrete structures, with the exception of fully compressed elements and beams with prestressed reinforcement, work with cracks in the tension area.
Ensuring the safety, security, and reliability of reinforced concrete structures and extending their service life requires evaluation and diagnosis of their condition. Depending on the method of impact, on the condition and suitability of the structures after the test, the control of the materials and elements of reinforced concrete structures can be destructive and non-destructive [3].
In the case of destructive (traditional) control, we have complete damage in the test area. It is labor-intensive and expensive. The study is limited to individual points and does not provide information on the quality and damages of the whole structure [3,4,5].
With non-destructive testing (NDT) the parameters of materials, elements and joints of reinforced concrete structures can be verified, tested and evaluated non-invasively [3]. This can be done both during construction and during service. The tests can be repeated several times, in different sections of the structure, to track in real time the change of important parameters for the reinforced concrete structure, related to their suitability and proper operation.
The advantages of NDT are many [3,4,5,6,7,8,9,10,11,12,13,14,15,16,17,18,19,20,21,22], namely:
  • The integrity of the structural element is preserved.
  • There is an ability for measuring locations that are difficult to reach or within considerable distances from the surface of the elements.
  • High sensitivity, allowing detection of very small defects.
  • Obtaining data on structures that are unsafe.
  • Opportunity to study part or all of the structure.
  • Evaluation of the effectiveness of reconstructions.
  • Repeatability of results.
  • Safety for operators.
  • Faster execution.
  • Saving of materials and equipment.
  • Method automation, continuous data recording, integration into information systems.
  • Portability of equipment.
  • Minor energy consumption.
  • Minimal impact on staff.
For tracking the appearance and propagation of cracks in reinforced concrete elements in real time different non-destructive methods can be used. The main methods are:
  • Acoustic emission (AE) is a method used for characterization of the crack initiation and propagation mechanisms of a structure in real time. It enables recording of the initiation and spreading of elastic waves of acoustic signals at propagating cracks. Information regarding the location of the cracking sources and their mode can be supplied by proper analysis of acoustic emission. The experience of the user is essential in order to explain the acoustic emissions trends [23].
  • The ultrasonic pulse velocity method is based on the propagation of ultrasonic waves in the elements. Short ultrasonic pulse-waves are transmitted into materials to detect internal flaws or to characterize materials. It continues to be an important non-destructive technique, which provides reliable results based on rapid measurements with relatively inexpensive equipment. It has many advantages, such as: it does not affect the appearance or the functioning of the structures under analysis and there is no need for application of cables, fibers, and equipment on the structure; data can be periodically collected from the same test points, making possible the control of variations over time; the ultrasonic pulse velocity can be employed for the detection of cracks but this cannot be used solely and should be accompanied by other techniques for better accuracy and identification of the cracks. The main disadvantages of non-destructive ultrasonic pulse velocity method (NDUPVM) are: it is necessary to have free access to the examined element and surfaces (sometimes it requires a cut in traffic temporary, a need for additional facilities, etc.); results are affected in the case of the elements are exposed on direct external conditions (such as rain, snow, etc.), as the results of this research shows.
  • Digital image correlation (DIC) is a non-destructive, non-contact and precise method for crack measurements in reinforced concrete elements [23,24,25,26,27]. This method is of interest for monitoring аt different loading stages in real time. Digital images are taken and by comparing the images it is possible for the crack initiation and crack propagation to be obtained in the object subjected to external loads. It gives a clear depiction of the surface strain field and its transient changes according to stress redistribution which occurs after fracture moments [28]. This method is very effective for measuring the crack growth in concrete. Different pattern that should be printed on the object can be used to get the best results with this method [27]. The main disadvantage is that only the surfaces of the elements can be evaluated. DIC has big advantages to other methods, but it is more appropriate if we start monitoring an element, or even a whole structure from the beginning—after the structure is built and the pattern is printed on an unloaded structure. There are still some limitations for application on existing concrete structures, especially if they have existing cracks.
  • Fiber optic crack sensors are used for detecting and monitoring cracks in real time in concrete and reinforced concrete structures, where the crack locations are often not known in apriori. Tiny cracks before visual recognition could be detected with these sensors [28,29,30]. Their advantages are the small weight and dimensions, the strong immunity to electromagnetic interference and the scale flexibility for small-gauge and long-gauge measurements, and they provide high-resolution and measurement capabilities that are not feasible with conventional technologies [30]. They can be placed on the surface or to be embedded in reinforced concrete elements. Fiber optic crack sensors are a powerful tool for detection, even very small cracks, and are useful in many cases, such as usage of high performance concrete, concrete structures, and bridges that should not open cracks during their exploitation, etc., but they are very expensive and they still cannot be used to determine the depth of the cracks.
  • Visual observation by crack magnifiers [3,10,11,15,16,17,20] is a conservative and very reliable method. As it is well known that cracks have different patterns, and depths, because of the nature of the concrete (they follow gravels, internal small defects, etc.), the method has the same disadvantage, like DIC, that cracks can be evaluated only on the surfaces of the elements and require a clear access to the elements.
In recent years, for assessment of reinforced concrete structures, construction quality control, and detecting existing cracks, NDUPVM has gained increasing popularity and interest [3,4,5,6,7,8,9,10,11,21]. It is a highly specialized and complex method that requires careful data collection and expert analysis. It is possible to be carried out periodically or by continuous measurements for the same test points during the service of the reinforced concrete structure and the process of detecting the damages to be automated. Among the available methods of NDT, the NDUPVM methods can be considered as one of most promising methods for evaluation the concrete structures.

2. Essence of the Non-Destructive Ultrasonic Pulse Velocity Method

In the assessment, diagnosis, forecasting, and control of defects and cracks in existing reinforced concrete structures very often only one of their sides is available. Then, NDUPVM is irreplaceable and reliable. The method is based on the propagation of ultrasonic waves which passes through the material. The speed of the wave varies as a function of the density and elastic properties of the material, allowing the estimation of the porosity and the detection of discontinuities.
Two transducers are used—one transmitter of ultrasonic signals and the other as a receiver of these signals [3,4,5,6,7,8,9,10,11,12,13,14,15,16,17,18,19,20,21,22]. They usually operate in the frequency range of 25–60 kHz. The transmitter of ultrasonic pulses [10,11] causes longitudinal, transverse, and surface waves, which undergo numerous reflections on the boundaries of the various components of reinforced concrete within the reinforced concrete element. The receiving transducer registers the beginning of the longitudinal ultrasonic waves, which are the fastest. It is measured the velocity and/or time of passing of the pulses between the two transducers. In concrete without any defects, the transmitting time of the ultrasonic signal is less than in the case with defects. Thus, by determining this time, the properties of structural concrete can be assessed [10].
The mechanical properties, the deformation characteristics, and the concrete parameters such as compressive strength and modulus of elasticity [3,6,7] can be determined from the velocity or transmitting time of the ultrasonic signal. The NDUPVM is used in order to verify the concrete homogeneity, to detect internal imperfections (presence of caverns, internal defects and cracks), to evaluate the depth of imperfections, to estimate the modulus of elasticity and the compressive strength of the concrete, and to monitor the characteristics variations of concrete throughout time [3,4,5,6,7,8,9,10,11,12,13,14,15,16,17,18,19,20,21,22,31,32,33,34,35,36,37,38,39,40,41].
The ultrasonic pulse velocity in concrete reaches 4500–5000 m/s.
There are difficulties when using the NDUPVM related to the non-homogeneity of the concrete, which should be taken into account in the measurements. There are many factors that affect the accuracy of the measurement [3,4,5,6,7,8,9,10,11,12,13,14,15,16,17,18,19,20,21,22]:
  • temperature;
  • water–cement ratio;
  • inclusion of air in the concrete;
  • age, type, properties, and parameters of the concrete, through which ultrasonic pulses passes;
  • type and size of coarse aggregate (crushed stone, gravel, chemical and/or mineral additives, etc.);
  • technology for preparing and laying the concrete mix;
  • contact between transducers and the surface of the reinforced concrete element;
  • distance between the transducers.
The dependence of ultrasonic spread on all the factors above is very complex.

3. Experimental Setup

The research was carried out on four series of three specimens (total 12) of reinforced concrete beams (Figure 1), which differed in longitudinal reinforcement, concrete cover, and reinforcement ratio. All beams had a span of 3 m.
  • Specimens type A had a cross section of 27/15 cm, bottom longitudinal reinforcement 2N12 (steel B500), stirrups ф8/10(15) cm (steel B235).
  • Specimens type B had a cross section 27/15 cm, bottom longitudinal reinforcement 2N18 (steel B500), stirrups N8/10(15) cm (steel B500).
  • Specimens type C had a cross section 30/15 cm, bottom longitudinal reinforcement 2N12 (steel B500), stirrups ф8/10(15) cm (steel B235).
  • Specimens type D had a cross section 30/15 cm, bottom longitudinal reinforcement 2N18 (steel B500), stirrups N8/10(15) cm (steel B500).
The 12 beams were prepared of concrete grade C25/30, a fine fraction of the coarse aggregate (dmax = 12 mm), and with a consistency S3.
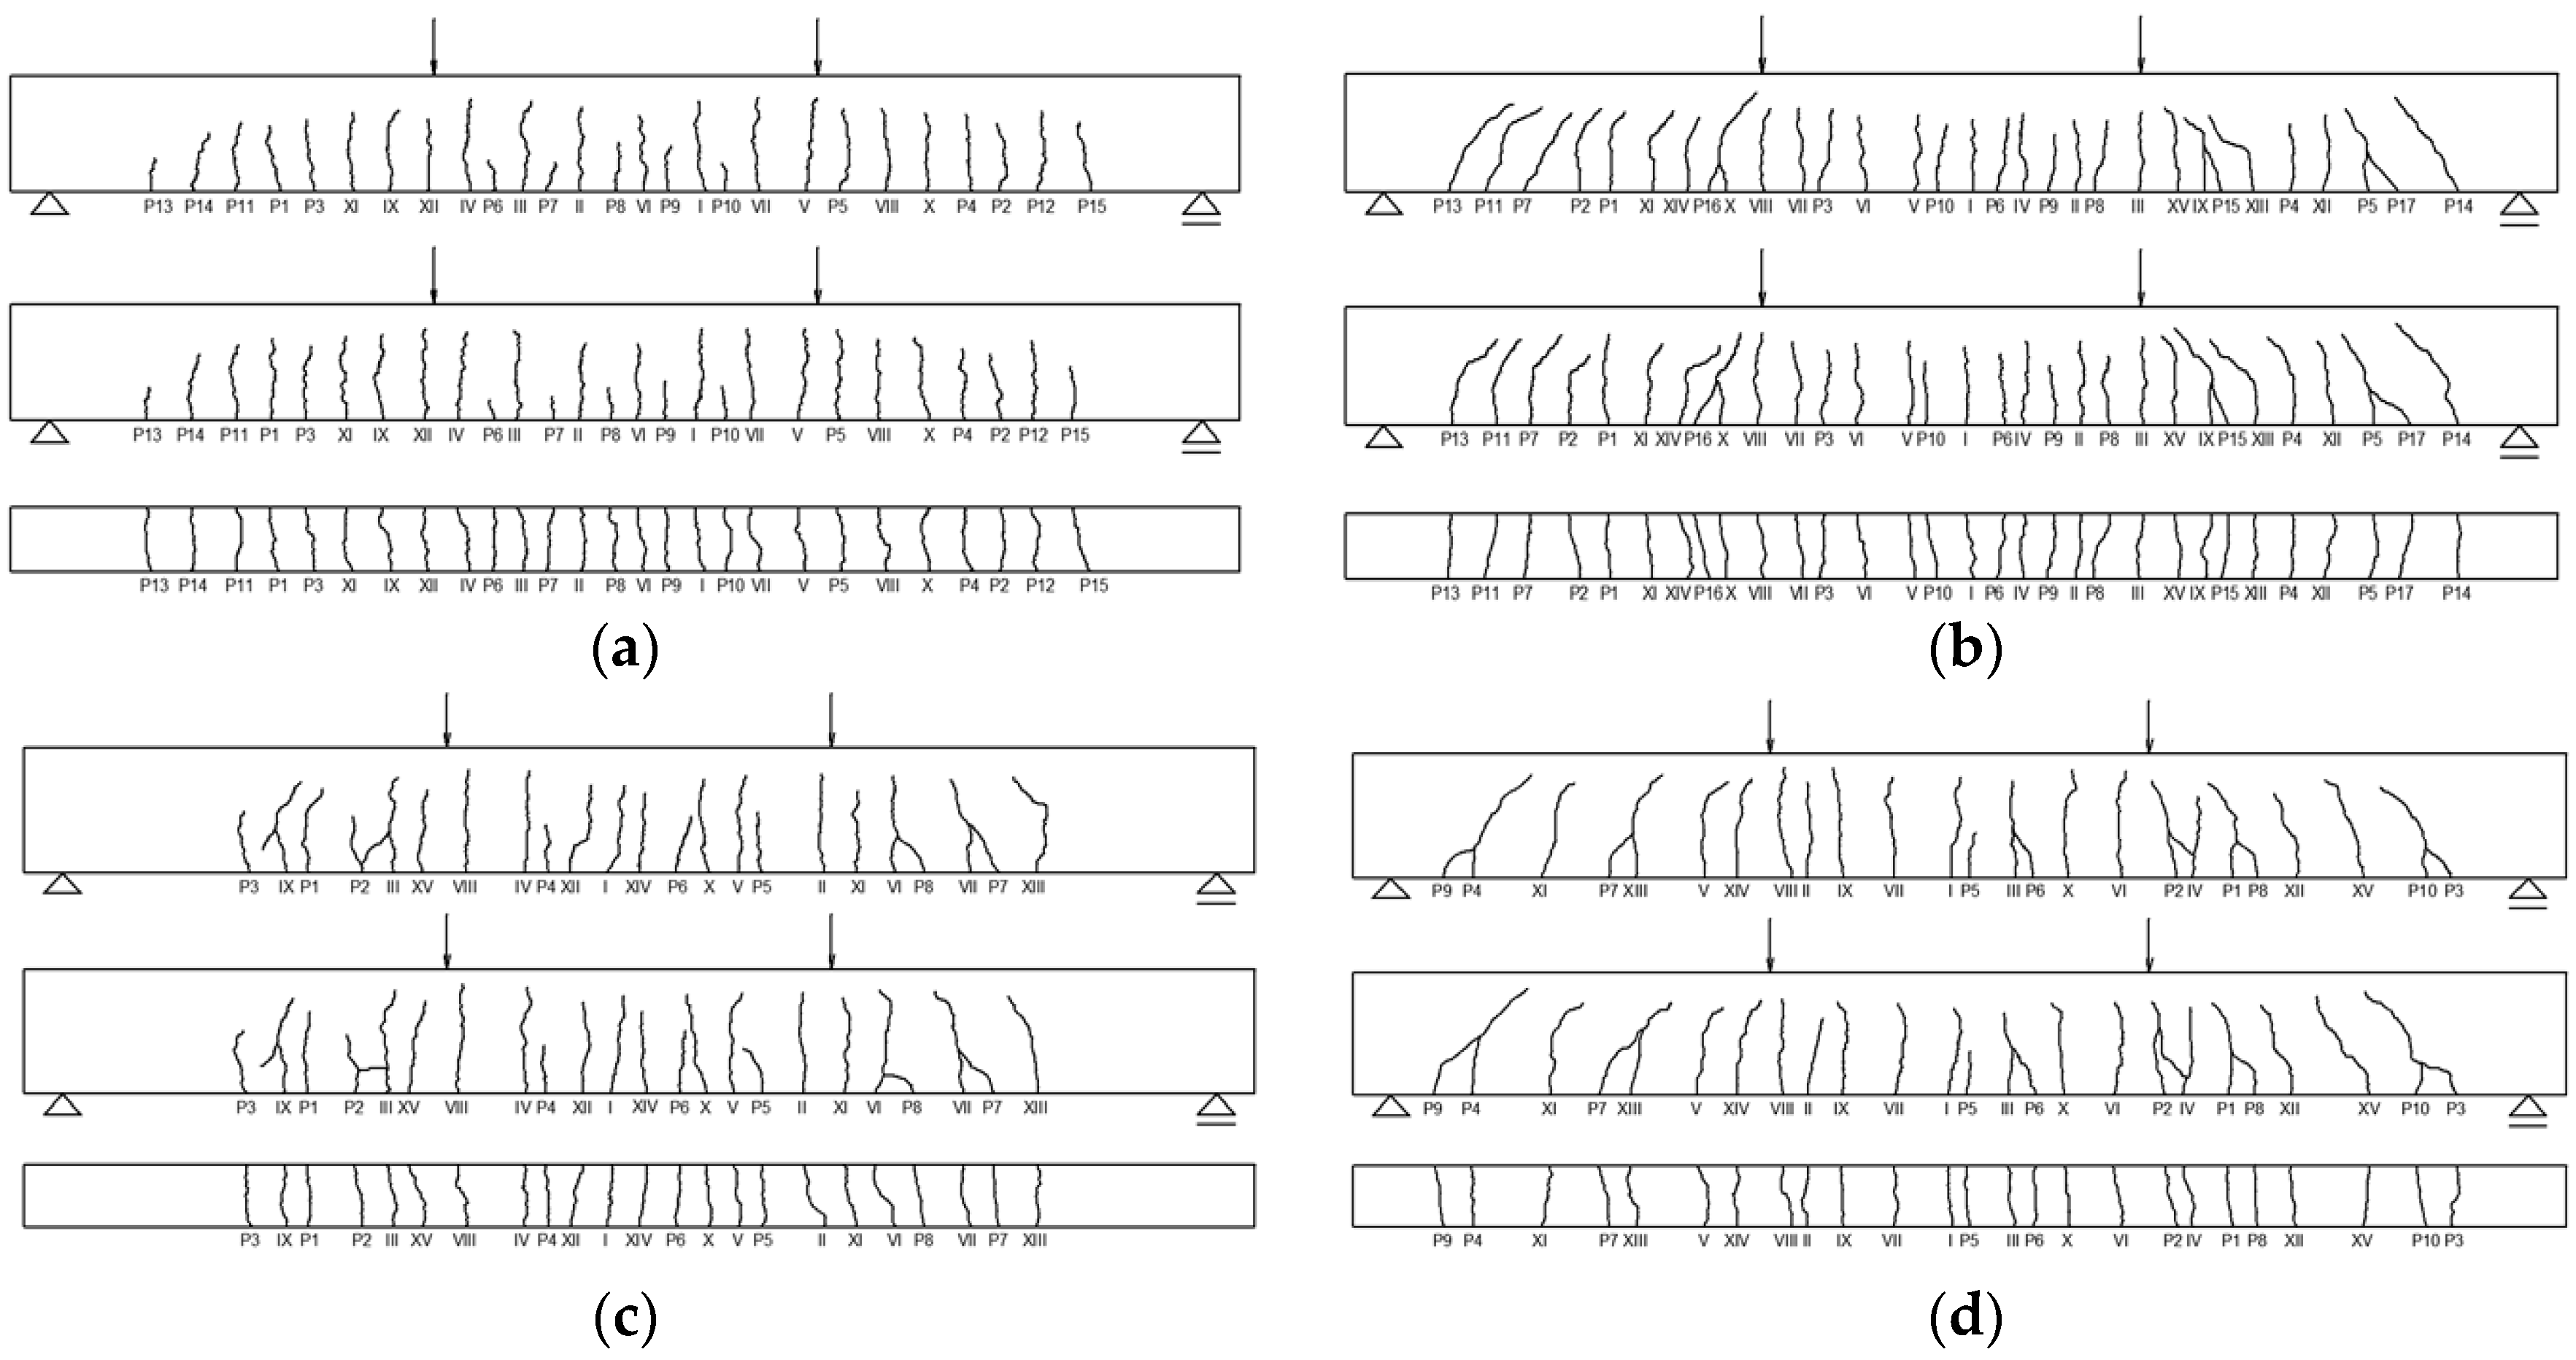
Their structural parameters were chosen to meet the characteristic parameters of the beams used in practice in industrial and civil construction. The laboratory nature of the experimental study required scaled elements. For the longitudinal tensile reinforcement of the beams for the different types of specimens, reinforcing steel with common reinforcement ratios were used as in the real practice. The distance between the stirrups was chosen to ensure that the specimen’s failure would be due to bending, and not by sheer force. Different reinforcement ratios, cross sections, and concrete covers resulted in different density and inclination of the cracks for each type of specimen (Figure 2).
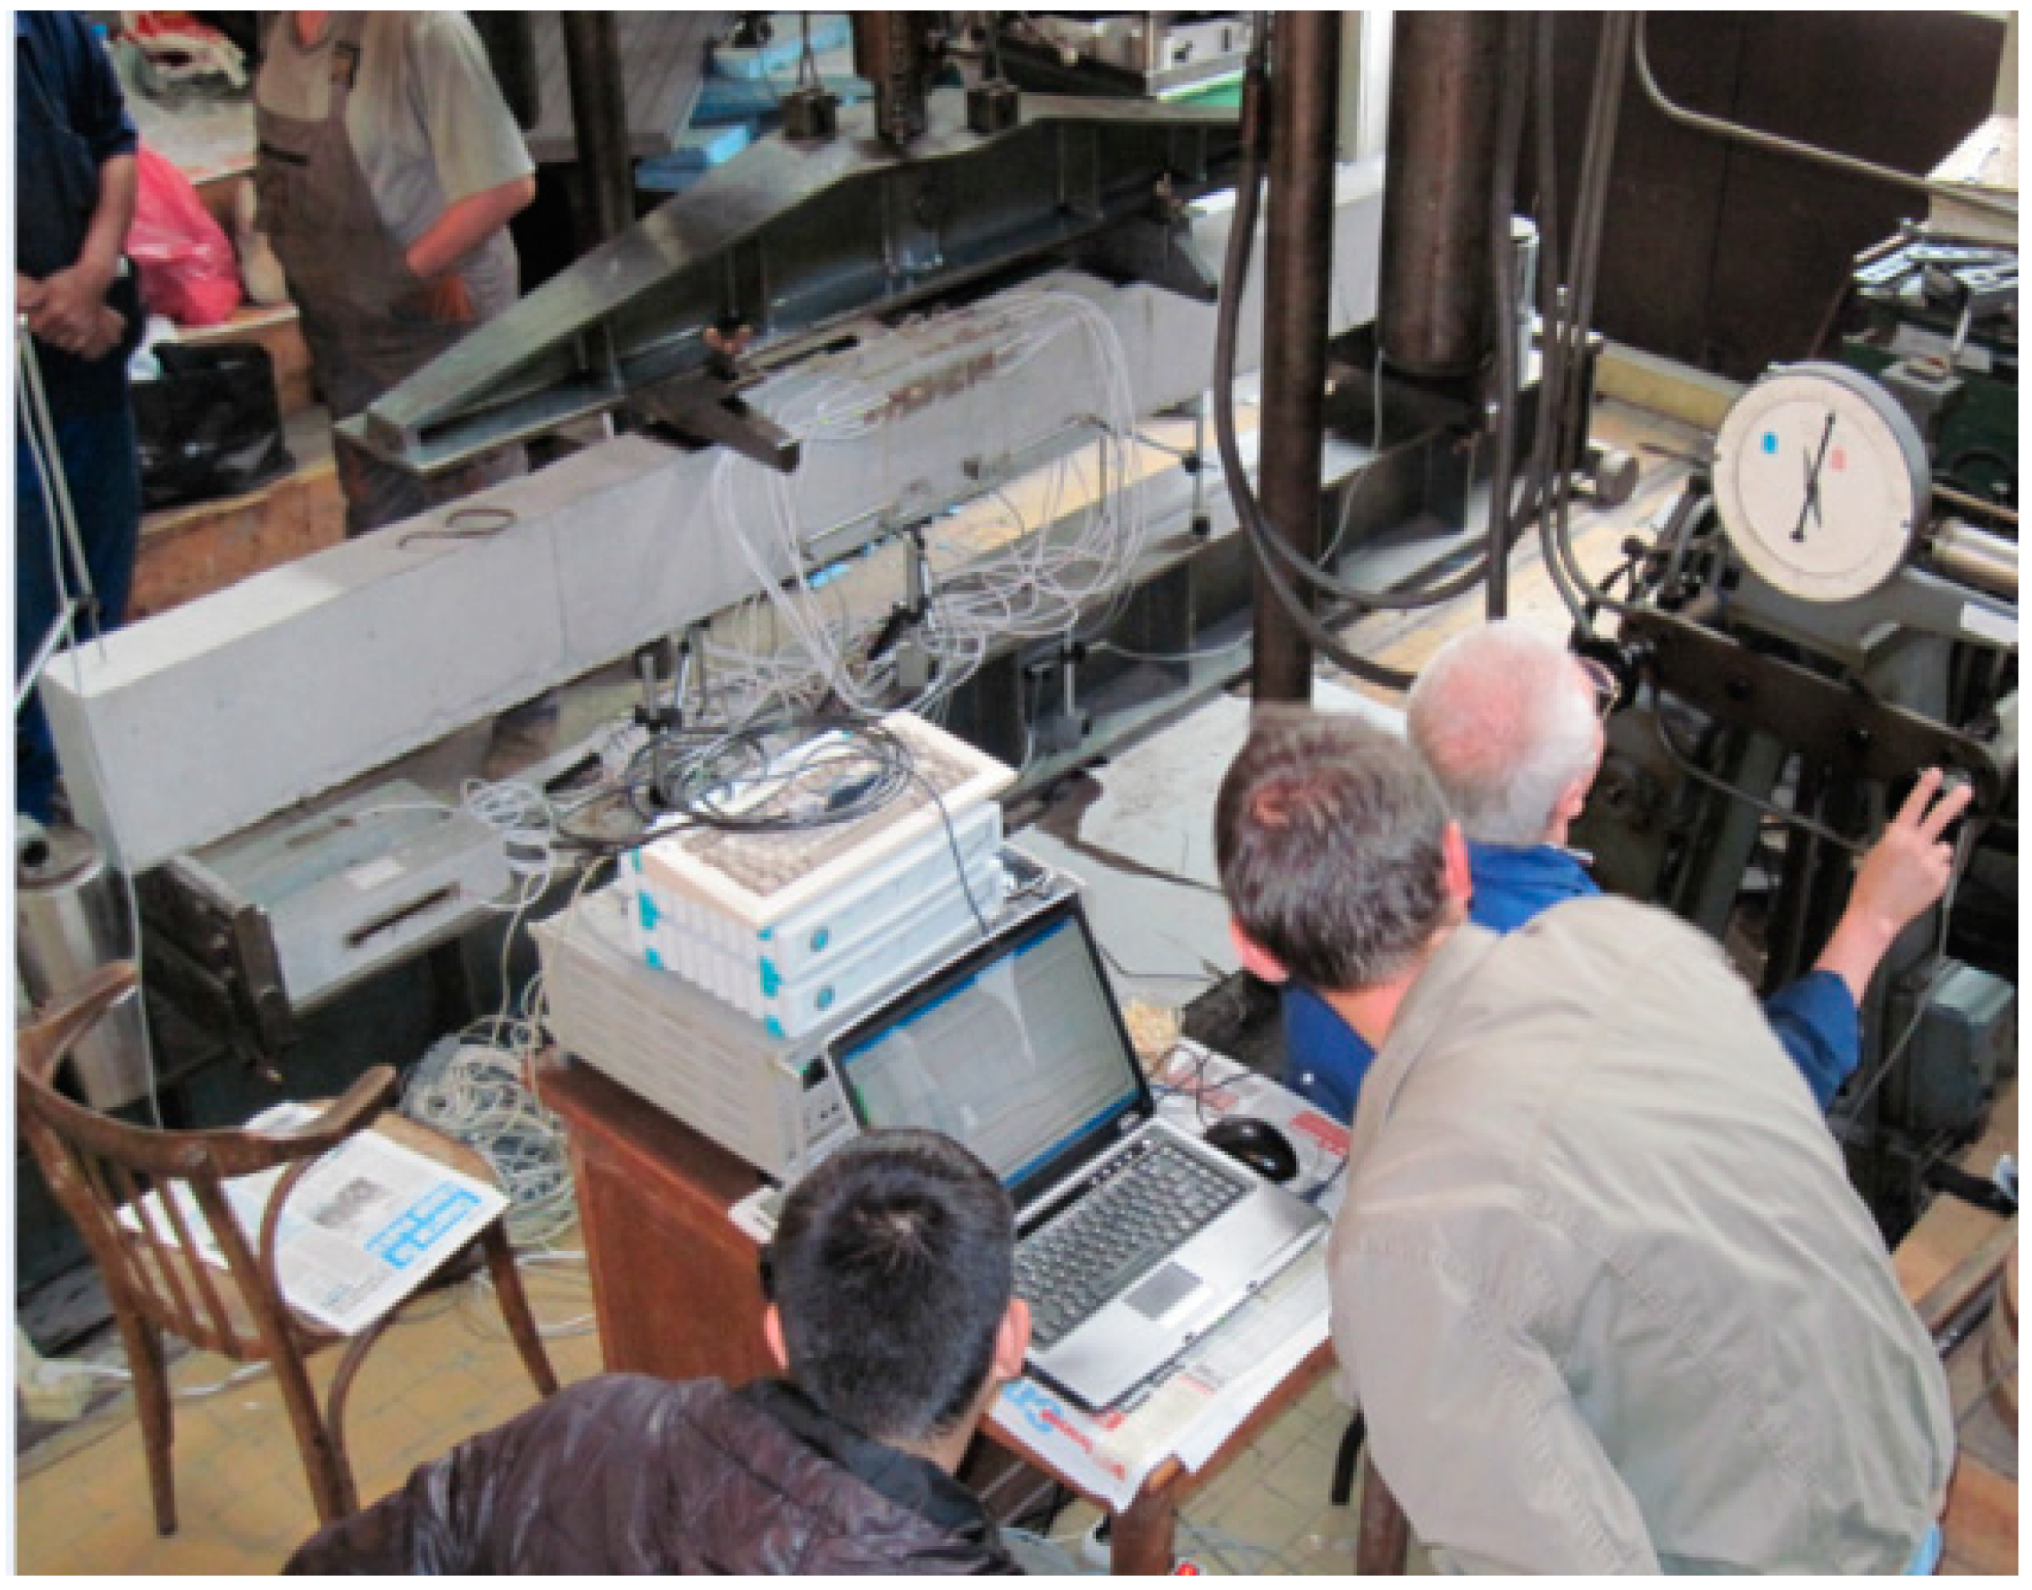
Some of the beams were loaded (Figure 3) until the stage corresponding to yielding of the longitudinal reinforcement and others to a loading stage reaching a maximum crack width of 0.3 mm.
The impact was from two concentrated forces located in the thirds of the span with the static scheme of a simply supported beam (four-point bending test). According to EC2 for exposure classes XC2, XC3, XC4, XD1, XD2, XS1, XS2, and XS3 the maximum allowed crack width is 0.3 mm for non-prestressed structures at quasi-permanent combination. During previous experimental studies on the two side-surfaces of the beams, the cracks were outlined in the order of their appearance and their depths were noted at each of the loading stages. After completion of each of the experiments the location of the cracks on the bottom surfaces of the beams were outlined too (Figure 2). For all the cracks, the distances between them (at the reinforcement’s centroid), and their depths were measured.
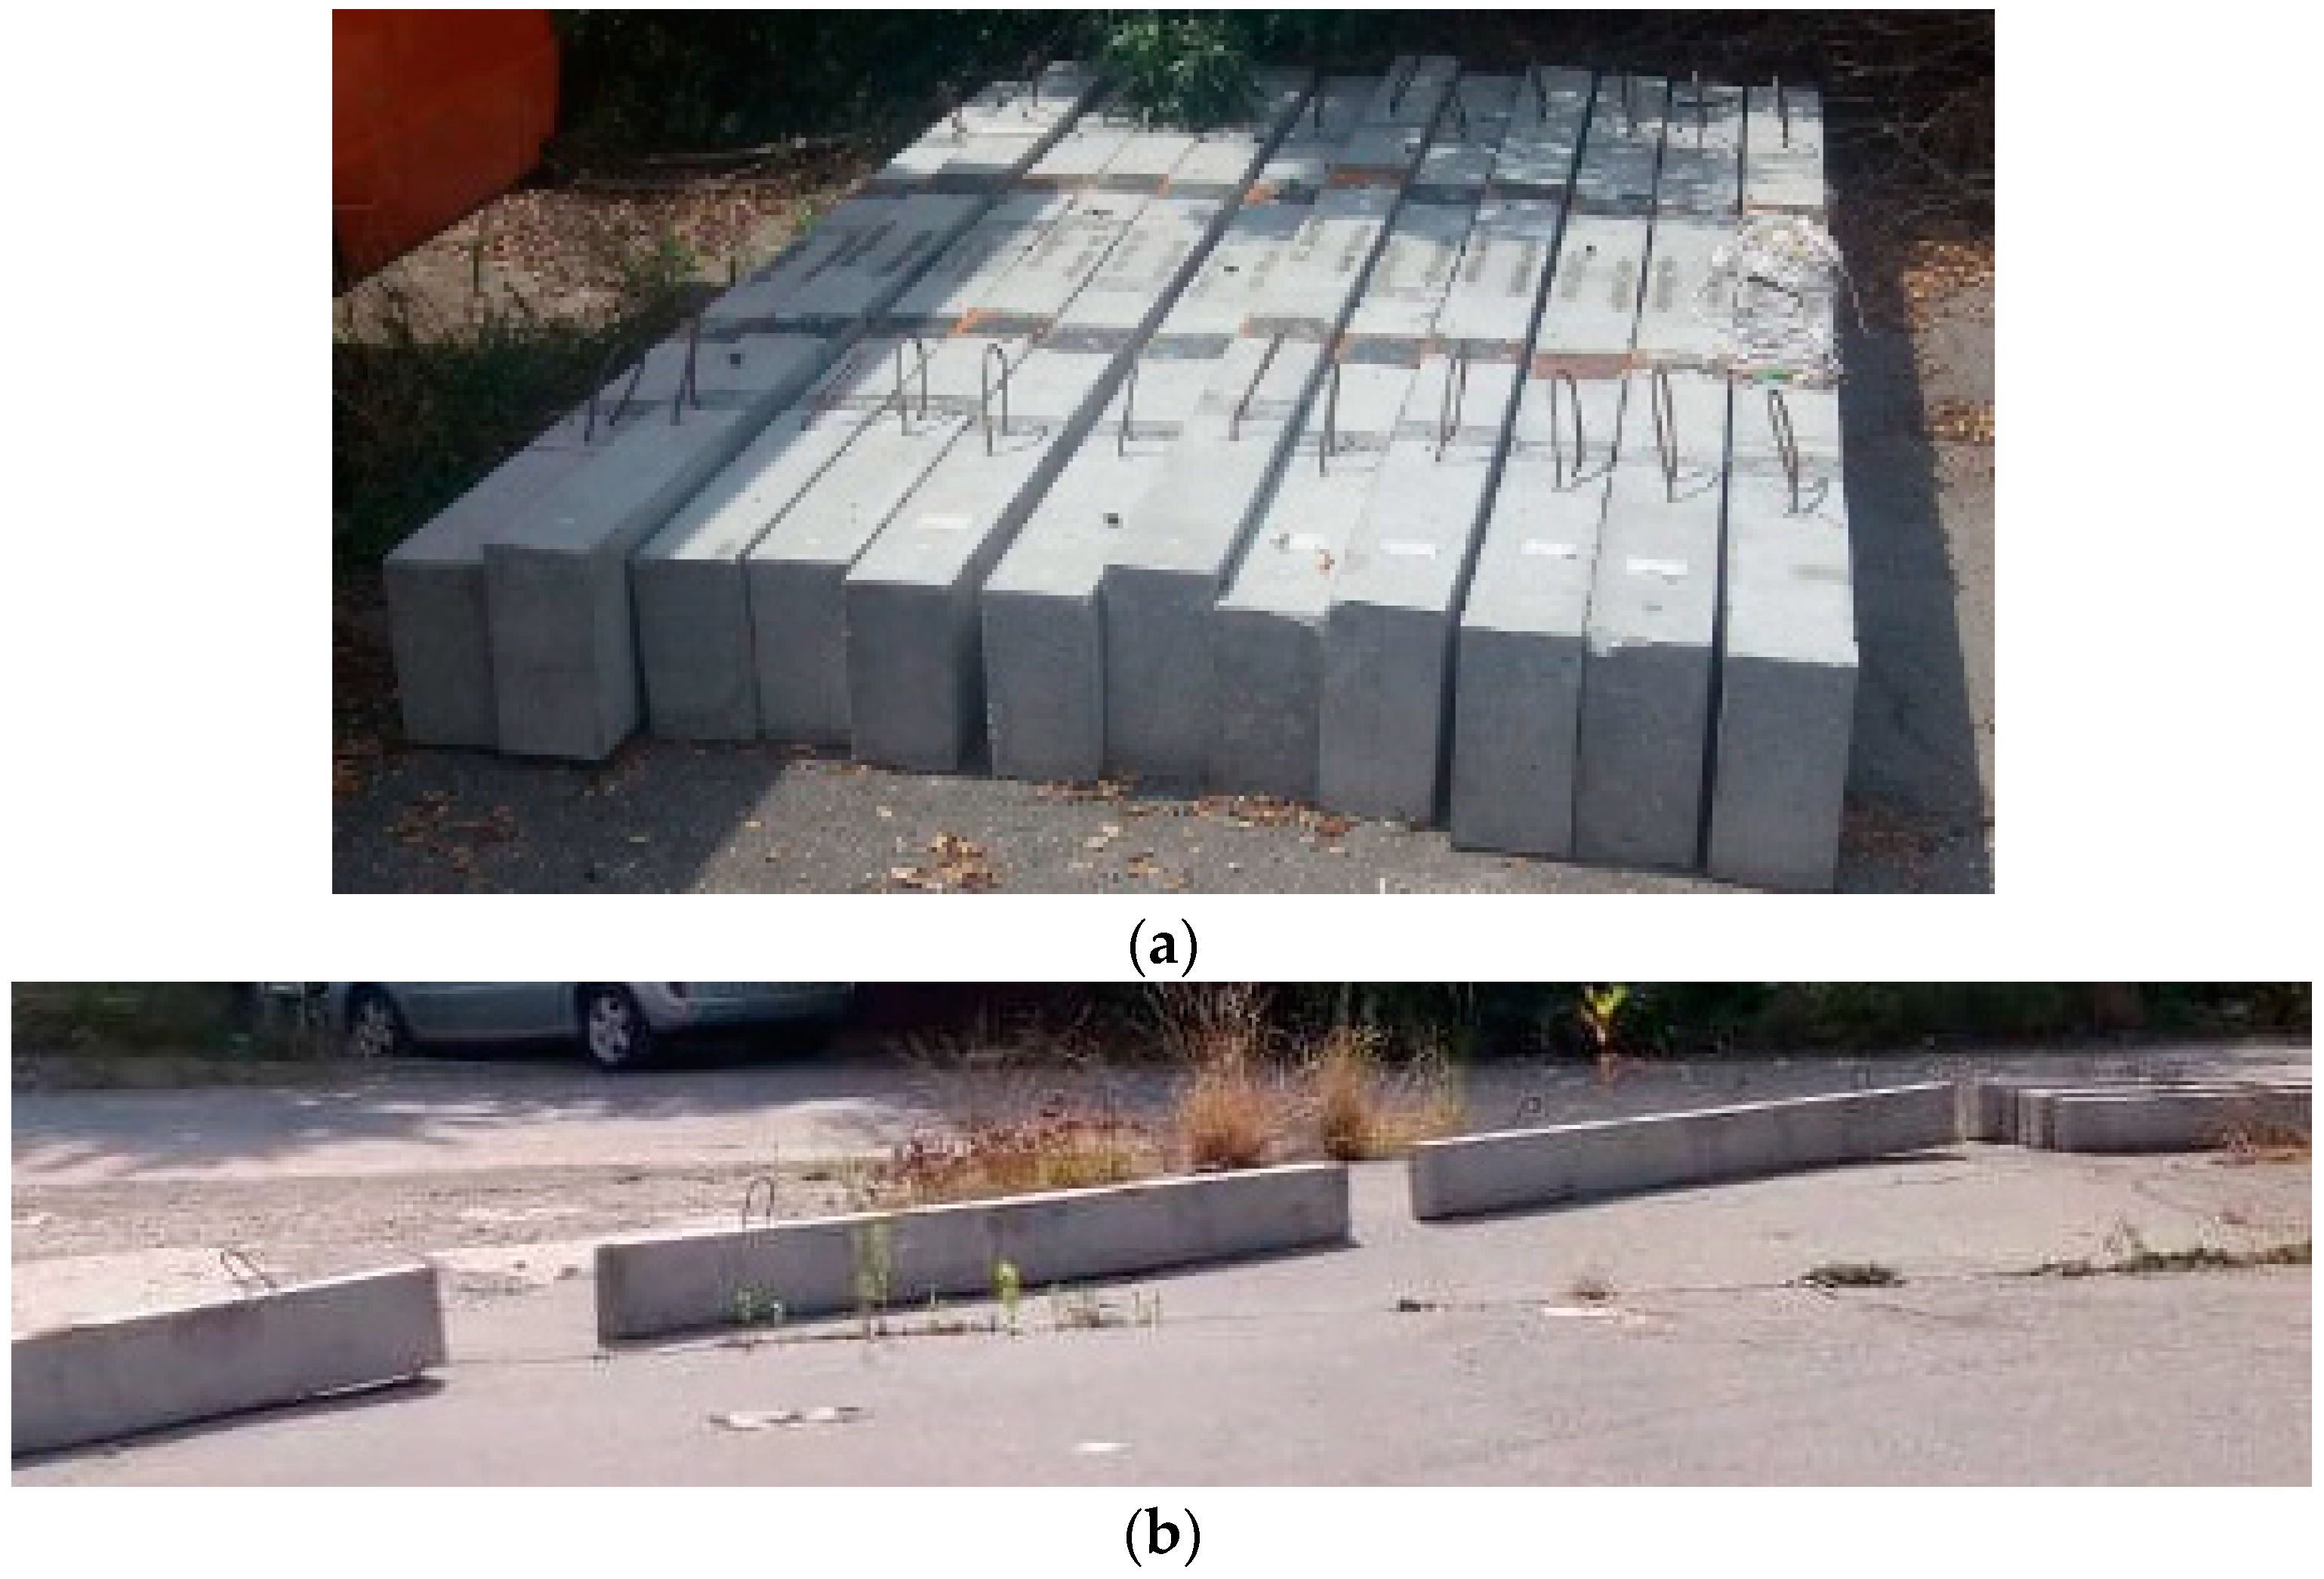
For two years, the reinforced concrete elements were in enclosed premises and the following three years were left outdoors, subject to external atmospheric impacts, such as wind, rain, and snow (Figure 4). Presented measurements were made in the springtime, when it often rains, after the wintertime when the specimens were exposed to rain and snow.
This experiment aimed to explore the possibilities for the application of NDUPVM for detecting and determining the depth of normal cracks and to examine the impact of the extreme external conditions to the accuracy of the measured crack depths.
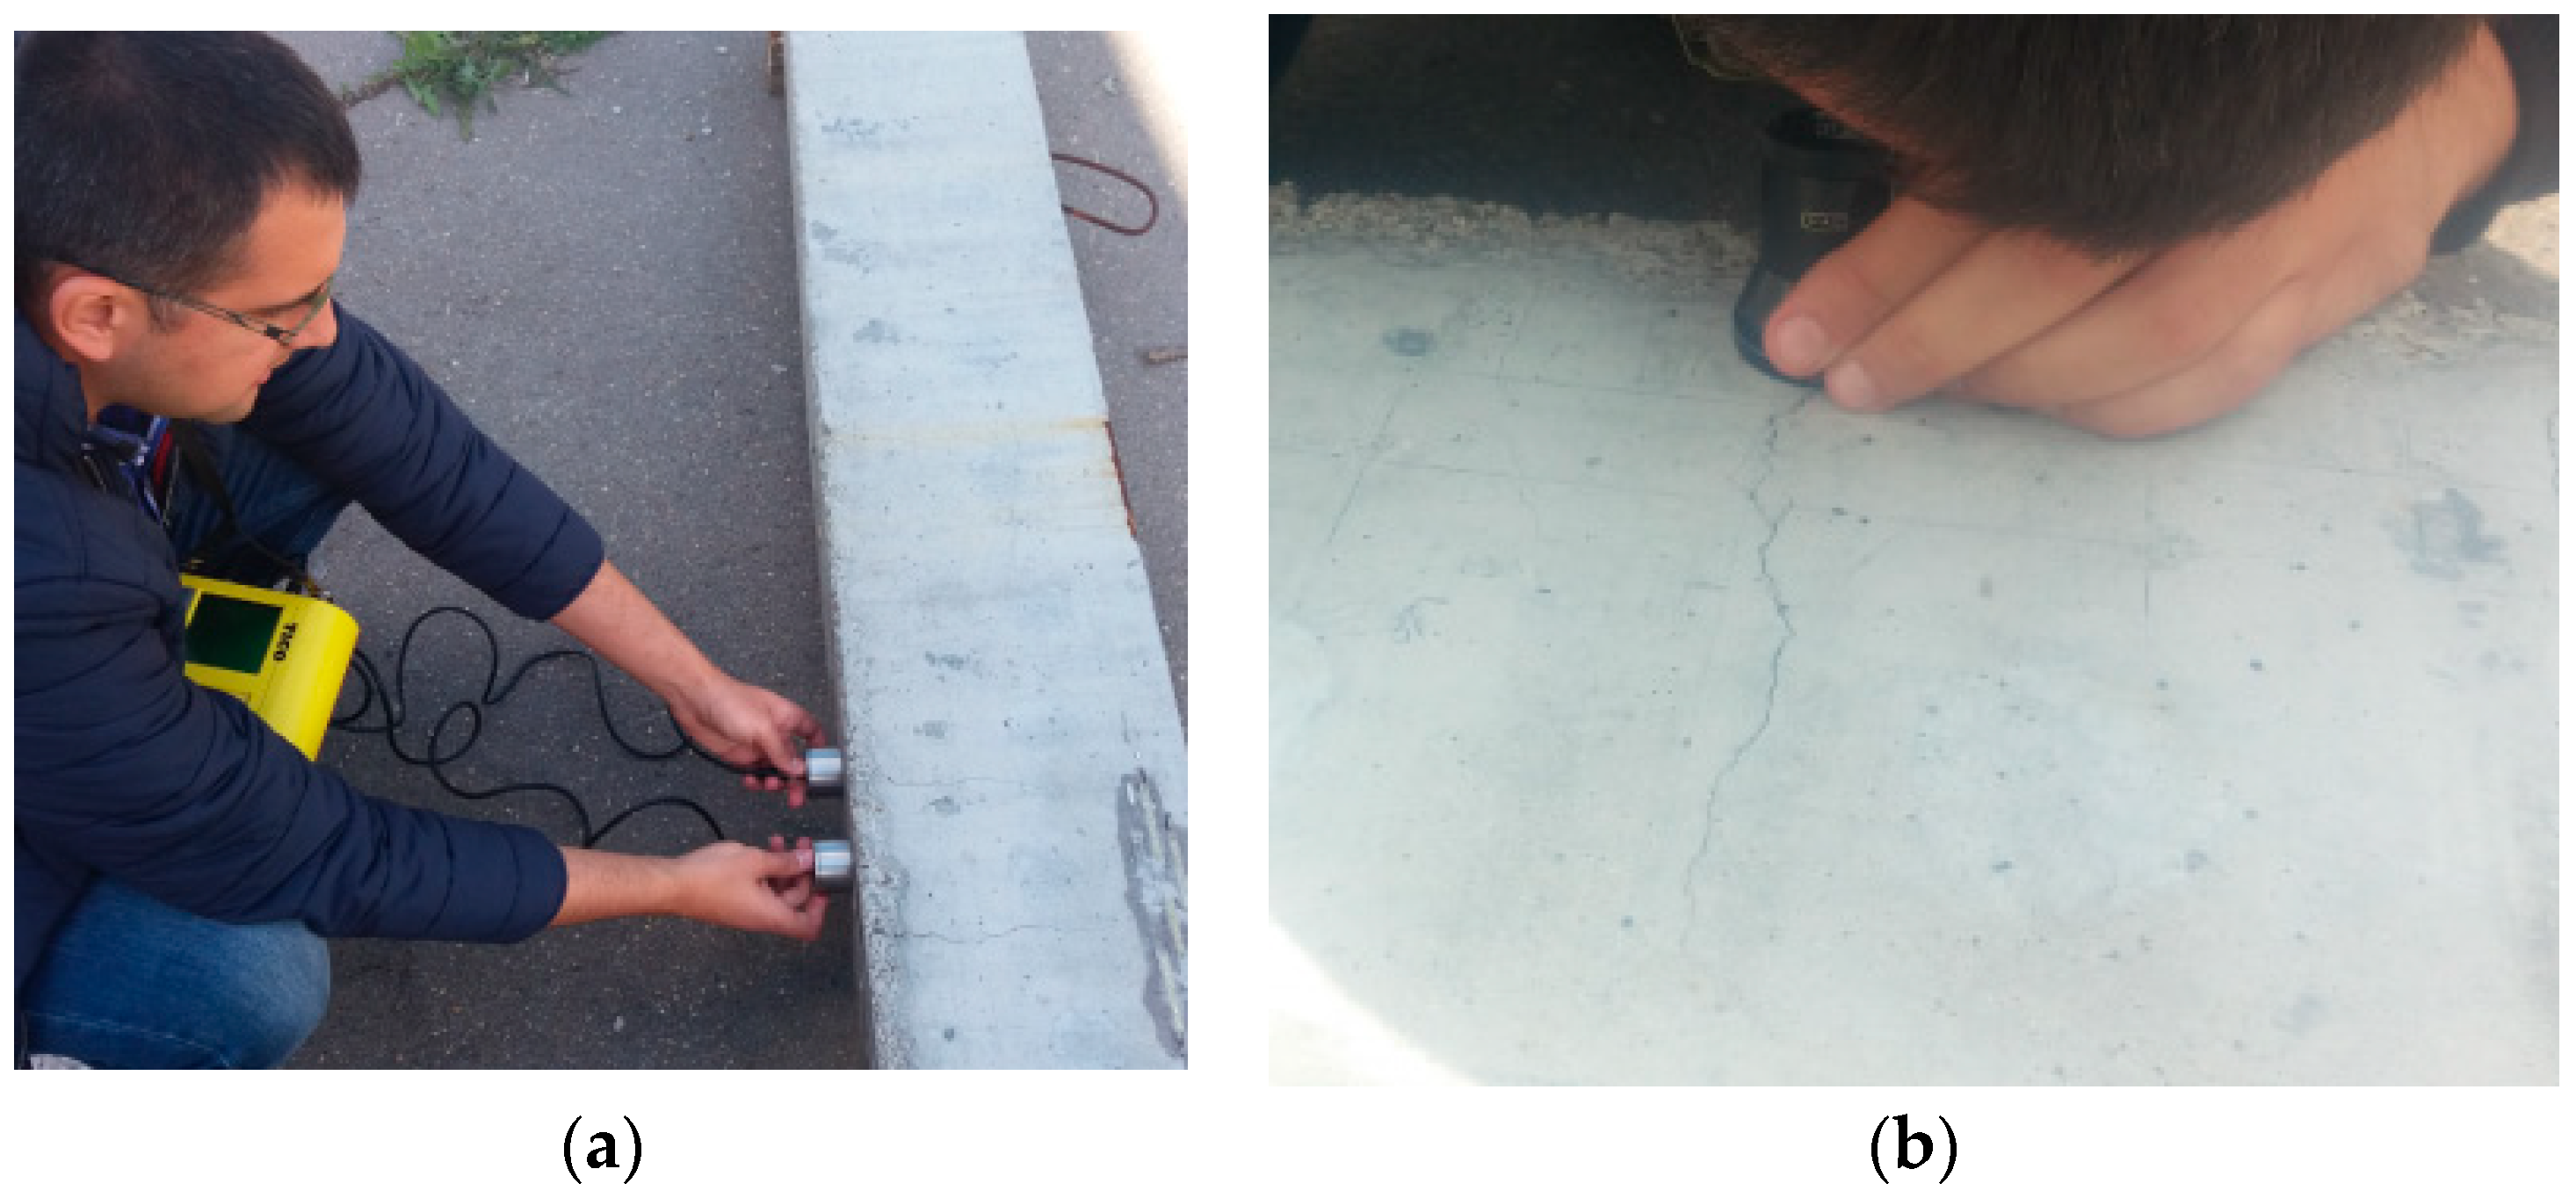
The results obtained for the depths of normal cracks with NDUPVM were compared with those visually measured using a crack magnifier Proceq (Figure 5b) [42].
For the experimental research of the normal cracks with NDUPVM, portable ultrasonic testing instrument Proceq TICO [12] was used (Figure 5a). The operating frequency of the transmitting and receiving transducer was 54 kHz, the resolution was 0.1 μ s . The contact between the piezoelectric transducers and the surface of the reinforced concrete element must be very good, so the surface must be smooth. Ultrasonic waves cannot move through the air, so the surfaces of the transmitting, receiving transducer and concrete surfaces have to be covered with a special coupling paste.
If there are no defects or cracks in the test area of concrete with a homogeneous structure, the ultrasonic signal will pass in the least amount of time between the transmitting and the receiving transducer. If there is reinforcement, the ultrasonic signal spreads faster. In the case of very small defects or cracks and if they are filled with water or other inclusions, the transmitting time will not change significantly.
When the ultrasonic pulses encounter a crack, they do not pass through the air-filled space [8,9,10,11], and some of them surround it by moving along trajectories that allow it to pass in the shortest way, i.e., with the highest velocity [9], see Figure 6a.
The distance between the transducers should be in the range from 10 cm to 25 cm depending on the frequency of the used transducers. According to [9], if the distance is less than 10 cm, the surface waves arrive faster to the receiver than the reflected longitudinal waves, and if the distance is greater than 25 cm the receiver will have multiple reflected waves and this will increase the error in the measurement.
For the ultrasonic testing instrument Tico [12], used in the research, the minimum distance between the transducers for concrete, with ultrasonic pulse velocity from 3600 to 4800 m/s, is from 5.4 cm to 7.2 cm, and the maximum distance is 25 cm.
Depending on the location of the sensors on the reinforced concrete beams the following transition is possible: direct (the sensors are located on two opposite sides), semi-direct (the sensors are located on two adjacent sides) and indirect (the sensors are located on one side). In the experimental tests, an indirect location of the sensors on the bottom surface of the reinforced concrete elements was used.

4. Results and Discussion

4.1. Measuring the Depth of Normal Cracks

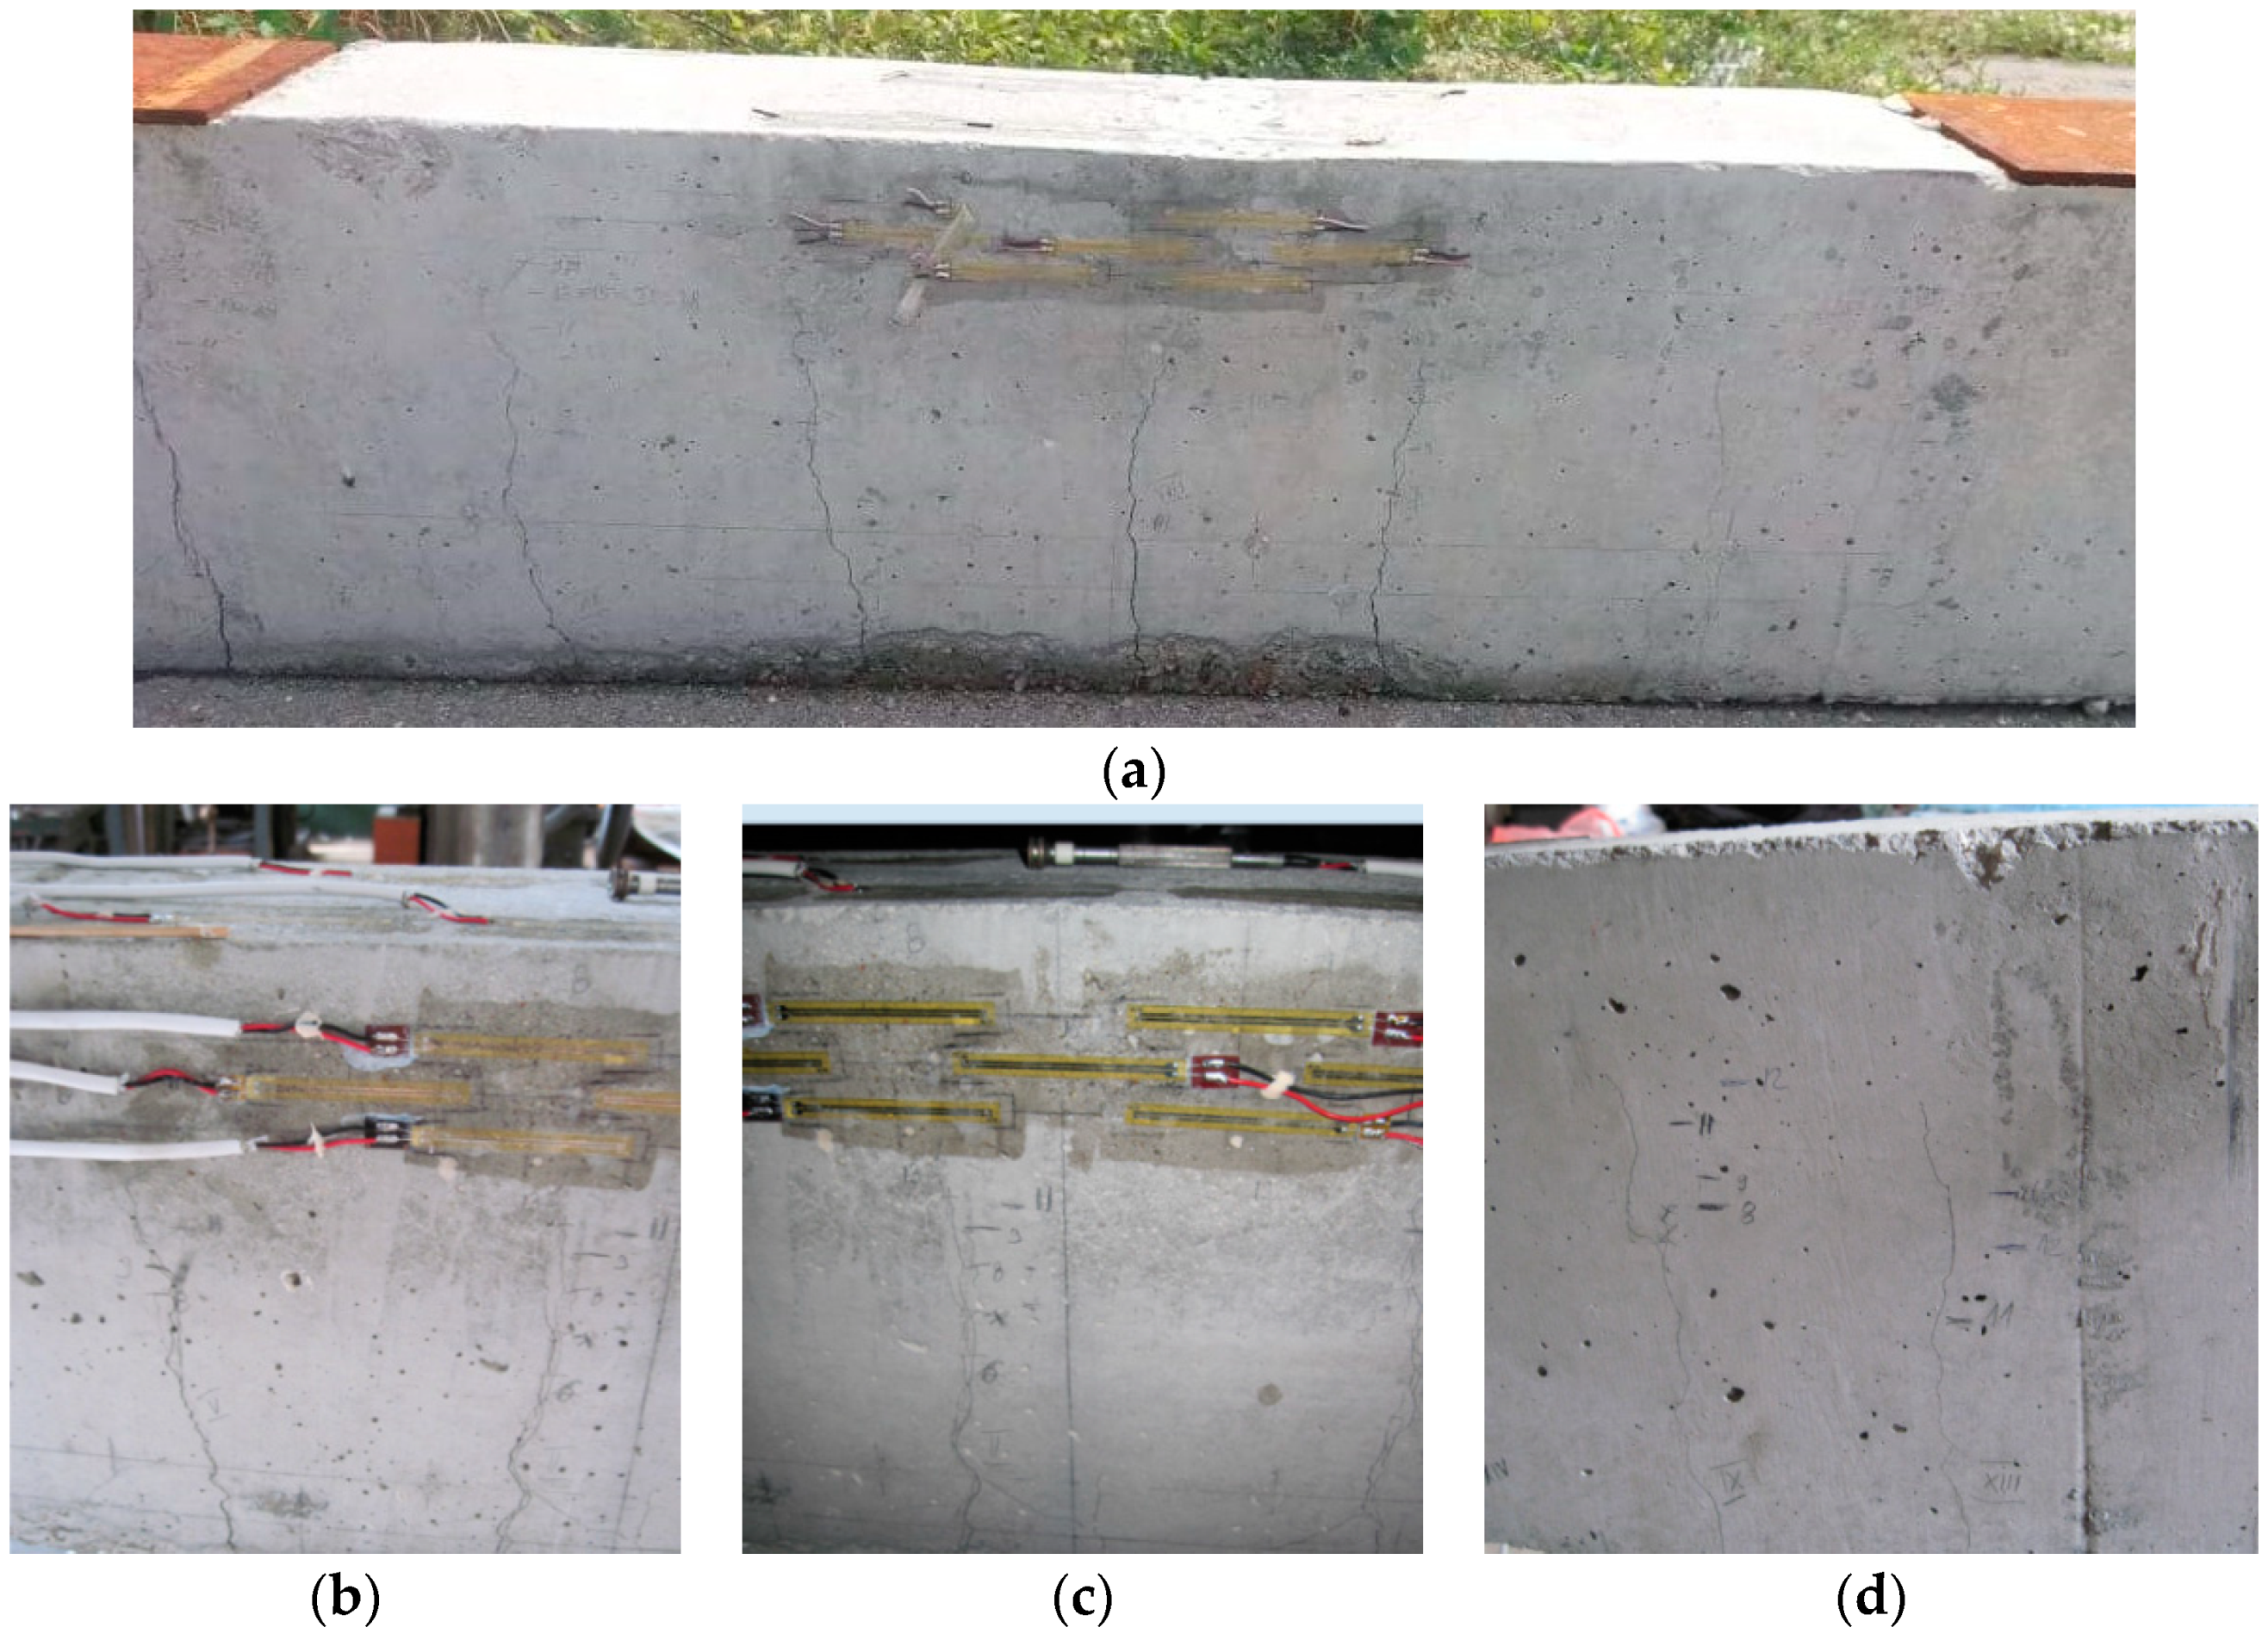
Different normal cracks with different widths located on the tested beams (Figure 7) were investigated by the NDUPVM and by visual observation. The width of the investigated cracks was between 0.05 and 1.30 mm. The transmitter and receiver were located on both sides of the crack at the same distances (Figure 6). For cracks that were located closer to each other (a distance less than 5 cm) the depth could not be measured due to the minimum gap between the transducer and the crack.
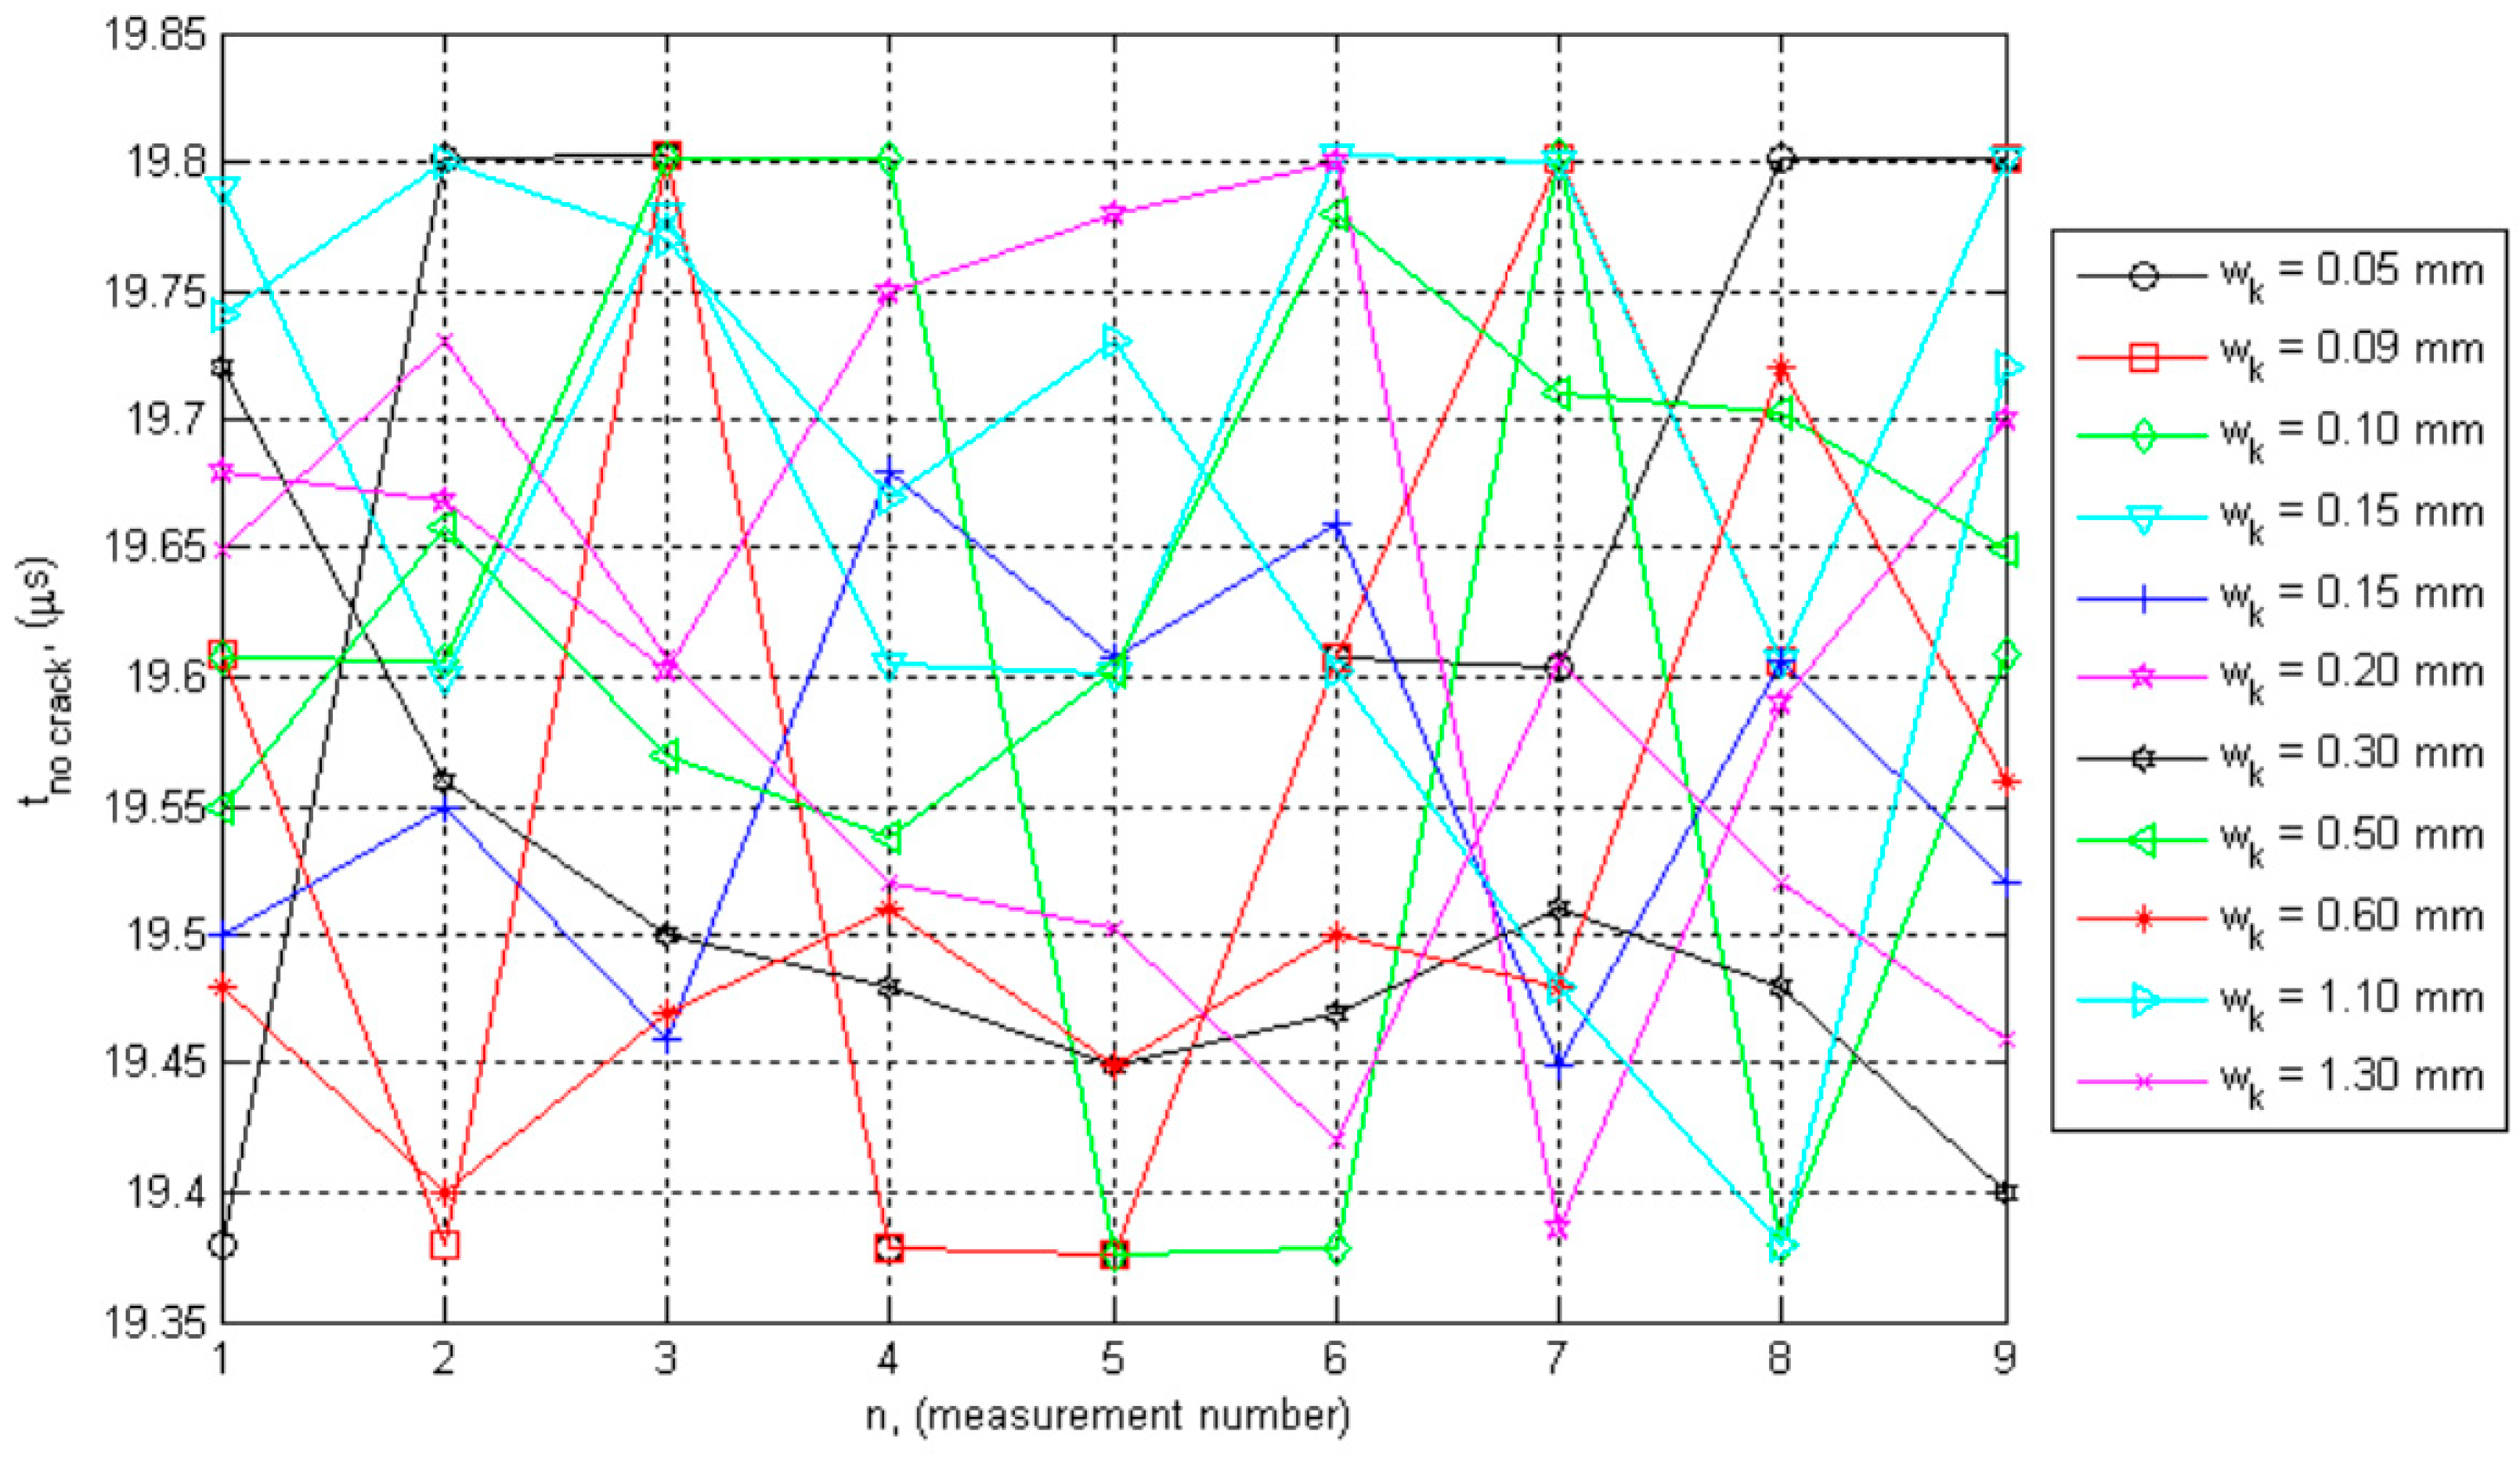
At least nine measurements were made for each of the typical crack’s width. The measured velocity of ultrasonic pulse v no   crack in the region of the beam without crack was in the range between 5050 m/s and 5160 m/s. The measured transmitting time of the ultrasonic pulse t no   crack in the region of the beam without a crack (Figure 8) was in the range between 19.38 μ s and 19.802 μ s . Results confirmed the good quality and homogeneity of the concrete used for the production of tested elements.
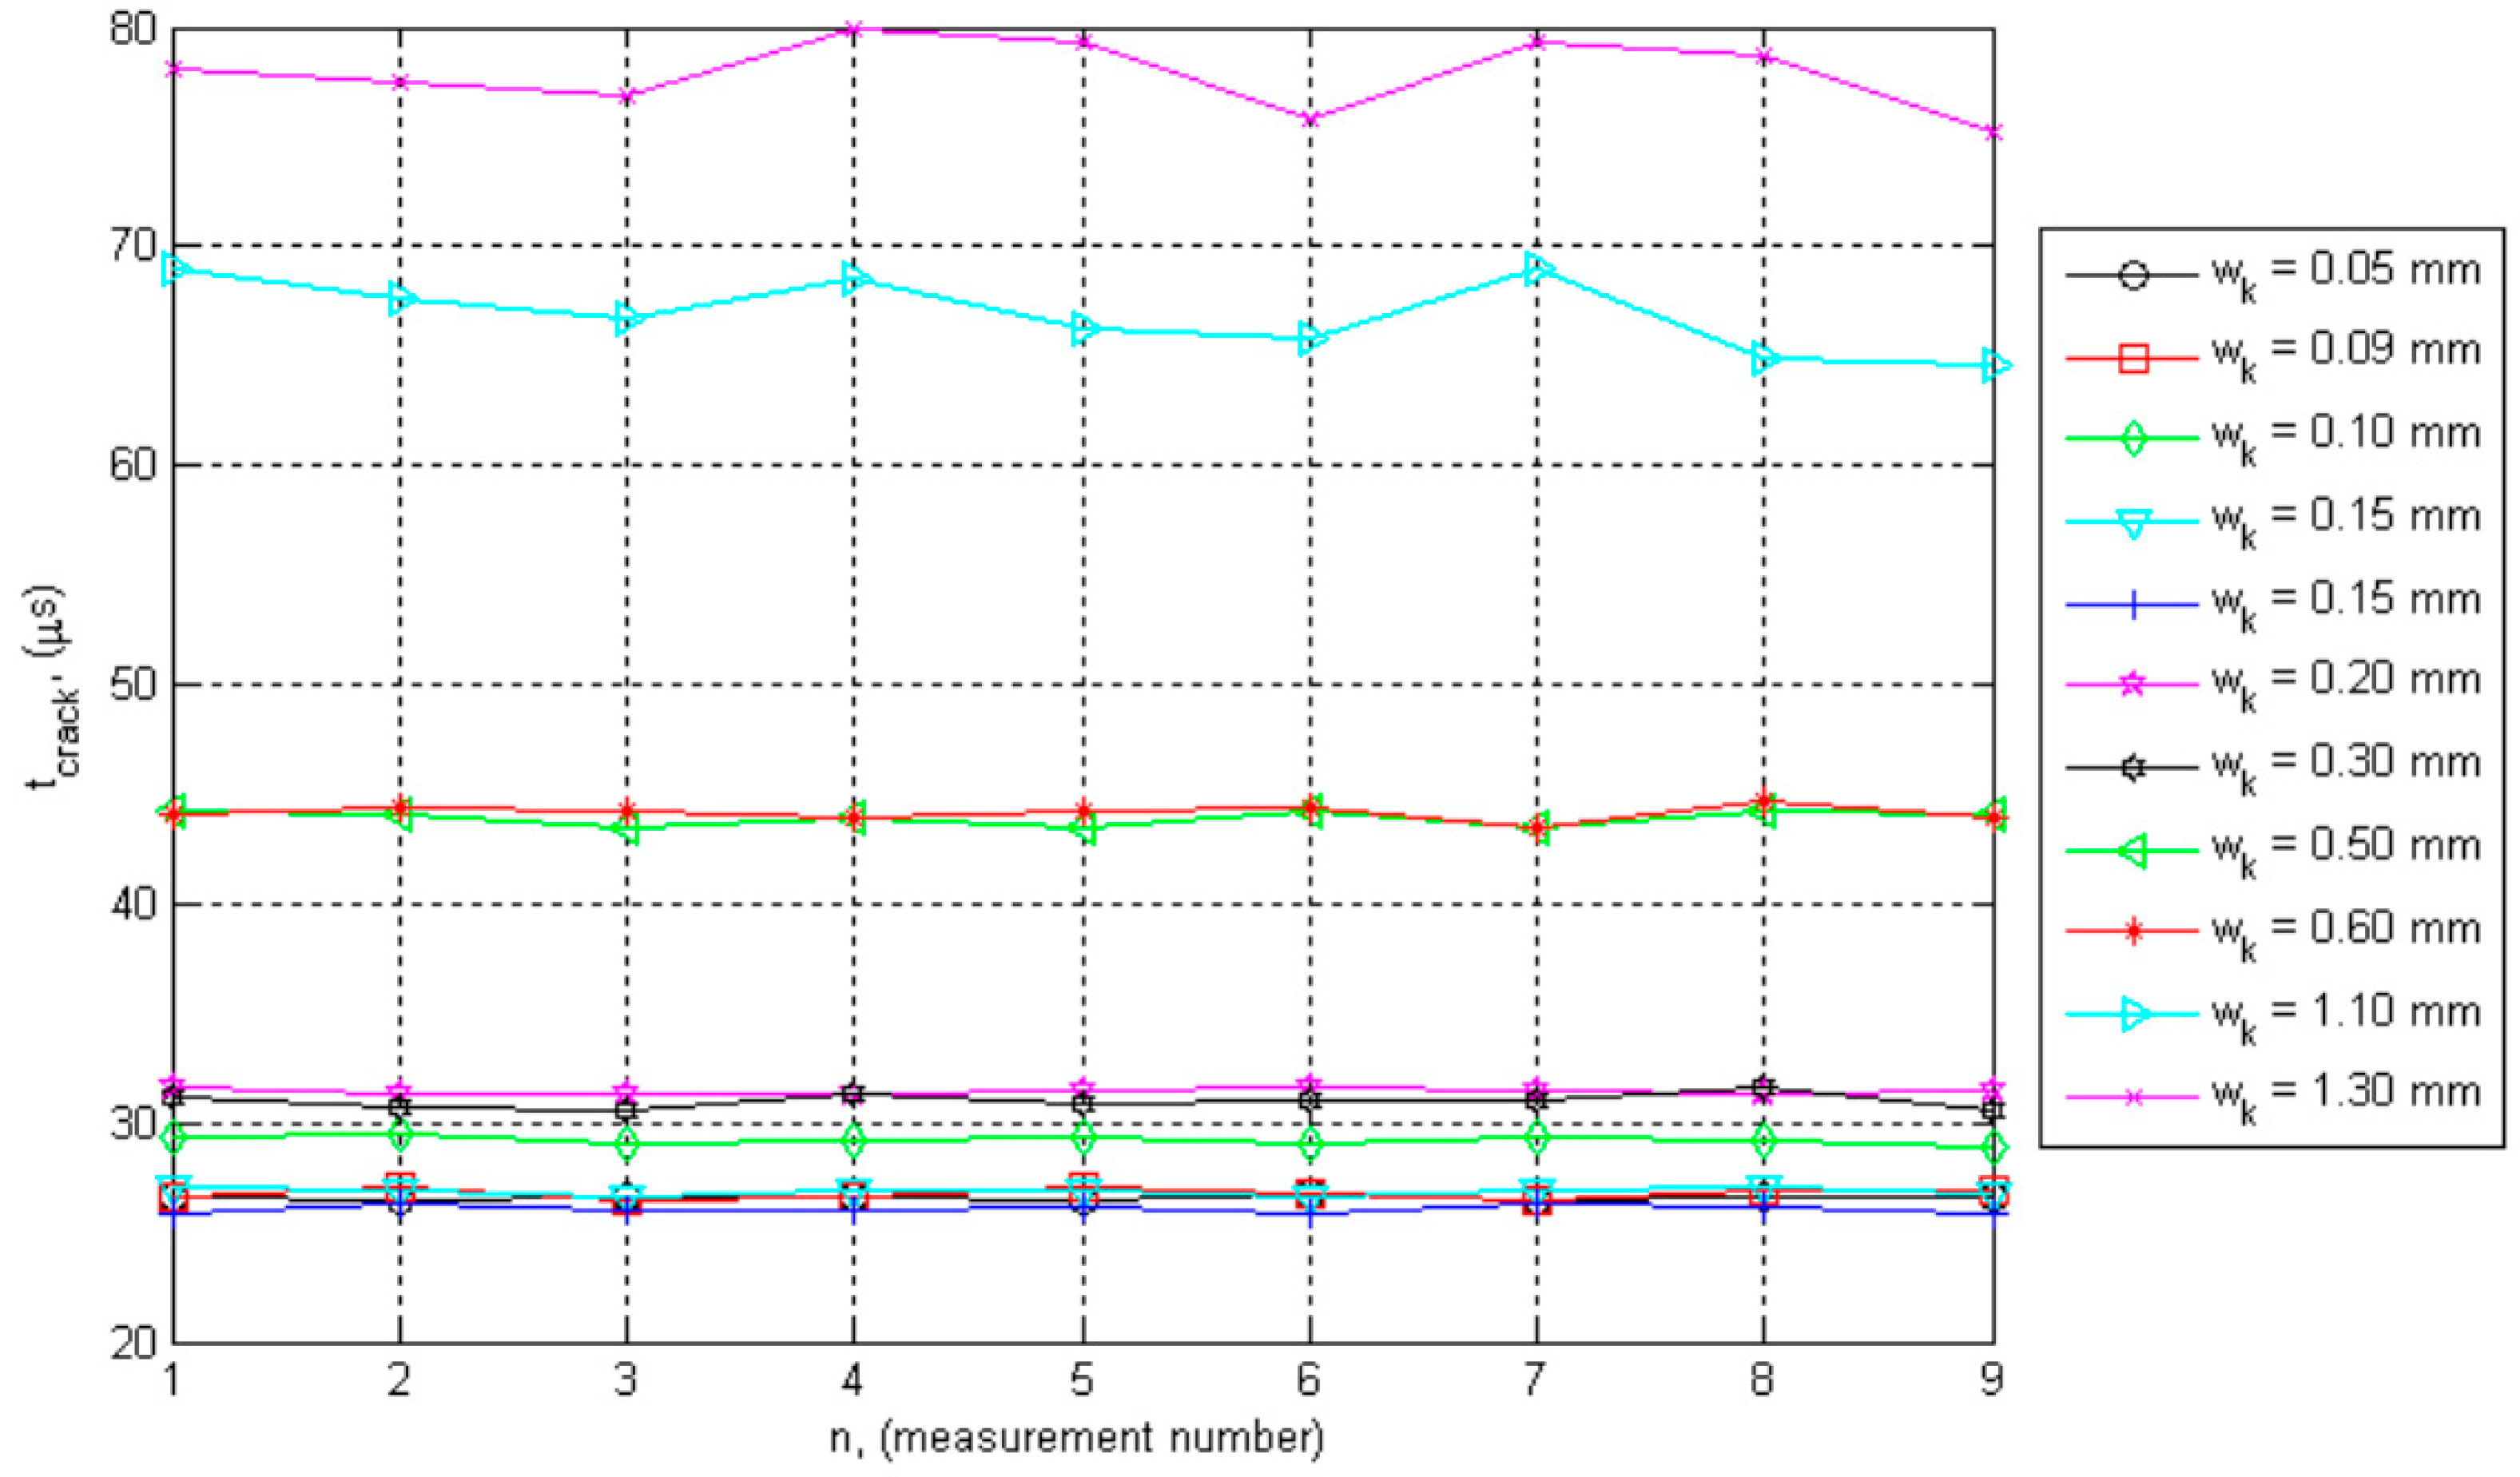
The measured transmitting time of the ultrasonic pulse t crack in region of the beam with a normal crack (Figure 9) was in the range between 25.84 μ s and 80.00 μ s . For all the measurements the distance between the measuring transducers was 10 cm.
Maximum, minimum, and mean value of t crack and standard deviation at different crack widths are given in Table 1.
Depth of normal cracks “c”, based on the physics law of distance at a constant velocity v no   crack , is determined by the formula [3,8,10,11,40]:
c = b t crack 2 t no   crack 2 1 = v no   crack 2 t crack 2 t no   crack 2
where:
b is the distance from the center of the transducer to the middle of the crack;
v no   crack is the velocity of the ultrasonic pulse in region of the beam without a crack;
t no   crack is the transmitting time of the ultrasonic pulse in region of the beam without a crack;
t crack   is the transmitting time of the ultrasonic pulse in region of the beam with a normal crack.
Note: In the experiment, the distance between the transducers was “2b” = 10 cm.
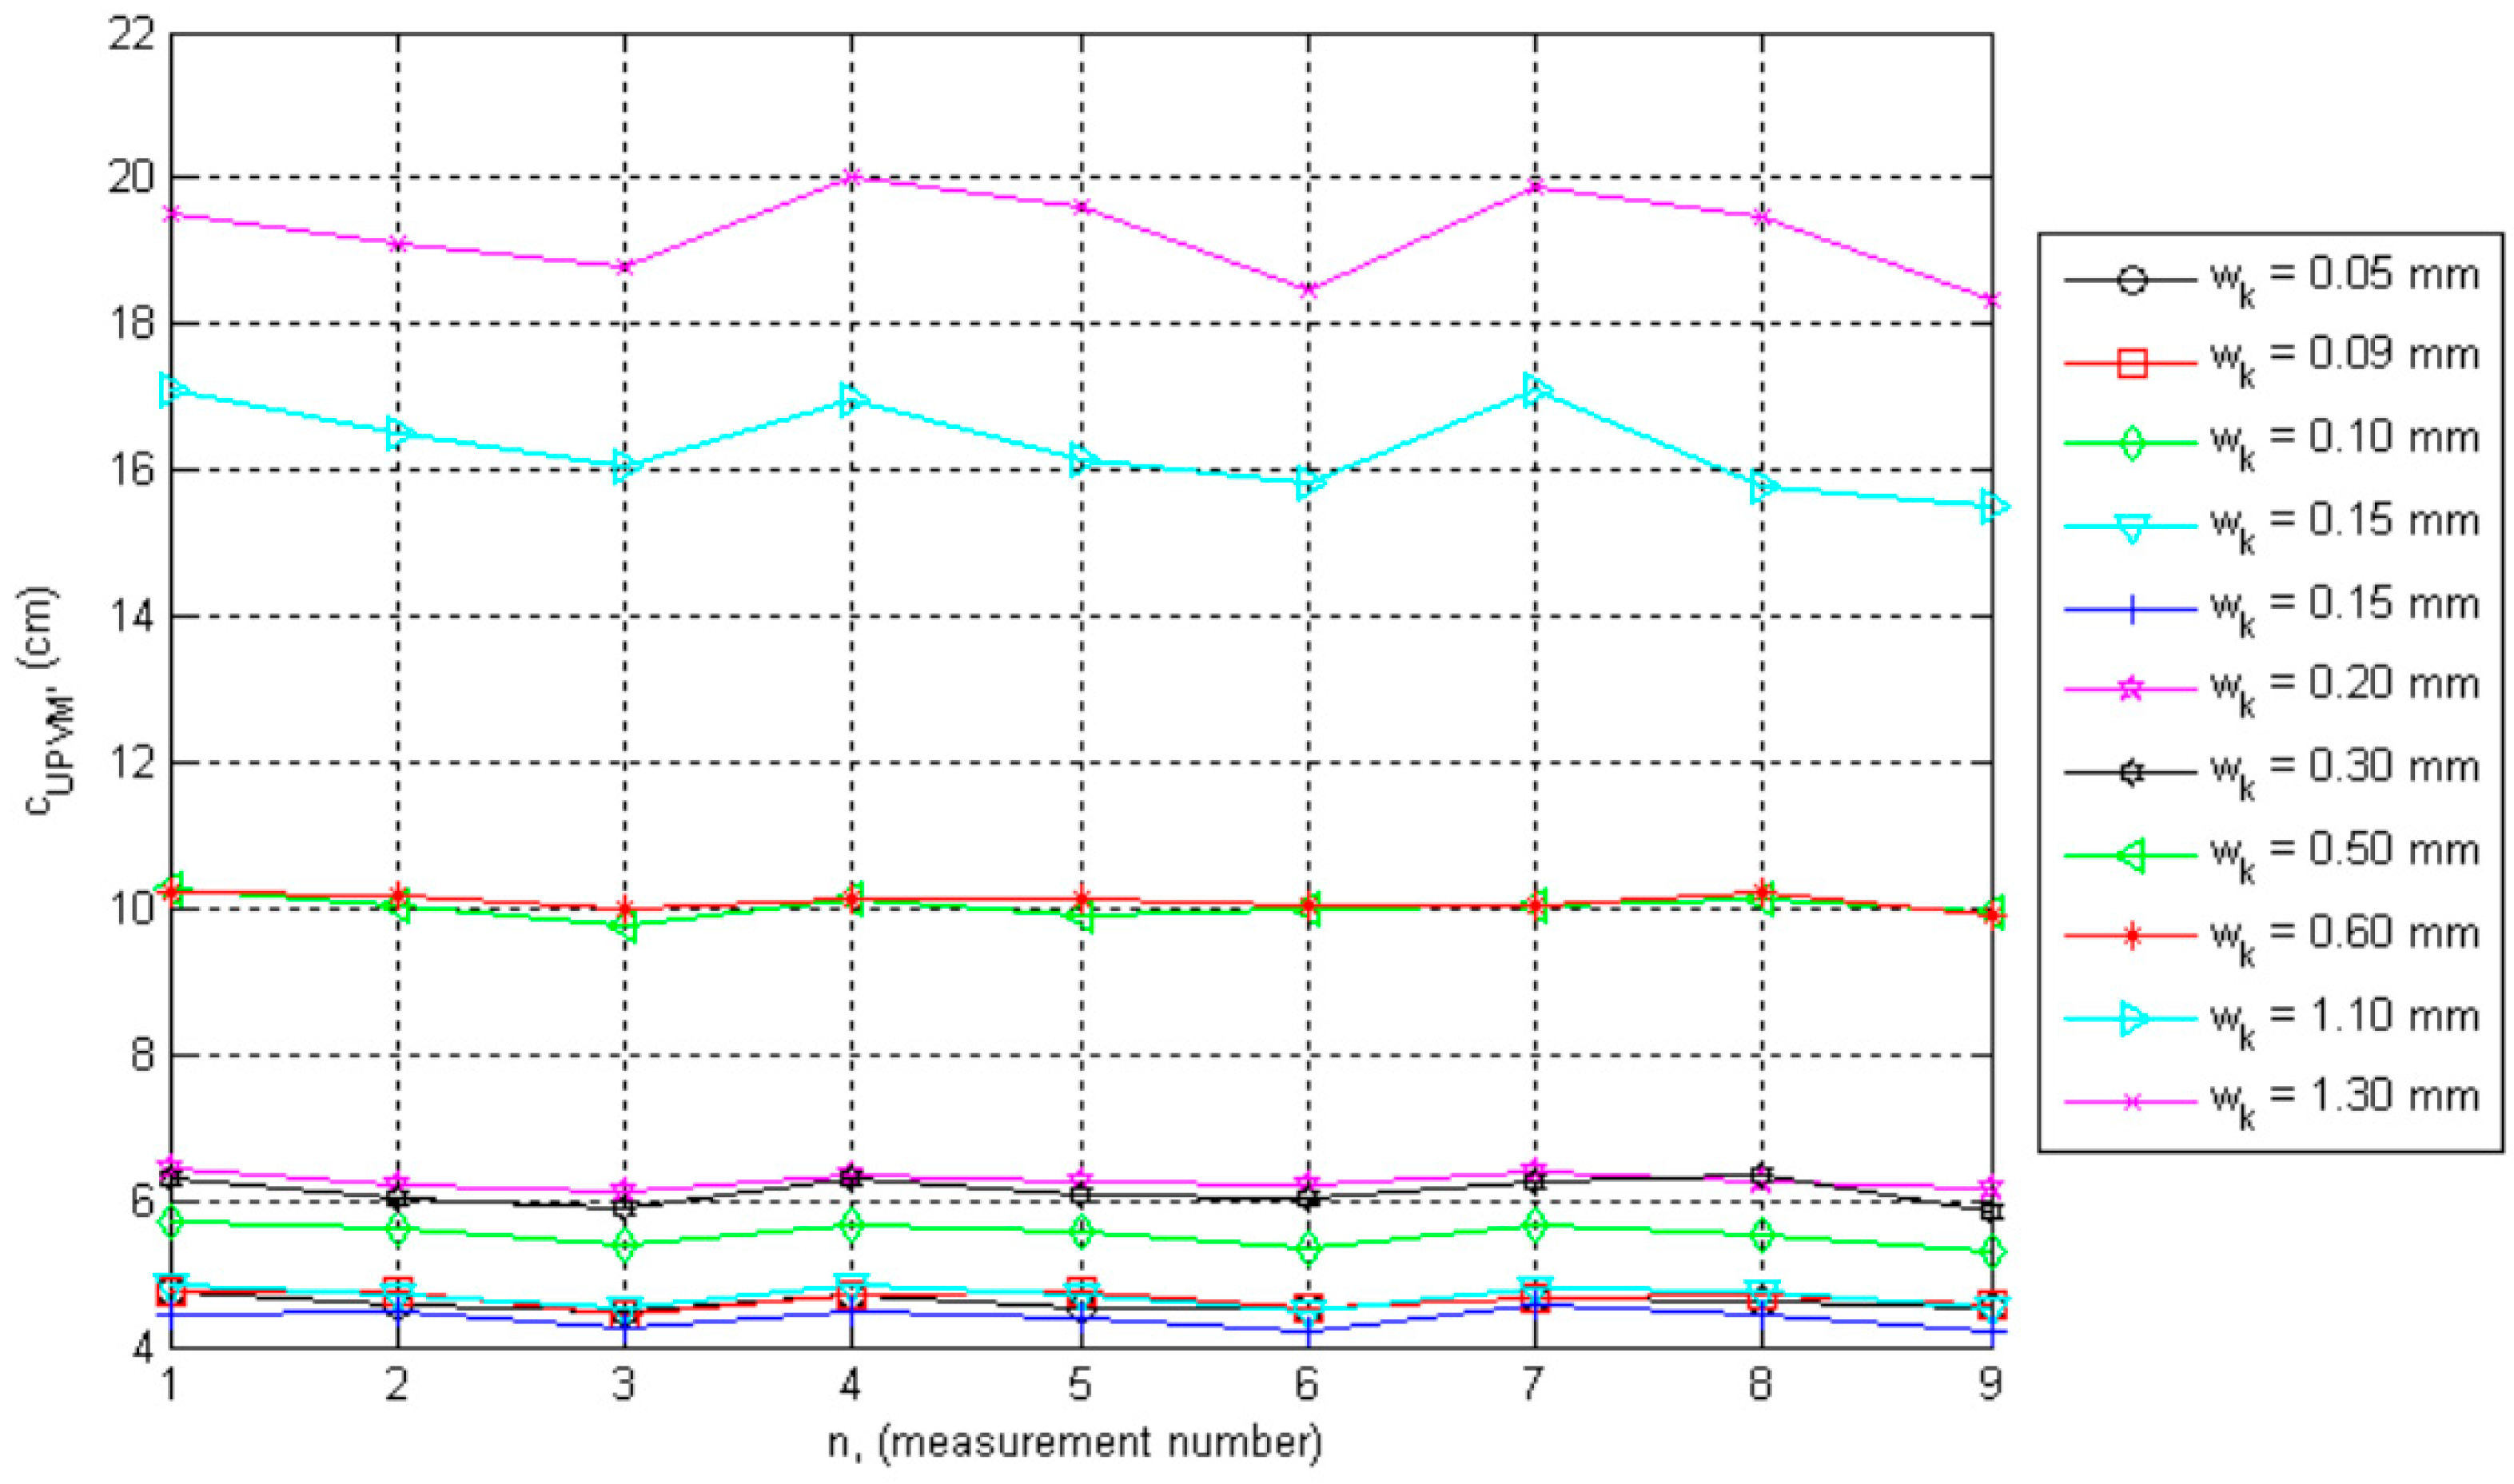
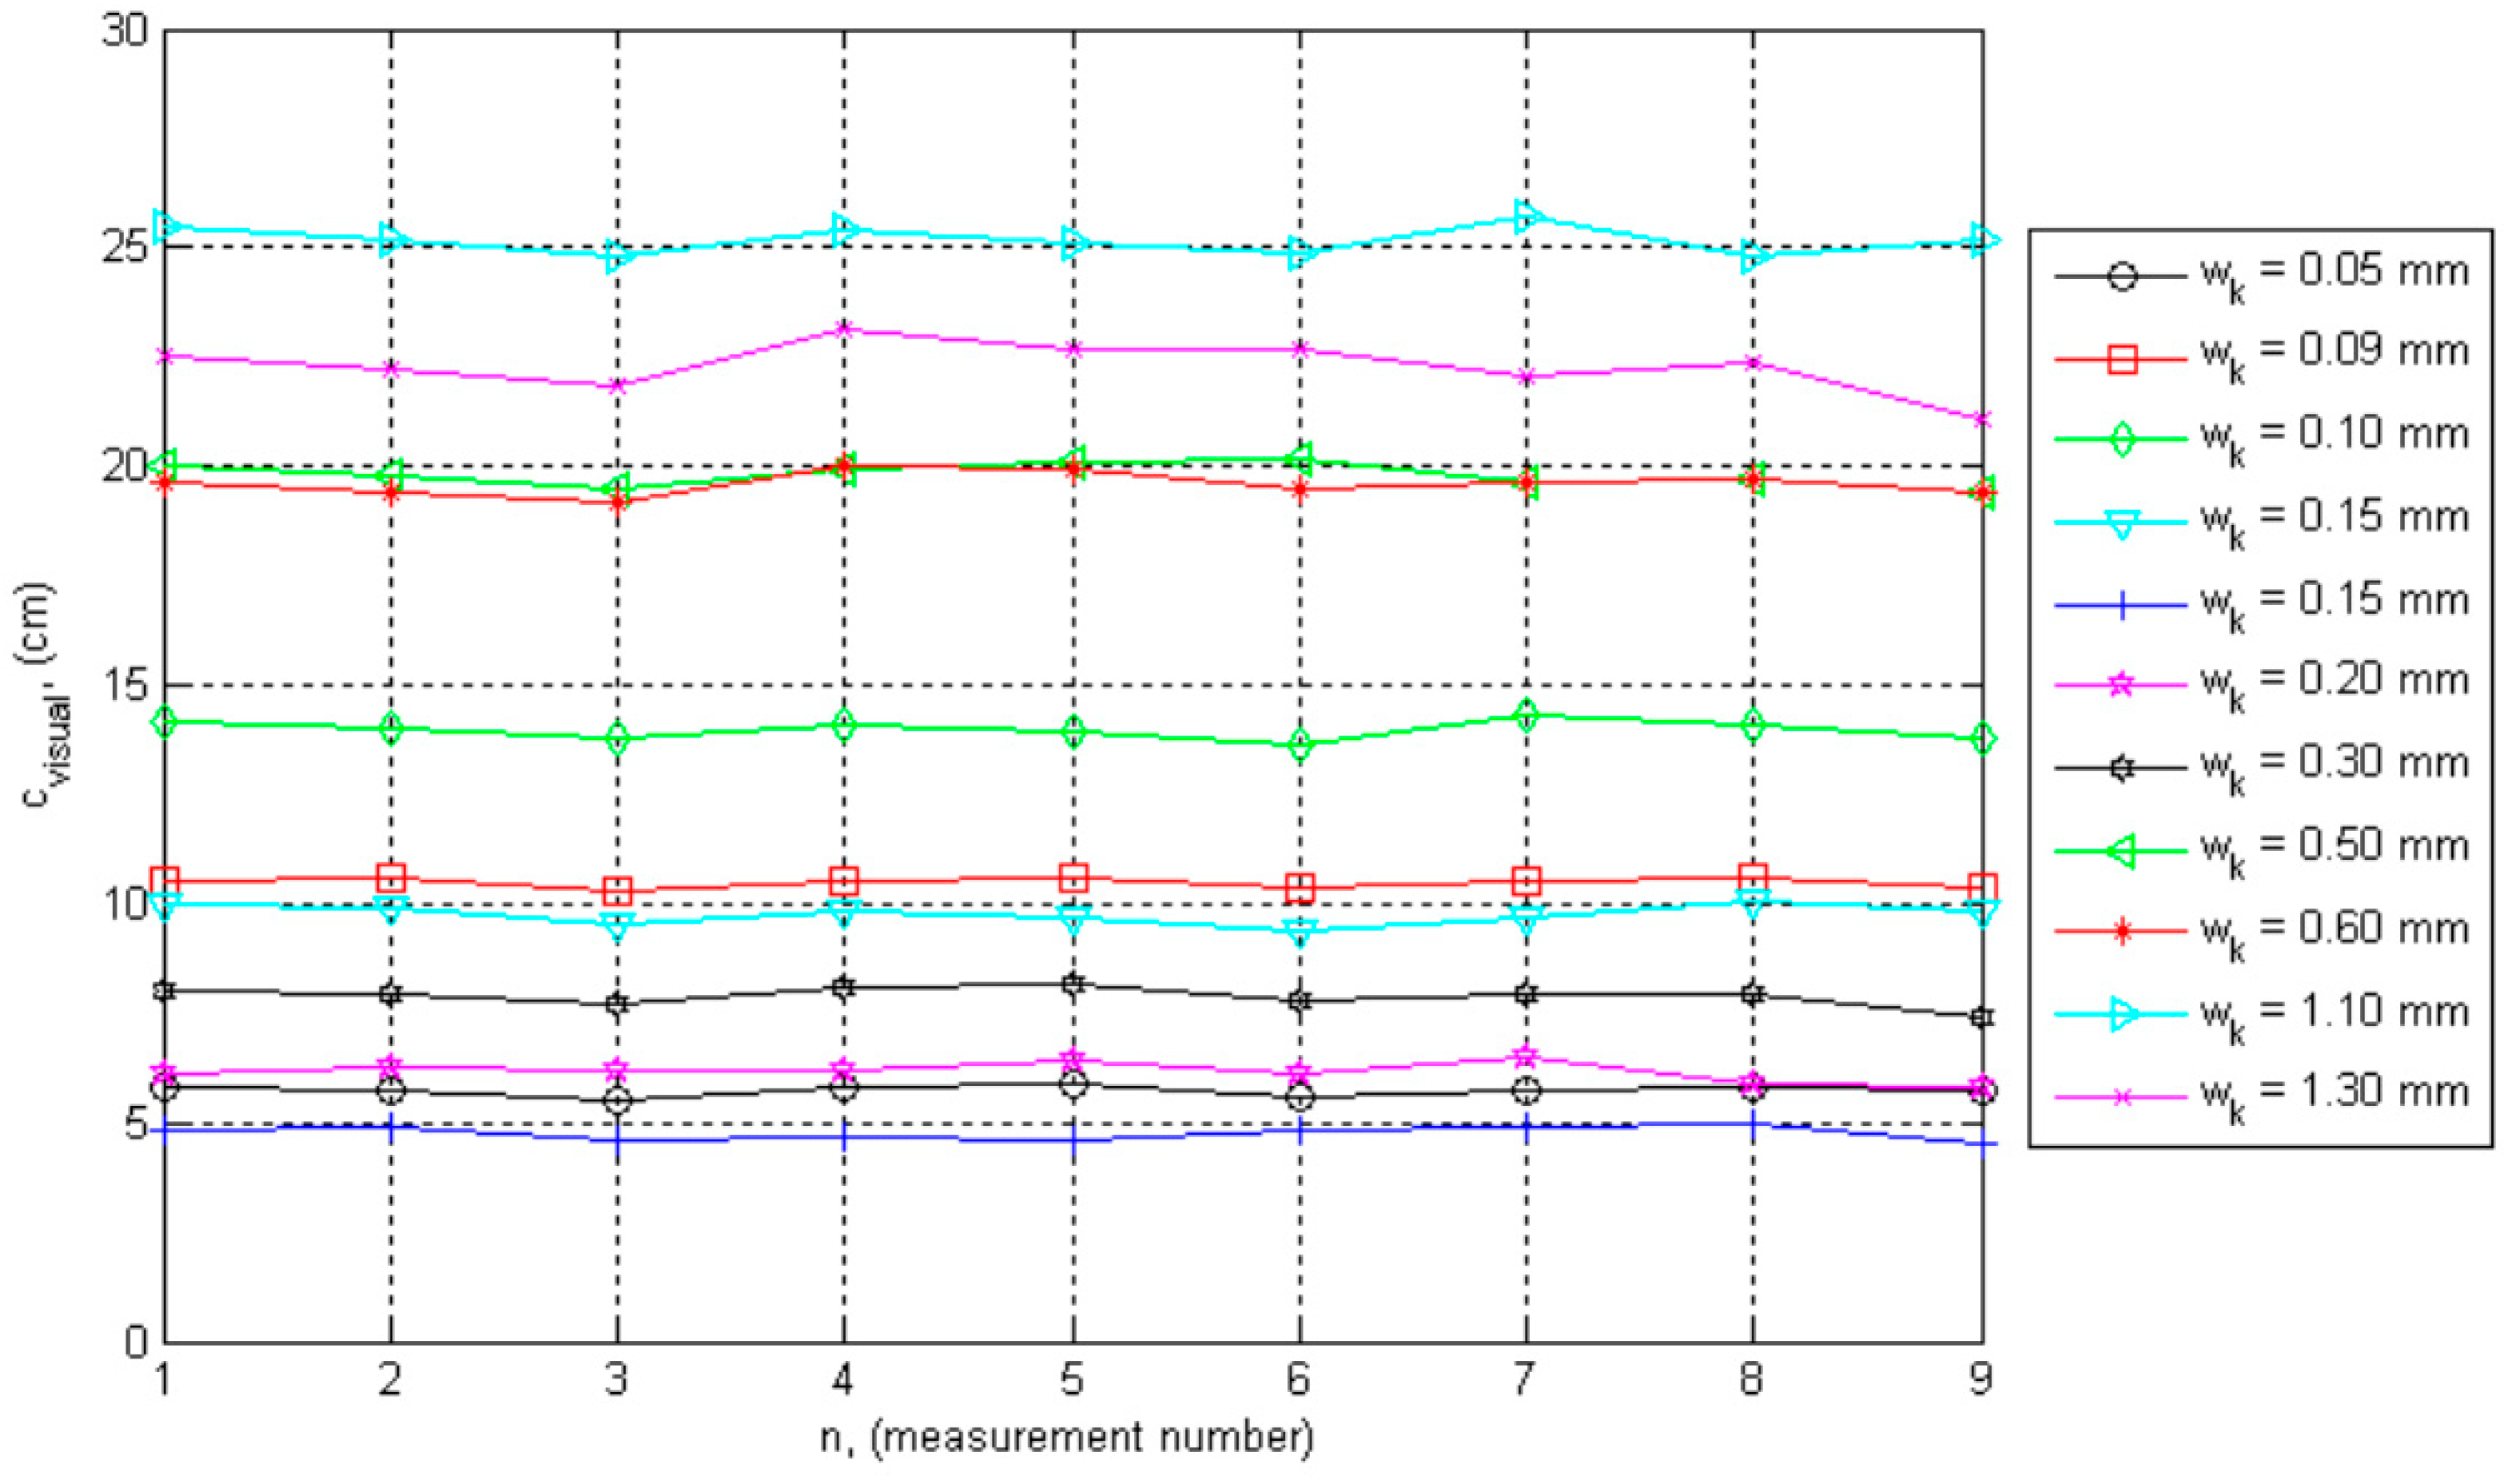
Experimentally determined depths of cracks by NDUPVM ( c UPVM ) and by visual observation ( c visual ) for the corresponding crack widths are shown in Figure 10 and Figure 11, respectively.
Maximum, minimum, and mean value of c UPVM and standard deviation at different crack widths are given in Table 2.
The relative error is calculated by the formula:
ε c % = c visual   c UPVM c visual   × 100 ,   ( % )
where: c visual is the visually measured depth of the crack, c UPVM is the measured depth of the crack determined by the NDUPVM.
The depths of 99 normal cracks were experimentally determined, using both methods—by NDUPVM and by visual measurement.
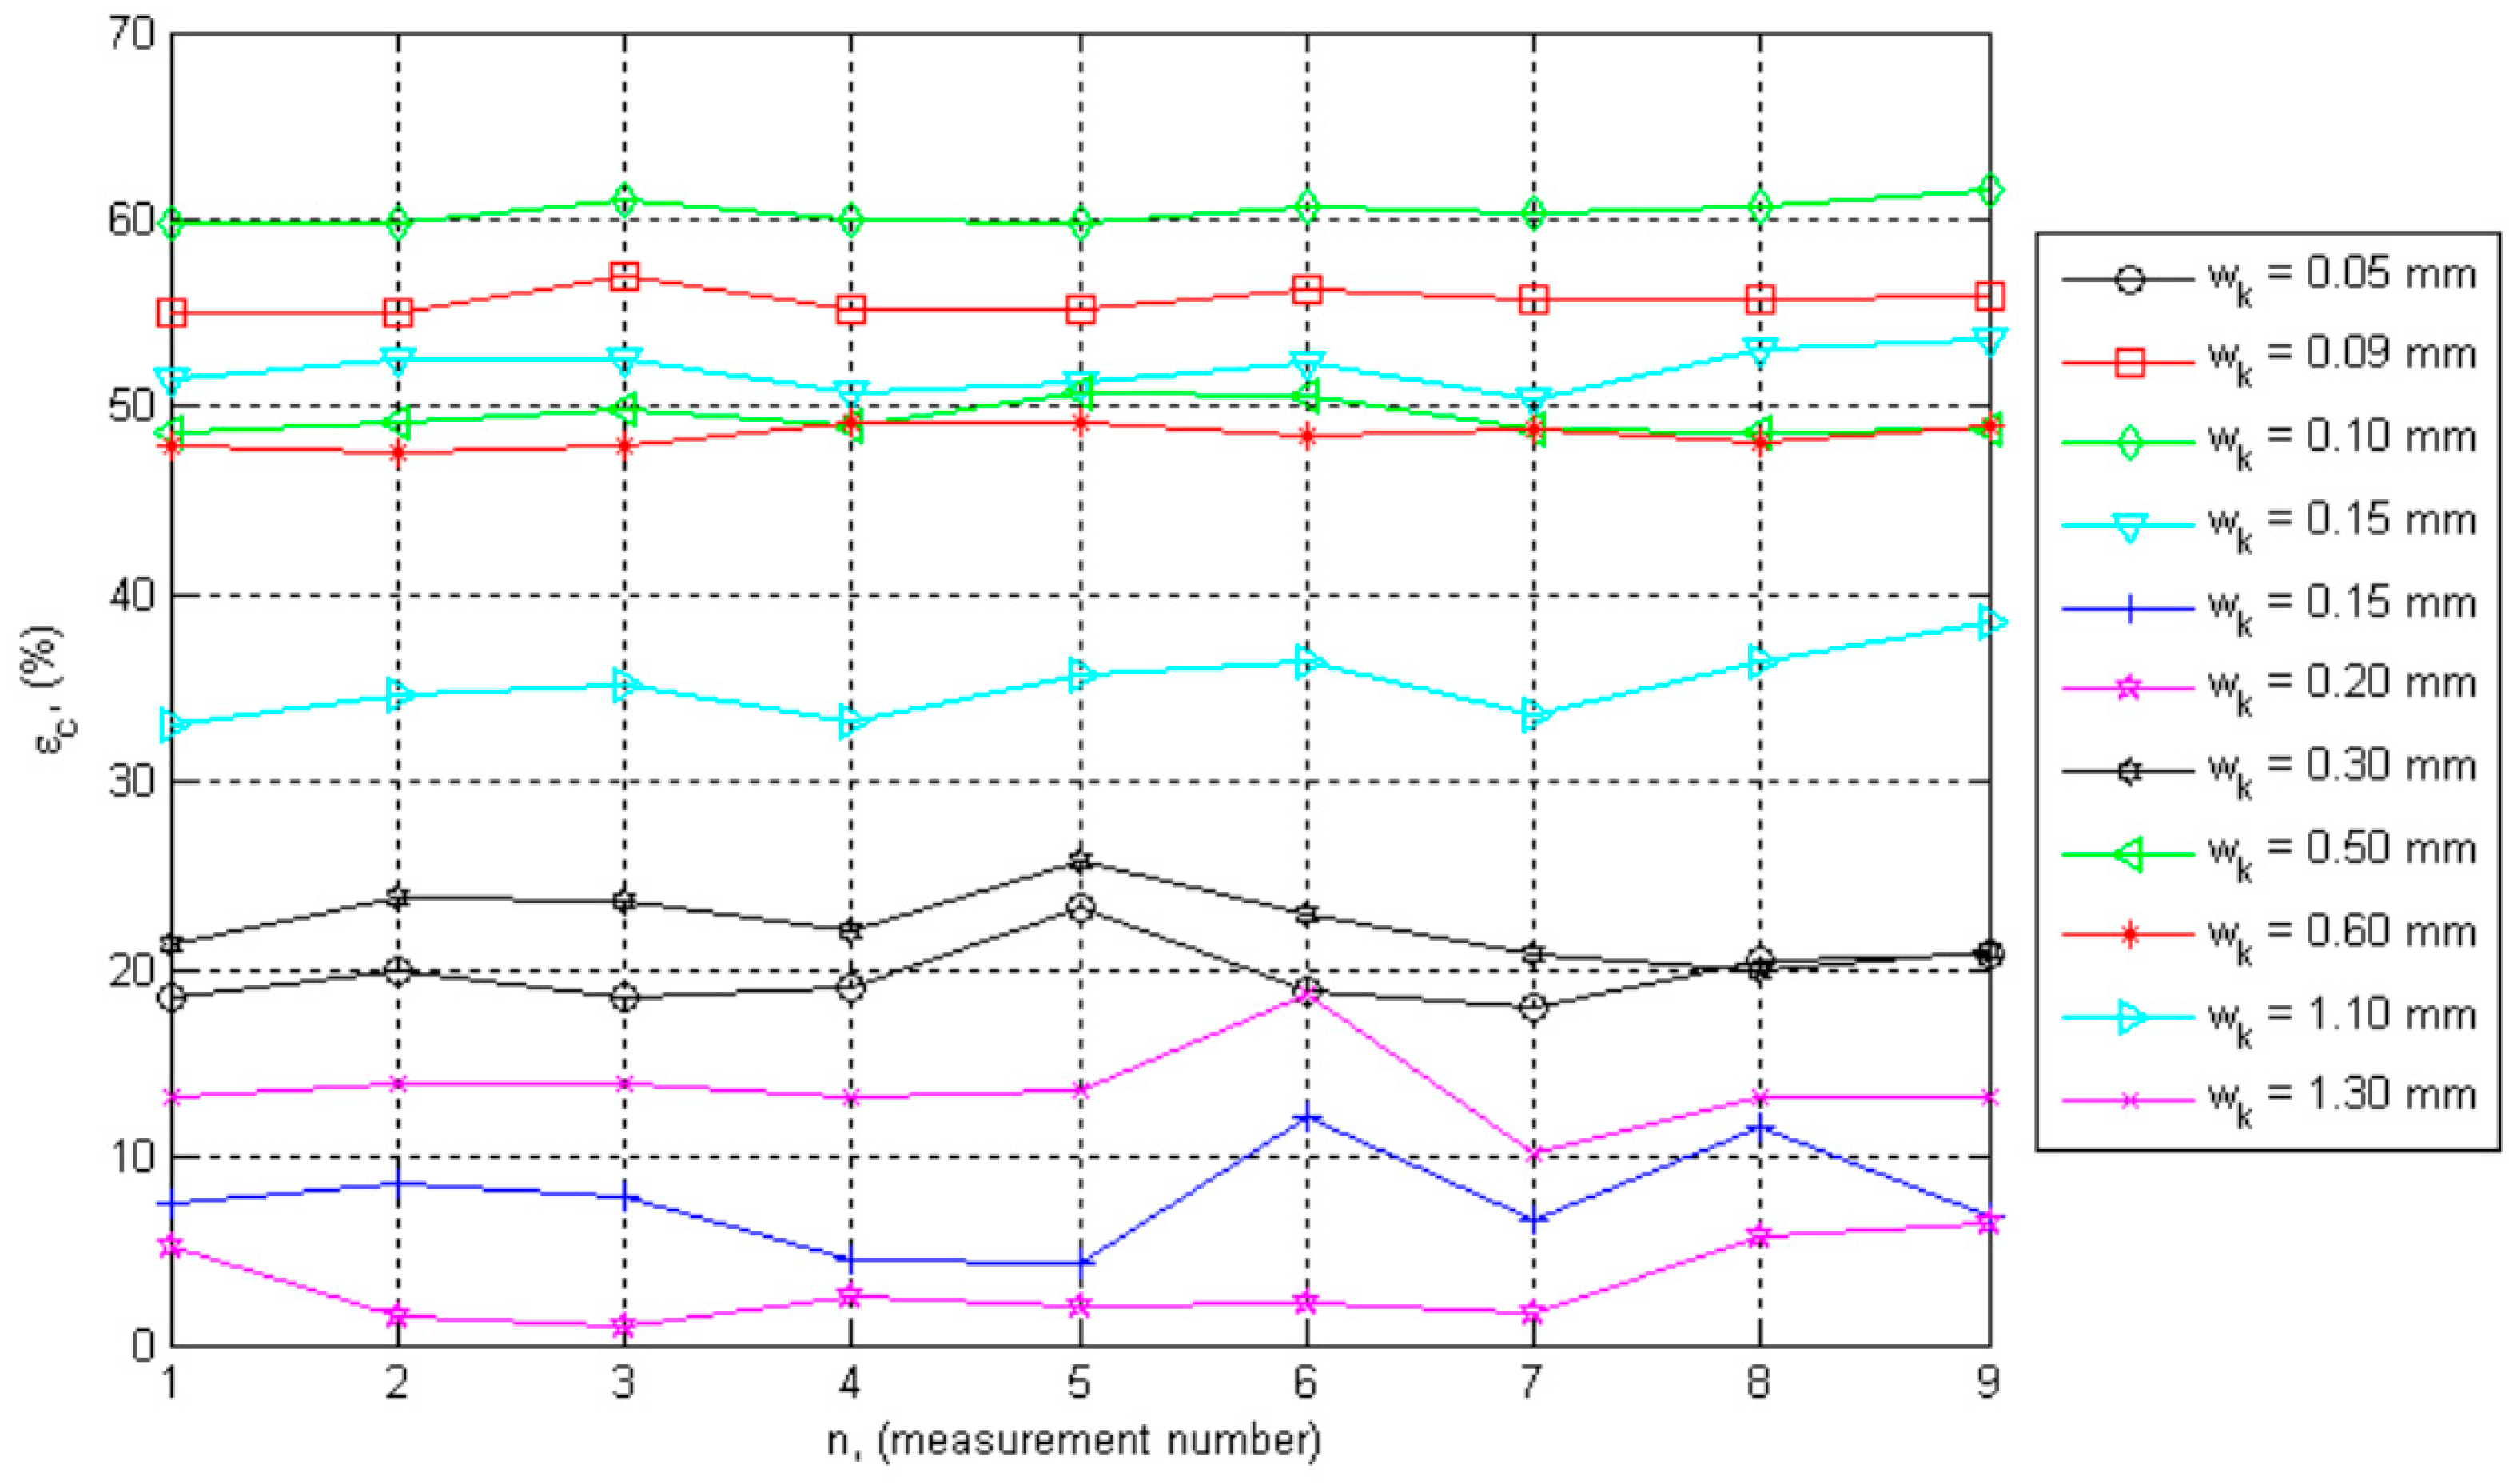
From the visual observation and NDUPVM measurements of crack depths the relative errors were calculated, by Equation (2), and the data is plotted in Figure 12.
Maximum, minimum and mean value of ε c and standard deviation for the corresponding crack widths are given in Table 3.

4.2. Results Summary

The results analysis showed that:
  • At crack depths from 4.5 cm to 14.3 cm measured visually and a crack width from 0.05 mm to 0.30 mm, the relative error was from 0.97% to 61.67%.
  • At crack depths from 19.2 cm to 20.2 cm measured visually and crack width from 0.50 mm to 0.60 mm, the relative error was 47.58% to 50.75%.
  • At crack depths from 21.1 cm to 25.7 cm measured visually and crack width from 1.10 mm to 1.30 mm, the relative error was 10.14% to 38.49%.
  • According to [18], the visually determined crack depths are greater than those determined by the NDUPVM and it was confirmed by the present research.
  • Measured values for t no   crack and t crack had good consistency and the obtained standard deviations were low. It proves that the measurements were properly made.
  • The standard deviations for all, but the common crack width of 0.15 mm, ε c values were acceptable for such measurements.
  • The biggest value of ε c for the common crack’s width showed that these cracks were mainly affected by external exposure.

5. Conclusions

This paper presents the results of experimental studies on the measurement of cracks depths in reinforced concrete elements by NDUPVM and by visual observation. The transmitting time of the ultrasonic pulse in concrete without cracks and defects, and such in cracks with widths from 0.05 to 1.3 mm and depths from 4.8 to 25.5 cm were determined by the NDUPVM. The depths and widths of normal cracks were also determined visually using a crack magnifier. Maximum, minimum, and mean value of t crack and standard deviation at different crack widths, maximum, minimum, and mean value of c UPVM and standard deviation for the corresponding crack widths, and maximum, minimum, and mean value of ε c , and standard deviation for the corresponding crack widths were obtained and analyzed.
As we know, cracks in concrete appear because of tensile strain and the low tensile strength of concrete, but also because of initial small defects, reinforcement, and imperfections, etc. Crack patterns are unpredictable and follow mainly the tensile strain, but also gravels and imperfections in concrete. All the non-destructive methods that can be used to access crack parameters have advantages and disadvantages. The best method still does not exist.
Traditional methods of diagnostics, assessment, and analysis of building structures are destructive, more costly, and labor intensive. NDT methods are being developed and implemented more and more worldwide that allow the properties of the building materials used and the quality of the elements and structures to be controlled repeatedly, both during their construction and during different stages of their exploitation.
Analyzing the obtained results, some important conclusion can be defined:
  • The present study confirmed the possibility of using NDUPVM for the assessment of reinforced concrete structures and the possibility for obtaining information about the homogeneity of the reinforced concrete, for detection of caverns and cracks, and assessment of the quality of the construction.
  • Measuring, processing, analyzing, and interpreting the obtained results required careful data collection, high qualification of the researchers, and expert analysis.
  • All measured crack depths by the NDUPVM were smaller than the real ones.
  • This research confirmed that the visually determined crack depths were greater than those determined by the NDUPVM.
  • The direct exposure on external atmospheric impacts, such as rain, snow, etc. had an influence on the accuracy of the NDUPVM measurements.
  • The relative error ε c varied in a wide range, between 0.97% and 61.67%, and it was not possible to predict the real value of crack depth only by NDUPVM in the case of direct exposure of external atmospheric impacts over the examined structures.
  • Further research is required to systematize the methods for detecting defects and cracks in reinforced concrete.
  • It is necessary to extend the research on beams with different shape, reinforcement ratio, concrete grade, etc., and on other structural elements, like slabs, columns, walls, etc.
Limitations in the usage of NDUPVM are required if the investigated elements were exposed to direct atmospheric conditions. This is especially important when examining slabs, walls, and other elements without clear access and if it is impossible to verify the NDUPVM by visual observation or by another method.
Authors recommend finally that two different methods should be used in the structural condition assessment of concrete elements, including crack depth determination. A combination of NDUPVM with visual observation is still one of the best solutions in most common cases.
The results of this study will contribute to the faster, reliable, and inexpensive control required for the safe exploitation of buildings and facilities.

Author Contributions

Conceptualization, I.I. and V.S.; methodology, I.I. and V.S.; formal analysis: I.I. and V.S.; investigation: I.I. and V.S.; resources, I.I. and V.S.; writing—I.I. and V.S.; writing—review and editing, I.I. and V.S.; visualization, I.I. and V.S.; supervision, I.I. and V.S.; project administration, I.I. and V.S.; funding acquisition, I.I. and V.S.

Funding

This research was supported by the research grant No. KP-06-OPR01/3-2018 for the project “Creation of a flexible methodology for development and management of innovative project in scientific organizations” (2018/2021) funded by National Science Fund, “Competition for Financial Support for Basic Research Projects on Societal Challenges 2018”, Ministry of Education and Science, Bulgaria.

Conflicts of Interest

The authors declare no conflict of interest.

References

  1. Zaharieva-Gueorguieva, B. Theoretical and Experimental Study of Reinforced Concrete Elements of High Strength Concrete Loaded on Compression and Bending. Ph.D. Thesis, University of Architecture, Civil Eng. and Geodesy (UACG), Sofia, Bulgaria, 1991. [Google Scholar]
  2. Rusev, K.; Kardjiev, V.; Traykova, M.; Yanchev, V.; Andreev, M.; Nikolova, B.; Barakova, N.; Hristov, P.; Stefanov, G.; Georgiev, E.; et al. Manual on Reinforced Concrete Eurocode 2; Chamber of Engineers in the Investment Design: Sofia, Bulgaria, 2011. [Google Scholar]
  3. Dimov, D. Non-Destructive Testing of Building Structures; Direct Services: Sofia, Bulgaria, 2011. [Google Scholar]
  4. Concu, G.; Trulli, N. Concrete Defects Sizing by Means of Ultrasonic Velocity Maps. J. Build. 2018, 8, 176. [Google Scholar] [CrossRef]
  5. Ivanchev, I.; Slavchev, V. Experimental Determination of Homogeneity, Compressive Strength and Modulus of Elasticity of Concrete in Reinforced Concrete Elements by Non-Destructive Ultrasonic Pulse Velocity Method. In Proceedings of the 16th International Conference on New Trends in Statics and Dynamics of Buildings, Bratislava, Slovakia, 18–19 October 2018; Faculty of Civil Engineering STU Bratislava, Slovak Society of Mechanics SAS: Bratislava, Czechoslovakia, 2018; pp. 179–184, ISBN 978-80-227-4845-2. [Google Scholar]
  6. Ivanchev, I. Experimental Determination of Concrete Compressive Strength by Non-Destructive Ultrasonic Pulse Velocity Method. Int. J. Res. Appl. Sci. Eng. Technol. 2018, 6, 2647–2651. [Google Scholar] [CrossRef]
  7. Ivanchev, I. Experimental Determination of Modulus of Elasticity of Concrete by Non-Destructive Ultrasonic Pulse Velocity Method. Int. J. Res. Appl. Sci. Eng. Technol. 2018, 6, 1929–1993. [Google Scholar] [CrossRef]
  8. Kumar, S.; Santhanam, M. Detection of Concrete Damage Using Ultrasonic Pulse Velocity Method. In Proceedings of the National Seminar on Non-Destructive Evaluation, Hyderabad, Indian Society for Non-Destructive Testing Hyderabad Chapter, Hyderabad, India, 7–9 December 2006; pp. 301–308. [Google Scholar]
  9. Lorenzi, A.; Tisbierek, F.; Pinto, L. Ultrasonic Pulse Velocity Analysis in Concrete Specimens. In Proceedings of the IV Conferencia Panamericana de END, Buenos Aires, Argentina, 22–26 October 2007. [Google Scholar]
  10. Kalyan, T.; Chandra Kishen, J. Experimental Evaluation of Cracks in Concrete by Ultrasonic Pulse Velocity. In Proceedings of the APCNDT 2013, Asia Pacific Conference on Non-Destructive Testing (14th APCNDT), Mumbai, India, 18–22 November 2013. [Google Scholar]
  11. Zatar, W. Assessing the Service Life of Corrosion-Deteriorated Reinforced Concrete Member Highway Bridges in West Virginia; Prepared for the WVDOT/DOH RP# 234; West Virginia Department of Transportation: Charleston, West Virginia, USA, 2014.
  12. Proceq TICO, Operating Instructions, Ultrasonic Testing Instrument, Proceq SA, Switzerland. 2008. Available online: http://www.abmbv.nl/files/proceq_tico_user_manual_en.pdf (accessed on 1 June 2014).
  13. Bogas, J.; Gomes, M.; Gomes, A. Compressive strength evaluation of structural lightweight concrete by non-destructive ultrasonic pulse velocity method. Ultrasonics 2013, 53, 962–972. [Google Scholar] [CrossRef] [PubMed]
  14. Ponchon, A. Determining of Crack Depths in Reinforced Concrete Elements with Non-Destructive Ultrasonic Pulse Velocity Method. In Proceedings of the 16 International Conference on New Trends in Statics and Dynamics of Buildings, Bratislava, Slovakia, 18–19 October 2018. [Google Scholar]
  15. Omar, M. Nondestructive Testing Methods and New Applications; InTech: Rijeka, Croatia, 2012; ISBN 978-953-51-0108-6. [Google Scholar]
  16. Introduction to Nondestructive Testing; The American society for Non-Destructive Testing: Columbus, OH, USA, 2019.
  17. Arne, K.; Crack, C. Depth Measurement in Reinforced Concrete Using Ultrasonic Techniques. Master’s Thesis, Georgia Institute of Technology, Atlanta, GA, USA, 2014. [Google Scholar]
  18. Panzera, T.; Christoforo, A.; Cota, F.; Borges, P.; Bowen, C. Ultrasonic Pulse Velocity Evaluation of Cementitious Materials. In Advances in Composite Materials—Analysis of Natural and Man-Made Materials; InTech: InTech, Rijeka, Croatia, 2011; ISBN 978-953-307-449-8. [Google Scholar] [Green Version]
  19. ACI 228.2R-98. Nondestructive Test Methods for Evaluation of Concrete in Structures; ACI Committee 228, Chairman: Davis A.; American Concrete Institute: Farmington Hills, MI, USA, 1998. [Google Scholar]
  20. Mathey, R.; Clifon, J. Review of Nondestructive Evaluation Methods Applicable to Construction Materials and Structures; NBS Technical Note 1247; U.S. Government Printing Office: Gaithersburg, MD, USA, 1988.
  21. Ongpeng, J. Non-Destructive Testing Using Ultrasonic Waves in Reinforced Concrete. 2015. Available online: https://www.researchgate.net/publication/282869893_NON-DESTRUCTIVE_TESTING_USING_ULTRASONIC_WAVES_IN_REINFORCED_CONCRETE (accessed on 10 November 2015). [CrossRef]
  22. Irie, H.; Yoshida, Y.; Sakurada, Y.; Ito, T. Non-destructive-testing Methods for Concrete Structures. NTT Tech. Rev. 2008, 6, 1–8. [Google Scholar]
  23. Aggelis, D.; Verbruggen, S.; Tsangouri, E.; Tysmans, T.; Van Hemelrijck, D. Characterization of mechanical performance of concrete beams with external reinforcement by acoustic emission and digital image correlation. Constr. Build. Mater. 2013, 47, 1037–1045. [Google Scholar] [CrossRef]
  24. Küntz, M.; Jolin, M.; Bastien, J.; Perez, F.; Hild, F. Digital image correlation analysis of crack behavior in a reinforced concrete beam during a load test. Can. J. Civ. Eng. 2006, 33, 1418–1425. [Google Scholar] [CrossRef]
  25. Fayyad, T.; Lees, J. Application of Digital Image Correlation to reinforced concrete fracture. In Proceedings of the, 20th European Conference on Fracture (ECF20), Trondheim, Norway, 30 June–4 July 2014; Elsevier: Trondheim, Norway, 2014; Volume 3. [Google Scholar]
  26. Alam, S.; Loukili, A. Application of digital image correlation to size effect tests of concrete. In Proceedings of the 7th International Conference on Fracture Mechanics of Concrete and Concrete Structures, Jeju, Korea, 23–28 May 2010. [Google Scholar]
  27. Stoilov, G.; Kavardzhikov, V.; Pashkouleva, D. Comparative Study of Random Patterns for Digital Image Correlation. J. Theor. Appl. Mech. 2012, 42, 55–66. [Google Scholar] [CrossRef]
  28. Wan, K.; Leung, C. Applications of a distributed fiber optic crack sensor for concrete structures. Sens. Actuators A Phys. 2007, 135, 458–464. [Google Scholar] [CrossRef]
  29. Imai, M.; Nakano, R.; Kono, T.; Ichinomiya, T. Crack Detection Application for Fiber Reinforced Concrete Using BOCDA-Based Optical Fiber Strain Sensor. J. Struct. Eng. 2010, 136, 1001–1008. [Google Scholar] [CrossRef]
  30. Casas, J.; Cruz, P. Fiber Optic Sensors for Bridge Monitoring. J. Bridge Eng. 2003, 8, 362–373. [Google Scholar] [CrossRef] [Green Version]
  31. Silva, M.; Rocha, J.; Monteiro, E.; Póvoas, Y.; Rabbani, E. Evaluation of the ultrasound test for estimating the depth of cracks in concrete. Rev. ALCONPAT 2018, 9, 79–92. [Google Scholar] [CrossRef]
  32. EN 12504-4:2004 Testing Concrete—Part 4: Determination of Ultrasonic Pulse Velocity; CEN: Brussels, Belgium, 2014.
  33. Prime, F.; Solutions, C. 3 Methods for Crack Depth Measurement in Concrete. 2017. Available online: https://www.fprimec.com/3-methods-crack-depth-measurement-in-concrete/ (accessed on 1 February 2018).
  34. Adamatti, D.; Lorenzi, А.; Chies, J.; Silva Filho, L. Analysis of reinforced concrete structures through the ultrasonic pulse velocity: Technological parameters involved. Rev. IBRACON Estrut. Mater 2017, 10, 358–385. [Google Scholar] [CrossRef]
  35. Hasbullah, M.; Yusof, R.; Yusoff, M. Assessing the Performance of Concrete Structure Based on the Width of the Crack Using UPV. J. Eng. Sci. Technol. 2017, 12, 17–25. [Google Scholar]
  36. Ahn, E.; Kim, H.; Sim, S.H.; Shin, S.; Shin, M. Principles and Applications of Ultrasonic-Based Nondestructive Methods for Self-Healing in Cementitious Materials. J. List Mater. (Basel) 2017, 10, 278. [Google Scholar] [CrossRef] [PubMed]
  37. Snyder, K.; Sung, L.; Cheok, G. Nondestructive Testing (NDT) and Sensor Technology for Service Life Modeling of New and Existing Concrete Structures; National Institute of Standards and Technology: Gaithersburg, MD, USA, 2013. [CrossRef]
  38. Ahmad, N.; Rahim, R.; Rahim, H.; Rahiman, M. A Review of Ultrasonic Application on Non-destructive Testing Method for Concrete Structure. J. Teknol. 2014, 70, 119–122. [Google Scholar] [CrossRef]
  39. Naik, T.; Malhotra, V.; Popovics, J. The Ultrasonic Pulse Velocity Method. In Handbook on Nondestructive Testing of Concrete; CRC Press: Boca Raton, FL, USA, 2004. [Google Scholar]
  40. Guidebook on Non-Destructive Testing of Concrete Structures IAEA; IAEA–TCS–17; IAEA: Vienna, Austria, 2002; ISSN 1018-5518.
  41. Malhotra, V.; Carino, N. Handbook on Second Edition Nondestructive Testing of Concrete; CRC Press: Boca Raton, FL, USA, 2004. [Google Scholar]
  42. PROCEQ. Available online: https://www.proceq.com/ (accessed on 7 November 2014).
Figure 1. The 12 tested beams preparation (personal archive).
Buildings 09 00202 g001
Figure 2. Typical crack patterns on both sides and bottom surfaces for the Specimens—(a) type A, (b) type B, (c) type C, (d) type D.
Buildings 09 00202 g002
Figure 3. Load of the beams (personal archive).
Buildings 09 00202 g003
Figure 4. The 12 beams—series A to D, (a) subject to external atmospheric impacts, (b) preparation for measurements (personal archive).
Buildings 09 00202 g004
Figure 5. Determination of crack depths in reinforced concrete elements by ultrasonic testing instrument Proceq-TICO (a), visually by using crack magnifier Proceq (b) (personal archive).
Buildings 09 00202 g005
Figure 6. (a) Location of the transmitter and the receiver relative to the crack and distribution of the ultrasonic signal for normal cracks, (b) measurement (personal archive).
Buildings 09 00202 g006
Figure 7. Different normal cracks in the tested beams, (a) typical general view, (b), (c), (d) detailed views (personal archive).
Buildings 09 00202 g007
Figure 8. Transmitting time of the ultrasonic pulse t no   crack in the region of the beam without a crack in an area close to the crack for the corresponding crack widths.
Buildings 09 00202 g008
Figure 9. Transmitting time of the ultrasonic pulse t crack in the region of the beam with a normal crack for the corresponding crack widths.
Buildings 09 00202 g009
Figure 10. Crack depths determined by NDUPVM c UPVM for the corresponding crack widths.
Buildings 09 00202 g010
Figure 11. Crack depths determined by visual observation c visual for the corresponding crack widths.
Buildings 09 00202 g011
Figure 12. Relative errors ε c for visually determinate and NDUPVM crack depths for the corresponding crack widths.
Buildings 09 00202 g012
Table 1. Minimum, minimum, and mean value of t crack and standard deviation at different crack widths.
w measured ,   ( mm ) 0.050.090.100.150.200.300.500.601.101.30
t crc , max ,   ( μ s )26.7427.1029.5027.0331.6531.6544.2544.6468.9780.00
t crc , min ,   ( μ s ) 26.4626.4628.8225.8431.2530.4943.4843.4864.5275.19
t crc , mean ,   ( μ s ) 26.6026.7629.2226.4631.4330.9643.9044.1466.9077.89
s ,   ( μ s ) 0.090.230.220.440.120.360.340.361.691.68
Table 2. Maximum, minimum and mean value of depths of cracks determined by non-destructive ultrasonic pulse velocity method (NDUPVM),   c UPVM and standard deviation for the corresponding crack widths.
w measured ,   ( mm ) 0.050.090.100.150.200.300.500.601.101.30
c UPVM , max ,   ( cm ) 4.734.775.714.866.426.3310.2610.2317.0820.03
c UPVM , min ,   ( cm ) 4.484.435.294.196.145.859.779.8815.5018.31
c UPVM , mean ,   ( cm ) 4.594.655.534.546.276.1210.0210.0916.3319.24
s ,   ( cm ) 0.090.110.160.210.100.190.150.110.600.61
Table 3. Relative errors ε c for the corresponding crack widths.
w measured , ( mm ) 0.050.090.100.150.200.300.500.601.101.30
ε c , max , ( % )23.2256.9961.6753.676.3825.8550.7549.2538.4918.68
ε c , min   , ( % ) 18.0754.9559.784.350.9719.8748.6847.5833.0210.14
ε c , mean , ( % ) 19.7355.6860.4329.903.1522.3549.3748.4835.1713.68
s ,   ( % )1.630.670.6722.842.051.870.820.621.782.19