Article

Probability-Statistical Estimation Method of Feed Influence on As-Turned Finish of Steels and Non-Ferrous Metals

1
Department of Industrial Automation, Ternopil National Ivan Pul’uj Technical University, Rus’ka str. 56, 46001 Ternopil, Ukraine
2
Department of Higher Mathematics, Lviv Polytechnic National University, Ukraine, Bandera str. 12, Lviv 79013, Ukraine
3
Antanas Gustaitis′ Aviation Institute, Vilnius Gediminas Technical University, Linkmenų g. 28, LT-08217 Vilnius, Lithuania
4
Department of Mobile Machinery and Railway Transport, Faculty of Transport Engineering, Vilnius Gediminas Technical University, Plytinės g. 27, LT-10105 Vilnius, Lithuania
*
Author to whom correspondence should be addressed.
Metals 2018, 8(11), 965; https://doi.org/10.3390/met8110965
Submission received: 11 October 2018 / Revised: 13 November 2018 / Accepted: 15 November 2018 / Published: 19 November 2018

Abstract

:
Based on the experimental data on the roughness parameter Ra, which stands for the mean arithmetic deviation of the profile, as obtained in the process of turning test specimens from different materials with constant elements of the cutting mode (depth a and velocity v) and structural-geometric parameters of the cutting tool, but with different feed rates f, the probability-statistical method for estimating the influence of feed rate f on the resulting surface roughness by the parameter Ra is proposed using the theory of a small sample.

1. Introduction

One of the most important indicators of the surface quality after processing is its roughness, which to a large extent, provides for enhanced service properties of machine parts. For the quantitative evaluation of the surface roughness formed by turning, the current standard [1] envisages a set of appropriate parameters. The roughness of the surface formed by finish turning or thin turning should be evaluated by the parameter Ra, which stands for the arithmetic mean deviation of the profile [2,3]. In this paper, the effect of feed rate on this roughness parameter is investigated. Of all structural and geometric parameters of the cutting tool (cutter), such as the nose radius r; the outlet of the cutter l; the axial moment of inertia of the cutter holder section Iy; the tool cutting edge angle of the major, κ1 and minor, κr1 cutting edges; the rake, γ and clearance, α angles; and, the technological elements of the cutting mode a and v, the greatest influence on the parameter Ra comes from the cutting feed f. Taking into account the geometrical models of the cut-off layer and the remaining layer when finishing with a cutter that has nose radius r, i.e., when r ≥ a, it is recommended to determine the parameter Ra according to the formula R a = f 2 / 8 r , k R a > 0 , where k R a is the coefficient of proportionality and Rz is the microroughness height of the profile at ten points [2,3]. Thus, with increasing f, the function R a = f ( f ) is a growing function according to the parabolic law. However, the above formula for determining Ra does not take into account the simultaneous action of many variable factors that are stochastic in nature, especially the feed rate, and therefore, it is logical to assume that the parameter Ra is a random variable. Therefore, based on the above, the influence of the feed rate f on the surface roughness parameter Ra formed by the finish turning should be evaluated in the probabilistic aspect.
The analysis of the existing literary sources [2,3,4,5,6,7,8,9,10,11,12,13,14,15,16] has shown that many scientists have paid much attention to the development of methods for conducting research on the formation and prediction of surface roughness obtained by turning. At the same time, it has been established from the analysis of literary [17,18,19,20,21,22,23] sources that there is no unanimous opinion about the nature of the feed effect on roughness, in particular, on the parameter Ra. Thus, one of the first scientific papers [22] dedicated to the research on the influence of cutting elements, geometric parameters of the cutter, and the value of its wear on roughness, indicates that an increase in the feed rate within the range of 0.07 ≤ f ≤ 0.26 mm/rev leads to a monotonous increase in the roughness parameter, such as the maximum height of roughness Hmax, which, according to [1], corresponds to the greatest height of roughness Rzmax. At the same time, the influence of s on Hmax was assessed at a depth of 0.5 ≤ a ≤ 1.0 mm, which is recommended for semi-rough and rough processing. In addition, the constructive and geometric parameters of the tools that were used in the research were not indicated.
According to Arshinov [24], when cutting without a lubricating and cooling medium, an increase in the feed rate from f = 0.075 mm/rev to f = 0.21 mm/rev leads to an increase in the Ra values from 1.3 μm to 2.7 μm, this dependence being of linear nature. According to Isaev [4,5], the analysis of the effect of the feed rate s on the roughness parameter, such as the height of the profile roughness at ten points Rz when turning steel EI 107 with a cutter having γ = 15°, λ = 0°, φ = 45°, φ′= 20°, r = 1.75 mm shows the power dependence of Rz on f. The intensity of the influence of s on Rz depends on the feed rate value. When turning with the feed rate f < 0.05 mm/rev, its effect on Rz is weakened. At the same time, it follows from the calculation formulas of A.I. Isaev [4,5] that the dependence of Rz on f is linear and it is described by the function R z = k R z R a .
It was noted in [19] that among the elements of the cutting mode, such as a, f, v, the feed rate has the greatest influence on the roughness of the treated surface. Thus, when turning steel 45 with an increase in the cutting rate from 42 m/min to 84 m/min (twice), the height of roughness decreased by 1.5 times, and with a decrease in the feed rate from 0.3 mm/rev to 0.15 mm/rev (twice), the height of roughness decreased by six times. In addition, it was noted that in the processing of carbon steel with the feed rate f < 0.06 mm/rev, there was no decrease in the height of roughness, which contradicts the data given in [9,12,13]. The analysis of the empirical formulas for determining the roughness parameter given in [2,3,4,5,24,25] indicates different values of the power index y R a , which characterizes the influence of f on Ra. In addition, it is suggested in [2] that, depending on the material being processed, it may vary within the range 0.54 < y R a < 1.1 .
In [20], the theoretical dependences are given, which link the surface roughness to the elements of the cutting mode, in particular, the feed rate. Such models are inaccurate and many researchers are engaged in their improvement by introducing additional parameters. In [23], a surface imitation model is proposed for modeling the surface profile that was obtained by turning with known vibration characteristics. It was found that radially directed vibrations affect the surface roughness much more than tangentially directed or axial vibrations. A more detailed study of the influence of geometric parameters of the cutting tool and the hardness of the workpiece material on the surface quality and cutting force in the process of finish turning is given in [24,26].
An in-depth study of the influence of the cutting tool vibration on the formation of surface roughness in the course of dry turning is illustrated in [25]. Six parameters were investigated, in particular, the material of the workpiece and the length of the cutting tool. The dispersion analysis and the analysis of the interaction between experimental data showed that the feed rate and the rounding radius of the cutter nose are the most influential parameters. Smaller roughness was obtained at a high-speed processing with a low feed rate and a large rounding radius at the cutter nose. The analysis of the above-mentioned literary sources has shown that, at present, there are two views on the nature of the influence of f on Ra: according to the first view, this dependence is monotonically increasing, and to the second—an increase in the feed rate from low to high (f > 0.02 mm/rev) results in a decrease in roughness to a certain minimum value, and a further increase in s results in its growth.
The analysis of a large number of publications describing the results of research on the influence of f on the roughness parameter Ra did not reveal the repetition of experiments, which may indicate a deterministic approach in conducting such studies. Given that a large number of factors [2,16,25], which by their nature are random variables, act simultaneously in forming the parameter Ra, we can accept the hypothesis that the parameter Ra is a random variable. The purpose of this research is to develop a probability-statistical method for estimating the influence of the feed rate s on the roughness parameter Ra of the surface that was formed by turning, which is based on the theory of a small sample and the iteration method, while providing the constant values of other elements of the cutting mode and the geometric parameters of the cutting tool. It is assumed that Ra is a random value and it has a normal distribution law [11,16].
The estimation of the effect of f on the surface roughness Ra is proposed to be made on the basis of the sample mean values R a ¯ and the sample variances D(Ra) using the Student and Fisher criteria, which is undoubtedly new and relevant.

2. Materials and Methods

The essence of the proposed probability-statistical method [17] for estimating the influence of f on Ra is as follows. We use test specimen 1 (Figure 1a) in the form of a cylinder of constant diameter D, with sections 2, 3, …, 11 evenly distributed along its length, which are separated by grooves 12 having a width of 3 mm, with a central opening 14 at the end 15. At one of the specimen ends, a specimen of a smaller diameter 13 is placed for fixation in chuck 16 of the turning lathe (not shown in the figure).
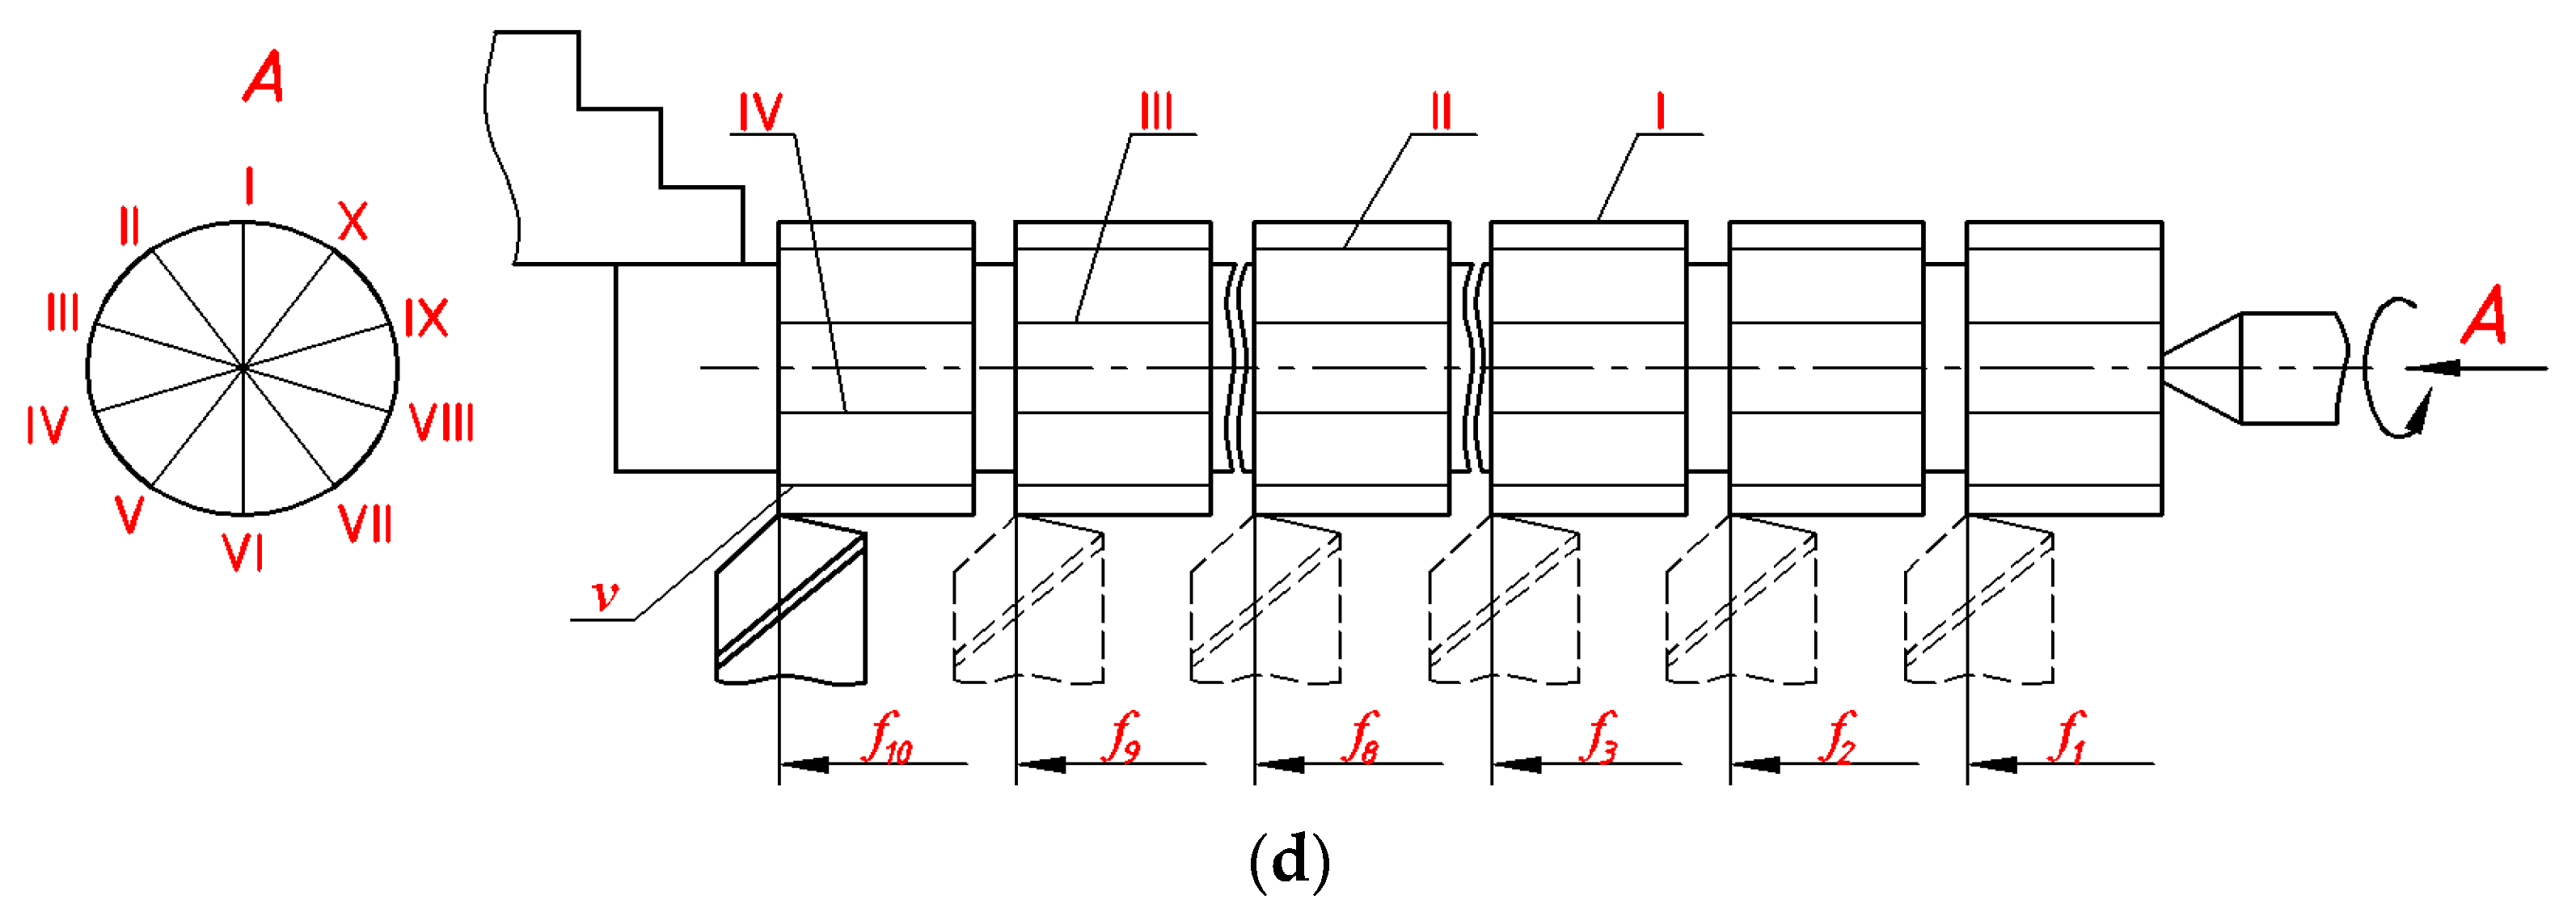
Cutting tool 17 with constant geometric and structural parameters is used. At the first stage, test specimen 1 is fixed in the turning chuck 16 of the lathe and it is supported by the rear center 18. (Figure 1c). The first pass is done with constant elements of the cutting mode: depth аn; feed fn; cutting rate vn, which correspond to the semi-rough processing, Figure 1c. At the second stage, Figure 1d, the permanent elements of the cutting mode, such as depth ach, and the cutting speed vch, are set like in the case of finish turning. The estimated spindle rate n p = 1000 v r / π D is determined and adjusted in accordance with the lathe passport pd, and then set on the lathe. The cutting process is performed on each section of the workpiece with the variable feed rate: f1, f2, f3, , f9, f10. The variable feed rates fq on the selected lathe 16K20 are determined as random values according to the method that is presented in [22].
Cutting performance optimized for modern cutting machines involves machining at high cutting speeds, large feed, and a significant depth of cutting [27]. However, since the formation of roughness occurs at the finishing operations of the technological process, the treatment modes for conducting research were selected to correspond to this operation—with a small cutting depth and feed [27,28]. The cutting speed thus made v = 100 m/min for steels and 150 m/min for non-ferrous alloys. Cutting performance optimized for modern cutting machines involves machining at high cutting speeds, large feed, and a significant depth of cutting [27]. However, since the formation of roughness occurs at the finishing operations of the technological process, the treatment modes for conducting research were selected to correspond to this operation—with a small cutting depth and feed [27,28]. The cutting speed thus made v = 100 m/min for steels and 150 m/min for non-ferrous alloys.
After processing the statistical series of cutting feed, their passport values and characteristics of scattering are entered into Table 1.
At the third stage, on each of the ten tracks (і = І, ІІ, ІІІ…Х) of each j–th section ( j = 1 , 10 ¯ ), which are obtained for the finish turning with the relevant mean values of the feed rate f ¯ j ( j = 1 , 10 ¯ ) , they determine value r k j ( k = 1 , 10 ¯ ) , the arithmetic mean deviations of the profile Raij, and these values are taken as random values.
From the obtained values rk, statistical series are formed and checked for homogeneity according to the Grubbs test for each section of the test specimen [6]. The values that stand out significantly (if detected) are discarded and value rk+1j is entered additionally, which is obtained on an additional separate track of the j-th section, and the statistical series are checked again for homogeneity.
At the fourth stage, using the method for estimating the distribution law for a small sample, the probability density distribution f(raj) of the random variable Raj is found for each j–th section ( j = 1 , 10 ¯ ), which has the following form [8]:
f ( r a j ) = 1 b j a j k = 1 n c k j + k = 1 n 1 σ j 2 π exp [ 1 2 ( r r k j σ j ) 2 ] i = k n c i j ,
where [ a j ; b j ] is the variation range of experimental values r k j of the value R a j ; a j = r k j min , b j = r k j max ( r k j min , r k j max ) is the lowest and highest values among r k j ( k = 1 , n ¯ ) , respectively; n is the number of values R a j (sample size);
ñ k j = 1 1 + Φ ( z k 2 ) Φ ( z k 1 ) ,   z k 1 = a j r k j σ j ,   z k 2 = b j r k j σ j ;
where ck refers to the normalizing factors obtained from the condition а b f k ( t ) d t = 1 k = (1, n), to which the density of distributions f k ( t ) at each k-th step of iteration must correspond.
σ j = b j a j 6 is the standard deviation of the random variable R a j ;
Φ ( x ) = 1 2 π 0 x e t 2 2 d t is the Laplace’s function.
D ( R a j ) = a j 2 + a j b j + b j 2 3 k = 1 n c k j + k = 1 n i = k n c i j { σ j 2 π [ ( σ j z k 1 + 2 r k j ) e z k 1 2 2 ( σ j z k 2 + 2 r k j ) e z k 2 2 2 ] + ( σ j 2 + r k j 2 ) [ Φ ( z k 2 ) Φ ( z k 1 ) ] } [ M ( R a j ) ] 2 .
Note that, while finding the distribution density of the random variable R a j , we take into account that the probability distribution of the kj-th experiment is the probability distribution of a single experiment. Therefore, the probability distribution of the kj-th experiment stands for the density of normal distribution with the mathematical expectation r k j and the standard deviation σ j , which we consider to be the same for all experiments.
For the found distribution density f ( r a j ) of the random variable R a j , the formulas for calculating its mathematical expectation M ( R a j ) and variance D ( R a j ) have the following form, respectively:
M ( R a j ) = a j + b j 2 k = 1 n c k j + k = 1 n i = k n c i j { σ j 2 π ( e z k 1 2 2 e z k 2 2 2 ) + r k j [ Φ ( z k 2 ) Φ ( z k 1 ) ] }  
D ( R a j ) = a j 2 + a j b j + b j 2 3 k = 1 n c k j + k = 1 n i = k n c i j { σ j 2 π [ ( σ j z k 1 + 2 r k j ) e z k 1 2 2 ( σ j z k 2 + 2 r k j ) e z k 2 2 2 ] + ( σ j 2 + r k j 2 ) [ Φ ( z k 2 ) Φ ( z k 1 ) ] } [ M ( R a j ) ] 2 .
In this case, the mean square deviation will be equal to
σ ( R a j ) = D ( R a j )  
At the fifth stage, the Student’s criteria for the parameter M ( R a ) and Fisher’s criteria F for the dispersions D ( R a ) are calculated and checked for a significant variation from standard [6].
At the sixth stage, having admitted that M ( R a j ) R a j , they determine the maximum value of roughness by the formula R max = R ¯ a j + 3 σ ( R a j ) .
Having performed stages from one to six with respect to the values of the roughness parameter R a f q and using the criteria of Student and Fisher, they estimate the significance of the feed rate effect on the surface roughness that was obtained in the process of cutting.

3. Approbation of the Proposed Method, Experimental Studies and Their Results

Experimental studies of the influence of the feed rate f on the roughness parameter Ra were performed for materials from two groups of alloys:
(a) alloys of the Fe-C class, in particular, steel 45 (C = 0.45–0.50, Si = 0.17–0.37, Mn = 0.50–0.80, Ni ≤ 0.3, S ≤ 0.04, P ≤ 0.035, Cr ≤ 0.25, Cu ≤ 0.30), σus = 590 MPa; σys = 590 MPa; steel 30KhGSA (C = 0.28–0.34, Si = 0.90–1.20, Mn = 0.80–1.10, Ni ≤ 0.3, S ≤ 0.025, P ≤ 0.025, Cr ≤ 0.80–1.10, Cu ≤ 0.30), σus = 1080 MPa; σys = 830 MPa; and, cast iron KCh30-6 (C = 2.6–2.9, Si = 1.0–1.6, Mn = 0.4–0.6, S ≤ 0.2, P ≤ 0.18, Cr ≤ 0.08); σus = 294 MPa.
(b) alloys of non-ferrous metals, in particular, alloy of aluminum and silicon–silumin–AL4 (Fe ≤ 1.0, Si = 8.0–10.5, Mn = 0.2–0.5, Al = 87.2–91.63, Mg = 0.17–0.3, Cu ≤ 0.1, Pb ≤ 0.05, Be ≤ 0.1, Zn ≤ 0.20, Sn ≤ 0.20), σus = 290 MPa; σys = 160 MPa; thermally treated alloy of aluminum, copper and manganese–duralumin–D16T (Fe ≤ 0.5, Si ≤ 0.5, Mn = 0.3–0.9, Cr ≤ 0.1, Ti ≤ 0.15, Al = 90.9–94.7, Cu = 3.8–4.9, Mg = 1.2–1.8), σus = 390 MPa; σys = 275 MPa; alloy of copper and lead–brass LS63-3 (Fe ≤ 0.1, P ≤ 0.01, Cu = 62–65, Pb = 2.4–3.0, Zn = 31.65–35.6, Sb ≤ 0.005, Bi ≤ 0.002, Sn ≤ 0.1), σus = 250 MPa.
Steels 45 and 30KhGSA were normalized prior to processing, and cast iron KCh30-6 was annealed. The cutting process was carried out on a turning lathe of model 16K20 in the laboratory of Ternopil National Ivan Pul’uj Technical University for all test specimens except for the specimen from steel 30KhGSA. The specimen from steel 30KhGSA was processed on an updated turning lathe with numerical control of model STL-100 at the Volochysk Machine-Building Plant of the <Motor-Sich Corporation>.
Turning was performed by the pass-thrustcutter. The cutting part of the cutting tool for the processing of steels and non-ferrous alloys was from a sintered carbide alloyT15K6 (Co ≤ 6.0%, carbides WC = 79%; TiC = 15%), hardness HRA ≤ 90, and for cast iron—from a sintered carbide alloy VK6M (Co ≤ 6.0%, carbide WC = 94%), hardness HRA ≤ 90. Geometric parameters of the cutters were: the side cutting edge angle κ1 = 90° ± 30′, the end cutting edge angle κr1 = 15° ± 30′, the true rake angle γ = 10° ± 15′, the bake relief angle α = 10° ± 15′, the nose radius r = 0.2 mm.
Processing modes: at the semi-rough junction, the cutting depth was an = 0.7 mm, at the finish junction, the cutting depth was ar = 0.4 mm; the cutting rate for steels and cast iron was v = 100 m/min; for non-ferrous alloys it was v = 150 m/min. The cutting process was performed without the use of lubricating and cooling liquids.
All sections of the test specimens except for the specimen from steel 30KhGSA were processed at the feed rate that corresponds to the mean values of the relevant passport feed rates given in Table 1, while the sections of the specimen from steel 30KhGSA were processed at the following feed rates (μm/rev): 20; 30; 50; 60; 70; 80; 88; 100; 125; 150.
After processing all sections of the test specimens, there were 10 tracks evenly placed in a circle on their surfaces. The measurement range enter of the profilometer was 0.02–10 µm. The radius of the probe tip was 10 ± 2.5 µm [29]. Minimum roughness step of the investigated surface was 0.004 mm. The values of the roughness parameter were determined—the mean arithmetic deviation of the profile Ra [30,31,32] Consequently, on each section of the test specimen turned with a given feed rate, ten values of the parameter Ra were obtained, which were taken as random variables with a normal distribution law.
According to formulas (2) and (3), the sample mean values R ¯ a f q and sample variances D ( R a f q ) were determined, respectively. According to the criteria of the Student tk and Fischer Fp [6], the significance of the differences between the mean values of R ¯ a f 1 and R ¯ a f 2 , R ¯ a f 2 , and R ¯ a f 3 , …, R ¯ a f q 1 and R ¯ a f q , and variances D ( R ¯ a f 1 ) and D ( R ¯ a f 2 ) , D ( R ¯ a f 2 ) , and D ( R ¯ a f 3 ) , … D ( R ¯ a f q 1 ) and D ( R ¯ a f q ) was determined.
Given that technological processes with K p 0.2 for the production conditions can be considered to be stable [18], the obtained values of the variation coefficients that are presented in Table 2, Table 3 and Table 4 confirm the stability of the roughness forming process. The results of the experimental data obtained for the test specimens are presented in Table 2, Table 3 and Table 4. The sample characteristics of a particular section of the test specimen were compared with the sample characteristics that were obtained at the adjacent section, which was previously processed at a substantially lower feed rate.
The following symbols are adopted: +< stands for a significant decrease in the sample mean; >+ stands for a significant increase in the sample mean; o stands for an insignificant change in the sample mean; – • stands for an insignificant change in sample variances; and, + • stands for a significant change in sample variances.
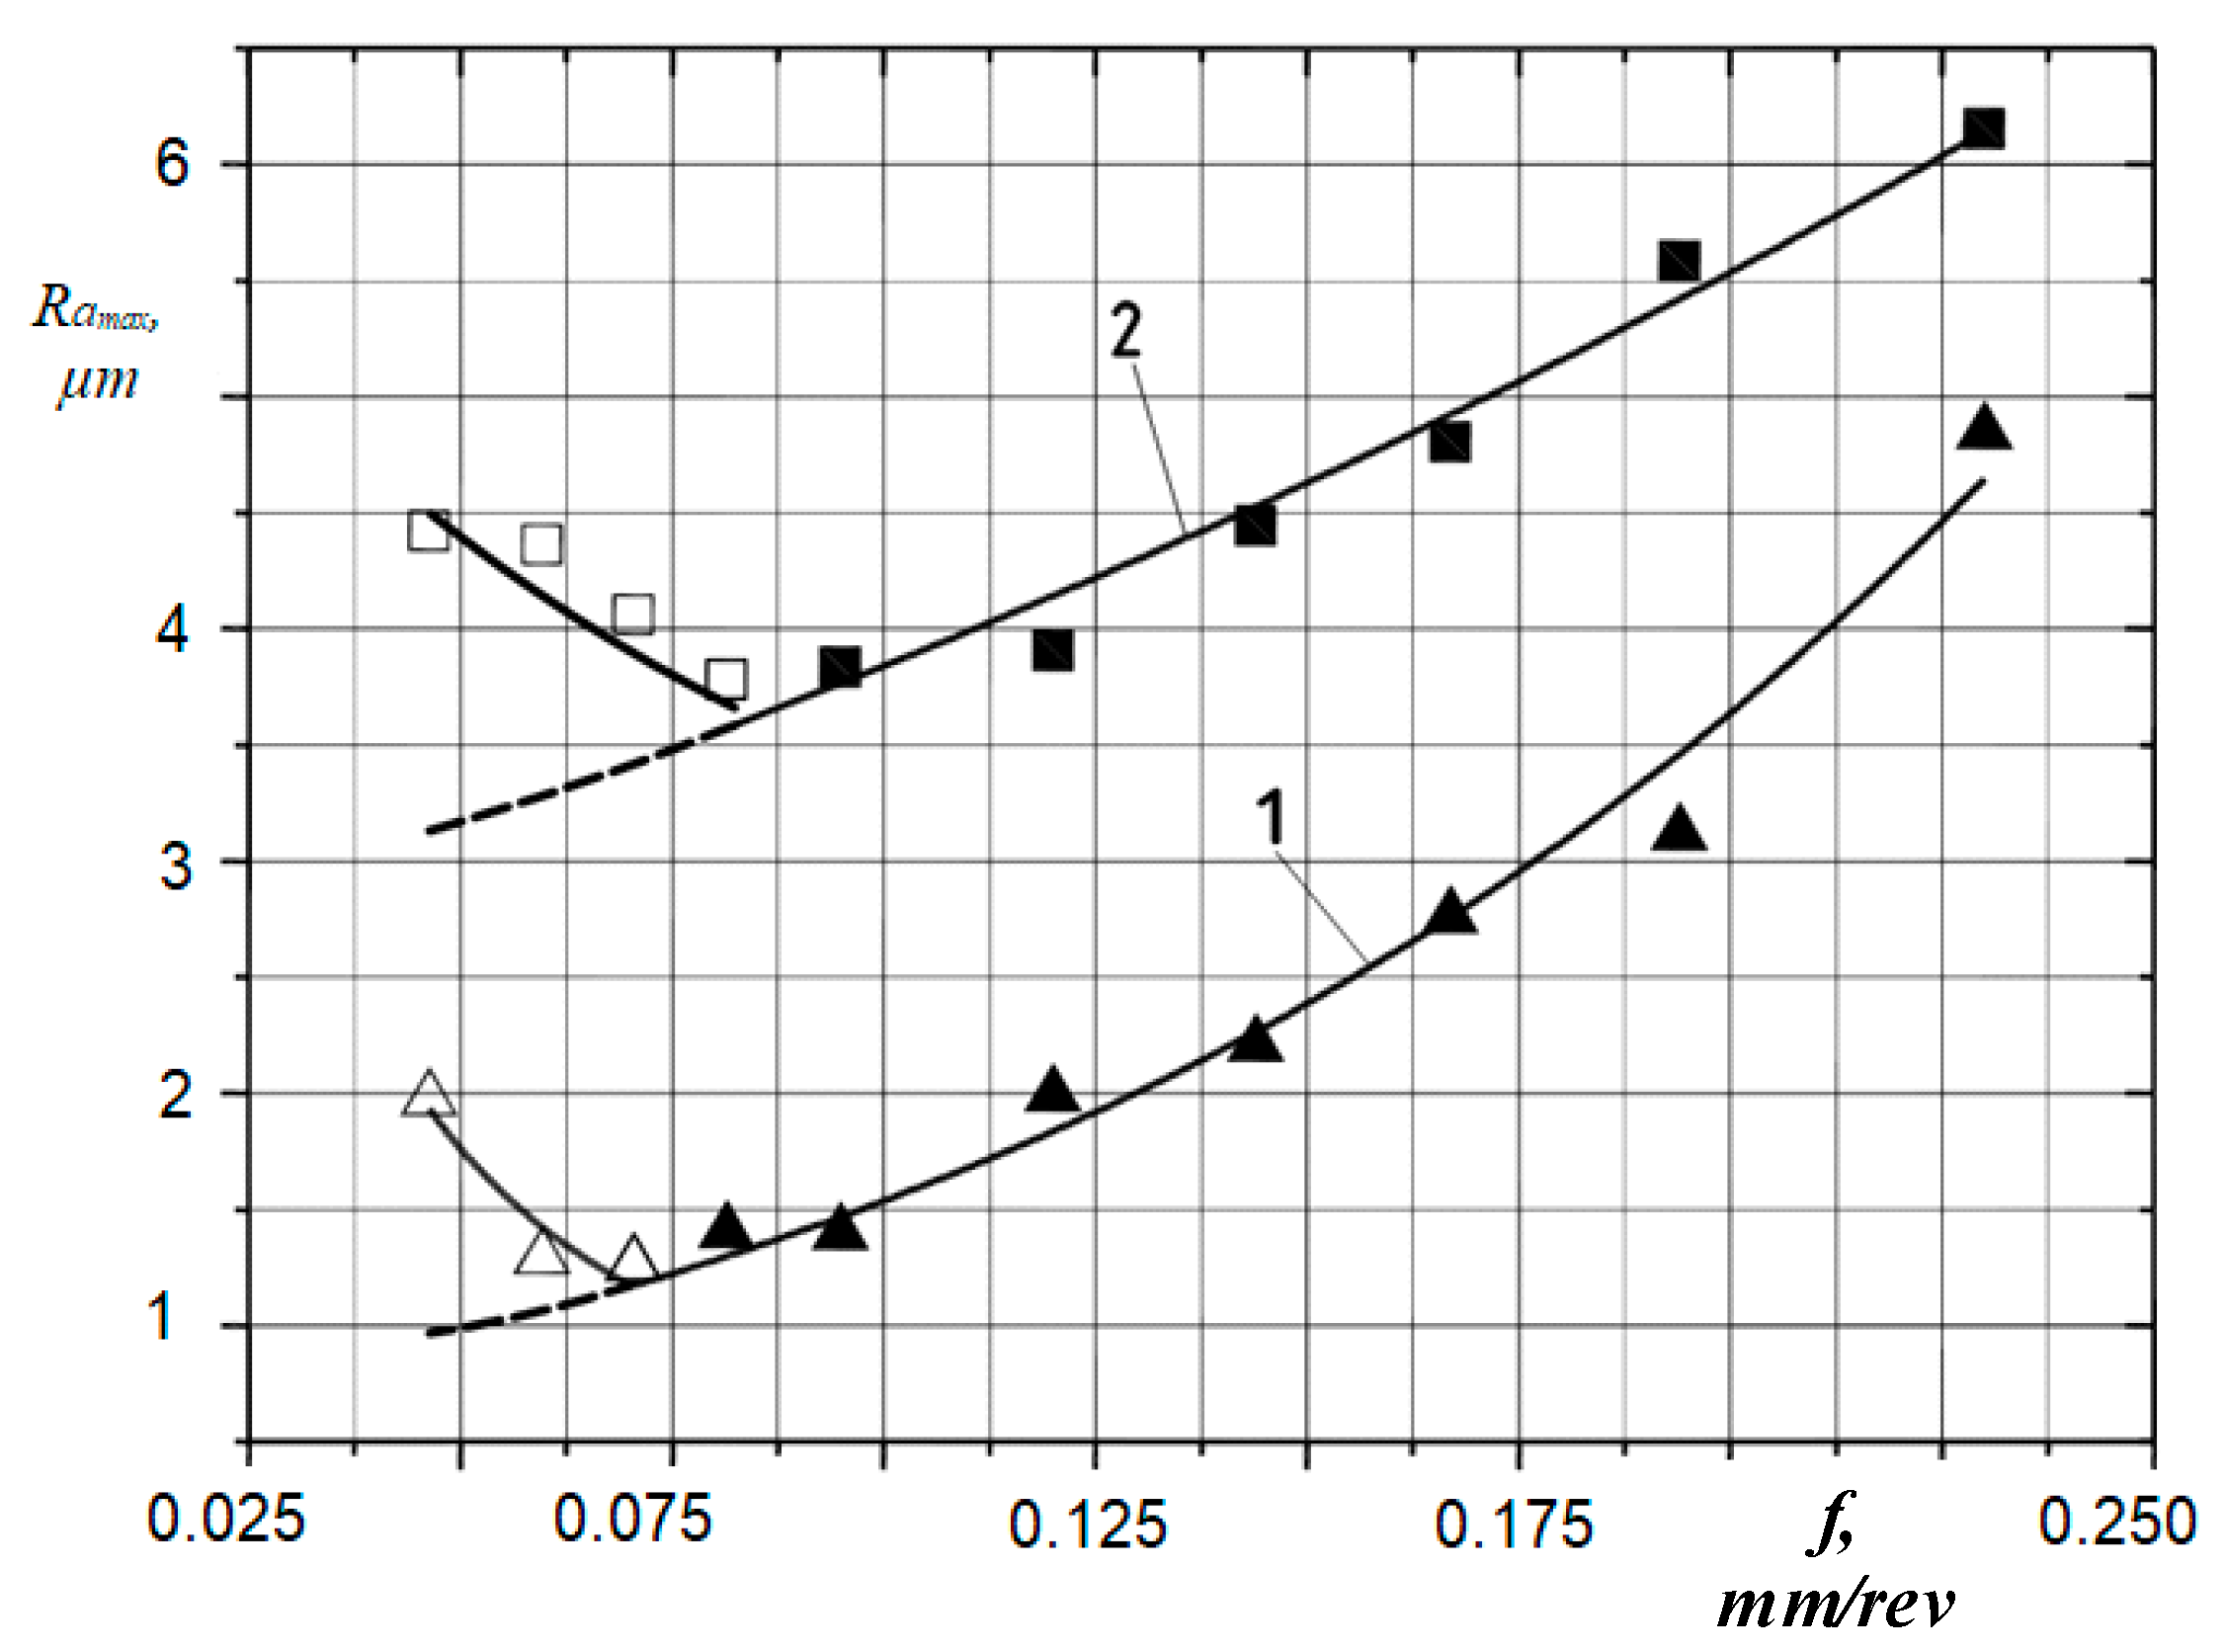
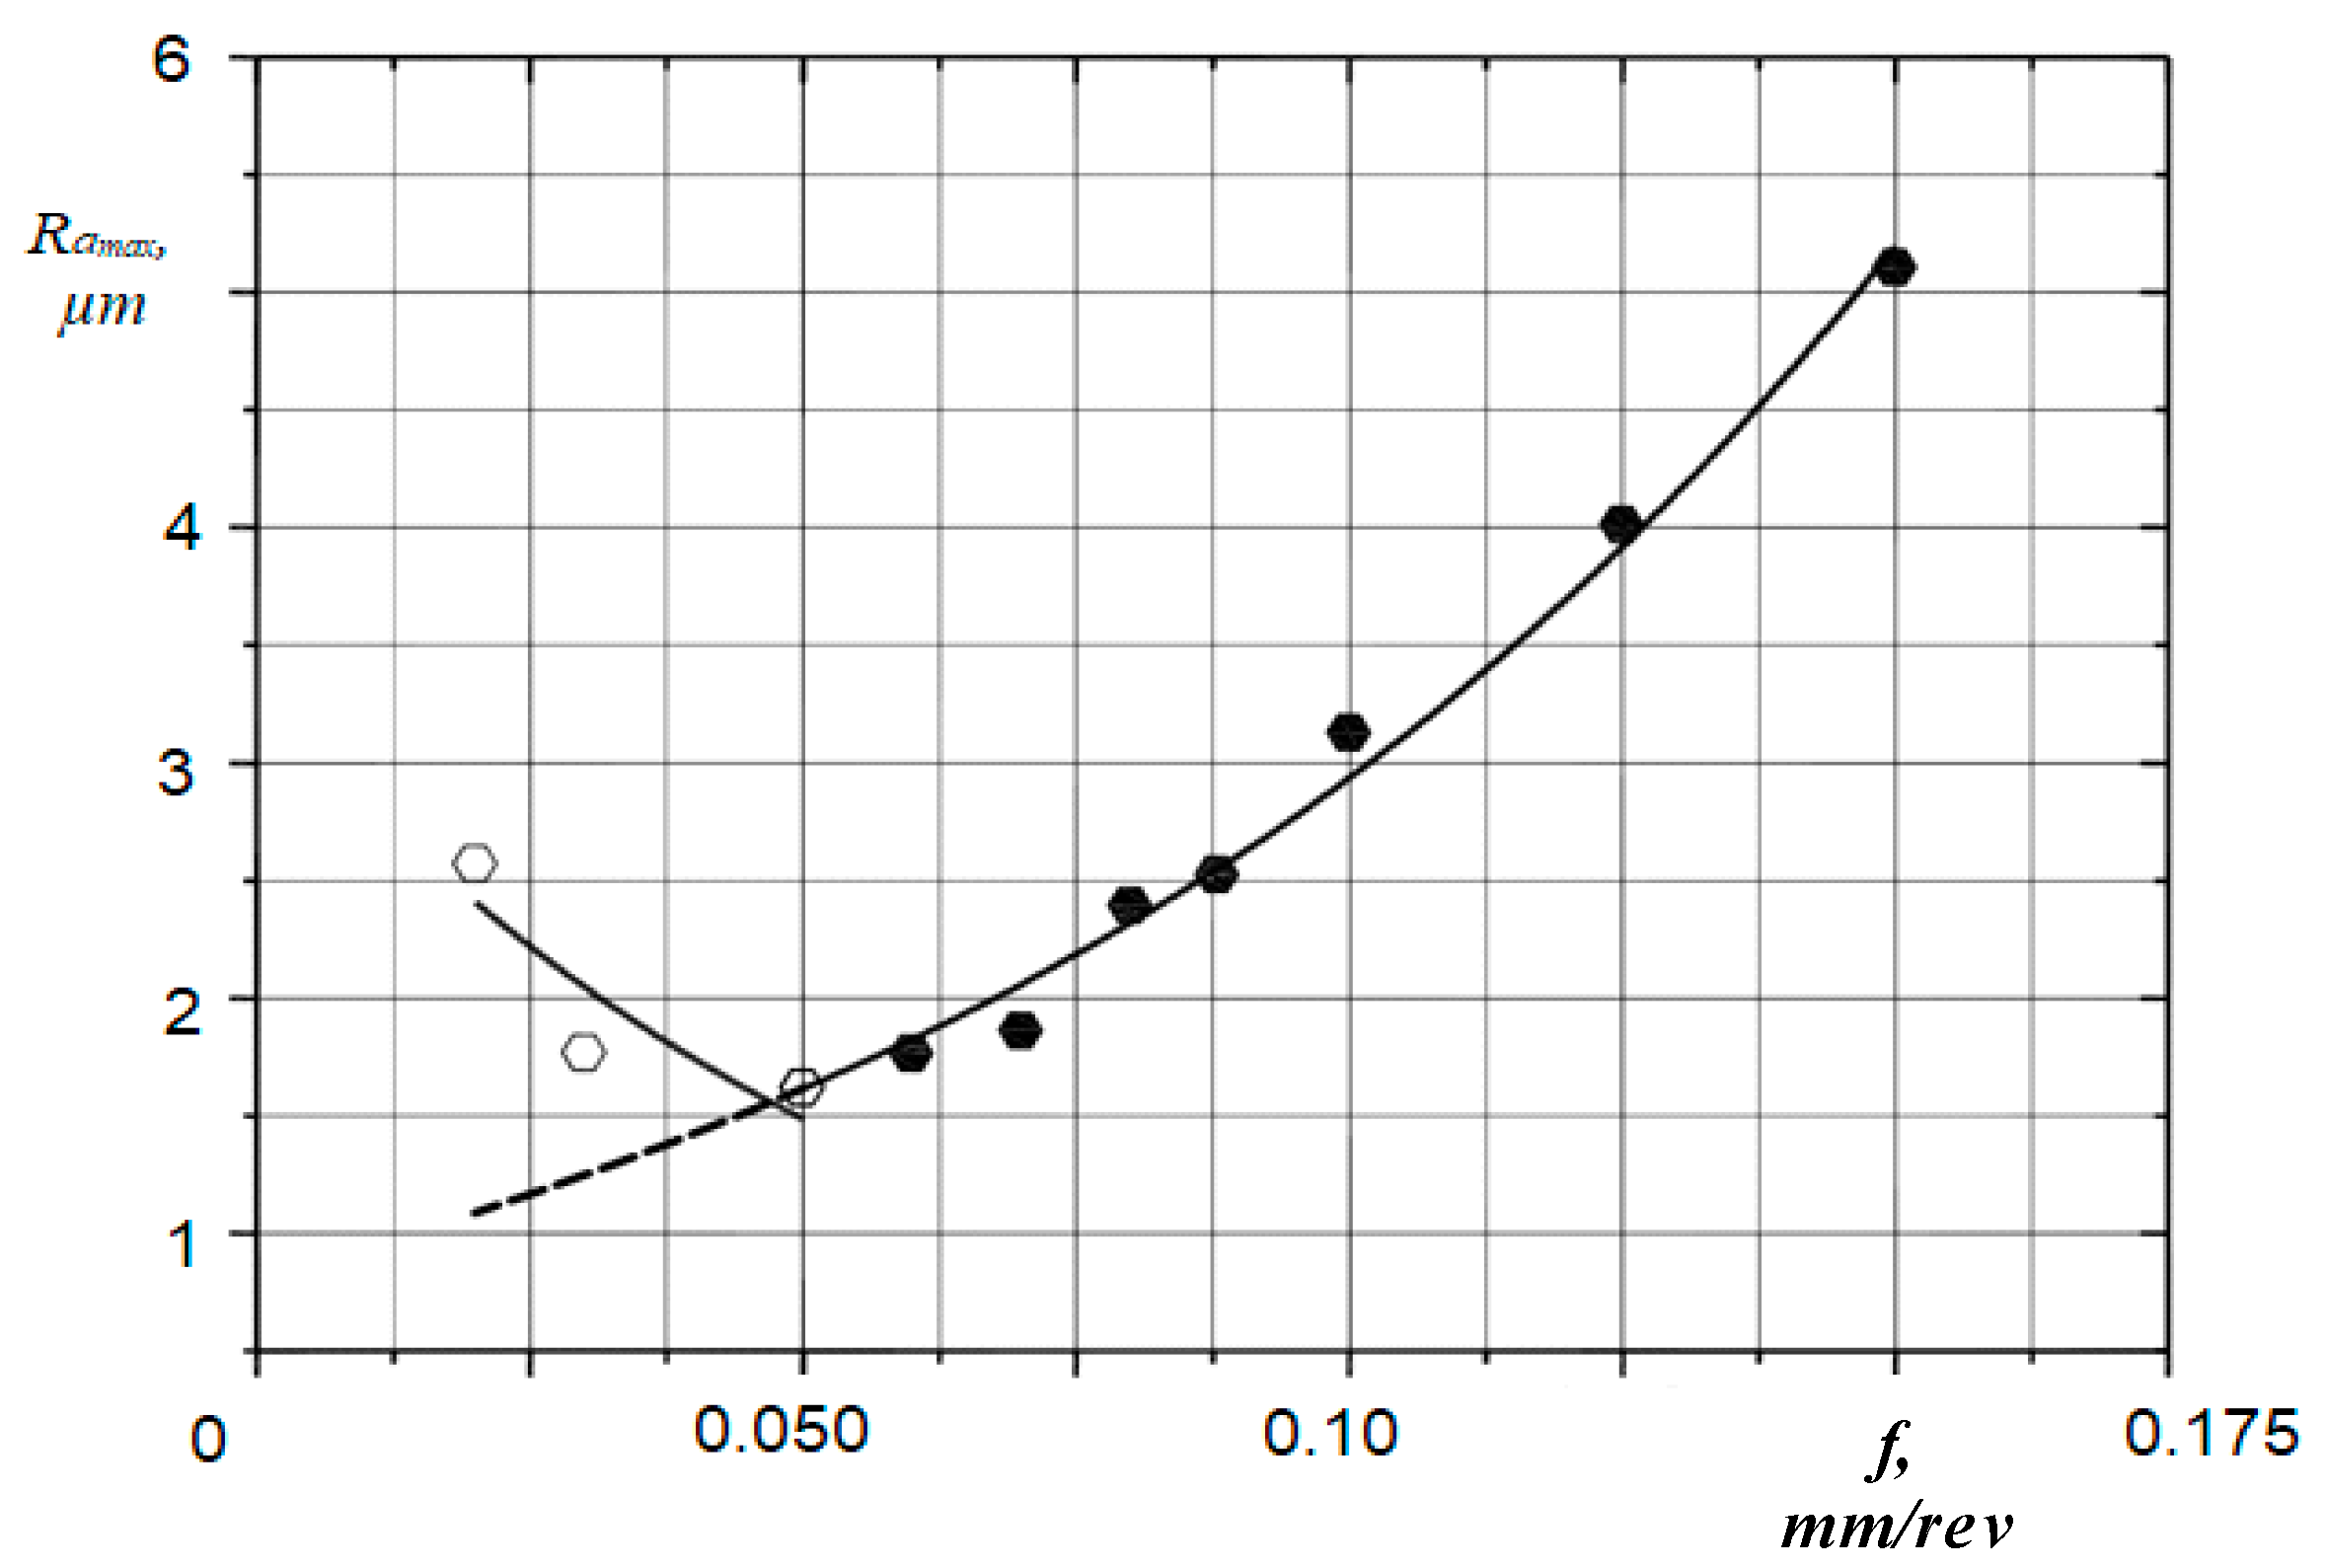
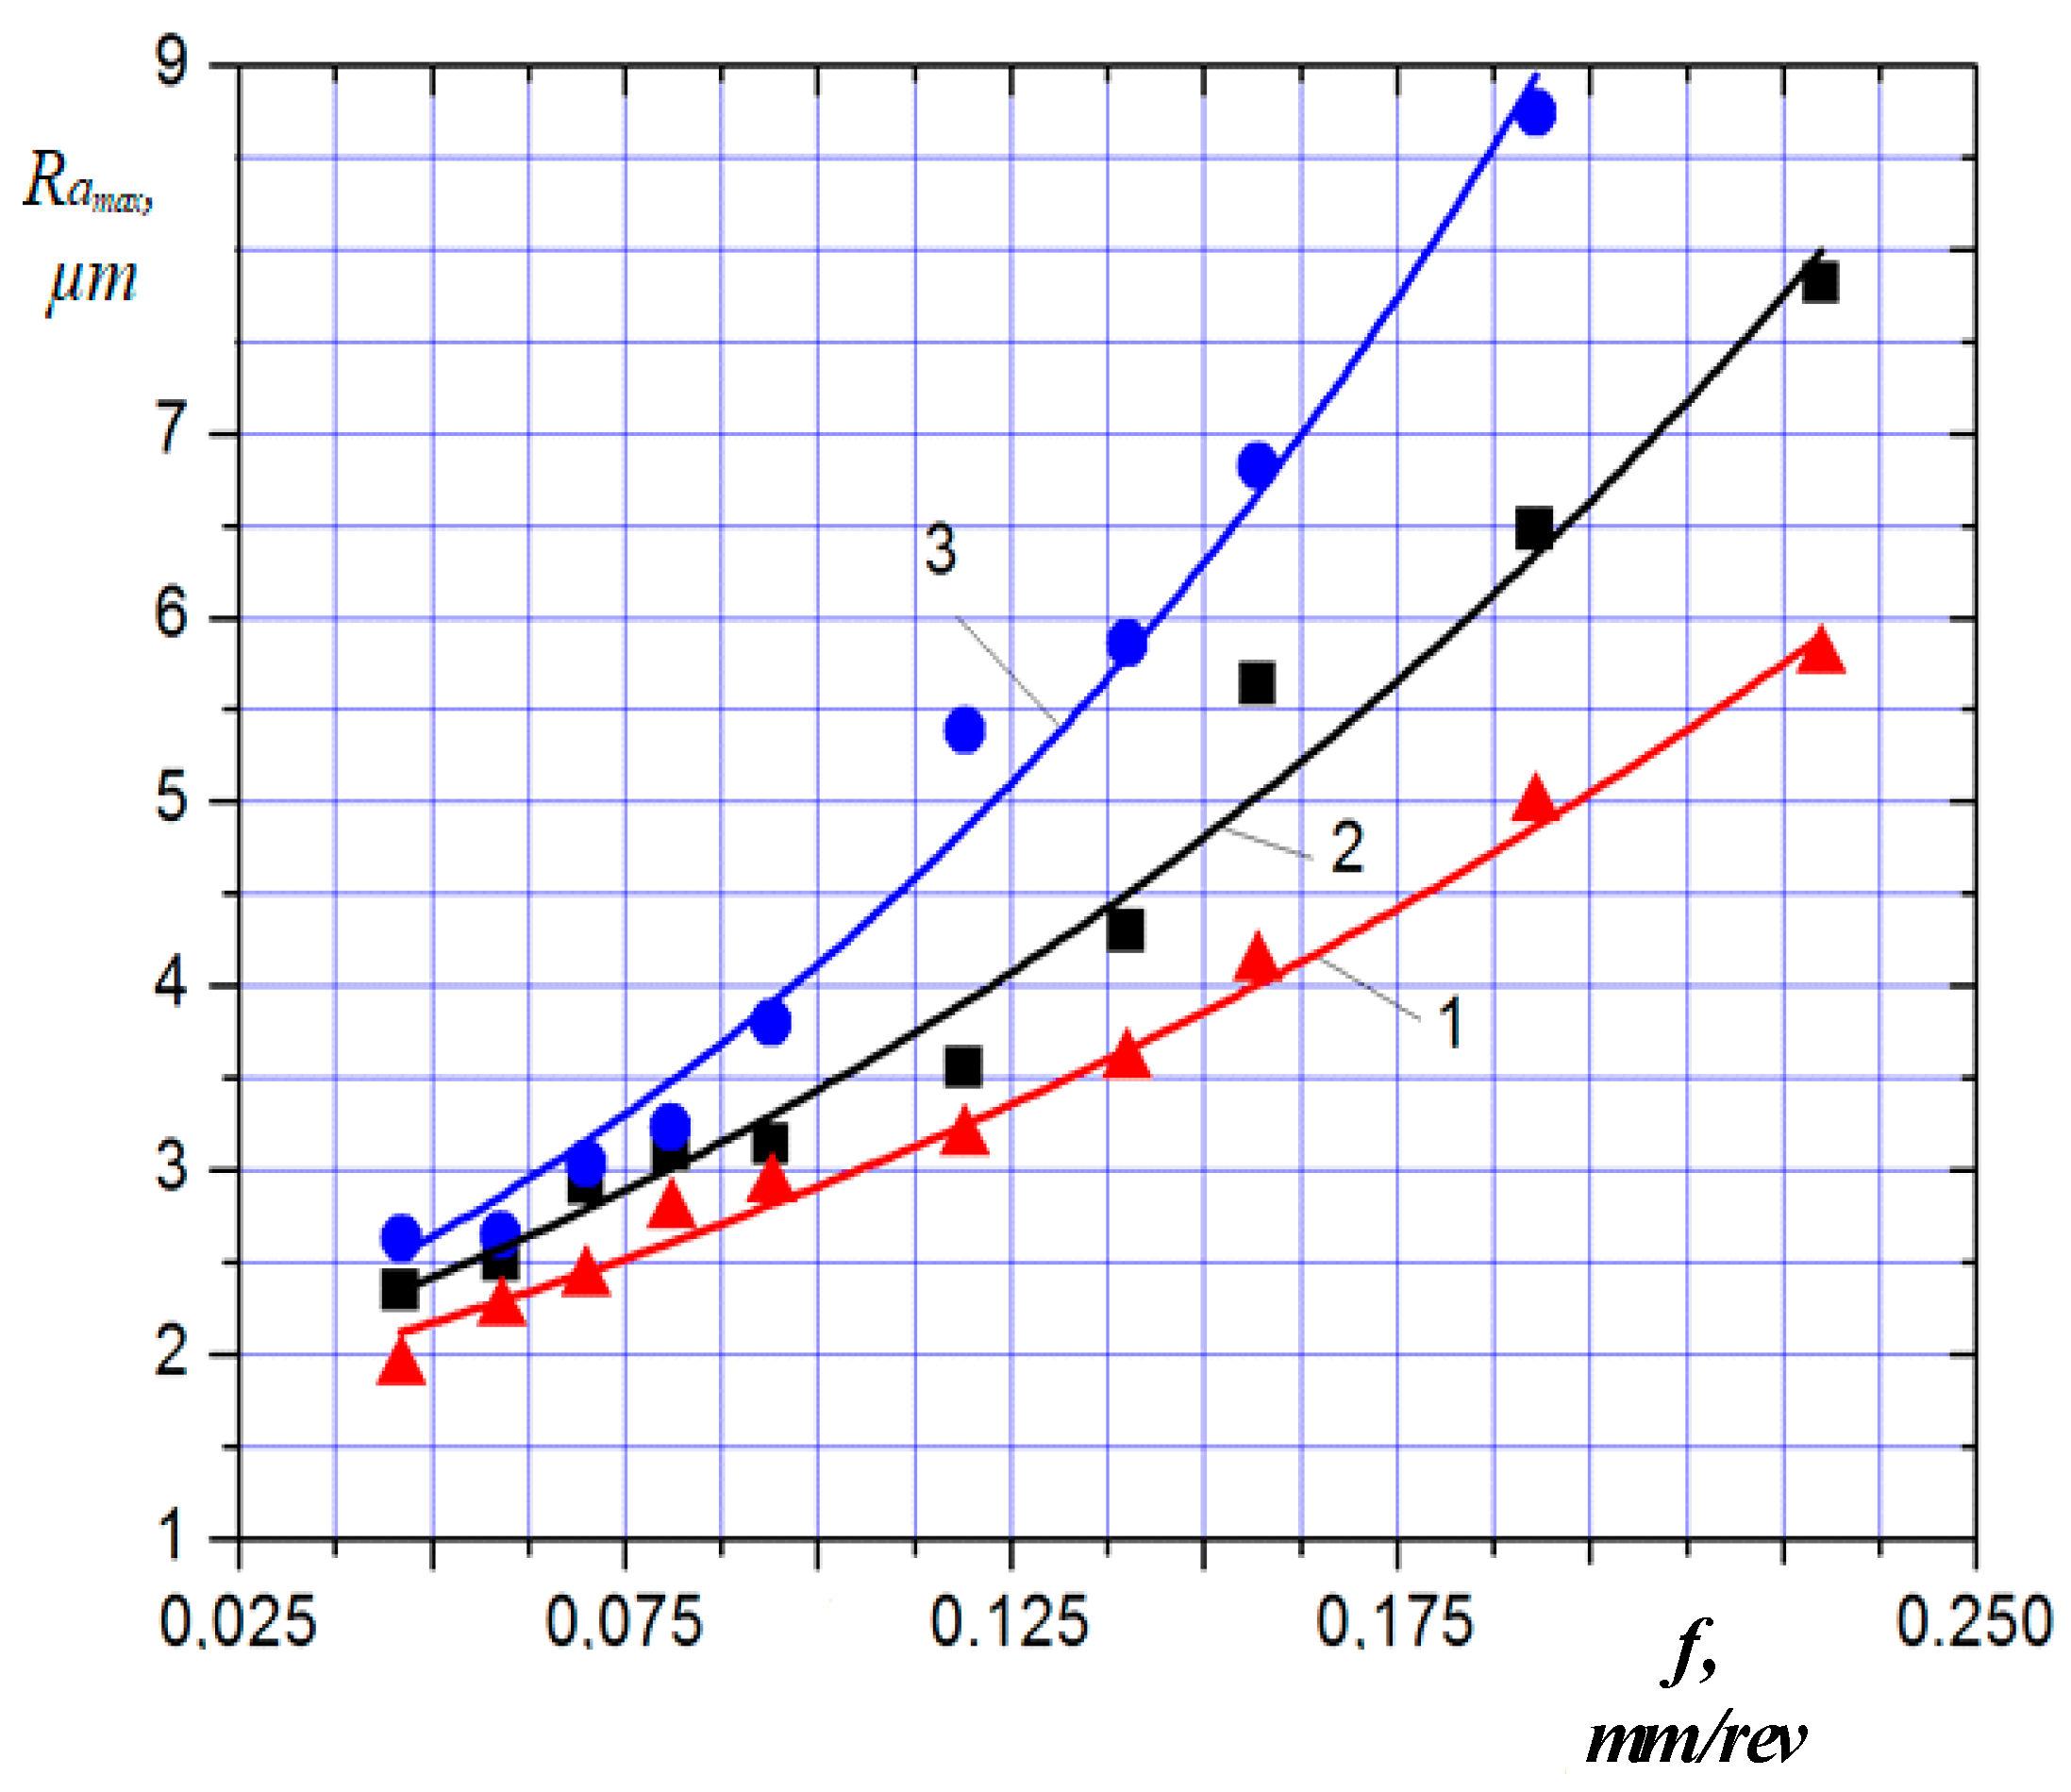
Figure 2, Figure 3 and Figure 4 show the graphic dependences of the influence of the feed rate s on the roughness parameter Ra, which are constructed based on the experimental data. Using the OrginPro 8 software (OriginLab Corporation, Northampton, MA, USA), we obtained the analytical relationships that describe the dependence of the surface roughness of the test specimens on the feed rate. For Fe-C alloys, the dependence of the surface roughness on the feed rate is given as a system of analytical dependencies:
For steel 45
R a max = { 0.0472 f 1.208 0.05 f 0.075 0.597 ( 1 + f ) 9.9 0.075 f 0.25 ;
For cast-iron KCh30-6
R a max = { 5.57 ( 1 + f ) 4.714 0.05 f 0.09 2.573 ( 1 + f ) 4.199 0.09 f 0.25 ;
For steel 30KhGSA
R a max = { 3.347 ( 1 + f ) 16.647 0.02 f 0.05 0.864 ( 1 + f ) 12.838 0.05 f 0.15 .

4. Analysis of Results

When feed rate is increased from 0.05 to 0.25 mm/rev while machining specimens from steel 45 and cast iron KCh30-6, and when feed rate is increased from 0.02 to 0.15 mm/rev while machining specimens from steel 30KhGSA, the sample mean values of R ¯ a change not monotonically and not in accordance with the parabolic dependence. With increasing the feed rate to certain values for specimens from cast iron KCh 30-6, steel 30KhGSA and steel 45, corresponding maximum values of R ¯ a 1 max , R ¯ a 2 max , R ¯ a 3 max decrease within their sample mean values, reaching the minimum values of R ¯ a 1 min , R ¯ a 2 min , R ¯ a 3 min . With a further increase in the feed rate, they increase as well (see Figure 2a). For test specimens from steel 45 and cast iron KCh 30-6, the minimum values R ¯ a 1 min , R ¯ a 2 min are reached at feed rates of 0.1 mm/rev and 0.075 mm/rev, respectively. For the test specimen from steel 30KhGSA, the minimum value R ¯ a 3 min is reached at the feed rate of 0.075 mm/rev.
The formation of roughness on test specimens from non-ferrous alloys with an increase in the feed rate from 0.05 mm/rev to 0.25 mm/rev is characterized by a monotonic function, the value of which increases with an increase in the feed rate. It should be noted that while machining these specimens, certain fissuring was observed, indicating the absence of a plastic component in the formation of roughness. A change in R ¯ a depending on the feed rate s is significant over the entire range of feed rates and for all materials of test specimens. For duralumin D16T, a change in dispersion over the entire range of feed rates (exception for the feed rate fi = 0.175 mm/rev) is insignificant. For other non-ferrous alloys, no regularities were established with regard to changes in dispersion.
The method for estimating the influence of the feed on the surface roughness that was formed by turning is proposed. For the first time, this method provides an opportunity, in the probabilistic aspect, based on the relevant criteria, to assess the significance of the feed effect on the roughness parameters of the treated surface throughout the range of feed values. The existing analytical dependencies for determining the surface roughness that was obtained in the process of turning, which are described in the review part of the article, do not take into account the physical processes that occur when turning with small feeds. Experimental research made it possible to establish that with increasing feed in the range of 0.02 ≤ f ≤ 0.075 mm/rev, the surface roughness of plastic materials decreases contrary to the well-known analytical dependencies. Only after the feed reaches the value of 0.075 mm/rev, the surface roughness begins to increase.
For brittle materials (non-ferrous alloys), the dependence of the surface roughness on the feed is characterized by a monotonic function, the value of which increases with an increase in the feed. The practical value of this research rests on demonstrating that when processing Fe-C alloys, it is possible to provide a given roughness by working with feeds that are 2–3 times higher than the minimum ones, which will contribute to an increase in labor productivity.

5. Conclusions

The proposed method for estimating the influence of the feed rate on the surface roughness that was formed by turning for the first time makes it possible to evaluate in the probabilistic aspect, taking into account the relevant criteria, the significance of the influence of the feed rate on the roughness parameters of the processed surface.
For estimating the surface roughness formed by turning it is for the first time proposed to use the maximum value of the mean arithmetic deviation of the profile Ramax as the sum of the mathematical expectation and three mean square deviations.
When processing plastic materials by turning with a small feed rate 0.02 ≤ f ≤ 0.075 mm/rev, the dependence of Ra on s is monotonically decreasing, and with the feed rate f > 0.075 mm/rev it is monotonically increasing. In particular, for steel 30KhGSA, a decrease in the feed rate from 0.05 to 0.02 mm/rev does not lead to a decrease in roughness according to the formula R z f 2 / 8 r , but, on the contrary, even to its increase.
When processing Fe-C alloys, it is possible to provide a pre-set roughness at the feed rate 2–3 times higher than the minimum feed rate, which will increase the productivity of labor. The analysis of the variation coefficient Kv for all the experiments conducted under the research program, which are in the range of 0.01 < Kv < 0.29, confirms that the roughness formation process is stable.
It is found that the analytical dependences to determine the surface roughness that was obtained by turning, which are known from the literature sources, do not always adequately describe the experimental data. This indicates a significant effect of the physical and mechanical properties of materials on the surface roughness in the process of turning. For brittle materials, (non-ferrous alloys silumin AL4, duralumin D16T, brass LS63-3), the dependence of surface roughness obtained by turning on the feed is described by a monotonic function, the value of which increases with an increase in the feed.

Author Contributions

All authors contributed equally to this work.

Conflicts of Interest

The authors declare no conflict of interests.

References

  1. Rao, P.N. Manufacturing Technology: Metal Cutting and Machine Tools; Tata McGraw-Hill Education: New York, NY, USA, 2013; 521p. [Google Scholar]
  2. Ryzhov, Y.V.; Suslov, A.T.; Fyedorov, V.P. Engineering Support of Machine Parts Service Characteristic; Mechanical Engineering: Moscow, Russia, 1979; 176p. [Google Scholar]
  3. Astakhov, V.P. Surface integrity—Definition and importance in functional performance. In Surface Integrity in Machining; Davim, J.P., Ed.; Springer Science & Business Media: Berlin, Germany, 2010; pp. 1–35. [Google Scholar]
  4. Reference Manual for Production-Mechanical Engineer in 2 Volumes, 4th ed.; Kosilova, A.H.; Meshcheryakov, R.K. (Eds.) Machynostroyeniye: Moscow, Russia, 1986; p. 656. [Google Scholar]
  5. Bobrov, V.F. Foundations of Metal Cutting Theory; Machynostroyeniye: Moscow, Russia, 1975; p. 344. [Google Scholar]
  6. Haskarov, D.V.; Shapovalov, V.I. Small Sample; Statistics: Moscow, Russia, 1978; p. 248. [Google Scholar]
  7. Kolker, Y.D. Mathematical Analysis of Machine Parts Working Accuracy; Technika: Kiev, Ukraine, 1976; p. 200. [Google Scholar]
  8. Kryvyi, P.D.; Dzyura, V.O.; Tymoshenko, N.M.; Krypa, V.V. Technological heredity and accuracy of the cross-section shapes of the hydro-cylinder cylindrical surfaces. In Proceedings of the ASME 2014 International Manufacturing Science and Engineering Conference Collocated with the JSME 2014 International Conference on Materials and Processing and the 42nd North American Manufacturing Research Conference, Detroit, MI, USA, 9–13 June 2014; p. 2, Paper No. MSEC2014-3946. [Google Scholar] [CrossRef]
  9. Dogra, M.; Sharma, V.S.; Dureja, J. Effect of tool geometry variation on finish turning—A Review. J. Eng. Sci. Technol. Rev. 2011, 4, 1–13. [Google Scholar] [CrossRef]
  10. Sam Paul, P.; Varadarajan, A.S.; Robinson, R. Gnanadurai Study on the influence of fluid application parameters on tool vibration and cutting performance during turning of hardened steel. Eng. Sci. Technol. Int. J. 2016, 19, 241–253. [Google Scholar] [CrossRef]
  11. Hughes, J.I.; Sharman, A.R.; Ridgwayk, C. The effect of cutting tool material and edge geometry on tool life and workpiece surface integrity. Proc. Inst. Mech. Eng. Part B J. Eng. Manuf. 2006, 220, 93–107. [Google Scholar] [CrossRef]
  12. Matsumoto, Y.; Hashimoto, F.; Lahoti, G. Surface integrity generated by precision hard turning. Ann. CIRP 1999, 48, 59–62. [Google Scholar] [CrossRef]
  13. Sasahara, H.; Obikawa, T.; Shirakashi, T. Prediction model of surface residual stress within a machined surface by combining two orthogonal plane models. Int. J. Mach. Tools Manuf. 2004, 44, 815–822. [Google Scholar] [CrossRef]
  14. Witenberg, Y.R. Surface Roughness and Methods of its Evaluation; Sydostroyeniye: Leningrad, Russia, 1971; p. 108. [Google Scholar]
  15. NCSR. AMTA Reliability Publications NO. 1-CNC Machining Centre; National Centre for System Reliability: Risley, UK, 1988. [Google Scholar]
  16. Lulyanov, V.S.; Rudzyt, Y.A. Surface Roughness Parameters; Izdatelstvo Standartov: Moscow, Russia, 1979; p. 162. (In Russian) [Google Scholar]
  17. Kryvyi, P.D.; Dzyura, V.O.; Hrytsay, I.Y.; Yatsyuk, V.A. Determination Method of Feed Effect on the Surface Roughness Machined by Cutting. Patent of Ukraine 112,248; 2 April 2015, 10 August 2016. [Google Scholar]
  18. Bashkov, V.M.; Katsev, P.H. Cutting Tool Durability Tests; Mashynostroyeniye: Moscow, Russia, 1985; p. 136. (In Russian) [Google Scholar]
  19. Filonenko, S.N. Metal Cutting; Technika: Kiev, Ukraine, 1975; p. 232. [Google Scholar]
  20. Knight, W.A.; Boothroyd, G. Fundamentals of Metal Machining and Machine Tools, 3rd ed.; CRC Press: Boca Raton, FL, USA, 2005; p. 602. [Google Scholar]
  21. Krupa, V.V. Metal Cutting Tools with Asymmetrical Cutting Edge Location for Machining of Deep Cylinder Ports. Ph.D. Thesis, TNTU, Ternopil, Ukraine, 2015. [Google Scholar]
  22. Klushyn, M.I. Metal Cutting, 2nd ed.; Gosnauchtechizdat Machynostroitelnoy Literatury: Moscow, Russia, 1958; 454p. [Google Scholar]
  23. Lin, S.C.; Chang, M.F. A study on the effects of vibrations on the surface finish using a surface topography simulation model for turning. Int. J. Mach. Tools Manuf. 1998, 38, 763–782. [Google Scholar] [CrossRef]
  24. Thomas, M.; Beauchamp, Y.; Youssef, A.Y.; Masounave, J. Effect of tool vibrations on surface roughness during lathe dry turning process. Comput. Ind. Eng. 1996, 31, 637–644. [Google Scholar] [CrossRef]
  25. Chen, C.-C.A.; Lui, W.-C.; Duffie, N.A. A surface topography model for automated surface finishing. Int. J. Mach. Tools Manuf. 1998, 38, 543–550. [Google Scholar] [CrossRef]
  26. Toulfatzis, A.I.; Pantazopoulos, G.A.; David, C.N.; Sagris, D.S.; Paipetis, A.S. Machinability of Eco-Friendly Lead-Free Brass Alloys: Cutting-Force and Surface-Roughness Optimization. Metals 2018, 8, 250. [Google Scholar] [CrossRef]
  27. Shaw, M.C. Metal Cutting Principles; Oxford University Press: Oxford, UK, 1984; pp. 487–519. [Google Scholar]
  28. Thomas, T.R. Rough Surfaces; Longman Inc.: New York, NY, USA, 1982; 261p. [Google Scholar]
  29. ISO 3274 Geometrical Product Specifications (GPS)-Surface Texture: Profile Method-Nominal Characteristics of Contact (Stylus) Instruments; International Organization for Standardization: Geneva, Switzerland, 1996; p. 13.
  30. ISO 4287, Geometrical Product Specifications (GPS)-Surface Texture: Profile Method-Terms, Definitions and Surface Texture Parameters; International Organization for Standardization: Geneva, Switzerland, 1997; p. 25.
  31. ISO 4288, Geometrical Product Specifications (GPS)-Surface Texture: Profile Method-Rules and Procedures for the Assessment of Surface Texture; International Organization for Standardization: Geneva, Switzerland, 1996; p. 8.
  32. ISO 8785 Surface Imperfections-Terms, Definitions, and Parameters; International Organization for Standardization: Geneva, Switzerland, 1998; p. 20.
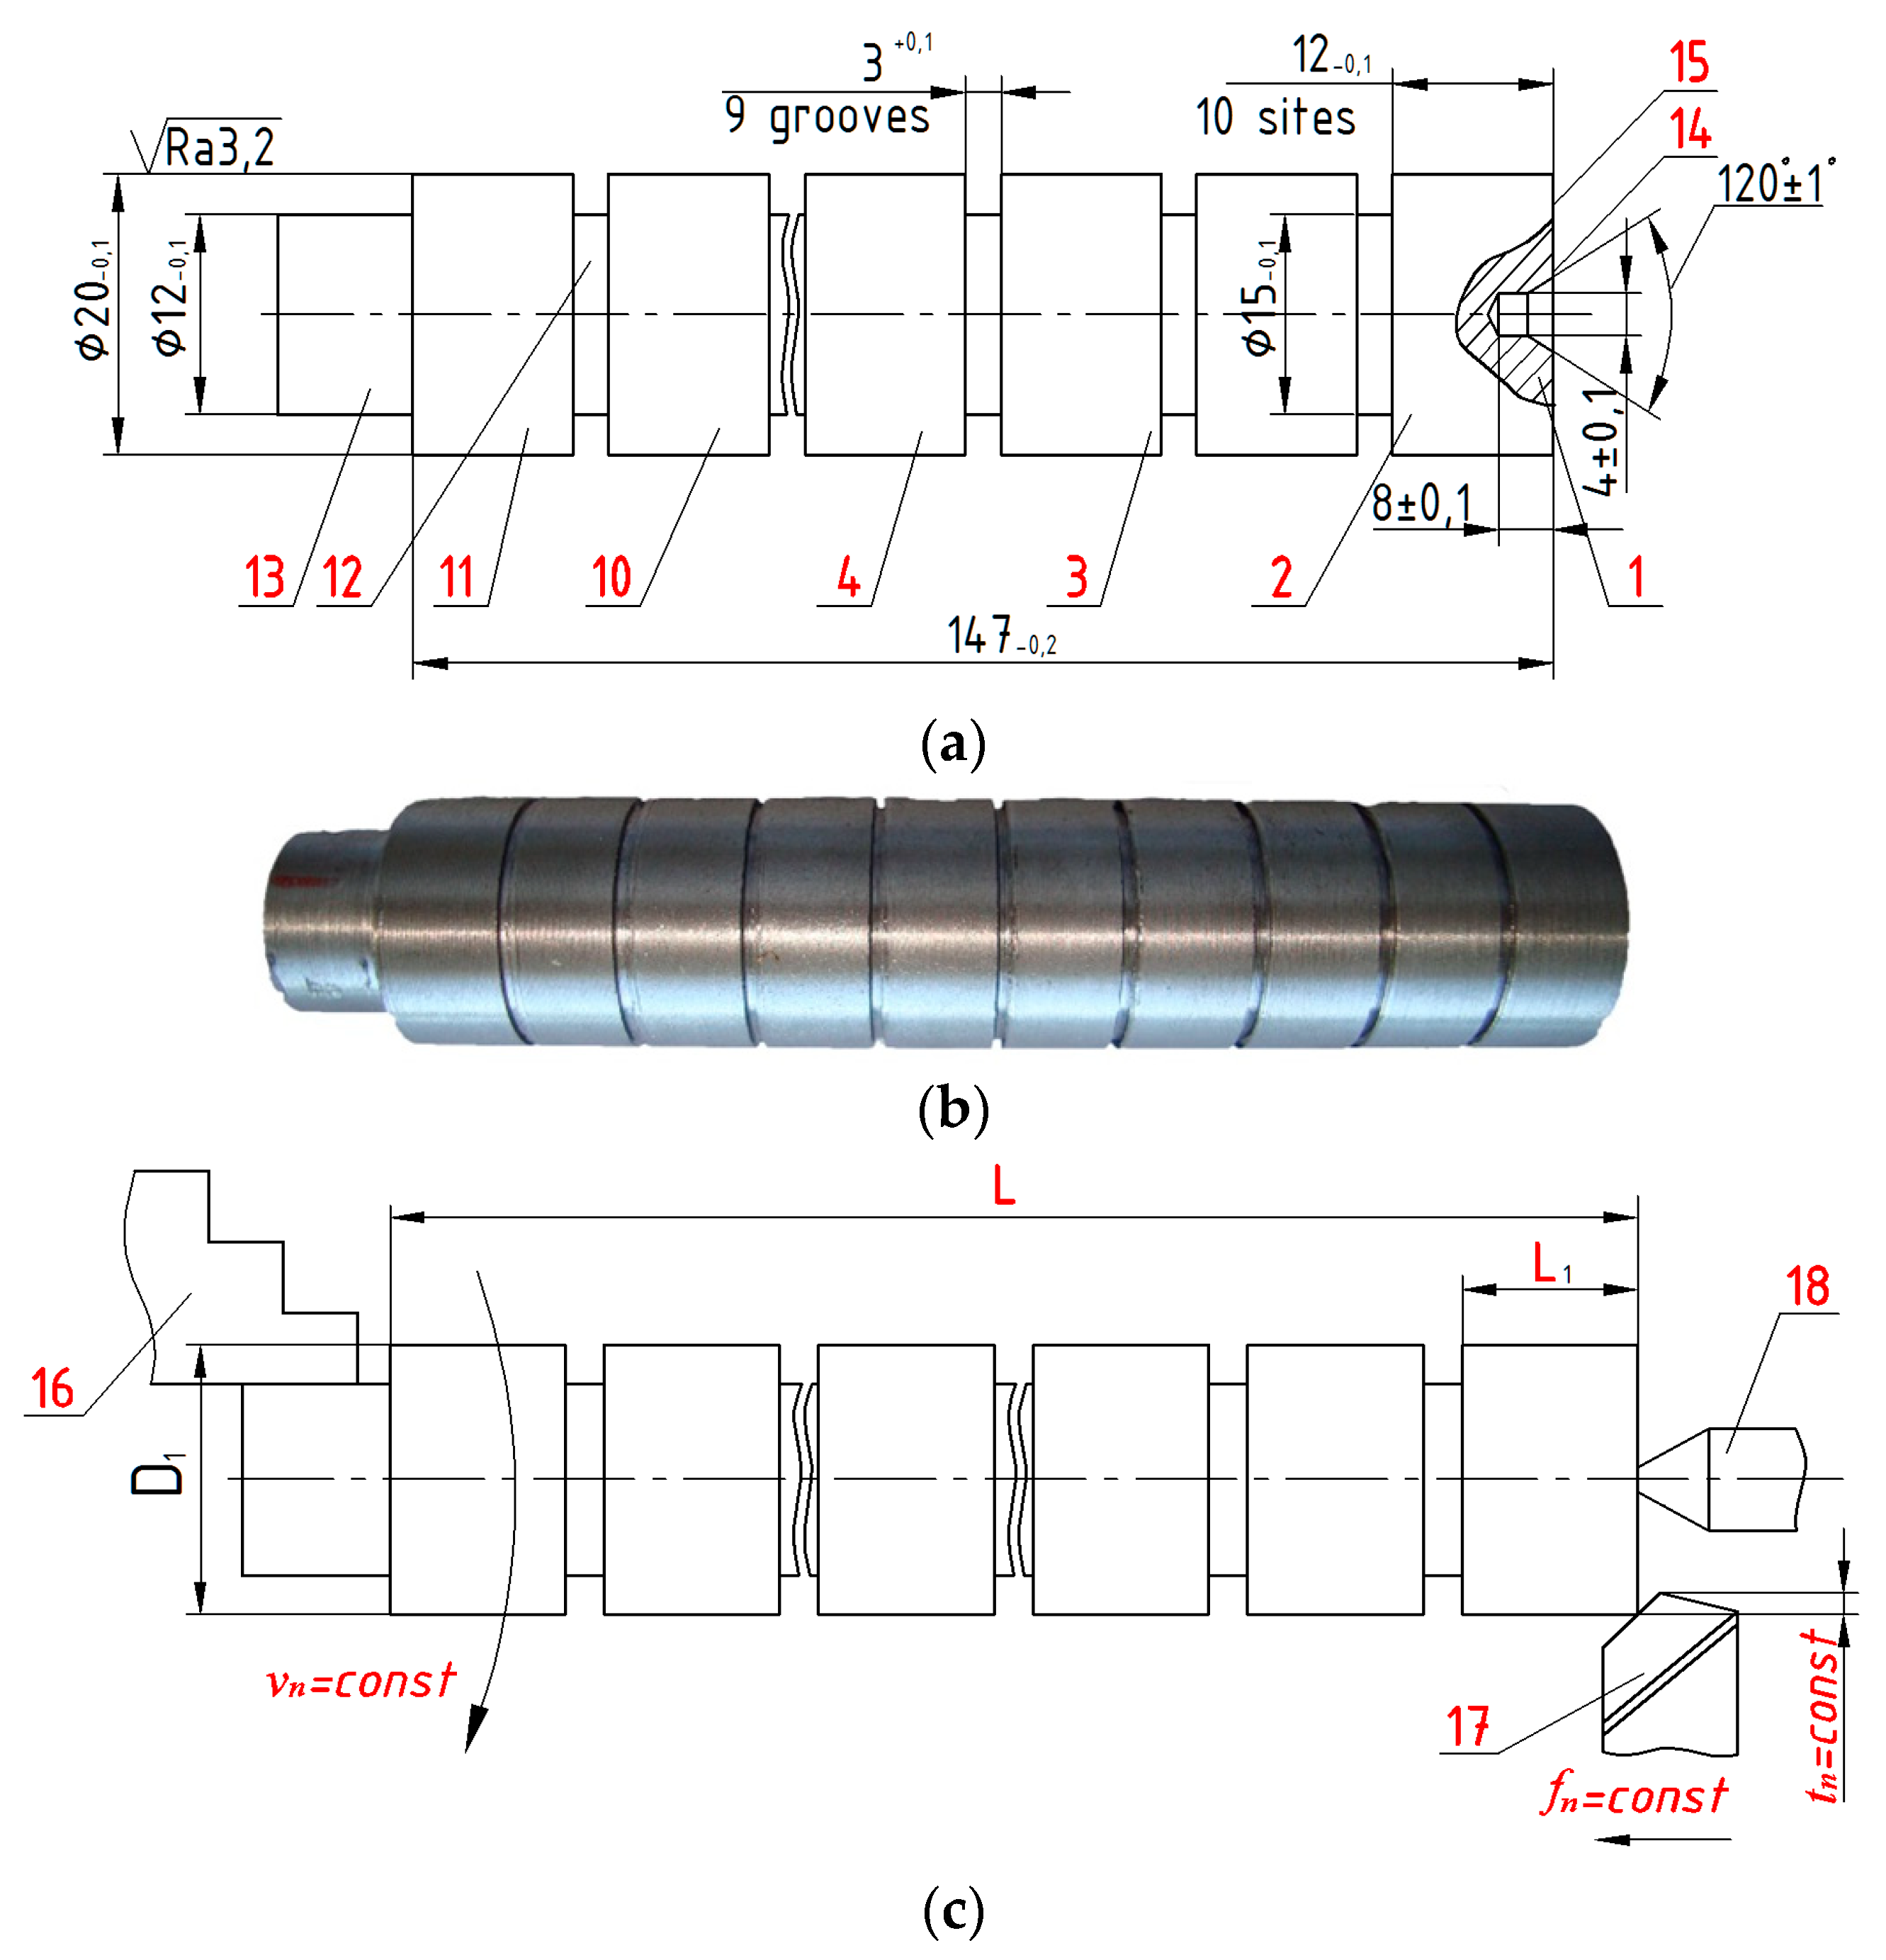
Figure 1. Test specimen and schemes of technological semi-rough and finish junctions: a—drawing of the test specimen; b—general view of the test specimen; c—scheme for the implementation of the semi-rough pass; d—scheme of finish pass and placement of tracks for measuring parameter Ra.
Metals 08 00965 g001aMetals 08 00965 g001b
Figure 2. Dependence of the sample mean roughness parameter R ¯ a on the feed rate f for Fe-C alloys: 1—steel 45; 2—cast iron KCh 30-6.
Metals 08 00965 g002
Figure 3. Dependence of the sample mean roughness parameter R ¯ a on the feed rate f for steel 30 KhGSA.
Metals 08 00965 g003
Figure 4. Dependence of the sample mean roughness parameter R ¯ a on the feed rate f for non-ferrous alloys: 1—silumin AL4 R a max = 1.594 ( 1 + f ) 6.321 ; 2—duralumin D16Т R a max = 1.673 ( 1 + f ) 7.553 ; 3—brass LS63-3 R a max = 1.655 ( 1 + f ) 9.56 .
Metals 08 00965 g004
Table 1. Passport values and scattering characteristics of the feed rate of the turning lathe of model 16K20.
Passport values, μm/rev50607590100125150175200250
Average value, μm/rev46.359.870.581.594.9120.0144.1167.5193.9-
Dispersion, (μm/rev)28.4620.1511.6421.1827.829.0834.5552.1560.78-
Mean square deviation, μm/rev2.914.493.414.605.275.395.877.227.80-
Table 2. Scattering characteristics of Ra, estimated values of the criteria of Student tр. and Fisher Fр., and coefficients of variation Кv. for steel 45 and cast iron KCh 30-6.
ParameterFeed Passport Values—Numerator Sample Average Feed Values—Denominator, μm/rev.
50 46.3   60 59.7   75 70.5   90 81.5   100 94.9   125 120   150 144   175 167   200 194   250 230  
Cast-iron KCh 30-6
R ¯ a , μm4.214.133.673.573.413.473.684.375.185.94
D ( R a ) , μm²0.0050.0060.0170.0050.0200.0210.0650.0210.0180.005
R a max , μm4.4224.3624.0613.7823.8343.9054.4454.8055.5826.152
tр.-2.3010.8818.9215.1813.856.0521.7110.8951.14
Change significance-+<+<+<+<+<+<>+>+>+
Fр.-1.323.621.194.264.4713.834.4738.721.19
Change significance-– •+ •– •+ •+ •+ •+ •+ •– •
Кv.0.020.020.040.020.040.040.070.030.070.01
Steel 45
R ¯ a , μm1.380.990.750.931.081.361.672.392.543.85
D ( R a ) , μm²0.0390.0100.0290.0250.0110.0440.0320.0150.0370.11
R a max , μm1.9721.291.2611.4041.3951.9892.2072.7573.1174.845
tр.-5.297.245.344.020.213.276.9712.6219.2
Change significance-+<+<+<>+>+>+>+>+>+
Fр.-3.91.341.563.551.131.223.851.052.82
Change significance-+– •– •+ •– •– •+ •– •– •
Кv.0.140.100.230.170.100.150.110.160.080.09
Table 3. Scattering characteristics of Ra, estimated values of the criteria of Student tр. and Fisher Fр., and coefficients of variation Кv. for steel 30KhGSA.
ParameterFeed Passport Values, μm/rev.
20305060708088100125150
R ¯ a , μm2.441.521.441.581.591.722.382.543.844.66
D ( R a ) , μm²0.00180.00660.00350.00390.00800.050.00220.03800.00320.0220
R a max , μm2.5671.7641.6171.7671.8582.3912.5213.1254.015.105
tр.-30.1141.2134.1725.7610.281.11.559.443.17
Change significance-+<+<+<+<+<oo>+>+
Fр.-3.671.942.174.4427.781.521.111.7812.22
Change significance-+ •– •– •+ •+ •– •+ •– •+ •
Кv.0.020.050.040.040.060.130.010.080.010.03
Table 4. Scattering characteristics of Ra, estimated values of the criteria of Student tр. and Fisher Fр., and coefficients of variation Кv. for non-ferrous alloys at different values of the feed rate s.
Parameter Feed Passport Values—Numerator Sample Average Feed Values—Denominator, μm/rev.
50 46.3   60 59.7   75 70.5   90 81.5   100 94.9   125 120   150 144   175 167   200 194   250 230  
Aluminium alloy D16T
R ¯ a , μm1.912.192.672.832.843.213.875.276.037.19
D ( R a ) , μm²0.0210.0110.0070.0080.0100.0130.0200.0150.0220.043
R a max , μm2.3452.5052.9213.0983.143.5524.2945.6376.4757.812
tр.-4.1913.0215.6815.3316.2725.6323.8159.1762.26
Change significance->+>+>+>+>+>+>+>+>+
Fр.-1.912.882.632.11.621.057.381.052.05
Change significance-------+--
Кv.0.070.050.030.030.040.040.040.070.020.03
Brass LS 63-3
R ¯ a , μm2.2142.362.572.983.554.545.145.897.85-
D ( R a ) , μm²0.0190.0090.0240.0070.0070.0790.0580.0960.088-
R a max , μm2.6282.6453.0353.2313.8015.3835.8626.828.74-
tр.-0.922.174.828.4312.7816.7119.6526.75-
Change significance-o>+>+>+>+>+>+>+-
Fр.-24.079.1325.4730.422.773.782.281.21-
Change significance-++++-+---
Кv.0.210.040.060.030.020.060.050.050.05-
Silumin AL4
R ¯ a , μm1.471.542.032.232.442.743.093.734.565.18
D ( R a ) , μm²0.0230.0550.0160.0330.0250.0210.0280.0170.0200.041
R a max , μm1.9252.2442.4092.7752.9143.1753.5924.1214.9845.787
tр.-0.064.124.218.6911.0611.1913.318.5215.85
Change significance-o>+>+>+>+>+>+>+>+
Fр.-1.621.222.395.526.574.931.231.452.97
Change significance----+++---
Кv.0.290.230.200.260.060.050.060.110.090.12