Article

Influence of Heat Treatment on the Microstructure and Properties of 2319 Aluminum Alloy Produced by Wire Arc Additive Manufacturing

1
China Academy of Space Technology, Beijing 100094, China
2
National Center for Materials Service Safety, University of Science and Technology Beijing, Beijing 100083, China
3
School of Mechanical Engineering and Automation, Beihang University, Beijing 100191, China
4
Ningbo Innovation Research Institute, Beihang University, Ningbo 315800, China
*
Authors to whom correspondence should be addressed.
Metals 2025, 15(9), 1002; https://doi.org/10.3390/met15091002
Submission received: 4 August 2025 / Revised: 31 August 2025 / Accepted: 6 September 2025 / Published: 9 September 2025

Abstract

A single-layer wall specimen of 2319 aluminum alloy was fabricated by the wire arc additive manufacturing (WAAM) technique through layer-by-layer welding, and it was then subjected to solution treatment and aging treatment. This study investigated the changes in the microstructure, mechanical properties, and corrosion resistance of the materials after deposition and heat treatment. The results show that in the as-deposited microstructure, there is a second phase in the form of a network structure. In addition, the number of impurity phases is large, and their sizes are relatively big. After solution treatment, most of the second phase is dissolved, and the remaining impurity phases are mainly the θ phase, with relatively small sizes. After subsequent aging treatment, a fine and dispersedly distributed second phase is formed in the dendrites. Compared with the as-deposited state, the number of secondary phases in the matrix after heat treatment is significantly reduced, and the distribution is more dispersed, which improves the mechanical properties and corrosion resistance of the material. After heat treatment, the tensile strengths in the horizontal and vertical directions of the alloy reach 362 MPa and 339 MPa, respectively, which are increased by 60.7% and 63.8% compared with the as-deposited state. However, the plastic deformation ability of the material after aging treatment decreases to a certain extent.

1. Introduction

As a metal with light weight and high strength, 2319 aluminum alloy is widely used in numerous applications in critical equipment. However, there are still challenges in its efficient and high-quality processing [1]. In recent years, the development of additive manufacturing technology has provided a new method for the rapid fabrication of high-performance and dense metal components [2,3]. Among them, the WAAM technology is an advanced additive manufacturing technology developed by combining arc welding technology with additive manufacturing process [4,5,6,7]. Due to characteristics such as high deposition rate, strong design flexibility, and integrated forming, it is regarded as one of the manufacturing technologies for producing large aluminum alloy components, and is widely applied in high-end manufacturing industries such as aerospace and automotive manufacturing [8,9,10,11]. However, in the process of applying WAAM technology, it has been found that the continuous heat input of the arc heat source causes defects in additive components, such as pores in the deposited layer, coarse grain size, microcracks, residual stress, and anisotropy, which seriously impact service performance [12,13,14,15]. To some extent, this restricts the application and promotion of this technology. Therefore, the research on the microstructure and properties of WAAM aluminum alloy additive manufacturing components has important theoretical significance and application value [16].
So far, there have been many in-depth studies on the microstructure and properties of aluminum alloy components obtained by WAAM. Qi et al. processed Al-Cu-Mg welding wires through double-wire arc additive manufacturing technology, studied the microstructure characteristics of components and proposed that interlayer defects such as pores and porosity are the main reasons for the differences in mechanical properties [17]. Some studies have found that the AlSi10Mg alloy materials prepared by additive manufacturing technology possess better mechanical properties than those in the cast state, and it has been confirmed that the properties further improve after certain heat treatments [18,19,20,21]. Wang et al. studied the microstructure evolution and corresponding mechanical properties of 2219 aluminum alloy fabricated by WAAM. They found that during the WAAM deposition process, the eutectic structure aggregates and transforms into a lamellar θ′ phase; the grains in the interface region are finer and the precipitated phases are more dispersed, resulting in higher hardness [22]. In addition, some studies have found that an excessive amount of acicular eutectic phases can increase the brittleness of aluminum alloys due to the stress concentration caused by the increase in dislocation density, leading to a serious decrease in the plasticity of the materials [19,23]. The coarse eutectic phases distributed at the grain boundaries can increase the length of the grain boundaries, thereby reducing the strengthening effect and resulting in a decrease in the strength of the aluminum alloys [24,25]. Moreover, Cai et al. found that the nickel-aluminum bronze prepared by the WAAM method has smaller grain size, the precipitation of the secondary phase is suppressed, and it has better corrosion resistance and resistance to microbial corrosion [26].
To improve the defect problems existing in the component manufacturing process of WAAM technology, researchers have also conducted extensive studies on the regulation of material microstructures. Tsai et al. regulated the microstructure of the alloy through microalloying, refined the eutectic structure, obtained a fibrous structural organization, and thus improved the mechanical properties of the material [27]. M. Albu et al. studied the influence mechanism of the local cooling rate on the additively manufactured components of AlSi10Mg and found that the well-defined Si network containing amorphous/disordered crystalline phases and nanoscale Si particles determined the mechanical properties and high yield stress of the material at lower temperatures [28]. M. Arana et al. combined aging heat treatment with a deposition strategy for generating equiaxed grains, which improved the mechanical properties of the WAAM components of 2319 aluminum alloy and ensured the isotropy of the material [29]. Furthermore, some studies on WAAM 2319 aluminum alloy also show that the influence of heat treatment on the mechanical properties of the material is greater than that of the forming direction, and the size of the eutectic structure has a greater impact on its fatigue limit and static tensile strength [30,31].
In this work, WAAM technology was adopted to manufacture single-walled 2319 aluminum alloy. Then, heat treatment was further designed and carried out. Through the comparative analysis of the changes in the internal defects, microstructure, mechanical properties, and corrosion resistance of the materials before and after heat treatment, the study explored whether heat treatments could be used to improve the properties, and the strengthening mechanism of heat treatment was revealed, providing a theoretical reference for the further optimization, promotion, and engineering application of this additive manufacturing technology.

2. Experiment

Indalco 2319 aluminum alloy welding wire (chemical composition is shown in Table 1) and the Advanced CMT+P droplet transfer mode were used to form a single-wall specimen with a length of 300 mm, a height of 200 mm, and a thickness of 10 mm. The WAAM system used in the experiment is composed of two KUKA KR22 robots (KUKA Inc., Augsburg, Germany), a welding machine with the model TPS 4000CMT as the heat source, a rotary positioner, a rotating boom, two sets of forming power supplies, and additive manufacturing path planning software. The forming process parameters are shown in Table 2, and the physical photograph of the formed single-walled wall specimen is shown in Figure 1a. After the forming was complete, first, three small blocks with a size of 20 × 20 × 10 mm3 were cut from the single-walled wall specimen (the sampling positions are shown in Figure 1a). One of them was directly prepared as a metallographic specimen for the study of the as-deposited microstructure, and the other two were subjected to heat treatment together with the single-walled specimen. The heat treatment system is shown in Figure 1c. First, the specimen was stress-relieved annealed (415 °C × 2.5 h), then solution quenching treatment was carried out (535 °C × 10 h, water cooling), and finally aging treatment was performed (190 °C × 5 h, air cooling). During the heat treatment process, the ramp rate remained constant at 10 °C/min, and all experimental conditions comprised an ordinary indoor atmospheric environment.
To analyze the microstructure of the parts, the samples after solution treatment and aging were cut, sanded (160, 320, 600, 1000, 1500, 2000#) and polished (1.5 μm), etched with Keller (95 mL H2O + 2.5 mL HNO3 + 1.5 mL HCl + 1 mL HF) for 20 s, and then cleaned. The metallographic structure of the cross-section was observed using an optical microscope (OM, Zeiss Axio Observer Elm, Jena, Germany), the microstructure was observed using a scanning electron microscope (SEM, Hitachi S-3700, Tokyo, Japan), and the phase composition was analyzed using an energy dispersive spectrometer (EDS, Oxford, Oxford, UK). Then, tensile specimens were cut from the single-walled wall specimens before and after heat treatment along the horizontal and vertical directions to test the mechanical properties. The sampling method is shown in Figure 1a, and the dimensions of the tensile specimens are shown in Figure 1b. The tensile test was carried out on an electronic universal testing machine according to GB/T228.1-2010, and the fracture morphology of the tensile specimens was observed using SEM. Each sample group was tested three times, and the average values were calculated. Finally, the samples before and after heat treatment were processed into specimens with a size of 10 × 10 × 3 mm3. They were then polished with sandpaper (160, 320, 600, 1000, 1500#), and electrochemical tests were carried out in a 3.5 wt% NaCl solution using the Gamry electrochemical workstation.

3. Results and Discussion

3.1. Microstructure Evolution During Heat Treatment

3.1.1. Microstructure of As-Deposited Specimen

Figure 2 shows the microstructure of the as-deposited specimen of WAAM 2319 aluminum alloy. Overall, the microstructure of the as-deposited specimen is predominantly composed of equiaxed dendritic crystals. A substantial amount of intergranular metal compounds exist at the grain boundaries, forming an interconnected network (Figure 2b,e). This phenomenon indicates that during the WAAM process, intergranular intermetallic compounds precipitate preferentially and distribute continuously along the grain boundaries. Subsequently, these compounds gradually coarsen as the thermal cycling progresses.
Regarding the microstructural characteristics, the interlayer region exhibits a significant presence of tiny pores. Notably, the eutectic structure surrounding these defects is highly heterogeneous (Figure 2a), characterized by a greater number and larger size of secondary phases (Figure 2c). In contrast, the intralayer structure contains fewer pores (Figure 2d), features a more homogeneous eutectic distribution, and displays smaller-sized intergranular intermetallic compounds (Figure 2f). At this time, the average grain sizes between and within layers are 49 and 40 μm, respectively, and the proportions of the secondary phase are 8.1% and 6.5%, respectively.
In order to further analyze the chemical composition and spatial distribution of intergranular intermetallic compounds, the as-deposited microstructure was examined using SEM, as illustrated in Figure 3. The corresponding EDS results are presented in Table 3. A detailed analysis of the EDS data reveals that the elemental composition of the intermetallic compounds located at the grain boundaries closely matches that of the θ phase (Al2Cu). This finding is the result of an approximate speculation, and it is consistent with previous studies on the wire arc additive manufacturing (WAAM) of 2319 aluminum alloy under various arc modes [22,23]. Consequently, it can be concluded that the as-deposited microstructure primarily consists of the α-Al matrix interspersed with the θ phase.

3.1.2. Microstructure of Solid State

Figure 4 shows the microstructure of the sample of WAAM 2319 aluminum alloy after solid solution treatment. It can be observed that most of the intergranular intermetallic compounds in the solution-treated microstructure dissolve, resulting in an uneven distribution of the remaining secondary phase particles (Figure 4b,e). At this stage, the average grain sizes of the interlayer and intralayer are 53 and 45 μm, respectively. Further observation revealed that near the defects in the interlayer microstructure (Figure 4c), there were still concentrated and coarse phases. In contrast, the secondary phase particles in the intralayer microstructure were fewer, and their distribution was more dispersed (Figure 4f). This might be due to the fact that during the solidification process, the secondary phases on the grain boundaries dissolve more rapidly within the layer structure, and some grains grow accordingly.
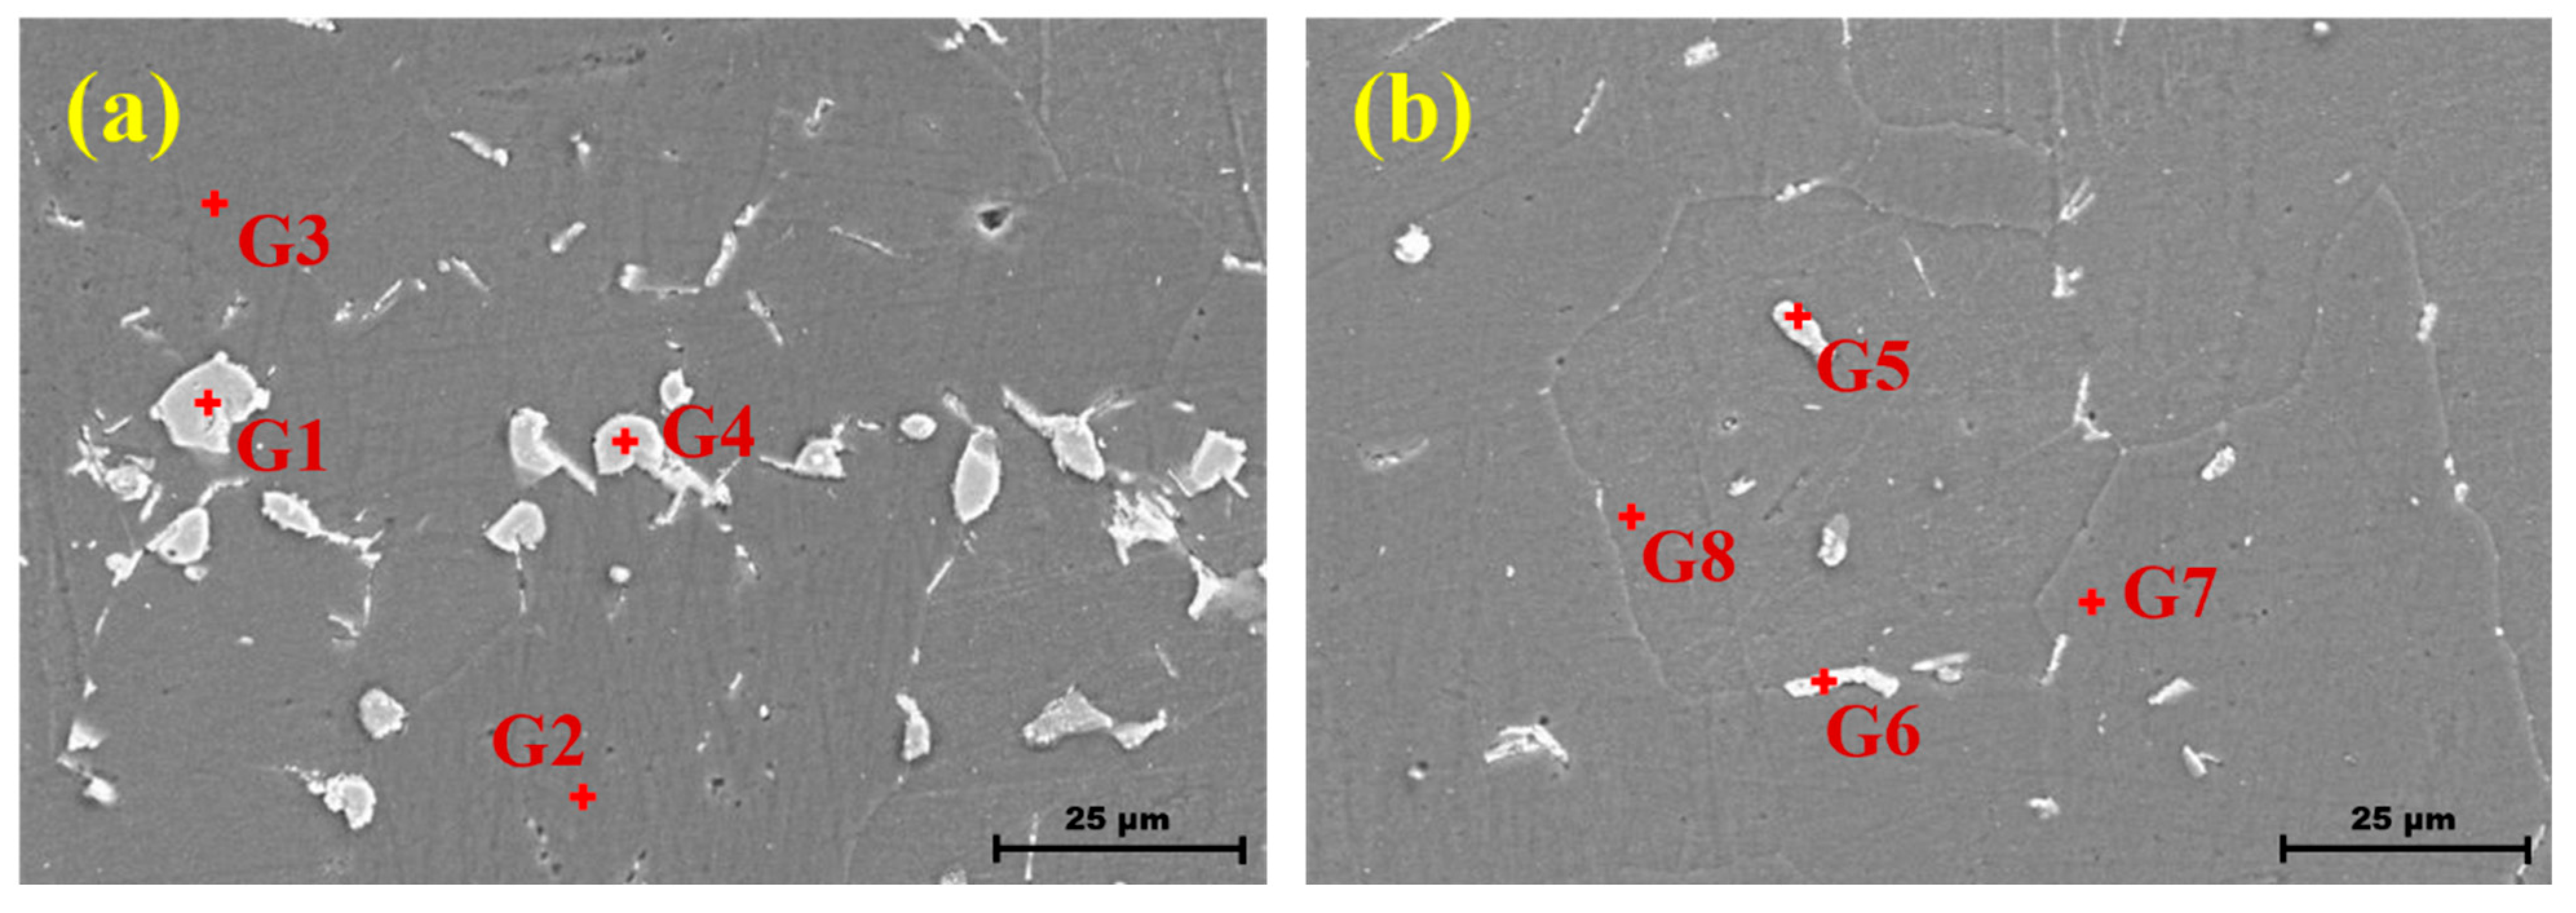
A further analysis of the scanning electron microscopy observations (Figure 5) and corresponding EDS results (Table 4) of the solid-state microstructure reveals that in the interlayer regions, larger secondary phase at locations G1 and G4 remain as the θ phase. In contrast, intralayer regions contain fewer residual θ phases, with most being strip-shaped phases rich in Fe and Mn (at locations G5 and G6). Additionally, the Cu content in the α(Al) matrix significantly increases to approximately 5.5–6.0% due to the dissolution of θ phases, higher than that in the as-deposited state.

3.1.3. Microstructure of Aging State

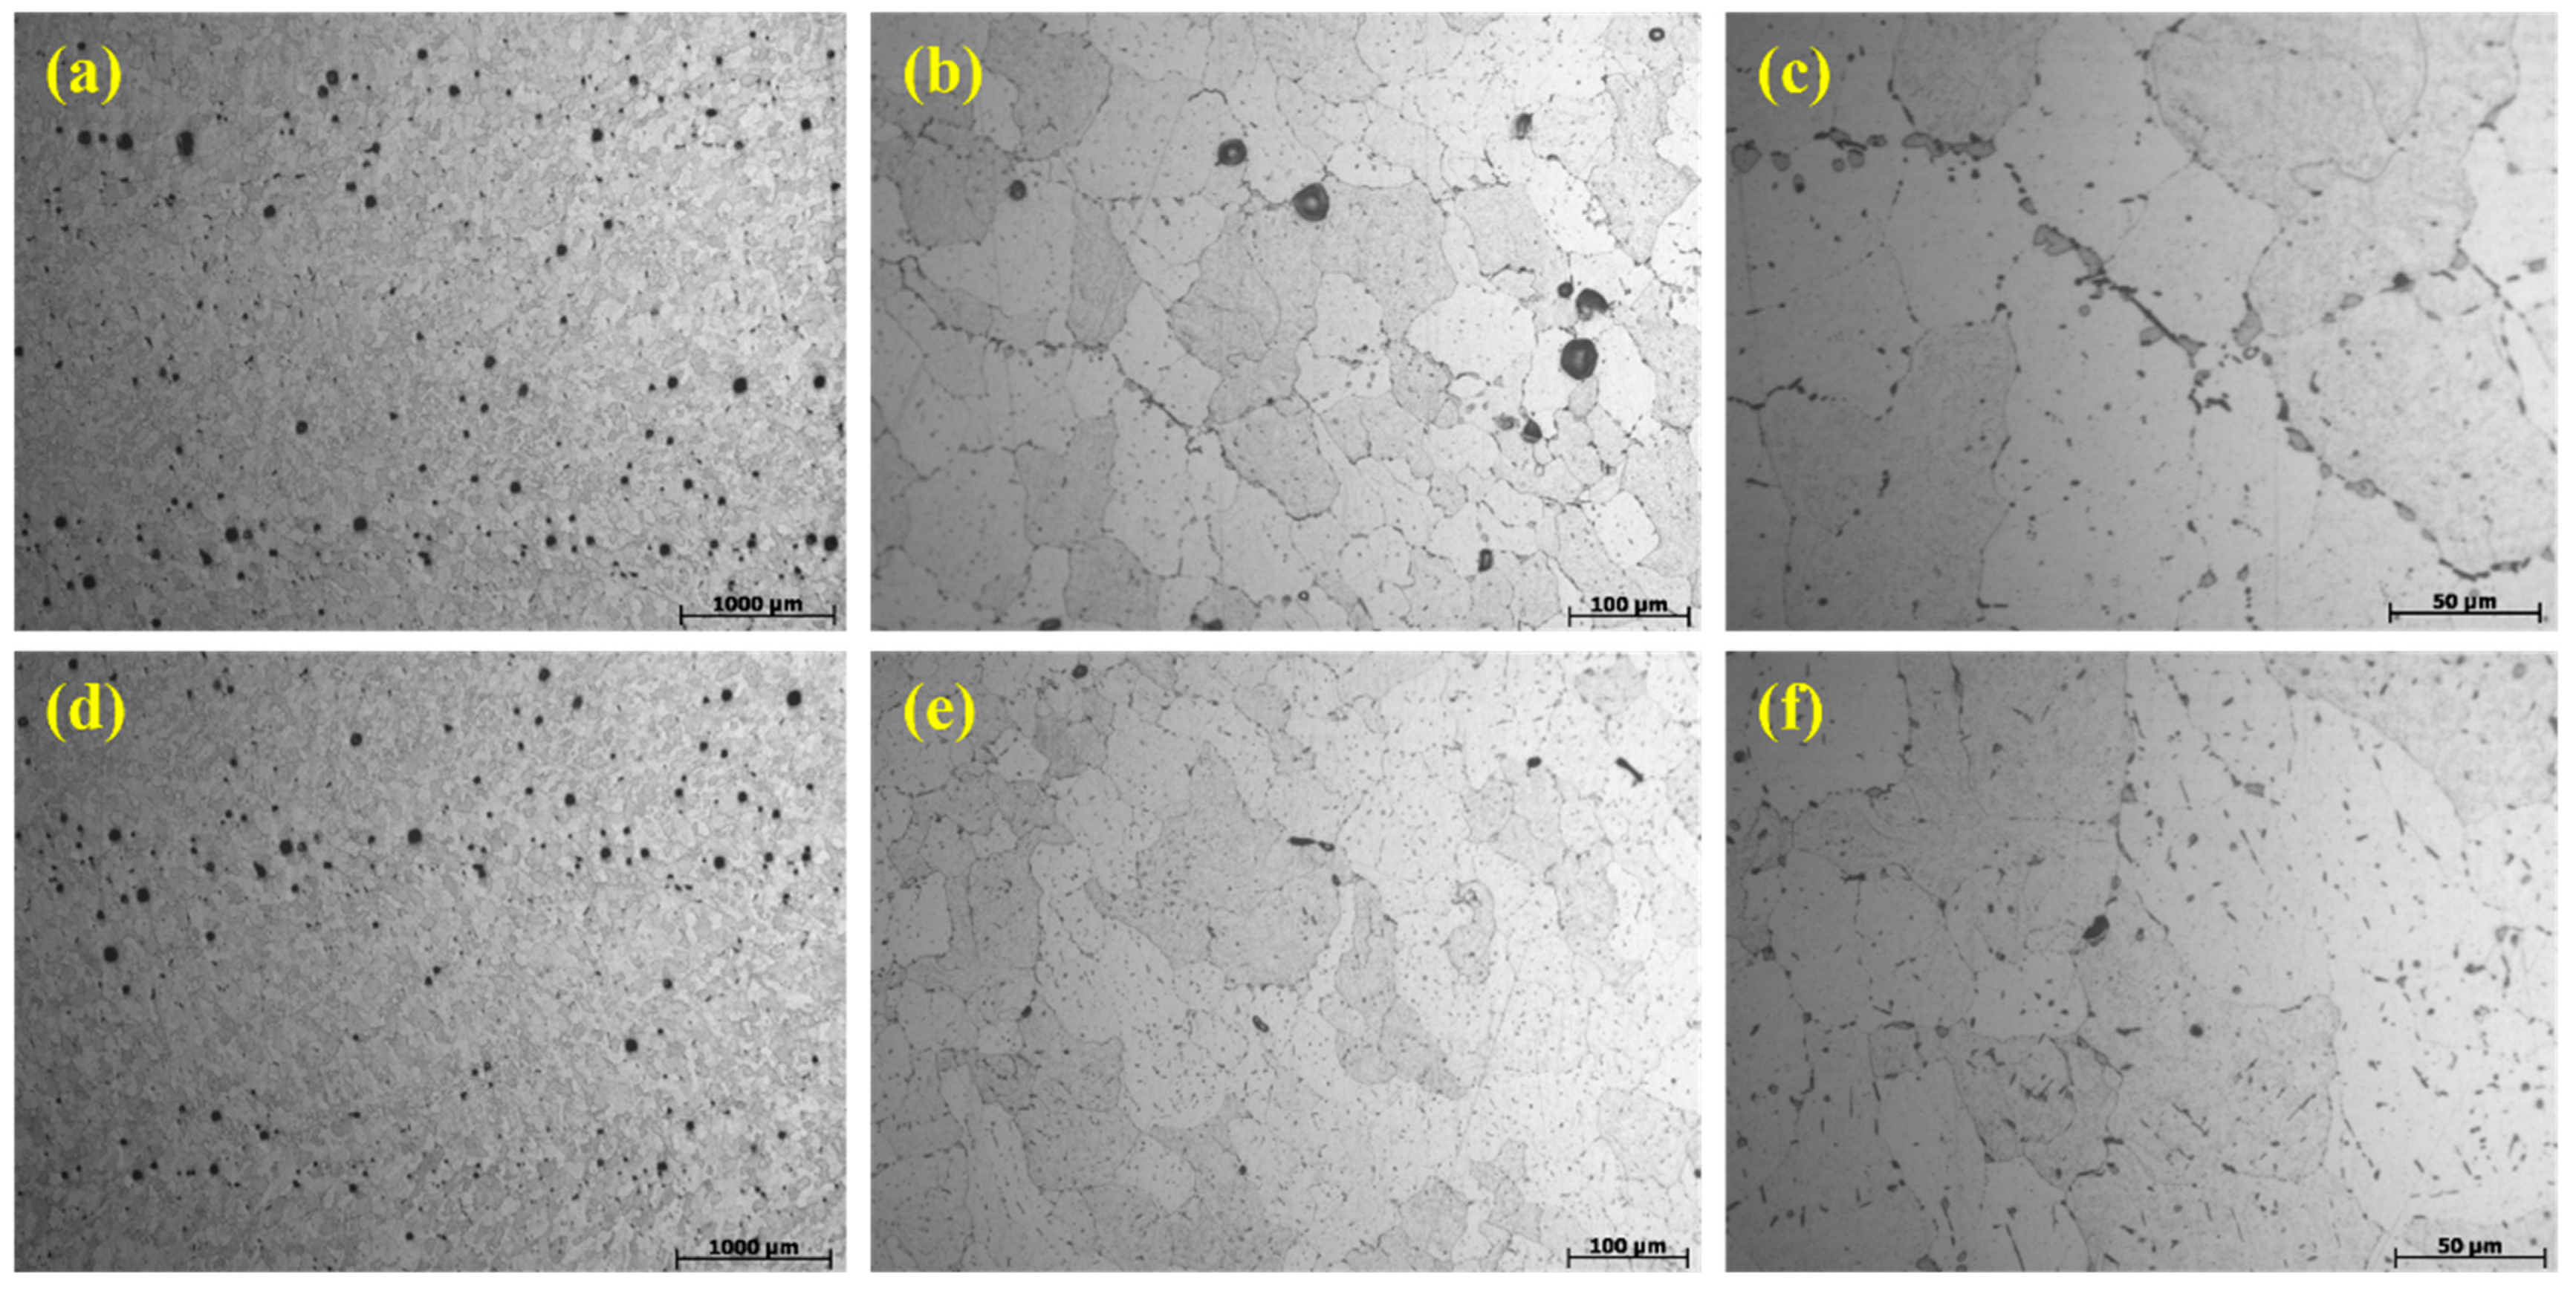
The microstructures of specimens after the aging treatment are depicted in Figure 6 and Figure 7. Analogous to the solid state, the aged microstructure displays a discontinuous granular θ phase (gray) and black, strip-like phases situated between dendrites (Figure 6b). Within dendrites, fine residual θ phases are present, mostly manifesting as black, strip-like impurity phases (Figure 6e). Nevertheless, compared to the solid-state specimen, the microstructure of the aging specimen contains a greater quantity of the secondary phase, which is more uniformly dispersed throughout the matrix (Figure 6c,f). At this time, the average grain sizes of the interlayer and intralayer are 51 and 45 μm, respectively, and the proportions of the secondary phase are 3.9% and 3.2%, respectively. The grain size is similar to that in the solid solution state, and the number of precipitated phases is less than that in the as-deposited state.

3.2. Mechanical Properties

The results of the room-temperature tensile test of the as-deposited and aging-state specimens are shown in Figure 8. For the as-deposited sample, the tensile strengths in the horizontal and vertical directions are 223 MPa and 207 MPa, respectively, and the elongations are 12.9% and 9.3%, respectively. For the aging-state sample, the tensile strengths in the horizontal and vertical directions are 362 MPa and 339 MPa, respectively, and the elongations are 9.7% and 8.2%, respectively. After heat treatment, the strength of the material increases significantly, with an increase of 60.7% in the horizontal direction and 63.8% in the vertical direction. However, the plastic deformation ability of the material decreases to a certain extent.
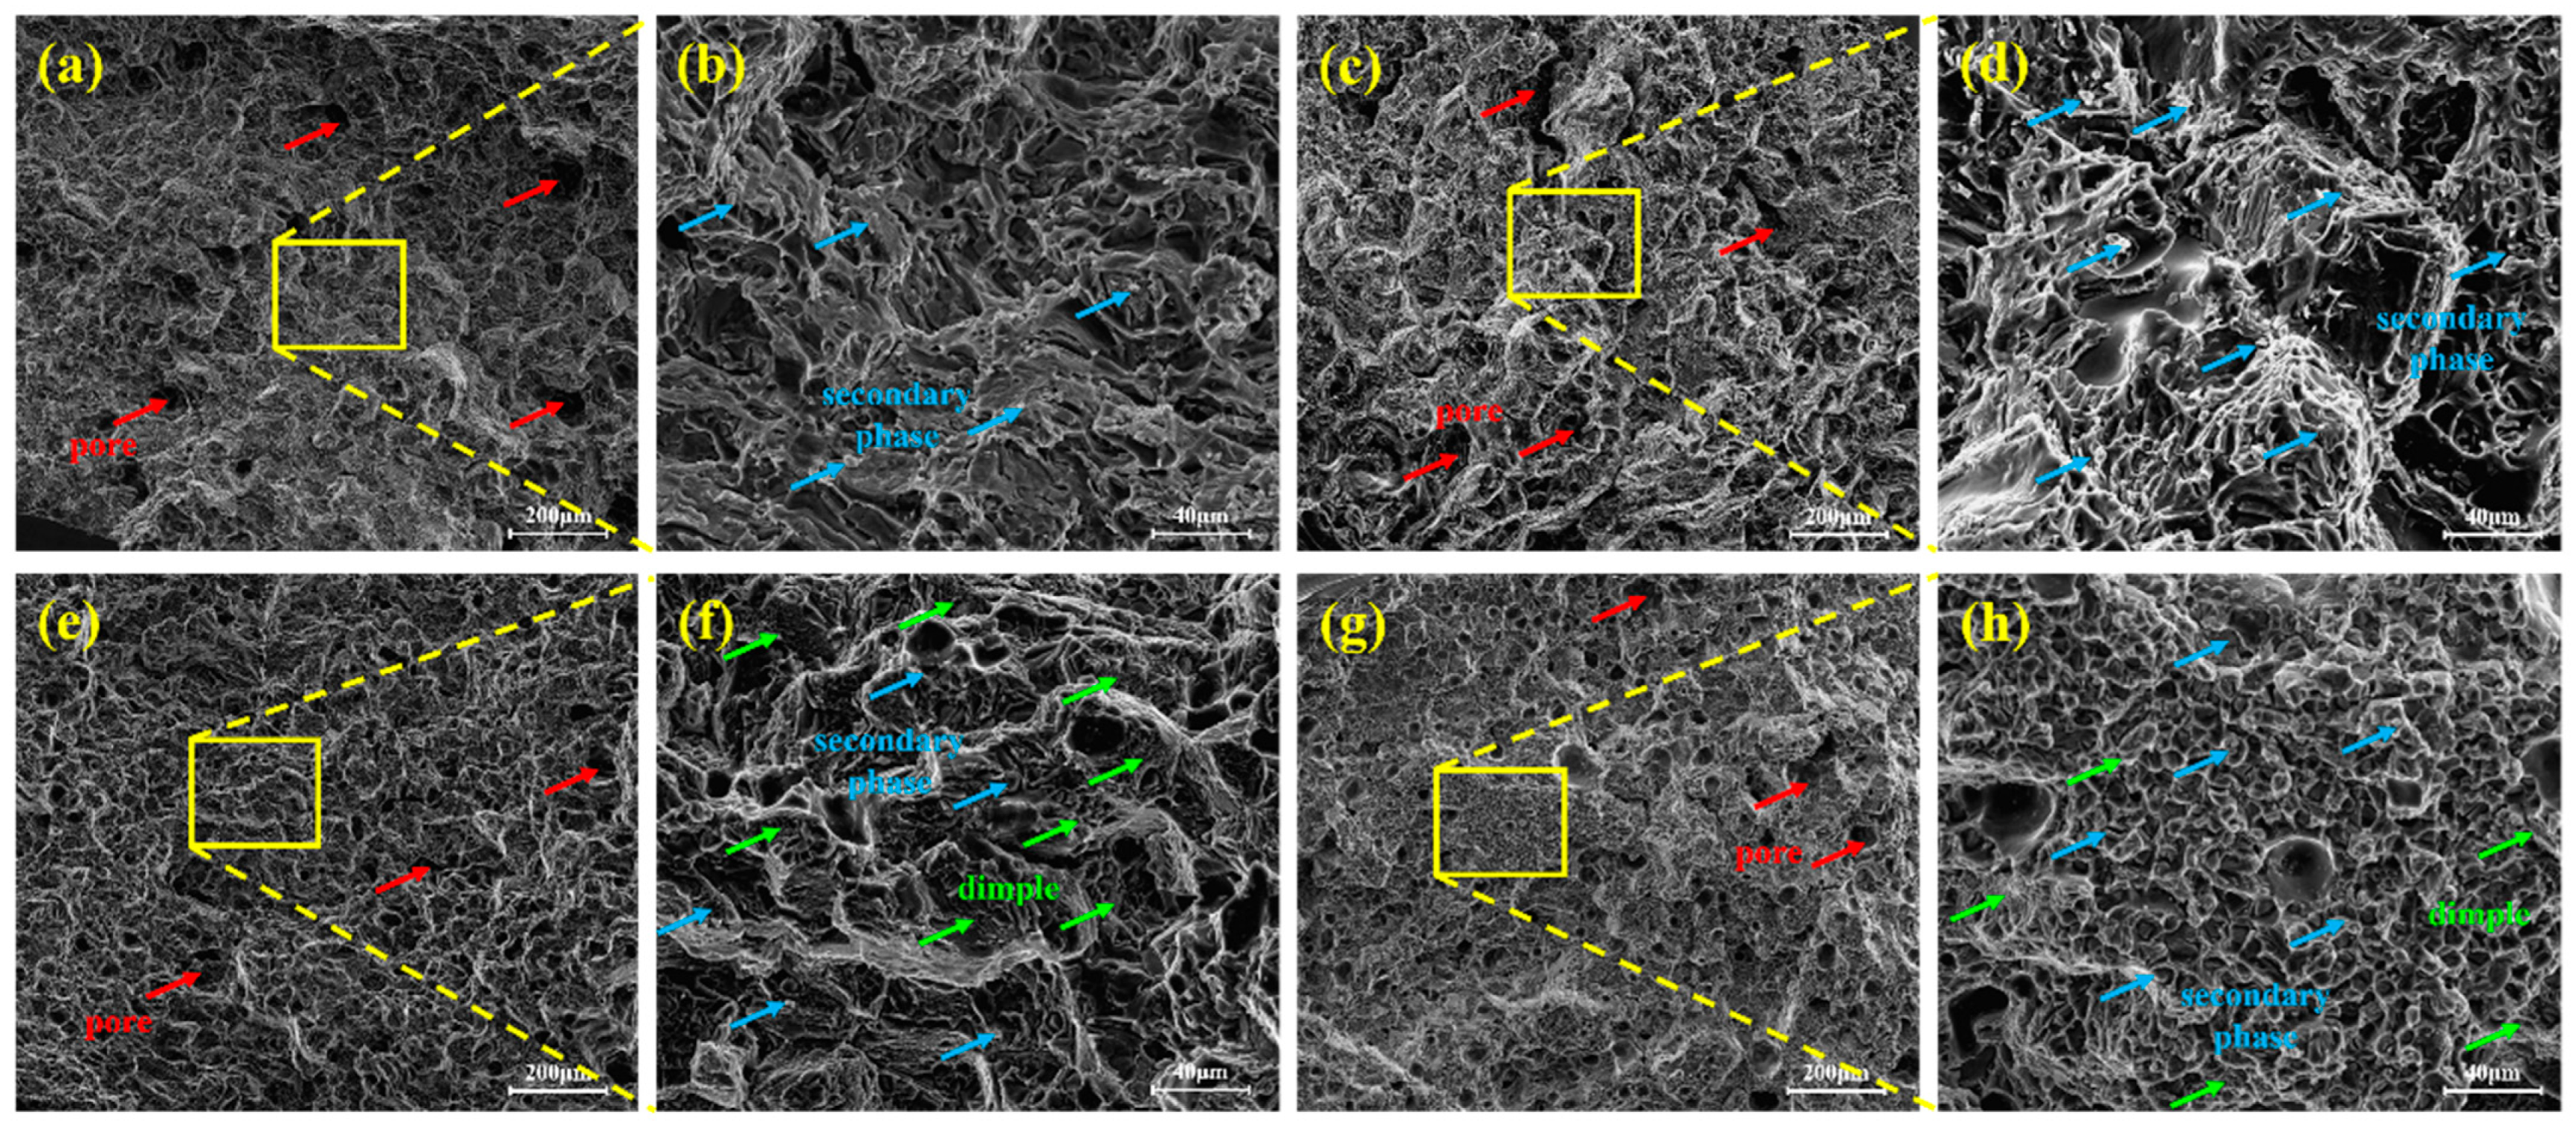
The reasons for the changes in the mechanical properties of the material are further analyzed in combination with the fracture morphology of the tensile specimens (as shown in Figure 9) and the microstructure. Firstly, in the as-deposited specimen, the θ phase is coarse and distributed in a network. The solution treatment enables the full dissolution of Cu atoms, forming a supersaturated α-Al solid solution (after heat treatment, the Cu content in the matrix increases from 3% in the as-deposited state to 6%). After the aging treatment, fine secondary phases are dispersedly precipitated within the matrix. As we all know, the morphology and size of eutectic phases are important factors affecting the mechanical properties of aluminum alloy [22,29,31]. These dispersed and distributed precipitated phases formed during the aging process can hinder the slip of dislocations, significantly increasing the strength of the material. However, while these precipitation phases impede the movement of dislocations, they reduce the ability of dislocations to cross-slip and climb, resulting in a decrease in the elongation of the material. In addition, the solution treatment can eliminate the dendritic segregation in the as-deposited state and homogenize the distribution of solute atoms. After aging, fine continuous precipitation phases are formed at the grain boundaries, which can inhibit the grain boundary sliding, thereby improving the strength of the grain boundaries and further enhancing the mechanical properties of the material.
Furthermore, it can be seen that there are obvious differences in the mechanical properties of the specimens in the horizontal and vertical directions. When the specimen is stretched vertically, it breaks in the area with dense interlayer pores, and the number of pores on the fracture surface is significantly more than that when the specimen is stretched horizontally. When the specimen is stretched horizontally, the tearing ridges are more numerous than when the specimen is stretched vertically, and the brittle fracture area is obviously less than that in the vertical direction. Combined with the results of microstructure characterization, it can be known that the dense distribution of micro-porosities, the θ phase, and other secondary phases between layers forms a weak zone, which is the reason for the anisotropy of the mechanical properties of the specimen in the horizontal and vertical directions. Combining the fracture morphologies of different samples (Figure 9), the fracture surface of the horizontal-direction samples is rougher than that of the vertical-direction samples, with more dimples and a greater tendency towards ductile fracture. Therefore, the horizontal-direction samples exhibit better ductility.
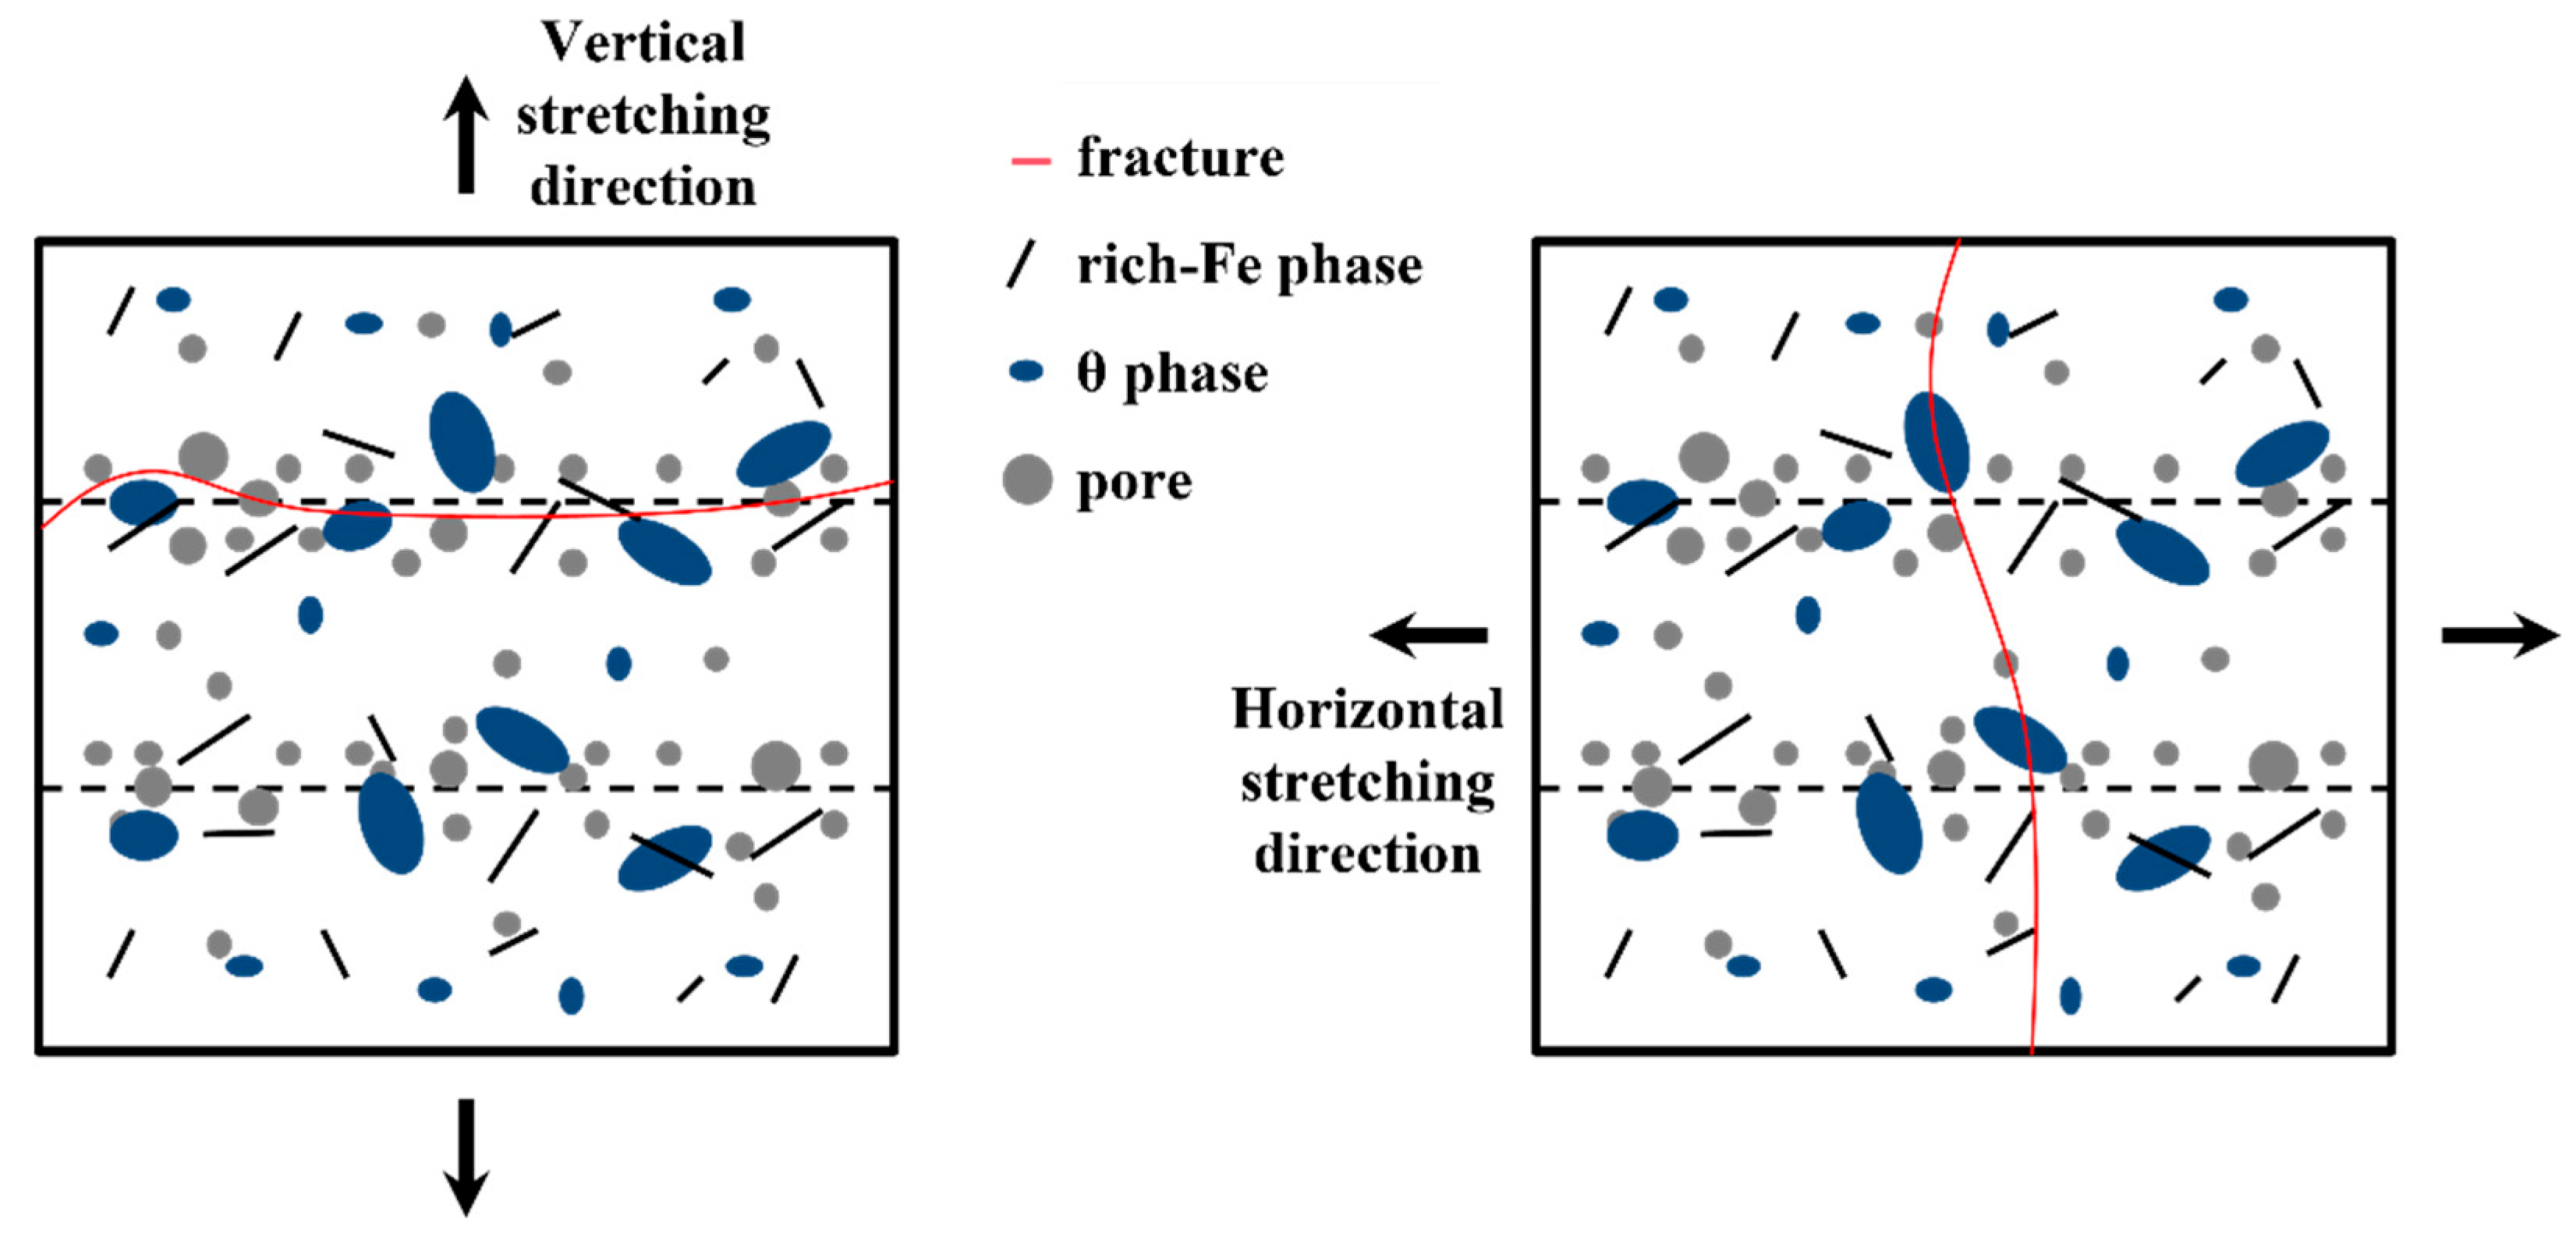
Based on the above analysis, a schematic diagram of the differences in mechanical properties in different directions of WAAM 2319 aluminum alloy as shown in Figure 10 is drawn. When the specimen is stretched vertically, the weak zone is perpendicular to the direction of the applied force. After entering the yield stage, micro-cracks are generated within the weak zone and rapidly aggregate, leading to macroscopic fracture. Therefore, the plasticity and tensile strength of the specimen in this direction are relatively low. When the specimen is stretched horizontally, the weak zone is parallel to the direction of the applied force. After entering the yield stage, the generated micro-cracks are isolated by the areas with better plasticity within the layer, and the crack propagation is hindered, delaying the macroscopic fracture process. Therefore, the plasticity and tensile strength are higher than when the specimen is stretched vertically.

3.3. Corrosion Behavior

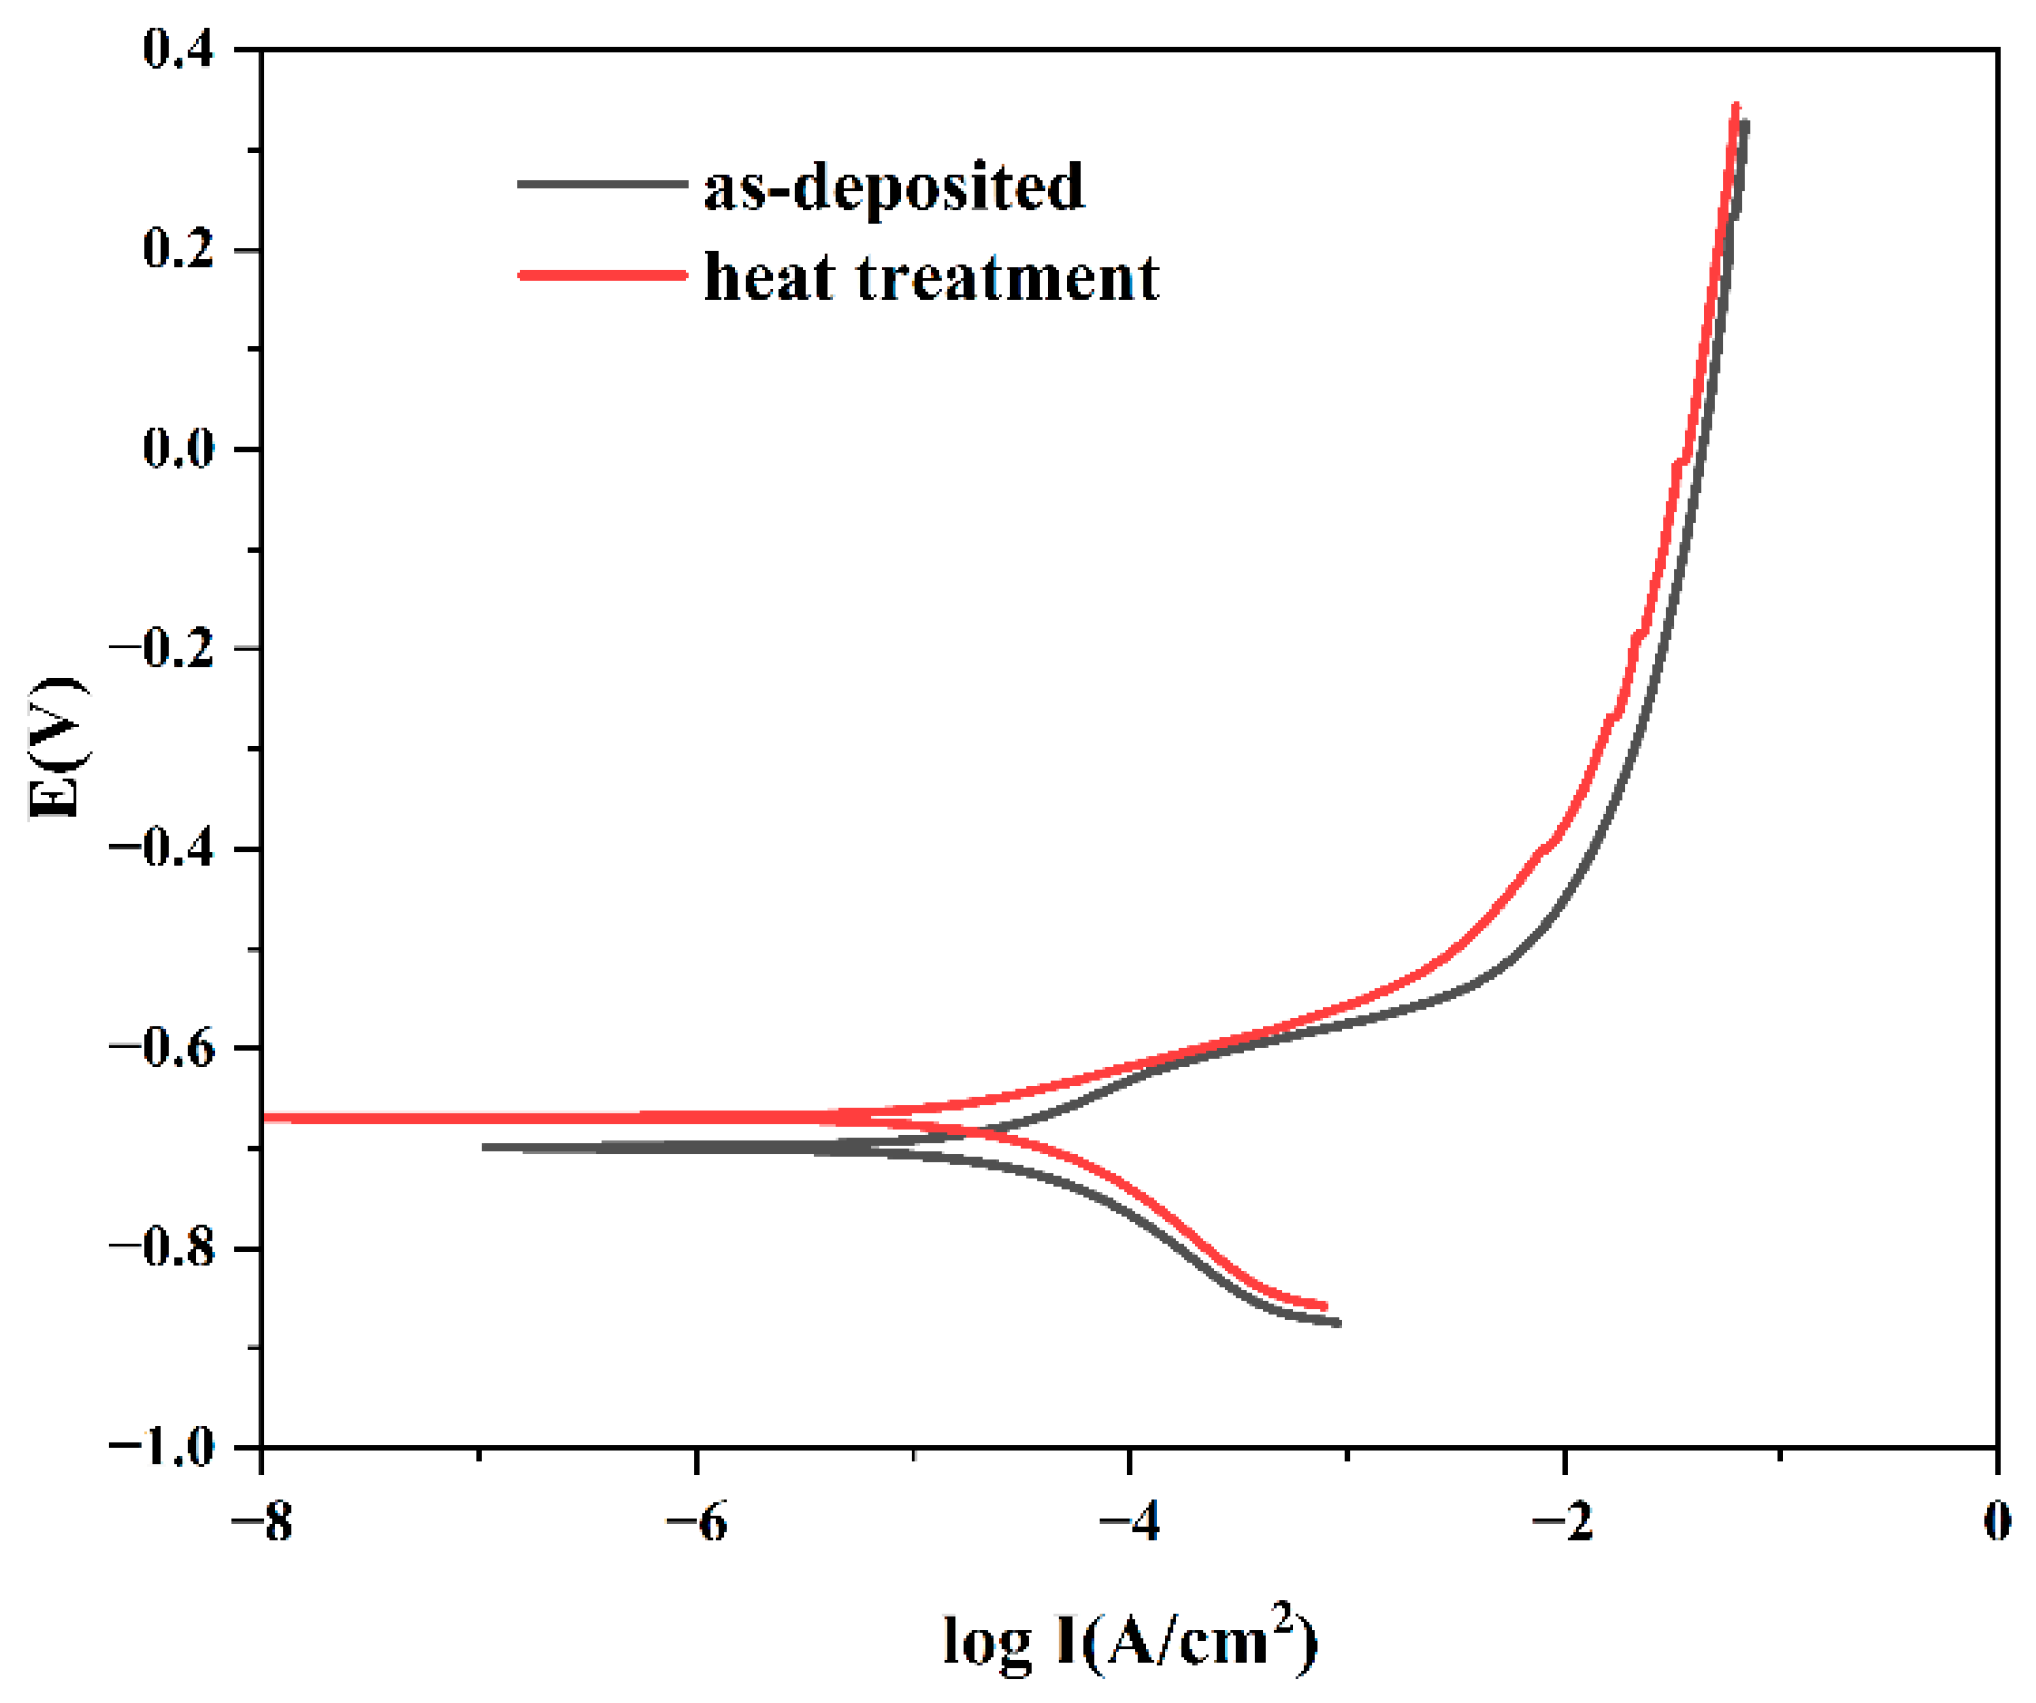
The influence of heat treatment on the corrosion behavior of WAAM 2319 aluminum alloy was investigated via electrochemical testing. Figure 11 shows the potentiodynamic polarization curves of WAAM 2319 aluminum alloy samples in the as-deposited and heat-treated states. It can be observed that the cathodic reactions of all samples are dominated by oxygen reduction with similar Tafel slopes, indicating comparable corrosion kinetics for the WAAM 2319 aluminum alloy. The anodic curves all exhibit active dissolution behavior. The heat-treated samples display a corrosion potential of −669 mV, which is higher than that of the as-deposited samples (−699 mV). This shift suggests an increased susceptibility to pitting corrosion after heat treatment. Furthermore, the corrosion current density of the sample after heat treatment was 5.7 × 10⁻⁶ A/cm2, which was lower than that of the deposited sample at 1.2 × 10⁻⁵ A/cm2, further indicating the improvement of the corrosion resistance of the material.
It is well known that the size, quantity, and distribution of secondary phases in materials and the changes in the chemical composition uniformity of materials have important effects on the corrosion performance of alloys [26,30]. When analyzing the microstructure morphology analysis of specimens in the as-deposited state and after heat treatment, since there are coarse and continuous intergranular intermetallic compounds in the as-deposited specimen, these secondary phases are more prone to pitting corrosion, which increases the pitting corrosion sensitivity of the material. After heat treatment, the quantity of the second phase in the material is significantly reduced, the size is smaller, and it is distributed dispersedly, thus greatly reducing the occurrence of pitting corrosion and improving the corrosion resistance of the material.

4. Conclusions

In this study, the WAAM technique was used to fabricate the 2319 aluminum alloy. The effect of a solid solution and aging treatment on microstructure evolution, mechanical properties, and corrosion properties was systematically investigated. The main conclusions are summarized as follows:
(1)
In the as-deposited microstructure of WAAM 2319 aluminum alloy, the secondary phases form a continuous network, which is numerous and coarse. After solution treatment, most of the secondary phase is dissolved, and the remaining secondary phases mainly consist of the θ phase and other phases. After continuing the aging treatment, a secondary phase with a dispersed distribution and small size is formed within the dendrites.
(2)
After heat treatment, the tensile strength of the alloy in the horizontal direction reaches 362 MPa, which is increased by 60.7% compared with the as-deposited state. The vertical-direction tensile strength reaches 339 MPa, which is increased by 63.8% compared with the as-deposited state. However, the plastic deformation ability of the material after aging treatment decreases to a certain extent. This is mainly caused by the micro-porosities and secondary phases being segregated between layers to form weak zones. When the material is stretched in the vertical direction, micro-cracks are likely to form between layers, resulting in poor plasticity and low tensile strength.
(3)
The specimens after heat treatment exhibit better corrosion resistance. Based on the analysis of the microstructural changes, the improvement in corrosion resistance is related to the decrease in the quantity, the reduction in size, and the more dispersed distribution of the secondary phases in the specimens after heat treatment.

Author Contributions

Conceptualization, Y.P.; data curation, Z.G.; supervision, X.L. and L.W.; writing—original draft, Y.P. and Z.G.; writing—review and editing, X.L. and L.W. All authors have read and agreed to the published version of the manuscript.

Funding

This research received no funding.

Data Availability Statement

The original contributions presented in this study are included in the article; further inquiries can be directed to the corresponding authors.

Conflicts of Interest

The authors declare that they have no conflicts of interest.

References

  1. Shi, Y.; Dong, Y.; Ding, H.; Li, T.; Ren, F.; Dai, T.; Bi, Y. Research on the Microstructure and Mechanical Properties of 2319 Aluminum Alloy Fabricated by Wire Arc Additive Manufacturing. J. Mater. Eng. Perform. 2025, 34, 16483–16493. [Google Scholar] [CrossRef]
  2. DebRoy, T.; Wei, H.L.; Zuback, J.S.; Mukherjee, T.; Elmer, J.W.; Milewski, J.O.; Beese, A.M.; Wilson-Heid, A.; De, A.; Zhang, W. Additive manufacturing of metallic components—Process, structure and properties. Prog. Mater. Sci. 2018, 92, 112–224. [Google Scholar] [CrossRef]
  3. Kumar Sinha, A.; Pramanik, S.; Yagati, K.P. Research progress in arc based additive manufacturing of aluminium alloys—A review. Measurement 2022, 200, 111672. [Google Scholar] [CrossRef]
  4. Ding, D.; Pan, Z.; Cuiuri, D.; Li, H. Wire-feed additive manufacturing of metal components: Technologies, developments and future interests. Int. J. Adv. Manuf. Technol. 2015, 81, 465–481. [Google Scholar] [CrossRef]
  5. Ke, W.C.; Oliveira, J.P.; Cong, B.Q.; Ao, S.S.; Qi, Z.W.; Peng, B.; Zeng, Z. Multi-layer deposition mechanism in ultra high-frequency pulsed wire arc additive manufacturing (WAAM) of NiTi shape memory alloys. Addit. Manuf. 2022, 50, 102513. [Google Scholar] [CrossRef]
  6. Sarıkaya, M.; Başcıl Önler, D.; Dağlı, S.; Hartomacıoğlu, S.; Günay, M.; Królczyk, G.M. A review on aluminum alloys produced by wire arc additive manufacturing (WAAM): Applications, benefits, challenges and future trends. J. Mater. Res. Technol. 2024, 33, 5643–5670. [Google Scholar] [CrossRef]
  7. Wu, B.; Pan, Z.; Ding, D.; Cuiuri, D.; Li, H.; Xu, J.; Norrish, J. A review of the wire arc additive manufacturing of metals: Properties, defects and quality improvement. J. Manuf. Process. 2018, 35, 127–139. [Google Scholar] [CrossRef]
  8. Cong, B.; Cai, X.; Qi, Z.; Qi, B.; Zhang, Y.; Zhang, R.; Guo, W.; Zhou, Z.; Yin, Y.; Bu, X. The effects of ultrasonic frequency pulsed arc on wire + arc additively manufactured high strength aluminum alloys. Addit. Manuf. 2022, 51, 102617. [Google Scholar] [CrossRef]
  9. Cunningham, C.R.; Flynn, J.M.; Shokrani, A.; Dhokia, V.; Newman, S.T. Invited review article: Strategies and processes for high quality wire arc additive manufacturing. Addit. Manuf. 2018, 22, 672–686. [Google Scholar] [CrossRef]
  10. Marinelli, G.; Martina, F.; Ganguly, S.; Williams, S. Grain refinement in an unalloyed tantalum structure by combining Wire+Arc additive manufacturing and vertical cold rolling. Addit. Manuf. 2020, 32, 101009. [Google Scholar] [CrossRef]
  11. Wang, F.; Wei, J.; Wu, G.; Qie, M.; He, C. Microstructural modification and enhanced mechanical properties of wire-arc additive manufactured 6061 aluminum alloy via interlayer friction stir processing. Mater. Lett. 2023, 342, 134312. [Google Scholar] [CrossRef]
  12. Gu, J.; Yang, S.; Gao, M.; Bai, J.; Zhai, Y.; Ding, J. Micropore evolution in additively manufactured aluminum alloys under heat treatment and inter-layer rolling. Mater. Des. 2020, 186, 108288. [Google Scholar] [CrossRef]
  13. Wu, B.; Pan, Z.; Ding, D.; Cuiuri, D.; Li, H. Effects of heat accumulation on microstructure and mechanical properties of Ti6Al4V alloy deposited by wire arc additive manufacturing. Addit. Manuf. 2018, 23, 151–160. [Google Scholar] [CrossRef]
  14. Yuan, T.; Yu, Z.; Chen, S.; Xu, M.; Jiang, X. Loss of elemental Mg during wire + arc additive manufacturing of Al-Mg alloy and its effect on mechanical properties. J. Manuf. Process. 2020, 49, 456–462. [Google Scholar] [CrossRef]
  15. Zhao, Y.; Jia, Y.; Chen, S.; Shi, J.; Li, F. Process planning strategy for wire-arc additive manufacturing: Thermal behavior considerations. Addit. Manuf. 2020, 32, 100935. [Google Scholar] [CrossRef]
  16. Langelandsvik, G.; Akselsen, O.M.; Furu, T.; Roven, H.J. Review of Aluminum Alloy Development for Wire Arc Additive Manufacturing. Materials 2021, 14, 5370. [Google Scholar] [CrossRef]
  17. Qi, Z.; Cong, B.; Qi, B.; Sun, H.; Zhao, G.; Ding, J. Microstructure and mechanical properties of double-wire + arc additively manufactured Al-Cu-Mg alloys. J. Mater. Process. Technol. 2018, 255, 347–353. [Google Scholar] [CrossRef]
  18. Aboulkhair, N.T.; Maskery, I.; Tuck, C.; Ashcroft, I.; Everitt, N.M. The microstructure and mechanical properties of selectively laser melted AlSi10Mg: The effect of a conventional T6-like heat treatment. Mater. Sci. Eng. A 2016, 667, 139–146. [Google Scholar] [CrossRef]
  19. Girelli, L.; Tocci, M.; Gelfi, M.; Pola, A. Study of heat treatment parameters for additively manufactured AlSi10Mg in comparison with corresponding cast alloy. Mater. Sci. Eng. A 2019, 739, 317–328. [Google Scholar] [CrossRef]
  20. Thijs, L.; Kempen, K.; Kruth, J.-P.; Van Humbeeck, J. Fine-structured aluminium products with controllable texture by selective laser melting of pre-alloyed AlSi10Mg powder. Acta Mater. 2013, 61, 1809–1819. [Google Scholar] [CrossRef]
  21. Yan, Q.; Song, B.; Shi, Y. Comparative study of performance comparison of AlSi10Mg alloy prepared by selective laser melting and casting. J. Mater. Sci. Technol. 2020, 41, 199–208. [Google Scholar] [CrossRef]
  22. Wang, Z.; Lin, X.; Wang, L.; Cao, Y.; Zhou, Y.; Huang, W. Microstructure evolution and mechanical properties of the wire + arc additive manufacturing Al-Cu alloy. Addit. Manuf. 2021, 47, 102298. [Google Scholar] [CrossRef]
  23. Liu, G.; Xiong, J.; Tang, L. Microstructure and mechanical properties of 2219 aluminum alloy fabricated by double-electrode gas metal arc additive manufacturing. Addit. Manuf. 2020, 35, 101375. [Google Scholar] [CrossRef]
  24. Bai, J.Y.; Yang, C.L.; Lin, S.B.; Dong, B.L.; Fan, C.L. Mechanical properties of 2219-Al components produced by additive manufacturing with TIG. Int. J. Adv. Manuf. Technol. 2015, 86, 479–485. [Google Scholar] [CrossRef]
  25. Sert, E.; Schuch, E.; Öchsner, A.; Hitzler, L.; Werner, E.; Merkel, M. Tensile strength performance with determination of the Poisson‘s ratio of additively manufactured AlSi10Mg samples. Mater. Und Werkst. 2019, 50, 539–545. [Google Scholar] [CrossRef]
  26. Cai, X.; Yang, M.; Wang, S.; Wang, Z.; Zhou, J.; Xue, F. Experimental investigations on corrosion behavior and antibacterial property of nickel-aluminum bronze fabricated through wire-arc additive manufacturing (WAAM). Corros. Sci. 2023, 214, 111040. [Google Scholar] [CrossRef]
  27. Tsai, Y.-C.; Chou, C.-Y.; Lee, S.-L.; Lin, C.-K.; Lin, J.-C.; Lim, S.W. Effect of trace La addition on the microstructures and mechanical properties of A356 (Al–7Si–0.35Mg) aluminum alloys. J. Alloys Compd. 2009, 487, 157–162. [Google Scholar] [CrossRef]
  28. Albu, M.; Krisper, R.; Lammer, J.; Kothleitner, G.; Fiocchi, J.; Bassani, P. Microstructure evolution during in-situ heating of AlSi10Mg alloy powders and additive manufactured parts. Addit. Manuf. 2020, 36, 101605. [Google Scholar] [CrossRef]
  29. Arana, M.; Ukar, E.; Rodriguez, I.; Aguilar, D.; Álvarez, P. Influence of deposition strategy and heat treatment on mechanical properties and microstructure of 2319 aluminium WAAM components. Mater. Des. 2022, 221, 110974. [Google Scholar] [CrossRef]
  30. Wang, C.; Jiang, Z.; Ma, X.; Zhang, Y.; He, P.; Han, F. Effect of solid solution time on microstructure and corrosion property of wire arc additively manufactured 2319 aluminum alloy. J. Mater. Res. Technol. 2023, 26, 2749–2758. [Google Scholar] [CrossRef]
  31. Yuan, T.; Xu, D.; Jiang, X.; Zhao, P.; Chen, S. Enhanced strength-plasticity of 2319 Al-Cu alloy formed by hybrid interlayer friction stir processing and wire-arc additive manufacturing. J. Mater. Process. Technol. 2023, 321, 118146. [Google Scholar] [CrossRef]
Figure 1. Physical drawing of WAAM 2319 aluminum alloy and schematic diagram of the sampling position for experimental testing (a), dimension of tensile specimen (b), and heat treatment process flow chart (c).
Metals 15 01002 g001
Figure 2. Microstructure (OM) of the as-deposited specimen: (ac) the interlayer and (df) intralayer.
Metals 15 01002 g002
Figure 3. Microstructure (SEM) of the as-deposited specimen: (a) the low magnification and (b) the high magnification.
Metals 15 01002 g003
Figure 4. Microstructure (OM) of the specimen after the solution treatment: (ac) the interlayer and (df) intralayer.
Metals 15 01002 g004
Figure 5. Microstructure (SEM) of the specimen after the solution treatment: (a) the interlayer and (b) intralayer.
Metals 15 01002 g005
Figure 6. Microstructure (OM) of the specimen after the aging treatment: (ac) the interlayer and (df) intralayer.
Metals 15 01002 g006
Figure 7. Microstructure (SEM) of the specimen after the aging treatment: (a) the low magnification and (b) the high magnification.
Metals 15 01002 g007
Figure 8. Tensile test results of the specimens in the deposited state and after heat treatment: (a) stress–strain curves and (b) histogram of average tensile strength and elongation.
Metals 15 01002 g008
Figure 9. Fracture morphologies of the different specimens: (ad) as-deposited sample images in the (a,b) horizontal and (c,d) vertical directions; (eh) aging-state sample images in the (e,f) horizontal and (g,h) vertical directions.
Metals 15 01002 g009
Figure 10. The schematic diagram of the differences in mechanical properties in different directions of WAAM 2319 aluminum alloy after the heat treatment.
Metals 15 01002 g010
Figure 11. Potentiodynamic polarization curves of the as-deposited and aging-state specimen.
Metals 15 01002 g011
Table 1. Chemical composition of the 2319 aluminum alloy wire (mass fraction, %).
CuMgSiMnFeZrTiAl
5.920.040.080.320.090.150.14Bal.
Table 2. The forming process parameters of WAAM 2319 single-wall aluminum alloy.
WFS (m/min)TS
(mm/s)
Fw
(Hz)
Dw
(mm)
EP/ENT Layer
(s)
Layer Height
(mm)
7.57332.0302.20
Table 3. EDS analysis of the as-deposited specimen in Figure 3b (mass fraction, %).
C1C2C3C4
Al70.0787.5696.7297.31
Cu29.9312.443.282.69
Table 4. EDS analysis of the specimen after the solution treatment in Figure 5 (mass fraction, %).
G1G2G3G4G5G6G7G8
Al50.6594.4694.4150.7564.3857.0794.1393.97
Cu49.355.545.5949.2526.5339.275.876.03
Fe----7.793.66--
Mn----1.30---
Disclaimer/Publisher’s Note: The statements, opinions and data contained in all publications are solely those of the individual author(s) and contributor(s) and not of MDPI and/or the editor(s). MDPI and/or the editor(s) disclaim responsibility for any injury to people or property resulting from any ideas, methods, instructions or products referred to in the content.