Article

Effect of Ni-Based Buttering on the Microstructure and Mechanical Properties of a Bimetallic API 5L X-52/AISI 316L-Si Welded Joint

by
Luis Ángel Lázaro-Lobato
1,
Gildardo Gutiérrez-Vargas
1,
Francisco Fernando Curiel-López
1,*,
Víctor Hugo López-Morelos
1,*,
María del Carmen Ramírez-López
1,
Julio Cesar Verduzco-Juárez
1 and
José Jaime Taha-Tijerina
2
1
Instituto de Investigación en Metalurgia y Materiales, Universidad Michoacana de San Nicolás de Hidalgo, Morelia 58000, Mexico
2
Departamento de Ingeniería, Universidad de Monterrey, Av. Ignacio Morones Prieto 4500 Pte., San Pedro Garza García 66238, Mexico
*
Authors to whom correspondence should be addressed.
Metals 2025, 15(8), 824; https://doi.org/10.3390/met15080824
Submission received: 16 June 2025 / Revised: 14 July 2025 / Accepted: 18 July 2025 / Published: 23 July 2025

Abstract

The microstructure and mechanical properties of welded joints of API 5L X-52 steel plates cladded with AISI 316L-Si austenitic stainless steel were evaluated. The gas metal arc welding process with pulsed arc (GMAW-P) and controlled arc oscillation were used to join the bimetallic plates. After the root welding pass, buttering with an ERNiCrMo-3 filler wire was performed and multi-pass welding followed using an ER70S-6 electrode. The results obtained by optical and scanning electron microscopy indicated that the shielding atmosphere, welding parameters, and electric arc oscillation enabled good arc stability and proper molten metal transfer from the filler wire to the sidewalls of the joint during welding. Vickers microhardness (HV) and tensile tests were performed for correlating microstructural and mechanical properties. The mixture of ERNiCrMo-3 and ER70S-6 filler materials presented fine interlocked grains with a honeycomb network shape of the Ni–Fe mixture with Ni-rich grain boundaries and a cellular-dendritic and equiaxed solidification. Variation of microhardness at the weld metal (WM) in the middle zone of the bimetallic welded joints (BWJ) is associated with the manipulation of the welding parameters, promoting precipitation of carbides in the austenitic matrix and formation of martensite during solidification of the weld pool and cooling of the WM. The BWJ exhibited a mechanical strength of 380 and 520 MPa for the yield stress and ultimate tensile strength, respectively. These values are close to those of the as-received API 5L X-52 steel.

1. Introduction

Bimetallic pipelines (BPs) are pieces normally composed of carbon steel or low alloy steel as backing material and an inner layer of corrosion-resistant alloy steel (CRAs) [1,2,3,4]. The manufacturing of CRAs or cladded steels can be performed by hot rolling, coextrusion, weld overlay, explosion bonding, and powder metallurgy covering the backing steel [5,6]. The weld overlay technique can be performed by several welding processes, such as gas tungsten arc (GTA), gas metal arc (GMA), shielding metal arc (SMA), and flux core arc (FCA) welding [7]. On the other hand, these BPs are commonly used in a wide variety of applications in oil and gas transportation, such as subsea equipment, valves, flowlines, risers, offshore platform construction, and pressure vessels, which require both good mechanical and corrosion resistance properties when exposed to critical environmental conditions [8]. Arc welding is a secondary process widely used for joining similar and dissimilar materials and, in terms of joint strength, cost, and safety in the operation life, is an efficient option of any structural component [9]. Commonly, the joints of BPs welded by the conventional welding process result in a complex system because of the great differences in the chemical, mechanical, and thermophysical properties of the dissimilar alloys that constitute the bimetallic plate [4,10]. During multi-pass welding, a suitable procedure and welding technology is essential when welding materials with a microstructure that is heat sensitive, such as carbon steel, to minimize the effect of heat transfer on the mechanical properties of the welded joint [11,12]. Currently, the pulsed automatic gas metal arc welding (GMAW-P) transfer mode has become quite popular in virtue of its assets, which include good bead appearance, minimized heat input, and its ability to provide better directional control over the weld bead at low average currents. The latter advantage leads to a reduction in the formation of discontinuities (surface and volumetric), residual stresses, and distortion [11,13]. The characteristics of GMAW-P are that, once the droplet of molten metal is transferred, the current is relatively low in the arc. These periods of low current allow the average arc current to be reduced to a suitable range, while periodic peaks of high current pulses allow the metal to be transferred in the spray mode [11,14].
In order to overcome the difficulties associated with the distinct thermo-physical properties between carbon and stainless steels and the metallurgical interactions during arc fusion welding (liquid mixing, solidification and cooling), the use of a buttering layer with Ni or Ni-based alloy is a viable alternative. Some relevant studies and an exhaustive investigation have been conducted toward the aim of applying a Ni-based buttering layer and studying its effects on the performance of dissimilar welded joints. Kumar et al. [15] have published works on dissimilar welding using Ni-based fillers and proved that these alloys are the prime candidates for improving the microstructural and mechanical properties, because these alloys have a thermal dilatation coefficient that is intermediate between carbon steel and stainless steel to minimize the possibility of solidification cracks and other related welding defects [16,17]. The mixing of alloying elements such as Ti, Nb, V, and N in API 5L X-52 steel with a Ni-based alloy with austenite as a matrix increases protection against the corrosion of the carbon steel. However, the dilution of these alloying elements influences the cladding welding process that is undertaken to obtain varying microstructure and mechanical properties [18,19,20]. Han et al. [21] have investigated the effects of the buttering layer thickness on the microstructural characteristics of underwater 16Mn/304L dissimilar welded joints. Their results show that, when the thickness of the buttering layer exceeds 6 mm, the microstructure of HAZ at the ferritic steel side is composed of ferrite and pearlite instead of quenched martensite, reducing the microhardness values. Kumar et al. [22] investigated the effect of the Inconel 82 (ERNiCr-3) buttering layer on the microstructure and mechanical properties of a gas tungsten arc dissimilar welded joint between Inconel 617 and P92 steel, fabricated using an Inconel 617 (ERNiCrCoMo-1) filler. The authors found correlations between microstructure and mechanical properties, like the presence of the TiC/NbC carbides in the Inconel 82 buttering layer, and reported an ultimate tensile strength of 620 ± 4 MPa and % elongation of 19 ± 4% at room temperature. Sirohi et al. [23] investigated the dissimilar welded joint of P92 steel and Inconel 625, fabricated using the pulsed current gas tungsten arc welding process. The microstructural results obtained revealed that the pulsed current resulted in finer equiaxed dendrites in the bulk weld metal, while elemental diffusion and segregation of Nb, Mo, and Ti at the interface were also confirmed through energy dispersive X-ray (EDS) analysis. From the existing literature, it is evident that buttering plays a crucial role in enhancing the metallurgical features and mechanical properties of dissimilar welded joints. However, exploration of bimetallic materials welding has been rather limited.
The objective of this study was to investigate the effect of the addition of an intermediate layer of ERNiCrMo-3 filler electrode on the microstructural characteristics and mechanical behavior of the hot welding pass and the metallurgical interactions between alloys at the interface zones of API 5L X-52 steel plates cladded with AISI 316L-Si steel and welded with the GMAW-P process. The results of this work are aimed at providing a robust basis for future techniques for welding bimetallic pipeline joints.

2. Experimentation

2.1. Materials, Cladding and Welding

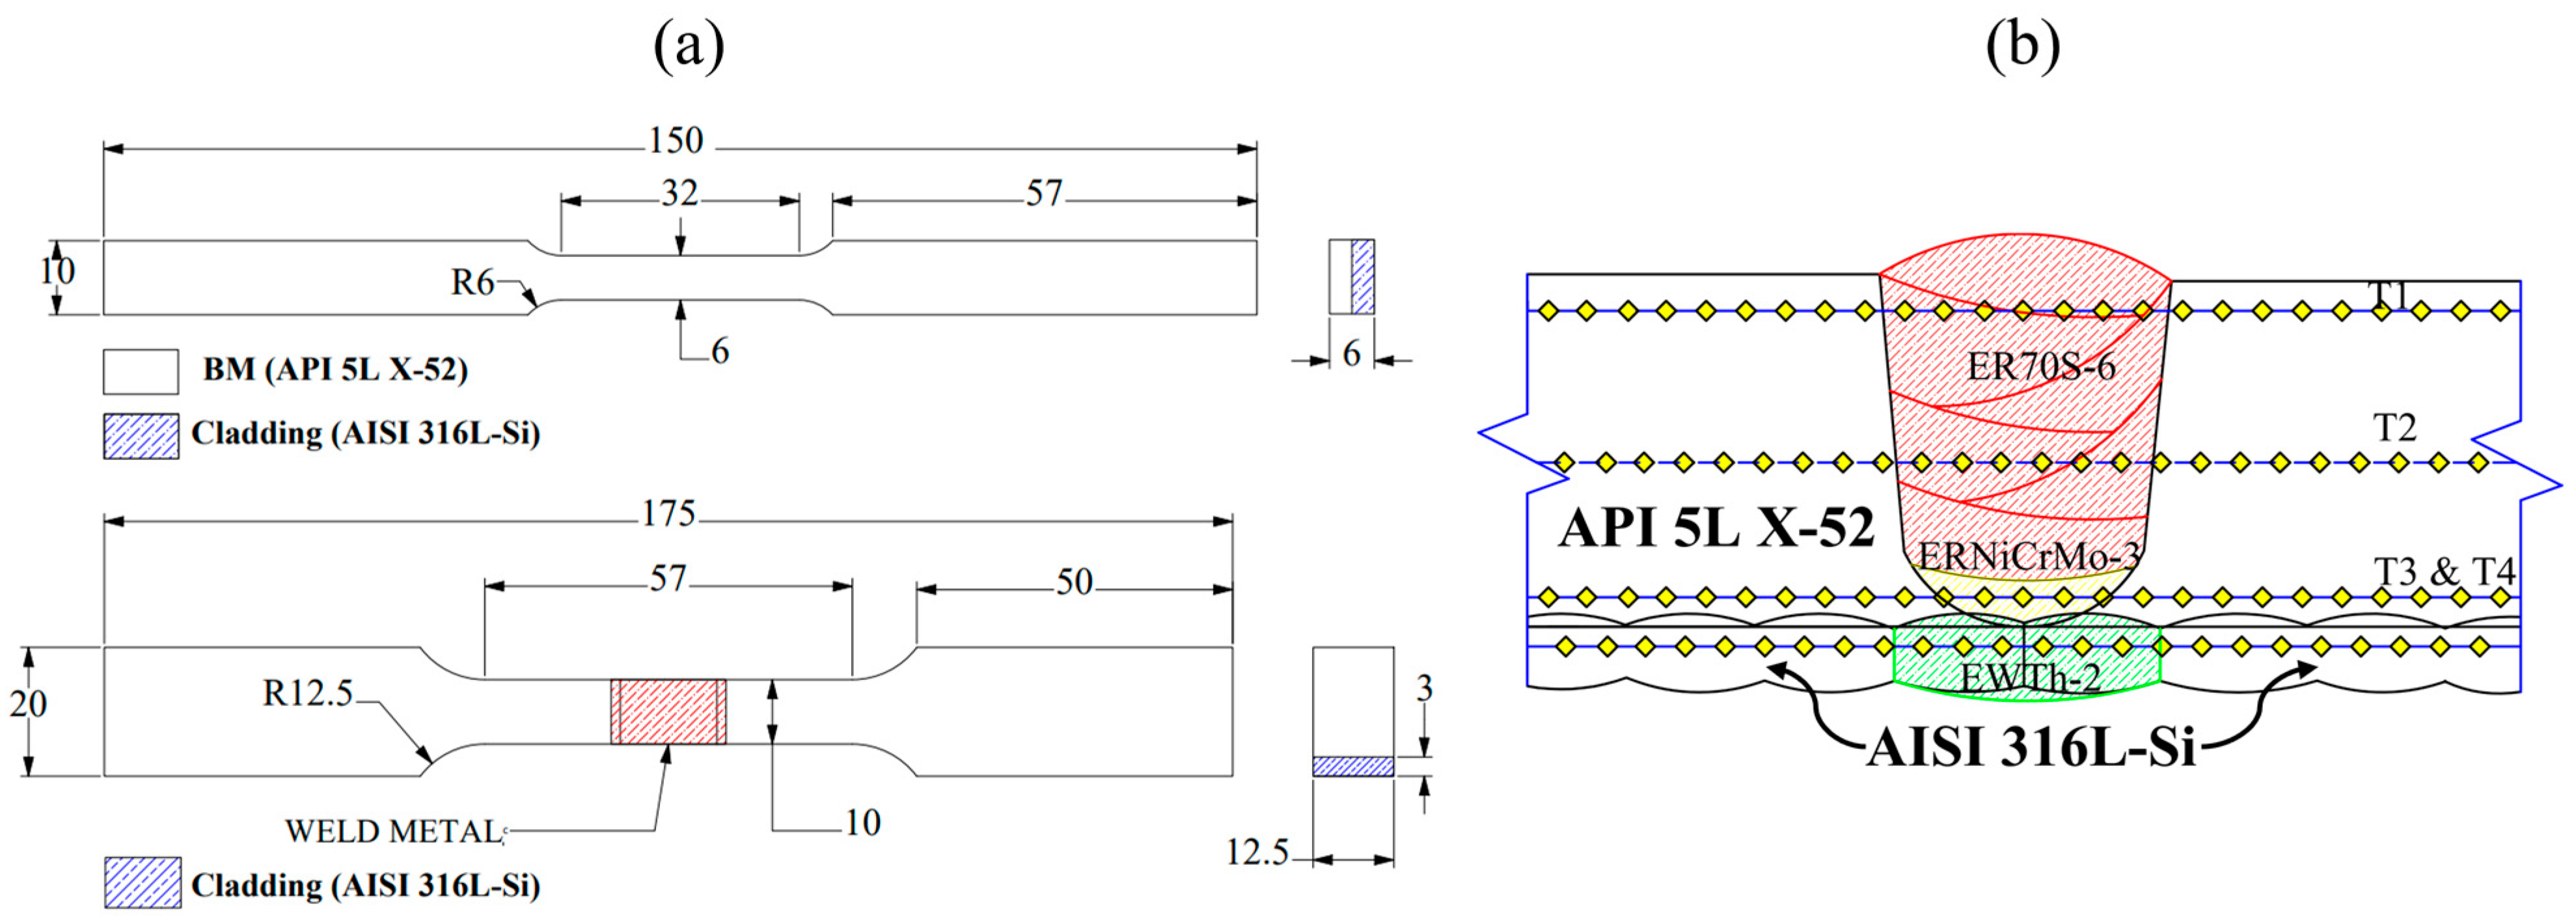
Plates of API 5L-X52 measuring 200 × 100 × 15.875 mm3 were used as the base metal. The plates were cladded with an ER316L-Si (WELDING ALLOYS PANAMERICANA, Irapuato, Guanajuato, México) stainless steel electrode of 1 mm in diameter. The weld beads were deposited and overlapped each other ~30%, with a 3 mm total thickness and using a mixture of 98% Ar and 2% O2 as shielding gas. The API 5L X-52/AISI 316LSi BWJ was welded employing a semi-automatic gas tungsten arc (GTA) and gas metal arc (GMA) welding process with a U-groove narrow-gap joint without separation, as shown in Figure 1a,b. The chemical composition of the bimetallic steel (BS) formed by the overlay arc welding technique and the electrodes of the GTAW and GMAW are shown in Table 1. The filler metals, ERNiCrMo-3 (LINCOLN ELECTRIC, Euclid, Ohio, USA) and ER70S-6 (LINCOLN ELECTRIC, Euclid, Ohio, USA), were used for the different welding passes, as shown in Table 2. Before welding, the plates of BS were cleaned to eliminate any oxide layer, dust, and grease over the surface.
The welding joint was performed in three stages using an OTC Welbee P400 power source (OTC DAIHEN Inc., Osaka, Japan) according to the welding conditions listed in Table 2. (i) GTAW-P with direct current electrode negative using a non-consumable EWTh-2 tungsten electrode (Ø3.2 mm) and 100% Ar as shielding gas was employed for the root welding pass. During welding, a gas purge plate was used as shown in Figure 1a. (ii) The buttering layer of Ni-based alloy was deposited with the GMAW-P process using an ERNiCrMo-3 filler wire (Ø1.2 mm) and 100% Ar as shielding atmosphere. The ERNiCrMo-3 was employed as a buttering layer to prevent the diffusion of carbon at the carbon steel/stainless steel interface. (iii) Multi-pass welding was performed with the GMAW-P process using an ER70S-6 filler wire (Ø1.2 mm) and a mixture of 75% Ar and 25% CO2 as shielding gas. The ER70S-6 filler wire is well known for its excellent welding properties, stable arc, high deposition efficiency, and low spattering. The welding interpass temperature was controlled at 200 °C between weld beads and monitored by an infrared digital Fluke™ 568 IR thermometer (Fluke Corporation, Springdale, CT, USA). Additionally, the oscillation speed of the welding torch and longitudinal travel distance were 15 mm/s and 8 mm, respectively. The plates of BS were placed over a gas purge system and clamped through T-slot clamps to the worktable to prevent any misalignment and distortion during the welding process.

2.2. Microstructural Characterization

The metallographic samples of API 5L X-52/AISI 316L BWJ were ground to mirror-like finishing by conventional techniques. The microstructure was revealed using a 2% Nital solution for the API 5L X-52 steel and ER70S-6 weld beads, while the buttering interlayer of ERNiCrMo-3 and the cladding 316L-Si were electrochemically etched with a solution of 20 mL H3PO4 + 10 mL H2O at 12 V for 45 s. The sample was observed under a Carl Zeiss Axio-A1 optical microscope (Carl Zeiss, Oberkochen, Germany), and an FEG-SEM-JEOL JSM-7600F field emission scanning electron microscope (JEOL, Tokyo, Japan) was used to characterize the microstructure of the welded joint.

2.3. Mechanical Characterization

Microhardness Measurements and Tensile Tests

Quasi-static uniaxial tension tests were performed at a strain rate of 1 mm/min according to the ASTM E8M-16 [24] standard on sub-size specimens of BM, cladding (cladded API X-52 plates), and welded joints using a Zwick Roell-Z100 (Zwick Roell, Ulm, Germany) servo-hydraulic testing machine with a capacity of 100 kN. An extensometer with a gauge length of 20 mm attached to the gauge length was used to measure the axial deformation during testing. The dimensions and final dog-bone geometry of tensile samples are shown in Figure 2a. Three specimens were tested for each sample condition to ensure the repeatability of the results, and the average values were reported. Fracture surfaces of tested specimens were examined in the SEM in secondary electron mode.
Microhardness profile measurements of the WBJ were performed by applying a load of 100 g during 10 s according to ASTM E-384 and E02 standards [25,26]. The distance between measurements was 500 µm in the heat affected zone (HAZ) and weld metal (WM) and 1 mm in the unaffected BM. The indentations were made along four horizontal lines on the top (T1), mid-height (T2), bottom (T3), and the cladding (T4) in the transverse section of the welded joint as shown in Figure 2b

3. Results

3.1. Root and Hot Pass Welding

Figure 3a shows the root pass performed with the GTAW-P welding process under the presence of the Ar gas purge on the back side of the joint. The weld face of the first welding pass shows a proper appearance with fusion on both sides of the base material and a proper ripple following the pulses generated by the welding process. The effect of the frequency in the penetration of melting metal did not melt through the cladding AISI 316L-Si wall sides curvature, avoiding dilution of the alloying elements and reduction in corrosion resistance. The use of narrow gap characteristics in the U-groove facilitates the homogeneity and distribution of heat input over the bead geometry obtaining a smooth profile. The presence of welding defects such as cracks and porosity were not observed. It is well known that the difficulty of Ni-based alloy welding is recognized in the welding technology field owing to its viscosity. However, the hot welding pass deposited with an ERNiCrMo-3 filler wire showed a slight convexity surface and good sidewall fusion (see Figure 3b). The oscillation of the electric arc and the radius of curvature of the U groove joint allow good wettability, fluidity, and fusion of the Ni-based alloy buttering layer on both the surface of the root pass and the sidewalls of the MB API X-52. The weld face is shown in Figure 3c, where the appearance and finish of the surface beads show adequate fusion at the foot of the weld on both sides of the base material.

3.2. Macrostructural Observation of BWJ

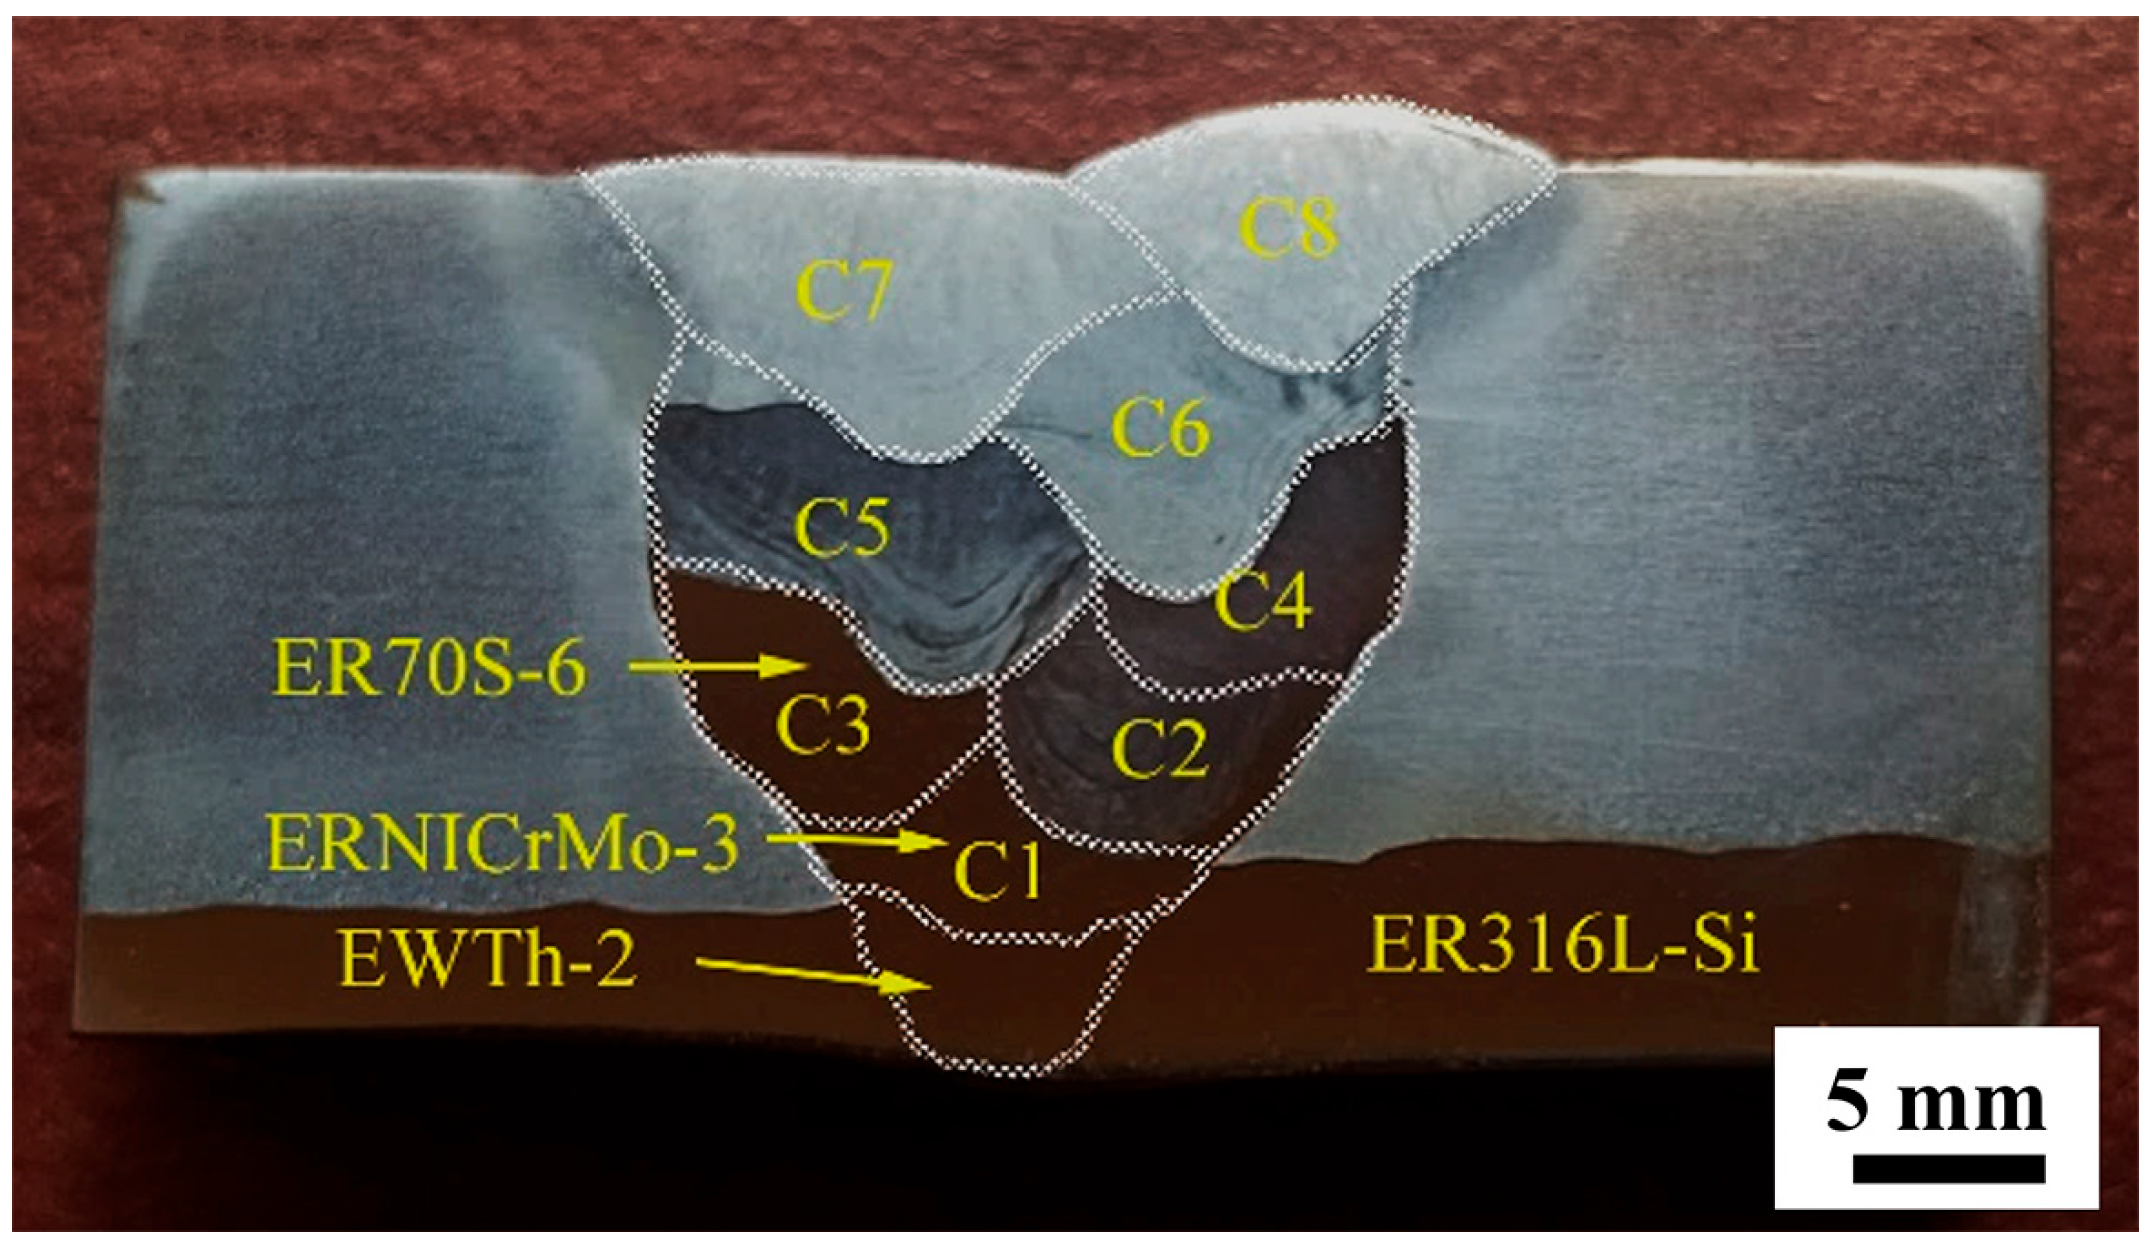
Figure 4 shows the cross-section of the complex union between the ER316L-Si cladding, buttered ERNiCrMo-3, and ER70S-6 filler electrodes, where C1, C2, etc., represent the sequence of the application of the weld beads in the different stages. The root welding pass shows complete fusion through the cladding without the presence of solidification cracking or micro-cracking on the sidewalls of the ER316L-Si electrode, showing that the parameters used in the GTAW process for the first welding pass were adequate. On the other hand, the ERNiCrMo-3 buttering forms the bond between the cladding and the API 5L X52 steel, which shows adequate fusion and mixing between the root pass and the U-groove walls. Finally, the subsequent filling steps with the ER-70S-6 electrode show the weld beads sequence for joint filling to melt the walls of the U-groove joint until it reaches the surface, where the weld crown exceeds the level of the plate alignment. In summary, no macro-discontinuities such as lack of fusion, lack of penetration, porosities, or cracks were observed.

3.3. Microstructural Characterization of BM API 5L X-52 and Cladding (AISI 316LSi)

The base metal and the transition between API 5L X-52 steel and ER316L-Si cladding were analyzed by optical microscopy. The microstructure of the BM (API 5L X-52) shows bands of ferrite and pearlite aligned along the rolling direction, with approximate fractions of 79.5 and 20.5%, respectively (see Figure 5a). The equiaxed grains have an average size of ~13.75 ± 5 µm (see Figure 5b). The cladding of 316L-Si stainless steel presents ferrite-like dendritic morphology surrounded by austenite bands, as shown in Figure 5c. It has been reported before [27] that cladding of 316L-Si has the tendency to form large columnar and dendritic grains with linked shapes as seen in Figure 5d, which is evident through the parallel orientation of the primary dendrites. The distribution and morphology of delta-ferrite in the austenitic grain boundaries were characterized by a ferritic–austenitic (FA) solidification mode oriented towards each respective weld-pool center [28,29,30,31,32].

3.4. Microstructural Characterization of the Mixture Weld Metal ERNiCrMo-3 and ER70S-6 Interface

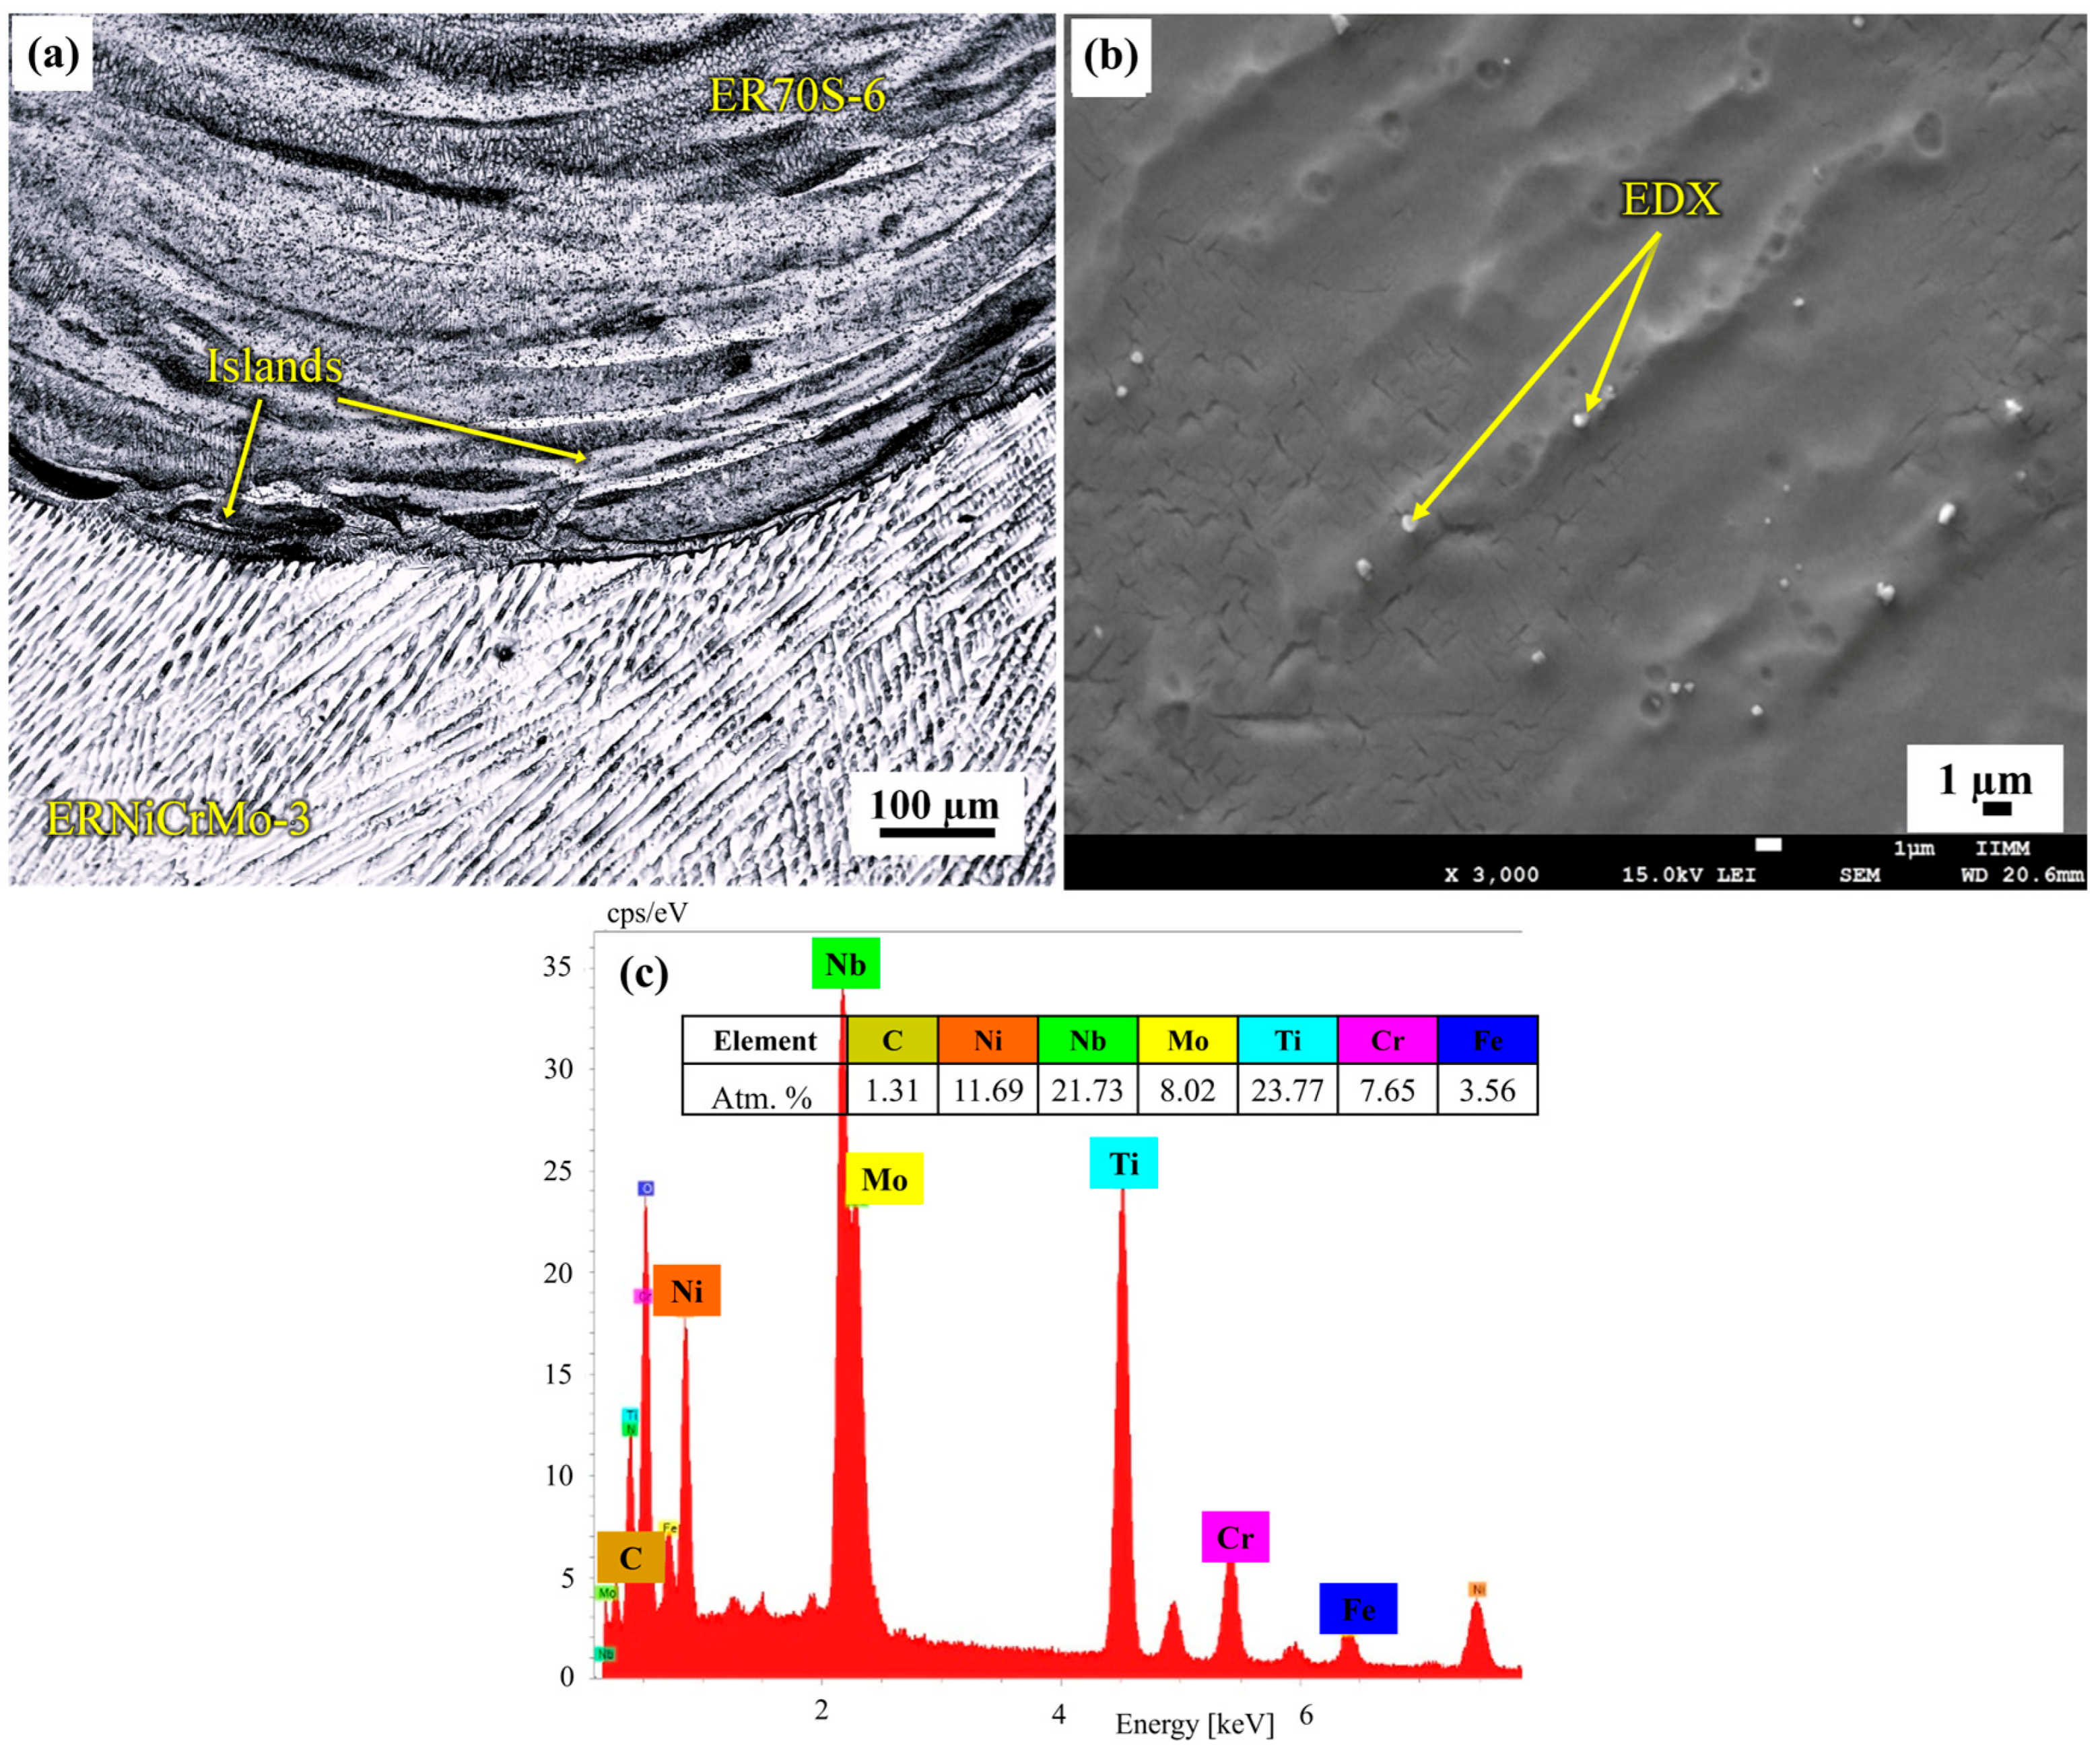
Figure 6a shows the weld metal (WM) microstructure produced between the ERNiCrMo-3 and the ER70S-6 filler wire. On the buttered side, it is observed that cellular-dendritic and equiaxed growth of grains is oriented perpendicular to the welding direction as seen in the weld beads C2 and C3. On the other hand, Figure 6b,c presents SEM micrographs and EDS spectra of the precipitation of particles rich in Nb and Ti in the inter-dendritic region of the austenitic matrix of ERNiCrMo-3 (buttering interlayer). According to this EDS punctual microanalysis, the presence of secondary phases of Nb and Ti was confirmed, most likely corresponding to carbides in the buttering interlayer. Opposingly, the most distinct microstructural features are found in the region of the mixture of ERNiCrMo-3 and ER70S-6 electrodes, which presents fine interlocked grains with honeycomb network shapes of the Ni–Fe mixture with Ni-rich grain boundaries and a cellular-dendritic and equiaxed solidification mode as observed in Figure 6a. A characteristic of these joints of Ni–Fe alloys is the formation of a microstructure in the form of a network by the Ni–Fe mixture, which is associated with the diffusion of both elements due to the accumulation of heat generated in the different subsequent welding passes during the welding solidification process. This network-shaped morphology on microstructure caused by the Ni–Fe mixture has been observed as a fish-scale morphology by other investigations [33]. Similarly, the presence of lath martensite, peninsulas, and islands near the ERNiCrMo-3/ER70S-6 interface is also observed. These WM chemical inhomogeneities can be attributed to the differences in chemical composition, BM melting range temperatures, metal filler thermo-physical properties, heat input, and cooling rate, which have a tempering effect [34].
The SEM and EDS line scan analyses were performed at the positions indicated by the red arrows in Figure 7a,b. The line scan passing through the interface ER70S-6/ERNiCrMo-3 filler metal showed an abrupt drop in intensity at 225 µm of distance in Fe content, while the content of Ni, Cr, and Mo increased gradually until ~300 µm. This behavior is related to the changes in the solidification mode from planar to cellular near the welding interface. Between 300 µm and 900 µm, the line scan shows a constant wave pattern. This feature has also been observed by Gonzaga et al. [35] and Cipriano et al. [36]. The variations in Nb content along the buttering layer are attributed to the dilution and segregation of chemical elements by weld pool oscillation generated during the filling welding pass. Finally, the Fe content increased whereas the Cr content significantly decreased in the cladding region. Similarly, EDS line scan results obtained at the mixture ERNiCrMo-3/ER70S-6 region presented variations in the chemical elements such as Fe, Cr, Ni, and Mo due to martensite formation and precipitation of carbides. This can be associated with the effect of cooling rate during the solidification process. Alloying elements such as C, Mn, Ni, Cr, and Mo were actively involved in the formation of martensite according to the study performed by Rathod et al. [37].
The microstructure of the HAZ of API 5L X-52 steel shows two subzones consisting of a fine-grained heat-affected zone (FGHAZ) and a coarse-grained heat-affected zone (CGHAZ). Both subzones presented complex microstructures constituted mainly by coarse bainite, AF, Widmanstätten ferrite, and polygonal ferrite, as can be observed in Figure 8 [38]. The HAZ width of the API 5L X-52 steel is narrow, around ~2 mm from the root pass up to the top (cap) of the BWJ. This may be associated with the joint configuration, the thermo-physical properties of materials, the manipulation of welding parameters, and electric arc oscillation, which allowed a homogeneous distribution of heat input during welding. Conversely, in the WM of ER70S-6, the different ferrite transformations such as proeutectoid ferrite (PF), ferrite grain boundary (FGB), Widmanstätten ferrite (WF), acicular ferrite (AF), and the presence of upper (UB) and lower bainite (LB) with a more marked grain refinement can be appreciated. It is also observed the precipitation of carbides and micropores within the ferritic grains. In low-carbon steels, reaustenitization occurs as coarse austenite grains convert into fine austenite grains in the second welding pass and decompose into fine ferrite and granular bainite during cooling. The combination of transfer mode and electric arc oscillation allow for fine-size grain ferrite transformation in the HAZ API 5L X-52 and WM ER70S-6 [39,40].

3.5. Mechanical Characterization of BM and BWJ

3.5.1. Microhardness

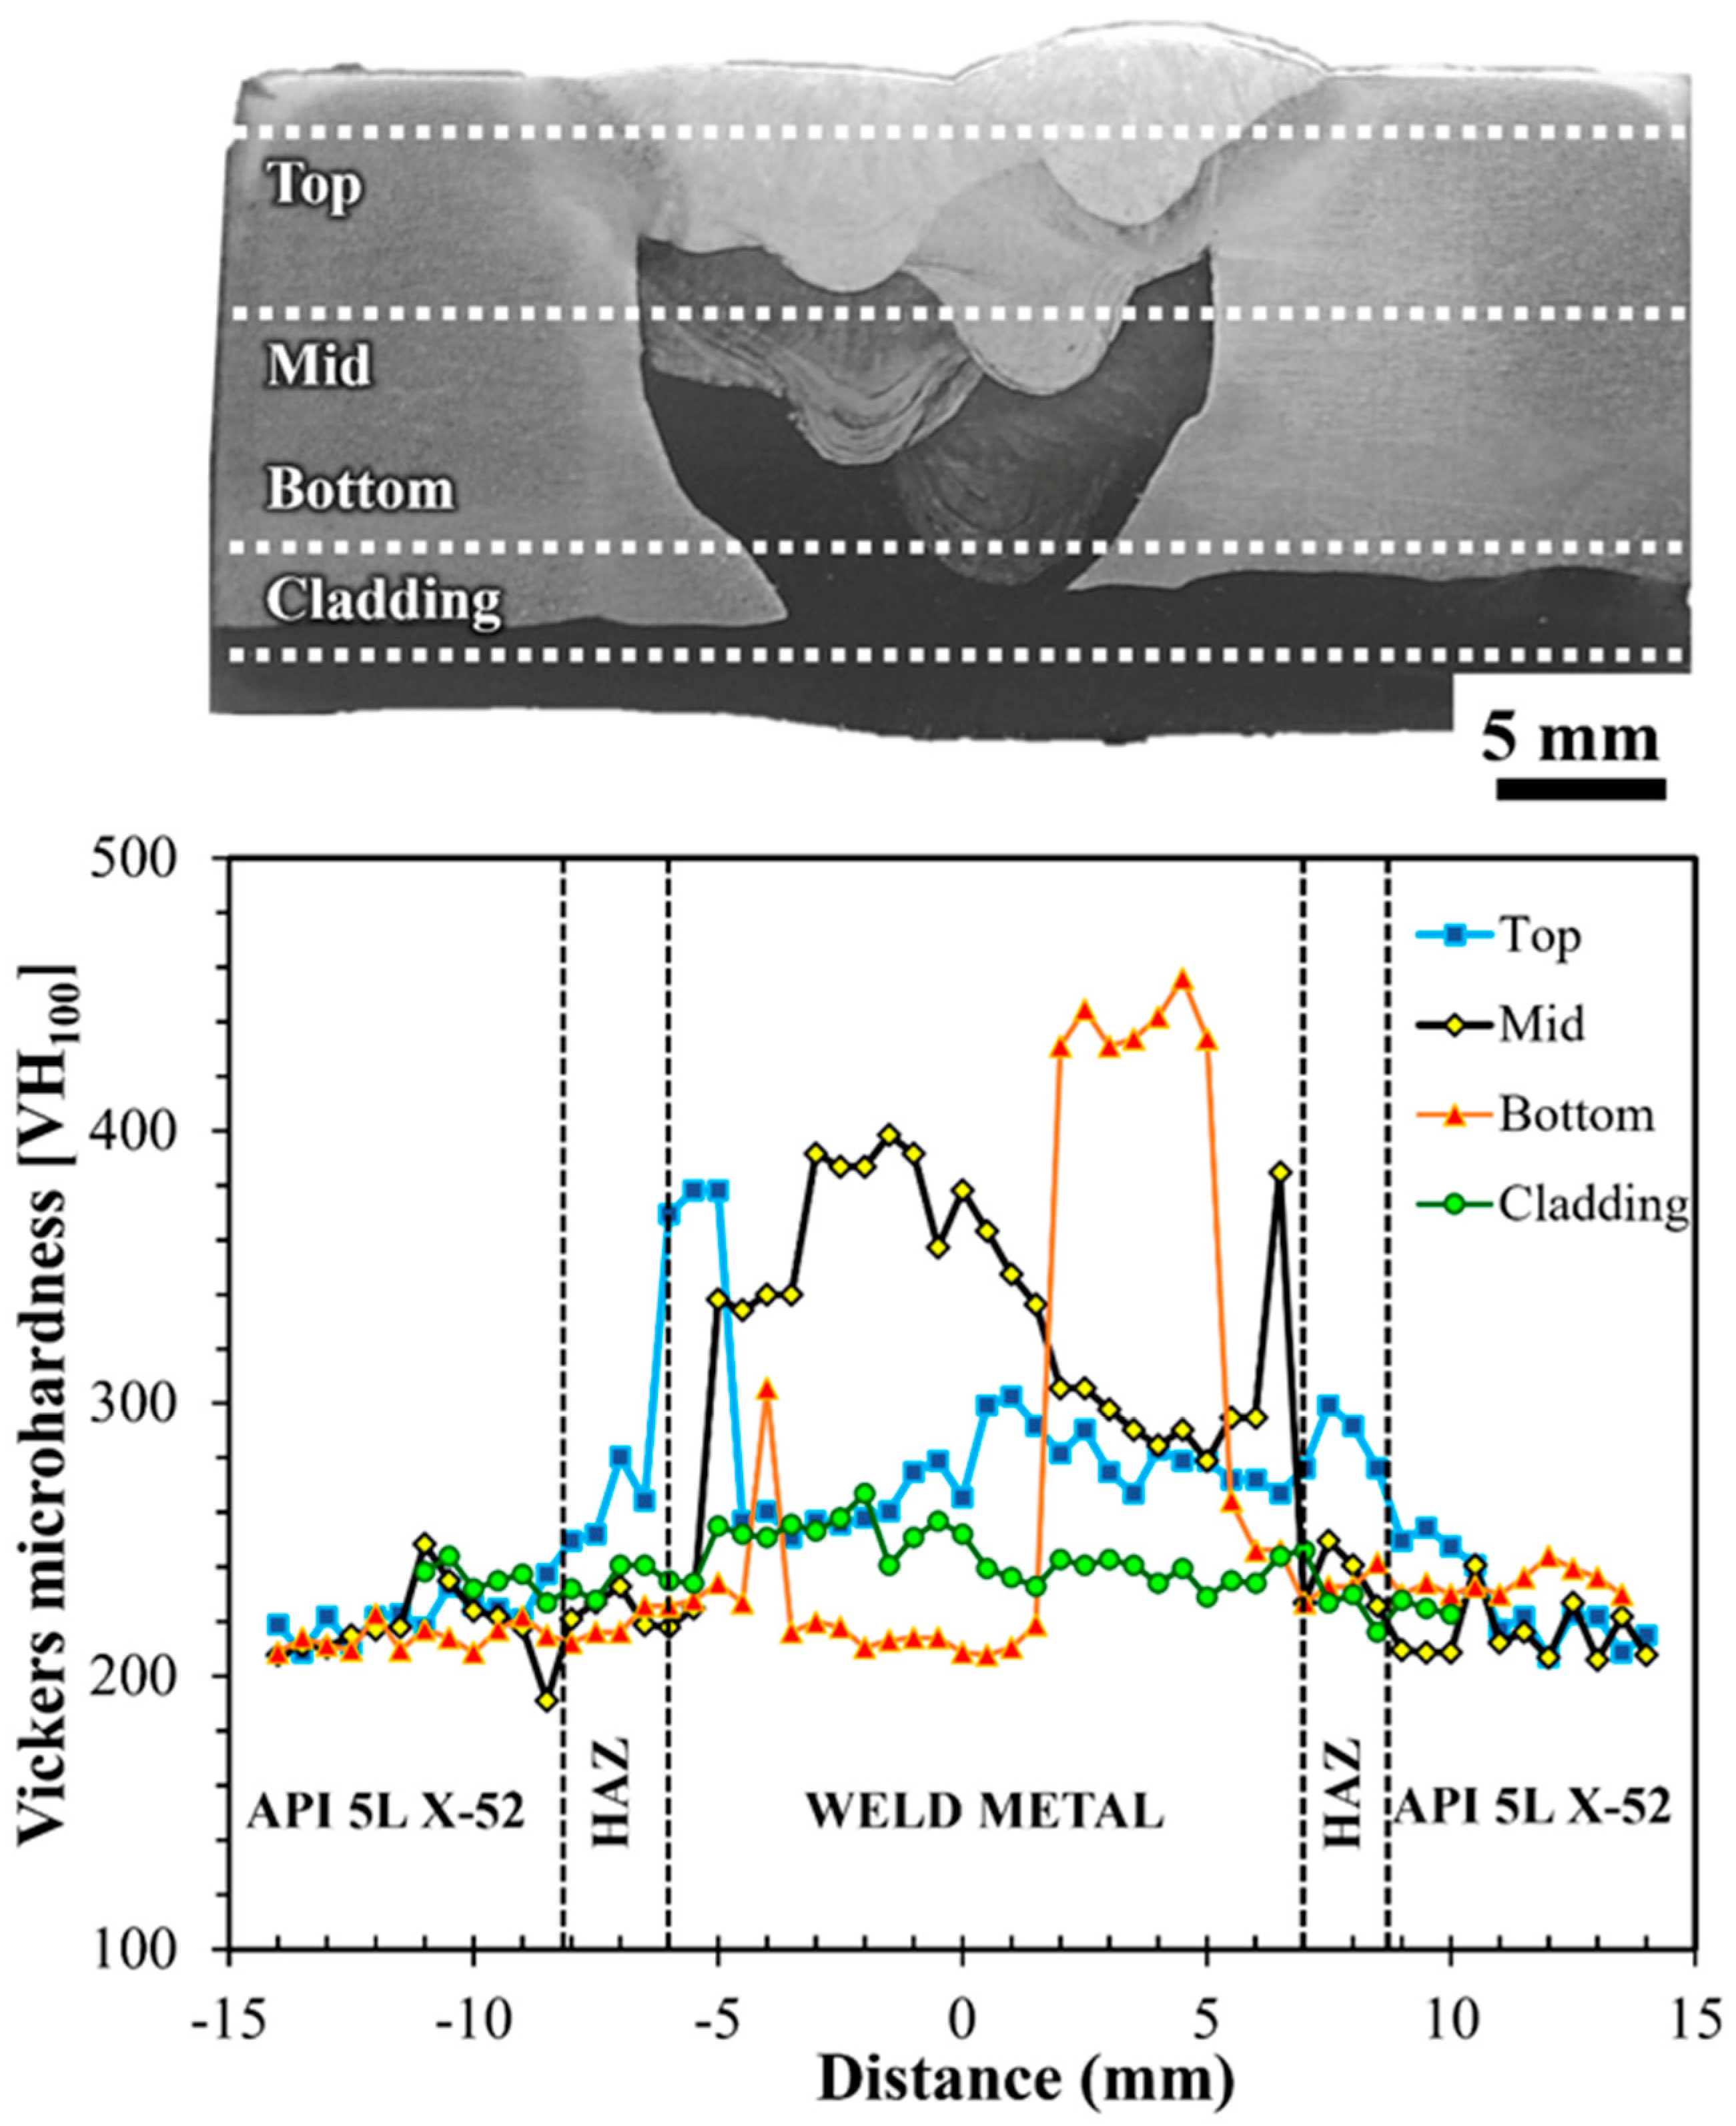
Microhardness profiles were performed on the base metal and the cross-section of the BWJ at the top, mid thickness, bottom, and cladding. The results of the Vickers microhardness measurements in the four weld regions of interest showed that for the BM zone of the API 5L X-52 steel, the average microhardness value was ~212 ± 6.94 HV and for the cladding, ~240 ± 4.22 HV, as observed in Figure 9. Nevertheless, at the top of the weld, there is a slight difference in the microhardness of the WM ER70S-6 and the HAZ of the API 5L X-52. This can be ascribed to different transformations of ferrite caused by the effects of thermal input and cooling rate. In the middle region of the weld, a significant effect on microhardness can be observed due to the precipitation of Ti and Nb carbides within the austenite on the WM of the mixture between ERNiCrMo-3 and ER70S-6, but also due to the formation of martensite. Finally, in the bottom zone, some microhardness peaks with values of ~455 HV are near the fusion line and interface between the mixture of Ni–Fe and ERNiCrMo-3 buttering. The last three regions showed microhardness values fluctuating from 284 HV to 319 HV in the region of the WM. The variations in microhardness values at the WM of the mixture between ERNiCrMo-3 and ER70S-6 of the middle zone are associated with the manipulation of the welding parameters, which directly affects the heat input level and the cooling rate to promote the martensite formation within the austenitic matrix during the welding thermal cycle between each weld bead [41]. However, the microhardness line scans pass through martensite laths, corresponding to the high peaks observed in the profiles. Due to the presence of harder phases and micro-constituents, the microhardness of WM ER70S-6 was higher than that of the BM (API 5L X-52) and the cladding (AISI 316L-Si); in the case of the top and mid, it surpassed that of the BM [42]. Hu et al. [43], in a study performed on a bimetallic composite pipe welded joint, observed that the hardness value in the filling weld bead is higher than the root weld bead due to temper softening during the welding process. This behavior is consistent with the results observed in the present study.

3.5.2. Tensile Results

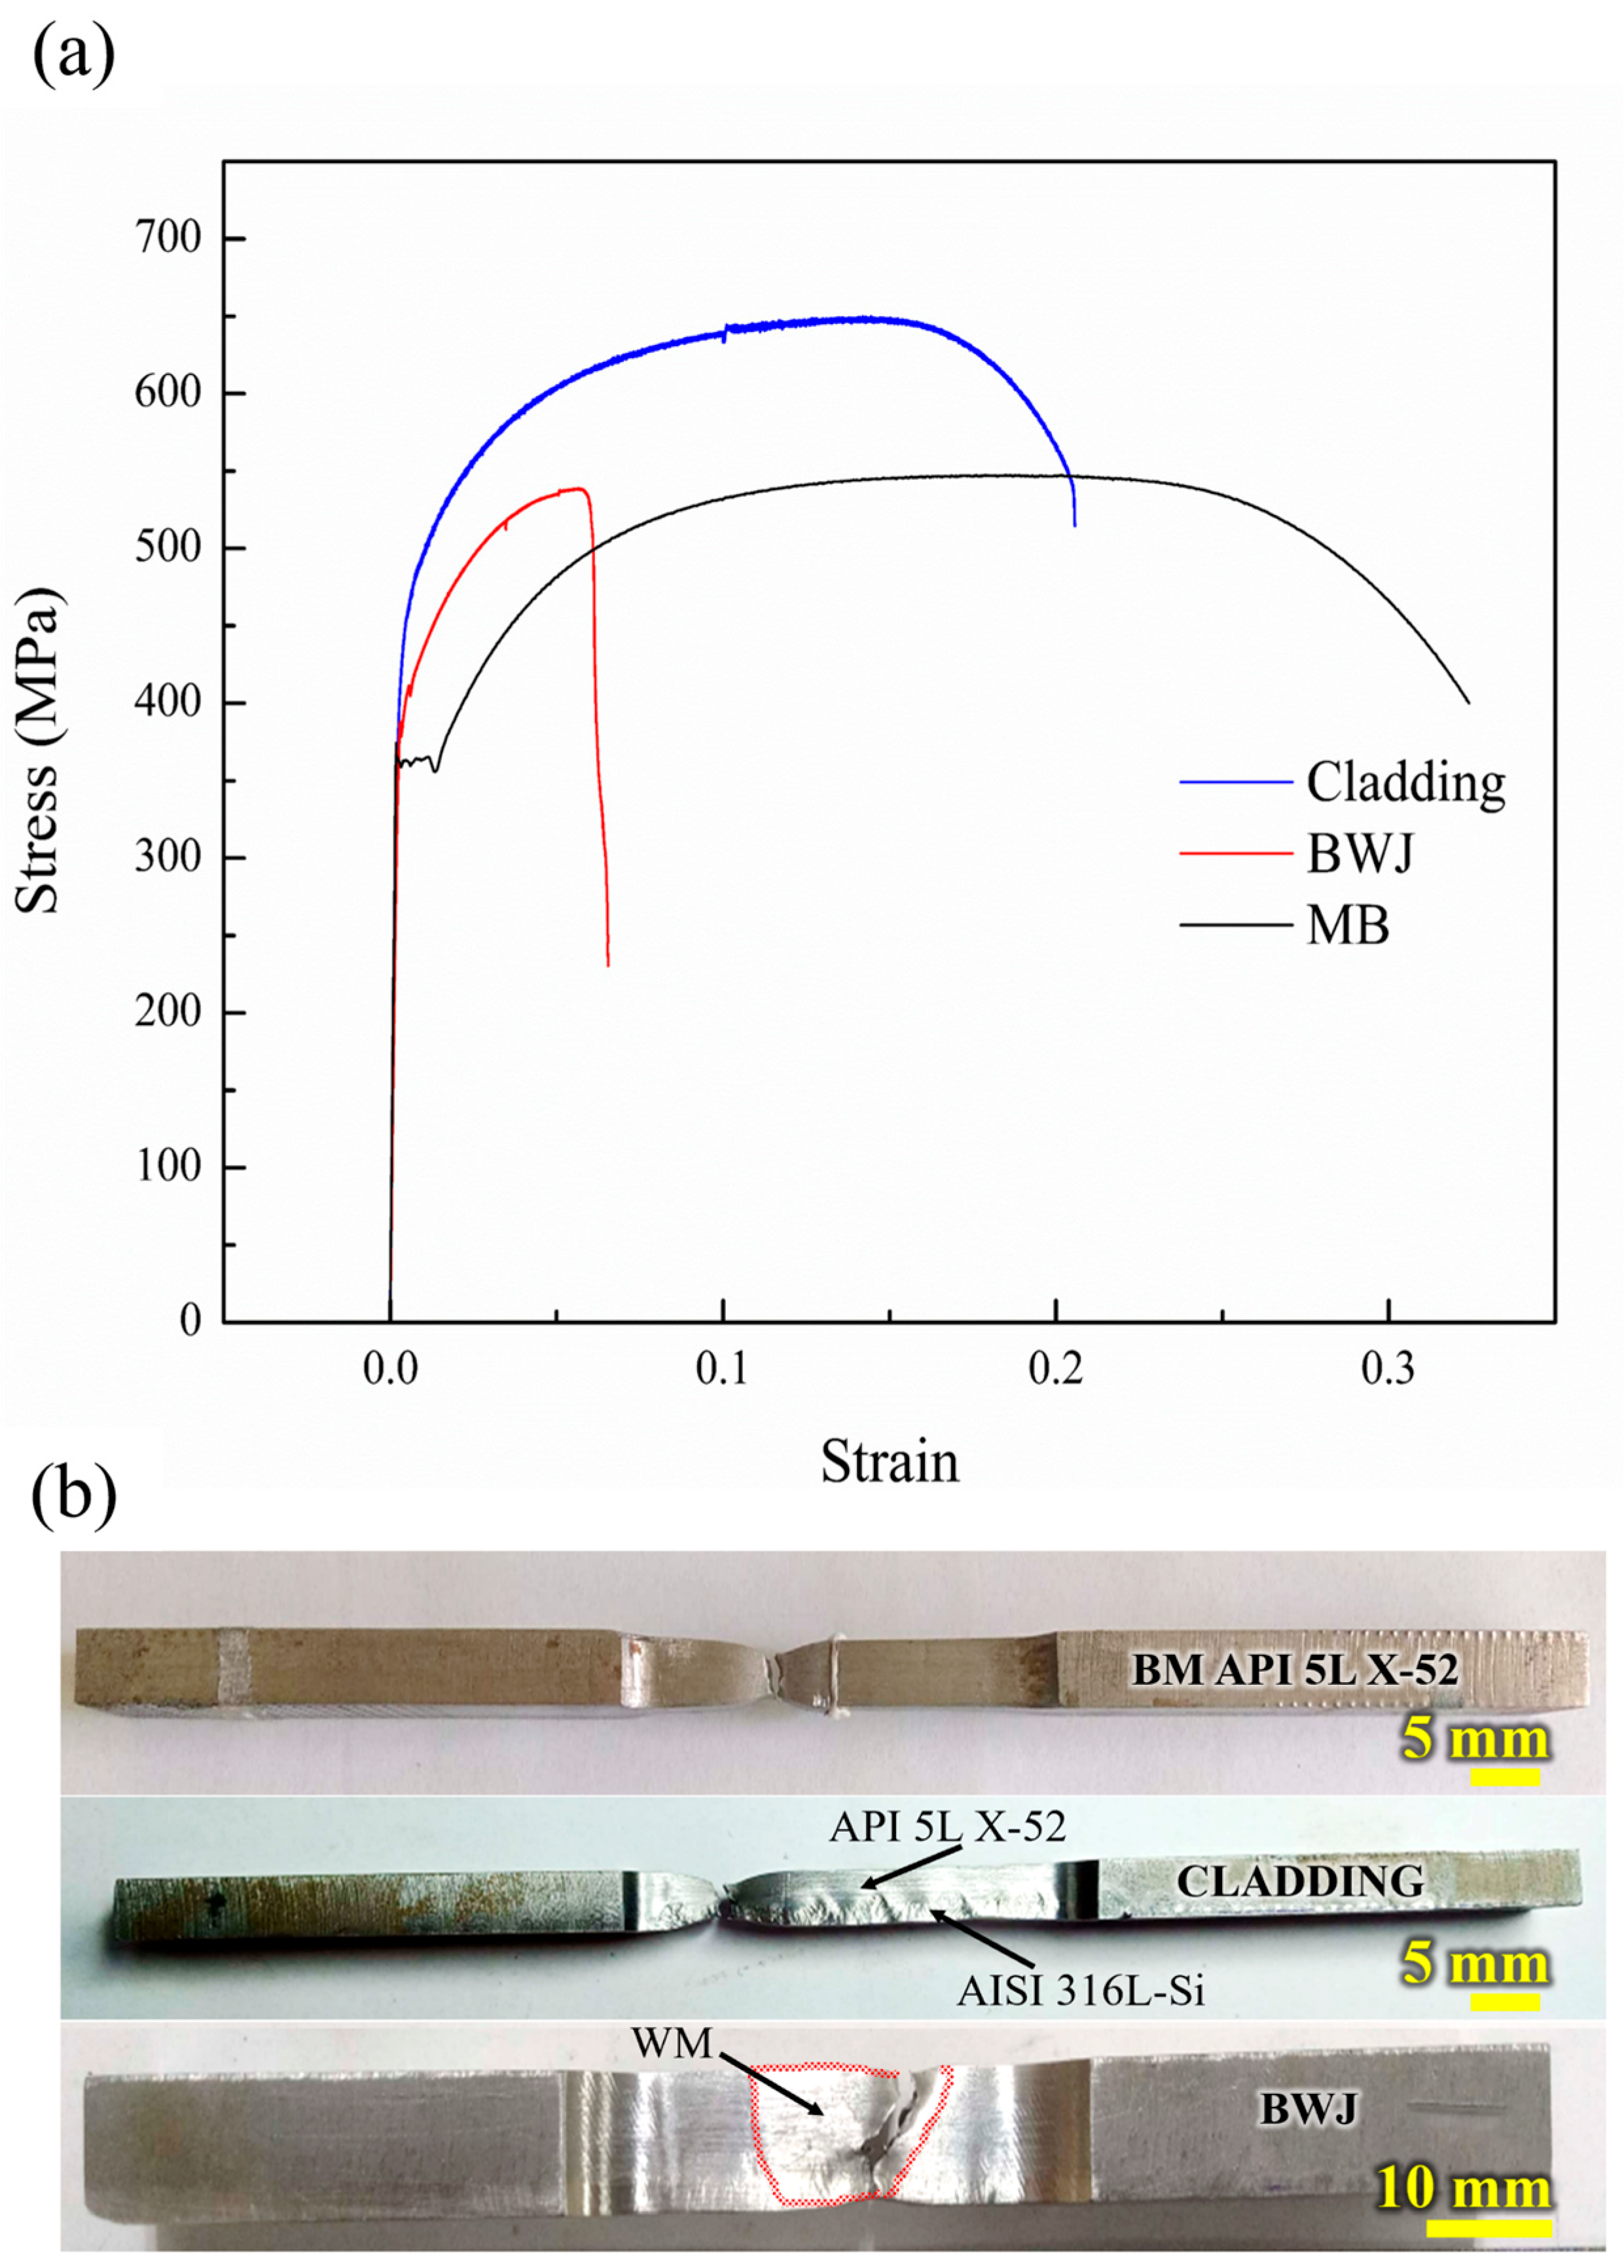
Figure 10a shows the tensile engineering stress–strain curves of BM, cladding, and bimetallic weld joints and Table 3 lists the mechanical properties obtained from these tests. The cladded plate sample presented an increase in tensile strength of approximately 17%, with a yield stress (YS) value of ~443 MPa, and an ultimate tensile strength (UTS) value of ~661 MPa as compared with BM API 5L X-52 steel, whose YS and UTS values are ~380 MPa and ~520 MPa, respectively. However, the bimetallic plate showed a reduction in ductility of about 10% as compared with the API 5L X-52. The deposition of the ER 316L-Si filler wire over the BM improves its mechanical strength but decreases its ductility. The tensile specimens of BWJ failed in the WM, as shown in Figure 10b, with a YS of 380 MPa, UTS of 520 MPa, and 7% elongation. This reduction in ductility can be associated with the formation of martensite and the precipitation of carbides in the austenitic matrix, causing ductility losses. These values of BWJ are slightly lower than the BM and the cladded plate. In this instance, the tensile specimen of BWJ failed along the fusion line at a 45° angle due to the effect of heat input and different microstructures induced by the fast cooling conditions. Nevertheless, according to Figure 10b, the fracture morphology is predominantly ductile over the entire surface.
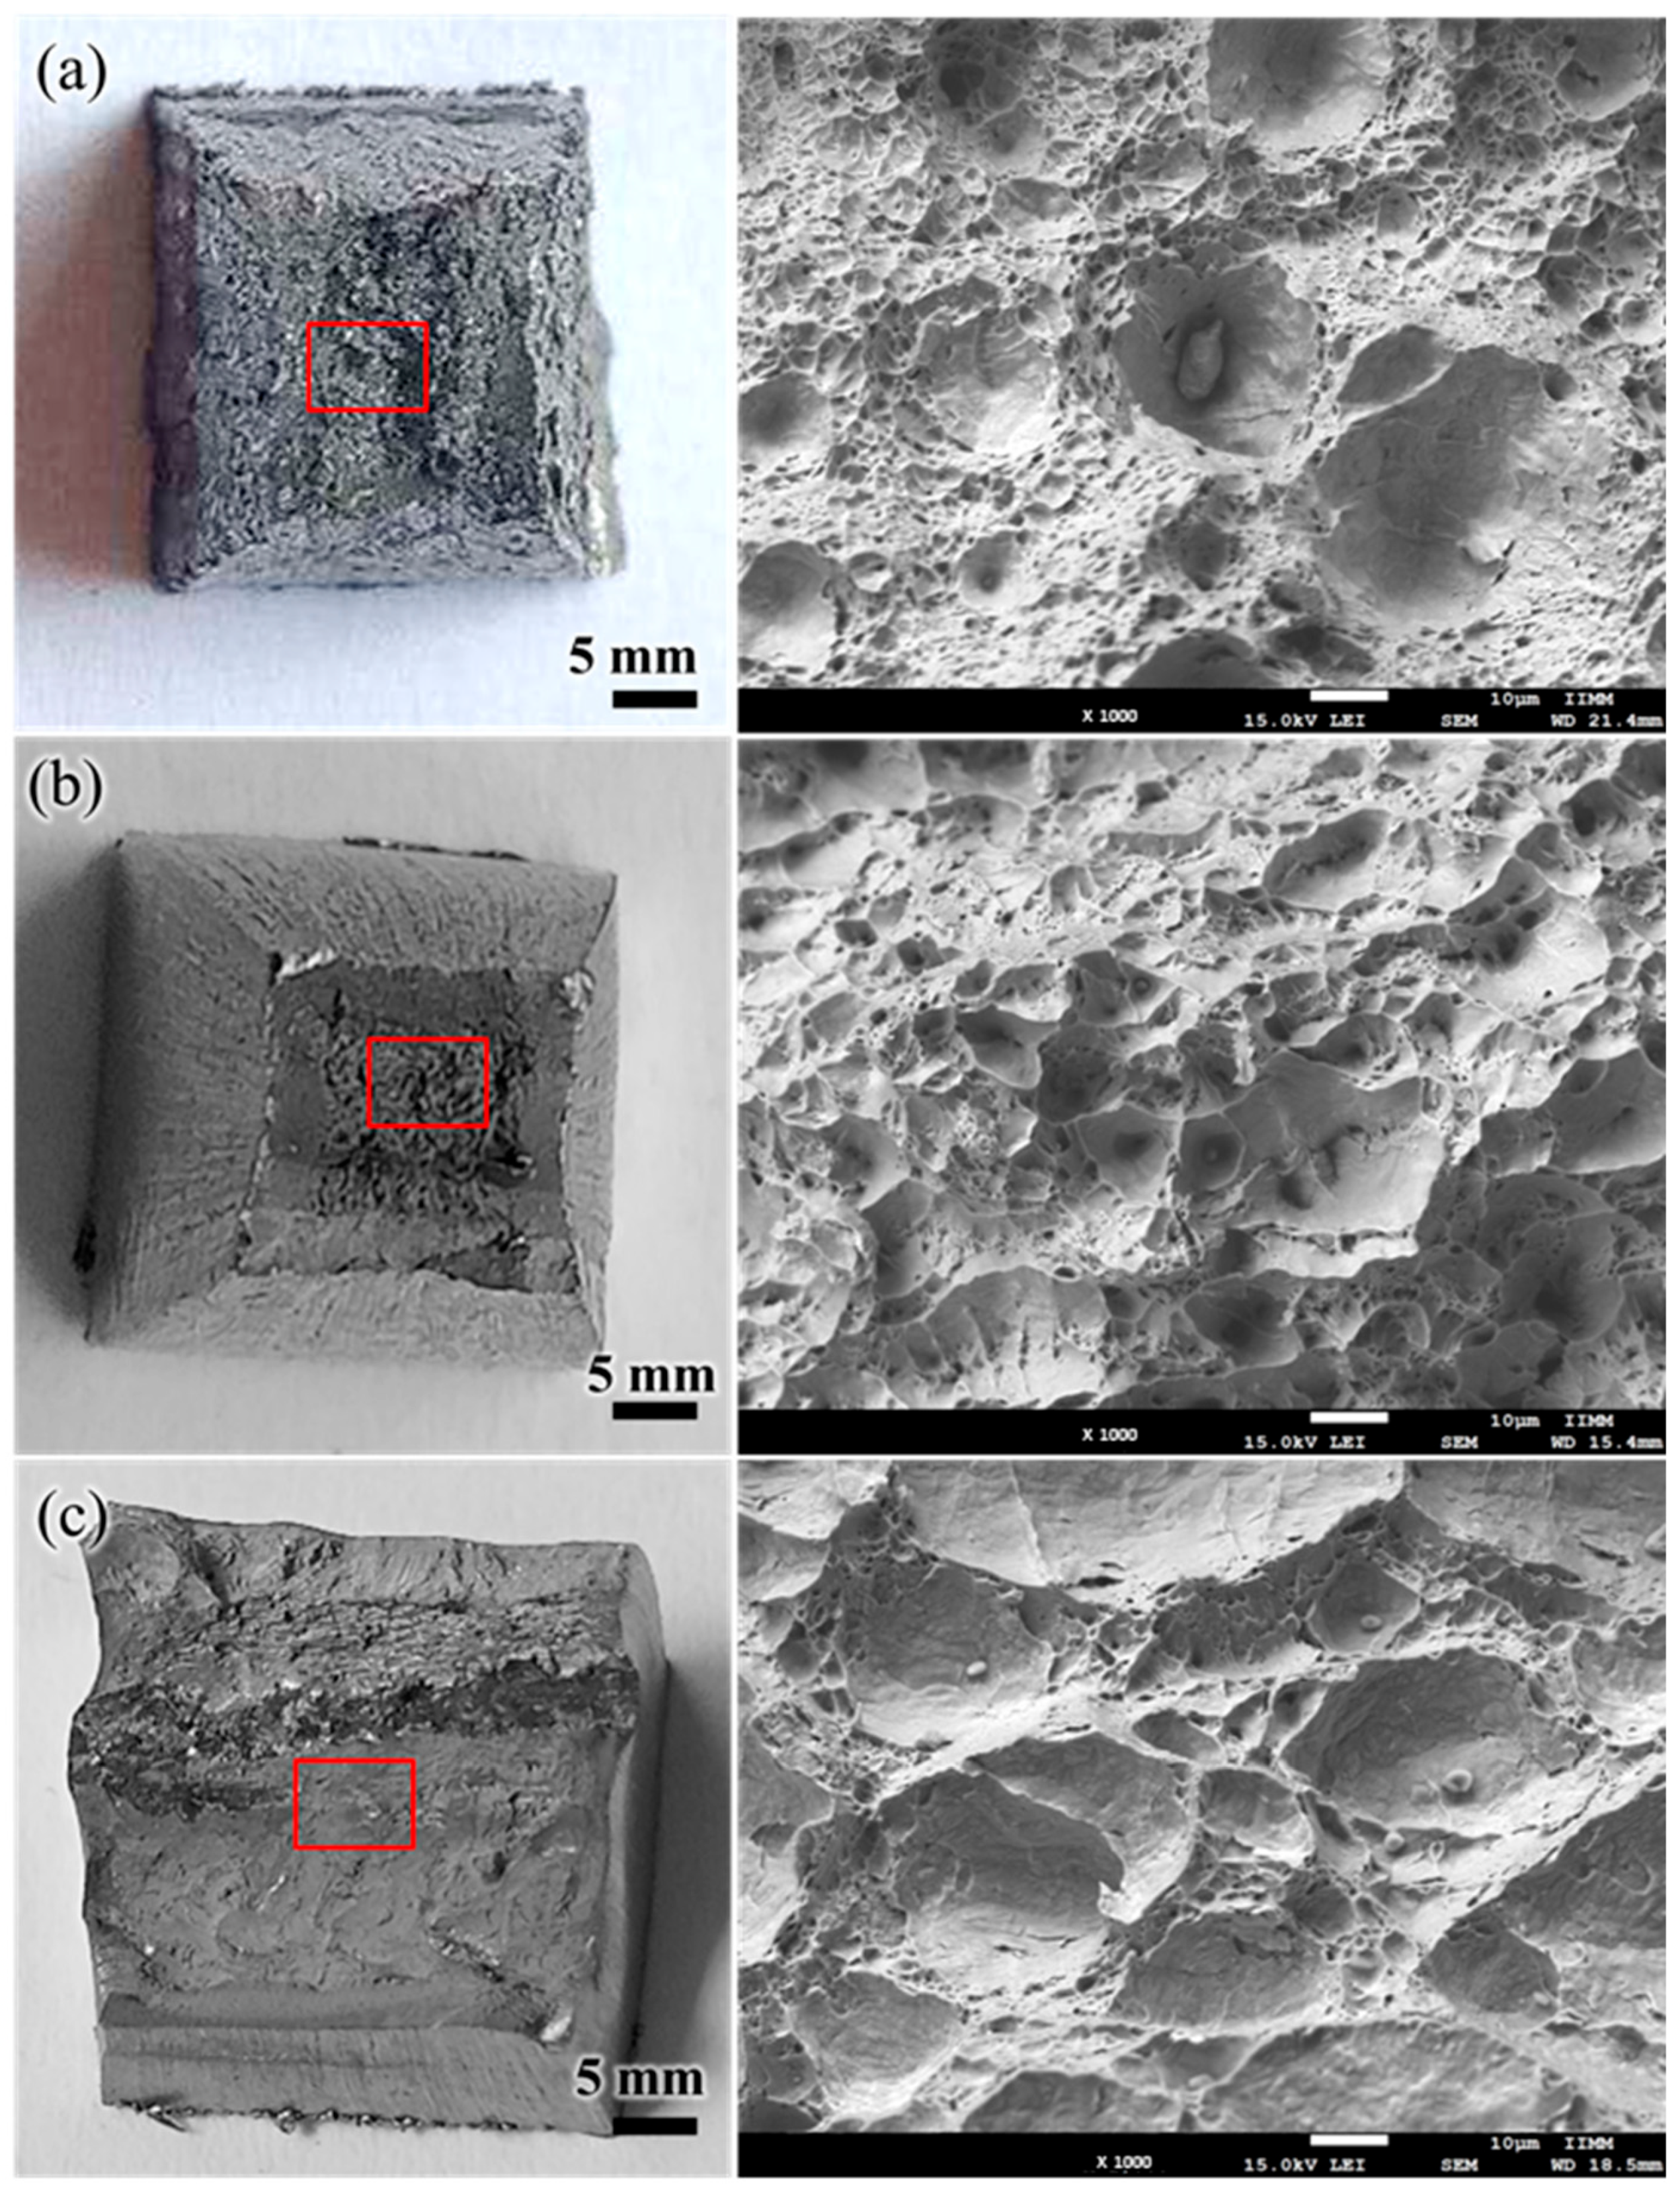
The fractures and their characteristics were analyzed in the SEM and are shown in Figure 11. According to Figure 11a,b, the fracture morphology of the base metal and the cladding is predominantly ductile over the entire surface. The elongation of the microvoids towards the surface indicates the direction of the applied load during the tests. Nonetheless, the surface of the BWJ exhibited in Figure 11c shows a mixture of ductile and fragile fractures, while the surface contains cleavage-like planes, small tearing ridges and microvoids, indicating a typical quasi-cleavage fracture mechanism [44].

4. Conclusions

This work investigated the effect of the ERNiCrMo-3 electrode on the hot welding pass of API 5L X-52 steel plates cladded with AISI 316L-Si steel welded by the GTAW-P and GMAW-P processes.
  • The correlation between transfer mode and electric arc oscillation can be considered a useful tool in improving the deposition of filler metal in the hot welding pass for BWJ.
  • The interplay of interpass temperature and cooling rate during solidification allowed for the maintenance of a narrow bandwidth of the same ferrite transformation throughout the HAZ of the API 5L X-52 steel.
  • The mixture of the ER70S-6/ERNiCrMo-3 filler wires in the first filling welding pass is sensitive to the variation of the heat input and cooling rate, showing the formation of martensite lath and precipitation of carbides.
  • The increase in hardness is also due to the presence of titanium and niobium precipitates within the austenite by the application of the ERNiCrMo-3 electrode on the hot welding pass.
  • Special care must be taken in the heat input generated in welding steps subsequent to the hot welding pass to avoid the formation of hard phases.
  • The mechanical strength of the BWJ joint showed a decrease in comparison with the BM and cladding due to the formation of martensite and the precipitation of carbides.
  • The effect of the heat input influences the fracture failure mechanisms, showing an increment in microhardness value and low tensile strength in the middle region of BWJ.

Author Contributions

Conceptualization, F.F.C.-L. and V.H.L.-M.; methodology, L.Á.L.-L., G.G.-V., J.C.V.-J. and J.J.T.-T.; validation, J.C.V.-J. and M.d.C.R.-L.; formal analysis, L.Á.L.-L. and G.G.-V.; investigation, L.Á.L.-L. and G.G.-V.; resources, F.F.C.-L. and V.H.L.-M.; writing—original draft preparation, L.Á.L.-L., G.G.-V., F.F.C.-L. and V.H.L.-M.; writing—review and editing, J.J.T.-T., M.d.C.R.-L. and J.C.V.-J.; visualization, L.Á.L.-L., G.G.-V. and F.F.C.-L.; supervision, F.F.C.-L. and V.H.L.-M.; project administration, F.F.C.-L., L.Á.L.-L., G.G.-V. and V.H.L.-M.; funding acquisition, F.F.C.-L. and V.H.L.-M. All authors have read and agreed to the published version of the manuscript.

Funding

This research received no external funding.

Data Availability Statement

The original contributions presented in this study are included in the article. Further inquiries can be directed to the corresponding author.

Acknowledgments

The authors express their gratitude to CONAHCYT for granting a scholarship to L.Á.L.-L. and G.G.-V. during his Ph.D. and postdoctoral studies, respectively. They also wish to express their gratitude to Coordinación de la Investigación Científica (CIC) of the Universidad Michoacana, to the Universidad de Monterrey, and for the aid from Antonio Rodriguez and Giovanni Candelario Justo with the SEM operation and welding facilities, respectively.

Conflicts of Interest

The authors declare no conflicts of interest.

References

  1. Wang, L.; Wu, D.; Xu, M.; Zhou, P.; Hu, Y. The fracture resistance and crack propagation path of L415/N08825 bimetallic composite pipe welded joint. Theor. Appl. Fract. Mech. 2022, 122, 103656. [Google Scholar] [CrossRef]
  2. Bunaziv, I.; Olden, V.; Akselsen, O.M. Metallurgical aspects in the welding of clad pipelines—A global outlook. Appl. Sci. 2019, 9, 3118. [Google Scholar] [CrossRef]
  3. Smith, L.M. (Ed.) Engineering with Clad Steel; Nickel Development Institute: Toronto, ON, Canada, 1994; pp. 1–24. [Google Scholar]
  4. Li, L.; Xiao, J.; Han, B.; Zhou, C.; Wang, X. Welding L415/316L bimetal composite pipe using post-internal-welding process. Trans. Indian Inst. Met. 2020, 73, 675–689. [Google Scholar] [CrossRef]
  5. Blanca, A.P.Á.; Melchor, S.M.; Victor, H.L.M.; García, R.; Francisco, F.C.L. Application of Magnetic Fields to Weld Overlay Cladding to Improve Its Performance in the Oil and Gas Industry. J. Manuf. Sci. Eng. 2022, 144, 094501. [Google Scholar] [CrossRef]
  6. Subhan, A.; Zahoor, A.; Mourad, A.-H.I. Advances in manufacturing techniques of cladding steel pipes using corrosion-resistant alloy material for offshore oil and gas pipelines. In Proceedings of the 2022 Advances in Science and Engineering Technology International Conferences (ASET), Dubai, United Arab Emirates, 21–24 February 2022; IEEE: Piscataway, NJ, USA, 2022; pp. 1–6. [Google Scholar]
  7. Saha, M.K.; Das, S. Gas metal arc weld cladding and its anti-corrosive performance: A brief review. AJTE 2018, 5, 155–174. [Google Scholar] [CrossRef]
  8. Papavinasam, S. (Ed.) Corrosion Control in the Oil and Gas Industry; Elsevier: Amsterdam, The Netherlands, 2013. [Google Scholar]
  9. Shuo, L.; Lingzhi, B.; Chengning, L.; Xinjie, D. Comparison of Fracture Toughness in the Coarse-Grain Heat-Affected Zone of X80 Pipelines Girth-Welded under Conventional and Ultra-Low Heat Input. Materials 2022, 15, 7701. [Google Scholar]
  10. Wang, B.; Lan, H.; Lei, B. Analysis on Fracture Toughness of the L360QS/N08825 Bimetallic Composite Pipe Welded Joint. Adv. Mater. Sci. Eng. 2019, 2019, 1–13. [Google Scholar] [CrossRef]
  11. Dos Santos, E.B.; Pistor, R.; Gerlich, A.P. High frequency pulsed gas metal arc welding (GMAW-P): The metal beam process. Manuf. Lett. 2017, 11, 1–4. [Google Scholar] [CrossRef]
  12. Schaupp, T.; Schroeder, N.; Schroepfer, D.; Kannengiesser, T. Hydrogen-Assisted Cracking in GMA Welding of High-Strength Structural Steel—A New Look into This Issue at Narrow Groove. Metals 2021, 11, 904. [Google Scholar] [CrossRef]
  13. Zondi, M.C. Factors that affect welding-induced residual stress and distortions in pressure vessel steels and their mitigation techniques: A review. J. Press. Vessel Technol. 2014, 136, 040801. [Google Scholar] [CrossRef]
  14. Palani, P.; Murugan, N. Selection of parameters of pulsed current gas metal arc welding. J. Mater. Process. Technol. 2006, 172, 1–10. [Google Scholar] [CrossRef]
  15. Kumar, N.; Pandey, C.; Kumar, P. Dissimilar welding of Inconel alloys with austenitic stainless-steel: A review. J. Press. Vessel Technol. 2023, 145, 011506. [Google Scholar] [CrossRef]
  16. Garcia, D.N.; Ferraresi, V.A.; Mota, C.A.M.d. Metallurgical and Mechanical Behaviors of 309L-Si and ERNiCrMo-3 Dissimilar Weld on ASTM A182 F22 Steel. Mater. Res. 2020, 23, e20190680. [Google Scholar] [CrossRef]
  17. Lee, S.H. A hot cracking on dissimilar metal weld between A106Gr. B and A312 TP316L with buttering ERNiCr-3. Metals 2019, 9, 533. [Google Scholar] [CrossRef]
  18. Sohn, S.S.; Han, S.Y.; Bae, J.-h.; Kim, H.S.; Lee, S. Effects of microstructure and pipe forming strain on yield strength before and after spiral pipe forming of API X70 and X80 linepipe steel sheets. Mater. Sci. Eng. A 2013, 573, 18–26. [Google Scholar] [CrossRef]
  19. Wang, J.; Atrens, A. Microstructure and grain boundary microanalysis of X70 pipeline steel. J. Mater. Sci. 2003, 38, 323–330. [Google Scholar] [CrossRef]
  20. Das, S.; Saha, M.K. Investigating The Effect of Nickel Buttering on Corrosion Resistance. Spektr. Ind. 2022, 20, 57–68. [Google Scholar] [CrossRef]
  21. Hang, K.; Cao, Y.; Li, H.; Hu, C.; Wang, J.; Zhu, Q. Influence of butter layer thickness on microstructure and mechanical properties of underwater wet 16Mn/304L dissimilar welded joint. Maters 2023, 16, 6646. [Google Scholar]
  22. Kumar, A.; Sirohi, S.; Singh, M.; Fydrih, D.; Pandey, C. Microstructure and mechanical properties of a dissimilar metal welded joint of Inconel 617 and P92 steel with Inconel 82 buttering layer for AUSC boiler application. Int. J. Press. Vessel. Pip. 2024, 209, 105–196. [Google Scholar] [CrossRef]
  23. Sirohi, S.; Kumar, A.; Singh, M.; Fydrih, D.; Pandey, C. Pulsed GTAW joint of P92 steel and Inconel 625: Microstructure and mechanical properties. Arch. Civ. Mech. Eng. 2025, 25, 93. [Google Scholar] [CrossRef]
  24. ASTM E8/E8M-22; E8M Standard Test Methods for Tension Testing of Metallic Materials. ASTM: West Conshohocken, PA, USA, 2001.
  25. ASTM E92-82; Standard Test Method for Vickers Hardness of Metallic Materials. ASTM: West Conshohocken, PA, USA, 2003; pp. 1–9.
  26. ASTM E384-22; Standard Test Method for Microindentation Hardness of Materials. ASTM: West Conshohocken, PA, USA, 1999; p. 399.
  27. Argumedo, J.G.; Mahmoudiniya, M.; Reinton, T.; Kestens, L.; Hermans, M.; Popovich, V. Functional grading of low alloy steel to 316 L by Wire Arc Additive Manufacturing–Microstructural and mechanical characterization of bi-metal interface. J. Mater. Process. Technol. 2024, 325, 118305. [Google Scholar] [CrossRef]
  28. Soudani, M.; Hadj Meliani, M.; El-Miloudi, K.; Bouledroua, O.; Fares, C.; Benghalia, M.; Azari, Z.; Capelle, J.; Sorour, A.A.; Pluvinage, G. Efficiency of green inhibitors against hydrogen embrittlement on mechanical properties of pipe steel API 5L X52 in hydrochloric acid medium. JBTC 2018, 4, 1–11. [Google Scholar] [CrossRef]
  29. Godefroid, L.B.; Cândido, L.C.; Toffolo, R.V.B.; Barbosa, L.H.S. Microstructure and mechanical properties of two API steels for iron ore pipelines. Mater. Res. 2014, 17, 114–120. [Google Scholar] [CrossRef]
  30. Guilherme, L.; Benedetti, A.; Fugivara, C.; Magnabosco, R.; Oliveira, M.F.d. Effect of MAG welding transfer mode on sigma phase precipitation and corrosion performance of 316L stainless steel multi-pass welds. J. Mater. Res. Technol. 2020, 9, 10537–10549. [Google Scholar] [CrossRef]
  31. Tabrizi, T.R.; Sabzi, M.; Anijdan, S.H.M.; Eivani, A.R.; Park, N.; Jafarian, H.R. Comparing the effect of continuous and pulsed current in the GTAW process of AISI 316L stainless steel welded joint: Microstructural evolution, phase equilibrium, mechanical properties and fracture mode. J. Mater. Res. Technol. 2021, 15, 199–212. [Google Scholar] [CrossRef]
  32. Souto, J.I.V.d.; Ferreira, S.D.; Lima, J.S.d.; Castro, W.B.d.; Grassi, E.N.D.; Santos, T.F.d.A. Effect of GMAW Process Parameters and Heat Input on Weld Overlay of Austenitic Stainless Steel 316L-Si. Soldag. Inspeçã 2023, 28, e2809. [Google Scholar] [CrossRef]
  33. Dovgyy, B.; Piglione, A.; Hooper, P.A.; Pham, M.-S. Comprehensive assessment of the printability of CoNiCrFeMn in laser powder bed fusion. Mater. Des. 2020, 194, 108845. [Google Scholar] [CrossRef]
  34. Wu, B.; Qiu, Z.; Pan, Z.; Carpenter, K.; Wang, T.; Ding, D.; Van Duin, S.; Li, H. Enhanced interface strength in steel-nickel bimetallic component fabricated using wire arc additive manufacturing with interweaving deposition strategy. J. Mater. Sci. Technol. 2020, 52, 226–234. [Google Scholar] [CrossRef]
  35. Gonzaga, R.S.; Farias, F.W.C.; da Cruz Payão Filho, J. Microstructural characterization of the transition zone between a C–Mn steel pipe and a 70% Ni30% Cu alloy cladding welded by HW-GTAW. Int. J. Press. Vessel. Pip. 2021, 192, 104433. [Google Scholar] [CrossRef]
  36. Cipriano Farias, F.W.; Payão Filho, J.d.C.; Barreto de Azevedo, L.M. Microstructural and mechanical characterization of the transition zone of 9% Ni steel cladded with Ni-based superalloy 625 by GTAW-HW. Metals 2018, 8, 1007. [Google Scholar] [CrossRef]
  37. Rathod, D.W.; Pandey, S.; Aravindan, S.; Singh, P. Diffusion control and metallurgical behavior of successive buttering on sa508 steel using Ni–Fe alloy and inconel 182. MMA 2016, 5, 450–460. [Google Scholar] [CrossRef]
  38. Jafarzadegan, M.; Ahangaryan, M.; Taghiabadi, R. Heat Input Effect on Microstructure and Mechanical Properties in Shielded Metal Arc Welding of Dissimilar AISI 316L/St-37 Steel. Int. J. Iron Steel Soc. Iran 2021, 17, 1–10. [Google Scholar]
  39. Zhang, T.; Zhao, W.; Deng, Q.; Jiang, W.; Wang, Y.; Wang, Y.; Jiang, W. Effect of microstructure inhomogeneity on hydrogen embrittlement susceptibility of X80 welding HAZ under pressurized gaseous hydrogen. Int. J. Hydrogen Energy 2017, 42, 25102–25113. [Google Scholar] [CrossRef]
  40. Kumar, S.; Nath, S.; Kumar, V. Effect of single and multiple thermal cycles on microstructure and mechanical properties of simulated HAZ in low carbon bainitic steel. Mater. Perform. Charact. 2015, 4, 365–380. [Google Scholar] [CrossRef]
  41. Qin, G.; Tang, Y.; Zhang, B.; Lin, S.; Geng, P. Microstructures and mechanical properties of stainless steel clad plate joint with diverse filler metals. J. Mater. Res. Technol. 2020, 9, 2522–2534. [Google Scholar] [CrossRef]
  42. An, Q.; Fan, K.; Ge, Y.; Liu, B.; Liu, Y.; Wang, S.; Chen, C.; Ji, P.; Yin, F. Microstructure and mechanical properties of stainless steel clad plate joints produced by TIG and MAG hybrid welding. J. Adhes. Sci. Technol. 2020, 34, 670–685. [Google Scholar] [CrossRef]
  43. Hu, Y.; Wang, B.; Xu, Y.; Wang, L.; Cheng, W. Investigation on the fatigue crack propagation behavior of L360MS pipeline steel welded joints with Inconel 625 weld metal. Trans. Indian Inst. Met. 2020, 73, 2387–2402. [Google Scholar] [CrossRef]
  44. Yu, W.; Liu, B.; Chen, C.; Liu, M.; Zhang, X.; Fang, W.; Ji, P.; He, J.; Yin, F. Microstructure and mechanical properties of stainless steel clad plate welding joints by different welding processes. Sci. Technol. Weld. Join. 2020, 25, 571–580. [Google Scholar] [CrossRef]
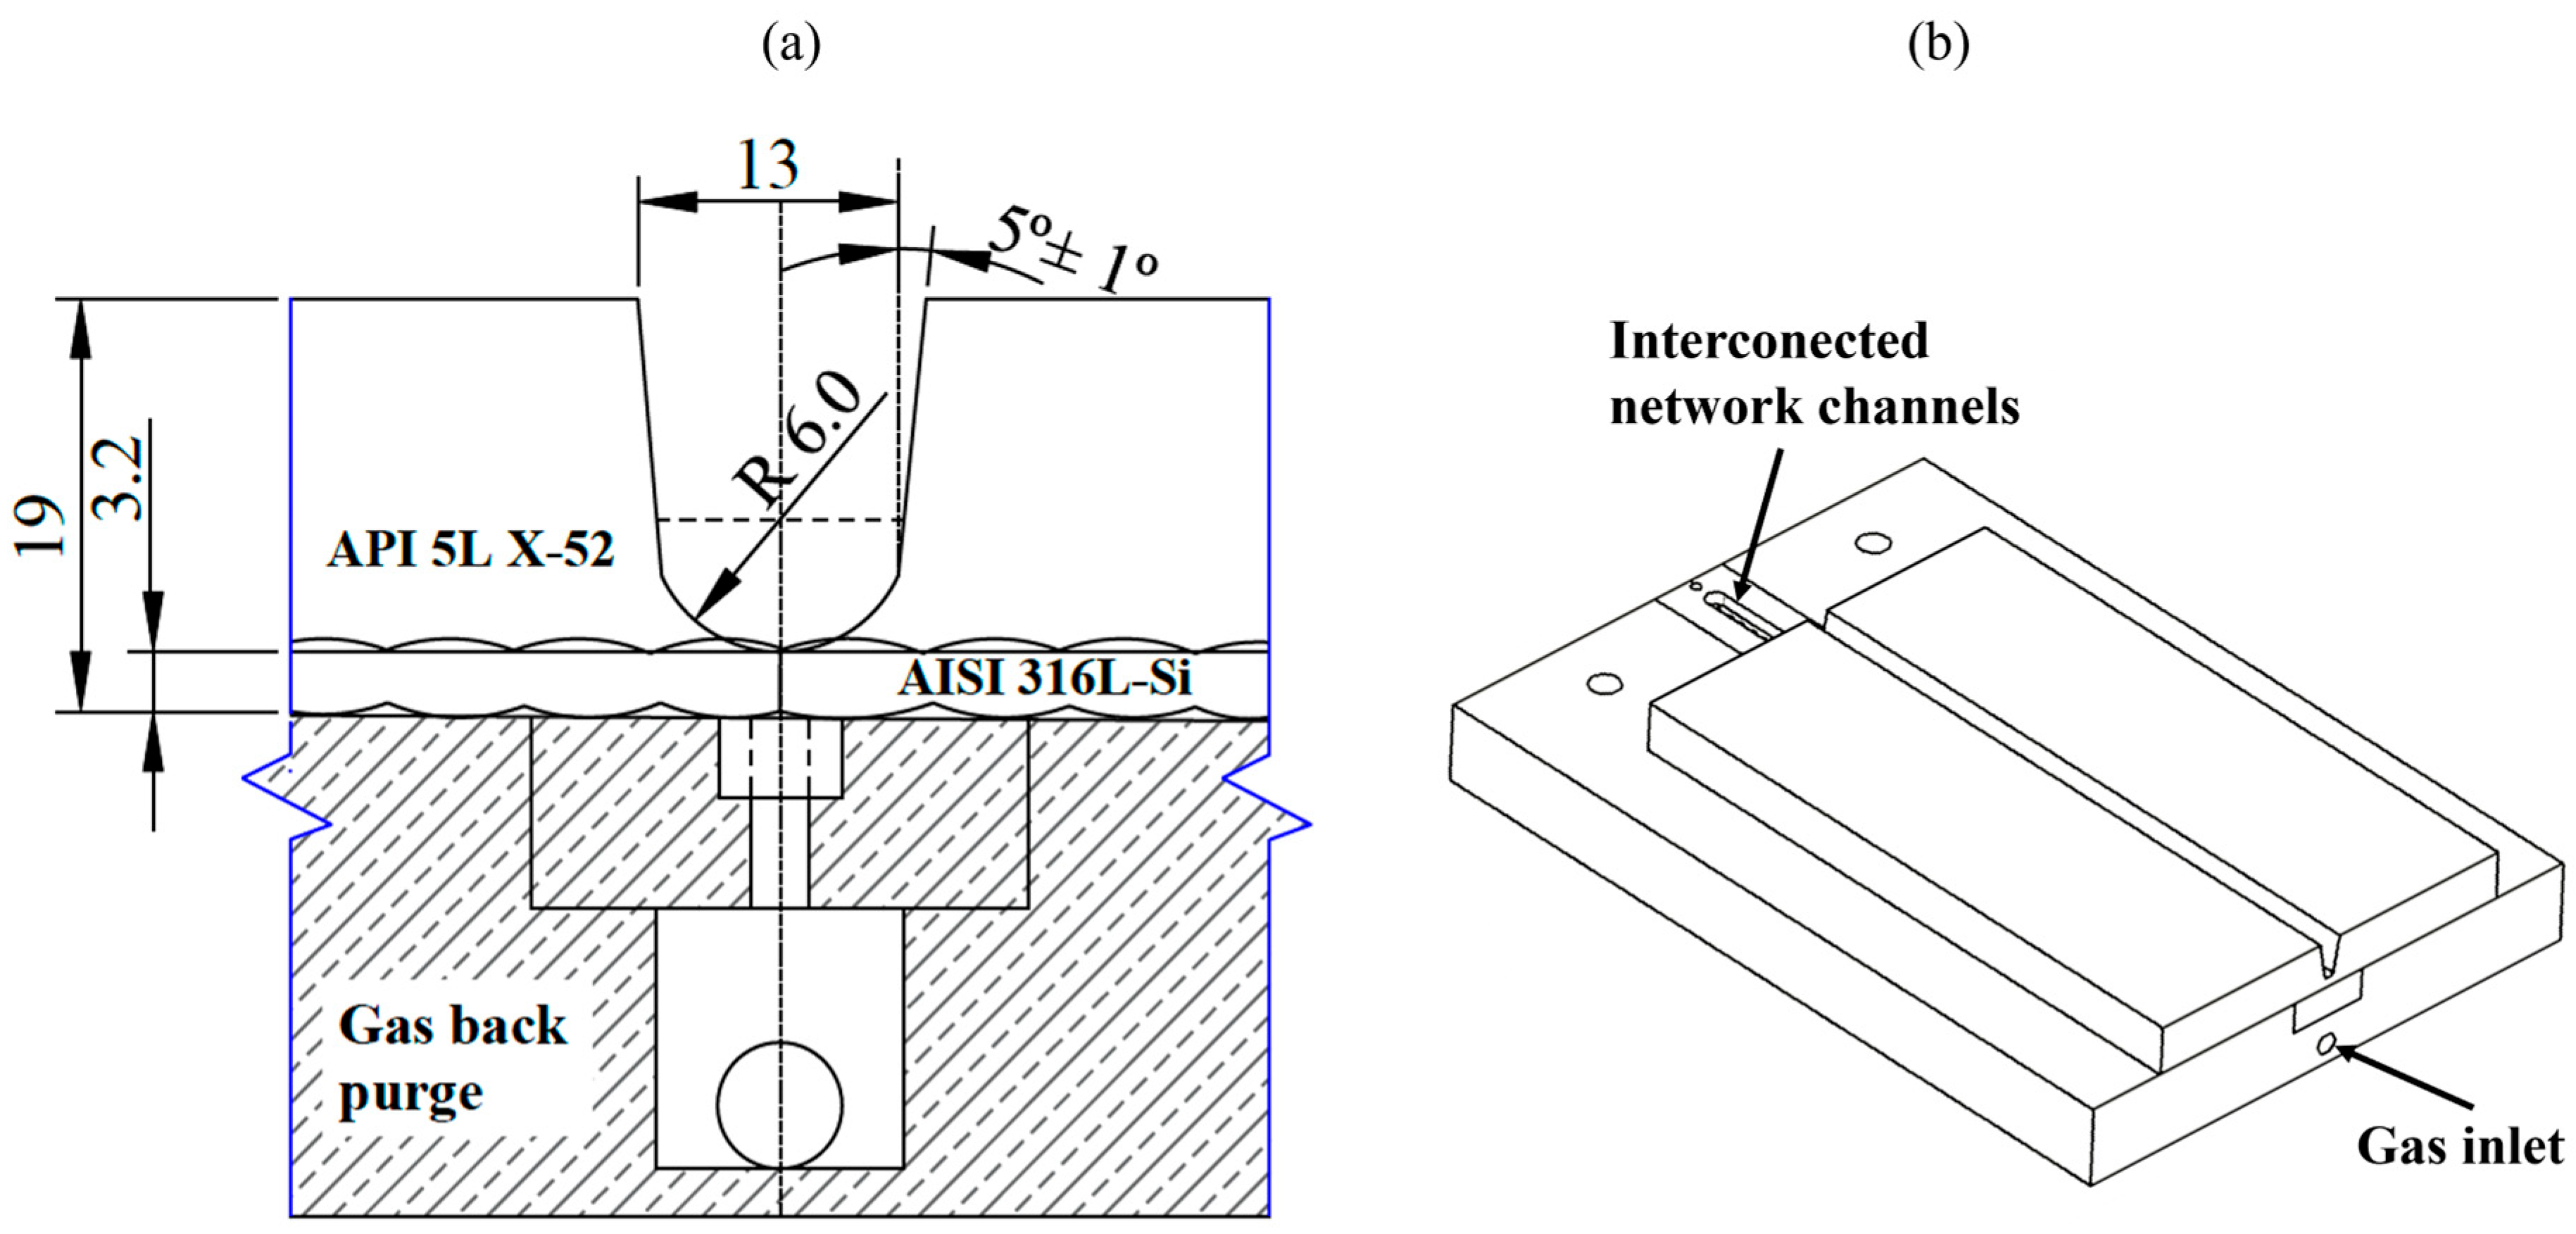
Figure 1. (a) Narrow-gap joint with U-groove geometry (units: mm), and (b) gas backing purge.
Metals 15 00824 g001
Figure 2. (a) Geometry and dimensions of samples used for tensile tests (units: mm), and (b) Vickers microhardness profiles of BJW samples.
Metals 15 00824 g002
Figure 3. Aspects of the surface performed by GTA-P and GMA-P welding processes: (a) root pass, (b) hot pass, and (c) cap passes.
Metals 15 00824 g003
Figure 4. Macrograph of the BWJ.
Metals 15 00824 g004
Figure 5. The microstructure of (a,b) BM API 5L X-52 and (c,d) AISI 316LSi steel and cladding.
Metals 15 00824 g005
Figure 6. Micrographs obtained by OM and SEM: (a) microstructure of ERNiCrMo-3/ER70S-6 mixture and (b,c) SEM image at the WM of ERNiCrMo-3 and EDS analysis.
Metals 15 00824 g006
Figure 7. Micrograph obtained by SEM and line scan energy-dispersive X-ray spectroscopy (EDS) of the interface of different alloys: (a) region cover by ER70S-6/ERNiCrMo-3/cladding and (b) region cover by API 5L X-52/mixture/ER70S-6. The red arrows in (a,b) correspond to the lines scanned by EDS.
Metals 15 00824 g007
Figure 8. Microstructure of the interface between the HAZ of API 5L X-52/WM ER70S-6 of BJW (The red dotted line corresponds to the fusion line).
Metals 15 00824 g008
Figure 9. Microhardness profiles across the BWJ.
Metals 15 00824 g009
Figure 10. (a) Stress–strain curves of the materials and (b) macrographs of the tested specimens.
Metals 15 00824 g010
Figure 11. Fractography of the tensile specimens; (a) BM, (b) cladding (AISI 316L), and (c) BWJ. The red squares indicate the sites where the SEM images, shown in the right column, were acquired.
Metals 15 00824 g011
Table 1. Chemical compositions of the API 5L X-52 and filler wires (wt. %) used in the BWJ.
MaterialCMnCrNiMoSiPSNbTiVFeWTh02
X-520.1621.44--0.0050.1900.0150.0050.100.0050.005Bal.--
ER316L0.031.918.5122.700.800.030.03---Bal.--
ERNiCrMo-30.010.12264.388.70.150.010.013.60.2-Bal.--
ER70S-60.161.2-0.150.150.850.020.03--0.03Bal.--
EWTh-2------------97.32.2
Table 2. Welding parameters performed by GTA-P and GMA-P welding processes.
ParametersRoot PassHot PassWeld Beads
Electrode (AWS)EWTh-2ERNiCrMo-3ER70S-6
Peak current (Ip)14564127
Background current (Ib)7315-
Pulse frequency (Hz)210-
Voltage (V)18.313523
Travel welding (mm/s)2.42.033
Wire feed speed (mm/s)-112.1876.2
Gas flow rate (L/min)9.4414.1611.8
Gas purge flow rate (L/min)4.72--
Stick out (mm)-1414
Table 3. Tensile mechanical properties for base metal and BWJ.
MaterialE (GPa)σy (MPa)σUTS (MPa)ε (%)
X-52208 ± 3.54366 ± 3.54546 ± 2.4932 ± 1.65
Cladding196 ± 2.2443 ± 3.54661 ±15.3422 ± 2.00
BWJ186 ± 6.43380 ± 28.28520 ± 27.547 ± 0.46
Disclaimer/Publisher’s Note: The statements, opinions and data contained in all publications are solely those of the individual author(s) and contributor(s) and not of MDPI and/or the editor(s). MDPI and/or the editor(s) disclaim responsibility for any injury to people or property resulting from any ideas, methods, instructions or products referred to in the content.