Article

Fabrication and Thermomechanical Processing of a Microalloyed Steel Containing In Situ TiB2 Particles for Automotive Applications

1
School of Chemical, Materials & Biological Engineering, The University of Sheffield, Sir Robert Hadfield Building, Sheffield S1 3JD, UK
2
Volkswagen Aktiengesellschaft, 38440 Wolfsburg, Germany
*
Author to whom correspondence should be addressed.
Metals 2025, 15(12), 1322; https://doi.org/10.3390/met15121322
Submission received: 18 October 2025 / Revised: 28 November 2025 / Accepted: 28 November 2025 / Published: 30 November 2025

Abstract

A microalloyed (MA) steel, combined with titanium diboride (TiB2), was utilised to create a unique steel matrix composite (SMC), enhancing the modulus of the MA steel while also improving its strength. Through thermomechanical processing stages, including hot rolling and plane-strain compression (PSC) testing, followed by various final cooling methods, a cooling rate of 0.1 °C/s was identified as the most effective for achieving a ferrite–pearlite microstructure, which is suitable for toughness and ductility. With TiB2 reinforcement successfully incorporated via Fe-Ti and Fe-B additions during vacuum induction melting (VIM), it was observed that the TiB2 particles were homogeneously dispersed in both 5% and 7.5% nominal volume fraction additions, exhibiting faceted and hexagonal morphology. TiB2 was found to exert a grain-pinning effect on recrystallised austenite at 1050 °C, as evidenced by the retention of grain orientation from hot rolling, in contrast to the MA steel deformed without the composite reinforcement. Increasing the volume fraction of TiB2 improved the stiffness and strength of both composite alloys, verified through mechanical testing.

1. Introduction

With continuous advancements in the electric automotive sector, the need for improving vehicle efficiency through lightweight design and geometric optimisation has become increasingly important. Lightweight design is particularly crucial for enhancing the range and dynamic performance of electric vehicles, including handling, acceleration, and braking. Traditionally, structural steels are favoured in both internal combustion and electric-powered vehicles due to their high modulus, stiffness, and strength. These steel components, which form integral parts of the chassis, body panels, and engine, contribute significantly to a vehicle’s overall mass.
The development of high-modulus steels (HMSs) with composite ceramic reinforcement is a well-researched approach for reducing the density of steel components while enhancing stiffness [1,2,3,4]. By lowering the density and maintaining or even increasing strength, vehicle parts can be redesigned with optimised geometries to achieve weight reduction. Alternatively, new composite-reinforced steels can keep the same geometry as existing parts and deliver similar or superior mechanical properties, reducing the overall weight of electric vehicles without compromising performance. This study focuses on the fabrication and thermomechanical processing (TMP) of a microalloyed steel composite (MASC) containing in situ TiB2 particles, a novel approach aimed at enhancing the mechanical properties of steel through the incorporation of ceramic reinforcement. The use of TiB2 as a reinforcing phase is common in steels due to its exceptional hardness, high melting point (2970 °C, [5]), and stability within a steel matrix.
Precipitation-hardened ferritic-pearlitic (PHFP) steels are medium-carbon in composition with a microstructure made up of ferrite and pearlite. The pro-eutectoid ferrite present in PHFPs can be manipulated by a controlled cooling rate [6]. Smaller amounts of ferrite improve hardness and fracture toughness; however, ductility is reduced. TiC, NbC, and VC precipitates form during solid-state transformation in medium-carbon steels and remain thermodynamically stable once formed. The idea of adding carbide precipitates to a base steel is to inhibit grain growth and, within grains, impede dislocation motion. TiB2 exhibits similar behaviour to carbide precipitates; however, the effects of grain pinning and thermodynamic stability of a boride-based reinforcement are greater. From previous findings, it is clear that the work on incorporating TiB2 as a composite reinforcement has been respectively studied on low-carbon and stainless steels [4,7,8]. Problems with current matrix composites are present in the form of damage mechanisms. These include de-cohesion and fracture at the location of reinforcement particles. From this, it can be said that the most important factor for an effective reinforcement addition is to have good bonding at grain interfaces without negatively impacting phase evolution [9]. Other factors that the reinforcement has on mechanical properties are the volumetric fraction of precipitates and their size. The homogeneity and morphology of reinforcement particles in SMCs are vital to understand, and these particles preferably lie at grain boundaries, which initiate a grain pinning mechanism under strain application, improving overall strength. TiB2 in particular has a high modulus and excellent stiffness-to-weight ratio whilst remaining very thermodynamically stable once formed. This makes it an ideal candidate for coupling with a steel matrix, as it can be formed in situ via a liquid metallurgy route, such as vacuum induction melting (VIM). Although TiB2 exhibits similar behaviour to carbide precipitates, the grain-pinning effect and thermodynamic stability of a boride-based reinforcement are superior. The key advantage of VIM in comparison to conventional casting approaches is the inert gas or vacuum atmosphere, which allows for a slag-free production of ingots, reducing porosity and oxide impurities. TiB2 is fabricated by mixing ferrous Ti (Fe-Ti) and ferrous boron (Fe-B), shown simply in the reaction equation below.
Fe[Ti] + Fe[B] ⇒ Fe + TiB2
Solution-precipitation is the main mechanism which forms TiB2 particles, holding thermodynamic stability up to a temperature of 3498 K once formed [10]. An investigation on mechanical and tribological behaviours of TiB2 in a reinforced AISI 420 martensitic stainless steel was carried out by Sadhasivam et al. [11], who incorporated a TiB2 powder in 1%, 2%, and 4% vol. fractions, respectively. The powder was added to the crucible with the AISI 420 stainless steel and brought up to a temperature of 1550 °C. TiB2 and ferrite peaks were observed through X-ray diffraction (XRD) as expected, with no unfavourable secondary phases being present such as TiB or TiB3. Microscopy results highlighted an improvement in grain refinement, hardness, and strength with increasing volumetric additions of TiB2, which was homogenous in all samples due to the electromagnetic stirring present in VIM. Tensile data revealed that the ultimate tensile strength (UTS) improved in all reinforcement addition amounts, with linear improvements being made with more TiB2 present. Yield strength also improved with a gradual decrease in ductility, leading to reduced fracture strain. This study identifies TiB2 as an ideal reinforcement ceramic addition to SMCs, as it does not change in morphology when mixed with a liquid state matrix and exhibits excellent mechanical properties in small wt.% additions. A more recent study by Chen et.al. [12] studied the effects TiB2 has on fracture toughness using hot rolling and tensile testing techniques. The first step was incorporating 9% and 13% volume fractions of TiB2 using VIM with melting at 1650 °C followed by a two-step hot rolling procedure. Microstructural analysis revealed that as-cast SMCs display typical hypoeutectic structures with coarse TiB2 particles homogenously distributed at less than 10 μm in size. After rolling, the particles are aggregated and fractured in regions, particularly at higher volume fractions. This was due to the deformation with the alignment of grains being observed in the direction of rolling. Upon tensile testing, it was clear that strength and elongation were improved with additions of TiB2 after hot rolling. This is partially due to the grain refinement during hot rolling and the increased stiffness brought by the TiB2 particles. At 13 vol.% fraction, TiB2 particles agglomerate and are very prone to crack initiation and propagation, which is not conducive to fracture resistance properties. Nevertheless, through hot rolling and further grain refinement, fracture toughness was improved by 30%. The pinning force (Fpin) associated with the movement of grain boundaries directly relates to the size of the precipitate, according to Zener’s theory (Equation (2)) [13]. The volume fraction of precipitates with radius ‘r’ will also affect the pinning force and grain migration behaviour in polycrystalline materials, as well as the volume fraction of particles per unit area (Ns). For instance, if a second phase particle is present at a migrating grain boundary, the surface energy of said boundary would reduce as the particle acting as a pinning mechanism replaces part of the original grain’s perimeter. This means that a greater amount of force (i.e., work) would be required for the grain boundary to move away from the particle. Similarly, Orowan’s Law (Equation (3)) looks at the precipitation contribution to strengthening σp, where f is the volume fraction of precipitates and d is the average grain diameter [14]:
Fpin = 4rσNs
σp = 8.995 × 10³f1/2d−1ln(2.417d)
A key study by Guk et al. [15] focused on the impact of hot rolling a sintered SMC ingot with in situ ZrO2 precipitates. For the experiment, a wedge-shape sample was used with conditions 900 °C and 1100 °C for the rolling temperature, 0.5 m/s for the rolling speed, and a holding time of 30 min. The observed microstructure, using scanning electron microscopy (SEM), was clear in signifying a realignment of ZrO2 particles, which had been orientated along the direction of rolling. Pore shrinkage occurred up to a point where no visible pores were detected at a rolling temperature of 1100 °C. This research aims to improve the modulus and strength of an MA steel by fabricating an HMS for automotive applications such as axles, gears, crankshafts, and drive shafts. By using vacuum induction melting (VIM), coupled with an identical TMP route, a direct comparison can be made to the MA steel. This study will look at the incorporation of TiB2 at two volume fractions, 5% and 7.5%, as nominal values; these alloys will be referred to as 5MASC and 7.5MASC, respectively.

2. Experimental Procedure

A Consarc 10 kg vacuum induction melting unit was used to fabricate a base MA alloy and two MASC alloys with in situ TiB2. All ingots were fabricated under vacuum conditions. As Figure 1 shows, the mould (80 mm × 80 mm in cross-sectional area) was assembled on the mould turntable inside the chamber due to the weight of the assembly components. An alumina crucible was mounted with a base steel inside along with iron pellets and ferrous refractory metals (Fe-Mo, Fe-Nb, Fe-B). The remaining alloying elements were placed in a charge ready for addition once the molten state was reached. A maximum temperature of 1600 °C (at ~18 kW) was recorded for both alloys. After the remaining ferro-Ti, V, Si, Cr, and Mn were dropped from the charge into the crucible, the material was left to electromagnetically stir for 5 min before pouring into the mould and cooling for approximately 4 h. Induced-coupled plasma optical emission spectroscopy (ICP-OES) was performed by Element Sheffield revealing the MASC steel to be medium carbon with composition (wt.%) shown in Table 1.
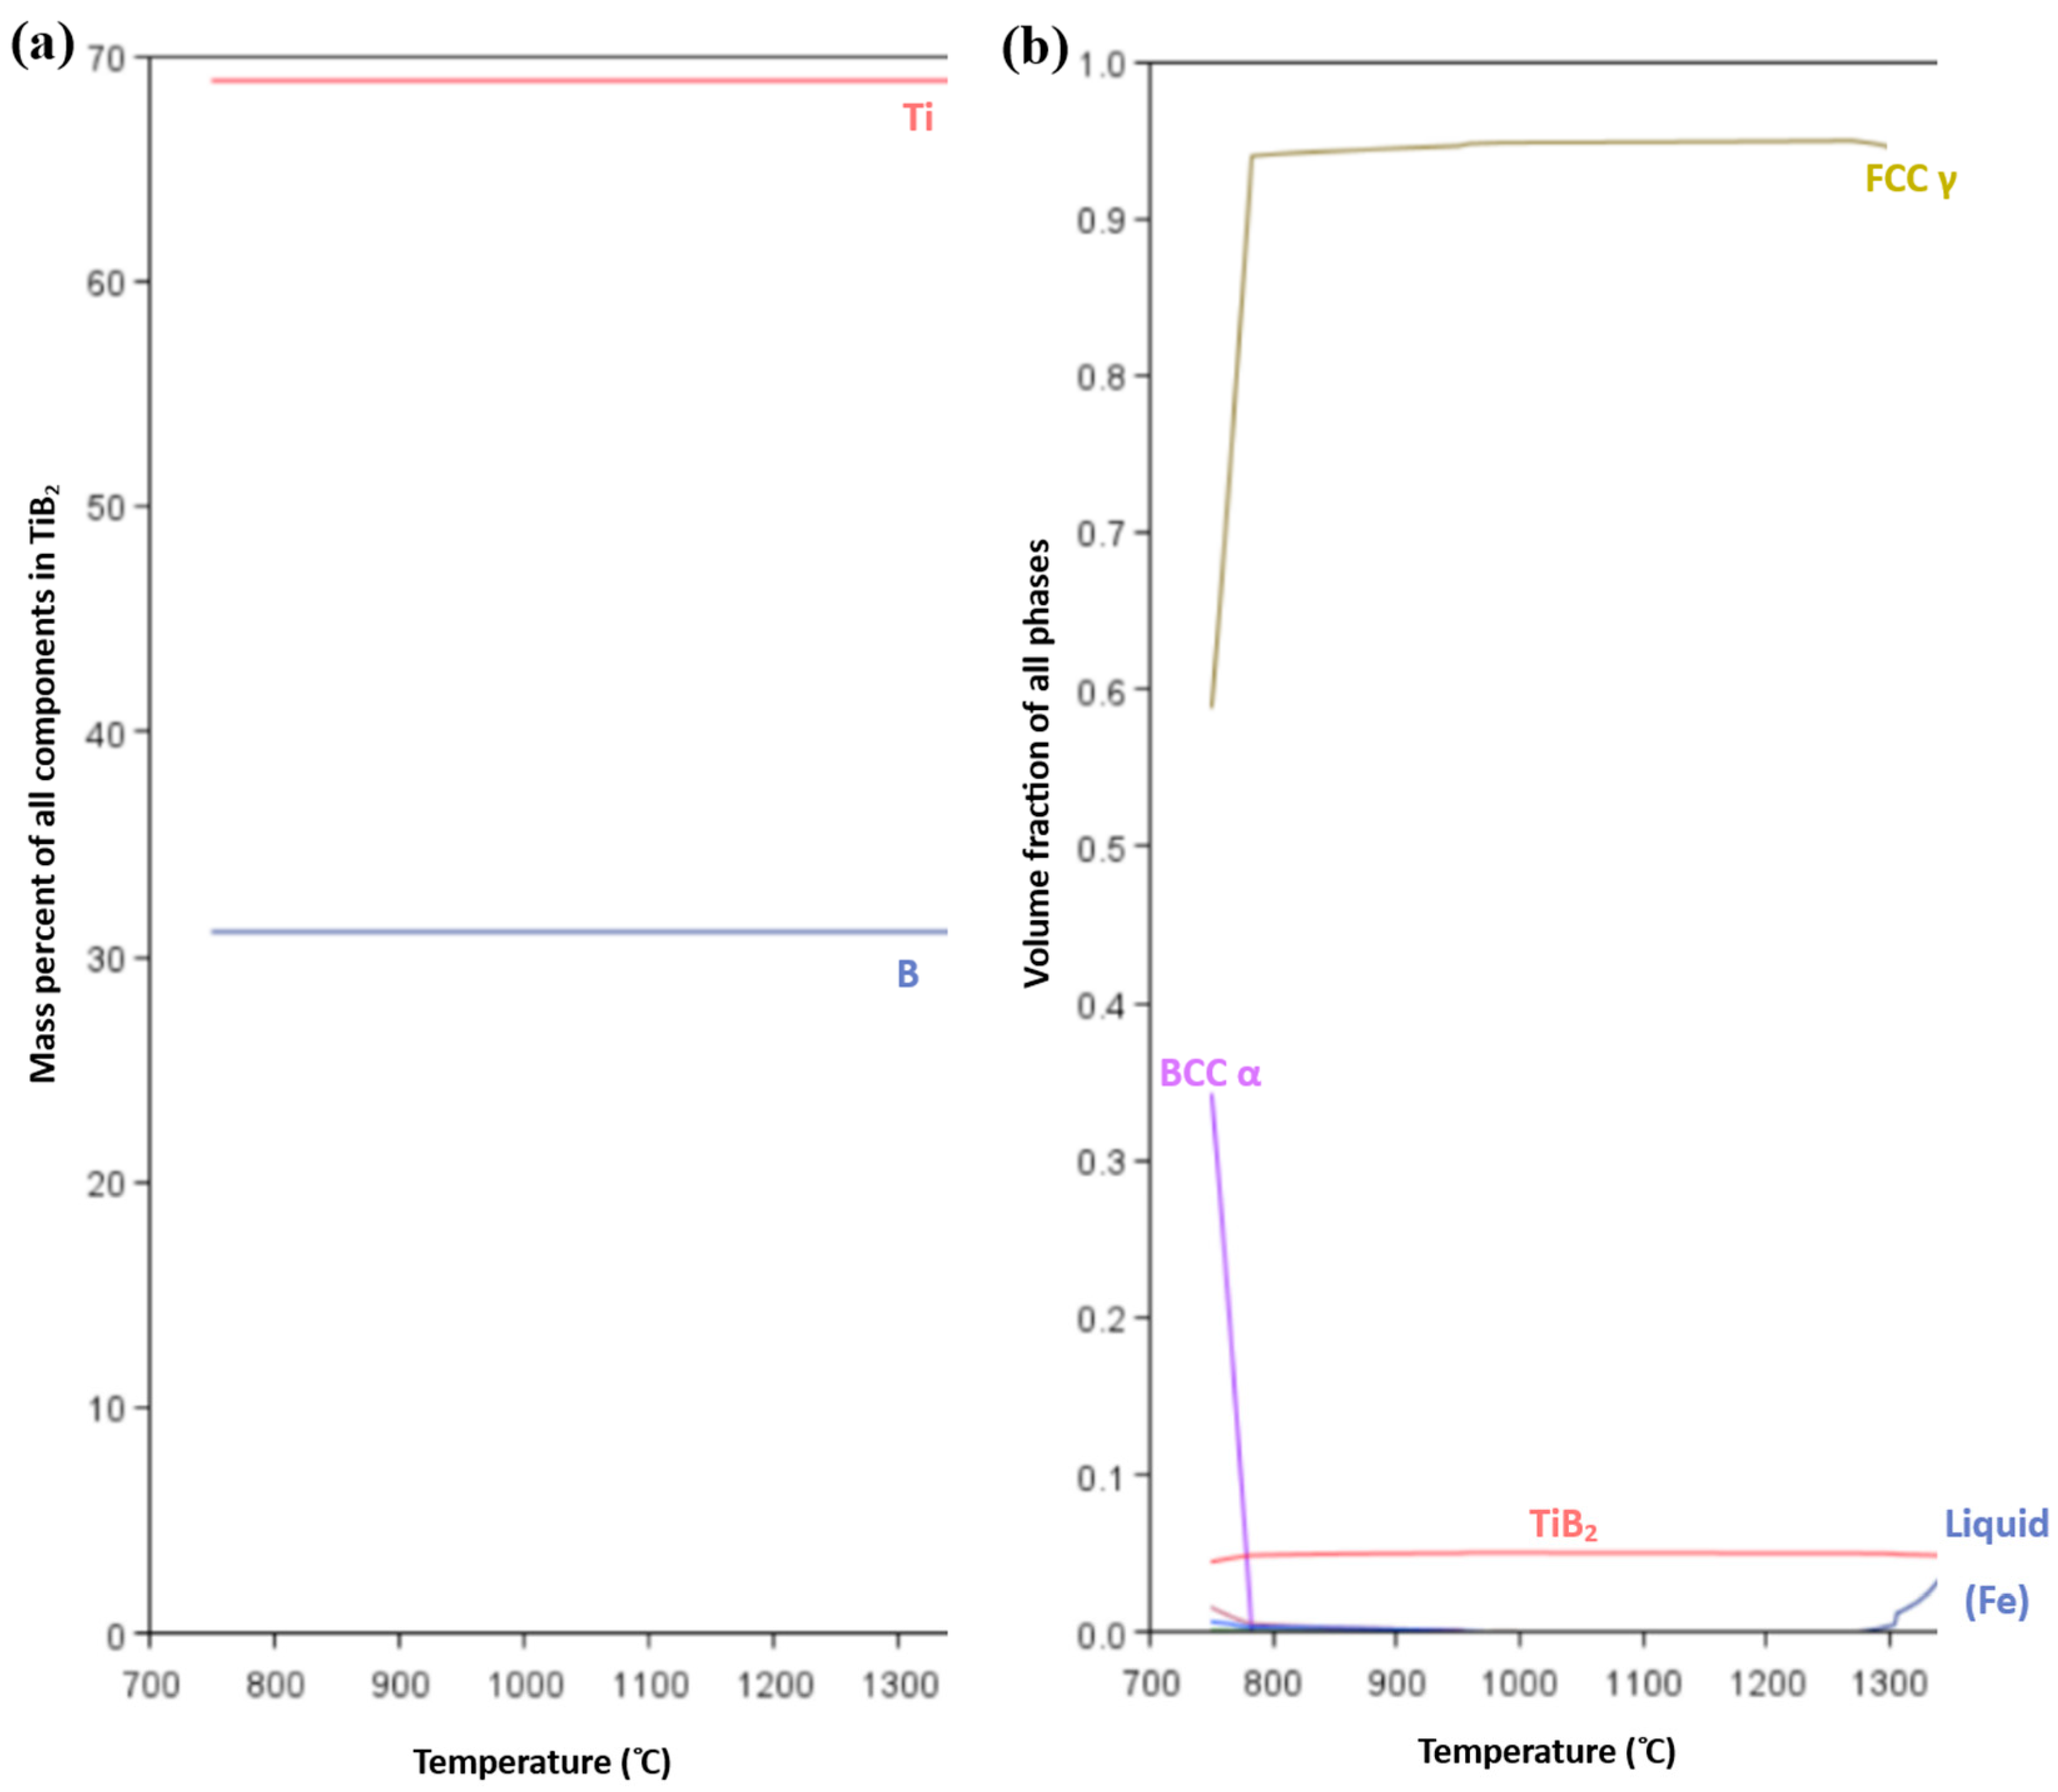
For the incorporation of TiB2 as the main reinforcing in situ composite, an initial target of 5% volume fraction of TiB2 was calculated using a generated property diagram from ThermoCalc (TCFE12 database) as well as mass fraction calculations of Ti and B in TiB2. The molar fraction of these elements is important to establish, as adding too much of either will result in unfavourable secondary and ternary phases, which are denser and more brittle than TiB2; some examples of these phases are Fe2B and TiB. The stoichiometric composition of TiB2 was taken into account; this was approximately 69 wt.% Ti and 31 wt.% B. Figure 2 shows the overall volume fraction of numerous phases, which form using the 5MASC composition given in Table 1 as the final calculated composition. Nominal volume fractions of TiB2 were verified using quantitative metallography; these values were 5.2% and 7.7% for the 5MASC and 7.5MASC alloys, respectively.
To calculate the volume fraction of TiB2 particles in both MASC alloys, SEM BSE imaging was utilised for its ability to enhance the contrast between the TiB2 particles and the MA steel matrix. The methodology involves the following steps:
Image Acquisition: Captured 8 500x magnification BSE images, ensuring clear differentiation between TiB2 particles and the matrix.
Image Analysis: Used an integrated software measurement tool to find the maximum diameter of each particle in the image, with approximately 30–40 particles dimensioned per image. Particles that were partially cut off from the image were neglected.
Area Fraction Calculation: Determined the area fraction by dividing the total area of the TiB2 particles by the total area of the micrograph. This gives a 2D area fraction, which can be considered equivalent to volume fraction, which is true in this case due to excellent homogeneity.
Multiple Measurements: Measured multiple (×8) micrographs from different regions of the sample to account for any variability in particle distribution and size.
Statistical Analysis: Calculated the average volume fraction and used the standard deviation to represent the uncertainty. The standard deviation is calculated by taking the square root of the variance (the average of the squared differences from the mean) of the area fractions from all measured images.
Final Volume Fractions: As a result of the methodology described above, the measured TiB2 volume fractions for the nominal 5MASC and 7.5MASC steels were 5.2% and 7.7%, respectively, and the uncertainty in these volume fraction measurements was ±0.36%. Finally, the average TiB2 particle size was 9.4 µm ± 0.45 µm.
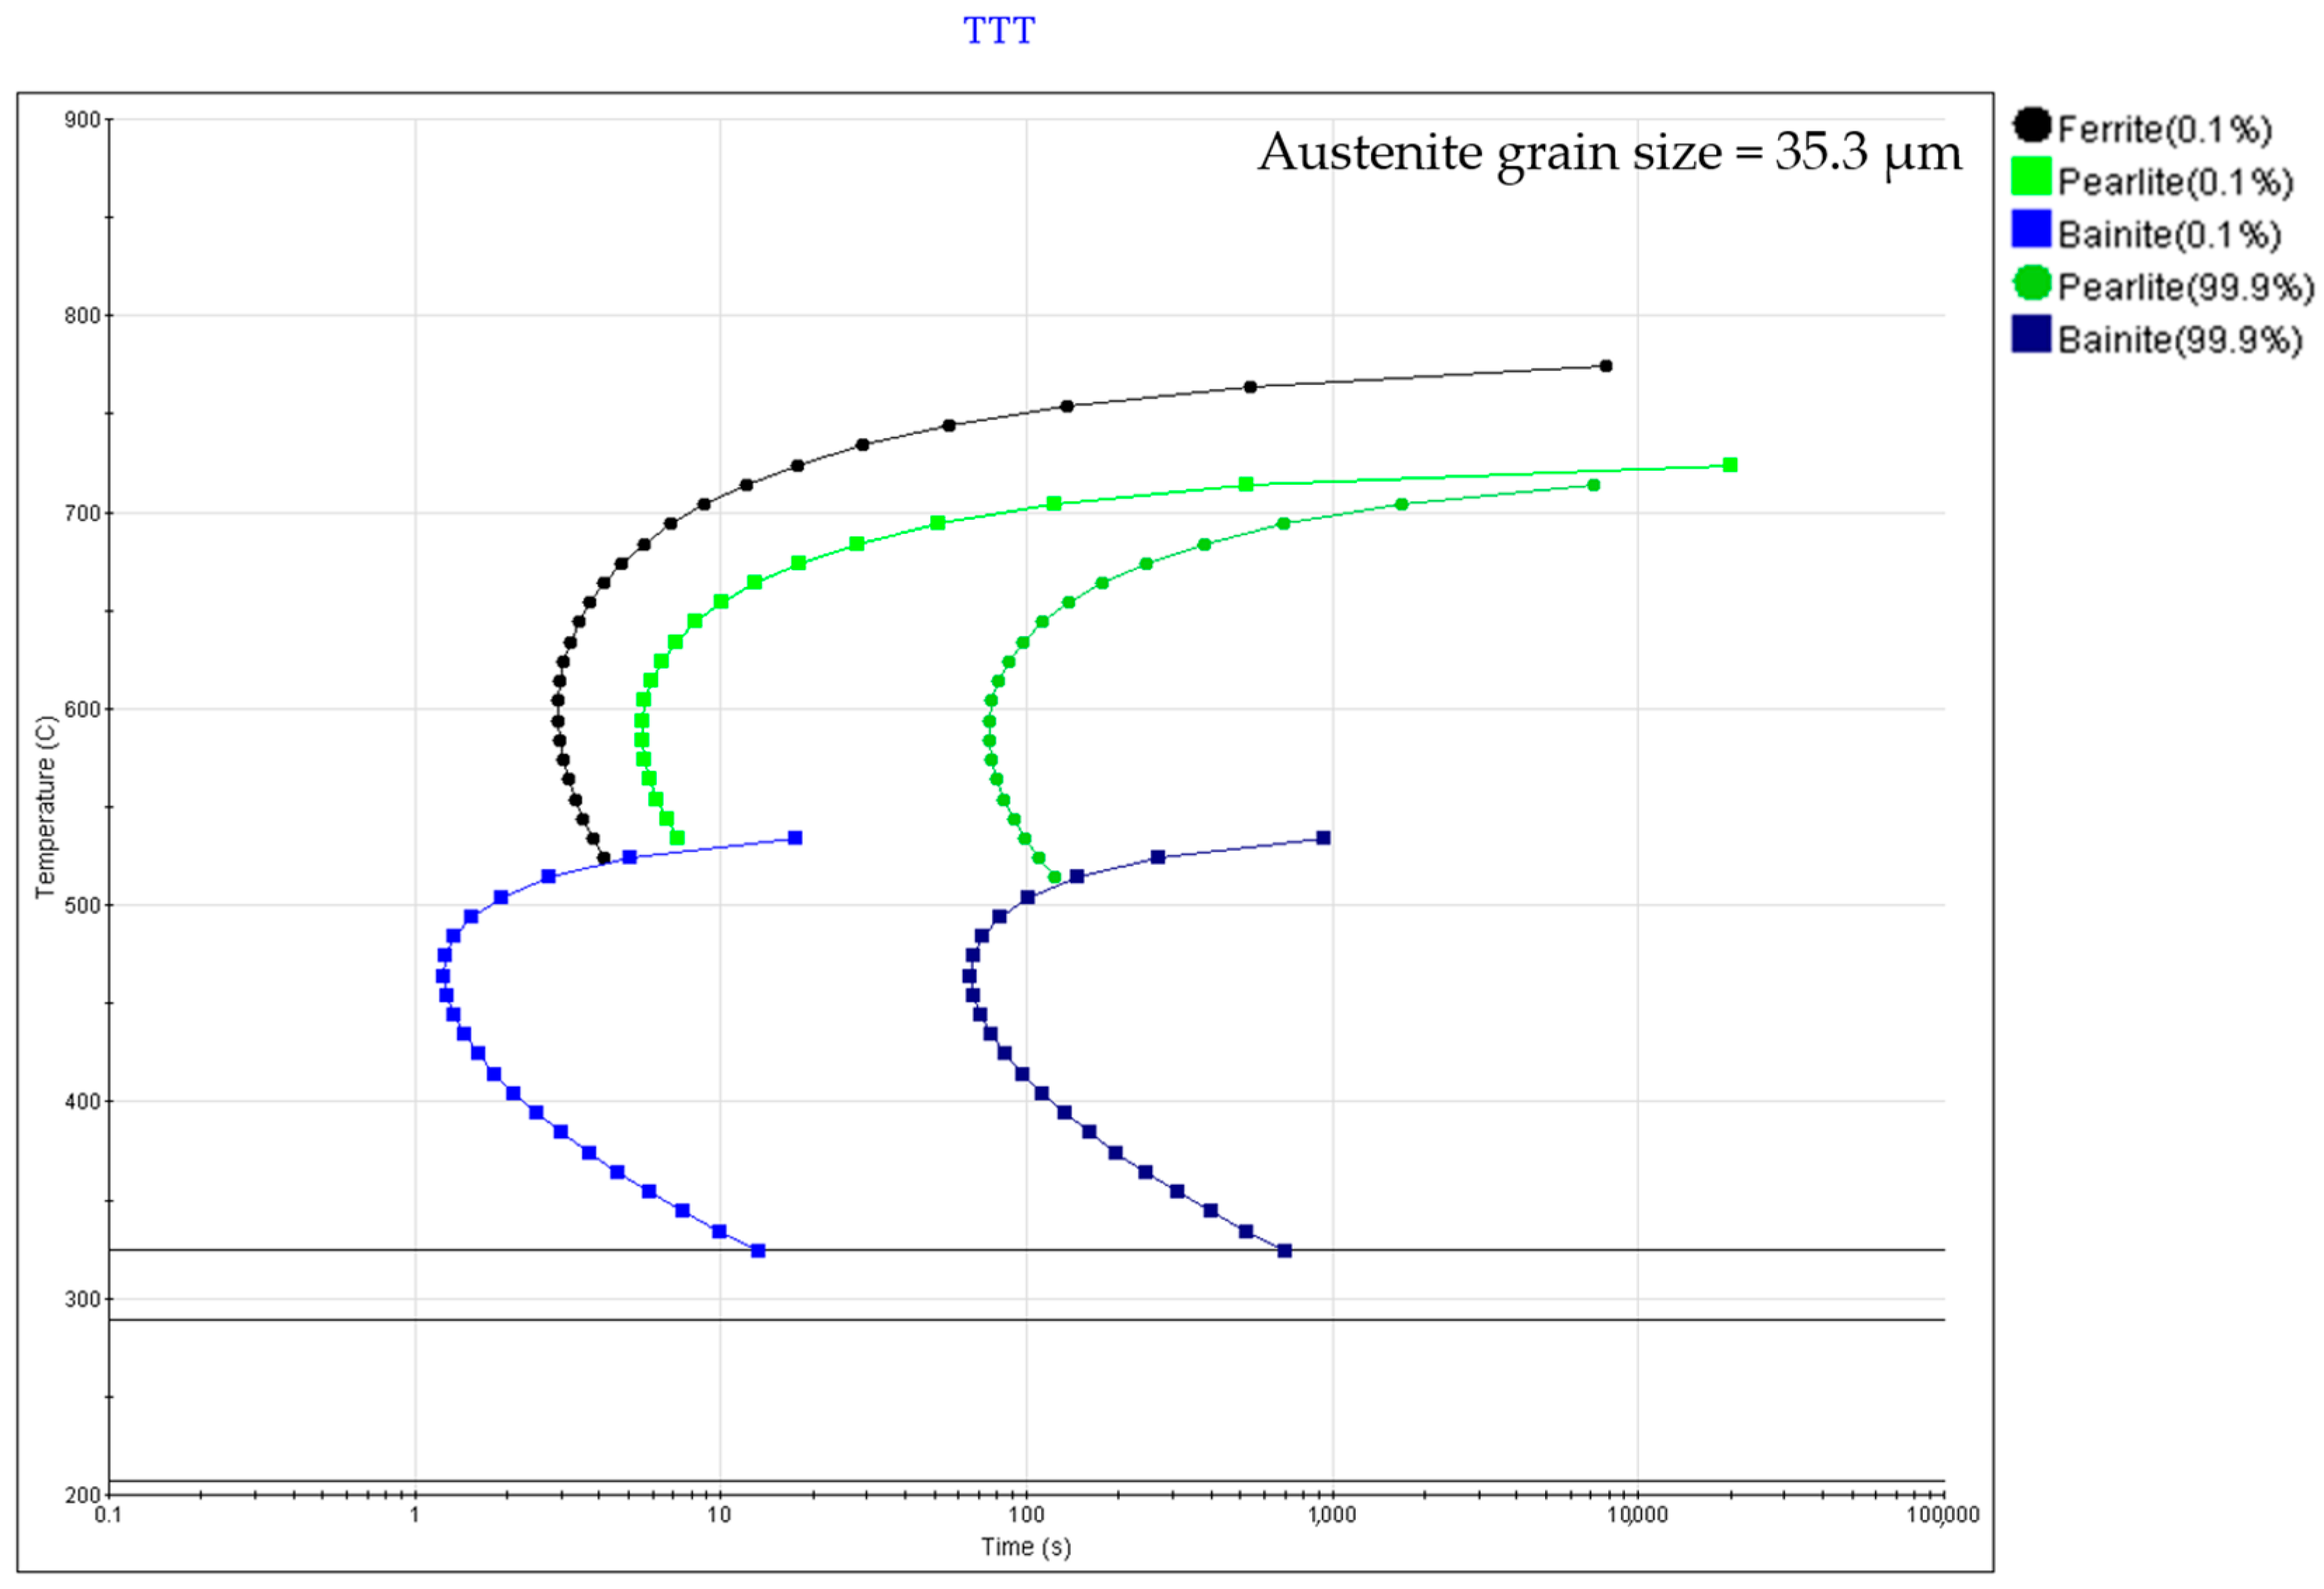
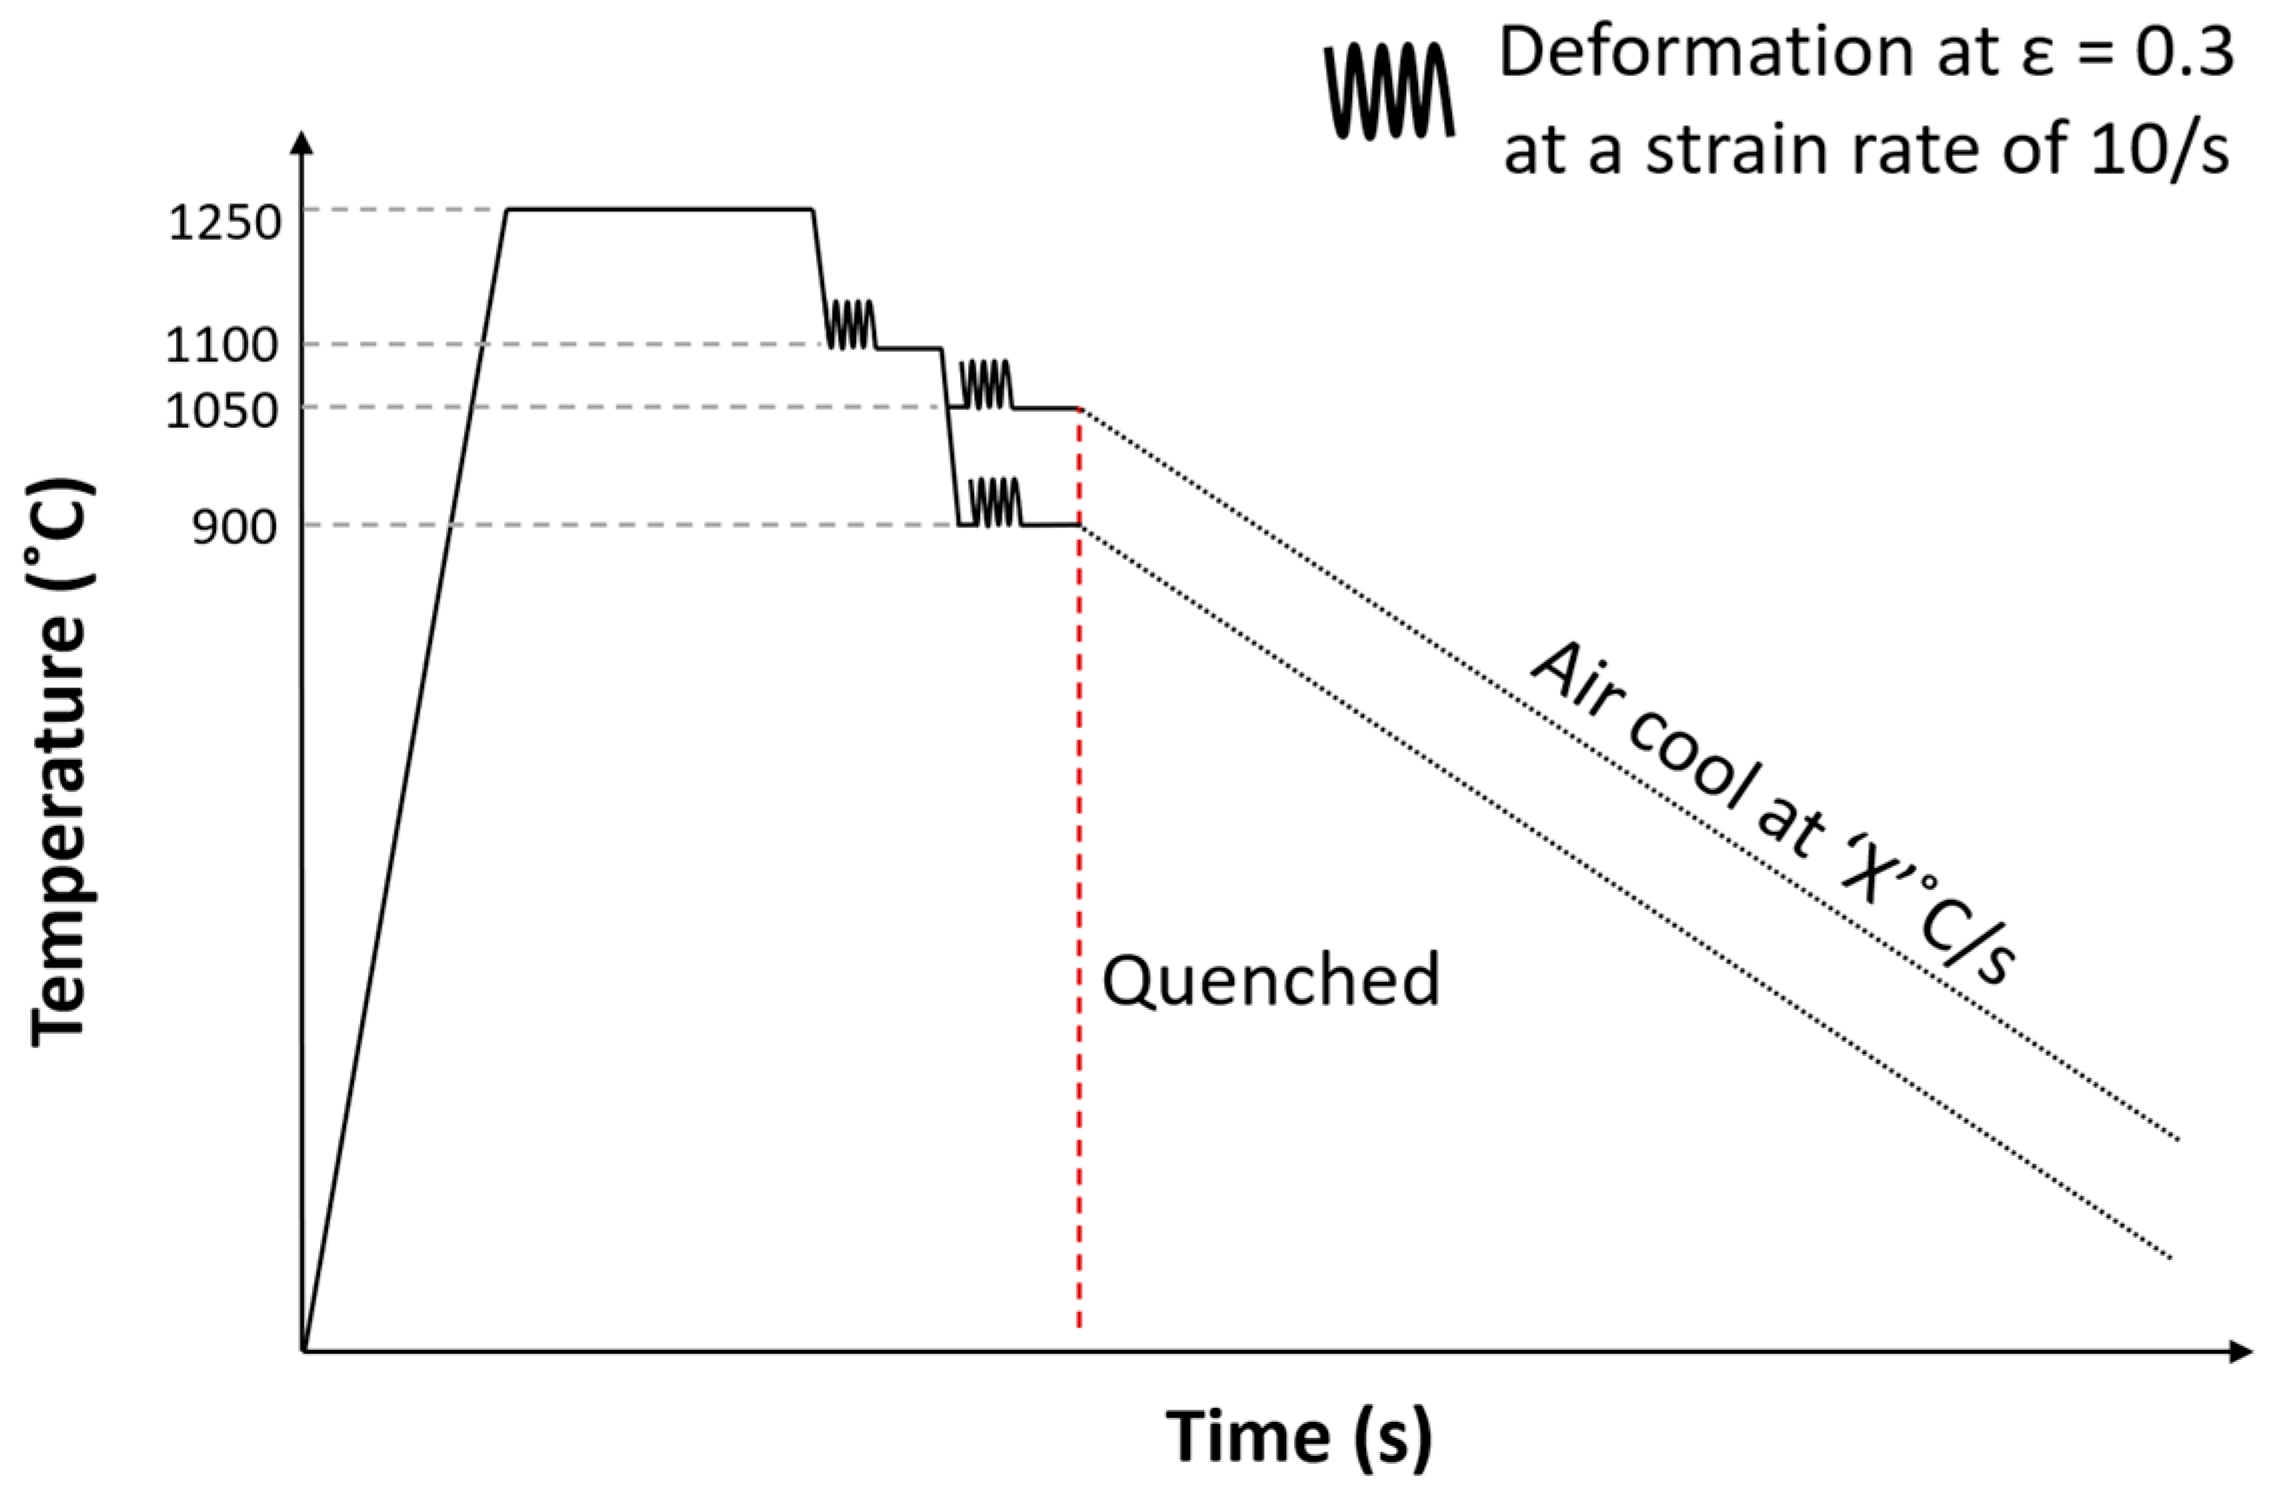
To ensure that the MASC alloys were entirely homogenised, a preliminary heat treatment was performed before the hot-rolling stage, where the ingots were placed in a furnace at 1150 °C for 1.5 h to ensure that all the alloying elements had been solutionised. A FENN 101mT two-high hot-rolling mill with a run-out cooling table was used. Upon removal from the furnace at 1150 °C, the 80 mm initial ingot thickness was reduced to a final thickness of 12 mm in 13 passes. The final 12 mm thickness was used as feedstock material to be machined into plane-strain compression (PSC) specimens. These specimens were of dimensions 60 mm × 30 mm × 10 mm and were subsequently deformed using a ServoTest thermomechanical compression (TMC) machine. The PSC testing consisted of two deformation passes, each of which were of 0.3 true strain and at a constant true strain rate of 10/s, as shown in Figure 3. The cooling rate was controlled to achieve a PHFP microstructure. For these experiments, the existing MA steel underwent further investigation to establish the correct cooling rate that gave a ferritic–pearlitic microstructure; these were deemed suitable in the matrix, as high-modulus steel predominantly exhibits excellent ductility from ferrite and stiffness from pearlite. To ensure this, the tested cooling rates, X, were 30 °C/s and 0.1 °C/s immediately after the two deformation passes. Results analysed from the micrographs of these experiments showed that 0.1 °C/s was a suitable cooling rate for the formation of the PHFP target microstructure, validating results predicted from JMatPro simulations, as indicated in Figure 3 and Figure 4.
The cooling rate of 30 °C/s was chosen to simulate case hardened steel manufactured in sheet metal forming in the automotive industry and was sufficient to achieve a lath martensite microstructure. Both cooling rates were achieved on the fast thermal treatment unit as part of the TMC machine [16]. As illustrated in Figure 5, following the reheating at 1250 °C, an initial roughing pass was performed at 1100 °C to provide an initial refinement of the as-cast and homogenised microstructure as a result of deformation and subsequent recrystallisation. The final deformation pass was conducted either at 1050 °C or 900 °C. The former temperature was chosen as it would exist above the recrystallisation-limit temperature, ensuring that the microstructure would transform from fully recrystallised austenite. This is distinguished from the final deformation pass at 900 °C, which is below the recrystallisation-stop temperature, resulting in the transformed microstructure originating from fully unrecrystallised austenite.
Metallographic preparation of PSC samples on the transverse plane to the rolling direction (as displayed in Figure 4) was carried out to a final 1 μm polished surface followed by etching with 2% nital solution until the polished surface of the samples became slightly cloudy and non-reflective. A reduced-sized ASTM E8 tensile test was conducted using a Zwick-Roell ProLine machine on deformed PSC specimens that were machined into dog-bone shapes, as shown in Figure 6, with the gauge area with a length of 12 mm located within the deformation zone. Scanning electron microscopy (SEM) was performed on the FEI Inspect F50.
Resonance frequency damping analysis (RFDA) was used to obtain the modulus of elasticity measured through a non-destructive technique using the IMCE RFDA Professional, which was then compared to modulus values from tensile testing. RFDA is an impulse excitation technique (IET) that can gather accurate measurements of modulus through vibration testing. ‘Free-free’ testing was used to avoid unnecessary damping and uncertainty of supports; this means that the sample was not clamped at either end. The RFDA experiment is simple, with multiple frequencies being detected by a microphone at the time of impulse excitation, which is a percentage defined by the user (impact strength). The loss rate indicated by the software is directly linked to the amplitude of the detected wavelengths. As well as the impulse excited detection, there are secondary vibrations and ambient noises to account for. The mass of the sample was accurately recorded on a top-pan balance followed by accurate dimensional measurements, which were taken with a micrometre. Mechanical properties such as the modulus of elasticity, yield strength, tensile strength, and uniform elongation were investigated for both MASCs. Dog-bone specimens were prepared, ensuring the gauge area was positioned within the deformation zone, and subjected to tensile testing on a Zwick Roell 50 kN tensile rig.

3. Results and Discussion

3.1. Flow Behaviour

The stress and strain values during the roughing deformation pass at 1100 °C and the subsequent finishing pass conducted at either 900 or 1050 °C were calculated for the MASC alloys. From the calculated stress–strain plots, determined from well-established best practice [16], shown in Figure 7 and Figure 8, the stress required for both MASC ingots at 1050 °C during the second deformation pass is lower than that required at 900 °C. The inclusion of TiB2 significantly increases the stress needed to achieve equivalent strain levels due to the particle reinforcement’s strengthening mechanism. At 900 °C, the stress for the 5MASC alloy reaches 188 MPa, representing a 95.8% increase from the base MA steel. This substantial increase indicates that the MASC alloy possesses a greater strength at the respective deformation temperature, necessitating greater energy input to achieve the same strain. Interestingly, the flow stress for the 7.5MASC alloy are slightly lower than those for the 5MASC, which can be attributed to the potential for reduced particle dispersion and possible agglomeration, leading to less effective reinforcement at higher TiB2 concentrations. In both figures, the total strain (ε) is closely aligned with the target of 0.6.

3.2. Microstructural Analysis

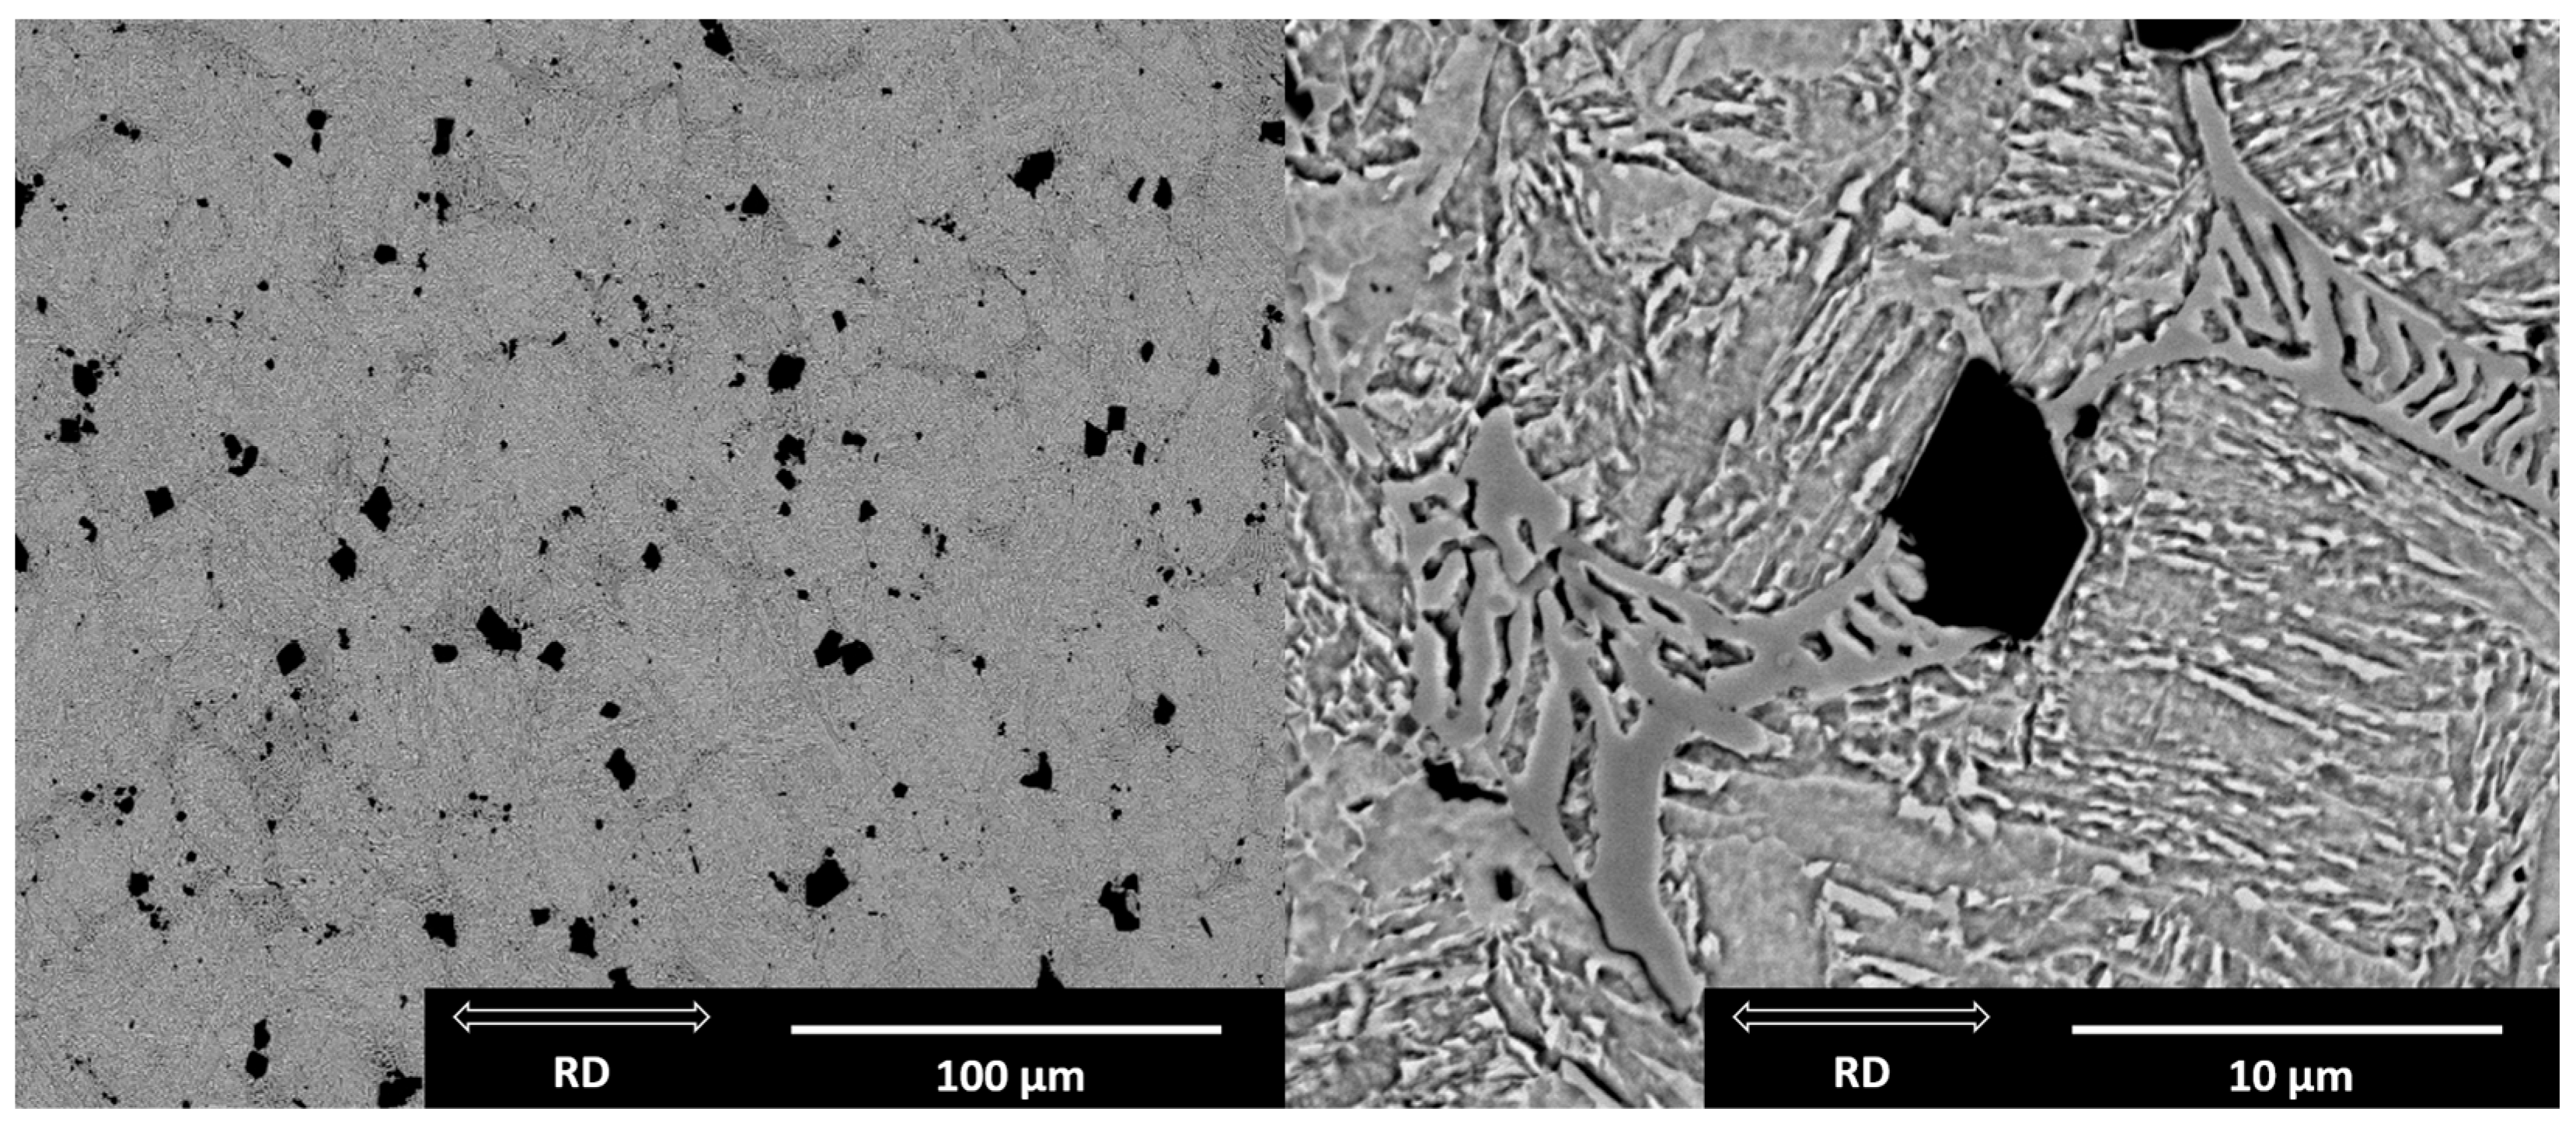
The as-cast 5MASC ingot was analysed through scanning electron microscopy (SEM), where the MA steel matrix with TiB2 reinforcement is visible. The dark particles scattered throughout the matrix are TiB2 particles in Figure 9. These particles appear black because they interact differently with the electron beam compared to the surrounding steel matrix, which is shown in lighter grey tones. Partial nucleation of pro-eutectoid ferrite exists at equiaxed grain boundaries. The TiB2 particles are distributed along the grain boundaries and within the grains themselves, indicating that they have been well dispersed during VIM processing. The presence of TiB2 along these boundaries can enhance the mechanical properties by hindering grain boundary movement, thus increasing the overall strength and hardness of the steel.
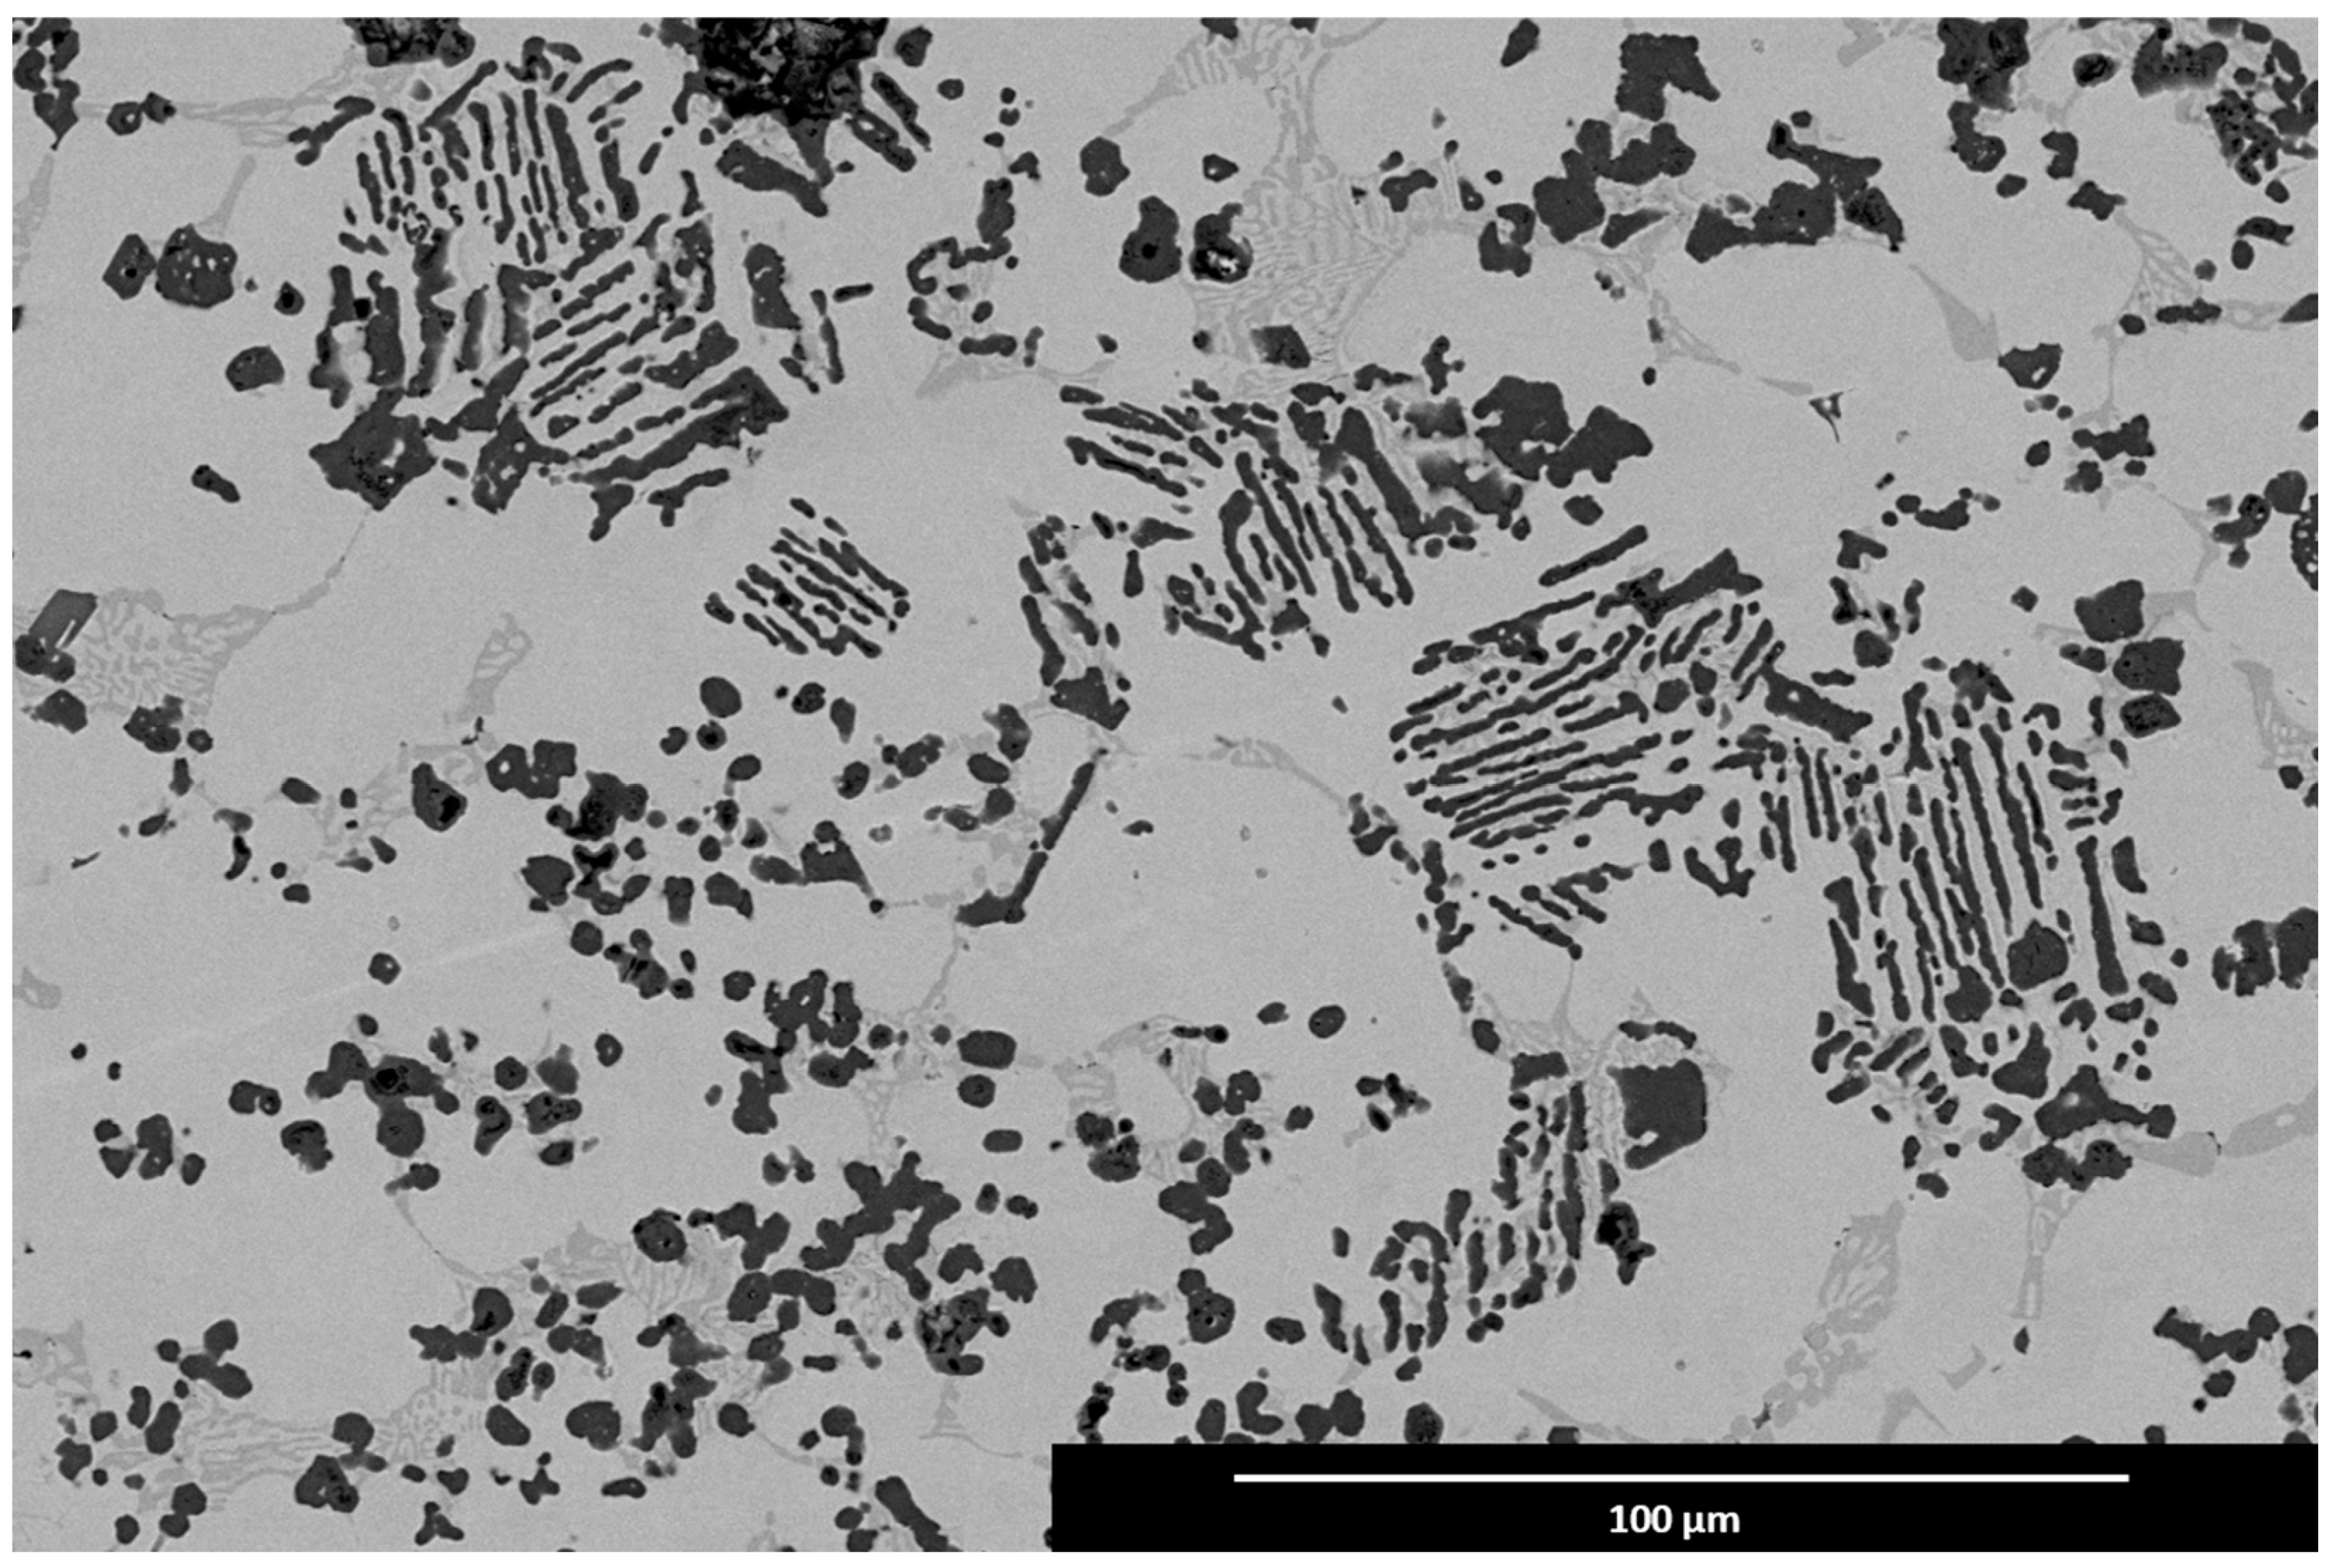
In Figure 9, TiB2 generally exhibits a distinctive morphology characterised by its fine, angular, and platelet-like structure. However, upon further investigation of the 5MASC alloy in the as-cast state, agglomerated and elongated dark particles were identified as displayed in Figure 10, not indicative of the nominal volume fraction of TiB2. The contrast of the MA matrix and darker phases was achieved using the backscattered electron (BSE) detector, which is sensitive to the atomic number of the elements present, with heavier elements appearing brighter due to their higher backscattering coefficient. This technique is useful for distinguishing between different phases. The elongated structures could be indicative of another compound that formed during solidification such as carbide phases, which are known to exhibit such morphologies.
The optical micrograph of the as-rolled 5MASC (Figure 11), etched with 2% nital, shows a mixture of polygonal ferrite, pearlite, and bainite. The nital etching process highlights the ferrite, pearlite, and/or bainite microstructures, where ferrite typically appears as lighter grains aligned in the direction of rolling and the pearlite/bainite as darker due to their respective higher carbide content. TiB2 particles are hard to observe in optical microscopy, as they appear similar to polygonal ferrite.
Due to the limited availability of the 5MASC material, only one sample was tested at a cooling rate of 30 °C/s. This test involved an initial deformation at 1100 °C, with a strain of 0.3 and a strain rate of 10/s. A second deformation pass was conducted under the same conditions at 900 °C. The resulting microstructure, shown in Figure 12, reveals a homogeneously dispersed TiB2 phase within a martensitic MA matrix with some pro-eutectoid ferrite observed at the grain boundaries. The TiB2 particles exhibit jagged and platelet morphology. Deformation has not altered the grain orientation nor affected the TiB2 morphology.
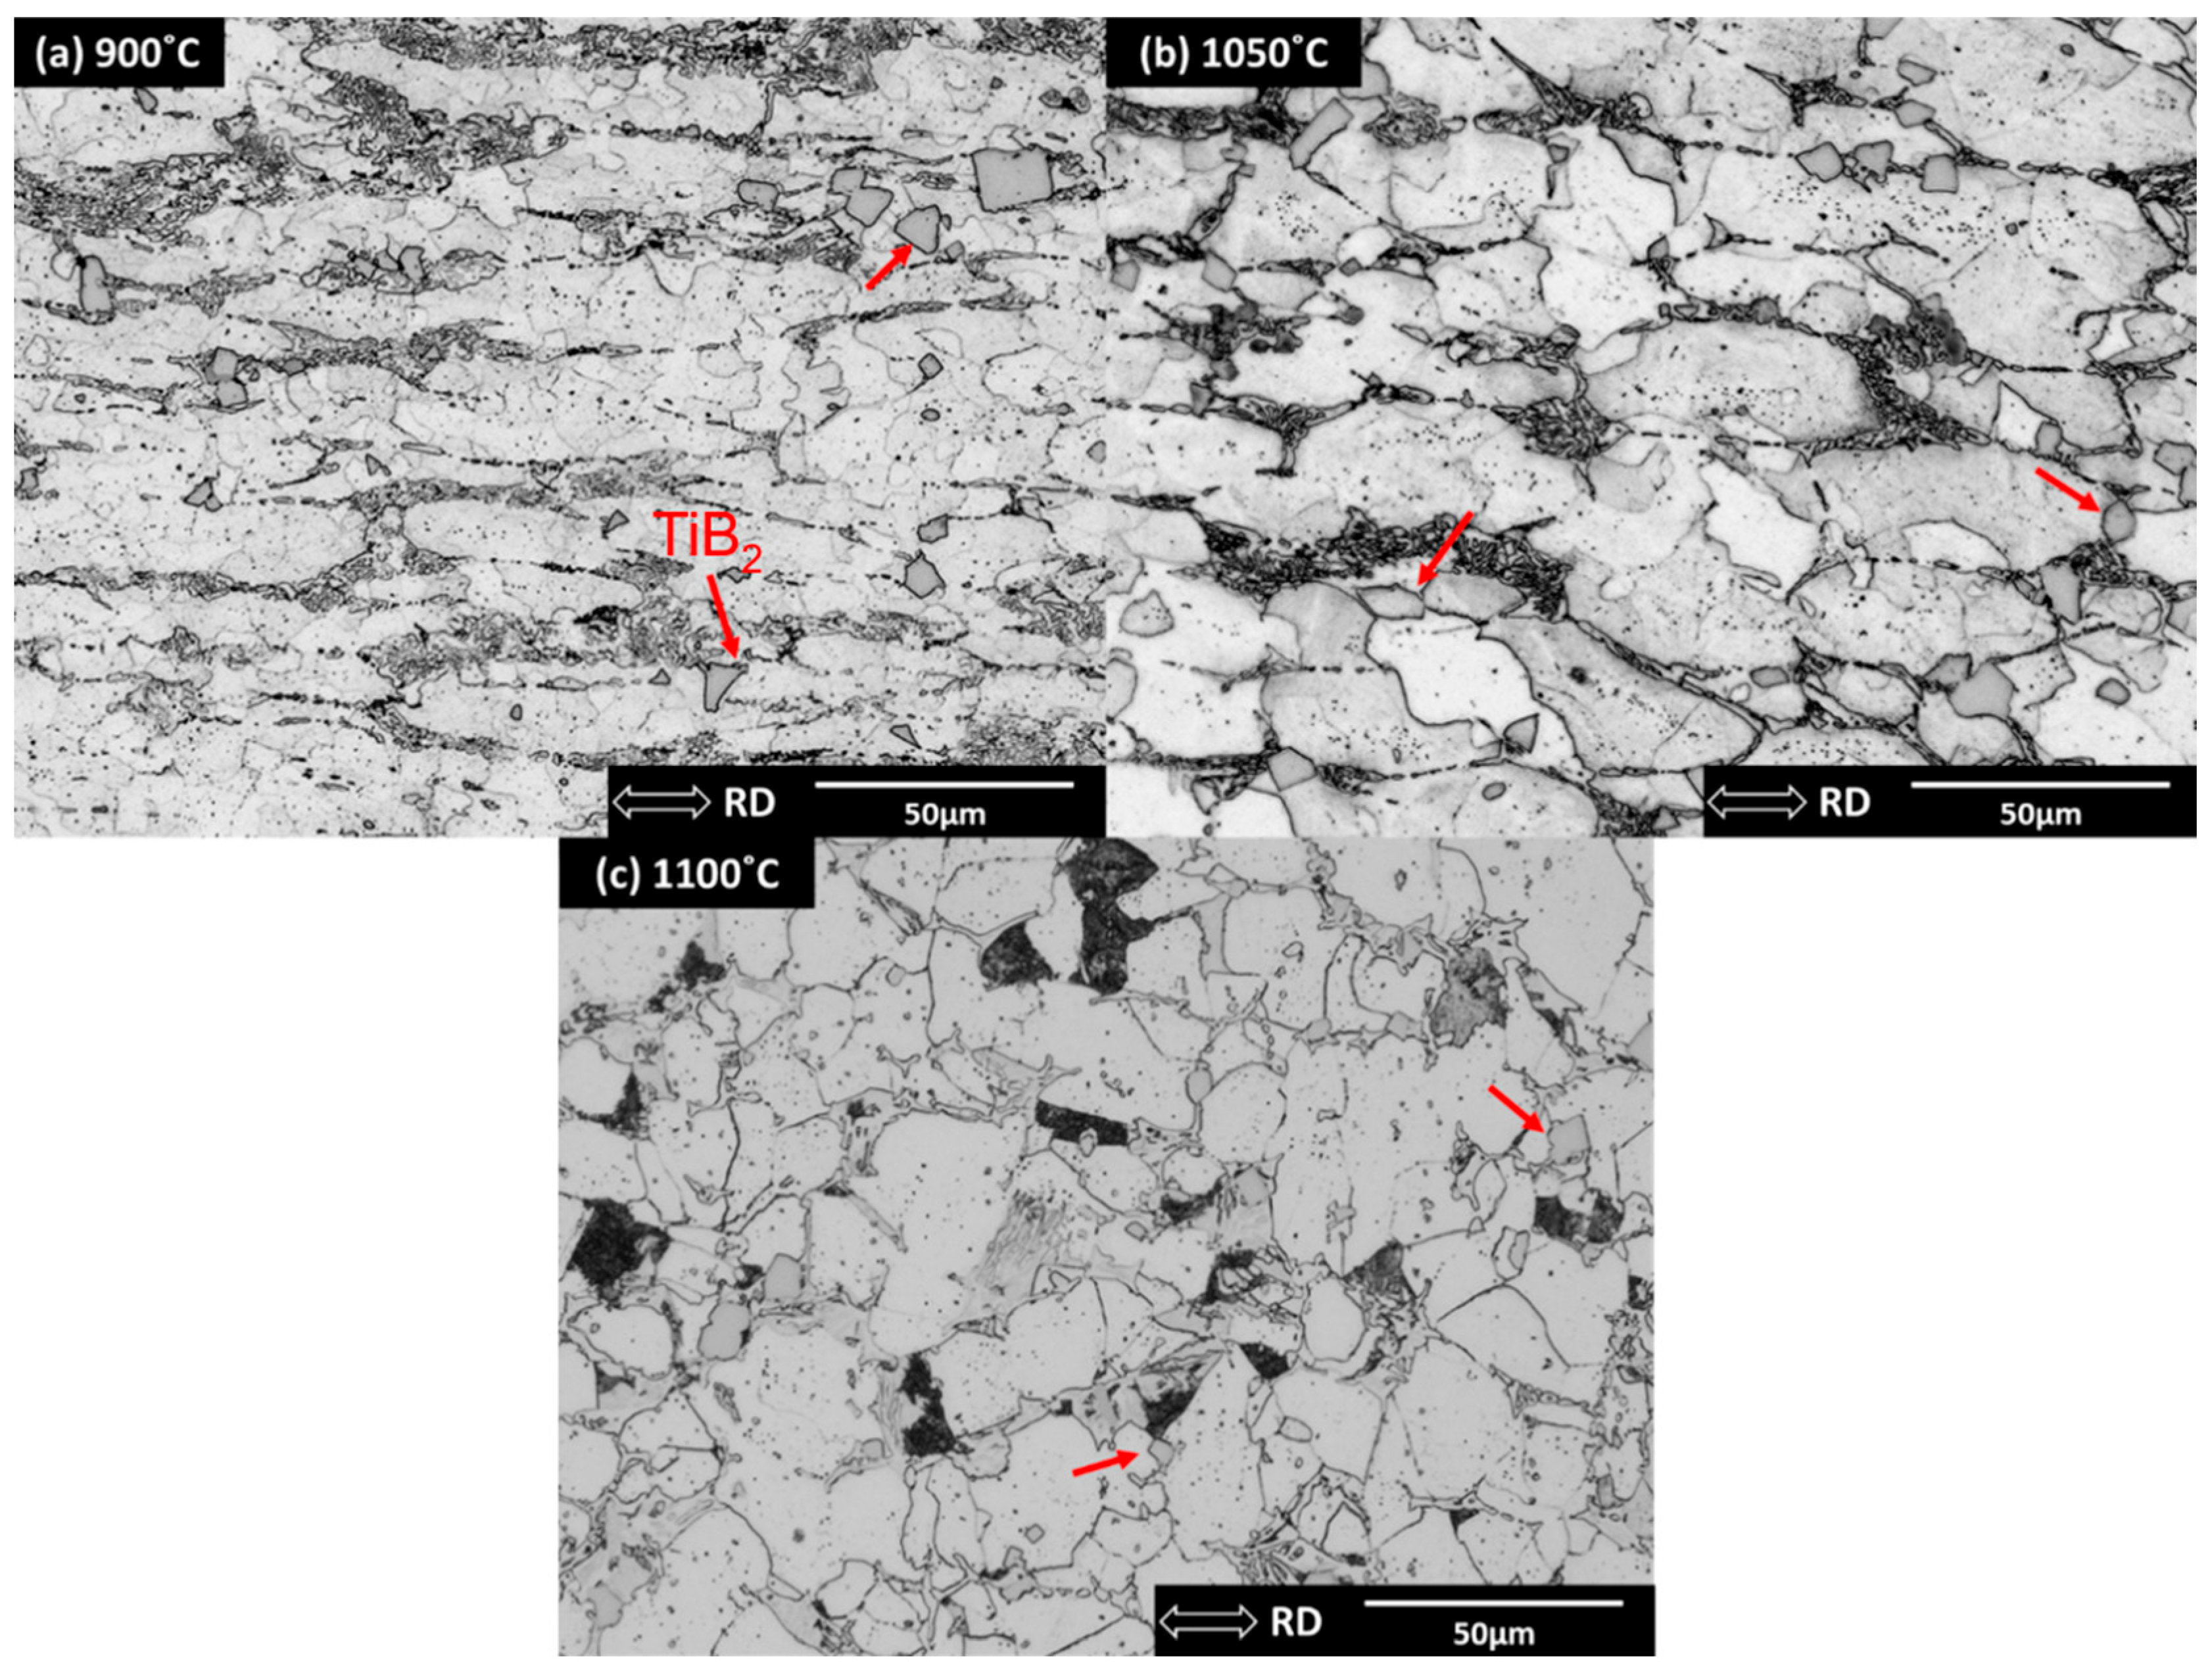
Figure 13 presents optical micrographs of 5MASC samples cooled at 0.1 °C/s from 900 °C, 1050 °C, and 1100 °C, respectively, with only one deformation pass performed on the 1100 °C specimen. The 900 °C specimen predominantly exhibits polygonal ferrite with regions of pearlite. The TiB2 particles, indicated by red arrows in Figure 13, show no alteration in morphology, size, or dispersion despite undergoing hot rolling and subsequent thermomechanical processing. Notably, the 1050 °C specimen demonstrates excellent retention of grain elongation in the rolling direction, predominantly featuring a polygonal ferrite phase. Interestingly, the TiB2 particles are primarily located at grain boundaries. Grain refinement diminishes upon reaching the austenite recrystallisation temperature. However, the grain refinement and retention of deformed grains are evident, likely due to the grain pinning effect attributed to TiB2 particles [14]. To assess whether the pinning mechanism remains effective at higher temperatures, the 1100 °C specimen was examined, but Figure 13 does not show significant grain refinement or elongation retention in the rolling direction; instead, there is an equiaxed microstructure.
Using the same PSC testing procedure as the 5MASC alloy, the 7.5MASC samples were subjected to controlled cooling from the finishing temperatures of 900° and 1050 °C at rates of 30 °C/s and 0.1 °C/s, followed by microstructural and mechanical analysis. The resulting microstructure cooled from 30 °C/s, as shown in Figure 14, reveals a homogeneously dispersed TiB2 phase within a needle-like martensitic MA matrix, similar to the 5MASC ingot. The martensite start temperature, calculated using JMatPro 2024, is 251 °C. The TiB2 particles maintain the jagged, platelet morphology seen in the 5MASC. Unlike the 5MASC alloy, elongated grains from TMP are preserved, with TiB2 particles predominantly positioned at grain boundaries. Increasing the TiB2 volume fraction by a nominal 2.5% has resulted in a greater number of particles per unit area.
The microstructure of the 7.5MASC alloy, cooled at a rate of 0.1 °C/s and depicted in Figure 15, reveals a homogeneously dispersed TiB2 phase throughout the MA matrix. Despite the slower cooling rate, there remains insufficient time for the complete development of pro-eutectoid ferrite and pearlite. These phases are only faintly discernible in these SE images. Compared to the 5MASC alloy, which was slow-cooled at 0.1 °C/s, the 7.5MASC alloy exhibits similar grain refinement due to TMP. Notably, the TiB2 particles in the 7.5MASC alloy show a tendency to align with the rolling direction. Despite the slower cooling rate, the MA matrix phase is fine and equiaxed.
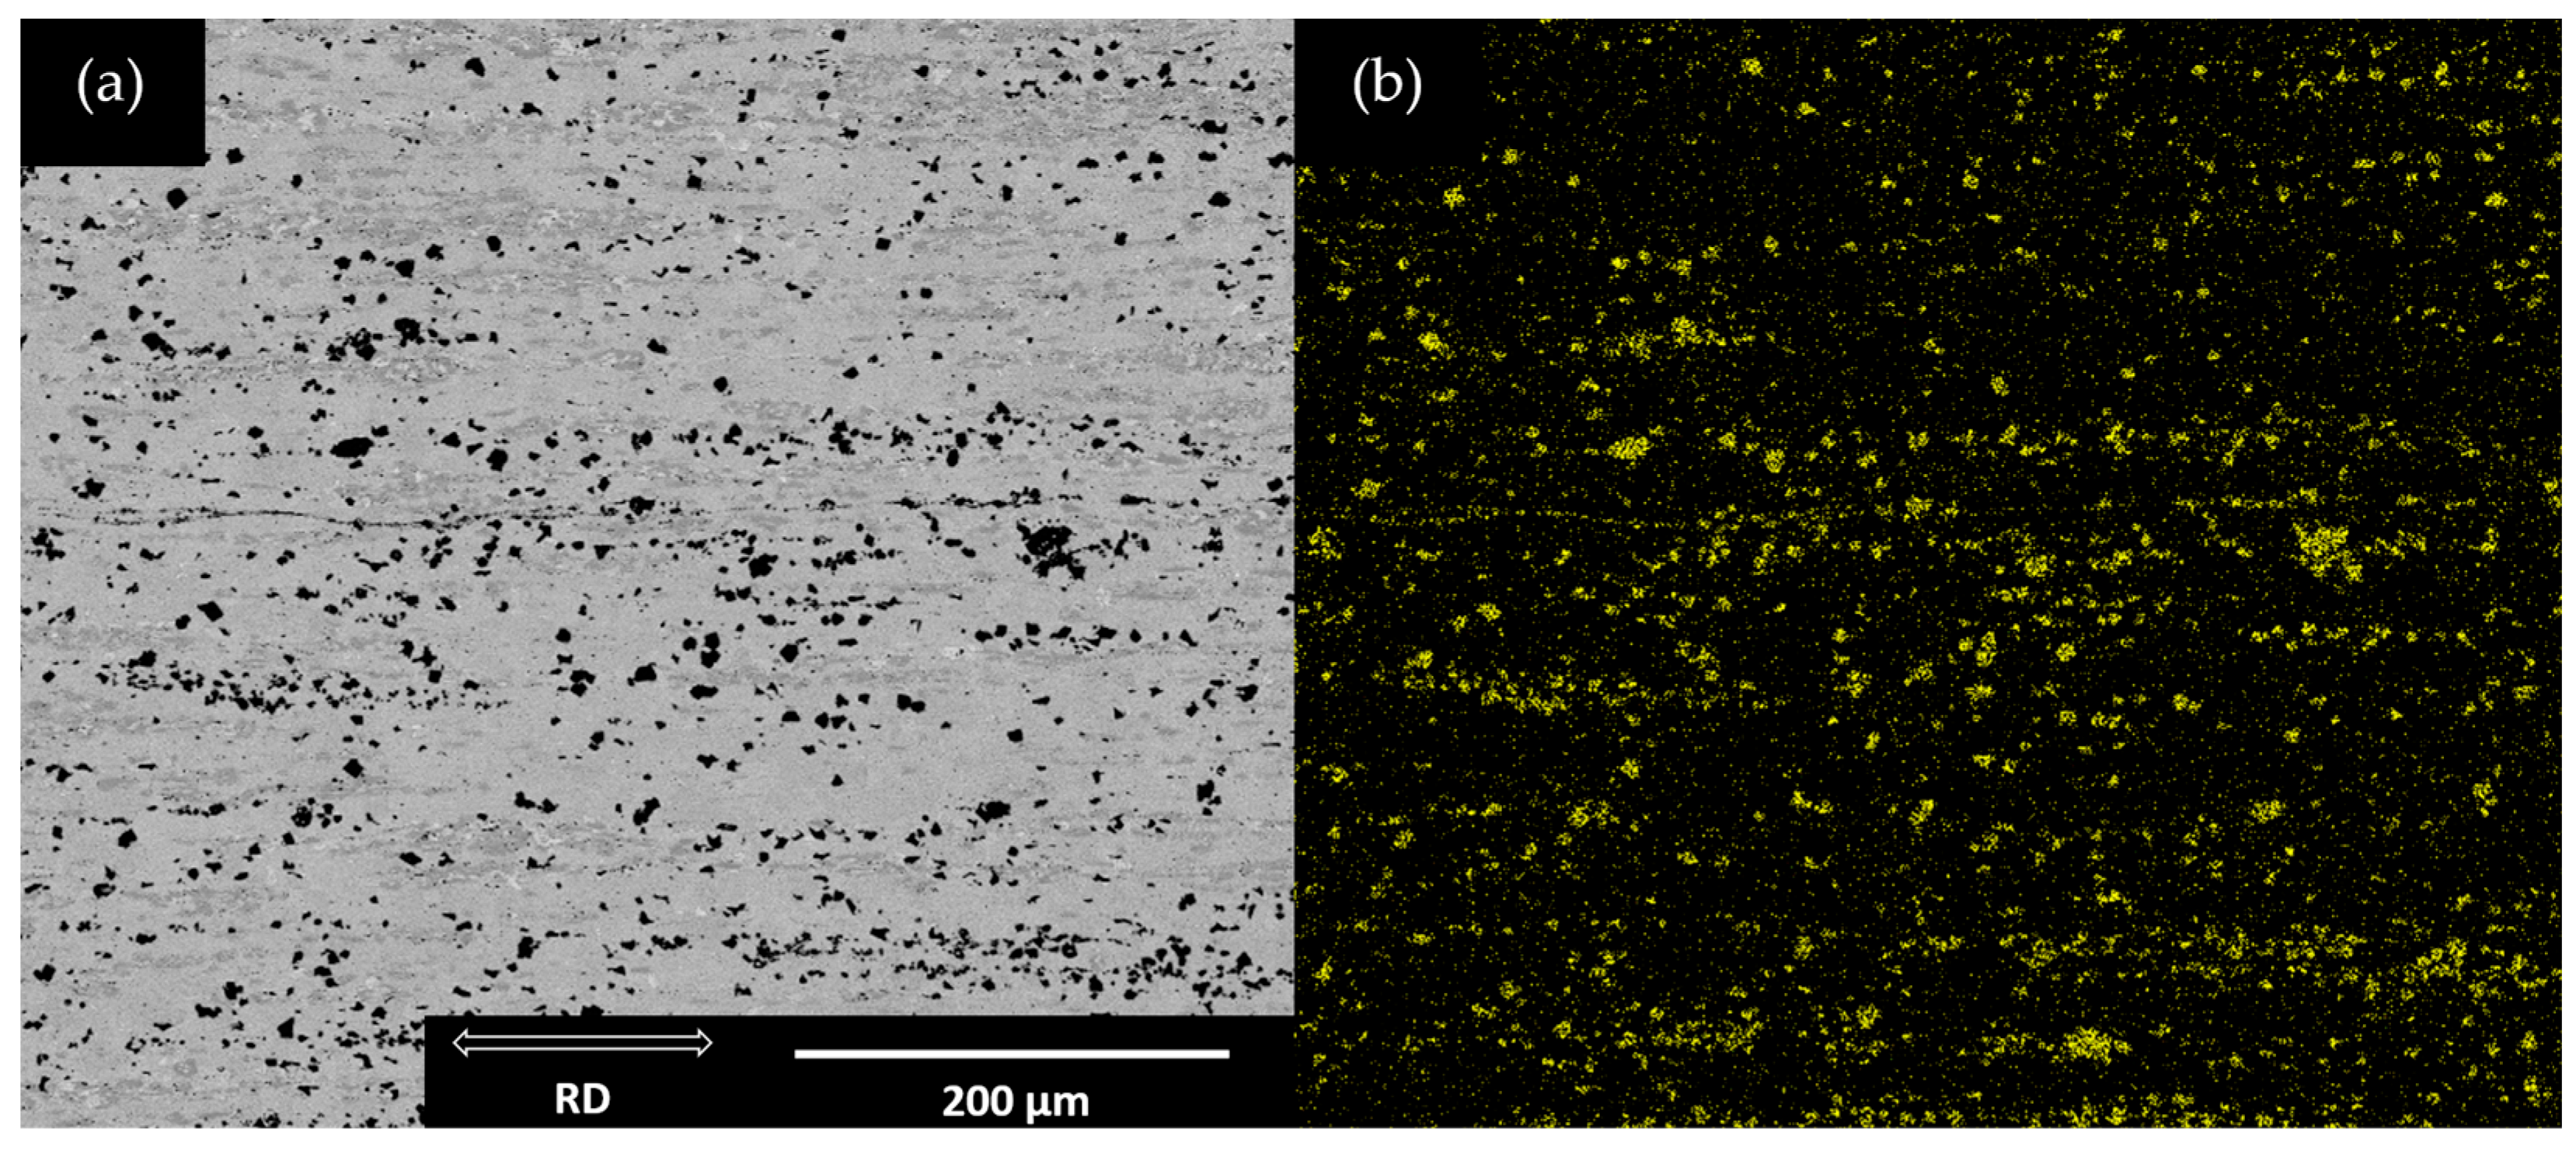
The presence of TiB2 in the sample was confirmed through X-EDS analysis. Using the EDS detector on the FEI Inspect F50, elemental scans were conducted, and the resulting map, shown in Figure 16, revealed a high concentration of titanium, specifically at the locations of the dark particles, thereby confirming the presence of TiB2. However, mapping boron proved challenging due to its low atomic weight, which makes it difficult for X-EDS to detect, as the X-ray energies associated with boron are too low for effective detection. Additionally, boron’s low energy peaks can be easily overshadowed by noise or other elements’ peaks, complicating accurate identification and quantification. This limitation is a known challenge in the analysis of light elements using X-EDS technology.

3.3. Mechanical Testing

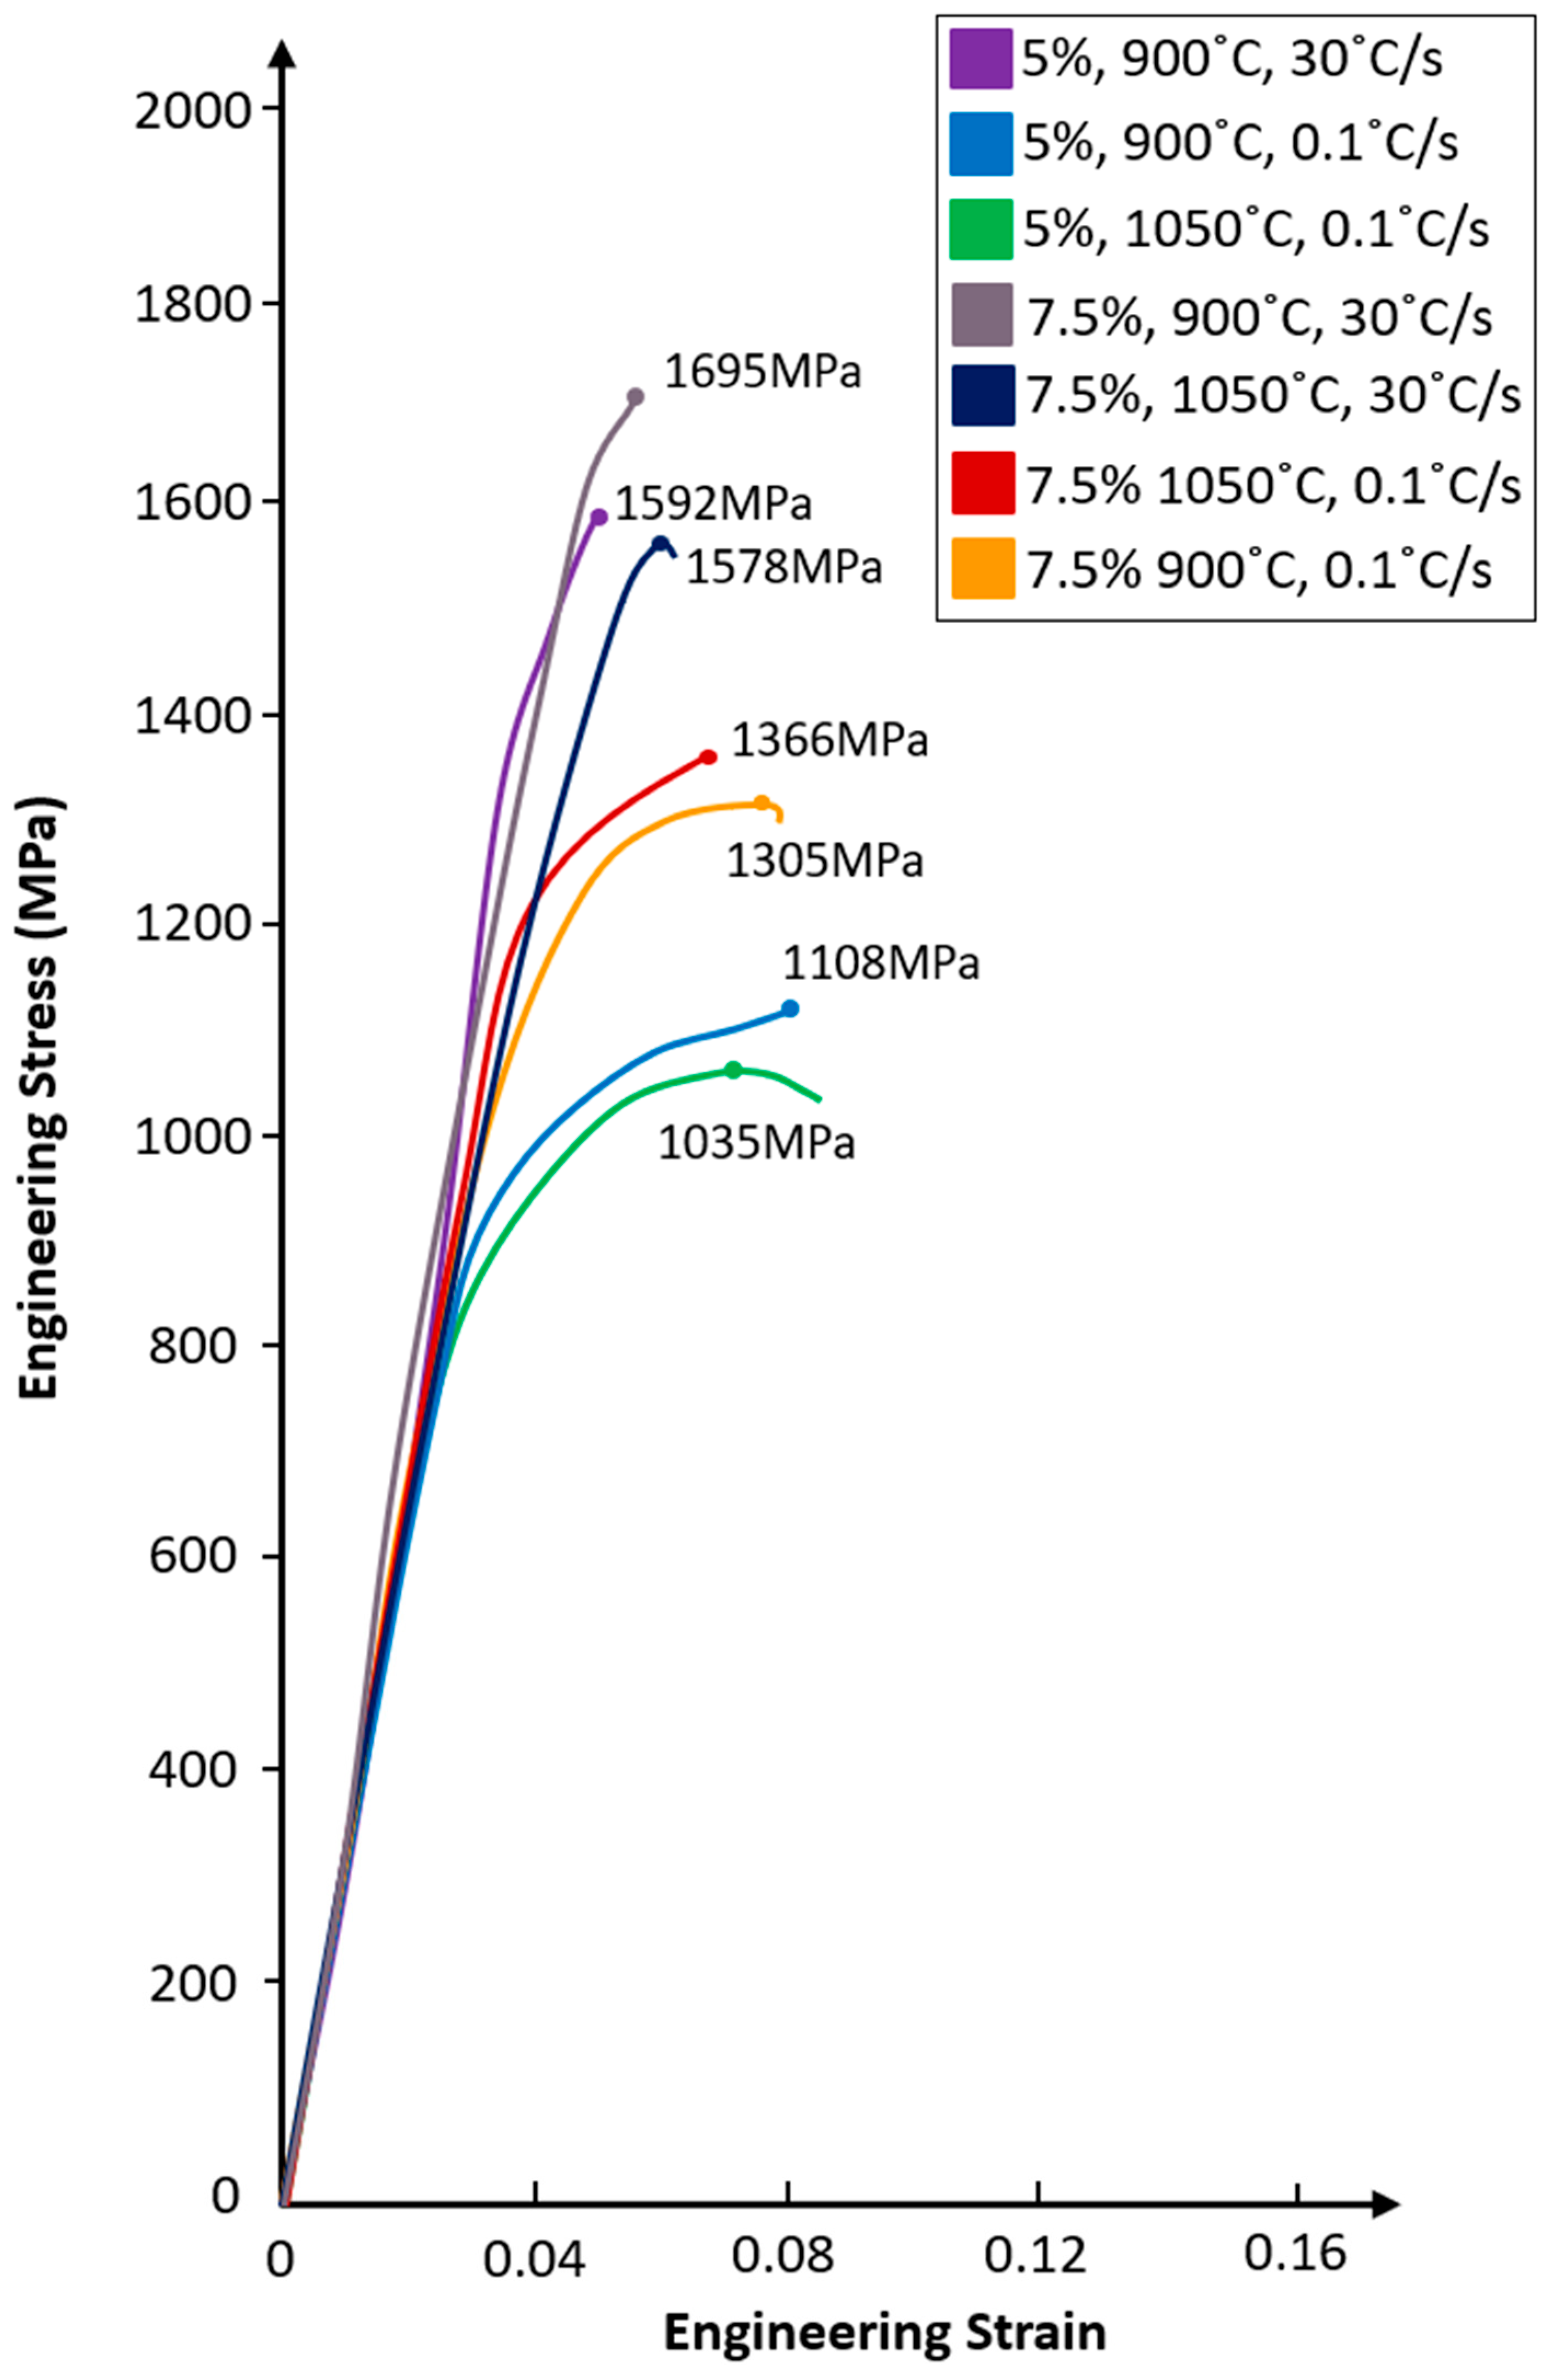
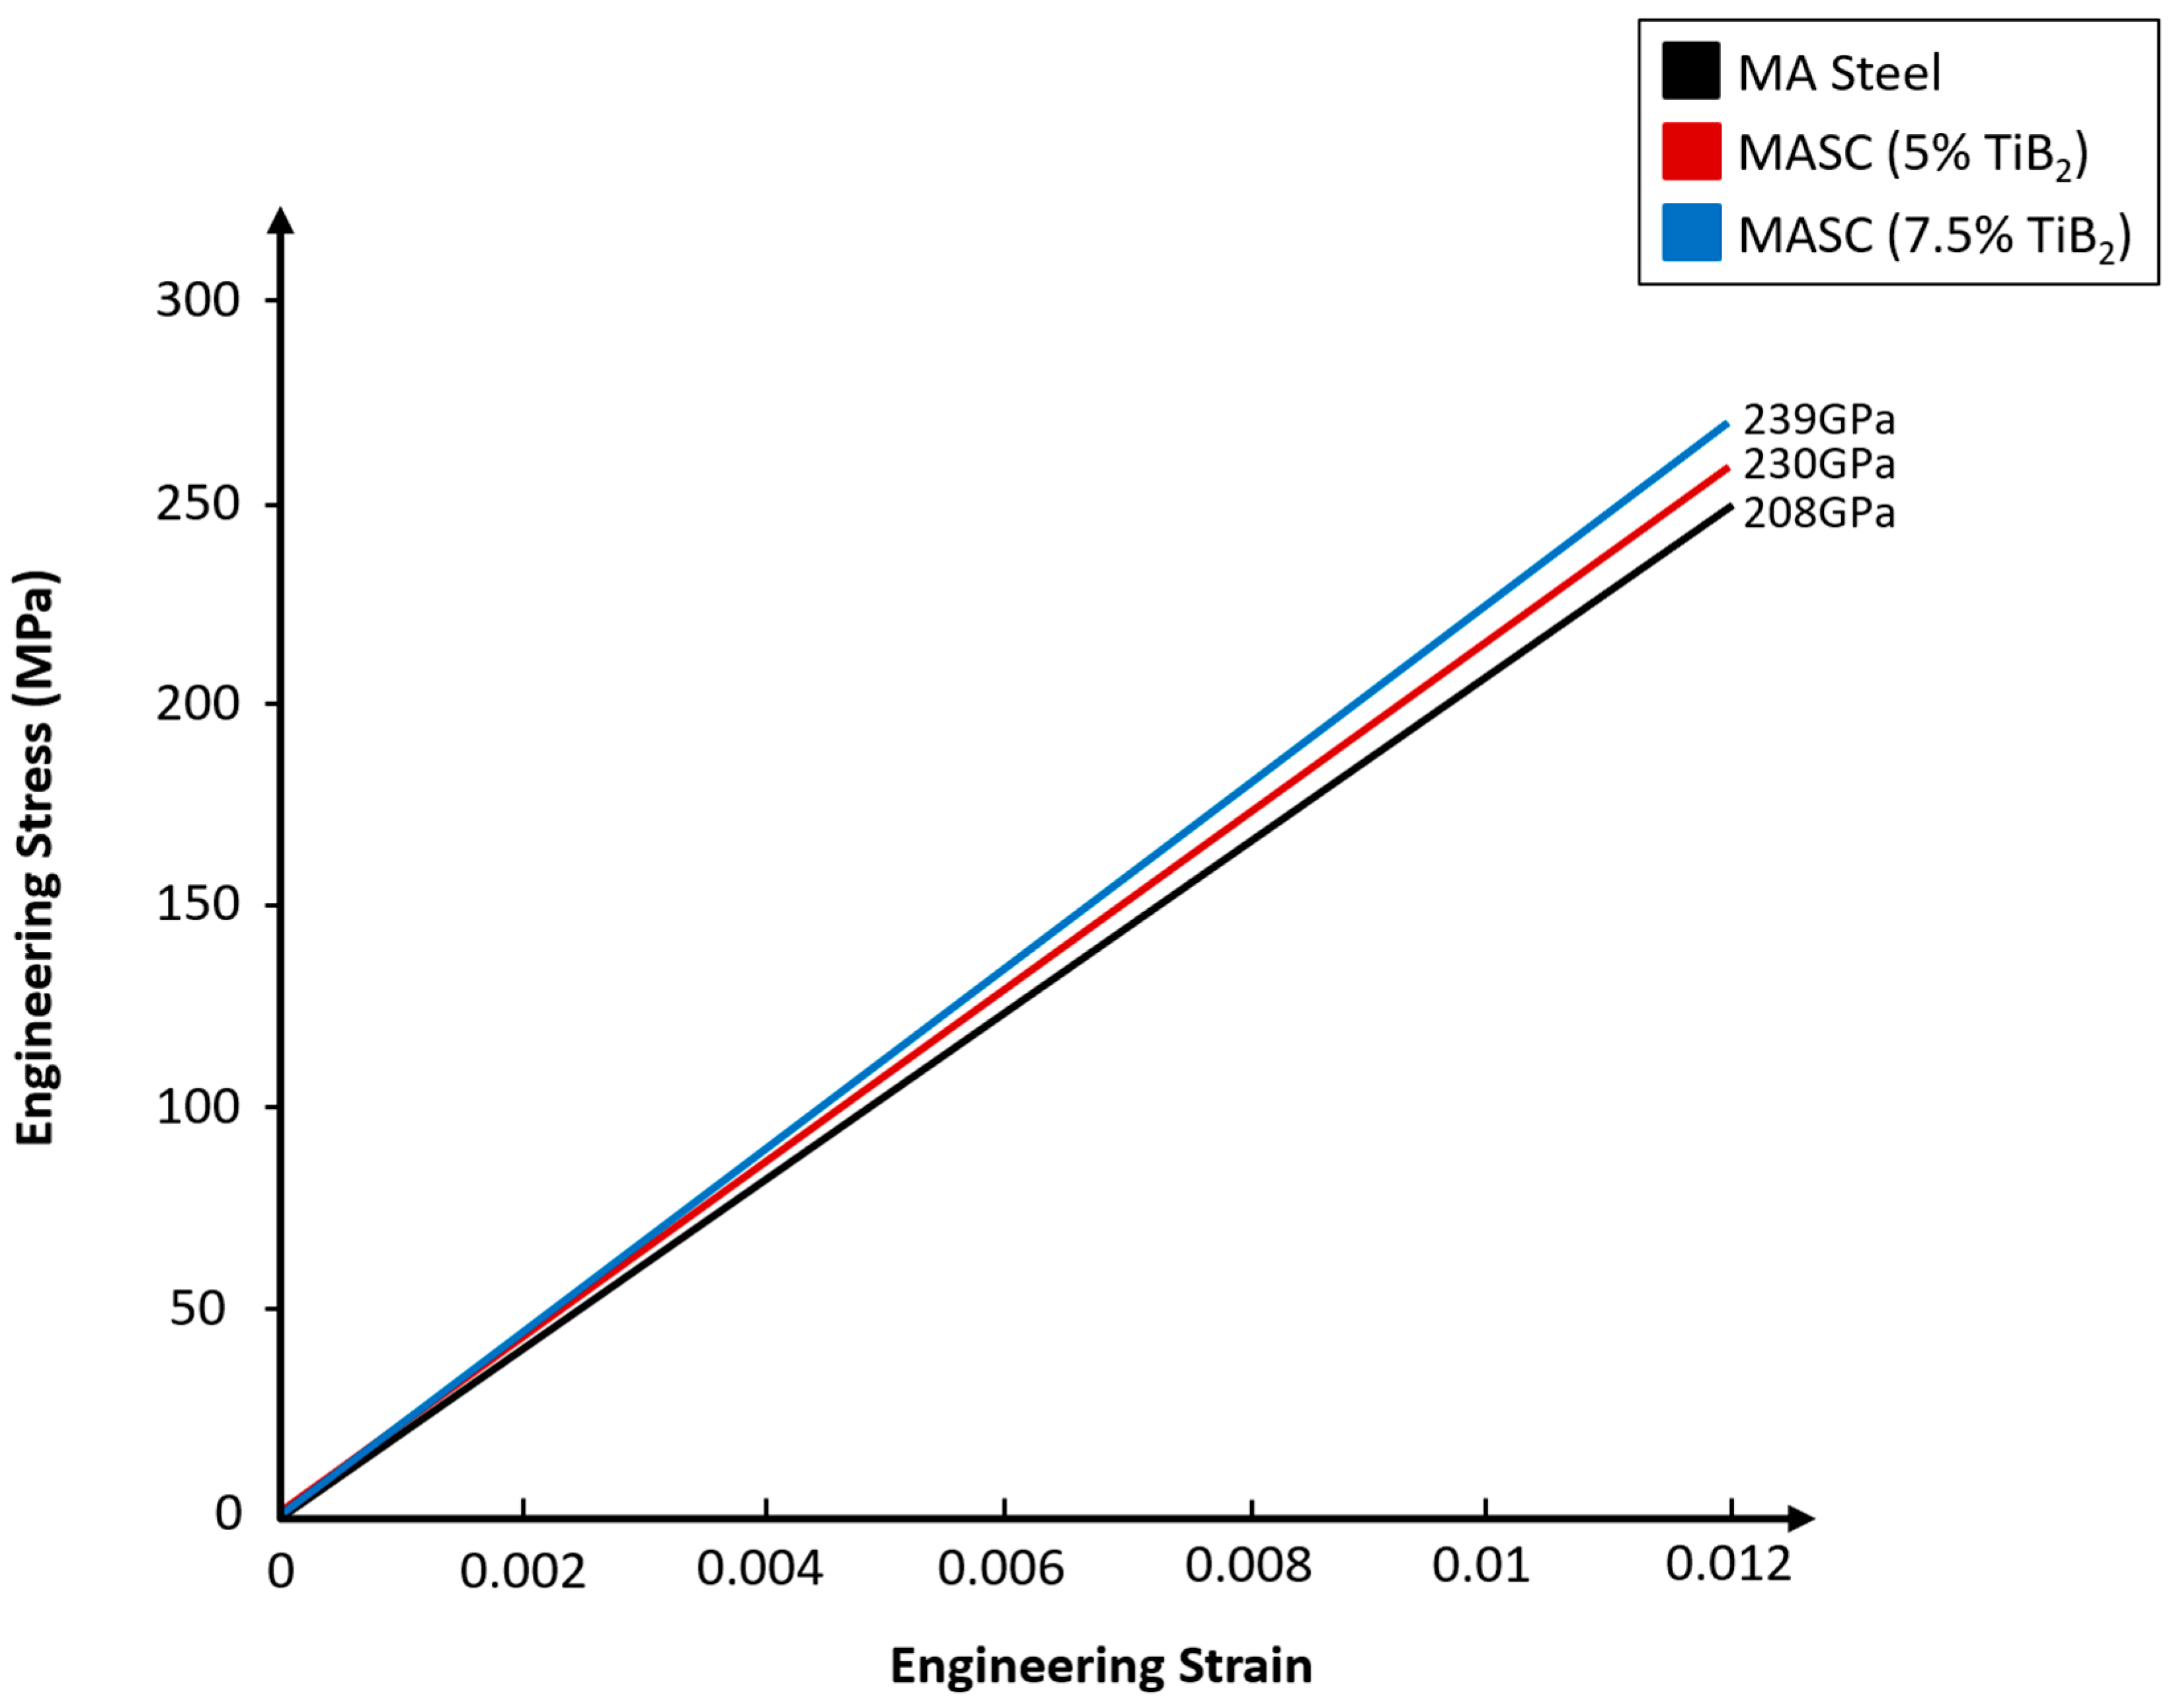
Testing was performed at room temperature with a video extensometer measuring the gauge length as the crosshead moved at a speed of 0.1 mm/min. The influence of TiB2 fracture and/or decohesion with the MA steel matrix, and any impact that had on the overall ductility, was not the subject of this research. The modulus of elasticity was determined by analysing the elastic region of a stress–strain curve in addition to using a non-destructive resonant frequency damping analysis (RFDA) technique. Additionally, Vickers hardness testing (HV1, 1 kg load) was performed to further reveal the mechanical properties of the specimens. The engineering stress–strain data presented in Table 2 and Figure 17 specify the mechanical properties and behaviour all tested samples. The highest tensile strength recorded was 1695 MPa, observed in the 7.5MASC cooled at 30 °C/s from 900 °C, corresponding to a low uniform elongation of 5.8%, though interestingly this value is only 0.3% lower than the MA steel alone. Adding 7.5% volume of TiB2 resulted in a 72 MPa tensile strength improvement. Yield strength is an important parameter in real-world applications, particularly in the automotive industry, where plastic deformation of components is undesirable. Maintaining a high yield strength ensures that automotive parts can withstand operational stresses without undergoing permanent deformation, thereby preserving the integrity and safety of the vehicle. The highest value of yield strength was recorded from the 7.5MASC alloy cooled from 900 °C at 30 °C/s (1657 MPa) followed by the same material with an identical cooling rate cooled from 1050 °C (1380 MPa). Conversely, the lowest tensile strength, 1035 MPa, was observed in the 5MASC cooled from 1050 °C at 0.1 °C/s. An average modulus of elasticity of 230 and 239 GPa was determined for 5MASC and 7.5MASC, respectively. All modulus measurements were performed following ASTM E111 and ISO 6892-1 standard [17,18], specifically identifying the gradient between 100 and 300 MPa on the stress–strain curve. These modulus values closely match the rule of mixtures calculation of the modulus of elasticity, which in this instance would take 94.5 or 92.3% from the modulus of the MA steel (208 GPa) and add either 5.5 or 7.7% from the modulus of TiB2 (565 GPa, [19]). These values are 227 GPa for 5MASC and 241 GPa for 7.5MASC, giving a percentage uncertainty of 1.7% and 0.4%, respectively. A representation of the modulus of elasticity values for all alloys is presented in Figure 18.
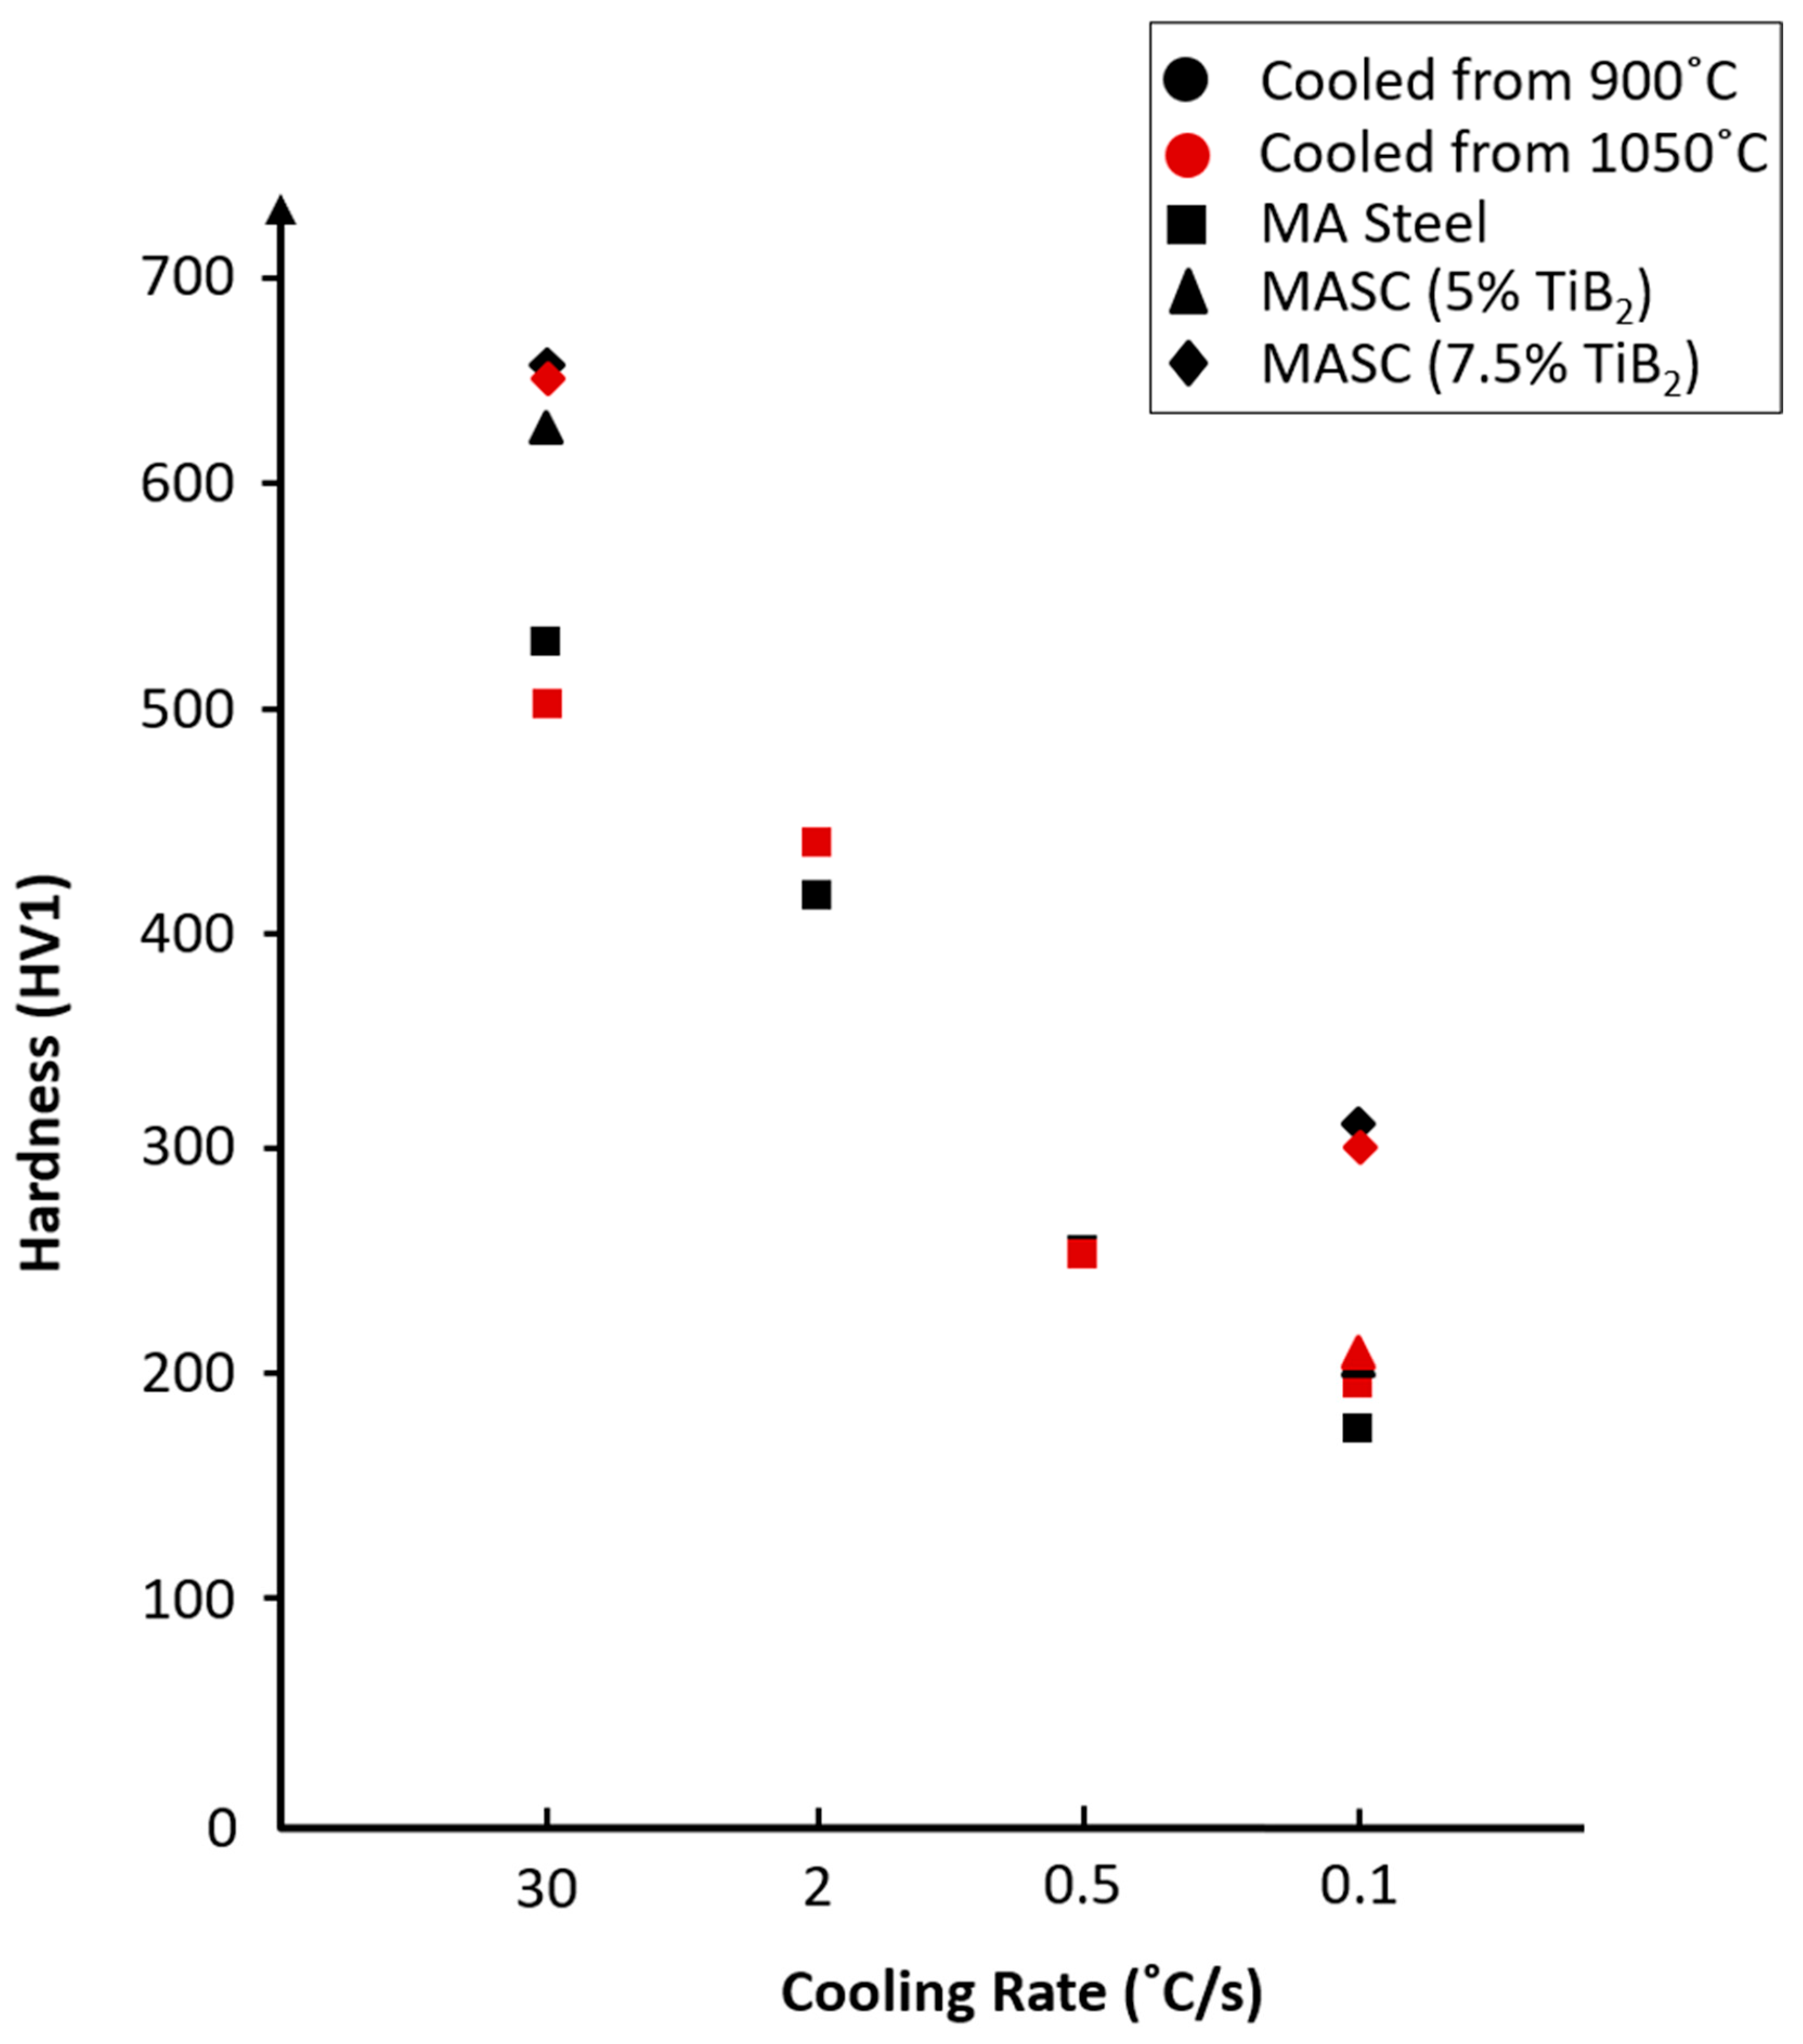
RFDA offers a non-destructive method for calculating the modulus of elasticity of the MASC alloys. Four samples of both MASC alloys were tested using RFDA. When compared to the MA steel without composite reinforcement, RFDA testing revealed an averaged 9.6% improvement in the modulus of elasticity for 5MASC with a value of 229 GPa and an 11.9% improvement for 7.5MASC with a value of 235 GPa. Vickers hardness values, detailed in Table 3 and presented in Figure 19, where HV1 refers to the hardness measurement under a 1 kg load for a 20 s dwell time, show a progressive increase in hardness using a quicker cooling rate.
The MASC alloys cooled from 30 °C/s exhibit high hardness in both MASC alloys due to the high hardness of TiB2. Their load-bearing capability and strong interfacial constraint dominate the overall response, even at higher cooling rates. While the matrix may experience some refinement, its contribution is secondary compared with the strengthening imparted by the TiB2 phase. For comparison, the highest hardness value of 668.8 HV1 from the 7.5MASC cooled from 30 °C/s is 22.2% higher than the MA steel which has undergone identical processing conditions.

4. Conclusions

The addition of TiB2 in an MA steel matrix has proven to be useful in refining and retaining the grain structure of a thermomechanically processed VIM ingot. The main conclusions from this study are as follows:
  • The TiB2 particles are homogeneously distributed within both MASC alloys, exhibiting an irregular hexagonal or jagged morphology. The successful formation of TiB2 through ferrous additions of Ti and B aligns well with findings from previous related studies [19,20,21,22].
  • The interface between TiB2 and matrix remains stable even at elevated temperatures, with grain pinning mechanisms notably effective in the 5MASC alloy, particularly when cooled at 0.1 °C/s from 1050 °C. The pinning effect is evidenced by the retention of elongated grains aligned in the rolling direction, which remains consistent at higher temperatures.
  • At a cooling rate of 30 °C/s, both alloys develop a martensitic matrix, with the TiB2 particles remaining unaffected. However, when the cooling rate is reduced to 0.1 °C/s, which can be observed in heavy sections, the 5MASC alloy displays polygonal ferrite and incomplete transformation of pearlite. In contrast, the 7.5MASC alloy at this slower cooling rate does not exhibit the same phase transformation. Instead, it shows the nucleation of polygonal ferrite without the presence of pearlite. This variation could be attributed to the presence and thermodynamic impact of higher-volume fractions of TiB2, which may alter the phase stability and transformation kinetics.
  • Tensile testing and RFDA results revealed improvements in the modulus of elasticity, from 208 GPa for the base MA steel to 230 GPa and 239 GPa for the 5MASC and 7.5MASC alloys, respectively. This demonstrates the effect of increasing TiB2 volume fraction on enhancing the material’s stiffness. The progressive improvement in modulus reflects the reinforcing role of TiB2, contributing to the overall mechanical performance of the alloys.
  • The primary objective of this study was to enhance the stiffness and strength of MA steel through ceramic reinforcement. The tensile results, particularly under conditions that mirror real-life applications where stiffness, yield strength, and uniform elongation are paramount, indicate that the 5MASC alloy cooled from 900 °C at 0.1 °C/s achieves an optimal yield strength of 905 MPa, coupled with a uniform elongation of 8%.

Author Contributions

Conceptualisation, R.R. and E.J.P.; methodology, S.K., Y.A., W.P., M.J. and E.J.P.; software, S.K.; validation, S.K., O.N. and R.R.; formal analysis, S.K., R.R., M.J. and E.J.P.; investigation, S.K., O.N., R.R., Y.A., W.P. and E.J.P.; resources, O.N., R.R., M.J. and E.J.P.; data curation, S.K.; writing—original draft preparation, S.K.; writing—review and editing, R.R. and E.J.P.; visualisation, S.K. and E.J.P.; supervision, R.R., M.J. and E.J.P.; project administration, O.N., R.R., M.J. and E.J.P.; funding acquisition, O.N., R.R., M.J. and E.J.P. All authors have read and agreed to the published version of the manuscript.

Funding

This work was supported by Volkswagen Germany, Science Foundation Ireland [18/EPSRC-CDT/3584] and the Engineering and Physical Sciences Research Council UK [EP/S022635/1].

Data Availability Statement

The original contributions presented in this study are included in the article. Further inquiries can be directed to the corresponding author.

Acknowledgments

We acknowledge EPSRC for the vacuum induction melting and rolling mill capabilities as part of the Henry Royce Institute (grants EP/R00661X/1, EP/P02470X/1, EP/S019367/1 & EP/X52850X/1). The authors show appreciation to the co-authors listed in this report and thank Advanced Metallic Systems (AMS) and Volkswagen for their support.

Conflicts of Interest

Authors Oliver Naeth and Ralf Rablbauer were employed by the company Volkswagen Group. The remaining authors declare that the research was conducted in the absence of any commercial or financial relationships that could be construed as a potential conflict of interest. The authors declare that this study received funding from Volkswagen Group, Science Foundation Ireland and the Engineering and Physical Sciences Research Council UK. The funder was not involved in the study design, collection, analysis, interpretation of data, the writing of this article, or the decision to submit it for publication.

References

  1. Li, Y.Z.; Huang, M.X. Revealing the interfacial plasticity and shear strength of a TiB2-strengthened high-modulus low-density steel. J. Mech. Phys. Solids 2018, 121, 313–327. [Google Scholar] [CrossRef]
  2. Chen, R.; Li, W.; Li, B.; Jiang, C. In situ experimental study on fracture toughness and damage mechanism of TiB2-reinforced steel matrix composites. Fatigue Fract. Eng. Mater. Struct. 2023, 46, 17–31. [Google Scholar] [CrossRef]
  3. de Miranda Salustre, M.G.; Gonoring, T.B.; Martins, J.B.R.; Lopes, H.D.A.; Orlando, M.T.D.A. Study of steel matrix composite samples with 12%Wt TiB2 produced by spark plasma sintering. Mater. Chem. Phys. 2023, 302, 127736. [Google Scholar] [CrossRef]
  4. Zhang, H.; Springer, H.; Aparicio-Fernández, R.; Raabe, D. Improving the mechanical properties of Fe–TiB2 high modulus steels through controlled solidification processes. Acta Mater. 2016, 118, 187–195. [Google Scholar] [CrossRef]
  5. Tanaka, K.; Saito, T. Phase equilibria in TiB2-reinforced high modulus steel. J. Phase Equilibria 1999, 20, 207–214. [Google Scholar] [CrossRef]
  6. Bleck, W.; Bambach, M.; Wirths, V.; Stieben, A. Microalloyed engineering steels with improved performance—An overview. HTM-J. Heat. Treat. Mater. 2017, 72, 346–354. [Google Scholar] [CrossRef]
  7. Li, B.H.; Liu, Y.; He, L.; Cao, H.; Gao, S.J.; Li, J. Fabrication of in situ TiB2 reinforced steel matrix composite by vacuum induction melting and its microstructure and tensile properties. Int. J. Cast. Met. Res. 2010, 23, 211–215. [Google Scholar] [CrossRef]
  8. Bonnet, F.; Daeschler, V.; Petitgand, G. High modulus steels: New requirement of automotive market. How to take up challeng? Can. Metall. Q. 2014, 53, 243–252. [Google Scholar] [CrossRef]
  9. Tjong, S.C.; Wang, G.S.; Mai, Y.W. Erratum to ‘Low-cycle fatigue behavior of Al-based composites containing in situ TiB2, Al2O3 and Al3Ti reinforcements’ [Mater. Sci. Eng. A 358 (1–2) (2003) 99–106]. Mater. Sci. Eng. A 2004, 366, 426. [Google Scholar] [CrossRef]
  10. Sadhasivam, M.; Sankaranarayanan, S.R.; Babu, S.P.K. Synthesis and characterization of TiB2 reinforced AISI 420 stainless steel composite through vacuum induction melting technique. Mater. Today Proc. 2020, 22, 2550–2558. [Google Scholar] [CrossRef]
  11. Chen, R.; Li, B.; Xu, K. Effect of particle morphology on fatigue crack propagation mechanism of TiB2-reinforced steel matrix composites. Eng. Fract. Mech. 2022, 274, 127736. [Google Scholar] [CrossRef]
  12. Palmiere, E.J.; Garcia, C.I.; DeArdo, A.J. The Influence of Niobium Supersaturation in Austenite on the Static Recrystallisation Behaviour of Low Carbon Microalloyed Steels. Metall. Mater. Trans. A 1996, 27A, 951–960. [Google Scholar] [CrossRef]
  13. Mengaroni, S.; Calderini, M.; Napoli, G.; Zitelli, C.; Di Schino, A. Micro-alloyed steel for forgings. Mater. Sci. Forum 2018, 941, 1603–1606. [Google Scholar] [CrossRef]
  14. Guk, S.; Milisova, D.; Pranke, K. Influence of deformation conditions on the microstructure and formability of sintered Mg-PSZ reinforced TRIP-matrix-composites. Key Eng. Mater. 2016, 684, 86–96. [Google Scholar] [CrossRef]
  15. Loveday, M.S.; Mahon, G.J.; Roebuck, B.; Lacey, A.J.; Palmiere, E.J.; Sellars, C.M.; van der Winden, M.R. Measurement of flow stress in hot plane strain compression tests. Mater. High. Temp. 2006, 23, 85–118. [Google Scholar] [CrossRef]
  16. Suttner, S.; Merklein, M. A new approach for the determination of the linear elastic modulus from uniaxial tensile tests of sheet metals. J. Mater. Process Technol. 2017, 241, 64–72. [Google Scholar] [CrossRef]
  17. Aegerter, J.; Kühn, H.-J.; Frenz, H.; Weißmüller, C. EN ISO 6892-1:2009; Tensile Testing: Initial Experience from the Practical Implementation of the New Standard. De Gruyter Brill: Marl, Germany, 2011.
  18. Munro, R.G. Material Properties of Titanium Diboride. J. Res. Natl. Inst. Stand. Technol. 2000, 105, 709–720. [Google Scholar] [CrossRef] [PubMed]
  19. Tanaka, K. Ultra High Modulus Steel Reinforced with Titanium Boride Particles. R&D Rev. Toyota CRDL 2000, 35, 2000. [Google Scholar]
  20. Sadhasivam, M.; Mohan, N.; Sankaranarayanan, S.R.; Babu, S.P.K. Investigation on mechanical and tribological behaviour of titanium diboride reinforced martensitic stainless steel. Mater. Res. Express 2019, 7, 016545. [Google Scholar] [CrossRef]
  21. Liu, W.J.; Li, J.; Shi, C.B.; Huo, X.D. Effect of Boron and Titanium Addition on the Hot Ductility of Low-Carbon Nb-Containing Steel. High. Temp. Mater. Process. 2015, 34, 813–820. [Google Scholar] [CrossRef]
  22. Baron, C.; Springer, H.; Raabe, D. Efficient liquid metallurgy synthesis of Fe-TiB2 high modulus steels via in-situ reduction of titanium oxides. Mater. Des. 2016, 97, 357–363. [Google Scholar] [CrossRef]
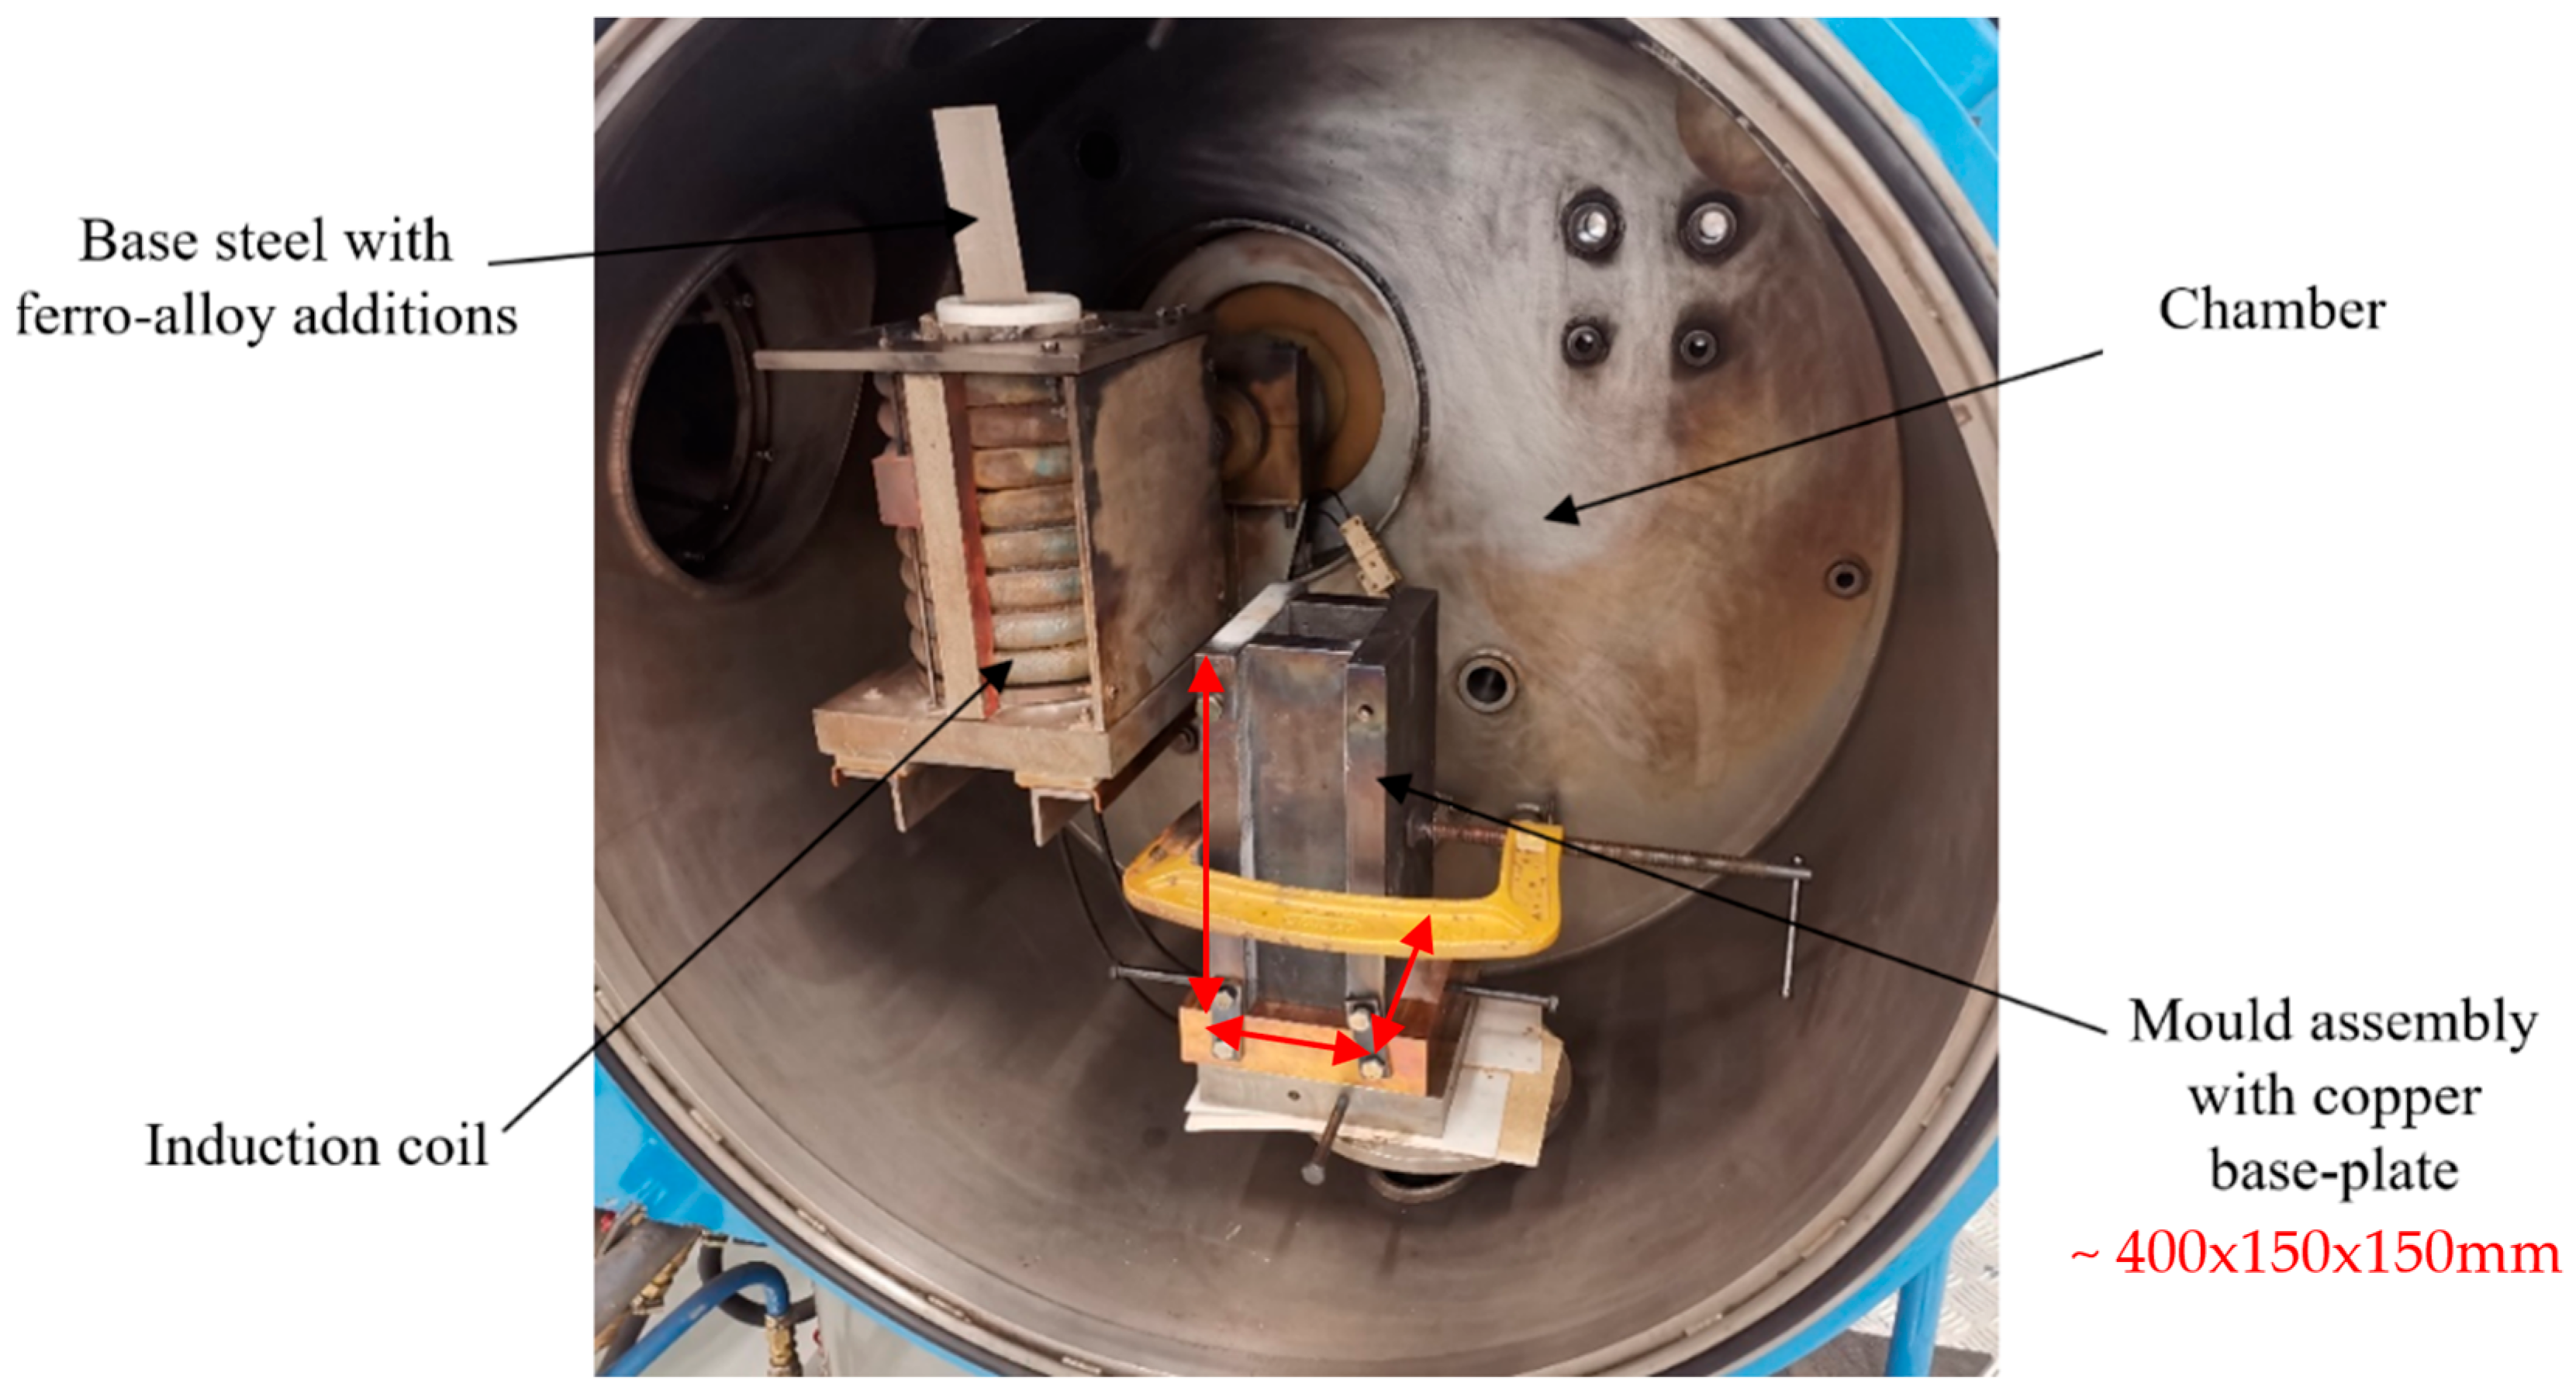
Figure 1. Labelled assembly in the Consarc 10 kg VIM chamber.
Metals 15 01322 g001
Figure 2. ThermoCalc plots which show (a) stoichiometric composition of TiB2, (b) example of volume fraction of all phases vs. temperature for 5MASC.
Metals 15 01322 g002
Figure 3. Construction of TTT curve from the MA composition using JMatPro 13.3.
Metals 15 01322 g003
Figure 4. Construction of CCT curve from the MA composition using JMatPro 13.3.
Metals 15 01322 g004
Figure 5. Temperature profile for PSC experiments.
Metals 15 01322 g005
Figure 6. (a) Schematic of how a tensile dog-bone specimen is machined from a deformed PSC sample, with the indication of microstructural analysis on the RD plane and (b) tensile dog-bone geometry. Note that RD is rolling direction, STD is short transverse direction, and LTD is long transverse direction.
Metals 15 01322 g006
Figure 7. PSC stress–strain curves during deformation passes of 5MASC alloy with peak values of strength indicated for both second deformation temperatures.
Metals 15 01322 g007
Figure 8. PSC stress–strain curves during deformation passes of 7.5MASC alloy with peak values of strength indicated for both second deformation temperatures.
Metals 15 01322 g008
Figure 9. SEM scanning electron (SE) images of 5MASC as-cast from VIM.
Metals 15 01322 g009
Figure 10. SEM BSE image highlighting particle agglomeration and lamellar formation in as-cast 5MASC, 5.2% volume fraction of TiB2.
Metals 15 01322 g010
Figure 11. Optical micrograph at two magnification levels of as-rolled 5MASC left to air cool without post-heat treatment, where RD is the rolling direction.
Metals 15 01322 g011
Figure 12. SEM (scanning electron, SE) images of 5MASC at two magnification levels after deformation from PSC; the final cooling rate used was 30 °C/s from 900 °C.
Metals 15 01322 g012
Figure 13. Optical micrographs of 5MASC after deformation using PSC; the final cooling rate used was 0.1 °C/s from (a) 900 °C, (b) 1050 °C, and (c) 1100 °C.
Metals 15 01322 g013
Figure 14. SEM (backscattered electron, BSE) images of 7.5MASC after deformation from (a) 900 °C and (b) 1050 °C, with a final cooling rate of 30 °C/s.
Metals 15 01322 g014
Figure 15. SEM (SE) images of 7.5MASC after deformation using PSC; the final cooling rate used was 0.1 °C/s from (a) 900 °C and (b) 1050 °C.
Metals 15 01322 g015
Figure 16. (a) SEM (BSE) image of 7.5MASC example used for X-EDS analysis of TiB2 particles and (b) Ti map in the MA matrix.
Metals 15 01322 g016
Figure 17. Engineering stress–strain plots of MASC alloys cooled from 900 °C/1050 °C at two cooling rates. The tensile strength values are stated at the peaks of each plot.
Metals 15 01322 g017
Figure 18. Average elastic region representation of each MA alloy which illustrates the increasing trend in t modulus of elasticity with greater volume fraction additions of TiB2.
Metals 15 01322 g018
Figure 19. Vickers hardness values (HV1) for all MA alloys with varying cooling rates from 900/1050 °C after the second deformation pass during PSC testing.
Metals 15 01322 g019
Table 1. Elemental composition (wt.%) for the MA and MASC ingots fabricated using VIM.
MaterialFeCCrMnMoNbNiPSSiTiVB
MA Steel96.560.470.131.370.060.0300.170.0130.0100.720.030.18--
5MASC94.0210.430.101.280.070.030.170.0110.0080.702.050.180.95
7.5MASC92.9910.380.111.290.070.030.170.0130.0060.752.550.191.45
Table 2. Yield strength and uniform elongation values of each MA steel sample.
MaterialTemp. (°C) of PSC SampleCooling Rate (°C/s)Yield Strength (MPa)Uniform Elongation (%)Standard Deviation (MPa)
5MASC9003013025.124.5
9000.19058.017.8
10500.18697.615.3
7.5MASC9003016575.832.7
10503013806.126.1
9000.111047.219.9
10500.111537.816.5
Table 3. Average RFDA modulus of elasticity and Vickers hardness (HV1) values for the MASC alloys using different PSC conditions.
MaterialTemp. (°C) of PSC SampleCooling Rate (°C/s)The Modulus of Elasticity (GPa)Vickers Hardness (HV1)
5MASC90030229624.2
9000.1206.9
10500.1204.9
11500.1187.4
7.5MASC90030235668.8
105030664.7
9000.1314.1
10500.1302.0
Disclaimer/Publisher’s Note: The statements, opinions and data contained in all publications are solely those of the individual author(s) and contributor(s) and not of MDPI and/or the editor(s). MDPI and/or the editor(s) disclaim responsibility for any injury to people or property resulting from any ideas, methods, instructions or products referred to in the content.