Review

A Review on Extrusion Additive Manufacturing of Pure Copper

by
Chowdhury Sakib-Uz-Zaman
and
Mohammad Abu Hasan Khondoker
*
Industrial Systems Engineering, Faculty of Engineering and Applied Science, University of Regina, Regina, SK S4S 0A2, Canada
*
Author to whom correspondence should be addressed.
Metals 2023, 13(5), 859; https://doi.org/10.3390/met13050859
Submission received: 3 March 2023 / Revised: 24 April 2023 / Accepted: 24 April 2023 / Published: 28 April 2023
(This article belongs to the Section Additive Manufacturing)

Abstract

:
Copper, due to its high thermal and electrical conductivity, is used extensively in many industries such as electronics, aerospace, etc. In the literature, researchers have utilized different additive manufacturing (AM) techniques to fabricate parts with pure copper; however, each technique comes with unique pros and cons. Among others, material extrusion (MEX) is a noteworthy AM technique that offers huge potential to modify the system to be able to print copper parts without a size restriction. For that purpose, copper is mixed with a binder system, which is heated in a melt chamber and then extruded out of a nozzle to deposit the material on a bed. The printed part, known as the green part, then goes through the de-binding and sintering processes to remove all the binding materials and densify the metal parts, respectively. The properties of the final sintered part depend on the processing and post-processing parameters. In this work, nine published articles are identified that focus on the 3D printing of pure copper parts using the MEX AM technique. Depending on the type of feedstock and the feeding mechanism, the MEX AM techniques for pure copper can be broadly categorized into three types: pellet-fed screw-based printing, filament-fed printing, and direct-ink write-based printing. The basic principles of these printing methods, corresponding process parameters, and the required materials and feedstock are discussed in this paper. Later, the physical, electrical, and mechanical properties of the final parts printed from these methods are discussed. Finally, some prospects and challenges related to the shrinkage of the printed copper part during post-processing are also outlined.

1. Introduction

Due to its unique qualities, copper is frequently used as a raw material in different industries, e.g., electronics, power generation, military, aerospace, etc. Owing to its outstanding thermal and electrical conductivity and reasonable pricing in comparison with that of other metals with comparable properties such as gold and silver, copper is primarily utilized for thermal management and electrical conduction services [1,2,3,4]. Additionally, copper parts have superior machinability, corrosion resistance, and antibacterial performance, which makes copper a desirable material for medical devices as well as automotive and construction applications [5]. Copper is utilized in the production of a wide variety of parts, including heat exchangers, electrical connectors, springs, bearings, propulsion mechanisms for aircraft, cooling channels, and gas turbines [5]. Today’s rapid industrial development necessitates copper components with more complicated geometries and optimum properties, which mandates advanced manufacturing technologies [5].
Since the 1980s, technologies for additive manufacturing (AM) have been continuously evolving [6]. Various AM technologies for printing metallic parts have been developed over this time [7,8]. AM offers a unique feature—adding thin layers of material to realize 3D parts—that has enabled the manufacturing of complex parts with enhanced performance straight from designs without the need for costly tooling [9,10]. Because of these, AM has recently evolved as one of the core components of the fourth industrial revolution, Industry 4.0 [9]. Steels, aluminum, nickel, and titanium alloys have been processed using AM techniques such as selective laser melting (SLM) [11]. Laser-based AM techniques, however, due to inherent rapid heating and cooling cycles, find it difficult to create complicated geometries with minimal porosity to ensure the high heat conductivity of copper parts [12]. Due to the high thermal conductivity of copper, the laser’s thermal energy in SLM is significantly transferred from the melt pool to the previously printed layer which introduces defects, a lower density and subpar surface quality [13,14,15,16]. Because optical reflectivity has no bearing on the materials, it has been possible to produce dense copper parts using the electron beam melting (EBM) AM technique [17]. However, EBM-fabricated specimens exhibit defects such as internal tensions, porosity, shape distortion, and cracks [18,19,20,21]. Additionally, the high setup cost associated with SLM and EBM systems makes them uneconomical for applications not requiring high-resolution, fine-feature printing capabilities [22].
Material extrusion (MEX) is one of the seven AM categories defined by the F42 ASTM International sub-committee, where a material, either molten or flowable ink, is forced to be extruded through a small orifice and to be selectively deposited layer by layer to realize a 3D object [23]. The limited mass transport between adjacent deposited beads ensures intra- and inter-layer adhesion [24]. Fused deposition modeling (FDM) and fused filament fabrication (FFF) refer to the same MEX technique whereby a thermoplastic material is first molten before extruding it through the nozzle. This is arguably the most widely used AM technique today that can be used to print a wide range of materials such as thermoplastics [25,26], metallic glasses [27], composites [28], metals [29,30,31,32], concrete [33] and ceramics [34]. To produce metallic parts using this method, metal powders are first mixed with polymer binders to form a meltable and extrudable feedstock. Once the part, which is often called the green part, is printed, the binders are then removed from the part using a solvent and/or heat treatment. Finally, a sintering cycle is carried out, resulting in the bonding of powder particles and the creation of dense metal parts. Compared to SLM or EBM technologies, the advantage of MEX is that it features a significantly lower initial investment, fast processing durations, a comparatively easier operating system, more control over the processing parameters, reduced waste of materials, and the ability to use multiple materials at once [5]. The technique does not require an enclosed chamber because no laser beam is involved, hence, it is a scalable approach that does not put any size restriction on the printed parts and is not impacted by the material’s melting temperature, reflectivity, reactivity, and/or thermal conductivity [5].
Depending on the type of feedstocks and the feeding mechanism, the MEX AM techniques for pure copper can be broadly categorized into three types: pellet-fed screw-based printing (PFSP), filament-fed roller-based printing (FFRP), and direct-ink write-based printing (DIWP). In PFSP, commercially available copper metal injection molding (MIM) feedstock granules containing copper powder are fed into a single screw-based extrusion 3D printer [35,36]. Typically, a two-component binder system is used in which a thermoplastic polymer binder melts at the extrusion temperature and provides sufficient degrees of melt viscosity, and a backbone binder (e.g., wax) helps to maintain the printed structure during the sintering process. After printing the green part, the thermoplastic binder is removed via a solvent de-binding process and the backbone binder is removed during a thermal de-binding process. Depending on the system architecture, this thermal de-binding process may be a pre-sintering step or thermal de-binding may occur during the sintering process. During sintering at an elevated temperature just below the melting temperature of copper, the part undergoes a significant shrinkage and achieves near-full density [37]. In contrast, in FFRP, wire-shaped feedstock rods are first made by blending copper powders with a binder system of a suitable thermoplastic polymer matrix and wax. The metal rod is then fed in extrusion 3D printers by using the feeding system of a motor roller, similarly to the polymer filament feeding mechanism used in conventional FFF techniques. The post-processing steps of FFRP-processed green parts are similar to that of PFSP-processed green parts. On the contrary, DIWP starts with preparing inks or pastes by mixing copper powder with a binder system (such as polylactic acid dissolved in dichloromethane). Once the ink is prepared and loaded, the material is fed into an extrusion 3D printer by using a pneumatic feeding system [38,39,40]. Unlike PFSP and FFRP-processed parts, the binder systems used in the DIWP technique are removed after printing via a single thermal step, e.g., sintering integrated with thermal de-binding [41]. Depending on the various characteristics of the ingredients, such as the sinterability of the powder, the wettability of the binder, and specific applications, researchers have developed both organic and inorganic types of binder systems [42,43,44]. It was shown that reducing the ink solvent’s evaporation rate can help metal products have fewer defects and cracks [45]. Due to the ease of use, low cost, and ability to print on soft substrates, DIWP has huge potential in applications such as printing electronics [43,46].
The AM extrusion of pure copper is a relatively a new field in which a very limited number of published articles are available in the literature. To the best of the authors’ knowledge, there are nine available articles on the extrusion of pure copper which can be reviewed to represent the three methods discussed above. In this paper, the extrusion of pure copper based on the above three methods, and the subsequent electrical, mechanical, microstructural, and rheological properties reported in published papers are reviewed. Among the nine articles reviewed, two articles are on PFSP [22,37], three articles are based on FFRP [5,9,47], and the remaining four articles are on DIWP [48,49,50,51]. Table 1 lists the printing parameters, binder system, post-processing activities, and properties of different parts printed in different methods.

2. Feedstocks for Extrusion AM of Pure Copper

2.1. Feedstocks Used in PFSP

In [22,37], Singh et al. used a MIM feedstock with 93.54 wt% copper (average particle size of 5.9 μm) and a 6.46 wt% binder system (wax and polyethylene glycol (PEG)). When molten, the thermoplastic PEG imparted the desired viscosity for the extrusion process. After printing, the water-soluble PEG was removed by submerging the printed green part under water for an extended period of time. After this initial de-binding process, the second binder, wax, serving as the backbone binder, held the copper powders together until the sintering process began. Figure 1 shows the SEM image of the feedstock exhibiting both copper powders with wide size ranges and a binder matrix containing voids of different sizes [37].

2.2. Feedstocks Used in FFRP

Cañadilla et al. [5] and Rodriguez et al. [9] used a commercially available 1.85 mm feedstock filament (product number F-MF-1010, Markforged, Watertown, MA) with a >95 wt% copper content [5,9]. The copper powders of a 10–20 µm size range coated with a binder system composed of paraffin wax and a high-molecular-weight polymer (name withheld) were used.
Gonzalez-Gutierrez et al. [47] prepared the feedstock’s binder system by mixing a grafted polyolefin (gPO (BYK-Chemie GmbH, Wesel, Germany)) and a thermoplastic elastomer—TPE (Kraiburg TPE GmbH & Co. KG, Waldkraiburg, Germany). As THE feedstock’s filler, gas-atomized copper powder (99/9 wt% purity and D90 = 33.6 µm) was used. The TPE and gPO pellets were first mixed and co-extruded using a single-screw extruder. The binder filament was dried at 60 °C and pelletized. A co-rotating, twin-screw extruder was used to blend the copper powder with the pelletized binder system and manufactured feedstock rod with 92 wt% copper. The extrudate from the twin-screw extruder was transported to a conveyor belt and air cooled before pelletizing. The same single screw extruder that was used to create the binder was also utilized to create filaments. The extruded filament had an ovality of <0.1 mm and a diameter of 1.75 ± 0.05 mm [47].

2.3. Feedstocks Used in DIWP

To prepare copper ink for DIWP, Zhao et al. [48] mixed 45 g of a commercially available copper powder (98% purity and 10–25 μm in size) with a binder system which was produced by dissolving 1 g of acrylic in 10 mL of organic solvents (such as acetone). For the same purpose, Yan et al. [49] also utilized a commercially available copper powder (purity of ≥99.5% and 0.5 mm size) with a binder system based on paraffin wax (melting point: 164.3 to 315.1 °C; density: 0.9 g/cm3). A preparation tool was used to combine the two ingredients into a paste while stirring and heating the resulting mixture to a temperature between 50 and 250 °C.
Hong et al. [51] used copper powder (size 106 µm and 25 µm) with polyvinyl alcohol (PVA) and a polyvinyl carboxy polymer to synthesize high-viscosity pastes. First, a PVA solution and polyvinyl carboxy polymer gel were separately prepared by dissolving 7 wt% of each in water and blending them with a ratio of 95:5, respectively. Then, copper powder was added with a varying composition of 50 to 65 wt%, and the final copper paste was used without air contact.
Ren et al. [50] used copper powder (≥99.5% purity) blended with an organic binder that was prepared by mixing 74 wt% paraffin wax (PW), 23 wt% low-density polyethylene (LDPE), and 3 wt% stearic acid (SA) while maintaining a temperature of 180 °C. The materials were then finally crushed into small particles into sizes of no larger than 3 mm.
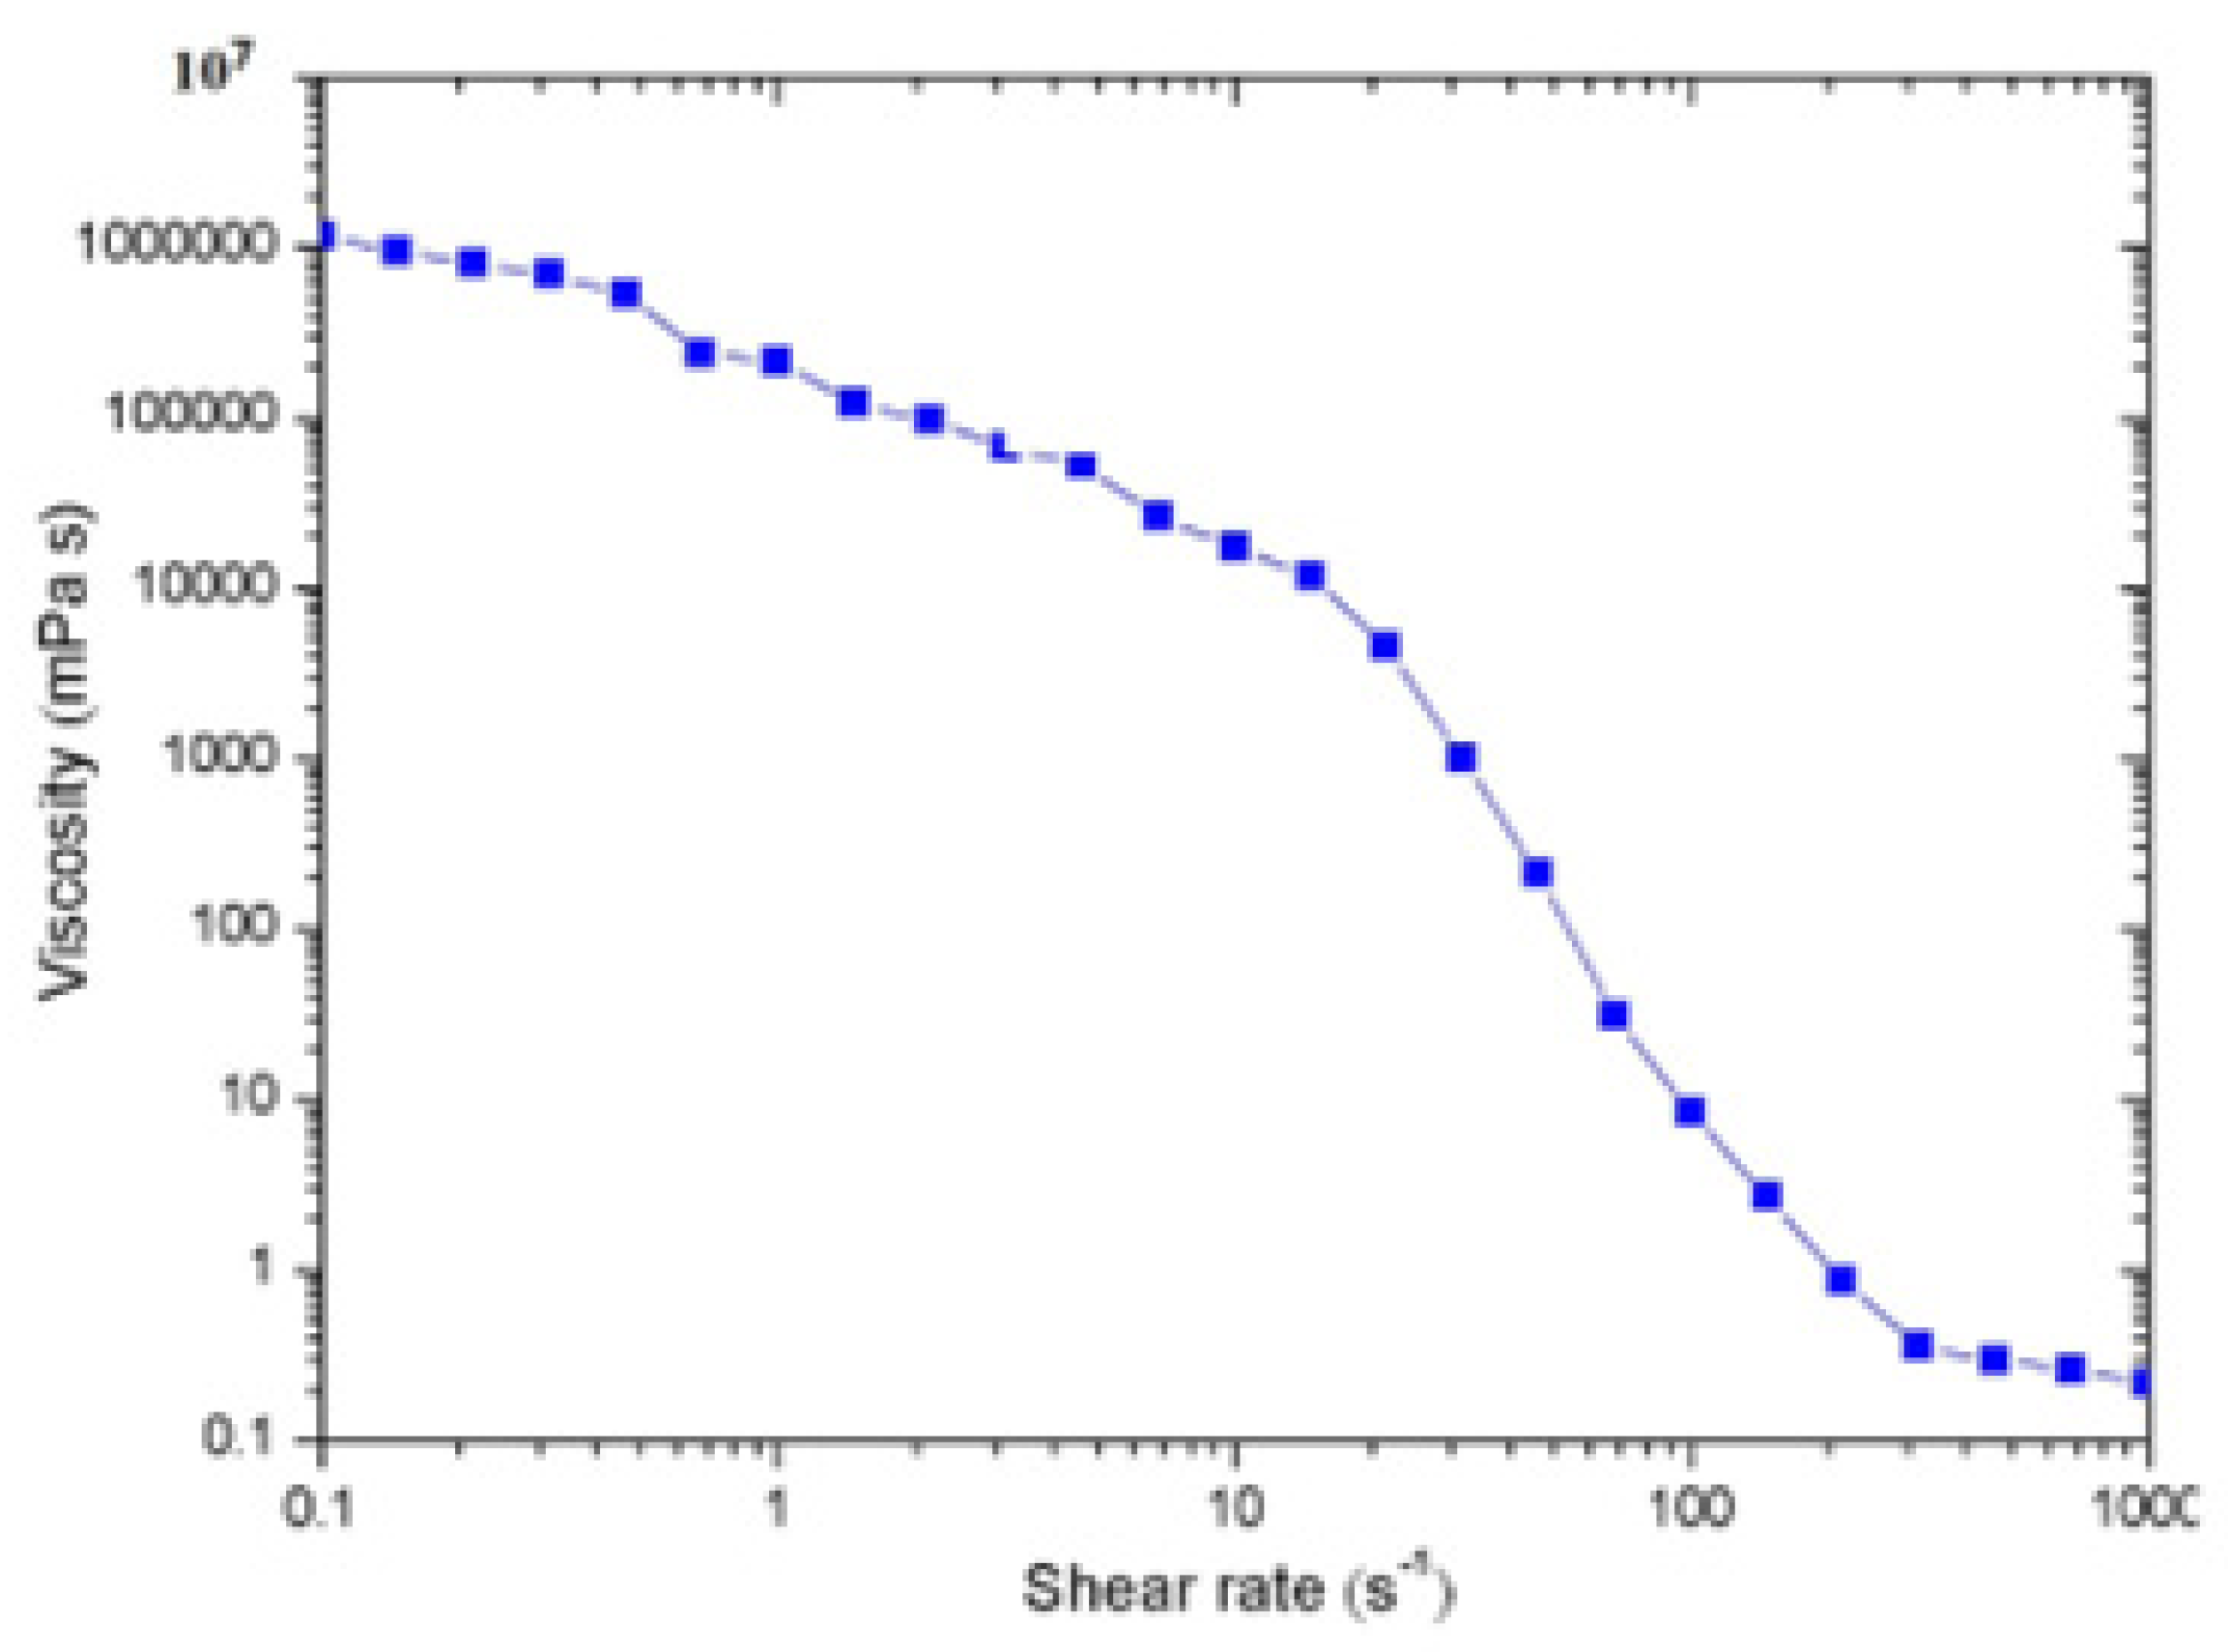
The rheological behaviors of inks/pastes such as viscosity, flow rate, etc. directly impact the printing speed of DIWP. Hong et al. [51] utilized the Hagen–Poiseuille equation to correlate the viscosity and volumetric flow rate of copper paste as the copper content increased. It was found that as the copper content increases, paste viscosity non-linearly increases and hence the volumetric flow rate decreases. As a result, pastes with a higher copper content set a limit on the maximum attainable printing speed. The maximum copper content that was tested was 65 wt%. It was found that with the increase of copper content up to 55 wt%, the viscosity and volumetric flow rate of copper paste increases and decreases sharply, respectively. The rate of change slows down after that and the slopes of the curves approach a plateau. As in typical fused filament fabrication (FFF), the paste for DIWP also shows shear thinning behavior which facilitates the extrusion of pastes a with higher copper content even with relatively lower pressure. Ren et al. [50] measured apparent viscosity as a function of shear rate as shown in Figure 2.

3. Manufacturing of Pure Cu Parts

3.1. 3D Printing Processes

3.1.1. PFSP Process

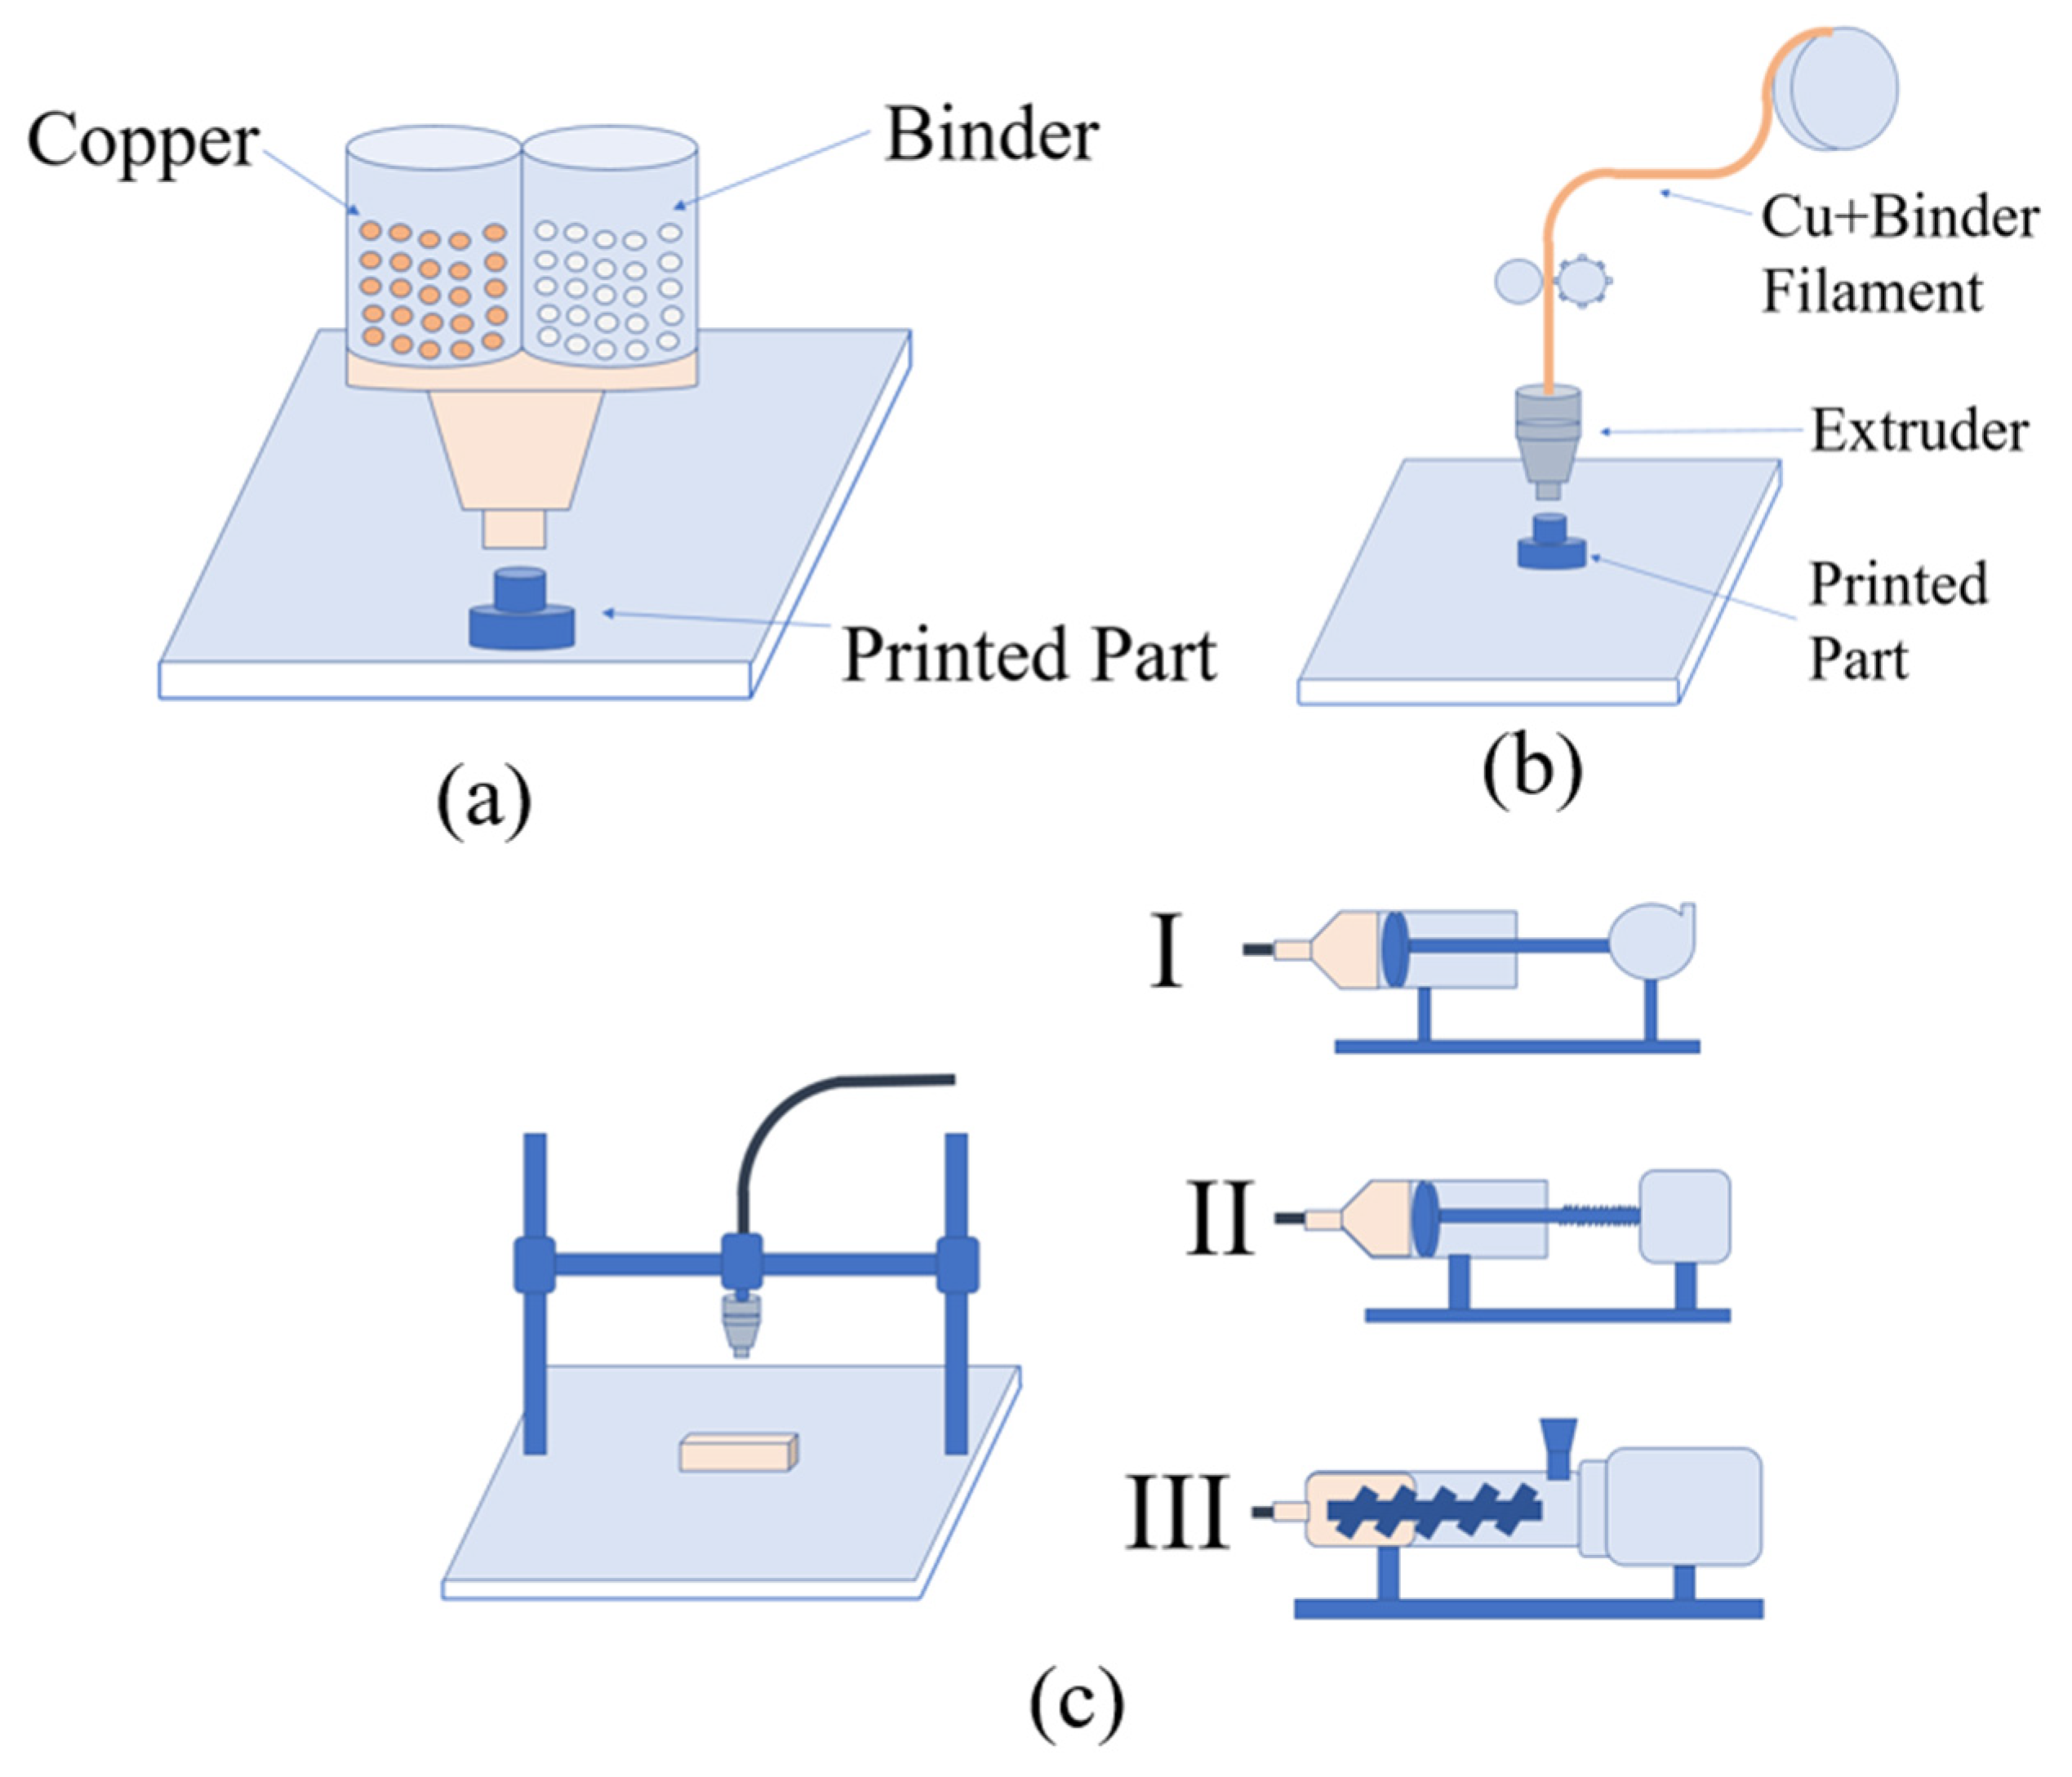
Singh et al. [22,37] used a screw-based extrusion 3D printer, (model: ExAM 255, AIM3D GmbH, Rostock, Germany), that uses a pneumatically powdered piston with a hopper to continuously push the pellets into the extruder. The material was extruded from a hardened steel nozzle with a 0.4 mm diameter at an extrusion temperature of 196 °C. The other printing parameters were a layer thickness of 0.05 mm, extrusion width of 0.51 mm, 65% overlap, bed temperature of 60 °C, nozzle movement speed of 20 mm/s, 100% infill density, and extrusion flow rate of 120% of the usual value. Figure 3a depicts the schematic diagram for the process.

3.1.2. FFRP Process

Rodriguez et al. [9] and Cañadilla et al. [5] used a commercially available system (model: Metal X, Markforged, Watertown, MA, USA) with proprietary materials. Markforged’s atomic diffusion additive manufacturing (ADAM) is an FFRP technique, that was used to print pure copper parts [9]. This system uses a proprietary binder system and utilizes separate units for chemical de-binding and thermal de-binding/sintering [5,9]. When using this technique, two different filaments are employed: the copper filament is used to print the parts, and a ceramic filament is utilized to print support structures [5].
Gonzalez-Gutierrez et al. [47] used a different system, (model: X1000, German RepRap GmbH, Feldkirchen, Germany) with different print settings such as a nozzle diameter of 0.6 mm, printing speed of 30 mm/s, layer height of 0.3 mm, bed temperature of 90 °C and extrusion temperature of 240 °C. To produce a high-quality filament, a single-screw extruder system with copper and binder feeding in different temperature zones was used.
Figure 3b shows a general schematic diagram for the process.

3.1.3. DIWP Process

Zhao et al. loaded the paste in a syringe tube of a pneumatic dispenser, and printed using Teflon sheets for easy demolding. Once the solvent evaporation from a prior printed layer was complete, the next layer was printed atop the previous layer. Yan et al. [49] developed a custom paste-injection 3D printing system consisting of a 3D platform and a 0.3 mm diameter syringe-based dispensing system.
Hong et al. [51] developed a screw-based paste extruder that was integrated with a typical desktop 3D printer using a hose and syringe-based deposition head. This system allows the feeding of a highly viscous metal paste and the printing of 3D copper parts.
Ren et al. [50] also developed a custom piston-based extrusion 3D printer that has a heated syringe to maintain the rheology of the slurry-like molten feedstock during printing. First, copper powder mixed with an organic binder is heated and crushed to prepare the feedstock which is then used to 3D-print green parts using the the following parameters: extrusion temperature: 160 °C; extrusion head speed: 360 mm/min; piston speed: 0.047 mm/s; nozzle diameter: 2 mm. Then, thermal de-binding was performed at 450 °C followed by sintering at 1083 °C.
Figure 3c shows a general schematic diagram for the processes.

3.2. De-Binding and Sintering

3.2.1. For Parts Printed by PFSP

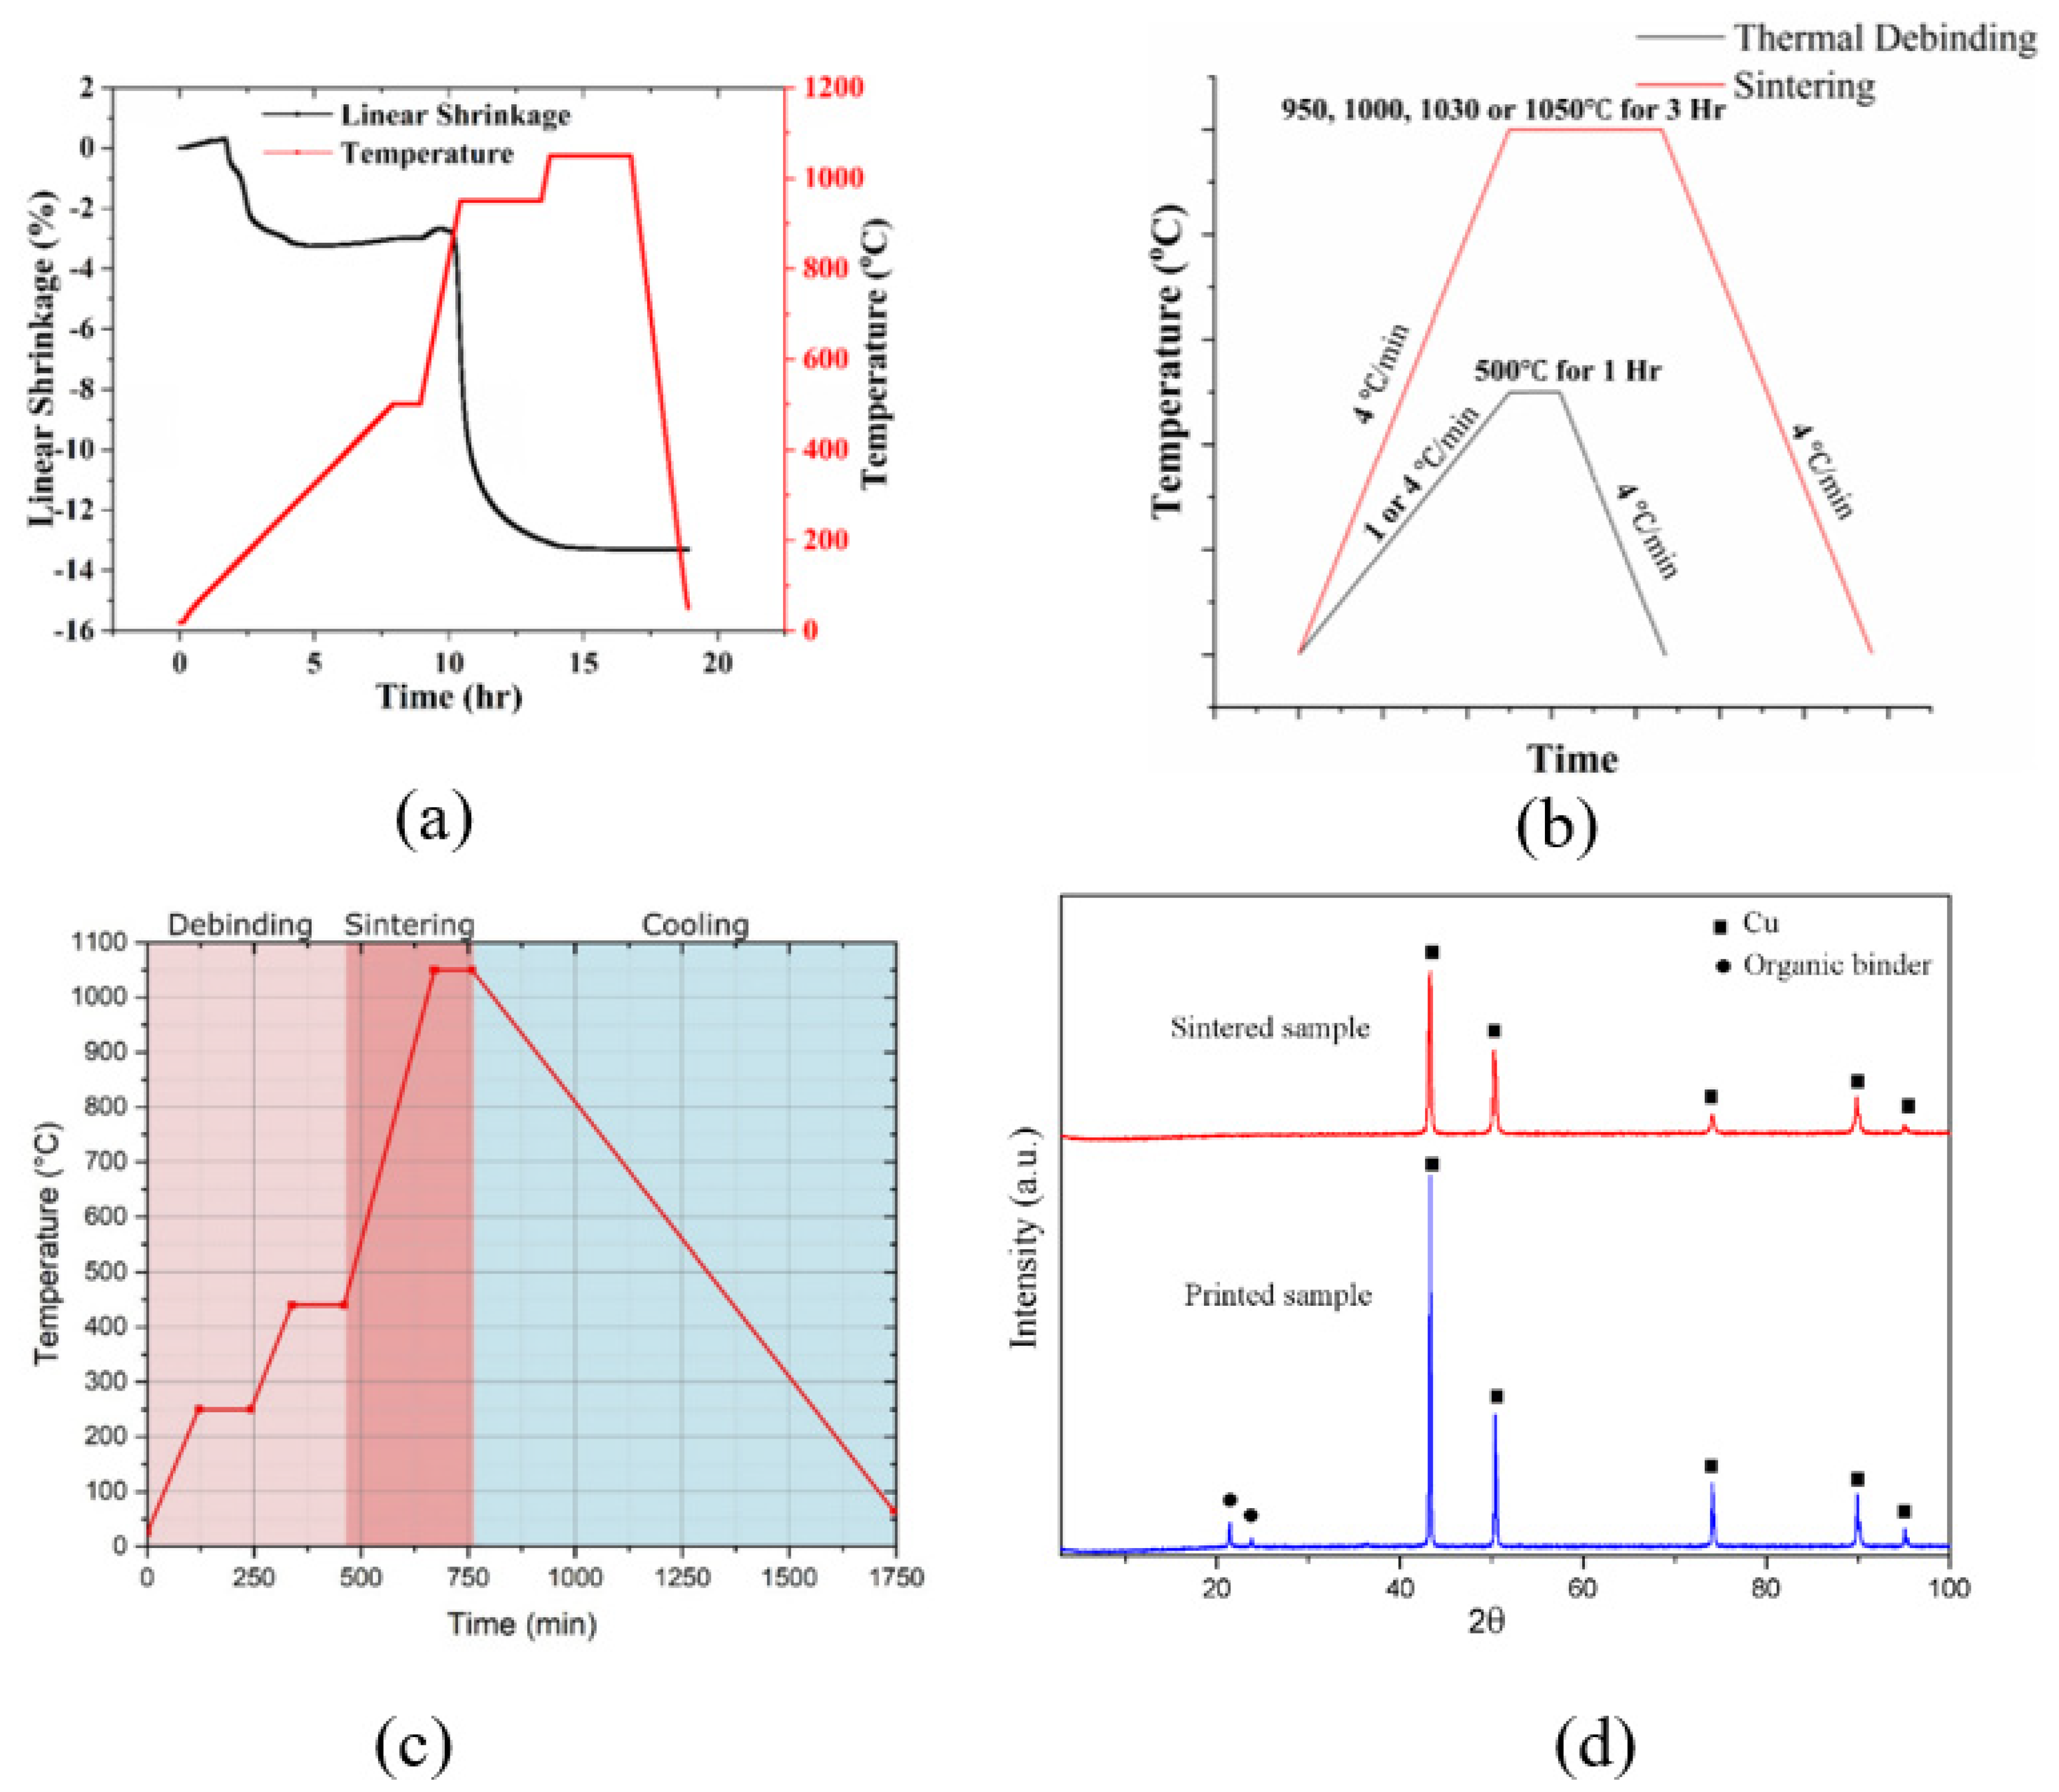
Singh et al. [22] performed solvent de-binding by submerging the printed green parts under water for 14 h to dissolve PEG, followed by drying at 100 °C for 2 h in an oven. After that, the parts were subjected to thermal de-binding using a vertical dilatometer by heating them to 500 °C at a rate of 1 °C/min and holding them at that temperature for 1 h to remove wax. The parts were sintered by continuing heating to 950 °C at the a rate of 4 °C/min, holding them at that temperature for 3 h, then again heating them to 1030 °C at the a rate of 4 °C/min, holding them again for 3 h, and finally cooling them down at a rate of 6 °C/min. Both thermal de-binding and sintering were performed in the presence of a gas flow containing 96% He and 4% H2. Figure 4a shows the thermal profile observed during the de-binding and sintering process [22]. While in this study, Singh et al. used the same heating cycle for thermal de-binding and sintering, in another study [37], the same researchers used two separate heating cycles for both thermal de-binding and sintering, as shown in Figure 4b.
The binder system of Gonzalez-Gutierrez et al. [47] comprised a soluble cyclohexane TPE and a grafted polyolefin (gPO) as an insoluble backbone. Solvent de-binding was conducted by submerging the parts in cyclohexane at 60 °C to remove the TPE, followed by drying for around 4 h in a fume hood at ambient temperature. After that, the specimens went through thermal de-binding and sintering in a hydrogen-filled furnace. As Figure 4c depicts, the temperature was raised to 250 °C (with holding for 1 h) and 450 °C (with holding for 1 h) for two-stage de-binding process. For sintering, the parts were heated to 1050 °C and held for 1 h, followed by being cooled. All heating cycles were performed at a rate of 2 °C/min.

3.2.2. For Parts Printed by FFRP

Both Rodriguez et al. [9] and Cañadilla et al. [5] used Markforged’s Wash-1 unit for solvent de-binding to remove Markforged’s proprietary solvent (Opteon SF-79) from the printed green parts. For thermal de-binding and sintering in the same cycle, both groups used Markforged’s Sinter-1 unit that [9] can heat up to 1300 °C. First, it was heated up to a certain de-binding temperature and then maintained at that temperature for a specific amount of time to ensure the complete removal of the high-molecular-weight (HMW) polymer binder. Then, the temperature was increased to the sintering temperature followed by being held for the holding time. Lastly, it was cooled down to the room temperature. The entire thermal cycle took place under protective atmospheric conditions and lasted 30 h in total. The thermal de-binding stage involved a 2.8% H2 and 97.8% Ar atmosphere, and the sintering and cooling steps were carried out in a pure Argon environment. After the full heating cycle, the final metallic pure copper components were produced [5].

3.2.3. For Parts Printed by DIWP

The organic solvent used in DIWP does not require a solvent de-binding step, as the volatile solvent evaporates during and after printing in ambient temperature. While some researchers conducted simultaneous thermal de-binding and sintering processes in one single step, others performed two different but sequential steps for thermal de-binding and sintering. For example, Zhao et al. [48] used a furnace flooded with 95% N2 and 5% H2 to heat the printed green parts to 1000 °C and cooled them at a rate of 5 °C/min after holding them at the peak temperature for 2 h. Yan et al. [49] performed sintering of copper green parts at various temperatures (750 °C, 800 °C, 850 °C, 900 °C, 950 °C, 1000 °C, and 1050 °C) where the temperature was raised at a rate of 10 °C/min. They found that a minimum temperature of 950 °C with a holding period of 120 min was necessary to realize fully sintered copper parts. Similarly, Hong et al. [51] dried printed copper green parts in air at ambient temperature, then subjected them to a heat treatment with charcoal in a box furnace at 950 °C for two hours.
While Ren et al. [50] also did not require a solvent de-binding step, they applied a two-stage post-processing step in a furnace under a vacuum. First, the copper green parts were heated to 500 °C at a rate of 2 °C/min, held at that temperature for 2.5 h, then heated again to 1083 °C at a rate of 3 °C/min and held at that temperature for 3 h. The X-ray diffraction (XRD) analysis, shown in Figure 4d, exhibits the disappearance of peaks associated with the organic binder after sintering.

4. Performance Characterization of Pure Copper Parts

4.1. Electrical Properties

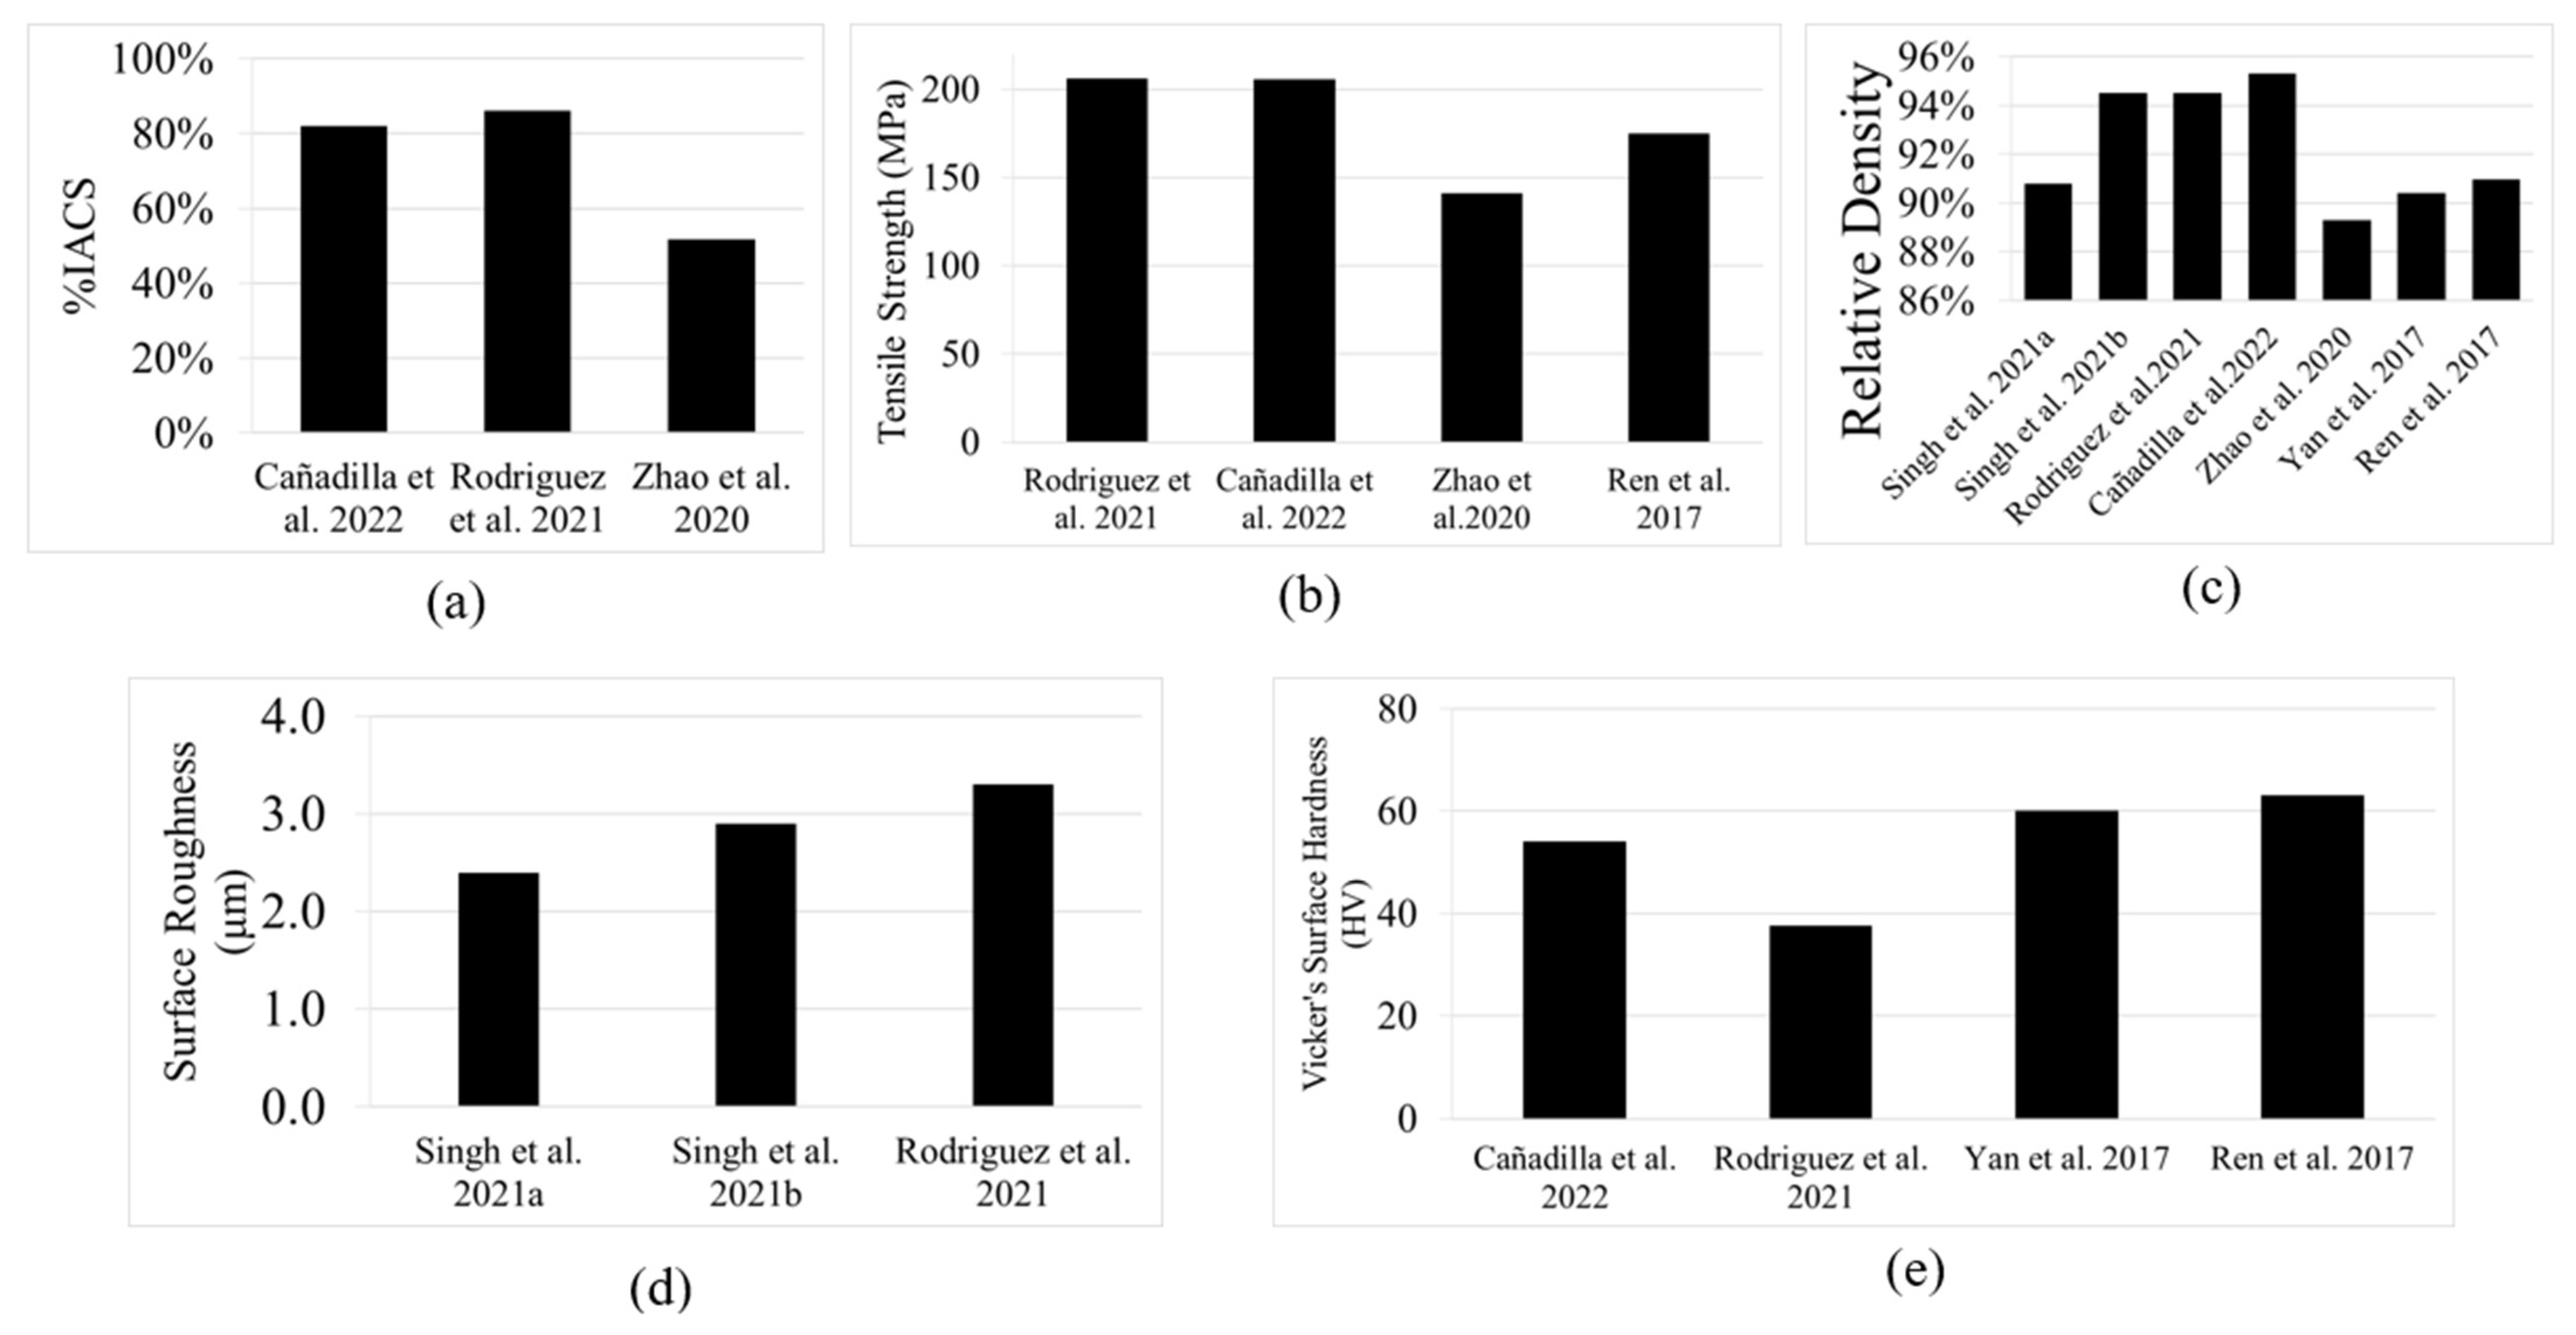
To evaluate the electrical conductivity, Cañadilla et al. [5] applied the van der Pauw method, where four probes are placed at four contact points located around the edges of the sample. The average electrical conductivity measured in this method was found to be up to 48 × 106 S/m, which is around 82% of the International Annealed Copper Standard (IACS), 58 × 106 S/m. Rodriguez et al. [9] conducted electrical direct current (DC) resistance testing, per ASTM B193, and found the electrical conductivity to be 86.11 ± 6.92% of the IACS. Zhao et al. [48] carried out the electrical conductivity test on the part which was sintered at 1000 °C. They reported the electrical conductivity to be 30 × 106 S/m, which is only 51.7% of the IACS. The comparative conductivities (% of the IACS) from the studies are shown in Figure 5a.

4.2. Mechanical Properties

4.2.1. Tensile Strength

Rodriguez et al. [9] performed tensile tests on sintered copper parts, per ISO 6892-1, and reported a tensile strength of 205.87 ± 0.07 MPa. Cañadilla et al. [5] found the tensile strength of their ADAM-processed copper part to be 205.8 ± 5.0 MPa. The authors concluded that a prolonged high-temperature sintering process might result in more ductile properties compared to copper parts processed by selective laser melting (SLM) and that altering the sintering parameters can change microstructures and various mechanical properties [5,9]. Zhao et al. [48] measured the tensile strength of samples sintered at 1000 °C to be 141 ± 19 MPa, which is around 20% greater than the tensile strength (116.7 MPa) of copper parts processed by binder jetting and sintered at 1080 °C [52]. Ren et al. [50] evaluated the tensile strength of printed and sintered specimens in accordance with the guidelines of ASTM D638-2003 and ASTM E8, respectively. Four different tensile tests were carried out for each of the printed and sintered samples and the tensile strength of the sintered part was reported to be 175 MPa. The comparative tensile strengths of copper parts processed in different studies are shown in Figure 5b.

4.2.2. Density

The copper parts sintered by Singh et al. [22] exhibited an overall shrinkage of ~13% and a relative density of ~90.8% of the bulk density of pure copper, which is 8.96 gm/cm3 [22]. In a different investigation, Singh et al. [37] were able to achieve a relative density of ~94.5% with similar isotropic shrinkage (<13.1%). Using Markforged’s ADAM technology, while Rodriguez et al. achieved a relative density of 94.51% [9], Cañadilla et al. [5] reported a slightly higher density of 95.3%. For DIWP-processed parts, while Zhao et al. [48] reported a relatively density of 89.28%, Yan et al. [49] and Ren et al. [50] found the maximum relative densities of 90.4% and 90.95%, respectively. The comparative relative densities reported in different studies are shown in Figure 5c.

4.2.3. Surface Roughness

The surface roughness of sintered copper parts was found to depend on printing parameters such as layer thickness, nozzle speed, extrusion temperature, extrusion multiplier and so on [22,37]. Interestingly, higher material flow rates resulting from a higher extrusion multiplier (between 105% and 150%) were not found to affect the surface roughness of copper parts [22]. Signh et al. [22] reported a minimum surface roughness of 2.4 μm and 2.9 μm for parts printed with a 200 °C and 196 °C [37] extrusion temperature, respectively. The parts processed by Rodriguez et al. [9] exhibited a surface roughness of 3.3 ± 0.02 μm. The comparative surface roughness reported in different studies are shown in Figure 5d.

4.2.4. Mechanical Hardness

Using Vicker’s microhardness measured along the cross section of the copper specimens, Cañadilla et al. [5] found the hardness to be ~54 HV, which is lower than the hardness of copper parts manufactured by SLM (85 ± 4.2 HV) [53,54,55] and wrought copper (40–130 HV) [56]. Rodriguez et al. [9] also reported a lower hardness of 37.6 ± 5.5 HV. Using DIWP, Yan et al. and Ren et al. found a higher hardness of about 60 HV [49] and 63 HV [50], respectively. The comparative surface hardness reported in different studies are shown in Figure 5e.

4.2.5. Flexural Strength

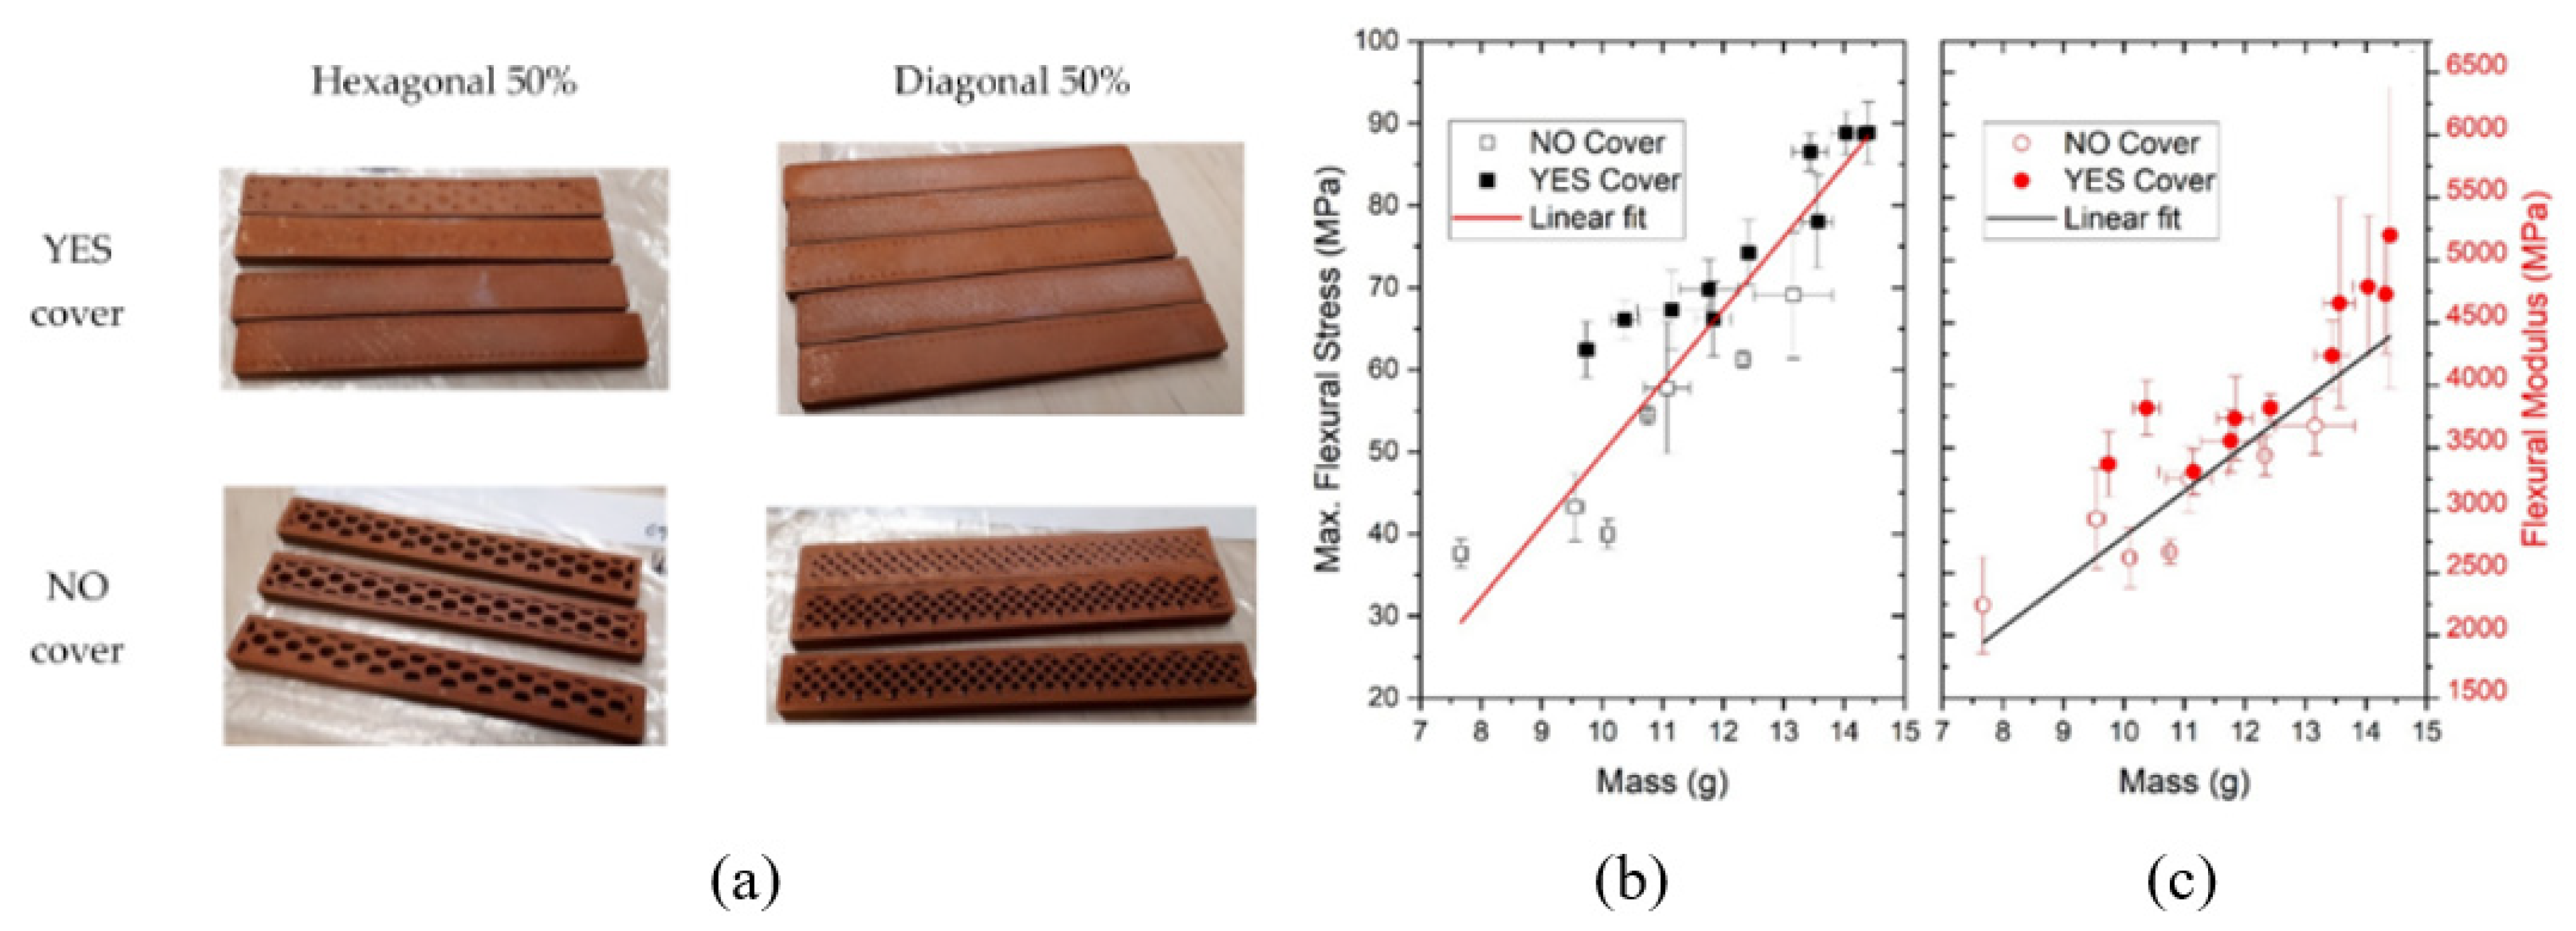
Among others, only Gonzalez-Gutierrez et al. [47] tested the flexural properties of a printed copper part by conducting a three-point bend test under defined conditions per the ISO 178 standard. They printed a number of specimens with different infill patterns and infill densities with or without covers, as shown in Figure 6a. They observed that with the increase in the mass, as expected, the flexural strength and flexural modulus also increased, as shown in Figure 6b,c. Another important finding from this test is that some samples with a cover exhibited similar flexural properties, although their masses were lower than the mass of samples without covers. Hence, this approach demonstrates potential for printing lightweight components.

4.2.6. Microstructural Analysis

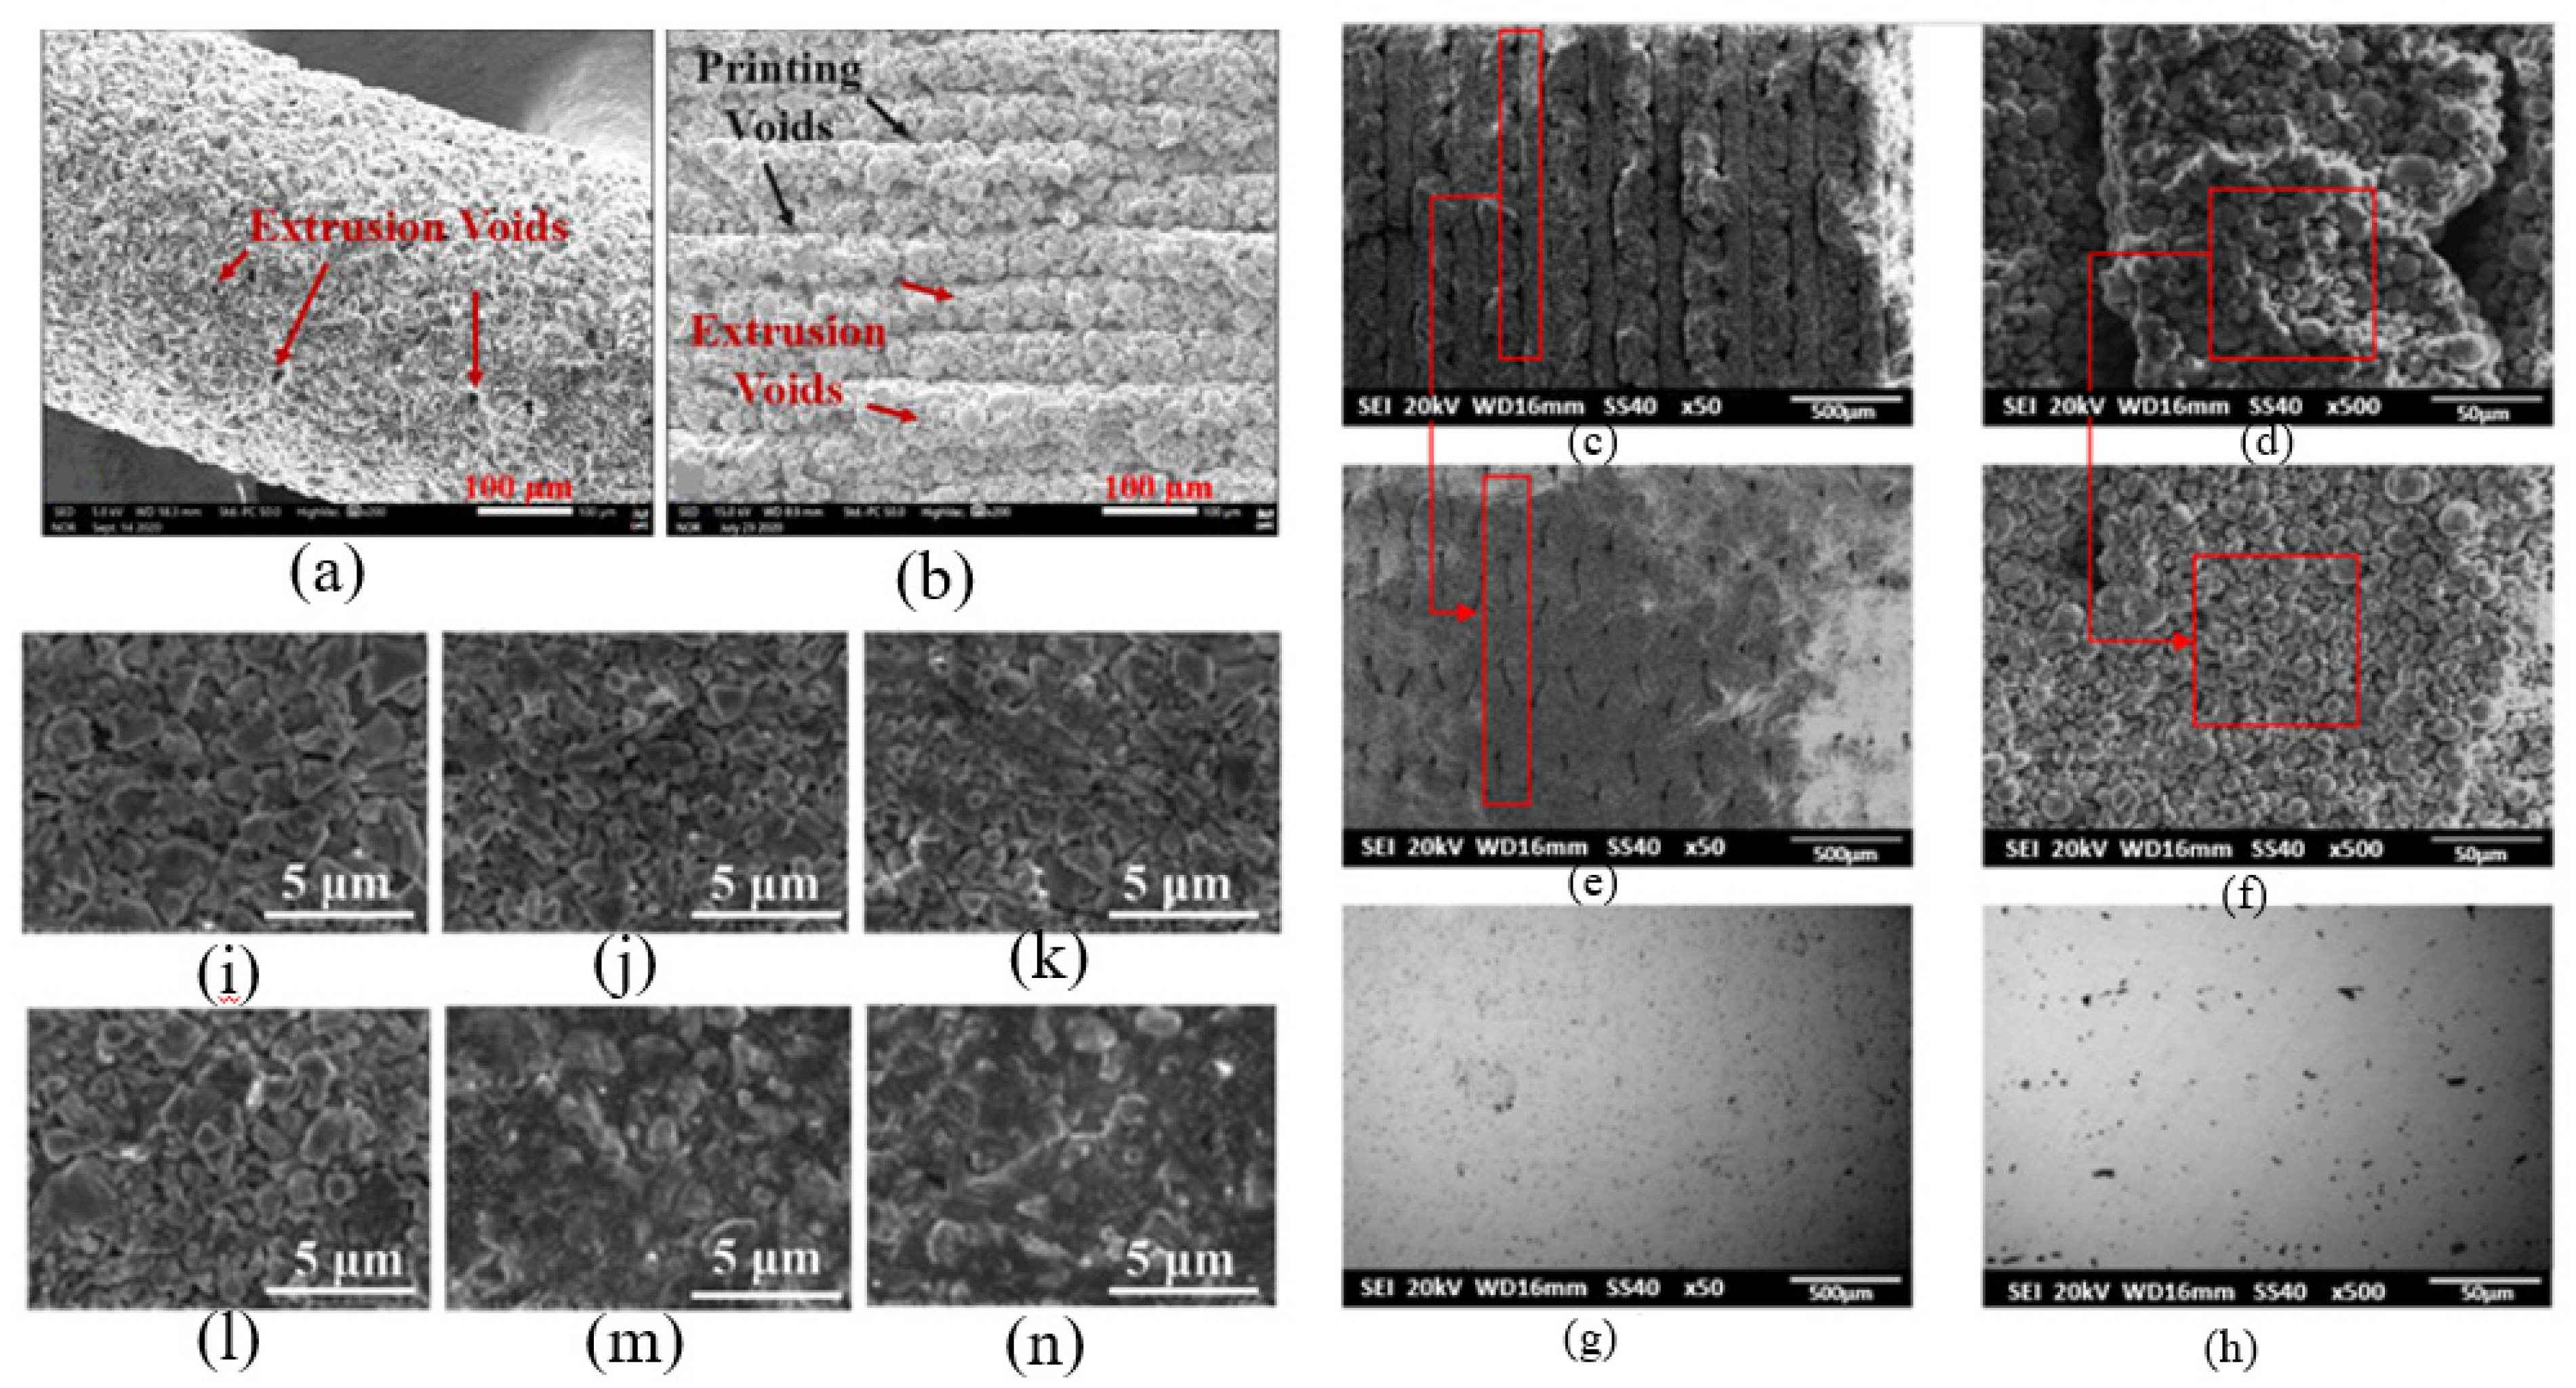
Scanning electron microscopy (SEM) images of extrudates and printed layers revealed that the process involves ‘extrusion voids’ and ‘printing voids’ [37]. ‘Extrusion voids’ are the voids that are larger than the size of the copper particles (usually 10–20 μm) that are formed due to a severe shear force associated the with extrusion process and a variation in viscosity because of the non-homogenous cooling of deposited layers, as shown in Figure 7a. On the other hand, ‘printing voids’ depicted in Figure 7b are the voids that resulted from insufficient adhesion between adjacent deposited layers due to the difference in temperature between two successive layers.
As the printed copper green parts undergo different de-binding and sintering steps, their surface morphology changes, resulting in different material properties. Figure 7c–h illustrates the SEM images of the green, brown, and final parts obtained by Cañadilla et al. [5], in which different types of printing defects are observed. Figure 7c,d shows the SEM images of the sidewall and top surfaces of a copper green part before de-binding steps are performed, exhibiting both ‘extrusion voids’ and ‘printing voids’. The SEM images of the brown part obtained right after the solvent de-binding step is performed are shown in Figure 7e,f, while confirms the removal of the wax component of the binding system as copper particle agglomeration appears to be less substantial. In Figure 7g,h, as there were no signs of the binders, the solvent and thermal de-binding processes were successful and did not adversely affect the material’s ability to sinter. SEM scans revealed that the sintered copper was mesostructured, with a continuous appearance and homogenous texture [5].
To fully understand the effect of different sintering temperatures on the microstructures of sintered copper parts, Yan et al. [49] examined SEM images of copper parts sintered at 800 °C, 850 °C, 900 °C, 950 °C, 1000 °C, and 1050 °C, as shown in Figure 7i–n. The parts showed many pores after sintering at 800 °C (Figure 7i,j). The pores were eliminated and the dispersed microstructures were progressively fused together as the temperature increased and as the atomic diffusion increased (Figure 7k,l). After sintering at 1000 °C, as in Figure 7m, the original fragments of the grain eventually coalesced into a large crystal. Most of the remaining pores disappeared when the sintering temperature increased to 1050 °C, resulting in improved metallurgical bonding (Figure 7n).

5. Challenges and Future Prospects Associated with Extrusion AM

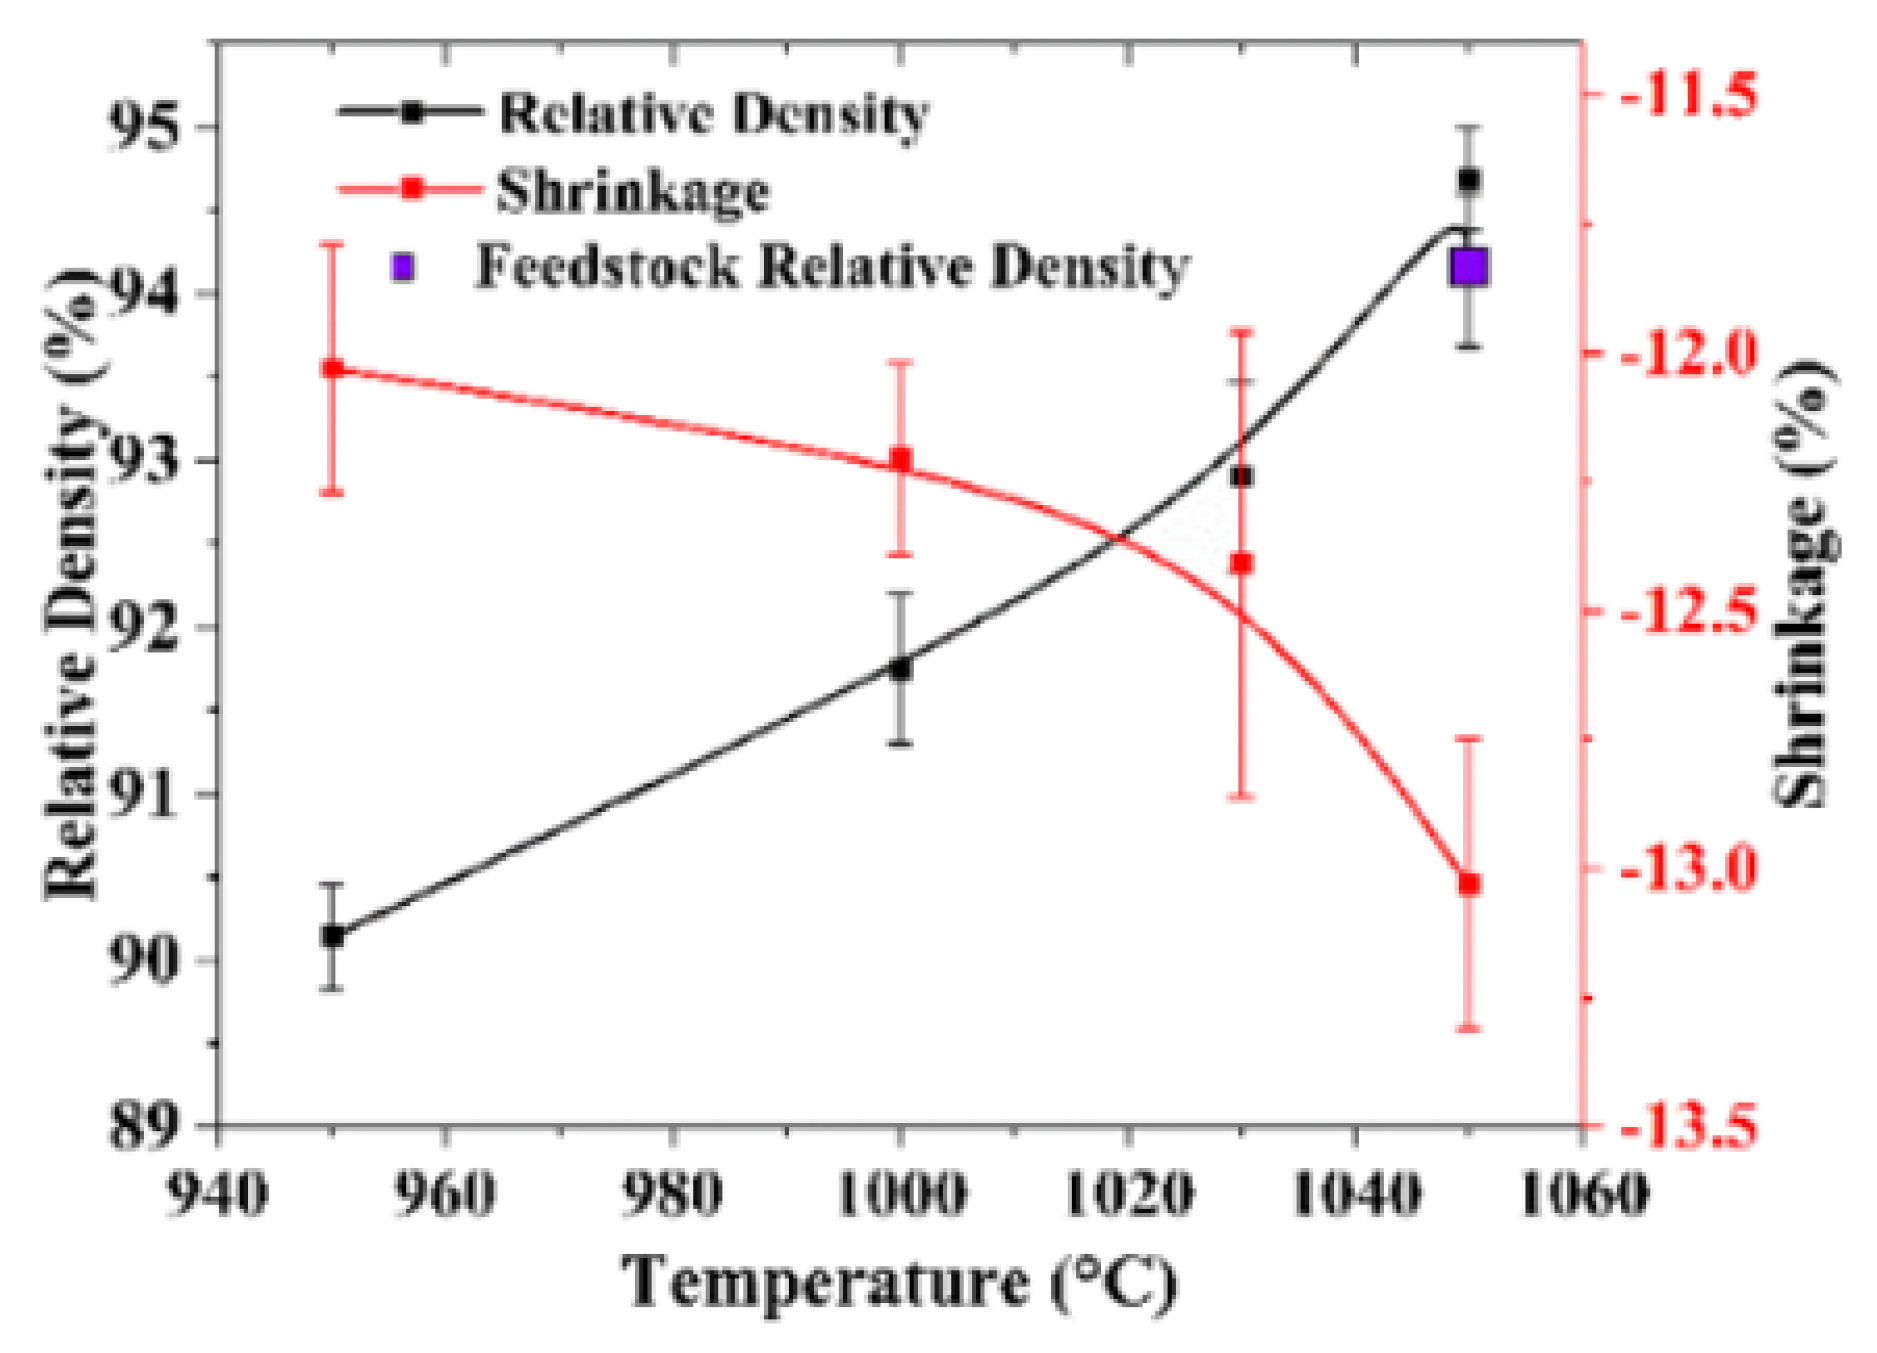
Singh et al. [22] opined that there is a need for an additional optimization of the parameters related to de-binding and sintering in order to achieve a maximum sintered density. However, the most pressing challenge of the sintered copper part is managing the shrinkage. As the binder material is removed in de-binding steps, this leaves gaps between adjacent layers and copper particles. During sintering, when the adjacent copper particles sinter by forming necks, the gap between two particles shrink, resulting in a shrinkage of the overall dimensions. Singh et al. [37] found that as the sintering temperature increased, both the relative density and isotropic shrinkage also increased, as shown in Figure 8. A maximum 13.1% shrinkage was observed for samples sintered at 1050 °C. Such significant shrinkage can be compensated in the CAD models, which may be challenging if a tight tolerance is desired for the final parts. Hong et al. [51] reported a 1.25% volumetric shrinkage in the final part compared to the original part after sintering. They also observed that as the copper content increased, the shrinkage of the final part decreased. The part printed with a feedstock composed of 82 wt% copper was subjected to around 23% shrinkage. Ren et al. [50] measured shrinkages in three perpendicular directions to be 20.85%, 21.19% and 21.06%.
Although some studies on the extrusion of copper alloys performed fatigue testing on the fabricated parts, none of the studies discussed above performed any form of fatigue testing of the sintered pure copper parts [57,58]. Fatigue testing is crucial to ensure the durability and performance of printed parts under repeated stresses. The results of fatigue testing can inform the design and optimization of additive manufacturing processes for pure copper parts, ultimately leading to improved quality and reliability.
Similarly, none of the articles discussed any form of surface treatment of the sintered parts. Surface treatment, such as polishing and chemical etching, can improve surface roughness and eliminate defects. Copper has high thermal conductivity and high surface tension, which can cause surface defects during printing. These steps are essential to ensure high-quality copper parts with excellent functional properties [59,60].
Understanding of the effect of printing parameters in the studies is limited. Singh et al. experimented with thirty-one combinations of layer thickness, nozzle speed, extrusion multiplier and extrusion temperature to find out the best parameters to obtain minimum surface roughness. However, other studies did not explore in detail how the process parameters would affect the properties of the final part.
Another important issue is the lack of computed tomography (CT) studies to provide detailed 3D images of printed parts. CT scans allow the identification and analysis of defects and internal structures that cannot be detected using traditional methods. This is particularly important for quality control in AM, as defects such as voids, cracks, and porosity can significantly affect the fatigue performance and reliability of printed parts. CT can also be used to optimize the design and printing parameters of AM parts by analyzing the internal structures and their properties [61,62].
Electrical conductivity (% of the IACS), tensile strength and relative density of the parts manufactured by the DIWP method were found to be lower compared to those of the parts produced by the other two methods. Therefore, PFSP and FFRP are preferred when parts with higher electrical conductivity and tensile strength are desired.

6. Conclusions

Compared to other metal AM techniques such as selective laser melting, electron beam melting or directed energy deposition, extrusion AM offers a relatively low-cost solution for metal 3D printing. Not only that, the safety requirements of those high-energy-involving techniques make extrusion AM a perfect candidate for applications not requiring high-resolution printing capability. Therefore, printing metal parts via extrusion AM is ever-promising and the field is actively progressing. All nine research articles reviewed in this work collectively present the current state-of-the-art manufacturing methods. The present paper has covered the following:
  • The printing processes are classified into three categories: PFSP, FFRP and DIWP, based on the feedstock materials and their feeding mechanisms.
  • The binder systems used with copper consist of one polymeric binder component that facilitates the extrusion process and a backbone binder that helps maintain the 3D shape during sintering.
  • Depending on the category of the technique, binders may include PEG, TPE, wax, polyolefin, PW–LDPE–SA, or PVA.
  • The ranges of the commonly used printing parameters included the following: printing speed: 2–100 mm/s; layer thickness: 0.05–2 mm; bed temperature: 60–90 °C; extrusion temperature: 180–240 °C.
  • While PFSP and FFRP required a solvent de-binding step, in DIWP, solvent evaporation at ambient temperature was the only step required to remove the polymeric binder component.
  • While most researchers applied a maximum sintering temperature of 1000–1050 °C, only one study used a temperature of 1083 °C.
  • The relative density of the final sintered part varied from 89.5% to 95.4% of that of pure copper. Electrical conductivity varied from 51.7% of the IACS to 86.1% of the IACS
  • The tensile strength, hardness and surface roughness ranged from 141 MPa to 205 MPa, 54.8 HV to 63 HV, and 2.4 µm to 3.3 µm, respectively.
  • Shrinkage was identified as the major challenge for this technology, which was reported to be from 13.1% to as high as 23%.
  • However, the studies did not perform any form of fatigue testing on the sintered parts.
  • Surface treatment can improve surface roughness and eliminate defects. In addition, CT scans can be used to identify and analyze internal voids and defects.
  • The electrical conductivity, tensile strength, and relative density of the parts produced by the DIWP method were found to be lower than those of the parts produced by the other two methods. PFSP and FFRP are preferred when parts with higher electrical conductivity and tensile strength are required.

Author Contributions

C.S.-U.-Z.: investigation, methodology, literature review, and writing—original draft. M.A.H.K.: conceptualization, supervision, writing—review and editing. All authors have read and agreed to the published version of the manuscript.

Funding

This research and APC are funded by the President’s Office, University of Regina, and Natural Sciences and Engineering Research Council of Canada.

Data Availability Statement

No new data were created or analyzed in this study. Data sharing is not applicable to this article.

Conflicts of Interest

The authors declare that they have no conflicts of interest.

References

  1. Silvain, J.F.; Heintz, J.M.; Veillere, A.; Constantin, L.; Lu, Y.F. A Review of Processing of Cu/C Base Plate Composites for Interfacial Control and Improved Properties. Int. J. Extrem. Manuf. 2020, 2, 012002. [Google Scholar] [CrossRef]
  2. Vasiliev, L.L. Heat Pipes in Modern Heat Exchangers. Appl. Therm. Eng. 2005, 25, 1–19. [Google Scholar] [CrossRef]
  3. Jiang, P.-X.; Fan, M.-H.; Si, G.-S.; Ren, Z.-P. Thermal-Hydraulic Performance of Small Scale Micro-Channel and Porous-Media Heat-Exchangers. Int. J. Heat Mass Transf. 2001, 5, 1039–1051. [Google Scholar] [CrossRef]
  4. Lee, J.; Mudawar, I. Two-Phase Flow in High-Heat-Flux Micro-Channel Heat Sink for Refrigeration Cooling Applications: Part I—Pressure Drop Characteristics. Int. J. Heat Mass Transf. 2005, 48, 928–940. [Google Scholar] [CrossRef]
  5. Cañadilla, A.; Romero, A.; Rodríguez, G.P.; Caminero, M.Á.; Dura, Ó.J. Mechanical, Electrical, and Thermal Characterization of Pure Copper Parts Manufactured via Material Extrusion Additive Manufacturing. Materials 2022, 15, 4644. [Google Scholar] [CrossRef]
  6. Wong, K.v.; Hernandez, A. A Review of Additive Manufacturing. ISRN Mech. Eng. 2012, 2012, 1–10. [Google Scholar] [CrossRef]
  7. Frazier, W.E. Metal Additive Manufacturing: A Review. J. Mater. Eng. Perform. 2014, 23, 1917–1928. [Google Scholar] [CrossRef]
  8. Zhang, Y.; Wu, L.; Guo, X.; Kane, S.; Deng, Y.; Jung, Y.G.; Lee, J.H.; Zhang, J. Additive Manufacturing of Metallic Materials: A Review. J. Mater. Eng. Perform. 2018, 27, 1–13. [Google Scholar] [CrossRef]
  9. Rodriguez, J.; Vicente, J.I.; Ezeiza, J.C.; Zuriarrain, A.; Arrazola, P.J.; Badiola, X.; Dominguez, E.; Soler, D. Mechanical and Electrical Properties of Additively Manufactured Copper. IOP Conf. Ser. Mater. Sci. Eng. 2021, 1193, 012034. [Google Scholar] [CrossRef]
  10. Bandyopadhyay, A.; Traxel, K.D. Invited Review Article: Metal-Additive Manufacturing—Modeling Strategies for Application-Optimized Designs. Addit. Manuf. 2018, 22, 758–774. [Google Scholar] [CrossRef]
  11. Singh, S.; Ramakrishna, S.; Singh, R. Material Issues in Additive Manufacturing: A Review. J. Manuf. Process 2017, 25, 185–200. [Google Scholar] [CrossRef]
  12. El-Wardany, T.; She, Y.; Jagdale, V.; Garofano, J.K.; Liou, J.; Schmidt, W. Challenges in 3D Printing of High Conductivity Copper. In Proceedings of the ASME 2017 International Technical Conference and Exhibition on Packaging and Integration of Electronic and Photonic Microsystems, InterPACK 2017, Collocated with the ASME 2017 Conference on Information Storage and Processing Systems, San Francisco, CA, USA, 29 August–1 September 2017. [Google Scholar] [CrossRef]
  13. Kruth, J.P.; Wang, X.; Laoui, T.; Froyen, L. Lasers and Materials in Selective Laser Sintering. Assem. Autom. 2003, 23, 357–371. [Google Scholar] [CrossRef]
  14. Pogson, S.R.; Fox, P.; Sutcliffe, C.J.; O’Neill, W. The Production of Copper Parts Using DMLR. Rapid Prototyp. J. 2003, 9, 334–343. [Google Scholar] [CrossRef]
  15. Zhu, H.H.; Fuh, J.Y.H.; Lu, L. Microstructural Evolution in Direct Laser Sintering of Cu-Based Metal Powder. Rapid Prototyp. J. 2005, 11, 74–81. [Google Scholar] [CrossRef]
  16. Silbernagel, C.; Gargalis, L.; Ashcroft, I.; Hague, R.; Galea, M.; Dickens, P. Electrical Resistivity of Pure Copper Processed by Medium-Powered Laser Powder Bed Fusion Additive Manufacturing for Use in Electromagnetic Applications. Addit. Manuf. 2019, 29, 100831. [Google Scholar] [CrossRef]
  17. Ramirez, D.A.; Murr, L.E.; Li, S.J.; Tian, Y.X.; Martinez, E.; Martinez, J.L.; Machado, B.I.; Gaytan, S.M.; Medina, F.; Wicker, R.B. Open-Cellular Copper Structures Fabricated by Additive Manufacturing Using Electron Beam Melting. Mater. Sci. Eng. A 2011, 528, 5379–5386. [Google Scholar] [CrossRef]
  18. Lodes, M.A.; Guschlbauer, R.; Körner, C. Process Development for the Manufacturing of 99.94% Pure Copper via Selective Electron Beam Melting. Mater. Lett. 2015, 143, 298–301. [Google Scholar] [CrossRef]
  19. Raab, S.J.; Guschlbauer, R.; Lodes, M.A.; Körner, C. Thermal and Electrical Conductivity of 99.9% Pure Copper Processed via Selective Electron Beam Melting. Adv. Eng. Mater. 2016, 18, 1661–1666. [Google Scholar] [CrossRef]
  20. Guschlbauer, R.; Momeni, S.; Osmanlic, F.; Körner, C. Process Development of 99.95% Pure Copper Processed via Selective Electron Beam Melting and Its Mechanical and Physical Properties. Mater. Charact. 2018, 143, 163–170. [Google Scholar] [CrossRef]
  21. Ramirez, D.A.; Murr, L.E.; Martinez, E.; Hernandez, D.H.; Martinez, J.L.; MacHado, B.I.; Medina, F.; Frigola, P.; Wicker, R.B. Novel Precipitate–Microstructural Architecture Developed in the Fabrication of Solid Copper Components by Additive Manufacturing Using Electron Beam Melting. Acta Mater. 2011, 59, 4088–4099. [Google Scholar] [CrossRef]
  22. Singh, G.; Missiaen, J.M.; Bouvard, D.; Chaix, J.M. Copper Extrusion 3D Printing Using Metal Injection Moulding Feedstock: Analysis of Process Parameters for Green Density and Surface Roughness Optimization. Addit. Manuf. 2021, 38, 1778. [Google Scholar] [CrossRef]
  23. Khondoker, M.A.H.; Asad, A.; Sameoto, D. Printing with Mechanically Interlocked Extrudates Using a Custom Bi-Extruder for Fused Deposition Modelling. Rapid Prototyp. J. 2018, 24, 921–934. [Google Scholar] [CrossRef]
  24. Khondoker, M.A.H.; Baheri, N.; Sameoto, D. Tendon-Driven Functionally Gradient Soft Robotic Gripper 3D Printed with Intermixed Extrudate of Hard and Soft Thermoplastics. 3D Print. Addit. Manuf. 2019, 6, 191–203. [Google Scholar] [CrossRef]
  25. Ligon, S.C.; Liska, R.; Stampfl, J.; Gurr, M.; Mülhaupt, R. Polymers for 3D Printing and Customized Additive Manufacturing. Chem. Rev. 2017, 117, 10212–10290. [Google Scholar] [CrossRef] [PubMed]
  26. Brenken, B.; Barocio, E.; Favaloro, A.; Kunc, V.; Pipes, R.B. Fused Filament Fabrication of Fiber-Reinforced Polymers: A Review. Addit. Manuf. 2018, 21, 1–16. [Google Scholar] [CrossRef]
  27. Gibson, M.A.; Mykulowycz, N.M.; Shim, J.; Fontana, R.; Schmitt, P.; Roberts, A.; Ketkaew, J.; Shao, L.; Chen, W.; Bordeenithikasem, P.; et al. 3D Printing Metals like Thermoplastics: Fused Filament Fabrication of Metallic Glasses. Mater. Today 2018, 21, 697–702. [Google Scholar] [CrossRef]
  28. Ebrahimi, N.D.; Ju, Y.S. Thermal Conductivity of Sintered Copper Samples Prepared Using 3D Printing-Compatible Polymer Composite Filaments. Addit. Manuf. 2018, 24, 479–485. [Google Scholar] [CrossRef]
  29. Wu, G.; Langrana, N.A.; Sadanji, R.; Danforth, S. Solid Freeform Fabrication of Metal Components Using Fused Deposition of Metals. Mater. Des. 2002, 23, 97–105. [Google Scholar] [CrossRef]
  30. Bose, A.; Schuh, C.A.; Tobia, J.C.; Tuncer, N.; Mykulowycz, N.M.; Preston, A.; Barbati, A.C.; Kernan, B.; Gibson, M.A.; Krause, D.; et al. Traditional and Additive Manufacturing of a New Tungsten Heavy Alloy Alternative. Int. J. Refract. Met. Hard Mater. 2018, 73, 22–28. [Google Scholar] [CrossRef]
  31. Singh, P.; Shaikh, Q.; Balla, V.K.; Atre, S.V.; Kate, K.H. Estimating Powder-Polymer Material Properties Used in Design for Metal Fused Filament Fabrication (DfMF3). JOM 2019, 72, 485–495. [Google Scholar] [CrossRef]
  32. European Powder Metallurgy Association (EPMA). Properties of Additive Manufactured Hardmetal Components Produced by Fused Filament Fabrication (FFF). Available online: https://www.epma.com/publications/euro-pm-proceedings/product/ep18-3991543 (accessed on 30 September 2022).
  33. Lengauer, W.; Duretek, I.; Fürst, M.; Schwarz, V.; Gonzalez-Gutierrez, J.; Schuschnigg, S.; Kukla, C.; Kitzmantel, M.; Neubauer, E.; Lieberwirth, C.; et al. Fabrication and Properties of Extrusion-Based 3D-Printed Hardmetal and Cermet Components. Int. J. Refract. Met. Hard Mater. 2019, 82, 141–149. [Google Scholar] [CrossRef]
  34. Jafari, M.A.; Han, W.; Mohammadi, F.; Safari, A.; Danforth, S.C.; Langrana, N. A Novel System for Fused Deposition of Advanced Multiple Ceramics. Rapid Prototyp. J. 2000, 6, 161–174. [Google Scholar] [CrossRef]
  35. Jisa, R.; Laumann, S.; Cihak-Bayr, U.; Tomastik, C.; Eberle, R.; Keppeler, M.; Hofmann, U.; Franek, F. Tribological Properties of MIM Manufactured Copper Alloys. Tribol. Mater. Surf. Interfaces 2014, 8, 27–34. [Google Scholar] [CrossRef]
  36. Muhsan, A.S.; Ahmad, F.; Mohamed, N.M.; Yusoff, P.S.M.M.; Raza, M.R. Uniform Dispersion of Multiwalled Carbon Nanotubes in Copper Matrix Nanocomposites Using Metal Injection Molding Technique. Int. J. Manuf. Eng. 2013, 2013, 1–9. [Google Scholar] [CrossRef]
  37. Singh, G.; Missiaen, J.-M.; Bouvard, D.; Chaix, J.-M. Copper Additive Manufacturing Using MIM Feedstock: Adjustment of Printing, Debinding, and Sintering Parameters for Processing Dense and Defectless Parts. Int. J. Adv. Manuf. Technol. 2021, 115, 449–462. [Google Scholar] [CrossRef]
  38. Kim, F.; Kwon, B.; Eom, Y.; Lee, J.E.; Park, S.; Jo, S.; Park, S.H.; Kim, B.S.; Im, H.J.; Lee, M.H.; et al. 3D Printing of Shape-Conformable Thermoelectric Materials Using All-Inorganic Bi2Te3-Based Inks. Nat. Energy 2018, 3, 301–309. [Google Scholar] [CrossRef]
  39. Wang, L.; Liu, J. Compatible Hybrid 3D Printing of Metal and Nonmetal Inks for Direct Manufacture of End Functional Devices. Sci. China Technol. Sci. 2014, 57, 2089–2095. [Google Scholar] [CrossRef]
  40. Lewis, J.A. Direct Ink Writing of 3D Functional Materials. Adv. Funct. Mater. 2006, 16, 2193–2204. [Google Scholar] [CrossRef]
  41. Xu, C.; Quinn, B.; Lebel, L.L.; Therriault, D.; L’espérance, G. Multi-Material Direct Ink Writing (DIW) for Complex 3D Metallic Structures with Removable Supports. ACS Appl. Mater. Interfaces 2019, 11, 8499–8506. [Google Scholar] [CrossRef]
  42. Jakus, A.E.; Taylor, S.L.; Geisendorfer, N.R.; Dunand, D.C.; Shah, R.N. Metallic Architectures from 3D-Printed Powder-Based Liquid Inks. Adv. Funct. Mater. 2015, 25, 6985–6995. [Google Scholar] [CrossRef]
  43. Zhao, Y.; Li, H.; Gao, W.; Ren, F. Biopolymer-Assisted Manufacturing of Aluminum-Copper Nanoparticle Composites with Enhanced Sinterability. ACS Appl. Nano Mater. 2019, 2, 5688–5694. [Google Scholar] [CrossRef]
  44. Franchin, G.; Maden, H.S.; Wahl, L.; Baliello, A.; Pasetto, M.; Colombo, P. Optimization and Characterization of Preceramic Inks for Direct Ink Writing of Ceramic Matrix Composite Structures. Materials 2018, 11, 515. [Google Scholar] [CrossRef] [PubMed]
  45. Liu, S.; Li, Y.; Xing, S.; Liu, L.; Zou, G.; Zhang, P. Structure Inheritance in Nanoparticle Ink Direct-Writing Processes and Crack-Free Nano-Copper Interconnects Printed by a Single-Run Approach. Materials 2019, 12, 1559. [Google Scholar] [CrossRef] [PubMed]
  46. Zhang, Q.; Zheng, Y.; Liu, J. Direct Writing of Electronics Based on Alloy and Metal (DREAM) Ink: A Newly Emerging Area and Its Impact on Energy, Environment and Health Sciences. Front. Energy 2012, 6, 311–340. [Google Scholar] [CrossRef]
  47. Gonzalez-Gutierrez, J.; Cano, S.; Ecker, J.V.; Kitzmantel, M.; Arbeiter, F.; Kukla, C.; Holzer, C. Bending Properties of Lightweight Copper Specimens with Different Infill Patterns Produced by Material Extrusion Additive Manufacturing, Solvent Debinding and Sintering. Appl. Sci. 2021, 11, 7262. [Google Scholar] [CrossRef]
  48. Zhao, Y.; Gao, W.; Xi, J.; Li, H.; Ren, F. Development of Copper Powder Paste for Direct Printing and Soft Mold Casting. Addit. Manuf. 2020, 31, 992. [Google Scholar] [CrossRef]
  49. Yan, X.; Hao, L.; Xiong, W.; Tang, D. Research on Influencing Factors and Its Optimization of Metal Powder Injection Molding without Mold via an Innovative 3D Printing Method. RSC Adv. 2017, 7, 55232–55239. [Google Scholar] [CrossRef]
  50. Ren, L.; Zhou, X.; Song, Z.; Zhao, C.; Liu, Q.; Xue, J.; Li, X. Process Parameter Optimization of Extrusion-Based 3D Metal Printing Utilizing PW-LDPE-SA Binder System. Materials 2017, 10, 305. [Google Scholar] [CrossRef]
  51. Hong, S.; Sanchez, C.; Du, H.; Kim, N. Fabrication of 3D Printed Metal Structures by Use of High-Viscosity Cu Paste and a Screw Extruder. J. Electron. Mater. 2015, 44, 836–841. [Google Scholar] [CrossRef]
  52. Bai, Y.; Williams, C.B. An Exploration of Binder Jetting of Copper. Rapid Prototyp. J. 2015, 21, 177–185. [Google Scholar] [CrossRef]
  53. Jadhav, S.D.; Dadbakhsh, S.; Goossens, L.; Kruth, J.-P.; van Humbeeck, J.; Vanmeensel, K. Influence of Selective Laser Melting Process Parameters on Texture Evolution in Pure Copper. J. Mater. Process. Technol. 2019, 270, 47–58. [Google Scholar] [CrossRef]
  54. Ikeshoji, T.T.; Nakamura, K.; Yonehara, M.; Imai, K.; Kyogoku, H. Selective Laser Melting of Pure Copper. JOM 2018, 70, 396–400. [Google Scholar] [CrossRef]
  55. Yan, X.; Chang, C.; Dong, D.; Gao, S.; Ma, W.; Liu, M.; Liao, H.; Yin, S. Microstructure and Mechanical Properties of Pure Copper Manufactured by Selective Laser Melting. Mater. Sci. Eng. A 2020, 789, 139615. [Google Scholar] [CrossRef]
  56. Davis, J.R. ASM Specialty Handbook, Copper and Copper Alloys. In ASM Handbook; ASM International: Almere, The Netherlands, 2001; p. 133. [Google Scholar]
  57. Schneller, W.; Leitner, M.; Pomberger, S.; Grün, F.; Leuders, S.; Pfeifer, T.; Jantschner, O. Fatigue Strength Assessment of Additively Manufactured Metallic Structures Considering Bulk and Surface Layer Characteristics. Addit. Manuf. 2021, 40, 101930. [Google Scholar] [CrossRef]
  58. Jirandehi, A.P.; Khonsari, M.M.; Guo, S.; Gradl, P. Fatigue Assessment of Additively-Manufactured C-18150 Copper Alloy at Room and Elevated Temperatures via a Microstructure-Sensitive Algorithm. Int. J. Fatigue 2022, 159, 106777. [Google Scholar] [CrossRef]
  59. Maleki, E.; Bagherifard, S.; Bandini, M.; Guagliano, M. Surface Post-Treatments for Metal Additive Manufacturing: Progress, Challenges, and Opportunities. Addit. Manuf. 2021, 37, 101619. [Google Scholar] [CrossRef]
  60. Cunico, M.W.M.; Cunico, M.M.; Cavalheiro, P.M.; De Carvalho, J. Investigation of Additive Manufacturing Surface Smoothing Process. Rapid Prototyp. J. 2017, 23, 201–208. [Google Scholar] [CrossRef]
  61. Peitsch, C.M.; Ramsey, A. The Role of Computed Tomography in Additive Manufacturing. In Proceedings of the 2018 ASPE and Euspen Summer Topical Meeting: Advancing Precision in Additive Manufacturing, Berkeley, CA, USA, 22–25 July 2018; pp. 201–209. [Google Scholar]
  62. Du Plessis, A.; Yadroitsava, I.; Yadroitsev, I. Effects of Defects on Mechanical Properties in Metal Additive Manufacturing: A Review Focusing on X-Ray Tomography Insights. Mater. Des. 2020, 187, 108385. [Google Scholar] [CrossRef]
Figure 1. SEM image of the surface of copper feedstock pellets. Adapted from [37] © Springer. Used under CC-BY.
Metals 13 00859 g001
Figure 2. Viscosity vs. shear rate at 160 °C [50] © MDPI. Used under CC-BY.
Metals 13 00859 g002
Figure 3. Schematic diagrams for (a) PFSP, (b) FFRP, and (c)-(I) DIWP with pneumatic dispenser (c)-(II), piston-based DIWP (c)-(III) and screw-based DI.WP.
Metals 13 00859 g003
Figure 4. Thermal profiles of the de-binding and sintering processes (a) [22] © Elsevier, used with permission (b) [37] © Springer, used under CC-BY (c) [47] © MDPI, and used under CC-BY (d). Comparison of the XRD patterns of the printed specimen and the sintered specimen [50] © MDPI. Used under CC-BY.
Metals 13 00859 g004
Figure 5. Comparative values of (a) conductivity (% of IACS) [5,9,48], (b) tensile strength [5,9,48,50], (c) relative density [5,9,22,37,48,49,50], (d) surface roughness [9,22,37] and (e) Vicker’s surface hardness [5,9,49,50].
Metals 13 00859 g005
Figure 6. (a) Specimens with different infill patterns and densities with and without covers, (b) maximum flexural stress and (c) flexural modulus for copper samples [47] © MDPI. Used under CC-BY.
Metals 13 00859 g006
Figure 7. SEM images of the (a) extruded material and (b) the green part [37] © Springer. Used under CC-BY. (c,d) Green part, (e,f) brown part and (g,h) sintered final part. (c,e,g) ×50, and (d,f,h) ×500 [5] © MDPI. Used under CC-BY. SEM images of samples sintered at different temperatures: (i) 800 °C; (j) 850 °C; (k) 900 °C; (l) 950 °C; (m) 1000 °C; (n) 1050 °C [49] © RSC. Used under CC BY-NC 3.0.
Metals 13 00859 g007
Figure 8. Shrinkage and relative density with the increase in temperature [37] © Springer. Used under CC-BY.
Metals 13 00859 g008
Table 1. Printing parameters, post-processing and properties of the parts.
Printing MethodPrinting ParametersBinder SystemSolvent De-BindingThermal De-BindingSinteringProperties of Final PartsRef.
PFSPPS: 20–100 mm/s
LT: 0.05–0.25 mm
BT: 60 °C
ET: 180–220 °C
EM: 90–150%
PEG and waxPlaced under water for 14 h, then dried in oven for 2 h at 100 °CHeated to 500 °C at 1 °C/min and held for 1 hHeated to 950 °C at 4 °C/min and held for 3 h; heated to 1030 °C at 4 °C/min, held for 3 h, and cooled at 6 °C/minRD: 90.8%
SR: 2.42 ± 0.92 μm
[22]
PS: 20 mm/s
LT: 0.05 mm
BT: 60 °C
ET: 196 °C
EM: 120%
Placed under water for 12 h with stirring at 40 °C and 60 °C, then dried in over at 100 °C for 2 hHeated to 500 °C at 1 °C/min and held for 1 h, then cooled to RT at 4 °C/minHeated to 950 °C–1050 °C at 4 °C/min with 96% He and 4% H2 and held for 3 h, then cooled to RT at 4 °C/minRD: 94.5%
SR: ~2.9 μm
[37]
FFRPLT: 0.129 mmThermoplastic polymer and waxWashed in proprietary solvent Opteon SF-79Placed in proprietary furnace filled with H2 and Ar Parameters set per manufacturer’s specifications RD: 94.51 ± 0.4%
SR: 3.3 ± 0.02 μm
EC: 86.11 ± 6.92% of IACS
TS: 205.87 ± 0.07 MPa
[9]
LT: 0.129 mm
ET: 220 °C
Paraffin wax and high-molecular-weight (HMW) polymerImmersed in OpteonSF-79 solvent to remove the paraffin wax using the washing equipment for 10 h30 h long thermal cycle in presence of 2.8% H2 and 97.8% ArRD: 95.3 ± 0.5%
EC: 48 ± 1 × 10⁶ S/m
(82% of IACS)
TS: 205.8 ± 5.0 MPa
SH: 54.8 ± 2.1 HV
[5]
PS: 30 mm/s
LT: 0.3 mm
BT: 90 °C
ET: 240 °C
EM: 120%
ND: 0.6 mm
TPE and grafted polyolefinSubmerged in cyclohexane at 60 °C for a fixed period of time, and dried at room temperature in a fume hood for at least 4 hHeated up to 450 °C for about 8 h in H2 atmosphere at 2 K/min with 1 h holding at 250 and 450 °C Heated up to 1050 °C in H2 atmosphere. Heating rate: 2 K/min; 1 h de-binding plateau at 1050 °C Flexural strength and modulus increased with increase in mass[47]
DIWP 1 gm of acrylic dissolved in 10 mL of acetone EvaporationHeating and cooling cycle at 5 °C/min in presence of flowing forming gas (95% N2 and 5% H2). Held for 2 h at peak temperatures. Highest temp.: 1000 °C.RD: 89.28%
EC: 30 × 106 S/m
(51.7% of IACS)
TS: 141 ± 19 MPa.
[48]
LT: 0.35, 0.45, 0.55, 0.65, 0.75 mmParaffin wax Heated up to 750 °C, 800 °C, 850 °C, 900 °C, 950 °C, 1000 °C and 1050 °C at 10 °C/min. Holding time for 30 min
(best temperature at 950 °C with holding time of 120 min)
RD: 90.4%
SH: 60 HV
[49]
PS: 2–10 mm/s
LT: 0.4 mm
Tip Size: 0.5 mm
Fill density: 50–90%
Screw Extruder RPM: 45 RPM
Polyvinyl carboxy polymer and PVA Dried in air at room temperature. Later, heat treatment conducted in a box furnace with charcoal at 950 °C for 2 hWith the increase in Cu content, viscosity increased but volumetric flow rate decreased[51]
PS: 6 mm/s
LT: 2 mm
ET: 160 °C
Piston Speed: 0.047 mm/s
Paraffin wax, polyethylene, and
stearic acid
No solvent de-bindingHeated up to 500 °C in a vacuum atmosphere furnace at 2 °C/min with holding period of 150 minHeated up to 1083 °C; heating rate: 3 °C/min, holding time: 3 h
(optimal combination from nine samples)
RD: 90.95%
EC: 0.114940 Ω mm2/m
TS: 175 MPa
SH: 63 HV
Decrease of viscosity with the increase of shear rate
[50]
PS = printing speed; LT = layer thickness; BT = bed temperature; ET = extrusion temperature; EM = extrusion multiplier; ND = nozzle diameter. RD = relative density; SR = surface roughness; RT = room temperature; EC = electrical conductivity; TS = tensile strength; SH = surface hardness.
Disclaimer/Publisher’s Note: The statements, opinions and data contained in all publications are solely those of the individual author(s) and contributor(s) and not of MDPI and/or the editor(s). MDPI and/or the editor(s) disclaim responsibility for any injury to people or property resulting from any ideas, methods, instructions or products referred to in the content.