Article

Performance Evaluation of Austempered Ductile Iron Camshaft Low Alloyed with Vanadium on an Electric Spin Rig Test

by
Alejandro Cruz Ramírez
1,*,
Eduardo Colin García
1,*,
Jaime Téllez Ramírez
2 and
Antonio Magaña Hernández
2
1
Instituto Politécnico Nacional–ESIQIE, UPALM, Ciudad de México 07738, Mexico
2
R&D ARBOMEX S.A de C.V., Calle Norte 7 No. 102, Cd. Industrial, Celaya, Guanajuato 38010, Mexico
*
Authors to whom correspondence should be addressed.
Metals 2023, 13(2), 198; https://doi.org/10.3390/met13020198
Submission received: 19 December 2022 / Revised: 9 January 2023 / Accepted: 13 January 2023 / Published: 18 January 2023
(This article belongs to the Special Issue Recent Advances in Cast Irons)

Abstract

:
Arbomex S.A. de C. V. is one of the largest worldwide manufacturers of ductile cast iron camshafts, produced by means of the phenolic urethane no-bake sand mold casting method and cold box by stack molding technology. As a result of the development of high-strength ADIs, low alloyed with vanadium, for camshaft manufacturing, previous results were published on the as-cast process and the austempering heat treatments applied to the camshafts. In the present work, camshafts of ADIs, low alloyed with 0.2 and 0.3 wt.% V, were produced at austempering temperatures of 265 and 305 °C. The performance of the new camshafts was evaluated by wear testing to ensure the function and durability of the camshafts by means of the block-on-ring wear test and a valve train system to evaluate the volume loss of material removed and the geometrical changes of the camshaft, respectively. The ADIs heat treated to 265 °C showed a microstructure constituted of fine ausferrite that aided in obtaining the highest wear resistance in the block-on ring wear test. No wear or pitting evidence was detected on the camshaft lobes and roller surfaces after the OEM test protocol during the electric spin ring test at low and high conditions for the ADI alloyed with 0.2 wt.% V heat treated at 265 °C.

1. Introduction

The trend toward reduced size and increased power output in current engine designs has placed demands on component materials. Achieving fuel economy in the automotive industry and reducing vehicle weight have been major research interests over the last few decades. Cast iron and aluminum alloys are the most commonly cast metal parts used in the automotive industry, due to their low cost, ease of machining, ease of casting into complex shapes and desired physical properties [1]. When mechanical properties, density, and cost are included in the material evaluation, ductile iron may offer more advantages than aluminum, especially for thin wall ductile iron parts [2]. If the yield stress/cost ratio of the various materials is compared, austempered ductile iron (ADI) is, most of the time, the preferred choice. ADI material can be used to achieve design flexibility, having minimum energy requirements and maximum material utilization, and, hence, providing a better cost-to-benefit ratio with low-cost production. These properties are beneficial to a wide spectrum of user industries that include the automotive sector, mining sector, railways, etc. [2,3]. ADI is a family of ductile iron (DI) that has been treated by austempering (isothermal heat treatment) [4] resulting in nodules immersed in an ausferritic matrix composed of acicular ferrite (αAc) and high carbon austenite (γHC) [5]. The austempering heat treatment to obtain ADI is carried out in a two stage reaction.
Stage   I   reaction :   γ α Ac + γ HC   ( ausferrite )
Stage   II   reaction :   γ HC   α +   carbide   ( Fe 3 C   or   ε   )
The maximum ausferrite amount is obtained between the two stages of austempering, which is at the end of the first stage and at the onset of the second stage. This period is called the process window (PW). The amount and morphology of the high-carbon austenite and acicular ferrite depend on the austempering parameters, temperature, and holding time [6]. The camshaft, crankshaft, gearbox, engine block, automobile suspension, cylinder head, and steering systems are some of the casting products from foundries used in automotive industries [1]. In the automotive industry, ADI has an important task as a structural material that should have good wear resistance and tensile strength in such applications as camshafts [7,8]. Some forged steel components have been replaced by austempered ductile iron (ADI), mainly in automotive applications, such as camshafts. A camshaft is a critical component required to enable a combustion engine to work. It is constituted of a shaft with shaped lobes (cam lobes) positioned along it. When the shaft is rotated, the profile of the lobe allows it to act upon a valve or switch to a degree matching the speed of rotation controlling the rate of action. The camshafts are connected via a timing belt or chain to the turning of the crankshaft, which directly moves the pistons inside the cylinder [9]. During functioning, camshafts are subject to bending and torsional stresses, and lobe surfaces are highly loaded, so high toughness and wear resistance are essential for this component [10]. Engine camshafts are unique in that the manufacturing requirements are very different from the operating needs of the product. Thus, there must be a balance that achieves the needs of a hard, strong, and wear-resistant material with ease of manufacturing, and, most notably, offering the ability of machining the product. The ever-shorter development times of car manufacturers require ever faster and more effective product development. An elementary component of product development is the validation of new products by testing to ensure the function and durability of such products. Different testing methods are employed to evaluate the performance of camshafts, like cam phaser systems or valve train systems [11,12].
Alloying elements are used to improve the mechanical properties or modify the austemperability of ADI [13]. Since vanadium is a carbide stabilizer, its addition promotes the formation of eutectic carbide that appears as small white inclusions in the microstructure. The addition of vanadium to the ductile cast iron increases its strength and hardness by an increase of the pearlite amount [14].
Arbomex [15]., a Mexican company located at Celaya and Apaseo Guanajuato, as well as El Salto Jalisco, Mexico, specializes in camshaft manufacturing, developing ductile irons, low alloyed with vanadium (0.2 and 0.3 wt.%), for camshaft application [16]. Homogeneous distribution of spheroidal graphite, with high nodularity for casting, was obtained from the regions of the lobes analyzed. A high nodule count of smaller size was found in the lobe surfaces instead of in the middle region where big nodules with low nodule count were found. The tensile properties were increased when the vanadium content increased; however, the toughness and ductility of the as-cast alloys decreased as a result of an increase in the volume fraction of carbide particles [16]. Afterwards, the DI, low alloyed with vanadium, was austempered to 265 and 305 °C for 30, 60, 90, and 120 min to obtain high-strength ADIs. The highest amount of ausferrite was determined at 90 min for both austempering temperatures by X-ray diffraction measurements and was in good agreement with the evolution of microstructures and hardness as the austempering time increased. The mechanical properties of tensile strength, hardness, and toughness were evaluated, obtaining results in the range expected for an ADI grade 3 [17]. Camshafts are an important part of a valve train system. The camshafts are driven by a crankshaft and they run at about half of the angular speed of the crankshaft. In high-speed engines, the rotational speed of the camshaft can be very high, leading to high torsional vibrations, which then leads to high stresses in the valve train system. Cams are commonly used in the opening and closing of valves in internal combustion engines. The inlet and outlet valves are regulated using a cam and follower and the mechanical contact between both components are partially responsible for wear damage. There are different types of wear mechanisms involved; however, adhesive wear is, by far, the most dominant form of material loss among sliding components in machinery [12,18]. This work aimed to evaluate the performance of camshafts of high-strength ADIs, low alloyed with vanadium, on sliding wear, by means of the block-on-ring wear test, and on an electric spin rig test to check and ensure the durability of the camshaft under engineering specification parameters.

2. Materials and Methods

Arbomex [15] is a North American-based company with more than 45 years of providing Aluminum and Zamak by High-Pressure Die Casting (HPDC), steel and aluminum metal sheet stamping, and cast iron with the lost foam process for applications, such as brackets and housings, for the heavy-duty automotive industry and, on the other hand, camshafts manufactured by molding processes, like the phenolic urethane no-bake sand process, and cold box by stack molding technology.

2.1. Ductile Iron Castings

Two ductile irons, low alloyed with vanadium, and identified as DI-0.2V and DI-0.3V, for camshafts were produced in a dual-track coreless induction furnace by the phenolic urethane no-bake sand mold casting method.
The base iron was produced by using 30 wt.% low carbon steel, 30 wt.% iron burrs from the machining area, and cast-iron scrap as balance at 1400–1440 °C. The base iron was poured into a preheated ladle where the chemical composition was adjusted by adding the ferroalloys: FeSi (70%), high-purity carbon, and FeV (61.5%). The ductile iron alloy was poured into a tundish ladle where 1.05 wt.% of MgFeSi (45% Si, 7.5% Mg, 0.8% Al, 2.6% Ca, 2.48% Rare earth) was added as a nodulizing agent. Later, the melt was poured into a ladle and inoculated with the inoculant FeSi (70% Si + 0.8% Ca, 3.9% Al) by the ladle inoculation method. Each of the two cast alloys was then poured at 1385–1420 °C into phenolic urethane no-bake sand molds, previously obtained by tooling with four cavities of camshafts (intake and exhaust lobes) for the casting method. The nominal chemical composition in the camshafts was analyzed by an OBLF GS 1000 II emission optic spectrograph (OBLF Gesellschaft für Elektronik und Feinwerktechnik mbH, Witten, Germany). Carbon and sulfur content was determined by combustion analysis using a Leco C/S 744 analyzer (LECO Corporation, St. Joseph, MI, USA). The reported values were the average of three measurements on each cast alloy.

2.2. Austempering Heat Treatment

Four camshafts were randomly selected from each alloy and the lobes were sectioned on the cross-section with a metallographic fine cutter disc and liquid cooling for the austempering heat treatment. Figure 1 shows a lobe sample taken from the camshaft and the regions analyzed from the top area (nose of the lobe), middle, and bottom (base circle) for the microstructural characterization.
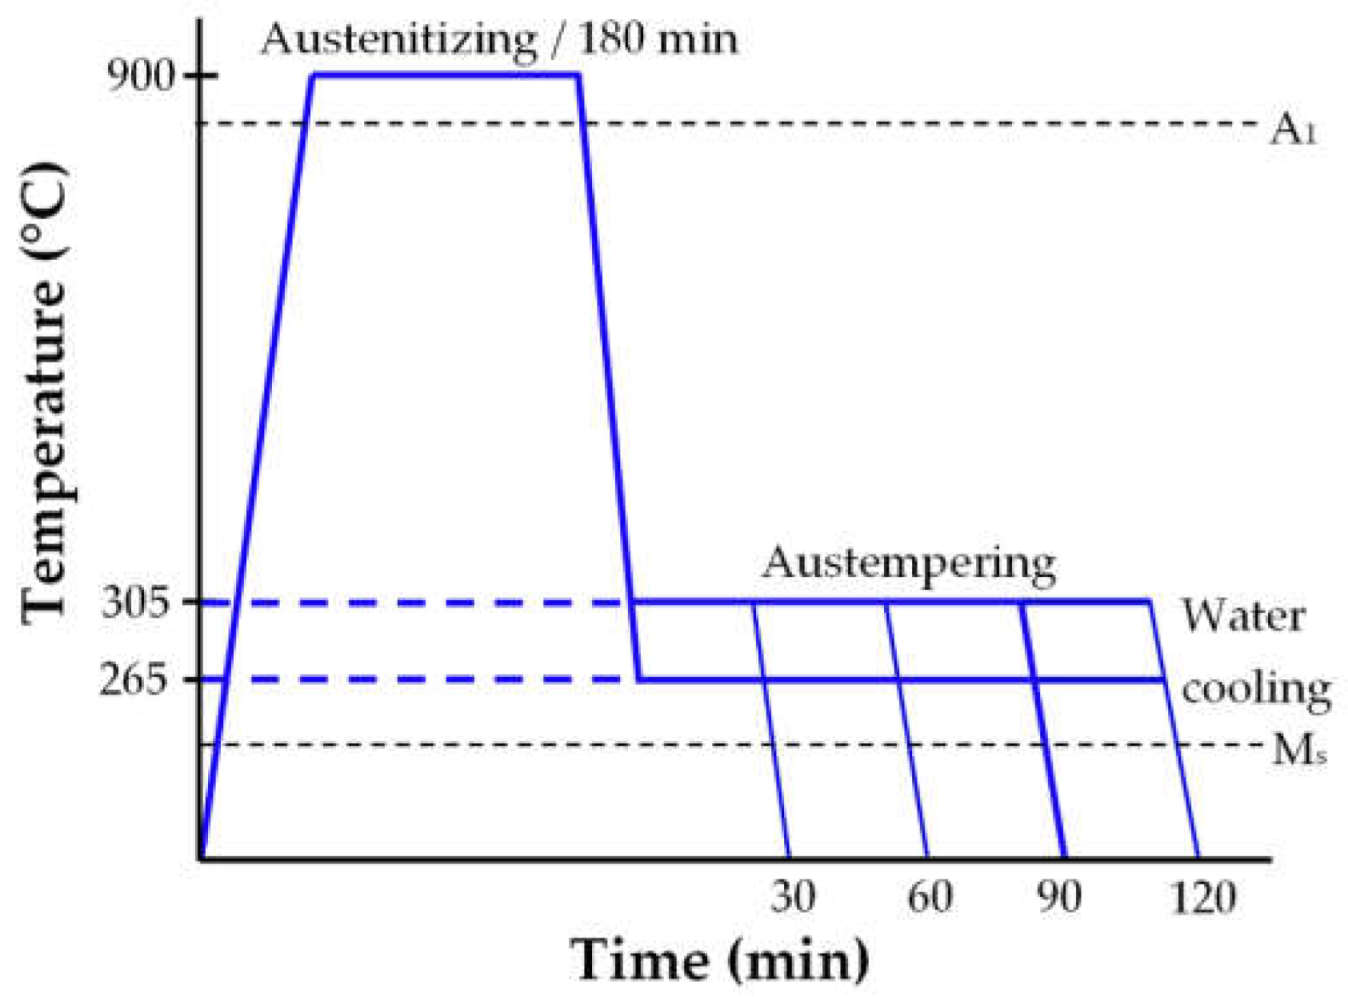
Two austempering heat treatments were carried out based on the austempering heat treatment cycles of Figure 2. The samples were coated with carbon paint (to avoid decarburization) during austenitizing held at 900 ± 5 °C with a residence time of 180 min. Then, the samples were quickly transferred to a second furnace containing a salt bath melt (50% KNO3 and 50% NaNO3) at 265 or 305 ± 5 °C. The soaking time was set at 30, 60, 90, and 120 min, and then the samples were water-cooled at room temperature.

2.3. Microstructural Characterization

Microstructural examinations of the DI and ADI samples were carried out by using an optical microscope Olympus PMG-3 model (Olympus Corporation, Center Valley, PA, USA), according to the standard ASTM A247, and Image J software (NIH, Bethesda, MD, USA) to evaluate the nodule count, average nodule size, and nodularity, while the volume fraction of phases and microconstituents were obtained on samples etched with nital 3%. The optical microscopy results were the average of three different regions on each sample. Carbides were revealed by etching for 3 min with a water solution of ammonium persulfate (10% vol) [19]. The volume fraction of high-carbon austenite (% V𝛾HC) was obtained from the heat-treated samples by X-ray diffraction measurements using an X-Ray Bruker D8 Focus diffractometer (Bruker, Billerica, MA, USA) with monochromatic Cu Kα1 radiation working in θ/2θ configuration, using the method reported by Miller [20].

2.4. Mechanical Properties

Samples were obtained from the camshafts of both alloys for the tensile strength, hardness, wear, and impact properties by the Charpy test. Keel-block castings, based on the standard specification ASTM A 536, were also used to obtain samples for tensile strength to ensure process quality. The samples were austempered according to the procedure reported in Figure 2, and the soaking time was chosen according to the highest high-carbon austenite value obtained by XRD measurements. Figure 3 shows the samples obtained from camshafts and Keel-block casting to evaluate the mechanical properties at room temperature.
Rockwell C hardness measurements were made on the polished surfaces of the cross-section of the camshaft lobes with a Wilson 3T TBRB hardness tester (Buehler, Lake Bluff, IL, USA). The hardness test was carried out under the standard specification ASTM E 18-02 and an applied load of 150 kg. Tensile testing was carried out using a universal testing machine, Shimadzu (Shimadzu Corporation, Kyoto, Japan) of 100 kN, with 10 mm/min cross-head speed. The size and geometry of the specimens followed the specifications of ASTM E 8. Charpy unnotched bars impact tests were machined, based on the specifications of ASTM A 327. Four specimens from each cast alloy were taken from the camshaft and were tested for impact in a Tinius Olsen Charpy impact testing machine (Tinius Olsen TMC, Hursham, PA, USA).
The mechanical properties of DIs and ADIs alloyed with 0.2 and 0.3 wt.% vanadium for camshaft production were previously reported [16,17]. High strength, hardness, and toughness were obtained for the evaluated austempering heat treatments; however, the performance of the camshafts had to be evaluated under wearing conditions to ensure the good behavior of the component during functioning. Thus, this work aimed to determine the wear resistance of the camshaft under engineering specification parameters by an electric spin rig test and the block-on-ring wear test.

Wear Test

The standard abrasion testing used was ASTM G77 which determines the resistance of materials to sliding wear using the block-on-ring wear test. This test method covers laboratory procedures for determining the resistance of materials to sliding wear. The test utilizes block-on-ring friction and a wear testing machine to rank pairs of materials according to their sliding wear characteristics under various conditions. The wear resistance was evaluated in a TE 53SLIM multi-purpose friction machine (Phoenix Tribology, Berkshire, UK) on cube samples of 12.5 mm obtained from the camshaft lobes closer to the lobe nose, as can be observed in Figure 3a, with hardened machined flat surfaces without lubricant. A metal ring, with a hardness of 63 HRC, rotated on the surface of the sample to 300 rpm, applying a load of 45 N for a distance of 100 m. The wear results were obtained with Equation (1):
S c a r   v o l u m e = D 2 t 8 [ 2 s i n 1   b D s i n ( 2 s i n 1 b D ) ]
where D is the diameter of the ring (mm), t is the block width (mm) and b is the width average of the scar (mm). The block-on-ring test was used, because it maintained a constant contact area between the sample and the ring during wear.

2.5. Camshaft Bench Testing

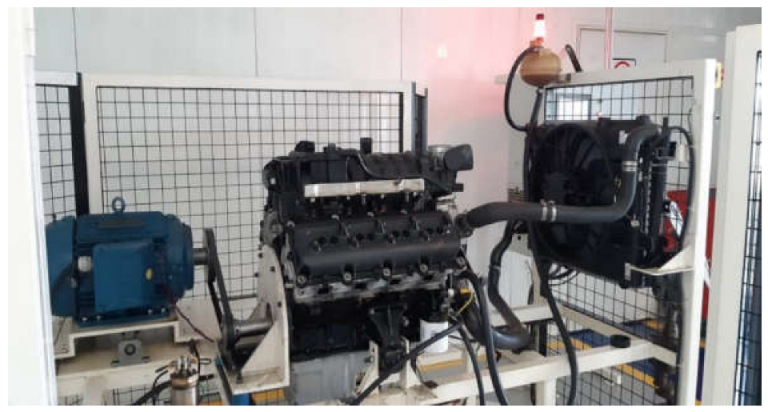
During functioning, camshafts are subject to bending fatigue strength and torsional stresses and the lobe surfaces present high Hertzian contact stresses. Thus, high toughness, yield strength, and wear resistance are essential for this component. A spin rig test was used to evaluate the camshaft performance. The electric spin rig machine of Figure 4 is a modification of the original combustion engine OEM V8 5.7L, developed in the Arbomex camshaft testing laboratories. This is an Overhead valve engine (OHV) (OEM Engine, Ramos Arizpe, Coahuila, México), where the camshaft is placed inside the block and the valves are operated through lifters, pushrods, and rocker´s arms. This mechanism is called a valvetrain.
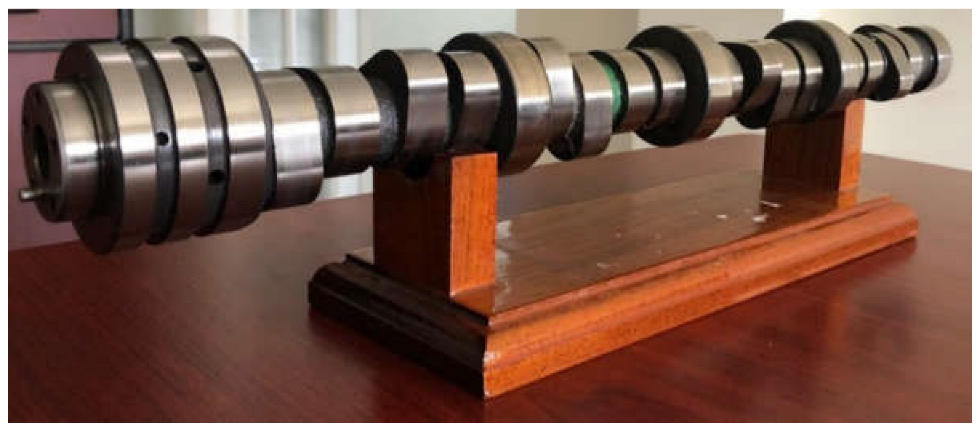
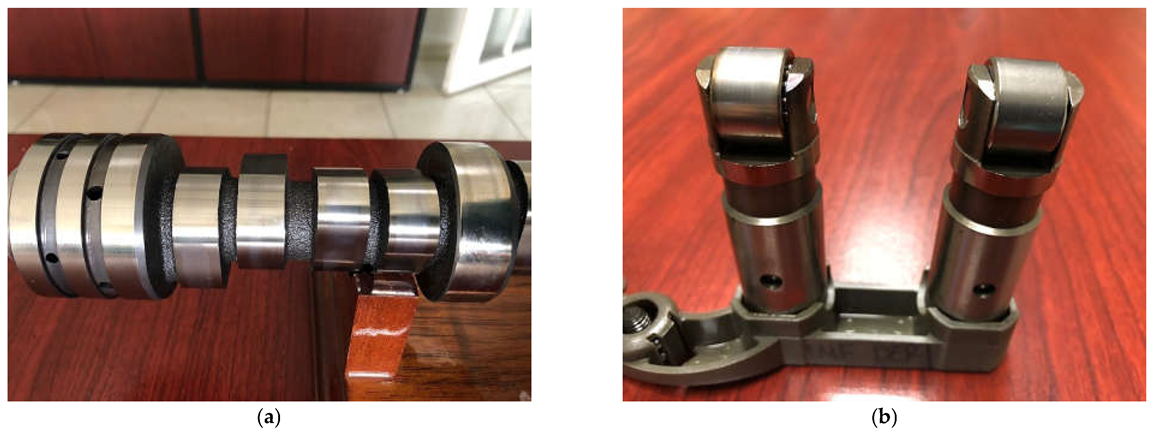
The OHV design is more suitable for larger V6 and V8 engines. The advantages of an OHV engine include lower cost, higher low-end torque, and more compact size; in addition to durability. Figure 5 shows the automotive engine camshafts V8 5.7L made of ADI, low alloyed with vanadium, used for the trials. Prior to the test, the engine and cavities were cleaned, and the engine head gaskets and camshaft support fasteners were changed.
The test parameters of Table 1 were used to evaluate the performance of the high-strength camshafts low alloyed with vanadium.
It must be noticed that the bench testing parameters fulfilled the requirements of the OEM test protocol. As can be observed, the requirements were very rigorous and the total number of test cycles exceeded 60 million. The lobes were visually checked every 300 h during testing and the test protocol considered the temperature of oil and anti-freeze.

3. Results

3.1. Ductile Irons

The chemical composition of the ductile irons alloyed with 0.2 and 0.3 wt.% V is shown in Table 2. The chemical compositions were in the range expected for hyper-eutectic ductile iron and fulfilled the standard specifications of Arbomex for camshaft production. The chemical compositions of the cast alloys produced were similar and the only difference was the amount of vanadium added to the castings. The residual magnesium content of 0.04% indicated an adequate nodule formation, as well as the typical residual sulfur after treatment, recommended in [21]. High manganese and copper amounts were required to form a high amount of pearlite in the camshafts produced. Furthermore, both elements delayed the first stage of the austempering heat treatment. It was reported in [22] that manganese is a carbide-forming element that segregates in eutectic cell boundaries during solidification, while vanadium is a strong carbide-forming element used to increase the strength and hardness of ductile irons, which does not influence the kinetics of the austempering process [23].
A detailed analysis of the graphite features, namely nodule count, nodularity, nodule size, non-metallic inclusions, and porosities, as well as the main phases formed, like graphite, ferrite, pearlite, and carbides, on the ductile iron camshaft lobes low alloyed with vanadium was previously reported in [16]. Only a summary of the main results is given here.
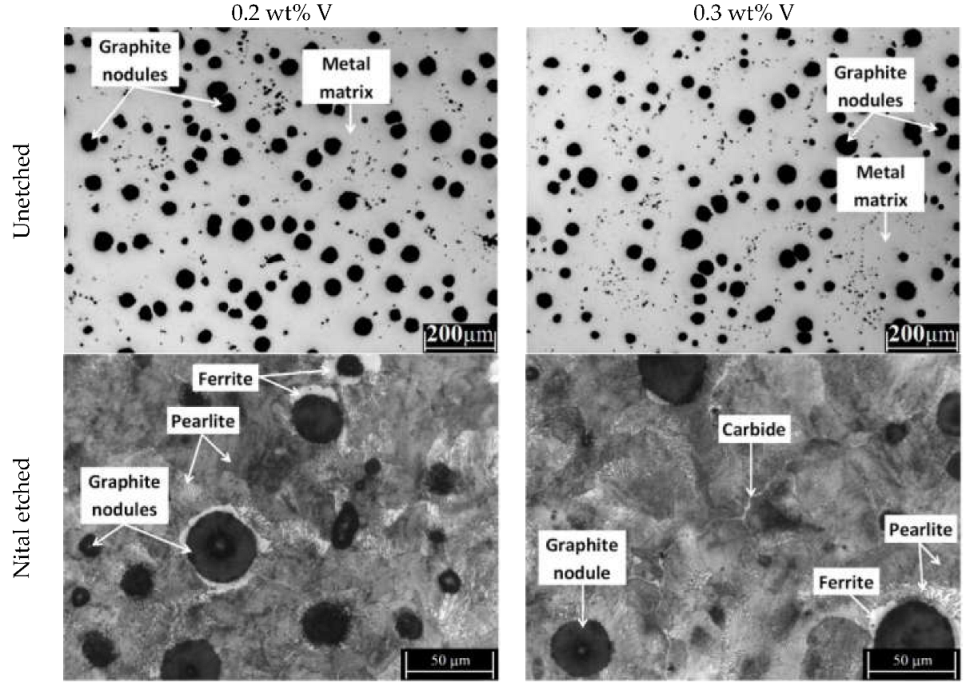
A homogeneous distribution of spheroidal graphite with high nodularity for both ductile irons low alloyed with vanadium was obtained, as can be observed in Figure 6. The etched samples showed a microstructure constituted of graphite nodules in a fully pearlitic matrix with small amounts of white zones attributed mainly to ferrite and carbides. The chemical composition, reported in Table 2, showed high manganese and copper amounts were used to obtain a high amount of pearlite in the camshafts produced, while vanadium was a strong carbide-forming element that was added to increase the strength and hardness of ductile irons [23].
Table 3 summarizes the graphite features and the phases obtained in the ductile irons low alloyed with vanadium, respectively.
It can be observed from Table 3 that when the vanadium content increased from 0.2 to 0.3 wt.%, the nodule count decreased, while the nodule size and the volume fraction of graphite increased. The low addition of vanadium did not affect the nodule shape, as can be observed in the nodularity results. Being strong in carbide forming, the increase of vanadium allowed for an increase in the volume fraction of carbides. The pearlite content remained almost constant, while the ferrite slightly decreased when the vanadium content increased.

3.2. Austempered Ductile Irons

The DIs low alloyed with vanadium were austempered to 265 and 305 °C for 30, 60, 90, and 120 min to obtain high-strength ADIs. A detailed analysis of the microstructural and hardness evolution as the austempering time increased was previously reported in [17]. The highest amount of high-carbon austenite was obtained for a soaking time of 90 min for both austempering temperatures by means of X-ray diffraction measurements. Table 4 shows the phases formed for an austempering time of 90 min, considering ausferrite as the main phase formed during the heat treatment. The ADIs obtained were designated, in terms of the vanadium content and the austempered temperature, as ADI-0.2V-265, ADI-0.3V-265, ADI-0.2V-305, and ADI-0.3V-305.
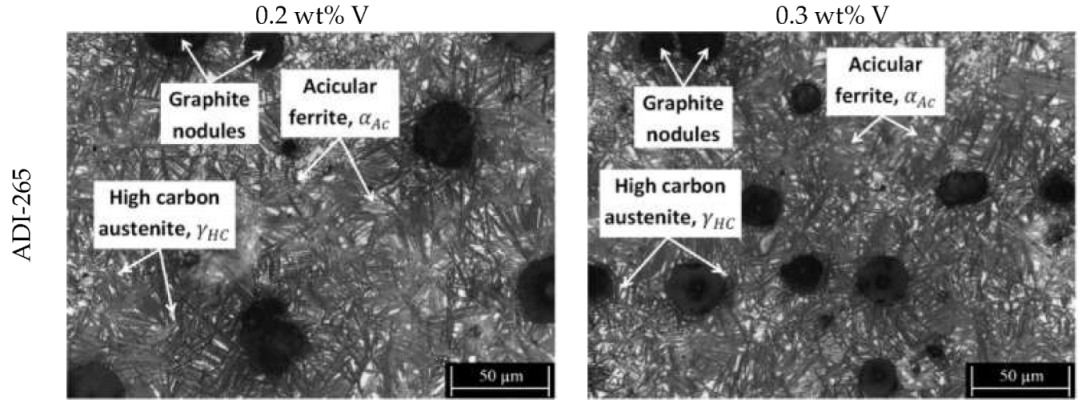
Figure 7 shows the microstructure by light microscopy of the ADIs containing 0.2 and 0.3 wt.% V for the austempering temperatures of 265 and 305 °C and 90 min of soaking time. It was observed that the ADIs showed a fine ausferrite matrix, composed mainly of tiny fine acicular ferrite (needle-like) and a few blocks of high-carbon austenite. This microstructure was related to the low austempering temperature. It was reported in [24] that a fine ausferrite morphology was obtained for austempering heat treatments carried out at temperatures lower than 325 °C, while feathery ausferrite was obtained at austempering temperatures higher than 350 °C. The results showed that the ADIs obtained at 265 °C presented a finer ausferrite microstructure, with a high-volume fraction of acicular ferrite and a low-volume fraction of high-carbon austenite. An opposite behavior was observed when the austempering temperature was increased to 305 °C, as is reported in Table 3. During the austempering heat treatment, the ferrite formed from unstable austenite by a nucleation and growth process in the solid state, for a low austempering temperature, such as 265 °C, the supercooling rate was higher, which increased the ferrite nucleation, obtaining larger regions of acicular ferrite [25]. On the other hand, the small blocks of high-carbon austenite were attributed to a low diffusion of carbon atoms when austempering reactions occurred at low temperatures. The unstable austenite ejected the carbon atoms forming ferrite. Due to the low diffusion of carbon atoms, only a small block of austenite was stable [26].
When the austempering temperature was increased to 305 °C, the ausferrite was coarser and the high-carbon austenite increased slightly over those obtained at 265 °C. In this case, the cooling was slower; thus, less acicular ferrite was nucleated and the volume fraction of high-carbon austenite increased [25,27]. The effect of the austempering temperature and its influence on the fine or coarse ausferrite formation was previously reported by Bendikiene [28] in ADIs obtained at austempering temperatures in the range from 270 to 330 °C.
Table 5 summarizes the results of the mechanical tests performed on DIs and ADIs low alloyed with vanadium at room temperature. The ADI mechanical properties were evaluated for the austempering of both DIs to 265 and 305 °C for a soaking time of 90 min, where the highest high-carbon austenite value was obtained. The mechanical results were previously reported and analyzed in [16,17].
The mechanical properties of hardness, tensile strength, and impact energy were increased by the austempering heat treatment because the mechanical behavior depended directly on phases and microconstituents. The microstructure obtained in the as-cast condition contained pearlite, ferrite, and carbides formed during the camshaft solidification process, while the austempering heat treatment applied to the ductile iron promoted phase transformations forming harder phases as ausferrite and martensite with a low volume fraction of vanadium carbides homogeneously distributed in the camshaft microstructure. In general, hardness and tensile strength were higher in ADIs obtained at an austempering temperature of 265 °C, due to the microstructure being constituted by fine ausferrite with bigger volume fractions of acicular ferrite. However, the elongation and impact energy were higher for ADIs heat treated to 305 °C, due to the formation of coarser ausferrite with an increase of the volume fraction of high-carbon austenite, based on the results of Table 3. Similar mechanical results were obtained for ADIs alloyed with manganese in the range from 0.2 to 1 wt.% heat treated to the austempering temperatures in the range of 320 to 420 °C [29].

3.3. Wear Resistance

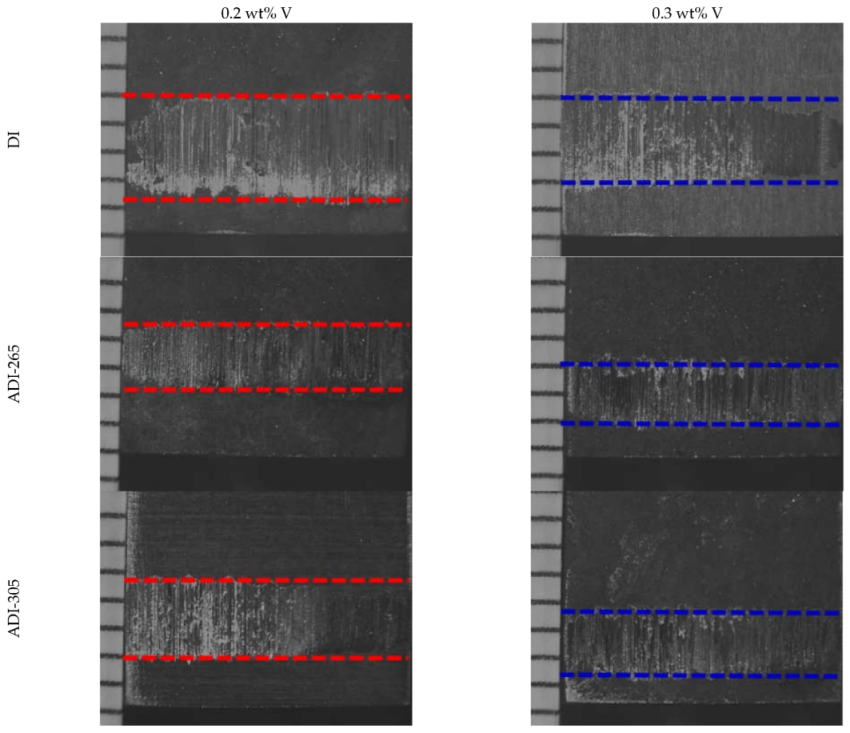
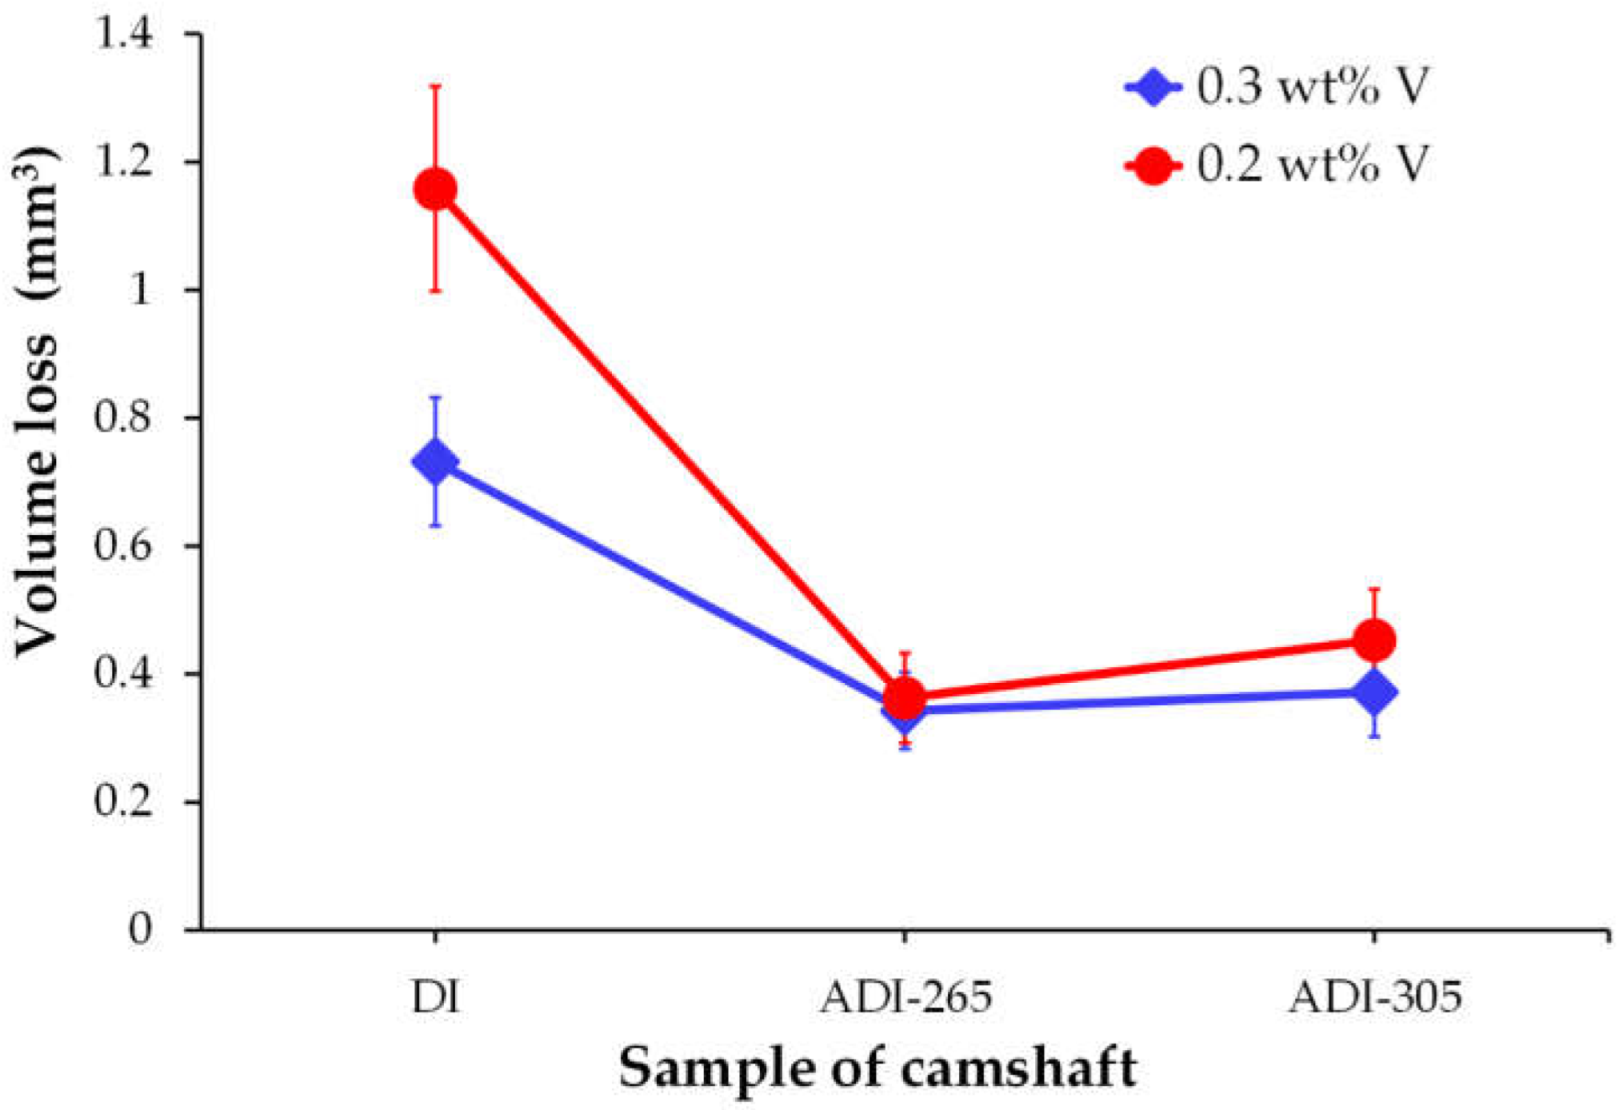
The block-on-ring wear test was carried out on DI and ADI samples; the scar width was measured and, by using Equation (1), the volume loss of material removed by the abrasion of the sample with the metal ring was determined. The wear scars of the DIs and ADIs are shown in Figure 8, while the volume loss of each material is observed in Figure 9. As expected, the as-cast condition microstructure was mainly constituted of pearlite, which was a softer phase when compared with the ausferrite and martensite microstructures obtained for ADIs, as can be observed in Figure 6 and Figure 9. The volume loss of material was higher for the as-cast condition than the ADIs, because of the hardness difference in both materials; therefore, exhibiting lower wear resistance [30].
It was observed that the austempering temperature affected the wear resistance of the ADIs evaluated. The higher wear resistance values were obtained for the ADIs heat-treated at 265 °C because of the higher volume fraction of ferrite acicular and lower volume fraction of high carbon austenite presented in the fine ausferritic matrix. This condition was beneficial to improve wear resistance due to hardness [31]. On the contrary, higher austempering temperatures increased the volume fraction of high-carbon austenite, and the ausferrite was coarser; hence, the wear resistance decreased [32].
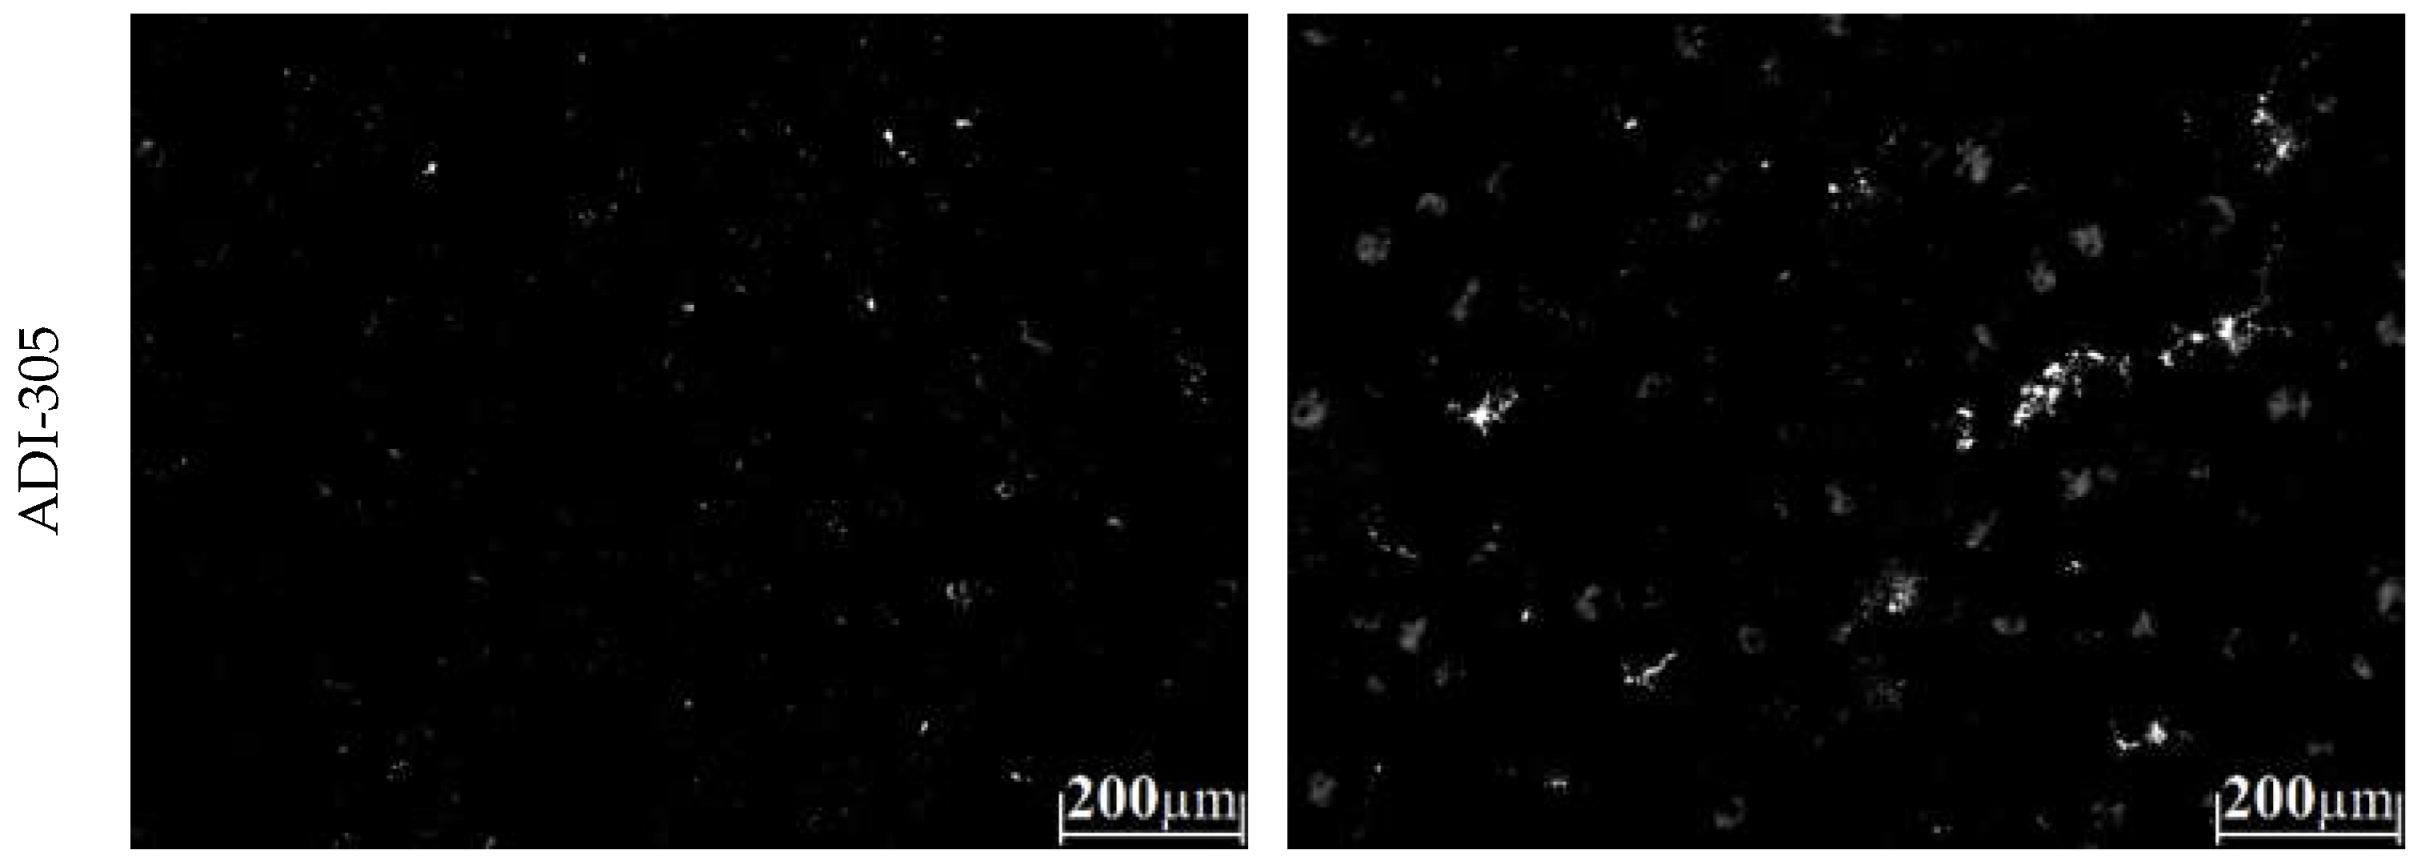
The addition of vanadium promoted the formation of eutectic carbide that appeared as small white inclusions in the microstructure. The presence of carbides reinforced the metallic matrix, due to its high hardness, increasing the wear resistance of the material [33]. Figure 10 shows the DI and ADIs microstructures etched with ammonium persulfate to identify only the carbides. A small number of carbides, identified as white regions with elongated shapes, was observed for the DIs, while the ADIs showed a lower carbide amount as dotted particles homogeneously distributed.
Despite the high thermodynamic stability of alloyed carbides, due to the vanadium addition in the ductile irons [34], there was a reduction in the carbide formation after application of the heat treatment, as can be observed in the as-cast results compared with the ADIs obtained, reported in Table 2 and Table 3, respectively. It was reported in [17] that a microsegregation effect in the middle region of the camshaft occurred because this region is the last to freeze. Therefore, the presence of carbides was expected to promote an increase in the abrasion wear resistance; however, toughness was expected to decrease for ADIs containing higher carbide contents. The ADIs heat treated to 265 °C, with different vanadium contents, had a fine ausferrite microstructure, improving the wear resistance, due to the hardness of the acicular ferrite and the low amount of high-carbon austenite [35]. Although both ADIs presented fine ausferrite, it was observed that ADI-0.3V-265 showed a lower volume loss than ADI-0.2V-265. This behavior was because the ADI-0.3V-265 contained the highest volume fraction of carbides in the matrix. The wear resistance in ADIs improved when the microstructure was constituted of fine ausferrite with fine carbides dispersed in the matrix without martensite [36]. Similar wear results on DIs and ADIs were obtained by Balos [37], who evaluated the wear resistance of DIs and ADIs with different microstructures with the pin-on-disc wear test. The results showed, in all cases, that ADIs had a lower volume loss than the DIs matrix and the wear resistance improved for ADIs heat treated to low austempering temperatures.

3.4. Bench Testing

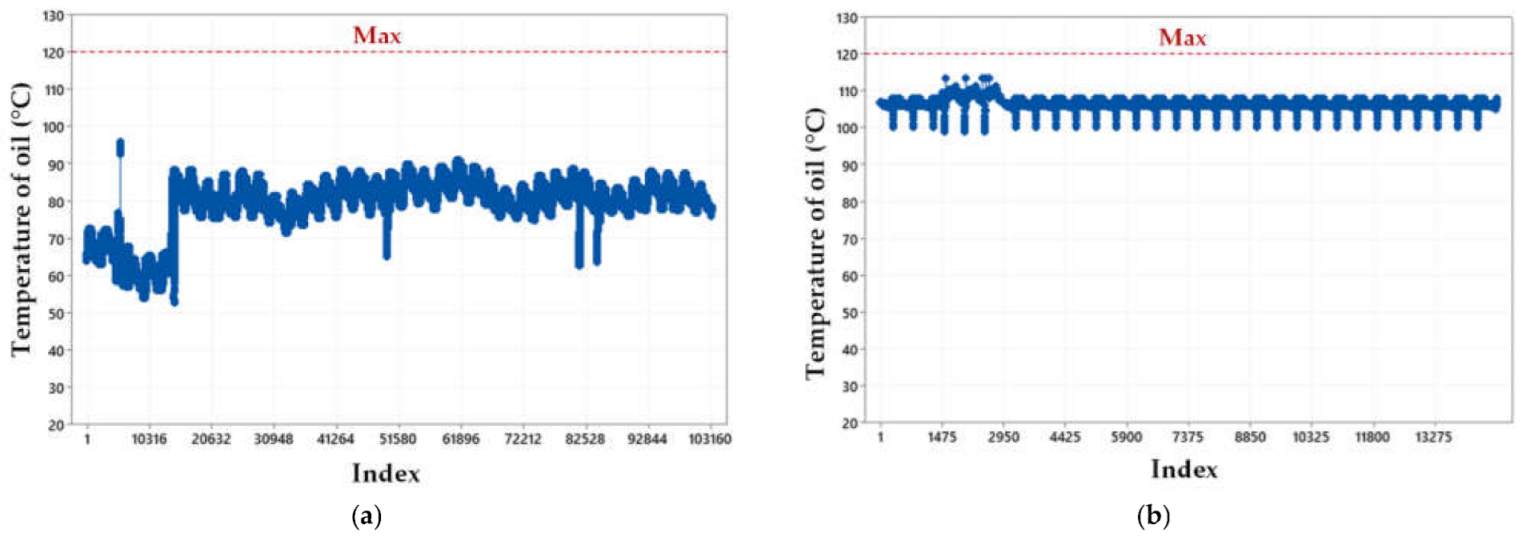
The research and development department of Arbomex focuses on the development of new products, such as high-strength camshafts using a wide variety of testing methods during different stages of the product development process. Camshaft functionality testing, through the electric spin rig machine, was carried out for the camshaft ADI-0.2V-265. This sample was chosen, based on the results of Table 5 and Figure 9, because adequate hardness and wear resistance were obtained for the lowest vanadium content and austempering temperature. For the bench testing, a component-compatible test oil was used, and its properties simulated those of engine oil. The oil temperature was monitored for low and high conditions, according to the specifications reported in Table 1, and the results are shown in Figure 11.
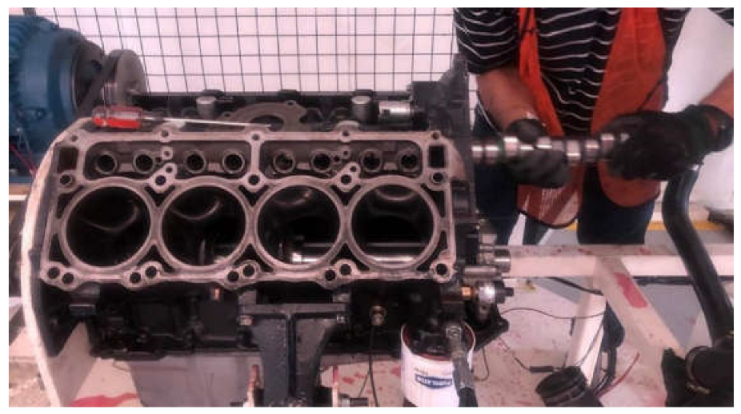
The results of Figure 11 show that the oil temperature remained lower than the maximum temperature allowed for the test protocol for both conditions. The index represents the number of temperature inspections that were carried out during each condition of the tests through an automatic system that recorded the data in real time for a database. As can be seen, at the beginning of the test for the low condition, the oil temperature was close to 55–66 °C and, as the engine progressed through its work cycles, this temperature increased slightly and stabilized throughout the test. For the high condition, the oil temperature did not present any considerable variation for the whole test. It is essential to control the oil temperature, considering the environment in which the engine is exposed during functioning, because oil temperature is directly related to its fluidity. Prior to the spin rig test, the camshaft was dimensionally evaluated according to OEM test protocol. The camshaft machining line considers a dimensional inspection of profiles and roundness as one of the last manufacturing operations to assure the quality of the parts. The camshaft parameters inspected were angularity, camshaft lobe lift error, center deviation, chatter, concentricity, profiles, and runout. Figure 12 shows the camshaft extraction from the bench testing for visual and dimensional inspection of profiles and roundness to evaluate wear presence, damage or superficial defects originating from the test.
Figure 13 shows the results of the radius base circle and the error angle of the sixteen lobes of the camshaft for the initial and final dimensions after the test. It can be observed in Figure 13a that, during the test, the surface lobes showed a micro-expansion regarding reference (zero). The increase in volume modified the lobes reference, as observed in the error angle measurement (Figure 13b) because the offset was even along the entire camshaft. This micro-expansion was considered insignificant and did not affect the camshaft performance in any way. Automotive engine camshafts need to be able to resist high rolling contact loads and the adhesive wear (pitting) conditions that result from the functioning of the camshaft. The austenite contained in the ausferrite is thermodynamically, but not mechanically, stable. When a high normal force is applied to an austempered component, a strain-induced transformation of austenite to martensite occurs. This results in the formation of a layer of hard, wear-resistant martensite that is backed by tough ausferrite. This ability to form martensite is the primary reason for the excellent wear properties of austempered ductile irons [38].
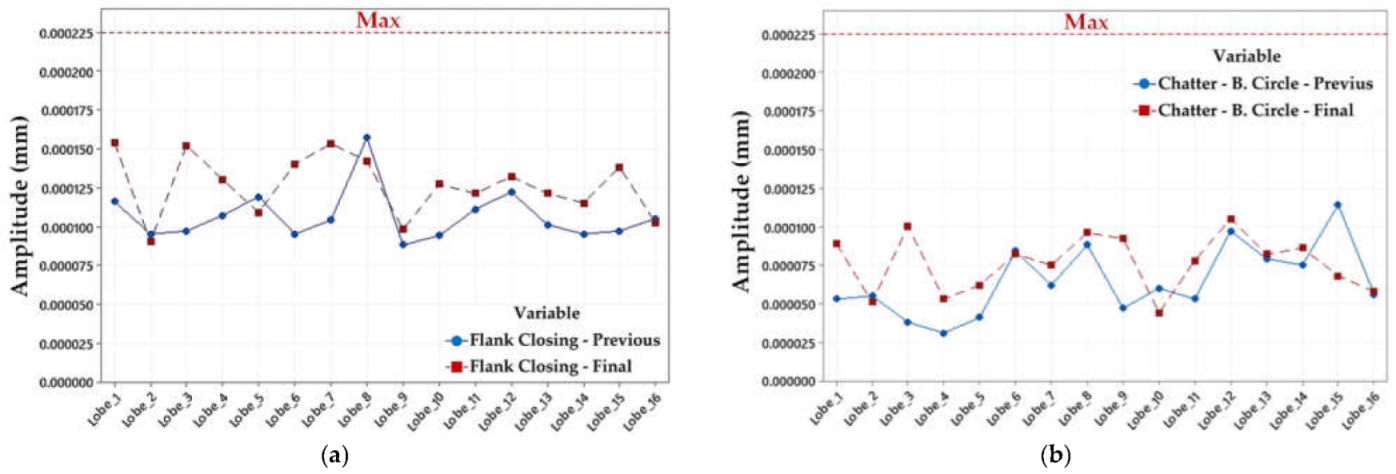
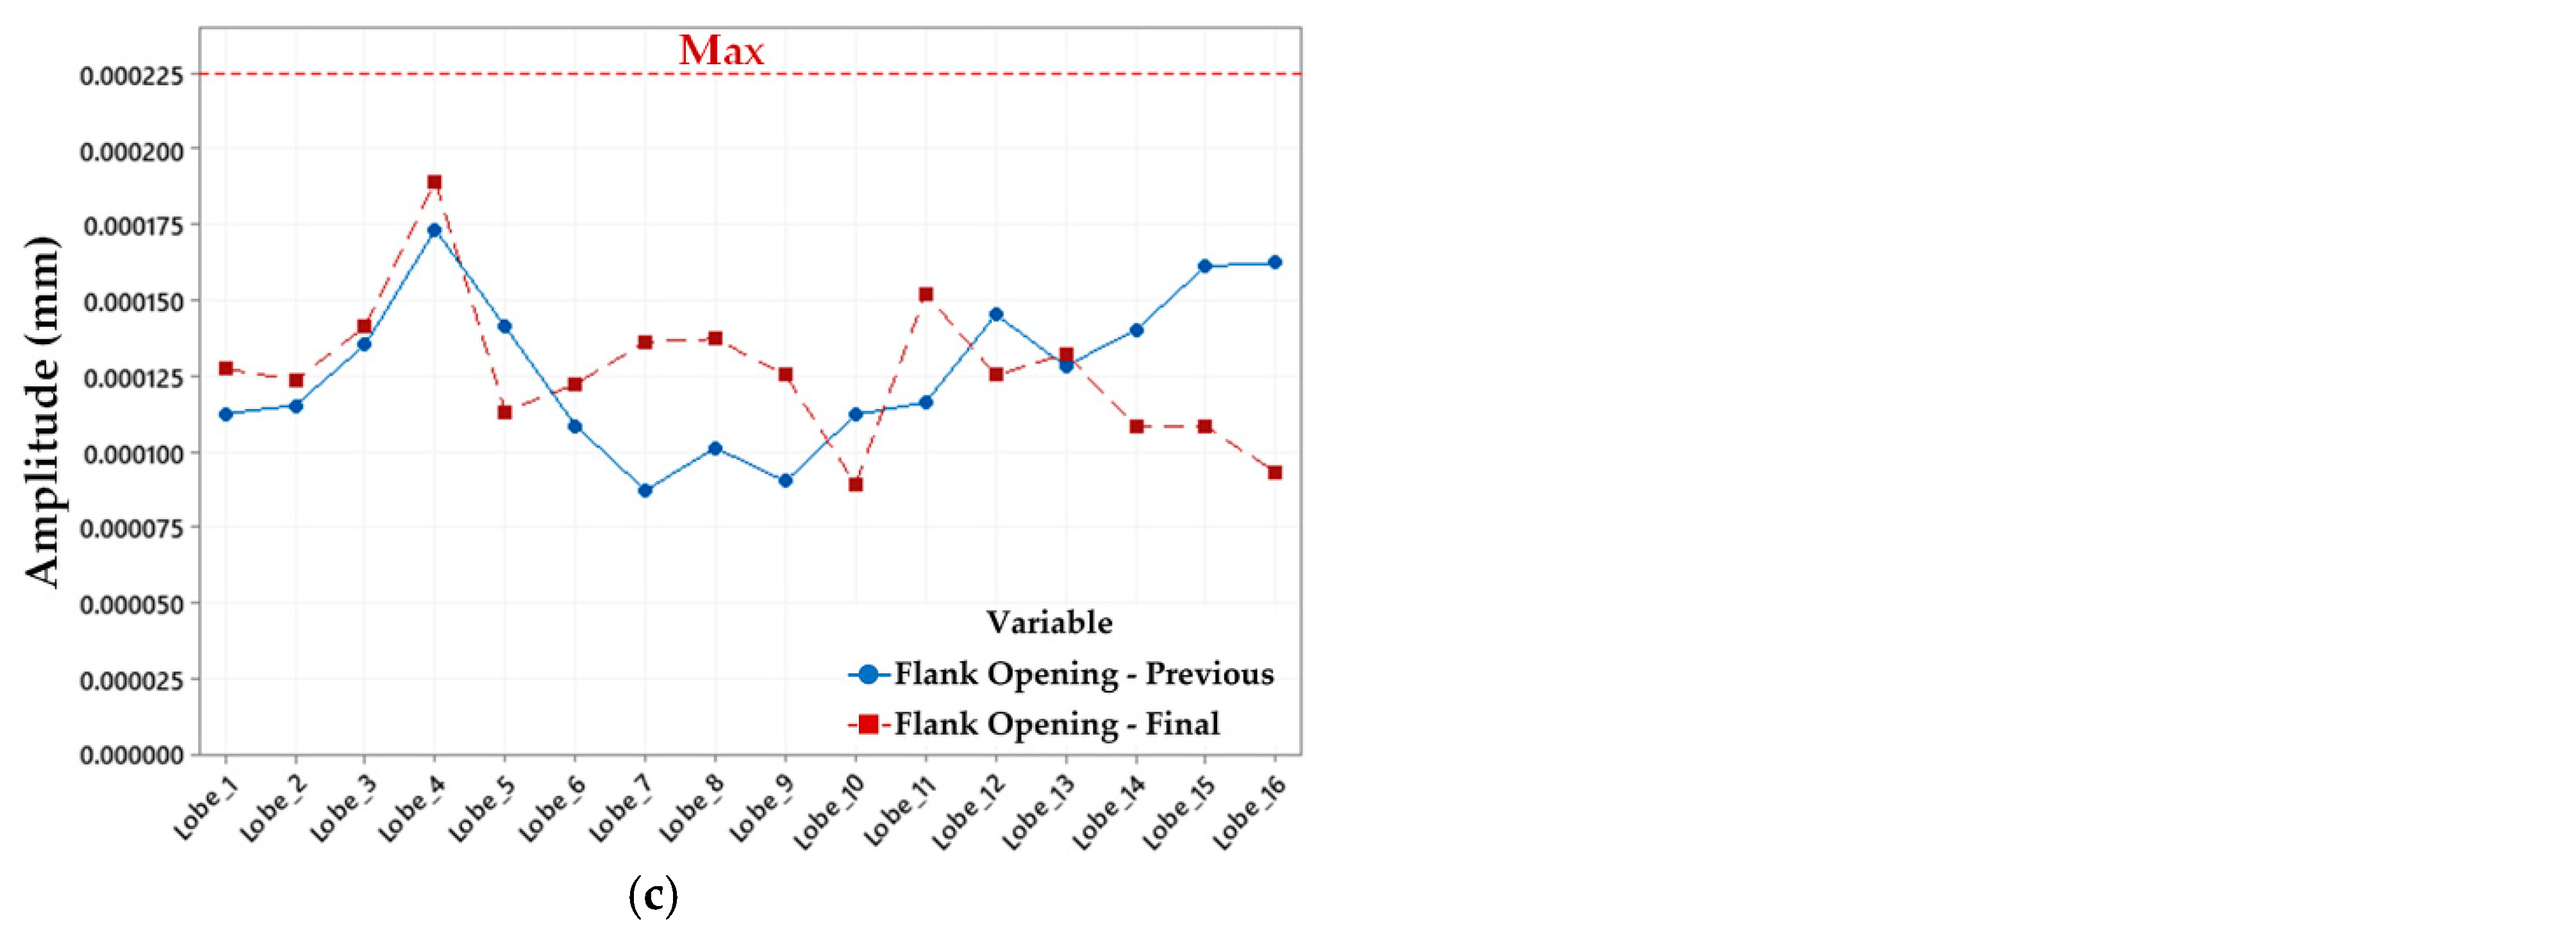
Despite the behavior shown in Figure 13, the chatter measurements on the flank closing, flank opening, and base circle kept the same tendency in closer values to the previous and final conditions in the surfaces for every lobe (Figure 14). Therefore, there was no sign of material loss, wear, or scuff marks on the lobe surface that was in contact with the steel roller during the entire spin rig test (Figure 15).
It is possible to increase the hardness and wear resistance of the camshafts by increasing the amount of vanadium; however, the strong carbide-forming tendency of the vanadium could affect further mechanical operations in camshaft production. An adequate balance between hardness and wear resistance was obtained for the ADI-0.2V-265 sample, where there was no evidence of wear damage or any defect based on the geometrical measurements of the camshaft carried out in the spin rig electric testing machine.
The camshaft is subject to different mechanisms of degradation, such as multiaxial stresses, corrosion, abrasion, creep, and wear, as a result of contact stresses and temperature operations that can induce cracking or failure. Wear is developed at the top of the cams causing a change in the design contour. Based on the requirements of the component, the samples of ADIs heat treated to 265 °C showed the highest wear resistance, compared to the ADIs obtained at 305 °C (Figure 9). However, the sample ADI-0.3V-265 had the highest carbide amount (Table 4) and the lowest toughness (Table 5). The reduction in toughness and an increase in the volume fraction of carbides could affect the continuity of the matrix acting as crack initiation sites causing a possible fracture mechanism. For these reasons, the sample ADI-0.2V-265 was the best choice to ensure optimal performance of the component, as was proven by the spin rig electric test.

4. Conclusions

In this work, two austempered ductile irons were produced from ductile irons low alloyed with 0.2 and 0.3 wt.% V, which were heat-treated to 265 and 305 °C for camshaft production. A sliding wear evaluation of the high-strength ADIs was carried out using a block-on-ring wear test and a spin rig electric machine, according to OEM protocol for the V8 engine, to evaluate the volume loss of material removed and the geometrical changes of the camshaft, respectively. The results obtained can be summarized as follows:
  • The vanadium addition to the DI allowed the obtaining of carbides that were partially dissolved by the applied austempering heat treatment to obtain a low volume fraction of fine carbides homogeneously distributed in the cams.
  • The high-volume fraction of acicular ferrite and the low high-carbon austenite microstructure, together with the fine carbide particles, increased the wear resistance in the ADIs heat treated to 265 °C, showing the lowest volume loss of material removed by the block-on-ring wear test.
  • After the OEM test protocol at low and high conditions (~60 million total cycles); no signs of wear or pitting were detected in any lobe along the camshaft; only “dark” mirror marks were observed on the lobe’s surfaces because of the oil color, the same phenomenon was presented in the roller surfaces.
  • Lobe’s surfaces presented a micro expansion according to the dimensional inspection of profiles and roundness carried out previous to, and after, the spin rig test. This behavior was potentially due to contact stresses between the lobe and roller surfaces. The high load produced a strain-induced transformation of austenite to martensite. This micro-expansion was considered insignificant according to the flank closing, base circle, and flank opening results after the test and did not affect the camshaft performance in any way.
  • The sample ADI-0.2V-265 fulfilled the mechanical requirements of hardness, wear resistance, and toughness in the camshaft to ensure optimal performance of the component, as was evidenced by the spin rig electric test.

Author Contributions

Data curation, A.C.R., E.C.G. and A.M.H.; Formal analysis, A.C.R. and E.C.G.; Investigation, E.C.G., A.C.R. and A.M.H.; Methodology, E.C.G., A.C.R., J.T.R. and A.M.H.; Project administration, J.T.R.; Supervision, J.T.R.; Validation, A.C.R. and J.T.R.; Visualization, A.C.R. and A.M.H.; Writing—original draft, A.C.R. and E.C.G.; Writing—review and editing, A.C.R. and E.C.G. All authors have read and agreed to the published version of the manuscript.

Funding

This research received no external funding.

Institutional Review Board Statement

Not applicable.

Informed Consent Statement

Not applicable.

Data Availability Statement

No additional data.

Acknowledgments

The authors wish to thank the enterprise Arbomex for the facilities given for the trial’s development. A. Cruz and E. Colin wish to thank the Institutions CONACyT, SNI, COFAA, and SIP-Instituto Politécnico Nacional for their permanent assistance to the Process Metallurgy Group at ESIQIE-Metallurgy and Materials Department.

Conflicts of Interest

The authors declare no conflict of interest.

References

  1. Foundry Products: Competitive Conditions in the U.S. Market. Available online: https://www.usitc.gov/publications/332/pub3771.pdf (accessed on 12 November 2020).
  2. Stefanescu, D.M.; Ruxanda, R. Lightweight iron castings-can they replace aluminum castings. In Proceedings of the 65th World Foundry Congress, Gyeongju, Republic of Korea, 20–24 October 2002. [Google Scholar]
  3. Samaddar, S.; Das, T.; Chowdhury, A.K.; Singh, M. Manufacturing of engineering components with austempered ductile iron—A review. Mater. Today Proc. 2018, 5, 25615–25624. [Google Scholar] [CrossRef]
  4. Blackmore, P.A.; Harding, R.A. The effects of metallurgical process variables on the properties of austempered ductile irons. J. Heat Treat. 1984, 3, 310–325. [Google Scholar] [CrossRef]
  5. Cekic, O.E.; Sidjanin, L.; Rajnovic, D.; Rajnovic, D.; Balos, S. Austempering kinetics of Cu-Ni alloyed austempered Ductile Iron. Met. Mater. Int. 2014, 20, 1131–1138. [Google Scholar] [CrossRef]
  6. Erfanian-Naziftoosi, H.R.; Haghdadi, N.; Kiani-Rashid, A.R. The effect of isothermal heat treatment time on the microstructure and properties of 2.11% Al austempered ductile iron. J. Mater. Eng. Perform. 2012, 21, 1785–1792. [Google Scholar] [CrossRef]
  7. Meena, A.; Mansori, M.E. Study of dry and minimum quantity lubrication drilling of novel austempered ductile iron (ADI) for automotive applications. Wear 2011, 271, 2412–2416. [Google Scholar] [CrossRef]
  8. Cetin, B.; Meco, H.; Davut, K.; Arslan, E.; Can, M. Microstructural analysis of austempered ductile iron castings. Hitt. J. Sci. Eng. 2016, 3, 29–34. [Google Scholar] [CrossRef] [Green Version]
  9. Pulkrabeth, W.W. Introduction Engine components. In Engineering Fundamentals of the Internal Combustion Engine; Prentice-Hall: Upper Saddle River, NJ, USA, 2004; pp. 18–19. [Google Scholar]
  10. Bereteu, L.; Crâştiu, I.; Nyaguly, E.; Simoiu, D. Investigation of a camshaft repaired by welding using the vibration signal analysis. Adv. Mat. Res. 2015, 1111, 199–204. [Google Scholar] [CrossRef]
  11. INA-Schaeffer KG, Testing Cam Phaser Systems; Herzogenaurach, Germany. Communication, 2004.
  12. Hatwalane, S.; Kothavale, B. Camshaft torque analysis of diesel engine. Int. J. Curr. Eng. Tech. 2017, 7, 1–5. [Google Scholar]
  13. Padan, D.S. Microalloying in austempered ductile iron (ADI). AFS Proc. 2012, 12–19, 1–12. [Google Scholar]
  14. Sadighzadeh, B.A. Effect of alloying elements on austempered ductile iron (ADI) properties and its process: Review. China Foundry 2015, 12, 54–70. [Google Scholar]
  15. Arbomex Web Page. Available online: https://www.arbomex.com (accessed on 28 November 2022).
  16. Colin, G.E.; Cruz, R.A.; Reyes, C.G.; Téllez, R.J.; Magaña, H.A. Microstructural and mechanical assessment of camshafts produced by ductile cast iron low alloyed with vanadium. Metals 2021, 11, 146. [Google Scholar] [CrossRef]
  17. Colin, G.E.; Cruz, R.A.; Reyes, C.G.; Chávez, A.J.F.; Téllez, R.J.; Magaña, H.A. Heat treatment evaluation for the camshafts production of ADI low alloyed with vanadium. Metals 2021, 11, 1036. [Google Scholar] [CrossRef]
  18. Patel, G.; Minstry, K.; Patel, M. Experimental analysis of cam and follower of valve train system for prediction of wear rate. IJARIIE 2017, 3, 1–11. [Google Scholar]
  19. Pedro, D.I.; Dommarco, R.C. Rolling contact fatigue resistance of Carbidic Austempered Ductile Iron (CADI). Wear 2019, 418–419, 94–101. [Google Scholar] [CrossRef]
  20. Aranzabal, J.; Gutierrez, I.; Rodriguez-Ibabe, J.M.; Urcola, J.J. Influence of Heat treatments on microstructure and toughness of austempered ductile iron. Mater. Sci. Technol. 1992, 8, 263–273. [Google Scholar] [CrossRef]
  21. Cueva, G.; Sinatora, A.; Guesser, W.L.; Tschiptschin, A.P. Wear resistance of cast irons used in brake disc rotors. Wear 2003, 255, 1256–1260. [Google Scholar] [CrossRef] [Green Version]
  22. Hamid, A.A.S.; Elliot, R. Influence of austenitising temperature on austempering of an Mn-Mo-Cu alloyed ductile iron Part 1 Austempering kinetics and the processing window. Mater. Sci. Tech. 1996, 12, 1021–1031. [Google Scholar] [CrossRef]
  23. Rezvani, M.; Harding, R.A.; Campbell, J. The effect of vanadium in as-cast ductile iron. Int. J. Cast Metal Res. 1997, 10, 1–15. [Google Scholar] [CrossRef]
  24. Han, J.M.; Zou, Q.; Barber, G.C.; Nasir, T.; Northwood, D.O.; Sun, X.C.; Seaton, P. Study of the effects of austempering temperature and time on scuffing behavior of austempered Ni-Mo-Cu ductile iron. Wear 2012, 290–291, 99–105. [Google Scholar] [CrossRef]
  25. Putatunda, S.K.; Gadicherla, P.K. Effect of austempering time on mechanical properties of a low manganese austempered ductile iron. J. Mater. Eng. Perform. 2000, 9, 193–203. [Google Scholar] [CrossRef]
  26. Parhad, P.; Umale, S.; Likhite, A.; Bhatt, J. Characterization of inoculated low carbon equivalent iron at lower austempering temperature. Trans. Indian Inst. Met. 2012, 65, 449–458. [Google Scholar] [CrossRef]
  27. Wang, B.; Barber, G.C.; Qiu, F.; Zou, Q.; Yang, H. A review: Phase transformation and wear mechanisms of single-step and dual-step austempered ductile irons. J. Mater. Res. Technol. 2019, 9, 1054–1069. [Google Scholar] [CrossRef]
  28. Bendikiene, R.; Ciuplys, A.; Cesnavicius, R.; Jutas, A.; Bahdanovich, A.; Marmysh, D.; Nasan, A.; Shemet, L.; Sherbakov, S. Influence of austempering temperatures of the microstructure and mechanical properties of austempered ductile cast iron. Metals 2021, 11, 967. [Google Scholar] [CrossRef]
  29. Hegde, A.; B M, G.; Hindi, J.; Sharma, S.; M C, G. Effect of austempering temperature and manganese content on the impact energy of austempered ductile iron. Cogent Eng. 2021, 8, 1939928. [Google Scholar] [CrossRef]
  30. Minkoff, I. The Physical Metallurgy of Cast Iron; John Wiley and Sons: Salisbury, UK, 1983; p. 183. [Google Scholar]
  31. Zhou, W.S.; Zhou, Q.D. Lubricated sliding and rolling wear of austempered ductile iron. Wear 1993, 162–164, 696–702. [Google Scholar] [CrossRef]
  32. Sellamuthu, P.; Harris Samuel, D.G.; Dinakaran, D.; Premkumar, V.P.; Li, Z.; Seetharaman, S. Austempered ductile iron (ADI): Influence of austempering temperature on microstructure, mechanical and wear properties and energy consumption. Metals 2018, 8, 53. [Google Scholar] [CrossRef] [Green Version]
  33. Laino, S.; Sikora, J.A.; Dommarco, R.C. Development of wear resistant carbidic austempered ductile iron. Wear 2008, 265, 1–7. [Google Scholar] [CrossRef]
  34. Caldera, M.; Rivera, G.; Boeri, R.; Sikora, J. Precipitation and dissolution of carbides in low alloy ductile iron plates of varied thickness. Mater Sci. Technol. 2005, 21, 1187–1191. [Google Scholar] [CrossRef]
  35. BabaZadeh, M.; PourAsiabi, H.; PourAsiabi, H. Wear Characteristics of ADIs; a compressive review on mechanisms and effective parameters. J. Basic Appl. Sci. Res. 2013, 3, 646–656. [Google Scholar]
  36. Pérez, M.J.; Cisneros, M.M.; López, H.F. Wear resistance of Cu-Ni-Mo austempered ductile iron. Wear 2006, 260, 879–885. [Google Scholar] [CrossRef]
  37. Balos, S.; Rajnovic, D.; Dramicanin, M.; Labus, D.; Eric-Cekic, O.; Grbovicn-Novakovic, J.; Sidjanin, L. Abrasive wear behavior of ADI material with various retained austenite content. Int. J. Cast Met. Res. 2016, 29, 187–193. [Google Scholar] [CrossRef]
  38. Keough, J.R.; Hayrynen, K.L. Wear properties of Austempered Ductile Irons. Appl. Process Inc. Technol. Div. USA SAE Int. 2005, 1690, 1–9. [Google Scholar]
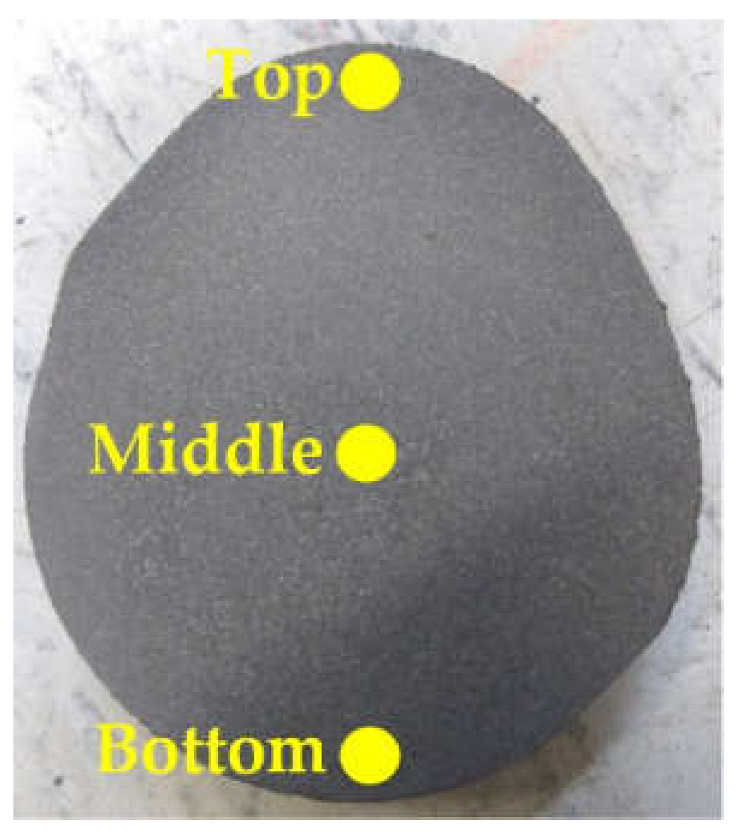
Figure 1. Lobe taken from camshaft showing the three regions analyzed.
Metals 13 00198 g001
Figure 2. Austempering heat treatment cycles for temperatures of 265 and 305 °C.
Metals 13 00198 g002
Figure 3. Samples for mechanical properties were obtained from (a) Camshafts and (b) Keel-block casting.
Metals 13 00198 g003
Figure 4. Electric Spin Rig machine—V8 engine 5.7L.
Metals 13 00198 g004
Figure 5. ADI low alloyed with vanadium camshaft 5.7L with 16 intake and exhaust lobes.
Metals 13 00198 g005
Figure 6. Microstructure at high magnifications for the DI low alloyed with V in unetched condition and etched with nital 3%.
Metals 13 00198 g006
Figure 7. Microstructure of ADI alloyed with 0.2 wt.% V heat-treated to 265 °C and 305 °C for 90 min.
Metals 13 00198 g007aMetals 13 00198 g007b
Figure 8. Wear scars samples for DI and ADI alloyed with 0.2 and 0.3 wt.% V, austempered at 265 and 305 for 90 min.
Metals 13 00198 g008
Figure 9. Effect of the austempering temperature and vanadium content on the wear resistance for the evaluated ADIs.
Metals 13 00198 g009
Figure 10. Etched microstructure with ammonium persulfate revealed the carbide phases (white regions) of the DIs and ADIs low alloyed with vanadium.
Metals 13 00198 g010aMetals 13 00198 g010b
Figure 11. Oil temperature monitoring for (a) low condition (500 rpm camshaft), and (b) high condition (2500 rpm camshaft).
Metals 13 00198 g011
Figure 12. Removing the camshaft after complying with the test protocol.
Metals 13 00198 g012
Figure 13. Dimensional measurements of the camshaft lobes before and after the spin rig test for (a) radius base circle, and (b) error angle.
Metals 13 00198 g013
Figure 14. Dimensional measurements of the camshaft lobes before and after the spin rig test for (a) flank closing, (b) base circle, and (c) flank opening.
Metals 13 00198 g014aMetals 13 00198 g014b
Figure 15. Condition of parts after spin rig test (a) lobe surfaces and journals, and (b) roller surfaces.
Metals 13 00198 g015
Table 1. Camshaft bench testing parameters.
SpeedLow Condition (500 rpm-Camshaft)
(1000 rpm-Engine)
High Condition (2500 rpm-Camshaft)
(5000 rpm-Engine)
Test duration1000 h300 h
Number of cycles~24 million cycles~36 million cycles
Change oil and oil filtersEvery 300 hOnly to start the test
Lubrication5W-30
Load @Nose
Initial Spring length 53.50 mm
1696 N @ to 29.62 mm compress
Hydraulic roller lifters materialSteel–Superficial 61.5 HRC
Table 2. Chemical composition of camshafts low alloyed with vanadium (wt.%).
SampleCSiMnPSMgVNiAlCuCrMoTiSnPbCE
DI-0.2V3.612.490.960.0160.0130.0450.20.1170.0160.9430.200.0980.0060.0030.0014.44
DI-0.3V3.582.480.940.0160.0120.0410.30.1150.0160.9680.130.0920.0060.0040.0014.41
Balance Fe. CE: Carbon Equivalent = %C + 1/3%Si + 1/3%P.
Table 3. Graphite features and volume fraction of phases formed for camshaft alloyed with 0.2 and 0.3 wt.% V.
CharacteristicsDI-0.2VDI-0.3V
Nodularity (%)85.26 ± 3.4585.32 ± 5.36
Nodule count (particles/mm2)223 ± 31.25216 ± 41.67
Nodule size (µm)25.91 ± 0.9831.01 ± 2.03
Porosity, inclusions, and micro-shrinkages (%)0.69 ± 0.090.91 ± 0.16
Graphite (%)10.11 ± 1.7911.21 ± 1.73
Ferrite (%)2.83 ± 0.431.21 ± 0.41
Pearlite (%)85.96 ± 3.9885.74 ± 4.11
Carbides (%)0.41 ± 0.100.93 ± 0.12
Table 4. The volume fraction of phases for the ADIs produced.
PhasesADI-0.2V-265ADI-0.2V-305ADI-0.3V-265ADI-0.3V-305
High-carbon Austenite (%)9.5310.938.8312.93
Carbides (%)0.180.120.270.21
Graphite (%)10.1110.1111.2111.21
Acicular ferrite (%)80.1778.7379.7775.64
Table 5. Mechanical properties of the ADI camshafts low alloyed with 0.2 and 0.3 wt.% V.
Mechanical PropertiesDI-0.2VDI-0.3VADI-0.2V-265ADI-0.2V-305ADI-0.3V-265ADI-0.3V-305
Hardness (HRC)37.05 ± 236.54 ± 244 ± 0.743 ± 0.547 ± 0.844 ± 1.2
Yield strength (MPa)559 ± 21588 ± 251032 ± 32781 ± 281051 ± 22999 ± 29
Tensile strength (MPa)775 ± 28782 ± 261107 ± 25989 ± 211200 ± 241176 ± 30
Elongation (%)4.5 ± 0.63.6 ± 0.43.04 ± 0.33.5 ± 0.33.58 ± 0.43.32 ± 0.4
Impact energy (J)14.8 ± 1.211.0 ± 1.429.08 ± 330.58 ± 3.425.88 ± 3.140.45 ± 3.3
Disclaimer/Publisher’s Note: The statements, opinions and data contained in all publications are solely those of the individual author(s) and contributor(s) and not of MDPI and/or the editor(s). MDPI and/or the editor(s) disclaim responsibility for any injury to people or property resulting from any ideas, methods, instructions or products referred to in the content.