Article

Deformation Property and Suppression of Ultra-Thin-Walled Rectangular Tube in Rotary Draw Bending

1
HVAC Systems Production Engineering Department, Marelli Corporation, 8 Sakae-cho, Sano, Tochigi 327-0816, Japan
2
Faculty of Education, Saitama University, 255 shimo-Okubo, Sakura-ku, Saitama 338-8570, Japan
3
Graduates of Faculty of Education, Saitama University, 255 shimo-Okubo, Sakura-ku, Saitama 338-8570, Japan
4
Department of Advanced Science and Technology, Daido University, 10-3 Takiharu-cho, Minami-ku, Nagoya 457-0819, Japan
*
Author to whom correspondence should be addressed.
Metals 2020, 10(8), 1074; https://doi.org/10.3390/met10081074
Submission received: 17 July 2020 / Revised: 6 August 2020 / Accepted: 7 August 2020 / Published: 10 August 2020
(This article belongs to the Special Issue Latest Hydroforming Technology of Metallic Tubes and Sheets)

Abstract

:
Recently, miniaturization and weight reduction have become important issues in various industries such as automobile and aerospace. To achieve weight reduction, it is effective to reduce the material thickness. Generally, a secondary forming process such as bending is performed on the tube, and it is applied as a structural member for various products and a member for transmitting electromagnetic waves and fluids. If the wall thickness of this tube can be thinned and the bending technology can be established, it will contribute to further weight reduction. Therefore, in this study, we fabricated an aluminum alloy rectangular tube with a height H0 = 20 mm, width W0 = 10 mm, wall thickness t0 = 0.5 mm (H0/t0 = 40) and investigated the deformation properties in the rotary draw bending. As a result, the deformation in the height direction of the tube was suppressed applying the laminated mandrel. In contrast, it was found that the pear-shaped deformation peculiar to the ultra-thin wall tube occurs. In addition, axial tension and lateral constraint were applied. Furthermore, the widthwise clearance of the mandrel was adjusted to be bumpy. As a result, the pear-shaped deformation was suppressed, and a more accurate cross-section was obtained.

1. Introduction

Tubes are subjected to secondary forming processing such as bending and used as parts in the automobile and aerospace industries. To bend the tubes, press bending, rotary draw bending, and other bending methods have been developed and applied to actual product production. However, during bending of a thin-walled tube with a space in the cross-section, flattening, thickness deviation, wrinkling, folding, and other undesirable distortions occur [1,2,3]. Generally, it is effective to apply a mandrel to suppress undesirable distortions. A ball-type mandrel is often used [4,5,6,7,8], and the results of investigating the effects of the clearance between the pipe inner diameter and the mandrel on flattening [9,10] and wrinkling [11] have been reported. Moreover, there have been reports on the effect of mandrels on springback [12]. In addition, there have been reports on the effect of the friction coefficient of the ball mandrel on undesirable distortions and analysis of the stress state of the mandrel during bending [13,14,15,16]. In addition, other studies include the following: A study using a chain-link type mandrel, which is cheaper than a ball type one [17], a mandrel that combines hard and soft rubber [18], and a study that suppresses cross-sectional deformation by applying fluid pressure inside the pipe [19]. Moreover, the effects of mandrels on various materials such as steel, aluminum alloys, copper alloys, titanium, and high tensile strength materials have been reported [20,21,22,23].
However, these studies are mainly the results of investigations of circular pipes and materials with a wall thickness of 1.0 mm or more [24,25]. In contrast, there has been little research on clarifying and suppressing the cross-sectional deformation phenomenon during bending of a rectangular tube with a rectangular cross-section and ultra-thin materials with a wall thickness of 1.0 mm or less. If ultra-thin tubes can be applied to various components in the automobile and aerospace industries, it is expected that they will contribute significantly to the reduction of size and weight, which is a common issue in each industry in recent years. Among them, the rectangular tube is considered for application in the waveguide, which is a component for electromagnetic wave propagation in the aerospace industry. However, in order to improve the electromagnetic wave propagation efficiency, it is necessary to minimize the cross-sectional deformation after bending. We investigated the effect of a mandrel and a restraint plate on undesirable distortions in the cross section of an extruded square tube on press bending [26]. Furthermore, we also reported that wrinkling in rotary draw bending can be suppressed by axial tension, and that cracking is considerably affected by the bending radius and material. In addition, it has been clarified that pear-shaped cross-section deformation occurs when a mandrel is applied during the bending of ultra-thin tubes [27,28].
Therefore, in this study, in order to contribute to further weight reduction of the tubular material application parts in each industry by rendering the tubular material thinner, we investigated the deformation property during rotary draw bending using an ultra-thin aluminum alloy rectangular tube. As a result, the pear-shaped deformation peculiar to the ultra-thin rectangular tube was confirmed. The suppression method was then investigated. Specifically, axial tension was used to suppress wrinkling due to bending. A restraint jig was used to suppress convex distortion at the sides. To suppress the flattening, we applied a laminated mandrel to adjust the clearance between the tube shape and the mandrel. As a result, it was found that the deformation of the cross-section peculiar to the ultra-thin rectangular tube can be suppressed by controlling axial tension, applying side restraint, and adjusting the widthwise clearance of the mandrel on the compression and the tension sides of the tube.

2. Materials and Methods

2.1. Workpiece

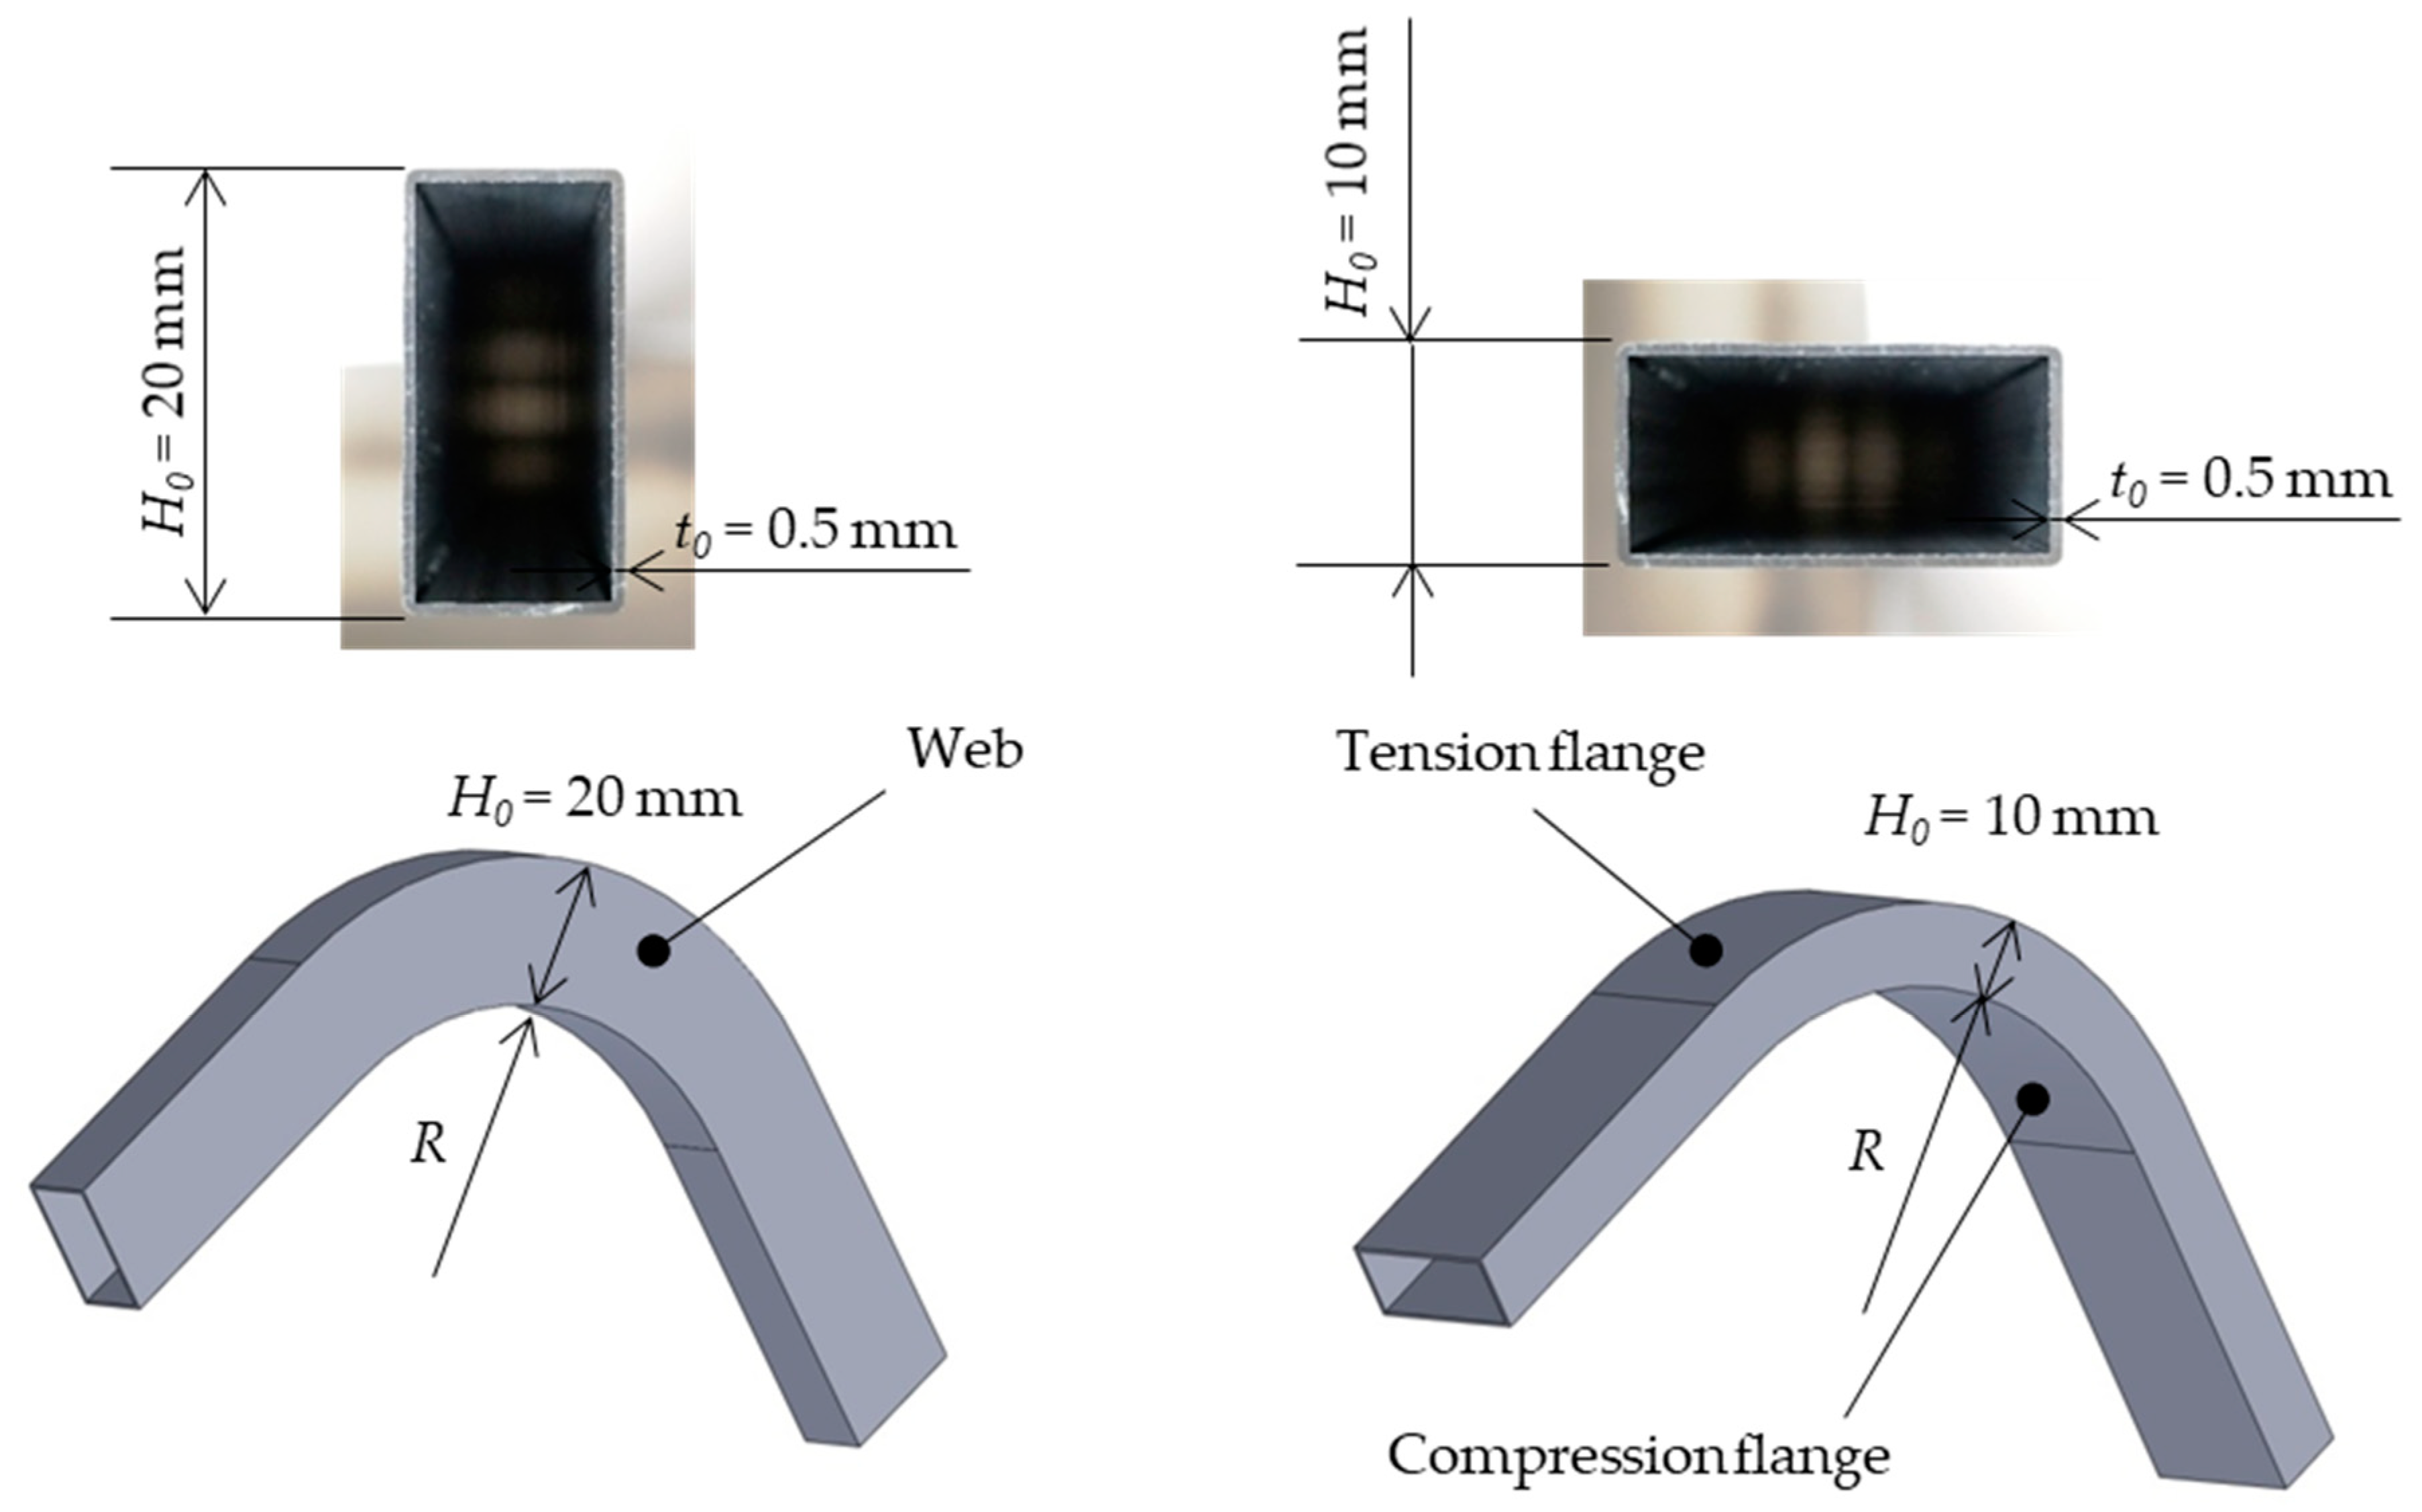
The workpiece used in the experiments and simulations was an aluminum alloy with annealing (A6063-O). Table 1 shows the mechanical properties, and Figure 1 shows the shape and dimensions of the workpiece. The dimensions of the cross-sectional shape were set as follows: height H0 = 20, 10 mm; width W0 = 10, 20 mm; and thickness t0 = 0.5 mm. The waveguide, which is an example of the application range of ultra-thin tubes, has a standard regarding the material, but the rectangular tube with a wall thickness of 0.5 mm applied in this study is not part of this standard. Moreover, it is not marketed because there is a limit to thinning in extrusion. Therefore, in this study, a commercial extruded tube was processed by drawing to achieve a wall thickness of 0.5 mm and applied to the experiment.

2.2. Bend Radius

As shown in Figure 2, the bending radius R is the bending drum radius; more precisely, the inside of the rectangular tube is the bending radius. There are two types of rectangular tubes with outer height H0 = 20, 10 mm, and thickness t0 = 0.5 mm (H0/t0 = 40, 20).

2.3. Rotary Draw Bending System

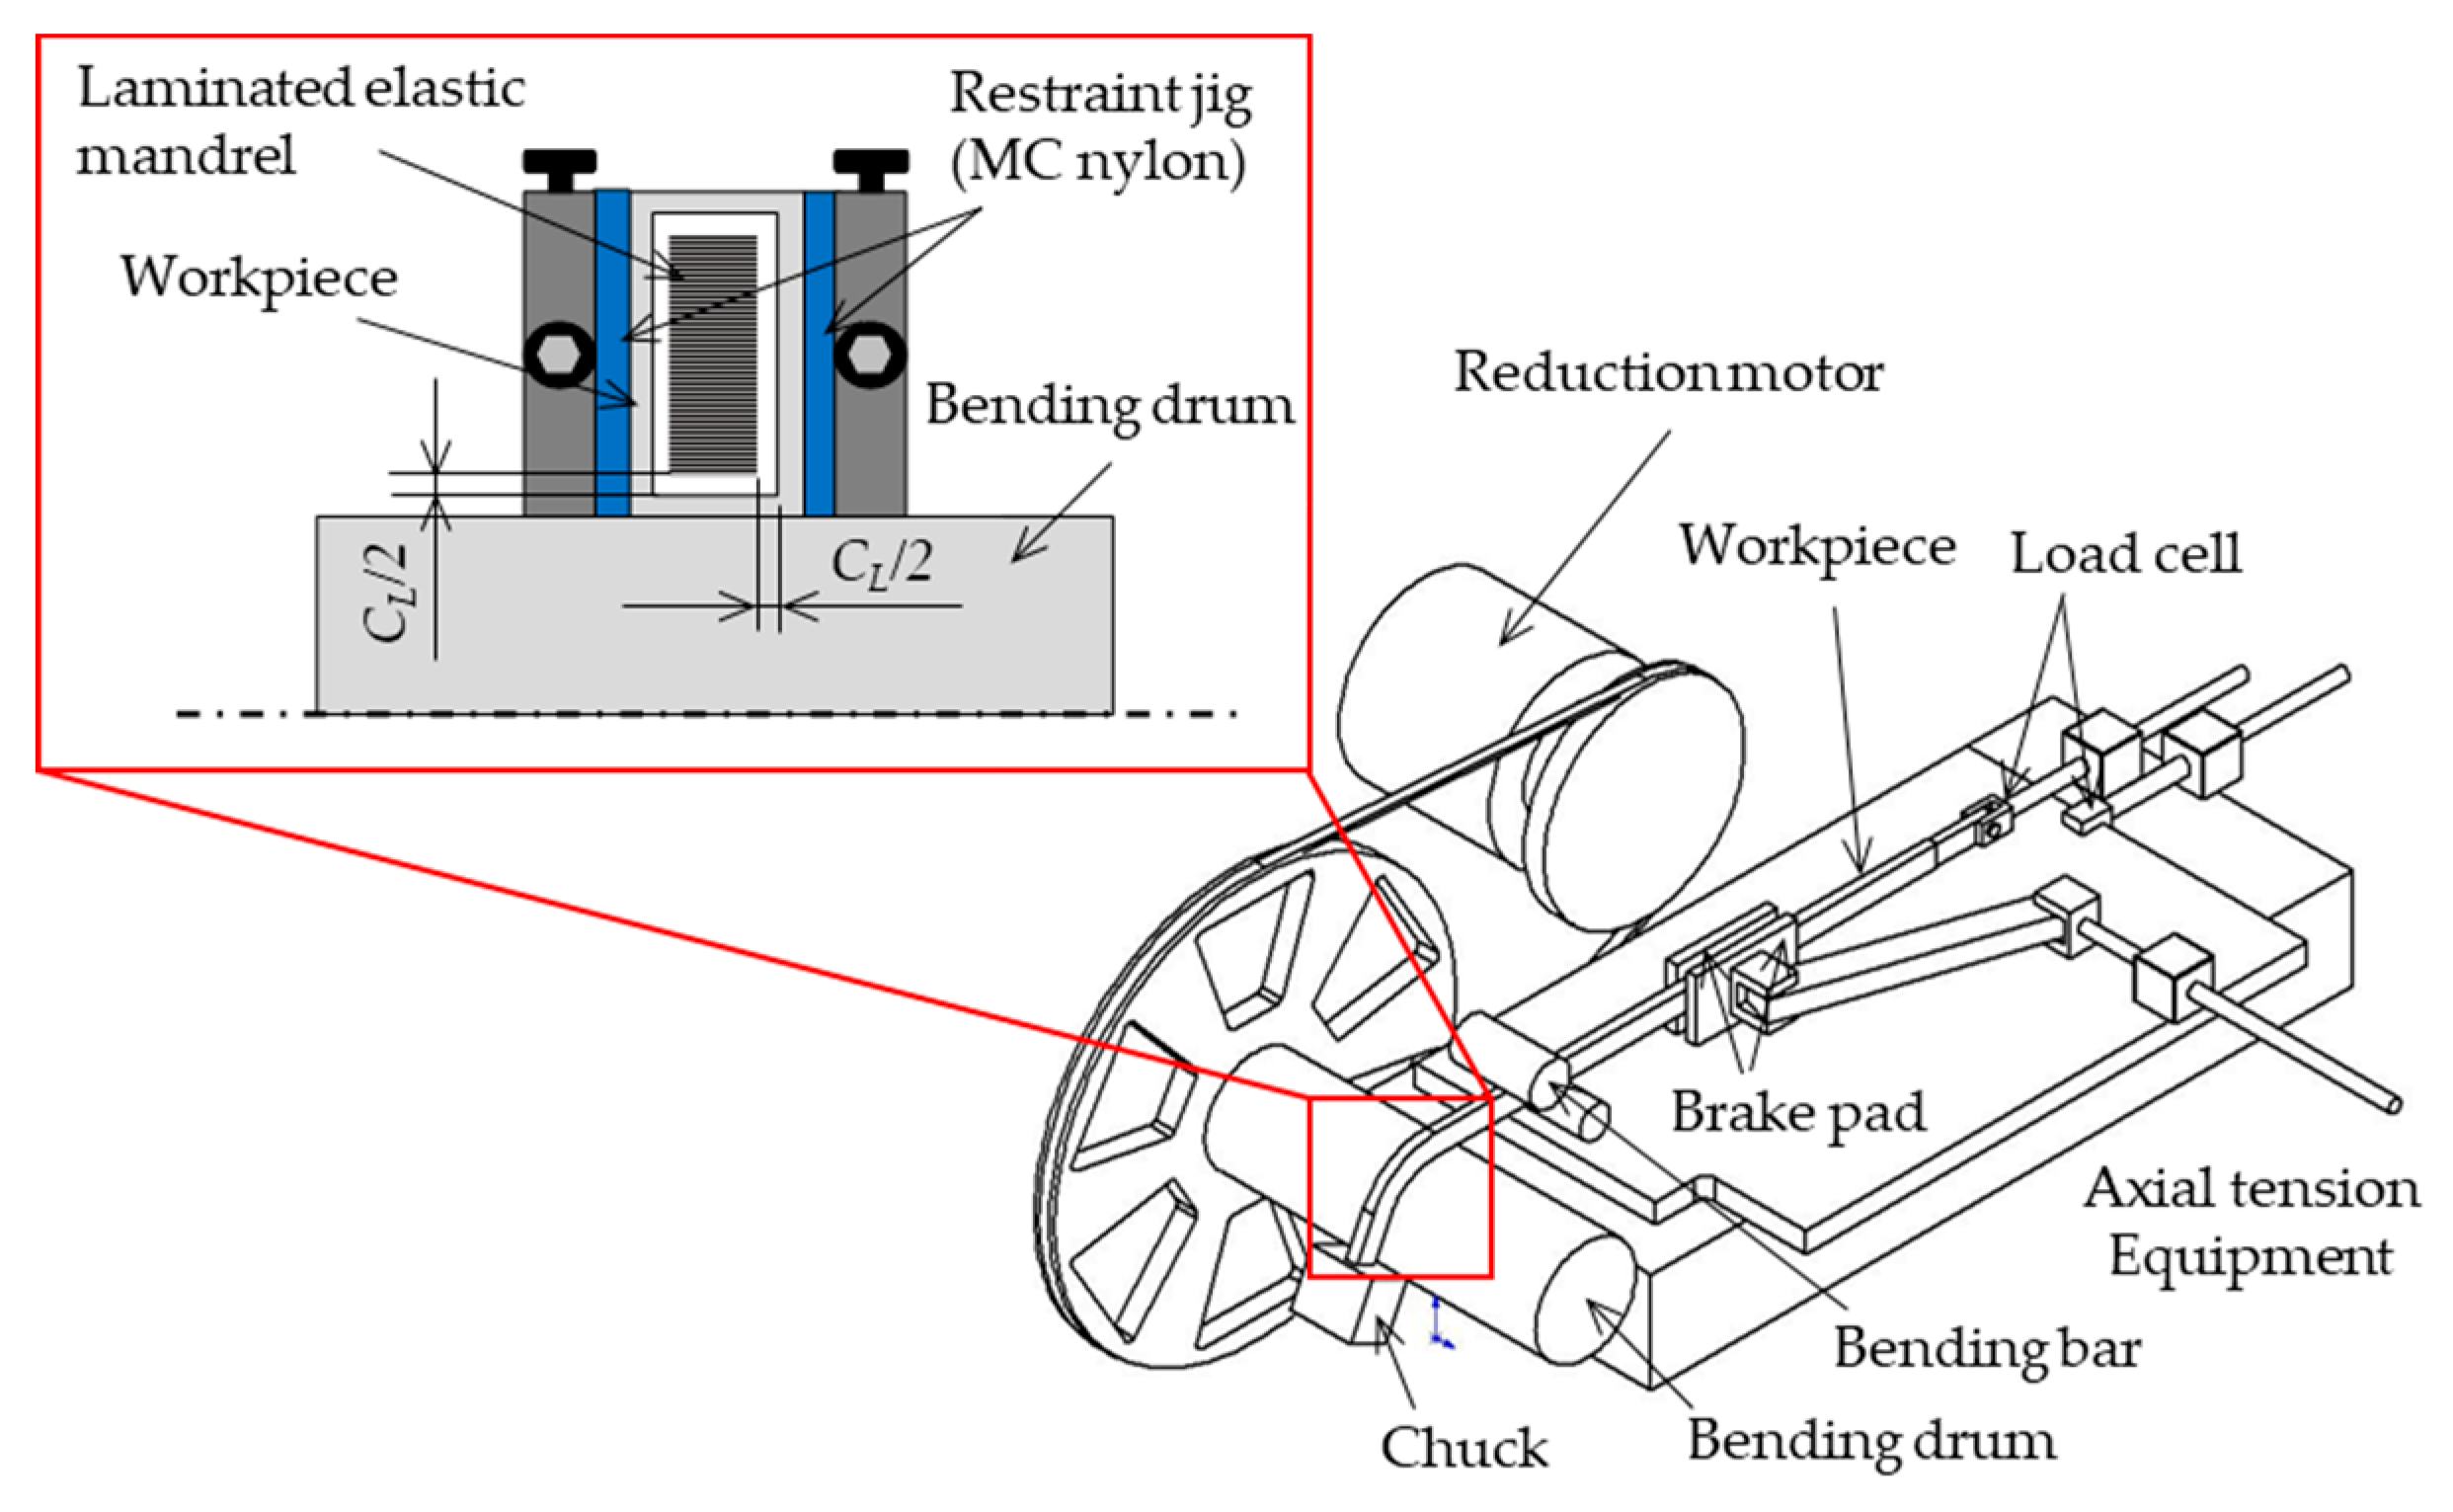
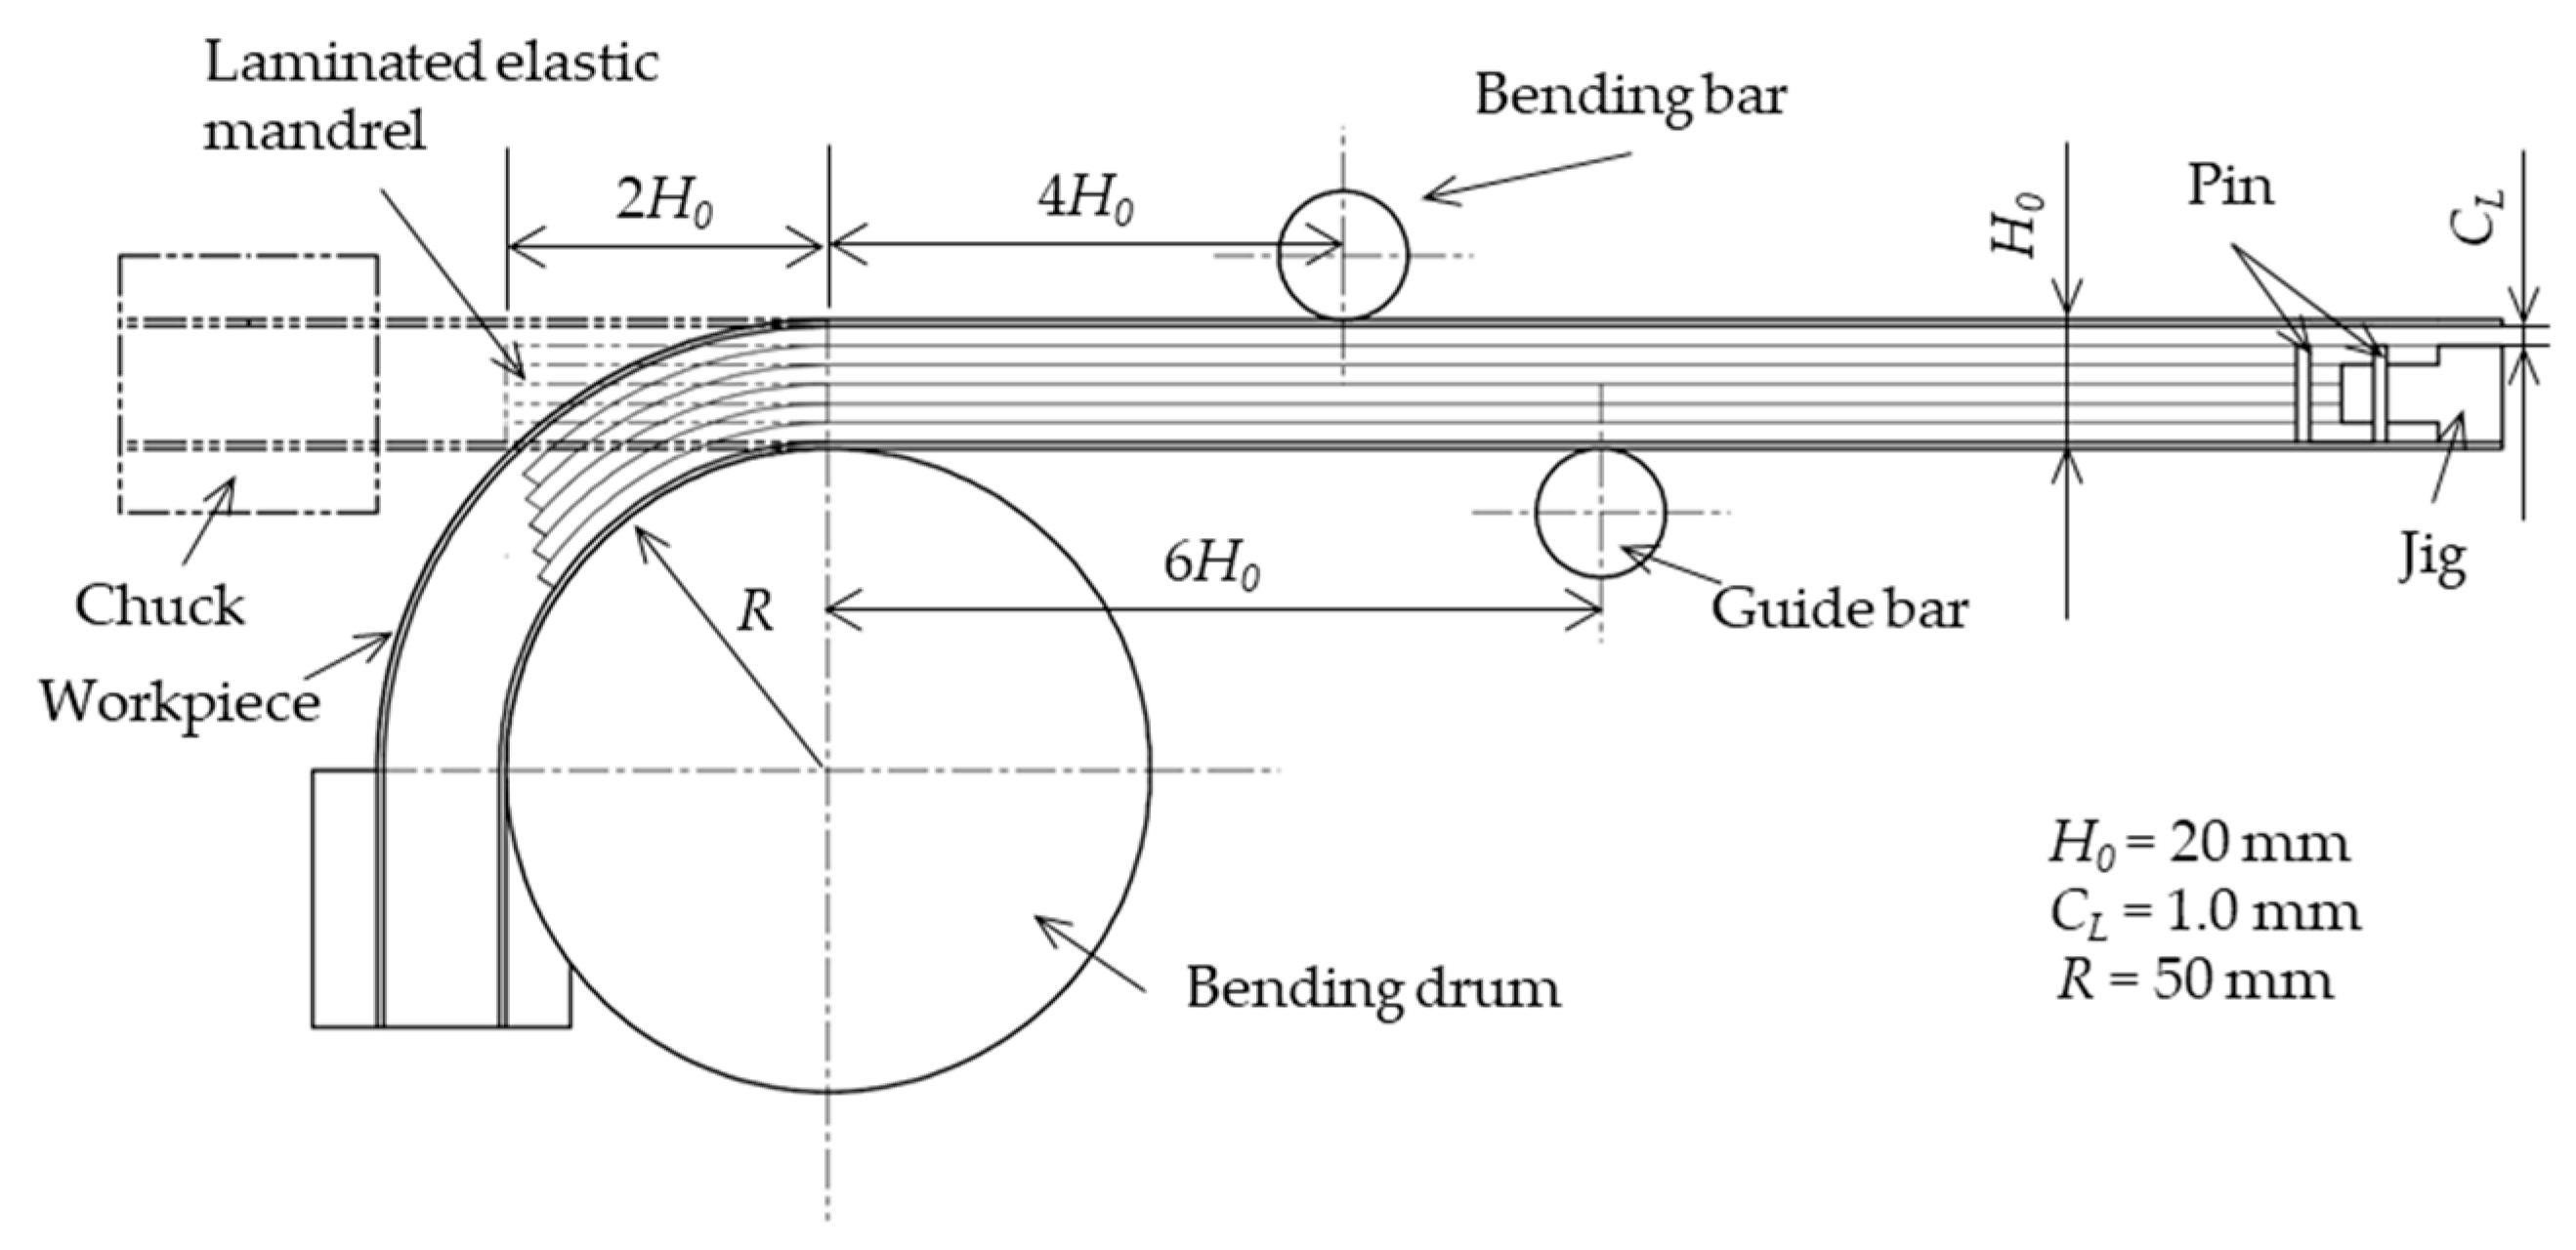
Figure 3 shows a schematic of the rotary draw bending machine, and Figure 4 shows a schematic of the tool alignment of rotary draw bending. This device has a mechanism with a chuck that fixes the material, a bending drum that determines the bending radius, and a bending load rod that generates a bending moment. In addition, it is also equipped with a structure that can apply axial tension. The bending drum can be selected from those with a radius R of 20 to 200 mm, and in this experiment, the workability R/H0 = 1, 2.5. Moreover, a plate made of MC nylon was installed as a side restraint jig.

2.4. Mandrel

Figure 5 shows a schematic of the mandrel. The core material has a structure in which 0.01 mm to 2.0 mm PVC (polyvinyl chloride) and stainless-steel thin plates are bundled by a jig. The flexural rigidity of the laminated mandrel was adjusted to minimize the adverse effect on the workpiece during bending. In addition, the clearance with the workpiece was adjusted to CL = 1.0 mm in both width and height.

2.5. Finite Element Analysis (FEA) Model

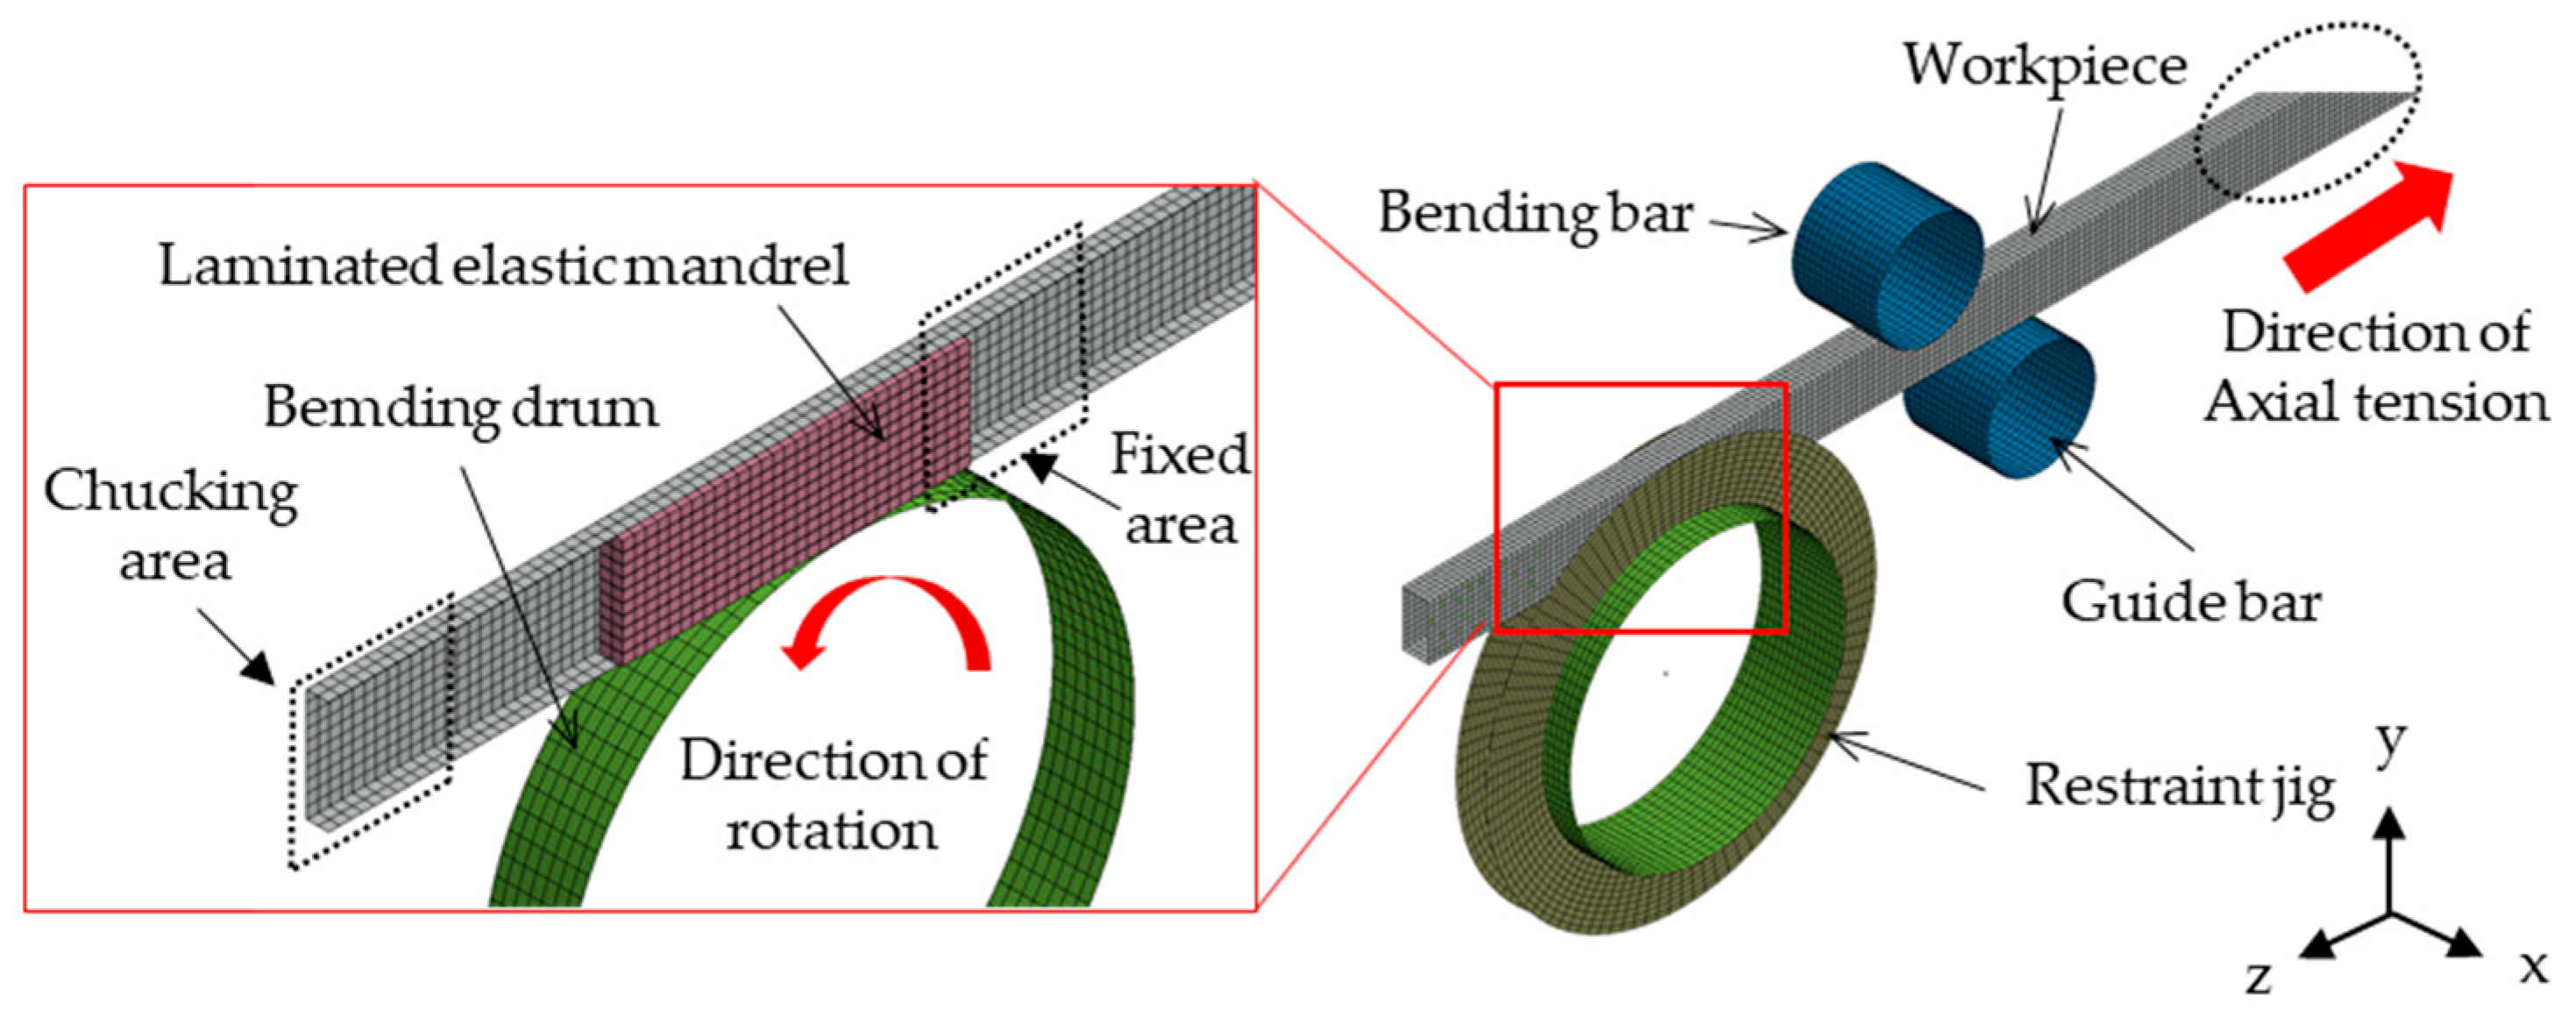
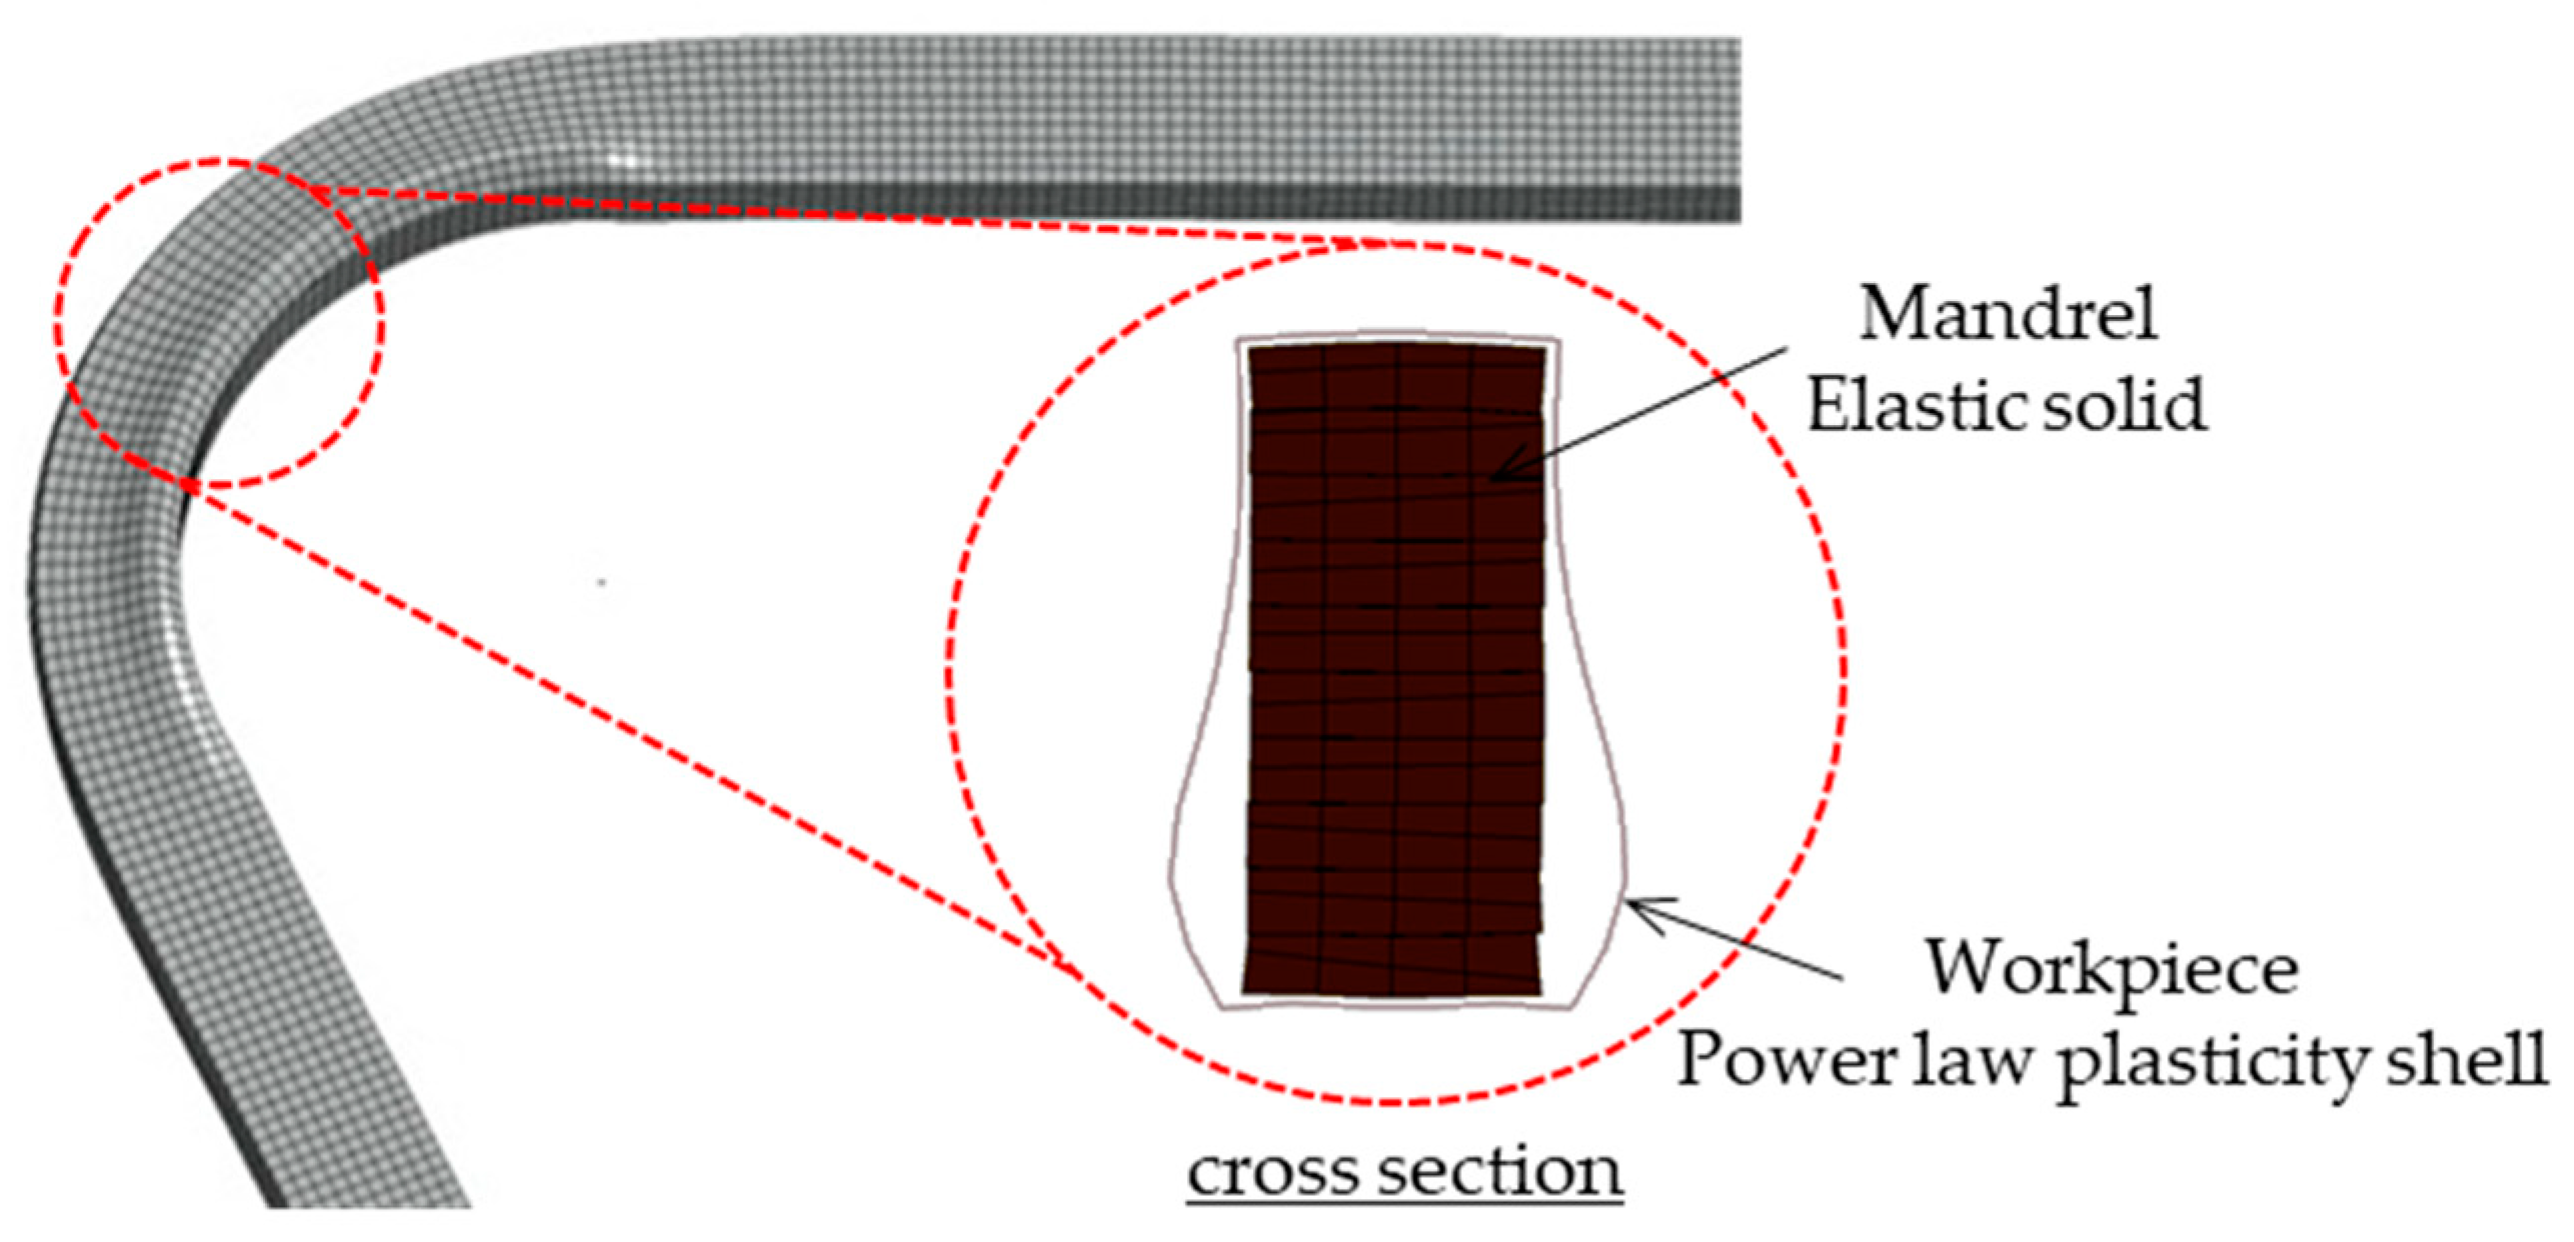
Figure 6 and Table 2 show a schematic of the Finite Element Analysis (FEA) model and the boundary conditions of FEA. LS-DYNA 3D (Ver.R10.1.0, ANSYS Inc. Canonsburg, PA, USA), a commercially available finite explicit element analysis software package, was used for the simulation. The laminated mandrel is a solid element and the rest are shell elements. The mesh size was 2 mm and the number of elements of the workpiece was 17,250. The friction coefficient between the inner surface of the workpiece and the mandrel was set to 0.01 on the assumption that there was almost no friction because the lubricant was applied. In addition, the workpiece was analyzed as an elasto-plastic (Von-Mises) according to the exponentiation hardening rule, the mandrel as an elastic body, and the rest as a rigid body. The workpiece in the model was assumed to be an isotropic elastoplastic body with the power law hardening rule. The constitutive equation is given as Equation (1).
σ = C ( ε y p + ε ¯ p ) n
where, εyp is an elastic strain and ε ¯ p is an equivalent plastic strain. Moreover, the elastic strain is calculated by the following Equation (2).
ε y p = ( E / C ) ( 1 / ( n 1 ) )
where, E is Young’s modulus. Accordingly, the constitutive equation of the workpiece can be expressed by Equation (3).
σ = 160 ( 0.002424 + ε ¯ p ) 0.27

3. Results and Discussion

3.1. The Mechanism of Cross-Sectional Deformation

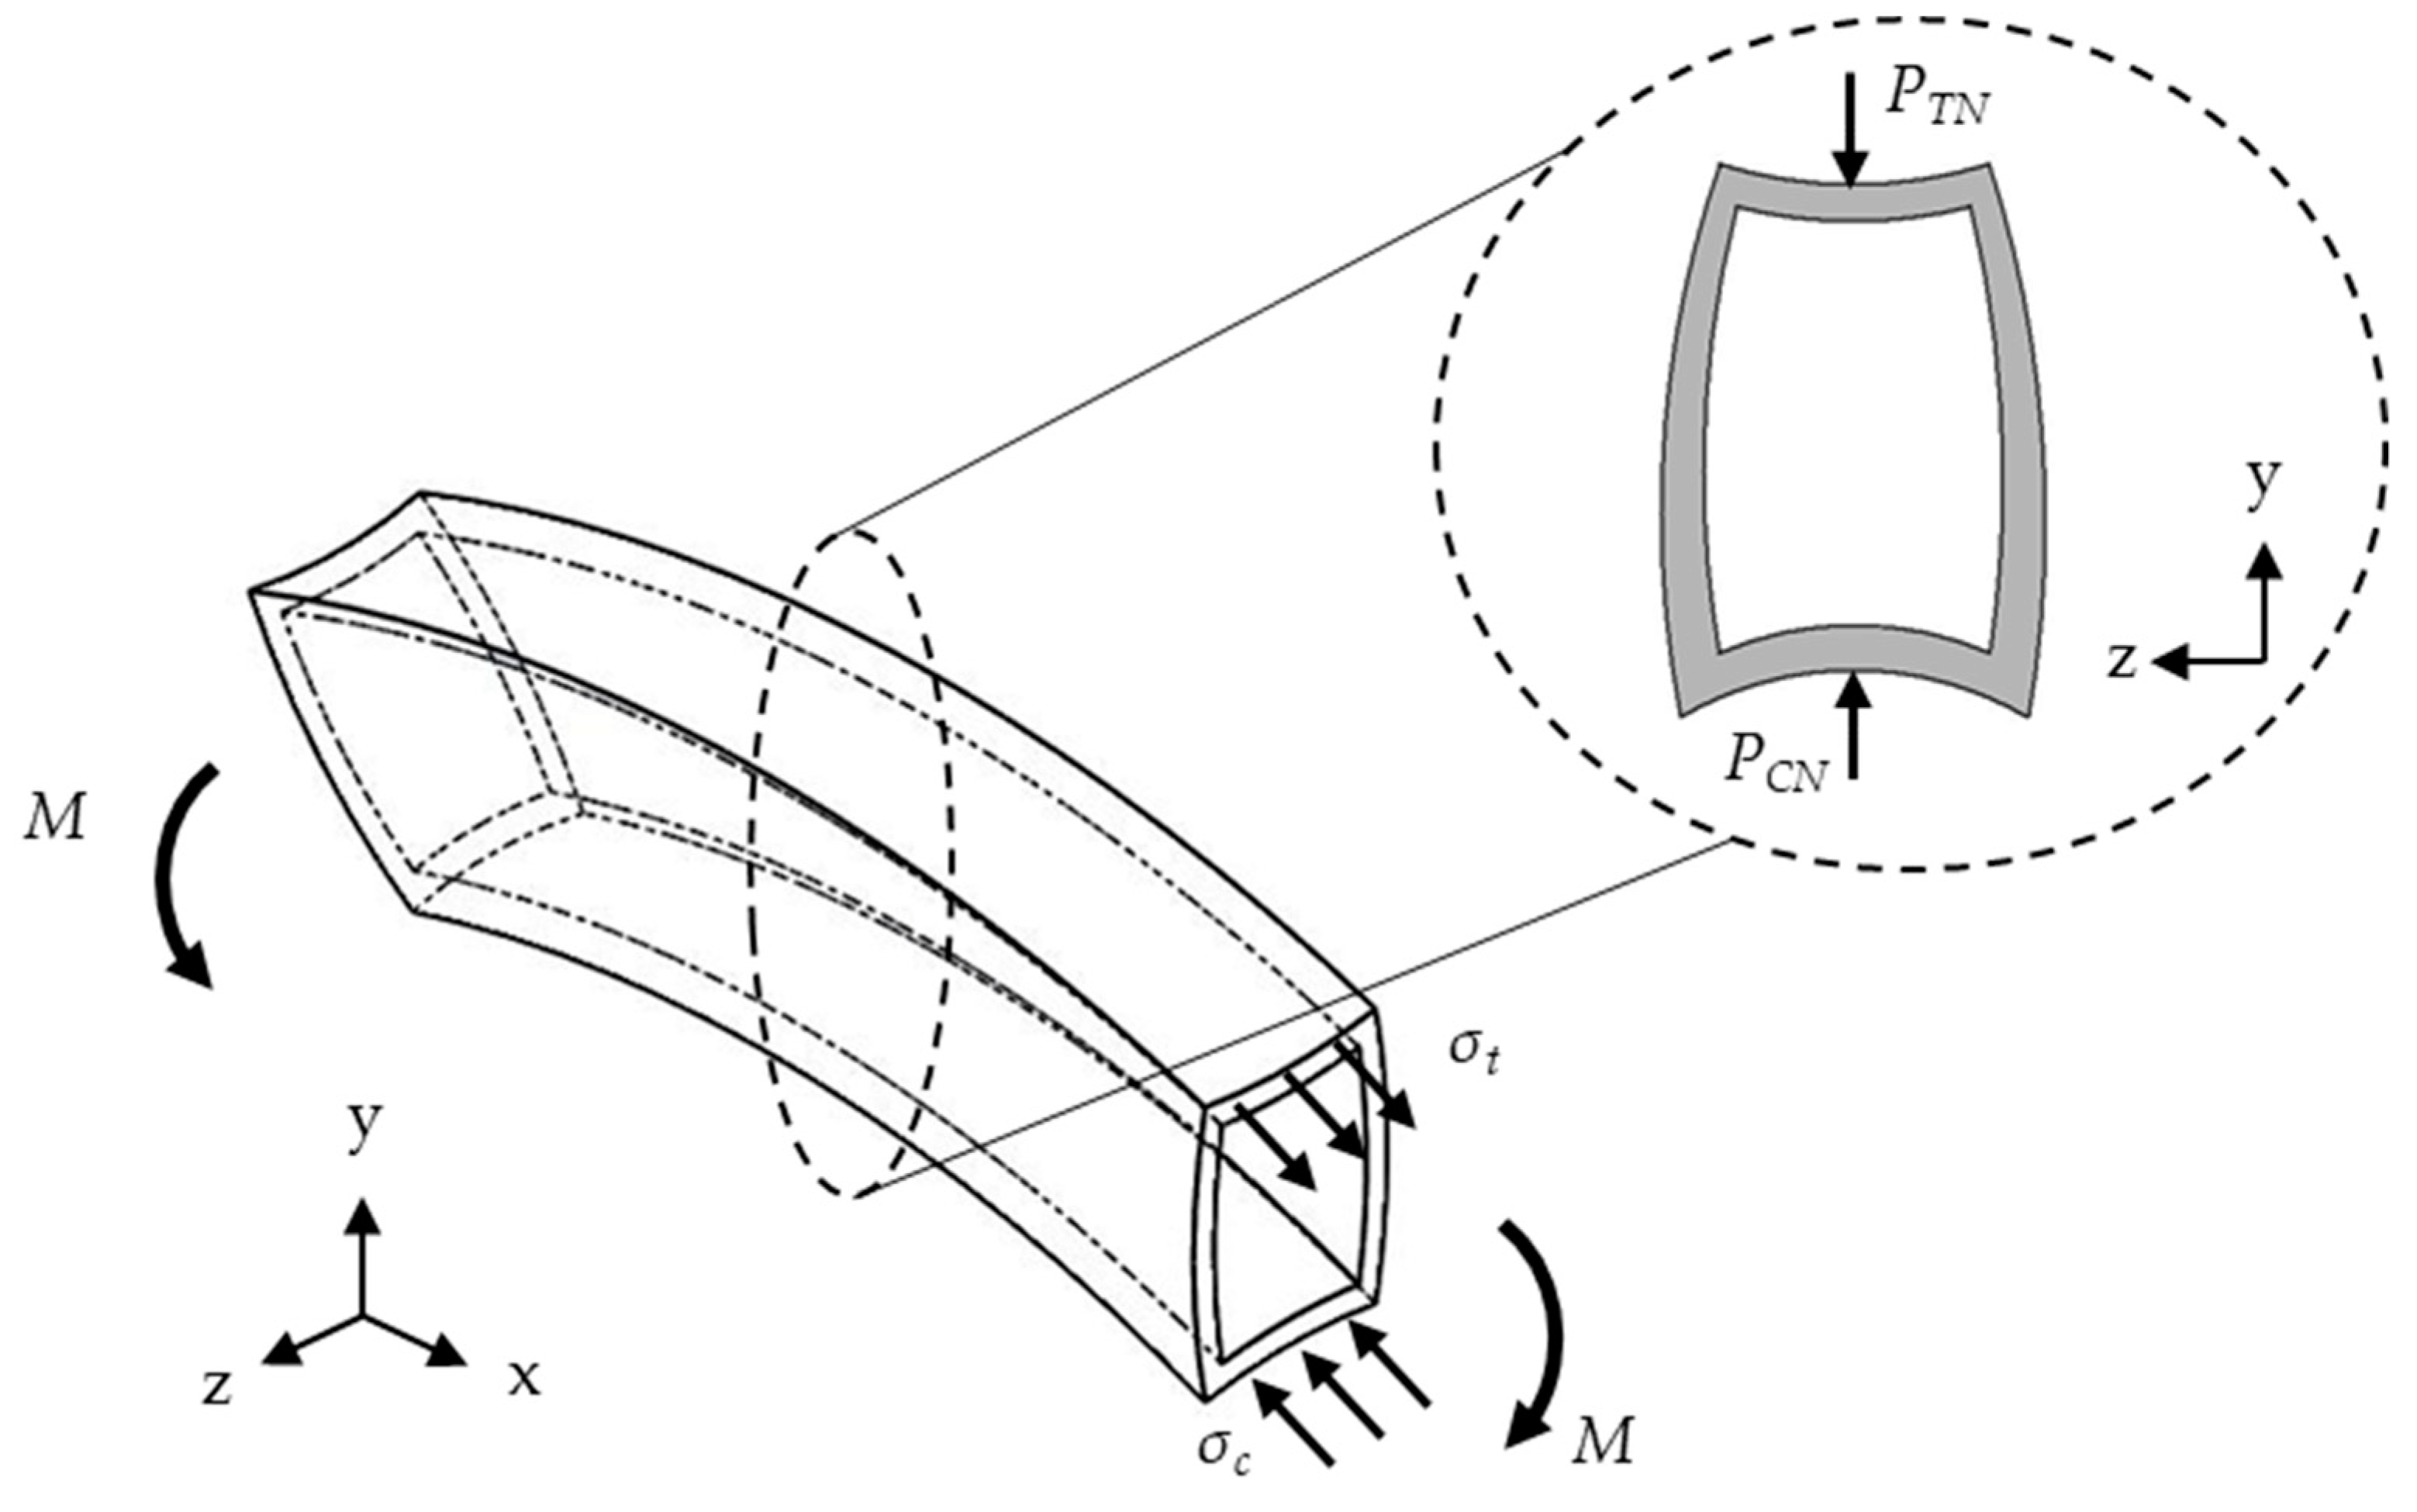
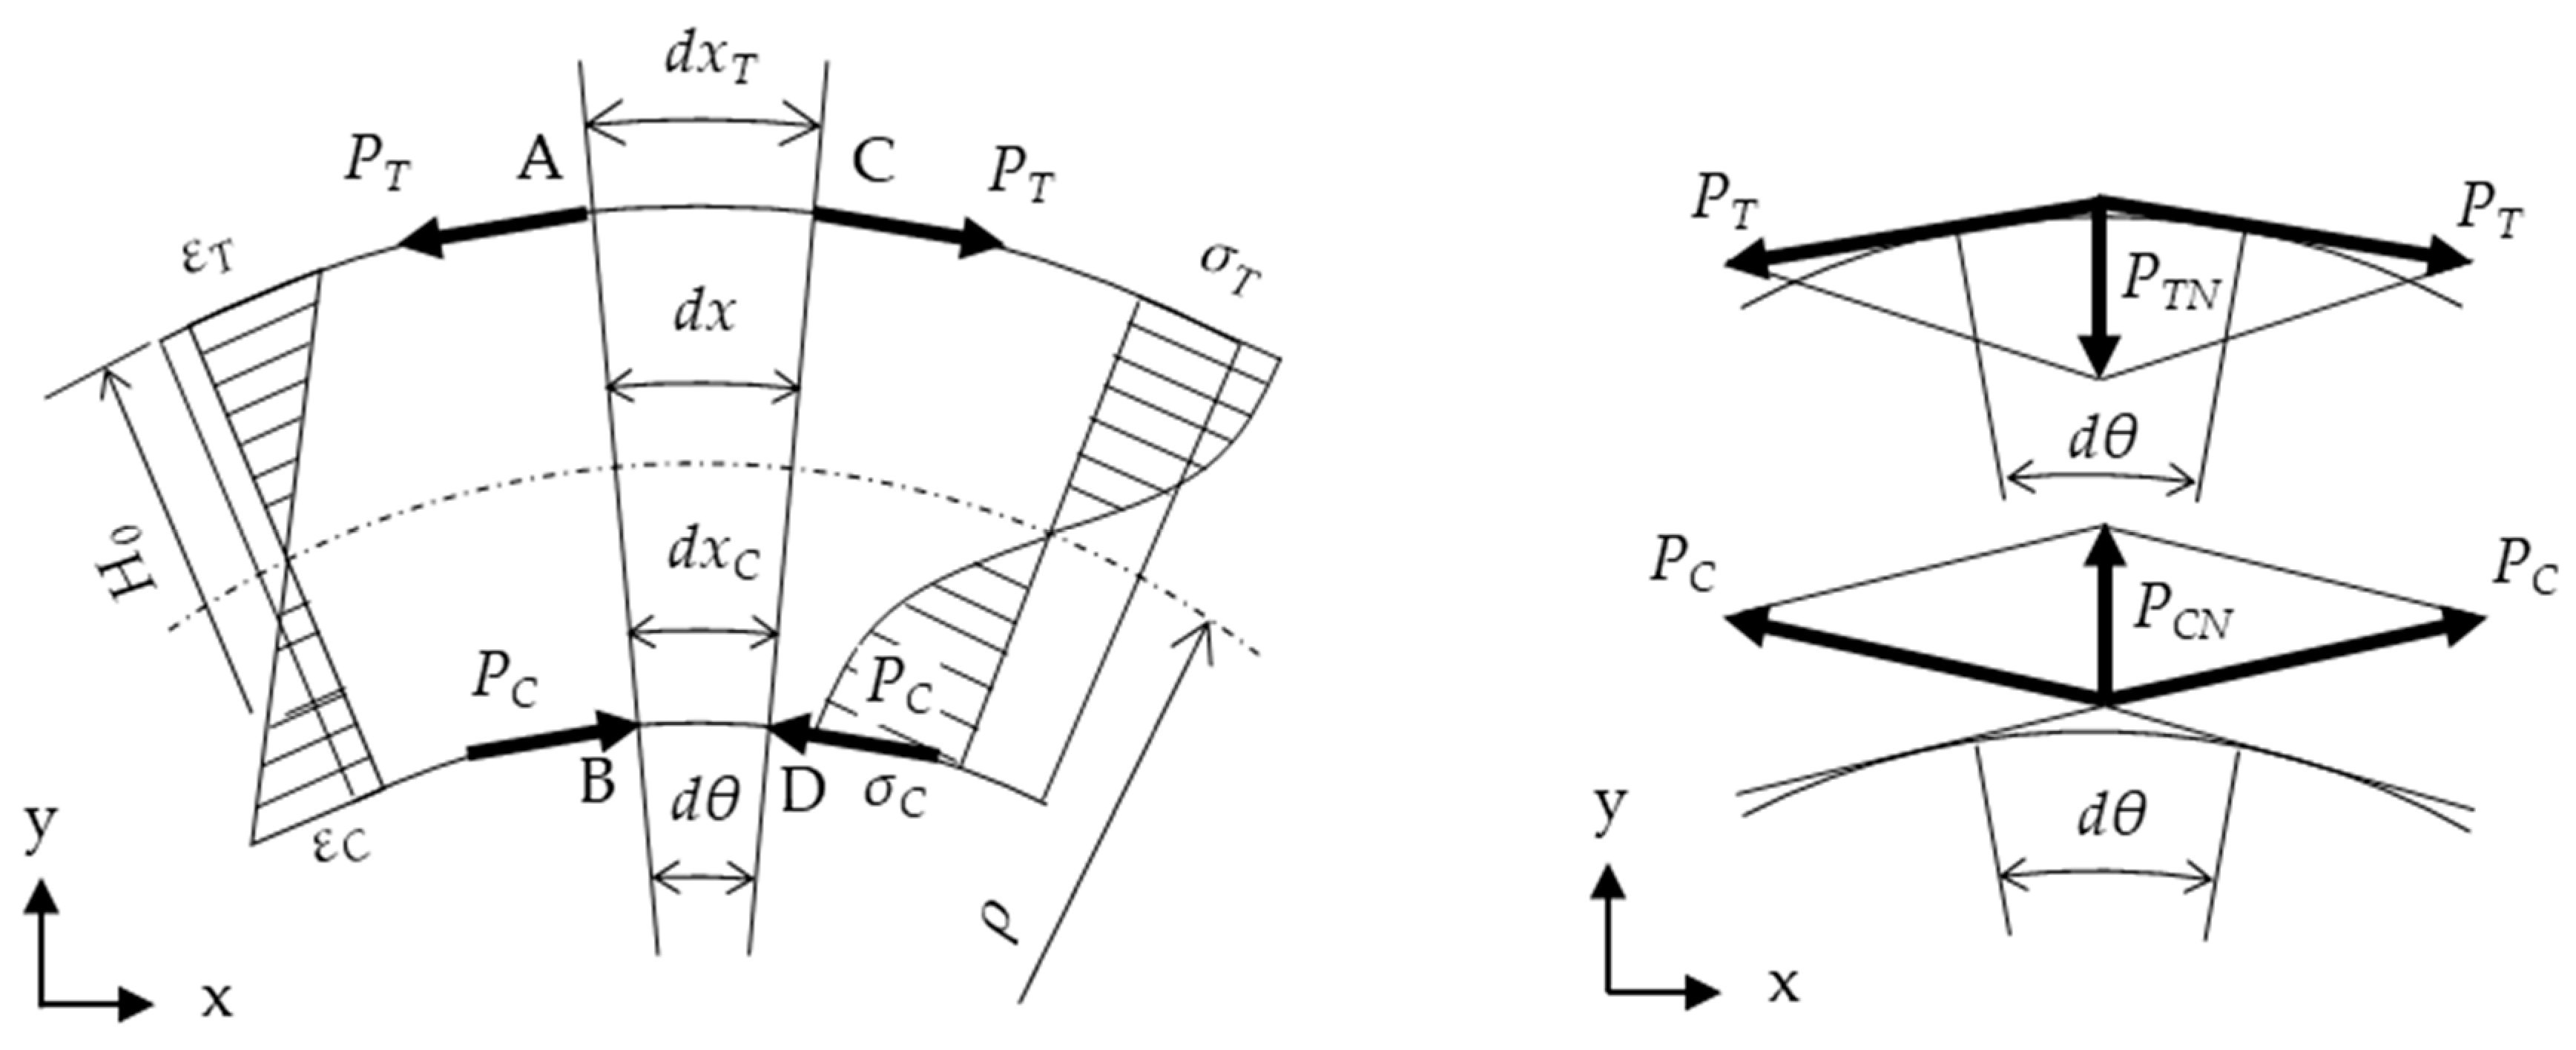
Figure 7 and Figure 8 show the mechanism of cross-sectional deformation. Here, M is the Bending moment, σt is the tensile stress, σc is the compression stress, PT is the circumferential force of the tension side in the flattening, PC is the circumferential force of the compression side, PTN is the flattening component of the tension side, and PCN is the flattening component of the compression side. The flange falls due to the component force generated in the compression flange and the tension flange by the bending moment. Subsequently, due to the moment generated by the component force, the component force acts on the web, resulting in flattening. The purpose of applying the mandrel is to restrain the component force PTN generated in the compression flange and the tension flange. In addition, PTN is expressed as Equations (4) and (5), using bending stress σTE in the elastic state. However, it is qualitatively the same as that in plastic region.
P T N   = 2 σ T E t 0 W 0 sin ( d θ 2 )     σ T E t 0 W 0 d θ   = t 0 W 0 E H 0 d θ 2 ρ
d x T   = ( ρ + H 0 2 ) · d θ     ρ d θ
where t0 is the thickness of the workpiece, W0 is the width of the workpiece, dxT is the length between points A and C on the tension flange, E is the Young’s modulus, and ρ is the bending degree (R + H0/2) [29].
Distributed flattening force wTN on the tension flange is expressed as Equation (6), using Young’s modulus, E, in the elastic state. In the plastic state, the tangent modulus Et is used in Equation (7).
w T N = P T N d x T W 0 = H 0 t 0 E 2 ρ 2
E t = d σ d ε = C ε n
Figure 9 shows the graph of wTN calculated under various conditions from Equation (4). It demonstrates that the wTN increased as the wall thickness increased; thus, flattening was more likely to occur. Additionally, wTN increases as ρ/H0 decreases. In this study, R/H0 = 1.5 (H0 = 20, R = 50), and t0 = 0.5 mm. Under this condition, the wTN is small because the wall thickness is thin, but ρ/H0 is also smaller than that of a square tube with a general wall thickness; accordingly, so the wTN is larger and the deformation after bending is expected to be larger. Furthermore, when the axial tension Pa is applied, PTN (wTN) is further increased because Pa is added to PT.

3.2. Method for Evaluating Deformation

The deformation ratio was defined as (H−H0)/H0, (W−W0)/W0 (measured values H, W; initial values H0, W0), and the cross-sections before and after processing were compared. In addition, the maximum height and width of the workpiece are Hmax and Wmax, and the minimum workpiece width is Wmin. Furthermore, the load factor of axial tension was defined and evaluated as Pa/Fmax (axial tension Pa, tensile strength Fmax of the workpiece).

3.3. Effect of the Laminated Mandrel and Axial Tension

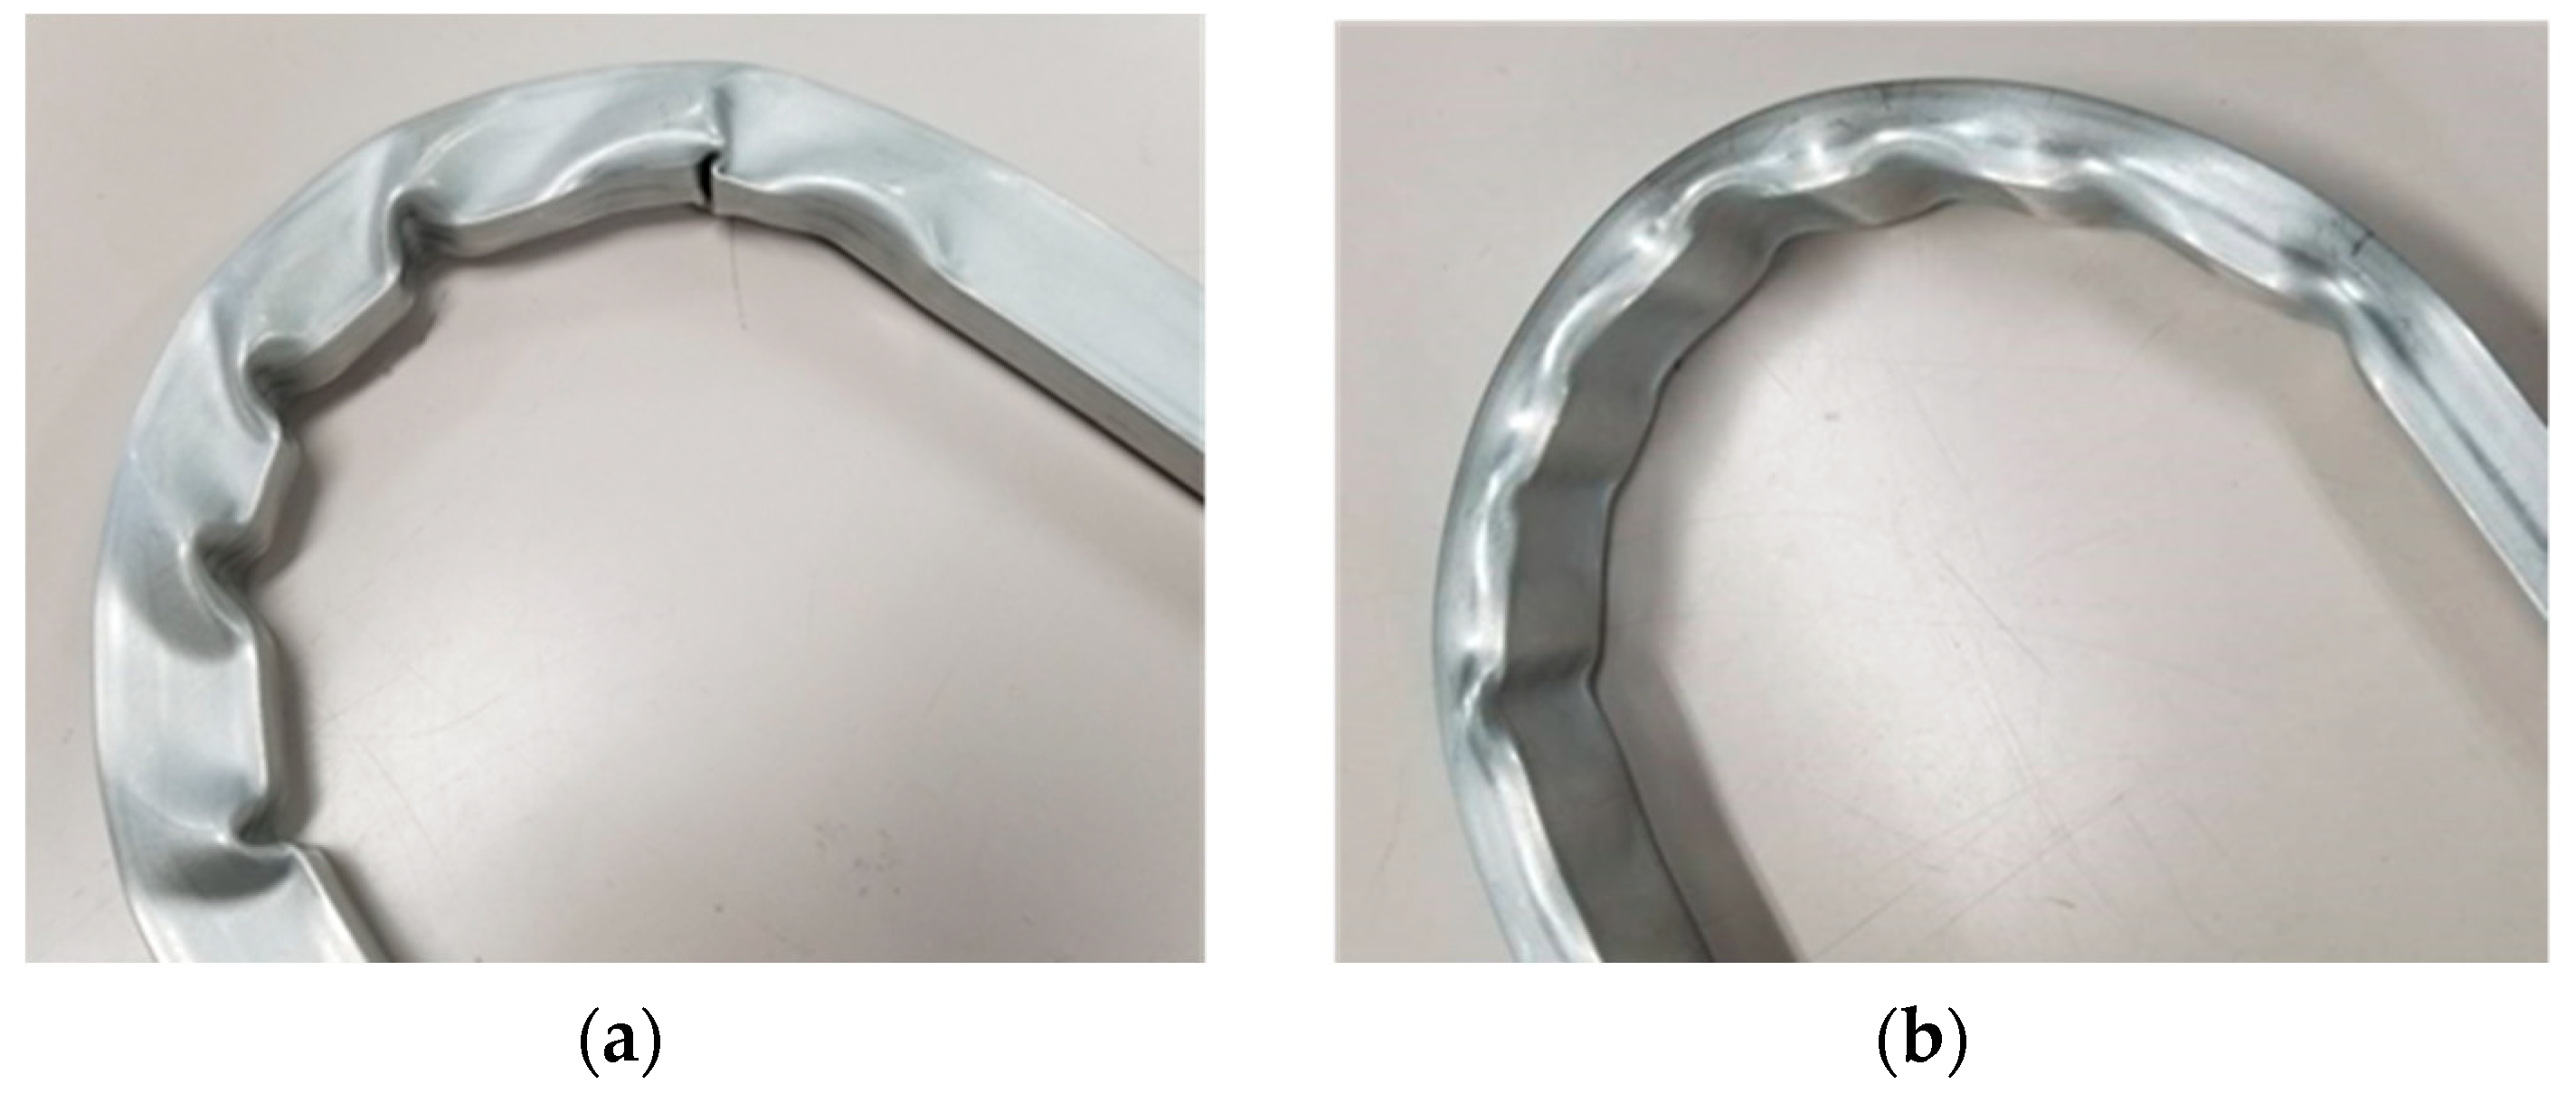
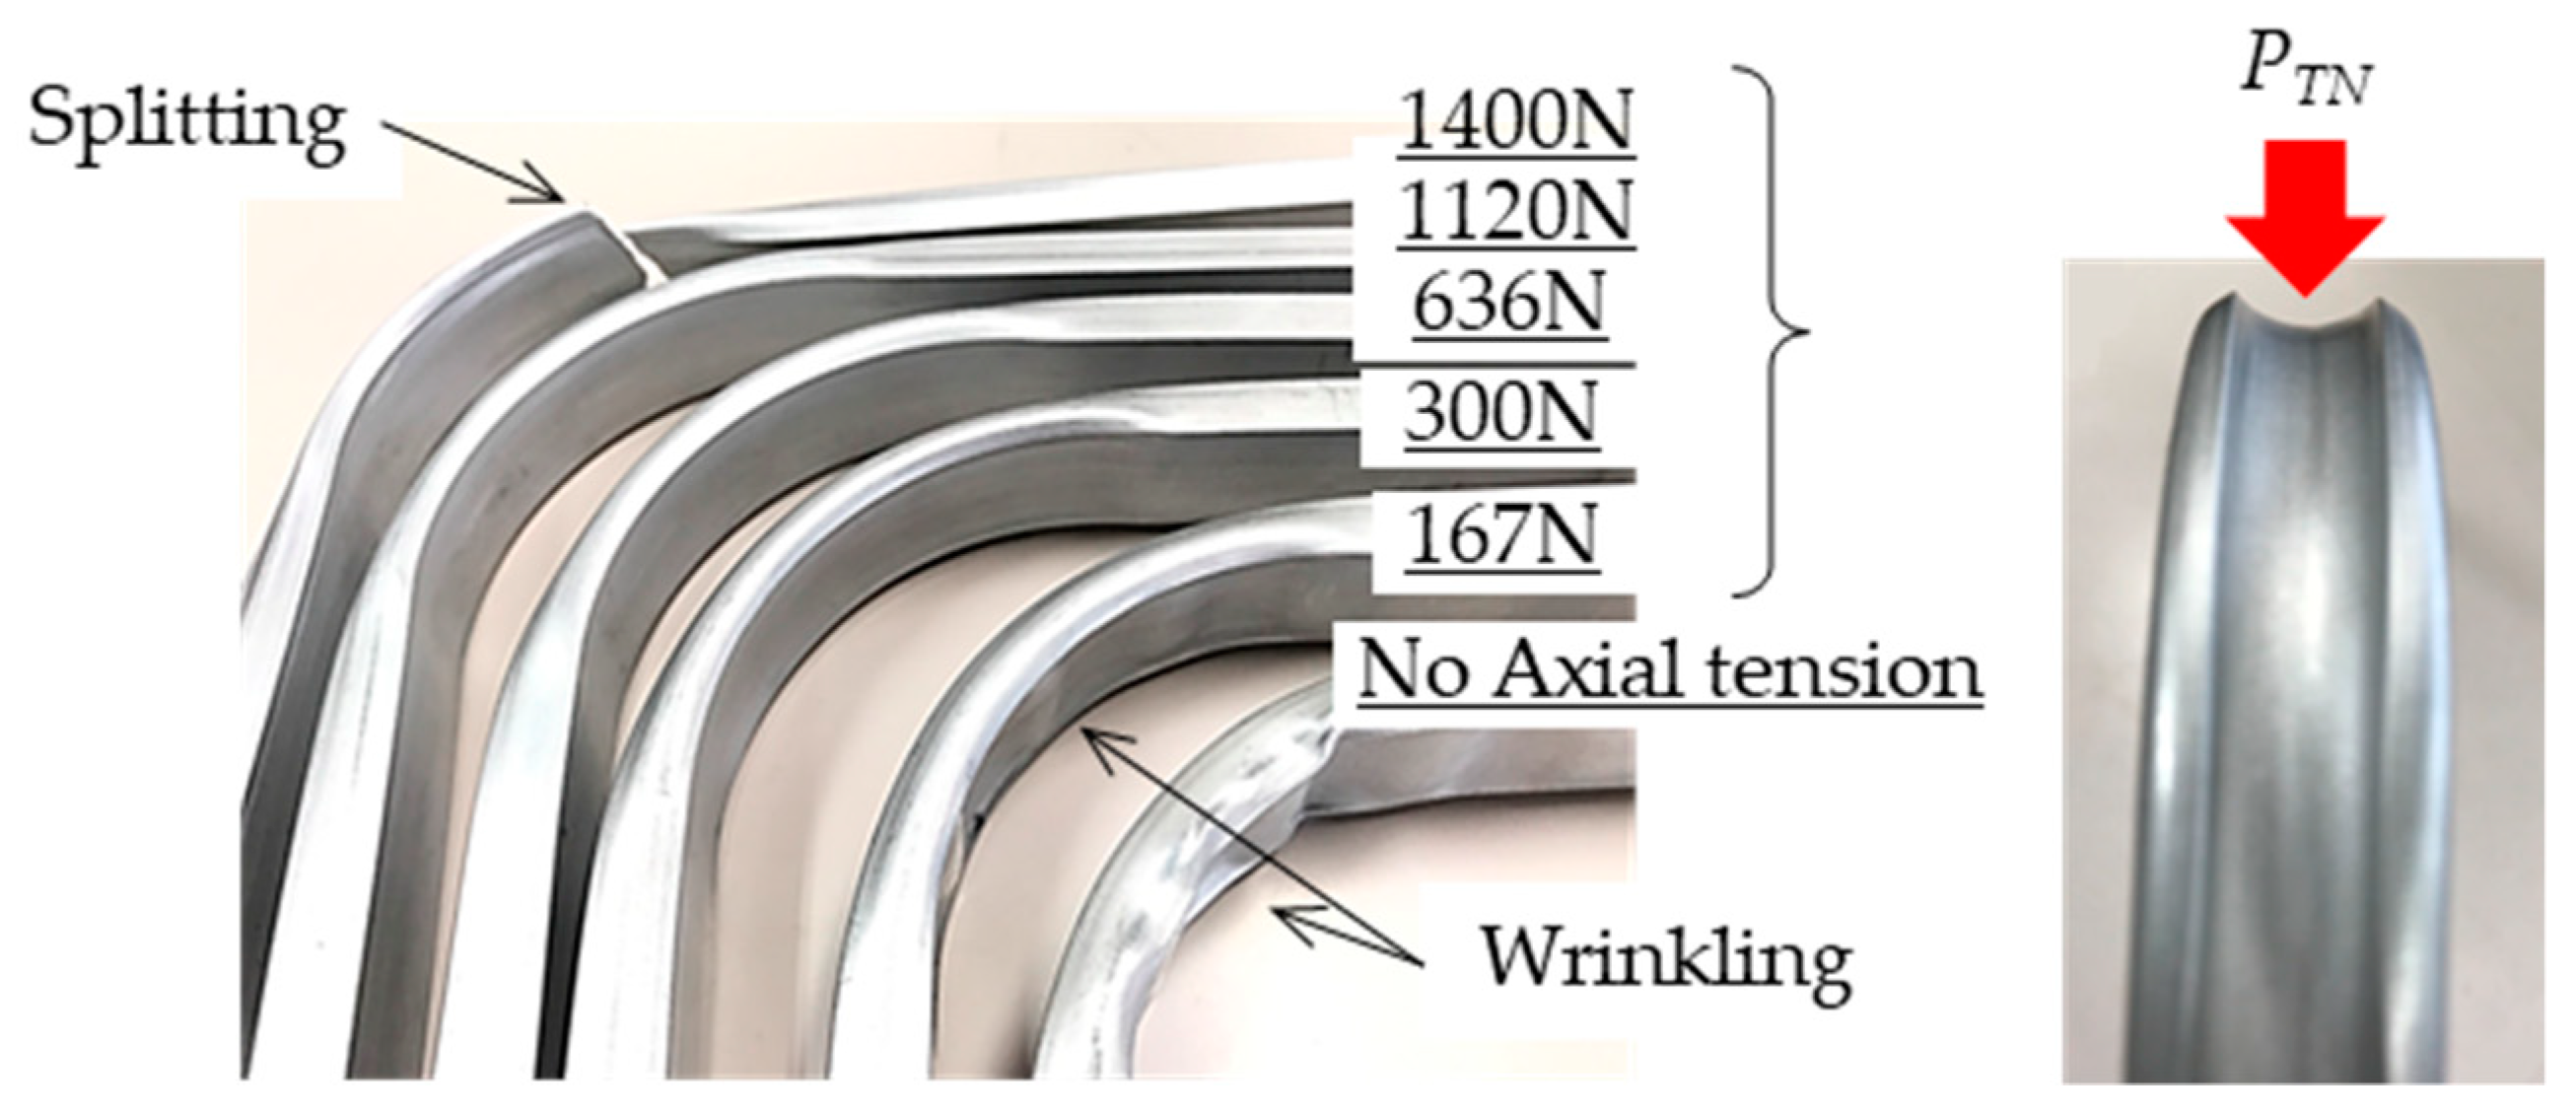
Figure 10 shows the appearance of the workpiece after rotary draw bending without a material, restraint jig, and axial tension. At R/H0 = 1.5 (H0 = 20, R = 50), folding occurred, and at R/H0 = 5.0 (H0 = 10, R = 50), wrinkling occurred. In addition, Figure 11 shows the effect of axial tension. As shown in Figure 11, the wrinkling can be suppressed by axial tension. In contrast, the fall of the flange became large. The axial tension reduced the compression region of the tube, suppressed buckling deformation, and suppressed wrinkling. However, the component force PTN increased as the tensile force increased, causing the tensile flange to fall greatly, resulting in a large expansion of the web. From this result and Equation (6), it was found that the following factors increased influence the cross-section deformation:
  • Axial tension
  • 1/R
  • Cross-section outline
  • Thickness
  • Work-hardening exponent
  • Plastic modulus (Young’s modulus)
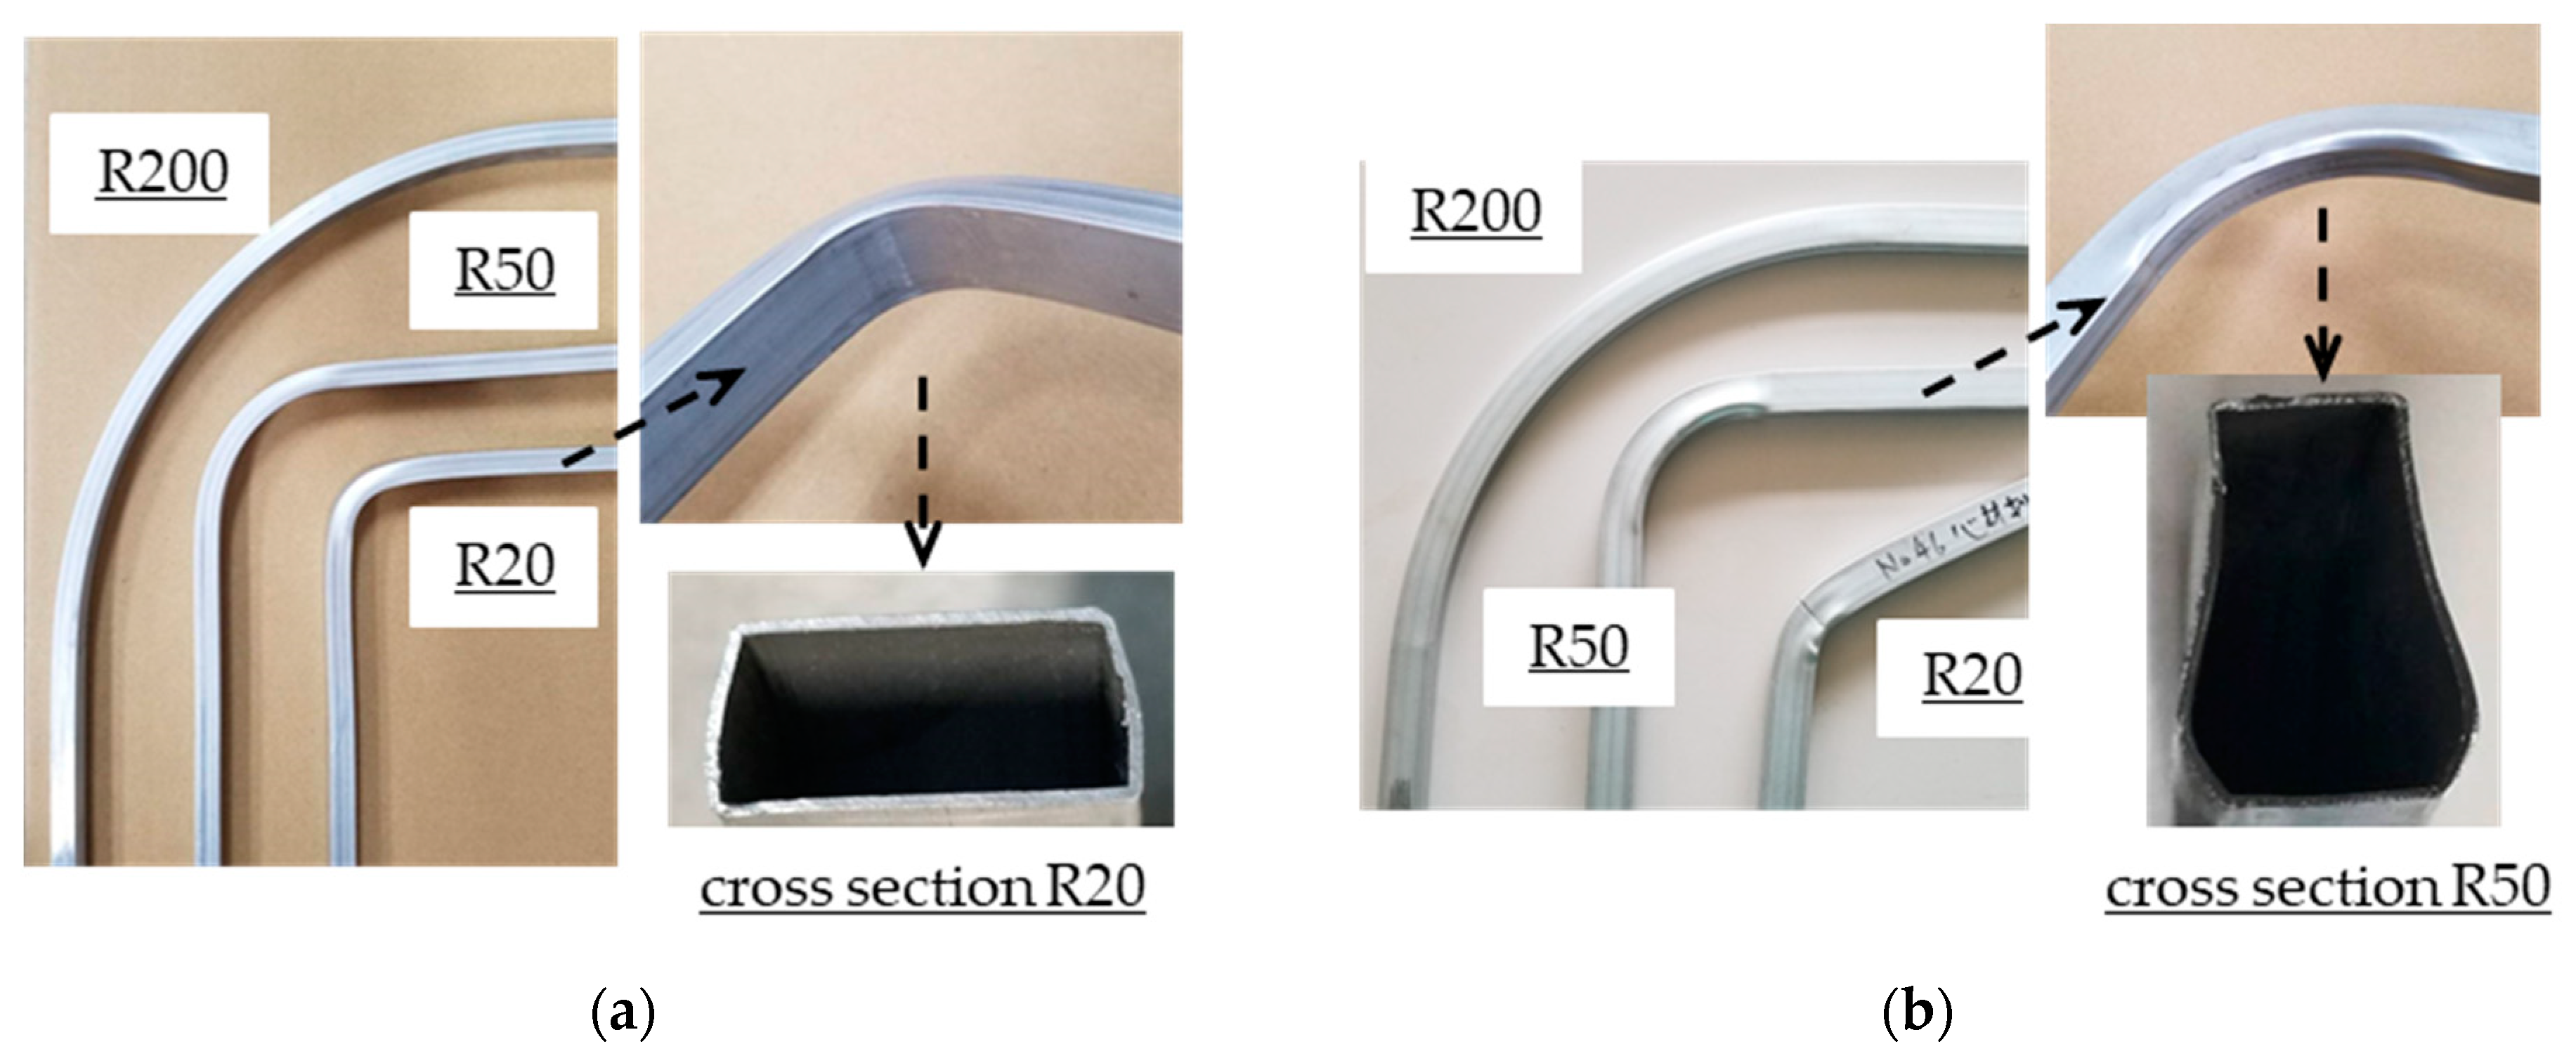
Figure 12 shows the effects of the mandrel and axial tension. R/H0 = 2.0 (H0 = 10, R = 20) was possible bending without wrinkling and splitting, whereas splitting occurred in the condition of R/H0 = 1.0 (H0 = 20, R = 20). Wrinkling and splitting did not occur at R/H0 = 1.5 (H0 = 20, R = 50). In contrast, the cross-section deformation was large for both H0 = 10 and 20. Especially at R/H0 = 1.5 (H0 = 20, R = 50), a pear-like deformation occurred in which the deformation of the web side enlarged. Considering this deformation as buckling, and considering one side of the web as buckling of a long column, the end on the tension side was constrained and the end on the compression side is constrained to rotate, which is similar to the deflection of a beam. In addition, the effect of the mandrel was confirmed by the small deformation of both the tension and compression side flanges.
Additionally, the convex distortion of the web is larger when H0 = 20 than when H0 = 10. It is assumed that this is because the mandrel was compressed by PTN by axial tension and deflected to the web. In this experiment, the number of laminated mandrels with H0 = 20 was larger than that with H0 = 10. This is because by lowering the bending rigidity of the mandrel, it is possible to prevent adverse effects such as splitting and convex distortion in the tensile flange of the tube. Therefore, as the number of laminated layers increases, it is possible that minute voids are generated between the plates. It is considered that the voids were compressed by PTN and became substantially larger than the set clearance, resulting in larger deformation than H0 = 10.
Furthermore, Figure 13 shows the results of FEA. The same phenomenon as in the experiment was confirmed in FEA. Therefore, it was confirmed that the pear-shaped deformation is a deformation peculiar to the ultra-thin rectangular tube. The analysis conditions were R/H0 = 1.5 (H0 = 20, R = 50), the mandrel was applied, and axial force was applied. To reduce the analysis time, the laminated mandrel in FEA has a smaller number and a larger thickness than in the experiment. The laminated plate is an elastic body, and Young’s modulus was set small to match the moment of inertia with the experiment. Thus, the deformation of the mandrel in the plate thickness direction was larger than in the experiment, resulting in depression or convex distortion in the tension and compression flanges.

3.4. Effect of Restraint Jig

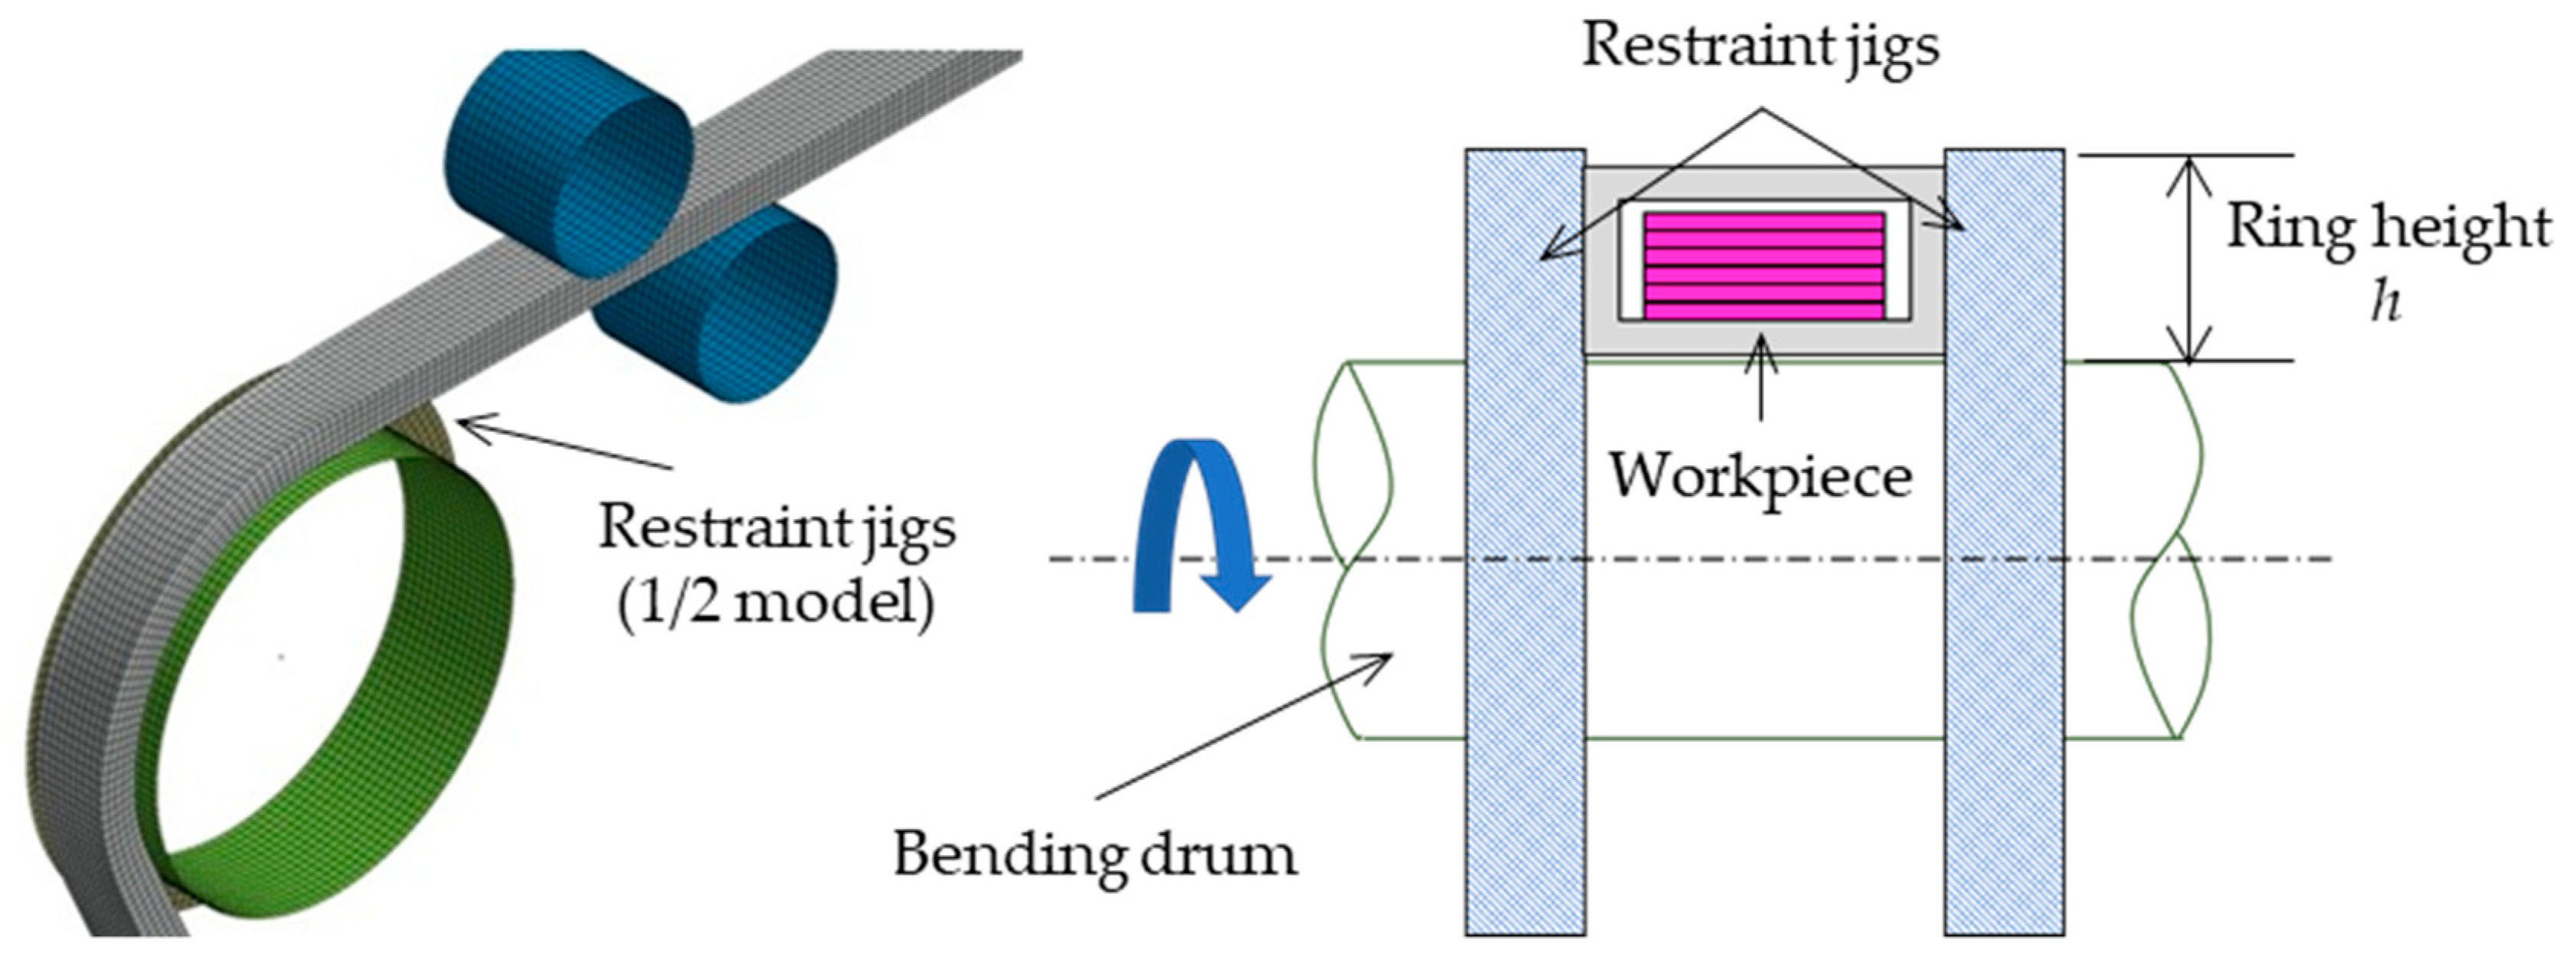
An experiment was conducted by applying a jig that restrains the web surface in order to suppress the outward convex distortion of the web. Figure 14 shows a schematic of the jig and FEA model. In bending with H0 = 10, the height of the restraining ring was 10 mm. At H0 = 20, the deformation of the compression side is particularly large. Therefore, two types of conditions were applied: one for constraining only the compressed part of the web and one for constraining the entire web. Namely, there are two types of ring height h = 10, 20 mm.
Figure 15 shows the experimental results for R/H0 = 2.0 (H0 = 10, R = 20). It was found that the convex distortion of the web was suppressed to less than 5% by applying the restraint jig. In addition, at the minimum part (tensile flange), the width W decreased due to axial tension applied to suppress wrinkling. Therefore, it was found that the accuracy of the width tends to deteriorate slightly compared to the maximum part (compression flange).
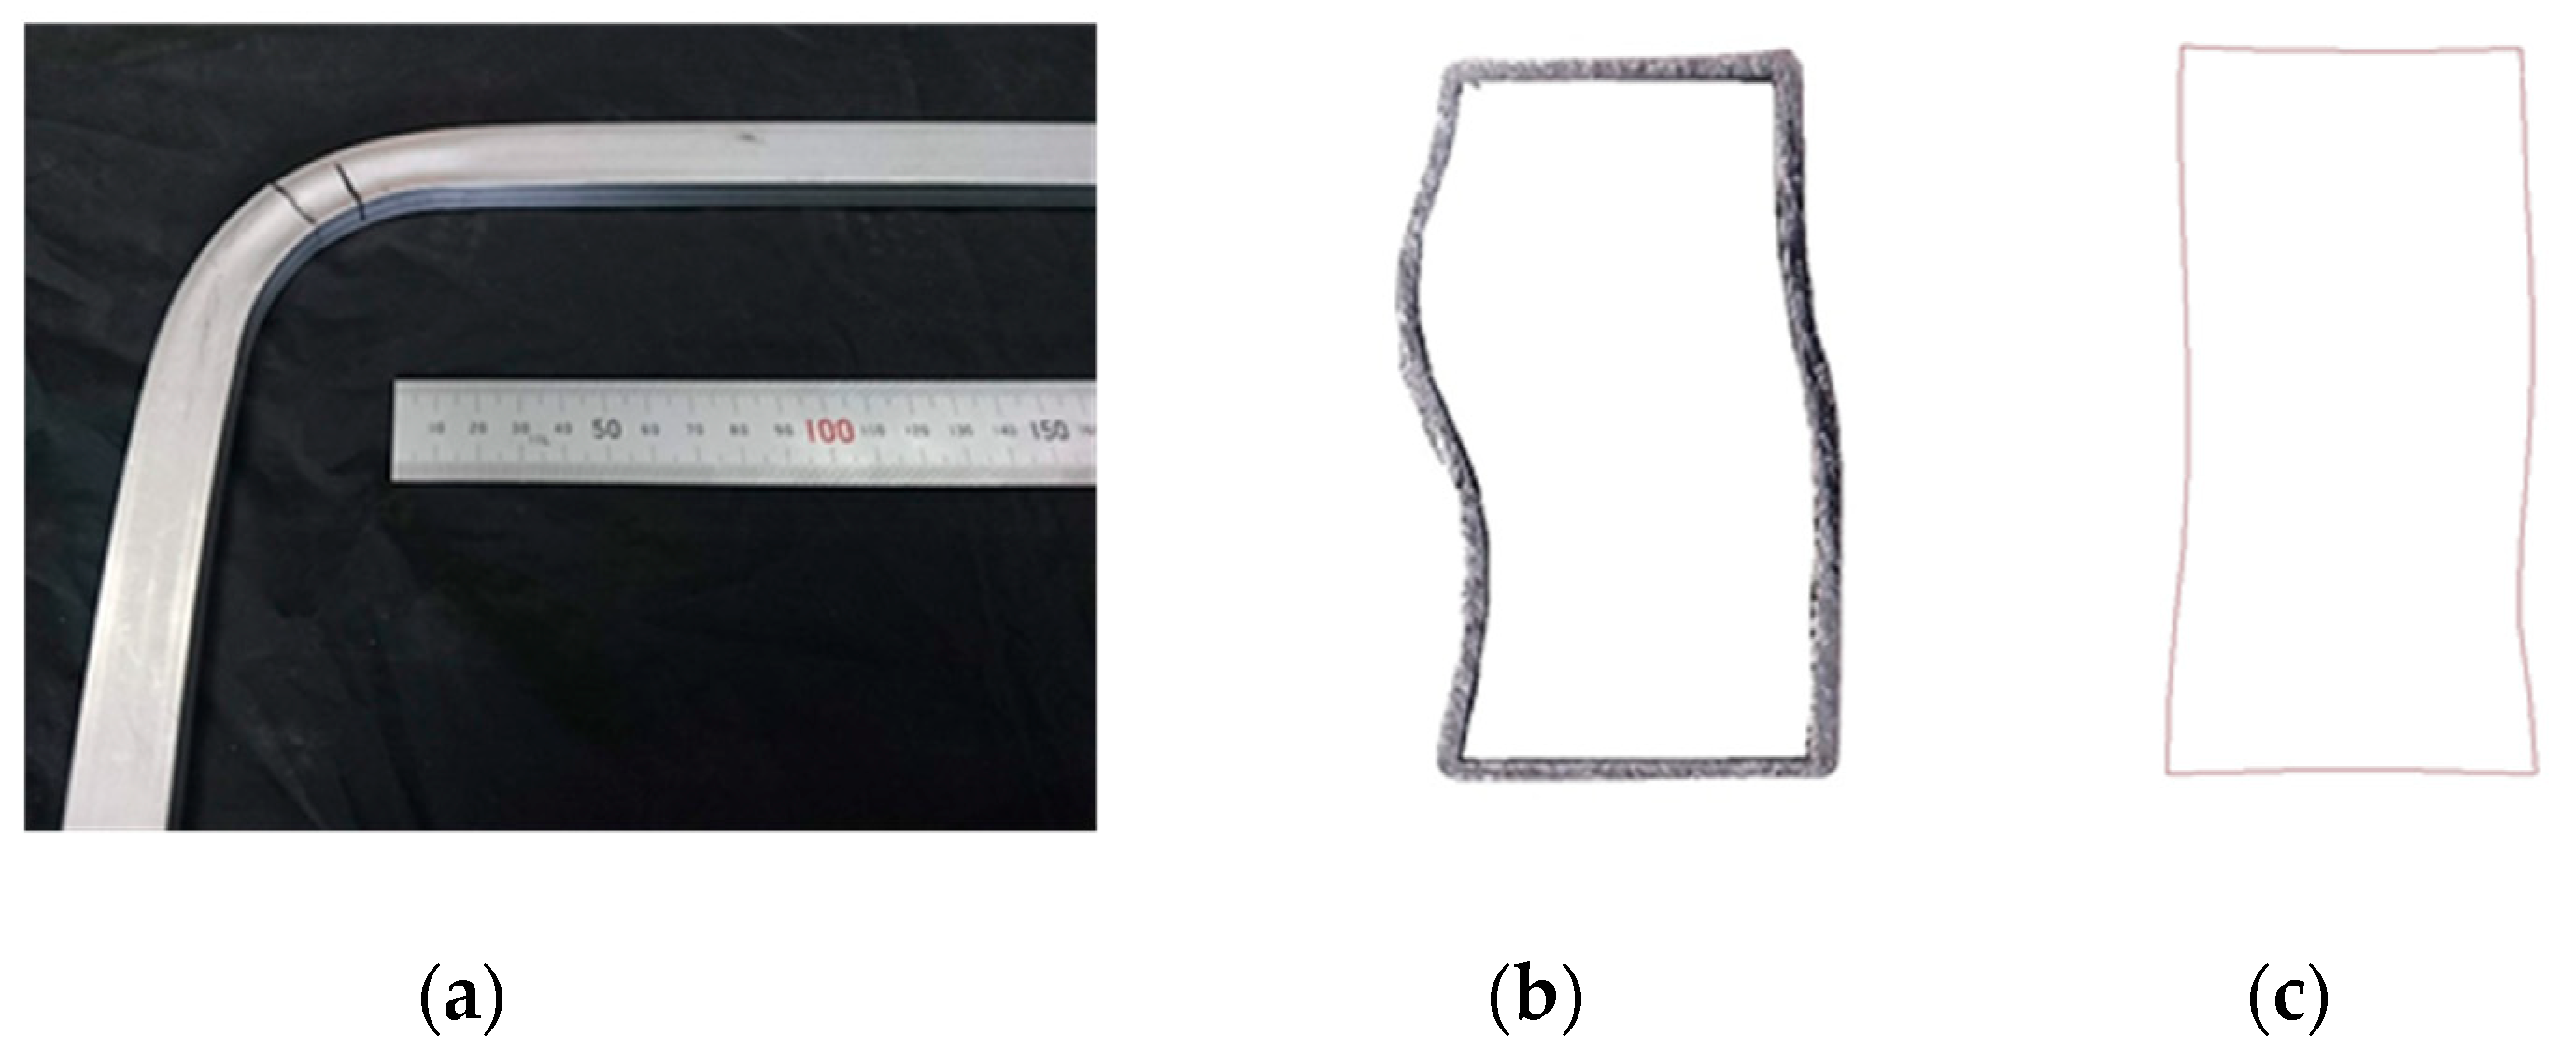
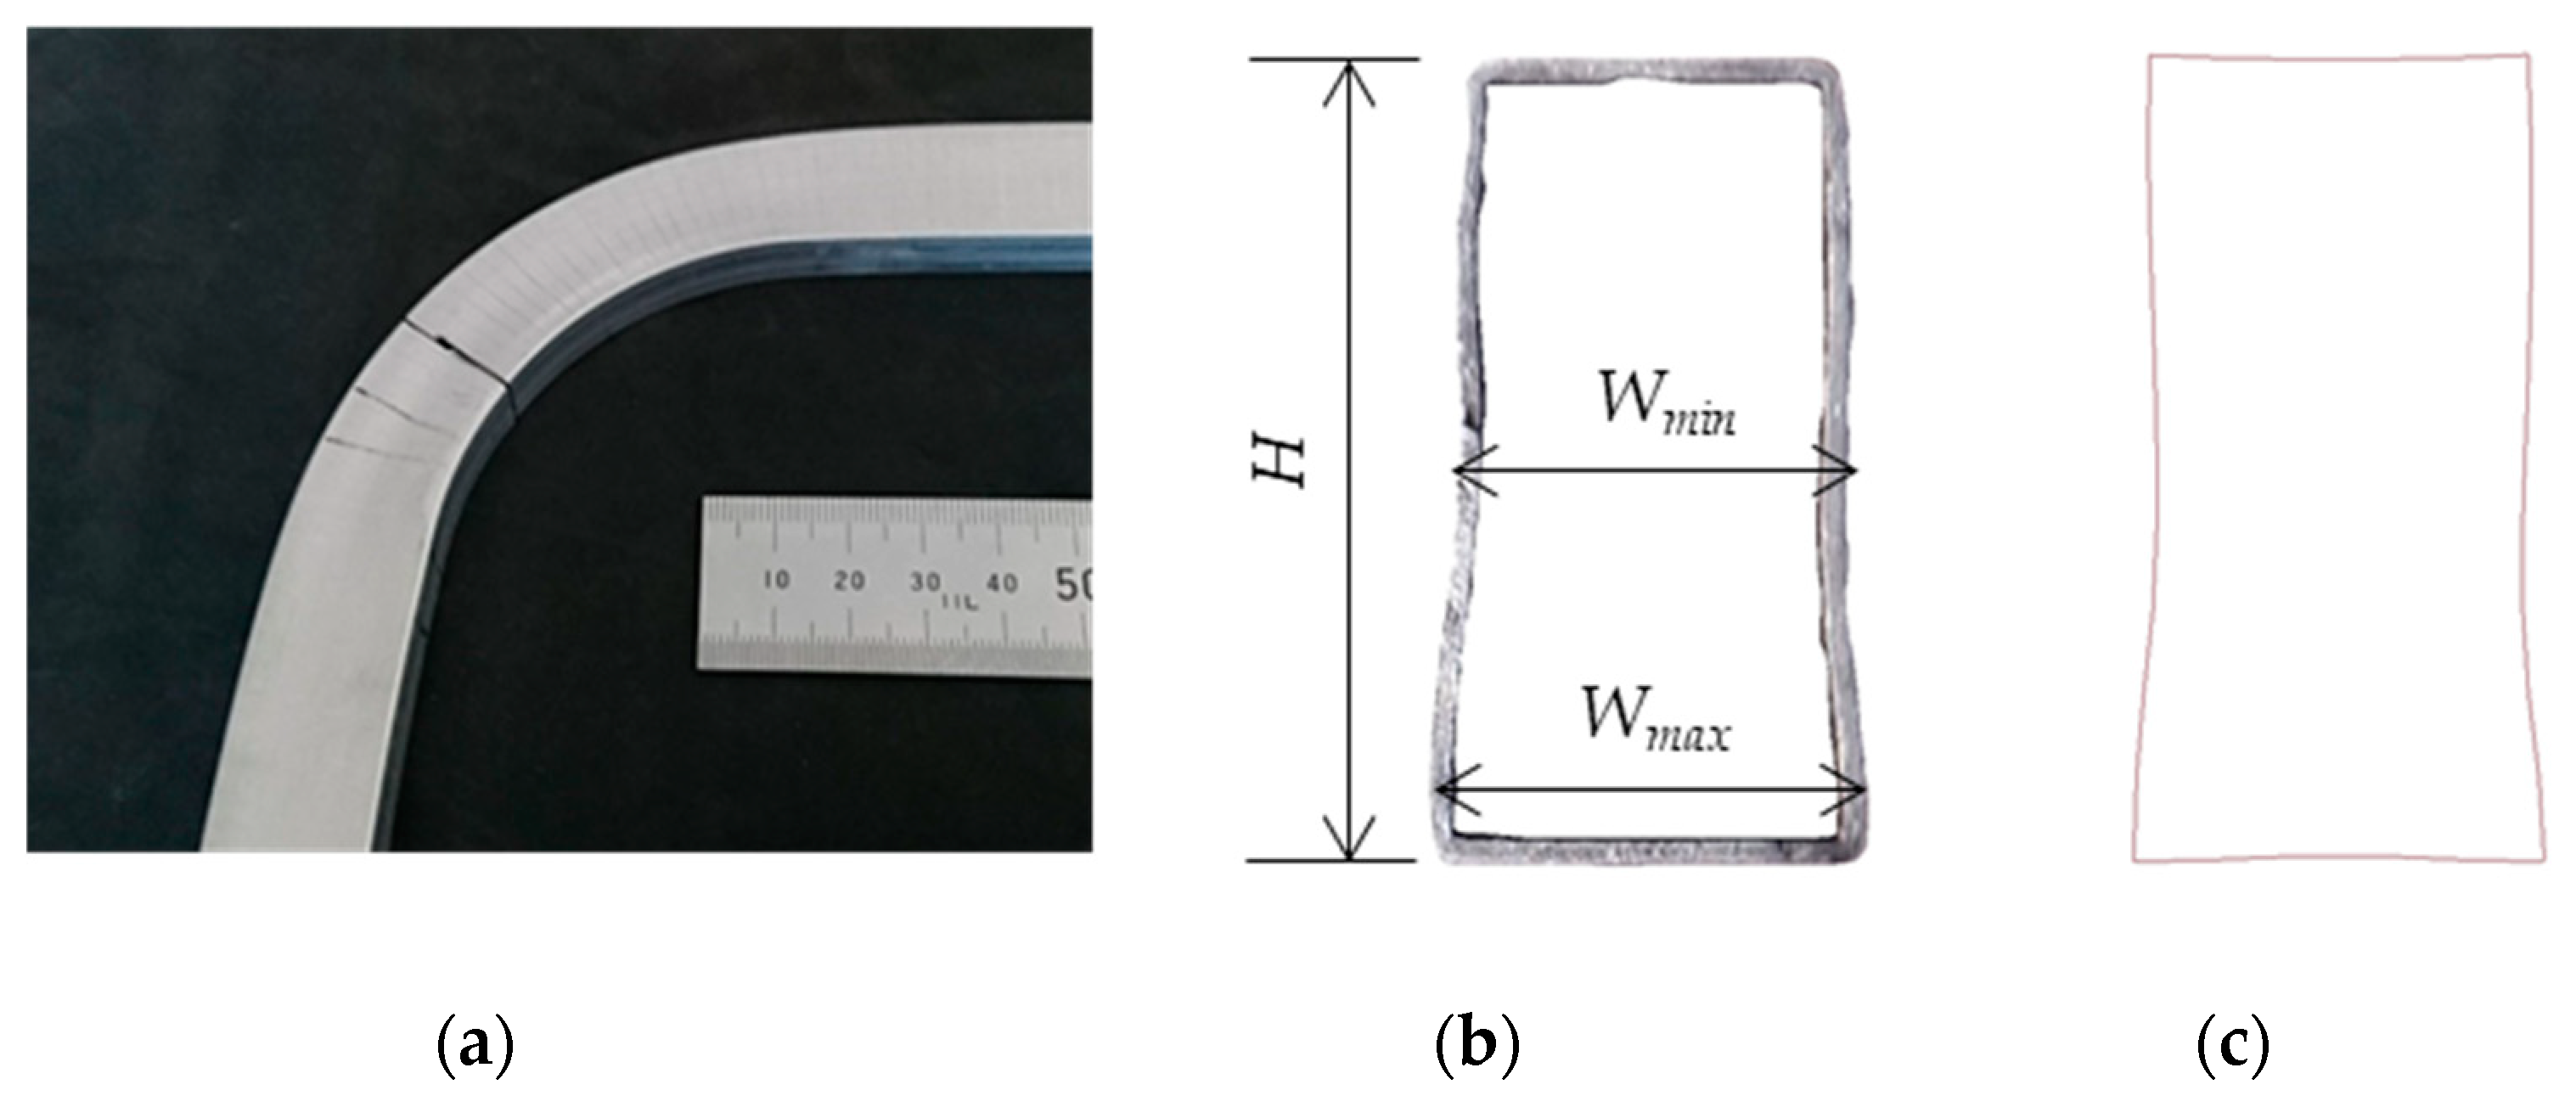
In addition, Figure 16 shows the experimental and FEA results for R/H0 = 1.5 (H0 = 20, R = 50), and restraint jig ring height h = 10. As shown, the web compression side is inward, and the web tension side is outward. As mentioned above, it is known that convex distortion occurs outward during bending on the compression side. However, in this case, a restraint jig was provided on the side surface, and accordingly, outward convex distortion was suppressed. Nevertheless, since there is clearance (0.5 mm × 2 on each side) between the tube and the mandrel, it is presumed that the web is deformed inward by that amount. In addition, since the restraint jig was not provided on the tension side, it is considered that the web collapsed outward and convex distortion due to the above-mentioned deflection on the compression side.
Furthermore, Figure 17 shows the results when the restraint jig ring height h = 20. Deformation was suppressed compared to h = 10 in both experiments and FEA. However, it was not possible to completely suppress the waveform deformation of the web. This is attributed to the fact that the clearance between the tube and the mandrel was set to 1.0 mm in both height and width. It is considered that the PTN during bending compressed the web by the amount of clearance, buckled, and caused wavy deflection.

3.5. Effect of the Bumpy Laminated Elastic Mandrel

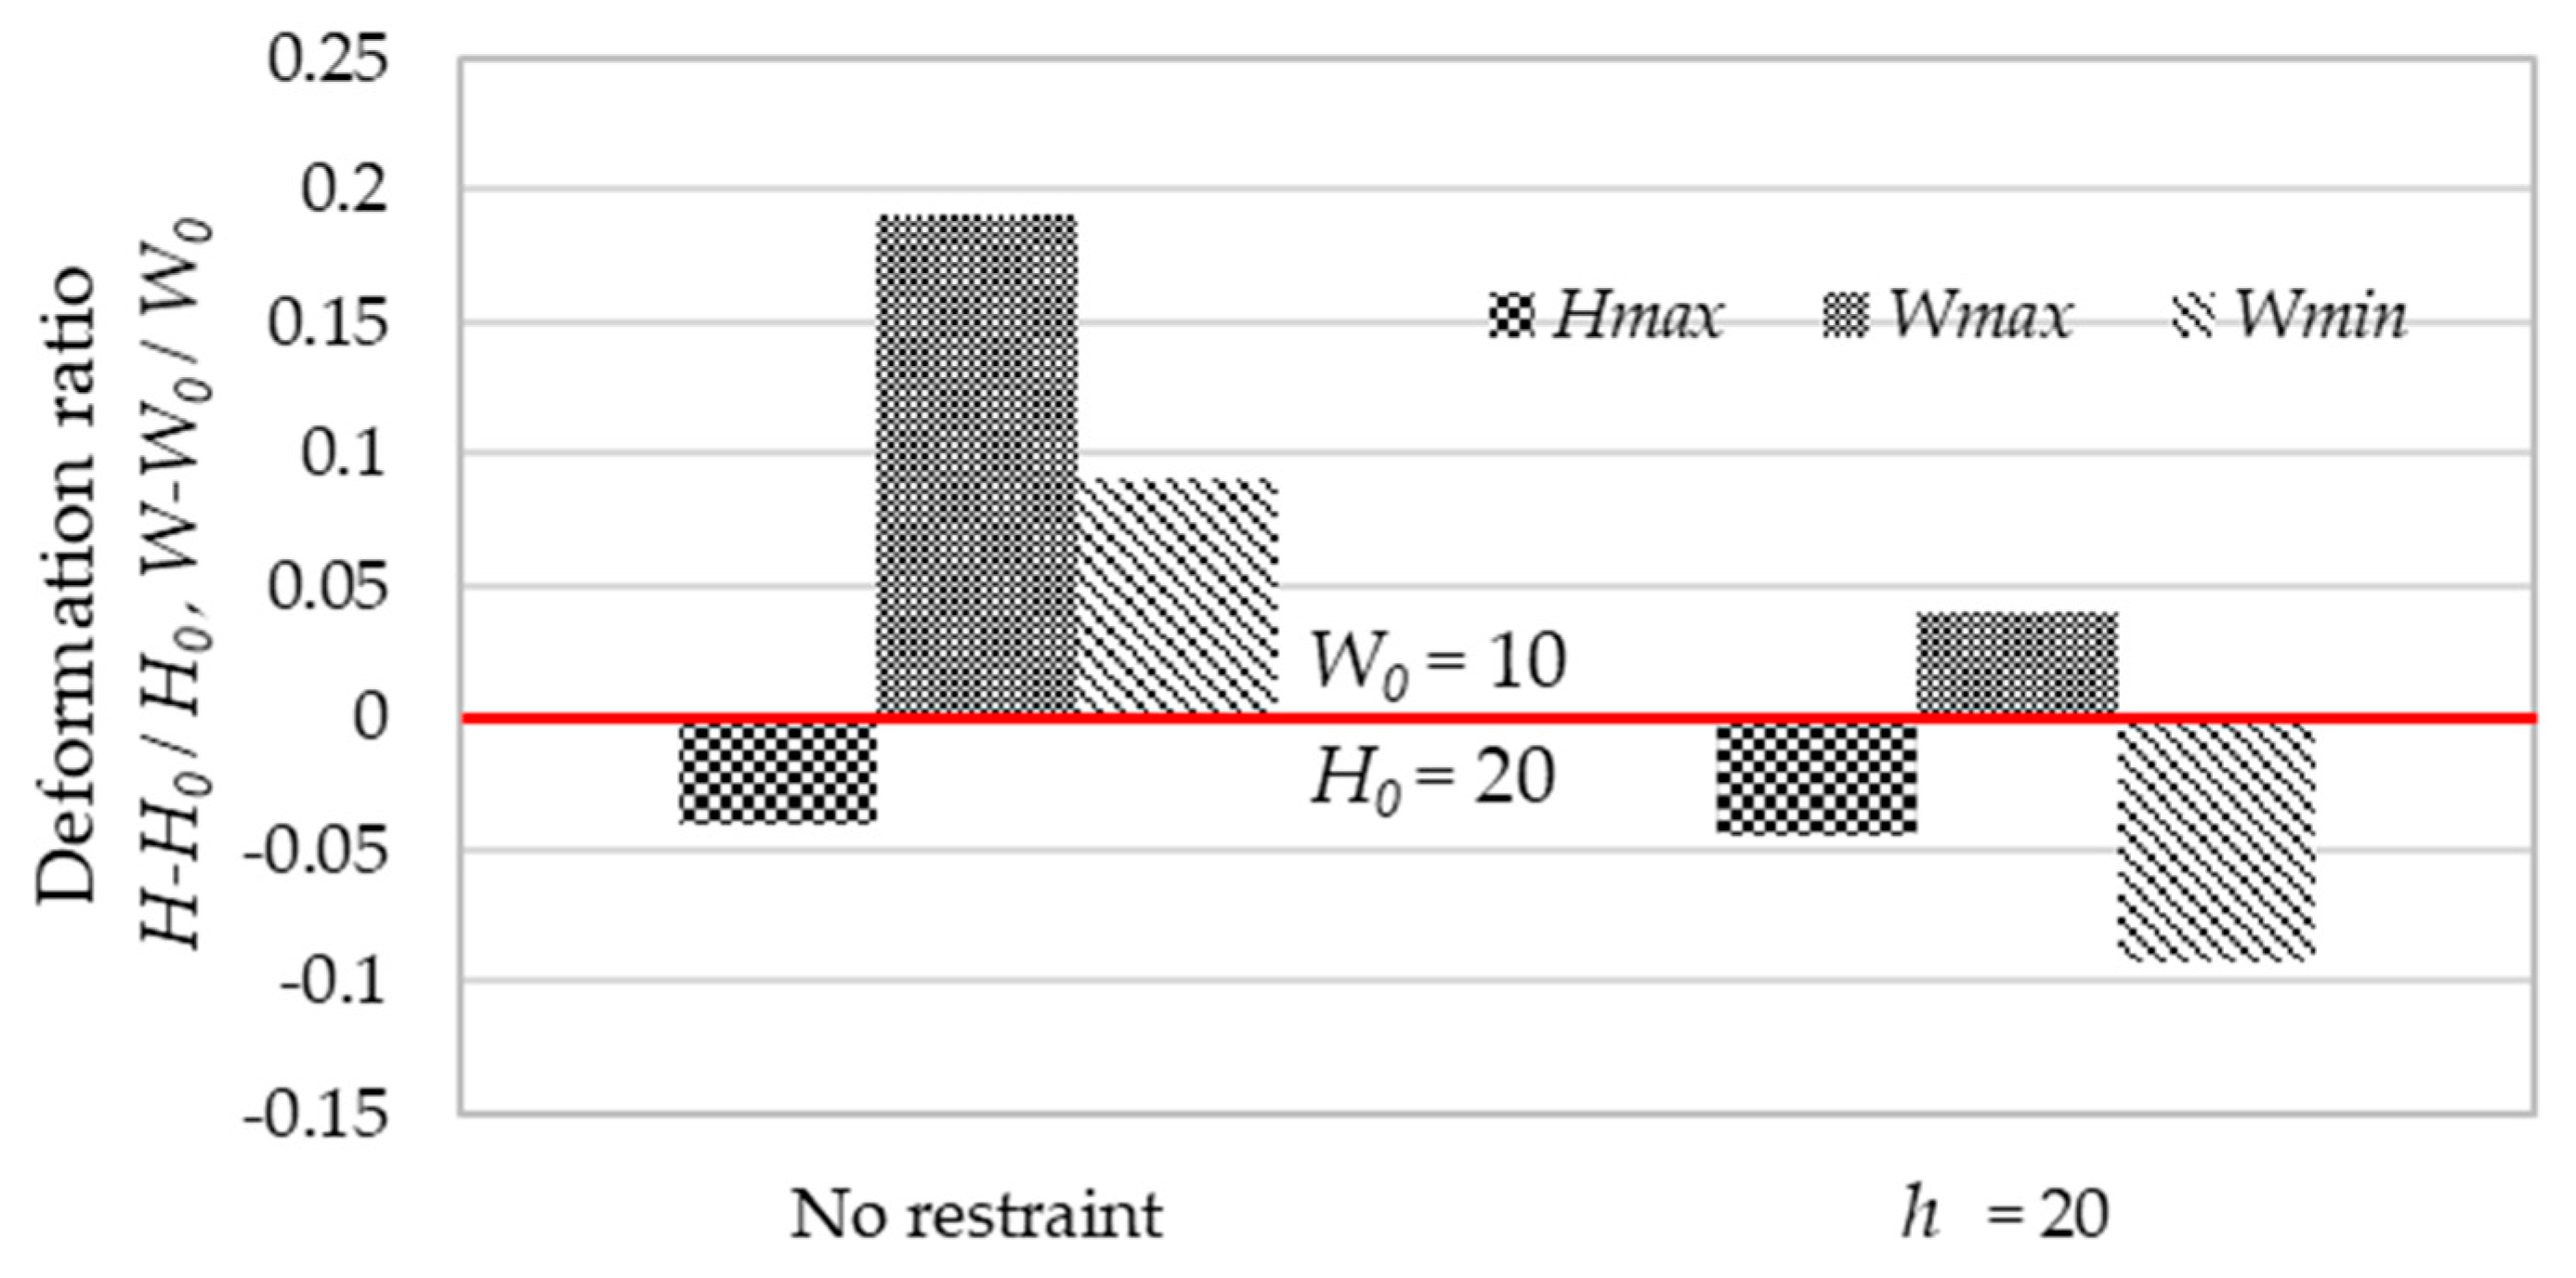
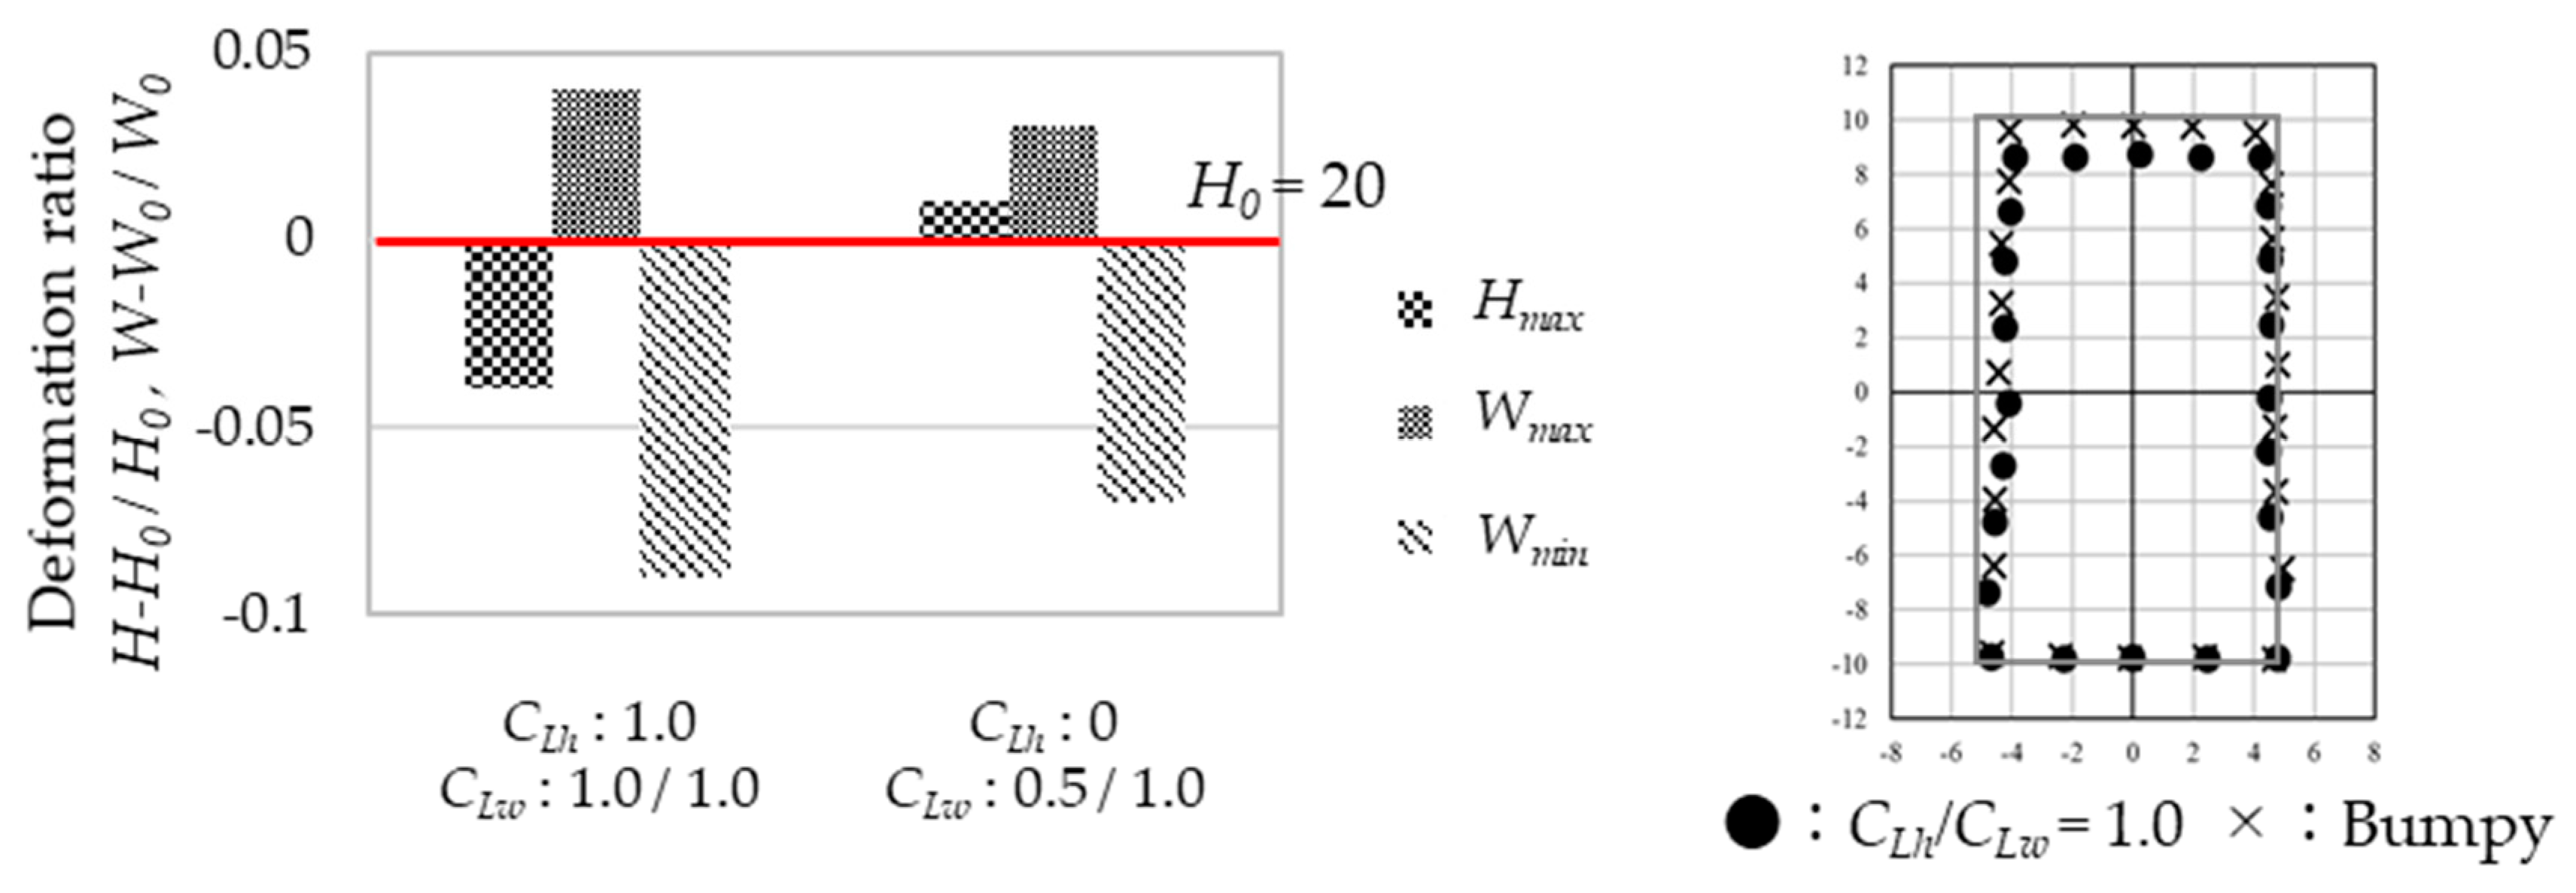
Based on the results obtained so far, Figure 18 shows a comparison of the cross-sectional shapes acquired by unconstrained and constrained bending. As shown in Figure 18, the maximum width Wmax was significantly improved by applying the constraint. In addition, the height H was reduced by 4.4%, and the minimum width Wmin was reduced by 9.8%. A decrease in height H is considered to be due to the clearance between the tube and the mandrel, and the decrease in minimum width Wmin is considered to be due to the axial tension.
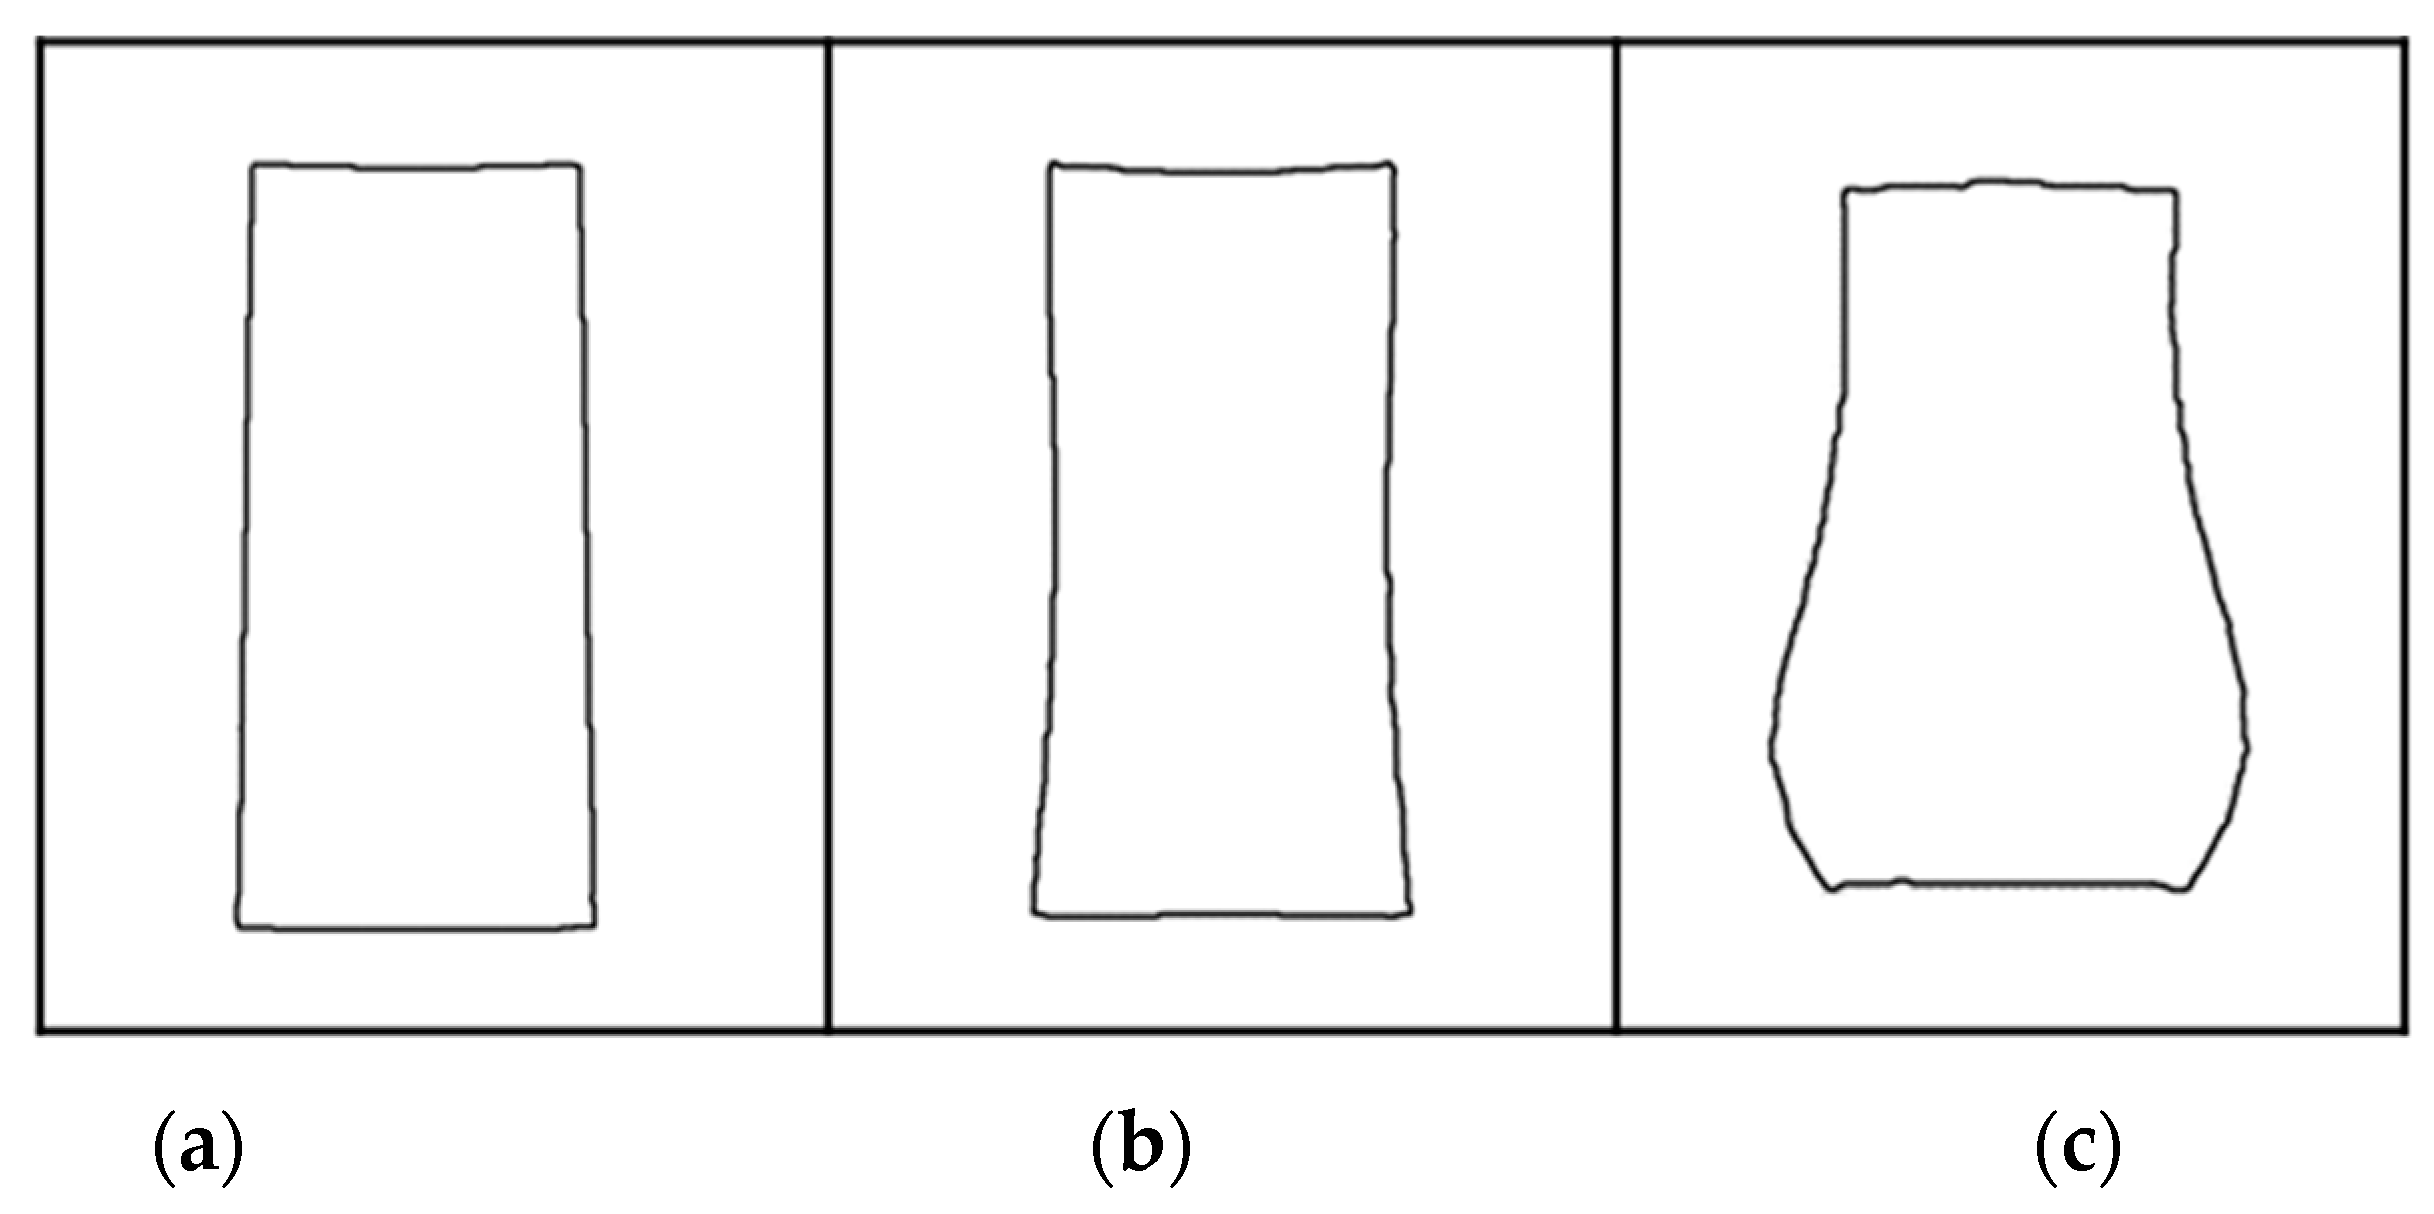
In addition, Figure 19 shows the result of FEA using a model in which the wall thickness of the rectangular tube was changed. The wall thickness of the rectangular tube increased; the above-mentioned deformation in which the web collapses inward and wavy deformation was not observed, but the deformation was mainly trapezoidal. Thus, it is considered that the pear-shaped or corrugated cross-section deformation is peculiar to the ultra-thin rectangular tube. In order to suppress this waveform deformation, it is necessary to adjust the clearance between the rectangular tube and the core material.
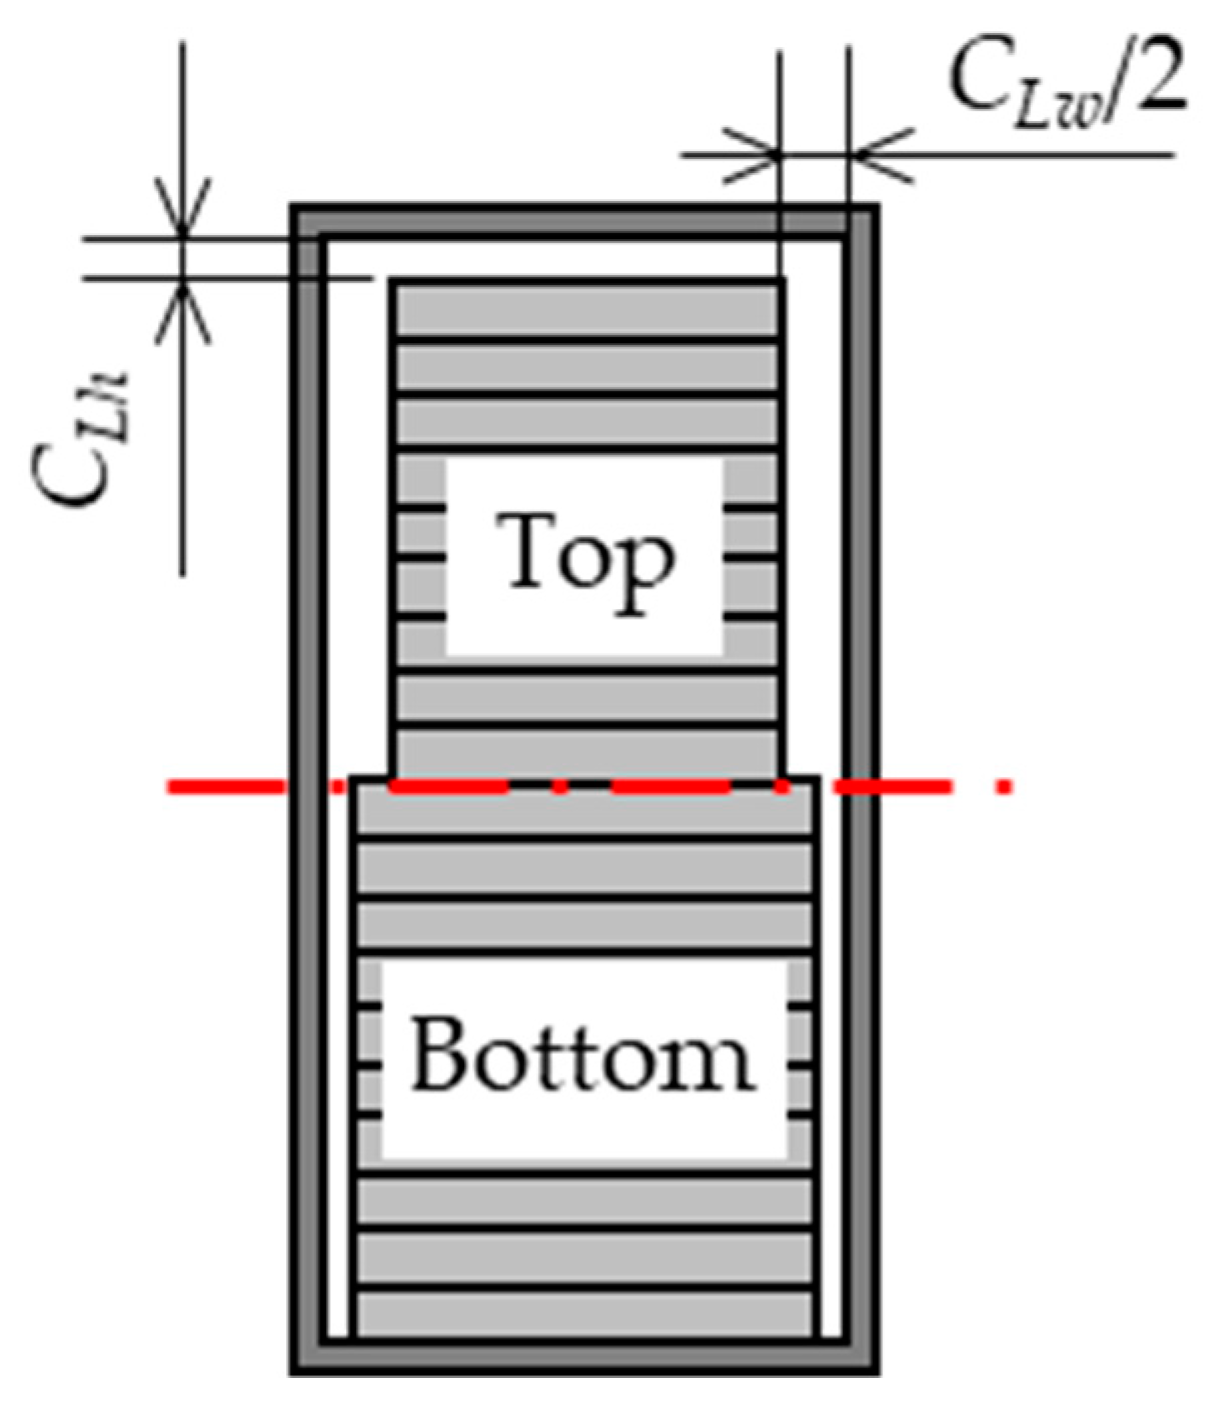
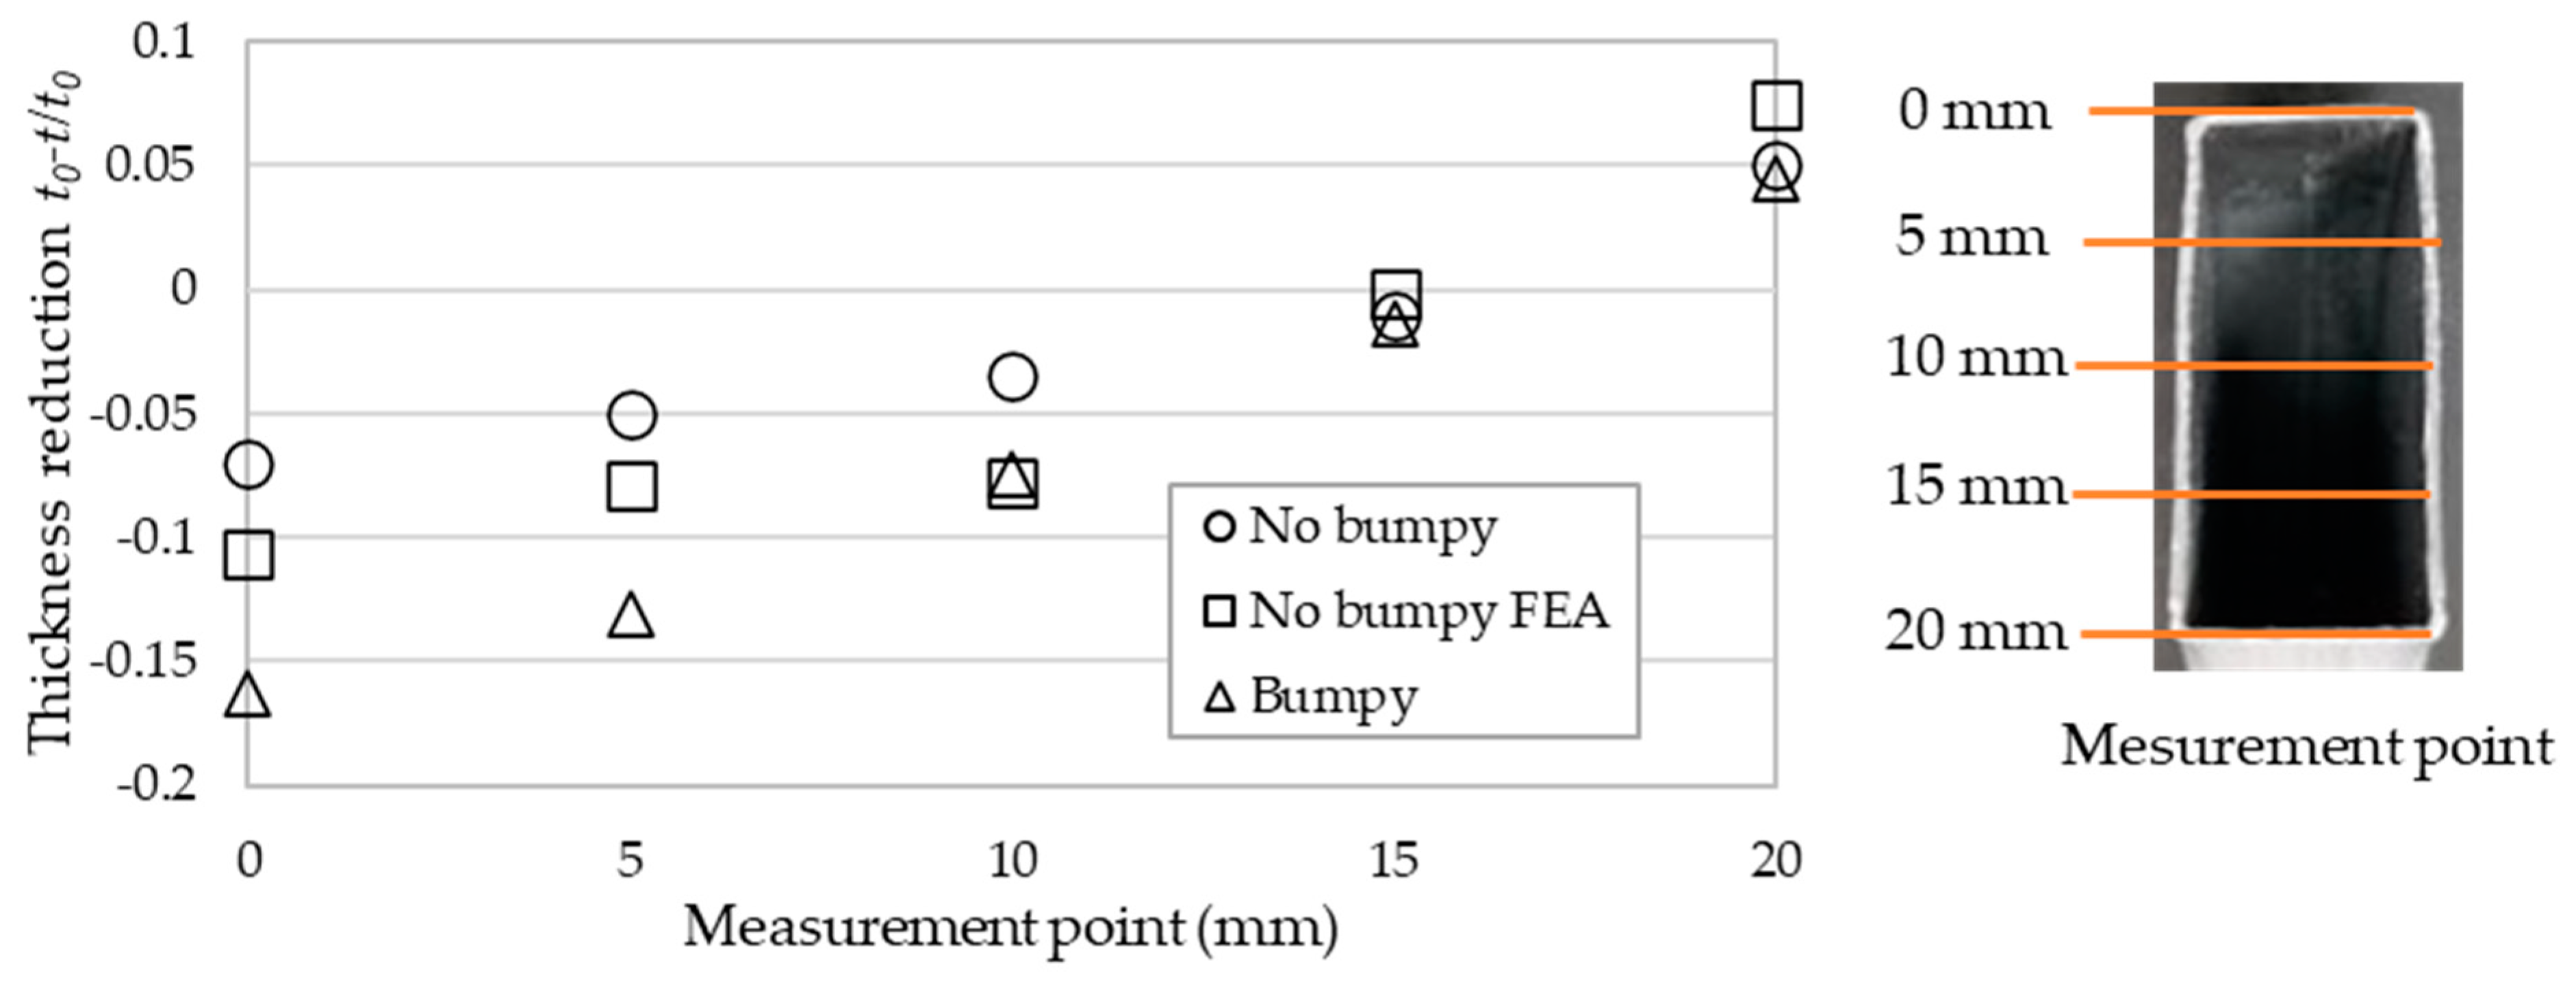
Therefore, bending was performed by applying a stepped laminated mandrel, as shown in Figure 20. Table 3 shows the experimental conditions. The height of the rectangular tube was H0 = 20 and the bending radius was R = 50. Axial tension was applied, and the height of the restraint jig was set to h = 20. The clearance between the rectangular tube and the core material was ChL = 0 to 0.5 in the height direction and 0.5 mm in the width direction. Moreover, the effect was confirmed by adding a step of 1.0 mm on the compression side and 0.5 mm on the tension side with the center line as the boundary. Figure 21 shows the appearance after bending under each condition. Wrinkling occurred in Figure 21a. This is considered to be because the clearance in the height direction was as large as 0.5 mm and the depression of the compression side flange surface, PTN, could not be suppressed. In addition, in Figure 21b, splitting occurred. In contrast, in Figure 21c, a cross-sectional shape without wrinkling or splitting was obtained. In order to examine these results, the post-bending cross-sections were compared under the condition that the clearance was 1.0 mm in both height and width, and the condition where the bumpy mandrel was applied. Figure 22 shows a comparison of deformation ratio and Figure 23 shows a comparison of changes in wall thickness. Figure 20 demonstrates Hmax was significantly suppressed in the bumpy mandrel. It is considered that this is because the bending in the case of using the bumpy mandrel was CLh = 0 mm; thus, the deformation in the height direction could be suppressed more than CLh = 1.0 mm. Accordingly, it was found that the clearance in the height direction needs to be as small as possible to suppress the deformation in the height direction. In contrast, the deformation of the width W was suppressed to some extent, but its effect was smaller than that of H. As shown in Figure 21b, if the clearance on the tension side in the width direction is set small (0.5 mm), a decrease in the width direction is suppressed, but conversely, cracking occurs. It is considered that this is because the tension of the mandrel was increased and the friction between the mandrel and the tube was increased by decreasing the clearance. Therefore, it was found that it is necessary to adjust the clearance in the width direction of the mandrel on the tension side to allow the tension and friction to relief in order to obtain a highly accurate cross-section after bending in thin-walled tubes.

4. Conclusions

The results of investigating the deformation characteristics and suppression of the ultra-thin rectangular tube in rotary draw bending are as follows:
  • The component flattening forces PTN and the distributed flattening force wTN increase as bending degree ρ (bending radius R), thickness t0, height H0, and axial tension Pa increase.
  • Wrinkling tended to occur when bending an ultra-thin wall tube. However, wrinkling can be suppressed by applying axial tension.
  • By applying the mandrel to a tube with R/H0 = 1.5 (H0 = 20, R = 50), it was possible to suppress cross-sectional deformation in the height direction. In contrast, pear-shaped deformation peculiar to ultra-thin wall tube occurred.
  • The pear-shaped deformation could be suppressed to Wmin = −4%, Wmax = 1% by restraining the side surface of the ultra-thin wall tube with H0 = 10, R = 20. In contrast, wrinkling and waveform deformation such as a long column buckling phenomenon occurred on the web of the tube with H0 = 20, R = 50, h = 20.
  • By adjusting and stepping the clearance in the width direction of the mandrel on the tension side and the compression side of the ultra-thin wall tube with R/H0 = 1.5 (H0 = 20, R = 50, h = 20), along with the restraint on the side surface and the axial force, it was possible to suppress to H = 1%, Wmax = 3%, and Wmin = −7%. Namely, it was possible to suppress the pear-shaped deformation peculiar to ultra-thin wall tube and waveform deformation such as a long column buckling phenomenon.
  • It was found that the deformation of the cross-section peculiar to the ultra-thin rectangular tube can be suppressed by applying axial tension, applying side restraint (h = 20), and adjusting the widthwise clearance of the mandrel on the compression and the tension sides of the tube (CLh = 0 mm, CLw = 1.0 mm/0.5 mm).

Author Contributions

Conceptualization, N.U.; Methodology, N.U.; Resources, N.U.; Material provision, N.U.; Experimental work, K.N. and Y.S.; Numerical analysis, K.N., N.U. and Y.S.; Data curation, K.N., N.U. and Y.S.; Writing—original draft preparation, K.N. and Y.S.; Supervision, N.U. and M.Y.; Project administration, N.U.; Funding acquisition, N.U. All authors have read and agreed to the published version of the manuscript.

Funding

This research was funded by AMADA Foundation grant number AF-2016026.

Acknowledgments

The authors would like to gratefully acknowledge the funding source for this study, the AMADA Foundation.

Conflicts of Interest

The authors declare no conflict of interest.

References

  1. Takahashi, K.; Murata, M. Trend of tubular bending. J. JPN Light Met. 2006, 56, 283–289. [Google Scholar] [CrossRef]
  2. Utsumi, N.; Sakaki, S. Countermeasures against undesirable phenomena in the draw-bending process for extruded square tubes. J. Mater. Process. Technol. 2002, 123, 264–269. [Google Scholar] [CrossRef]
  3. Fuchs, F.J., Jr. Waveguide Bending Design Analysis: Theory of Bending and Formulae for Determination of Wall Thicknesses. Bell Syst. Tech. J. 1959, 38, 1457–1484. [Google Scholar] [CrossRef]
  4. Gu, R.J.; Yang, H.; Zhan, M.; Li, H.; Li, H.W. Research on the springback of thin-walled tube NC bending based on the numerical simulation of the whole process. Comput. Mater. Sci. 2008, 42, 537–549. [Google Scholar] [CrossRef]
  5. Zhang, H.; Liu, Y.; Liu, C. Multi-Objective Parameter Optimization for Cross-Sectional Deformation of Double-Ridged Rectangular Tube in Rotary Draw Bending by Using Response Surface Methodology and NSGA-II. Metals 2017, 7, 206. [Google Scholar] [CrossRef]
  6. Strano, M. Automatic tooling design for rotary draw bending of tubes. Int. J. Adv. Manuf. Technol. 2005, 26, 733–740. [Google Scholar] [CrossRef]
  7. Sherif, S.S.; Mostafa, S.; Mohammad, M.M. Limit load analysis of thin-walled as-fabricated pipe bends with low ovality under in-plane moment loading and internal pressure. Thin Walled Struct. 2019, 114, 106336. [Google Scholar]
  8. Gantnerl, P.; Harrison, D.K.; De Silva, A.K.; Bauer, H. The Development of a Simulation Model and the Determination of the Die Control Data for the Free-Bending Technique. Proc. Inst. Mech. Eng. Part B J. Eng. Manuf. 2007, 221, 163–171. [Google Scholar] [CrossRef]
  9. Masoumi, H.; Mirbagheri, Y. Effect of Mandrel, Its Clearance and Pressure Die on Tube Bending Process via Rotary Draw Bending Method. Int. J. Adv. Des. Manuf. Technol. 2012, 5, 47–52. [Google Scholar]
  10. Hassan, H.R.; Abdulgaffar, S.M.; Mohsen, K.K.; Egab, K. Investigation of Material Properties Effect on the Ovalization Phenomenon in the Tube Bending Produced by RDB. IOP Conf. Ser. Mater. Sci. Eng. 2020, 671, 012010. [Google Scholar] [CrossRef]
  11. Kourosh, H.; Mahmoud, B.; Behnaz, A.; Mehrdad, P. The effect of anisotropy on wrinkling of tube under rotary draw bending. J. Mech. Sci. Technol. 2013, 27, 783–792. [Google Scholar]
  12. Xin, X.; Juan, L.; Gabriela, V.; Jose, G. Twist springback of asymmetric thin-walled tube in mandrel rotary draw bending process. Procedia Eng. 2014, 81, 2177–2183. [Google Scholar]
  13. Christopher, H.; Rainer, S.; Bernd, E. Rotary-draw-bending using tools with reduced geometries. Procedia Manuf. 2018, 15, 804–811. [Google Scholar]
  14. Linda, B.; Christopher, K.; Peter, F.; Bernd, E. Sensitivity analysis of the rotary draw bending process as a database of digital equipping support. Procedia Manuf. 2019, 29, 592–599. [Google Scholar]
  15. Yang, H.; Li, H.; Zhan, M. Friction role in bending behaviors of thin-walled tube in rotary-draw-bending under small bending radii. J. Mater. Process. Technol. 2010, 210, 2273–2284. [Google Scholar] [CrossRef]
  16. Muresan, C.; Achimas, G. Numeric Simulation of Material Behavior in Mandrel Bending. Appl. Math. Mech. Eng. 2014, 57, 455–460. [Google Scholar]
  17. Mohammad, S.; Mahmoud, F.; Mahmoud, K.; Mohsen, N. A chain link mandrel for rotary draw bending: Experimental and finite element study of operation. Int. J. Adv. Manuf. Technol. 2015, 79, 1071–1080. [Google Scholar]
  18. Kami, A.; Dariani, B.M. Prediction of wrinkling in thin-walled tube push-bending process using artificial neural network and finite element method. Proc. Inst. Mech. Eng. Part B J. Eng. Manuf. 2011, 225, 1801–1812. [Google Scholar] [CrossRef]
  19. Lucian, L. Effect of internal fluid pressure on quality of aluminum alloy tube in rotary draw bending. Int. J. Adv. Manuf. Technol. 2013, 64, 85–91. [Google Scholar]
  20. Kajikawa, S.; Wang, G.; Kuboki, T.; Watanabe, M.; Tsuichiya, A. Prevention of defects by optimizing mandrel position and shape in rotary draw bending of copper tube with thin wall. Procedia Manuf. 2018, 15, 828–835. [Google Scholar] [CrossRef]
  21. Fang, J.; Lu, S.; Liang, C.; Ceng, L.; Zheng, D. Influences of mandrel types on forming quality of TA18 high strength tube in numerical control bending. IOP Conf. Ser. Mater. Sci. Eng. 2019, 631, 032032. [Google Scholar] [CrossRef]
  22. Zhang, Z.; Yang, H.; Li, H.; Ren, N.; Tian, Y. Bending behaviors of large diameter thin-walled CP-Ti tube in rotary draw bending. Prog. Nat. Sci. Mater. Int. 2011, 21, 401–412. [Google Scholar] [CrossRef] [Green Version]
  23. Fang, J.; Lu, S.; Wang, K.; Xu, J.; Xu, X.; Yao, Z. Effect of Mandrel on Cross-Section Quality in Numerical Control Bending Process of Stainless Steel 2169 Small Diameter Tube. Adv. Mater. Sci. Eng. 2013, 2013, 1–9. [Google Scholar] [CrossRef] [Green Version]
  24. Frode, P.; Torgeir, W. Cross-sectional deformations of rectangular hollow sections in bending: Part I–experiments. Int. J. Mech. Sci. 2001, 43, 109–129. [Google Scholar]
  25. Hong, Z.; Yuli, L.; Honglie, Z. Study on cross-sectional deformation of rectangular waveguide tube with different materials in rotary draw bending. J. Mater. Res. 2017, 32, 3912–3920. [Google Scholar]
  26. Nakajima, K.; Utsumi, N.; Yoshida, M. Suppressing method of the cross-section deformation for extruded square tubes in press bending. Int. J. Precis. Eng. Manuf. 2013, 14, 965–970. [Google Scholar] [CrossRef]
  27. Utsumi, N.; Saito, Y.; Yoshida, M. Effects of axial tension in rotary draw bending of thin-walled rectangular aluminum alloy tubes. In Proceedings of the 69th Japanese Joint Conference for the Technology of Plasticity, Kumamoto, Japan, 27–28 October 2018. [Google Scholar]
  28. Saito, Y.; Kono, Y.; Kamimura, T.; Utsumi, N.; Yoshida, M. Deformation of property and working limit of thin-walled rectangular tube in rotary draw bending. In Proceedings of the 5th Asian Symposium on Materials and Processing, Bangkok, Thailand, 7–8 December 2018. [Google Scholar]
  29. Sakaki, S.; Utsumi, N. Deformation property and working limit of extruded square sections in rotary-bending process. Adv. Technol. Plast. 2002, 2, 1763–1768. [Google Scholar]
Figure 1. Shape and dimension of the workpiece.
Metals 10 01074 g001
Figure 2. Bending radius and bending height.
Metals 10 01074 g002
Figure 3. Schematic representation of the rotary draw bending device.
Metals 10 01074 g003
Figure 4. Tool alignment of rotary draw bending.
Metals 10 01074 g004
Figure 5. Schematic of the laminated elastic mandrel.
Metals 10 01074 g005
Figure 6. Schematic representation of the simulation model in rotary draw bending.
Metals 10 01074 g006
Figure 7. Schematic of flattening distortion of a square tube.
Metals 10 01074 g007
Figure 8. Mechanism of flattening components.
Metals 10 01074 g008
Figure 9. Relationship of flattening component of the tension side and thickness.
Metals 10 01074 g009
Figure 10. Result of rotary draw bending (Without a mandrel and axial tension); (a) Folding (H0 = 20, R = 50); (b) Wrinkling (H0 = 10, R = 50).
Metals 10 01074 g010
Figure 11. Effect of axial tension (H0 = 10, R = 50).
Metals 10 01074 g011
Figure 12. Effect of axial tension and the mandrel; (a) H0 = 10; (b) H0 = 20.
Metals 10 01074 g012
Figure 13. Result of FEA; (H0 = 20, R = 50, using the mandrel and axial tension).
Metals 10 01074 g013
Figure 14. Schematic representation of restraint jigs and simulation model.
Metals 10 01074 g014
Figure 15. Effect of restraint jigs (H0 = 10, R = 20).
Metals 10 01074 g015
Figure 16. Effect of restraint jigs (H0 = 20, R = 50, h = 10); (a) Appearance after bending; (b) Experiment; (c) FEA.
Metals 10 01074 g016
Figure 17. Effect of restraint jigs (H0 = 20, R = 50, h = 20); (a) Appearance after bending; (b) Experiment; (c) FEA.
Metals 10 01074 g017
Figure 18. Comparison of the existence of restraint jigs.
Metals 10 01074 g018
Figure 19. Effect of thickness; (a) t0 = 2.0 mm; (b) t0 = 1.0 mm; (c) t0 = 0.5 mm.
Metals 10 01074 g019
Figure 20. Schematic of the bumpy laminated elastic mandrel.
Metals 10 01074 g020
Figure 21. Effect of the bumpy laminated elastic mandrel; (a) CLh = 0.5 mm, CLw = 0.5/0.5 mm, Axial tension; (b) CLh = 0 mm, CLw = 0.5/0.5 mm, Axial tension; (c) CLh = 0 mm, CLw = 1.0/0.5 mm, Axial tension.
Metals 10 01074 g021
Figure 22. Effect of the bumpy laminated elastic mandrel on deformation ratio.
Metals 10 01074 g022
Figure 23. Effect of the bumpy laminated elastic mandrel in thickness.
Metals 10 01074 g023
Table 1. Mechanical properties of the workpiece.
A6063-O
Tensile Strength σB/MPa91
Proof Stress σ0.2/MPa39
Elongation δ/%24.3
Work-hardening Exponent n *0.27
Plastic Modulus C */MPa160
* Refer to JIS Z2201 σ = Cεn.
Table 2. Boundary conditions of Finite Element Analysis (FEA).
WorkpieceMandrelBending DrumRestraint JigBar
Element TypeElasto-Plastic/ShellElastic/SolidRigid/ShellRigid/ShellRigid/Shell
Number of Elements17,25012001515H0 = 10:1010765
H0 = 20:2020
Restraint conditionfreefree * 90° rotationfixedfixed
* Fixed area of mandrel.
Table 3. Conditions of experiment and simulation.
Height of Workpiece H020 mm
Bending drum radius R50 mm
Axial tension αApply
Height of restraint jigs h20 mm
Laminated Elastic MandrelHeight CLh0.5 mm0 mm0 mm
Width CLw (Top/Bottom)0.5/0.5 mm0.5/0.5 mm1.0/0.5 mm