Article

Low Friction and High Solid-Solid Contact Ratio—A Contradiction for Laser-Patterned Surfaces?

by
Simon Bettscheider
1,2,
Philipp G. Grützmacher
1 and
Andreas Rosenkranz
1,3,*
1
Chair of Functional Materials, Department of Materials Science and Engineering, Saarland University, 66123 Saarbruecken, Germany
2
INM—Leibniz Institute for New Materials, 66123 Saarbruecken, Germany
3
Center for Memory and Recording Research, University of California, San Diego, CA 92093, USA
*
Author to whom correspondence should be addressed.
Lubricants 2017, 5(3), 35; https://doi.org/10.3390/lubricants5030035
Submission received: 1 August 2017 / Revised: 24 August 2017 / Accepted: 25 August 2017 / Published: 26 August 2017
(This article belongs to the Special Issue Improvement of Friction and Wear by Laser Surface Texturing)

Abstract

:
Recording of Stribeck-like curves is a common way to study the effect of laser-patterned surfaces on the frictional efficiency. However, solely relying on the coefficient of friction when identifying the lubrication regime and the underlying working principles can be misleading. Consequently, a ball-on-disc tribometer was combined with an electrical resistivity circuit to simultaneously measure Stribeck-like curves and solid-solid contact ratios for polished and laser-patterned samples. Line-like surface patterns with different periodicities were produced by direct laser interference patterning on steel substrates (AISI304). The reference shows a Stribeck-like behavior well correlating with the contact ratios. The behavior deviates for high sliding velocities (high contact ratios) due to a loss of lubricant induced by centrifugal forces pulling the lubricant out of the contact zone. In contrast, the solid–solid contact ratio of the laser-patterned samples is around 80% for all sliding velocities. Those values can be explained by higher contact pressures and the structural depth induced by the surface topography which make a full separation of the surfaces unlikely. Despite those high values for the contact ratio, laser-patterning significantly reduces friction, which can be traced back to a reduced real contact area and the ability to store oil in the contact zone.

1. Introduction

Friction, wear and lubrication play a significant role in numerous daily applications and can be directly related to the energy efficiency of those applications and components [1,2,3]. Applications range from passenger cars to aircrafts over wind turbines or heavy vehicles in the mining industry. In terms of passenger cars, Holmberg et al. published a manuscript dealing with their energy consumption. By looking at friction occurring in the different components of cars, Holmberg et al. showed that roughly one third of the entire fuel energy needs to be used to overcome frictional losses. The authors estimated that the involved frictional losses can be reduced by 18% in the next 5 to 10 years by making use of advanced technologies. In the long term, they predicted potential savings of about 60%, which would save millions of liters of fuel and millions of tons of CO2 emissions worldwide [4]. Likewise, Holmberg et al. examined the energy efficiency of heavy vehicles in the mining industry considering potential losses induced by friction and wear. They concluded that, in the mining industry, roughly 40% of the entire energy needs to be used to overcome those losses. New concepts might lead to a reduction of those losses by 30% in the next 20 years, which would significantly contribute to reduced CO2 emissions, fuel savings and sustainability. In this context, a large range of possible approaches can be named, such as new material concepts with improved strength and hardness properties, more efficient surface treatments, newly designed lubricants, as well as advanced coatings [5].
A very promising approach to effectively tailor the friction and wear properties is to create certain deterministic surface patterns, thus modifying the surface topography. Those patterns are typically of a periodic nature with feature sizes (spatial dimensions and depth) in the micron range and can be generated by different techniques such as laser patterning, lithography, embossing and others [6,7,8,9,10,11]. In this context, laser surface patterning has proven to be beneficial since this technique allows for efficient, fast, single-step and environment-friendly processing. In contrast to coatings and new lubricant systems that mainly work under boundary and hydrodynamic lubrication, specifically designed surface patterns can be used in all the different lubrication regimes in order to positively affect friction and wear. Under dry friction and boundary lubrication, surface patterns are beneficial since they are able to reduce the contact area and store wear particles [12,13,14,15,16,17,18,19]. Considering mixed lubrication, those patterns can additionally store lubricant in order to induce a secondary oil effect and contribute to the build-up of additional hydrodynamic pressure [20,21,22,23,24]. In the case of hydrodynamic lubrication, the role of surface patterns is basically limited to modify the hydrodynamic pressure build-up [6,7,8,25,26]. Furthermore, lubrication regimes can be shifted to higher loads and/or lower velocities with the help of surface patterns [7,8,27,28].
A common way to evaluate the frictional performance of patterned surfaces is to record Stribeck-like curves by varying the relative sliding velocity and keeping the normal load as well as the oil viscosity constant. Many publications prove the beneficial effects of surface patterns under different lubricated conditions [7]. In the case of hydrodynamic lubrication, the underlying effects (additional pressure build-up) are rather clear and well understood. In contrast to that, the situation for mixed lubrication is more difficult since the load is partly carried by the oil film and the surface asperities. In this context, more detailed knowledge of the amount of load supported by the asperities and the oil film would be very helpful to understand the positive effects coming from the surface patterning. Kovalchenko et al. recorded Stribeck-like curves for a laser-patterned surface and correlated those results with measurements of the electrical resistance. They demonstrated that laser surface patterning helps to shift the transitions between the different lubrications regimes to more severe conditions (higher loads and lower velocities) [27,28]. Apart from the electrical resistance, it is possible to evaluate the voltage-time curves recorded by an oscillospe directly, thus deriving values for the solid-solid contact. Nakatsuji et al. studied the frictional performance of micro-stents on steel surfaces under rolling conditions. They used an electrical circuit to study the oil film and to shed light on the metal–metal contact during the experiments [29]. Rosenkranz et al. developed an electrical resistivity set-up in order to measure the amount of solid–solid contact with high temporal and spatial resolution. This resolution is necessary since changes in the contact situation under mixed lubrication due to contacting asperities and variations in the oil film happen at a rather high temporal rate as well as in small spatial dimensions [30]. Grützmacher et al. performed unidirectional ball-on-disk experiments with polished reference samples dependent on oil viscosity used and angular velocity adjusted by the respective track radius. They correlated the resulting coefficient of friction (COF) with the simultaneously measured solid-solid contact ratios and showed that the centrifugal forces significantly affect the oil film lifetime [31].
In this research work, Stribeck-like curves of polished samples and laser-patterned surfaces with a line-like geometry fabricated by direct laser interference patterning (DLIP) were recorded. Two different periodicities, namely, 9 and 15 µm, both with a structural depth of 1 µm were tested. For the tribological experiments, a ball-on-disk tribometer was utilized keeping the normal load and oil viscosity constant while adjusting the sliding velocity. Simultaneously, an electrical resistivity circuit was used to determine the solid-solid contact ratio in order to correlate the frictional results with the respective amount of solid-solid contact.

2. Materials and Methods

2.1. Samples

Stainless steel specimens with a thickness of 1 mm (specification AISI 304) and a mirror-polished surface ( R q of about 40 nm) were used as tribological substrate in this study. 100Cr6 steel balls (specification AISI 52100) with a diameter of 6 mm served as tribological counter bodies ( R q of about 20 nm). Table 1 displays the chemical compositions of both substrate and counter body as specified by the suppliers. All samples were cleaned using an ultrasonic bath with a multi-step procedure starting with cyclohexan, followed by acetone and isopropanol (ten minutes for each solvent). This procedure ensures the removal of all apolar and polar contaminations.

2.2. Direct Laser Interference Patterning (DLIP)

A solid-state Nd:YAG laser (Quanta Ray Pro 290, Newport Spectra Physics, Irvine, CA, USA) with a pulse duration of 10 ns, wavelength of 355 nm and repetition rate of 10 Hz was used. The optical setup to realize DLIP consists of a shutter, an attenuator, a lens, a beam splitter and a mirror. The primary laser beam is split up into two sub-beams and by means of the mirror, those sub-beams are brought to interference on the steel surface. The periodicity of the laser pattern depends on the used laser wavelength and the angle between the respective sub-beams. Two-beam interference induces a line-like surface topography. Using DLIP, well-defined, line-like surface patterns with two periodicities, namely 9 and 15 µm, having a structural depth of 1 µm were produced. The homogeneity of the surface patterns was the quality criterion for the selection of the pattern periodicity. Surface patterns with intermediate periodicities can be produced with the highest homogeneity [32]. The laser fluence was kept constant at 29 J/cm2 for all samples. DLIP was performed under ambient conditions using one single laser pulse. Further details about the DLIP can be found elsewhere [32,33,34,35].

2.3. Wight Light Interferometry (WLI)

The surface topography of all specimens was analyzed by WLI (New View 7300, Zygo, Middlefield, CT, USA) prior to and after DLIP to measure the surface roughness and to evaluate the quality of the produced surface patterns. Parameters such as periodicity and structural depth were used to describe the resulting surface profile of the fabricated patterns.

2.4. Ball-On-Disk Tribometer

The tribological experiments were performed on a ball-on-disc tribometer (Microtribometer Anton Paar, formerly known as CSM Instruments, Graz, Austria) in rotational sliding mode. Two different normal loads, namley 1 and 5 N, were adjusted by dead weights (acting in normal direction). The relative sliding velocities were varied between 0.013 and 0.505 m/s (rotational speeds between 31 and 1200 rpm) in order to record Stribeck-like curves for the polished reference and the laser-patterned samples. The experiments were performed in an oil containment with a constant oil volume of 7 mL Poly-α-olefin oil (PAO 40 provided by Castrol). The kinematic viscosity of the used oil at 100 °C is about 39.6 cSt. The tribometer was embedded in a climatic chamber to ensure reproducible conditions in terms of temperature (25 ± 1 °C) and relative humidity (45 ± 1%) for all experiments. The stop condition of the tribometer was set to 300 sliding cycles. With respect to the line-like surface topography, it is worth mentioning that no preferred orientation/alginment was adjusted due to the rotational sliding mode. Each tribological measurement was repeated three times. A summary of all experimental conditions is given in Table 2.

2.5. Electrical Resistivity Circuit

The solid-solid contact ratio was measured during the experiments in order to quantify the amount of load that is carried by the oil film and the surface asperities. This can be a helpful information in order to explore the differences in the frictional behavior between laser-patterned samples and the polished reference. An experimental set-up introduced by Rosenkranz et al. [30] was used to determine the respective ratios. The respective set-up is illustrated in Figure 1.
In terms of the used lubricant, the isolating properties of the lubricant ensure that no electric current can flow when an oil film with a sufficient thickness has been formed between the rubbing surfaces. By using a known input voltage V 0 (rectangular and alternating) with amplitude of 5 V, the resulting output voltage V out can be measured using a sliding contact. The solid-solid contact ratio r SSC , which can be used to identify different lubrication regimes, can be directly calculated from the respective input and output signal:
r SSC = I Output I Input = t 0 t | V out | d t t 0 t | V 0 | d t ,
where I Output and I Input   are the output and input signal, respectively. The output signal will be about zero in the case of a thick oil film separating both rubbing surfaces. For boundary lubrication or an insufficient oil film thickness, the output signal is equal or almost equal to the input signal. Considering mixed lubrication, a fluctuating signal can be expected. The voltage-time-signal was measured at a frequency of 1 MHz over a period of 10 ms. The solid-solid contact ratios were calculated ten times (equidistant time step), and the respective mean values as well as standard deviations are given.

3. Results

3.1. Topographical Analysis

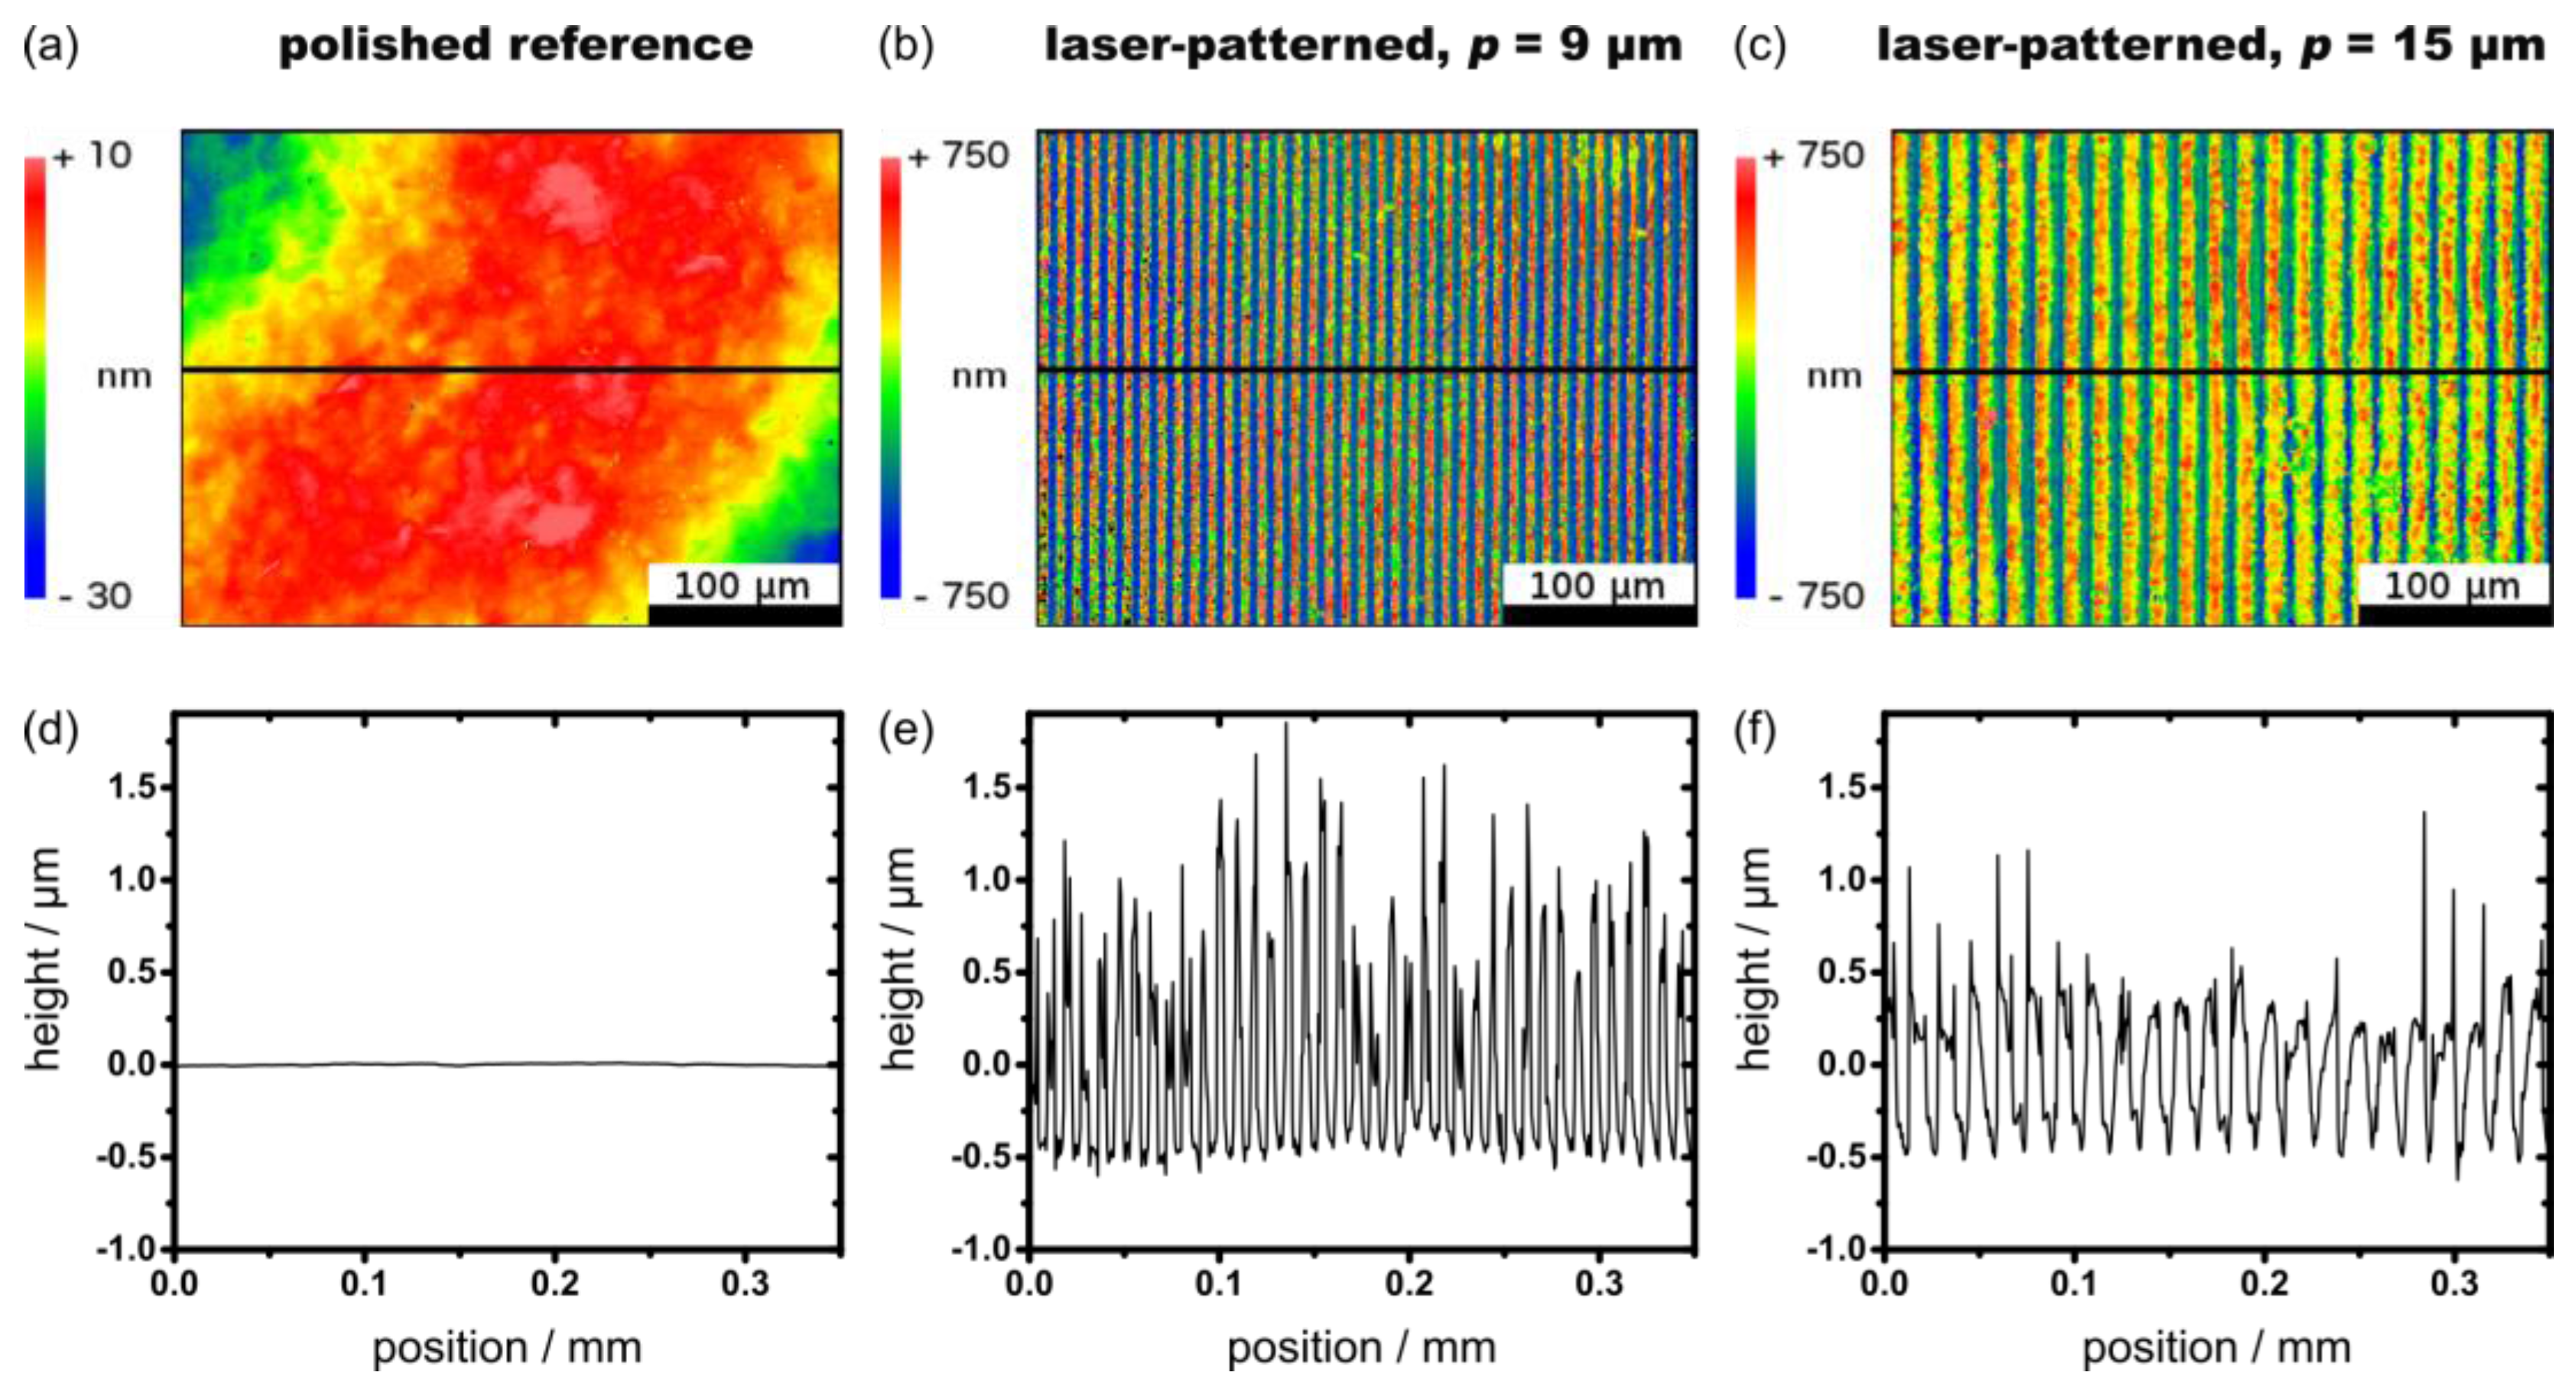
Prior to tribological testing, the surface topography of all samples was analyzed by white light interferometry (WLI). The respective images and surface profiles are shown in Figure 2.
The polished reference shows a smooth surface with almost no irregularities (cf. Figure 1a,d). In contrast, the surface of both laser-patterned samples consists of a regular pattern with different periodicity, thus repeating topographic peaks and valleys (cf. Figure 1b,e as well as Figure 1c,f). For both laser-patterned samples irrespective of the periodicity, some deviations and irregularities with respect to the height distribution can be found. This can be traced back to the dynamic processes of melting and resolidification involved in DLIP. However, it should be emphasized that the periodicity tends to be very regular.
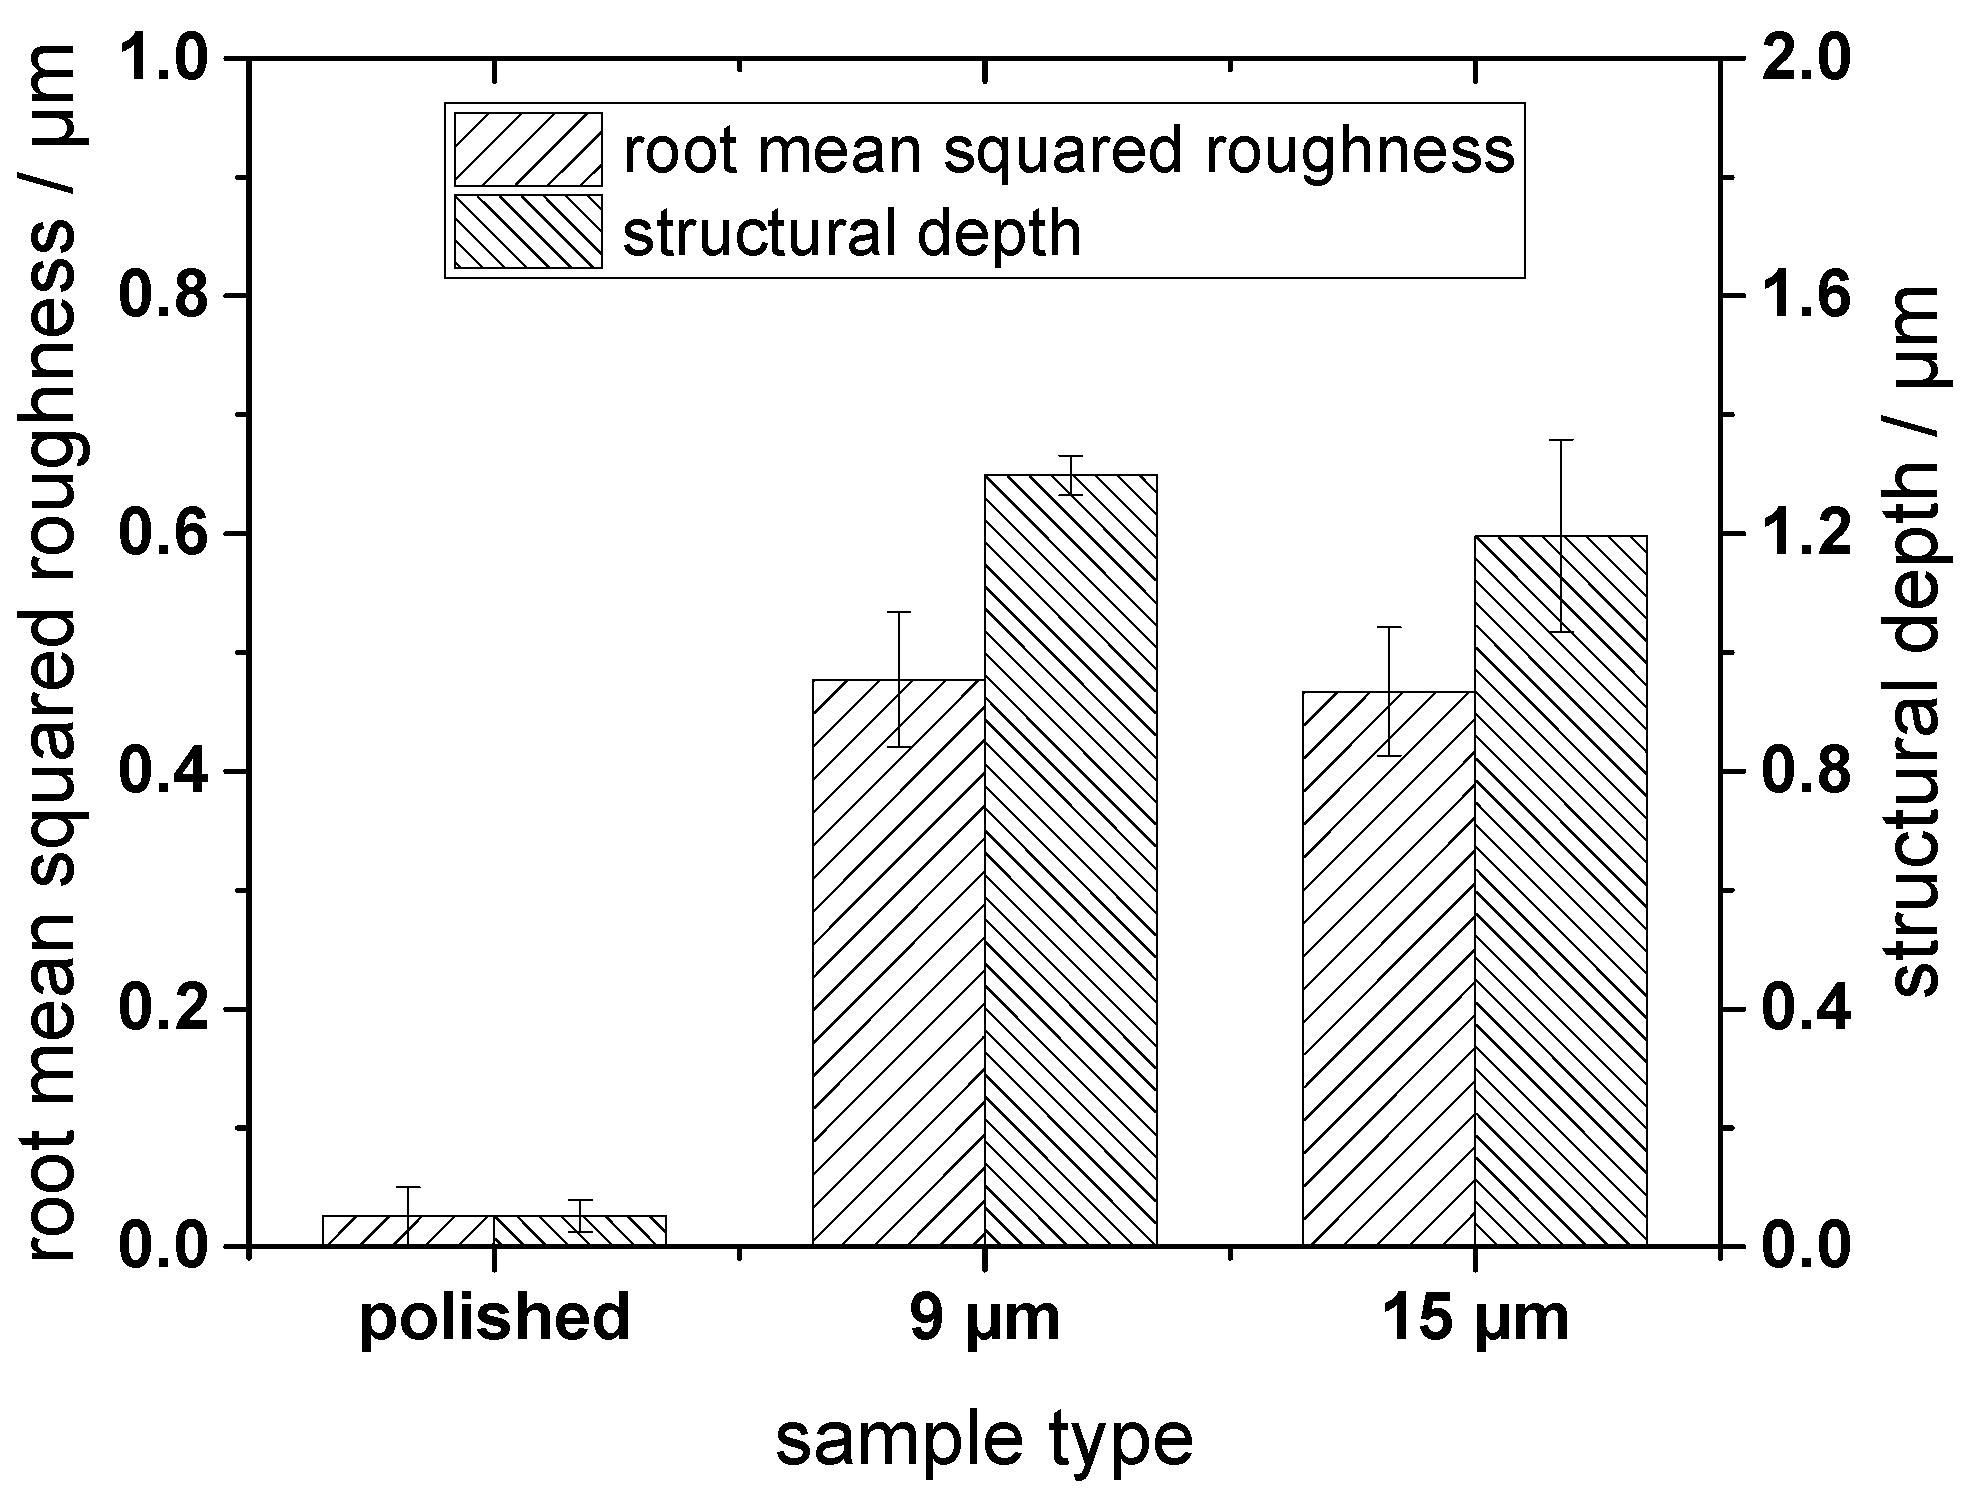
In addition, the root mean square roughness R q , and the structural depth D s of the polished reference, of both laser-patterned samples, and the steel ball were analyzed by WLI. For the laser-patterned samples, the periodicity P of the line-like pattern was also determined. Results are summarized in Table 3.
The surface roughness of the steel ball and the polished reference is rather similar, thus demonstrating a very good surface finish and a smooth surface. In contrast to that, R q and S d unveil that the roughness of the laser-patterned samples is more than an order of magnitude larger than that of the polished reference. This is also shown in Figure 3. The periodicity of the laser-patterned samples is close to their nominal periodicity, and the roughness parameters of the two laser-patterned samples are similar. Hence, the testing conditions are ensured to be similar for both laser-patterned samples. It is worth mentioning that the standard deviations for the laser-patterned samples are within 15%, which again underlines the homogeneity of the laser-patterned samples and the reproducibility/accuracy of DLIP.

3.2. Calibration of the Electrical Resistivity Circuit

Two different types of calibration measurements were performed in order to ensure the correct functioning of the electrical resistivity circuit. First, open and closed contacts were studied under dry conditions. For the closed contact, both static and dynamic conditions were considered. The electrical input and output signals are shown in Figure 4. As outlined in Section 2.5, those signals were used to determine the solid-solid contact ratio by dividing the integral of the output signal over the input signal.
Figure 4a shows input and output signals for an open contact. The input signal is a rectangular signal as outlined in Section 2.5 and [30]. Since the sphere and sample are well separated, the output signal is zero, which is also reflected in the calculated solid–solid contact ratio of 0.44%. In contrast, the static, closed contact in Figure 4b shows an output that exactly follows the input signal. The solid-solid contact ratio is 99.93%. For the closed contact under a very small sliding velocity of 0.013 m/s (Figure 4c), minor fluctuations can be observed in the output signal. These might stem from vibrations in the system. However, the solid–solid contact ratio of 99.80%, which is close to the ideal value of one, indicates that these vibrations do not significantly impact the results and can be neglected.
In addition, the setup was tested under a normal load of 5 N and a rotational velocity of 1200 rpm (sliding velocity of 0.63 m/s). At such high rotational speeds, the oil is pulled out of the tribological contact area over time due to centrifugal forces, meaning that the amount of oil available in the contact area should decrease over time, which can be detected in the electrical output signal [31]. Figure 5 shows the respective temporal evolution of the electrical input and output signals at three different times.
Figure 5a shows the input and output signal at the beginning of the experiment. The output signal is zero for almost the entire measuring time. Consequently, the two bodies are well separated by a stable oil film (cf. [30]). This can be assigned to hydrodynamic lubrication. Since the measurement was taken at the beginning of the experiment, enough lubricant was available in the contact area in order to separate both rubbing surfaces. The output signal also shows some peaks, meaning that some current was transmitted and that the oil film was locally or temporarily interrupted, most probably induced by contacting asperities. However, the solid-solid contact ratio is about 0.86% which is close to the value of zero, reflecting hydrodynamic lubrication. This suggests that irregularities in the surface topography (ball and/or polished reference) do not significantly influence the results of the experiment.
The second measurement (Figure 5b) was taken later in the experiment. The electrical output signal demonstrates major break-ins. The solid–solid contact ratio can be calculated to be about 79.33%. This is typical for mixed lubrication where the load is partly carried by an oil film and surface asperities. This can be mainly traced back to the high rotational speed used, thus pulling the lubricant out of the contact zone due to centrifugal forces and reducing the lubricant available in the contact zone [31].
Finally, the third measurement (Figure 5c) shows an identical electrical input and output signal. When this measurement was taken, the oil was almost completely pulled out of the contact zone. The solid-solid contact ratio of 99.93% goes hand in hand with this observation and underlines that, at this stage, the frictional behavior is mainly influenced by the contacting asperities. These results are in good agreement with results presented in [31].

3.3. Tribological Results

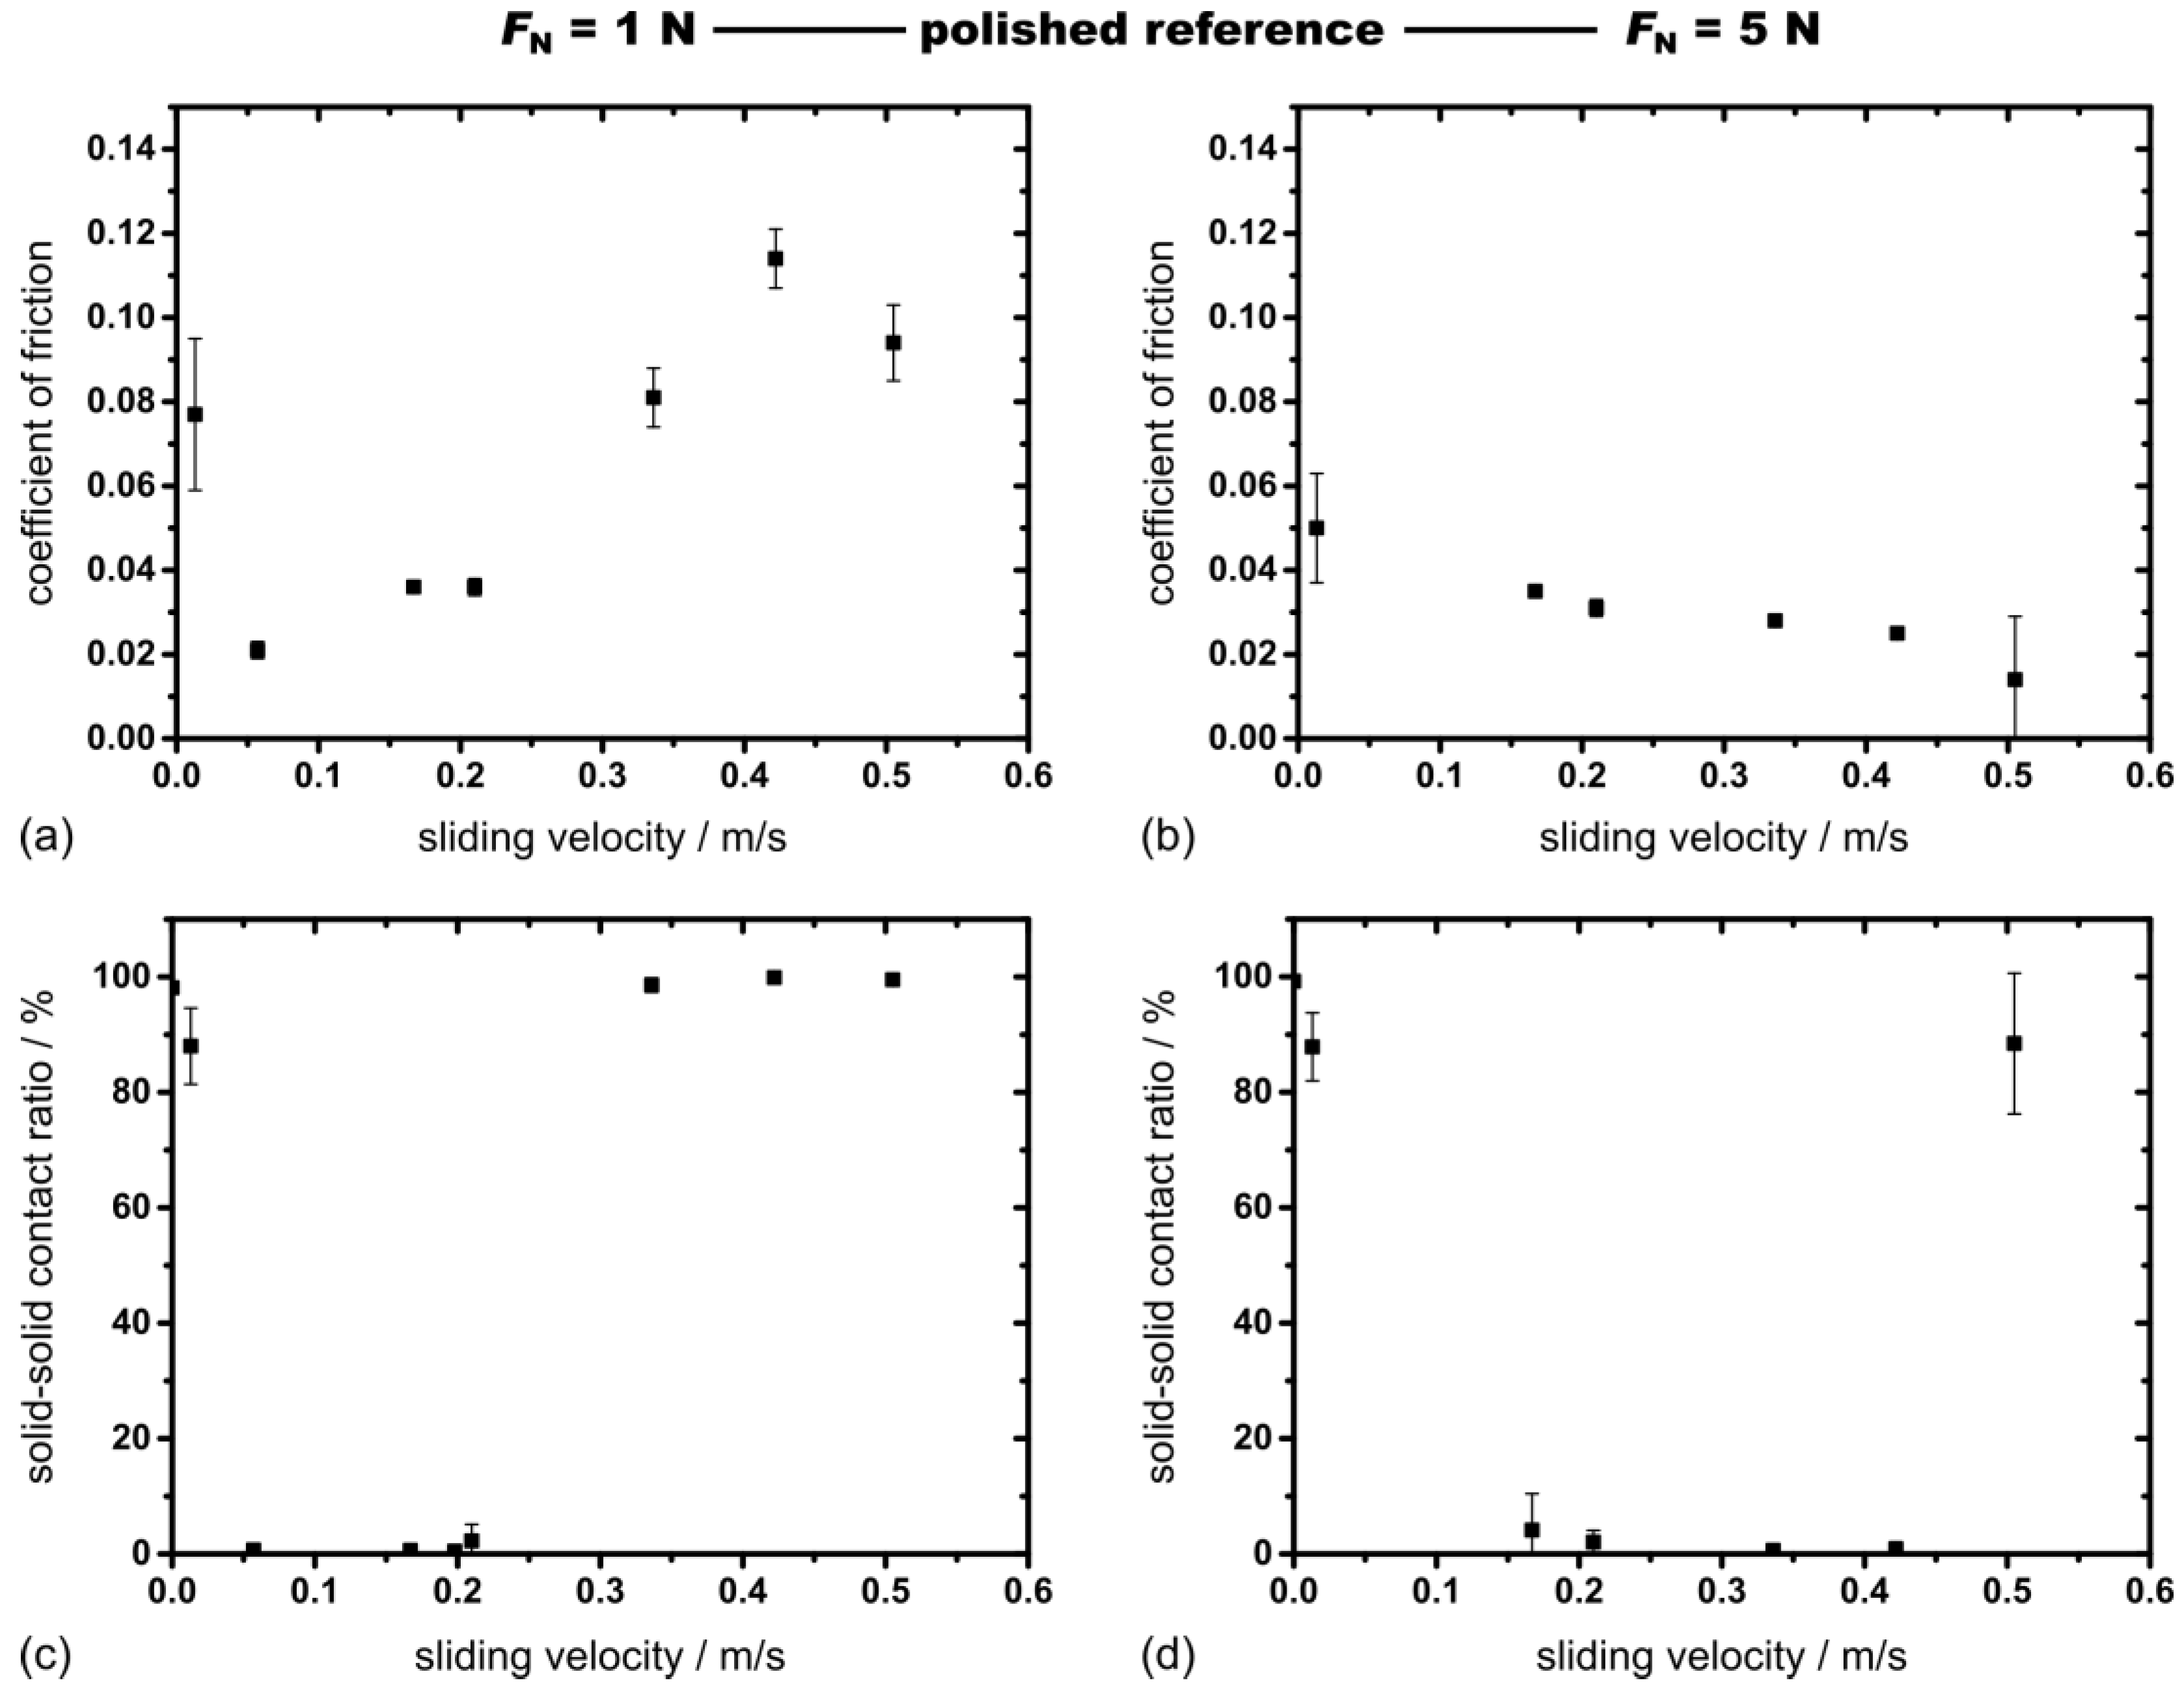
After calibrating the set-up, the COF and the solid-solid contact ratio were simultaneously measured under lubricated conditions for all samples using normal loads of 1 and 5 N at different sliding velocities. Results for the polished reference are presented in Figure 6.
For 1 N, the COF follows a Stribeck-like curve up to a sliding velocity of 0.3 m/s. The COF starts at a higher value for smaller sliding velocities and then decreases to achieve its minimum at a velocity of roughly 0.05 m/s. Afterwards, the COF increases again. This transition is associated with a change in the lubrication regime from mixed to hydrodynamic lubrication. The solid–solid contact ratio, shown below the COF, is in very good agreement with this observation. For the smallest sliding velocity tested, the solid–solid contact ratio is about 88.02%. This correlates well with the increased COF for this sliding velocity and can be associated with mixed lubrication. While the COF reaches its minimum, the solid-solid contact ratio decreases to values close to zero, implying that both bodies are well separated and the system can be characterized as hydrodynamic. For sliding velocities larger than 0.3 m/s, the COF starts to significantly increase. This behavior can be explained by looking at the solid–solid contact ratios. The respective values are close to 100%. For rotational speeds of more than 800 rpm, centrifugal forces are significant, thus pulling the lubricant out of the contact zone. Consequently, there is not enough oil in the contact zone to carry effectively the normal load – although the relative sliding velocities would allow to form those oil films. This also explains the rather large standard deviations of the COF for sliding velocities larger than 0.3 m/s since the frictional performance is more dominated by the contacting asperities.
For 5 N, a comparable behavior can be observed for small sliding velocities. The COF starts at a higher value with a pronounced standard deviation which correlates well with a solid-solid contact ratio of about 84%. Afterwards, the COF slightly decreases with insignificant error bars and solid-solid contact ratios around 0. Solid–solid contact ratios close to zero are observed at larger sliding velocities than under a normal load of 1 N, which can be explained by the Stribeck-parameter that predicts that the transition from mixed to hydrodynamic lubrication is shifted to greater speeds for higher loads. For a sliding velocity of 0.5 m/s, the COF stays rather low but with well pronounced error bars. Taking a closer look at the solid-solid contact ratio reveals a tremendously increased ratio, thus indicating the onset of the effect of the centripetal forces. With a normal load of 5 N, this phenomenon starts at larger velocities than with a normal load of 1 N. This might be due to higher contact pressures for 5 N, thus hindering the oil from leaving the contact zone and therefore, higher centripetal forces are required to pull the oil out of the contact zone.
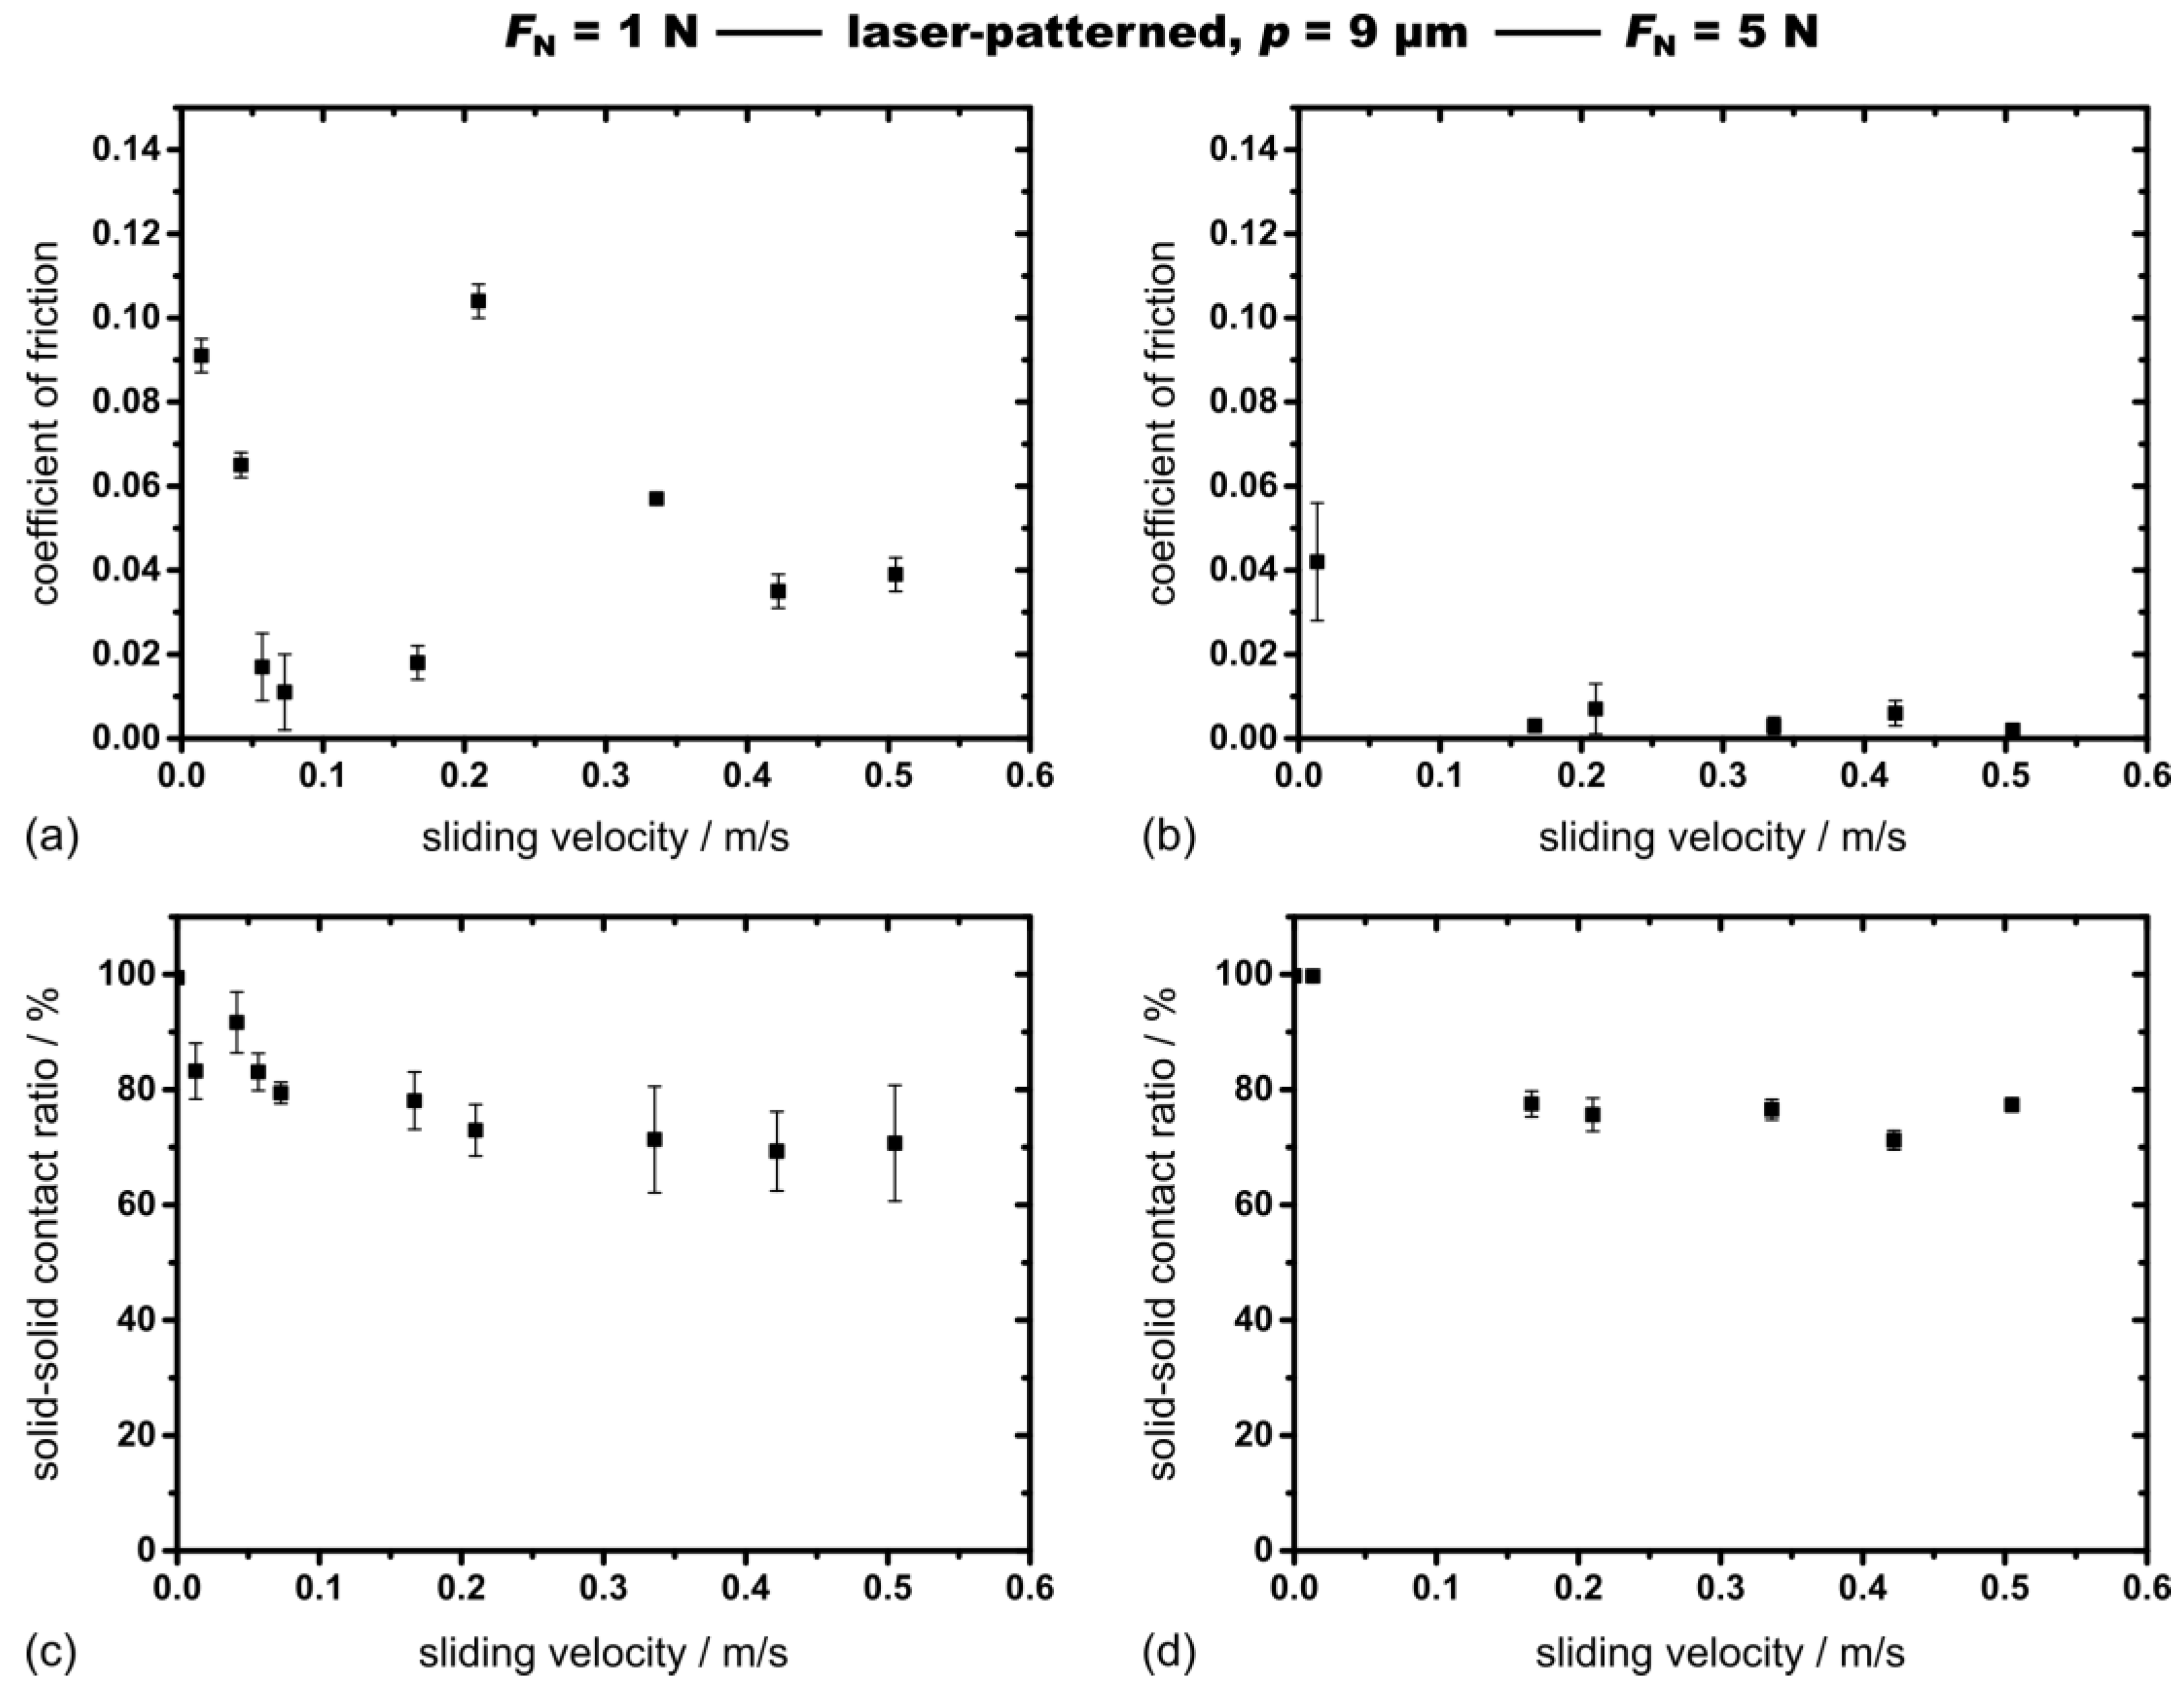
The respective results for the laser-patterned sample with a periodicity of 9 µm are shown in Figure 7.
For 1 N, a Stribeck-like behavior can be observed for sliding velocities smaller than 0.2 m/s. The COF starts at 0.091, drops down and finally increases again. For a sliding velocity of 0.210 m/s, the highest COF of 0.104 can be found followed by a decreased COF for higher velocities. The solid-solid contact ratio shows values between 70% and 80% (considering the respective standard deviations) irrespective of the sliding velocity adjusted, which can be well correlated with mixed lubrication. The introduction of a line-like surface topography significantly changes the ratio of the oil film thickness and combined surface roughness (λ-parameter). The surface pattern increases the combined surface roughness, thus shifting the λ-parameter to smaller values, which implies a change in the lubrication regime. In addition, the line-like surface profile leads to an increase in the contact pressure, thus increasing the asperity contact and making a complete separation of both rubbing surface less likely.
Under a normal load of 5 N, a completely different behavior can be observed. For the lowest sliding velocity, the highest COF of about 0.042 was measured. Afterwards, the COF drops down and remains fairly low for all sliding velocities. The COF is generally lower than the one obtained with the smaller normal load of 1 N. Given the very low COF, it is interesting that the solid-solid contact ratio mainly lies between 71% and 78%, matching quite well with the aforementioned results for 1 N. Those values can be again associated with mixed lubrication.
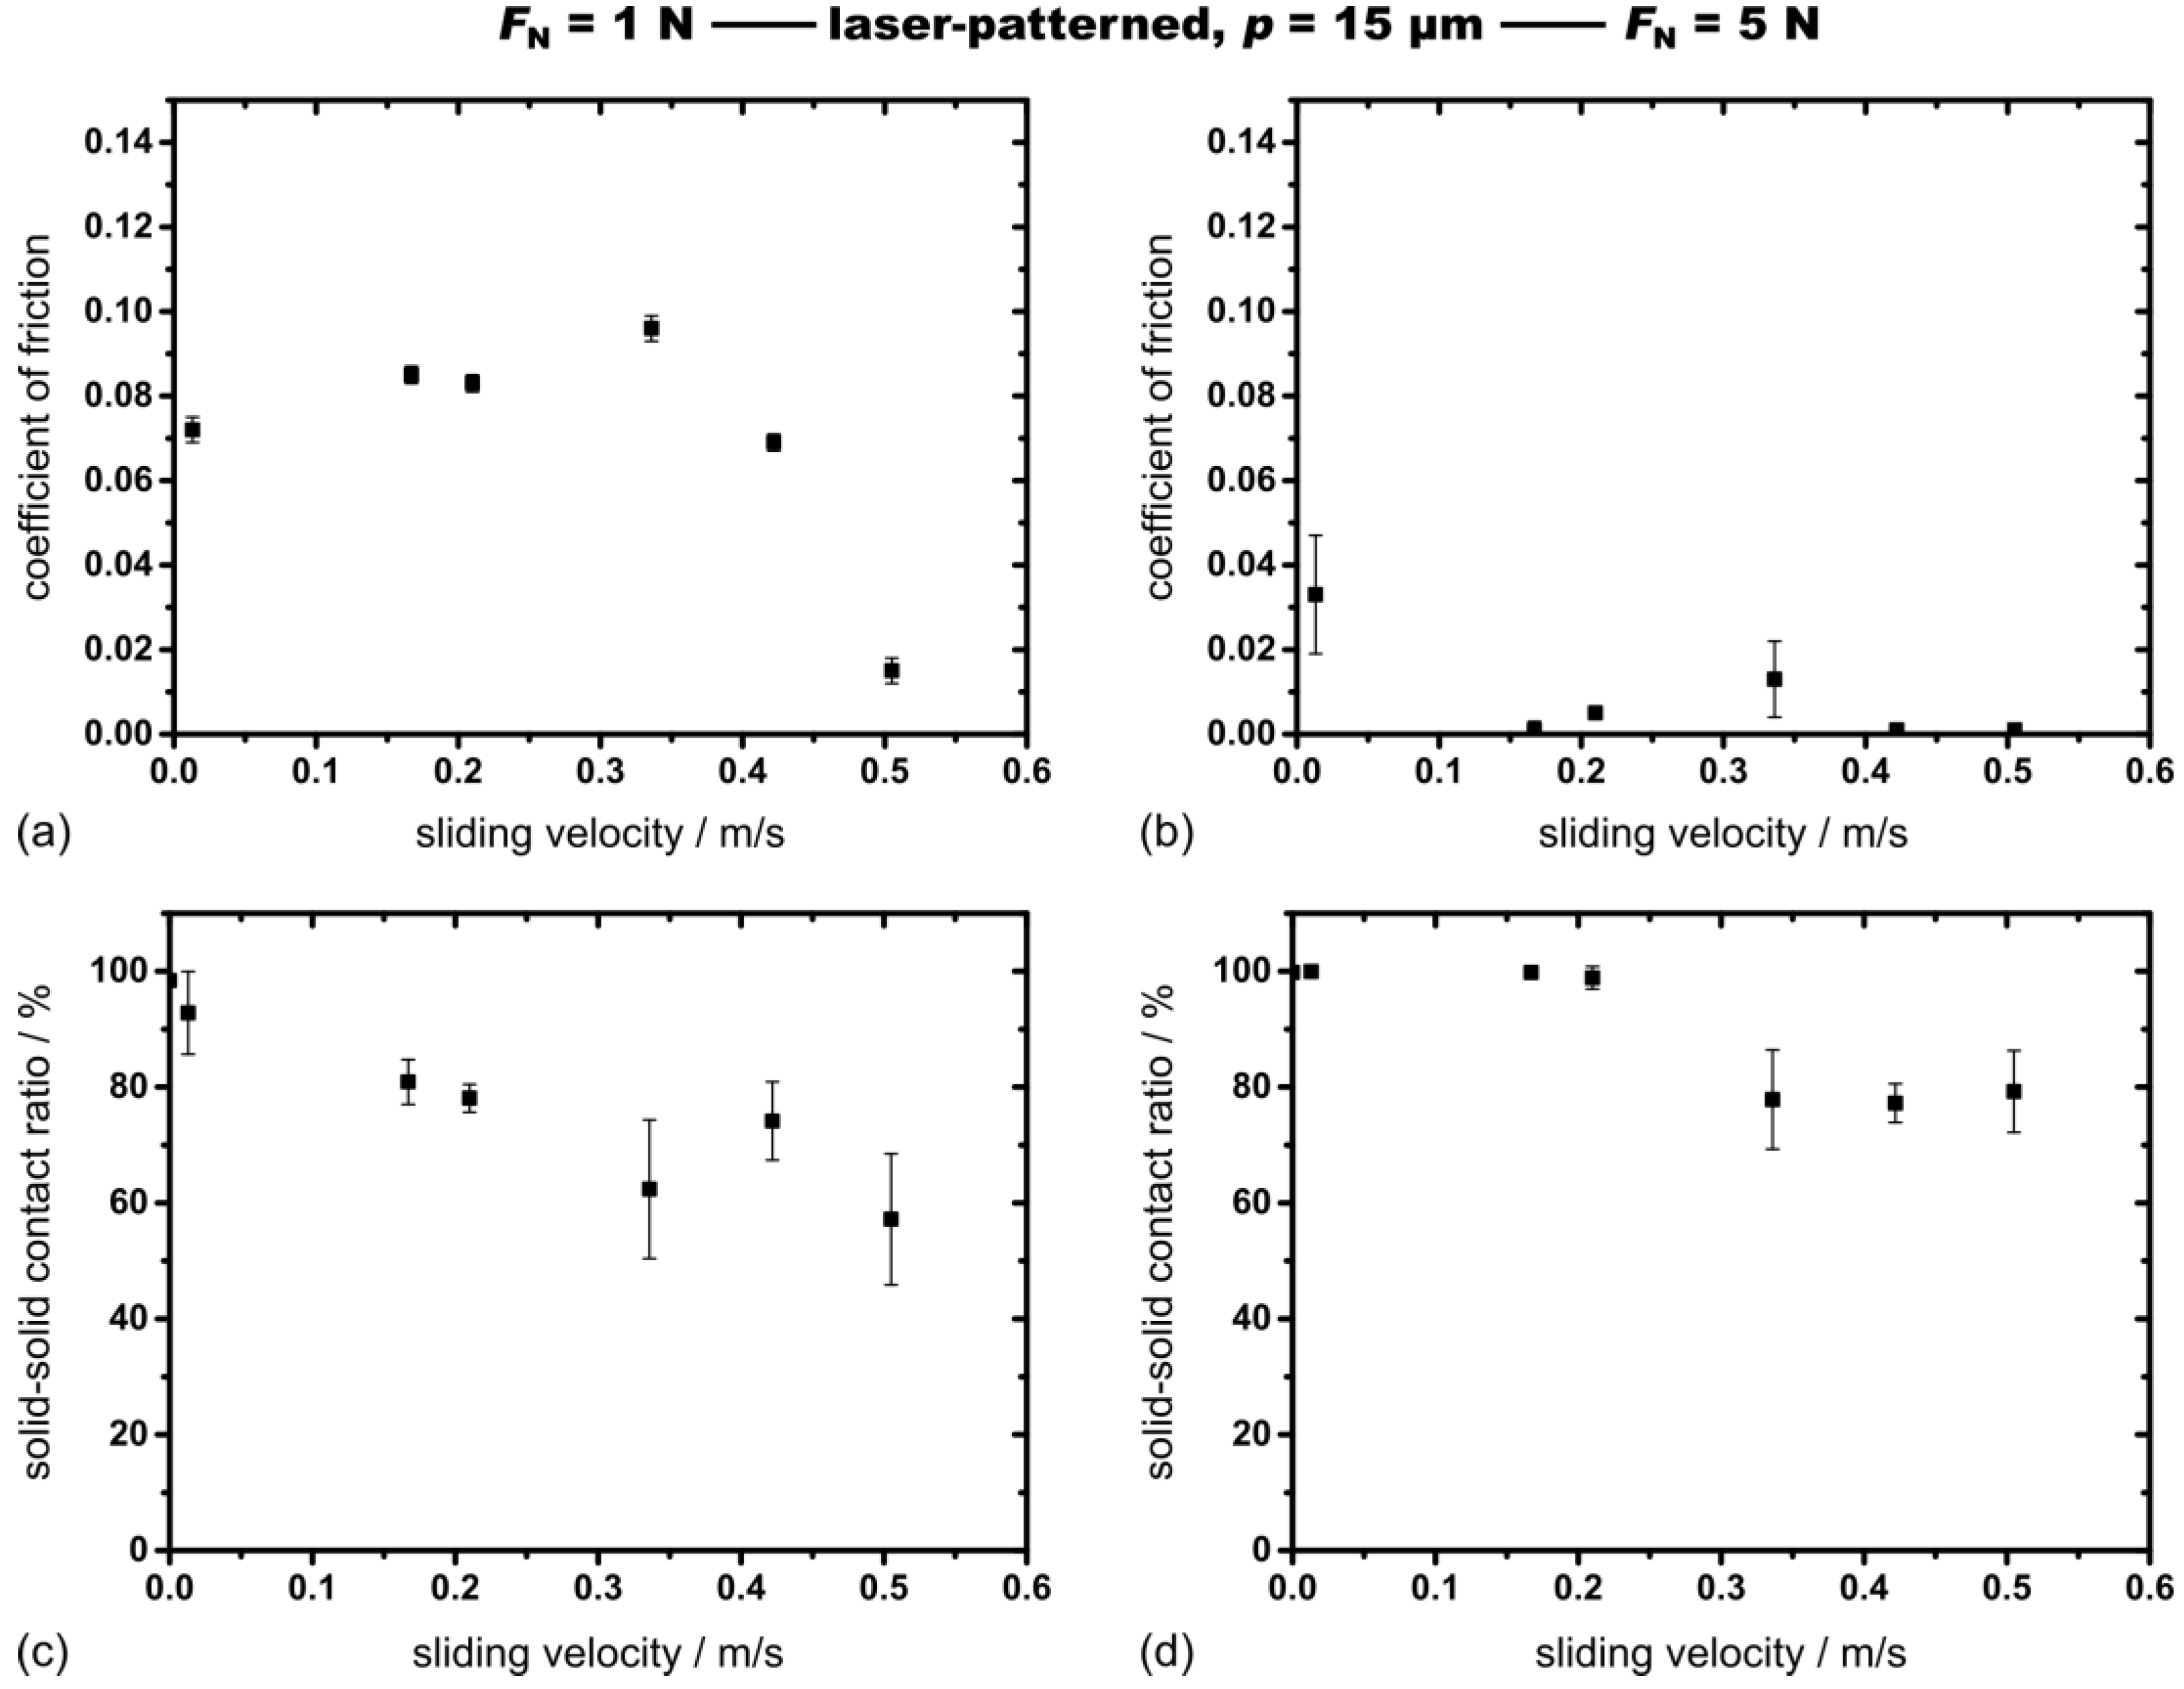
The corresponding results for the laser-patterned sample with a periodicity of 15 µm are displayed in Figure 8.
For 1 N, the COF is about 0.07 for a sliding velocity of 0.013 m/s. The COF remains relatively high and above 0.069 for speeds up to 0.42 m/s before dropping to 0.015 for a velocity of 0.50 m/s. Meanwhile, the ratio of solid–solid contact drops down to values of as low as 57.19%. It is worth mentioning that all solid–solid contact ratios can be well associated with mixed lubrication. The error bars for the COF are fairly small while the error bars of the solid–solid contact ratio tend to increase for sliding velocities larger than 0.33 m/s.
Under a normal load of 5 N, the COF is initially high with a value of 0.033 for a sliding velocity of 0.013 m/s and then decreases to values around 0.01 for higher sliding velocities. The solid-solid contact ratio is close to 100% for sliding velocities of up to 0.210 m/s and then decreases to values between 77% and 80% (mixed lubrication). The fact of having a high solid–solid contact ratio while the COF drops from 0.033 to very small values seems to be contradictory. The disagreement between the observation in the COF and the solid–solid contact ratio can be explained by very thin oil films forming on top of the topographic peaks of the laser-patterned sample. If the oil film is thin enough that current could flow through the oil film, the ratio of solid-solid contact would still be close to 100%. However, the COF could be at the same time low as expected for mixed lubrication.

4. Discussion

A comparison between the frictional behavior of the polished reference and the laser-patterned samples shall be drawn. The lowest COF measured for the polished reference is about 0.021 and 0.014 under normal loads of 1 N and 5 N, respectively. However, for the laser-patterned samples, the COF is as low as 0.011 (periodicity of 9 µm) and 0.015 (periodicity of 15 µm) under a normal load of 1 N and as low as 0.002 (periodicity of 9 µm) and 0.001 (periodicity of 15 µm) under 5 N.
Considering the polished reference, a Stribeck-like curve can be observed. The COF decreases from an initially high value to smaller values being associated with mixed and hydrodynamic lubrication. Simultaneously measuring the solid–solid contact ratios helps to understand the evolution of the COF and to correlate them with the respective lubrication regime. Thereby, the solid–solid contact ratio tends to be high for low sliding velocities, which can be correlated with mixed lubrication. A drop in the solid–solid contact ratio represents the transition from mixed to hydrodynamic lubrication, which goes hand in hand with lower values of the COF. Due to centrifugal forces that pull the oil out of the contact zone, the solid–solid contact ratios and therefore also the COF increase for higher sliding velocities. This behavior is observed for lower sliding velocities at a normal force of 1 N compared to 5 N, which can be traced back to higher contact pressures that keep the oil in the contact zone. In contrast to that, the laser-patterned samples do not reach hydrodynamic lubrication and remain in the mixed regime for all sliding velocities tested, which is clearly indicated by the solid-solid contact ratios of about 70 to 80%. The lower COF but higher solid–solid contact ratio seem to contradict each other, but the paradox can be solved by looking at the surface topography created by the DLIP. The increased solid-solid contact ratio correlates well with a reduced λ-parameter induced by the respective surface topography. Another contribution to the increased contact ratio is the structural depth of the samples, thus increasing the contact pressure due to a reduced real contact area. Such a reduction in the real contact area has already been observed previously with laser-patterned surfaces [12,13,36]. A stable oil film, that would be needed to run in hydrodynamic lubrication, cannot be formed. On the other hand, the produced surface topography allows for the storage of wear particles, if generated, and a significant reduction of the contact area. Both factors account for the lower COF. Those conclusions are supported by other research work published [7,20,21].
Additionally, the tribological setup leads to centrifugal forces acting on the lubricant. The lubricant can therefore be pulled out of the contact zone. This behavior is indeed observed for the polished reference at speeds above 0.336 m/s under a normal load of 1 N and 0.505 m/s under 5 N. The laser-patterned samples again show a different behavior. The repeating pattern of valleys and hills acts as a barrier and hinders the oil from leaving the contact zone.

5. Conclusions

In this study, a ball-on-disc tribometer combined with an electrical resistivity circuit was used to simultaneously measure Stribeck-like curves and the solid-solid contact ratio of polished reference samples and laser-patterned line-like surface topographies. In terms of the methodology and experimental setup, the results emphasize that only looking at either the COF or the solid-solid contact ratio can be misleading when identifying lubrication regimes and the underlying principles of friction reduction for laser-patterned surfaces. Instead, the combination of both parameters allows for a better understanding of the frictional performance of laser-patterned surfaces.
Concerning the frictional performance, the polished reference shows a Stribeck-like behavior, which can be well correlated with the measured solid-solid contact ratios. The behavior deviates for high sliding velocities where high solid-solid contact ratios are observed. This can be explained by induced centrifugal forces which pull the lubricant out of the contact zone, thus leading to oil starvation which in turn results in an increased COF and solid-solid contact ratio. In contrast to that, the frictional behavior of the laser-patterned surface shows a completely different behavior. The solid-solid contact ratio of the laser-patterned samples is typically in a range between 70% and 80% irrespective of the sliding velocity adjusted. The rather high solid-solid contact ratio can be explained by a shifted λ-parameter and the higher contact pressure induced by the overall surface topography and the structural depth of 1 µm, which make a full separation of the sliding surfaces unlikely. Despite those high values for the solid-solid contact ratio, the laser-patterning significantly reduces the COF, which can be especially seen for the higher normal load of 5 N and lower sliding velocities. This can be traced back to a reduced real contact area and the ability to store oil in the contact zone due to the surface topography.

Acknowledgments

Andreas Rosenkranz kindly acknowledges the Feodor Lynen Fellowship of the Alexander von Humboldt foundation.

Author Contributions

Simon Bettscheider and Andreas Rosenkranz designed the experiments; Simon Bettscheider performed the experiments; Simon Bettscheider, Philipp G. Grützmacher and Andreas Rosenkranz analyzed the data and discussed the results; Simon Bettscheider, Philipp G. Grützmacher and Andreas Rosenkranz wrote the manuscript.

Conflicts of Interest

The authors declare no conflict of interest. The founding sponsors had no role in the design of the study, the analysis and interpretation of the data. The founding sponsors did not influence the decision to publish the data.

References

  1. Carpick, R.W.; Jackson, A.; Sawyer, W.G.; Argibay, N.; Lee, P.; Pachon, A.; Gresham, R.M. The tribology opportunities study: Can tribology save a quad? Tribol. Lubr. Technol. 2016, 72, 44–45. [Google Scholar]
  2. Greco, A.; Sheng, S.; Keller, J.; Erdemir, A. Material wear and fatigue in wind turbine systems. Wear 2013, 302, 1583–1591. [Google Scholar] [CrossRef]
  3. Wong, V.W.; Tung, S.C. Overview of automotive engine friction and reduction trends–Effects of surface, material, and lubricant-additive technologies. Friction 2016, 4, 1–28. [Google Scholar] [CrossRef]
  4. Holmberg, K.; Andersson, P.; Erdemir, A. Global energy consumption due to friction in passenger cars. Tribol. Int. 2012, 47, 221–234. [Google Scholar] [CrossRef]
  5. Holmberg, K.; Kivikytö-Reponen, P.; Härkisaari, P.; Valtonen, K.; Erdemir, A. Global energy consumption due to friction and wear in the mining industry. Tribol. Int. 2017, 115, 116–139. [Google Scholar] [CrossRef]
  6. Etsion, I. State of the art in laser surface texturing. J. Tribol. 2005, 127, 248–253. [Google Scholar] [CrossRef]
  7. Gachot, C.; Rosenkranz, A.; Hsu, S.M.; Costa, H.L. A critical assessment of surface texturing for friction and wear improvement. Wear 2017, 372, 21–41. [Google Scholar] [CrossRef]
  8. Gropper, D.; Wang, L.; Harvey, T.J. Hydrodynamic lubrication of textured surfaces: A review of modeling techniques and key findings. Tribol. Int. 2016, 94, 509–529. [Google Scholar] [CrossRef]
  9. Szurdak, A.; Hirt, G. Development and Experimental Verification of a New Roller-Coining Setup to Texture Flat and Curved Surfaces. Appl. Mech. Mater. 2015, 794, 128–135. [Google Scholar] [CrossRef]
  10. Wei, X.; Li, W.; Liang, B.; Li, B.; Zhang, J.; Zhang, L.; Wang, Z. Surface modification of Co–Cr–Mo implant alloy by laser interference lithography. Tribol. Int. 2016, 97, 212–217. [Google Scholar] [CrossRef]
  11. Zhang, B.; Huang, W.; Wang, J.; Wang, X. Comparison of the effects of surface texture on the surfaces of steel and UHMWPE. Tribol. Int. 2013, 65, 138–145. [Google Scholar] [CrossRef]
  12. Gachot, C.; Rosenkranz, A.; Reinert, L.; Ramos-Moore, E.; Souza, N.; Müser, M.H.; Mücklich, F. Dry friction between laser-patterned surfaces: Role of alignment, structural wavelength and surface chemistry. Tribol. Lett. 2013, 49, 193–202. [Google Scholar] [CrossRef]
  13. Rosenkranz, A.; Reinert, L.; Gachot, C.; Mücklich, F. Alignment and wear debris effects between laser-patterned steel surfaces under dry sliding conditions. Wear 2014, 318, 49–61. [Google Scholar] [CrossRef]
  14. Prodanov, N.; Gachot, C.; Rosenkranz, A.; Mücklich, F.; Müser, M.H. Contact mechanics of laser-textured surfaces. Tribol. Lett. 2013, 50, 41–48. [Google Scholar] [CrossRef]
  15. Rosenkranz, A.; Hans, M.; Gachot, C.; Thome, A.; Bonk, S.; Mücklich, F. Direct laser interference patterning: Tailoring of contact area for frictional and antibacterial properties. Lubricants 2016, 4, 2. [Google Scholar] [CrossRef]
  16. Trinh, K.E.; Tsipenyuk, A.; Varenberg, M.; Rosenkranz, A.; Souza, N.; Mücklich, F. Wear debris and electrical resistance in textured Sn-coated Cu contacts subjected to fretting. Wear 2015, 344, 86–98. [Google Scholar] [CrossRef]
  17. Rosenkranz, A.; Pangraz, J.C.; Gachot, C.; Mücklich, F. Load-dependent run-in and wear behaviour of line-like surface patterns produced by direct laser interference patterning. Wear 2016, 368, 350–357. [Google Scholar] [CrossRef]
  18. Xing, Y.; Deng, J.; Feng, X.; Yu, S. Effect of laser surface texturing on Si3N4/TiC ceramic sliding against steel under dry friction. Mater. Des. 2013, 52, 234–245. [Google Scholar] [CrossRef]
  19. He, D.; Zheng, S.; Pu, J.; Zhang, G.; Hu, L. Improving tribological properties of titanium alloys by combining laser surface texturing and diamond-like carbon film. Tribol. Int. 2015, 82, 20–27. [Google Scholar] [CrossRef]
  20. Rosenkranz, A.; Heib, T.; Gachot, C.; Mücklich, F. Oil film lifetime and wear particle analysis of laser-patterned stainless steel surfaces. Wear 2015, 334, 1–12. [Google Scholar] [CrossRef]
  21. Rosenkranz, A.; Szurdak, A.; Gachot, C.; Hirt, G.; Mücklich, F. Friction reduction under mixed and full film EHL induced by hot micro-coined surface patterns. Tribol. Int. 2016, 95, 290–297. [Google Scholar] [CrossRef]
  22. Braun, D.; Greiner, C.; Schneider, J.; Gumbsch, P. Efficiency of laser surface texturing in the reduction of friction under mixed lubrication. Tribol. Int. 2014, 77, 142–147. [Google Scholar] [CrossRef]
  23. Ramesh, A.; Akram, W.; Mishra, S.P.; Cannon, A.H.; Polycarpou, A.A.; King, W.P. Friction characteristics of microtextured surfaces under mixed and hydrodynamic lubrication. Tribol. Int. 2013, 57, 170–176. [Google Scholar] [CrossRef]
  24. Zhang, H.; Zhang, D.Y.; Hua, M.; Dong, G.N.; Chin, K.S. A study on the tribological behavior of surface texturing on babbitt alloy under mixed or starved lubrication. Tribol. Lett. 2014, 56, 305–315. [Google Scholar] [CrossRef]
  25. Costa, H.L.; Hutchings, I.M. Hydrodynamic lubrication of textured steel surfaces under reciprocating sliding conditions. Tribol. Int. 2007, 40, 1227–1238. [Google Scholar] [CrossRef]
  26. Fowell, M.T.; Medina, S.; Olver, A.V.; Spikes, H.A.; Pegg, I.G. Parametric study of texturing in convergent bearings. Tribol. Int. 2012, 52, 7–16. [Google Scholar] [CrossRef]
  27. Kovalchenko, A.; Ajayi, O.; Erdemir, A.; Fenske, G.; Etsion, I. The effect of laser surface texturing on transitions in lubrication regimes during unidirectional sliding contact. Tribol. Int. 2005, 38, 219–225. [Google Scholar] [CrossRef]
  28. Kovalchenko, A.; Ajayi, O.; Erdemir, A.; Fenske, G.; Etsion, I. The effect of laser texturing of steel surfaces and speed-load parameters on the transition of lubrication regime from boundary to hydrodynamic. Tribol. Trans. 2004, 47, 299–307. [Google Scholar] [CrossRef]
  29. Nakatsuji, T.; Mori, A. The tribological effect of mechanically produced micro-dents by a micro diamond pyramid on medium carbon steel surfaces in rolling-sliding contact. Meccanica 2001, 36, 663–674. [Google Scholar] [CrossRef]
  30. Rosenkranz, A.; Martin, B.; Bettscheider, S.; Gachot, C.; Kliem, H.; Mücklich, F. Correlation between solid-solid contact ratios and lubrication regimes measured by a refined electrical resistivity circuit. Wear 2014, 320, 51–61. [Google Scholar] [CrossRef]
  31. Grützmacher, P.G.; Rosenkranz, A.; Rammacher, S.; Gachot, C.; Mücklich, F. The influence of centrifugal forces on friction and wear in rotational sliding. Tribol. Int. 2017, 116, 256–263. [Google Scholar] [CrossRef]
  32. Rosenkranz, A.; Fleischmann, S.; Gachot, C.; Mücklich, F. Anisotropic Spreading Behavior of PAO Oil on Laser-Patterned Stainless Steel Surfaces. Adv. Eng. Mater. 2015, 17, 1645–1651. [Google Scholar] [CrossRef]
  33. Mücklich, F.; Lasagni, A.F.; Daniel, C. Laser interference metallurgy—Using interference as a tool for micro/nano structuring. Int. J. Mater. Res. 2006, 97, 1337–1344. [Google Scholar] [CrossRef]
  34. Lasagni, A.F.; Holzapfel, C.; Weirich, T.; Mücklich, F. Laser interference metallurgy: A new method for periodic surface microstructure design on multilayered metallic thin films. Appl. Surf. Sci. 2007, 253, 8070–8074. [Google Scholar] [CrossRef]
  35. Lasagni, A.F.; D’Alessandria, M.; Giovanelli, R.; Mücklich, F. Advanced design of periodical architectures in bulk metals by means of Laser Interference Metallurgy. Appl. Surf. Sci. 2007, 254, 930–936. [Google Scholar] [CrossRef]
  36. Bettscheider, S.; Gachot, C.; Rosenkranz, A. How to measure the real contact area? A simple marker and relocation foot-printing approach. Tribol. Int. 2016, 103, 167–175. [Google Scholar] [CrossRef]
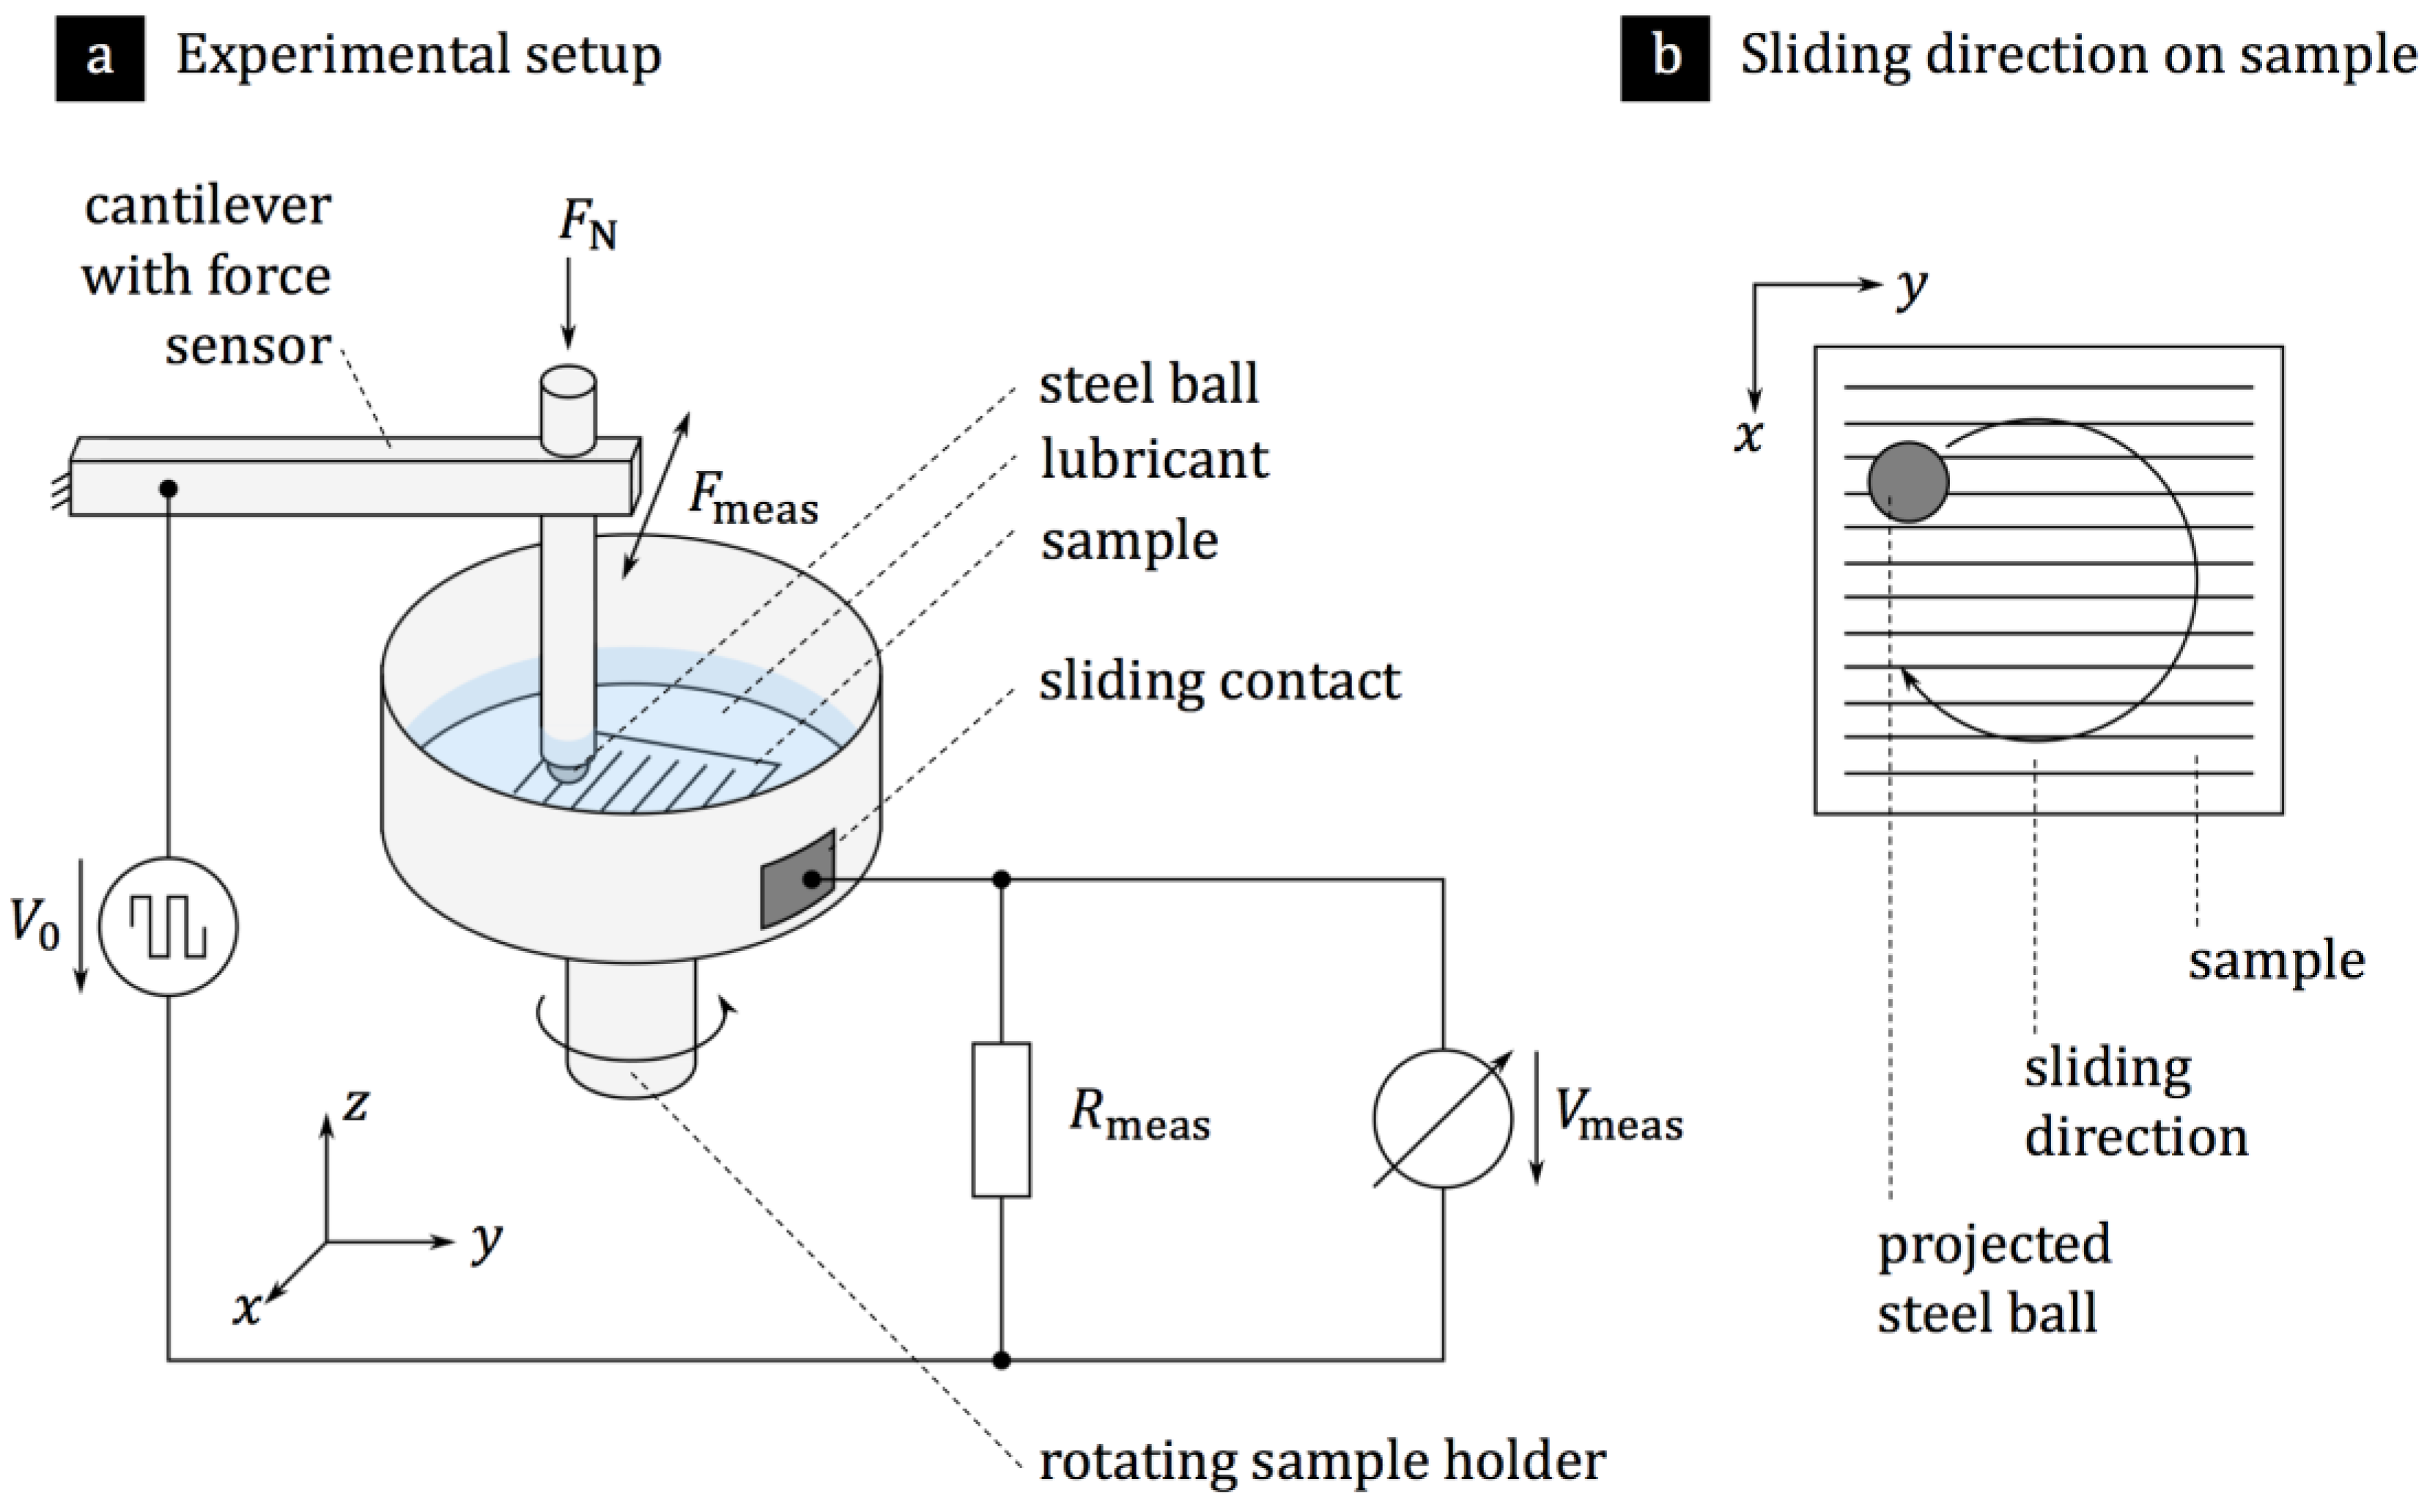
Figure 1. (a) Experimental setup combining the ball-on-disk tribometer and the electrical resistivity circuit in order to measure the COF and the solid-solid contact ratio simultaneously; (b) The sliding direction continuously changes with respect to the orientation of the line-like surface pattern due to the rotational sliding mode adjusted.
Lubricants 05 00035 g001
Figure 2. Topographic images acquired by WLI of the polished reference (a) and both laser-patterned samples (b,c) as well as corresponding surface profiles along the black line (df). Please note that the color scale differs for the polished reference and the laser-patterned samples in the WLI images (ac). Colored version online.
Lubricants 05 00035 g002
Figure 3. Root mean square roughness and structural depth for the polished reference and the laser-patterned samples with a periodicity of 9 and 15 µm. Error bars show the standard deviation.
Lubricants 05 00035 g003
Figure 4. Electrical input and output signals for the polished reference under dry conditions. (a) Open contact; (b) closed and static contact under a normal load of 1 N; (c) closed contact under a normal load of 1 N and a sliding velocity of 0.013 m/s. The calculated solid-solid contact ratio r ssc , which is the ratio of the time integrals of output and input signals, is given on top of each graph. Colored version online.
Lubricants 05 00035 g004
Figure 5. Electrical input and output signals at different times (ac) of the polished reference under a normal load of 5 N and a sliding velocity of 0.63 m/s. The calculated solid-solid contact ratio r ssc is given on top of each graph. Colored version online.
Lubricants 05 00035 g005
Figure 6. COF (a,b) and solid-solid contact ratio (c,d) versus sliding velocity for the polished reference under a normal load of 1 (a,c) and 5 N (b,d). Error bars show the respective standard deviation.
Lubricants 05 00035 g006
Figure 7. COF (a,b) and solid-solid contact ratio (c,d) versus sliding velocity for the laser-patterned sample with a periodicity of 9 µm under a normal load of 1 (a,c) and 5 N (b,d). Error bars show the standard deviation.
Lubricants 05 00035 g007
Figure 8. COF (a,b) and solid-solid contact ratio (c,d) versus sliding velocity for the laser-patterned sample with a periodicity of 15 µm under a normal load of 1 (a,c) and 5 N (b,d). Error bars show the standard deviation.
Lubricants 05 00035 g008
Table 1. Chemical composition of the used substrate and counter body in wt % as specified by the suppliers.
Used Steel SpecimensFeCrNiMnSiC
Substrate (AISI 304)68.91810210.1
Ball (AISI 52100)96.71.5/0.40.31
Table 2. Summary of experimental conditions.
ParameterUnitValues
Periodicity of laser-patterned samplesµm9 and 15
Sliding velocitiesm/s0 to 0.505
Normal loadsN1 and 5
Kinematic oil viscosity at 100 °CcSt39.6
Oil volumemL7
Temperature°C25 ± 1
Relative humidity%45 ± 1
Table 3. Roughness parameters and their standard deviations for the steel ball, the polished reference and the laser-patterned samples measured by WLI, with R q being the root mean square roughness, D s the structural depth, and P the periodicity of the line-like surface pattern.
Sample R q /µm D s /µm P /µm
Steel ball0.020 ± 0.003
Polished reference0.040 ± 0.0050.03 ± 0.003
Laser-patterned, 9 µm0.477 ± 0.0571.298 ± 0.0339.5 ± 0.507
Laser-patterned, 15 µm0.467 ± 0.0541.196 ± 0.16215.5 ± 0.532