Abstract
In addition to the bulk properties of a workpiece material, characteristics of the tribofilms formed as a result of workpiece material mass transfer to the friction surface play a significant role in friction control. This is especially true in cutting of hardened materials, where it is very difficult to use liquid based lubricants. To better understand wear performance and the formation of beneficial tribofilms, this study presents an assessment of uncoated mixed alumina ceramic tools (Al2O3+TiC) in the turning of two grades of steel, AISI T1 and AISI D2. Both workpiece materials were hardened to 59 HRC then machined under identical cutting conditions. Comprehensive characterization of the resulting wear patterns and the tribofilms formed at the tool/workpiece interface were made using X-ray Photoelectron Spectroscopy and Scanning Electron Microscopy. Metallographic studies on the workpiece material were performed before the machining process and the surface integrity of the machined part was investigated after machining. Tool life was 23% higher when turning D2 than T1. This improvement in cutting tool life and wear behaviour was attributed to a difference in: (1) tribofilm generation on the friction surface and (2) the amount and distribution of carbide phases in the workpiece materials. The results show that wear performance depends both on properties of the workpiece material and characteristics of the tribofilms formed on the friction surface.
1. Introduction
Dry machining has been gaining some traction among manufacturers nowadays, as industry recognizes its benefits over conventional wet machining, such as eliminating costs and health/environmental risks associated with coolant, and reducing thermal shock in interrupted cutting operations [1,2,3]. As such, the technique has also been increasingly applied to hard materials (typically in the range of 58 to 68 HRC) and is even replacing conventional grinding processes in some instances, due to reduced machining costs, as well as improved surface integrity [4,5]. However, the application of dry high speed machining of hard materials introduces the problems of harsh tribological conditions at the tool-chip interface and excessive tool wear. Indeed, most limitations and drawbacks to hard machining relate to the high rates of tool wear, e.g., tooling cost per unit is significantly higher than in grinding, the surface finish of machined parts can deteriorate even within tool life [4], and “white layer” formation is prominent [6,7].
Under extreme tribological conditions, cutting tools must simultaneously withstand high temperatures, easily above 700 °C, and even 1000 °C in some cases, and heavy mechanical loads, around 1–3 GPa [4,8,9]. Cutting tools for hard turning typically employ negative rake angles to ensure adequate strength at the tool tip; although this adversely intensifies the sticking zone and heat generation. Similarly, relatively light feed rates and depths of cut are employed to prevent immediate fracture of the cutting edge. Of the range of cutting tool materials available, ceramics (based on alumina (Al2O3) or silicon nitride (Si3N4)) and polycrystalline cubic boron nitride (PcBN) are most widely used for hard and high-speed machining in industry [4,10]. Compared to ceramic inserts, PcBN inserts cost more and are primarily used in finish hard turning [11,12]. Although pure alumina possesses relatively low thermal shock resistance and toughness [13], improvement in its physical properties can be realized by additives, such as ZrO2, SiC, TiC and TiCN [14,15].
Tribofilms are dynamic structures, forming as a result of self-adaptive behaviour at the frictional interface. Most of them can favorably alter or benefit the friction and wear process, particularly under heavy load and high temperature conditions; while some of them may be non-beneficial [16]. Various tribofilms formed by tool surface modification with further tribo-oxidation during the cutting process have been found to date: Franz et al. reviewed vanadium containing self-adaptive hard coatings for high-temperature applications [17] and Fox-Rabinovich et al. investigated hierarchical adaptive nanostructured PVD coatings for extreme tribological applications. Recently, the generation of tribofilms due to workpiece material transfer during tool/chip interaction was reported [18].
Most previous studies on the formation of tribofilms were focused on medium hardness workpiece materials, such as hot work tool steel AISI H13 (50-53HRC) [19,20,21], cold work steel AISI D2 (52HRC) [22] and high speed steel (HSS) AISI T15 (52HRC) [23]. However, very few studies have discussed tribofilm formation during machining of harder materials (57 HRC and above).
When using small depth of cut and feed rate, the material removal rate (MRR) is so small that ploughing may dominate over cutting and result in unpredictable surface quality and tool wear. Additionally, the low MRR is not practical for industry. Cutting under more aggressive conditions is possible, as demonstrated by Arsecularatne [24], who investigated variations of cutting speed and feed rate in turning hardened AISI D2 steel of 62 HRC with PCBN tools. Combinations of cutting speed ranging from 70–120 m/min and feed rate in the range of 0.08–0.20 mm/rev were all found to be feasible.
2. Experimental Work
This study aims to explore the process of tribofilm generation arising from workpiece material transfer, primarily in machining of hardened steel but also supplemented by testing on a heavy-load, high-temperature tribometre. Two grades of hardened steel, possessing significant differences in alloying content but nearly identical hardness, were utilized in order to study the factors determining tool wear and tool life.
2.1. Workpiece Material
AISI T1 high tungsten HSS and AISI D2 high chromium cold work tool steel were selected as workpiece materials and hardened to 59.0 HRC and 58.7 HRC, respectively. The chemical composition of both steels is shown in Table 1, while the heat treatments applied to each of the annealed workpieces is presented in Table 2. Figure 1 shows the microstructure of both workpiece materials after heat treatment. Compared to T1, the D2 workpiece is seen to feature less of the carbide phase, in agreement with [25], which is present in smaller and more evenly distributed particles.

Table 1.
Chemical composition of workpiece materials.

Table 2.
Heat treatment processes applied to workpiece materials.
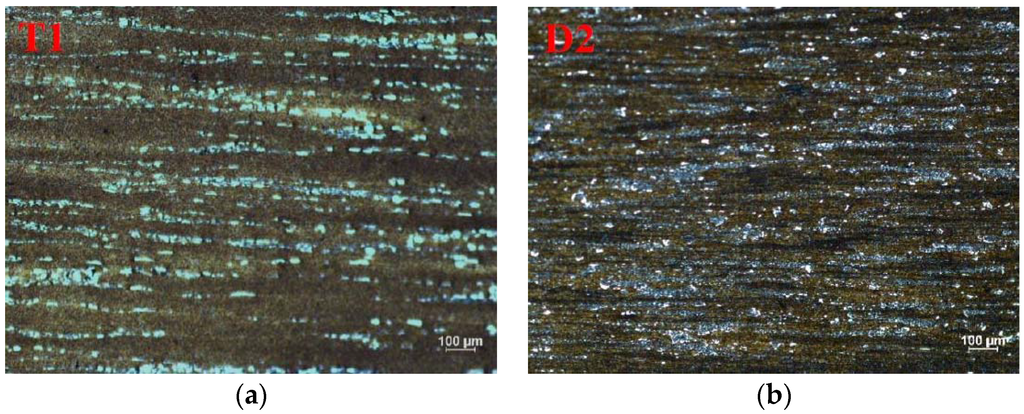
Figure 1.
Metallography of hardened workpiece materials: (a) AISI T1; (b) AISI D2.
2.2. Cutting Tool and Turning Tests
Turning tests were performed using Sumitomo CNGA432NB90S (Al2O3+TiN) mixed alumina inserts held in a KenclampTM DCLNL166DKC4 tool holder (see Table 3 for details). All tests were conducted under a constant cutting speed v = 100 m/min, feed rate f = 0.075 mm/rev and depth of cut DOC = 0.10 mm, without coolant. Prior to each cutting pass, the workpiece was pre-machined using a separate insert at a lower cutting speed (v = 30 m/min) and higher depth of cut (DOC = 1 mm) to remove any work hardened layer from the previous pass.

Table 3.
Material properties and geometry of the cutting inserts and tool holder.
Tool life tests were carried out on an Okuma Crown L1060 CNC lathe, removing the inserts after each pass for inspection of flank wear land width (Vb) using a Mitutoyo TM microscope. Chips were collected after the first few passes, and tool life was quantified as the accumulated length of cut upon reaching Vb = 300 µm.
Cutting force measurements were acquired for three successive passes, with intermittent cleaning passes, as described above, on a Nakamura-Tome SC-450 CNC lathe with a Kistler 9121 tool dynamometer.
2.3. Characterization
A JEOL-6610 scanning electron microscope (SEM) was used to study the wear mechanism and morphology of the worn cutting inserts.
The rake surface of the worn cutting inserts was characterized by X-ray photoelectron spectroscopy (XPS) to reveal details about tribofilm formations. The XPS equipment consisted of a Physical Electronics (PHI) Quantera II spectrometer with a hemispherical energy analyzer, an Al anode source for X-ray generation, and a quartz crystal monochromator for focusing the generated X-rays. The X-ray source was from a monochromatic Al K-alpha (1486.7 eV) at 50 W and the system base pressure was between 1.0 × 10⁻⁹ to 2.0 × 10⁻⁸ Torr. At the beginning, the samples were sputter-cleaned for 5 min with a 4 kV Ar+ beam before collecting the data. The beam diameter for data collection was 200 µm, and all spectra were obtained at a 45° take off angle. A dual beam charge compensation system was utilized to ensure neutralization of all samples. The pass energy to obtain all survey spectra was 280 eV, while to collect all high resolution data it was 55 eV. The instrument was calibrated with a freshly cleaned Ag reference foil, where the Ag 3d5/2 peak was set to 368 eV. All data analyses were performed in PHI Multipak version 9.4.0.7 software.
Roughness measurements of the machined workpiece surfaces were taken from the beginning of the first cutting pass using a white light interferometer (Zygo NewView 5000).
2.4. Friction Tests in Tribometer
Friction tests were performed on a custom heavy-load, high-temperature tribometer in order to elucidate lubricating properties of tribofilms arising from the two grades of steel. The tests involve loading a ball-tipped pin, made of the tool material, against a flat disc of work material. The greater hardness of the pin generates considerable plastic strain in the disc, thereby forming a hemispherical imprint. After reaching the desired load, electric current is drawn through the pin-disc interface in order to heat the specimen contact zone. Finally, the disc is rotated about the axis of the pin, resulting in primarily adhesive interactions between the materials in isolation of macroscopic ploughing. The applied load and the resulting frictional torque and imprint diameter are used to calculate a friction coefficient under the given load and temperature condition. Additional details about the tribometer can be found in Boyd’s publication [27]. Due to the requirement for electrical conductivity of the sample materials, TiAlN-coated tungsten carbide was used in the place of mixed alumina as the pin material, while discs were prepared from the bar stock of T1 and D2 steel used in the cutting tests. Testing occurred under an applied load of 1000 N (generating mean contact pressures on the order of 2.5–4 GPa, as per [28]) and elevated temperatures in the range of about 550–900 °C.
3. Results and Discussion
3.1. Tool Life and Tool Wear
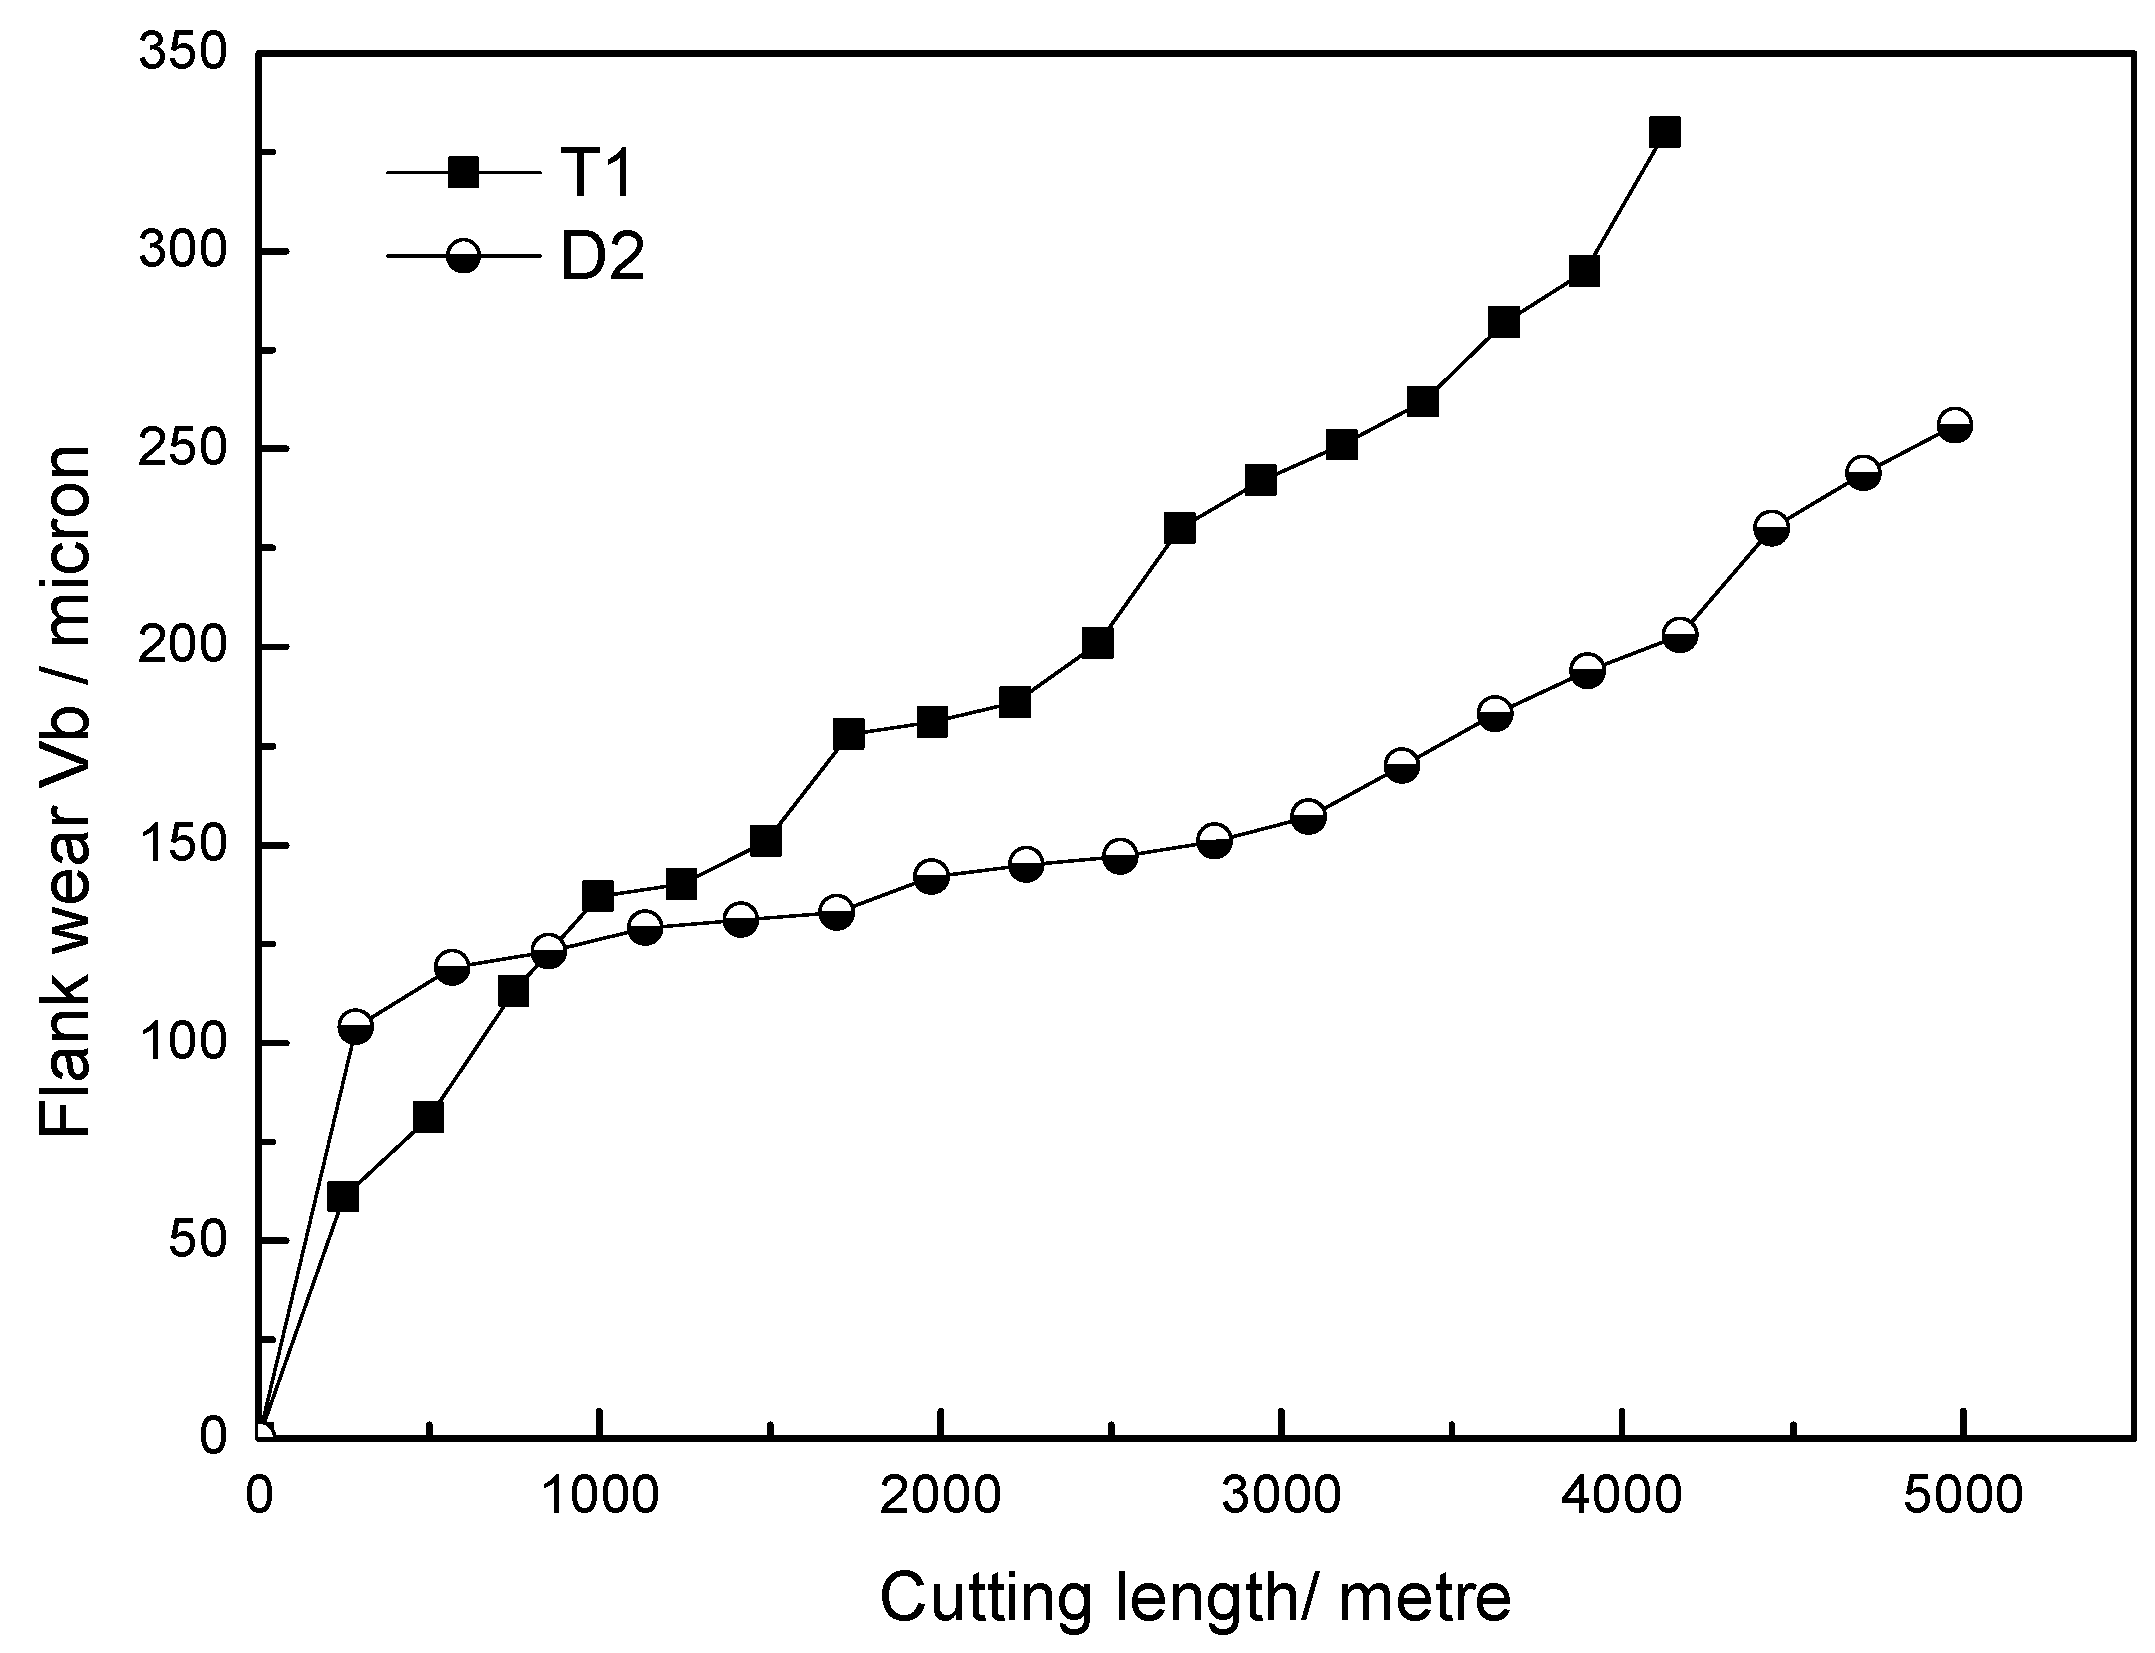
Figure 2 presents the progression of flank wear land width, Vb, with cutting length in the hard turning of T1 and D2 steels. It should be noted that testing on D2 steel was stopped prior to Vb = 300 µm on account of catastrophic failure of the cutting edge that occurred during the last pass, attributed to chipping. Nonetheless, despite the equivalent hardness values of the two workpieces (Table 2), the ceramic inserts exhibited longer tool life (by 23%) when dry turning D2 steel (4976 m) as compared to T1 steel (4124 m). From about 1000 m length of cut (i.e., post-running-in stage) until the end of tool life, flank wear on the insert was distinguishably lower when cutting D2 steel, which would suggest generally higher quality machined surfaces for this material over T1 steel.

Figure 2.
Flank wear land width versus cutting length during turning tests.
It is postulated that the improved tool life for the ceramic inserts when cutting D2 steel compared with T1 steel is due to (1) differences in the amount and size of carbide phases present in each workpiece material, and (2) differences in tribofilms generated on the tool friction surfaces in contact with each workpiece, due to their different alloying content.
Carbide phases within both workpiece materials will cause abrasive wear of the cutting inserts, manifesting in flank wear. The higher amount of carbide phase present in the T1 workpiece, as well as its generally larger particle size (Figure 1), would thus contribute to more intensive abrasive wear of the ceramic inserts during cutting than would the carbide phases in the D2 workpiece.
In conjunction, the differences in alloying content in each workpiece (Table 1) allow for different tribofilms with distinct protective properties to form at the friction surfaces between tool and workpiece. The nature of these tribofilms, in turn, can affect tool wear rates as well as cutting forces and machined surface integrity. However, the formation of these tribofilms necessitates mass transfer of workpiece material to the tool surface (i.e., adhesion) as a pre-requisite.
Repeat tests were performed under identical conditions in order to achieve a moderate level of cutting insert flank wear, stopping after a similar length of cut to allow for a more detailed inspection of the worn surfaces. Figure 3 shows the cutting edge of the ceramic inserts after turning T1 for 3304 m (reaching Vb = 240 µm) and D2 for 3468 m (reaching Vb = 193 µm). Both inserts exhibited signs of abrasive wear on their flank face, which was more extensive for T1 turning. Crater wear, a crucial consideration in tool life assessment according to ISO standards [29], was also much more pronounced on the insert used to cut T1 steel. In contrast, more significant built-up edge was observed on the rake surface of the insert used to cut D2 steel, along with evidence of attrition or peeling away of the ceramic insert at the rear of the crater on the rake surface. No such attrition or peeling was observed on the insert used to cut T1 steel.
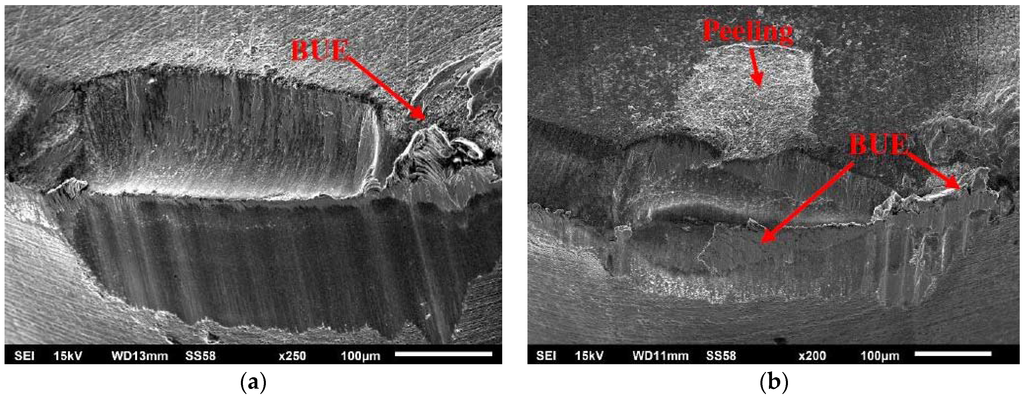
Figure 3.
Worn rake and flank faces of ceramic insert after cutting (a) T1 steel to 3304 m; and (b) D2 steel to 3468 m.
3.2. Adaptive Behaviour
Tribofilm formation during friction plays a significant role in the wear behaviour, especially in heavily loaded tribo-systems such as hardened metal machining processes [30,31], and can offer protection to the underlying coating and substrate in two ways: (1) as a thermal barrier due to ultra-low thermal conductivity; and/or (2) as an in-situ lubricant, reducing the intensity of work material sticking [19].
The tribofilms formed on the worn rake surfaces of the inserts after cutting (to the same cutting length as described earlier in Figure 3) were characterized by XPS. In agreement with the predominant alloying elements listed in Table 1, survey spectra of insert that cut T1 showed significant tungsten (W) signal and some chromium (Cr), while spectra from the D2 insert showed only Cr signal.
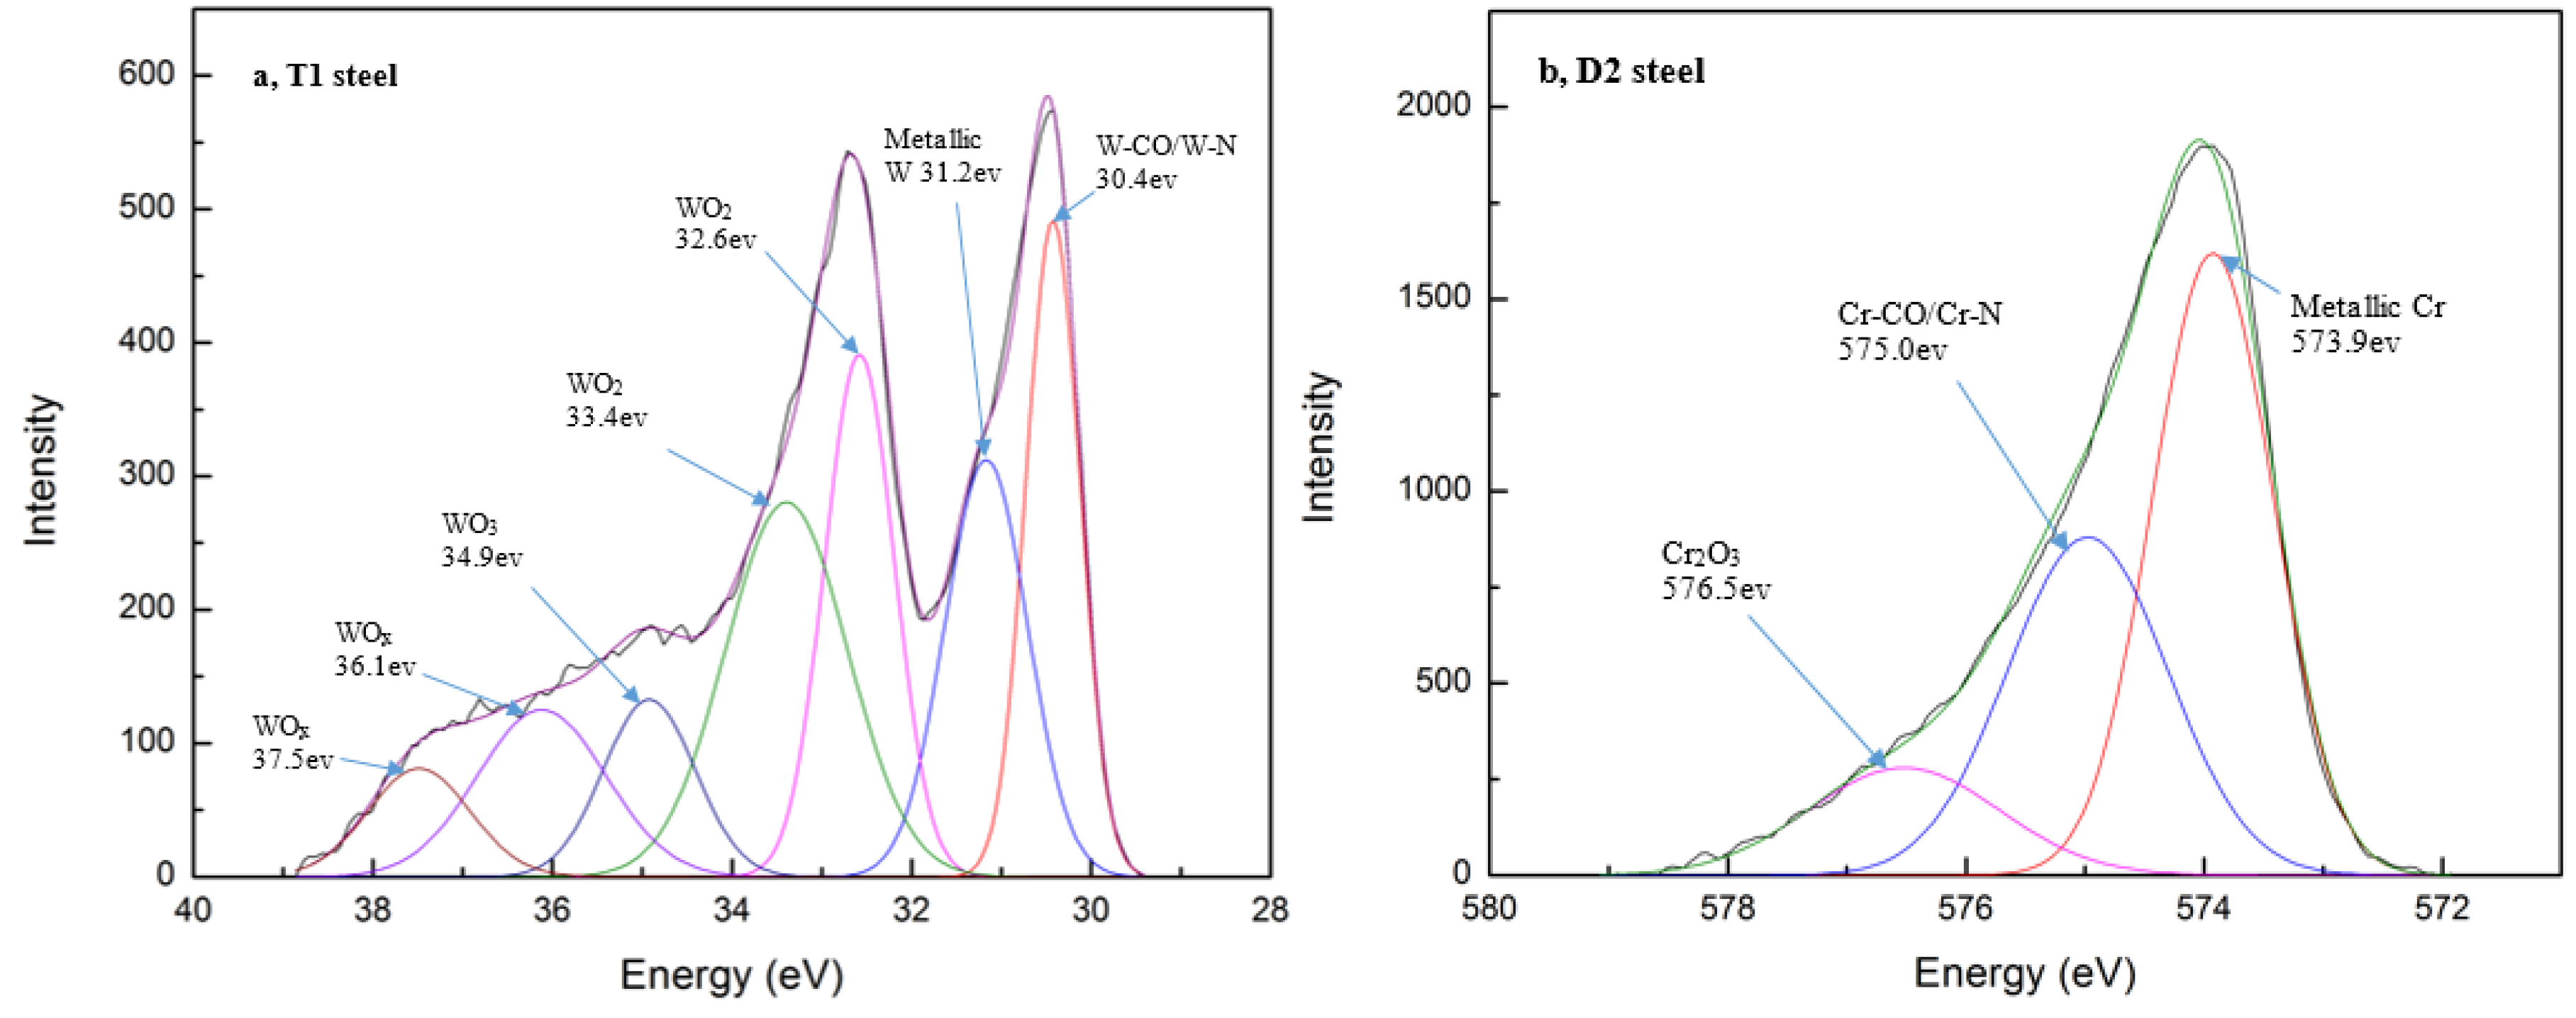
High resolution spectra revealed different types of chemical bonds of W (Figure 4a) and Cr (Figure 4b), in simple and complex oxide tribofilms, on the T1 and D2 inserts, respectively. These meta-stable phases have been observed on the worn surface of coated tools [32,33], and uncoated tools [18] during different cutting processes. Photoelectron lines might be slightly shifted from the binding energy values of pure elements in various offsets (W-O in Figure 4a and Cr2O3 in Figure 4b), which indicates various degrees of oxidation with the formation of nonequilibrium phases and ”nonphase” clusters [33].
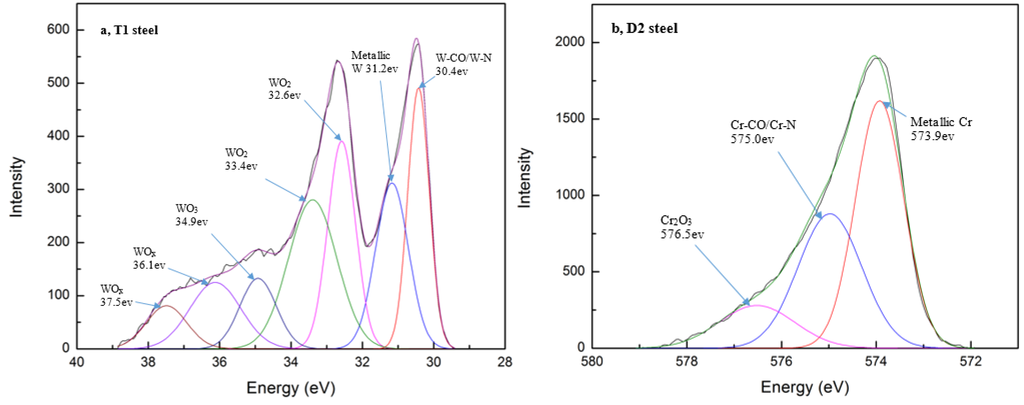
Figure 4.
High-resolution XPS spectra from the worn rake surface of ceramic inserts after cutting (a) T1 steel; and (b) D2 steel.
W-O based tribofilms have been demonstrated to improve the wear behaviour during cutting processes; the W-O carries energy dissipating properties [31] and WO3 is a high-temperature lubricant [34], due to its low shear strength [21]. A variety of Cr-O oxides have been previously reported as providing a lubricious function at friction surfaces [35].
According to the high-resolution data of Figure 4, acquired from the inserts during the stable-stage of wear, W-O tribofilms constituted 65% of the W signal present on the rake surface of the T1 insert, while Cr-O tribofilms comprised just shy of 15% of the total Cr signal on the D2 insert. In addition, the proportion of tungsten in T1 (18.1%) is higher than the proportion of chromium in D2 (11.54%). This would suggest that more intensive lubricant and energy dissipating W-O tribofilms form on the tool during dry cutting of hardened T1 than do Cr-O tribofilms in dry cutting of hardened D2. As was shown in Figure 2, the T1 insert exhibited a lower initial wear rate than did the D2 insert, which is attributed to intensive formation of W-O tribofilms, which is not possible when cutting D2. The energy dissipating qualities of W-O would decrease the micro damage of tool surface while its lubricious aspects would lessen the seizure between tool and workpiece material, as reflected in the noticeably lesser build-up of material on the insert used to cut T1 as compared to D2 (Figure 3). Nonetheless, for the majority of the cutting length (beyond roughly 1000 m of cut), the D2 insert exhibited lower flank wear and demonstrated longer tool life than the T1 insert. This is attributed to lower amount of carbide phase, as well as its smaller size and more even distribution within the steel matrix. This better distribution of carbides in D2 steel would lead to less aggressive tribological conditions in the abrasive wear process. In contrast, over the long run, the damage to the tool surface due to aggressive abrasive action of the more plentiful and larger-sized carbide phase in the T1 workpiece would accumulate and result in shorter tool life. The generation of tribofilms are usually determined by coatings’ design in most situation; but for uncoated tools, controlling of cutting conditions would be a feasible choice [36].
3.3. Cutting Performance During Early Stages of Tool Wear
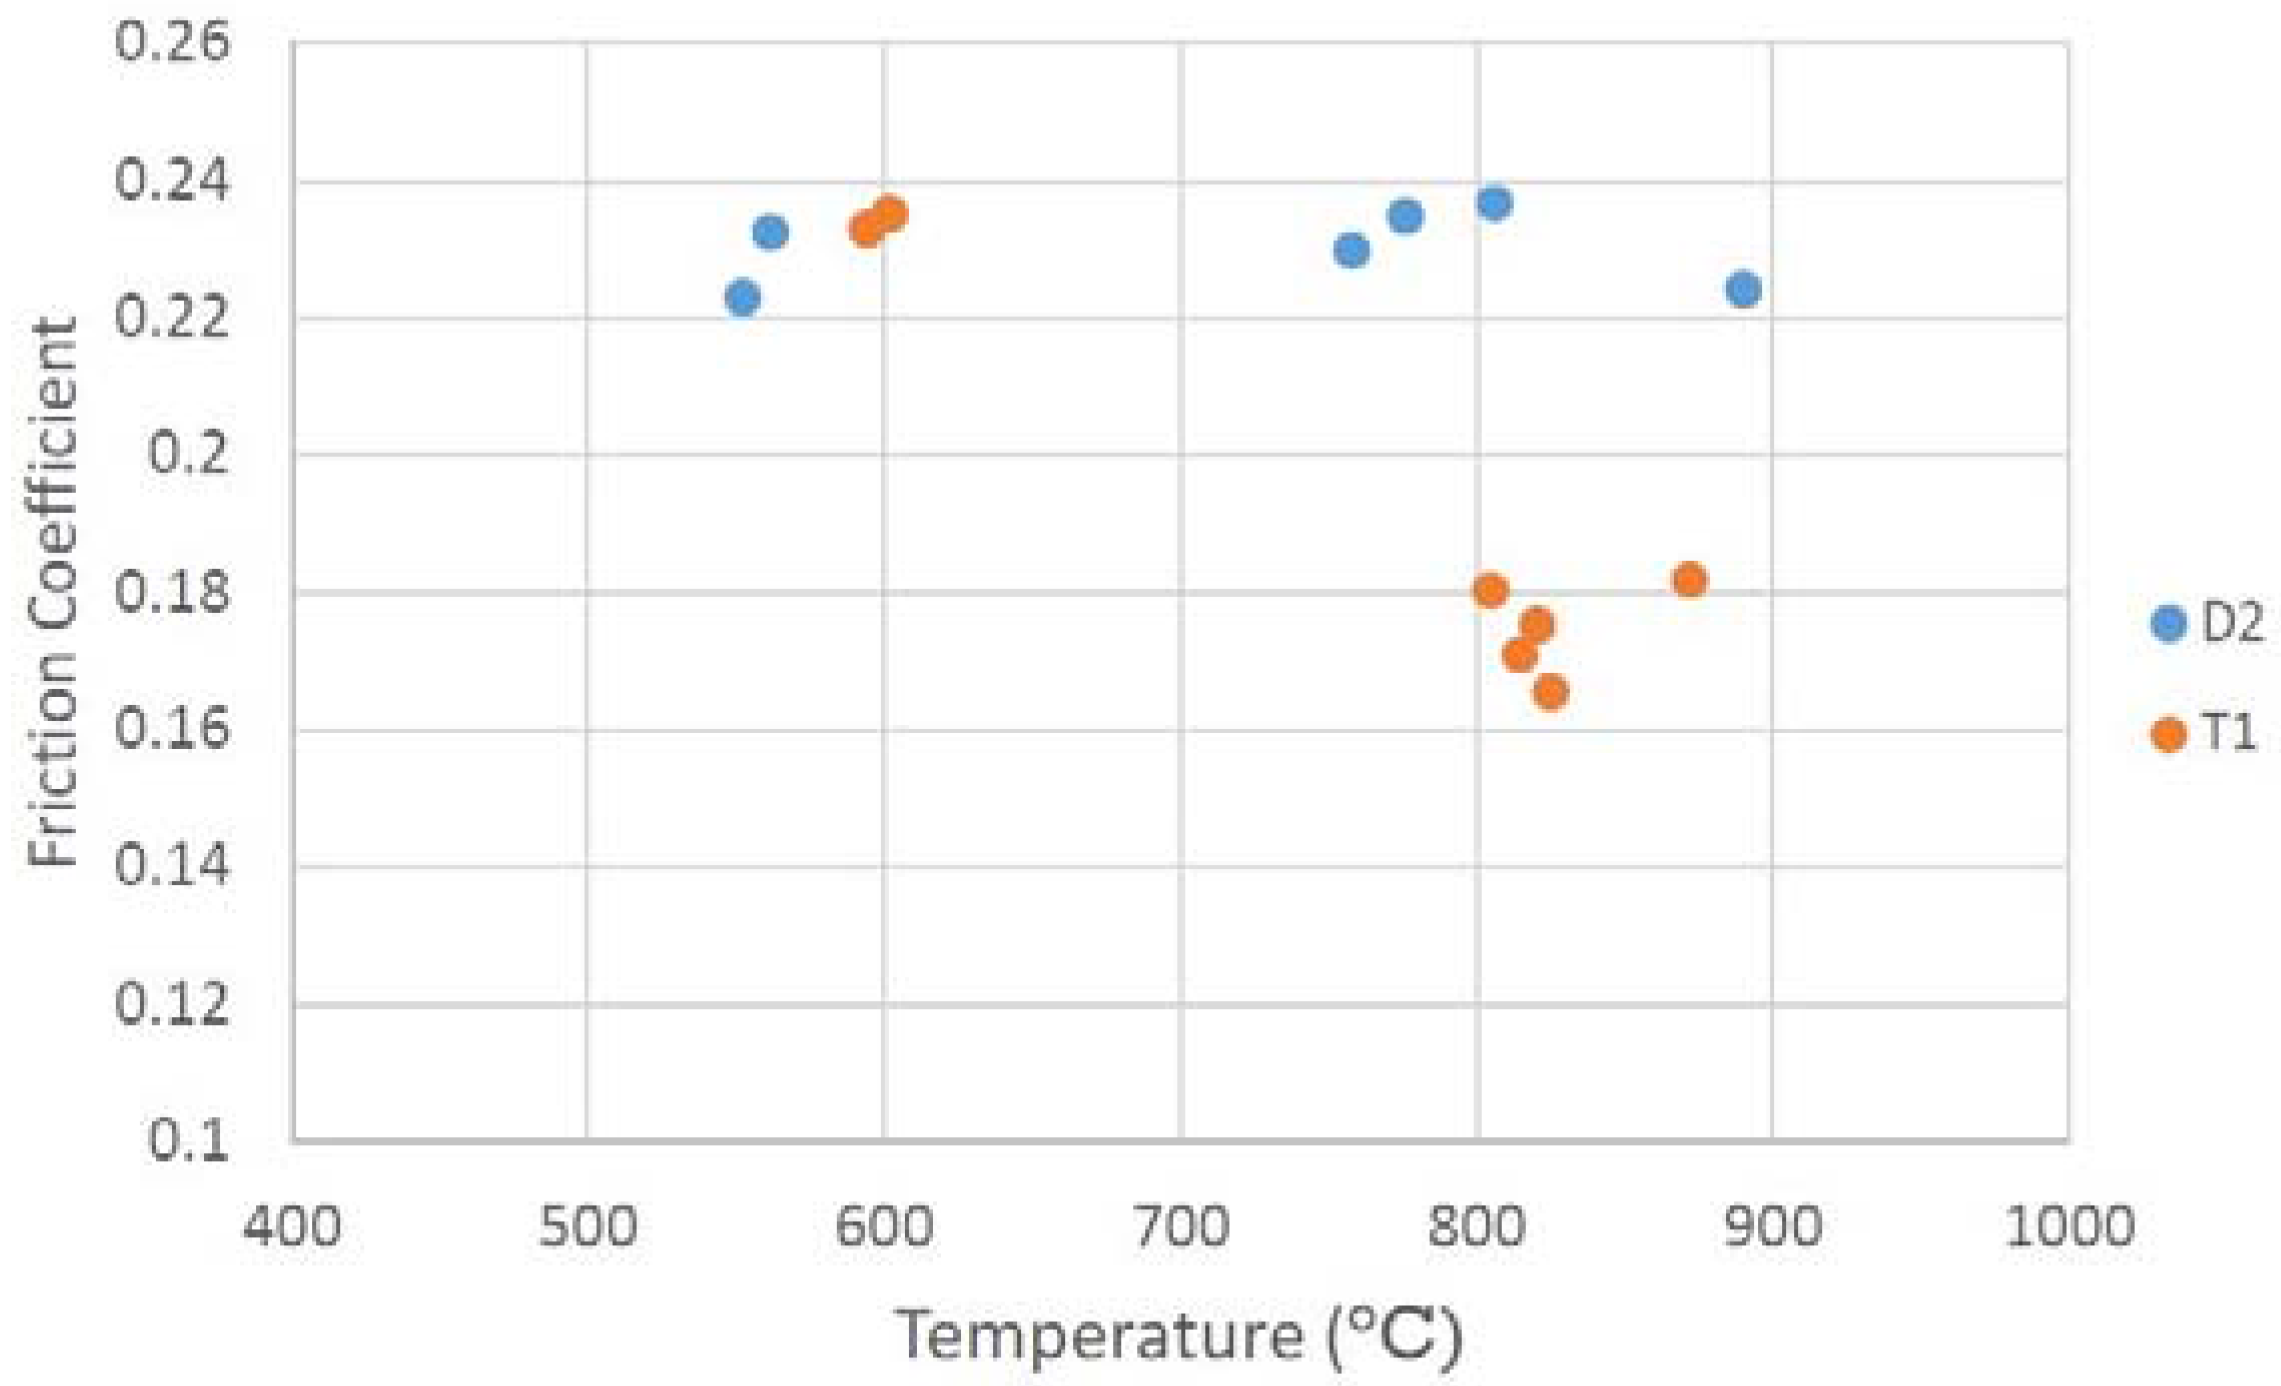
Table 4 presents the average (Ra) and peak-to-valley (PV) roughness values obtained from the surface of each work material at the far end of the bar stock, where the tool first engages the workpiece, after machining with an unworn insert. Machining of T1 steel resulted in much lower surface roughness than did machining of D2 steel (50% lower Ra, 35% lower PV). Cutting force measurements obtained during the first pass (approximately 150 m length of cut) with unworn inserts were also consistently lower in feed and tangential directions when cutting T1 steel (Figure 5). Chips collected from these trials were of a golden brown and bluish colour, corresponding to tool-chip interfacial temperatures of roughly 850–950 °C [26]. As shown in Figure 6, heavy-load, high-temperature tribometer tests demonstrated nearly identical coefficient of friction (COF) for TiAlN-coated carbide against both materials at 550–600 °C (COF = 0.22–0.23); however, between 800–900 °C friction had dropped considerably for T1 steel (COF = 0.16–018) but remained the same for D2 steel. The combination of lower surface roughness and lower cutting forces when machining T1 steel with an unworn insert suggests the formation of lubricating tribofilms on the cutting insert friction surfaces, arising from the work material, which is corroborated by the drop in friction coefficient and generally lower friction seen in tribometer results for T1 steel in the expected temperature range at the tool-chip interface.

Table 4.
Roughness measurements of workpiece surfaces machined with unworn inserts.
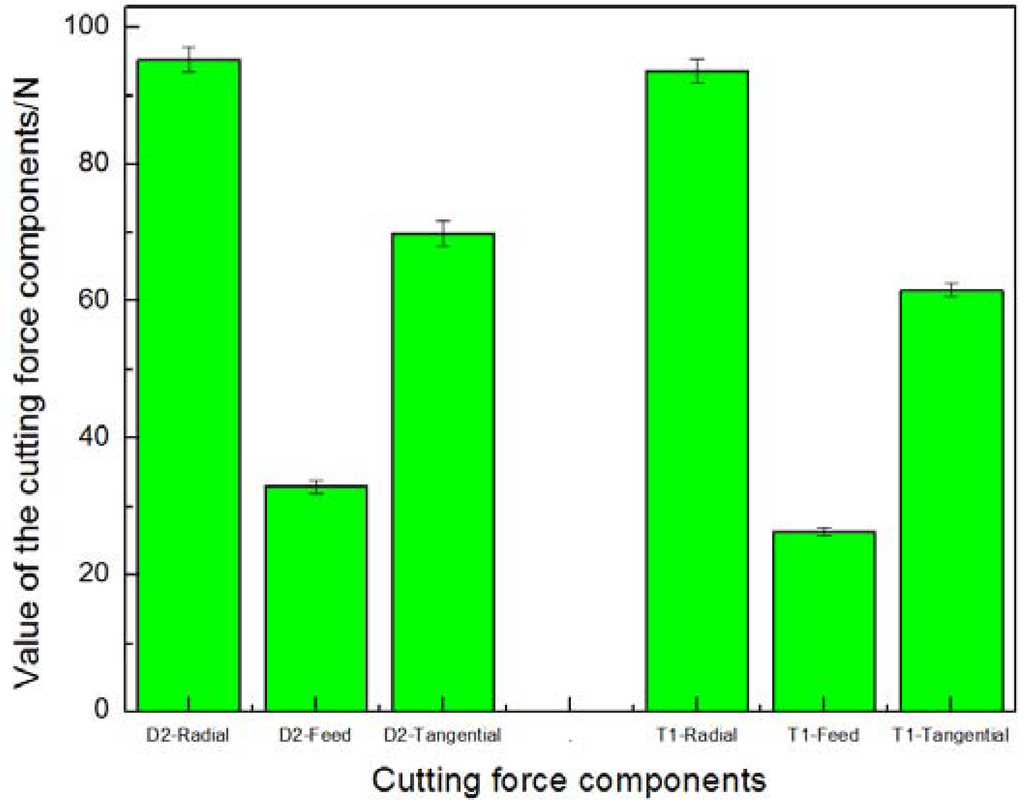
Figure 5.
Cutting force measurements during the first machining pass with unworn inserts.
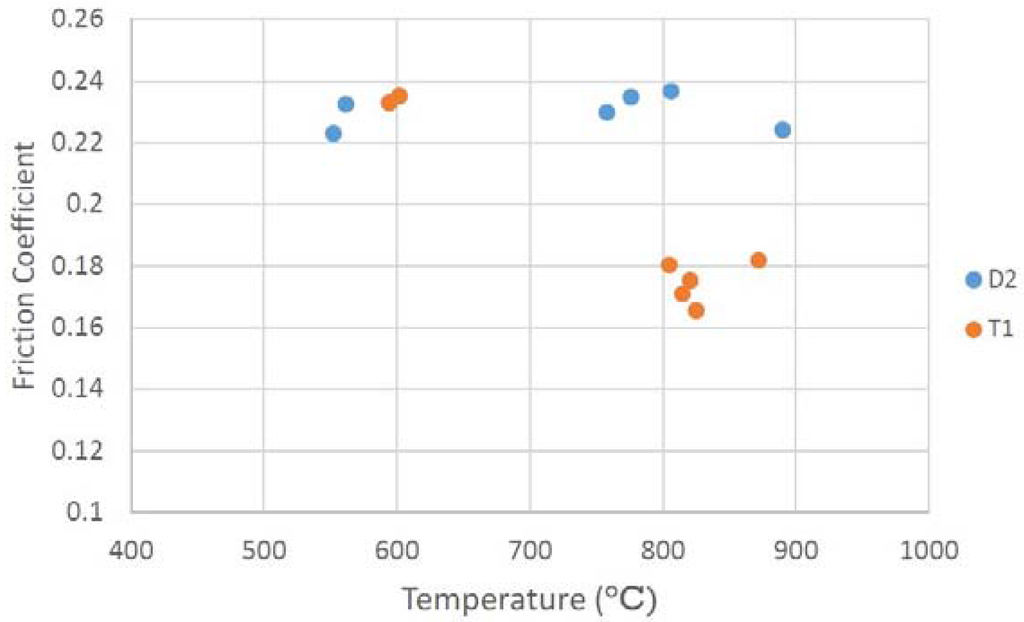
Figure 6.
Measured friction coefficient of individual tribometer tests between TiAlN-coated carbide pins against discs of T1 and D2 steel, under 1000 N load and various elevated temperatures.
4. Conclusions
Hard, dry turning of AISI T1 and AISI D2 steels, of comparable hardness, with uncoated mixed alumina ceramic tools was studied under identical cutting conditions. Metallography of workpiece steels, wear mechanisms of the tool inserts and tribofilms formed on the tools were studied with optical microscope, SEM and X-ray photoelectron spectroscopy. Abrasive wear dominated in both hard turning processes, but tool life was 23% higher in turning of AISI D2 as compared to T1.
Metallographic studies showed AISI D2 steel feature less of the carbide phase, which is smaller and more evenly distributed compared to AISI T1 steel. XPS analysis was used to detect the variety of tribofilms formed during cutting; a variety of lubricious Cr-O tribofilms manifested when turning D2, while energy dissipating W-O and lubricious WO3 were presentin the turning of T1. The tribological properties of these two tribofilms were assessed on a heavy-load, high-temperature tribometer with similar conditions to hard turning. The friction coefficient in the tribometer tests agreed well with the analysis from hard turning, with noticeably lower friction for the T1 steel than D2 in the range of 800–900 °C.
Conventionally, the carbide phase has been the only determining factor for wear conditions and tool life in turning of similar hardness steels. This study presented a new, nano-scale perspective to help explain the observed results: Besides the amount and distribution of carbide phase in the workpiece material, tribofilm generation on the friction surface of the tool insert plays a significant role in determining the tribological conditions and tool life.
Acknowledgments
Authors gratefully acknowledge funding support from the Natural Sciences and Engineering Research Council of Canada (NSERC) discovery grant program.
Author Contributions
Junfeng Yuan (J.Y.) designed the cutting experiments in consultation with German S. Fox-Rabinovich (G.S.F.-R.) and Stephen C. Veldhuis (S.C.V.). J.Y. performed the cutting experiments (tool wear and cutting force measurement) and performed SEM analyses. Danielle Covelli (D.C.) performed all XPS analyses and assigned peaks in collaboration with J.Y. and G.S.F.-R. Jeremy M. Boyd (J.M.B.) designed and performed the friction experiments on the tribometer and also performed surface roughness measurements of the turned work material samples. Taib Arif (T.A.) helped in cutting experiments, SEM samples preparation and analyses. J.Y. wrote the paper in collaboration with J.M.B.
Conflicts of Interest
The authors declare no conflict of interest.
References
- Byrne, G.; Dornfeld, D.; Denkena, B. Advancing cutting technology. CIRP Ann. Manuf. Technol. 2003, 52, 483–507. [Google Scholar] [CrossRef]
- Sreejith, P.; Ngoi, B. Dry machining: Machining of the future. J. Mater. Process. Technol. 2000, 101, 287–291. [Google Scholar] [CrossRef]
- Dudzinski, D.; Devillez, A.; Moufki, A.; Larrouquère, D.; Zerrouki, V.; Vigneau, J. A review of developments towards dry and high speed machining of Inconel 718 alloy. Int. J. Mach. Tools Manuf. 2004, 44, 439–456. [Google Scholar] [CrossRef]
- Davim, J.P. Machining of Hard Materials; Springer-Verlag: London, UK, 2011. [Google Scholar]
- Hashimoto, F.; Guo, Y.; Warren, A. Surface integrity difference between hard turned and ground surfaces and its impact on fatigue life. CIRP Ann. Manuf. Technol. 2006, 55, 81–84. [Google Scholar] [CrossRef]
- Chou, Y.K.; Evans, C.J. White layers and thermal modeling of hard turned surfaces. Int. J. Mach. Tools Manuf. 1999, 39, 1863–1881. [Google Scholar] [CrossRef]
- Matsumoto, Y.; Hashimoto, F.; Lahoti, G. Surface integrity generated by precision hard turning. CIRP Ann. Manuf. Technol. 1999, 48, 59–62. [Google Scholar] [CrossRef]
- Ezugwu, E.; Bonney, J.; Yamane, Y. An overview of the machinability of aeroengine alloys. J. Mater. Process. Technol. 2003, 134, 233–253. [Google Scholar] [CrossRef]
- Claudin, C.; Rech, J.; Grzesik, W.; Zalisz, S. Characterization of the frictional properties of various coatings at the tool/chip/workpiece interfaces in dry machining of AISI 4140 steel. Int. J. Mater. Form. 2008, 1, 511–514. [Google Scholar] [CrossRef]
- Trent, E.M.; Wright, P.K. Metal Cutting; Butterworth-Heinemann: Boston, MA, USA, 2000. [Google Scholar]
- Lahiff, C.; Gordon, S.; Phelan, P. PCBN tool wear modes and mechanisms in finish hard turning. Robot. Comput. Integr. Manuf. 2007, 23, 638–644. [Google Scholar] [CrossRef]
- Barry, J.; Byrne, G. Cutting tool wear in the machining of hardened steels: Part II: Cubic boron nitride cutting tool wear. Wear 2001, 247, 152–160. [Google Scholar] [CrossRef]
- Richards, N.; Aspinwall, D. Use of ceramic tools for machining nickel based alloys. Int. J. Mach. Tools Manuf. 1989, 29, 575–588. [Google Scholar] [CrossRef]
- Barry, J.; Byrne, G. Cutting tool wear in the machining of hardened steels: Part I: Alumina/TiC cutting tool wear. Wear 2001, 247, 139–151. [Google Scholar] [CrossRef]
- Ayas, E.; Kara, A. Pressureless Sintering of Al2O3-TiCN Composites. Key Eng. Mater. 2004, 264, 849–852. [Google Scholar] [CrossRef]
- Fox-Rabinovich, G.; Totten, G.E. Self-organization During Friction: Advanced Surface-engineered Materials and Systems Design; CRC Press: Hamilton, Canada, 2010. [Google Scholar]
- Franz, R.; Neidhardt, J.; Sartory, B.; Kaindl, R.; Tessadri, R.; Polcik, P.; Derflinger, V.H.; Mitterer, C. High-temperature low-friction properties of vanadium-alloyed AlCrN coatings. Tribol. Lett. 2006, 23, 101–107. [Google Scholar] [CrossRef]
- Fox-Rabinovich, G.S.; Gershman, I.; Hakim, M.A.E.; Shalaby, M.A.; Krzanowski, J.E.; Veldhuis, S.C. Tribofilm Formation As a Result of Complex Interaction at the Tool/Chip Interface during Cutting. Lubricants 2014, 2, 113–123. [Google Scholar] [CrossRef]
- Fox-Rabinovich, G.S.; Yamomoto, K.; Veldhuis, S.C.; Kovalev, A.I.; Dosbaeva, G.K. Tribological adaptability of TiAlCrN PVD coatings under high performance dry machining conditions. Surf. Coat. Technol. 2005, 200, 1804–1813. [Google Scholar] [CrossRef]
- Fox-Rabinovich, G.S.; Yamomoto, K.; Veldhuis, S.C.; Kovalev, A.I.; Shuster, L.S.; Ning, L. Self-adaptive wear behavior of nano-multilayered TiAlCrN/WN coatings under severe machining conditions. Surf. Coat. Technol. 2006, 201, 1852–1860. [Google Scholar] [CrossRef]
- Shalaby, M.; El Hakim, M.; Abdelhameed, M.M.; Krzanowski, J.; Veldhuis, S.; Dosbaeva, G. Wear mechanisms of several cutting tool materials in hard turning of high carbon–chromium tool steel. Tribol. Int. 2014, 70, 148–154. [Google Scholar] [CrossRef]
- El Hakim, M.; Abad, M.; Abdelhameed, M.; Shalaby, M.; Veldhuis, S. Wear behavior of some cutting tool materials in hard turning of HSS. Tribol. Int. 2011, 44, 1174–1181. [Google Scholar] [CrossRef]
- Arsecularatne, J.; Zhang, L.; Montross, C.; Mathew, P. On machining of hardened AISI D2 steel with PCBN tools. J. Mater. Process. Technol. 2006, 171, 244–252. [Google Scholar] [CrossRef]
- Geller, Y. Tool Steels; Mashinostroenie: Moscow, Russia, 1979. [Google Scholar]
- Ning, Y.; Rahman, M.; Wong, Y. Investigation of chip formation in high speed end milling. J. Mater. Process. Technol. 2001, 113, 360–367. [Google Scholar] [CrossRef]
- Boyd, J.M.; Hosseinkhani, K.; Veldhuis, S.C.; Ng, E. Improved prediction of cutting forces via finite element simulations using novel heavy-load, high-temperature tribometer friction data. Int. J. Adv. Manuf. Technol. 2016. [Google Scholar] [CrossRef]
- Biksa, A. Tribological Characterization of Surface Engineered Tooling for Metal Cutting Applications. Master’s Thesis, University of Toronto, Toronto, Canada, August 2010. [Google Scholar]
- International Organization for Standardization. Tool Life Testing with Single-point Turning Tools; American Society of Mechanical Engineers: New York, NY, USA, 1986. [Google Scholar]
- Jacobson, S.; Hogmark, S. Tribofilms—On the crucial importance of tribologically induced surface modifications, Recent developments in wear prevention. Frict. Lubr. 2010, 661, 197–225. [Google Scholar]
- Bouzakis, K.D.; Michailidis, N.; Skordaris, G.; Bouzakis, E.; Biermann, D.; M'Saoubi, R. Cutting with coated tools: Coating technologies, characterization methods and performance optimization. CIRP Ann. Manuf. Technol. 2012, 61, 703–723. [Google Scholar] [CrossRef]
- Lehn, J.M. Toward self-organization and complex matter. Science 2002, 295, 2400–2403. [Google Scholar] [CrossRef] [PubMed]
- Fox-Rabinovich, G.; Kovalev, A.; Veldhuis, S.; Yamamoto, K.; Endrino, J.; Gershman, I.; Rashkovskiy, A.; Aguirre, M.; Wainstein, D. Spatio-temporal behaviour of atomic-scale tribo-ceramic films in adaptive surface engineered nano-materials. Sci. Rep. 2015, 5. [Google Scholar] [CrossRef] [PubMed]
- Kovalev, A.; Wainstein, D.; Fox-Rabinovich, G.; Veldhuis, S.; Yamamoto, K. Features of self-organization in nanostructuring PVD coatings on a base of polyvalent metal nitrides under severe tribological conditions. Surf. Interface Anal. 2008, 40, 881–884. [Google Scholar] [CrossRef]
- Fox-Rabinovich, G.; Kovalev, A.; Aguirre, M.; Yamamoto, K.; Veldhuis, S.; Gershman, I.; Rashkovskiy, A.; Endrino, J.; Beake, B.; Dosbaeva, G. Evolution of self-organization in nano-structured PVD coatings under extreme tribological conditions. Appl. Surf. Sci. 2014, 297, 22–32. [Google Scholar] [CrossRef]
- Yuan, J.; Yamamoto, K.; Covelli, D.; Tauhiduzzaman, M.; Arif, T.; Gershman, I.S.; Veldhuis, S.C.; Fox-Rabinovich, G.S. Tribo-films control in adaptive TiAlCrSiYN/TiAlCrN multilayer PVD coating by accelerating the initial machining conditions. Surf. Coat. Technol. 2016, 294, 54–61. [Google Scholar] [CrossRef]
© 2016 by the authors; licensee MDPI, Basel, Switzerland. This article is an open access article distributed under the terms and conditions of the Creative Commons Attribution (CC-BY) license (http://creativecommons.org/licenses/by/4.0/).


