Article

Enhancement of Wear Behaviour and Optimization and Prediction of Friction Coefficient of Nitrided D2 Steel at Different Times

1
Laboratory of Mechanics, Materials and Processes (LMMP), National High School of Engineering of Tunis (ENSIT)—University of Tunis, 5, Avenue Taha Hussein, Montfleury, Tunis 1008, Tunisia
2
Laboratoire Génie Mécanique, École Nationale d’Ingénieurs de Monastir, Université de Monastir, Monastir 5000, Tunisia
3
Deanship of Scientific Research, Imam Mohammad Ibn Saud Islamic University (IMSIU), Riyadh 11432, Saudi Arabia
*
Author to whom correspondence should be addressed.
Lubricants 2025, 13(12), 550; https://doi.org/10.3390/lubricants13120550
Submission received: 13 November 2025 / Revised: 3 December 2025 / Accepted: 8 December 2025 / Published: 17 December 2025

Abstract

The objective of this study is to evaluate the impact of thermal and thermochemical treatment, specifically gas nitriding, on the wear properties of AISI D2 cold work tool steel. The steel was austenitized at 1050 °C, then subjected to two annealing cycles at 560 °C for two hours each. It was then gas-nitrided for 16 and 36 h. The Vickers microhardness measurements of AISI D2 steel for the three distinct conditions, non-nitrided (NN), nitride at 16 h (N16) and nitride at 36 h (N36), are 560 HV0.1, 1050 HV0.1 and 1350 HV0.1, respectively. Wear tests were conducted utilizing a ball device, under dry friction conditions at ambient temperature, with loads of 5, 10 and 15 N, over 5000, 10,000 and 15,000 cycles at a constant sliding velocity of 30 mm/s and a sliding distance of 10 mm. Furthermore, the utilization of ANFIS modeling of experimental data facilitated the prediction of the variation in the coefficient of friction as a function of nitriding conditions and specific test parameters. The results show a significant effect of nitriding, leading to a marked reduction in the coefficient of friction. In the non-nitrided condition, the average value reaches 0.80, while extended nitriding to 36 h reduces this value to around 0.49, confirming a substantial tribological improvement. This enhancement is ascribed to the formation of hard, resilient nitride layers on the steel surface, thereby increasing wear resistance and cur-tailing in industrial applications.

1. Introduction

Class D steels, of which AISI D2 is a notable representative, occupy a strategic position in many industrial sectors due to their advanced mechanical properties [1,2,3,4]. Designed to offer high wear resistance and exceptional durability, these steels are widely used in the manufacture of punching tools, molds and critical cutting tools. Their main qualities lie in their ability to be optimally hardened, their good toughness and their high fatigue strength. These characteristics are essential for withstanding high loads and extending the service life of industrial components [5,6,7,8,9]. To meet the growing demands for performance in the face of wear, sustained efforts are being made in the research and development of new methods and technologies [10,11]. These initiatives are aimed at improving the wear resistance of Class D steels, which is essential for increasing operational efficiency and reducing maintenance costs. The wear of these materials is influenced by a multitude of interdependent factors, such as surface condition, metal microstructure, chemical composition, application of specialized lubricants and surface hardness. Each of these factors plays an essential role in the tribological behavior of materials and their long-term performance [12,13,14,15,16,17].
As part of the research carried out on Class D steels, various surface treatment techniques are employed to enhance their hardness and improve their tribological properties. Among these methods, thermochemical approaches such as carburizing, nitriding, boriding and vanadiumation are favored for their ability to alter the steel’s surface layer, thereby increasing its wear resistance and ability to withstand extreme mechanical stresses [18,19,20]. Meanwhile, metal coating technologies such as physical vapor deposition (PVD), chemical vapor deposition (CVD) and plasma-assisted chemical vapor deposition (PACVD) offer effective solutions, although they are often costly and technologically demanding, limiting their widespread application [14,21,22,23].
Among surface hardening methods, gas nitriding stands out as a particularly effective technique for improving the surface hardness of AISI D2 steel. This technique has been shown to significantly increase the wear resistance and longevity of components, while optimizing their performance in harsh industrial environments [24,25,26,27,28,29,30]. This treatment promotes the formation of the white layer of nitrides, modifies the microstructure through the precipitation of Cr, V and Mo nitrides, and determines surface thickness, density and hardness. In this study, two nitriding times, 16 h and 36 h, were chosen to assess the influence of treatment time on the formation and thickness of the white layer, as well as on surface hardness. A treatment time of 16 h enables early microstructure development to be observed, while 36 h favors a thicker layer and maximum hardness. Despite existing research, the effect of nitriding time on microstructure, white layer thickness and surface hardness, as well as on residual stresses and wear behavior, remains poorly documented and sometimes contradictory. This gap justifies a targeted study to better understand the influence of treatment and nitriding time on the tribological performance of nitrided D2 steel. As part of this study, a rigorous evaluation of the coefficient of friction of AISI D2 steel was undertaken. Samples were subjected to alternating linear wear tests under various loads (5 N, 10 N and 15 N) at room temperature, enabling precise characterization of the steel’s tribological performance. This experimental approach is fundamental to understanding the specific behavior of AISI D2 steel under realistic working conditions [31,32]. The results of this study are essential for optimizing manufacturing and surface treatment processes aimed at improving the durability and performance of critical industrial components made from this steel. Moreover, the study focuses on establishing a direct link between the nitriding parameters and the resulting tribological properties, thereby providing practical insights for industrial applications. By highlighting the specific improvements in wear resistance and friction behavior due to gas nitriding, this work aims to offer targeted guidance for optimizing manufacturing and surface treatment processes, ultimately enhancing the durability and performance of critical components made from AISI D2 steel.
In the context of conventional surface treatment methods, the optimization of treatment parameters is of crucial importance. In this respect, statistical optimization approaches, such as Taguchi’s method and response surface analysis, are employed to determine optimal processing conditions. These aim to maximize surface hardness while minimizing structural imperfections, thus promising optimum tribological performance under a range of operating conditions. Furthermore, it has been demonstrated that the prediction of tribological performance can be enhanced by advanced techniques such as the Adaptive Neuro-Fuzzy Inference System (ANFIS) [33,34,35,36].

2. Experimental Procedures

2.1. Material

For this study, AISI D2 steel was chosen as the research material. It is widely recognized in the scientific community that this steel tool is characterized by exceptional wear resistance and toughness. The detailed chemical composition of this steel is presented in Table 1.
Wear tests were performed with a 10 mm diameter AISI 52100 steel ball under controlled ambient conditions. The tests were performed by applying progressive loads of 5, 10, and 15 N, with a sliding speed maintained at 30 mm per second over a linear stroke of 10 mm, for a number of cycles of 5000, 10,000 and 15,000. Each test was repeated at least three times to ensure the reproducibility of the results, and the average of the tests was used for the analysis. The uncertainty of the error does not exceed 5% of the measured value.
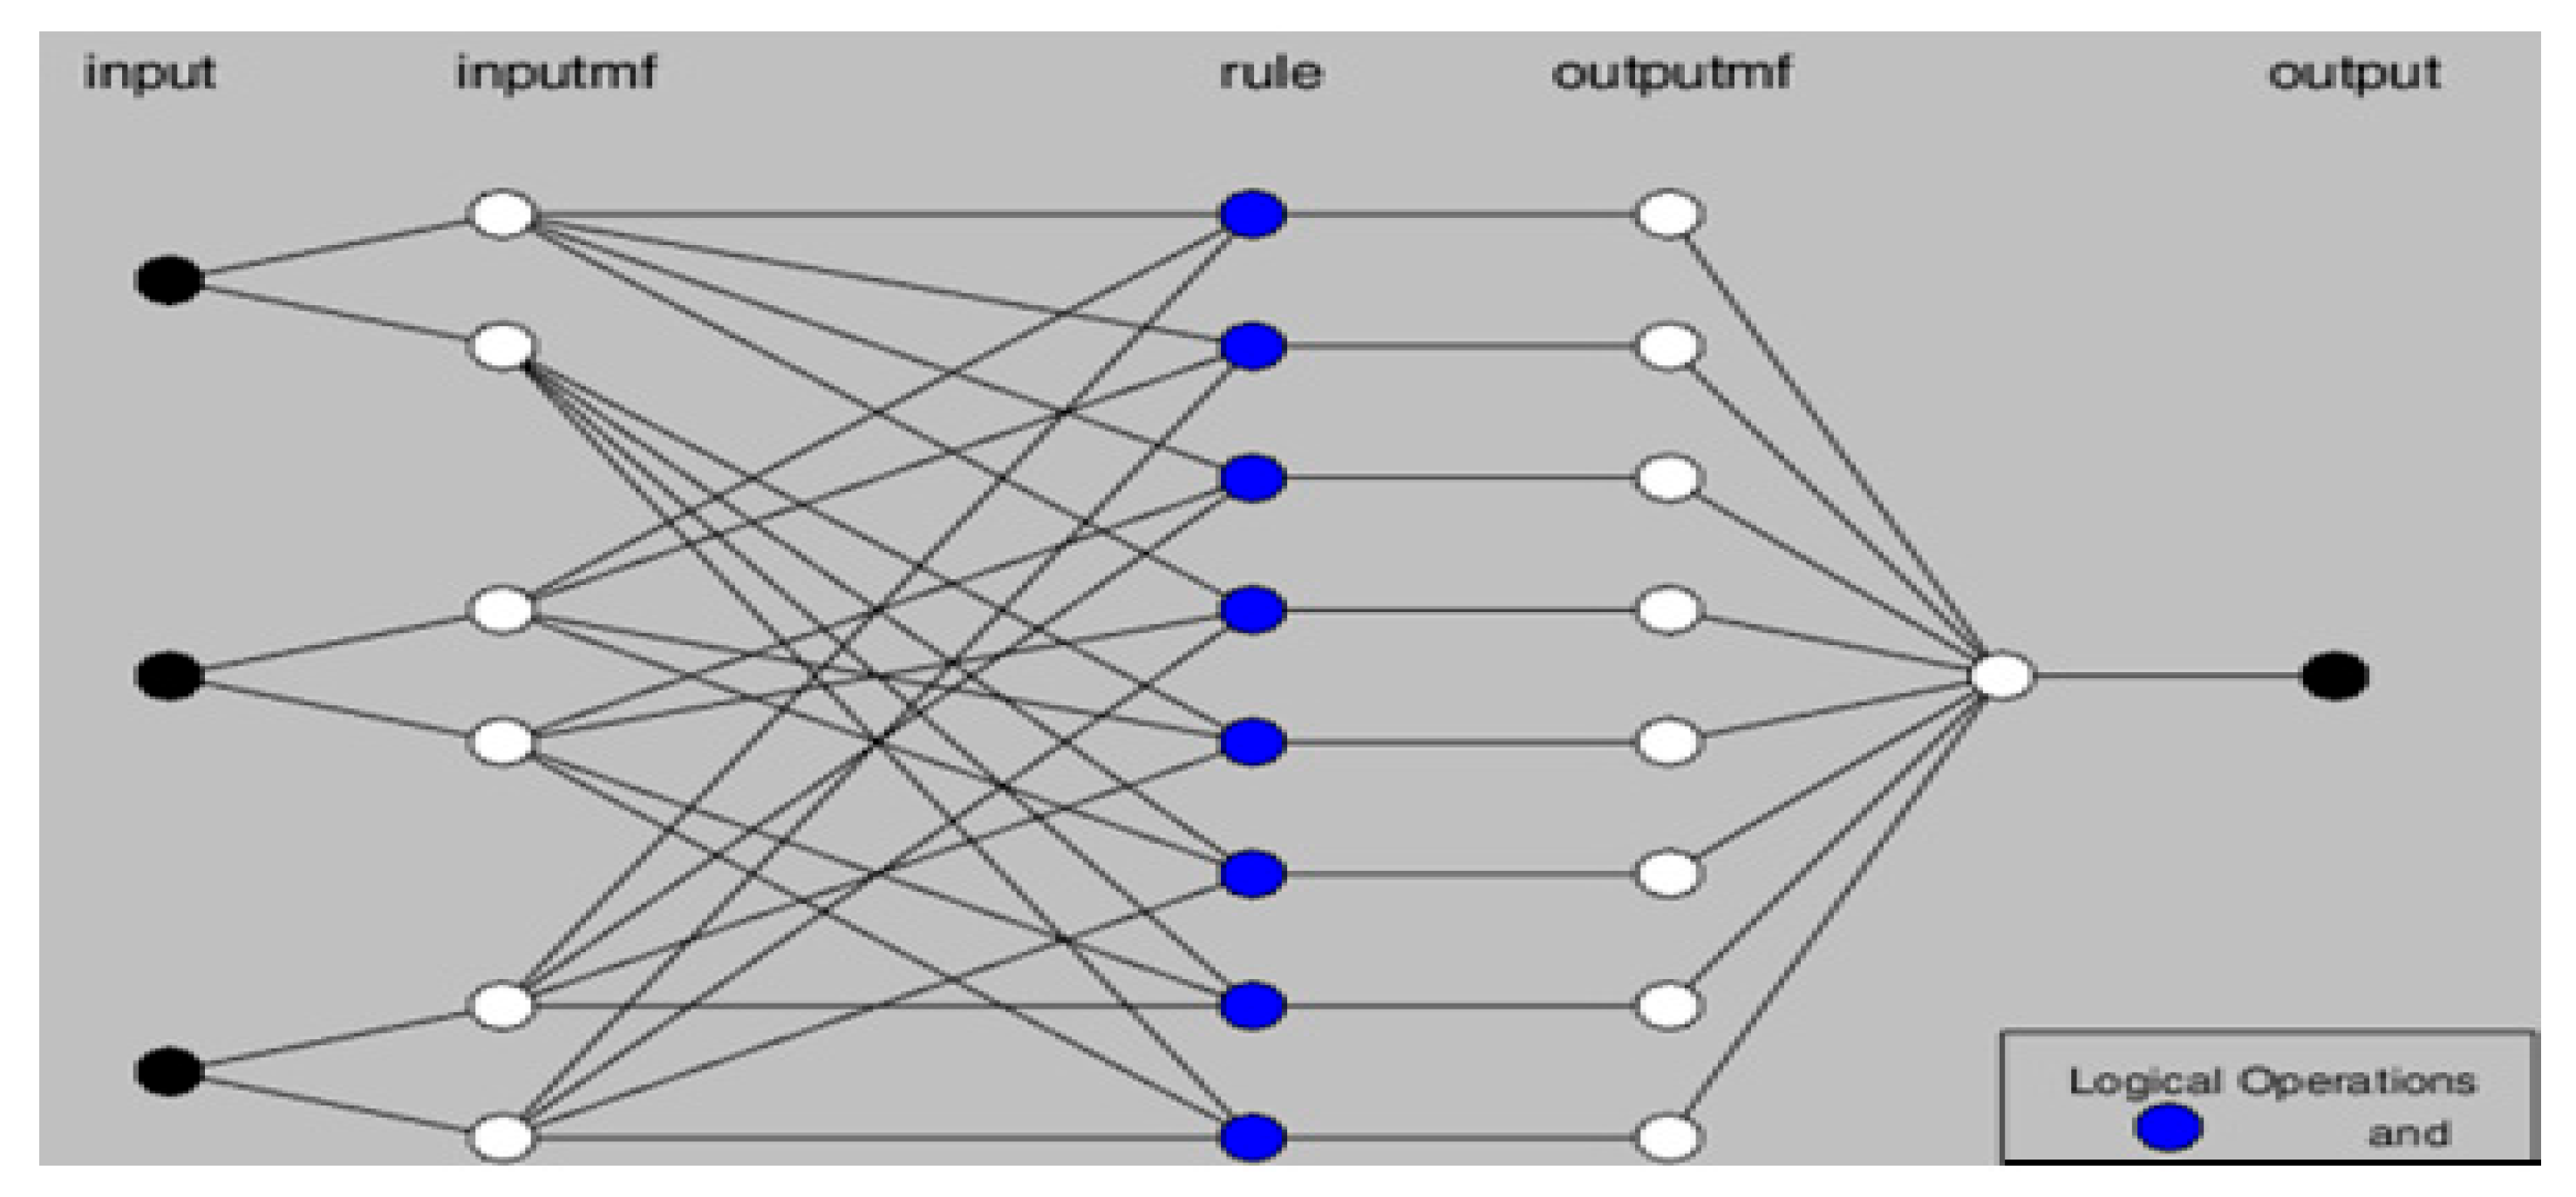
These experiments were carried out using state-of-the-art wear testing equipment available at the Mechanical Engineering Laboratory (LGM), as shown in Figure 1. The coefficient of friction between the ball and the samples was calculated by relating the friction force to the normal load applied, thus providing an accurate measure of the wear resistance of the tested material. In this study, all wear data examined were obtained from experiments conducted on D2 steel samples and are presented in Table 2. To predict the coefficient of friction results, an ANFIS (Adaptive Neuro-Fuzzy Inference System) model was used in this study. This hybrid model integrates the learning capability of neural networks with fuzzy logic, enabling accurate representation of non-linear interactions between processing parameters (force, hardness and number of cycle) and tribological response (COF). The ANFIS structure comprises a set of initial fuzzy rules generated from the data, which are automatically optimized via a backpropagation-based learning algorithm, guaranteeing reliable and robust prediction of tribological performance.

2.2. Treatment Details

In this study, AISI D2 steel was subjected to advanced heat treatments and thermochemical nitriding in order to modulate its characteristics. Figure 2 illustrates the heat treatment cycle, the duration of which was modified to create the first state, the non-nitrided state (NN). This is the result of quenching at 1050 °C for one hour, followed by two tempering cycles at 560 °C for two hours each. This process produced a final hardness of approximately 560 HV0.1, characterizing the initial mechanical properties of the steel prior to any nitriding treatment. The heat treatment’s cycle shown of D2 steel corresponds to previous study [11], comprising high-temperature austenitizing, rapid quenching and then two tempering processes applied at the same temperature. Quenching forms martensite but leaves a residual austenite fraction. The first tempering process serves to reduce this residual austenite and stabilize the martensitic structure while fixing the hardness. The second tempering process, identical to the first, completes this stabilization and places the microstructure in a thermal state compatible with nitriding, whose treatment temperature is close to that of the tempering process. This choice of cycle thus ensures that D2 steel is hard, stable and properly prepared for subsequent thermochemical treatment.
As part of the study carried out on thermochemical nitriding treatment applied to AISI D2 steel, two nitriding times were analyzed in depth: a first session of 16 h and a second one of 36 h. The nitriding process was carried out at a temperature of 525 °C, with an ammonia dissociation rate of 35%, and under two treatment durations of 16 h and 36 h. During these processes, the steel was exposed to a nitrogen-rich atmosphere at controlled temperatures, allowing the nitrogen to diffuse onto the surface of the material. This process induces changes in the composition of the surface layer, giving rise to nitrides which, as shown in Figure 3, lead to an enhancement of the steel’s hardness and wear resistance. Figure 3 highlights the importance of this thermochemical treatment method for optimizing the performance of AISI D2 steel, based on wear resistance and durability criteria in various industrial environments.

3. Results

3.1. Microstructural Characterization

Figure 4 shows the SEM micrograph of D2 steel, revealing a martensitic matrix with a relatively homogenous dispersion of carbides rich in chromium and vanadium, chemical elements essential for the material’s hardness and wear resistance. Primary carbides, which are generally coarser and inherited from solidification, have well-defined angular shapes, while secondary carbides appear as finer precipitates dispersed in the matrix after heat treatment. This microstructure gives D2 steel excellent wear resistance.
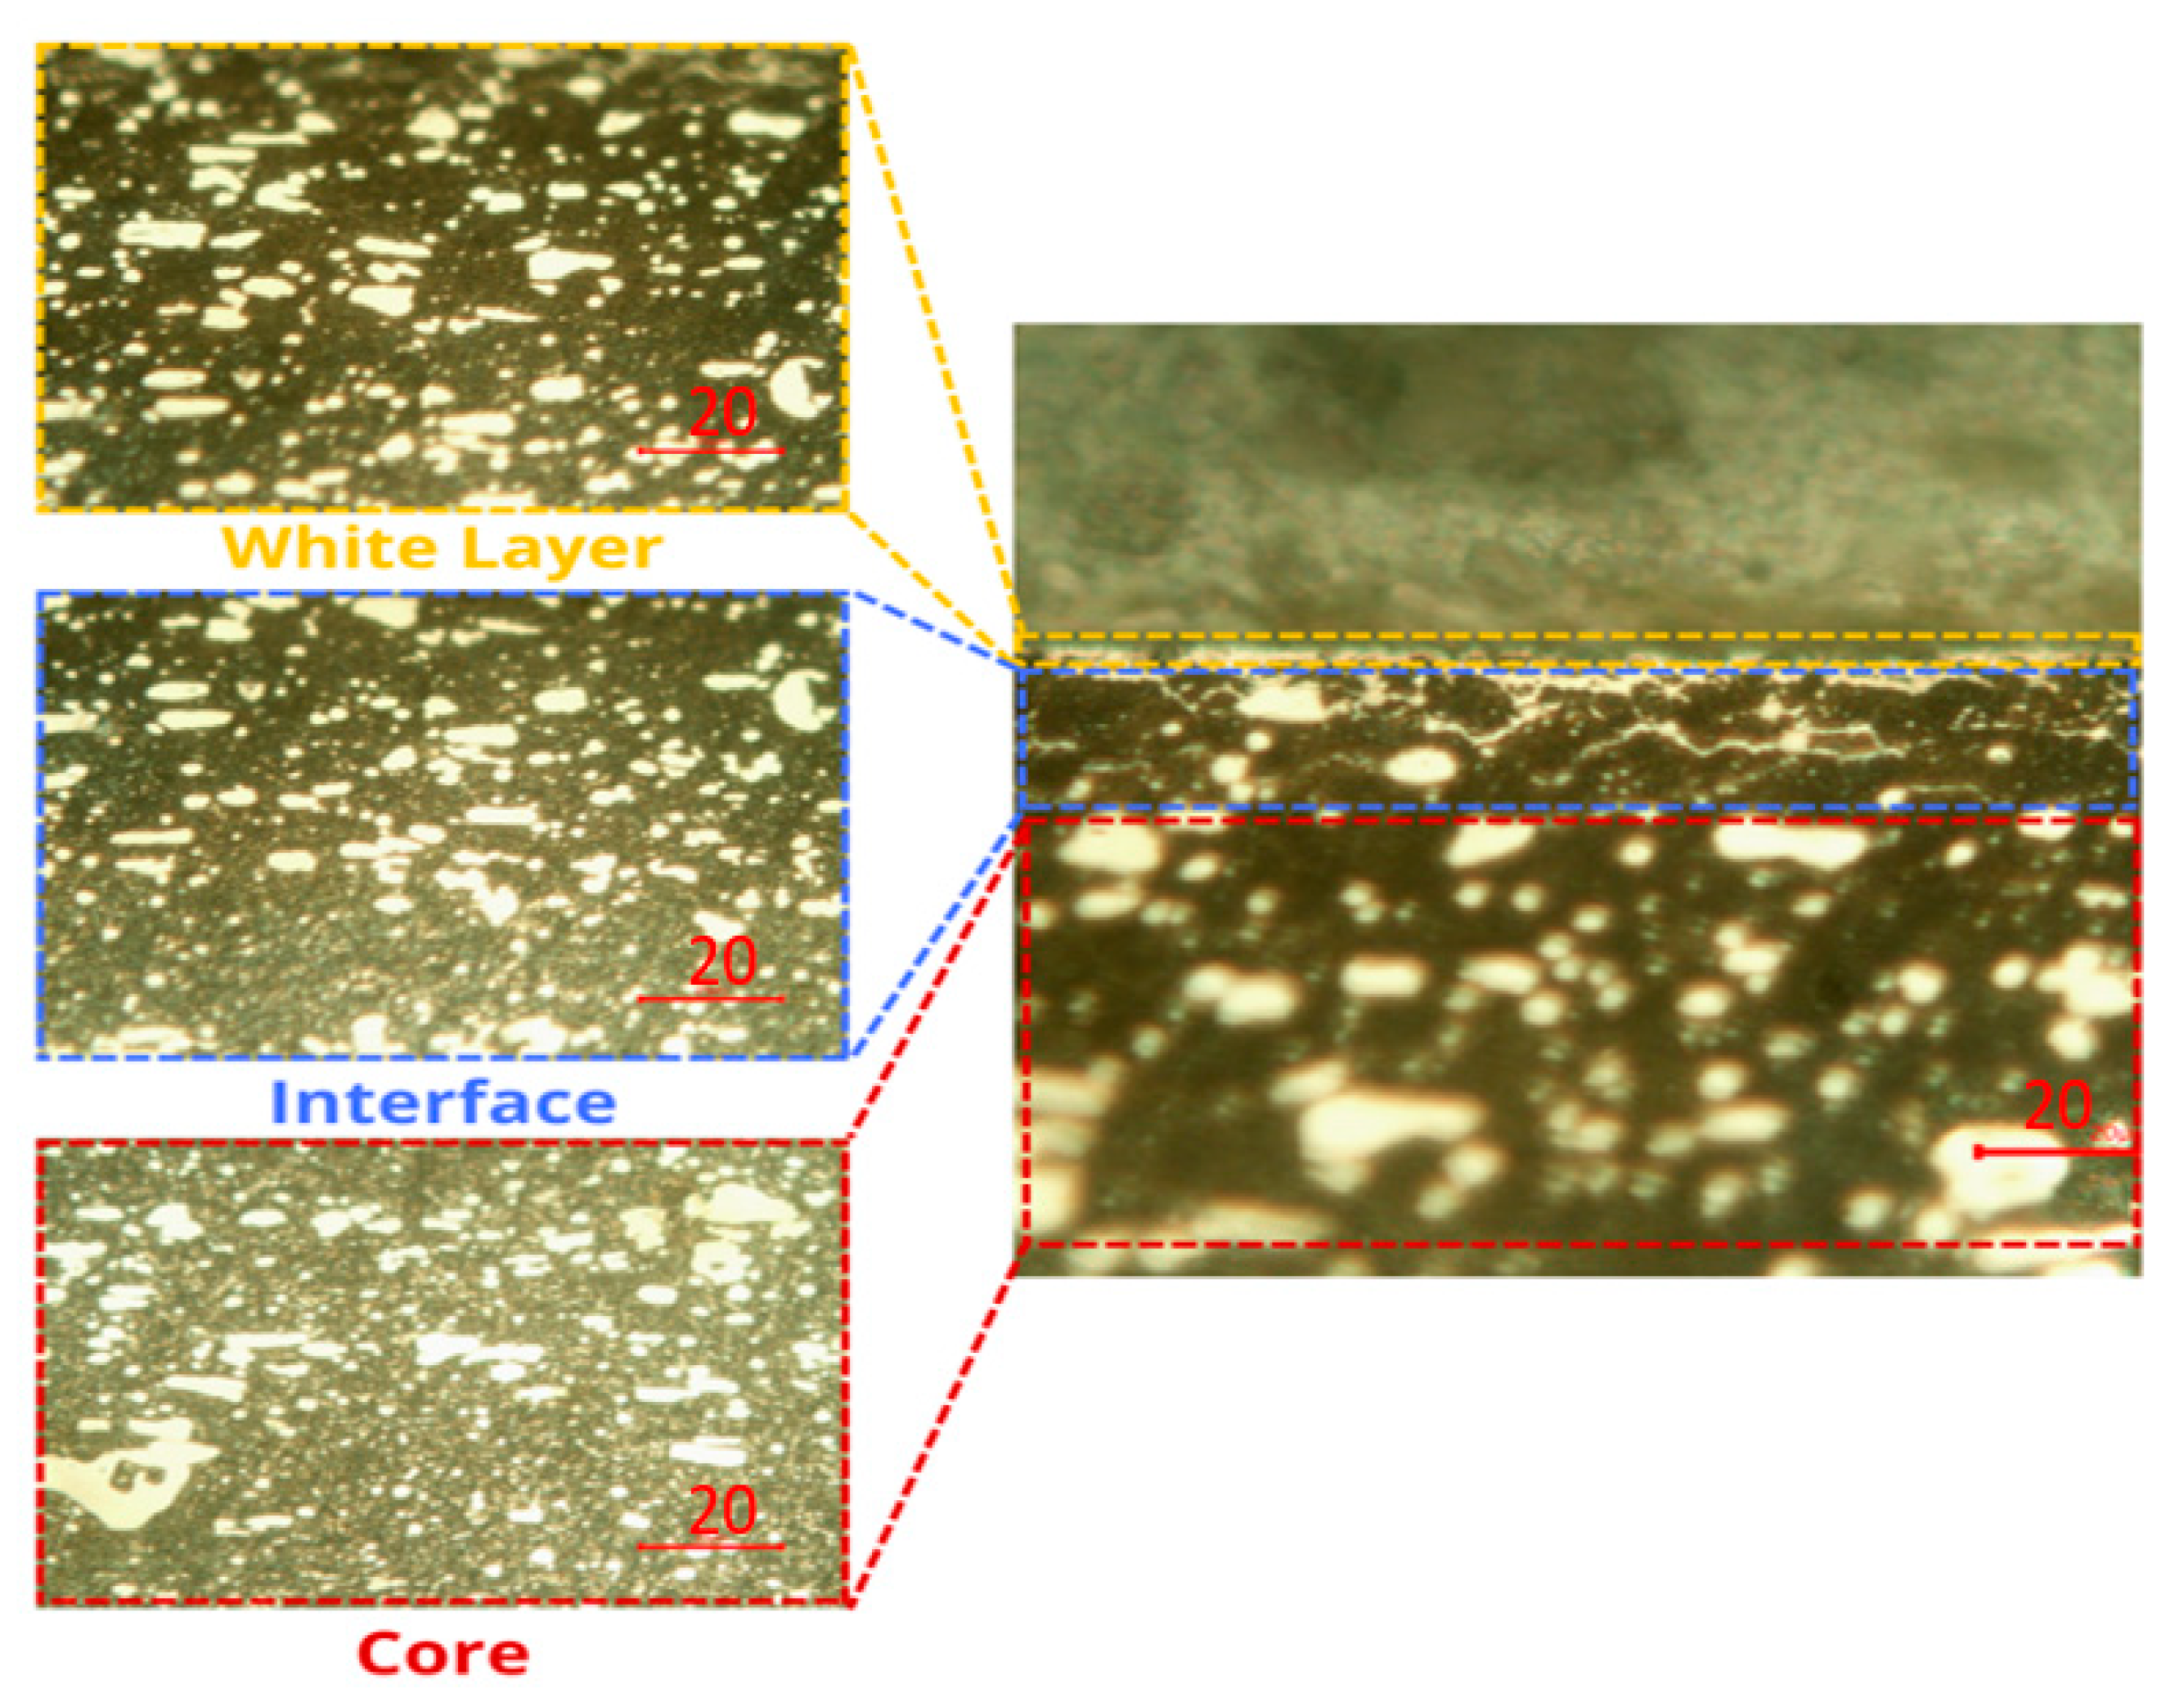
Figure 5 illustrates the typical microstructure of AISI D2 steel after gas nitriding, showing a clear stratification into three distinct zones. On the surface, the white layer, rich in iron and nitrogen nitrides, provides very high surface hardness and excellent protection against wear. Immediately below, the interface zone is characterized by the gradual diffusion of nitrogen into the matrix, promoting the formation of nitrogen-enriched phases that reinforce the mechanical strength of the structure. Finally, the core of the steel retains its original microstructure, preserving the toughness and resilience of the material. The thickness, continuity, and homogeneity of the nitrided layer are key criteria for assessing the quality of the treatment, as they determine the achievement of the desired mechanical properties, such as increased surface hardness and optimized wear resistance, while maintaining the integrity of the core of the steel.

3.2. Chemical Composition

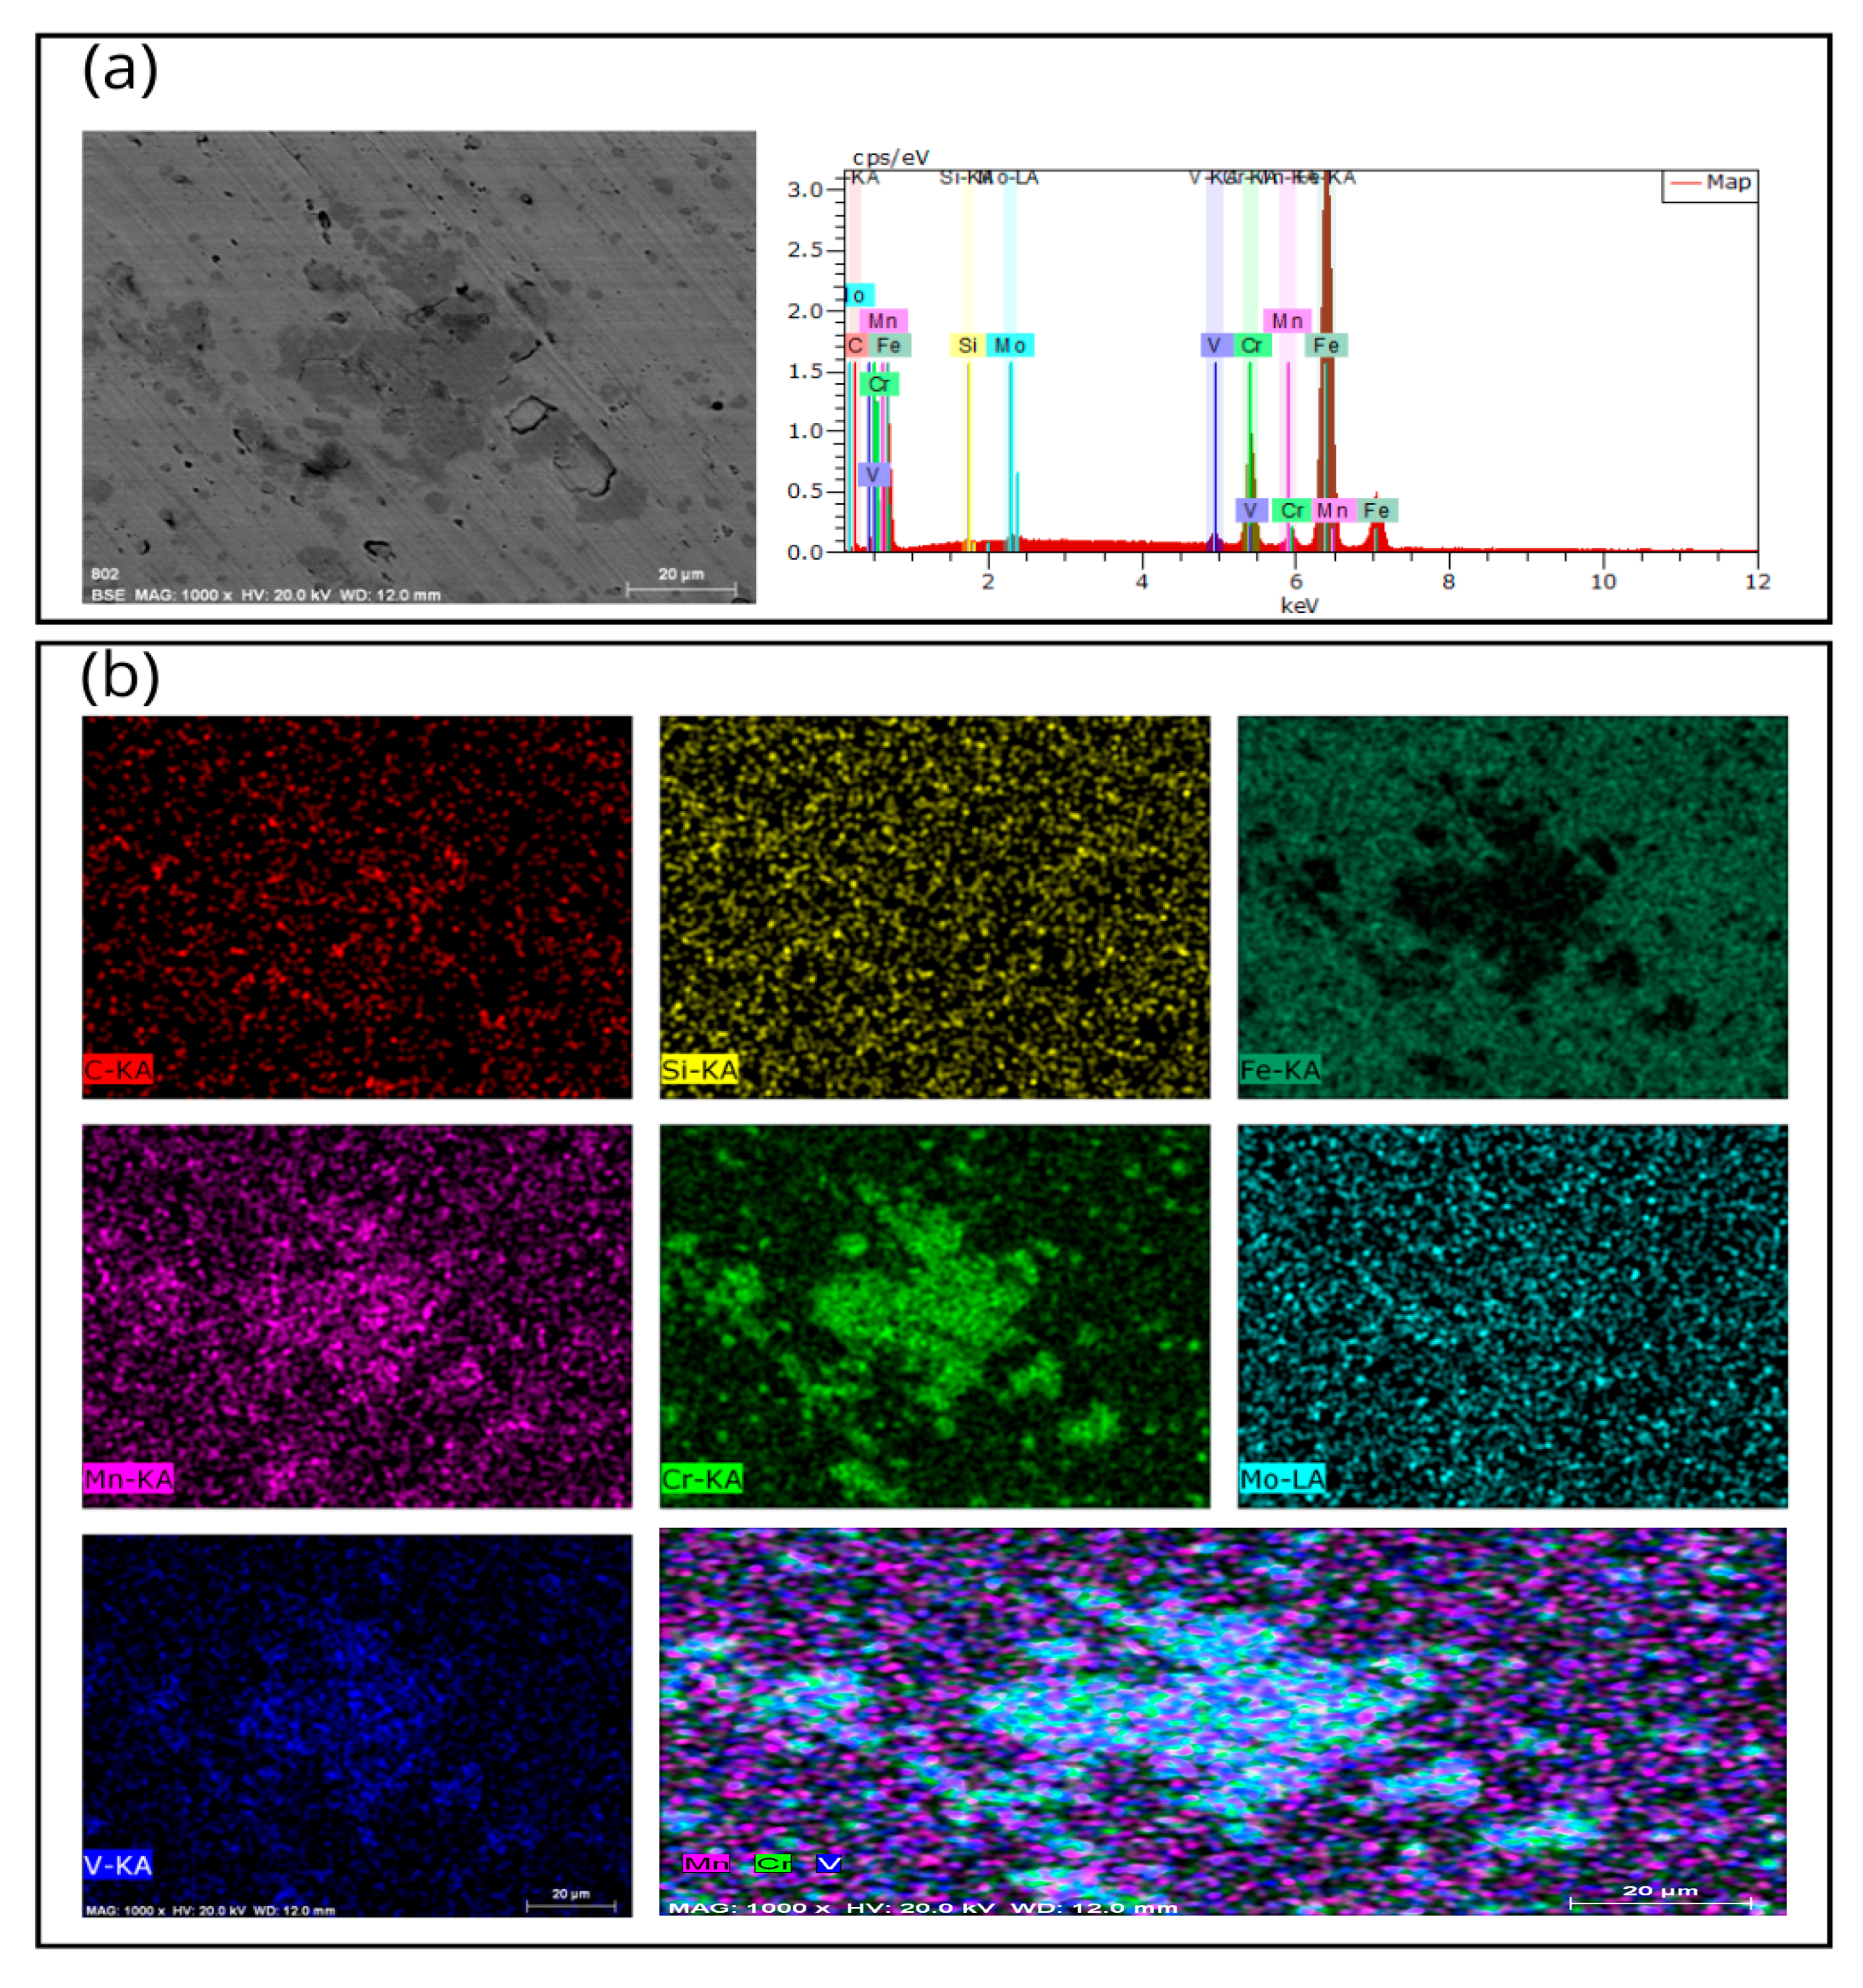
The local chemical composition of the sample was assessed by scanning electron microscopy coupled with X-ray energy-dispersive spectroscopy (SEM-EDX). The elemental map in Figure 6a visualizes the overall distribution of elements within the microstructure, while the specific maps in Figure 6b identify the location of each of the elements analyzed, notably Fe, Cr, V, Mn, Mo, C and Si. These analyses reveal that the carbides present are mainly enriched in chromium, vanadium and manganese, confirming the presence of Cr-rich, V-rich and Mn-rich carbides dispersed in the martensitic matrix. This method thus provides qualitative and semi-quantitative information on the local chemical composition and distribution of secondary phases, essential for correlating the microstructure with the mechanical and tribological properties of AISI D2 steel.

3.3. Microhardness

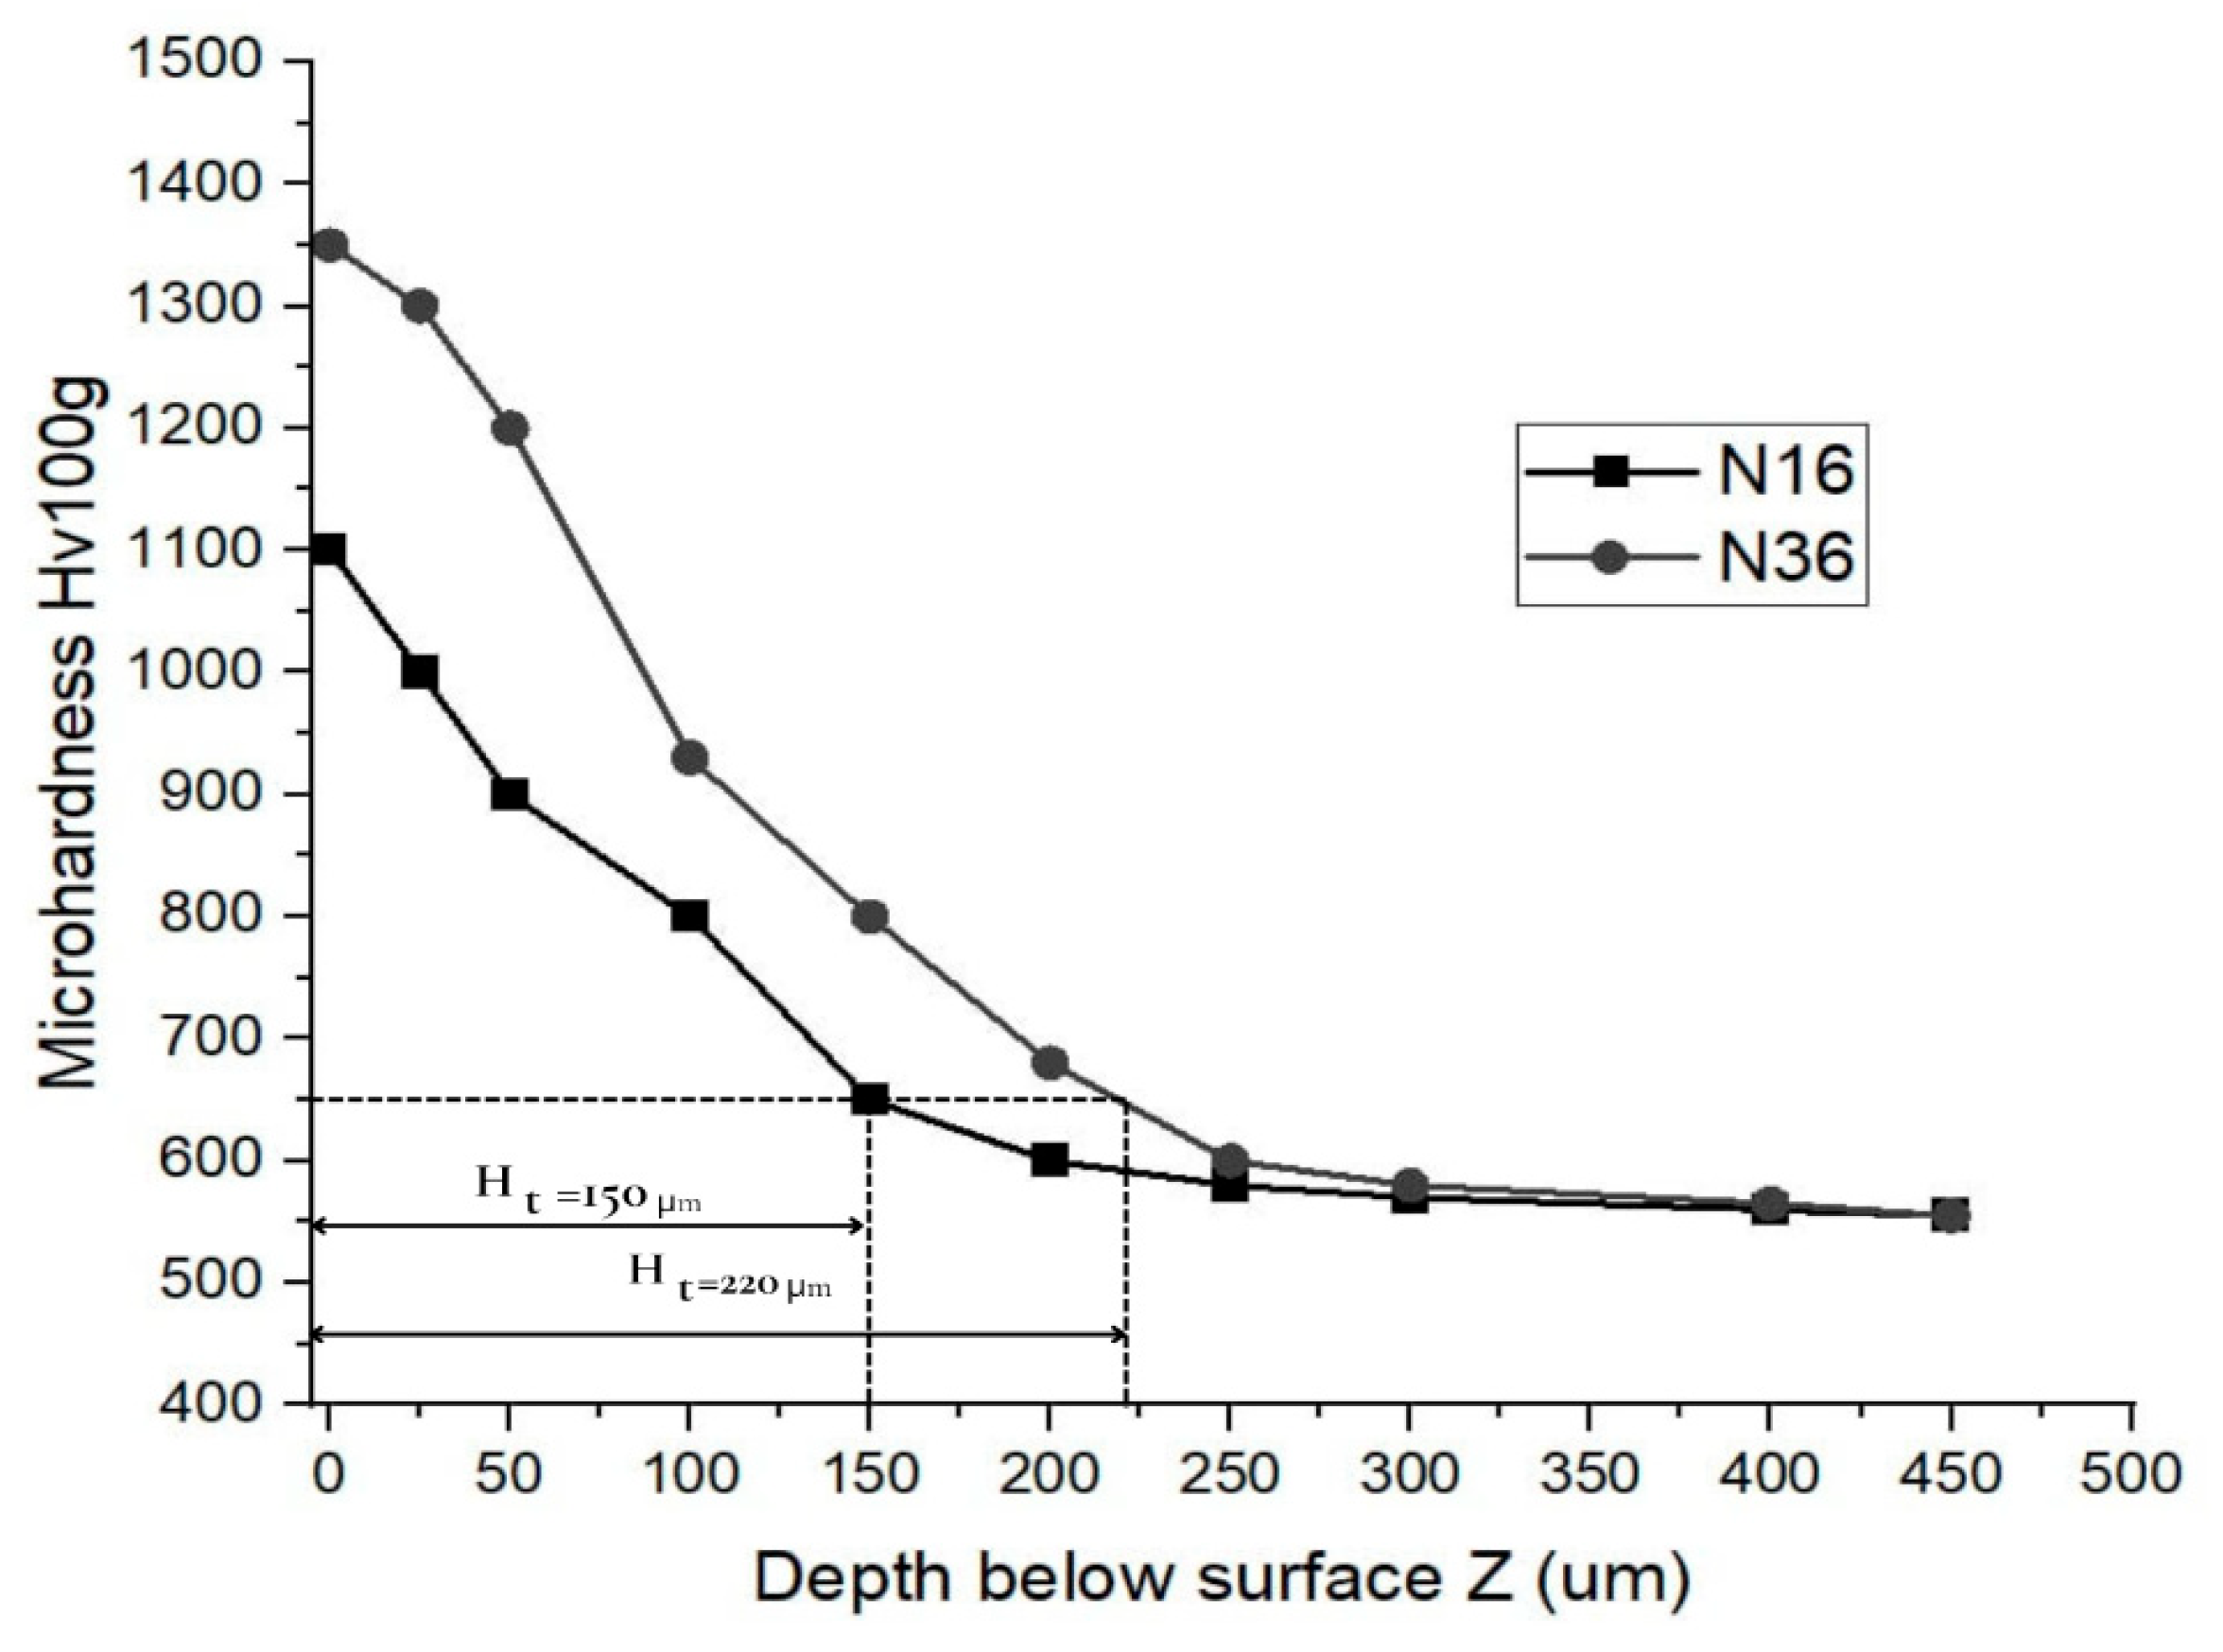
Figure 7 shows the microhardness curves of nitrided D2 steel for two different treatment times, 16 h and 36 h. The results reveal significant variations in surface hardness depending on the treatment process applied. Samples subjected to thermochemical treatment for 16 h show a gradual increase in hardness, reaching a maximum value of 1100 HV0.1 after this period. In contrast, samples thermochemically treated for 36 h showed a higher initial hardness of 1350 Hv0.1, followed by stabilization and a slight decrease in hardness as the treatment time increased.
Analysis of the microhardness curves also highlights the evolution of the hardened layer thickness as a function of depth below the surface Z. After 16 h of nitriding, the thickness of the zone with significantly increased hardness reaches approximately 150 µm, while prolonged treatment at 36 h results in a hardened layer of approximately 220 µm. This increase in hardened thickness is explained by deeper diffusion of nitrogen into the D2 steel matrix, promoting the formation of nitrides and modifying the microstructure at greater depths. Thus, prolonging the thermochemical treatment not only increases surface hardness, but also increases the wear resistance and durability of the part thanks to a thicker functional layer. These results highlight the importance of the duration of the nitriding parameter in controlling the mechanical properties and in-service performance of nitrided steels.

3.4. Wear Behavior

3.4.1. Influence of Normal Force (F)

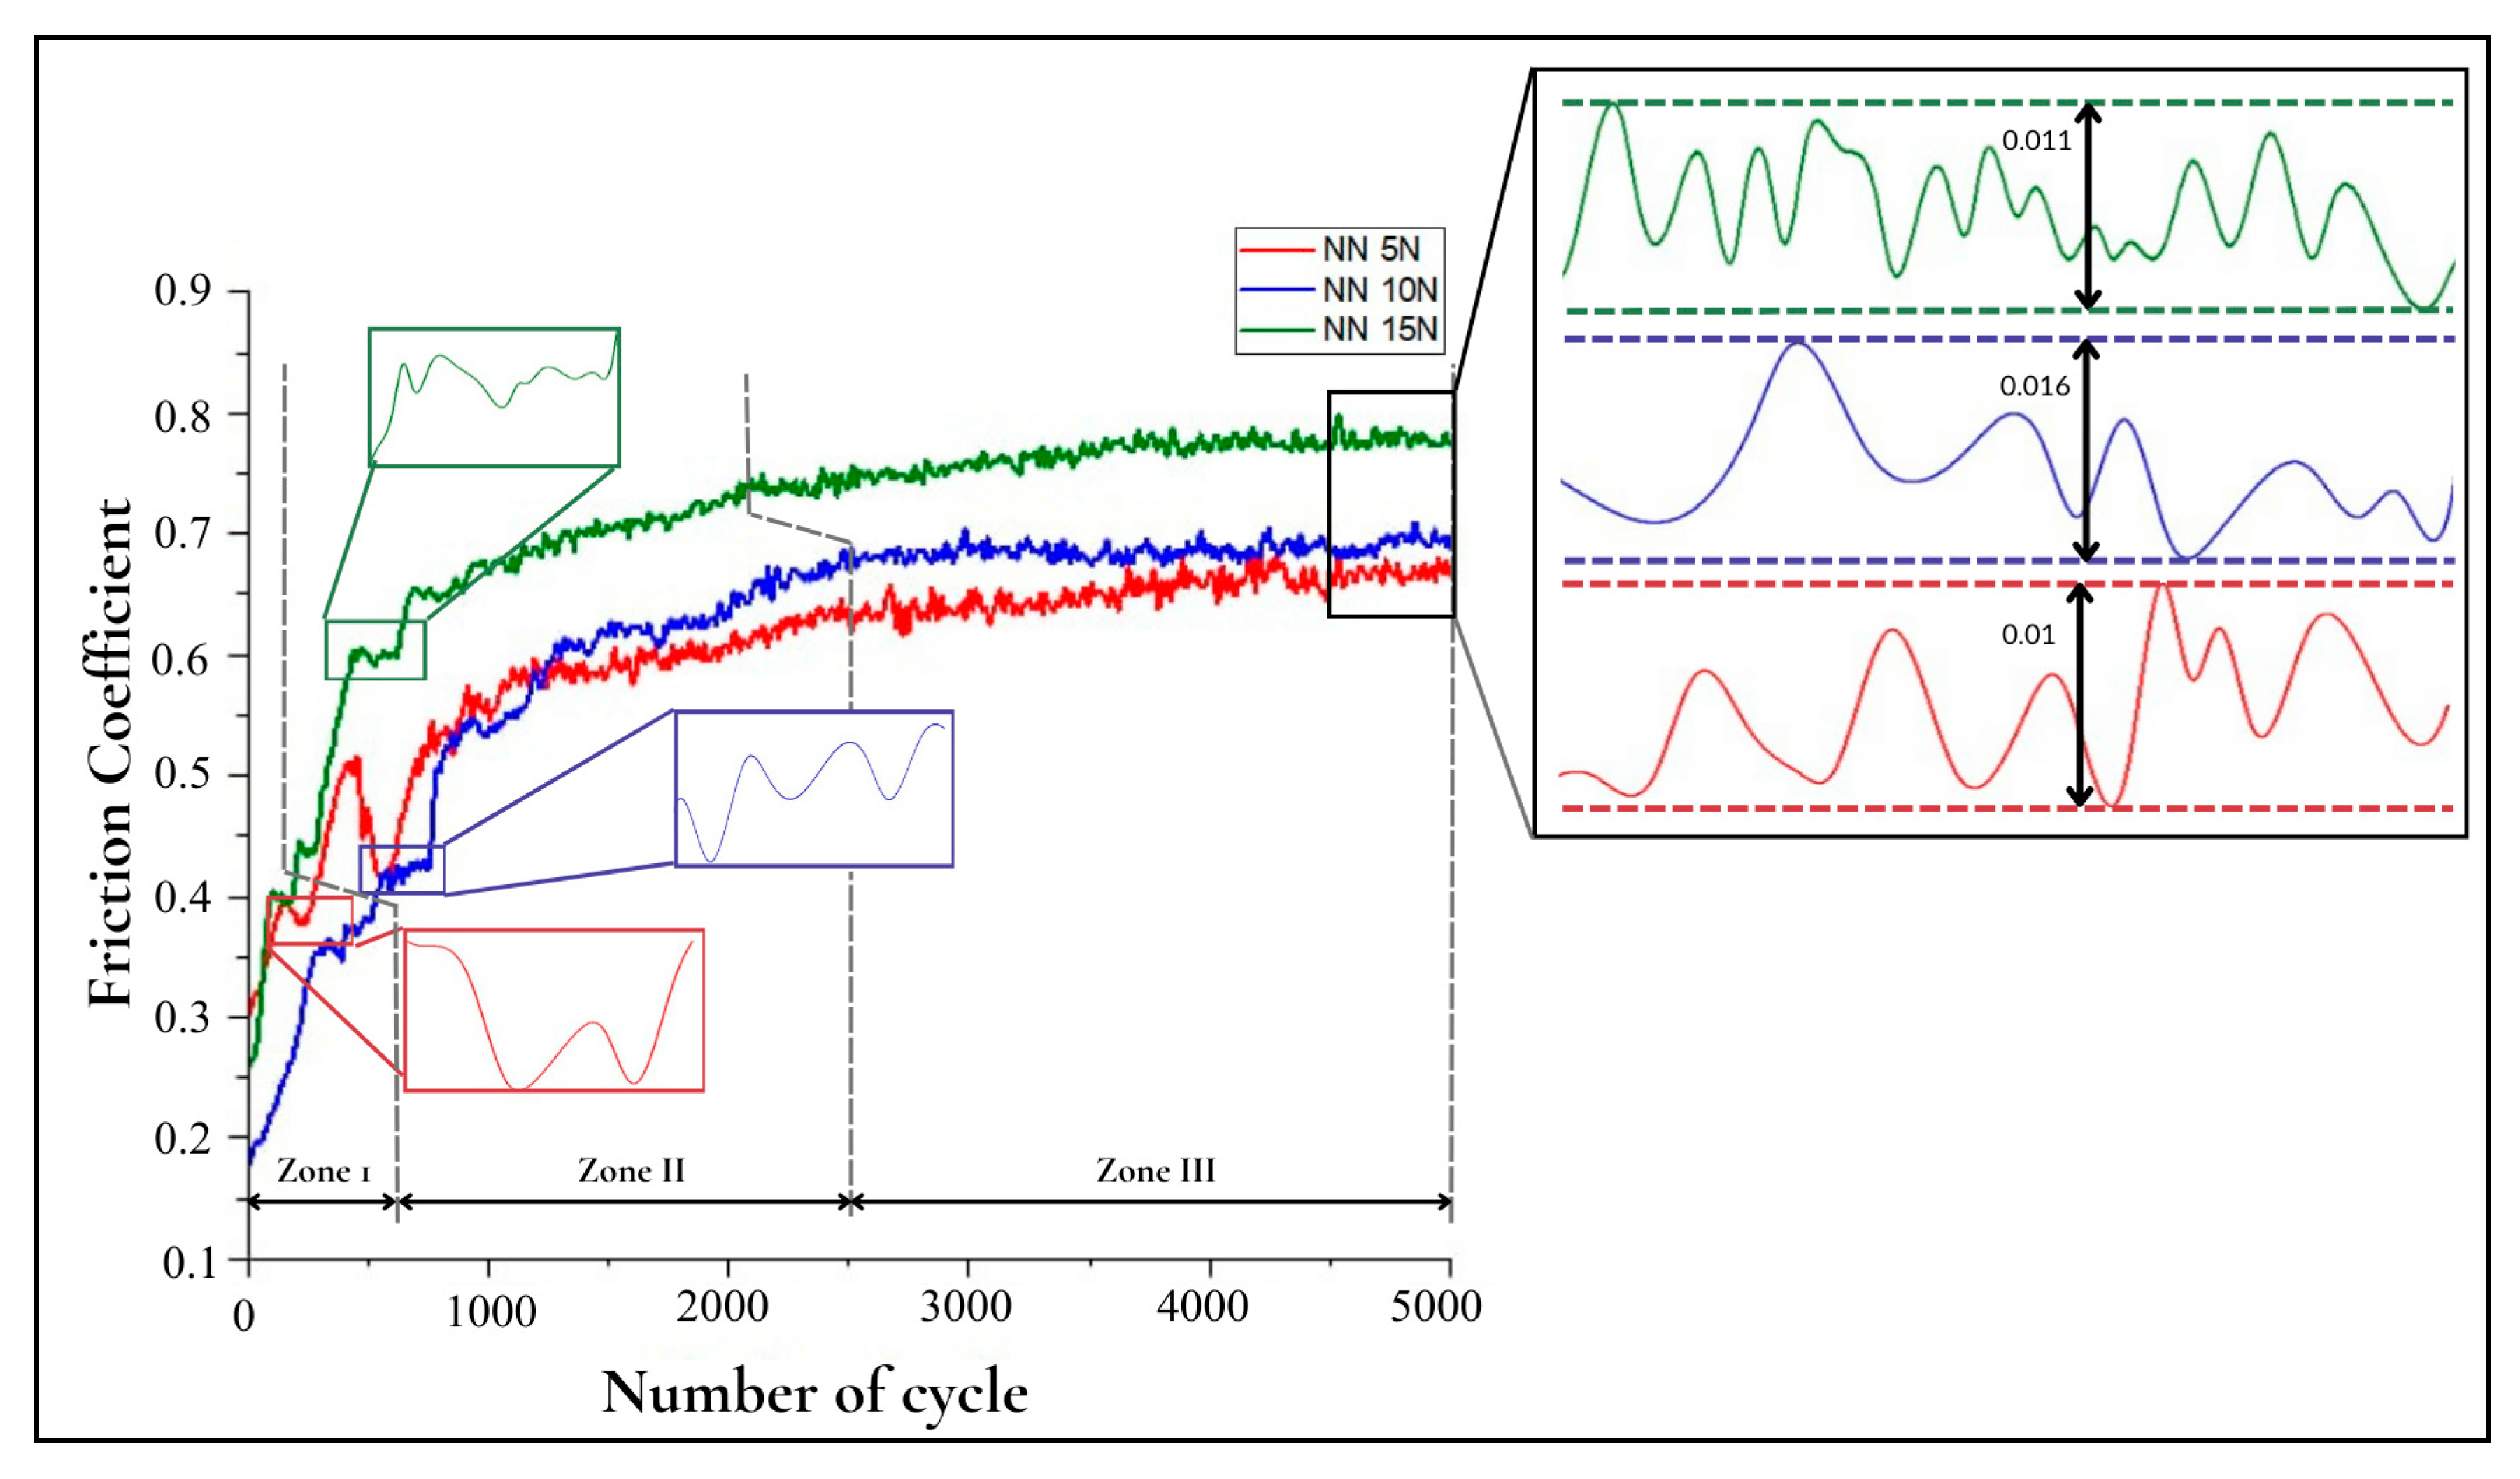
Figure 8 shows the evolution of the coefficient of friction (COF) as a function of the number of cycles up to 5000 cycles and the applied force (5, 10, and 15 N). Based on the COF figure, the sliding behavior of AISI D2 steel was divided into three zones: Zone I: The COF increases rapidly regardless of the force in relation to the number of cycles, where the COF for all curves was almost the same. Zone II: regular sliding zone, starting at around 600 cycles. This zone is characterized by a regular increase in the COF slope for the three forces, with the upward slope being almost the same and parallel. Zone III: rough sliding zone, starting from the boundary of zone II (2500 cycles) and caused by the true COF value with different applied forces. More specifically, the measurements indicate that the normal stress of 5 N produces the lowest COF values, followed by stresses of 10 N and 15 N, which show increasing COF values, respectively. This observation suggests a correlation between lower normal stresses and a lower COF, while higher stresses are associated with an increase in this coefficient. This trend is attributed to variations in deformation and surface interaction mechanisms under different load levels. This trend can be attributed to variations in surface interaction and deformation mechanisms under different load levels: low-intensity loads reduce wear and friction by decreasing contact pressure and plastic deformation, resulting in a lower COF, while higher-intensity loads induce greater contact forces and deformation, resulting in a higher COF.

3.4.2. Influence of Nitriding Treatment

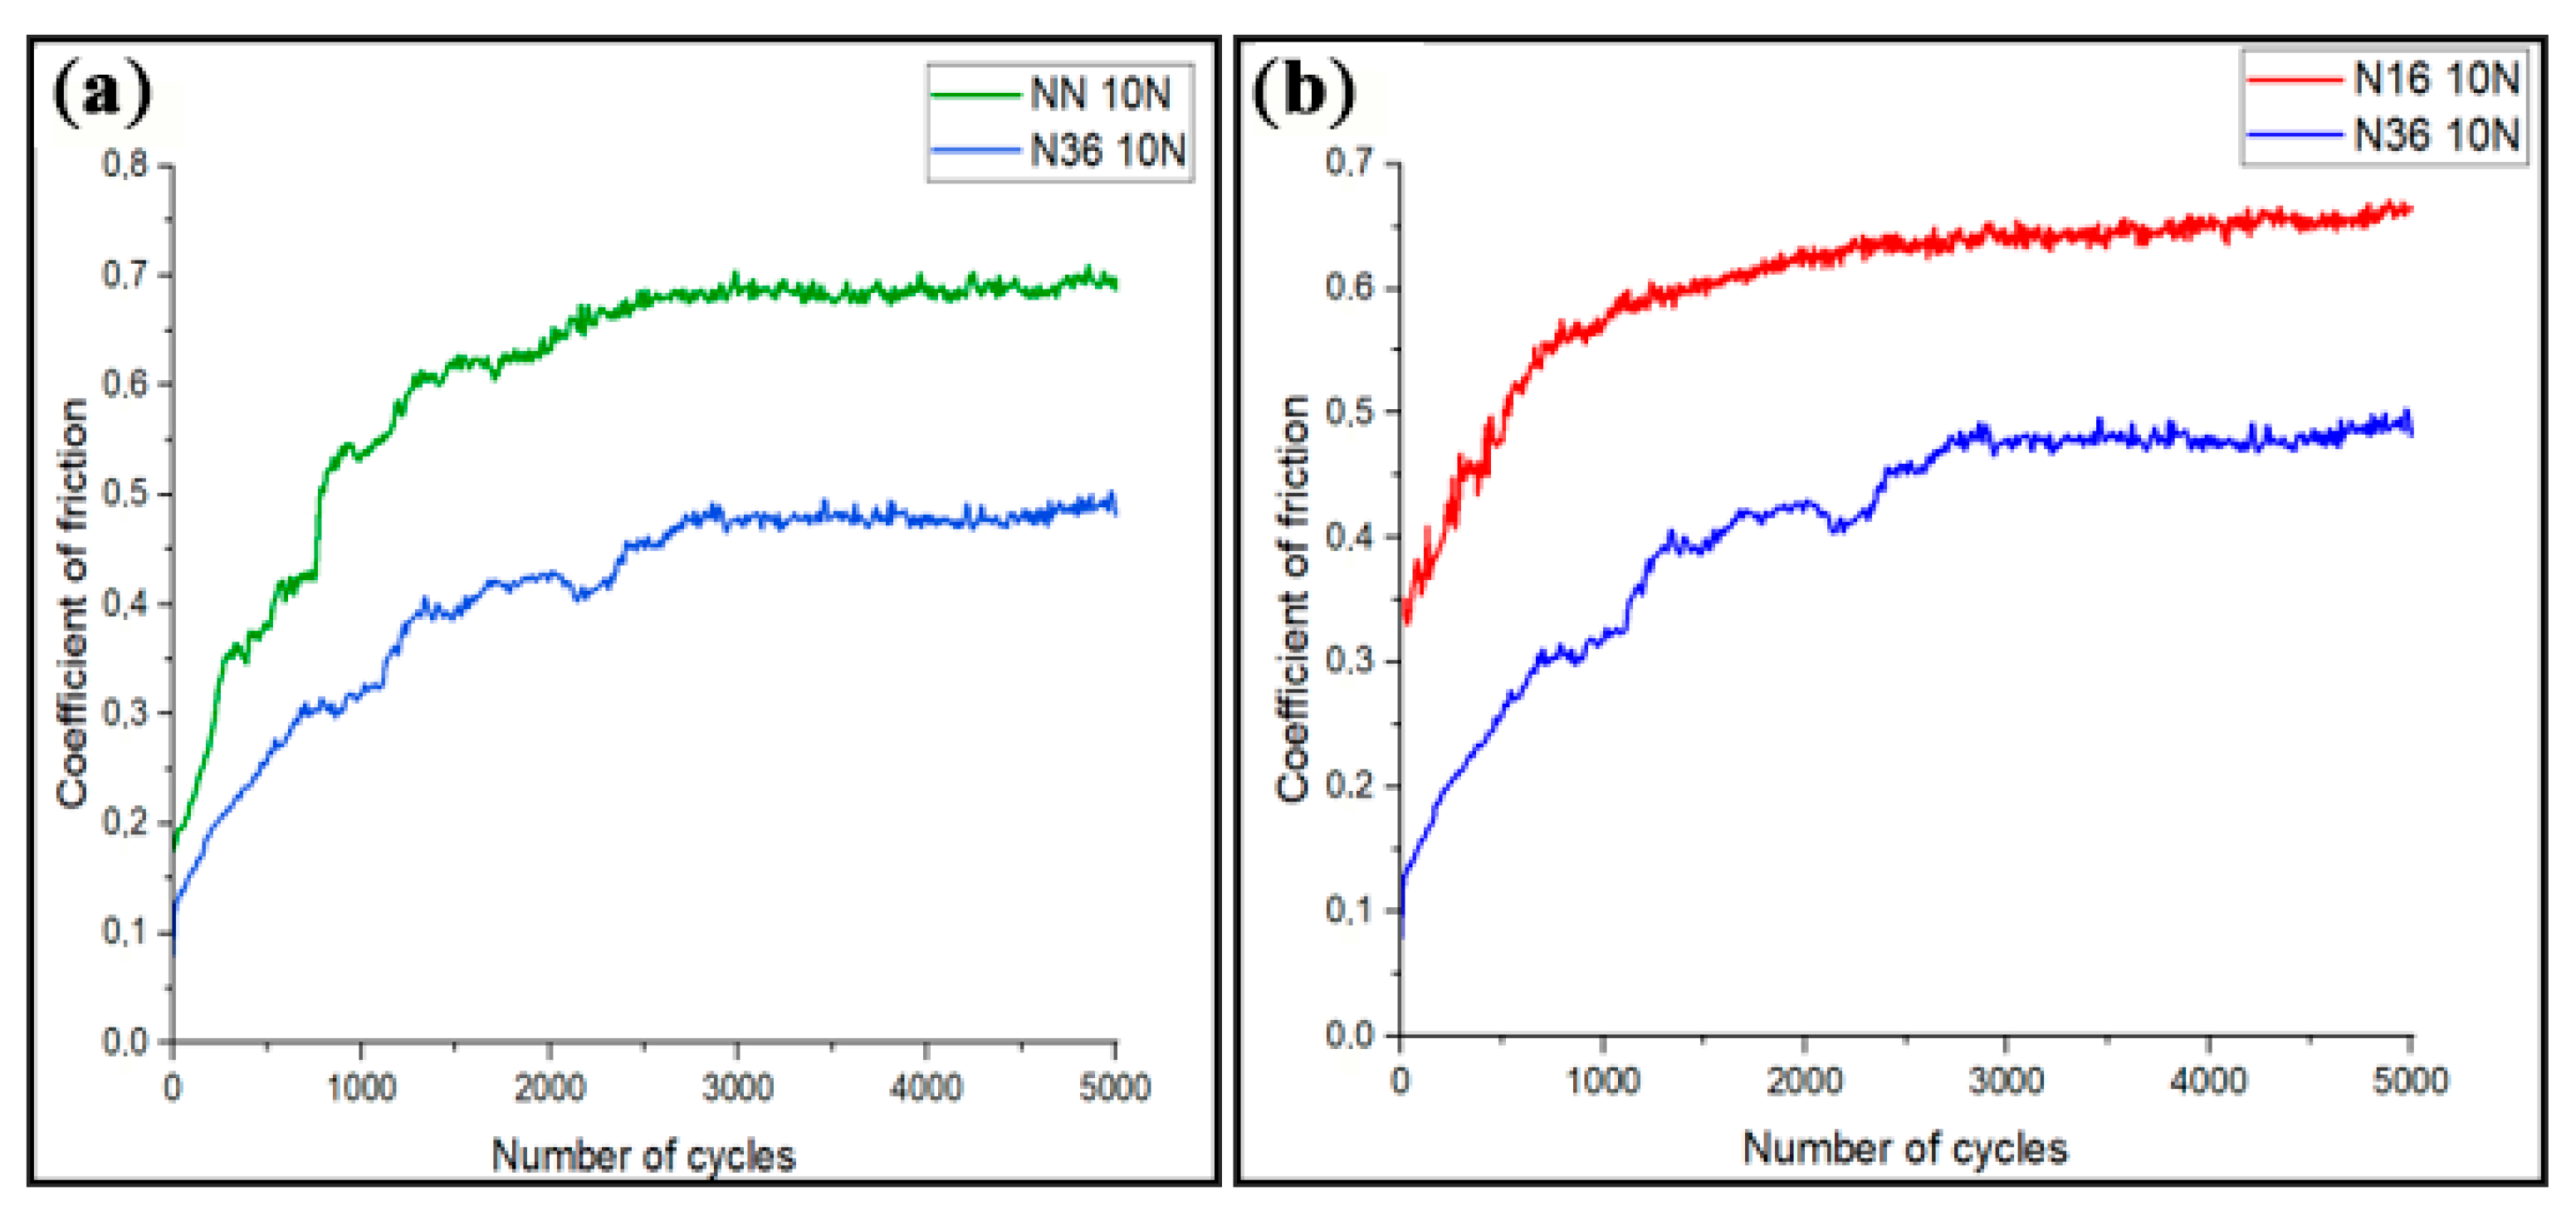
Figure 9 illustrates the evolution of the COF as a function of the number of cycles and surface condition, for a constant normal force of 10 N. As shown in Figure 9a, condition NN has the highest COF, with a result of around 0.7 after stabilization. Condition N36, on the other hand, shows the lowest value, approaching 0.49. Figure 9b validates this hypothesis, with condition N16 generating an intermediate behavior, stabilized at around 0.58. It was observed that the COF exhibits initial instability, with a rapid increase during the first few cycles, before reaching a more stable regime after around 15.103 cycles. These results suggest that increasing surface hardness by gas nitriding leads to a significant reduction in the overall level of friction and an improvement in its stability. Furthermore, the N36 condition stands out for its most favorable tribological performance over all 5.103 cycles.
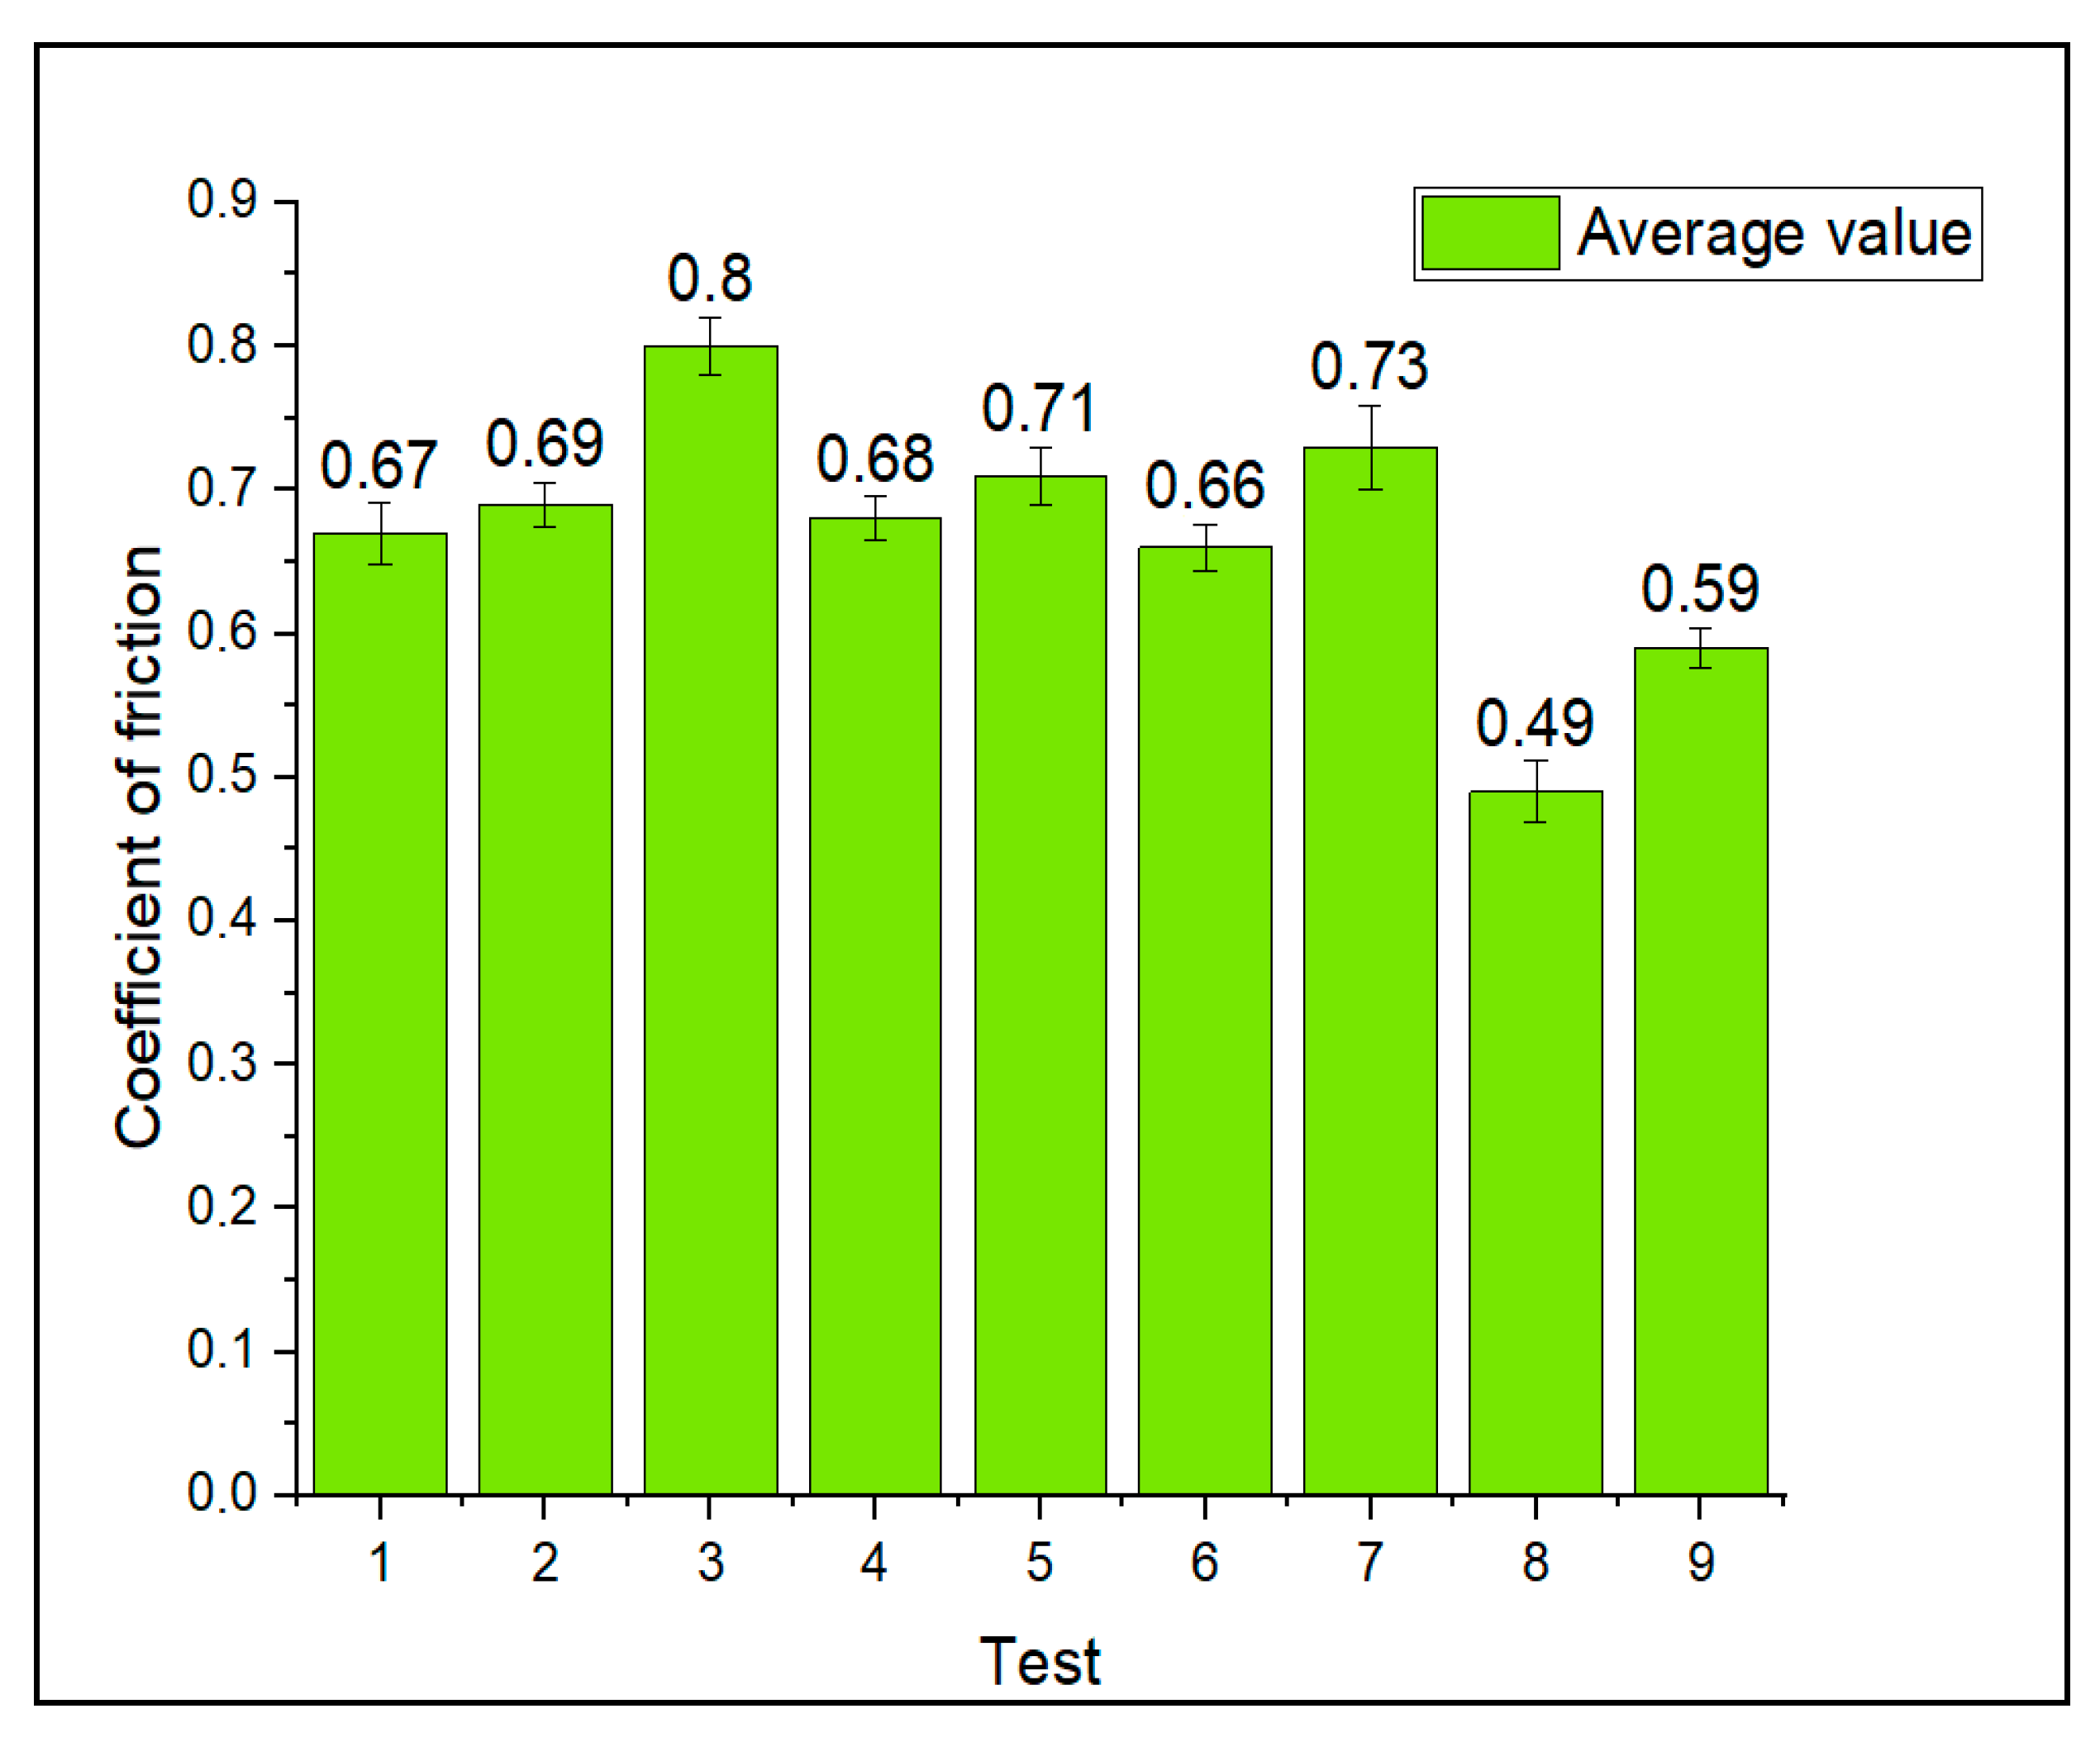
Figure 10 shows the results of the COF in the form of a histogram and highlights a marked variability in the average COF, with values ranging from 0.49 to 0.80 depending on the test conditions. Test number 3 has the highest coefficient (0.80), reflecting greater adhesion on contact, while test number 8 has the lowest value (0.49), indicating a more stable friction regime and potentially less wear. These differences highlight the decisive influence of operating conditions on the tribological behavior of the tested surfaces.

3.4.3. Wear Microstructure

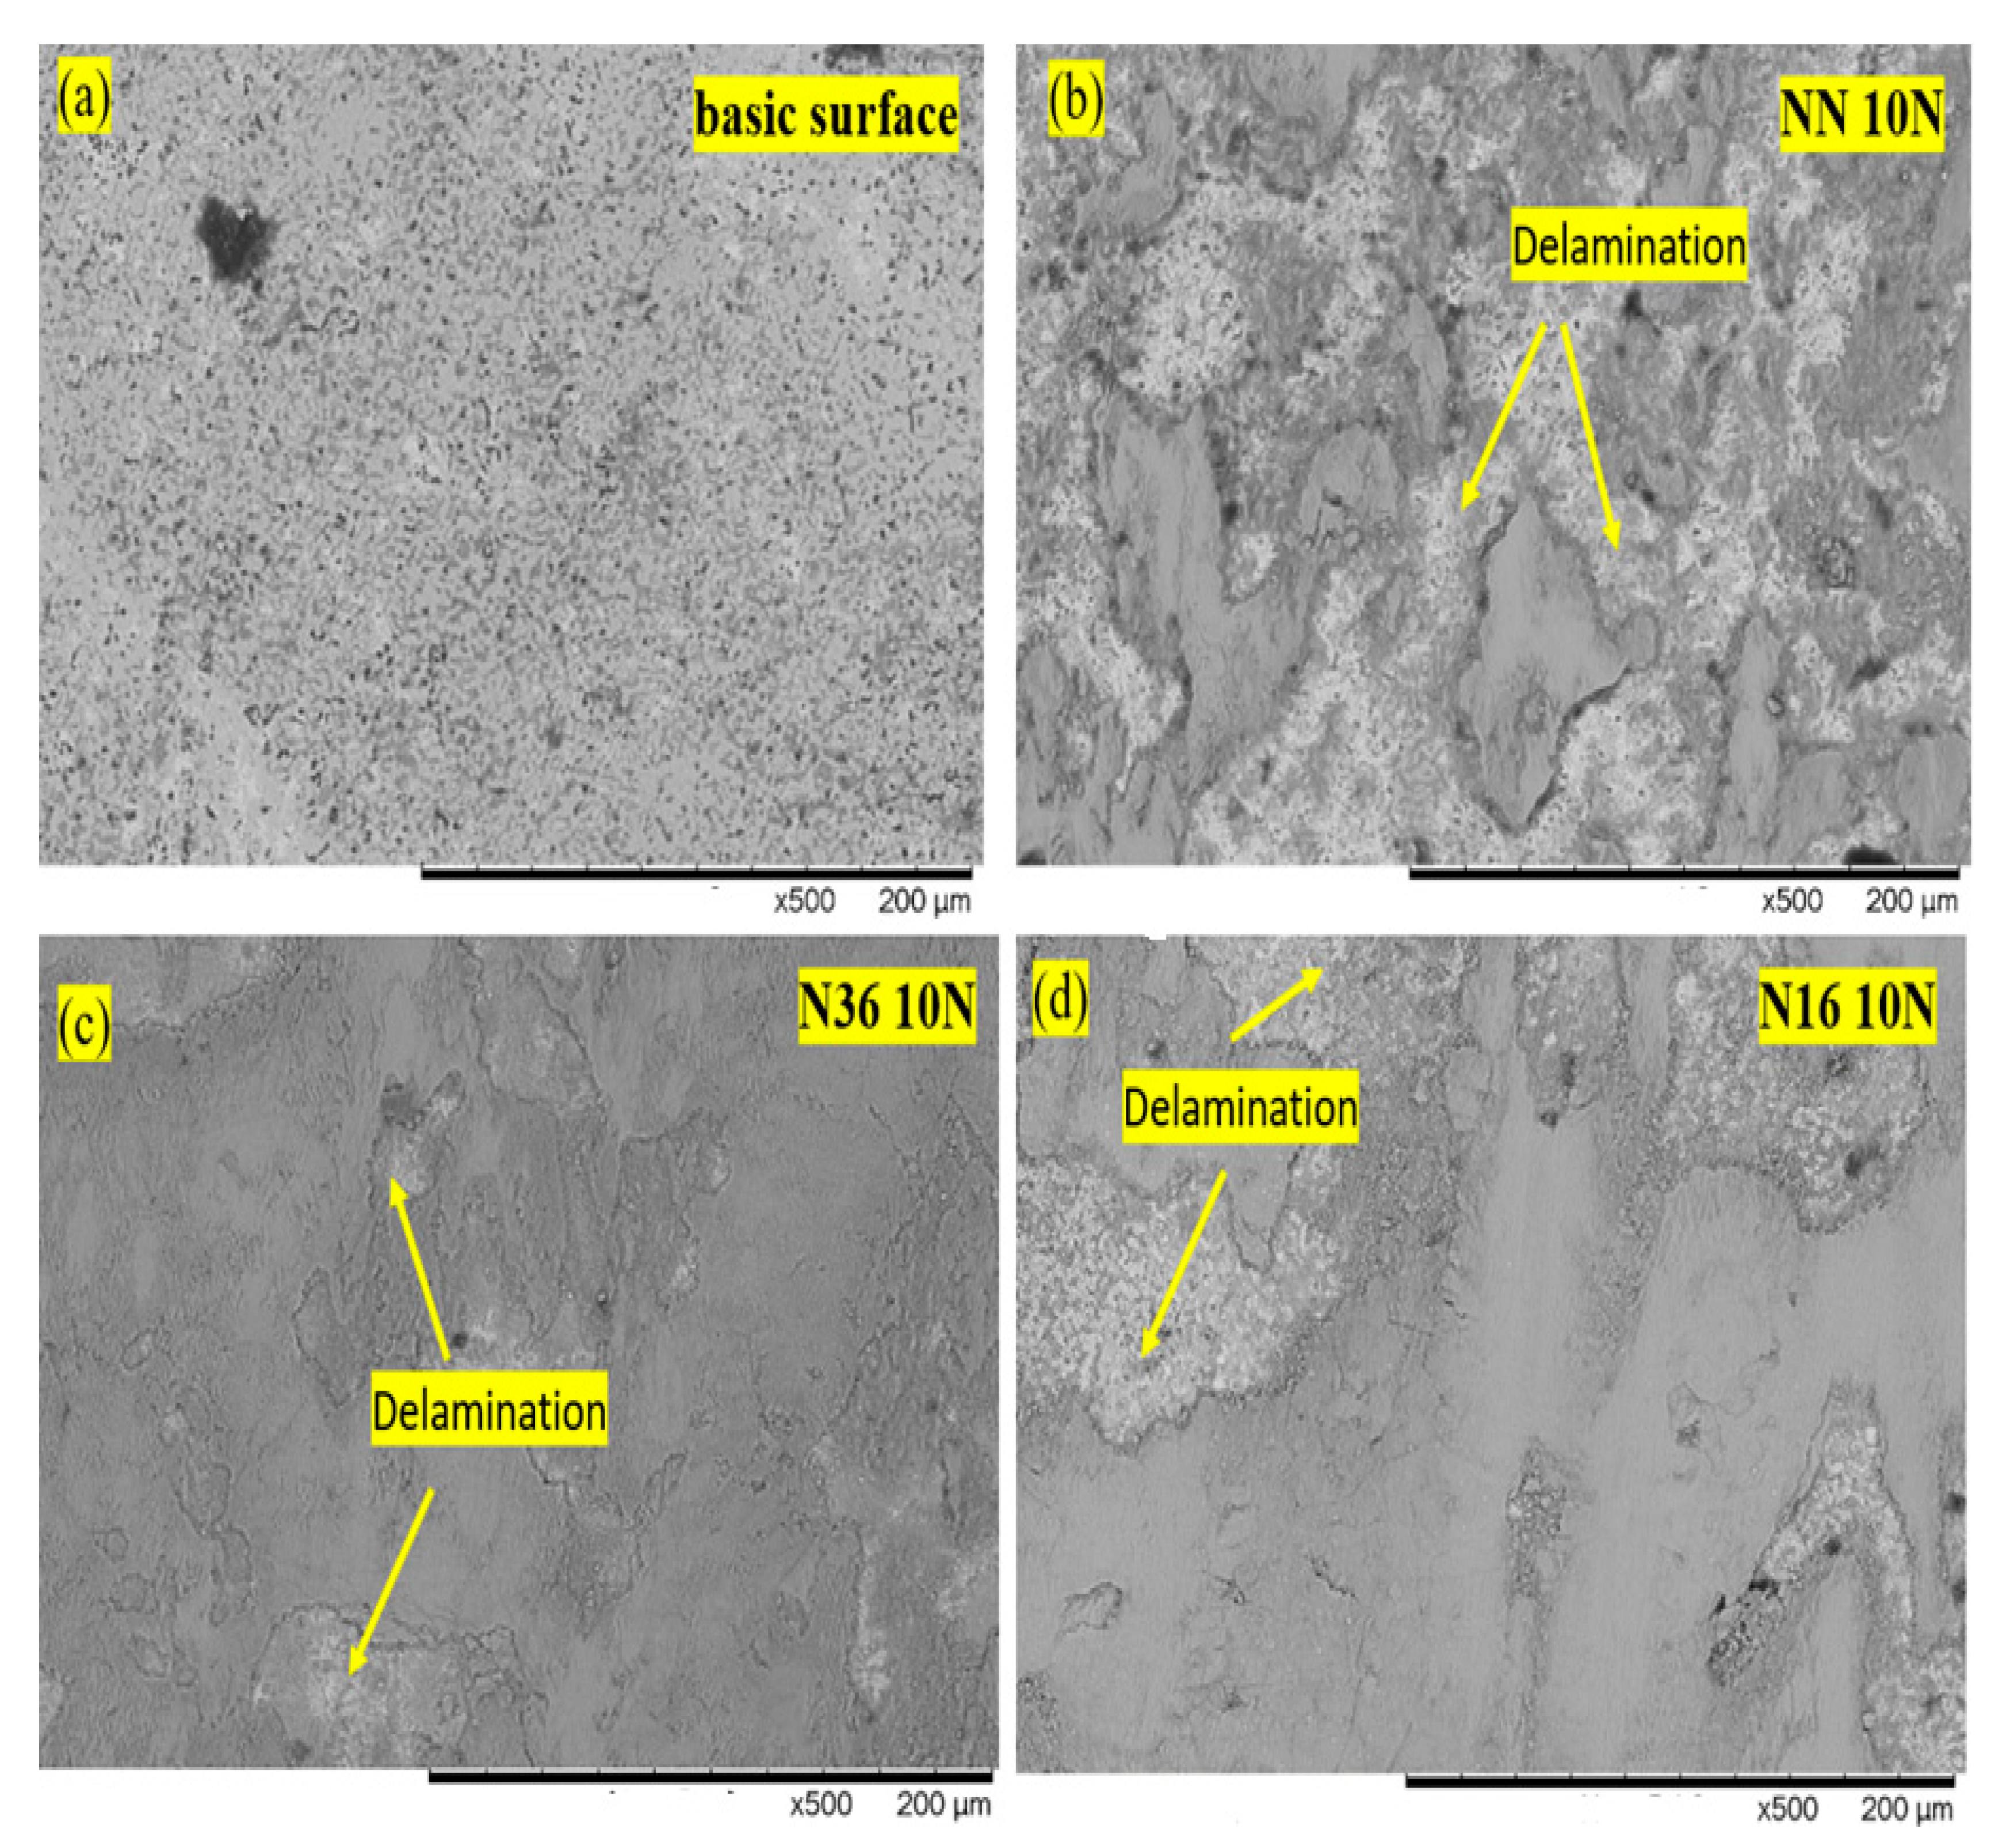
Figure 11 illustrates the observations made by scanning electron microscopy (SEM), highlighting the substantial impact of gas nitriding on the material’s wear resistance. The non-nitrided sample (NN:10 N) shows severe wear, accompanied by marked delamination, indicating relatively low mechanical strength under load, while the nitride samples show a marked improvement in wear resistance. The sample nitrided for 16 h (N16: 10 N) still shows signs of delamination, but these are less marked than on the non-nitrided sample, suggesting an improvement in surface quality. The sample nitrided for 36 h (N36: 10 N) shows the best resistance, with a more uniform and less damaged surface, confirming that the longer the nitriding time, the better the protection against wear. Thus, gas nitriding plays an essential role in strengthening the surface layer of the material, thus causing wear and delamination.
(a) NN worn surface
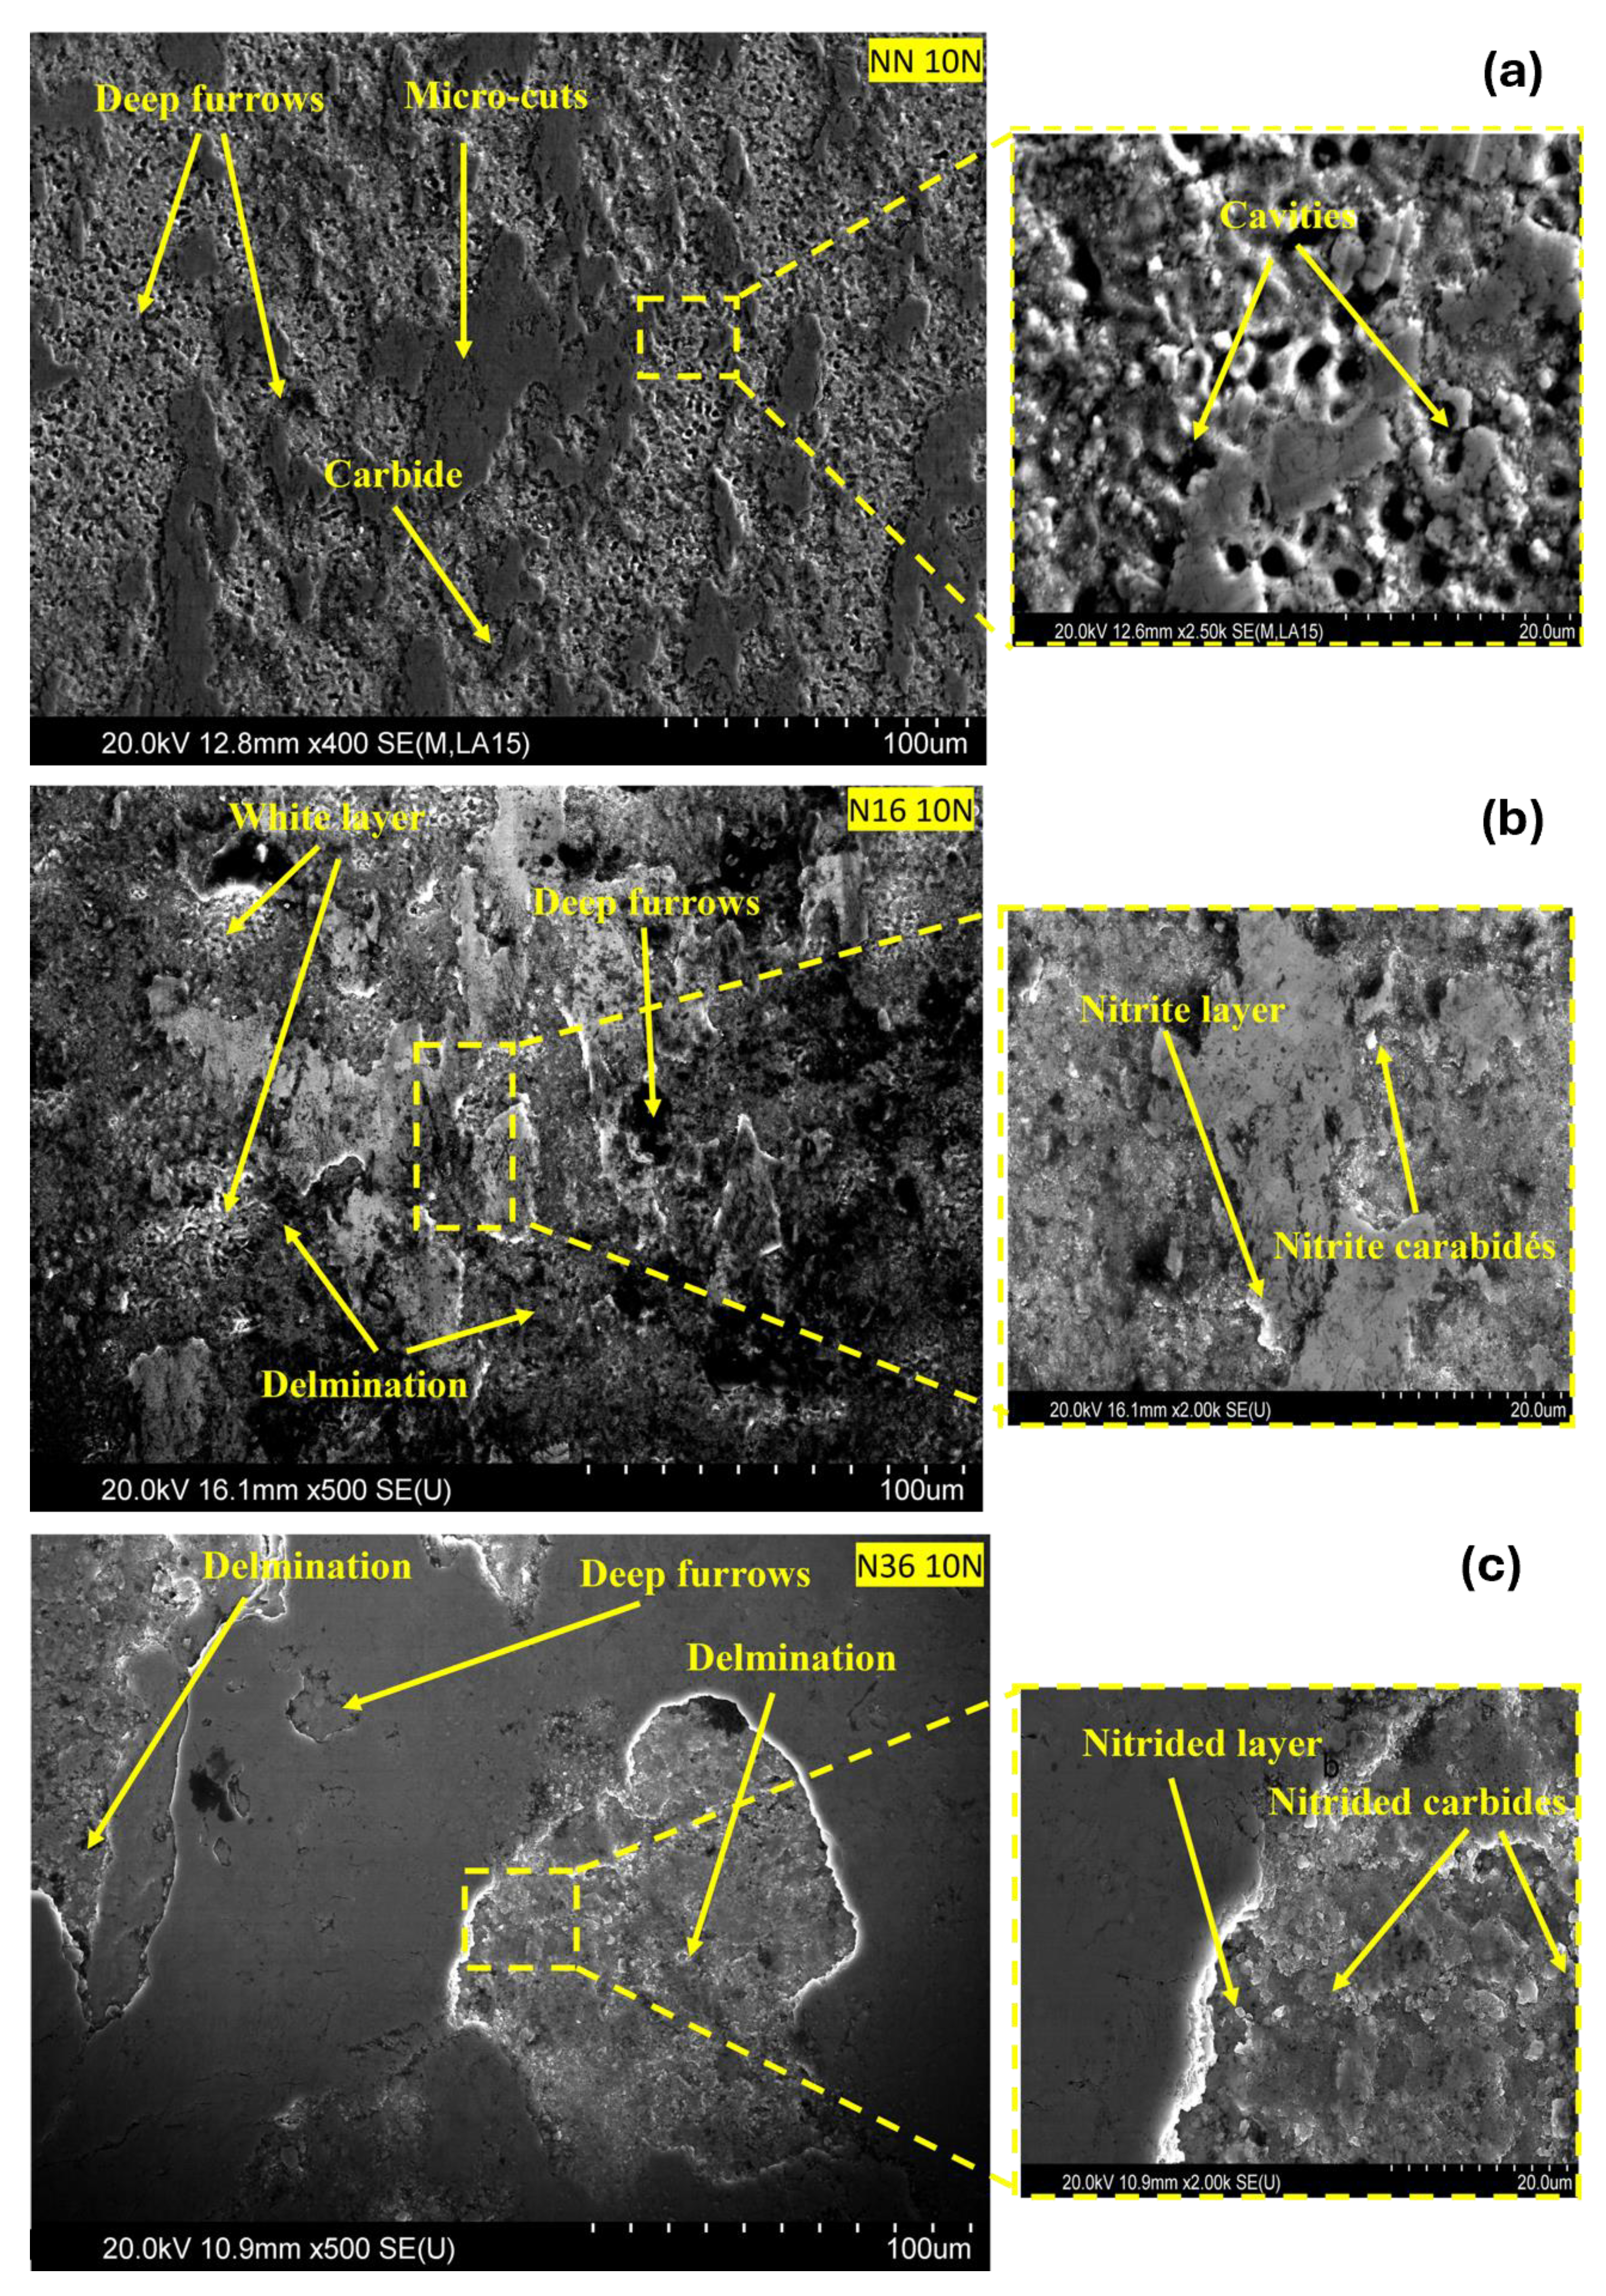
Figure 12a shows the SEM image of non-nitrided AISI D2 steel shows a highly degraded surface, characterized by a very rough topography with numerous cavities and asperities, revealing intense abrasive wear where hard particles, either from the environment or generated by friction, tear away material and form deep grooves and micro-cuts. Local plastic deformation is clearly visible, with areas where the matrix appears to have been crushed or laminated under repeated mechanical stress. Physically, the absence of nitriding maintains surface hardness at the level of hardened D2, without the benefit of nitrogen diffusion strengthening, making the surface vulnerable to microcrack propagation and particle pull-out despite the presence of carbides in the matrix. This brittleness encourages the formation of wear debris. In addition, the dissipation of energy by friction leads to a local rise in temperature, accentuating the phenomena of surface oxidation and embrittlement. This image illustrates a severe wear regime dominated by abrasion and plasticity, where low surface resistance leads to rapid material degradation, underlining the need for surface treatment to improve the wear resistance of D2 steel under demanding tribological conditions.
(b) N16 worn surface
After 16 h of nitriding, the surface of AISI D2 steel shows a marked evolution, as shown in Figure 12b of the SEM image revealing large areas delimited by clear cracks, signs of partial delamination of the nitrided layer. This morphology results from the formation of a layer of nitride compounds on the surface, which confers increased hardness, but remains relatively thin and brittle under repeated mechanical stress. Nitriding induces a residual stress gradient and a local rise in hardness, thus reducing plastic deformation of the surface. However, a layer that is too thin or contains defects such as porosities or microcracks may crack and delaminate under load cycles, exposing the underlying, less hard matrix. This delamination is typical of a surface fatigue wear mechanism, in which the accumulation of microcracks leads to the breakdown of the protective layer. The image thus highlights a compromise: while 16 hours of nitriding improves initial wear resistance, long-term durability remains limited by the cohesion and thickness of the nitrided layer, as suggested by the reduction in abrasive wear and the persistent presence of cracks and delaminated zones, indicating a still-high level of protection compared to the non-nitrided state.
(c) N36 worn surface
The surface of D2 steel nitrided for 36 h has a much smoother, more homogeneous morphology, as shown in Figure 12c SEM images, which reveal a marked reduction in asperities and wear debris, as well as a virtual absence of major cracks. This transformation results in the formation of a thick, dense and continuous nitrided layer, capable of effectively resisting the mechanical and thermal stresses imposed by tribological contact. From a physical point of view, prolonged nitrogen diffusion induces a greater hardness gradient and better cohesion between the layer of nitrided compounds and the substrate, which considerably improves mechanical strength. The high surface hardness limits plastic deformation and inhibits the propagation of microcracks. This picture illustrates the effectiveness of the extended treatment: 36 h of nitriding gives D2 steel significantly enhanced wear resistance, guaranteeing long-lasting protection and dimensional stability of the surface under severe friction conditions.

3.4.4. Degradation Mode

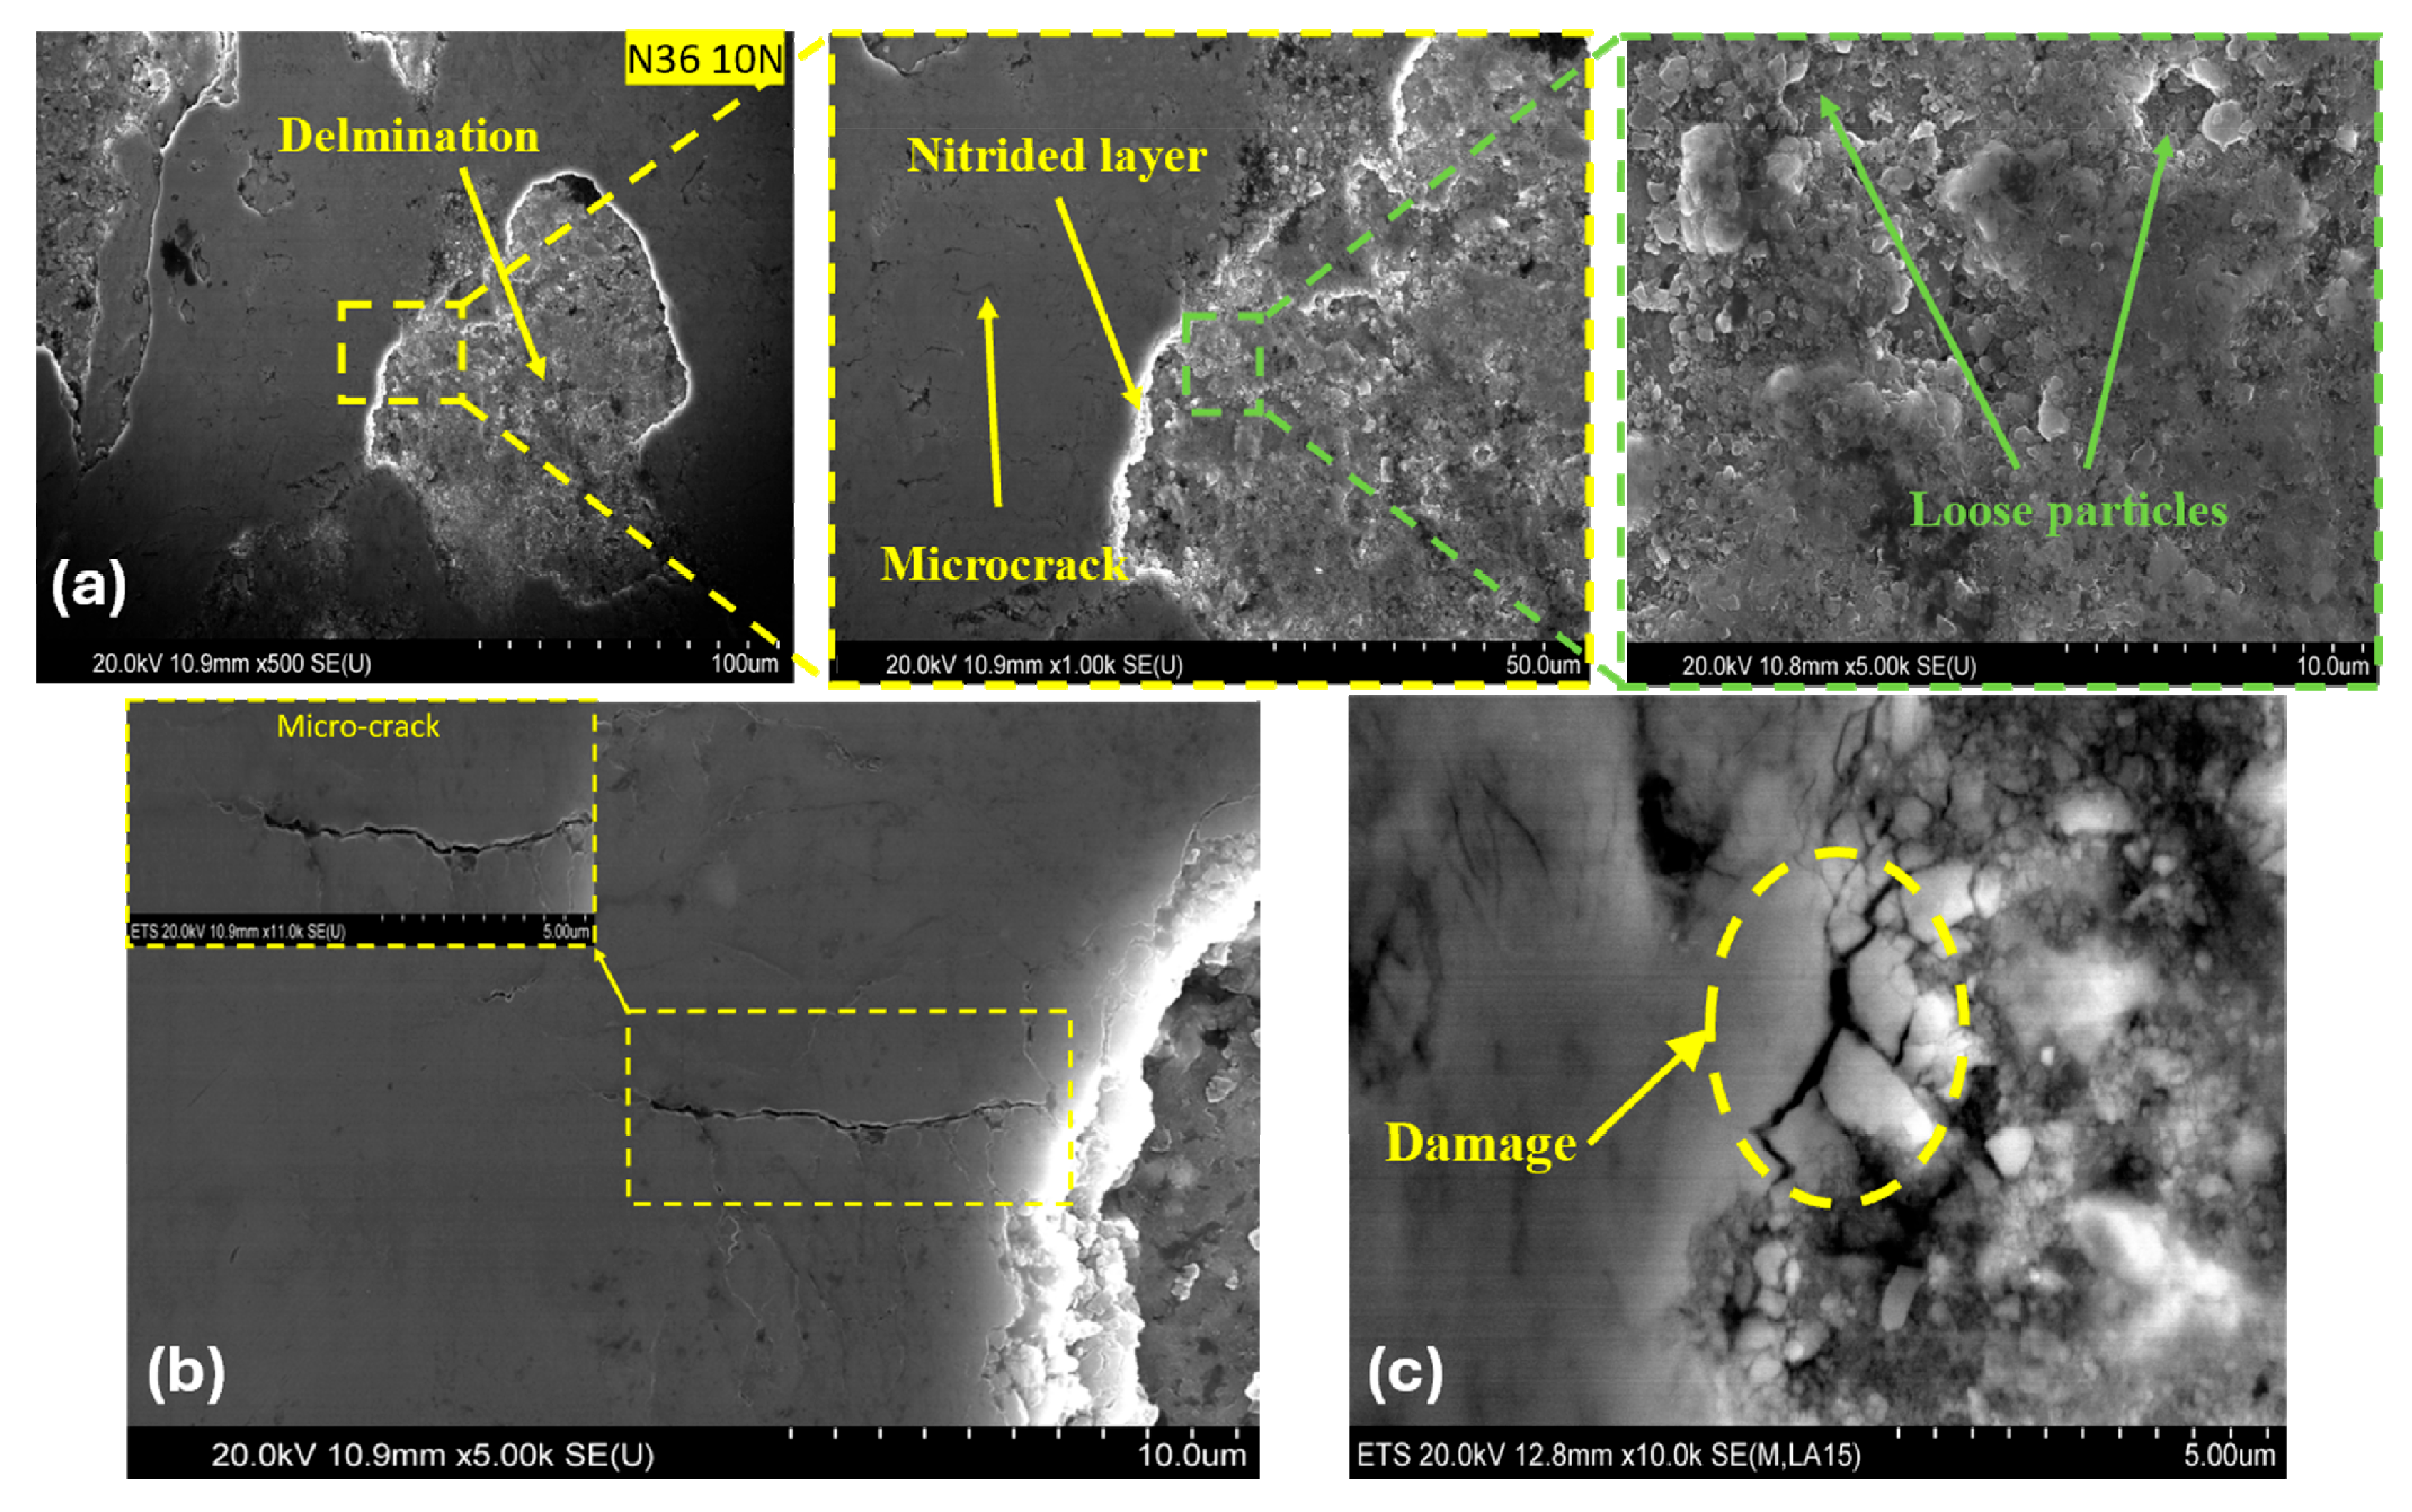
Figure 13a shows that the surface of D2 steel nitrided for 36 h exhibits a degradation mode mainly associated with light abrasive wear, accompanied by partial detachment of the nitrided layer. At low magnification, some areas of the nitrided layer remain globally intact, but show irregular contours and textural differences, indicating the onset of localized disintegration. At higher magnifications, signs of micro-fractures and loose particles become visible, suggesting surface fatigue combined with sliding wear.
Although this degradation is moderate, it is not accompanied by deep cracks or massive pull-outs, demonstrating that the nitrided layer acts as an effective barrier against severe wear. However, over time, repeated mechanical stress seems to cause progressive fragmentation of this layer, leading to localized mechanical wear. This phenomenon indicates that, although nitriding improves wear resistance, it nevertheless has its limits under conditions of intense stress. As shown in Figure 13b, SEM analysis reveals the presence of cracks in the material after wear testing. These cracks highlight the degradation mechanisms induced by tribological stresses. The cracks, mainly located at the periphery of the surface used, appear to be initiated by repeated mechanical stresses, favoring crack propagation under the effect of contact fatigue. The accumulation of stresses and progressive alteration of the microstructure lead to local rupture of the surface layer, possibly resulting in delamination. In addition, the morphological disparity between the smooth zone and the rougher region suggests a gradual detachment of the material under the effect of abrasive and adhesive wear.
SEM analysis reveals, as shown in Figure 13c, advanced damage to the material surface after wear testing. This damage is characterized by a fragmented microstructure and the appearance of intergranular cracks. The presence of these cracks suggests a tribological fatigue mechanism, where the accumulation of mechanical and thermal stresses leads to the progressive rupture of inter-grain bonds. The morphology observed indicates degradation induced by a combination of abrasive and adhesive wear, leading to destabilization of the surface layer. The organization of cracks and fragmented zones reveals a process of granular decohesion, which can lead to the progressive detachment of particles, amplifying the wear phenomenon.

3.5. Optimization

3.5.1. Main Effects of the Parameters

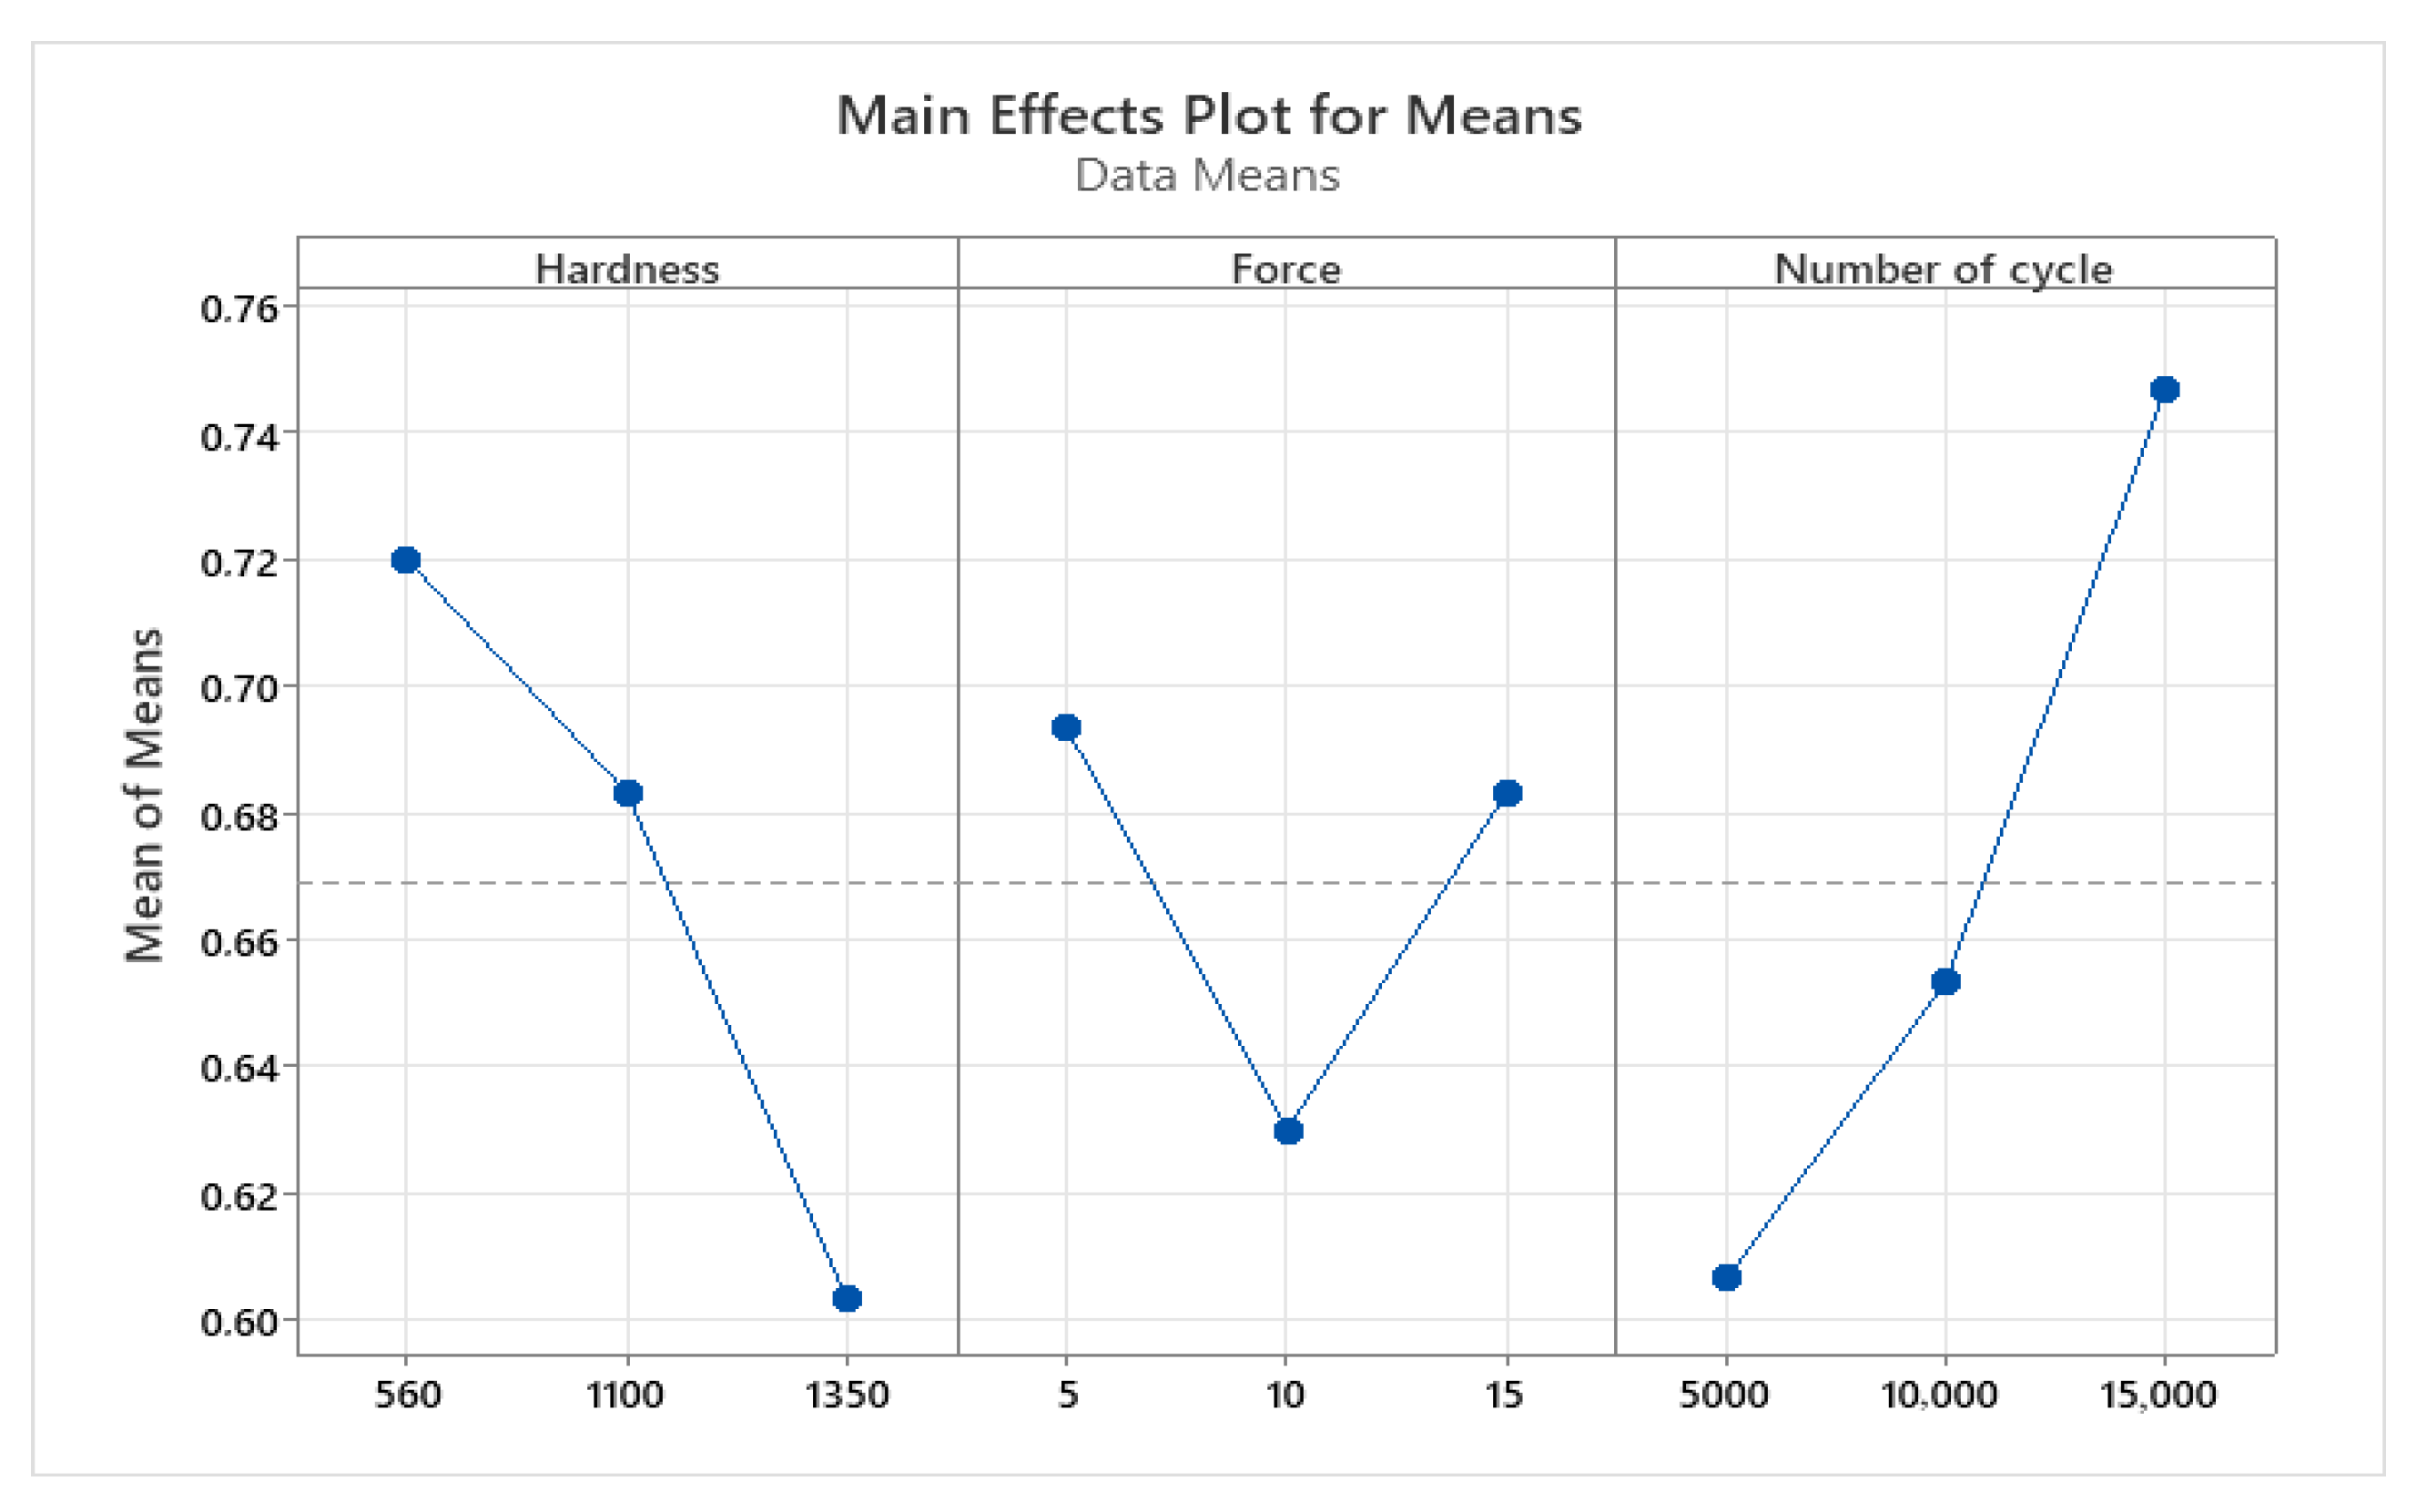
As shown in Figure 14, the optimum combination of wear parameters, i.e., the combination of the COF, is achieved when the following values are met: a surface hardness (HV) of 1350 HV0.1, a normal force (F) of 10 N and a number of cycles (N-C) of 5000.

3.5.2. Regression Equation

As part of this study, a regression model was successfully developed. It combines the Taguchi L9 design of experiments and the Response Surface Method (RSM). This model enables us to accurately describe the relationship between the COF and the three wear conditions. These are surface hardness (HV), normal force (F) and number of cycles (N-C). The use of advanced statistical methods has enabled us to develop a reliable regression equation. The latter is the result of an in-depth analysis to determine the influence of various variables on the COF.
COF = 0.67334 + (−0.05553) * HV + (−0.005) * F + (0.07) * (N-C)
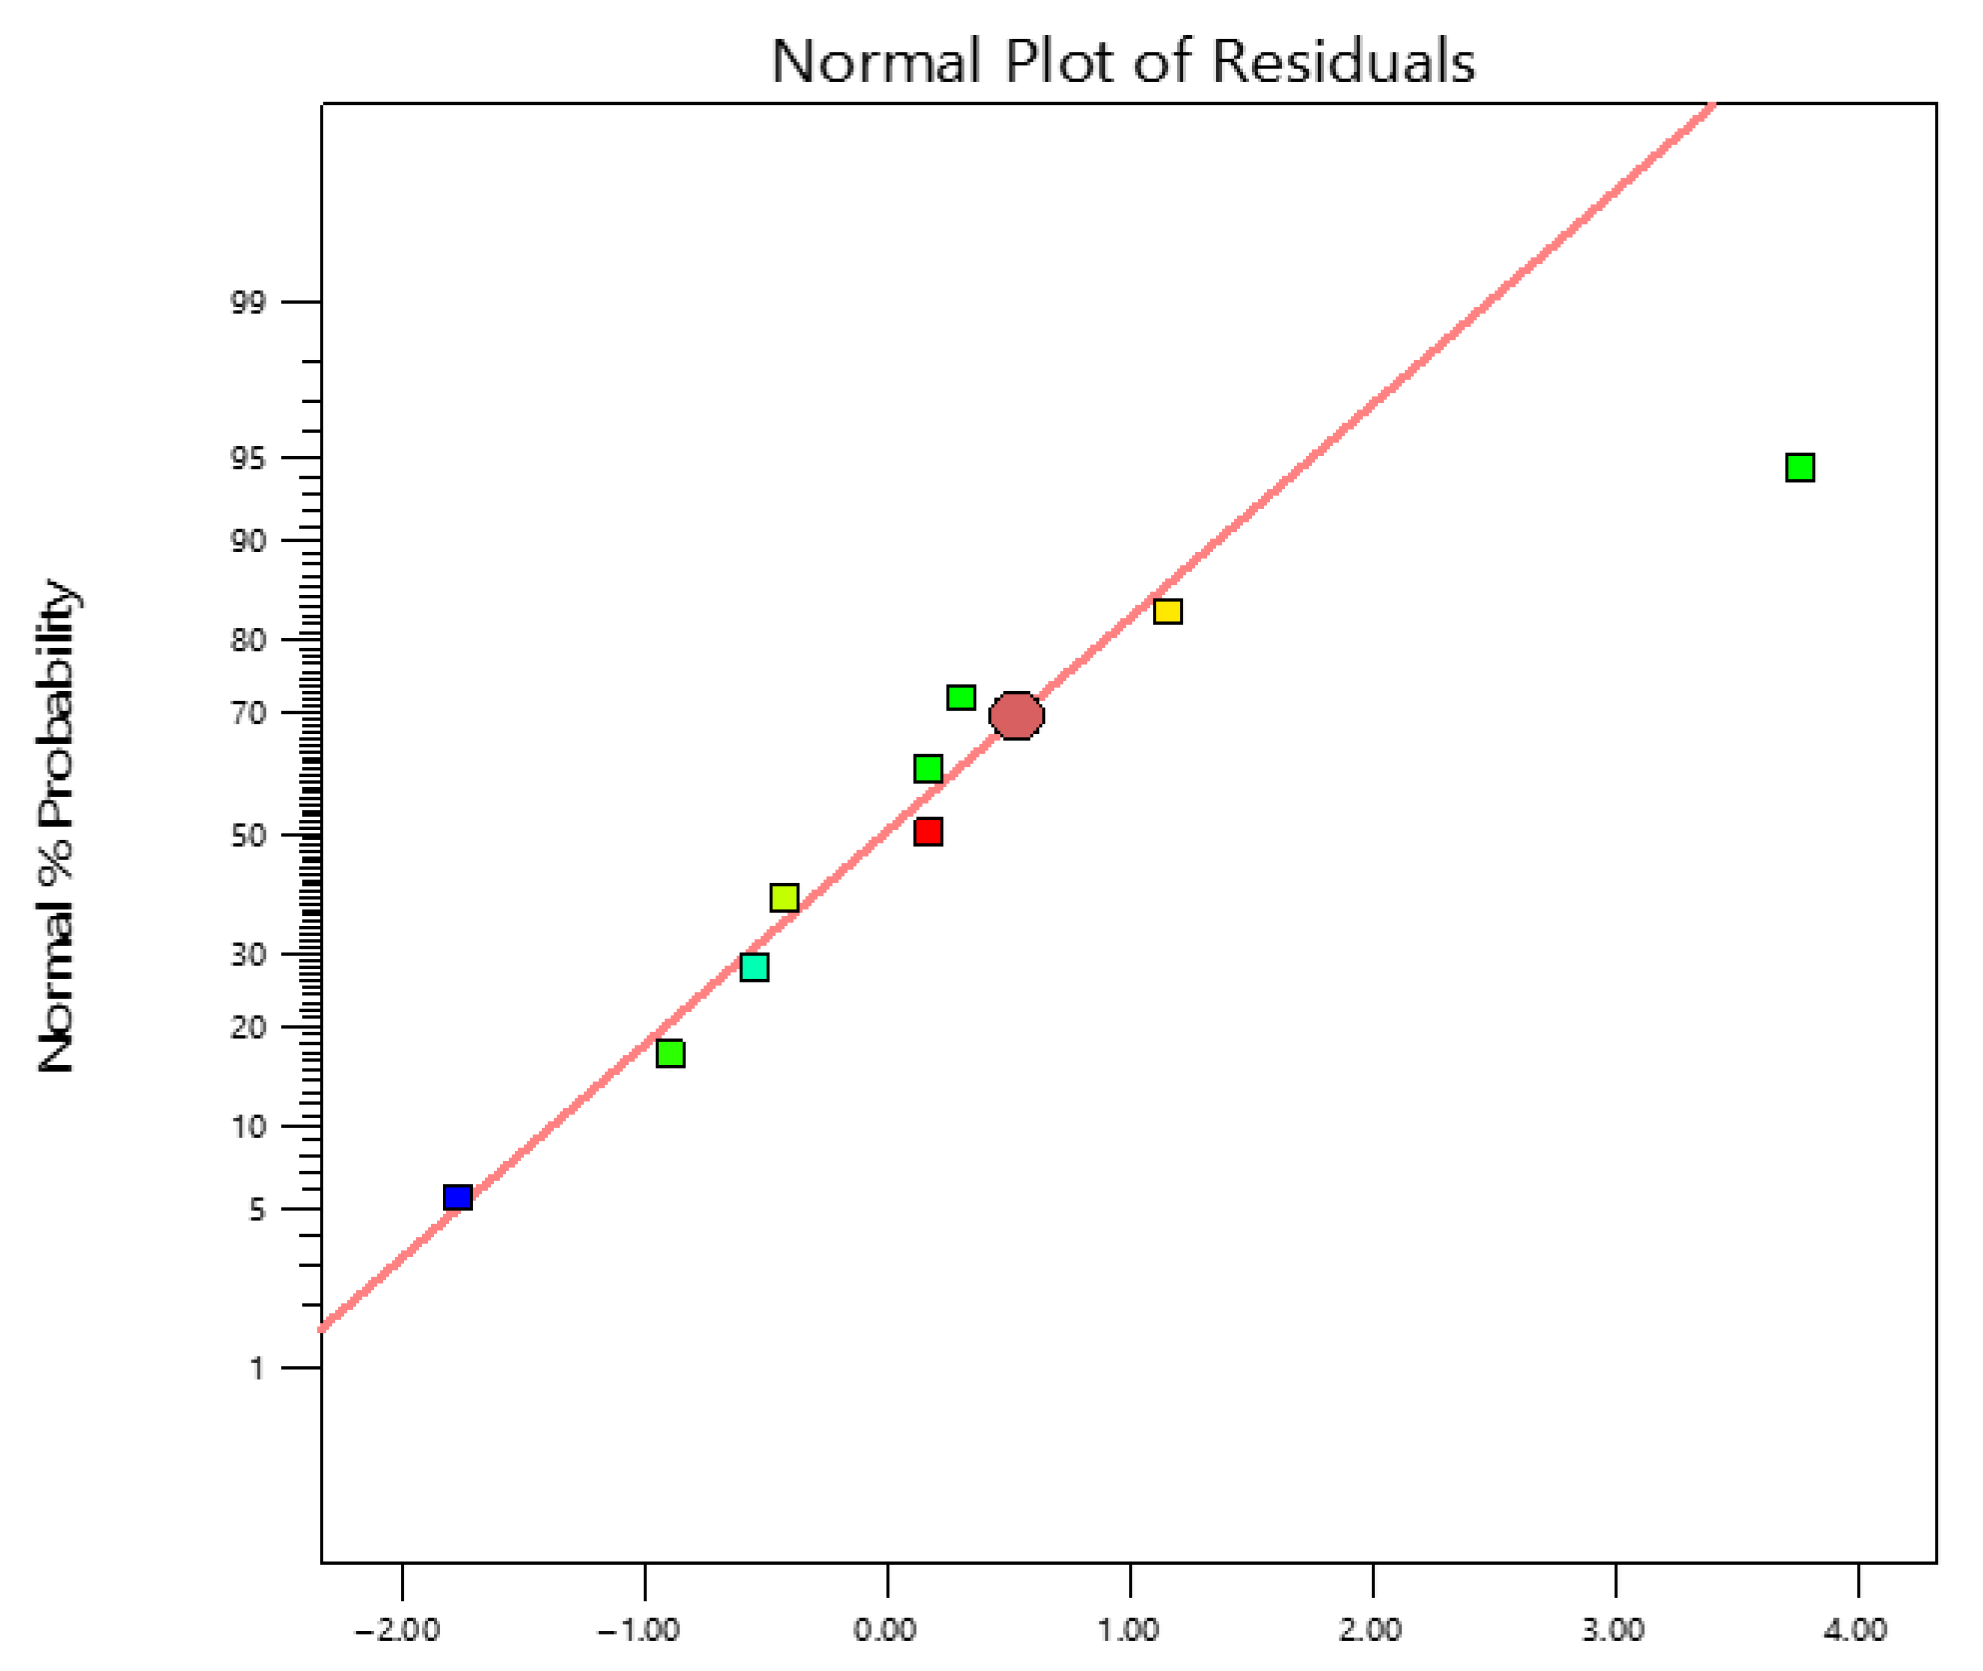
As shown in Figure 15, the plots of the friction coefficient model residuals follow a normal distribution. Analysis of these residuals reveals behavior consistent with said distribution, suggesting that the model’s predictions are both accurate and acceptable. This result suggests that the model is a good fit for the experimental data, reflecting statistical adequacy and reliability of friction predictions.

3.5.3. Interactive Influence of Wear Conditions on the COF

Analysis of the response surface contour for the COF shows how this coefficient varies with wear conditions. The graph highlights the use of contour lines to illustrate areas where the COF remains constant. These contours make it easier to identify the optimum conditions for minimizing friction. The study of these contours provides a better understanding of the interaction between input parameters.
Figure 16a shows the contour of the friction coefficient as a function of surface hardness and number of cycles. When the normal force is set at 10 N, the contour plot reveals a linear trend in the COF. It should be noted that the highest value of the friction coefficient is reached under the conditions of highest number of cycles and surface hardness. This demonstrates that the interactive influence between number of cycles and surface hardness on the COF is significant.
As shown in Figure 16b, the contour map highlights the dynamic interaction between hardness and normal force on the COF, for a number of cycles of 10,000. The contour reveals a linear trend in the COF. The state leading to the highest COF is characterized by the lowest hardness.
Figure 16c shows the contour map, demonstrating the influence of normal force and number of cycles on the COF, when surface hardness is set at 1050 HV. It can be seen that the COF increases with increasing stress and number of cycles. It should be noted that the lowest value of the COF is reached under the lowest stress conditions and the lowest number of cycles.

3.5.4. Analysis of Variance

As part of the data analysis, Table 3 highlights the analysis of variance for the linear model employed in the estimation of the COF. The values reported in the following section correspond to the p-values. The results of this analysis reveal that only two parameters, namely material hardness and number of cycles, prove effective and exert significant effects. Statistical analysis revealed that hardness, with a coefficient of 0.0436, and number of cycles, with a coefficient of 0.0203, are the most influential parameters on the COF, respectively.

3.5.5. Desirability

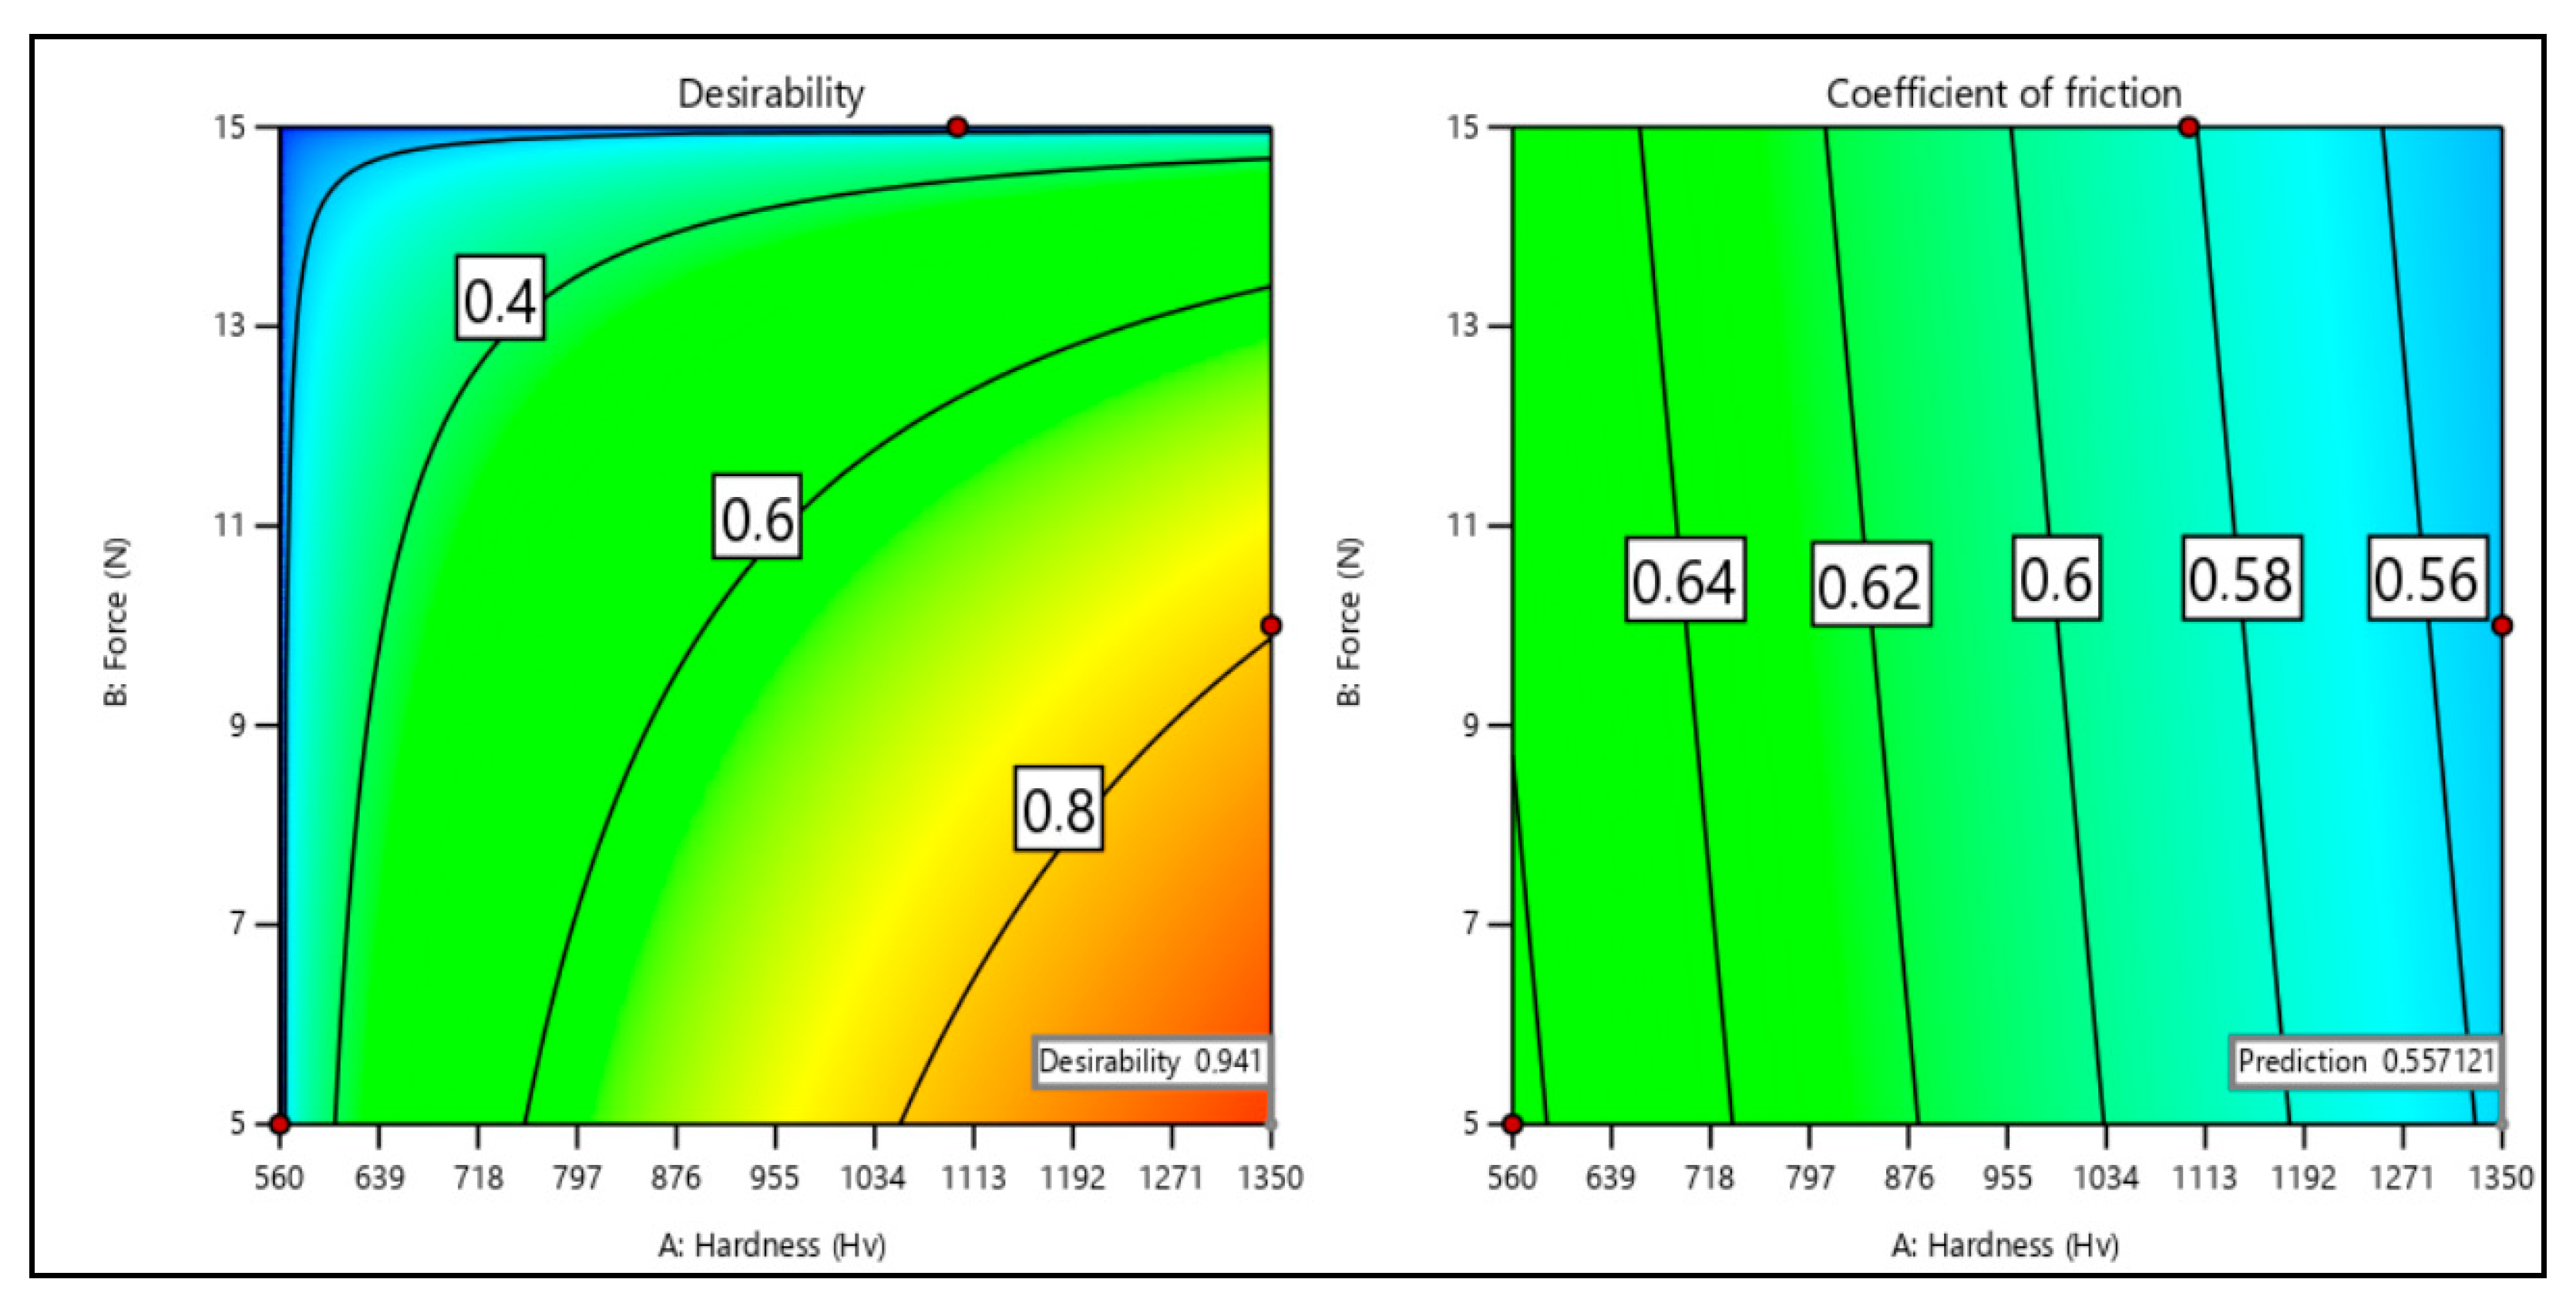
As shown in Figure 17, the desirability of the response surface, with a desirability coefficient of 0.94, is a function of normal force and surface hardness. This high desirability coefficient indicates optimum conditions, where the COF is well balanced, enabling efficient tribological performance. The graphical analysis highlights the crucial importance of judicious selection of normal stress and hardness levels to achieve the desired COF. This optimization increases material performance while reducing wear and the COF.

3.5.6. Optimum Solution

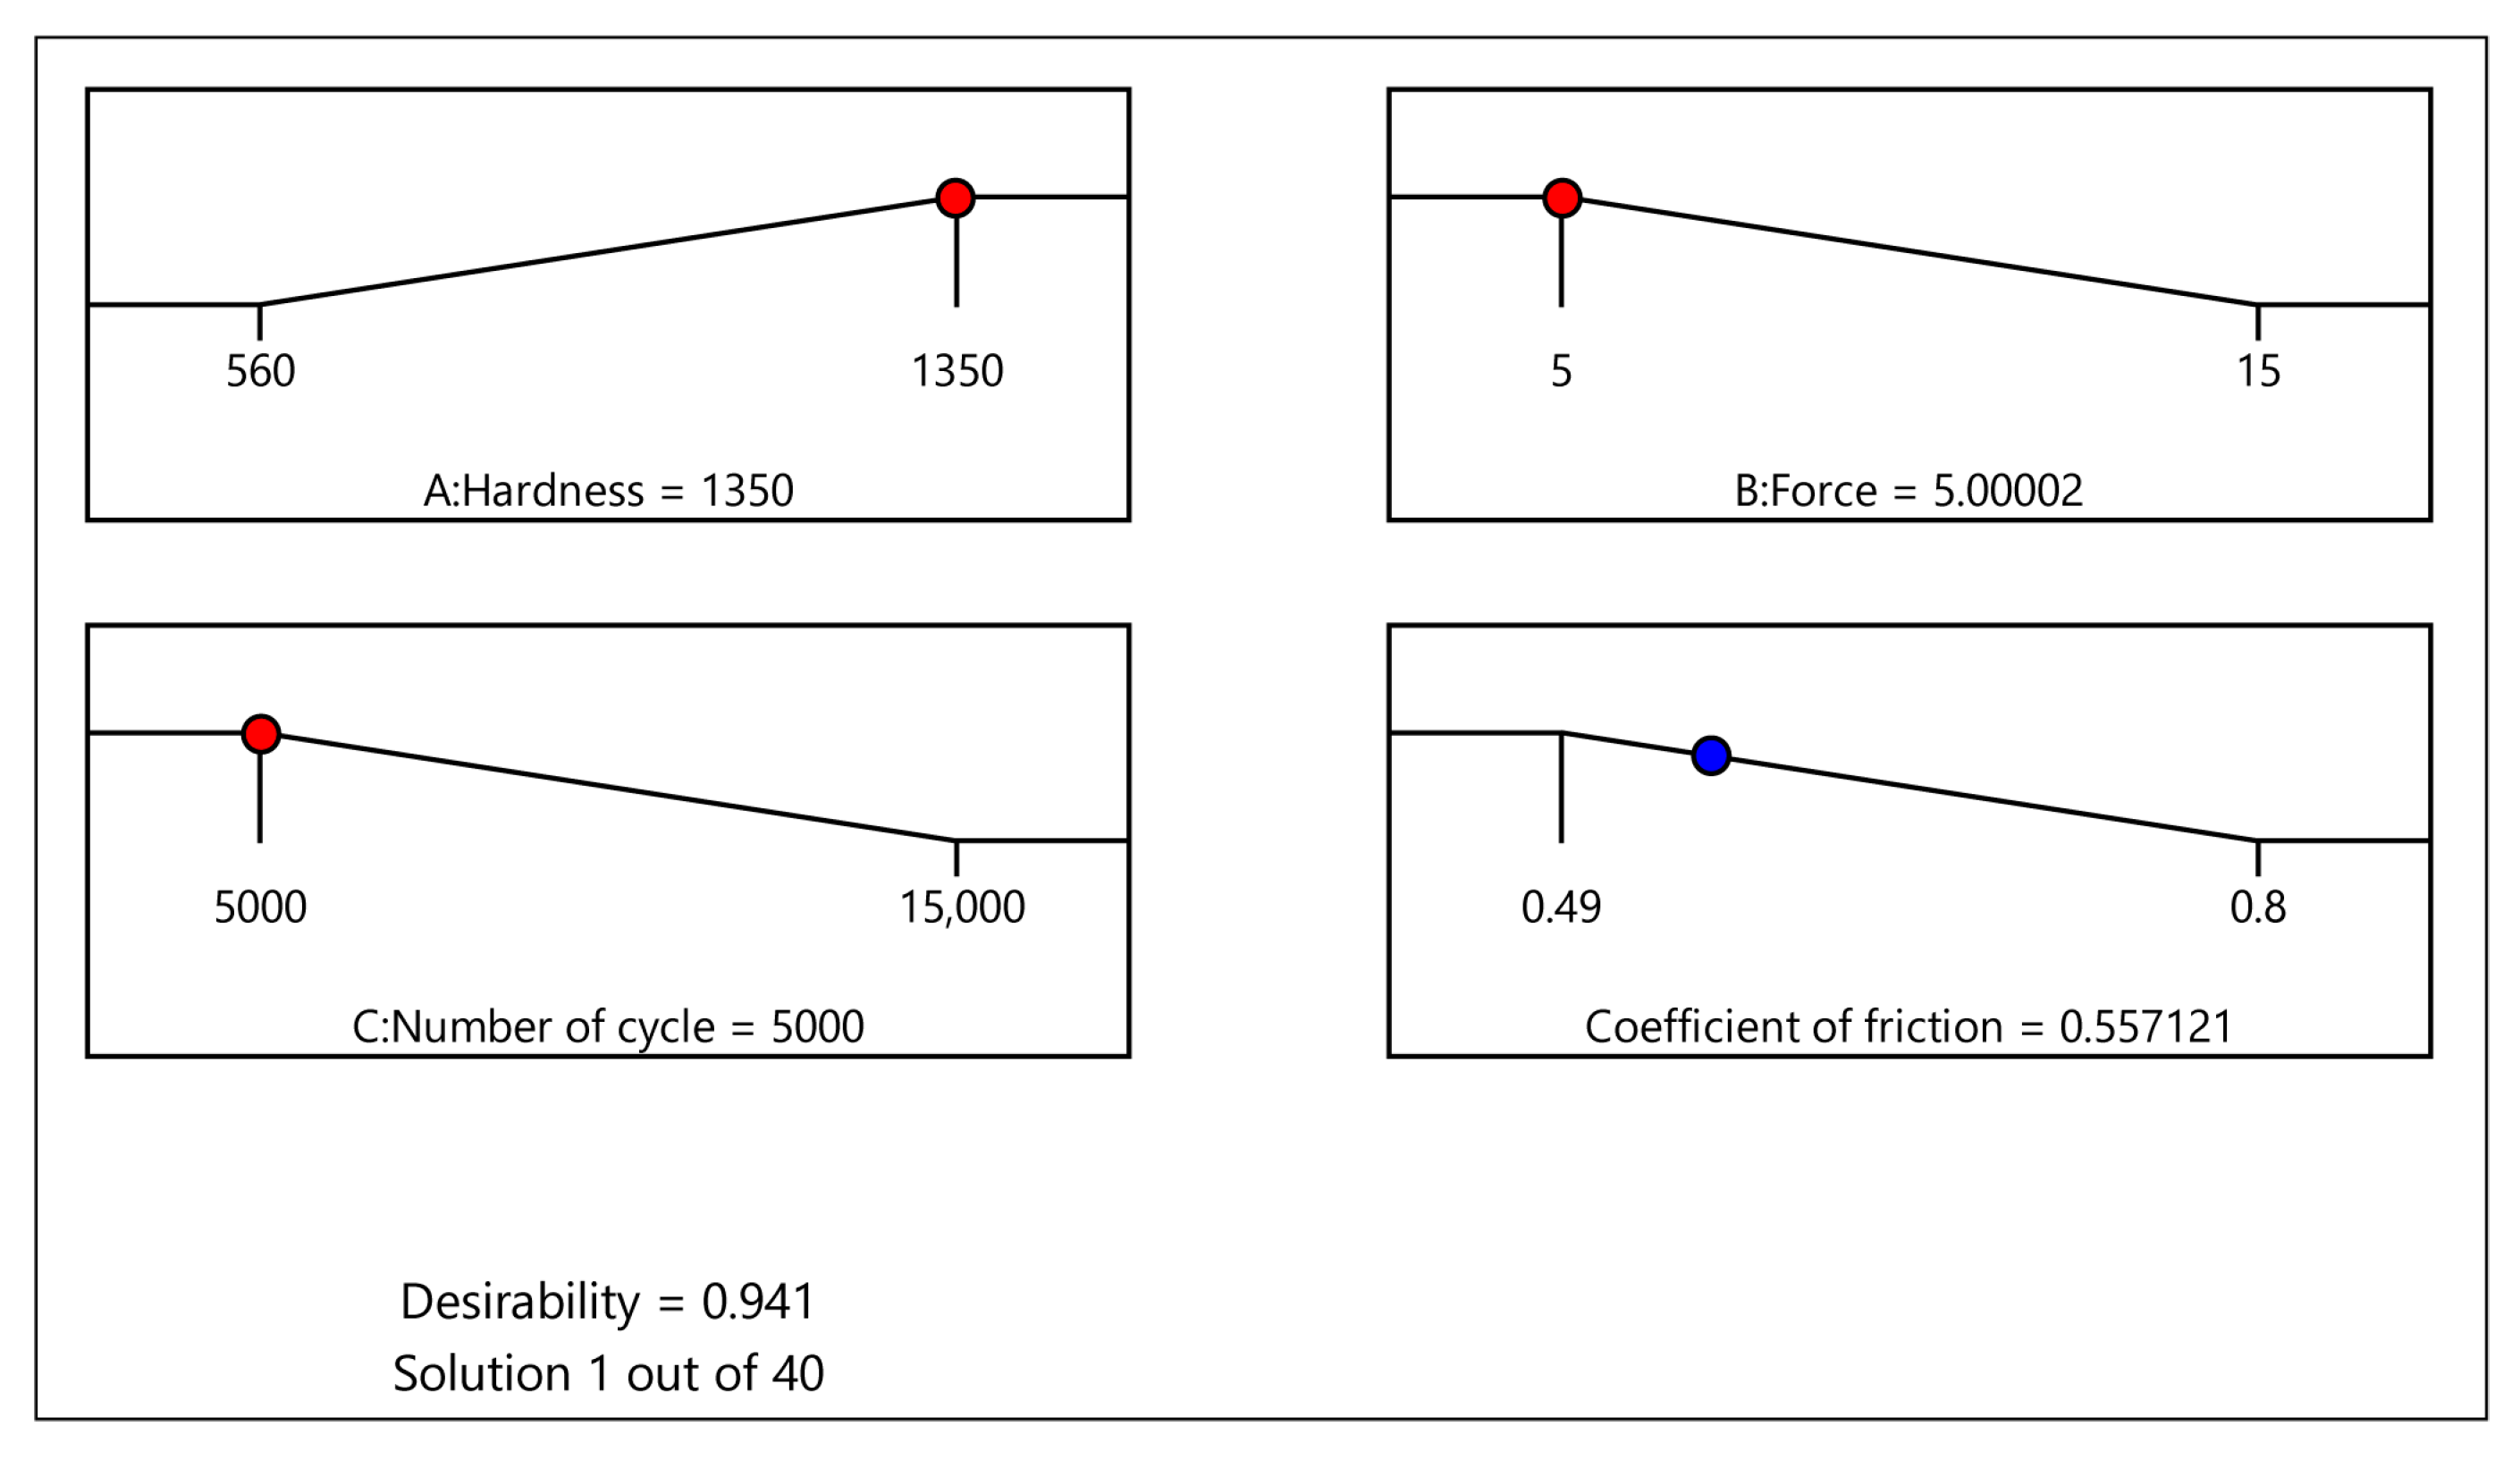
As shown in Figure 18, the optimum solution for the COF is obtained when the normal force is set to 5 N, the number of cycles to 5000 and the surface hardness to 1350 HV01. Under these conditions, the COF is minimized, indicating optimum tribological performance. The normal force of 5 N provides an adequate contact load, while the 5000 cycles enable robust long-term wear analysis. The surface hardness of 1350 HV0.1 confers enhanced resistance to deformation and abrasion. This combination of parameters achieves an optimum balance between friction resistance and material durability, maximizing tribological efficiency.

3.6. Prediction

In order to better understand the impact of gas nitriding on the tribological behavior of AISI D2 steel, this study uses ANFIS (Adaptive Neuro-Fuzzy Inference System) modeling. This hybrid approach, combining neural network learning and fuzzy logic, makes it possible to capture the complex nonlinear relationships between treatment parameters and tribological responses. The accuracy of the model depends on the quality of the experimental data used for its training and validation, which highlights the importance of considering experimental uncertainties, such as local microstructural variations and margins of error in friction measurements.
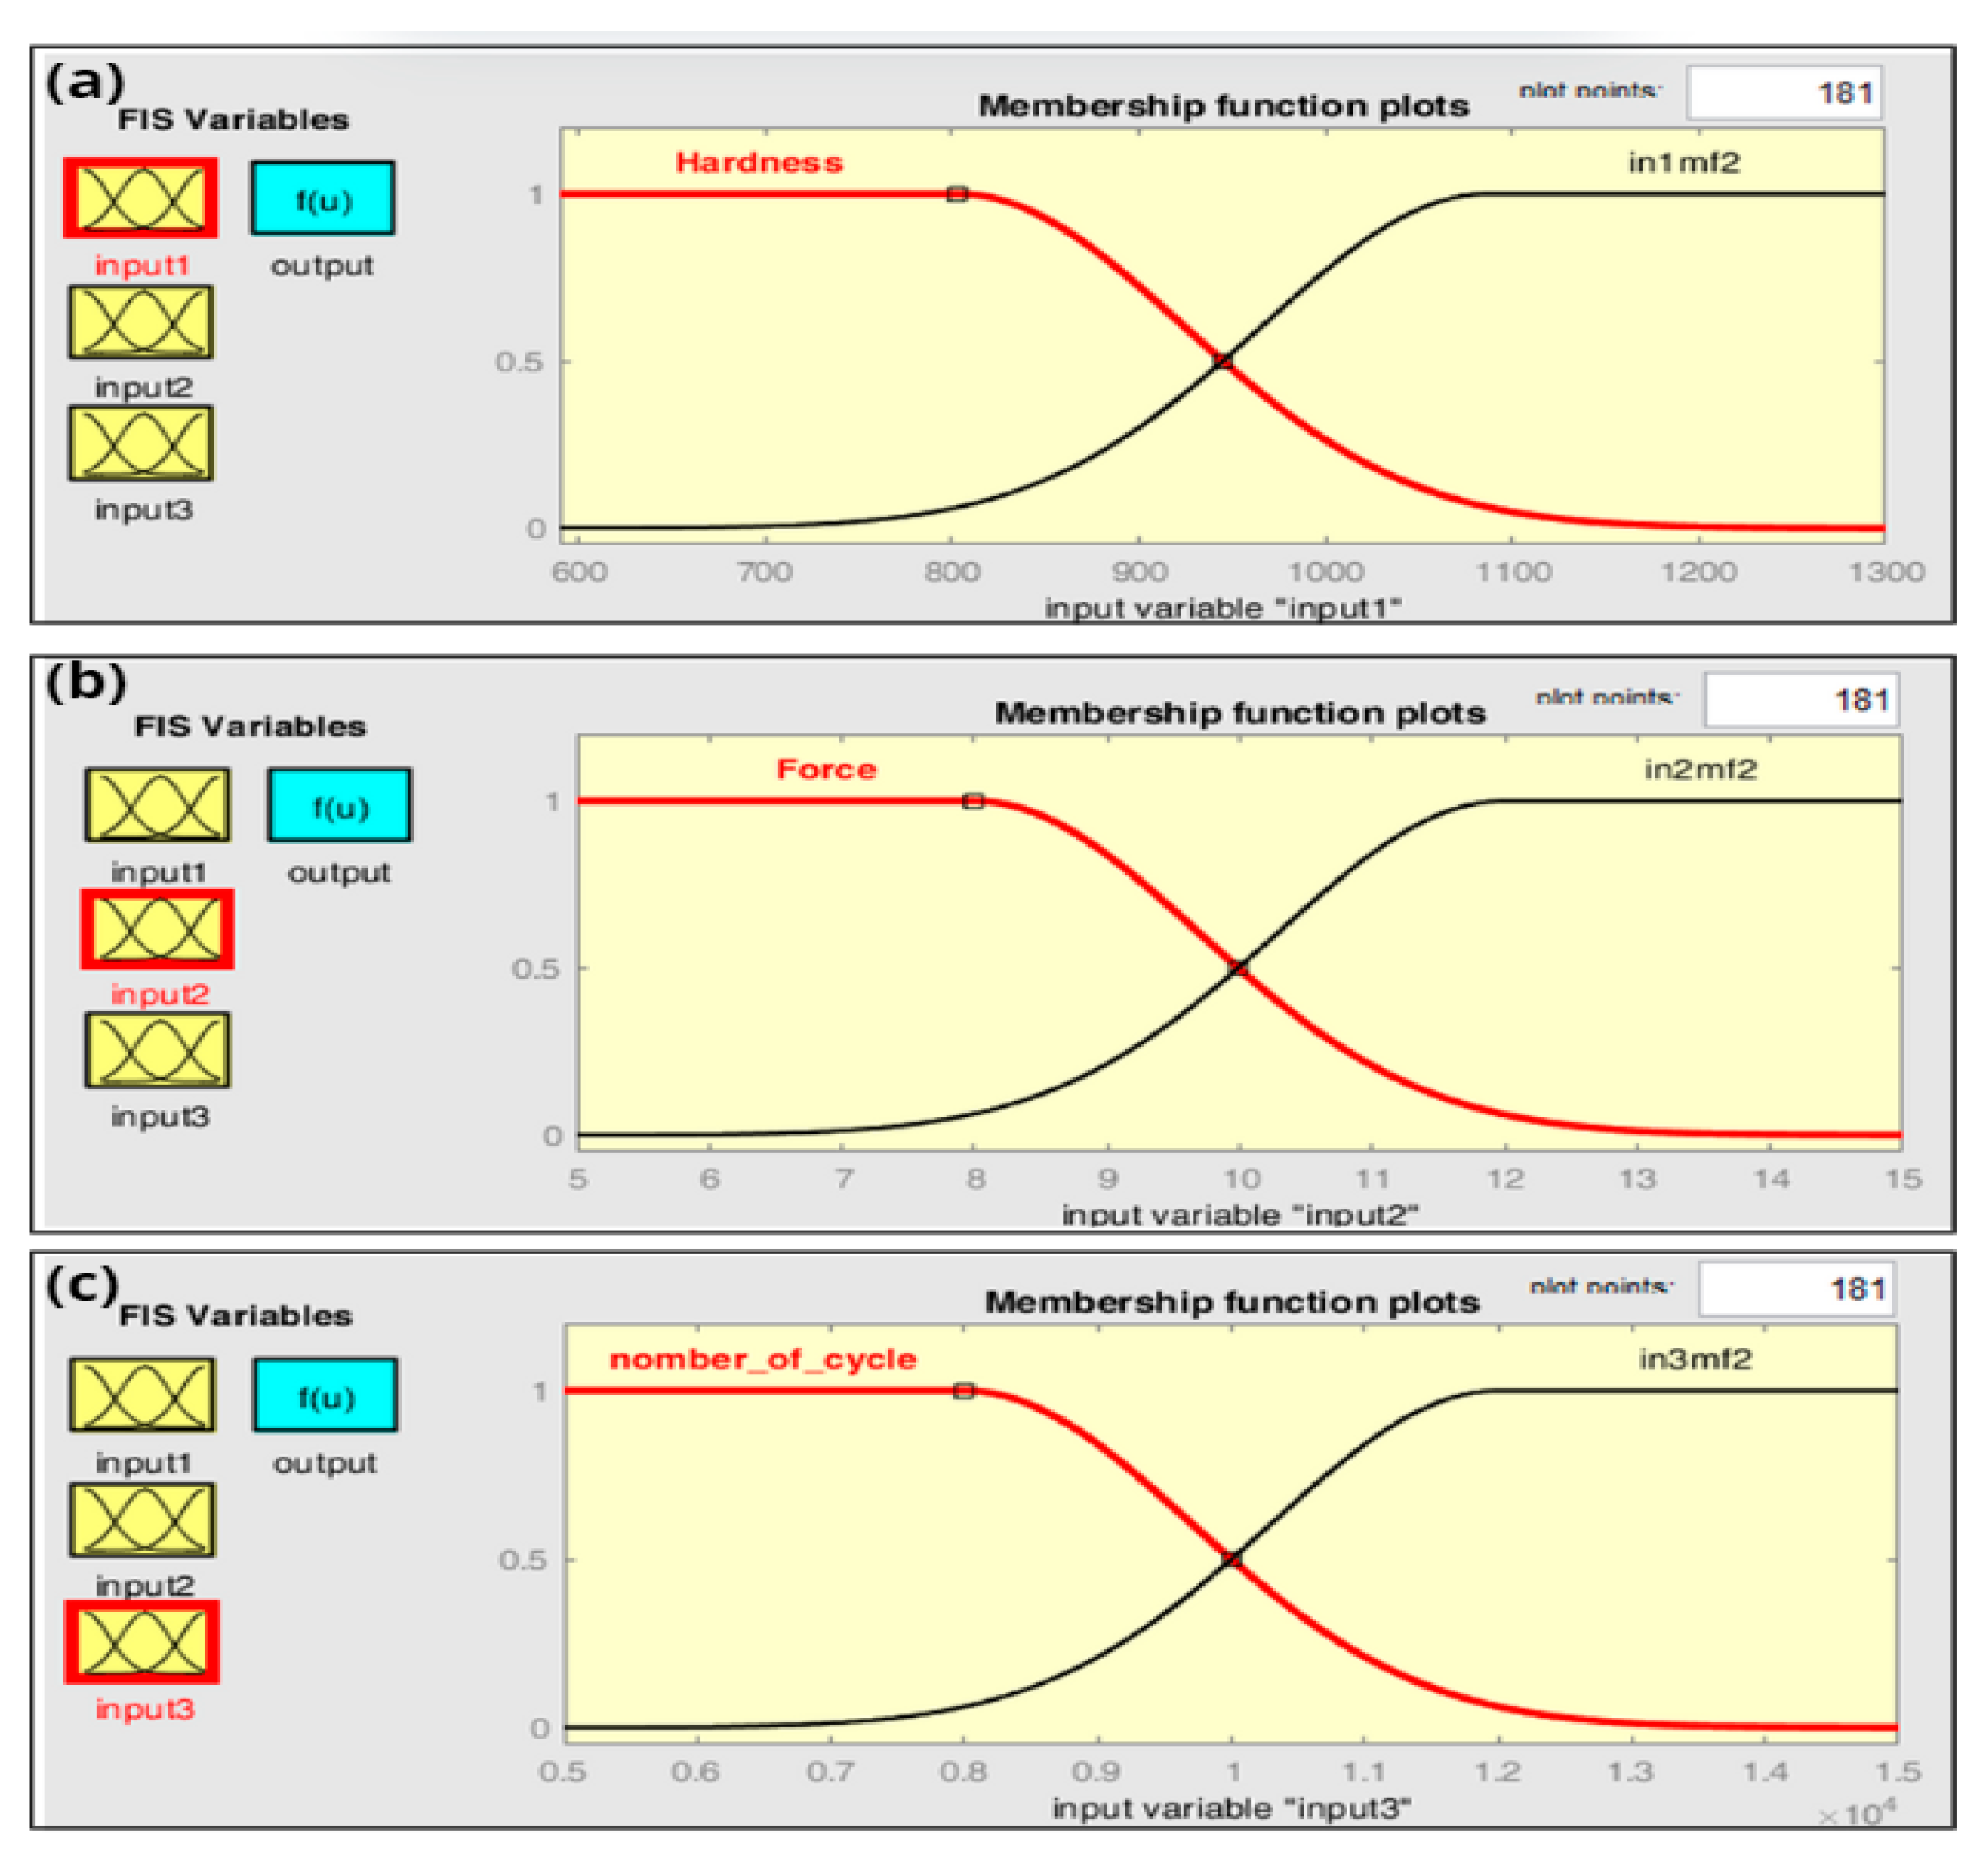
In this study, the aim is to develop a predictive model for the friction coefficient of the D2 steel wear process. It should be noted that an imprecise relationship was identified between the input parameters and the friction coefficient. Consequently, a fuzzy logic model was developed using the results of the wear experiment. The input variables are shown in Figure 19a–c. For each of these variables, the range is determined on the basis of all the values used during the experiment.
For experimental purposes, three separate variables were considered. However, with the aim of building a prediction system based on fuzzy logic, the range was extended to the experimental upper limit attainable in the future. The interval values were segmented into a series of fuzzy subsets, each assigned a Gaussian distribution. In addition, the range of the response variable was determined from the experimental values of the COF. The results of the experiment lead to the conclusion that the minimum COF was 0.47 and the maximum 0.80. The experimental design consists of 9 trials: 6 are used for training and 3 for testing the network. The network is trained using the Gaussian algorithm as shown in Figure 20.
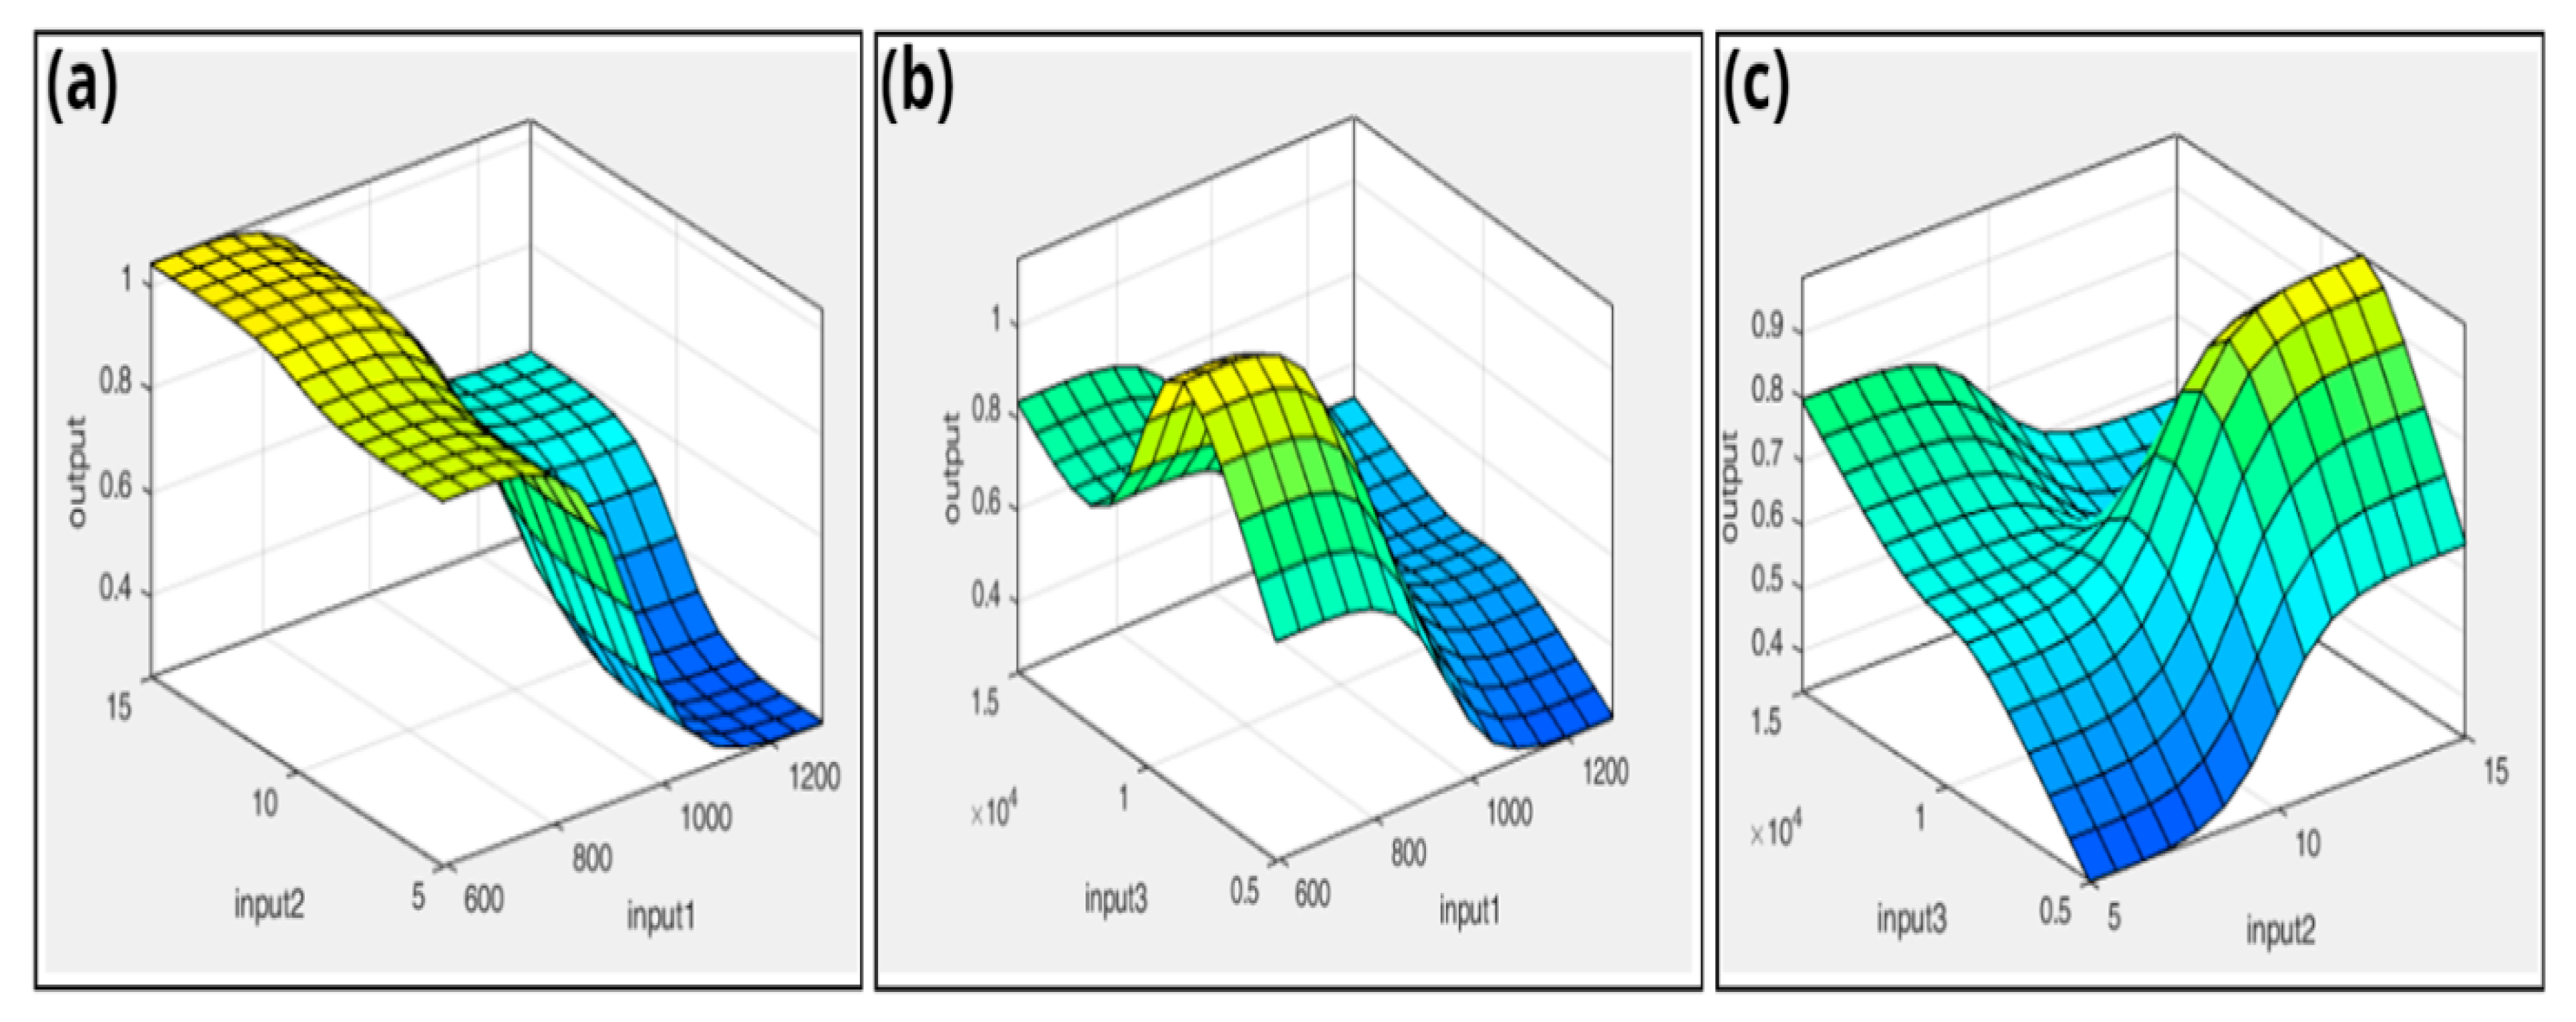
As shown in Figure 21a, the ANFIS model of the friction coefficient for the combination of surface hardness and stress highlights the significant impact of these two parameters on the friction coefficient. Indeed, an increase in wear stress leads to a significant rise in the COF. It has been observed that the COF reaches its peak when operating with a minimum surface hardness of 560 HV0.1.
Figure 21b illustrates the effects of input parameters on the COF, as analyzed using fuzzy logic. As shown in Figure 21b, the COF reaches a minimum at a minimum surface hardness of 1350 HV0.1 and a minimum number of cycles of 5000 cycles, after which it increases to reach a maximum at a surface hardness of 560 HV0.1 and a number of cycles of 10,000 cycles.
As shown in Figure 21c, analysis of the input parameters on the COF reveals a significant increase in the latter with force. Furthermore, it is noticeable that the number of cycles has a lesser influence on the COF.
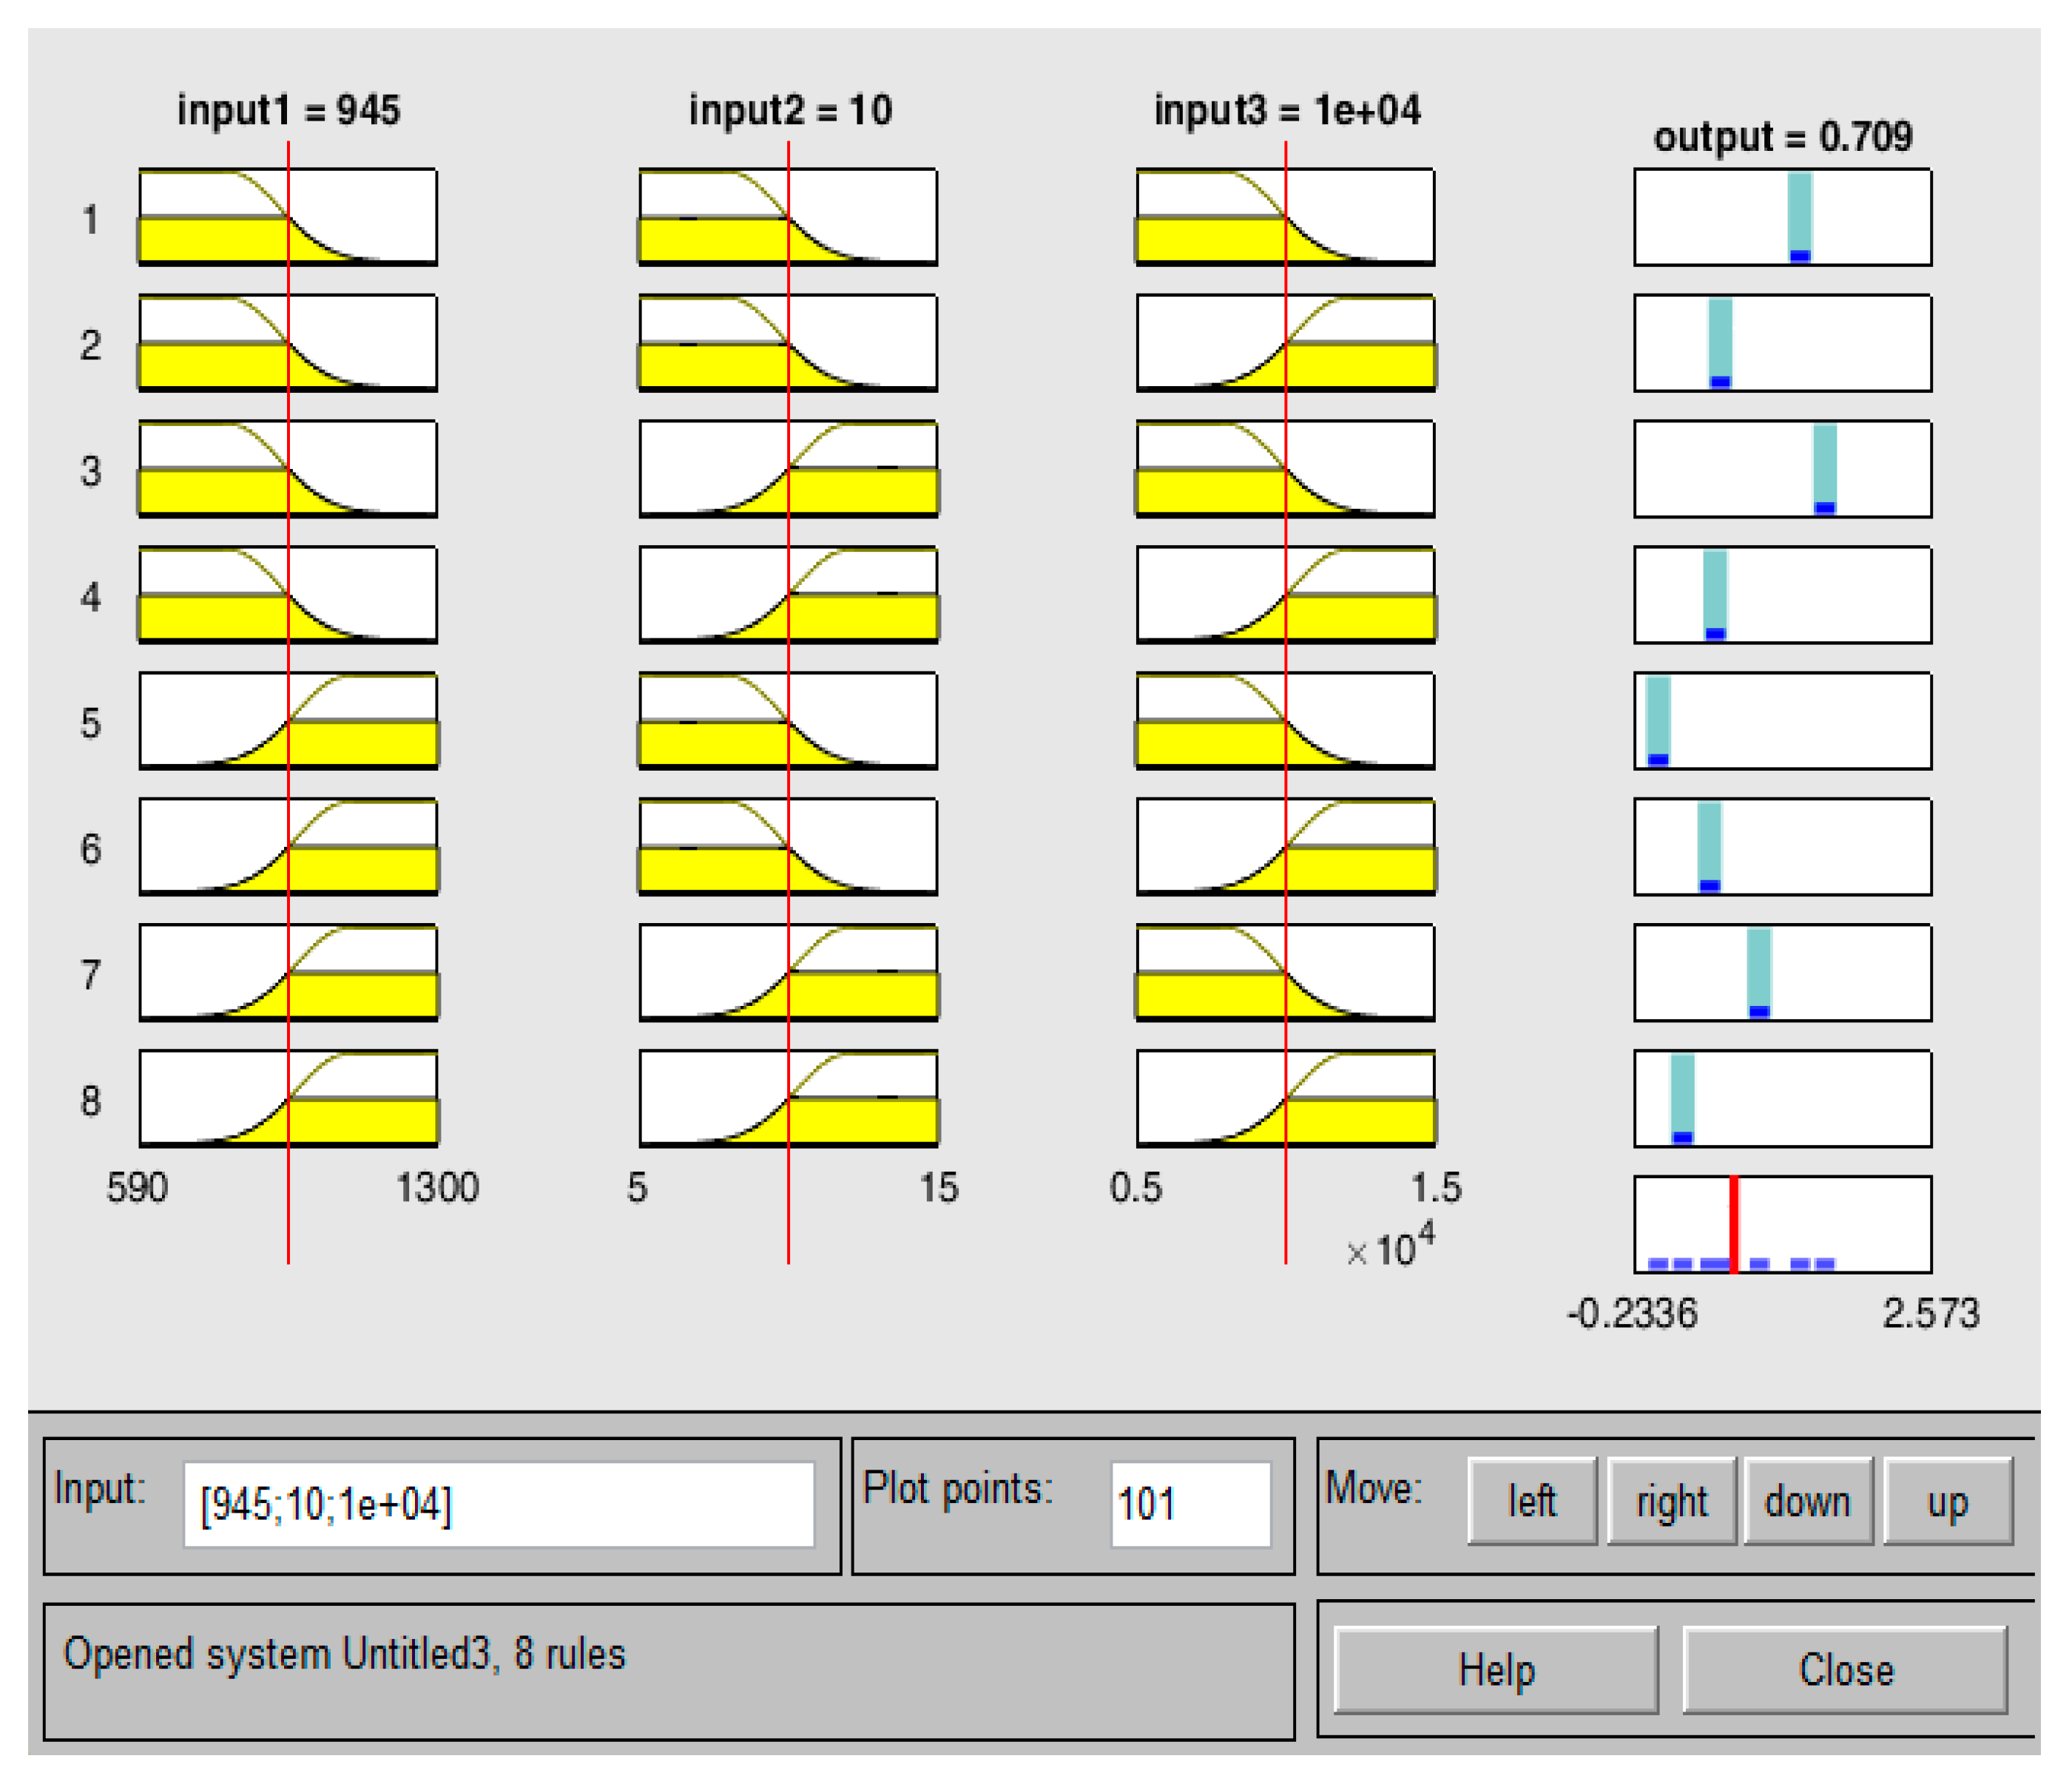
Defuzzification is the process of assigning precise, predefined output values to a fuzzy controller. This method is used to predict the output parameter, as illustrated in Figure 22. The operation was performed using the fuzzy controller in the MATLAB version 2020 tool.
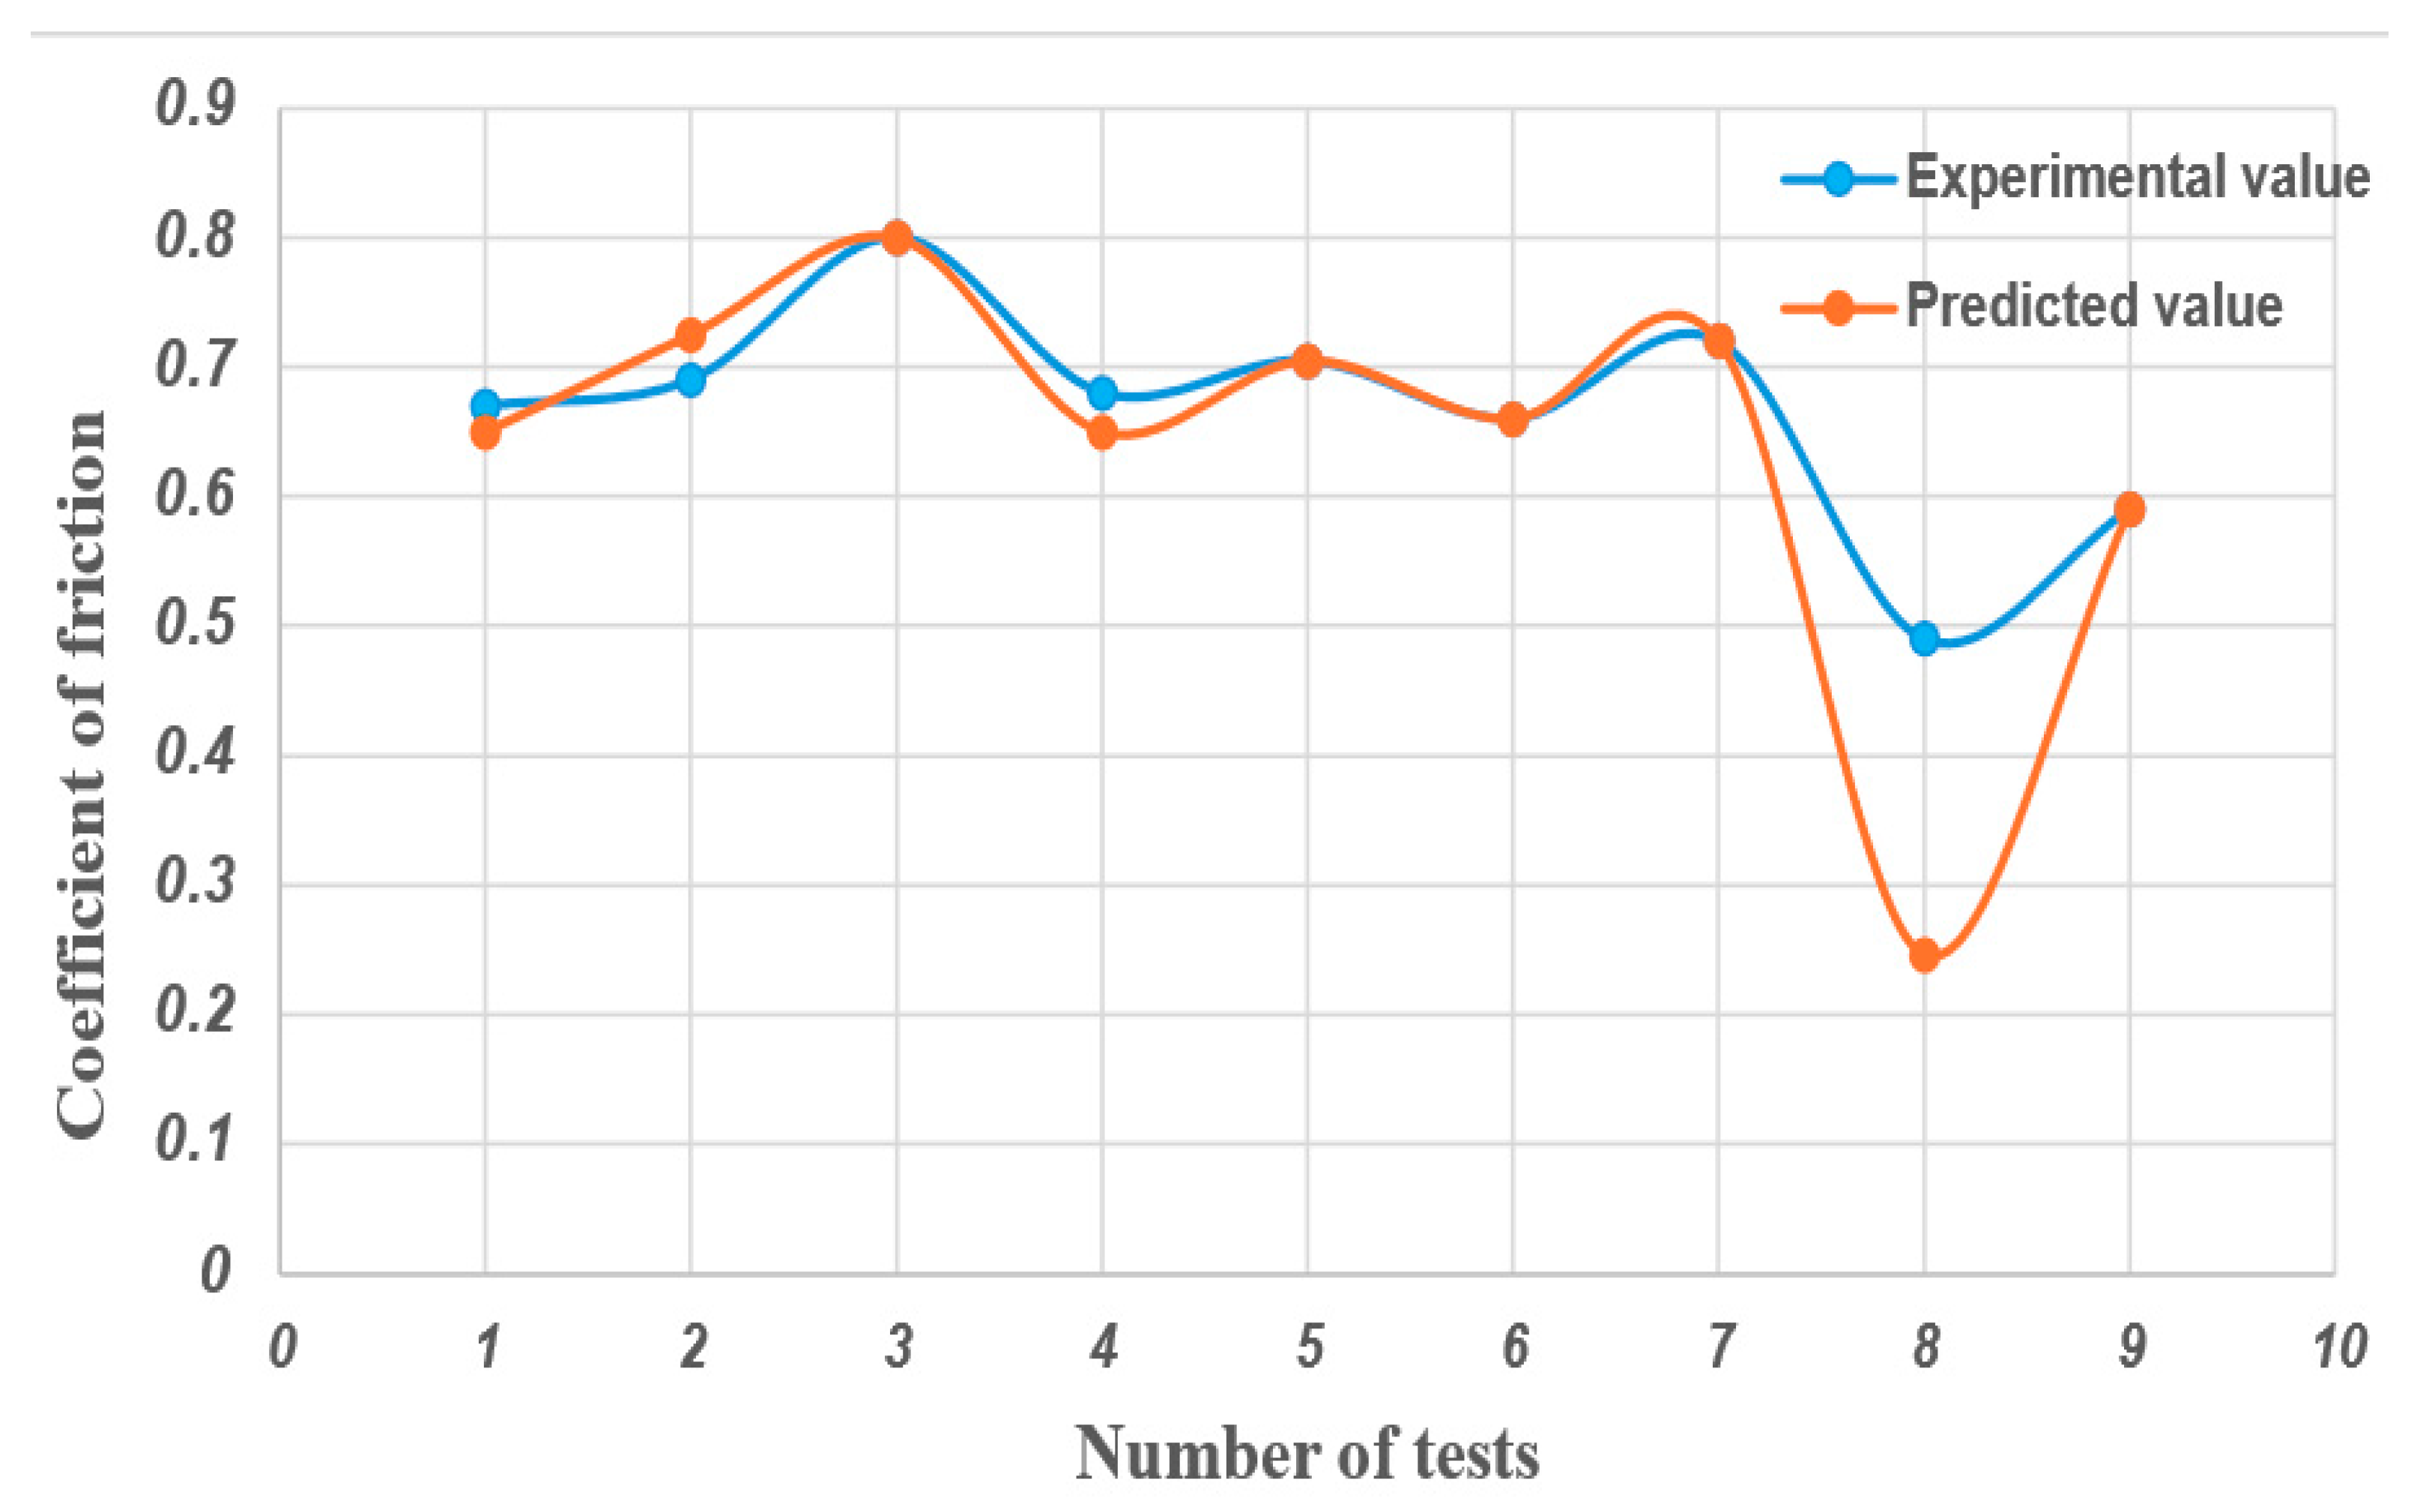
In order to corroborate the results obtained using the fuzzy logic model, the process parameters were provided as input, enabling the surface to be calculated according to the same model. The COF, measured experimentally, was found to be 0.80, a value which is significantly close to that obtained by ANFIS. This agreement is illustrated in Figure 22. After checking other values, as shown in Figure 23, the predicted model gives values close to the experimental data, leading to the conclusion that the model’s prediction is highly accurate and gives satisfactory results. Furthermore, analysis of the results revealed an average error of around 3.74% between the friction coefficient obtained experimentally and that predicted by fuzzy logic. It should be stressed that the accuracy of the predicted results depends on the choice of membership function, fuzzy rules and input process.
As shown in Figure 23, the agreement between experimental and predicted values for the COF, for both drive and test assemblies, is remarkable. This graph shows a significant correspondence between the experimental data and the predictions generated by the ANFIS model, validating the accuracy of the model’s predictions and underlining its robustness and reliability. Indeed, the ANFIS model demonstrates an ability to accurately reproduce friction coefficient fluctuations, indicating effective modeling of the tribological phenomena studied.

4. Discussion

The study presented here makes a significant contribution to understanding the effects of thermochemical treatment by gas nitriding on the tribological behavior of AISI D2 steel, based on rigorous experimental methodology and advanced predictive modeling.
Microstructural observations by SEM revealed the progressive formation of the nitride layer, characterized by distinct stratification into three zones: the nitride-rich white layer, the nitrogen-enriched diffusion zone and the core preserving the initial martensitic microstructure. This microstructural evolution, directly correlated with the treatment time (16 h and 36 h), resulted in a maximum hardness of 1100 HV0.1 and 1350 HV0.1, respectively. These values confirm the strong ability of gas nitriding to induce a substantial increase in surface hardness, in line with previous studies on alloy and tool steels [9,20]. The increase in thickness of the hardened zone, reaching 220 µm after 36 h of treatment, testifies to a deeper diffusion of nitrogen, giving the material greater resistance to severe tribological stresses.
Analysis of the COF curves reveals a gradual decrease in the latter as a function of the nitriding condition. Non-nitrided samples showed a stabilized average COF close to 0.67, while nitride samples for 16 h and 36 h reached reduced values of around 0.58 and 0.49, respectively. This tribological improvement is attributable to the synergy between the increase in surface hardness and the reduction in adhesion mechanisms during sliding contact. The presence of a continuous, homogeneous nitrided layer limits local plasticity and the formation of wear debris, elements known to promote increased friction and contact instability [8,22]. Friction tests under increasing loads (5, 10 and 15 N) have shown that increasing the normal force induces an increase in the COF, reflecting an intensification of adhesion and surface damage mechanisms. However, this trend is less marked on nitride surfaces, whose high hardness reduces plastic deformation and stabilizes the contact film. These observations corroborate the work of Cho et al. [2], who highlight the effectiveness of nitriding in limiting sensitivity to normal loading.
The friction dynamics show an initial phase of rapid COF increase during the first cycles, followed by a stabilized regime. Nitriding not only reduced the average COF value, but also improved its temporal stability, thanks to greater resistance to microcracking and abrasive wear. The beneficial effect is particularly marked in the 36 h nitrided condition, confirming the value of a longer treatment time for applications requiring high durability under prolonged cyclic loading.
SEM analysis of worn surfaces revealed a significant reduction in delamination, cracking and debris formation in the nitrided condition compared with the untreated state. The microstructure of nitrided surfaces after 36 h reveals a more homogeneous morphology, with limited residual cracking, testifying to improved cohesion of the nitrided layer and enhanced resistance to contact fatigue and micro-abrasion mechanisms. These results concur with the findings of [12], who demonstrated the effectiveness of thick nitrided layers in containing crack propagation and extending component life.
The integration of an ANFIS model has made it possible to capture the non-linear relationships between experimental parameters (hardness, normal force, number of cycles) and tribological response. The accuracy of the model, evidenced by a low mean deviation between experimental and predicted values, validates the relevance of this approach to COF prediction. This predictive capability is essential for optimizing heat treatment and tribological parameters without recourse to exhaustive experimental campaigns, and constitutes one of the major original contributions of this study.

5. Conclusions

The study focused on analyzing the wear behavior and mechanical properties of AISI D2 steel following nitriding treatment. The results obtained highlight the following points:
-
It has been shown that the surface hardness properties of the layers formed during nitriding have a significant influence on the COF.
-
It has been shown that longer nitriding times result in a lower COF. Specifically, this coefficient is reduced to around 0.59 for a nitriding time of 16 h (N16) and to around 0.49 for 36 h (N36), compared with around 0.67 for non-nitrided steel.
-
Analysis of the wear test results shows that the normal load applied has a significant impact on the COF, whether the material is treated or untreated steel.
-
A detailed study revealed that 36 h of nitriding (N36) induces a more significant variation in the COF than 16 h of nitriding (N16). This variation is a function of the number of cycles performed.
-
In order to achieve a substantial reduction in the COF of D2 steel, it is recommended to extend the nitriding time beyond 16 h.
-
The nitriding treatment is capable of reducing the friction coefficient by approximately 39%.
-
The study revealed that the main factors determining the COF are processing parameters, such as surface hardness and normal load, as well as the number of cycles. ANFIS identified these complex relationships with remarkable efficiency, highlighting the importance of these variables in optimizing tribological performance.
Overall, this study demonstrates that gas nitriding significantly improves the tribological performance of AISI D2 steel. Future work could aim to predict the wear rate of gas-nitrided AISI D2 steel to further deepen understanding of its tribological behavior.

Author Contributions

Conceptualization, A.S. and M.A.T.; Methodology, A.S., M.A.T. and S.M.; Validation, M.A.T.; Formal analysis, A.S. and S.M.; Data curation, A.S. and S.M.; Writing—original draft, A.S.; Writing—review & editing, B.L. and M.A.T.; Visualization, S.M. and M.A.T.; Supervision, M.A.T.; Project administration, A.S. All authors have read and agreed to the published version of the manuscript.

Funding

This work was supported and funded by the Deanship of Scientific Research at Imam Mohammad Ibn Saud Islamic University (IMSIU) (grant number IMSIU-DDRSP2503).

Data Availability Statement

The original contributions presented in this study are included in the article. Further inquiries can be directed to the corresponding author.

Acknowledgments

The treatments were performed with the support of F3T and the Manufacturing Department. The authors would like to express their sincere gratitude to Chokri MBAREK for his valuable assistance.

Conflicts of Interest

The authors declare that they have no known competing financial interests or personal relationships that could have appeared to influence the work reported in this paper.

References

  1. Rehman, H.U.; Naeem, M.; Abrar, M.; Shafiq, M.; Díaz-Guillén, J.; Yasir, M.; Mahmood, S. Enhancement of hardness and tribological properties of AISI 321 by cathodic cage plasma nitriding at various pulsed duty cycle. J. Alloys Compd. 2024, 1002, 175280. [Google Scholar] [CrossRef]
  2. Cho, K.T.; Song, K.; Oh, S.H.; Lee, Y.K.; Lee, W.B. Enhanced surface hardening of AISI D2 steel by atomic attrition during ion nitriding. Surf. Coatings Technol. 2014, 251, 115–121. [Google Scholar] [CrossRef]
  3. Najafizadeh, M.; Ghasempour-Mouziraji, M.; Sadeghi, B.; Cavaliere, P. Characterization of Tribological and Mechanical Properties of the Si3N4 Coating Fabricated by Duplex Surface Treatment of Pack Siliconizing and Plasma Nitriding on AISI D2 Tool Steel. Met. Mater. Trans. A 2021, 52, 4753–4766. [Google Scholar] [CrossRef]
  4. Terres, M.A.; Sidhom, H.; Larbi, A.B.C.; Ouali, S.; Lieurade, H.P. Influence de la résistance à la fissuration de la couche de combinaison sur la tenue en fatigue des composants nitrurés. Matériaux Tech. 2001, 89, 23–36. [Google Scholar] [CrossRef]
  5. Moretti, M.L.; Recco, A.A.C. Duplex treatment on AISI D2 tool steel: Plasma nitriding and reactive deposition of TiN and TiAlN films via magnetron sputtering. Rev. Mater. 2022, 27, e20220111. [Google Scholar] [CrossRef]
  6. Conci, M.D.; Bozzi, A.Ô.C.; Franco, A.R. Effect of plasma nitriding potential on tribological behaviour of AISI D2 cold-worked tool steel. Wear 2014, 317, 188–193. [Google Scholar] [CrossRef]
  7. Duman, K.; Karabeyoğlu, S.S.; Yaman, P. Effect of nitriding conditions and operation temperatures on dry sliding wear properties of the aluminum extrusion die steel in the industry. Mater. Today Commun. 2022, 31, 103628. [Google Scholar] [CrossRef]
  8. Cho, K.T.; Lee, Y.K.; Lee, W.B. Wear behavior of AISI D2 steel by enhanced ion nitriding with atomic attrition. Tribol. Int. 2015, 87, 82–90. [Google Scholar] [CrossRef]
  9. Terres, M.A.; Bechouel, R.; Mohamed, S.B. Low Cycle Fatigue Behavior of Nitrided Layer of 42CrMo4 Steel. Int. J. Mater. Sci. 2014, 6, 18–27. [Google Scholar]
  10. Yarasu, V.; Jurci, P.; Hornik, J.; Krum, S. Optimization of cryogenic treatment to improve the tribological behavior of Vanadis 6 steel using the Taguchi and grey relation approach. J. Mater. Res. Technol. 2022, 18, 2945–2962. [Google Scholar] [CrossRef]
  11. Landgraf, P.; Bergelt, T.; Rymer, L.-M.; Kipp, C.; Grund, T.; Bräuer, G.; Lampke, T. Evolution of Microstructure and Hardness of the Nitrided Zone during Plasma Nitriding of High-Alloy Tool Steel. Metals 2022, 12, 866. [Google Scholar] [CrossRef]
  12. Yapici, A.; Aydin, S.E.; Koc, V.; Kanca, E.; Yildiz, M. Wear Behavior of Borided AISI D2 Steel under Linear Reciprocating Sliding Conditions. Prot. Met. Phys. Chem. Surf. 2019, 55, 341–351. [Google Scholar] [CrossRef]
  13. Alphonse, M.; Bupesh Raja, V.K.; Gupta, M. Optimization of plasma nitrided, liquid nitrided & PVD TiN coated H13-D2 friction drilling tool on AZ31B magnesium alloy. Mater. Today Proc. 2019, 46, 9520–9528. [Google Scholar] [CrossRef]
  14. Díaz-Guillén, J.C.; Alvarez-Vera, M.; Díaz-Guillén, J.A.; Acevedo-Davila, J.L.; Naeem, M.; Hdz-García, H.M.; Granda-Gutiérrez, E.E.; Muñoz-Arroyo, R. A Hybrid Plasma Treatment of H13 Tool Steel by Combining Plasma Nitriding and Post-Oxidation. J. Mater. Eng. Perform. 2018, 27, 6118–6126. [Google Scholar] [CrossRef]
  15. Yang, L.; Wang, D.; Guo, Y.; Liu, S. Friction and wear behaviors of sand particle against casing steel. Proc. Inst. Mech. Eng. Part J J. Eng. Tribol. 2019, 233, 393–405. [Google Scholar] [CrossRef]
  16. Anghel, I.M.; Pascu, A.; Hulka, I.; Woelk, D.H.; Uțu, I.D.; Mărginean, G. Characterization of Cobalt-Based Composite Multilayer Laser-Cladded Coatings. Crystals 2025, 15, 970. [Google Scholar] [CrossRef]
  17. Duan, Y.; Qu, S.; Jia, S.; Li, X. Evolution of wear damage in gross sliding fretting of a nitrided high-carbon high-chromium steel. Wear 2021, 464–465, 203548. [Google Scholar] [CrossRef]
  18. Liu, M.; Wang, W.; Hu, H.; Cai, F.; Liu, S.; Xu, G. The corrosion and wear behaviors of a medium-carbon bainitic steel treated by boro-austempering process. Metals 2021, 11, 1959. [Google Scholar] [CrossRef]
  19. Félix-Martínez, C.; García-Salas, L.D.; González-Carmona, J.M.; Ruiz-Luna, H.; García-Moreno, Á.I.; Alvarado-Orozco, J.M. Microstructure, hardness, and tribological performance of D2 tool steel fabricated by laser cladding using pulsed wave and substrate heating. Opt. Laser Technol. 2024, 175, 110862. [Google Scholar] [CrossRef]
  20. Aktaş Çelik, G.; Yarar, E.; Atapek, H.; Polat, Ş. Prediction of contact stress and wear analysis of nitrided and CAPVD coated AISI H11 steel under dry sliding conditions. Eng. Fail. Anal. 2024, 165, 108738. [Google Scholar] [CrossRef]
  21. Díaz-Guillén, J.C.; Naeem, M.; Hdz-García, H.; Acevedo-Davila, J.; Díaz-Guillén, M.; Khan, M.; Iqbal, J.; Mtz-Enriquez, A. Duplex plasma treatment of AISI D2 tool steel by combining plasma nitriding (with and without white layer) and post-oxidation. Surf. Coat. Technol. 2020, 385, 125420. [Google Scholar] [CrossRef]
  22. Chabak, Y.; Efremenko, V.; Barma, Y.; Petrišinec, I.; Efremenko, B.; Kromka, F.; Sili, I.; Kovbasiuk, T. Enhancing Dry-Sliding Wear Performance of a Powder-Metallurgy-Processed “Metal Matrix–Carbide” Composite via Laser Surface Modification. Eng 2025, 6, 313. [Google Scholar] [CrossRef]
  23. Karamboiki, C.M.; Mourlas, A.; Psyllaki, P.; Sideris, J. Influence of microstructure on the sliding wear behavior of nitro-592 carburized tool steels. Wear 2013, 303, 560–568. [Google Scholar] [CrossRef]
  24. Kaba, M.; Filiz, H.I.; Cui, Z.; Baydogan, M.; Cimenoglu, H.; Alpas, A.T. Microstructural effects on impact-sliding wear mechanisms in D2 steels: The roles of matrix hardness and carbide characteristics. Wear 2024, 538–539, 205224. [Google Scholar] [CrossRef]
  25. Weitao, S.; Bin, W.; Xiaoliang, L.; Yuqian, W.; Jian, Z. Controlling the tribology performance of gray cast iron by tailoring the microstructure. Tribol. Int. 2022, 167, 107343. [Google Scholar] [CrossRef]
  26. Daghbouch, A.; Terres, M.A. Optimization of Mass Loss During Abrasive Wear of Nitrided AISI 4140 Steel Parts. Lecture Notes in Mechanical Engineering. In Design and Modeling of Mechanical Systems—VI; Springer: Cham, Switzerland, 2024; pp. 243–253. [Google Scholar] [CrossRef]
  27. Drozd, K.; Walczak, M.; Szala, M.; Gancarczyk, K. Tribological behavior of alcrsin-coated tool steel k340 versus popular tool steel grades. Materials 2020, 13, 4895. [Google Scholar] [CrossRef] [PubMed]
  28. Aghajani Derazkola, H.; Fauconnier, D.; Kalácska, Á.; Garcia, E.; Murillo-Marrodán, A.; De Baets, P. Tribological behaviour of DIN 1.2740 hot working tool steel during mandrel mill stretching process. Tribol. Int. 2025, 202, 110361. [Google Scholar] [CrossRef]
  29. Zhu, Y.; Li, H.; Li, F.; Zhu, D.; Ji, L.; Liu, X.; Zhou, H.; Chen, J. Relationship between discoloration, condensation, and tribology behavior of steel surfaces at cryogenics in vacuum. Tribol. Int. 2024, 191, 109104. [Google Scholar] [CrossRef]
  30. Mandal, B.B.; Kumar, V.; Sahoo, S.; Oraon, B.; Mukherjee, S. Nanoparticle-Reinforced Electroless Composite Coatings for Pipeline Steel: Synthesis and Characterization. Materials 2025, 18, 3949. [Google Scholar] [CrossRef]
  31. Rakhadilov, B.; Satbayeva, Z.; Maulit, A.; Kadyrbolat, N.; Rustemov, A. Electrolytic-Plasma Nitriding of Austenitic Stainless Steels After Mechanical Surface Treatment. Crystals 2025, 15, 992. [Google Scholar] [CrossRef]
  32. Zhang, H.; Que, B.; Dong, L.; Li, Z.; Cheng, Y.; Wang, X. Unraveling the Friction and Wear Mechanisms of a Medium-Carbon Steel with a Gradient-Structured Surface Layer. Lubricants 2025, 13, 448. [Google Scholar] [CrossRef]
  33. Sagar, P. Hybrid GA-ANN and GA-ANFIS soft computing approaches for optimizing tensile strength in magnesium-based composites fabricated via friction stir processing. Mater. Today Commun. 2025, 44, 112083. [Google Scholar] [CrossRef]
  34. Sivarajan, S.; Elango, M.; Sasikumar, M.; Doss, A.S.A. Prediction of surface roughness in hard machining of EN31 steel with TiAlN coated cutting tool using fuzzy logic. Mater. Today Proc. 2022, 65, 35–41. [Google Scholar] [CrossRef]
  35. Ngerntong, S.; Butdee, S. Surface roughness prediction with chip morphology using fuzzy logic on milling machine. Mater. Today Proc. 2019, 26, 2357–2362. [Google Scholar] [CrossRef]
  36. Qazani, M.R.C.; Pourmostaghimi, V.; Moayyedian, M.; Pedrammehr, S. Estimation of tool–chip contact length using optimized machine learning in orthogonal cutting. Eng. Appl. Artif. Intell. 2022, 114, 105118. [Google Scholar] [CrossRef]
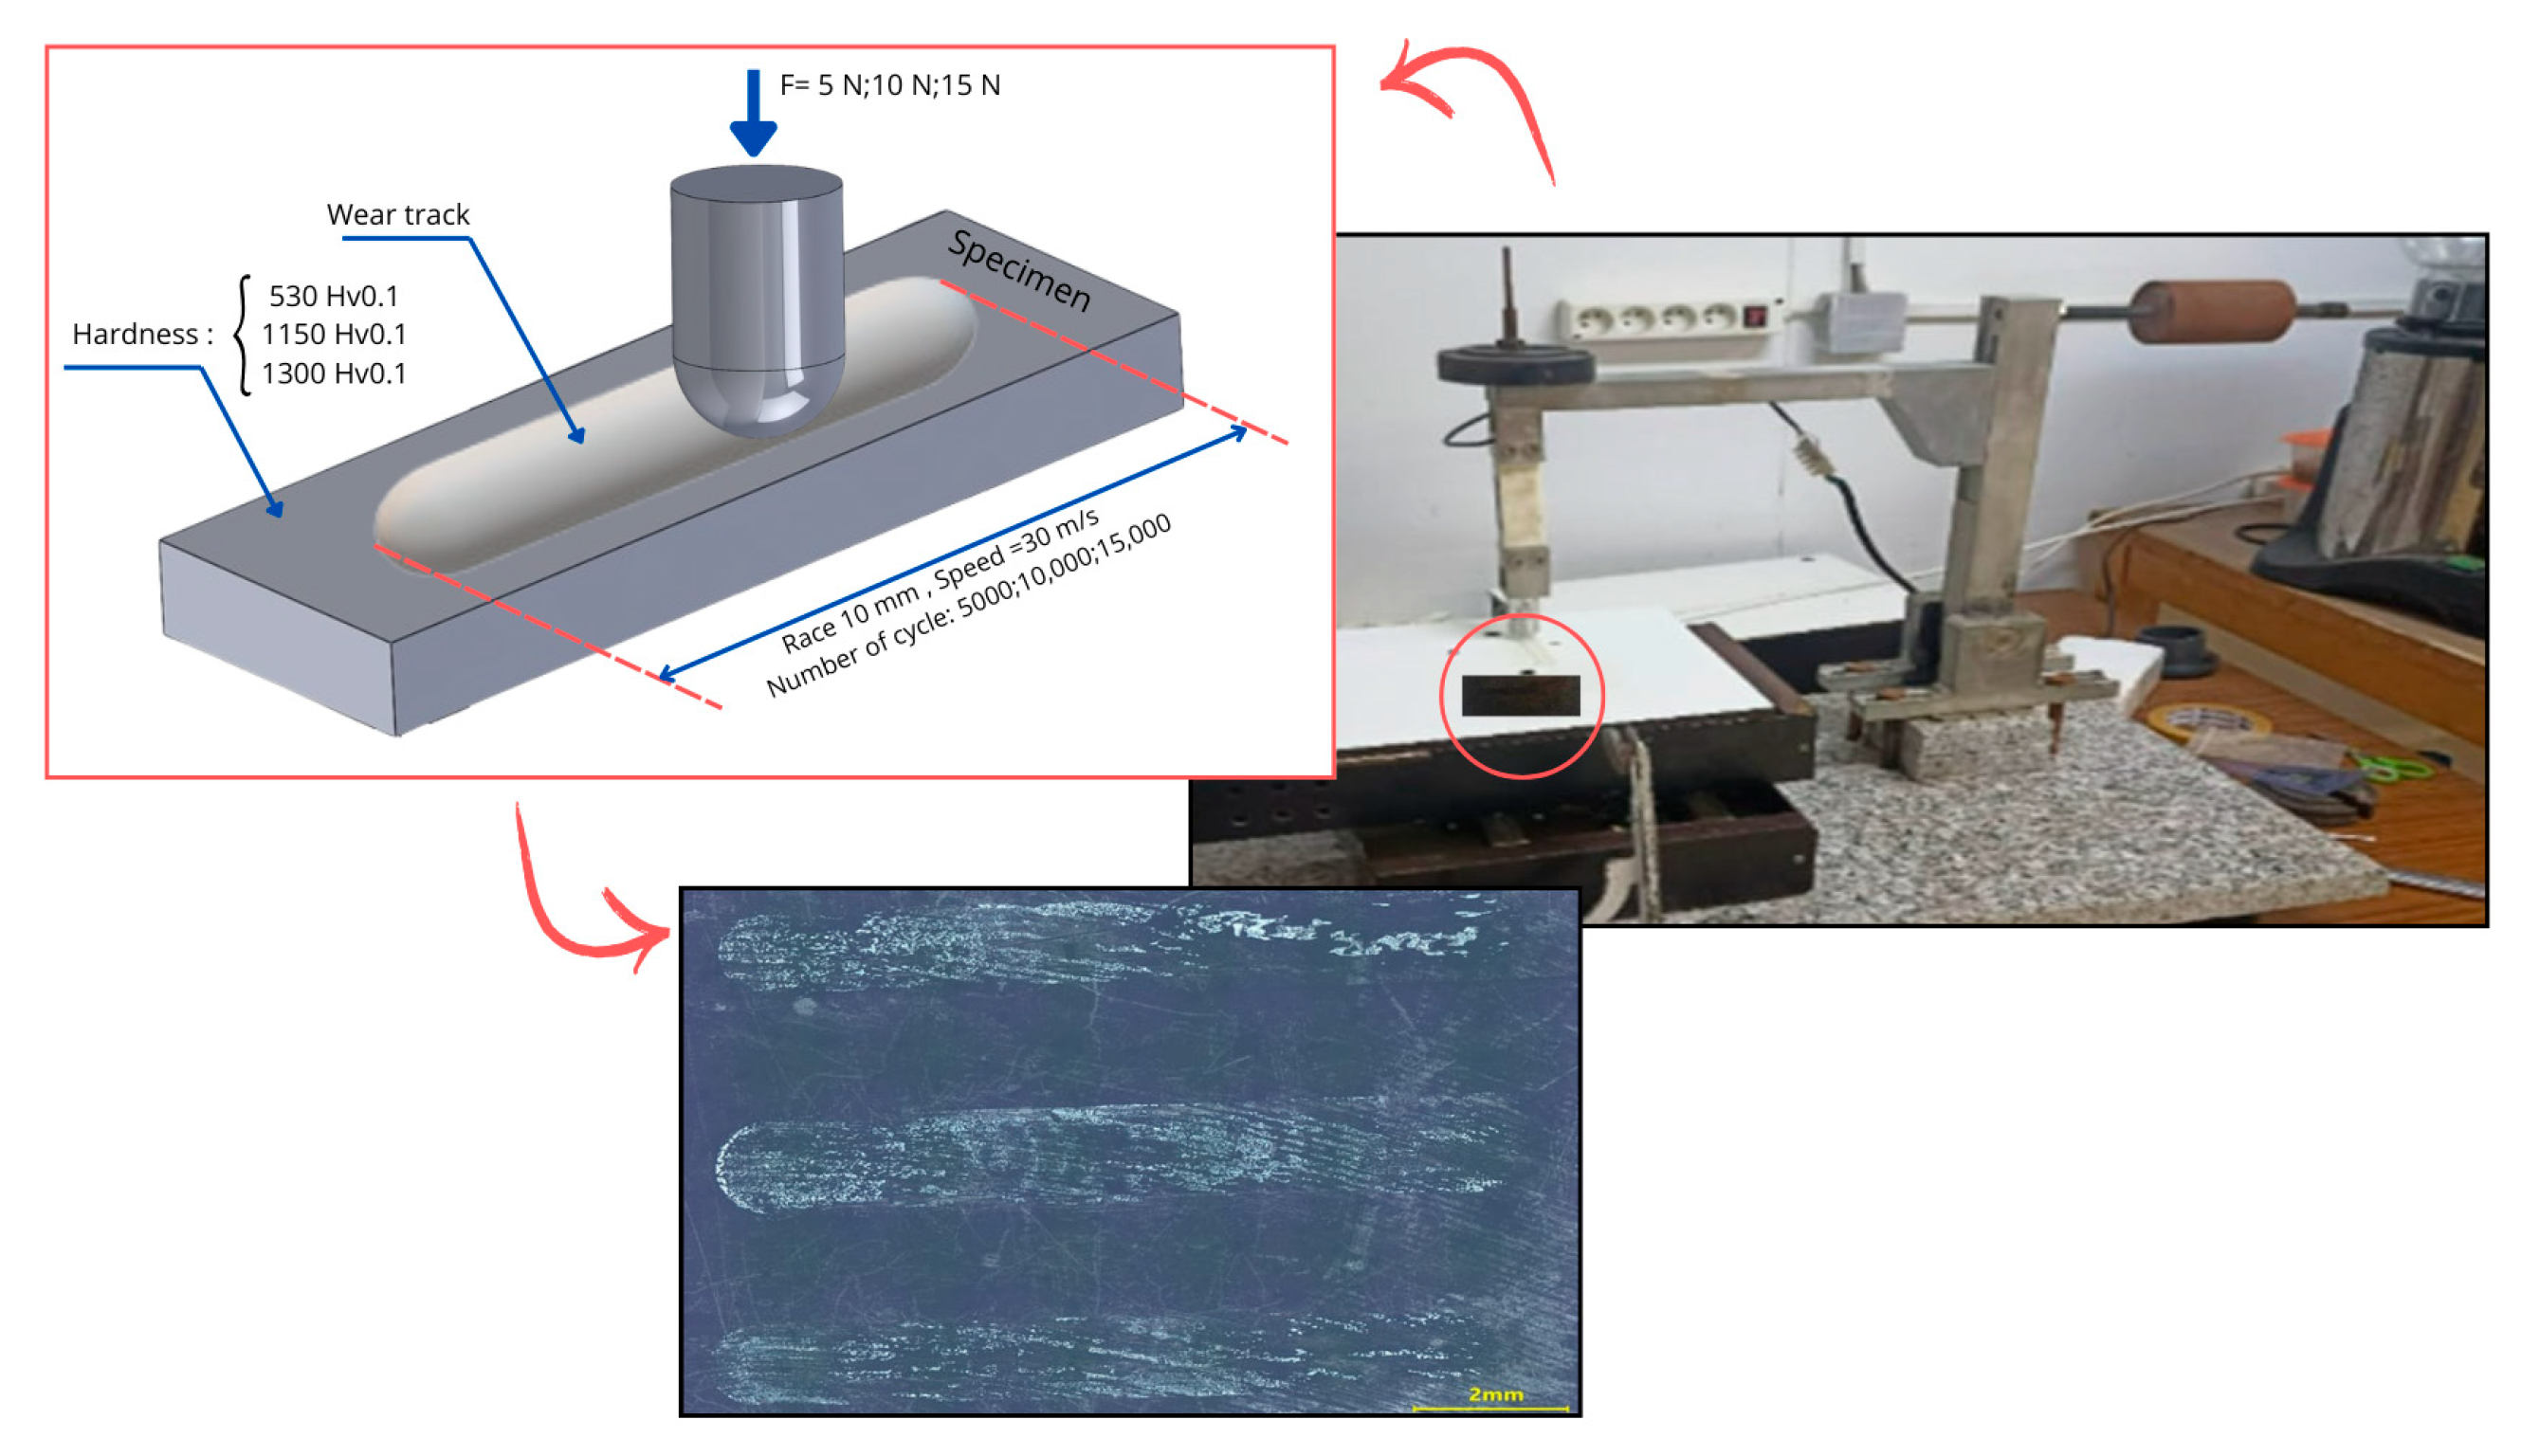
Figure 1. Reciprocating wear testing system.
Lubricants 13 00550 g001
Figure 2. Thermal treatment cycle.
Lubricants 13 00550 g002
Figure 3. Thermochemical treatment cycle.
Lubricants 13 00550 g003
Figure 4. Non-nitrided state microstructure.
Lubricants 13 00550 g004
Figure 5. Nitrided state microstructure.
Lubricants 13 00550 g005
Figure 6. Chemical analysis: (a) surface morphology and EDX spectrum; (b) distribution maps.
Lubricants 13 00550 g006
Figure 7. Microhardness profiles of N16 and N36 states.
Lubricants 13 00550 g007
Figure 8. Friction coefficient as a function of normal force.
Lubricants 13 00550 g008
Figure 9. The evolution of the coefficient of friction with a normal force of 10 N. (a) The influence of nitriding and (b) the influence of nitriding time.
Lubricants 13 00550 g009
Figure 10. Wear results.
Lubricants 13 00550 g010
Figure 11. SEM microstructures of samples: (a) base material, (b) non-nitrated state, (c) nitrated state for 36 h and (d) nitrated state for 16 h.
Lubricants 13 00550 g011
Figure 12. SEM microstructures of worn samples: (a) SEM microstructures of worn sample NN, (b) SEM microstructures of worn sample N16 and (c) SEM microstructures of worn sample N36.
Lubricants 13 00550 g012
Figure 13. SEM of worn areas: (a) Degradation mode, (b) cracking and (c) damage after wear.
Lubricants 13 00550 g013
Figure 14. Main effects.
Lubricants 13 00550 g014
Figure 15. Residual plots for the friction coefficient model: normal distribution of residual values.
Lubricants 13 00550 g015
Figure 16. Contour plots of friction coefficient as a function of (a) cycle number (N-C) and hardness (HV), (b) force (F) and hardness (HV) and (c) force (F) and number of cycles (N-C).
Lubricants 13 00550 g016
Figure 17. Desirability.
Lubricants 13 00550 g017
Figure 18. Optimum solution.
Lubricants 13 00550 g018
Figure 19. Input adhesion functions: (a) hardness (HV), (b) force (F) and (c) number of cycles (N-C).
Lubricants 13 00550 g019
Figure 20. ANFIS architecture.
Lubricants 13 00550 g020
Figure 21. The coefficient of friction in relation to (a) hardness (HV) and force (F), (b) hardness (HV) and number of cycles (N-C) and (c) force (F) and number of cycles (N-C).
Lubricants 13 00550 g021
Figure 22. The coefficient of friction is visualized using fuzzy logic analysis.
Lubricants 13 00550 g022
Figure 23. Comparison of experimental and predicted values.
Lubricants 13 00550 g023
Table 1. Chemical composition of D2 steel (wt. %).
DesignationCSiMnPSCrMoVFe
AISI D21.550.300.340.0230.00311.60.740.92Bal.
Table 2. Wear factors and their levels.
Hardness (HV0.1)Force (N)Number of Cycles
Level 156055000
Level 211001010,000
Level 313501515,000
Table 3. Analysis of variance.
SourceSum of SquaresdfMean SquareF-Valuep-Value
Model0.048430.01616.170.0392Significant
A—Hardness0.018910.01897.210.0436
B—Force0.000210.00020.05730.8203
C—Number of cycles0.029410.029411.240.0203
Residual0.013150.0026
Cor Total0.06158
Disclaimer/Publisher’s Note: The statements, opinions and data contained in all publications are solely those of the individual author(s) and contributor(s) and not of MDPI and/or the editor(s). MDPI and/or the editor(s) disclaim responsibility for any injury to people or property resulting from any ideas, methods, instructions or products referred to in the content.