Abstract
This study investigates the effect of graphene nanoplatelets (GNPs) and milling duration on the microstructure, mechanical properties, and wear resistance of the AA7020 alloy reinforced with Fe3O4 and GNP. The composites were prepared with a fixed 10 wt.% Fe3O4 and varying GNP contents (0.5 and 1 wt.%) using high-energy ball milling for 4 and 8 h, followed by hot pressing. The aim was to enhance the performance of the AA7020 alloy for potential use in defense, automotive, aviation, and space applications, where superior mechanical properties and wear resistance are required. The results showed that the incorporation of 0.5 wt.% GNP and optimized milling significantly improved the composite’s performance. The AA7020 + 10 wt.% Fe3O4 + 0.5 wt.% GNP composite achieved the highest density (99.70%) when milled for 4 h. Its hardness increased with both the inclusion of GNP and extended milling duration, with the composite milled for 8 h exhibiting the highest hardness value (149 HBN). The tensile strength also improved, with the composite milled for 4 h showing a 28% increase (292 MPa) compared with the unreinforced alloy. Additionally, the friction coefficient decreased with GNP content and milling duration, with the composite milled for 8 h showing a 26% reduction. Wear resistance was notably enhanced, with the composite milled for 8 h exhibiting the lowest specific wear rate (7.86 × 10⁻⁷ mm3/Nm).
1. Introduction
Aluminum (Al) and its alloys have been used in machinery production, construction, transportation, and aviation for many years. As Al alloys have low density, high specific strength, hardness, good electrical conductivity, and corrosion resistance, it has begun to be widely applied in such modern industries as space, aviation, and defense [1,2]. Although aluminum alloys have high mechanical properties, they exhibit low tribological properties in cases of dry sliding or insufficient lubrication [3]. Metal matrix composites (MMCs) have been developed to improve the low performance of traditionally used metals [4]. MMCs can be produced by making use of infiltration, stirred, centrifugal casting, and powder metallurgy (PM) techniques. Among the production techniques, it provides a significant advantage for the homogeneous distribution and layered production of PM particles [5,6]. In the PM technique, powders serving as raw materials can undergo various processes, including conventional methods like sintering, as well as innovative approaches such as hot pressing, laser sintering, etc., to produce composite materials [7,8,9]. Laminated MMC manufacturing, an innovative manufacturing technique, allows the production of composite materials where the main material properties are preserved while being reinforced with additional elements on the surface [10,11]. The reinforcement elements used on the surface vary according to the desired optical, magnetic, wear, and strength properties [12,13]. Currently, scientists are researching laminated composite materials with hybrid particle additions for this purpose [14].
Various reinforcement materials, such as ceramics, nitrides, oxides, graphene, and fibers, are commonly utilized in the production of metal matrix composites. Hybrid reinforced metal matrix composites (HRMMCs), one type of composite material, have been widely studied to meet industrial requirements [15,16,17]. HRMMCs are seen as a new generation of materials that can replace single-reinforced composites by increasing the performance of the materials using two or more reinforcement elements in the structure [18]. Many studies have been carried out to increase the strength and tribological performance of materials related to HRMMCs [19]. In the production of hybrid reinforced composite materials, it is extremely difficult to distribute nanoparticles evenly in the metal matrix due to the large surface/volume ratio, especially in methods such as casting and infiltration [20,21]. In order to distribute the ceramic particles homogeneously in the matrix, the wettability of the initial composite powders can be increased through high-energy ball-mill devices using the powder metallurgy method [22]. It is crucial to keep the cost of HMMC materials produced to improve their mechanical properties at an optimum level. Cost-effective reinforcements, such as silicon carbide (SiC), aluminum oxide (Al2O3), and magnetite (Fe3O4), are used in HMMC materials [23].
Therefore, magnetite (Fe3O4) is utilized as a reinforcement particle due to its low cost and good mechanical properties. It is also known that Fe3O4 reinforcement in aluminum improves mechanical and wear properties [24]. According to previous research, adding nanoparticles to the composite affects the properties of composite materials in a positive way [25]. Highly efficient nano-sized reinforcements have attracted much attention to improving the properties of Al matrix composites [25,26]. In addition, graphene (GNP) is used as a reinforcement element in metal matrices, such as aluminum, magnesium, and titanium, to improve the properties of metal matrix nanocomposites [27,28]. Nano graphene in particular has been utilized in research due to its superior electrical, thermal, mechanical, and tribological properties [29,30]. Khan and et al. investigated the mechanical properties of hybrid composites prepared through high-energy ball-milling with B4C and GNP reinforcement in the AA6061 matrix. The hardness values indicated that the hybrid composite reinforced with 1% B4C and 0.1% GNP by weight increased by approximately 32% and reached 65 HV compared with the AA6061 material without reinforcement [26]. Şenel and Gürbüz investigated hybrid composite samples’ production and mechanical properties by reinforcing pure Al with B4C and GNP at different rates using the powder metallurgy method. Their experiment resulted in microhardness (HV0.2) values that improved due to increasing hybrid reinforcement ratios, and the highest value was 109.8 HV in the Al + 30% B4C + 0.15% GNP sample [28]. Srivyas et al. added 6 wt.% Al2O3 and varying amounts of 1, 2, and 3 wt.% GNP to the Al–Si alloy. They conducted the production by milling the initial hybrid composite powders at a 1/10 powder-to-ball ratio for 12 h at 240 rpm, followed by processing through the spark plasma sintering method. They subsequently investigated the corrosion and wear characteristics of the materials. Additionally, they have reported that the coefficient of friction decreases with increasing percentage of GNP [29].
Tabandeh-Khorshid et al. examined the wear properties of pure Al and composites containing 0.1 and 1% GNPs by weight at varying 5, 10, and 15 N loads. They stated that the lowest friction coefficient (0.24 µm) and the lowest weight loss of 0.02 g were in the sample containing 1% GNP. According to the results, they emphasized that they achieved superior tribological properties with self-lubricating ability due to the increased GNP ratio [30].
Recent studies have demonstrated the positive impact of graphene nanoplatelets (GNPs) on the mechanical properties of aluminum matrix hybrid composites, highlighting improvements in hardness, strength, and wear resistance. However, a significant gap exists in understanding how milling duration influences the mechanical and tribological properties of AA7020 matrix composites reinforced with 10 wt.% Fe3O4 and varying GNP contents. Most existing research has focused on composites with a single level of GNP reinforcement, leading to limited data on how different milling durations affect the density, hardness, and wear behavior of these materials.
This study aims to fill this gap by investigating the effects of milling duration (4 and 8 h) on the density, hardness, and wear properties of AA7020 matrix composites reinforced with 10 wt.% Fe3O4 and GNPs, fabricated using the PM method. The motivation for this research stems from needs in various engineering industries, particularly in the defense, automotive, aviation, and space sectors. These industries require materials that not only offer lightweight solutions, but also exhibit high strength, improved wear resistance, and durability under extreme conditions. By optimizing the properties of AA7020-based hot-pressed hybrid composites, this research seeks to solve key engineering problems, such as reducing the weight of structural components while enhancing their mechanical performance and wear resistance, thereby contributing to more efficient and reliable applications in these high-demand fields.
2. Materials and Methods
2.1. Production Method of Composite Samples
A pre-alloyed AA7020 powder with sub-100-micron “spherical” particle size for the initial morphology of the AA7020 powder, “angular” initial morphology of Fe3O4 powder with an average size of 40 microns, and 99.9+% purity graphene nanoplatelets (GNPs) with a size of 5 nm were used as starting materials. To fabricate the hybrid composite, 10 wt.% Fe3O4 and two weight ratios (0.5 wt.% and 1 wt.%) of GNPs were mixed with the AA7020 powder using a ball mill. Ball-milling is a convenient way to disperse reinforcement particles in a metal matrix. The mechanical forces during milling help to embed the Fe3O4 and GNPs into the surface of AA7020 particles, creating a strong interface. Therefore, ball-milling was conducted using high-purity zirconia balls in a sealed container to prevent contamination and the oxidation of the powders. The mixing process utilized a ball-to-powder ratio of 16:1, and the milling durations were 4 h and 8 h to achieve a homogeneous mixture. Figure 1 depicts a schematic illustration of the ball-milling process. Table 1 presents the chemical composition of the AA7020 alloy powder employed as the matrix material in the fabrication of the hybrid composite.
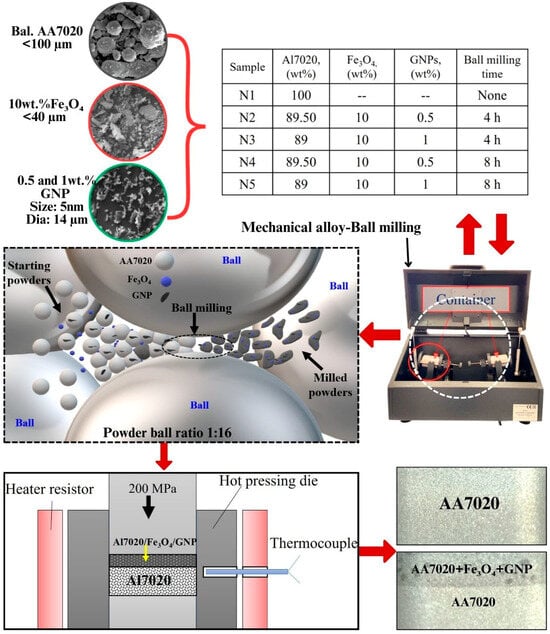
Figure 1.
Fabrication process of test specimens under study.

Table 1.
Chemical composition of AA7020 alloy.
The mixed powders were carefully poured into a specially designed hot-pressing mold fabricated from H13 steel, facilitating the creation of a layered composite structure. The preparation process of the layered structure for samples N2–N5 involved three distinct phases, as shown in Figure 1. First, a base layer of AA7020 powder was poured into the mold to form the substrate, constituting approximately 89% and 89.5% of the total powder volume, depending on the sample. Subsequently, the mixed Fe3O4 and GNP powders were distributed over the AA7020 substrate layer, with Fe3O4 making up 10% and GNPs making up either 0.5% or 1% of the total volume. Within the controlled environment of the furnace, the mold was subjected to an initial application of a cold load set at 20 MPa, followed by a gradual temperature ramp of 10 °C per minute until reaching the final hot-pressing temperature of 575 °C. The temperature was chosen to optimize the interface bonding between the matrix and reinforcement particles, crucial for achieving the desired material properties. The hot-pressing process ensued under a pressure of 200 MPa, ensuring sufficient consolidation, and was maintained for an appropriate dwell time to guarantee proper material cohesion. As a result of this methodical process, laminated composite materials with dimensions of 40 × 40 × 20 mm3 were successfully produced.
2.2. Microstructure and Mechanical Analysis
Samples were prepared from two regions of the hot-pressed composite materials from the AA7020 alloy region and the AA7020 + Fe3O4 + GNP composite region. The samples designated for analysis were ground and polished using an automated sanding and polishing machine with SiC papers of grits 600, 800, 1000, and 1200, followed by polishing with diamond suspensions (9, 6, and 3 microns) on diamond cloths in an aqueous medium. Finally, a colloidal silica suspension (0.001 μm) was used for a final polishing step to remove scratches. To reveal the microstructure, the polished samples were etched with Keller’s reagent (1 mL HF + 200 mL H2O) for 15 s and examined under the Leica DM4000 M optical microscope (Leica Microsystems, Wetzlar, Germany). Microstructure images of the samples were captured. Density measurements of composite materials were taken with the Sartorius brand density measurement kit, which measures according to the Archimedes principle (Equation (1)) [31].
where is the density of the material (g/cm3), is the density of water at room temperature (g/cm3), ma is the weight of the material in air (g), and mw is the weight of the material in water (g).
Figure 2 provides an overview of (a) the tensile and microstructure test specimens, and (b, c) the hardness test specimens. The test samples were prepared by cutting on a Mitsubishi CNC wire electrical discharge machine. Tensile tests were carried out on an Instron 3369 brand universal tensile tester with a tensile and compression capacity of 50 kN at a tensile speed of 1 mm/min (at room temperature). Scanning electron microscopy (SEM) was employed to analyze the morphology of the powders, the microstructure of the composites, the worn surfaces after wear testing, and the fracture surfaces after the tensile test.
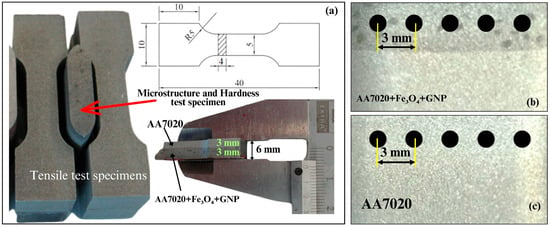
Figure 2.
Overview of (a) the tensile and microstructure test specimens, and (b,c) hardness test specimens.
A Tescan Maia3 XMU model SEM device was used to obtain SEM images, and energy dispersive X-ray spectroscopy (EDS) analysis (Tescan, Brno, Czechia), and EDS mapping analysis of the composites. SEM images were taken using secondary electron imaging and backscattered electron imaging methods. X-ray diffraction (XRD) analysis using a Bruker D8 Advance diffractometer was conducted for phase identification. XRD analysis was performed at a scan rate of 3° per minute and a scan range of 20° to 90°. The analysis of wear surfaces at a 90-degree angle and the measurement of surface roughness values in the 1D line roughness mode were conducted using a Filmetrics Profilm 3D-200 device (KLA Corporation, Milpitas, CA, USA).
The hardness of the composite materials was measured using the Brinell hardness test according to the ASTM E10-23 standard [32] on an Emco-Test Duravision 200 hardness tester (Emco-Test, Kuchl, Austria). A ball diameter of 2.5 mm and a load of 31.25 kg were used. The average hardness value was determined by taking nine measurements from three different areas for each material.
Wear tests were carried out on the UTS Tiribometer T 10/20 brand test device (UTS, Trabzon, Türkiye) with pin on disk. For the wear test, composite materials were used from three samples for each test, with a diameter of 10 mm and a height of 10 mm. Wear tests were performed in accordance with the ASTM G99-23 standard [33]. In the wear test, composite materials were used as the pin material, while a Hardox 400 steel plate (SSAB, Stockholm, Sweden) was preferred as the abrasive disk. Wear tests were carried out at a sliding diameter of 100 mm, sliding speed of 1 m/s, under 10 N load, and at a distance of 1500 m. A schematic diagram of the wear test setup is illustrated in Figure 3.
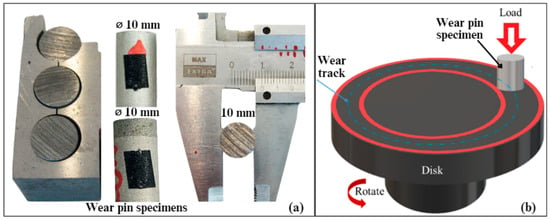
Figure 3.
(a) Wear test specimens, (b) and overview of the wear test setup.
3. Results and Discussion
3.1. Morphological Evolution of Composite Powders
Figure 4 presents SEM images of the AA7020 alloy powder used as the matrix, along with the Fe3O4 and GNP reinforcement powders. The AA7020 alloy powder exhibited a spherical morphology, while the Fe3O4 particles possessed irregular, complex shapes. The GNPs, as expected, displayed a two-dimensional, plate-like structure.
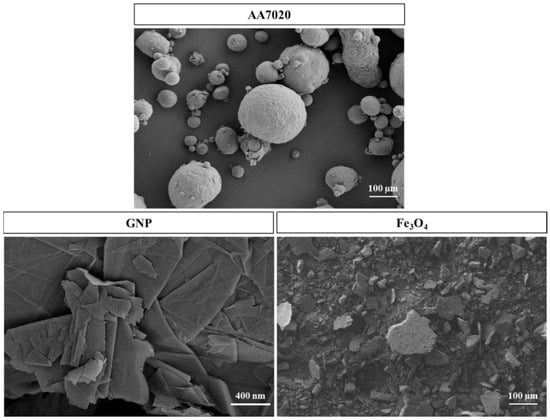
Figure 4.
Starting powders used in this study.
When comparing the morphology of the composite powders prepared by milling for different durations (4 and 8 h) with their initial shapes (Figure 5), significant changes were observed. Examination of the SEM micrographs revealed the influence of the dry milling process on the distribution and morphology of the Fe3O4 and GNP reinforcements within the powder matrix. Notably, the composite powders milled for both durations exhibited a flattened morphology compared with the initial, spherical shape of the unreinforced AA7020 powder. This flattening effect became more pronounced with increasing GNP content. This observation aligns with findings reported in [34], suggesting that the lubricating property of GNPs likely influenced the milling process by promoting particle deformation and flattening during ball–powder interactions.
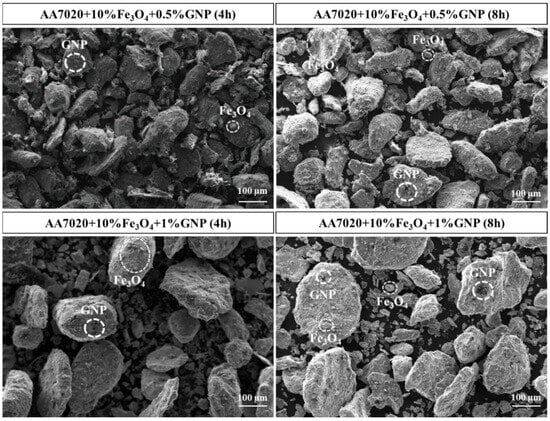
Figure 5.
SEM images of AA7020 starting powder and composite powders after mechanical alloying for 4 and 8 h.
3.2. Microstructural Analysis
The X-ray diffraction (XRD) patterns depicted in Figure 6 illustrate the characteristics of the AA7020 + 10% Fe3O4 + 1% GNP hybrid reinforced composite material. Analysis of these patterns discerned the presence of an AlMg4Zn11 intermetallic phase alongside an α-Al matrix phase within the composite structure. Notably, peaks corresponding to the Fe3O4 reinforcement material were identified, both overlapping with the matrix alloy peaks and appearing as additional minor peaks. Furthermore, the presence of GNP particles was confirmed by the characteristic C peak. The identification of these phases and particles corroborated the successful incorporation of the reinforcement materials within the composite.
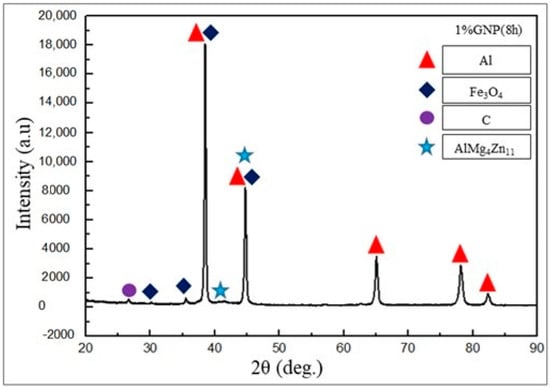
Figure 6.
XRD patterns of AA7020 + 10 wt.% Fe3O4 + 1 wt.% GNP (8 h) hybrid reinforced composite.
Figure 7 shows optical microscope images of both the AA7020 alloy and the AA7020 + Fe3O4 + GNP composite materials, produced through hot pressing at 575 °C under 200 MPa pressure (in an argon shielding gas environment), following a 20 MPa pre-cold load application to the test powders.
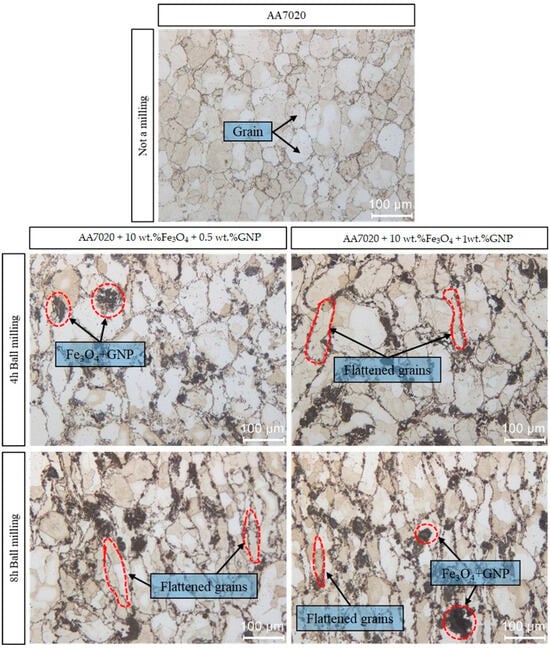
Figure 7.
Optical images of AA7020 alloy and hybrid composite specimens’ ball-milled for 4 and 8 h.
The uniform dispersion of AA7020 + Fe3O4 + GNPs within the hybrid reinforcement matrix held the utmost significance for the mechanical properties of the resultant composite materials. Notably, Figure 7 reveals minimal agglomeration in the composite powders shown in Figure 4. This was attributable to the effective dispersion of Fe3O4, and GNPs achieved through ball milling at varying rates, depending on the mixing technique employed. Furthermore, the ball milling process appeared to result in the flattening of Fe3O4 + GNPs by the matrix powders, indicative of a dynamic homogenization mechanism influenced by compression and impact forces.
Figure 8 and Figure 9 present SEM analysis of both the AA7020 alloy and the AA7020 + Fe3O4 + GNP hybrid composite materials devoid of reinforcement, respectively. These materials exhibited an upper layer of hybrid composite, juxtaposed with the remaining AA7020 alloy portion lacking mechanical alloying treatment. This stratification aimed to facilitate a cost-effective examination of characteristic surface features. Notably, prolonged grinding times, particularly with increased GNP reinforcement, led to flatter morphology in the AA7020 matrix powders, potentially attributed to the lubricating effect of GNPs during grinding, which aided in flattening without inducing cracks. Figure 10 presents the SEM image and corresponding EDX mapping analysis of the AA7020 + 10% Fe3O4 + 1% GNP composite. The EDX mapping clearly showed the distribution of carbon (C) at the grain boundaries, which corresponded to the location of the GNPs. The absence of significant voids or cracks in these regions was evidenced by the consistent carbon signals along the grain boundaries. This mapping confirmed that the black contrast observed under SEM observation was due to the presence of GNPs, rather than cracks, thereby validating our assertion that the GNPs aided in flattening without inducing cracks. Additionally, a homogeneous distribution of Fe3O4 particles within the structure was observed to correlate with extended grinding durations.
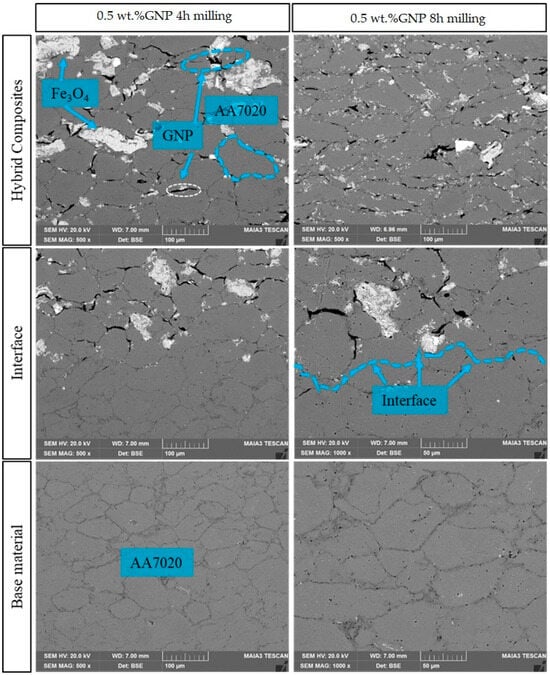
Figure 8.
SEM images of AA7020 + 10 wt.% Fe3O4 + 0.5 wt.% GNP hybrid composite specimens.
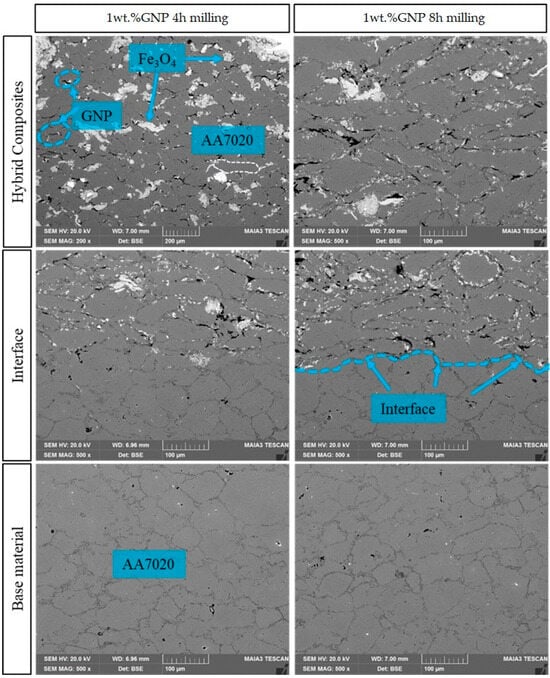
Figure 9.
SEM images of AA7020 + 10 wt.% Fe3O4 + 1 wt.% GNP hybrid composite specimens.
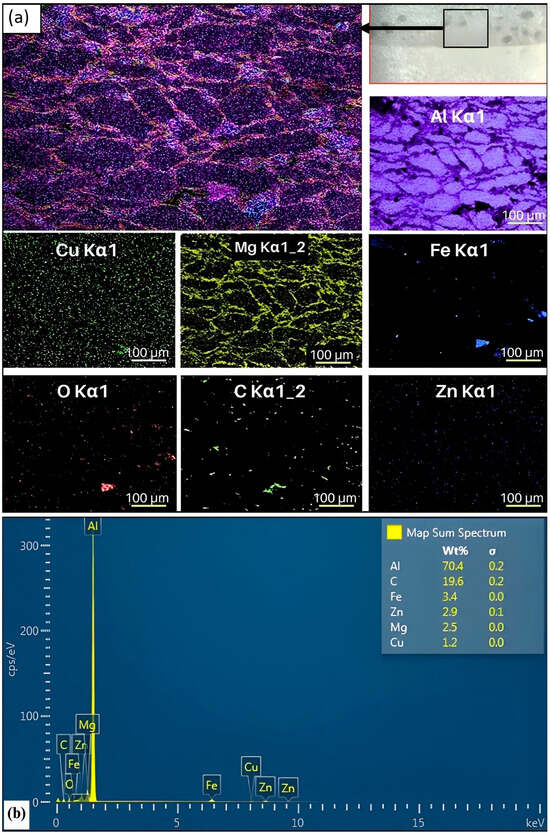
Figure 10.
(a) EDS mapping analysis and (b) EDS spectrum of 8 h milled AA7020 + 10 wt.% Fe3O4 + 1 wt.% GNP hybrid composite specimen.
The SEM analyses in Figure 8 and Figure 9 show that no discernible porosity developed at the bonding interfaces. This could be attributed to the enhanced bonding between the matrix and reinforcement particles, achieved through the effective application of heat and pressure during hot pressing. Hence, the microstructures of the hybrid composite materials exhibited remarkably low levels of porosity, which was observed to be between 0.4% and 1.2%. Notably, within Figure 8 and Figure 9, the presence of Fe3O4 and GNP reinforcement particles was predominantly observed at the grain boundaries. Despite the incorporation of hybrid reinforcements at these boundaries, the minimal levels of porosity and agglomeration could be attributed to the careful preparation involving high-energy ball-milling techniques. Further insights into the microstructural composition were obtained through EDS mapping analysis, as illustrated in Figure 10. This analytical approach revealed that the black regions delineating the grain boundaries in the SEM images of Figure 8 and Figure 9 exhibited an enrichment of GNP, whereas the white regions depicted a higher concentration of Fe3O4. Such spatial heterogeneity within the microstructure provides compelling evidence of the effective dispersion and localization of the reinforcement particles within the composite material.
3.3. Physical and Mechanical Properties Analysis
Figure 11 depicts the density of the fabricated hybrid reinforced composite samples. The highest density value, reaching 99.7%, was observed for the sample containing 10 wt.% Fe3O4 and 0.5 wt.% GNP reinforcement milled for 8 h. Conversely, the unreinforced AA7020 sample exhibited the lowest density (98.8%). Interestingly, while an increase in GNP content led to a decrease in density for the 4 h milling duration, the samples milled for 8 h displayed a trend of increasing density with higher GNP content. This observation suggests the achievement of improved homogenization and integration of reinforcement particles within the AA7020 matrix powder with extended milling time.
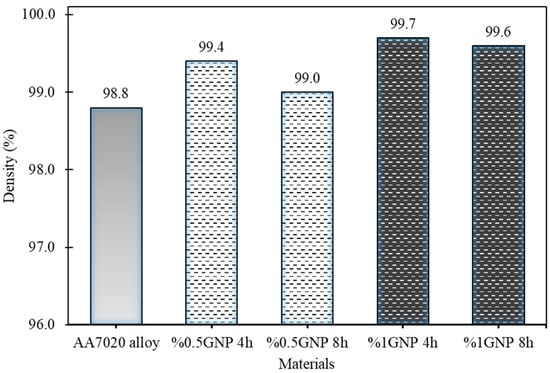
Figure 11.
Densities for AA7020 alloy and hybrid composite specimens.
The hardness measurements are presented in Figure 12. The sample containing 10 wt.% Fe3O4 and 1 wt.% GNP reinforcement milled for 8 h exhibited the highest hardness value of 149 HBN. The AA7020 alloy displayed the lowest hardness value. Therefore, it can be stated that the presence of hard Fe3O4 particles and the load-bearing capability of GNPs increased the composite’s hardness, and the effective hot-pressing further contributed to higher microhardness. These results indicate a continuous increase in the hardness with both the GNP content and the ball-milling time.
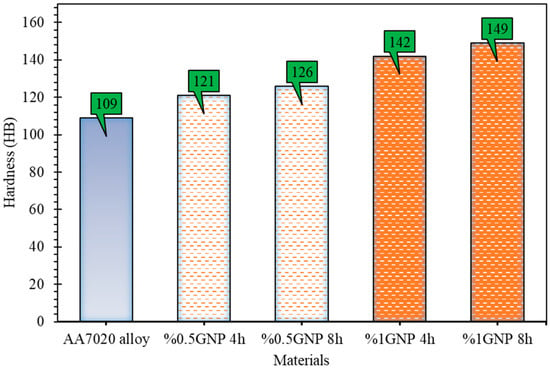
Figure 12.
Hardness values for AA7020 alloy and hybrid composite specimens.
3.4. Tensile Strength Analysis
Figure 13 presents the tensile test results for the fabricated composites. The AA7020 + 10 wt.% Fe3O4 composite reinforced with 1 wt.% GNP and milled for 4 h exhibited the highest tensile strength. Conversely, the unreinforced AA7020 alloy displayed the lowest value. Notably, composites produced from powders milled for 8 h generally demonstrated higher tensile strengths compared with those milled for 4 h.
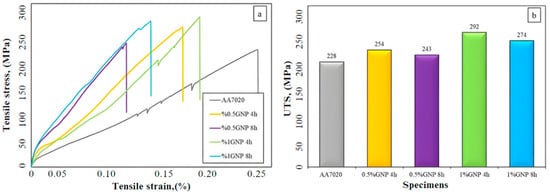
Figure 13.
(a) Stress–strain curves for studied materials and (b) ultimate tensile strengths of studied materials.
The tensile strength of the specimen containing 1 wt.% GNP after 8 h of milling was observed to decrease compared with its 4 h counterpart. An increased milling duration typically leads to work hardening and potentially higher hardness in the composite particles, but it can also introduce a higher density of dislocations within the material. This elevated dislocation density can inversely affect hardness and lead to a decrease in both tensile strength and elongation. The increased brittleness associated with higher GNP content at different milling times might have contributed to the observed reduction in tensile strength. Furthermore, the analysis revealed that ductility consistently decreased with increasing ball milling time, regardless of the GNP content. The unreinforced AA7020 alloy exhibited the highest ductility, while the composite milled for 8 h with 0.5 wt.% GNP exhibited the lowest formability. The reduction in ductility for the composite materials compared with the AA7020 alloy can be attributed to several factors, including grain size and the nature of the interface between the matrix and reinforcements. The influence of density on tensile behavior was significant, as samples with lower densities (AA7020 alloy and hybrid composite with 0.5 wt.% GNP for 4 h) were more prone to defects, such as pores and cracks. These defects act as stress concentrators during tensile testing, leading to premature failure. Fractography analysis under SEM revealed the crack paths and locations of porosities, confirming their impact on mechanical performance (Figure 14). The decrease in ductility with increasing ball milling time can be related to grain refinement and increased brittleness due to the higher density of dislocations introduced during the milling process. The interface between the matrix and the reinforcements plays a crucial role in determining the mechanical properties. Strong interfacial bonding is essential for effective load transfer, but excessive milling can lead to the formation of brittle intermetallic phases or micro-cracks at the interfaces, adversely affecting ductility and tensile strength.
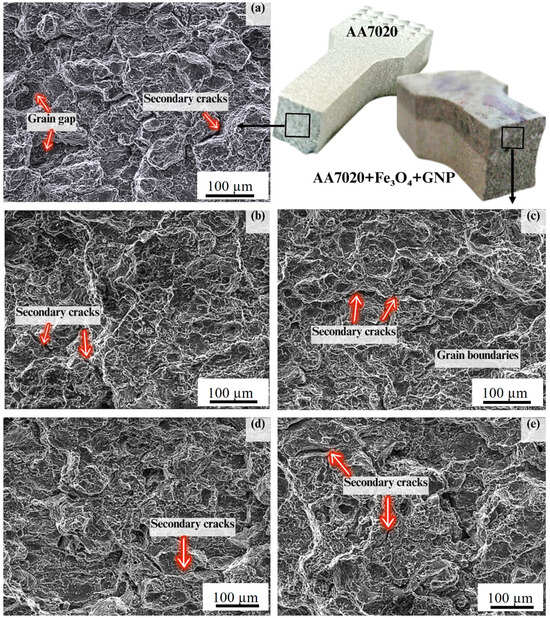
Figure 14.
Fracture surfaces of specimens after tensile tests for (a) AA7020, (b) 0.5 wt.% GNP (4 h), (c) 0.5 wt.% GNP (8 h), (d) 1 wt.% GNP (4 h), and (e) 1 wt.% GNP (8 h).
Figure 14 presents SEM images of the fractured surfaces of the AA7020 alloy and the AA7020 + Fe3O4 + GNP hybrid reinforced composite materials after tensile testing. The fracture morphology of the unreinforced AA7020 alloy revealed intergranular fracture along grain boundaries, resulting in the formation of characteristic dimple features. These dimples likely corresponded to voids that matched the opposing fractured surfaces. The presence of dense eutectic phases at the grain boundaries, as identified in previous studies [35,36], may have contributed to this intergranular fracture behavior in the AA7020 alloy. In contrast, the fracture surfaces of the hybrid reinforced composites exhibited a reduction in grain voids and dimples. This observation suggests a transition toward a more layered fracture mode. This change in fracture behavior can be attributed to two potential mechanisms. Firstly, as noted in prior literature [36], extended milling durations can induce strain hardening within the material, leading to increased hardness, but potentially reduced ductility. Secondly, the distribution of Fe3O4 and GNP reinforcements across the grain boundaries, as influenced by different milling times observed on the fractured surfaces, might have played a role. These reinforcements could potentially hinder crack propagation initiated at grain boundaries, thereby enhancing the overall mechanical properties [37]. The analysis of the fractured surfaces further revealed an increase in intragranular fractures, secondary cracks, and cleavage planes within the composites. Notably, a significant increase in cleavage planes was observed in the fractured surfaces of composites containing 1 wt.% GNP after both 4 and 8 h of milling. This suggests that the presence of Fe3O4 and GNP reinforcements might enhance the material’s resistance to crack propagation at grain boundaries during tensile testing, potentially leading to improved mechanical properties [36].
3.5. Wear Analysis
Figure 15 and Figure 16 present the weight loss and specific wear rate of hybrid composite samples, respectively. Compared with the unreinforced AA7020 material, both weight loss and SWR values decreased with increasing GNP content and milling duration. Notably, variations in the coefficient of friction with respect to the GNP ratio and milling time were observed and considered to be influenced by both factors (Figure 17).
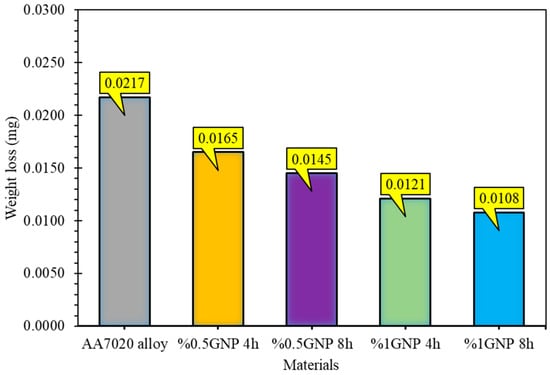
Figure 15.
Weight loss for AA7020 alloy and hybrid composite specimens.
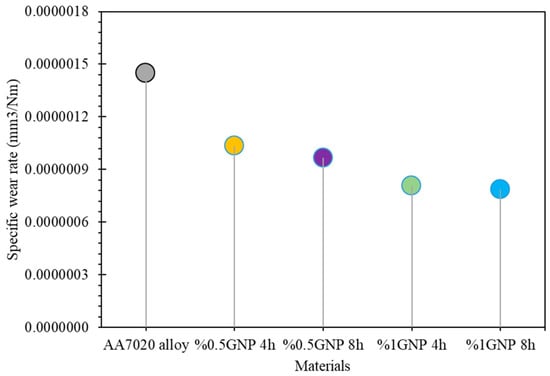
Figure 16.
Specific wear rates for AA7020 alloy and hybrid composite specimens.
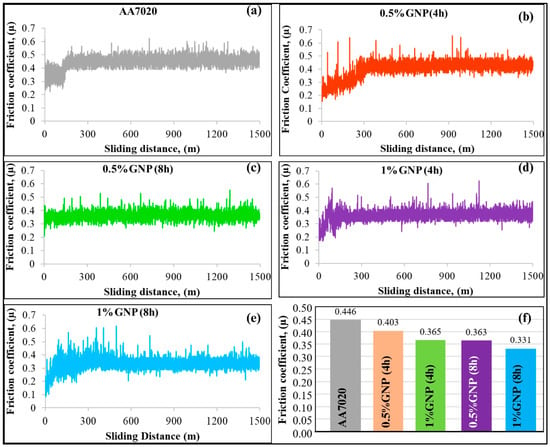
Figure 17.
Coefficients of friction for (a) AA7020 alloy, (b–e) hybrid composite specimens, and (f) the average value of the COF.
The wear tests revealed that the composite materials consistently exhibited lower wear rates compared with the matrix alloy. Notably, a decrease in wear rate was observed when the GNP reinforcement content increased from 0.5 wt.% to 1 wt.%. The specific wear rate (SWR) of the AA7020 alloy was 1.44 × 10⁻⁶ mm3/Nm, while the SWR of the AA7020 + 10% Fe3O4 + 1% GNP (8 h) composite was significantly lower, at 7.86 × 10⁻⁷ mm3/Nm. The hard Fe3O4 particles acted as barriers to wear, while GNPs reduced friction due to their lubricating properties. This synergistic effect led to significantly enhanced wear resistance. This improvement in wear resistance was likely attributed to the homogeneous distribution of nano-reinforcements throughout the composite structure, achieved by the milling process, as shown in Figure 15. The agglomeration of these reinforcements would be detrimental to wear performance. Furthermore, the effective placement of the hybrid reinforcement particles along grain boundaries, as reported in [37,38], is known to contribute to the enhanced wear resistance observed in the composites.
During wear testing, friction serves as the resistance encountered by contacting surfaces during motion, and this resistance is quantified by the dimensionless coefficient of friction (COF) [39]. In the context of this study, the ball milling process was presumed to effectively disperse the GNP reinforcements onto the worn surface, thereby enabling them to function as a solid lubricant [40]. The composite specimens exhibited reduced coefficients of friction compared with the unreinforced AA7020 alloy.
We observed variations in the duration of the run-in period among different samples. This variability can be attributed to differences in material composition, surface roughness, and the effectiveness of the lubricating mechanisms present. Figure 17 illustrates the COF evolution curves (Figure 17a–e) and the corresponding average COF values (Figure 17f) for all studied materials [41,42,43]. While the initial run-in period may vary, the steady-state COF provides valuable insights into the tribological performance of the materials. Notably, the observed reduction in COF for composite materials compared with the unreinforced AA7020 alloy is indicative of the beneficial effects of GNP reinforcements in reducing friction. The highest COF value recorded was 0.45 µ, while the lowest value (0.33 µ) was observed for the sample containing 10 wt.% Fe3O4 and 1 wt.% GNP milled for 8 h. This indicates an approximate 26% reduction in the coefficient of friction compared with the unreinforced AA7020 material, indicating the effectiveness of GNP reinforcements in mitigating frictional resistance and improving tribological performance.
The volume losses of the composite materials were determined by measuring them with a micrometer post-wear. Furthermore, the specific wear rate (SWR) was calculated using the following formula [44]:
where V represents the wear volume loss, Wi is the initial weight before the abrasion test, Wf is the weight after the abrasion test, P is the density of the composite materials (g/mm3), L is the applied load, and D is the wear distance.
SEM, EDS, and 3D optical profilometry were employed to investigate the wear mechanisms affecting the unreinforced AA7020 alloy and the AA7020 + Fe3O4 + GNP hybrid reinforced composite materials after wear testing. The analysis focused on the effect of different factors, including milling durations (4 and 8 h) and the presence of GNP reinforcements at varying ratios, on the tribological behavior (wear and friction) of the materials.
Figure 18 presents SEM images and surface profile views of the worn surfaces from the wear tests conducted under a 10 N load. The SEM images of the AA7020 alloy revealed a worn surface characterized by deep grooves, debris, delamination, and evidence of significant adhesive wear. Adhesive wear is a wear mechanism where asperities (high points) on contacting surfaces weld together under pressure and friction. As relative motion continues, these welds break, resulting in the tearing and removal of material from both surfaces. Additionally, abrasive particles can become lodged between the contacting surfaces, further promoting scratching and material removal [45].
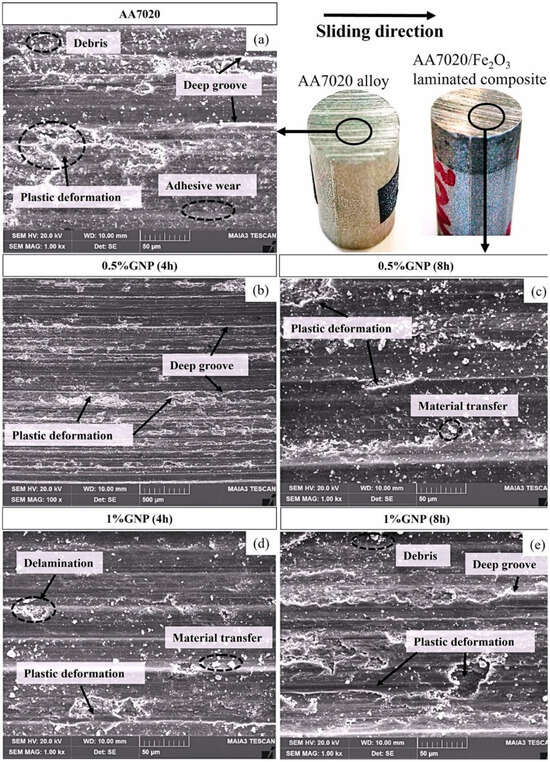
Figure 18.
Surface profile views of the worn surfaces for (a) AA7020 alloy and (b–e) hybrid composite specimens.
The SEM analysis of the worn surfaces indicated that GNP and Fe3O4 particles in the hybrid composites contributed to the formation of deep abrasive grooves. These particles may have also hindered the detachment of material fragments during wear, potentially leading to delamination [46]. Notably, the increased GNP content appeared to correlate with an increase in the number of deep grooves, material transfer, and debris formation, indicating a shift toward abrasive wear compared with the dominant adhesive wear mechanism observed in the unreinforced AA7020 alloy. The influence of milling duration on the wear behavior of the composites seemed to be minimal. While wear images of the 4 h milled composites showed more craters and delamination areas, those milled for 8 h exhibited features like material transfer, debris, plastic deformation, and deeper grooves. These observations are generally consistent with the trends observed in the hardness and coefficient of friction measurements. Additionally, oxide stripes, likely formed during the wear test, were identified on the worn surfaces of all experimental materials [47].
Three-dimensional optical profilometry was employed to further investigate the worn surfaces (Figure 19). The profilometry results corroborate the observations from the SEM analysis. The unreinforced AA7020 alloy exhibited shallow wear grooves consistent with adhesive wear behavior, with minimal plastic deformation and debris formation on the surface [26]. For the 4-h milled composites, the profilometry analysis revealed a clear increase in groove depth with increasing GNP content. In particular, the composite containing 1 wt.% GNP milled for 4 h displayed deep grooves and a significant delamination area, aligning well with the corresponding SEM image. Similarly, the profilometry results of the 8 h milled composites supported the SEM observations. Increases in the number of grooves and the extent of plastic deformation were observed with a higher GNP content [48].
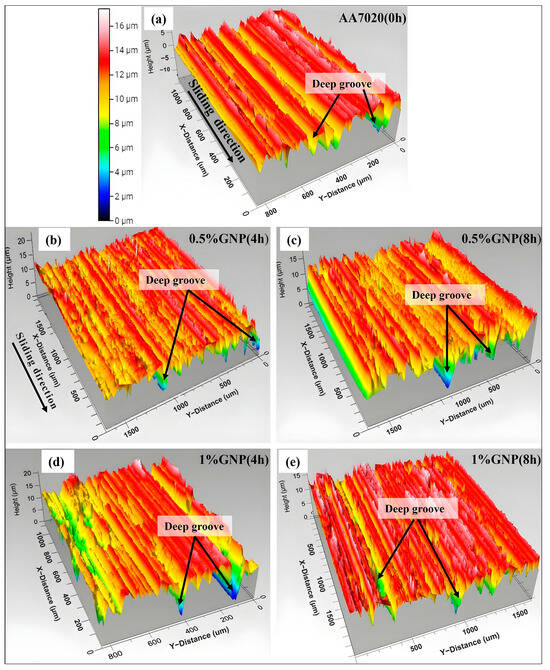
Figure 19.
Three-dimensional optical profilometer images of the worn surfaces for (a) AA7020 alloy and (b–e) hybrid composite specimens.
Figure 20 presents the EDS analysis of the AA7020 + 10% Fe3O4 + 1% GNP composite material milled for 8 h after the wear test. The analyses (numbered 52 and 53) confirmed the presence of embedded GNP and Fe3O4 particles within the matrix. Additionally, area 54 indicated the formation of a GNP tribo layer on the worn surface. The presence of white, small particles in the EDS image suggests wear debris. Visual examination also revealed evidence of plastic deformation (linear areas), material transfer, and micro-cutting.
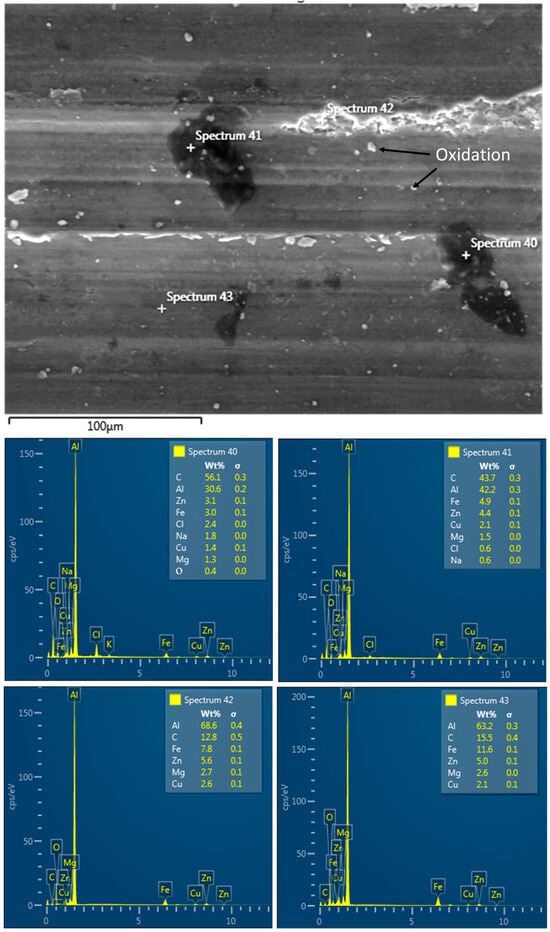
Figure 20.
EDS analysis result images of the worn surface of AA7020 + 10 wt.% Fe3O4 + 1 wt.% GNP (8 h) material.
4. Conclusions
This study investigated the influence of milling duration (4 and 8 h) and graphene nanoplatelet (GNP) content on the microstructure, hardness, and wear properties of hot-pressed AA7020 + Fe3O4 + GNP hybrid composites. The reinforcement of Fe3O4 and GNPs, combined with optimized milling and sintering conditions, significantly enhanced the composite’s mechanical performance. The key findings are summarized below:
- The optimized parameters for ball grinding and sintering resulted in strong particle cohesion and densification, leading to the highest density (99.70%) in the AA7020 + 10% Fe3O4 + 0.5% GNP composite milled for 4 h, while the unreinforced AA7020 alloy exhibited the lowest density (98.8%);
- The presence of hard Fe3O4 particles and the load-bearing capability of GNPs, along with effective hot-pressing, resulted in a substantial increase in microhardness. The AA7020 + 10% Fe3O4 + 0.5% GNP composite milled for 8 h displayed the highest hardness (149 HBN) compared with the unreinforced alloy (109 HBN);
- The AA7020 + 10% Fe3O4 + 0.5% GNP composite milled for 4 h exhibited the highest tensile strength (292 MPa), representing a 28% increase compared with the unreinforced alloy (228 MPa);
- The incorporation of Fe3O4 and GNPs, combined with optimized milling and sintering, significantly reduced the friction coefficient. The unreinforced AA7020 alloy had the highest coefficient (0.45 µm), while the composite milled for 8 h showed the greatest reduction (0.33 µm, a 26% decrease);
- The hard Fe3O4 particles acted as barriers to wear, while the lubricating properties of GNPs reduced friction, resulting in a synergistic effect that significantly enhanced wear resistance;
- The AA7020 + 10% Fe3O4 + 0.5% GNP composite milled for 8 h demonstrated the lowest specific wear rate (7.86 × 10⁻⁷ mm3/Nm), while the unreinforced alloy demonstrated the highest (1.44 × 10⁻⁶ mm3/Nm).
Author Contributions
Conceptualization—U.T. and H.K.; Formal Analysis—T.A.Y. and Ş.K.; Investigation—U.T., H.K., T.A.Y. and Ş.K.; Methodology—U.T., H.K., T.A.Y. and Ş.K.; Resources—U.T. and H.K.; Supervision—H.K., Visualization—U.T. and Ş.K.; Writing—Original Draft—U.T., H.K., T.A.Y. and Ş.K.; Writing—Review and Editing—U.T., H.K., T.A.Y. and Ş.K. All authors have read and agreed to the published version of the manuscript.
Funding
This research received no external funding.
Data Availability Statement
The raw/processed data required to reproduce these findings cannot be shared as the data also form part of an ongoing study.
Conflicts of Interest
The authors declare that they have no known competing financial interests or personal relationships that could have influenced the work reported in this paper.
References
- Yang, H.; Sha, J.; Zhao, D.; He, F.; Ma, Z.; He, C.; Shi, C.; Zhao, N. Defects Control of Aluminum Alloys and Their Composites Fabricated via Laser Powder Bed Fusion: A Review. J. Mater. Process. Technol. 2023, 319, 118064. [Google Scholar] [CrossRef]
- Stojanovic, B.; Bukvic, M.; Epler, I. Application of Aluminum and Aluminum Alloys in Engineering. Appl. Eng. Lett. 2018, 3, 52–62. [Google Scholar] [CrossRef]
- Hasan, M.S.; Wong, T.; Rohatgi, P.K.; Nosonovsky, M. Analysis of the Friction and Wear of Graphene Reinforced Aluminum Metal Matrix Composites Using Machine Learning Models. Tribol. Int. 2022, 170, 107527. [Google Scholar] [CrossRef]
- Saba, F.; Sun, H.; Fan, G.; Tan, Z.; Xiong, D.B.; Li, Z.; Li, Z. Strength-Ductility Synergy Induced by High-Density Stacking Faults in Aluminum Alloy Composites with Micro/Nano Hybrid Reinforcements. Compos. Part A Appl. Sci. Manuf. 2023, 173, 107700. [Google Scholar] [CrossRef]
- Saberi, Y.; Oveisi, H. Development of Novel Cellular Copper–Aluminum Composite Materials: The Advantage of Powder Metallurgy and Mechanical Milling Approach for Lighter Heat Exchanger. Mater. Chem. Phys. 2022, 279, 125742. [Google Scholar] [CrossRef]
- Zhu, P.; Zhang, L. Powder metallurgy aluminium alloys. Treatise Mater. Sci. Technol. 1994, 31, 323–364. [Google Scholar] [CrossRef]
- Gökmeşe, H.; Bülbül, Ş. Production of AA 2014 Matrix Wollostanite/Wood Ash Solid Waste Particle Reinforced Hybrid Composite with Powder Metallurgy and Investigation of Its Structural Properties. JOM 2024, 76, 1294–1305. [Google Scholar] [CrossRef]
- Kumar, A.; Rana, R.S.; Purohit, R.; Saxena, K.K.; Xu, J.; Malik, V. Metallographic Study and Sliding Wear Optimization of Nano Si3N4 Reinforced High-Strength Al Metal Matrix Composites. Lubricants 2022, 10, 202. [Google Scholar] [CrossRef]
- Bandyopadhyay, A.; Traxel, K.D.; Lang, M.; Juhasz, M.; Eliaz, N.; Bose, S. Alloy Design via Additive Manufacturing: Advantages, Challenges, Applications and Perspectives. Mater. Today 2022, 52, 207–224. [Google Scholar] [CrossRef]
- Yang, Y.; Yan, D.; Dong, Y.; Wang, L.; Chen, X.; Zhang, J.; He, J.; Li, X. In Situ Nanostructured Ceramic Matrix Composite Coating Prepared by Reactive Plasma Spraying Micro-Sized Al-Fe2O3 Composite Powders. J. Alloys Compd. 2011, 509, L90–L94. [Google Scholar] [CrossRef]
- Ardalanniya, A.; Nourouzi, S.; Jamshidi Aval, H. Effects of Multipass Additive Friction Stir Processing on Microstructure and Mechanical Properties of Al-Zn-Cup/Al-Zn Laminated Composites. JOM 2021, 73, 2844–2858. [Google Scholar] [CrossRef]
- Çelebi, M.; Çanakçi, A.; Güler, O.; Akgül, B.; Karabacak, A.H. Study on Effect of Milling Time on the Mechanical and Wear Properties of the ZA40-B4C-Graphene Hybrid Nanocomposites Fabricated by Vacuum Hot-Pressing. JOM 2023, 75, 3935–3950. [Google Scholar] [CrossRef]
- Şahingöz, B.; Karakoç, H.; Çıtak, R. Production of AA6061/TiB2/B4C/GNP hybrid surface composites processed by friction stir processing (FSP) and ınvestigation of mechanical properties. Gazi Univ. J. Sci. Part C Des. Technol. 2024, 12, 405–426. [Google Scholar] [CrossRef]
- Sadeghi, B.; Cavaliere, P.; Sadeghian, B. Enhancing Strength and Toughness of Aluminum Laminated Composites through Hybrid Reinforcement Using Dispersion Engineering. J. Compos. Sci. 2023, 7, 332. [Google Scholar] [CrossRef]
- Şap, S. Understanding the Machinability and Energy Consumption of Al-Based Hybrid Composites under Sustainable Conditions. Lubricants 2023, 11, 111. [Google Scholar] [CrossRef]
- Çinici, H.; Karakoç, H.; Şahin, Ö.; Ovalı, İ. Investigation of Microstructure, Mechanical, and Tribological Properties of SiC/h-BN/Gr Hybrid Reinforced Al6061 Matrix Composites Produced by Hot Extrusion Method. Diam. Relat. Mater. 2023, 136, 110028. [Google Scholar] [CrossRef]
- Karakoc, H.; Ovalı, İ.; Dundar, S.; Çıtak, R. Wear and Mechanical Properties of Al6061/SiC/B4C Hybrid Composites Produced with Powder Metallurgy. J. Mater. Res. Technol. 2019, 8, 5348–5361. [Google Scholar] [CrossRef]
- Ghandourah, E.; Ahmadian, H.; Zhou, T.; Sadoun, A.M.; Fathy, A.; Atif, M.; Senthil Kumar, A.; Weijia, G. Comprehensive Investigation of the Impact of Milling Time on Microstructural Evolution and Tribological Properties in Mg-Ti-SiC Hybrid Composites. Mater. Today Commun. 2024, 38, 107835. [Google Scholar] [CrossRef]
- Ames, W.; Alpas, A.T. Wear Mechanisms in Hybrid Composites of Graphite-20 Pct SiC in A356 Aluminum Alloy (Al-7 Pct Si-0.3 Pct Mg). Metall. Mater. Trans. A 1995, 26, 85–98. [Google Scholar] [CrossRef]
- Rashad, M.; Pan, F.; Hu, H.; Asif, M.; Hussain, S.; She, J. Enhanced Tensile Properties of Magnesium Composites Reinforced with Graphene Nanoplatelets. Mater. Sci. Eng. A 2015, 630, 36–44. [Google Scholar] [CrossRef]
- Kavimani, V.; Prakash, K.S.; Thankachan, T. Experimental Investigations on Wear and Friction Behaviour of SiC@r-GO Reinforced Mg Matrix Composites Produced through Solvent-Based Powder Metallurgy. Compos. Part B Eng. 2019, 162, 508–521. [Google Scholar] [CrossRef]
- Tasci, U.; Yilmaz, T.A.; Bostan, B. Investigation of Microstructure, Wear and Transverse Rupture Strength of WE43/Nano B4C Composites Produced by Powder Metallurgy Method. Tribol. Int. 2023, 180, 108231. [Google Scholar] [CrossRef]
- A, S.; Subramanya, R.; Basavaraj, Y. Tensile Hardness and Wear Properties of Iron Oxide (Fe3O4) Reinforced Aluminium 7075 Metal Matrix Composites. Adv. Mater. Process. Technol. 2022, 8, 4598–4612. [Google Scholar] [CrossRef]
- Ashrafi, N.; Hanim, M.A.A.; Sarraf, M.; Sulaiman, S.; Hong, T.S. Microstructural, Tribology and Corrosion Properties of Optimized Fe3O4-Sic Reinforced Aluminum Matrix Hybrid Nano Filler Composite Fabricated through Powder Metallurgy Method. Materials 2020, 13, 4090. [Google Scholar] [CrossRef] [PubMed]
- Lin, F.; Ren, M.; Wu, H.; Lu, Y.; Huo, M.; Yang, M.; Chen, Z.; Jiang, Z. Fabrication of TiC-Graphene Dual-Reinforced Self-Lubricating Al Matrix Hybrid Nanocomposites with Superior Mechanical and Tribological Properties. Tribol. Int. 2022, 171, 107535. [Google Scholar] [CrossRef]
- Khan, M.; Din, R.U.; Basit, M.A.; Wadood, A.; Husain, S.W.; Akhtar, S.; Aune, R.E. Study of Microstructure and Mechanical Behaviour of Aluminium Alloy Hybrid Composite with Boron Carbide and Graphene Nanoplatelets. Mater. Chem. Phys. 2021, 271, 124936. [Google Scholar] [CrossRef]
- Wang, Y.; Li, J.; Guan, B.; Tang, B.; Luo, H.; Lu, Y.; Yu, H.; He, W.; Chen, X.; Zheng, K. Microstructure and mechanical properties of hybrid graphene nanoplatelets/titanium particles reinforced AZ91 laminated composite. Mater. Sci. Eng. A 2022, 856, 144017. [Google Scholar] [CrossRef]
- Şenel, M.C.; Gürbüz, M.; Koç, E. Mechanical and Tribological Behaviours of Aluminium Matrix Composites Reinforced by Graphene Nanoplatelets. Mater. Sci. Technol. 2018, 34, 1980–1989. [Google Scholar] [CrossRef]
- Srivyas, P.D.; Gupta, A.; Medhi, T.; Arumugam, S.; Kumar, D.; Mohan, S. Corrosion and Tribo-Investigations on Alumina–Graphene-Doped Hybrid Aluminium Composites. Trans. Indian Inst. Met. 2023, 76, 3281–3291. [Google Scholar] [CrossRef]
- Tabandeh-Khorshid, M.; Ferguson, J.B.; Schultz, B.F.; Kim, C.S.; Cho, K.; Rohatgi, P.K. Strengthening mechanisms of graphene-and Al2O3-reinforced aluminum nanocomposites synthesized by room temperature milling. Mater. Des. 2016, 92, 79–87. [Google Scholar] [CrossRef]
- Göçer, A.; Nair, F.; Karamış, M.B. Mechanical and Micro structural Characterization of Al-Al/B4C Laminated Composites Depending on Manufacturing Parameters. In IOP Conference Series: Materials Science and Engineering; IOP Publishing: Bristol, UK, 2018; Volume 295, p. 012043. [Google Scholar]
- ASTM E10-23; Standard Test Method for Brinell Hardness of Metallic Materials. ASTM International: West Conshohocken, PA, USA, 2023. [CrossRef]
- ASTM G99-23; Standard Test Method for Wear and Friction Testing with a Pin-on-Disk or Ball-on-Disk Apparatus. ASTM International: West Conshohocken, PA, USA, 2023. [CrossRef]
- Zhang, H.; Xu, C.; Xiao, W.; Ameyama, K.; Ma, C. Enhanced Mechanical Properties of Al5083 Alloy with Graphene Nanoplates Prepared by Ball Milling and Hot Extrusion. Mater. Sci. Eng. A 2016, 658, 8–15. [Google Scholar] [CrossRef]
- Kaya, N.; Çetinkaya, C.; Karakoç, H.; Ada, H. Effect of Process Parameters of Al5083/SiC Surface Composites Fabricated by FSP on Microstructure, Mechanical Properties and Wear Behaviors. Mater. Chem. Phys. 2024, 315, 128991. [Google Scholar] [CrossRef]
- Zheng, Z.; Zhang, X.X.; Li, J.C.; Geng, L. High-Content Graphene Nanoplatelet Reinforced Aluminum Composites Produced by Ball Milling and Hot Extrusion. Sci. China Technol. Sci. 2020, 63, 1426–1435. [Google Scholar] [CrossRef]
- Thankachan, T.; Prakash, K.S.; Kavimani, V. Investigating the Effects of Hybrid Reinforcement Particles on the Microstructural, Mechanical and Tribological Properties of Friction Stir Processed Copper Surface Composites. Compos. Part B Eng. 2019, 174, 107057. [Google Scholar] [CrossRef]
- Wakhi Anuar, N.F.B.; Salleh, M.S.; Omar, M.Z.; Zamri, W.F.H.W.; Md Ali, A.; Samat, S. Wear Properties of Graphene-Reinforced Aluminium Metal Matrix Composite: A Review. Rev. Adv. Mater. Sci. 2023, 62, 20220326. [Google Scholar] [CrossRef]
- Zhang, S.; Chen, Z.; Wei, P.; Liu, W.; Zou, Y.; Lei, Y.; Yao, S.; Zhang, S.; Lu, B.; Zhang, L. Wear properties of graphene/zirconia biphase nano-reinforced aluminium matrix composites prepared by SLM. Mater. Today Commun. 2022, 30, 103009. [Google Scholar] [CrossRef]
- Omrani, E.; Moghadam, A.D.; Kasar, A.K.; Rohatgi, P.; Menezes, P.L. Tribological Performance of Graphite Nanoplatelets Reinforced Al and Al/Al2O3 Self-Lubricating Composites. Materials 2021, 14, 1183. [Google Scholar] [CrossRef] [PubMed]
- Zeng, X.; Yu, J.; Fu, D.; Zhang, H.; Teng, J. Wear Characteristics of Hybrid Aluminum-Matrix Composites Reinforced with Well-Dispersed Reduced Graphene Oxide Nanosheets and Silicon Carbide Particulates. Vacuum 2018, 155, 364–375. [Google Scholar] [CrossRef]
- Sharma, A.; Narsimhachary, D.; Sharma, V.M.; Sahoo, B.; Paul, J. Surface Modification of Al6061-SiC Surface Composite through Impregnation of Graphene, Graphite & Carbon Nanotubes via FSP: A Tribological Study. Surf. Coatings Technol. 2019, 368, 175–191. [Google Scholar] [CrossRef]
- Abbas Shafqat, Q.; Rafi-Ud-Din; Shahzad, M.; Khan, M.; Mehmood, S.; Syed, W.A.; Basit, A.; Mehboob, N.; Ali, T. Mechanical, Tribological, and Electrochemical Behavior of Hybrid Aluminum Matrix Composite Containing Boron Carbide (B4C) and Graphene Nanoplatelets. J. Mater. Res. 2019, 34, 3116–3129. [Google Scholar] [CrossRef]
- El-Garhy, G.; El Mahallawy, N.; Shoukry, M.K. Effect of grain refining by cyclic extrusion compression (CEC) of Al-6061 and Al-6061/SiC on wear behavior. J. Mater. Res. Technol. 2021, 12, 1886–1897. [Google Scholar] [CrossRef]
- Zhang, J.; Yang, S.; Chen, Z.; Wu, H.; Zhao, J.; Jiang, Z. Graphene Encapsulated SiC Nanoparticles as Tribology-Favoured Nanofillers in Aluminium Composite. Compos. Part B Eng. 2019, 162, 445–453. [Google Scholar] [CrossRef]
- Zheng, K.; Du, X.; Qi, H.; Zhao, T.; Liu, F.; Sun, B. Sliding-Wear Behavior of Aluminum-Matrix Composites Reinforced with Graphene and SiC Nanoparticles. Mater. Tehnol. 2020, 54, 41–48. [Google Scholar] [CrossRef]
- Samad, A.; Arif, S.; Ansari, S.; Muaz, M.; Mohsin, M.; Ulla Khan, A.; Khan, M.E.; Bashiri, A.H.; Zakri, W.; Ali, W. Machine Learning Enabled Prediction of Tribological Properties of Cu-TiC-GNP Nanocomposites Synthesized by Electric Resistance Sintering: A Comparison with RSM. J. Mater. Res. Technol. 2024, 28, 2290–2312. [Google Scholar] [CrossRef]
- Pillari, L.K.; Lessoway, K.; Bichler, L. Reciprocating Dry Sliding Friction and Wear Behavior of B319 Aluminum Alloy-Graphene Composites. Tribol. Int. 2024, 192, 109334. [Google Scholar] [CrossRef]
Disclaimer/Publisher’s Note: The statements, opinions and data contained in all publications are solely those of the individual author(s) and contributor(s) and not of MDPI and/or the editor(s). MDPI and/or the editor(s) disclaim responsibility for any injury to people or property resulting from any ideas, methods, instructions or products referred to in the content. |
© 2024 by the authors. Licensee MDPI, Basel, Switzerland. This article is an open access article distributed under the terms and conditions of the Creative Commons Attribution (CC BY) license (https://creativecommons.org/licenses/by/4.0/).