Article

Minimisation of Friction Resistance of Elastomeric Lip Seals on Rotating Shafts

1
Faculty of Mechanical and Power Engineering, Wroclaw University of Science Technology, 50-370 Wroclaw, Poland
2
Faculty of Mechanical Engineering and Mechatronics, West Pomeranian University of Technology in Szczecin, 70-310 Szczecin, Poland
3
Faculty of Mechatronics and Mechanical Engineering, Kielce University of Technology, 25-314 Kielce, Poland
*
Authors to whom correspondence should be addressed.
Lubricants 2024, 12(4), 103; https://doi.org/10.3390/lubricants12040103
Submission received: 13 February 2024 / Revised: 13 March 2024 / Accepted: 21 March 2024 / Published: 22 March 2024

Abstract

:
This article presents the results of a study of oil lip seals with a modified outer lip layer texture. In the first step, the interaction of flat rubber samples with different surface layer textures with the steel surface was recognised. Measurements of the friction coefficient of flat samples with different surface layer textures were carried out. The next step was an experimental study of rotating shaft lip seals in standard and prototype versions. The contact width of the sealing lip before and after durability tests was examined, and the clamping force of the lip on the shaft before and after durability tests was measured. The final step was to create a FEM model of the interaction of the sealing ring lip with the shaft to determine the lip seal pressure and width. These calculations, in cooperation with the previously determined friction coefficient and porosity of the lip seal, allowed the calculation of the friction torque. The solution proposed in this article was intended to be simple and viable for industrial applications. Satisfactory results were achieved with prototype rings in terms of reduced resistance to movement, tightness, and durability.

1. Introduction

Machines and equipment often become inoperable due to minor component failures [1]. The lip seals of rotating shafts are among these critical elements. These seals act as a barrier, ensuring that the inside of the machine remains protected from external factors such as dirt and moisture [2]. This prevents contamination of the surrounding area, protects sensitive equipment, and ensures that sealed components function properly. Without effective seals, there is a risk of lubricants leaking out, damaging machinery, or causing safety hazards. Elastomer lip seals are part of the contact seal group [3]. Their characteristic feature is the friction loss caused by the relative rotation of the lip and shaft. In turn, their wear affects the sealing mechanism [4]. Oil lip seals are well recognised and have been in use for several decades, but the issues of leakage, durability, and friction resistance are still relevant and improving [5,6].
The friction interaction of two mating surfaces is highly influenced by the texture, roughness, hardness, and properties of the bulk material. In recent decades, much research has focused on surface texturing as a way to control friction and wear. However, there is still much controversy about the underlying causes of surface texturing effects under different contact and lubrication conditions. Although progress has been made in fabricating accurate surface textures and modelling their effects on specific cases, there are conflicting reports on the effectiveness of surface texturing under specific contact conditions.
Gachot et al. [7] reported on the effects of surface textures in different lubrication regimes on the Stribeck curve, with a clear distinction between conformal and non-conformal contacts, the strengths and weaknesses of different production methods, their typical sizes, costs, and types of used materials. Particular focus was given to the analysis of friction-reducing mechanisms and their effect on wear under different friction conditions. An approach to numerical modelling of aspects of shaft sealing has been described in [8]. The presented simulation makes it possible to predict the behaviour of a rotary lip seal under different operating conditions and meniscus positions. This knowledge can then be used to improve the design and performance of rotary lip seals in various applications. The results show that a normal, non-leaking rotary lip seal can be simulated with an elasto-hydrodynamic model of the sealing zone and a simplified model of the meniscus. Under normal operating conditions, the meniscus is positioned on the air side of the seal, separating the sealed liquid from the atmosphere. However, as the shaft speed increases, the meniscus gradually approaches the edge of the lip. Eventually, a critical speed is reached at which the meniscus is absorbed into the sealing zone. This absorption of the meniscus creates multiple equilibrium positions in the meniscus. This means that seal performance is no longer solely dependent on seal design and steady-state conditions. The history of the seal, including previous operating conditions, becomes an important factor in determining seal behaviour.
A semi-analytical method for assessing the effectiveness of a radial shaft seal is presented in [9]. This method uses a microscale contact model to simulate the assembly process between the sealing lip and the shaft, taking into account different degrees of sealing lip wear. By analysing the resulting shear stresses along the axial direction at the seal contact, the driving force behind the pumping behaviour in the axial direction can be determined, thereby providing insight into the sealing capability. The simulation includes the incremental application of continuous wear to the sealing lip geometry after each iteration, reflecting actual conditions. The shear stresses obtained from the simulation serve as indicators of sealing performance.
There are basically two types of surface layer texture modification found in the literature, i.e., shaft surface modification and sealing lip surface modification. Keller et al. [10] described the modification of the lip surface. The proposed friction reduction methodology includes microstructuring and surface treatment of the seal sliding surface. The microstructure was made in the form of regular spherical indentations. A simulation-based approach using Computational Fluid Dynamics (CFD) was applied. Through these simulations, the optimal geometric shape for the microstructure was determined based on the specific operating conditions. By implementing this optimised design, frictional losses at the sealing interface can be reduced, thus improving the overall efficiency of the system.
Further attempts to modify the texture of the sealing lip surface layer are described in [11], where the authors analyse the effect of roughness and different micro-dimple surface textures on oil seal performance. The aim of this article was to determine the film thickness, friction torque, and pumping rate of an oil seal. The methodology used in this article is based on elasto-hydrodynamic lubrication and the pumping mechanism of rotating shaft seals. A numerical model was established to simulate hybrid oil seal lubrication in the sealing area. The model combines fluid mechanics, rough peak contact mechanics, and deformation analysis. The findings of this study indicate that the surface texture significantly improves the lubrication properties of the oil seal. In particular, an oil seal with a square texture has the largest oil film thickness, while a seal with an equilateral triangle texture has a better pumping rate. The results were achieved numerically. A continuation of the work is presented in [12], where the performance of oil seals was investigated for a texture with triangular dimples on the sealing lip.
The effects of texturing the shaft surface are described in [13,14]. The computational model assumes that the sealing lip is smooth and the shaft has a grooved texture. The elasto-hydrodynamic analysis considers both the fluid mechanics of the lubricating film and the elastic deformation of the sealing lip under isothermal conditions. The simulation results show a significant improvement in reverse pumping due to the oblique grooves on the shaft.
Another set of shaft surface texture patterns was analysed in [15]. The impact of deterministic microstructures on the behaviour of a radial lip seal was investigated. The focus was on the effect of the orientation of the triangular cavity of the nickel foil on seal performance, including flow direction, pumping rate, and friction torque. The findings revealed that the surface texture on the shaft can indeed control the pumping direction and enhance sealing performance by increasing the pumping rate. Microtextured shafts were found to achieve pumping rates up to eight times higher than stainless steel shafts. The preferential orientation of the indentations directed the oil towards the wider end or base of the triangular indentations, while patterns with neutral or non-preferential orientations resulted in a reversal of the pumping direction. Moreover, the presence of microindentations caused a reduction in friction torque of up to 51% during pumping and, in all cases, led to a reduction in operating temperatures. Additionally, in some cases, when the seal was operating in a starved condition, the microindentations reduced the friction torque by 8–13%.
Li et al. [16] conducted numerical simulations to compare their results with previously reported experimental results on radial lip seals interacting with textured shafts. In the experimental cases, the lip seals were in a full-lubrication film with minimal contact. A soft elasto-hydrodynamic model was developed using the finite element method (FEM) to determine the contact conditions and structural deformation of the elastomer. The article also examined the influence of elastomer surface roughness and the shaft assembly process on the seal. The model agreed with experimental results, showing that triangular surface asperities pump oil towards their apex, while triangular surface indentations pump oil towards their base. The model also showed that surface asperities provide a higher load-carrying capacity and pumping effect compared to surface indentations. However, the numerical model did not include transient effects such as viscoelasticity and sliding film dynamics, which may explain some discrepancies between the model and the experiment. Also, surface treatment may lead to a reduction in the frictional resistance of the elastomer interacting with the steel shaft surface.
Verheyde et al. [17] presented aspects of dry friction of elastomeric parts moving against a metal counter body. Two different surface treatment techniques for elastomer parts were applied: laser cladding and plasma treatment under atmospheric pressure. The material used to manufacture the seal has a major impact on the friction coefficient of the oil lip seal. The article by Sekiguchi et al. [18] focuses on the development of a new material and design practices that have resulted in significant improvements in torque losses and reduced oil flow rates in power transmission systems. To reduce these losses, a new material has been developed that shows a 50% improvement in measured torque loss on the transmission shaft.
Gong et al. [19] compared the frictional and sealing properties of three different polymeric materials, which include Polytetrafluoroethylene (PTFE), Polyimide (PI), and Polyetheretherketone (PEEK) composites. The tests were conducted on a specialised stand using a sealing ring configuration against a steel counter surface. The researchers used scanning electron microscopy to examine the wear patterns of the sealing composites and the nature of the fillers used. The results showed that the surface temperature and leakage rate of all three composites increased with increasing speed under oil-lubricated conditions. The friction coefficient initially decreased with increasing speed, reached a minimum, and then increased again. Comparing the three materials, it was found that the PTFE and PEEK sealing composites exhibited lower friction coefficients and less leakage during testing compared to the PI sealing composite.
The study by Wang et al. [20] focused on the preparation of expanded graphite and acrylonitrile-butadiene rubber (NBR) composites using two different methods: direct mechanical blending (microcomposites) and the latex compounding technique (nanocomposites). Compared to microdispersion, the graphite nano-sized dispersion was advantageous in forming a continuous, uniform, and stable lubricating film at high sliding velocity and heavy load. This contributed to reducing the friction coefficient and improving the wear resistance of the nanocomposites.
Degrange et al. [21] dealt with the characterisation of two NBR rubbers, with particular emphasis on their thermos-mechanical, viscoelastic, and tribological behaviour. The study involves conducting tribological experiments in which a steel ball is moved over a rubber sample under dry conditions, replicating a critical contact scenario. Two rubbers with different glass transition temperature (Tg) values are investigated, and it is found that their tribological behaviour differs significantly, despite limited differences in their mechanical properties. The rubber with the higher Tg value appears to be more resistant to wear, while the rubber with the lowest Tg value experiences significant wear during prolonged sliding.
Frölich et al. [22] presented a macroscopic simulation model for the contact behaviour of elastomer sealing rings in radial shaft seals. The model considers the interaction of temperature, friction, and wear to accurately simulate the performance of the seals. The model uses the finite element method to simulate the contact pressure between the seal ring and the rotating shaft under different wear states. A semi-analytical approach was used to calculate the contact temperature, taking into account the effects of shear strain and fluid friction on the temperature rise in the contact area. An empirical approach was used to calculate the friction between the seal ring and the shaft. The article describes the configuration of the simulation model, including the parameters and assumptions used. This approach allows for a more accurate prediction of sealing ring wear, as it takes into account actual data obtained from wear tests and specific friction conditions [23]. By coupling the semi-analytical method with the finite element method, the contact between the sealing lip and the shaft can be accurately resolved, considering both the exact discretisation of the contact zone and the structural behaviour.
The authors, who attempted to investigate the effect of the texture of the sealing lip surface layer and optimised the proposed solution, did not plan experimental studies [10,11,12]. Therefore, it is not known what effect would have been achieved after experimental verification in terms of durability and tightness. The solution proposed in our article was intended to be simple and viable for industrial applications. This article estimates the effectiveness of a simple method of modifying the rubber surface to reduce the resistance to movement and reduce the intensity of wear in application to lip elastomeric sealing rings [24]. The seal tightness, as a basic functional parameter of the seal, was also evaluated. On the grounds of the studied literature, a numerical model was created to determine values beyond the limits of the experiment and to optimise the issue of interaction between the sealing lip and the shaft in the future. The conducted research is an extension of the thesis formulated by Gawlinski [25] that the introduction of a surface layer into the structure of a porous body is an effective way to reduce the frictional resistance of the lip seal.

2. Materials and Methods

2.1. Experimental Research

2.1.1. Research Objects

In the first part of the experiment, flat rubber samples were tested with different modifications to their external surface. The flat rubber samples were fabricated using the mould surface reproducing method. The surface texture of the rubber was mechanically modified by mapping the texture of the vulcanisation mould. The composition of the rubber did not change. The repeatability of such a process is extremely high, as the mould made of steel does not degrade too quickly. The proposed method involves obtaining a finished product without the need to carry out additional operations such as laser exposure. After vulcanisation, rubber samples with a porous surface layer texture were obtained. Porosity is defined as a rough, discontinuous surface layer and is understood as the presence of empty spaces in a given body volume. This article assumes that the surface layer roughness, i.e., certain discontinuities in the surface layer texture, can be treated as porosity at an extremely small depth. Five different samples were prepared with surface roughness parameters determined in accordance with [26] and summarised in Table 1, in which the following designations were adopted:
  • Ra—a commonly used parameter in surface metrology that quantifies the average surface roughness of a component. It is calculated by measuring the vertical deviations of the roughness profile from the mean line over a specified length and averaging these values.
  • Rz—a parameter calculated as the average value of the absolute distances between the highest peaks and the lowest valleys on the surface profile within a specified cutoff length.
  • Rt—a parameter calculated by measuring the vertical distance between the highest peak and lowest valley on the surface profile along a specified length.
The Insize ISR-C002 roughness tester (Insize, Suzhou New District, China) was used for the measurement.
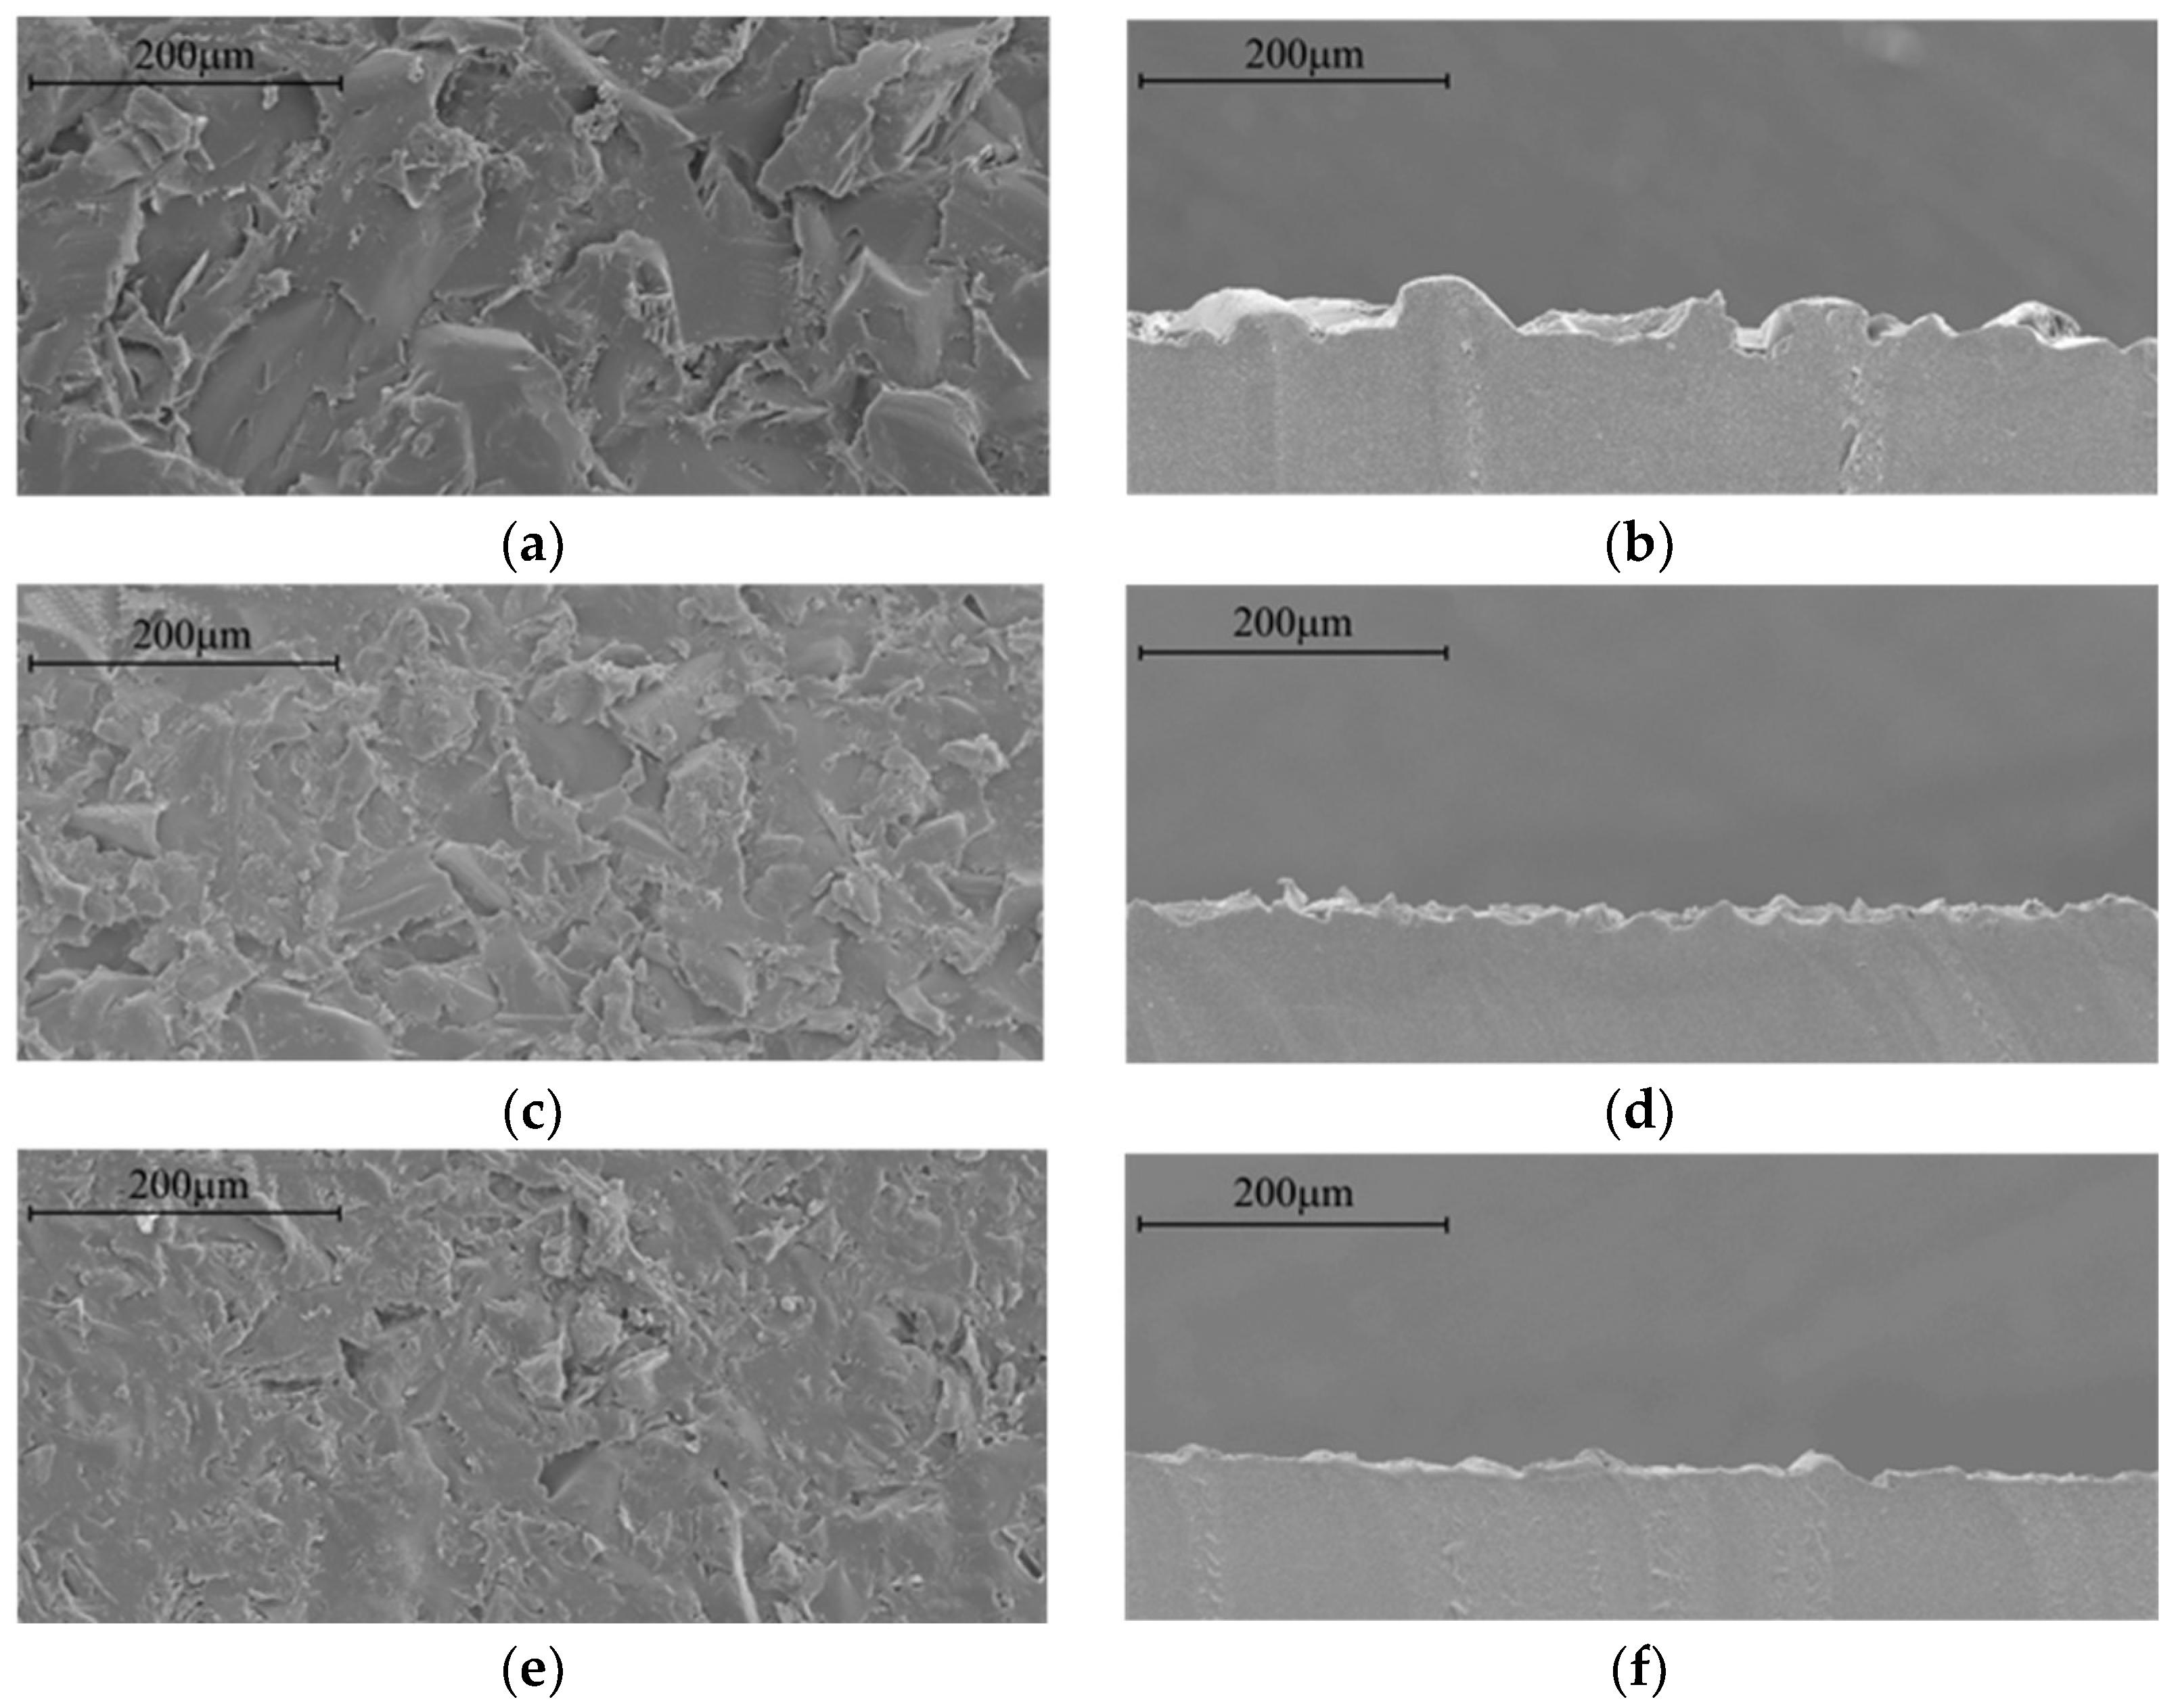
Images of the surface of the samples were taken using a JEOL JSM-7500F field emission scanning electron microscope (JEOL, Akishima, Japan) and are shown in Figure 1 and Figure 2. The markings of rubber samples were introduced, identical to those of the plate used to produce them.
The surface roughness of the rubber samples is an order of magnitude higher than the recommended surface roughness of the shaft interacting with the sealing ring.
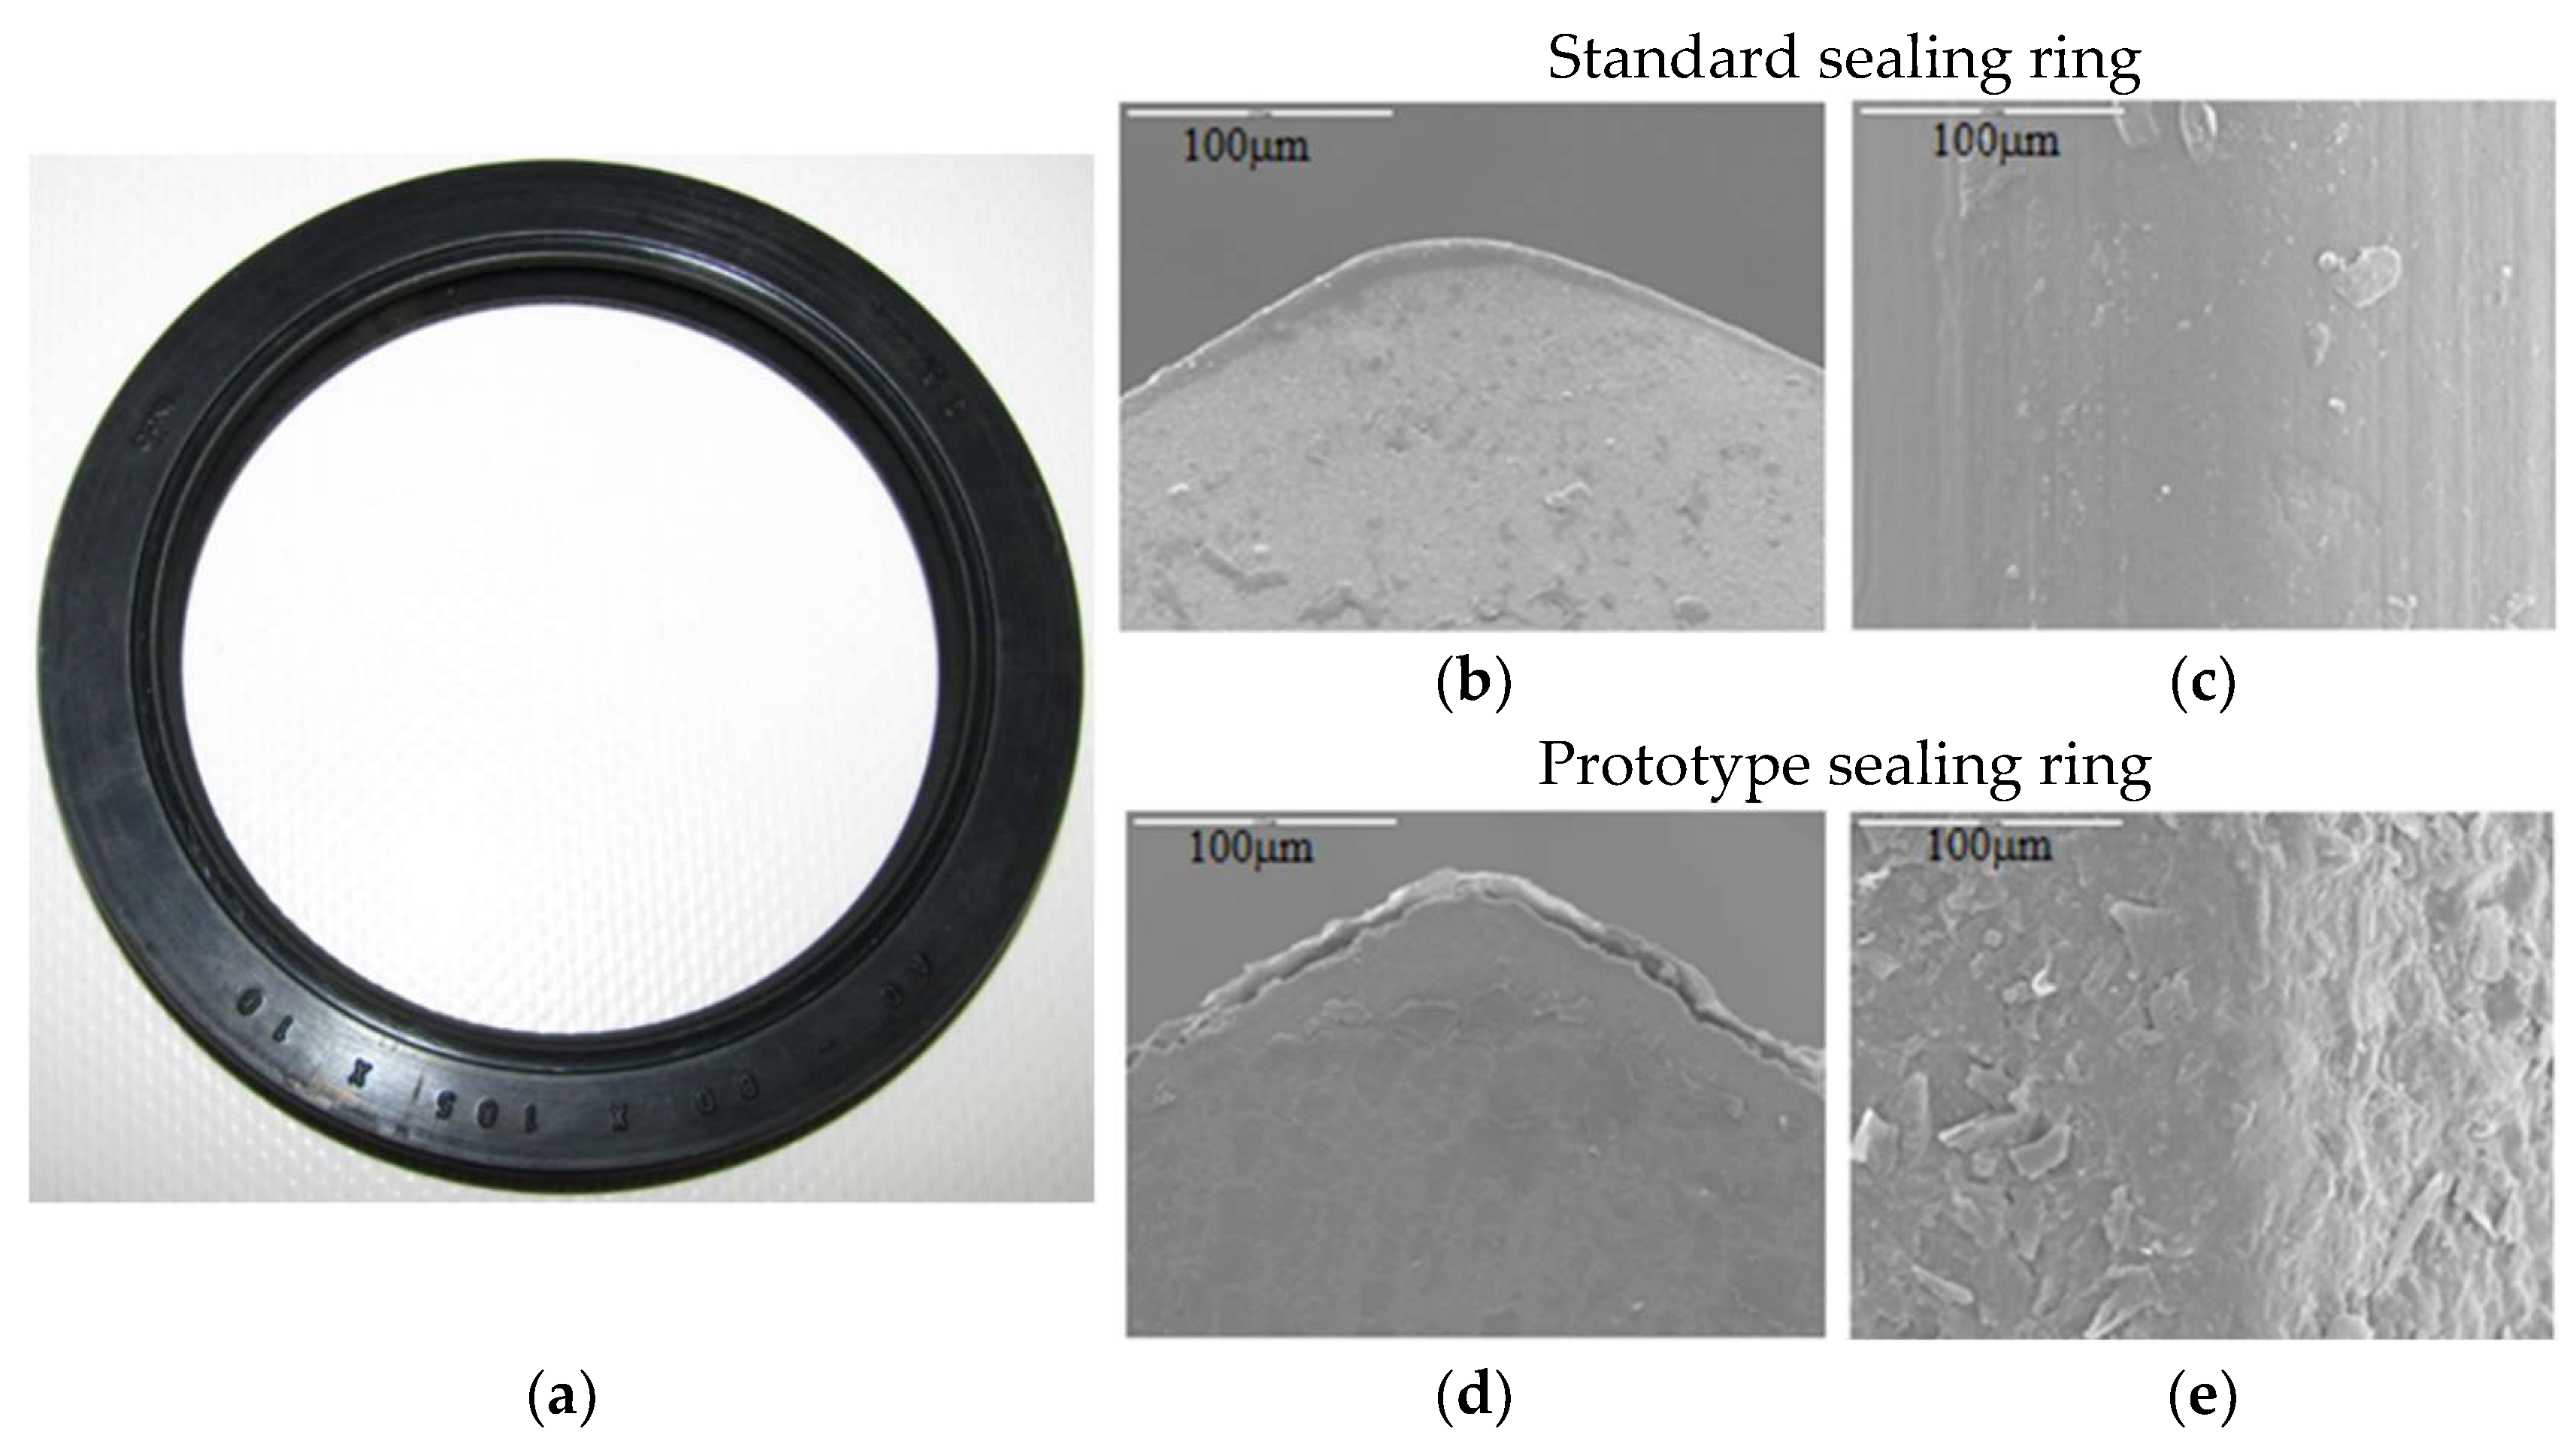
The second part of the tests focused on the sealing ring. The research object in these tests were oil lip seals 80 × 105 × 10 made of NBR 77A elastomer compound in two variants. The first was the standard version, and the second was a prototype version with a modified texture of the external layer of the sealing lip. A mould surface reproducing method was used. The modified prototype version was covered and described by patent protection [27]. The differences between the two versions (standard and prototype) of the tested oil seals are shown in Figure 3. The values of the surface roughness parameters of the seals are shown in Table 2.
As written above, the material of the flat rubber samples was NBR 77A elastomer. The following are components of the tested material, with percentages in brackets:
  • Caoutchouc KER N-29 (49.33);
  • Zinc oxide (3.95);
  • Oleostearine (0.66);
  • Antidegradant TMQ (0.99);
  • Brown factor (0.99);
  • Kaolin KOM (6.58);
  • N-550 medium carbon black (9.86);
  • Corax N-339 hard carbon black (19.74);
  • Dibutyl phthalate (6.58);
  • Vulkacit CBS accelerator powder (0.33);
  • Vulkacit TMTD-80 accelerator granulate (0.66);
  • M-9985-I ground sulphur (0.33).
NBR 77A elastomer is a type of acrylonitrile-butadiene rubber that is commonly used for rotating shaft seals due to its oil resistance and sufficient performance while maintaining cost-effectiveness. Since the subject of the research was the effect of the texture of the elastomer surface layer on the resistance to motion rather than the effect of rubber additives, it was decided to use the most common material for the production of sealing rings in the machinery industry, with a plan to expand the research spectrum to other materials in the future.
The general properties of the original NBR 77A elastomer are as follows:
  • Durometer, Shore A: 77;
  • Specific gravity: 1.24 g/cm3;
  • Tensile: 17 MPa;
  • Elongation: 385%;
  • Compression at 70 °C and 22 h: 10.5%.

2.1.2. Test Stands and Test Procedures

Flat rubber samples were tested on a T-01M test stand (Lukasiewicz Research Network—Tele and Radio Research Institute, Warsaw, Poland). The experiment conditions were as follows:
  • Sample diameter—8 mm;
  • Sample load—1 MPa;
  • Linear speed range—0.31 ÷ 1.79 m/s;
  • Experiment time duration—10 s;
  • Temperature—25 °C.
The tests were carried out under dry friction conditions and with 15W40 mineral engine oil lubrication. A pressure of 1 MPa was chosen because this is the typical value under the sealing lip. The test stand is shown in Figure 4.
The test stand shown in Figure 4 allowed the shaft–seal system to be tested at speeds of up to 1.79 m/s. In addition, the samples were also tested on a MAN 38.008 test stand (MAN SE, Munich, Germany), which allowed the shaft–seal system to be tested at speeds of up to 15 m/s and the static friction coefficient (at 0 m/s) to be measured. Test results from the two stands were used to determine the friction coefficient over the entire speed range of the shaft used in the tests in the next step (on the test stand shown in Figure 5). As the durability of the modified surface layer was unknown, it was decided to keep the experiment time as short as possible. In addition, an attempt was made to maintain the ambient temperature during the tests. The effect of temperature on the friction coefficient value was particularly noticeable during tests under lubrication conditions. The analysis of the subject indicates the possibility of overheating the new elastomer during the first hours of operation due to run-in. This can occur in the presence of certain unfavourable circumstances, such as insufficient roughness of the shaft surface, improper elastomer composition, too little filler, and improper fillers. The solution to this problem is the proposed modification, which reduces the resistance to movement after the run-in period.
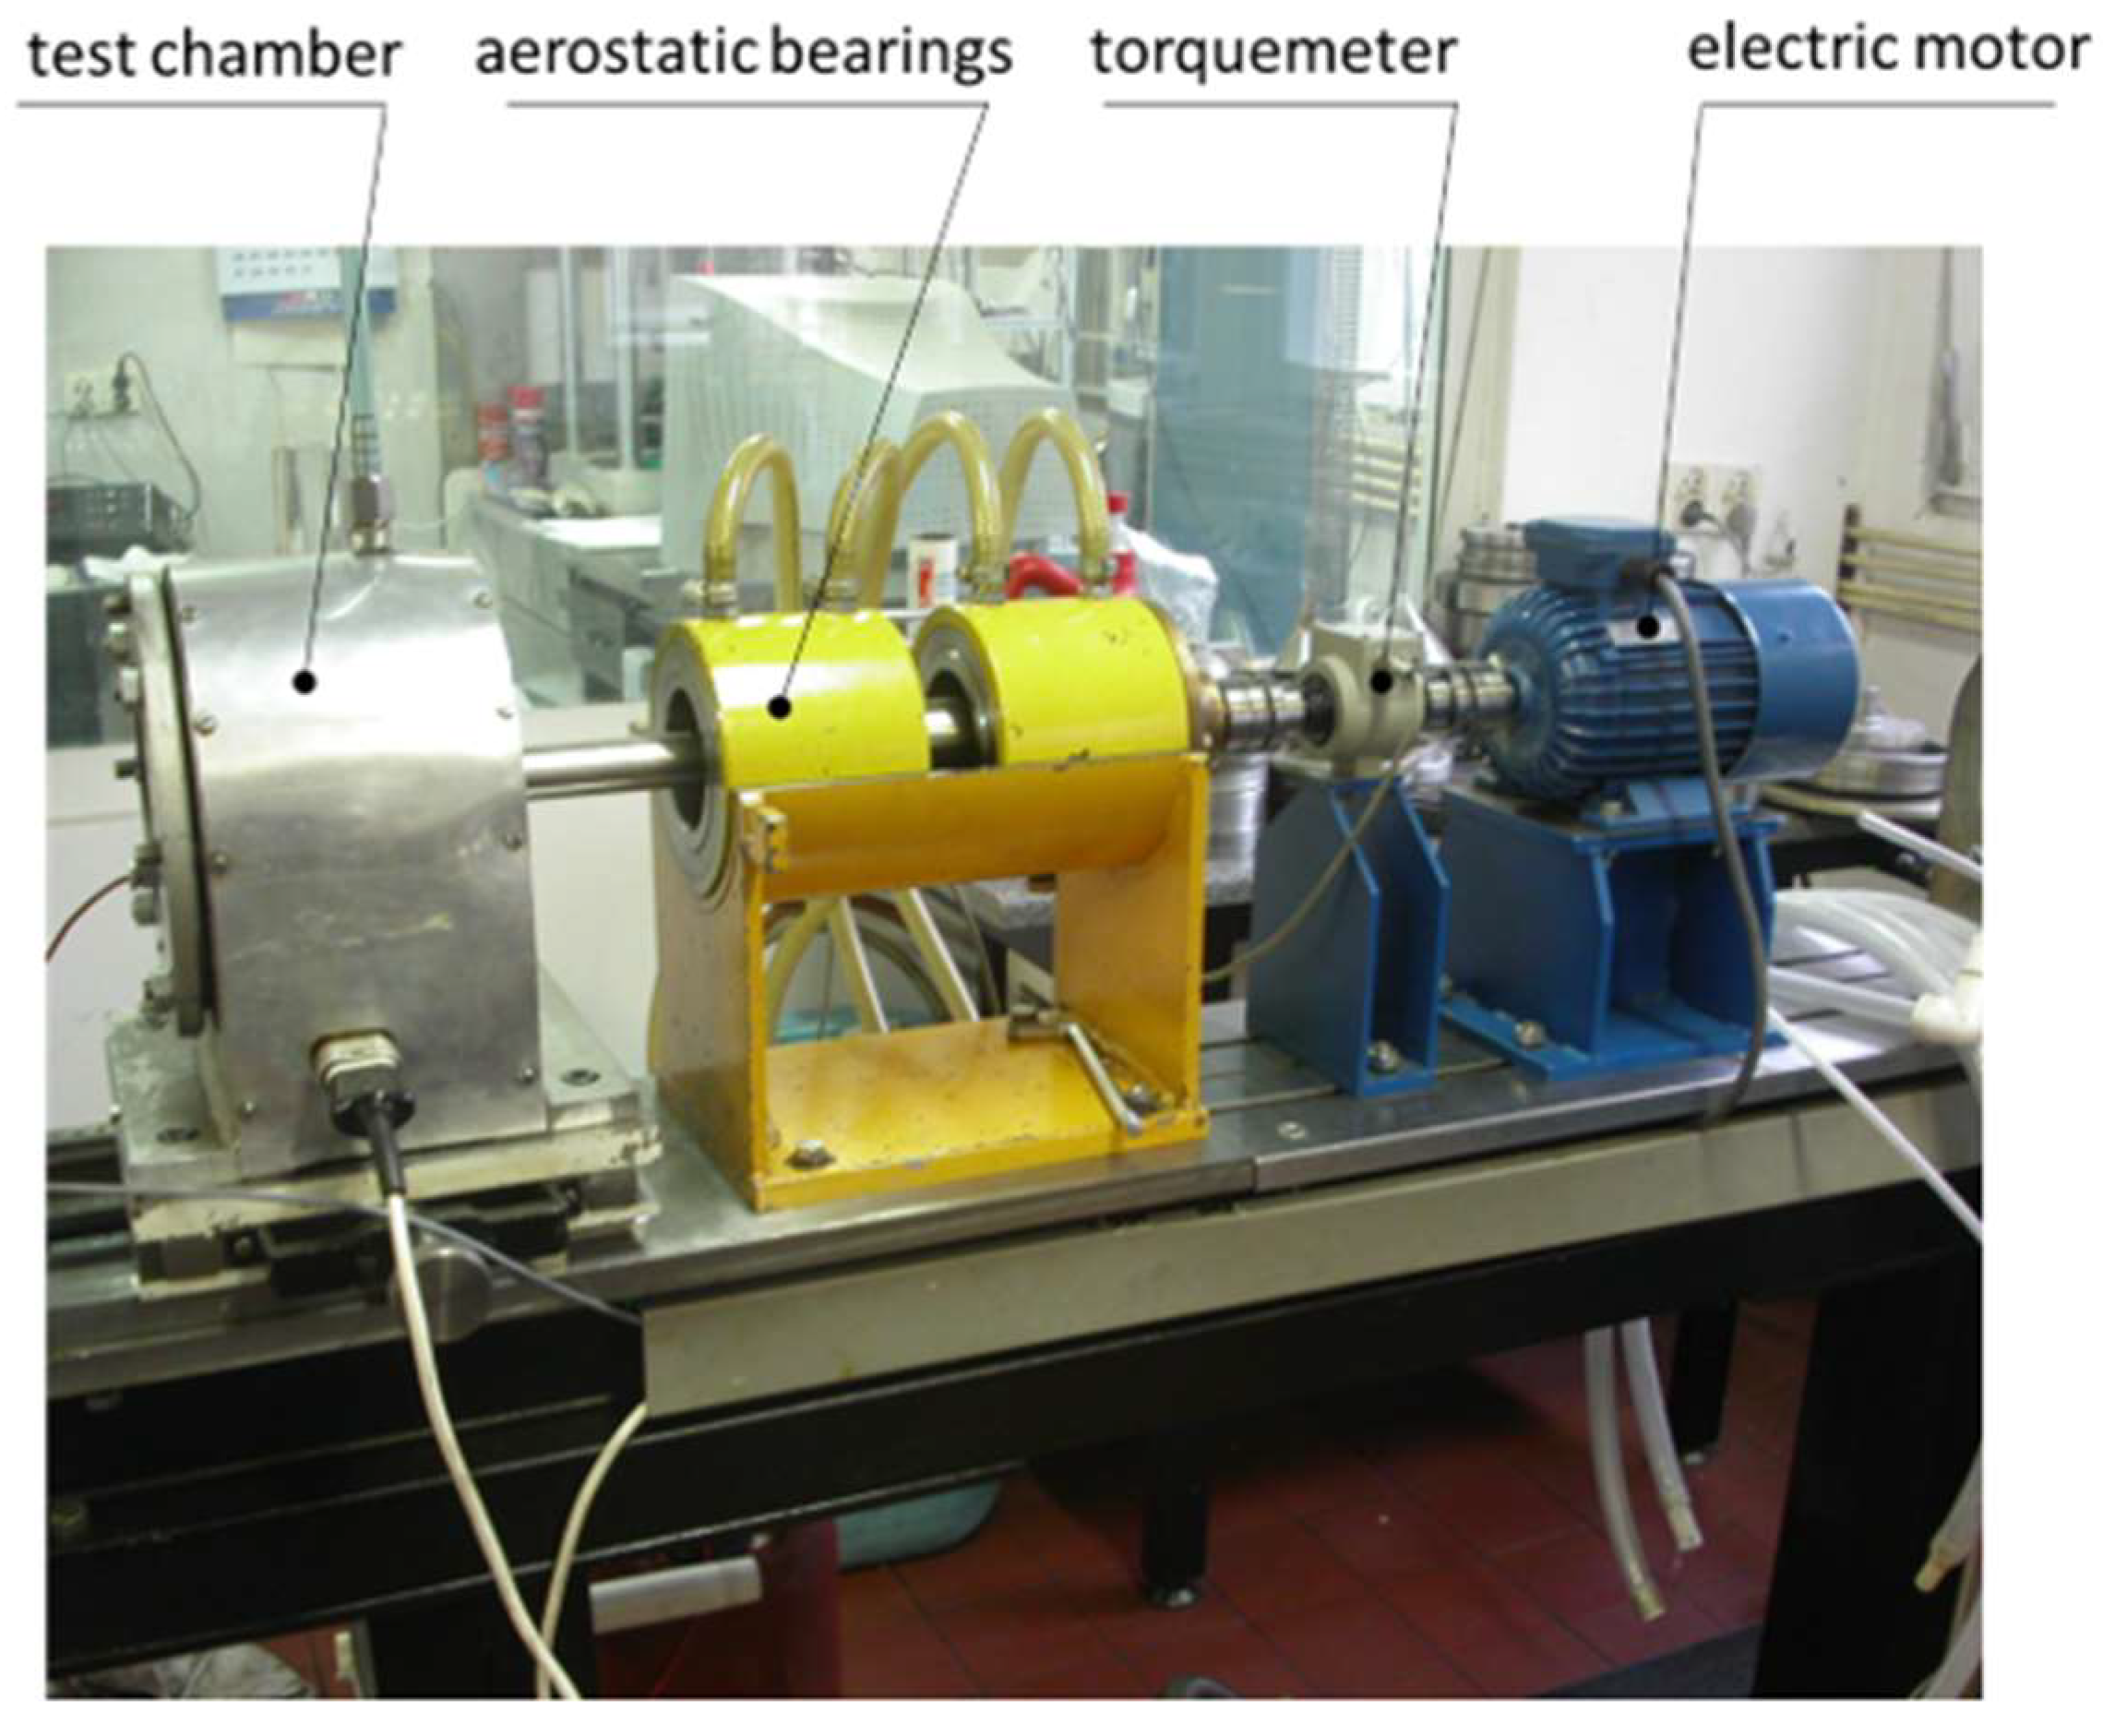
Durability tests of sealing rings (standard and prototype) were carried out on a test stand for rotating shaft seals shown in Figure 5. The test stand was designed and manufactured by the Wroclaw University of Science and Technology, Poland. The stand is automated and allows the registration of friction torque over time. Tests can be conducted at ambient and elevated temperatures under dry and lubricated friction conditions. The experiment conditions were as follows:
  • Test time—8 h;
  • Shaft rotational speed—3000 rpm;
  • Lubrication with 15W40 mineral engine oil.
  • The rheological properties of the used oil are as follows:
  • Viscosity at 100 °C: 14.5 cSt;
  • Viscosity at 40 °C: 109.84 cSt;
  • Viscosity index: 135;
  • Density at 15 °C: 904 kg/m3;
  • Pour point: −27 °C;
  • Flash point: 220 °C.
The tested sealing rings were mounted sequentially in the test chamber housing. The seals interacted with an 80-millimetre-diameter shaft made of 40 steel, hardened to 55 HRC. The surface of the shaft was ground (to achieve Ra = 0.20 µm). The seal worked only once at a given location on the shaft, which means that each tested seal always worked with the original shaft surface.
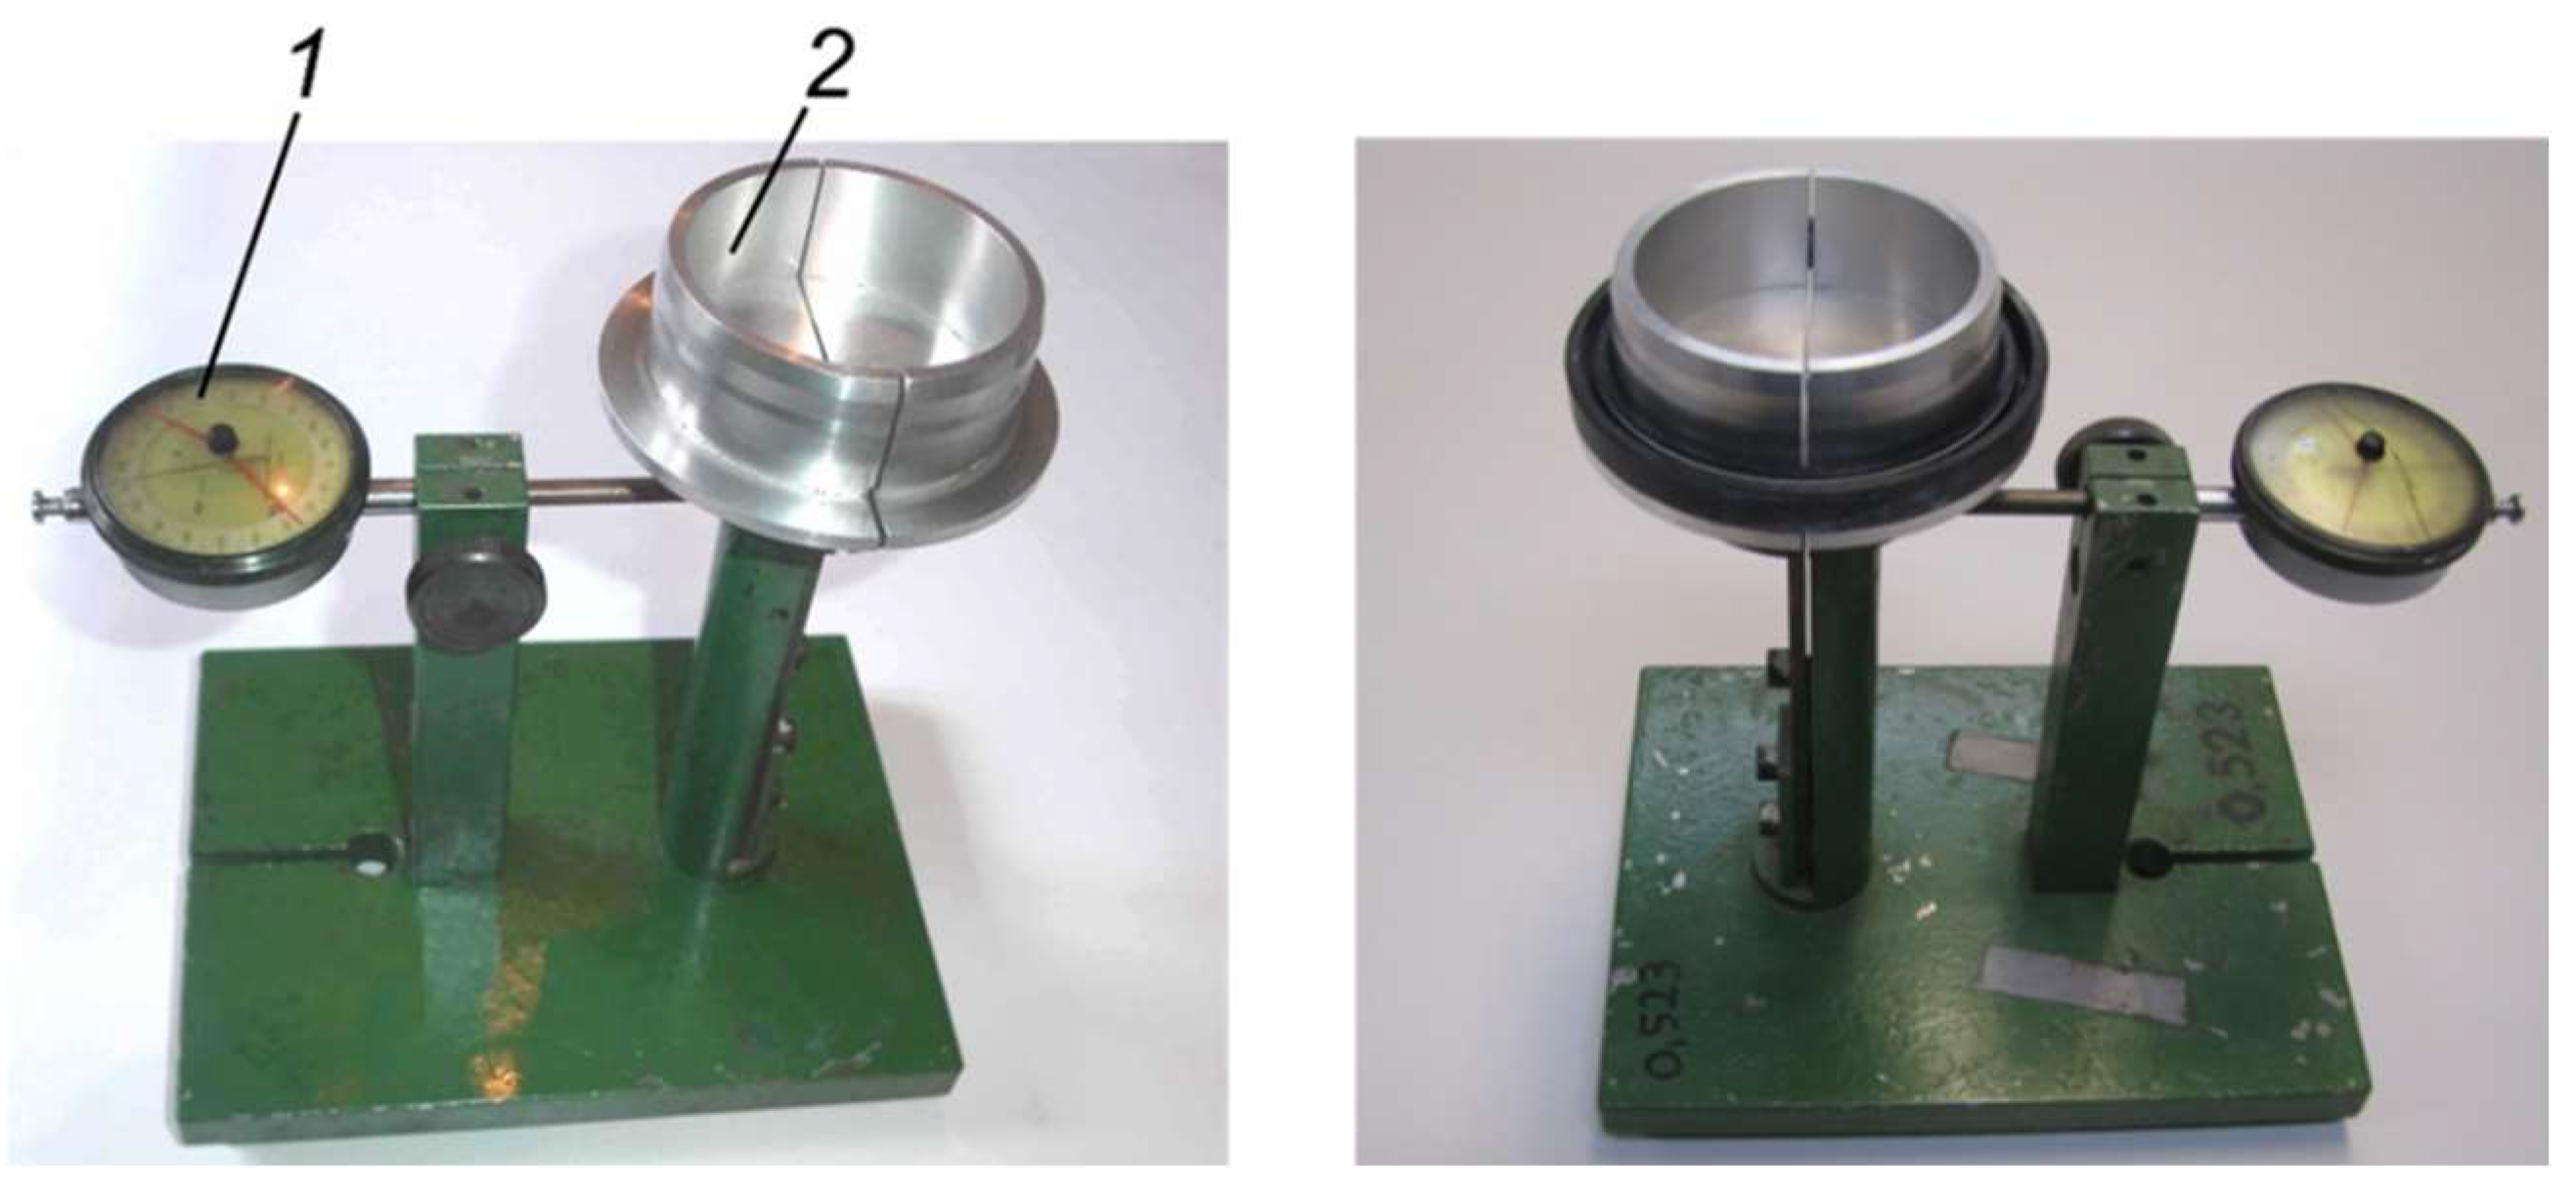
Before testing, the clamping force of the sealing lip on the shaft was measured. A SZ-4 type device (Inco Veritas, Sroda Slaska, Poland), shown in Figure 6, was chosen for this purpose. During the tests, the sealing ring was placed on the split shaft of the device. The displacement value of half the shaft was read on a dial gauge and was treated as proportional to the applied force. This value, given in micrometres and multiplied by the instrument constant, gave the value of the clamping force in newtons.
Before and after the tests, the contact width between the sealing lip and the shaft was measured on the test stand shown in Figure 7. An optical microscope, PZO MST2 (PZO Microscopes, Warsaw, Poland), was used for the observations and measurements. Measurements were taken using the optical method at three locations around the circumference of the ring. During testing, the sealing ring was placed on a hollow Plexiglass shaft, and the contact width was observed using a prism through a microscope. Measurements were taken for the seal, with and without the garter spring. A properly calibrated microscope made it possible to read the measured quantity. The contact width measured before and after durability tests gives an image of the wear of the lip in interaction with the shaft and translates into a contact pressure value under the lip.

2.2. Numerical Calculations

The purpose of the numerical calculations was to determine the contact pressure between the lip seal and the shaft in the case of mounting and sealing under pressure. Knowledge of this contact pressure is necessary to calculate the average friction torque. To determine it, a two-dimensional axisymmetric model was applied (for comparison, see [28]). The numerical calculations were performed in Ansys Workbench version 19.2 (ANSYS, Inc., Canonsburg, PA, USA) using static structural analysis. The simulation did not take into account the rotation of the shaft.

2.2.1. Computational Mesh

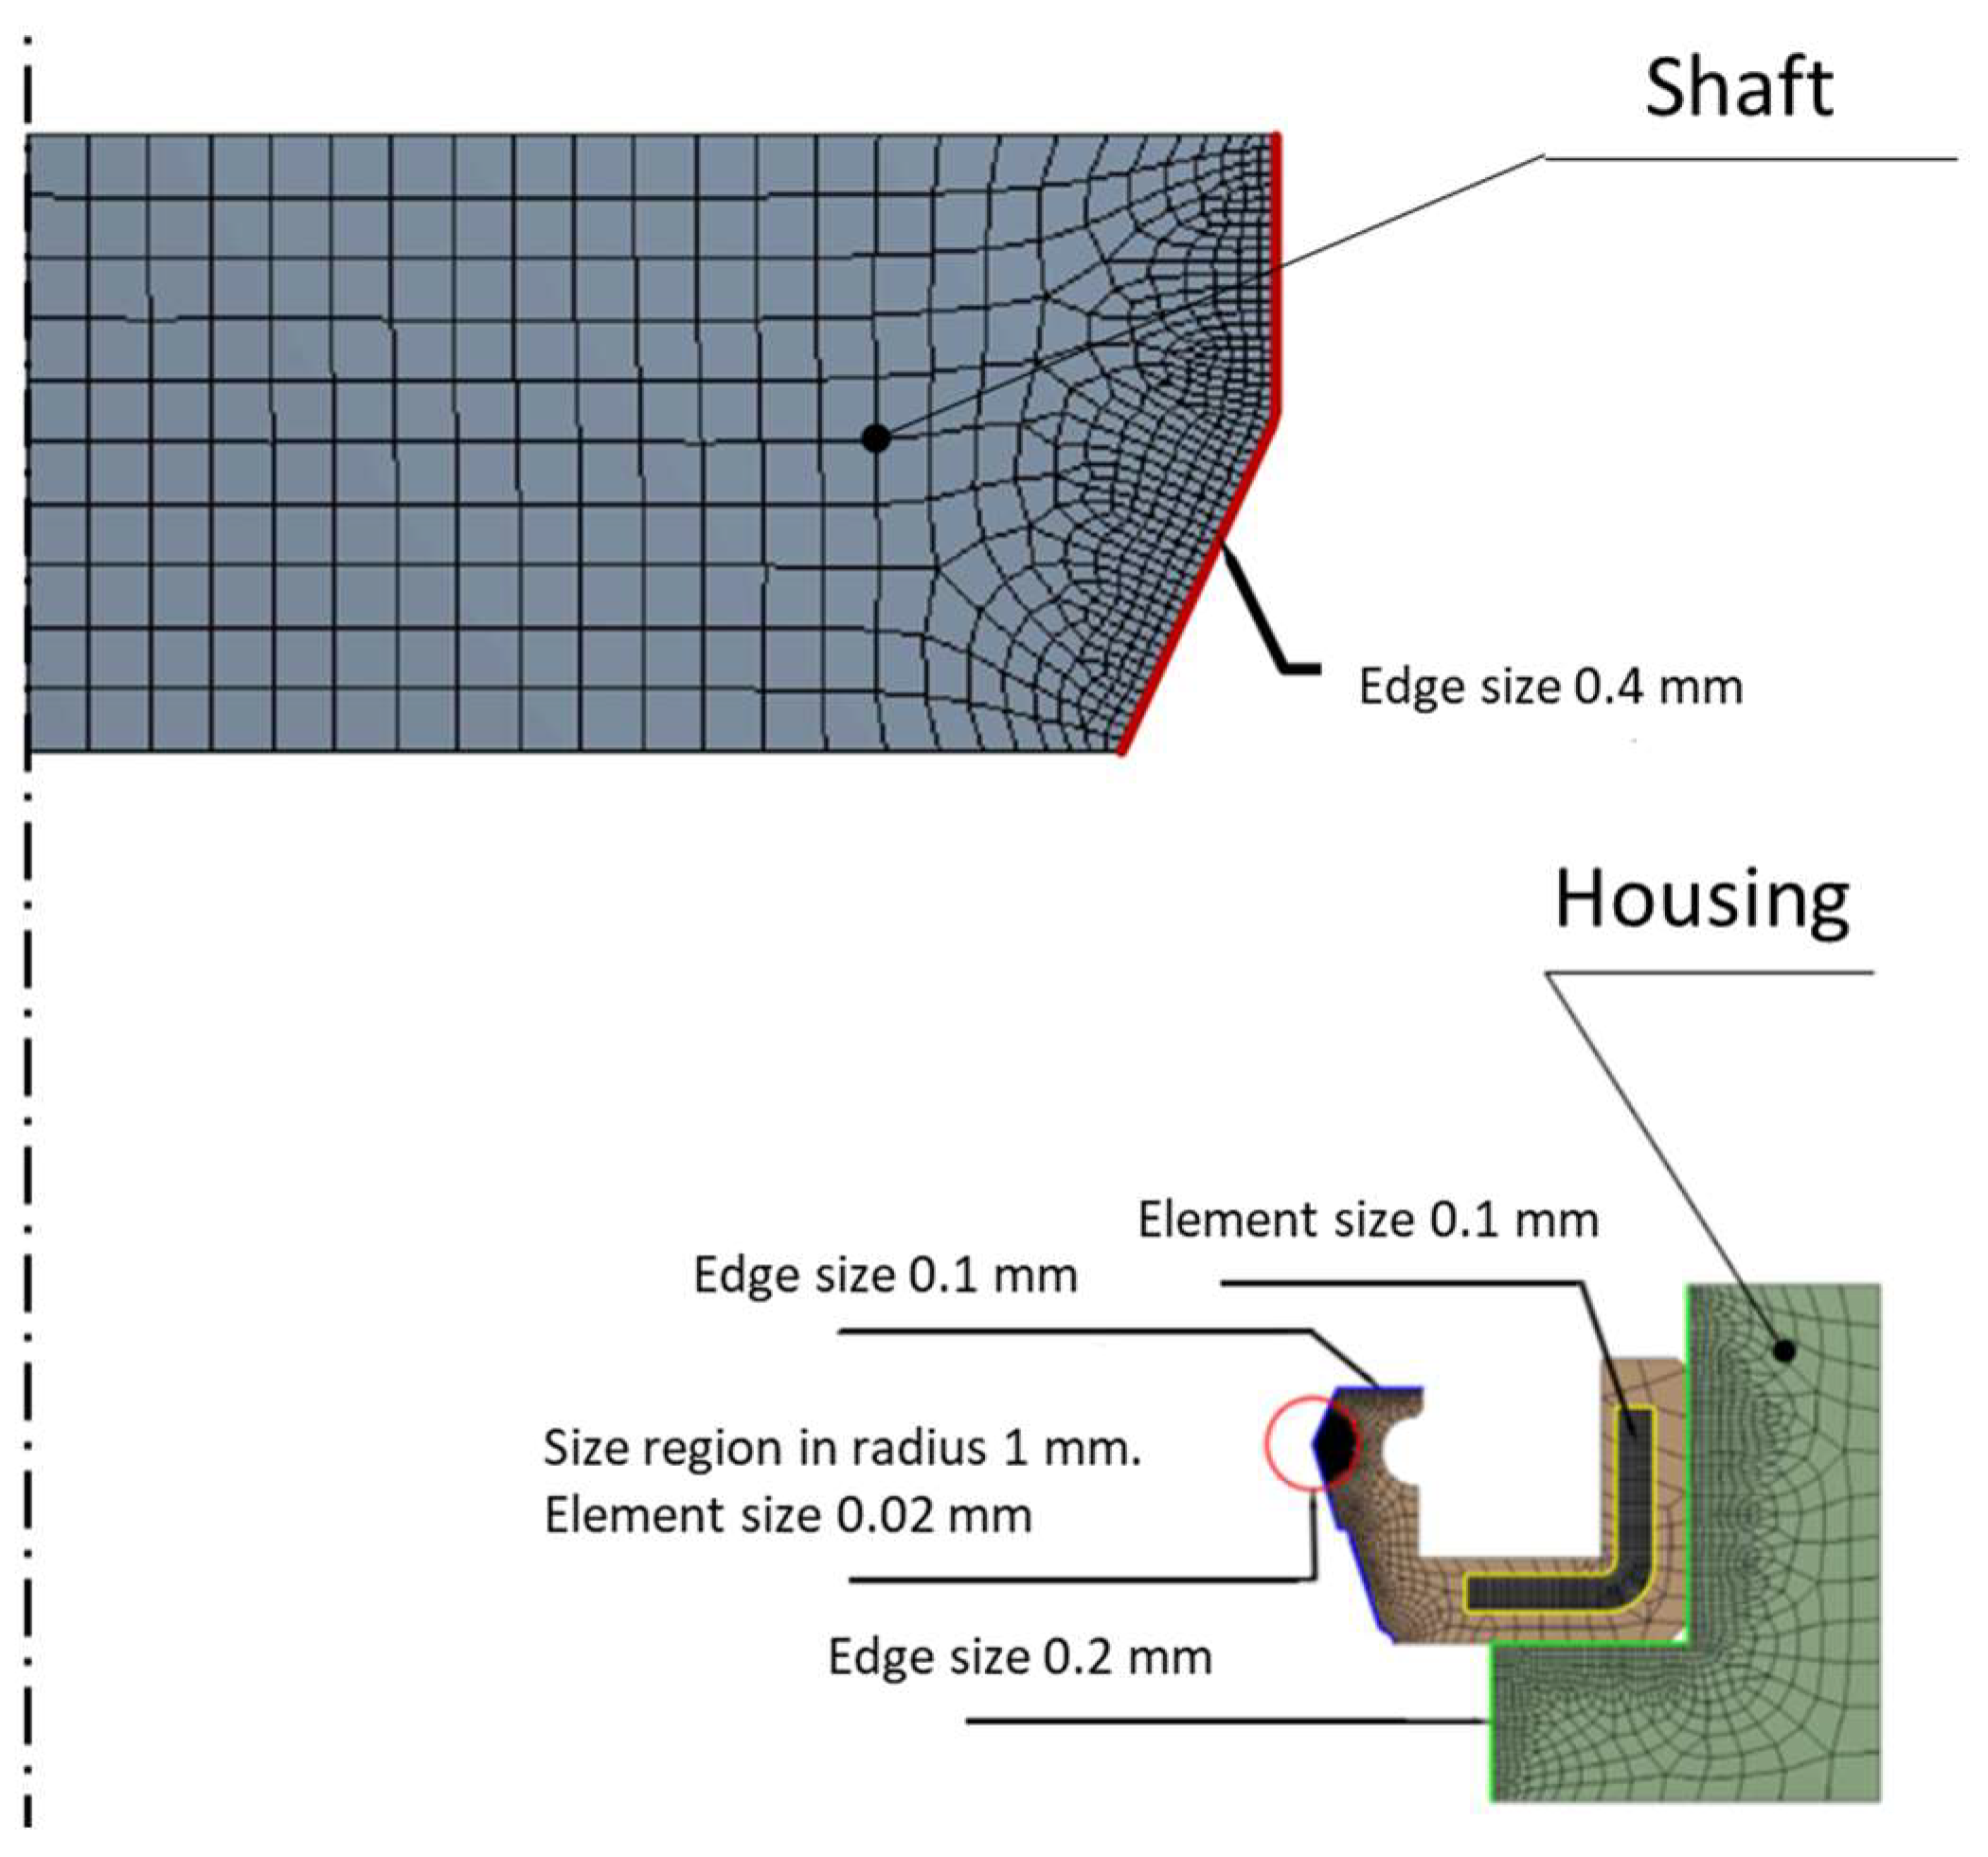
Figure 8 presents the mesh of the computational model. This model consists of three basic parts: the sealing ring, the housing, and the shaft. In order to accurately model the contact surfaces and obtain an accurate stress distribution, the mesh in the contact zone has been refined.
The optimised lip seal element size in the contact region between the seal and the shaft was determined by an independent mesh test. The element edge length for the lip was set at 0.02 mm. Further decreasing the finite element size did not affect the results, especially the contact stress distribution. The deviation from the results was less than 2%. Moreover, the mesh was also improved in the region where stress concentration was expected. The finite element ‘Plane 183’ with a higher-order shape function was used to discretise the model. In this form, the model consists of 146,826 nodes and 36,343 elements.

2.2.2. Boundary Conditions

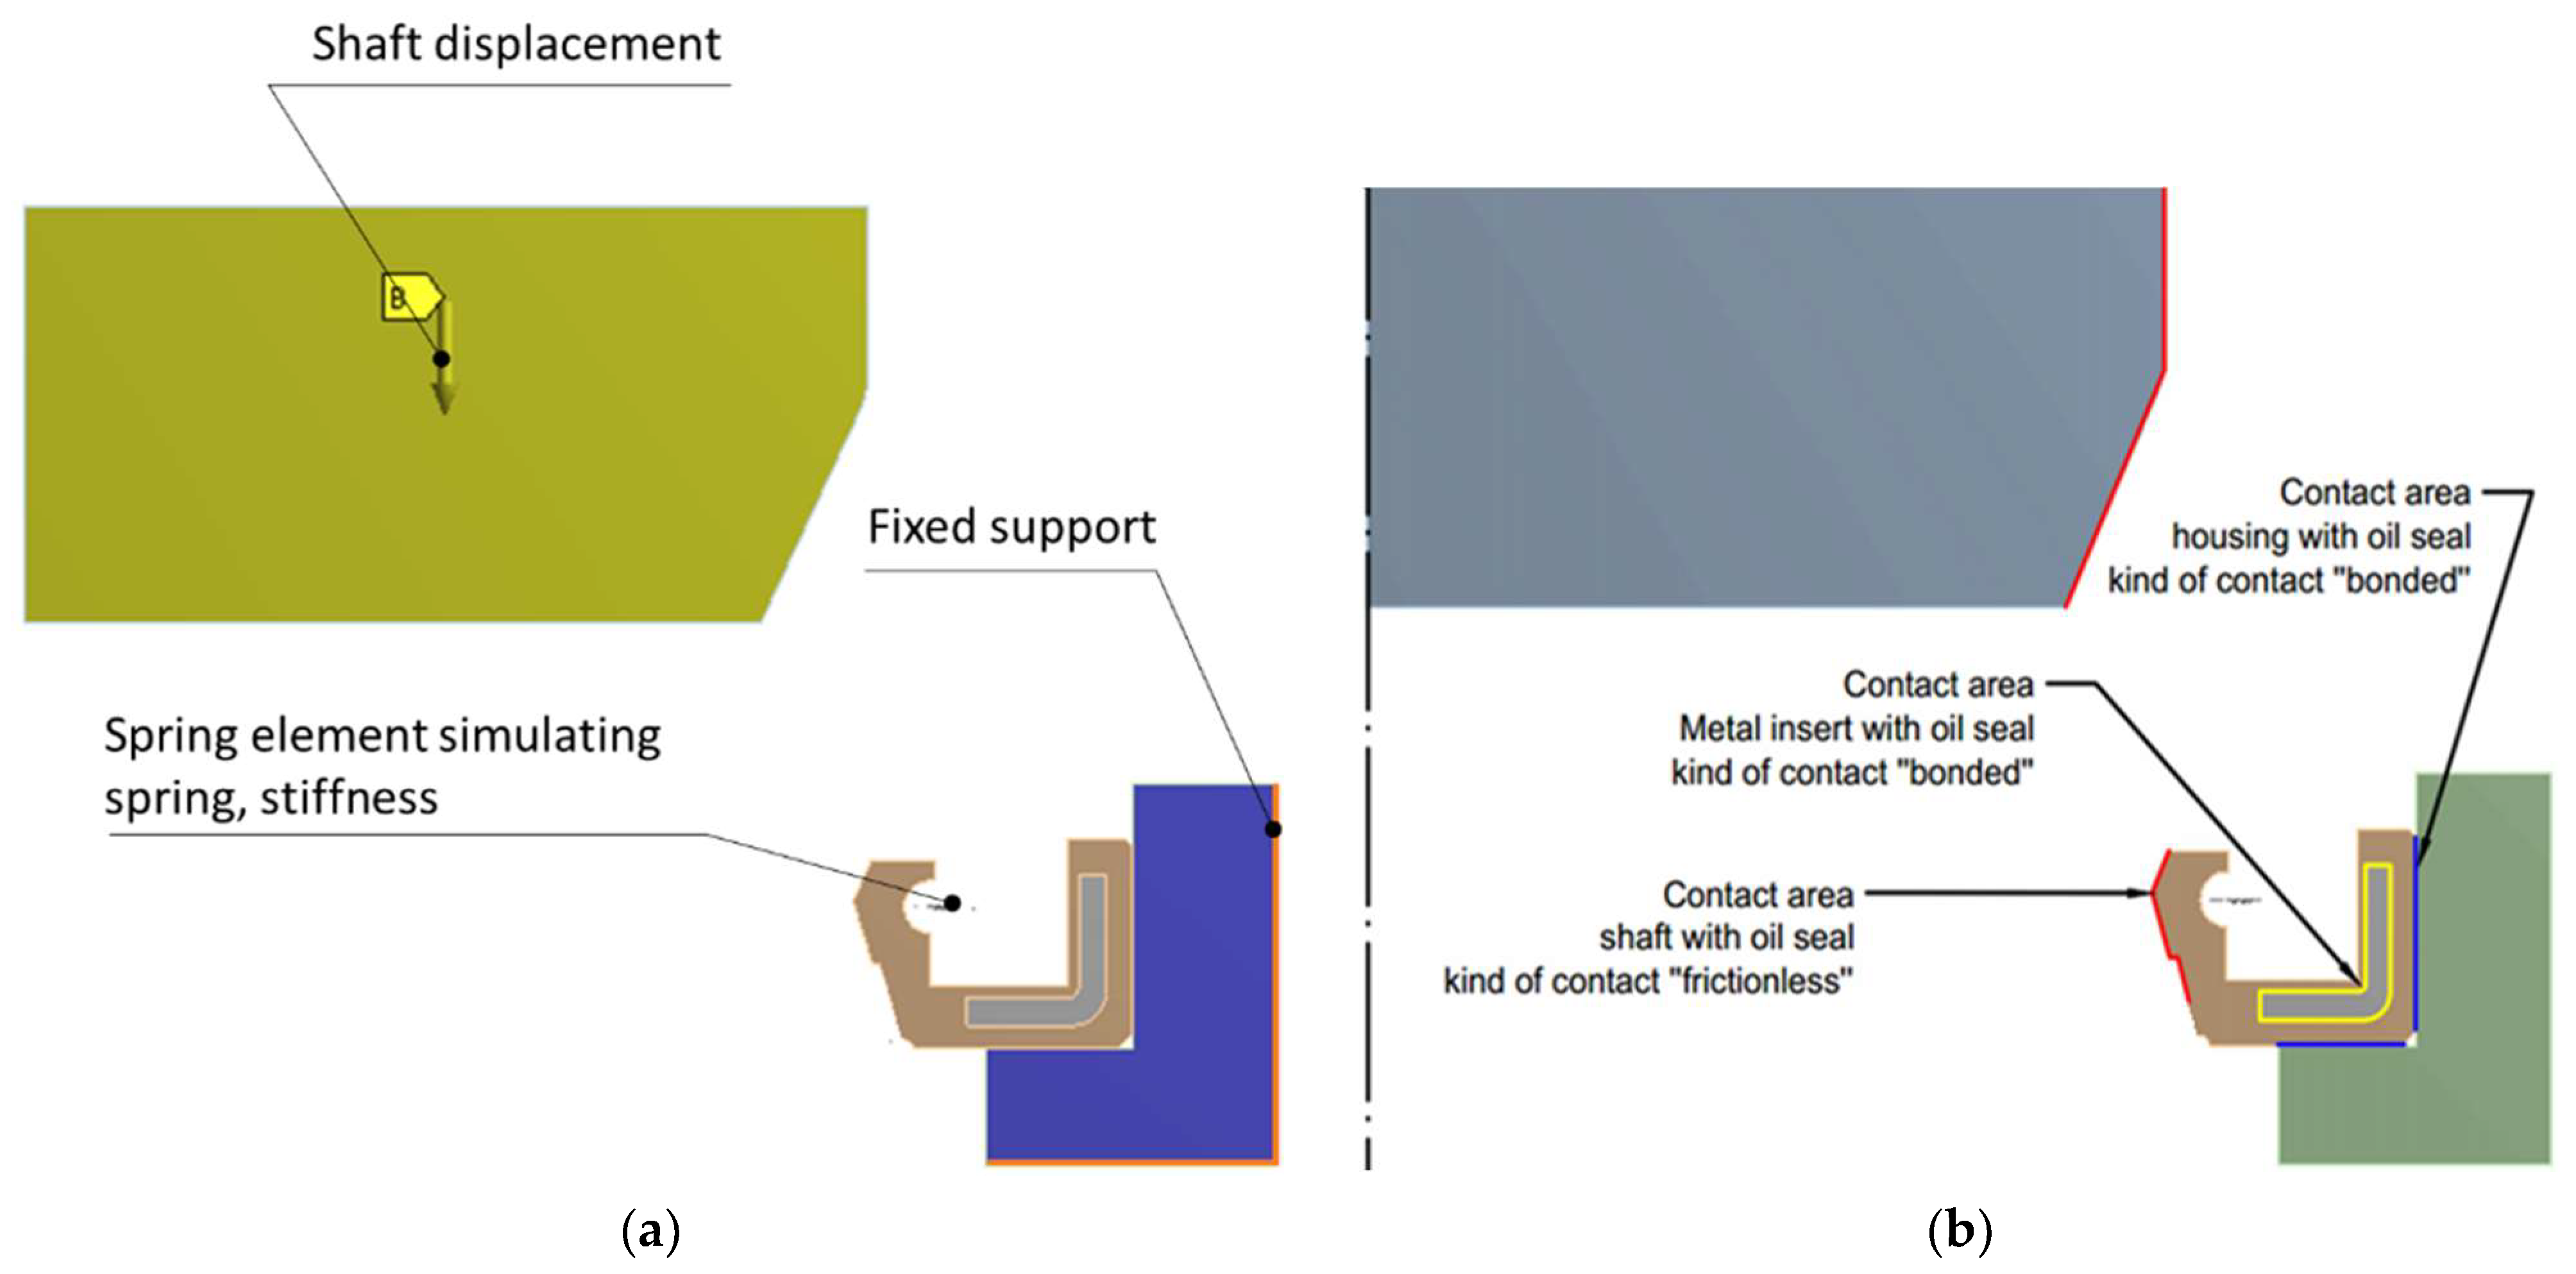
The boundary conditions are presented in Figure 9a. This figure shows the initial position of the shaft. The simulation was divided into two stages. The first stage simulated the assembly of the sealing ring on the shaft, and the second stage simulated the operating conditions of the sealing ring in the pressurised state. The housing was fixed to its external surfaces. In the first stage, the shaft was moved to the seal ring assembly position. In the second stage, oil pressure was applied to all external surfaces of the sealing ring. All contact regions were marked and described in Figure 9b. The metal ring spring was modelled using a spring element with the appropriate stiffness. This stiffness was determined using the test stand for measuring clamping forces, as described in Section 2.1.2.

2.2.3. Material Properties

The shaft, housing, and metal reinforcement of the sealing ring were modelled using an elastic material model. For the shaft and housing, the elastic properties of 316 L stainless steel were assigned (modulus of elasticity E = 197 GPa, Poisson ratio ν = 0.33). The properties of the metal ring reinforcement were typical of carbon steel (modulus of elasticity E = 206 GPa, Poisson ratio ν = 0.3). The rubber part of the sealing ring was modelled as a hyperelastic material [29], using a parametric Mooney–Rivlin model related to the strain energy density as follows:
W = C 10 I ¯ 1 3 + C 01 I ¯ 2 3 + C 11 I ¯ 1 3 I ¯ 2 3
The Mooney–Rivlin model is a typical model used to model the properties of lip seals [30,31,32]. The parameters C10 = 0.964, C01 = −0.273, and C11 = 0.066 were determined based on uniaxial and biaxial tests of NBR rubber previously carried out by Jaszak [33].

2.3. Analytical Calculations

The friction in the contact area between the shaft and the deformed lip seal is generated due to the following three basic parameters: the clamping force F R , the shaft diameter d s   and the friction coefficient μ . The friction torque M F   generated in this zone can be written as follows:
M F = F R · μ · d s 2
The contact pressure in this zone is defined as follows:
p = F R A i
where A i is the actual contact surface between the lip seal and the shaft.
The nominal contact surface can be defined as follows:
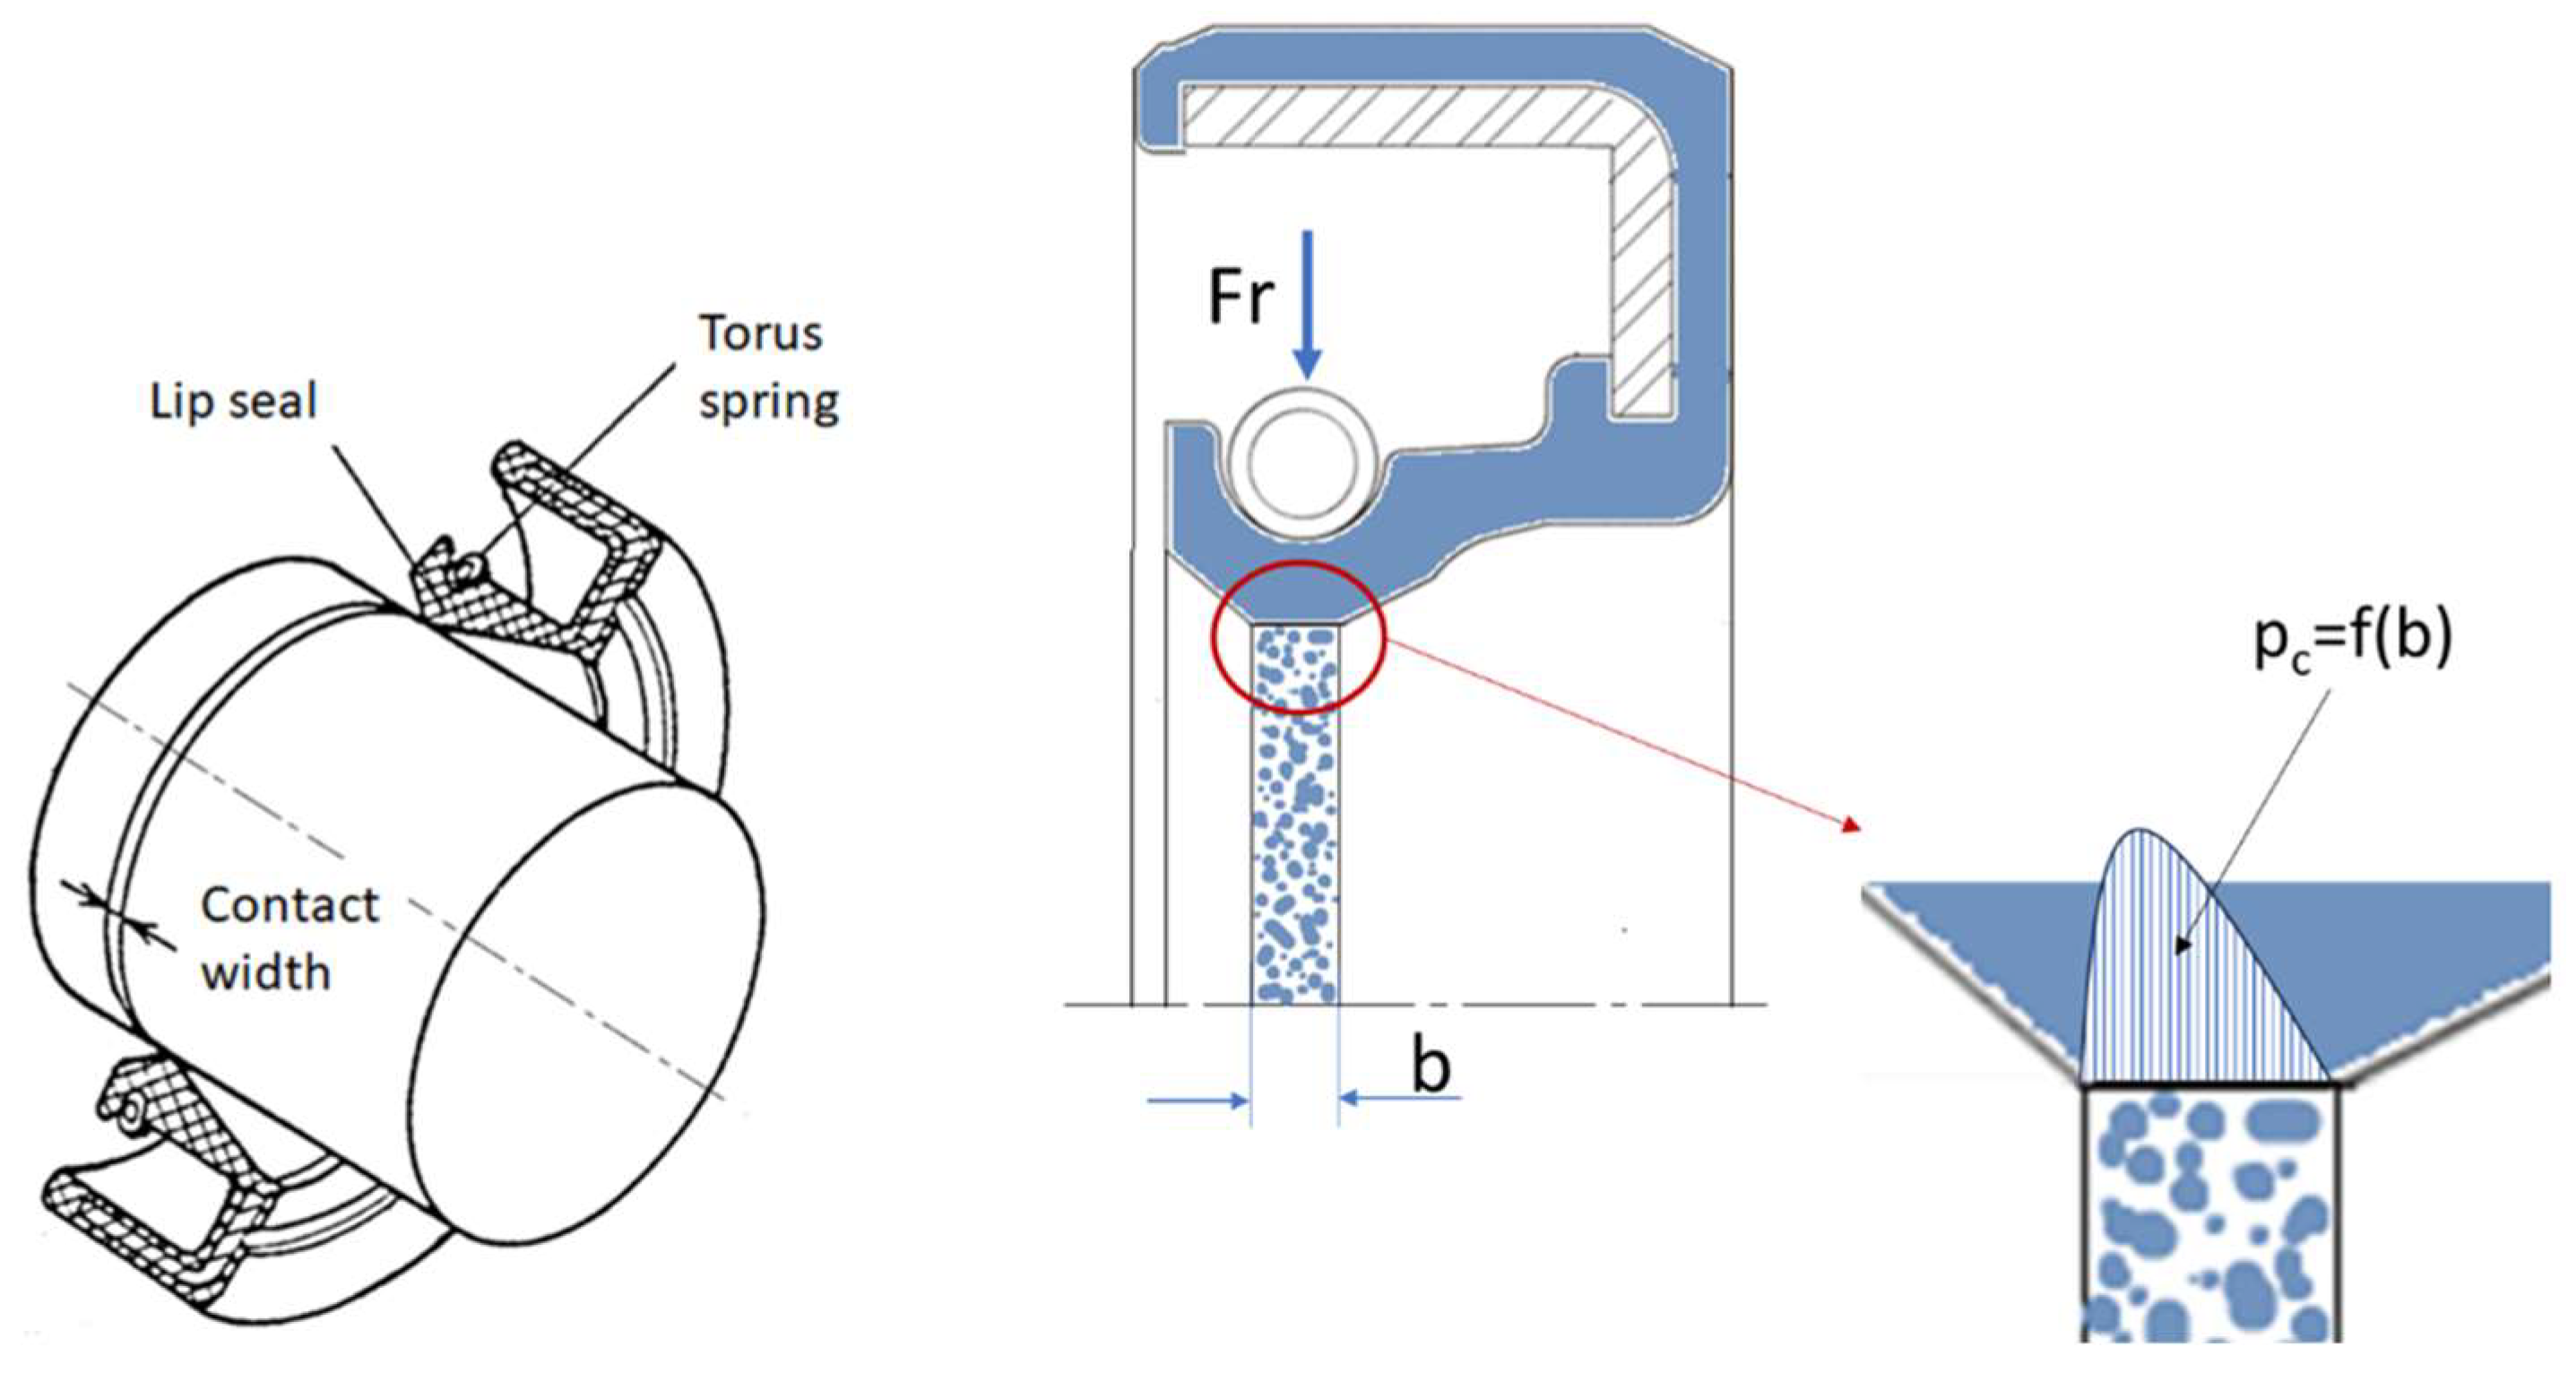
A c = π · d s · b
where b is the contact width (see Figure 7b).
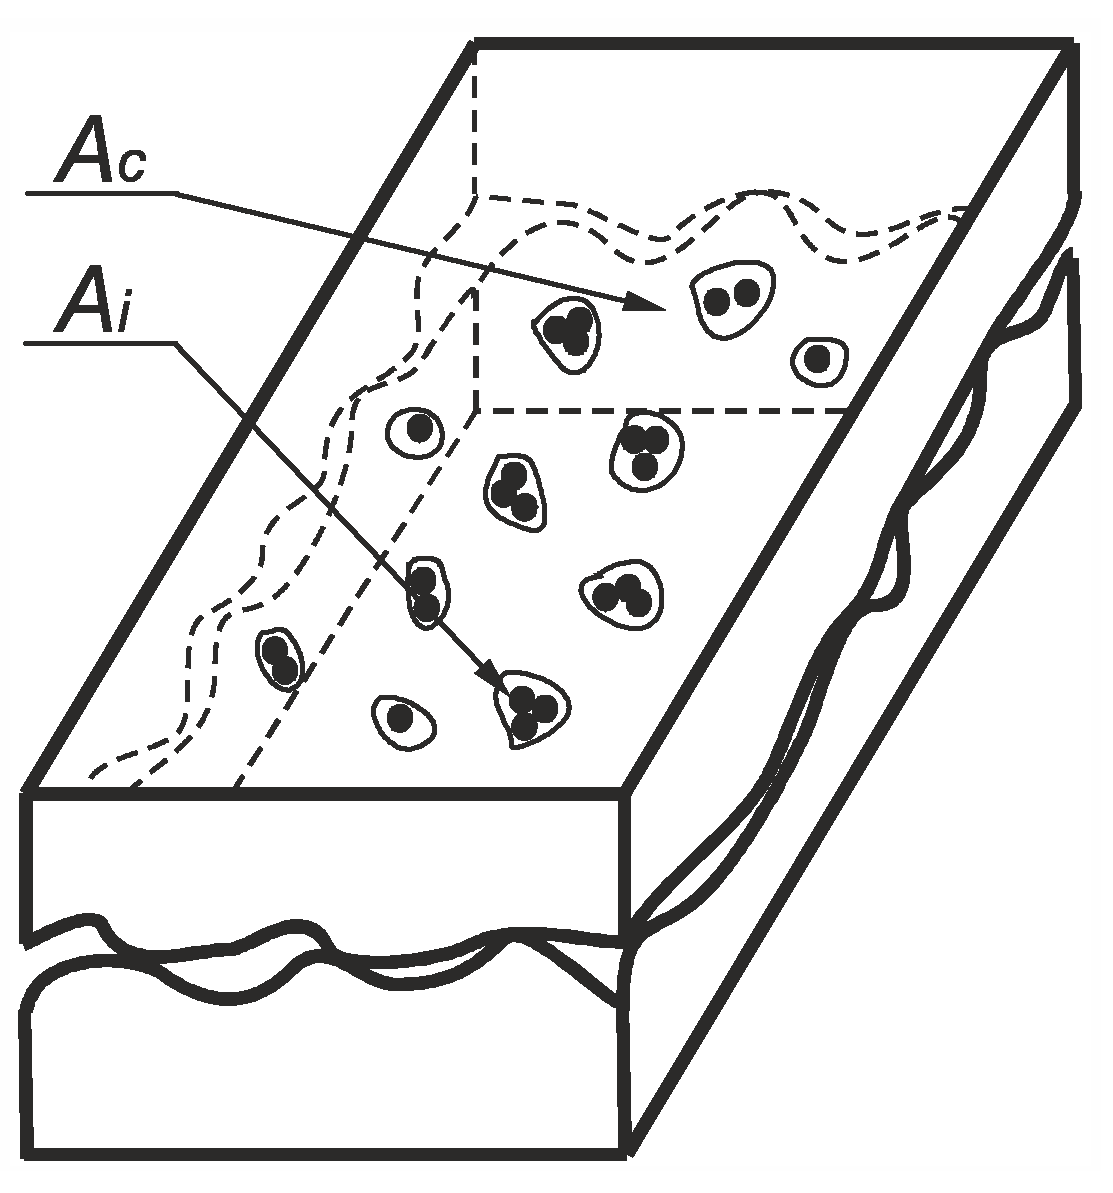
It is well known that the contact surface between two mating components is not smooth [34]. Only a certain percentage of the nominal contact surface takes part in actual contact due to surface irregularities (roughness), as shown in Figure 10.
The relationship between the elemental contact surface and the nominal contact surface can be defined as the porosity level of the form as follows:
ε = A p A c = A c A i A c = 1 A i A c
Surface porosity is therefore understood here as the ratio of the pore area Ap to the nominal contact surface Ac.
By taking into account Equations (3)–(5), Equation (2) can be written as follows:
M F = π · μ · 1 ε · p · b · d s 2 2
It can be seen that, for a constant shaft diameter, the crucial parameters affecting the friction torque, in addition to those previously mentioned, are the porosity level and contact pressure. Figure 11 shows the contact area between the shaft and the lip seal.
The magnitude and distribution of the contact pressure depend mainly on the spring stiffness and the rubber hardness. From a mathematical point of view, this pressure can be determined by the equations proposed in [35]. Nevertheless, numerical simulations by means of FEM, as presented in Section 3.2, may be a more accurate method.
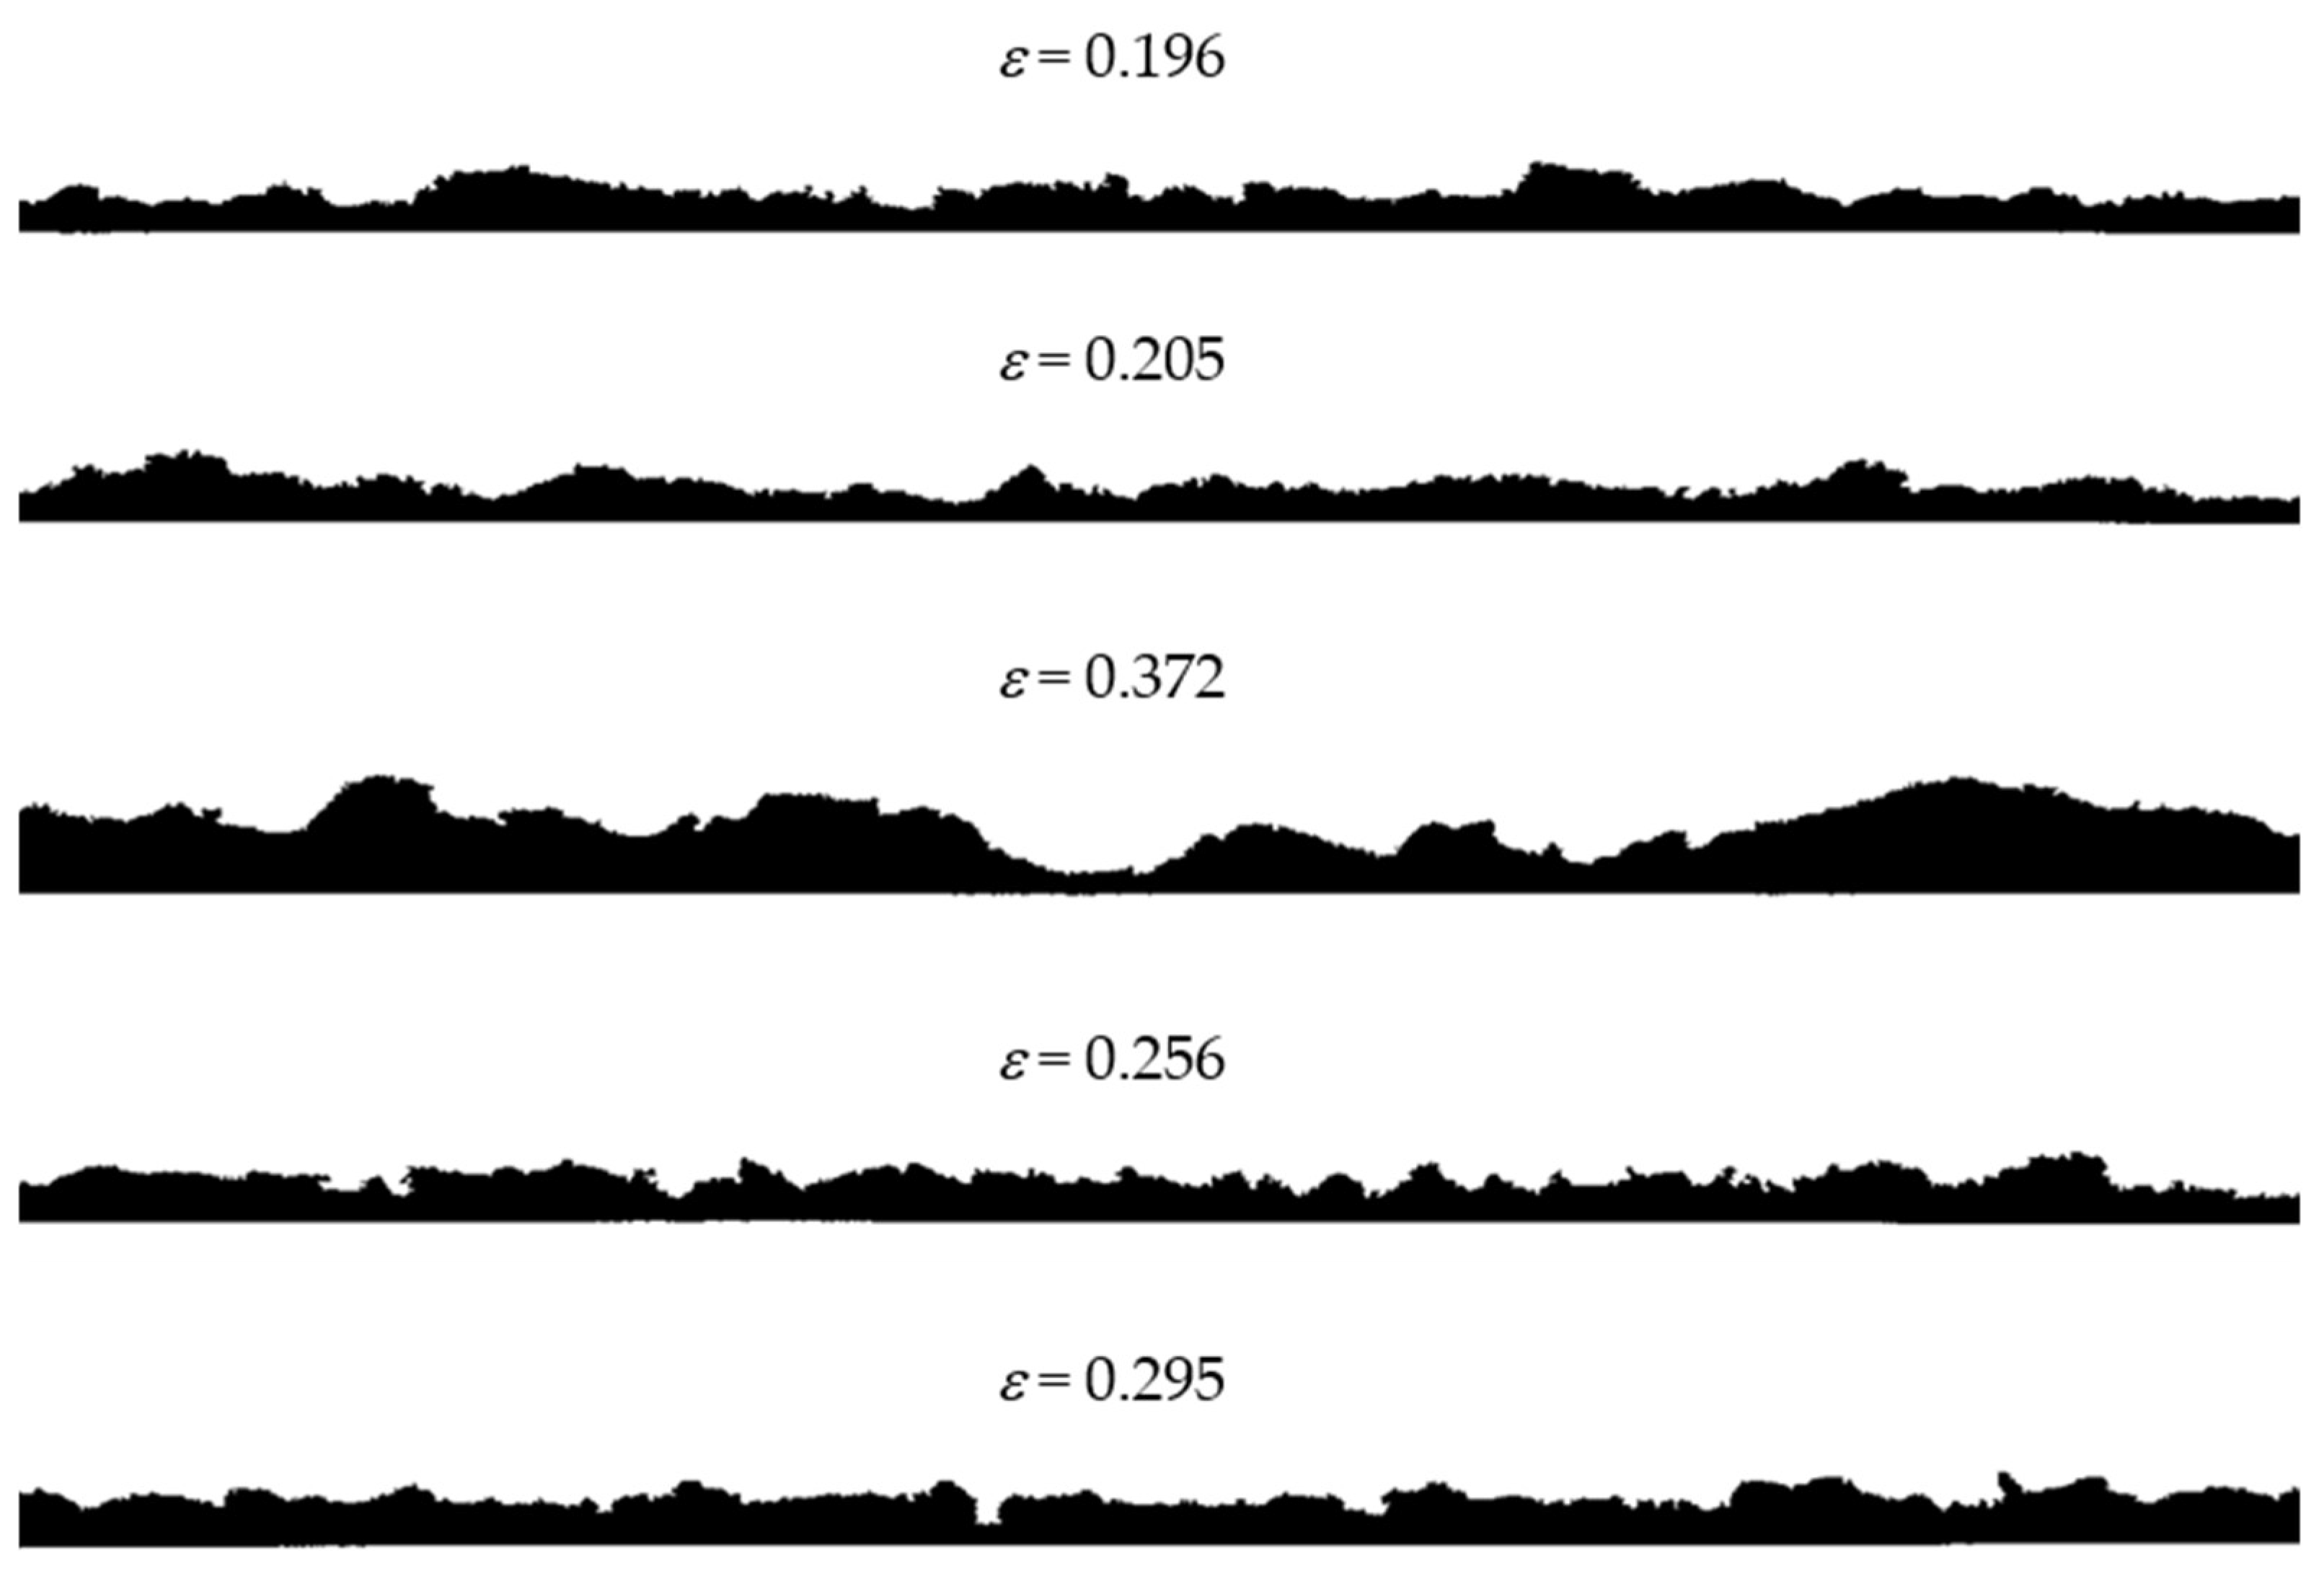
The porosity level, which also has a major influence on the friction torque, can be determined from the roughness profile. In this article, a certain simplification has been made in that the porosity level (in the contact zone) is only specified by the roughness profile of the rubber. The metal surface was treated perfectly smoothly. The porosity level based on the roughness profile was determined as follows:
ε = A p L · h
with parameters Ap, L, and h shown in Figure 12.

3. Results

3.1. Experimental Results

Table 3 shows the values of the determined friction coefficients for all five flat rubber samples tested at different velocities (v). The standard deviations of the friction coefficient experimental values are shown in Table 4. The tests were performed under dry and lubricated conditions. It can be seen that there is an effect of the rubber texture on the friction coefficient in both test conditions. In each case, the standard rubber (SR) has a higher value of the friction coefficient compared to the prototype rubber samples. The greatest reduction in friction coefficient value compared to standard rubber was observed for sample 1C (45% without lubrication and 50% with lubrication). The other samples showed smaller differences, but all were above 5%. It was noticed that there is no simple correlation between surface roughness and the friction coefficient.
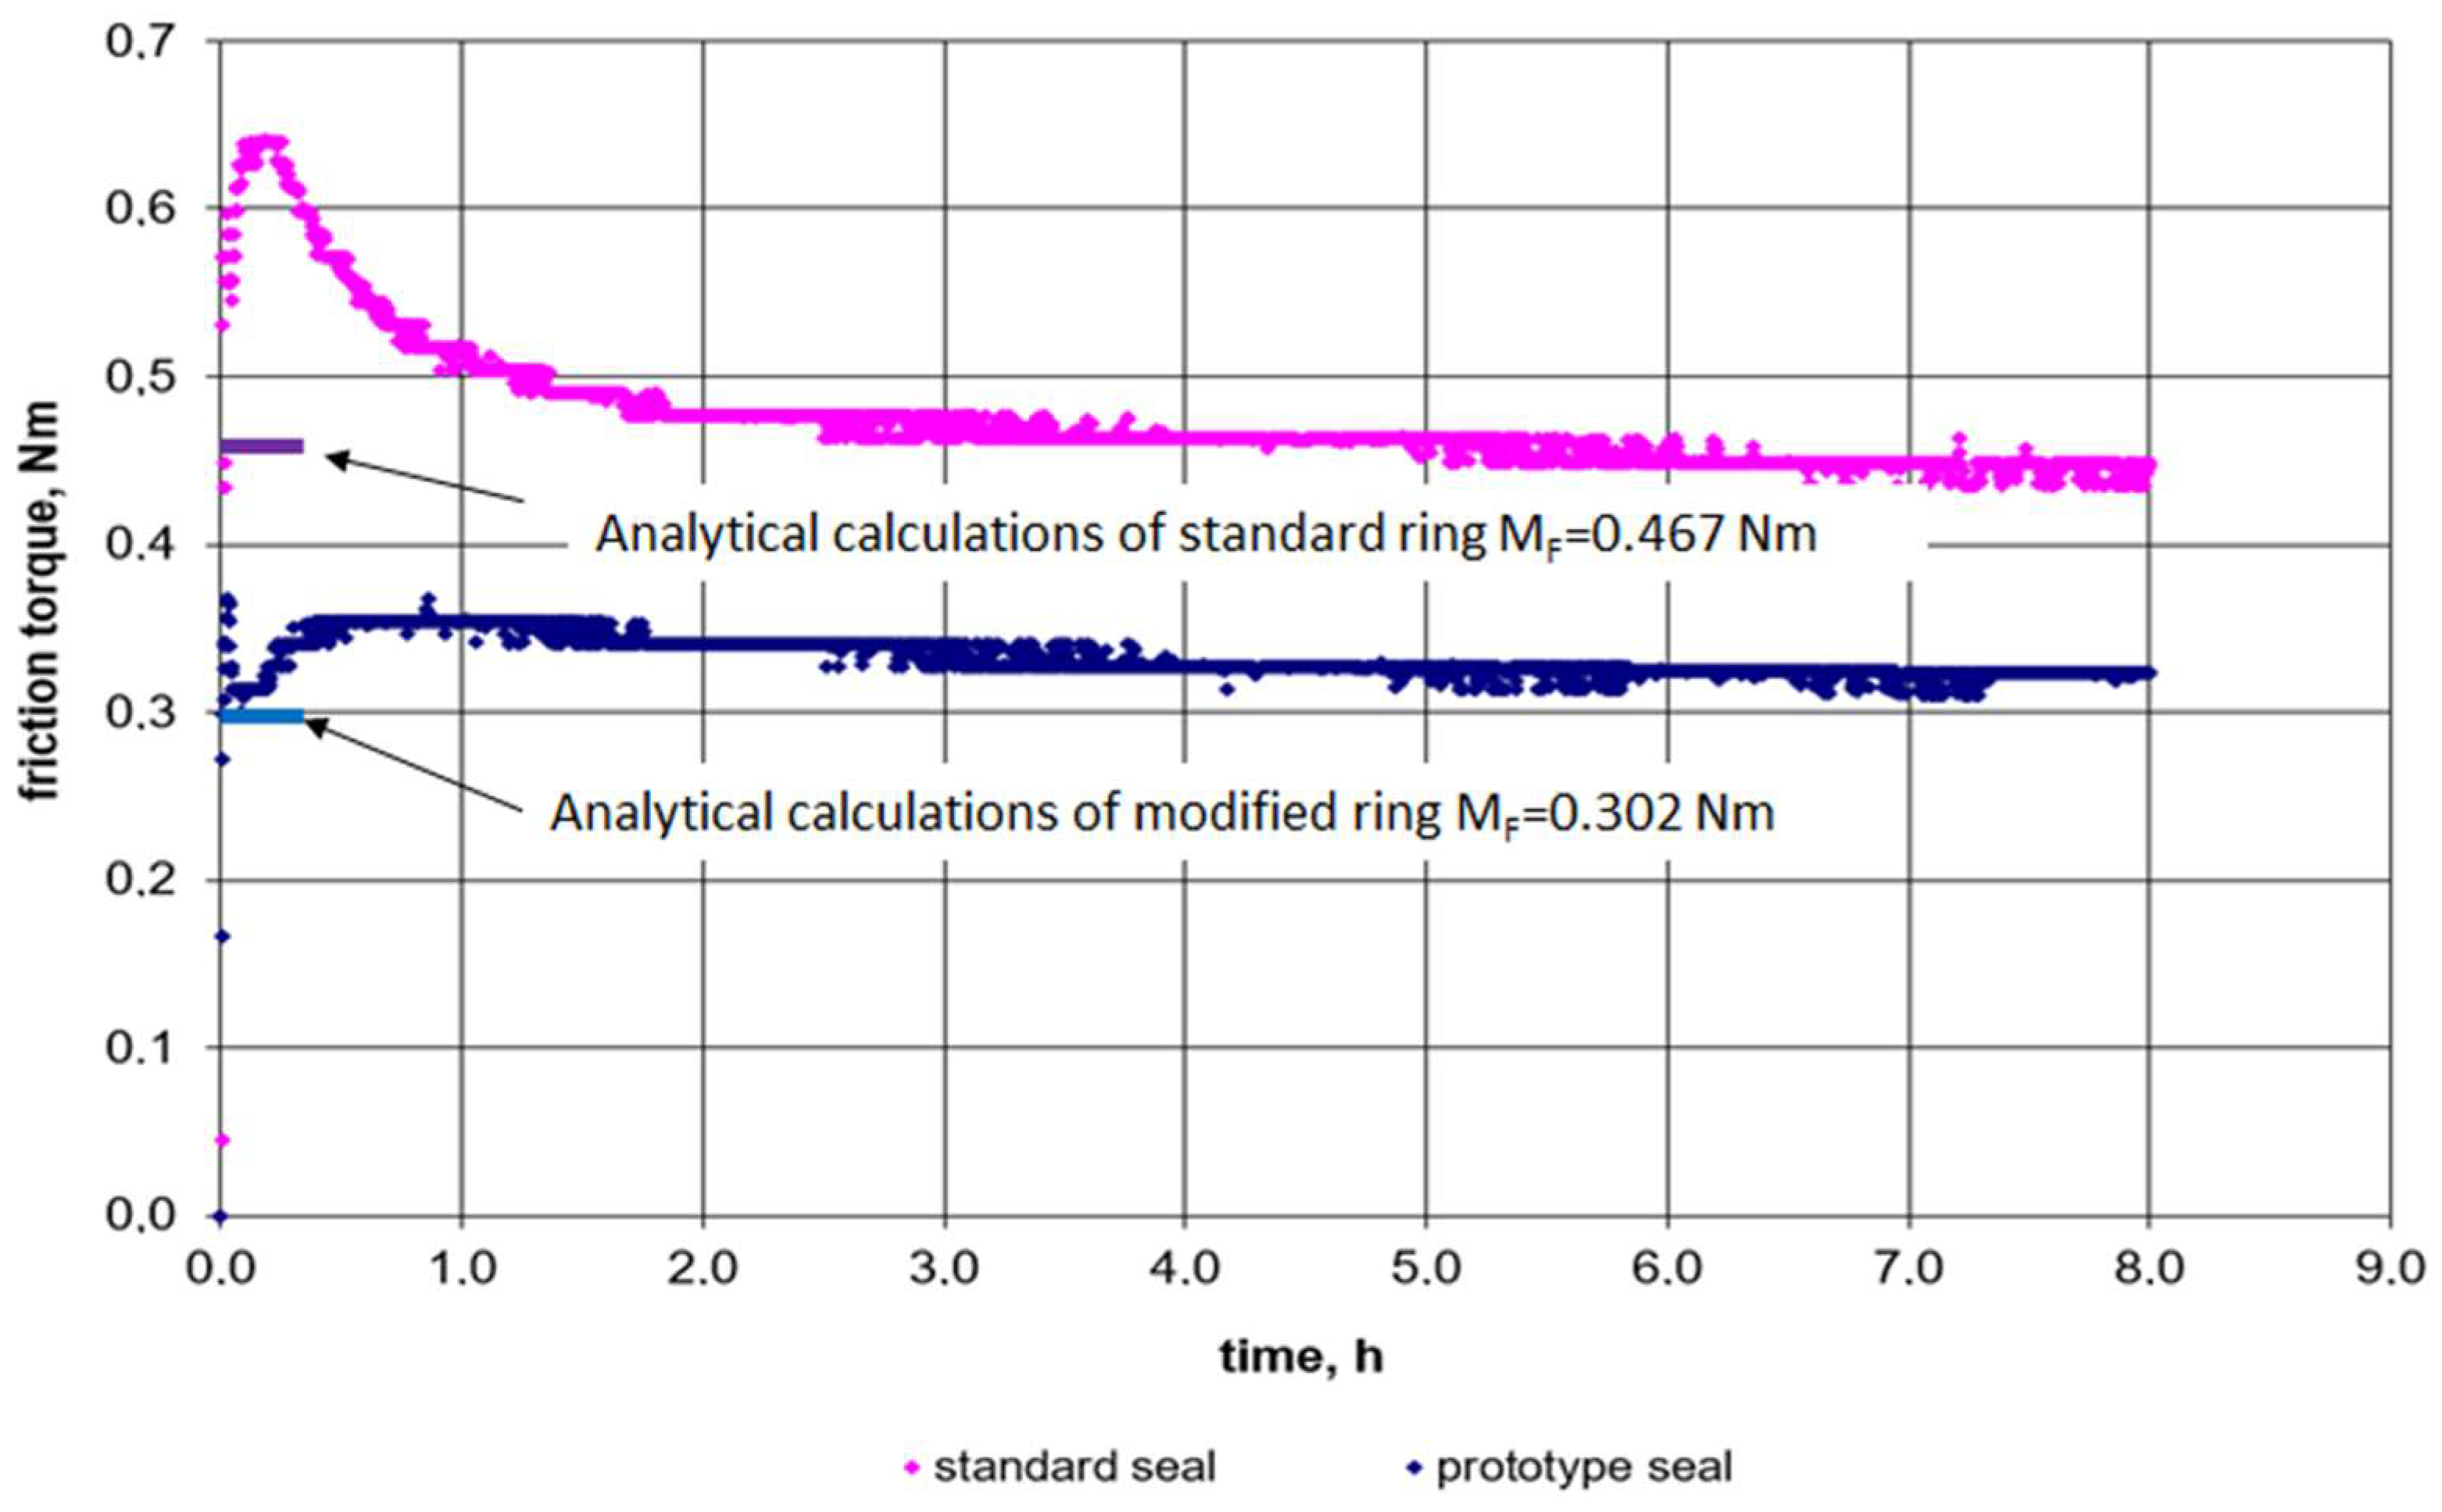
The chart presented in Figure 13 shows the friction torque for the standard and prototype rings. A characteristic feature of all the standard rings tested was an increase in friction torque values over 0.6 Nm during the first hour of operation. It was investigated that the reason for this increase is the intensive wear of the sealing lip in interaction with the shaft surface, as well as the strong thermal load due to poor lubrication conditions. After a few hours of seal operation, the friction torque stabilises. The difference in the friction torque of seals with the standard and porous sealing lip texture then becomes visible. In the first hour of operation, the friction torque resulting from the increased surface roughness of the sealing lip is approximately 43% lower compared to standard seals. At the end of the 8-h test, the difference in friction torque reaches about 27%, as the contact width between the lip and the shaft has increased significantly.
Table 5 shows the results of measurements of lip seal width Wl, clamping force Fc, and ring weight Wr for the standard and prototype sealing rings before and after testing, while Table 6 shows the standard deviation of the characteristic features of these rings.
It can be noted that the lip width of the standard sealing ring is about 18% greater compared to the prototype seal. Considering the intensity of wear after the test, the following can be observed:
  • The increase in lip width was 38.3% for the standard sealing ring and 20.8% for the prototype sealing ring.
  • The decrease in clamping force was 9.1% for the standard sealing ring and 8.9% for the prototype sealing ring.
  • The ring weight loss was 0.46% for the standard sealing ring and 0.4% for the prototype sealing ring.

3.2. Numerical Results

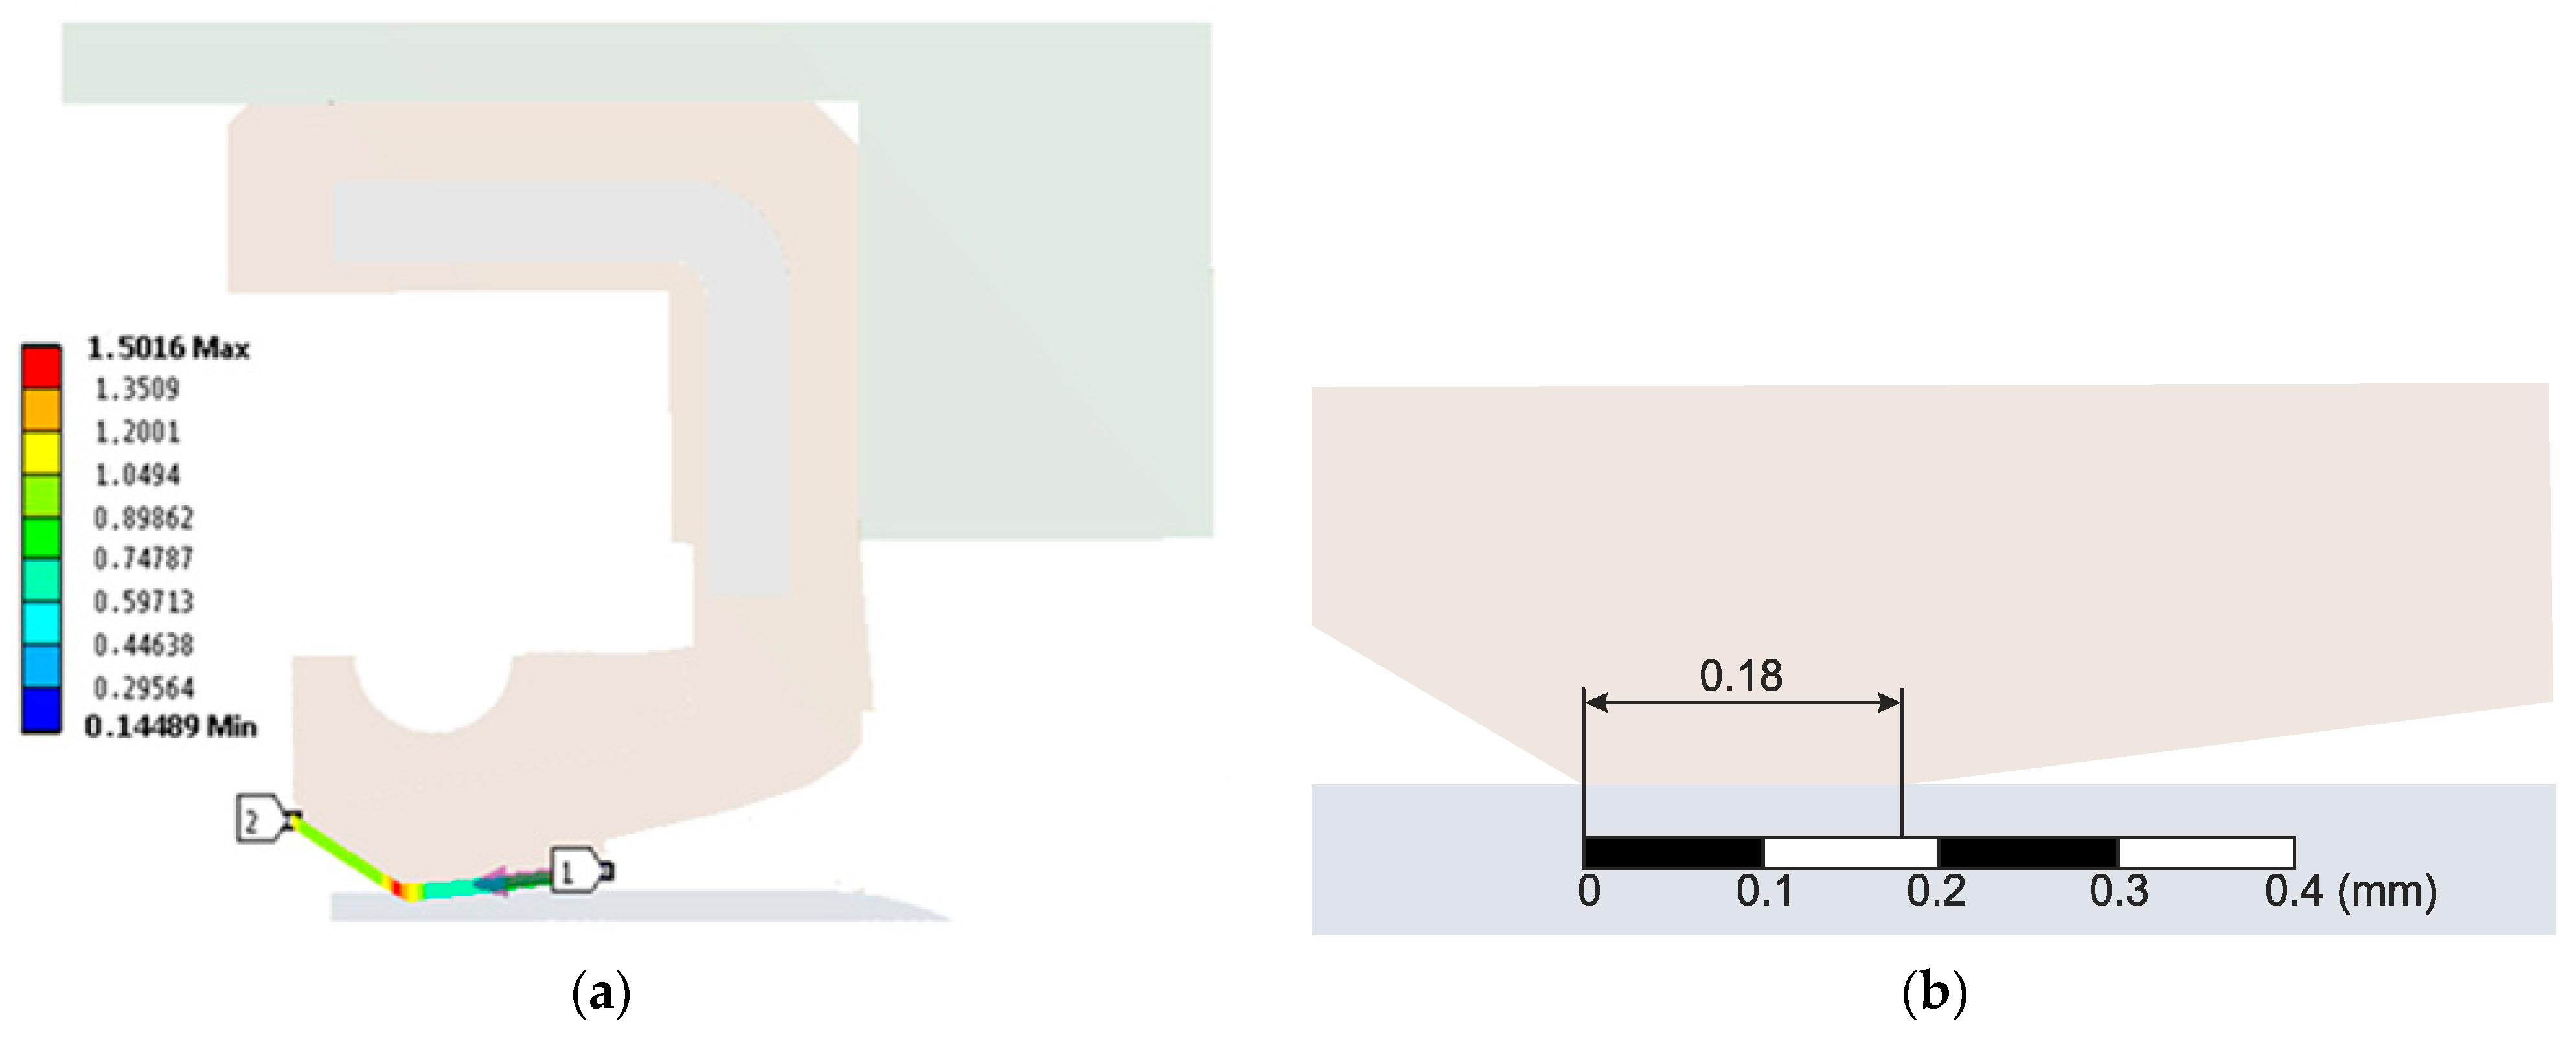
Figure 14a shows the distribution of contact pressure between the lip seal and the shaft. According to it, the contact pressure varies from 1.2 to 1.5 MPa, so the average value in this range is 1.35 MPa. The contact width in this zone is 0.18 mm, as shown in Figure 14b.

3.3. Analytical Results

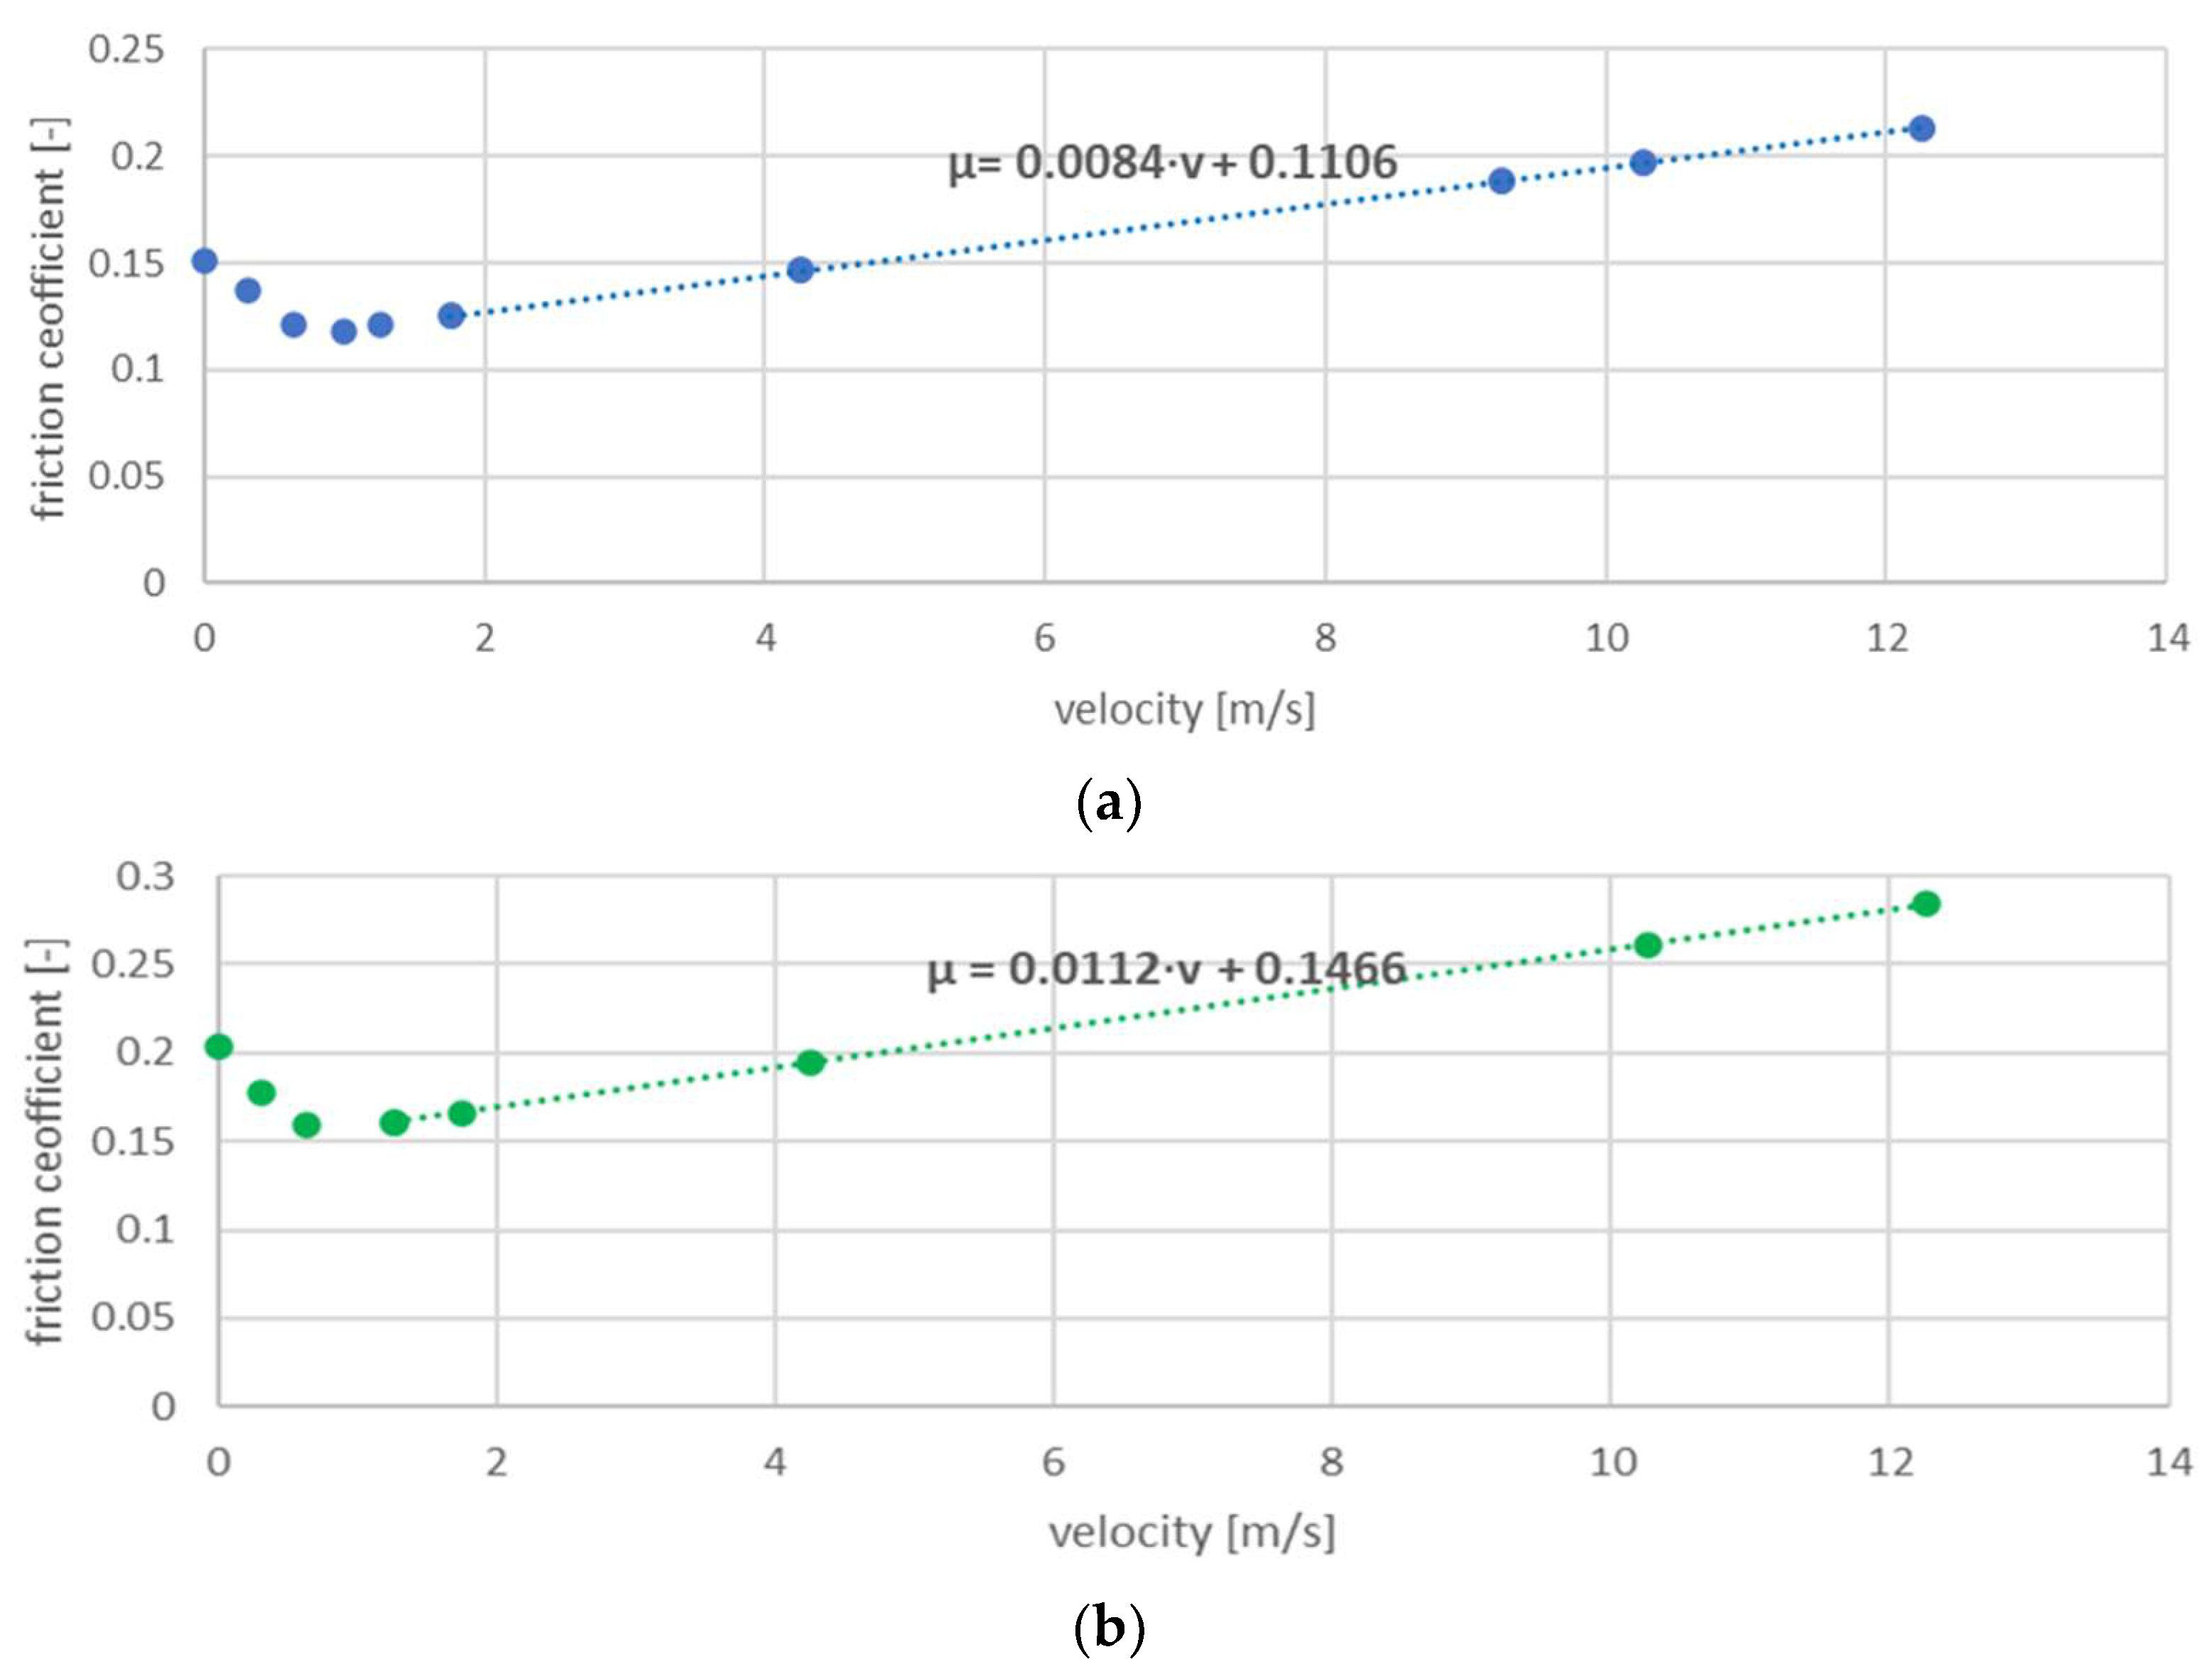
To complete the analytical model, data in the form of the porosity level and the friction coefficient at a given shaft speed were needed. It is worth mentioning that during the test, the shaft rotated at 3000 rpm, so the velocity was 11 m/s. The determined values of the porosity level as a function of roughness are presented in Figure 15. The friction coefficients at a shaft velocity of 11 m/s for the standard and prototype sealing rings were obtained from the curves presented as an example in Figure 16. The reported friction results are for lubricated conditions.
The final results of the friction torque calculations in accordance with Equation (6) are collected in Table 7. These are the values from the beginning of the test. The differences between the torque values obtained experimentally and from the calculations result from not taking into account the heat of friction and thermal expansion of the materials.

4. Discussion

The friction tests of flat rubber samples at different velocities and in dry and lubricated conditions provide information that modification of the surface texture resulted in a reduction of the friction coefficient. This phenomenon was observed in both test conditions. The largest reduction in friction coefficient compared to the standard rubber was seen in sample 1C, with a reduction of 45% without lubrication and 50% with lubrication. In other cases, the reduction ranged from 5 to 40% without lubrication and from 23 to 50% with lubrication. In dry conditions, the reduction in the friction coefficient is caused by a reduction in the deformation component of the friction coefficient, as the porous, discontinuous structure of the surface layer reduces the tangential stiffness. The second reason is a reduction in the adhesive component of friction.
The introduced texture of the surface layer in tests with lubrication improves lubrication conditions as the microindentations become oil storage places. The formation of converging gaps facilitates the generation of hydrodynamic lubrication. The same tendency was noticed during sealing ring tests. A common feature of all the standard rings tested was an initial increase in friction torque during the first hour of operation, reaching more than 0.6 Nm in each sample. This increase in friction torque was due to intensive wear of the sealing lip in contact with the rough shaft surface and a strong thermal load caused by poor lubrication conditions. This is a very energy-consuming process and can lead to ring failure due to the strong thermal load in the contact area. After a few hours of operation, the friction torque stabilises. The difference in friction torque between sealing rings with standard and porous lip textures becomes evident. In the first hour of operation, the friction torque due to the increased surface roughness of the sealing lip is approximately 43% lower compared to standard sealing rings. At the end of the 8-h test, the difference in friction torque reaches approximately 27% due to a significant increase in contact width between the lip and the shaft.
In order to assess the effectiveness of the introduced modification, some measurements were carried out quantitatively and qualitatively before and after durability tests. It is observed that the lip width of the standard sealing ring was about 18% larger compared to the prototype sealing ring. After the test, it was observed that the lip width increased by 38.3% for the standard sealing ring and by 20.8% for the prototype sealing ring. The decrease in clamping force was 9.1% for the standard sealing ring and 8.9% for the prototype seal, while the weight loss was 0.46% for the standard seal and 0.4% for the prototype sealing ring. The measured values show that the wear intensity of prototype sealing rings is lower compared to standard ones. Lower values of the friction torque, especially in the first stage of operation, imply a lower thermal load and, therefore, a lower intensity of heat ageing of the elastomer.
The introduced modification improved the difficult operating conditions of the seal due to the high contact pressure (about 1 MPa). The obtained contact pressure distribution between the lip seal and the shaft indicates that the contact pressure ranges from 1.2 to 1.5 MPa, with an average value of 1.35 MPa. The contact width in this zone is 0.18 mm. The calculated data coincide with the actual values typical of oil lip seals. The analytical model was supplemented with data on the porosity level and the friction coefficient at a shaft speed of 3000 rpm (i.e., a velocity of 11 m/s). The porosity level of the flat rubber samples, depending on the roughness, is in the range of 0.196 to 0.372, while the friction coefficient at a shaft velocity of 11 m/s for the example standard and prototype samples is presented in Figure 16. Beginning with static friction, a decrease in the friction coefficient is evident, with a minimum at a speed of 1 m/s, and then an increase in the value is noticeable.
The final results of the friction torque calculations according to Equation (6) are collected in Table 7. These values represent the initial test conditions. The difference between the standard and prototype sealing rings reaches a value of 35%. The discrepancies between the experimental and calculated torque values can be attributed to the omission of frictional heat and the thermal expansion of materials in the calculations. The shaft surface was treated as ideally smooth, which facilitates simulations, but the results are subject to some error.

5. Conclusions

The results of the work can be summarised as follows:
  • The validity of the thesis that the way to reduce the frictional resistance of the sealing lip-steel shaft pair is to reduce the tangential stiffness of the sealing lip surface layer is demonstrated.
  • The data for carrying out the calculations and determining the friction coefficient values were established from the adopted porous body model and the surface model of the substitute surface layer of rubber. The modelling of the rubber surface layer was based on profilograms of rubber samples, the deviation of which from the actual surface was not large.
  • The modification used should be considered effective and easy to apply.
  • Friction coefficient measurements of rubber samples with a given porosity rubbing against the surface of a metal disc showed satisfactory convergence with the calculated friction coefficient values for the adopted model of interaction of the two surfaces.
  • During dry friction of the flat rubber samples, a reduction in the friction coefficient of 5 to 40% was observed compared to the samples with a smooth surface. Also, in the case of lubrication, a reduction in the friction coefficient of up to 50% was observed.
  • Modification of the sealing lip surface resulted in a 43% reduction in friction torque in the first hour of sealing operation and a 27% reduction after 8 h of operation.
  • Torque deviations between analytical calculations and experimental results are substantiative due to the roughness profile changing under load and movement.
  • Modification of the surface layer reduces mass consumption and thermal loading of the lip during the initial period of sealing operation, i.e., when it is the highest.
  • No leakage was observed from the sealing rings with the modified sealing lip texture.
  • The created numerical model enables the calculation of the friction coefficient of the flat samples and the sealing ring.
  • Discrepancies between the model and experiment are due to simplifications to facilitate the calculations, but the differences do not exceed several percent.
  • The roughness parameters of the surface layer of the sealing lip in the tested case are the maximum values above which leakage was observed.
  • With wear, no reconstruction of the rubber texture was observed due to the specific composition of the rubber. For this reason, the introduced modification is temporary and significantly reduces friction resistance in the initial period of operation, when high thermal loads and run-in occur.
  • It seems advisable to carry out research on the influence of fillers in rubber on reproducing the original texture of the surface layer.
  • The effectiveness of the proposed modification method when using other materials for lip sealing rings is unknown.
  • In the case of other methods of modifying the elastomer surface, such as laser impact, additional technological operations are required.
  • The solution proposed in the article guarantees a finished product immediately after removal from the mould.

Author Contributions

Conceptualisation, G.R. and P.J.; methodology, G.R. and P.J.; software, G.R. and P.J.; validation, G.R., P.J. and R.G.; formal analysis, G.R. and P.J.; investigation, G.R. and P.J.; resources, G.R. and P.J.; data curation, G.R. and P.J.; writing—original draft preparation, G.R. and P.J.; writing—review and editing, R.G. and P.Z.; visualisation, G.R., P.J. and R.G.; supervision, P.J.; project administration, R.G.; funding acquisition, P.Z. All authors have read and agreed to the published version of the manuscript.

Funding

This research received no external funding.

Data Availability Statement

The data presented in this study are available on request from the corresponding authors.

Conflicts of Interest

The authors declare no conflicts of interest.

References

  1. Jaszak, P.; Skrzypacz, J.; Borawski, A.; Grzejda, R. Methodology of leakage prediction in gasketed flange joints at pipeline deformations. Materials 2022, 15, 4354. [Google Scholar] [CrossRef] [PubMed]
  2. Brown, C.A. Axiomatic design applied to a practical example of the integrity of shaft surfaces for rotating lip seals. Procedia Eng. 2011, 19, 53–59. [Google Scholar] [CrossRef]
  3. Embury, P.; Armour, J. Influence of elastomer compound design on the performance of rotary shaft lip seals. Seal. Technol. 2004, 2004, 7–10. [Google Scholar] [CrossRef]
  4. Grün, J.; Feldmeth, S.; Bauer, F. Wear on radial lip seals: A numerical study of the influence on the sealing mechanism. Wear 2021, 476, 203674. [Google Scholar] [CrossRef]
  5. Cankar, M.; Koch, U. New radial shaft seals for turbo applications. MTZ Worldw. 2016, 77, 56–59. [Google Scholar] [CrossRef]
  6. Rogula, J. Crankshaft Lip Seals with Reduced Friction Resistance; SAE Technical Paper; 2022-01-1098; SAE: Warrendale, PA, USA, 2022. [Google Scholar]
  7. Gachot, C.; Rosenkranz, A.; Hsu, S.M.; Costa, H.L. A critical assessment of surface texturing for friction and wear improvement. Wear 2017, 372–373, 21–41. [Google Scholar] [CrossRef]
  8. Salant, R.F. Modelling rotary lip seals. Wear 1997, 207, 92–99. [Google Scholar] [CrossRef]
  9. Foko Foko, F.; Burkhart, C.; Thielen, S.; Sauer, B. Analysis of the sealing capability of radial shaft sealing rings using a semi-analytical contact model. Tribol. Online 2022, 17, 97–109. [Google Scholar] [CrossRef]
  10. Keller, D.; Jacobs, G.; Neumann, S. Development of a low-friction radial shaft seal: Using CFD simulations to optimise the microstructured sealing lip. Lubricants 2020, 8, 41. [Google Scholar] [CrossRef]
  11. Zhang, F.; Yang, J.; Shui, H.; Dong, C. Effect of roughness on sealing performance of oil seals with surface texture. Ind. Lubr. Tribol. 2020, 72, 525–532. [Google Scholar] [CrossRef]
  12. Zhang, F.; Zhang, Y. Research on sealing performance of oil seals with micro-dimple texture on lips. Ind. Lubr. Tribol. 2021, 73, 113–119. [Google Scholar] [CrossRef]
  13. El Gadari, M.; Fatu, A.; Hajjam, M. Shaft roughness effect on elasto-hydrodynamic lubrication of rotary lip seals: Experimentation and numerical simulation. Tribol. Int. 2015, 88, 218–227. [Google Scholar] [CrossRef]
  14. El Gadari, M.; Fatu, A.; Hajjam, M. Effect of grooved shaft on the rotary lip seal performance in transient condition: Elasto-hydrodynamic simulations. Tribol. Int. 2016, 93, 411–418. [Google Scholar] [CrossRef]
  15. Warren, K.H.; Stephens, L.S. Effect of shaft microcavity patterns for flow and friction control on radial lip seal performance—A feasibility study. Tribol. Trans. 2009, 52, 731–743. [Google Scholar] [CrossRef]
  16. Li, W.; Stephens, L.S.; Wenk, J.F. Experimental benchmarking of the numerical model of a radial lip seal with a surface textured shaft. Tribol. Trans. 2013, 56, 75–87. [Google Scholar] [CrossRef]
  17. Verheyde, B.; Rombouts, M.; Vanhulsel, A.; Havermans, D.; Meneve, J.; Wangenheim, M. Influence of surface treatment of elastomers on their frictional behaviour in sliding contact. Wear 2009, 266, 468–475. [Google Scholar] [CrossRef]
  18. Sekiguchi, S.; Suzuki, H.; Van Ryper, R.G.; Ritchey, D.J. Development of a new seal material to reduce energy losses in vehicle transmissions. Seal. Technol. 2009, 2009, 8–11. [Google Scholar] [CrossRef]
  19. Gong, R.; Liu, M.; Zhang, H.; Xu, Y. Experimental investigation on frictional behavior and sealing performance of different composites for seal application. Wear 2015, 342–343, 334–339. [Google Scholar] [CrossRef]
  20. Wang, L.; Zhang, L.; Tian, M. Effect of expanded graphite (EG) dispersion on the mechanical and tribological properties of nitrile rubber/EG composites. Wear 2012, 276–277, 85–93. [Google Scholar] [CrossRef]
  21. Degrange, J.-M.; Thomine, M.; Kapsa, P.; Pelletier, J.M.; Chazeau, L.; Vigier, G.; Dudragne, G.; Guerbé, L. Influence of viscoelasticity on the tribological behaviour of carbon black filled nitrile rubber (NBR) for lip seal application. Wear 2005, 259, 684–692. [Google Scholar] [CrossRef]
  22. Frölich, D.; Magyar, B.; Sauer, B. A comprehensive model of wear, friction and contact temperature in radial shaft seals. Wear 2014, 311, 71–80. [Google Scholar] [CrossRef]
  23. Foko Foko, F.; Heimes, J.; Magyar, B.; Sauer, B. Friction energy-based wear simulation for radial shaft sealing ring. Lubricants 2020, 8, 15. [Google Scholar] [CrossRef]
  24. Croft, S. Rotary shaft lip seals—A tale of two standards. Seal. Technol. 2004, 2004, 10–12. [Google Scholar] [CrossRef]
  25. Gawlinski, M. Local Contact Conditions and Friction Resistance of Elastomeric Lip Sealing Rings; Publishing Office of the Wroclaw University of Science and Technology: Wroclaw, Poland, 2004. (In Polish) [Google Scholar]
  26. PN-EN ISO 4288; Geometrical Product Specifications (GPS), Surface Texture: Profile Method, Rules and Procedures for the Assessment of Surface Texture. Polish Committee for Standardization: Warsaw, Poland, 2011.
  27. Gawlinski, M.; Romanik, G. Elastomer Lip Seal of Rotating Shaft, PAT.217180; Polish Patent Office: Warsaw, Poland, 2014. [Google Scholar]
  28. Jia, X.; Guo, F.; Huang, L.; Wang, L.; Gao, Z.; Wang, Y. Effects of the radial force on the static contact properties and sealing performance of a radial lip seal. Sci. China Technol. Sci. 2014, 57, 1175–1182. [Google Scholar] [CrossRef]
  29. Dąbrowska, K.Z.; Turek, A.; Grzejda, R.; Kobielarz, M. Mechanical properties of the porcine pericardium extracellular matrix cross-linked with glutaraldehyde and tannic acid. Acta Bioeng. Biomech. 2022, 24, 21–31. [Google Scholar] [CrossRef] [PubMed]
  30. Jia, X.; Jung, S.; Haas, W.; Salant, R.F. Numerical simulation and experimental study of shaft pumping by plunge ground shafts with rotary lip seals. Tribol. Int. 2012, 48, 155–161. [Google Scholar] [CrossRef]
  31. Tasora, A.; Prati, E.; Marin, T. A method for the characterization of static elastomeric lip seal deformation. Tribol. Int. 2013, 60, 119–126. [Google Scholar] [CrossRef]
  32. Huang, T.-C.; Lin, C.-Y.; Liao, K.-C. Sealing performance assessments of PTFE rotary lip seals based on the elasto-hydrodynamic analysis with the modified Archard wear model. Tribol. Int. 2022, 176, 107917. [Google Scholar] [CrossRef]
  33. Jaszak, P. Rationalization of the shape of the rubber diaphragm of shut-off valve. Elastomery 2018, 22, 122–135. [Google Scholar]
  34. Grzejda, R. Modelling nonlinear preloaded multi-bolted systems on the operational state. Eng. Trans. 2016, 64, 525–531. [Google Scholar]
  35. Peng, C.; Miao, J.; Bauer, N.; Schmitz, K. Investigation into the inter-lip characteristics of combined seals with double lips in different working conditions. Tribol. Int. 2023, 178, 108036. [Google Scholar] [CrossRef]
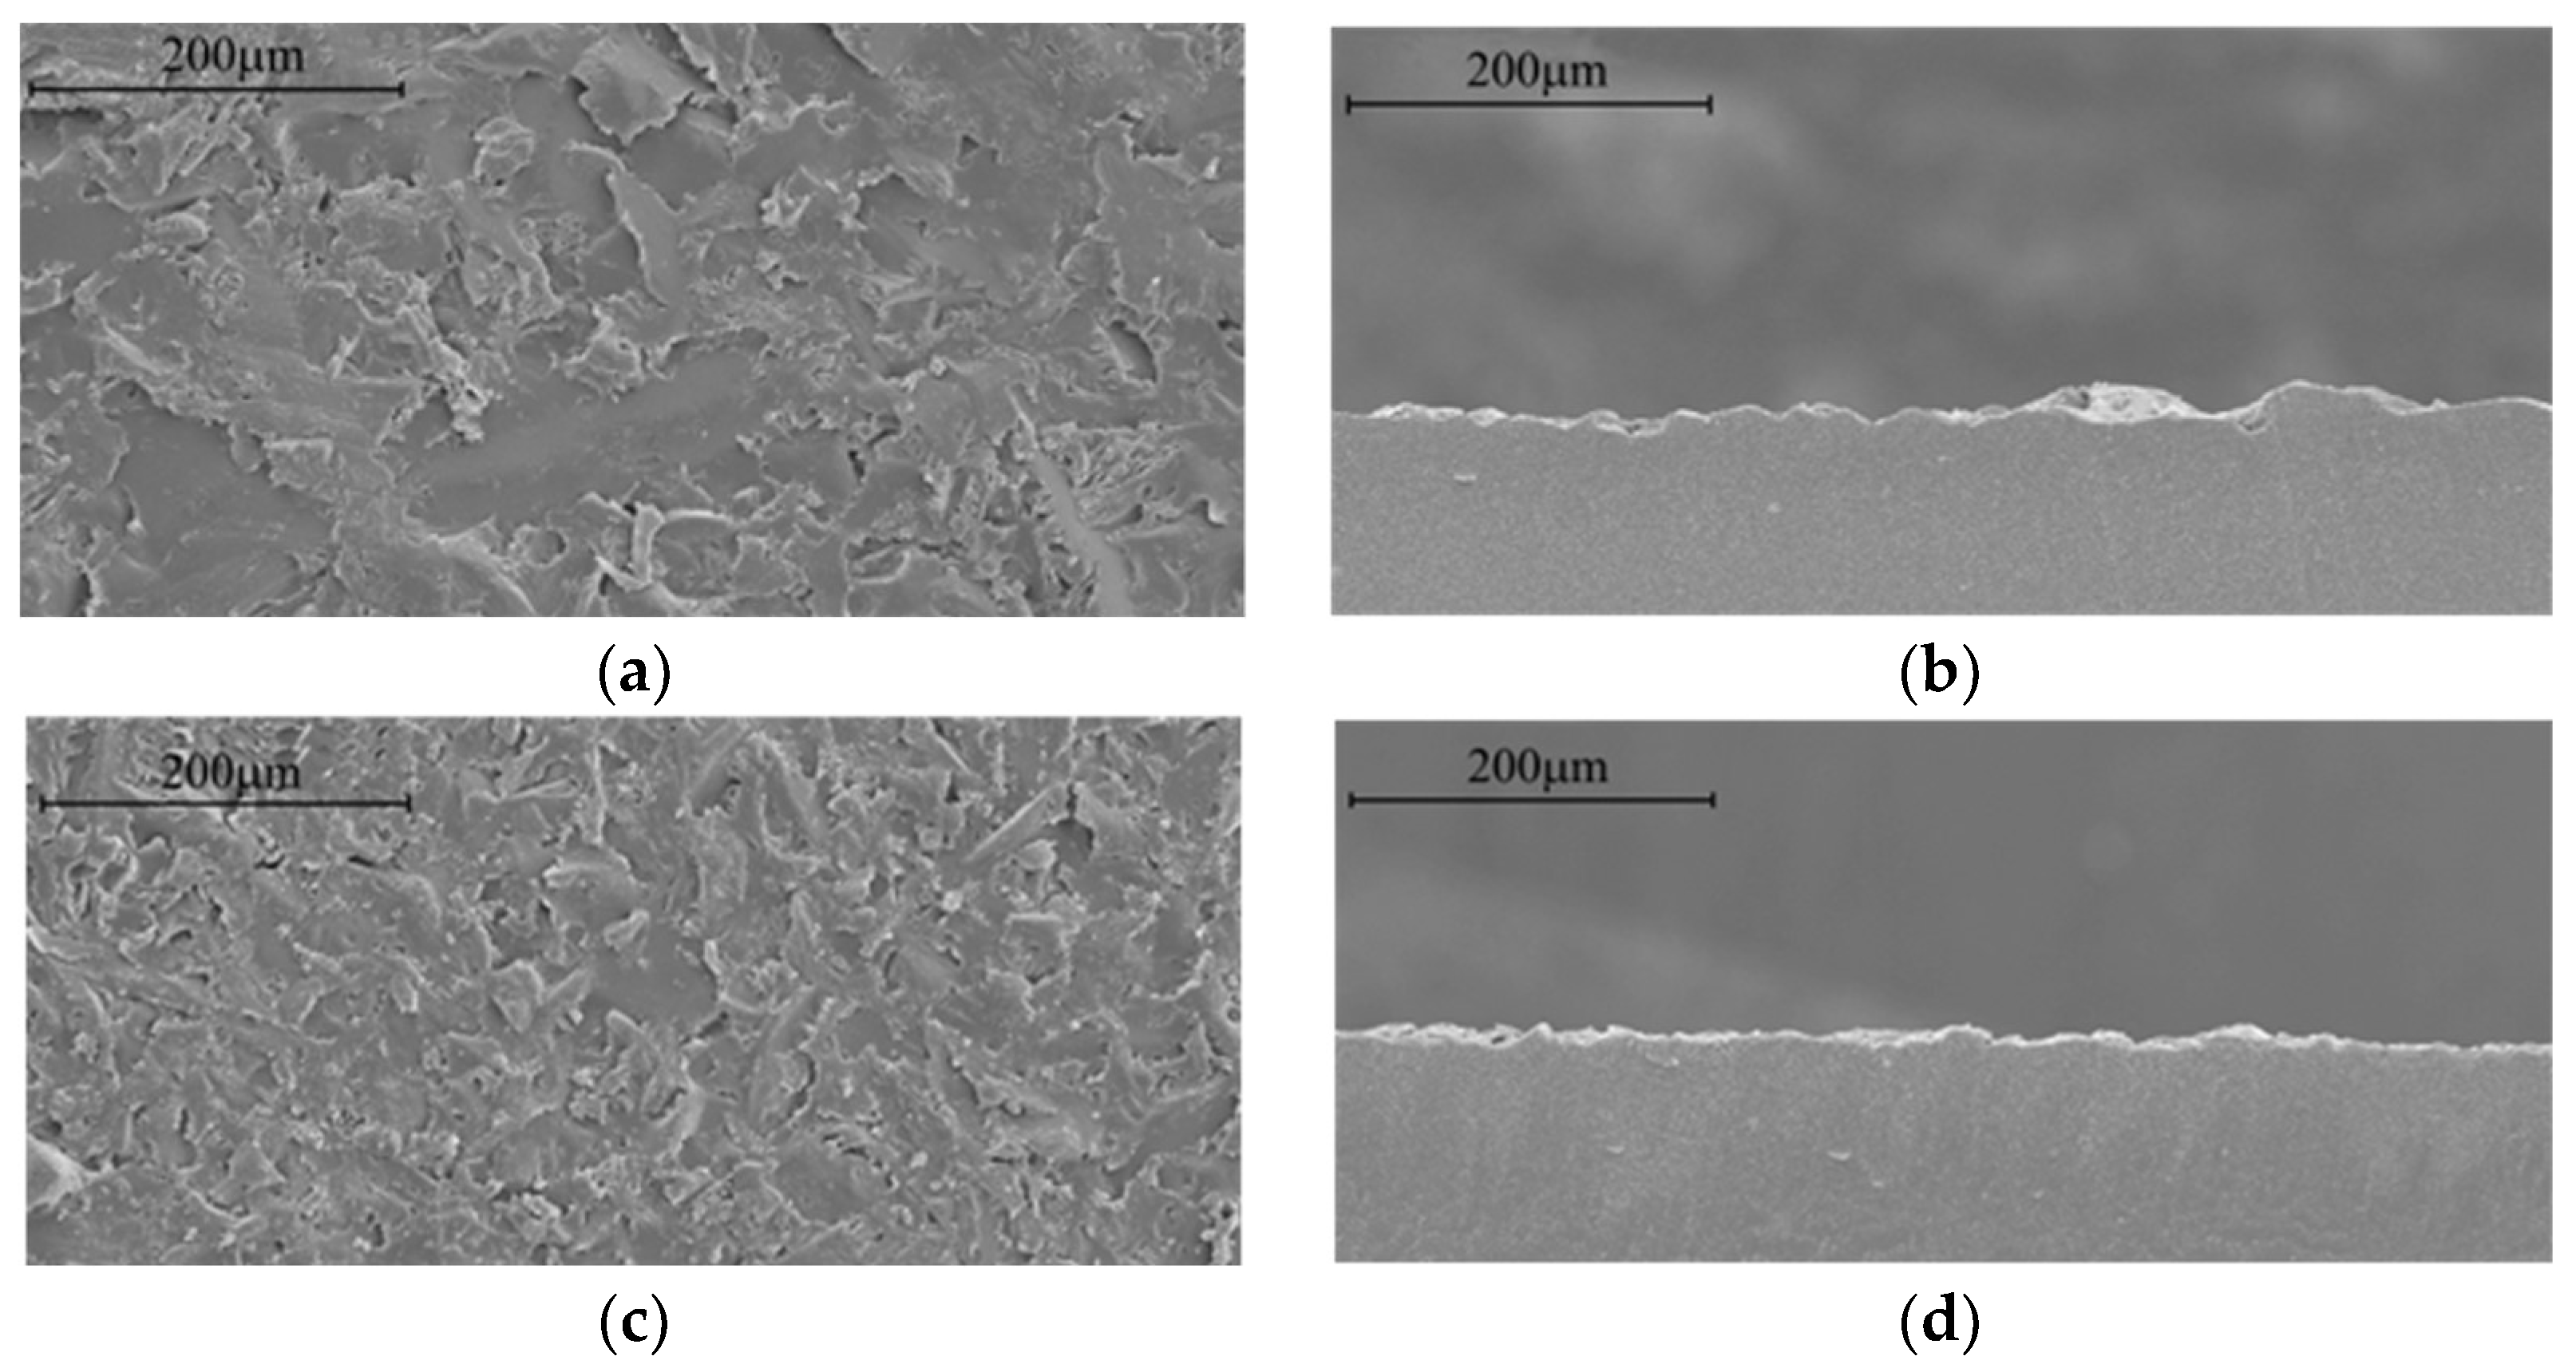
Figure 1. SEM images of rubber samples with different surface layer textures in top view on the left and in cross-section on the right: (a,b) sample 1B; (c,d) sample 2B.
Lubricants 12 00103 g001
Figure 2. SEM images of rubber samples with different surface layer textures in top view on the left and in cross-section on the right: (a,b) sample 1C; (c,d) sample 2C; (e,f) sample E.
Lubricants 12 00103 g002
Figure 3. Oil lip seals for testing: (a) overall view of the tested oil lip seal; (b) lip’s cross-section of the standard seal; (c) normal view of the standard lip seal; (d) lip’s cross-section of the prototype seal; (e) normal view of the prototype lip seal.
Lubricants 12 00103 g003
Figure 4. T-01M test stand for a flat rubber sample.
Lubricants 12 00103 g004
Figure 5. Test stand for sealing of rotating shafts.
Lubricants 12 00103 g005
Figure 6. Device for determining the clamping force of the seal lip on the shaft (1—dial gauge, 2—split shaft).
Lubricants 12 00103 g006
Figure 7. Measurement of lip-shaft contact width: (a) microscope; (b) enlargement of the contact area.
Lubricants 12 00103 g007
Figure 8. Computational mesh of the analysed model.
Lubricants 12 00103 g008
Figure 9. Description of the numerical model: (a) boundary conditions; (b) contact surfaces.
Lubricants 12 00103 g009
Figure 10. Actual contact surface of two rough components (Ac—nominal contact surface, Ai—actual contact surface).
Lubricants 12 00103 g010
Figure 11. Contact area between the shaft and sealing lip.
Lubricants 12 00103 g011
Figure 12. An example of a rubber surface profile and its characteristic dimensions.
Lubricants 12 00103 g012
Figure 13. Friction torque vs. time.
Lubricants 12 00103 g013
Figure 14. Results of numerical calculations: (a) distribution of contact pressure between the lip seal and the shaft under operating conditions along the path from point 1 to point 2; (b) contact width between the lip seal and the shaft.
Lubricants 12 00103 g014
Figure 15. Roughness profile of the tested flat rubber samples and the specified porosity level.
Lubricants 12 00103 g015
Figure 16. Correlation of the friction coefficient and the shaft speed for: (a) prototype sample; (b) standard sample.
Lubricants 12 00103 g016
Table 1. Surface roughness parameters of rubber samples.
SampleRa, µmRz, µmRt, µm
ValueSD 1ValueSD 1ValueSD 1
1B3.590.01722.880.06934.310.030
2B2.090.02113.230.08217.130.027
1C8.000.06542.090.26065.100.105
2C4.450.02725.800.10931.960.091
E2.920.02117.430.08526.100.064
1 Labels: SD—standard deviation of surface roughness parameters of rubber samples.
Table 2. Surface roughness parameters of the tested sealing ring.
Ring VersionRa, µmRz, µmRt, µm
ValueSD 1ValueSD 1ValueSD 1
Standard0.520.0272.750.1064.200.032
Prototype1.970.0269.020.10422.890.034
1 Labels: SD—standard deviation of surface roughness parameters of rubber samples.
Table 3. Experimental values of the friction coefficient.
v, m/sDry ConditionsLubricated Conditions
Sample
1B2B1C2CESR1B2B1C2CESR
00.1650.1920.1500.1570.1720.2720.1500.1510.1170.1380.1400.204
0.310.5980.6380.5570.5610.6040.6710.1100.1370.0890.1040.1190.178
0.630.5770.6330.5500.5340.5980.7070.1020.1210.0870.0960.1140.159
1.260.5830.5910.5480.5400.5820.6790.0990.1150.0830.0990.1180.149
1.790.5920.6180.5360.5180.6090.7170.1140.1300.0840.0970.1230.173
Table 4. Standard deviations of experimental values of the friction coefficient.
v, m/sDry ConditionsLubricated Conditions
Sample
1B2B1C2CESR1B2B1C2CESR
00.0100.0090.0090.0070.0040.0080.0100.0110.0060.0080.0070.009
0.310.0080.0080.0070.0060.0090.0060.0090.0060.0080.0090.0090.008
0.630.0070.0100.0090.0040.0080.0070.0080.0050.0070.0060.0040.009
1.260.0030.0050.0080.0090.0100.0090.0050.0050.0030.0090.0080.007
1.790.0090.0080.0060.0080.0090.0070.0070.0080.0050.0070.0030.003
Table 5. Characteristic features of the standard and prototype sealing rings before and after the test (measured at 20 °C).
Ring
Version
Before the TestAfter the Test
Wl, mmFc, NWr, gWl, mmFc, NWr, g
Standard0.10936.6156.1320.15033.2555.876
Prototype0.08934.6555.8480.10731.5555.624
Table 6. Standard deviations of the characteristic features of the standard and prototype sealing rings before and after the test.
Ring
Version
Before the TestAfter the Test
Wl, mmFc, NWr, gWl, mmFc, NWr, g
Standard0.0090.9480.2190.0070.8800.199
Prototype0.0030.7800.3220.0110.6150.223
Table 7. Final calculation results of the friction torque.
Ring Versionεμv, m/sds, mmb, mmp, MPaMF, Nm
Standard0.0720.26911700.181.350.467
Prototype0.2050.20311700.181.350.302
Disclaimer/Publisher’s Note: The statements, opinions and data contained in all publications are solely those of the individual author(s) and contributor(s) and not of MDPI and/or the editor(s). MDPI and/or the editor(s) disclaim responsibility for any injury to people or property resulting from any ideas, methods, instructions or products referred to in the content.