Article

Investigation on Tooth Surface Wear of Cycloid Drives Considering Tooth Profile Modifications

1
School of Mechanical and Electrical Engineering, Soochow University, Suzhou 215137, China
2
School of Rail Transportation, Soochow University, Suzhou 215137, China
*
Authors to whom correspondence should be addressed.
Lubricants 2023, 11(8), 323; https://doi.org/10.3390/lubricants11080323
Submission received: 30 June 2023 / Revised: 19 July 2023 / Accepted: 24 July 2023 / Published: 30 July 2023
(This article belongs to the Special Issue Advances in Gear Tribology)

Abstract

:
Cycloid drives are widely used in various mechanical systems due to their high reduction ratio, compact size, and high efficiency. Tooth surface wear is a major problem that affects the reliability and durability of cycloid drives. However, compared to the research on the wear of involute gears, the prediction of tooth surface wear in cycloid drives is relatively limited and less extensive. To fill this gap, the theoretical wear model of the tooth surface of cycloid-pin gear pairs is proposed based on the Hertz contact theory and Archard’s formula, with consideration of tooth profile modifications. Firstly, the loaded tooth contact analysis model is established to determine the relative sliding velocity and tooth contact stress. Secondly, the calculation steps of single tooth surface wear are presented within one gear mesh cycle. With this, the effects of the tooth profile modifications, the operating conditions such as output torque, input speed, and the assembly eccentricity on the wear depth within one gear mesh cycle are investigated. This study gives a deeper understanding of the tooth surface wear mechanisms of cycloid drives and could be employed to assist gear design and to improve the wear resistance.

1. Introduction

Cycloid drives are widely applied in mechanical systems, including industrial robots, automotive systems, lifting and transportation, construction machinery and aerospace engineering, among other different mechanical engineering fields. The cycloid drive has outstanding features such as compact size, high transmission efficiency, smooth operation, and a wide range of transmission ratios. During the long-term, high-speed operation of cycloid gearboxes, wear damage has become the main cause of the working failure. As shown in Figure 1, After a long period of gear meshing, fatigue wear has occurred on the tooth surfaces of a cycloid-pin gear pair in RV reducer. As the gear wear progresses, the material on the tooth surface is gradually removed and the tooth surface morphology and load distribution on each mating tooth pair are gradually changed. Excessive tooth surface wear reduces the accuracy and efficiency of the gear system, and exacerbates the vibration and noise, which induces and accelerates the occurrence of other forms of failure. Therefore, it is necessary to conduct an in-depth study of tooth surface wear behavior, elucidate its mechanism of action, and investigate the implication of gear design parameters and operating factors on the amount of tooth wear. This will offer a theoretical basis for reducing gear wear and extending working life.
Research on the wear of many types of gears has increased over time and provided a deeper understanding of wear due to the widespread use of gears in various mechanical systems. The literature on the topic includes experimental studies of wear behavior and theoretical models to predict the wear coefficient based on contact stress and sliding distance. Research specifically focused on the wear of cycloid drives, however, is still in its early stages. Although there have been some studies on the topic, the number of publications is relatively small, and the understanding of the wear mechanisms and contributing factors is still limited. Nevertheless, there has been recent progress in this area, and a growing number of researchers are paying attention to the problem of tooth surface wear in cycloid drives.
Extensive studies have been conducted in academia on the issue of gear wear. Wu et al. [1,2] treated the meshing of spur gears as a contact problem involving a pair of equivalent cylinders with time-varying radii, and analyzed the tooth wear under constant load in conjunction with a proposed sliding wear model. Flodin et al. [3] calculated the relative sliding distances and contact stresses between tooth surfaces of involute gears based on a simplified Winkler model, and established a tooth wear prediction model for spur gears in combination with the Archard wear equation to numerically simulate the amount of wear in the tooth profile direction. Using a similar approach, Flodin et al. [4,5] again extended the wear model to helical gear drives and developed a tooth wear pattern of helical gears. Park et al. [6] combined a finite element-based contact model with the Archard formula to calculate the relative sliding distance and the contact stress on the contact zone as a way to analyze the wear of hypoid gears. Park. et al. [7,8] introduced another semi-analytical method into an initial tooth wear model and presented a faster approach to quantify the surface wear of hypoid gears. Yuksel et al. [9] calculated the contact stresses in a quasi-static planetary gear set, and the Archard formula was used to determine the tooth wear. Imrek et al. [10] studied the transient stress variation in a single meshing region along the gear profile of a spur gear with modified tooth shape, then compared the tooth surface wear of the gear with and without modified shape. Sun et al. [11] established a wear pattern for small-modulus gears, taking into account the effects of mounting errors and position tolerances on contact stresses and gear tooth wear. In this work, the dynamic wear during the transmission of small-modulus gears was numerically simulated and analyzed with a miniature planetary gear reducer as the research object. Zhao et al. [12] combined the Archard and the Reynolds equations to develop a double-arc harmonic gear wear model under elastic hybrid lubrication (EHL). The wear characteristics under lubrication conditions are numerically simulated and analyzed. Onishchenko et al. [13] presented the results of theoretical and experimental studies of spur gear tooth wear in heavy machinery. Based on Blok’s concept, a tooth wear model considering the instantaneous contact temperature was developed, and numerical simulations and analyses were performed. Chernets et al. [14] presented tooth surface wear calculations for Archimedes and involute worm gears after tooth profile corrections. The effect of gear tooth profile correction on tooth wear is described. Kahraman et al. [15] combined a finite element-based tooth contact model with the Archard equation to calculate the tooth wear distribution of helical gears. In this work, the effect of tooth profile misalignment (tooth profile shape modification or manufacturing errors) on gear tooth wear was also verified. Bajpai et al. [16] also combined a finite element-based gear contact model with the Archard equation to calculate the wear distribution of spur gears and helical gears. The change in gear contact stress during gear wear was also illustrated. Li et al. [17] proposed an improved prediction model for tooth surface wear of involute gears. The Archard wear model was combined with an improved fractal method to analyze the tooth contact characteristics and their changes with surface wear accumulation. They then compared the predicted results of gear surface wear to experimental results to validate the model. After this, Li et al. [18] also calculated gear tooth wear based on fractal theory and the Archard wear equation, and explored the impact of tooth wear on the dynamic response of the gear bearing system. Research has shown that the wear gap calculated using this wear model can better exhibit the effect of wear on system response. Zheng et al. [19] investigated the wear of gears produced with improved cutting tools and verified it through numerical calculations. They found that appropriate tool modifications can improve the wear resistance of the produced gears. Zhang et al. [20] combined the Langkali Nikraves contact model with the Archard formula to calculate the wear of RV reducers.
Thus, tooth surface wear of many gear systems has been extensively studied in academia, and the related exploration of gear wear problems is well established. However, little research has been conducted on the tooth wear of cycloid gearboxes. Therefore, based on the summary of the previous work, this paper investigates the wear condition of cycloid gearboxes. Firstly, the geometric parameters of the cycloid gear teeth are obtained, including the tooth surface in standard and modfied conditions. Then, the wear calculations of gear teeth are discussed, including loaded tooth contact analysis, and the contact stress, relative sliding velocity, and wear depth calculations. Finally, numerical simulations were performed to analyze the variation of tooth wear of the cycloid drive under different design parameters and different operating conditions. This study delivers a theoretical foundation for reducing tooth wear and improving tooth life during the operation of the cycloid gearbox.

2. Loaded Tooth Contact Analysis

2.1. Tooth Contact Analysis

Tooth contact analysis (TCA) is a method used as a pre-processing step of Loaded tooth contact analysis (LTCA) to analyze the contact conditions and contact point positions during gear meshing. Figure 2 shows two dynamic coordinate systems and a static coordinate system. S f ( x f , y f ) is a fixed coordinate system, which is fixed to the frame, and O f is the origin of the coordinates. S 1 ( x 1 , y 1 ) and S 2 ( x 2 , y 2 ) are movable coordinate systems that are firmly attached to the cycloid and pinwheel, respectively, with origins, O 1 and O 2 . O 1 and O f are coincident, and the distance between O 1 and O 2 is the eccentric distance, e . The radius of the roller is represented by r r p , and the radius of roller position is represented by r p . The rotation angles of the needle wheel and the cycloid wheel are ϕ 2 and ϕ 1 , respectively. The angular parameter at contact point M is θ .
In order to compensate for manufacturing and mounting errors and to ensure adequate lubrication, the tooth profile of the cycloid gear needs to be modified. Cycloid gear tooth profile modification methods can be roughly categorized as corner, equidistant, shift distance, or combined modification methods. Using the individual or combined trimming method, the tooth profile of the cycloid gear is modified by altering the two tooth shape parameters r p and r r p in tooth shape equation.
According to Reference [21], the position vector of the pin tooth profile in the coordinate system S 1 is defined as:
r 1 ( θ 1 i ) = r p cos ( i ψ r ) + r r p cos ( θ 1 i ) r p sin ( i ψ r ) r r p sin ( θ 1 i ) 0 1
n 1 ( θ r i ) = r 1 ( θ 1 i ) θ 1 i × K r 1 ( θ 1 i ) θ 1 i × K ,
where i represents the numbering of roller; θ 1 i represents the angular parameter of the contact point on the roller profile; and K represents the unit vector in the Z-axis direction.
The position vector, r 2 ( θ 2 i ) , and its unit normal vector, n 2 ( θ 2 i ) , of the cycloid gear with tooth profile modifications can be written in S 2 as:
r 2 ( θ 2 i ) = ( r p + Δ r p ) cos ( θ 2 i ) ( r r p + Δ r r p ) cos ( θ m θ 2 i ) e cos ( n 1 θ 2 i ) ( r p + Δ r p ) sin ( θ 2 i ) + ( r r p + Δ r r p ) sin ( θ m θ 2 i ) e sin ( n 1 θ 2 i ) 0 1
n 2 ( θ 2 i ) = r 2 ( θ 2 i ) θ 2 i × K r 2 ( θ 2 i ) θ 2 i × K ,
where θ c i represents the angular parameter of contact point on the cycloid tooth profile.
Afterwards, transforming to the fixed coordinate system S f :
r f 1 ( θ 1 i , φ i n ) = M f 1 ( φ i n ) r 1 ( θ 1 i ) n f 1 ( θ 1 i , φ i n ) = M f 1 ( φ i n ) n 1 ( θ 1 i )
r f 2 ( θ 2 i , φ 2 i ) = M f 2 ( φ 2 i ) r 2 ( θ 2 i ) n f 2 ( θ 2 i , φ 2 i ) = M f 2 ( φ 2 i ) n 2 ( θ 2 i ) ,
the coordinate transformation matrix is represented in the following:
M f 1 ( φ i n ) = cos φ i n sin φ i n 0 sin φ i n cos φ i n 0 0 0 1
M f 2 ( φ 2 i ) = cos φ 2 i sin φ 2 i 0 sin φ 2 i cos φ 2 i e 0 0 1 .
When performing the unloaded TCA, the geometric coordination condition for the cycloidal gear and pin contact is that the position vector and the unit normal are equal at any instant, thus:
r f 1 ( θ 1 i , φ i n ) = r f 2 ( θ 2 i , φ 2 i ) n f 1 ( θ 1 i , φ i n ) = n f 2 ( θ 2 i , φ 2 i ) .
The above vector equation yields three independent nonlinear equations consisting of four unknowns ( θ 1 i , φ i n , θ 2 i , φ 2 i ) . It is possible to make n f ( 1 ) = n f ( 2 ) = 1 . Given a specific input crank shaft angle φ i n , it is then possible to obtain the remaining three unknowns ( θ 1 i , θ 2 i , φ 2 i ) by means of a nonlinear system of equations. Several initial values will affect the results of this system of equations. Therefore, first of all, accurate initial parameters need to be obtained. As shown in Figure 2, the initial parameters are determined based on the geometric and dynamic relationships of the cycloid drive as the initial values for the iteration of Equation (9):
θ 1 i 0 = t a n o 0 o 1 ¯ sin ( π i ψ r ) P o 1 ¯ sin φ i n o 0 o 1 ¯ cos ( π i ψ r ) + P o 1 ¯ cos φ i n = tan ( r p + Δ r p ) sin ( π i ψ r ) e n 1 sin φ i n ( r p + Δ r p ) cos ( π i ψ r ) + e n 1 cos φ i n θ 2 i 0 = π tan o 0 o 1 ¯ sin ( π i ψ r ) M o 0 ¯ sin θ 1 i 0 o 2 o 1 ¯ sin φ i n o 0 o 1 ¯ cos ( π i ψ r ) M o 0 ¯ cos θ 1 i 0 + o 2 o 1 ¯ cos φ i n + φ 2 i 0 = π tan ( r p + Δ r p ) sin ( π i ψ r ) ( r r p + Δ r r p ) sin θ 1 i 0 e sin φ i n ( r p + Δ r p ) cos ( π i ψ r ) ( r r p + Δ r r p ) cos θ 1 i 0 + e cos φ i n + φ 2 i 0 φ 2 i 0 = φ i n n 2
By performing calculations using the initial values described above, the parameters θ 1 i , θ 2 i and φ 2 i can be solved. In a meshing cycle, each instantaneous φ i n corresponds uniquely to one set of meshing parameters ( θ 1 i , θ 2 i , φ 2 i ) . Then, the backlash, φ b , between the cycloid tooth and its mating pin, and the rotational angle, φ 2 , of the cycloid gear corresponding to different input crankshaft angles can be represented as:
φ b = φ 2 φ 2 i ,
and
φ 2 = max ( φ 2 i ) .

2.2. Relative Sliding Velocity

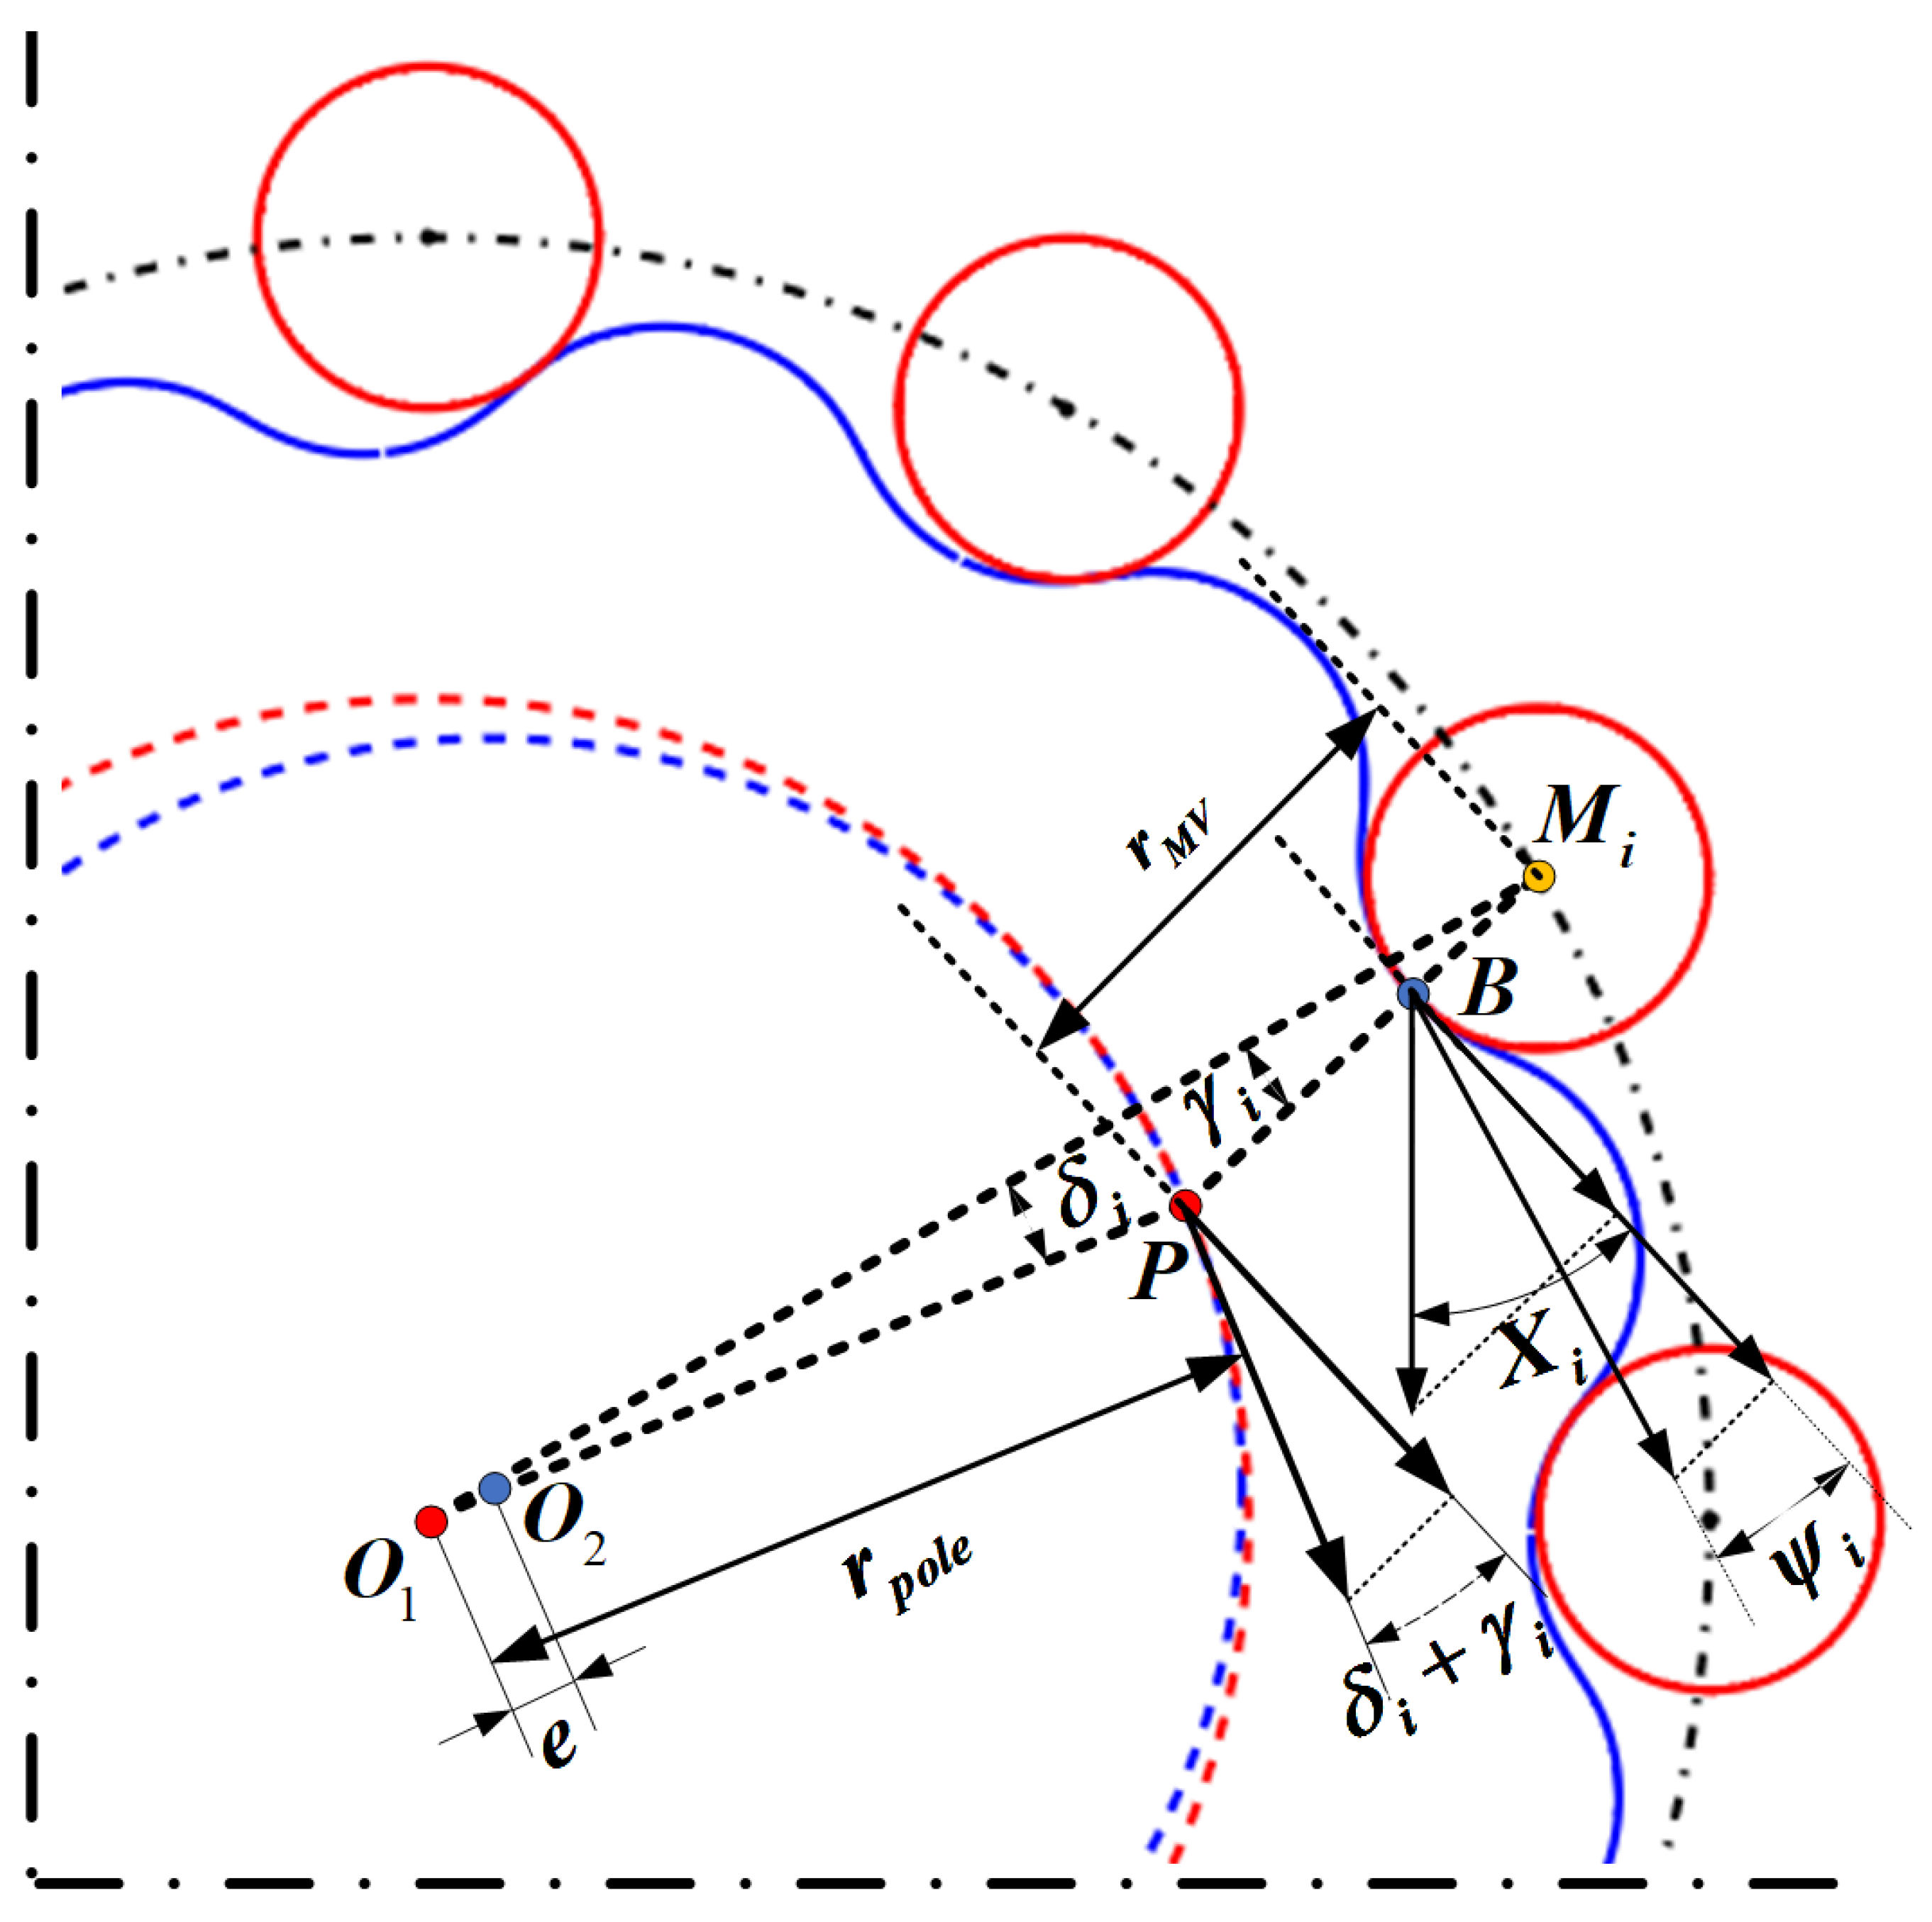
In the analysis of cycloidal pinwheel planetary transmission, the relative sliding velocity of the contact point is also an important factor in calculating tooth surface wear. It is necessary to construct a model of the relative sliding velocity by kinematically analyzing the contact between the teeth of the cycloid and the roller. As shown in Figure 3, at the contact point B , the velocity on the cycloidal gear, v 1 , and the velocity on the roller teeth, v 2 , are located on the common tangent line of that point. The velocity v 1 is the projection of the combined velocity of the translation velocity of the cycloidal disk and its rotational velocity around the pole P . The velocity v 2 is the rotational speed of pole, P , around the center, M i , of the needle roller. The relative sliding velocity v t at contact point B can be obtained by adding or subtracting velocities v 1 and v 2 . The expressions for the three speeds are as follows:
v 1 = ω i n cos δ i + γ i e + ω o u t r i cos ψ i + ω i n cos δ i + γ i r p o l e r r p r M W ,
v 2 = ω i n cos δ i + γ i r p o l e r r p r M W ,
and
v t = ω i n e cos δ i + γ i + ω o u t r i cos ψ i .

2.3. Tooth Contact Stress

According to Reference [22], the static equilibrium equations of the force and moment can be expressed as:
T = F c i l i F c i = K n i δ c i δ c i = α i l i ,
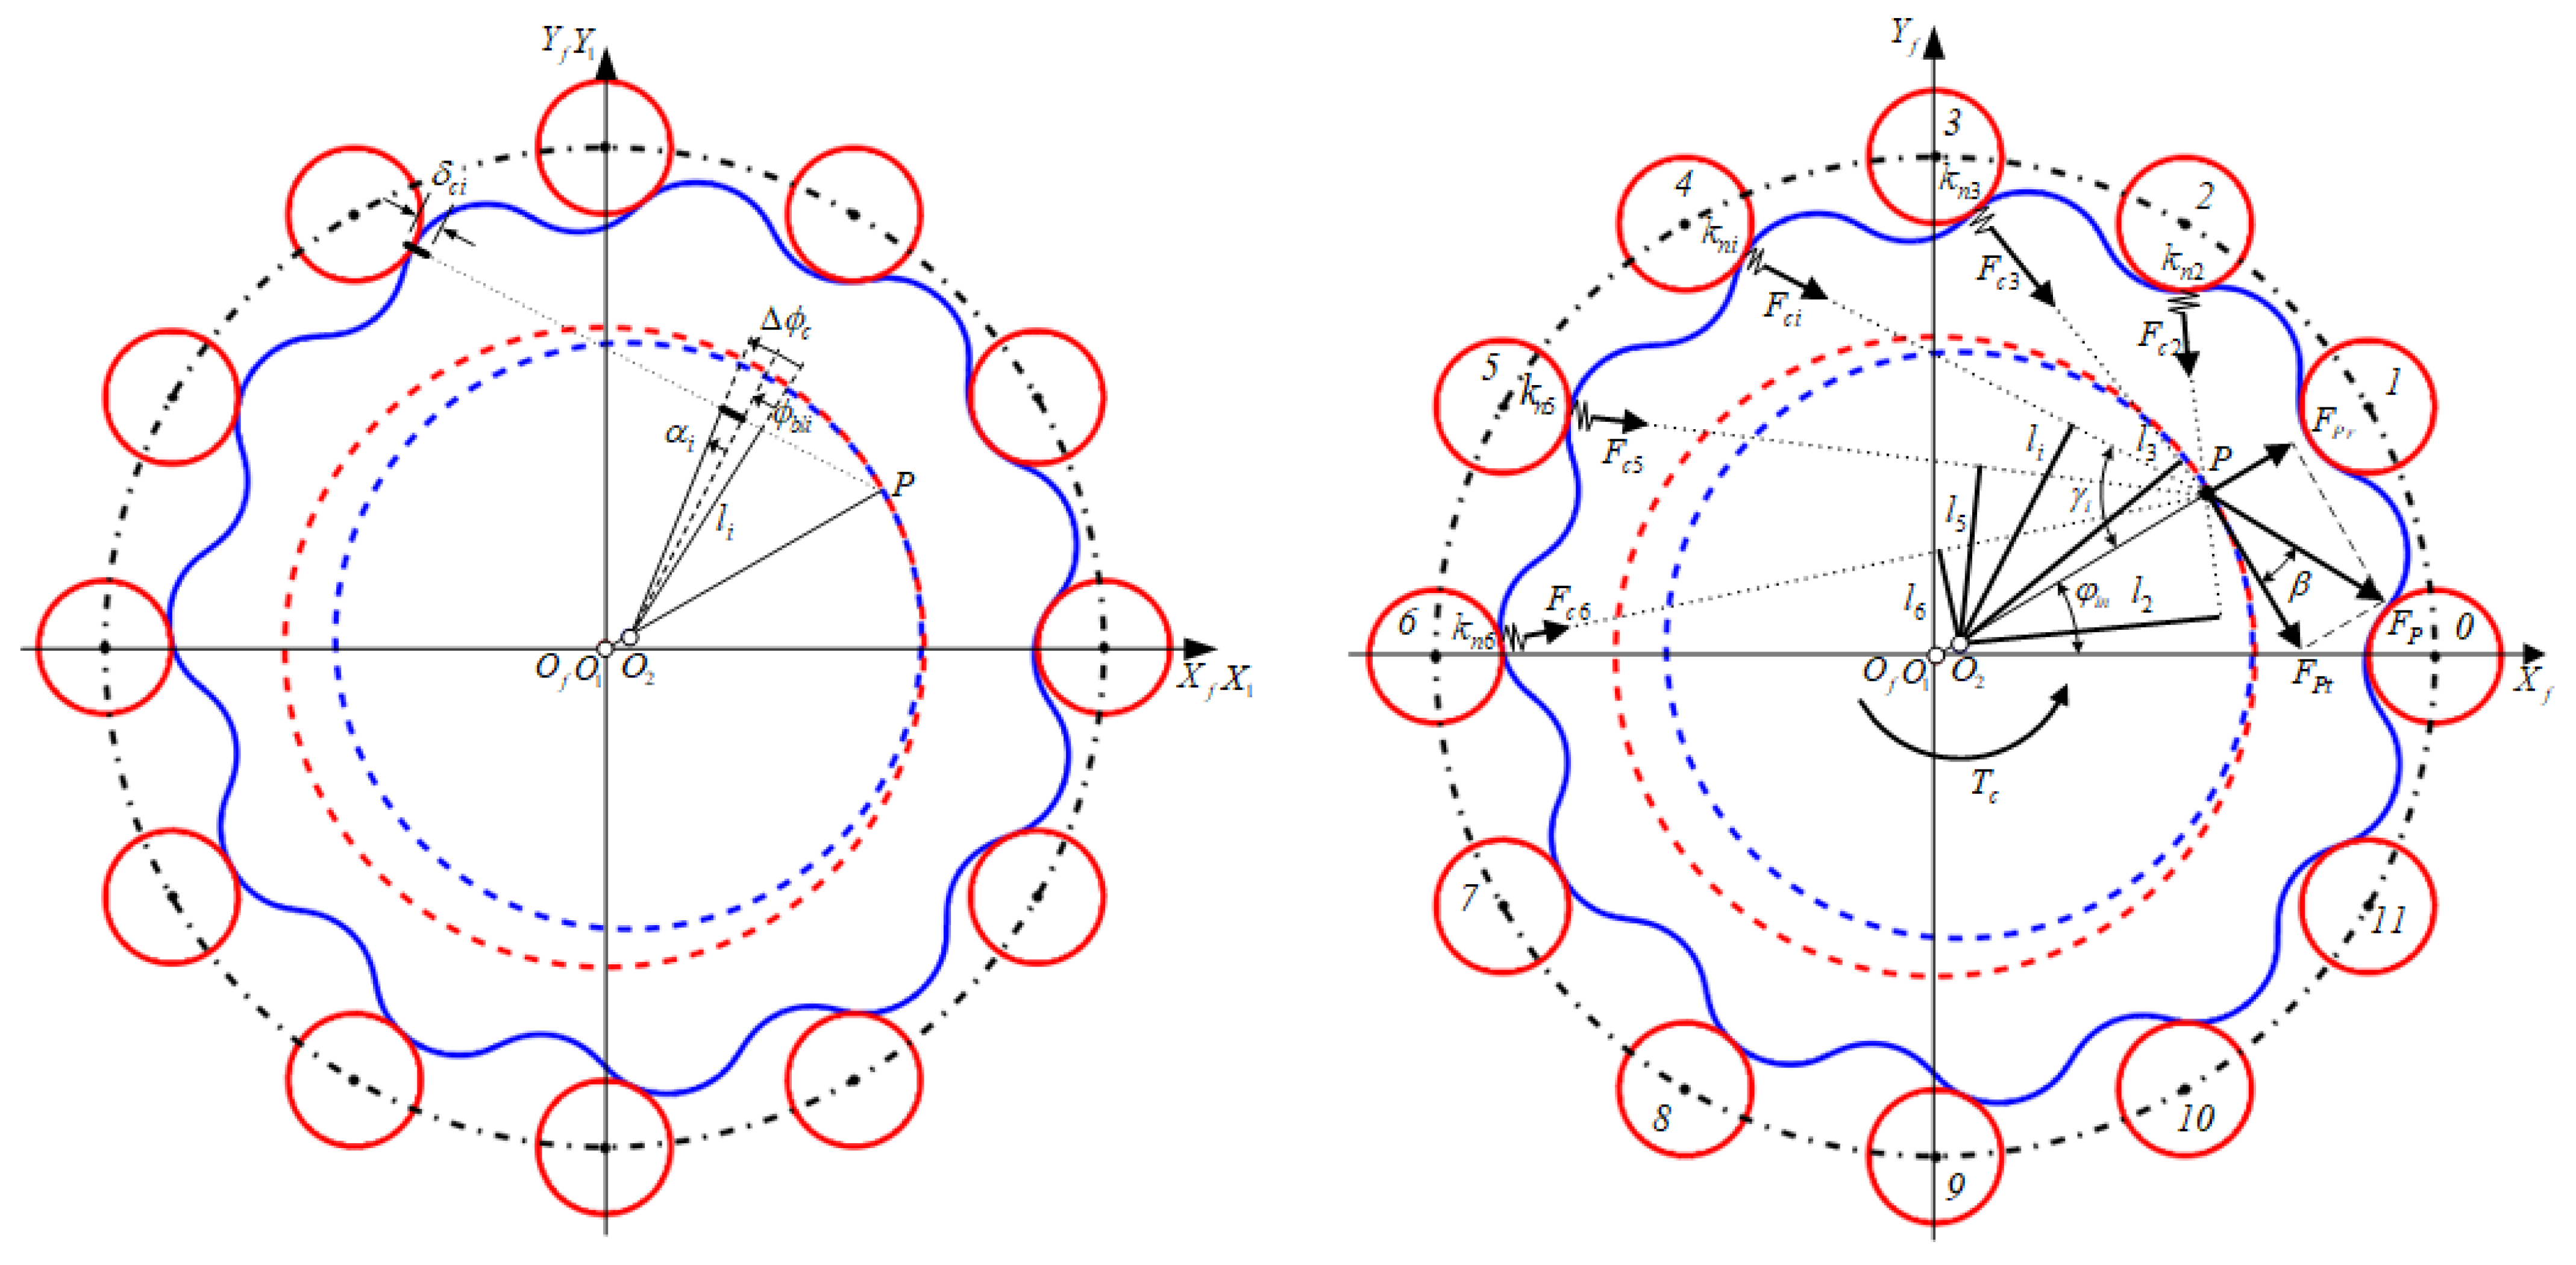
where K n i is the mesh stiffness between the tooth and roller, which is used to establish the force-displacement relationships. Here, α i is the angular displacement and l i is the arm of force. As shown in Figure 4, the compatibility conditions can be expressed as:
in   contact :   out   of   contact :   Δ ϕ c > ϕ b l i , α i = Δ ϕ c ϕ b l i Δ ϕ c < ϕ b l i , α i = 0 ,
where Δ ϕ c is the rotational angle variation, and α i is the angular displacement. Then, the forces acting on each pair of teeth can be determined for the following contact stress calculation.
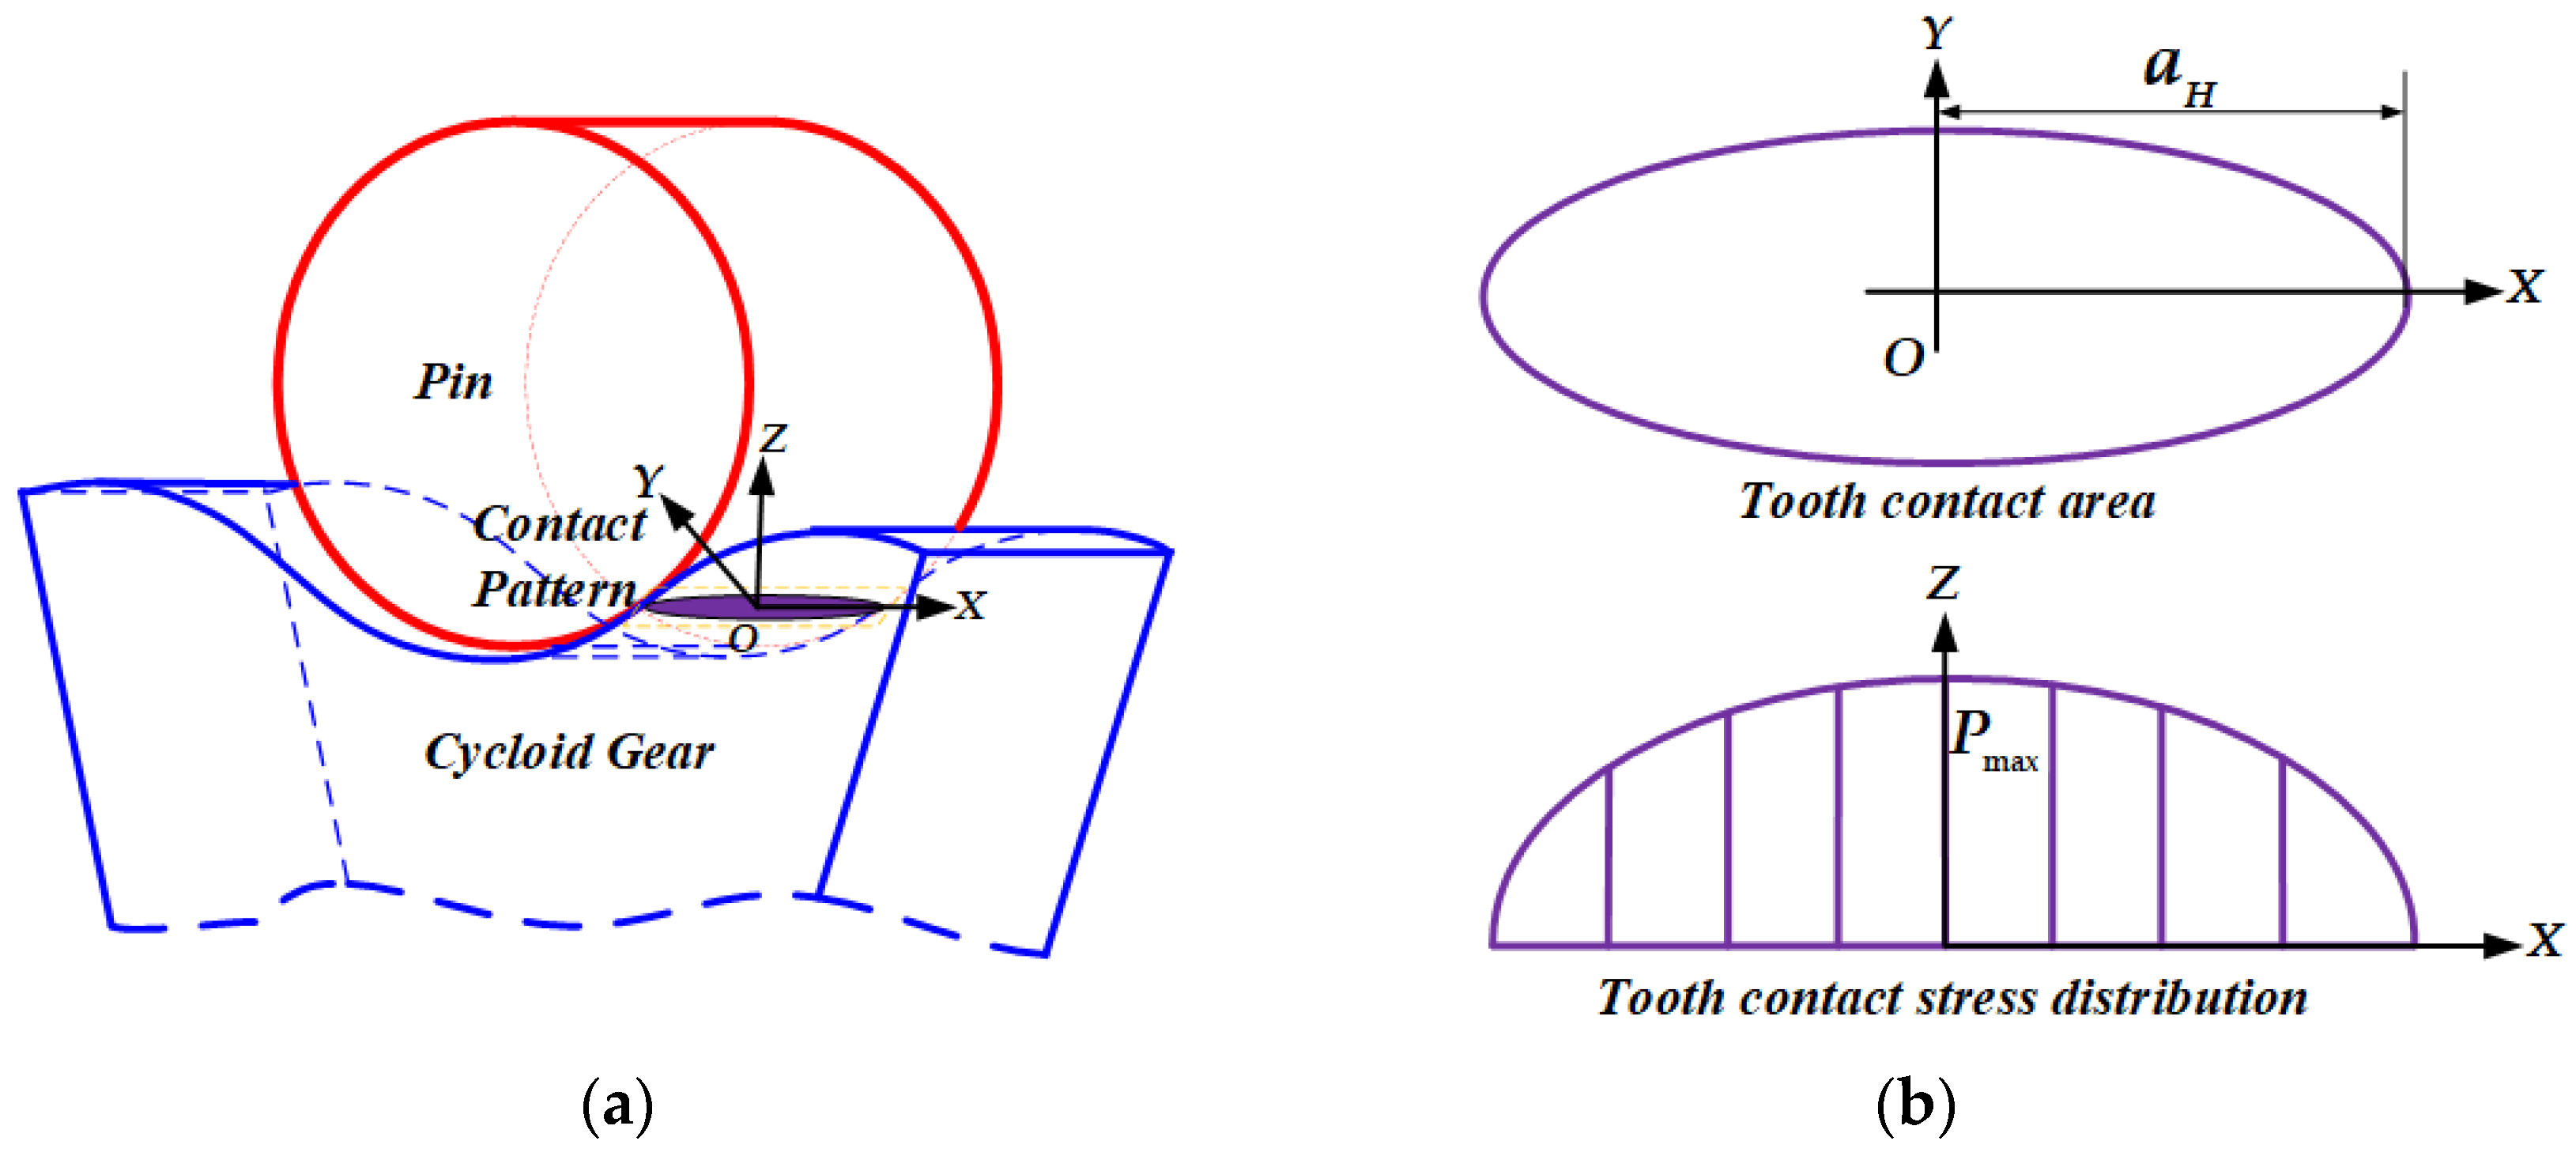
The contact surface undergoes local elastic deformation because of the normal meshing force, forming an approximately rectangular contact area. In the Figure 5, a H is the half contact width:
a H = 4 F c i R π B 1 μ 1 2 E 1 + 1 μ 2 2 E 2 ,
where F c i denotes the normal contact force, R denotes the comprehensive radius of curvature, B denotes the width of the cycloid, μ 1 , and μ 2 denotes Poisson’s ratios. E 1 and E 2 denote the modulus of elasticity of the cycloidal gear and needle tooth, respectively.
According to the Hertz contact theory, the tooth contact stress is elliptically distributed and the maximum value is generated at the center. The contact stress at the contact point on the tooth surface is expressed as:
p ( x ) = 2 F c i π B a H 2 a H 2 x 2 1 / 2 .
The time period from meshing to complete disengagement of the gear teeth is defined as a wear cycle. Obviously, the corresponding tooth contact stress at each meshing position varies during a wear cycle. As shown in Figure 6, by discretizing the meshed tooth surface into I and J equal parts along the tooth profile and tooth width directions, the point on the meshed tooth surface can be approximated by a grid node, i j i = 0 I , j = 0 J . In order to obtain the accurate stress distribution, it is necessary to refine the mesh for the gear teeth contact area. The refined contact grid is divided into 2 N η = N N and 2 M ξ = M M segments along the tooth profile and tooth width, respectively, and the refined contact zone grid will then move with the gear rotation on the fixed tooth surface grid, i j .
Obviously, the stress at the moving grid nodes, η ξ , can be characterized by the average stress of the contact mesh cells obtained from the contact analysis when the cell mesh is sufficiently finely divided. If the mesh node i j is located in any of the contact mesh cells, η ξ , the stress at node ij is taken to be the stress at the node η ξ . Conversely, if the fixed mesh node i j is not in any of the contact grid cells, the stress is taken to be zero. Finally, the average stress of node during a wear cycle is obtained by averaging the stress of node i j at each engagement position.

3. Wear Calculation of Tooth Surface

3.1. Wear Calculation Steps

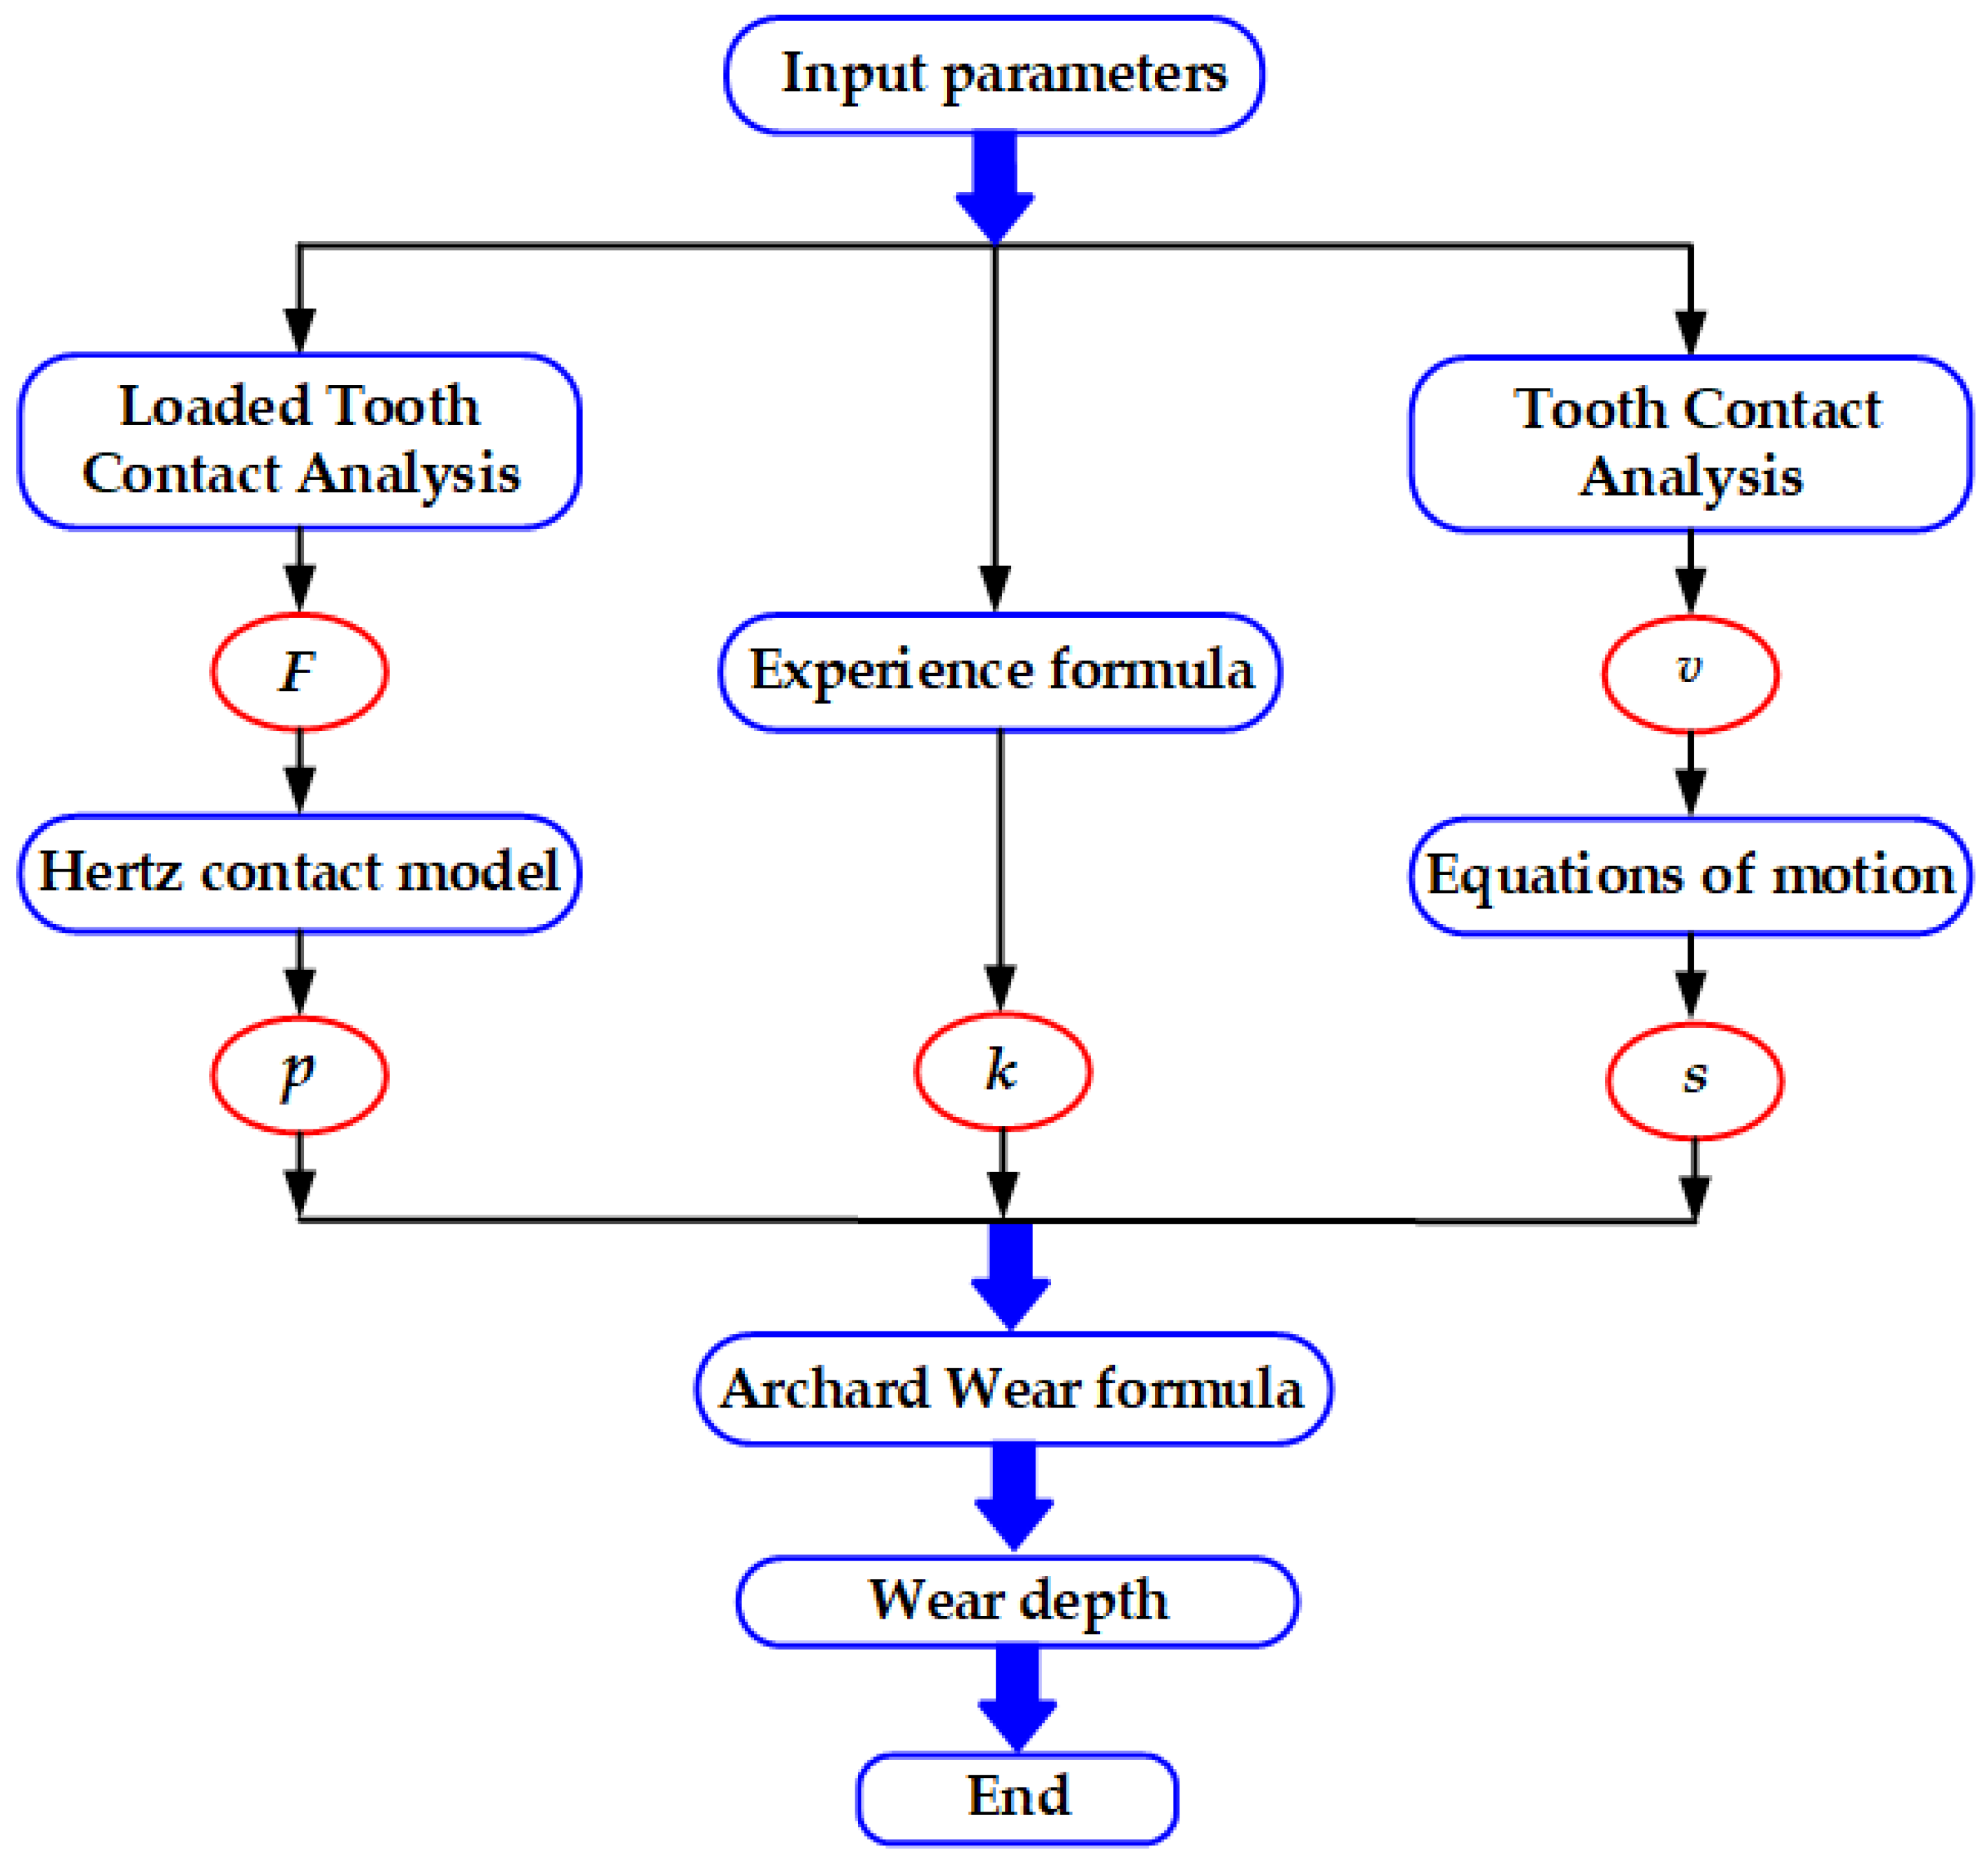
Since gear wear is a dynamic process of material removal, the calculation can only be done numerically. Figure 7 shows the calculation process of tooth wear. Firstly, k , p , and s are calculated separately from the original parameters and imported into the Archard wear equation to calculate the integral of the wear depth at the contact point. Since the time period of a single point in the contact area is less than the tooth meshing period, the average stress of the single point can be used to calculate the wear depth, h , accumulated in one tooth wear cycle. This avoids the need to repeat the integration of the wear depth at several discrete locations within a single wear cycle, thus, greatly increasing the speed and accuracy of the solution.

3.2. Relative Sliding Distance

The relative sliding distance refers to the distance between the contact point on the cycloid gear and the corresponding point on the meshing roller teeth when the cycloid wheel rotates through a certain angle. This can be obtained by integrating the relative sliding velocity between the two corresponding points on the meshing tooth surface over time. The relative sliding distance on the teeth of the cycloid is calculated by:
s = t 1 t 2 v ( t ) d t ,
where v ( t ) is the relative sliding velocity between two points, t 1 and t 2 , which are the moments when the nodes on the fixed tooth grid of the cycloid enter and exit the contact area, respectively.

3.3. Wear Coefficient for the Contact Tooth Surface

Janakiraman et al. [23] conducted a statistical analysis of the factors affecting the wear coefficient, and obtained the wear coefficient calculation equation:
k = 3.981 × 10 29 E L 1.219 G 7.377 S 1.589 ,
where, L , G , S , and E denote the dimensionless load, the lubricant pressure-viscosity coefficient, the dimensionless composite roughness and the equivalent elastic modulus, respectively. Each of the above parameters can be determined from the equations:
L = W E R G = α E S = R α 1 2 + R α 2 2 R ,
where W is load per unit length, R is the integrated radius of curvature, α is the stress-viscosity factor ( α is a temperature-dependent constant that is not affected by stress), and R α 1 and R α 2 are the roughness of the two gear surfaces, respectively.
All the factors affect the wear coefficient k , where the influence of G is the greatest and the influence of L is the least. When the gear is in the stable wear stage, the temperature between its working tooth surfaces tends to a constant value, so the stress-viscosity coefficient, α , can be determined according to the temperature in the wear calculation process.

3.4. Wear Depth Calculation

According to the Archard wear formula, holding the material hardness of the contact tooth surfaces constant, the amount of single point wear can be obtained from the following equation:
d h ds = k p ,
where, h is the depth of wear, p is the contact stress, and k is the wear coefficient.
Further, writing the Equation (23) mentioned earlier into integral form:
h = 0 s k p d s .
Several parameters related to the wear depth have been previously arrived at, such as wear coefficient, tooth contact stress, and relative sliding distance. By substituting these parameters into Equation (24), numerical calculations can be performed on the depth of tooth wear. Subsequently, the distribution of wear is analyzed and discussed.

4. Wear Analysis and Discussion

In this paper, the tooth contact stress, relative sliding velocity, and tooth wear depth are calculated using the proposed model for an example of a cycloid-pin gear pair with the design parameters shown in Table 1 and Table 2. On this basis, the effects of different operating parameters and tooth surface modification on tooth surface wear are further analyzed.

4.1. Tooth Contact Stress and Relative Sliding Speed

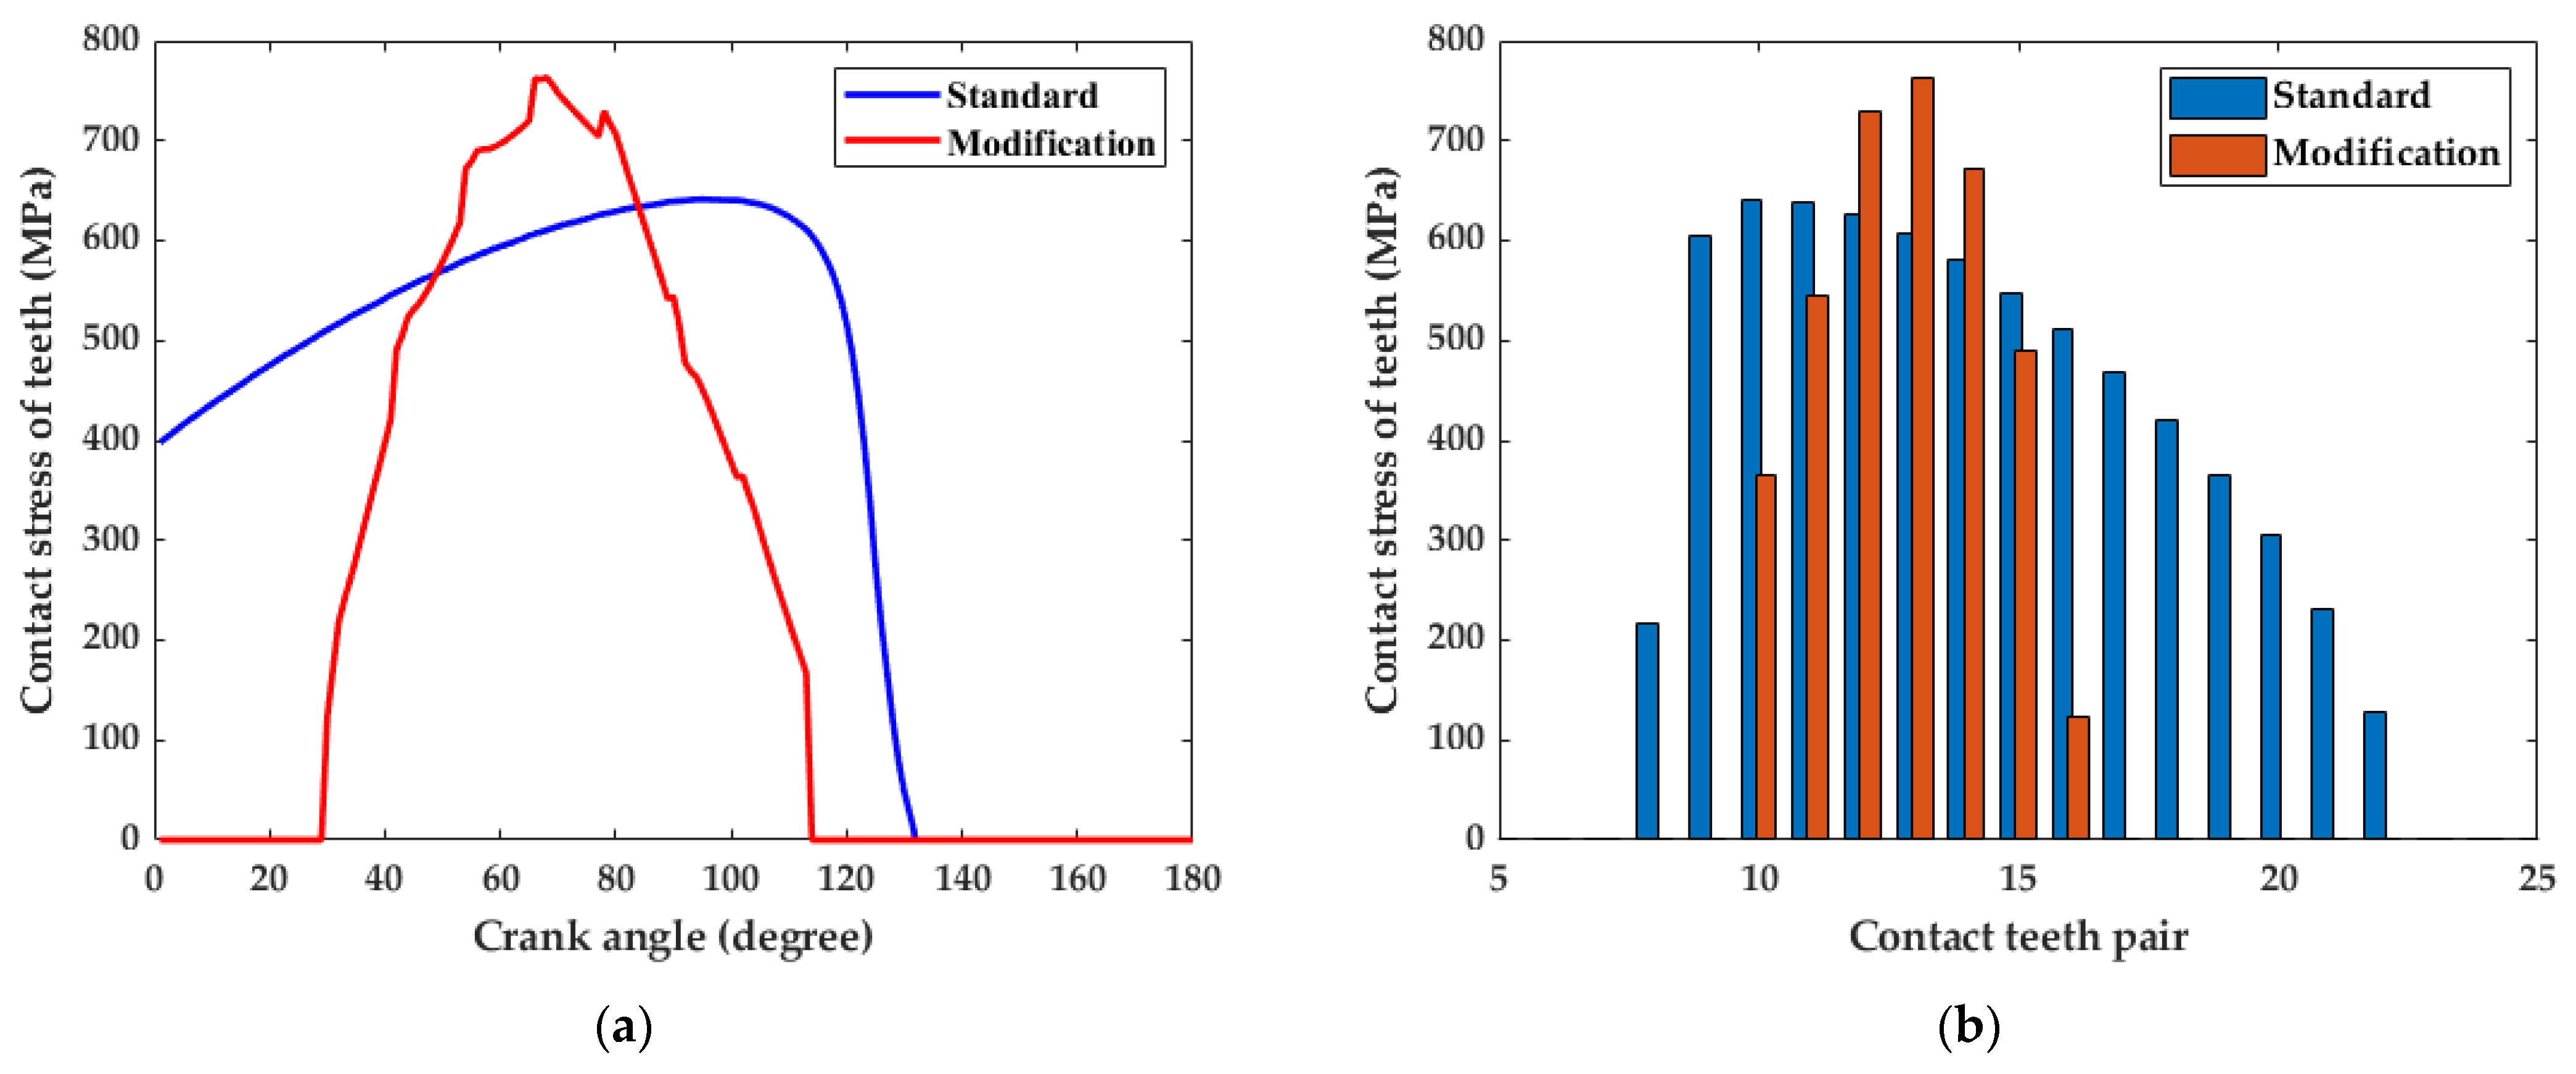
Before analyzing the tooth wear, the tooth contact stress and relative sliding velocity are first calculated. Figure 8a illustrates a comparison of the tooth contact stress of the 11th tooth pair in the standard condition and the modified condition, when the crankshaft is rotated at different angles. Figure 8b illustrates the contact stress of each tooth pair when the crankshaft is rotated at 90° in the standard condition and the modified condition.
By comparing the contact stress distribution of the cycloid-pin gear pair in the standard state to the tooth profile after modification, it can be found that the tooth contact stress of the cycloid wheel is more concentrated after the tooth profile modification. At the same time, the maximum contact stress increases slightly. After tooth profile modification, the angle range of the corresponding crankshaft, where tooth contact stress exists on the contacting teeth during crankshaft rotation is reduced from 0 ° to 131 ° for the standard tooth profile and from 30 ° to 131 ° for the reshaped tooth profile. The maximum contact stress of the modified tooth profile increases to 763.36 MPa compared to the standard tooth profile of 641.30 MPa. At the same time greater tooth contact stresss are distributed over fewer contact tooth pairs. The contact stresses for the standard tooth profile are distributed in tooth pairs 8 to 22, for which, the maximum contact stress of 639.72 MPa is in pair 10. After tooth profile modification, the contact stresses exist in pairs 10 to 16, and the maximum contact stress, 762.20 MPa, is in pair 13. This reflects the fact that, after tooth modification, the clearance between the cycloid meshing tooth pairs is reduced, while fewer teeth are involved in the meshing. The stress distribution diagram is consistent with the theoretical situation.
Afterwards, according to the cycloid parameters provided in Table 1, the relative sliding velocity is calculated under different tooth profile conditions, as shown in Figure 9.
By comparing the relative sliding velocities at the contact points of the cycloid in the standard condition and the modified tooth profile condition, the 11th pair of teeth on the standard tooth profile of the cycloidal transmission produces relative sliding when the crankshaft rotates from 0°to 131°. The 11th pair of teeth of the modified cycloidal needle wheel produces relative sliding when the crankshaft angle is 30° to 115°. From Figure 9b, the number of tooth pairs that generate the relative sliding are reduced from 8 to 22 pairs in the standard tooth profile and 10 to 16 pairs in the modified tooth profile after the modification. This means that, due to the tooth profile modification, each pair of teeth takes less time to engage, is released from the engagement zone earlier, and fewer teeth are engaged at the same time. This pattern is consistent with the theoretical situation after tooth profile modification. Meanwhile, combining the relative sliding velocity distribution and tooth contact stress distribution laws under the standard and modified tooth shapes of cycloid pinwheels, the two correspond to each other and coexist.

4.2. Effect of the Tooth Profile Modification

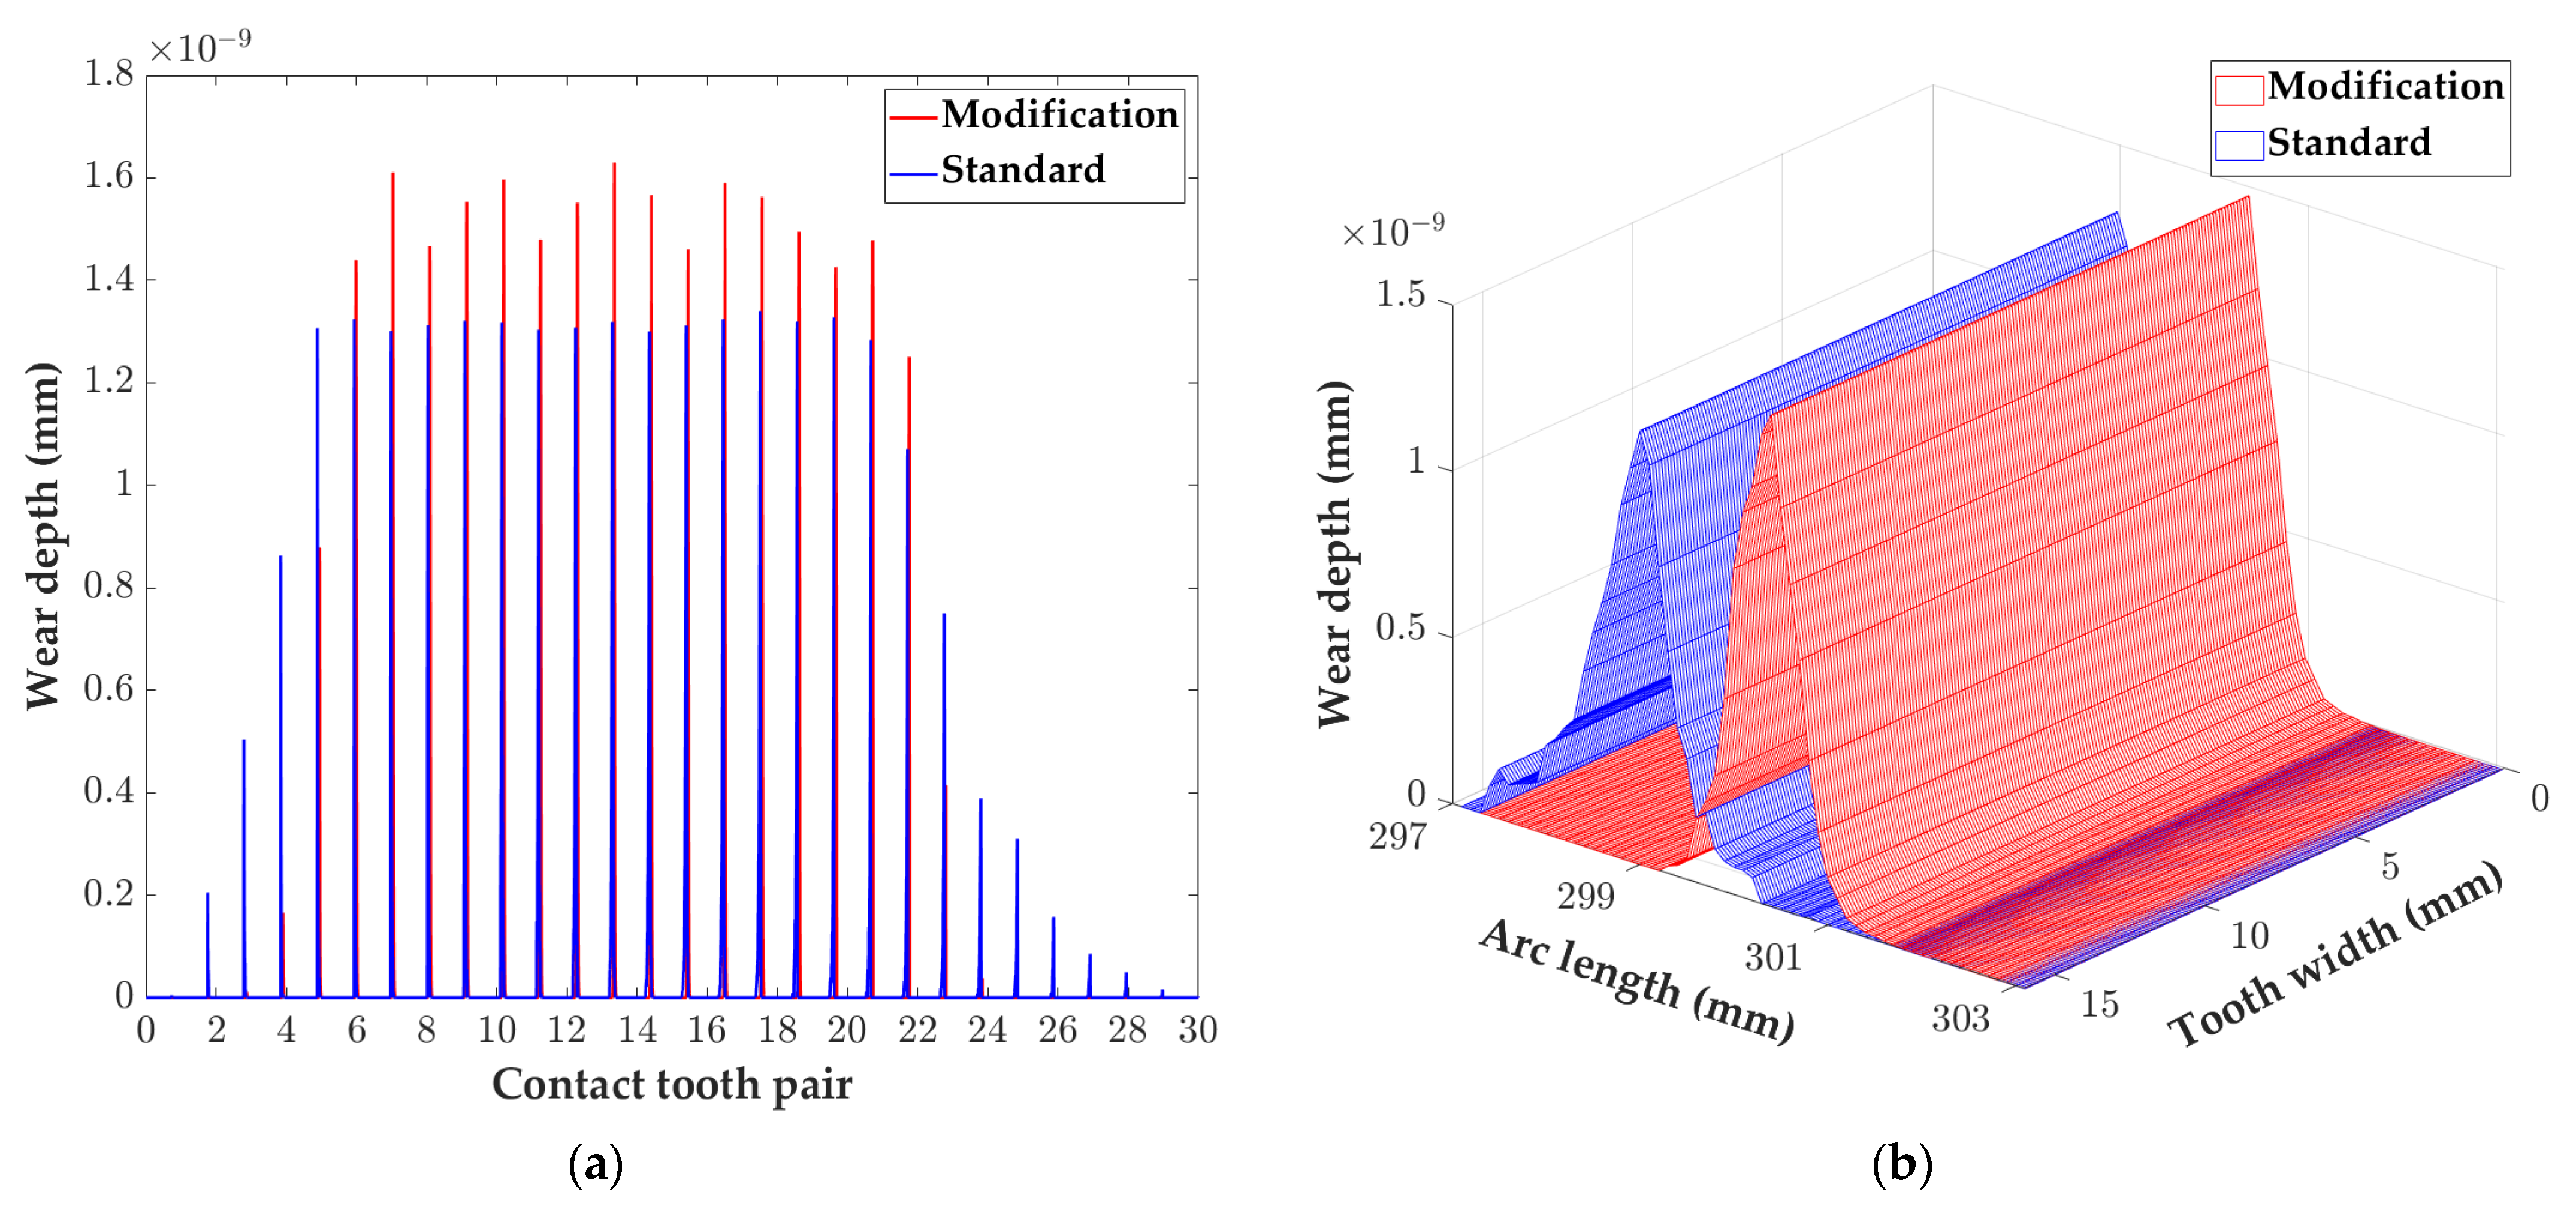
It is necessary to explore the impact of tooth profile modifications on the wear of cycloid gearboxes. In the case of a certain output torque and input speed (T = 400 Nm and ϖ = 1500 r/min, respectively), with a given amount of modification, Δ r p = 0.008 and Δ r r p = 0.016 , after the crankshaft is rotated over 180°, the tooth wear depth in the two cases of the standard and the trimmed tooth shapes are simulated and calculated to make a comparison graph. The wear distribution of the cycloid teeth for both standard and reshaped tooth profiles after 180 ° of crankshaft rotation is shown in Figure 10.
As seen in Figure 10, the tooth profile modification results in a more concentrated wear distribution and an increase in the maximum wear depth. After tooth profile modification, the tooth pairs with tooth surface wear were concentrated in tooth pairs 4~23, where the tooth surface wear depth on tooth pairs 6~22 was significantly greater than the wear depth under the standard tooth profile. The wear in individual teeth is also lower compared to that under the standard tooth profile. Using the 11th pair of teeth of the cycloid wheel as an example, the maximum wear depth increases from 1.30 × 10 9 mm under the standard tooth profile to 1.48 × 10 9 mm after tooth profile modification. In addition, on the tooth pairs where tooth wear is more concentrated, the wear depth under the modified tooth profile is also significantly greater than that under the standard tooth shape.
After tooth profile modification, fewer tooth pairs are meshed together, so the tooth contact stress increases and is concentrated. It can be concluded that the wear depth of the tooth is positively correlated with the contact stress. From the distribution law of the tooth contact stress above, it can be obtained that the wear distribution is more similar to the stress distribution. Therefore, after tooth profile modification, the maximum wear on the tooth increases and the wear distribution becomes more concentrated.

4.3. Effect of the Load Torque

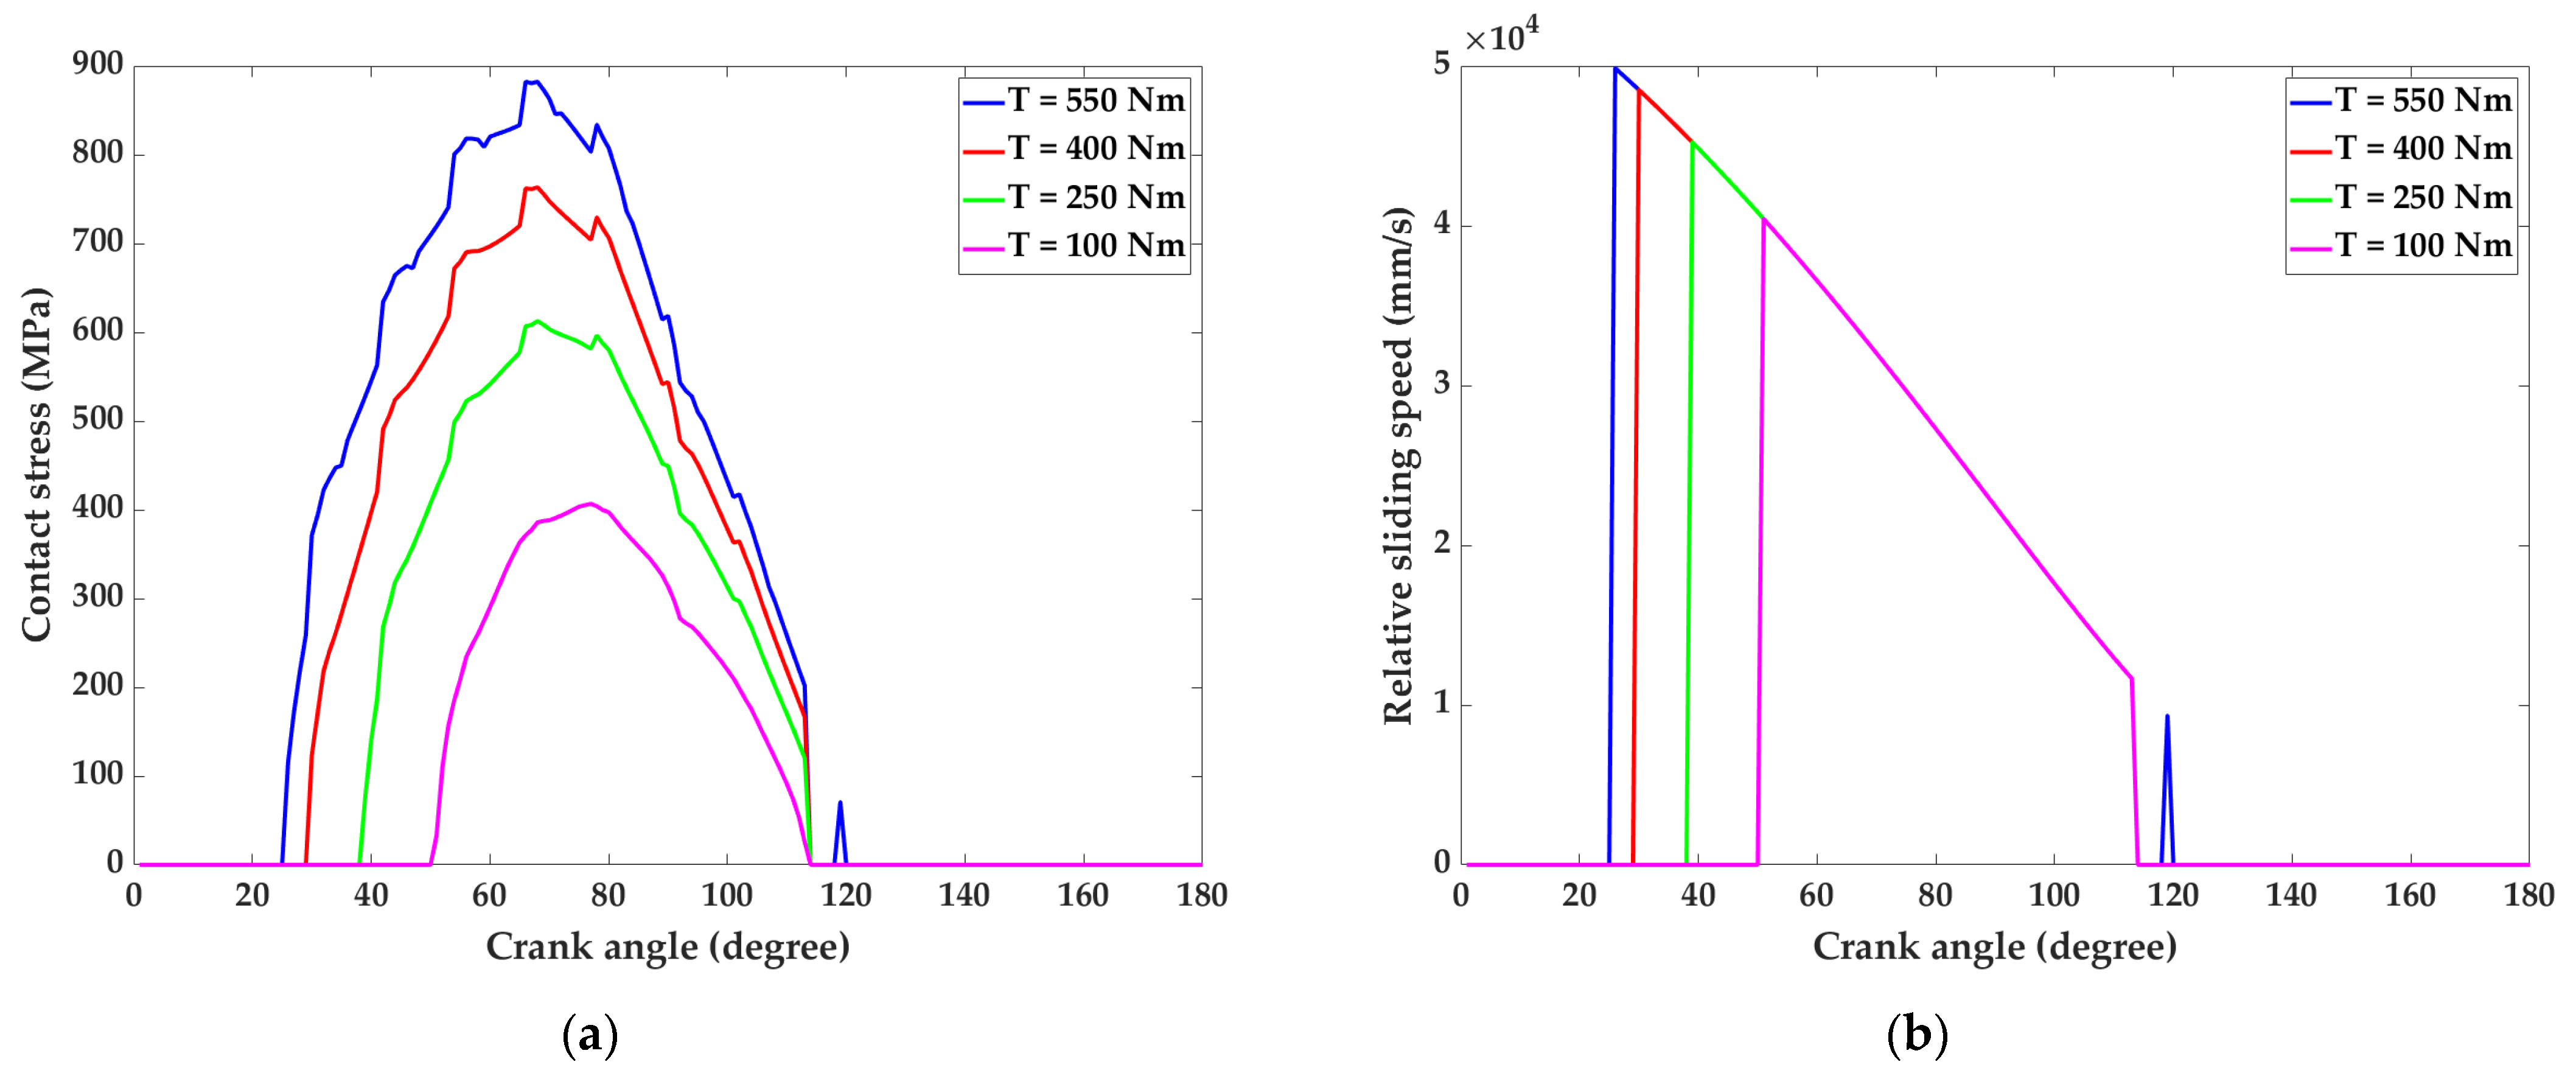
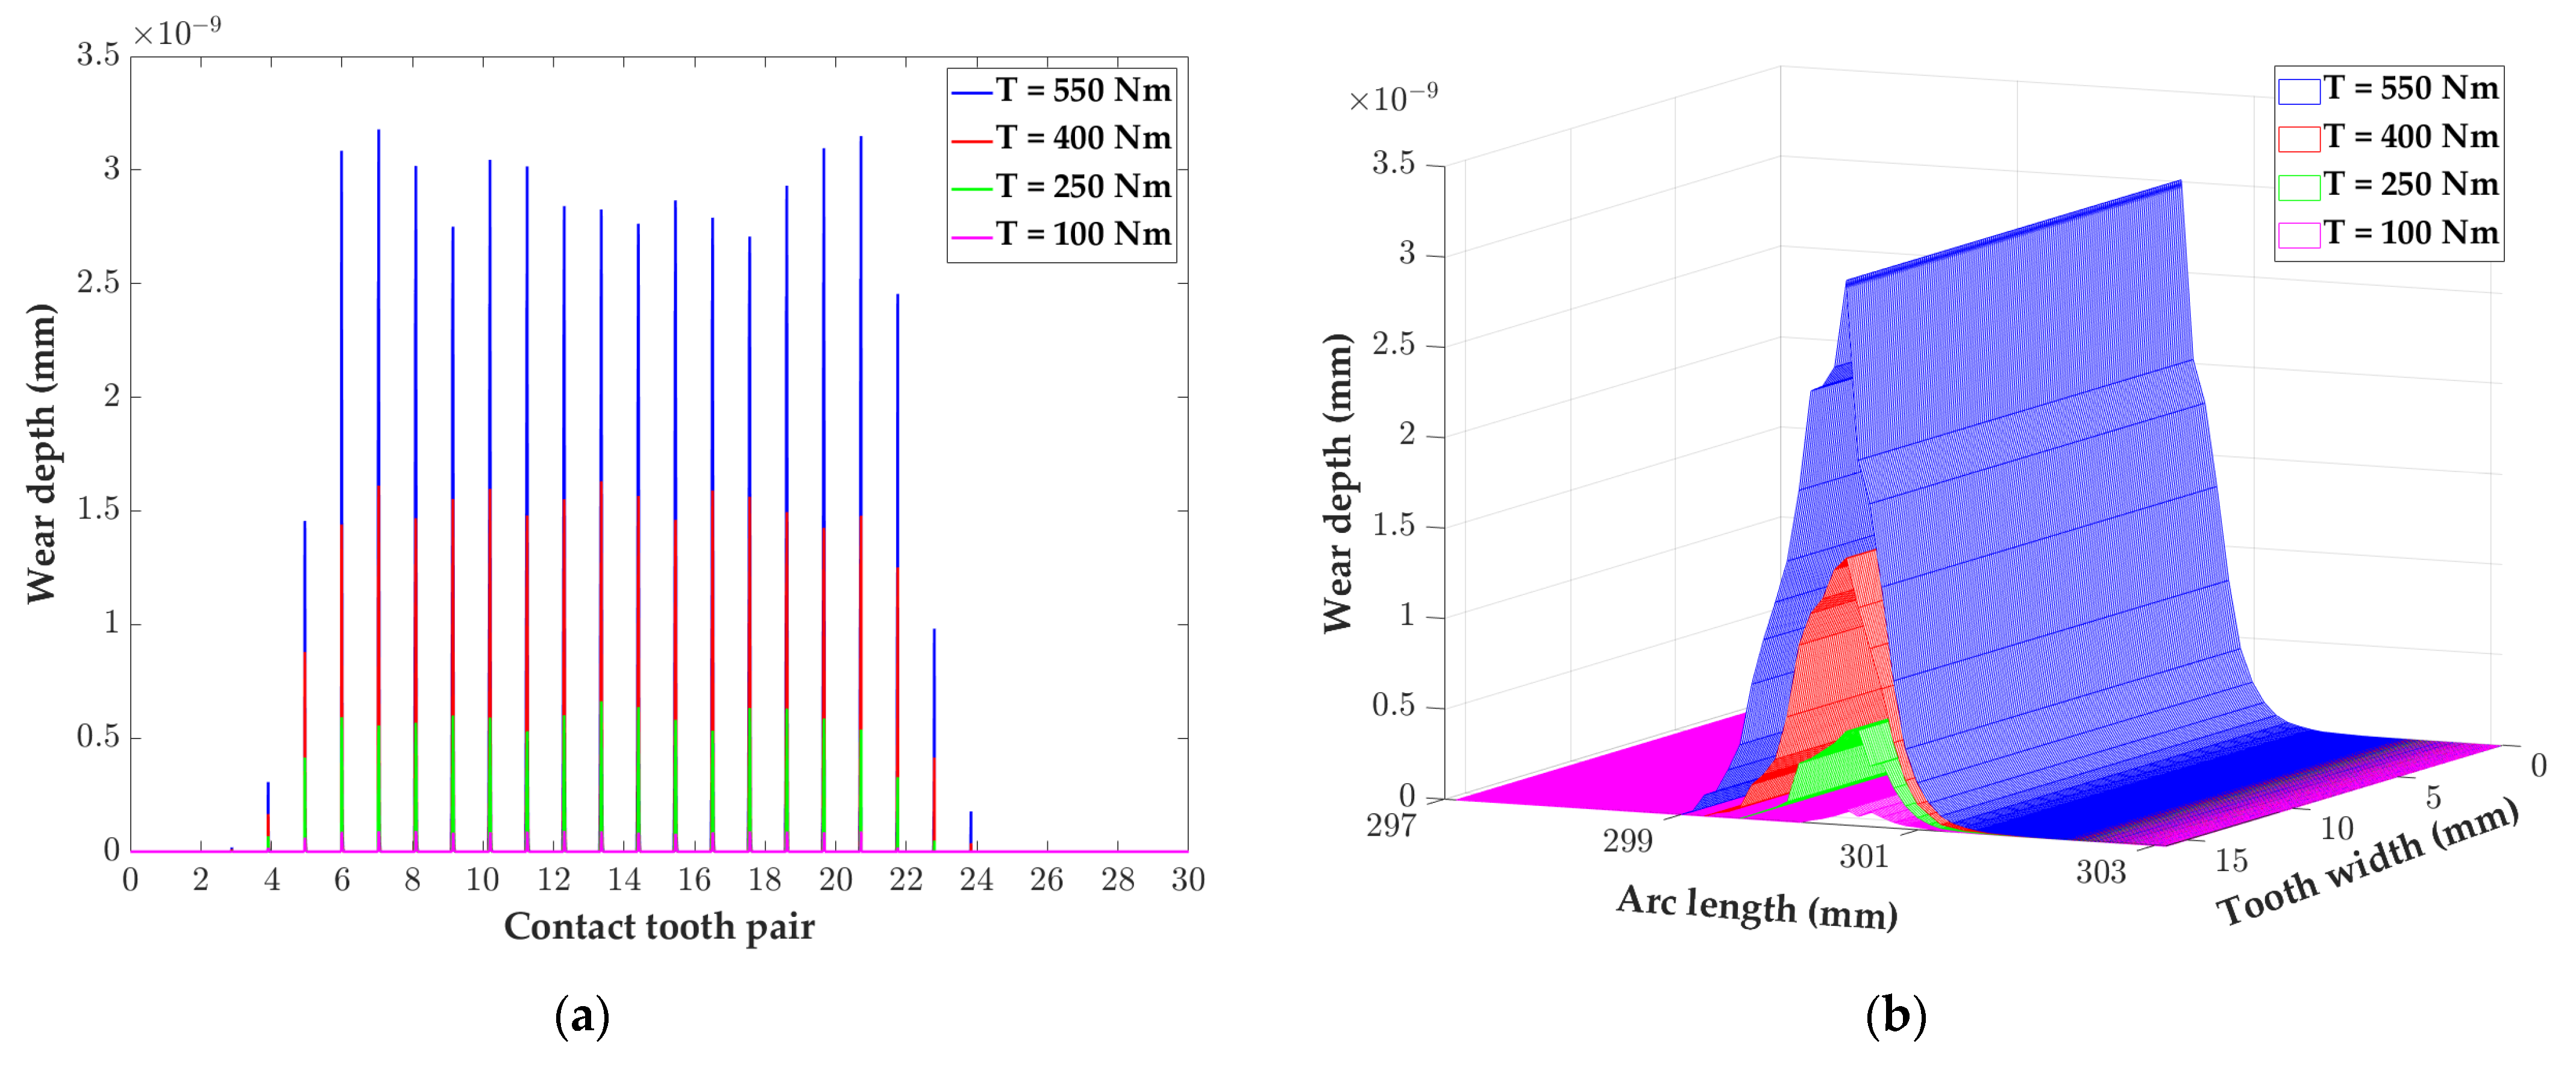
The load torque is one of the most influential variables in the operation of a cycloid reducer. The magnitude of the load torque closely affects the magnitude of the tooth contact stress and, thus, has impact on the amount of tooth wear. Figure 11 shows the effect of the output torque at 100, 250, 400, and 550 Nm on the tooth contact stress and relative sliding velocity of a cycloid-pin gear pair at a certain input speed (1500 r/min). It observed that the magnitude of tooth contact stress increases with increasing output torque, as expected. Figure 12 shows that the torque has a significant effect on tooth wear. Using the 11th tooth on the cycloid as an example, the maximum wear depth on the cycloid at T = 500 Nm is 20.50 times and 6.12 times higher than that at T = 100 Nm and T = 250 Nm, respectively. From Figure 12, it is also found that the slope of each wear curve (i.e., wear coefficient) increases with increasing load.

4.4. Effect of Crank Shaft Rotation Speed

To further investigate the influence of other factors on the wear condition, the speed of rotation is also a representative variable factor, and the distribution of the wear depth of the teeth of the cycloid wheel at different speeds of rotation is analyzed next. The cycloid is set to a certain output torque (T = 400 Nm), and the tooth contact stress and relative sliding velocity are calculated for different rotation speeds. Based on this, the wear distribution of the cycloidal gear is analyzed at different rotational speeds.
As shown in Figure 13, the crankshaft speed mainly affects the relative sliding velocity of the tooth contact point, while the stress is almost unaffected. When the crank shaft speed increases to three times that of the original speed, the relative sliding velocity of the tooth contact point also increases three folds. The two parameters approximate a positive proportional relationship. It follows that the rotation speed affects the depth of tooth wear by influencing the relative sliding velocity of the cycloid wheel teeth.
Figure 14 shows that for the same crankshaft rotation angle, as the input speed increases, so does the tooth wear depth. However, when the crank shaft speed is in a stable operating range (300 r/min to 1500 r/min), the speed has almost no effect on tooth wear. Meanwhile, as the crank shaft speed increases, the increase in the rate of tooth surface wear tends to slow down. Compared to the load torque, the rotational speed has less influence on tooth wear, especially when the crankshaft speed is in a stable operating range, there almost no influence on tooth wear. Since there is also a certain influence of rotational speed, the influence of rotational speed on gear wear and working life should also be taken into account when designing a cycloid reducer.

4.5. Effect of Different Eccentricity Errors

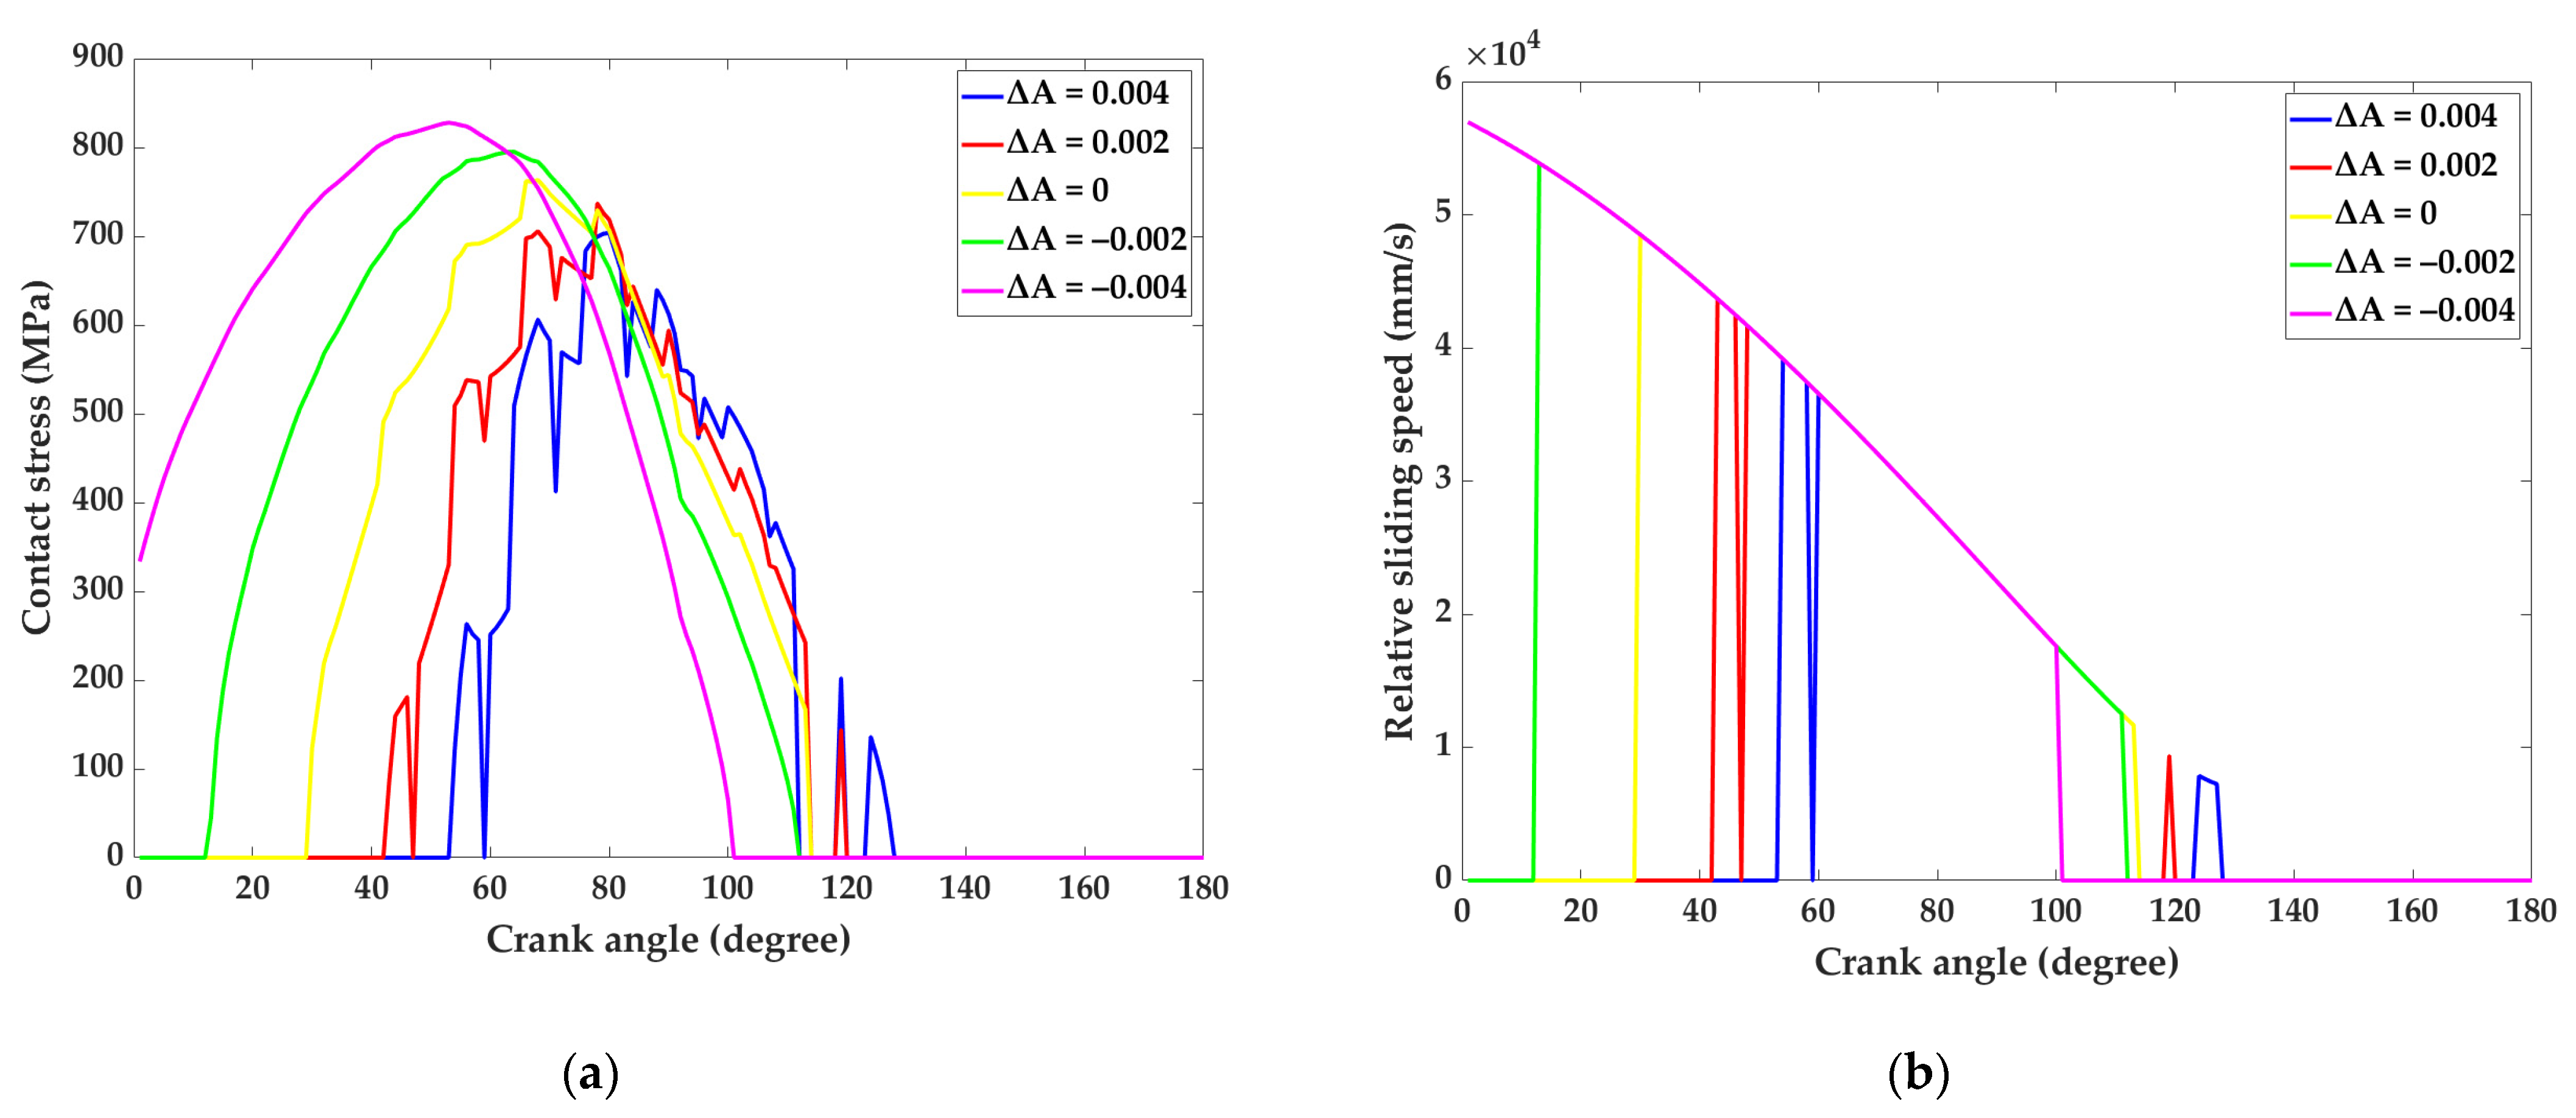
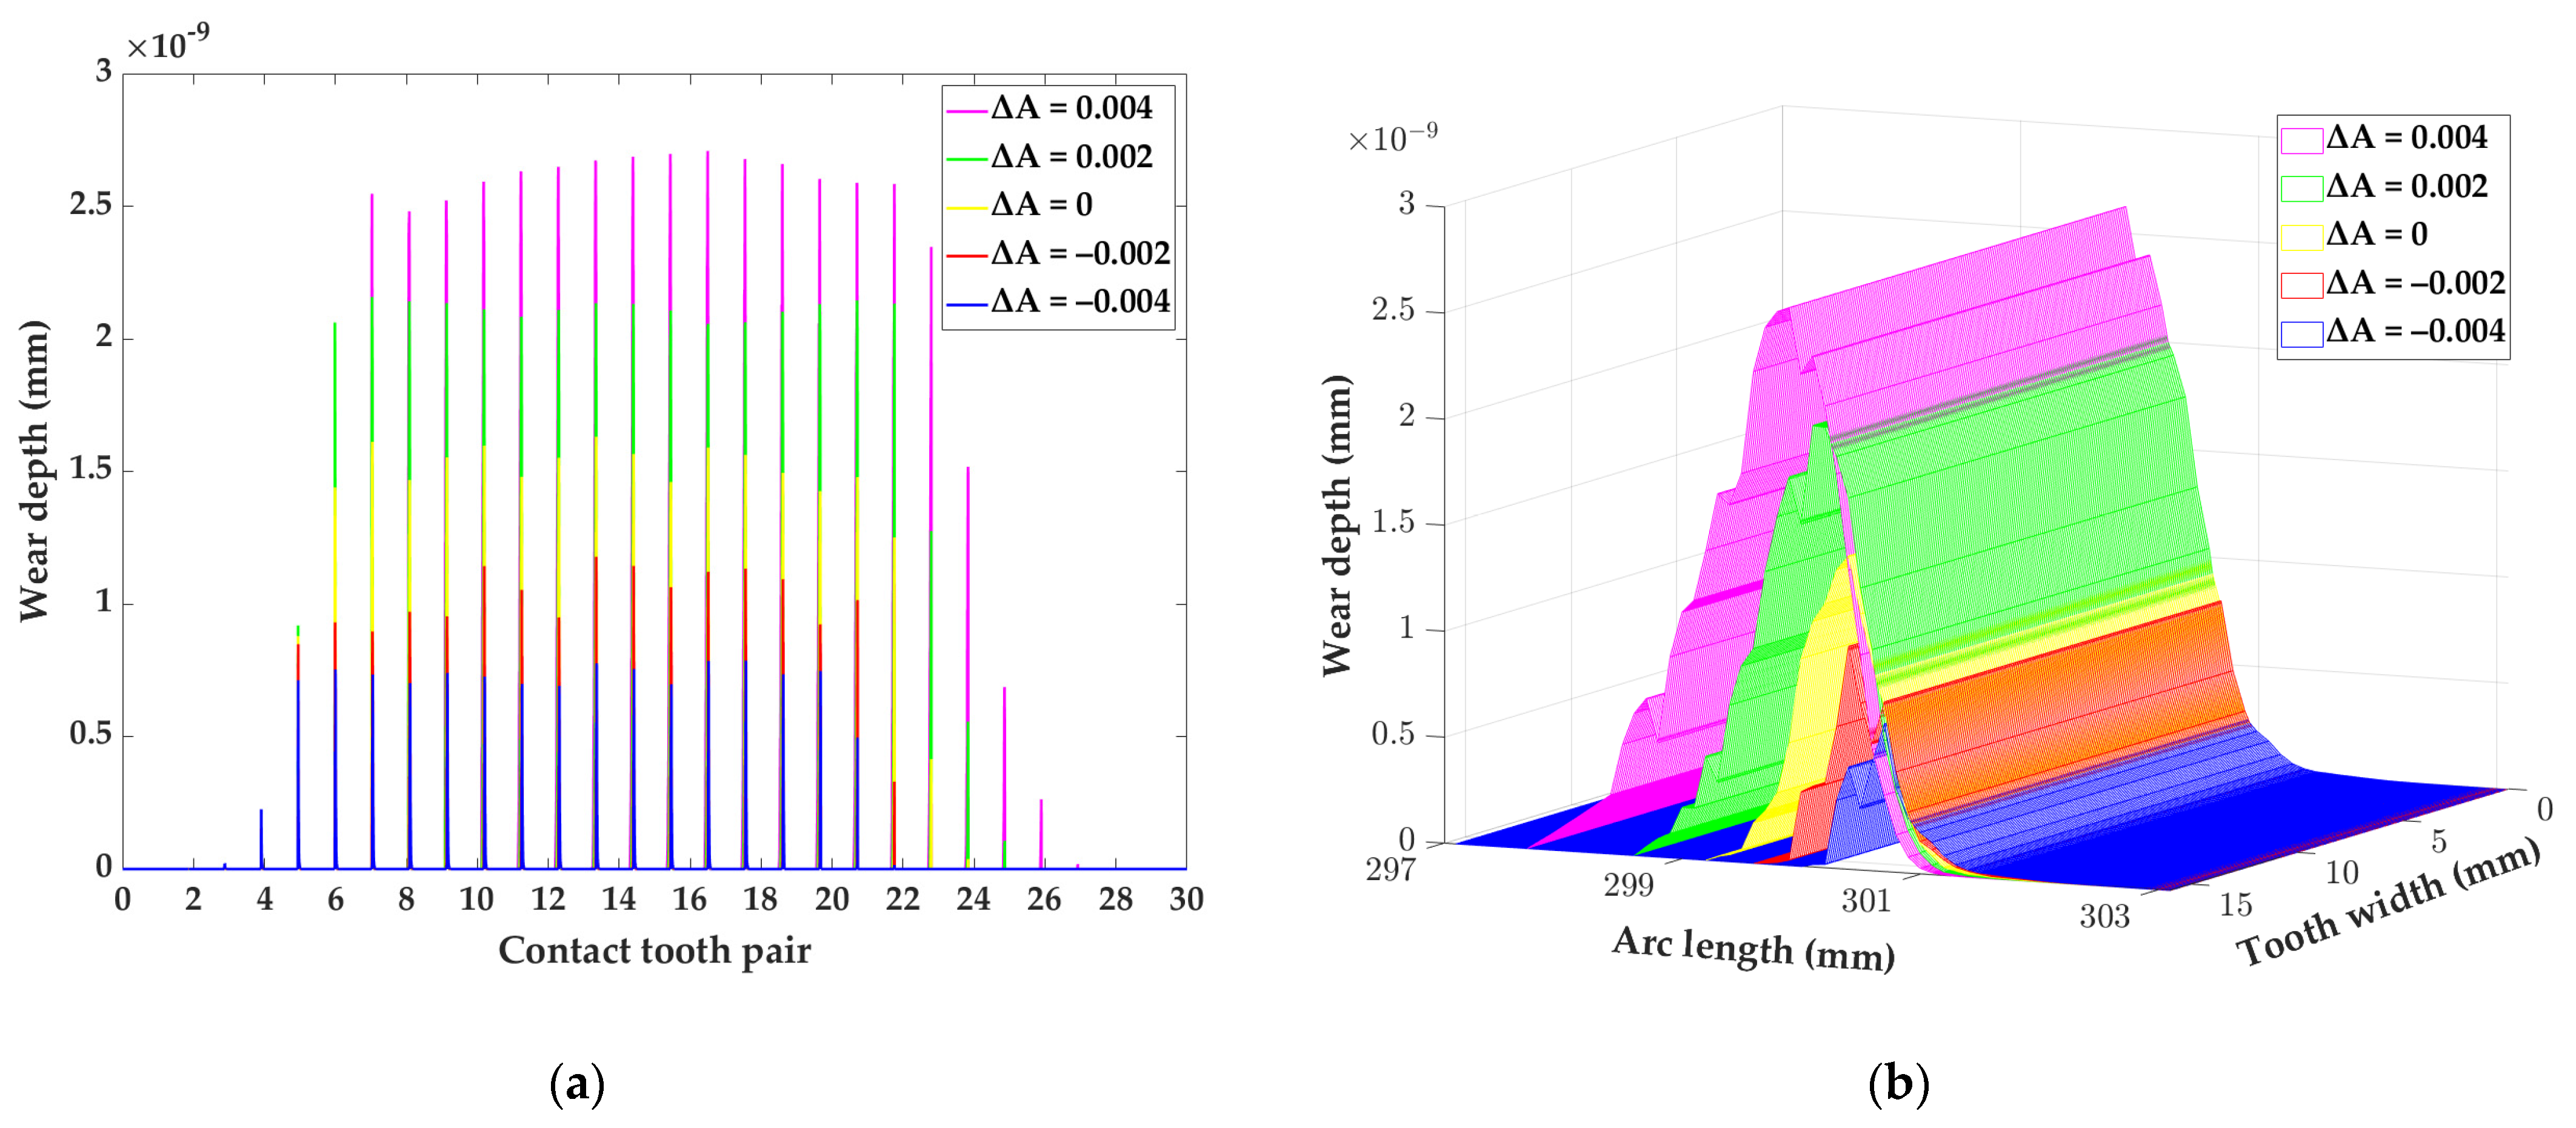
In the manufacturing or installation process of a cycloid pinwheel reducer, any lack of precision will lead to an eccentric distance between the cycloid wheel and the pinwheel with a certain dimensional error, called eccentricity error. The tooth wear depth of the cycloid wheel is also affected by eccentricity error, thus, it as an important working condition parameter. By calculating the contact stresses and relative sliding velocities under different eccentricity errors, the tooth wear distribution is further calculated to study the effect of the magnitude of eccentricity error on wear.
Seen in Figure 15, the eccentricity errors of the cycloidal gear simultaneously affect the contact stress and the relative sliding velocity. The maximum contact stress and the relative sliding velocity are negatively correlated with the eccentricity errors; that is, both increase as the eccentricity errors decrease. As the eccentricity errors increase, there is some delay in the time when contact stresses and relative sliding velocities start to appear on the same pair of teeth, while the time during which they persist on the teeth decreases. As the eccentricity error increases from –0.004 mm to 0.004 mm, the crankshaft rotation angle is delayed from 0 ° to 57 ° , and contact stresses and relative sliding velocities begin to appear on the tooth surfaces. The angular range of the crankshaft, when both persist on the tooth surface, is also reduced from 101 ° to 72 ° . This indicates that an increase in the eccentricity errors will result in a reduction in the number of teeth simultaneously meshed, as well as uneven loading on the tooth surfaces.
From Figure 16, it can be seen that the eccentricity errors of the cycloid have a significant impact on the wear depth of the tooth surface by affecting the contact stress and the relative sliding velocity. According to the conclusions obtained in Figure 16 and the wear equation, the wear depth of the cycloidal gear surface gradually increases with decreasing eccentricity error, which means that the two are negatively correlated. In addition, as the eccentricity errors increase, the number of simultaneously engaged teeth decreases and the area of tooth surface wear decreases. It is not difficult to infer that, in order to ensure uniform load distribution, reduce tooth wear and improve gear working life, the eccentricity errors must be strictly controlled during the manufacturing and installation of gears.

5. Conclusions

This article establishes a tooth surface wear model for a cycloid drive considering the tooth profile modification based on the Hertz theory and the Archard equation, and this model numerically simulates the wear distribution under different tooth shape conditions and working conditions.
The impact of torque and rotation speed on the wear depth of a cycloid-pin gear pair is analyzed. Torque output and input speed have further significant effects on tooth wear by influencing tooth contact stress and relative sliding speed, respectively. Tooth wear increases monotonically with increasing load torque and rotation speed. Furthermore, among these two factors, the influence of torque dominates. When the cycloidal gear reducer operates for a long time, in order to reduce wear and prolong its service life, it is necessary to strictly control the range of torque.
The presence of the eccentricity errors of the cycloid gear leads to a reduction in the number of simultaneously meshed teeth, which changes the stress distribution and significantly affects the wear depth of the teeth. The larger the eccentricity error is, the more uneven are the stress distribution and the tooth wear. To ameliorate the load distribution and slow the tooth surface wear, the eccentricity error of the cycloid wheel should be strictly controlled.
For the working conditions of cycloid gearboxes, a reasonable tooth profile modification plan should be formulated, according to the comprehensive influence of load torque, rotational speed, and eccentricity error, in order to ameliorate the load distribution and effectively reduce tooth surface wear.

Author Contributions

Conceptualization, X.L. and H.Y.; Methodology, X.L.; Validation, X.L. and H.Y.; Writing—Original Draft Preparation X.L.; Writing—Review and Editing, X.L., W.N. and R.G.; Supervision, X.L., W.N., R.G. and L.S. All authors have read and agreed to the published version of the manuscript.

Funding

This work was supported by National Natural Science Foundation of China (Grants No. 52005354) and the Natural Science Foundation of Jiangsu Province (Grants No. BK20220497).

Data Availability Statement

Not applicable.

Acknowledgments

The authors would like to acknowledge the support of the School of Mechanical and Electrical Engineering, Soochow University for paying the Article Processing Charges (APC) of this publication. And, the authors wish to acknowledge the editors and anonymous reviewers of their penetrating and wise suggestions to improve the quality of this publication.

Conflicts of Interest

The authors declare no conflict of interest.

References

  1. Wu, S.; Cheng, H.S. Sliding Wear Calculation in Spur Gears. J. Tribol. 1993, 115, 493–500. [Google Scholar] [CrossRef]
  2. Wu, S.; Cheng, H.S. A Sliding Wear Model for Partial-EHL Contacts. J. Tribol. 1991, 113, 134–141. [Google Scholar] [CrossRef]
  3. Flodin, A.; Andersson, S. Simulation of mild wear in spur gears. Wear 1997, 207, 16–23. [Google Scholar] [CrossRef]
  4. Flodin, A.; Andersson, S. A simplified model for wear prediction in helical gears. Wear 2001, 249, 285–292. [Google Scholar] [CrossRef]
  5. Flodin, A.; Andersson, S. Simulation of mild wear in helical gears. Wear 2000, 241, 123–128. [Google Scholar] [CrossRef]
  6. Park, D.; Kahraman, A. A surface wear model for hypoid gear pairs. Wear 2009, 267, 1595–1604. [Google Scholar] [CrossRef]
  7. Park, D.; Kolivand, M.; Kahraman, A. An approximate method to predict surface wear of hypoid gears using surface interpolation. Mech. Mach. Theory 2014, 71, 64–78. [Google Scholar] [CrossRef]
  8. Park, D.; Kolivand, M.; Kahraman, A. Prediction of surface wear of hypoid gears using a semi-analytical contact model. Mech. Mach. Theory 2012, 52, 180–194. [Google Scholar] [CrossRef]
  9. Yuksel, C.; Kahraman, A. Dynamic tooth loads of planetary gear sets having tooth profile wear. Mech. Mach. Theory 2004, 39, 695–715. [Google Scholar] [CrossRef]
  10. Imrek, H.; Düzcükoğlu, H. Relation between wear and tooth width modification in spur gears. Wear 2007, 262, 390–394. [Google Scholar] [CrossRef]
  11. Sun, Y.; Li, Y.; Zhang, Q.; Qin, X.; Chen, K. Wear analysis and simulation of small module gear based on Archard model. Eng. Fail. Anal. 2023, 144, 26. [Google Scholar] [CrossRef]
  12. Zhao, Q.; Xing, Z.; Yuan, J.; Zhang, Z.; Zhu, J.; Jiang, H. An Improved Modeling and Numerical Analysis Method for Tooth Surface Wear of Double-Arc Harmonic Gears. Materials 2022, 15, 8869. [Google Scholar] [CrossRef]
  13. Onishchenko, V. Investigation of tooth wears from scuffing of heavy duty machine spur gears. Mech. Mach. Theory 2015, 83, 38–55. [Google Scholar] [CrossRef]
  14. Chernets, M.V. Prediction Method of Contact Pressures, Wear and Life of Worm Gears with Archimedean and Involute Worm, Taking Tooth Correction into Account. J. Frict. Wear 2019, 40, 342–348. [Google Scholar] [CrossRef]
  15. Kahraman, A.; Bajpai, P.; Anderson, N.E. Influence of Tooth Profile Deviations on Helical Gear Wear. J. Mech. Des. 2005, 127, 656–663. [Google Scholar] [CrossRef]
  16. Bajpai, P.; Kahraman, A.; Anderson, N.E. A Surface Wear Prediction Methodology for Parallel-Axis Gear Pairs. J. Tribol. 2004, 126, 597–605. [Google Scholar] [CrossRef]
  17. Li, G.; Wang, Z.H.; Zhu, W.D. Prediction of Surface Wear of Involute Gears Based on a Modified Fractal Method. J. Tribol. 2019, 141, 13. [Google Scholar] [CrossRef]
  18. Li, X.; Xu, J.; Yang, Z.; Chen, R.; Yang, H. The Influence of Tooth Surface Wear on Dynamic Characteristics of Gear-Bearing System Based on Fractal Theory. J. Comput. Nonlinear Dyn. 2020, 15, 10. [Google Scholar] [CrossRef]
  19. Zheng, F.; Zhang, J.; Yao, L.; Tan, R. Investigation on the wear of spur gears generated by modified cutter. Friction 2020, 9, 288–300. [Google Scholar] [CrossRef]
  20. Zhang, R.; Zhou, J.; Wei, Z. Study on transmission error and torsional stiffness of RV reducer under wear. J. Mech. Sci. Technol. 2022, 36, 4067–4081. [Google Scholar] [CrossRef]
  21. Li, X.; Li, C.; Wang, Y.; Chen, B.; Lim, T.C. Analysis of a Cycloid Speed Reducer Considering Tooth Profile Modification and Clearance-Fit Output Mechanism. J. Mech. Des. 2017, 139, 033303. [Google Scholar] [CrossRef]
  22. Li, X.; Chen, B.-K.; Wang, Y.-W.; Lim, T.C. Mesh stiffness calculation of cycloid-pin gear pair with tooth profile modification and eccentricity error. J. Cent. South Univ. 2018, 25, 1717–1731. [Google Scholar] [CrossRef]
  23. Janakiraman, V.; Li, S.; Kahraman, A. An Investigation of the Impacts of Contact Parameters on Wear Coefficient. J. Tribol. 2014, 136, 031602. [Google Scholar] [CrossRef]
Figure 1. Surface wear of the cycloid-pin gear pair in RV reducer.
Lubricants 11 00323 g001
Figure 2. Coordinate systems for the tooth contact analysis of the cycloid-pin gear pair.
Lubricants 11 00323 g002
Figure 3. Velocity vector of the contact point B between the cycloid and the roller tooth.
Lubricants 11 00323 g003
Figure 4. Load distribution model of the cycloid-pin gear pair.
Lubricants 11 00323 g004
Figure 5. (a) Modeling of single-tooth contact on a cycloid pinwheel; (b) Tooth contact region and tooth contact stress distribution based on Hertzian theory.
Lubricants 11 00323 g005
Figure 6. Tooth contact grid when two tooth surface meshed.
Lubricants 11 00323 g006
Figure 7. Steps of calculating the wear of cycloid-pin gear pair within one mesh circle.
Lubricants 11 00323 g007
Figure 8. Tooth surface contact stress analysis: (a) Comparison of the tooth contact stress of the 11th tooth pair in the standard and corrected states when the crankshaft is rotated by different angles; (b) Contact stress for each tooth pair in the standard and corrected states when the crankshaft is rotated by 90°.
Lubricants 11 00323 g008
Figure 9. Relative sliding velocity analysis: (a) Relative sliding velocity of the 11th tooth pair in the standard and modified states when the crankshaft is rotated by different angles; (b) Relative sliding velocity of each tooth pair in the standard and modified states when the crankshaft is rotated by 90°.
Lubricants 11 00323 g009
Figure 10. Tooth wear of cycloid gearboxes with standard and modified tooth shapes: (a) The full tooth profile wear distribution for both tooth profiles; (b) The tooth surface wear distribution of the 11th tooth pair for both tooth profiles.
Lubricants 11 00323 g010
Figure 11. Tooth contact stress and relative sliding velocity on the cycloid wheel after tooth profile modification at different output torques: (a) Tooth contact stress distribution of the 11th pair of teeth in the range of 0~180° of crankshaft rotation; (b) Relative sliding velocity of the 11th pair of teeth within the range of 0~180° of crankshaft rotation.
Lubricants 11 00323 g011
Figure 12. Wear of tooth surface of cycloid reducer at different torque after 180° rotation of crank shaft: (a) The tooth surface wear of each tooth at different torques; (b) The tooth wear of the 11th tooth at different torques.
Lubricants 11 00323 g012
Figure 13. Tooth contact stress and relative sliding velocity of the cycloid reducer with modified tooth profile at different rotation speeds: (a) Tooth contact stress distribution of the 11th pair of teeth of the cycloid in the range of 0–180° of crank shaft rotation; (b) Relative sliding velocity of the 11th pair of teeth of the cycloid in the range of 0–180° of crank shaft rotation.
Lubricants 11 00323 g013
Figure 14. Tooth wear of the cycloid reducer after 180° rotation of the crankshaft and after tooth profile modification: (a) Tooth wear of each tooth on the cycloid at different rotation speeds; (b) Wear of the 11th tooth on the cycloid at different rotation speeds.
Lubricants 11 00323 g014
Figure 15. Tooth contact stress and relative sliding velocity of the cycloid reducer under different eccentricity errors: (a) Tooth contact stress distribution of the 11th pair of teeth of the cycloid reducer in the range of 0–180° of crankshaft rotation; (b) Relative sliding velocity of the 11th pair of teeth of the cycloid reducer in the range of 0–180° of crankshaft rotation.
Lubricants 11 00323 g015
Figure 16. Tooth wear of the cycloid reducer after 180° rotation of the crank shaft after tooth profile modification: (a) Tooth wear of each tooth on the cycloid under different eccentricity errors; (b) Wear of the 11th tooth on the cycloid under different eccentricity errors.
Lubricants 11 00323 g016
Table 1. Dimensional parameters of cycloid reducer.
Parameter NameCycloid GearPin
Number of teeth2930
Eccentricity e /mm3
Radius of roller position r p /mm120
Radius of roller r r p /mm8
Roller position modification amount Δ r p /mm0.008
Roller radius modification amount Δ r r p /mm0.016
Tooth width B /mm1716
Table 2. Material properties of cycloid reducer.
Gear MaterialGCr15GCr15
Modulus of elasticity E /GPa208208
Poisson’s ratio μ 0.30.3
Stress-viscosity factor α /Pa·s1.48 × 10−2
Roughness of the cycloidal tooth surface R α 1 /mm0.02 × 10−3
Roughness of the roller surface R α 2 /mm0.02 × 10−3
Disclaimer/Publisher’s Note: The statements, opinions and data contained in all publications are solely those of the individual author(s) and contributor(s) and not of MDPI and/or the editor(s). MDPI and/or the editor(s) disclaim responsibility for any injury to people or property resulting from any ideas, methods, instructions or products referred to in the content.