Article

Modelling Approaches of Wear-Based Surface Development and Their Experimental Validation

Mechanical Engineering, Montanuniversität Leoben, Franz-Josef-Straße 18, 8700 Leoben, Austria
*
Author to whom correspondence should be addressed.
Lubricants 2022, 10(12), 335; https://doi.org/10.3390/lubricants10120335
Submission received: 24 October 2022 / Revised: 15 November 2022 / Accepted: 23 November 2022 / Published: 26 November 2022
(This article belongs to the Special Issue Advances in Wear Predictive Models)

Abstract

:
Surface topography has a significant influence on the friction behaviour in lubricated contacts. During running-in, the surface topography is continuously changed. The surface structure influences the contact stiffness (asperity contact pressure) as well as the microhydrodynamics (flow factors). In this study, different models for wear simulation of real rough surfaces were created in Matlab© (MathWorks, Natick, MA) and Abaqus© (ABAQUS Inc., Palo Alto, CA, USA) using the Usersubroutine Umeshmotion. The arithmetic mean height Sa(wh), the maximum height Sz(wh), as well as the asperity contact pressure pasp(h,wh) as a function of the wear height (wh) are used to characterise the surface for the respective wear state. The surface characteristics obtained from the simulations are validated with parameters from experiments. The aim of this study was to create a simulation methodology for mapping surface development during the running-in process. The results show, that the qualitative course of the surface parameters can be reproduced with the applied simulation methodology. Compared to the experiments, the rough surfaces are flattened faster. By adapting the simulation results in postprocessing, good agreements with the experiments can be achieved.

1. Introduction

The quantitative determination of operational safety and the high efficiency of moving parts are essential aspects of mechanical engineering. Due to the requirements for efficiency, low-viscosity oils are often used, or the machine is switched off temporarily. This results in increased operation in the mixed friction regime of lubricated contacts. The characteristic of this friction condition is that the sliding surfaces are not completely separated by the fluid, therefore individual asperities are in contact [1]. In lubricated contacts, wear mainly occurs in this suboptimal mixed lubrication regime. The surface topography has a significant influence on the resulting friction regime [2]. Consequently, the calculation of wear in the mixed friction regime is an essential criterion for these applications. Experimentally, wear can be quantified very well by ex-situ tactile and gravimetric analysis. To monitor wear in real-time, a complex measuring system is required. To avoid this effort, wear simulations are necessary.
Wear takes place on different size scales. On the one hand, on the component scale (macro model), and on the other hand, on the micro scale (surface roughness) [3]. Since it is not yet possible for conformal contacts to consider the influence of microgeometry (roughness) and the macroscopic behaviour in a single simulation model, due to limited computational capacities, the system is usually split into a micro- and a macro model [4]. Based on the surface topography, asperity contact pressure curves and flow factors are determined in the micro model. These are usually implemented in the macro model to consider the influence of roughness on frictional behaviour.
In the mixed friction regime, the force equilibrium of the solid contact force, the hydrodynamic force and the external load is solved. The surface roughness has a significant influence on the contribution of the force components [5]. Furthermore, the wear rate is also a function of the surface topography and hence of the running-in process [6]. As wear progresses, the surface topography is modified, which changes the output variables of the micro model (asperity contact curve and flow factors) [1,7]. The running-in phase has an especially significant influence on the surface topography [8,9]. With a selection of surface parameters, it is even possible to estimate the friction performance in lubricated contacts. As a result, the friction in lubricated contacts can be reduced with specific surface modifications and the increase in efficiency can be estimated from the surface parameters [10,11].
To describe the change in surface characteristics on a micro scale due to wear, various models were developed in the past. Based on the wear particle formation in lubricated contacts, Kimura and Sugimura created a model to predict the surface roughness height probability distribution during running-in [12,13,14]. The model, according to Sugimura et al. [12], assumes a Gaussian-distributed surface; furthermore, plastic deformations are not considered. Among others, Winkler et al. [15] used the Sugimura surface adaption model to determine the wear evolution in EHD contacts. Here, the change in surface topography is considered by adjusting the statistical surface parameters. Jeng [16] combined the Sugimura model with the Johnson translatory [17] to handle non-Gaussian distributed surfaces.
König et al. [18] have developed a model based on Mokhtar’s [19] knowledge of hydrodynamic journal bearing tests, which adapts the surface structure of a softer bearing surface in dependence on the surface topography of a low-wear opposite shaft surface. It is assumed, that with increasing wear of the bearing surface, this surface takes on the inverted contour of the enveloping surface of the rotating shaft.
In the recent past, wear in lubricated or dry rough contacts has been more frequently determined by FE methods. The Johnson–Cook [20] model is often used to numerically determine the material removal due to mechanical processes. Based on local strains, the damage for a mesh element is calculated and the element is removed at corresponding damage values [21,22].
The well-known Archard wear equation in its local notation is commonly used to calculate local wear heights depending on the pressure distribution [23,24]. A constant wear coefficient was assumed during the running-in phase. The nodes on the wearing surface are moved depending on the local wear height. To avoid excessive mesh distortion, also the nodes next to the surface, are also displaced proportionally.
With the commercial FE program Abaqus©, it is possible to model wear on surfaces with the user subroutine UMESHMOTION [25,26,27]. To prevent excessive mesh deformation, arbitrary Lagrange–Euler (ALE) adaptive remeshing is usually applied whereby not only the surface nodes, but also adjacent nodes are shifted depending on the local wear level.
However, the established wear models according to Archard, and also the energetic approach according to Fleischer, are linear equations. Since much higher wear rates can occur during running-in, their application is therefore limited to the run-in condition for macroscopic tasks [18]. An approach to reflect the varying wear rate during running-in is the consideration of wear on the asperity scale [18,23,24,28]. Thus, the transient development of the output variables of the micro model can be represented and applied in the macro model. In order to take a more detailed look at this non-linear wear behaviour, different wear modelling approaches at the micro scale are compared. In the scope of this research, a selection of wear-dependent surface parameters from simulation results is validated with those from physical experiments. To enable the implementation of the wear-dependent parameters of the micro model in the macro model, the local wear height (wh) is used to characterise the current surface condition.

2. Materials and Methods

To model the wear of rough surfaces, the initial topography of the unworn surface in digitised form is necessary. Within the scope of this study, 2 different variants are used for virtual wear simulation. The necessary physical experiments to validate the simulation results are performed on a tribometer.

2.1. Experimental Setup

To generate wear on surfaces, a TE92HS rotary tribometer from Phoenix Tribology© (Kingsclere, UK) is used. In the test cell, a configuration for testing journal bearings is installed. Two bearing shells are pressed (FN) onto the shaft via a lever arrangement. The shaft is rotating in an oil bath (Figure 1). The oil is heated to the temperature T. Depending on the force on the bearing shells, the oil viscosity, the geometry of the bearing shells and the shaft, as well as the shaft speed, a certain friction condition is induced. The resulting COF can be determined indirectly via the frictional torque, which is determined via a load cell and the geometry. In the scope of this study, the parameters are set in such a way, that constant operating conditions in the mixed lubrication regime are generated (FN = 2000 N, n = 50 min−1). For more information about the test rig, please refer to [29,30,31].

2.1.1. Test Material

The bearing shells, used in the experiments, are metallic multilayer bearings. They consist of an AlSn20 sliding layer, a lead bronze layer, which is separated from the sliding layer by a Ni diffusion barrier, and a steel support. The bearing shells consist of cylinder segments with 120° and 21 mm width. The shaft with a diameter of dS = 47.522 mm is made of 34CrNiMo6 and the surface is ground. The hardness is set to 48 ± 3 HRC by surface hardening. With the shaft diameter dS, a bearing clearance of 1.6‰ is achieved. The oil Shell Rimula R5 10W-30 was used as lubricant in the tribological system. An overview of the parameters of the test material is listed in Table 1.

2.1.2. Test Strategy

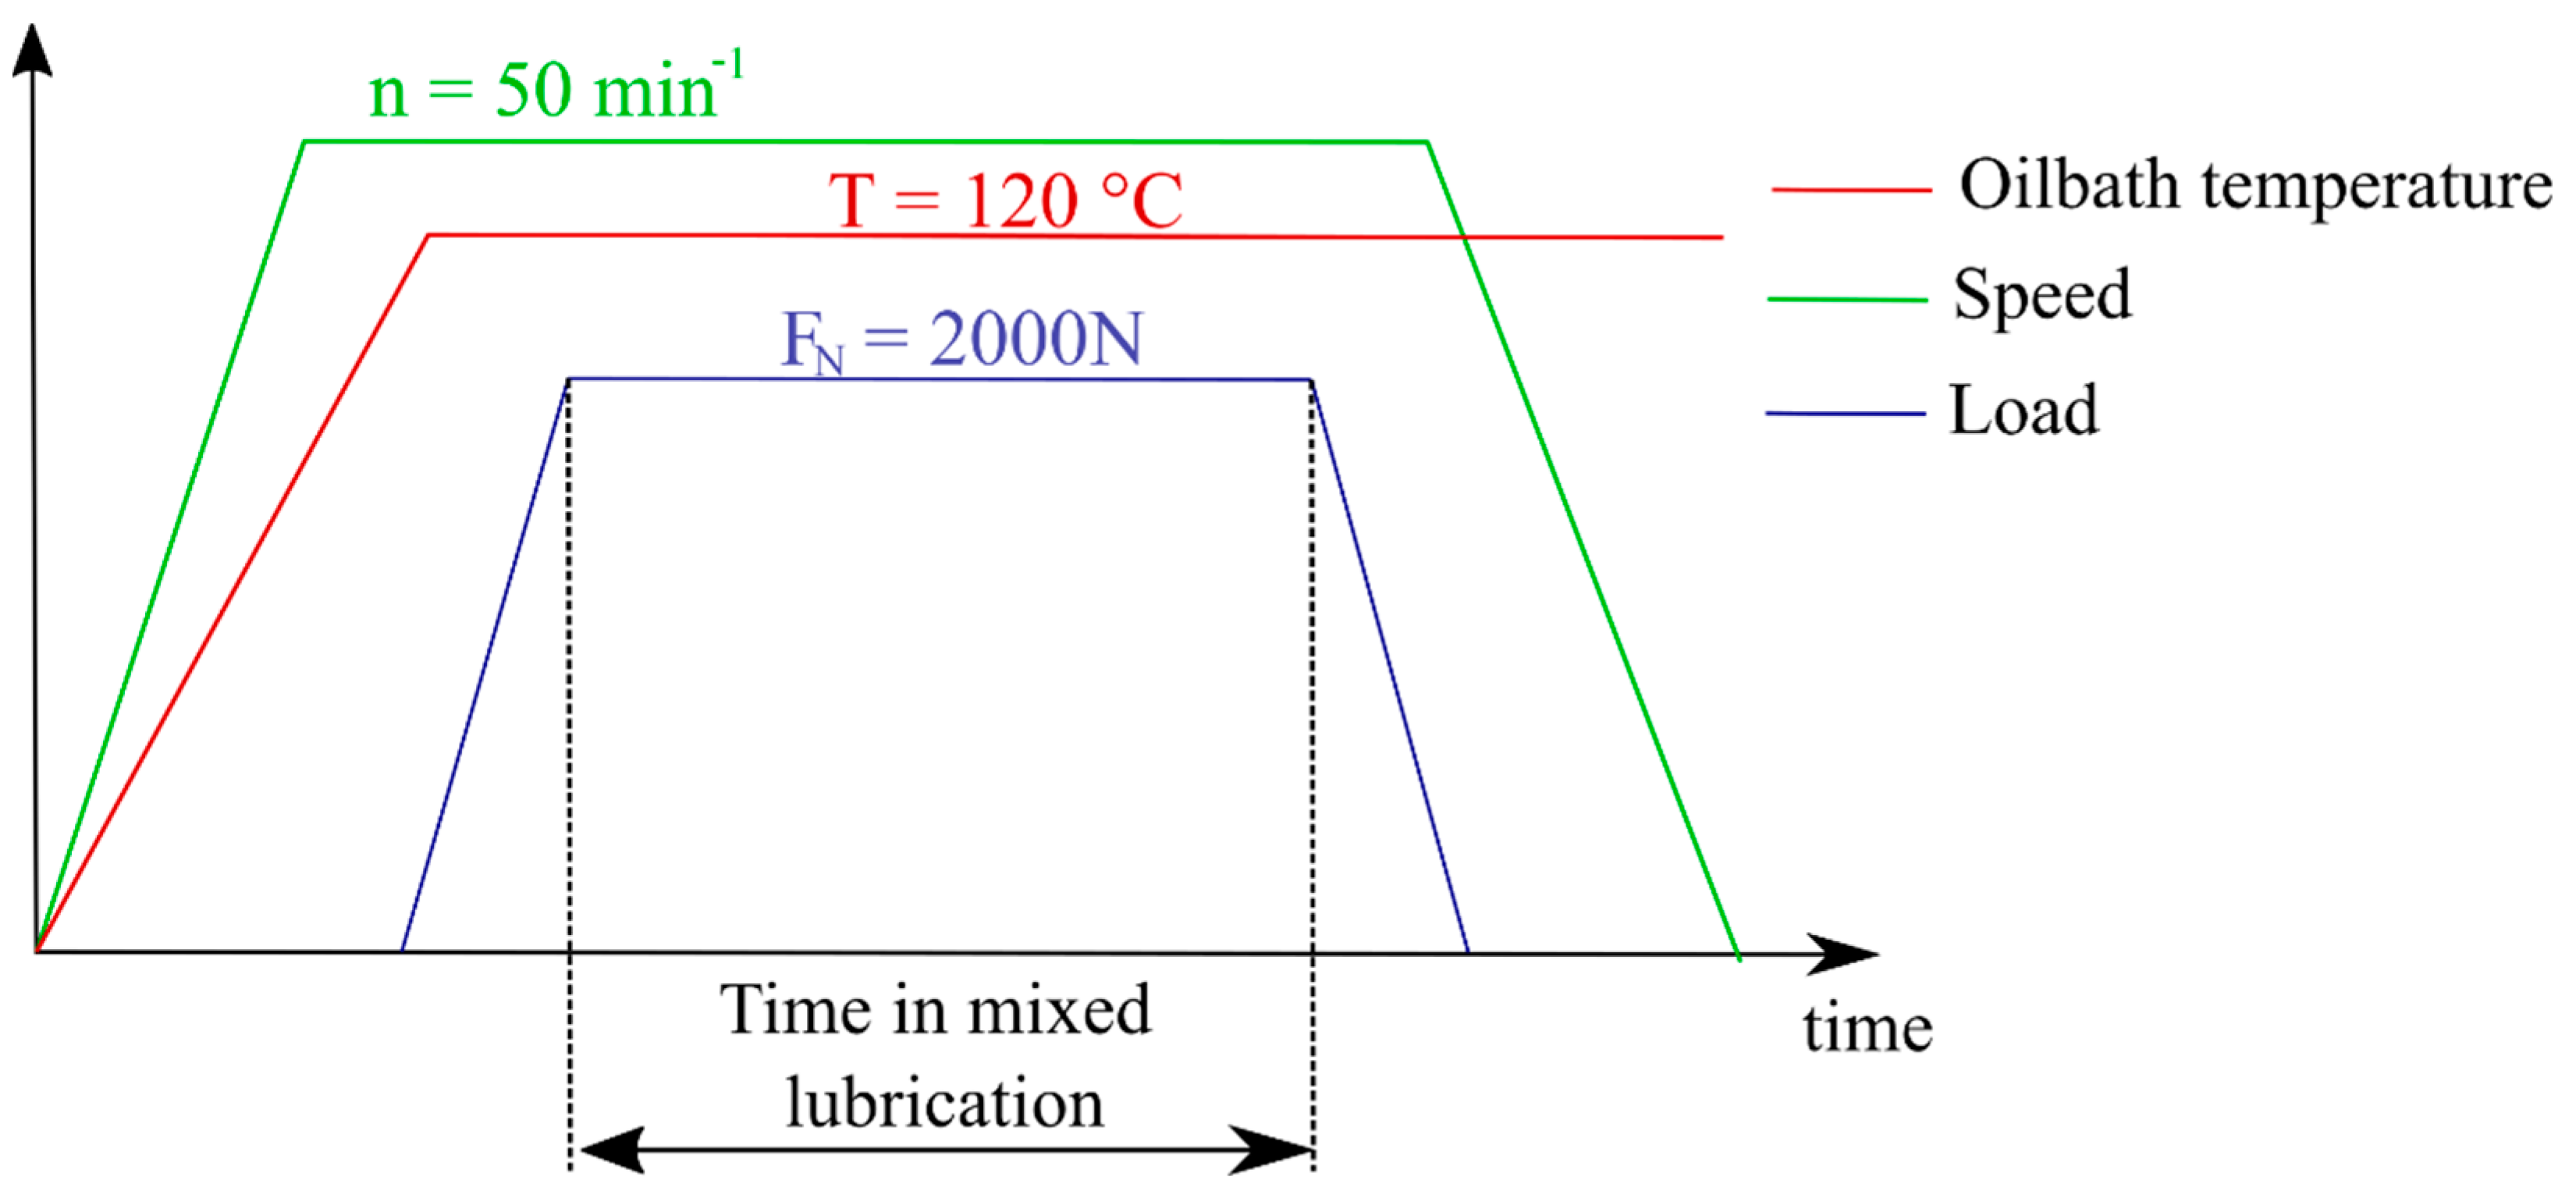
To generate wear, experiments with constant test parameters are carried out in the mixed friction regime. For this purpose, the shaft is first set in rotation (n → 50 min−1) and the oil is heated (T → 120 °C). After reaching the test temperature, the load (FN → 2000 N) is applied. This prevents wear during the heating phase. After the desired test time in mixed friction, first, the load is removed and then the shaft is stopped. This ensures that wear is generated with constant test parameters. The overall test strategy is illustrated in Figure 2.
In order to record the evolution of surface wear experimentally, tests were carried out with different times in the mixed friction regime. By varying the test time, different wear heights are induced and thus the evolution of the surface can be analysed. For every experiment, the shaft and bearing specimens, as well as the lubricant, are replaced.

2.1.3. Experimental Analysis

Two analyses are performed to document the evolution of the surface topography in the experiment. On the one hand surface sections are measured by using a confocal microscope to characterise the surface parameters. On the other hand, the corresponding wear height for the specific wear condition is determined with a tactile measuring device:
  • Wear analysis
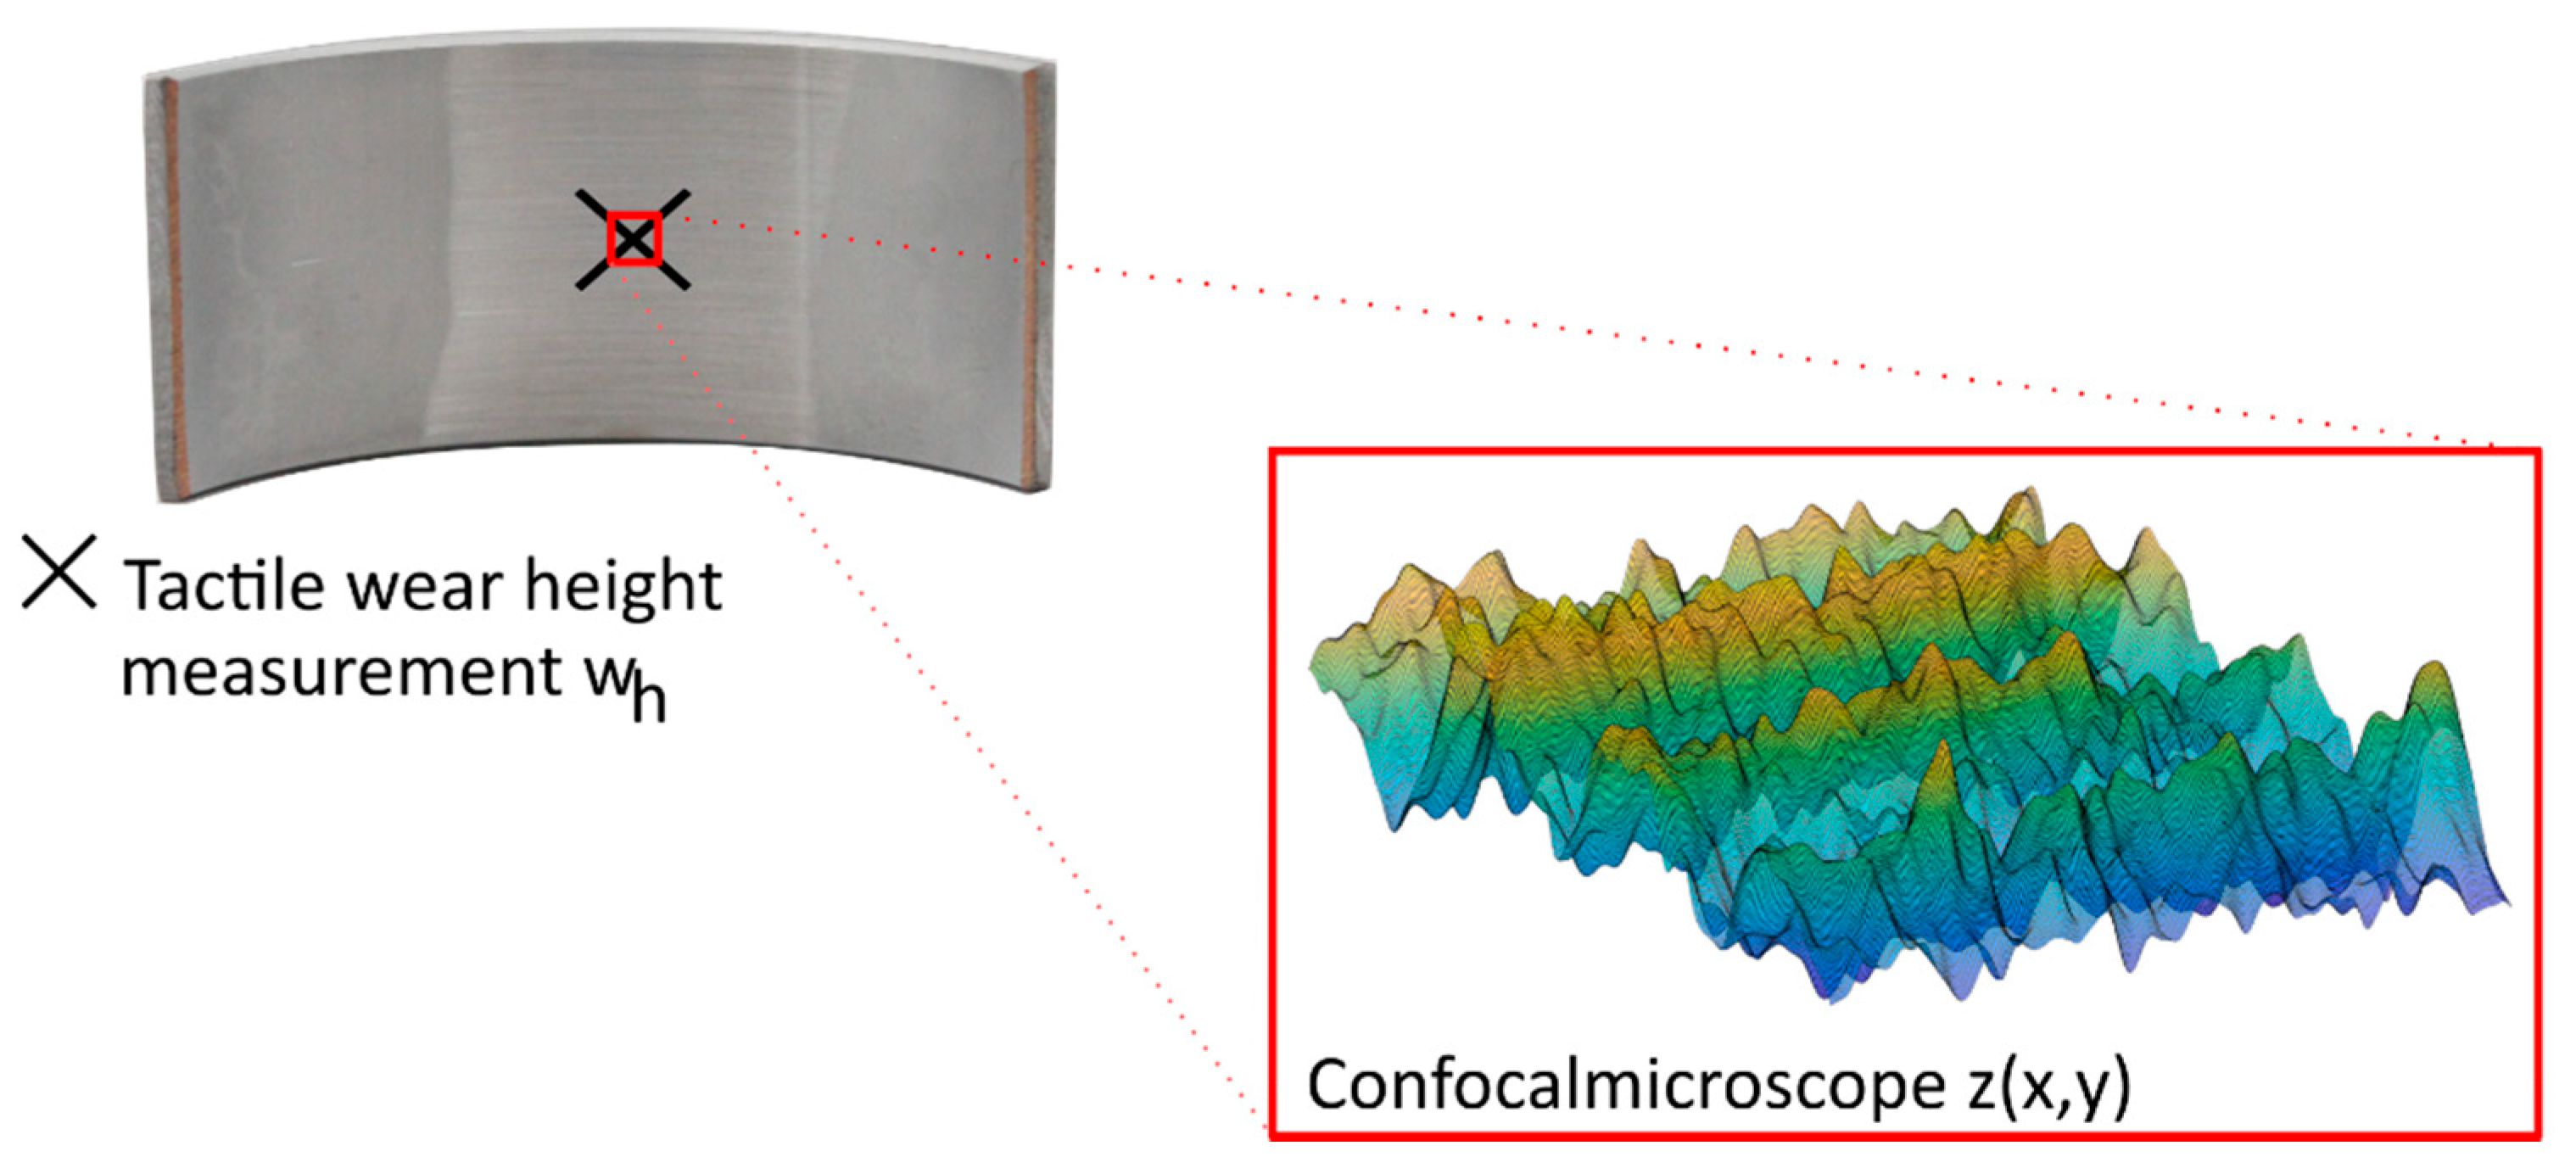
The bearing shells are measured tactilely before and after the test. The difference between the pre-test and post-test measurements can be used to determine the local wear height wh. Further information about the used tactile wear measuring device can be found in [32]. For the characterisation of the surface development, the cut-out centered on the bearing shell is used (Figure 3), therefore this local wear height (wh) is characteristic of the present surface condition.
2.
Surface analysis
The digitalisation of the surface is performed with an Alicona© (München, Germany) Infite Focus 3D Confocal microscope. According to [33], a resolution of 1 µm in lateral, 10 nm in vertical direction and a 100× magnification is used for measuring a surface section of 100 × 100 µm. The surface is scanned around the central surface section (Figure 3). From this resulting point cloud, different surface parameters can be evaluated and analysed depending on the local wear height (wh).

2.2. Simulation Model

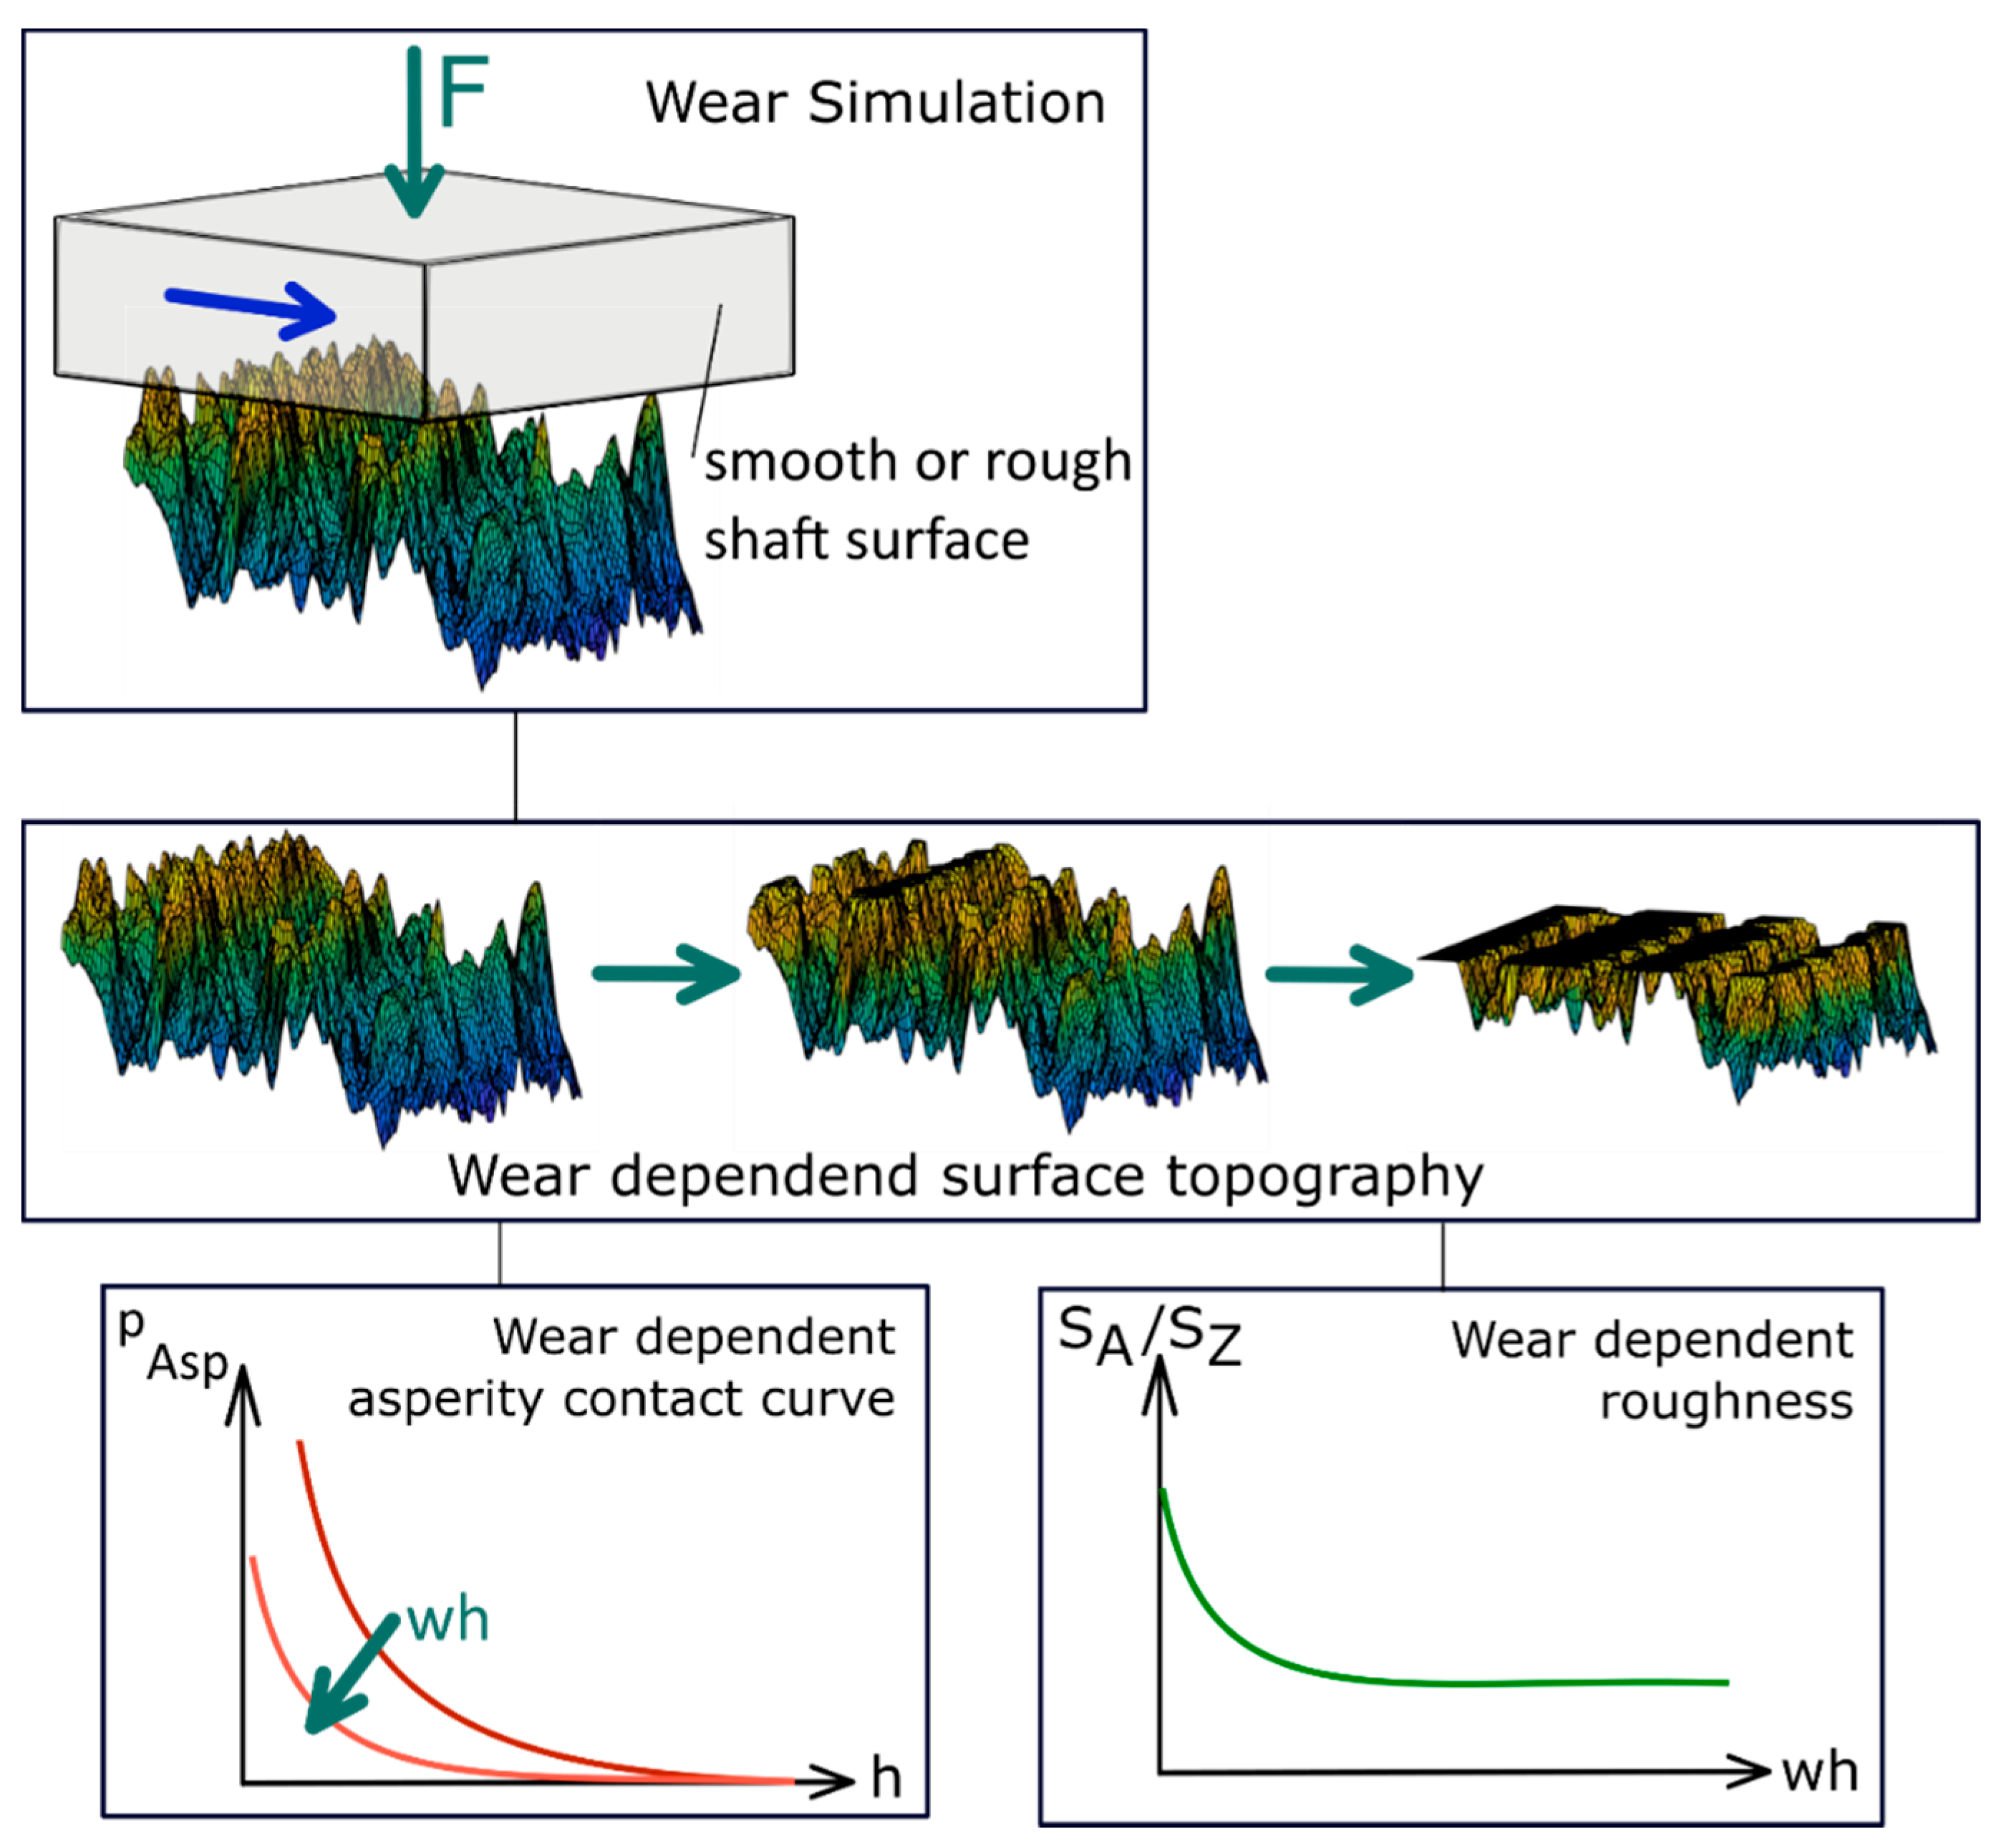
To simulate the surface wear, different modelling methodologies are presented in this study. For all of them, the point cloud of the initial state of the bearing surface (which is determined by the method explained in Section 2.1.3) is used. For the bearings and shaft materials used, it can be assumed, that the wear occurs predominantly on the bearing surface and therefore the shaft surface is not subject to any development over time. For a similar material combination (AlSn6, 34CrNiMo6), it was determined, that the wear volume on the softer bearing material is about two-tenths larger than on the shaft material [34]. The modelling approach for wear-dependent surface characterisation is shown in Figure 4: a surface section of the shaft is pressed onto a cut-out of the bearing surface. Depending on the modelling approach, a smooth or rough shaft surface cut-out is used. Due to the relative movement between the two surfaces, the topography is subjected to a wear-dependent change. In the case of a smooth shaft surface, the bearing surface is flattened accordingly. Surface parameters of the virtually worn surfaces are evaluated and compared to those with equivalent wear heights from experiments. Using the simulation model, the contact stiffness pAsp(h), as well as the mean arithmetic height Sa and the maxim height Sz, are evaluated as a function of the wear height (wh).

2.2.1. Geometric Modelling Approach

Using the point cloud, we created a wear model based on geometric considerations only. Therefore, in Matlab© a mesh-grid is generated and the height information is written for each node. The local wear heights are determined by three different variants:
A flat surface is successively aligned with the rough bearing surface (compare Figure 5a). If local overlaps occur, the bearing nodes are shifted until the intersection is eliminated.
In order not to wear the bearing surface to an ideal flat surface, a random value (Figure 5b) is added to the local wear height Δwhm. The amount of the random wear value follows a normal distribution 𝒩(µ,σrand). Where for µ the overlap of the nodes is used and sigma is determined as a function of the standard deviation for the run-in surface σrun_in, the current wear height whact, and the run_in wear height whrun_in:
σ r a n d = ( w h r u n _ i n 1 + w h a c t ) 1 k r a n d σ r u n _ i n
The exponent krand can be determined by the unworn (initial) and the run_in surface conditions (the values have to be inserted in µm):
k r a n d = lg ( w h r u n _ i n ) lg ( σ i n i t i a l σ r u n _ i n ) = lg ( 5.0 ) lg ( 0.3 0.15 ) = 2.32
For the present test conditions, this results in krand = 2.32.
Third, instead of the smooth surface, a section of the rough shaft surface is discretised and is continuously shifted towards the bearing surface. Again, nodes, where the overlapping occurs, are displaced (Figure 5c). Thus, the transient trend of the surface adaptation can be mapped easily and with little computational effort. The elastic deformation of the bearing and shaft is not considered in this methodology.

2.2.2. Elastic Modelling Approach

To consider the elastic deformation of the asperities due to the local contact pressure in the contact zone, an FE model was created in Abaqus© (ABAQUS Inc., Palo Alto, CA, USA). For the determination of the local wear heights, the widely used wear equation according to Archard (Equation (3)) is implemented in local notation (Equation (4)) [3,24,35].
V w = K H F N s
The quotient of the dimensionless wear coefficient K and the hardness H can be combined into a dimensioned wear coefficient k. The wear coefficient k is specific to the present tribosystem. By dividing Equation (3) by the contact area per node, the Archard wear equation is obtained in local form [35]:
w h m = k p m s
For wear modelling, a constant shaft surface velocity is assumed. Furthermore, it is supposed, that each node on the surface has the same velocity v = vm. A time-dependent consideration allows the local wear rate to be written as:
w h m t = k p m v
Hence, the local wear height for a discrete time step can be written as:
Δ w h m = k p m v Δ t = C p m Δ t
In the commercial FE program Abaqus©, a node shift can be implemented with the user subroutine UMESHMOTION. The script for the subroutine is written in Fortran. This is an established form to simulate wear [25,27,35].
A static/general study is prepared for implementation. Since the local wear height Δwhm only shifts the surface nodes, the underlying nodes must be shifted proportionally to the surface wear to avoid excessive mesh distortion. This is realised with ALE adaptive meshing. Since ALE adaptive meshing can only be applied to static/general studies, this type is used [36].
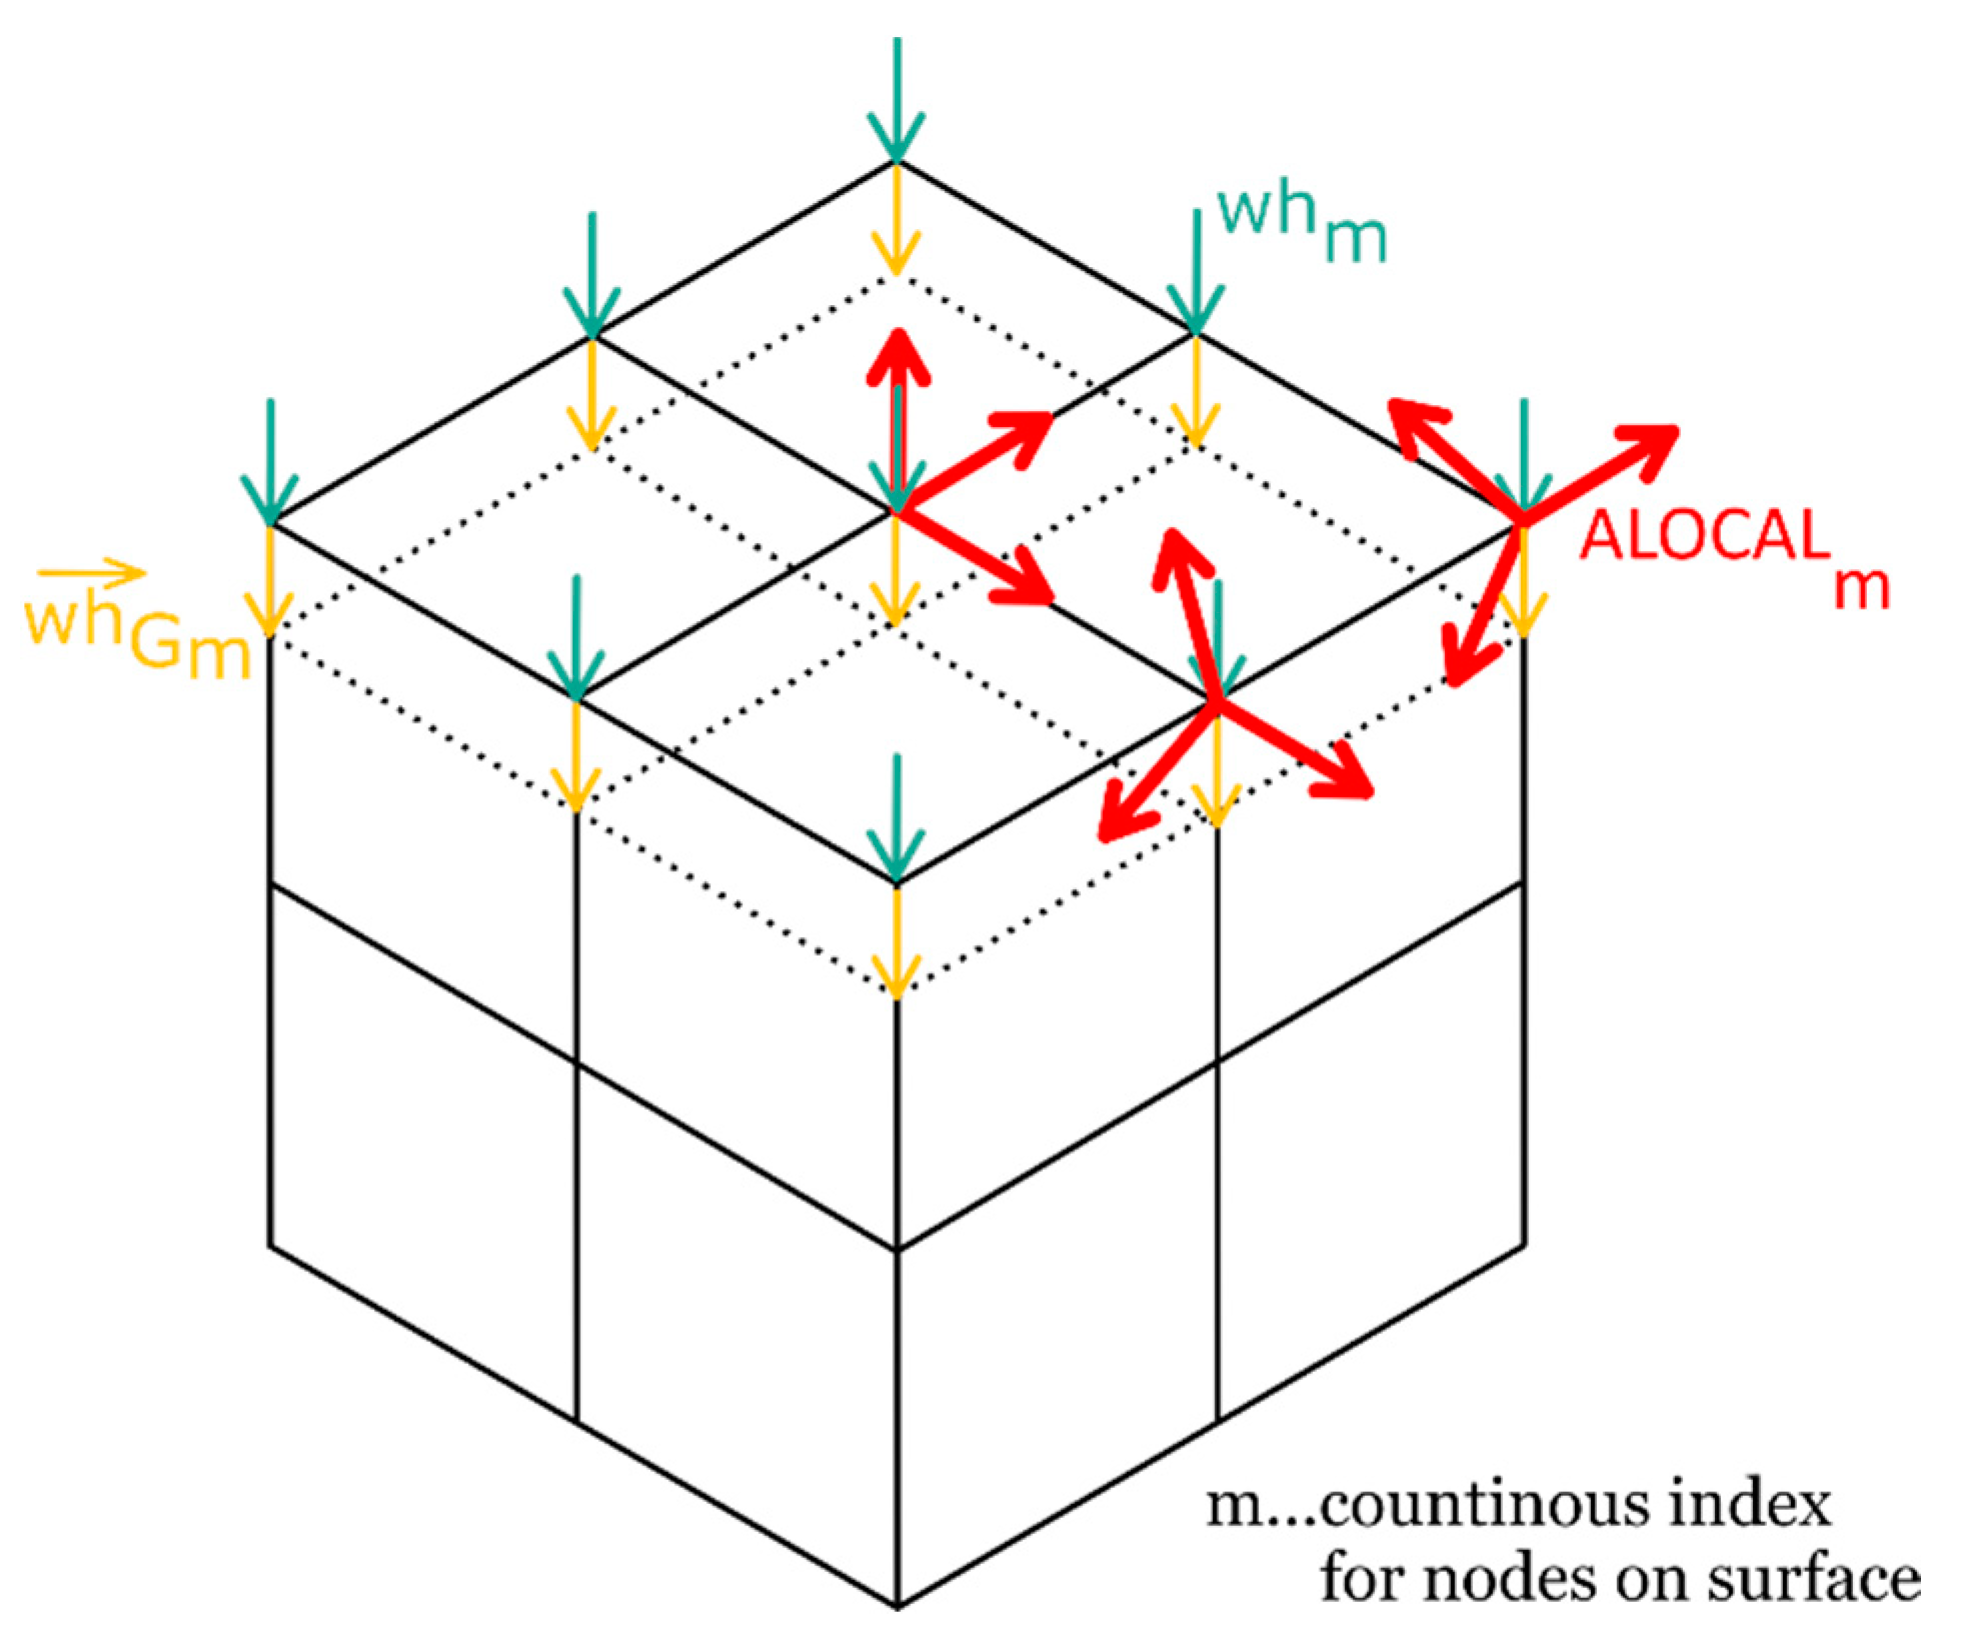
The local displacement of each node is calculated according to Equation (6). This corresponds to a displacement in the vertical direction. Using the subroutine Umeshmotion the node displacements can be applied related to the local node coordinate system ALOCAL [36]. Therefore, the local wear height in vertical direction whm must be transferred into a displacement vector ULOCAL, which is referred to as the local coordinate system ALOCAL. For nodes within a surface, the wear height can be directly assigned to the 3rd component in the locale wear vector ULOCAL(3). For nodes at an edge, or on corners, the components of ULOCAL have to be calculated (Figure 6).
The direction of the global wear vector w h G m is from a surface node to the nearest subjacent neighbour node. The wear height Δwhm for the corresponding node m is first split into the global components whGmi (i ∈ 1…3) of the respective vector.
The base vectors of the local coordinate system ALOCAL are combined in the base matrix B. Here, bij corresponds to the components of the 3 basis vectors (i ∈ 1…3, j ∈ 1…3). The global components of the wear vector can be represented by:
w h G = B u L = ( b 1 , 1 b 1 , 2 b 1 , 3 b 2 , 1 b 2 , 2 b 2 , 3 b 3 , 1 b 3 , 2 b 3 , 3 ) ( u L 1 u L 2 u L 3 ) = ( w h G 1 w h G 2 w h G 3 )
The transformation of the global wear vector w h G to the local system ALOCAL is carried out by multiplication with the inverse B-matrix (Equation (8)).
( u L 1 u L 2 u L 3 ) = B 1 ( w h G 1 w h G 2 w h G 3 )
An area of 100 × 100 µm is scanned by confocal microscope (Section 2.1.3). This point cloud is converted into a .stl-file by a Matlab© routine to mesh a cuboid with a rough surface using Hypermesh [37]. Since ALE adaptive meshing is only compatible with linear mesh elements [36], the mesh consists of linear hexahedral elements with 1µm side length.
In the FE model, the counter body (shaft) is pressed against the rough bearing surface. For each node, the local displacement Δwhm is calculated depending on the local pressure.
If the time increment (Equation (6)) is chosen small enough, the bearing surface assumes the contour of the shaft surface. In the case of a smooth shaft surface, the bearing surface is increasingly flattened.
In order not to produce an ideal smooth surface, a normal distributed random value 𝒩(µ,σrand) with µ = C pm Δt and σ according to Equations (1) and (2) is used for the local wear height whG (Figure 5b).
Instead of “roughening” the surface with artificial random values during the simulation, the third approach is introduced. Instead of a smooth surface, a rough shaft surface is pressed onto the bearing. The three implemented methods for simulating wear with Abaqus are visualised in Figure 5.
For the FE simulation, the bearing is fixed at the bottom side. The body, representing the shaft, is fixed in both horizontal directions. In the vertical direction, a force Fv = 0.225 N acts on the shaft, which induces the local asperity contact pressures pm. To avoid numerical complications, the shaft is constrained by a spring until the first contact with the bearing takes place. For more information about the boundary conditions please refer to [37]. An ideal elastic material behaviour is assumed for the bearing and shaft (EBearing = 77,590 N/mm², EShaft = 210,000 N/mm²).
For the individual surface parameter evaluation, the modified point clouds are provided as a function of the wear height. For these point clouds, the asperity contact model and other surface parameters can be evaluated.
The contact model is evaluated according to Greenwood and Williamson [38]. This is based on one rough and one smooth surface. Further assumptions are made for this contact model [38]: the asperities are approximated by elastic spheres with the same radius, the roughness follows a normal distribution, the asperities do not influence each other in their deformation and the surface roughness can be characterised by statistical parameters. To calculate the asperity contact pressure curves for different wear heights, the current surface topography and a flat surface are used in each case. For more information on the evaluation of the contact model, please refer to [33].
For the worn surfaces, which were generated with the Matlab routine, in addition to the GW contact model, the contact stiffness was determined using a FEM model. For this purpose, the point cloud of the bearing surface for specific wear heights is exported from the Matlab© wear routine and a solid is meshed with the rough bearing surface using HyperMesh. A smooth cuboid is modelled opposite the rough surface. For both bodies, a linear elastic material behaviour (EBearing = 77,590 MPa, νBearing = 0.32, EShaft = 210,000 MPa, νShaft = 0.30) is assigned. The cuboid is pressed against the rough bearing surface in a displacement-controlled way. The reaction force, generated by the displacement, is evaluated as a function of the mean gap height between the rough and smooth surfaces, and pAsp(h) can be determined. For more information on the used FE contact model, please refer to [37].

3. Results

3.1. Experimental Results

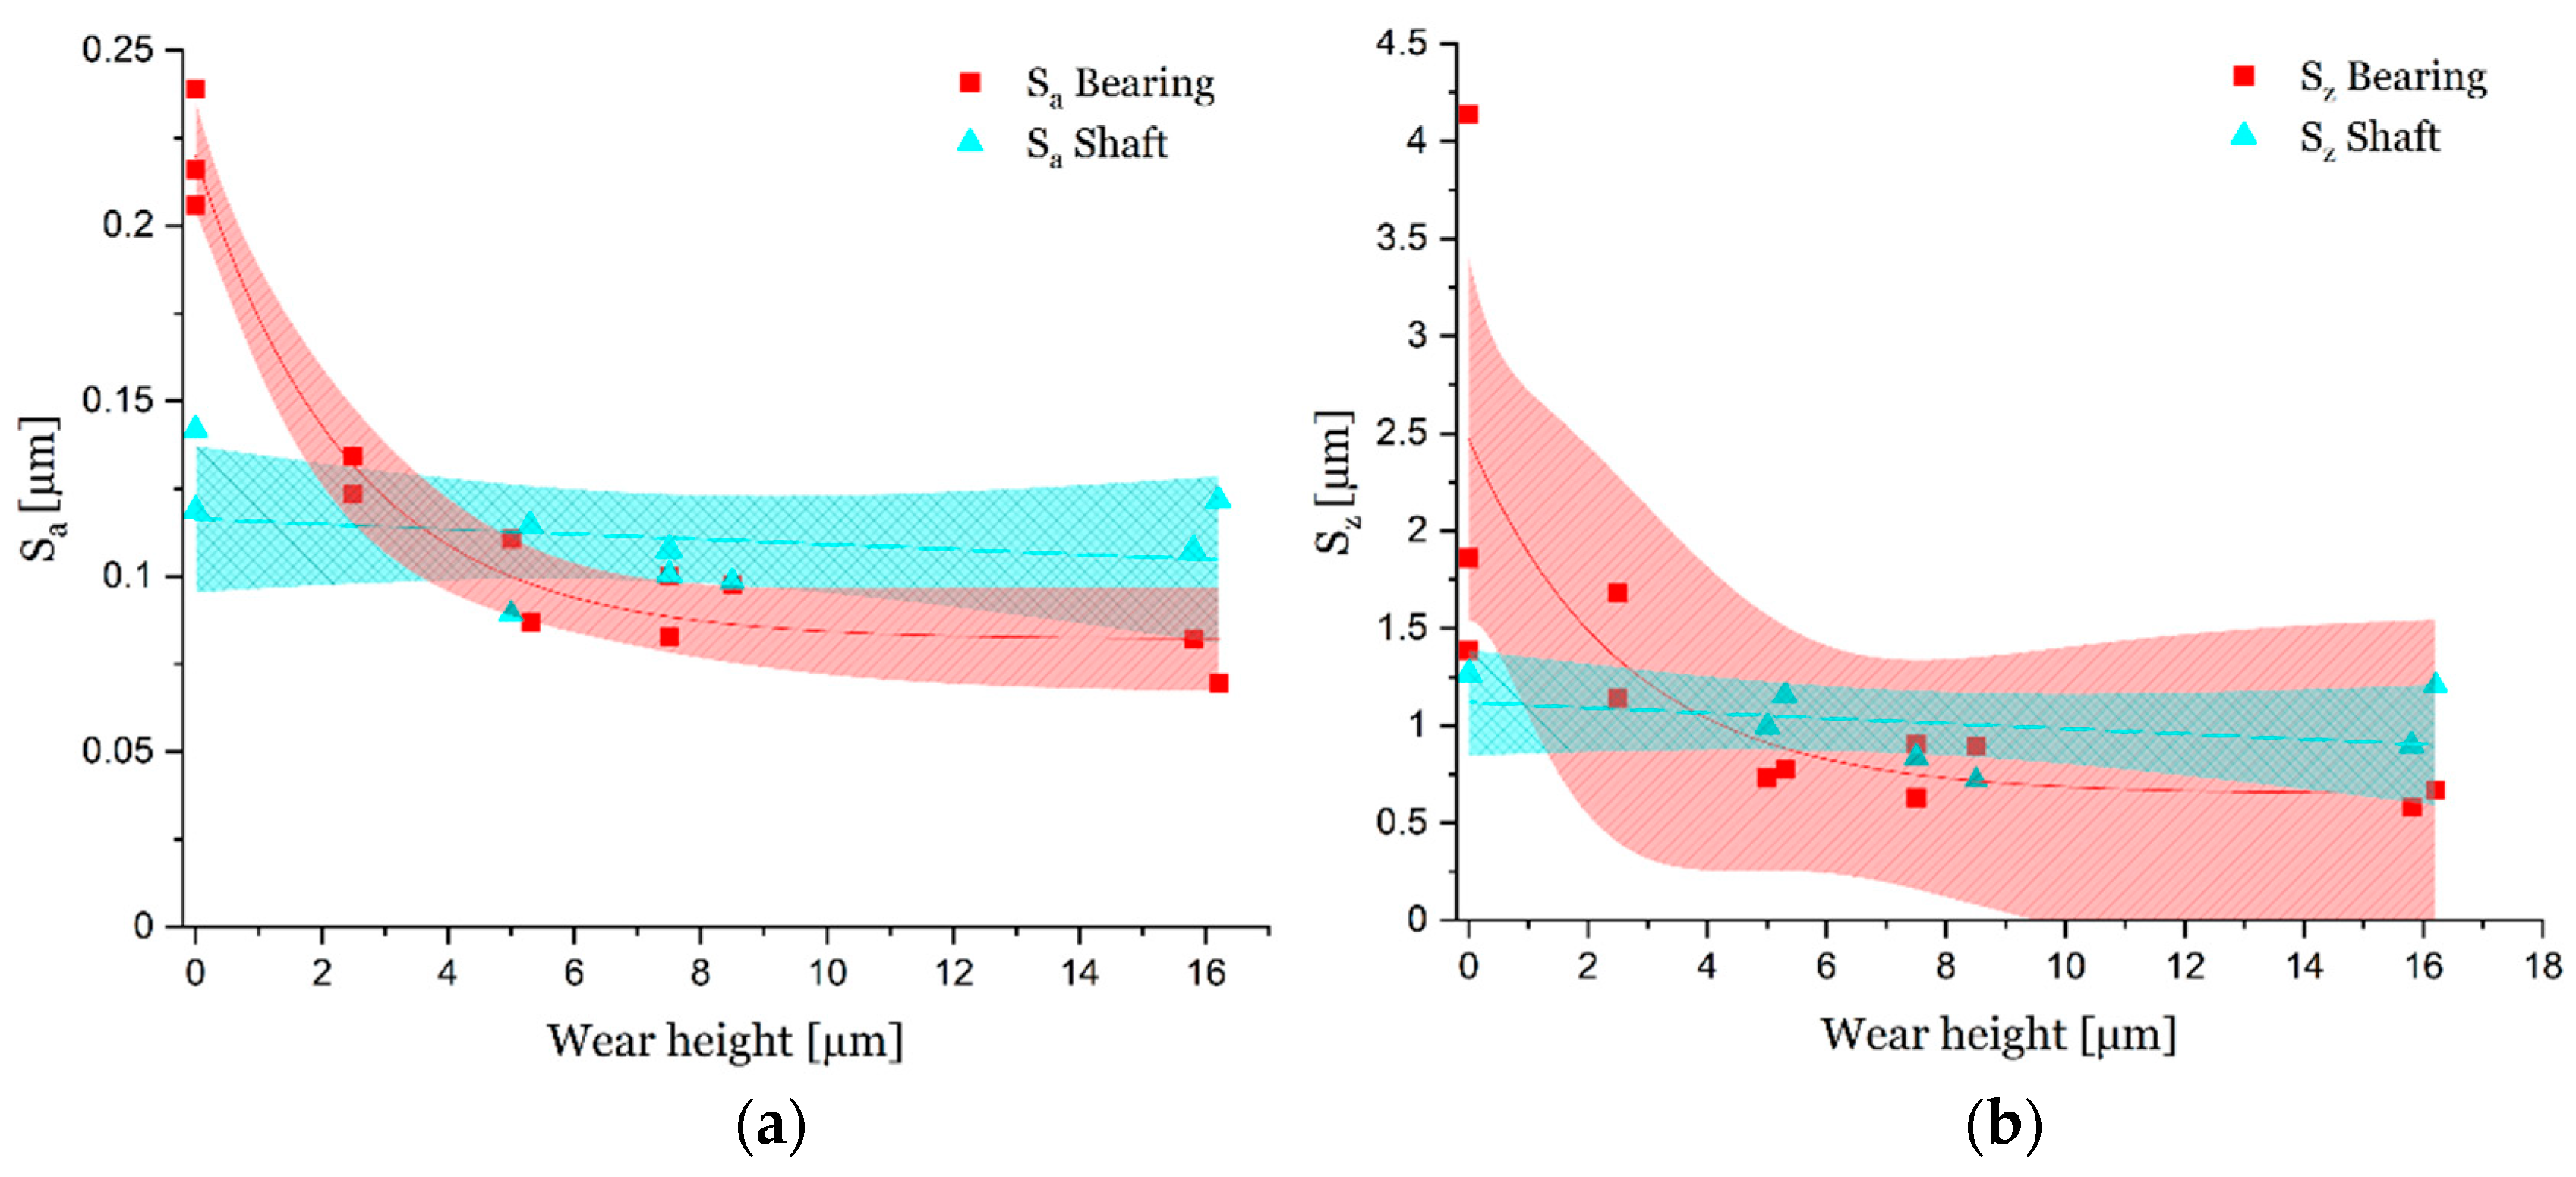
Experiments were carried out with different test times and surface cut-outs were measured for 12 different wear heights centered on the bearing shell (Figure 3). The trend of the mean arithmetic height Sa and the maximum height Sz for the shafts and bearings for specific wear heights on the bearing shell is visualised in Figure 7. In addition to the Sa- and Sz- values, respectively, the 95% confidence bands are shown. In the initial state (at wear height 0 µm), the bearing shows a roughness of Sa~0.22 µm and Sz~2.5 µm, respectively. As the wear height increases, a decreasing surface roughness is obvious, until it reaches a constant value of Sa~0.09 µm and Sz~0.9 µm from approximately 5 µm wear height. For the harder shaft surface, it can be seen, that the roughness remains at nearly constant values of Sa~0.11 µm and Sz~1.1 µm with increasing wear. Thus, it can be assumed, that in the present tribological system, wear occurs mainly on the bearing surface.
The change in surface roughness with increasing wear suggests, that the topography is also changing. The effect of continuous roughness development on contact stiffness can be analysed by evaluating the contact models for different wear heights.
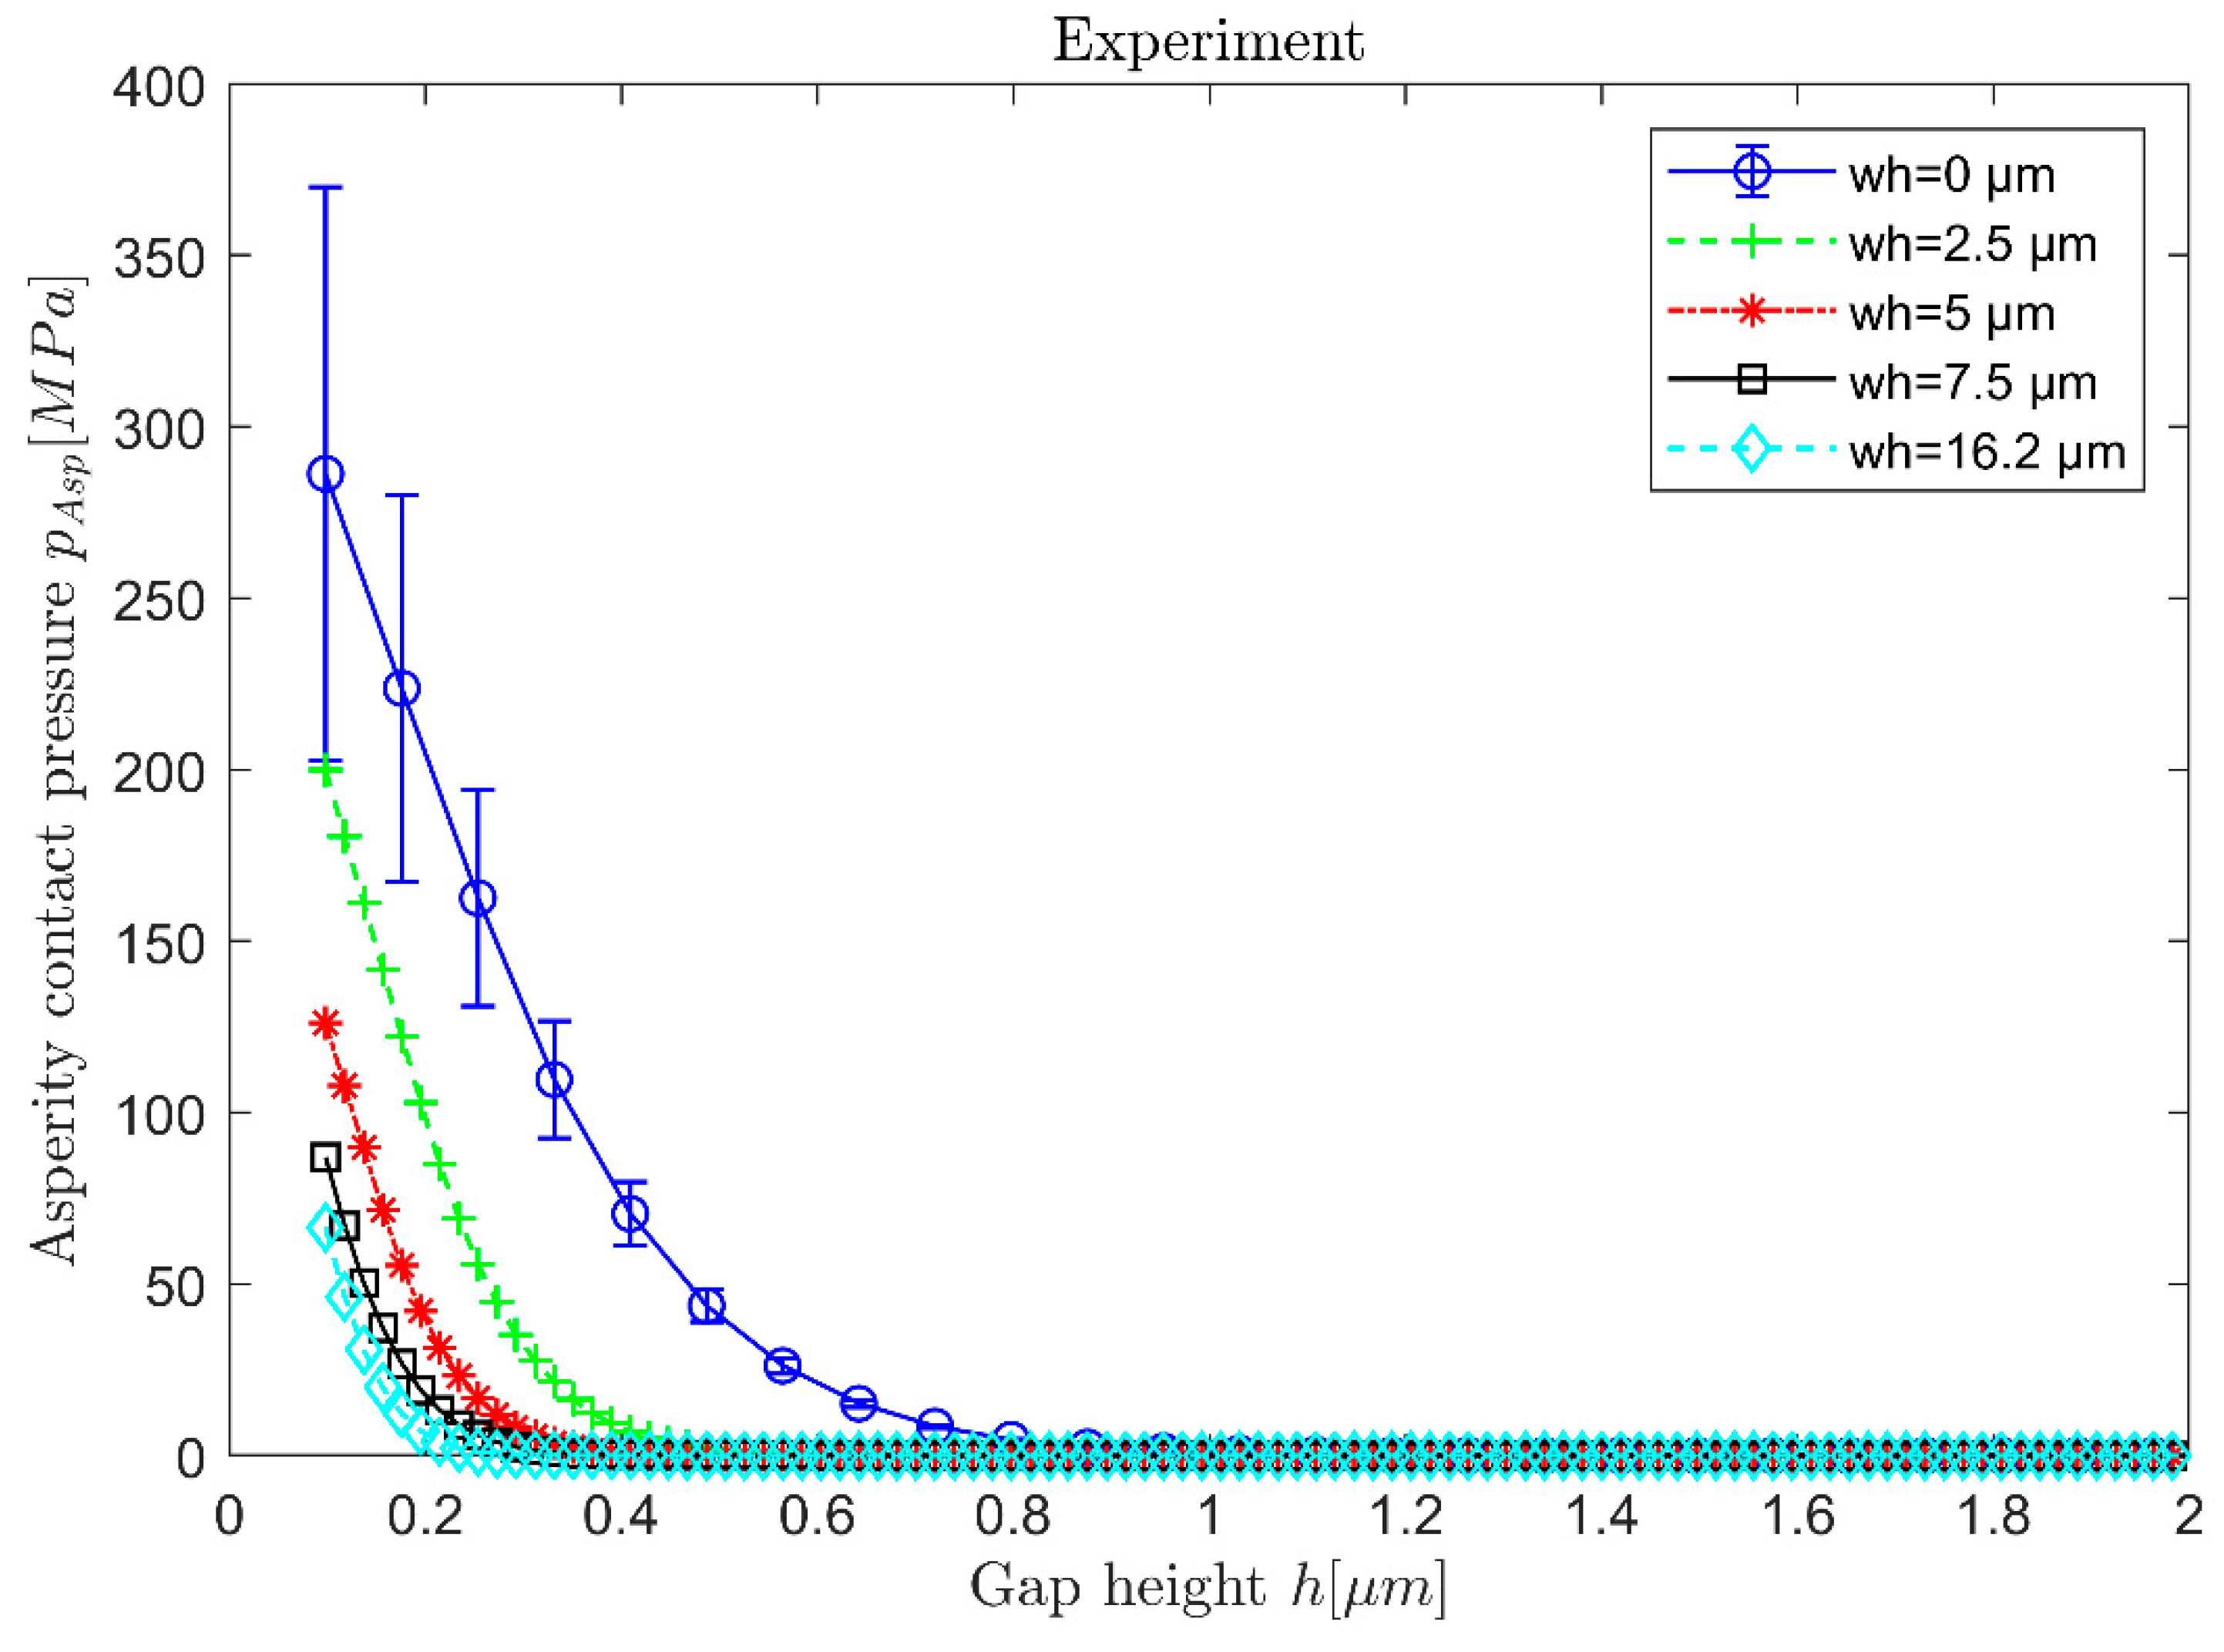
Starting from the initial state (wh = 0, blue line with error bars in Figure 8), the shift of the asperity contact curve towards smaller lubrication gap heights with increasing wear height is observed (Figure 8). As the wear height increases, the highest asperities are successively removed. As a result, the two contact surfaces come into contact at lower gap heights h.
For the initial state, the averaged asperity contact curve of three surface sections including error bars is shown. For the curves with increased wear heights, it is assumed, that the error bars can be adopted from the initial state. From a wear height of wh = 5 µm, all the respective pAsp(h) curves lie within the error band. Thus, it is supposed that from wh = 5 µm the run-in state is reached, which confirms the conclusion from Figure 7.

3.2. Geometric Modelling Approach—Results

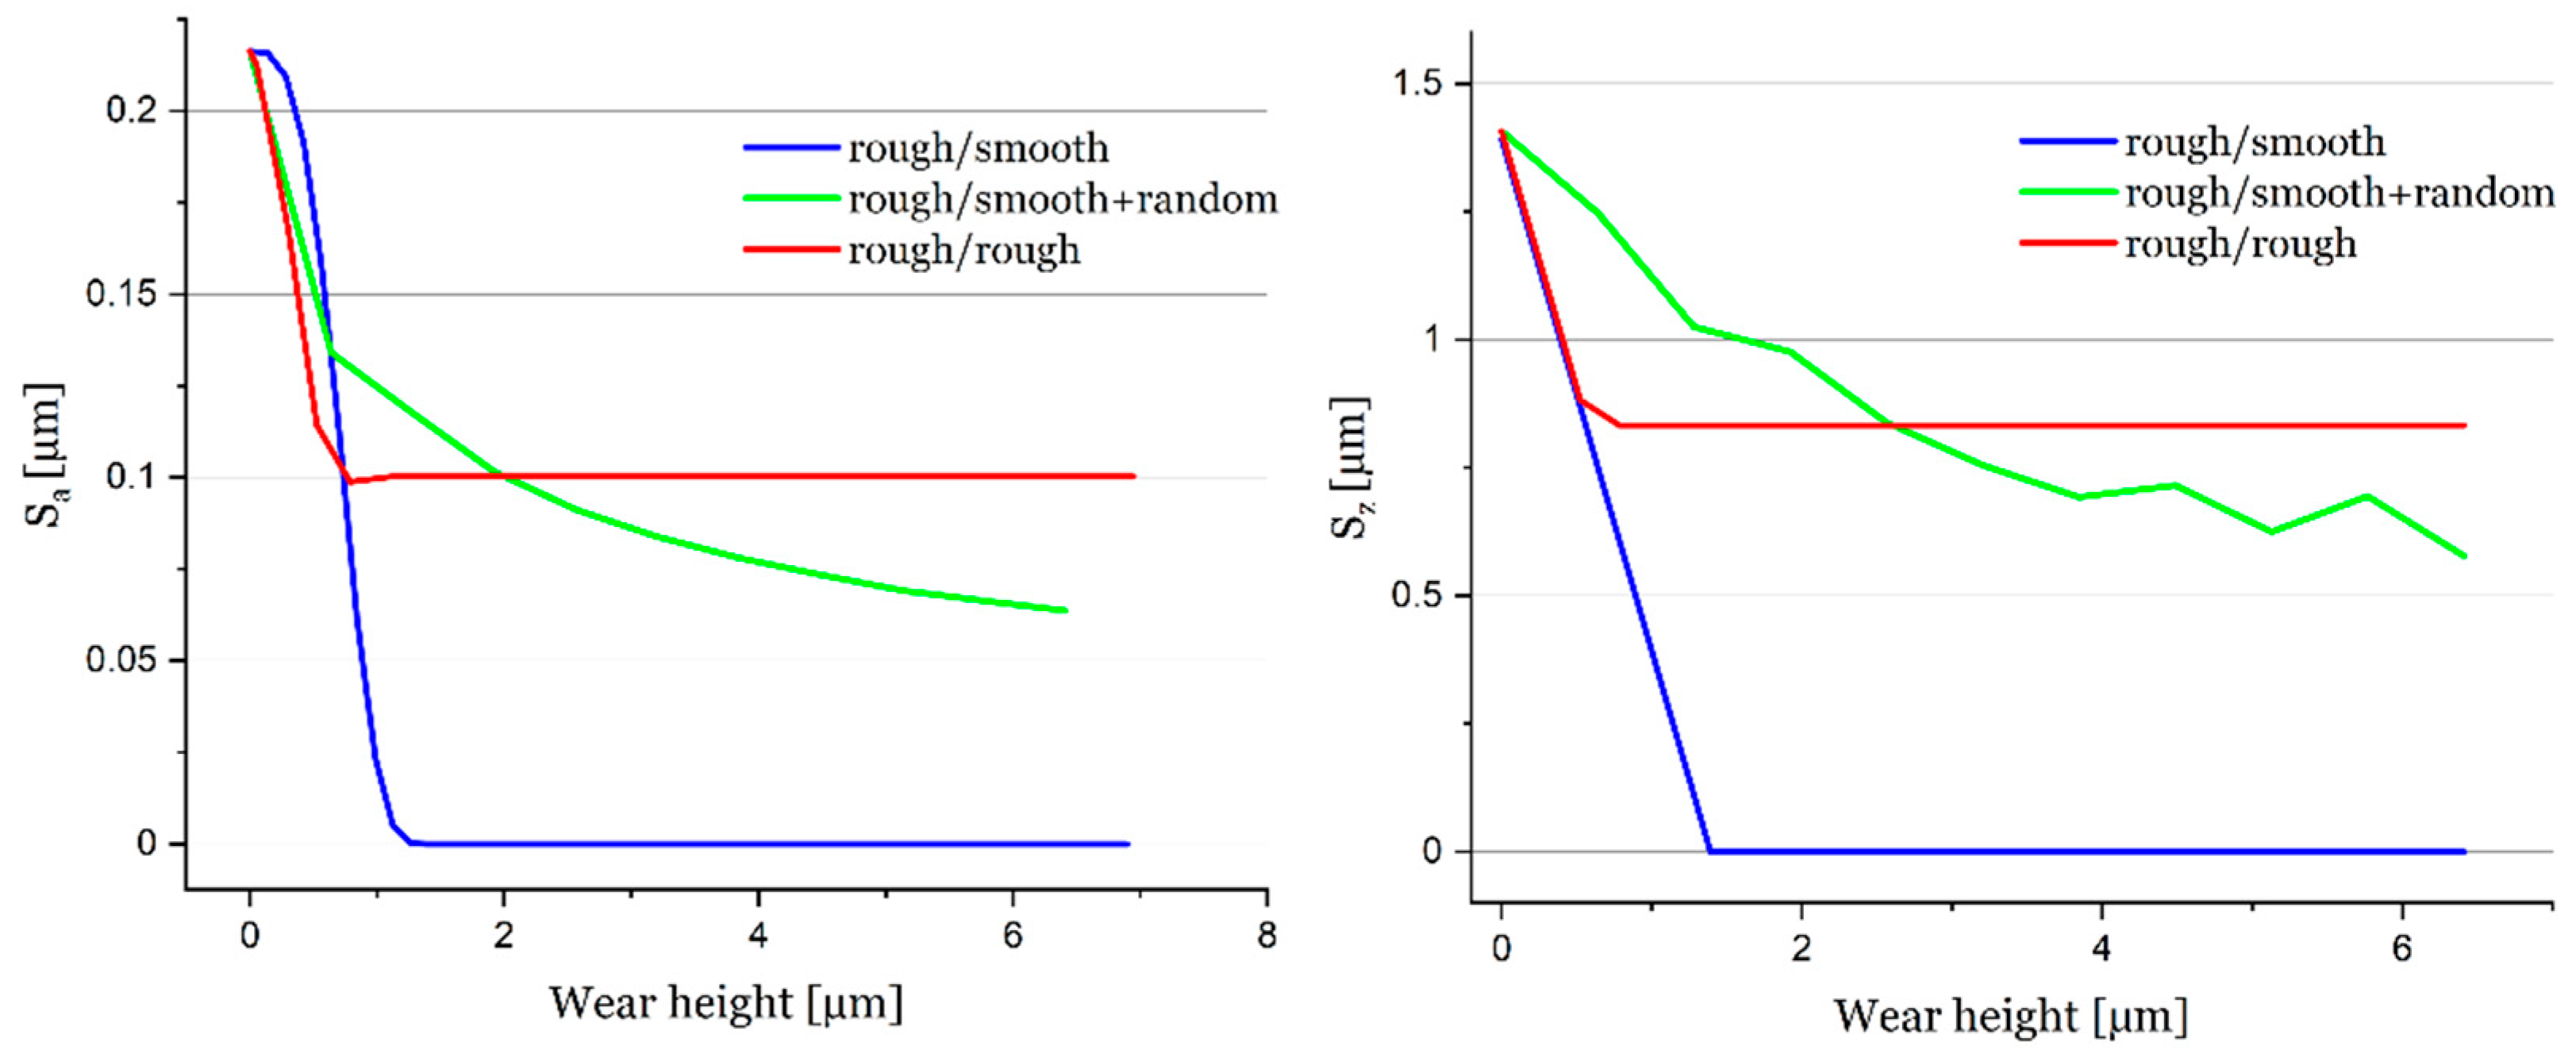
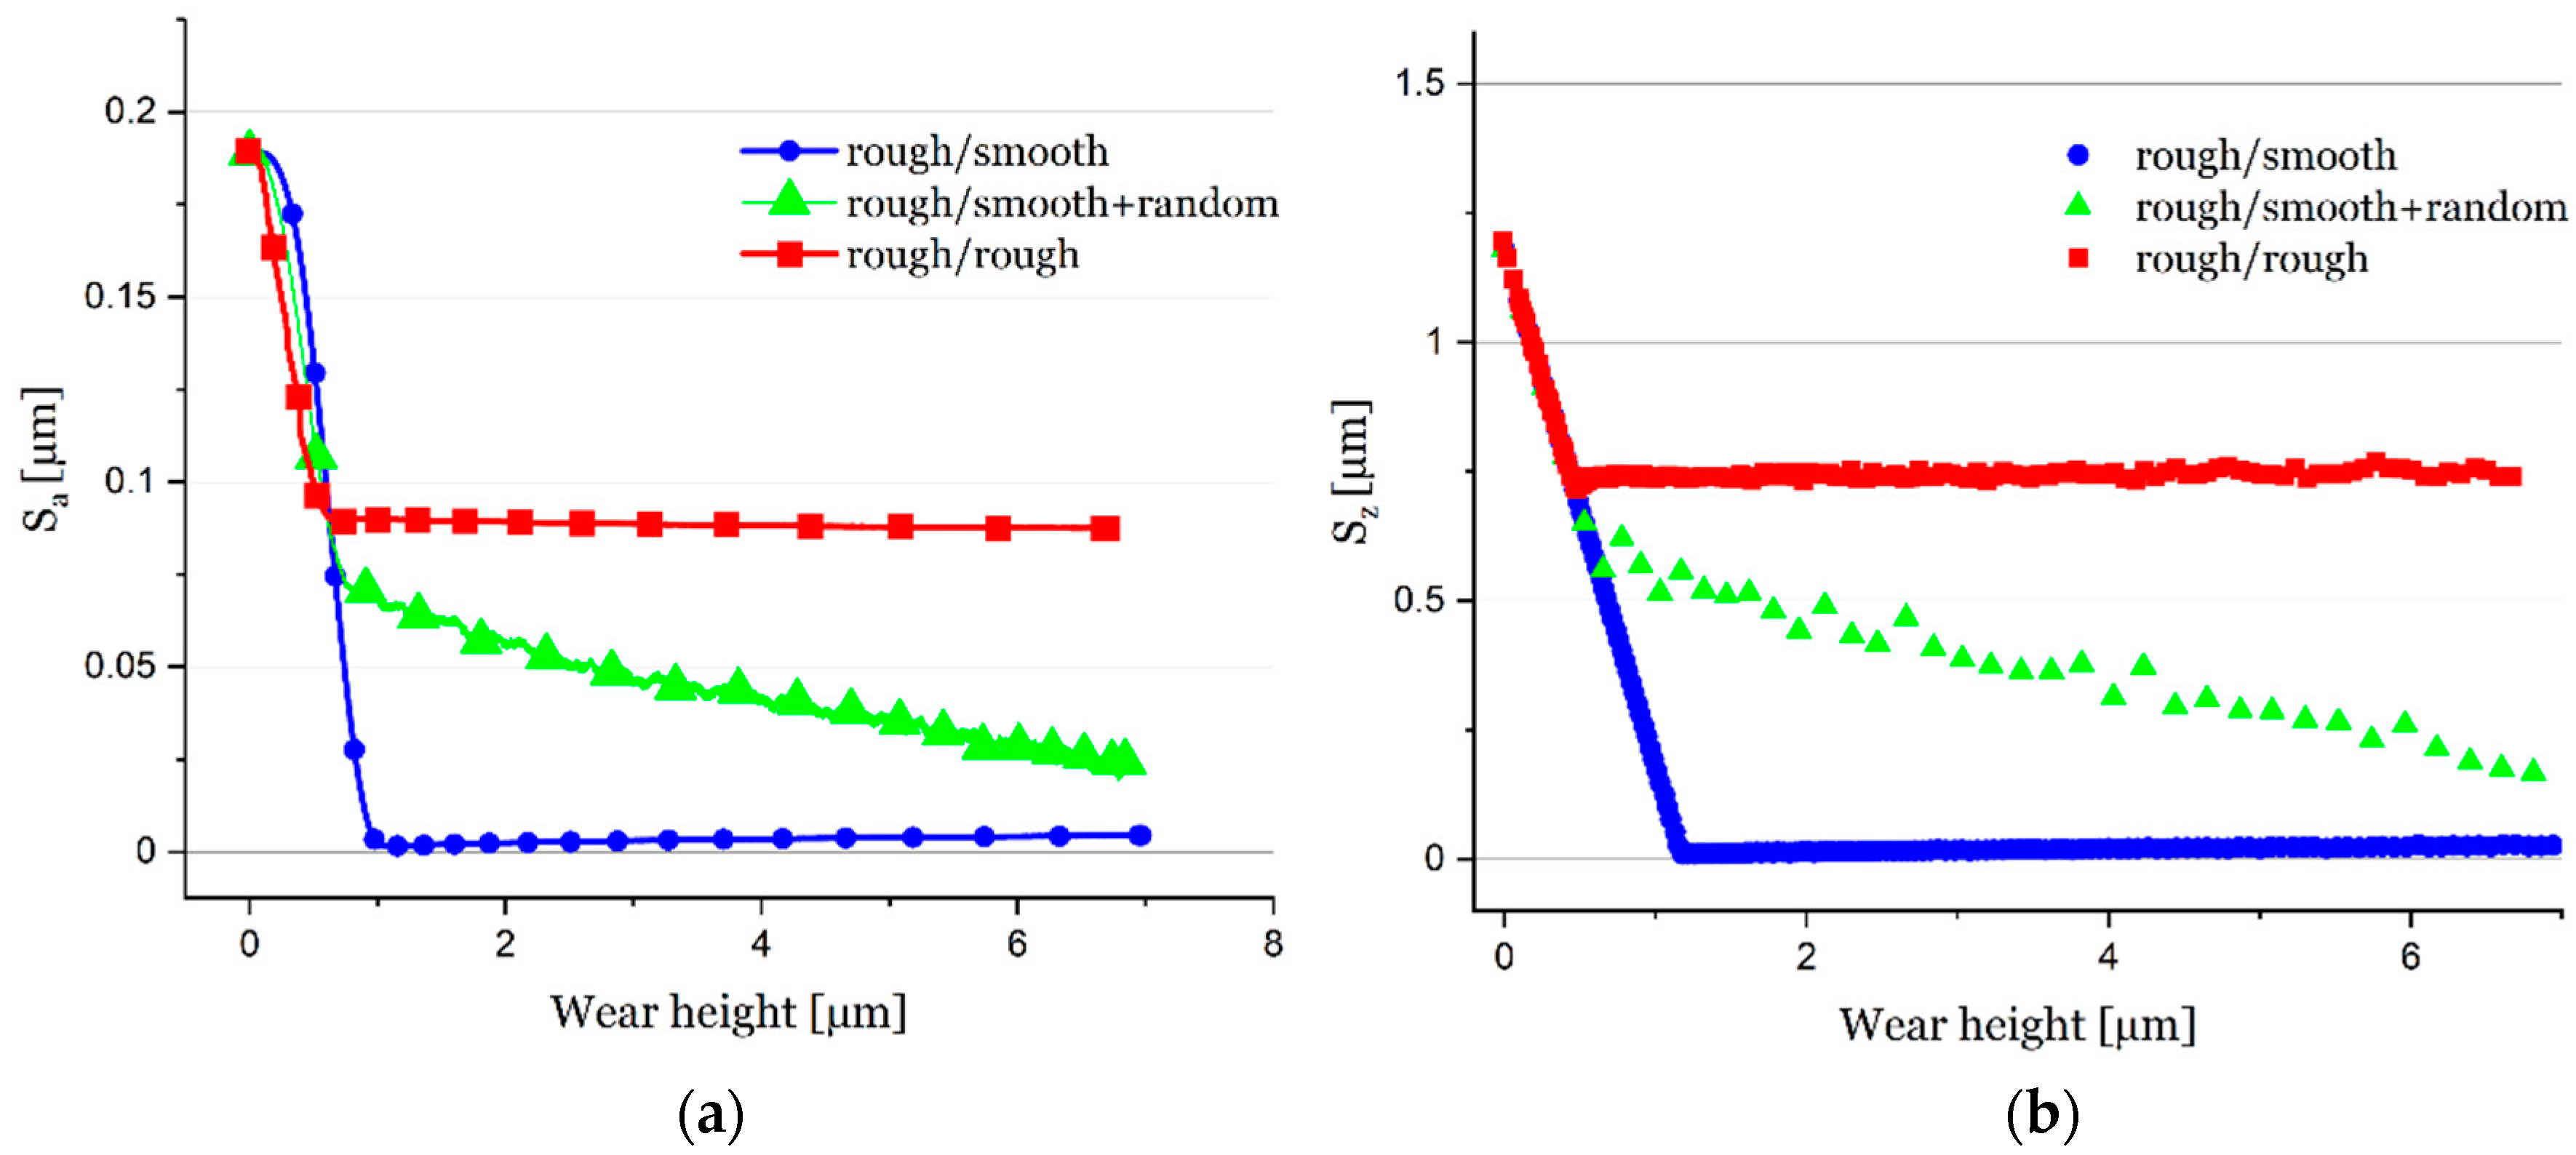
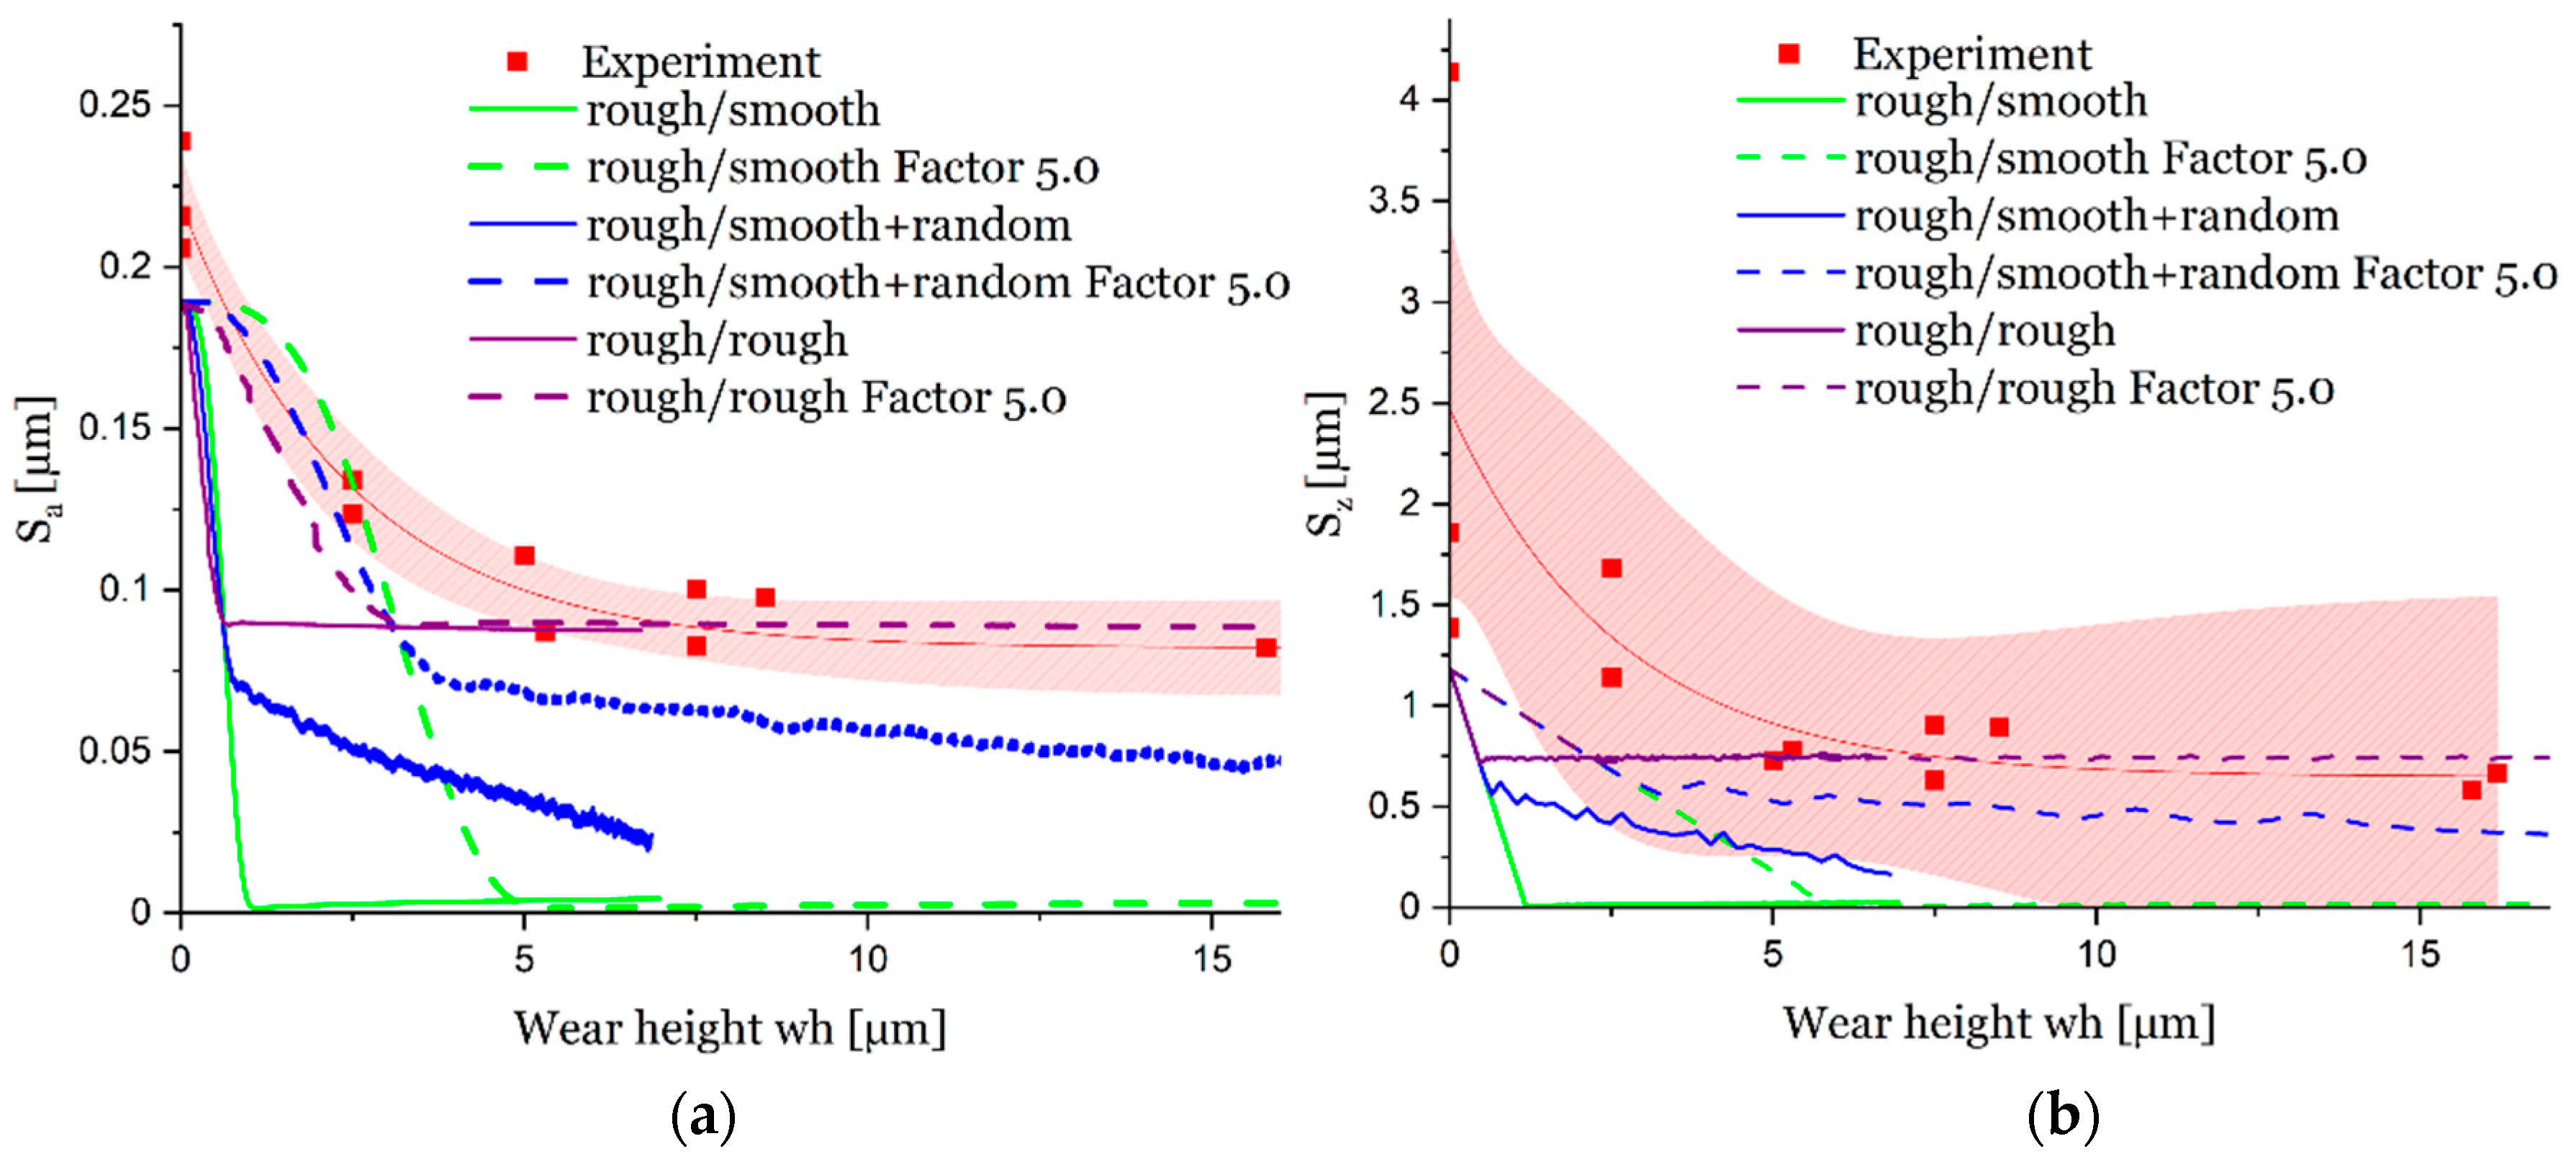
Up to a wear height of ~0.8 µm, the wear-dependent surface parameter Sa shows an approximately identical curve for the three different modelling methods (Figure 9). For wh~0.8 µm, the methodology (b) (rough/smooth + random) has a higher Sa value than the methodology (a) (rough/smooth), due to the additional random wear value. Since sigma in the normal distribution function for the random wear value is adjusted with progressive wear (Equation (1)), the rate of change S a w h for methodology (b) is dependent on the wear height.
The simulation of methodology (a) (rough/smooth) shows a rapid decrease in Sa until the bearing surface is fully smoothed (Sa = 0). The methodology (c) (rough/rough) gives similar results to (a) (rough/smooth), but Sa takes a constant value of (~0.1 µm), which corresponds to the roughness value of the used rough shaft surface.
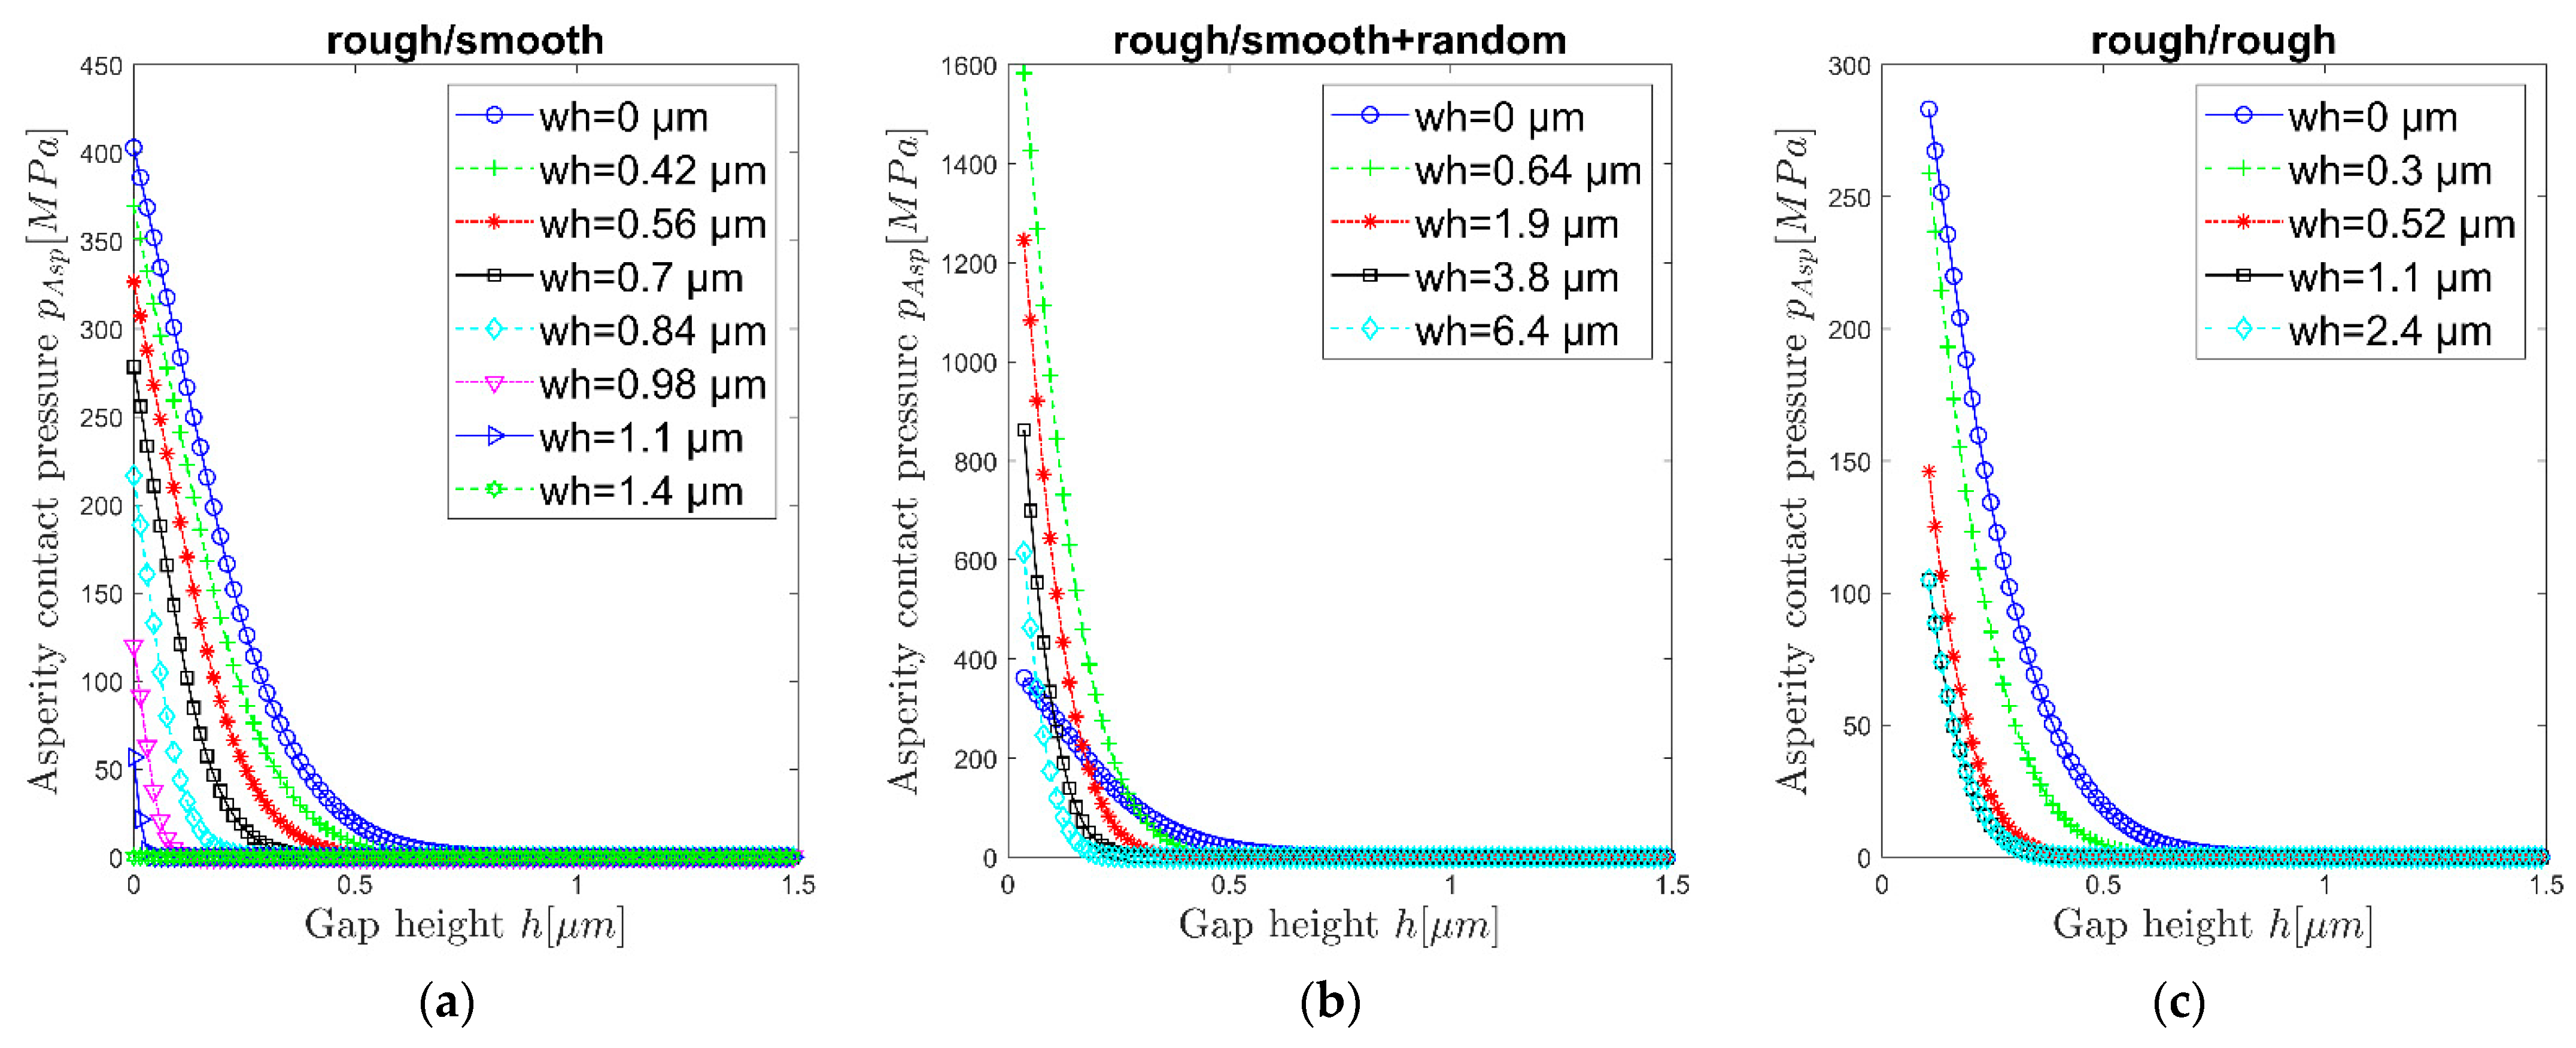
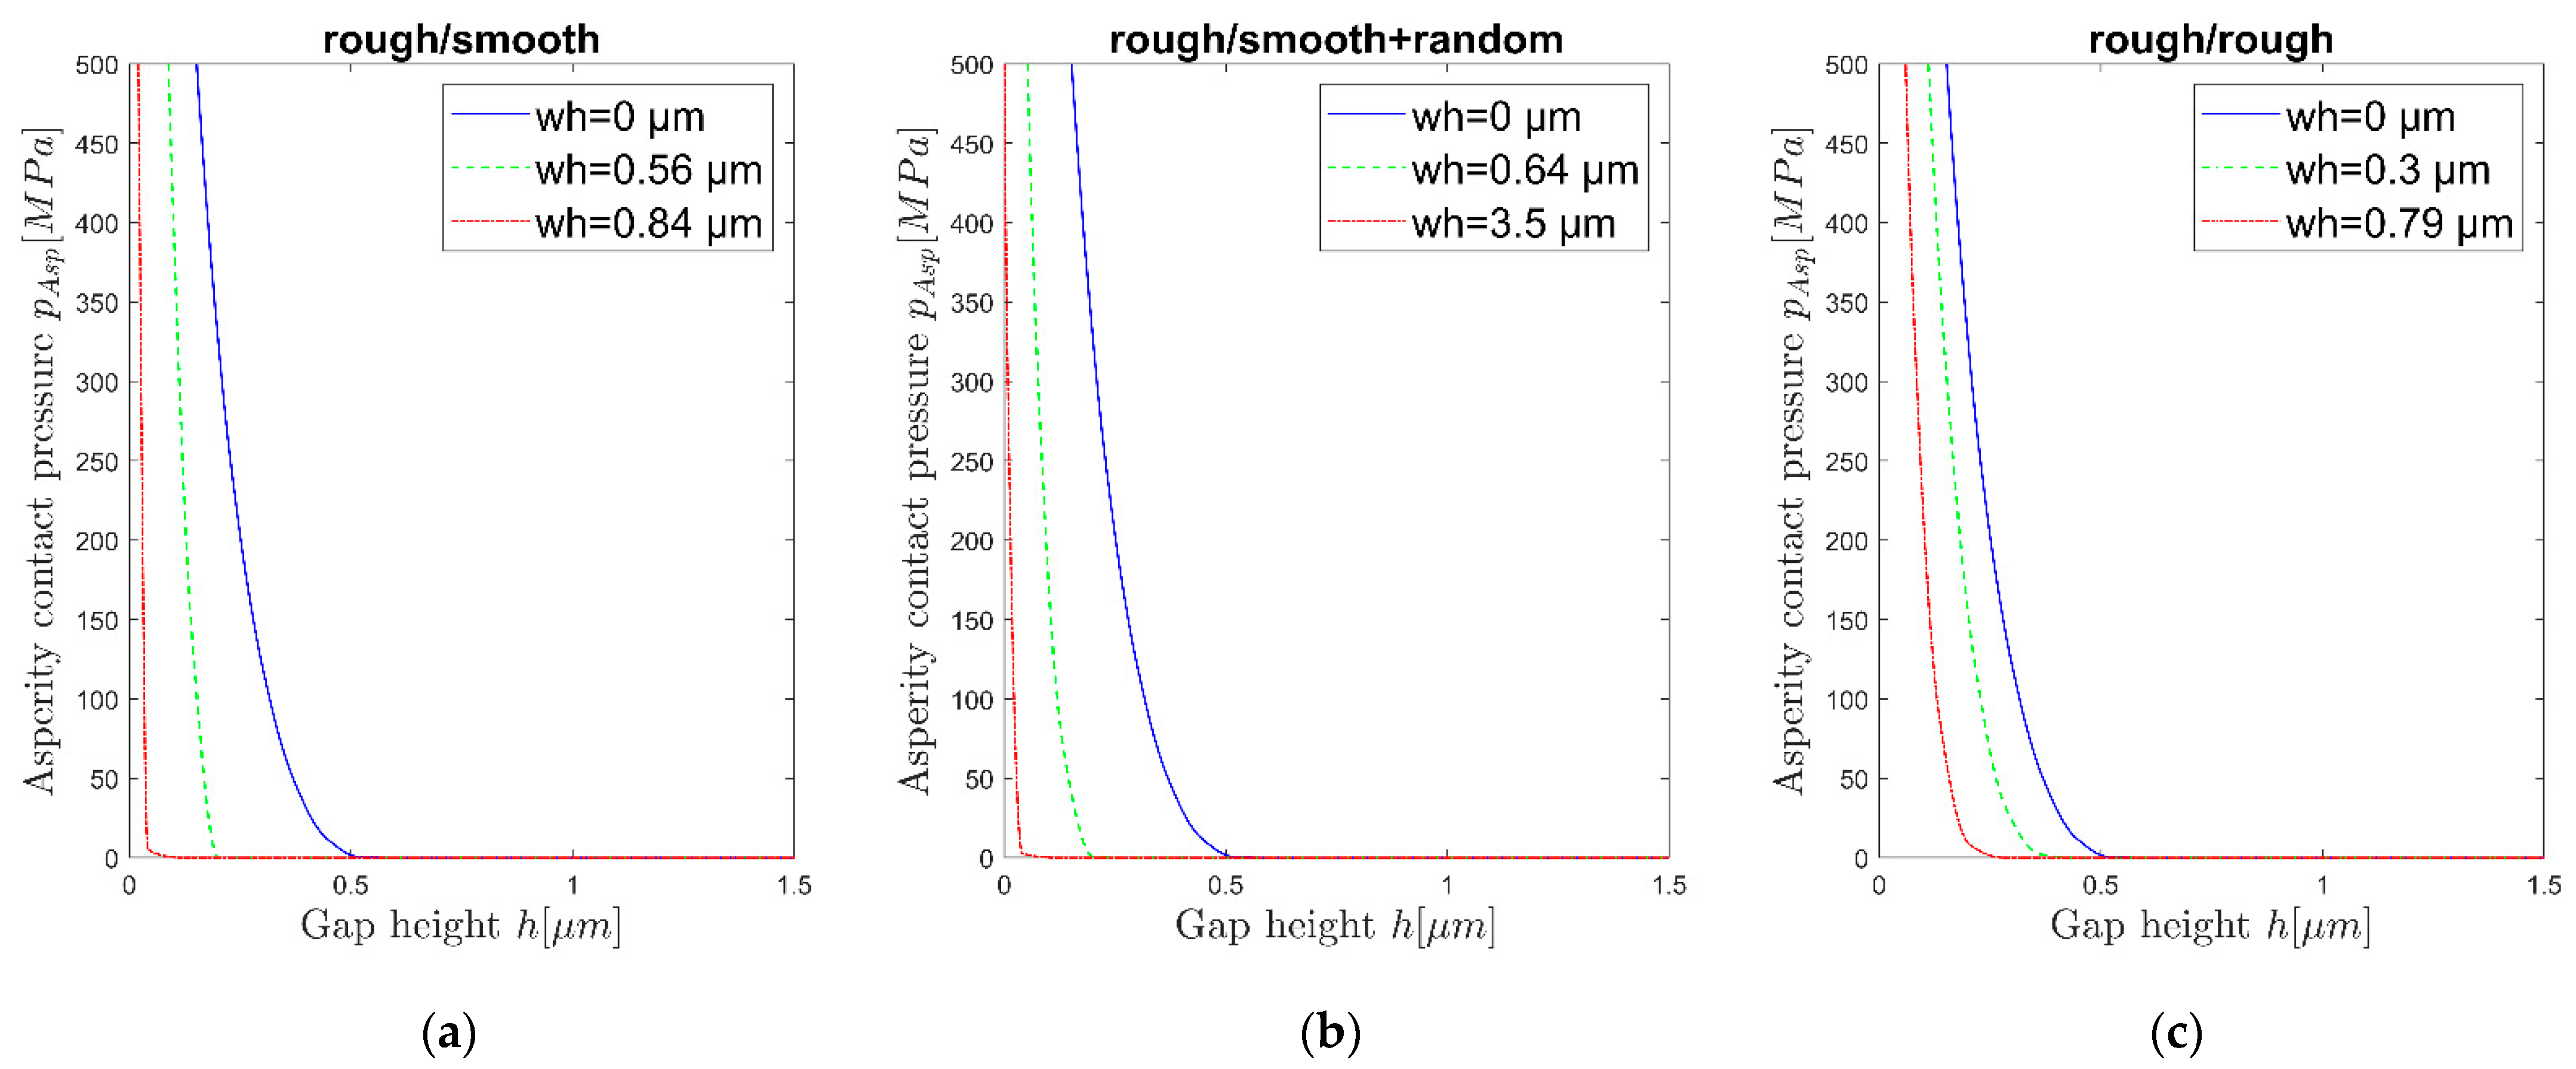
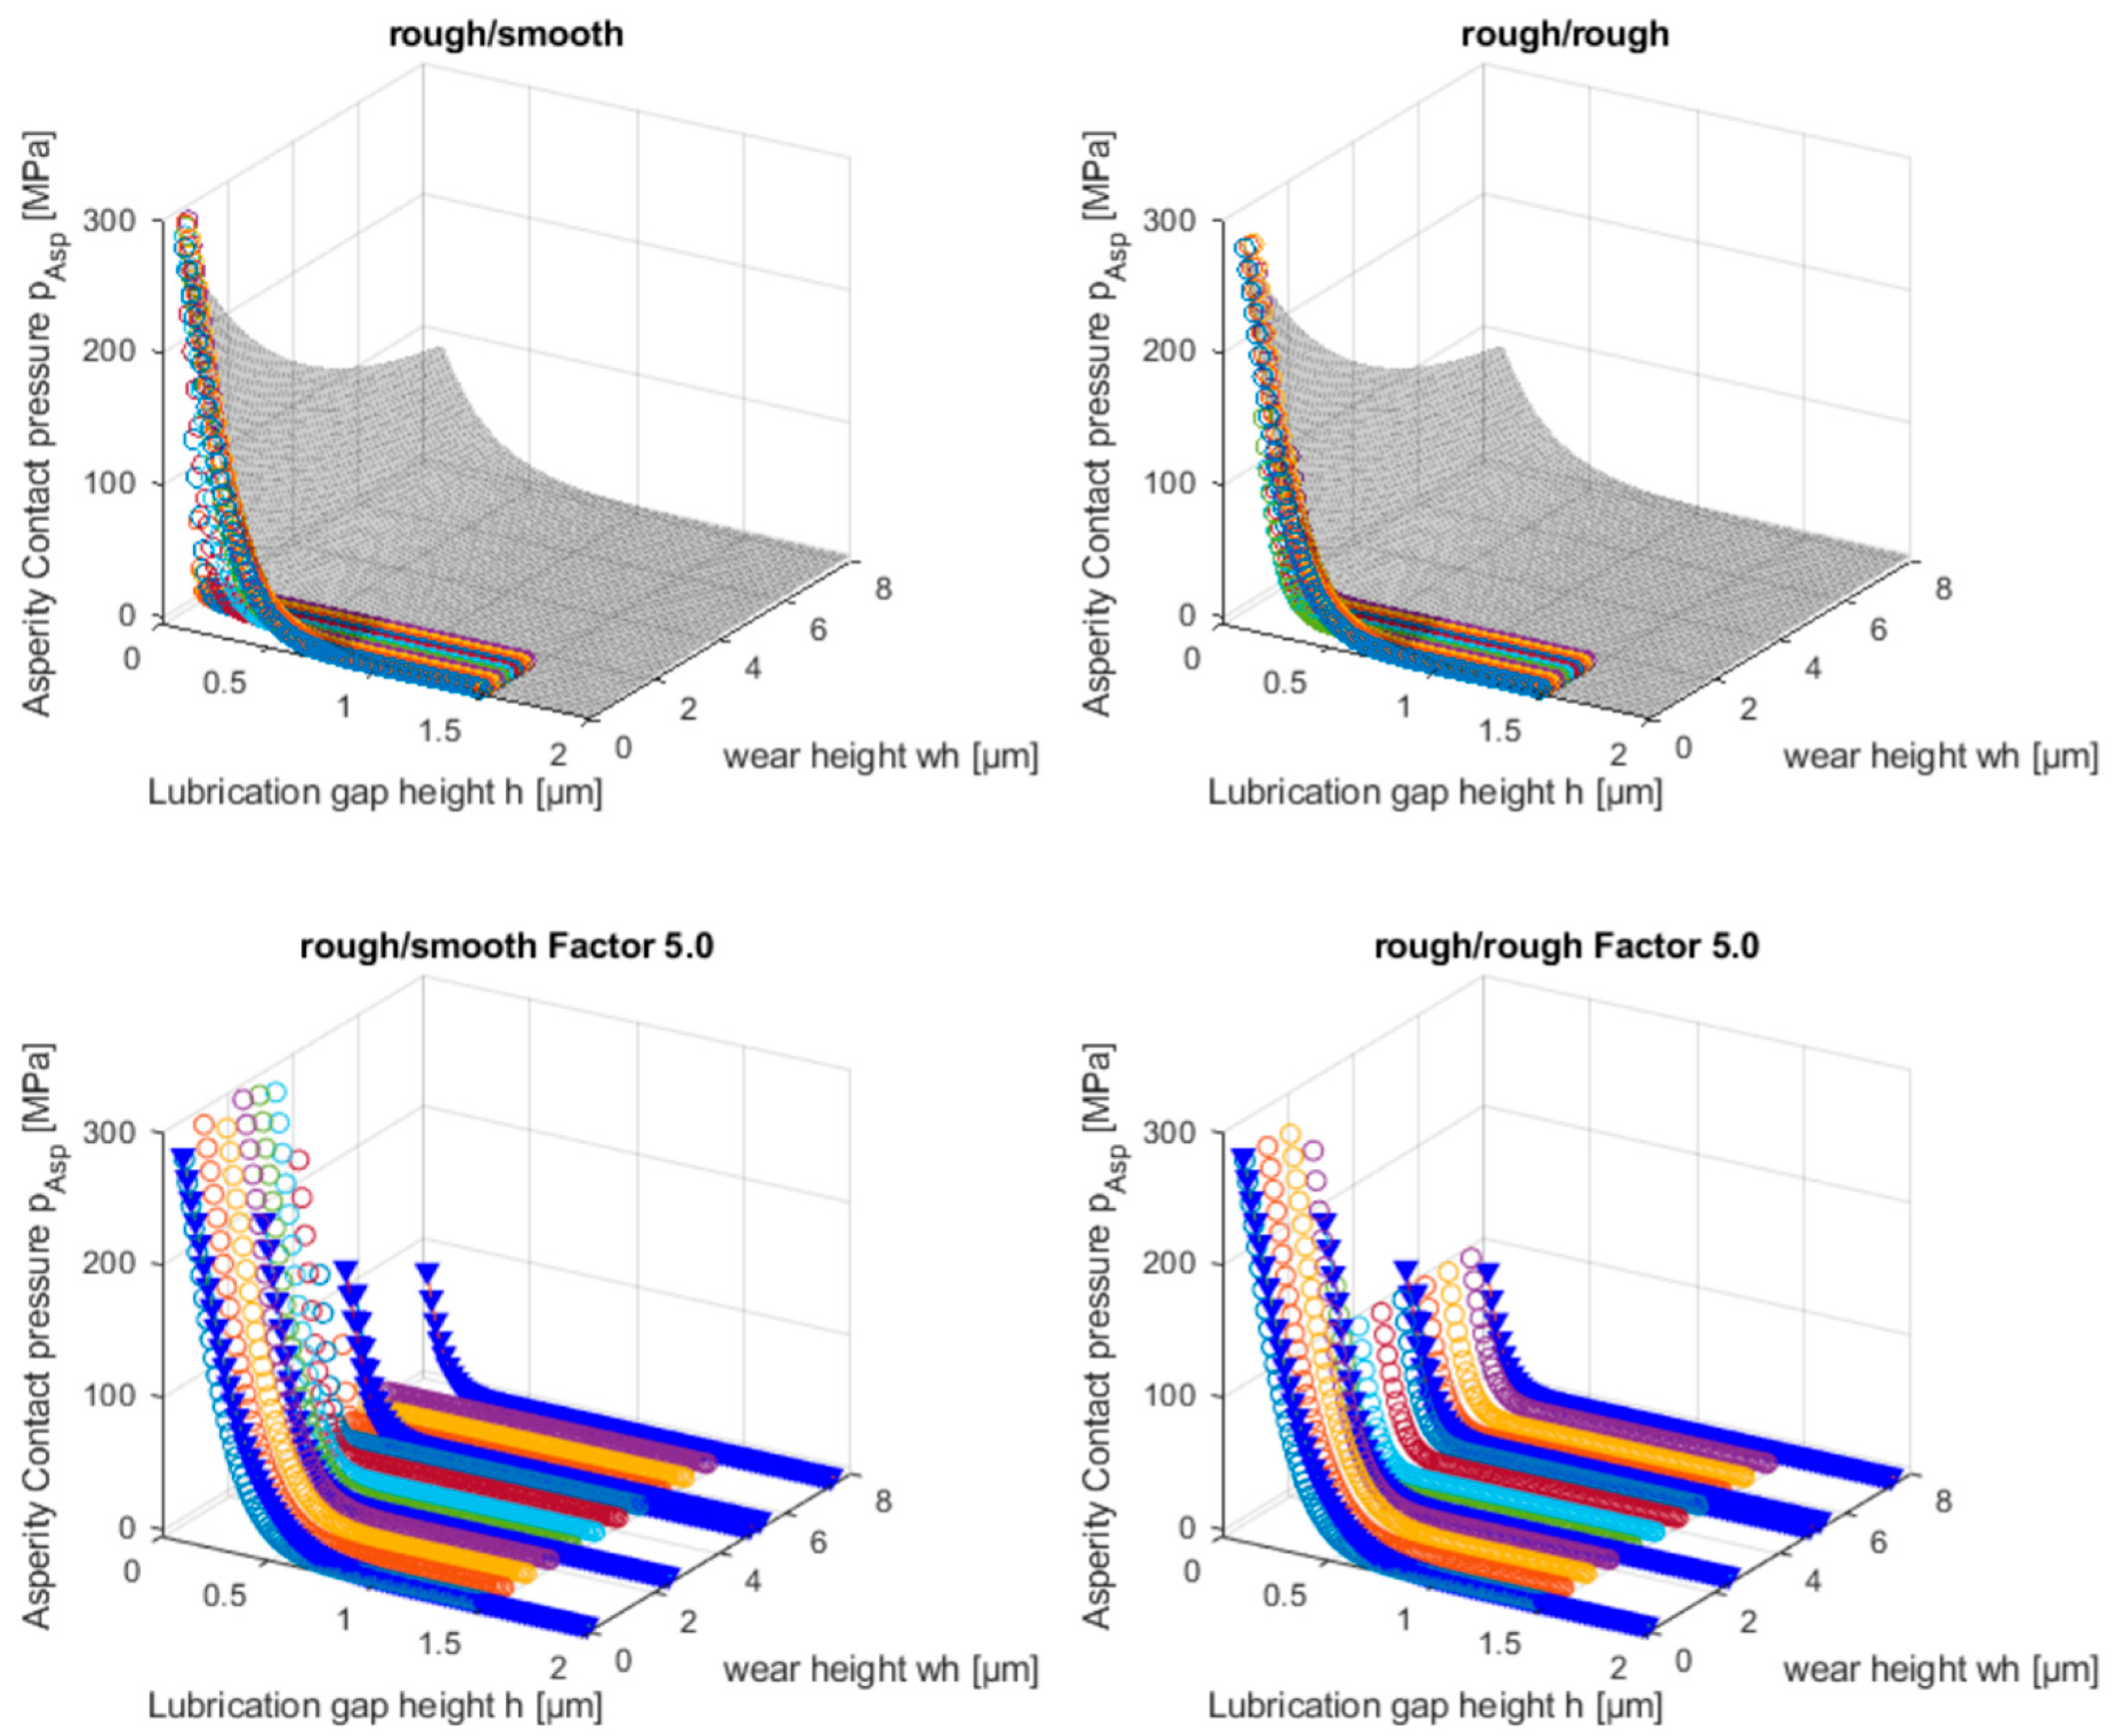
In Figure 10, the evolution of the asperity pressure contact curves according to GW for the geometric modelling methodologies is shown. For the different modelling approaches, the pAsp(h)- curves for the initial condition (wh = 0, blue line with o-marker) intersect the ordinate at ~400 MPa. For the three variants, the curves develop differently:
Method (a) (rough/smooth): With increasing wear the asperities are gradually flattened. As wear increases, the asperities only come into contact at lower gap heights h. The contact model according to GW assumes the same sphere radius for all asperities. With increasing wear, the number of asperities is reduced (as individual asperities are removed and these then form a plateau), thus the stiffness decreases with increasing wear at low gap heights. At wh = 1.39 µm, the bearing surface is completely flattened and the asperity contact model is no longer applicable.
Method (b) (rough/smooth + random): Starting from the initial state, the asperity contact pressure increases for the first couple of evaluated wear steps, since artificial asperities are added by the random wear value (individual nodes form additional roughness peaks). As wear increases, the surface approaches the run-in condition (wh = 5 µm) and the contribution of the random wear amount decreases.
Method (c) (rough/rough): Again, it can be seen, that with increasing wear, the asperity contact curve shifts from the initial state to smaller lubricating gap heights. Gradually, the bearing shell adopts the surface topography of the shaft. From the wear height of wh = 1.11 µm, there is no longer any essential change in the pAsp(h)- curves, since the bearing shell has taken on the shaft topography.
The development of the FEM contact model for the surfaces generated by the geometric wear routines is shown in Figure 11. Starting from the pAsp(h) curve for the initial condition (wh = 0), the asperity contact curve determined by FEM evolves differently for the three wear methodologies.
Method (a) (rough/smooth): As the wear height wh increases, the roughness peaks are gradually completely flattened. This implies, for the FEM asperity contact curve, that for a certain lubrication gap height hdef, the flattened area of the bearing surface comes into contact with the shaft surface, resulting in an abrupt increase in of the contact pressure. From a wear height of wh = 0.84 µm, the bearing surface is completely flattened. Therefore, the pAsp(h) curve suddenly ramps up at h~0.
Method (b) (rough/smooth + random): Compared to method (a), it can be seen that the shift of the pAsp(h) curve occurs at higher wear heights, which can be attributed to the additional random wear amount, which adds additional rough peaks to the areas that are flattened in method (a). The FEM contact model does not use statistical surface parameters to determine the pAsp(h) curve. Therefore, in comparison to the GW evaluation (Figure 10b), no intermediate increase of the asperity contact pressure is analysed.
Method (c) (rough/rough): With increasing wear height, the bearing surface takes the topography of the real shaft surface. From a wear height of ~0.8 µm, the bearing surface has adopted the surface topography of the shaft and the run-in condition is reached.

3.3. Elastic Modelling Approach—Results

As described in Section 2.2.2, a routine in Abaqus© was set up as an alternative to the geometric wear modelling methods. With the Abaqus methodology, elastic deformations are considered. This has an effect on the trend of the mean arithmetic roughness Sa and Sz. Compared to the geometric approach, this shows lower values for Sa and Sz, because the high asperities are reduced by the deformation and the surface parameter Sa is evaluated in the deformed state. To evaluate this influence, an analysis was carried out in which the surface roughness in the unloaded condition was evaluated. For the early wear stage, a difference of ΔSa~0.006 µm is obtained, which can be neglected compared to the absolute values. For the three different modelling approaches, analogical curves can be determined as with the geometric Matlab© routine (Figure 12).
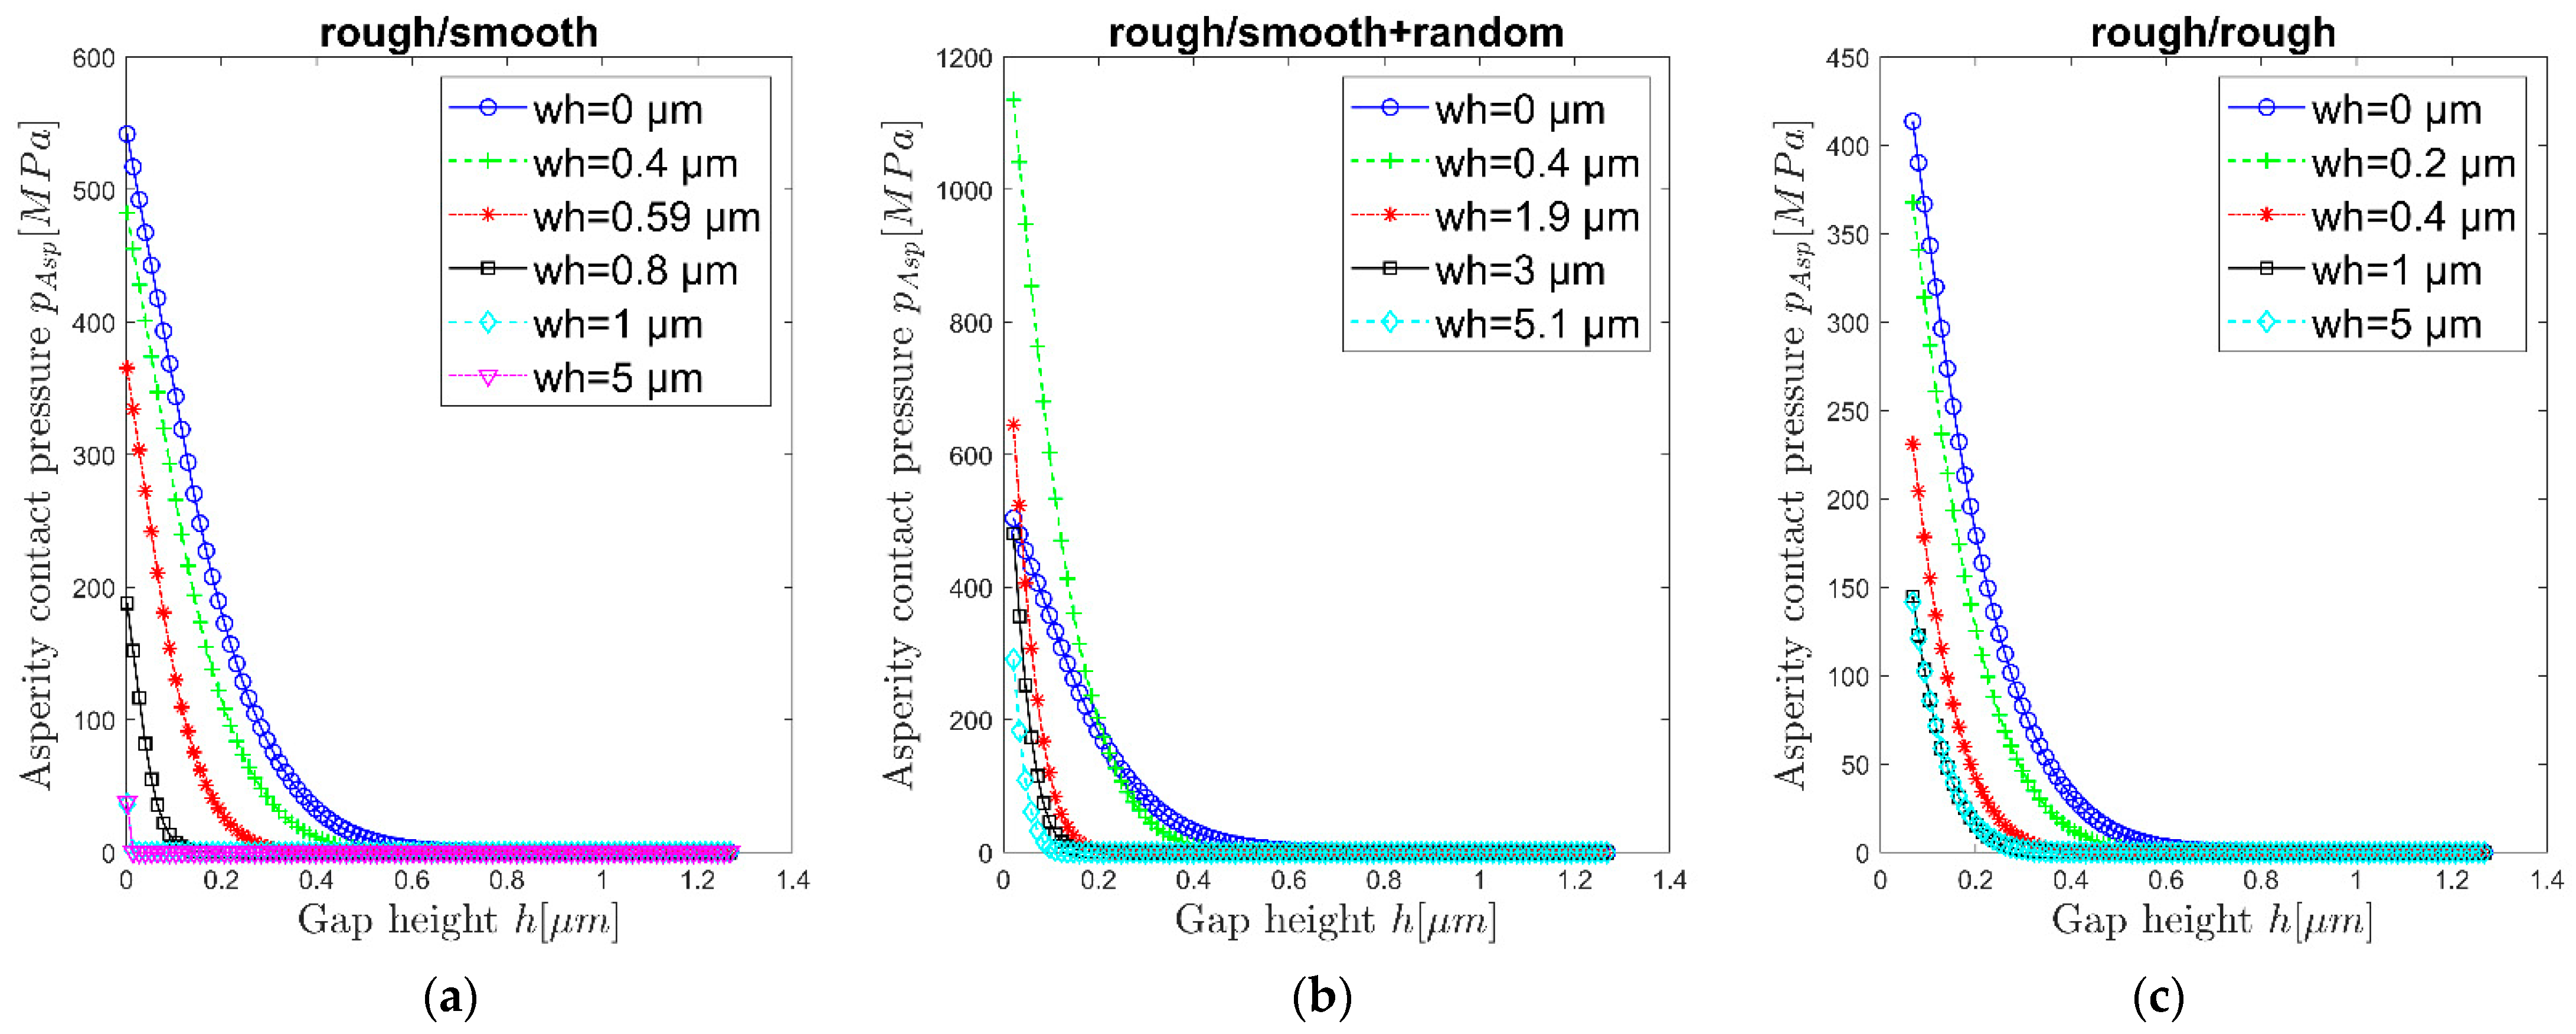
The asperity contact pressure curves for the worn surfaces, generated by the elastic modelling approach, also show similar values to the geometric approach (Figure 13). The curves for the initial state show higher pressure values.
For methodology (a) (rough/smooth), it can be seen that the asperity contact curve for wh = 5 µm does not become horizontal. This shows that the surface does not become ideally smooth. Depending on the minimum used calculation increment and the local pressure (Equation (6)), the surface nodes are displaced. Thus, the surface would become ideally smooth only at infinitely small time increments.
For method (b) (rough/smooth + random), which is equivalent to the geometric approach (Figure 10), an increase in the contact pressure can also be observed due to the additional roughness peaks. As the wear height increases, the random contribution to wear again decreases and the asperity contact pressure decreases.
For method (c) (rough/rough), it can be seen that the pAsp values are also generally higher than those of the geometric wear approach. This is again explainable by the fact, that the surface is additionally roughened by the time increment Δt > 0 (Equation (6)). Thus, the bearing in the run-in state does not exactly assume the shaft surface topography, but is additionally overlaid with a number of small peaks caused by the time discretisation.

4. Discussion

In this work, different simulation tools for modelling the wear of surface topography are developed and compared. For the validation of the simulation results, surface parameters from experiments are used.

4.1. Mean Arithmetic Surface Height Sa and Maximum Height Sz

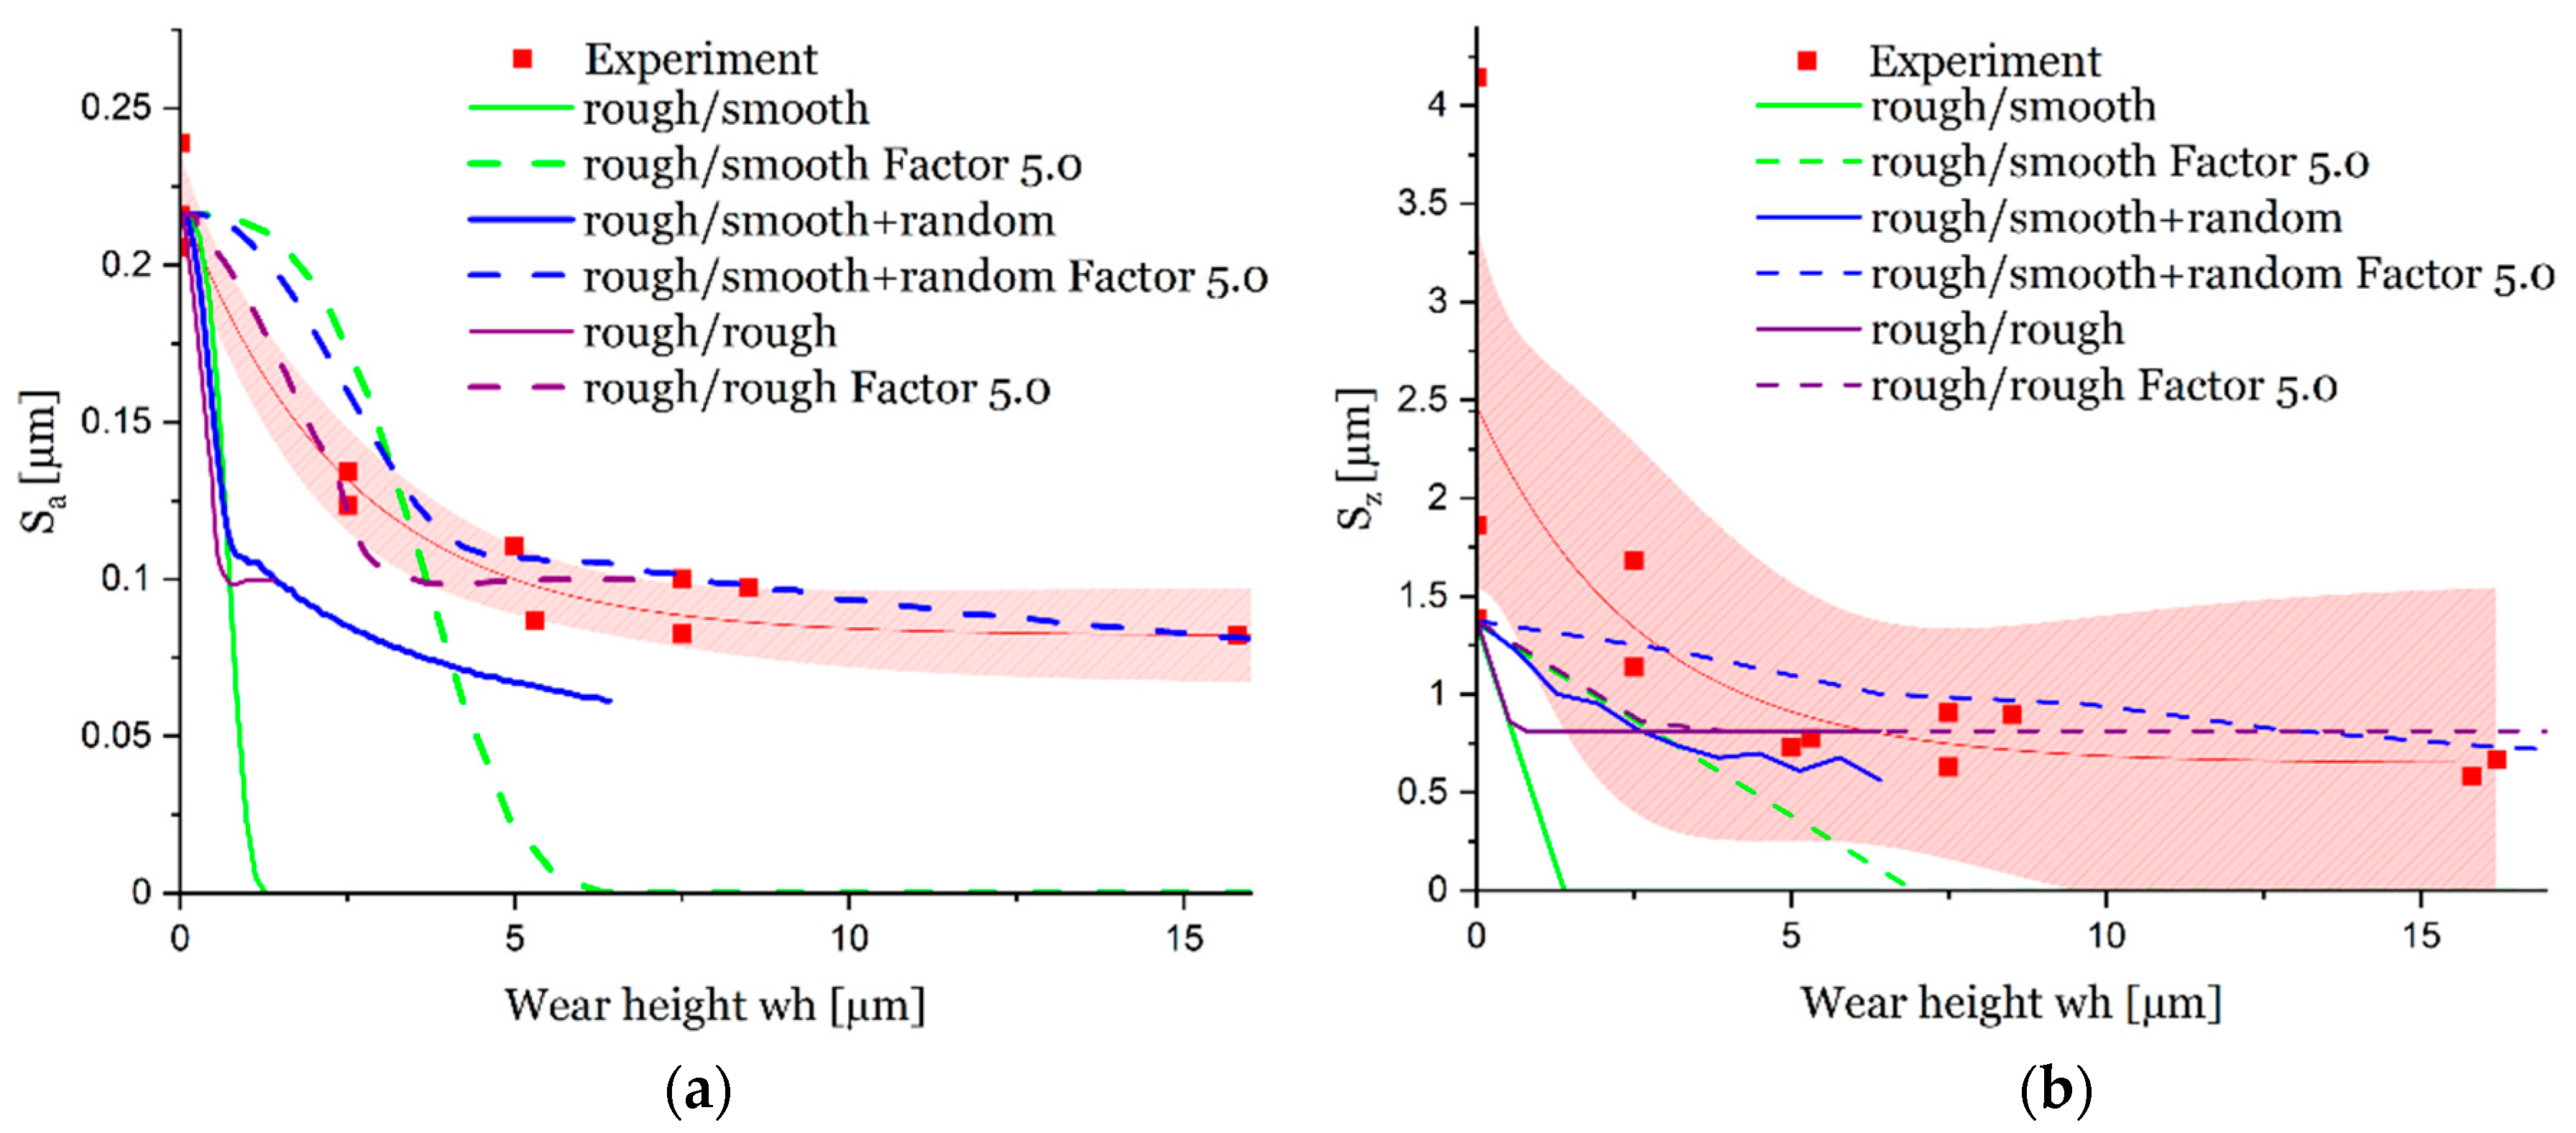
The comparison of the evolution of the surface parameter Sa from experiments and simulations allows a validation of the used modelling approaches. In Figure 14 the transient courses of Sa and Sz for the geometric simulations are shown next to the values carried out by the tests. The simulation results show a rapid decrease in the roughness compared to the experiments. Since surfaces never become infinitely smooth under real wear conditions, the applicability of method (a) (rough/smooth) is limited. Method (b) (rough/smooth + random) shows a decrease in the rate of change of S a w h , S z w h and leads to a value that is approximately equal to that of the run-in condition of the bearing shell from the experiments. Additionally, for method (c) (rough/rough), the values for Sa and Sz stabilise at ~0.10 µm and ~0.80 µm, respectively, which approximately correspond to that of the run-in state of the bearing. However, the surfaces in the simulation models are flattened too fast, i.e., the surface roughness values of the run-in condition are reached at lower wear heights wh compared to the experiment. If the results of the simulations are modified by multiplying the wh values by a factor fRG = 5.0 (this corresponds to a stretching of the Sa/Sz- curves to higher wear levels), the resulting curves for methods (b) and (c) are approximately in the range of the experiment.
From this, it can be concluded that during the running-in process the surfaces are not only smoothed but new roughness is constantly added during the wear process. This results in the conclusion, that the wear model, according to Archard, is limited in the applicability for wear simulations of rough surfaces, since with increasing wear the wearing surface becomes similar to the contour of the opposite surface and no new roughness is formed. However, in the case of the simulation methods (b) and (c), in combination with the roughness generation factor fRG, good agreements of the surface parameters Sa(wh) and Sz(wh) are obtained from the simulations and the experiments.
The Sa(wh) curves determined with the elastic modelling methodology (Figure 15) correspond approximately to those of the geometric simulations. In the initial state (wh = 0), it is visible, that the Sa and Sz values, which are determined from the simulation model, does not correspond to that of the experiment. For the FE-wear model, a .stl- file is generated from the point cloud, which is then meshed to a solid (according to Section 2.2.2.). When generating the .stl-surface by using the Matlab© routine, the point cloud is smoothed (sgolayfilt()). This results in an offset (ΔSa ~ 0.03 µm) for the Sa values at the beginning of the wear simulation.
As shown in Figure 14 it is also evident with the Abaqus simulation that the surfaces are smoothed too fast. Even with a roughness generation factor of fRG = 5.0, the surfaces are smoothed slightly too fast compared to the experiment. In the FE- wear simulation model, the elastic shaft cutout (made of steel) is pressed onto the more compliant, wearing-bearing body (made of AlSn20). This results in deformations of local asperities on the bearing surface. The coordinates of the nodes on the surface are evaluated in the deformed state and the surface parameter Sa is calculated from them. This results in lower values for Sa compared to the geoemetric wear simulation. However, the difference between the evaluation of the Sa values in the loaded and unloaded conditions is very small (ΔSa~0.006 µm). Hence, the difference in the Sa curve, between the geometric and elastic simulation approaches, can be attributed to the smoothing influence of the discretisation of the Abaqus simulation model.

4.2. Development of Asperity Contact Pressure Curves

Asperity contact curves are used to describe the solid contact forces in lubricated contacts. The pAsp(h) curve is determined based on the existing surface topography. Since the surface condition is adapted to the occurring wear, the asperity contact curve can also be written as a function of the wear height pAsp(h,wh). Based on the pAsp(h) curves for the respective wear heights wh (Figure 8), a surface can be approximated as a function pAsp(h,wh) (Figure 16). To prepare this two-dimensional function, first, a fit for the pAsp(h) curve in the initial state (wh = 0) is required. The coefficients a, b, c for the fit pAsp(h,wh = 0) = a eb h + c are found by minimising the Euclidean norm of (pAsp_fit-pAsp_Exp) using the function fminsearch() in Matlab©. In the second direction (development of the asperity contact pressure with wear), also a function is also fitted. For this purpose, the asperity contact pressures pAsp(h = 0.1,wh) for a lubrication gap height of h = 0.1 µm and different wear heights are used to find a fit of the form of pAsp(h = 0.1,wh) = d ef wh + g. Assuming that the functions are valid for all wear heights and lubrication gap heights, these can be combined as Equation (9) and Equation (10), respectively, which represents the asperity contact pressure as a surface (Figure 16).
p A s p ( h , w h ) = ( a   e b   h + c ) ( d   e f   w h + g ) max ( p A s p E x p ( h ) ) max ( ( a   e b   h + c ) ( d   e f   w h + g ) )
The analysis of the worn surfaces of the experiment provides the parameters for Equation (9). For this research, the wear height depending on the asperity contact pressure according to GW leads to Equation (10):
p A s p ( h , w h ) = 0.32 ( 489.9   e 4.59   h 2.82 ) ( 217.2   e 0.314   w h + 72.9 )
The comparison of Figure 10 and Figure 11 shows that the contact model according to GW is not applicable for worn surfaces generated by method (b) (rough/smooth + random). Since the assumptions for the GW model (all asperities have the same radius or asperities follow a normal distribution) are no longer fulfilled. To compare the contact stiffness behaviour of the experimental surfaces (Figure 16) and the simulated surfaces, the surfaces of the modelling methods (a) (rough/smooth) and (c) (rough/rough) are used.
In the upper two diagrams in Figure 17, the asperity contact pressure curves for certain wear heights, which were determined by the geometric modelling approach, are compared with the asperity contact curve pAsp(h,wh) (Equation (10)) from the experiment. It can be seen, that for both simulation methods, the asperity contact pressure decreases too fast compared to the experiment. Using method (a) (rough/smooth), the bearing surface is completely smoothed, while in (c) (rough/rough), the bearing surface adopts the surface topography of the shaft with increasing wear. In Section 4.1, it was already discussed, that the roughness is not continuously smoothed during the wear process, rather the surface is roughened during the material removal. Since no roughening of the surface is modelled in the simulation model, the factor fRG was introduced to obtain comparable Sa(wh) values from the simulation and the experiment. An equivalent behaviour can be observed for the asperity contact pressure. If the same value of fRG = 5.0 is used for the scaling of the Sa(wh) and Sz(wh) values (Figure 14), the resulting situation is shown in the bottom diagrams in Figure 17. For better visibility, the pAsp(h,wh) surface of the experiment is not shown, only individual pAsp(h) curves for specific wear heights (blue triangles) are shown. If a smooth contact body is used in the wear simulation model (method (a)), the calculated asperity contact curves with the scaling factor fRG = 5.0 approximately agree with pAsp(h,wh) from the test up to wh = 3 µm. Then, the surface is even further worn to a flat plane and the calculated asperity contact curves give too low asperity contact pressures. If a rough counterpart is used in the simulation model (method (c)), the scaling with the factor fRG = 5.0 gives a good agreement between the simulation and the experiment.
With the wear methodology of a smooth counter body (method (a)), the surface parameter Sa can be estimated up to a wear height of ~3 µm by including the factor fRG. If wear progresses, the surface is increasingly smoothed, which does not reflect natural wear mechanisms. To avoid the bearing surface wearing to an ideal flat surface, method (b) represents the possibility of artificially roughening of the worn area. The artificial, normally distributed roughening peaks allow a good estimation of the Sa(wh) curve. However, the surface topography created in this way does not correspond to any real surface geometry. Consequently, the further usability of this geometry, e.g., for the calculation of flow factors, is limited. Method (c) enables the surface not to be roughened randomly but is based on the rough, normally distributed shaft surface. In comparison to method (b), individual nodes are not displaced from the surface and thus a more continuous surface topography is generated.
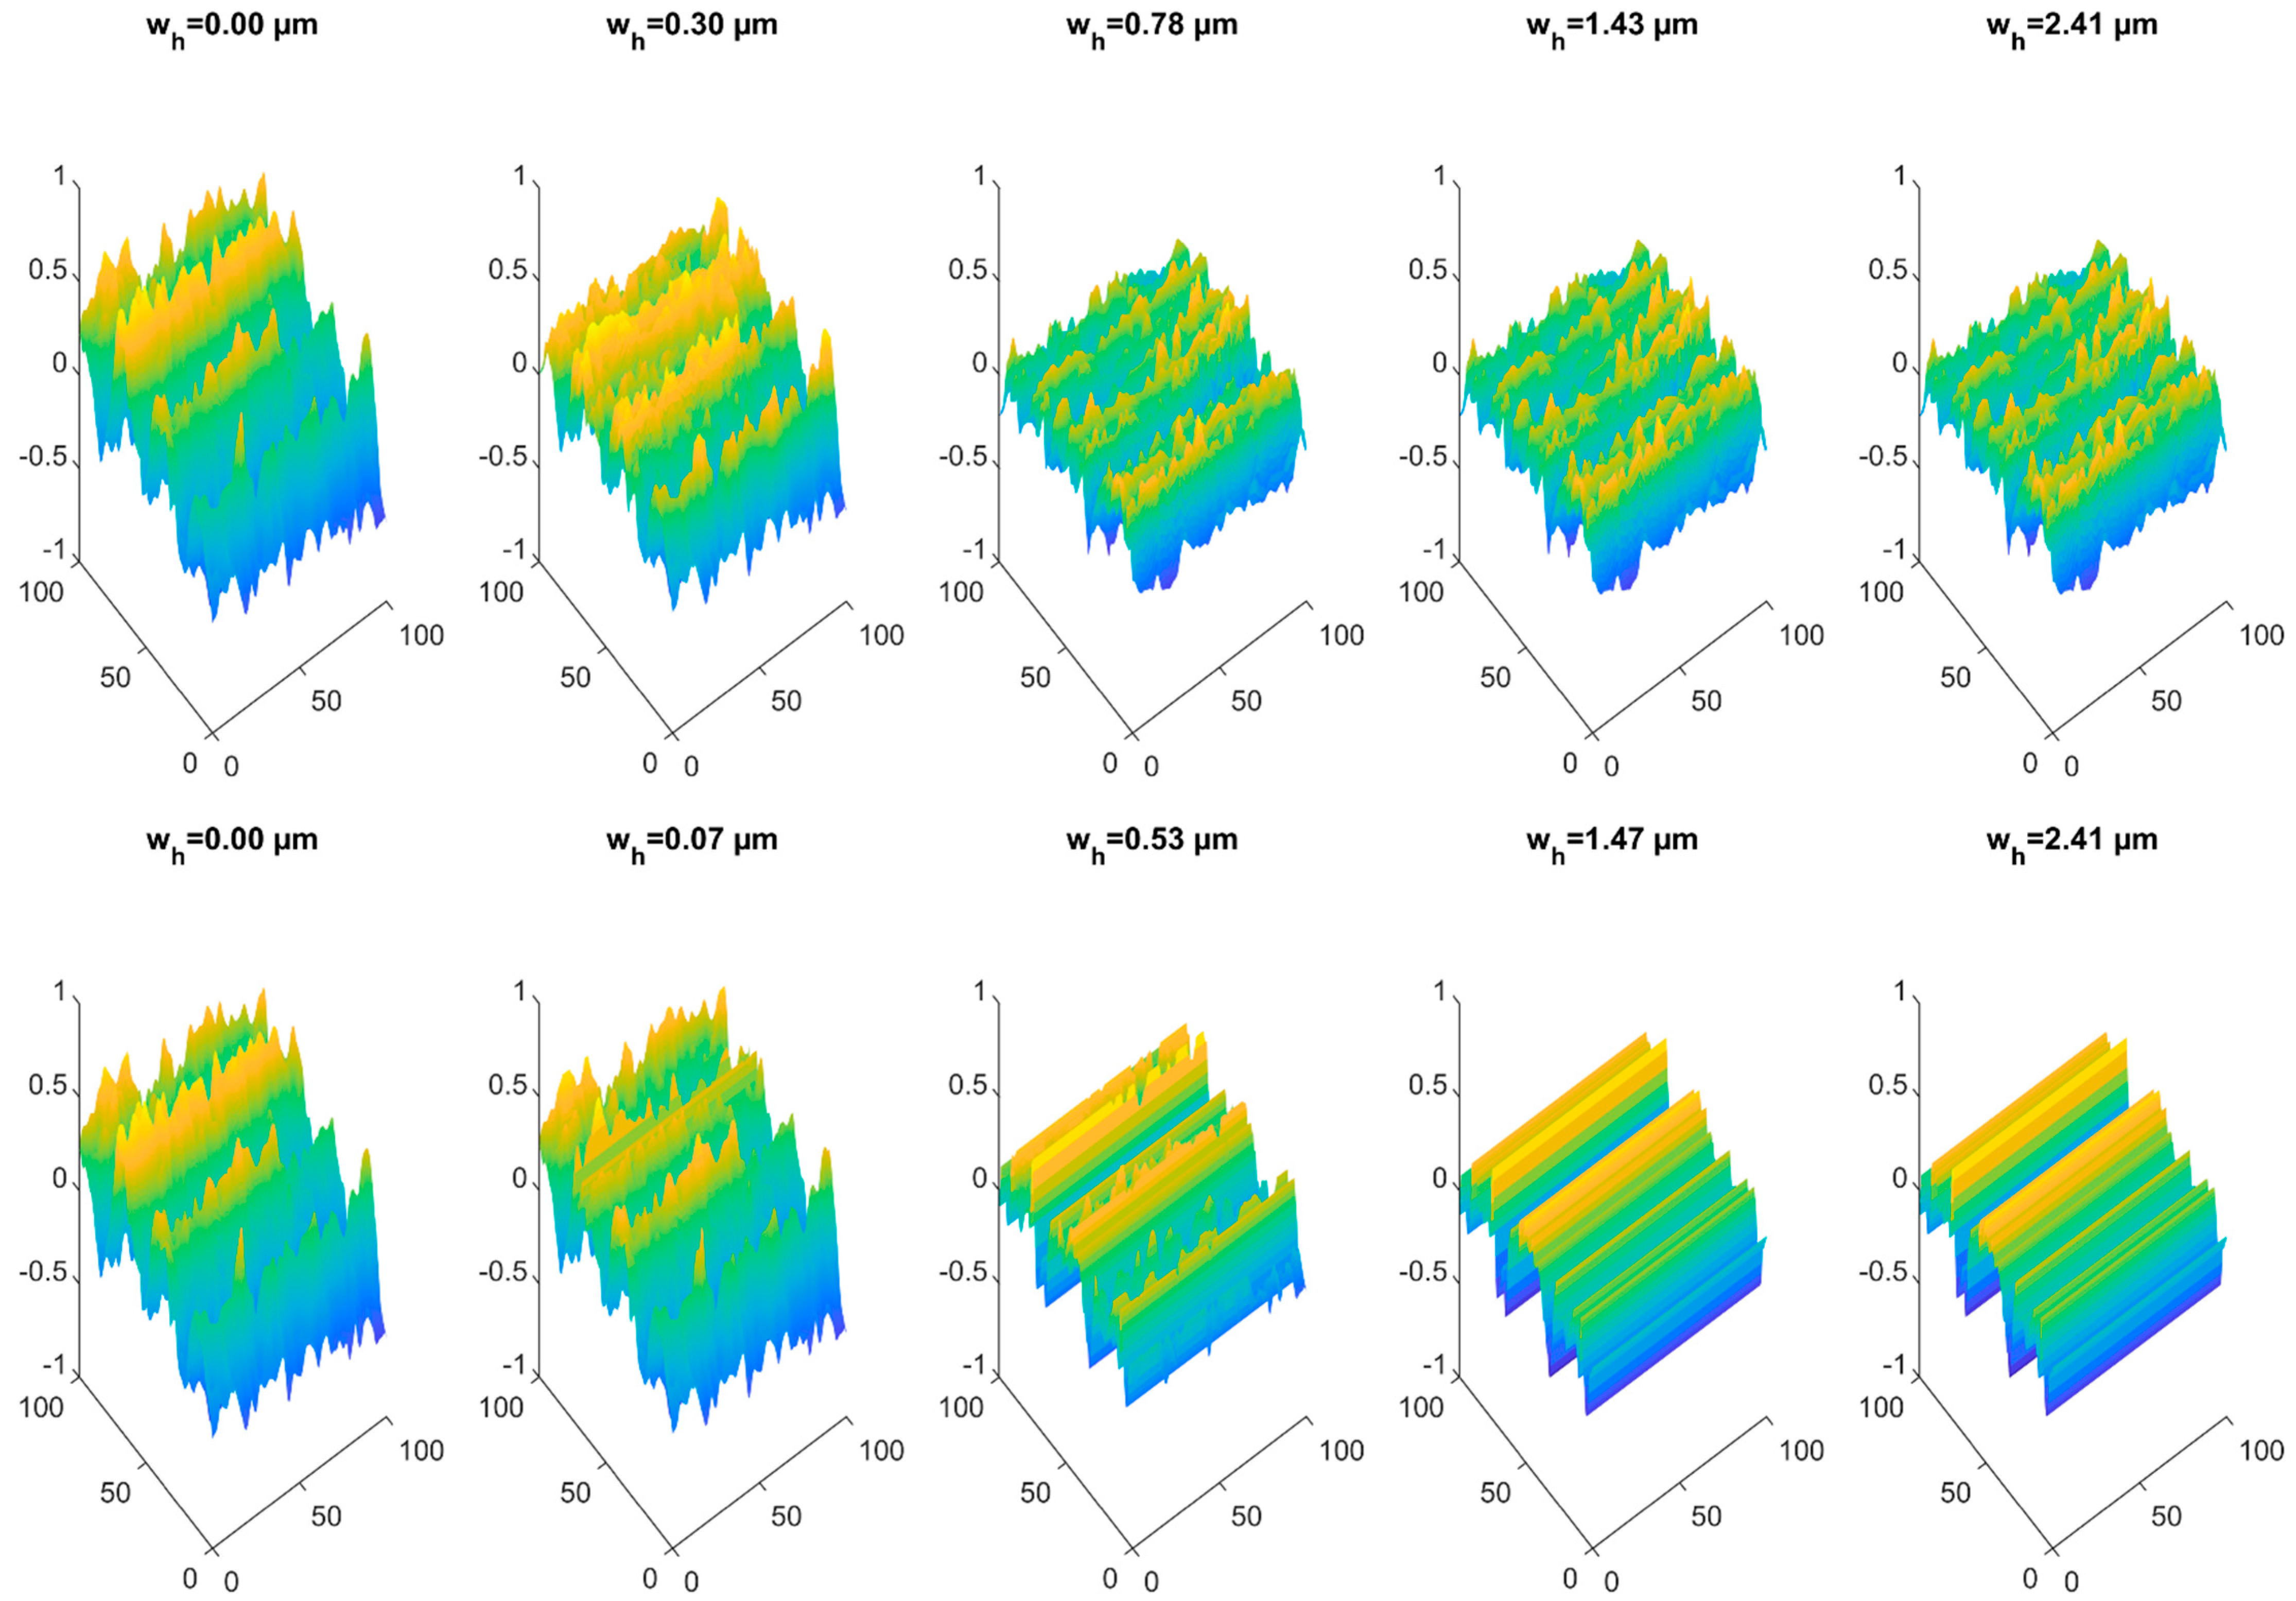
For the wear calculation of journal bearings considering a wear-dependent surface topography, the surface is modified in [18] in the following way: It is assumed that with increasing wear, the softer bearing surface adopts the enveloping surface topography of the shaft surface. The system observed in [18], corresponds to the experimental setup used in this study. To validate the geometric rough/rough modelling approach, the wear-dependent asperity contact pressure pAsp(h,wh) is compared with the rough/enveloping method used in the literature (Figure 18 and Figure 19). In comparison to the experiment, it is evident, that the surfaces are flattened too fast in both modelling approaches, and thus the asperity contact pressure curves are shifted too quickly to smaller lubrication gap heights with increasing wear. With the factor fRG = 5, which shifts the individual asperity contact pressure curves to higher wear heights, better agreement with the experiment can be achieved for both simulation methods (Figure 18).
For better visualisation, Figure 19 shows the asperity contact pressure curves from the experiment and the two wear modelling approaches (rough/rough, rough/enveloping) for selected wear heights. For a wear height of 2.5 µm, higher asperity contact pressures are calculated based on the surfaces from the experiment than for the surface topographies from the wear simulations (Figure 19a). However, by stretching the asperity contact model pAsp(h,wh) to higher wear heights (factor fRG = 5), the simulation method rough/rough, as well as the rough/enveloping method used in the literature, show good agreement with the experimental results. Therefore in Figure 19b, a wear level of 7.5 µm from the experiment and ~1.7 µm from the wear modelling approaches (which corresponds to ~7.5 µm in combination with the factor fRG = 5) are compared.
For a deeper insight, the surface development for the two geometric wear approaches rough/rough and rough/enveloping is shown in Figure 20.

5. Conclusions

In this research work, different methodologies were presented to simulate the wear of rough surfaces numerically and determine the influence of running-in on the surface parameters of rough surfaces. The most relevant points of this research are:
  • The surface topography is mapped as a function of the wear height. Therefore, it is irrelevant under which conditions the wear occurs (speed, pressure, temperature), as long as the wear mechanism remains the same;
  • The Sa(wh), Sz(wh) and pAsp(h,wh) parameters are used to characterise the surface topography. The validation of these surface parameters with experimental data provides an estimation of the applicability of the different modelling methods;
  • The difference between the geometric Matlab approach and the elastic FE analysis in the results of the surface parameters is mainly limited to the offset caused by the additional smoothing of the surfaces due to the discretization;
  • The methods used (a) (smooth/rough) and (b) (smooth/rough + random) are only partially applicable. The development of the roughness values of Sa and Sz can be estimated, but the surface topography is not suitable for a further use (e.g., calculation of flow factors). Furthermore, due to the artificial surface modification in method (b), the conditions for statistical contact models are no longer achieved and these models are not suitable for these surfaces. These restrictions do not apply to method (c) (rough/rough);
  • A scaling factor fRG is necessary to achieve agreement of the surface parameters between the experiment and the simulation. This implies that new roughness valleys are formed during the wear process and not only the roughness peaks are ablated. Since only the removal of the peaks is modelled in the simulation model, the roughness generation factor fRG is necessary. As a result, the wear model, according to Archard, which can be used to model the wear on asperities, is not suitable in unmodified form for the wear simulation of rough surfaces.
The following points can be considered in order to advance wear simulation on a micro scale:
  • To consolidate the factor fRG, the presented methodology should be applied to other surfaces and validated with experiments;
  • Instead of implementing random wear heights, an alternative variant could be created, that wears the surface to a realistic surface. This requires alternatives methods for the generation of rough surfaces [39];
  • To avoid the factor fRG, an alternative method must be introduced, in which not only the roughness peaks are removed, but also new roughness valleys are formed during the simulative wear process.

Author Contributions

Conceptualisation, M.M. and M.P.; Data curation, M.M.; Investigation, M.M. and M.P.; Methodology, M.M. and M.P.; Resources, F.G.; Validation, M.M.; Writing—original draft, M.M.; Writing—review and editing, M.P. and F.G. All authors have read and agreed to the published version of the manuscript.

Funding

This research received no external funding.

Conflicts of Interest

The authors declare no conflict of interest.

References

  1. Sander, D.; Allmaier, H.; Priebsch, H.; Witt, M.; Skiadas, A. Simulation of journal bearing friction in severe mixed lubrication—Validation and effect of surface smoothing due to running-in. Tribol. Int. 2016, 96, 173–183. [Google Scholar] [CrossRef] [Green Version]
  2. Ghatrehsamani, S.; Akbarzadeh, S.; Khonsari, M.M. Experimental and numerical study of the running-in wear coefficient during dry sliding contact. Surf. Topogr. Metrol. Prop. 2021, 9, 015009. [Google Scholar] [CrossRef]
  3. Waddad, Y.; Magnier, V.; Dufrénoy, P.; De Saxcé, G. Multiscale thermomechanical modeling of frictional contact problems considering wear—Application to a pin-on-disc system. Wear 2019, 426–427, 1399–1409. [Google Scholar] [CrossRef]
  4. Bartel, D. Simulation von Tribosystemen: Grundlagen und Anwendungen; Vieweg+Teubner Verlag/GWV Fachverlage GmbH: Wiesbaden, Germany, 2010. [Google Scholar]
  5. Cui, S.; Gu, L.; Fillon, M.; Wang, L.; Zhang, C. The effects of surface roughness on the transient characteristics of hydrodynamic cylindrical bearings during startup. Tribol. Int. 2018, 128, 421–428. [Google Scholar] [CrossRef]
  6. Hanief, M.; Wani, M. Effect of surface roughness on wear rate during running-in of En31-steel: Model and experimental validation. Mater. Lett. 2016, 176, 91–93. [Google Scholar] [CrossRef]
  7. König, F.; Sous, C.; Jacobs, G. Numerical prediction of the frictional losses in sliding bearings during start-stop operation. Friction 2020, 71, 22. [Google Scholar] [CrossRef]
  8. Ismail, R.; Tauviqirrahman, M.; Schipper, D.J. Topographical Change of Engineering Surface due to Running-in of Rolling Contacts. In New Tribological Ways; Ghrib, T., Ed.; InTech: Twente, The Netherlands, 2011. [Google Scholar]
  9. Khonsari, M.; Ghatrehsamani, S.; Akbarzadeh, S. On the running-in nature of metallic tribo-components: A review. Wear 2021, 474–475, 203871. [Google Scholar] [CrossRef]
  10. Chen, H.; Xu, C.; Xiao, G.; Yi, M.; Chen, Z.; Zhang, J. Analysis of the relationship between roughness parameters of wear surface and tribology performance of 5CB liquid crystal. J. Mol. Liq. 2022, 352, 118711. [Google Scholar] [CrossRef]
  11. Sedlaček, M.; Gregorčič, P.; Podgornik, B. Use of the Roughness Parameters Ssk and Sku to Control Friction—A Method for Designing Surface Texturing. Tribol. Trans. 2017, 60, 260–266. [Google Scholar] [CrossRef]
  12. Sugimura, J.; Kimura, Y.; Amino, K. Analysis of the topographical changes due to wear—geometry of the running-in process. Toraibarojisuto/J. Jpn. Soc. Tribol. 1986, 31, 813–820. [Google Scholar]
  13. Kimura, Y.; Sugimura, J. Microgeometry of sliding surfaces and wear particles in lubricated contact. Wear 1984, 100, 33–45. [Google Scholar] [CrossRef]
  14. Sugimura, J.; Kimura, Y. Characterization of topographical changes during lubricated wear. Wear 1984, 98, 101–116. [Google Scholar] [CrossRef]
  15. Winkler, A.; Marian, M.; Tremmel, S.; Wartzack, S. Numerical Modeling of Wear in a Thrust Roller Bearing under Mixed Elastohydrodynamic Lubrication. Lubricants 2020, 8, 58. [Google Scholar] [CrossRef]
  16. Jeng, Y.-R.; Lin, Z.-W.; Shyu, S.-H. Changes of Surface Topography During Running-in Process. J. Tribol. 2004, 126, 620–625. [Google Scholar] [CrossRef]
  17. Johnson, N.L. Systems of frequency curves generated by methods of translation. Biometrika 1949, 36, 149–176. [Google Scholar] [CrossRef] [PubMed]
  18. König, F.; Chaib, A.O.; Jacobs, G.; Sous, C. A multiscale-approach for wear prediction in journal bearing systems—From wearing-in towards steady-state wear. Wear 2019, 426-427, 1203–1211. [Google Scholar] [CrossRef]
  19. Mokhtar, M.O.A.; Howarth, R.B.; Davies, P.B. Wear Characteristics of Plain Hydrodynamic Journal Bearings During Repeated Starting and Stopping. ASLE Trans. 1977, 20, 191–194. [Google Scholar] [CrossRef]
  20. Johnson, G.R.; Cook, W.H. Fracture characteristics of three metals subjected to various strains, strain rates, temperatures and pressures. Eng. Fract. Mech. 1985, 21, 31–48. [Google Scholar] [CrossRef]
  21. Woldman, M.; Van Der Heide, E.; Tinga, T.; Masen, M.A. A Finite Element Approach to Modeling Abrasive Wear Modes. Tribol. Trans. 2016, 60, 711–718. [Google Scholar] [CrossRef] [Green Version]
  22. Elwasli, F.; Zemzemi, F.; Mkaddem, A.; Mzali, S.; Mezlini, S. A 3D multi-scratch test model for characterizing material removal regimes in 5083-Al alloy. Mater. Des. 2015, 87, 352–362. [Google Scholar] [CrossRef]
  23. Reichert, S.; Lorentz, B.; Heldmaier, S.; Albers, A. Wear simulation in non-lubricated and mixed lubricated contacts taking into account the microscale roughness. Tribol. Int. 2016, 100, 272–279. [Google Scholar] [CrossRef]
  24. Albers, A.; Reichert, S. On the influence of surface roughness on the wear behavior in the running-in phase in mixed-lubricated contacts with the finite element method. Wear 2017, 376–377, 1185–1193. [Google Scholar] [CrossRef]
  25. Hegadekatte, V.; Kurzenhäuser, S.; Huber, N.; Kraft, O. A predictive modeling scheme for wear in tribometers. Tribol. Int. 2008, 41, 1020–1031. [Google Scholar] [CrossRef] [Green Version]
  26. Yu, H.; Lian, Z.; Lin, T.; Liu, Y.; Xu, X. Experimental and numerical study on casing wear in highly deviated drilling for oil and gas. Adv. Mech. Eng. 2016, 8, 1687814016656535. [Google Scholar] [CrossRef] [Green Version]
  27. Arunachalam, A.P.S.; Idapalapati, S. Material removal analysis for compliant polishing tool using adaptive meshing technique and Archard wear model. Wear 2019, 418–419, 140–150. [Google Scholar] [CrossRef]
  28. Zhang, Y.; Kovalev, A.; Hayashi, N.; Nishiura, K.; Meng, Y. Numerical Prediction of Surface Wear and Roughness Parameters During Running-In for Line Contacts Under Mixed Lubrication. J. Tribol. 2018, 140, 061501. [Google Scholar] [CrossRef]
  29. Summer, F.; Bergmann, P.; Grün, F. Damage Equivalent Test Methodologies as Design Elements for Journal Bearing Systems. Lubricants 2017, 5, 47. [Google Scholar] [CrossRef] [Green Version]
  30. Pusterhofer, M.; Summer, F.; Maier, M.; Grün, F. Assessment of Shaft Surface Structures on the Tribological Behavior of Journal Bearings by Physical and Virtual Simulation. Lubricants 2020, 8, 8. [Google Scholar] [CrossRef] [Green Version]
  31. Renhart, P.; Summer, F.; Grün, F.; Posch, C.; Eder, A. The tribological performance of silver in aircraft turbine load cases. Tribol. Int. 2021, 163, 107184. [Google Scholar] [CrossRef]
  32. Renhart, P.; Summer, F.; Grün, F.; Eder, A. Close-to-Application Test Methodology Validated by a Baseline Study for Novel Bearing Developments in Aircraft Turbines. Lubricants 2020, 8, 7. [Google Scholar] [CrossRef] [Green Version]
  33. Bergmann, P.; Grün, F.; Gódor, I.; Stadler, G.; Maier-Kiener, V. On the modelling of mixed lubrication of conformal contacts. Tribol. Int. 2018, 125, 220–236. [Google Scholar] [CrossRef]
  34. Pusterhofer, M.; Summer, F.; Gódor, I.; Grün, F. Cumulative damage assessment of tribological durability limits. Wear 2020, 456–457, 203318. [Google Scholar] [CrossRef]
  35. Schmidt, A.A.; Schmidt, T.; Grabherr, O.; Bartel, D. Transient wear simulation based on three-dimensional finite element analysis for a dry running tilted shaft-bushing bearing. Wear 2018, 408–409, 171–179. [Google Scholar] [CrossRef]
  36. ABAQUS/Standard User’s Manual; Version 2021; Dassault Systèmes Simulia Corp: Providence, RI, USA, 2021.
  37. Maier, M.; Pusterhofer, M.; Summer, F.; Grün, F. Validation of statistic and deterministic asperity contact models using experimental Stribeck data. Tribol. Int. 2021, 165, 107329. [Google Scholar] [CrossRef]
  38. Greenwood, J.A.; Williamson, J.B.P. Contact of nominally flat surfaces. Proc. R. Soc. Lond. Ser. A Math. Phys. Sci. 1966, 295, 300–319. [Google Scholar] [CrossRef]
  39. Thompson, M. Methods for Generating Rough Surfaces in ANSYS. In Proceedings of the 2006 International ANSYS Users Conference & Exhibition, Pittsburgh, PA, USA, 7 March 2006. [Google Scholar]
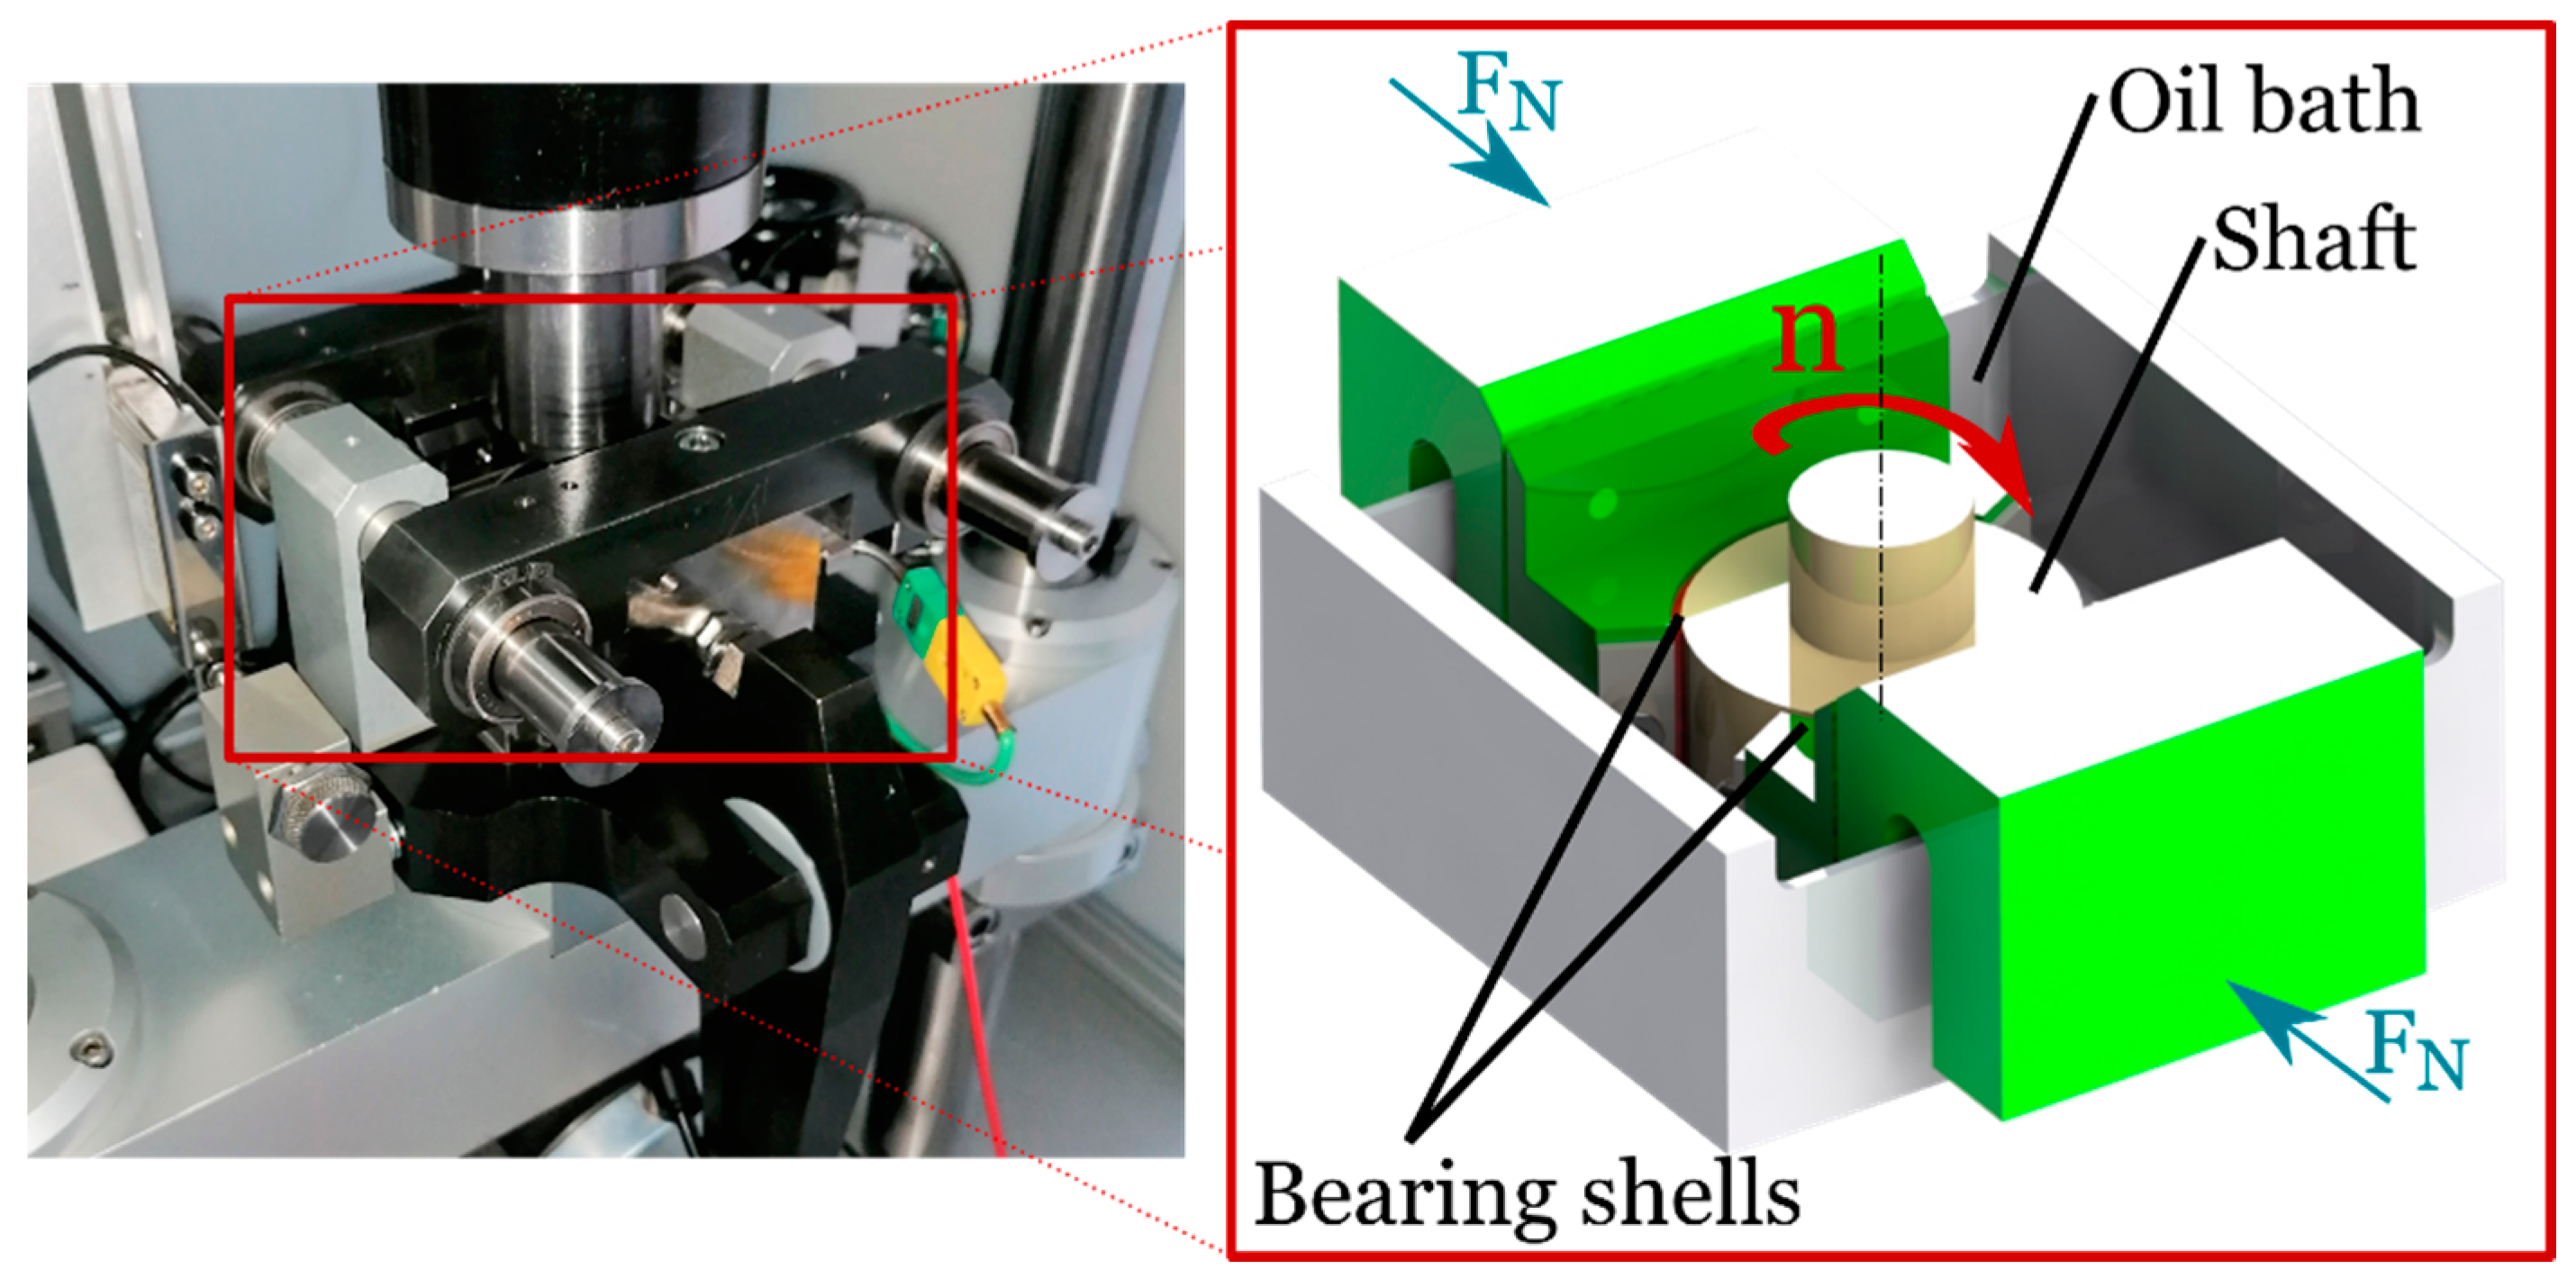
Figure 1. Test configuration of experimental surface wear.
Lubricants 10 00335 g001
Figure 2. Test strategy for constant experiment.
Lubricants 10 00335 g002
Figure 3. Measurement of local wear height and surface topography.
Lubricants 10 00335 g003
Figure 4. Methodical approach for wear-dependent surface characterisation.
Lubricants 10 00335 g004
Figure 5. Different methods for local wear height estimation—(a) rough/smooth, (b) rough/smooth + random, (c) rough/rough.
Lubricants 10 00335 g005
Figure 6. Applying node displacement in Abaqus usersubroutine UMESHMOTION.
Lubricants 10 00335 g006
Figure 7. (a) mean arithmetic height Sa and (b) maximum height Sz in dependence on the wear height for bearing and shaft cut-outs.
Lubricants 10 00335 g007
Figure 8. Asperity contact pressure according to GW for different wear heights.
Lubricants 10 00335 g008
Figure 9. Mean arithmetic height Sa and maximum height Sz in dependence of wear height evaluated by different geometric modelling approaches.
Lubricants 10 00335 g009
Figure 10. Development of asperity contact pressure curves pAsp(h) according to GW in dependence of wear height wh for different geometric modelling approaches: (a) rough/smooth, (b) rough/smooth + random, (c) rough/random.
Lubricants 10 00335 g010
Figure 11. Development of asperity contact pressure curves pAsp(h) determined by FEM in dependence of wear height wh for different geometric modelling approaches: (a) rough/smooth, (b) rough/smooth + random, (c) rough/random.
Lubricants 10 00335 g011
Figure 12. (a) mean arithmetic height Sa and (b) maximum height Sz in dependence on wear height evaluated by different elastic modelling approaches.
Lubricants 10 00335 g012
Figure 13. Development of asperity contact pressure curves pAsp(h) according to GW in dependence of wear height wh for different elastic modelling approaches: (a) rough/smooth, (b) rough/smooth + random, (c) rough/random.
Lubricants 10 00335 g013
Figure 14. (a) mean arithmetic height Sa(wh) and (b) maximum height Sz(wh) evaluated by different geometric modelling approaches compared to experimental results.
Lubricants 10 00335 g014
Figure 15. (a) mean arithmetic height Sa(wh) and (b) maximum height Sz(wh) evaluated by different Abaqus—modelling approaches compared to experimental results.
Lubricants 10 00335 g015
Figure 16. Approximated asperity contact pressure pAsp(h,wh) according to GW depending on lubrication gap height h and wear height wh.
Lubricants 10 00335 g016
Figure 17. Comparison of experimentally determined pAsp(h,wh) and asperity contact curves pAsp(h) for specific wear heights wh from geometric simulations.
Lubricants 10 00335 g017
Figure 18. Comparison of FEM asperity contact pressure of experiment, wear methods rough/rough and rough/enveloping.
Lubricants 10 00335 g018
Figure 19. Asperity contact pressure curves for specific wear heights (a) without and (b) with fRG.
Lubricants 10 00335 g019
Figure 20. Surface development for geometric wear approaches—rough/rough and rough/enveloping.
Lubricants 10 00335 g020
Table 1. Parameters of test material for the experiments.
MaterialParameter
Bearing shellAlSn20, Diameter dB = 47.598, Width bB = 21 mm
Shaft34CrNiMo6, 48 ± 3 HRC, Diameter dS = 47.522 mm, Width bB = 24 mm
OilDensity ρ15 °C = 863 kg/m³ at 15 °C
Viscosity ν40 °C = 80.5 mm²/s at 40 °C
Publisher’s Note: MDPI stays neutral with regard to jurisdictional claims in published maps and institutional affiliations.