1. Introduction
Compacted graphite iron (CGI) used for engine blocks has attracted attention due to its superior performance when compared to gray cast iron. In CGI, the graphite particles are connected, forming a “coral-like” shape, leading to superior mechanical properties, including the reduction of both nucleation and propagation of cracks [
1]. CGI also performs better than gray cast iron under lubricated conditions [
2]. Furthermore, a new grade of CGI—GJV500—has been introduced [
3] by changing the graphite morphology, and an enormous increase in thermo-mechanical fatigue was described by Bon et al. [
4] when compared to GJV450.
Considering the relevance of abrasive wear previously described by Dos Santos Filho et al. [
5] under lubricated conditions, an attempt to study severe wear was performed for high-strength CGIs by Wollmann and Pintaude [
6]. These researchers added carbon black to lubricant oil to simulate the soot. They found that the performance of GJV500 was slightly superior to GJV450 in the presence of carbon black in ring-on-cylinder reciprocating tests; otherwise, the frictional behavior showed that the carbon black acted more as a lubricant than an abrasive, opening discussion about the reproducibility of wear mechanisms observed in the field in lab rigs.
An alternative to measuring abrasive wear resistance is using microscale abrasion tests. Considering the typical size range of ashes resulting from engine combustion [
7] and that they fit very well to the sizes usually employed under microabrasion tests [
8], this rig can be used to determine the wear resistance of new classes of materials developed for engine blocks.
The dynamics of the microscale abrasion test can promote three modes of wear: firstly, the rolling abrasion, which results in indentations with no directionality on the worn surface; secondly, the grooving abrasion, which forms parallel grooves in the direction of slipping on the surface of the sample; and finally, there can exist both conditions, resulting in a mixed regime [
9].
Many aspects influence the performance of a material under microabrasion conditions: these include the normal load, the ball rotation, and the particle concentration. Among these parameters, the combination of load and size of abrasives is fascinating, because the results in the literature present significant variation. Esteves et al. [
10] pointed out that when lower loads and small particle sizes are used, it is easier for abrasives to enter the contact, causing more grooves on the worn surface. In this regard, it is worth mentioning the investigation performed by Fernandes et al. [
11], who described a microabrasion mechanism map for a Ni-based coating using silica as an abrasive particle; they varied the load (0.1, 0.2, and 0.5 N) and the volume fraction of abrasives (25, 50, and 65%), confirming that the grooving wear was predominant at lower concentrations and higher loads.
As different combustion particulates have different degrees of hardness, it is crucial to understand better the relationship between abrasive characteristics and severity, to evaluate the cost benefit of using GJV500 grade high-strength compacted iron. This study aims to compare the wear resistance of CGI grades GJV450 and GJV500, assessed by microscale abrasive tests carried out with diamond and silica abrasives.
3. Results
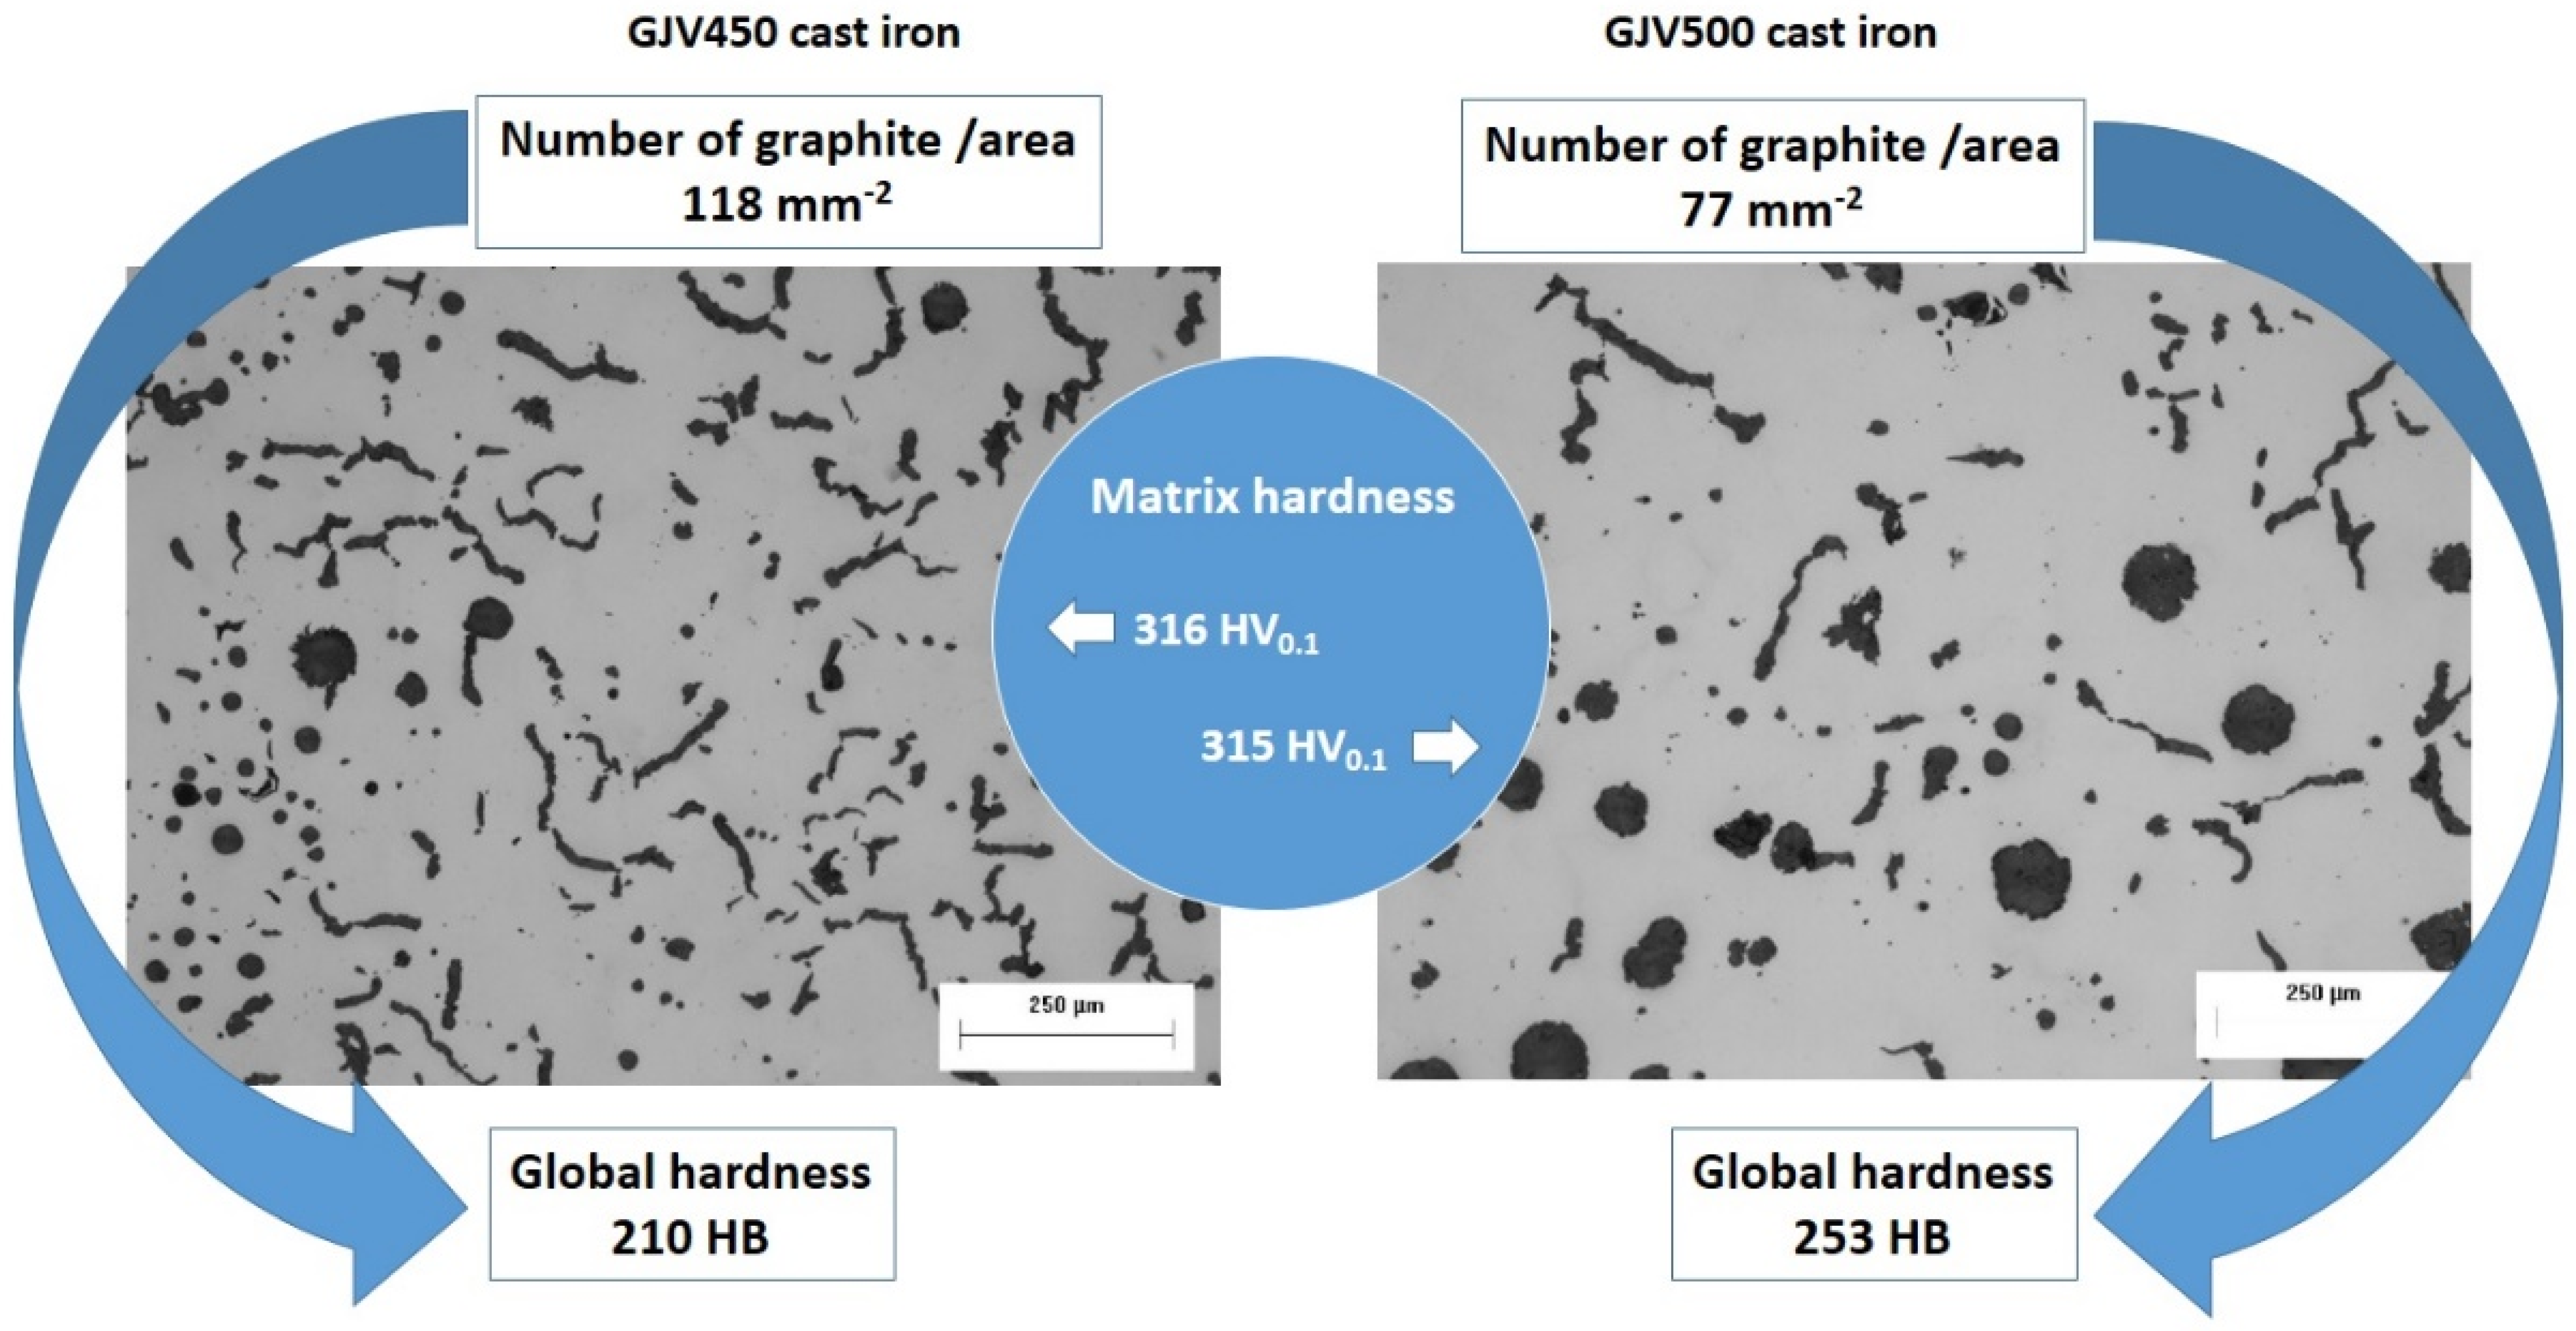
The microstructures of the tested cast iron are shown in
Figure 1, where the compacted graphite and nodules can be seen.
The graphite areas were not found to be significantly different, resulting in 0.9 ± 0.2 mm
2 for GJV 450 and 0.8 ± 0.1 mm
2 for GJV500; however, the graphite number per area and the fraction of graphite were higher for GVJ450 (105 ± 44 mm
−2 and 8%, respectively). These results agree with the lower global hardness for this CGI grade, 210 ± 10 HB. In the case of GJV500, the graphite number per area and the fraction of graphite were 77 ± 12 mm
−2 and 6%: this change in the microstructure was responsible for its higher global hardness, 253 ± 4 HB. Both values were within the expectation for these CGI grades [
15]. In
Figure 1, it is also possible to identify more graphite nodules for GVJ500: 33 ± 7% nodularity compared to 25 ± 5% of GJV450, which can be associated with higher magnesium and cerium percentages in the composition [
16].
The reason for the higher hardness of CGJ500 cast iron associated with the graphite number per area is corroborated by the microhardness measurements in the metallic matrix. We obtained similar values: 316 ± 15 HV0.1 for GJV450 and 315 ± 13 HV0.1 for GJV500. These values were attributable to the pearlitic matrix presented in both microstructures.
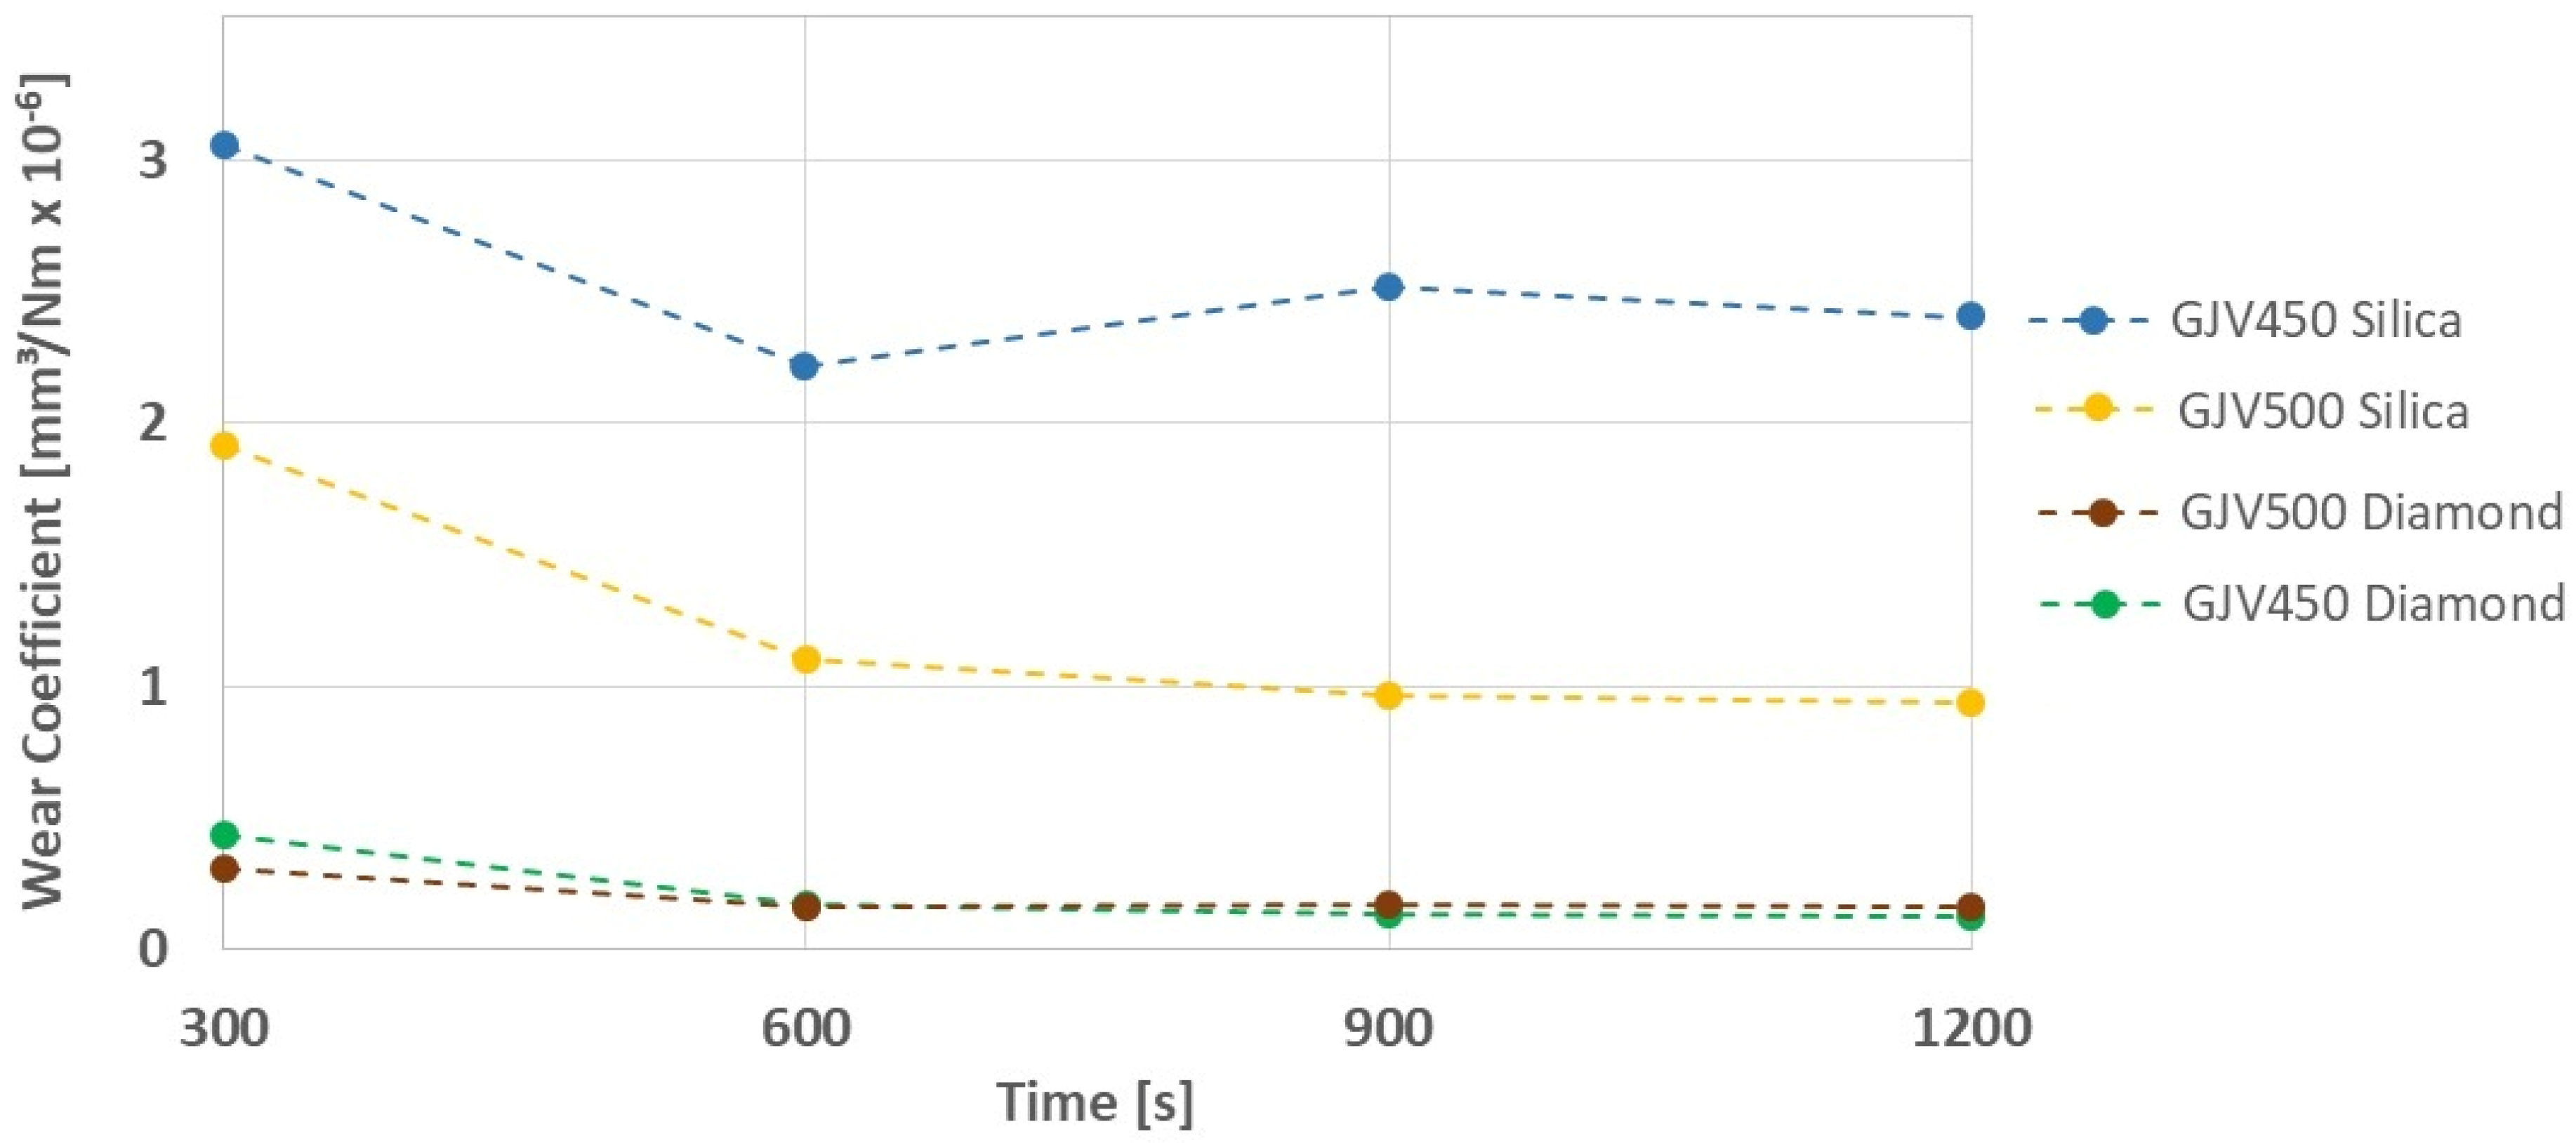
Figure 2 shows the variation of the wear coefficient as a function of testing time for all testing conditions. The samples tested with silica abrasive resulted in a wear coefficient at least four times higher than the diamond ones: this was expected and can be attributed to the differences in abrasive particle sizes, because the silica had an average particle size one order of magnitude higher than the diamond particles, thus promoting more damage to the CGI surfaces.
Table 2 summarizes the wear coefficient values under steady-state regime and also the roughness parameter corresponded to each worn surface.
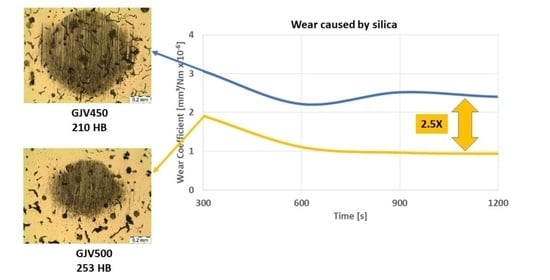
The wear caused by diamond particles was similar for both cast iron grades. On the other hand, using silica as an abrasive, there was a remarkable 2.5 times increase in wear resistance, with only an increase of 17% in the global hardness. The lambda parameter is a sound indicator of wear; however, in the case of the silica tests, this parameter did not reflect the wear differences: to understand these behaviors, we need to check the worn surfaces.
The cross-section profiles of the middle region of the craters of GJV450 and GJV500 after 20 min of testing are shown in
Figure 3. By comparing both scales, it was possible to identify the wider and deeper damage caused by the silica abrasive on the surface of GJV450.
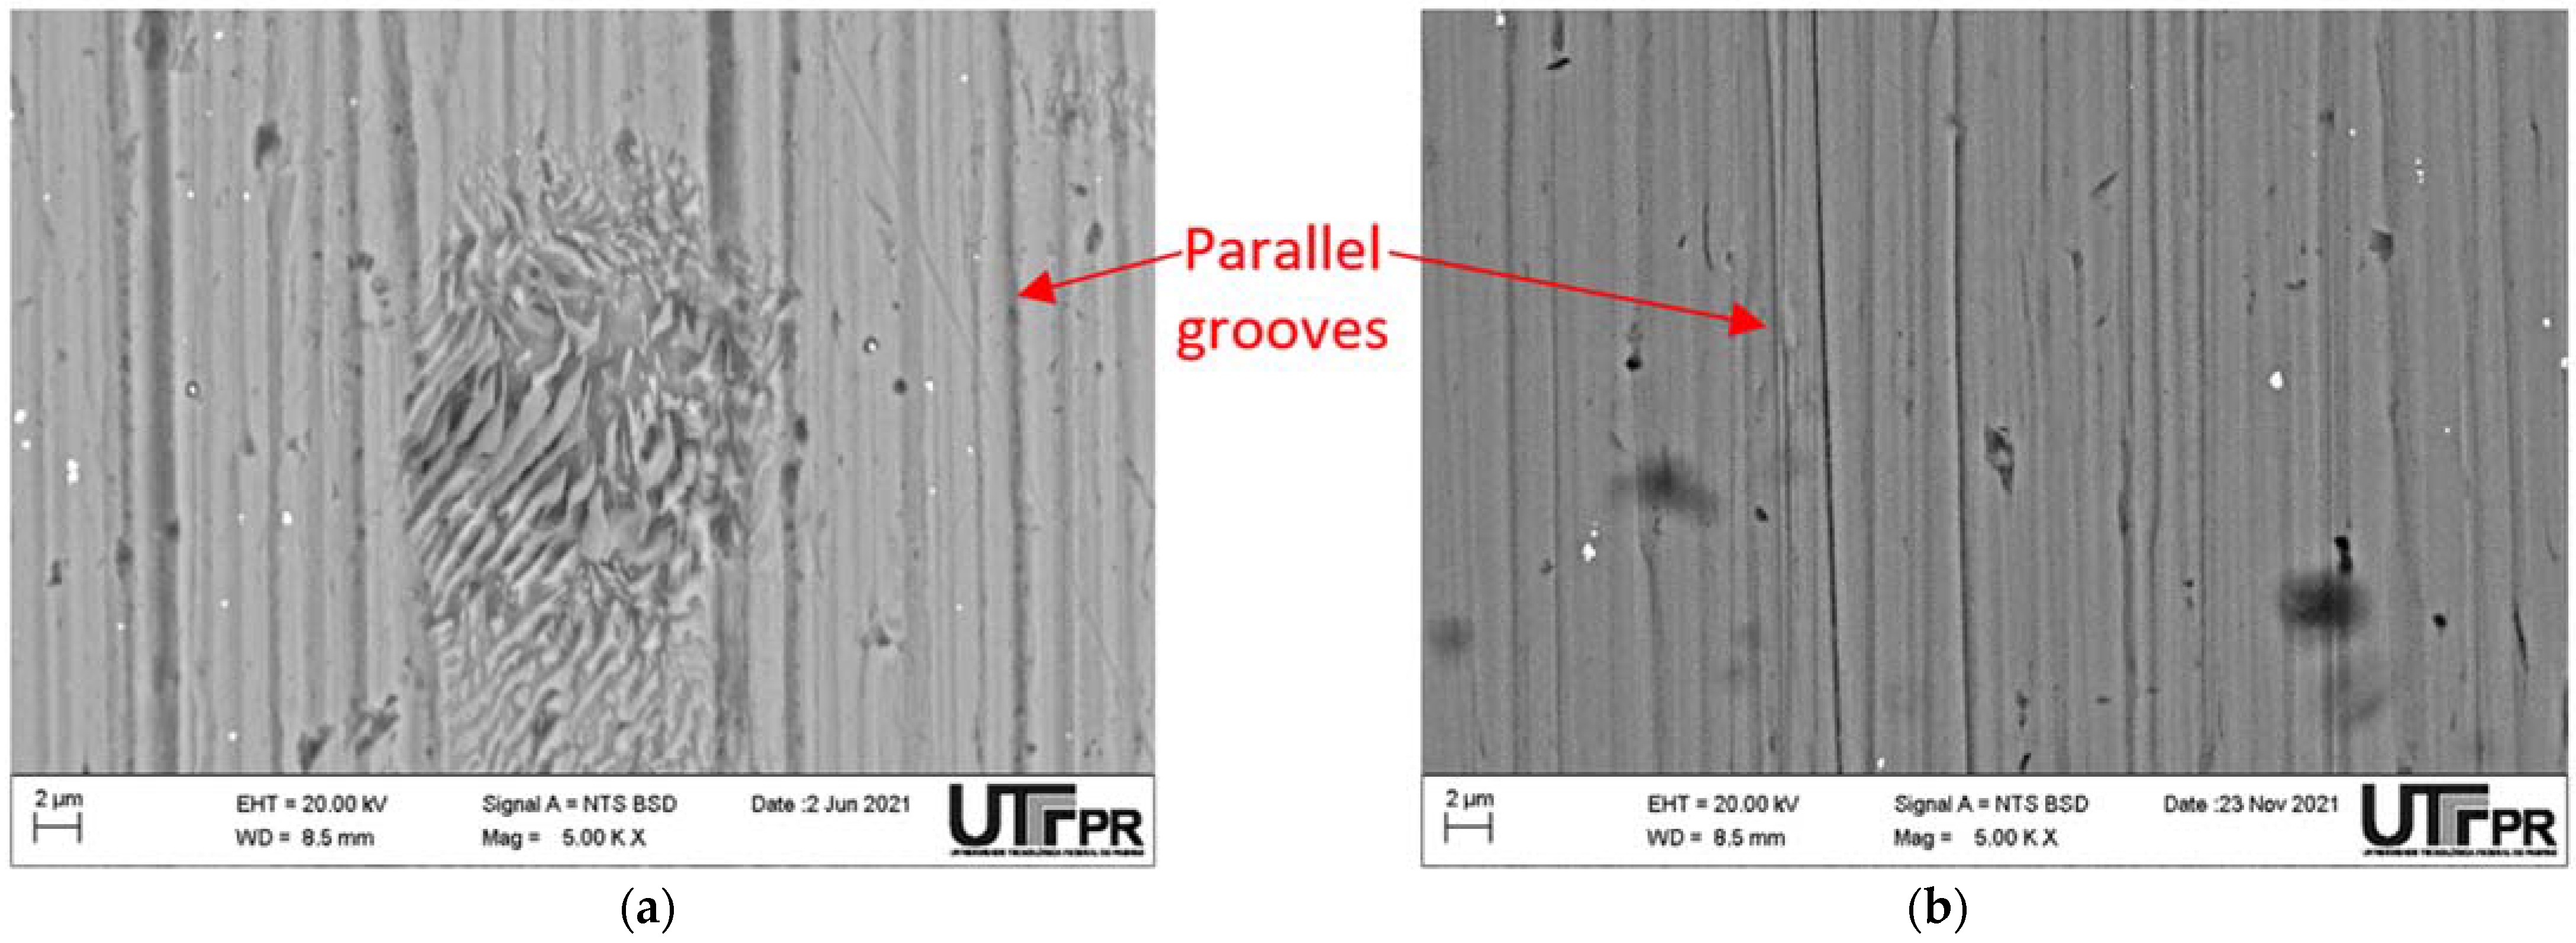
Figure 4 shows the central region of the craters after tests performed with diamond and silica. One can observe parallel grooves in both cases. The particle size effect is evident in the wear coefficients; even at the higher magnifications, there was no difference in the wear modes. The Sq parameters observed after the tests with silica (0.55 and 1.26 µm for GJV450 and GJV500, respectively) were more than double those determined using diamond (0.2 and 0.24 µm for GJV450 and GJV500, respectively). These results indicate that, on average, the frequency of contacts was more intense for bigger particles, as noted in
Figure 4b.
The particle size effect in our tests on the wear coefficient values showed a direct dependence on the microstructural features.
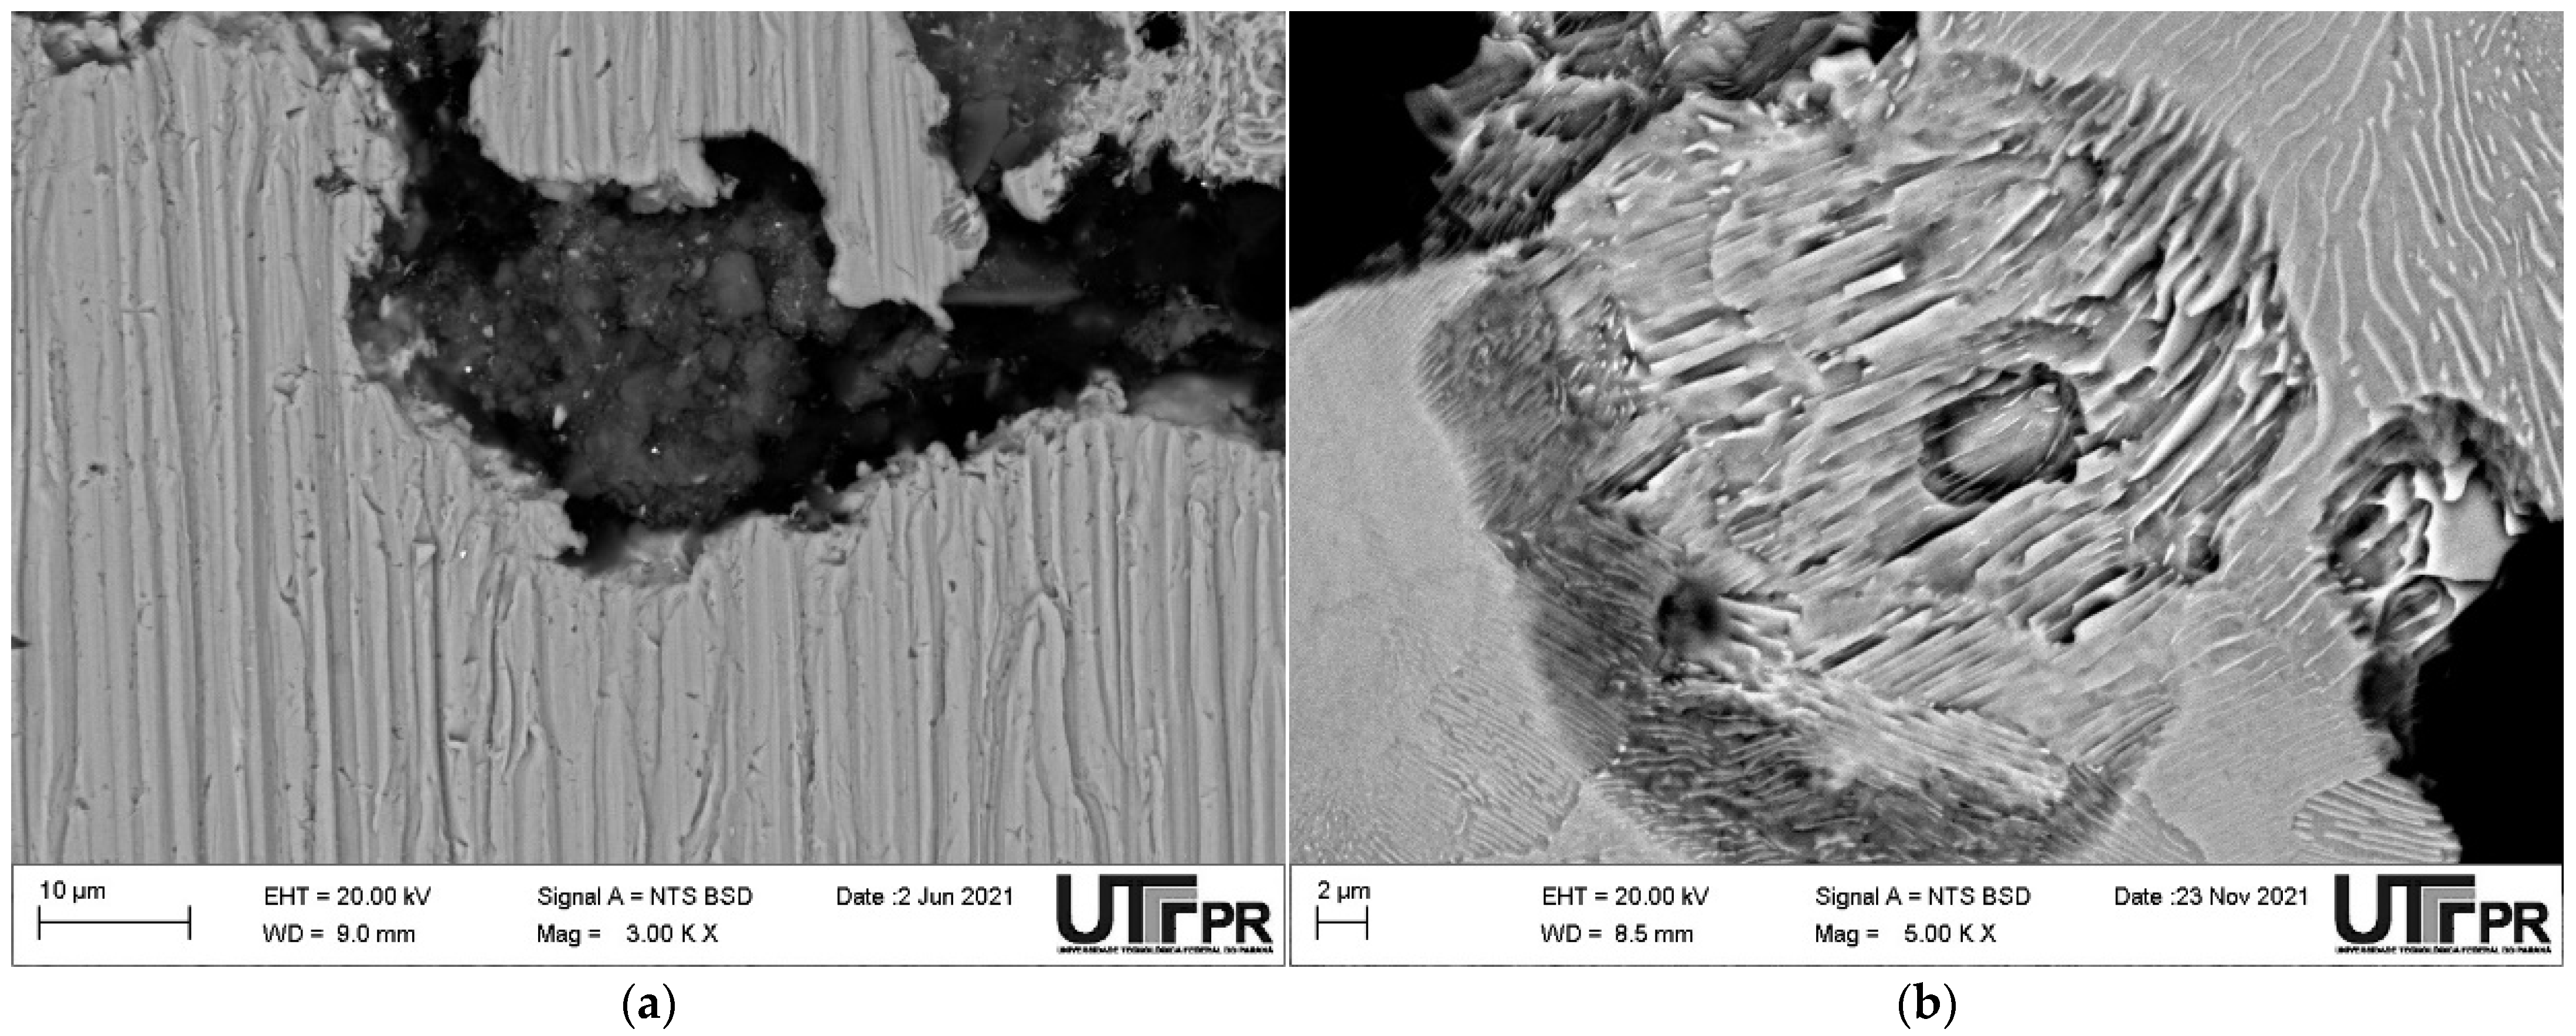
Figure 5 presents details of removed graphite after tests with diamond and silica.
Figure 5a shows the removal of the graphite area. The abrasion process left a hole, but inside the hole there was an accumulation of particles: this indicated that the size of the diamond particles was not sufficient—even considering their agglomeration—to remove the metallic matrix in severe mode due to the lack of bearing support and stress concentration. The opposite situation was verified after the tests with silica.
Figure 5b shows two neighborhood holes in the pearlitic matrix. The revelation of cementite is equivalent to a polishing process; however, the continuity of the abrasion process and the size of the slurry could act to deform/indent the thin residual material, operating in a severe mode. This description is a clue to the effect of the graphite area in tests with silica: the greater the graphite area, the more the matrix removal by lack of bearing support.
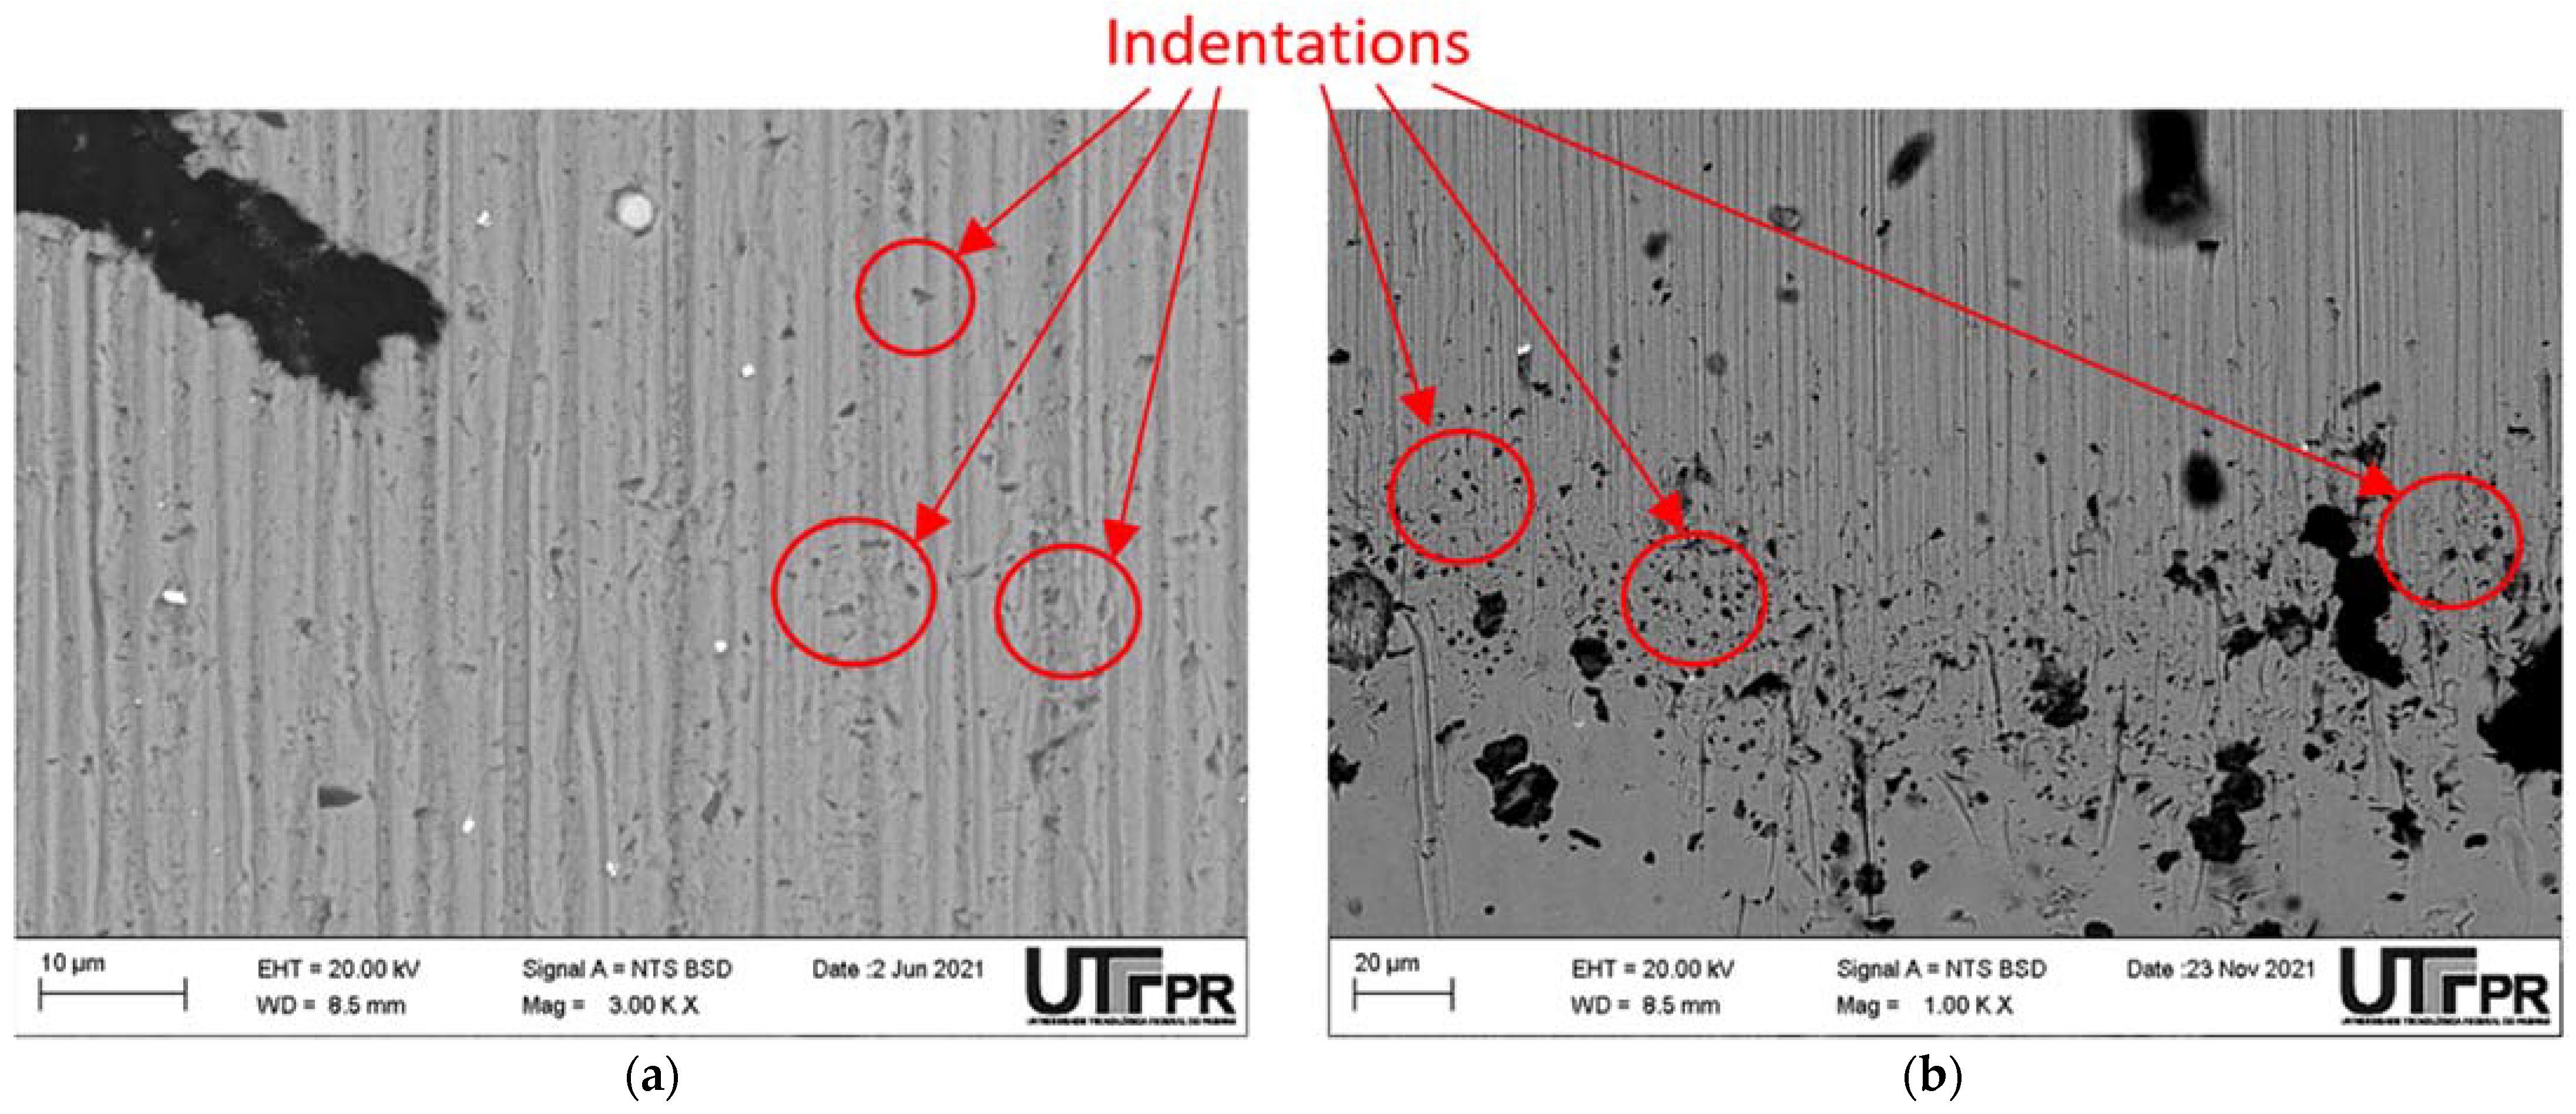
When the edges of the worn craters were analyzed, some indentations could be seen.
Figure 6 shows the end of the crater after 20 min of testing using diamond and silica abrasives against GJV500. The indentations promoted by the diamond particles could be identified using higher magnification (3000×) due to their small particle size. When the same region was analyzed in the samples tested with a silica abrasive, the indentations became more prominent and more profound, but the same mechanism occurred. Similar results had already been reported by Costa et al. [
9] and Allsopp et al. [
17] for smooth zirconia balls: in the latter case, the abrasive particles did not impregnate the sphere but embedded in the sample, remaining stationary at the edge of the contact; this changed the wear mode from sliding to rolling abrasion, with the harder abrasive particles indenting the softer material of the samples.
The frequency of embedded particles in
Figure 5b may have directly resulted from the relative high ball speed rotation employed (300 rpm). Following Esteves et al. [
18], this effect is commonly observed in the region where particles enter the contact, causing a reduction of the wear rates compared with tests at lower ball speed rotations.
It was not trivial to detect differences between wear mechanisms and wear modes amongst the test conditions used here. The low particle volume fraction chosen here was to simulate the probable low ash dispersion from the combustion process: however, under microabrasion, it strongly promoted the grooving wear.
At the beginning of the test, GJV450 presented a wear coefficient 50% higher than GJV500. This result was verified in
Figure 7, where one can see a more prominent crater in the case of GJV450. Surprisingly, after 10 min, the difference between both grades was 150%, which indicates that when GJV500 is submitted to mild conditions with abrasive hardness, it has superior wear behavior.
Figure 6 partially explains the failure of using the
λq roughness parameter to distinguish the two grades’ enormous differences in wear behavior. The graphite areas were exposed at the beginning because the surfaces were initially polished. The graphite areas were also identified within craters, meaning that the roughness measurements were affected by the presence of this constituent. Comparing
Figure 5a,b, the higher the crater, the higher the graphite area. The scratching of the cast iron was strongly affected by the presence of graphite, disturbing the widths of the grooves, as described previously by Do Vale et al. [
2]; therefore, there was a need to take into account this effect during roughness measurements, applying specific filters to distinguish the graphite effect, as done previously by Pintaude et al. [
19].
4. Discussion
The results presented here can be divided into three effects: (i) particle size; (ii) abrasive hardness; (iii) microstructure. The first effect caused the most significant difference in wear coefficient values, although the hardness of the diamond was much greater than the silica. When we tried to differentiate the effect of microstructure, the tests conducted with diamond slurry were not efficient.
Regarding the particle size effect, Silva et al. [
20] verified a significant influence of particle size on the wear of a PVD coating. When the authors used SiC as abrasive material, the change from 3.4 to 5.5 µm promoted a decrease in the wear coefficient of one order of magnitude (5.49 × 10
−3 to 8.27 × 10
−4 mm
3 N
−1 m
−1): the authors discussed the reason for this as being the increase of active particles in contact with smaller sizes. The particle size effect on microscale abrasion tests is not trivial. Gomez et al. [
21] showed a significant dependence on the size distribution, which means that a concept of “average size” is not enough to describe the particle effect on microabrasion—even though, comparing the extreme conditions used by these authors, the increase in the size of SiC particles from 2.1 to 6.6 µm caused an increase of 20% in the wear coefficient of 1020 carbon steel.
To our knowledge, all investigations have related a four-times difference in the wear coefficient using a microscale abrasion test, keeping the other relevant variables constant. We can focus some discussion on using more or less hard abrasives to discriminate the wear behavior.
Lyu [
22] verified a better compacted graphite iron performance when tin additions used a pin-on-disk test, where the disk was coated with corundum sandpaper. When tin was added, the reduction in wear was about 16.5%, and he attributed this to the reduction in the average size of the vermicular graphite. The severity of wear tests can be high enough not to distinguish the effect of microstructure: this has been demonstrated previously by many investigations.
The worry about reproducing adequate testing conditions is readily found in mining applications, which use white cast iron as wear-resistant material. A notable result was described by Albertin and Sinatora [
23]: they tested three matrices of high-chromium cast iron under a lab ball milling test. The martensitic matrix always performed well against three abrasive materials: phosphate rock, hematite, and quartz. When pin-on-disk tests were performed, the austenitic cast iron performed better using much harder particles, showing that the severity level can invert the performance of different microstructures. Bringing these findings to our problem, the hardness of the diamond seems to be high enough not to distinguish the graphite effect on the wear performance of high-strength compacted graphite iron. On the other hand, the differentiation of the microstructural effect on wear rates was less sensitive, looking at the results produced by Lyu [
22], who used a softer abrasive than diamond, and much softer than silica.
We can look at scratching tests to verify what happened when diamond slurry was used here, not discriminating the performance of different cast iron grades. Imposing scratches using a diamond tip can help to understand the role of global hardness on the wear results. Ghasemi et al. [
24] conducted nano-scratch tests, measuring the scratch hardness under different loads:
Table 3 summarizes their results for cast iron with different microstructures in graphite distributions and, consequently, hardness. We chose two conditions where the matrix hardness was not so different but the global hardness, due to the graphite distribution, was quite different, to approximate our investigation.
Taking the scratch hardness as the final result regarding grooves geometries (width and depth), the values can be considered statistically similar: we did not reproduce the standard deviation, but they were big enough to turn the equivalent of the value. This result corroborates the similarity of wear rates when the diamond slurry was employed in the microabrasion test.
Unfortunately, the articles of Gashemi et al. [
24] and Lyu [
22] did not report the graphite count in detail. We describe all parameters here, and the discussion in terms of microstructural effect loss in quality for CGI, considering that there are few examples of abrasive wear investigations for this class of cast iron.
Finalizing the difficulty in understanding the wear modes/mechanisms, it is proper to remember that the scale of microabrasion naturally creates difficulty in revealing the worn subsurfaces. On another scale, Su et al. [
25] compared the scratched surfaces of lamellar cast iron and steel, and they were able to describe two subsurface regions: fragmentation and compression zones. In the fragmentation zone, graphite particles dissolve at deeper distances from the surface, resulting in discontinuities and scratches. To reveal a fragmentation zone of approximately 5 µm depth, Su et al. [
25] produced scratches of 600 µm width. This comparison shows the challenge of describing the role of microstructural features after microscale abrasion tests, where the width dimensions of the grooves are much smaller than those described by reference [
25].
