Communication

Numerical Simulation and Experimental Validation of Surface Roughness by the Smoothing Small Ball-Burnishing Process

1
Department of Manufacturing Engineering, Faculty of Mechanical Engineering, Ho Chi Minh City University of Technology (HCMUT), Ho Chi Minh City 72506, Vietnam
2
Vietnam National University, Ho Chi Minh City 71300, Vietnam
3
Department of Material Processing Technology and Machinery, Faculty of Mechanical Engineering, Ho Chi Minh City University of Technology (HCMUT), Ho Chi Minh City 72506, Vietnam
*
Author to whom correspondence should be addressed.
Machines 2021, 9(3), 48; https://doi.org/10.3390/machines9030048
Submission received: 1 February 2021 / Revised: 19 February 2021 / Accepted: 20 February 2021 / Published: 25 February 2021

Abstract

:
The smoothing ball-burnishing process has commonly been used as a post-processing method to reduce the irregularities of machined surfaces. However, the mechanism of this process has rarely been examined. In this study, a simulation procedure is proposed to predict the surface roughness of a burnished workpiece under varying burnishing forces. The roughness of the workpiece surface was firstly approximated by parabolic functions. The burnishing process was then numerically simulated through two steps, namely the elastic–plastic indentation of the burnishing ball on the workpiece’s surface, and the sliding movement of the burnishing tool. The results of the simulation were verified by conducting small ball-burnishing experiments on oxygen-free copper (OFC) and Polmax materials using a load cell-embedded small ball-burnishing tool. For the OFC material, the optimal burnishing force was 3 N. The obtained experimental surface roughness was 0.18 μm, and the simulated roughness value was 0.14 μm. For the Polmax material, when the burnishing force was set at its optimal value—12 N, the best experimental and simulated surface roughness were 0.12 μm and 0.10 μm, respectively.

1. Introduction

The conventional cutting processes unavoidably damage the surface integrity of the components, producing cracks and tensile residual stress. These defects cause fatigue failures when the components are operated under dynamic loads. Thus, post-processing methods, such as grinding, lapping, and polishing, are required for most workpieces. Unlike chip removal processes, the ball-burnishing process uses a rigid ball to deform and drive materials from peaks into valleys. Therefore, the surface of a burnished workpiece has the qualities of low roughness and compressive residual stress.
According to Korzynski [1], ball-burnishing can be categorized into four types in terms of its operational purposes: hardening, dimensional, smoothing, and a mix of all three. The small ball-burnishing process mainly aims to improve the surface roughness, while the surface hardness is often not a significant concern. Therefore, this study investigates the surface smoothing mechanism.
Despite the compelling achievements reported in previous experimental works [2,3,4,5,6], universal application of these methods is not attainable. The validity of each empirical model is limited to a particular operating condition. For several decades, the theoretical study of burnishing processes has been developed using Hertz’s theory, which investigates the elastic deformation of a soft, flat surface under a load applied by a smooth, rigid ball [7,8]. Although the Hertzian model can be used to estimate the burnishing force in a static burnishing process, there are discrepancies in the obtained optimum forces between experimental works and the theoretical models [5,7]. This is because the Hertzian model does not consider plastic deformation and the effects of the initial workpiece’s surface. Luo et al. [9] proposed an analytical model for a cylindrical tool burnishing process with a surface comprising Gaussian-distributed spherical asperities. However, many actual engineering surfaces possess non-Gaussian height distribution. Pre-burnishing processes—turning or milling—usually produce surfaces with systematically stripy asperities, considered as non-Gaussian [9]. For the smoothing models established by Korzynski [1] and Li et al. [10] with wedge-shaped stripy surfaces, the drawbacks are that the authors used asperities of the same height and equal spaces between the surfaces’ stripes.
Therefore, in this study, a milled workpiece surface was numerically generated from experimental measures of surface roughness [10]. Then, Aramaki’s method [11] was applied to simply describe the surface profile with parabolas to obtain the asperities’ radii of curvature and heights. The small ball-burnishing process could then be simulated through two steps: the indentation of the ball on the surface and the sliding movement of the tool. The results of the simulated process were verified by experimental works on two different materials: the mold steel Polmax and oxygen-free copper (OFC). A load cell-embedded small ball-burnishing tool able to clamp a 0.5 mm diameter tungsten carbide ball was used to perform the burnishing processes.

2. Small Ball-Burnishing Process

The ball-burnishing process is one of the cold surface finishing methods that can improve the physical and mechanical properties of a workpiece. This process uses a polished ball with high hardness to deform and move material from peaks to valleys of the workpiece’s superficial irregularities with a normal and uniform load [1], as illustrated in Figure 1. This mechanism is performed by feeding the burnishing ball perpendicularly to the pre-machined surface’s lay direction while maintaining a regular compression force. The ball-burnishing process gives many advantages in comparison with chip removal processes. In addition to the benefit of producing a smoother surface [3,4], the burnishing process induces compressive residual stresses on the surface of a working piece and, therefore, the resistance to wear and fatigue also increases [2].
In order to conduct the small ball-burnishing process, a tool embedded with a spring or a load cell system to set and maintain the burnishing force is designed to clamp the small burnishing ball. The burnishing tool is mounted on a machining center to control the sliding speed and the burnishing step-over. There are many parameters involved in the small ball-burnishing process: the initial surface roughness of the workpiece, the number of burnishing passes, the ball and workpiece material, the ball diameter, the burnishing speed, the burnishing force, depth of penetration, burnishing feed, and the type of lubricant. Among these parameters, the burnishing force is the most significant factor to improve the workpiece’s surface roughness [5,6].

3. Simulation Process

3.1. Simulation Procedure

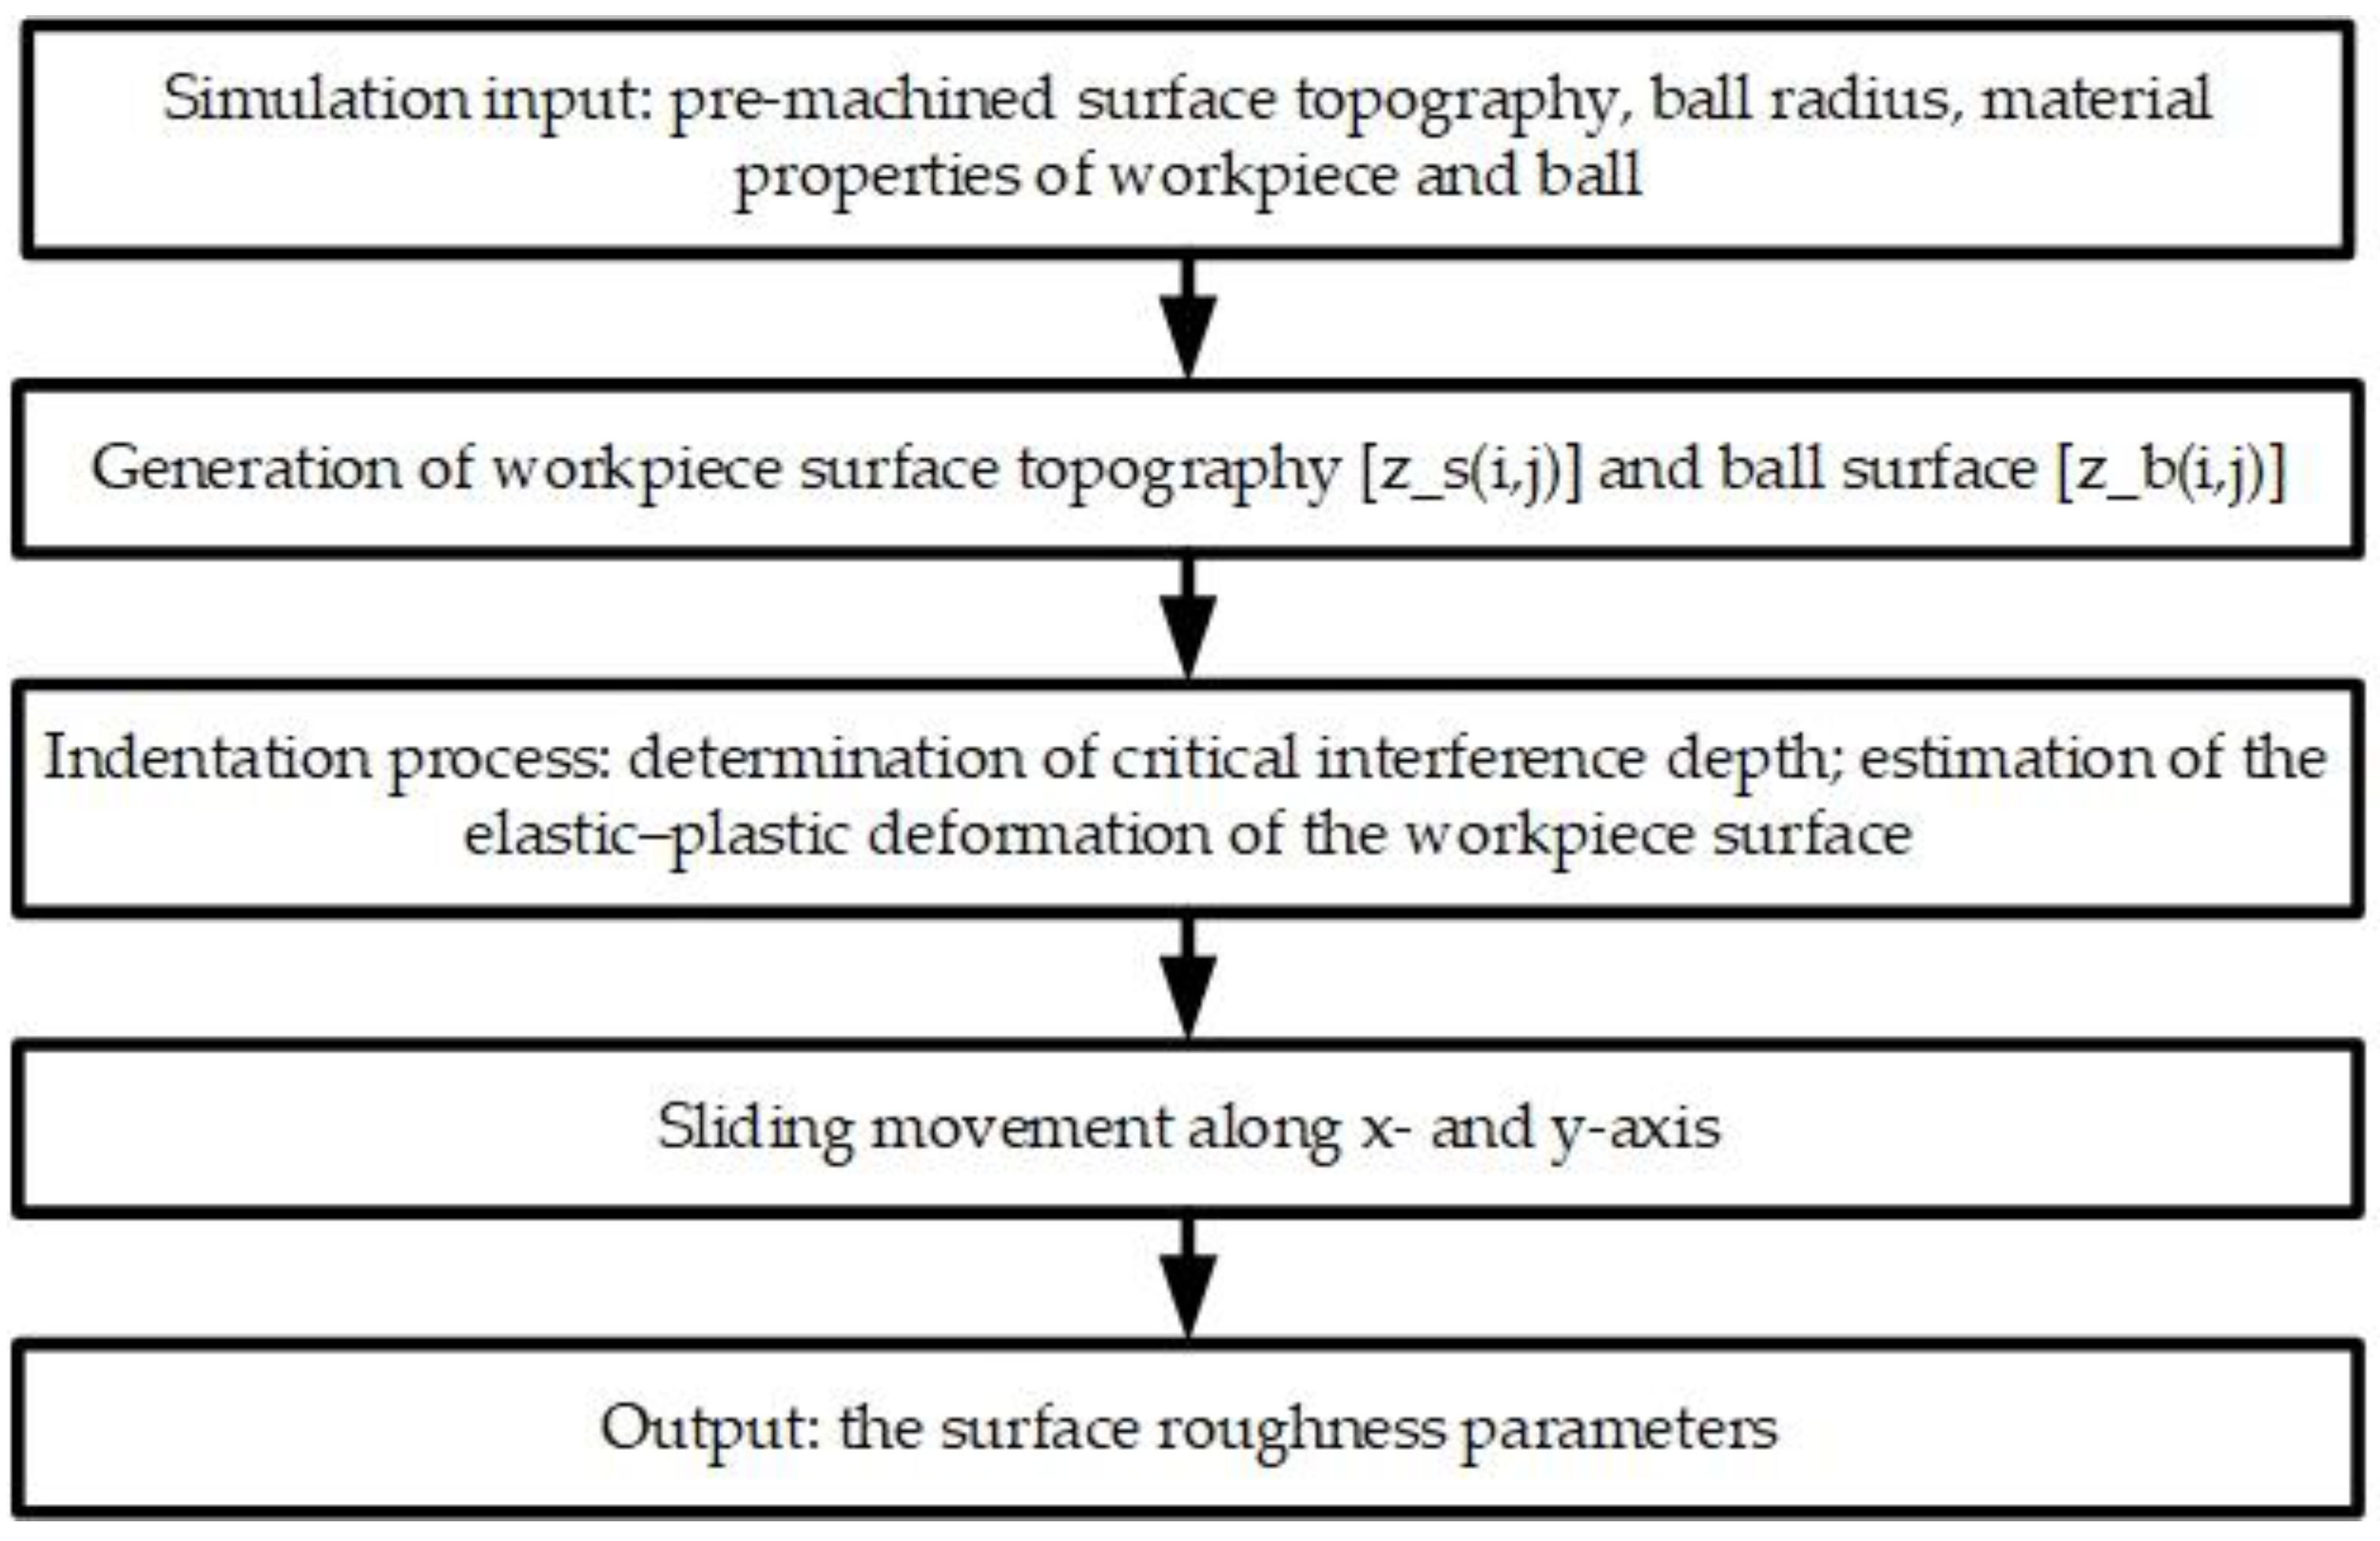
The simulation procedure of the smoothing small ball-burnishing process is shown in Figure 2. Inputs for the simulation included the pre-machined surface topography, the geometry of the burnishing ball, and the material properties of the workpiece and the ball. The simulation procedure began with the generation of the workpiece surface, (z_s(i,j)) and the ball’s surface, (z_b(i,j)) based on the input data. The indentation process was investigated afterward. The elastic–plastic deformation of the workpiece surface was estimated using the data from the generated topographical arrays, (z_s(i,j)) and (z_b(i,j)), and the material properties. After each iteration, the continuous sliding movement of the burnishing ball over the workpiece surface was maintained at the same rate to incrementally shift the indentation position. The workpiece surface array, (z_s(i,j)), was updated after every repetition of indentation and sliding movement. The output surface roughness parameters were then estimated using the obtained workpiece surface array (z_s(i,j)).

3.2. Surface Generation

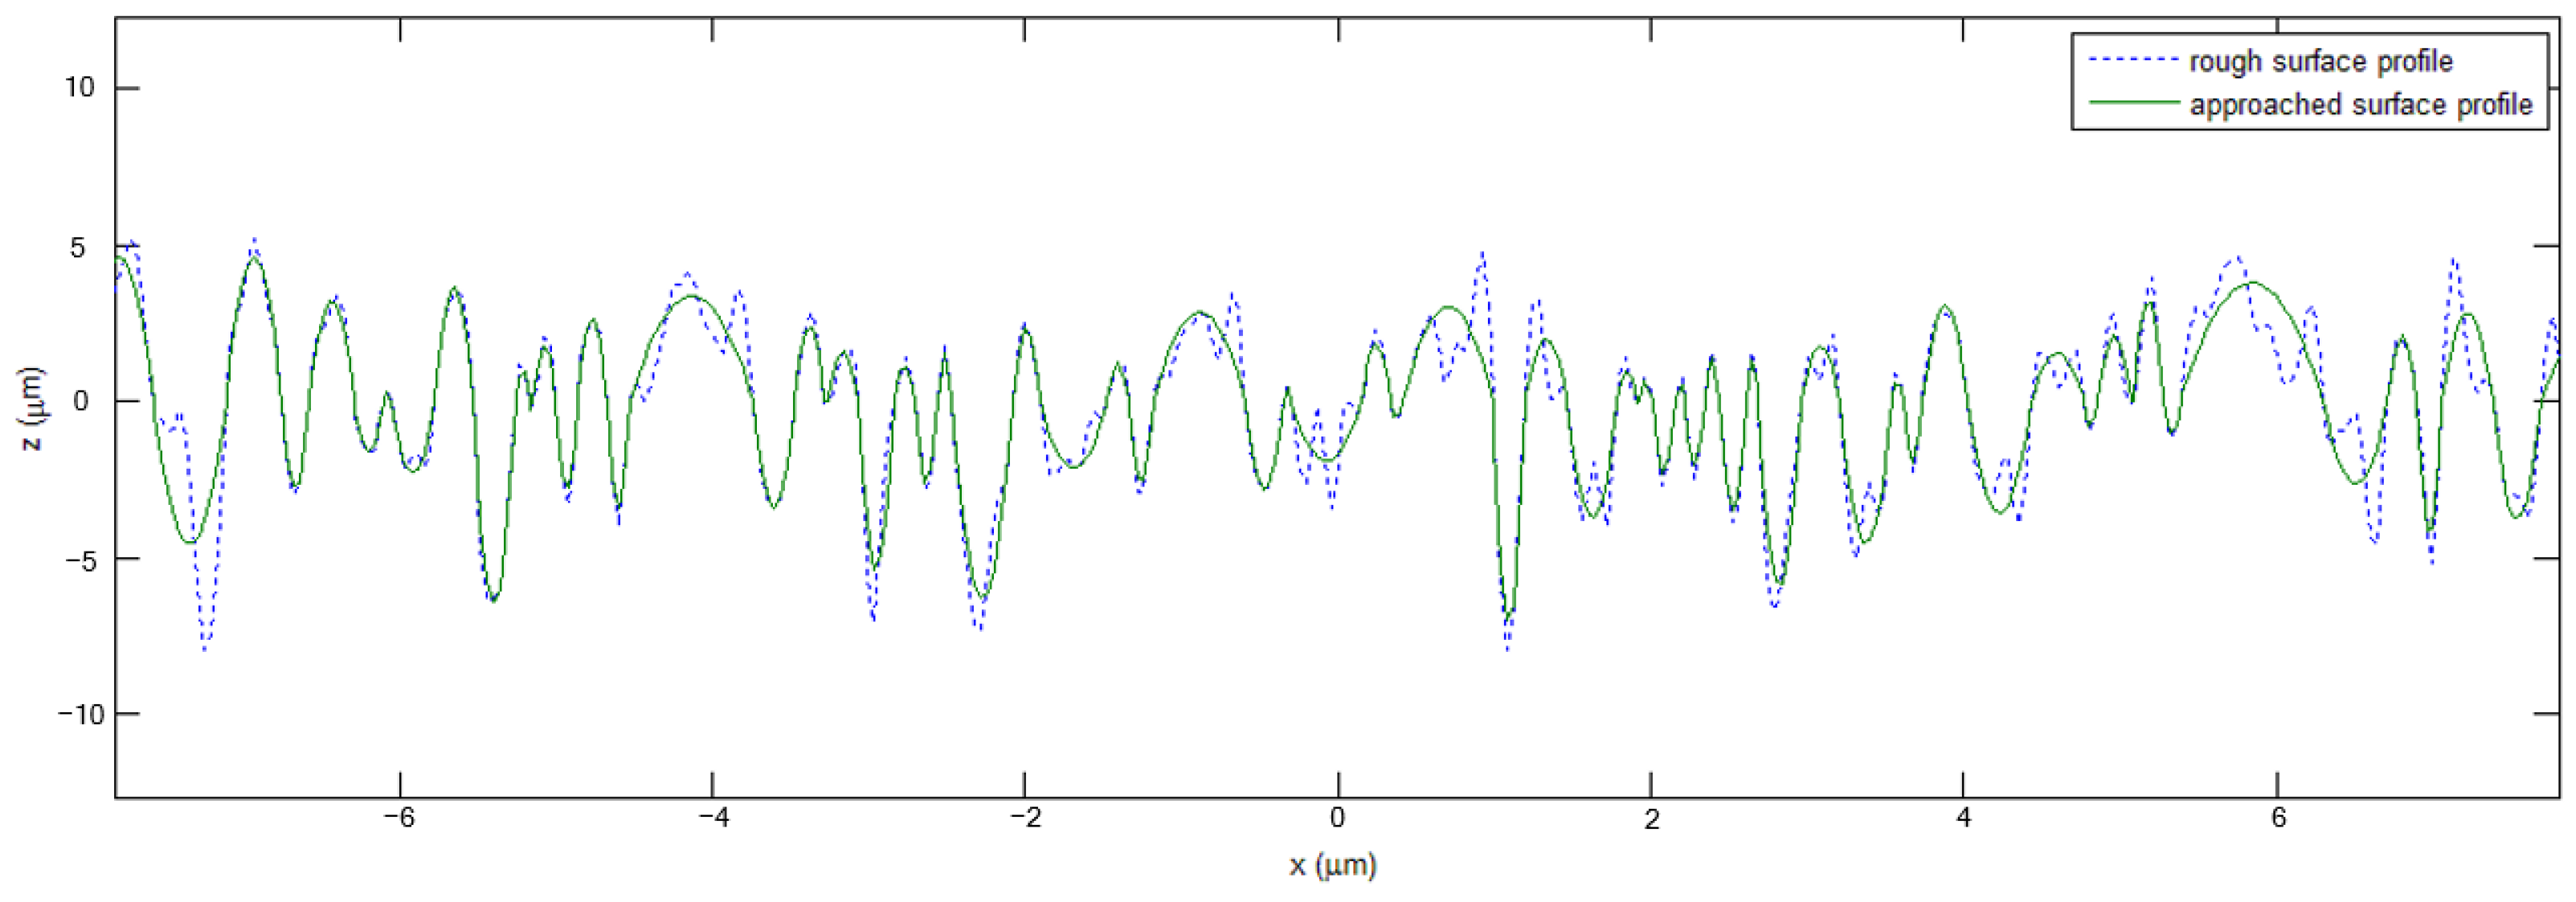
In this study, the Aramaki roughness model with quadratic function was utilized to describe the surface profile of the milled workpieces (Figure 3). The relationship between the parabola width, L, and height, z, was generated as the following equation:
z ( L ) σ = ( 2 π L 2 + 1 ) 1 / 2 L
where σ is the standard deviation of the roughness profile heights; L = ( α L ) / π with α is the coefficient of the auto correlation function.
The simulated surface of the milled workpiece was composed of successive ridges and furrows, generated by extruding the parabolic peaks and valleys (Figure 4).

3.3. Indentation Process

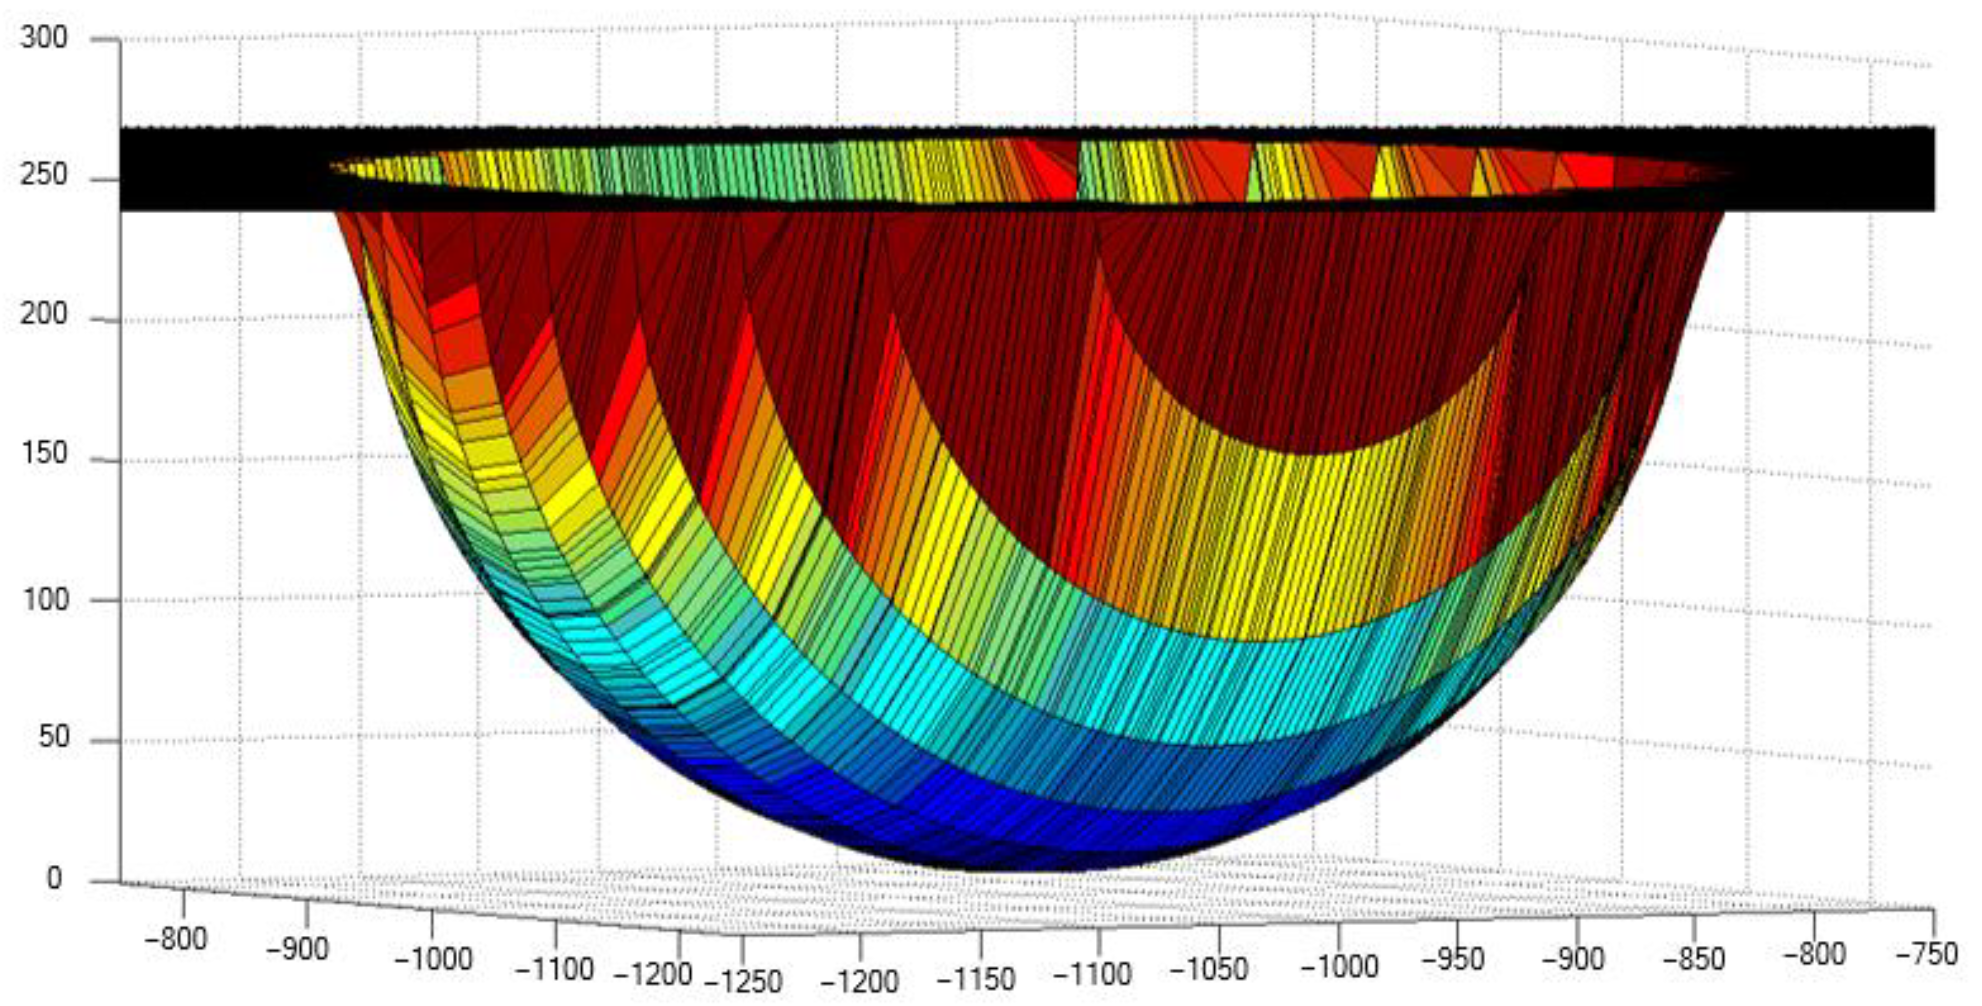
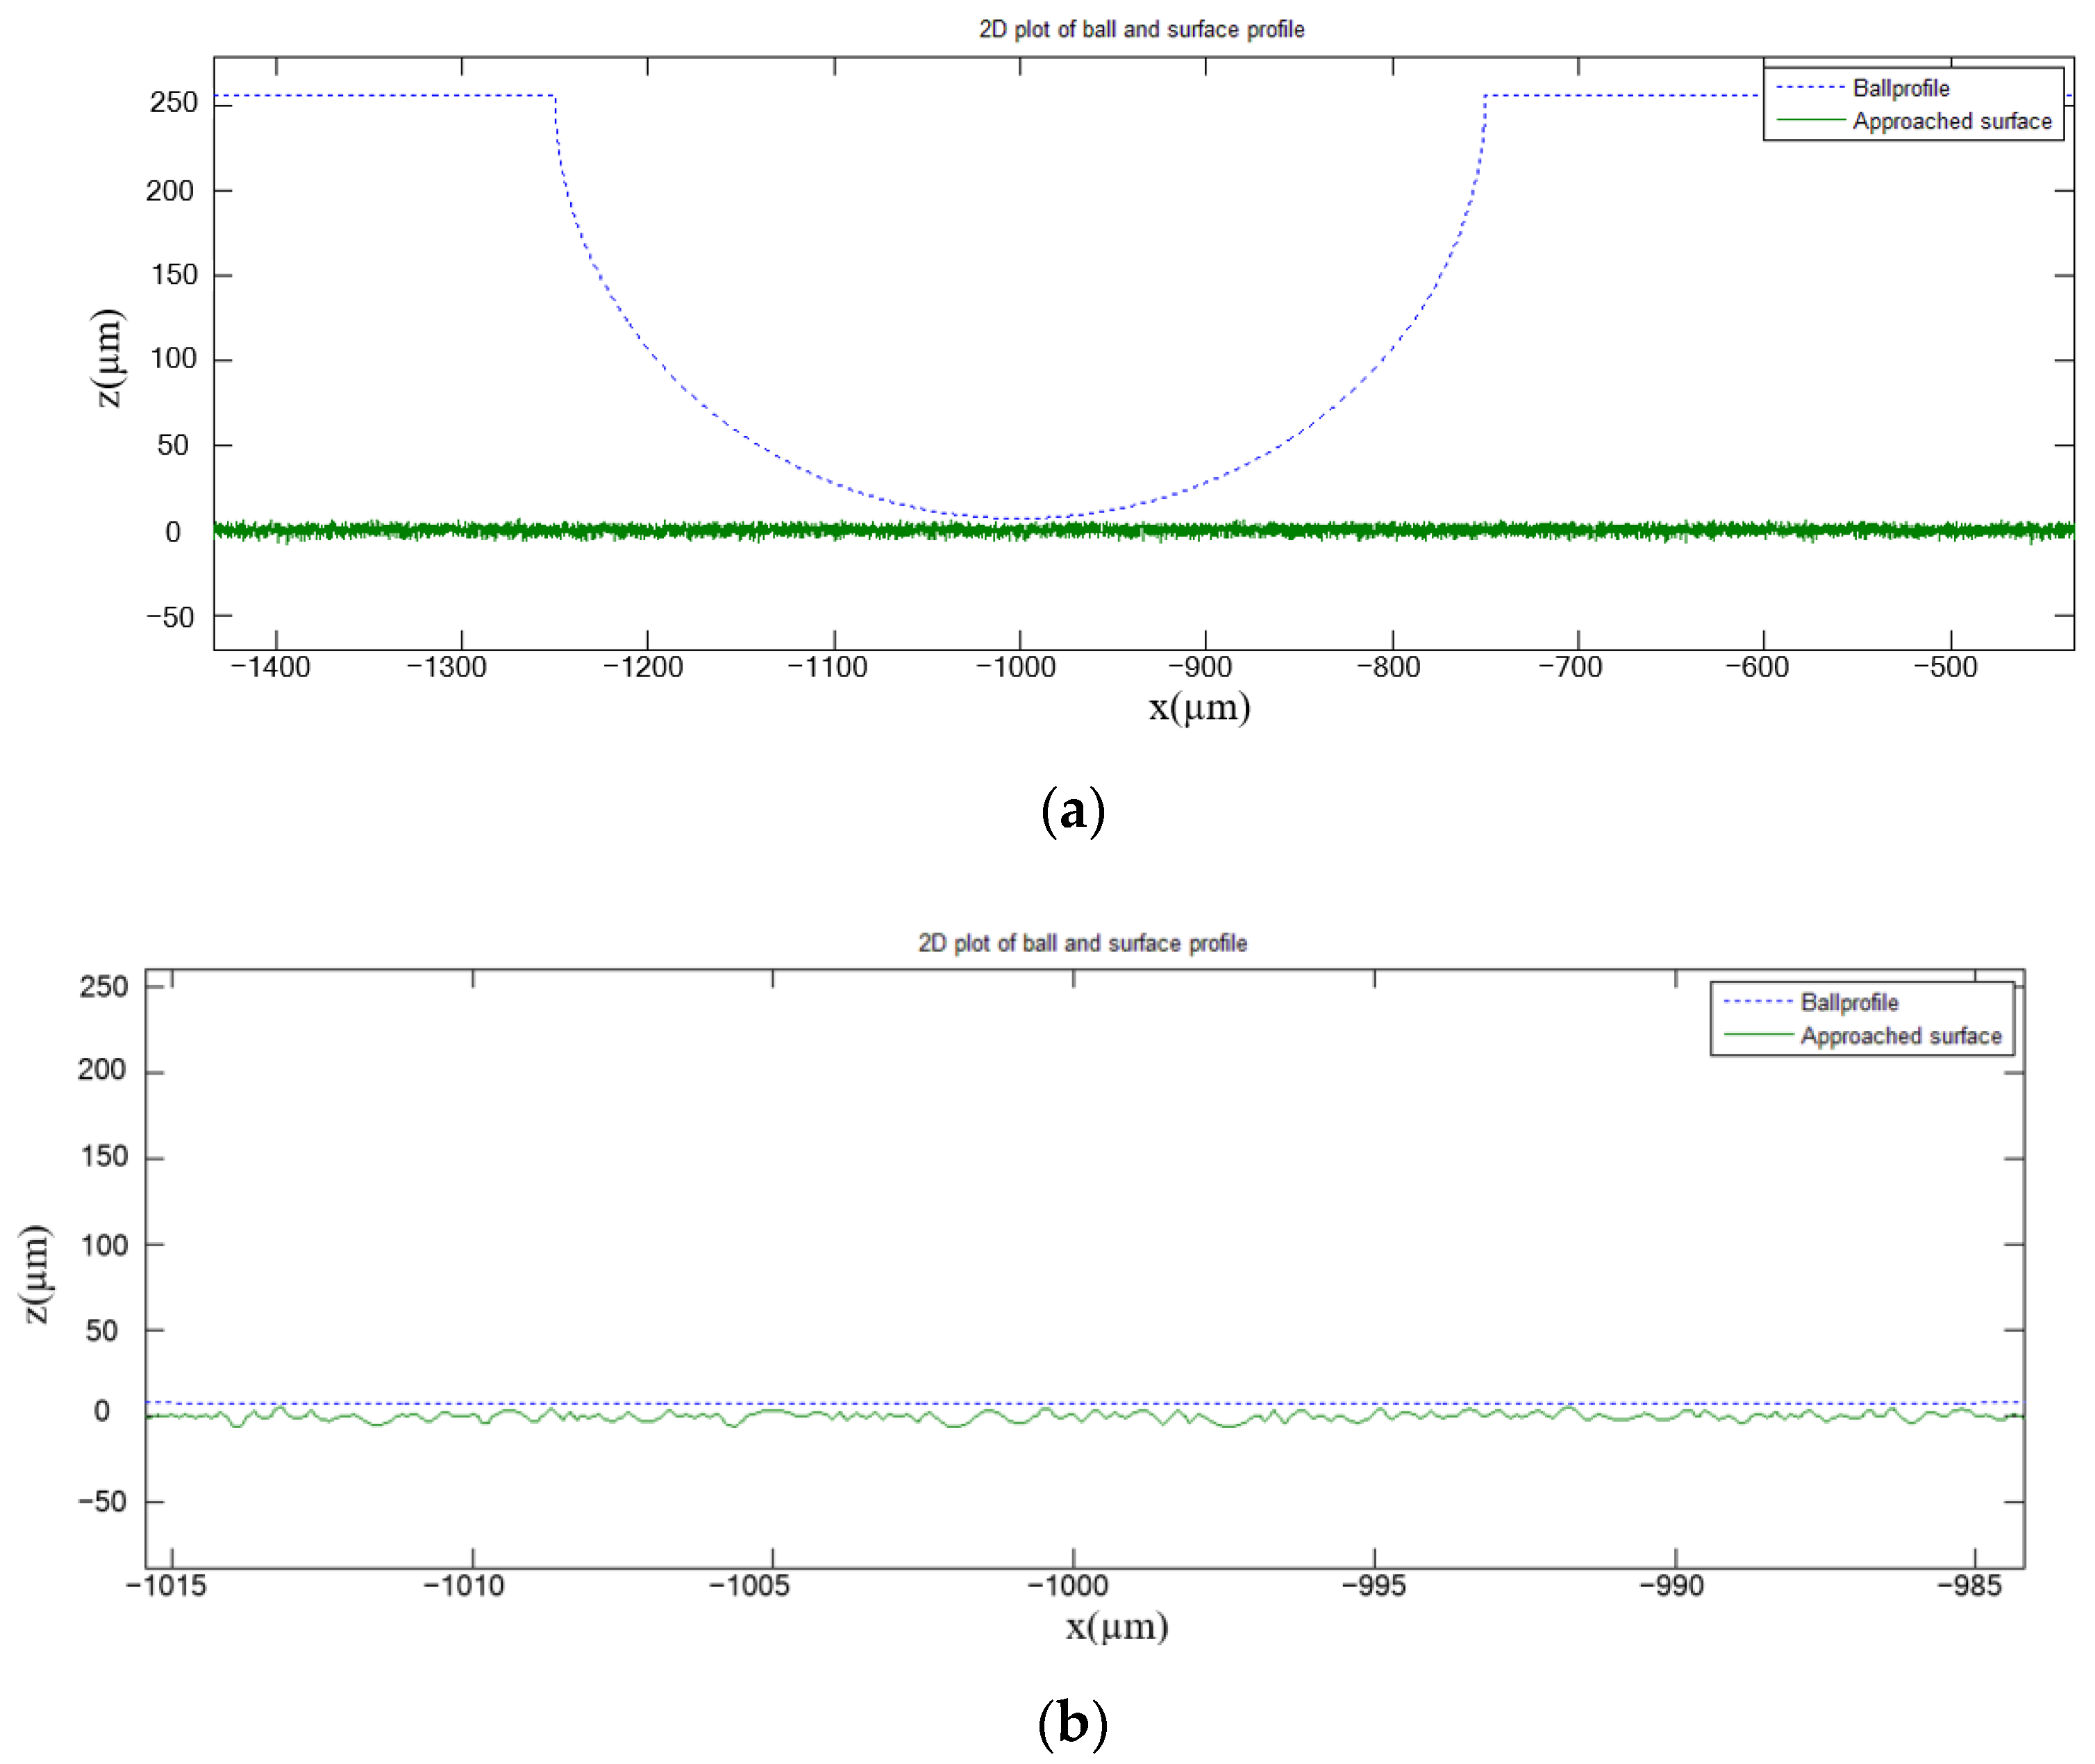
In this study, the workpiece was pre-machined by a face milling process. Its roughness tips were approximated by the parabolic ridges and furrows perpendicular to the direction of the feed. The ball’s surface (Figure 5) was considerably smoother compared to the surface of the workpiece. Hence, contact between the ball and the workpiece surface could be assumed as the sum of the parabolic ridge contacts and the smooth ball surface (Figure 6). Therefore, the indentation process was the constitution of the interference of the burnishing ball with each Δy length ridge in the contact region (Figure 7).
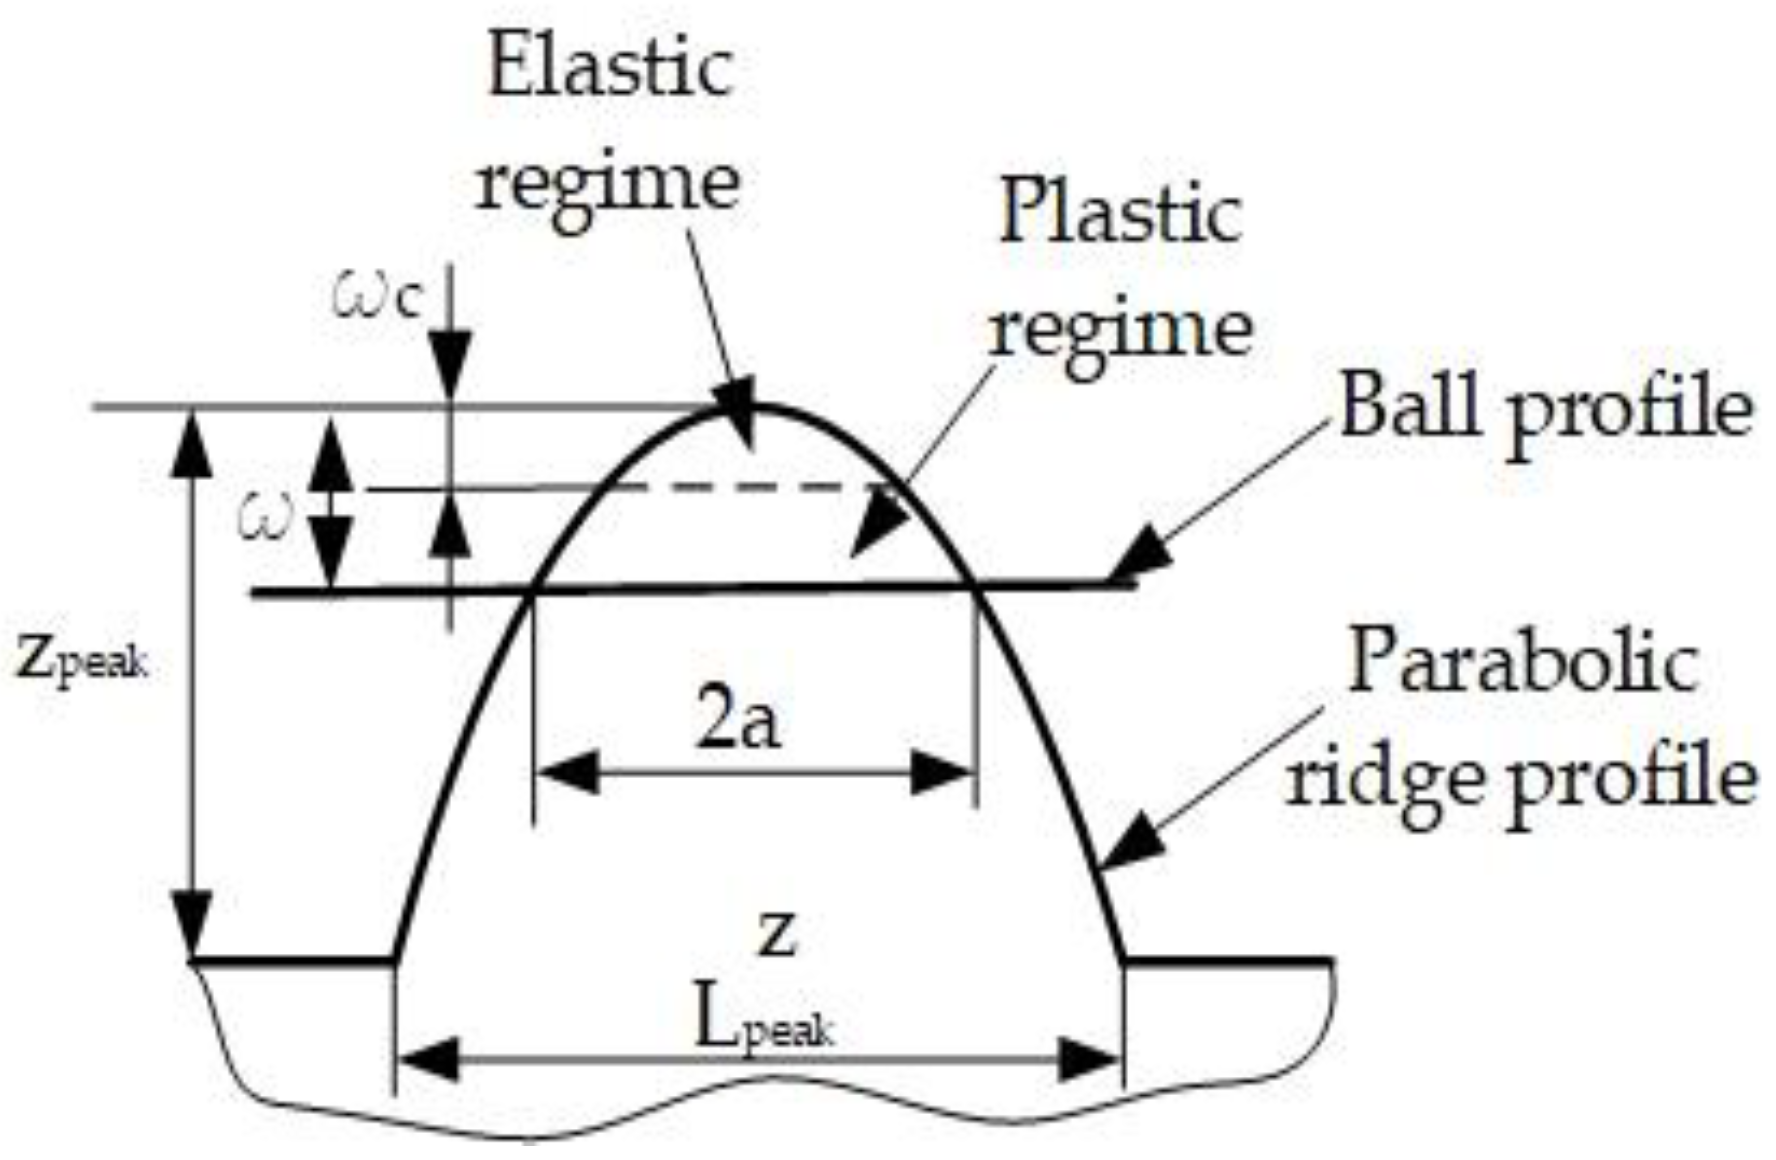
Under the pressure of the ball, the ridge was initially elastically deformed. As the load increased, the elastic behavior still described the deformation until a critical interference, wc, was reached [12]. Upward of this critical load, the interaction also included plastic contact. Thus, the total burnishing load, W , was the collective effect of the load in the elastic and plastic regime. According to the fictitious plastic asperity theory proposed by Abdo et al. [13], if we let A be the characteristic of contact (area, or load), then A may be obtained by appropriately accounting for the aforementioned interaction. Therefore,
W = W e 1 W e 2 + W p 2
where W e 1 is the characteristic of contact due to the elastic contact between the plane and surface asperity; W e 2 is the characteristic of contact due to elastic interference between the plane and the fictitious plastic asperity; W p 2 is the characteristic of contact due to the plastic interference of the plane and plastic asperity.

3.3.1. Elastic Analysis

In this research, the burnishing contact of the ball’s and workpiece’s surfaces was divided into equal Δy length slices perpendicular to the y-axis (Figure 4). Within the small contact area, the burnishing ball surface was a combination of cylindrical surfaces that had the same Δy length and 0.5 mm diameter. For the workpiece’s surface, the burnishing contact at each slice was the sum of the Δy length parabolic ridges. Therefore, in this simulation model, the Hertzian solution of the contact width and contact pressure of the elastic contact between the two cylinders were estimated using the following equations [14].
The contact patch is of half-width a i , such that
a i = 2 { W e 1 R π E } 1 / 2
where W e 1 is the normal load per unit length along y axis, and R and E are the reduced radius and modulus of contact, respectively. R and E are determined using the following equations:
1 E = 1 ν 1 2 E 1 + 1 v 2 2 E 2
where E 1 ,   E 2 are the Young’s moduli of the ball and workpiece material, respectively. ν 1 ,   ν 2 are the Poison’s ratios of the ball and workpiece material, respectively.
1 R = 1 R 1 + 1 R 2
where R 1 ,   R 2 are the radii of the ball and the contacted asperity.
The peak pressure, p 0 , is calculated as
p 0 = ( W e 1 E π R ) 1 2
The mean pressure, p m , over the contact strip is given by
p m = π p 0 / 4
The center of the ball moves by a small distance, ω, where
ω = 2 W e 1 π [ 1 ν 1 2 E 1 ( l n ( 4 R 1 a i ) 1 2 ) + 1 ν 2 2 E 2 ( l n ( 4 R 2 a i ) 1 2 ) ]
In a numerical solution, the positions of the two cylinders were obtained first; the contact force was then calculated at each integration time step. Therefore, for each given penetration, ω, Equation (8) had to be solved iteratively to obtain the contact force. Equation (8) includes the logarithmic function, which imposes mathematical complications. Hence, in this study, the simplicity model suggested by Liu et al. [15] was used: the contact force can be expressed as an explicit function of the penetration. Thus, the elastic load of the ball applied on a Δy length ridge can be determined as
W e 1 = 1 2 π ω E ω 2 ( Δ R + ω ) Δ y
where Δ R = R 1 + R 2 for external cylindrical contact, R 1 ,   R 2 are the ball radius and the Δy length ridge radius, respectively.

3.3.2. Plastic Analysis

It was proposed by Tabor [16] that the maximum contact pressure reach, p 0 = k H , where H is the hardness of the softer material, the critical interference distance, ωc, can be determined as
ω c = 2 R ( k H ) 2 E 2 [ 1 ν 1 2 E 1 ( ln ( 2 π E R 1 R ( k H ) ) 1 2 ) + 1 ν 2 2 E 2 ( ln ( 2 π E R 2 R ( k H ) ) 1 2 ) ]
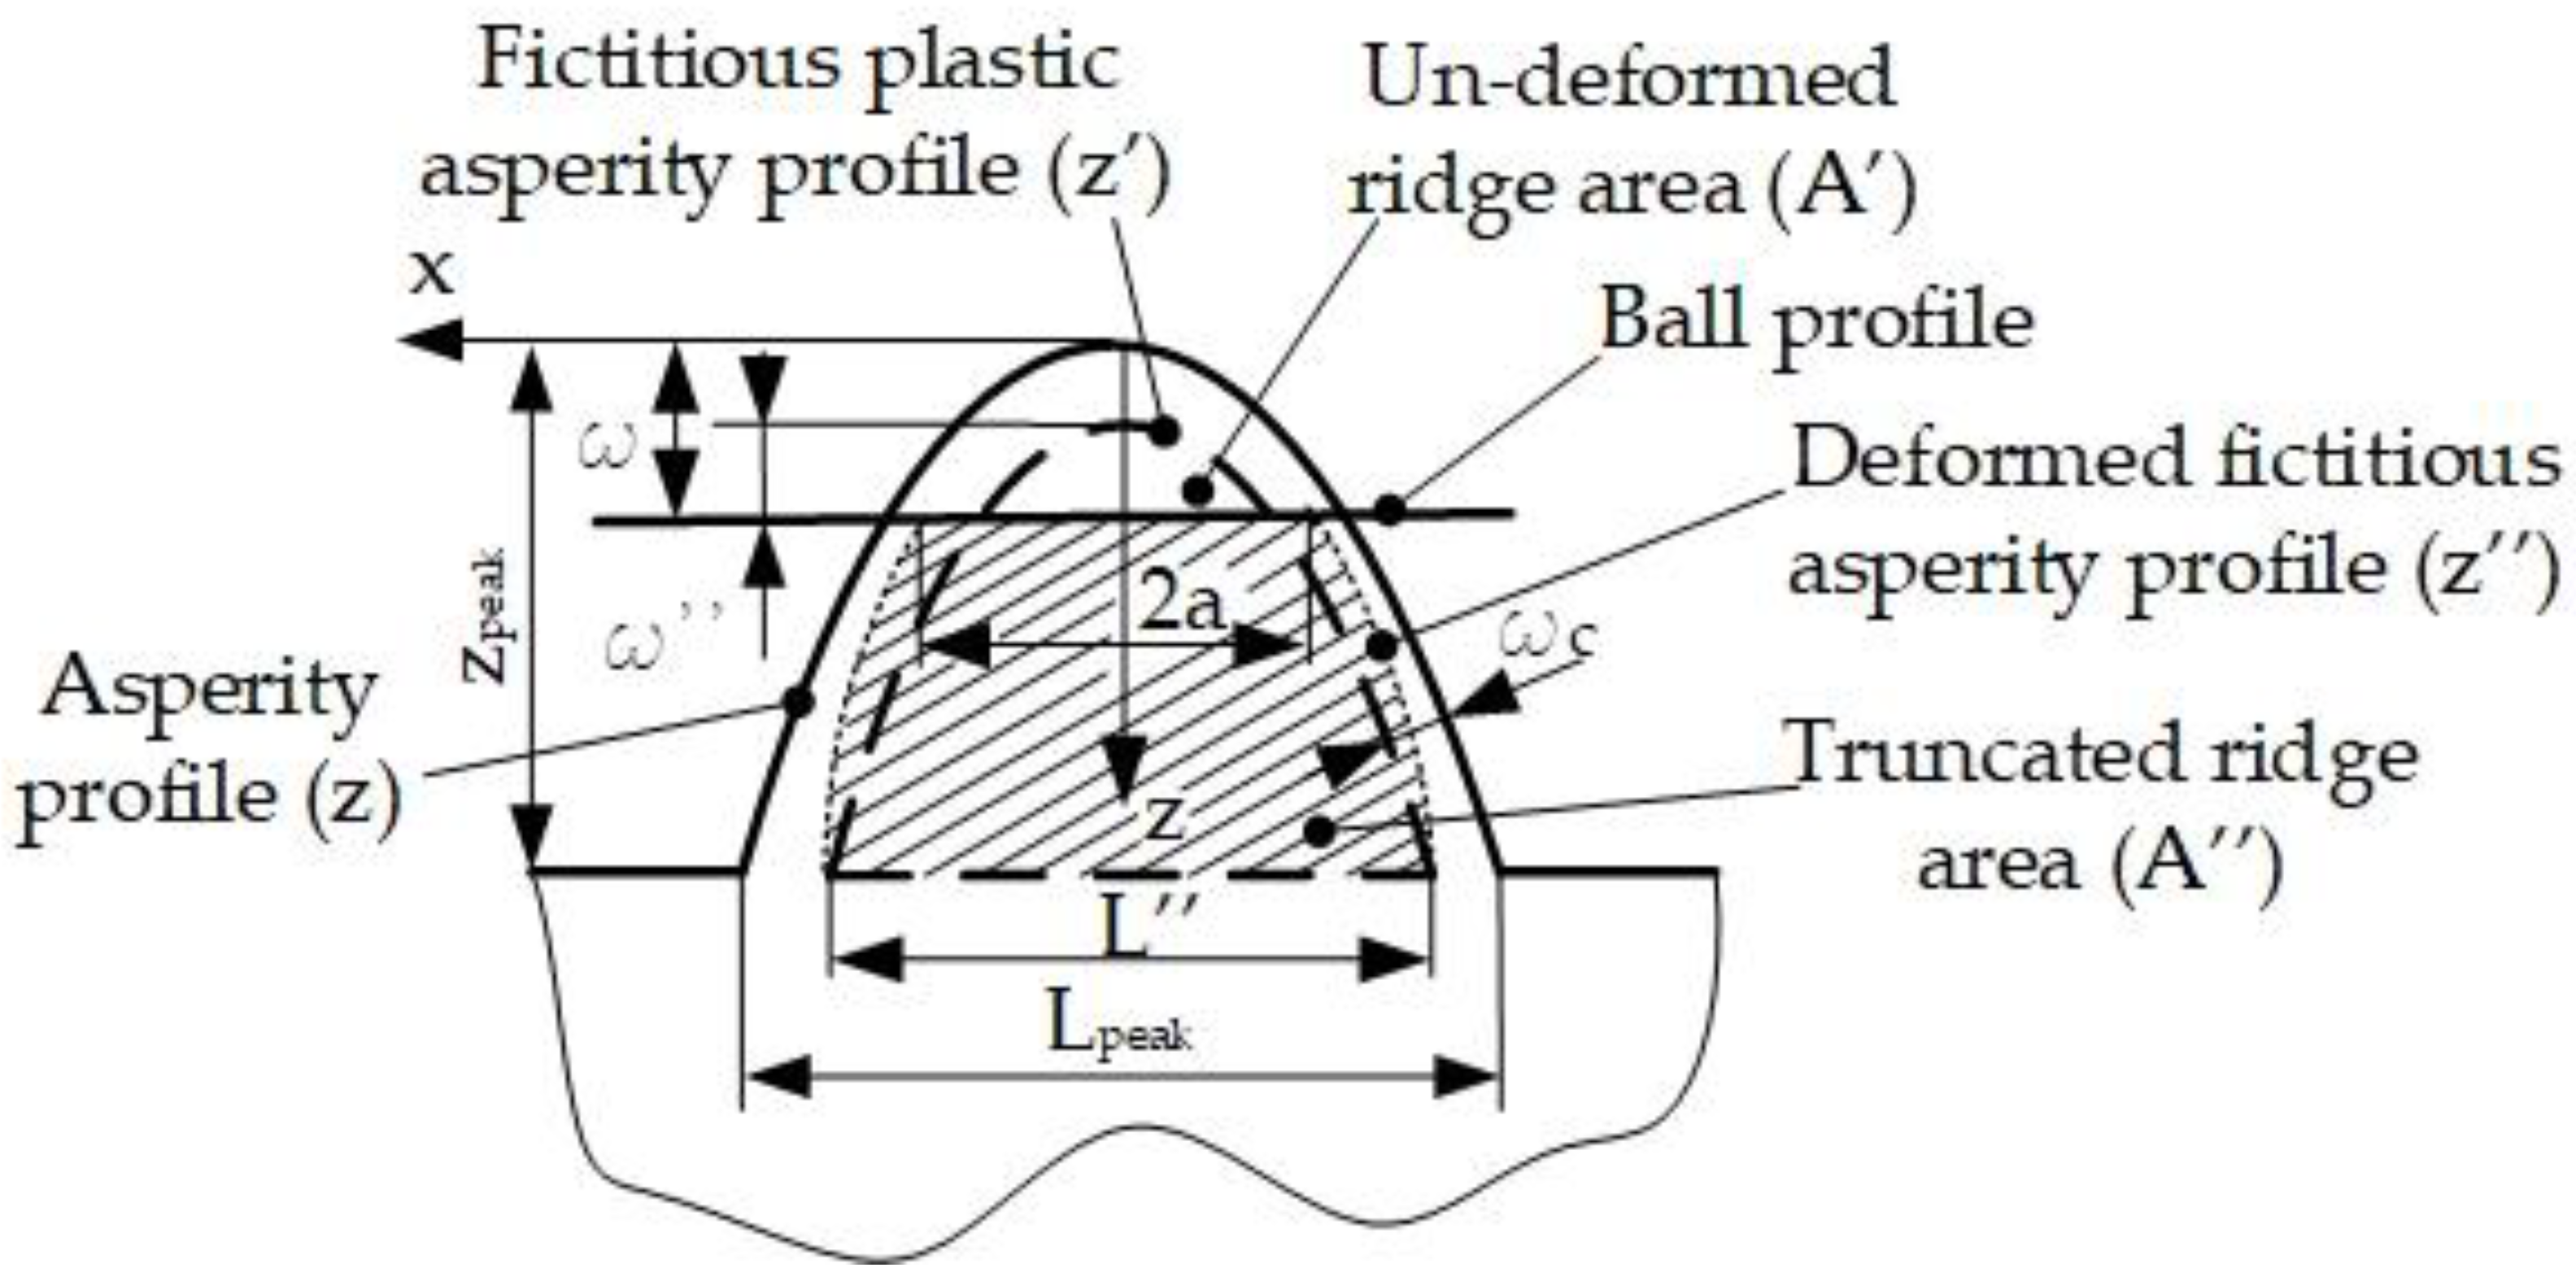
When ω exceeds critical value ωc, plastic deformation occurs. Utilizing the model of elastic–plastic proposed by Jamil Abdo et al. [13], the fictitious surface was obtained by replacing every point on the real surface with the critical interference distance along the direction normal to the surface (Figure 8). The equation describing the fictitious surface was obtained as the following:
z = 1 2 ( R ω c ) x 2
The plastic contact area was determined using the volume conservation model. Because the parabola-shaped ridges were along the y direction, it could be assumed that these ridges were solely deformed along the x direction. Hence, the volume conservation model could be transformed into a cross-sectional area conservation model. As depicted in Figure 8, the deformed ridge was modeled by the truncated parabolic segment. The equation of the truncated parabolic ridge is
z = 1 2 R x 2
where R″ is the summit radius of the deformed fictitious parabola.
This parabola passes through the point ( x = a ,   z = ω ) , where ω is the interference depth of the fictitious parabola wedge, ω = ω ω c . Thus,
R = a 2 / 2 ω
The cross-sectional area of the truncated ridge is
A = 2 ( 0 L / 2 z d x 0 a z d x )
Substitute Equations (12) and (13) into Equation (14):
A = 2 ω 3 a 2 ( L 3 8 a 3 )
The cross-sectional area of the truncated ridge, A , is equal to the cross-sectional area of the un-deformed fictitious parabolic ridge, A
A = 2 3 L ( z p e a k ω c )
where L is the width of the fictitious peak at the mean line, L = L 2 ω c .
The width of the plastic contact a can be determined using the following Equation:
a 3 + 3 a 2 A ω L = 0
with the constrain 0 < a < L / 2 .
For an individual Δy length ridge, the plastic portion of a normal load applied on it when the ball moves a small distance, ω , is
W p = H 2 a Δ y
The elastic portion of the normal load between the plane and the fictitious plastic asperity can be determined by
W e 2 = 1 2 π ( ω ω c ) E ω ω c 2 ( Δ R + ω ω c ) Δ y
Therefore, from Equations (2), (9), (18), and (19), the net load of contact between the ball and an individual Δy length ridge, W i , when the interference depth, ω , exceeds the critical interference, ω c , can be estimated as
W i = 1 2 π ω E ω 2 ( Δ R + ω ) Δ y 1 2 π ( ω ω c ) E ω ω c 2 ( Δ R + ω ω c ) Δ y + 2 a H Δ y
Cross-sectional deformation analysis of each Δy length parabolic ridge should be integrated to obtain the burnishing force. Therefore, the normal load can be determined by
  W = i = 1 n W i
where n is the number of Δy length ridges in contact with the ball, and W i is the contact load of each ridge estimated using Equation (9) or Equation (20), depending on the magnitude of their interference with the burnishing ball.

4. Experimental Verification

4.1. Experimental Materials

Oxygen-free copper (OFC) and Polmax rectangular blocks with dimensions of 40 × 70 × 30 mm were used for validation. The two blocks were pre-machined using one-pass 50 mm face milling with a spindle speed of 350 rpm, feed rates of 150 and 80 mm/min for OFC and Polmax, respectively. The average surface roughness values of the milled OFC and Polmax surfaces, measured by a Hommel Tester T4000, were approximately Ra 0.89, and Ra 0.76, respectively.

4.2. Small Ball-Burnishing Process

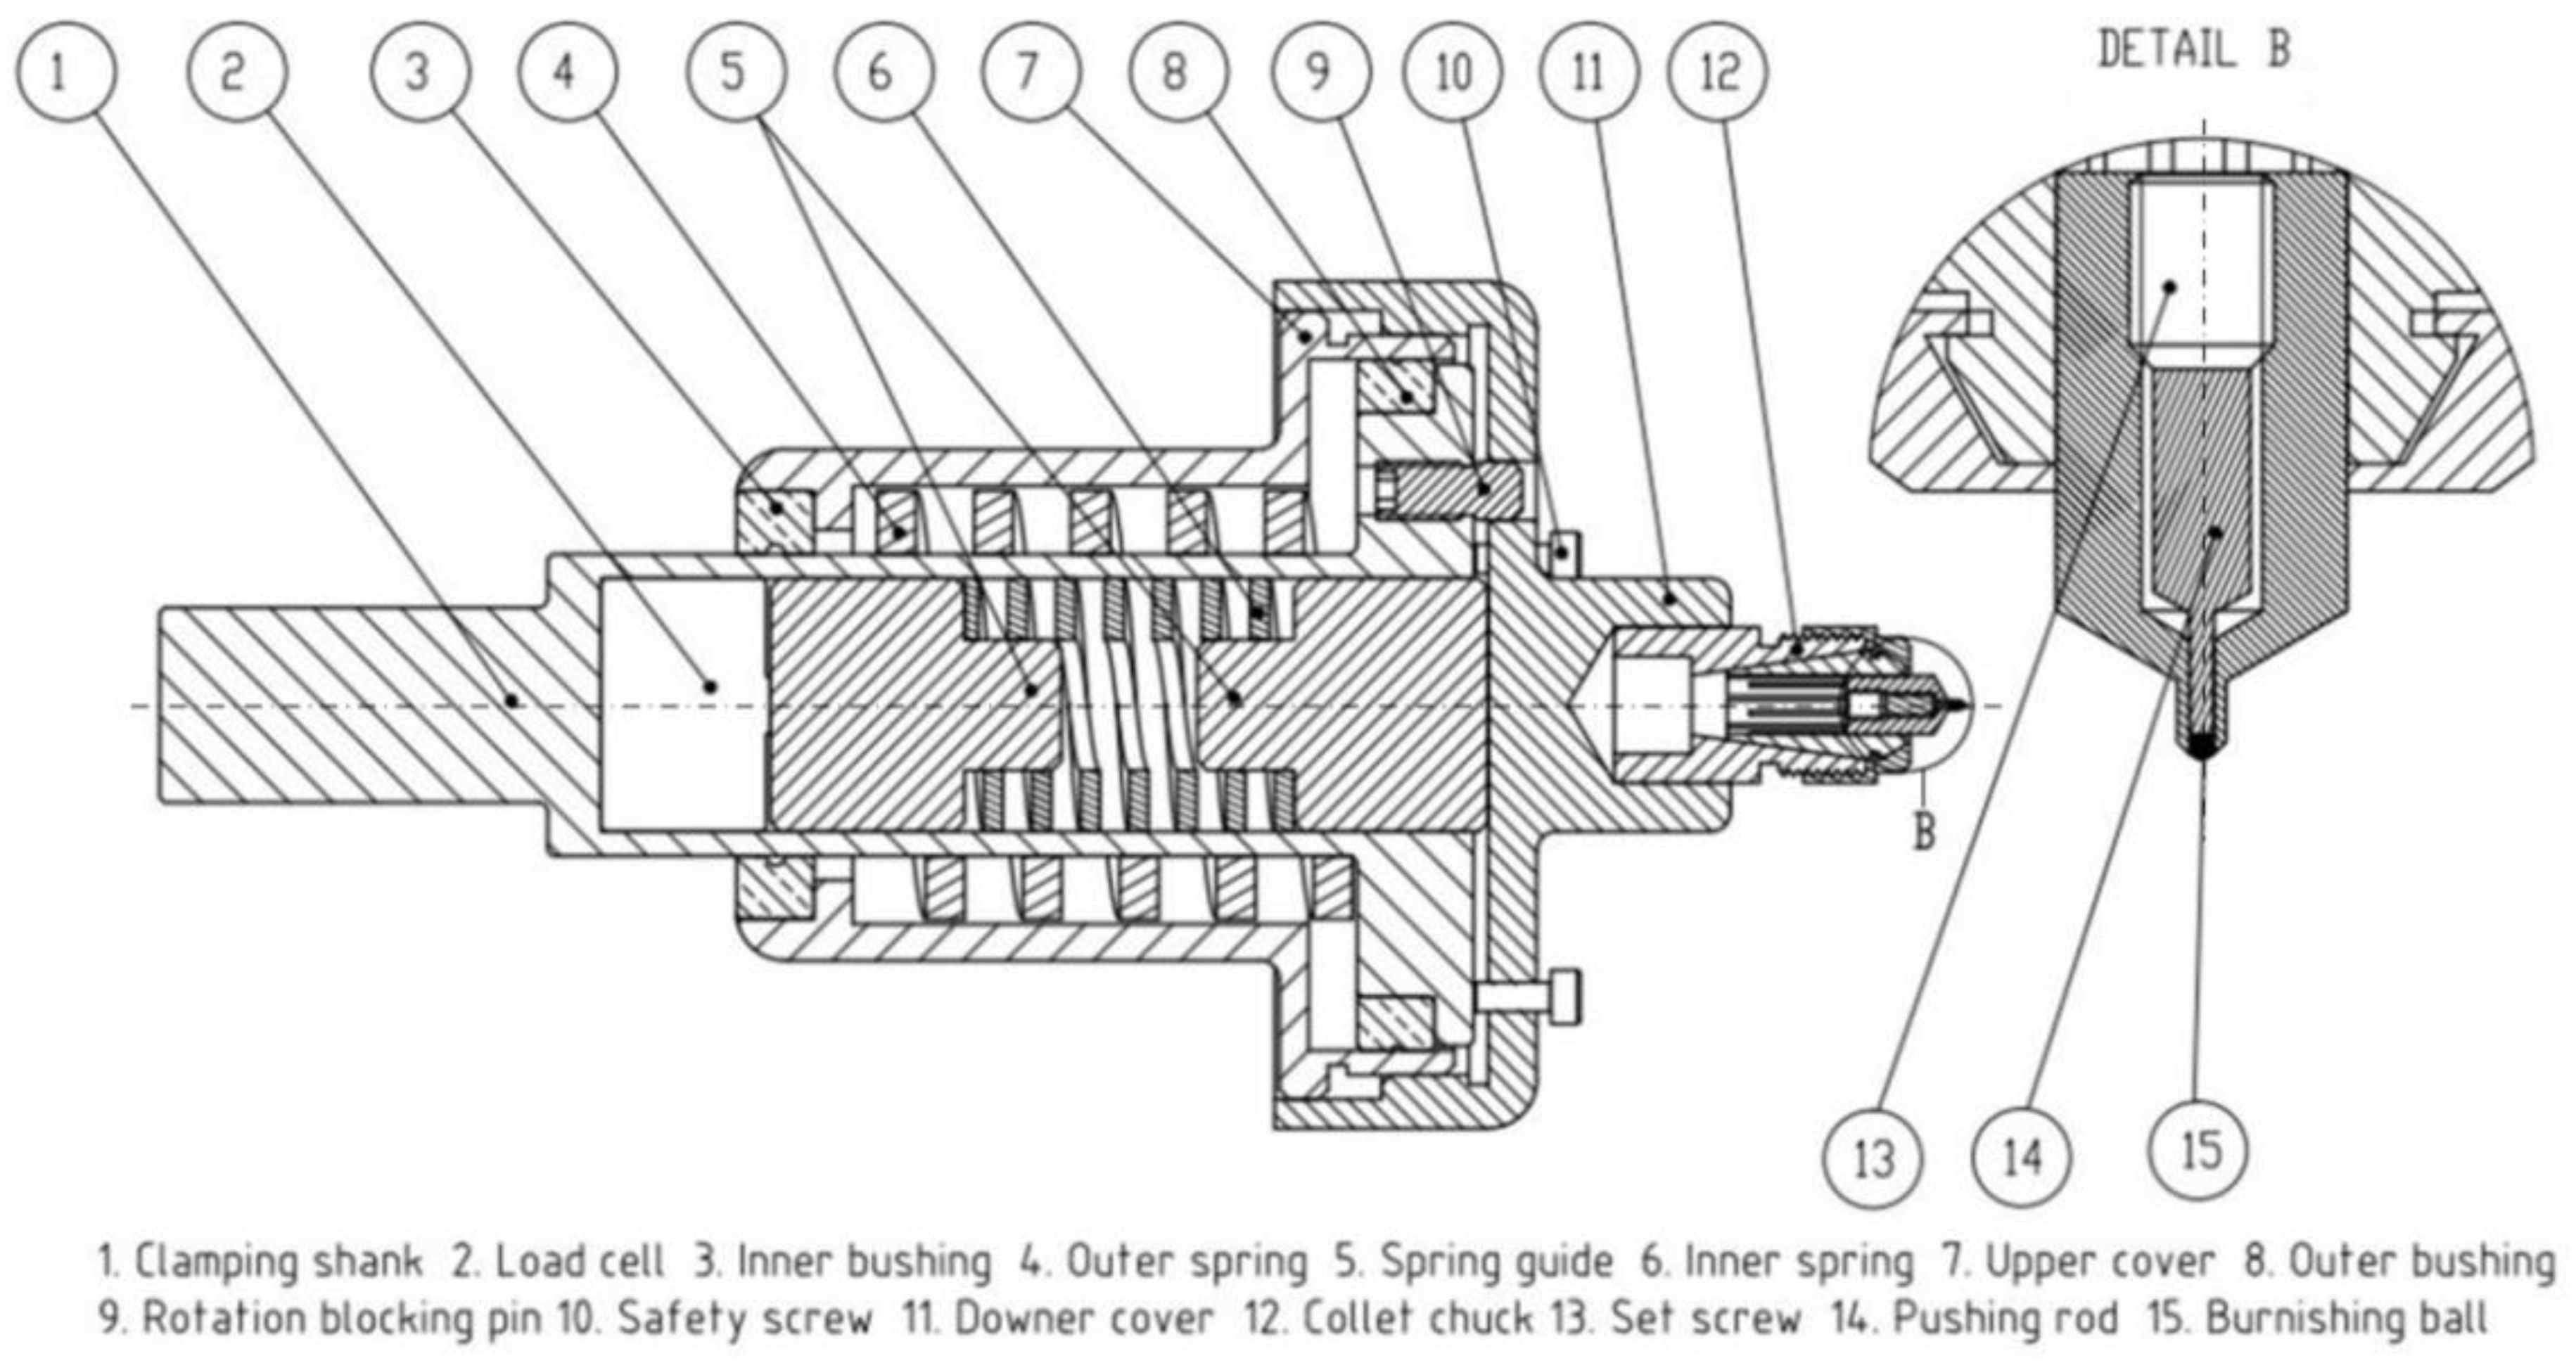
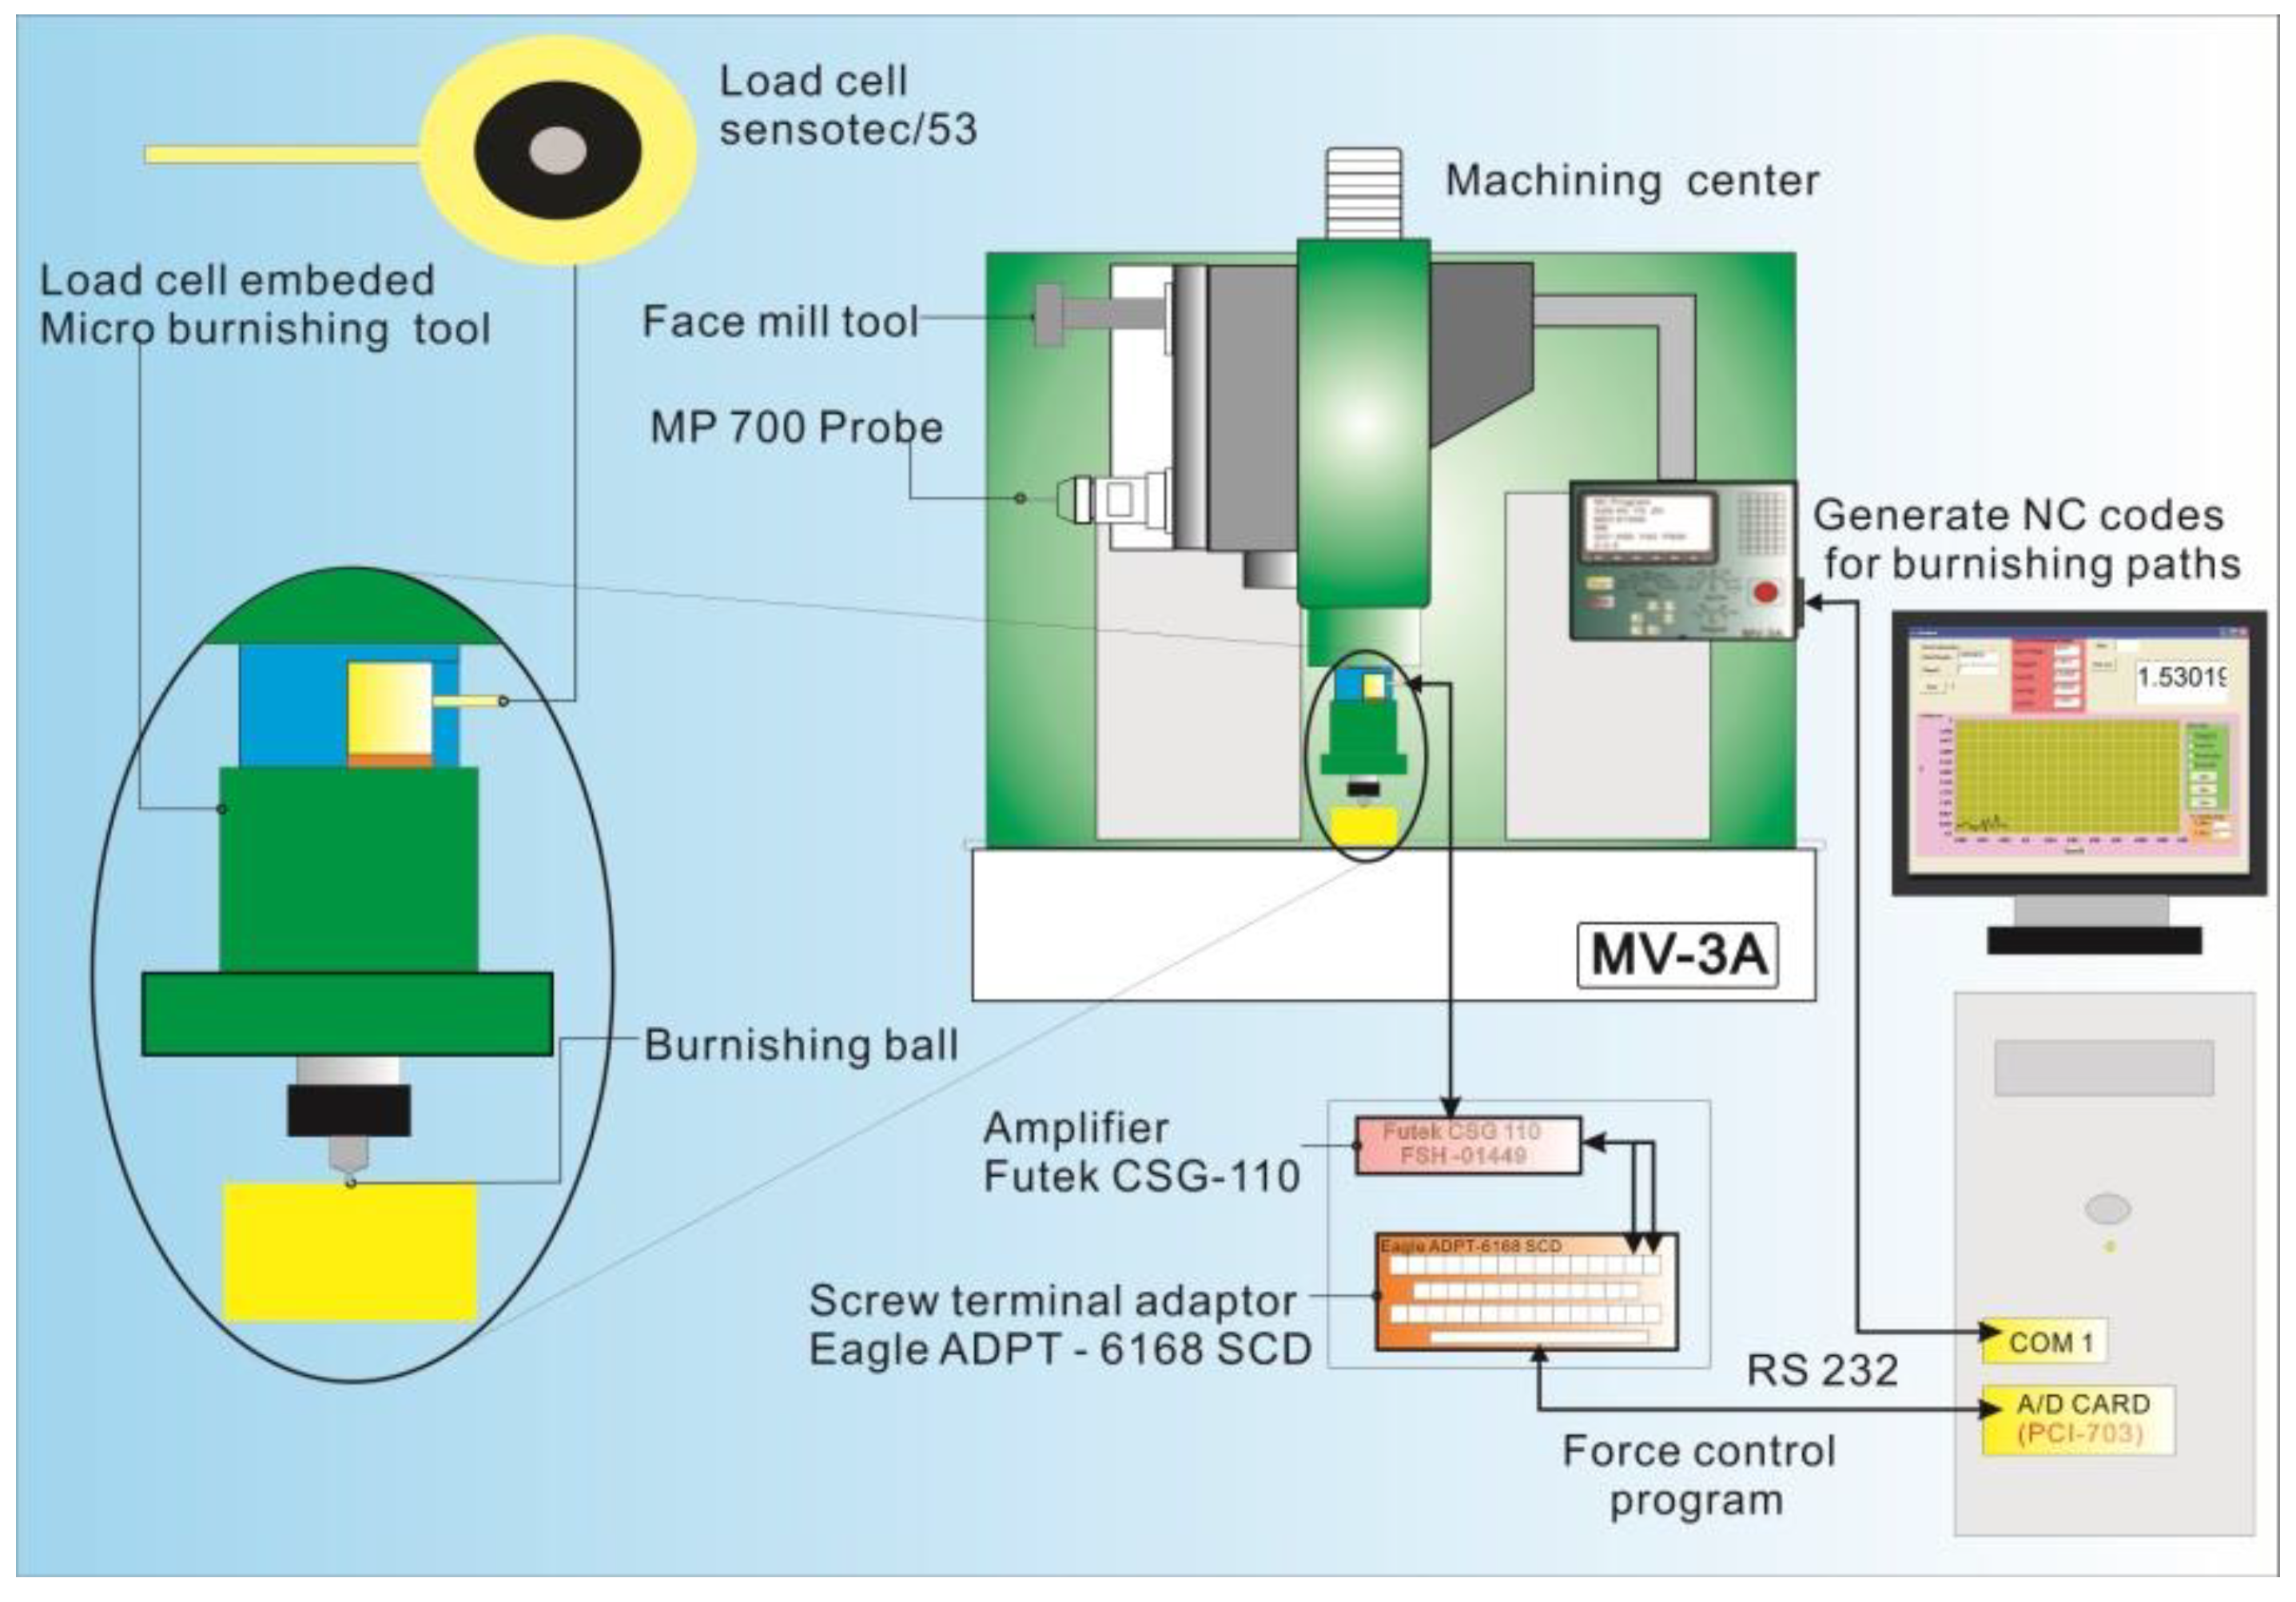
A novel double-spring-mechanism tool (Figure 9) was used to conduct the experiments. The tool was designed so that a 0.5 mm diameter burnishing ball could be clamped and replaced. A low-cost load cell system was embedded in the burnishing tool to precisely monitor the forces induced during the burnishing process. The MV-3A three-axis machining center made by Yang-Ion Co was used for the milling and burnishing experiments. The experimental setup of the small burnishing process is shown in Figure 10.

4.3. Process Parameters

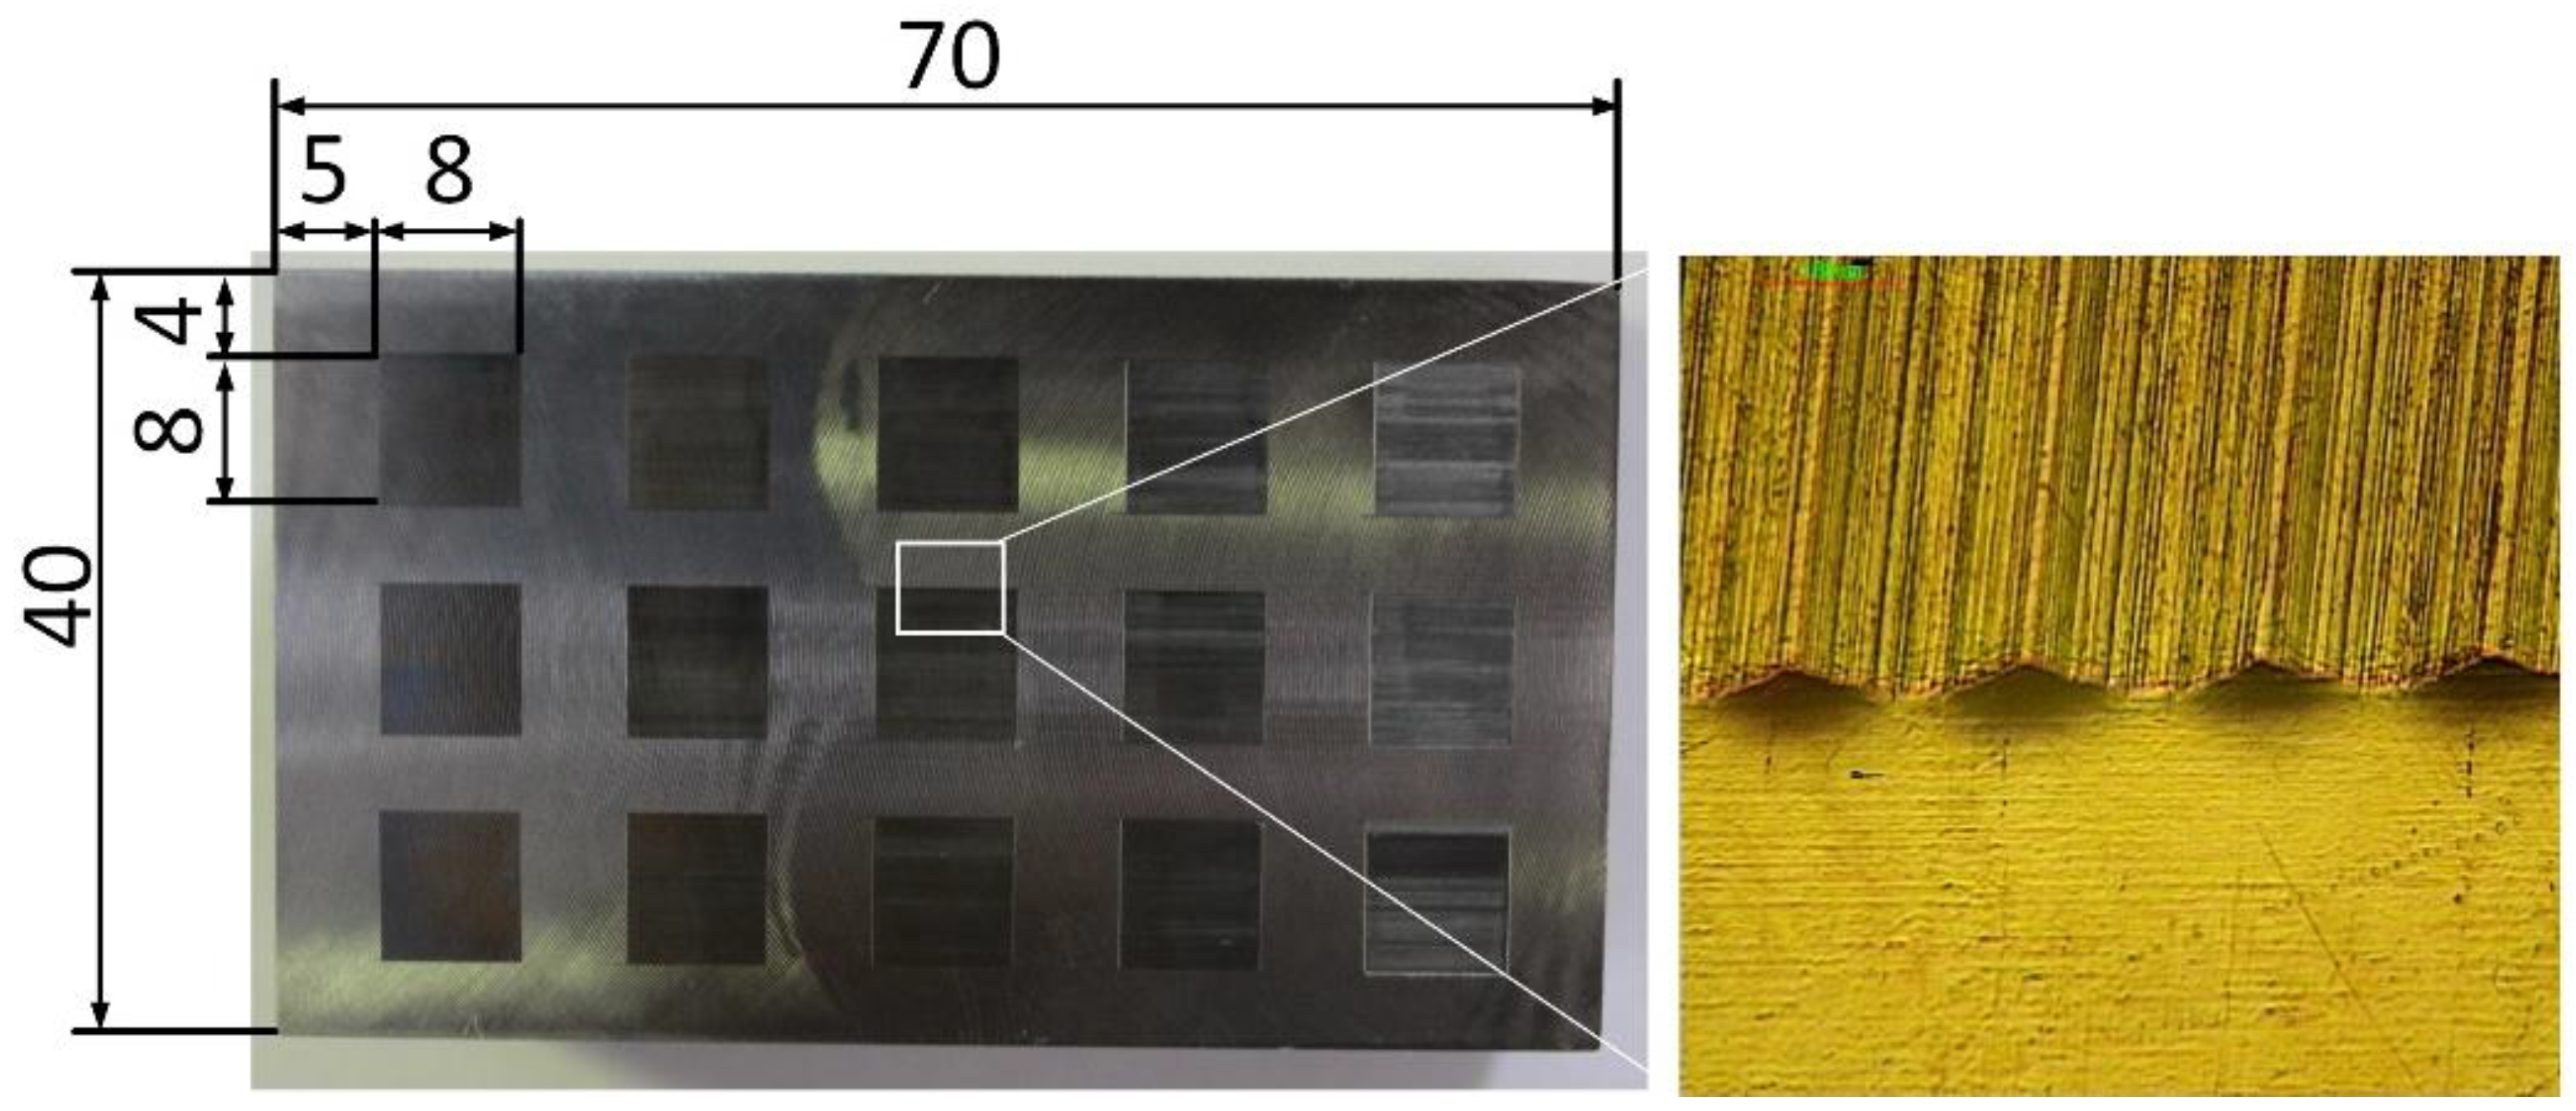
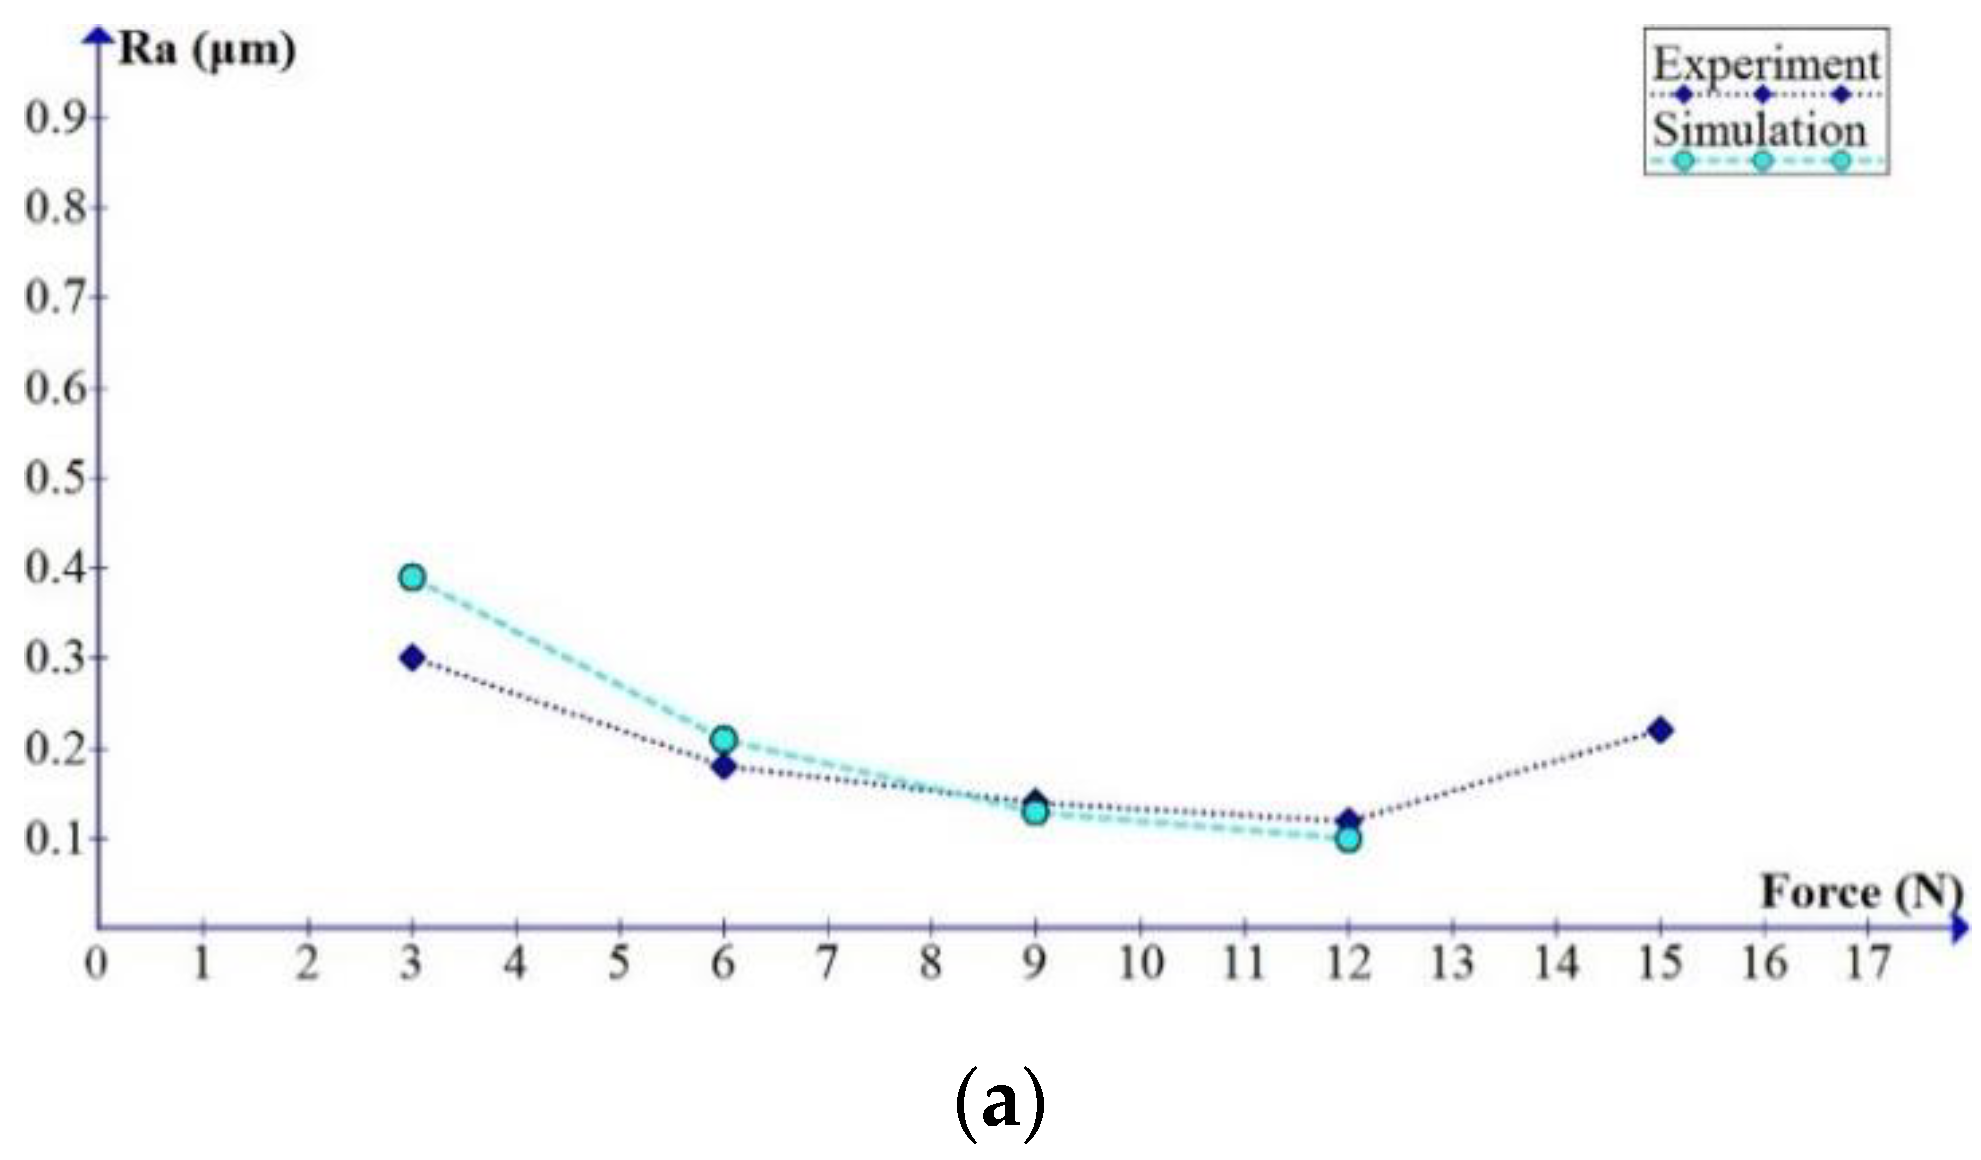
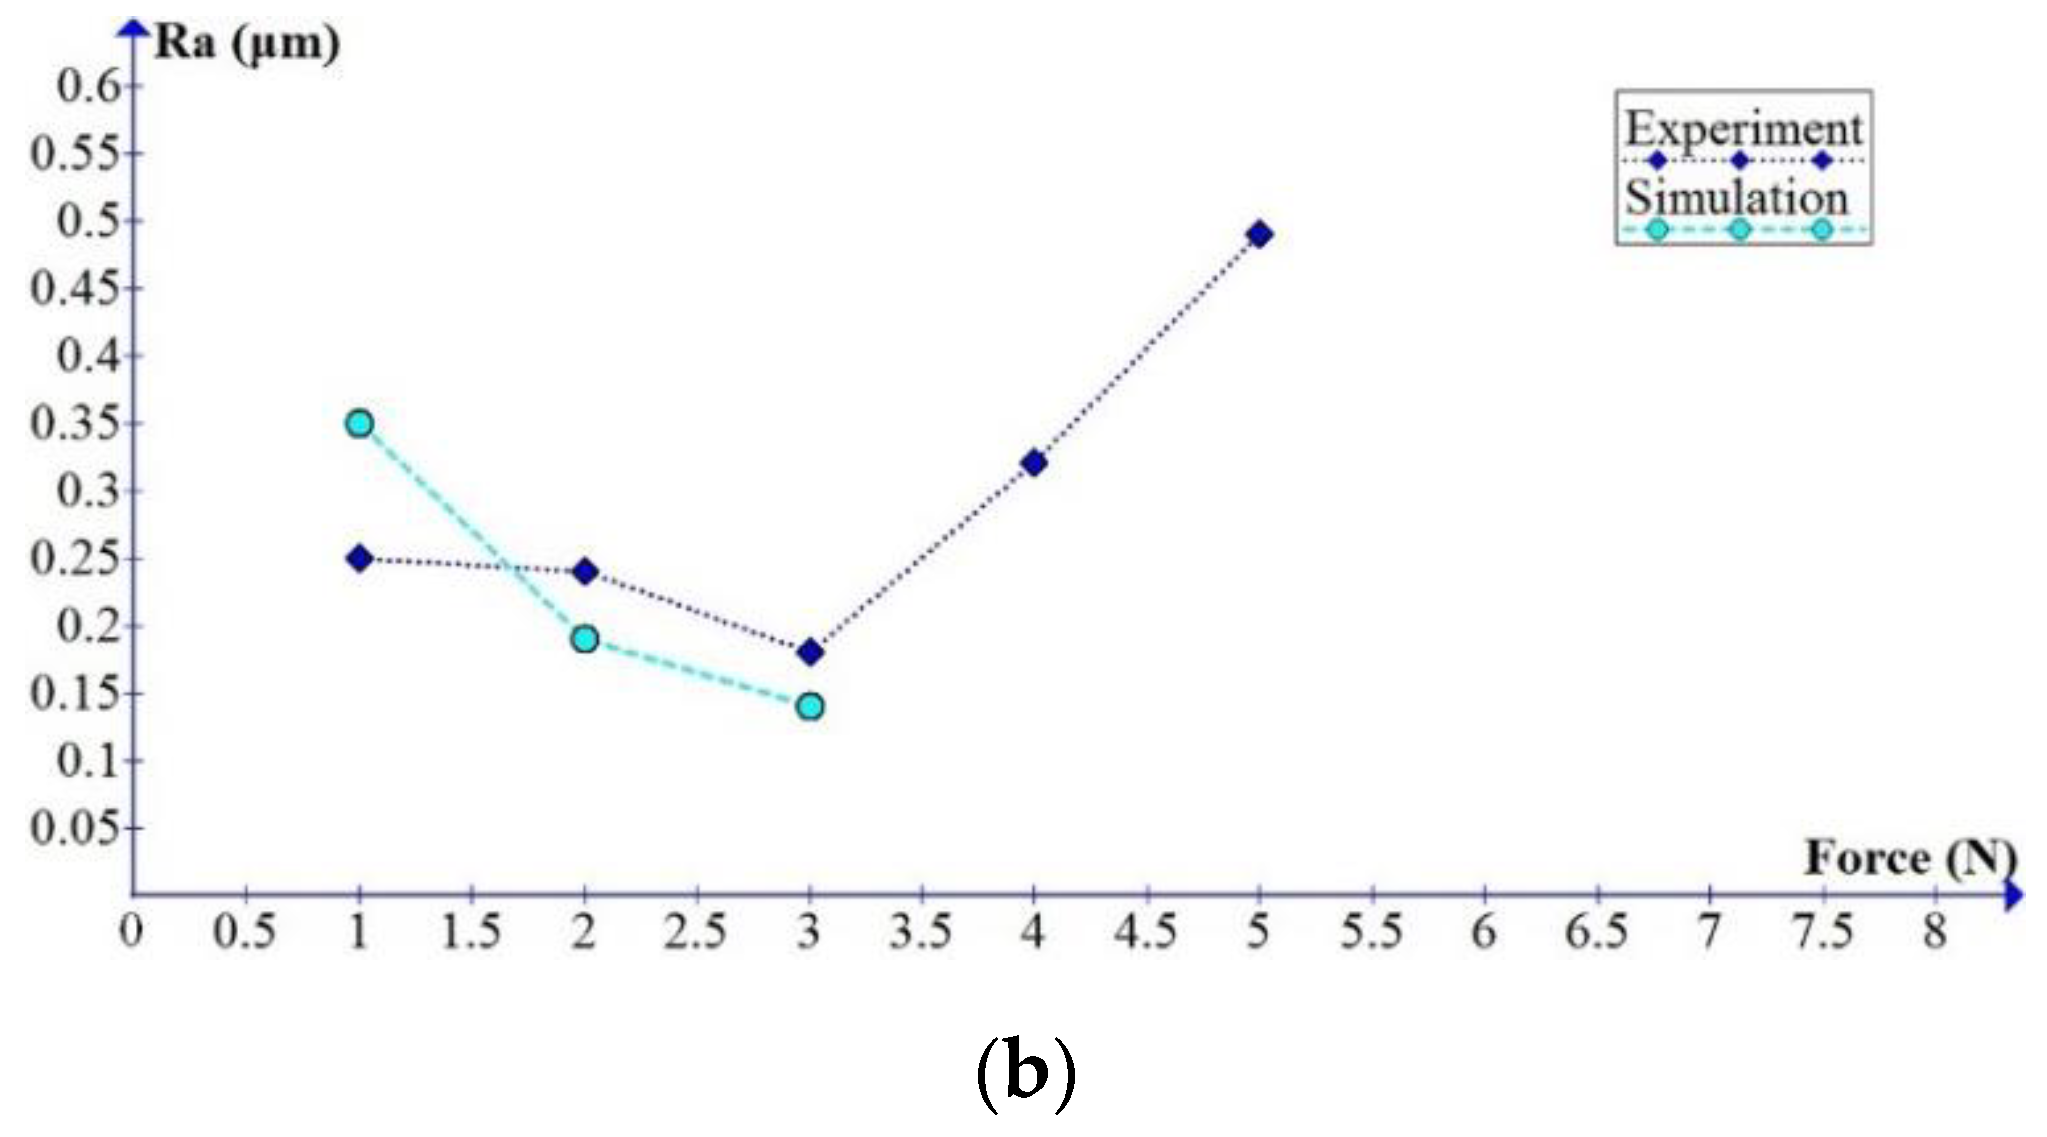
The burnishing parameters used in the confirmation experiments were referenced from the research of Shiou et. al. [17,18]. The burnishing experiments were conducted on 15 different regions of each material block, corresponding to different equivalent sets of parameters. The burnishing conditions were grease as the lubricant, a burnishing speed of 500 mm/min, a step-over of 4 μm, burnishing forces of 3, 6, 9, 12, and 15 N for Polmax, and 1, 2, 3, 4, and 5 N for oxygen-free copper (OFC). The burnished surface roughness values, Rmax and Ra, were measured at each specific region using the Hommel Tester T4000 measurement device.

5. Results and Discussions

Figure 11 and Figure 12 illustrate the topography of the simulated and experimental milled–burnished areas, respectively. As depicted in these two figures, the two resultant surfaces resemble each other. The milling tool marks were noticeably removed after the burnishing process. The quantitative results of the simulated and experimental workpieces’ surface roughness are shown in Table 1.
When the burnishing forces were set at 12.5 N for Polmax and 3.5 N for OFC, the penetration depths of the burnishing ball after the indentation processes were 5.78 μm for Polmax, and 6.25 μm for OFC. The simulated milled surface roughness, Rmax, was 5.71μm for Polmax and 6.21 μm for OFC. If the burnishing forces increased, the values of depth of penetration kept rising. Thus, the process cannot be considered as smoothing burnishing [1]. Therefore, when the burnishing forces reach 12.5 N for Polmax, and 3.5 N for OFC, the simulation process will stop, and the surface roughness values will no longer be available.
For the Polmax material (Figure 13a), the experiment and simulation yielded the smallest burnished surface roughness at 12 N force. The best experimental surface roughness value was 0.12 μm, slightly larger than the simulated result, 0.10 μm. For OFC (Figure 13b), the best surface roughness was obtained when the burnishing force was set at 3 N. The experimental result was 0.18 μm, and the simulated roughness value was 0.14 μm. Notably, in both cases, the simulation process yielded better results than the experiment did. This is due to the fact that the simulation process did not take into account additional reasons for the deterioration of the burnished surface, such as the friction between the burnishing ball and workpiece, the vibrations and deformations of the machine chuck tool system, and the heat generated during the process.

6. Conclusions

In this research, a numerical simulation of the smoothing small ball-burnishing process was conducted to predict the surface roughness of the workpiece. The pre-burnishing surface roughness was numerically described using parabolic approximation. The mechanism of the burnishing process was divided into two consecutive steps, namely the elastic–plastic contact between the burnishing ball and the workpiece surface, and the sliding movement of the ball along the surface. In addition to Hertzian’s elastic contact model, the novel conservation of the cross-sectional areas mechanism was utilized to determine the new surface asperities’ heights in the plastic contact domain. Therefore, the surface roughness of the burnished workpiece could then be determined from the resultant surface array. A load cell-embedded small ball-burnishing tool was used to conduct the burnishing experiments on the Polmax and OFC materials to verify the simulated results. The obtained surfaces proved that the simulated results were in agreement with the experimental ones. Thus, the proposed simulation procedure can be applied to determine the optimal burnishing force of the smoothing small ball-burnishing process on a specific material.

Author Contributions

Conceptualization, Q.-N.B. and A.S.T.; methodology, Q.-N.B.; software, Q.-N.B.; validation, Q.-N.B. and H.-D.N.; formal analysis, Q.-N.B.; investigation, H.-D.N.; resources, H.-D.N.; data curation, H.-D.N.; writing—original draft preparation, Q.-N.B.; writing—review and editing, Q.-N.B.; visualization, H.-D.N.; supervision, A.S.T. All authors have read and agreed to the published version of the manuscript.

Funding

This research was funded by Ho Chi Minh City University of Technology (HCMUT) under grant number T-CK-2019-01. The APC was funded by T-CK-2019-01.

Acknowledgments

We acknowledge the support provided to this study by Ho Chi Minh City University of Technology (HCMUT), VNU-HCM in the form of time and facilities.

Conflicts of Interest

The authors declare no conflict of interest. The funders had no role in the design of the study; in the collection, analyses, or interpretation of data; in the writing of the manuscript, or in the decision to publish the results.

References

  1. Korzynski, M. Modeling and experimental validation of the force–surface roughness relation for smoothing burnishing with a spherical tool. Int. J. Mach. Tools Manuf. 2007, 47, 1956–1964. [Google Scholar] [CrossRef]
  2. Dzionk, S.; Przybylski, W.; Ścibiorski, B. The Possibilities of Improving the Fatigue Durability of the Ship Propeller Shaft by Burnishing Process. Machines 2020, 8, 63. [Google Scholar] [CrossRef]
  3. Dzierwa, A.; Markopoulos, A.P. Influence of Ball-Burnishing Process on Surface Topography Parameters and Tribological Properties of Hardened Steel. Machines 2019, 7, 11. [Google Scholar] [CrossRef] [Green Version]
  4. Yuan, X.; Sun, Y.W.; Li, C.Y.; Liu, W.R. Experimental investigation into the effect of low plasticity burnishing parameters on the surface integrity of TA2. Int. J. Adv. Manuf. Technol. 2017, 88, 1089–1099. [Google Scholar] [CrossRef]
  5. Shiou, F.J.; Chen, C.H. Freeform surface finish of plastic injection mold by using ball-burnishing process. J. Mater. Process. Technol. 2003, 140, 248–254. [Google Scholar] [CrossRef]
  6. López de Lacalle, L.N.; Lamikiz, A.; Sánchez, J.A.; Arana, J.L. The effect of ball burnishing on heat-treated steel and Inconel 718 milled surfaces. Int. J. Adv. Manuf. Technol. 2007, 32, 958–968. [Google Scholar] [CrossRef]
  7. Sai, W.B.; Sai, K. Finite element modeling of burnishing of AISI 1042 steel. Int. J. Adv. Manuf. Technol. 2005, 25, 460–465. [Google Scholar] [CrossRef]
  8. Bougharriou, A.; Sai, W.B.; Sai, K. Prediction of surface characteristics obtained by burnishing. Int. J. Adv. Manuf. Technol. 2010, 51, 205–215. [Google Scholar] [CrossRef]
  9. Luo, H.Y.; Liu, J.Y.; Wang, L.J.; Zhong, Q.P. Study of the mechanism of the burnishing process with cylindrical polycrystalline diamond tools. J. Mater. Process. Technol. 2006, 180, 9–16. [Google Scholar] [CrossRef]
  10. Jeng, Y.R. Characterization of surface height distributions. J. Chin. Soc. Mech. Eng. 1998, 19, 7. [Google Scholar]
  11. Aramaki, H.; Cheng, H.S.; Chung, Y.-W. The Contact Between Rough Surfaces With Longitudinal Texture—Part I: Average Contact Pressure and Real Contact Area. J. Tribol. 1993, 115, 419–424. [Google Scholar] [CrossRef]
  12. Chang, W.R. An elastic-plastic contact model for a rough surface with an ion-plated soft metallic coating. Wear 1997, 212, 229–237. [Google Scholar] [CrossRef]
  13. Abdo, J.; Farhang, K. Elastic–plastic contact model for rough surfaces based on plastic asperity concept. Int. J. Nonlin. Mech. 2005, 40, 495–506. [Google Scholar] [CrossRef]
  14. Bhushan, B. Principles and Applications to Tribology; John Willey & Sons Ltd.: West Sussex, UK, 2013. [Google Scholar]
  15. Liu, C.S.; Zhang, K.; Yang, R. The FEM analysis and approximate model for cylindrical joints with clearances. Mech. Mach. Theory 2007, 42, 183–197. [Google Scholar] [CrossRef]
  16. Tabor, D. The Hardness of Metals; Illustrated, Ed.; Oxford Classics Series 2000; Oxford University Press Inc.: New York, NY, USA, 2000. [Google Scholar]
  17. Shiou, F.J.; Banh, Q.N. Development of an innovative small ball-burnishing tool embedded with a load cell. Int. J. Adv. Manuf. Technol. 2016, 87, 31–41. [Google Scholar] [CrossRef]
  18. Banh, Q.N.; Shiou, F.J. Determination of Optimal Small Ball-Burnishing Parameters for Both Surface Roughness and Superficial Hardness Improvement of STAVAX. Arab. J. Sci. Eng. 2016, 41, 639–652. [Google Scholar] [CrossRef]
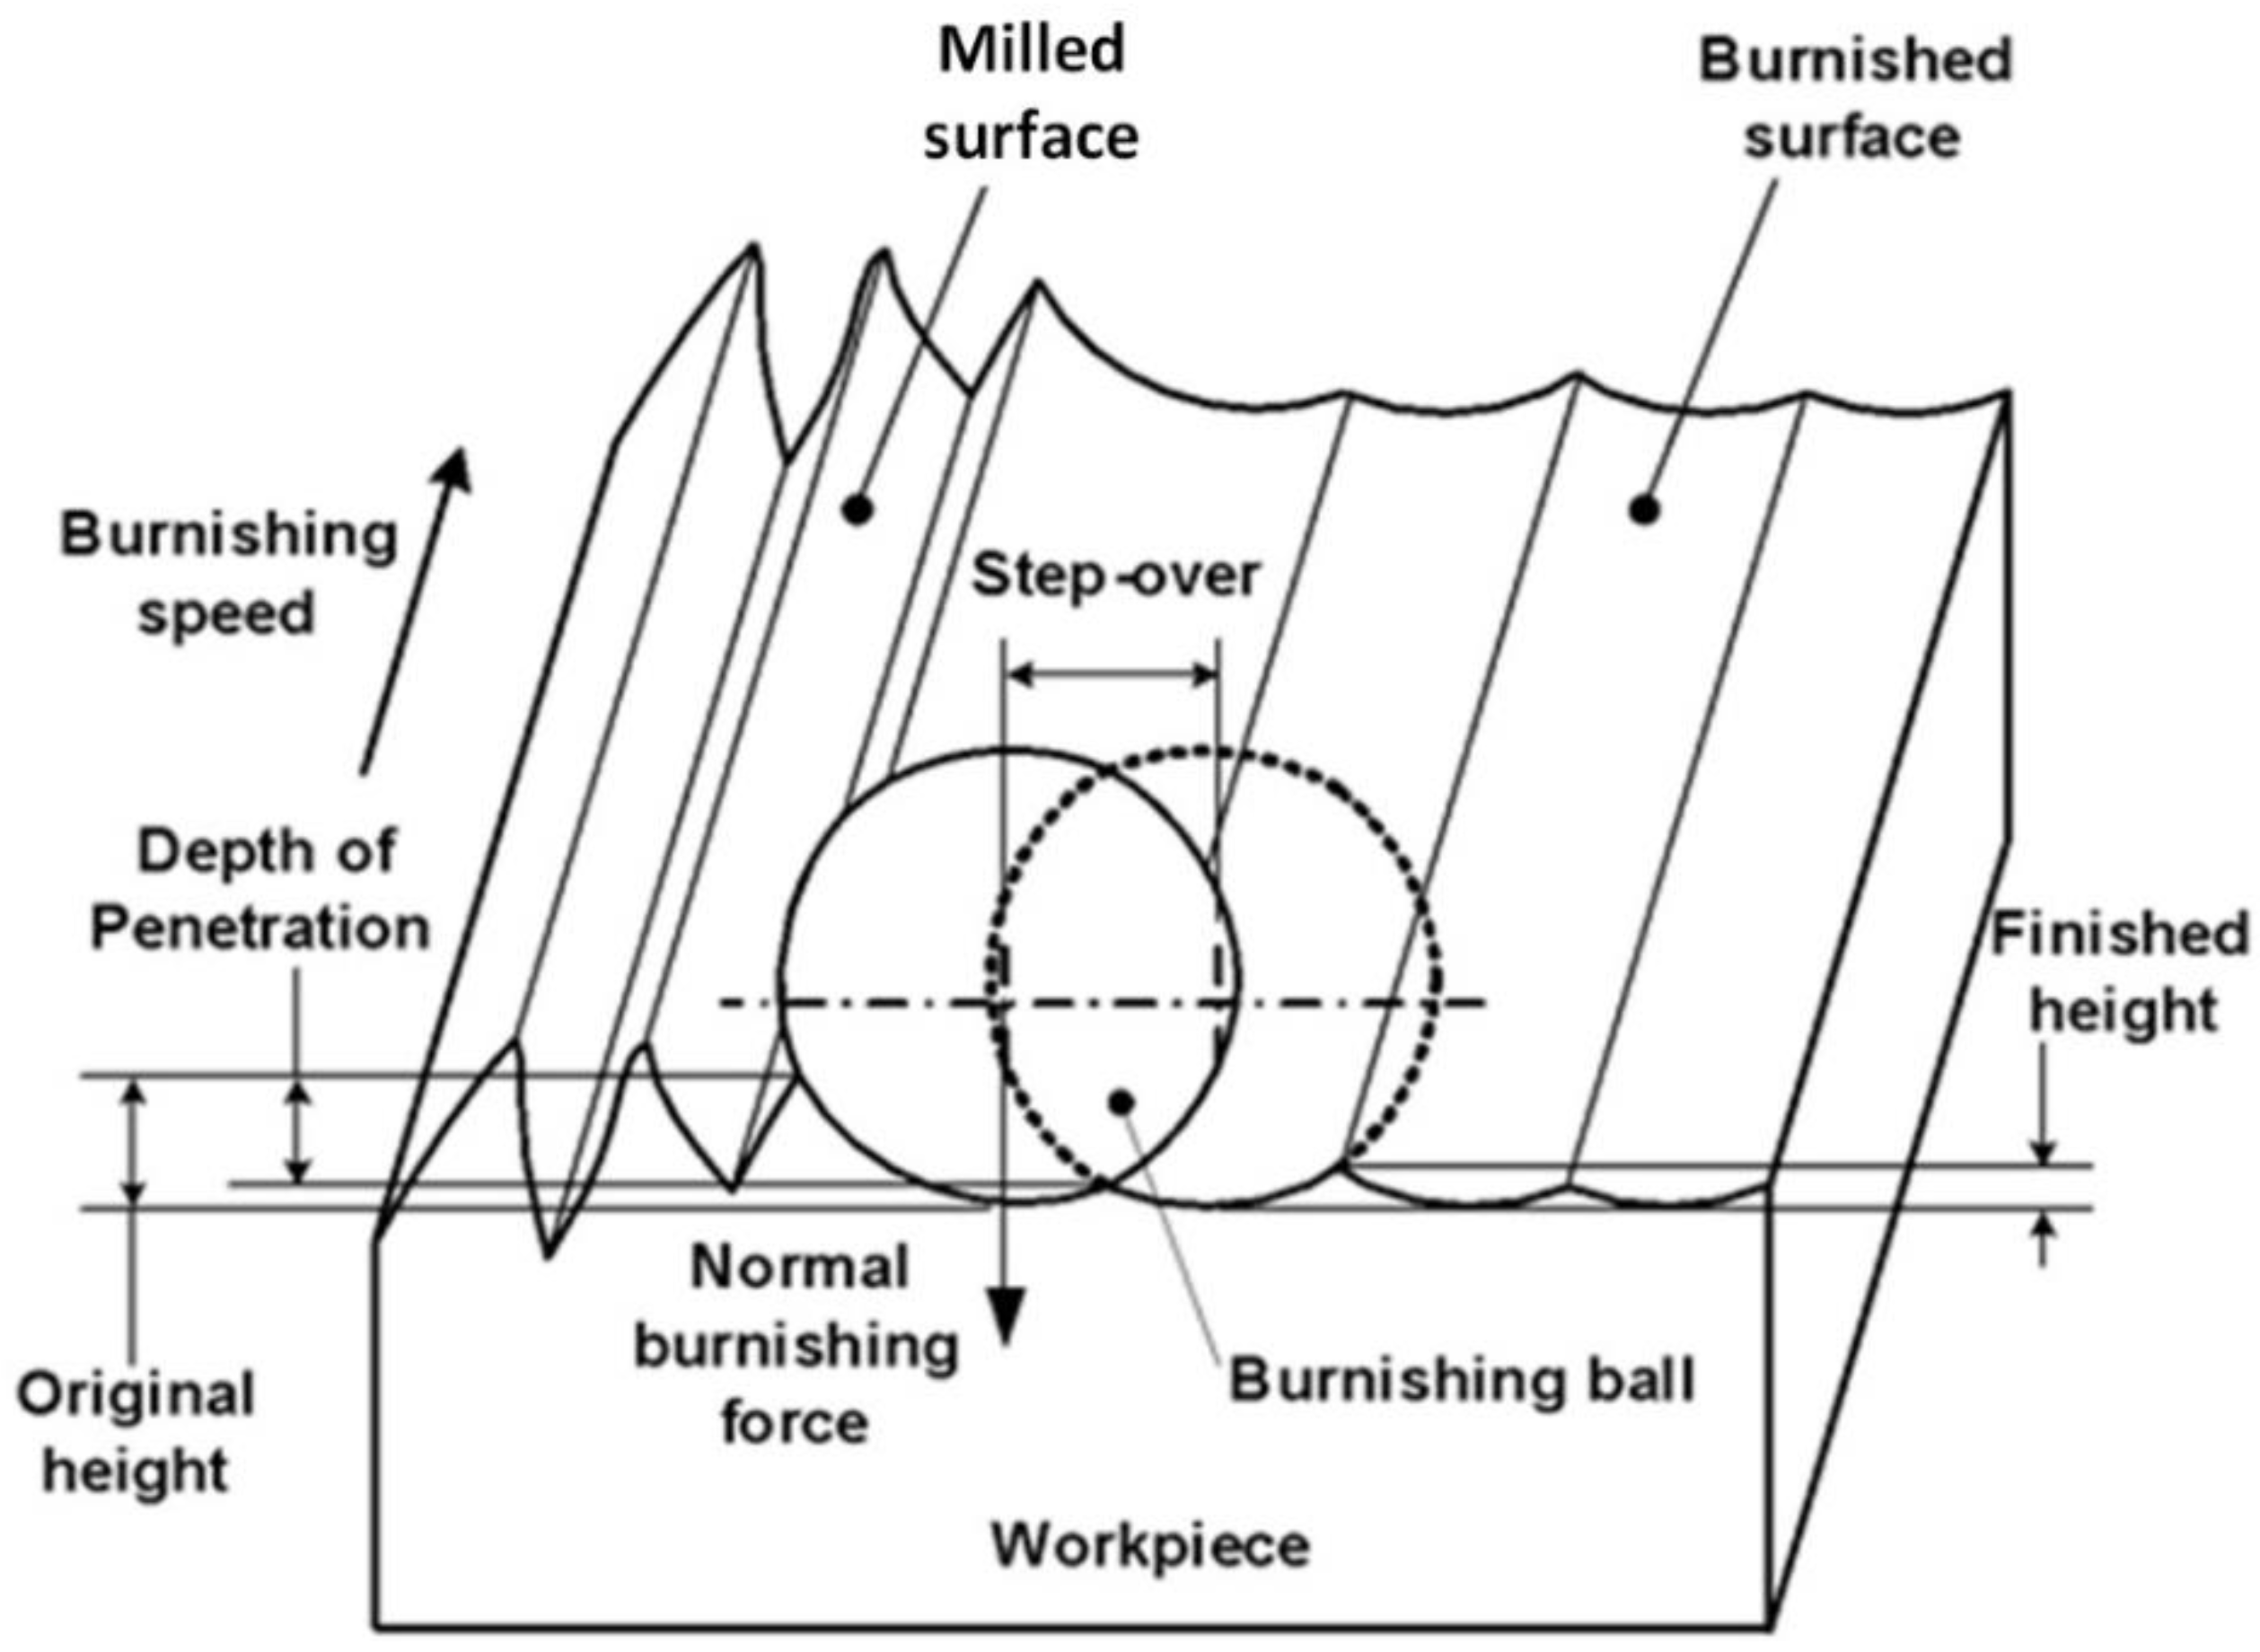
Figure 1. Schematic of the small ball-burnishing process.
Machines 09 00048 g001
Figure 2. Simulation procedure of the smoothing small ball-burnishing process.
Machines 09 00048 g002
Figure 3. Aramaki’s roughness approximation.
Machines 09 00048 g003
Figure 4. The simulated surface of the workpiece: (a) 4000 × 4000 μm, (b) in detail.
Machines 09 00048 g004
Figure 5. Three-dimensional lower half of the burnishing ball.
Machines 09 00048 g005
Figure 6. Visualization of two-dimensional contact between the ball and workpiece surfaces: (a) 1000 μm length, and (b) in detail.
Machines 09 00048 g006
Figure 7. Two-dimensional elastic–plastic interaction of an individual Δy length parabolic ridge with a smooth surface.
Machines 09 00048 g007
Figure 8. Plastic interaction between ball profile and parabolic asperity.
Machines 09 00048 g008
Figure 9. Design of the load cell-embedded small ball-burnishing tool.
Machines 09 00048 g009
Figure 10. Experimental setup of the ball-burnishing process.
Machines 09 00048 g010
Figure 11. The simulated milled-burnished area (a) 3D view, (b) 2D profile (Polmax material).
Machines 09 00048 g011
Figure 12. The experimental milled–burnished area of Polmax (optical microscope 30×).
Machines 09 00048 g012
Figure 13. Comparison of the simulated and experimental relationships between the burnishing forces and the surface roughness: (a) Polmax and (b) on oxygen-free copper (OFC) materials.
Machines 09 00048 g013aMachines 09 00048 g013b
Table 1. Simulated and experimental surface roughness results.
WorkpieceForce (N)Rmax(μm)Ra (μm)
ExperimentSimulationExperimentSimulation
123Mean123Mean
PolmaxMilled6.226.056.116.135.710.770.750.760.760.76
31.61.521.541.401.710.320.280.300.300.39
61.371.41.421.121.330.170.190.190.180.21
91.091.131.151.220.830.130.140.150.140.13
121.251.21.21.220.640.120.120.130.120.10
152.182.22.272.73N/A0.210.220.220.22N/A
OFCMilled7.076.866.826.986.210.900.880.880.890.89
12.11.921.982.002.220.250.230.270.250.35
21.892.082.212.062.010.230.230.250.240.19
31.441.371.421.411.610.190.170.190.180.14
42.562.492.682.58N/A0.320.320.330.32N/A
53.853.663.753.76N/A0.510.490.470.49N/A
Publisher’s Note: MDPI stays neutral with regard to jurisdictional claims in published maps and institutional affiliations.