Article

Evaluating Service Characteristics of Working Surfaces of Car Parts by Microgeometric Quality Parameters

1
Department of Wheel Whiecles, Ternopil Ivan Puluj National Technical University, 46001 Ternopil, Ukraine
2
Department of Manufacturing Technologies and Machine Tools, Technical University of Varna, 9010 Varna, Bulgaria
3
Department of Robotics and Integrated Mechanical Engineering Technologies, Lviv Polytechnic National University, 35000 Lviv, Ukraine
4
Department of Mobile Machinery and Railway Transport, Vilnius Gediminas Technical University, LT-10223 Vilnius, Lithuania
*
Author to whom correspondence should be addressed.
Machines 2021, 9(12), 366; https://doi.org/10.3390/machines9120366
Submission received: 21 November 2021 / Revised: 12 December 2021 / Accepted: 14 December 2021 / Published: 17 December 2021
(This article belongs to the Section Material Processing Technology)

Abstract

:
The correlation between the service characteristics of the working surfaces of car parts belonging to the rotary body class, and quality parameters—in particular, the height-related roughness parameter Ra—was estimated. Low values of Ra were found to be unable to guarantee an optimal microrelief geometry and, accordingly, high-performance characteristics of the working surface. The oil-accumulation power of the parts was investigated as a primary characteristic of sliding friction using the group of Rk parameters in the Abbott–Firestone diagram, based on the profilogram of the test specimen’s surfaces. The oil-absorption power of the surfaces formed by different technological operations was compared with different microgeometric quality parameter values.

1. Introduction

One of the significant part classes in the machine-building industry nomenclature is the “rotary body” class. Parts belonging to this class (such as hydraulic cylinder liners of truck cranes, hydraulic cylinders of clutch control mechanisms, cylinders of car-turning mechanisms, cylinder liners of internal combustion engines, cones of variator transmissions, etc.) mainly work in conjunction with other parts and provide for the transmission of motion from one moving object to another [1,2,3]. Therefore, ensuring the required quality of these parts’ working surfaces and, consequently, the specified service characteristics is essential for the machine-building industry [4,5,6,7].
The accuracy, form, size, and roughness are the essential quality parameters of the machined surface; however, the proper functioning of the working surfaces of machines and mechanism parts is not always guaranteed by these parameters. Algorithms that help attain these predetermined service characteristics are proposed in [8,9]. In particular, these algorithms can select the conditions and structures of the technological operations used in the machining of working surfaces of car parts.
The technological operations for the manufacturing and processing of the working surfaces of many machine parts, such as the sleeves of internal combustion engines, pneumatic and hydraulic cylinders, and shock absorbers—which provide the required service characteristics—are complex. This is because these working surfaces belong to the “deep hole” class, in which the length to diameter ratio exceeds L/D > 5, thereby complicating the tool’s access to the treated surfaces. A typical sequence of technological operations used in the machining of internal cylindrical surfaces usually contains two groups of operations: turning operations, which provide for the necessary shape and size of a surface, and finishing operations, which provide for the necessary physical and mechanical properties of a surface [10,11].
In [12], the authors compared the roughness parameters of test specimens’ polished and honed surfaces with different values of the height-related roughness parameter Ra. Using an Ra parameter of 0.1 to 0.2 μm, which characterizes a honed surface, provides for approximately the same friction coefficient as that of surfaces honed under different interaction cycles. However, if the Ra value is about 0.035 μm, the honed surface provides a friction coefficient equal to 0.08, while that of the polished surface is 0.09. These data indicate the possibility of using optimal surface treatment methods to create microreliefs, which have the ability to retain lubricants and provide for a better performance of these surfaces at the same height-related roughness parameter Ra.
The authors of [13] developed a mathematical model that describes the wear rates and friction coefficients in conjugate parts that operate under conditions of ultimate friction. This model allows for the determination of the life and mechanical friction losses of the developed tribological systems without conducting field experiments. The wear rates and friction coefficients of different structures of tribological systems are simulated in this paper, the accuracy of these models is evaluated, and their errors are identified.
Research findings were reported that describe a functional copper-containing surface layer that is formed on car engine parts using running-in tribotechnology; decreased wear of parts was observed during their operation [14]. The coating formed was found to act as an elastic layer, which reduced stress in the base material. Experimental investigations into the coercive force of the working surfaces of parts have confirmed a decreased concentration of failure stress in the near-surface layers. Basic laws for running-in tribotechnology have been proposed, which optimize the stress–strain state in the contact zone and allow for increasing wear resistance, as well as improving the technical conditions of diesel cylinder liners: the coercive force decreasing by 7.5%, while operating time increased by 16%.
The wear peculiarities of the coating applied to the working surfaces of hydraulic cylinder liners were investigated in [15]. The major disadvantage of this unit operation is that it causes damage to the sealing elements and, consequently, the leakage of oil due to the gradual damage to the coating layer. The application of an alternative metal–ceramic coating was proposed to improve the performance of the working surfaces of the hydraulic cylinder elements.
It is noteworthy that an ordered microrelief microstructure formed on the inner cylindrical surface of the cylinder liner contributes to its ability to retain an oil film [16,17]. As a result, the surface performance is improved, and the cylinder life is extended. This is confirmed by the findings presented in [18,19]. Regular microreliefs with different geometric parameters can control the conditions of friction and lubrication of conjugate friction surfaces, and prevent unacceptable conditions in which the surface will be damaged.
Therefore, the purpose of this research is to evaluate the performance of working surfaces of hydraulic cylinder liners with microgeometries that guarantee the maximum oil-absorption power of their surfaces.

2. In-Service Analysis of Damage and Failures of Rotary Bodies

2.1. In-Service Wear and Damage of Rotary Bodies

The performance characteristics of the surfaces were evaluated by their profilograms, followed by determining their roughness using the group of Rk parameters in the Abbott–Firestone diagram. This procedure is regulated by ISO 4287 1996 and eliminates the need for in-service testing. The microgeometric quality parameters of working surfaces of machine parts are regulated by a significant number of international [2,3], interstate [4,5] and state [6] regulations. The ISO International Standards, which regulate surface texture, and the rationing and measurement of roughness parameters, include a group of 11 individual standards, including ISO 4287-1997, ISO 1302-2001, ISO 3274-1996, ISO 4288-1996, ISO 5436-1-2000, ISO 5436-2-2000, ISO 8785-1999, ISO 11562-1996, ISO 12179-2000, ISO 1356-1996. These documents are included in the system of GPS standards, which defines the requirements for surface quality parameters.
Hydraulic cylinders. The technical requirements for hydraulic cylinder surfaces are regulated by many industry standards and other regulations, and have been analyzed in the dissertation presented in [1]. It has been proven that the roughness of the working surface of cylinder liners is Ra = 0.04–0.8 μm and their hardness 40–45 HRC, with the riveted layer depth being 6–7 mm. Such parameters are provided by technological processes using plastic deformation of the surface as the finishing operation. As a result, the cylinder life is extended by 2.5–5 times [1].
Cylinder liners of internal combustion engines. Finishing operations performed during the technological process provide relatively high-quality parameters of working surfaces of cylinder liners of internal combustion engines. However, the service characteristics of these surfaces are sometimes inadequate. This is because the quality control of products is only conducted by such parameters as the accuracy of the shape, and the roughness/hardness, of their surfaces.
The performance characteristics of the working surfaces of cylinder liners of internal combustion engines are provided by the unique structure that forms on them during the finishing operation of honing (Figure 1). However, besides ensuring high-quality parameters (roundness deviations of longitudinal and cross sections, good roughness parameters, etc.), this technology has several significant shortcomings, forcing us to look for new technical solutions [7].
Using grinding or honing as the finishing operations of the technological process, in order to ensure proper performance, is impossible in some cases. In particular, this applies to the machining of deep holes found in long cylindrical workpieces, whose length is five or more times their diameter. Such parts include hydraulic and pneumatic cylinder liners, shock absorbers, and other similar products. Using honing as a finishing process operation is not recommended when machining surfaces that work with rubber seals. This is because the surface structure formed due to such operations contributes to the rapid wear of the seal and breakdown of the unit.
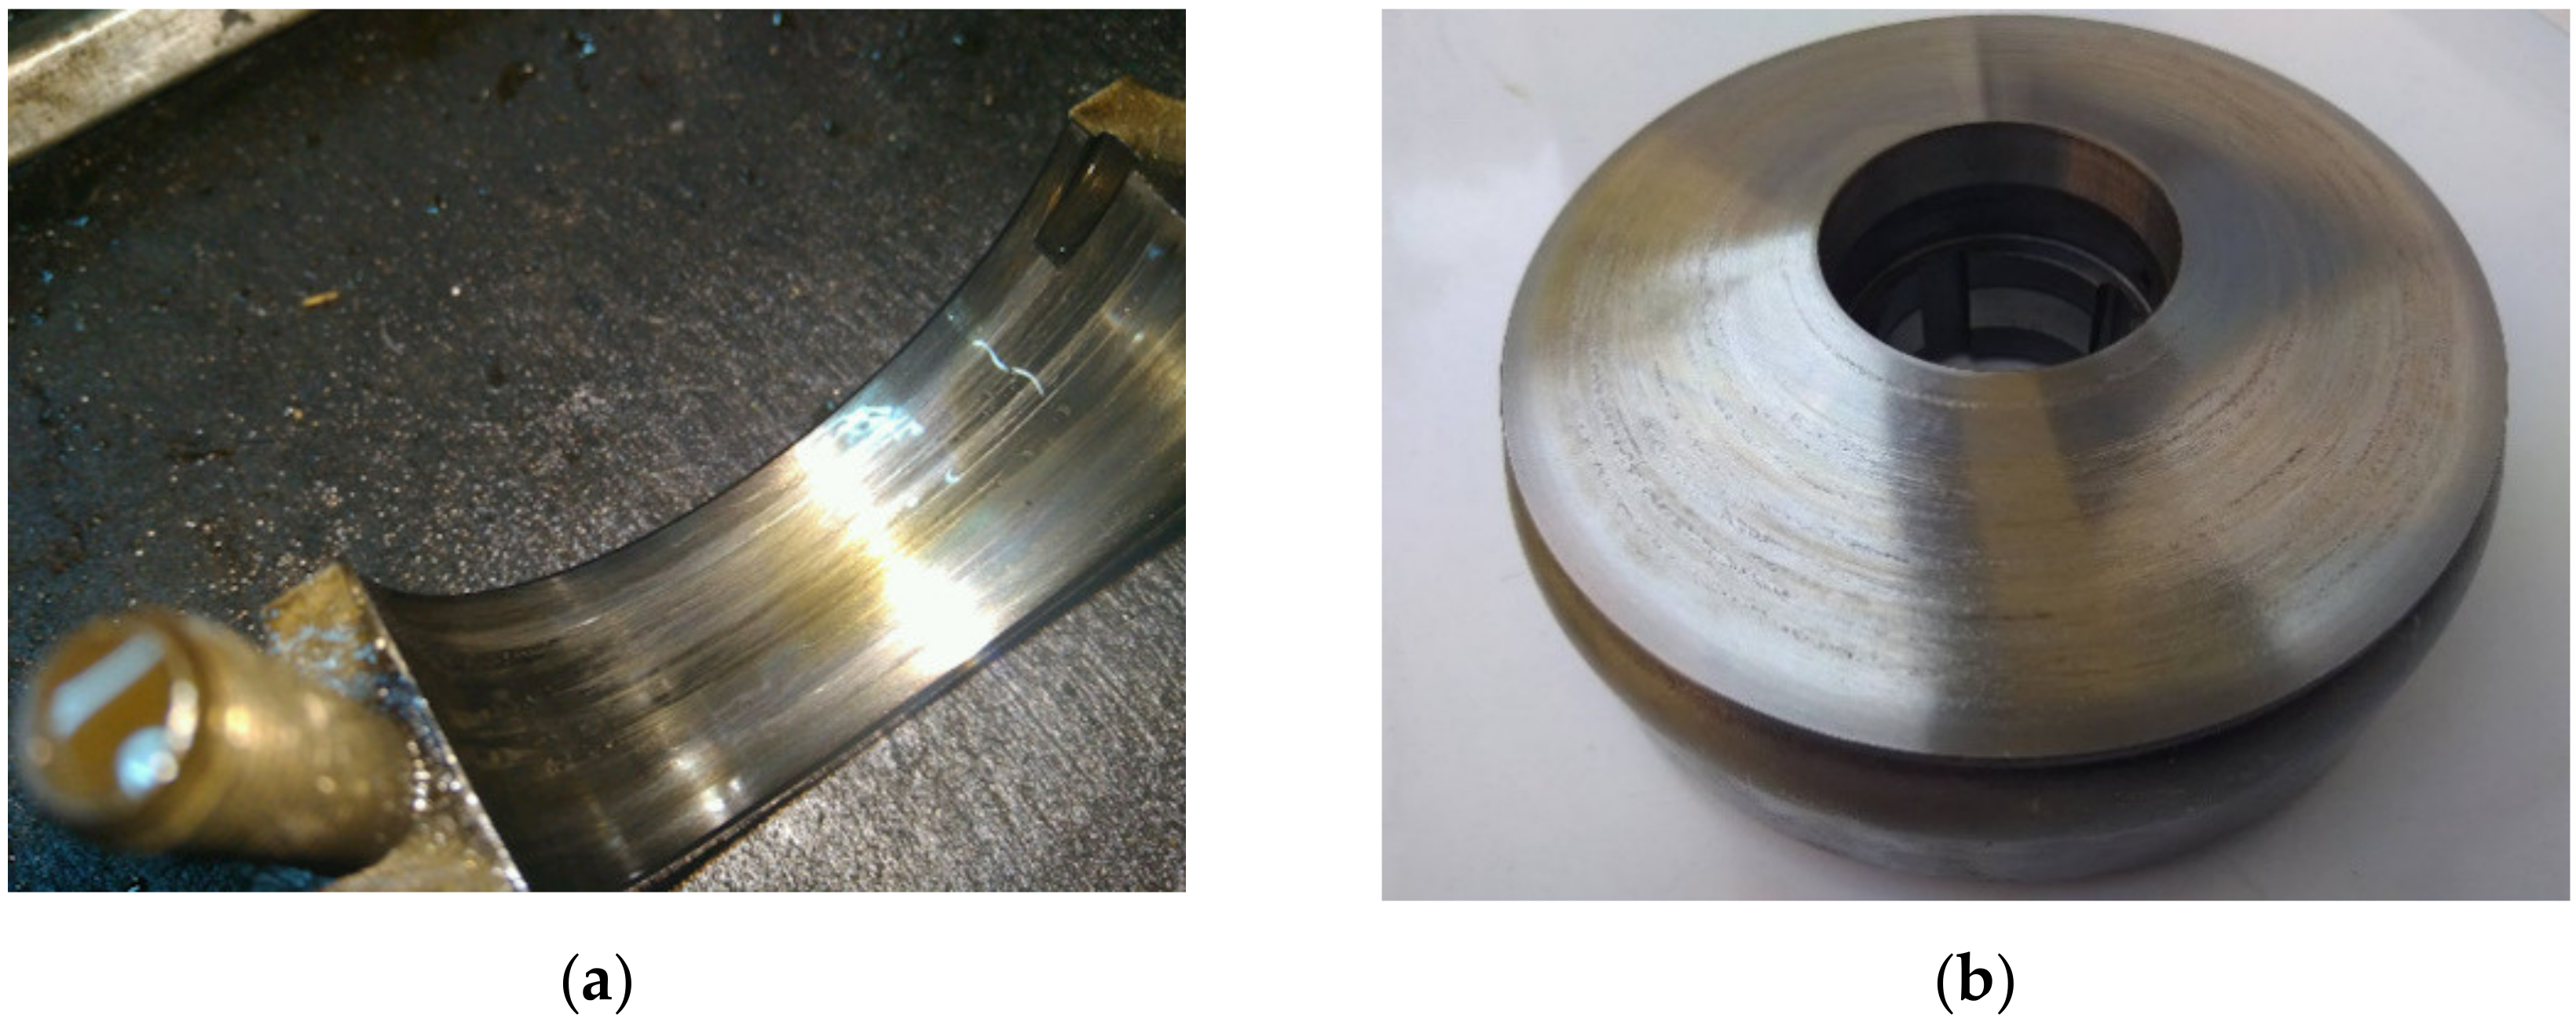
Failure to ensure the proper performance of the working surfaces of such machine parts and violation of their operating conditions leads to the formation of damage, as shown in Figure 2.
While analyzing the typical damage types that occur during operation, we can identify several main reasons for their formation:
-
Deviation of the working surface microgeometry;
-
Deviation of the working surface macrogeometry;
-
Non-optimal service characteristics of the surface;
-
Violation of operating conditions.
Defect types formed, in particular, on the working surfaces of hydraulic cylinder liners during operation are detailed in [1]. The author found that major defects included wear of the cylinder mirror surface, warping, chipping, deep burrs, cracks, and wear and tear. Only some of these defects can be eliminated by technological methods, while others lead to failure of the cylinder liner.

2.2. Relationship between Process Operations and the Oil-Absorption Power of the Surface

We considered the relationships between surface quality parameters and service characteristics during the performance of basic process operations of manufacturing for a hydraulic cylinder liner (Figure 3). Turning operations, such as fine turning, can provide for a low height-related roughness parameter Ra. However, surface hardness on the HRB scale remains within 80 units, which is inadequate to ensure the surface quality’s specified physical and mechanical parameters. The complexity of using thermal operations is accompanied by a low rigidity of the part and, accordingly, a high probability of its warping during cooling.
Therefore, the surface hardness set by the designer is provided by rolling, which increases the surface hardness from 80 to 90 units on the HRB scale and reduces the height-related roughness parameter Ra. However, this process also reduces the oil-absorption power of the surface, thereby deteriorating its performance properties. Therefore, to meet all of the above requirements, it is necessary to perform a process operation or a sequence of operations to resolve the technical contradiction described.

3. Materials and Methods

The material of the test specimen was steel 17G1S (C = 0.15–0.20; Si = 0.4–0.6; Mn = 1.15–1.6; Ni ≤ 0.3; S ≤ 0.04; p ≤ 0.035; Cr ≤ 0.035; Cu < 0.3). The workpiece surface was pre-treated by turning (rough and semi-finishing).
To conduct the experimental research, we needed to make two batches of samples—type I and type II:
-
Type I were samples whose surface was machined with subsequent rolling.
-
Type I were samples for which the surface was processed by turning, with the subsequent formation of a regular microrelief.
Schematically, the experiment can be divided into several stages and visualized using Figure 4.
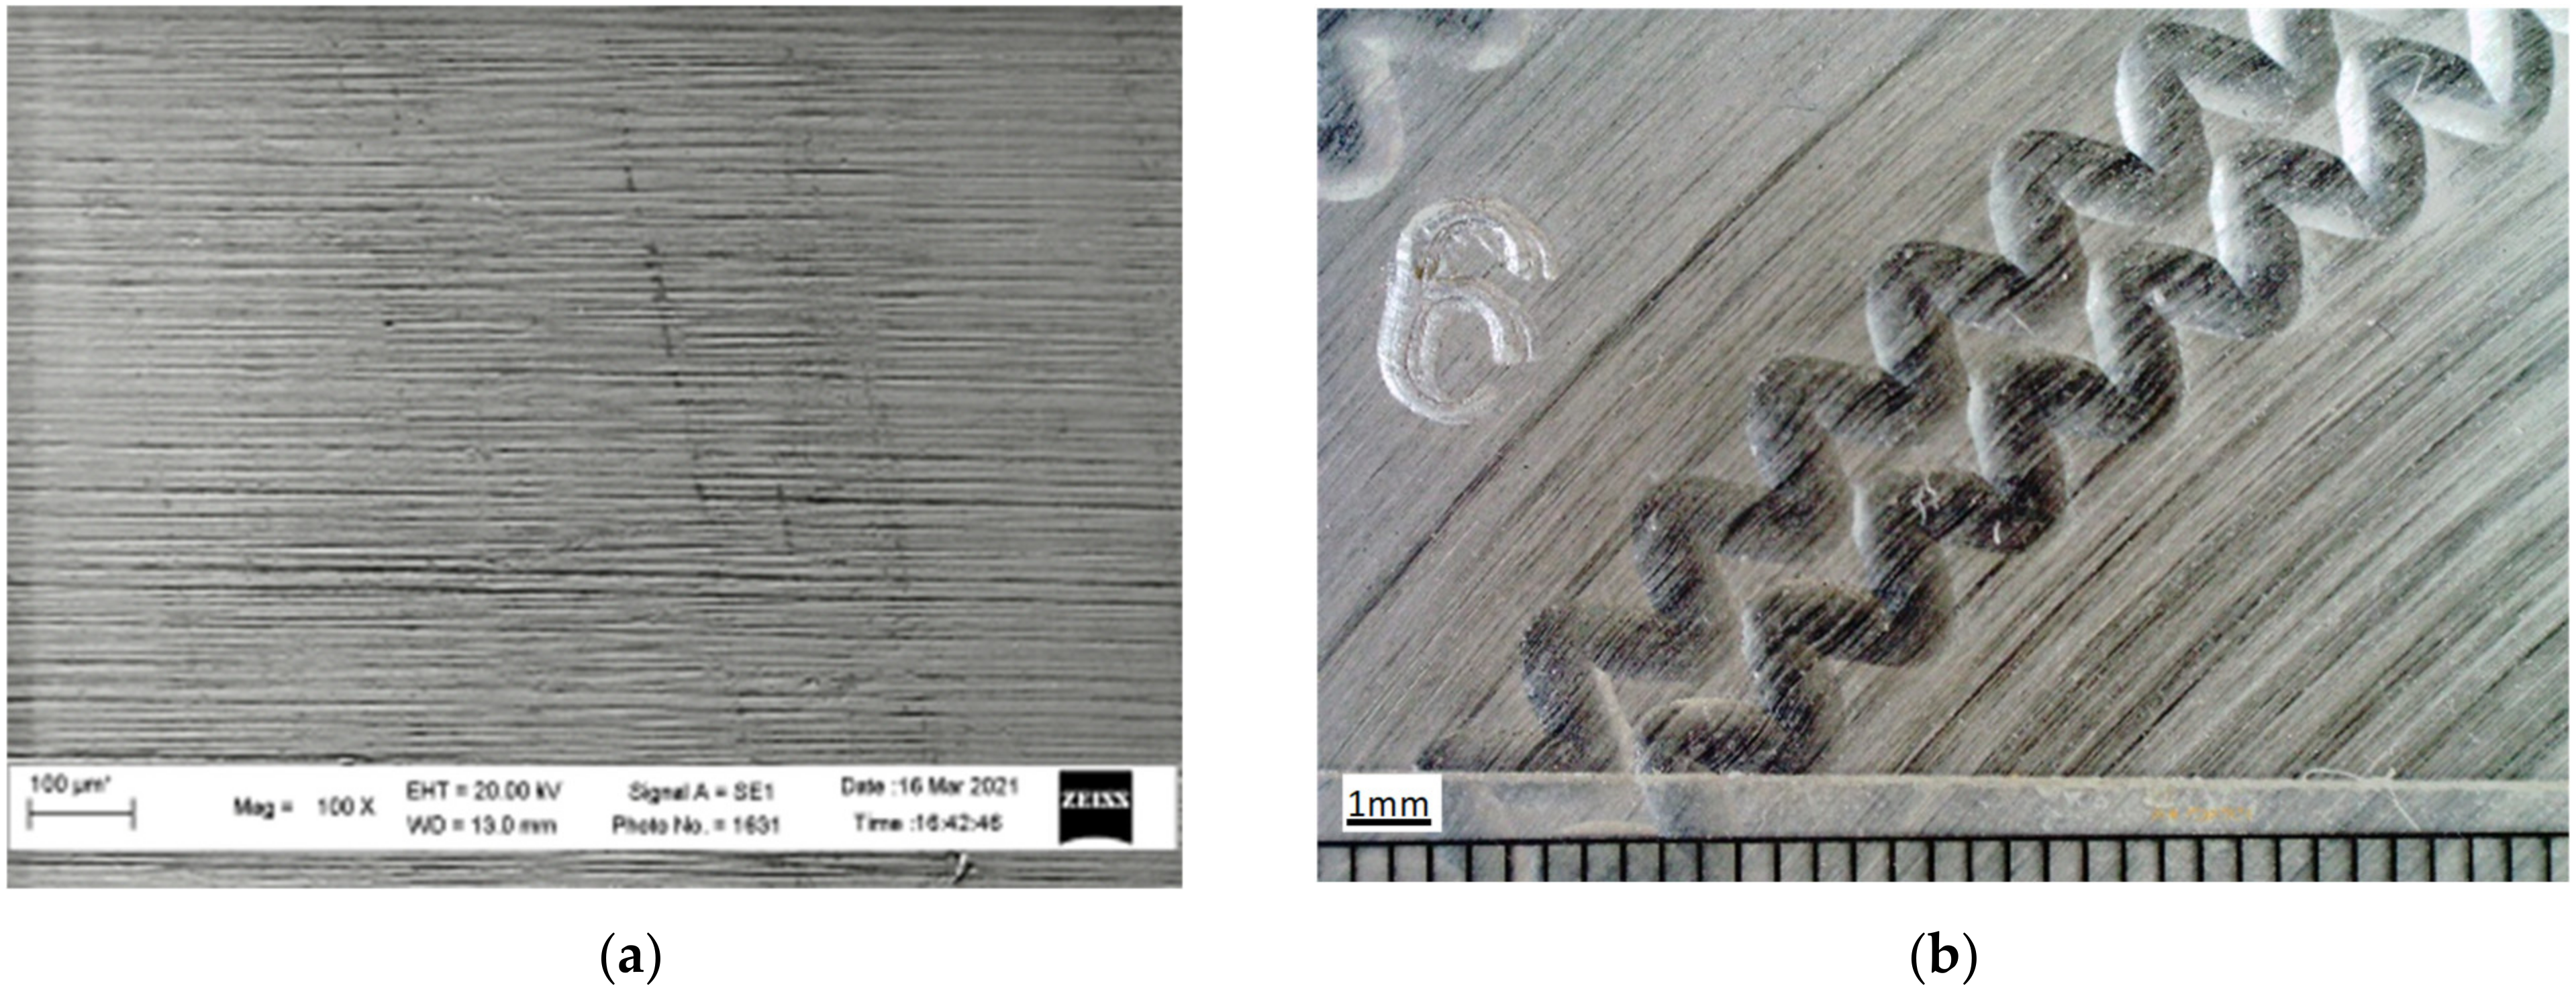
The specimen was machined by roller (Figure 5a) and ball burnishing, with the formation of a regular microrelief (Figure 5b). The performance characteristics of the working surfaces were investigated by evaluating their profilograms, using a group of Rk parameters in the Abbott–Firestone diagram. This technique allows for the determination of the amount of oil that the working surface of the part can retain.
Two surfaces obtained after (Figure 5a) finishing operations of rolling and (Figure 5b) fine-turning, with the formation of a regular microrelief, were compared. These were typical working surfaces of hydraulic and pneumatic cylinder liners and other parts, which are extremely hard to machine using traditional methods because of their design features.
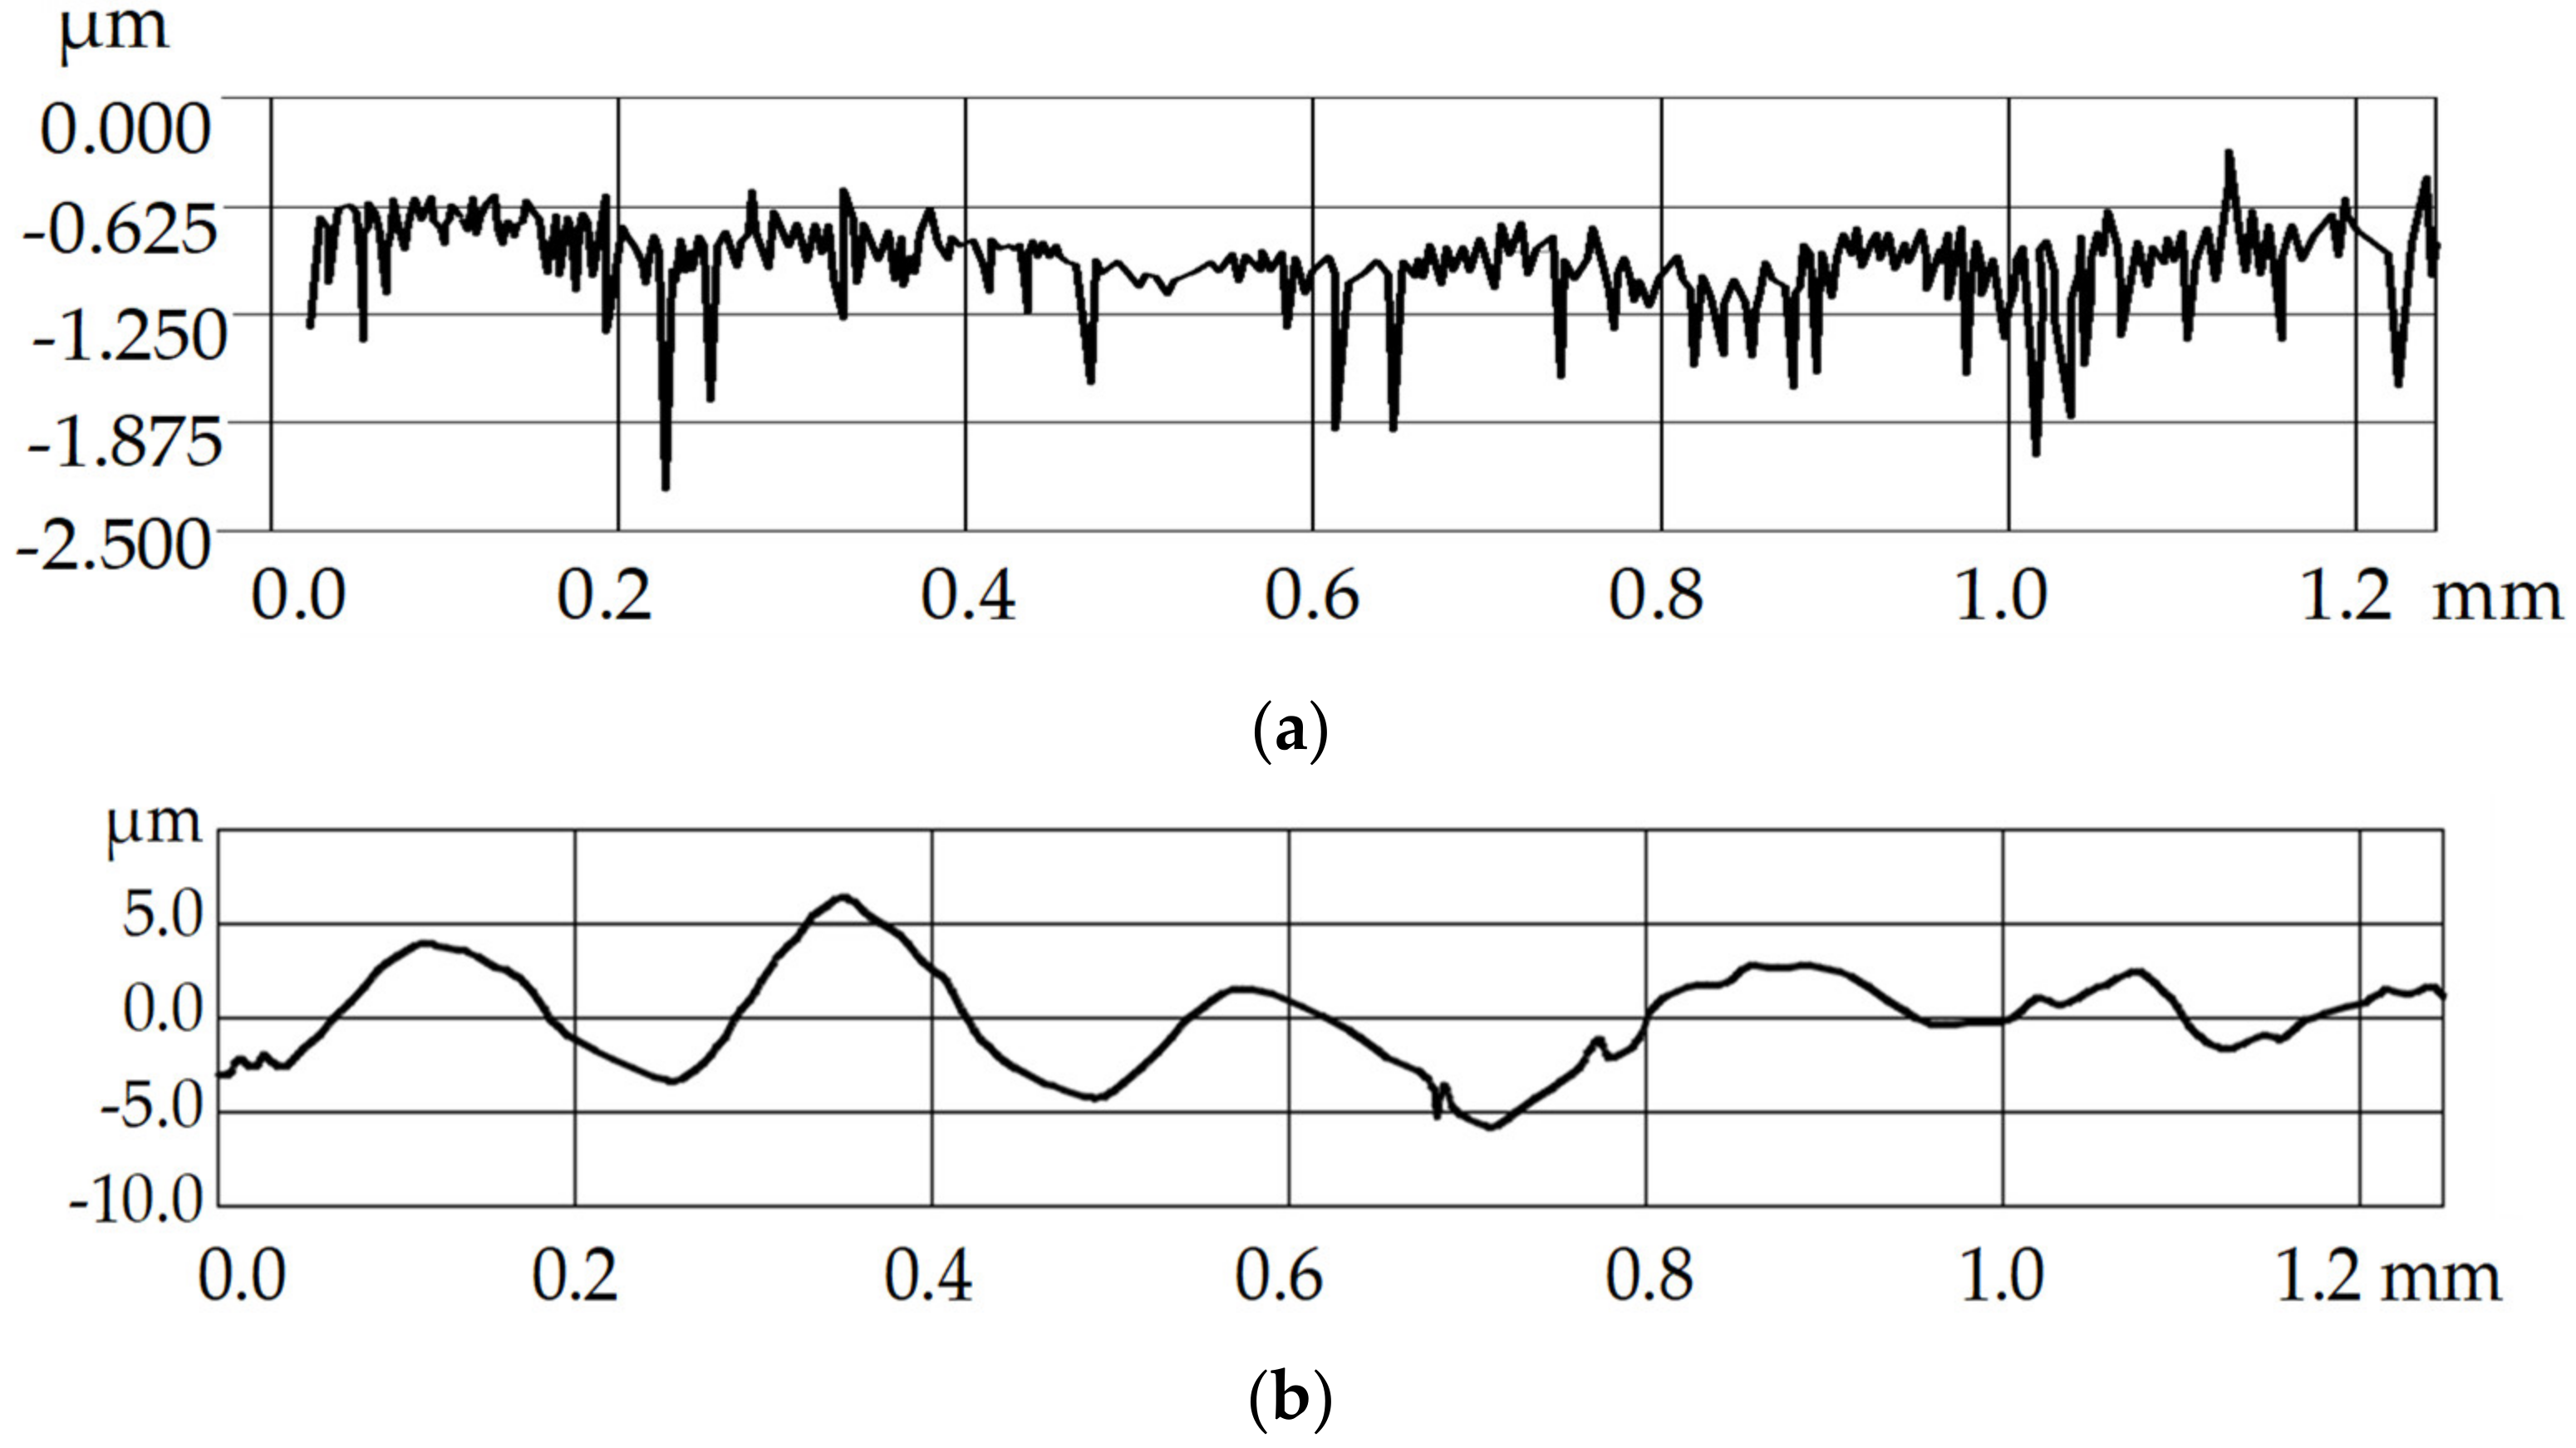
A regular microrelief was formed on the experimental flat specimen using an HAAS TM-1 CNC-milling machine, using a tool with a spherical working part [20,21,22,23] that had a deformation force Fd.i = 200 N and a feed rate fin.i = 500 mm/min. The roughness of the machined surface was measured by the Ra parameter using a Surface Roughness Tester—Mitutoyo, SurfTest SJ-301, which yielded a profilogram of the surface studied (Figure 6).
Five roughness profilograms were obtained for each test specimen, in order to eliminate the influence of random factors on the measurement results for the surface roughness parameters.

4. Results

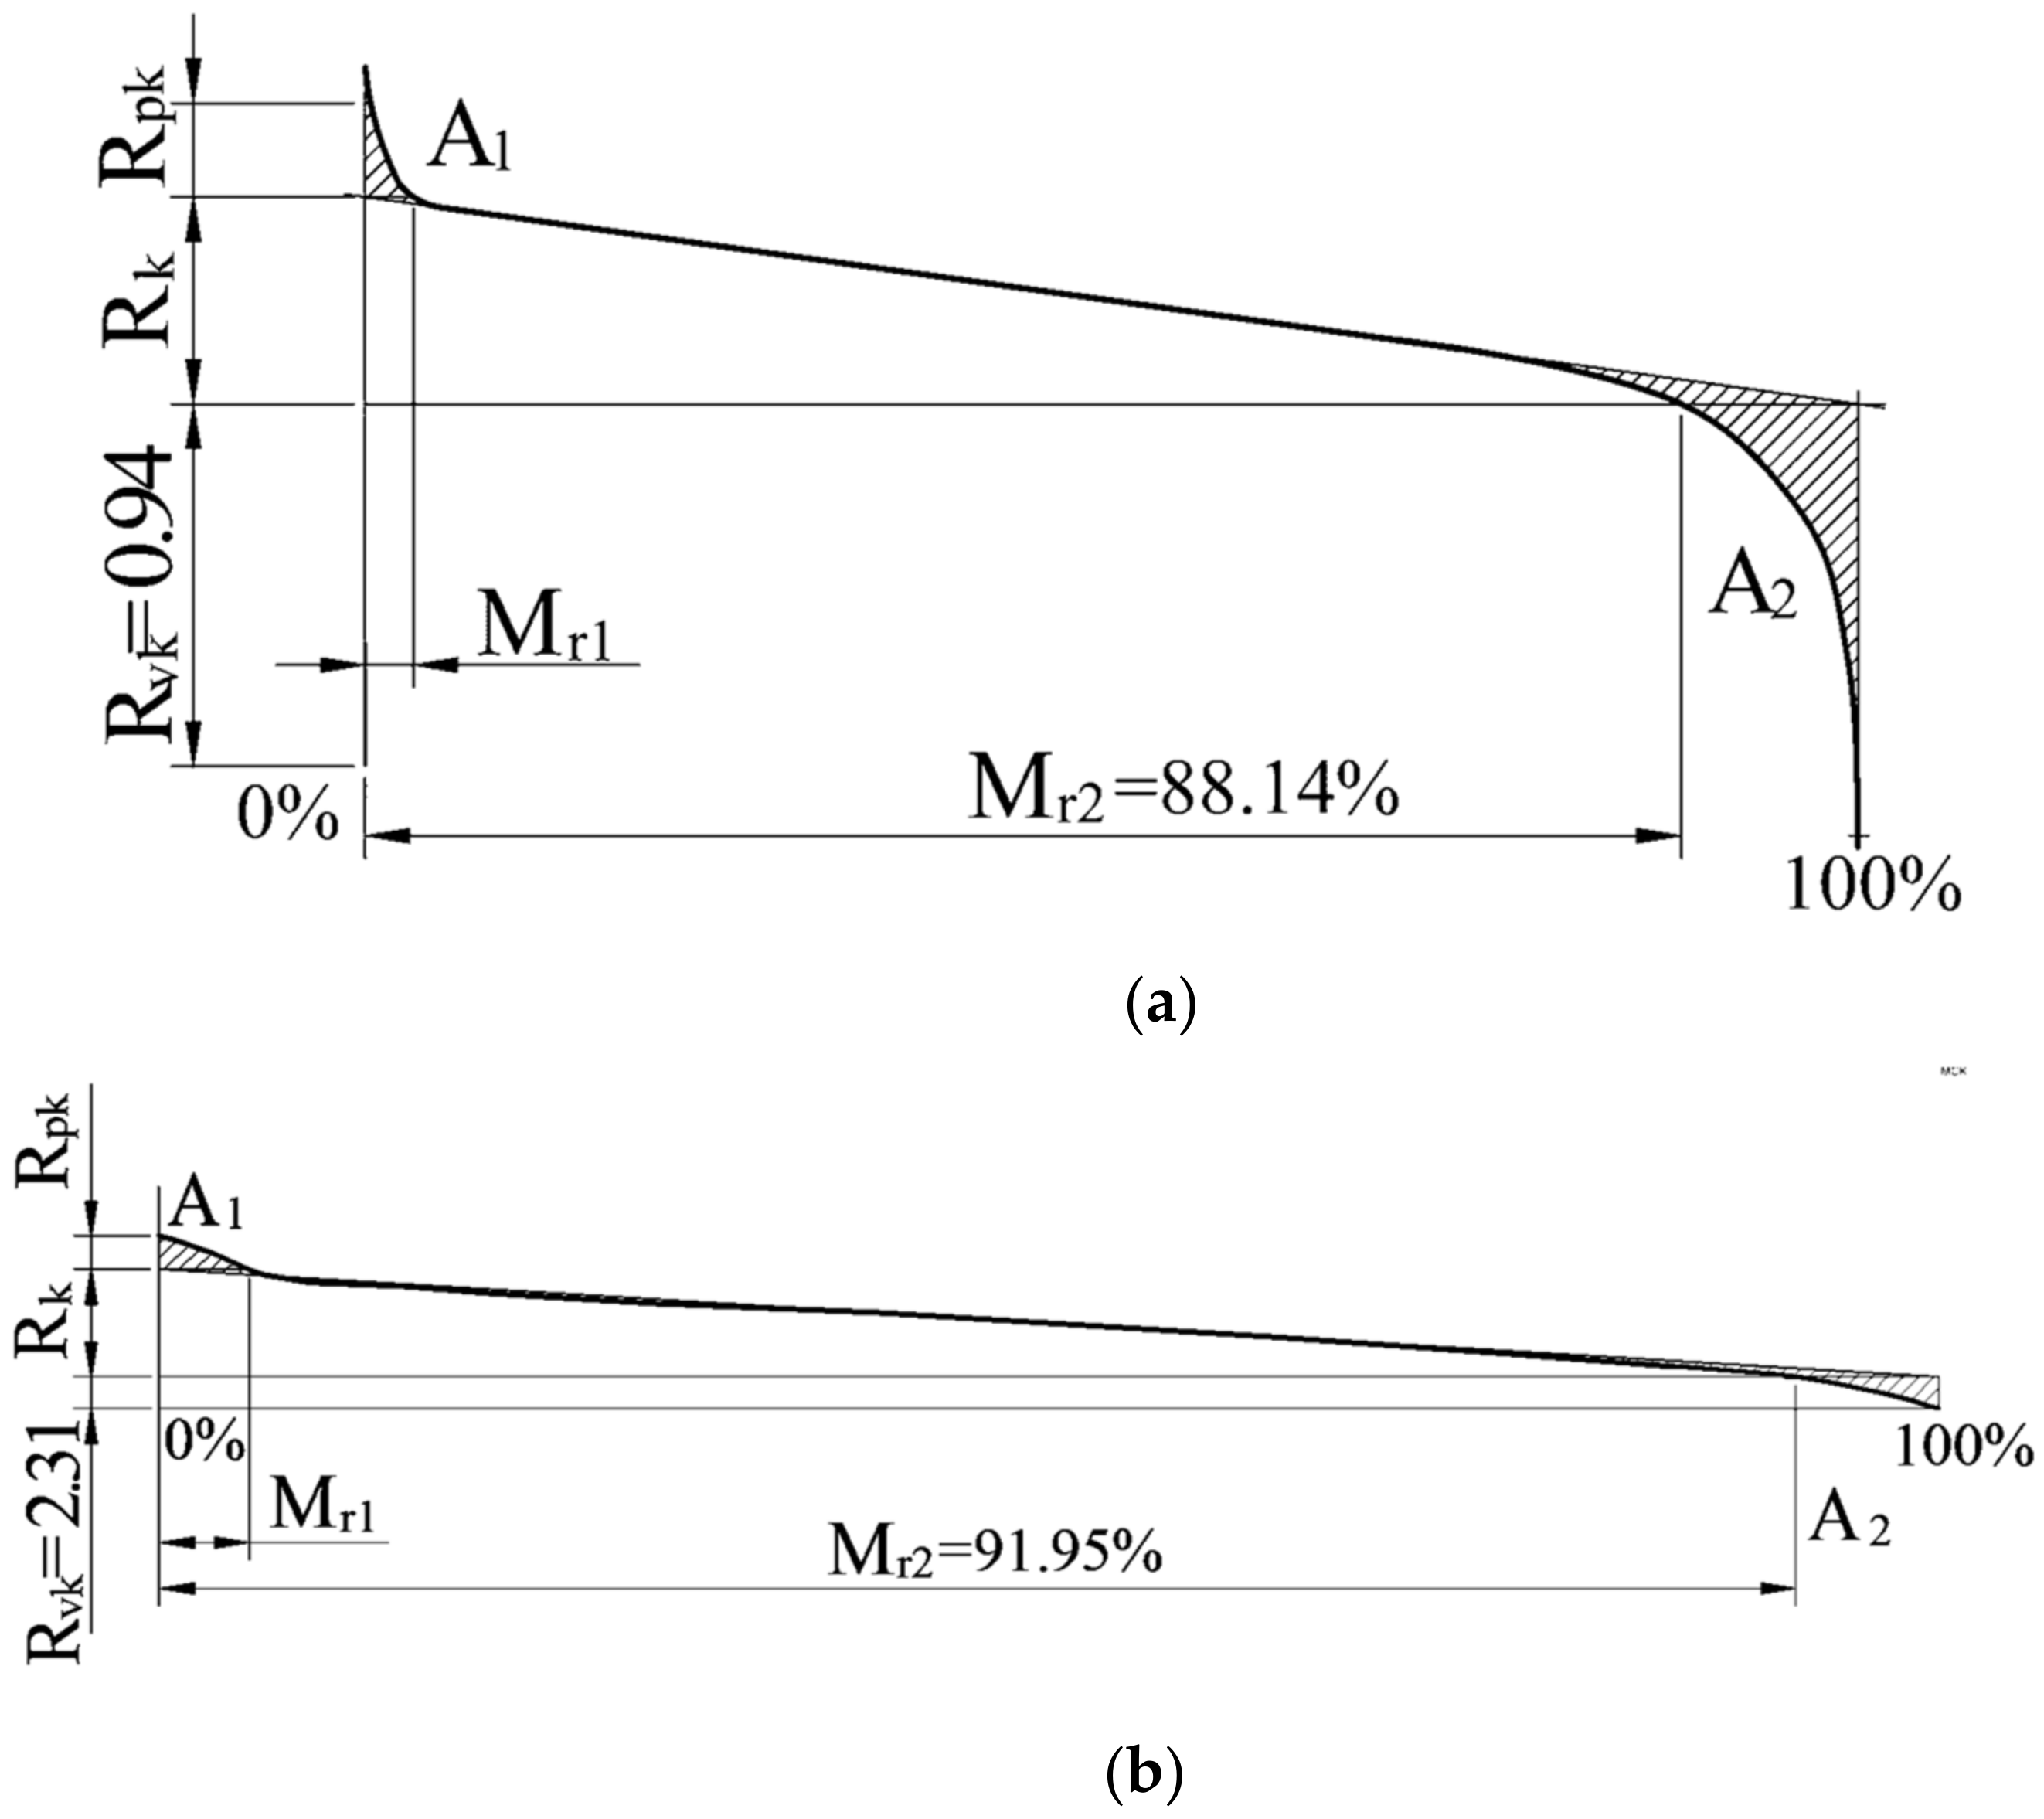
Based on the profilogram analysis of the surfaces studied, an Abbott–Firestone diagram (ISO 4287 1997) was constructed for the surfaces obtained after the finishing operation of burnishing (Figure 7), with the formation of a regular microrelief. The curve describes the length of material filling-to-estimated length ratio at the specified cutting depth, expressed in %. Simultaneously, a small value of the Rpk parameter and a decreased value of Mr1, expressed in %, indicated an increase in the material proportion above the profile midline (valley), which caused a significant increase in the actual contact area of the surface. The slope at the beginning of the curve reflects the profile peaks that caused the seal wear, and the slope at the end of the curve reflects the profile valleys, which were oil reservoirs.
Standard [3] provides a dependency for the determination of the amount of oil that will be produced on the surface:
V o = R v k 100 M r 2 200
where Vo is the volume that contains oil, mm3/cm2.
The amount of oil that will be retained on the surfaces was calculated using the values obtained from the diagrams shown in Figure 7a,b, using Formula (1). The obtained results are shown in the Table 1.

5. Discussion of Research Findings

As follows from the results summarized in Table 1, the numerical value of the surface roughness parameter is not directly dependent on the performance characteristics of the surface, in particular, its oil-absorption power. Thus, surfaces with a higher numerical value of roughness (Ra = 1.114 μm) have the best oil-absorption power (V0 = 0.093 mm3/cm2). It should also be noted that during the exploitation of conjugate surfaces, their topography will change and, accordingly, their roughness will decrease to a specific value. The surface’s wear will also affect the amount of oil V0 that the surface can hold. This value will decrease until the tribological system switches to the limit friction mode [24]. Therefore, when choosing the finishing operation of the technological process, which will form the service properties of the machined surfaces, it should be borne in mind that the oil-absorption power of the surface must remain in a given range of values within the specified service life of the part. We should emphasize that the numerical value of the roughness parameter (Ra = 1.114 μm), obtained by combining fine-turning with the subsequent formation of a regular microrelief, is high enough for the liner surfaces of hydraulic and pneumatic cylinders. In addition, the structure of the fundamental technological process, with rolling used as a finishing operation, allows for increases in the hardness of the machined surfaces from 83 to 94.5 units of HRB [16,22,23,24]. Therefore, the critical surface parameter of the car parts—which work in conjunction with other surfaces and form tribological systems—is not the minimum roughness of the machined surface, but its optimal topography, which provides for the maximum oil-absorption power during the finishing process operation. Based on these considerations, it is recommended to introduce burnishing of working surfaces in order to form a regular microrelief on them. The results obtained here correlate with the scientific results of research obtained earlier in [25], and both develop and deepen these findings. They indicate that there is a range of optimal values of the roughness parameter at which the performance properties of the surface will be optimal. It is also confirmed that the performance properties depend more on the topography of the surface than on the numerical value of the roughness parameter, and so for their evaluation, it is advisable to use special parameters [26] and the Abbott–Firestone diagram [27,28]—especially for surfaces with formed surface structures. It is also confirmed that for finishing operations, it is advisable to use ball-rolling operations, which reduce the surface roughness and improve its physical and mechanical quality parameters [29,30].

6. Conclusions

The numerical values of the microgeometric surface quality parameter Ra and the oil-absorption ability of these surfaces V0 were analyzed using the group of Rk parameters in the Abbott–Firestone diagram. The surface roughness profile was found to have a determining influence on the service characteristics of the surface. The numerical values of the roughness parameter Ra were derived.
The topography of the working surfaces of car parts that form tribological systems was found to have a more significant effect on the service characteristics of these surfaces than the numerical values of the surface roughness parameter Ra.
As can be seen from these studies, the reduction of surface roughness on the parameter Ra from 1.114 μm to 0.165 μm leads to a deterioration in its performance properties–in particular, in oil accumulation. The formation of a surface structure with a microrelief of the appropriate type allows the increase of oil accumulation by almost two times. Due to the fact that the technology for forming regular microreliefs does not require special machines and expensive tools, this direction for improving performance properties is extremely promising.

Author Contributions

Conceptualization, V.D. and P.M.; methodology, V.D., S.S. and V.G.; formal analysis, V.D., P.M., S.S. and V.G.; validation, V.D., P.M., S.S. and V.G.; writing (original draft), V.D., P.M., S.S., V.G. and O.P.; writing (review and editing), V.D. and O.P.; supervision, P.M. All authors have read and agreed to the published version of the manuscript.

Funding

This research received no external funding.

Institutional Review Board Statement

Not applicable.

Informed Consent Statement

Not applicable.

Data Availability Statement

The data presented in this study are available on request from the corresponding author.

Conflicts of Interest

The authors declare no conflict of interest.

References

  1. Aimukhanbet, B.A. Influence of the Stress-Strain State of the Surface on Its Quality Indicators at Processing Cylindrical Parts by Plastic Deformation Methods. Ph.D. Thesis, Satbayev University, Almaty, Kazakhstan, 2019; p. 159. (In Russian). [Google Scholar]
  2. ISO 1302:2002. Geometrical Product Specifications (GPS)—Indication of Surface Texture in Technical Product Documentation; ISO: Geneva, Switzerland, 2002. [Google Scholar]
  3. ISO 13565-2:1996. Geometrical Product Specifications (GPS)—Surface Texture: Profile Method; Surfaces Having Stratified Functional Properties—Part 2: Height Characterization Using the Linear Material Ratio Curve; ISO: Geneva, Switzerland, 1996. [Google Scholar]
  4. GOST 2789-73. Surface Roughness. Parameters and Characteristics; State Committee of Standards of the Council of Ministers of the USSR: Moscow, Russia, 1975; p. 7. (In Russian) [Google Scholar]
  5. GOST R ISO 4287-2014. Geometrical Product Specifications (GPS). Surface Texture. Profile Method. Terms, Definitions and Surface Texture Parameters; International Organization for Standardization: Moscow, Russia, 2015; p. 18. (In Russian) [Google Scholar]
  6. DSTU GOST 25142: 2009. Surface Roughness. Terms and Definitions; State Committee for Technical Regulation and Consumer Policy: Kyiv, Ukraine, 2009; p. 22. (In Ukrainian) [Google Scholar]
  7. Tabenkin, A.N.; Tarasov, S.B.; Stepanov, A.N. Sherokhovatost’, Volnistost’, Profil’. Mezhdunarodnyyopyt [Roughness, Waviness, and Profile, International Experience]; Izd-voPolitekhn. Un-ta: Saint Petersburg, Russia, 2007; p. 136. (In Russian) [Google Scholar]
  8. Stupnytskyy, V.V. Structural-parametric optimization of the technological processes for the assurance of part’s service properties. East. Eur. J. Enterp. Technol. 2014, 2, 9–16. [Google Scholar] [CrossRef]
  9. Nagorkin, M.N. Reliability of Technological Support of Roughness and Wear Resistance of Surfaces of Parts with Tools Made of Synthetic Superhard Materials. Ph.D. Thesis, Bryansk State Technical University, Bryansk, Russia, 2020; p. 337. (In Russian). [Google Scholar]
  10. Gamez-Montero, P.J.; Salazar, E.; Castilla, R.; Freire, J.; Khamashta, M.; Codina, E. Friction effects on the load capacity of a column and a hydraulic cylinder. Int. J. Mech. Sci. 2009, 51, 141–151. [Google Scholar] [CrossRef]
  11. Qin, P.; Yang, C.; Huang, W.; Xu, G.; Liu, C. Honing process of hydraulic cylinder bore for remanufacturing. In Proceedings of the 4th International Conference on Sensors, Measurement and Intelligent Materials, Shenzhen, China, 27–28 December 2015; Atlantis Press: Paris, France, 2016; pp. 64–68. [Google Scholar] [CrossRef]
  12. Kim, E.-S.; Kim, S.-M.; Lee, Y.-Z. The effect of plateau honing on the friction and wear of cylinder liners. Wear 2018, 400–401, 207–212. [Google Scholar] [CrossRef]
  13. Voitov, V.A.; Zakharchenko, M.B. Modeling the processes of friction and wear in tribosystems under boundary lubrication conditions. Part 2. Simulation results. Probl. Tribol. 2015, 76, 36–45. (In Russian) [Google Scholar]
  14. Aulin, V.; Hrynkiv, A.; Lysenko, S.; Dykha, A.; Zamota, T.; Dzyura, V. Exploring a possibility to control the stressed-strained state of cylinder liners in diesel engines by the tribotechnology of alignment. East. Eur. J. Enterp. Technol. 2019, 99, 6–16. [Google Scholar] [CrossRef]
  15. Castro, R.; Rocha, A.; Curi, E.M.; Peruch, F. A Comparison of microstructural, mechanical and tribological properties of WC-10Co4Cr—HVOF coating and hard chrome to use in hydraulic cylinders. Am. J. Mater. Sci. 2018, 8, 15–26. [Google Scholar] [CrossRef]
  16. Dzyura, V.; Maruschak, P. Optimizing the formation of hydraulic cylinder surfaces, taking into account their microrelief topography analyzed during different operations. Machines 2021, 9, 116. [Google Scholar] [CrossRef]
  17. Zhang, Y.; Zeng, L.; Wu, Z.; Ding, X.; Chen, K. Synergy of surface textures on a hydraulic cylinder piston. Micro Nano Lett. 2019, 14, 424–429. [Google Scholar] [CrossRef]
  18. Radionenko, O.; Kindrachuk, M.; Tisov, O.; Kryzhanovskyi, A. Features of transition modes of friction surfaces with partially regular microrelief. Aviation 2018, 22, 86–92. [Google Scholar] [CrossRef]
  19. Kindrachuk, M.; Radionenko, O.; Kryzhanovskyi, A.; Marchuk, V. The friction mechanism between surfaces with regular micro grooves under boundary lubrication. Aviation 2014, 18, 64–71. [Google Scholar] [CrossRef]
  20. Honing Cylinders: Technology Overview and Quality Criteria. Available online: https://rad-star.ru/pressroom/articles/khoningovanie-tsilindrov (accessed on 12 December 2021). (In Russian).
  21. Slavov, S.; Iliev, I. Design and fem static analysis of an instrument for surface plastic deformation of non-planar functional surfaces of machine parts. Fiability Durab. 2016, 2, 3–9. [Google Scholar]
  22. Sotnykov, O.; Rodionov, M.; Maruschak, P.; Brezinová, J.; Guzanová, A.; Apostol, Y. Failure analysis of the hingelever mould oscillator bearings of the continuous casting machine. Strength Fract. Complex. 2014, 8, 135–143. [Google Scholar] [CrossRef]
  23. Dzyura, V.O.; Maruschak, P.O.; Zakiev, I.M.; Sorochak, A.P. Analysis of inner surface roughness parameters of load-carrying and support elements of mechanical systems. Int. J. Eng. Trans. B Appl. 2017, 30, 1170–1175. [Google Scholar] [CrossRef]
  24. Dzyura, V.; Maruschak, P.; Tkachenko, I.; Kuchvara, I. Ensuring a stable relative area of burnishing of partially regular microrelief formed on end surfaces of rotary bodies. Stroj. Časopis J. Mech. Eng. 2021, 71, 41–50. [Google Scholar] [CrossRef]
  25. Pawlus, P.; Reizer, R.; Wieczorowski, M. Functional importance of surface texture parameters. Materials 2021, 14, 5326. [Google Scholar] [CrossRef] [PubMed]
  26. Dzierwa, A.; Markopoulos, A.P. Influence of ball-burnishing process on surface topography parameters and tribological properties of hardened steel. Machines 2019, 7, 11. [Google Scholar] [CrossRef] [Green Version]
  27. Sedlaček, M.; Gregorčič, P.; Podgornik, B. Use of the roughness parameters Ssk and Sku to control friction—A method for designing surface texturing. Tribol. Trans. 2017, 60, 260–266. [Google Scholar] [CrossRef]
  28. Zeng, Q.; Qin, Y.; Chang, W.; Luo, X. Correlating and evaluating the functionality-related properties with surface texture parameters and specific characteristics of machined components. Int. J. Mech. Sci. 2018, 149, 62–72. [Google Scholar] [CrossRef]
  29. Swirad, S.; Pawlus, P. The effect of ball burnishing on dry fretting. Materials 2021, 14, 7073. [Google Scholar] [CrossRef] [PubMed]
  30. Zhang, P.; Liu, Z.; Du, J.; Su, G.; Zhang, J.; Xu, C. On machinability and surface integrity in subsequent machining of additively-manufactured thick coatings: A review. J. Manuf. Process. 2020, 53, 123–143. [Google Scholar] [CrossRef]
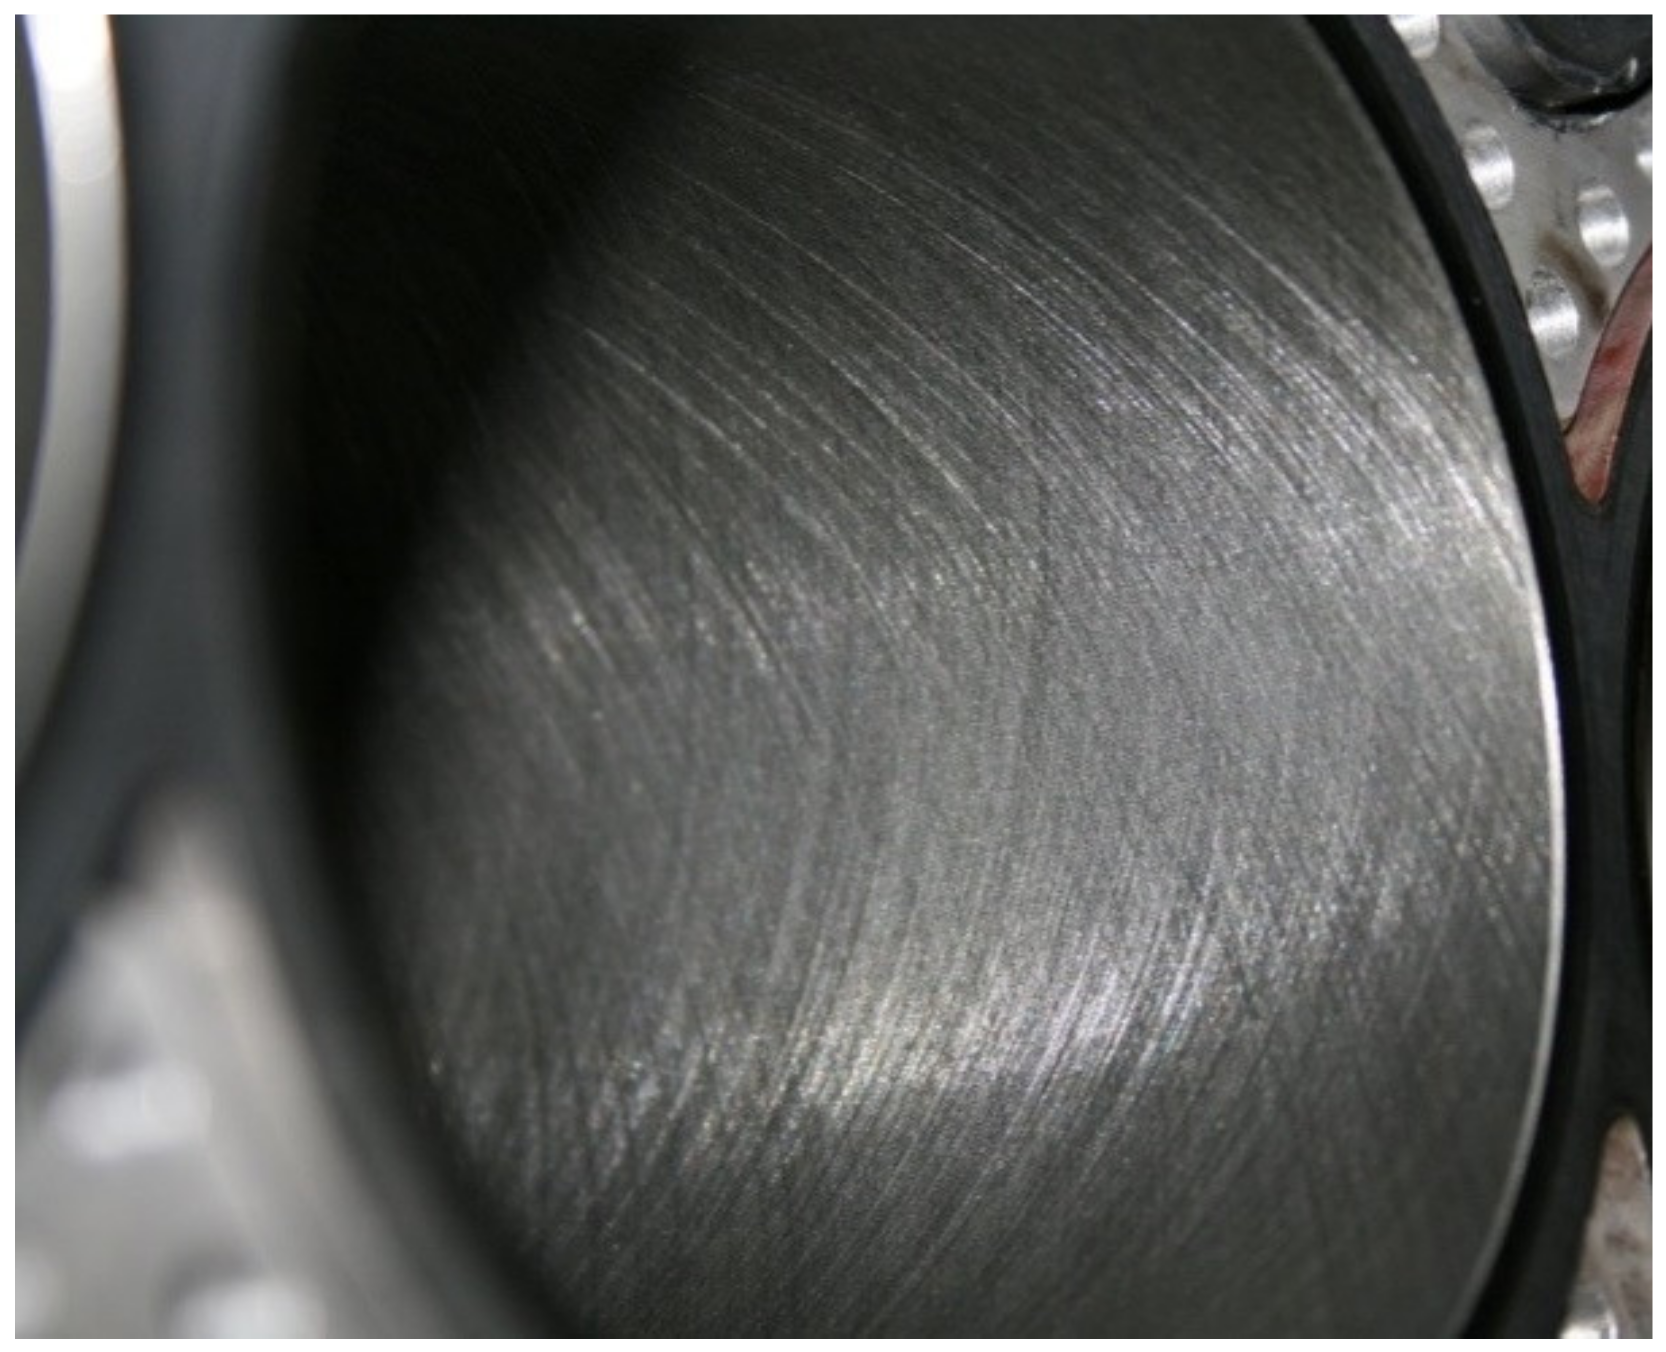
Figure 1. The surface structure of the cylinder liner of the internal combustion engine formed by honing [20].
Machines 09 00366 g001
Figure 2. Typical damage types that occur on the working surfaces of machine parts: (a)—surface of the crankshaft-connecting rod bearing; (b)—variator’s disc surface.
Machines 09 00366 g002
Figure 3. Relationship between surface microgeometry and performance characteristics during process operations.
Machines 09 00366 g003
Figure 4. The scheme of the experiment.
Machines 09 00366 g004
Figure 5. Photographs of specimen surfaces from steel 17G1S during finishing operations of the technological process: (a) after rolling; (b) ball burnishing, with the formation of a regular microrelief.
Machines 09 00366 g005
Figure 6. Profilograms of the test specimen surface: (a)-after rolling; (b)-after fine turning, with the formation of a regular microrelief.
Machines 09 00366 g006
Figure 7. Abbott–Firestone diagram for the inner cylindrical surface of the specimen obtained after finishing operations of: (a)—after rolling; (b)—after fine turning, with the formation of a regular microrelief, Rpk is the reduced peak height; Rk is the profile core depth; Rvk is the reduced valley depth; Mr1 is the percentage of material, separated by a line that divides the peak from the profile core; Mr2 is the percentage of material, separated by a line that divides the valley from the profile midline.
Machines 09 00366 g007
Table 1. Comparison of quality parameters and performance characteristics of surfaces machined by various technological operations.
Finishing MethodMeasured and Calculated Roughness Parameters
Rai, µmMean Ra, µmRvk, µmMean Rvk, µmMr2, %Mean Mr2, %Volume of Oil, V0, mm3/cm2
Rolling10.1650.1650.940.95688.1488.7840.054
20.1620.9686.29
30.1970.8790.08
40.1541.0289.23
50.1460.9990.18
Ball burnishing11.111.1142.312.31291.9591.920.093
21.292.1990.72
31.172.2292.38
40.972.4592.61
51.032.3991.94
Publisher’s Note: MDPI stays neutral with regard to jurisdictional claims in published maps and institutional affiliations.