1. Introduction
The aim of this study was to report and comment on the application of design for disassembly (DfD) to a case study of a gearbox. Design for disassembly be defined as a design approach in which the goal is to optimize the architecture and construction features of a product in relation to the following main requirements:
Design for disassembly is a design method oriented to the simplification and facilitation of the disassembly phase of the products; however, it is not limited to the end-of-life phase. The disassembly of products is necessary whenever it is appropriate to remove subsystems or individual components comprising the product itself. Starting from a perspective of environmental protection, disassembly can have several objectives: recovery of parts, components and sub-assemblies that can be reused in new products, recovery of recyclable materials, and access to parts or components that can be subject to assistance operations (e.g., repair, maintenance, diagnostics). The implementation of a correct DfD is essential, both in terms of preventive maintenance and corrective maintenance.
Design for environment (DfE) can be defined as a methodology aimed at the systematic reduction or elimination of the environmental impacts associated with the entire life cycle of a product, from the extraction of raw materials to the disposal of the product. Design for disassembly is considered as “green production”, and it is the structural basis of DfE, as it offers techniques aimed at simplifying the assembly of a product in order to make maintenance and final disassembly of the object easier and faster, while also allowing the recovery of subsystems to be reconditioned or raw materials to be recycled. Using these methodologies, it is possible to reduce a product’s environmental impact, with the reuse of parts belonging to end-of-life products. Design for disassembly has been gaining attention, especially in recent years, due to the growing pressure of the DfE, and, at the same time, due to the fact that it is increasingly difficult to source raw materials.
The benefits of DfD can be seen in terms of the reduction of production costs (for the manufacturing company), both in the life cycle and recovery of the product (to the benefit of the user). Although recycling and reuse are important, when faced with a product that cannot be disassembled precisely and effectively, these operations are not cost effective [
1,
2].
In the industrial field, DfD was also born out of the need to improve the ability to maintain products remotely. One such way that this is possible is by implementing proper DfD in parallel with augmented reality (AR).
Following a correct design according to a DfD approach, the application of augmented reality becomes useful, because it is possible, for example, to simulate the maintenance of a product, avoiding the use of prototypes. In fact, the use of AR allows for:
The speedup of industrial operations;
Increasing the efficiency of production processes;
Reducing the chances of error.
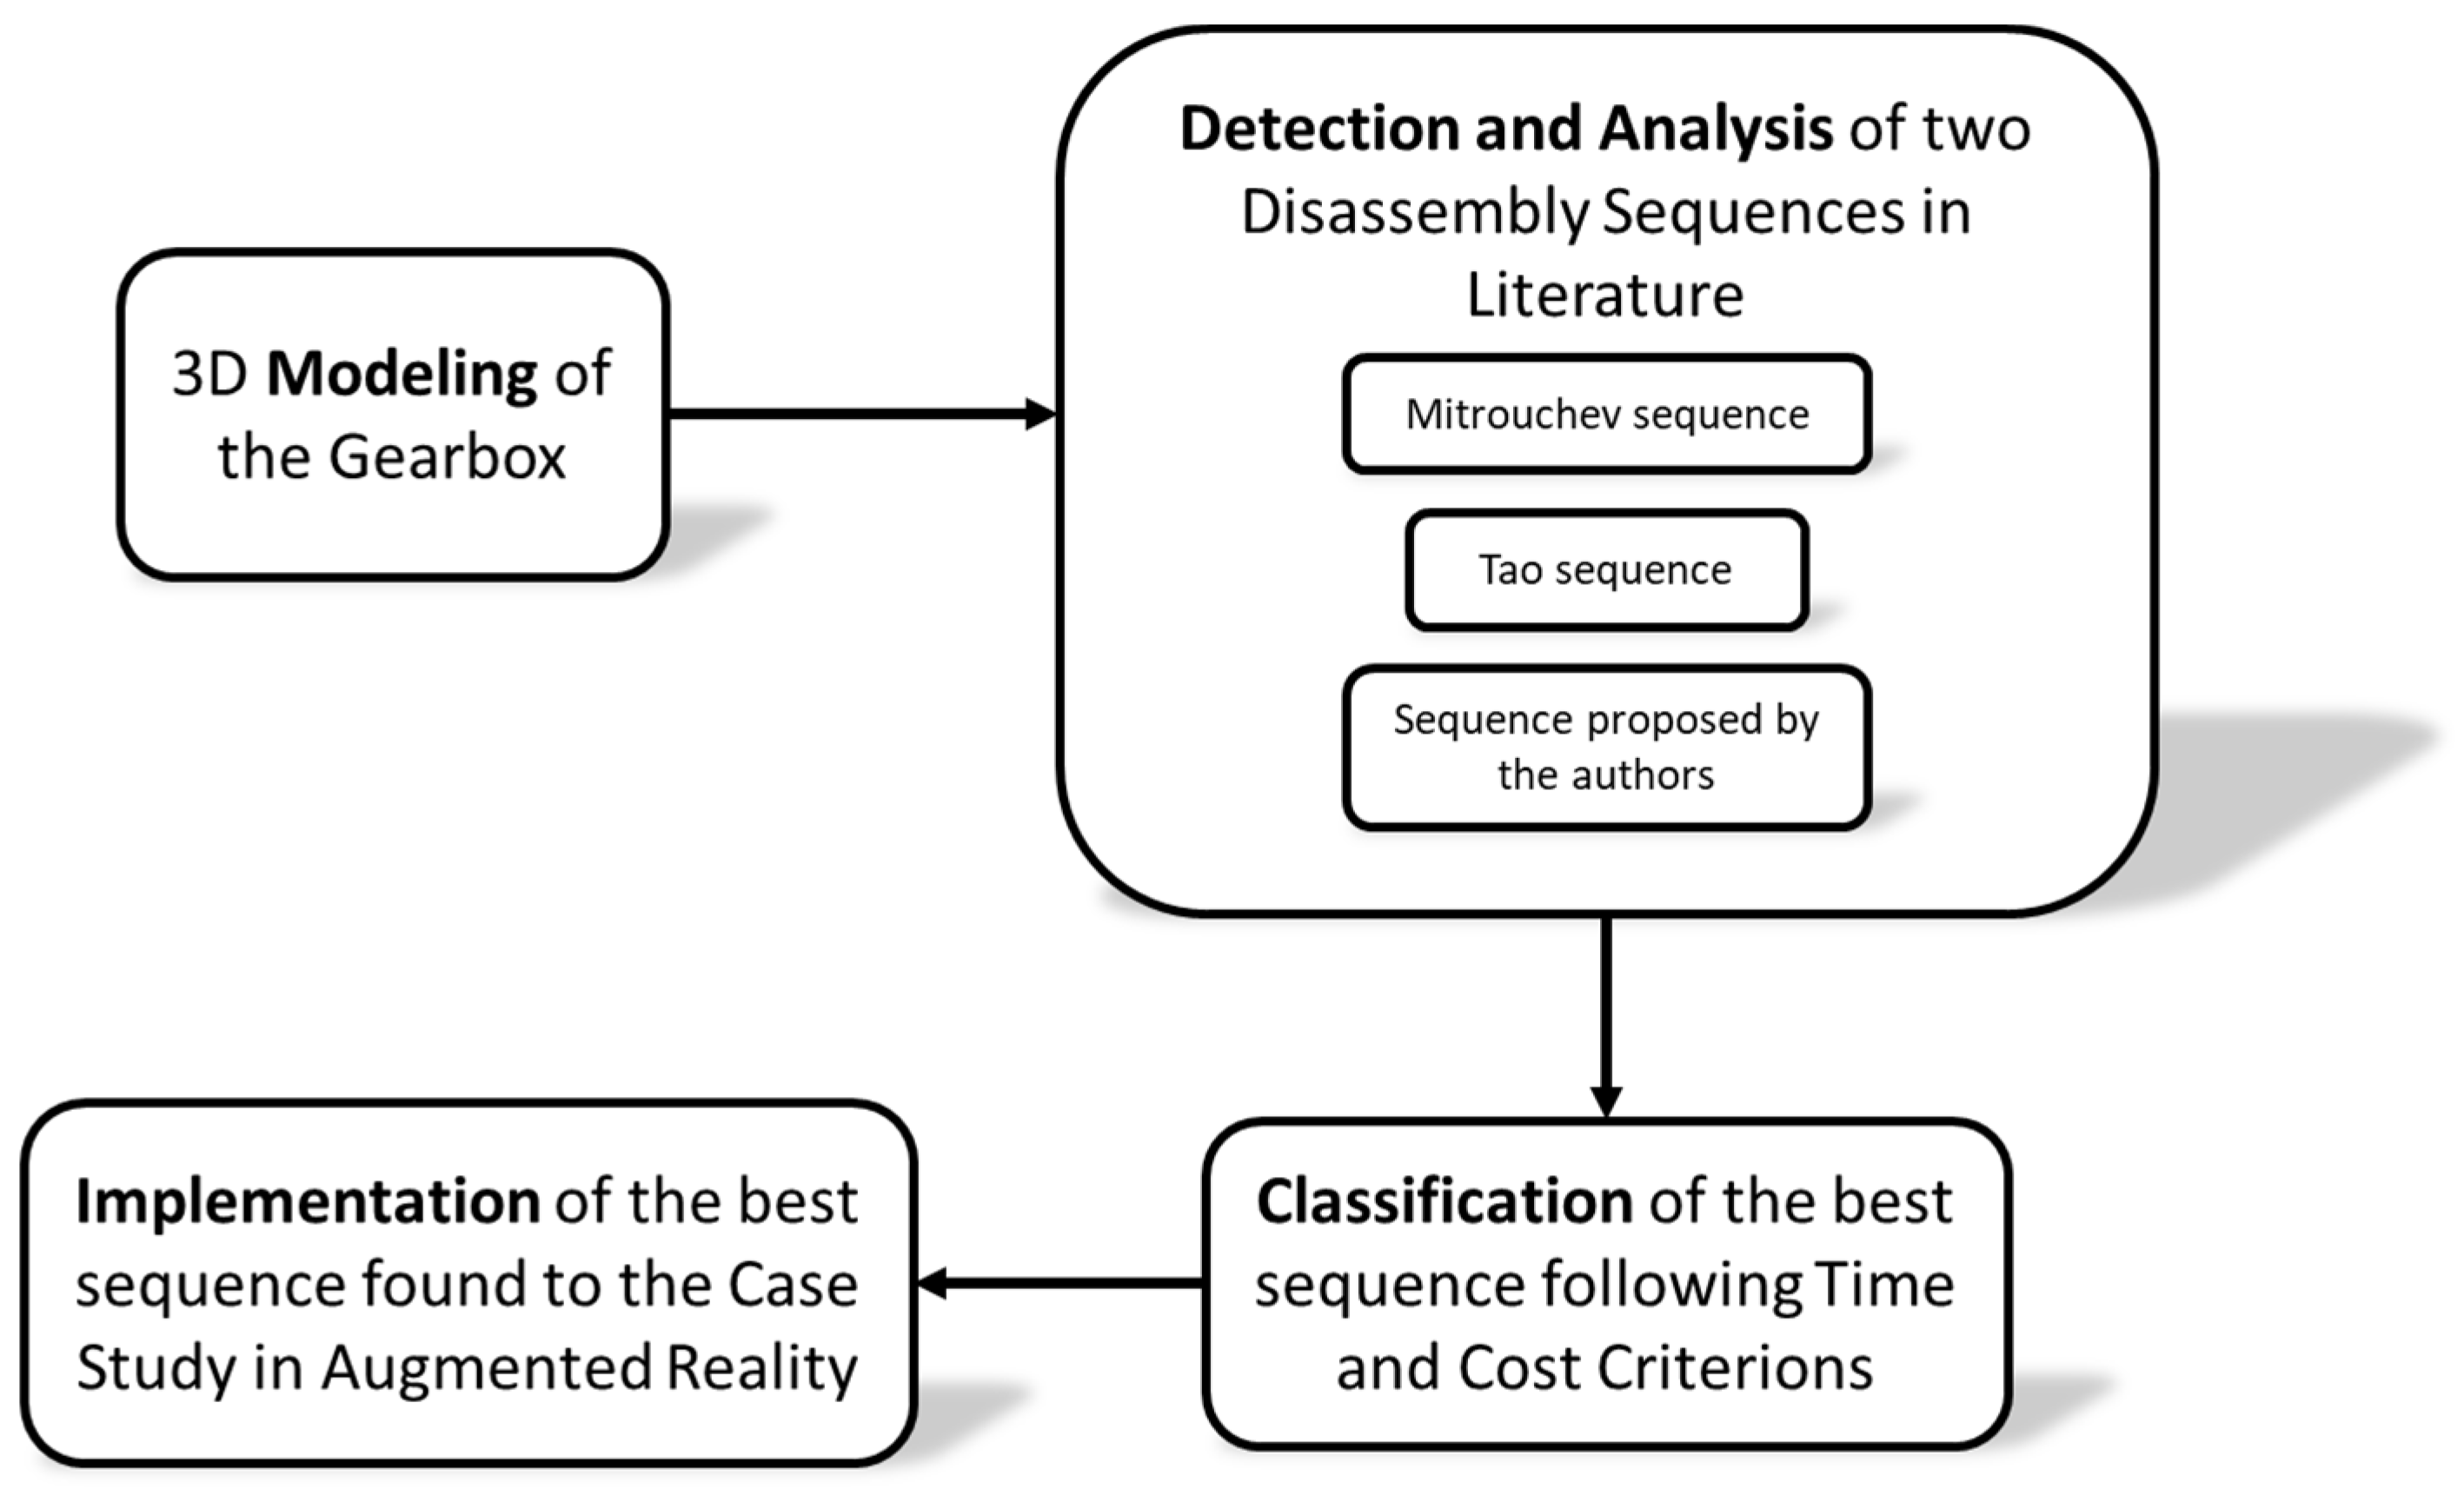
The authors carried out this study intending to apply disassembly sequences to a gearbox and then choosing the most convenient sequence. After a description of DfD and the known disassembly methods that were implemented in this study, the authors present the results and discussion, followed by the conclusion.
Starting with the 3D CAD (Computer-Aided-Design) of a parallel axis gearbox and its bill of materials (BOMs), two known disassembly methods were applied. In
Section 2.4 and
Section 2.5, the authors explain the two methods used. In the first method, called partial parallel disassembly sequence planning for complex products, a complete disassembly was applied, disassembling the gearbox into the individual parts that compose it. This first method is based on a dynamic matrix (disassembly precedence matrix), which must be updated during the application of this approach [
3]. In the second method, called selective disassembly sequence generation, based on the lowest level disassembly graph method, partial disassembly was applied [
4]. The goal was to disassemble the gearbox base, which was considered the target component. This is a graphical method based on the level of removal of each component, based on the collision with any of the other components. A component can be removed immediately if it does not collide or is not blocked by other components during its disassembly. In
Section 2.4.1 and
Section 2.5.4, the application of the two methods is presented. To these two generated sequences, a third is proposed in
Section 2.6, based on the experience gained from the study of the two previous ones. Each sequence was then quantified in terms of time and money, so that the optimal sequence could be chosen. The disassembly time used by each sequence was calculated with the disassembly evaluation chart, which is a matrix in which evaluations were made based on specific parameters, as explained in
Section 2.7 [
5]. With the calculated times and using the data reported by the Italian Ministry of Labor and Social Policies, the economic saving of one sequence compared to another was calculated in
Section 2.8. As a final step, presented in
Section 2.10, of the work through the Unity software, used for the application of CAD contents to augmented reality, it was possible to simulate the best disassembly sequence in the real world (
Figure 1).
2. Materials and Methods
2.1. Design for Disassembly
In this period of mass production, when all activities are planned in detail, design becomes an important tool with which humans shape the world in which they live. The purpose of product design is also extended to the management of environmental problems.
By disassembly of an object, we mean the decomposition of this into the parts that compose it, under the condition that the disassembly process does not cause damage to the parts. This method, known as DfD, is an approach to design that allows the recovery of the parts, components and materials that make up the product at the end of the life cycle. It is therefore a design method that guarantees better quality and the reduction of times and costs related to product disassembly and allows us to pay attention to waste and environmental care. It can be useful both in terms of preventive maintenance (replacement of a component that has not yet failed), and in terms of corrective maintenance (replacement or repair of a defective component), or to recycle the materials of components that are no longer usable. A product must be disassembled whenever it is necessary to remove subassemblies or individual components from that product.
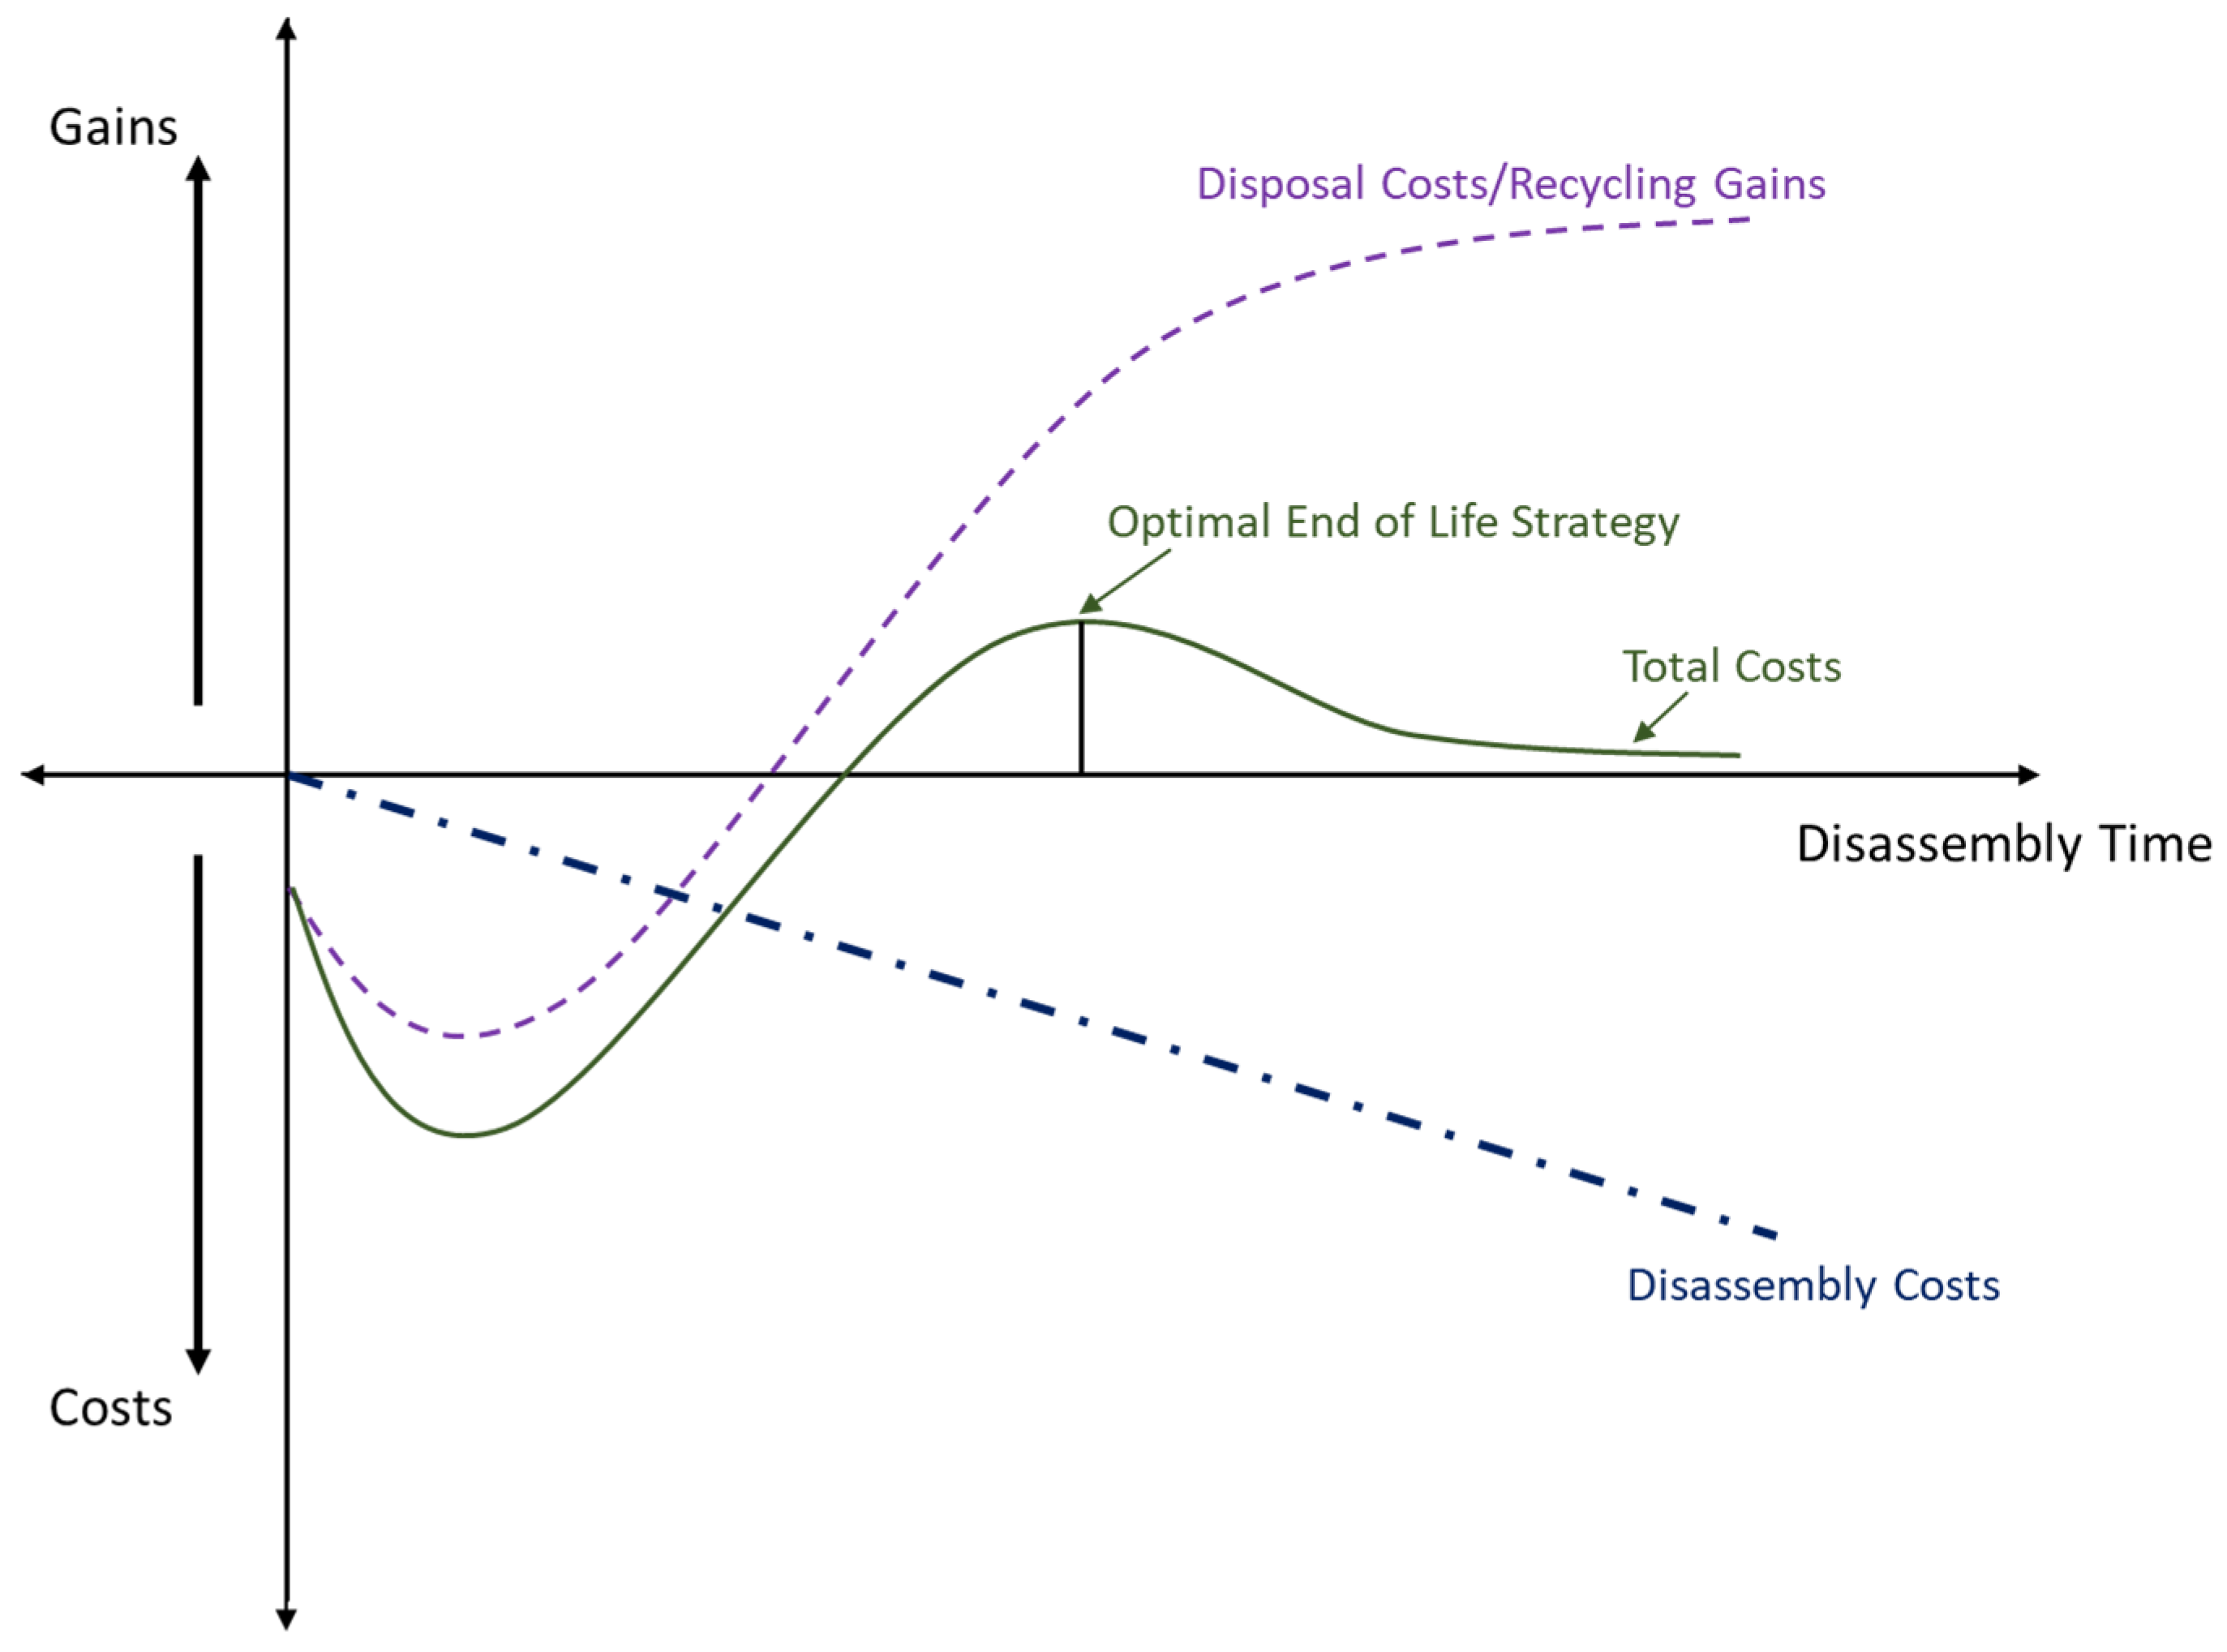
A further aspect of the DfD is the calculation of the “depth” of disassembly (i.e., the total number of sequential phases of disassembly). It has been shown that the cost of disassembly has an almost linear trend with depth and becomes prohibitive with increasing disassembly depth (
Figure 2). The revenue has a rapid initial increase and then stabilizes with increasing depth. A pure material is obtained by using more time, energy and resources during disassembly. This is compensated by a recovery of costs during recycling. The profit curve (given by the difference between the two previous curves) has a maximum point, after which it tends to decrease as the disassembly depth increases. The aim is therefore to optimize the area where there is a higher revenue with low costs: to do this, it is good practice to position, if possible, the most important components in easily accessible areas [
6].
The DfD techniques are not only an effective design tool to reduce the current and future (economic and social) costs of a product, but also consolidated methods that are important for designers and companies interested in reducing the environmental and economic impact through the DfE. DfD techniques are design strategies that affect the end-of-life disposal of products.
2.2. Disassembly Sequence Planning
Disassembly sequence planning (DSP) consists of the realization of a disassembly sequence in line with the benefits that DfD offers. The method is based on an efficient representation of the product and the search for an effective sequence. The DSP considers the structure of the product, the direction of removal of the components, the constraints between them, and the planning of the sequence.
Disassembly can be completed when all the components are disassembled, or selective when the product is disassembled not completely, but until one or more predetermined components (target components) are reached.
Furthermore, disassembly can be non-destructive when the removal of the various parts does not cause them to break, allowing reuse, or it can be destructive when it leads to the breakage of the components during disassembly. From an environmental point of view, efficient planning of disassembly operations assumes strategic importance, since it can influence both the use phase (facilitating maintenance/maintenance and repair operations) and the end-of-life phase (favoring recycling operations materials and the reuse of components) [
7,
8,
9,
10].
2.3. Bill of Materials (BOM) and Gearbox
For 3D modeling of the gearbox, the authors used SolidWorks software. Solidworks is a drawing software for parametric three-dimensional design, produced and marketed by Dassault Systèmes [
11,
12].
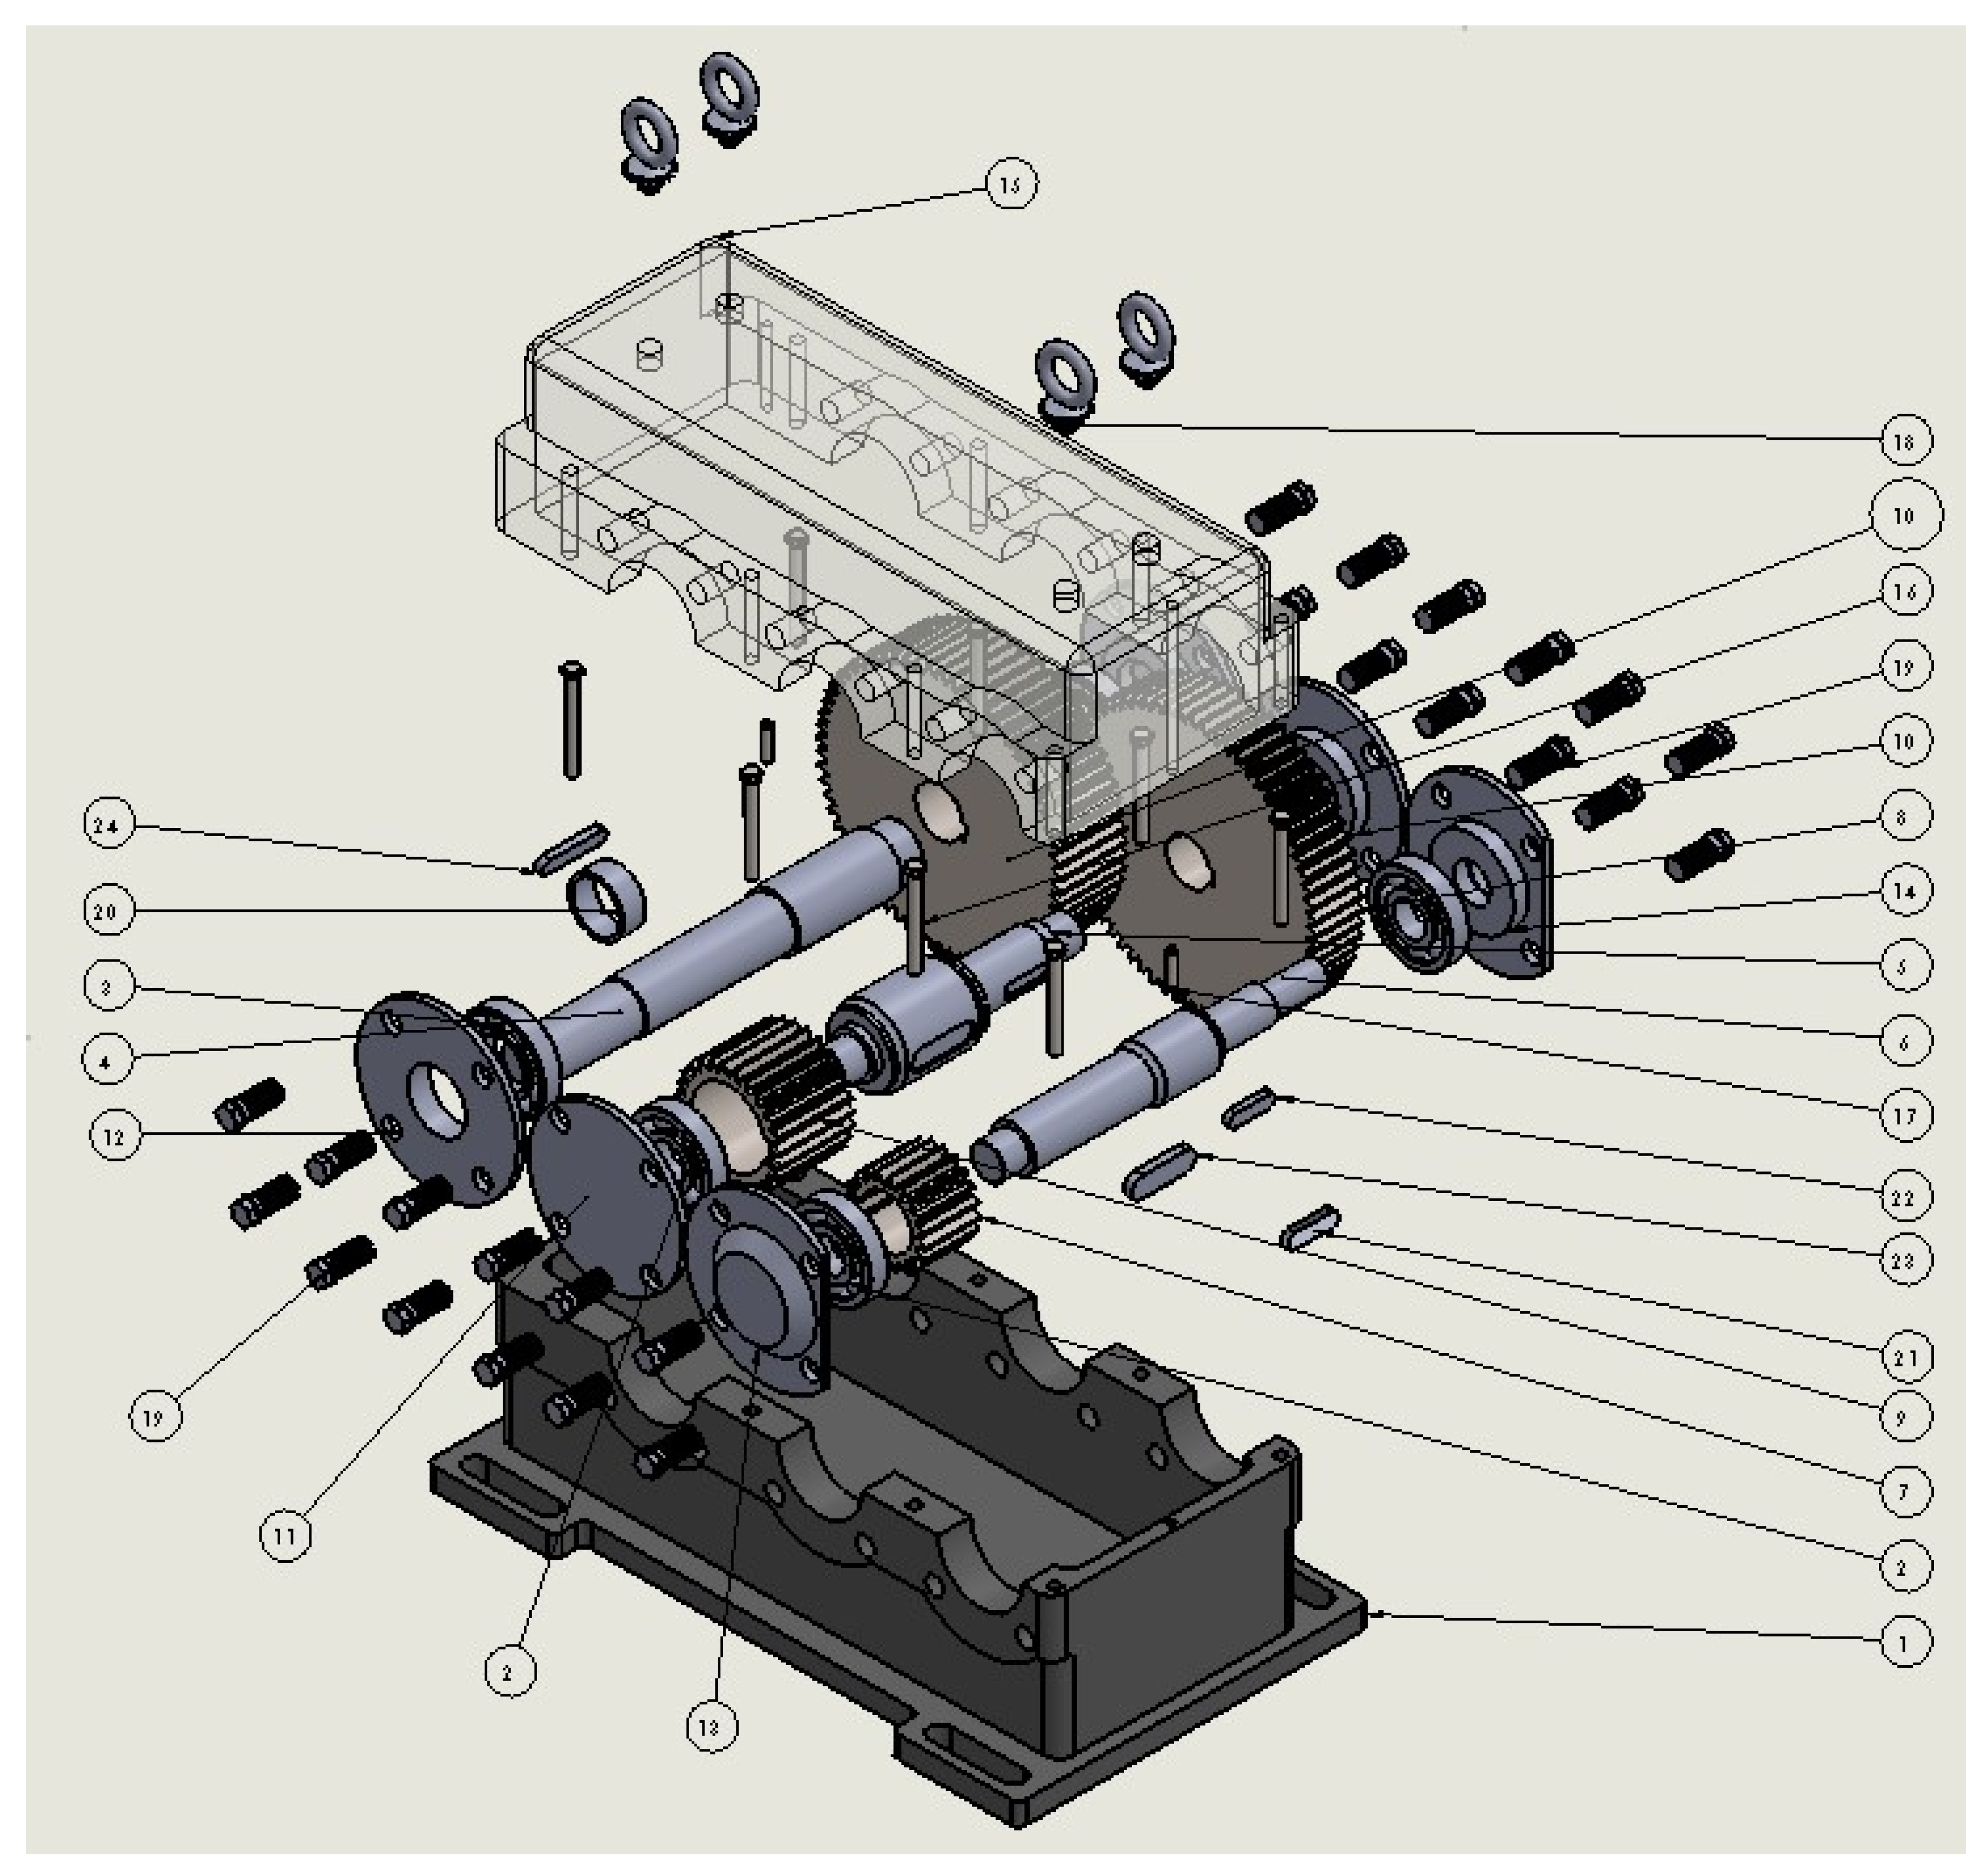
The gearbox consists of 64 components, some of which are repeated. The BOM is below (
Table 1):
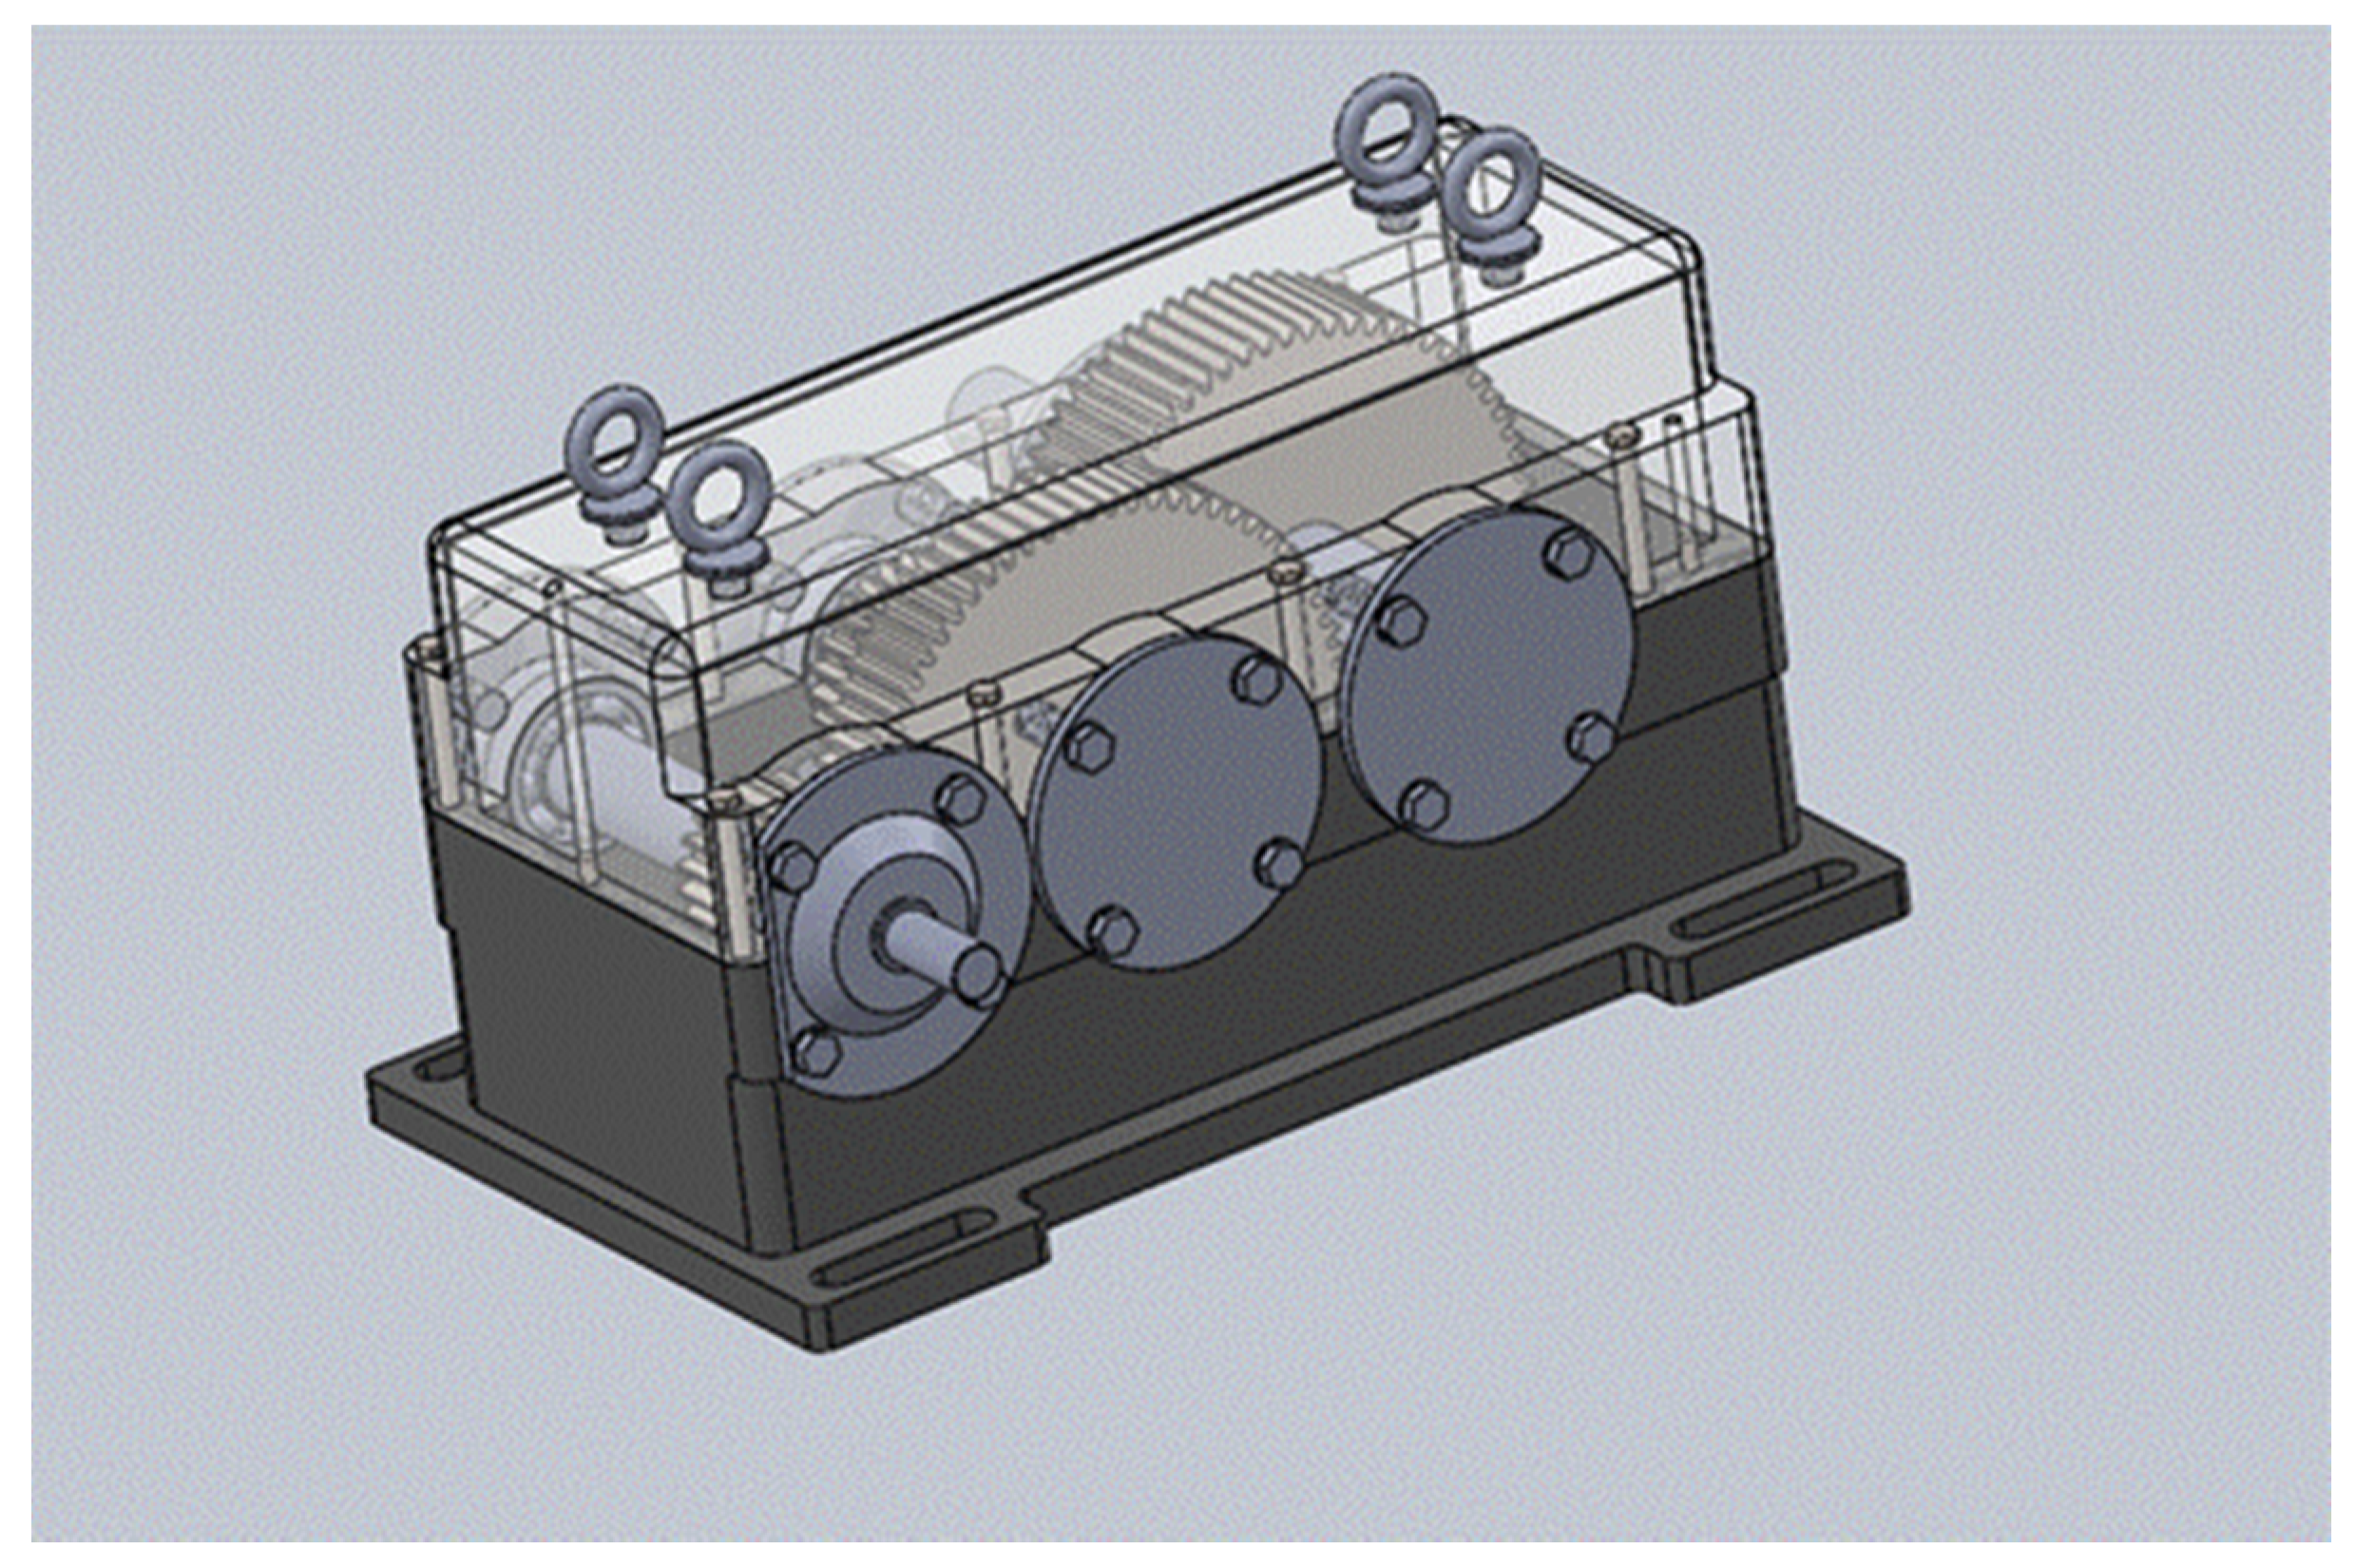
The gearbox in the complete and exploded view is presented as below (
Figure 3 and
Figure 4):
2.4. First Method: “Partial Parallel Disassembly Sequence Planning for Complex Products”
The “Partial-Parallel Disassembly Sequence Planning for Complex Products” is a method, presented by Fei Tao, Luning Bi, Ying Zuo and A. Y. C. Nee, which allows the planning of partial and/or complete disassembly sequences through the use of matrices.
Before disassembly, the product must be imagined as a combination of “components” and “fasteners”.
The disassembly sequence is represented by the disassembly precedence matrix (DPM). The DPM is made up of four submatrices:
CFM (components fasteners matrix): the vector of the j-th row represents the limitations due to the presence of the fasteners that the component j has in the directions in which it can be removed. The directions in a three-dimensional space are +x, −x, +y, −y, +z, −z. If along the removal direction of the component j, a fastener prevents its movement, “1” is inserted in the corresponding cell, otherwise “0”. “1” in a cell indicates that the component in question is blocked by the corresponding fasteners in the direction in which it must be removed.
FCM (fasteners components matrix): the vector of the i-th row represents the limitations to which the fastener i is subject due to the presence of one or more components in the directions of removal of the fastener. If there is “1” in a cell, the fastener is blocked by the component; if, instead, there is “0”, the fastener is not blocked in the removal direction.
CCM (components components matrix): the vector of the j-th row represents the limitations to which the component j is subject, due to the presence of other components in the possible directions of removal of the component j. If there is “1” in a cell, component j is blocked by another component; if “0” is present, component j is not blocked by any other component in the direction in which it is removed.
FFM (fasteners fasteners matrix): represents the disassembly precedence between two fasteners. If “1” is present in a cell, the fastener i is prevented from moving by another fastener, while if “0” is present, the fastener i is not blocked by another fastener in the direction in which it is removed.
The DPM is dynamic and it is updated every time a component is removed. The corresponding row and column corresponding to the component being removed are deleted. In addition, when disassembling any modules, the DPM is divided into two or more sub-DPMs, each representing a new branch for disassembly. This dynamic system helps to reduce the size of the DPM and reduces the difficulty in finding feasible solutions.
Two basic rules are used to know when to remove a fastener or component:
Disassembly of a fastener: the i-th fastener, indicated with F_i, can be removed when FCM (i,:) == 0 and FFM (i,:) == 0, where FCM (i,:) == 0 means that there are no components that block F_i along the disassembly direction, while when FFM (i,:) == 0, there are no other fasteners that have priority over F_i.
Disassembly of a component: the j-th component, indicated with C_j, can be removed when CFM (j,:) == 0 and CCM (j,:) == 0, where CFM (j,:) == 0 means that all the fasteners used to block C_j have been removed, while CCM (j,:) == 0 means that there are no more components blocking C_j along the disassembly direction.
To these two rules, a third one can be added if a module has to be disassembled: a module is a set of components and fasteners connected. If during the disassembly process, the product is separated into modules, it is possible to disassemble the modules in parallel, reducing the overall execution time.
Disassembly of a module: in a module, the previous relations between the parts become internal limitations. If there are no other 1’s in the corresponding lines of the DPM except for internal limitations, the module can be removed and subsequently disassembled into its components.
To perform a partial/parallel disassembly sequence, five steps must be followed:
Randomly generate a fasteners disassembly sequence;
Disassemble the fasteners one at a time in the order of the sequence generated in Step 1. If the current fastener meets Rule 1, remove the fastener and go to Step 3, otherwise go to the next fastener;
Remove all components that meet rule 2;
If the disassembly comes to an end (the achievement of a target component in the case of a partial disassembly), the final sequence is obtained. Otherwise, go to Step 5.
Check if any modules meet Rule 3. If they exist, disassemble them in parallel; otherwise, return to Step 2.
Depending on the random fasteners sequence chosen in the first step, different disassembly sequences can be obtained in compliance with the above rules. If the sequence of fasteners initially chosen had been different, I would certainly have arrived at a different disassembly sequence. However, this method is very expensive in terms of time and calculations, since it requires the compilation of a large number of tables in the case of complex elements.
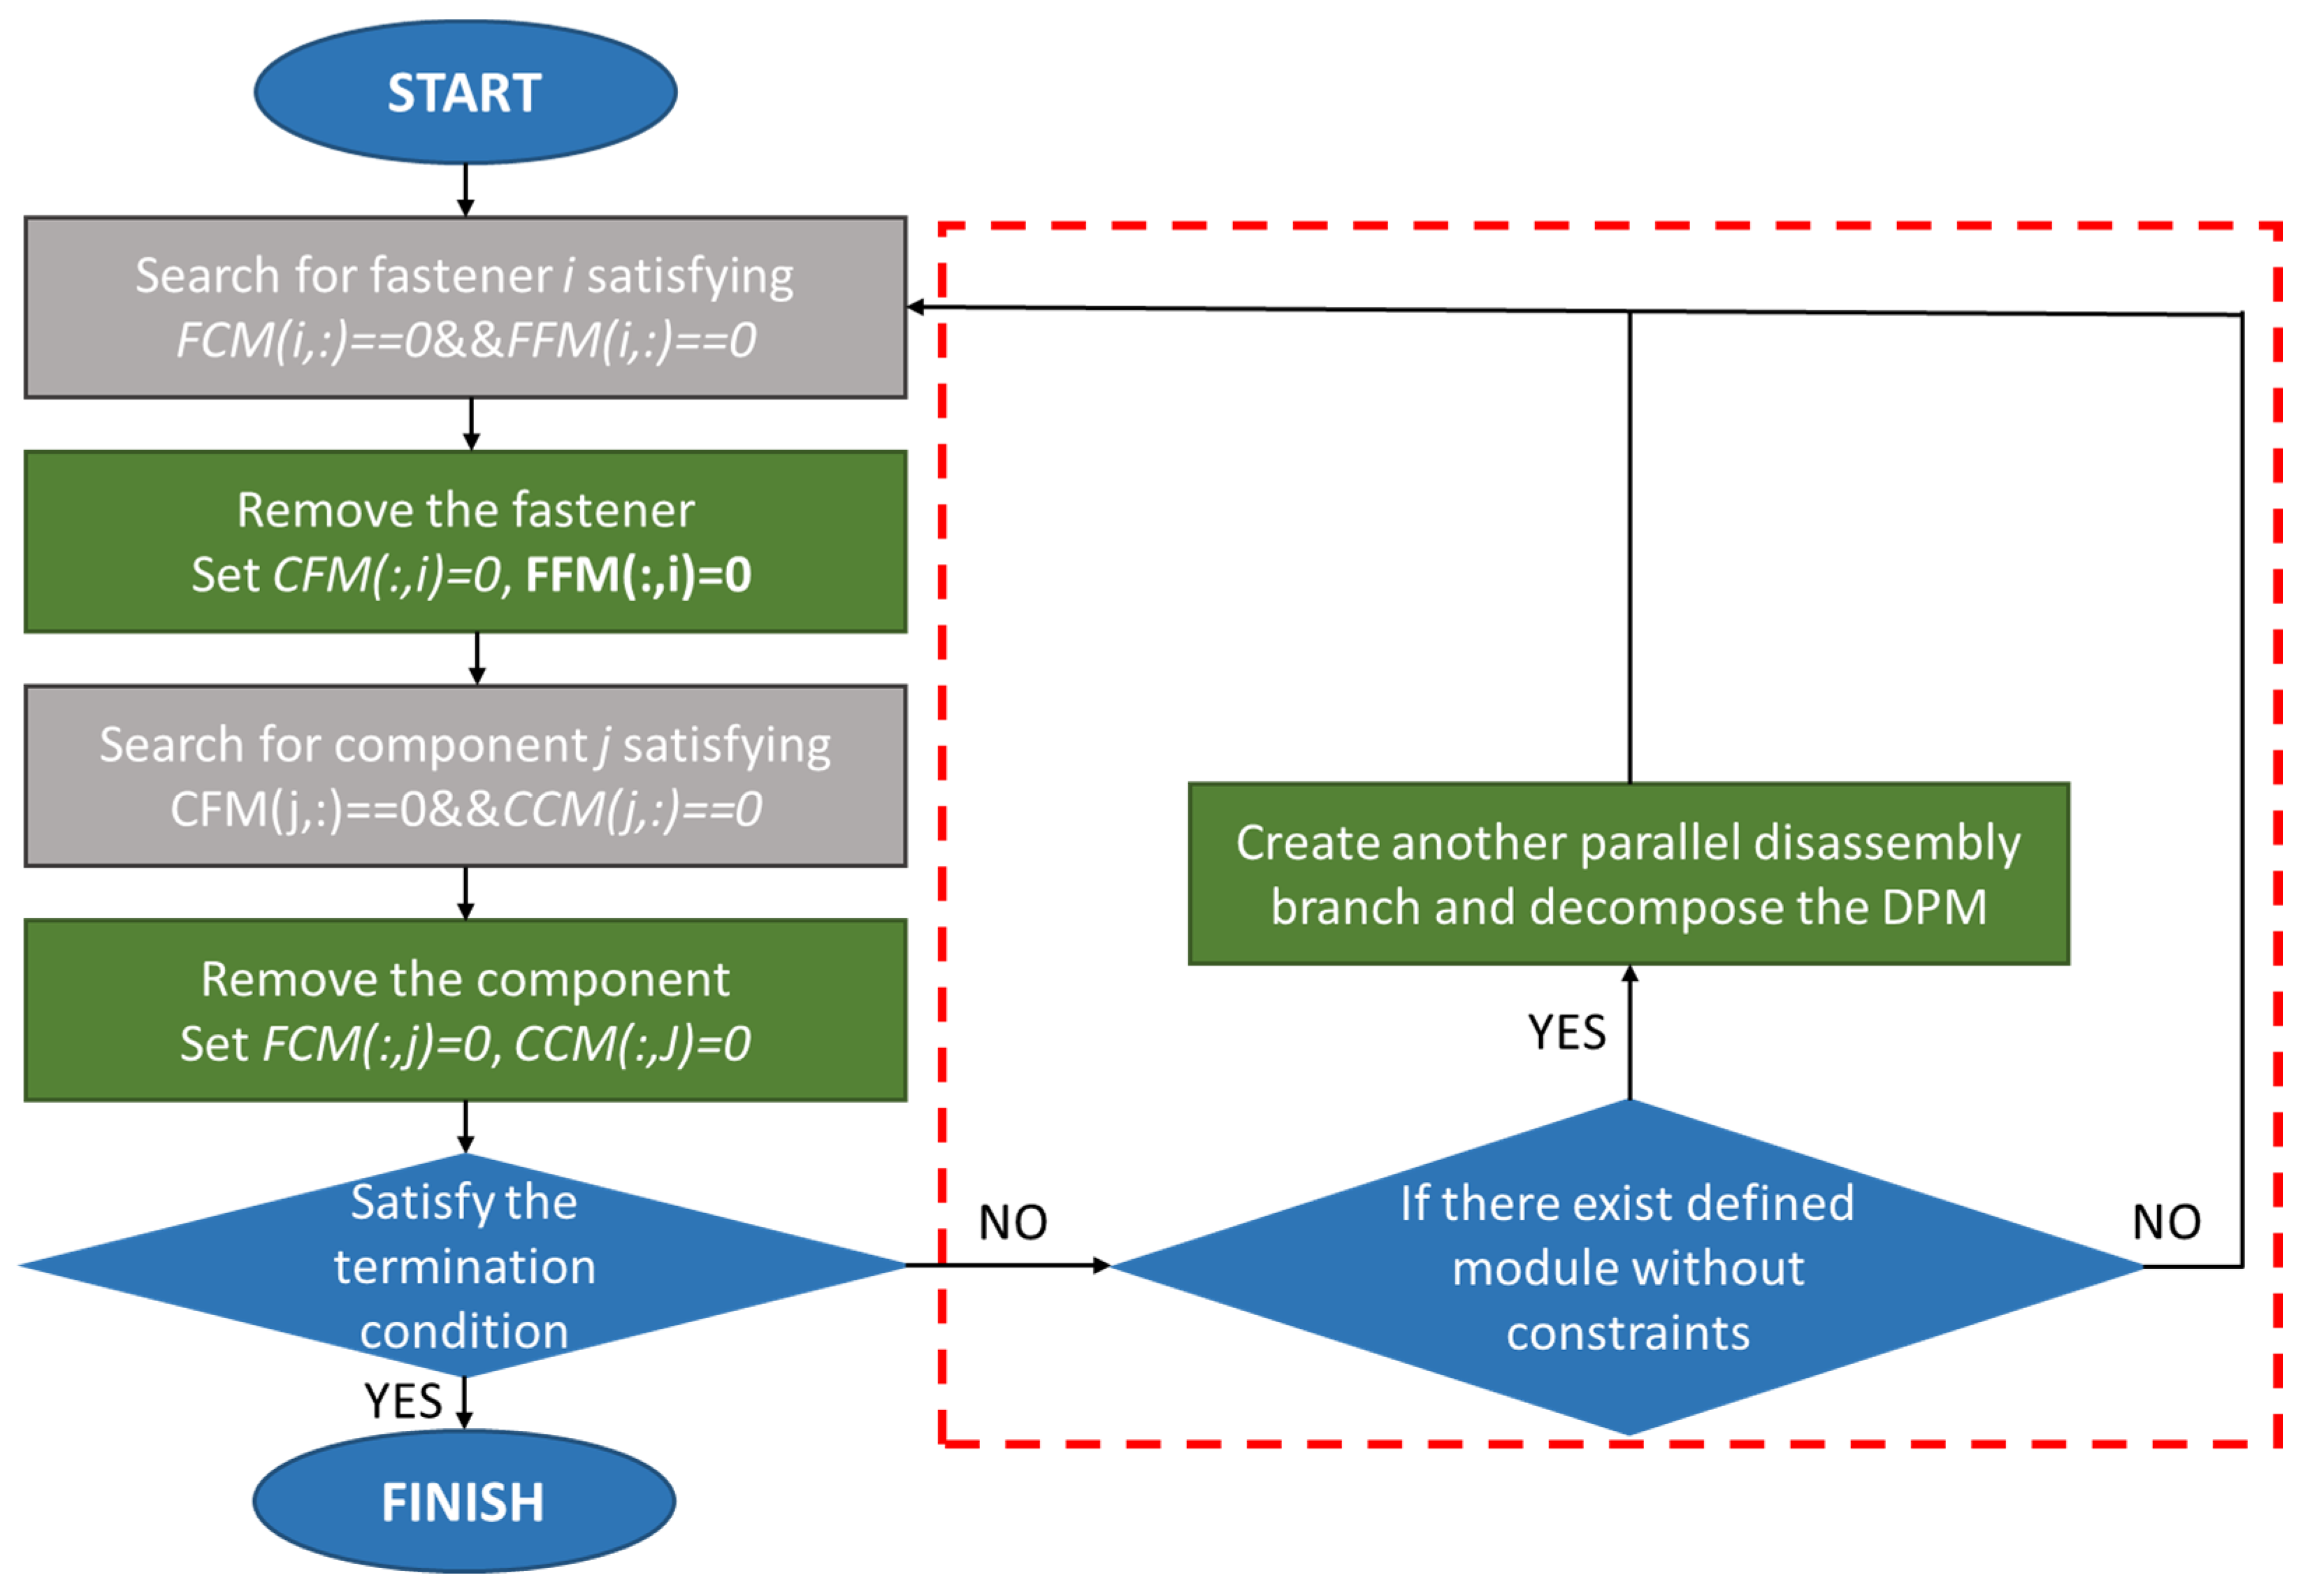
This method follows an iterative approach (
Figure 5).
2.4.1. First Method Application
To apply the first method of disassembly, the authors divided the components of the gearbox into components and fasteners. They considered the gearbox base as the target component of my disassembly.
For this method, the complete disassembly of the gearbox was carried out, disassembling every single component of the product. This certainly involves a longer time than considering a partial disassembly, where the product can be broken down into modules. The main purpose of the DfD is not to disassemble every single piece, but to reach the target component.
The removal directions have been indicated through the use of binary digits, where 1 indicates if it is possible to remove the element along that direction, and 0 if it is not. For example, if the removal direction of a component is +y, “000100” is written (
Table 2).
The tables below represent the division into components (
Table 3) and fasteners (
Table 4) and the removal directions (
Table 2) of each part.
The sub-matrices necessary for the realization of the DPM (the CFM, the CCM, the FCM, the FFM) are illustrated in
Appendix A. The obtained DPM will be (
Table 5):
At this point, a random sequence of removal of the fasteners is proposed: F1, F2, F3SX, F3DX, F4, F5, F6, F7. The first fastener to be removed is F1, since in the DPM, it has a row of all zeros. The DPM is updated by deleting the row and column relating to F1. At this point, check if there is the possibility of removing some component (C16) and update the DPM by eliminating the corresponding row and column. Now, since other components cannot be eliminated, following the chosen sequence, the next fastener is removed. An iterative process is implemented.
After 28 steps, the disassembly sequence is: F1, C16, F3SX, C11SX, C12, C14, F3DX, C11DX, C13, C15, C2SX, C2DX, C3SX, C3DX, C7, C8, C9, C17, C10, F2, F4, C4, F5, F6, C5, F7, C6, C1.
2.5. Second Method: “Selective Disassembly Sequence Generation Based on Lowest Level Disassembly Graph Method”
The “Selective disassembly sequence generation based on lowest level disassembly graph method” is a method proposed by P. Mitrouchev, C. G. Wang, L. X. Lu, and G. Q. Li. It is a disassembly model that is based on graphs in which the terminal nodes represent the parts of the assembly, and the lines that connect the nodes represent the connections between the various parts of the assembly. This method aims to reduce the complexity of calculation based on the concept of “Gaussian Sphere”, used in determining the possible directions according to which a component can be separated from the rest of the product (SDR, set of directions of removal). Before applying the method, a careful study of the CAD reproduction of the product to be disassembled is necessary to identify any collisions between the projections of the components useful for planning the possible trajectories for disassembling a part. Furthermore, it is possible to proceed with a partial disassembly of the product, grouping its components in subassemblies (modules) to reach the target component without disassembling the whole product piece by piece. A module is considered as a single component.
2.5.1. Geometric Feasibility
The geometric feasibility of a movement is the possibility that two bodies or subassemblies have to be assembled/disassembled in the complete absence of collisions in order to identify the path and direction of disassembly.
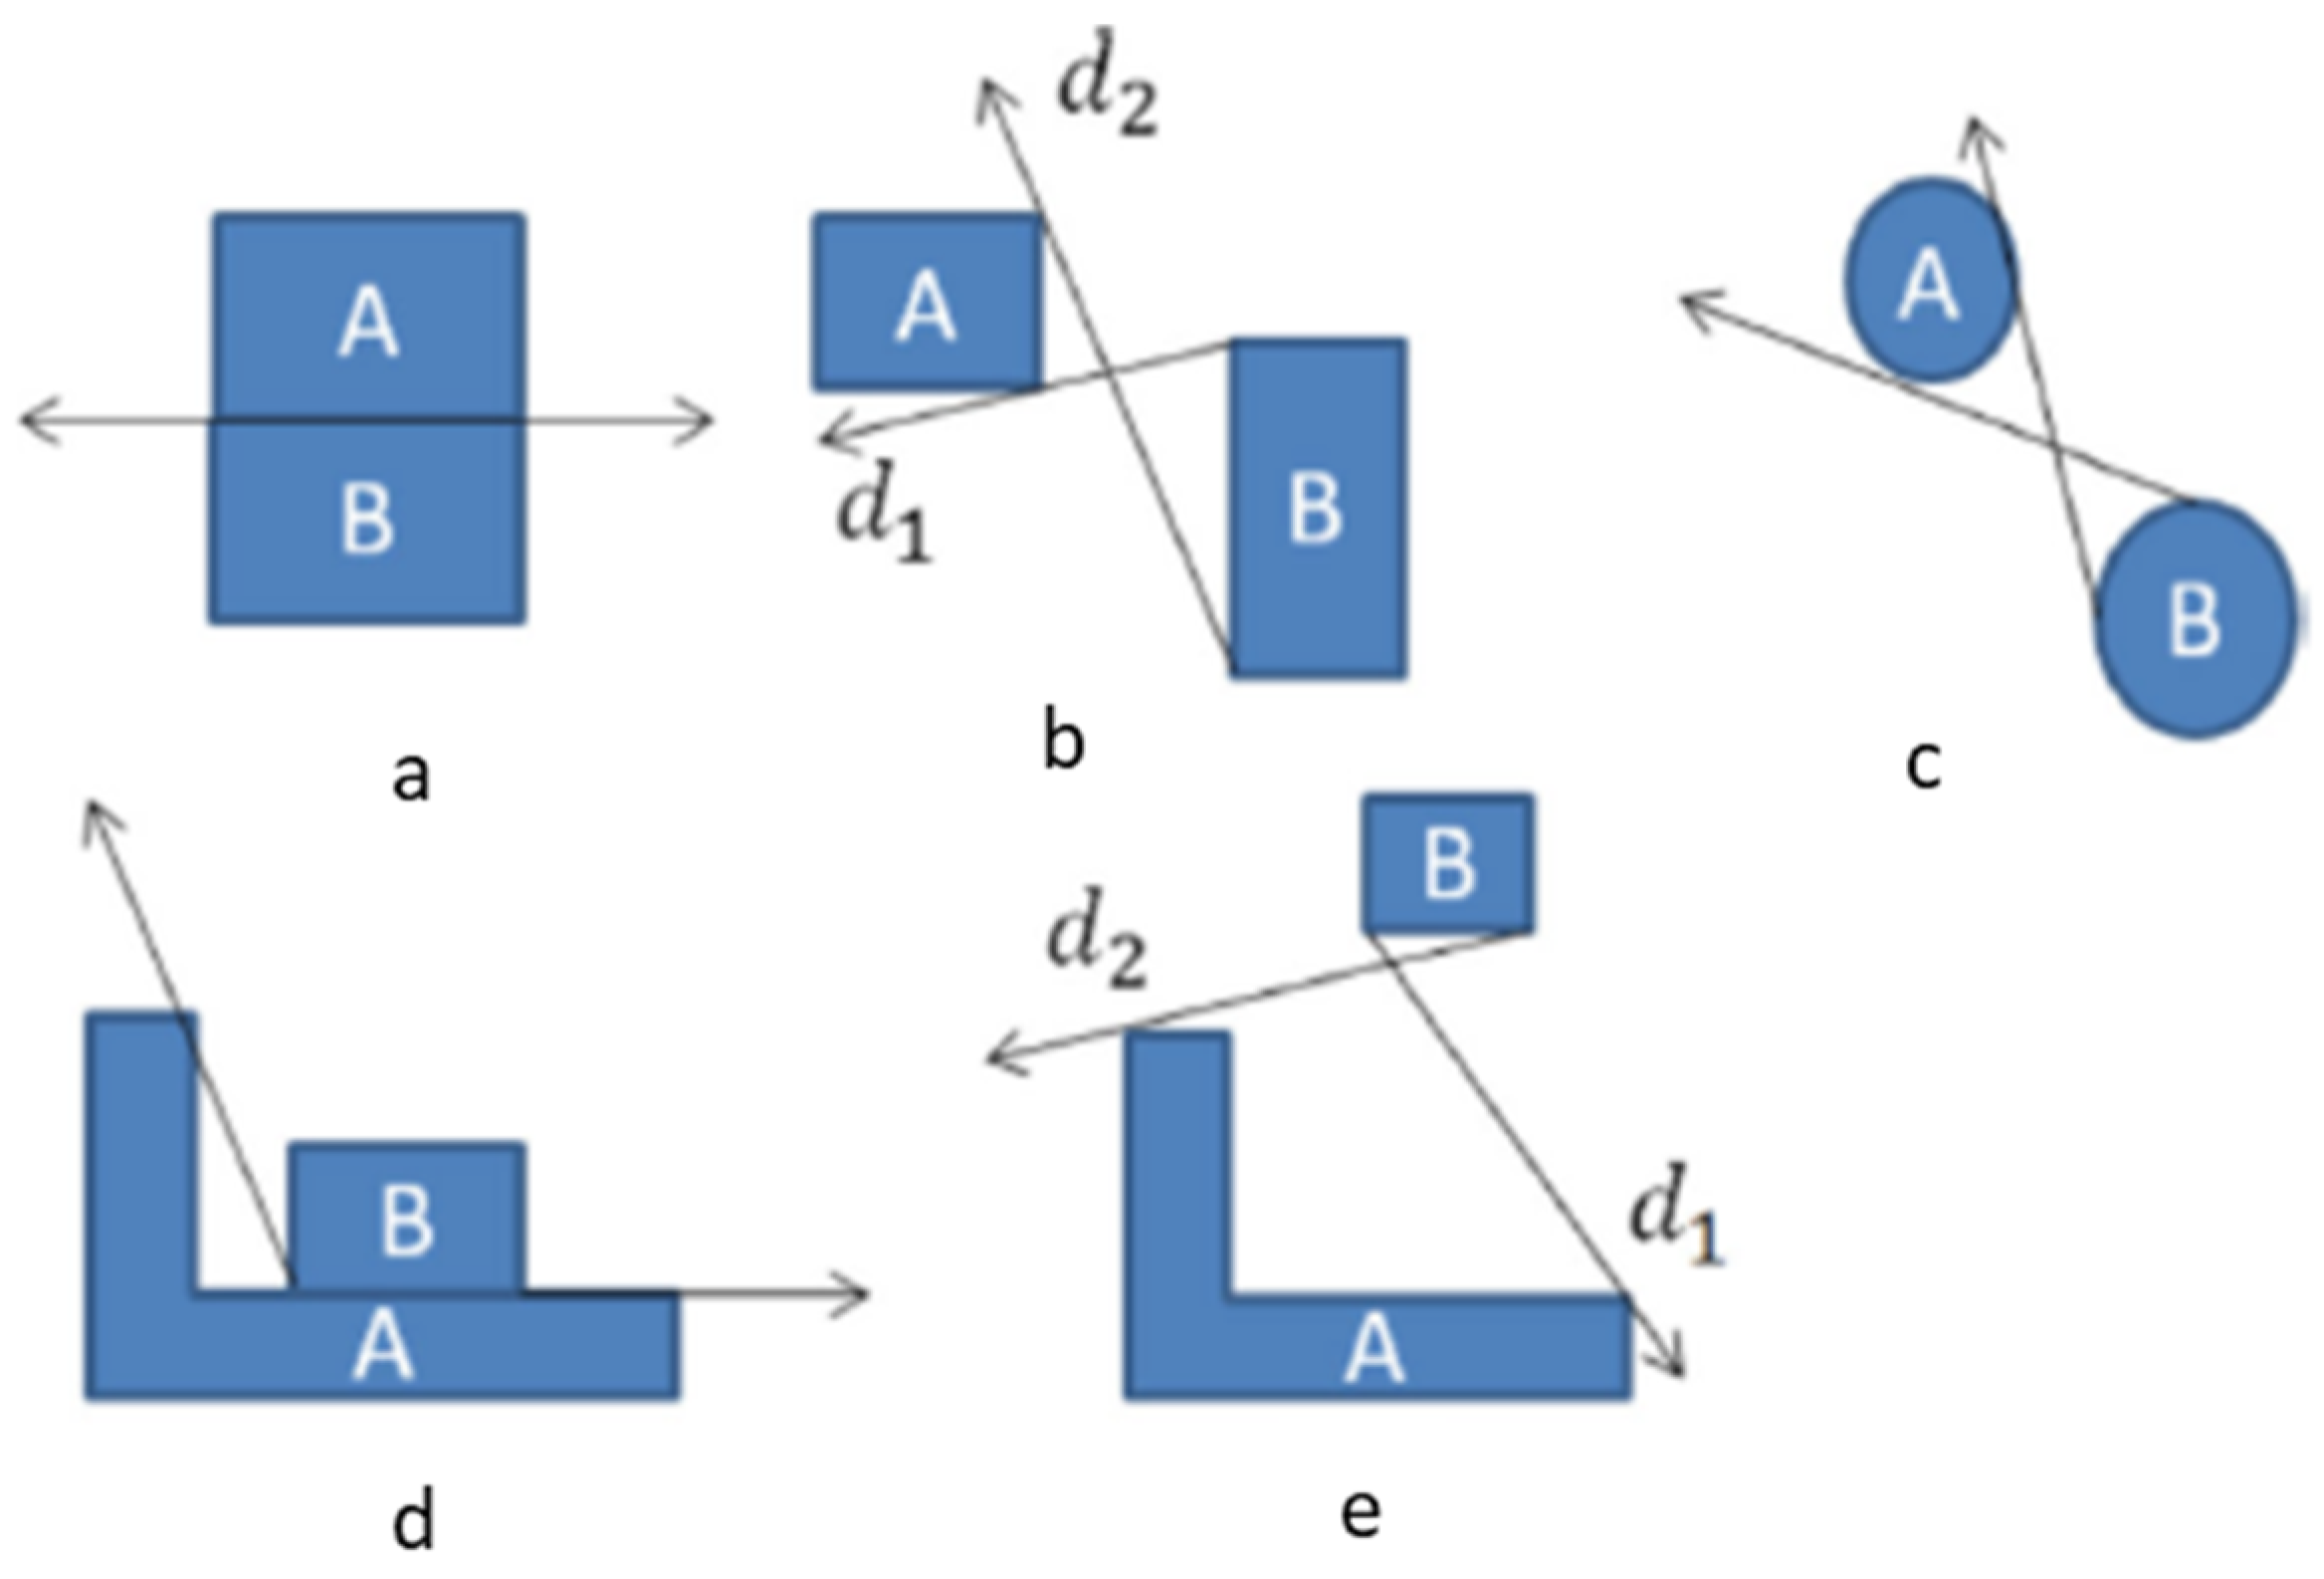
The figure below shows five possible removal movements of body B with respect to A (a, b, c, d, e) and the respective constraints (
Figure 6). The arrows indicate the directions in which the decoupling can take place and be obtained by translating B and finding the relative positions of the two bodies at the collision limit.
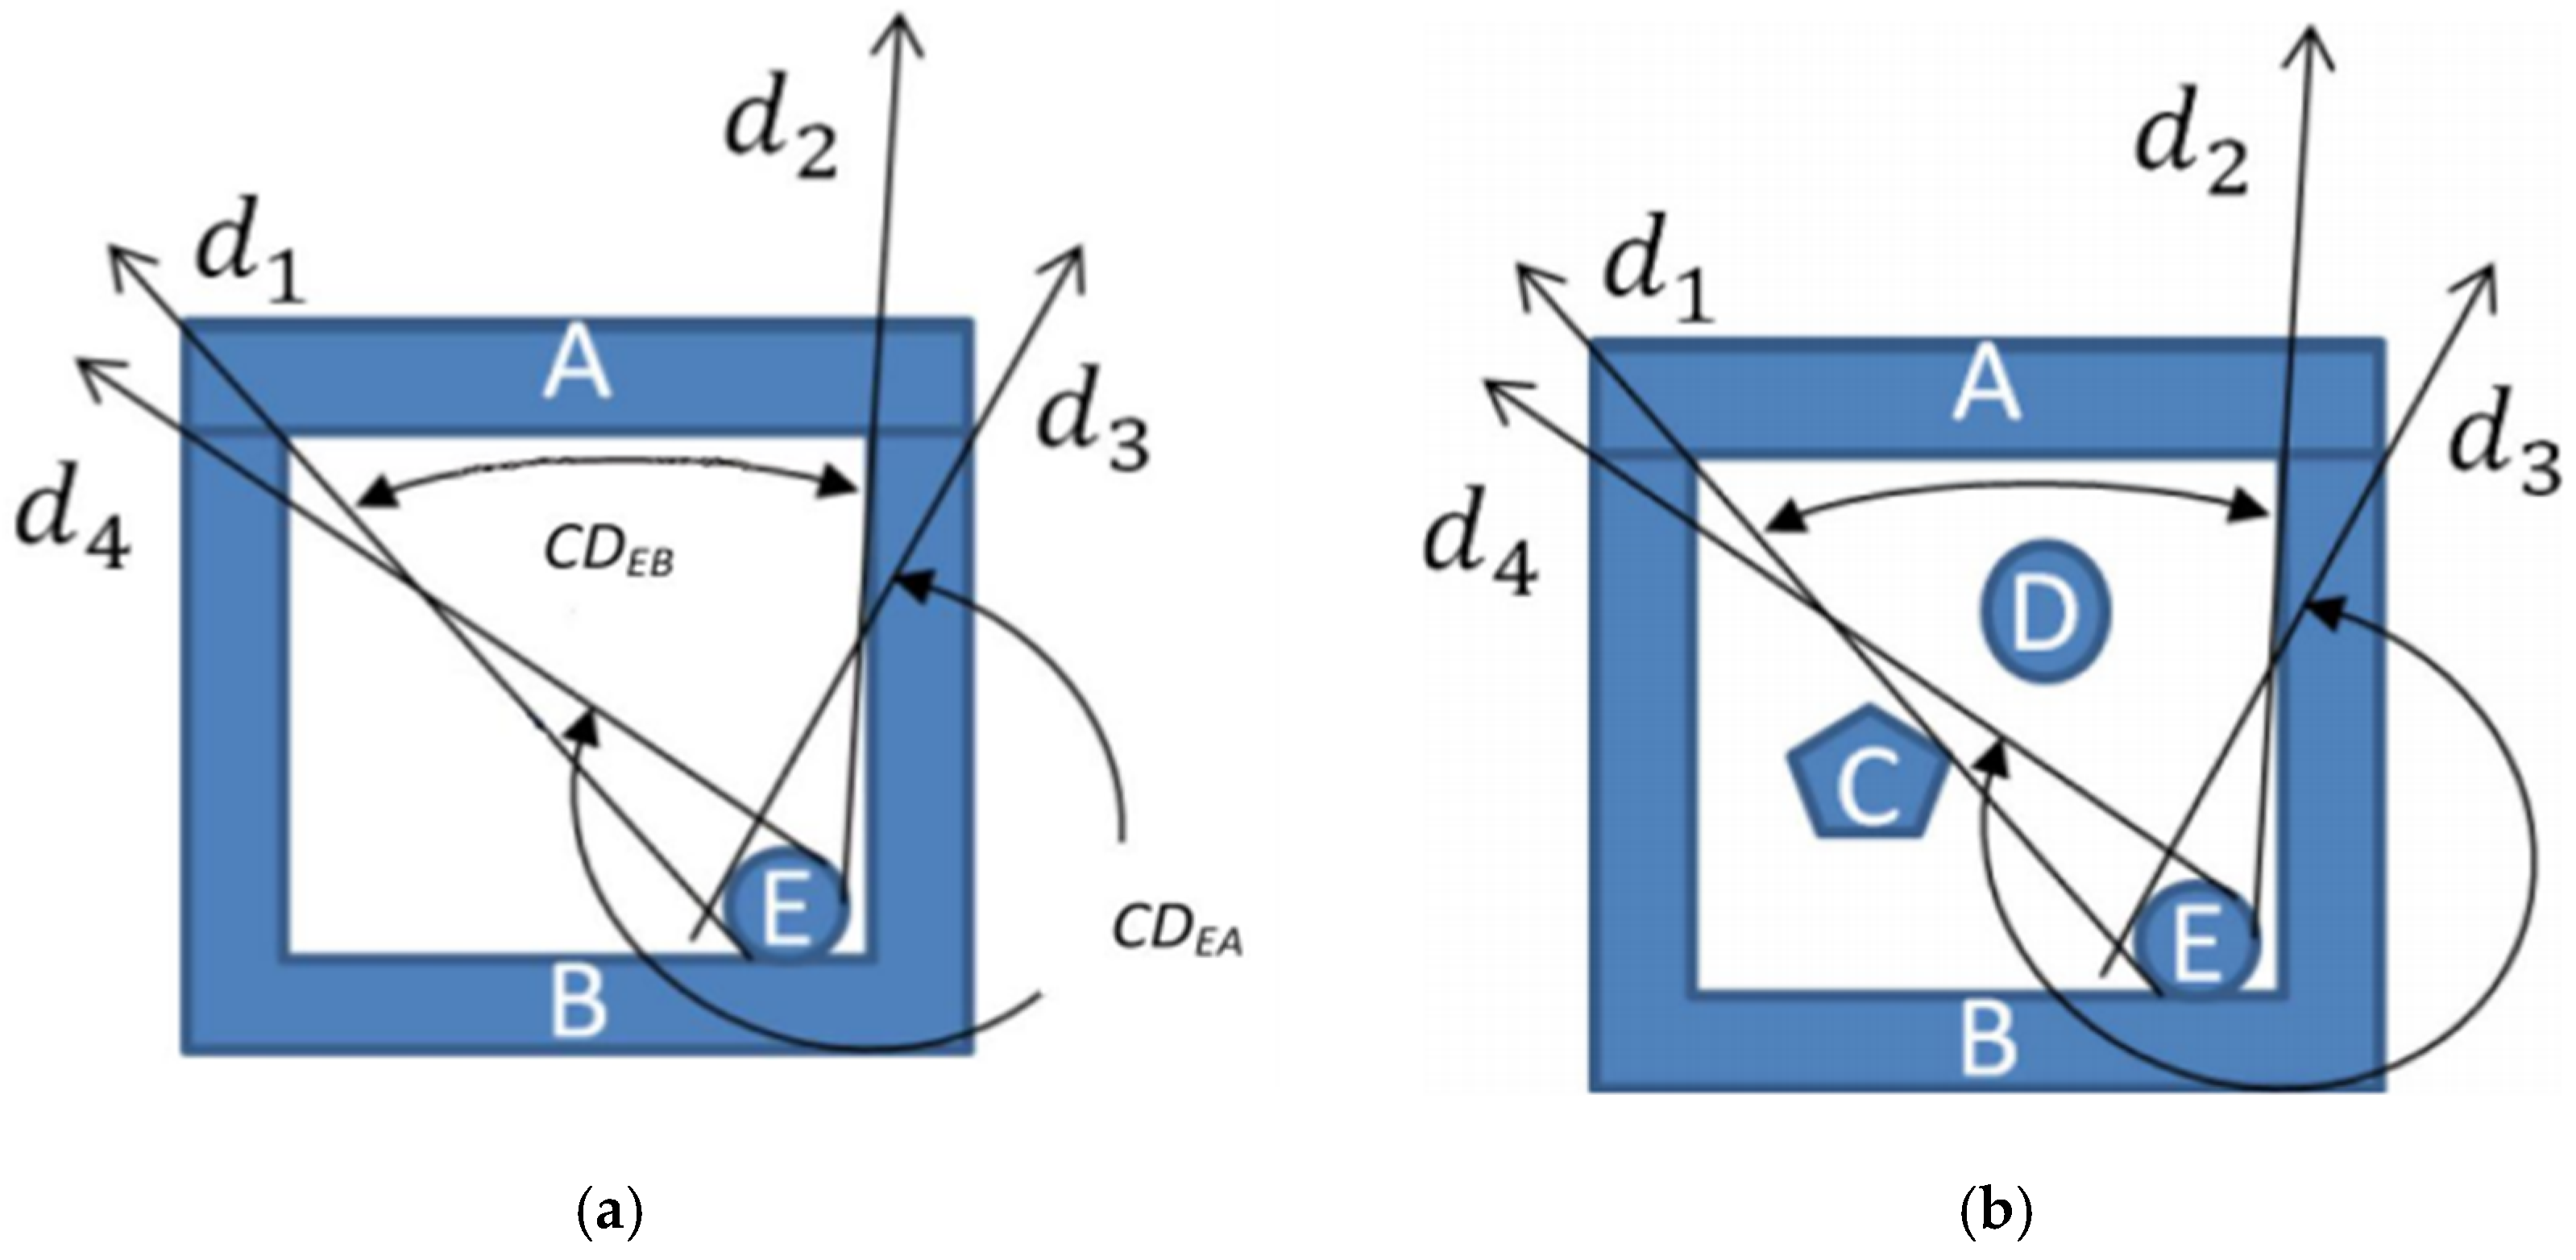
To move a body with respect to multiple bodies, it is considered an assembly consisting of several parts: A (cover), B (body), C, D, and E, which define N = (A, B, C, D, E). There is the body E contained in a box B closed by a cover A. To remove E from the subassembly S = {A, B}, it is possible to do it with respect to B within the space enclosed by
d1 and
d2, while with respect to A within the space enclosed by
d3 and
d4. Limits in the directions between two components
i and
j are written as
, defined as the limitation in the direction that part j imposes on part i.
The definitive direction to remove the component
E with respect to the subassembly
S corresponds to the union of the two intervals:
If = (0, 2π), I have that part E is completely blocked in every direction of S.
2.5.2. Collisions
Once obtained the SDR, the next step is to identify the collisions that occur during the disassembly process. To represent the possible collisions between the parts, the “Projection calculation” method, proposed by Jiménez, is used [
13]. This method consists of projecting the volume (3D) of the part under examination in a chosen direction (2D). If the projection of the piece does not intersect the projection of another component along the same direction, it means that there is no collision between the parts in the direction considered. The basic concept is that if a collision is found in the two-dimensional environment, then it will certainly also occur in the three-dimensional one (
Figure 7). A component cannot be removed if it has no SDR (i.e., possible directions for disassembly) and if it has collisions with other parts.
2.5.3. Proposed Method
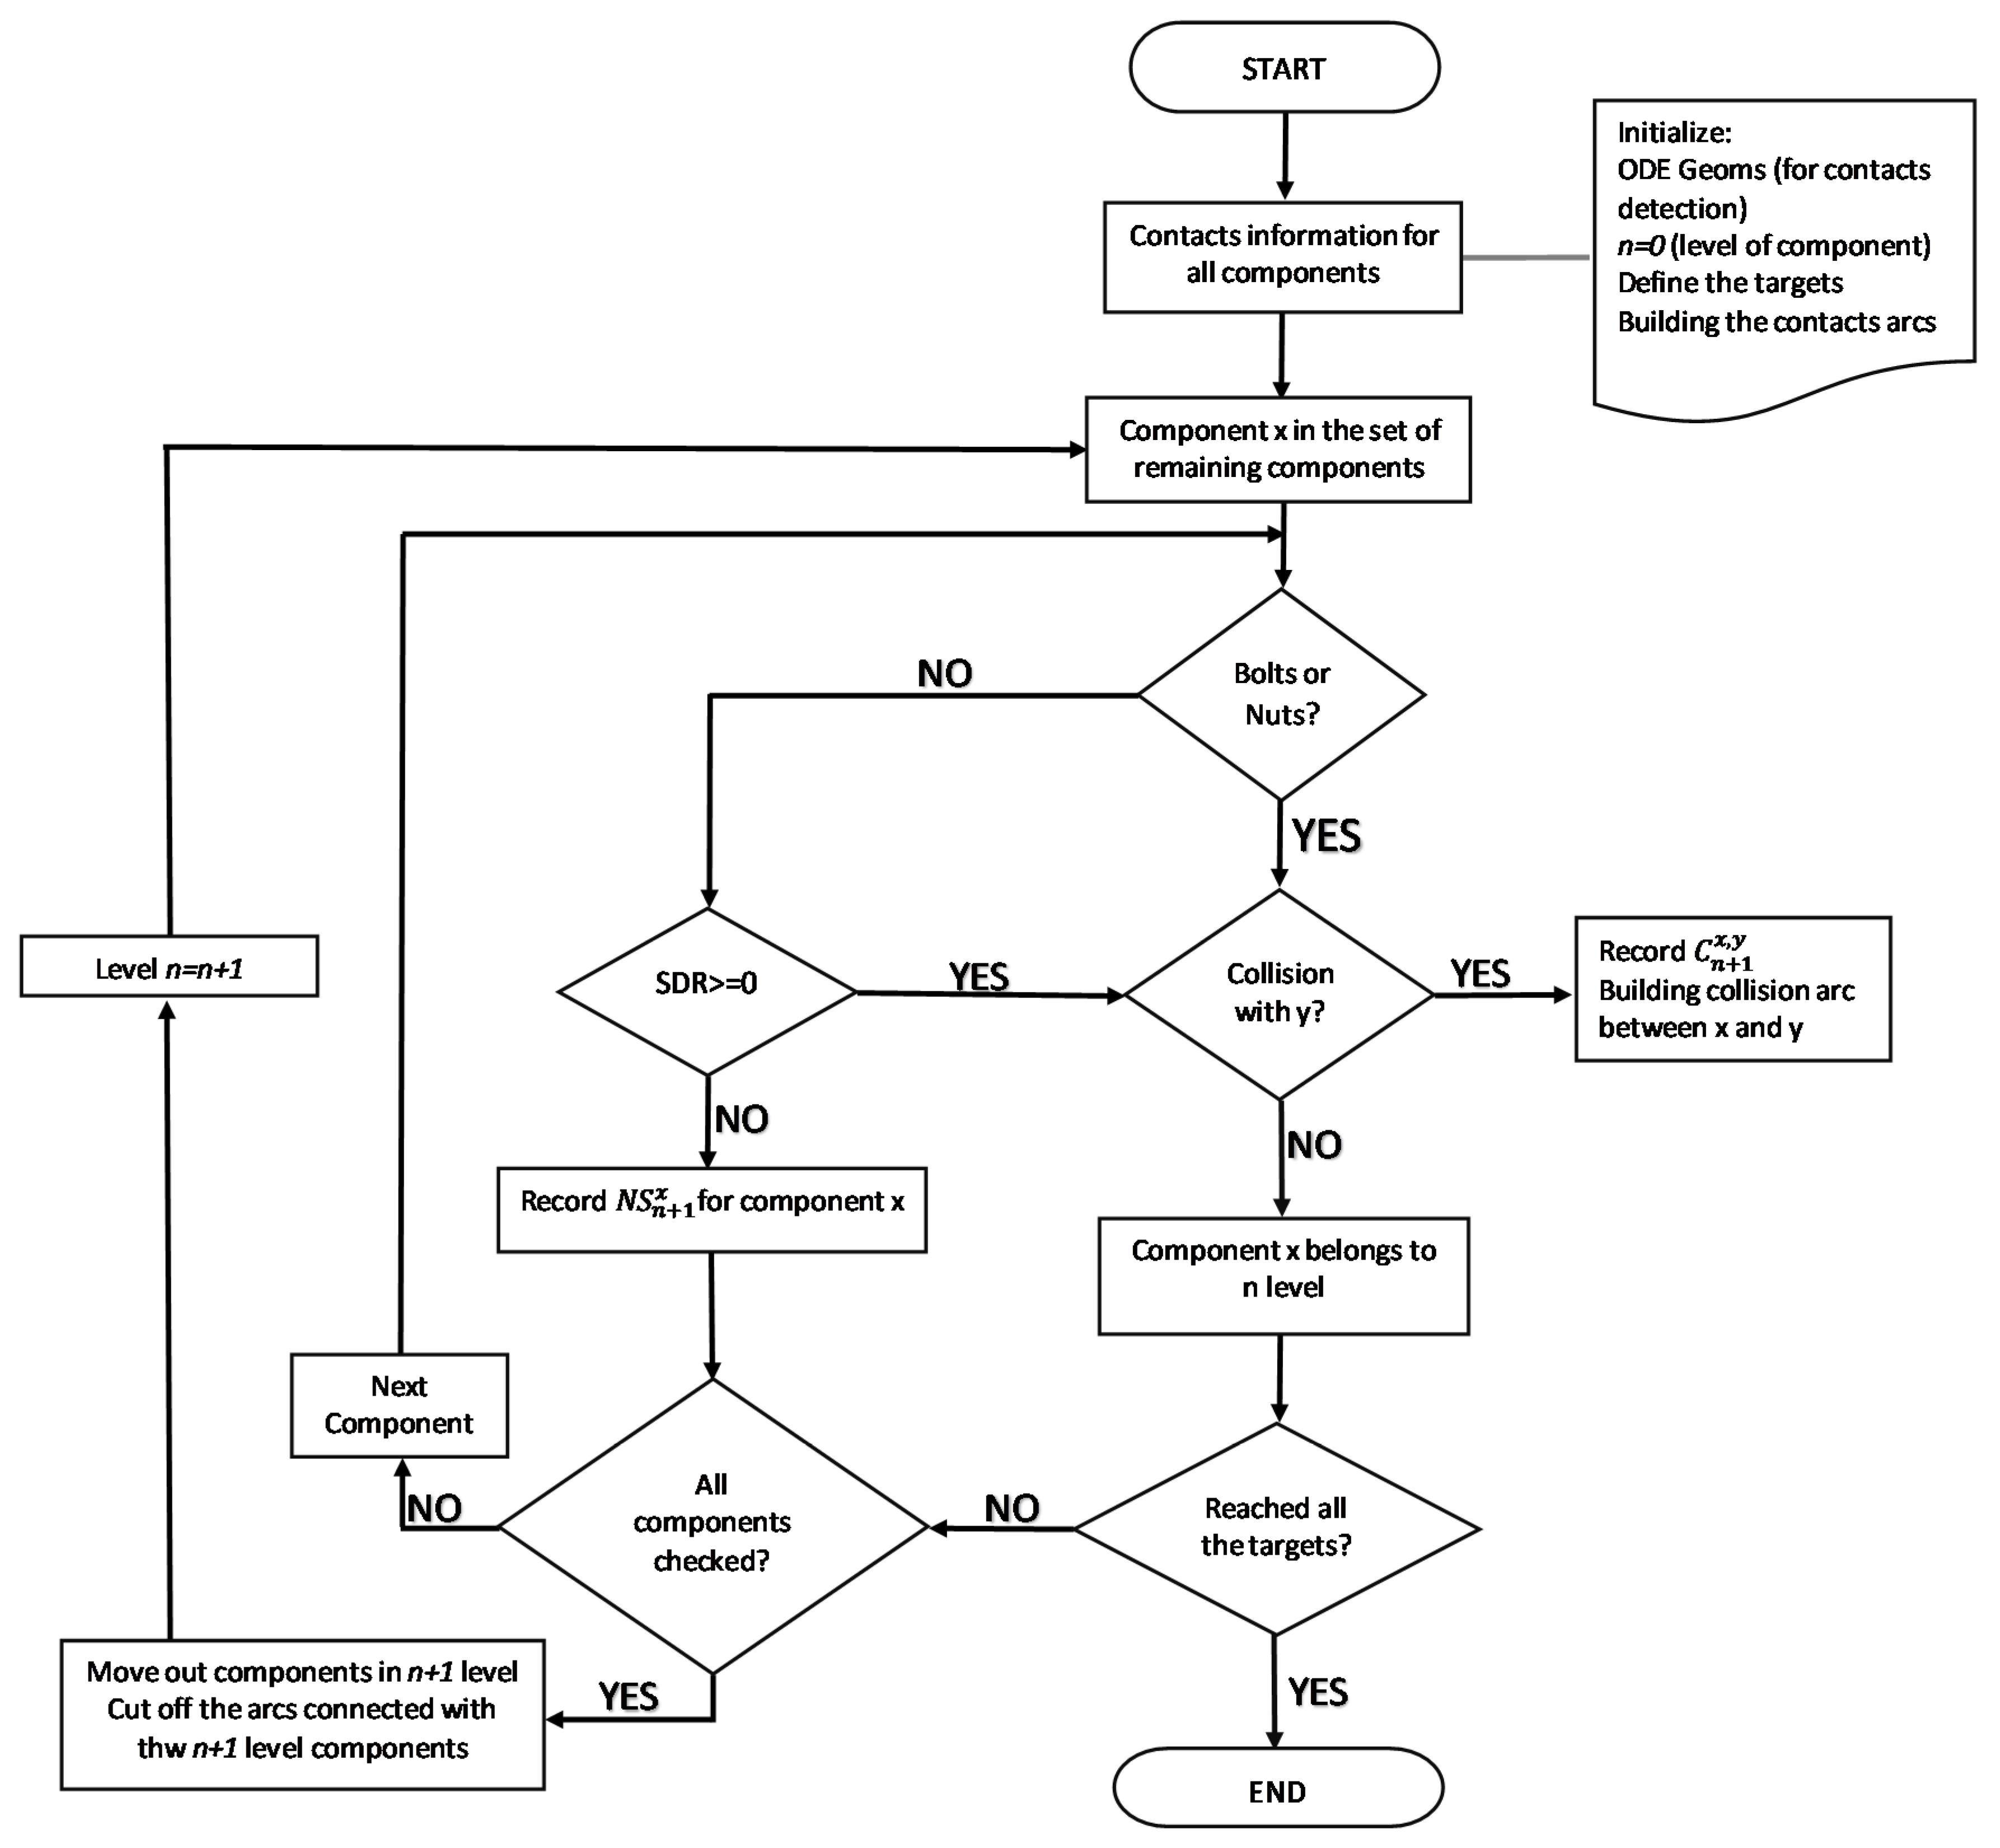
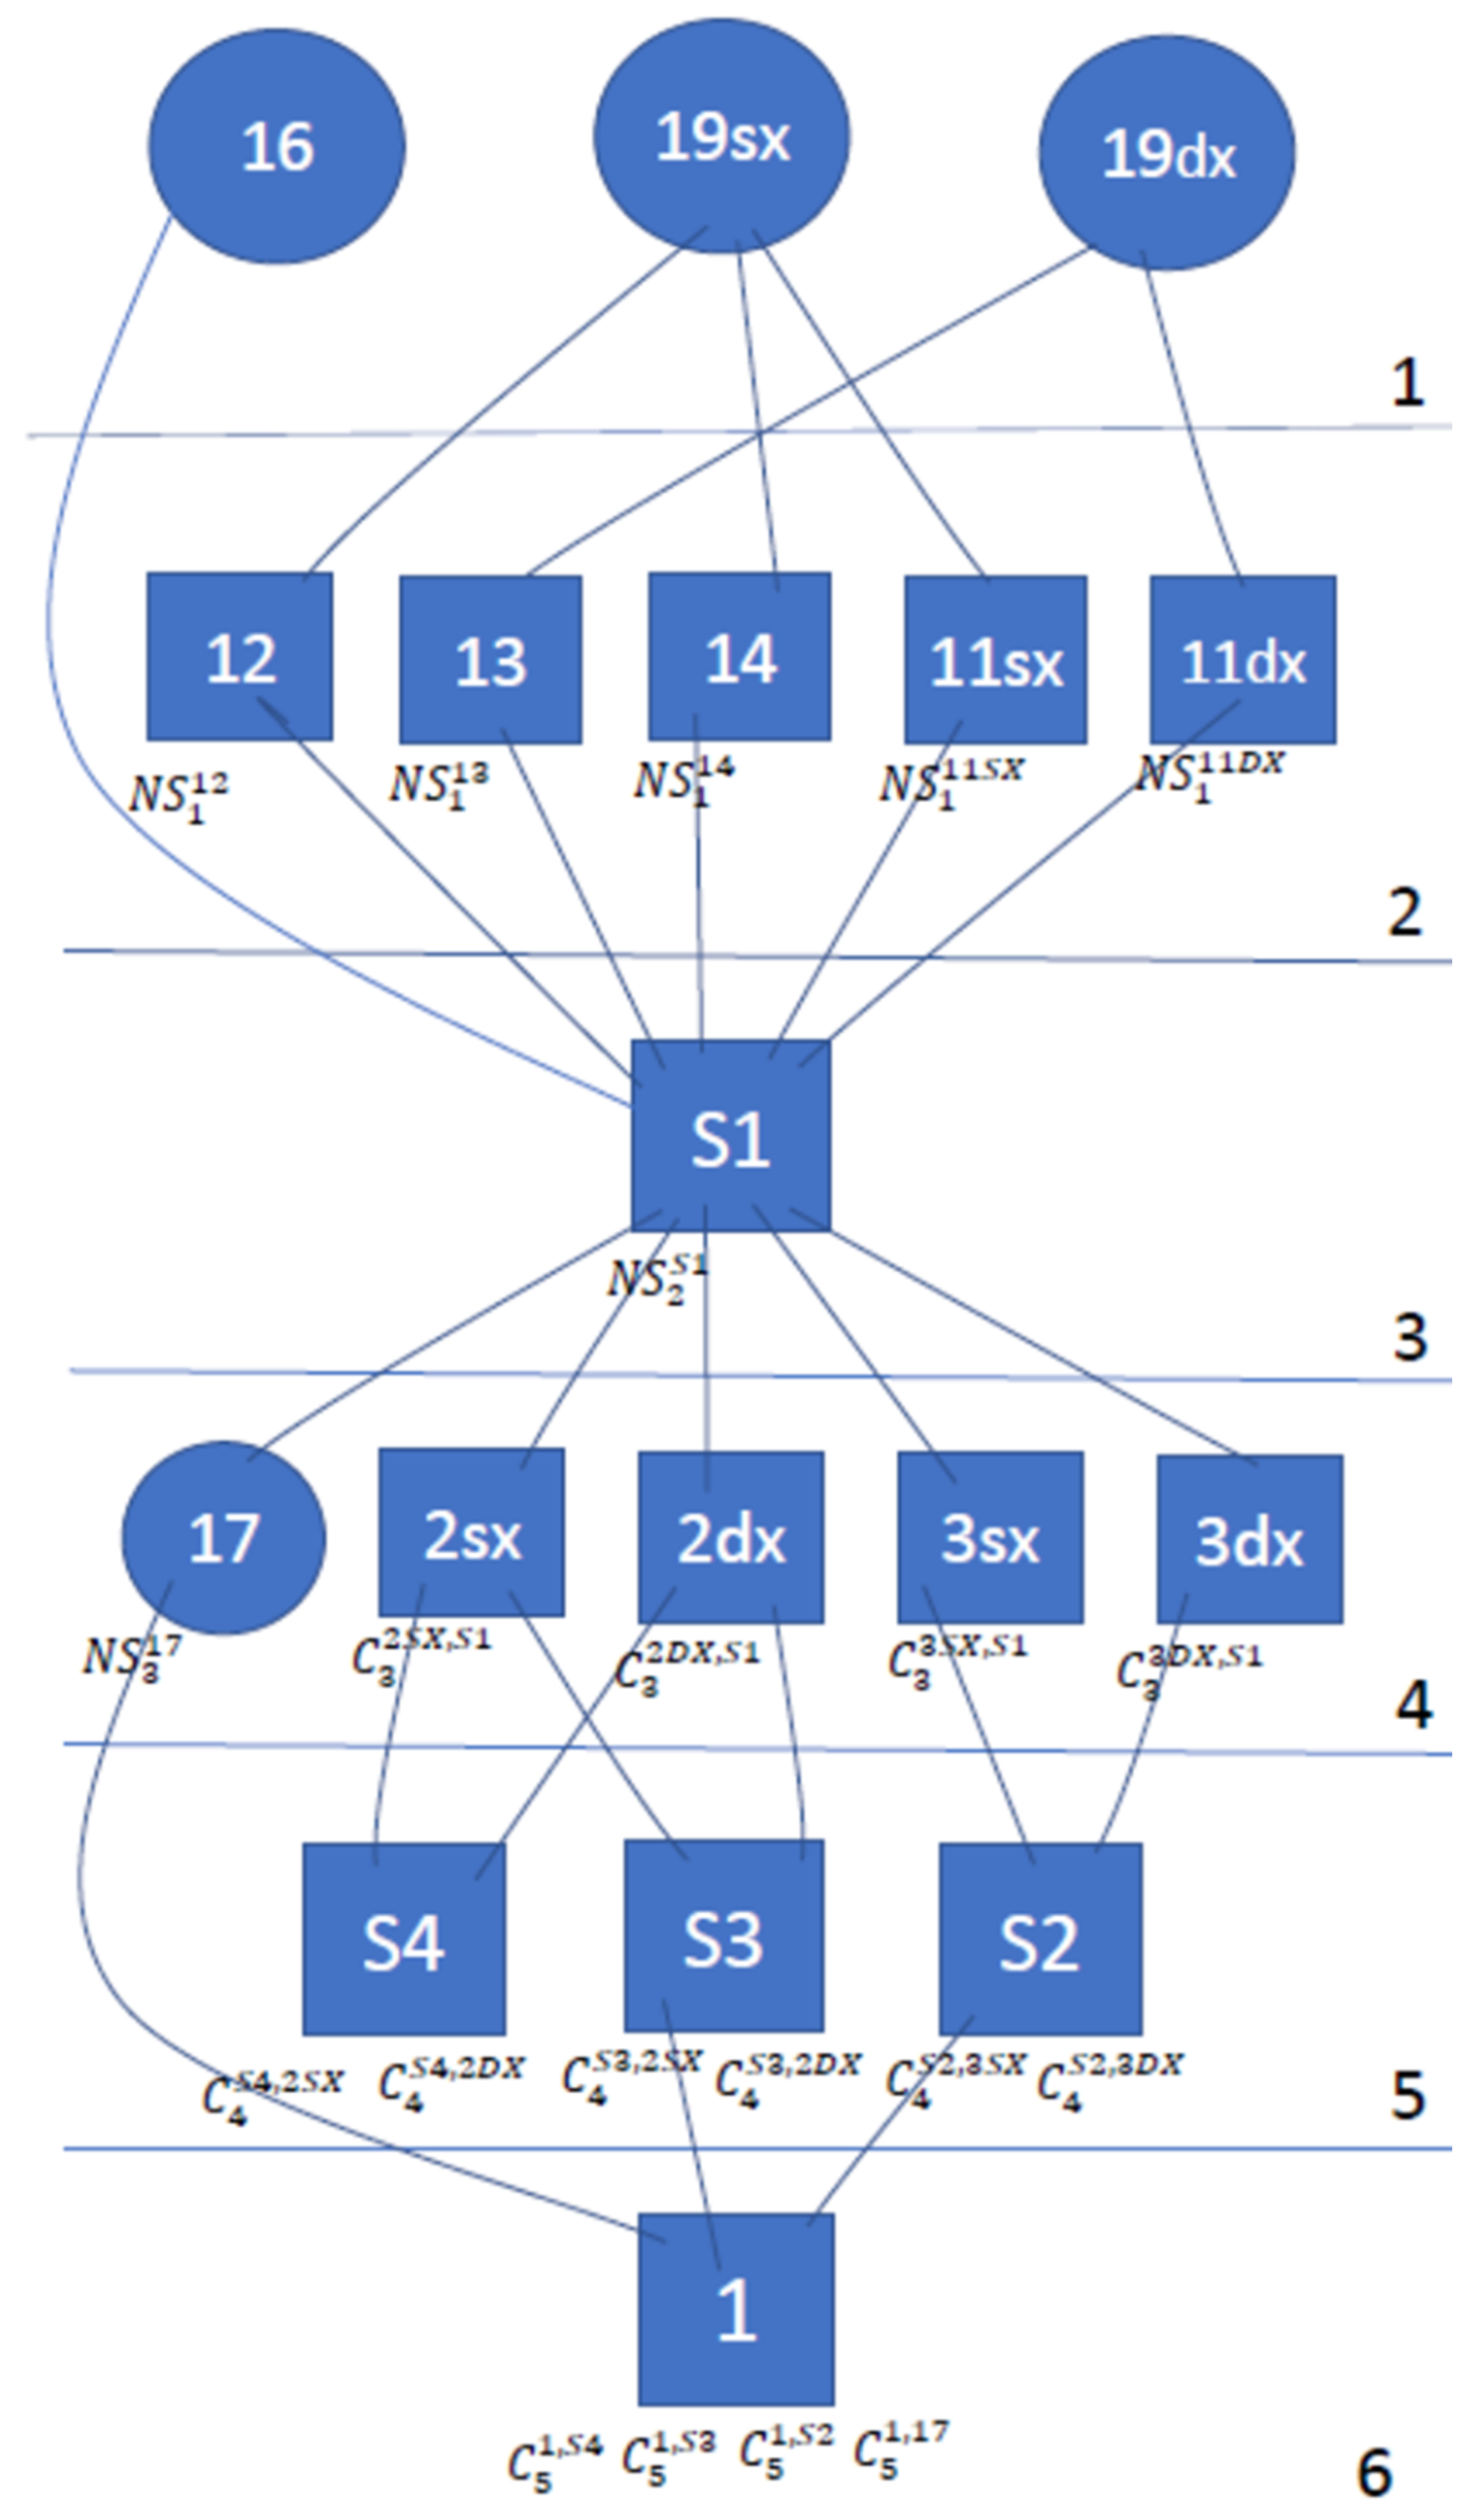
The method consists of two steps: the first is the construction of the geometric product disassembly chart (DGCG), while the second is the generation of the disassembly sequence. The DCGC wants to divide the components related to the target part into different levels of disassembly, according to their characteristics. If some components can be removed directly, without removing others, they constitute the first level of disassembly. For the generation of the DGCG, the following iterative diagram is used (
Figure 8):
Given a product consisting of n parts, each one determines the SDR and the related collisions for each level. Once m iterations are made, the first level appears. To constitute the second level, similar reasoning is made on the remaining parts, always checking for collisions and SDRs. The construction of the chart ends when the target component is reached.
In addition to identifying the respective level of each component, the method specifies why a part cannot be removed in the upper levels, through the following notations:
If component i cannot be dismantled in level n due to a collision with part j, write ;
If component i cannot be dismantled in level n because it has no SDR available, is written.
By convention, the fasteners are represented by a square, while the other parts by a circle. Fasteners are generally the components of the first level of disassembly. If this is not the case, it is because there will be a collision with other components. To generate the disassembly sequence, once the various levels have been identified, starting from the first, these are removed and the level is lowered, removing the components that block those of the next level [
9,
10,
11].
2.5.4. Second Method Application
To apply the second method to the case of the gearbox, first sub-assemblies of the product have been identified in order to speed up the disassembly: S1 = {15, 18}, S2 = {4, 20, 10, 21}, S3 = {5, 9, 8, 22, 23}, S4 = {6, 7, 24}. The choice of the target component was the basis of the gearbox. The division into modules must not include the target component.
The overall design studies the geometric viability and any collisions of each part. By applying the rules of the method, the DGCG graph is obtained, which divides the disassembly sequence into several levels. For each part, it is possible to find out why it cannot be disassembled at the previous level ().
As for the graph, in compliance with the rules, fasteners are represented by circles, while the components by rectangles. Furthermore, the same components that must be disassembled separately are distinguished in the right, i.e., +Z direction and left, i.e., −Z direction.
The first level of disassembly consists of all those elements that are not constrained and do not have collisions with the others.
Partial disassembly was applied in this method, considering component modules as individual components. The result will certainly be beneficial in terms of costs and money. If the purpose of the disassembly of the gearbox is to remove all the components from the base on which they rest and then reuse it, the disassembly of the modules will be superfluous compared to my goal.
The disassembly sequence obtained is: 19SX, 19DX, 16, 11SX, 11DX, 12, 13, 14, S1, 17, 2SX, 2DX, 3SX, 3DX, S2, S3, S4, 1 (
Figure 9).
2.6. Sequence Proposed by the Authors
Finally, a third disassembly sequence is proposed based on the experience gained. Furthermore, in this sequence, the movements of the operators during the disassembly of the piece are taken into account and, if a tool is needed, the authors try to use it as much as possible before laying it. The result obtained gives a more convenient and very close disassembly sequence in terms of time to the application of the second method.
The modules identified are the same as those identified in the second method:
M1 = 15, 18;
M2 = 6, 7, 24;
M3 = 5, 9, 8, 22, 23;
M4 = 4, 10, 21.
In the end, the sequence obtained will be: 19DX-19SX-11SX-12-14-11DX-13-16-M1-17-2SX-2DX-M2-2SX-2DX-M3-3SX-3DX-20-M4-1.
2.7. Disassembly Evaluation Chart
Once three sequences have been identified, the convenience of the three sequences in terms of time is quantified. The “Disassembly Evaluation Chart” method is used, as well as a matrix in which an evaluation is inserted following specific parameters. This chart describes an evaluation method for objectively quantifying ease of disassembly. It is a matrix on which each row represents a specific parameter to evaluate, while each column contains data relating to the different aspects of the disassembly assessment.
Tasks are recorded sequentially and evaluated in separate rows of the sheet during the simulation of the disassembly. Below, the content of each column is described.
COLUMN 1: PART NUMBER
During disassembly, an identification number is assigned to each part. The same number can be assigned to the same parts and removed at the same time and under the same conditions. A group of connected parts is not considered a subassembly of the product if it is disassembled immediately after removal. If, on the other hand, it is removed and set aside, then it is considered as a single part, and an identification number with the suffix (sub) is assigned to it.
COLUMN 2: QUANTITY
Represents the number of parts that have the same identification number in column 1. This column is left blank for a subset that is further disassembled. However, if the module is removed and not disassembled, it is considered as a single part.
COLUMN 3: TASK TYPE
The type of task is the key to evaluating the difficulty associated with a disassembly operation, because some tasks are more difficult than others. Some possible examples of types of tasks with the related code to be inserted in column 3 are indicated in the table below (
Figure 10):
COLUMN 4: NUMBER OF TASK REPETITIONS
Represents the number of times a disassembly task is performed. This column is not always the same as column 2: in fact, a single part could require multiple tasks, or more parts can be removed through a single overturning operation.
COLUMN 5: REQUIRED TOOL
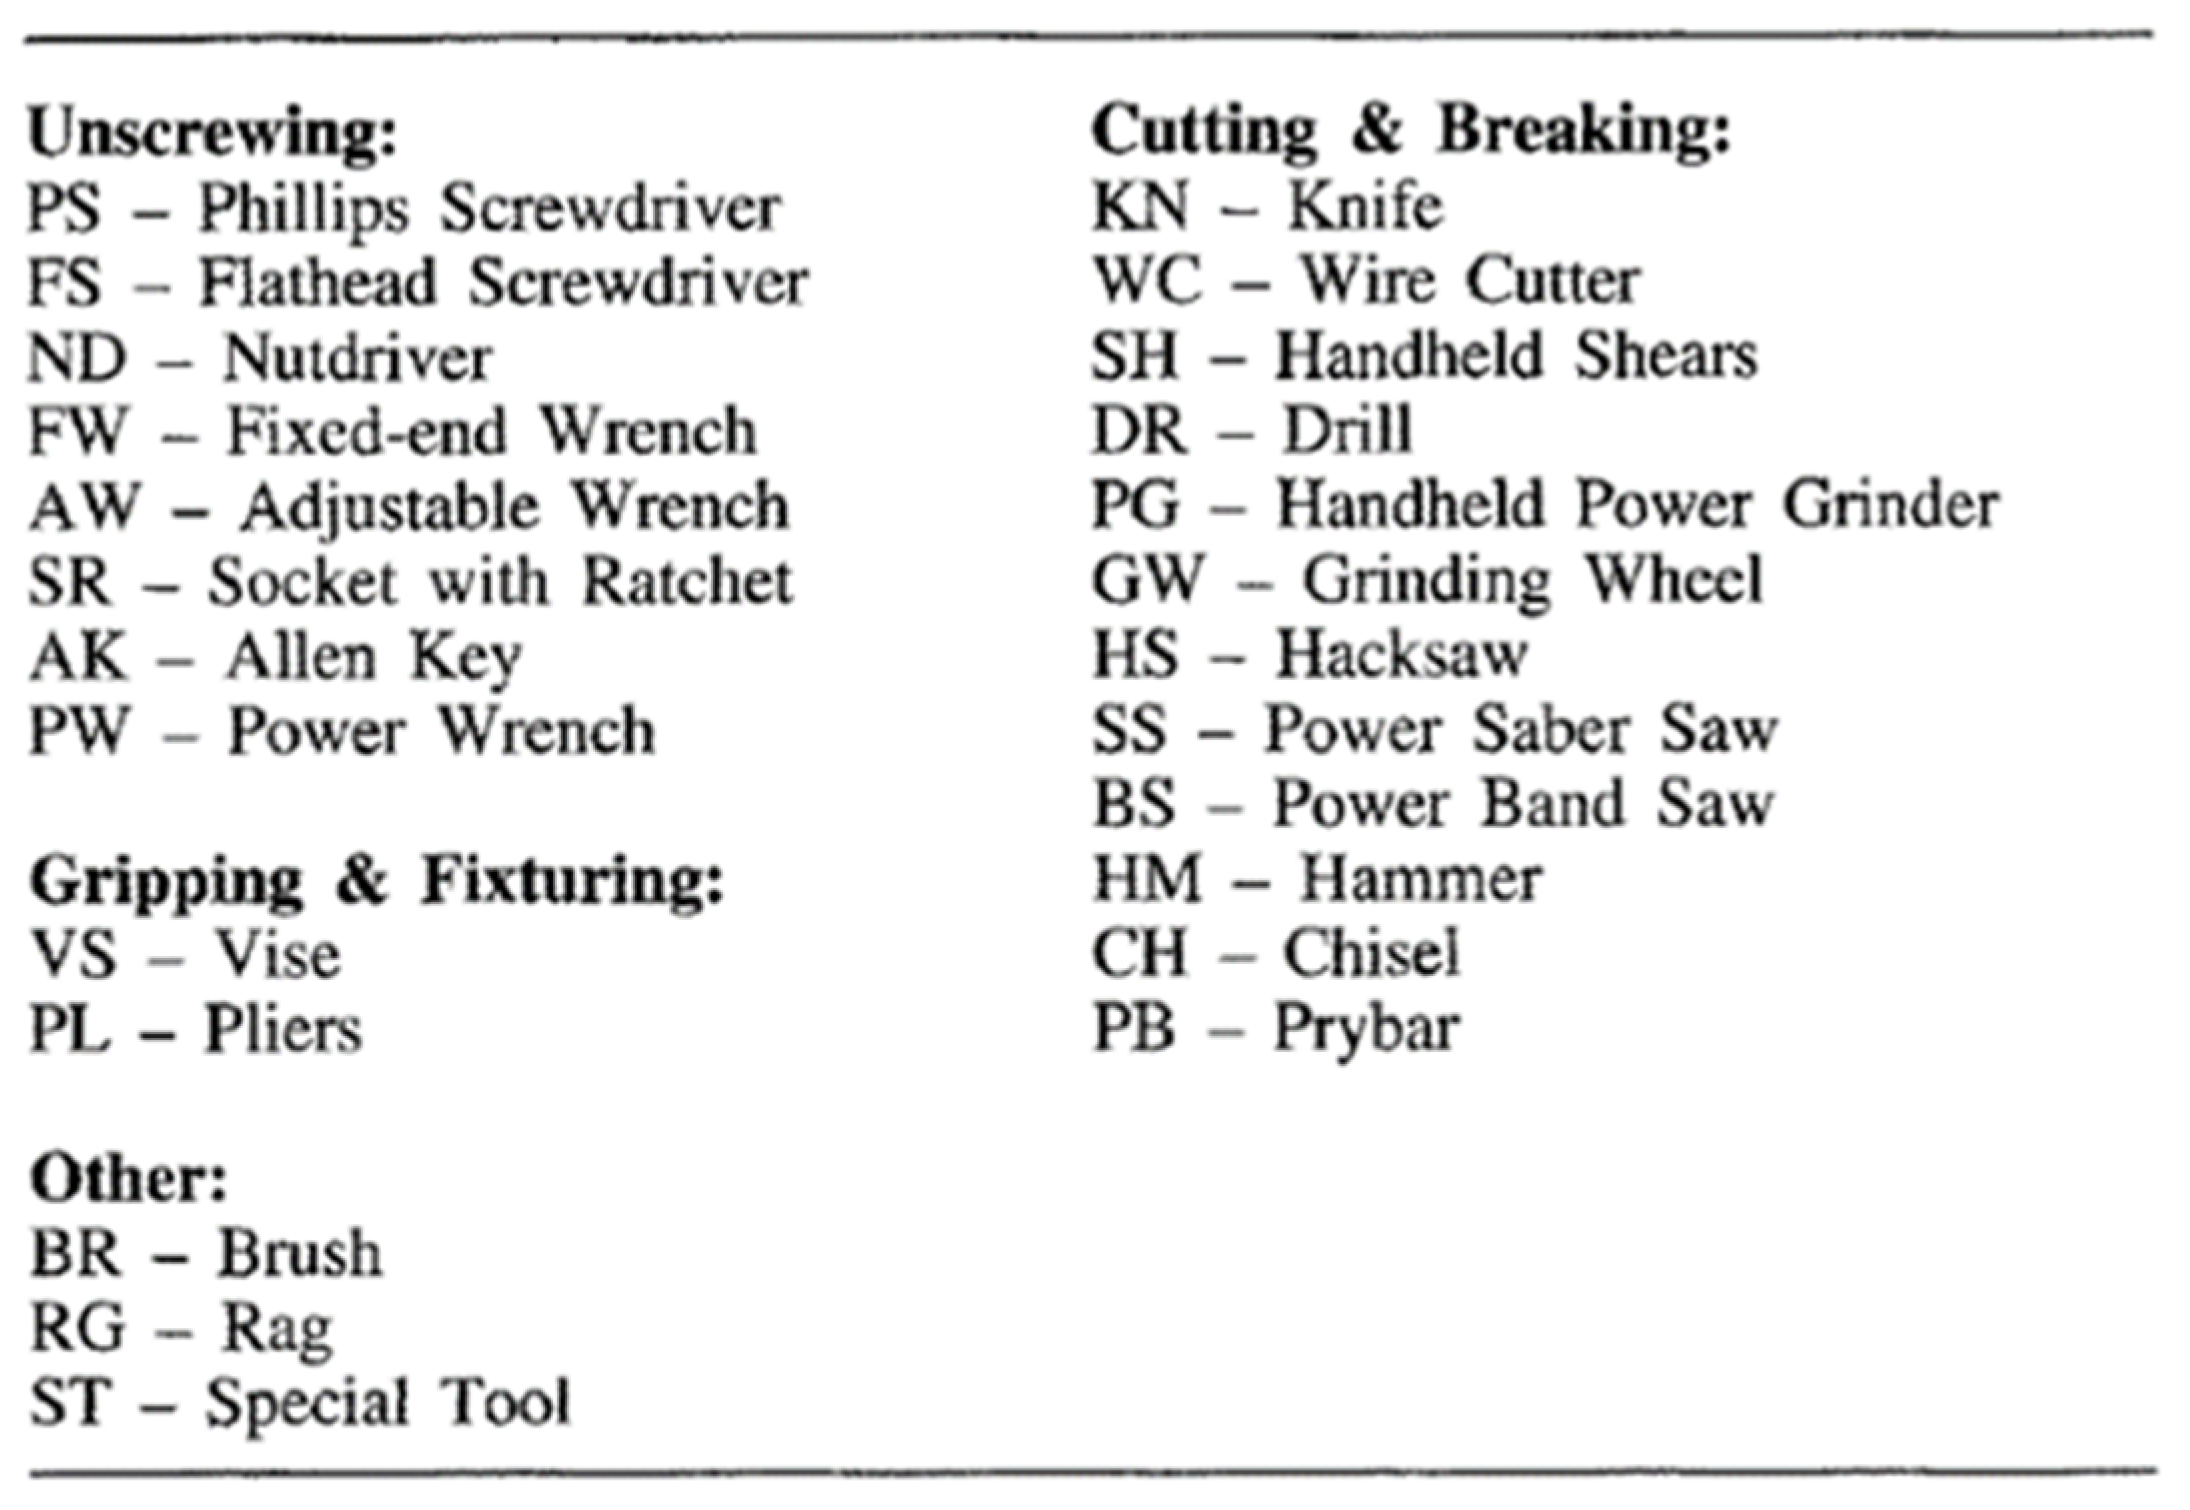
The necessary tool to operate is recorded in this column. The table below identifies 24 standard disassembly tools with the respective code to be inserted in the column (
Figure 11).
If the operations performed are manual, the column is left empty. Manual operation is defined as the movement of the hand towards and from the part.
A manipulation with an instrument occurs whenever this instrument is taken or put back in its place, and this occurs every time a different instrument code appears in different rows of the chart.
COLUMN 6–10: DIFFICULTY RATINGS
A quantitative difficulty score is assigned to each task according to five aspects concerning the task performance. The score is based on a scale ranging from 1 (easy) to 10 (difficult). The five categories are:
ACCESSIBILITY: measures the ease with which each part can be reached by the tool used or by the hand.
POSITIONING: is the degree of precision required to position the tool or hand.
FORCE: measurement of the amount of force required to perform the task.
BASE TIME: the time required to perform a basic movement without difficulty. It does not include time spent on positioning or sustained effort.
SPECIAL: this category covers special circumstances not considered in the standard task model. If the disassembly task follows the standard task model, 1 is inserted.
COLUMN 11: SUBTOTAL
It represents the sum of the individual difficulties, that is, for each row, the sum of the scores from columns 6 to 10. It is the difficulty in carrying out a single repetition of a task.
COLUMN 12: TOTAL
This is the product of column 11 for column 4 and considers the repetition of a task.
COLUMN 13: COMMENTS
Once the disassembly chart has been obtained, it can be used to estimate the disassembly time through a simple equation.
The first member in parentheses represents the score of the difficulty of the lines and is multiplied by a coefficient equal to 1.04 to convert the time into seconds. The number of tools and hand manipulations is obtained from column 6. All the lines where the code of an instrument appears in column 6 are counted and the sum is multiplied by two. If the same instrument code appears in subsequent lines, only one is counted. As for manual operations, they are the sum of these in column 5, which corresponds to an empty cell in column 6, and the whole is multiplied by two.
The result is in seconds. There is, however, another unit of measurement of time, whose conversion occurs through a simple equation.
By applying this model to the three proposed sequences, the authors obtained that the fastest is the third sequence, even if there is little difference compared to the second method [
14].
The complete Disassembly Evaluation Charts of the three sequences are illustrated in
Appendix B of the article.
The results in terms of time obtained applying the disassembly time formula are:
2.8. Economic Analysis
Referring to the data reported by the Ministry of Labor and Social Policies [
15], it is possible to quantify the savings that can be obtained by using certain sequences compared to others. The data contained in the table were updated in June 2019 and refer to workers belonging to companies in the private metalworking industry and plant installation.
Taking as reference the data relating to a worker hired at the 4th level, the authors obtained:
Average annual cost = €35,036.90.
Average hourly cost = €21.90.
Theoretical annual hours = 40 h × 52.2 weeks = 2088.
Average annual hours worked = 1600.
Starting from one of the three disassembly sequences made, considering the duration obtained, it is possible to calculate the number of pieces worked in a year and then obtain the unit cost.
First, the sequence obtained by the “Partial Parallel Disassembly Sequence Planning for Complex Products” method is considered because it was the least productive. The annual cost is calculated and then the production cost is calculated for the same quantity of products for the other two sequences. By comparing these values with the cost of the first sequence, it is possible to quantify the savings obtained (
Table 6).
Considering this, it is possible to note how a good realization of the disassembly sequence can lead to savings in terms of time and money. The great saving obtained from the second and third sequences is because these two methods allow disassembly also sets of components (partial disassembly), unlike the first, which leads to complete disassembly of our gearbox (
Figure 2). The sequence obtained by the authors, which leads to a saving of over €5000, is not necessarily the best, since other more advantageous ones may exist.
2.9. Augmented Reality and Software Used
Augmented reality (AR) is the technology that allows the addition of virtual content to the real world. AR should not be confused with virtual reality. The latter creates an artificial environment, built on the computer and makes it credible by using technologies that give the feeling to those who use them to find themselves truly immersed in the scenario (flight simulators or game viewers). AR starts from what is around, which is, however, modified with the addition of animations and digital contents for more in-depth knowledge of the environment around. If virtual reality is an artificial reality, augmented reality can be called enriched reality, since it increases the real environment rather than completely replacing it. AR is a high technology that allows interacting with the external environment using particular digital tools. AR takes advantage of elements already present in the environment and interaction with the surrounding environment to obtain a more in-depth and specific knowledge of certain elements. AR platforms are applied in the medical, military, and industrial fields. However, a large part of the market today is made up of entertainment. The industrial sphere is that of the authors interest and the augmented reality technological scenario enables wide and numerous application horizons: for example, by framing a printer, it is possible to explain how to replace a cartridge through an animated simulation, or it is possible to present a piece of industrial machinery detailing the explanations and instruction manuals, thanks to the support of contents that appear on the screen in real-time, showing both the inside and the outside of each component, videos that explain the functioning of gears and systems, the dynamics of processes and specificities. AR offers a promising approach to the training of technical staff. To carry out assembly, maintenance, and repair work, the presence of highly specialized personnel who have developed knowledge thanks to work experience is often required. Less experienced workers can perform complex operations thanks to the assistance offered by AR. The improvement of maintenance represents an important opportunity to reduce production costs, improve productivity, and improve profits [
16,
17,
18].
For applying AR to the gearbox, the authors used Unity software, combined with the Vuforia package.
Unity is a game development engine, where it is possible to create video games and export them for multiple platforms. It is made up of a graphics engine, a physical engine, and a live game preview in which the changes made are viewed in the programming phase in real-time. It is a complete set of tools for creating video games and other interactive projects, simplifying the development process, and making it faster.
One of the advantages of Unity is that it is an integrated development environment, helping programmers to develop source code. Another advantage is its possible use on multiple platforms; games are compiled only once and made for multiple environments (Windows, Mac, PlayStation, Nintendo, etc.).
The Unity language is called UnityScript and can be developed through two programming languages: C # and JavaScript. It is possible to use a combination of these two languages within the same project, even if the advice is to use only one to better understand the code and avoid conflicts.
Vuforia is a software development kit (SDK) for AR applications, capable of providing fast and accurate image tracking, and is the most used software platform in the context of AR. Vuforia offers developers a cross-platform solution to combine digital content with physical objects and environments. Through an extension of the Unity program, Vuforia allows the development of AR applications by integrating with Unity often and making certain components available.
A very important component is the AR Camera, a component used to locate the marker, acting like a video camera within the program and connecting with the real world thanks to the devices used for AR (webcam, goggles, etc.).
The target can be identified based on different types of existing targets, but in this article, the authors used image targets. Image targets are the simplest since they use flat 2D objects. They represent the most common trackable used by Vuforia.
To allow greater interaction between the physical world and AR, virtual buttons are used. They represent virtual buttons positioned above a real-world image target and allow us to activate predefined functions when the user presses them. When the user touches a specific part of a traceable image, the app will respond. It is possible to insert, in the same image target, different virtual buttons with which different events are associated [
19,
20,
21,
22,
23].
2.10. AR Application
Once the most convenient disassembly sequence was identified, the authors went to apply it to AR through the use of unity software and the Vuforia package, previously described. After carrying out a new project on Unity, it is necessary to import all the elements necessary for augmented reality: the Vuforia package, the AR camera, and the image target.
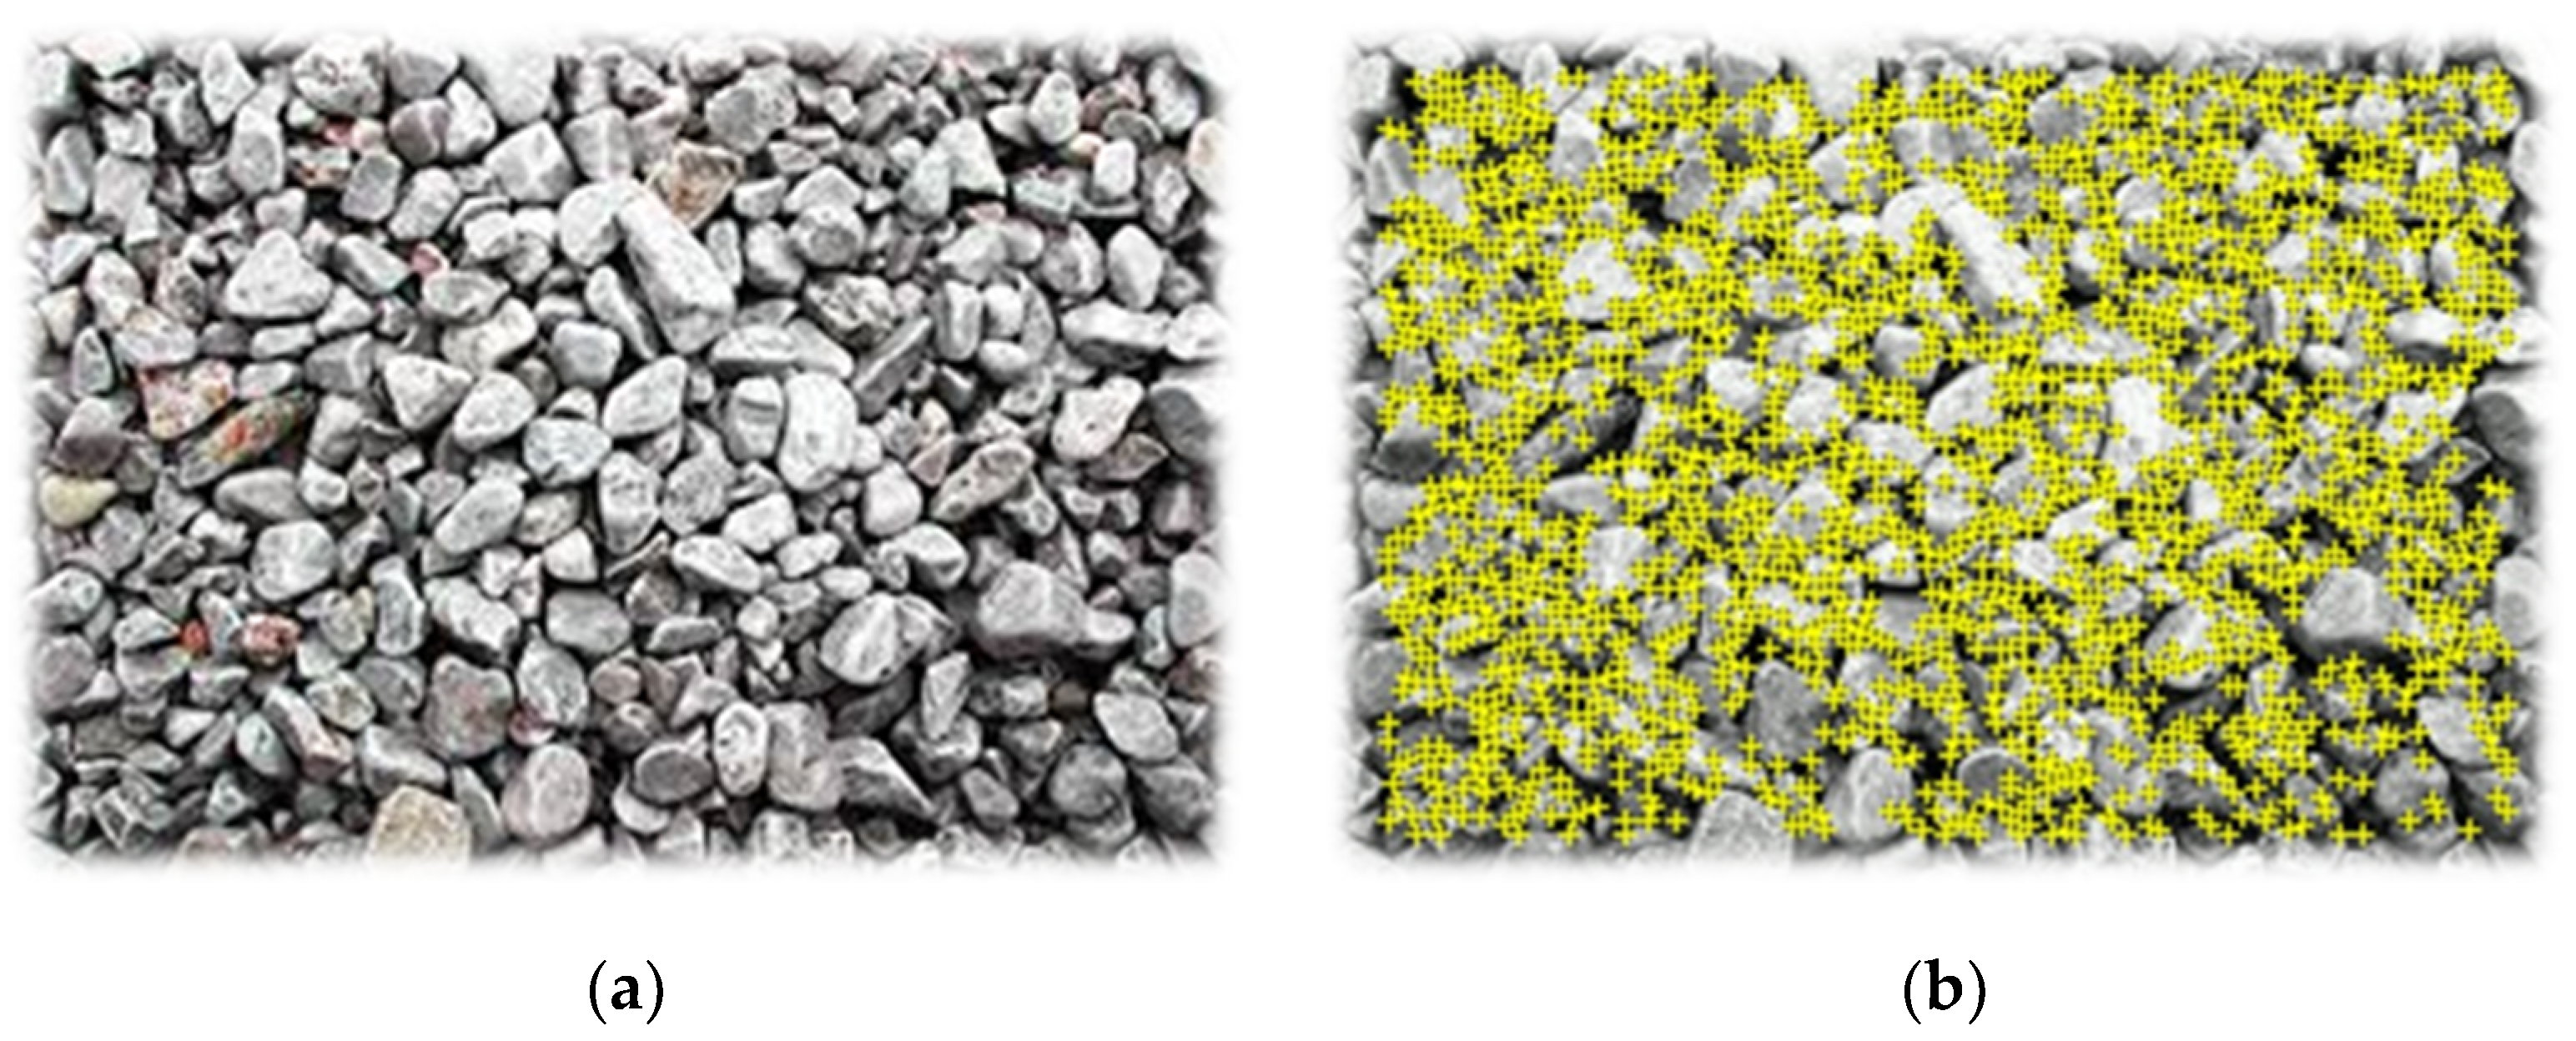
Image targets are not random images, but are precise and suitable images for this use. Each image is characterized by a rating, which defines the image quality for the generation of the AR. The image quality is defined based on the tracking point number [
24] (
Figure 12).
From the Hierarchy window, an empty GameObject is created and the gearbox in OBJ format is inserted as a child of the previously imported image target (
Figure 13).
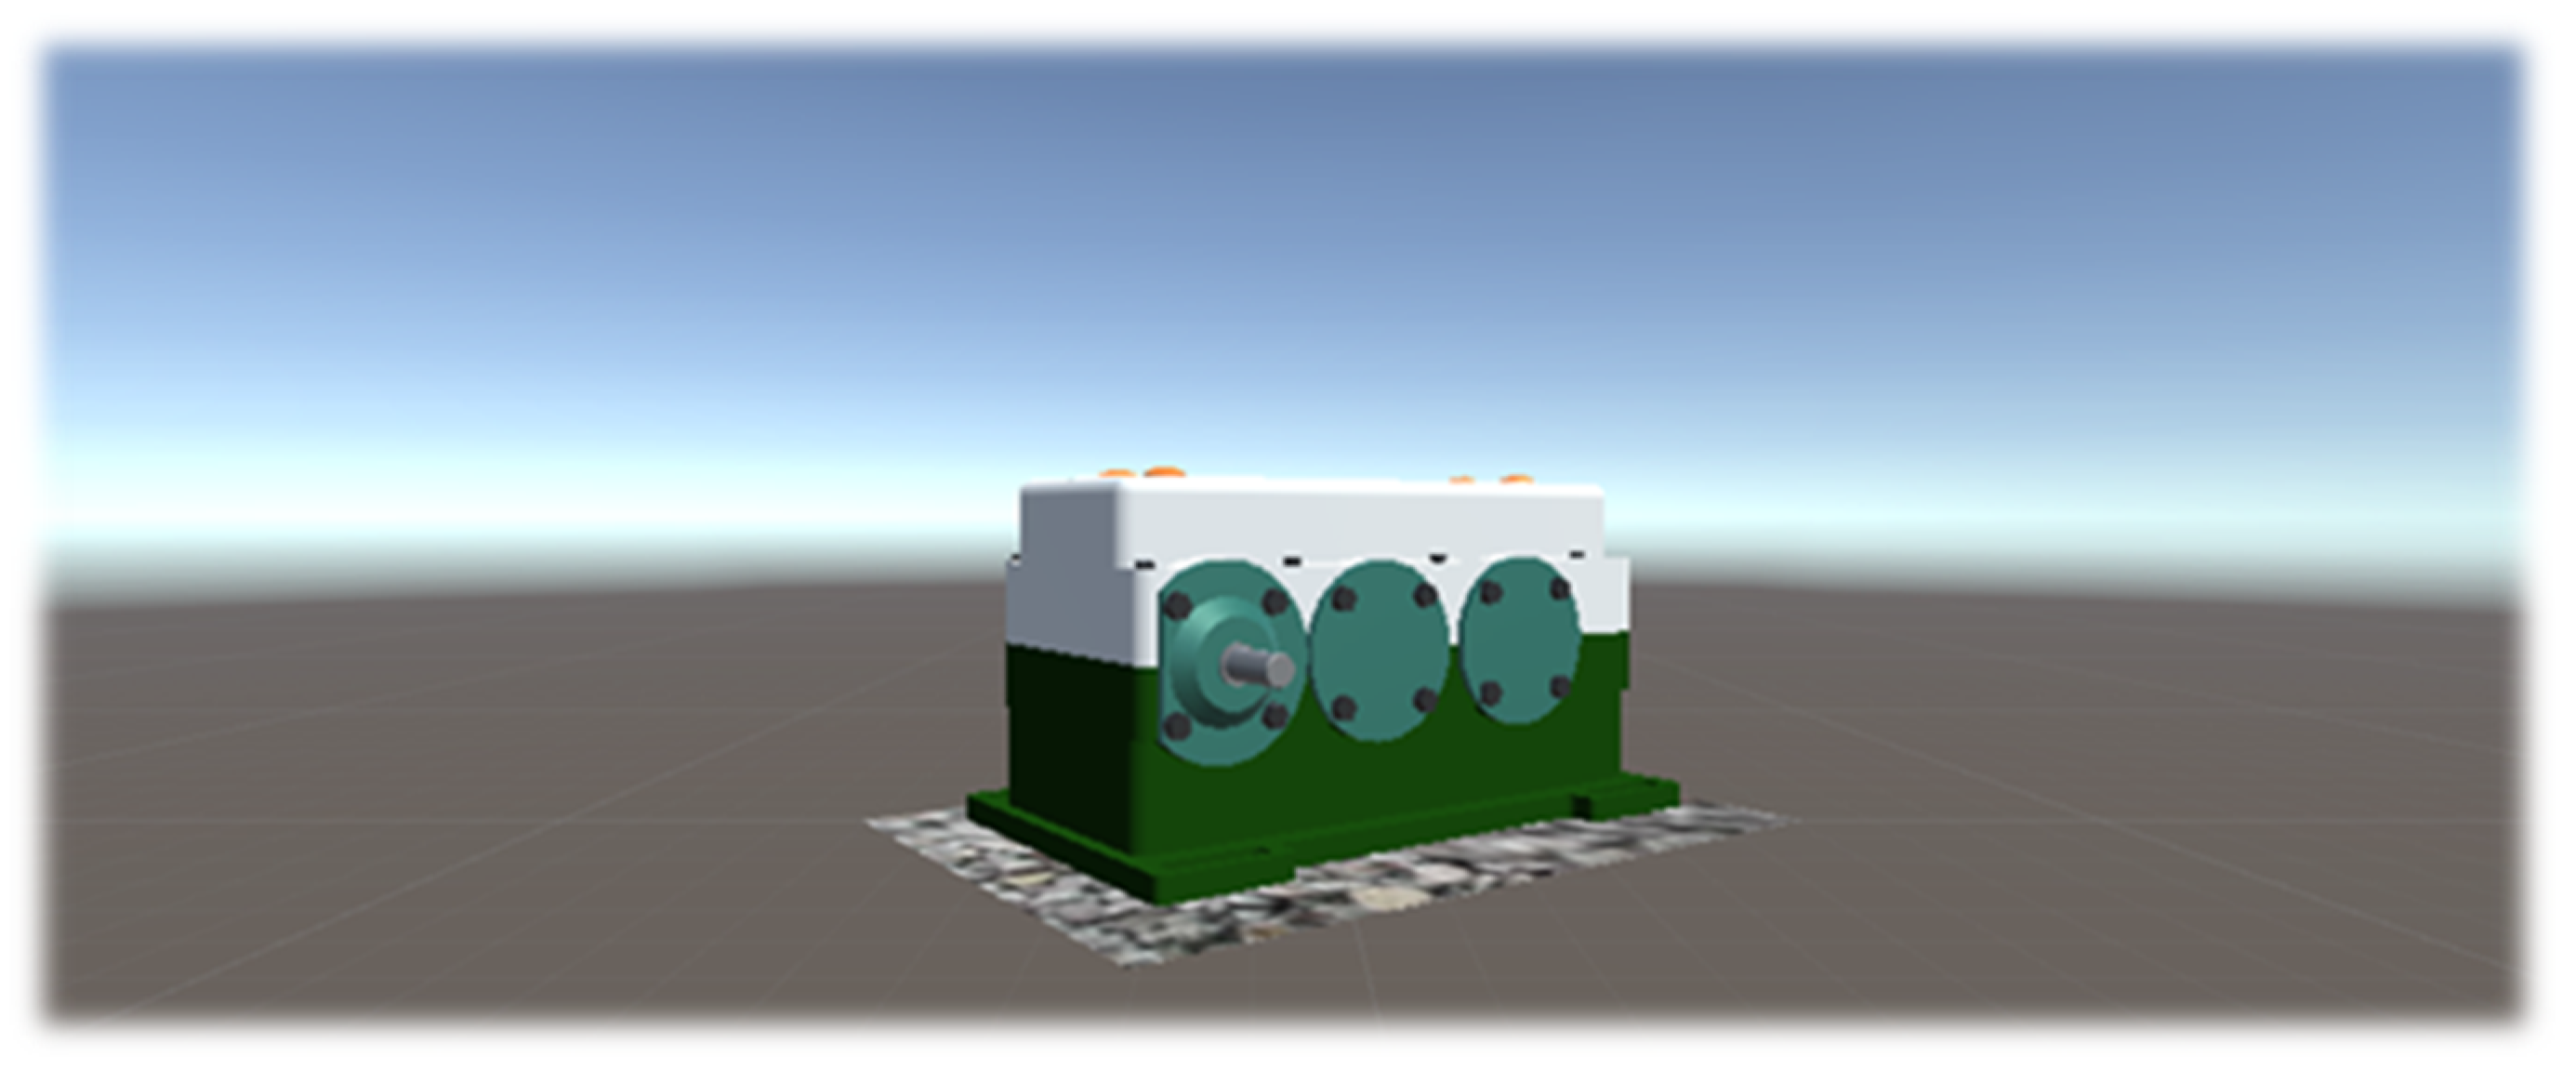
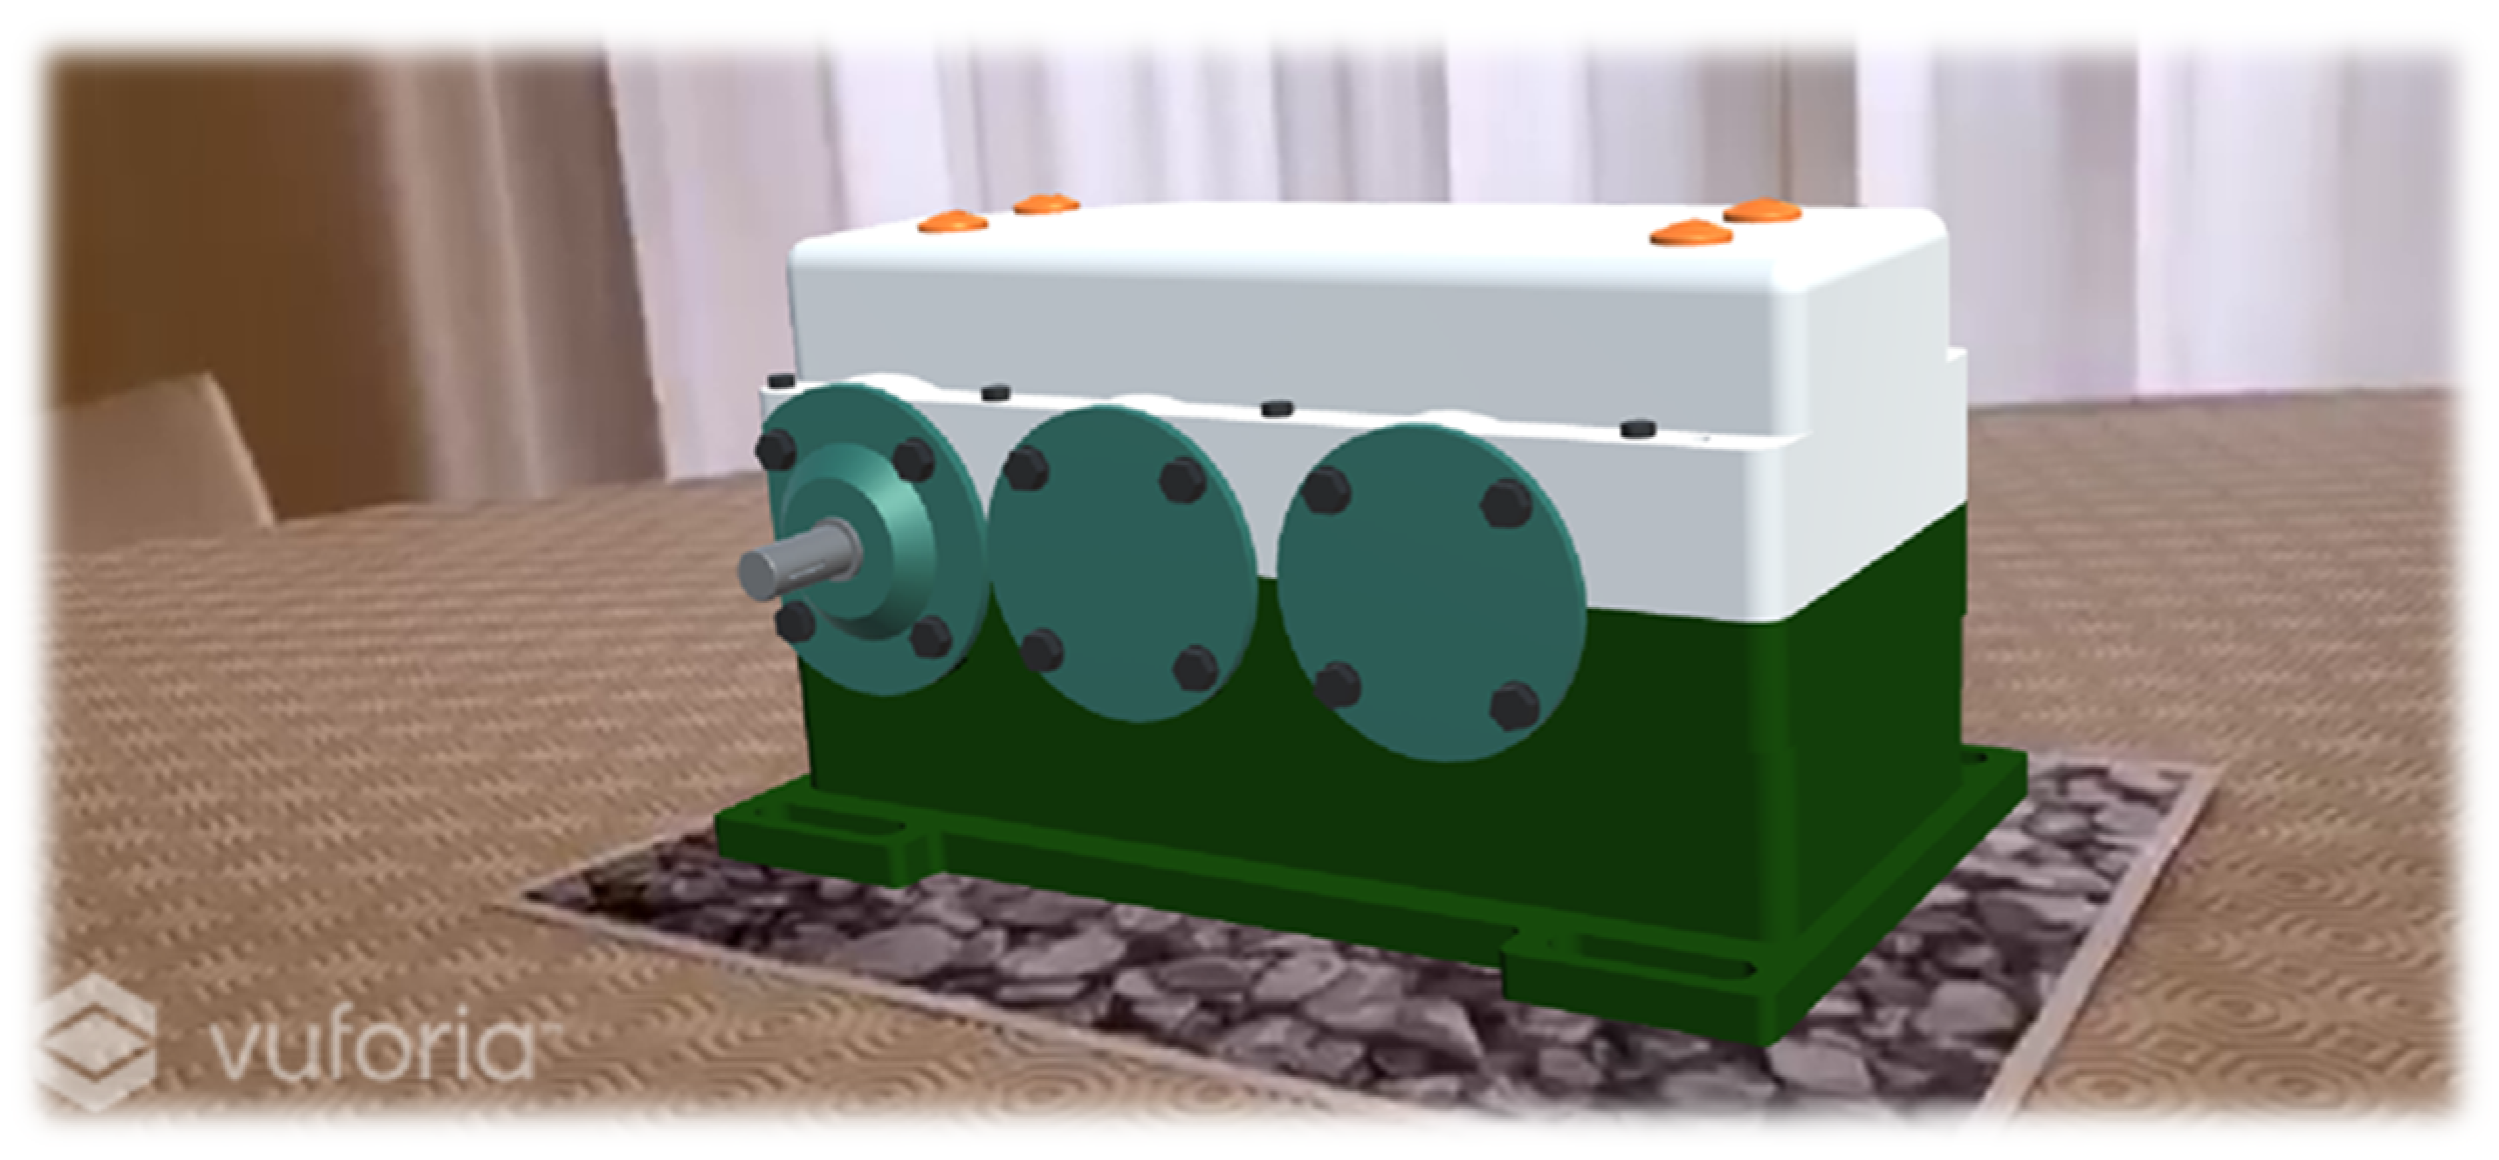
By framing the printed image target with the PC webcam and starting the game mode, the gearbox will appear on the screen (
Figure 14).
The gearbox appears still and the rotation around it with the webcam is the only action possible.
At this point, an animation of the gearbox GameObject is created, in which the disassembly of the components is simulated. This simulation allows the authors to concretize and mirror the results obtained previously on reality [
25].
To create an Animation, a succession of movements are created which are recorded and scanned in the timeline. After selecting the element to be moved, a keyframe is inserted (i.e., a frame) to indicate the position that the part of the gearbox occupies in a certain instant. For each component, the authors created a keyframe at the instant when the component starts moving from the position it is in before the disassembly. The next keyframe is placed in the instant when the piece stops moving to the position it is in after removal (
Figure 15). The software automatically identifies the keyframes that are positioned in the time interval.
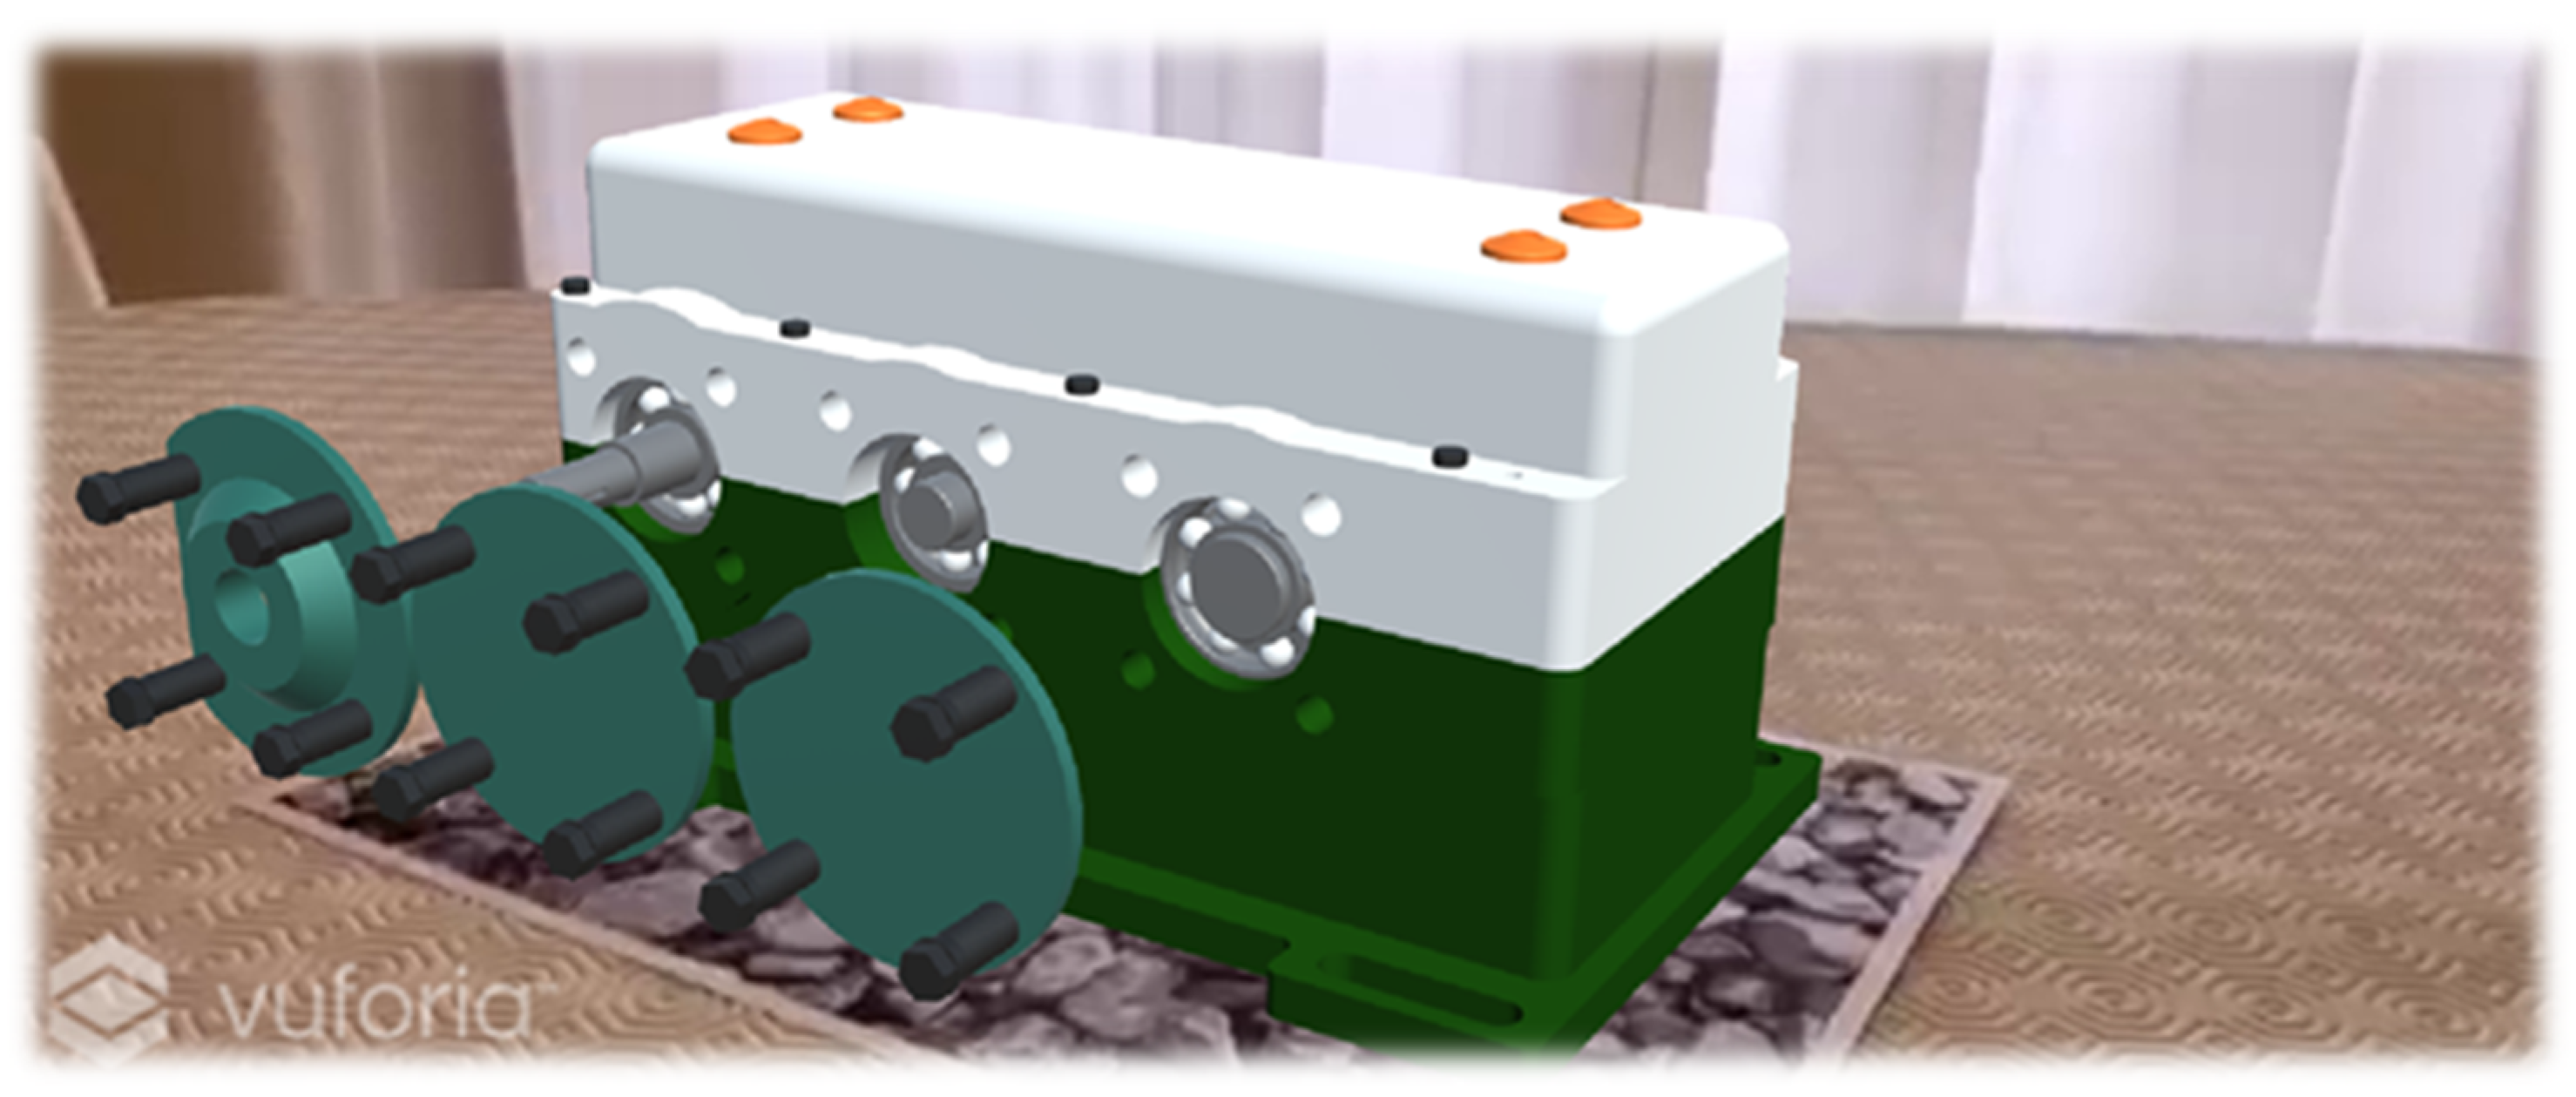
Once the image target is framed with the webcam, the animation starts automatically (
Figure 16).
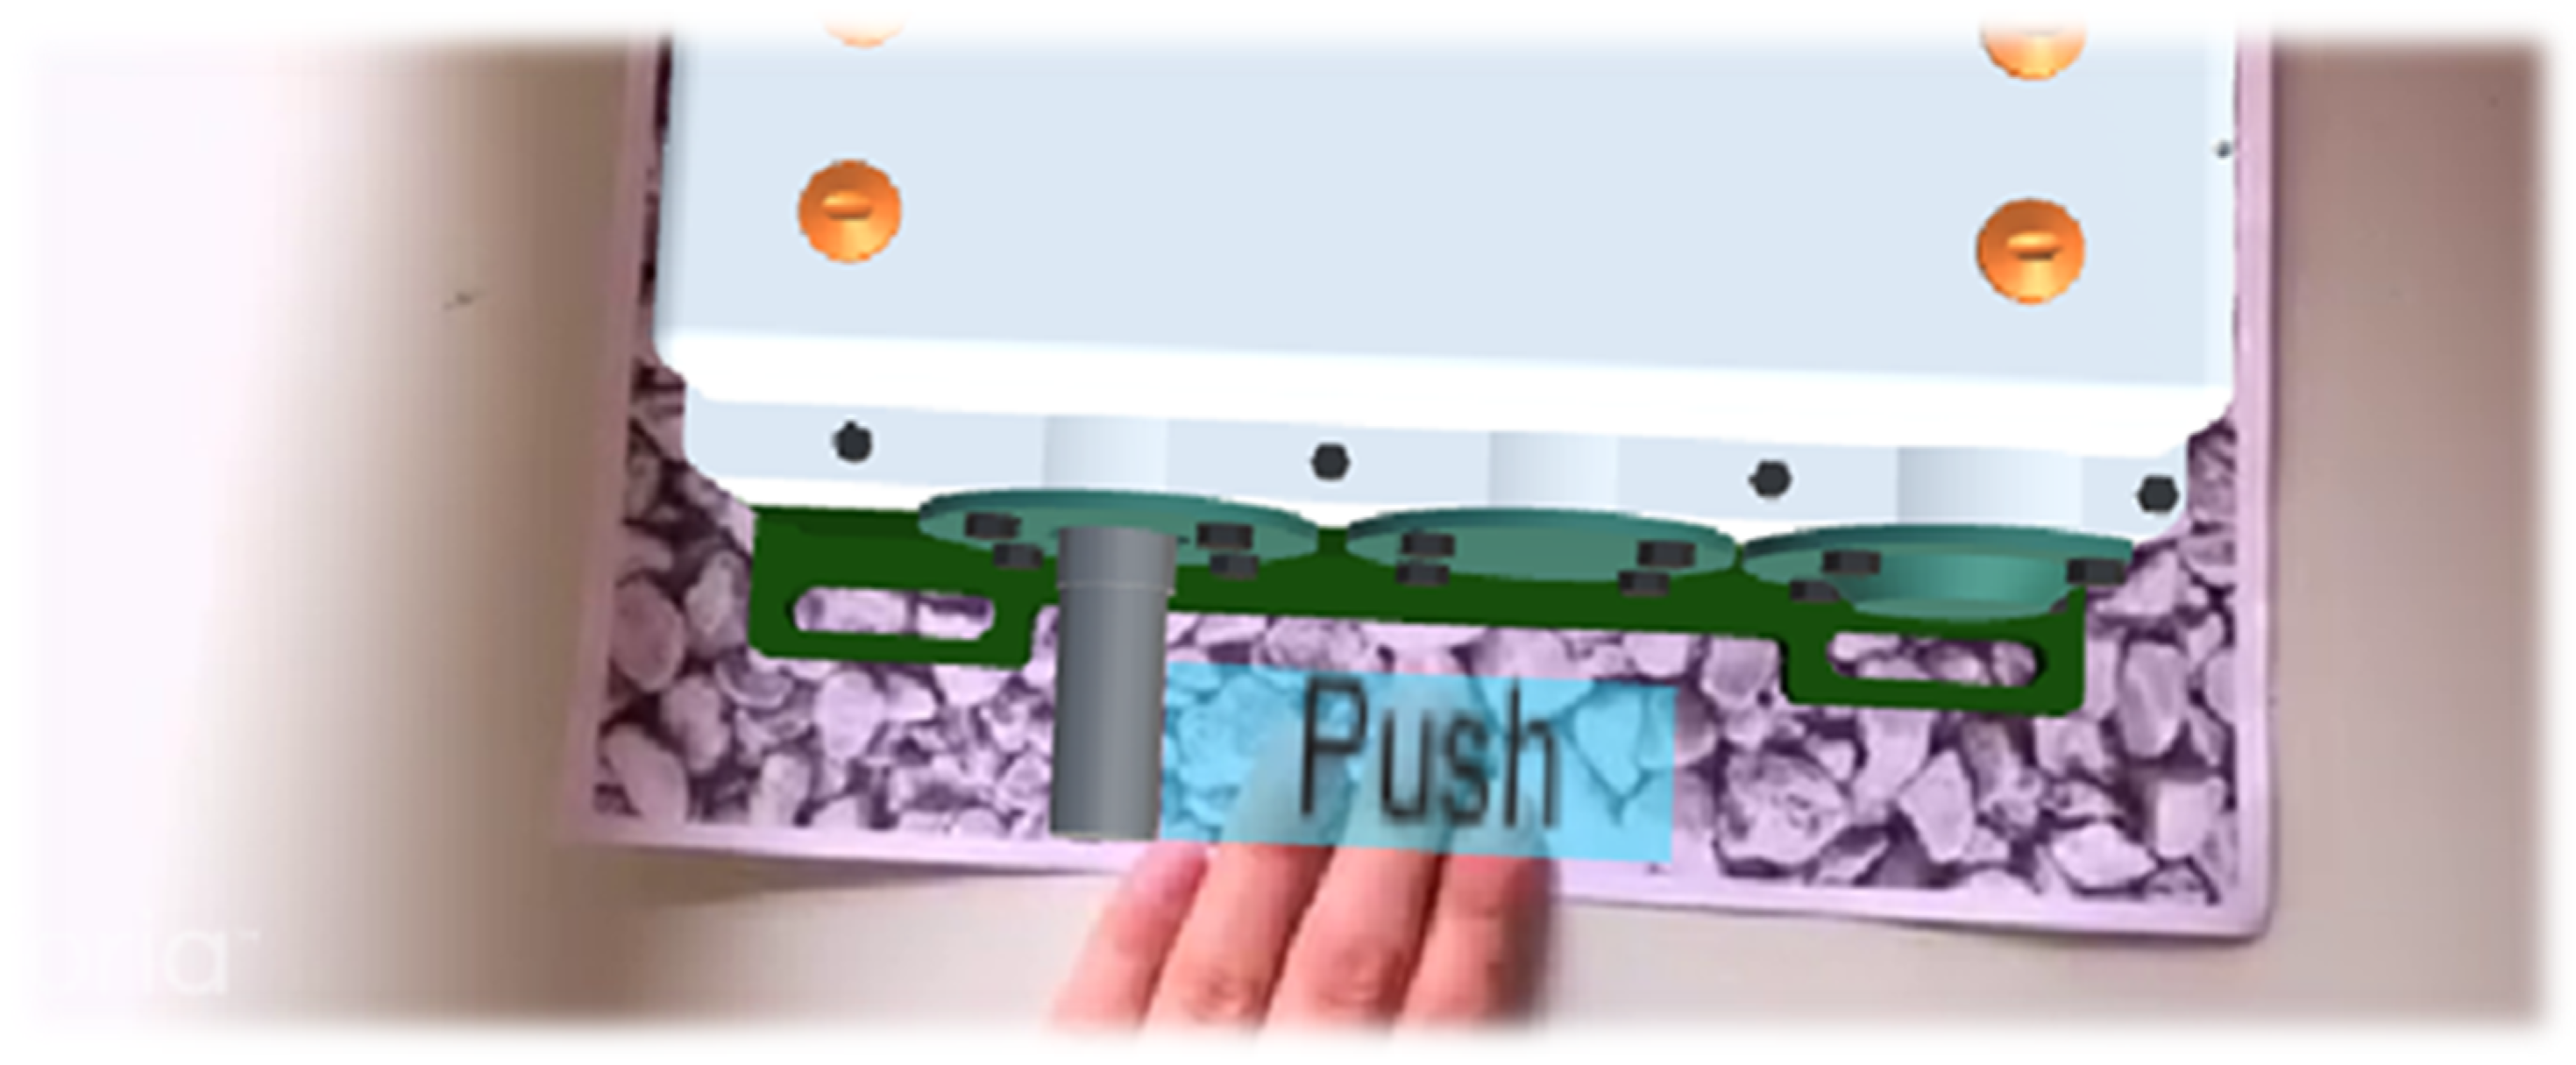
For a greater interaction with the gearbox in AR, it is possible to create a VirtualButton that allows the animation to start once it is “pressed”. The virtual button is positioned above the ImageTarget (
Figure 17).
When the webcam is started, the gearbox will appear above the marker and the VirtualButton will also appear. As soon as the author’s hand is placed between ImageTarget and VirtualButton, the animation will start.
The behavior of the VirtualButton is not defined, but it is necessary to compile a script that describes how it should behave.
4. Discussion and Conclusions
DfD is developing rapidly in today’s world, because people are always asking for new and up-to-date products. It is rare to bring a product to the end of its life, therefore, to save money in the creation of new products it is possible to recover parts of old products that are still functional. One of the buyer’s priorities, in addition to having a new product, is also to spend as little as possible. Designers must conceive, develop and build products over a long duration, foreseeing their reuse at the end or the mode of divestment. With the increasing costs of divestment, the simplicity of disposal becomes as important as the ease of construction.
The study of DfD will be increasingly important in future years and simulation through the use of software such as Unity and Solidworks will be increasingly useful. During the development of this work, the authors were able to perceive the advantages that the DfD can offer from different points of view. On one hand, there is a better management of resources, through the possible reuse of components not at the end of life; on the other hand, the implementation of disassembly sequences allows one to save in terms of time and costs related to disassembly. Moreover, DfD is used to simplify the maintenance of products: in fact, the most important aspect of product’s design is the simplicity of disassembly. It is a help for production managers to better plan maintenance tasks by optimizing time and costs.
As far as AR is concerned, the authors have been able to perceive the great advantages that augmented reality can offer in many sectors, particularly in the industrial field. A possible use of AR is in the industrial field as a support for the operator in the disassembly of a piece. This technology could be a benchmark for an inexperienced operator: a small error in assembling/disassembling a piece could lead to a waste of time and money for the company. Furthermore, the use of instruction manuals with hundreds of pages by a beginner operator could lead to considerable downtime. In practice, with AR, it is possible to create a digital user manual that supports the maintainer by instructing them more quickly and operating remotely. For example, if a company needs to do a maintenance in a place far from its country, it could instruct local workers through remote work by replicating AR instead of sending maintainers there.
What has been studied during this work allows one to improve this type of performance, through the use of CAD software for the modeling of a product to be industrialized. The application of DfD concepts must be carried out in order to re-use materials and increase savings on disposal costs. Consequently, the use of AR becomes essential to teach operators the optimal working methods, thanks to the visual mode offered. However, this technology is not yet widespread and used. Over time and with the further development of this technology, it is hoped that augmented reality will be used more.
The application of AR to the gearbox made it possible to perceive the dimensions of each component of the product in question and the overall footprint. Simulating disassembly sequences in AR took time to implement, as the authors had to specify the movement of each component over time. However, it has been observed that the use of graphic representation and its interface with the real world, through AR, allows one to save in terms of prototyping. The realization of the prototypes, on which the first verifications and tests will be carried out, requires one to bear a cost for the realization and to spend time, which in the world of industry, turns out to be a scarce and expensive resource. So, AR serves to implement in a user-friendly way the results obtained from the application of the DfD.
In conclusion, the benefits that can be gained from the use of this methodology are greater than the small difficulties encountered during the work.


