1. Introduction
In the field of biomedical technology, there is a continuous evolution of increasingly sophisticated devices, designed to improve patients’ quality of life and support healthcare personnel in therapy management. Among these, mechanical devices play a primary role, representing an essential component of everyday therapeutic practice. These include, for example, mechanical dispensers for drug administration, which may be disposable or designed for a limited number of uses. Although often small in size and seemingly simple, such devices perform critical functions within the therapeutic process, as they ensure the controlled and precise release of medication according to well-defined modes and timing.
The proper functioning of these devices is essential not only to guarantee the effectiveness of pharmacological treatment but also to safeguard patient safety. Possible malfunctions—such as mechanical blockages, irregular dosing, or structural failures—can compromise therapy adherence and, in more severe cases, create clinical risks with potentially significant consequences, particularly for vulnerable patients or in high-risk contexts [
1].
From an engineering perspective, these devices exhibit a relatively complex structure, often made of plastic materials and characterized by compact geometries and multiple moving parts. Such features make them inherently prone to mechanical wear, clearance accumulation, and material degradation, especially under repeated use. Consequently, it becomes crucial to study their behavior not only through analytical models and numerical simulations but also by means of physical experiments and fatigue tests specifically designed to replicate real operating conditions.
In this context, the assessment of long-term mechanical reliability becomes a central issue [
2]. The ability to detect potential functional anomalies or hidden defects in advance, even before they manifest critically, is fundamental for realistically and safely estimating the service life of the device, while minimizing the likelihood of unexpected failures during operation.
A particularly promising approach in this field consists of integrating advanced non-invasive monitoring techniques, including the acquisition and analysis of acoustic signals generated during fatigue tests. Acoustic analysis of mechanical components is a typical approach for the early detection of failures or excessive clearances, especially in complex mechanisms or components that are difficult to instrument directly [
3,
4,
5]. When properly processed, these signals can provide valuable insights into abnormal mechanical play, incipient cracks, or localized material degradation. Such techniques are especially effective for compact plastic devices, widely used in the biomedical industry due to their cost-effectiveness, light weight, and ease of manufacturing.
One of the main advantages of acoustic testing lies in its inherently non-invasive nature: the analysis is carried out without physically interfering with the internal structure of the device and without altering its functional configuration. This aspect is crucial, as it allows for the monitoring of the system actual behavior during operation, avoiding the introduction of sensors or equipment that might alter the device mechanical dynamics. As a result, a faithful and representative evaluation of the product life cycle can be obtained, supporting design, validation, and continuous improvement processes.
Ultimately, the combination of analytical precision and non-invasiveness makes acoustic testing a highly strategic tool for the development and verification of biomedical devices that are increasingly reliable, safe, and durable.
The present work describes in detail the design and construction of a mechanical test bench developed for the comparative evaluation of three different configurations of a purely mechanical biomedical device, a nominal configuration currently available on the market and two alternative optimized solutions, designed to improve long-term structural reliability and functional performance. The possibility of comparing three different components, one of which is currently commercialized and has known life data, on the same test bench allows for the validation of both the methodology and the rig [
6].
This work proposes the integration of acoustic analysis technologies to identify failures on test benches for fully assembled biomedical components. Specifically, the study aims to perform analysis not on a single component or specimen [
7], but on the complete device. Furthermore, by detecting damage during testing through non-invasive measurement techniques, the approach enables the use of the test architecture while minimizing intervention on the analyzed device. Minimal invasiveness on the samples helps to reduce the risk of damage due to handling, an often difficult-to-reproduce variable, and allows for the test bench to be employed with a reduced setup time, i.e., for periodic testing.
The integration of acoustic analysis technology in the field of small biomedical devices requires correlating the microphone signal with damage propagation in small thermoplastic devices, a correlation that has been scarcely investigated compared to metallic components [
4].
The combination of these analytical challenges, small and inaccessible devices, short cycles, plastic fatigue, and fully assembled plastic components, has been scarcely investigated in the literature and represents a relevant research opportunity.
The test bench was conceived to perform mechanical fatigue tests under controlled and reproducible conditions, simulating the cyclic stresses typical of real device use. To support the experimental activity, an acoustic acquisition system was integrated, capable of monitoring the dynamic behavior of components in real time throughout the entire operating cycle. The analysis of sound signals generated by the device mechanical operation provides an objective, continuous, and completely non-invasive assessment of the internal condition of the components, thereby offering valuable information on wear, looseness, deformation, or the onset of defects.
This implementation enables a systematic and consistent evaluation of the three analyzed solutions, allowing for a more accurate estimation of their remaining service life and the identification of possible structural or functional criticalities, with a view toward continuous improvement aimed at enhancing product safety and overall quality.
This methodology is useful for detecting failures in fully assembled components at the end of the manufacturing line. The purpose of the output is to evaluate the service life while considering all the variables encountered during the development and manufacturing process.
Furthermore, this study highlights the engineering rationale behind the development of the control system, with particular focus on the software architecture and hardware components dedicated to the management of the acoustic acquisition system, which constitutes a fundamental part of the decision-making algorithm employed to evaluate the device mechanical endurance. Finally, the methodology for processing acoustic signals and their integration into the performance validation process is discussed, with the aim of demonstrating the effectiveness of this approach as a non-destructive analysis tool in the mechanical domain.
2. Specific Mechanical Issue and Investigation Methodology
2.1. Mechanical Issue
The specific issue addressed in this analysis concerns a drug delivery device intended for inhalation therapy. The system, designed for individual and home use, consists of a set of micro-mechanical components integrated into a compact and user-friendly body. The main functions that the device is required to perform include the following:
The precise dosing of the active ingredient to be administered;
The effective mixing of the drug in solid form (typically micronized powder) with the airflow generated during patient inhalation;
The accurate counting of remaining doses, in order to avoid incomplete administrations or overdosing;
The generation of an acoustic signal, in the form of a “click,” to confirm to the user the correct positioning of the device for effective administration.
In this context, the component under detailed investigation is the mechanism responsible for generating the acoustic feedback—a sharp and recognizable sound produced during device actuation, which serves as confirmation to the user that the therapeutic action has been correctly performed. This sound has not only an informative function but also represents a critical element for the clinical effectiveness of the treatment, as it ensures that administration takes place under the conditions required by the usage protocol.
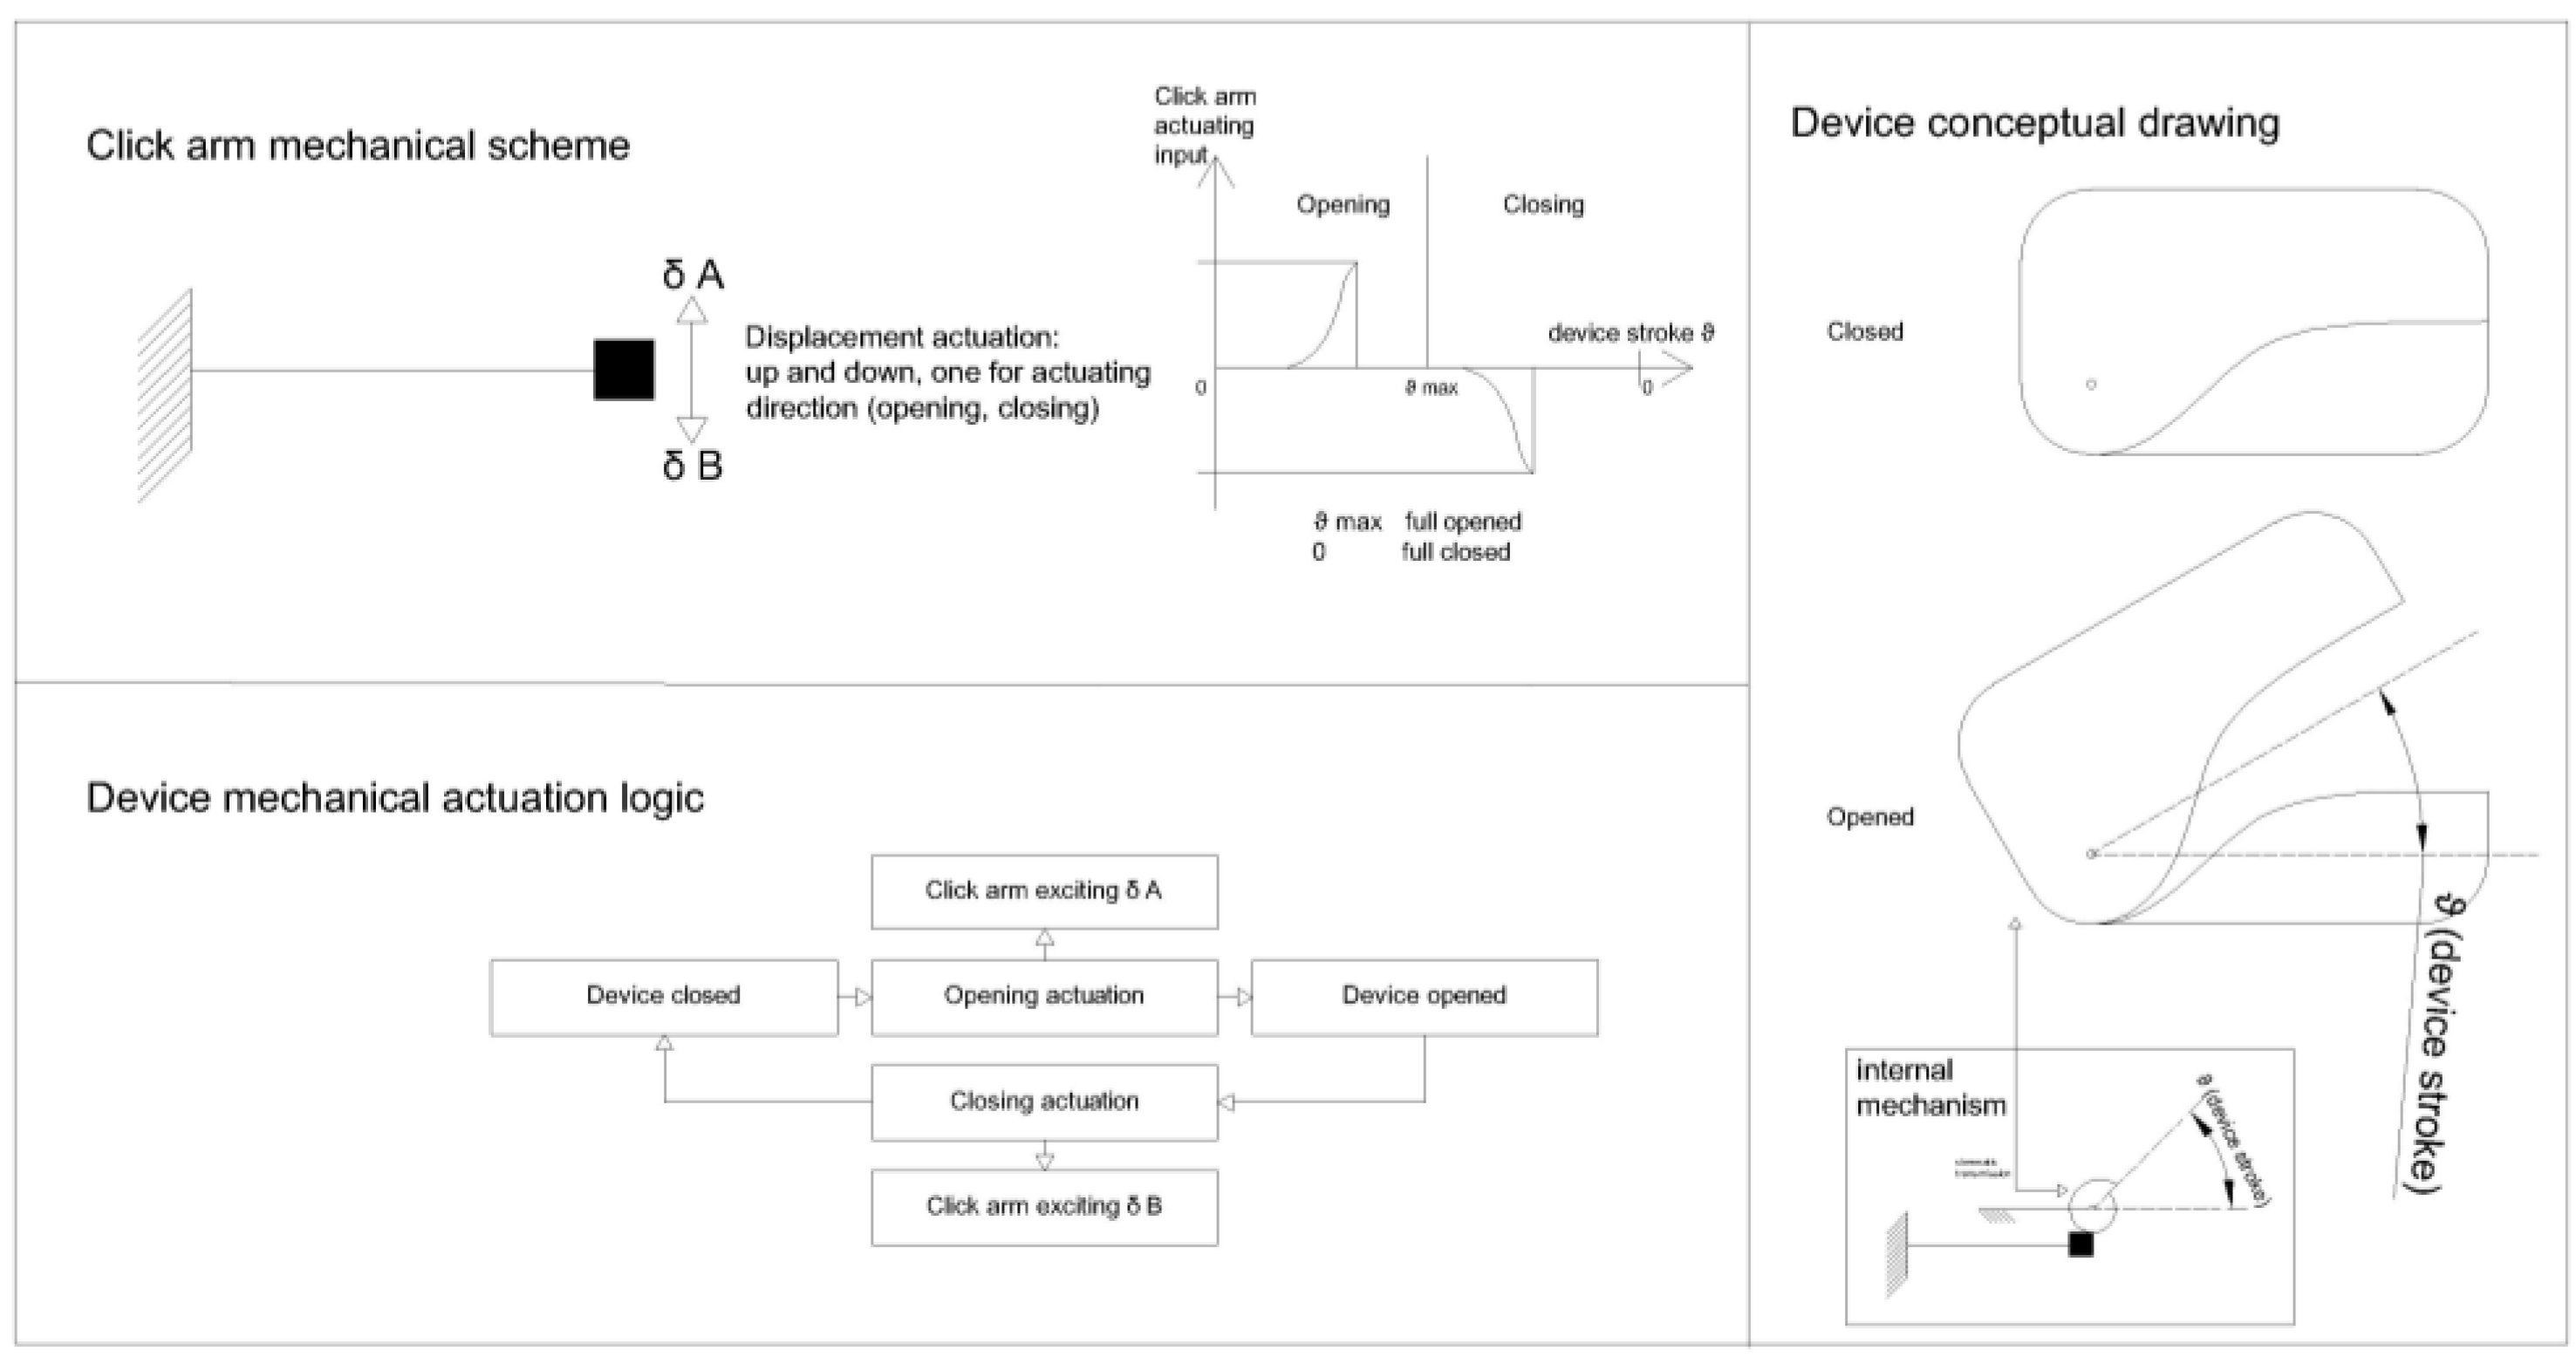
The emission of the acoustic signal is the direct consequence of a mechanical stress applied to an elastic component of the device. Specifically, the mechanism can be effectively modeled as a cantilever beam, fixed at one end and subjected to an imposed displacement at the other end, which is then released in an almost impulsive manner. This triggers a free oscillatory motion during which the component vibrates within the audible frequency range, generating the characteristic “click” (
Figure 1). The component responsible for producing the “click,” hereafter referred to as the click arm, is actuated by a kinematic system linked to the opening and closing movements of the device. The mechanism can be imagined as being driven by two cams, each with a different profile, attached to the device cover. One cam engages the click arm during opening and the other during closing. These cams approximate the behavior of the internal mechanism used by the device to excite the click arm, which itself is not subject to direct analysis.
The operating conditions of the mechanism are strongly constrained by geometric and material selection factors. The small dimensions of the device impose strict spatial limitations on the component geometry, requiring an extremely compact and optimized design. Furthermore, material choice is heavily influenced by biocompatibility requirements.
To obtain an acoustic response that is sufficiently intense and distinguishable during use, while still respecting geometric constraints, the structure operates in an elastoplastic deformation regime. Despite the relative simplicity of the mechanism, its small size prevents the adoption of a design capable of entirely avoiding material plasticization and thereby eliminating the issue of low-cycle fatigue. As a result, the total number of possible actuations is limited: it is estimated that the component can withstand only a few hundred cycles before its mechanical properties degrade beyond functional limits.
In order to increase the safety margin with respect to the required service life of the component, a geometric optimization process was undertaken. This optimization, implemented through iterative loops of redesign and Finite Element (FE) calculations, produced two improved geometries, whose details are out of scope of the present contribution. However, due to insufficient background knowledge regarding material properties, friction effects, and other factors, the analyses carried out could only provide a comparative assessment relative to the original solution. To establish an absolute evaluation of the problem, the construction of an experimental test bench was therefore deemed necessary.
2.2. Investigation Methodology
The small size and structural complexity of the system prevent the integration of mechanical sensors within the component, making direct monitoring of internal stresses or deformations impossible. Moreover, to ensure that the test is representative of real operating conditions, it is not feasible to adopt equivalent external actuation methods, such as applying linear or rotary actuators directly to the disassembled component. The behavior of the mechanism is strongly influenced by the fully assembled device, which provides the actual constraints and boundary conditions, including internal friction, mechanical couplings, and functional clearances.
Given these constraints, the most effective validation strategy involves performing endurance tests on the fully assembled device, actuated under conditions similar to those experienced by the end user. The activation cycle is therefore replicated by an anthropomorphic arm that simulates the operator action, ensuring consistency between test conditions and real use [
8].
The monitoring of component functionality is carried out by analyzing the acoustic signal emitted during each activation cycle. Although indirect, this methodology enables non-invasive verification of the component actual functionality, detecting possible degradation over time in the form of reduced sound intensity, changes in the spectral content of the signal, or the disappearance of the “click.” Such variations provide a reliable indicator of the component damage threshold being exceeded.
This approach also respects the constraints of miniaturization and does not interfere with the structural integrity of the system. Through appropriate audio acquisition and subsequent signal processing—using, for example, time- and frequency-domain analysis techniques (FFT, spectrograms, cepstrum, etc.)—it becomes possible to objectively identify the onset of functional degradation [
9].
In addition to acoustic analysis, a load cell is used to measure the actuation force (opening and closing of the device). Monitoring the actuation load makes it possible to detect jamming conditions or increased friction. This is useful for stopping the test in time in the event of a component failure that does not produce a significant change in the “click,” but which could continue damaging the device and make it impossible to identify the root cause. The test interruption based on load cell monitoring also allows for the validation of the complete component and the measurement of possible end-of-life conditions arising from causes external to the click arm itself.
3. Test Setup
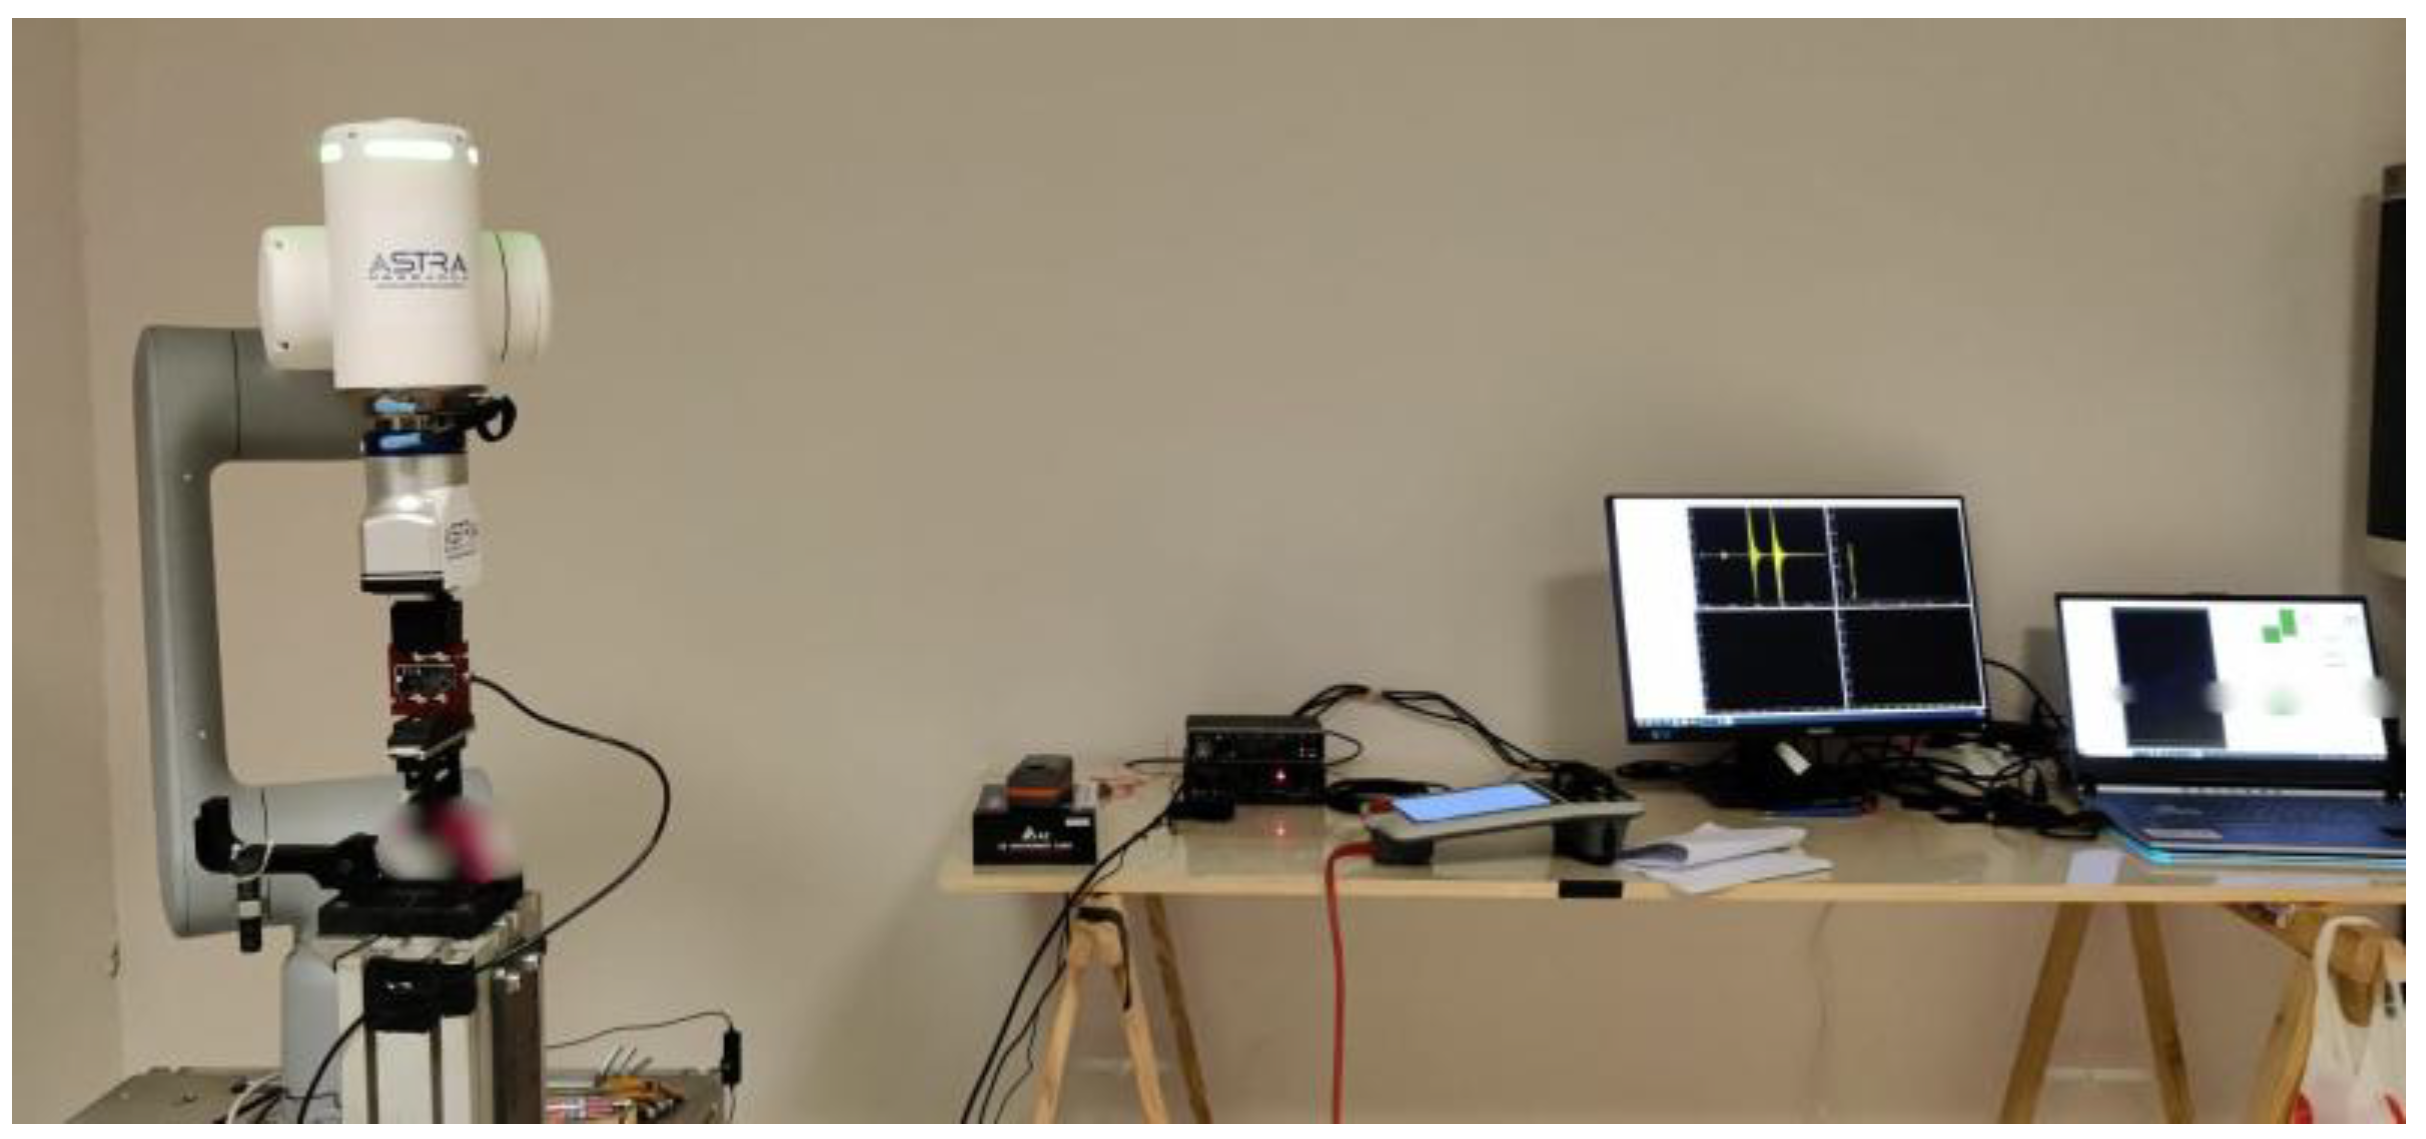
The mechanical actuation of the component is performed using an anthropomorphic robotic arm. The choice of employing a robotic arm allows for natural motion, consistent with the manual operation of a portable device, while at the same time ensuring that identical movements are repeated across cycles (
Figure 2).
This is an essential requirement for the test setup, which must replicate real operating conditions as closely as possible while guaranteeing repeatability between cycles.
The actuating cycle consists of device opening and closing, as illustrated in
Figure 1. The movement is controlled by displacement corresponding to the full available stroke. The velocity is constant at the maximum speed allowed by the robot for each segment. Consequently, the actuating frequency is determined by the actuation speed, allowing for one full cycle to be completed every 5 s. The actuating frequency is not critical for the test parameters, as real operational actuation is much slower and occurs only a few times during a day. Therefore, the speed is only relevant for the duration of the tests.
The gripping fixtures are manufactured by 3D printing with plastic material and are designed to meet the following requirements:
Avoid mechanical interference (e.g., excessively high contact pressures);
Be non-destructive (no drilling, interference fits, etc.);
Be chemically non-aggressive (neutral adhesives or treatments in a way to do not damage the material);
Allow the integration of a load cell for monitoring the actuation load.
The adopted solution was to design friction-based grippers with controlled load application.
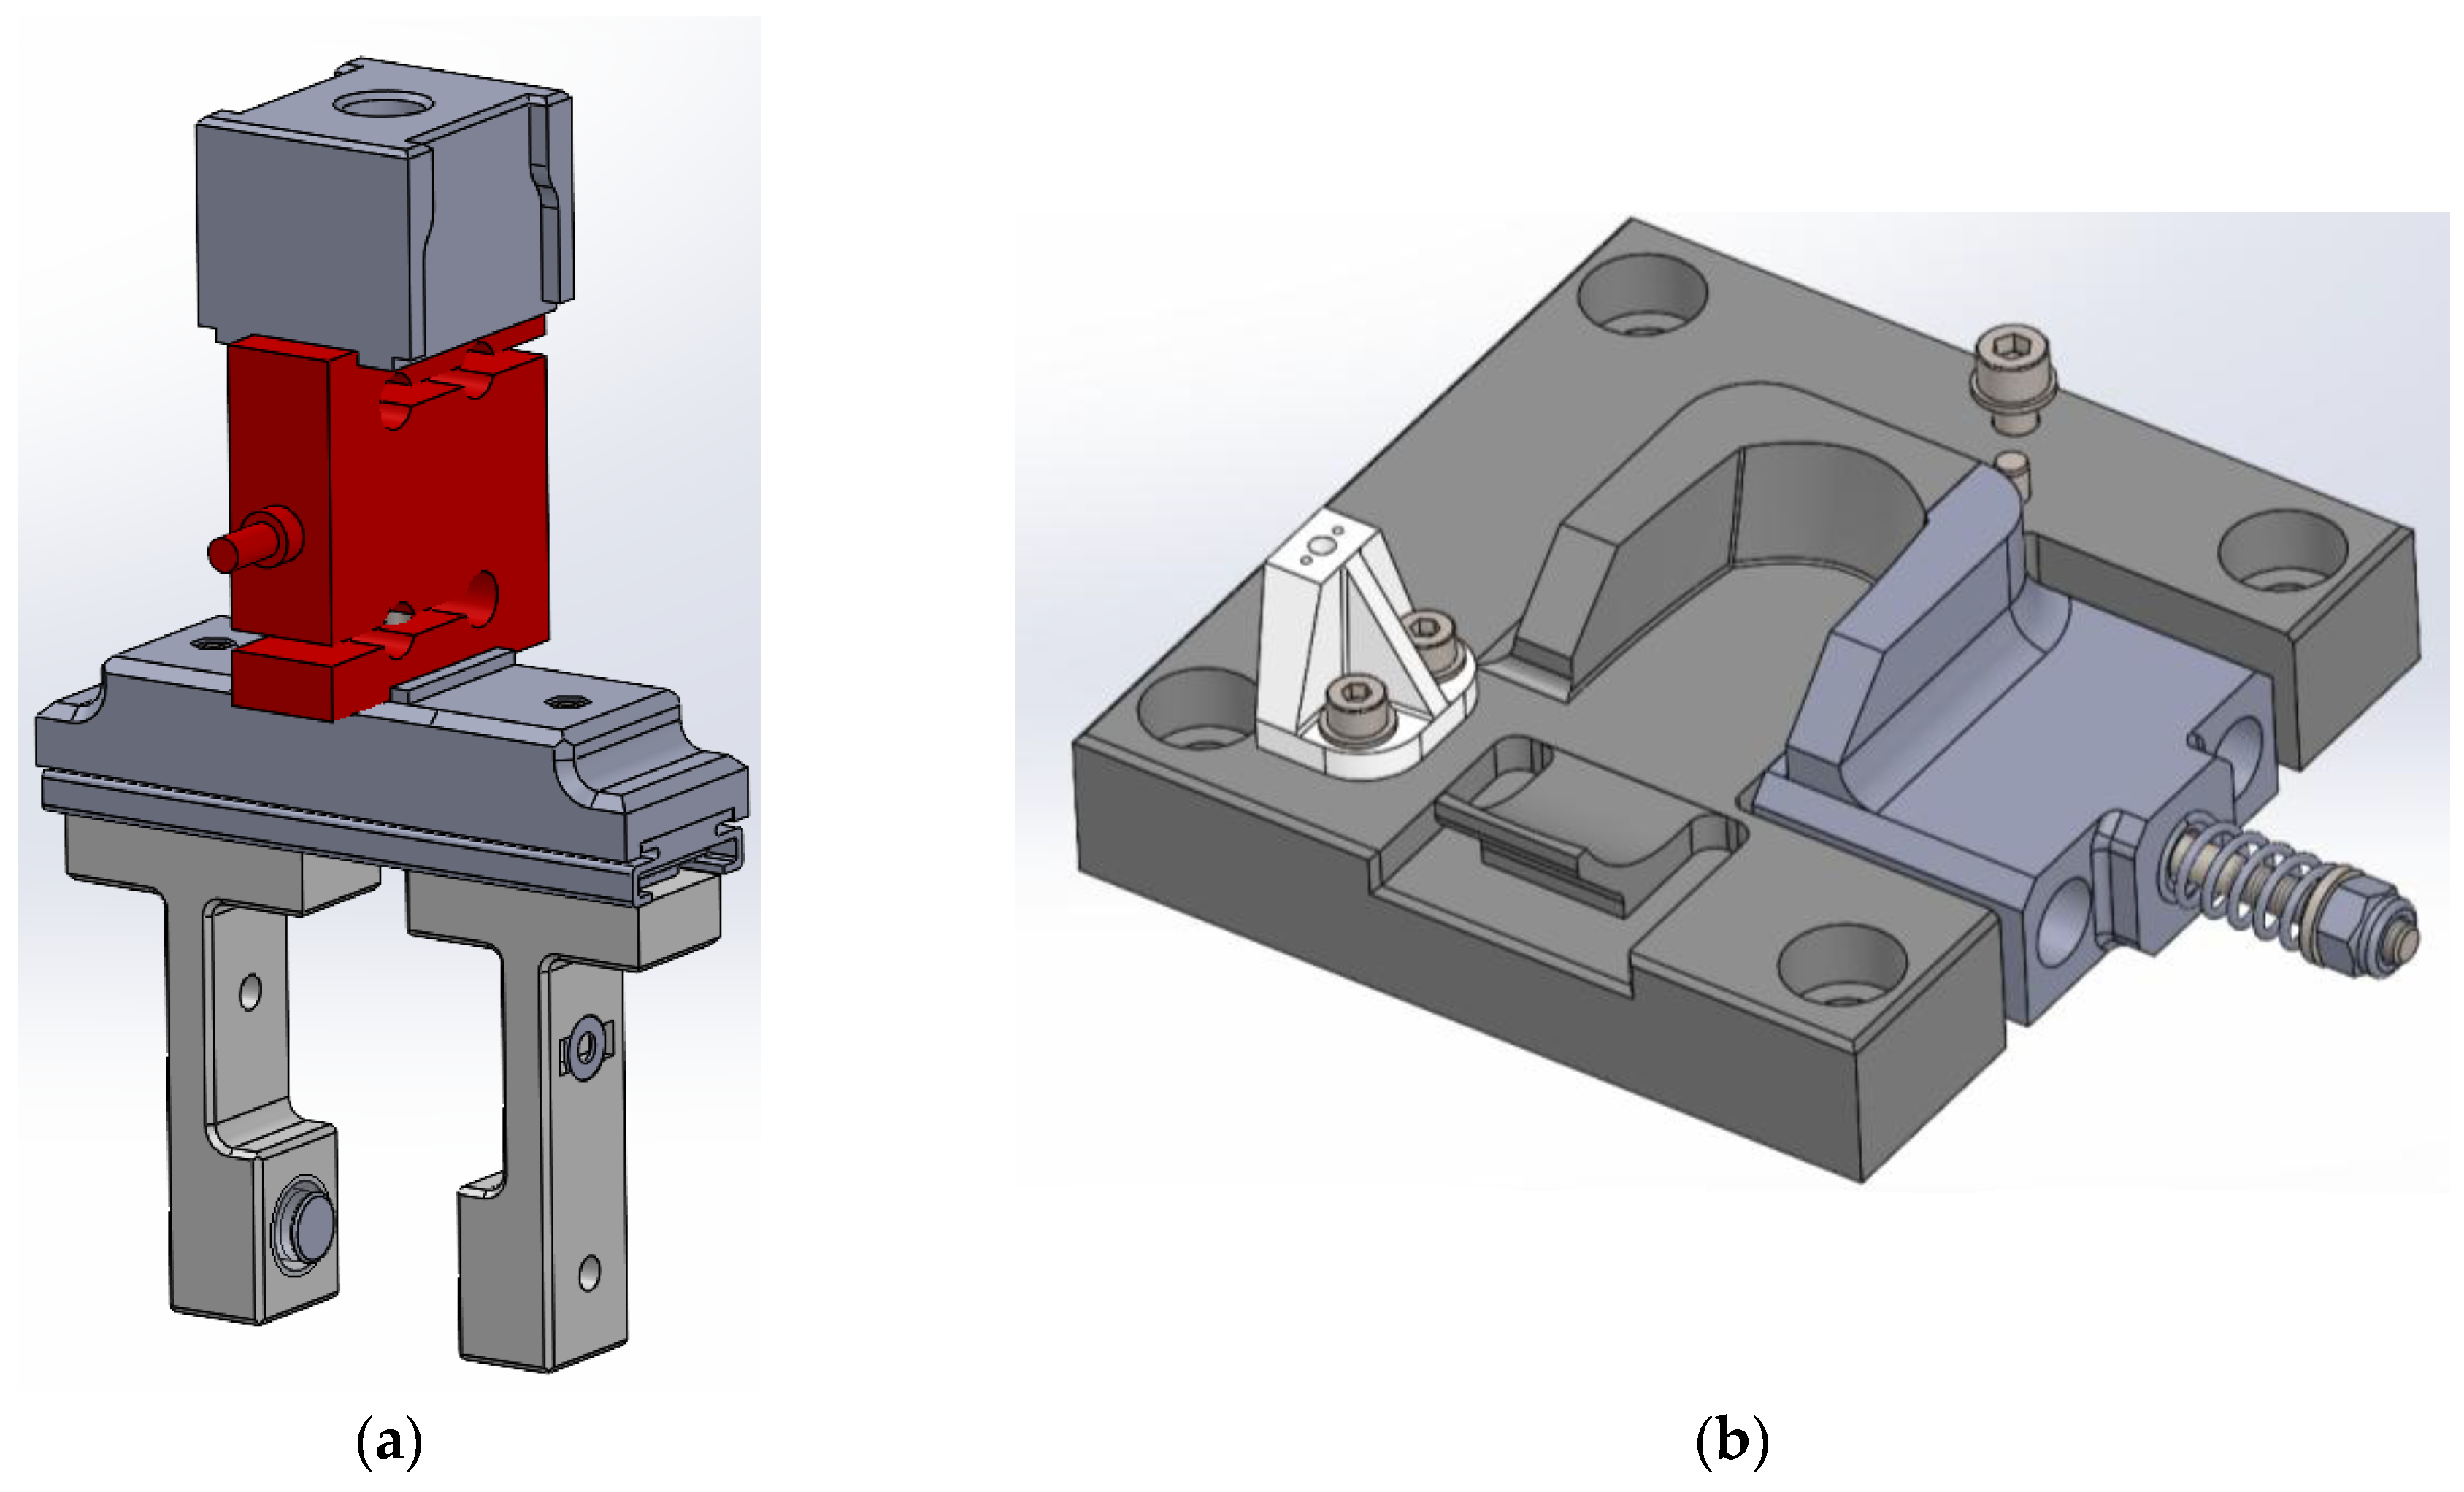
The lower gripper (
Figure 3a) accurately reproduces the shape of the component. The component itself is composed of two shells that can slide relative to each other, thereby generating load at the interface with the component and securing the device in place. The load is elastically applied via a helical spring. The entire lower gripper assembly is fixed to the base.
The upper gripper (
Figure 3b) also applies contact load to ensure sufficient friction for actuation. In addition, adhesive pads are used to reduce the stiffness of the applied load, improve the distribution of the contact area, and provide a minimal adhesive force. The adhesives employed are certified as chemically non-interfering with the thermoplastics used in the device.
The kinematic structure of the upper gripper consists of two floating arms relative to the robot gripping point. This floating configuration ensures automatic centering without the risk of inducing parasitic loads. Between the arm guide and the robot gripper, a load cell is installed. The load cell provides output data regarding the actuation torque.
The trajectory of the robotic arm is programmed to ensure that the axis of the gripper always remains tangent to the device opening path. By maintaining tangency between the gripper position and the circular opening trajectory, radial loads are avoided, and the actuation torque can be extracted directly and reliably from the load cell.
4. Analysis Setup and Robot Interface
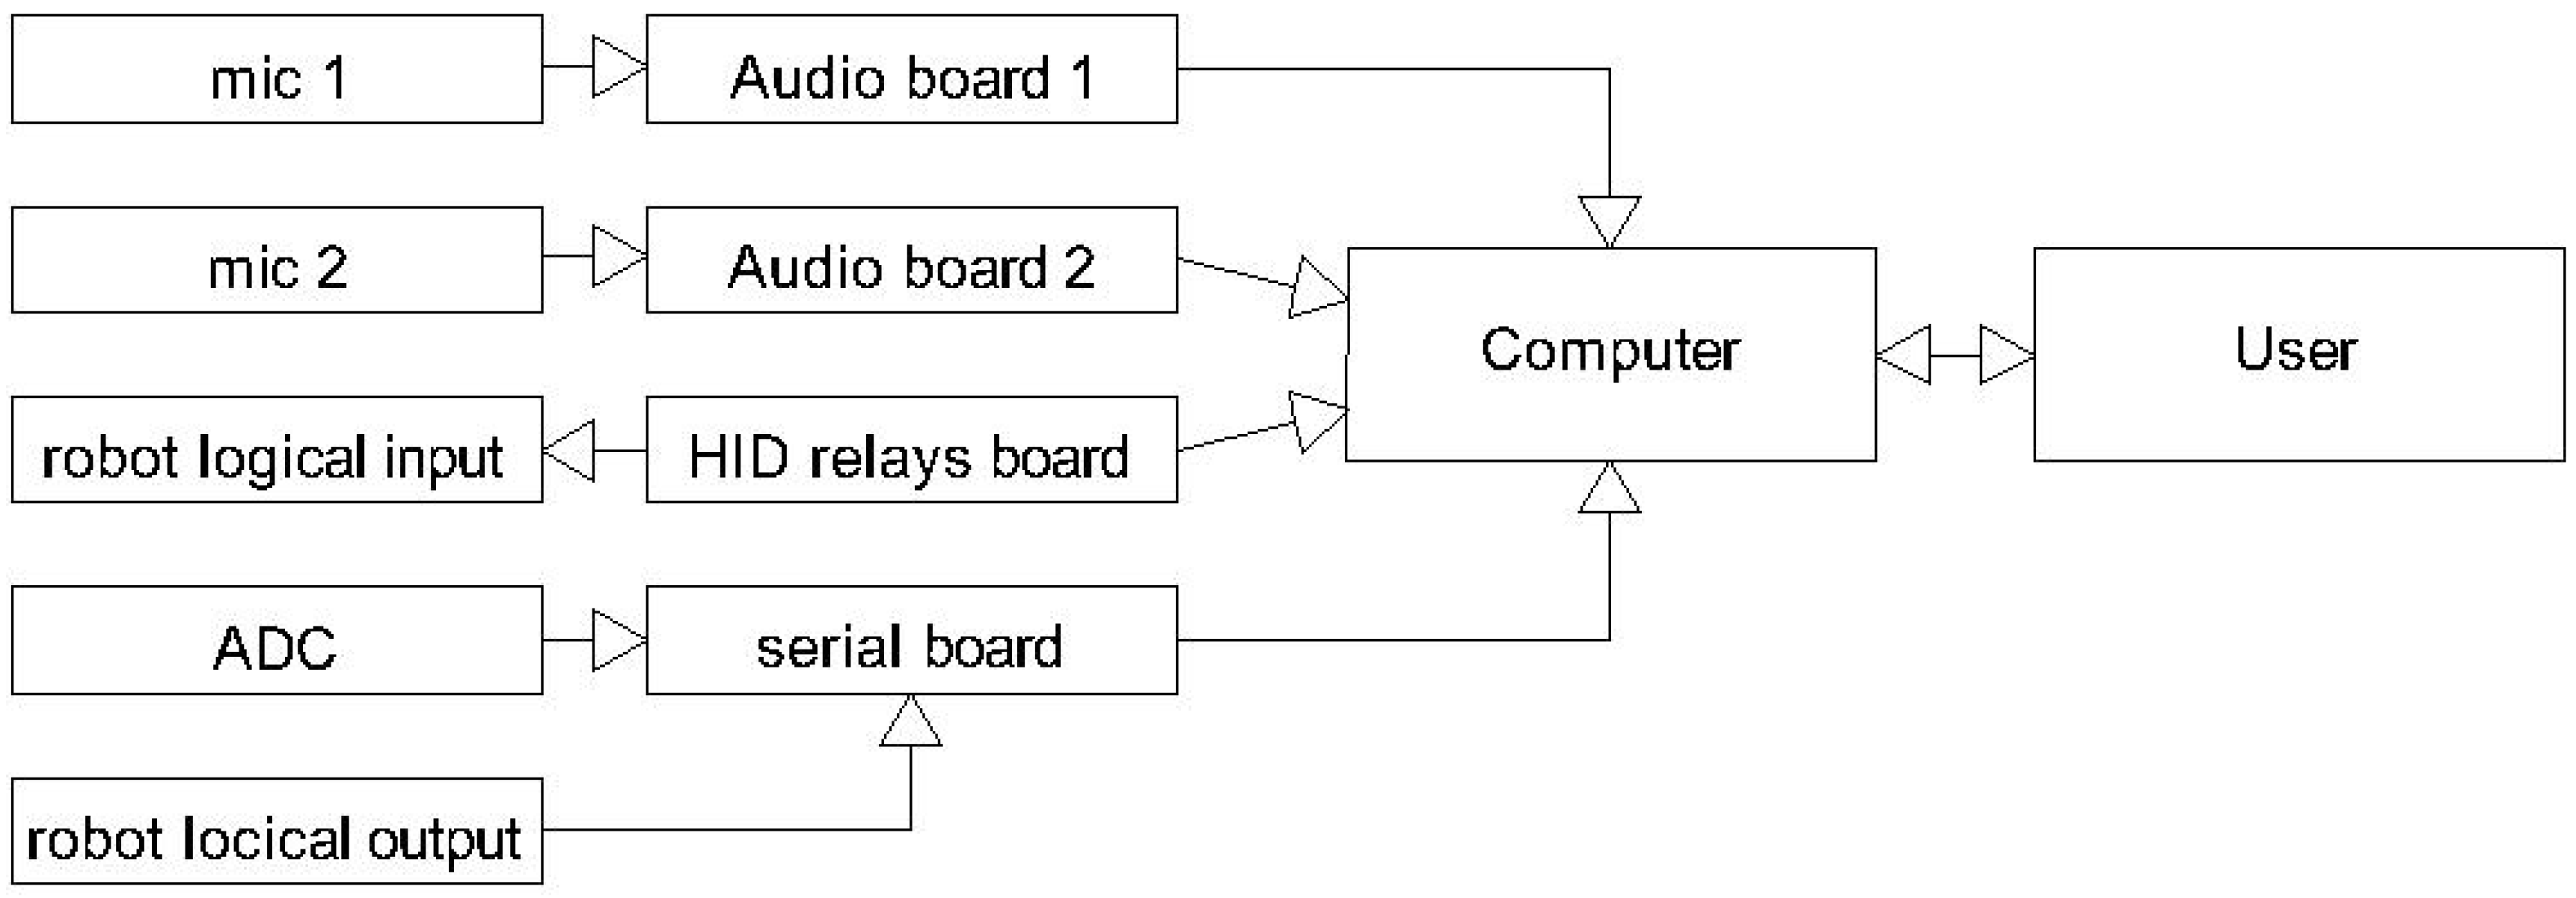
The functional analysis is carried out through the acquisition of three analog signals (
Figure 4):
4.1. Acquisition of Microphone Signals
The environmental microphone was included solely to provide an ambient reference track for use during post-processing. The rationale behind this choice is that, unlike the local capsule microphone, the environmental microphone captures the device signal in a highly attenuated form while strongly amplifying environmental disturbances. For this role, a capacitive cardioid-pattern microphone was selected. It is positioned at a distance from the device, with its direction of minimum sensitivity oriented toward the device itself. This placement is intended to minimize the detection of the device “click” signal.
In contrast, the capsule microphone positioned close to the device is specifically intended to maximize the capture of the device signal while attenuating external noise. This capsule has predominantly directional characteristics and is oriented directly toward the component under test, at just a few millimeters of distance. A foam windscreen was placed over the capsule to eliminate potential air flow noise. However, the controlled laboratory environment in which the tests were conducted made additional precautions unnecessary. In fact, even in the early tests, the recorded signal proved to be remarkably clean [
10,
11].
In this case, the use of an appropriate frequency filter is sufficient to cancel background noise. Indeed, the combination of placing the microphone close to the system relative to the noise intensity, together with adequate gain settings, ensures that the noise has minimal influence on the frequency spectrum of interest. The data collected from the environmental microphone are useful for future studies aimed at evaluating the possibility of improving a noise-canceling model by combining signals from both the environmental and local microphones. Implementing a noise-canceling algorithm would further expand the applicability of this test rig.
The two microphones are acquired through separate audio interfaces, while the load cell signal is acquired via an analog-to-digital converter (ADC). The environmental microphone requires +48 V phantom power, supplied directly by the acquisition interface. The capsule microphone also requires phantom power, but at a significantly reduced level of approximately 4 V. Therefore, a suitable voltage reducer was introduced.
Both supply voltages are derived from their respective audio interfaces. This ensures that the ADCs share the same voltage reference as that which powers the microphones, thereby eliminating the risk of amplitude drift caused by supply voltage variations. If an external circuit had been used, small fluctuations in supply voltage—likely to differ between the ADC and the power supply unit (assuming two separate devices)—could have introduced unpredictable amplitude errors. The issue is resolved by maintaining proportionality between the microphone supply voltage and the reference voltage of the acquisition board [
12].
The solution required the inclusion of a component to step down the supply voltage for the capacitive capsule microphone, since high-performance commercial audio interfaces typically provide only +48 V phantom power.
Both audio interfaces used are capable of 24-bit, 192 kHz acquisition. However, after initial testing, it was determined that the problem under investigation could be adequately addressed using 16-bit, 44 kHz sampling. This was advantageous in terms of data storage requirements. It was estimated that the full test campaign on 89 components, with 40 min trials, generated approximately 1.8 TB of data. The data are stored as binary vectors in HDF-format data frames, without any lossy compression algorithm. For this reason, storage requirements are not comparable to typical audio files such as WAV, where compression or reduced resolution is often applied.
4.2. Load Cell Acquisition
The load cell is used both to monitor the evolution of the device resistant load and to prevent forcing the device into closure in the event of damage leading to mechanical blockage. The chosen sensor is a conventional S-type load cell with a full scale of 2 kg. Electrically, the cell is configured as a full-bridge type and is supplied with a calibration certificate, which allows for its use without the need for additional calibration. The load cell is an AEP transducer with a sensitivity of 2 mV/V and an uncertainty of 0.002%.
The analog-to-digital conversion is performed using the Texas Instruments ADS1220, a 24-bit Sigma-Delta ADC [
13,
14]. For this application, it is configured in single differential channel mode with a 5V reference voltage. Communication with the PC is handled via an Arduino Mega 2560, which communicates with the ADC through SPI and is responsible for
Setting the ADS1220 registers;
Reading and packaging data from the ADC;
Reading the robot status contact.
The analog signal is acquired at 24-bit resolution and 330 samples per second. The Arduino communicates with a Python 3.12 software, running on the setup computer, via a serial port, transmitting hexadecimal strings. Each packet contains the robot contact status, the value acquired by the ADC, and the timestamp associated with the value. The ADC provides a data-ready (DRDY) pin, which ensures that the buffer is not overwritten until the value is read. This guarantees synchronization with the circuit clock, but it is not sufficient to ensure the exact temporal position of the samples. Relying solely on the Time Sample field recorded in the register to reconstruct the time series could lead to two problems:
Propagation of a time error, caused by even small discrepancies in the actual sample time;
Loss of traceability of a missed acquisition, e.g., due to a full buffer.
To mitigate this issue, the Arduino is configured with an interrupt driven by the DRDY pin, helping to compensate for potential systematic errors in the temporal alignment of the samples.
Two additional digital signals—test start and emergency contact—are managed via an external HID relay board. The choice to use a separate relay board rather than integrating these functions into the Arduino + ADC circuit was motivated by two reasons: ensuring an additional technology option for future applications and guaranteeing access to the emergency contact even if the Arduino + ADC system were to lock up. In this regard, the use of an HID device is advantageous due to its versatility, ease of implementation, and fast deployment. Numerous libraries are available depending on the intended application.
All I/O signals are managed by Python programs running concurrently on the same computer. These programs are responsible for
Ensuring correct timing of signals;
Executing the required operations;
Detecting the presence or absence of failure conditions;
Managing the test sequence (cycle counting, robot start/stop, etc.).
The software logic is described in detail in the following section.
5. Software Logic
The software can be divided into three main interfaces:
The last two points are invoked by the user through the cycle manager.
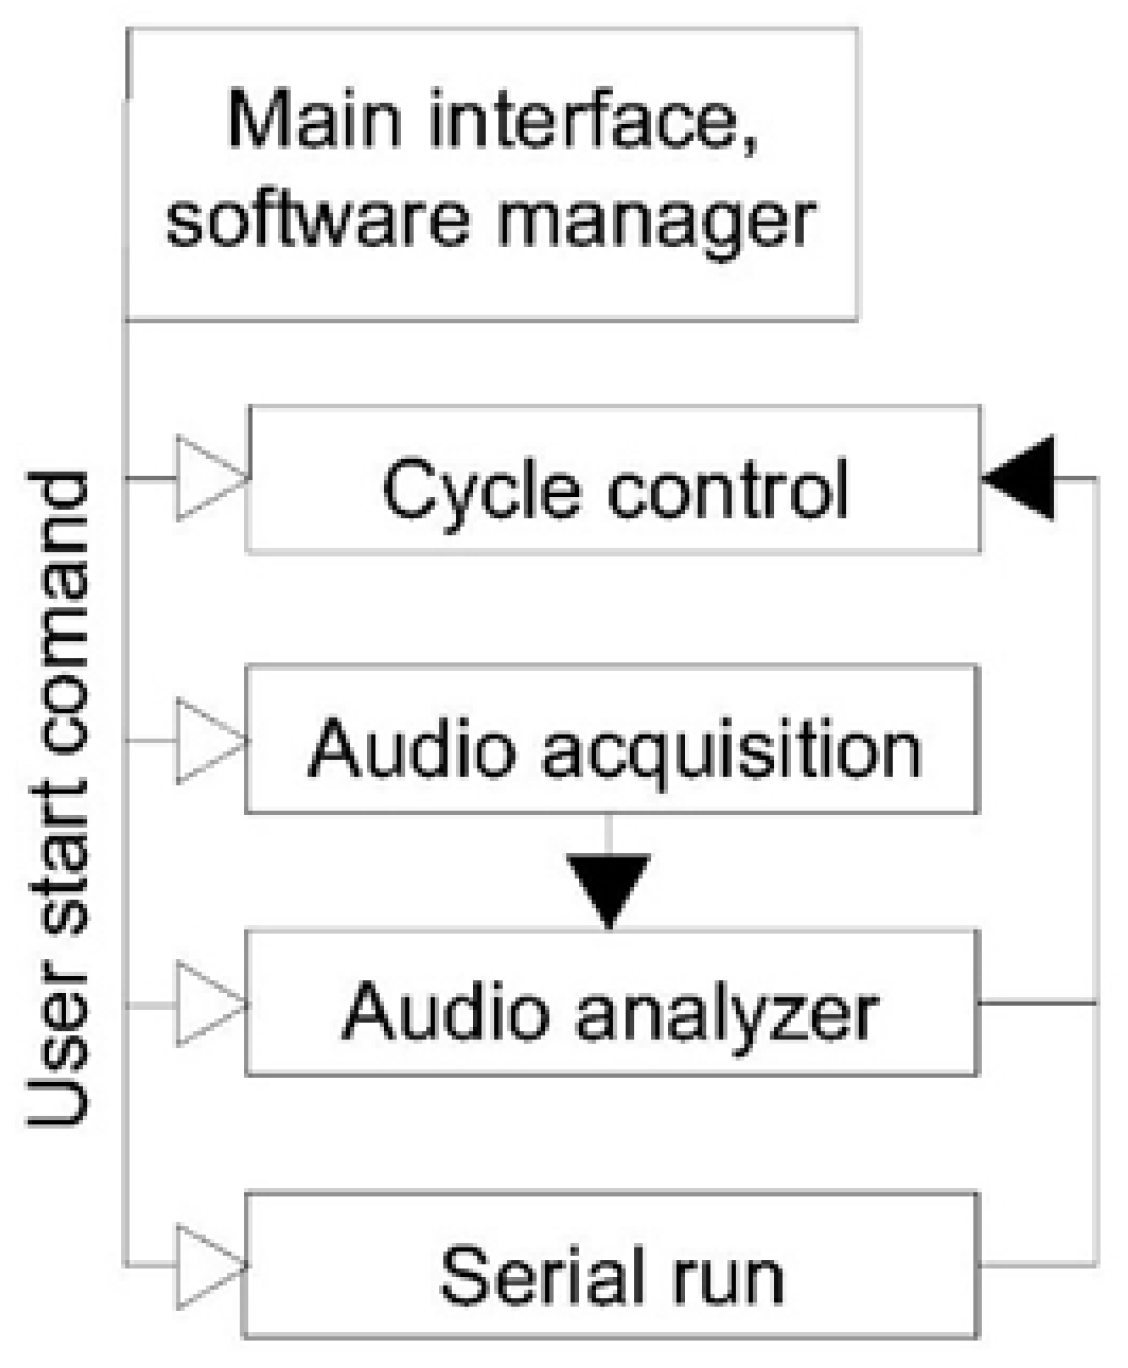
In the software diagram (
Figure 5), hollow arrows represent user commands, while solid arrows indicate the flow of information exchanged between the different software blocks.
The Cycle Control block outputs directly to the Main Interface. The main interface contains both the commands for starting and stopping the other applications and the commands for managing the test cycle.
The audio acquisition system does not directly generate an output visible to the user; therefore, a semaphore was added to the main interface to confirm its activation. The acquisition tool produces packets addressed to the audio analyzer, which are then used to generate the reference outputs.
5.1. Cycle Manager
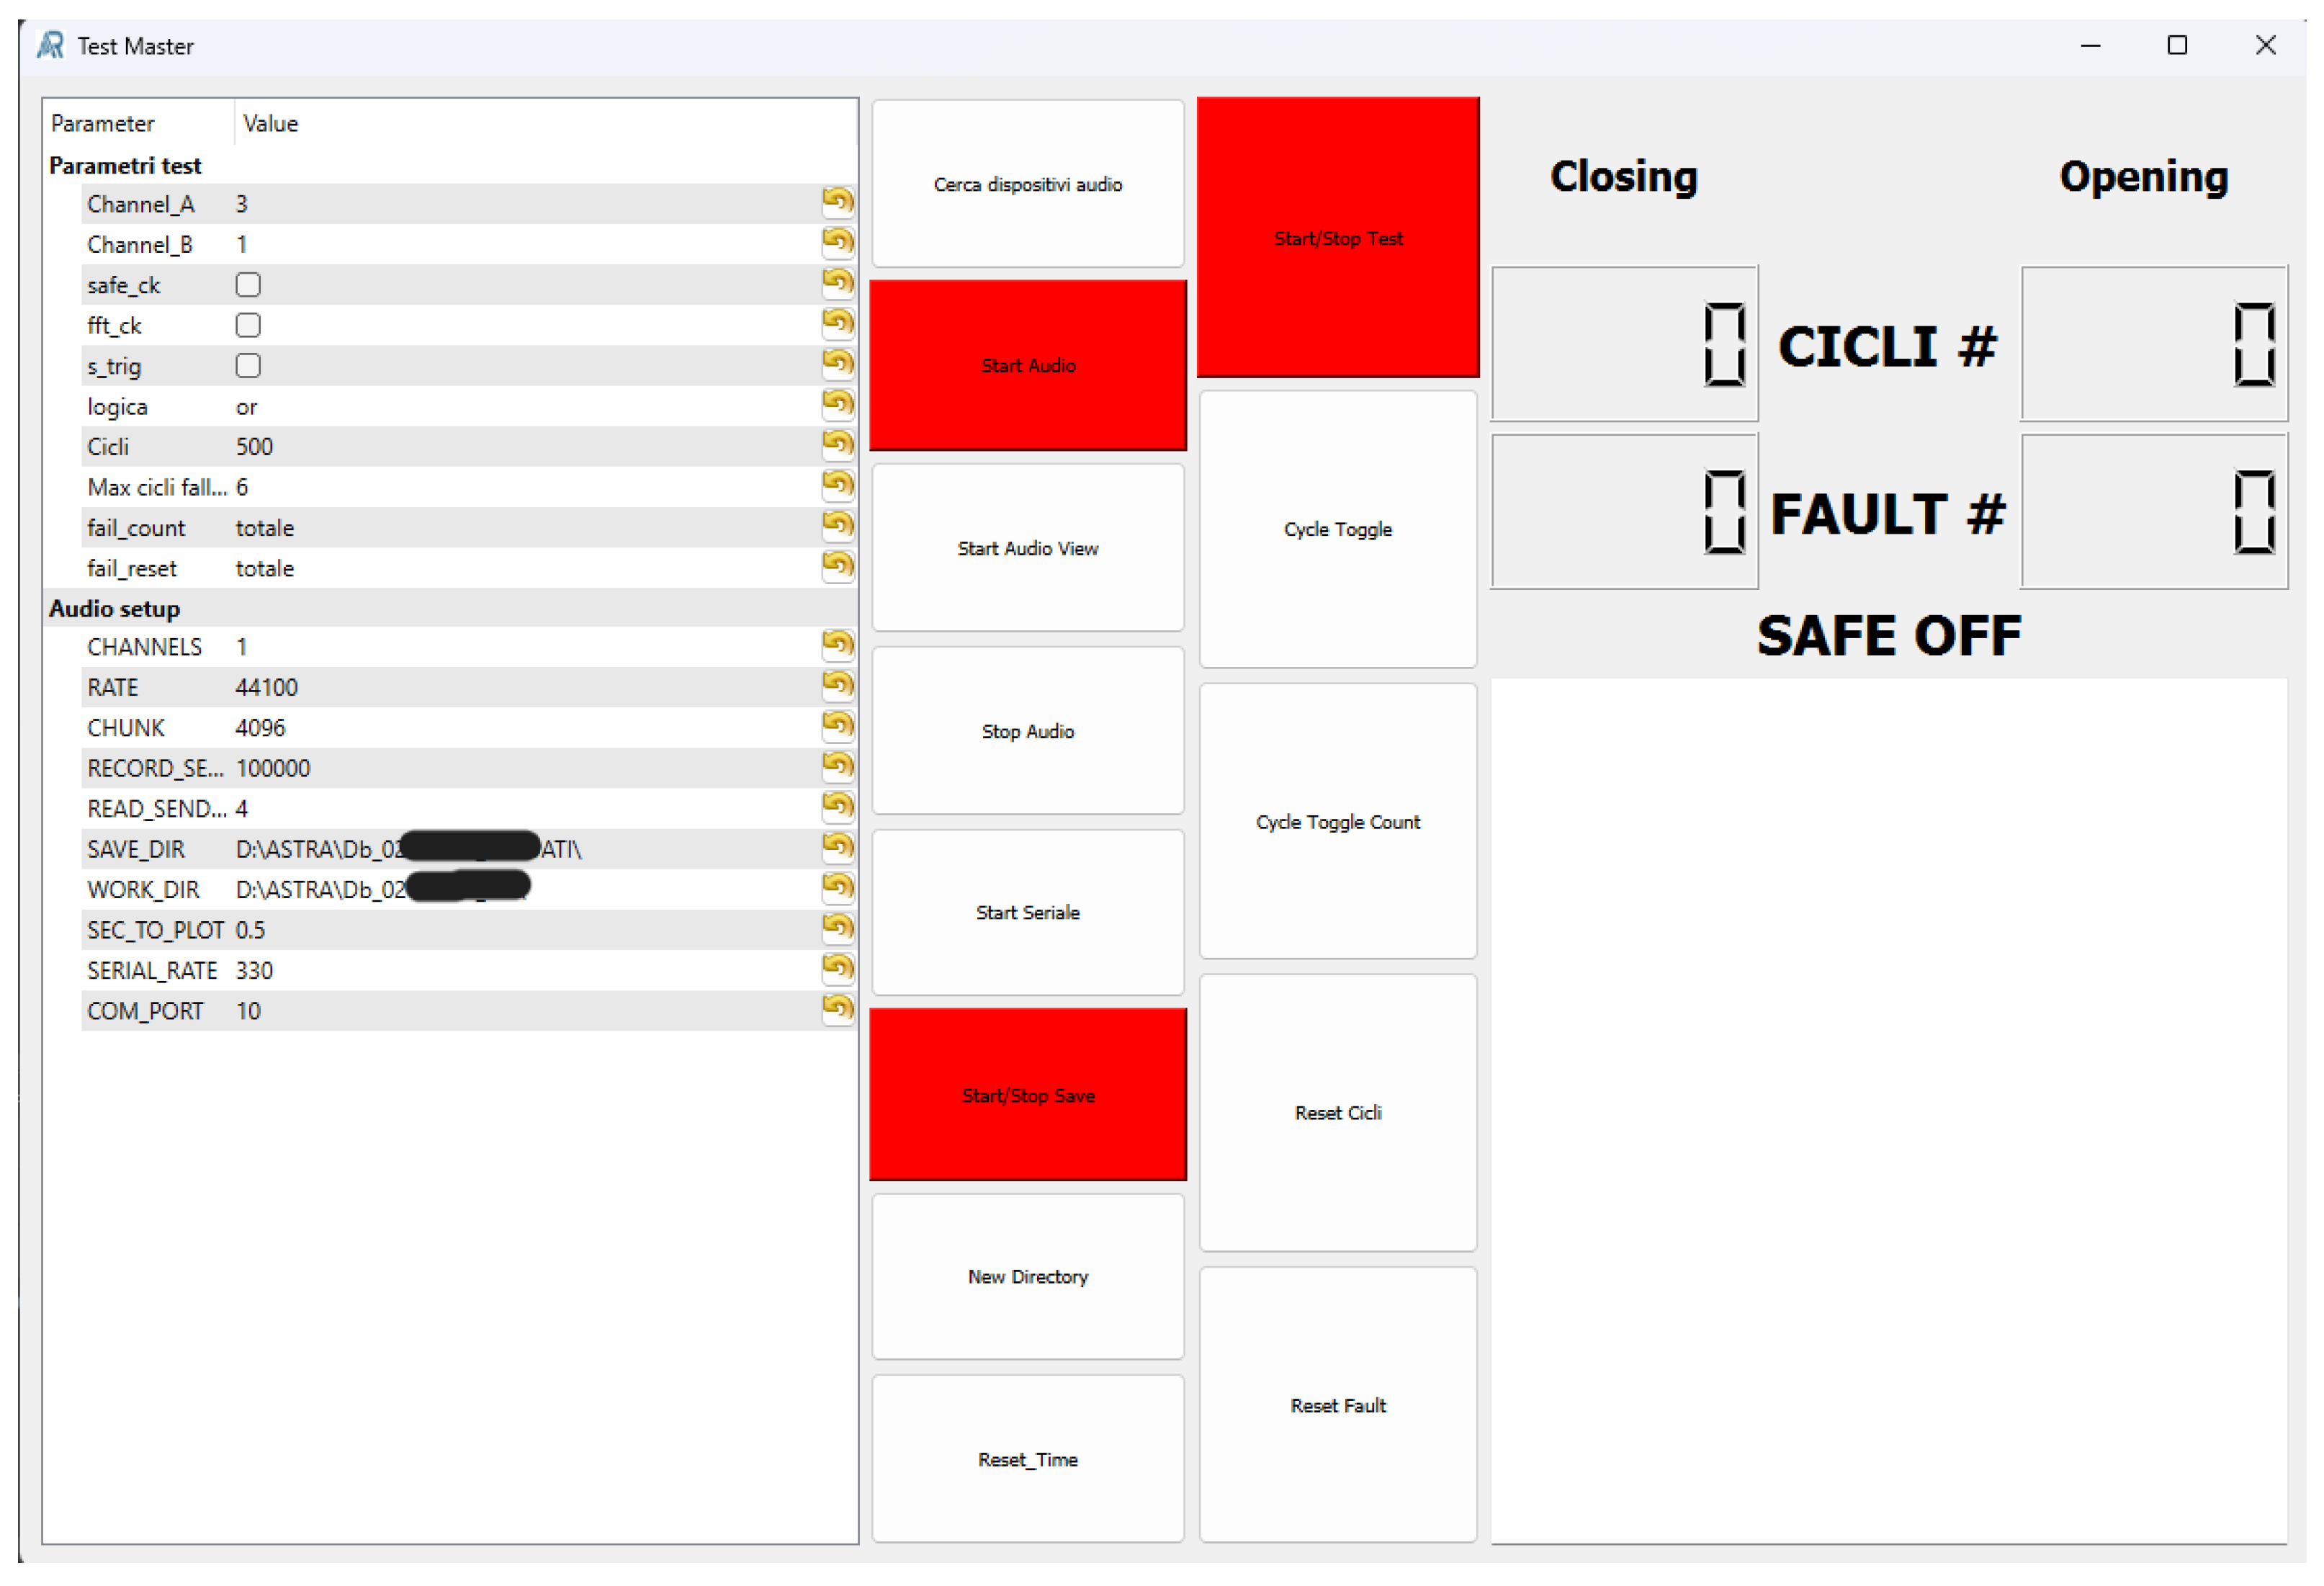
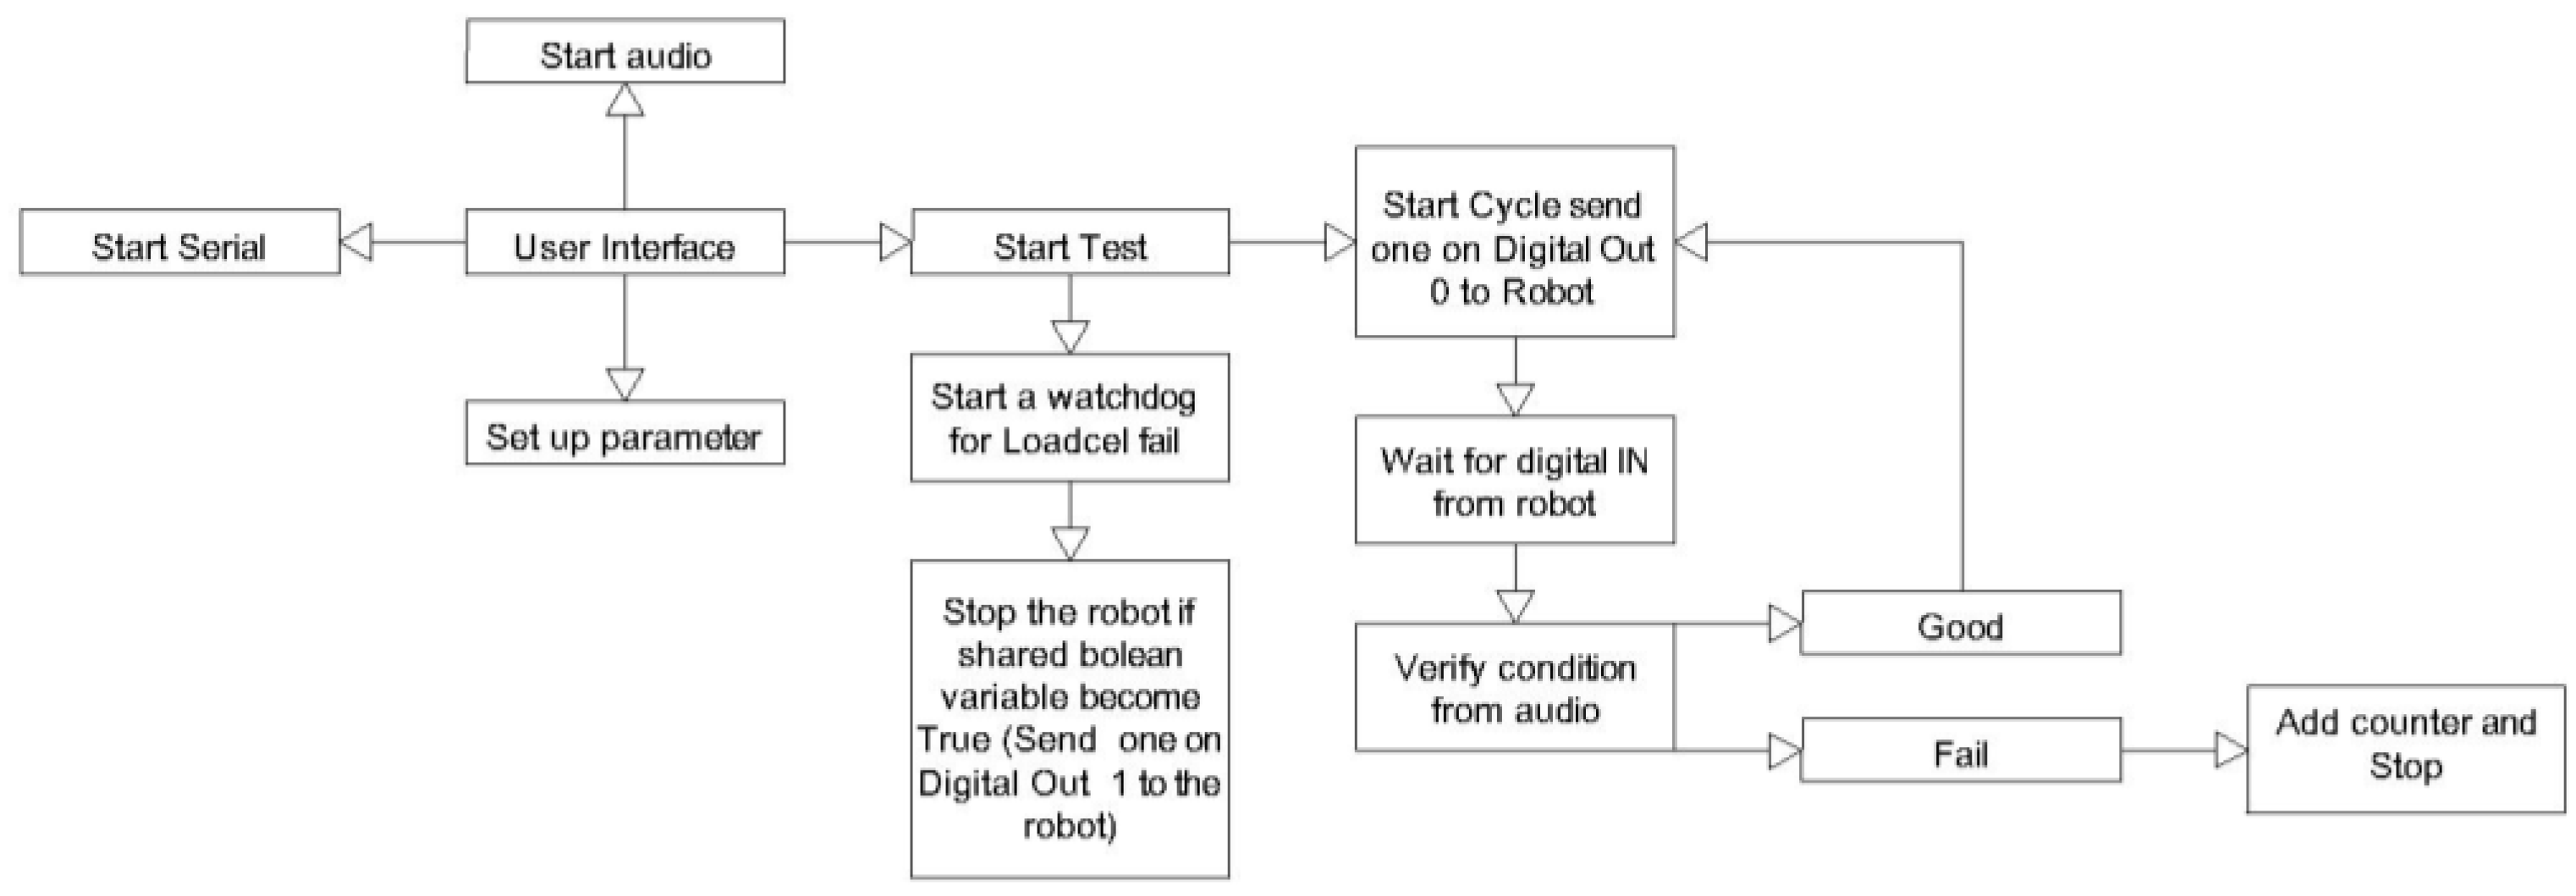
The cycle management interface is the first program launched at startup. It functions both as the main user interface and as the cycle manager (
Figure 6). The areas in red indicate that the corresponding tools are inactive; they turn green when the tools are started.
Within this program, the following tasks are performed:
Input of test parameters;
Communication with the robot;
Management of test start, stop, and safe shutdown;
Logging of test execution.
The user interface shown in the diagram (
Figure 7) represents the main interface, which controls the startup of the other applications as well as the cycle parameters. From this interface it is possible to configure the pre-launch settings of the various software submodules (such as serial ports, sampling frequencies, etc. Once all the necessary systems have been initialized, the user can configure the cycle and start the test.
The cycle configuration has been designed to be as general as possible. Among the required parameters for test automation, the most important are
Cycle limit;
Failure logic.
The upper cycle limit defines the maximum number of cycles, beyond which the test loses significance regardless of whether a failure has occurred. Cycles are categorized into opening and closing phases. Ideally, in cyclic actuation, the mechanism should return to its starting position at the end of each cycle. However, in cases where intermediate positions exist, it may be useful to split the cycles into sub-cycles.
The failure logic requires several parameters to be configured:
Failure detection strategy;
Tolerance time (in cycles) before stopping;
Reset strategy if the tolerance time is not exceeded.
The failure detection strategy defines which features are monitored to declare a component as failed. In this work, amplitude and frequency checks are performed. The user can choose whether to monitor one, both, or apply logical combinations (OR/AND) between them [
15].
The failure tolerance time, expressed in cycles, sets the number of consecutive failures required before declaring a definitive failure. This avoids stopping the test due to spurious measurement errors or transient information loss, while keeping the margin of error very small and limited to a few cycles. This tolerance can be disabled by setting it to zero. It is important to note that this mechanism does not override safety checks: once a safety condition is triggered, the test stops immediately regardless of tolerance settings.
The reset strategy defines how the system exits the failure tolerance window. Since each cycle can be split into two sub-cycles, i.e., opening and closing, the user can specify whether the reset condition should be evaluated on a single sub-cycle or on the entire cycle. This tolerance ensures that the test does not stop when an isolated error is detected. Because this tolerance is known and very small, it does not affect the test results.
At the end of the test, the tool generates a log file, where each executed sub-cycle is recorded as a row.
Each log entry includes the following:
5.2. Audio Acquisition and Analyzer
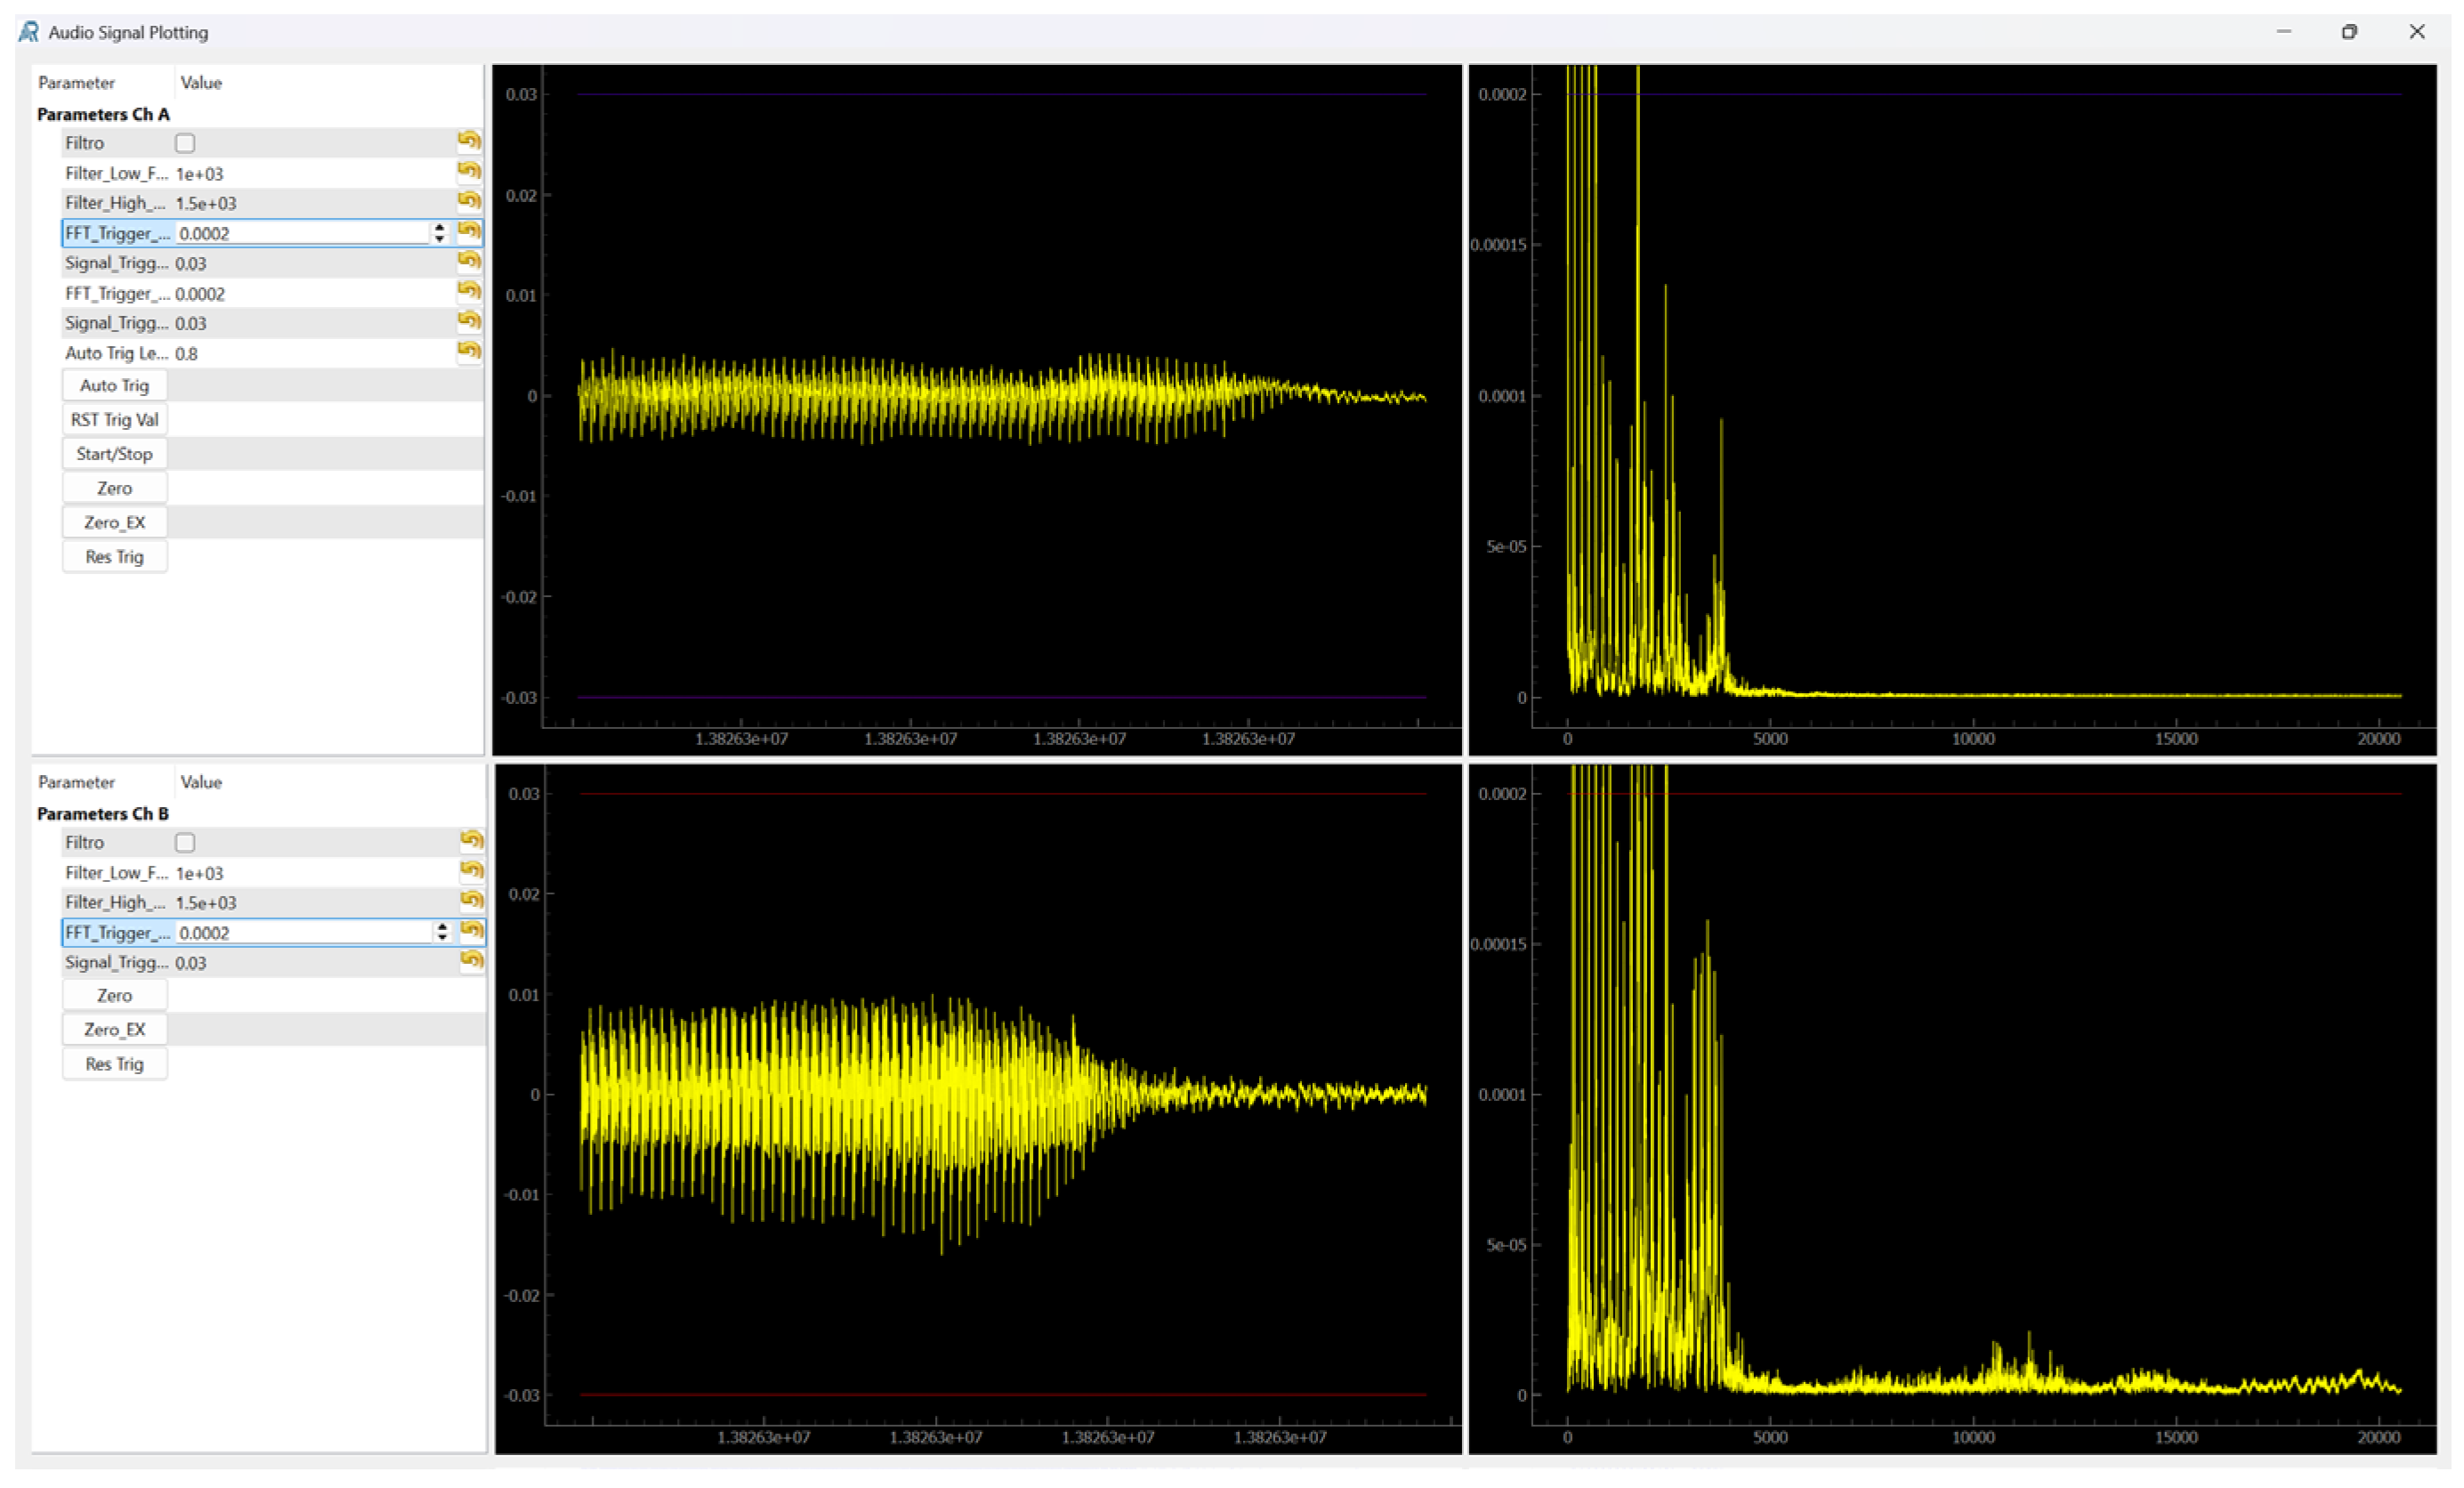
The user interface for the audio analyzer comprised a detection-parameter setting area and a visualization of time-domain signals and frequency-domain computations (
Figure 8).
The main challenge in this part of the system is ensuring that all audio packets are preserved (i.e., preventing the loss of temporal segments) while maintaining a sufficiently low latency to allow for real-time usability.
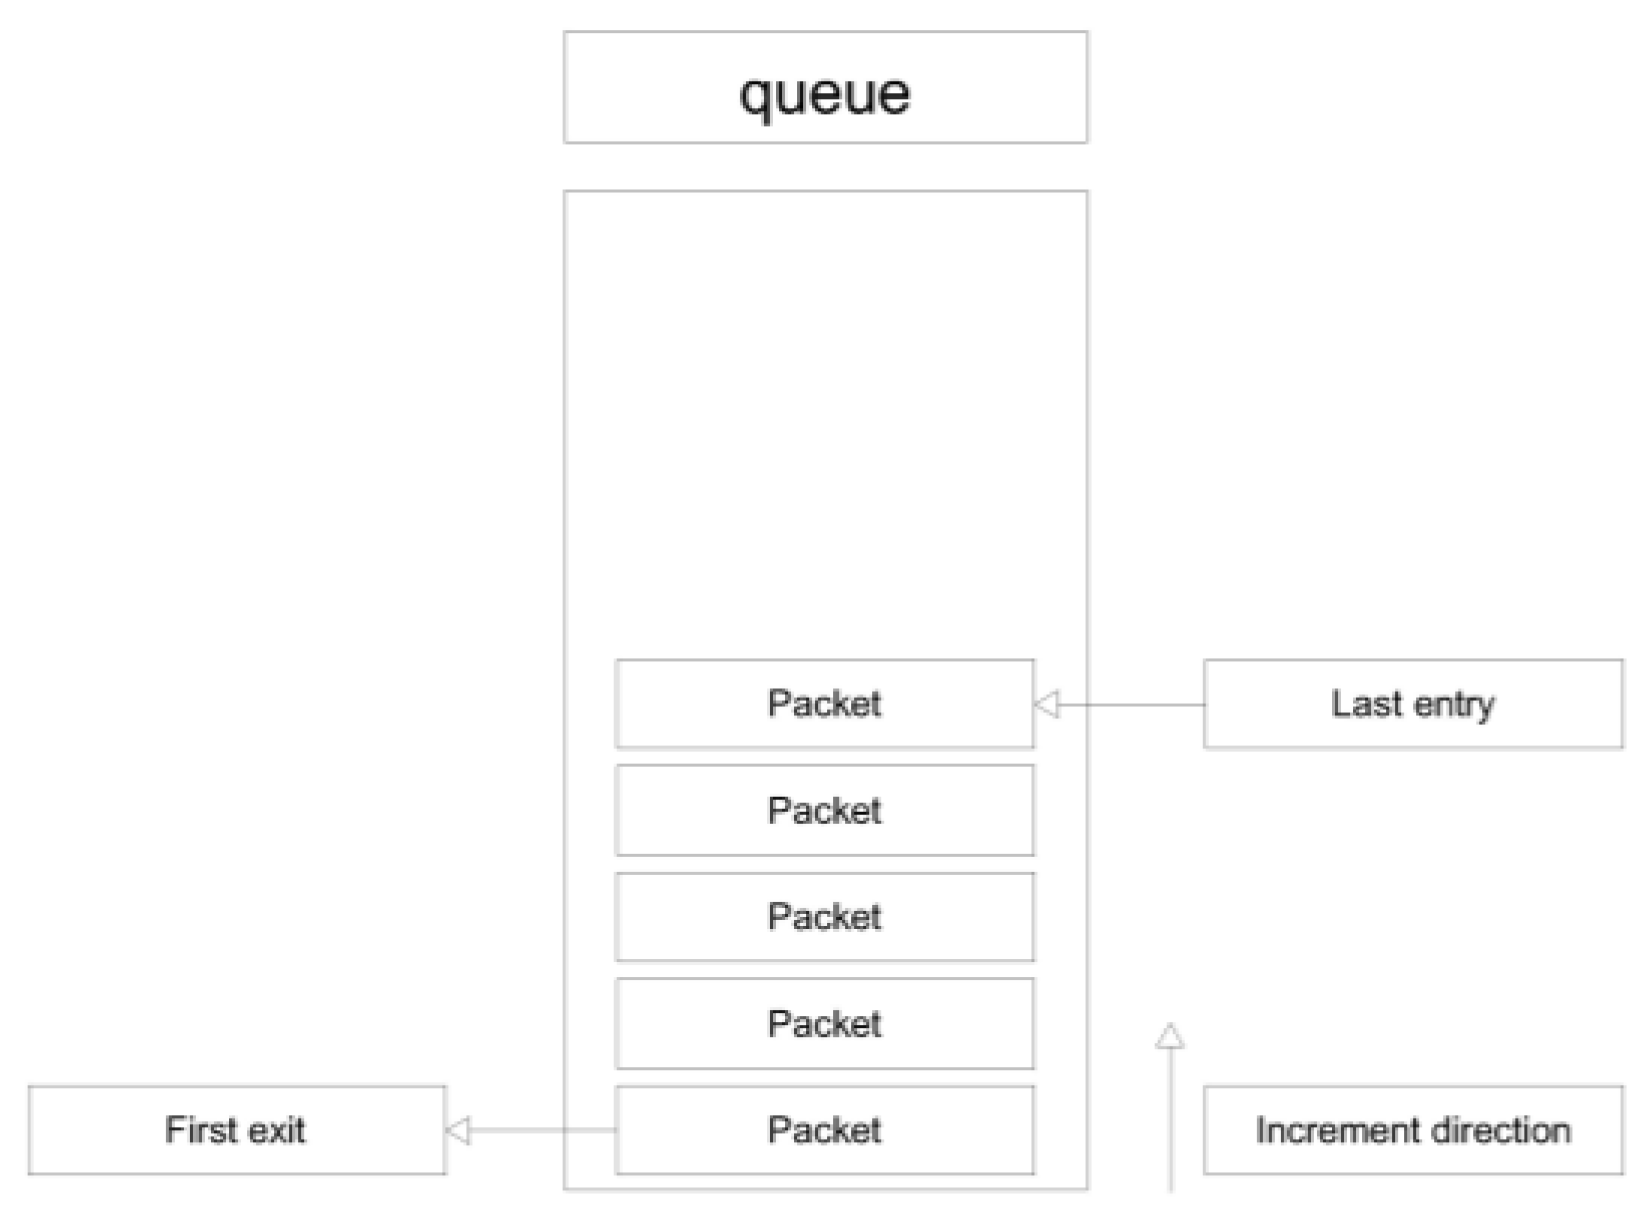
To address this issue, the system extensively relies on the queue principle (
Figure 9).
The queues are of the FIFO type (First-In-First-Out), allowing for processes to operate independently so that a slowdown in one stage does not block the previous one. This approach prioritizes data integrity (no packet loss) at the expense of a slightly less strict real-time performance. In other words, the system guarantees that the entire timeline of interest is processed, with latency between acquisition and output depending on the available computational power [
16,
17].
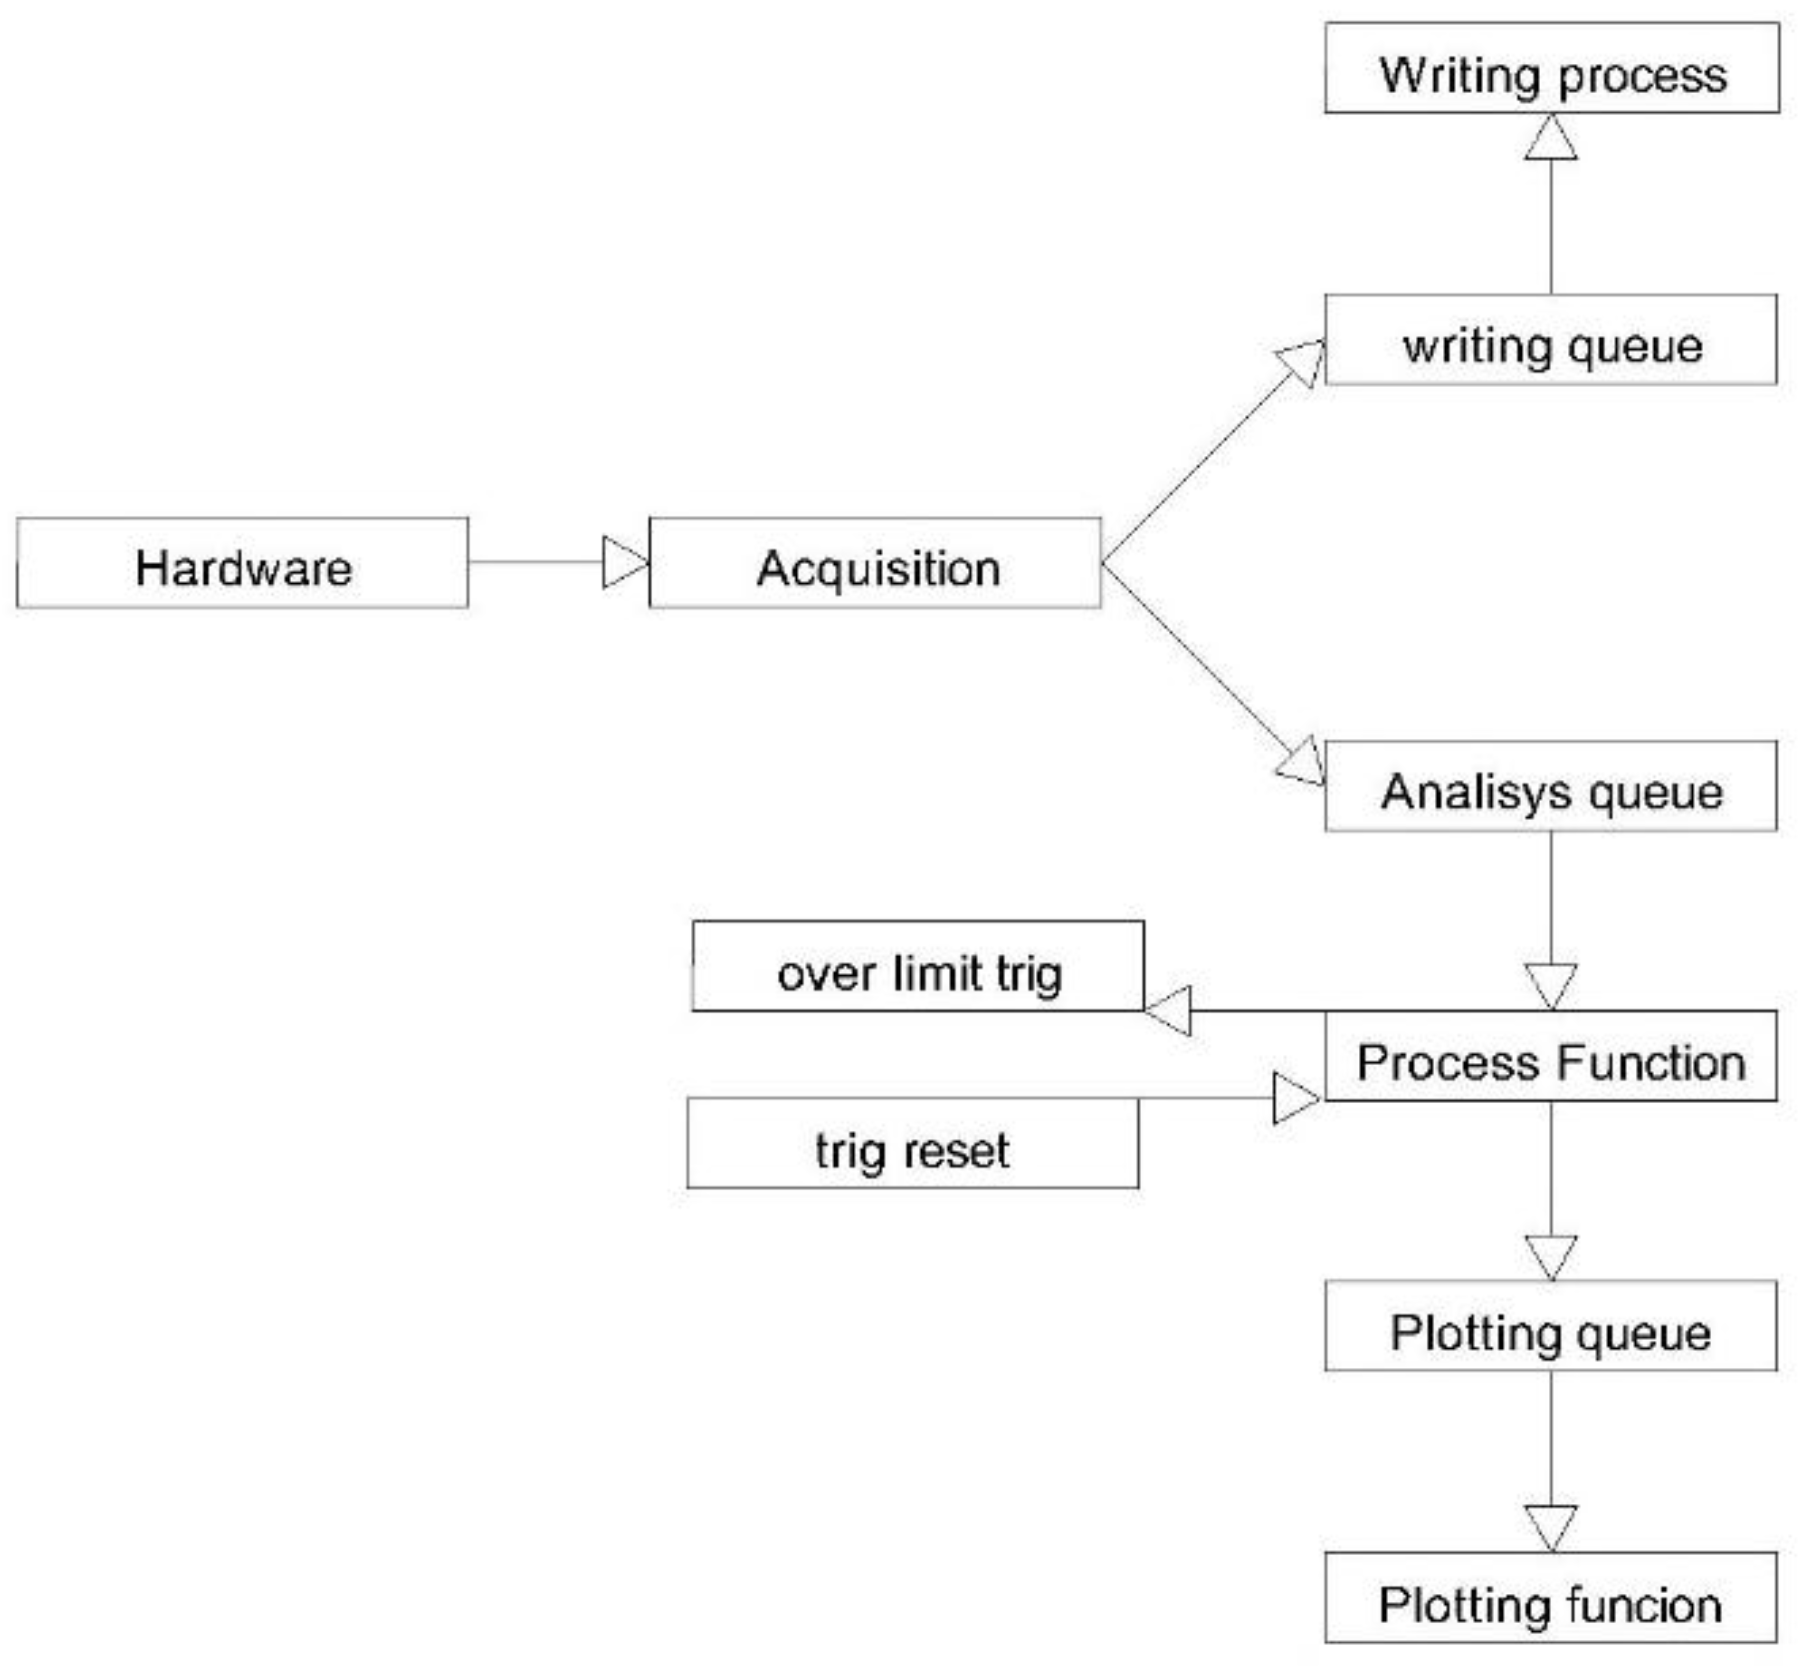
The following functions are executed for each channel involved in the test (
Figure 10).
A timestamp is assigned to every acquired audio packet. Since each packet contains a defined number of samples and a fixed sampling frequency, the corresponding time vector can be reconstructed. Tests were conducted to check for reconstruction errors by comparing the expected acquisition period with the time delta between the last sample of one packet and the first sample of the next one. These tests, performed across different sampling frequencies with random input signals of varying amplitude, showed errors only within numerical precision limits. This means that the hardware system is adequate for the required operating conditions.
In the Writing Process, acquired RAW data are written directly to the disk without conditioning. Data are grouped into fixed-length blocks, and upon completion of each block, the function writes a Data Frame into an HDF (h5) file.
This process generates multiple files during the test, each with a fixed number of samples. At the end of each test, all files are merged into one using an appropriate tool. This ensures that any occurrences during the test do not compromise the data already written in the previous files. In the processing sequence, the signal is analyzed both in the time domain and in the frequency domain. The objective is to determine whether a minimum amplitude threshold is exceeded, thereby validating whether the component has operated correctly.
For each packet, the processing pipeline consists of
Band-pass filtering;
FFT computation;
Threshold comparison.
Filtering is performed using two consecutive 10th-order Butterworth filters (low-pass and high-pass) to isolate the band of interest.
The FFT is executed with redundancy factor 4 (see
Figure 11).
Each time a new packet is available, an FFT is computed including the current packet and the previous three. Given that each packet spans a duration T,
AcqFilt(0, 4T) → FFT(0);
AcqFilt(T, 4T + T) → FFT(1);
AcqFilt(2T, 4T + 2T) → FFT(2);
…
Here, AcqFilt(t) is the time-domain filtered acquisition vector, and FFT(n) is the matrix of transforms (dimensions: m = 2T, n = processed packets—3) [
18,
19,
20,
21].
This method ensures that at least one transform fully contains the signal of interest. Since successive transforms overlap in time, the amplitude evaluation remains stable. For this reason, windowing functions are not used, as they would introduce uncertainty depending on whether the signal of interest falls within the same window segment, potentially causing amplitude errors. The windowing algorithm used in this case does not combine the FFTs with each other; it is only applied to ensure that the click signal is fully captured within a single FFT window.
Once the sequence of FFTs is obtained, both the time-domain and frequency-domain results are compared against predefined thresholds. When the thresholds are exceeded, two shared Boolean variables (“success”) are triggered: one corresponding to the time-domain check, the other to the frequency-domain check.
With this configuration, the average lag from the acoustic occurrence to the triggering event is approximately 400 ms. However, this value is strongly influenced by the window size and the hardware capabilities. In particular, the window size directly affects the time lag, as it is necessary to wait for the acquisition to complete before performing the analysis. At the same time, the minimum window size is constrained by the duration of the acoustic event.
After verifying these “success” variables, the cycle controller resets them to zero and instructs the robot to proceed with the next cycle [
22].
5.3. Serial Port Analyser
The serial port analyzer performs the following tasks:
Reading the load cell signal;
Plotting it as a time-domain graph;
Comparing it against predefined threshold values (specifically, protection limits);
Reading the status of digital inputs.
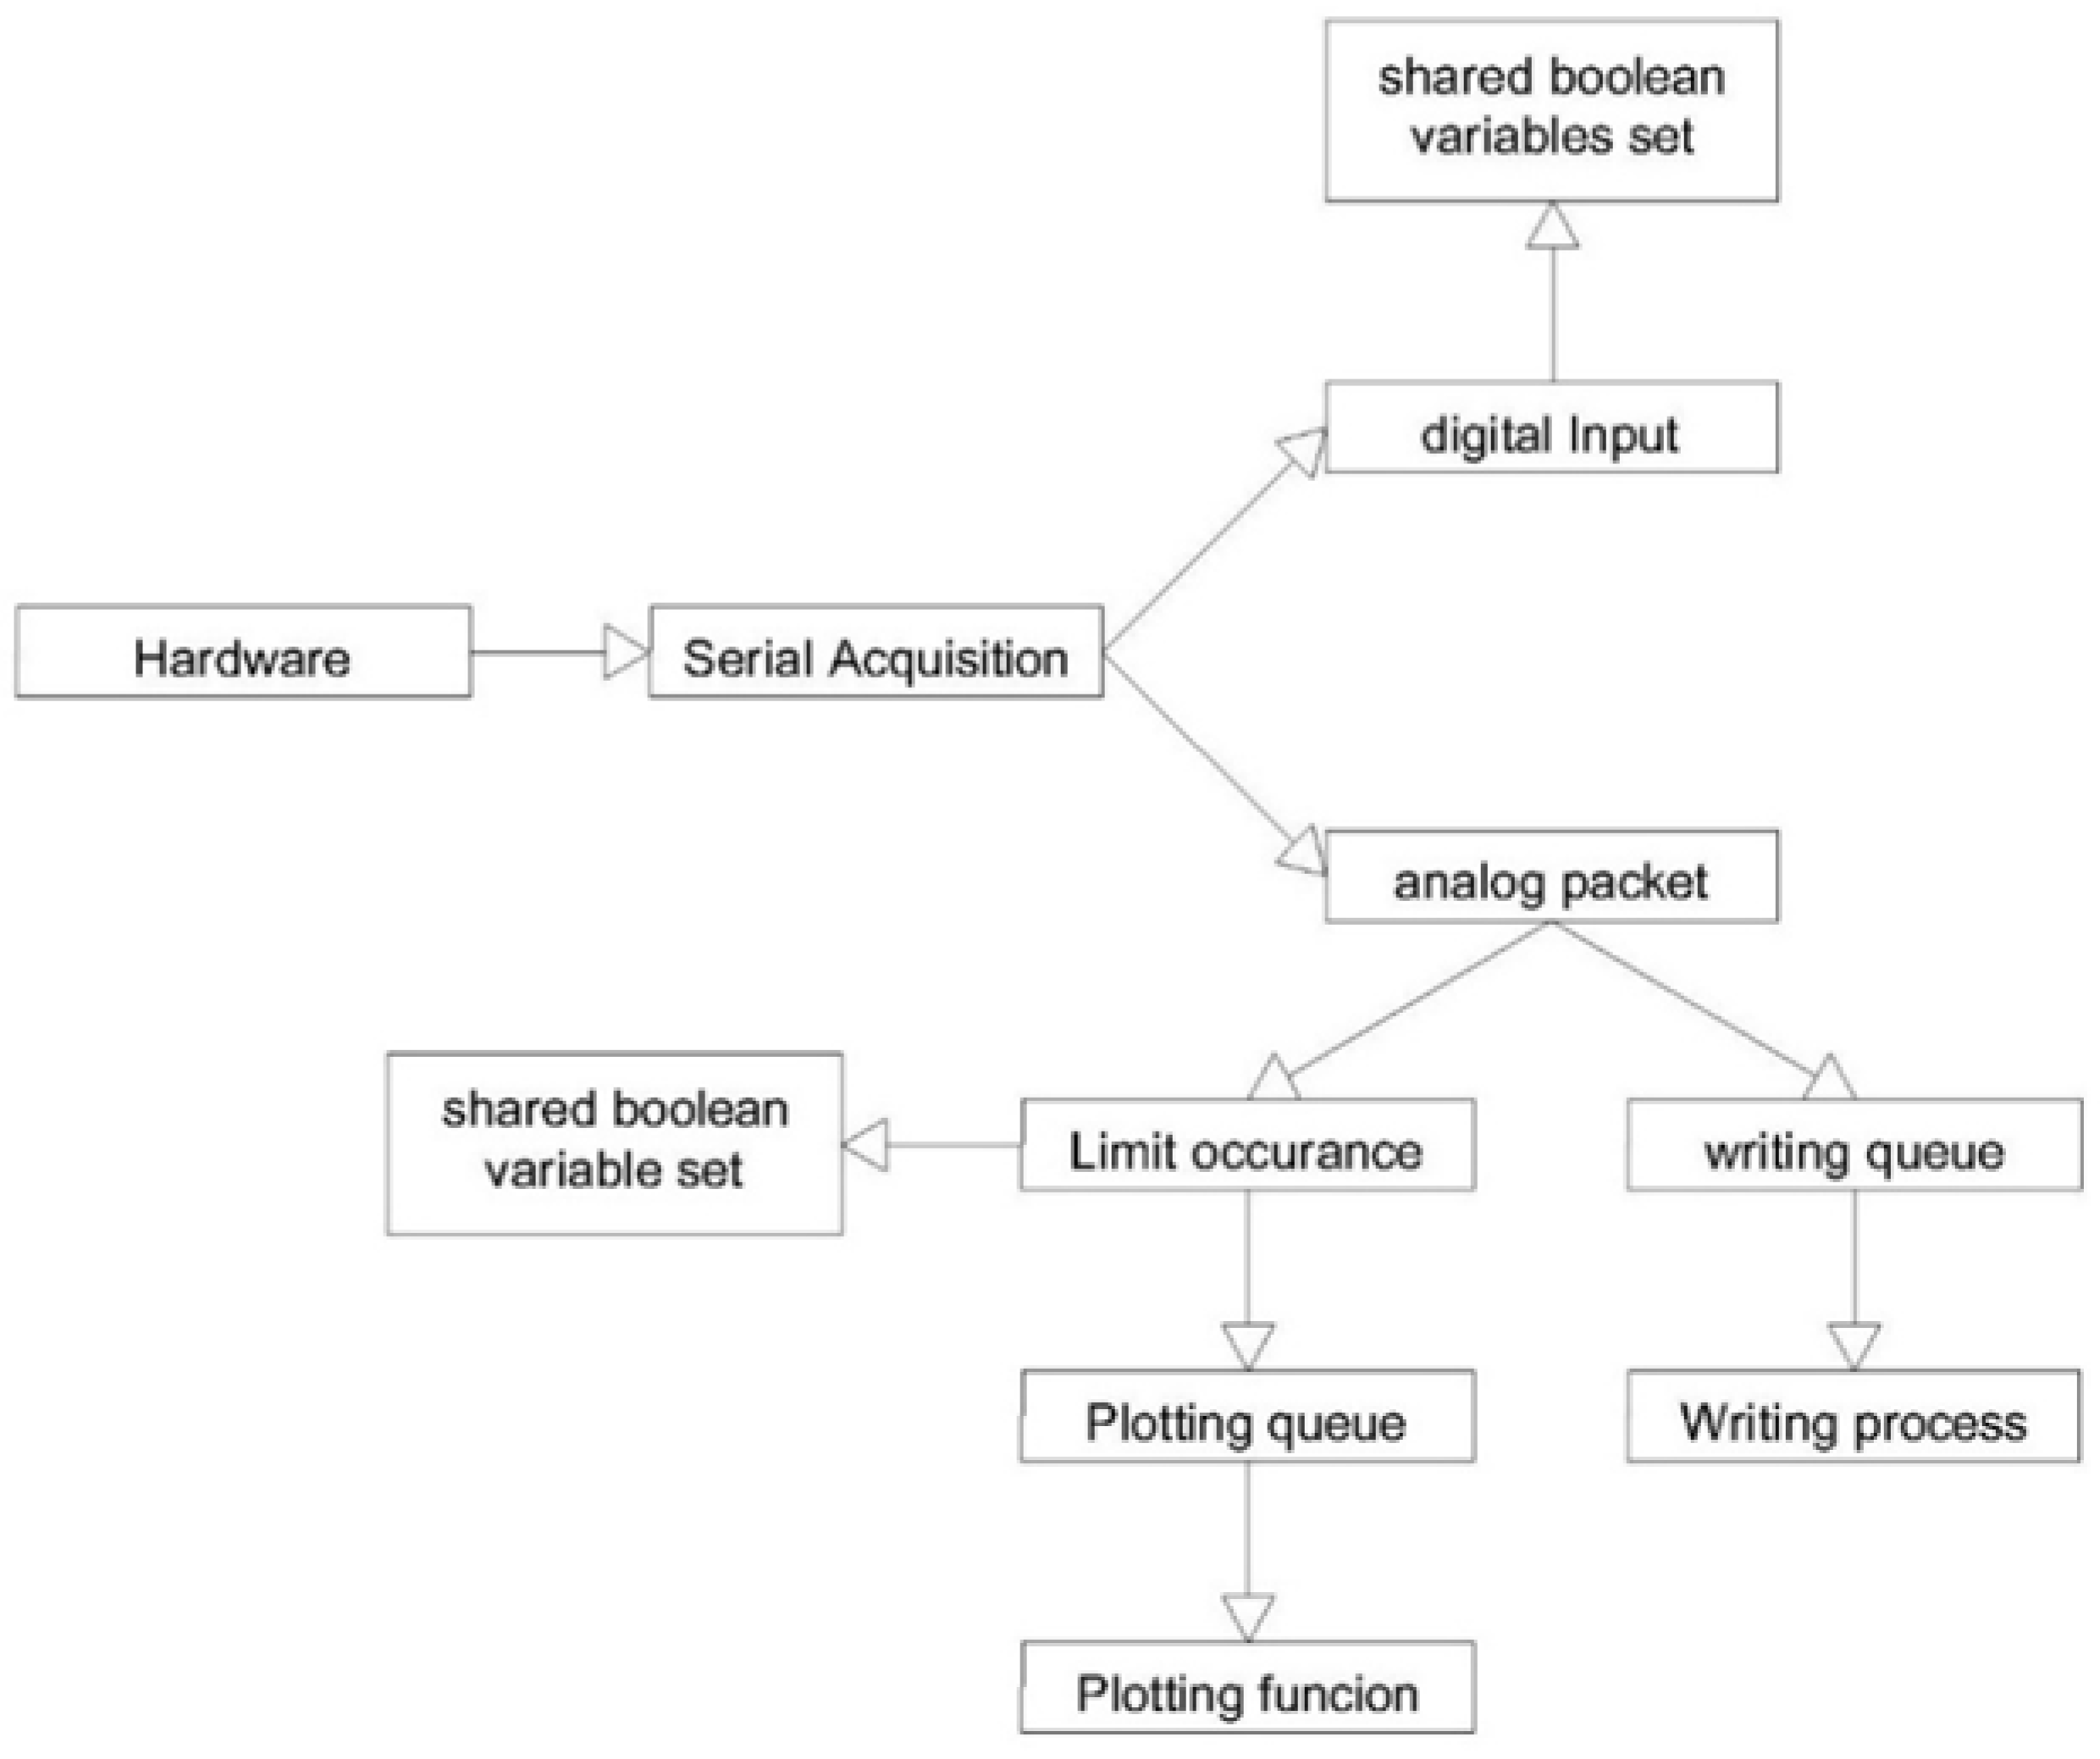
The program receives packets from the serial interface and distinguishes whether they contain status information or a time-series segment from the load cell (see
Figure 12) [
23,
24,
25].
In the case of Boolean status signals, the analyzer simply updates the corresponding shared variables.
If the packets contain load cell data, the software processes them, plots the signal, and stores it.
This analysis implements a safety circuit based on load limits. When the signal exceeds the threshold, the shared variable “safe” is set to 1. As is standard in safety logic, the reset of the “safe” state can only be performed manually via the user interface.
The system operates in a manner very similar to the audio analyzer. Similarly to audio systems, the data are written to disk in fixed-length packets. However, since the load cell is used exclusively for protection purposes, no frequency-domain analysis is required in this case.
6. Results
The proposed setup allowed for all system “clicks” to be detected and enabled evaluation of the actual lifetime of all tested samples. Specifically, the results provide two key pieces of information:
When presenting the following results, we would like to note that sensible values have been normalized with respect to a reference limit value for industrial confidentiality reasons [
26].
Figure 13 shows a typical output in the time domain. In particular, it displays the recordings from the proximity microphone corresponding to a generic cycle, including both opening and closing phases. From the signal, the peak values identified by the red markers can be easily extracted. In the graph, the horizontal red line represents the signal threshold.
The maximum recorded for each cycle can then be plotted as a function of the opening and closing sub-cycles, as shown in
Figure 14.
By observing the figure, a decay in amplitude is immediately noticeable—particularly for the closing signal—as the number of cycles increases. This trend highlights the onset of the fracture in the “click arm” under investigation [
27,
28]. To increase the reliability and confidence of the results, in addition to the time-domain Mini One—Cooper R50–53 (2001–2006) Rivestimento del sottoporta delle minigonne lateralianalysis, a frequency-domain analysis was also performed using the FFT of the signal, as described in detail in
Section 2.1. In particular,
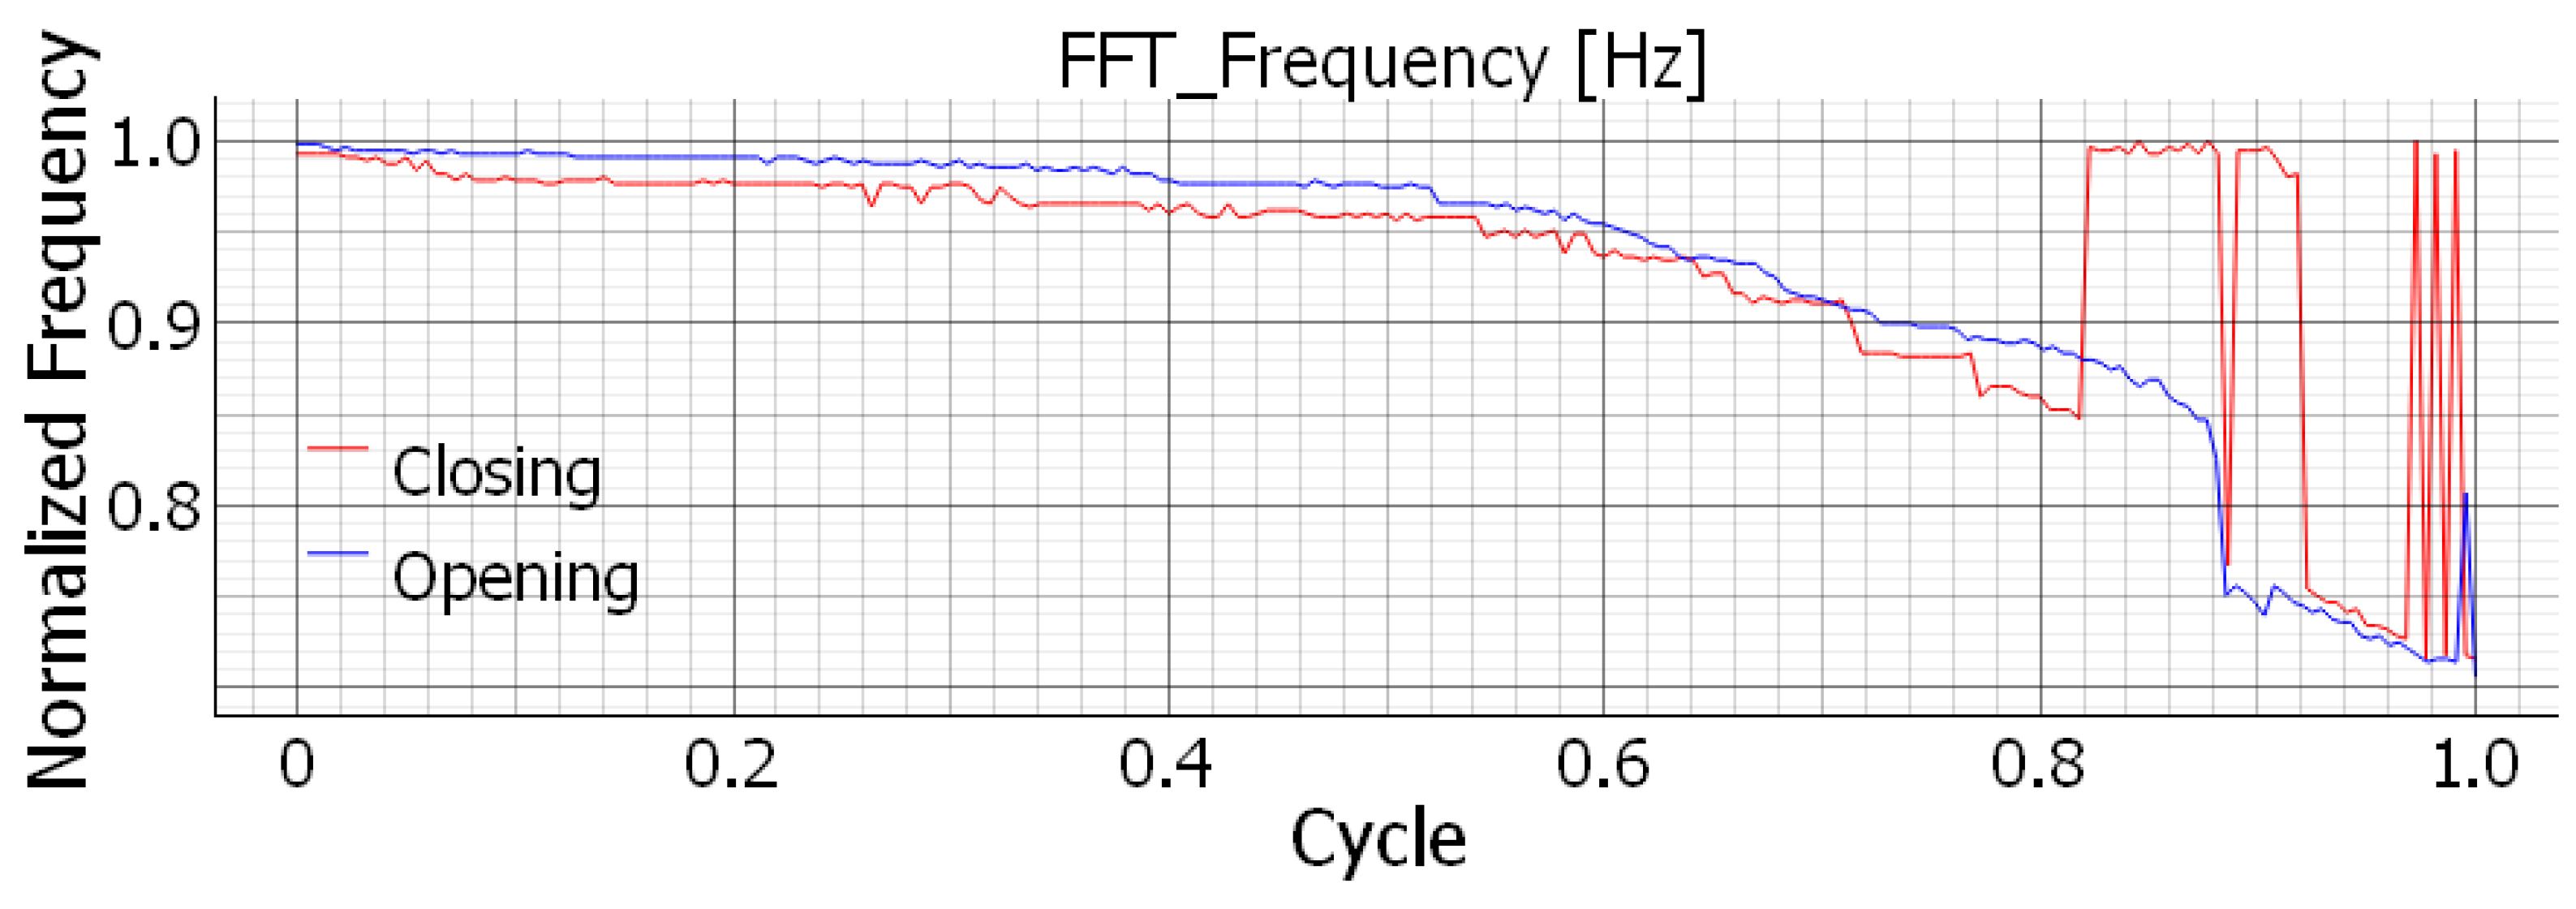
Figure 15 shows the trend of the maximum amplitude in the frequency domain as a function of the opening and closing sub-cycles, while
Figure 16 displays the corresponding frequency, also as a function of the sub-cycles.
In all the diagrams, a general decrease can be observed both in the amplitude of the peaks and in the corresponding frequency. This decay is observed in all components and across all tests, showing the same behavior. Qualitatively, this result is consistent with the behavior of a generic clamped beam, where the propagation of a crack near the clamped end leads to an overall reduction in bending stiffness and, consequently, in both the first natural frequency and the oscillation amplitude when excited by an imposed end displacement, see
Figure 1.
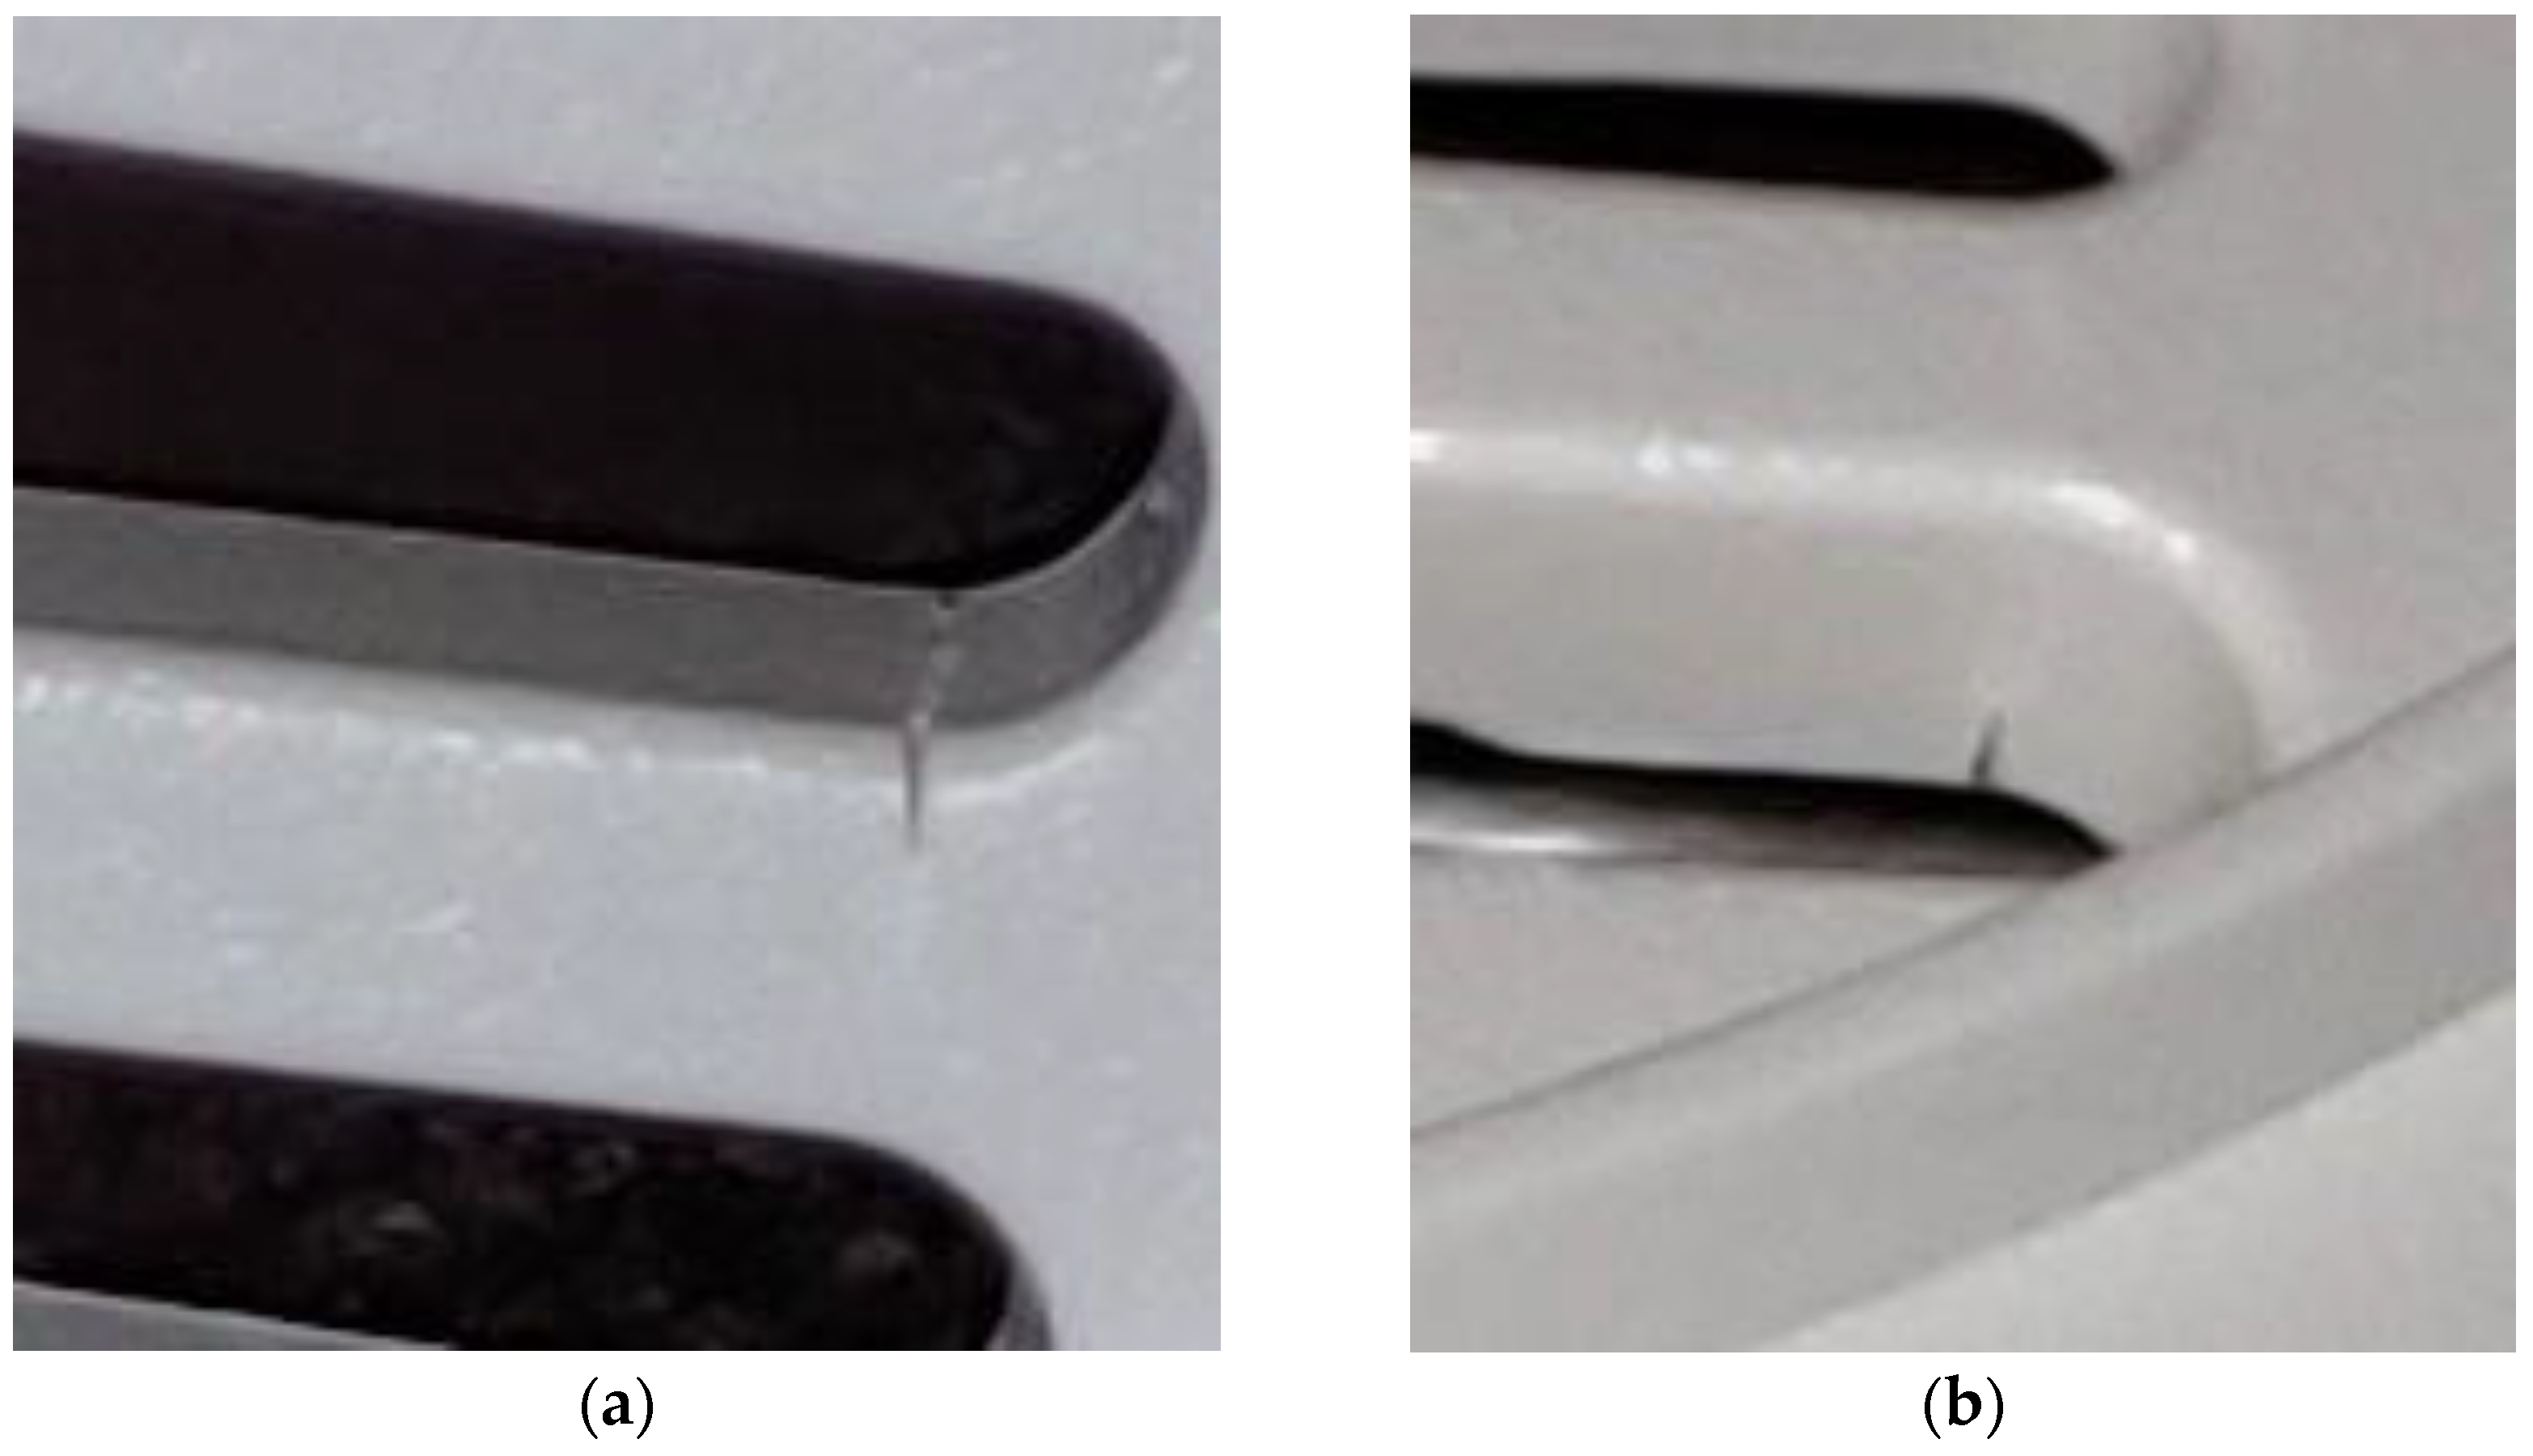
The decrease in amplitude and frequency was also confirmed by visual inspection of the components. Unfortunately, the “click arm” is not accessible without disassembling the device, and the limited number of specimens does not allow for multiple analyses at progressive cycle stops to study the continuous propagation. However, it was possible to stop a few tests when an initial decay became perceptible, and
Figure 17 shows the initial crack propagation. This behavior is consistent with the already described behavior of a clamped beam.
In order to identify the service life of the component, it appears evident that an appropriate lower threshold can be defined for the amplitudes as a function of the cycles, both in the time and frequency domains, as well as for the corresponding frequencies as a function of the cycles.
In this case, amplitude monitoring is used to control the test, since the main function of the component is to emit perceptible acoustic feedback. Provided that the signal remains within the audible frequency range, functionality is confirmed if the amplitude remains above a predefined limit.
Moreover, by comparing
Figure 15 and
Figure 16, the amplitude signal appears more stable, particularly in the final decay region. In fact, in the frequency plot, near the end of the test, the closing curve exhibits some spikes or unusually high values that do not conform to the expected decay. This can be explained considering the kinematics of the mechanism: during closing, higher-frequency peaks, normally filtered out, can interfere with the decay period. Indeed, as the component begins to fail, the decay of both frequency and amplitude is not uniform across the spectrum. Some cycles, at crack initiation, may feature higher-frequency peaks with amplitudes comparable to the characteristic response, causing temporary instability in the plot.
In terms of amplitude, the perceptible acoustic threshold was defined subjectively according to usage requirements and, in consultation with the manufacturer, was set to ensure the device would not fall below a level where damage would become imperceptible. To determine this operational limit, several samples were taken near failure and evaluated subjectively by the client.
Once the limit thresholds are defined, for each tested sample, the service life can be identified as the intersection between the amplitude–cycle curves and their corresponding thresholds, both in the time and frequency domains.
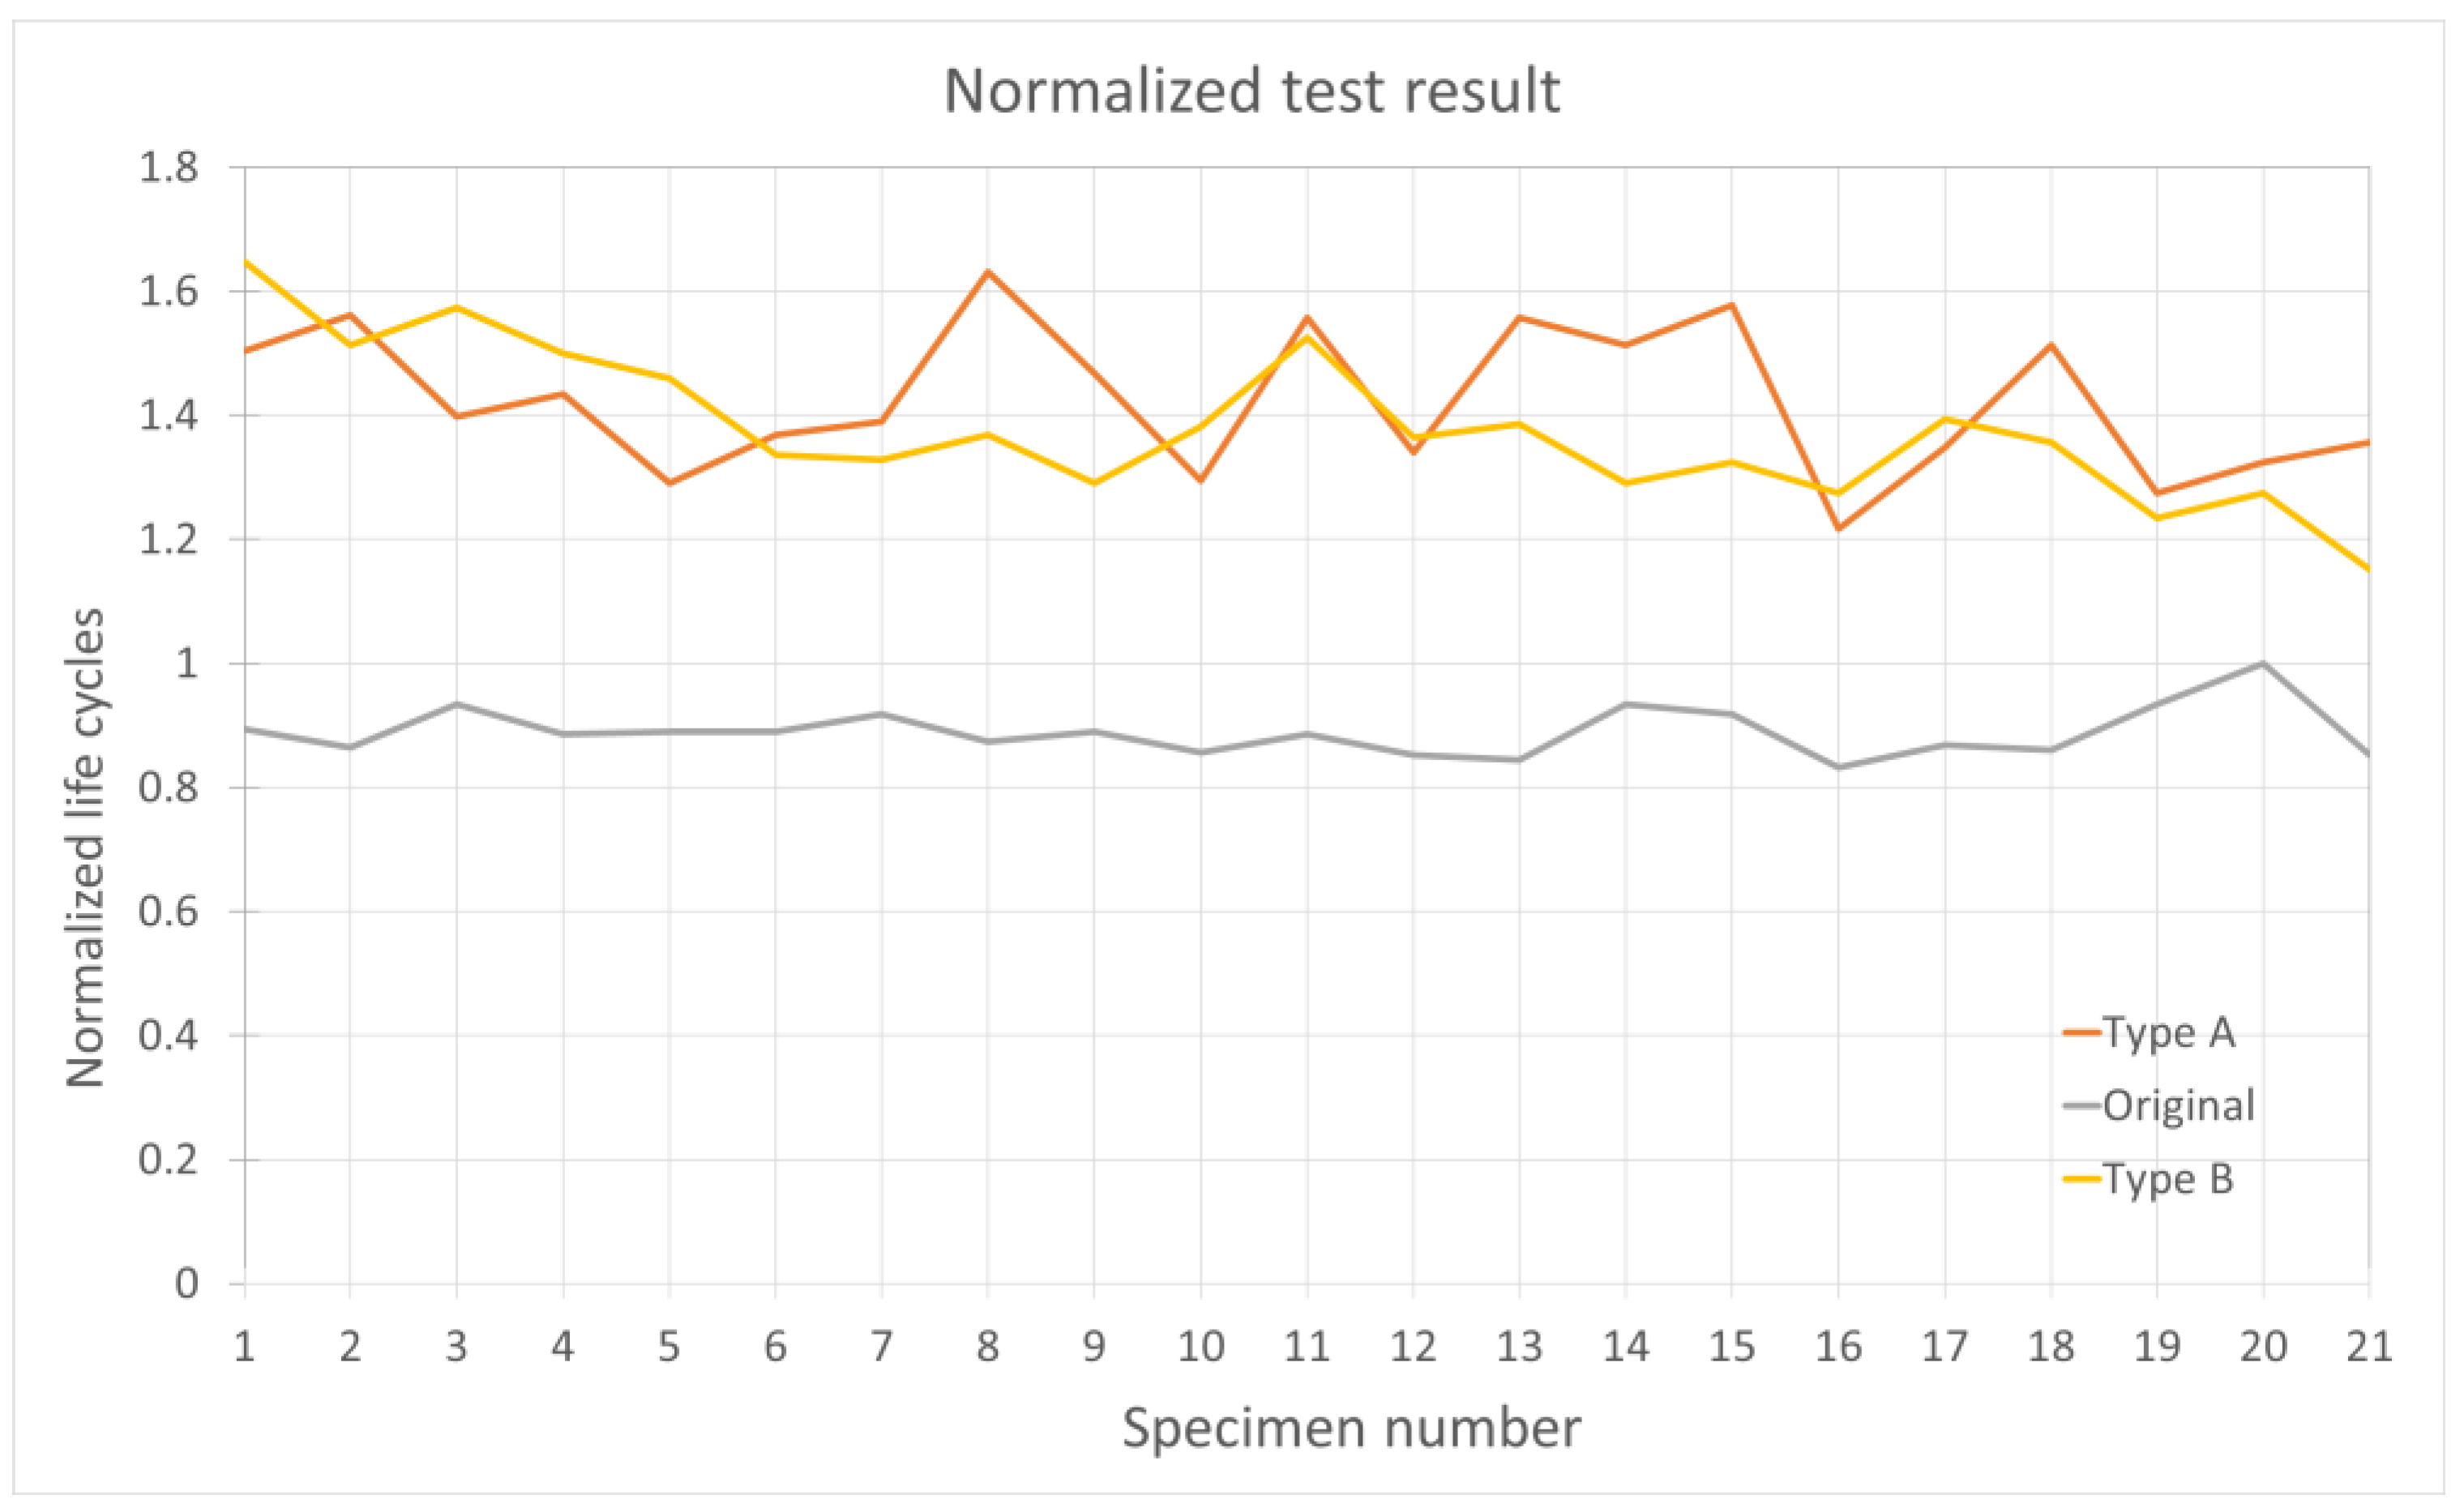
Figure 18 shows the experimentally derived service life for the 21 tested samples across the three types, i.e., the original (Reference) and the two optimized solutions obtained from numerical simulations (Type A and Type B). To reduce test variability and maximize sample homogeneity, all specimens were produced from the same molding batch.
The service life was normalized with respect to the maximum value obtained for the reference configuration. Good stability and consistency can be observed among the results belonging to the same type, thus validating the measurement system and the repeatability of the tests.
The results indicate that the two optimized designs demonstrate approximately 50% improved performance. This outcome also validates the calculation methodology, although the detailed method is beyond the scope of this discussion. Overall, the results not only confirm that the product-specific objectives are met but also validate the investigation methodology, demonstrating that the test bench functions as intended.
7. Conclusions and Future Developments
This work presents the design and implementation of a mechanical test bench for evaluating three configurations of a biomedical device. A real-time acoustic acquisition system enabled non-invasive monitoring under cyclic loading, reproducing operational stresses.
The methodology described in this work is designed for seamless integration into the production line. Its ultimate goal was to provide a system capable of testing samples during manufacturing. This was useful for identifying any issues that occur during component production, whether related to materials or assembly, and allows for the affected lot to be removed.
The results demonstrate that acoustic monitoring reliably detects early signs of failure and allows for the estimation of service life by correlating amplitude trends with operating cycles. This approach provides an objective measure of structural performance and durability, validating the test bench as a robust platform for fatigue testing of compact mechanical devices.
The system combination of hardware and software components ensures repeatability and accuracy, while its modular design offers potential for adaptation to other devices. Future improvements include the development of a single interface board to increase versatility, the implementation of wireless signal acquisition for moving components, and a generalized software interface to manage various cycle protocols. Integration with robots or other industrial devices could further enhance automation.
From a data analysis perspective, the availability of time- and frequency-domain signals allows for energy analyses, noise reduction, and the application of AI algorithms for pattern recognition or predictive maintenance. These enhancements would expand the test bench capabilities and provide deeper insights into device behavior under cyclic stress.
