Abstract
Traditional grinding, which is predominantly performed with a negative rake angle (NRA), can be transformed into grinding with a positive rake angle (PRA) by employing femtosecond pulsed laser technology to modify the apex angle of the grains to be less than 90°. This innovative approach aims to reduce grinding forces and grinding temperatures while improving the surface quality of typical hard-to-machine materials. To assess the performance of PRA single grain grinding and to investigate the underlying mechanisms, the finite element simulation software ABAQUS 6.14 was employed to model the grinding of Ti6Al4V titanium alloy with a single diamond abrasive grain. The dependence of grinding force and temperature in single grain grinding with a PRA or an NRA under different grinding parameters was studied and compared. PRA and NRA single diamond grain grinding experiments on Ti6Al4V alloy were carried out, with grinding forces measured using a dynamometer and compared with the simulation results. The grinding surface morphology and surface roughness were observed and measured, and a comparison was made between PRA and NRA grinding. The results indicated that in single diamond grain grinding, transforming to a PRA significantly enhances grinding performance, as evidenced by reduced grinding forces, lower temperatures, improved surface morphology, and decreased surface roughness. These findings suggest that PRA single diamond grain grinding offers substantial benefits for the precision machining of hard-to-machine materials, marking a step forward in optimizing surface finishes.
1. Introduction
Titanium alloys, cemented carbides, and engineering ceramics exhibit exceptional physical and mechanical properties, making them highly sought after in industries like aerospace, new energy, automotive, and general machinery manufacturing [1,2,3]. Titanium alloys, for example, are frequently utilized in critical aerospace engine components like engine casings and turbine blades for the sake of their low density, superior specific strength, and remarkable temperature and corrosion resistance [4,5]. These materials, with their distinctive structural characteristics and superior physical attributes, fall into the category of hard-to-machine materials, leading to poor machinability. Currently, precision machining of such materials primarily relies on grinding techniques utilizing superabrasive tools like diamond and CBN grinding wheels. In traditional diamond grinding processes, the geometric structures of the abrasive grains, typically octahedral or dodecahedral, lead to a majority of grains having an NRA because the apex angle of the grains exceeds 90°. This exacerbates friction between the workpiece and abrasive grains, leading to increased plastic deformation of the workpiece. Consequently, the grinding force and temperature experienced with hard-to-machine materials like titanium alloys are significantly higher compared to the cutting forces in comparable cutting processes [6,7], leading to enhanced risks of plastic deformation, micro cracks, phase transformations, residual stresses, and other surface/subsurface damages in the machined workpiece. Consequently, they result in compromised surface integrity, severely impacting the performance and functionality of the machined components [8].
Considering these challenges, this study introduces an innovative approach called PRA grinding, employing femtosecond laser technology to ablate material from the top edge region of grains and, thereby, modify the apex angle to less than 90°, ensuring that the diamond grains have a PRA at the cut-in point. This technique combines the advantages of cutting processes that include no sliding and ploughing processes and have a low friction force with the precision machining benefits of grinding with minimal material removal. By converting the traditional NRA grinding into PRA grinding, this approach aims to reduce grinding forces and temperatures, improve the grinding conditions for titanium alloys and other hard-to-machine materials, and enhance the surface quality of machined components.
Because of the stochasticity in shape, dimension, location, cone angle, and protrusion height of the numerous abrasive grains involved in grinding, the interaction between the workpiece and the grinding wheel is extremely intricate. This complexity brings great inconvenience to the observation and analysis of grinding experiments and the understanding of grinding mechanisms [9,10]. Therefore, this paper investigates the mechanism of PRA grinding from the perspective of single abrasive grain machining to avoid the mutual influence among multiple grains, and simplify the simulation and experimental processes.
Researchers have performed a sequence of theoretical simulations and experiments on grinding mechanisms through single abrasive grain grinding. Anderson et al. [11,12] combined experimental observations and finite element simulations to conduct in-depth studies on single diamond abrasive grain grinding of AISI 4340 alloy steel. The results revealed that due to the workpiece’s strain rate hardening, the normal grinding force escalates with the grinding speed, whereas the tangential grinding force diminishes with the grinding speed elevation attributed to a reduced friction coefficient between the abrasive grain and the workpiece and the change in the cutting mechanism. Liu [13] conducted simulation and experimental studies on the machining of silicon nitride ceramic materials with single diamond abrasive grains, revealing the impact of grinding process parameters on both grinding force and surface morphology, and further integrated these findings into a model of grinding wheel surface morphology for predicting the processing quality of silicon nitride ceramic spherical surfaces. Dai et al. [14] executed single diamond grain grinding experiments on nickel-based superalloys, investigated the influence of abrasive wear status on material removal during the grinding process, and summarized four types of abrasive wear. Fu et al. [15] developed an FEM model for single abrasive grain grinding of Ti6Al4V by considering the variation in cutting depth along the grinding trajectory. Yin et al. [16] developed a comprehensive model for SiCp/Al composites’ grinding with a single diamond grain, providing essential insights into grinding forces and material removal rates. Li et al. [17] conducted a comparative analysis of mechanical behavior and the modeling of grinding forces, enhancing the accuracy of predictions in single grain grinding. Li et al. [18] explored the material removal mechanism and grinding force modeling in ultrasonic vibration-assisted grinding of SiC ceramics via single grain scratch. Meng et al. [19] provided a detailed review of the modeling of grinding mechanics and assessed the strengths and limitations of various models. The study analyzed the impacts of parameters, including grinding speed and grinding depth, on both grinding force and stress distribution.
Although the single grain grinding method has been widely applied in the study of grinding mechanisms for various materials and has made significant progress, research concerning the mechanism of PRA grinding using this approach has not yet been reported. This paper employs the single grain grinding method and conducts finite element simulations and experimental comparisons of positive and negative rake angle grinding on Ti6Al4V titanium alloy material. It explores the variation patterns in grinding force, grinding temperature, surface morphology, and surface roughness under different process parameters. The study hypothesizes that PRA grinding will provide lower grinding forces and superior grinding quality compared to traditional NRA grinding, and it is expected to be validated by both simulation and experimental data. By quantifying the performance differences between PRA and NRA grinding, this research not only demonstrates the feasibility and advantages of PRA grinding but also provides empirical evidence for engineering applications.
2. Finite Element Model
2.1. Material Constitutive Modeling
The grinding of metallic materials is a thermo-mechanical coupling process involving high strain, a high strain rate, and elevated temperatures, during which phenomena like material strain hardening and material strain rate strengthening typically occur. Before simulating, it is essential to determine the material’s constitutive features under deformation at elevated temperatures. Many researchers have proposed various material constitutive models, including the Johnson–Cook model, Bodner–Partom model, Khan–Huang model, and Zerilli–Armstrong model [20,21]. The Johnson–Cook constitutive model posits that materials experience strain rate strengthening, strain hardening, and thermal softening at elevated strain rates. Therefore, this model can effectively describe the deformation behavior of titanium alloys in single grain grinding. The expression for the Johnson–Cook model is provided below [22]:
where σ is the equivalent flow stress, A is the initial yield strength of the material, B denotes the hardening strength, C is the strain rate strengthening coefficient, ε represents the equivalent plastic strain, n is the strain hardening exponent, and are the equivalent and referential strain rates, respectively, Tr is the ambient temperature, Tm is the melting temperature of the workpiece material, T is the current grinding temperature, and m is the thermal softening coefficient. The constitutive model parameters of Ti6Al4V titanium alloy material are shown in Table 1.

Table 1.
Parameters of Ti6Al4V constitutive model parameters [23].
The simulation employs a single crystal diamond as the single abrasive. Single crystal diamonds are characterized by ultra-high hardness, good strength, and excellent thermal conductivity, and it is commonly used in grinding and cutting processes for its superior performance [24,25]. Its physical and thermal properties are presented in Table 2.

Table 2.
Physical and thermal properties of single crystal diamond [26].
2.2. Material Failure Criterion
From a microscopic perspective, the failure of titanium alloy materials is primarily due to plastic fracture caused by the formation and propagation of cracks. This paper adopts the Johnson–Cook failure criterion based on the strain analysis to control the material failure process. Whether the magnitude of the equivalent plastic strain surpasses the material’s failure strain value is the basis for determining the occurrence of failure, according to the strain failure criterion. The failure parameter ω of the Johnson–Cook fracture model is defined as follows [22]:
When ω > 1, the material is considered to have failed, and the element mesh at the failed material location is removed, signifying the separation of chips from the workpiece. represents the increment of equivalent plastic strain, and represents the critical equivalent plastic strain, which is expressed as follows [22]:
where D1–D5 are material failure parameters, represents the dimensionless force, p represents the hydrostatic pressure; represents the dimensionless strain rate, is the dimensionless temperature. The values of D1–D5 are shown in Table 3.

Table 3.
Johnson–Cook failure parameters of Ti6Al4V.
2.3. Geometric Model and Simulation Parameters
In conventional wheel grinding, the motion of an individual grain is a rotational movement associated with a changing grinding thickness. However, since the grinding arc length is generally on the millimeter scale, while the grinding thickness is on the micrometer scale, the motion of abrasive grains can be considered as a linear movement with a constant grinding thickness over a short grinding wheel path. Finite element simulations using ABAQUS were conducted separately for the grinding of Ti6Al4V titanium alloy with single diamond abrasive grains having a PRA and an NRA. The grinding schemes for single diamond grains with an NRA and a PRA are shown in Figure 1a and Figure 1b, respectively.

Figure 1.
Schematic diagram of NRA/PRA single grain grinding: (a) NRA single grain grinding; (b) PRA single grain grinding.
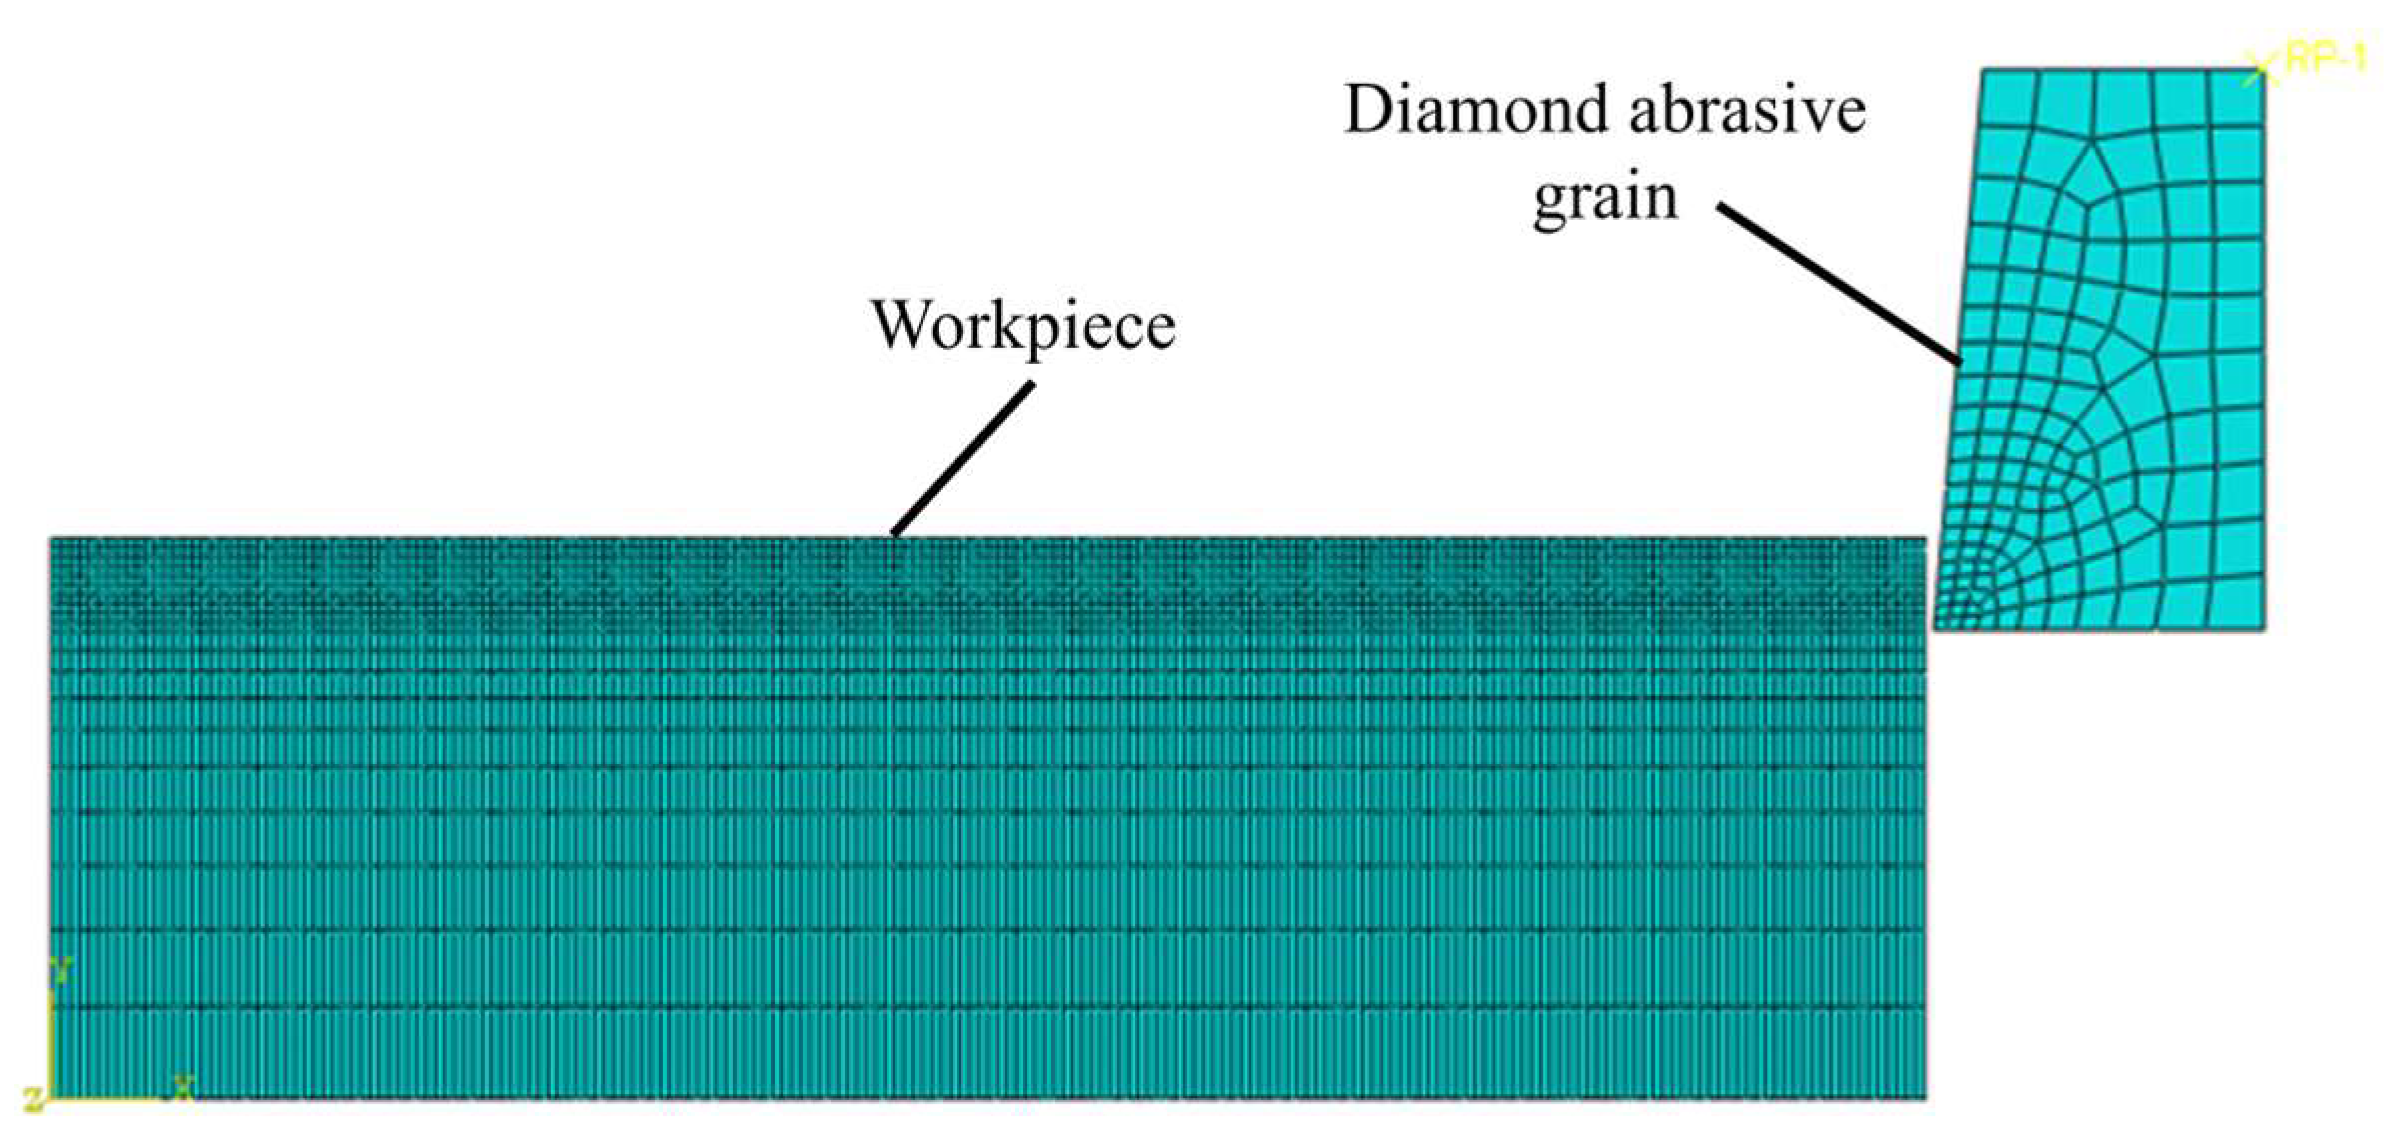
In the FEM geometric model of single diamond grain grinding, the dimension of the Ti6Al4V workpiece is 0.2 mm × 0.06 mm. The main physical properties of Ti6Al4V are listed in Table 4, and the thermal physical properties are listed in Table 5 [27]. To reduce computational costs while maximizing the accuracy of the simulation calculations, the meshing of the undeformed chip layer, the grinding area on the workpiece substrate, and the vicinity surrounding the diamond grinding edge were refined. The simplified FEM geometric model of single diamond grain grinding is shown in Figure 2. Both the tool and the workpiece use four-node thermo-mechanical coupled elements in the model. During the simulation, the bottom of the workpiece substrate remained completely fixed, and the left and right boundaries were only constrained in terms of movement and rotation in the X direction. The diamond grain was considered as a rigid body, the upper right corner of the grain is set as a reference point, and it was bound with constraints to the grain, with the grinding direction being horizontally to the left. At the onset of the simulation, both the abrasive grain and the workpiece were initialized to a temperature of 20 °C, consistent with the ambient temperature.

Table 4.
Main physical properties of Ti6Al4V.

Table 5.
Thermal physical properties of Ti6Al4V.
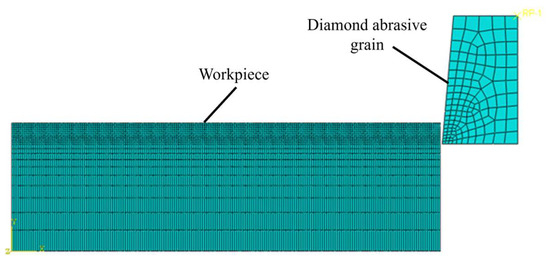
Figure 2.
Finite element geometric model of single diamond grain grinding.
In the simulation of single grain grinding, the clearance angle of the grain was kept at 0°. The process parameters that are subject to change include the grinding speed, depth, and the rake angle of the diamond abrasive grain. Four levels were selected for each of these parameters:
Grinding Speeds: 6 m/s, 8 m/s, 10 m/s, and 12 m/s. These values were selected to represent a range from the low to moderately high speeds typically used in single grain grinding operations.
Grinding Depths: 5 μm, 10 μm, 15 μm, and 20 μm. The selected depths cover a range of shallow to moderately deep cuts.
Abrasive Grain Rake Angles: −10°, −5°, 0°, 5°, 10°, and 30°. These angles were chosen to explore the impact of both negative and positive rake angles on grinding performance.
A single-factor experimental method was utilized to investigate the variation patterns of grinding force and grinding temperature with different process parameters. To ensure consistent and comparable results, the grinding time for each simulation test and each grinding experiment was set to 1 min. This time duration was chosen based on preliminary tests to ensure adequate material removal while preventing excessive tool wear.
3. Simulation Results
3.1. Grinding Force
In single grain grinding, the grinding force is a crucial performance metric that significantly influences the morphology of the grind traces, the chip formation, and the wear condition of grains. Simulation studies on grinding force are instrumental in enhancing our comprehension of the intricate grinding process.
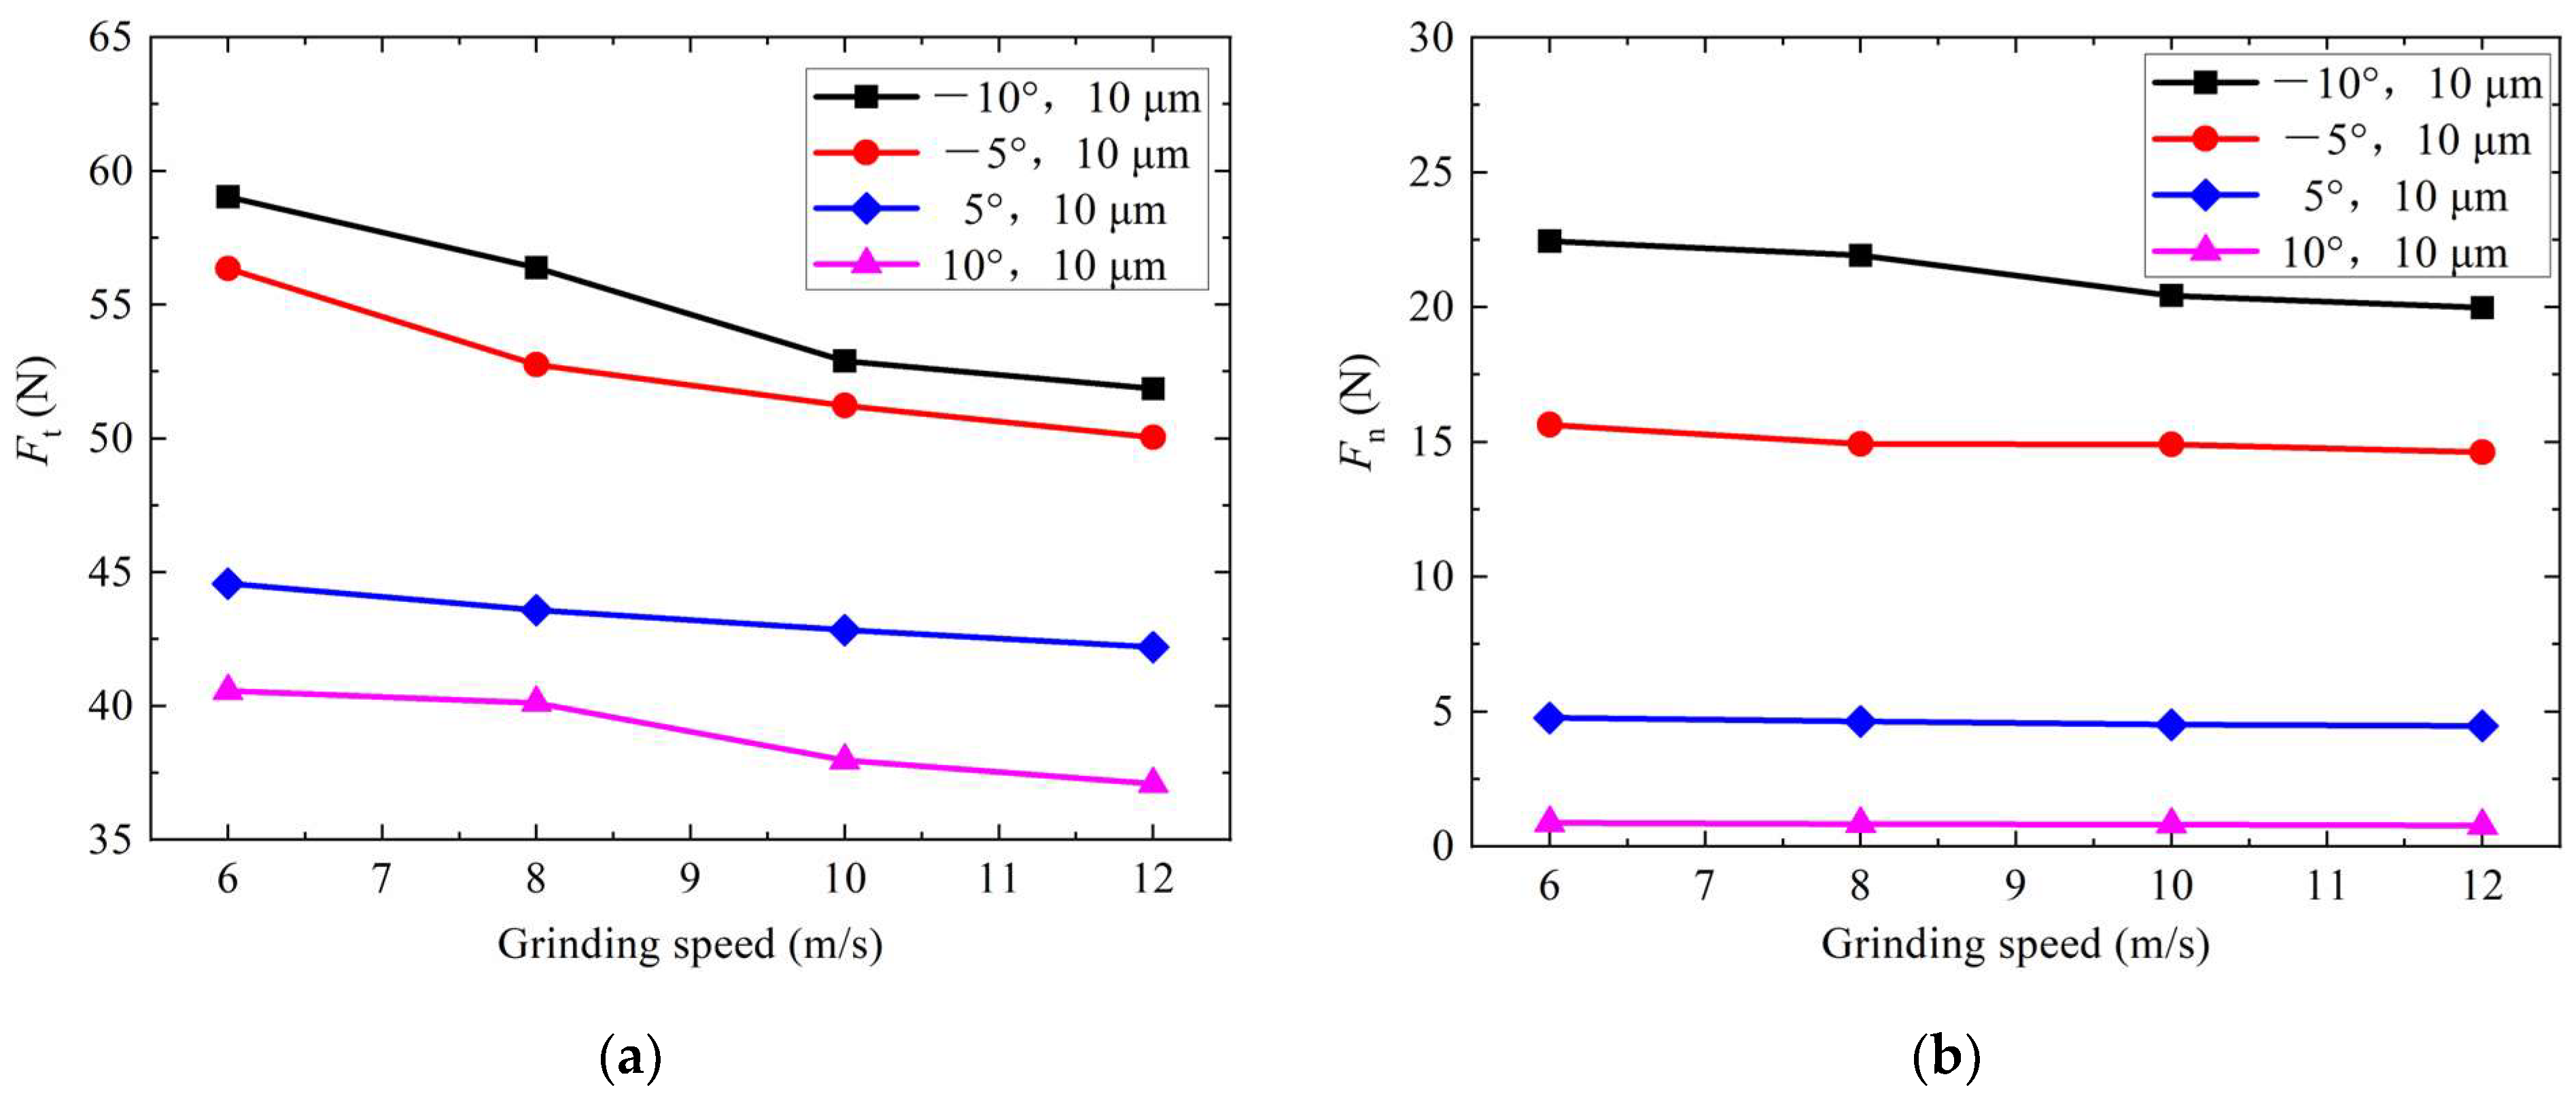
To investigate the impact of grinding speed on the grinding force, the simulation maintained a constant grinding depth and rake angle of the abrasive grain, and only varied the grinding speeds. The simulation results, as shown in Figure 3, demonstrate that with constant grinding depth and rake angle, both tangential and normal grinding forces in single grain grinding experience a slight decrease with increasing grinding speed, and the tangential force generally surpasses the normal force. This trend occurs because, under a fixed grinding depth and abrasive grain rake angle, an increase in grinding speed elevates the maximum temperature in the grinding area, enhancing the thermal softening plasticity of the material and the adiabatic shearing effect. Concurrently, as the grinding speed rises, the abrasive grain engages the workpiece more frequently within the same duration, reducing the grinding thickness and, consequently, the grinding forces. Additionally, the results illustrate a decrease in both tangential and normal grinding forces as the rake angle of the diamond grain transitions from negative to positive.
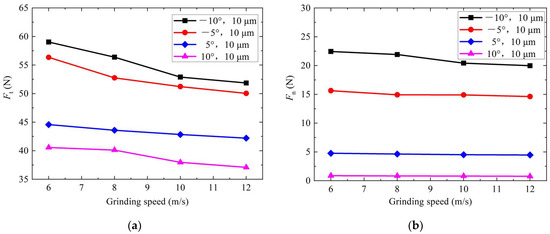
Figure 3.
The relationship between grinding speed and (a) tangential grinding force Ft, (b) normal grinding force Fn.
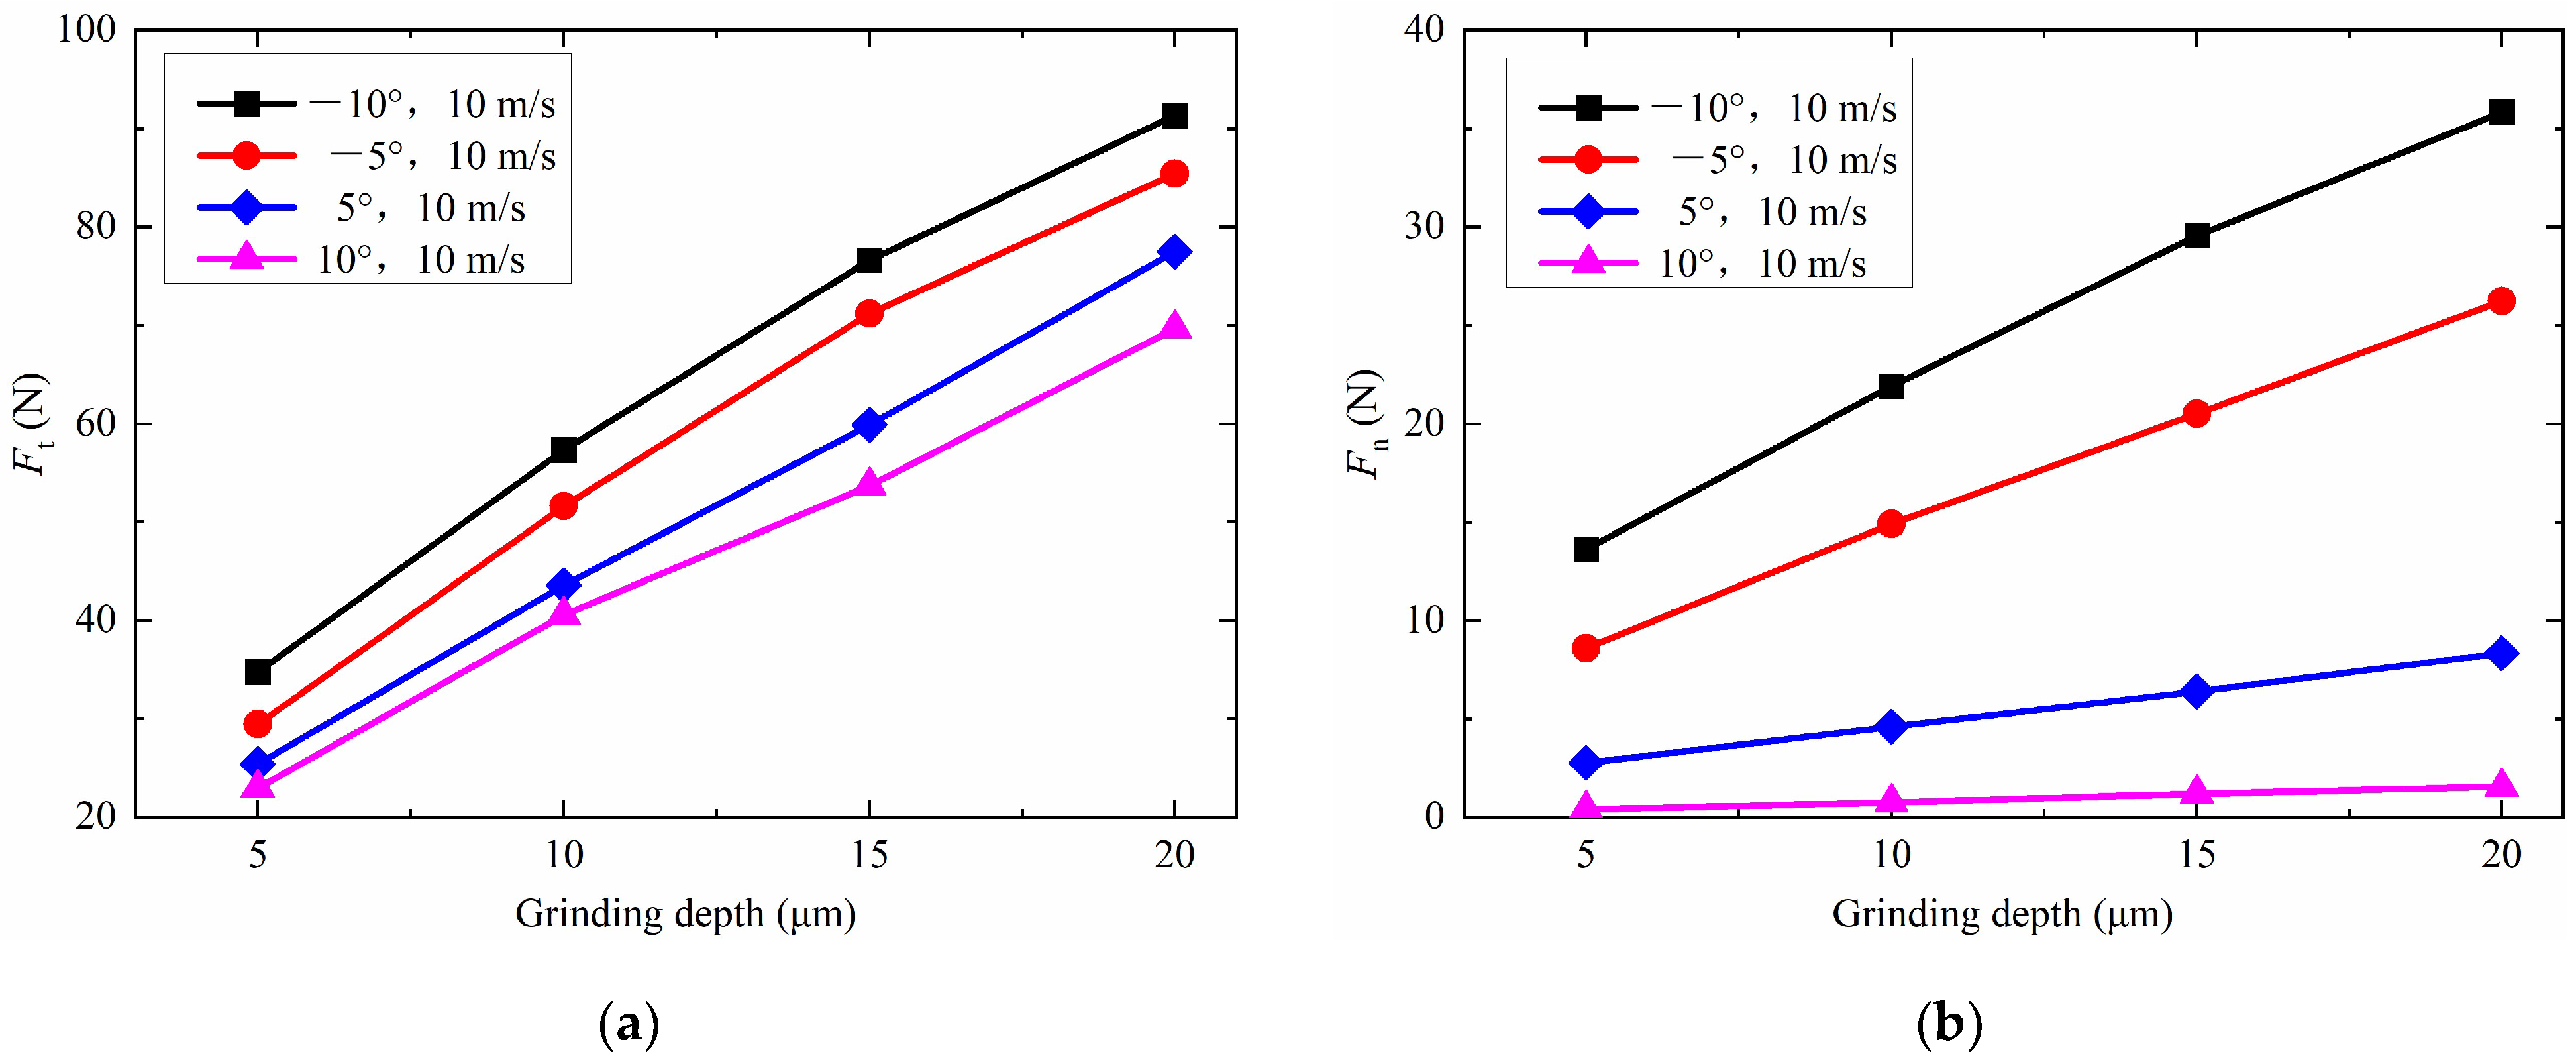
To explore the effect of grinding depth on grinding forces, the grinding speed and abrasive grain rake angle in single grain grinding were maintained at constant settings, while the grinding depth parameters varied from 5 μm to 20 μm. The simulation results, as illustrated in Figure 4, reveal that with a constant grinding speed and abrasive grain rake angle, both tangential and normal grinding forces increase as the grinding depth rises. This phenomenon is attributed to the enlargement of grinding thickness when the grinding depth is increased under a constant grinding speed and abrasive grain rake angle. The increase in grinding thickness leads to a greater volume of material experiencing plastic deformation within the same period. This results in the abrasive grain encountering greater plastic strain, thereby amplifying both the deformation force and friction force, and consequently elevating the grinding forces.
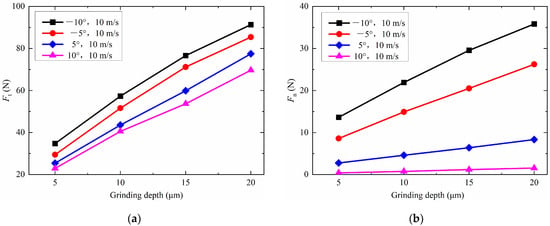
Figure 4.
The relationship between grinding depth and (a) tangential grinding force Ft, (b) normal grinding force Fn.
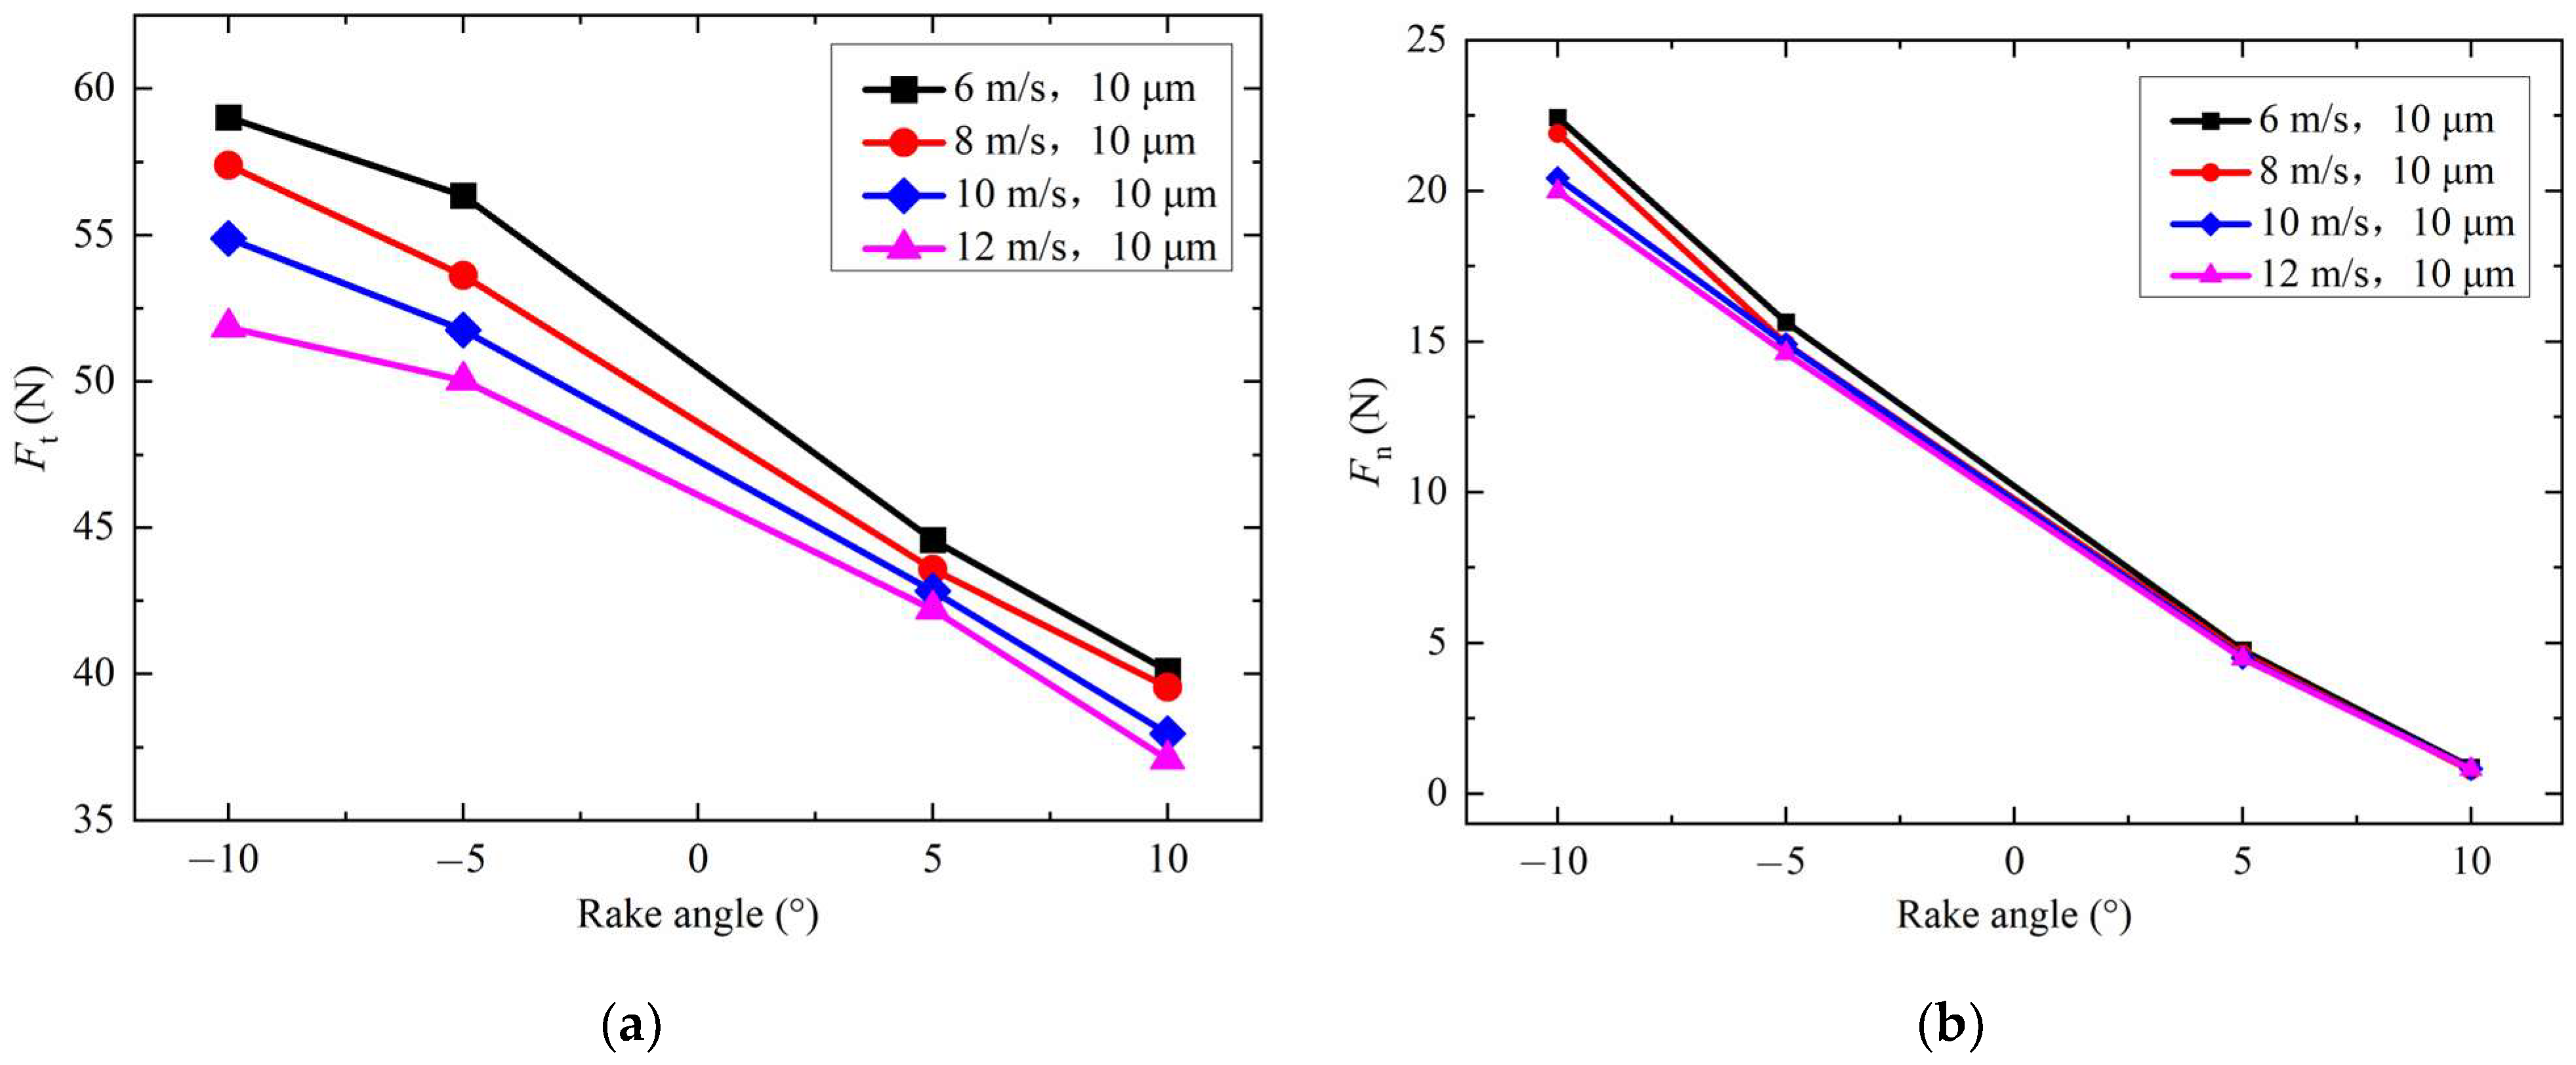
By maintaining a constant grinding speed and grinding depth, and only varying the rake angle of abrasive grain during the simulation, the impact trend of the rake angle on grinding force could be accurately determined. The rake angles were set at −10°, −5°, 5°, and 10°. The simulation result is presented in Figure 5 and the results reveal a significant decrease in both tangential and normal grinding forces with the increase of the rake angle of the diamond abrasive grains. The reason is that the smaller the rake angle, the greater the compressive stress in the interaction zone between the diamond grain and the chip, leading to increased shear stress on the rake face of the chip. Additionally, as the shear strain increases, more grinding heat is generated, raising the grinding temperature, and causing more severe shear deformation. The chips undergo greater deformation, thereby increasing the grinding force.

Figure 5.
The relationships between rake angle of abrasive grain and (a) tangential grinding force Ft, (b) normal grinding force Fn.
3.2. Grinding Temperature
Grinding temperature also serves as a crucial indicator for evaluating grinding performance. The high temperatures generated during grinding can cause phase transformations in the workpiece material substrate, leading to processing defects such as burns and cracks on the workpiece surface. Hence, it is imperative to investigate the temperature variation patterns in single grain grinding process with grains possessing a PRA and an NRA. This exploration is essential for mitigating grinding defects and enhancing the surface quality of the machined components. In single grain grinding experiments, accurate measurement of the highest temperature in the grinding contact zone is challenging due to the small dimension of the area and rapid heat dissipation. Consequently, this paper conducted a study on grinding temperature using simulation methods.
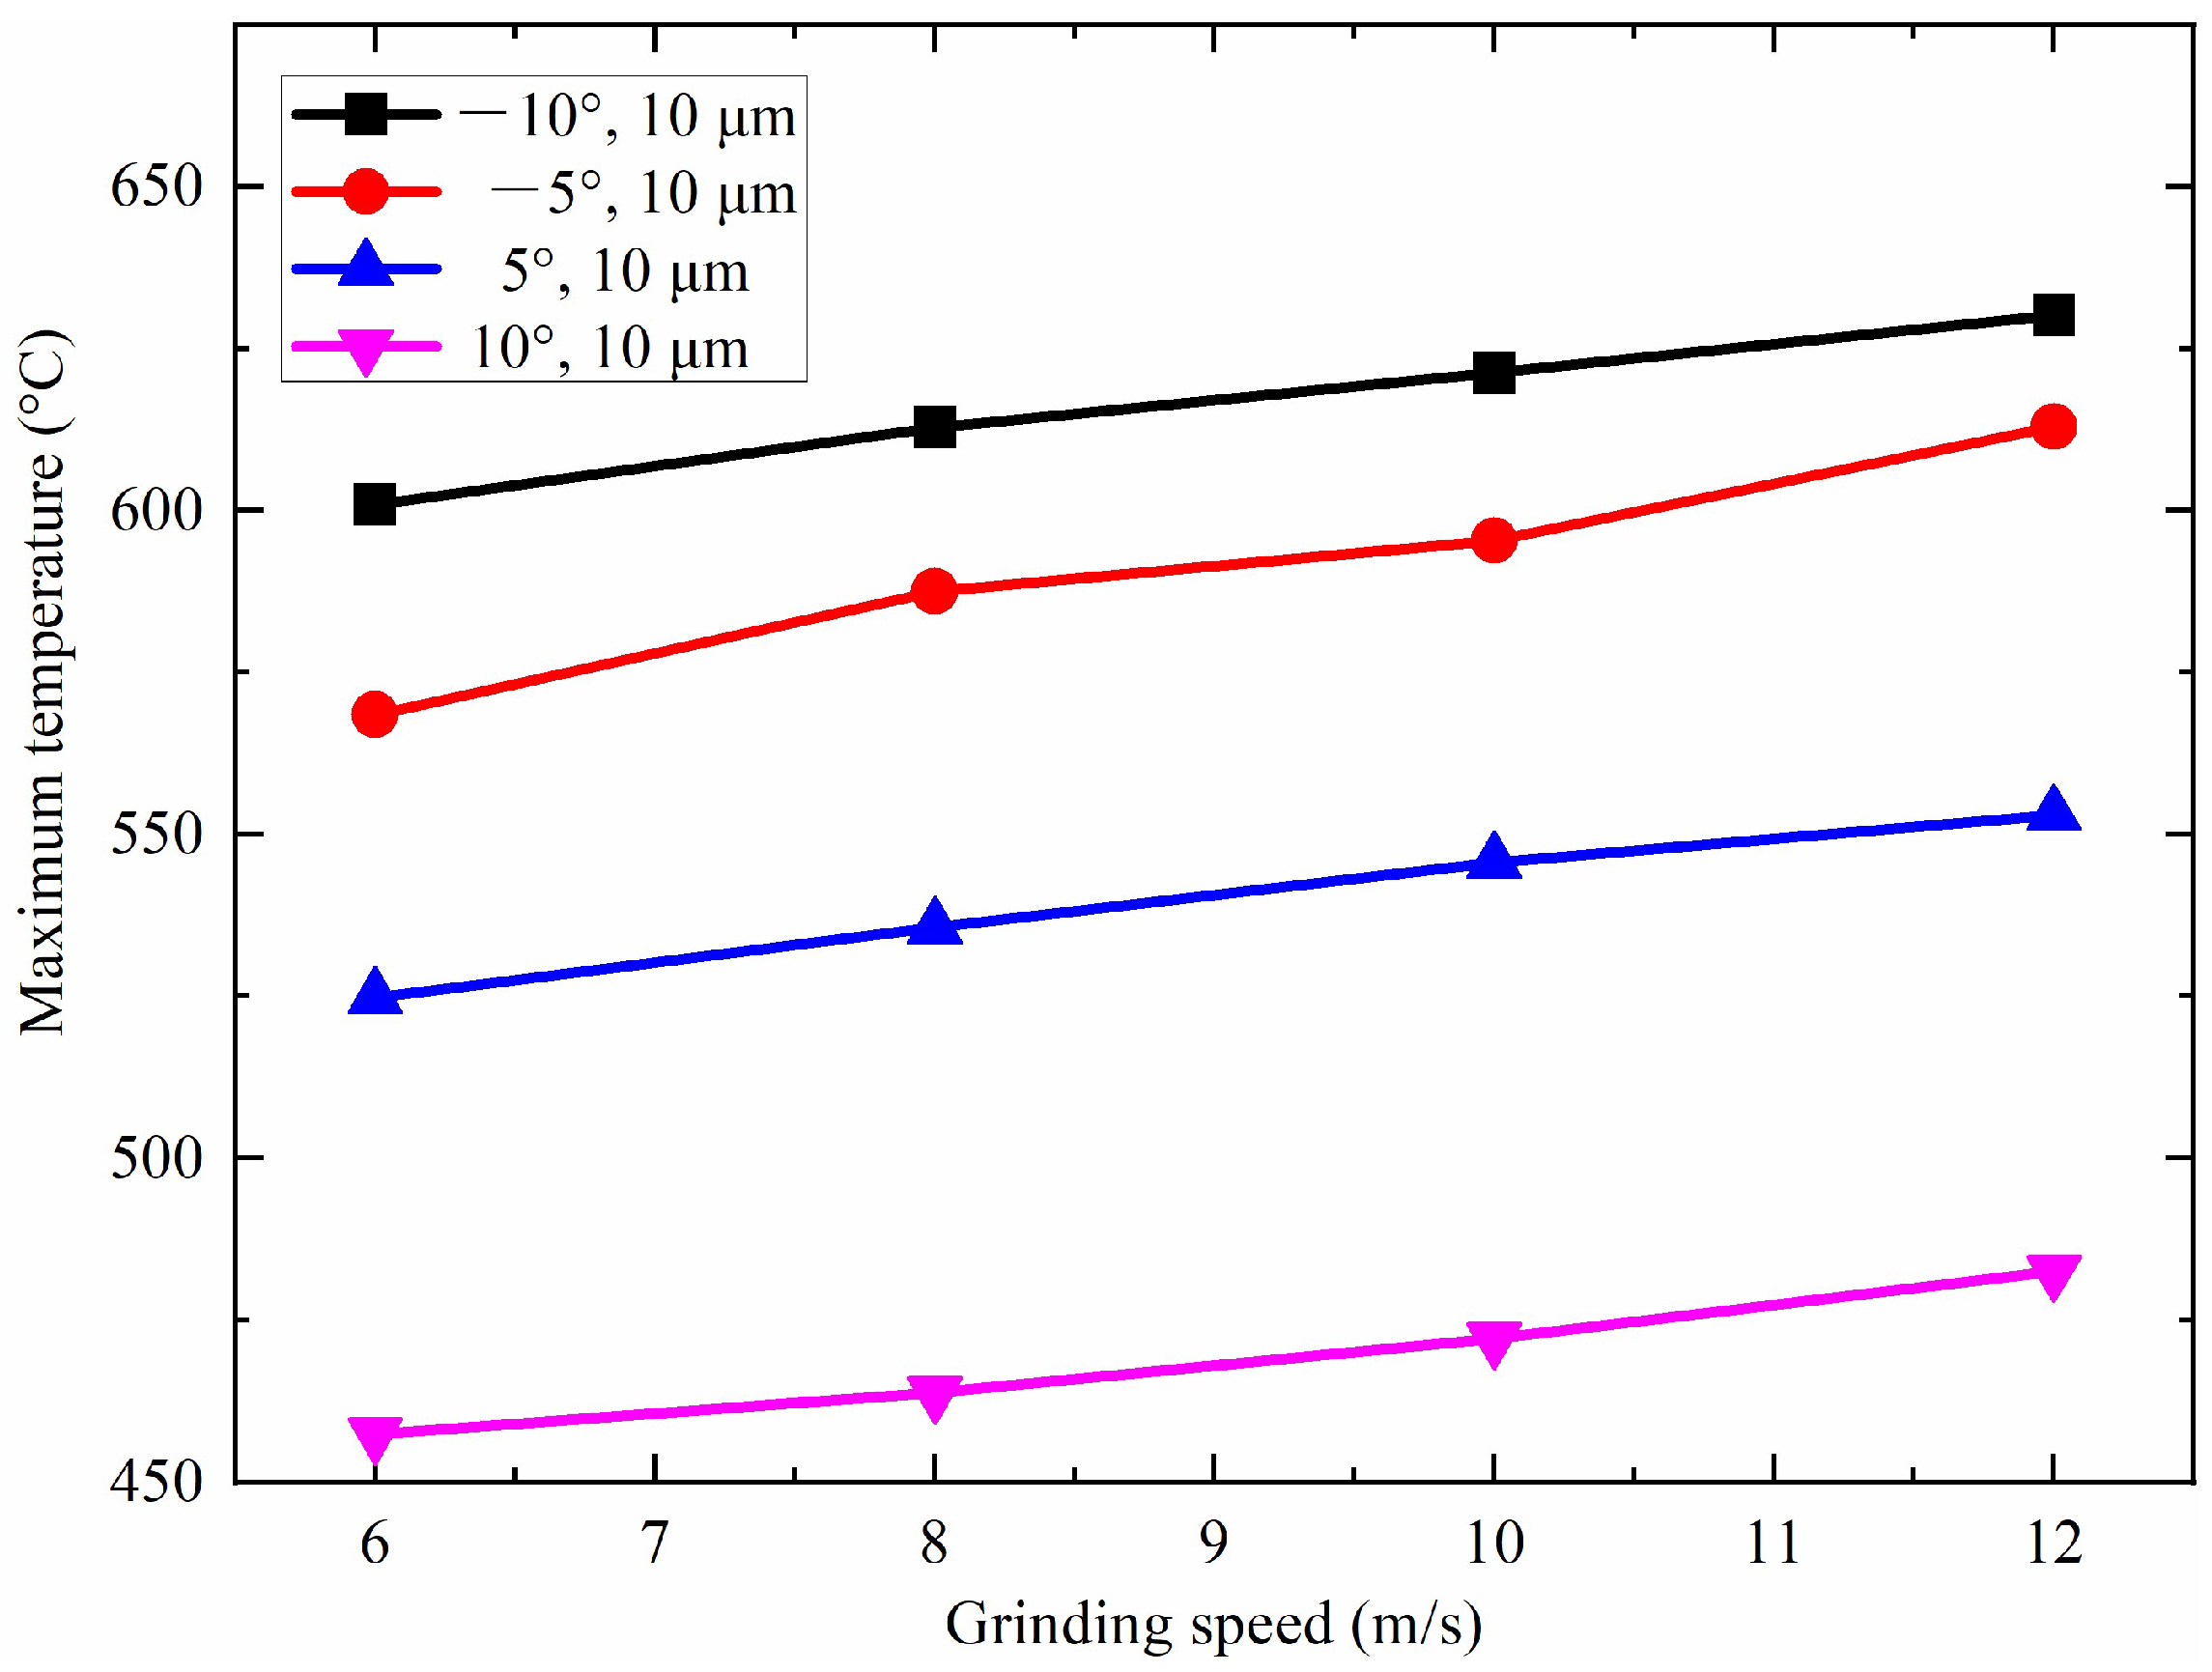
To investigate the impact of grinding speed on the highest grinding temperature of the grinding zone, the simulation was conducted with a constant grinding depth and abrasive grain rake angle, varying only the grinding speed. The results, illustrated in Figure 6, indicate a correlation between increased grinding speed and a higher maximum grinding temperature. In the single grain grinding process, there are two primary heat sources; one is the heat produced from friction between the diamond grain and workpiece surface, and the other is the heat generated from the plastic deformation of the workpiece along the tangential direction of the rake face. As the grinding speed increases, more material is removed in the same amount of time, requiring more work to overcome friction. Consequently, the generated frictional heat increases and cannot be conducted quickly enough to the chips or inside the abrasive grain. Simultaneously, the energy required for workpiece deformation also amplifies, leading to a rise in grinding temperature.
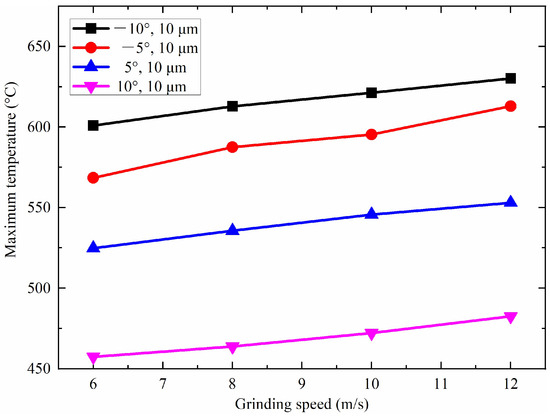
Figure 6.
The relationship between grinding speed and maximum grinding temperature.
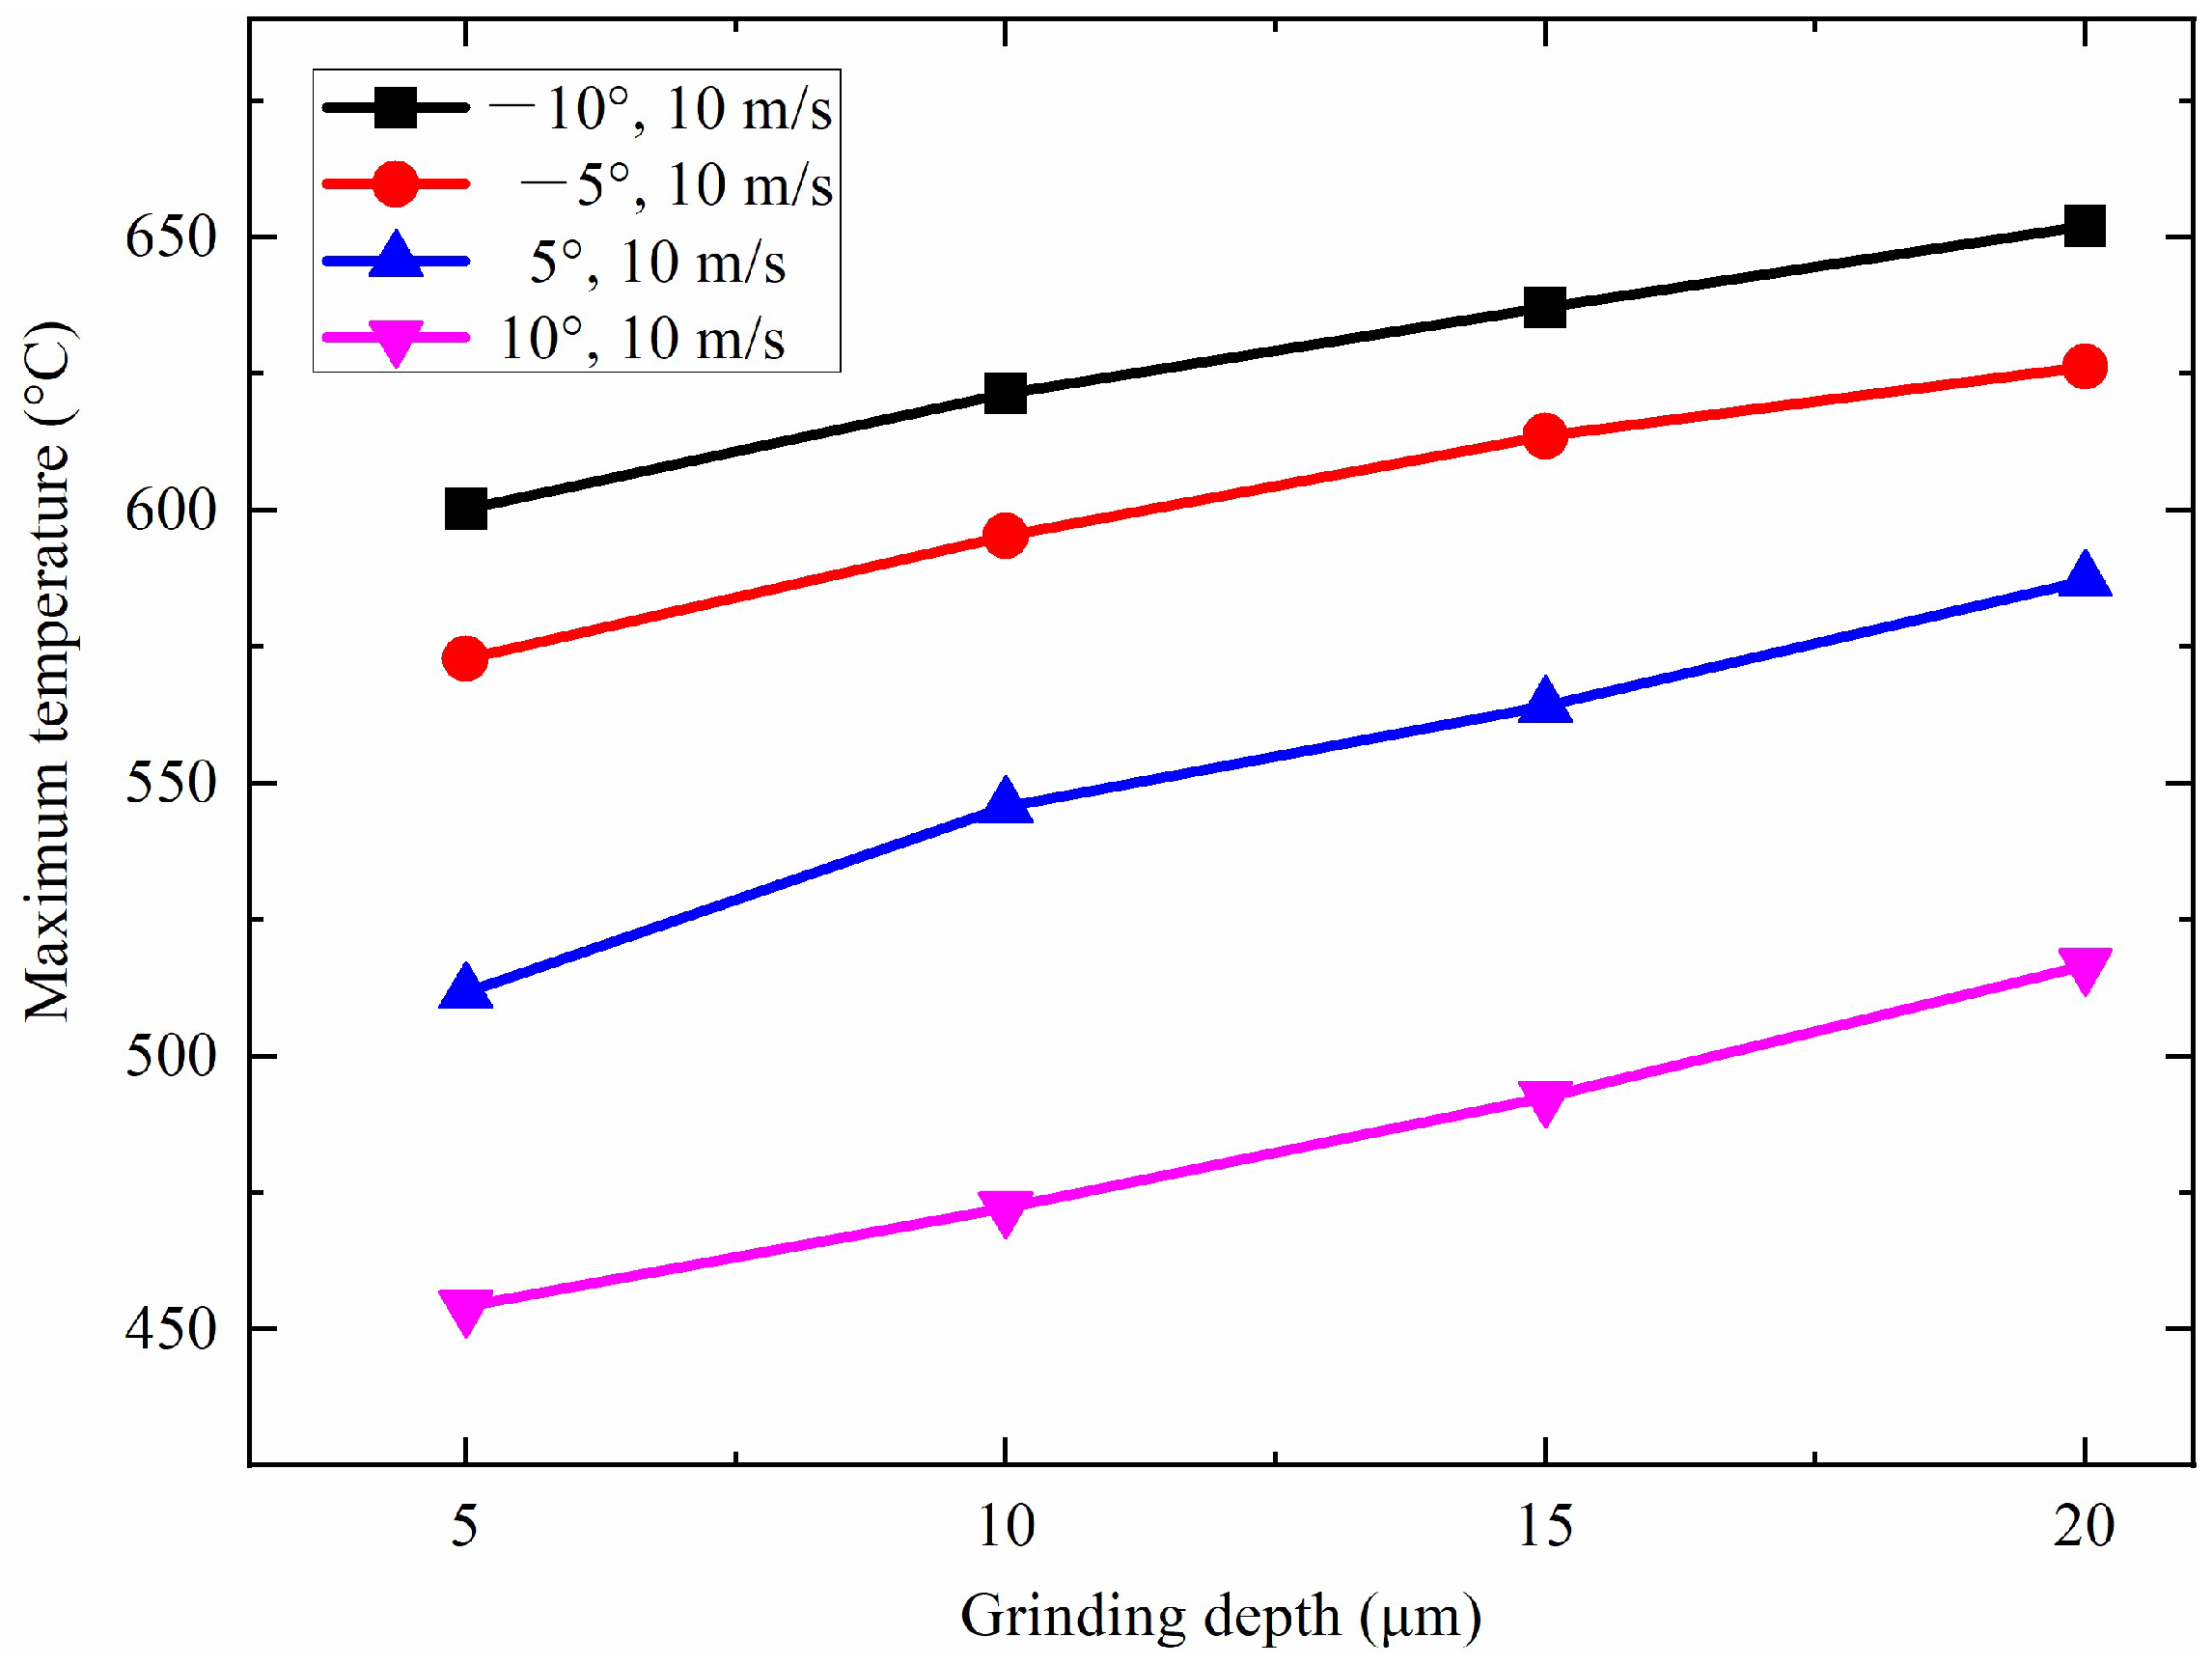
Figure 7 illustrates the impact of grinding depth on the maximum grinding temperature. It is evident from the figure that when the grinding speed and the rake angle of the abrasive grain remain constant, an elevation in grinding depth leads to a rise in the maximum grinding temperature. This phenomenon occurs because as the grinding depth increases, the contact area between the diamond abrasive grain and the workpiece enlarges, leading to an increase in the amount of material undergoing plastic deformation within the same time period, thereby increasing the heat generated during grinding and consequently raising the maximum grinding temperature.
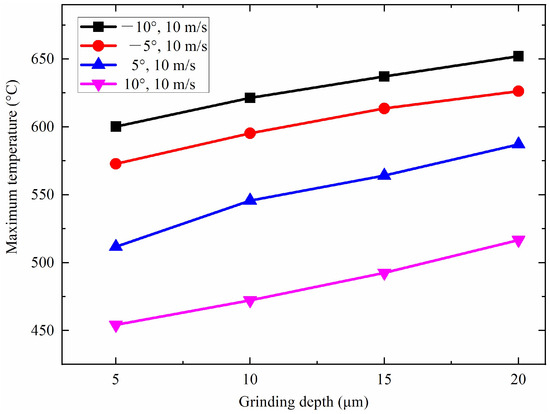
Figure 7.
The relationship between grinding depth and maximum grinding temperature.
Figure 8 depicts the impact of the rake angle of the abrasive grain on the maximum grinding temperature. It is evident from the figure that, under a constant grinding speed and depth, an increase in the rake angle leads to a notable reduction in the maximum grinding temperature. This is because as the abrasive grain rake angle decreases, especially in the situation of an NRA, the normal stress on the rake face of the abrasive grain interacting with the workpiece sharply increases. Since the chips are primarily formed through the compression of the abrasive grain against the workpiece, the chips undergo substantial plastic deformation and consequently generate a high amount of heat. When the abrasive grain rake angle is relatively small, the primary source of heat is merely the friction between the diamond grain and the workpiece, resulting in less heat generation.
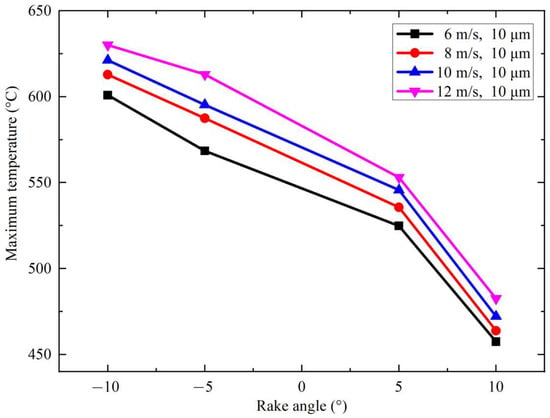
Figure 8.
Relationship between rake angle of abrasive grain and maximum grinding temperature.
It is worth mentioning that although finite element simulation studies have demonstrated that employing abrasive grains with a larger PRA results in smaller normal grinding forces, tangential grinding forces, and lower grinding temperatures, an excessive increase in the rake angle may compromise the strength of the grinding edge of the grain. Moreover, there is a tendency for the abrasive grains to embed into the workpiece and for edge chipping to occur. Therefore, in forthcoming experimental investigations, it is planned to ablate and modify the apex angle of the grains to 85°, corresponding to a rake angle of 5° for diamond grains.
4. Experimental Setup and Scheme
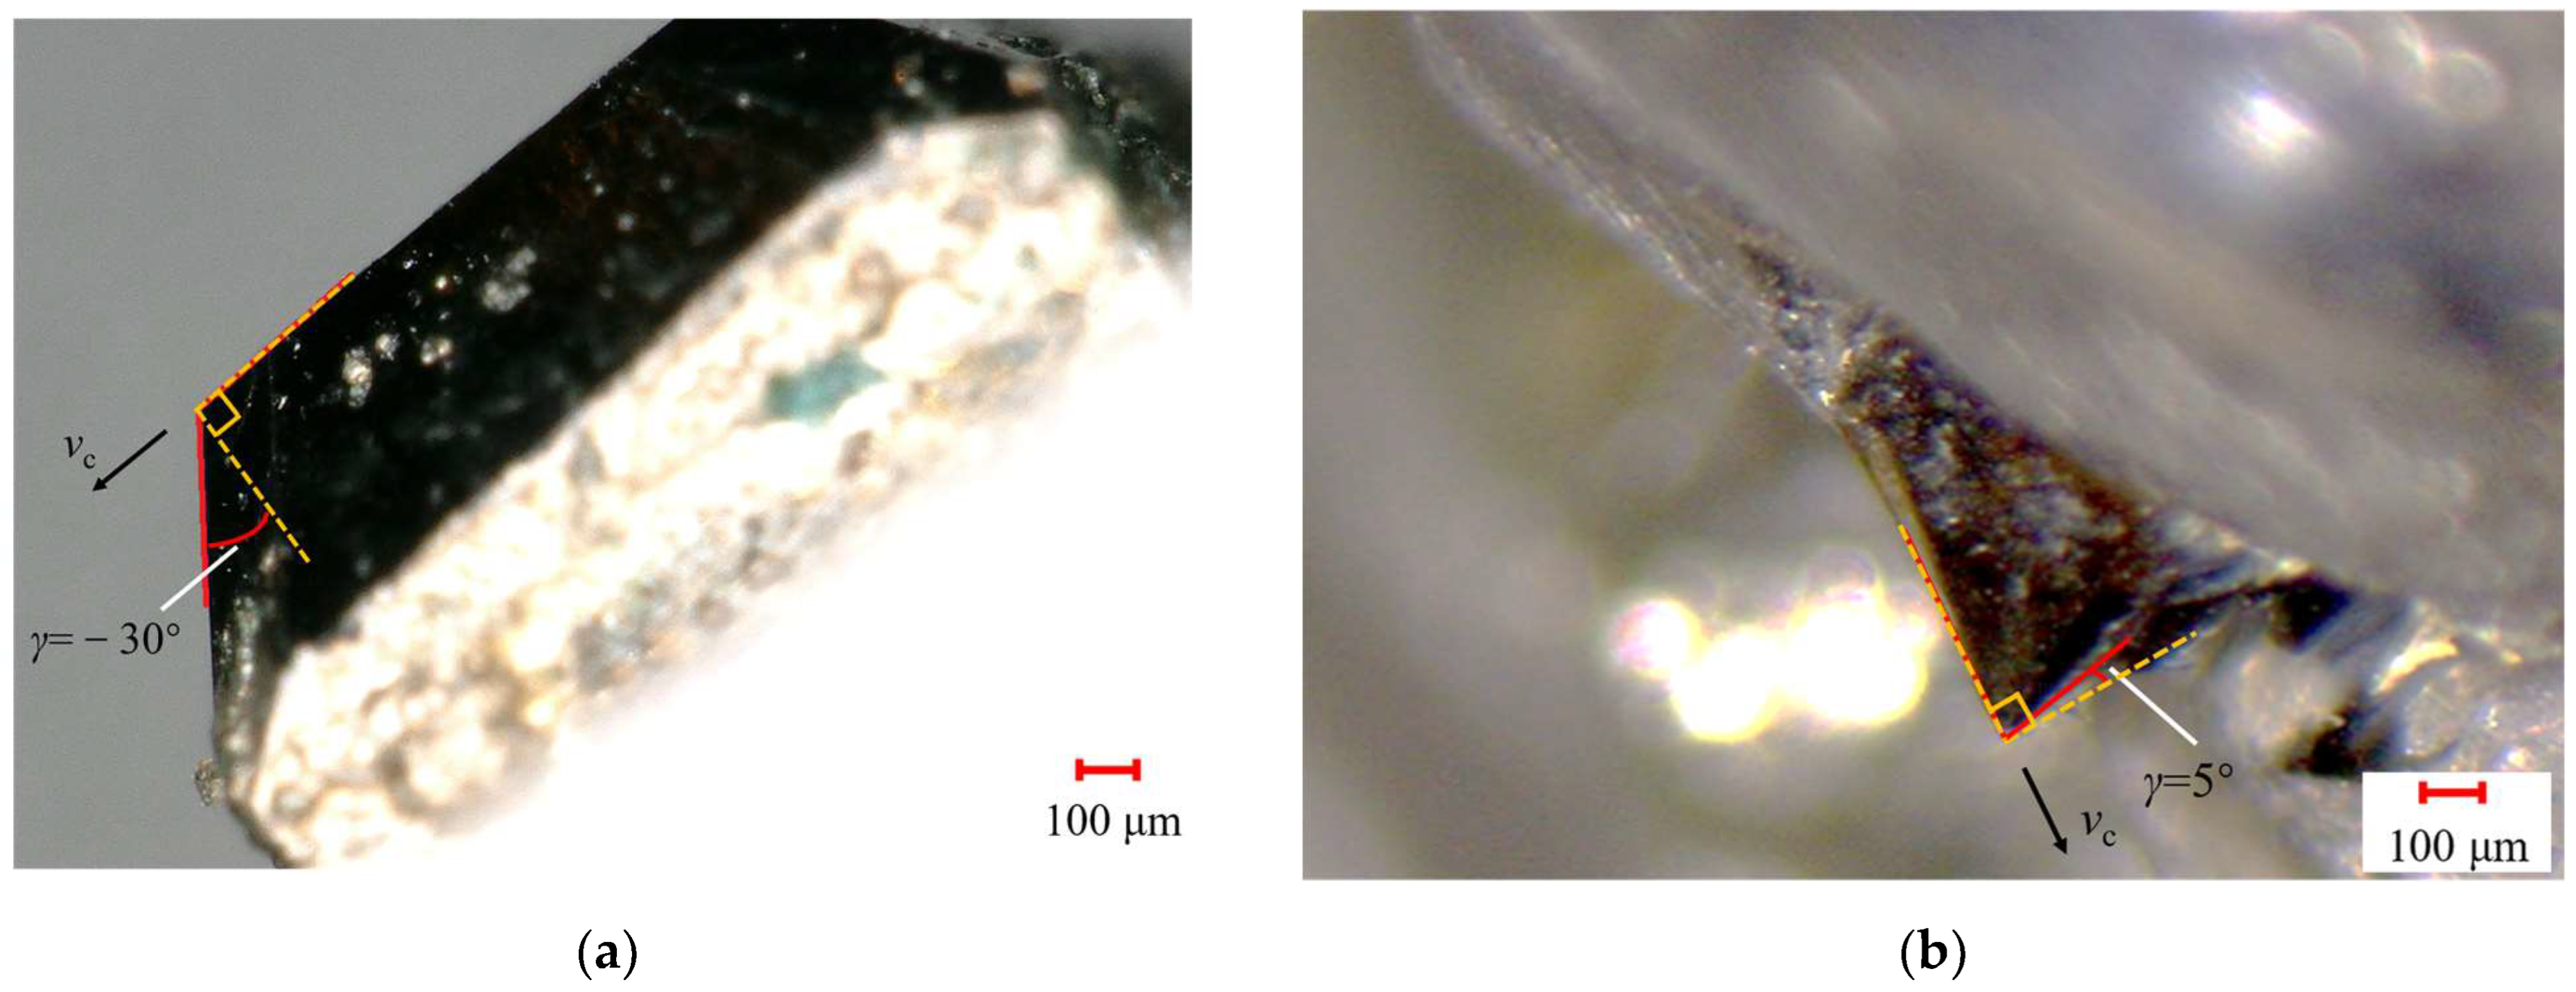
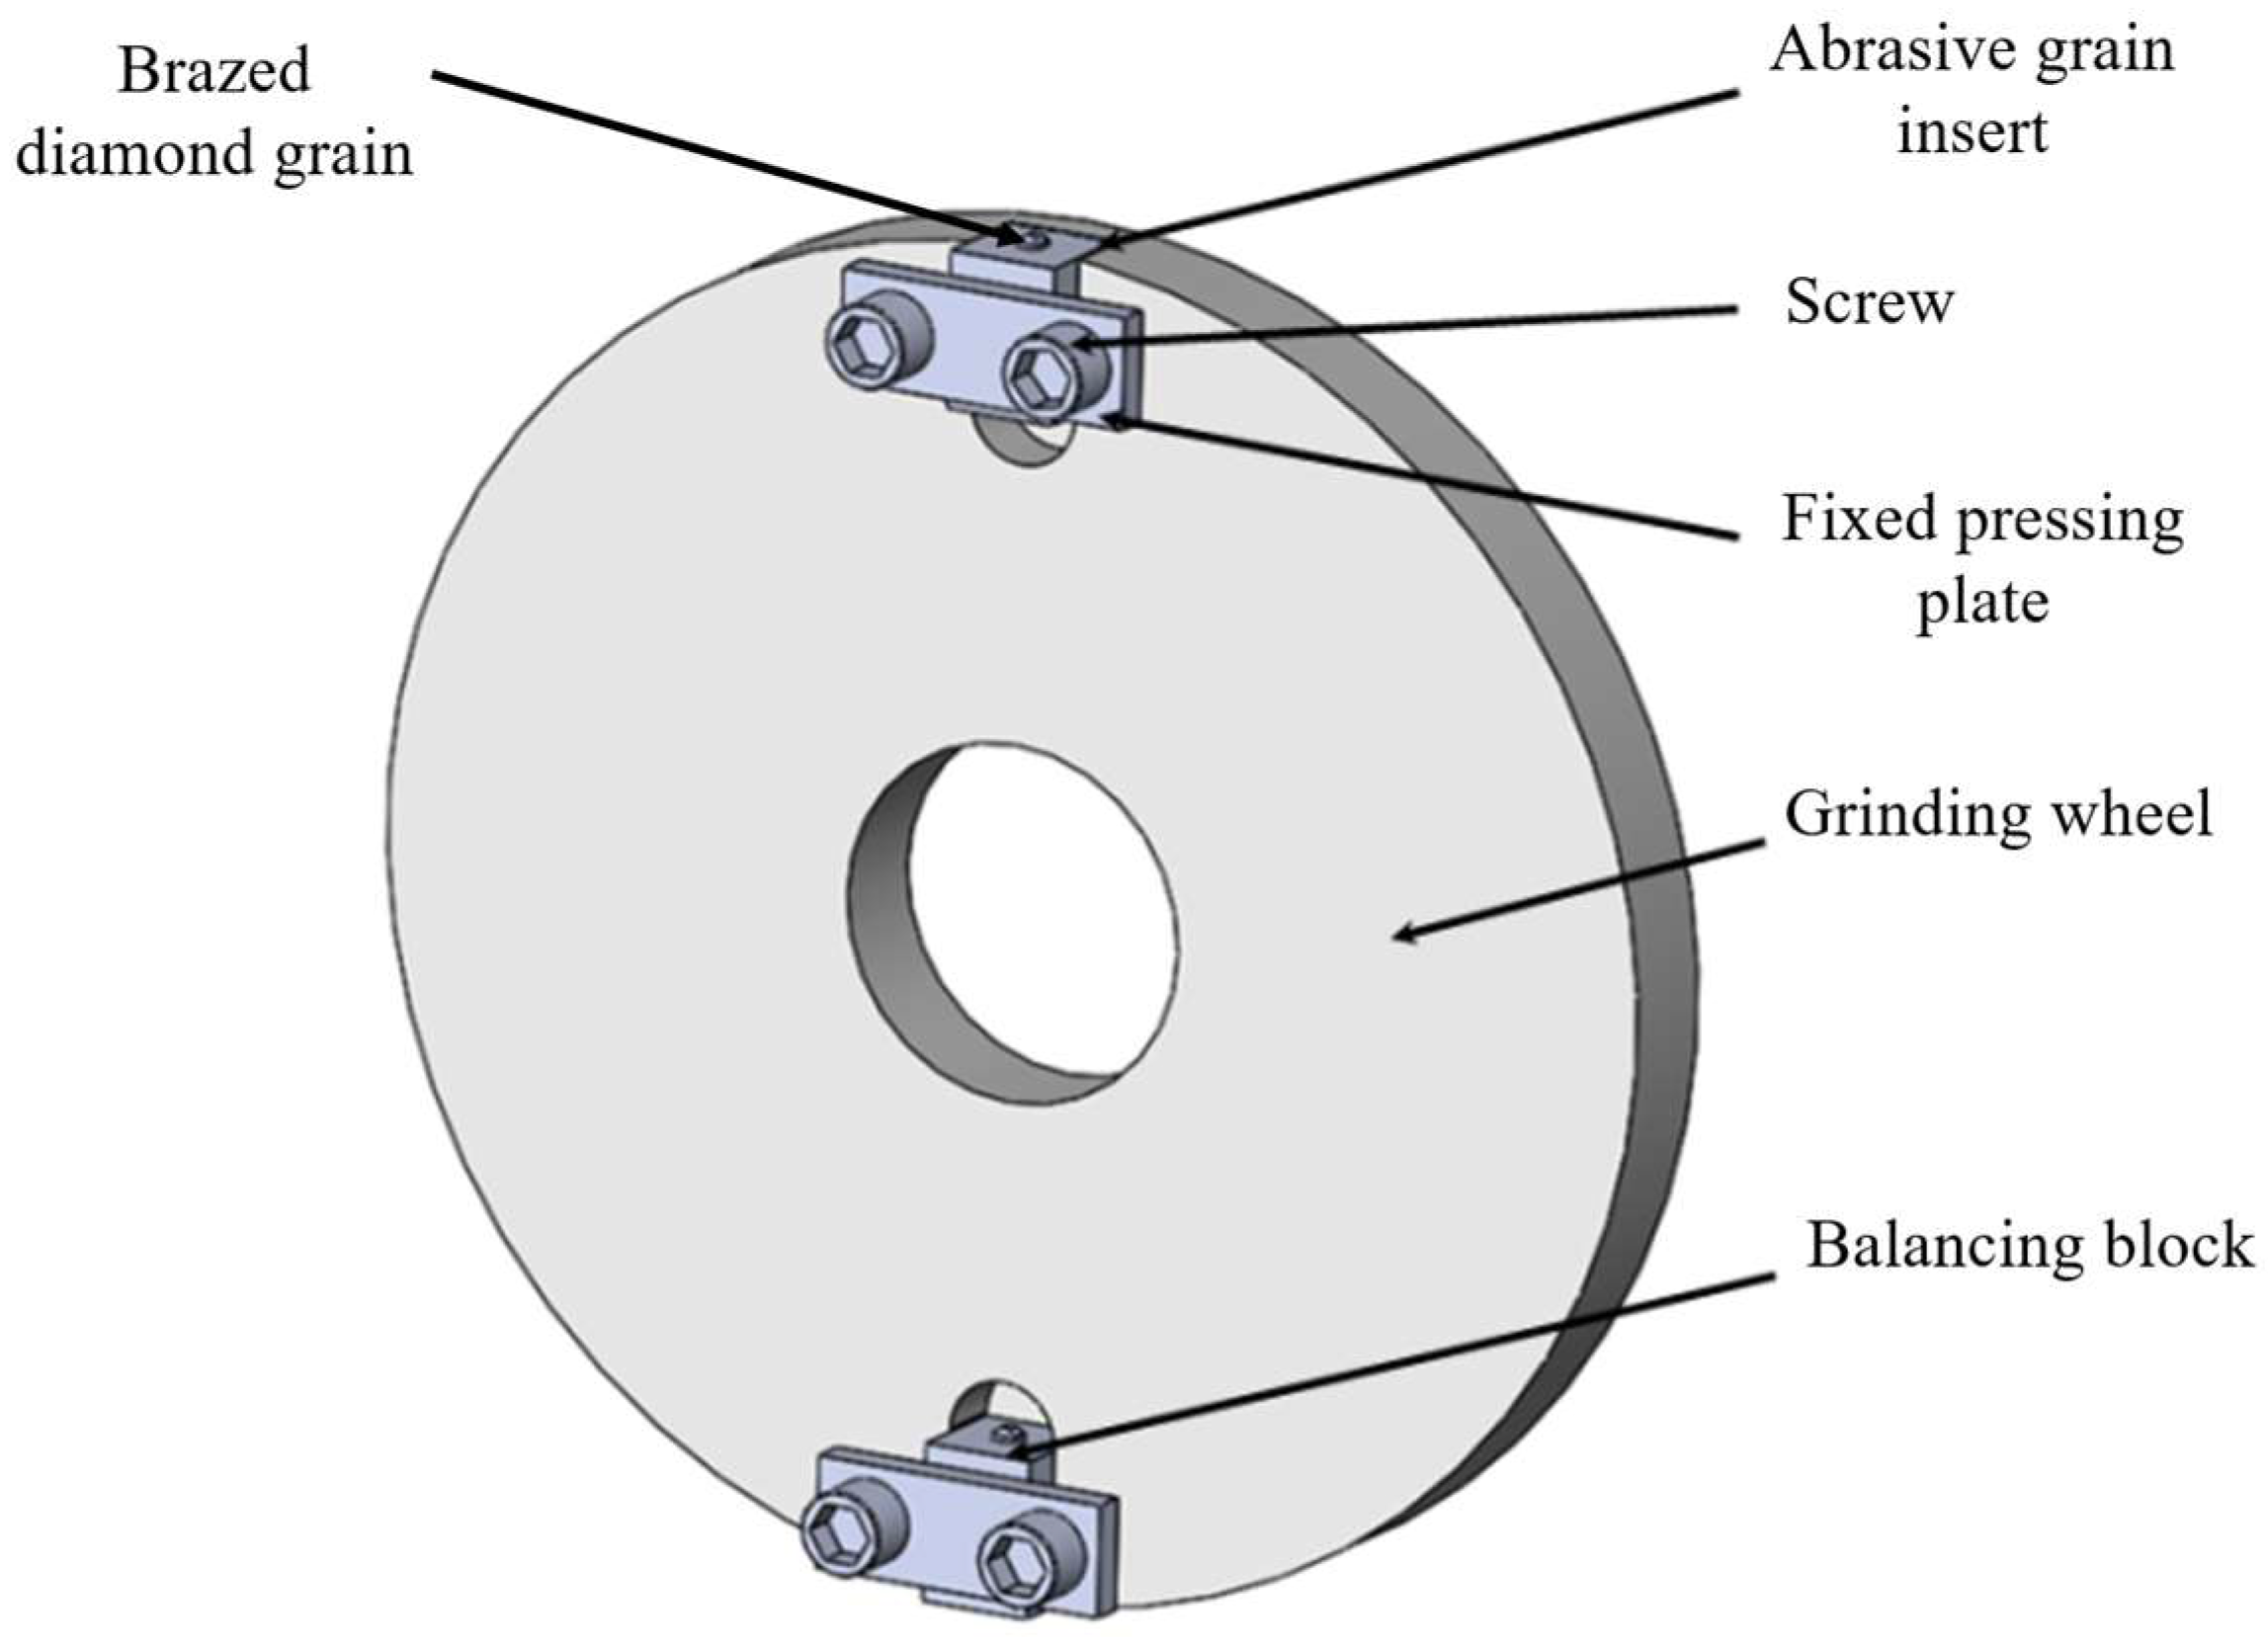
Based on the preliminary research, femtosecond pulse laser ablation was determined to be a feasible technique to remove the material from the top edge region of the grains [28]. After laser fabrication, the apex angle became acute, and thereby transformed the traditional NRA grinding into PRA cutting, as shown in Figure 9. We mounted the brazed insert of a single diamond abrasive grain, which had been processed to have a PRA structure using a femtosecond laser, onto the grinding wheel. For comparison, a similarly sized original negative rake angle diamond abrasive brazed insert was also used in the experiment. The chosen single crystal diamond abrasive grain has a diameter of approximately 2 mm and is shaped as a truncated octahedron. The assembled single grain grinding tool, as shown in Figure 10, consists of a wheel, an abrasive grain insert, a balancing block, and fixed press plates. Screws on both sides of the groove on the grinding wheel facilitate quick replacement between PRA and NRA abrasive inserts.
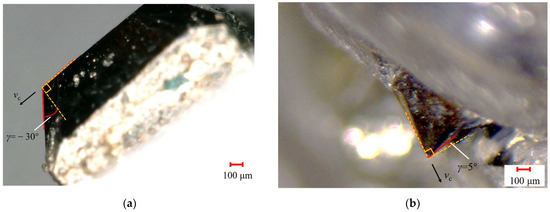
Figure 9.
Diamond abrasive grain (a) before and (b) after applying femtosecond laser fabrication.

Figure 10.
Structure of the single diamond grain grinding tool.
Comparative grinding experiments were conducted on an SL800A/1-HZ-type precision surface grinding machine using a dry grinding method to prevent interference from the grinding fluid on force measurement. To enhance the resemblance between the grinding method of single diamond abrasive grain and the operations observed with actual grinding wheels, and ensure that the processing path aligned with the real grinding, the experiment adjusted the movement speed of the worktable of the grinding machine to produce continuous grinding traces. During the process, the grinding forces were measured using a Kistler 9119AA2 dynamometer with a measurement range of −400 kN to 400 kN and a sensitivity of 26 pC/N. The experiment utilized a Ti6Al4V titanium alloy with dimensions of 60 mm × 25 mm × 12 mm, and the workpiece surface was polished in advance. The grinding wheels equipped with diamond abrasive inserts with a PRA and an NRA were mounted onto the grinding machine, respectively. The worktable of the grinding machine was equipped with an electromagnetic chuck, on which the dynamometer was securely mounted. To carry out single grain grinding experiments for comparison, the Ti6Al4V alloy was clamped on the dynamometer with a specially designed fixture. The experimental equipment for single grain grinding is shown in Figure 11. Following the grinding process, observation of the titanium alloy’s surface morphology was made through a Zeiss inverted metallographic microscope, Axio Vert.A1, which is capable of up to 1000× magnification, equipped with digital imaging and analysis software. And the surface roughness of the workpiece was assessed using a TIME3200 handheld surface roughness gauge with a measurement range from 0.05 µm to 10 µm, and an accuracy of ±5%.
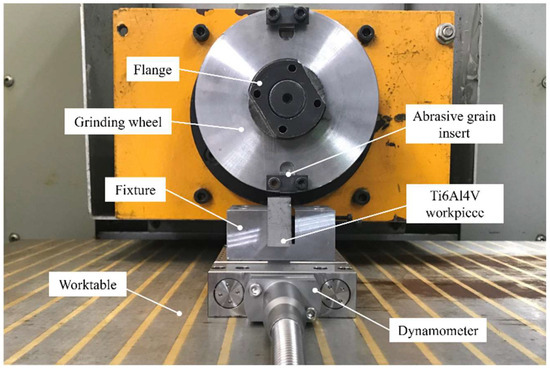
Figure 11.
Experimental equipment for single grain grinding.
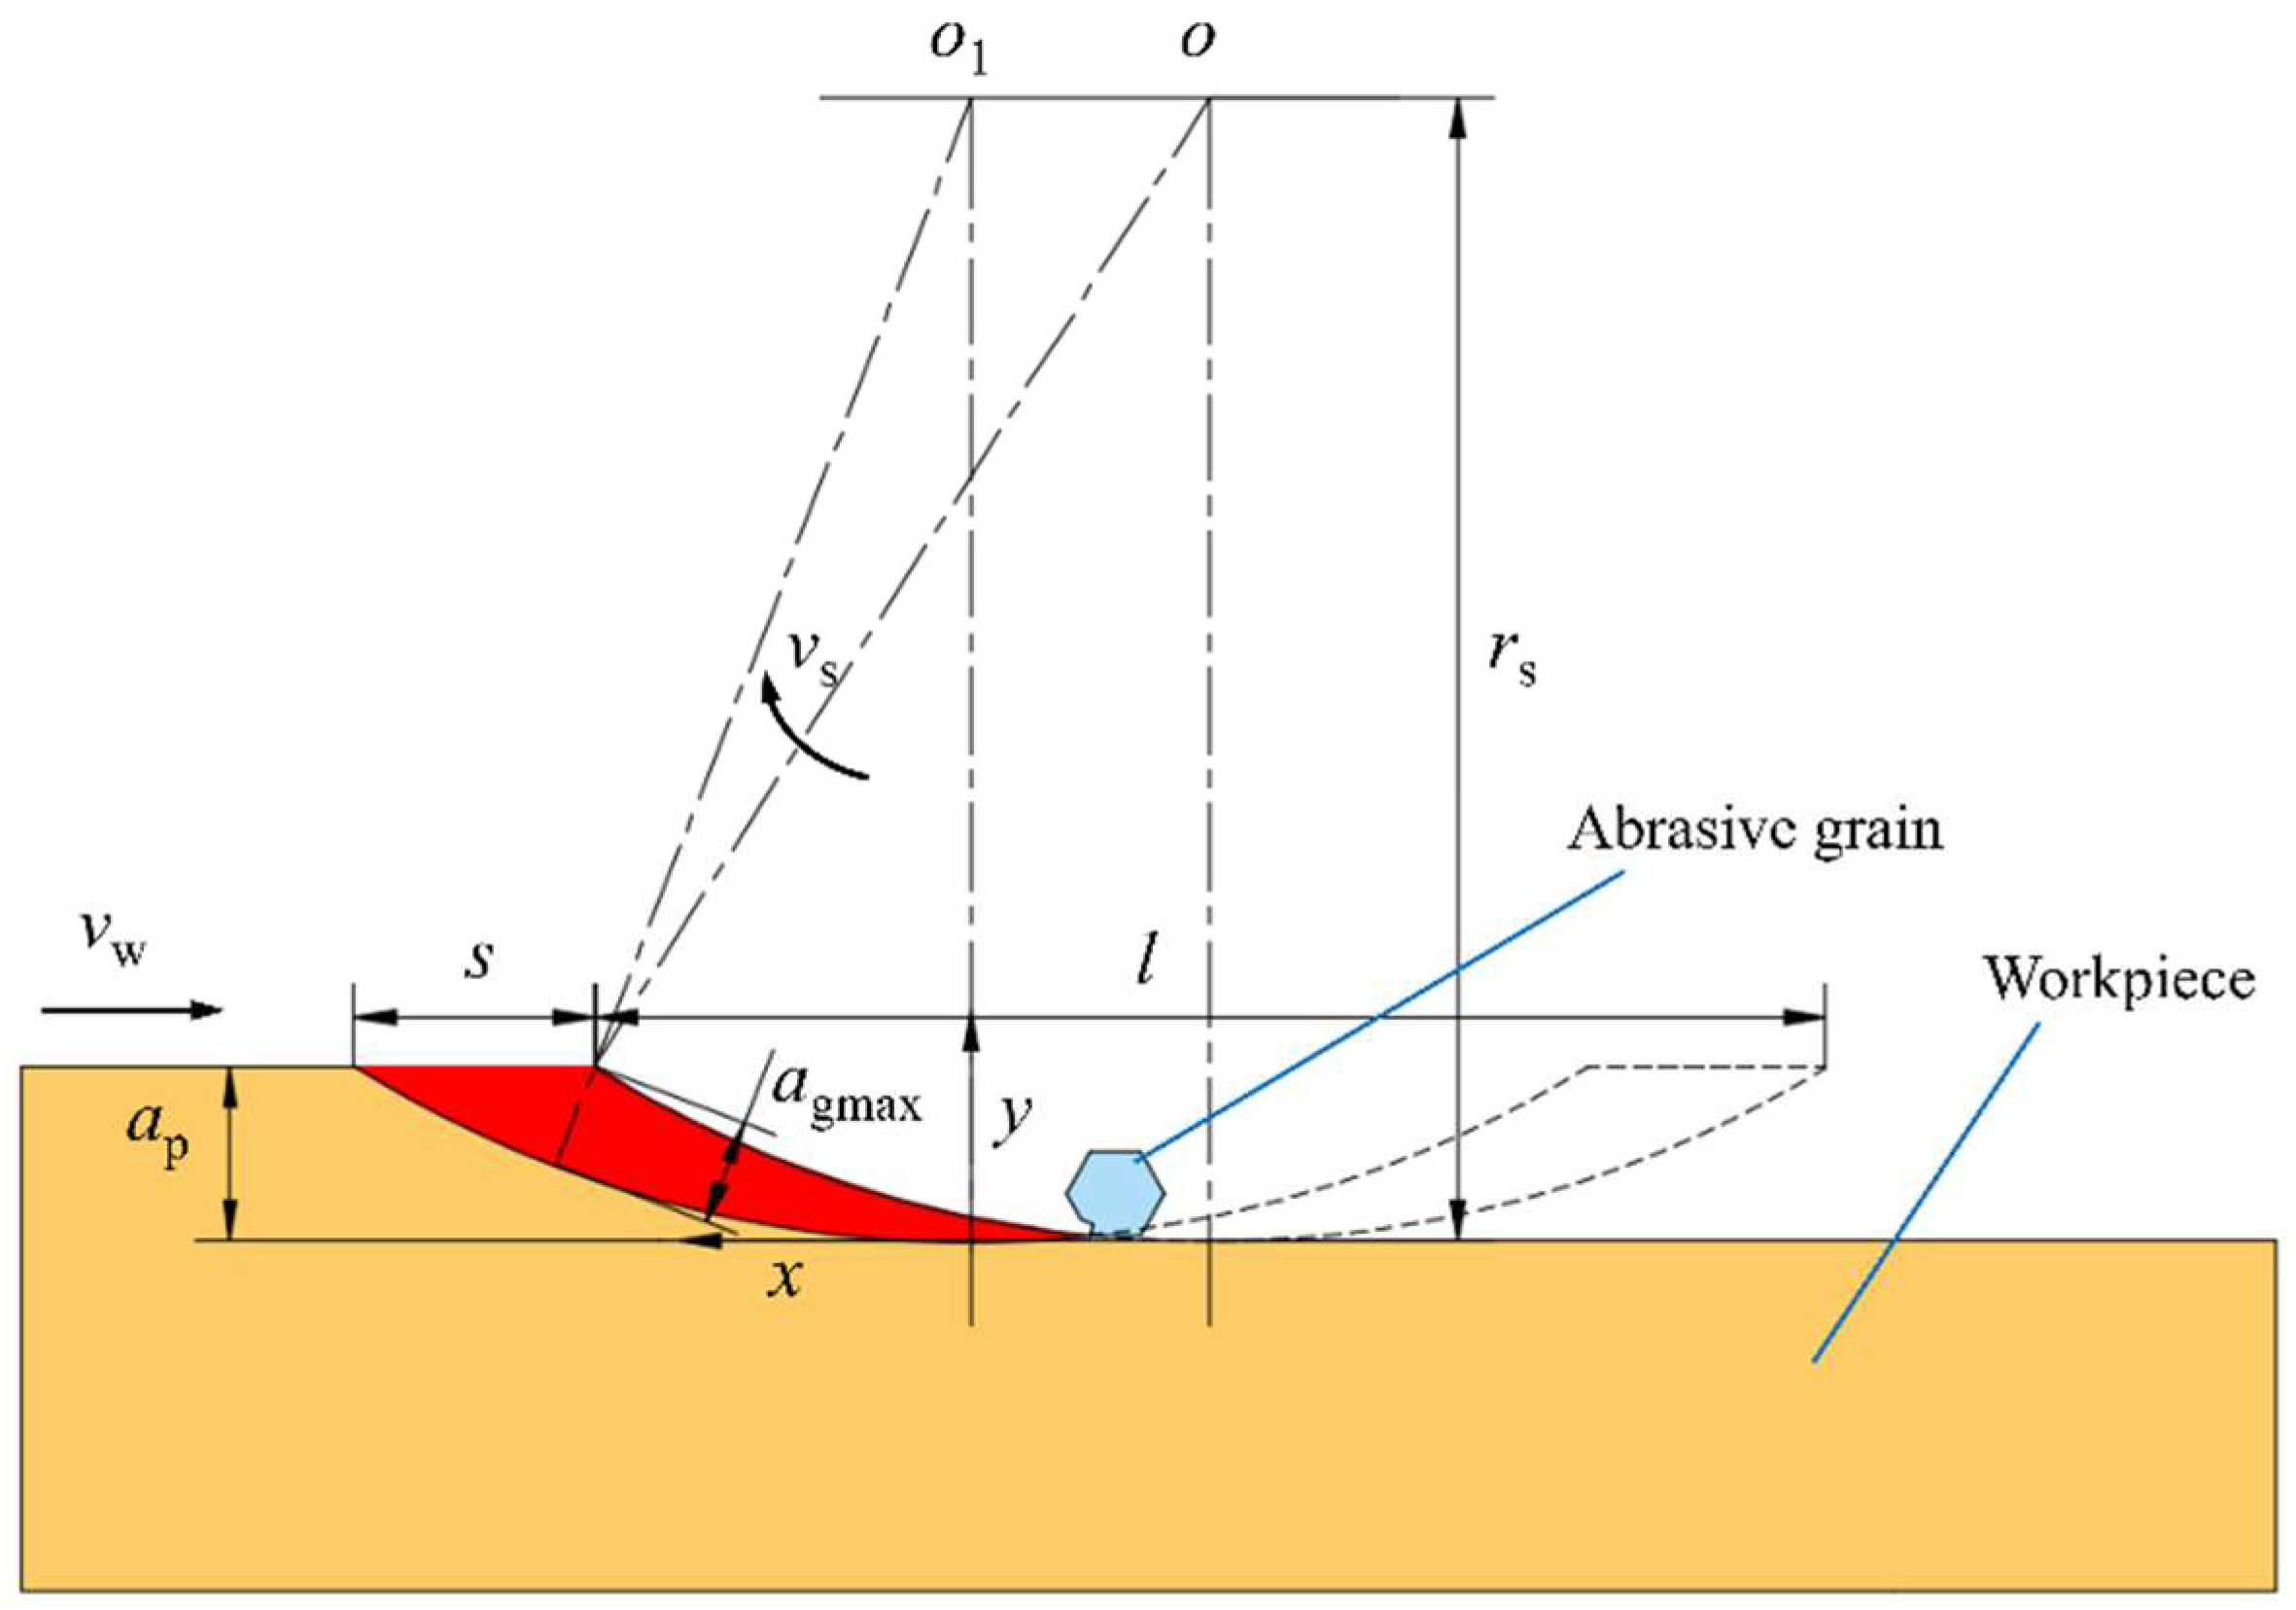
In single diamond grain grinding, the grain mounted on the circumference of the grinding wheel rotates at a grinding speed of vs, while the worktable of the grinding machine drives the workpiece to move horizontally at feed speed vw. The motion trajectory of the single grain during the grinding operation is an extended cycloidal path, and the expression for its processing path is [13]
where rs represents the diameter of the grinding wheel, and ± is used to distinguish between down grinding and up grinding.
Figure 12 depicts the grinding path for a single abrasive grain. In the figure, agmax represents the maximum undeformed chip thickness, and it is used to assess the maximum cutting thickness of a single grain. This parameter is influenced by various factors, including grinding speed, grinding depth, and feed rate, and it significantly impacts the grinding force, the maximum temperature of grinding area, wear on the abrasive grain, and the surface finish of the machined components. Figure 12 also illustrates the two grinding traces that a diamond abrasive grain leaves on the surface of the workpiece after two continuous rotations of the wheel, while the workpiece moves at a feed speed of vw. The spacing between these two traces is denoted as s, which can be expressed as

Figure 12.
Schematic diagram of the grinding path of the single grain.
To make the single grain grinding process more closely resemble the actual wheel grinding, it is necessary to ensure that the single grain grinding has a similar processing method and cutting path to the actual wheel grinding, which means it can form continuous scratches on the workpiece surface. For this purpose, the maximum undeformed chip thickness produced by the single grain should be less than the depth of grinding, and geometrically it should satisfy s < l/2, where l represents the length of the scratch, which can be approximately expressed as
Therefore, to achieve the condition for generating continuous grinding traces, the feed speed should satisfy the following criteria:
To ensure continuous grinding, the feed speed vw = 2 mm/s was maintained constantly during the experiment. In the experiments with single diamond grains with a PRA and an NRA, the influence of the PRA, which was fabricated by a femtosecond laser, on the edge strength and grinding force was considered, and a rake angle of 5° was selected for the PRA diamond grain. The rake angle range for the original single diamond grain, which had not been processed by laser, generally lay between −20° and −40. Hence, a rake angle of −30° was selected in the NRA grinding experiment. Comparative experiments were conducted by varying the grinding speed and grinding depth, with specific machining process parameters, as presented in Table 6.

Table 6.
The process parameters of the grinding experiments.
5. Results and Discussion
5.1. Grinding Force
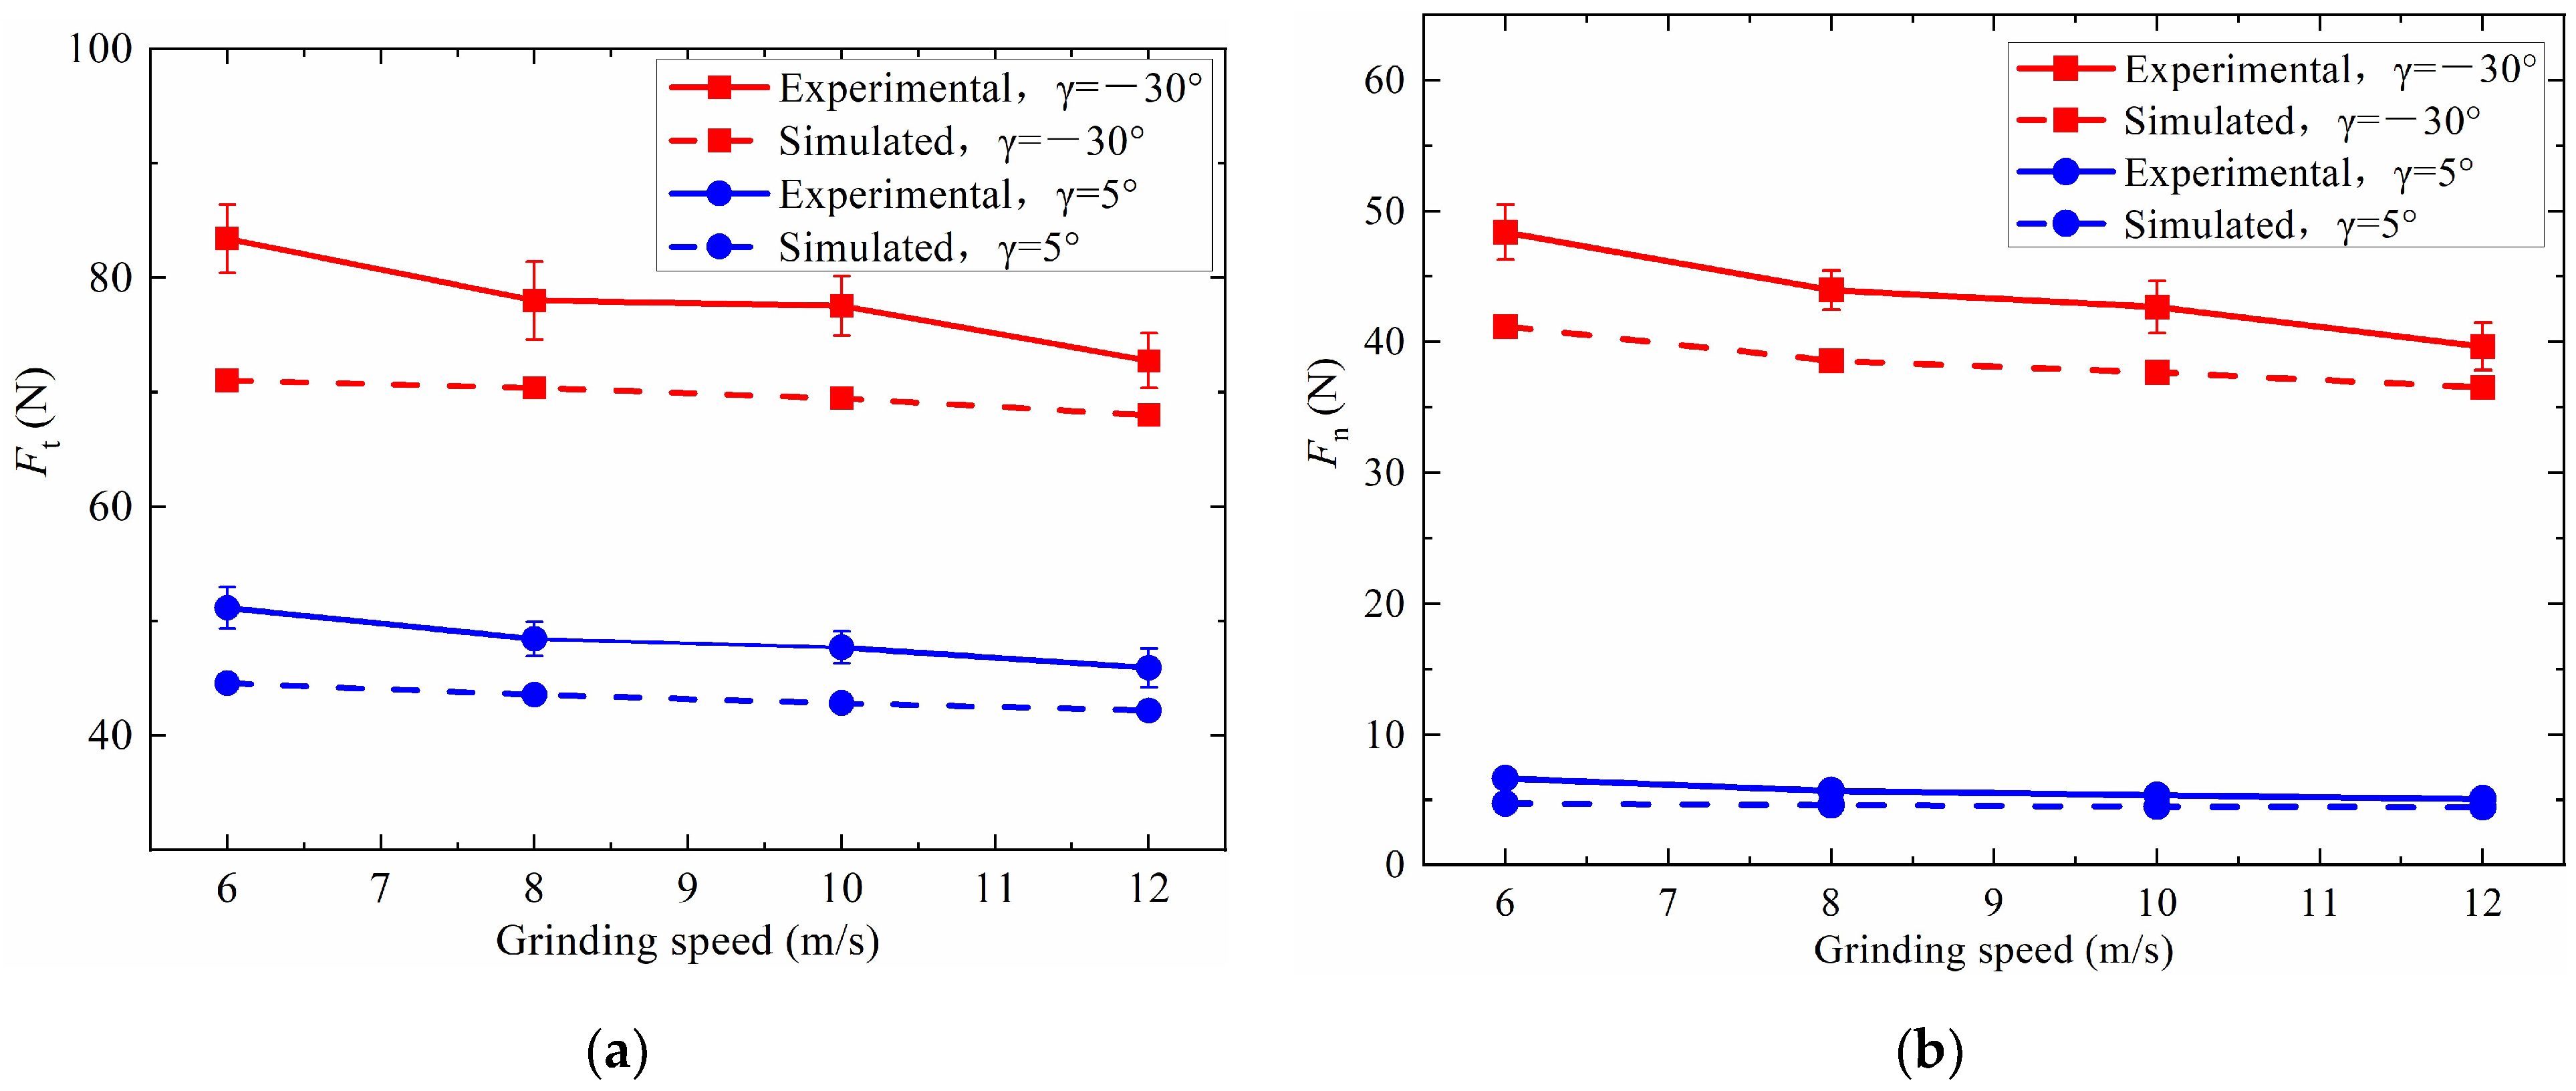
In the single diamond grain grinding experiments, the rake angles were set at −30° and 5°, respectively, and the grinding depth was kept constant; Figure 13 illustrates how the tangential and normal forces experienced during grinding varied with the grinding speed. In the figure, the simulation results of the grinding forces for grains at rake angles of −30° and 5° are represented by dashed lines for reference. It can be observed that the trends of the experimental values and the simulation results are generally consistent. Overall, the experimental results are slightly higher than the model predictions. The main reason for this discrepancy is that the model includes simplifying assumptions, such as uniform material distribution and stable grinding processes, which are difficult to fully achieve in practice.
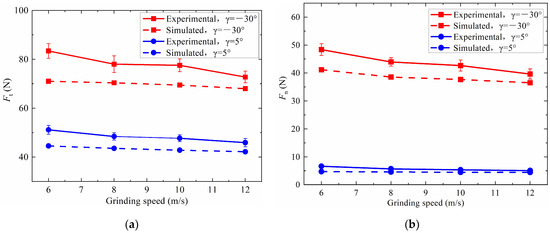
Figure 13.
The grinding forces under different grinding speeds with PRA/NRA: (a) tangential grinding force Ft, (b) normal grinding force Fn.
As illustrated in Figure 13, with constant grinding depth, the grinding forces for both PRA and NRA single diamond grains tend to decrease gradually when the grinding speed is increased. Notably, the grinding force during PRA single grain grinding was lower compared to that of NRA single grain grinding. Under different grinding speeds, the reduction in tangential grinding force in PRA grinding ranged from 37% to 41%, and the normal force was reduced by 83% to 86%. This is because, in NRA grinding, greater compressive stress in the normal direction occurs at the grain–chip contact point, increasing the shear strain and generating more grinding heat. Consequently, the grinding temperature rises, causing more severe shear deformation and a larger deformation of the chip. Therefore, the grinding forces, particularly the normal grinding force, are greater. Additionally, the trend of grinding force variation obtained in the simulation aligns with those observed in experimental data, confirming the accuracy and reliability of the simulation model.
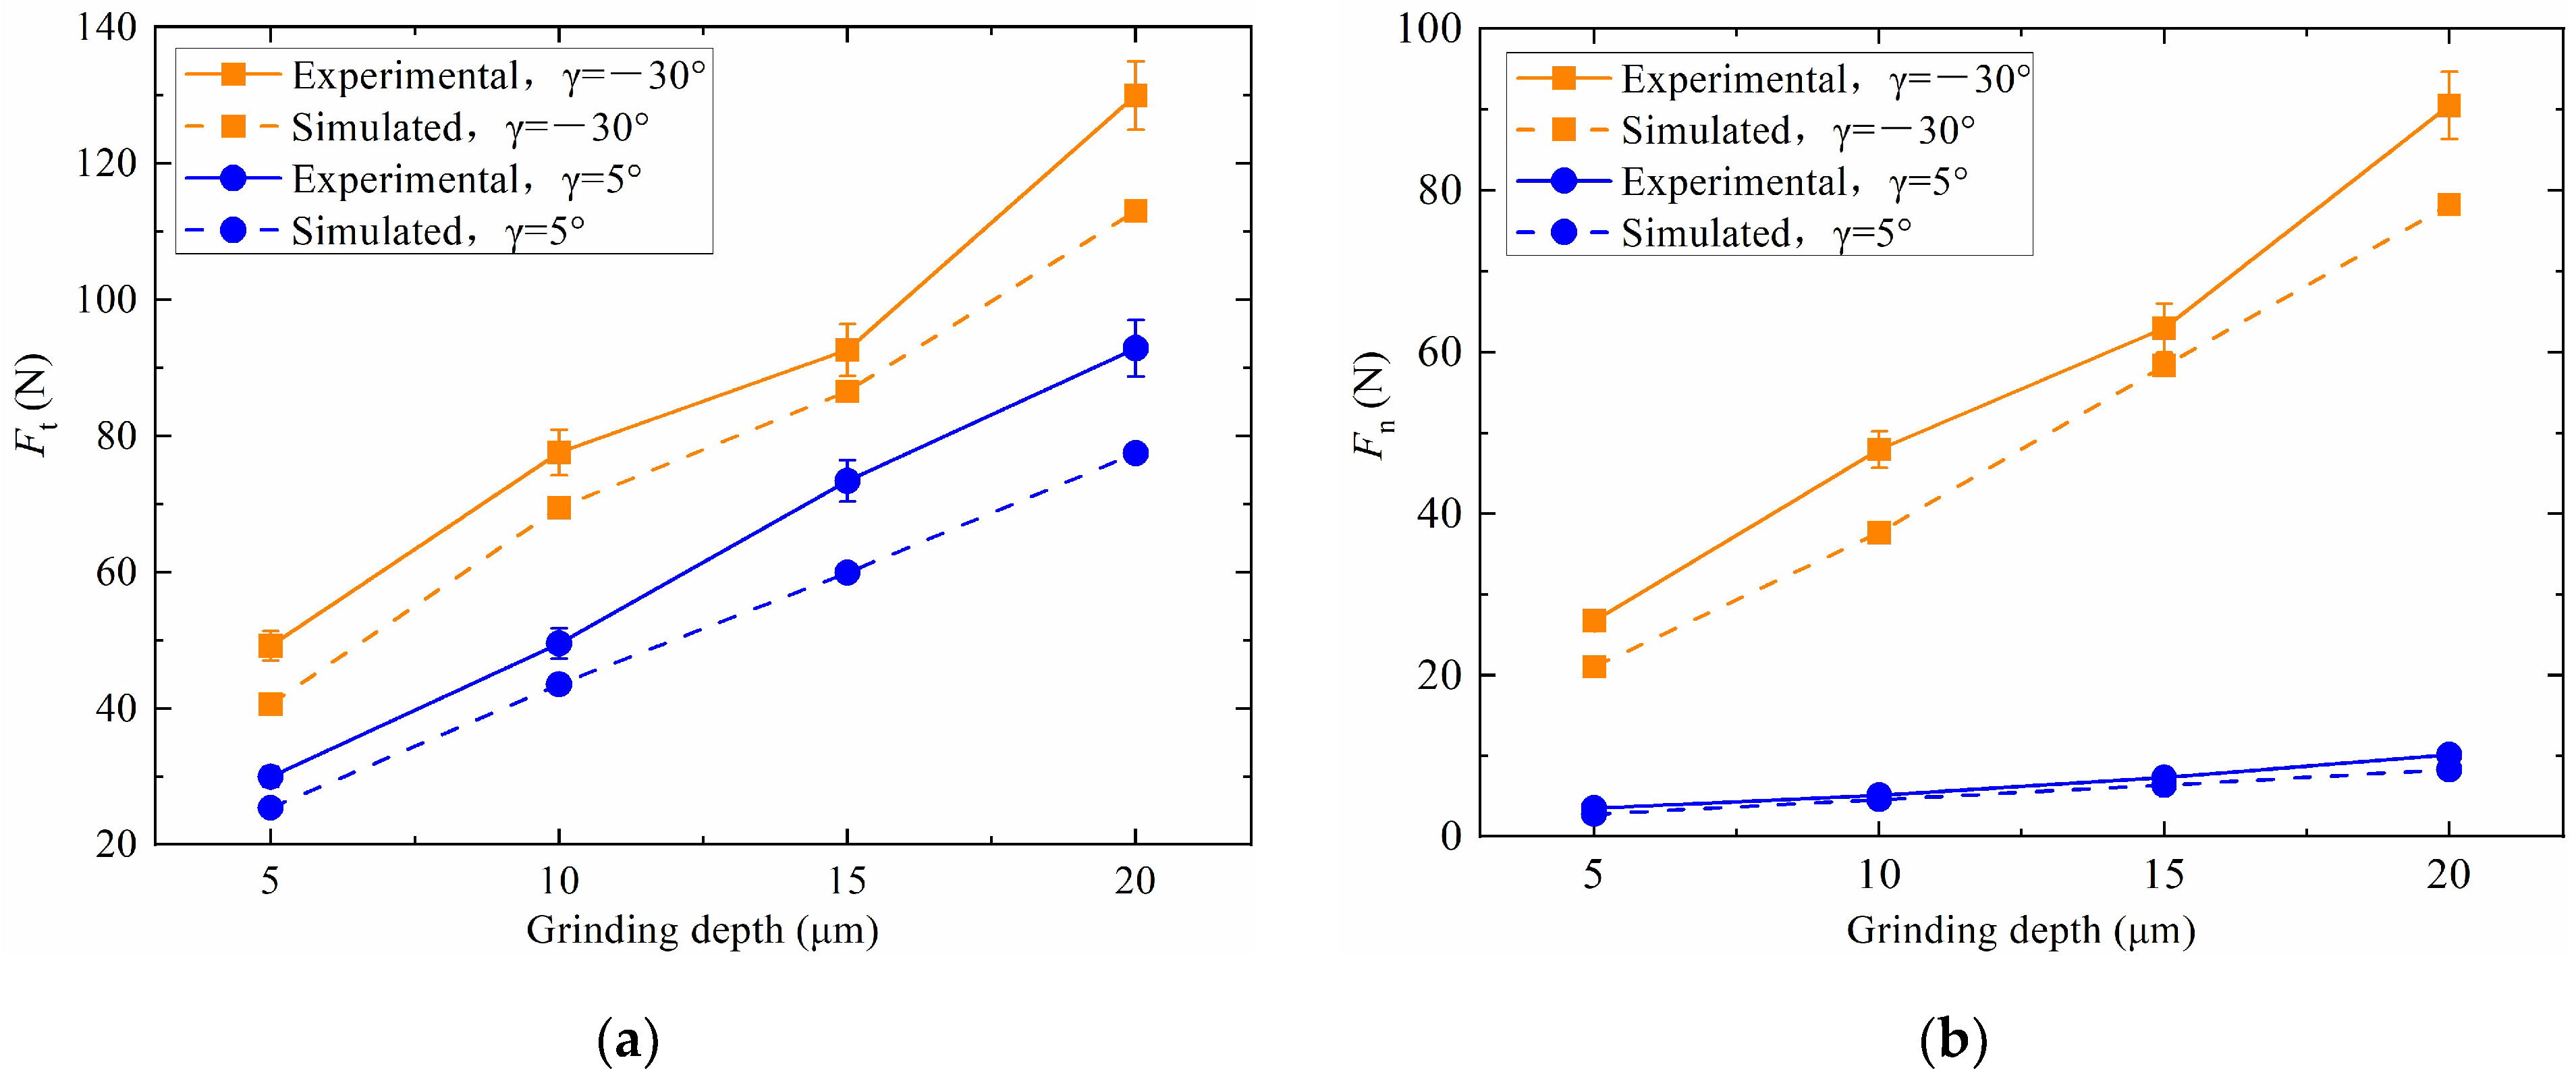
In the single grain grinding experiments with rake angles of −30° and 5° while maintaining a constant grinding speed, the variation in grinding forces with grinding depth and the comparison with simulation results were as shown in Figure 14. The graph indicates that at a constant grinding speed, the grinding forces for both PRA and NRA diamond grains increase as the grinding depth increases. This increase is attributed to the enhanced grinding thickness and the corresponding rise in material undergoing plastic deformation within the same period. Consequently, the abrasive grain must overcome greater plastic strain, thereby increasing the forces of deformation and friction. In PRA single grain grinding, the grinding forces are less than those observed in NRA single grain grinding. Specifically, at various grinding depths, the tangential grinding forces decrease by 25–41%, and the normal grinding forces decrease by 81–89% in PRA grinding. Likewise, the trend of grinding force variation in the simulation aligns well with the experimental results.
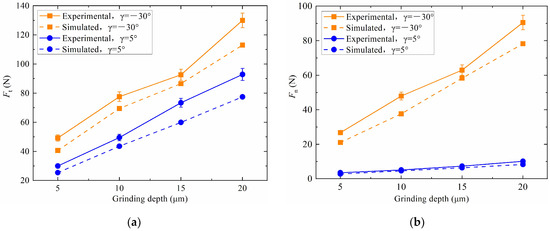
Figure 14.
The grinding force under different grinding depths with PRA/NRA: (a) tangential grinding force Ft, (b) normal grinding force Fn.
5.2. Surface Morphology and Surface Roughness
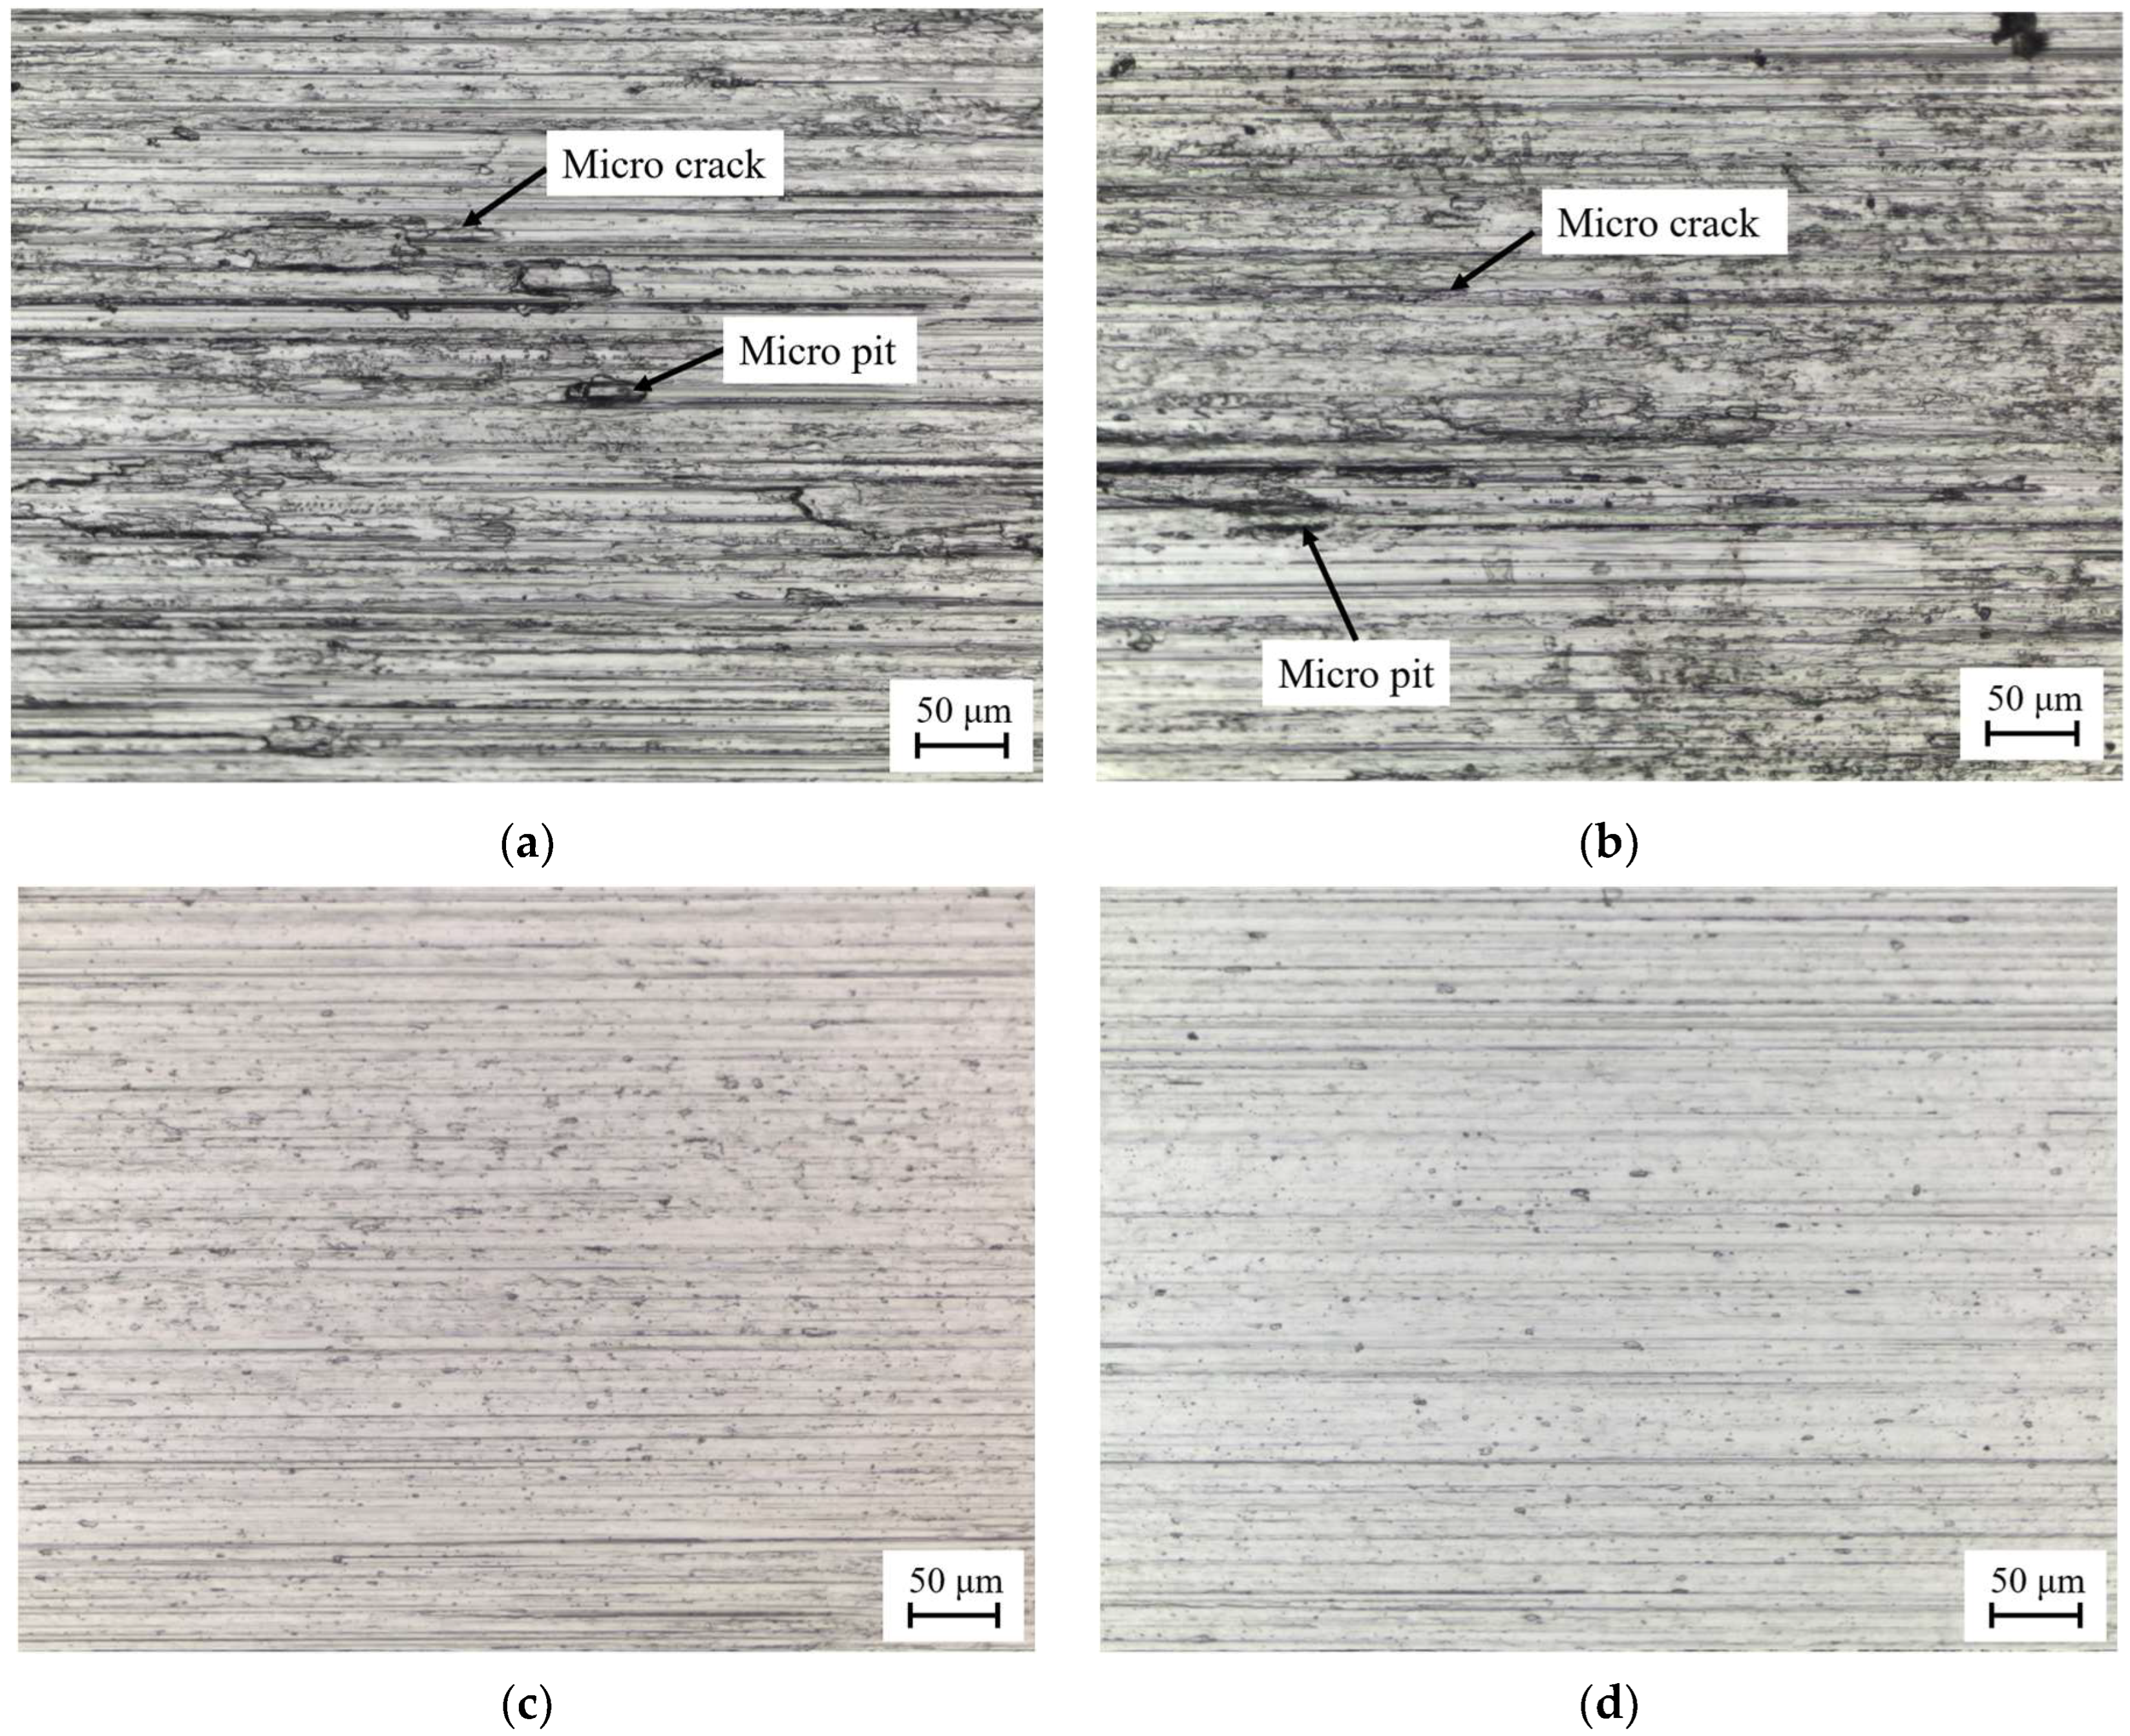
The typical comparative results of the surface morphology after single grain grinding with a PRA and an NRA are shown in Figure 15. The morphological images were taken at the bottom of the scratch created by the single diamond grain. Evidently, the grinding surface in NRA grinding exhibits deeper and more numerous grinding traces, along with more micro cracks. This is attributed to the compressive action exerted by the diamond abrasive grain during NRA grinding, leading to ploughing and scratching on the workpiece surface, thereby intensifying its plastic deformation. During this process, some materials undergo shearing and sliding deformation due to compression, leading to these defects. Along the grinding direction, micro pits are visible, predominantly resulting from the material’s removal through brittle fracture. In contrast, PRA single grain grinding skips the friction and plowing stages, directly cutting into the material without inducing severe compressive sliding deformation. As a result, the grinding traces produced by PRA grinding are shallower, leading to a smoother surface after grinding. Under identical processing conditions, PRA single grain grinding achieves a better workpiece surface morphology.
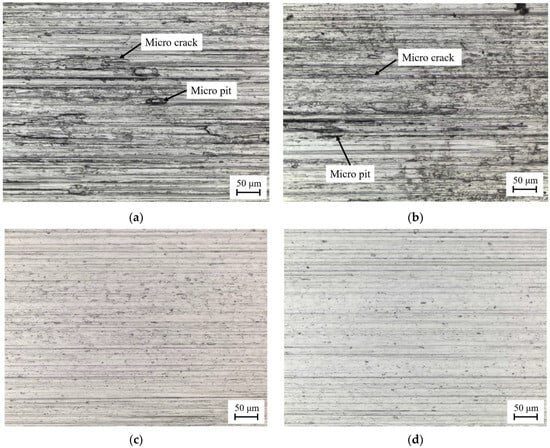
Figure 15.
Comparison of typical grinding surface morphology with PRA/NRA: (a) vs = 6 m/s, ap = 10 μm, γ = −30°, (b) vs = 8 m/s, ap = 10 μm, γ = −30°, (c) vs = 6 m/s, ap = 10 μm, γ = 5°, (d) vs = 8 m/s, ap = 10 μm, γ = 5°.
The variation in surface roughness of workpieces after single grain grinding with a PRA and an NRA at different grinding speeds is illustrated in Figure 16. The surface roughness measurements were taken along the grinding direction over a length of 2.5 mm. With a fixed grinding depth, an increase in grinding speed resulted in a lower surface roughness of Ti6Al4V alloy. This reduction was mainly caused by the increased number of grinding interactions per unit of time, which diminished the extent of plastic deformation on the ground surface, thereby relatively decreasing the surface defects of the workpiece. This trend aligns with the variation in grinding forces as a function of grinding speed. The roughness values for surfaces processed with a PRA diamond grain are lower than those obtained with an NRA grain. Compared to NRA single grain grinding, the roughness values of surfaces ground with a PRA at various speeds were reduced by 58% to 65%. This quantitatively confirms the observational results of the surface morphology.
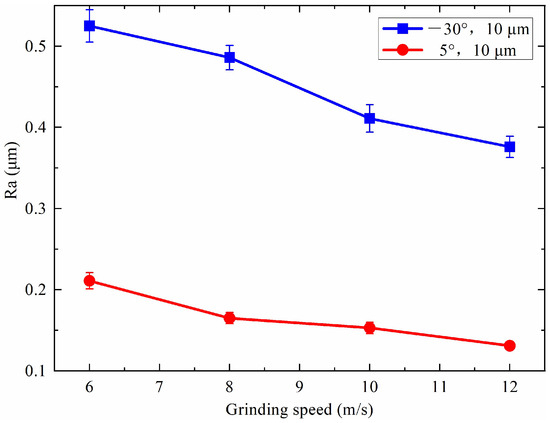
Figure 16.
Surface roughness under different grinding speed with PRA/NRA.
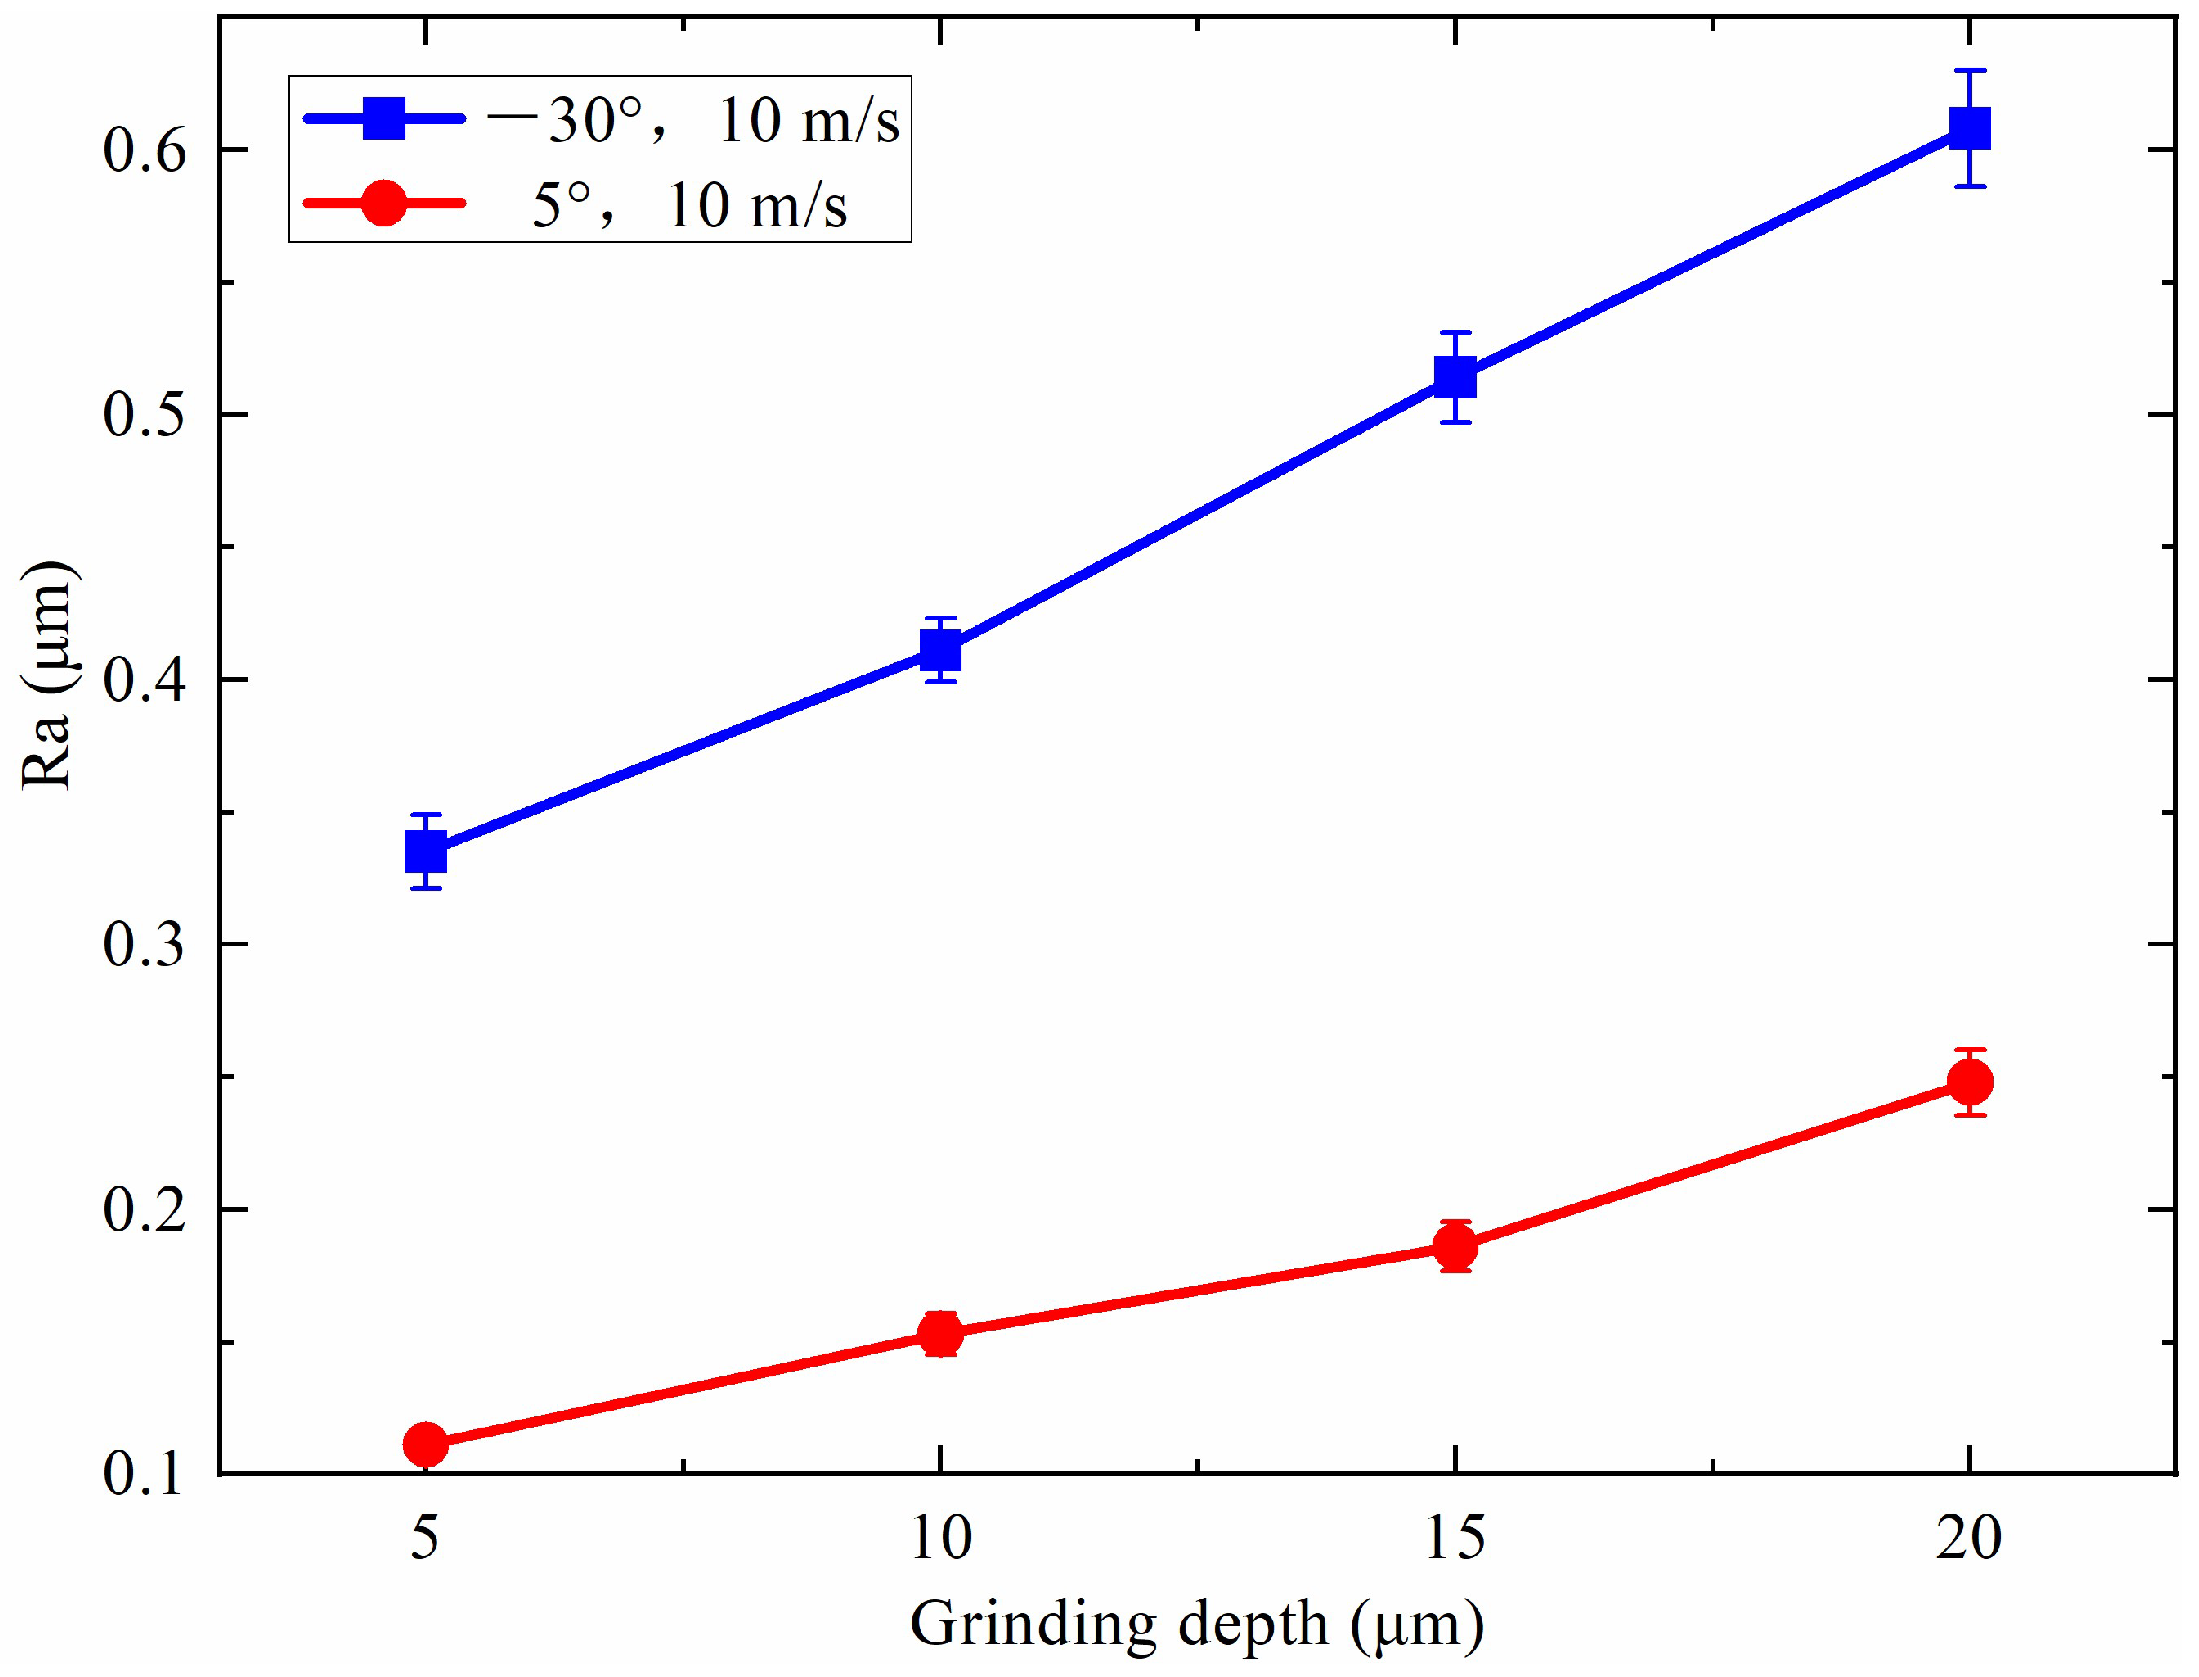
The variations in surface roughness of workpieces after single diamond grain grinding with a PRA and an NRA at various grinding depths are depicted in Figure 17. The graphical data suggest that an increase in grinding depth, while the grinding speed remains constant, results in an elevated roughness of the workpiece surfaces. This trend primarily stems from the increasing grinding thickness, which leads to intensified plastic deformation. As a result, the surface being machined experiences heightened forces of deformation and friction. The surface roughness after PRA single grain grinding under different grinding depths is lower than those obtained in PRA grinding, showing a reduction of approximately 59% to 66%. It can be concluded that under the same grinding conditions, single grain grinding with a PRA abrasive grain achieves a higher workpiece surface quality.
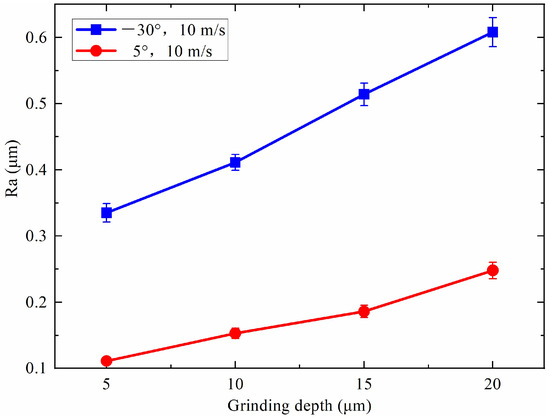
Figure 17.
Surface roughness Ra under different grinding depths with PRA/NRA.
6. Conclusions
In this study, finite element simulation combined with grinding experiments have been conducted to comparatively and comprehensively analyze the variations in grinding force, temperature, and surface integrity during the single diamond grain grinding of Ti6Al4V alloy, featuring both a PRA and an NRA. It offers new insights into the distinct effects of rake angles on grinding performance, validating the superior benefits of employing a positive rake angle. The key findings are outlined below:
- In single diamond grain grinding, both tangential and normal grinding forces slightly decline as the grinding speed is increased, regardless of PRA or NRA. With the increment in grinding depth, the grinding forces gradually rise. When the rake angle is varied from −30° to 5°, the tangential grinding forces decrease by 25–41% and the normal forces decrease by 81–89%.
- In the grinding with both PRA and NRA single diamond abrasive grains, there is a gradual increase in the maximum temperature within the grinding zone correlating with increases in both grinding speed and depth. When the rake angle of the diamond grain transitions from negative to positive, the maximum grinding temperature significantly decreases.
- After the single grain grinding process, the roughness of the workpiece surface exhibits a decrease as the grinding speed rises and shows an increase in response to a greater grinding depth. Compared to NRA single grain grinding, PRA single diamond grain grinding skips the friction and ploughing stages, directly cutting into the material without inducing severe compressive sliding deformation, resulting in shallower grinding traces and fewer processing defects. The surface roughness in single grain grinding with a PRA were reduced by 58% to 66%, indicating that a diamond abrasive grain with a PRA can effectively improve the surface integrity after grinding for hard-to-machine materials.
Using diamond abrasive grains with a PRA significantly reduces grinding forces and improves the surface integrity of hard-to-machine materials. These benefits have substantial practical implications, especially in industries like aerospace, new energy, and automotive, where precision is critical. However, this study is limited by its simplified model assumptions, specific grinding conditions, and the absence of interaction analyses between process parameters. Future research will focus on the fabrication methodologies and grinding processes for cylindrical grinding wheels equipped with PRA diamond abrasives. This will aim to further expand the application scope of PRA grinding techniques in the field of hard-to-machine materials grinding.
Author Contributions
Conceptualization, J.Y.; methodology, J.Y. and R.S.; software, J.Y., C.M. and S.Z.; validation, J.Y. and C.C.; formal analysis, J.Y., C.M. and C.C.; investigation, J.Y.; resources, R.S. and C.M.; data curation, J.Y., C.C. and S.Z.; writing—original draft preparation, J.Y.; writing—review and editing, C.M. and C.C.; visualization, C.M. and S.Z.; supervision, R.S.; project administration, R.S.; funding acquisition, J.Y. All authors have read and agreed to the published version of the manuscript.
Funding
This research was funded by the Scientific Research Foundation of the Hunan Provincial Education Department [grant number 23A0565].
Institutional Review Board Statement
Not applicable.
Informed Consent Statement
Not applicable.
Data Availability Statement
Data will be made available on request.
Conflicts of Interest
Author Sun, R. and Ming, C. were employed by the company Shandong Taikai Power Switchgear Co., Ltd. The remaining authors declare that the research was conducted in the absence of any commercial or financial relationships that could be construed as a potential conflict of interest.
References
- Huang, H.; Li, X.; Mu, D.; Lawn, B.R. Science and Art of Ductile Grinding of Brittle Solids. Int. J. Mach. Tools Manuf. 2021, 161, 103675. [Google Scholar] [CrossRef]
- Zeng, K.; Wu, X.; Jiang, F.; Shen, J.; Zhu, L.; Li, L. A Comprehensive Review on the Cutting and Abrasive Machining of Cemented Carbide Materials. J. Manuf. Process. 2023, 108, 335–358. [Google Scholar] [CrossRef]
- Wu, D.; Liu, S.; Wang, H. High Surface Integrity Machining of Typical Aviation Difficult-to-Machine Material Blade. Int. J. Adv. Manuf. Technol. 2023, 129, 2861–2873. [Google Scholar] [CrossRef]
- Khanna, N.; Zadafiya, K.; Patel, T.; Kaynak, Y.; Rahman Rashid, R.A.; Vafadar, A. Review on Machining of Additively Manufactured Nickel and Titanium Alloys. J. Mater. Res. Technol. 2021, 15, 3192–3221. [Google Scholar] [CrossRef]
- Cui, X.; Li, C.; Zhang, Y.; Ding, W.; An, Q.; Liu, B.; Li, H.N.; Said, Z.; Sharma, S.; Li, R.; et al. Comparative Assessment of Force, Temperature, and Wheel Wear in Sustainable Grinding Aerospace Alloy Using Biolubricant. Front. Mech. Eng. 2023, 18, 3. [Google Scholar] [CrossRef]
- Fang, N. Tool-Chip Friction in Machining with a Large Negative Rake Angle Tool. Wear 2005, 258, 890–897. [Google Scholar] [CrossRef]
- Pimenov, D.Y.; Mia, M.; Gupta, M.K.; Machado, A.R.; Tomaz, Í.V.; Sarikaya, M.; Wojciechowski, S.; Mikolajczyk, T.; Kaplonek, W. Improvement of Machinability of Ti and Its Alloys Using Cooling-Lubrication Techniques: A Review and Future Prospect. J. Mater. Res. Technol. 2021, 11, 719–753. [Google Scholar] [CrossRef]
- Liao, Z.; la Monaca, A.; Murray, J.; Speidel, A.; Ushmaev, D.; Clare, A.; Axinte, D.; M’Saoubi, R. Surface Integrity in Metal Machining—Part I: Fundamentals of Surface Characteristics and Formation Mechanisms. Int. J. Mach. Tools Manuf. 2021, 162, 103687. [Google Scholar] [CrossRef]
- Axinte, D.; Butler-Smith, P.; Akgun, C.; Kolluru, K. On the Influence of Single Grit Micro-Geometry on Grinding Behavior of Ductile and Brittle Materials. Int. J. Mach. Tools Manuf. 2013, 74, 12–18. [Google Scholar] [CrossRef]
- Wei, C.; He, C.; Chen, G.; Sun, Y.; Ren, C. Material Removal Mechanism and Corresponding Models in the Grinding Process: A Critical Review. J. Manuf. Process. 2023, 103, 354–392. [Google Scholar] [CrossRef]
- Anderson, D.; Warkentin, A.; Bauer, R. Experimental and Numerical Investigations of Single Abrasive-Grain Cutting. Int. J. Mach. Tools Manuf. 2011, 51, 898–910. [Google Scholar] [CrossRef]
- Anderson, D.; Warkentin, A.; Bauer, R. Comparison of Spherical and Truncated Cone Geometries for Single Abrasive-Grain Cutting. J. Mater. Process. Technol. 2012, 212, 1946–1953. [Google Scholar] [CrossRef]
- Liu, W.; Deng, Z.; Wan, L.; Zhao, X.; Pi, Z. Simulation and experiment study for silicon nitride cutting with single diamond grain. Chin. J. Mech. Eng.-En. 2015, 51, 191–198. [Google Scholar] [CrossRef]
- Dai, C.; Ding, W.; Xu, J.; Fu, Y.; Yu, T. Influence of Grain Wear on Material Removal Behavior during Grinding Nickel-Based Superalloy with a Single Diamond Grain. Int. J. Mach. Tools Manuf. 2017, 113, 49–58. [Google Scholar] [CrossRef]
- Fu, D.; Ding, W.; Miao, Q.; Xu, J. Simulation Research on the Grinding Forces and Stresses Distribution in Single-Grain Surface Grinding of Ti-6Al-4V Alloy When Considering the Actual Cutting-Depth Variation. Int. J. Adv. Manuf. Technol. 2017, 91, 3591–3602. [Google Scholar] [CrossRef]
- Yin, G.; Gong, Y.; Li, Y.; Song, J.; Zhou, Y. Modeling and Evaluation in Grinding of SiCp/Al Composites with Single Diamond Grain. Int. J. Mech. Sci. 2019, 163, 105137. [Google Scholar] [CrossRef]
- Li, L.; Zhang, Y.; Cui, X.; Said, Z.; Sharma, S.; Liu, M.; Gao, T.; Zhou, Z.; Wang, X.; Li, C. Mechanical Behavior and Modeling of Grinding Force: A Comparative Analysis. J. Manuf. Process. 2023, 102, 921–954. [Google Scholar] [CrossRef]
- Li, C.; Zhang, F.; Meng, B.; Liu, L.; Rao, X. Material Removal Mechanism and Grinding Force Modelling of Ultrasonic Vibration Assisted Grinding for SiC Ceramics. Ceram. Int. 2017, 43, 2981–2993. [Google Scholar] [CrossRef]
- Meng, Q.; Guo, B.; Zhao, Q.; Li, H.N.; Jackson, M.J.; Linke, B.S.; Luo, X. Modelling of Grinding Mechanics: A Review. Chin. J. Aeronaut. 2023, 36, 25–39. [Google Scholar] [CrossRef]
- Lin, Y.C.; Chen, X.M. A Critical Review of Experimental Results and Constitutive Descriptions for Metals and Alloys in Hot Working. Mater. Des. 2011, 32, 1733–1759. [Google Scholar] [CrossRef]
- Kong, J.; Zhang, T.; Du, D.; Wang, F.; Jiang, F.; Huang, W. The Development of FEM Based Model of Orthogonal Cutting for Pure Iron. J. Manuf. Process. 2021, 64, 674–683. [Google Scholar] [CrossRef]
- Mao, C.; Lu, J.; Zhao, Z.; Yin, L.; Hu, Y.; Bi, Z. Simulation and Experiment of Cutting Characteristics for Single CBN-WC-10Co Fiber. Precis. Eng. 2018, 52, 170–182. [Google Scholar] [CrossRef]
- Kacalak, W.; Lipiński, D.; Bałasz, B.; Rypina; Tandecka, K.; Szafraniec, F. Performance Evaluation of the Grinding Wheel with Aggregates of Grains in Grinding of Ti-6Al-4V Titanium Alloy. Int. J. Adv. Manuf. Technol. 2018, 94, 301–314. [Google Scholar] [CrossRef]
- Eberle, G.; Dold, C.; Wegener, K. Laser Fabrication of Diamond Micro-Cutting Tool-Related Geometries Using a High-Numerical Aperture Micro-Scanning System. Int. J. Adv. Manuf. Technol. 2015, 81, 1117–1125. [Google Scholar] [CrossRef]
- Konov, V.I. Laser in Micro and Nanoprocessing of Diamond Materials. Laser Photonics Rev. 2012, 6, 739–766. [Google Scholar] [CrossRef]
- Rehman, Z.U.; Janulewicz, K.A. Structural Transformation of Monocrystalline Diamond Driven by Ultrashort Laser Pulses. Diam. Relat. Mater. 2016, 70, 194–200. [Google Scholar] [CrossRef]
- Setti, D.; Sinha, M.K.; Ghosh, S.; Venkateswara Rao, P. Performance Evaluation of Ti-6Al-4V Grinding Using Chip Formation and Coefficient of Friction under the Influence of Nanofluids. Int. J. Mach. Tools Manuf. 2015, 88, 237–248. [Google Scholar] [CrossRef]
- Yin, J.; Chen, G.; Xiong, B.; Zhu, Z.C.; Jin, M. Femtosecond Pulsed Laser Fabrication of a Novel SCD Grinding Tool with Positive Rake Angle. Appl. Phys. A Mater. Sci. Process. 2018, 124, 859. [Google Scholar] [CrossRef]
Disclaimer/Publisher’s Note: The statements, opinions and data contained in all publications are solely those of the individual author(s) and contributor(s) and not of MDPI and/or the editor(s). MDPI and/or the editor(s) disclaim responsibility for any injury to people or property resulting from any ideas, methods, instructions or products referred to in the content. |
© 2024 by the authors. Licensee MDPI, Basel, Switzerland. This article is an open access article distributed under the terms and conditions of the Creative Commons Attribution (CC BY) license (https://creativecommons.org/licenses/by/4.0/).


