Abstract
This paper presents an ultimate motion methodology of a face-milling spiral bevel gear pair to synthesize the mating tooth surfaces with a predesigned fourth-order motion curve. The methodology is to control some contact points along the contact path in the process of tooth contact analysis via application of an extended local synthesis which permits some transmission errors rather than zero at the concerned contact point. The modified offset motion correction is selected to demonstrate the proposed methodology. Applied torque corresponding to an elastic approach of 0.00635 mm at the mean contact point is calculated and the loaded tooth contact analysis is performed. Numerical results show that the extended local synthesis can effectively control the transmission errors on the predesigned fourth-order motion curve at arbitrarily predesigned contact points along the contact path of the spiral bevel gear pair. The tooth contact pattern for the actual tooth pair is scattered into three segments since the rotational motion of the driven gear at any instant angular position is dependent on the tooth pair with the least transmission error among the three adjacent tooth pairs. The actual tooth contact patterns of the spiral bevel gear pair become continuous when meshing tooth surfaces are elastically deformed.
1. Introduction
Spiral bevel gears are widely used in aviation, helicopters, navigation systems, automobiles, and renewable energy devices. Similar to other types of gears, operation performances, e.g., vibration, efficiency, and reliability [1], of spiral bevel gear pairs mainly depend on their contact patterns and motion curves (MCs). Much research work has been dedicated to the synthesis and manufacturing of face-milling spiral bevel gears [2,3,4]. Litvin [5] presented a local synthesis method to control its contact patterns actively with a parabolic MC. Litvin [6] contrasted the pinion tooth surfaces produced by head cutters with circular and straight blades, respectively. After obtaining the stabilized contact pattern with a limited magnitude of MC, they proceeded to investigate tooth root bending stress and the contact pressure by using loaded tooth contact analysis (LTCA). Fan [7] discussed distinctive characteristics of the face-milling and the face-hobbing processes of spiral bevel gears and discounted mechanisms of tooth contact analysis (TCA) that are suitable for free-form numerical controlled machines and LTCA, considering tooth deformations and the housing deflection. Liu [8] presented a semi-analytical LTCA method for spiral bevel gears which uses analytical formulas and finite element analysis correction and involves Tredgold’s approximation, an optimization model, and a contact judgment strategy. Simon [9] conducted a numerical analysis to investigate the effects of pinion misalignments and tooth spacing errors on contact patterns and motion relationships of the spiral bevel gear. Sheveleva [10] introduced the concept of intermediate tangent grids for the pinion and the gear in a spiral bevel gear pair. Meshing performances can be observed by measuring the distance between the gear and the pinion as the gear pair rotated around the respective axes. A face-milling method for hypoid gears with a fourth-order transmission error model was developed to reduce error sensitivity due to misalignments [11]. Mu [12] proposed a tooth surface modification method to prevent tooth edge contact for high-contact-ratio (HCR) spiral bevel gears under misalignments or heavy loads based on cutter blade profile corrections. Alves [13] proposed a method to calculate bending displacements of a spiral bevel gear pair combining a finite element model with interpolation techniques to improve the calculation efficiency. This helps for a more efficient analysis of the bending behavior of spiral bevel gears under various operating conditions. Tsai [14] focused on designing the machine-tool settings for a four-axis milling machine tool for spiral bevel gears to improve contact performances using a predesigned motion curve. Ma [15] developed a nonlinear dynamic model to optimize operation performances of four-point contact ball bearings in a three-point contact state considering lubrication traction and dynamic characteristics of the bearing assemblies. Xiang [16] conducted an analysis of geometric errors of a spiral bevel gear pair in motion axes and their impacts on gear meshing performances. They focused on six-axis CNC grinding machines and used forward and inverse kinematics modeling techniques based on screw theory to create models for predicting and compensating for volumetric errors, ultimately improving the accuracy and quality of gear grinding processes. Alvarez [17] developed the surface topology model for predicting the roughness of spiral bevel gear surfaces, which can help manufacturers better control product quality and reduce trial and error costs, and verified the accuracy of the surface topology model to achieve the size and surface quality of gear production. Mu [18] presented an approach for designing high-contact-ratio spiral bevel gears with a focus on minimizing higher-order transmission errors. This method improved meshing performances and overall functionality of spiral bevel gears by using a concept of function-oriented design to optimize the gear design process. The authors of [19] proposed a mathematical model for a logarithmic spiral bevel gear drive. This type of gear drive offers several advantages over conventional spiral bevel gears, including higher contact strength and the ability to separate their shaft angle. These characteristics make logarithmic spiral bevel gear drives highly promising for a wide range of applications, providing improved performance and functionality compared to traditional spiral bevel gears. Mu [20] proposed a higher-order tooth surface modification method aimed at reducing loaded transmission errors (LTEs) and meshing impacts for improving dynamic characteristics of an HCR spiral bevel gear pair. Chen [21] presented an integration of various factors to achieve a global tooth surface control method of spiral bevel gears to solve an ease-off surface equation and optimize producing parameters. Yang [22] introduced a taper design method for face-milled hypoid and spiral bevel gears within the completing process. This approach ensures that there are proportional modifications in both the tooth space width and tooth thickness in relation to the cone distance.
Much of the research work is concerned with the parabolic MC which can absorb tooth meshing impacts at the changeover points to some extent between adjacent tooth pairs caused by linear MC due to misalignments. However, the discontinuity of the first derivative to the parabolic MC at the changeover points still causes some tooth impact in the transition of mesh. Stadtfeld and Gaiser [23] noticed this and proposed a combined motion curve (CMC), composed of a parabolic and a fourth-order polynomial, named as ultimate motion graph (UMG), which narrows the gap of the first derivative discontinuity at the changeover point. Stadtfeld demonstrated via experimentation that the ground hypoid gears produced on a free-form CNC hypoid generator with CMC excelled the ground hypoid gears with a parabolic MC to a great extent. Fan [24] introduced a CNC six-axis generator developed by the Gleason Works. He mentioned the concept of UMG which could be implemented via instantaneous machine settings including modified roll that were expressed by the higher-order polynomial functions up to the sixth-order with respect to the cradle rotation angle. So far, the UMG enables the tooth flank crowning with the greatest flexibility. Li et al. [25] developed a gear form-grinding method with a predesigned fourth-order transmission error. Wang and Fong [26] developed a method to form a fourth-order MC which was a simplified form of CMC and used the radial motion correction to control the initial bias of the contact path and the MC, respectively. They found that the radial motion correction could be also used on the CNC machine to increase its adjustability [27]. They also used the same method along with a variant cradle rotation angle to generate the tooth surfaces of a hypoid gear pair with the fourth-order polynomial MC [28]. Since they chose several points on the predesigned contact path and the corresponding number of points in the vicinity of the predesigned fourth-order polynomial MC, the two machine settings mentioned above at these points were calculated one after another and fitted with sixth-order polynomials. In addition, they thought that the MC and the contact path were decoupled by taking the cradle rotation angle and the instantaneous radial setting as controlling parameters. Since the fluctuation degree of MC is relatively small, different MCs could correspond to almost the same contact path. In other words, the change in the contact path of the spiral bevel gear pair occurs at a slower rate than adjustments to machine settings or roll motion.
In this paper, a predesigned fourth-order CMC of the spiral bevel gear pair is developed as a design input to improve its meshing performances and determine the instantaneous offset corrections. The work presents a general method to accurately control transmission errors of the spiral bevel gear pair with an arbitrarily predesigned CMC. Numerical TCA and LTCA results show that the proposed method is very efficient in analyzing meshing performances of the spiral bevel gear pair.
2. Predesigned CMC of a Spiral Bevel Gear Pair
2.1. Basic MC
It has already been recognized by researchers that the main source of vibration and noise is MC. Reducing MC and controlling the shape of an MC function curve can improve dynamic performance and reduce vibration of a gear system. Conventionally, a general MC function is defined as
where and are actual rotation angles of the pinion and the gear, respectively; is the speed ratio of the spiral bevel gear, i.e., , in which and are the tooth number of the pinion and the gear, respectively; and and are theoretical rotation angles of the pinion and the gear, respectively.
When a spiral bevel gear pair is in meshing, the difference between the gear’s actual rotation angle and its mean rotation angle is defined as the MC of the gear pair, and the second-order and the fourth-order polynomial MCs can be represented as
respectively, where is the order number of the MC determined by kinematic requirements, and superscripts (2) and (4) represent the second-order and the fourth-order MC functions of the spiral bevel gear pair, respectively.
2.2. Formation of CMC
For a specific spiral bevel gear pair, we proposed a method to determine its CMC. The CMC formation process of the spiral bevel gear pair is as follows:
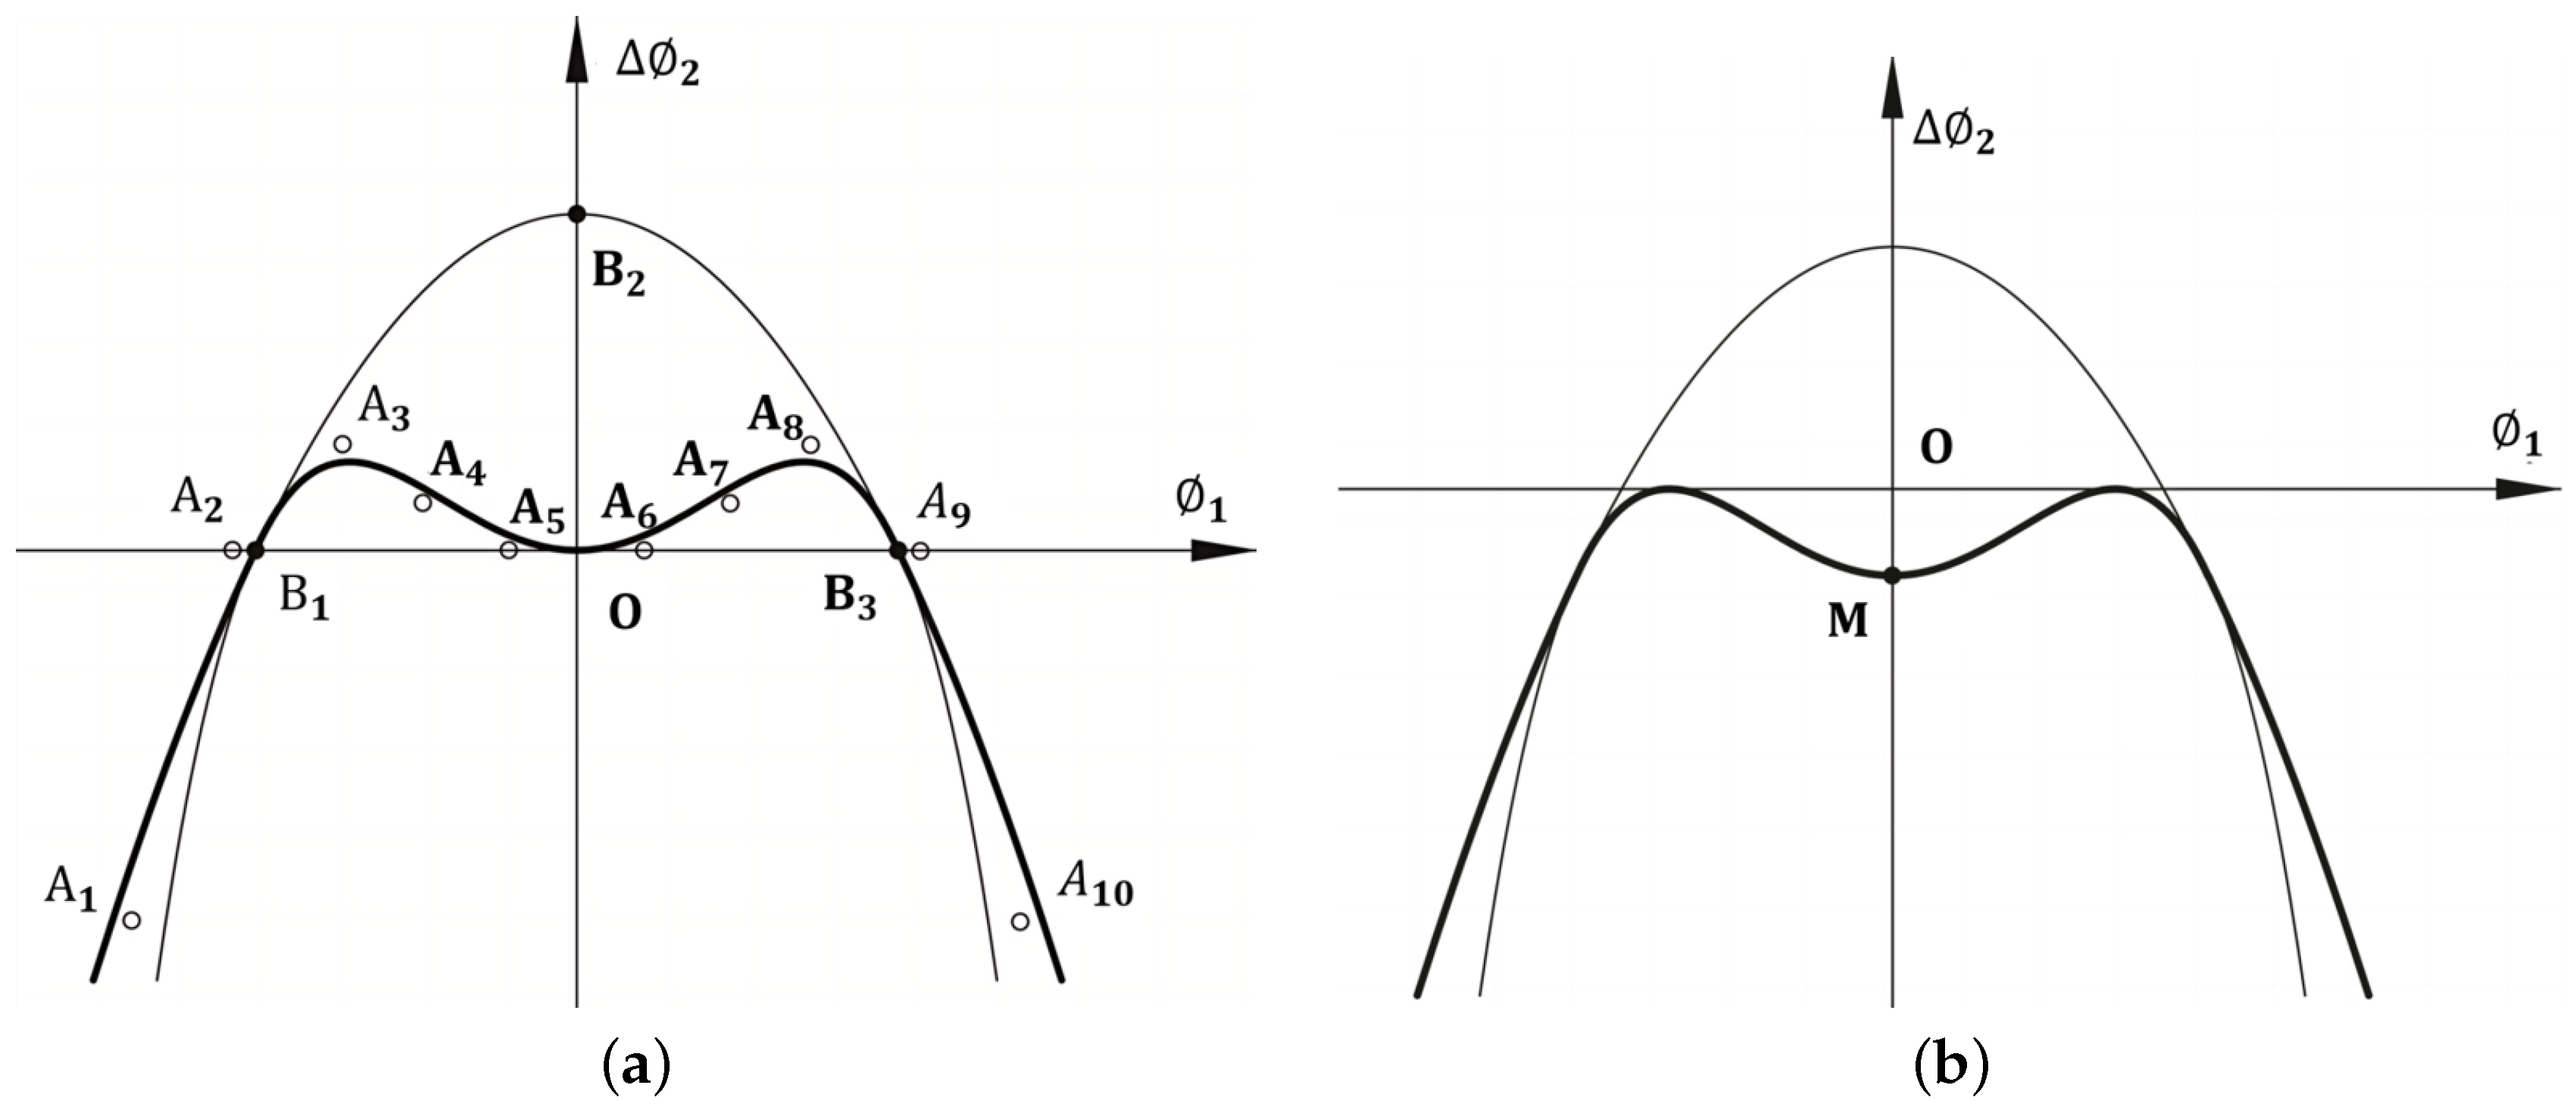
Step 1: According to the pinion tooth number and kinematic errors of the spiral bevel gear pair, 10 points , denoted by as in Figure 1a, are chosen to control the shape of the fourth-order MC. Using the least squares method, the values of can be determined.
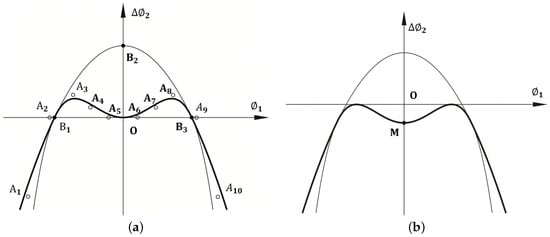
Figure 1.
Formation of CMC of the spiral bevel gear pair. (a) CMC up to the fourth order in process; (b) CMC in the end.
Step 2: Combining two intersections of the above fourth-order polynomial MC with the abscissa, which are symmetrical about the coordinate origin and another point on the ordinate, i.e., , denoted by as in Figure 1b, the second-order polynomial MC can be represented as
where , or , and are the coordinates of , i.e., , and , respectively.
Step 3: The upper part of the fourth-order polynomial MC and the lower part of the second-order polynomial MC, as in the thick line in Figure 1, comprises a CMC, which can be represented as
Step 4: Moving the combined curve in the thick line downward until the maximum point coincides with the abscissa, the final combined function of transmission errors (FTEs), i.e., the CMC, as in Figure 1b, is formed, in which the minimum point M denoted by represents the mean contact point. The CMC function of the spiral bevel gear pair can be represented as
where is the ordinate value of the maximum point of Equation (5).
3. Derivation of Tooth Surfaces of the Work Gear
3.1. Coordinate Systems of the Face-Milling Machine Tool
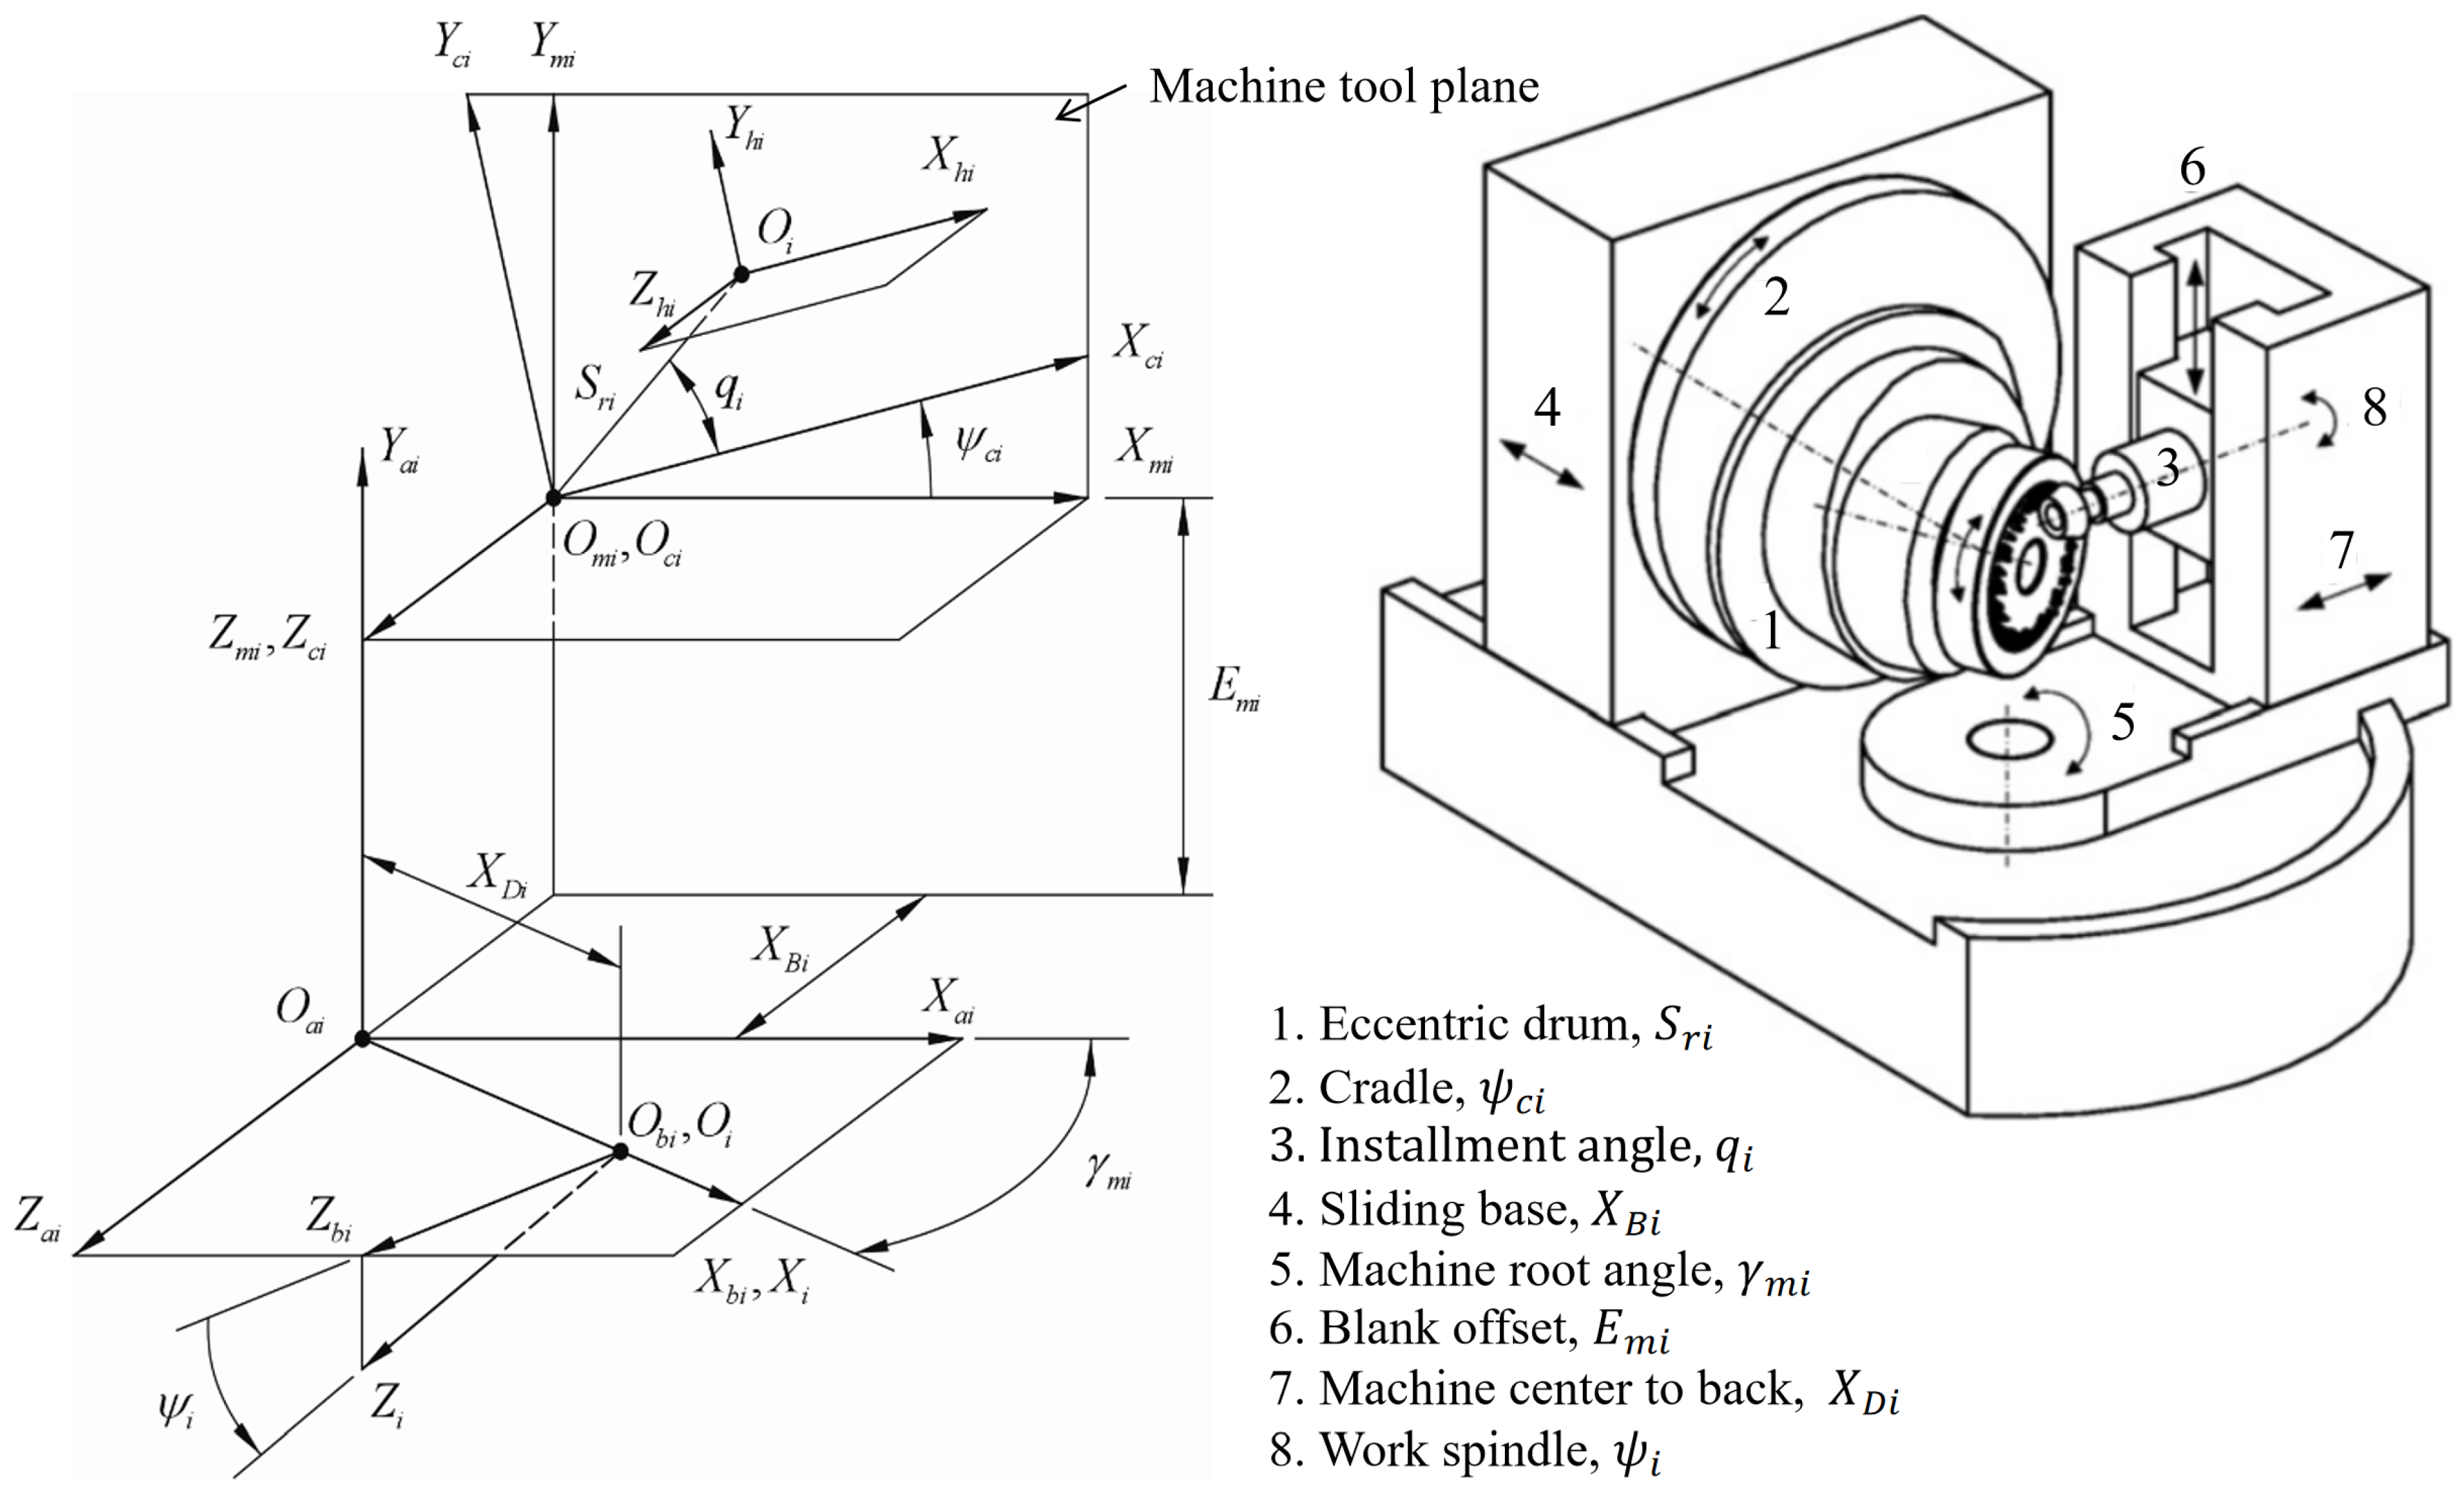
A common mathematical model for the generation of tooth surfaces of the pinion and the gear is used in Figure 2. There are six coordinate systems. A coordinate system is rigidly attached to the work gear. A movable coordinate system is used to describe the angular position of the cradle. A coordinate system is rigidly connected to the cutting machine tool. The cradle and the work gear perform related rotations around the -axis and -axis, respectively. A coordinate system is rigidly attached to the head cutter of the work gear. Coordinate systems and are used for assisting the installment of the work gear. Angles and are rotation angles of the cradle and the work gear, respectively. There are six potential auxiliary motions that can be used to modify the tooth flank: the sliding base , the radial setting , the blank offset , the installment angle , the machine center to back , and the machine root angle .
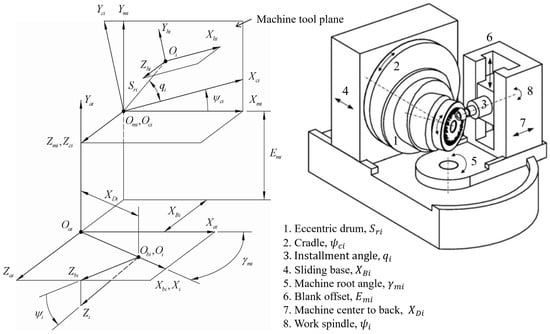
Figure 2.
Coordinate systems for tooth surface generation of the gear.
3.2. Coordinate Systems of the Head Cutter
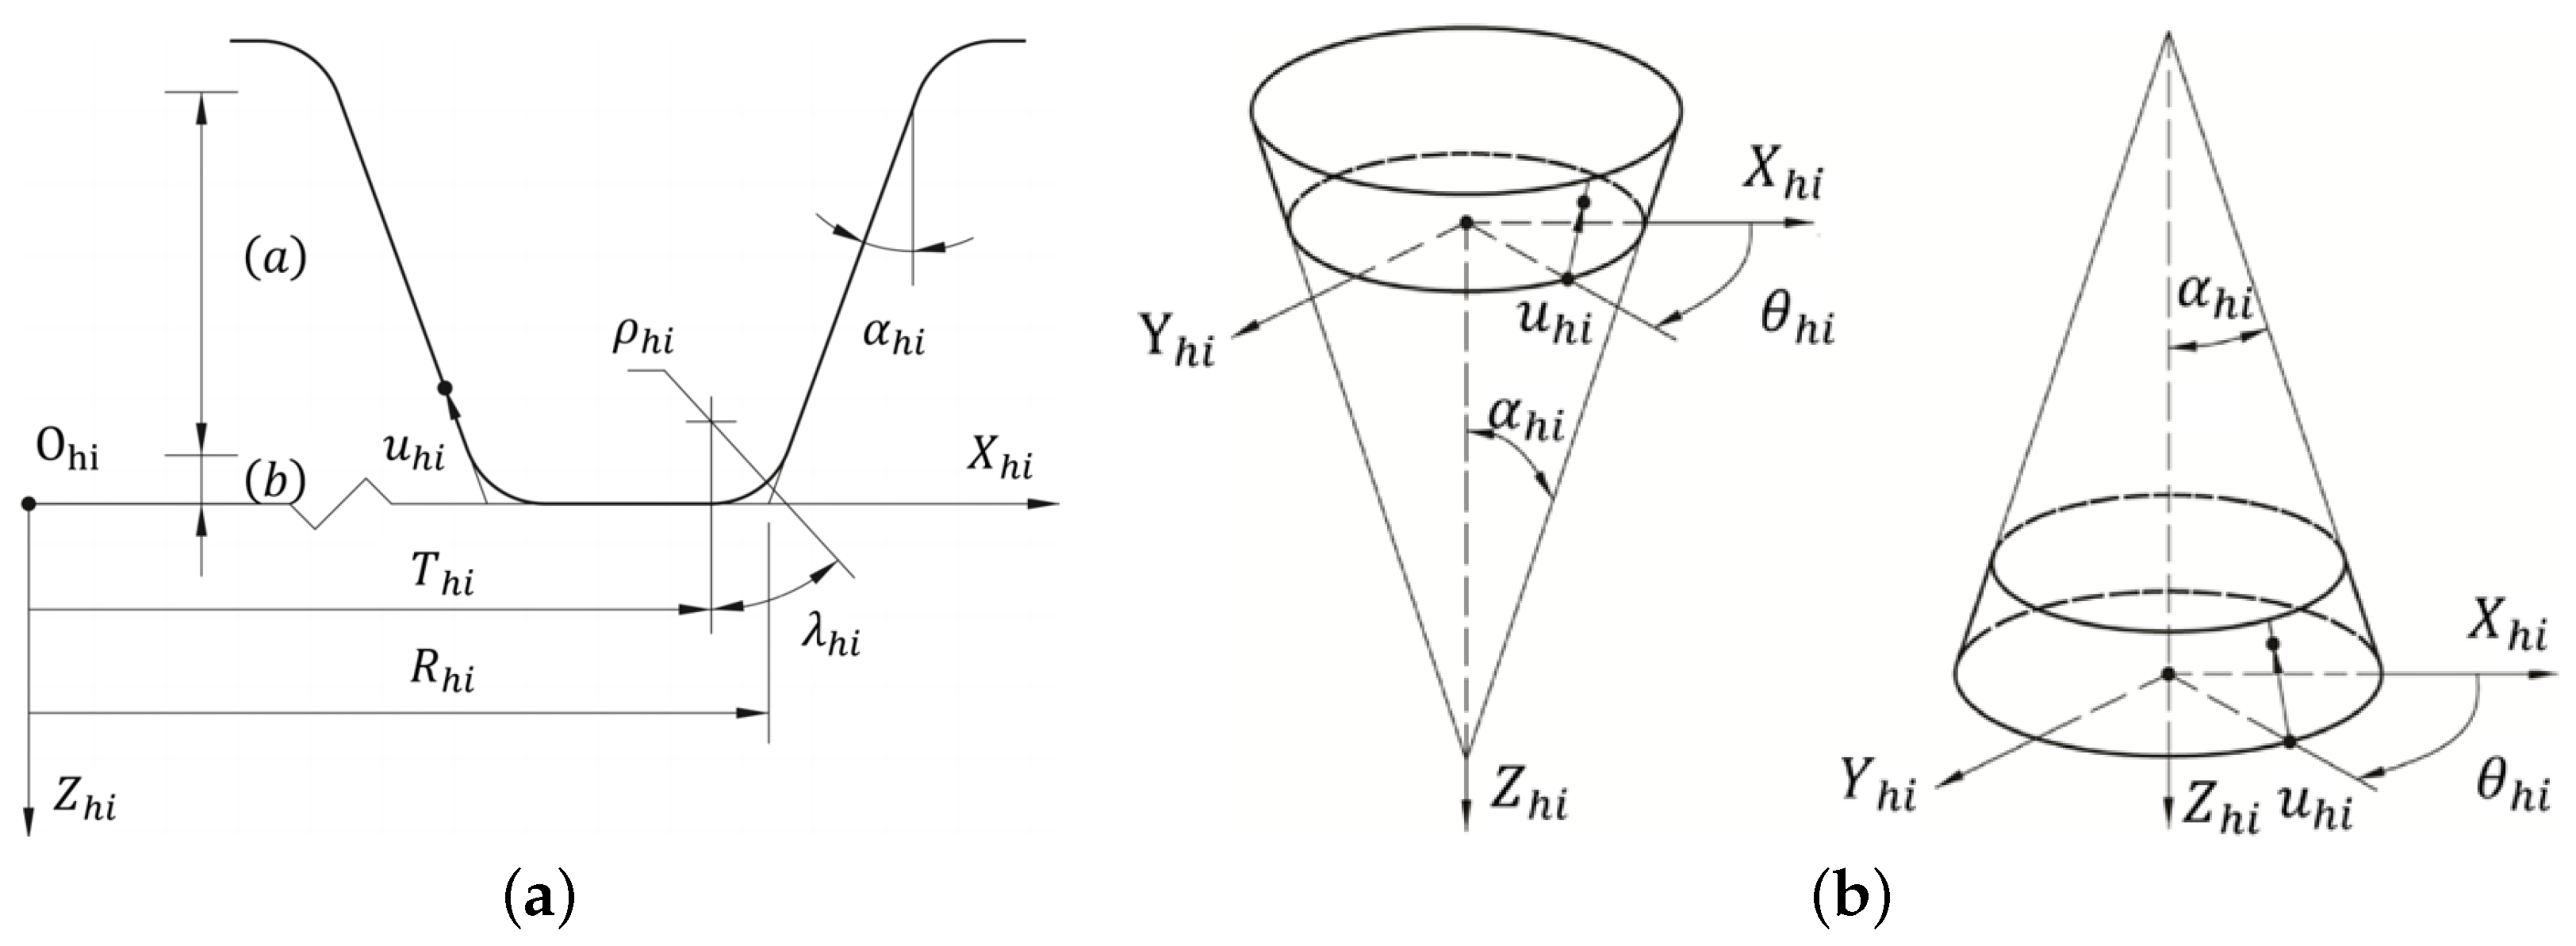
The head cutter blade usually composes a straight edge and a circular arc in Figure 3. The position vectors of the head cutter in can be represented as
where and are the modified blade angle and head cutter point radius, respectively; and are tooth surface parameters, where is defined in the range of ; and are the head cutter fillet center radius and the fillet radius, respectively; and are tooth fillet parameters, where is meaningful when it is in the range . and are related by . The upper sign in “ ” and “ ” should be regarded for the concave side or outer blade, and the lower sign for the convex side or inner blade. Superscripts (a) and (b), (c) represent the straight edge and the fillet arc of the head cutter blade, respectively.
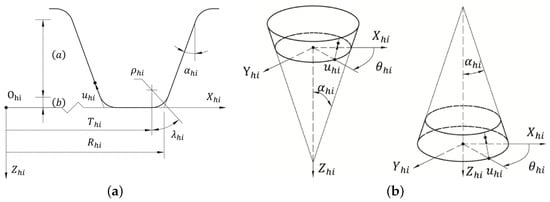
Figure 3.
Head cutter blade and generating surface. (a) Head cutter composition; (b) concave side or outer blade.
The unit normal vectors of the straight edge and fillet arc can be derived from Equations (7) and (8), respectively, which can be represented as
The straight edge of the blade forms a cone, and the fillet arc forms a revolution surface. They are used to form the tooth surface and fillet part, respectively.
3.3. Generation of Tooth Surfaces of the Gear
Transforming Equations (7)–(10) of the head cutter blade from coordinate system to the coordinate system , a family of generating surfaces are generated. The work gear tooth surface is the envelope to the family of generating surfaces, which can be represented as
where is the transformation matrix from the head cutter axis to the work gear axis. is the upper-left submatrix of . , and are the equations of meshing for the tooth surface and the fillet part of the head cutter, respectively. The equations of meshing of the straight edge and the fillet arc of the head cutter and the work gear can be represented as
respectively, where is the relative transitional velocity between the head cutter and the work gear for both the straight edge and the fillet arc of the head cutter. When only the blank offset is chosen as the design variable, the relative transitional velocity of the head cutter and the work gear can be represented as
4. Extended Local Synthesis and Multi-Point Control Approach
4.1. Coordinate Systems for TCA
When a spiral bevel gear pair is in meshing, five coordinate systems are used to describe the meshing state, as shown in Figure 4. A coordinate system is rigidly attached to the frame. Coordinate systems and are rigidly connected to the pinion and the gear, respectively. Coordinate systems and are auxiliary reference coordinate systems for the pinion and the gear, respectively. Four misalignments are defined: and are axial errors of the pinion and the gear, respectively; is the shortest distance between the axes of the gear and the pinion when pinion–gear axes are crossed rather than intersected; and is the error of the shaft angle . When the gear set is aligned, all four misalignments are counted as zeros.

Figure 4.
Coordinate systems for TCA of the spiral bevel gear pair.
4.2. Equations for Tooth Meshing and Contact
The pinion tooth surface and the gear tooth surface are in continuous tangency when the following equations stand in the coordinate system of meshing
4.3. Extended Local Synthesis
Local synthesis controls the meshing performance at the mean contact point, where the transmission error is zero, meaning that the ratio of the rotational speed of the gear pair is equal to the inverse ratio of the tooth numbers. In order to realize the predesigned CMC, the meshing performance of any concerned point on the CMC must be controlled, not just the mean contact point. Generally, the transmission error at these points is not equal to zero. This requires that the local synthesis needs to be extended to suit this situation, and thereafter, the local synthesis becomes global.
4.3.1. Multi-Point Control Approach
The predesigned CMC is taken as the design objective, of which the following inequality must sustain for the meshing point at the instant angular position of the mating gear pair
where is the actual value of CMC, and is an arbitrarily convergent limit, i.e., . As we can see, only one variable is needed to satisfy Equation (17). We choose the blank offset of the pinion as the design variable. From the above analysis, we can see that there are eight equations and nine variables in Equations (16) and (17). The independent design variables are and . We can solve Equations (16) and (17) simultaneously by assigning an instant value of for every meshing position. The process of solution is as follows.
Step 1: Based on the local synthesis, calculate the machine-tool settings of the pinion at the mean contact point M. Three design requirements are given at the mean contact before the calculation is performed. They are the direction of the tangent to the contact path, the semi-major axis of the contact ellipse, and the magnitude of the FTE. Among the three design requirements, the third one is chosen around the maximum value of the fourth-order polynomial MC, as shown in Figure 1a. The instant blank offset is related to it. The actual machine-tool settings will be formed afterward according to the predesigned fourth-order polynomial FTE. Since an error exists at the mean contact point for the CMC, as shown in Figure 1b, the machine-tool settings of the pinion should be regulated to some extent by observing Equation (17).
Step 2: Solve the set of Equations (16) and (17). Departing from the mean contact point, the pinion is rotated about its own axis, and the tooth surface of the gear must be in contact with that of the pinion. In other words, Equation (16) must be satisfied. At the same time, the predesigned CMC must also be fulfilled, so Equation (17) can be satisfied as well. The calculation is performed by using an iterative strategy.
Step 3: Perform the tooth contact analysis. After the machine-tool settings are calculated, the TCA gives the results of FTEs, the contact path, the instant ellipses, and the relative velocity of a meshing point over the tooth surface of the pinion and gear. The instant blank offset is interpolated linearly between the above serial instant blank offsets obtained in Step 2.
4.3.2. Loaded Tooth Contact Analysis (LTCA)
LTCA is used to analyze transmission errors and tooth contact patterns of the spiral bevel gear pair under load, considering tooth deformations and the load sharing among neighboring tooth pairs. It is carried out by obeying the force equilibrium condition, the deformation compatibility condition, and the non-embedding condition.
where n is the total number of the discrete potential contact points on the pinion and gear tooth surfaces at the instant meshing position; C is the flexibility matrix which is reciprocal of the stiffness matrix with the unit of N/m; w and d represent the initial tooth surface gap and the deformed tooth surface gap between the mating tooth surfaces, respectively; r is the distance from the contacting points to the gear shaft; F is the normal force at the contacting points; is the variation in the gear rotational angle under torque T; and subscripts n and t denote the normal section of the tooth and the rotational plane of the gear, respectively.
According to the experience of the Gleason Works, the amount of the tooth surface approach is approximately 0.00635 mm on a gear rolling test machine. Taking the amount as the target, the torque applied on the gear is calculated via loaded tooth contact analysis when the mating tooth pair contacts at the mean contact point.
5. Numerical Studies
An aviation spiral bevel gear set is investigated to confirm the proposed method. The design parameters of the gear drive are listed in Table 1. The predesigned CMC of the spiral bevel gear pair based on the proposed method is shown in Figure 5. Figure 5a shows a CMC for a single meshing tooth pair with the maximum transmission error of 3″. Figure 5b shows three entwined CMC from left to right representing the proceeding tooth pair, the actual tooth pair, and the following tooth pair, respectively. Design specifications of the spiral bevel gear drive are listed in Table 2. Polynomial coefficients of the CMC function of the spiral bevel gear pair are listed in Table 3. The installation parameters of the gear head cutter are listed in Table 4. They are assumed to be known according to an SB card provided by the Gleason Works. The machine-tool settings of the head cutter of the pinion are listed in Table 5.

Table 1.
Blank data of the spiral bevel gear pair.

Figure 5.
Predesigned CMC of the spiral bevel gear pair. (a) CMC for single tooth pair; (b) CMC for multi-tooth pairs.

Table 2.
Design specifications of the spiral bevel gear pair.

Table 3.
Polynomial coefficients of the CMC function of the spiral bevel gear pair.

Table 4.
Installation parameters of the head cutter of the gear.

Table 5.
Machine-tool settings of the head cutter of the pinion.
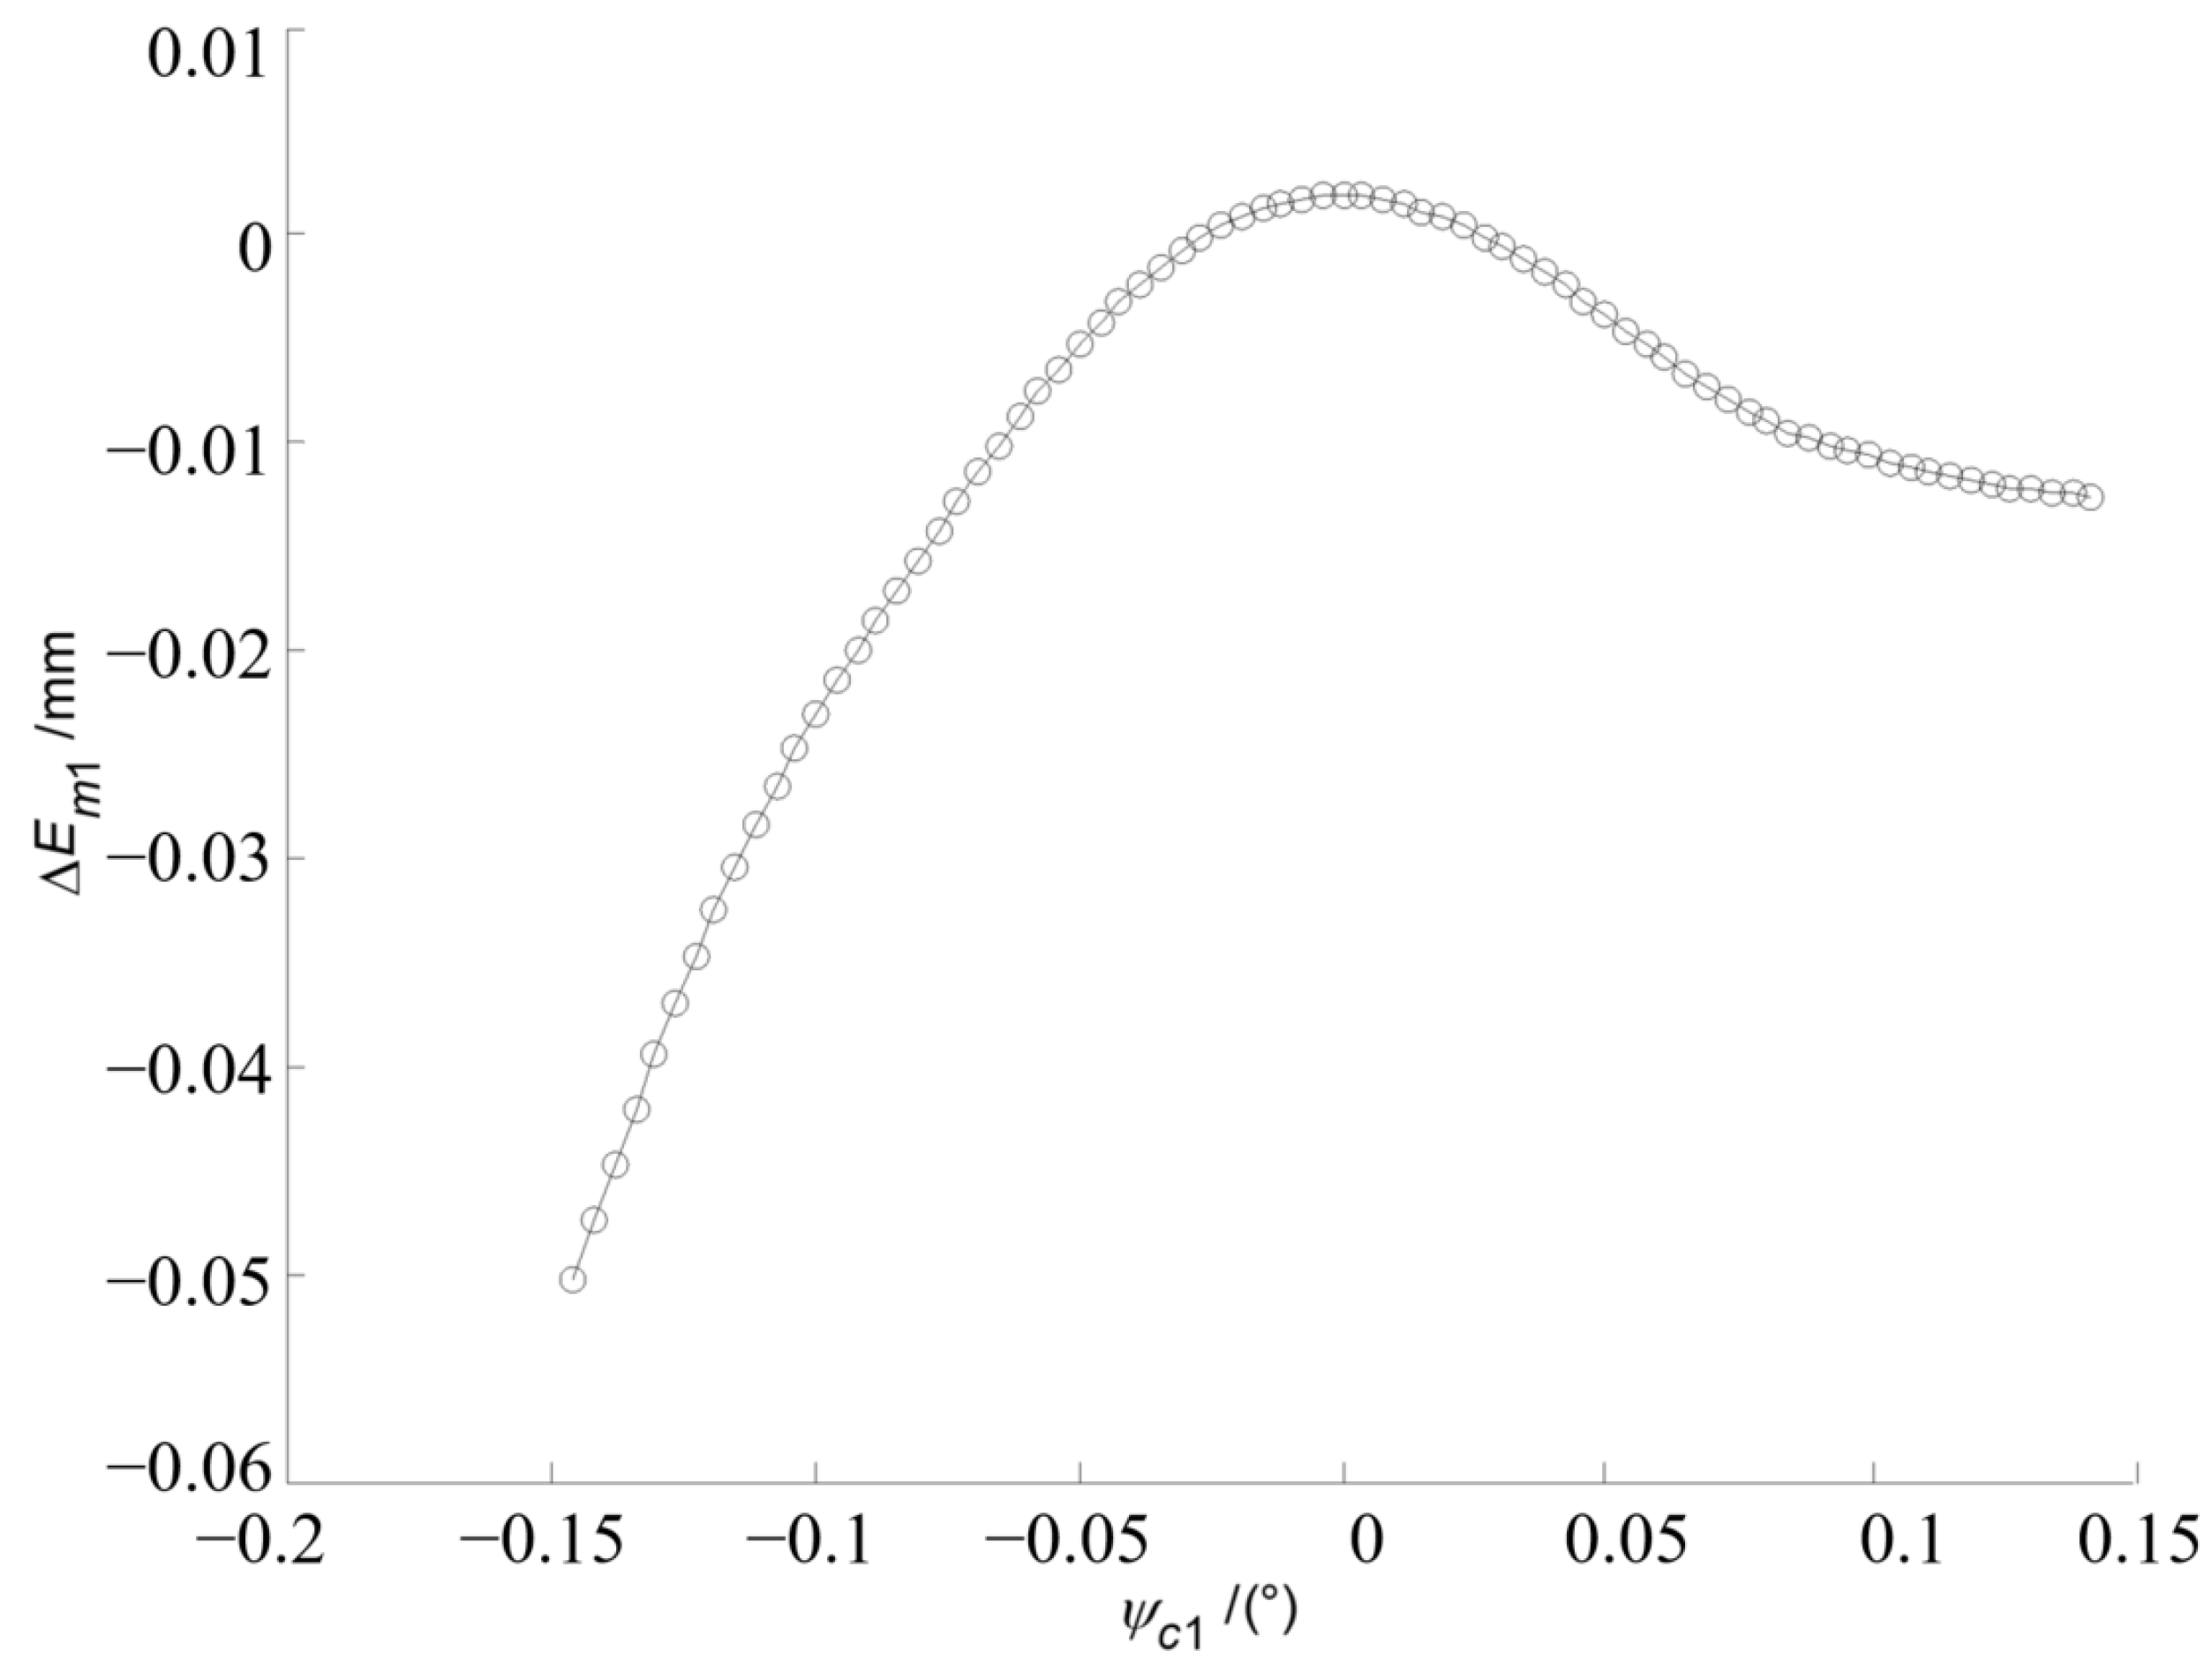
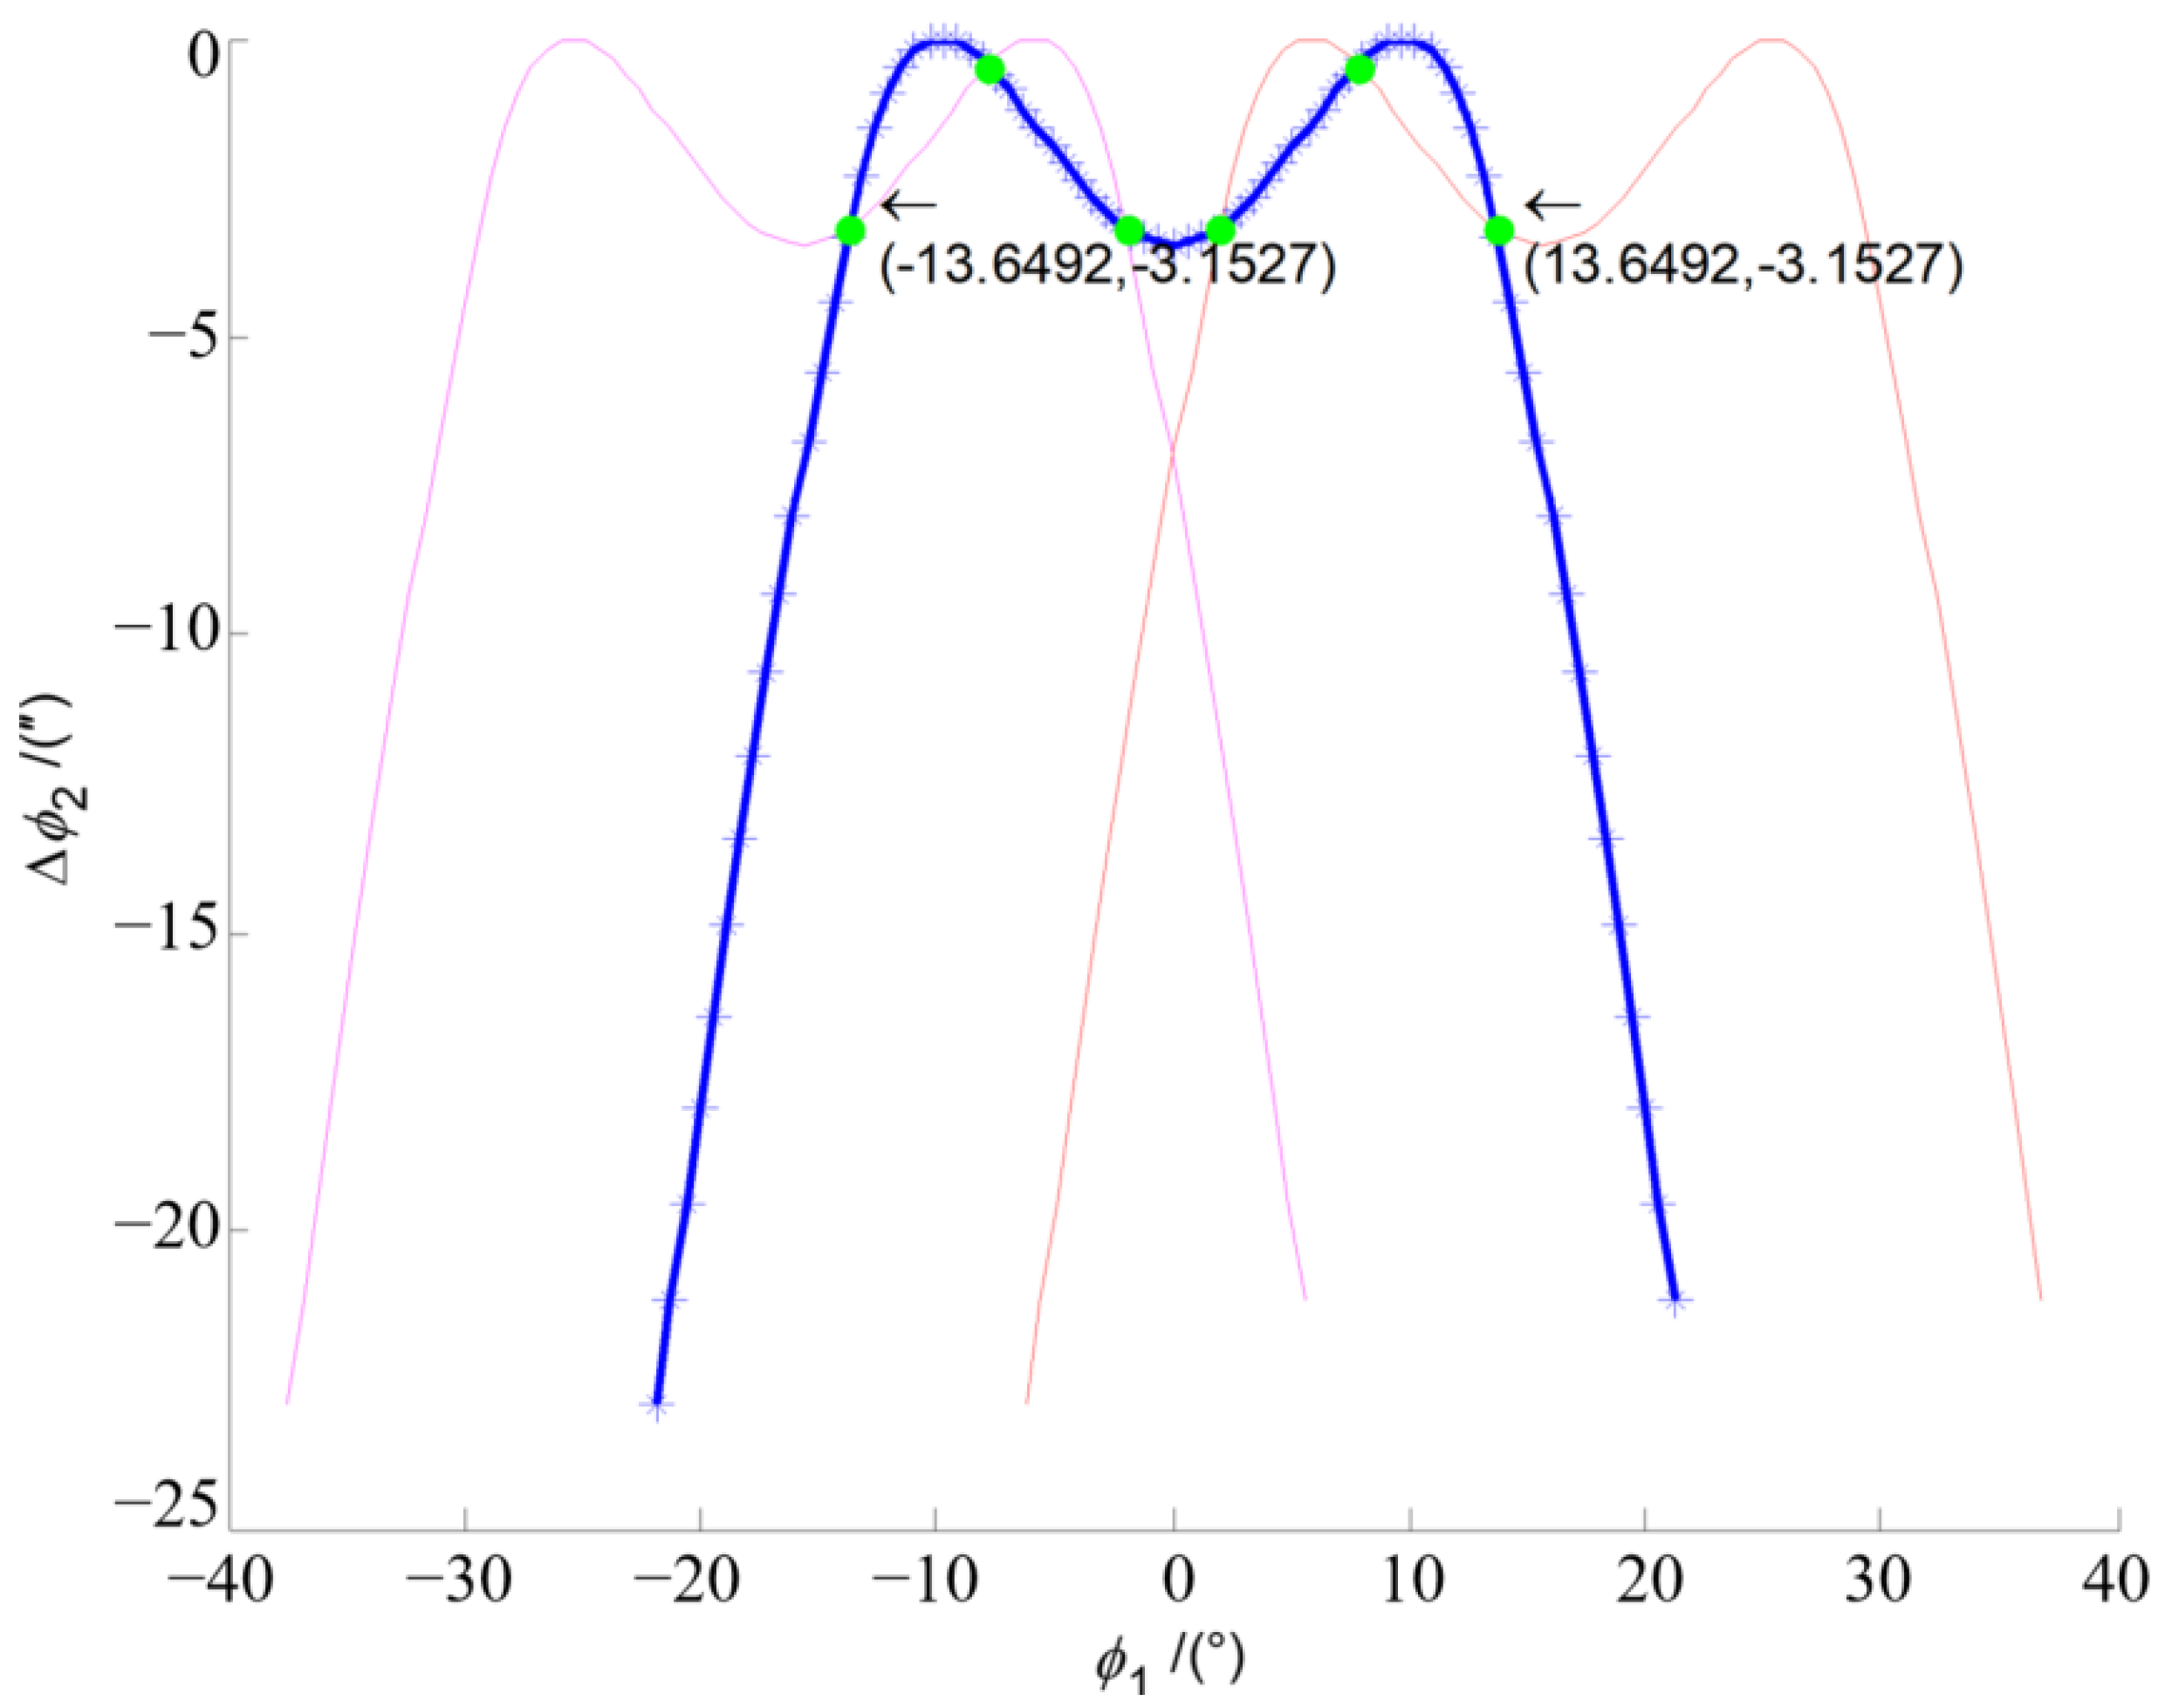
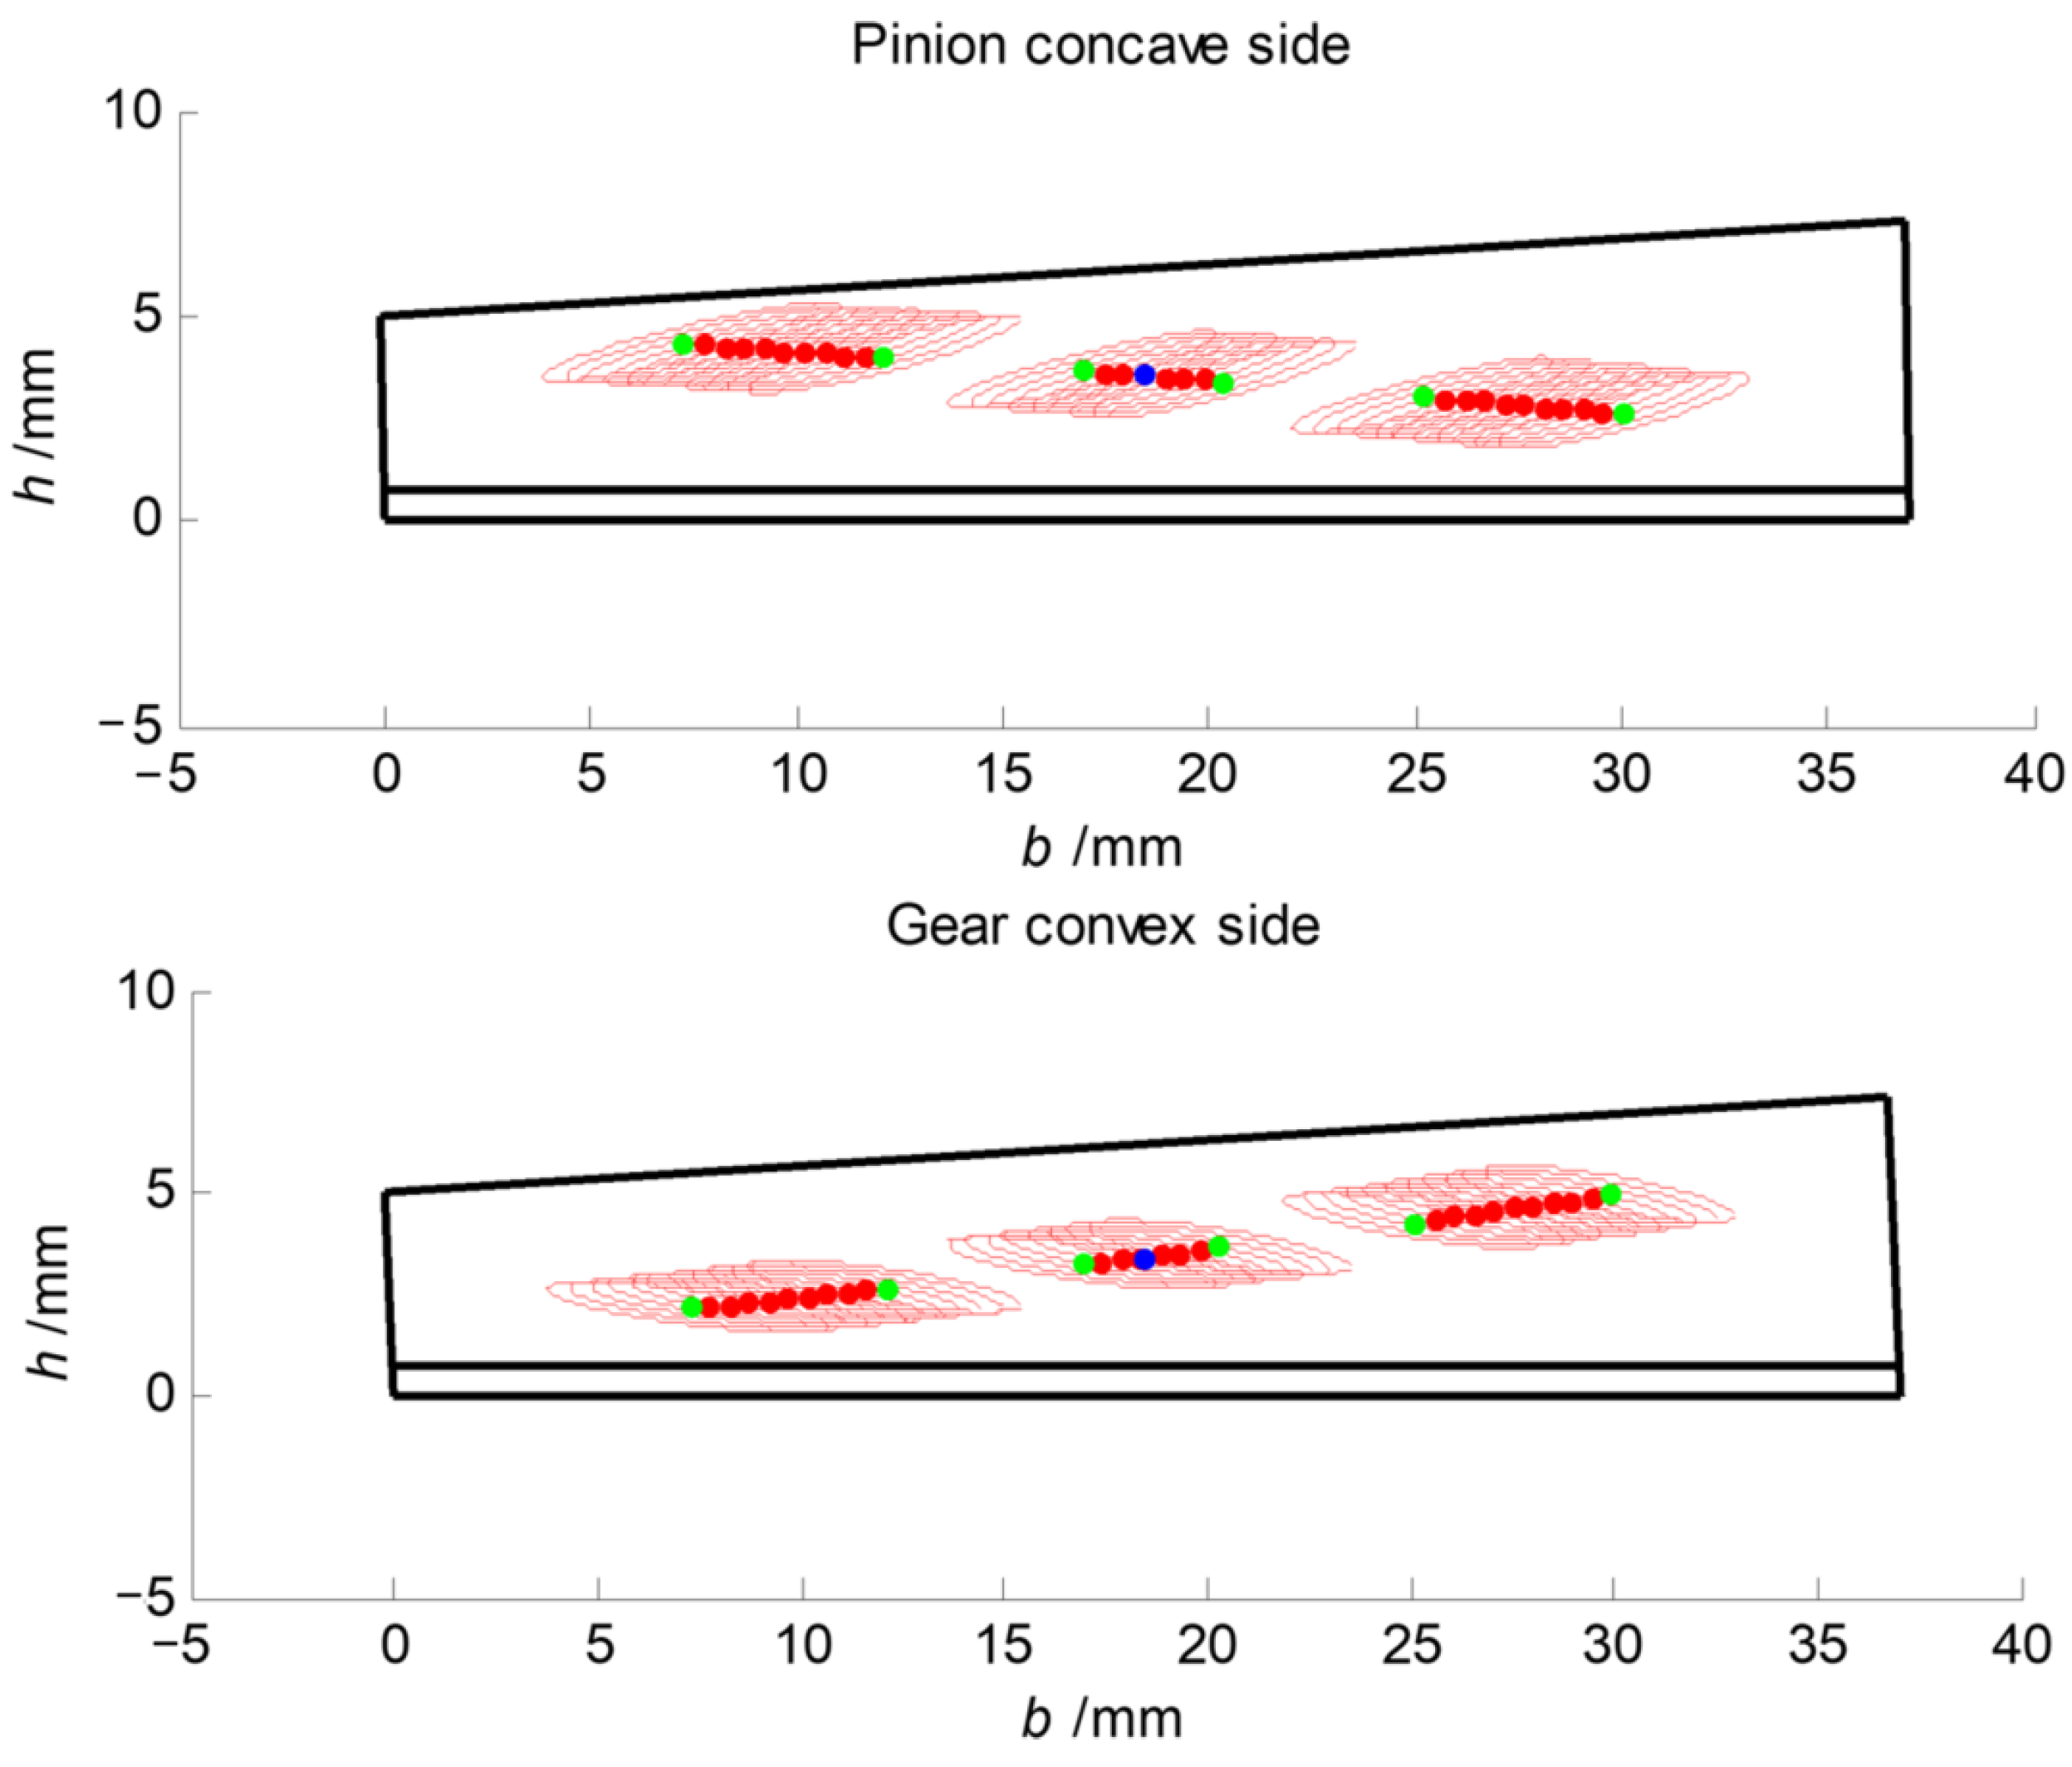
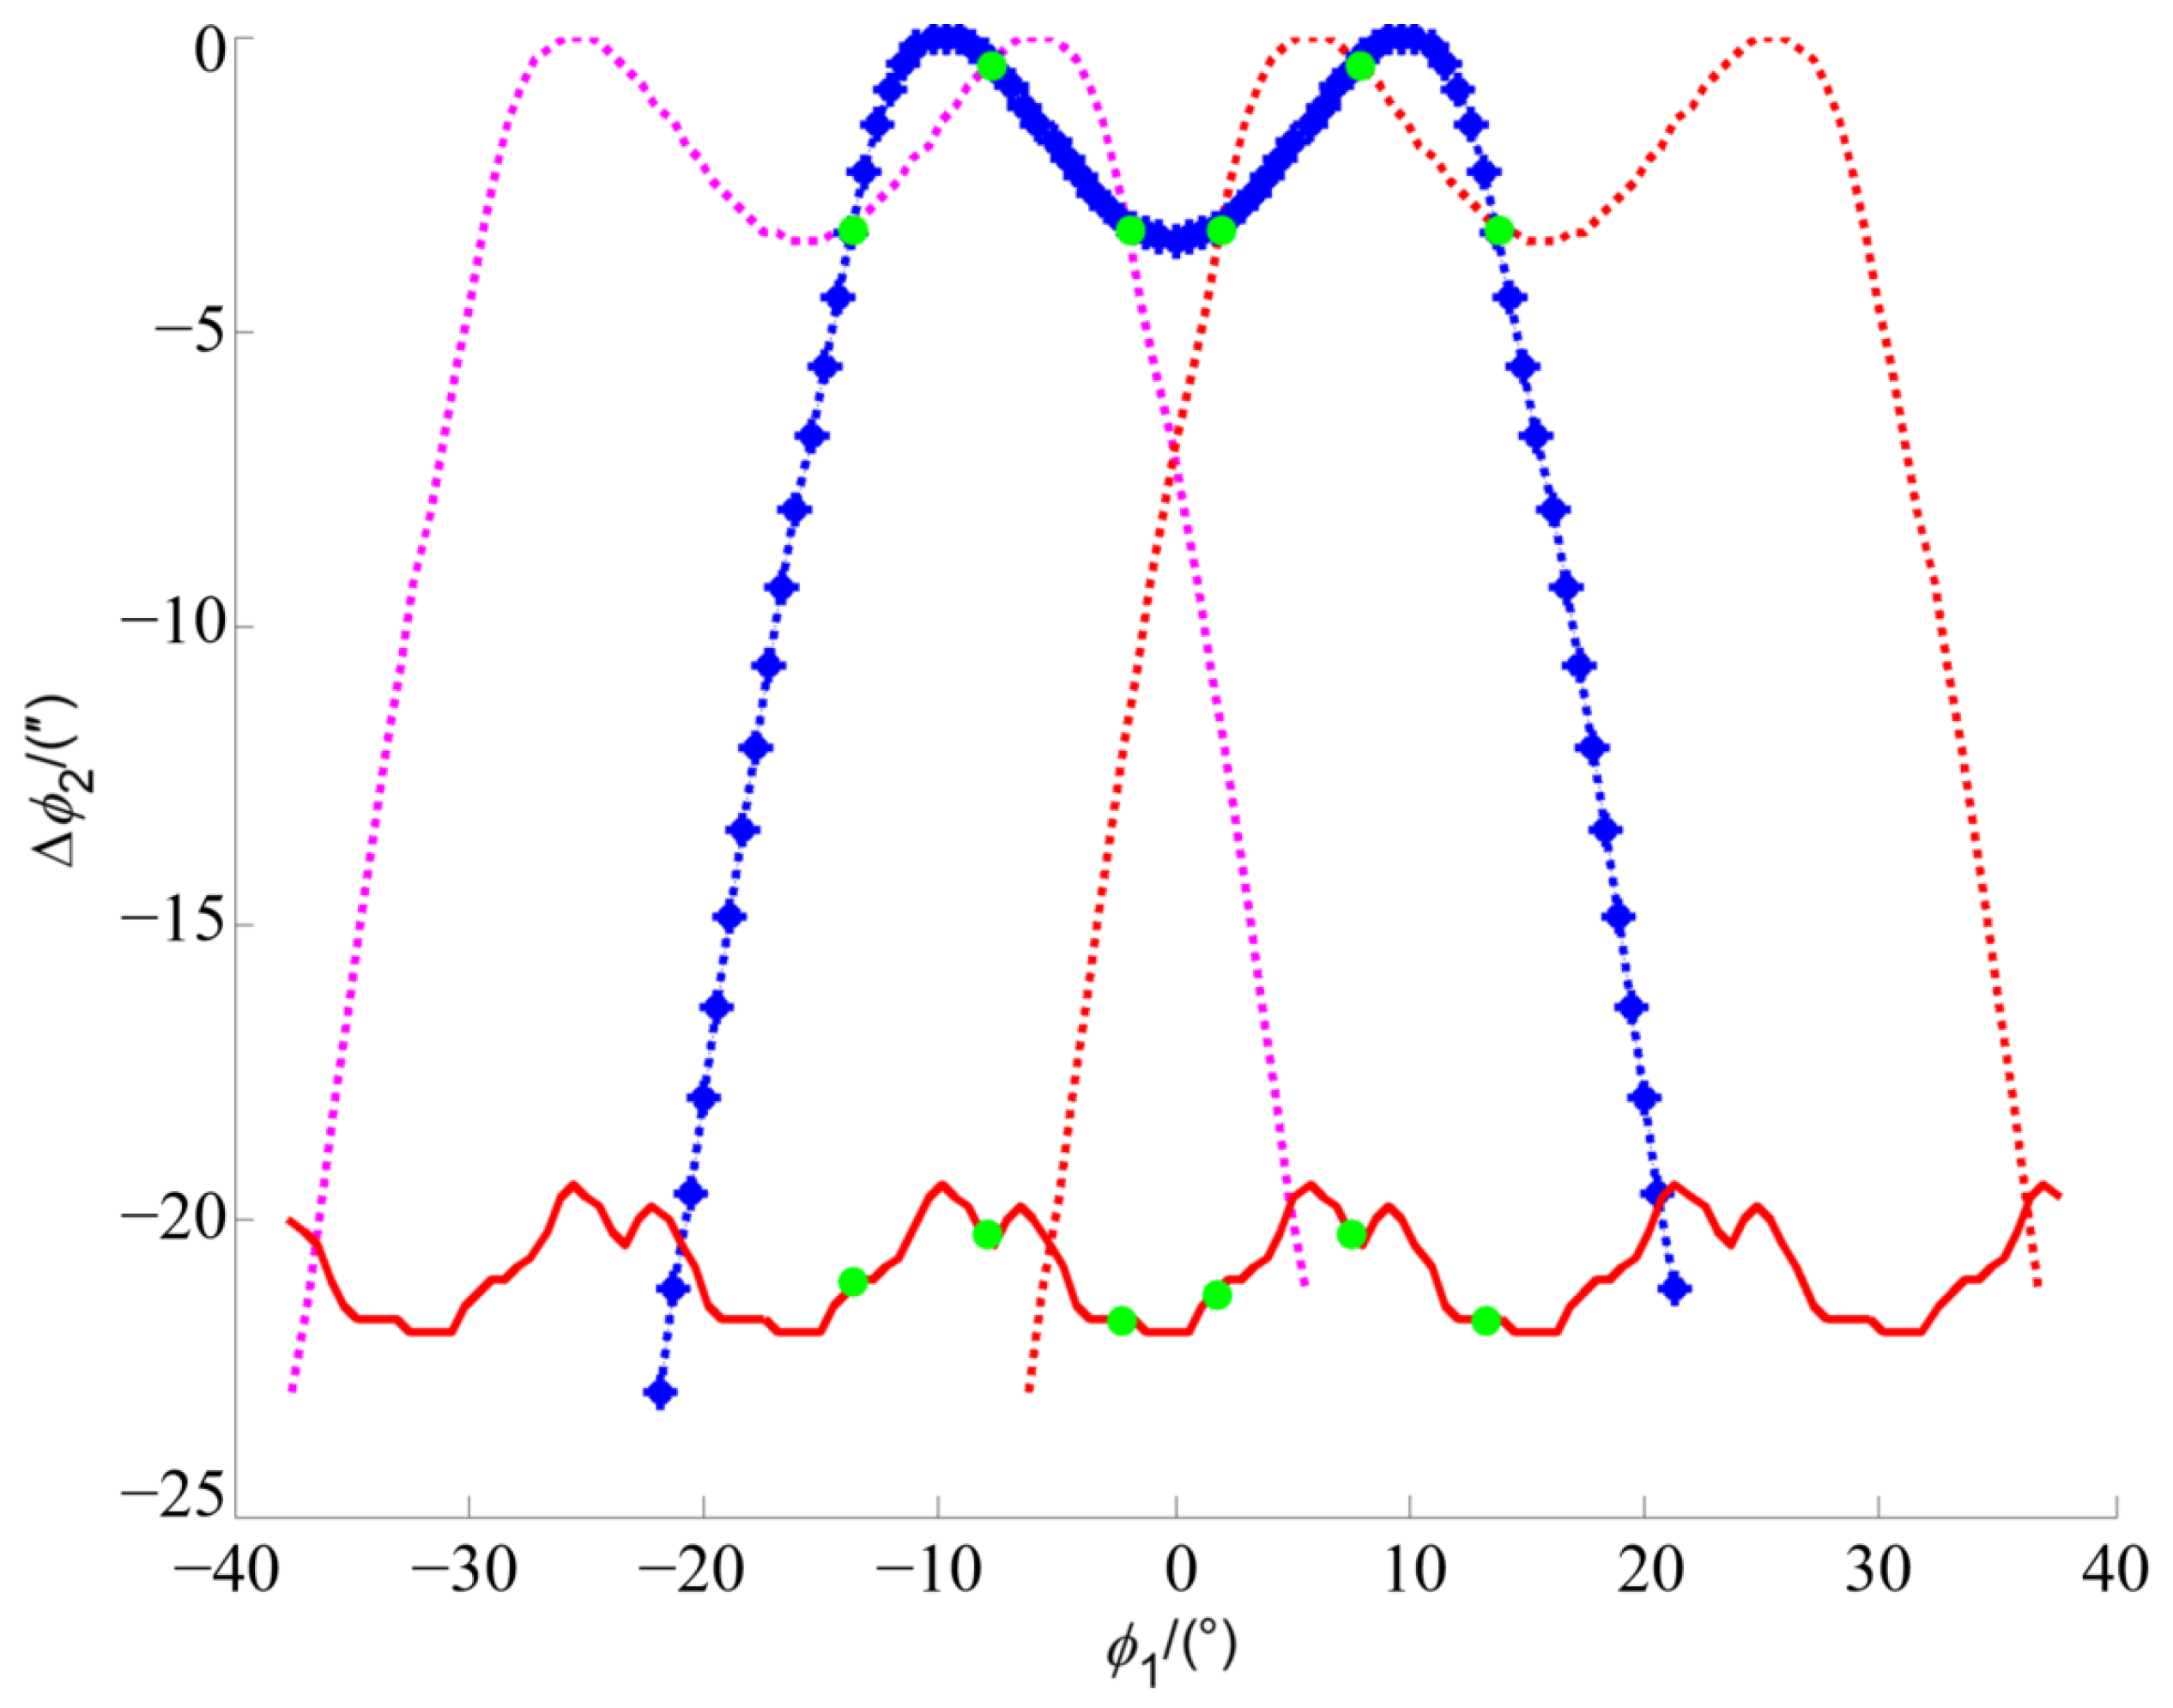
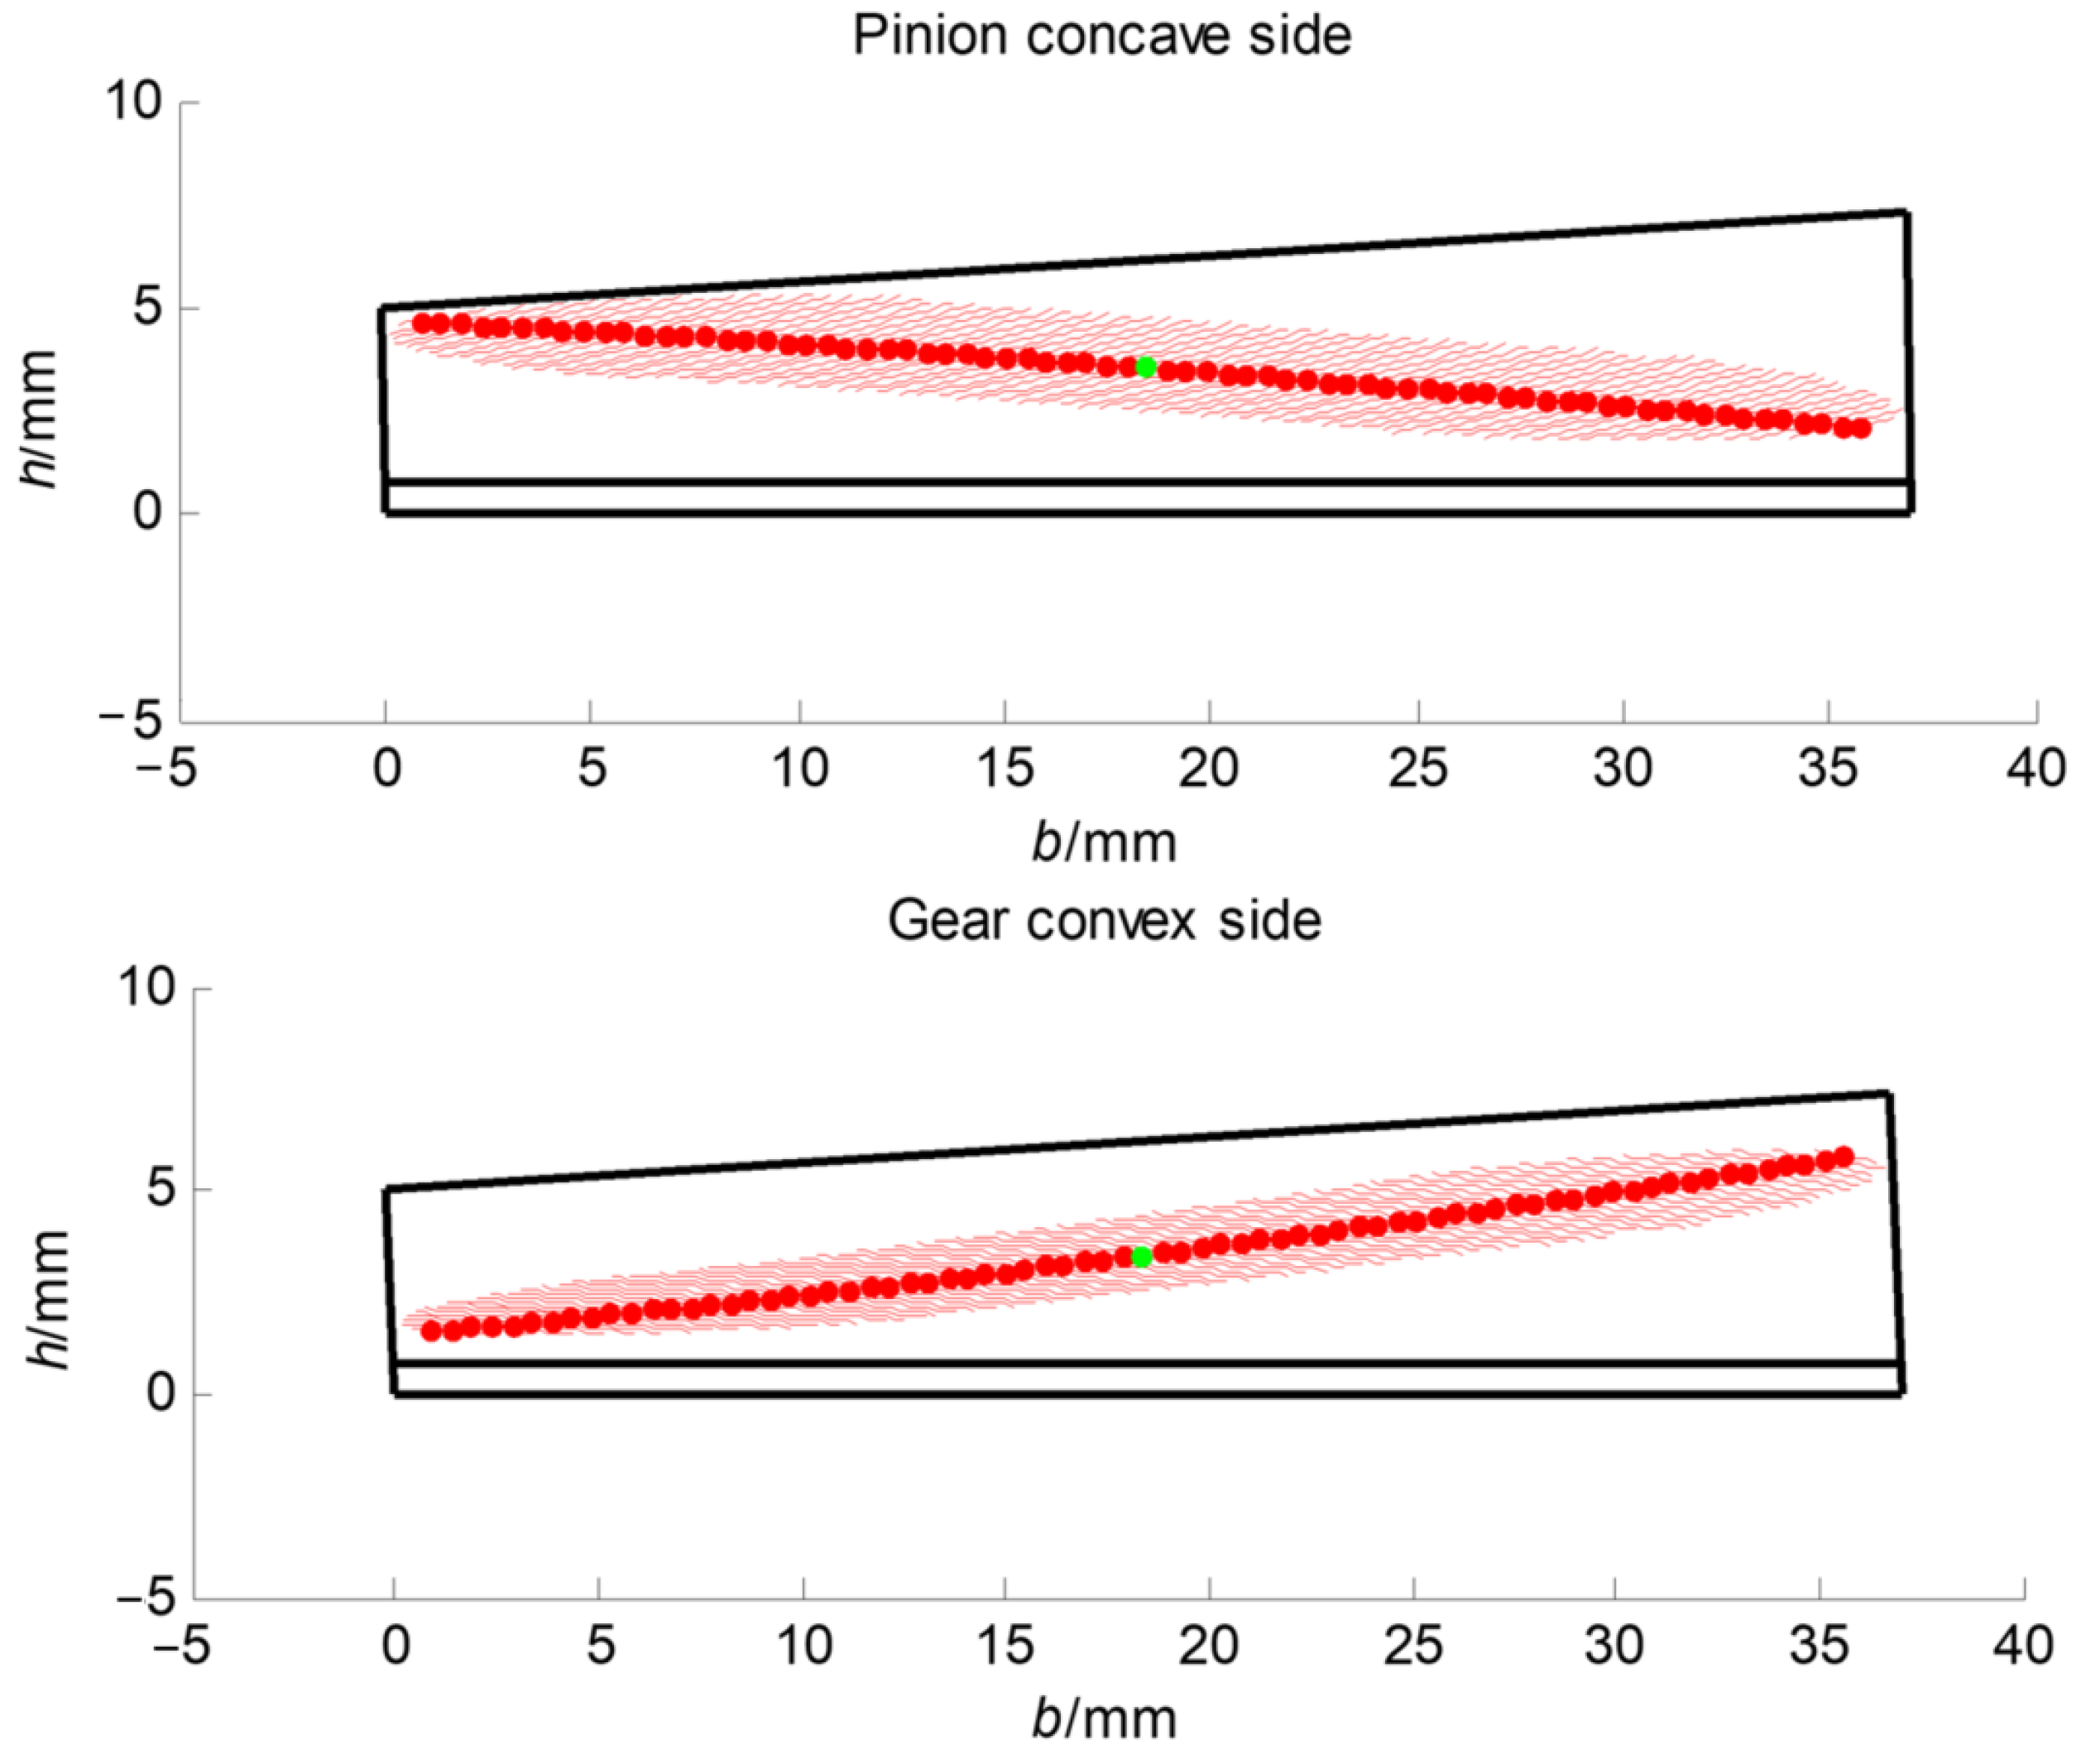
The variation in the instant blank offset with respect to the value at the mean contact point for the concave side of the pinion tooth surface is shown in Figure 6. The blank offset of the head cutter of the pinion changes with the CMC of the spiral bevel gear pair in Figure 5. The results of tooth contact analysis have confirmed that the predesigned CMC is fulfilled with sufficient accuracy as shown in Figure 7, in which the dotted points in the middle line represent the controlled points for the actual tooth pair, while the three continuous lines represent the CMC of TCA. Based on the numerical results of TCA of the spiral bevel gear pair, the maximum transmission error is −3.1527″. The difference between the maximum transmission error and the predesigned CMC is 0.1527″. As the gear is driven by the tooth pair with the least transmission error among three neighboring tooth pairs, the contact pattern of the actual tooth pair is scattered into three segments over the tooth surfaces, as in Figure 8, when the spiral bevel gears are considered as rigid bodies. The corresponding CMC of LTCA of the spiral bevel gear pair is shown in Figure 9. This is specific to the CMC and should not be taken as bridge contact, which is usually unacceptable. Based on the numerical results of LTCA of the spiral bevel gear pair, the maximum loaded transmission error is −22.0763″. Actually, when the loads are applied, contact patterns on tooth surfaces of the spiral bevel gear pair become continuous, and the maximum transmission error increases by −18.9236″ due to the elastic deformation of the meshing tooth surfaces as shown in Figure 10.
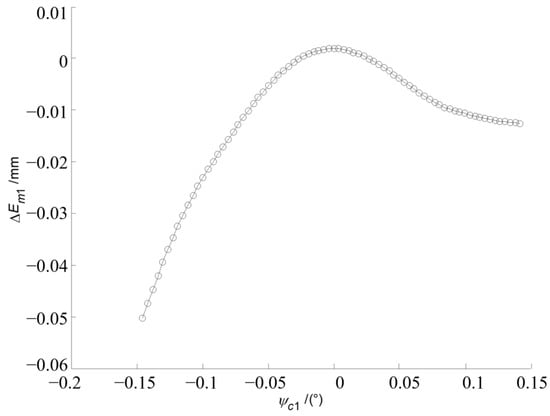
Figure 6.
Variation in blank offset of the head cutter for pinion concave side.
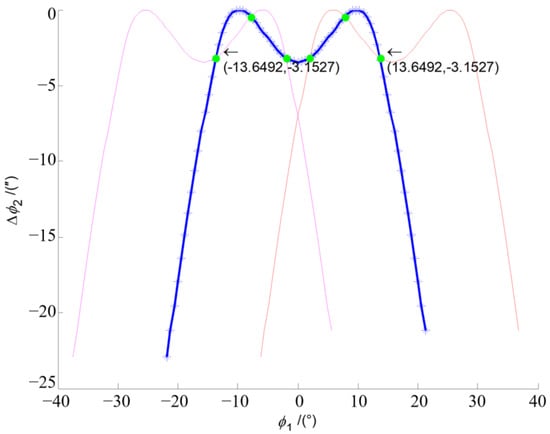
Figure 7.
Numerical results of the CMC of TCA of the spiral bevel gear pair.
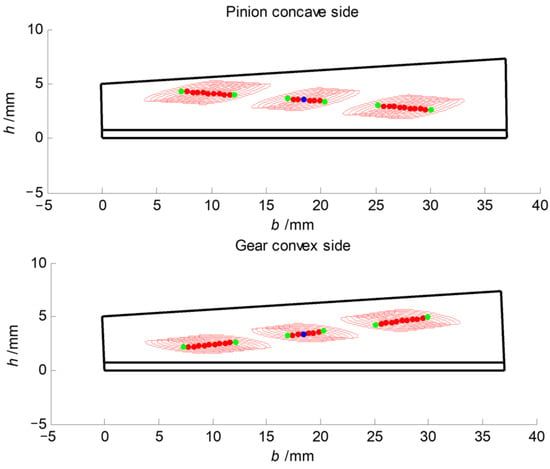
Figure 8.
Contact patterns of TCA of the spiral bevel gear pair.
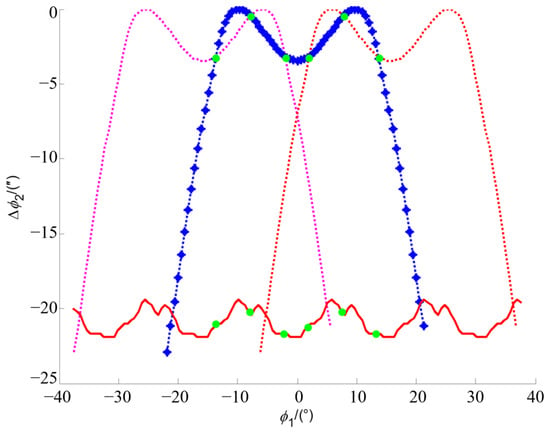
Figure 9.
Numerical results of the CMC of LTCA of the spiral bevel gear pair.
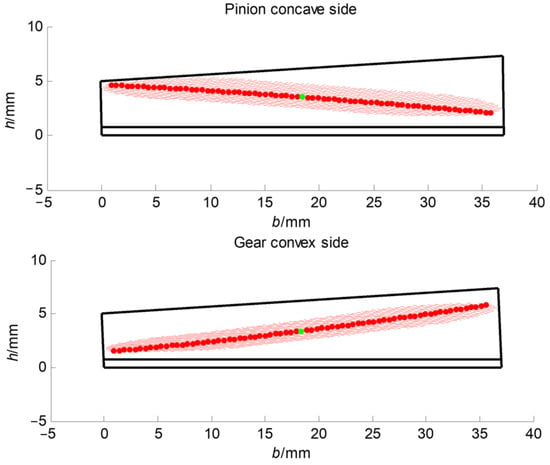
Figure 10.
Contact patterns of LTCA of the spiral bevel gear pair.
6. Conclusions
Theoretically, the proposed predesigned face-milling method based on the predesigned fourth-order CMC function is not limited to gear tooth profiles of spiral bevel gears and is applicable to hypoid gears. Local gear tooth modifications of spiral bevel gears can be calculated based on the predesigned fourth-order CMC function. Especially, spiral bevel gears with completed time-varying meshing stiffness and tooth profiles are difficult to adjust the amount of modification. Based on TCA and LTCA results of contact patterns and transmission errors of the face-milled spiral bevel gear pair, the proposed predesigned fourth-order CMC function can improve its meshing performances. Some conclusions can be given as follows:
- A method for the development of the combined MC up to the fourth-order CMC of the spiral bevel gear pair has been proposed;
- A mathematical model is established and an extended local synthesis is used to obtain the instant blank offset for the combined motion curve. The basic idea is to introduce a closed-loop strategy for tooth contact analysis. In this way, the meshing performance of the kinematic errors over the whole tooth surface of a is controlled;
- The proposed method was validated by a numerical study of TCA of a spiral bevel gear pair. The maximum transmission error of the TCA results is −3.1527″. The difference between the maximum transmission error and the predesigned CMC is only 0.1531″, which is 4.86% of the maximum transmission error.
- When the tooth surfaces of the spiral bevel gear pair are elastically deformed during meshing, the actual tooth contact patterns become continuous. When the loads are applied, the elastic deformation of the meshing tooth surfaces results in an increase in the maximum transmission error of −18.9236″.
Author Contributions
Conceptualization, Y.L. and G.L.; methodology, Y.L.; software, Y.L.; validation, Y.L. and G.L.; formal analysis, Y.L.; investigation, L.C.; resources, L.C.; data curation, Y.L.; writing—original draft preparation, Y.L.; writing—review and editing, G.L.; visualization, L.C.; supervision, L.C.; project administration, L.C. All authors have read and agreed to the published version of the manuscript.
Funding
This research was funded by Huazhong University of Science and Technology, Intelligent design and CNC basic key technology research and development Grant No. 2021AAB001.
Institutional Review Board Statement
Not applicable.
Informed Consent Statement
Not applicable.
Data Availability Statement
Data are contained within the article.
Conflicts of Interest
The authors declare no conflicts of interest.
References
- Huang, D.; Wang, Z.; Li, G.; Zhu, W. Conjugate approach for hypoid gears frictional loss comparison between different roughness patterns under mixed elastohydrodynamic lubrication regime. Tribol. Int. 2019, 140, 105884. [Google Scholar] [CrossRef]
- Zhou, Y.; Chen, Z.C.; Tang, J. A new method of designing the tooth surfaces of spiral bevel gears with ruled surface for their accurate five-axis flank milling. J. Manuf. Sci. Eng. 2017, 139, 061004. [Google Scholar] [CrossRef]
- Zhang, W.; Tan, R.; Guo, X.; Chen, B.; Shu, R.; Zheng, F. Analytical synthesis of the kinematic geometry of spiral bevel gears of pure-rolling contact. Mech. Mach. Theory 2020, 153, 103992. [Google Scholar] [CrossRef]
- Vivet, M.; Tamarozzi, T.; Desmet, W.; Mundo, D. On the modelling of gear alignment errors in the tooth contact analysis of spiral bevel gears. Mech. Mach. Theory 2021, 155, 104065. [Google Scholar] [CrossRef]
- Litvin, F.L.; Zhang, Y. Local Synthesis and Tooth Contact Analysis of Face-Milled Spiral Bevel Gears; Technical Report; NASA: Washington, DC, USA, 1991.
- Litvin, F.L.; Fuentes, A.; Mullins, B.R.; Woods, R. Computerized Design, Generation, Simulation of Meshing and Contact, and Stress Analysis of Formate Cut Spiral Bevel Gear Drives; NASA National Technical Information Service: Washington, DC, USA, 2003.
- Zhang, Y.; Yan, H. New methodology for determining basic machine settings of spiral bevel and hypoid gears manufactured by duplex helical method. Mech. Mach. Theory 2016, 100, 283–295. [Google Scholar] [CrossRef]
- Liu, Z.; Li, F.; Xu, Z.; He, Q. Semi-analytical loaded tooth contact analysis method for spiral bevel gears. Int. J. Mech. Sci. 2023, 253, 108329. [Google Scholar] [CrossRef]
- Simon, V. Influence of tooth errors and misalignments on tooth contact in spiral bevel gears. Mech. Mach. Theory 2008, 43, 1253–1267. [Google Scholar] [CrossRef]
- Sheveleva, G.I.; Volkov, A.E.; Medvedev, V.I. Algorithms for analysis of meshing and contact of spiral bevel gears. Mech. Mach. Theory 2007, 42, 198–215. [Google Scholar] [CrossRef]
- Li, G.; Zhu, W. An Active Ease-Off Topography Modification Approach for Hypoid Pinions Based on a Modified Error Sensitivity Analysis Method. ASME J. Mech. Des. 2019, 141, 093302. [Google Scholar] [CrossRef]
- Mu, Y.; Li, W.; Fang, Z. Tooth surface modification method of face-milling spiral bevel gears with high contact ratio based on cutter blade profile correction. Int. J. Adv. Manuf. Technol. 2020, 106, 3229–3237. [Google Scholar] [CrossRef]
- Alves, J.T.; Guingand, M.; de Vaujany, J.P. Set of functions for the calculation of bending displacements for spiral bevel gear teeth. Mech. Mach. Theory 2010, 45, 349–363. [Google Scholar] [CrossRef]
- Tsai, Y.C.; Hsu, W.Y. The study on the design of spiral bevel gear sets with circular-arc contact paths and tooth profiles. Mech. Mach. Theory 2008, 43, 1158–1174. [Google Scholar] [CrossRef]
- Ma, S.; He, G.; Yan, K.; Li, W.; Zhu, Y.; Hong, J. Structural optimization of ball bearings with three-point contact at high-speed. Int. J. Mech. Sci. 2022, 229, 107494. [Google Scholar] [CrossRef]
- Xiang, S.; Li, H.; Deng, M.; Yang, J. Geometric error analysis and compensation for multi-axis spiral bevel gears milling machine. Mech. Mach. Theory 2018, 121, 59–74. [Google Scholar] [CrossRef]
- Álvarez, Á.; Calleja, A.; Arizmendi, M.; González, H.; Lopez de Lacalle, L.N. Spiral bevel gears face roughness prediction produced by CNC end milling centers. Materials 2018, 11, 1301. [Google Scholar] [CrossRef] [PubMed]
- Mu, Y.; Li, W.; Fang, Z.; Zhang, X. A novel tooth surface modification method for spiral bevel gears with higher-order transmission error. Mech. Mach. Theory 2018, 126, 49–60. [Google Scholar] [CrossRef]
- An, L.; Zhang, L.; Qin, S.; Lan, G.; Chen, B. Mathematical design and computerized analysis of spiral bevel gears based on geometric elements. Mech. Mach. Theory 2021, 156, 104131. [Google Scholar] [CrossRef]
- Mu, Y.; He, X. Design and dynamic performance analysis of high-contact-ratio spiral bevel gear based on the higher-order tooth surface modification. Mech. Mach. Theory 2021, 161, 104312. [Google Scholar] [CrossRef]
- Chen, P.; Wang, S.; Li, F.; Zou, H. A direct preset method for solving ease-off tooth surface of spiral bevel gear. Mech. Mach. Theory 2023, 179, 105123. [Google Scholar] [CrossRef]
- Yang, Y.; Mao, S.; Cao, W.; Huang, Y. A novel taper design method for face-milled spiral bevel and hypoid gears by completing process method. Int. J. Precis. Eng. Manuf. 2022, 23, 1–13. [Google Scholar] [CrossRef]
- Stadtfeld, H.J.; Gaiser, U. The Ultimate Motion Graph. J. Mech. Des. 1999, 122, 317–322. [Google Scholar] [CrossRef]
- Fan, Q. Enhanced Algorithms of Contact Simulation for Hypoid Gear Drives Produced by Face-Milling and Face-Hobbing Processes. ASME J. Mech. Des. 2006, 129, 31–37. [Google Scholar] [CrossRef]
- Li, G.; Wang, Z.; Zhu, W.; Kubo, A. A function-oriented active form-grinding method for cylindrical gears based on error sensitivity. Int. J. Adv. Manuf. Technol. 2017, 92, 3019–3031. [Google Scholar] [CrossRef]
- Wang, P.Y.; Fong, Z.H. Mathematical model of face-milling spiral bevel gear with modified radial motion (MRM) correction. Math. Comput. Model. 2005, 41, 1307–1323. [Google Scholar] [CrossRef]
- Wang, P.Y.; Fong, Z.H. Adjustability improvement of face-milling spiral bevel gears by modified radial motion (MRM) method. Mech. Mach. Theory 2005, 40, 69–89. [Google Scholar] [CrossRef]
- Wang, P.Y.; Fong, Z.H. Fourth-Order Kinematic Synthesis for Face-Milling Spiral Bevel Gears With Modified Radial Motion (MRM) Correction. ASME J. Mech. Des. 2005, 128, 457–467. [Google Scholar] [CrossRef]
Disclaimer/Publisher’s Note: The statements, opinions and data contained in all publications are solely those of the individual author(s) and contributor(s) and not of MDPI and/or the editor(s). MDPI and/or the editor(s) disclaim responsibility for any injury to people or property resulting from any ideas, methods, instructions or products referred to in the content. |
© 2024 by the authors. Licensee MDPI, Basel, Switzerland. This article is an open access article distributed under the terms and conditions of the Creative Commons Attribution (CC BY) license (https://creativecommons.org/licenses/by/4.0/).

