Abstract
In drilling engineering, the cost of drilling tool fracture is enormous, and studying the fatigue failure process of drilling tools has practical significance. This paper uses metal magnetic memory detection technology to design and conduct fatigue damage tests on typical drilling tool material 42CrMo specimens under tensile, torsional, compressive, tensile, compressive, and torsional dynamic loading conditions. By analyzing the changes in the tangential component Hp(x) and gradient value K of the magnetic memory signal under different load conditions with the number of loading times, the process of fatigue failure of the specimens and the trend of changes in the magnetic memory signal in local stress concentration areas are explored. The characteristic parameters of fatigue damage based on magnetic memory detection were extracted and the critical point at which fatigue damage leads to crack initiation was inferred. This confirms that metal magnetic memory testing technology is an effective means of analyzing the fatigue damage process of drilling tools and provides a certain reference for formulating judgment standards for drilling tool maintenance on site.
1. Introduction
In drilling engineering, the stress of drilling tools is complex, and they are prone to fatigue failure or even fracture under various loads, resulting in huge economic losses. According to the drilling survey from 1977 to 1980, the average cost of drilling tool fracture was approximately USD 106,000, accounting for 41% of the drilling cost [1]. Therefore, studying the fatigue failure of drilling tools, predicting and discovering stress concentration of drilling tools, and avoiding crack propagation as early as possible are of great significance for effectively preventing the occurrence of drilling tool fatigue fracture accidents. MMM detection technology is a damage detection method first proposed by Dubov to determine the stress concentration area on the surface of parts [2,3]. This method utilizes the effect of the Earth’s magnetic field on ferromagnetic materials to detect free leakage magnetic fields for fatigue damage assessment. Due to the irreversible reorientation of magnetic domains in the stress concentration area of the material under loading conditions, a magnetic field is generated, which changes the spontaneous magnetization direction of the magnetic domains and forms a free leakage magnetic field in the stress concentration area. Moreover, when the loading conditions of the material change, the reorientation of the magnetic domain organization caused by magnetomechanical effects will continue to be retained. The location of microscopic defects or stress concentration in ferromagnetic components has been “memorized” [2,4,5]. Therefore, by detecting the free leakage magnetic field, stress concentration and crack propagation in ferromagnetic materials can be detected and predicted.
MMM detection technology has been widely applied in the study of fatigue failure of ferromagnetic materials, such as fatigue crack tests on steel structures, weld fatigue tests, pipeline scratch tests, and cracks in large machinery, and has achieved certain results. For example, Jin, Di, et al. conducted tensile fatigue tests on Q235B steel notched specimens under square wave loading and measured magnetic memory signals, obtaining that the magnetomechanical effect can better explain the changes in magnetic memory signals during the initial stage of cycling [6]; He, Zhuo, et al. conducted fatigue tests on I-shaped steel beams containing butt welds and found that the sudden change in magnetic signal distribution curve can characterize the occurrence of macroscopic fatigue cracks and the processed average magnetic field characteristic curve can characterize the process of weld fatigue changes and provide early warning for macroscopic fatigue cracks [7]; Song, Ding, et al. conducted static tensile tests on standard steel specimens with welds and fatigue tests on steel bridge decks, studying the correlation between coercive force and crack initiation and propagation [8]; Shen G, Hu B, et al. conducted dynamic changes in the amplitude of metal magnetic memory signals for crane beam cracks under load, demonstrating that the MMM testing method can be used to monitor the activity of surface cracks or damage in steel structures [9]. In addition, researchers have also explored the changes in magnetic field strength of different types of steel material specimens under different loading conditions and it has been proven that this technology can effectively predict fatigue life. For example, Leng et al. conducted typical fatigue tests on tempered medium carbon 45-steel specimens under cyclic bending moment conditions using MMM testing, discussing the possible causes of surface magnetic field changes before and after fracture [10]. Subsequently, their team analyzed the normal and tangential residual magnetic field components of medium carbon steel specimens in rotational bending fatigue tests [11]; Li et al. investigated the relationship between the phase component of the surface magnetic field intensity method and the applied cyclic stress in the rotational bending fatigue test using AISI 1045 steel specimens [12].
In fatigue tests using magnetic memory detection technology, the state parameters reflecting force include the normal component of magnetic field strength, tangential component, coercive force, etc. Researchers have established the relationship between residual magnetic field, residual stress, plastic strain, and fatigue damage degree based on these parameters in order to quantitatively evaluate the damage state of ferromagnetic materials; for example, Juraszek J presents the implementation of the method of own residual magnetic field to identify damages occurring in a steel rope [13]; Qian Z, Liu H, et al. has proposed a new low-cost and efficient Residual Magnetic Scanning Measurement (RMSM) method, which can improve the accuracy of early damage assessment for ferromagnetic materials [14]; Shen Z, Chen H, et al. used metal magnetic memory technology to quantitatively evaluate the residual stress of 35CrMo steel cylinder before and after heat treatment, revealed the correlation between coercive force and structural mechanics, and obtained that the structural mechanics state of 35CrMo steel cylinder can be justified by measuring its coercive force [15]; Pang C, Zhou J, et al. proposed a nondestructive testing method to detect the internal tensile force of steel bars by analyzing the Self Leakage Magnetic Field (SMFL) signal based on the metal magnetic memory effect and obtained the SMFL signal parameters that can be used to quantitatively calculate the tensile force of steel bars [16]; Su S, Ma X, Wang W, et al. conducted indoor experiments on S355 steel under low cycle fatigue (LCF) mode and simulated the coupling between magnetic memory signal and cumulative plastic strain using finite element method; they established a universal quantitative expression for the magnetic damage model, providing a direct method for the cumulative plastic damage of low-carbon steel under LCF [17]. In addition to the experimental conditions such as rotational bending, LCF, and tensile load carried out by the aforementioned researchers, Zhou W, Fan J C, et al. also studied the fatigue damage state under pulse impact conditions; they measured magnetic memory signals during the fatigue process of X80 pipeline steel in the laboratory and analyzed the linear relationship between magnetic memory characteristic parameters and fatigue crack depth, proving that magnetic memory signals can reflect changes in fatigue damage status [18]. A large number of experiments and studies have proven that MMM detection technology can relatively well analyze the stress concentration and fatigue damage degree of ferromagnetic materials.
In oil and gas field drilling engineering, the service conditions of drilling tools are complex and, in actual working processes, they will not only bear a single load, but a composite effect of multiple loads. In order to explore the process of fatigue damage of drilling tools, researchers have conducted research on fatigue damage of drilling tool joints and drilling tools using MMM detection technology. Among them, Cheng et al. conducted magnetic memory detection tests using full-size drilling tools in 2017, analyzing the evolution process of drilling tool damage [4]; Zhang and others designed a cantilever beam bending fatigue testing machine to study the location of fatigue damage in drilling tool joints using magnetic memory detection method [19]; Hu et al. conducted four-point bending fatigue tests and tensile fatigue tests on typical materials of drilling tools, 35CrMo and 42 CrMo steel, respectively, and evaluated the fatigue damage of drilling tools [20,21]. There have been numerous experiments and studies using magnetic memory detection technology to evaluate the fatigue damage state of drilling tools under uniaxial dynamic load conditions but there are few experimental studies under composite dynamic load conditions. This paper designs fatigue damage tests of drilling tools under uniaxial dynamic load conditions and tests under three composite dynamic load conditions of tension torsion, compression torsion, and tension compression torsion based on typical working conditions of drilling tools. The aim is to analyze the relationship between stress and magnetic field distribution, summarize the characteristics of magnetic field components of magnetic memory signals, and determine the location of fatigue damage of drilling tools, providing evidence for the prediction and analysis of damage using magnetic memory detection technology.
2. Fatigue Mechanism of Drilling Tools
2.1. Force on Drilling Tools
When drilling tools work, they mainly bear three types of loads. The first is the axial tension generated by their own gravity, drilling fluid buoyancy, and the pressure of the drilling and production system. The second is due to the radial pressure generated by the squeezing of drilling fluid, the collision and squeezing of drilling tools with the wellbore wall, and the squeezing force generated by the slips on the drilling tools during tripping operations. The third is torque load. In addition to these three main loads, drilling tools are also subjected to centrifugal force, bending torque, and vibration loads generated by longitudinal, transverse, torsional, and stick-slip vibrations. The complex coupling effect of these loads runs through the entire drilling work. During the service process of drilling tools, they bear the interaction of multiple forces, and factors such as wear, corrosion, and wellbore temperature brought by the operating environment are also reasons for their failure. The main forms of drilling tool failure include surface damage, excessive deformation, puncture, and fracture. Surface damage is caused by corrosion, wear, and human operation. Excessive deformation is due to stress exceeding the yield limit of the material. Puncture and fracture are caused by corrosion and fatigue.
2.2. Failure Mechanism of Drilling Tools
The underground conditions are complex and the failure forms of drilling tools are diverse and their failure mechanisms mainly include the following three aspects:
- Low stress fatigue failure.
Although the stress value is small, the degree of fatigue damage gradually increases during the continuous accumulation process, ultimately leading to fracture failure. This form of failure occurs without warning and there is no plastic deformation at the macro level; it is a brittle fracture.
- 2.
- Environmental fatigue.
Environmental factors such as wear, corrosion, erosion, and impact can lead to stress concentration in drilling tools, forming microcracks under external forces, which then develop into macroscopic cracks and ultimately lead to fatigue failure.
- 3.
- Plastic fatigue failure (low cycle fatigue).
Due to stress concentration in processing defects, welds, scratches, shoulder lifts, threads, and other areas, drilling tools are prone to macroscopic plastic deformation under external forces, with a nonlinear relationship between strain and stress. In this case, the plastic deformation is large, the stress is large, and the cyclic load is the most serious damage to the drilling tool. Fatigue leads to the initiation of cracks, which then develop into crack propagation and eventually develop into macroscopic cracks, leading to fracture failure. Low cycle fatigue is mainly a method of predicting the lifespan of materials by analyzing the mechanical behavior of stress concentration areas. The stress concentration area is basically in a plastic state, with fluctuations in stress. Strain is the main factor affecting fatigue, and cyclic strain leads to material fatigue failure. Due to the occurrence of microcracks in the early stages of plastic fatigue, fatigue prediction can be made.
3. Magnetic Memory Fatigue Test
This paper focuses on the main stress conditions of drilling tools and designs magnetic memory testing fatigue tests on typical drilling tool material samples of 42CrMo steel notched specimens under uniaxial dynamic load conditions and composite dynamic load conditions, further exploring the fatigue damage process of material samples.
3.1. Magnetic Memory Technology
3.1.1. Theoretical Basis of Magnetic Memory Technology
The theoretical basis of magnetic memory detection is the self-leakage magnetic field theory. The location and degree of stress concentration and fatigue damage is determined by detecting the changes in the tangential component Hp(x) or normal component Hp(y) of the leakage magnetic field. Under the simultaneous action of the geomagnetic field and external loads on ferromagnetic components, the Hp(x) of the leakage magnetic field at the stress and deformation concentration area reaches its maximum value, while Hp(y) crosses the zero point and changes the symbol [6,22]; this magnetic state is irreversible, so obtaining the tangential and normal components of the magnetic memory signal of ferromagnetic components can determine the stress concentration information of the workpiece. Magnetic memory detection technology can detect the stress state, defects, or damage of ferromagnetic workpieces and also achieve early diagnosis of their damage. The principle of magnetic memory detection and experimental testing are shown in Figure 1a [5] and Figure 1b, respectively.
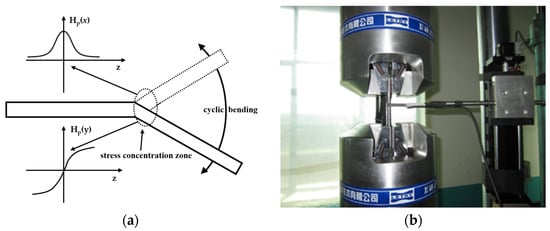
Figure 1.
(a) Principle of magnetic memory detection [5]. (b) Magnetic memory detection experimental testing.
3.1.2. Magnetic Memory Signal Processing
According to the principle of magnetic memory detection, the more severe the damage to the component, the greater the strength of the leakage magnetic field. This paper mainly studies the fatigue damage state by obtaining the values of the tangential component Hp(x) of the magnetic memory signal. By denoising, gradient processing, range processing, and peak extraction of magnetic memory signals, the stress concentration and damage degree of components at different positions and stages are determined and the evolution process of the entire fatigue process is characterized.
- Noise reduction
Magnetic memory signals are typical low-frequency weak spatial signals and the collected magnetic memory signals are interfered by surrounding environmental equipment and superimposed with high-frequency noise signals. The mathematical model of the signal can be represented by Equation (1):
where S(k)—magnetic memory signal with noise; f (k) —real signal; ε—noise level; e(k)—the variance is σ2 Gaussian white noise, which obeys N (0, σ2) distribution; N—signal length.
Due to the presence of interference noise, the collected magnetic memory signal curve exhibits many burrs, which affect the judgment of the degree of fatigue damage of components. The signal is denoised using the moving average method and the algorithm of this processing method is represented by Equation (2):
where yk represents the moving average value of the k-th (k = 1, 2, 3, …, N); xi represents original signal value; N indicates the sliding window range and depends on the specific signal. The comparison of signal curves after denoising using the moving average method is shown in Figure 2.

Figure 2.
Raw signal and denoised signal (the left side is the original signal; the right side is the processed signal).
- 2.
- Gradient processing
The gradient value of tangential components K reflects the trend of changes in tangential components and represents the severity of stress concentration. The gradient value is obtained from two points at a certain distance, as shown in Equation (3):
where Hp(x)i and Hp(x)i+n represent the angential component values of the magnetic memory signal at the i-th and i + n sampling points, respectively; Li and Li+n are the horizontal co-ordinate positions.
- 3.
- Range
The range is a characteristic parameter related to the size of the load, and the range of the tangential component value and the gradient value of the tangential component of the magnetic memory signal are as follows (4) and (5):
- 4.
- Peak extraction
The peak value of the tangential component represents the maximum value of the tangential component within a certain region, as shown in the Equation (6):
3.1.3. Characteristics of Magnetic Memory Detection Technology
The research on the fatigue damage process of ferromagnetic materials using magnetic memory detection technology has been very rich. This technology can achieve real-time tracking detection, dynamic recording of the fatigue damage process, and present all details of the fatigue failure process. In addition, the use of magnetic memory technology for testing does not require specialized magnetization and surface pretreatment of components, and the testing instrument is lightweight and convenient to use. Therefore, using magnetic memory detection technology to study the fatigue damage process of typical drilling tool materials has its unique advantages.
3.2. Samples and Equipment
The specimen material selected in the fatigue test based on magnetic memory detection is a typical drilling tool steel 42CrMo and its chemical composition and mechanical properties are shown in Table 1. The specimens were designed and processed according to international standards. The size and dimensions of the sample are shown in Figure 3, with a detection path of S (centerline), a surface incision width of 2 mm and a depth of 2 mm, and an effective testing distance of 20 mm.

Table 1.
Chemical composition and mechanical properties of test specimens.
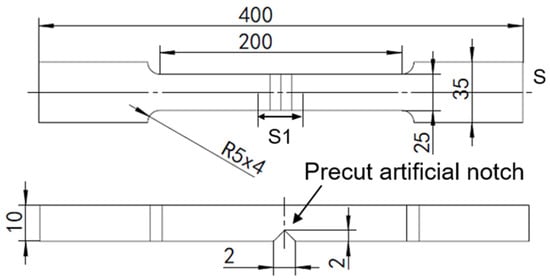
Figure 3.
Schematic diagram of sample geometry.
The equipment for material fatigue damage testing mainly includes a PLN-100 electro-hydraulic servo tension torsion fatigue testing machine and a magnetic memory detection system. The testing system is as follows:
- PLN-100 electro-hydraulic servo tension torsion fatigue testing machine.
The test uses a tension torsion fatigue testing machine to apply dynamic loads to the samples. This equipment can apply tensile, compression, and torsional loads to metal materials and small components and can carry out low-frequency fatigue, low cycle fatigue, fracture mechanics, and other tests.
- 2.
- A self-developed magnetic memory detection system.
According to the need of detection, the Giant Magneto Resistance (GMR) probe made in the laboratory is used to scan and detect the test piece with a certain number of loading cycles. The PLC device controls the scanning path and speed of the GMR probe. The DATAQ data collector converts the magnetic field distribution state collected by the GMR probe into voltage signal and transmits it to the computer.
3.3. Testing Load
3.3.1. Test Load under Tensile Dynamic Load Conditions
The loading of fatigue test force is generally based on tensile strength. In this experiment, 35% and 55% of the material’s tensile strength are taken as the peak values of the fatigue test loading load. Selecting 0.35σb (20.25 KN) and 0.55σb (31.81 KN), two types of high and low stress loads are applied.
3.3.2. Test Load under Pure Torsion Conditions
The yield strength determines the magnitude of the allowable tensile stress, which further determines the torque value in the torsion test. The relationship between the allowable tensile stress and the yield strength, as well as the allowable torsional stress, is as follows in Equations (7) and (8):
Taking the safety factor n as 1.6~2.5, the formula and calculation are as follows:
According to the strength condition of circular axis torsion:
Therefore, there are:
The torque value of the specimen loading should be controlled between 31 and 59 N·m.
3.4. Test Method
3.4.1. Uniaxial Dynamic Load Test Conditions
- The initial magnetic field of the specimen is measured before the test so that it can be compared with the loaded signal.
- The load types include sine wave load and sine wave torque, with sine wave load divided into two stress levels: high and low. Figure 4a,b show the time-varying curves of low and high loads of sine waves, respectively; Figure 5 shows the variation curve of sine wave torque load over time.
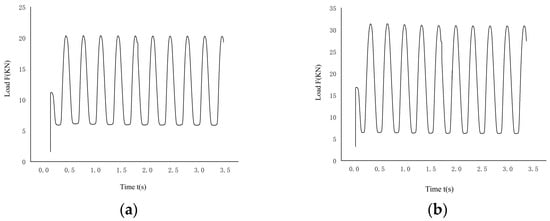 Figure 4. Curve of tensile dynamic load versus time. (a) Low stress load; (b) high stress load.
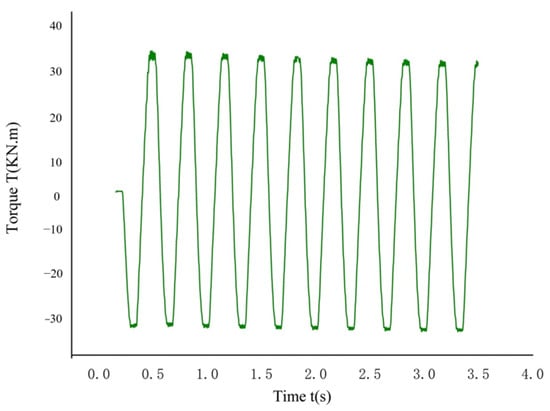 Figure 5. Dynamic torque vs. time curve.
 - The tensile load is 20.25 KN, 31.81 KN; the stress ratios R under low and high stress conditions are 0.3 and 0.2, respectively. Based on the calculation results of the loading torque value of the aforementioned sample, the torque load is taken as 35 KN·m.
- The sample is equipped with four detection channels and the tensile load is stopped for testing every 2000 cycles. The magnitude of the sine wave torque load is controlled by the peak-to-peak value, stopping and testing every 900 cycles.
3.4.2. Composite Dynamic Load Test Conditions
The composite dynamic load includes fatigue tests under three test conditions: tension torsion, compression torsion, and tension compression torsion. The load variation curves under these three conditions are shown in Figure 6 and Figure 7a,b.
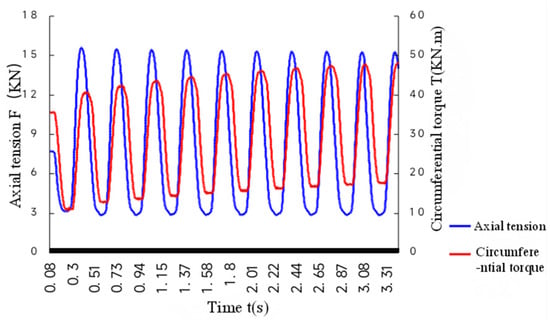
Figure 6.
Tension torsion load vs. time curve.
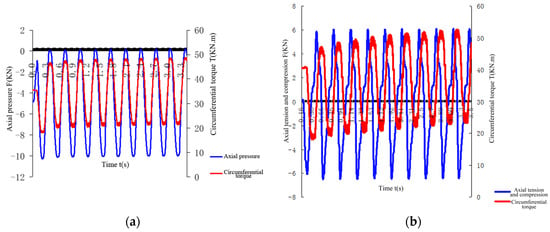
Figure 7.
(a) Changes in compressive and torsional loads over time (left). (b) Changes in tensile, compressive, and torsional loads over time (right).
- Tensile and torsional composite dynamic load fatigue test
Applying both tensile and torsional loads to the sample simultaneously, stopping and unloading after 2000 loading cycles, the magnetic memory signal value of the sample notch is detected, before continued loading and online detection of the magnetic memory signal, and the unloading and loading process is repeated for 2000 cycles until the sample fractures.
- 2.
- Compression torsion composite dynamic load fatigue test
Both axial pressure and circumferential torque are applied to the sample at the same time, with a pressure of −10 KN, a stress ratio of R = 0, and a torque value of 20–45 KN·m. The phase angles of the two loads are 0° and 45°, respectively. After 900 loading cycles, they are unloaded and the magnetic memory signal value detected online.
- 3.
- Tensile, compressive, and torsional composite dynamic load fatigue test
Axial tension, pressure, and circumferential torque are applied to the sample simultaneously, with a stress ratio of R = −1 and a torque value of 20–50 KN·m. The phase angle, number of cycles, and signal detection method of the load are the same as those in 2 of Section 3.4.2.
3.5. Results
3.5.1. Uniaxial Dynamic Load
- Tension
When the loading times are fixed, the magnetic memory signals obtained by scanning on four channels are similar, and only one channel of test data is selected for experimental analysis. Figure 8 and Figure 9 show the curves of the tangential component Hp(x) and its gradient K of the magnetic memory signal under low stress as a function of the number of loading cycles. From Figure 8a–d, it can be seen that there is a sudden change in the magnetic memory signal value at the notch of the sample. The change in Hp(x) can be divided into four stages. The first stage is the rapid growth during the initial loading stage, which is the fatigue softening stage. The second stage is stable within a certain range, which is a stable cycle stage. The third stage rapidly increases again, which is the propagation stage after crack initiation. The fourth stage suddenly decreases and is the unstable fracture stage. From the gradient value variation curve, it can be seen that there is a sudden change in the notch position K of the sample, which characterizes the severe stress concentration and fatigue damage, and also indicates that the Hp(x) change in this position is the most severe. In addition, with the increase in loading times, the gradient value increases, indicating that K can characterize the degree of fatigue damage of components, which can be used as a characteristic parameter to judge the degree of fatigue damage in tensile dynamic loading.
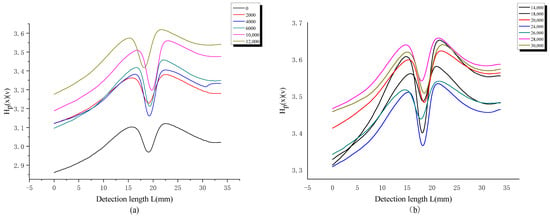
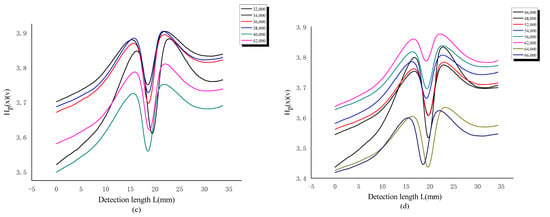
Figure 8.
Hp(x) variation curve at different cycle times (a) 0–12,000; (b) 14,000–30,000; (c) 32,000–42,000; (d) 46,000–66,000; under low stress.
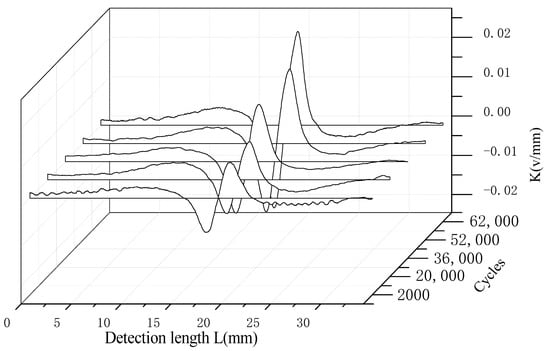
Figure 9.
Gradient value K curve of magnetic memory signal at different cycles under low stress.
In Figure 10a–c are respectively represented as the variation curves of the magnetic memory signal value with the detection length under high stress, with a number of cycles ranging from 2000 to 22,000. From the figure, it can be seen that the Hp(x) shows an overall growth trend but the growth rate varies at each stage. The fatigue process shown in the figure is consistent with the low stress loading situation. The variation pattern is that the initial stage gradually increases, the intermediate stage steadily increases, and decreases before fracture, which is roughly consistent with the fatigue process of the material. The process of rapid increase in signal value is not obvious, as the loading frequency of high stress is significantly lower than that of low stress, and the details of the fatigue failure process are not fully reflected. From Figure 11, it can be seen that the location of fatigue damage can be observed based on K and the degree of fatigue damage can also be determined based on the numerical value.
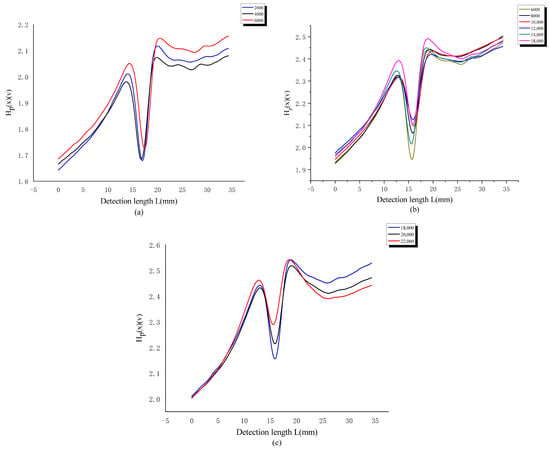
Figure 10.
Curve of magnetic memory signal value with detection length under high stress, with cycles ranging from 2000 to 22,000, (a) 2000–6000; (b) 6000–18,000; (c) 18,000–22,000.
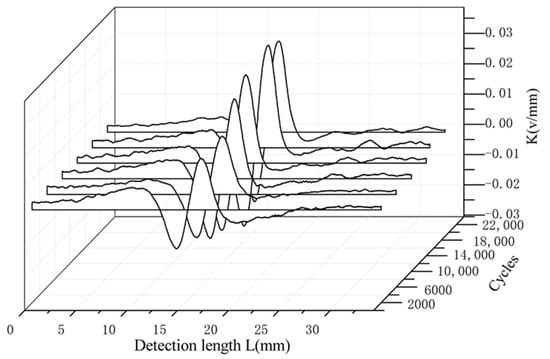
Figure 11.
Gradient value change curve of magnetic memory signal at different cycles under high stress.
Comparing and analyzing the characteristic parameters Hp(x)sub and Ksub under low stress and high stress loads (Figure 12), it can be seen that the size of the characteristic parameter values shows a strong correlation with the stress level. Therefore, Hp(x)sub and Ksub can characterize the stress process of the specimen.
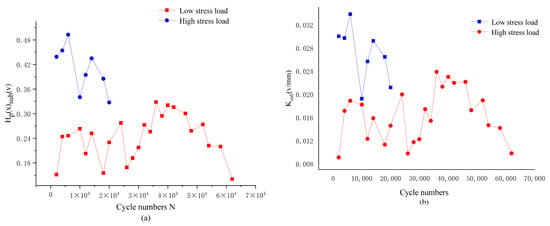
Figure 12.
Comparison curves of characteristic parameters Hp(x)sub (a) and Ksub (b) under different stress effects.
- 2.
- Torsion
From the magnetic memory signal curve of the dynamic torsional fatigue test (Figure 13), it can be seen that Hp(x) gradually stabilizes as the number of cycles increases. Compared to the tensile test, the amplitude of Hp(x) change detected in the pure torsion test is significantly reduced, which is related to the load type but can also characterize the stress concentration and fatigue damage location of the specimen.
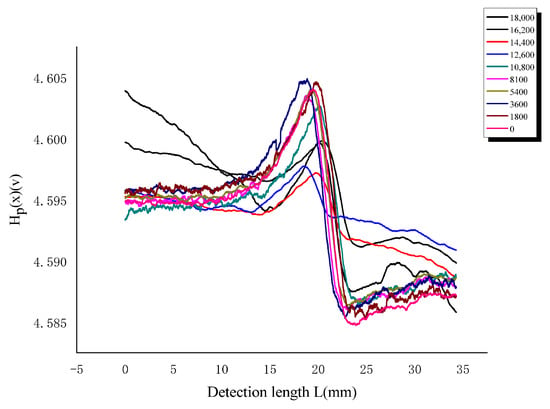
Figure 13.
Hp(x) variation curve under pure torsion conditions.
3.5.2. Composite Dynamic Load
- Tensile torsion
From the variation curve of Hp(x) and K with detection length under different cycles of tension torsion composite load (Figure 14a,b), it can be seen that Hp(x) gradually increases with the increase in loading times throughout the entire fatigue cycle, which is positively correlated with the degree of stress concentration. The gradient value in the area with severe intermediate stress concentration shows the maximum mutation, and different mutation values represent different degrees of damage to the material. Therefore, it can be concluded that the location where Hp(x) and K undergo sudden changes can be identified as a stress concentration or a location with severe fatigue damage. When Hp(x) and Kmax reach a certain value, it can be determined that the material has entered the fatigue failure stage.
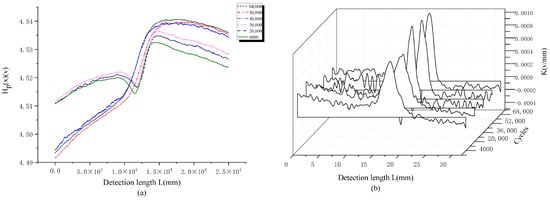
Figure 14.
The variation curve of Hp(x) (a) and K (b) with detection length under different cycles of tension torsion composite load.
In order to provide a more detailed analysis of the fatigue failure process of the specimen under tension torsion composite dynamic load, Hp(x) was segmented (as shown in Figure 15). From the figure, it can be seen that, throughout the entire fatigue cycle, the Hp(x) value gradually increases with the increase in loading times. After reaching a certain cycle, the waveform is relatively stable and enters a stable cycle stage. Afterwards, there is a sudden change and then it slowly increases until the signal value of fracture decreases. It has been proven that Hp(x) can characterize the fatigue damage process under tensile and torsional loads.
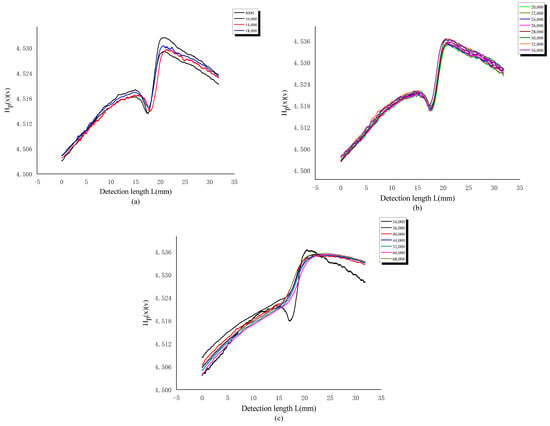
Figure 15.
Curve of Hp(x) variation with detection length under different cycles (a) 4000–18,000; (b) 20,000–34,000; (c) 34,000–68,000 of tension torsion load.
- 2.
- Compression torsion
The Hp(x) variation curve (Figure 16) under the combined dynamic loading conditions of compression and torsion shows that there is a sudden change in Hp(x) in the middle part. The fatigue damage location and degree of the sample under compression and torsion dynamic loading can be well reflected by the changes in Hp(x).
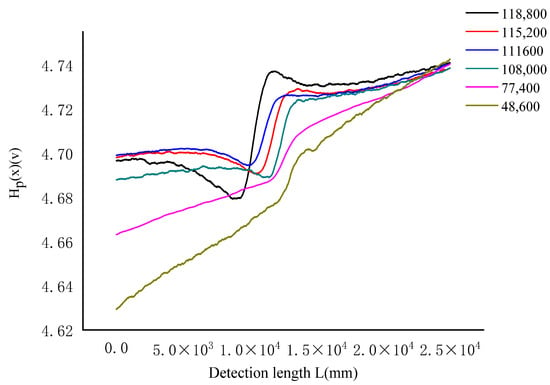
Figure 16.
Curve of Hp(x) with sampling points at different cycles under compression torsion load.
4. Analysis and Discussion
In order to better reveal the fatigue damage process of the test piece and explore the fatigue damage law, the tangential component and gradient value of the magnetic memory signal in the axial tensile testing under the uniaxial dynamic load and low stress condition are processed, and the change law of the magnetic memory signal characteristic quantities Hp(x)max and Kmax with the cycle N is obtained (as shown in Figure 17). In theory, the dynamic fatigue evolution process is divided into four stages: I initial stage, II damage development and crack initiation stage, III crack propagation, and IV unstable fracture stage. From Figure 17, it can be seen that the change process of Hp(x)max is consistent with the evolution law of the dynamic fatigue process. The variation trend of Hp(x)max in the local stress concentration area on the surface of the specimen is closely related to the changes in the internal microstructure of the material and is a macroscopic manifestation of microstructure changes. The rapid growth of internal damage and magnetic memory signals in the specimen is a reflection of the changes in the dislocation substructure of the material. Due to the susceptibility of magnetic materials to fatigue [22,23], the dislocation density increases sharply during the initial damage stage, resulting in a rapid increase in Hp(x)max, which belongs to the cyclic softening stage. When the material is determined, the dislocation energy inside the material can reach stability in a short period of time and enter the stable cycle stage in a short period of time. During the subsequent cyclic deformation process, the fatigue damage increases very slowly and the magnetic memory signal value shows small fluctuations.
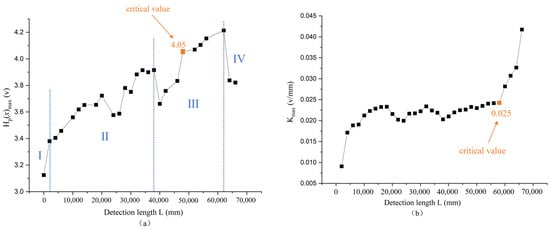
Figure 17.
Changes in Hp(x)max (a) and Kmax (b) with cyclic cycles under axial tensile low stress conditions.
Based on the scanning electron microscope images magnified by 1000 times under different stress effects (Figure 18), it is inferred that the fatigue fracture of the sample is brittle fracture. Dislocations increase with the increase in cyclic loading times and generate corresponding stress fields. Under the action of magnetoelastic coupling, the stress field interacts with the magnetic domain walls. Due to the ferromagnetic effect of loaded ferromagnetic materials, in the Earth’s magnetic field environment, the displacement of the magnetic domain changes 180 degrees and the direction of spontaneous magnetization changes at the same time, which offset the strain energy through magnetoelastic properties [24]. It is precisely because of the fluctuations in energy that the total energy presents a relatively stable state, which is manifested externally as fluctuations in the magnetic memory signal value, namely the stable cycle stage. After entering the stage of crack propagation and unstable fracture, the magnetoelastic performance increases sharply and the leakage magnetic field increases sharply. The external manifestation is a sharp increase in the tangential component value of the magnetic memory signal. As the crack continues to expand, the stress energy accumulated before the specimen fracture will continue to be released, resulting in a decrease in magnetoelastic performance, manifested as a decrease in the leakage magnetic field before unstable fracture. The average of the parameters of the tested samples showed that the critical values of Hp(x)max and Kmax for crack initiation caused by fatigue damage were stable at 4.05 V and 0.025 V/mm, respectively.
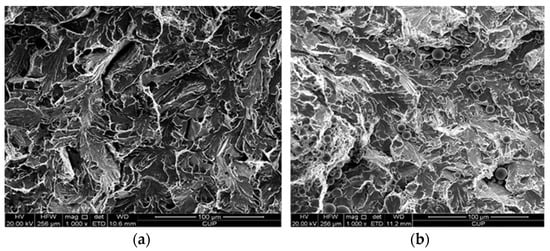
Figure 18.
Fracture morphology of fatigue specimens under low (a) and high (b) stress.
Similarly, the feature components of the magnetic memory signal were extracted and analyzed for the fatigue failure process of pure torsion (as shown in Figure 19). From the figure, it can be seen that the same changes in the magnetic memory signal as during axial tension occur; Hp(x)max is also divided into four stages throughout the entire fatigue process. The variation pattern of Hp(x)max can preliminarily determine the degree of stress concentration at the notch of the sample. The average of the parameters of the tested samples shows that the Hp(x)max of crack initiation caused by fatigue damage is stable at 4.61 V.
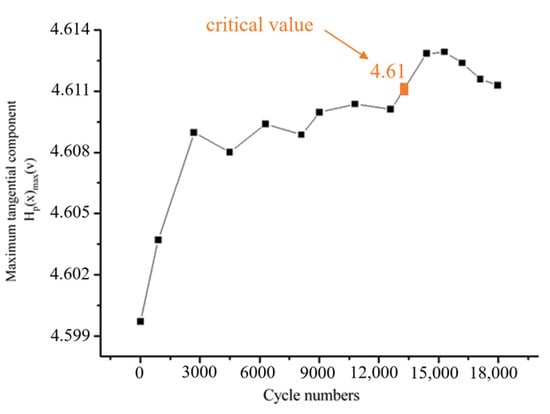
Figure 19.
The variation curve of Hp(x)max with cycle number under torsion conditions.
Extracting the characteristic parameters Hp(x)max and Kmax under composite dynamic load tension and torsion conditions (as shown in Figure 20), it can be seen from the figure that the tangential component of the leakage magnetic field Hp(x)max shows an overall upward trend with the increase in fatigue loading times. This is due to the increase in material stress concentration, which leads to an increase in the leakage magnetic field and Hp(x)max [25]. The high initial growth rate indicates a rapid change in stress concentration after loading, while the maximum value steadily increases after entering a stable cycle, which is determined by the characteristics of fatigue cycles. The increase in magnetic memory signal value is the result of an increase in fatigue loading times, reflecting an increase in stress concentration. After crack initiation, the Hp(x)max value undergoes a sudden change, the leakage magnetic field steadily increases, and the stress concentration reaches its maximum limit. The variation trend of Hp(x)max value during the tension torsion loading process is roughly consistent with the loading process but there are certain errors at each stage.
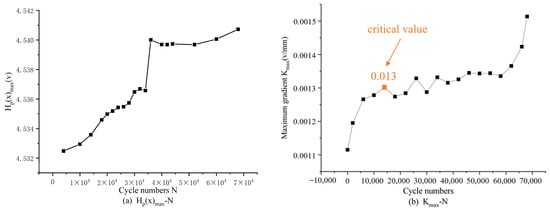
Figure 20.
The variation curve of Hp(x)max and Kmax with the number of cycles under tension and torsion conditions.
The critical value of Kmax for crack initiation caused by fatigue damage is stable at 0.0013 V/mm, and the variation trend of Kmax more accurately interprets the fatigue damage process of material specimens under tensile and torsional loads than Hp(x)max. Therefore, by observing the dynamic changes of materials through the changes in Hp(x)max and Kmax, the fatigue stage of the material can be detected as early as possible, which plays a certain warning role in avoiding oil field production accidents. When axial tension and circumferential torque are combined on the sample, the Kmax in the characteristic parameter of the magnetic memory signal can effectively characterize the entire fatigue process of the sample. The characteristic parameter Kmax of the magnetic memory signal under the combined dynamic load conditions of compression torsion and tension compression torsion is extracted (as shown in Figure 21).
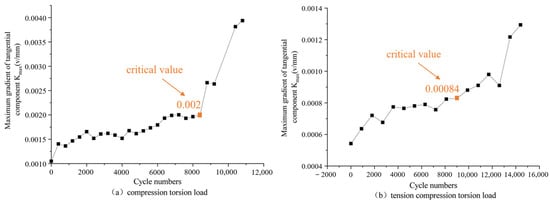
Figure 21.
Curve of Hp(x)max and Kmax with cycle number under composite dynamic load conditions.
From Figure 21a, it can be seen that the fatigue process can also be divided into four stages according to Kmax, which is basically consistent with the division of fatigue theory and reflects the process of material microstructure changes from a microscopic perspective. The loading of dynamic loads leads to changes in the substructure of fatigue dislocations, which, in turn, increases the dislocation density of the material and initiates strong domain wall pinning [20], resulting in an increase in Kmax. The critical value of Kmax for crack initiation caused by fatigue damage under compression and torsion conditions remains stable at 0.002 V/mm. During the loading process, after entering the stable cycle stage, the degree of fatigue damage and stress concentration intensifies slowly and continues until crack initiation. When further loading, the crack expands from micro to macro, producing a strong demagnetization effect. The leakage magnetic field at the crack increases rapidly and the Kmax value also increases rapidly. In the final fracture stage, the stress energy is suddenly released and the corresponding demagnetization field energy increases sharply, reaching the maximum value of Kmax. The variation pattern of characteristic parameters under the combined tensile, compressive, and torsional loads (Figure 21b) is similar to that under the combined tensile and torsional loads. The gradient average of the signal values of the tested samples indicates that the critical value of Kmax for crack initiation caused by fatigue damage is stable at 0.00084 V/mm. The critical values of Hp(x)max and Kmax for crack initiation caused by fatigue damage can provide reference for the development of judgment standards for drilling tool maintenance on site and have certain engineering significance.
Finally, in order to explore the impact of load on the detection results, a comparison of loading and unloading detection methods under tension and torsion conditions was designed. The signal values and parameter comparison results are shown in Figure 22 and Figure 23, respectively. From the figures, it can be seen that the change trend of characteristic parameters during the loading and unloading process is consistent but the values detected during the loading process are slightly larger than those detected during unloading; this is because the number of cycles during loading detection is greater than the number of cycles during unloading detection. In addition, there are fluctuations in the curve of the feature quantity of the magnetic memory signal during loading, and the signal is unstable. However, the waveform of the detected value under unloading is stable, with a small difference from the value during loading. The trend of the extracted feature parameter curve is completely consistent. Therefore, in subsequent experiments, online unloading detection can be used to simulate the stress-state detection of on-site drilling tools.
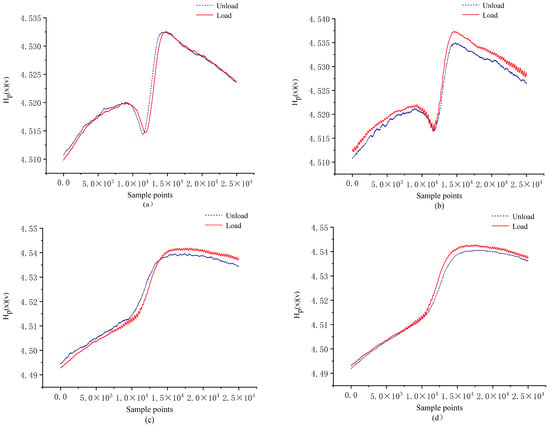
Figure 22.
Changes in Hp(x) with detection length during loading and unloading under different cycles (a) 14,000; (b) 28,000; (c) 36,000; (d) 52,000; of tension and torsion conditions.
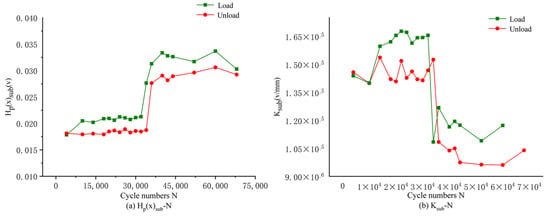
Figure 23.
Curve of Hp(x)sub and Ksub with number of cycles during loading and unloading under tension and torsion conditions.
5. Conclusions
This paper uses magnetic memory detection technology to conduct fatigue damage tests on a typical material 42CrMo under uniaxial dynamic load conditions and composite dynamic load conditions. By analyzing the variation curve of magnetic memory signal characteristics with detection length under different conditions, the characteristic values of magnetic memory signals that can characterize fatigue damage of the sample are extracted. Finally, a comparison of loading and unloading detection methods under tension and torsion conditions is designed and the following conclusions are drawn:
- (1)
- The magnetic memory signal of the specimen during loading can be roughly divided into four stages: initial stage, damage development and crack initiation stage, crack propagation stage, and unstable fracture stage. The tangential component Hp(x) and the gradient value K of the tangential component of the magnetic memory signal can both characterize the fatigue damage process of the component and serve as characteristic parameters to determine the degree of fatigue damage.
- (2)
- In the axial tensile testing under low stress conditions, the critical value points of Hp(x)max and Kmax caused by fatigue damage to crack initiation are, respectively, stable at 4.05 V and 0.025 V/mm. The Hp(x)max of crack initiation caused by fatigue damage under torsional conditions is stable at 4.61 V. The critical values of Kmax for fatigue damage leading to crack initiation under tension torsion, compression torsion, and tension compression torsion conditions are stable at 0.0013 V/mm, 0.002 V/mm, and 0.00084 V/mm, respectively. By observing the dynamic changes of materials through the changes in Hp(x)max and Kmax, the fatigue stage of the materials can be detected in a timely manner, which has a certain warning effect on oil field production accidents. It can provide reference for the on-site development of judgment standards for drilling tool maintenance and has certain engineering significance.
- (3)
- The unloading magnetic memory detection method may be more in line with the actual drilling process conditions compared to loading, so it is more suitable for on-site stress detection of drilling tools.
Author Contributions
Each of the authors contributed to performing the experiments and writing the paper. Y.H. is the main author of this manuscript and this work was conducted under the advisement of Q.X., W.H., X.X., X.W. and X.F. helped to conduct the experiments and data curation. All authors have read and agreed to the published version of the manuscript.
Funding
This research was funded by National Natural Science Foundation of China, grant number 42072341.
Data Availability Statement
Unable to obtain data due to privacy restrictions.
Acknowledgments
The authors would like to thank the Foundation of National Natural Science Foundation of China (Project Approval No. 42072341) for its financial support.
Conflicts of Interest
The authors declare no conflict of interest.
References
- Moyer, M.C.; Dale, B.A.; Kusenberger, F.N. An automated tool-joint inspection device for the drillstring. J. Pet. Technol. 1984, 36, 982–986. [Google Scholar] [CrossRef]
- Dubov, A.A. A study of metal properties using the method of magnetic memory. Met. Sci. Heat Treat. 1997, 39, 401–405. [Google Scholar] [CrossRef]
- Deng, Y.-G.; Liu, N.-N.; Huang, Y.-R.; Zhang, L.-H.; Hu, A.-Z.; Ming, C.-Z.; Mou, H.-L. Metal magnetic memory testing of high-strength connecting bolts. Drill. Prod. Technol. 2010, 33, 60. [Google Scholar]
- Cheng, C.; Fan, J.; Hu, Z.; Gao, W.; Wu, J.; Liu, S.; He, Y. Test on bending fatigue damage of full-size drill string. China Pet. Mach. 2017, 45, 38–41. [Google Scholar]
- Wu, J.; Fan, J.; Hu, Z.; Gao, W. Experimental study on coiled tubing cutting based on magnetic memory testing method. J. Saf. Sci. Technol. 2017, 13, 84–89. [Google Scholar]
- Jin, B.; Di, X.J.; Zhang, J.J.; Li, W. Metal magnetic memory signal feature of fatigue cracking propagation. J. Mater. Eng. 2014, 4, 102–106. [Google Scholar]
- He, Z.; Zhuo, J.; Ma, H.; Zou, Y.; Zhang, X. Fatigue experiment of steel structure weld based on metal magnetic memory. Sci. Technol. Eng. 2021, 21, 7762–7769. [Google Scholar]
- Song, Y.; Ding, Y.; Chen, C. Metal magnetic memory testing method and its application for static load and fatigue test in steel structure. Sci. Technol. Eng. 2016, 16, 125–128. [Google Scholar]
- Shen, G.; Hu, B.; Gao, G.; Li, Y. Investigation on MMM signal during loading. Int. J. Appl. Electromagn. Mech. 2010, 33, 1329–1334. [Google Scholar] [CrossRef]
- Leng, J.; Xu, M.; Xu, M.; Zhang, J. Magnetic field variation induced by cyclic bending stress. NDT E Int. 2009, 42, 410–414. [Google Scholar] [CrossRef]
- Leng, J.; Xu, M.; Zhao, S.; Zhang, J. Fatigue damage evaluation on ferromagnetic materials using magnetic memory method. In Proceedings of the 2009 International Conference on Measuring Technology and Mechatronics Automation, Zhangjiajie, China, 11–12 April 2009; IEEE: Piscataway, NJ, USA, 2009; Volume 2, pp. 784–786. [Google Scholar]
- Li, J.; Zhong, S.; Lv, G.; Wang, Z.; Tian, C. The variation of surface magnetic field induced by fatigue stress. J. Nondestruct. Eval. 2013, 32, 238–241. [Google Scholar] [CrossRef]
- Juraszek, J. Residual magnetic field for identification of damage in steel wire rope. Arch. Min. Sci. 2019, 64, 79–92. [Google Scholar]
- Qian, Z.; Liu, H.; Xu, J.; Ge, Y.; Cheng, H.; Huang, H. Visualization of Damage Degree on Remanufacturing Cores Based on Residual Magnetic Scanning Measurement. 2022. Available online: https://ssrn.com/abstract=4241491 (accessed on 7 June 2023).
- Shen, Z.; Chen, H.; Huang, H.; Chai, J.; Niu, Y.; Wang, D.; Zhang, Z. A method for quickly evaluating heat treatment quality of 35CrMo steel cylinder using magnetic properties. J. Magn. Magn. Mater. 2022, 543, 168622. [Google Scholar] [CrossRef]
- Pang, C.; Zhou, J.; Zhao, R.; Ma, H.; Zhou, Y. Research on internal force detection method of steel bar in elastic and yielding stage based on metal magnetic memory. Materials 2019, 12, 1167. [Google Scholar] [CrossRef] [PubMed]
- Su, S.; Ma, X.; Wang, W.; Yang, Y.; Hu, J. Quantitative evaluation of cumulative plastic damage for ferromagnetic steel under low cycle fatigue based on magnetic memory method. Strain 2021, 57, e12379. [Google Scholar] [CrossRef]
- Zhou, W.; Fan, J.C.; Liu, X.Y.; Liu, S.J. Metal magnetic memory testing of the drilling riser pipeline steel based on pulsating-impact-fatigue test. In Proceedings of the Materials Science Forum, Tokyo, Japan, 14–17 June 2009; Trans Tech Publications Ltd.: Zurich, Switzerland, 2020; Volume 975, pp. 15–24. [Google Scholar]
- Zhang, R.; Fan, J.; Su, X.; Wang, Z.; Ge, B. MMS Features of drilling tool joint sample in bending load. China Pet. Mach. 2013, 41, 24–27. [Google Scholar]
- Hu, Z.; Fan, J.; Wu, S.; Dai, H.; Liu, S. Characteristics of MMM testing of 35CrMo steel during fatigue loading. Metals 2018, 8, 119. [Google Scholar] [CrossRef]
- Hu, Z.; Fan, J.; Su, X.; Gao, F.; Xin, K. Early Inspection of Drill String Fatigue Damage Based on MMM Method. In Proceedings of the 19th World Conference on Non-Destructive Testing, Munich, Germany, 13–17 June 2016; pp. 121–127. [Google Scholar]
- Wang, Z.D.; Yao, K.; Deng, B.; Ding, K.Q. Theoretical studies of MMM technique on magnetic flux leakage signals. Ndt E Int. 2010, 43, 354–359. [Google Scholar] [CrossRef]
- Jiang, S.T.; Li, W. Magnetic Physics of the Condensed Matter; Science Press: Beijing, China, 2003; pp. 258–289. ISBN 7-03-011190-7. [Google Scholar]
- Ren, J.L.; Chen, C.; Liu, C.K. Experimental Research of Magnetic Memory Testing on The Effect of Stress on The Magnetic Domains. Non-Destr. Test. 2010, 32, 157–159. [Google Scholar] [CrossRef]
- Wang, W.; Yi, S.C.; Su, S.Q. Research on The Relationship Between Magnetic Flux Leakage Gradient by Metal Magnetic Memory Effect and Tensile Stress of Building Steel Specimen. J. Xi’an Univ. Arch. Tech. Nat. Sci. Ed. 2015, 47, 341–346. [Google Scholar]
Disclaimer/Publisher’s Note: The statements, opinions and data contained in all publications are solely those of the individual author(s) and contributor(s) and not of MDPI and/or the editor(s). MDPI and/or the editor(s) disclaim responsibility for any injury to people or property resulting from any ideas, methods, instructions or products referred to in the content. |
© 2023 by the authors. Licensee MDPI, Basel, Switzerland. This article is an open access article distributed under the terms and conditions of the Creative Commons Attribution (CC BY) license (https://creativecommons.org/licenses/by/4.0/).