Abstract
As the core component of a wind turbine, the performance of main shaft bearings directly affects the transmission efficiency and reliability of wind turbines. To the best of our knowledge, few reliability analyses of wind power bearings have been carried out with the consideration of mechanical properties. In this paper, a finite element model is established to calculate the subsurface stress of the main shaft bearing of a wind turbine, considering the structural thicknesses, the friction conditions, and the interference conditions of the bearing. The randomness of several factors is considered, including structural thicknesses, material parameters, friction coefficients and the interference of the bearing. Latin hypercube design is used to get sample points, and the bearing’s mechanical responses of these sample points are analyzed. Through the data of these sample points, a Kriging model is established. The comparison with the finite element results shows that the Kriging model greatly improves the computational efficiency of the finite element model, with a relative error result of only 3.80 × 10⁻⁵. The Monte Carlo simulation method is applied to analyze the reliability and sensitivity of the bearing’s subsurface stress. The results show that an increase in the inner ring thickness will improve the bearing’s stress reliability, while an increase in other parameters will reduce the bearing’s stress reliability, including outer ring thickness, roller length, material elastic modulus, density, bearing and stationary shaft interference, and friction coefficients. The research results provide a reasonable reference for optimizing the design of the structure, assembly and material selection for main shaft bearings of wind turbines.
1. Introduction
As one of the most commercially promising and dynamic renewable energy sources, wind energy has many advantages, such as a large space for the growth of installed units, a safe way of obtaining energy, and inexhaustibility [1]. As a typical large mechanical piece of equipment, the wind turbine usually operates under alternating loads and harsh natural environments, such that its components are liable to fatigue failure during their 20-year lifetime [2]. As the core component of wind turbines, the performance of main shaft bearings directly affects the transmission efficiency and reliability of wind turbine systems. Recently, accidents related to the quality of the components of main bearings have occurred frequently, causing huge economic losses and affecting the safety of employees in the wind power industry [3]. Therefore, it is of great theoretical and engineering significance to study the structural reliability of the main shaft bearings of wind turbines.
The commonly used reliability analysis methods for wind turbines mainly include data-based statistical analysis and load-based stress–strength interference theory. Tavner et al. [4] extracted the average failure rate and reliability growth curve of wind turbines maintained in Germany and Denmark from the fault data of WINDSTATS and compared the technology advancements of wind turbines in the two countries, taking into account regional weather. Spinato et al. [5] analyzed the reliability characteristics of different types of wind turbine components by comparing the reliability data of more than 6000 onshore wind turbines in Denmark and Germany over a decade. Ma et al. [6] compared the failure rates and maintenance times of wind turbines with different capacities in different countries. The results showed that the positions of wind farms and the wind type characteristics had an impact on the failure rate of wind turbines. Based on the operation data of wind farms in Germany and Denmark, Kusiak et al. [7] analyzed the reliabilities of each component of the wind turbines, and discussed the feasibility of reliability prediction of large-scale wind turbines. Sheng et al. [8] discussed the basic principles of wind turbine reliability and the current situation of the industry and summarized a number of potential opportunities to improve the reliability of wind turbines based on existing data or maintenance records collected at a typical wind farm.
In general, reliability data of wind turbines are usually obtained from vast amounts of experiments and statistical analyses. However, as a kind of large, expensive and long-life equipment, wind turbines are faced with the dilemma of insufficient statistical data. There are few reliability analyses of wind turbine bearings based on mechanical properties analysis. Studies have shown that subsurface stress caused by rolling contact is the main factor in the formation of fatigue cracks in wind turbine bearings [9,10]. In recent years, advances in finite element technology and computing capabilities have enabled engineers to conduct more detailed numerical simulations of the complex geometries and loading conditions of bearings [11]. Chudzik et al. [12] determined the maximum equivalent subsurface stress distribution and the depth required for fatigue life calculation by the finite element method, and compared the results with the SKF catalog method. The results showed that fatigue life was reduced by the axial load of cylindrical roller bearings and the roller tilt associated with their operation. Mason et al. [11] analyzed the subsurface stress of the tapered roller bearing by the finite element method and proposed to develop a tool, using finite element analysis, that can be utilized to optimize complex raceway crown geometries for severe applications. Deng et al. [13] carried out the finite element simulation of bearing subsurface cracks by ABAQUS. Considering the influence of the shape, depth and size of cracks on the above results, the calculation method of the stress intensity factor and the crack growth rate was studied. Wang et al. [14] calculated the contact deformation and subsurface stress of the bearing raceway accurately and efficiently by the finite element method and sub-model technique. The results show that the finite element method using sub-model technology can accurately and efficiently calculate the stress distribution in the subsurface of bearings by considering the actual contact deformation of the bearing raceway. Then, the fatigue life of composite ceramic ball bearing (HCBB) could be predicted by Ioannides and Harris (IH) theory [15]. Xu et al. completed a fatigue life analysis of the yaw bearing for six wind turbine concepts applying the damage equivalent loads to an FE model of the yaw bearing to calculate fatigue life and compared it to a code-based approach [16]. However, the above research did not analyze the subsurface stress characteristics and reliability of large-scale wind turbine bearings in an assembled state.
The research object of this article is a main shaft bearing of a 2.5 MW wind turbine which is used to support the rotation of the hub and rotary shaft of the wind turbine, and is the core support component of the wind power equipment. A model of the wind turbine main shaft bearing is established in this paper to analyze the stress distribution of the bearing subsurface, and the randomness of the bearing in the process of machining and assembly is considered. The Latin hypercube sampling method is used to obtain the design variable samples, and an Ansys workbench is used to calculate the subsurface orthogonal shear stress of the samples to construct the Kriging model. The Monte Carlo simulation method is used to calculate the failure probability and analyze the reliability sensitivity. The research results of this article provide a theoretical basis for improving the reliability of the main shaft bearings of wind turbines.
2. Subsurface Stress Analysis of Wind Turbine Main Shaft Bearing
The 2.5 MW wind generator adopts a two-point support design, combining a double-row tapered roller bearing and a cylindrical roller bearing, which can enhance the carrying capacity by increasing the distance between the bearings. As shown in Figure 1, the main part of the wind generator is composed of a double-row tapered roller bearing, a cylindrical roller bearing, a stationary shaft, and a rotating shaft. Because there is no preloading force on the cylindrical roller bearing, a single roller may not rotate during the bearing operation, resulting in sliding, which will produce a very large peak load and significantly increase the stress in the subsurface, thus affecting the life of bearings. Therefore, it is of great significance to study the stress state of bearings.
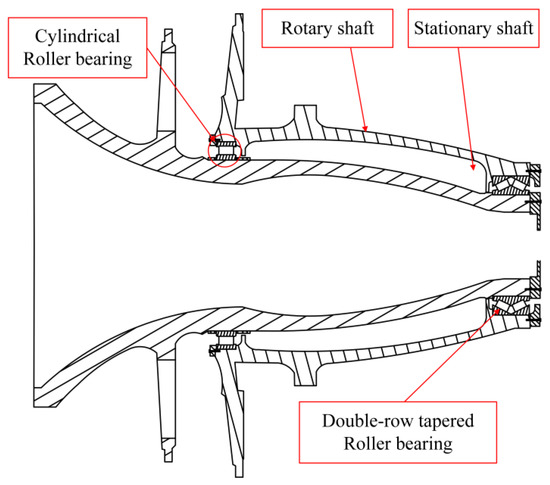
Figure 1.
Two-point support wind turbine.
2.1. Stress Analysis of Bearing Subsurface Based on Hertz Contact Theory
The classical Hertz line contact theory is usually used to solve the contact stress and maximum orthogonal shear stress of bearings. The contact diagram is shown in Figure 2. The radii of contact bodies I, II are R1 and R2, respectively. b is the half width of the contact area, and the contact length is l.
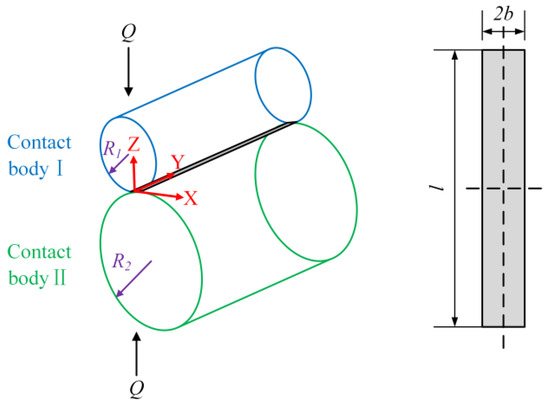
Figure 2.
Hertz line contact schematic.
Hertz contact theory is applicable to ideal linear contact conditions, that is, contact body I and II are regular cylinders of equal length [17], and the stress distribution in the contact area has a semi-elliptic shape, as shown in Figure 3.
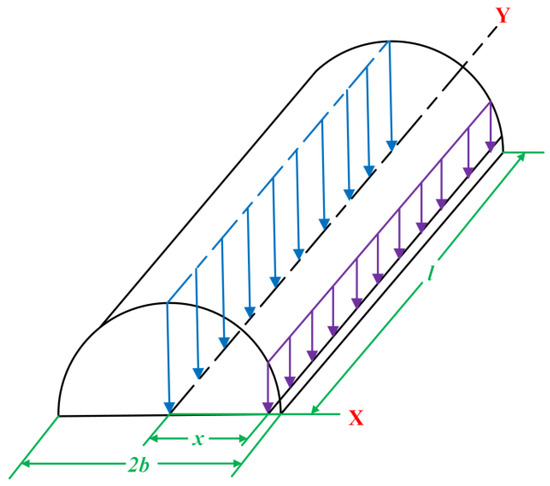
Figure 3.
Compressive stress distribution of a semi-elliptic cylindrical shape with ideal linear contact.
Hertz line contact maximum contact stress Pmax can be calculated as [18]:
where Q is normal Load, l is contact length, and b is the half width.
For steel bearings, the half width of the contact surface can be approximated as [19]:
Palmgren [20] proposed the contact deformation as:
The curvature sum ∑ρ of the cylindrical roller bearing is [21]:
where ρ is the curvature sum of the cylindrical roller bearing and α is the contact angle.
In Equation (4), R represents the radius of the roller contour, r represents the curvature of the raceway groove, the contact angle α is 0°, the diameter of the pitch circle dm = 0.5(di + do), where di and do are the bottom diameter of inner and outer ring groove, respectively.
Palmgren and Lundberg [22] described the relationship among the ratio of short half axis b to long half axis a in the contact region, the orthogonal shear stress τxz and its occurrence depth z as:
where z is the coordinate in the depth direction Z, x is the coordinate in the rolling direction X, ϑ and ϕ are the auxiliary angles, and the relationship between ϑ and ϕ can be described as:
The relationship between ϑ and ϕ is defined as follows:
where t is the auxiliary parameter satisfying the following relation:
By combining Equations (6)–(12) [23], the relation curves of τ0/Pmax, z/b and b/a can be deduced:
where τ0 is the amplitude of the maximum orthogonal shear stress and z is the coordinate of the position of the maximum orthogonal shear stress in the depth direction Z.
The study by Hertz theory shows that the maximum orthogonal shear stress τmax appears on subsurface of the contact area, and orthogonal shear stress is symmetrically distributed about the center of contact [19].
For roller bearings, the ratio b/a in the contact area is zero. According to Figure 4, the depth value Z0 of τmax is approximately 0.5b, and the magnitude τ0 of τmax is about 0.25 Pmax.
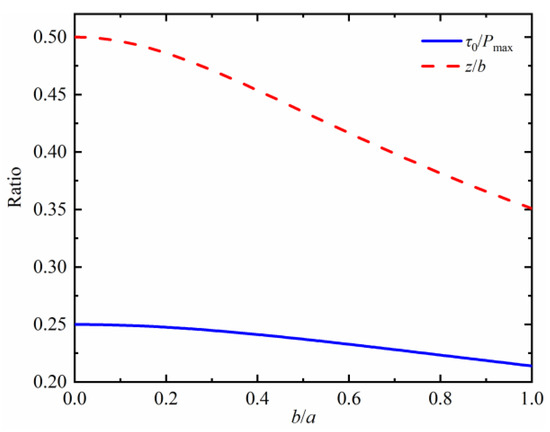
Figure 4.
The relation curves of τ0/Pmax, z/b and b/a under normal load.
The detailed discussion of a method for calculating the orthogonal shear stress distribution on the subsurface is given in [24,25].
The pressure distribution P(x) resulting from linear contact is semi-elliptic:
The analytic coordinate range is x ∈ (−∞, ∞) and z ∈ (−∞, 0).
At any (x,z) position, the stress can be expressed in terms of m and n, and is defined as:
where m and n are usually defined as , and then the following equations can be obtained:
where σxx is the principal stress in the X direction, σzz is the principal stress in the Z direction, and τxz is the orthogonal shear stress in the XZ plane. Thus, the principal stress in the Y direction is σyy = ν(σxx + σzz), where ν is the elastic modulus of the material.
The von Mises stress can be calculated as:
2.2. Stress Analysis of Bearing Subsurface Based on Finite Element Technology
In Section 2.1, the analytic method to solve the subsurface stress distribution of ideal line contact is systematically expounded. Although the analytic method is mature, efficient and convenient in calculation, it assumes two cylinders of equal length, and ignores the influence of assembly factors between contact bodies. In practical scenarios, the lengths of inner and outer rings and rollers are not the same. Meanwhile, the assembly relationship of bearings is complex. Therefore, it is necessary to develop a more practical calculation model to consider the impact of these factors on subsurface stress for main shaft bearings.
In this section, a finite element modeling method, considering the length of each part of the bearing, the friction between the contact bodies and the assembly factors, is proposed to analyze the subsurface stress of the bearing.
The development of the finite element model is based on the dimensions of the main shaft bearing of a 2.5 MW wind turbine (WT) in actual use, as shown in Figure 5a. In order to study the subsurface stress in the loading area of the inner raceway of the main shaft bearing, only the part of loading area is modeled. The model mainly describes the circumferential two-dimensional cross-section of the bearing and rotary shaft, as shown in Figure 5b. The sector angle of the geometry is selected as the angle covering a roller, which is symmetrically distributed along the center of the roller, equal to 360°/n, where n is the number of rollers.

Figure 5.
(a) Assembly drawing of the cylindrical roller bearing and the stationary shaft. (b) Model boundary conditions and load settings.
Regarding contacts, frictional contact is defined for the roller–raceway contact, with a coefficient of 0.1, and inner ring-stationary shaft contact is frictional too, with a coefficient of 0.15 concerning an interference fit between the bearing’s inner ring and the stationary shaft.
In practice, the stationary shaft of the wind generator is connected to the frame, so the Z-direction degree of freedom (DOF) of the bottom surface of the stationary shaft is restricted. By simulating the cage of bearing, the X-direction DOF of the side of the roller is restricted. The frictionless support is applied on all the sectioned surfaces, and the normal force Q is applied on the outer surface of the outer ring. The thickness of each part of the model is defined in an Ansys Workbench.
3. Reliability Sensitivity Analysis of Bearing Subsurface Stress
3.1. Determination of Random Variables
Due to the influence of manufacturing, machining and assembly processes, the structural and material parameters of bearings have random uncertainties which lead to large analysis errors [26].
In current reliability studies of bearings’ structural parameters, the parameters such as inner and outer ring raceway diameters, inner and outer ring raceway curvature radius and balls or rollers diameters are usually set as random variables, but the influences of bearing thickness parameters, friction coefficients and interferences on the results are rarely considered. Based on the proposed finite element model, bearing reliability and sensitivity analysis are carried out in this paper. The thickness of the bearing’s outer ring To, the roller length L, the thickness of the bearing’s inner ring Ti, the elastic modulus of the material Em, the material density ρ, the interference between the bearing inner ring and the stationary shaft I, the friction coefficient μo between rollers and outer raceway and the friction coefficient μi between rollers and inner raceway are selected as random variables (Figure 6). The final parameter design variable is determined as X = [To, L, Ti, Em, ρ, I, μo, μi]T.

Figure 6.
Structural random variables of the model.
3.2. Determination of Limit State Function
According to the ISO 281 [27] specification and the domestic wind power industry standards, the maximum contact stress of wind turbine main bearings under fatigue condition should be less than 1500 Mpa. Meanwhile, the maximum orthogonal shear stress in the subsurface of the cylindrical roller bearing under the fatigue condition should meet the requirement τmax = 0.25Pmax < 375 Mpa based on Palmgren and Lundberg theory, as shown in Figure 4. The results of finite element calculation show that the maximum orthogonal shear stress of the bearing subsurface of the inner ring is always greater than that of the outer ring under the normal force Q. Hence, it can be considered that the fatigue failure of the bearing occurs first in the inner ring [19].
According to the above research, considering the influence of random factors on bearings’ structural and material parameters, using the finite element analysis model, considering whether the subsurface stress of the inner ring of the bearing exceeds the specified value as the discriminant condition, the limit state function can be established as:
where X = [To, L, Ti, Em, ρ, I, μo, μi]T, τ(X) is the orthogonal shear stress response value, and τmax is the maximum orthogonal shear stress of 375 MPa under fatigue condition.
3.3. Kriging Model
Using response surface models to simulate the real complex configuration can greatly reduce the computational burden and improve computational efficiency, which has very important research significance and application value [26]. Among the response surface models, the Kriging model can accurately approximate the finite element model with fewer training points, which has obvious advantages in dealing with complex nonlinear problems [28,29].
The Kriging model [30] can be approximately expressed as the sum of a polynomial and a random distribution function:
where y(x) represents the estimated value of the Kriging model for the structural response; F(β,x) is a linear regression model; and f(x) is a polynomial function of the basic variable x, which reflects the global approximation of the model. β is a polynomial regression coefficient matrix; and z(x) is regarded as a basic process of random distribution, which is the main basis for distinguishing Kriging from classical response surface methodology. And z(x) is normally distributed, with a mean value μ = 0, variance of σ2, and a covariance as follows:
where xi and xj are any two sample points; and R(θ, xi, xj) is a correlation function with parameter θ, which plays a leading role in determining the accuracy of the model. In practical application process, a Gaussian function can usually get better calculation results, which can be expressed as Equation (25):
xik and xjk are the kth elements of the sample point respectively, and θk is the parameter to be estimated.
The response value of a given point is Y = [y1, y2,…ym], the linear combination vector c is used to estimate the response value of the unknown point x, which can be expressed as:
The residual value of the estimated structural response can be obtained from the above equation:
In order for this process to be unbiased, the mean of the above equation has to be equal to zero:
The variance of the estimated value of structural response can be solved as:
where R is the correlation function matrix; and r is the correlation vector.
To ensure the accuracy of the model, ϕ(x) should be minimized, thus solving the value of the linear combination vector c can be transformed into the following optimization problem.
To solve Equation (30), the predicted value of the Kriging model is:
In Equation (31), β* and σ2 can be estimated by using maximum likelihood estimation [31,32,33].
With the above optimization problems solved, the estimated value of parameter θk can be obtained, and the Kriging model can be established.
3.4. Reliability Sensitivity Analysis
Monte Carlo simulation (MCS) is the most direct numerical simulation method [34]. The MCS method is applied in this paper for reliability calculation. The basic processes of MC to calculate structural reliability are as follows. The joint probability density function fX(x) = fX(x1, x2,…, xn) is set up, then a large number of random samples Xj(j = 1, 2,…, NMC) are generated. The limit state function value g(Xj) is calculated, and the sample number Nf of g(Xj) ≤ 0 is counted, then the estimated failure probability is:
The probability of reliability Pr can be obtained by integrating the probability density function [35] of the random variables:
The failure domain indicator function is:
The reliability sensitivity is defined as the partial derivative of the failure probability Pf with respect to the distribution parameters of the input variable. For the independent normal distribution random variables, the reliability sensitivity of the mean and standard deviation can be expressed as:
The sensitivity coefficients S of mean μxi and standard deviation σxi obtained by dimensionless treatment are [36]:
The Kriging model is used to conduct the reliability sensitivity analysis, and the calculation process is shown in Figure 7.
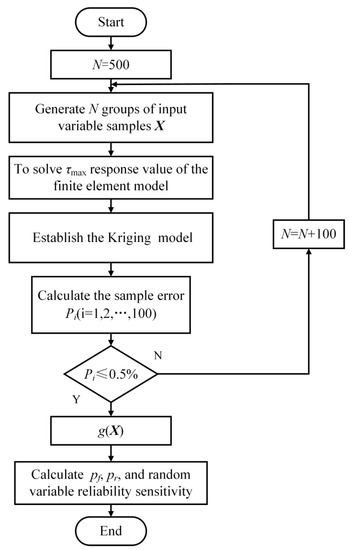
Figure 7.
Flow chart of stress reliability analysis of bearing subsurface.
The process of subsurface stress reliability analysis of the bearing is as follow:
Step 1: Determine the initial sample size N = 500.
Step 2: Generate variable samples X with size of N using the Latin hypercube design (LHD) method.
Step 3: Input the samples X into the finite element model to obtain the response value of the maximum orthogonal shear stress τmax of the bearing’s inner ring under the normal force Q.
Step 4: Establish the Kriging model by using the (N-100) groups’ variable samples and corresponding finite element response values. Set the remaining 100 groups’ variable samples and the corresponding response values as the test data.
Step 5: Solve the relative error Pi between the finite element response value of the 100 groups of test data and the predicted value of the Kriging model.
5.1 If Pi ≤ 0.5%, it is considered that the accuracy of the Kriging model meets the requirements, and the model can be used to calculate the reliability.
5.2 If Pi > 0.5%, it is considered that the accuracy of the Kriging model does not meet the requirements. Add 100 groups of sample points and return to Step 2 to update Kriging model until the accuracy of the model meets the requirements
Step 6: According to the limit state function established in Section 3.2, the reliability can be calculated by using the Kriging model with accuracy and the Monte Carlo simulation method. The failure probability Pf, reliability Pr and random variable reliability sensitivity can be obtained.
4. Numerical Example
4.1. Material and Method
The wind turbine bearing studied in this paper is a cylindrical roller bearing, and its structural parameters are shown in Figure 8. The assembly of the bearing and the shafts is interference fit. The material of the main shafts is iron QT400-18AL and the material of the bearing is G20CrNi4. In the elastic deformation range, the isotropic linear elastic material model is adopted. The mechanical properties of the materials are shown in Table 1. The subsurface stress analysis of the main shaft bearing is investigated in Section 4.2. Furthermore, the reliability sensitivity investigation for the main shaft bearing is carried out in Section 4.3.
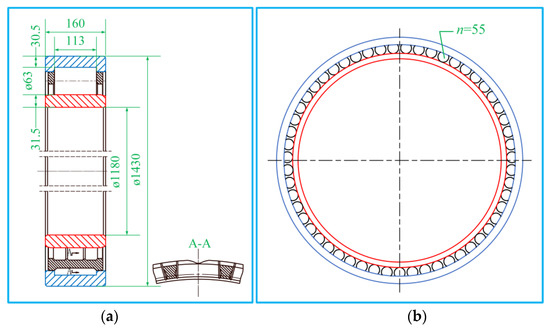
Figure 8.
(a) Bearing profile plane. (b) Bearing frontal plane.

Table 1.
Model material parameters.
4.2. Subsurface Stress Analysis
The finite element analysis model is constructed according to the method in Section 2.2, specific settings of the model are shown in Figure 9, and the analysis of subsurface stress are illustrated in Figure 10 and Figure 11.

Figure 9.
Bearing stress analysis model established by ANSYS.
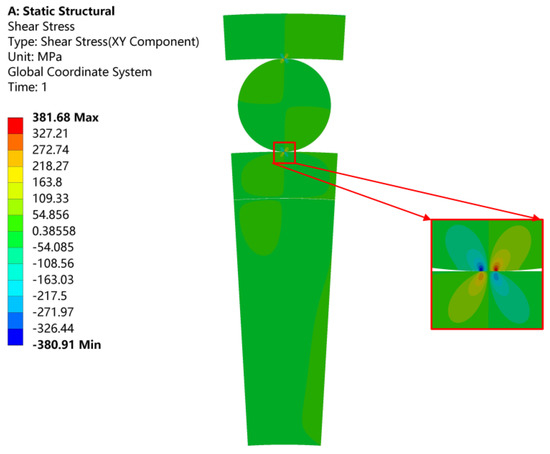
Figure 10.
Orthogonal shear−stress distribution.
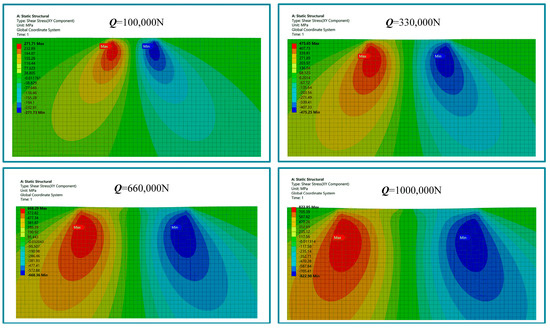
Figure 11.
Orthogonal shear−stress distribution with the normal force changes.
The finite element analysis results show that the orthogonal shear stress on the bearing’s inner ring is symmetrically distributed in the shape of butterfly wings, and the maximum orthogonal shear stress τmax occurs at a certain depth in the subsurface of the inner ring, where the depth Z0 is about 0.5b. With the increase in the external normal force Q, the maximum orthogonal shear stress amplitude on the bearing inner ring increases, its position tends to be far away from the symmetry center and occurs at a deeper depth, which is the same as the trend of the classical theoretical solution.
In order to verify the correctness of the finite element model and the influence of mesh size, considering the application range of Hertz contact theory, an ideal linear contact finite element model is established to calculate the contact stress on the inner ring’s surface and the maximum orthogonal shear stress on the subsurface which is affected by the normal force (the lengths of contact bodies are equal, the friction coefficients are 0 and bearing interference is 0).
Figure 12a,b show that mesh size has a great influence on the accuracy of the calculation results. It can be seen that with the refinement of the mesh, the finite element calculation values are gradually close to the theoretical results, and the mesh size has a greater influence on the subsurface maximum orthogonal shear stress. It is found that τmax occurs at mesh points and, when the mesh size is large, the amplitude and position change in τmax is not sensitive. The maximum error of Pmax and τmax is 2.39% and 2.88%, respectively, when the mesh of the contact area is up to 0.1 mm. The comparison of the solution time and relative error for the four types of grids is shown in Table 2. The compressive stress distribution on the contact surface of the bearing’s inner ring is extracted and enlarged from Figure 12a when the normal force Q = 350 kN, as shown in Figure 13a. For ideal linear contact, the maximum orthogonal shear stress occurs at x = ±0.9b, z = 0.5b [32]. The orthogonal shear stress is extracted along the path in the Z direction, x = 0.9b, as shown in Figure 13b. By comparison with the theoretical solution of Hertz linear contact, the errors of contact stress amplitude Pmax, contact width b, maximum orthogonal shear stress τmax and its occurrence position Z0 are very small, which verifies the accuracy of the finite element model.
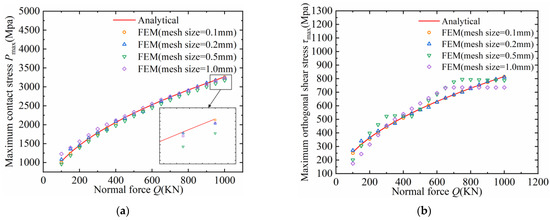
Figure 12.
(a) Relationship between contact stress and mesh size. (b) Relationship between subsurface maximum orthogonal shear stress and mesh size.

Table 2.
Quantitative comparison of efficiency.
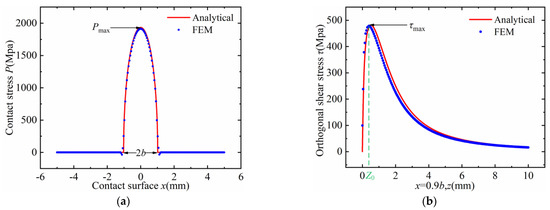
Figure 13.
(a) Distribution of contact stress. (b) Subsurface orthogonal shear stress varying with depth.
The above contents simulate the ideal line contact. On the basis of the verified model, the true thickness of each component of the model is given in an ANSYS workbench, that is, the thickness of the inner and outer rings of the bearing is 160 mm, the length of the rollers is 113 mm, the thickness of the stationary shaft is 200 mm and the interference between the inner ring and the stationary shaft is 0.153 mm. The settings of the friction coefficient are shown in Figure 5b. As shown in Figure 14, three paths are established in the finite element model. Path A is located on the contact surface of the bearing’s inner ring and roller, path B is the path through τmax along the rolling direction and path C passes through τmax and points in the Z direction.

Figure 14.
Schematic diagram of selective paths.
Based on the finite element model, by applying an equidistant increasing normal force Q, contact compressive stress on path A and the orthogonal shear stress on path B and C are extracted; the changes of contact stress and subsurface orthogonal shear stress are shown in Figure 15.
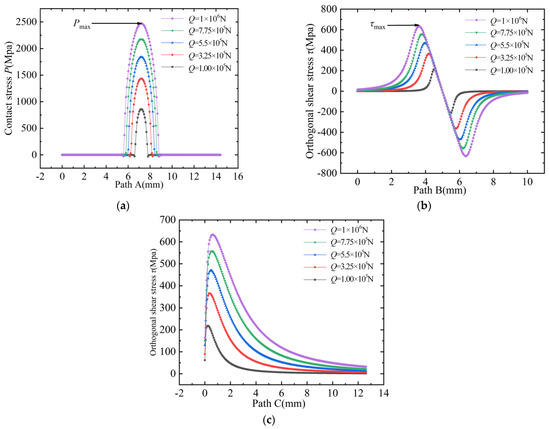
Figure 15.
(a) Contact stresses on path A with different normal forces. (b) Orthogonal shear stresses on path B with different normal forces. (c) Orthogonal shear stresses on path C with different normal forces.
In the actual thickness model, the maximum contact stress Pmax and the maximum orthogonal shear stress τmax are both slightly less than the classical theoretical solution. With the increase in the external normal force, the contact stress and the contact half width on the inner ring increase, the amplitude of the maximum orthogonal shear stress increases accordingly, and the position of the maximum orthogonal shear stress occurs in the deeper subsurface layer, which indicates that the finite element solution results have the same trend as the classical theoretical solution.
4.3. Reliability Sensitivity Investigation
The random variables selected in this paper are shown in Table 3. Under the conditions of different interferences, I = 0.12 mm, 0.153 mm and 0.186 mm, the results can be obtained by changing the value of the normal force Q and using the Ansys workbench to calculate response values of the random variables obtained by the LHD (Latin hypercube design) method.

Table 3.
Distribution of random variables.
Figure 16a shows the Kriging model prediction and finite element calculation results under the condition of Q = 350 kN and I = 0.153 mm. Figure 16b shows the average relative error between the Kriging model and FEM. It can be seen that the average relative error of the Kriging model is approximately 3.80 × 10⁻⁵. The comparison of the computational efficiency between the two models is shown in Table 4.
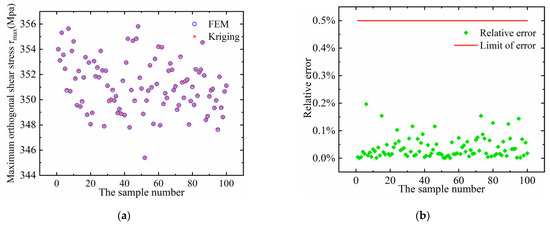
Figure 16.
(a) Comparison of Kriging model and finite element calculation. (b) Relative error between Kriging model prediction and finite element calculation.

Table 4.
Comparison of the efficiency and accuracy of Kriging and FEM.
The reliability and sensitivity can be solved according to the method in Section 3.4, and the curve of reliability can be fitted by changing the external normal force Q.
As shown in Figure 17, when the magnitude of interference is equal to 0.153 mm and the normal force is less than 331 kN, the bearing’s stress reliability is approximately 1, indicating that the subsurface stress of the bearing meets the requirements, and the possibility of premature failure is very small. When the normal force exceeds 331 kN, the reliability begins to decline and the risk of bearing failure increases. When the normal contact force exceeds 365 kN, the reliability is zero.
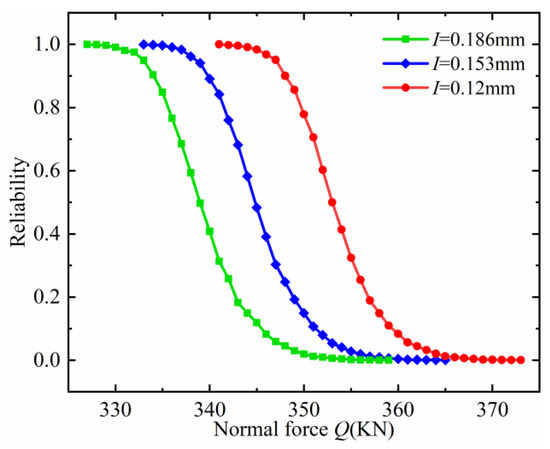
Figure 17.
Reliability curve.
Reliability sensitivity analysis shows the influence of random variables on bearing stress reliability, as shown in Figure 18.

Figure 18.
(a) Mean reliability sensitivity analysis. (b) Standard deviation sensitivity analysis.
From Figure 18, it can be seen that the increase in outer ring thickness, roller length, material elastic modulus, density, bearing and stationary shaft interference, roller and inner and outer ring friction coefficient will reduce the bearing’s stress reliability, while the increase in inner ring thickness will improve the bearing’s stress reliability. The research results provide a reasonable reference for the structure, assembly and material optimization design of wind turbine main shaft bearings.
5. Conclusions
In this paper, the stress state of wind turbine main shaft bearing subsurface is analyzed by the finite element method. Considering the randomness of the bearing structure, material and assembly state, and focusing on the influence of the thickness of the bearing structure on the stress state, the proposed model is more consistent with the real situation. By establishing a high-precision Kriging model, and combining it with a Monte Carlo simulation method, its reliability and sensitivity are analyzed.
The main contribution of this paper can be summarized as follows:
In this paper, the Ansys workbench 2D analysis method was used to make the mesh size become accurate and reduce the amount of calculation, which shortens the calculation time in the process of reliability analysis. At the same time, the thickness of the structure can be given from 2D analysis, and the influence of thickness parameters on the results can be considered.
The results show that the thickness of the bearing’s inner ring has the greatest influence on the subsurface maximum orthogonal shear stress. Therefore, it is of great significance to improve the process conditions and reduce the lower limit of tolerance of inner ring thickness during machining for enhancing the fatigue life of bearings and the reliability of wind power equipment. In the design process of cylindrical roller bearings, the thickness of the bearing’s inner ring can also be appropriately increased to obtain a higher bearing reliability.
Increasing the mean value of the interference between the bearing and the stationary shaft of the wind turbine reduces the reliability of bearing stress. In order to improve the stress reliability of the bearing, the smallest interference value should be ensured as far as possible under the condition of ensuring the normal operation of the bearing.
Author Contributions
Writing—original draft preparation, W.Z.; writing—review and editing, Z.J.; visualization, P.Z.; project administration, X.H. All authors have read and agreed to the published version of the manuscript.
Funding
This research is financially supported by the National Natural Science Foundation of China (grant No. 51975110) and Applied Basic Research Program of Liaoning Province (2023JH2/101300160).
Data Availability Statement
Not applicable.
Conflicts of Interest
The authors declare that they have no known competing financial interests or personal relationships that could have appeared to influence the work reported in this paper.
References
- Mostafaeipour, A. Productivity and development issues of global wind turbine industry. Renew. Sustain. Energy Rev. 2010, 14, 1048–1058. [Google Scholar] [CrossRef]
- Liu, Y.; Tao, T.; Zhao, X.; Zhang, C.; Ma, Y. Support vector regression-based fatigue damage assessment method for wind turbine nacelle chassis. Structures 2021, 33, 759–768. [Google Scholar] [CrossRef]
- de Azevedo, H.D.M.; Araújo, A.M.; Bouchonneau, N. A review of wind turbine bearing condition monitoring: State of the art and challenges. Renew. Sustain. Energy Rev. 2016, 56, 368–379. [Google Scholar] [CrossRef]
- Tavner, P.J.; Xiang, J.; Spinato, F. Reliability analysis for wind turbines. Wind Energy 2007, 10, 1–18. [Google Scholar] [CrossRef]
- Spinato, F.; Tavner, P.J.; van Bussel, G.J.W.; Koutoulakos, E. Reliability of wind turbine subassemblies. IET Renew. Power Gener. 2009, 3, 387–401. [Google Scholar] [CrossRef]
- Ma, C.; Duan, B. Design and application of wind farm fault diagnosis system. In Proceedings of the 2011 Asia-Pacific Power and Energy Engineering Conference, Washington, DC, USA, 25–28 March 2011; IEEE: Manhattan, NY, USA, 2011; pp. 1–4. [Google Scholar]
- Kusiak, A.; Li, W. The prediction and diagnosis of wind turbine faults. Renew Energy 2011, 36, 16–23. [Google Scholar] [CrossRef]
- Sheng, S.; O’Connor, R. Chapter 15—Reliability of Wind Turbines. In Wind Energy Engineering; Letcher, T.M., Ed.; Academic Press: Cambridge, MA, USA, 2017; pp. 299–327. [Google Scholar]
- Otsuka, A.; Sugawara, H.; Shomura, M. A test method for mode ii fatigue crack growth relating to a model for rolling contact fatigue. Fatigue Fract. Eng. Mater. Struct. 1996, 19, 1265–1275. [Google Scholar] [CrossRef]
- Miyashita, Y.; Yoshimura, Y.; Xu, J.Q.; Horikoshi, M.; Mutoh, Y. Subsurface Crack Propagation in Rolling Contact Fatigue of Sintered Alloy. JSME Int. J. Ser. A Solid Mech. Mater. Eng. 2003, 46, 341–347. [Google Scholar] [CrossRef]
- Mason, M.A. A Practical Tool for the Determination of Surface Stresses in Railroad Bearings with Different Contact Geometries and Load Conditions Using Finite Element Analysis; VCU University Archives: Richmond, VA, USA, 2014. [Google Scholar]
- Chudzik, A.; Warda, B. Fatigue life prediction of a radial cylindrical roller bearing subjected to a combined load using FEM. Eksploat. I Niezawodn.-Maint. Reliab. 2020, 22, 212–220. [Google Scholar] [CrossRef]
- Deng, S.; Qin, X.; Huang, S. A study on the effect of subsurface crack propagation on rolling contact fatigue in a bearing ring. J. Mech. Sci. Technol. 2015, 29, 1029–1038. [Google Scholar] [CrossRef]
- Wang, C.; Yu, W.; Ren, C.Z. An accurate method for calculating the contact subsurface stress field of hybrid ceramic ball bearing. Solid State Phenom. 2011, 175, 215–218. [Google Scholar] [CrossRef]
- Ioannides, E.; Harris, T. A New Fatigue Life Model for Rolling Bearings. J. Tribol. ASME 1985, 107, 367–377. [Google Scholar] [CrossRef]
- Xu, J.; Benson, S.; Wetenhall, B. Comparative analysis of fatigue life of a wind turbine yaw bearing with different support foundations. Ocean Eng. 2021, 235, 109293. [Google Scholar] [CrossRef]
- M’Ewen, E.X.L.I. Stresses in elastic cylinders in contact along a generatrix (including the effect of tangential friction). Lond. Edinb. Dublin Philos. Mag. J. Sci. 2010, 40, 454–459. [Google Scholar] [CrossRef]
- Gonzalez-Perez, I.; Iserte, J.L.; Fuentes, A. Implementation of Hertz theory and validation of a finite element model for stress analysis of gear drives with localized bearing contact. Mech. Mach. Theory 2011, 46, 765–783. [Google Scholar] [CrossRef]
- Harris, T.A.; Kotzalas, M.N. Advanced Concepts of Bearing Technology; CRC Press: Boca Raton, FL, USA, 2006. [Google Scholar]
- Palmgren, A. Ball and Roller Bearing Engineering: Philadelphia; SKF Industries Inc.: Gothenburg, Sweden, 1959. [Google Scholar]
- Liu, J.; Wang, L. Dynamic modelling of combination imperfects of a cylindrical roller bearing. Eng. Fail. Anal. 2022, 135, 106102. [Google Scholar] [CrossRef]
- Lundberg, G.; Palmgren, A. Dynamic Capacity of Rolling Bearings. J. Appl. Mech. Jun 1949, 16, 165–172. [Google Scholar] [CrossRef]
- Jones, A.B. Analysis of Stresses and Deflections Vol.1. New Depart. Eng. Data 1946, 1–180. [Google Scholar]
- Williams, J.A.; Dwyer-Joyce, R.S. Contact between solid surfaces. In Modern Tribology Handbook; Springer: New York, NY, USA, 2001; pp. 121–162. [Google Scholar]
- Hills, D.A. Mechanics of fretting fatigue. Wear 1994, 175, 107–113. [Google Scholar] [CrossRef]
- Li, N.; Zhang, D.; Liu, H.; Li, T. Optimal design and strength reliability analysis of pressure shell with grid sandwich structure. Ocean Eng. 2021, 223, 108657. [Google Scholar] [CrossRef]
- International Standard ISO 281; Rolling Bearings—Dynamic Load Ratings and Rating Life, 2nd ed. ISO: Geneva, Switzerland, 2007.
- Khuri, A.I.; Mukhopadhyay, S. Response surface methodology. WIREs Comput. Stat. 2010, 2, 128–149. [Google Scholar] [CrossRef]
- Jeong, S.; Murayama, M.; Yamamoto, K. Efficient Optimization Design Method Using Kriging Model. J. Aircr. 2005, 42, 413–420. [Google Scholar] [CrossRef]
- Kaymaz, I. Application of kriging method to structural reliability problems. Struct. Saf. 2005, 27, 133–151. [Google Scholar] [CrossRef]
- Zhang, L.; Lu, Z.; Wang, P. Efficient structural reliability analysis method based on advanced Kriging model. Appl. Math. Model. 2015, 39, 781–793. [Google Scholar] [CrossRef]
- Kleijnen, J.P.C. Kriging metamodeling in simulation: A review. Eur. J. Oper. Res. 2009, 192, 707–716. [Google Scholar] [CrossRef]
- Liu, Z.; Lu, Z.; Ling, C.; Feng, K.; Hu, Y. An improved AK-MCS for reliability analysis by an efficient and simple reduction strategy of candidate sample pool. Structures 2022, 35, 373–387. [Google Scholar] [CrossRef]
- Huang, X.; Li, Y.; Zhang, Y.; Zhang, X. A new direct second-order reliability analysis method. Appl. Math. Model. 2018, 55, 68–80. [Google Scholar] [CrossRef]
- Al-Tameemi, H.A.; Long, H. Finite element simulation of subsurface initiated damage from non-metallic inclusions in wind turbine gearbox bearings. Int. J. Fatigue 2020, 131, 105347. [Google Scholar] [CrossRef]
- Wu, Y.T.; Mohanty, S. Variable screening and ranking using sampling-based sensitivity measures. Reliab. Eng. Syst. Saf. 2006, 91, 634–647. [Google Scholar] [CrossRef]
- Xinning, Z.; Yingdong, Q.; Hongwang, Y.; Rongde, L. Low temperature impact toughness and fracture mechanism of cast QT400-18L ductile iron with different Ni additions. China Foundry 2013, 10, 310–314. [Google Scholar]
Disclaimer/Publisher’s Note: The statements, opinions and data contained in all publications are solely those of the individual author(s) and contributor(s) and not of MDPI and/or the editor(s). MDPI and/or the editor(s) disclaim responsibility for any injury to people or property resulting from any ideas, methods, instructions or products referred to in the content. |
© 2023 by the authors. Licensee MDPI, Basel, Switzerland. This article is an open access article distributed under the terms and conditions of the Creative Commons Attribution (CC BY) license (https://creativecommons.org/licenses/by/4.0/).