Abstract
Composite structures in aeroplanes are often thin-walled and lightweight, resulting in significant compliance, which presents a handling and assembly challenge due to the associated part deformations. In order to counteract these deformations, the parts are held in their specified geometry using stiff and correspondingly heavy fixtures or jigs. Mobile industrial robots are very versatile and widely used in industrial volume production, but they are limited in their payload capacity. High-rate production of large aerospace modules requires highly automated flexible assembly processes. The approach presented in this paper is to combine mobile units with lightweight assembly jigs that have the capability of deformation compensation. The subject of the study is a high-rate assembly process for flap modules using an Autonomous Industrial Mobile Manipulator (AIMM) and a lightweight end effector. The end effector has a shape compensation function, implemented by an integrated Stewart platform, which enables the compensation of manufacturing tolerances as well as gravity effects. The compensation function is used in a closed loop and counteracts shape deviations by appropriate fixture shape adjustments. The paper reports on the conceptual design of the assembly scenario, the design of the end effector, its realization and the successful experimental demonstration at 1:1 scale.
1. Introduction/Motivation
In order to increase the efficiency and decrease the cycle time of the aeroplane assembly, it is desirable to increase the size of the pre-assembled components delivered to the final assembly line. Bigger components allow for less steps, which reduces the cycle time. Due to their greater size, they tend to deform significantly under their own weight, which makes the assembly difficult.
While robot technology is increasingly finding its way into industrial manufacturing and production, the Autonomous Industrial Mobile Manipulator (AIMM), a fusion of a mobile platform and a robotic arm, plays a particular role here. In the development of AIMMs, Germany is well ahead of China and the USA, accounting for almost one-third of developments [1]. In the last decade, a number of such mobile platforms have been developed as prototypes, of which most are small or medium-sized platforms for factory, warehouse logistics or in the context of service robotics. So far, however, they have not been widely adopted in industrial production, especially not in large-scale assembly processes. Yet in a production environment such as the aerospace industry, the use of mobile platforms is desirable [2].
Parts for aircrafts are commonly compliant due to their light weight and therefore thin-walled design. These compliant parts are particularly challenging to handle. Both compliant and non-compliant parts suffer from manufacturing deviations leading to deviations from the part’s nominal shape. Additionally, compliant parts also change their shape significantly according to acting forces. These forces are mainly introduced by gravity and the fixture holding the part. Since gravitational forces are acting according to the mass distribution of the part and the forces introduced by the holding fixture are acting on individual points or small areas, the part can never be expected to be in its intrinsic shape when held in a fixture; therefore, it is the main objective of the fixture to ensure that the joining features are within their specified shape.
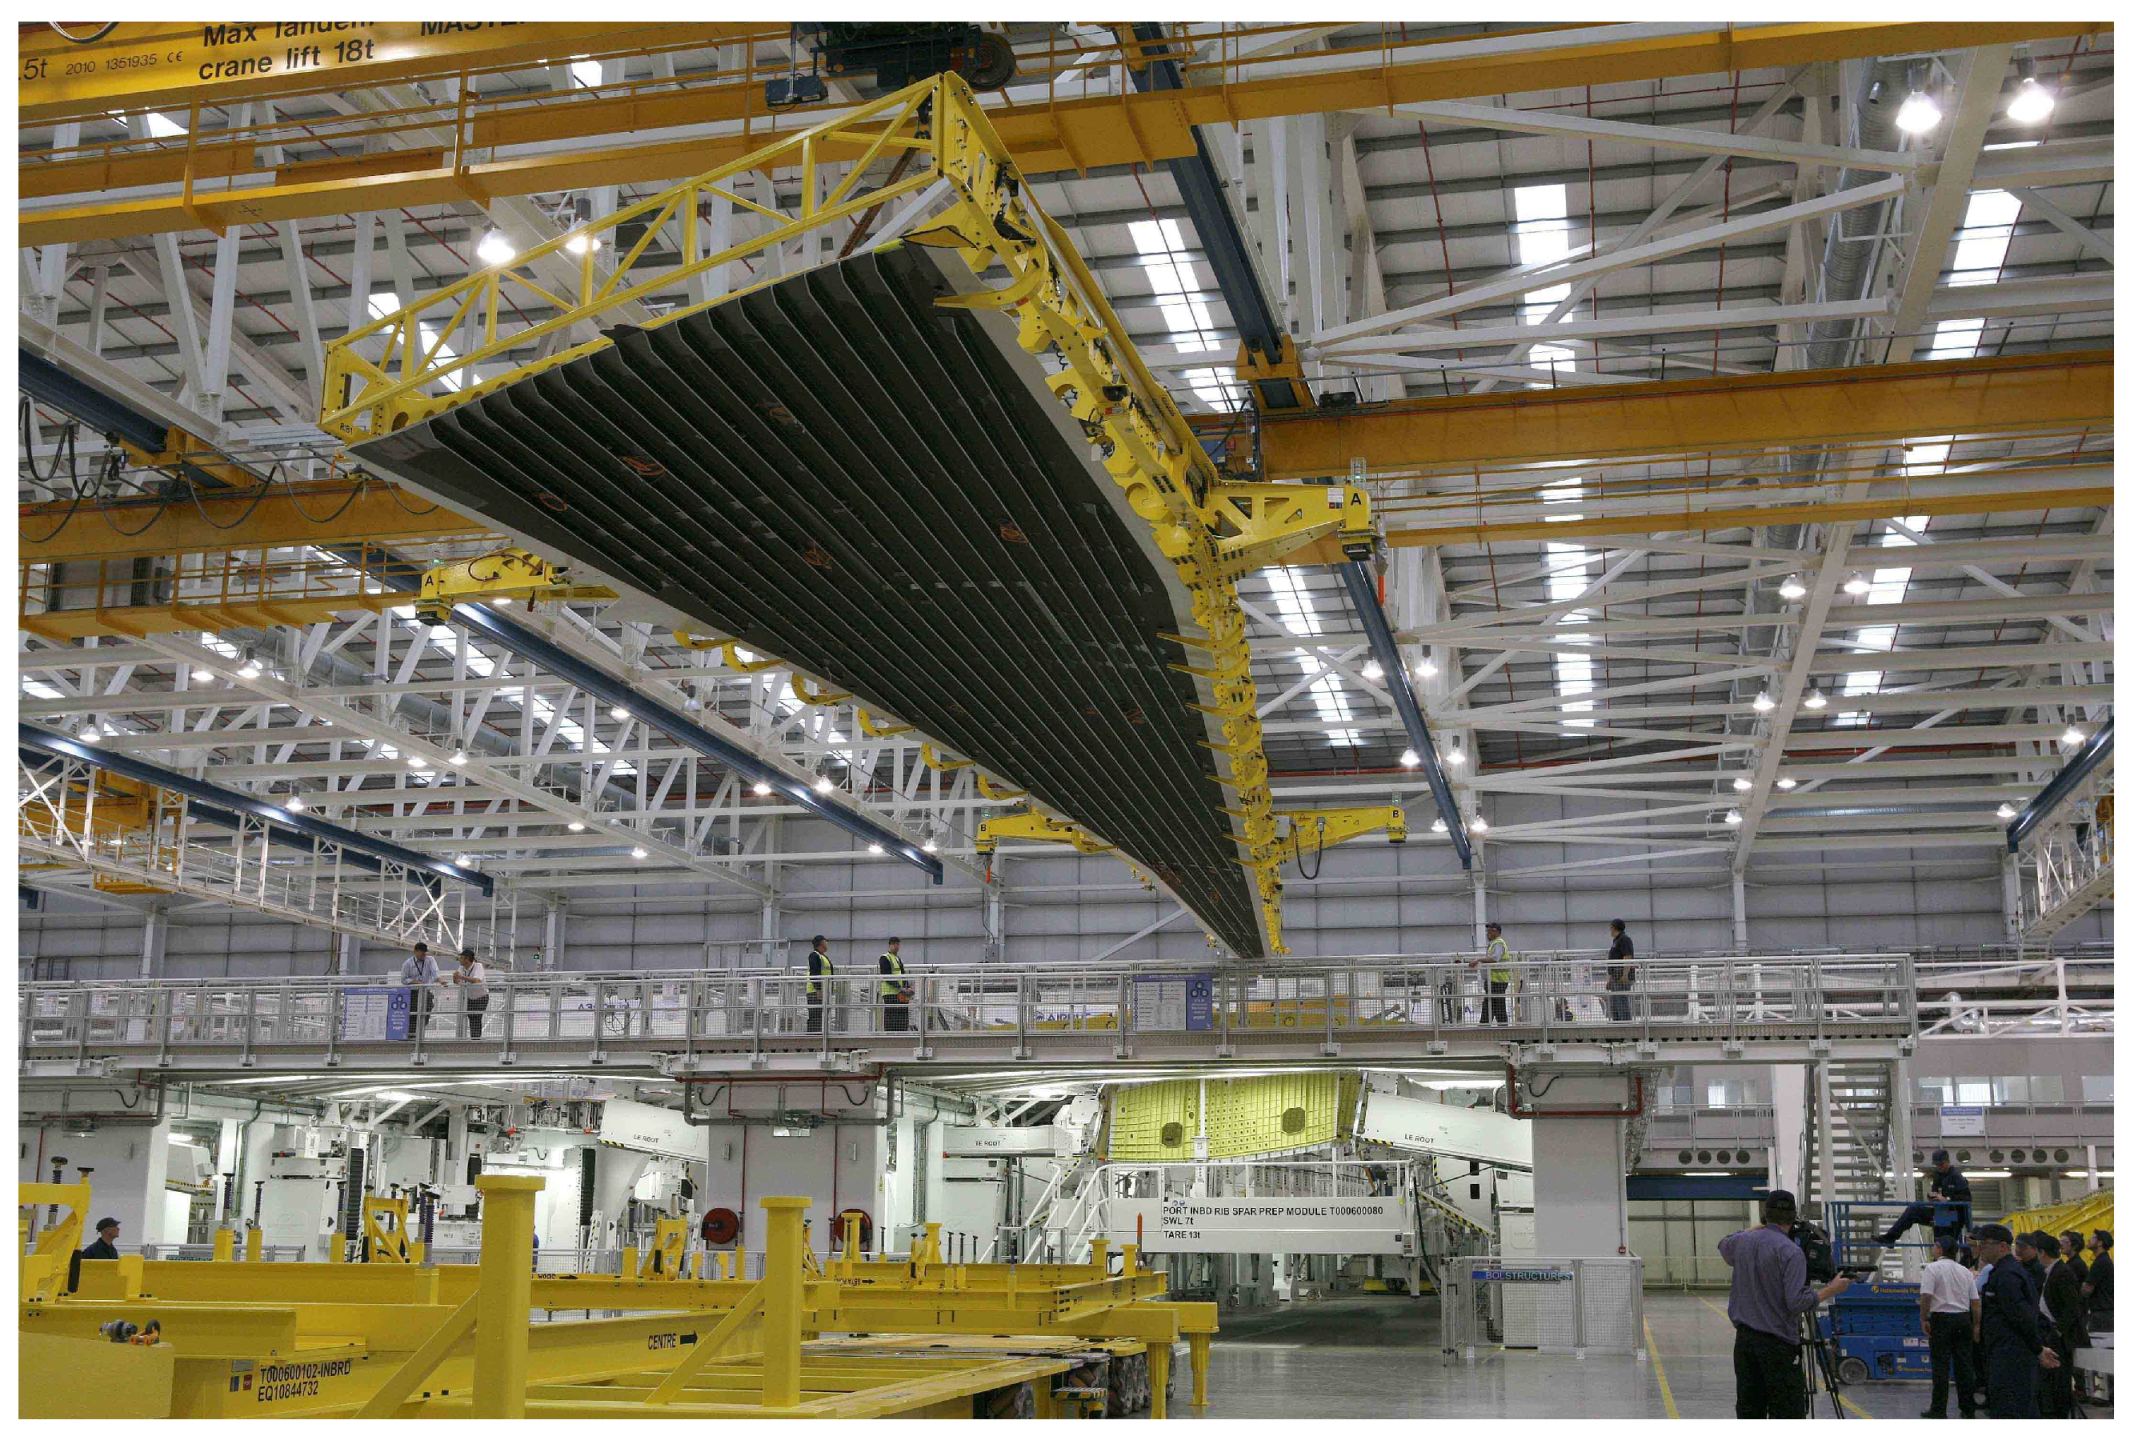
Figure 1 shows the handling of an A350 XWB wing cover as an example of the state-of-the-art in the handling of compliant structures. The common approach is to use high-stiffness assembly jigs made of steel to ensure the geometry of the part to a high level of precision. These jigs have one major drawback. Due to their enormous weight they cannot be moved by industrial robots. It would be possible to design AIMMs with custom kinematics allowing for the transport of these jigs; however, these custom kinematics would be more expensive and less flexible compared to AIMMs using of-the-shelf industrial robots; therefore, a significant reduction in the weight of the jigs is needed in order to allow AIMMs to handle and assemble compliant parts.
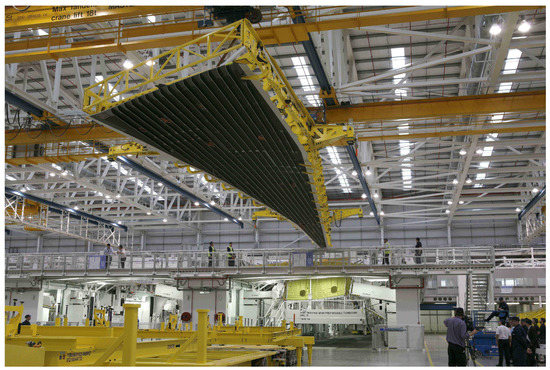
Figure 1.
Assembly jig for the A350 XWB wing cover as an example for current approaches to assembling compliant structures [3].
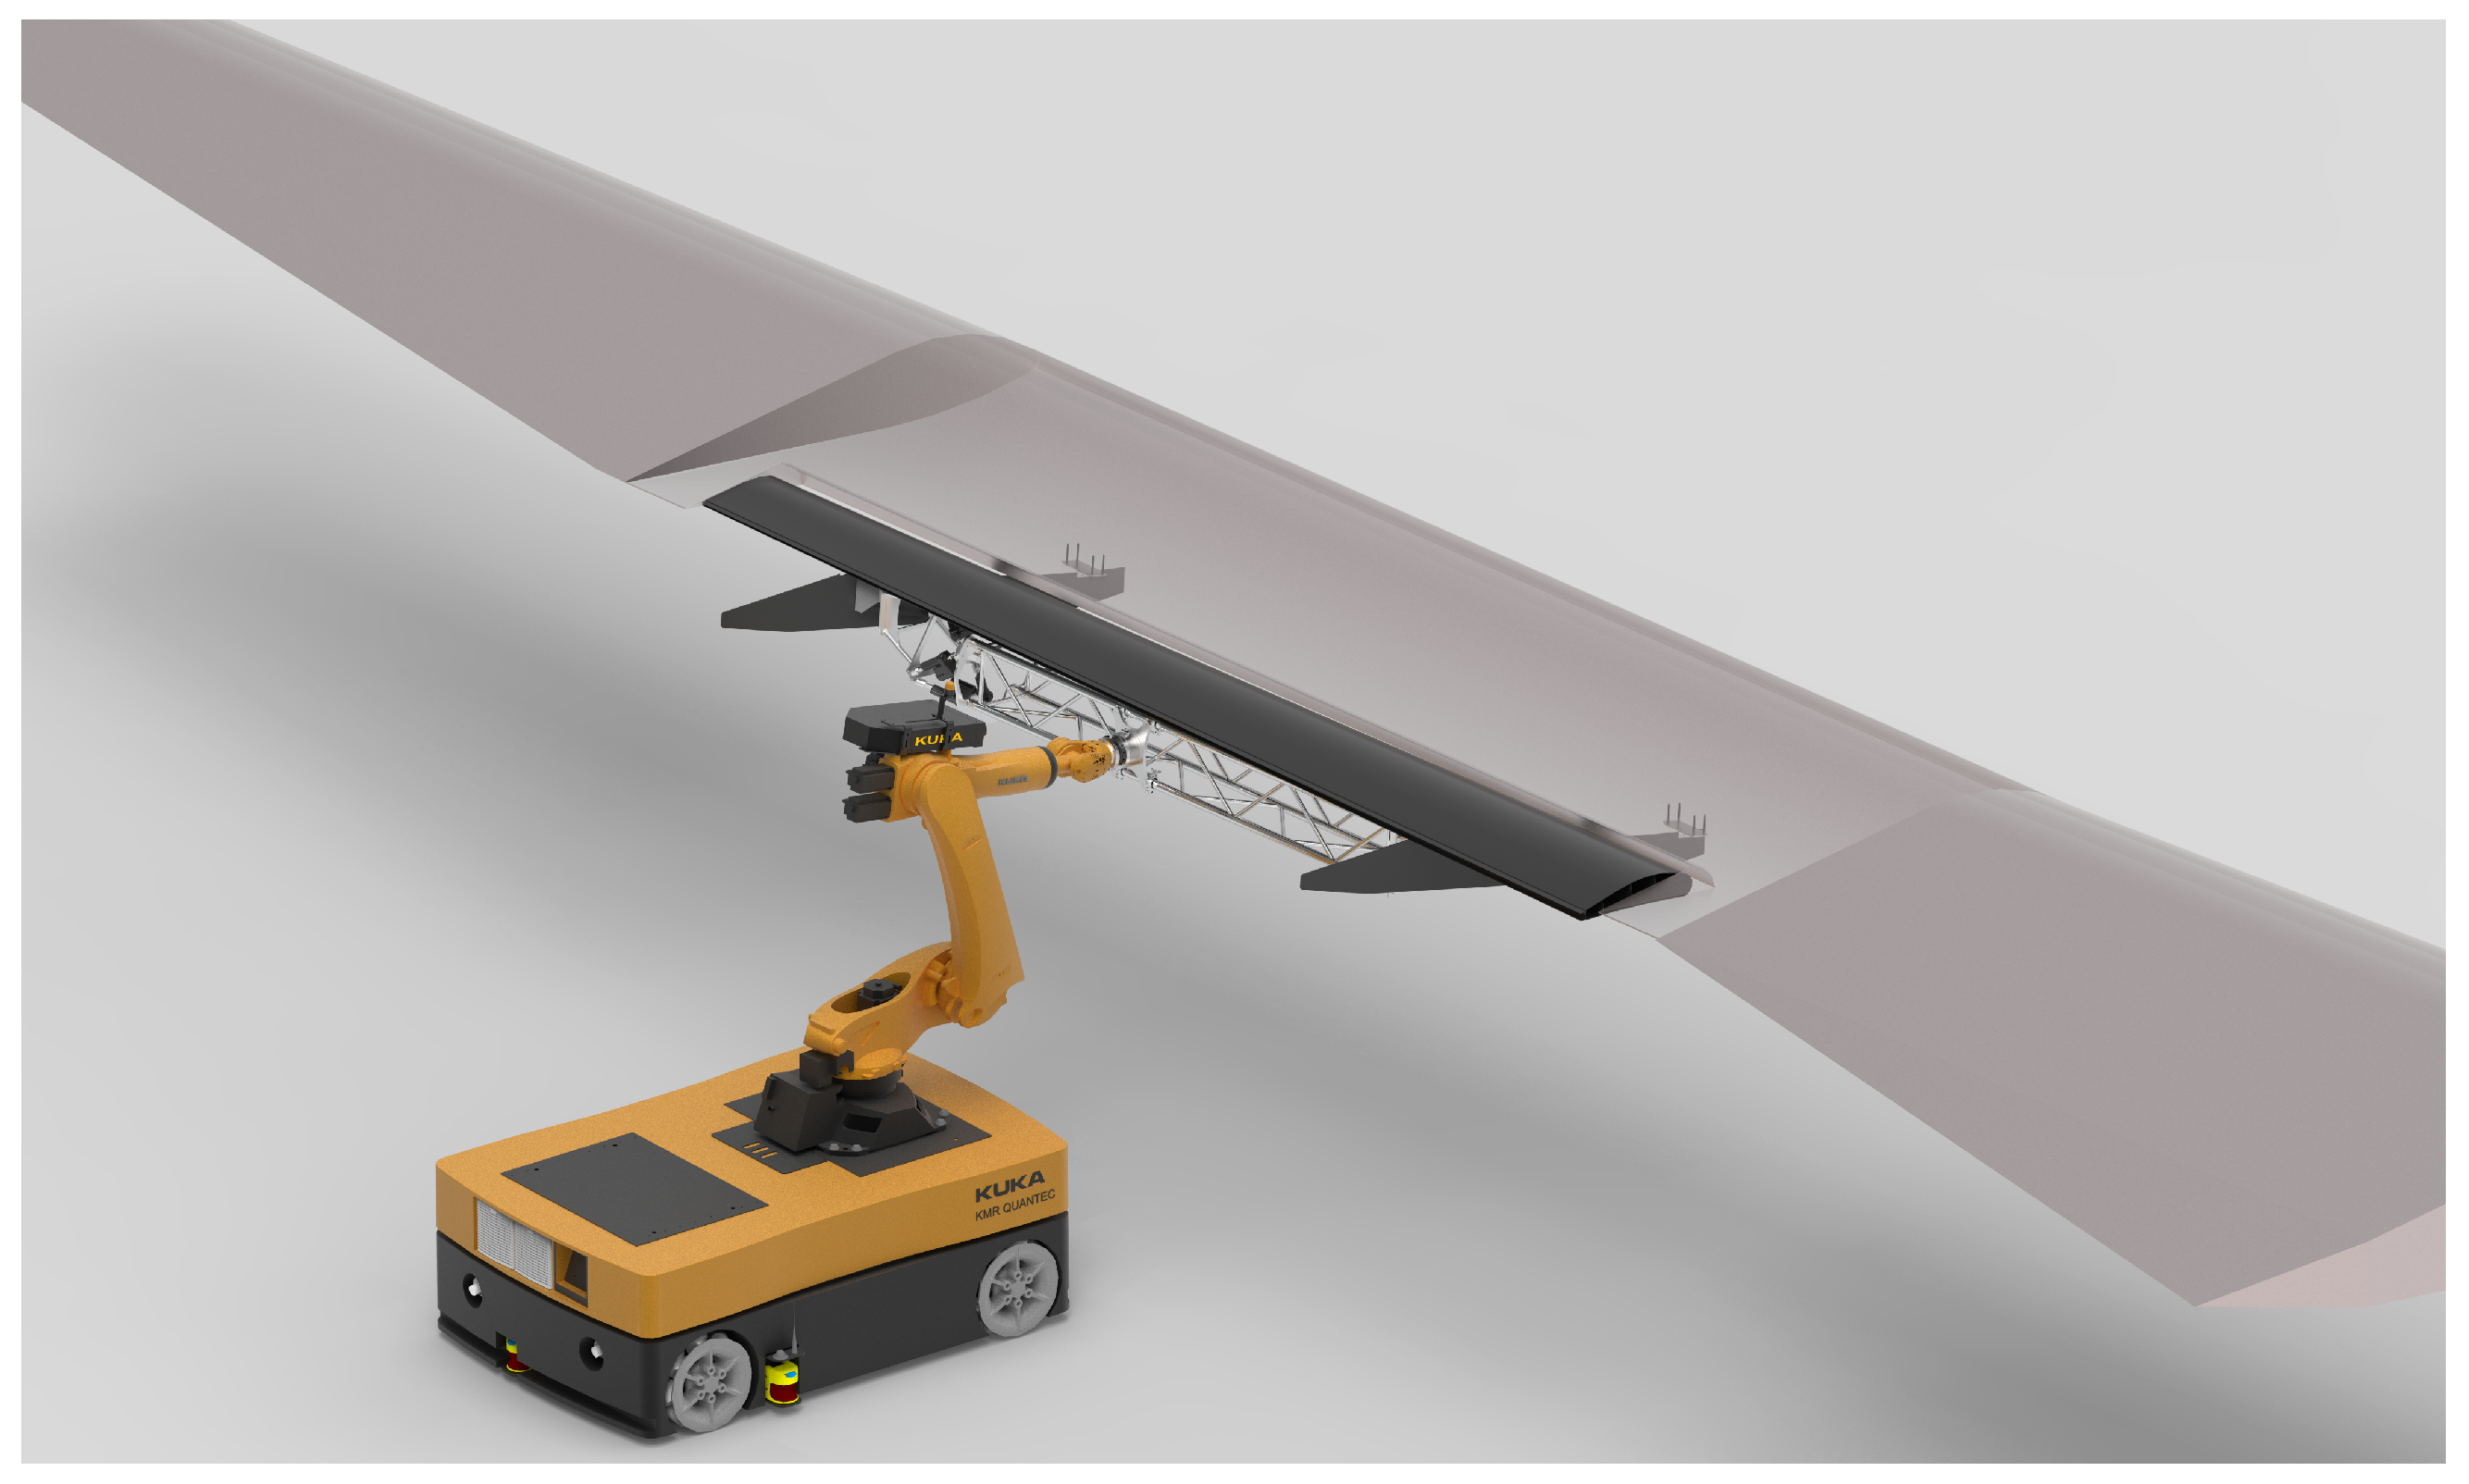
This paper proposes a novel approach facilitating a light assembly jig, which allows the jig to be handled by a common AIMM. The proposed jig ensures the part’s geometry, not with the common approach of employing high stiffness, but with active deformation compensation consisting of actuators and sensors in a control loop. Since the jig is moved by the robot, it is referred to as an end effector in this paper. Utilizing the proposed lightweight end effector, AIMMs are able to assist in all assembly steps of compliant components. In this paper, the mounting of an A320’s flap module to the wing’s rear spar is used as a case study for the assembly of compliant structures (see Figure 2). The flap module consists of the flap body itself and its supports. Since the flap supports contain the actuators and kinematics needed to move the flap, they account for a significant portion of the flap module’s weight. In order to join the flap module to the aircraft’s wing, studs at the tip of the flap supports need to be aligned to and inserted into holes in the wing’s rear spar while compensating for the deformations of the flap.
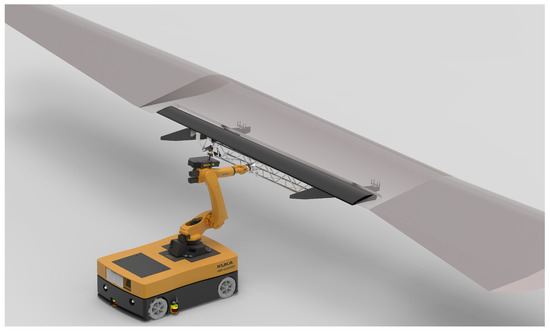
Figure 2.
Proposed flap-module assembly scenario featuring an AIMM and a lightweight end effector with shape compensation functionality.
Following the literature review, the paper starts the conceptual development of the end effector with the identification of sensors and algorithms for the identification of the shape deviation of parts. This section is followed by a detailed description of the assembly process of the flap modules. The thorough understanding of the assembly process lays the foundation for the development of a detailed concept for the end effector. Based on this concept, the end effector is developed and built up. In order to prove the overall concept, the testing of the end effector concentrates on its mechanical aspects since the needed sensors and the control loop for the automatic deformation compensation can be replaced by manual measurements and control. The mechanical tests show the actuators capability to deform the flap and its capability to join the flap module to the aircraft’s spar.
2. Usage of Robots and Mobile Robots in the Assembly of Compliant Structures
In order to meet the accuracy requirements in the assembly of compliant aircraft structures it is state-of-the-art to use jigs to hold the compliant parts in place and ensure their geometry [4]. These jigs are commonly heavy-duty steel structures. Due to their size and weight, their transport takes a lot of effort (see Figure 1). Furthermore, they occupy a large storage area near the final assembly line since every assembly step needs its own jig. The costs for these jigs limit the possibility of individualization of the aeroplanes during production. These facts lead to a demand for adjustable and highly automatable production and assembly strategies [4]. One approach for more automation is the usage of mobile robots.
One of the main limitations in the usage of industrial robots, and especially AIMMs, is their maximum payload. In order for AIMMs to handle compliant parts, new lightweight jig concepts are needed, since the jigs need to be light enough to be used as an end effector of the AIMM; therefore, the established approach to ensure the part’s geometry and pose with very stiff and rigid jigs cannot be continued.
Mei presents a review on flexible fixtures [5]. He shows that the position and the geometry of a part can be ensured by smaller and therefore lighter fixtures containing actuators and sensors. These sensors and actuators form a closed control loop to ensure the parts pose and geometry. This allows for a dramatic reduction in stiffness and therefore weight of the fixture; thus, it is possible to use flexible jigs as end effectors by stationary robots or AIMMs.
The assembly of large compliant structures for aeroplanes is commonly divided into two steps:
- The first step is the assembly of parts creating components, commonly known as assembly;
- The second step is the alignment and joining of the components creating the aeroplane is commonly known as integration.
The main difference between those two steps is found in their location and timing. The assembly of components is performed prior to final assembly in independent production lines, whereas integration of the components is performed in the final assembly line. Since the modifications of components in the final assembly line are very costly, quality control of the components and parts has to be conducted in the assembly step, thus allowing for an efficient final assembly of the aircraft [5].
Current research on the usage of robots handling large-scale parts and components in the production of aircraft concentrates mainly on shell segments for fuselages.
Weidner builds a scaled end effector for the installation of fuselage segments to a fuselage under construction. He uses linear actuators equipped with suction cups on a metal frame to grab and deform the shell. A laser tracker is used to check the position and shape of the segment. Additionally, he uses force sensors to limit the induced stresses within the segment. Since the actuators only allow for linear movement, not all deviations of the part’s geometry can be removed. Experiments show that the end effector is able to ensure the needed geometry within a 2 mm boundary. The positioning accuracy is not tested [6,7].
Bock uses a similar end effector but concentrates on the shape of the shell prior to the application of stiffeners. His end effector distinguishes itself from Weidner’s by the usage of CFRP as the material for the main structure and a 3D camera for the evaluation of the shape. His results show that 3D cameras are able to generate very detailed information regarding the shape and shape deviation from the target shape. The large residual shape deviation after nine iterations of shape measurement and active deformation suggests either a too low stiffness of the main frame, too low actuation forces or stroke or not enough control ability of the shape due to the configuration of the linear actuators [8].
Ramirez presents a fixture for fuselage shells utilizing Stewart platforms instead of linear actuators for actuation. He shows that it is possible to actively deform a shell to sub-millimeter accuracy [9,10]; however, he uses a steel main frame, which is probably too heavy in order to be moved by an AIMM.
Due to the potential severeness of accidents when using AIMMs to handle flap modules in close proximity to humans, safety aspects have to be taken into account in the automation concepts. Since safety in human–robot collaboration is still a field of ongoing research, it often poses a bottleneck in the usage of AIMMs in production environments [11]. Following the state-of-the-art in human–robot collaboration, it seams feasible to combine manual control for tasks that contain safety risks and only automate tasks that pose negligible risks. One widely adopted method to reduce the risk is to separate human from robotic workspaces with fences or light curtains that stop or alter the robots movement when crossed [12].
3. Sensors and Methods for the Determination of Pose and Geometry of Parts and Components
For the proposed assembly process, 3D sensors fulfill two tasks. They are needed to close the control loop in order to compensate deformations due to gravity and they are needed to align the component to the partly assembled aeroplane in order to join the component to the plane. Mei proposes three applicable sensor systems for these steps [5]:
- A 3D camera generating point clouds;
- Indoor Global Positioning System (iGPS);
- Laser tracker.
Laser trackers are an established technology for large parts and high demands in accuracy; however, they are expensive and impractical, since the laser beam between the tracker and the corresponding reflector cannot be intersected while measuring. iGPS offers a large measuring area, does not need a clear line of sight and has mediocre accuracy. On the other hand, 3D cameras offer smaller measuring spaces compared to iGPS and laser tracker systems and can reach sub-millimeter accuracy in the measurement of individual points. With point clouds, it is possible to determine geometric features with a higher accuracy compared to individual point measurements. This is achieved by evaluating a large number of points; therefore, it is often possible to use affordable sensors. Hence, 3D cameras represent a promising sensor for integration into the end effector for the assembly of large compliant parts.
Since the proposed assembly process is part of the final assembly, all delivered flaps can be excepted to be within the allowed tolerance ranges due to inspection prior to the delivery to the final assembly line. Thus, it can be assumed that all deformations larger than the allowed tolerances are either due to gravitation or induced forces from the jig.
Experiences from geometric product specification (GPS) standardization and recent research efforts on tolerance show that only the distinction between the real workpiece, its abstract and conceptual model (skin model) and the virtual representation of this abstract model allows a proper understanding of geometric deviations [13]. Schleich [13] calls the connection between real and virtual world “twinning”, but does not provide a concrete methodology. Lartigue and Thiebaut [14] present an approach to identify geometry deviations of flexible components. With the help of an additional measurement of support forces of the component, the stress-free and therefore undeformed component shape can be determined via a modified finite element method. Since finite element (FE) calculations for large models typically involve considerable computational effort, Lin [15] provides approaches that significantly reduce the computational effort. Another approach by Thiebaut [16] uses a reduced number of measurement points from a point cloud to optimize the computational cost of his modified FE formulation. Söderberg [17] goes one step further and creates a combination of variational calculus and quality control into an autonomous model for quality optimization. He calls this concept “digital twin for geometry assurance”; however, all approaches require a robust registration method to register measurement points, which are usually in the form of point clouds, to CAD models in order to determine component deviations.
Registration is the process of aligning point cloud data to a CAD model in order to find the coordinate transformation between both. The registration problem is commonly formulated as a least-square minimization problem [18]. Various approaches have been proposed in this area, as reviewed in [19], either in an iterative form [20,21] or as a method with a direct solution. In the latter case, a solution is obtained using, e.g., singular value decomposition [22,23] and unit-/dual- quaternions [24,25]. A qualitative comparison of the algorithms in terms of accuracy and robustness was investigated in [26]. Recent algorithms use statistical methods such as the Gaussian mixture model [26,27] or incorporate surface registration and 3D reconstruction algorithms [28,29,30,31,32,33,34,35]; however, in most applications, the iterative closest point (ICP) algorithm has become the standard fitting method due to its simple formulation and computational efficiency [27,36,37,38]. A general problem with ICP is sensitivity to measurement errors, data artefacts and point cloud density. These problems can be traced back to the general solution of the ICP formulation, which is based on a least-square minimization method. Special filters such as outlier removal [39] or de-noising [40] provide an improvement; however, in some cases, ICP still leads to unreliable fitting results, especially for complex shapes such as curved surfaces [41].
In summary, it can be stated that there are powerful algorithms available to determine the deformation of a part using tolerancing methods and the pose of the flap in regards to the airplane using ICP registration approaches; therefore, both the active deformation compensation and the assembly are expected to be efficiently automatable using 3D cameras.
4. Case Study: Fully Equipped Flap with Flap Supports
The flaps of an aircraft represent a particularly challenging component for the assembly of compliant structures and are therefore used as a case study within this paper. Flaps combine a slender and tapered design with a lightweight construction leading to high compliance with mass concentration at the flap supports leading to large weight-induced deformations.
At the moment, flap systems are mounted in two steps. The assembly starts with the flap supports. They are mounted to the rear spar of the wing and contain all the linkages and actuators. The second step of the assembly consists of the mounting of the flap to the flap supports.
Similar to that mentioned in the introduction, it is desirable to increase the efficiency of the flap assembly by preassembling the flap supports to the flap prior to the final assembly line. By doing so, the cycle time within the final assembly line can be reduced. The preassembled flap system is also called a fully equipped flap. For the integration of the fully equipped flap to the aeroplane’s wing, it needs to be positioned precisely to the rear spar of the wing (see Figure 3). In order to mount the flap support on the spar, four tapered studs are attached at the tip of it. These studs need to be aligned precisely to bolt holes in the rear spar of the wing for the integration. After a proper alignment, the fully equipped flap is lifted vertically and the tapered studs are slid into the bolt holes. The assembly of the fully equipped flap ends with the replacement of the tapered studs by proper bolts.
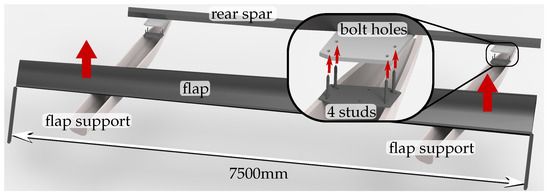
Figure 3.
Rendering showing the flap with supports and a mock-up of the airplanes rear spar.
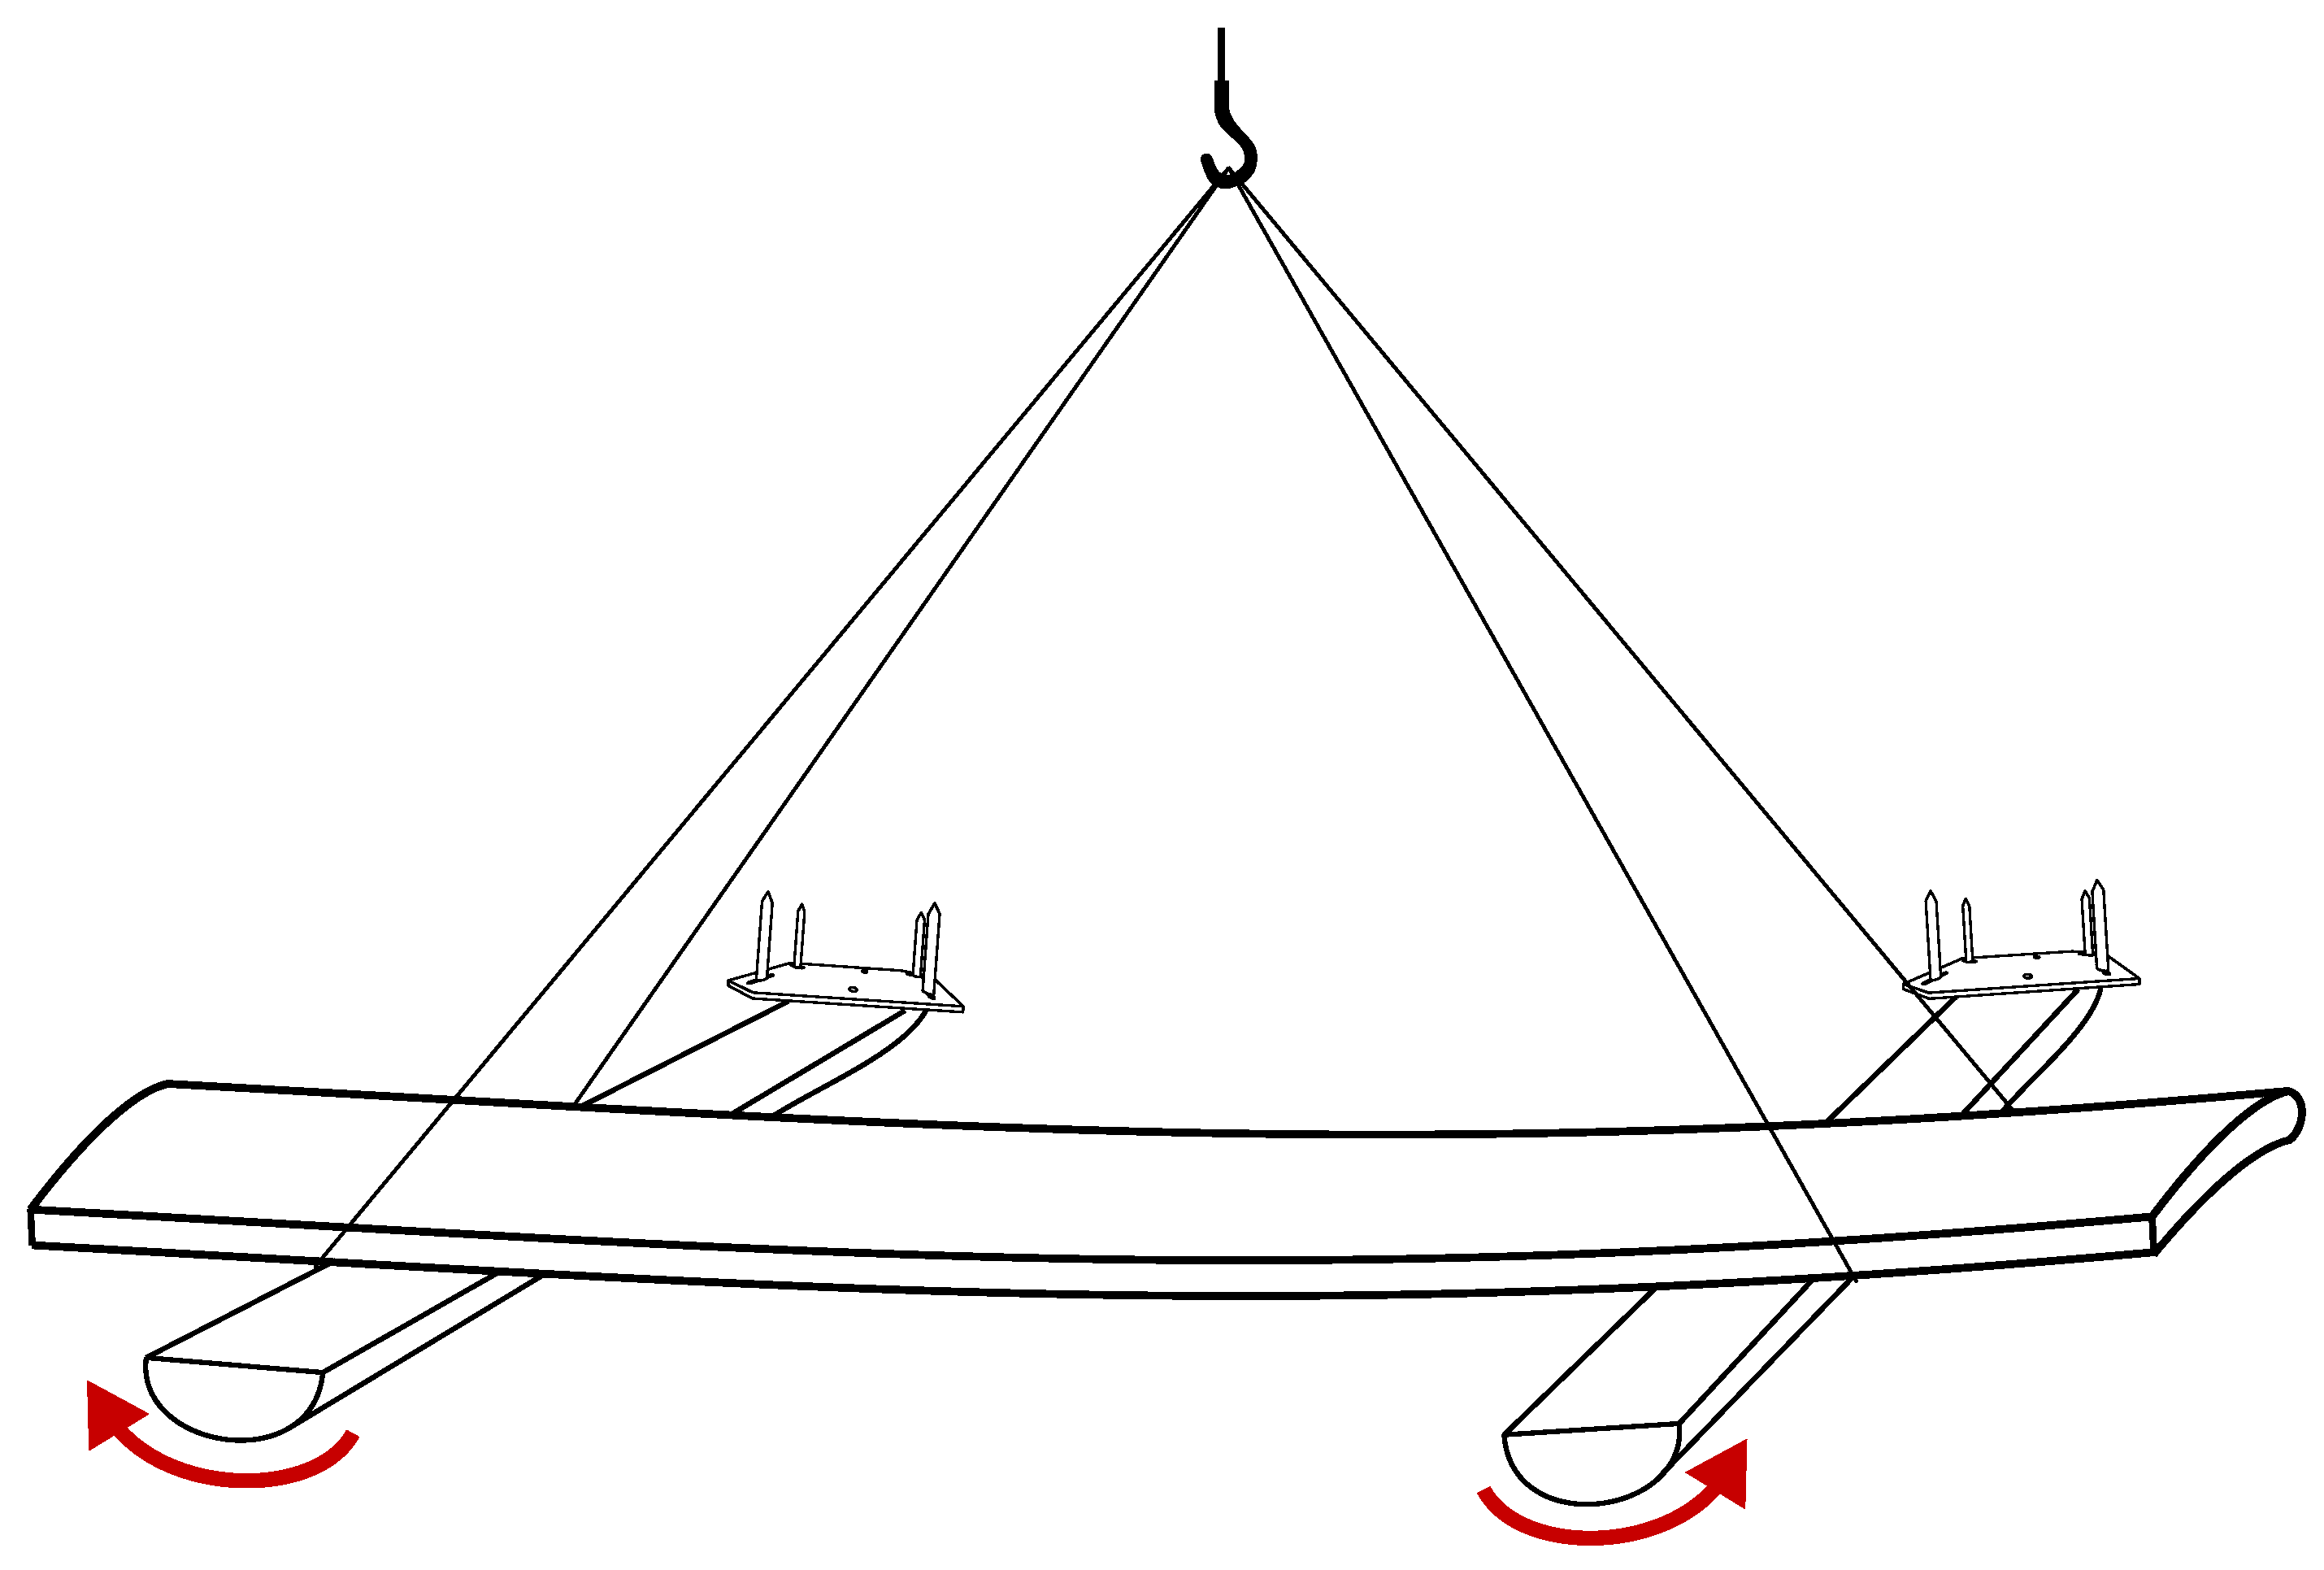
The positioning and joining of the studs is quite challenging due to the gravity-induced deformations of the equipped flap (see Figure 4). The weight of the fully equipped flap ranges between 300 kg to 400 kg, with the flap weighing ≈ 60 kg and the flap supports weighing ≈ 150 kg each. Due to this deformation, the studs of both supports are not parallel and insertable to the bolt holes with a simple linear movement performed by a crane. This leads to the need for applying forces and moments to the flap in order to counteract the gravity-induced deformations.
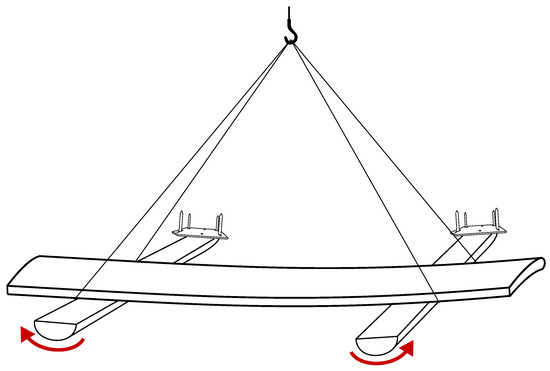
Figure 4.
Flap distortion by own weight while lifting it with a crane.
To test the assembly process on a full scale, a fully equipped flap is needed. Since the fully equipped flap alone would exceed the payload of the available AIMM, it needs to be adapted in order to leave headroom for the end effector. Since the stiffness of the flap has a major impact on the forces needed for bending, no major changes on the flap body itself can be made. The used flap body is described in [42,43,44].
The needed reduction in weight is mainly realized in the construction of simplified lightweight flap supports. For maximum weight reduction, 2D mock-ups are used to represent the flap supports (see Figure 5). They resemble the shape of the original A320 flap supports and provide a light mounting possibility for the mounting studs. In order to hold the flap with the end effector and to transfer the actuation forces into the flap body, L-shaped brackets are attached to the bottom of the flap.

Figure 5.
Lightweight demonstrator of fully equipped flap with spar representative.
5. Concept for the Assembly of Flaps Using an AIMM
The following section describes the proposed usage of an AIMM for the integration of a fully equipped flap with flap supports. The process starts with the transport of the fully equipped flap module to the final assembly line of the aeroplane by the AIMM. The transport will be controlled manually by an employee. Automatic movement of the AIMM for the transport of the flap would be desirable, but due to the potential severeness of accidents and since the safety of human–robot collaboration is subject to ongoing research [45], the manual approach for the transportation seems most efficient.
The automatic assembly process starts after the employee has moved the flap to a position close to the desired mounting position. As described in the introduction, the flap assembly’s shape differs from its nominal shape for two main reasons. The first one is manufacturing deviations, which can be assumed to be within tolerances since the flap will have been checked prior to the delivery to the final assembly line. The second one is elastic deformations due to gravitational load and forces from the handling jig. Since these elastic deformations are commonly bigger than the allowable tolerances, they need to be compensated by the jig prior to integration.
The common approach to ensure the flap’s geometry is the usage of a very stiff jig, which forces the flap into an integratable shape. This approach is not feasible for AIMMs due to payload limitations (see Figure 1). To comply to this limitation, a lightweight end effector for the flap handling with an actuator-driven deformation compensation is developed (see Section 6). The end effector consists of a light and therefore compliant main beam, actuators and sensors for the automatic deformation compensation and means to grab the flap supports in order to securely hold the whole flap assembly (see Figure 6).

Figure 6.
Concept of an end effector for the handling of flap modules.
As stated in Section 3, 3D cameras will be used to determine the flap’s shape and pose. The number and position of the 3D cameras has a big impact on the automatic assembly process and is therefore discussed first. As stated before, the integration process ought to be flexible and therefore it is best to accommodate all needed sensors within the end effector. The only position from which both the flap geometry and the mounting surfaces can be assessed with one camera would be high above the flap, which is impractical. This leads to the need for several 3D cameras. In order to fuse the individual measurement into one point cloud, the coordinate transformations between the sensors must be known; however, since the main beam of the end effector must be assumed to be compliant, the coordinate transformation between the individual sensors will change depending on the loads. If the field of view of the individual 3D cameras overlaps, it could be possible to calculate the current coordinate transformation using registration algorithms; however, these algorithms need characteristic shapes, which are scarce in aerodynamic surfaces; therefore, the registration will probably be prone to errors.
All of these challenges can be avoided by considering that all components delivered to the final assembly line will be within their tolerances; thus, only the joining surfaces of the flap and the wing attachment area need to be aligned [5]. This allows for the usage of the wing spar as a reference for the deformation compensation. This approach has two main advantages. First of all, only two sensors are needed. Each sensor measures the relative position of the flap support studs with respect to their corresponding mounting holes within the spar. This allows for a convenient placement of the sensors within the main beam of the end effector and for low-range sensors. Secondly, the alignment of the studs and the bolt hole pattern will be better. Wings are compliant and suffer from elastic deformations; thus, the spar will deform differently depending on the state of assembly and the configuration of the aeroplane. At first glance, this contradicts the usage of the spar as a reference for the active deformation compensation, since it introduces errors within the shape measurement of the flap; however, this approach will ensure a better alignment of the mounting points to each other, since the deformations of the spar are accounted for without additional effort; therefore, it is very efficient only to evaluate the relative positions of the bolt holes and the studs for each side of the flap independently.
For the bolt hole pattern in the spar, four holes for each flat support with step bores with 17.2 mm and 13.7 mm in diameter are chosen. Into these holes, the corresponding tapered bolts at the tip of the flap supports must be inserted. The diameter of the bolts is 12 mm. This leads to the requirement for the 3D camera and the algorithm to identify the relative positioning of the joining features with sub-millimeter accuracy.
The spars deformation in the final assembly line will be significantly lower than within flight and the manufacturing tolerances are checked prior to the integration process; therefore, the introduced loads to the flap will be well within the specifications of the flap.
Additional benefits can be prospected when adjusting capabilities within the flap-module kinematic (e.g., eccentric bushings) are pre-installed adequately in order to assure the correct final flap position. If this is already achieved within the assembly procedure, additional trimming operations to adjust gaps between flaps and the wing or flap-tip position for example, can be minimized.
This realization leads to the proposed deformation compensation and alignment process consisting of two steps. In the first step, the fixed side of the flap is aligned precisely and the movable side is aligned roughly. The first alignment step is achieved by the AIMM’s industrial robot and ends with the studs of the fixed side in a position ready to be inserted into the bolt holes. A precise alignment of both sides with the AIMM’s robot arm is not possible due to the deformation of the flap. In the second step, the actuators of the end effector are used to bend the flap in a way that the studs of the movable side of the end effector align to the corresponding bolt hole pattern. This bending leads to no additional significant assembly stresses since the flap is mainly bent back to its original shape without gravitational loads.
When both sides are aligned only a movement upwards of the end effector in the direction of the studs is needed in order to join the flap component to the aeroplane. As a summary, the automatic assembly consists of these six steps:
- A fully equipped flap module is picked up by an AIMM using the end effector;
- AIMM and end effector can be used for logistics;
- Manual rough positioning of the flap in reference to the wing spar;
- Automatic fine positioning of the fixed side of the flap;
- Automatic deformation compensation using 6-DOF actuation;
- Automatic assembly.
6. Development of the End Effector
In order to test the concept from Section 5, it is mandatory to build an end effector. As described, sensors are only needed to find the relative position of the bolt hole patterns in the spar to the studs of the flap supports. Since 3D cameras and algorithms for the detection of these simple geometric features from point cloud data are readily available, it can be safely assumed that the task of the automatic alignment is possible if the end effector is able to deform the flap module. Therefore, the development of the end effector concentrates on the mechanical aspects only, leaving the topic of automatic alignment open for further work. The following section describes the development of the end effector without the integration of sensors, limiting the later testing of the end effector to manual control.
The Kuka KMR Quantec 150 with a dynamic payload of 150 kg is used as our test robot. If the center of gravity of the end effector is close to the flange of the robot arm of the AIMM, a load up to 180 kg is possible, limiting the robot to quasistatic speeds. Considering the weight of 75 kg of the flap with the flap support mock-ups and the the maximum allowable weight of the AIMM, the end effector’s weight is limited to 105 kg. The final end effector is shown in Figure 7.

Figure 7.
End effector used for assembly experiments.
The design of the end effector follows the concept from the previous section. Due to the weight limitations, it is rational to start the construction with the biggest and therefore potentially heaviest part; thus, the main beam is designed first. The main design criteria of the main beam, aside from its weight, is its stiffness, since the forces applied by the actuators in order to bend the flap also act on the main beam. Figure 8 shows a simplified model of one half of the end effector deforming the flap. This model allows us to estimate a minimum stiffness of the beam. The actuators create a moment M. This force lead to a deformation of both the flap () and the beam (). The deformation depends mainly on the stiffnesses of the flap and of the beam.
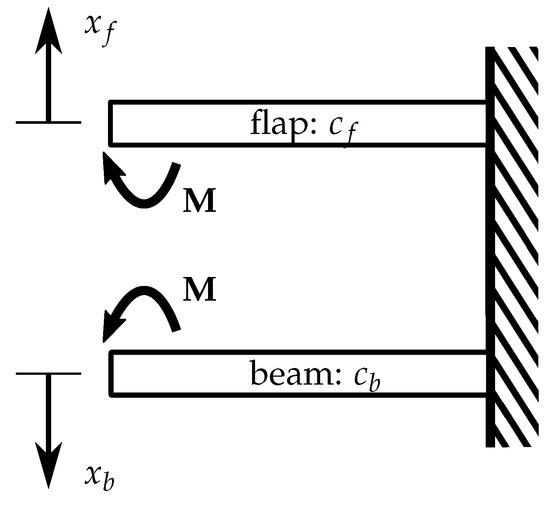
Figure 8.
Model to determine the minimum stiffness of the flap.
These equations can be rearranged:
In order to ensure that the flap bends more than the beam, it can be shown that the stiffness of the beam must be greater than the stiffness of the flap; thus, allowing for reasonable certainty regarding the bending of the flap. The most important bending direction is depicted in Figure 4 since the flap will be deformed in that way by the weight of the flap supports. The flap’s maximum second moment of area is ≈2500 cm for these movements; thus, the main beam needs at least the same second moment of area. Since trusses offer an excellent stiffness-to-weight ratio, an aluminum truss is chosen. These trusses are easily available since they are widely used in the event industry. The chosen truss has a second moment of area of 3729 cm, weighs 21 kg and is 3.5 m long.
The second-most critical part is the kinematic for the bending of the flap. As stated before, the lateral bending of the flap is most important; however, since the flap and the main beam are bending in parallel, the compensation kinematic should move on a trajectory, which bends the flap with minimal internal stresses. The shape and calculation of this trajectory is expected to be quite complex, since the flap is made from non-isotropic CFRP and the construction is statically overdetermined. This leads to several options for the bending compensation. The first is to neglect the bending line and bend the flap with a rotational actuation only, which can lead to high internal stresses. The second is to design a mechanical mechanism that moves on the needed trajectory and is actuated by one actuator. The third option is to build a kinematic with more than one degree of freedom and generate the trajectory with computer numerical control. Since changes in the bending behavior of the flap can easily be accounted for with the third option, it is therefore favorable.
Parallel kinematics are known to offer higher stiffnesses, greater actuation forces and lower weights than serial kinematics. Their main drawback is the smaller workspace; however, since only a few centimeters of bending are needed, a parallel kinematic offers the best option. A small study comparing different serial and parallel kinematics showed that the chosen Stewart platform, based on the design of Stewart and Gough [46,47], offers one of the lightest options while giving a lot of flexibility with its six degrees of freedom. It is widely used, well documented and therefore easy to build. In order to save weight, it is designed according to the expected loads and is built up from six electrical linear actuators. Due to the lack of a model describing the bending behavior of the end effector holding the flap, the sizing was determined using rough estimates based on beam theory. Only load cases were regarded, which are needed to counteract the bending of the flap module due to its own weight. For example, the opportunity to stretch the flap in longitudinal directions or bending it around the vertical axis would have lead to significantly bigger actuators and is not needed in order to counteract the bending due to the flap’s weight. The calculations showed that the deciding factors for the actuators and their position are the actuation forces, since only a few centimeters and often less than one degree of movement are needed to counteract the flaps deformations. These requirements are fulfilled in every considered configuration that is able to deliver the needed actuation forces. The actuators are controlled by an external PLC. Since the goal of this paper is to prove the overall concept the Stewart platform, in its current state, only performs simple rotational and translational movements that are controlled manually. This limits the needed programming of the PLC to the inverse kinematics of the Stewart platform. The bending behavior needs to be accounted for in further research.
Due to the strong abstraction of flap supports in this paper, the gripper system is not designed with the ability to grip the flap supports. Instead, flanges are bolted to corresponding brackets, which are fixed to the flap body. The flanges are designed using topology optimization in order to minimize weight. This reduces the weight dramatically and allows for a good transfer of forces between the end effector and the flap. For a full-scale demonstration, the addition of a gripping system is not expected to pose major challenges.
7. Capability of the End Effector to Bend the Flap
The testing of the end effector starts with the evaluation of its ability to deform the flap body. The Stewart platform is able to move in six degrees of freedom (see Figure 9). Since the actuators are not powerful enough to generate significant deformation of the flap when moving translatory in x or z-directions and rotatory around y, these directions were not investigated. A translation in y resembles a rotation around x and is also not investigated. These exclusions lead to two remaining degrees of freedom of the Stewart platform, which were investigated, namely a rotation around x and z.
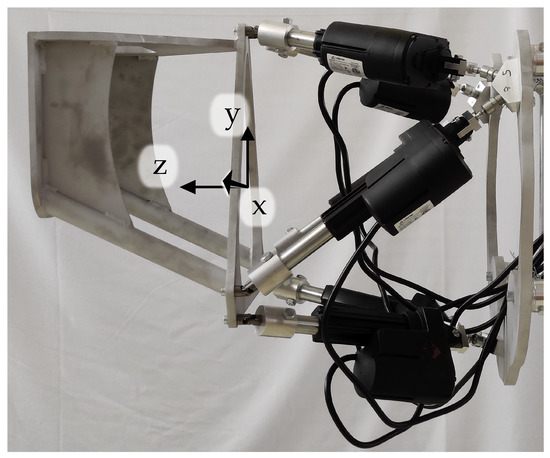
Figure 9.
Coordinate system of the Stewart platform.
Since there is no model implemented describing the bending behavior of the end effector holding the flap jet, it is not possible to define the exact requirements regarding the required bending in order to compensate the weight-induced deformations; therefore, this section concentrates on finding the maximal deformation possible with the actual setup. At the start of these experiments, the Stewart platform was not centered in its work space since it was moved in order to be connected to the flap. From that starting point, the maximal movable distance differs in all six degrees of freedom. It was at least ±36 mm in every translatory direction and ±7.8 in every rotatory direction.
The first experiment contemplated the ability to twist the flap body by the angle when the Stewart platform rotates around the z-direction (see Figure 9 and Figure 10). The rotation of the flap is measured with an MEMS-based inclinometer with an accuracy of fixed to the flap supports in order to use gravity as an external reference. The inclinometer was zeroed at the beginning of the experiments; therefore, 0 represents the state without any induced twist. Figure 11 shows a linear relationship between the Stewart platform’s rotation and the movement of the flap. The slope of the line is smaller than one since the main beam bends as well, thus confirming the assumption regarding the needed stiffness of the main beam in Section 6.

Figure 10.
Experimental setup for inclination measurement of the flap by a rotation around z-axis.
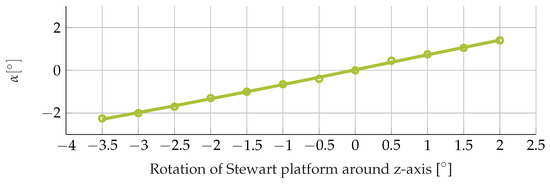
Figure 11.
Rotation of the Stewart platform and induced deformation of the flap.
The second experiment concentrated on the lateral bending of the flap. In order to evaluate the shape of the flap, a string was strung along the length zf of the flap (see Figure 12). The string serves as a straight reference for the measurement of the value v, which indicates the bending of the flap by its distance to the string. The accuracy of the measurement is ±0.5 mm. In contrast to the proposed concept, the bending behavior was not considered in the movement of the Stewart platform, since the required models are complex and not needed in order to demonstrate the overall concept.

Figure 12.
Experimental setup for deflection measurement of the flap by a rotation around x-axis.
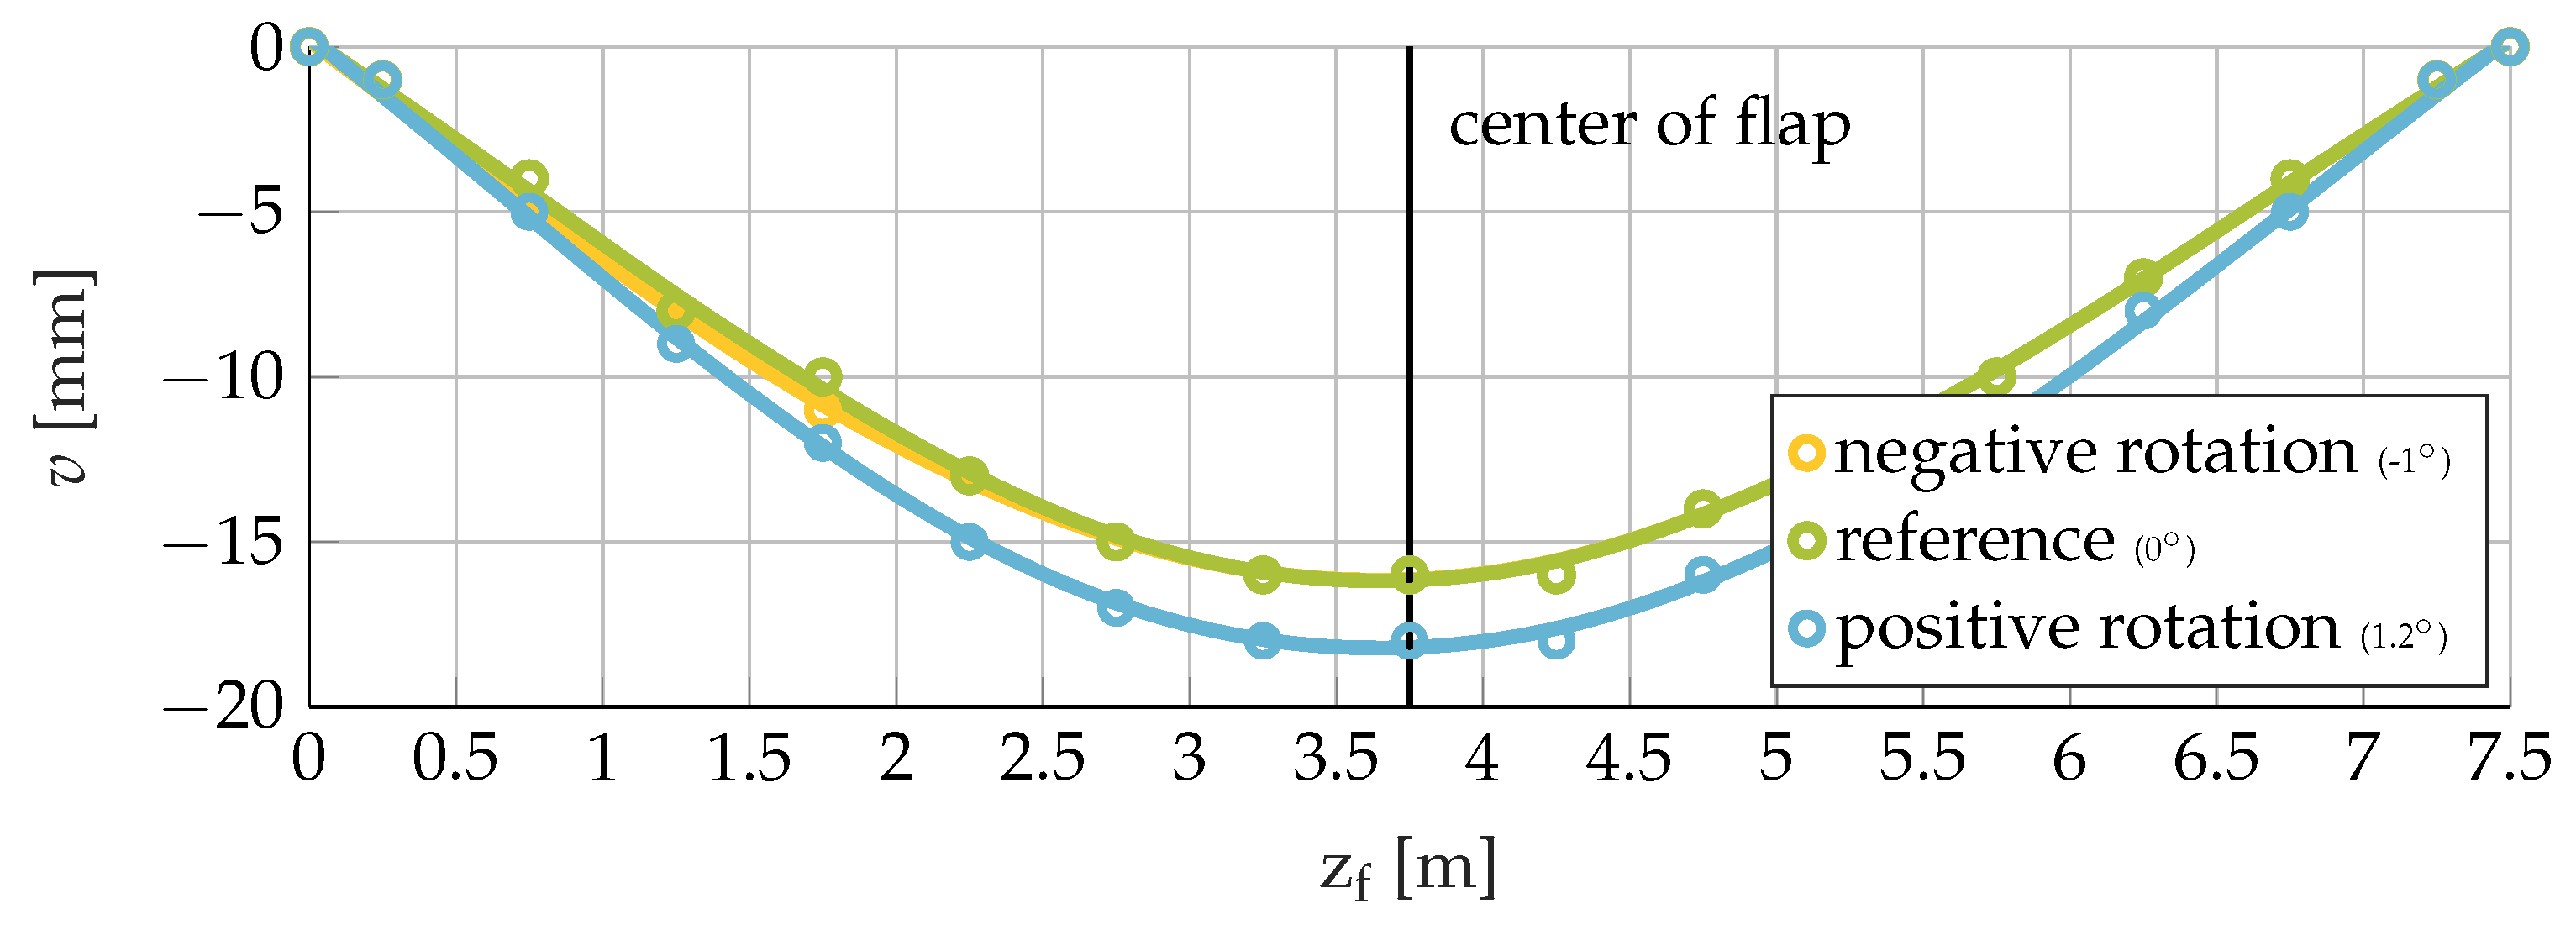
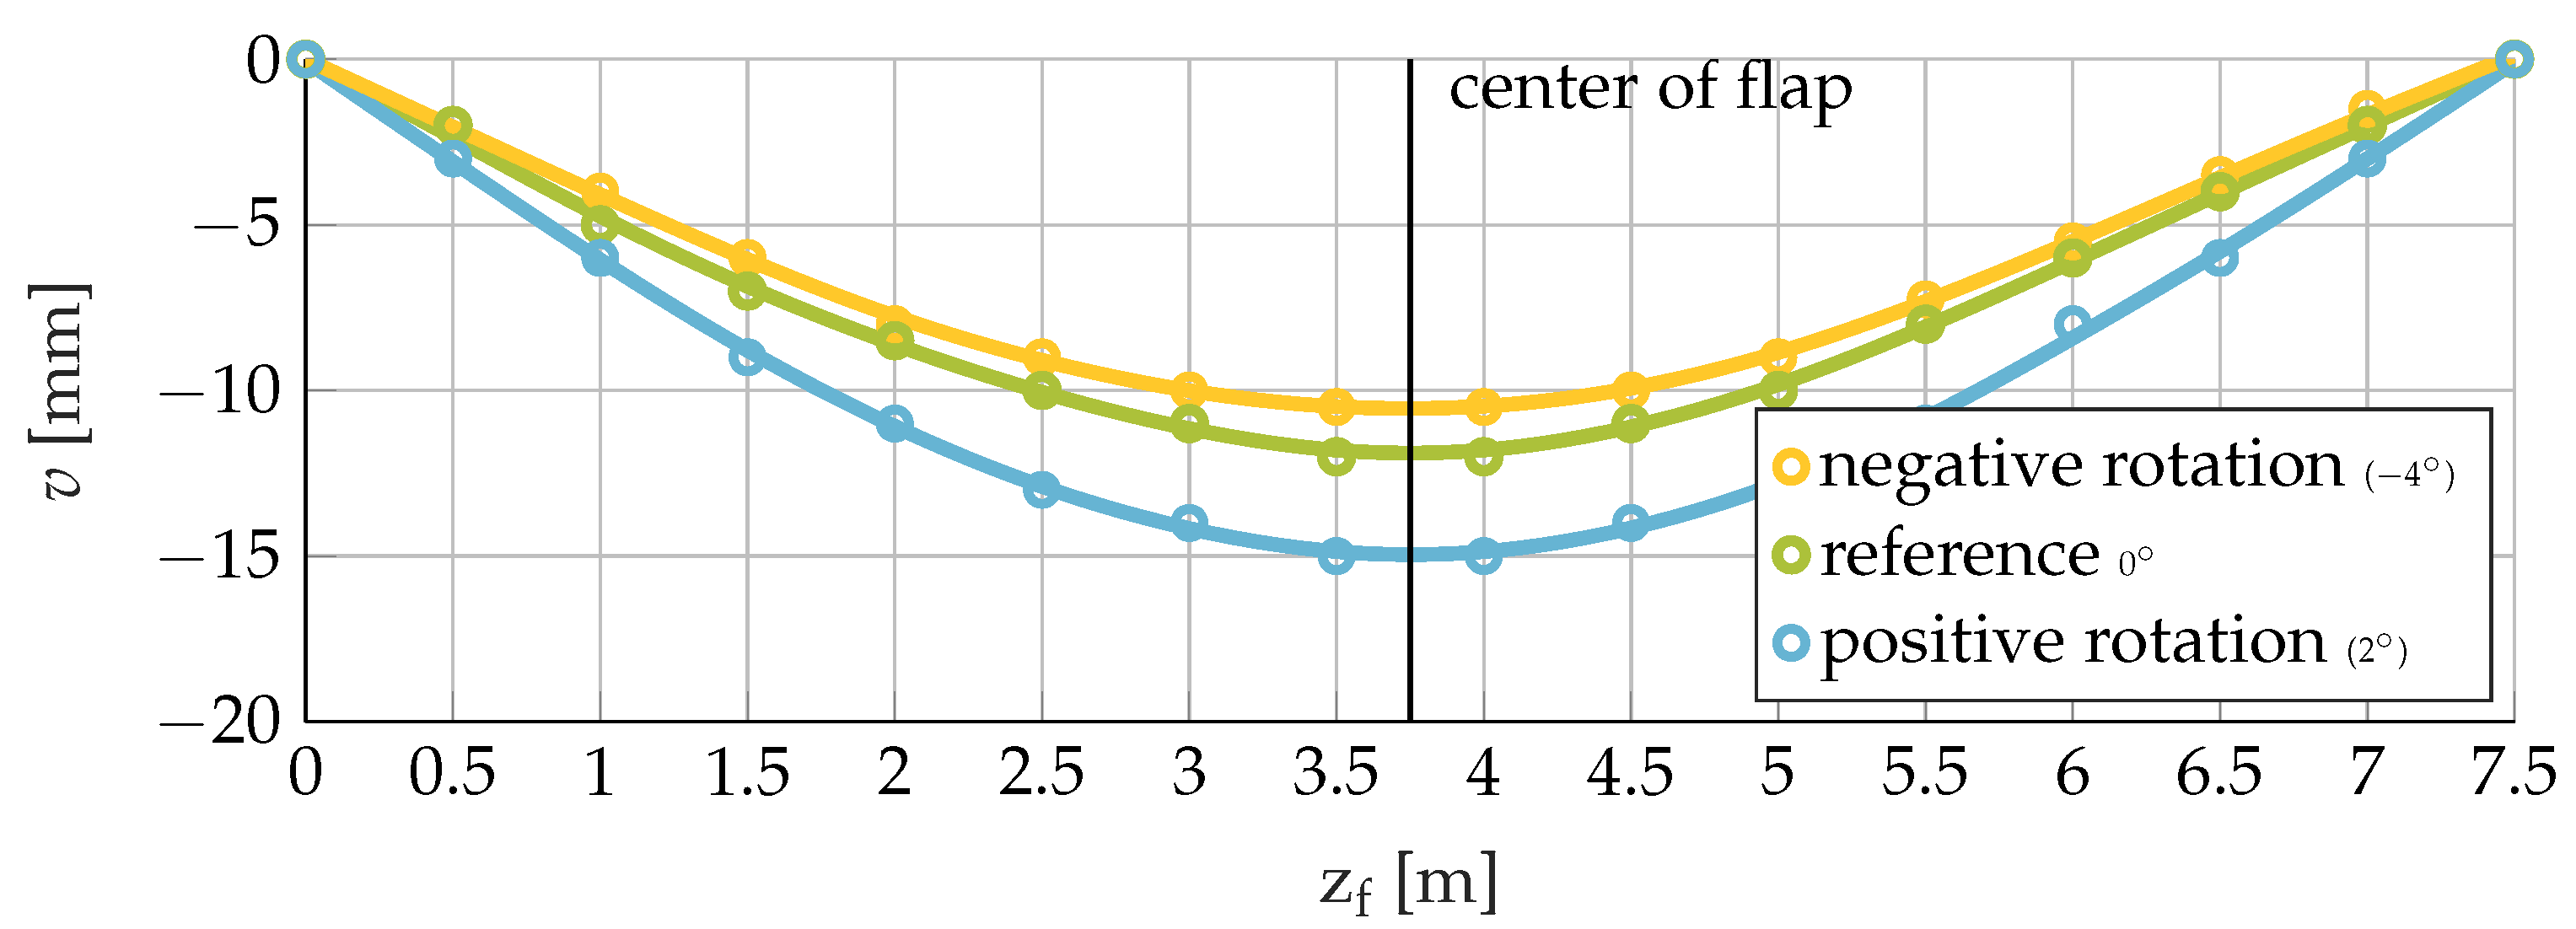
Figure 13 shows the shape of the flap with a rotation of the Stewart platform around the x-axis (see Figure 9). The reference shape emerges when the flap was initially mounted to the end effector. In order to mount the flap, it hangs on a crane as depicted in Figure 4 and the end effector was moved below the flap. The fixed side of the end effector was bolted to the flap first. In the second step, the Stewart platform was moved in order to align the bolt holes at the moveable side; therefore, the flap was not free from internal stresses in the reference shape. In order to determine the maximum possible bending of the flap with the Stewart platform used, the platform was rotated around the x-axis in both positive and negative directions until the actuators generated their maximum bending moment. It can be seen that the flap cannot be bent by negative rotation.
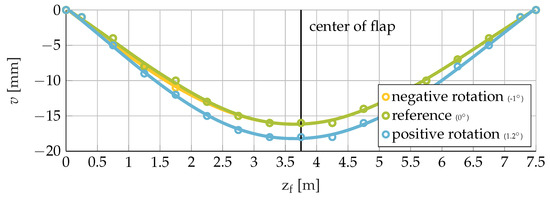
Figure 13.
Deflection of the flap by a rotation around x-axis.
Experiments with an earlier version of the end effector (see Figure 14) show that a low stiffness in the interfaces between the Stewart platform and the flap module can be beneficial. In this earlier version, the interfaces connecting the Stewart platform to the main beam and the flap are significantly less stiff. The deformation shown in Figure 15 was generated without using the maximum actuator forces, since the corner elements connecting the aluminum extrusions failed. Despite the lower forces, the maximum deformation v of the flap is bigger than the deformation, which is generated by the stiff interfaces (4.5 mm vs. 2 mm) (see Figure 13 and Figure 15); therefore, it can be assumed that the low stiffness of the interfaces allowed the flap to bend more closely to its deflection curve, lowering the needed actuation forces.
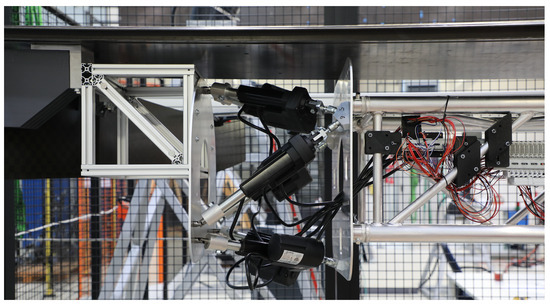
Figure 14.
Early version of the end effector with lower stiffness and strength.

Figure 15.
Deflection of the flap by a rotation around x-axis and compliant interfaces.
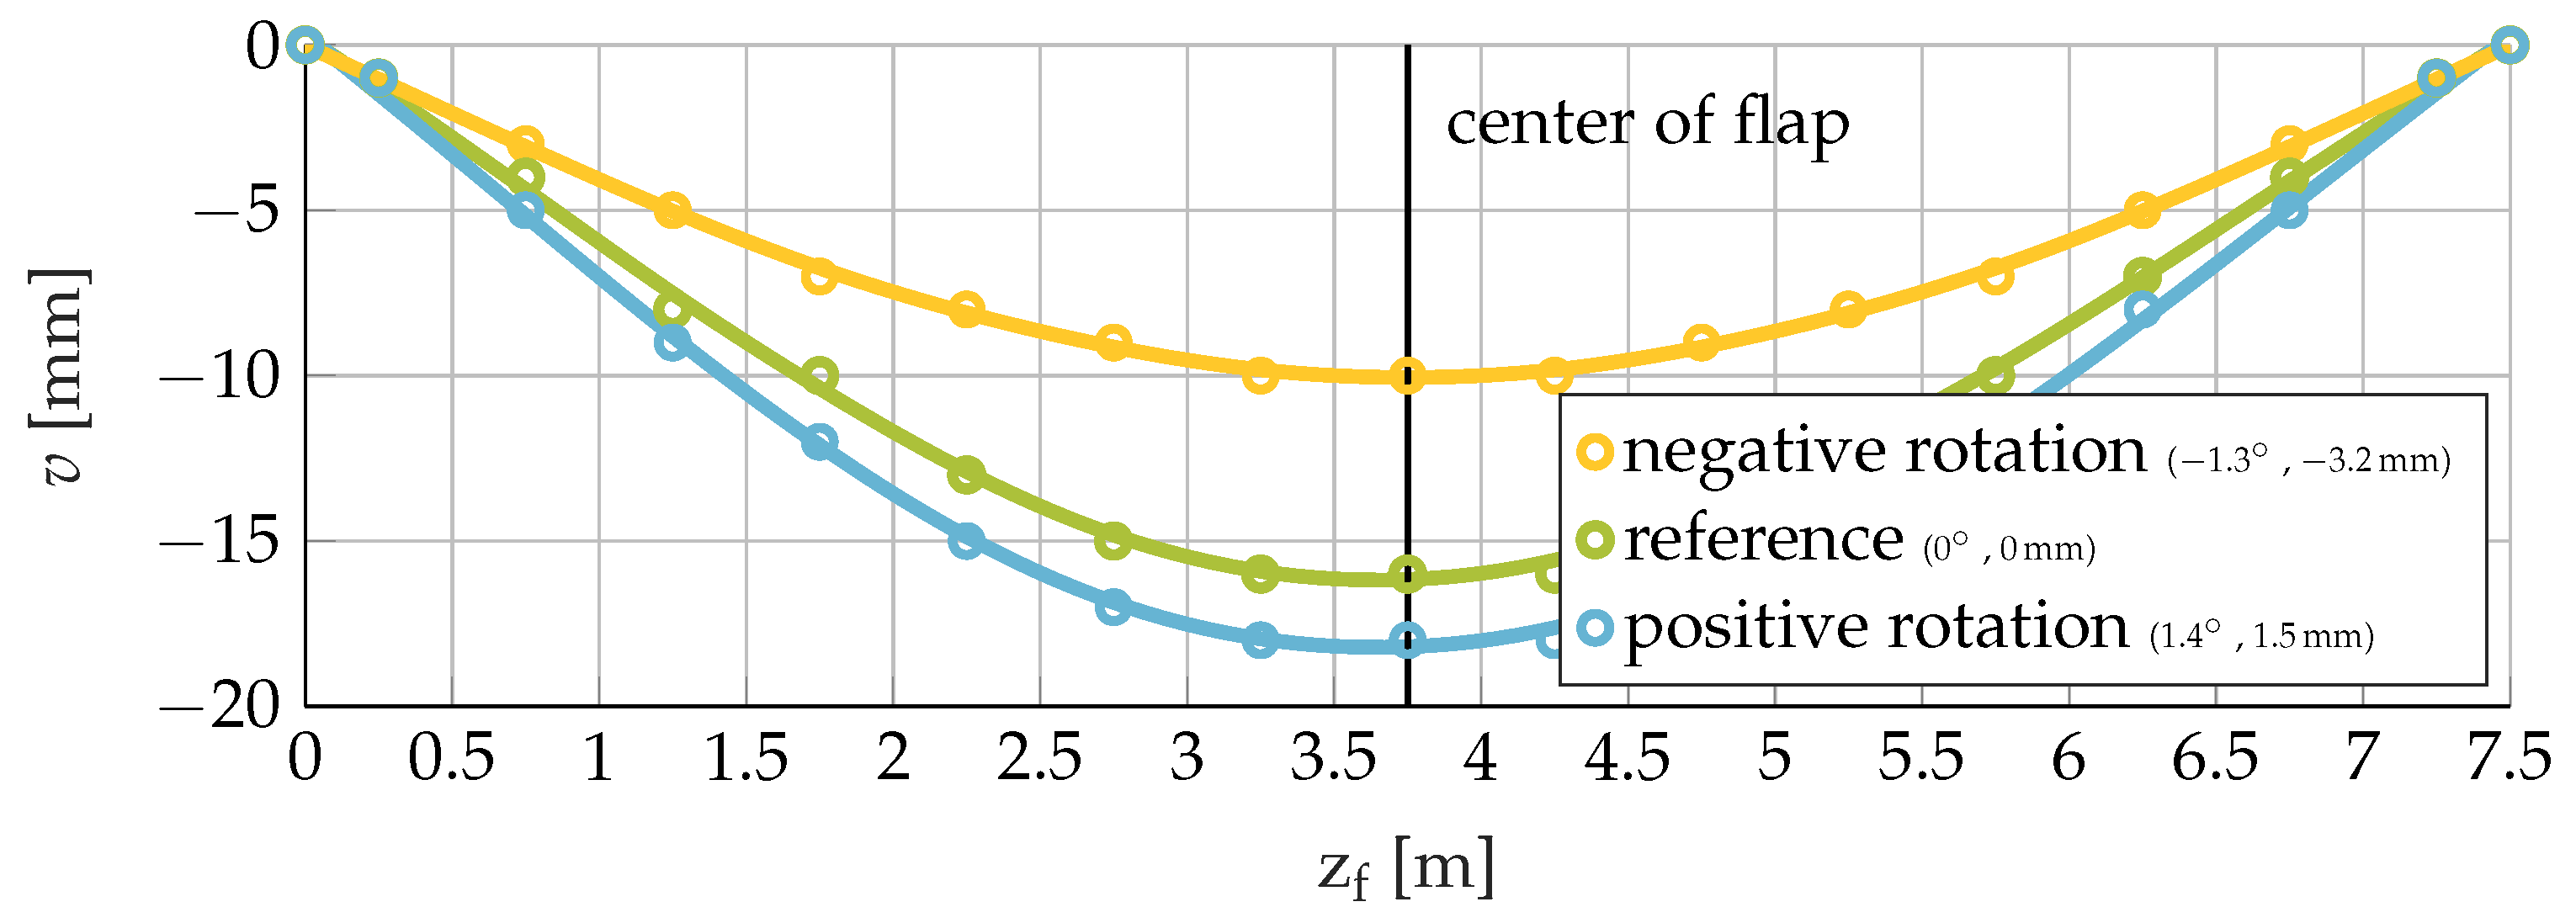
Figure 16 shows the achievable bending with the stiffer interfaces when the Stewart platform also moves translatory in the z-direction in order to better follow the deflection curve of the flap. The translational movement of the Stewart platform is determined iteratively by analyzing the actuator forces until the actuators reach their maximum forces. The bigger deflection shows that accounting for the deflection curve of the flap leads to bigger possible deformations when rotating in the negative direction.
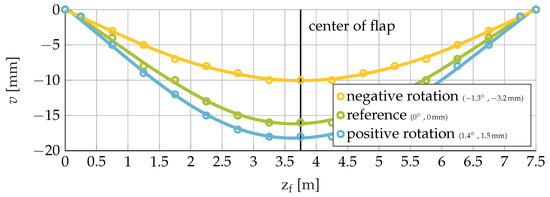
Figure 16.
Deflection of flap with rotation around x-axis and translation in z-direction.
In summary, it can be stated that the end effector is able to bend the flap in all important directions. The maximum deformation is limited by the actuation forces and can easily be increased by using bigger actuators. Furthermore, it is shown that the deflection curve of the flap must be accounted for. There are two options for this. One option is to move the Stewart platform along the deflection curve and the other one is to reduce the stiffness of the end effector.
8. Testing of the Assembly of the Flap
Figure 17 shows the setup for the evaluation of the integration of the fully equipped flap. The wing spar is represented by an aluminum extrusion profile fixed to a wall. The bolt hole pattern is drilled into plates that are bolted to the extrusion.
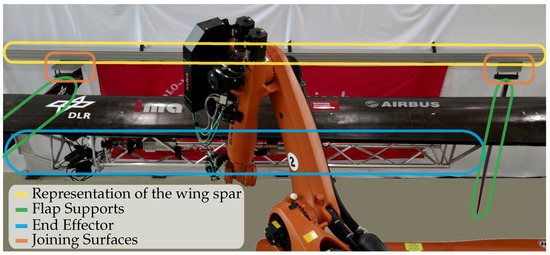
Figure 17.
Mobile robot with end effector integrating the equipped flap to the rear spar.
The experiments show that the end effector is able to hold the fully equipped flap securely and in any desired position (see Figure 18). When the flap is moved by the industrial robot, the end effector tends to swing significantly. The swinging can be reduced by moving the flap slowly. The motion consists mainly of a rotatory movement around the industrial robots wrist. It can easily be explained by the fact that the moment of inertia of the end effector exceeds the industrial robot’s specifications; therefore, it can be avoided in the future by using a bigger industrial robot. When the AIMM drives through the hangar using its wheels, no disturbing vibrations are noticeable; therefore, only the industrial robot needs to be replaced with a higher payload capability, which is needed anyway in order to be able to carry a fully equipped flap with full-scale flap supports.
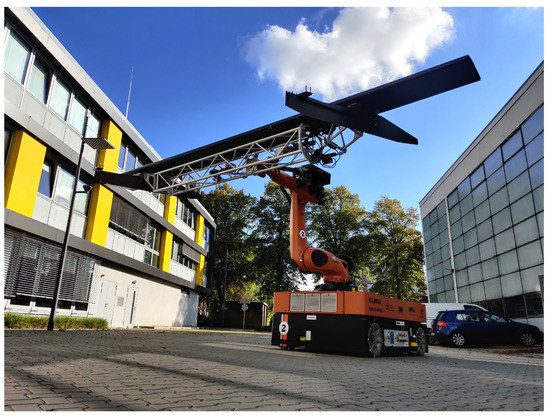
Figure 18.
Mobile robot holding the flap in assembly position.
As described in Section 5, the integration of the fully equipped flap starts with the alignment of the studs on the fixed side of the end effector to their corresponding bolt holes using the industrial robot.
Following Section 6, the alignment of the studs is performed manually by eyeballing. In order to be able to insert the studs into the bolt holes with a linear movement, the studs must coincide with their corresponding bolt holes. Experiments show that it is possible to align the studs on the fixed side within a couple of minutes with an iterative approach using the robots control panel to move the end effector and the flap as a whole. The alignment is considered complete when the tips of the studs are centered within the spar’s bolt holes and the surfaces containing the studs and bolt holes are parallel. Within this alignment step, the movable side was also aligned roughly in order to ease the following steps.
After the alignment of the fixed side, the next step is to compensate the bending of the flap using the Stewart platform. This is performed by aligning the studs on the movable side of the end effector to their corresponding bolt holes using the Steward platform. This process is performed similarly with one difference. Instead of the robot’s kinematic, the Stewart platform is used for alignment, thereby compensating the bending of the flap and aligning the joining feature in one step. This process was also performed manually within a couple of minutes.
After proper alignment, the integration is completed by the insertion of the studs into the bore holes with a linear motion of the industrial robot. The studs enter the bore holes smoothly and without any jamming. Due to the limited accuracy of the manual alignment by eyeballing without the use of measuring devices, it can be expected that an automatic alignment will also provide the needed accuracy.
The smooth fit of the studs is assisted by the low stiffness of the AIMM and the flap support mock-ups. Only small forces are needed to move the studs horizontally and the combination of step bores and tapered bolts helps to provide these small correctional forces. It is not possible to clarify conclusively if the studs would fit as well as shown if the AIMM and flap support mock-ups would be stiffer. The same effect applies for the positioning of the industrial robot. There is a risk that the assembly process would work worse if the required bigger industrial robot and full-size flap supports are used since both will be stiffer. Nevertheless, these risks seem manageable, since the full-scale flap supports contain locating and floating bearings as mounting points, which act similar to a low stiffness in the structure itself. Further, the robot’s stiffness can be lowered by means of impedance control [48]; therefore, the assembly of real fully equipped flap modules with AIMMs seems possible.
9. Conclusions
In summary, this paper shows that the integration of fully equipped flap modules to an aeroplane’s wing spar with AIMMs is possible.
Within the scope of the paper, a concept for the mounting of fully equipped flap modules to a wing spar using AIMMs is presented. In order to test the concept, a mock-up of a fully equipped flap, a wing representative and an end effector were constructed. The deformation compensation capabilities of the proposed end effector were demonstrated in bending experiments. The proposed method to ensure the flap’s geometry using a Stewart platform and the aircraft’s spar as a reference was also experimentally confirmed. Assembly experiments show that the insertion of studs from the fully equipped flap module into bolt holes of the wing spar works smoothly; thus, showing the capability of AIMMs to assemble large compliant structures.
For further research, a thorough investigation of the bending behavior of the whole system is needed. Regarding the shape compensation, a model to predict the deflection curve of the flap body is needed in order to account for it when deforming the flap. This model allows us to lower the internal stresses in the flap and the needed actuation forces; therefore, the model needs to describe the coupled bending behavior of both the flap and the end effector. A simple model is desirable since it has to be calculated in real time. As shown in Section 7, a lower stiffness of the end effector lowers the needed precision of the model; therefore, it is favorable to find a method to determine the minimum required stiffness of the end effector prior to the development of the bending model.
Furthermore, the automatic alignment of the flap needs to be implemented and tested. Approaches are described in Section 3. Since a lower stiffness of the industrial robot has a decreasing effect on the needed accuracy for the positioning of the flap, it seems rational to investigate the use of impedance control for stiffness adjustment.
Author Contributions
Conceptualization, M.N., E.K. and C.H.; methodology, M.N. and T.R.; software, T.R.; validation, M.N. and T.R.; formal analysis, M.N. and T.R.; investigation, M.N. and T.R.; resources, M.N.; data curation, M.N. and T.R.; writing—original draft preparation, M.N. and T.R.; writing—review and editing, M.N., T.R., E.K. and C.H.; visualization, T.R.; supervision, C.H.; project administration, M.N.; funding acquisition, E.K. and C.H. All authors have read and agreed to the published version of the manuscript.
Funding
This research was funded by the German Federal Ministry for Economic Affairs and Energy (BMWI) grant number 20X1724D (Flink 4.0—Virtuelles Toleranzmanagement für effiziente Flügelausrüstungsindustrialisierungskonzepte 4.0).
Data Availability Statement
Not applicable.
Acknowledgments
Within the project, a video showing the proposed concept of the assembly process was produced. It can be found at: https://youtu.be/maWaBMLGMcs (accessed on 10 April 2022).
Conflicts of Interest
The authors declare no conflict of interest.
References
- Shneier, M.; Bostelman, R. Literature Review of Mobile Robots for Manufacturing; National Institute of Standards and Technology: Gaithersburg, MD, USA, 2015. [CrossRef]
- Zhou, K.; Ebenhofer, G.; Eitzinger, C.; Zimmermann, U.; Walter, C.; Saenz, J.; Castano, L.P.; Hernandez, M.A.F.; Oriol, J.N. Mobile manipulator is coming to aerospace manufacturing industry. In Proceedings of the 2014 IEEE International Symposium on Robotic and Sensors Environments (ROSE) Proceedings, Timisoara, Romania, 16–18 October 2014; pp. 94–99. [Google Scholar] [CrossRef]
- Airbus. Airbus Starts Making the Wings for First A350 XWB; Airbus: Leiden, The Netherlands, 2011. [Google Scholar]
- Stepanek, P.; Rall, K.; Wulfsberg, J.P. Flexibel automatisierte Montage von leicht verformbaren großvolumigen Bauteilen: Zugl.: Hamburg-Harburg, Techn. Univ., Institut für Werkzeugmaschinen, Roboter und Montageanlagen, Diss., 2006. In Schriftenreihe des Arbeitsbereichs Werkzeugmaschinen und Automatisierungstechnik der Technischen Universität Hamburg-Harburg; Shaker: Aachen, Germany, 2007; Volume 16. [Google Scholar]
- Mei, Z.; Maropoulos, P.G. Review of the application of flexible, measurement-assisted assembly technology in aircraft manufacturing. Proc. Inst. Mech. Eng. Part B J. Eng. Manuf. 2014, 228, 1185–1197. [Google Scholar] [CrossRef]
- Weidner, R.; Schwake, K.; Wulfsberg, J. Hochgenaue Montage von Strukturbauteilen. Z. Wirtsch. Fabr. 2013, 108, 27–31. [Google Scholar] [CrossRef]
- Schwake, K.; Wulfsberg, J. Robot-based System for Handling of Aircraft Shell Parts. Procedia CIRP 2014, 23, 104–109. [Google Scholar] [CrossRef] [Green Version]
- Bock, M.; Kleineberg, M. Assembly 4.0—Flexibly Picked Up, Precisely Mounted; SAE Technical Paper Series; SAE International: Warrendale, PA, USA, 2019. [Google Scholar] [CrossRef] [Green Version]
- Ramirez, J.; Wollnack, J.; Borrmann, C.; Brencher, T.; Valencia, D. Development of automated assembly systems for large cfrp-structures. In Proceedings of the 4th International Workshop on Aircraft System Technologies; von Estorff, O., Thielecke, F., Eds.; Berichte aus der Luft- und Raumfahrttechnik, Shaker: Aachen, Germany, 2013; pp. 395–404. [Google Scholar]
- Ramirez, J.; Wollnack, J. Flexible Automated Assembly Systems for Large CFRP-structures. Procedia Technol. 2014, 15, 447–455. [Google Scholar] [CrossRef]
- Mukherjee, D.; Gupta, K.; Chang, L.H.; Najjaran, H. A Survey of Robot Learning Strategies for Human-Robot Collaboration in Industrial Settings. Robot. Comput. Integr. Manuf. 2022, 73, 102231. [Google Scholar] [CrossRef]
- Robla-Gomez, S.; Becerra, V.M.; Llata, J.R.; Gonzalez-Sarabia, E.; Torre-Ferrero, C.; Perez-Oria, J. Working Together: A Review on Safe Human-Robot Collaboration in Industrial Environments. IEEE Access 2017, 5, 26754–26773. [Google Scholar] [CrossRef]
- Schleich, B.; Anwer, N.; Mathieu, L.; Wartzack, S. Shaping the digital twin for design and production engineering. CIRP Ann. 2017, 66, 141–144. [Google Scholar] [CrossRef] [Green Version]
- Lartigue, C.; Thiebaut, F.; Bourdet, P.; Anwer, N. Dimensional metrology of flexible parts: Identification of geometrical deviations from optical measurements. In Advanced Mathematical and Computational Tools in Metrology; Ciarlini, P., Filipe, E., Forbes, A.B., Pavese, F., Perruchet, C., Siebert, B.R.L., Eds.; World Scientific: Singapore, 2005; pp. 196–203. [Google Scholar] [CrossRef]
- Lin, J.; Jin, S.; Zheng, C.; Li, Z.; Liu, Y. Compliant assembly variation analysis of aeronautical panels using unified substructures with consideration of identical parts. Comput. Aided Des. 2014, 57, 29–40. [Google Scholar] [CrossRef]
- Thiébaut, F.; Lacroix, C.; Andolfatto, L.; Lartigue, C. Evaluation of the shape deviation of non rigid parts from optical measurements. Int. J. Adv. Manuf. Technol. 2017, 88, 1937–1944. [Google Scholar] [CrossRef] [Green Version]
- Söderberg, R.; Wärmefjord, K.; Carlson, J.S.; Lindkvist, L. Toward a Digital Twin for real-time geometry assurance in individualized production. CIRP Ann. 2017, 66, 137–140. [Google Scholar] [CrossRef]
- Marquardt, D.W. An Algorithm for Least-Squares Estimation of Nonlinear Parameters. J. Soc. Ind. Appl. Math. 1963, 11, 431–441. [Google Scholar] [CrossRef]
- Horn, B.K.P. Closed-form solution of absolute orientation using unit quaternions. J. Opt. Soc. Am. A 1987, 4, 629. [Google Scholar] [CrossRef]
- Besl, P.J.; McKay, N.D. A method for registration of 3-D shapes. IEEE Trans. Pattern Anal. Mach. Intell. 1992, 14, 239–256. [Google Scholar] [CrossRef]
- Kumar, R.; Hanson, A.R. Robust Methods for Estimating Pose and a Sensitivity Analysis. CVGIP Image Underst. 1994, 60, 313–342. [Google Scholar] [CrossRef]
- Arun, K.S.; Huang, T.S.; Blostein, S.D. Least-squares fitting of two 3-d point sets. IEEE Trans. Pattern Anal. Mach. Intell. 1987, 9, 698–700. [Google Scholar] [CrossRef] [PubMed] [Green Version]
- Scott, G.L.; Longuet-Higgins, H.C. An algorithm for associating the features of two images. Proc. R. Soc. Lond. Ser. B Biol. Sci. 1991, 244, 21–26. [Google Scholar]
- Horn, B.K.P. Relative orientation. Int. J. Comput. Vis. 1990, 4, 59–78. [Google Scholar] [CrossRef]
- Chou, J. Quaternion kinematic and dynamic differential equations. IEEE Trans. Robot. Autom. 1992, 8, 53–64. [Google Scholar] [CrossRef]
- Wang, Z.; Jepson, A.D. A new closed-form solution for absolute orientation. In Proceedings of the IEEE Conference on Computer Vision and Pattern Recognition CVPR-94, Seattle, WA, USA, 21–23 June 1994; pp. 129–134. [Google Scholar] [CrossRef]
- Eggert, D.W.; Lorusso, A.; Fisher, R.B. Estimating 3-D rigid body transformations: A comparison of four major algorithms. Mach. Vis. Appl. 1997, 9, 272–290. [Google Scholar] [CrossRef]
- Myronenko, A.; Song, X. Point set registration: Coherent point drift. IEEE Trans. Pattern Anal. Mach. Intell. 2010, 32, 2262–2275. [Google Scholar] [CrossRef] [Green Version]
- Bosché, F. Automated recognition of 3D CAD model objects in laser scans and calculation of as-built dimensions for dimensional compliance control in construction. Adv. Eng. Inform. 2010, 24, 107–118. [Google Scholar] [CrossRef]
- Nguyen, C.H.P.; Choi, Y. Comparison of point cloud data and 3D CAD data for on-site dimensional inspection of industrial plant piping systems. Autom. Constr. 2018, 91, 44–52. [Google Scholar] [CrossRef]
- Hattab, A.; Taubin, G. 3D Rigid Registration of Cad Point-Clouds. In Proceedings of the 2018 International Conference on Computing Sciences and Engineering (ICCSE), Kuwait City, Kuwait, 11–13 March 2018; pp. 1–6. [Google Scholar] [CrossRef]
- Bergström, P.; Edlund, O. Robust registration of surfaces using a refined iterative closest point algorithm with a trust region approach. Numer. Algorithms 2017, 74, 755–779. [Google Scholar] [CrossRef]
- Cho, Y.K.; Gai, M. Projection-Recognition-Projection Method for Automatic Object Recognition and Registration for Dynamic Heavy Equipment Operations. J. Comput. Civ. Eng. 2014, 28. [Google Scholar] [CrossRef]
- Son, H.; Kim, C.; Kim, C. 3D reconstruction of as-built industrial instrumentation models from laser-scan data and a 3D CAD database based on prior knowledge. Autom. Constr. 2015, 49, 193–200. [Google Scholar] [CrossRef]
- Kim, C.; Lee, J.; Cho, M.; Kim, C. Fully Automated Registration of 3D CAD Model with Point Cloud from Construction Site. In Proceedings of the 28th International Symposium on Automation and Robotics in Construction (ISARC 2011), Seoul, Korea, 29 June–2 July 2011; Kwon, S., Ed.; International Association for Automation and Robotics in Construction (IAARC): Edinburgh, UK, 2011. [Google Scholar] [CrossRef] [Green Version]
- Son, H.; Kim, C. 3D structural component recognition and modeling method using color and 3D data for construction progress monitoring. Autom. Constr. 2010, 19, 844–854. [Google Scholar] [CrossRef]
- Rusinkiewicz, S.; Levoy, M. Efficient variants of the ICP algorithm. In Proceedings of the Third International Conference on 3-D Digital Imaging and Modeling, Quebec City, QC, Canada, 28 May–1 June 2001; pp. 145–152. [Google Scholar] [CrossRef] [Green Version]
- Zhang, Z. Iterative point matching for registration of free-form curves and surfaces. Int. J. Comput. Vis. 1994, 13, 119–152. [Google Scholar] [CrossRef]
- Zinsser, T.; Schmidt, J.; Niemann, H. A refined ICP algorithm for robust 3-D correspondence estimation. In Proceedings of the 2003 International Conference on Image Processing (Cat. No.03CH37429), Barcelona, Spain, 14–17 September 2003; pp. II-695–II-698. [Google Scholar] [CrossRef]
- Wolff, K.; Kim, C.; Zimmer, H.; Schroers, C.; Botsch, M.; Sorkine-Hornung, O.; Sorkine-Hornung, A. Point Cloud Noise and Outlier Removal for Image-Based 3D Reconstruction. In Proceedings of the 2016 Fourth International Conference on 3D Vision (3DV), Stanford, CA, USA, 25–28 October 2016; pp. 118–127. [Google Scholar] [CrossRef]
- Galea, C.; Guillemot, C. Denoising of 3D Point Clouds Constructed from Light Fields. In Proceedings of the ICASSP 2019—2019 IEEE International Conference on Acoustics, Speech and Signal Processing (ICASSP), Brighton, UK, 12–17 May 2019; pp. 1882–1886. [Google Scholar] [CrossRef] [Green Version]
- Brauner, C. Analysis of Process-Induced Distortions and Residual Stresses of Composite Structures; Science Report aus dem Faserinstitut Bremen; Logos Verlag Berlin GmbH: Berlin, Germany, 2013; Volume 8. [Google Scholar]
- Brauner, C.; Bauer, S.; Herrmann, A.S. Analysing process-induced deformation and stresses using a simulated manufacturing process for composite multispar flaps. J. Compos. Mater. 2015, 49, 387–402. [Google Scholar] [CrossRef]
- Roth, Y.C.; Weinholdt, M.; Winkelmann, L. Liquid composite moulding-enabler for the automated production of CFRP aircraft components. In Proceedings of the 16th European Conference on Composite Materials, ECCM, Seville, Spain, 22–26 June 2014; pp. 22–26. [Google Scholar]
- Arents, J.; Abolins, V.; Judvaitis, J.; Vismanis, O.; Oraby, A.; Ozols, K. Human–Robot Collaboration Trends and Safety Aspects: A Systematic Review. J. Sens. Actuator Netw. 2021, 10, 48. [Google Scholar] [CrossRef]
- Stewart, D. A Platform with Six Degrees of Freedom. Proc. Inst. Mech. Eng. 1965, 180, 371–386. [Google Scholar] [CrossRef]
- Gough, V.E. Contribution to discussion of papers on research in automobile stability, control and tyre performance. Proc. Auto Div. Inst. Mech. Eng. 1957, 171, 392–395. [Google Scholar]
- Abu-Dakka, F.J.; Saveriano, M. Variable Impedance Control and Learning—A Review. Front. Robot. AI 2020, 7, 590681. [Google Scholar] [CrossRef] [PubMed]
Publisher’s Note: MDPI stays neutral with regard to jurisdictional claims in published maps and institutional affiliations. |
© 2022 by the authors. Licensee MDPI, Basel, Switzerland. This article is an open access article distributed under the terms and conditions of the Creative Commons Attribution (CC BY) license (https://creativecommons.org/licenses/by/4.0/).

