1. Introduction
Modern life is inseparable from manufacturing. Nowadays, critical components are manufactured at a high level of precision [
1]. With increasingly stricter dimensional tolerances on high-performance components, these precision techniques have become increasingly popular in attaining the expected performance of production [
2,
3]. The product performance should be satisfactory after its careful assembly if the geometric dimensions, tolerances, and surface roughness specified in the drawings are correctly satisfied during the manufacturing processes. In addition, most of the finished components require no additional or trimming processes [
4]. In brief, the geometric constraints of the components determined during the design process accurately ensure the expected performance of the products through this geometric-oriented manufacturing.
As manufacturing improves, more and more industries are placing higher demands on product performance. These demands, in turn, have led to higher standards for the critical components of such products. For example, the hemispherical resonator gyroscope (HRG) is one of the most precise gyroscopes that is available today. Hemispherical resonators, the core component of HRG, should be uniform in mass, elasticity, and damping and have a perfect surface shape to reduce the drift error [
5]. However, a perfect hemispherical shell cannot be machined. The actual vibration performance is inevitably different from the expected performance. To address this problem, many researchers introduced trimming processes to tune the resonators [
6,
7,
8]. However, the yield is not effectively guaranteed. The reason is that trace materials in a specific area must be removed during the tuning process, but there are uncontrollable errors in all of the processing removal methods. A gyroscope with an extremely high performance is sensitive to the manufacturing tolerance. Thus, a near-perfect hemispherical shell requires an increasing level of processing accuracy, but this causes an extensive loss of time and economic costs that limit the use of these products.
Dongming Guo, a co-author of this paper, proposed a basic methodology of high-performance components a decade ago and successfully implemented it in manufacturing processes [
9,
10,
11,
12]. This methodology has three stages: (1) the conceptual design and optimization of the expected performance without considering manufacturing process constraints; (2) the component design considering the material and machining processes capabilities; (3) the performance-oriented manufacturing considering the uncertainties using the mechanical trimming process. The first stage is relatively straightforward. However, in the second component design stage, the design of the previous step must be appropriately adapted to the available machine tools. Therefore, the expected performance of the component must also be adjusted accordingly. At the same time, the manufacturing tolerances of the component must be carefully designed and assigned in this step. Klocke et al. gave a weighted form of tolerance assignment based on the product performance [
13]. This method is essential for high-performance component manufacture because high-performance products are more sensitive to the manufacturing tolerances. Therefore, many researchers have developed processing models such as metal cutting (machining) processes [
14] and surface modification [
15,
16] to ensure that the final performance of the components is accurately achieved. However, processing modeling is time-consuming and has the problem of not being accurate, which limits its mass production and application [
17,
18]. Consequently, performance-oriented manufacturing is essential for products with high-performance requirements.
In order to achieve accurate performance, the uncertainty of the process parameters and the trimming process need to be taken into consideration. In exploring the processing uncertainties, Morse et al. revisited the uncertainty management methodology from the conceptual design to the final product for controlling the component tolerances to ensure the products’ functionality [
19]. The uncertainty and geometric specification are described in a mathematical model. However, there is no correlation between the product performance and the processing uncertainties. The product performance is dependent on processing uncertainty, and it is difficult to control precisely, which means that it remains unresolved. Particularly for the components that fulfill their function but do not perform as well as they should, the trimming process can provide the necessary enhancement.
This paper establishes a mathematical model for manufacturing high-performance components using available machine tools. This methodology introduces the sensitivity analysis of the process parameters which considers the processing uncertainties and is implemented on the modal tuning of hemispherical resonators. It will be possible to achieve the expected performance of the components using the parameter extraction, sensitivity analysis and trimming processes that consider the material removal resolution and the processing uncertainties innovatively. The proposed methodology resolves the contradiction between a limited manufacturing capability and stringent requirements for controlling the performance deviations.
2. Manufacturing Methodology of High-Performance Components
Engineers have been exploring the manufacturing of high-performance parts under limited machining capabilities. When it comes to mechanical watches, the hairspring is the core part of its accuracy performance. Due to limited machining precision, each hairspring and the regulator to which it is attached must be manually adjusted. By testing the rate performance of the watches and empirically adjusting the regulator to change the bending stiffness of the hairspring alternately, the watches finally achieve a reasonable drift error ± 2~60 s per day [
20]. These are iterative processes to eventually reach the expected performance through performance testing and trimming processes. The dynamic balance of the shaft systems also uses a similar method since it is extremely costly to manufacture the shaft systems with uniform materials and high machining and assembly accuracy in order to meet the requirements of the shaft systems. Guo [
12] refined the above manufacturing methods into a systematic methodology for manufacturing high-performance components.
The performance of such components is affected in complex ways by their geometric dimensions, material properties and machining processes. In order to meet high-performance requirements, these factors must be considered holistically. Mathematically, the actual performance of a component can be described as follows:
where
Φi is the
i-th performance indicator of the specific component, and it is dependent on the geometric dimensions
G and the material properties
M. The function
g is a vector-valued function.
It is noted that the mechanical process changes the geometric dimensions, and the geometric dimensions
G in Equation (1) have two parts:
where
G0 is the expected geometric dimensions during the component design.
Gd is the geometric error related to mechanical manufacturing, including the microtopography of the machined surface, so
Gd is dependent on the mechanical process parameters
P.
Similar to Equation (2), the material property
M in Equation (1) can also be described as:
where
M0C is the expected material properties determined by the component design, independent of manufacturing processes.
M0F is the material property error produced in the material preparation processes, but not in the mechanical manufacturing processes discussed in this paper.
Md is the material property errors induced by mechanical manufacturing, such as surface microstructure, residual stress, and microscopic defects. In general, material forming precedes the mechanical processes. Neither
M0C nor
M0F will change during the mechanical processes. In summary, the
G and
M are all vectors and vector-valued functions of the mechanical process parameters
P in Equation (3). The component performance
Φi in Equation (4) is dependent on the mechanical process parameters
P, and it can be written as:
On the other hand, the expected performance of the component, <
Φi>, can be expressed as a function of the expected vector of the geometry dimensions and the material properties:
During the component design stage, the performance is optimized using Equation (5). However, the actual geometry dimensions
G and material properties
M inevitably differ from the expected value
G0 and
M0C due to mechanical manufacturing uncertainties. Therefore, the actual performance
Φi must differ from the expected performance <
Φi>. The performance deviation Δ
Φi is dependent on the mechanical process parameters
P:
If we suppose that the effect of the deviation of the geometry dimensions and the material properties on the component performance is negligible or controllable, this results in a slight deviation in the final performance. In this case, the performance is easy to achieve. However, high-performance component performance is sensitive to the deviation of the mechanical process parameters. If the standard deviation
σX represents the uncertainty or deviation of any physical quantity
X, the performance uncertainty of the component
σΦi is related to the geometric and material uncertainty induced by mechanical manufacturing:
where
is the sensitivity vector.
μP is the expected vector of mechanical process parameters
P.
Σ is the covariance matrix of the mechanical process parameters
P whose (
m,
n) element is Cov (
Pm,
Pn).
Component performance is usually sensitive to processing uncertainties in precision and ultra-precision machining. It is also likely that the component performance will not meet the requirements if the performance deviation is of the same order of magnitude as the processing uncertainties. The ratio of the performance deviations to the expected value can quantify how much the processing uncertainties affect the component’s performance:
It should have an upper bound of
CVi max:
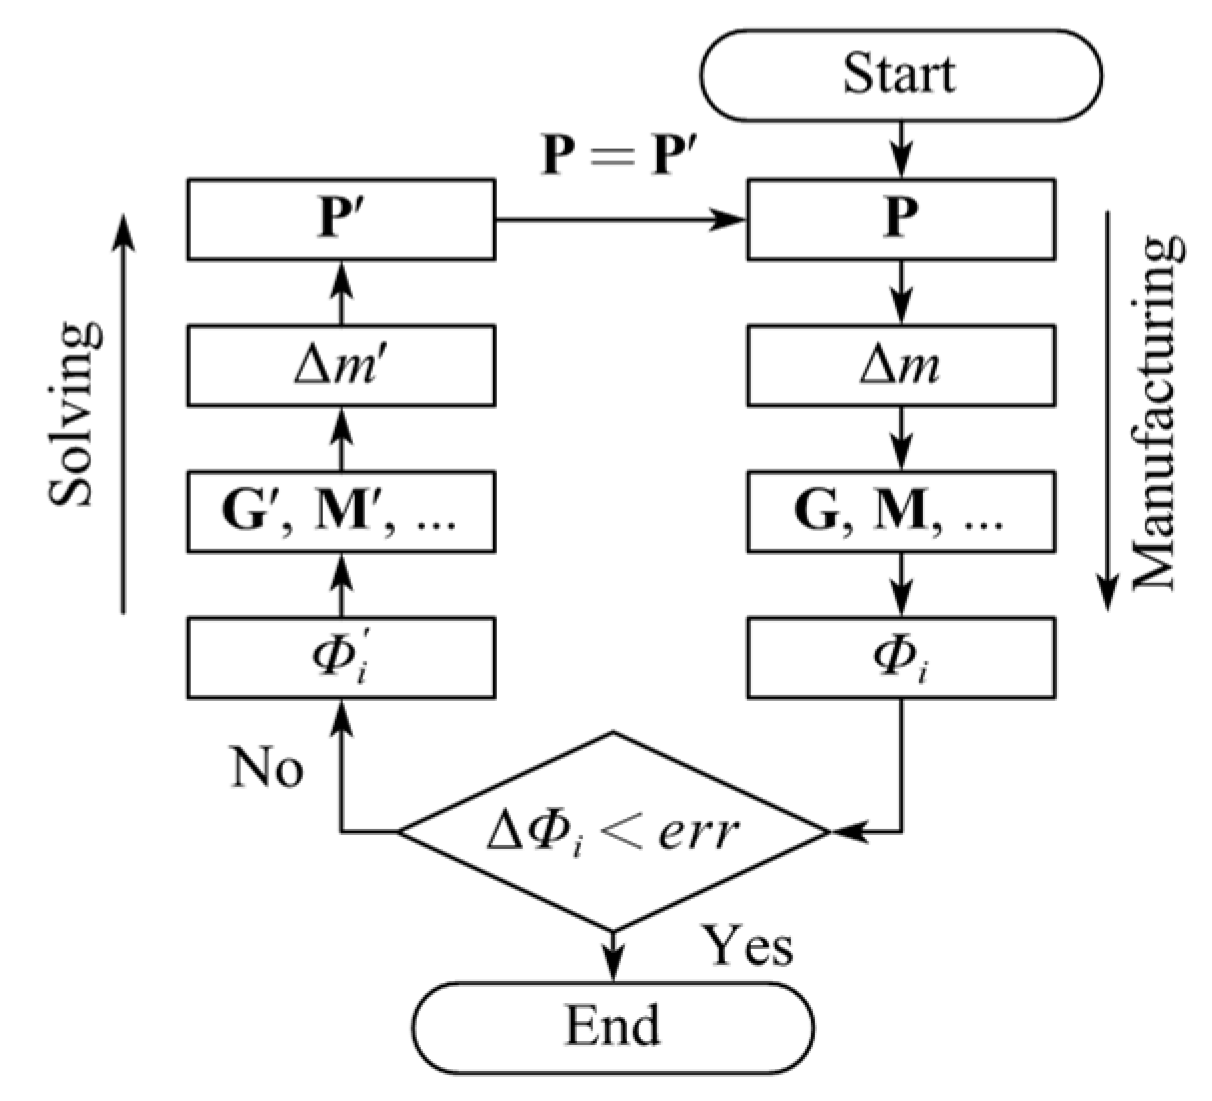
Therefore, in the production of high-performance components, it is necessary to evaluate the performance deviation and confirm the appropriate process parameters that are to be adjusted. By minimizing the performance deviation Δ
Φi in Equation (6), the corrected vectors in the trimming process
ΔG and
ΔM of the geometric dimensions
G and the material properties
M are found. After determining the trimming techniques, the trimming process is performed using the process parameters
P′ determined by
ΔG and
ΔM. This procedure is shown in
Figure 1.
In general, analyzing the component’s performance based on information about the geometry, material, and manufacturing is a positive problem, and most of these problems are well posed. However, finding the trimming process parameter P’ according to the performance deviation is an inverse problem involving the multi-parameter composite function. Most of the inverse problems are ill posed because too little information is known. The ill-posed problems often have multiple solutions, or the solutions are unstable and easily affected by perturbation. Fortunately, the sensitivity analysis and optimization method is an alternative method that is used to solve this inverse problem. It is also a necessary method to reveal the influence of the processing uncertainties on the performance of the components. The sensitivity Si of component performance Φi to the parameters P of a specific process technique can be expressed as Equation (8).
Two conditions generally constrain the process parameters. One of them is the need to correct the performance deviation quickly. The sensitivity should not be too small in this case. The other is the limitation of the machine tools’ capabilities. Under this condition, the sensitivity should not be too high or exceed the capabilities of the machine tools. Moreover, according to Equations (7), (9) and (10), a high sensitivity will cause drastic changes in the final performance, and these will even deviate from the expected performance with the same processing uncertainty. Therefore, the sensitivity must have the upper and lower bounds of each process parameter
Pk.
Finally, the optimization model for the trimming of high-performance components can be expressed in the following form:
Since most of the components have multiple performance indicators, finding the optimal process parameters is often a multi-objective optimization problem. Moreover, Equation (5) cannot be written explicitly for many components, so numerical models are commonly used to obtain an accurate performance through multiple iterations.
3. Application to Hemispherical Resonator Modal Tuning
The high-performance hemispherical resonator is one of the most complex high-performance components to be machined. The precession angle of the
n = 2 standing wave is used to sensitize the rotation angle of the base. There are no frequency splits in the balanced hemispherical resonators, and the
n = 2 flexing mode is double degenerate. The location of this
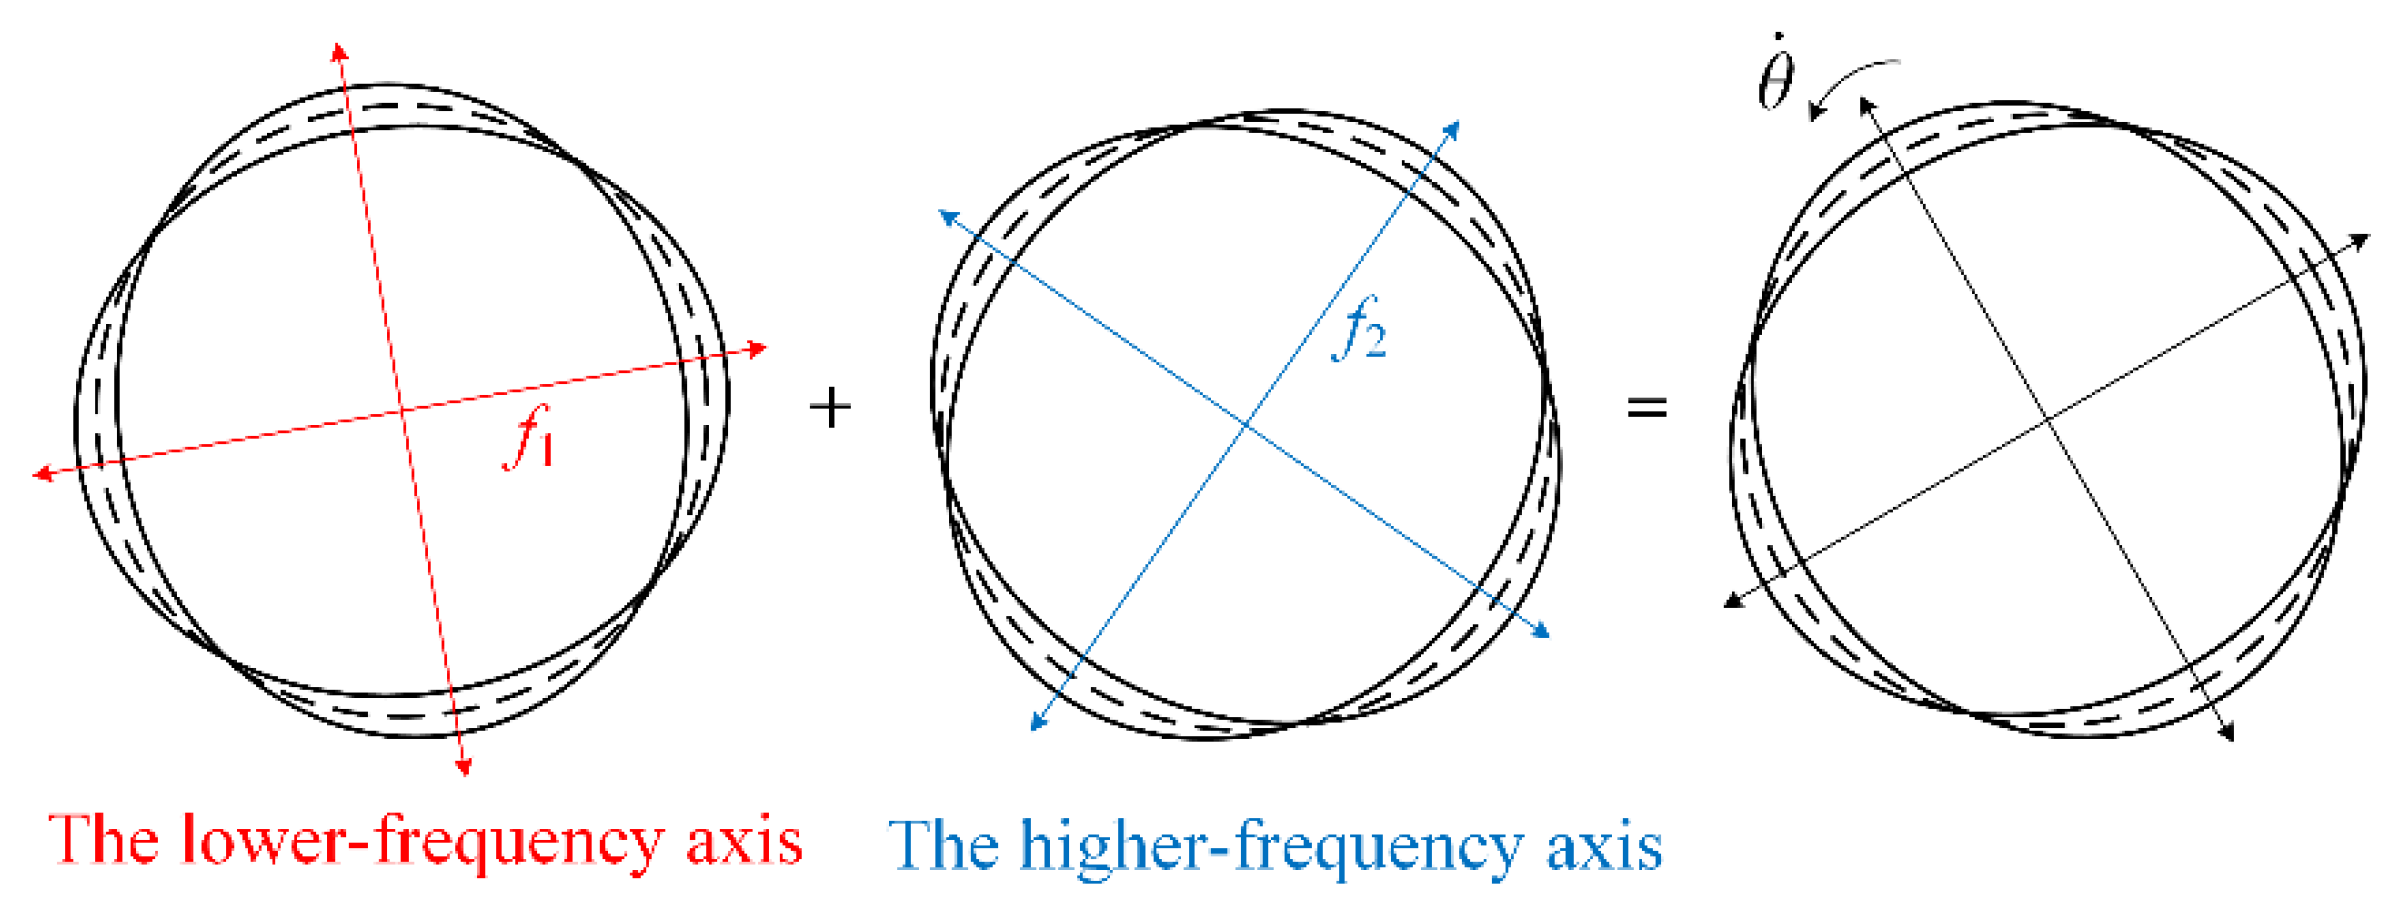
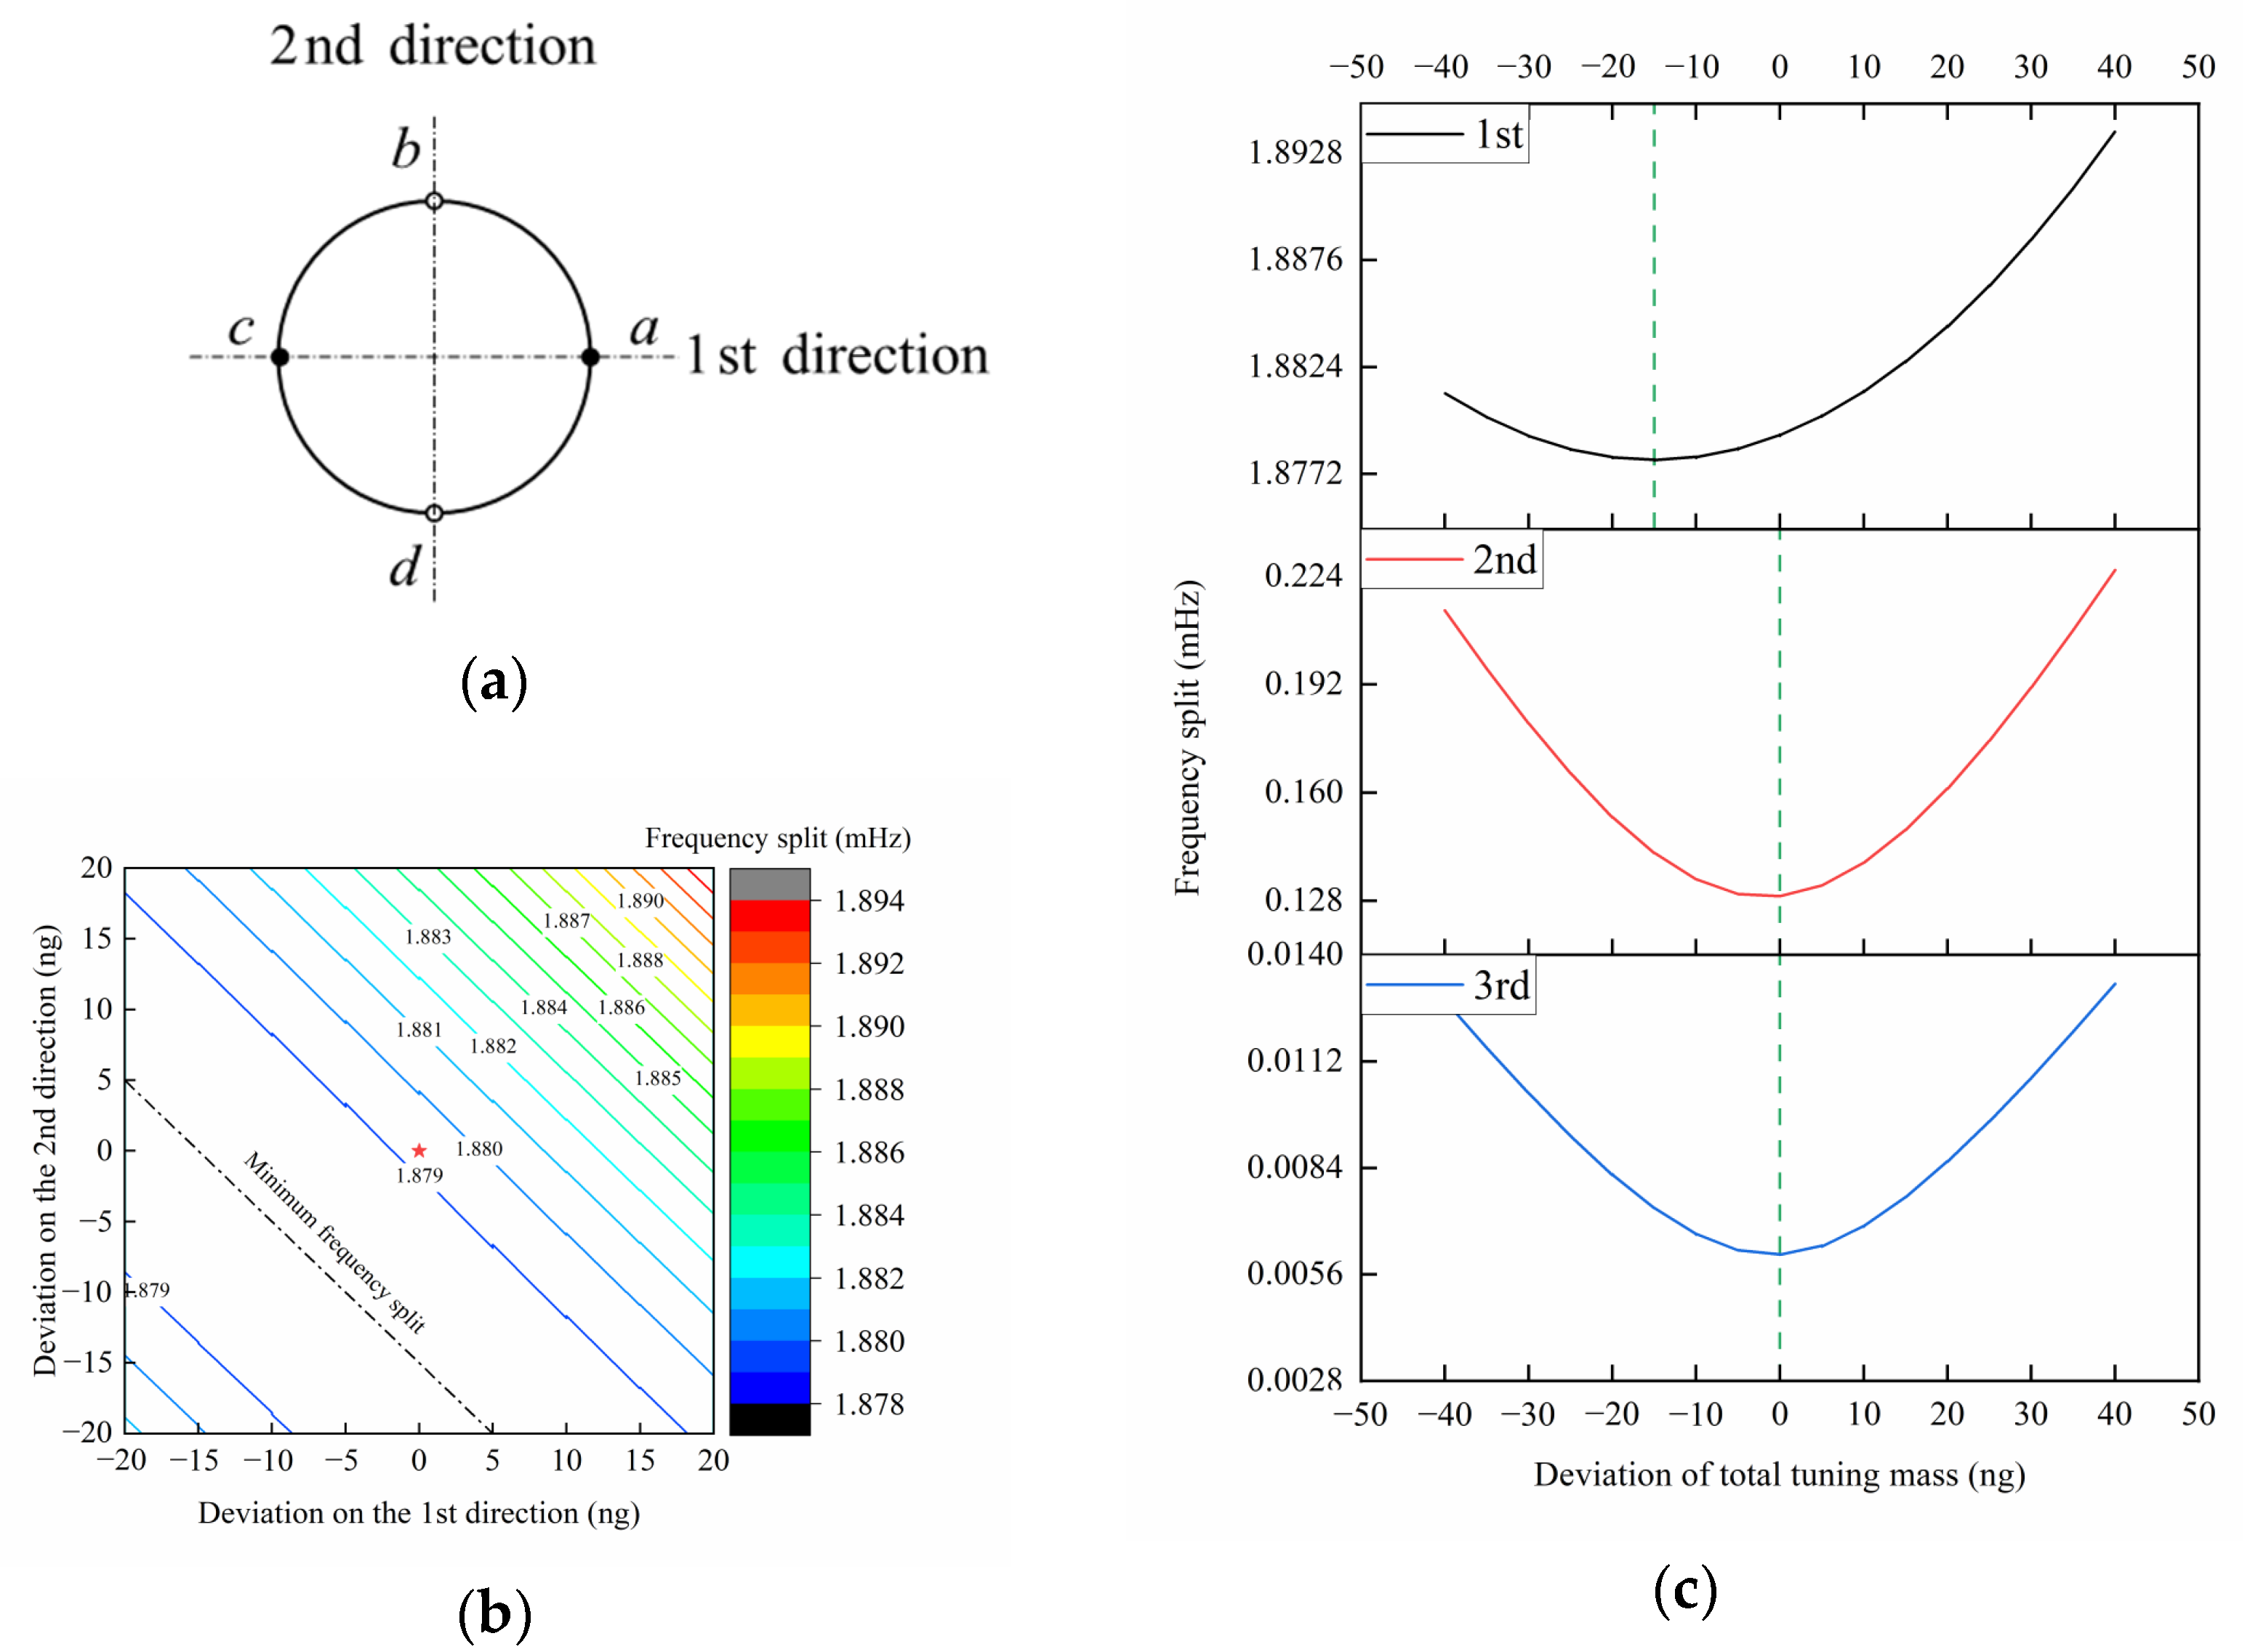
n = 2 standing wave does not change if no angular velocity is inputted. An unbalanced mass on the hemispherical resonators results in symmetric breaking, which leads to the frequency split between two basic flexing modes. The ideal
n = 2 flexing mode will split into two basic modes, and these have two principle axes with two different natural frequencies,
f1 and
f2, as shown in
Figure 2. The resonator vibrates as a superposition of these two basic modes. Finally, the frequency split Δ
f results in a drift error
of a gyroscope linearly, and it gravely determines the gyroscope’s performance. For the inertial navigation level HRGs, the drift error must be less than 0.01°/h [
21]. If we suppose that the hemispherical resonators induce the drift error solely, the frequency split has a linear relationship with the drift error:
where
k is a linear coefficient. Equation (13) reveals the mechanism of the performance deviation induced by unbalanced mass. The resonators with a zero-drift rate or a frequency split are therefore expected.
However, the mechanical processing inevitably induces defects on hemispherical fused silica resonators. After etching and polishing, the resonator generally has a frequency split of about 0.05 Hz, which is still far from the requirements of the inertial navigation-level HRG. The coaxiality between the shell and the rib has reached the limitation of the machine tools. Blindly tightening tolerances at this time is not feasible due to the high cost of performing them. Therefore, a conventional manufacturing methodology, which focuses on geometric accuracy, is not an appropriate solution to producing high-performance hemispherical resonators. The tuning technique is essential to correcting the frequency split precisely. Clarifying the relationship between the resonator frequency split and the tuning process parameters is key to producing high-performance HRGs at the inertial navigation level.
According to the previous research, the frequency split of a hemispherical resonator during the tuning process can be expressed as follows:
where Δ
f is the frequency split of the resonator, which is related to the geometric dimensions of the resonator, and the tuning process does not affect the material property
M.
pi is the material removal amount of the
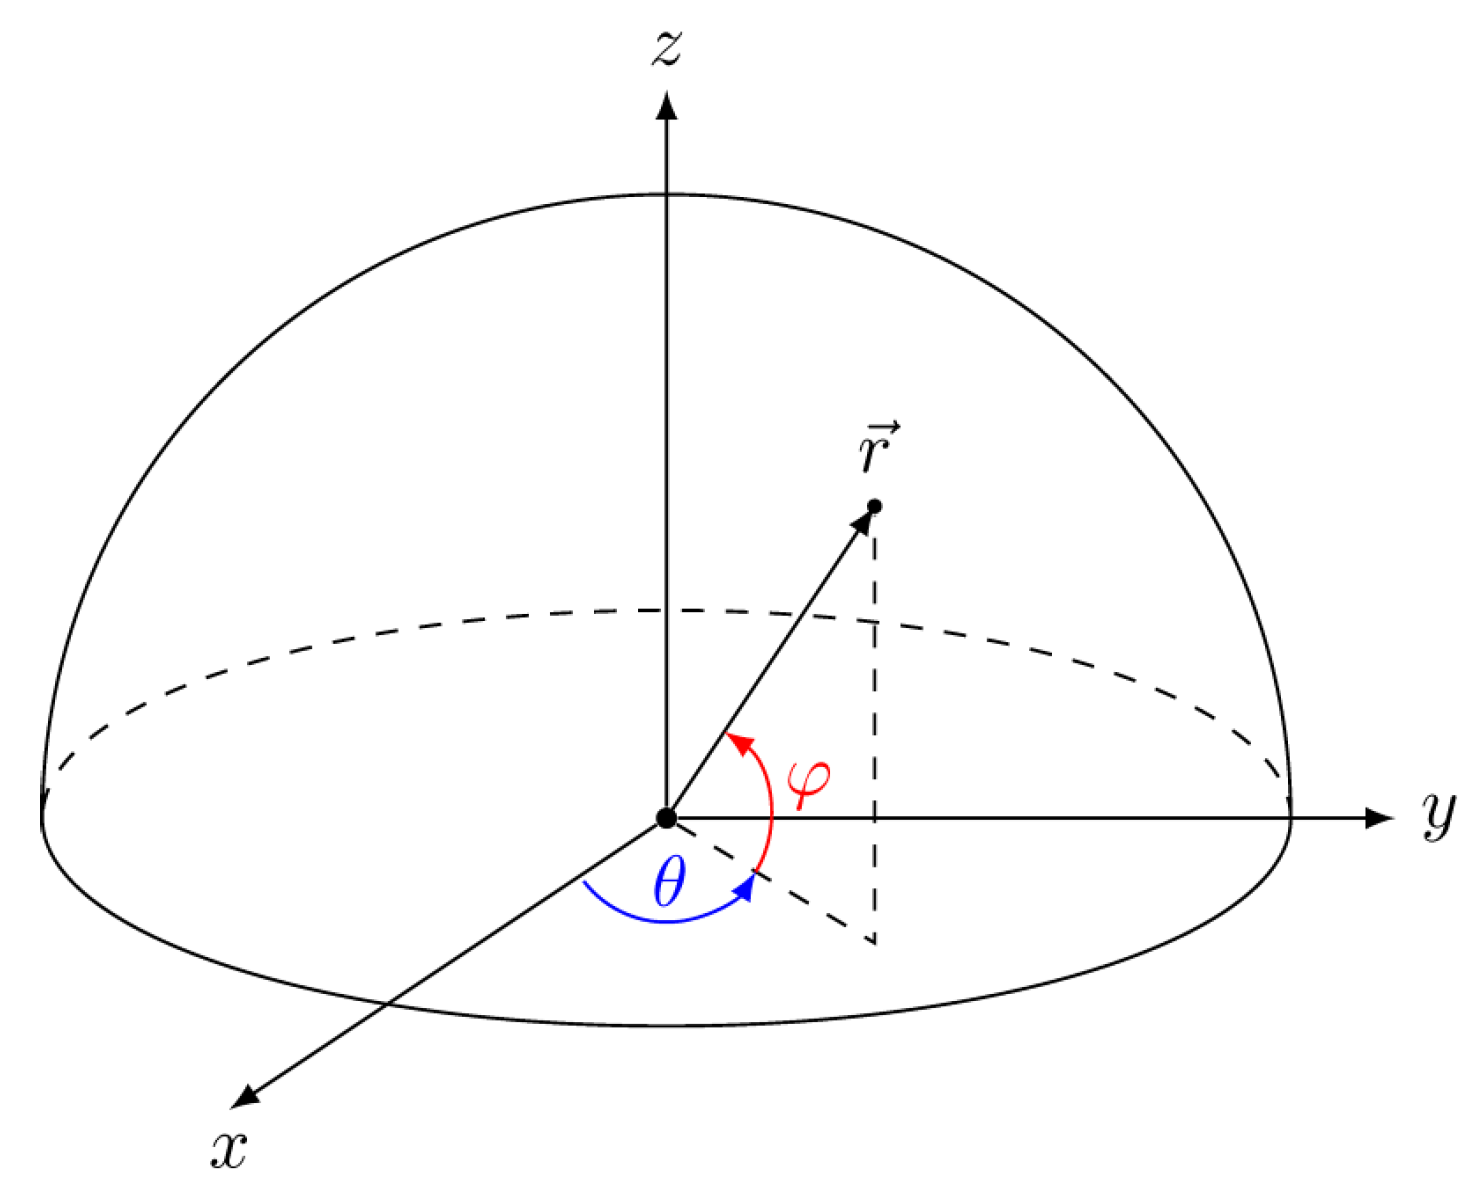
i-th tuning. Equation (14) is function of the longitude angle
θi and the latitude angle
φi in the spherical coordinate system, as shown in
Figure 3. The frequency split should be as close as possible to the design value 0. So the objective function is:
3.1. Numerical Modeling
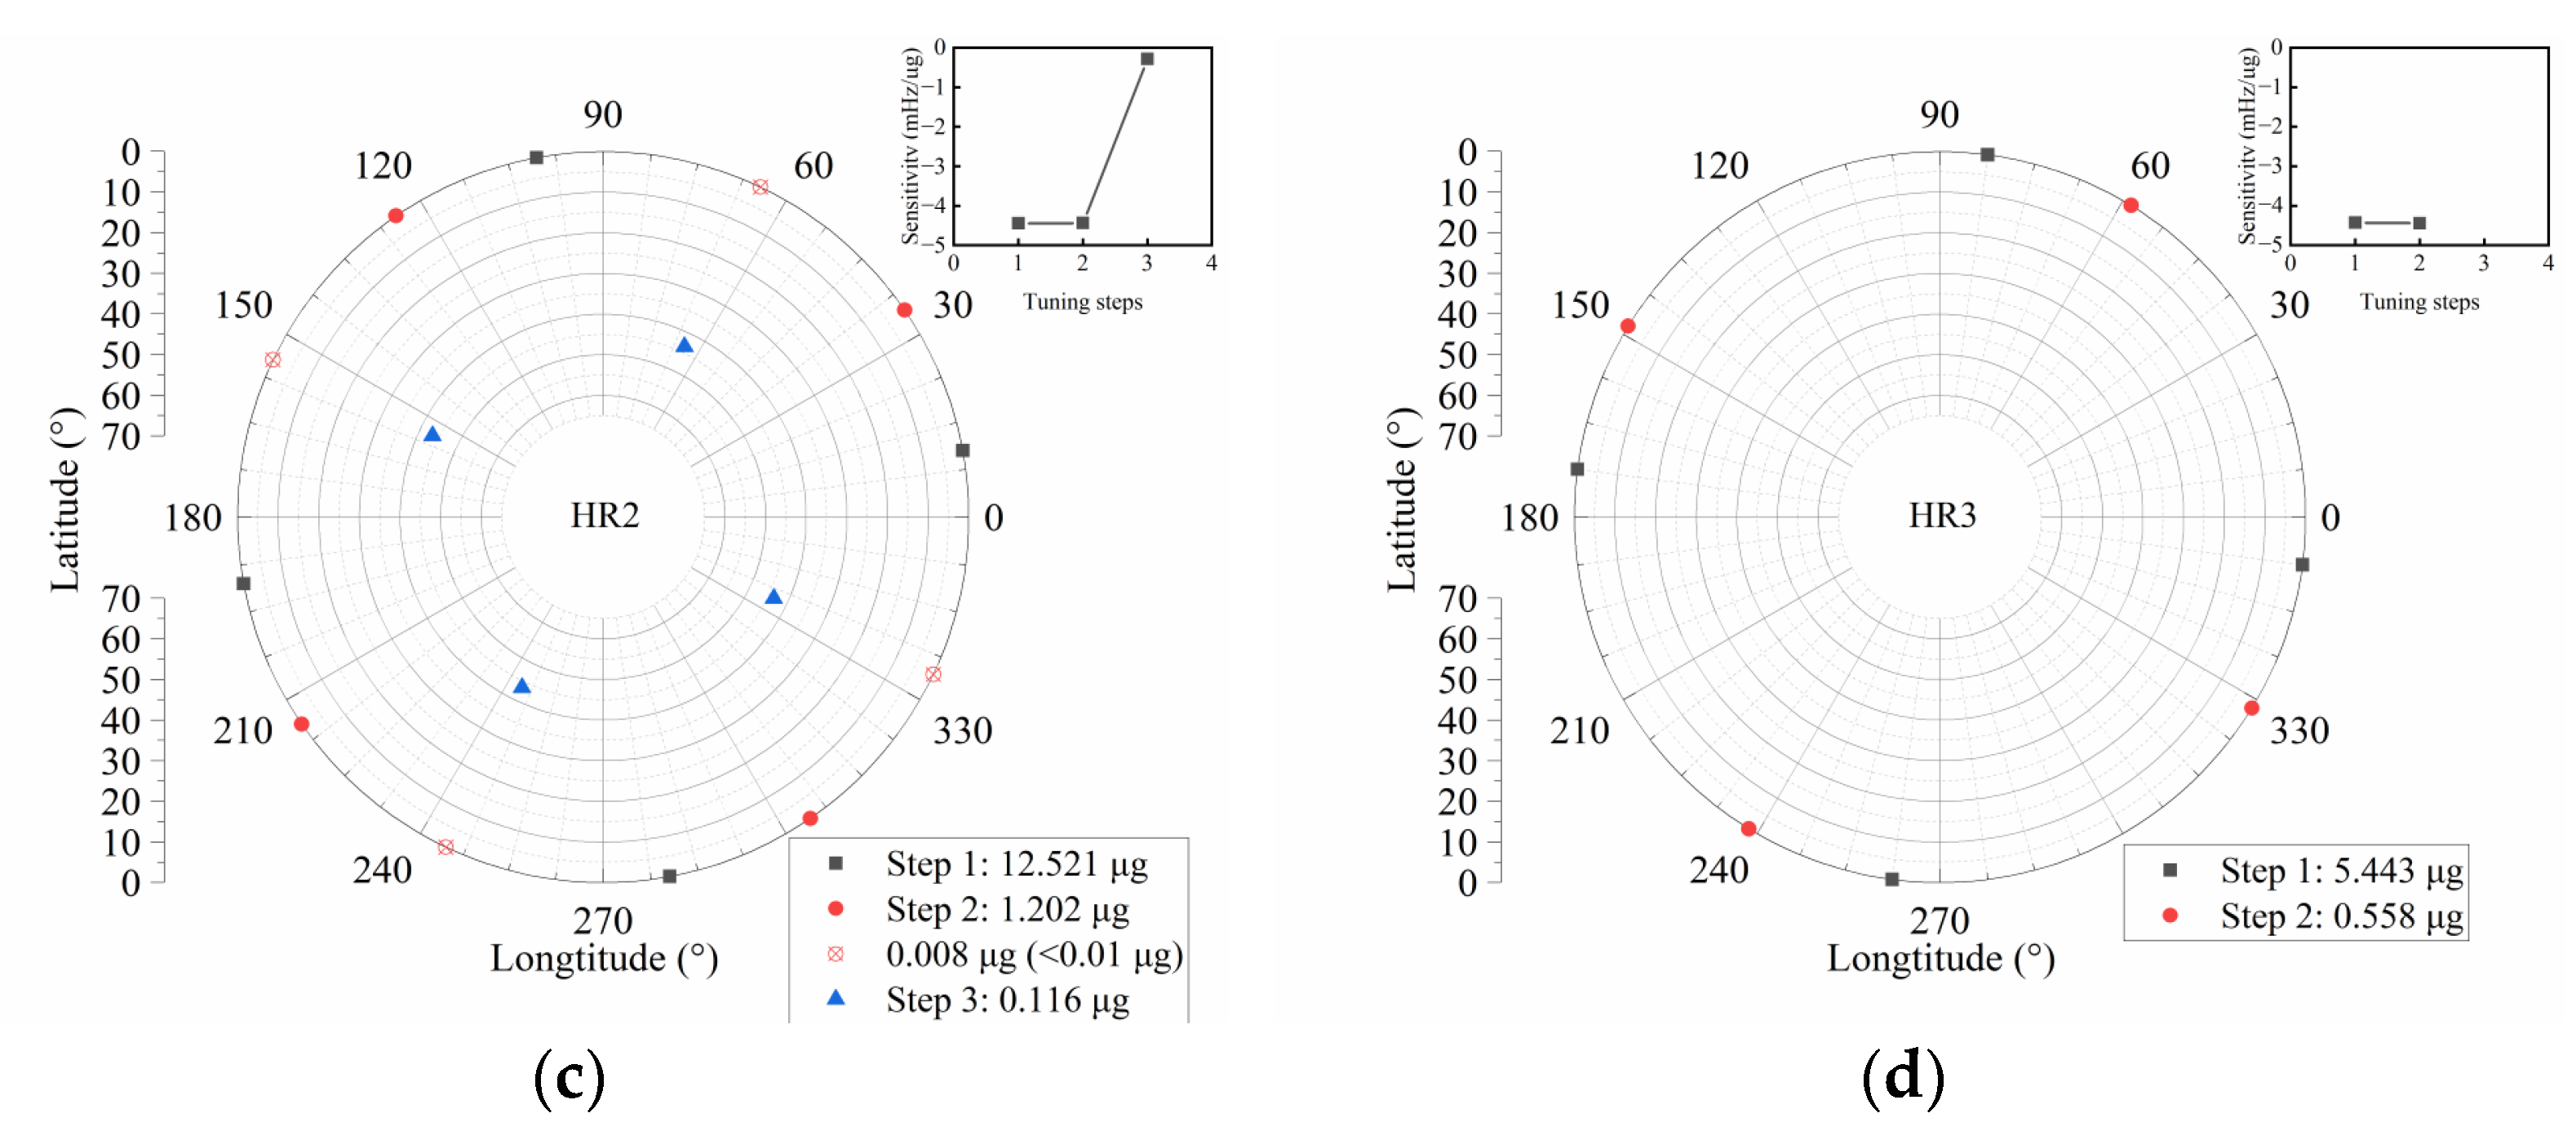
Finite element models of hemispherical resonators are established for numerical tuning, one of them is shown in
Figure 4. The second-order hexahedral elements are generated by the sweep method to ensure the uniformity of the mass distribution and minimize the initial frequency split. The rib of the resonator is fixed. When the defect element is not specified, the frequency split of the
n = 2 mode shape is in the order of 10
−8 Hz, which meets the needs of the following calculations. Then, based on this model, two groups of defects with 10 points each were artificially generated, as shown in
Figure 4 (purple elements (Type 1) and red elements (Type 2)), and the material parameters are listed in
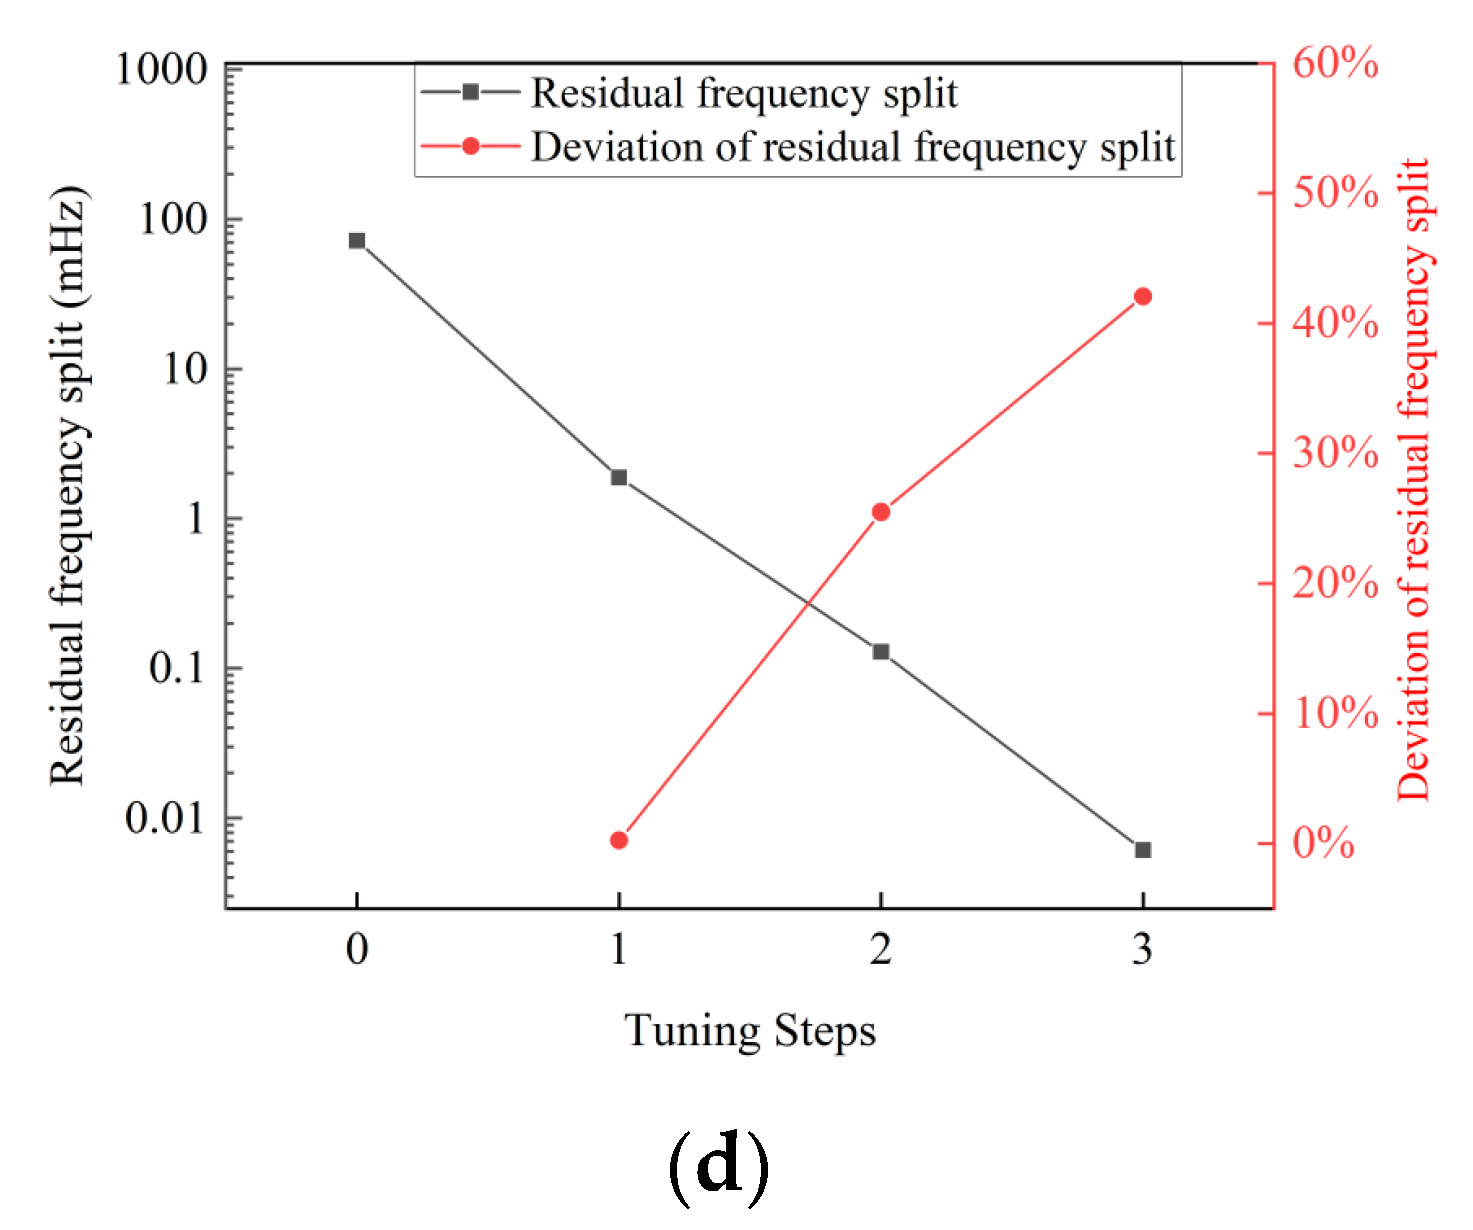
Table 1. The initial frequency splits of these three hemispherical resonators (HRs) are measured, and they are close to the residual frequency split of the resonator after etching and polishing.
3.2. The Mathematical Model for Resonator Tuning
The frequency split after one tuning step is affected by the material removal amount Δ
mi and the tuning position (longitude angle
θi; latitude angle
φi), namely:
The subscript
i represents the
i-th tuning step.
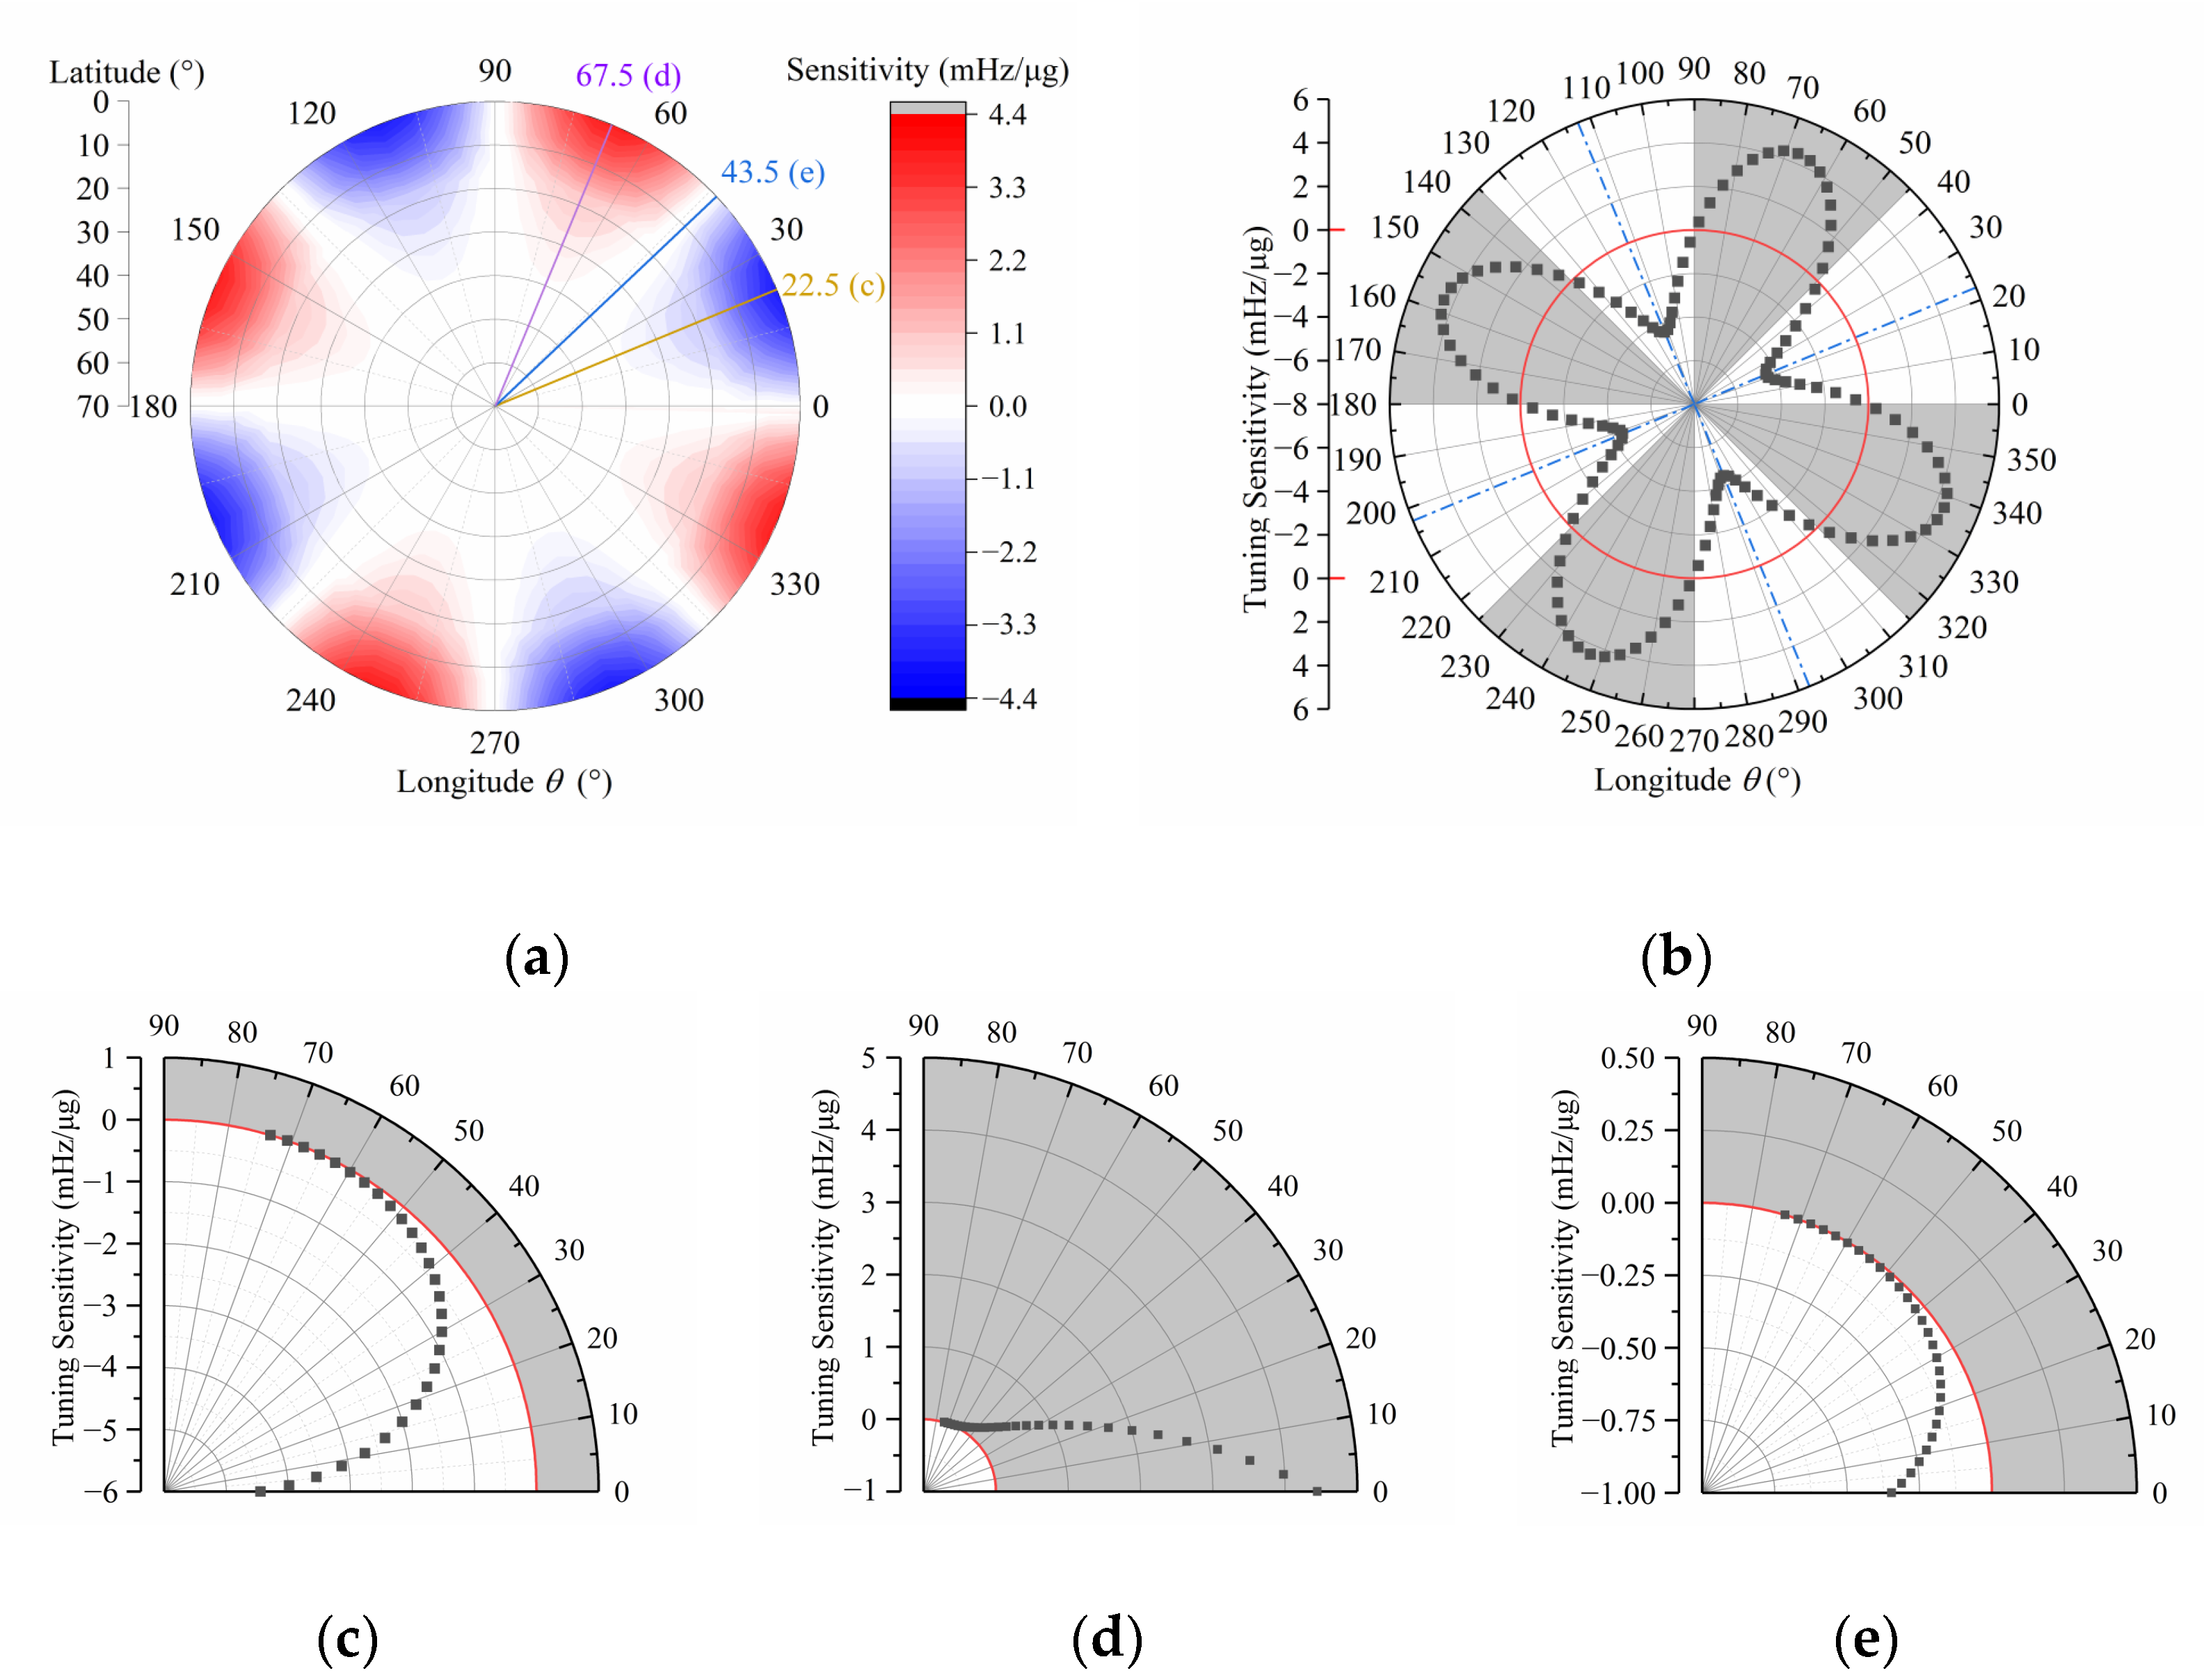
i = 0 represents the initial state of the resonator. Although there is no explicit expression for Equation (16), the local behavior of this function can be analyzed by performing a sensitivity analysis. The sensitivity of the
i-th tuning process
Smi (mHz/μg) is defined as the ratio of current frequency split to the amount of material that is to be removed from a specific location (
θi,
φi):
For the numerical calculation, Δ
mi is determined by the machining capability, i.e., the minimum material removal amount. In this paper, the tuning capability is Δ
mmin = 10 ng, and the uncertainty of the tuning process is
σ = 5 ng. A negative sensitivity indicates a smaller frequency split after tuning. Otherwise, the frequency split increases after tuning. In addition, the frequency split deviation caused by the ±1
σ (2
CV) processing uncertainty must also be kept within a reasonable range, such as 50%. In summary, all of the constraints can be written as:
To eliminate the frequency split quickly, tiny amounts of material are removed at four orthogonal positions of the lower frequency axis and its orthogonal axis [
6,
8,
22]. However, exceeding the machining capability is more likely to occur when the frequency split is extremely low. It is necessary to analyze the sensitivity of the residual frequency split to the tuning amount on the surface rather than on the lip. Therefore, tuning at an insensitive position is an alternative method. By selecting the appropriate positions, the amount that should be removed by four-position orthogonal tuning can be evaluated:
According to Equations (14)–(19), the mathematical model of high-performance hemispherical resonator tuning is:
