1. Introduction
The increasing demand for productive grinding processes that meet economic and quality standards leads to the constant development of grinding tools and associated dressing tools [
1]. An essential part of the grinding technology is the dressing process for the regeneration of the macro- and microgeometry of the grinding wheel topography. The dressing process is divided into profiling and sharpening. Through the sharpening process a sufficient chip space is achieved, and the required cutting grains are exposed from the bond by resetting the bond material. The sharpening process therefore determines the cutting ability and additionally influences the grinding process forces and the surface quality of the ground components [
2,
3,
4]. The reduction in the process forces can lead to less thermal damage to the ground workpiece due to the lower process-related heat generation [
4,
5,
6]. Grinding wheels adapted to the application can lead to constant work results and process parameters, which lead to improved process reliability [
1]. However, due to the lack of scientific knowledge, the sharpening process is mostly performed manually in industrial practice by holding a sharpening block against the grinding wheel and thus does not meet the requirements of highly accurate, secure and automated manufacturing.
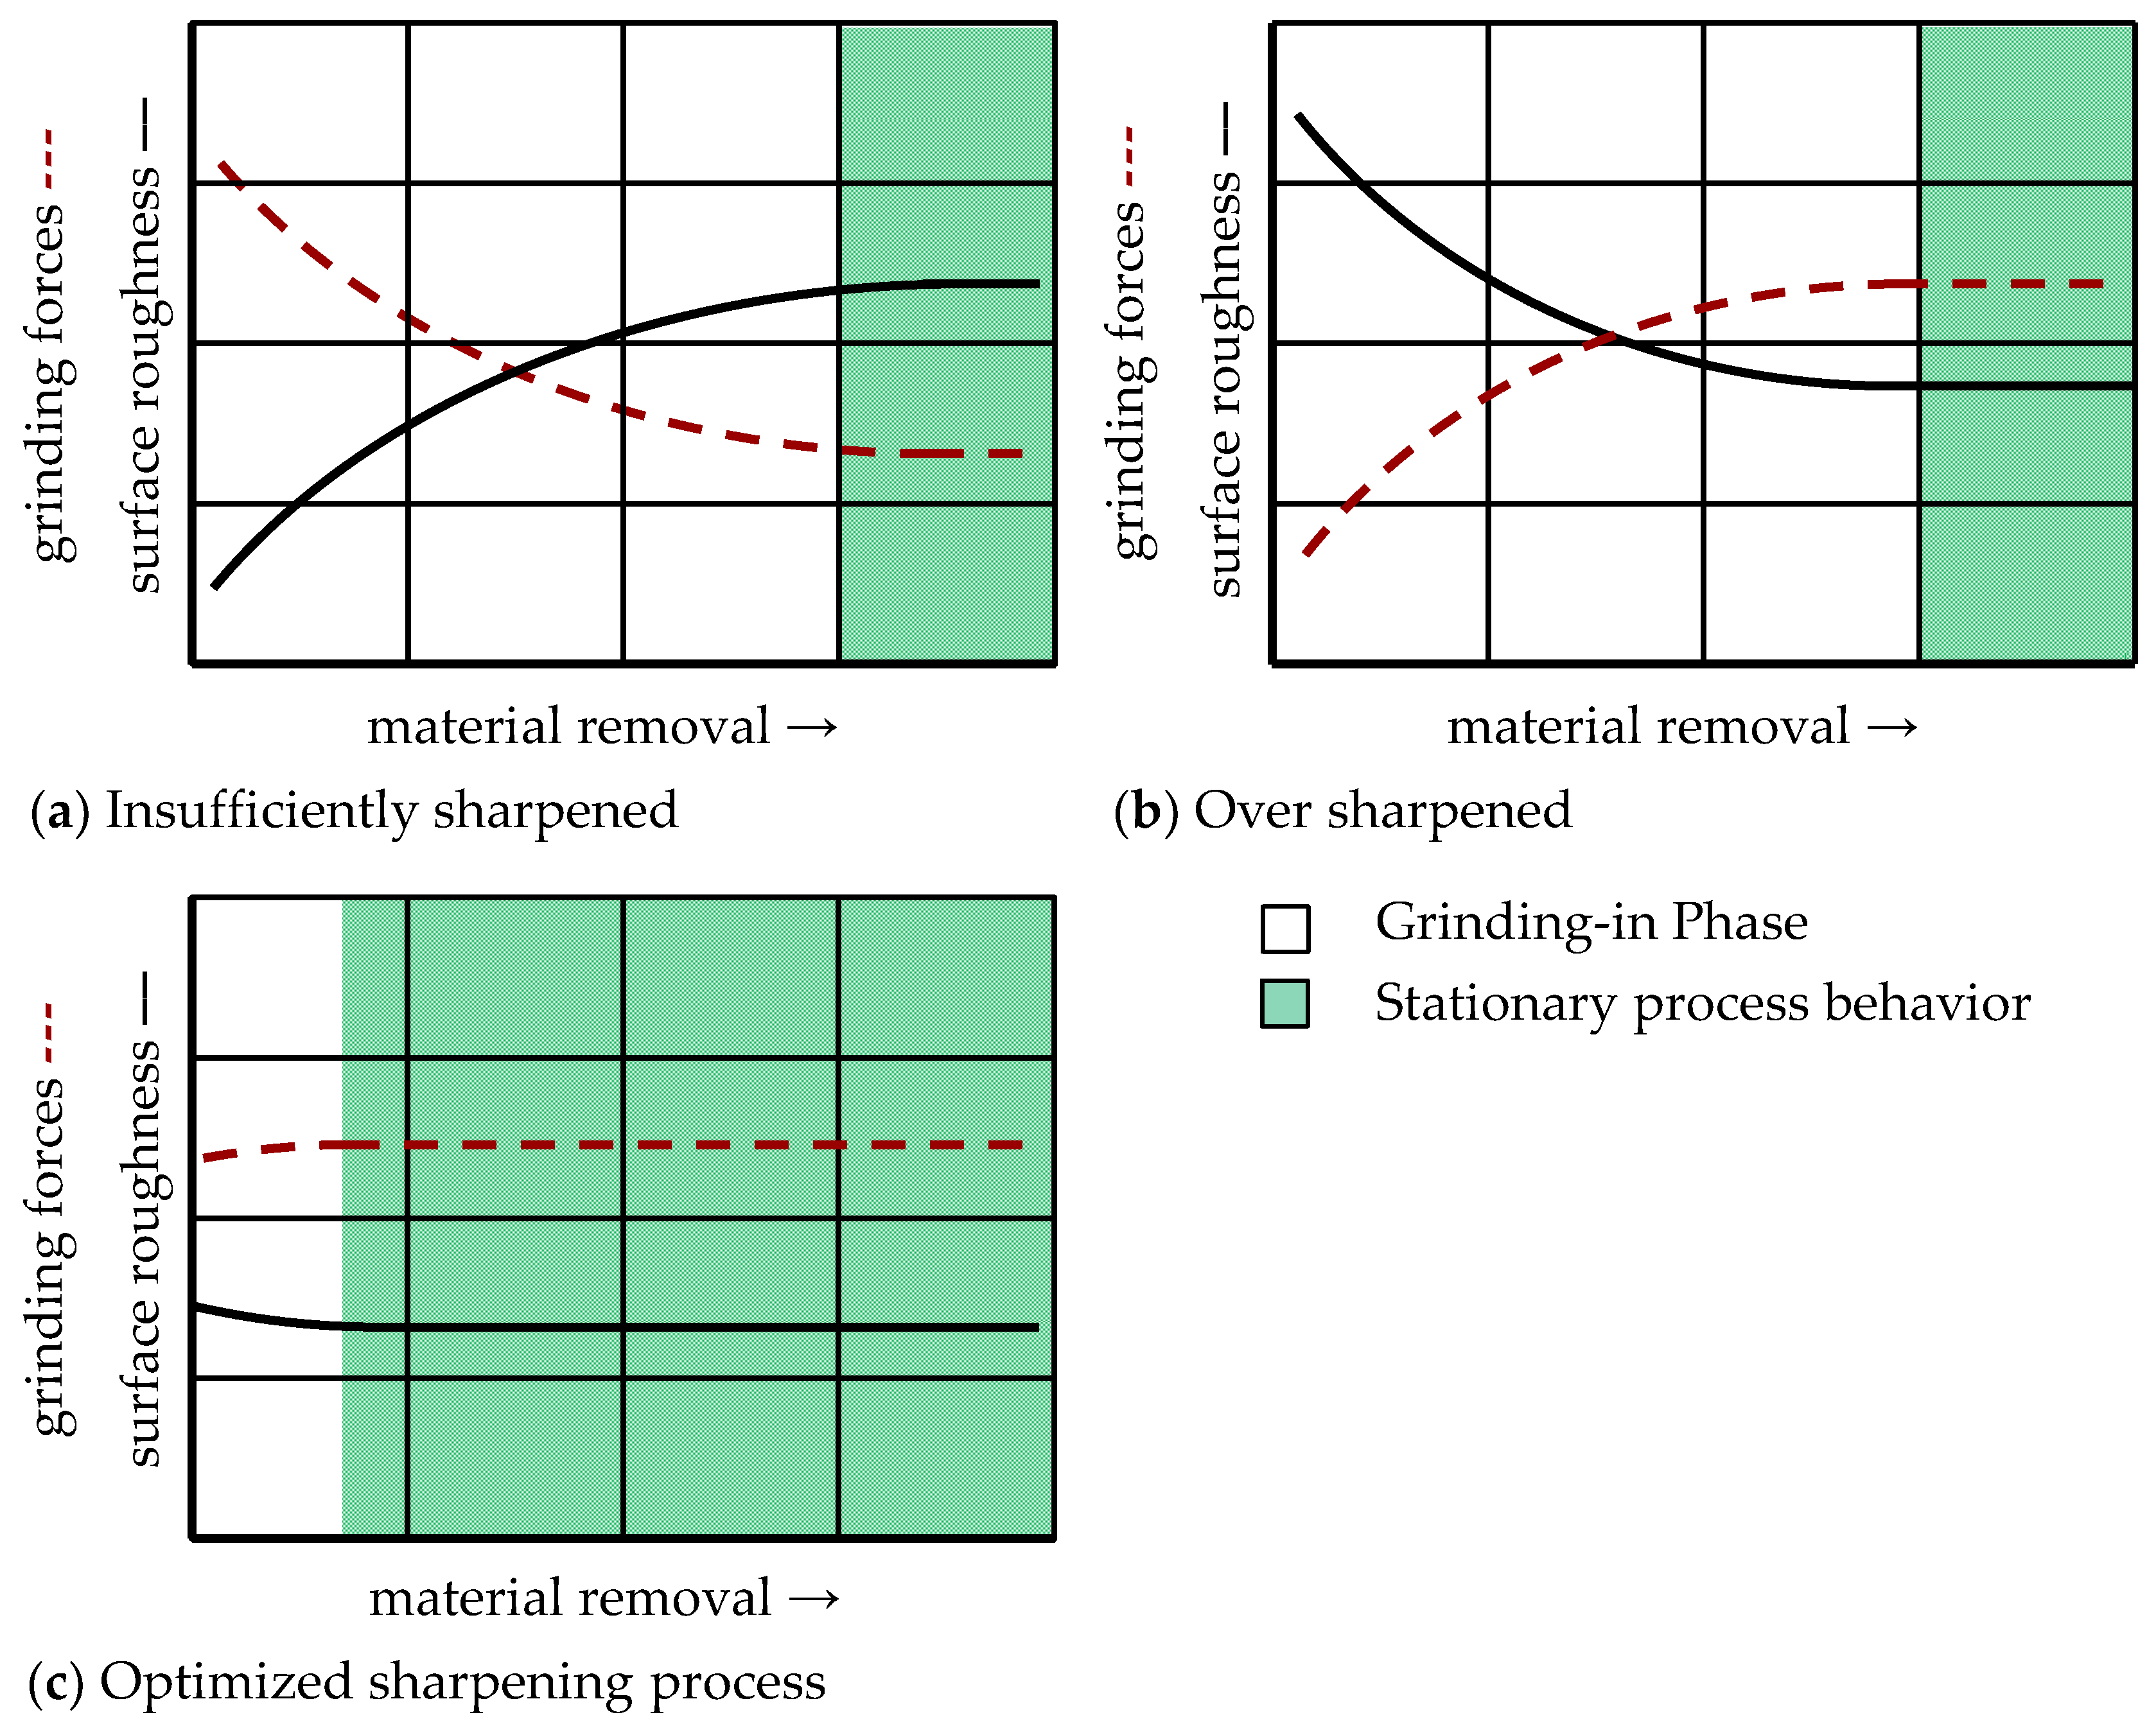
Figure 1 illustrates the qualitative course of the grinding behavior for an insufficiently sharpened, over sharpened and with optimized sharpening parameters and tools sharpened grinding wheel [
7]. An insufficiently sharpened grinding wheel results in high grinding forces and low surface roughness due to the low grain protrusion. The necessary cutting grains as well as the required chip space are ensured only through the time-consuming grinding-in phase (
Figure 1a). On the other hand, an over-sharpened grinding wheel is characterized by a high grain protrusion and leads to high surface roughness. Due to the high grain protrusion the process initially leads to low grinding forces, which reach a constant level in the course of the process by grain breakouts and rounded grains (
Figure 1b). Grinding wheels that are sharpened with optimized sharpening parameters and tools require a very short grinding-in phase in order to achieve the steady-state process condition. Thus, a well-sharpened grinding wheel is of great importance for an economical manufacturing process to achieve a steady-state process behavior and to ensure an almost constant workpiece quality (
Figure 1c).
Only a few publications are concerned with CNC-controlled sharpening processes.
Jacobs [
8] analyzed the automated sharpening process with ceramic- and resin-bonded CBN grinding wheels. He found that the microgeometry of a grinding wheel can be influenced by the parameters sharpening block width l
Sb and material removal V
Sb. The surface roughness increases asymptotically with increasing material removal V
Sb until a stationary value is reached. The increase in the sharpening block width l
Sb also resulted in an increase in roughness. The grain break-out mechanics of resin-bonded grinding wheels sharpened with corundum blocks was studied by
Schleich [
9]. He developed a model for the sharpening process to adjust the desired CBN grain protrusion. The sharpening process of ceramic-bonded grinding wheels was studied by
Stuff [
10]. He developed sharpening strategies through experimental studies to achieve a stationary grinding behavior. Studies on the sharpening process of metal-bonded grinding wheels are performed with electrophysical and electrochemical processes due to their electrical conductivity [
11,
12,
13,
14,
15].
Hübert [
16] investigated the intermittent sharpening process of resin-bonded diamond grinding wheels. He determined that the results of the sharpening process were dependent on the grinding wheel grain size. Furthermore, an increase in the dressing volume was detected for a higher specific material removal rate in sharpening Q’
Sb.
To date, only a small number of publications on the CNC-controlled sharpening process of diamond grinding wheels are available. This paper presents new findings concerning the CNC-controlled block sharpening process of hybrid-bonded diamond grinding wheels. In this case, the hybrid bond represents a combination of metal and resin bond. For this purpose, extensive experiments were performed to identify the significant sharpening parameters and to establish a functional relationship between the sharpening parameters and the resulting topography characteristics, the sharpening result. Based on the experimental results, an empirical regression model was developed.
2. Influence of the Sharpening Parameters on the Grinding Wheel Topography
Extensive sharpening experiments were carried out to identify the significant sharpening parameters influencing the process. The experiments were performed on the CNC tool grinding machine
WU 305 micro from Alfred H. Schütte, Köln, Germany. As possible influencing parameters, the grain size of the sharpening block d
kSb, the sharpening block width l
Sb, the area-related material removal in sharpening V’’
Sb, the area-related material removal rate in sharpening Q’’
Sb and the grinding wheel circumferential speed v
sSb were considered. In addition, the tests were carried out with two grinding wheel specifications, which differ in grain size d
k. The hybrid-bonded grinding wheels with specifications 1A1 D33 C100 and 1A1 D54 C100 from Saint-Gobain Diamantwerkzeuge GmbH Norderstedt, Germany, had a grinding wheel diameter of d
s = 100 mm. In order to be able to transfer the knowledge gained to other grinding wheel dimensions, the area-related material removal in sharpening V’’
sb and the area-related material removal rate in sharpening Q’’
sb were placed in relation to the lateral surface of the grinding wheel. In the first step, the parameters were varied by two values, as shown in
Table 1. The sharpening experiments were performed with the block sharpening method.
In order to evaluate the influence of the investigated sharpening parameters, the grinding wheels were prepared by a profiling process using silicon carbide (SiC) dressing rolls from Winterthur Technology GmbH, Reutlingen, Germany, in order to achieve reproducible and smooth initial surface conditions. The profiling was carried out with a depth of dressing cut of a
ed = 4 μm at a total depth of of dressing cut a
ed,ges = 800 μm, a dressing feed rate of v
fd = 1500 mm/min, a ratio of dressing speeds q
d = −1 and a grinding wheel circumferential speed during dressing of v
sd = 17 m/s. The sharpening blocks with corundum grains from Saint-Gobain Diamantwerkzeuge GmbH, Norderstedt, Germany, were soaked in cooling lubricant before the experiments. During the sharpening process, the grinding wheel was radially moved to the sharpening block without the supply of cooling lubricant. For the analysis of the CNC-controlled block sharpening process, imprints of a section of the grinding wheel were captured and optically measured. The imprints were made by using the dental imprint material Panasil
® contact plus X-Light of Kettenbach GmbH & Co. KG, Eschenburg, Germany. Subsequently, an optical surface measurement was carried out with a digital light microscope of the type VHX-5000 from Keyence Deutschland GmbH, Neu-Isenburg, Germany. Finally, the topography characteristics of the grinding wheels were determined according to DIN EN ISO 25178 [
17] using a developed algorithm in MATLAB
® from MathWorks, Natick, MA, USA.
Figure 2 shows the experimental procedure and the subsequent topography analysis. To ensure the reproducibility of the experiments statistically, each parameter combination was carried out three times.
After determining the topography characteristics, a significance analysis was performed to evaluate the sharpening parameters and identify the significant sharpening parameters. Therefore, a statistical evaluation tool was developed to establish a functional relationship between the input variables (sharpening parameters) and output variables (topography characteristics). To evaluate the accuracy of the established models and the influence of the sharpening parameters, the stochastic characteristics, the coefficient of determination R
2 and the
p-value were determined. The coefficient of determination R
2 indicates how suitable the models are for explaining the total variation of the determined topography characteristics. It varies between 0% (poor model accuracy) and 100% (good model accuracy). The
p-value describes the probability that the null hypothesis is true, where the null hypothesis is a general statement that declares there is no relationship between the input and output variable. If the
p-value of an input variable is below the significance level of 5%, then it can be assumed to have a significant influence on the output variable [
18,
19].
Figure 3 shows the result of the significance analysis for the topography characteristics, the reduced peak height Spk and the mean arithmetic height Sa. The standardized coefficients describe the linear influence of the respective sharpening parameter on the topography characteristic. Different model accuracy results were achieved for the analyzed topography characteristics. Considering the results of the grinding wheel with the grain size D33, it becomes clear that the established model to describe the reduced peak high Spk with a coefficient of determination R
2 = 22.85% does not adequately reflect the actual measurements. Additionally, the
p-values of the investigated sharpening parameters were clearly above the significance level, so it can be assumed that the investigated parameters have no significant influence on the reduced peak height Spk of the grinding wheel with the grain size D33. On the other hand, the quality for describing the mean arithmetic height Sa was R
2 = 69.90%. The
p-values for the grain size of the sharpening block d
kSb, the sharpening block width l
Sb, the area-related material removal rate in sharpening Q’’
Sb and the grinding wheel circumferential speed v
sSb were below the significance level of 5% and thus significantly influenced the topography characteristic Sa. However, the results of the grinding wheel with the grain size D54 show a high coefficient of determination R
2 = 74.86% for the reduced peak height Spk. The area-related material removal in sharpening V’’
Sb, the sharpening block width l
Sb and the grain size of the sharpening block d
kSb are the sharpening parameters that influence the topography characteristic Spk significantly. In contrast, the mean arithmetic height Sa is not influenced by the sharpening parameters.
The results of the investigated grinding wheels are different and show that the sharpening parameters affect the grinding wheel topography differently.
Figure 4 shows the reduced peak height Spk and the mean arithmetic height Sa for the respective sharpening experiments. The parameter of the experiments can be found in the
Appendix A,
Table A1. The grinding wheel topography after profiling is highlighted with a green bar and describes the initial state of the grinding wheels before the sharpening process. It becomes clear that the sharpening process results in a significant increase in the reduced peak height Spk for both grinding wheels D33 and D54.
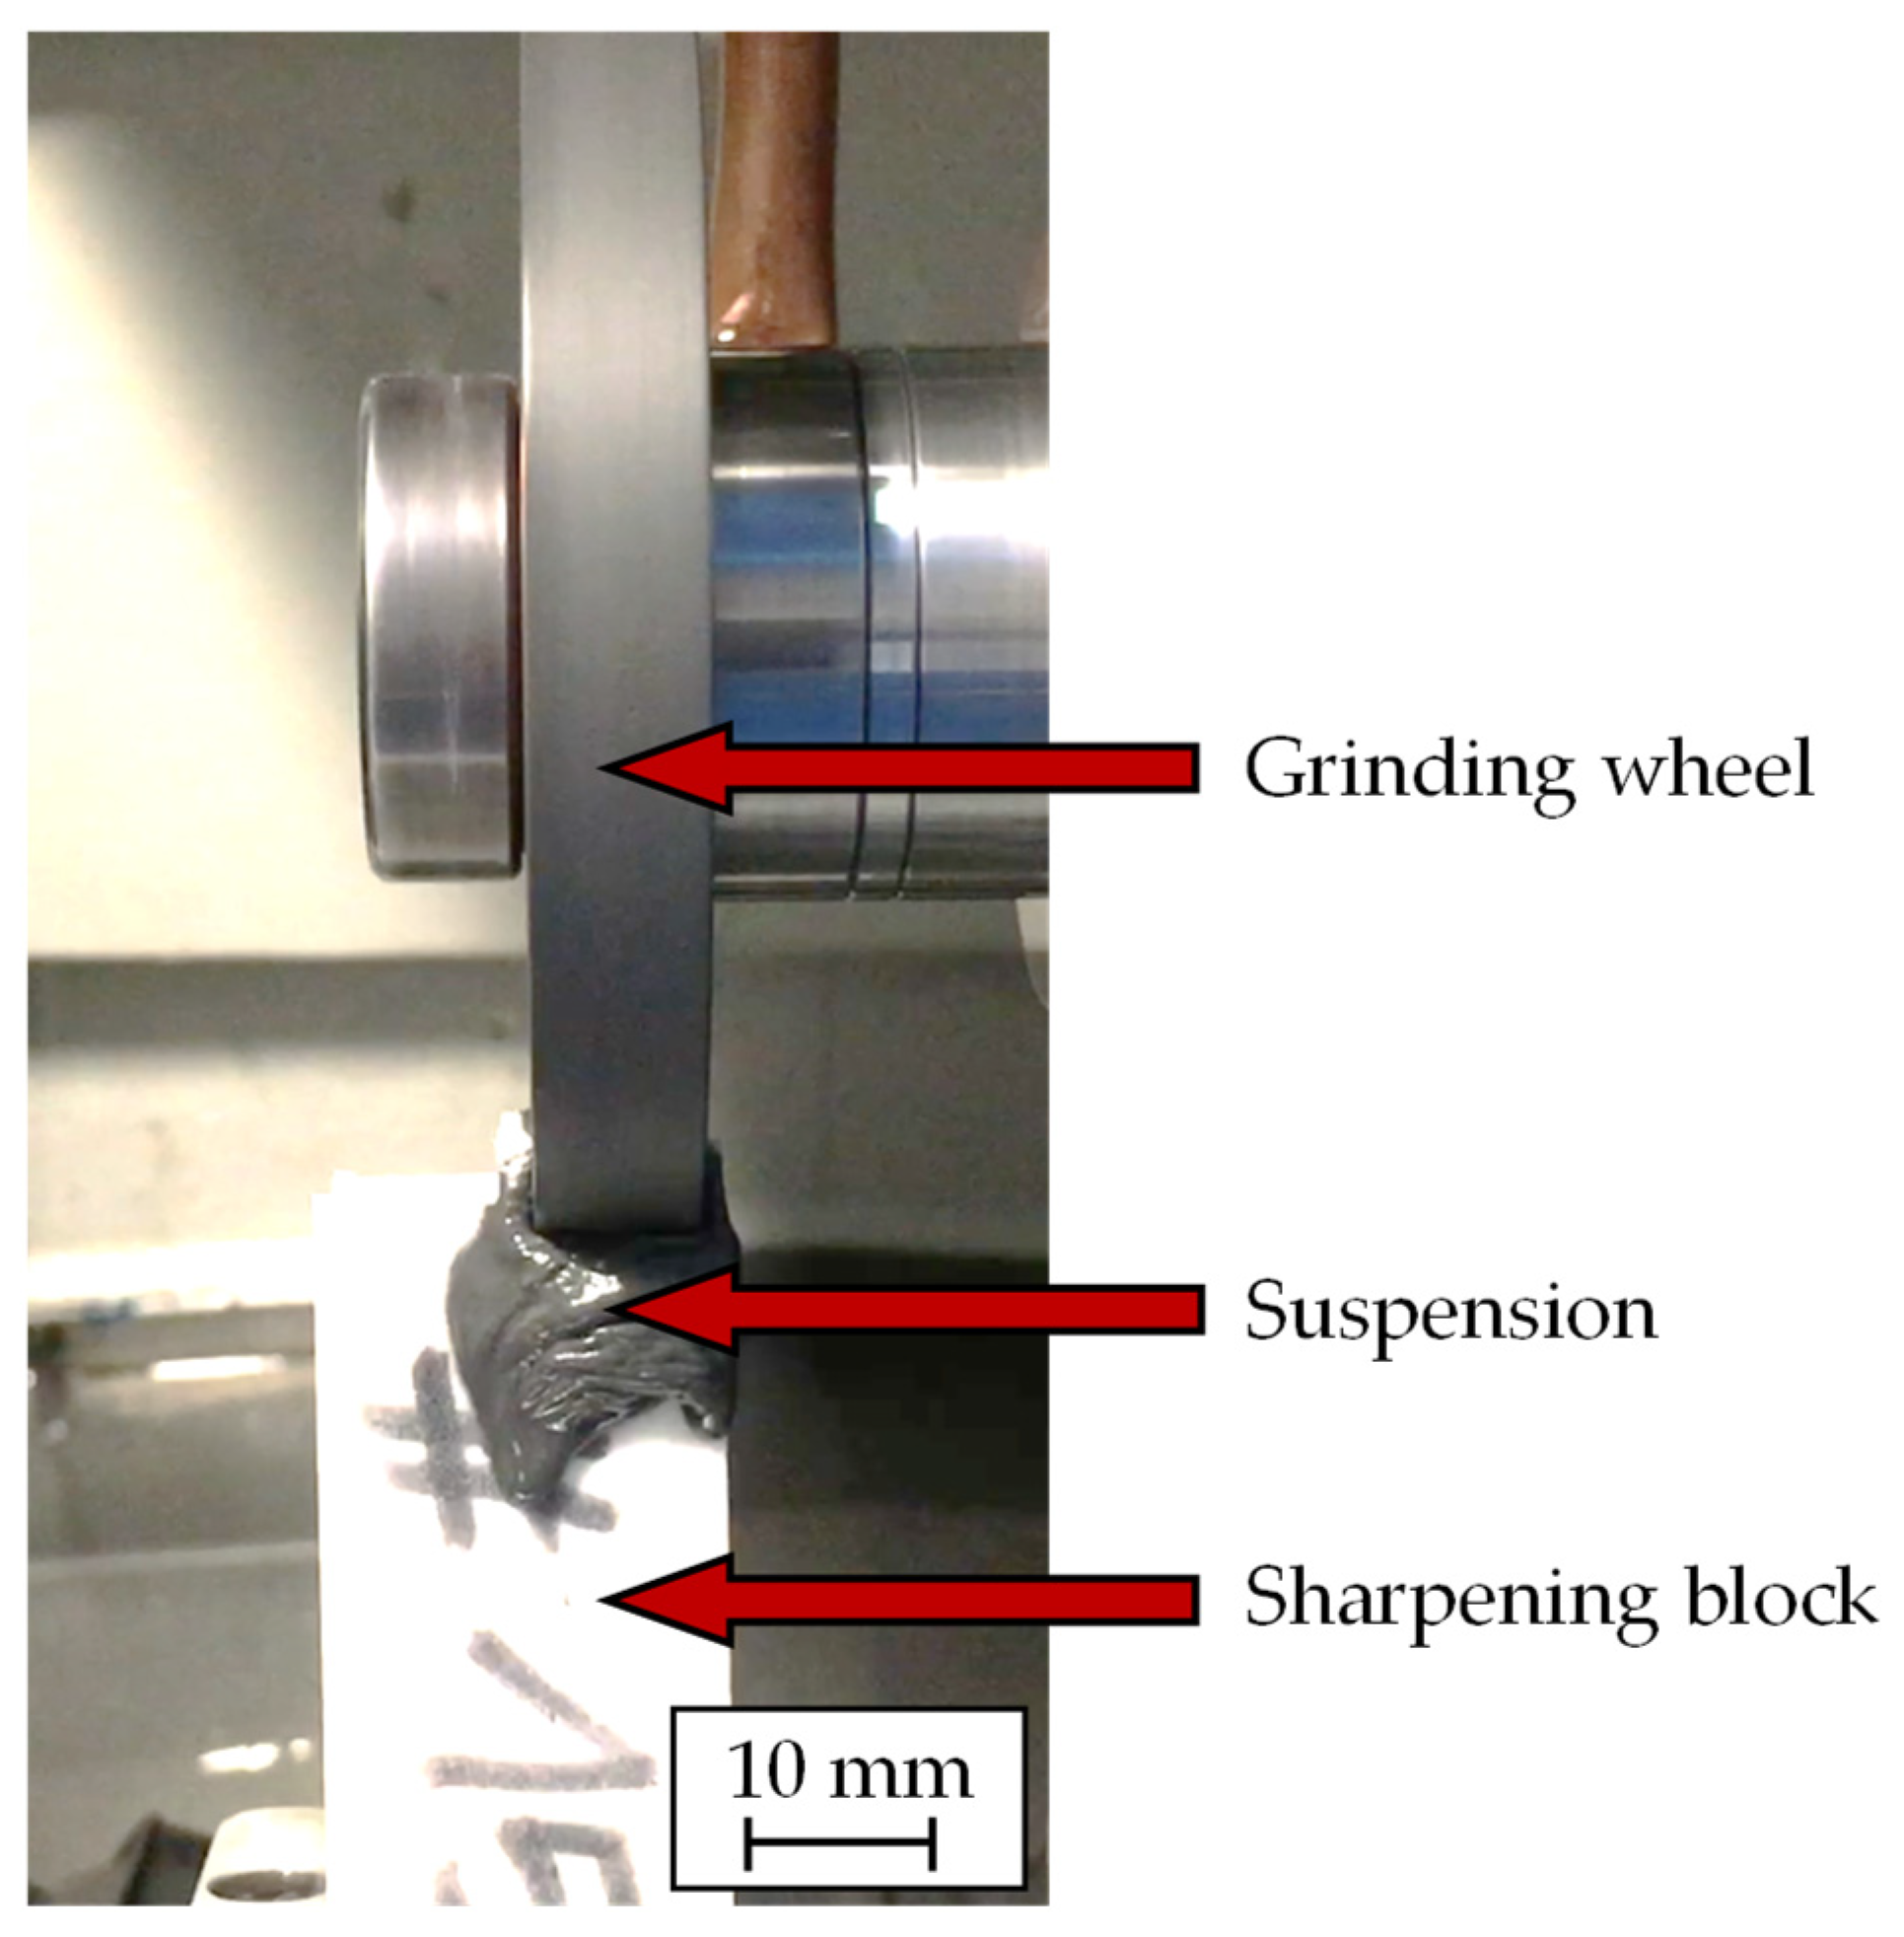
The increase is due to an effective resetting of the grinding wheel bond after profiling. During the sharpening process, a suspension forms between the grinding wheel and the sharpening block, which is mainly responsible for the resetting of the bond during the sharpening process, as shown in
Figure 5. The suspension is formed by the cooling lubricant and the corundum grains of the sharpening block, which are split during the process.
For the grinding wheel with the grain size D33, the reduced peak height Spk differed only slightly between the sharpening experiments. It can be assumed that the investigated sharpening parameters lead to an over-sharpened grinding wheel D33, and thus a change in the parameters has no significant influence on the topography characteristic Spk. However, significant differences can be seen between the experiments for the grinding wheel with the grain size D54. Here, the sharpening parameters clearly affect the topography characteristic Spk. The differences in the results are due to the grinding wheel specification, in this case the grinding wheel grain size. For both grinding wheels, the mean arithmetic height Sa is influenced by the variation of the sharpening parameters. The variations for the grinding wheel with a grain size of D54 are weak compared to the topography characteristic Spk. The findings are also reflected in the stochastic analysis.
The results of the significance analysis show that the grinding wheel specification has a decisive effect on which topography characteristics are influenced by the sharpening parameters. It could be determined that both investigated grinding wheels were mainly influenced by the sharpening width l
Sb and the grain size of the sharpening block d
kSb. In further investigations, the influence of the area-related material removal in sharpening V’’
Sb was studied in more detail. The result is shown in
Figure 6. It becomes clear that there is a non-linear relationship between the area-related material removal in sharpening V’’
Sb and the topography characteristics, reduced peak height Spk and mean arithmetic height Sa. The topography characteristics increased with a higher sharpening volume until a steady-state behavior was achieved. The stationary behavior was reached earlier by the grinding wheel with a grain size of D33. The investigation has shown that the area-related material removal in sharpening V’’
Sb also significantly influences the grinding wheel topography.
The main influencing parameters could be determined by the experimental analysis. However, the results of the significance analysis also reveal that the grinding wheel specification effectively define which sharpening parameters influence certain topography characteristics. Nevertheless, the study clearly showed that it is possible to find correlations between sharpening parameters and the resulting grinding wheel topography.
4. Interactions between the Sharpening Parameters
Besides the influence of the individual significant sharpening parameters, the parameter interactions also affect the sharpening process and thereby the formation of the grinding wheel topography. In particular, the grain size of the sharpening block d
kSb and the area-related material removal in sharpening V’’
Sb depend on each other, as shown in
Figure 14. The influence of the grain size of the sharpening block d
kSb on the reduced peak height Spk largely depends on the area-related material removal in sharpening V’’
Sb. With low area-related material removal, the grain size of the sharpening block has no influence on the Spk value, whereas with high material removal strong fluctuations in the Spk value could be observed depending on the grain size of the sharpening block d
kSb. For V’’
Sb = 0.12 mm
3/mm
2, the Spk value was almost constant over the grain size of the sharpening block d
kSb. Only with increasing material removal of the sharpening block did the influence of the grain size of the sharpening block d
kSb become more striking.
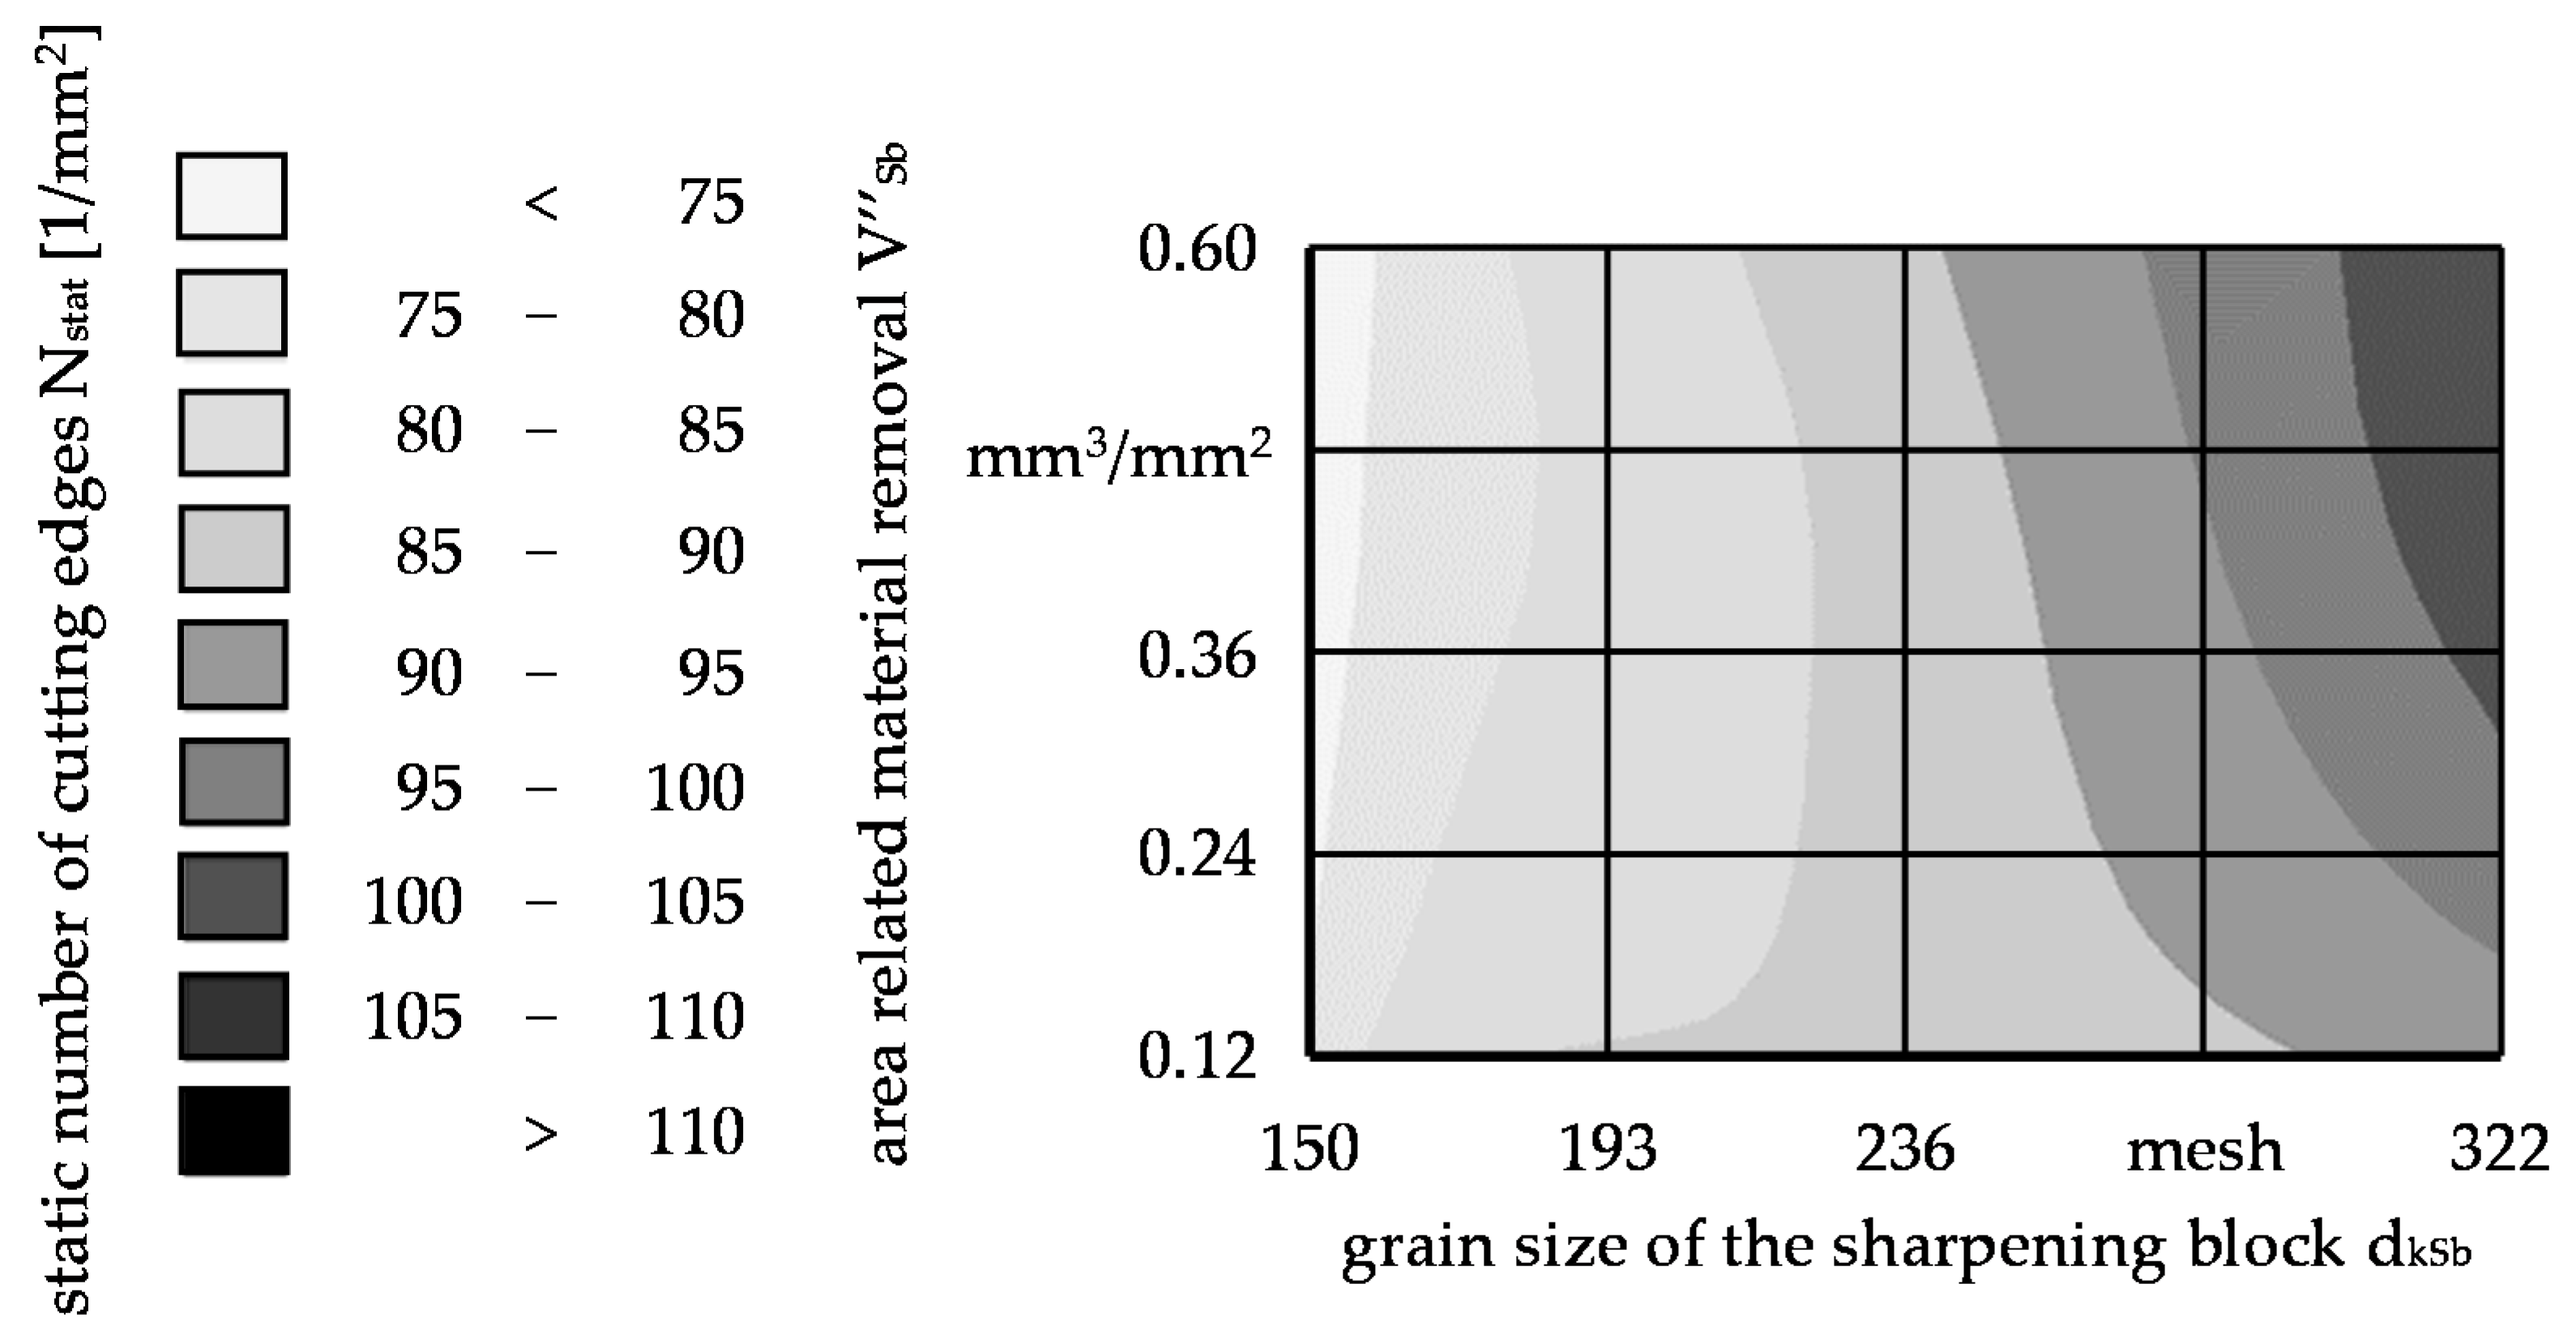
The static number of cutting edges N
stat also depends highly on the area-related material removal in sharpening V’’
Sb and the grain size of the sharpening block d
kSb, as seen in
Figure 15. For coarse grains of the sharpening block, a slight decrease in the static number of cutting edges N
stat could been obtained with increasing area-related material removal in sharpening V’’
Sb. The behavior was reversed for small grain sizes of the sharpening block d
kSb. A high static number of cutting edges N
stat could be obtained by a combination of small grains and high material removal V’’
Sb. However, it should be noted that a high static number of cutting edges N
stat is not necessarily equivalent to a rough grinding wheel.
The analysis of the interactions between the sharpening parameters on the grinding wheel topography makes it clear that the sharpening process cannot be modeled in sufficient quality by the influences of individual sharpening parameters.
5. Process Model
A process model based on regression analysis was developed by using the experimental results. The required data were determined in the form of topography characteristics. The aim of the process model is to provide the user with the necessary information for a quick and target sharpening process in order to achieve the grinding wheel topography in the stationary state, which depends on various grinding parameters. Therefore, a functional relationship between the input and output variables was developed by using regression equations. The input variables correspond to the three identified significant sharpening parameters, and the output parameters correspond to the determined topography characteristics. A regression equation was developed for each topography characteristic, which are shown in
Table 4.
The coefficient of determination R2 makes it possible to evaluate the accuracy of the established regression equations. It indicates how suitable the models are for explaining the total variation of the determined topography characteristics. The established regression equations differ greatly in their suitability for the process model. For the static number of cutting edges Nstat a high model accuracy was realized with a compact equation. Other parameters, in particular the area-related chip space volume V’’sp, are less suitable for modeling because of their poor accuracy. The interaction between the grain size dkSb and the area-related material removal in sharpening V’’Sb has been identified as a significant influencing factor.
The determined regression equations were then used to implement the process model by using the software MATLAB of MathWorks, Natick, MA, USA. For this purpose, a graphical user interface (GUI) was developed, which enables easy handling of the process model. The model can be used to predict the required sharpening parameters for certain target topographies or vice versa, returning the topography characteristics for explicit sharpening parameters. The desired sharpening and topography parameters were calculated by minimizing the quadratic error of the process model.
Figure 16 shows the graphical user interface of the process model. Any combination of topography characteristic and process parameter can be used as input variable. It should be noted that at least three parameters must be specified by the user in order to use the process model optimally. The algorithm automatically calculates the missing parameters with the best possible adaptation to the process model. In order to evaluate the accuracy, the value “error” is additionally calculated. The developed process model thus represents a tool for planning and illustrating the sharpening process.
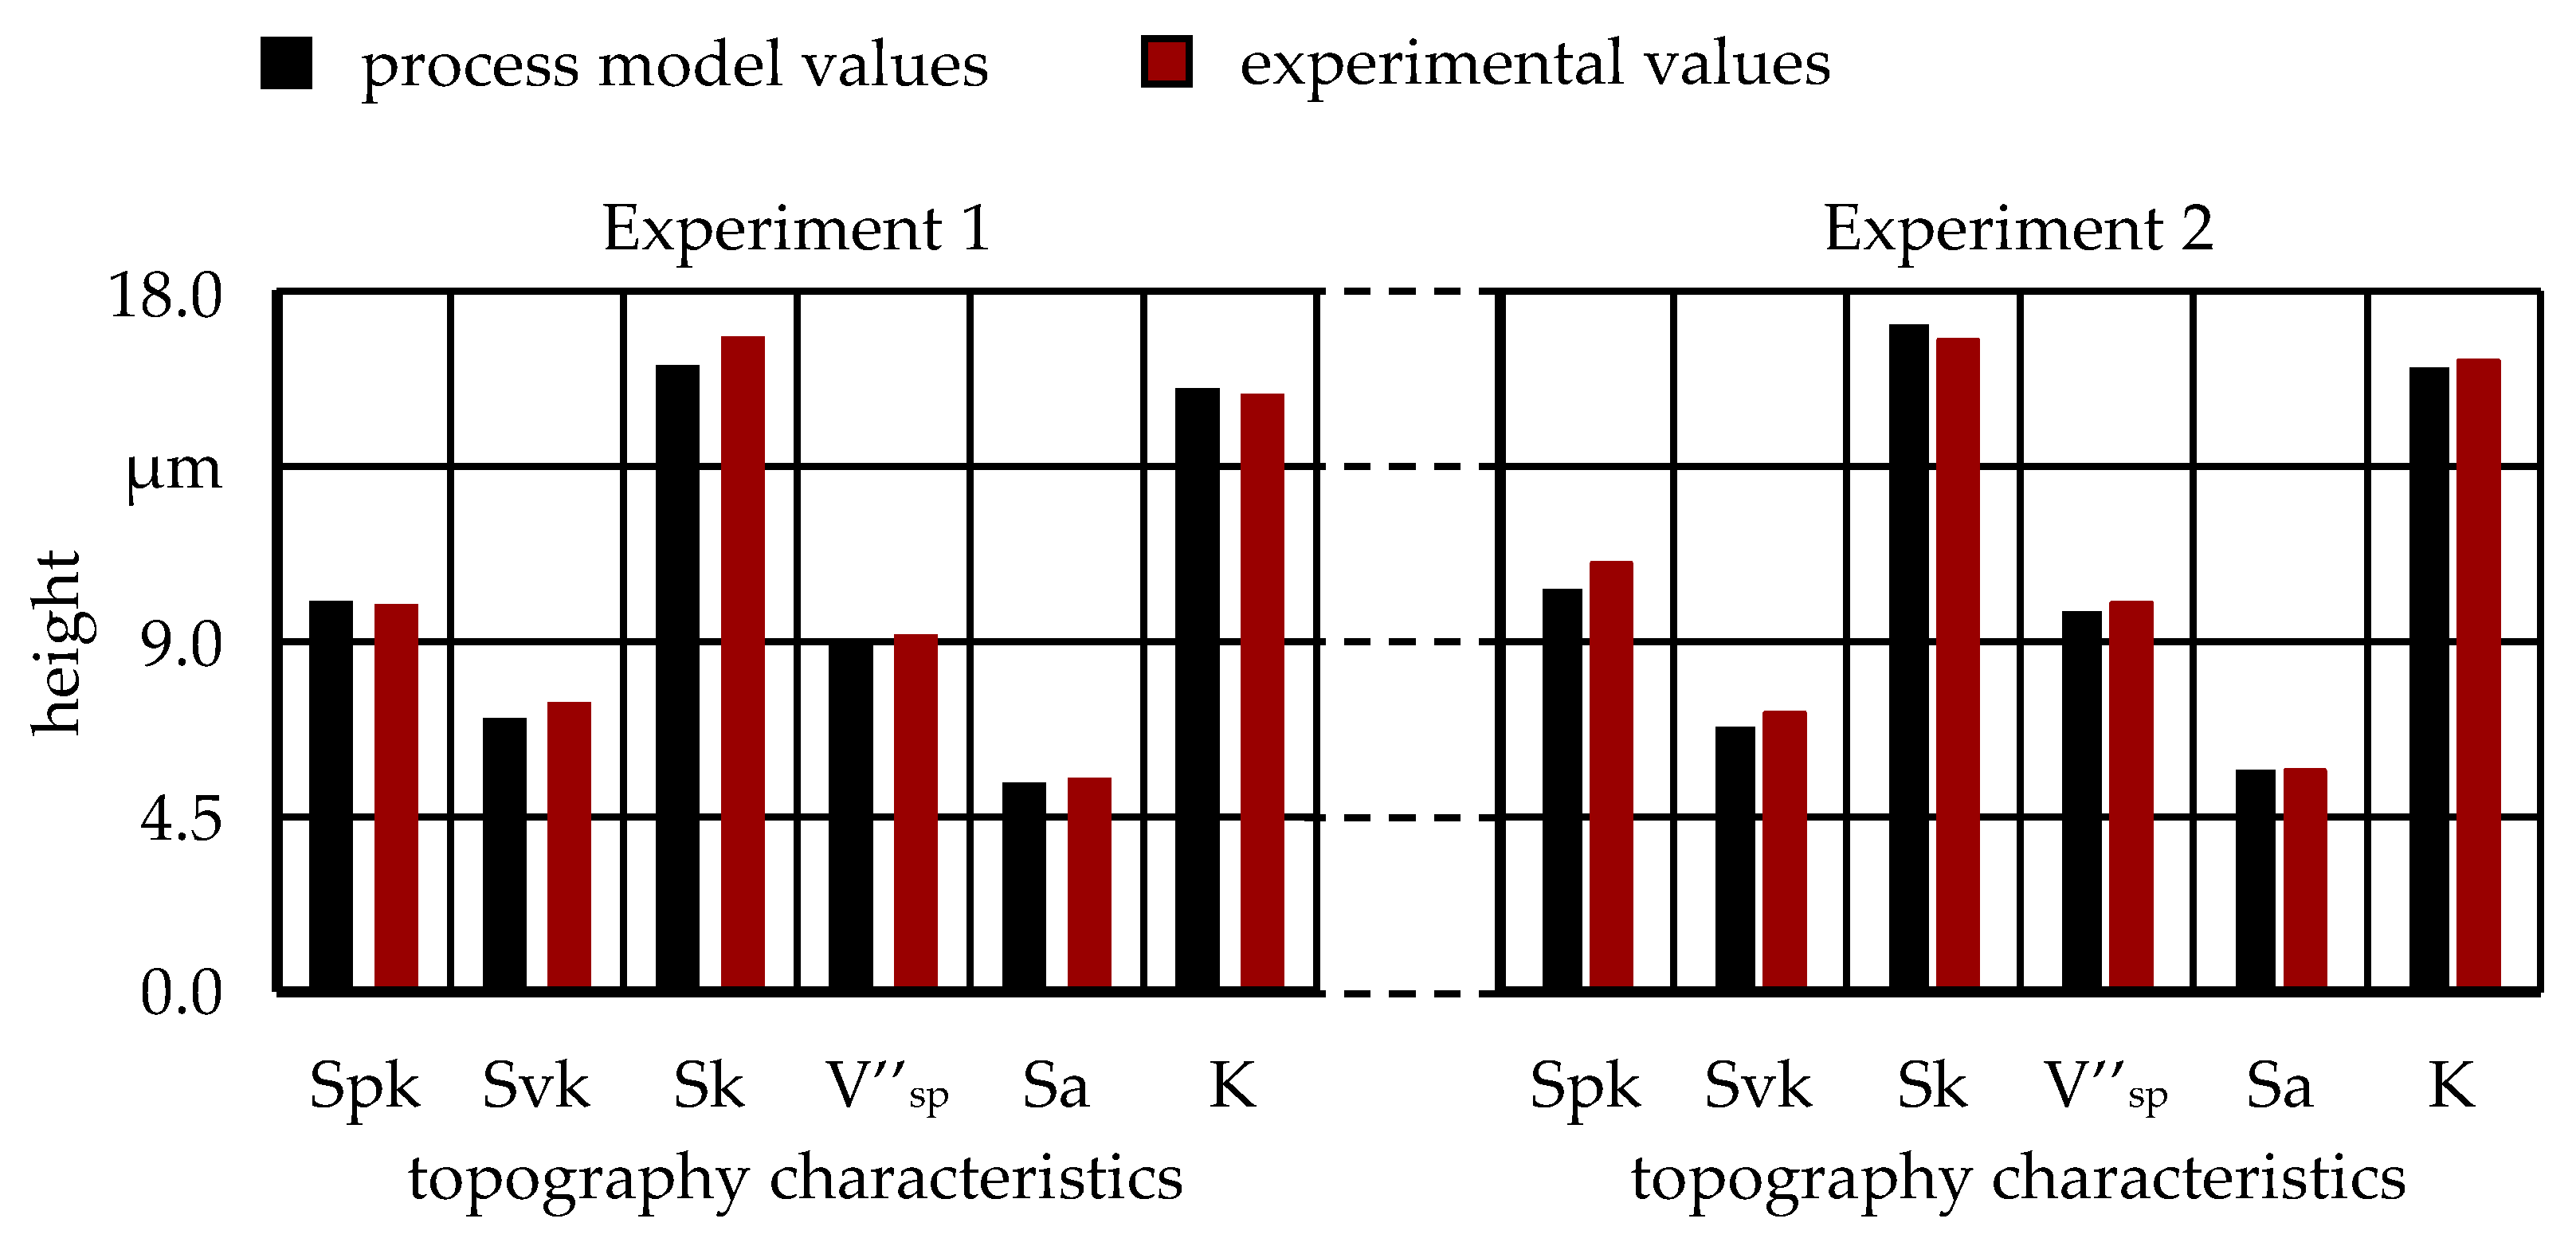
Further technological investigations were carried out to verify the process model. Therefore, the topography characteristics calculated for certain sharpening parameters are listed in
Table 5.
Afterwards, sharpening experiments were carried out with the specified parameters, and the topography characteristics were determined by means of imprints.
Figure 17 shows the calculated topography characteristics and those obtained from the sharpening experiments. It becomes clear that the calculated topography characteristics were close to the experimentally achieved values. The percentage difference was less than 10% for all determined topography characteristics. Thus, the process model is suitable for the targeted setting of the grinding wheel topography.
