Design and Vision-Based Calibration of a Five-Axis Precision Dispensing Machine
Abstract
1. Introduction
2. Design of a VBM-Based Five-Axis Dispensing Machine
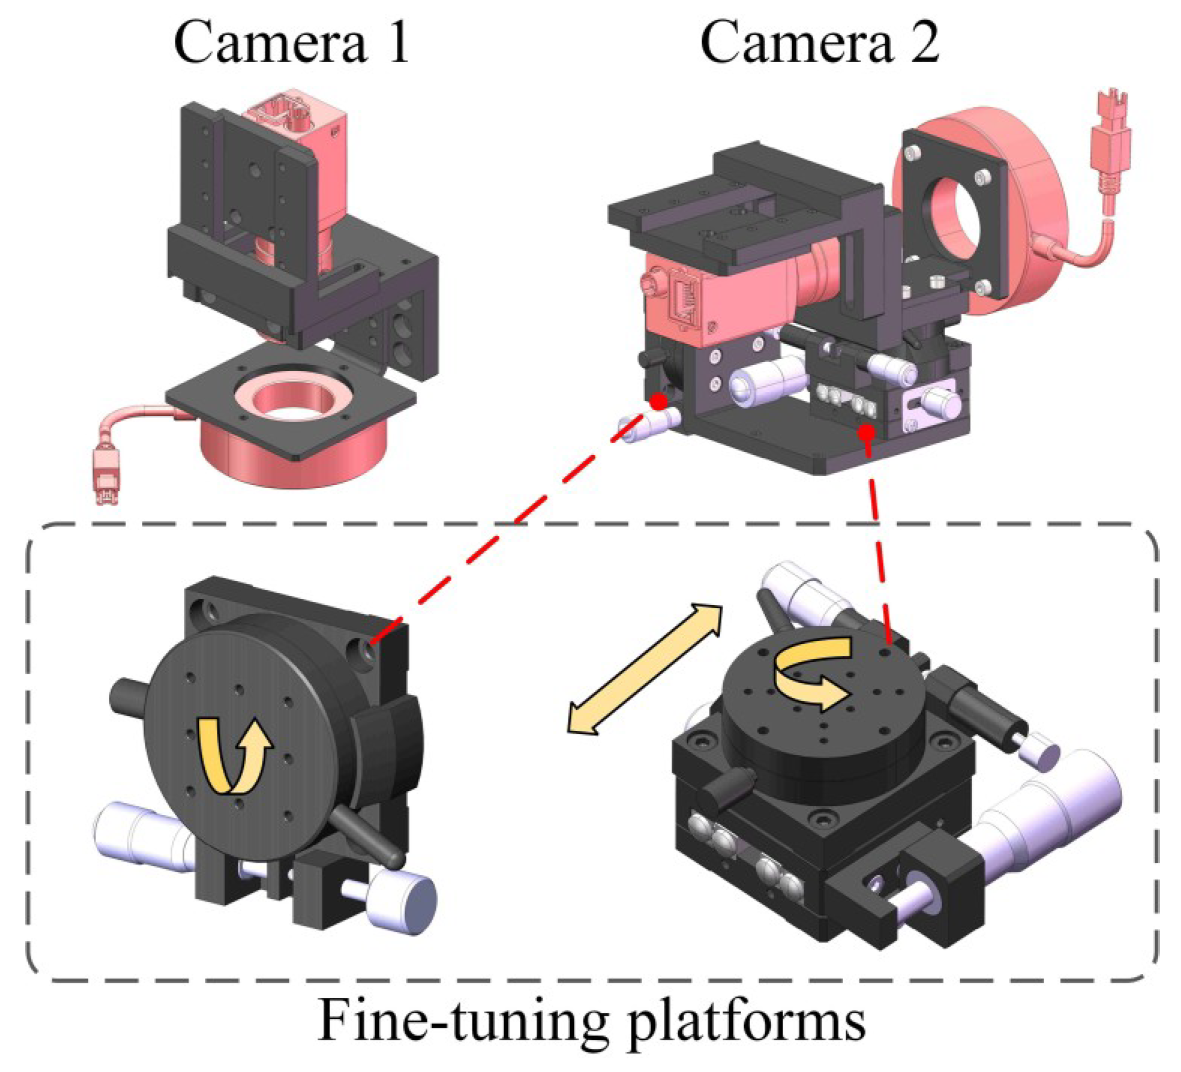
2.1. Design of a VBM System
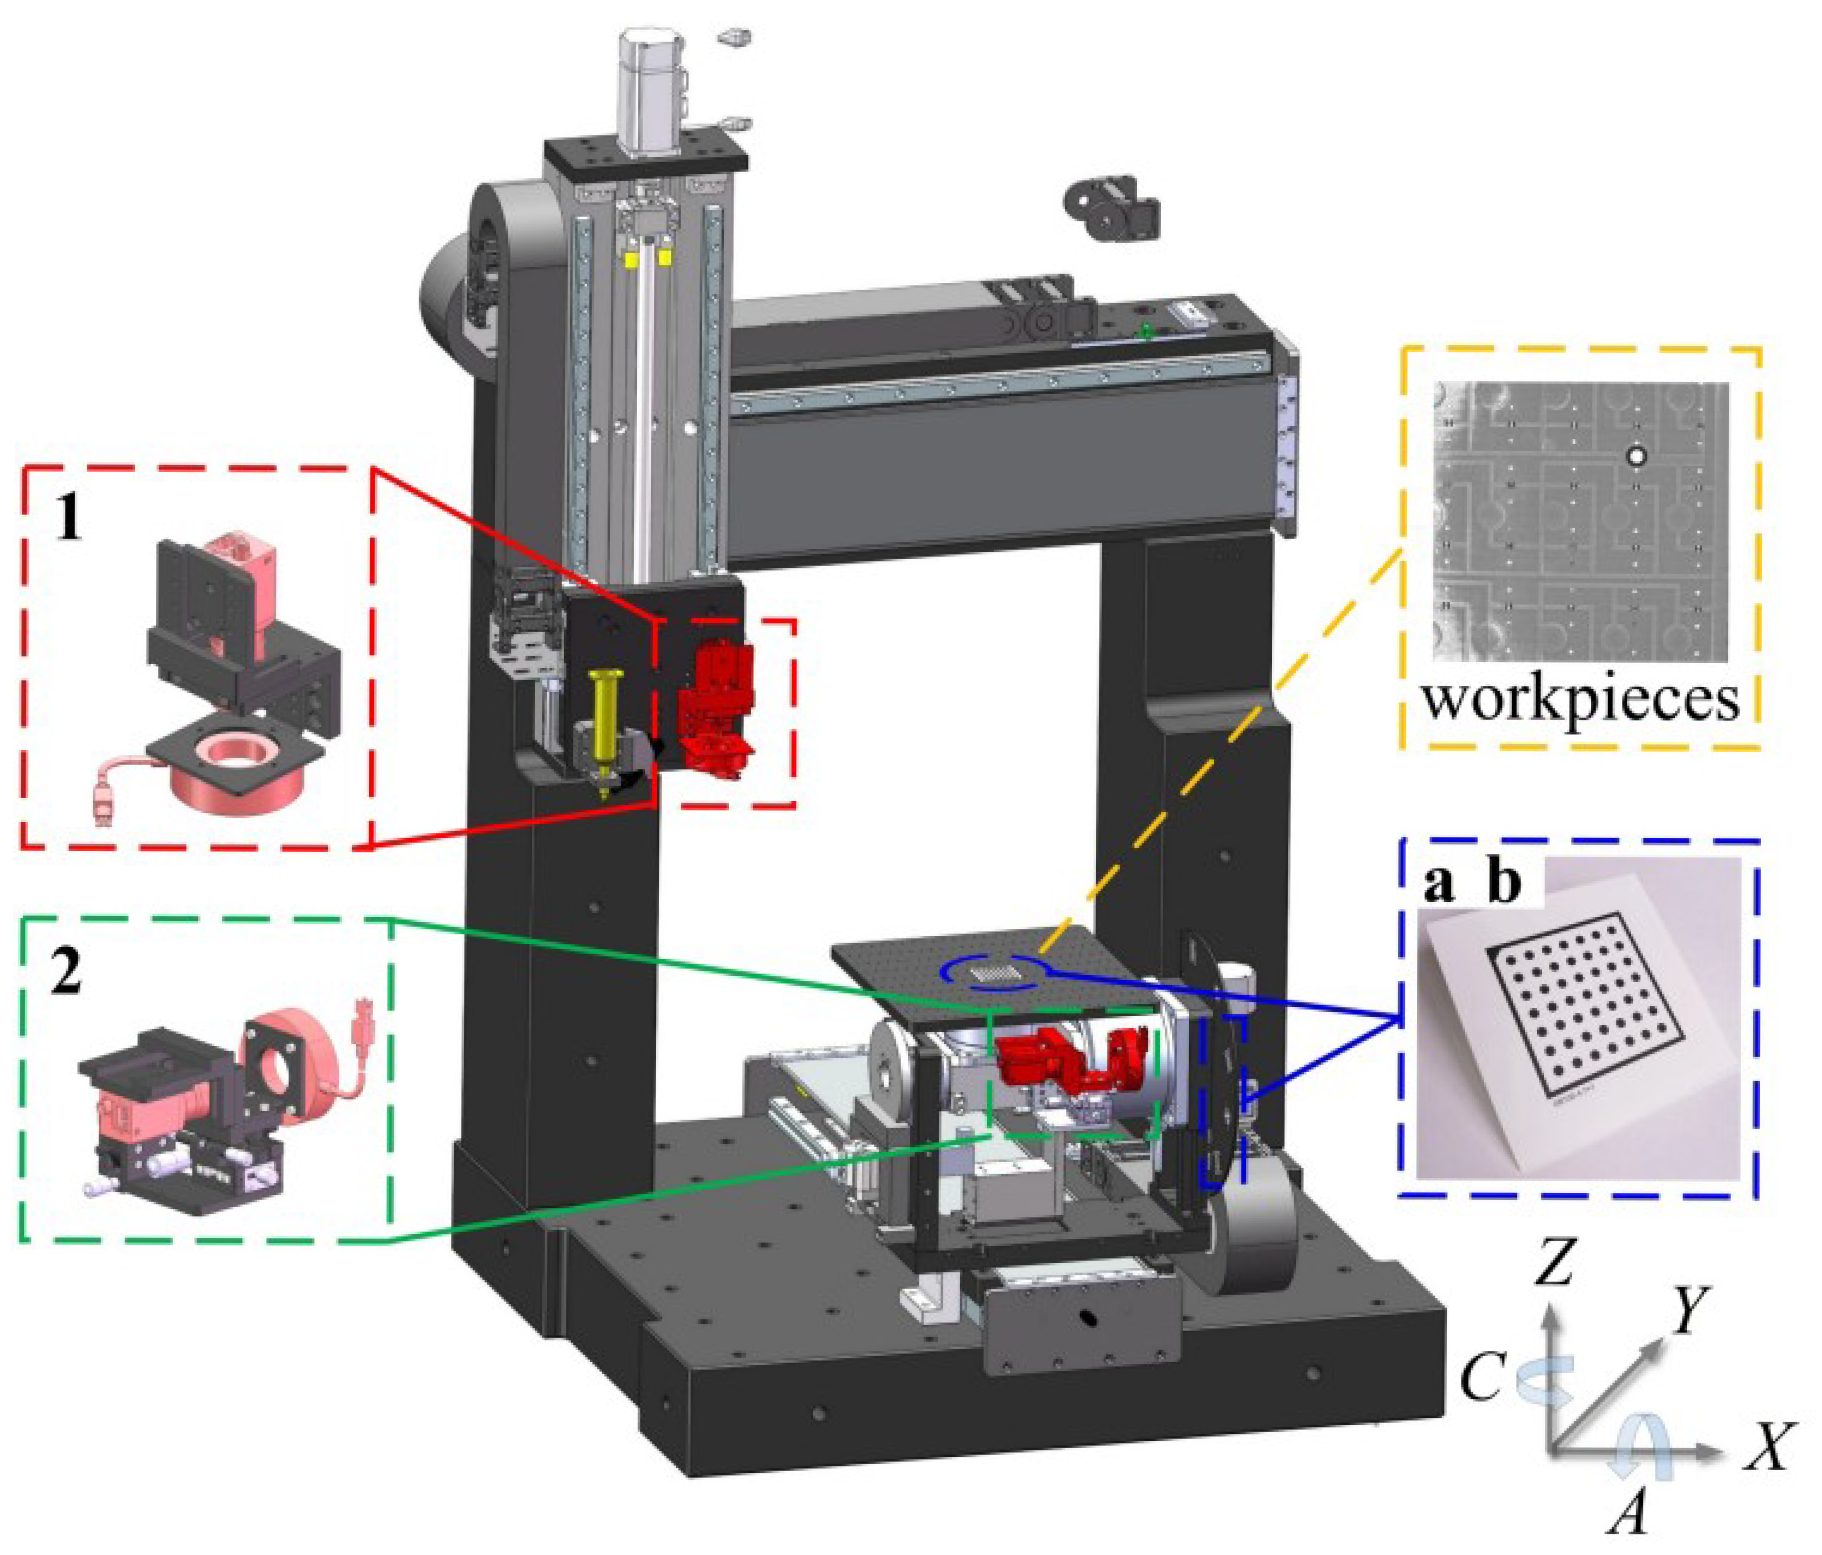
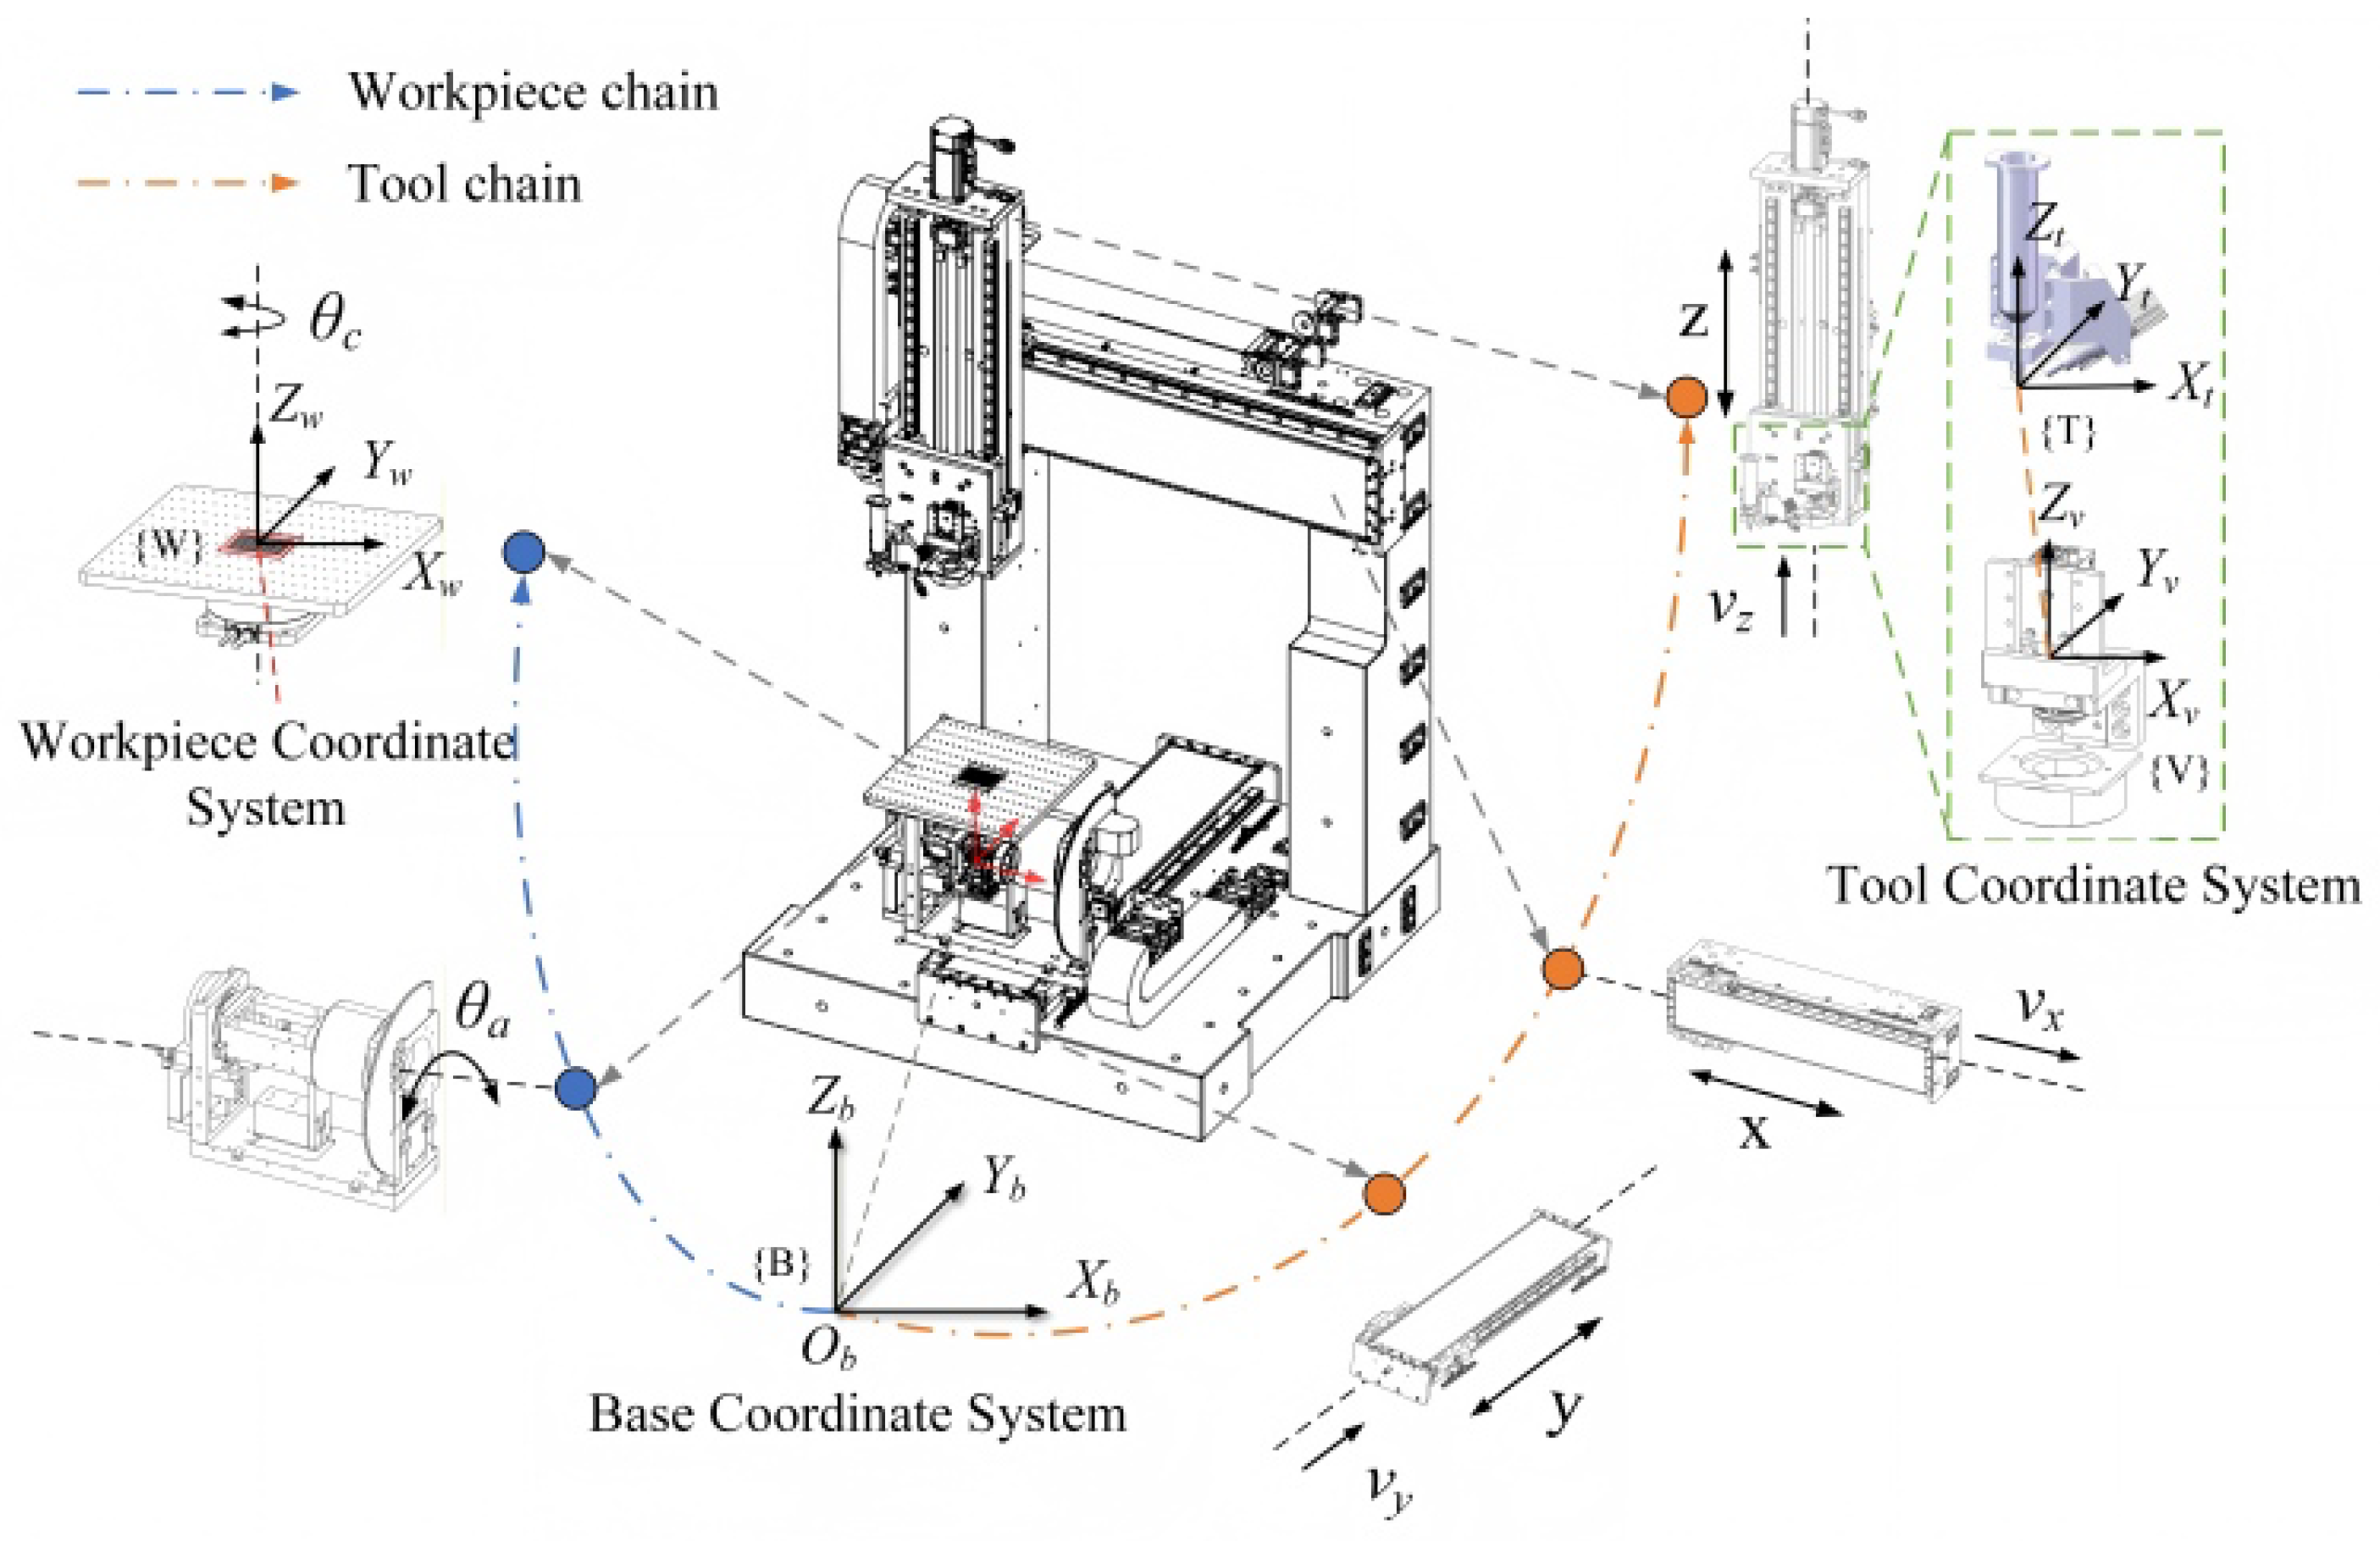
2.2. Design of a Five-Axis Dispensing Machine Using the VBM System
3. Kinematic Identification of the Five-Axis Dispensing Machine Using the VBM System
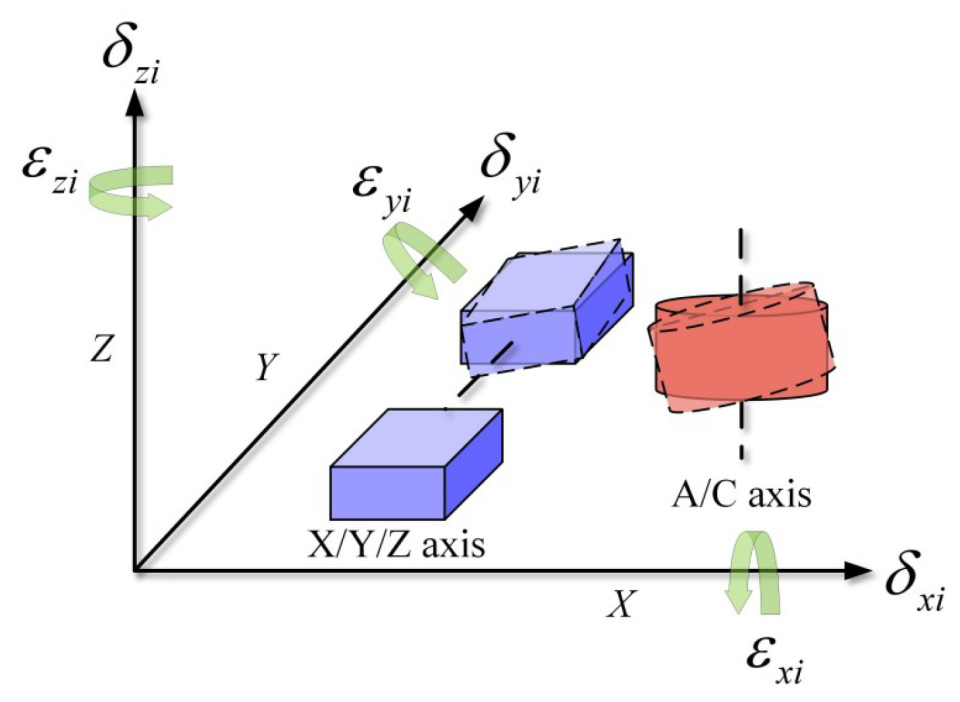
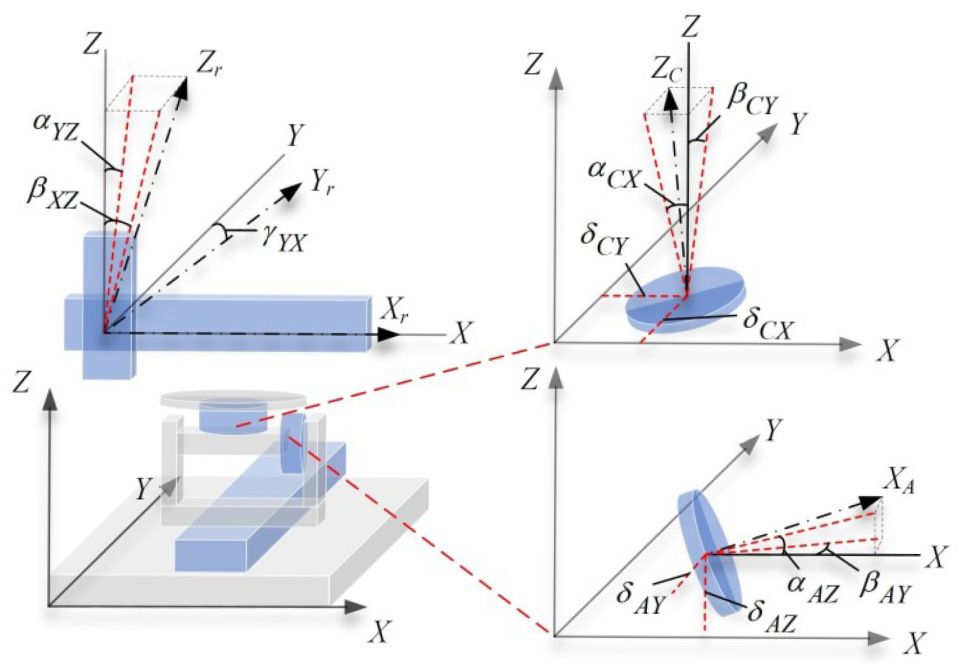
3.1. Kinematic Error Analysis of the Five-Axis Dispensing Machine
3.2. Kinematic Error Modeling of the Five-Axis Dispensing Machine
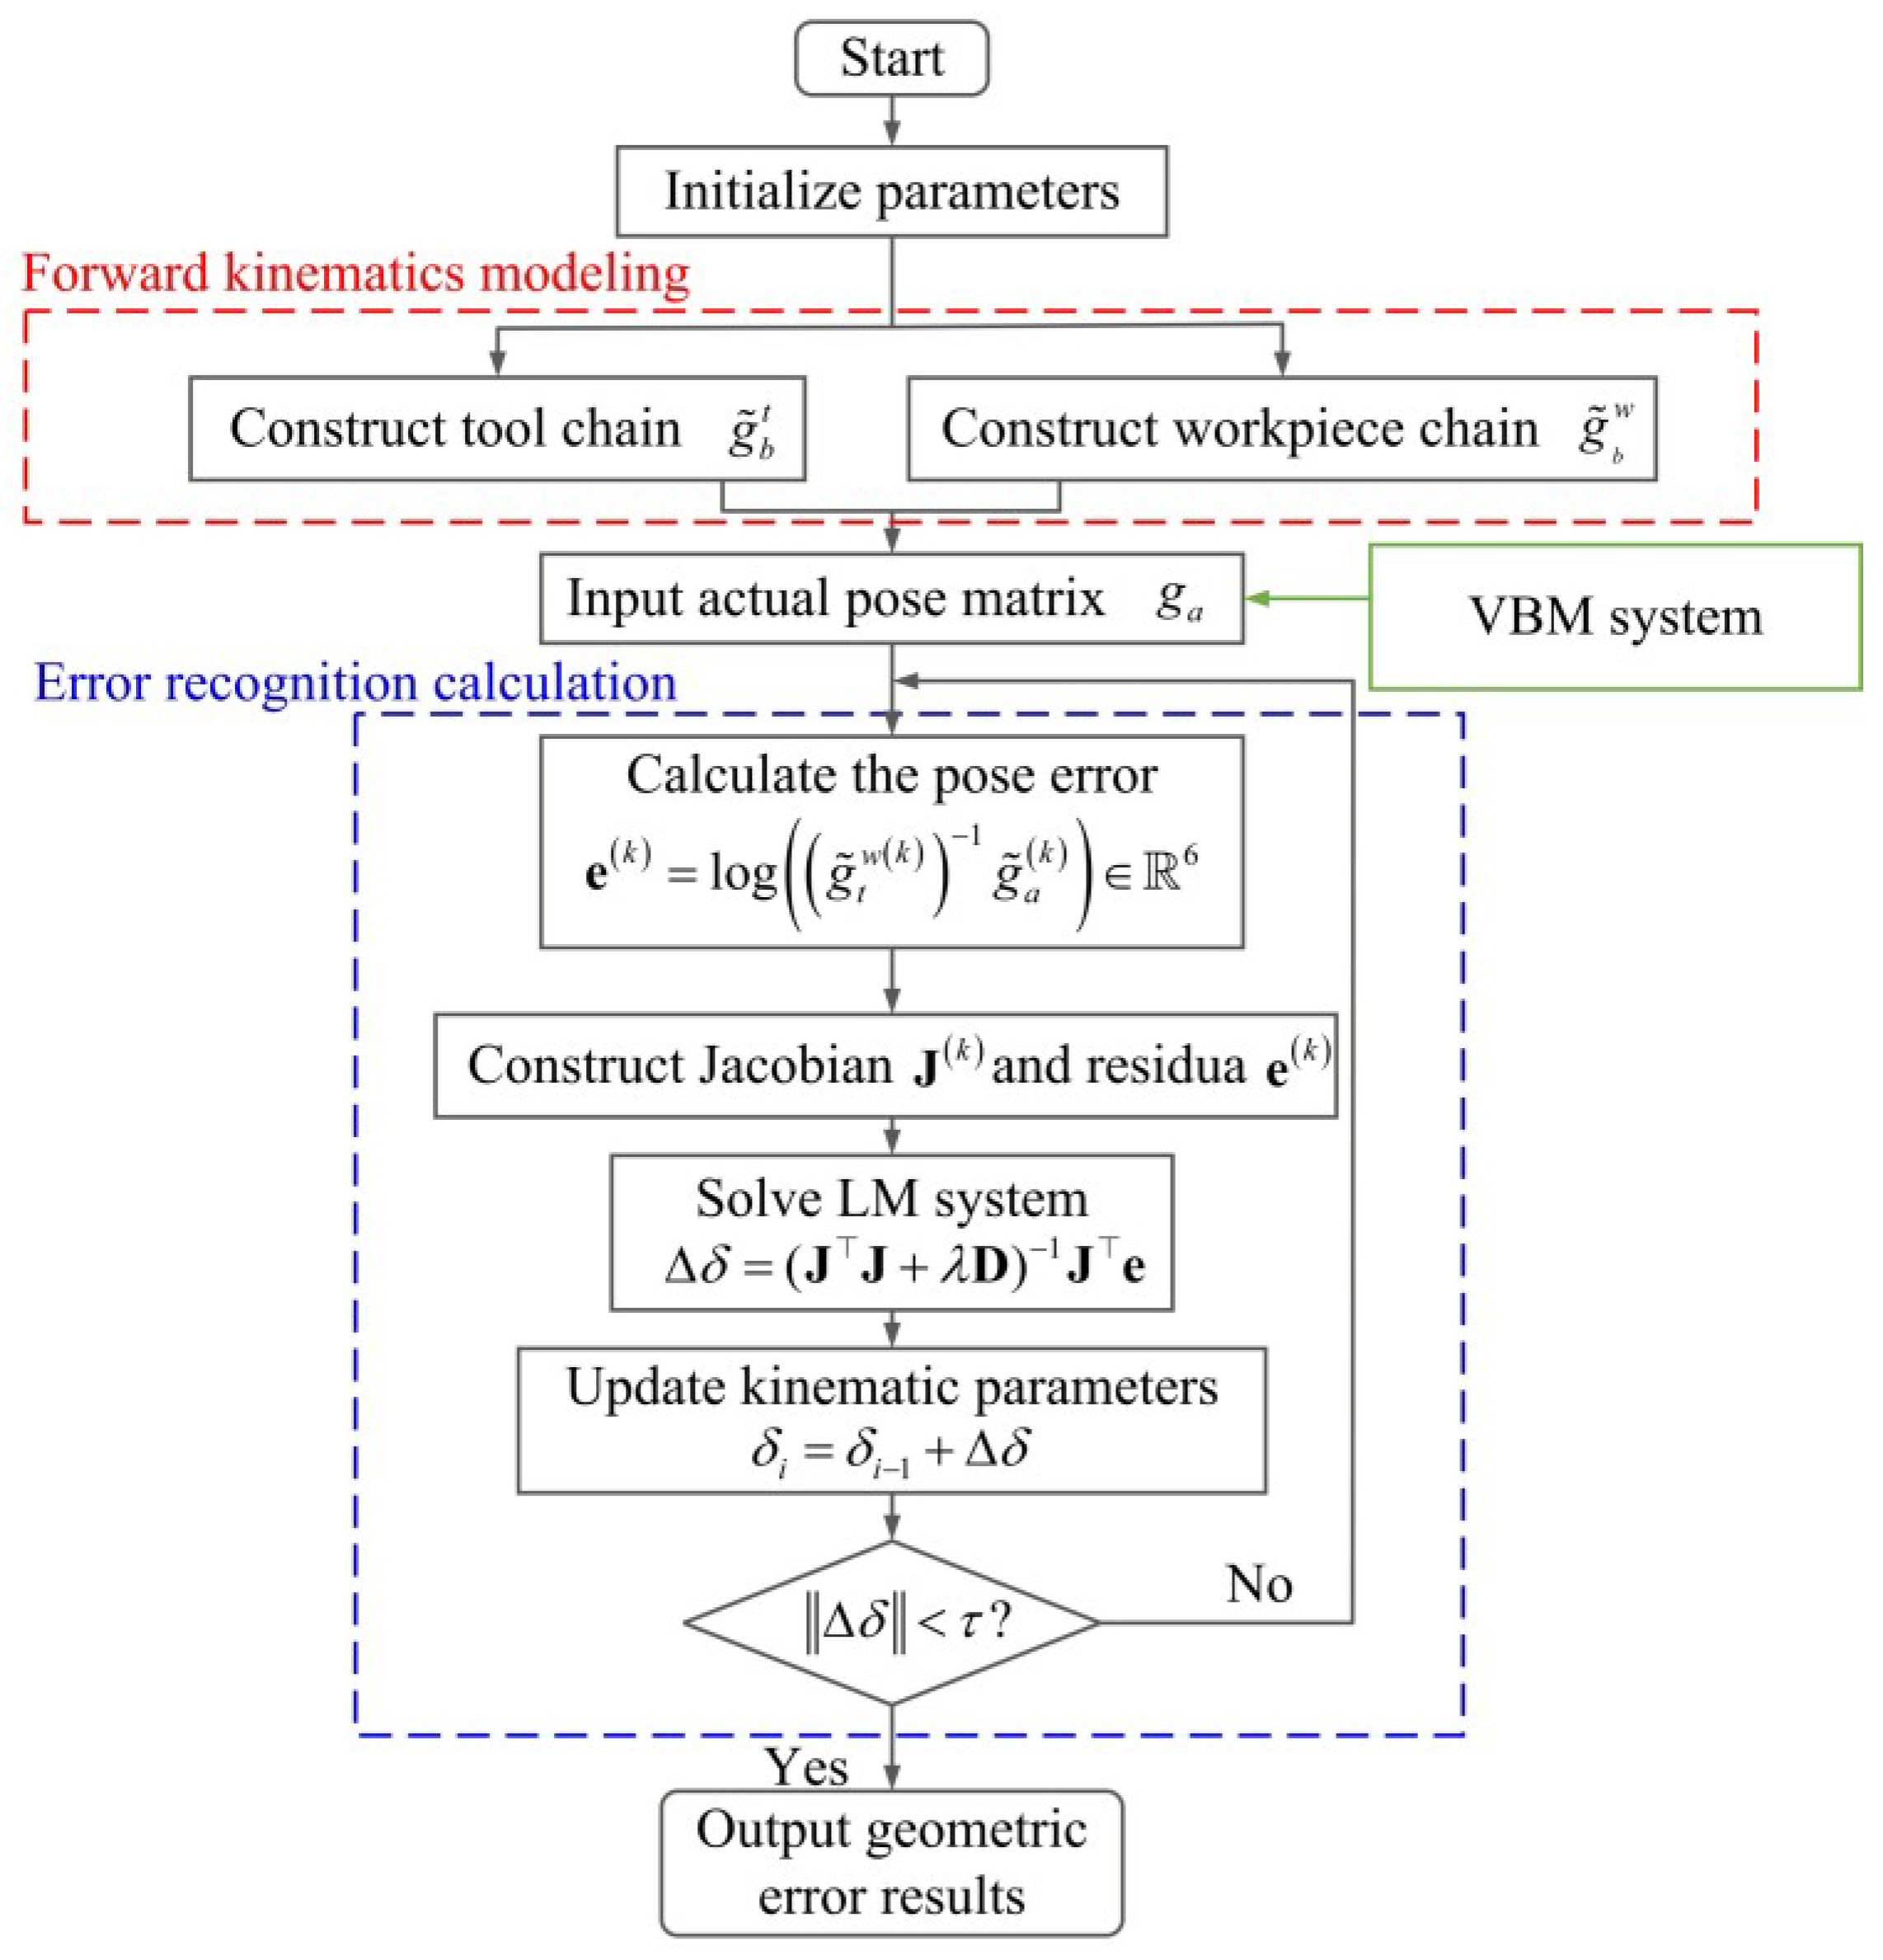
3.3. Geometric Error Identification
4. Calibration and Detection Using the VBM System
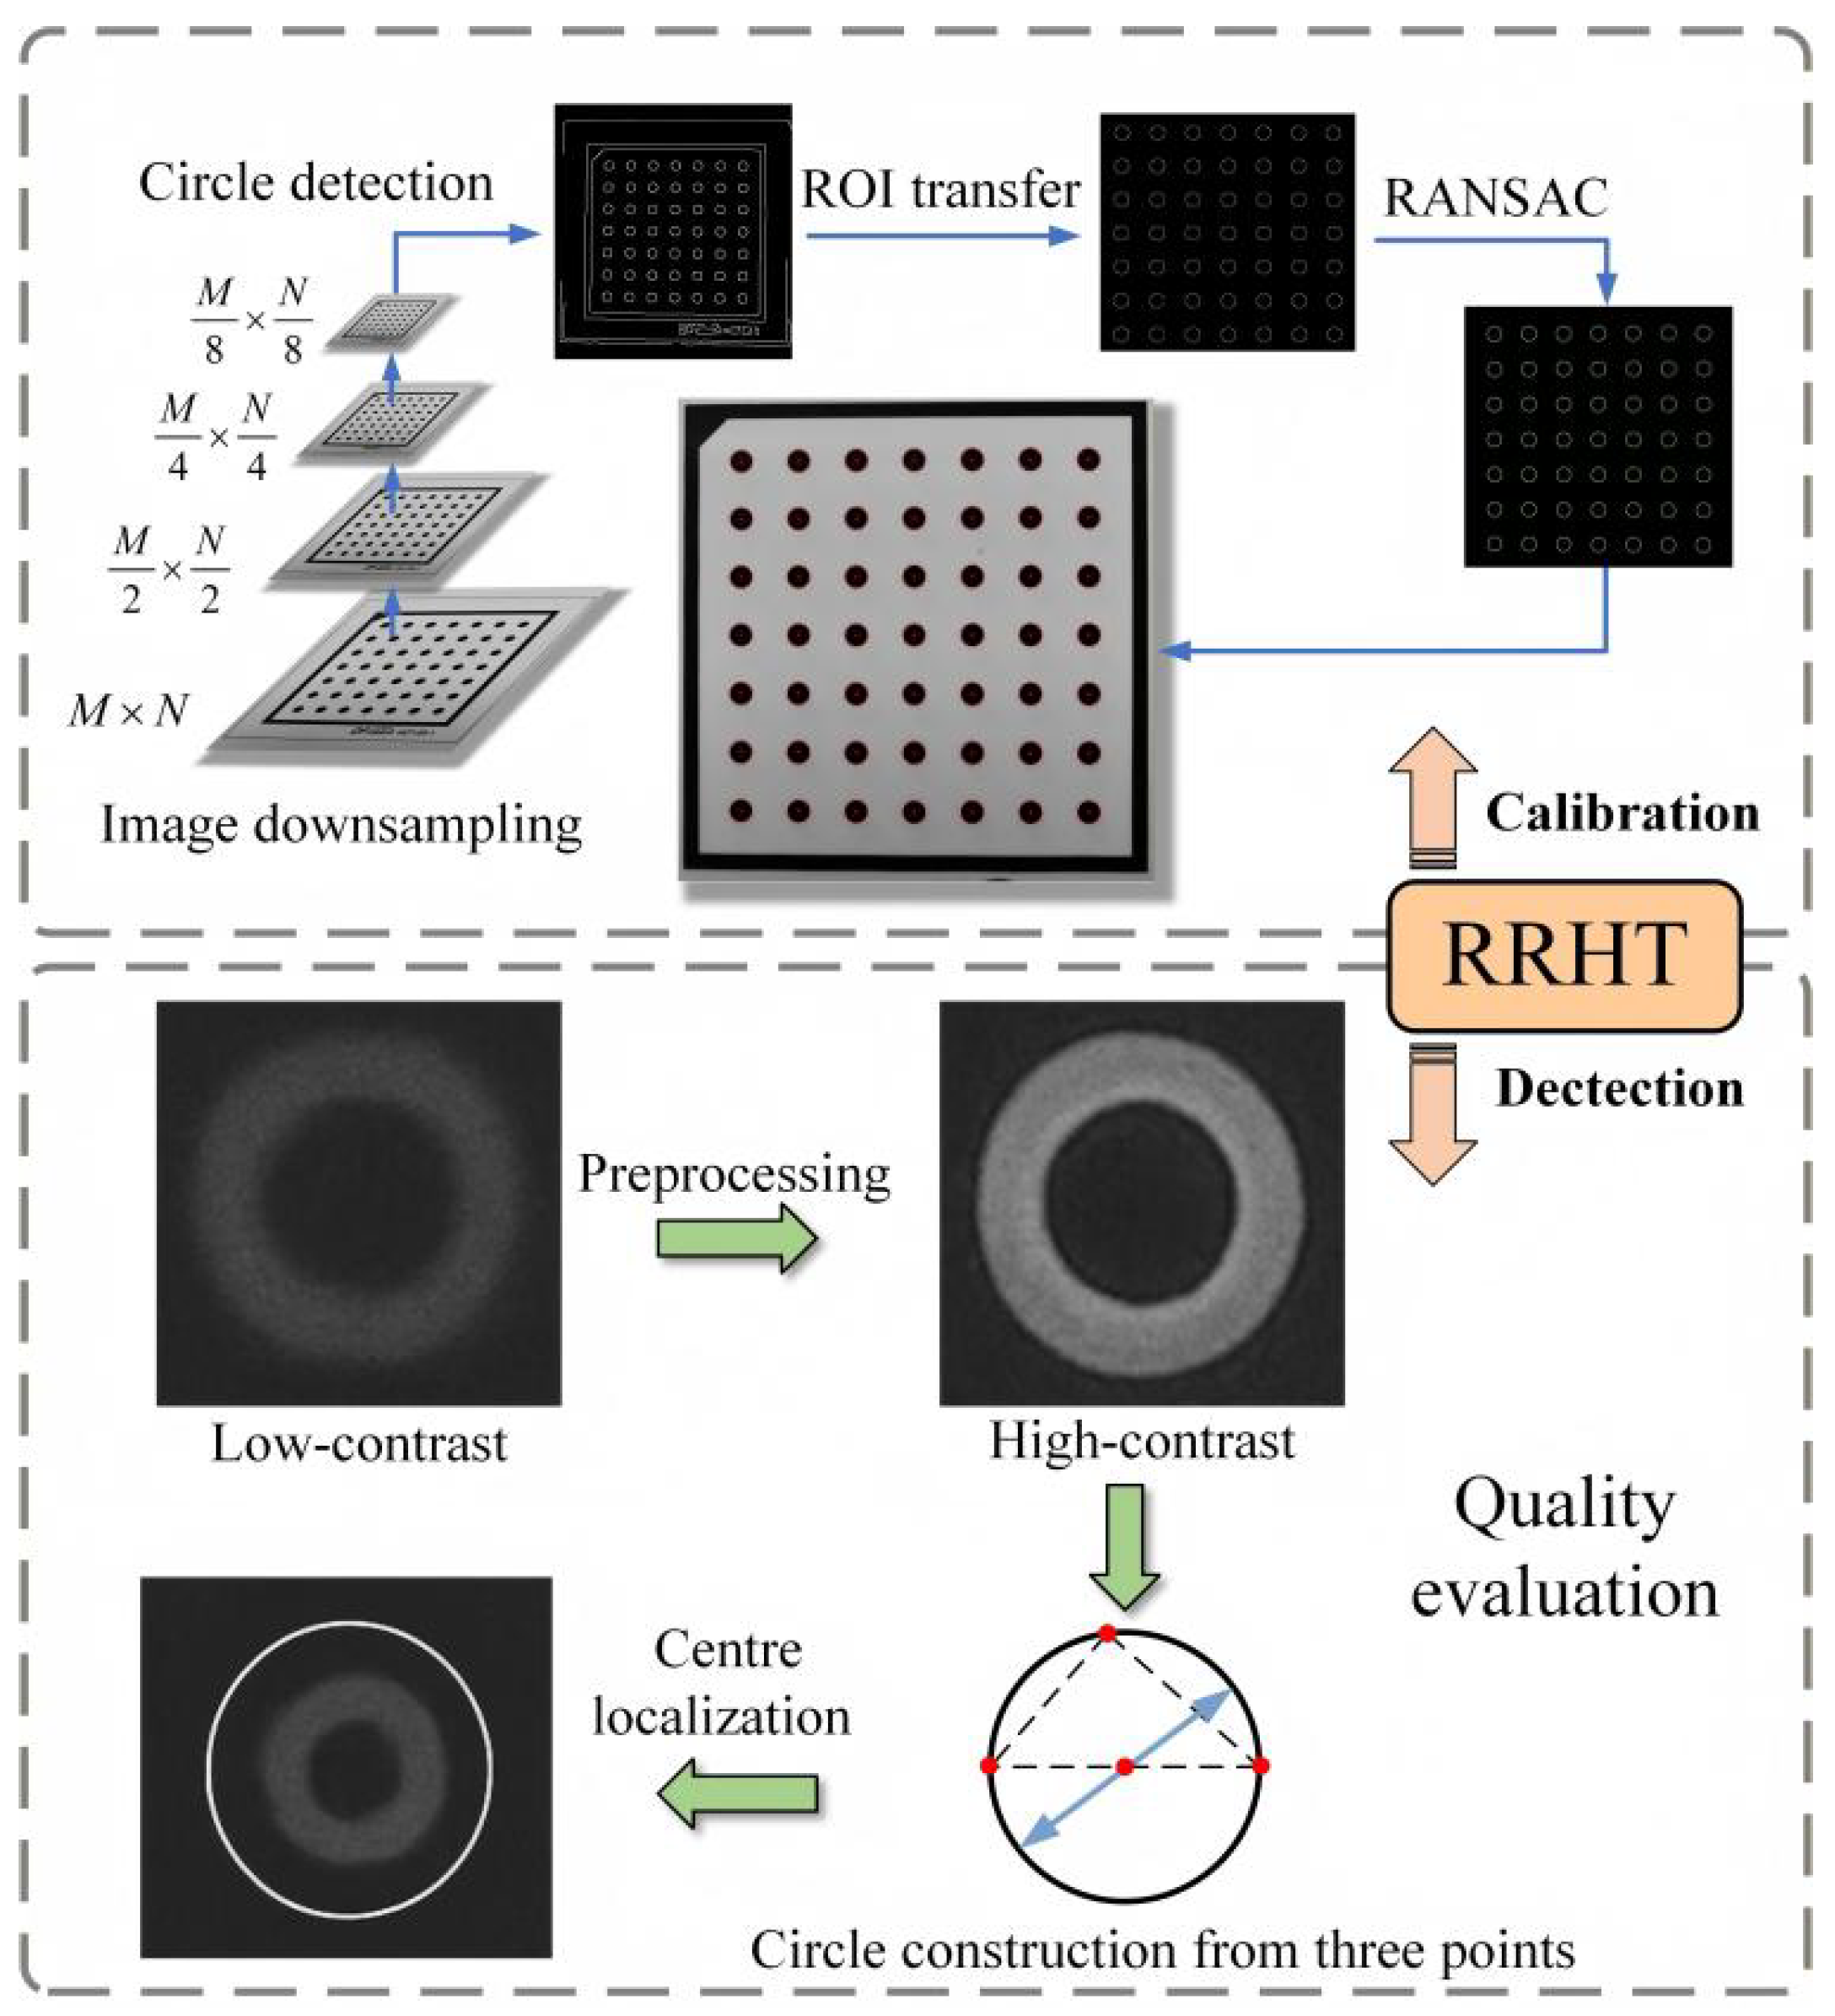
4.1. Design of a RRHT-Based Target Detection Framework
4.2. Design of a Vision-Based Five-Axis Calibration Algorithm
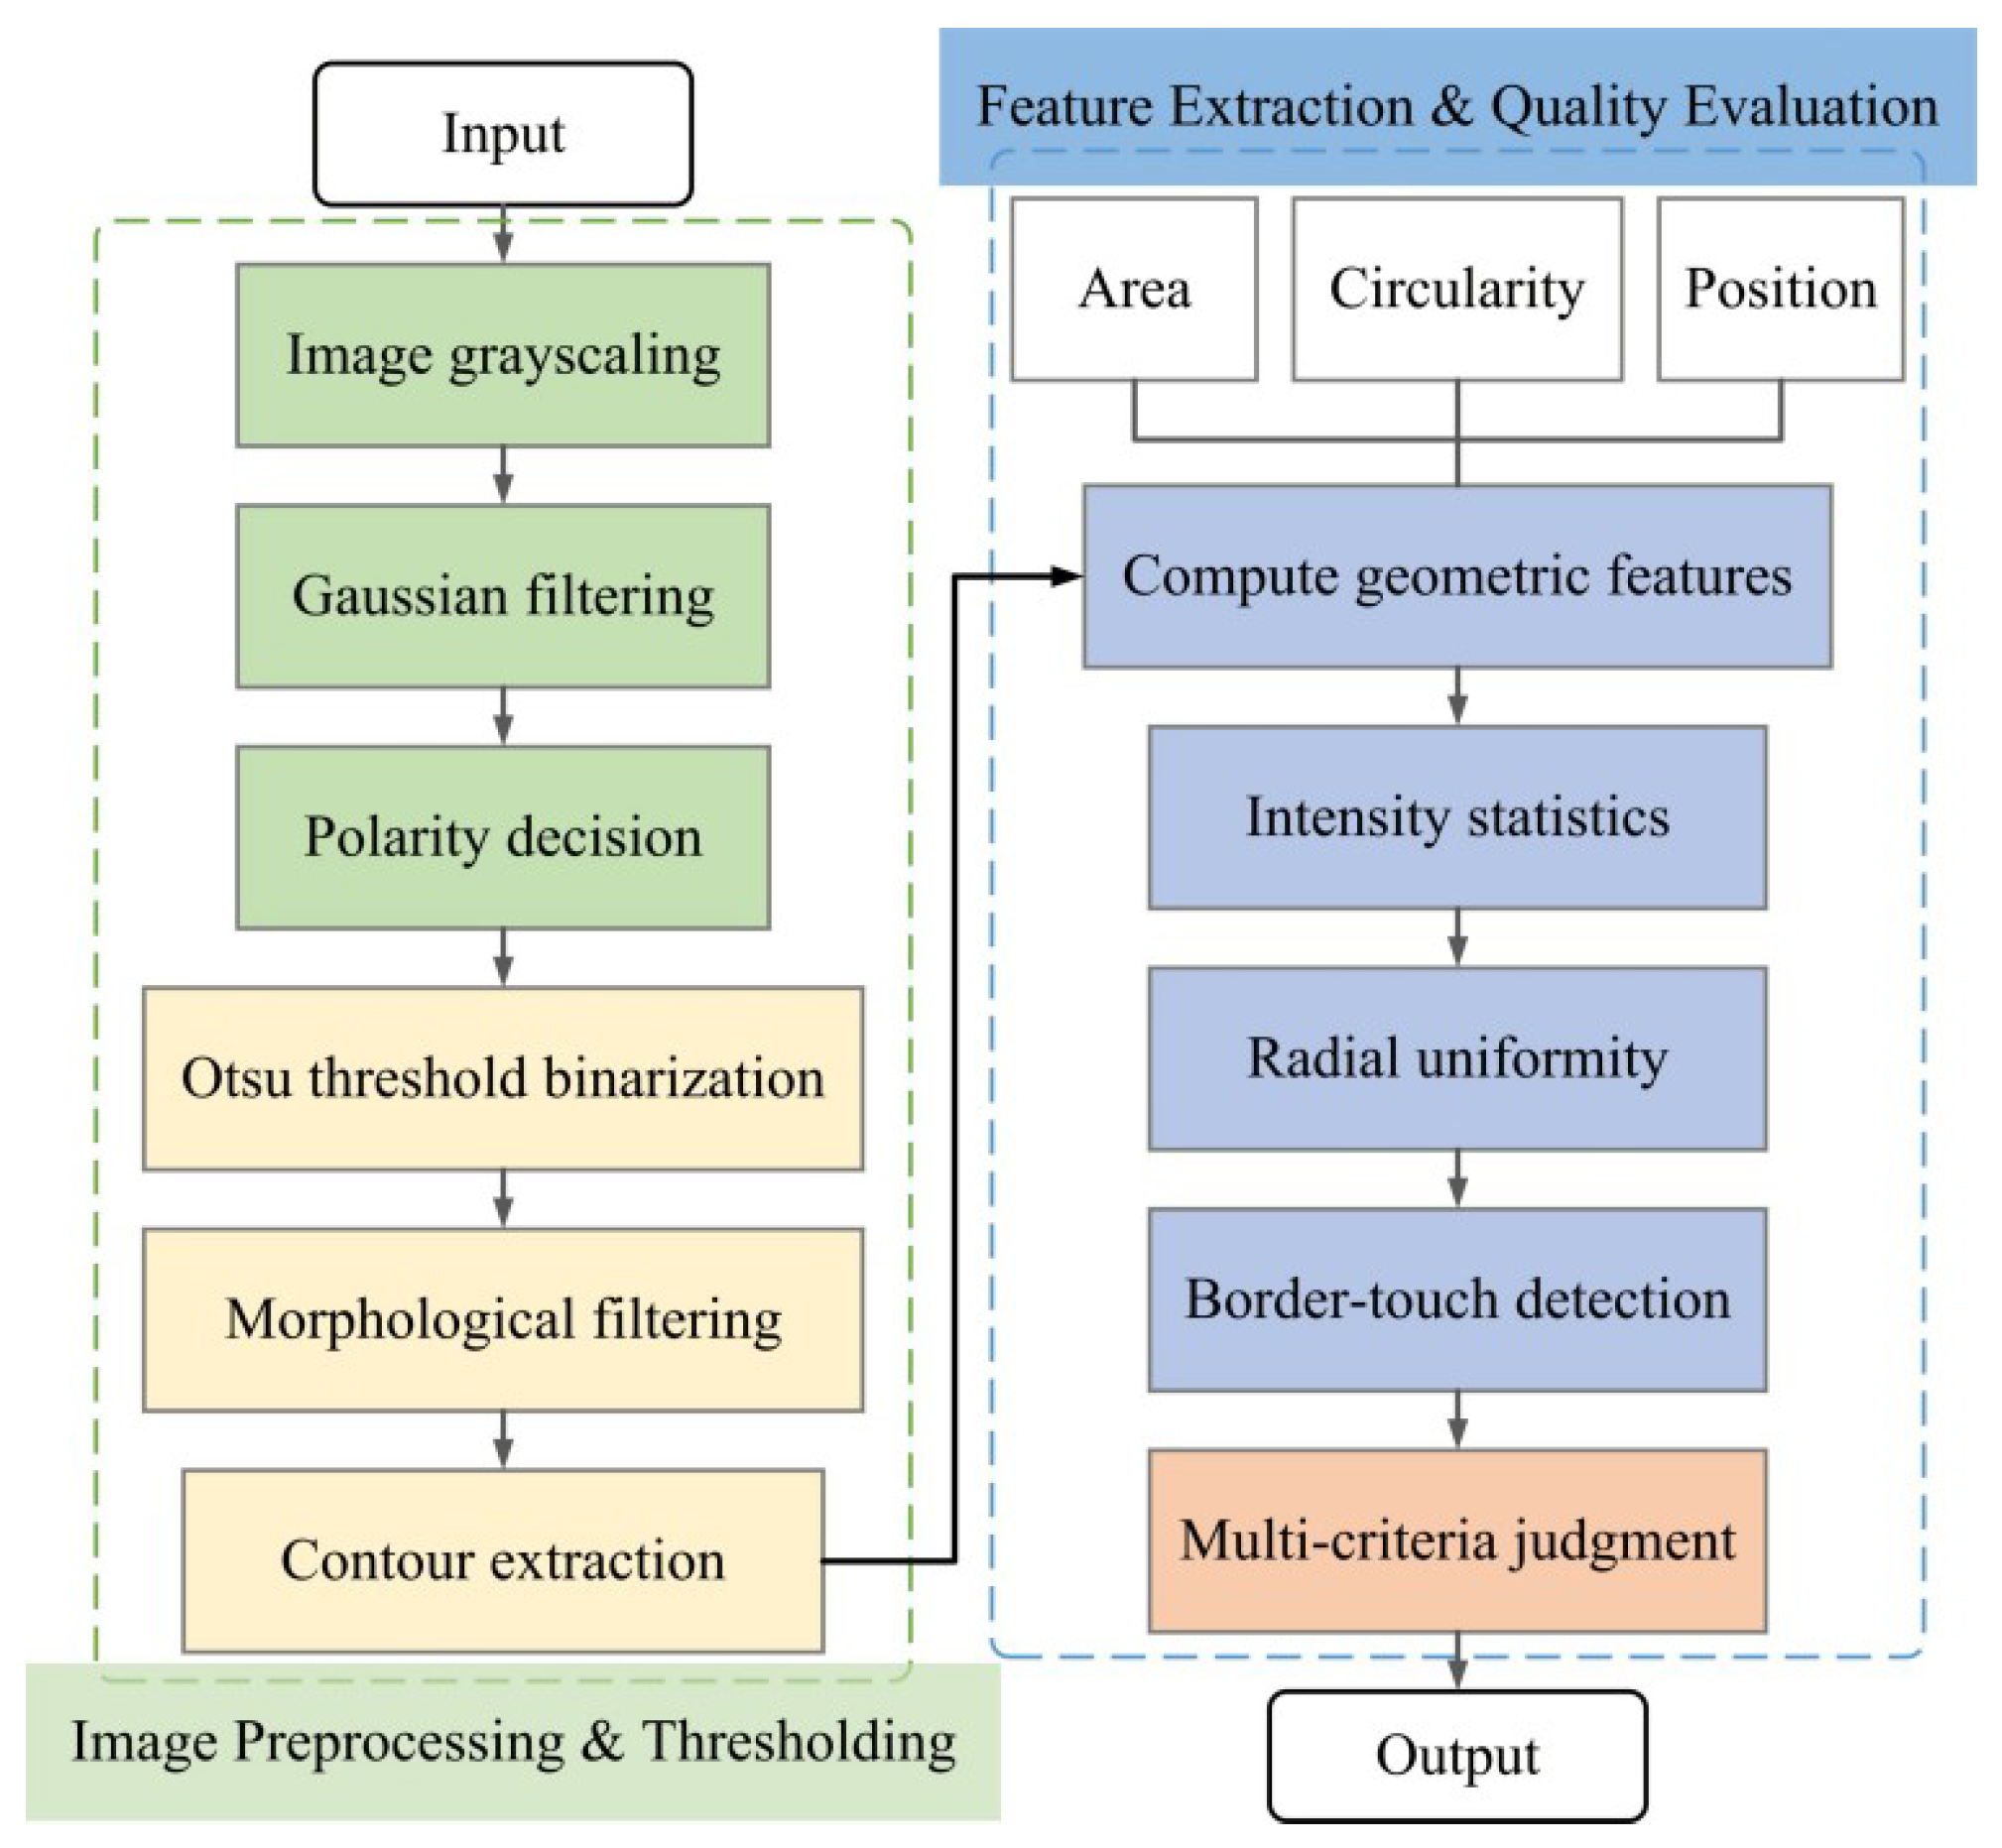
4.3. Design of a Detection Strategy for the Dispensed Workpiece
5. Test of the VBM System Inside the Five-Axis Dispensing Machine
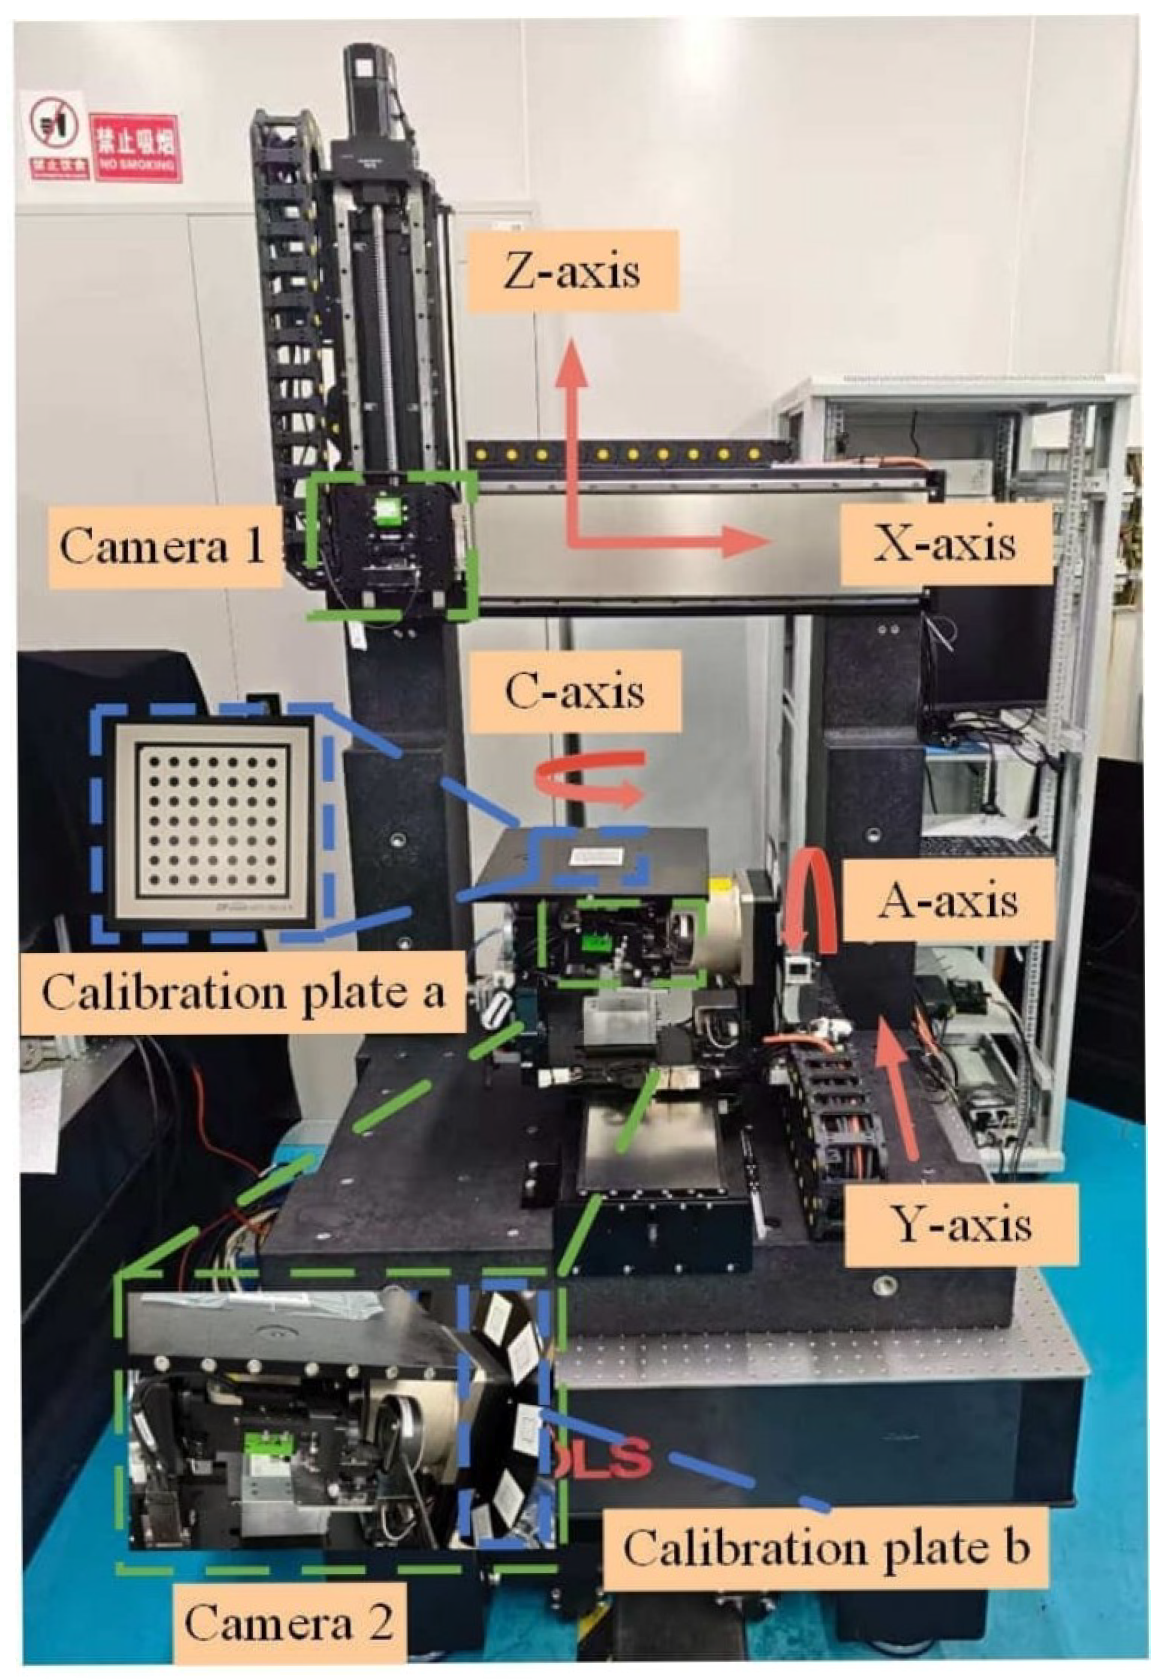
5.1. Prototype Fabrication and Test Setup
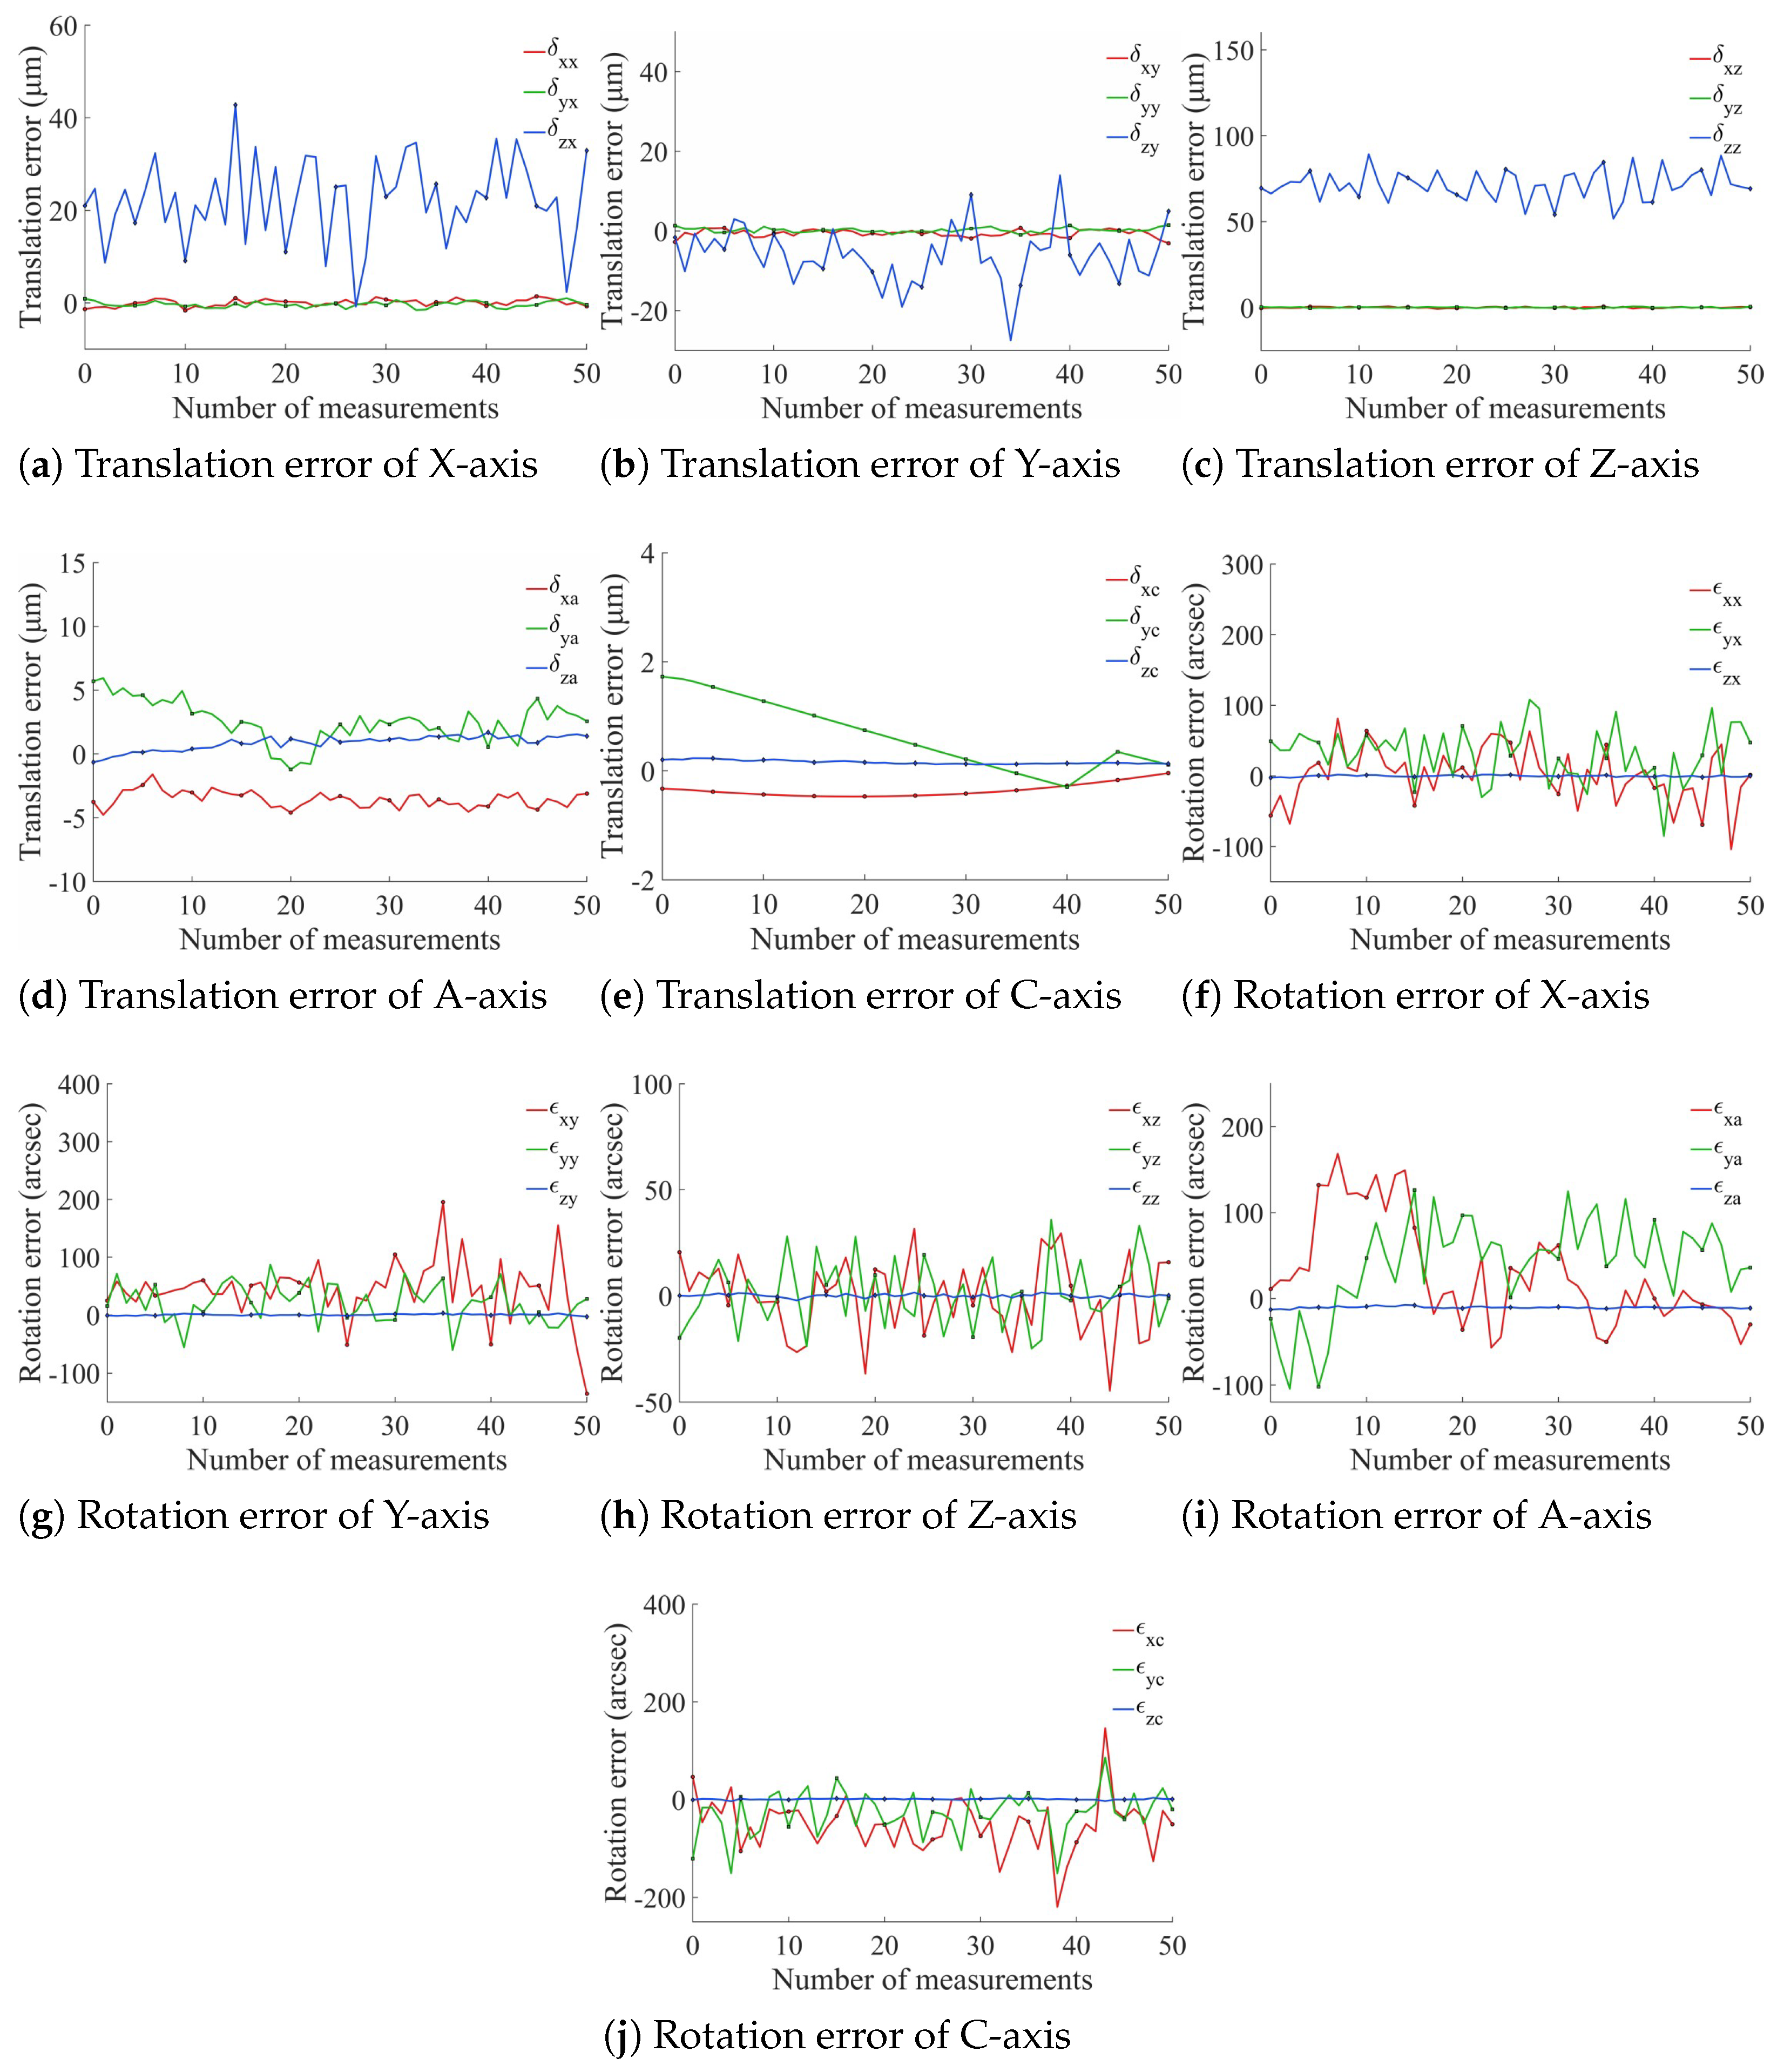
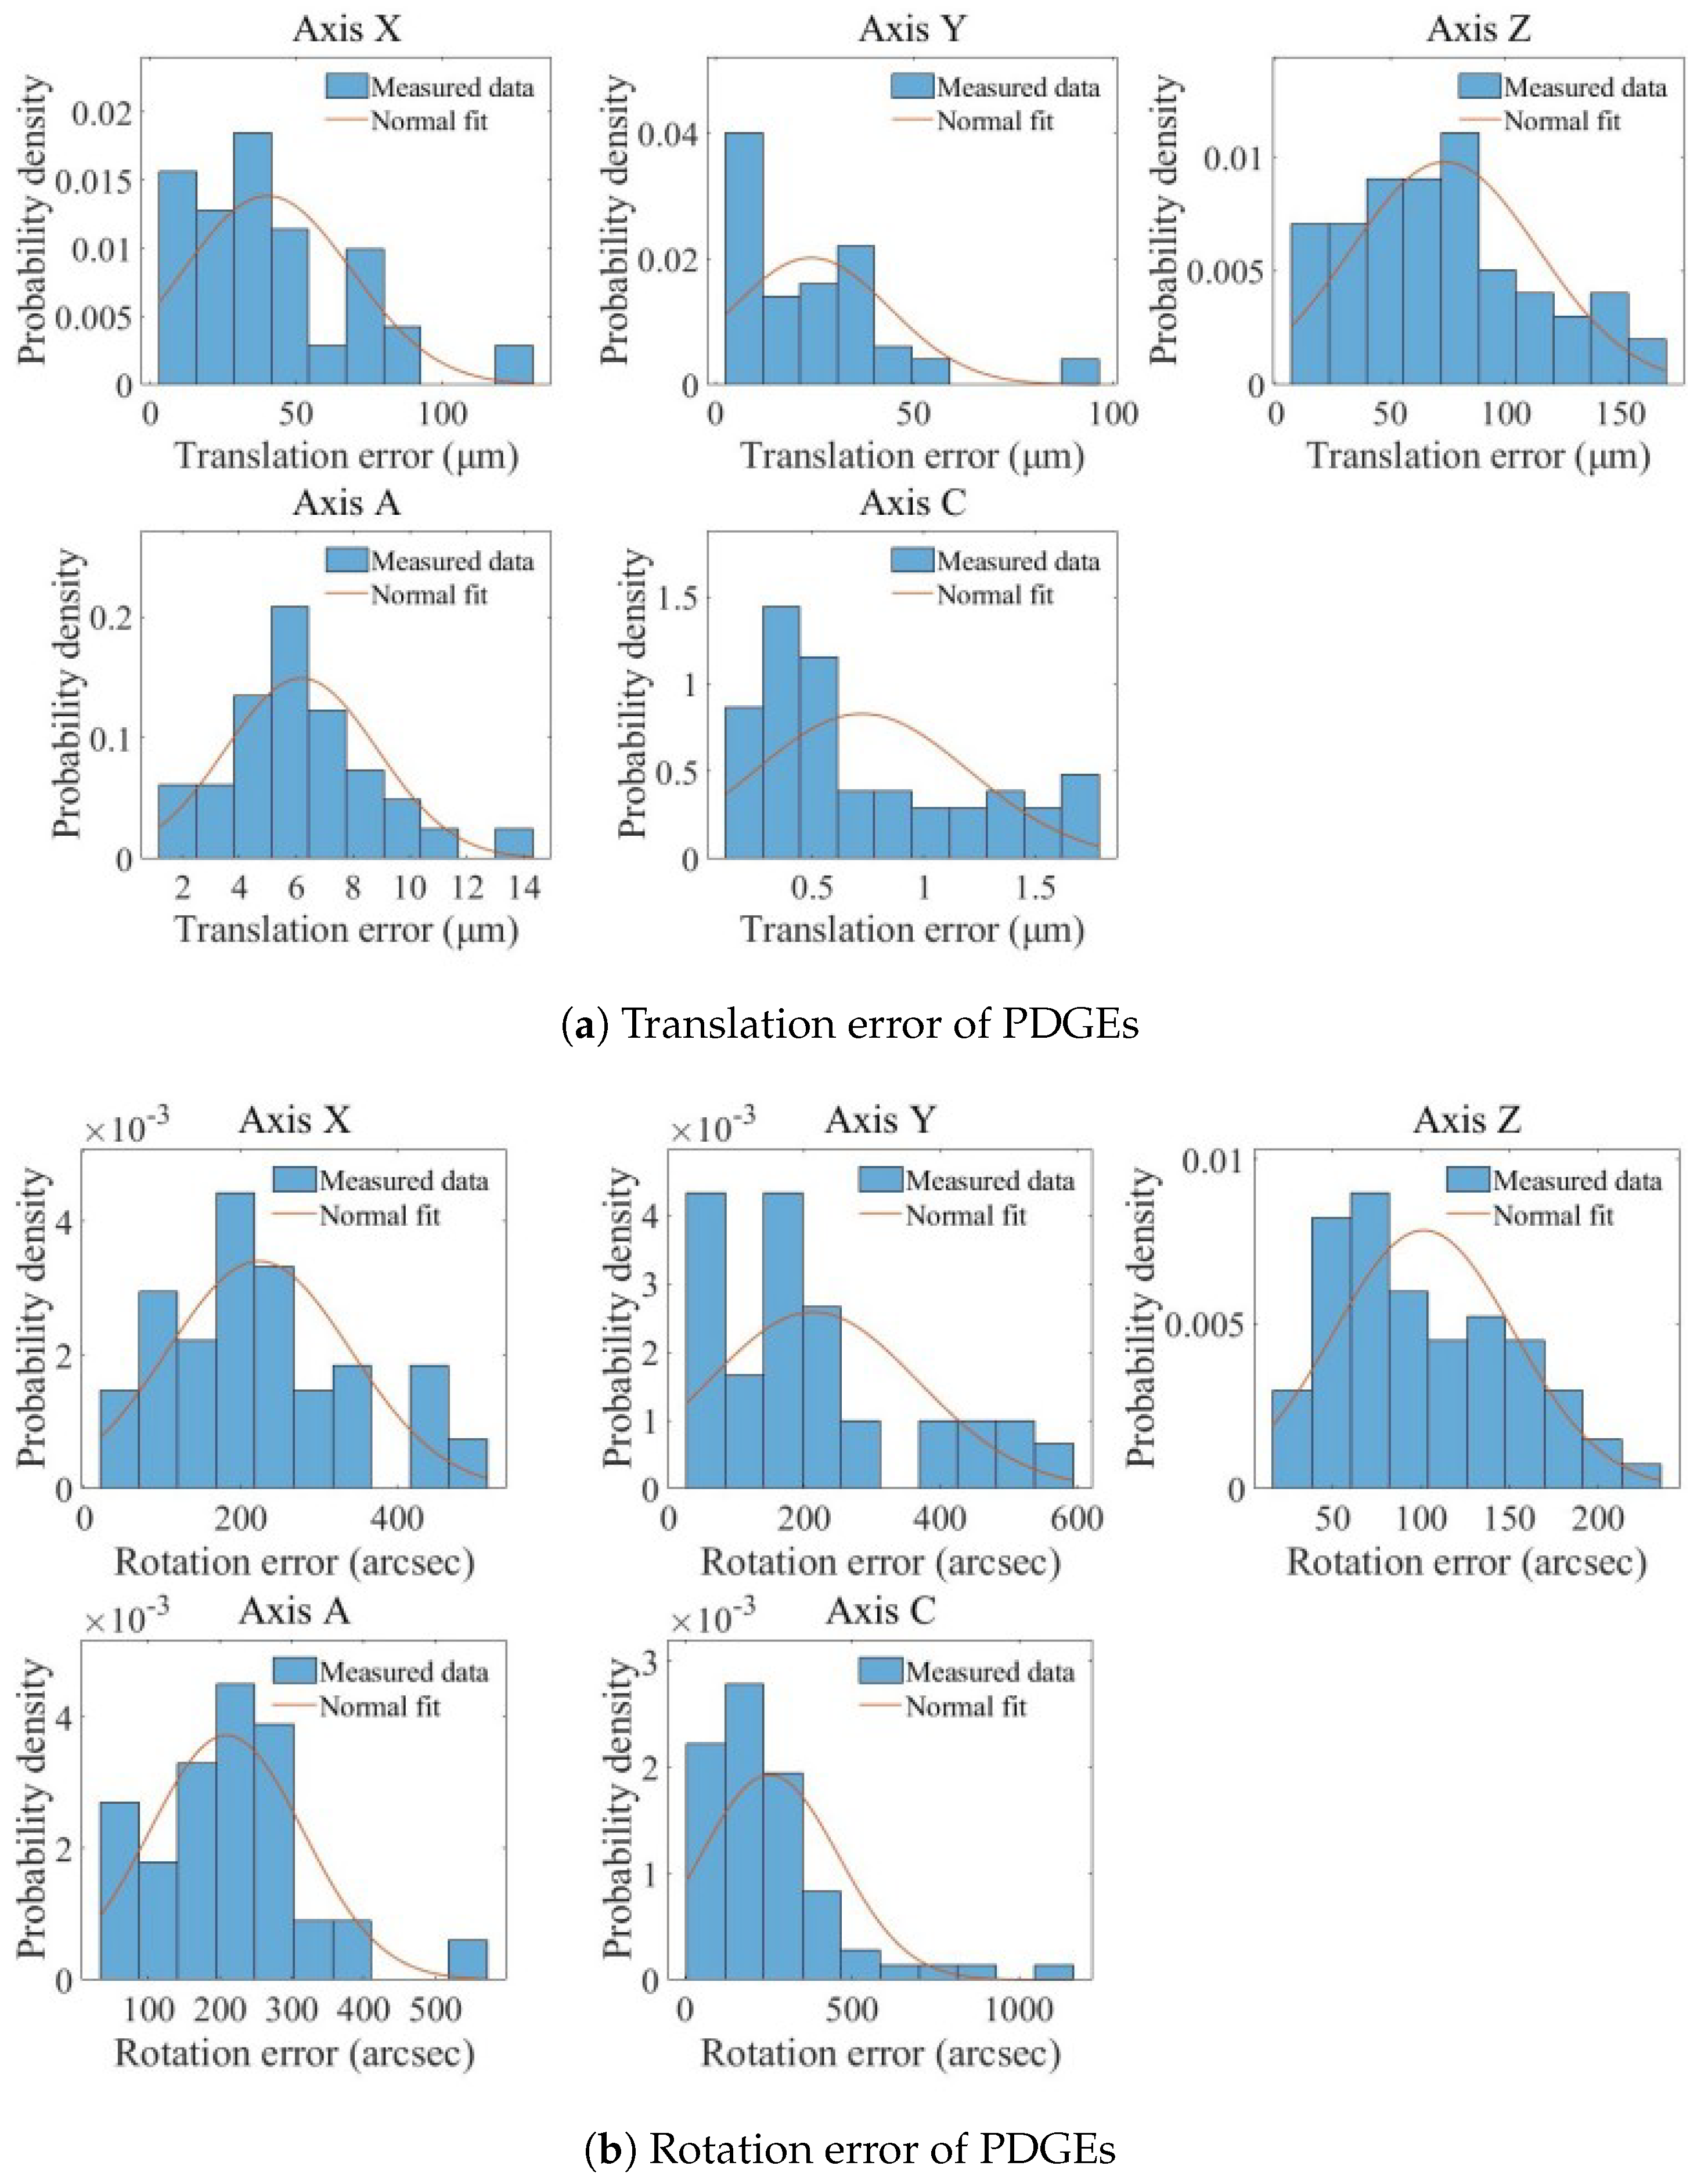
5.2. Test of the Kinematic Identification and Calibration Using the VBM System
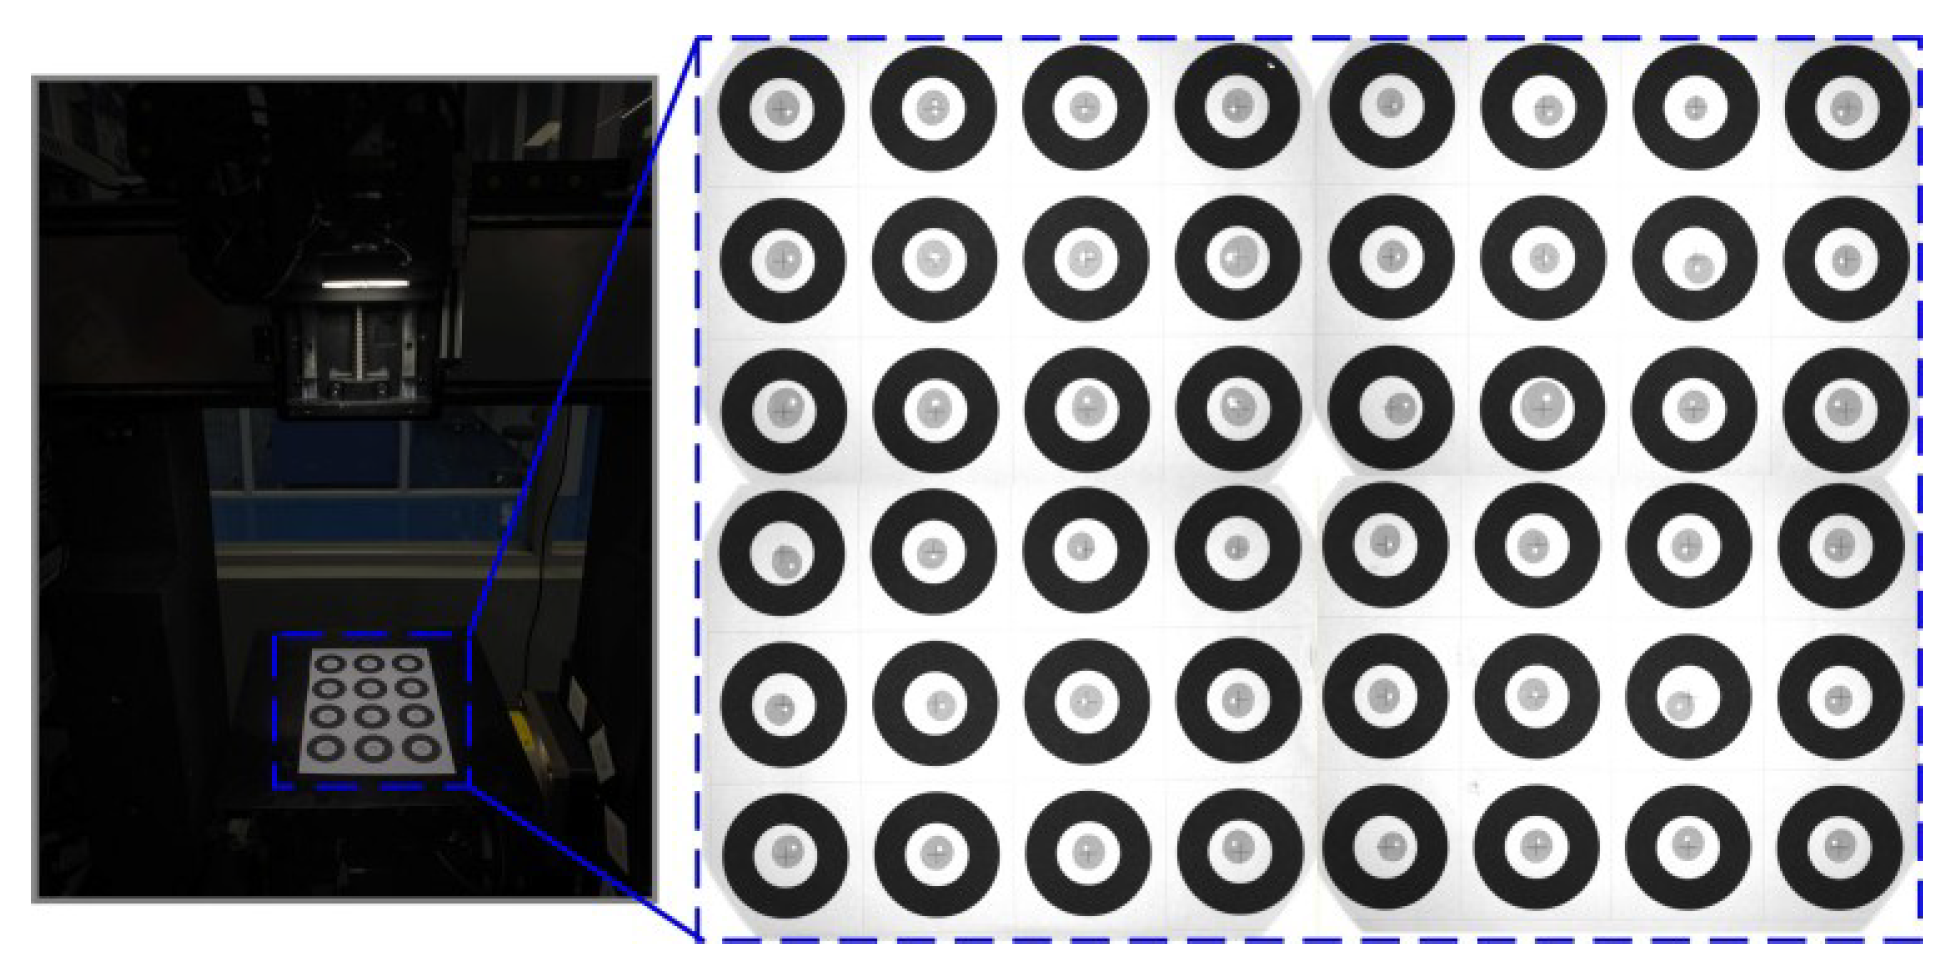
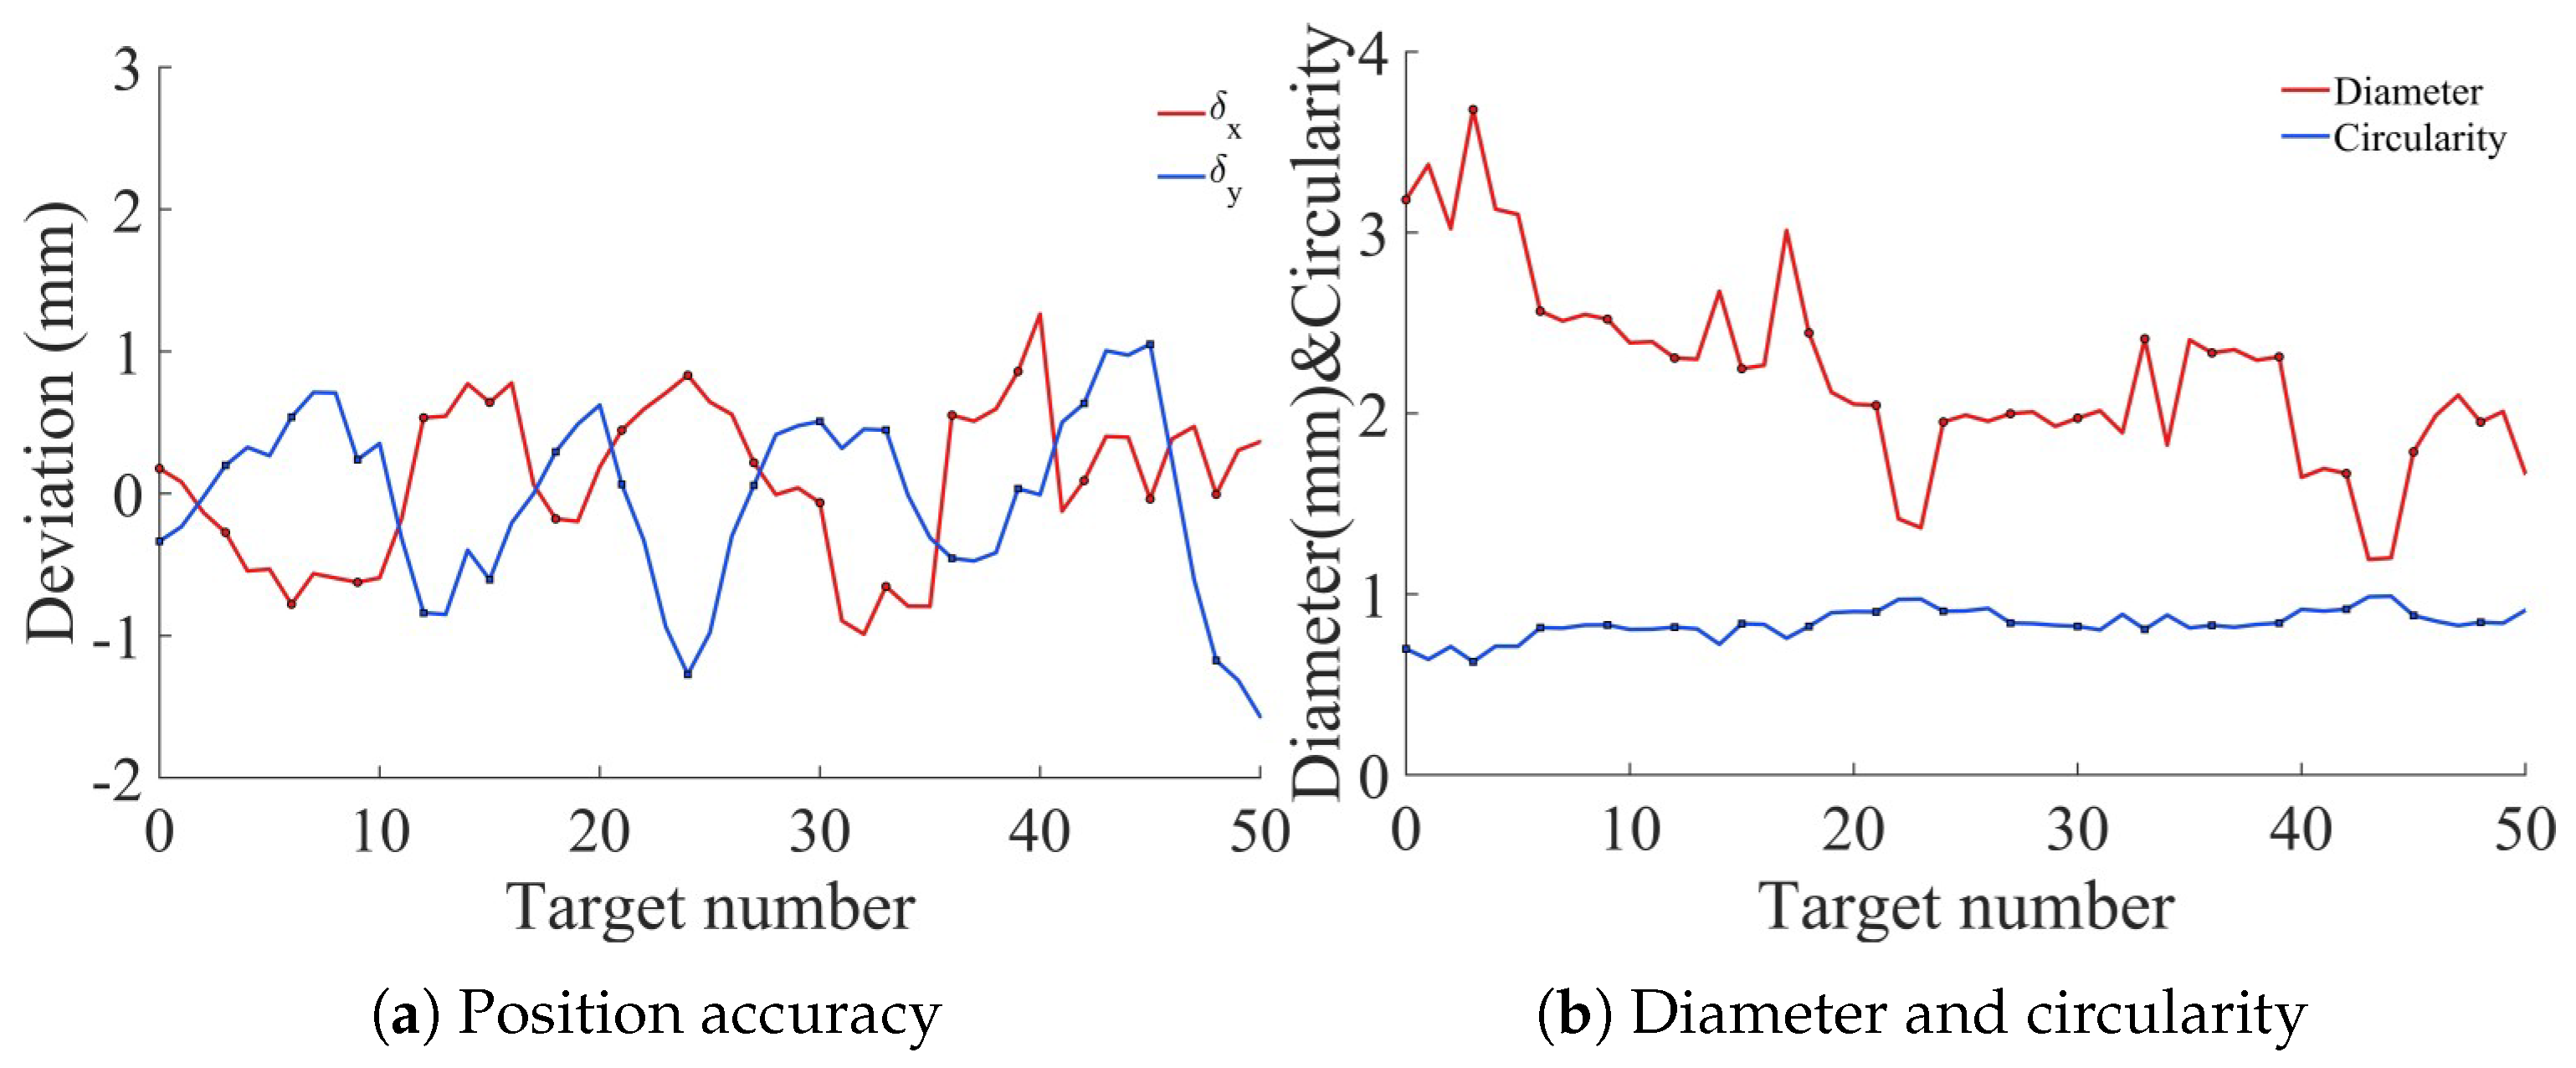
5.3. Test of the Detection Using the VBM System
6. Conclusions and Future Work
- A five-axis precision dispensing machine integrated with a VBM system was designed, and its kinematics were modeled using a local product-of-exponential formulation. This model features a relatively concise formulation and reliably computes the kinematic chain pose within the experimental range. The mean calculation time for a single set of data is approximately 0.088 ms, showing slight advantages in efficiency and accuracy compared with the Denavit–Hartenberg modeling method.
- A vision-based five-axis geometric error calibration algorithm was designed, which can be used to measure and identify the PDGEs of each axis and the eight items of PIGEs of the A-axis and C-axis of the prototype. Comprehensive measurements obtained using the VBM system show that the end-effector exhibits a mean spatial position error of approximately 59.9 μm and a mean orientation error of about 160 arcsec, representing the measured geometric error level of the prototype. For the VBM system, an RRHT-based target detection framework was designed to improve its measurement efficiency.
- A dispensing detection algorithm was preliminarily verified using sample adhesive dots. The proposed pipeline achieves reliable position and geometric feature extraction (diameter, circularity) of the adhesive dots. The current experiments, however, cover a limited number of samples and dot types, so the present results mainly demonstrate the basic applicability of the method rather than a comprehensive performance evaluation.
Author Contributions
Funding
Data Availability Statement
Conflicts of Interest
References
- Plachỳ, Z.; Pražanová, A.; Dušek, K.; Géczy, A. Underfill: A Review of Reliability Improvement Methods in Electronics Production. Polymers 2025, 17, 2206. [Google Scholar] [CrossRef]
- Chan, T.C.; Shao, X.Y.; Ullah, A.; Farooq, U. Intelligent evolution and enhancing five-axis gantry-type spatial motion structure for Industry 4.0 manufacturing. Int. J. Adv. Manuf. Technol. 2024, 134, 1965–1990. [Google Scholar] [CrossRef]
- Chen, G.; Sun, Y.; Lu, L.; Chen, W. A new static accuracy design method for ultra-precision machine tool based on global optimisation and error sensitivity analysis. Int. J. Nanomanuf. 2016, 12, 167–180. [Google Scholar] [CrossRef]
- Guo, S.; Zou, Y.; Huang, W.; Tang, S.; Mei, X. Kinematics characterizing with dual quaternion and parametric modeling of geometric error terms based on measuring path planning of CNC machine tools. Int. J. Adv. Manuf. Technol. 2024, 133, 2967–2994. [Google Scholar] [CrossRef]
- Schwenke, H.; Knapp, W.; Haitjema, H.; Weckenmann, A.; Schmitt, R.; Delbressine, F. Geometric error measurement and compensation of machines—An update. CIRP Ann. 2008, 57, 660–675. [Google Scholar] [CrossRef]
- Cheng, T.; Xiang, S.; Zhang, H.; Yang, J. New machining test for identifying geometric and thermal errors of rotary axes for five-axis machine tools. Measurement 2023, 223, 113748. [Google Scholar] [CrossRef]
- Yang, J.; Mayer, J.; Altintas, Y. A position independent geometric errors identification and correction method for five-axis serial machines based on screw theory. Int. J. Mach. Tools Manuf. 2015, 95, 52–66. [Google Scholar] [CrossRef]
- Chen, Y.T.; Liu, C.S.; Shiau, W.C.; Xie, H.F.; Chiu, C.L.; Yan, Q.H.; Lee, B.K.; Chen, T.H.; Huang, Y.Y. Geometric error measurement of rotary axes on five-axis machine tools: A review. Int. J. Precis. Eng. Manuf. 2024, 25, 1311–1332. [Google Scholar] [CrossRef]
- Hong, C.; Ibaraki, S. Non-contact R-test with laser displacement sensors for error calibration of five-axis machine tools. Precis. Eng. 2013, 37, 159–171. [Google Scholar] [CrossRef]
- Chen, G.; Yuan, J.; Ni, J. A displacement measurement approach for machine geometric error assessment. Int. J. Mach. Tools Manuf. 2001, 41, 149–161. [Google Scholar] [CrossRef]
- Guo, S.; Si, Z.; Sa, R.; Zou, Y.; Mei, X. Geometric error modeling and decoupling identification of rotary axis of five-axis machine tool based on spatial trajectory planning. Measurement 2024, 236, 114887. [Google Scholar] [CrossRef]
- Liu, Z.; Ukida, H.; Niel, K.; Ramuhalli, P. Industrial inspection with open eyes: Advance with machine vision technology. Integr. Imaging Vis. Tech. Ind. Insp. Adv. Appl. 2015, 1–37. [Google Scholar]
- Shirmohammadi, S.; Ferrero, A. Camera as the instrument: The rising trend of vision based measurement. IEEE Instrum. Meas. Mag. 2014, 17, 41–47. [Google Scholar] [CrossRef]
- Liu, W.; Li, X.; Jia, Z.; Li, H.; Ma, X.; Yan, H.; Ma, J. Binocular-vision-based error detection system and identification method for PIGEs of rotary axis in five-axis machine tool. Precis. Eng. 2018, 51, 208–222. [Google Scholar] [CrossRef]
- Tang, X.; Chen, L.; Wang, Z.; Zhou, H.; To, S.; Yip, W.S. Adaptive kinematic calibration method for reconfigurable five-axis dispensing machine using the product of exponential model. Measurement 2025, 253, 117576. [Google Scholar] [CrossRef]
- Nižetić, J.; Raos, P.; Šimunović, G.; Klaić, M.; Mutka, A. Calibration of a 5-axis CNC machine for making orthoses by means of a vision system. Trans. FAMENA 2022, 46, 81–102. [Google Scholar] [CrossRef]
- Zhu, S.; Ding, G.; Qin, S.; Lei, J.; Zhuang, L.; Yan, K. Integrated geometric error modeling, identification and compensation of CNC machine tools. Int. J. Mach. Tools Manuf. 2012, 52, 24–29. [Google Scholar] [CrossRef]
- Yang, J.; Altintas, Y. Generalized kinematics of five-axis serial machines with non-singular tool path generation. Int. J. Mach. Tools Manuf. 2013, 75, 119–132. [Google Scholar] [CrossRef]
- Rocha, C.; Tonetto, C.; Dias, A. A comparison between the Denavit–Hartenberg and the screw-based methods used in kinematic modeling of robot manipulators. Robot. Comput.-Integr. Manuf. 2011, 27, 723–728. [Google Scholar] [CrossRef]
- Karhan, H.; Bingül, Z. Automatic Determination of the Denavit–Hartenberg Parameters for the Forward Kinematics of All Serial Robots: Novel Kinematics Toolbox. Machines 2025, 13, 944. [Google Scholar] [CrossRef]
- Tian, W.; Gao, W.; Zhang, D.; Huang, T. A general approach for error modeling of machine tools. Int. J. Mach. Tools Manuf. 2014, 79, 17–23. [Google Scholar] [CrossRef]
- Tang, X.; Zhou, H.; Kuang, L. Geometric error self-calibration method of five-axis dispensing machine based on the product of exponentials formula. Measurement 2024, 231, 114561. [Google Scholar] [CrossRef]
- Majidi, B.H.; Emre, T.A.; Taner, T.L. A novel vision-based calibration framework for industrial robotic manipulators. Robot. Comput.-Integr. Manuf. 2022, 73, 102248. [Google Scholar]
- Yin, S.; Ren, Y.; Zhu, J.; Yang, S.; Ye, S. A Vision-Based Self-Calibration Method for Robotic Visual Inspection Systems. Sensors 2013, 13, 16565–16582. [Google Scholar] [CrossRef]
- Hu, Y.; Wu, W.; Yi, Y. Vision Calibration of Complex Micro-Device Flexible Assembly Robot System. In Proceedings of the Third International Conference on Control and Intelligent Robotics (ICCIR 2023), Changsha, China, 23–25 June 2023; Volume 12940, Proc. SPIE. p. 129401V. [Google Scholar]
- Huang, B.; Liu, X.; Yan, J.; Xie, J.; Liu, K.; Xu, Y.; Liu, J.; Zhao, X. Fully Automated Dispensing System Based on Machine Vision. Appl. Sci. 2023, 13, 9206. [Google Scholar] [CrossRef]
- Revia, R.A.; Wagner, B.; James, M.; Zhang, M. High-Throughput Dispensing of Viscous Solutions for Biomedical Applications. Micromachines 2022, 13, 1730. [Google Scholar] [CrossRef]
- Zhou, S.; Yao, S.; Shen, T.; Wang, Q. A Novel End-to-End Deep Learning Framework for Chip Packaging Defect Detection. Sensors 2024, 24, 5837. [Google Scholar] [CrossRef]
- Peng, Z.; He, H. Deep Learning-Enhanced Electronic Packaging Defect Detection via Fused Thermal Simulation and Infrared Thermography. Appl. Sci. 2025, 15, 6592. [Google Scholar] [CrossRef]
- Gao, W.; Ibaraki, S.; Donmez, M.A.; Kono, D.; Mayer, J.; Chen, Y.L.; Szipka, K.; Archenti, A.; Linares, J.M.; Suzuki, N. Machine tool calibration: Measurement, modeling, and compensation of machine tool errors. Int. J. Mach. Tools Manuf. 2023, 187, 104017. [Google Scholar] [CrossRef]
- Jiang, X.; Wang, L.; Liu, C. Geometric accuracy evaluation during coordinated motion of rotary axes of a five-axis machine tool. Measurement 2019, 146, 403–410. [Google Scholar] [CrossRef]
- Wang, R.; Zhang, Y.; Wang, H.; Zhang, X. Design and Test of a Robust BioCM-Based Measurement System for the LDI Machine. IEEE Trans. Instrum. Meas. 2025, 74, 5048214. [Google Scholar] [CrossRef]
- Fu, G.; Fu, J.; Xu, Y.; Chen, Z.; Lai, J. Accuracy enhancement of five-axis machine tool based on differential motion matrix: Geometric error modeling, identification and compensation. Int. J. Mach. Tools Manuf. 2015, 89, 170–181. [Google Scholar] [CrossRef]


| X-Axis | Y-Axis | Z-Axis | A-Axis | C-Axis |
|---|---|---|---|---|
| PIGEs for Translational Axes | PIGEs for Rotary Axes | |
|---|---|---|
| Image Group | 1 | 2 | 3 | 4 | 5 | 6 | 7 | 8 | 9 | 10 | Avg. | |
|---|---|---|---|---|---|---|---|---|---|---|---|---|
| Reprojection error (pixel) | Camera 1 | 0.165 | 0.244 | 0.141 | 0.205 | 0.212 | 0.162 | 0.157 | 0.150 | 0.115 | 0.173 | 0.172 |
| Camera 2 | 0.182 | 0.191 | 0.160 | 0.169 | 0.174 | 0.127 | 0.222 | 0.155 | 0.130 | 0.169 | 0.168 | |
| Item | RRHT | Blob | Hough |
|---|---|---|---|
| Reprojection error (pixel) | 0.897 | 0.620 | 0.664 |
| Detection time (s) | 10.5 | 28.8 | 20.9 |
| Pose estimation time (s) | 4.36 | 4.37 | 4.44 |
| Modeling Method | Mean Time/Group (ms) | Total Time (ms) | Error Norm |
|---|---|---|---|
| Denavit–Hartenberg [33] | 0.116 | 33.2 | 0.138 |
| Global product-of-exponential [23] | 0.230 | 69.9 | 1.023 |
| Local product-of-exponential [15] | 0.089 | 26.8 | <0.001 |
| Proposed method | 0.088 | 25.3 | <0.001 |
| PIGEs | ||||
|---|---|---|---|---|
| Values (arcsec) | −1234.8 | −263.9 | −986.4 | 2142.0 |
| PIGEs | ||||
| Values (μm) | −5.13 | 456 | 241 | 705 |
Disclaimer/Publisher’s Note: The statements, opinions and data contained in all publications are solely those of the individual author(s) and contributor(s) and not of MDPI and/or the editor(s). MDPI and/or the editor(s) disclaim responsibility for any injury to people or property resulting from any ideas, methods, instructions or products referred to in the content. |
© 2025 by the authors. Licensee MDPI, Basel, Switzerland. This article is an open access article distributed under the terms and conditions of the Creative Commons Attribution (CC BY) license.
Share and Cite
Wang, R.; Liao, J.; Wang, B.; Zhong, Q.; Dong, Y.; Wang, H. Design and Vision-Based Calibration of a Five-Axis Precision Dispensing Machine. Micromachines 2026, 17, 53. https://doi.org/10.3390/mi17010053
Wang R, Liao J, Wang B, Zhong Q, Dong Y, Wang H. Design and Vision-Based Calibration of a Five-Axis Precision Dispensing Machine. Micromachines. 2026; 17(1):53. https://doi.org/10.3390/mi17010053
Chicago/Turabian StyleWang, Ruizhou, Jinyu Liao, Binghao Wang, Qifeng Zhong, Yongchao Dong, and Han Wang. 2026. "Design and Vision-Based Calibration of a Five-Axis Precision Dispensing Machine" Micromachines 17, no. 1: 53. https://doi.org/10.3390/mi17010053
APA StyleWang, R., Liao, J., Wang, B., Zhong, Q., Dong, Y., & Wang, H. (2026). Design and Vision-Based Calibration of a Five-Axis Precision Dispensing Machine. Micromachines, 17(1), 53. https://doi.org/10.3390/mi17010053


