1. Introduction
1.1. Research Background
In recent years, with advancements in new technologies in the construction industry, many tasks have been digitalized and automated through the use of smart technologies to improve the quality and efficiency of building projects [
1,
2,
3,
4]. Attempts have been made to use Building Information Modeling (BIM) with various new technologies, such as Artificial Intelligence (AI), Augmented Reality (AR)/Virtual Reality (VR), Light Detection and Ranging (LiDAR) and other smart sensors [
5,
6,
7,
8]. Linking BIM with various smart technologies, many construction works have shifted from a manual to a digital process. These changes are occurring in each stage of construction projects, from the planning, design and construction to the maintenance stages [
9,
10,
11,
12]. Although many countries have established guidelines for the effective application of BIM at the planning and design stages, the level of integration between BIM and smart technologies in construction is still lacking. Automated methods linking BIM with smart technologies at the construction stage have long been proposed, but even simple inspection work is still conducted using a manual approach and paper documents [
13,
14].
One of the important factors hindering the application of BIM and smart technologies in construction is the lack of a “how-to” process model in relation to the adoption of BIM and smart technologies [
15,
16]. Sun et al. (2017) categorized five factors impeding the adoption of new technologies: technology, cost, management, personnel and legal factors [
17]. The management factor, which includes the absence of a process model, practical application strategies and standards that change when BIM is adopted in construction, had the most significant impact compared to the other factors.
A collaboration of BIM and smart technologies has been gradually introduced at the construction stage to address the aforementioned factors while implementing smart technologies and raising the standard of the construction industry [
18,
19,
20,
21,
22]. At this stage, quality inspection is a simple and repetitious process. However, if ignored, it negatively affects the efficiency and quality of a project. Many studies have already been conducted on integrating BIM with smart technologies to increase performance [
23,
24,
25,
26,
27]. However, most of these studies have dealt with particular work items without any appropriate “how-to” process model acceptable in current practice. This is also because of the absence of real-world usage cases of the many technologies that can be incorporated into quality control during the construction stage.
The obstacles to new technology adoption should be eliminated in order to integrate BIM-based smart technologies. Consequently, it is necessary to establish a new process model for practical application that may change with the adoption of smart technologies. Therefore, this research aims to propose a new “how-to” process model for adopting BIM and smart technologies to increase the performance of quality control during the construction stage. Furthermore, this study seeks to verify the effectiveness of the proposed model by conducting a case study to demonstrate its practical application.
1.2. Literature Review
1.2.1. Smart Technologies in Building Construction
In recent times, smart technologies have been applied and connected with BIM in various areas of building construction. They have been applied not only to quality management but also to schedule and safety management. Smart technologies have, thus, contributed to improved efficiency and productivity in the construction industry.
In terms of schedule management, Ratajczak et al. (2019) defined and used material information in BIM and provided details of the construction method in smartphone application in conjunction with AR to support easier work progress [
28]. This enabled us to check the precision rate through object tracking, resulting in an improvement in on-site productivity. Tran et al. (2021) leveraged the LiDAR point-cloud-based digital twin model available in prefabricated construction (PC) to monitor the construction schedule [
29]. By comparing plans with actual progress, an automatic analysis was obtained in the material delivery and installation process. Hamledari et al. (2021) provided an algorithm to identify locations that require inspection by linking unmanned aerial service (UAS) with the BIM model. Additionally, the inspection work items were recorded and the work progress rate can be obtained on a real-time basis [
30].
With regard to safety management, Zhang et al. (2015) developed a spatial-model-based safety-planning tool using a workspace visualization model in BIM via a global positioning system (GPS) logger [
31]. They provided a GPS sensor-based monitoring support system to improve the safety of construction workers. This enables us to effectively check whether workers are wearing safety hats. Wang et al. (2017) used radio frequency identification (RFID) to provide material tracking using real-time supply management, thereby ensuring the timely availability of the required materials, which resulted in timely delivery, by minimizing lead time and contributing to improvements in construction productivity [
32]. Du et al. (2018) presented a project collaboration model using collaborative virtual reality (CoVR), which is a cloud-based multi-user VR system for coordination management [
33]. They created an interactive VR environment through voice sharing between collaborators and contributed to increased communication efficiency in the construction process.
From the quality management perspective, Kim et al. (2016) developed a contactless dimensional quality assurance (DQA) technique by applying a laser scanner in conjunction with the BIM model to check the key parameters of the precast concrete automatically and precisely [
34]. This improved quality control efficiency in the structural work process. Golparvar-Fard et al. (2015) and Kim et al. (2020) used a computer vision technique to analyze 3D point cloud data obtained from LiDAR-installed UAS [
35,
36]. They collected the data necessary to document the work in progress from any unorganized construction photographic data. Comparing the BIM with the actual data, they proved that the new approach has the potential to achieve effective quality management. Kwon et al. (2014) suggested a defect management (DM) tool, combining the BIM and AR devices for on-site quality control in reinforced concrete work [
37]. With the development of an image-matching process, job-site management became more effective and faults were reduced significantly. Ma et al. (2018) conducted research on an indoor positioning algorithm, whereby an automatic quality checklist was extracted and transmitted via a BIM, which simplified the inspection process [
38]. By including the check-listed items in the automatic extraction process, susceptibility to omissions and mistakes in the conventional inspection process was reduced.
In the current inspection practice, on-site quality data are obtained through various data collection tools, i.e., tape measure, thermometer and manometer, and analyzed in terms of whether the quality criteria are met by comparing the data with the design criteria. Defect inspection has long been the focus of smart construction technology, and research is now being conducted to assist defect judgment using the BIM to find any faults based on 3D point cloud data and to configure the data set obtained by the advanced technologies [
39,
40]. To efficiently execute quality control using BIMs, research was conducted on the creation of add-in software embedded in the BIM models [
41,
42,
43]. However, as mentioned in the previous section, the technological application strategy in the quality inspection process has not been thoroughly established, despite a variety of smart technologies being actively adopted in the construction industry.
1.2.2. Preliminary Findings from Literature Review
The quality of construction work is influenced by a variety of factors, such as labor skillfulness, work environment and the management system, making it difficult to propose a standardized work process model. In the case of quality inspection, where there exists an established procedure, previous studies have focused on a particular work type and proposed replacing the existing work process with smart devices and/or equipment. The current work process can be improved by making the most of new technologies. Although there are various ways to acquire data for each type of work in quality inspection, it is difficult to designate one type of data collection. Therefore, most research on inspection deals with the technical part of data processing. Moreover, research that proposes a new technology for quality inspection does not deal with the overall process of quality inspection but only with the specific application of data acquired through various smart devices. Specifically, there is still insufficient research on the implementation of the quality inspection process from the beginning (planning) to the final (reporting) stage. There exists a limitation in that project managers who implement quality inspections on site do not know how to apply these new work practices in using the new technologies.
Therefore, it is necessary to develop a new work process model using BIM and smart technologies that can be applied to the overall quality inspection practice, both during and after project execution. Based on this research gap, this study developed an application programming interface (API) using the BIM tool RevitTM. This tool can improve the overall quality inspection process that is linked with smart construction devices. Furthermore, the authors verified the effectiveness of the new process via a real case study project to enhance the adoption of smart technologies in the quality inspection process within the BIM system environment.
2. Research Methods
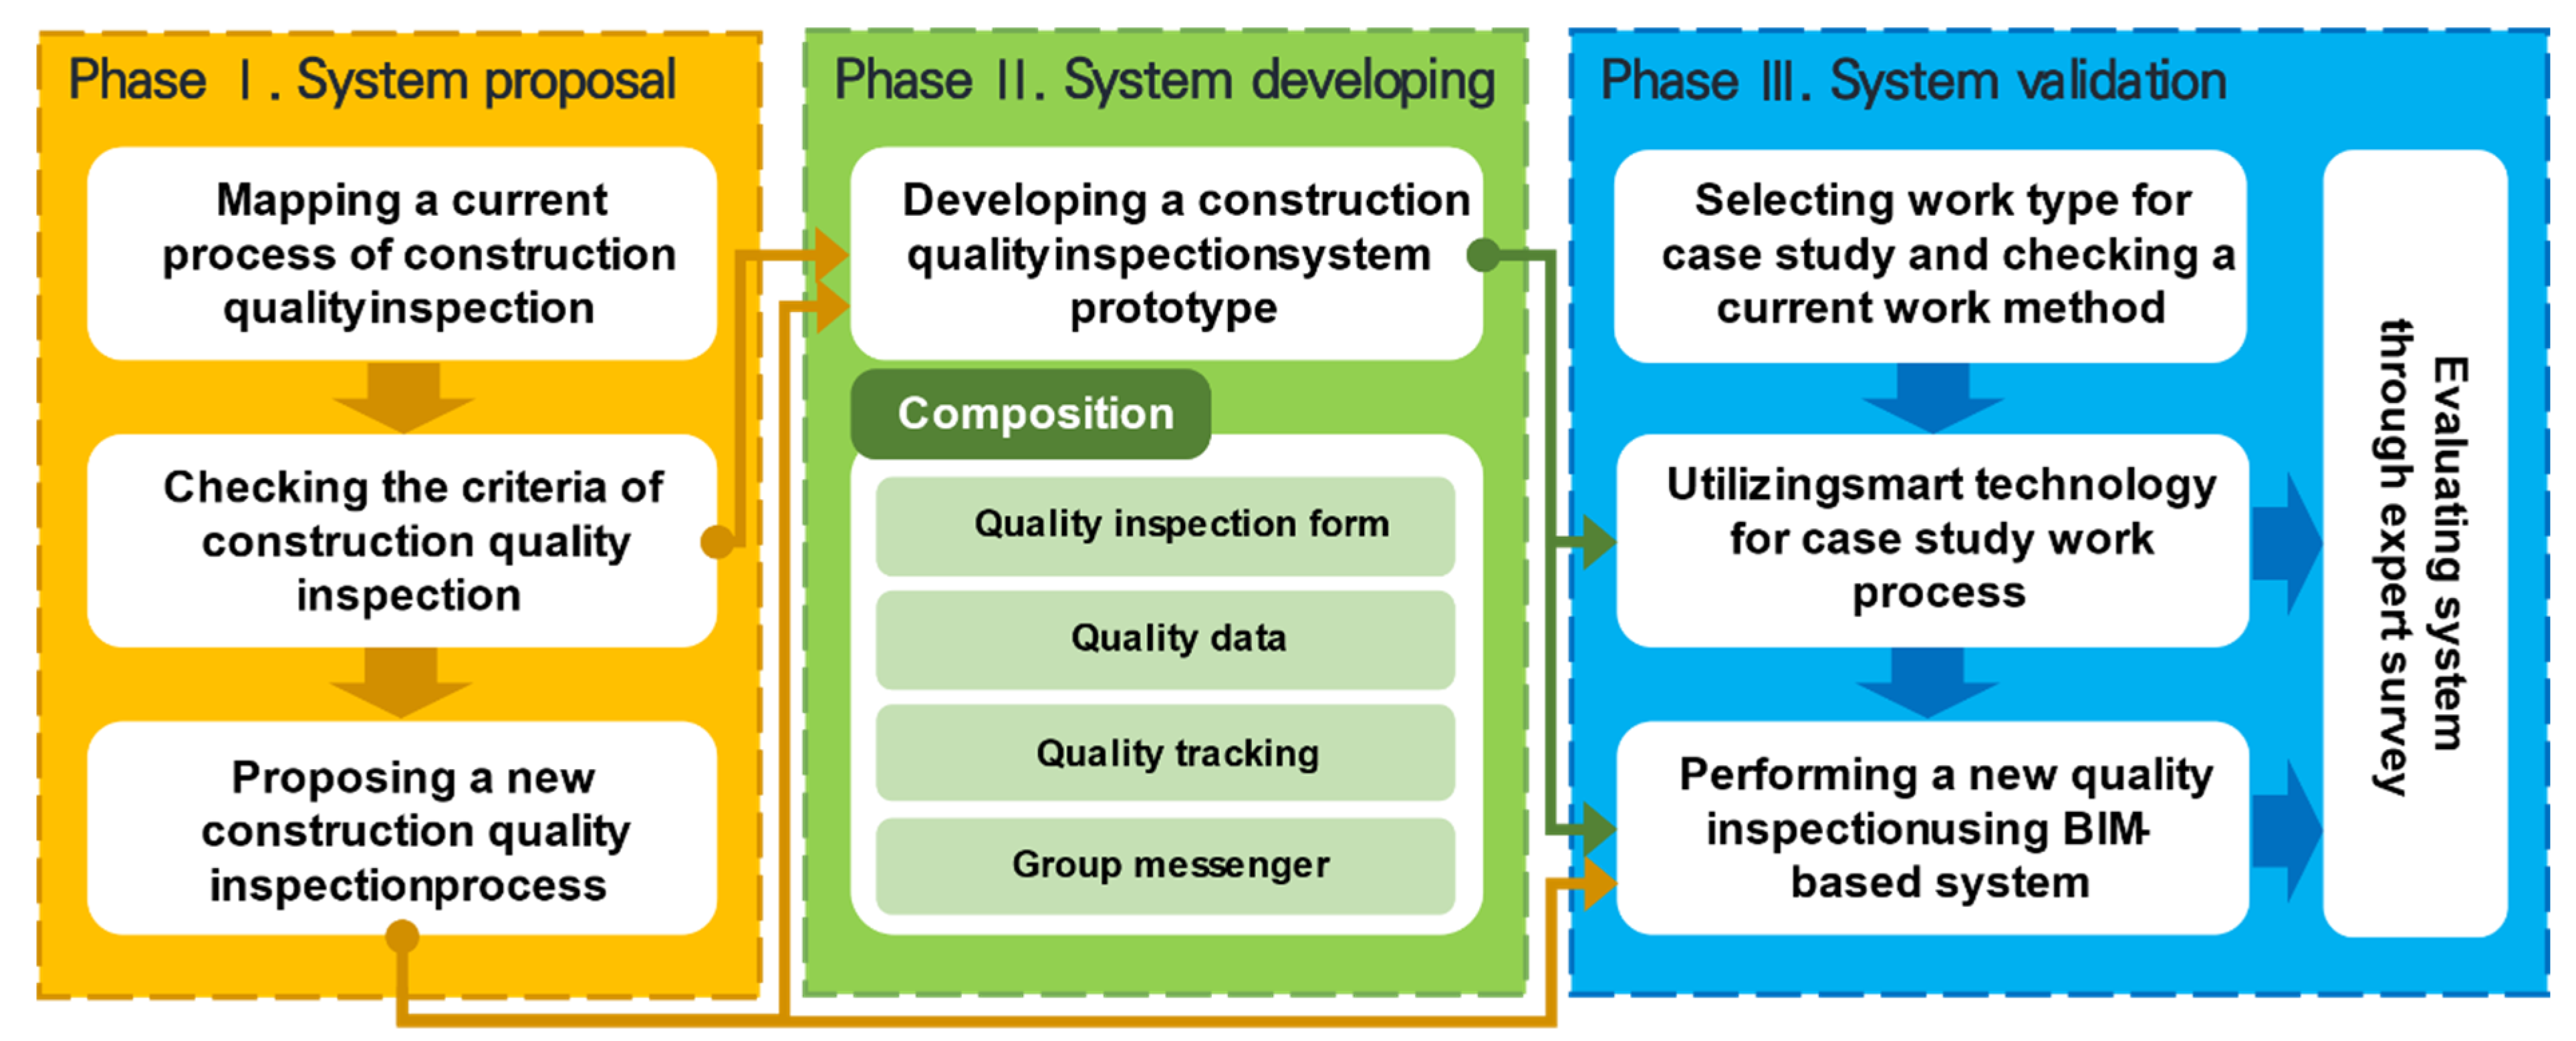
This study consists of three main phases: Phase I: proposing a new quality inspection process model; Phase II: developing a quality inspection-assisted system and Phase III: a case study on the new process model and validation. Details of each phase are depicted in
Figure 1.
Phase I of this study involves the adoption of smart technologies and proposes a new construction quality inspection process in comparison with the conventional inspection process in order to guarantee the quality criteria. In Phase II, the construction quality inspection-assisted system prototype was developed using the established construction quality inspection process. At present, the developed add-in system consists of four functions required at each stage of the quality inspection process, including “quality inspection form,” “quality data,” “quality tracking” and “group messenger.” In Phase III, after selecting a particular work type, such as tile work, the new process model was incorporated into the tile work inspection process. This real case study was carried out based on the proposed system. At this phase, a questionnaire survey was conducted to validate the effectiveness of the proposed model using the API system. In developing a construction quality inspection system, both RevitTM 2019 and Visual StudioTM 2022 were used. In the case study, Leica BLK360 was used as a smart device. BLK360 supports both high dynamic range (HDR) and thermal image and acquires 3D point cloud data required for tile construction quality inspection to measure the appropriateness of tile installation.
3. Proposing a New Quality Inspection Process (Phase Ⅰ)
The conventional quality inspection process was scrutinized to identify the barriers that may be removed by the adoption of smart technologies. This section proposes a new quality inspection process in collaboration with new technologies.
3.1. Process Mapping of Current Construction Quality Inspection
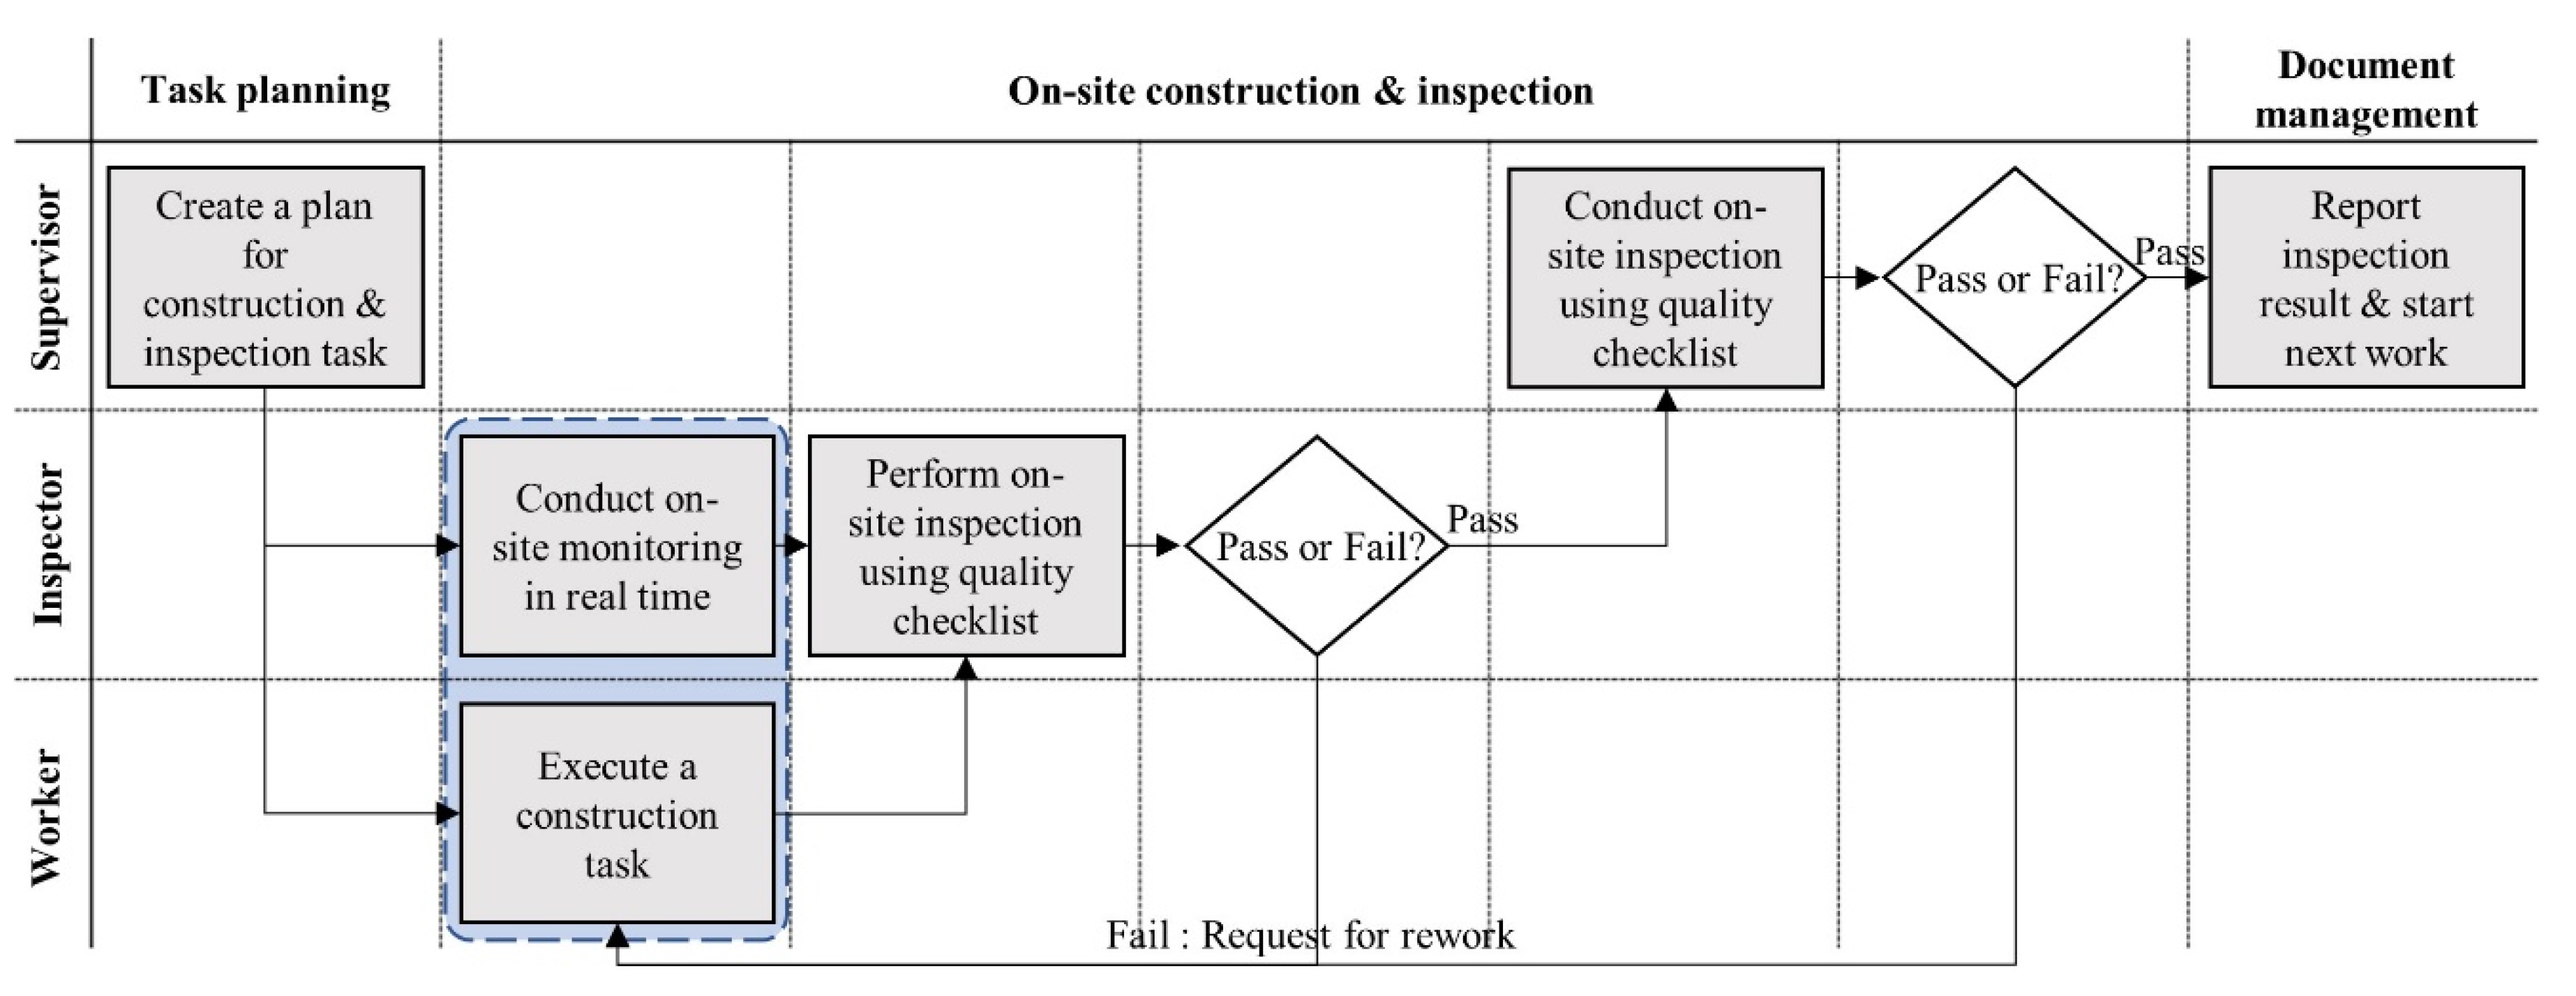
The current work process model for construction quality inspection was recognized. At the task-planning stage, a quality inspection plan is provided. Then, the work instructions are given to the laborers and on-site monitoring is carried out by project managers. After the assigned work is completed, an on-site quality check is conducted to evaluate whether the quality of the work is satisfactory. At this stage, the quality inspection checklist is used to assess the quality criteria. Project managers typically bring paper drawings and checklists to the jobsite and compare design elements with the actual installation. This process is traditionally carried out by on-site monitoring with a checklist when an inspection request occurs. When the construction quality does not meet the quality standards, the laborer has to be instructed to remedy the work. Otherwise, a quality inspection report has to be presented and recorded in a paper-based format. Details of this current process, mapping the quality inspection, are depicted in
Figure 2.
As seen in
Figure 2, the current quality management process has three steps, including task planning, on-site construction and inspection and document management. At each step, the participants, i.e., the supervisor, inspector and worker, are requested to perform their tasks. At the construction jobsite, each work item is initially carried out in accordance with the construction execution plan during the construction and inspection phases, and performance quality is checked and examined periodically. During the construction and inspection stage, the work is verified twice by the inspector and supervisor. Once this verification is conducted, paper records of the work are drawn up at the documentation step. When comparing the constructed work with the original plan to match the quality criteria, the subject work item is deemed satisfactory if no quality problem is detected.
The inspection checklist, which is used to verify whether the constructed work meets quality standards, includes measurement and judgment items in relation to the design drawings, specifications, supervision guidelines and inspection manuals. In general, the jobsite construction is carried out according to this checklist. The inspection checklist deals with material/equipment management and detailed construction methods that are not specified in the construction drawings.
Since it includes all the details necessary for construction quality management, the inspection can easily be conducted during the supervision stage. For instance, the inspection checklist for concrete formwork includes determining whether the form is installed according to the construction guidelines as well as examining whether it is built based on the formwork safety rules and regulations. The inspectors are required to check whether the intervals of the support material installation and deflection of the form are within the quality allowance. The maximum value of the allowable deflection is specified to be three millimeters (mm) according to the guidelines of the construction formwork installation. Likewise, in the case of concrete placement, a construction plan must be provided so that inspection items can be added in order to check whether the construction was conducted according to the inspection checklist.
The shortcomings of the current quality inspection process can be summarized as follows:
- (1)
Many documents used in the inspection are provided in a paper-based format. Maintaining these paper records is troublesome and error prone. Furthermore, if stakeholders need a particular document, they must review numerous documents to find the required one, which reduces work efficiency. As indicated in
Figure 2, all documents from “the task-planning stage” to “the documentation stage”, as well as the inspection documents at the on-site construction and inspection stage, must be prepared and created in paper format. As the instructions for rework after the site inspection are also given in paper format, it is difficult to give immediate feedback, which further reduces work efficiency.
- (2)
It is important to decide, based on the findings from a visual inspection, whether the final inspection standards have been met at the time of on-site inspection. Even if high-tech measuring systems are used to check the quality level, it is still difficult to avoid erroneous measurement and inaccurate judgment. A drawback of the current inspection approach is the possibility of causing a defect in the construction work.
- (3)
Due to unspecified inspection areas, it is difficult to recognize the exact amount of construction quantity required. Moreover, it requires additional time and effort. The laborers only carry out construction work that is called for, so there is no obligation to rework the parts that are not called for. Due to these aspects of the current practice, the inspector or supervisor must inspect the entire site and identify problematic locations before making a request. If the location where the construction quality in question is not specified, inspection of all work quantities is essential. Therefore, the request for reconstruction is inefficient and time consuming.
3.2. Process Mapping of Construction Quality Inspection Using Smart Technologies
To solve the aforementioned problems, the authors propose a new quality inspection process using smart construction technologies that support various types of work. This approach is helpful in improving the current quality control system that is mainly dependent on manual inspection.
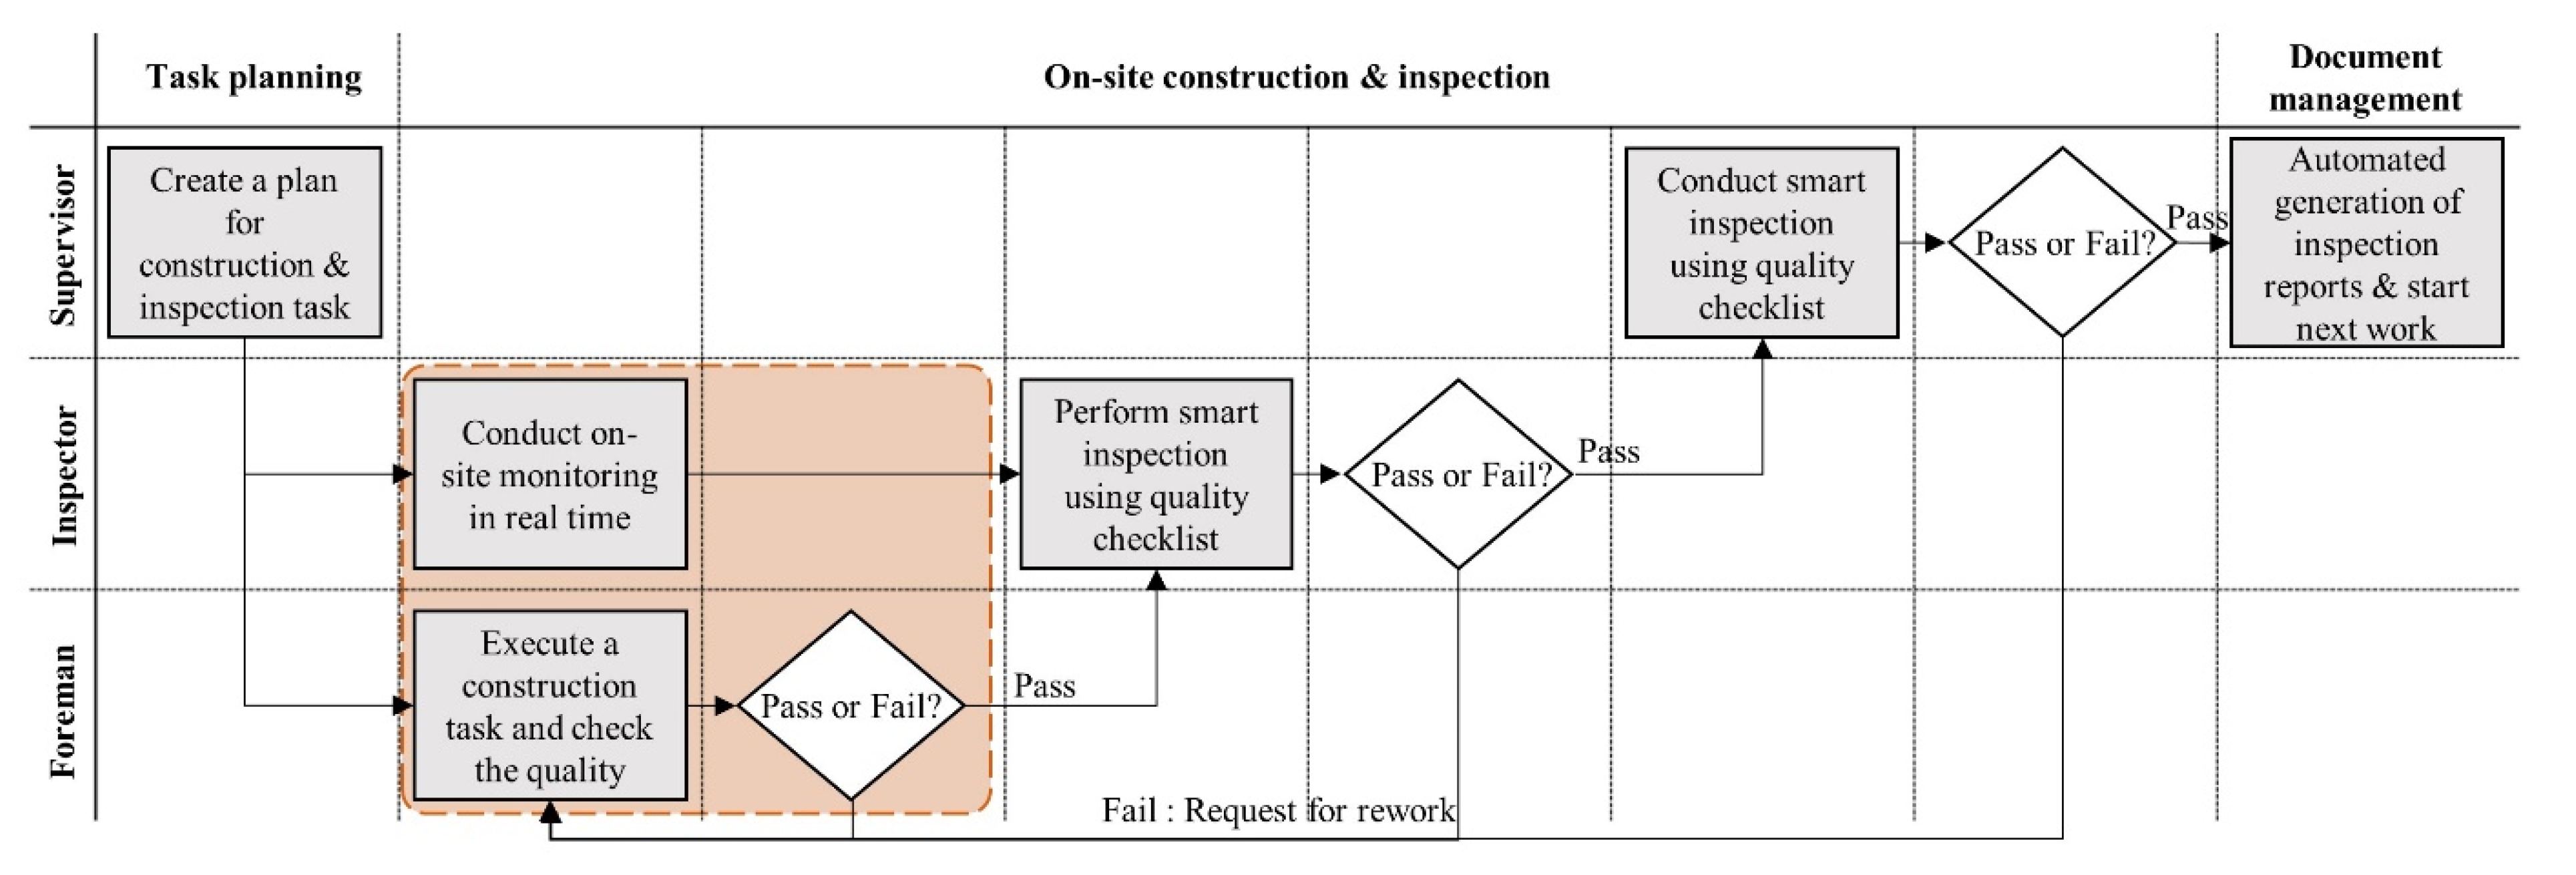
Figure 3 depicts a new quality inspection process proposed in this research.
The three-step process is similar to the conventional process. However, the detailed execution contents of each step are different in
Figure 3. In the task-planning stage, the supervisor makes a construction and inspection plan for the work type in progress and creates an inspection checklist for the BIM elements related to the particular subject work type. During the on-site construction and inspection stage, the construction work is carried out according to the predetermined construction plan. After completing execution, the work is confirmed as completed using smart technologies. The preliminary inspection is performed at the worker level. Both inspector-level and supervisor-level inspections follow once the worker-level inspection is completed. The highlighted part in
Figure 3 indicates this difference. The inspections performed by the inspector and supervisor judge whether the quality of construction deliverables is satisfactory. However, the worker-level inspection saves time that is wasted in requesting inspections, minor inspections and re-construction, before confirming the construction quality. In contrast to the planning stage, smart technologies are used in generating inspection results and are automatically stored in the BIM server.
A new quality inspection process proposed in this research contributes to solving the problems present in the current quality inspection process. The key elements are as follows:
- (1)
The vast amounts of documents used throughout the inspection process are archived and available on the BIM server. These are easier to manage, as they are digitally stored in an electronic file format. Thus, the inspection efficiency is improved, as there is no need to search for files, because the relevant data are linked with the BIM model. There is also no need to prepare documents, such as specifications or drawings, when conducting an on-site inspection, as the data can be easily obtained using smart technologies. Using the BIM, construction inspectors can log in to the program instead of transferring documents in a written format and work-related feedback, such as reconstruction work instruction is given immediately using a communication system, which improves work efficiency.
- (2)
Quality data are acquired using smart technologies and the pass/fail decision can be made on a real-time basis as the data can be obtained and analyzed in the BIM. The accuracy level is higher than inspecting with manual detection. In addition, most smart technologies acquire quality data in a non-destructive way, which has advantages over traditional methods.
- (3)
As shown in
Figure 3, temporary rework can be executed immediately, and the location in need of inspection is designated by adding an inspection spot at the worker level. This process can expedite inspectors’ and supervisors’ checks of the target workspace when an inspection is requested. By specifying the locations where a problem of quality has occurred, the current inspection practice is much improved. The new inspection process can tremendously save time wasted in inspection preparation, on-site inspections and rework requests, when compared to the current process.
4. Developing a Quality Inspection-Assisted API (Phase II)
To effectively carry out each task in the construction quality inspection process, as proposed in Phase I, the authors developed an assisted tool, API, that supports the new inspection process. To conduct efficient construction quality inspection based on the BIM, it is beneficial to use an application embedded in the BIM software. In addition, the relationships among the functions within the system must be clarified so that they can be effectively used in the construction quality inspection process.
4.1. Construction Quality Inspection API Architecture
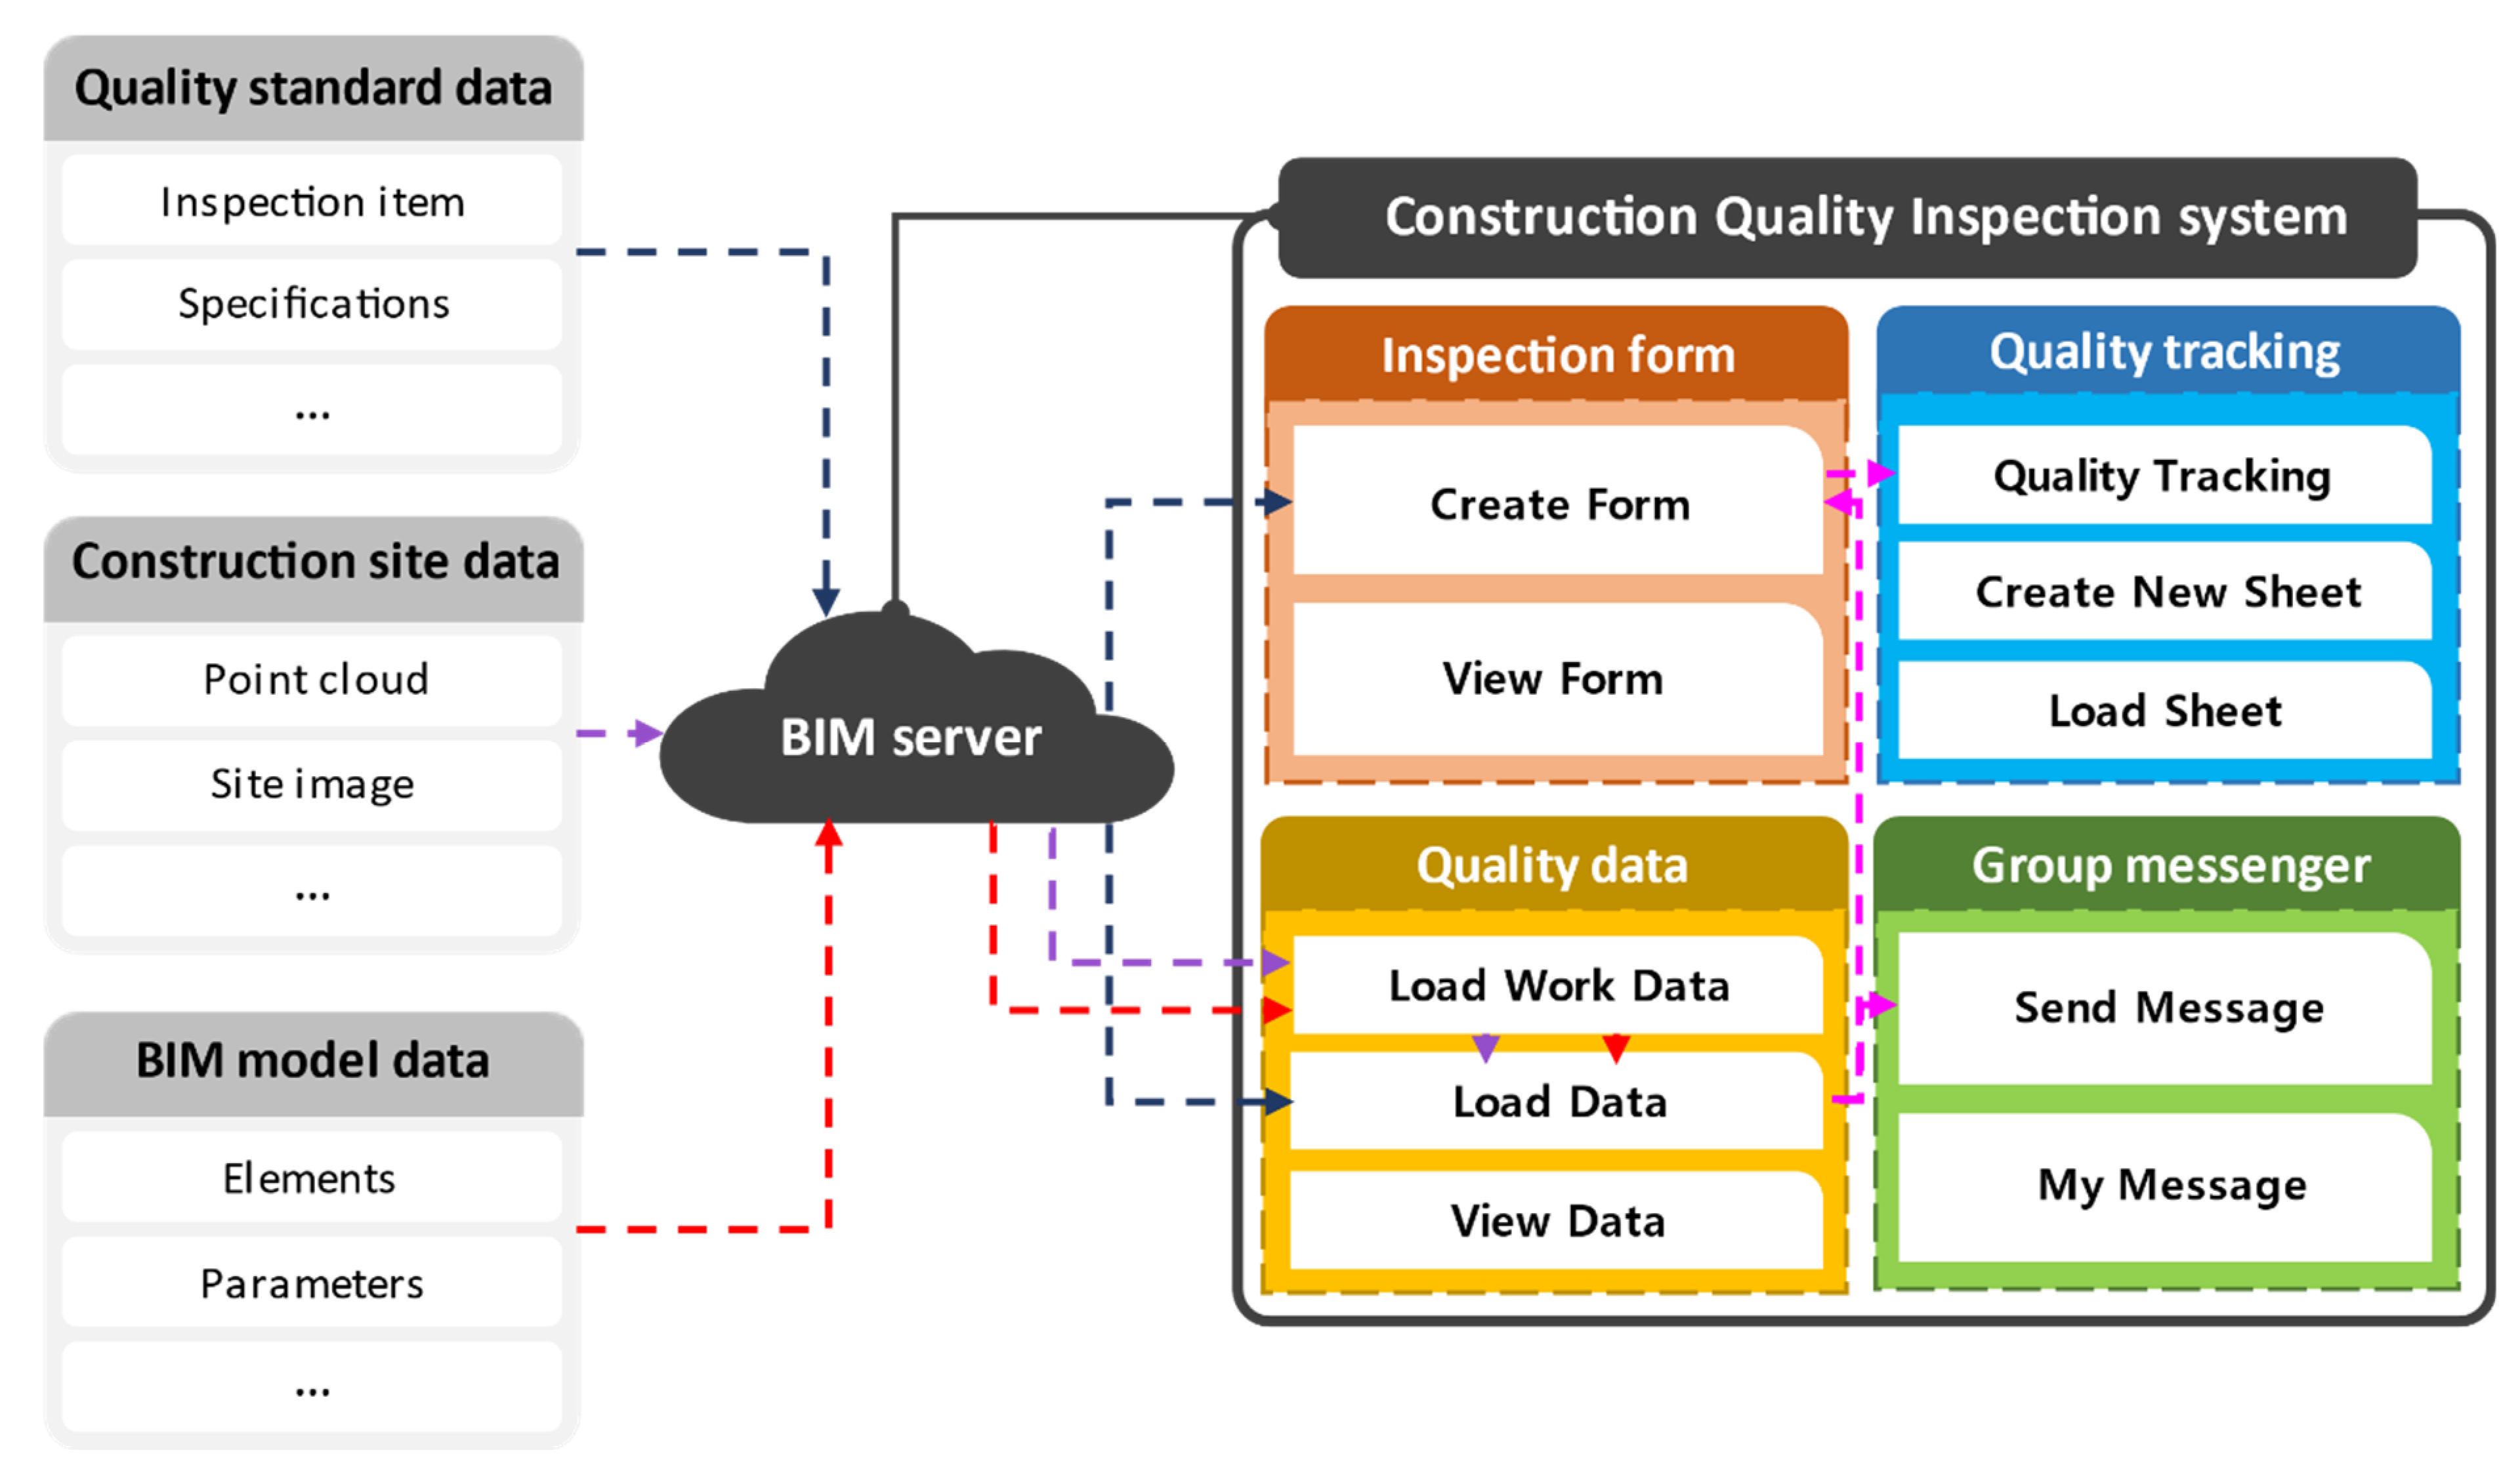
The system architecture is provided in
Figure 4. In this system, users are requested to input relevant information in advance so that the BIM can provide users with the appropriate information, i.e., drawings, specifications, quality checklists and inspection areas. After the quality inspection plan is created, workers are instructed to begin their job according to the construction drawings and specifications. Construction managers can monitor the work status via on-site cameras. When the assigned work is completed, quality data can be secured through smart devices available on site. However, the data type, obtained by smart devices, should be linked to the relevant items in the checklist, or the person responsible for confirming the relevant data should enter the same directly into the checklist. In order to link the on-site data with the associated items in the checklist, it is important to integrate smart devices with the BIM server. Without digital information, it is difficult to determine whether the on-site data match the quality criteria within tolerance. If the inspection lot is completed, a notification asking the supervisor to validate the inspection is issued by the system. Next, the system sends a warning signal within the BIM if the inspection does not meet the quality criteria; otherwise, it confirms the inspection to be completed within quality standards. It is also possible to request for reconstruction or re-inspection when needed, via instant messaging. Once all planned quantities have been constructed and inspected correctly, the quality inspection checklist documents are stored in the BIM server in a digital format for future usage. The add-in system architecture supporting the execution of the corresponding processes is shown in
Figure 4.
The add-in construction quality inspection that works within the BIM system consists of four items: inspection form, quality data, quality tracking and group messenger. Each component in the system is developed in a panel of the Revit
TM. As seen in
Figure 4, there are four functions and each function consists of multiple modules generated by the system buttons necessary to carry out the work.
The blue dotted line indicates “Quality standard” data flow; the purple dotted line shows “Construction site” data flow; and the red dotted line means the flow of “BIM model” data. These three types of data are stored in the BIM server and used in the Construction Quality Inspection system that created the add-in program via Revit. The pink dotted line in the system indicates the flow of “quality inspection result” data that are generated via the interaction of the three types of data entered into the BIM server.
The quality standard data in
Figure 4 are used to create an inspection form in the “Create Form” module and determine whether the quality standards have been met in the “Load Data” module. Construction-site data through smart technologies are uploaded into the BIM through the “Load Work Data” module. Then, the data are moved to the “Load Data” module and used to determine whether quality standards are met. The BIM data that are stored in the BIM server while a model is created are matched with the construction site data in the “Load Work Data” module and moved to the “Load Data” module to determine whether the quality criteria have been met along with quality standard data. The quality inspection result data, generated through the interaction between the three types of data, move to the “Create Form” module when inspection results meet the quality standards and are automatically reflected in the inspection form. Then, they are reflected in the process progress rate through the “Quality tracking” module. On the other hand, when quality standards are not met, they move to the “Send Message” module and are used to request rework by indicating the corresponding spot in the BIM.
Each module has a procedural relationship with a different module, but the “View Data Module” and the “Load Schedule Module” consist of functions to view existing data stored in the BIM database, indicating that there is no special procedural relationship. The construction quality inspection API is characterized by the fact that both the beginning and ending modules are placed in the “inspection form” and the modules for “quality data” are at the center of the system. In addition, the flow among the modules of this system is closely related to the construction quality inspection process, after the adoption of the smart technologies, as proposed in Phase I.
4.2. Developing a Quality Inspection System Prototype
In this research, the authors used Visual Studio
TM 2022 to develop an add-in-type construction quality inspection system via the BIM software Revit
TM. Based on the new quality inspection work procedure defined earlier, a new toolbar with panels and buttons was generated and applied to similar construction quality inspection processes. In this case, the construction quality inspection API can be customized to the relevant work types.
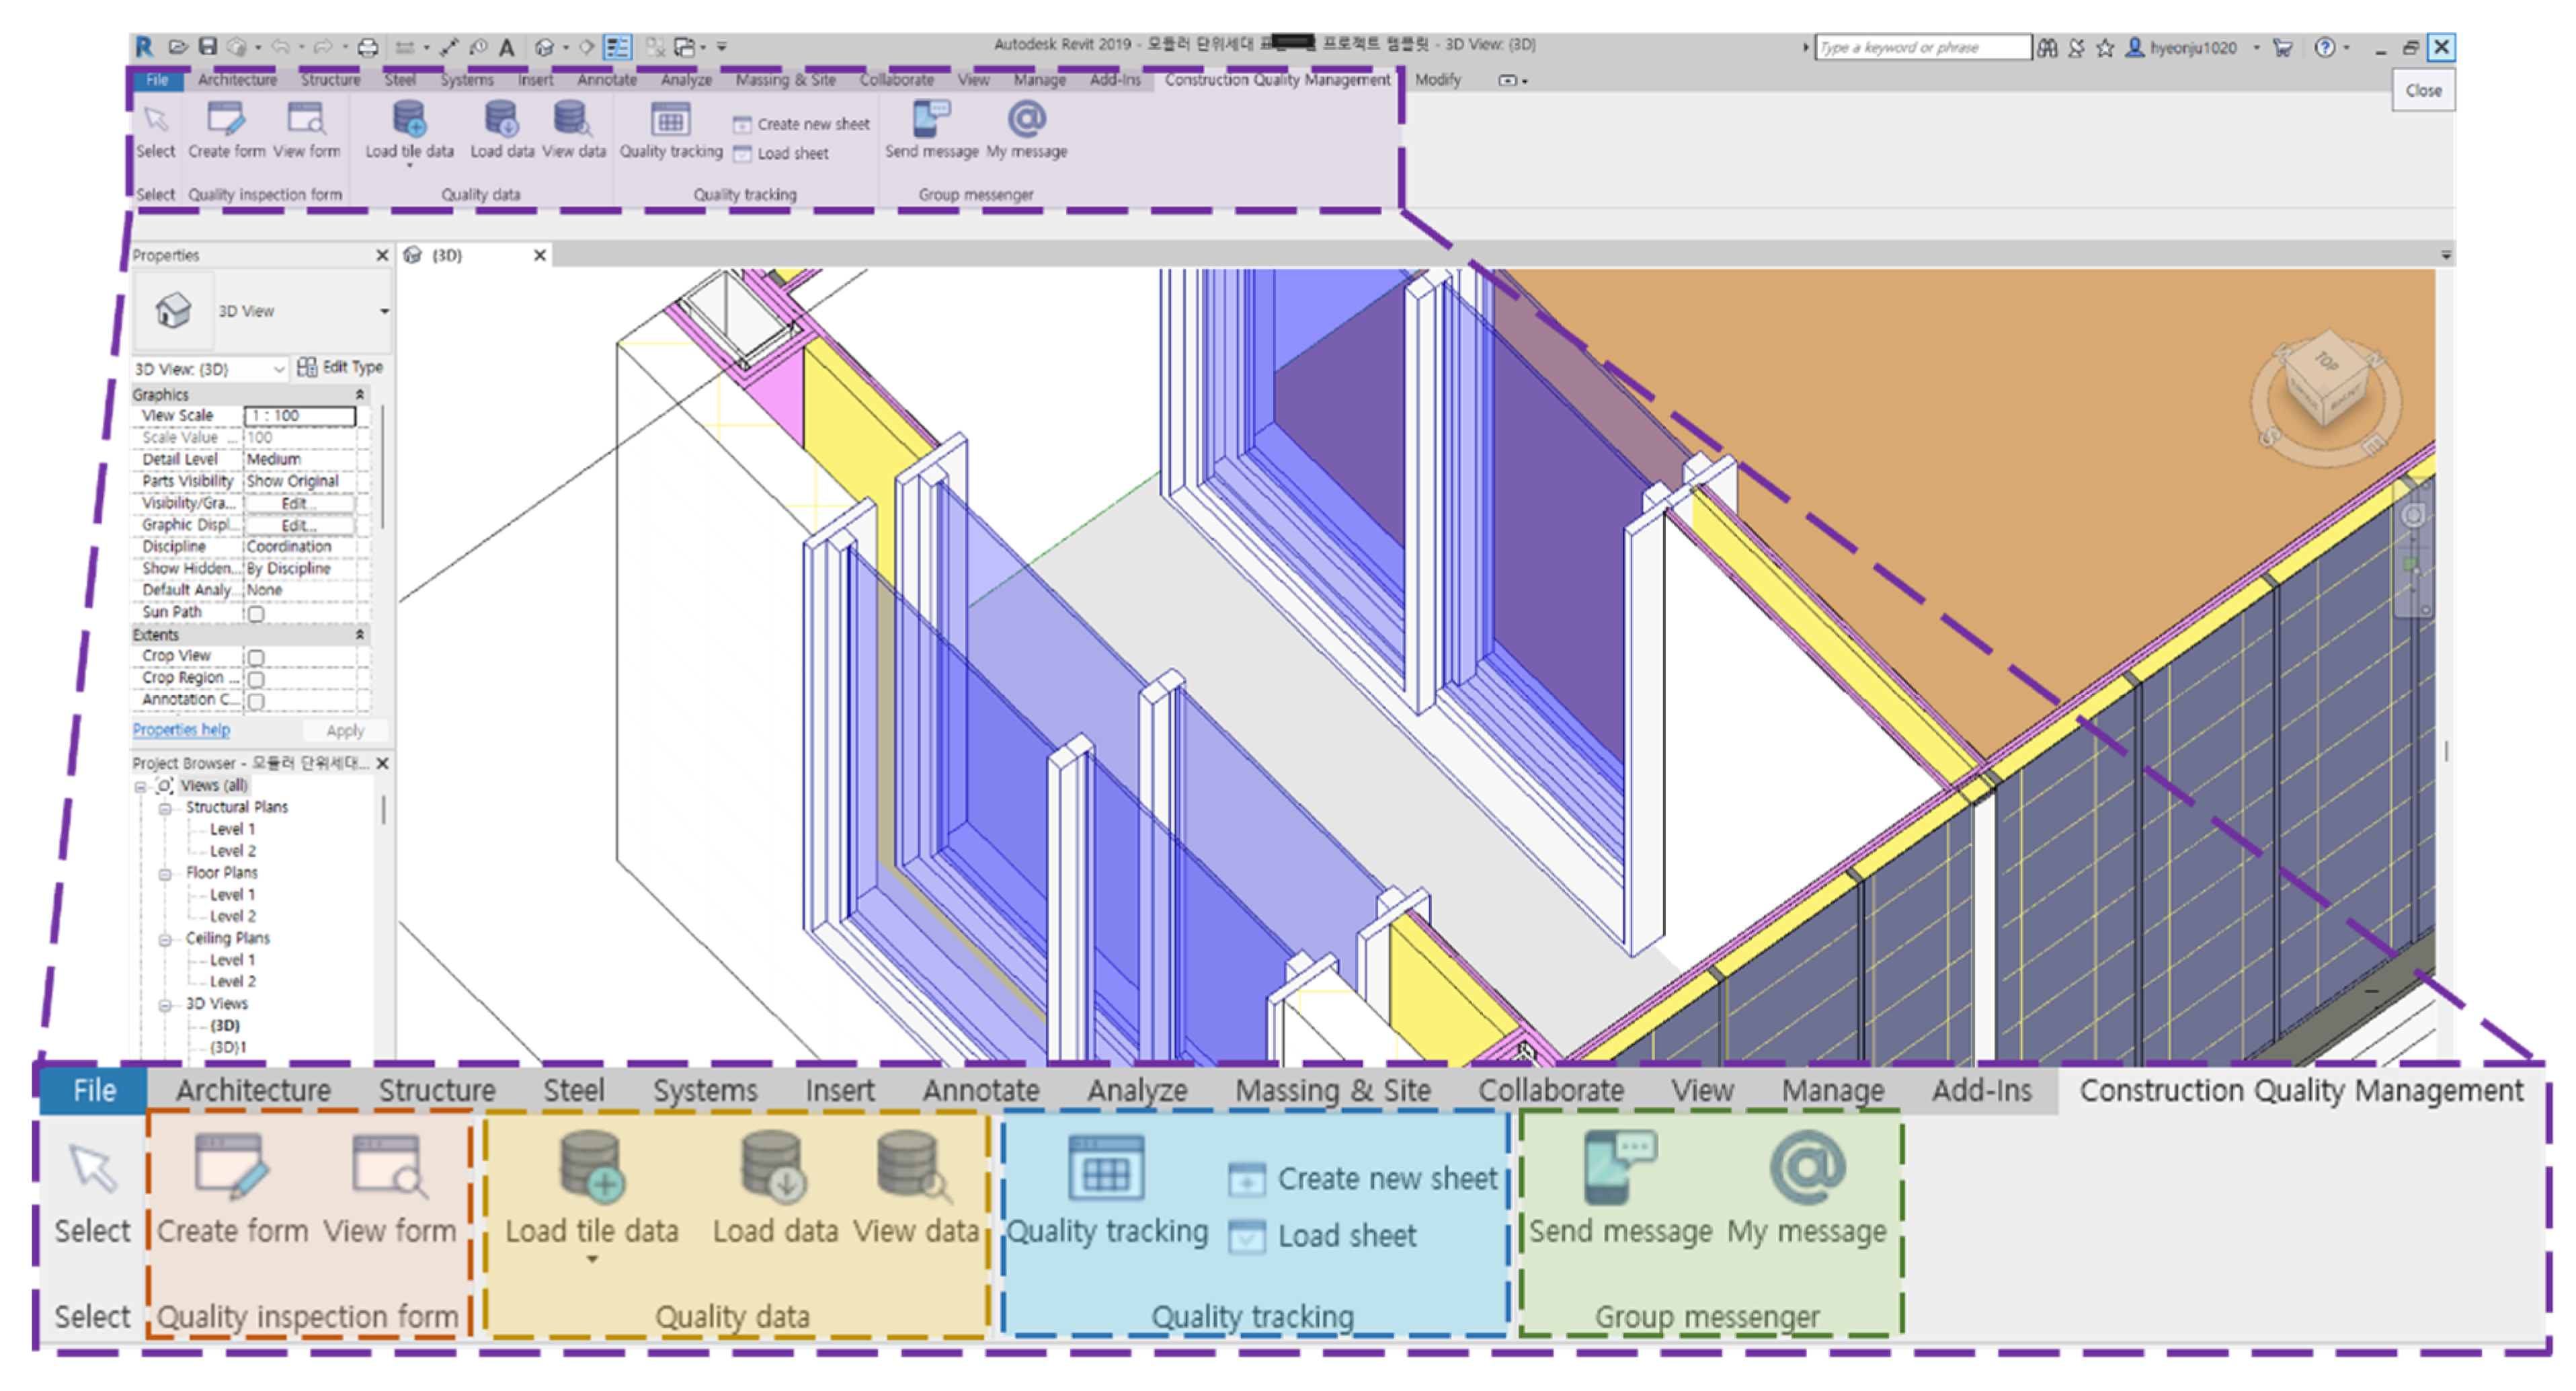
Figure 5 shows an exemplary graphic user interface (GUI) developed for the case study described in the next section.
As seen in
Figure 5, the corresponding system prototype consists of four main features: (1) The “quality inspection form” menu supports the creation of a new inspection checklist necessary for post-construction quality control or to confirm an existing inspection checklist. (2) The “quality data” menu enables the management of necessary image and sensor data information, such as thermal images, RGB images and 3D point clouds, collected for quality control in the BIM. (3) The “quality tracking” menu makes it possible to check the construction progress rate based on the amount of work passed during quality control and the ratio of problem-prone constructions during the entire construction process, according to each work item. (4) The “group messenger” menu expedites communication among project members by explaining reconstruction areas, work details and other quality issues. Under these four menu bars, each sub-function is grouped in the system with the corresponding buttons to be operated. The programming code for system GUI development is shown in
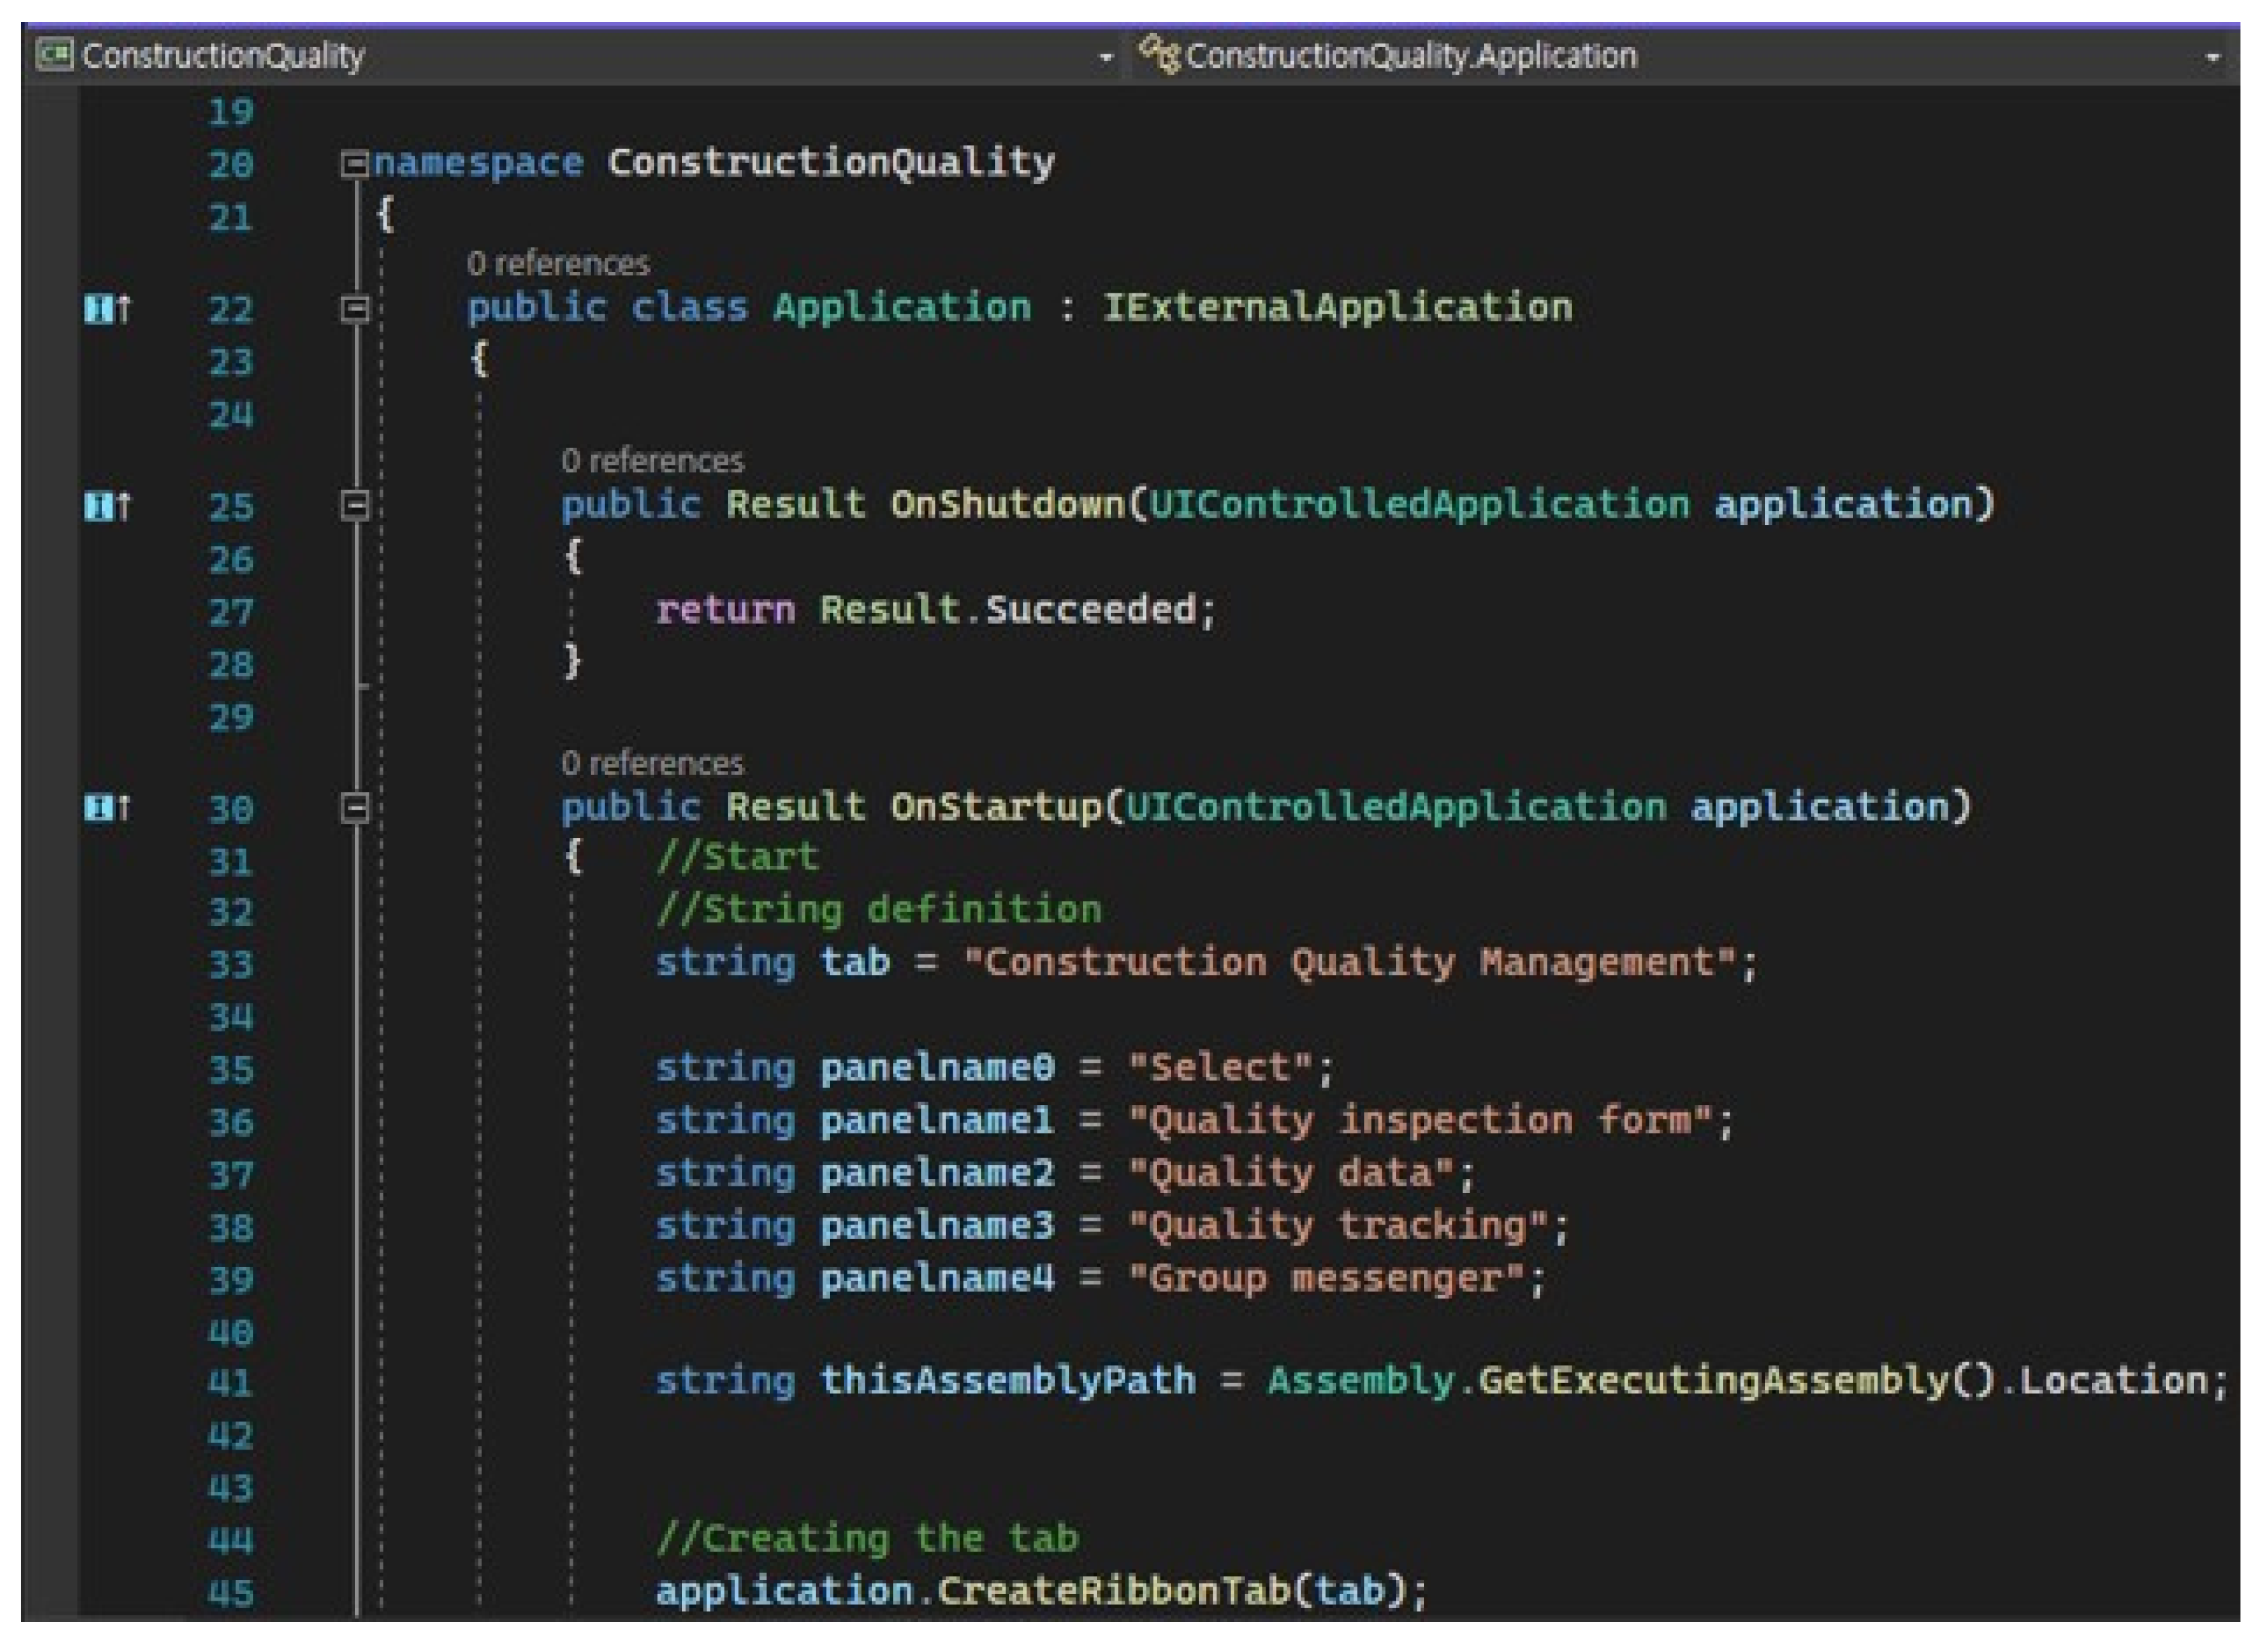
Figure 6.
The add-in system was developed in the form of an external application. Tabs and panels were programmed as menus using Revit
TM developer package code. It is set that the system operates at the same time as the Revit
TM is executed.
Table 1 details the four menu items and their sub-functions.
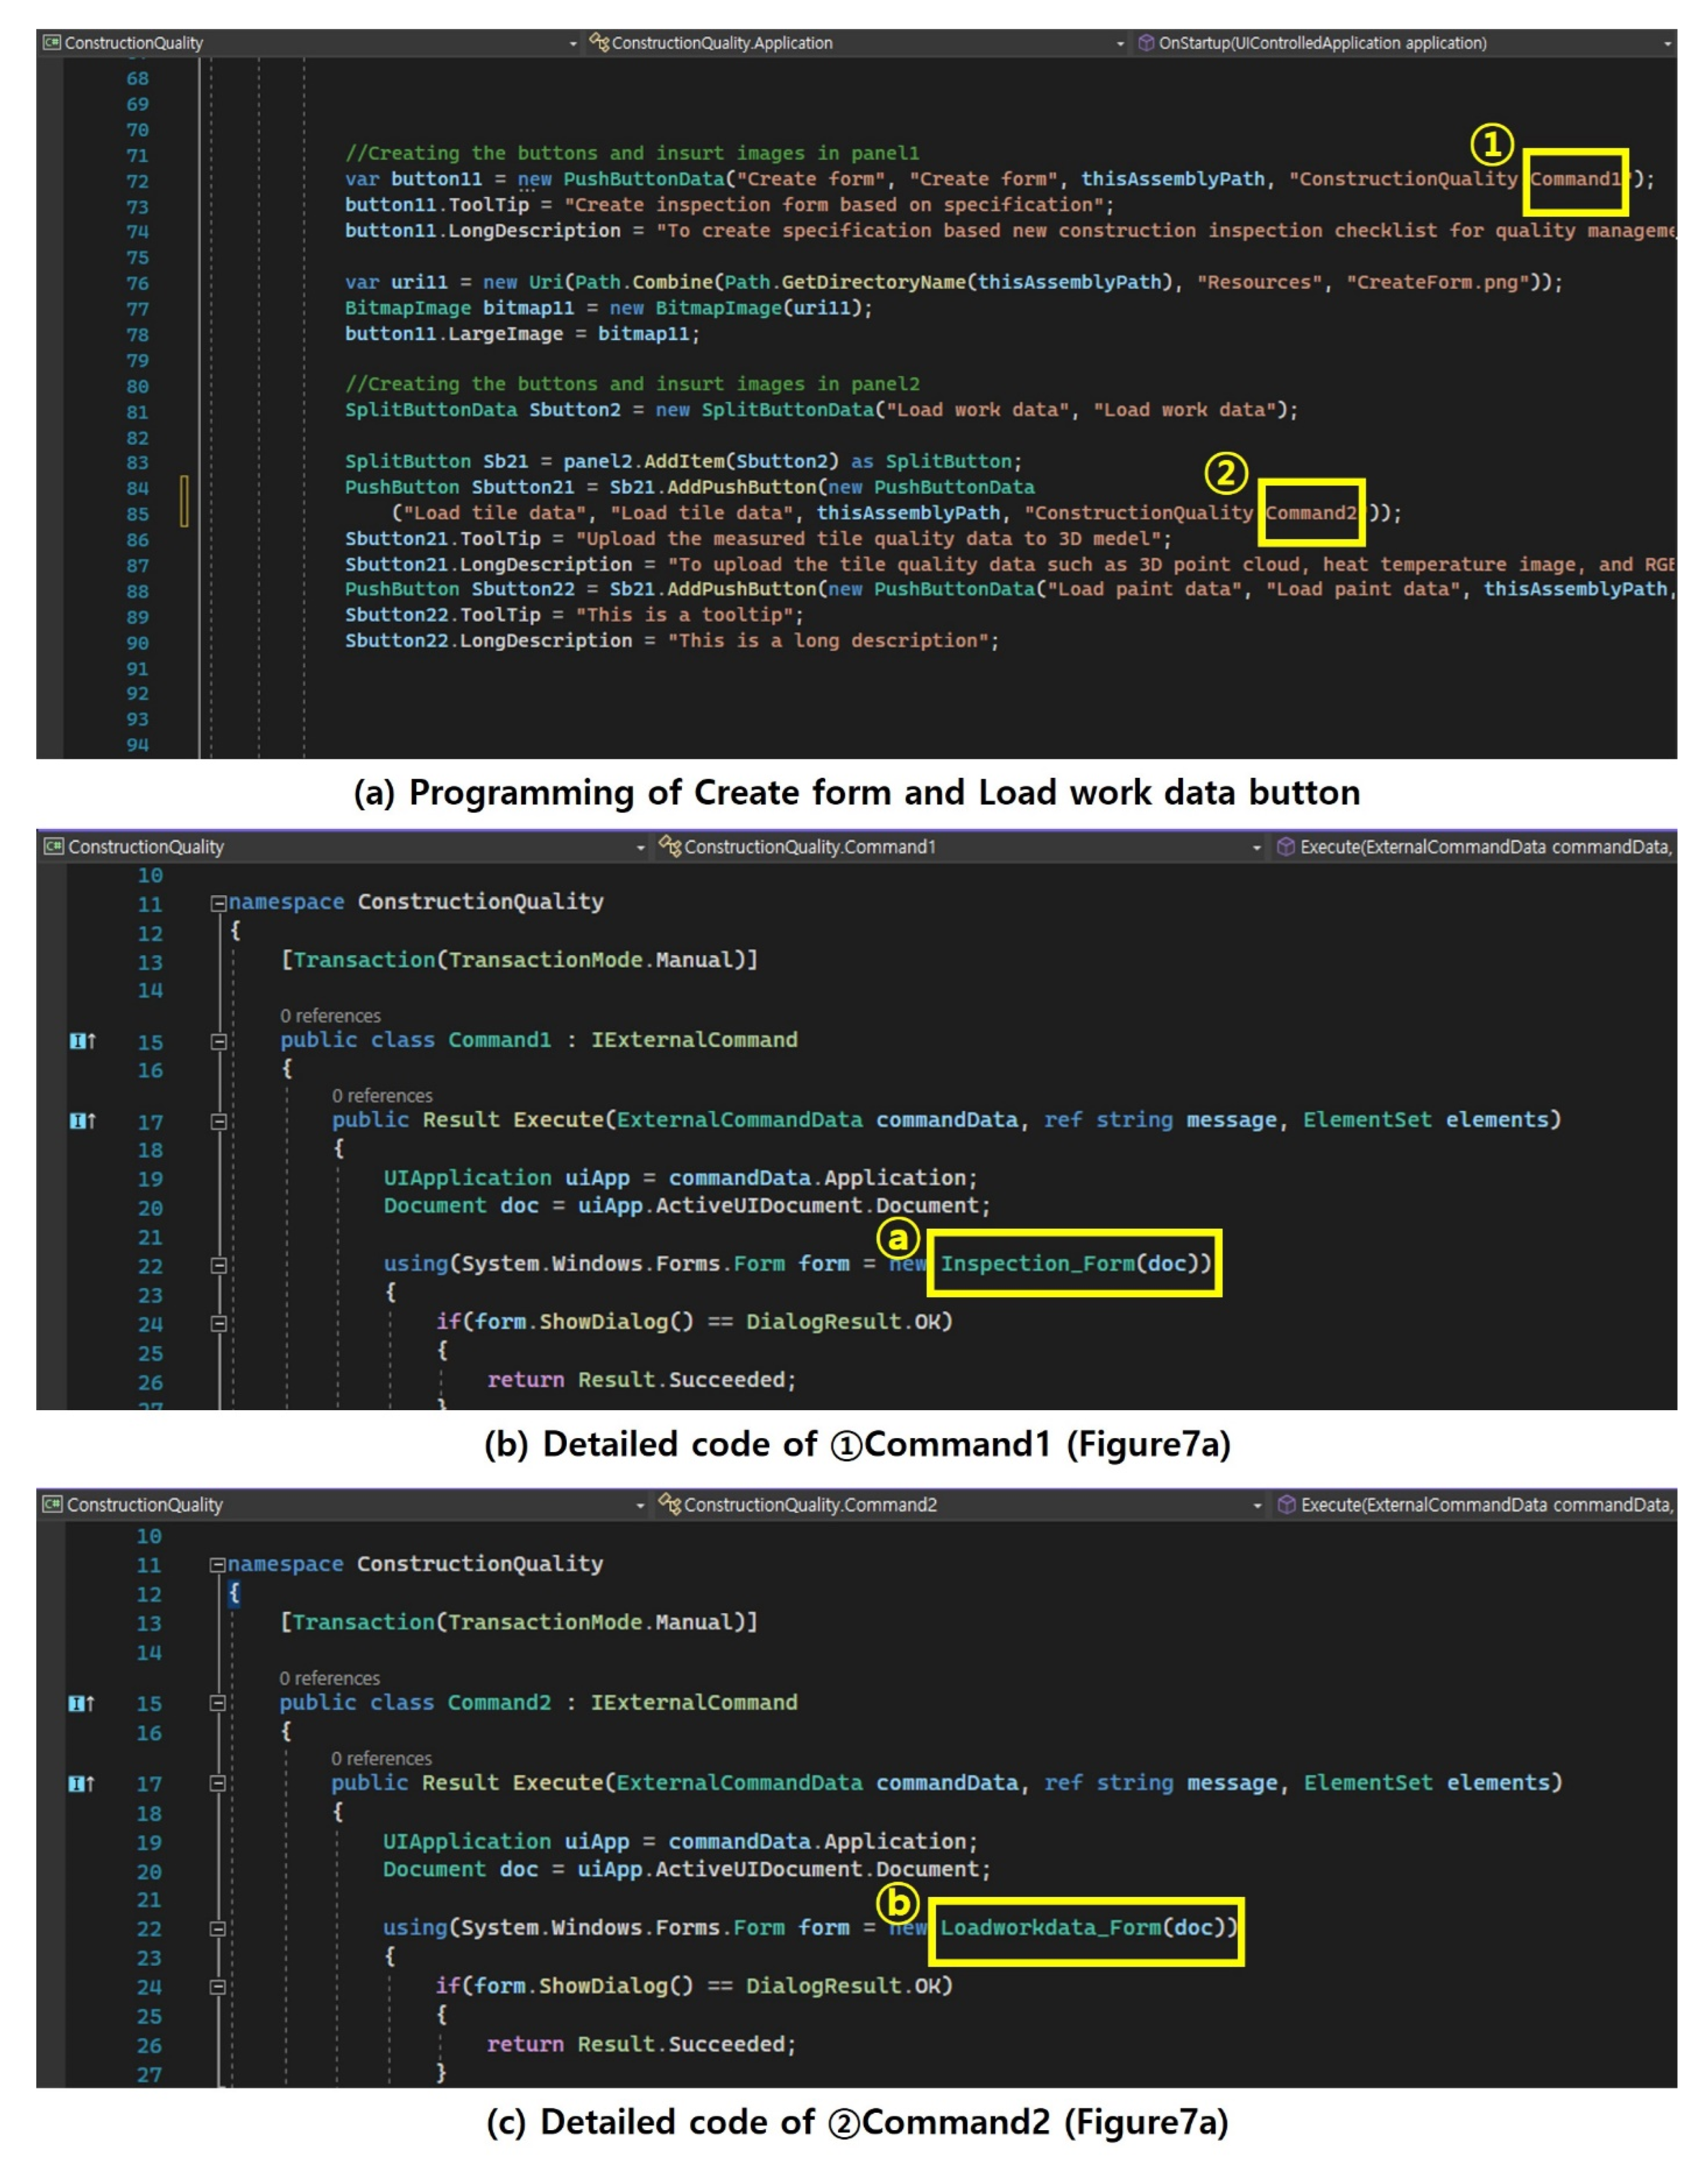
In implementing the smart quality inspection process, the key functions are operated using the “quality inspection form” and the “quality data” menus. For each button generated on the system interface, the authors enabled users to check the content of their work by clicking the corresponding button under the menu, so that they can easily use each command function. The detailed code to make the button work is as follows (see
Figure 7).
For the function requested when each button is clicked, the authors have programmed the command code to run. For example, The “Create form” button is connected to Commend1 as shown in mark ① of
Figure 7a, and the code for Commend1 is executed when the corresponding button is clicked. Similarly, the “Load work data” button is linked to Command2 in mark ② of
Figure 7a.
Figure 7b,c show the detailed code of Command1 and 2. Command1 is programmed to generate a checklist interface when a command is executed by linking it with the Inspection_Form document as shown in mark ⓐ (see
Figure 7b). In this way, by connecting Loadworkdata_Form document and Command2, it is programmed to open the interface of uploading the quality data when a command is operated as shown in mark ⓑ (see
Figure 7c).
In the same way as in
Figure 7, each button works by being connected to the command with a unique function. The operating principle of the system is applicable to general types of construction and differs in data type and the interpretation of quality standards. Since there is a difference in the form of data that can be acquired for each smart device, the appropriate data form and smart technologies should be defined for each type of work.
In the following section, this research conducts a case study by selecting a tile work to apply the new process developed in this study by defining the data type and the smart device required for qulity inspection.
5. Case Study of the Proposed API System (Phase III)
5.1. Selection of Work Type and Checking Current Inspection Process
To reduce any quality flaws that emerge after construction and save maintenance costs associated with errors, quality control plays an important role during the construction process. The case study was chosen based on the level of importance of the construction work. Kim et al. (2020) evaluated each work type considering the impact of defects in building construction [
44]. On calculating the defect importance rankings based on both the frequency of defect occurrences and the maintenance of unit costs, tile work ranked first. Therefore, this study selected tile work for the case study.
Prior to the proposal of a new quality inspection process for tile work, the current practice was reviewed. It is assumed that the tile materials are approved at the preconstruction quality control stage. Various inspection items are required to guarantee the quality of tile work, i.e., adhesive strength, surface leveling and lack of filling. If the adhesive strength is measured to be 80% or more of the quality standard, the adhesive strength of that mortar is considered to be satisfactory. If it does not meet the standard, rework should be carried out by removing the eight adjacent pieces of tile and reconstructing them.
More frequently, installed tiles are damaged during the inspection process for the quality check in tile construction. In addition, it is challenging to visually determine whether the adhesion strength meets the 80% rule during the adhesion test. Since the tile to be inspected is chosen randomly, it is almost impossible to check for every flaw that may be included in the constructed area. To solve this problem, a non-destructive quality check method that inspects the entire construction area is required. For this research, a case study was conducted with the widely used adhesion method. As proposed in the previous section, a smart-technology-based quality inspection plan was used to check the amount of construction work in a non-destructive way. The API system was also applied to check the quality inspection, as developed in Phase II of this research.
5.2. Adoption of Smart Technologies
The lack of bonding area causes significant problems in tile work. Thus, the quality check should inspect whether the adhesion area is sufficiently secured. In this case, the use of smart technology is powerful because it involves a non-destructive test to check the lack of adhesive in the tile work. The inspector can adopt a smart method that utilizes thermal data to confirm the amount of mortar filled, which is a non-destructive method. In addition, image data can also be obtained to check the vertical and horizontal alignment of the tile installation. In this regard, a laser scanner is considered to be a useful tool in providing thermal and/or image data on the surface of the tile work. Thus, by acquiring image extraction and point cloud data, the tile inspection process can be improved through the use of smart devices.
In this study, tile quality data were collected using a laser scanner, concentrating on the examination of the adhesion test of tiles based on the thermal/imaging camera. This was successful in checking data for the entire construction work without damaging the existing construction, which is advantageous compared to the current quality inspection method.
Figure 8 shows the process of acquiring tile quality data using a laser scanner as a case study.
Figure 8a illustrates the use of the laser scanner, BLK360TM, to inspect the quality of tile work. The device not only captures 3D point cloud data, but also provides both thermal and HDR images for quick recognition of surface defects.
Figure 8b shows the point cloud data obtained by laser scanning. By comparing the data set with the BIM, horizontal/vertical alignments can be measured. The acquisition of quality data on mortar filling was carried out by applying hot air and checking the thermal image temperature difference in the areas where the mortar was not filled (see
Figure 8c). The empty portion will have a higher temperature than the part filled with mortar. It is, thus, possible to determine whether quality standards are satisfied. As seen in
Figure 8c, a tile adhesion area can easily be identified based on the thermal image of the tile work when hot air is applied to the tile surface.
5.3. Application of a New Quality Inspection Process Using API System
Based on the proposed quality inspection process (see
Figure 3), a new process model in conjunction with the Revit–API system was developed to demonstrate the case study.
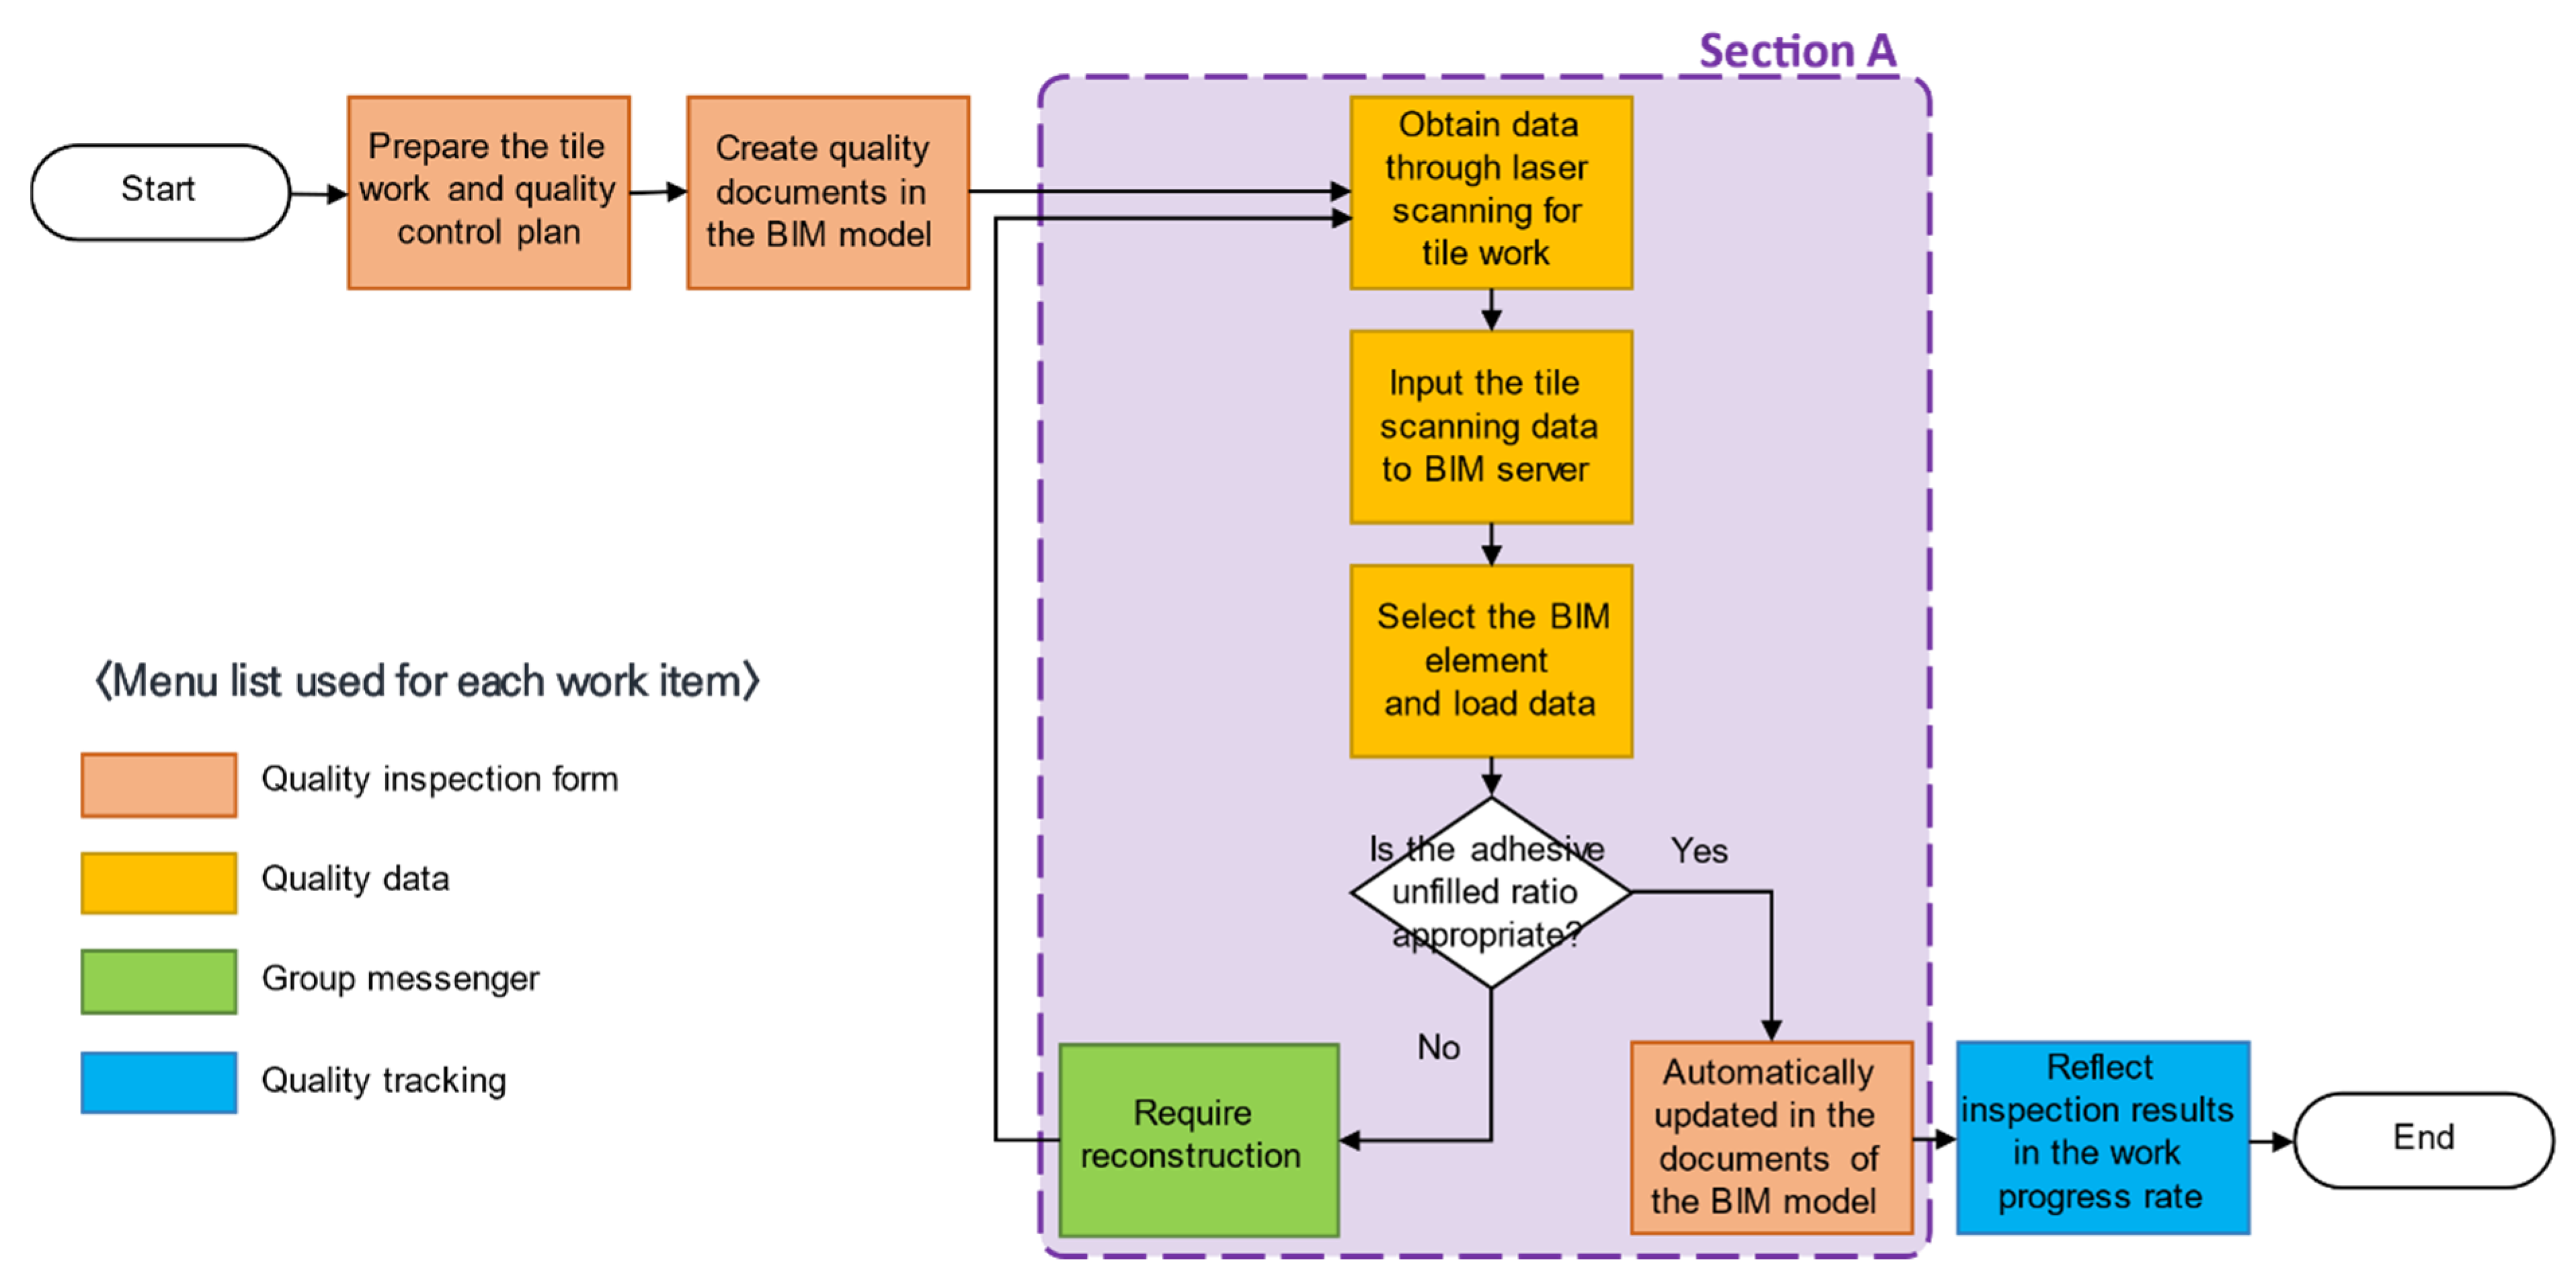
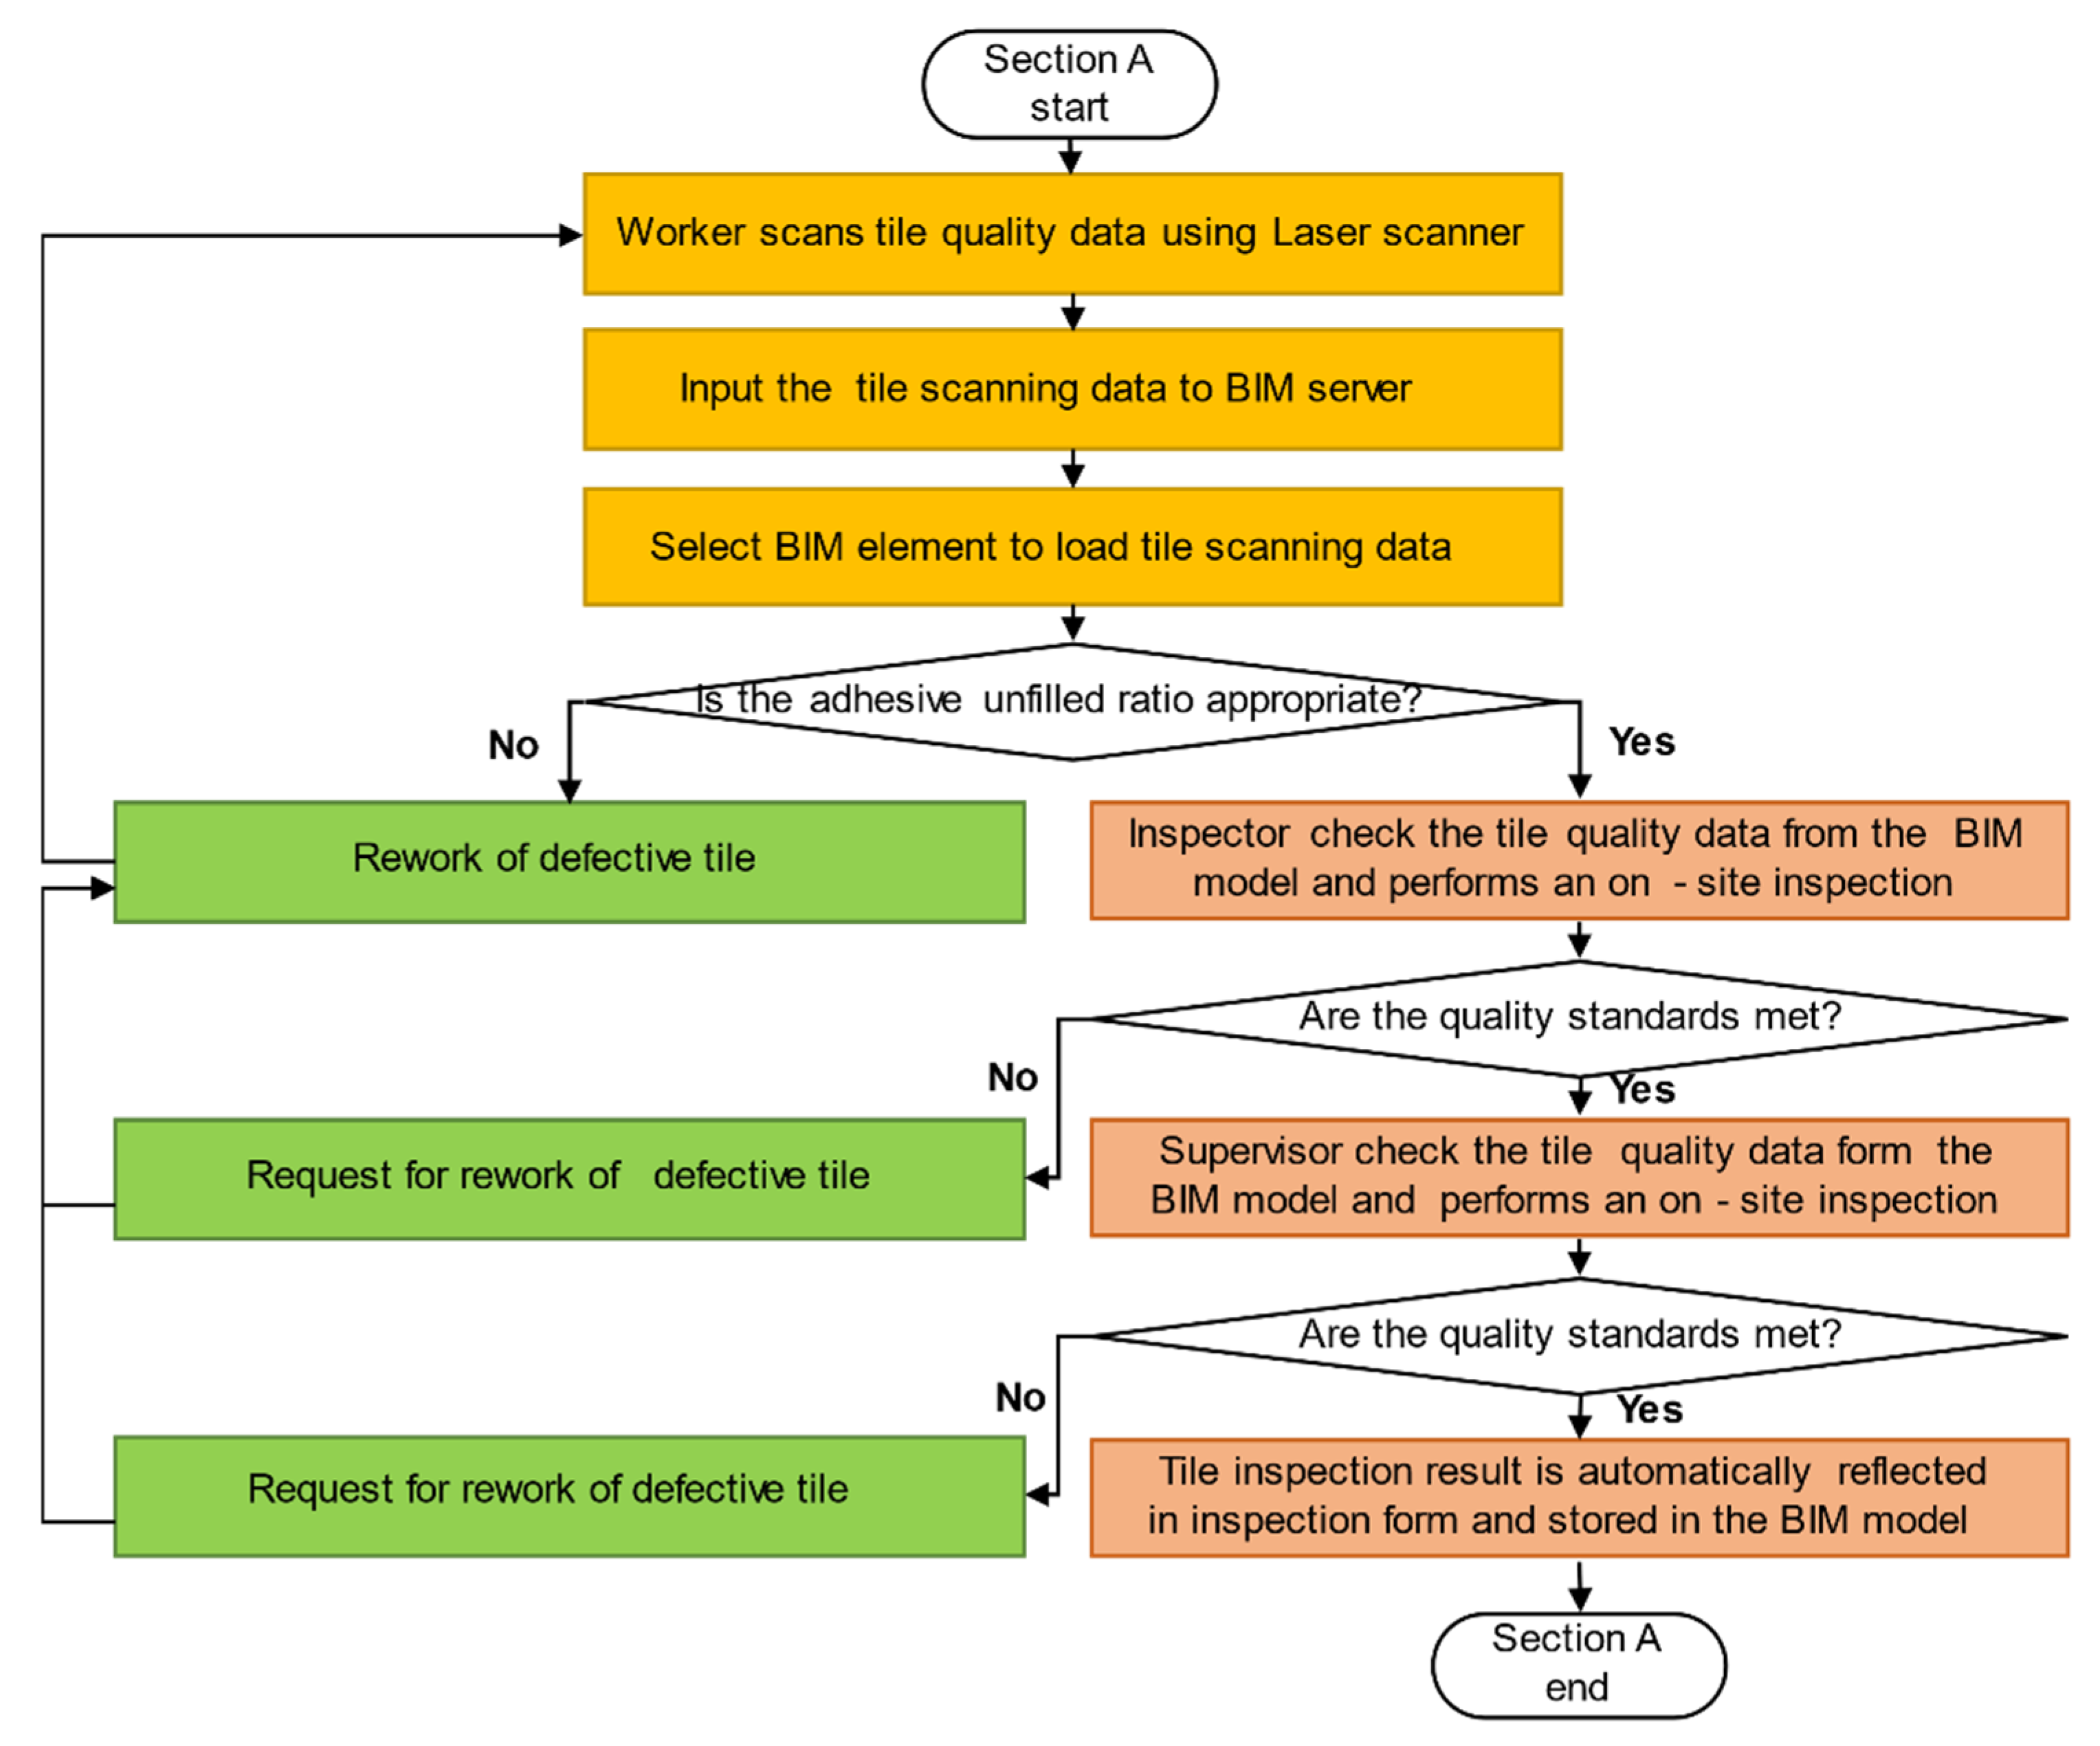
Figure 9 shows a step-by-step work process of the case study. As seen in
Figure 9, the tile work and inspection plan are to be prepared before creating a document via the BIM. This step relates to the “quality Inspection form” menu in the API system. Second, the “quality data” menu is utilized, by gathering tile quality data using laser scanning, importing it into the BIM server and matching each piece with the actual intended amount of work that was completed. Third, a decision is made based on the thermal image data of the tiles regarding whether they match the quality standard. The quality standard in this case study is provided in
Table 2.
The ratio of unfilled tile adhesive is critical in determining the quality of the tile work. The quality standard of the unfilled ratio varies in terms of tile location. If the tile work is at the corner of a room, the unfilled ratio should be 20% or less of the total surface area. On the other hand, if it is not in a corner area, the ratio should be 30% or less.
Once the inspection criteria have been evaluated for the particular work scope, the final step is feedback and tracking. The data are automatically stored in the inspection documents in the API system using the “quality inspection form” menu. Otherwise, the inspectors may request workers to rework the unfilled areas by using the “group messenger” menu. This process is repeated until the quality criteria are satisfied. If the inspection results satisfy the quality standard for the whole area, the relevant quantity is stored in the system using the “quality tracking” menu.
Figure 10 outlines the detailed inspection process using smart technologies in this case study. As visible, the workers perform a self-inspection. After the workers scan the tile work using a laser scanner, they upload the scanned data to the BIM server and choose the corresponding BIM model to link the captured data. The system automatically determines whether the mortar unfilling rate is satisfactory. When the data do not match the quality criteria, rework is requested by the system. If the results meet the standards, the inspector reviews the data and conducts an on-site inspection to verify the results. Since the system records the entire history of the quality inspection, the location where a defect occurs can be easily detected. After all the inspection areas have been completed without potential defects, the results are sent to the supervisor, and the final quality inspection is conducted to approve the confirmation.
It is noteworthy that the new process requires each of the three participants—workers, inspectors and supervisors—to perform a different task. A worker-level inspection is conducted as part of the worker’s routine job, while an inspector-level inspection is performed on the items that are difficult for workers to identify. The supervisor-level inspection endows the authority and obligation for the quality inspection process by confirming whether the tile work is assured based on the quality standards.
The tile work quality inspection process mentioned above was applied to the typical quality inspection process in this case study. The purpose of the case study is to determine whether the new inspection work process is applicable and beneficial in the current work practice. The result of the case study validating the same is given in the following section.
6. Validation of Case Study
6.1. Quality Inspection Using the Proposed System
An on-site test was performed to validate the proposed system and assess its practical applicability. The API quality inspection system was used to carry out the quality inspection on the tile work process.
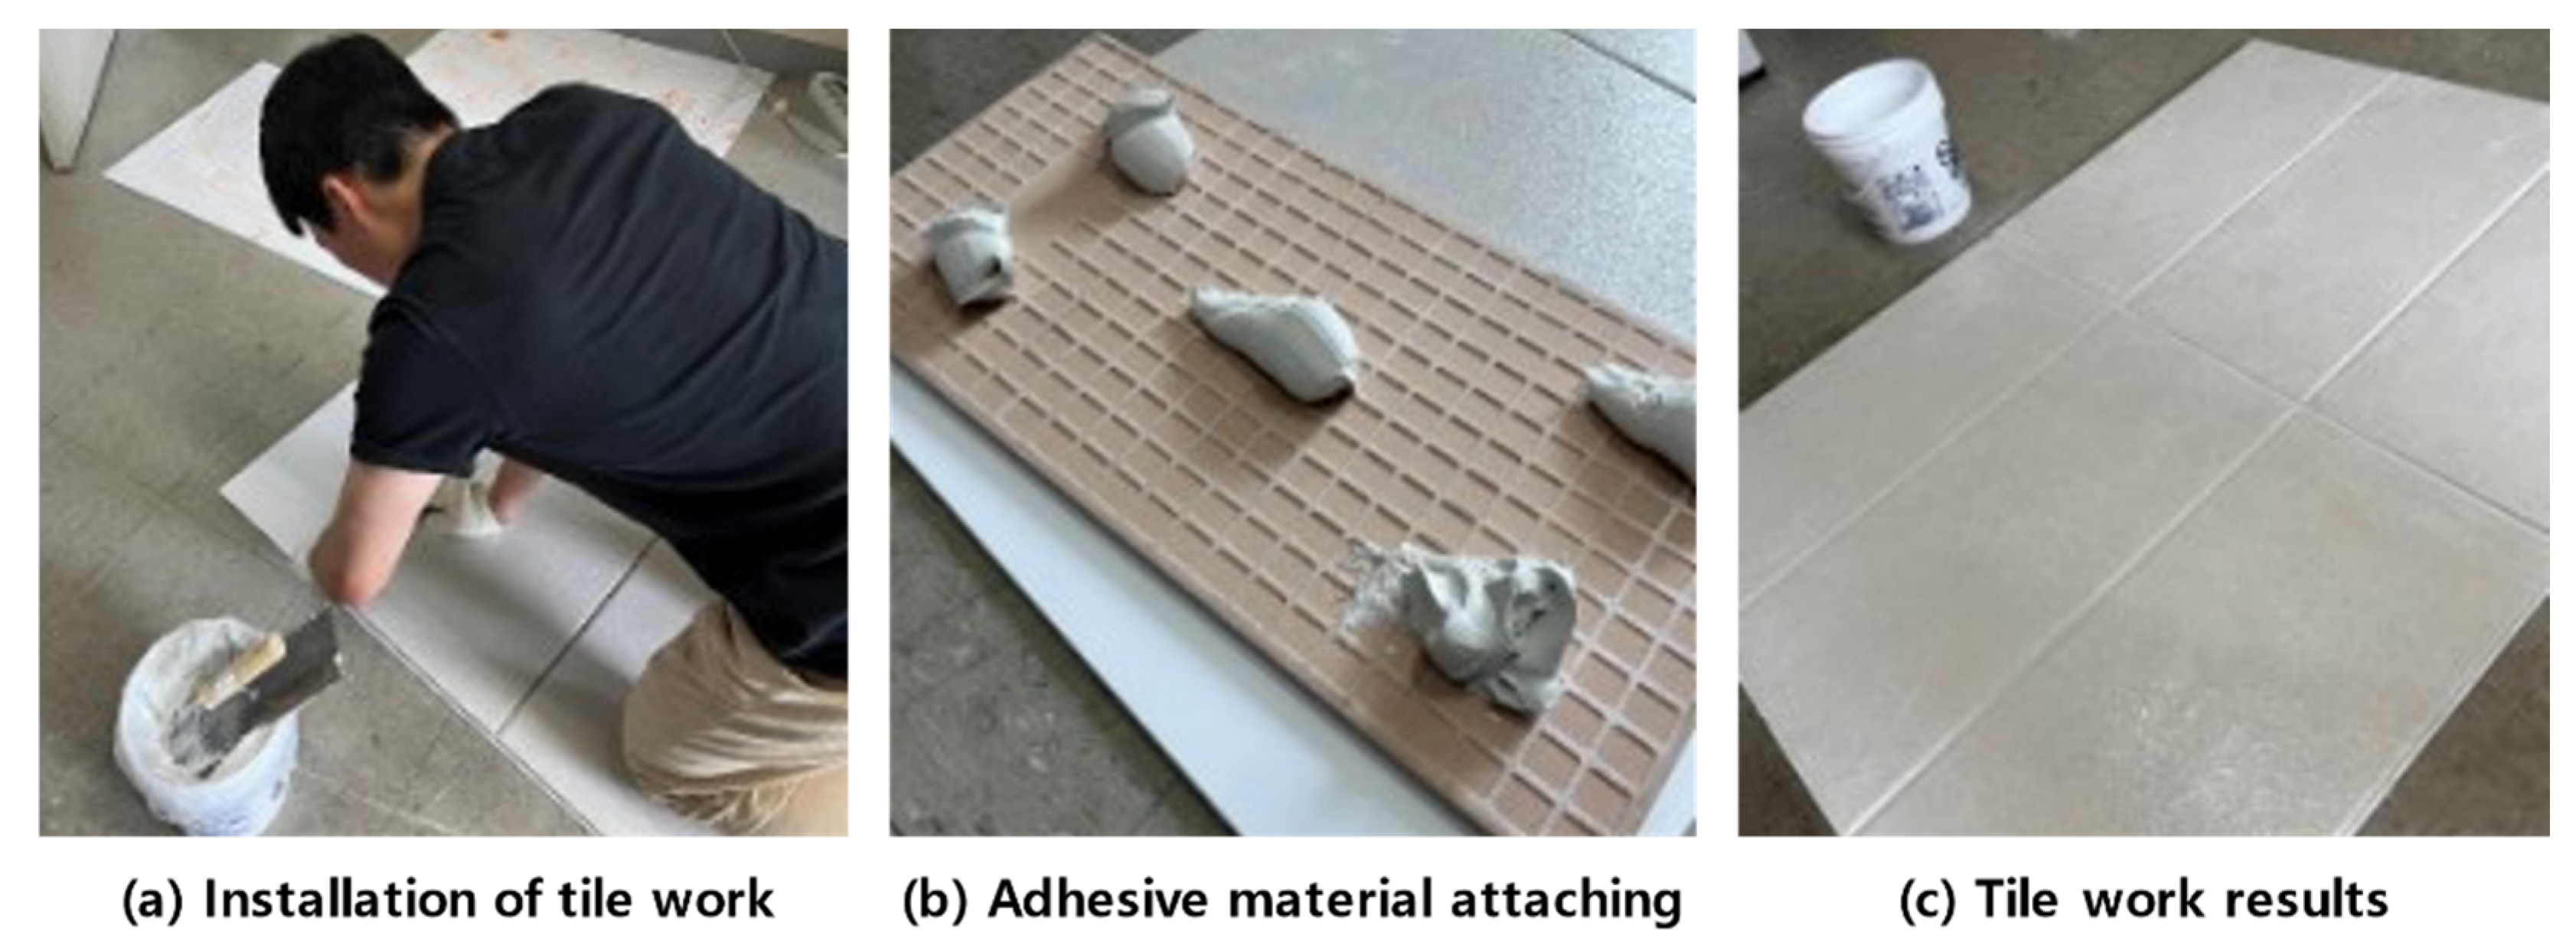
Figure 11 shows the tile work installation process.
A synthetic resin-based acrylic bond, Cerafix
TM, was used as an adhesive material.
Figure 11a shows how tiles are attached using the adhesive. By varying the amount of adhesive mortar filling for each tile, it was possible to confirm the difference in quality data according to the mortar-filling rate.
Figure 11b shows the appearance of the material attached to the back of the tile. In total, six 600 mm × 300 mm tiles were installed, as seen in
Figure 11c.
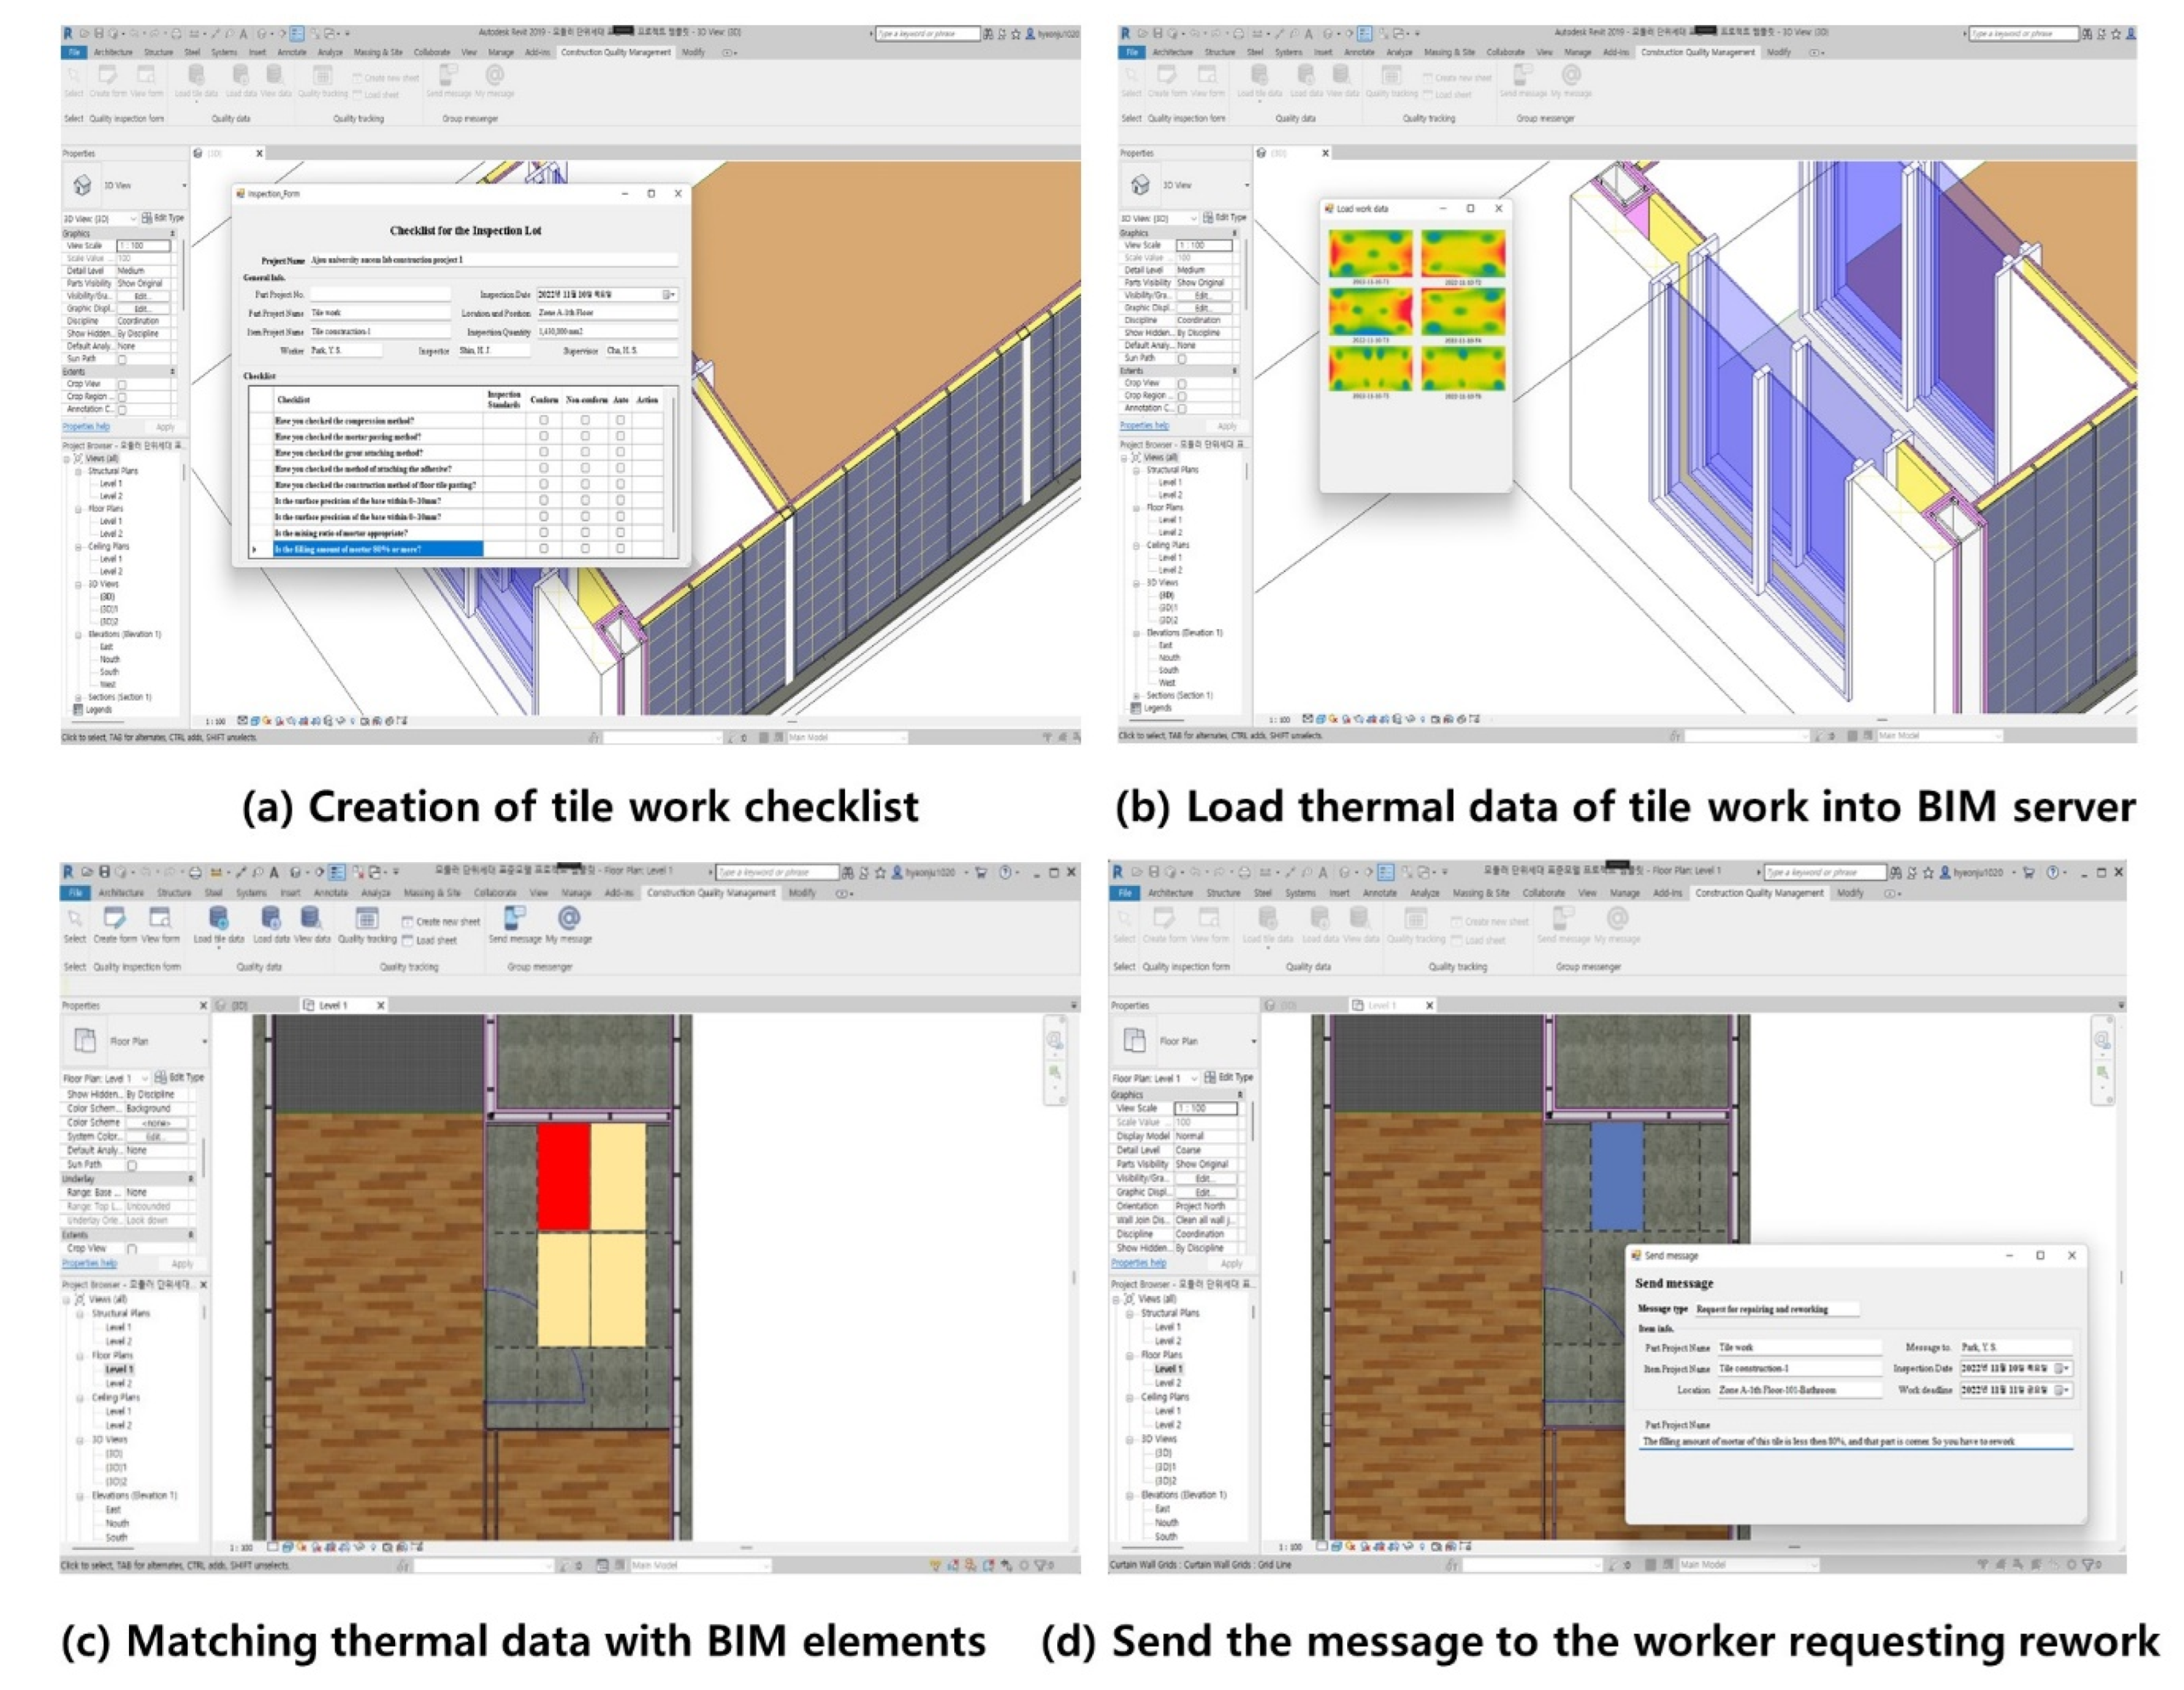
Using the Revit–API system, an inspection checklist was created via the BIM. According to the installation work plan, all six tiles were attached and exposed to hot air. Then, thermal image data were obtained by scanning the tile surface. The thermal image is used in computing the area of hot temperature. The unfilling rate of adhesive mortar is the same as that of hot air on the tile surface. Once the data are gathered, the system inspects the tile work automatically by indicating the defect area in the BIM. In addition, the system can notify the rework request to the workers to assure the quality level. The BIM system based on this case study is provided in
Figure 12.
Figure 12a depicts a tile work inspection checklist that is automatically created using the “create form” button in the system. As mentioned in Phase II of this study, it is essential to input the relevant information so that a quality inspection checklist can be created and displayed in the API system. Next, the thermal image data acquired by the laser scanner are uploaded to the BIM.
Figure 12b shows how the thermal images of six tiles are uploaded into the BIM using the “load work data” button.
Figure 12c shows a color pattern in the BIM model. If one object turns red, it needs to be checked because the thermal image indicates a low level of adhesion. This process can be operated by clicking the “load data” button.
Figure 12d shows how to use the “send message” button to request a rework of the target element. The message box provides the relevant information regarding the rework request.
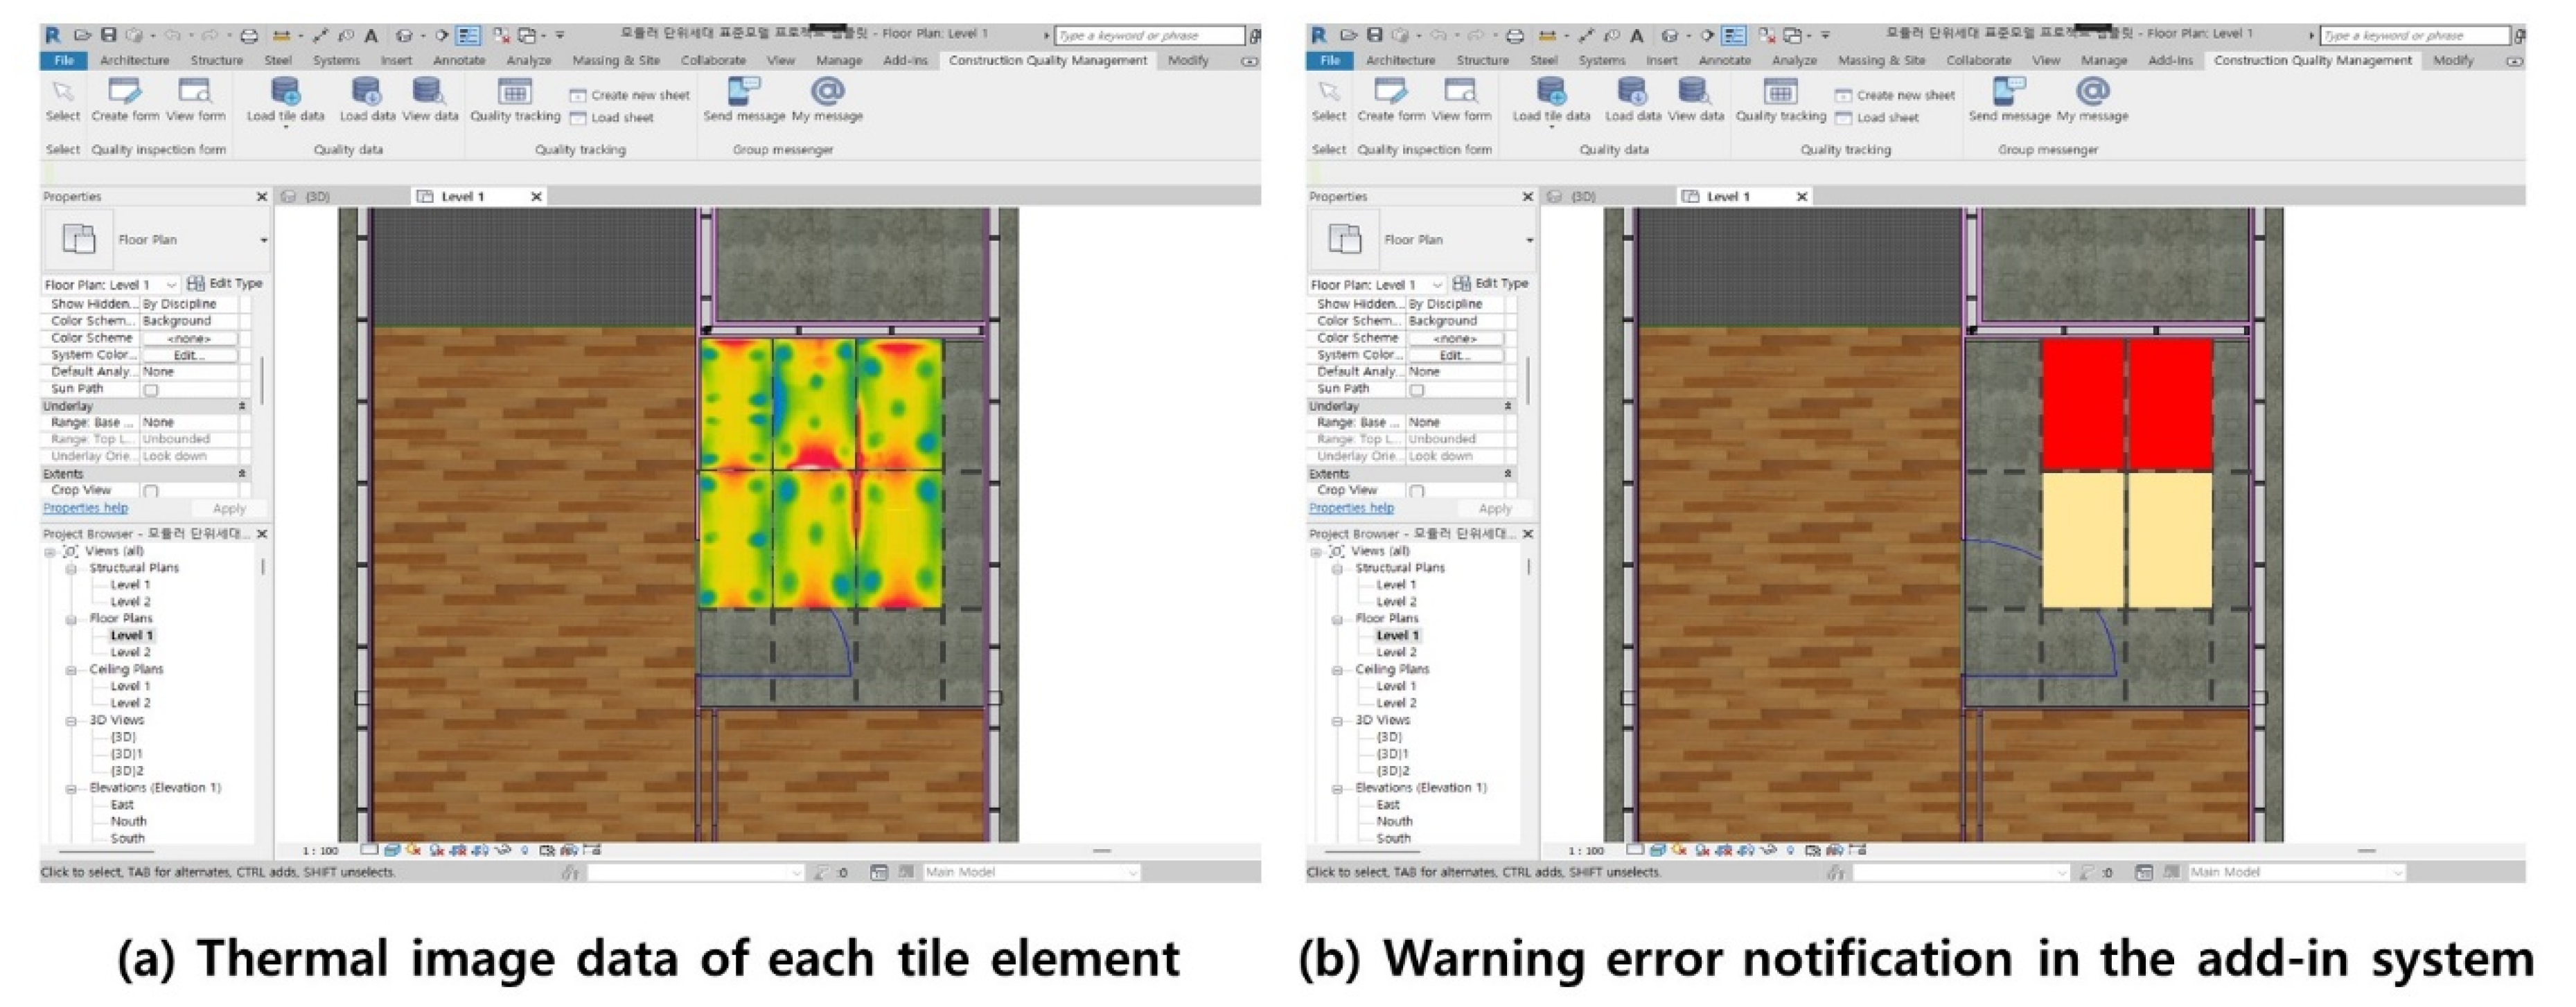
Figure 13 depicts how the system matches the thermal image with the BIM. As seen in
Figure 13, the low-quality inspection object has turned red. The system successfully indicates the rework area in the BIM, and the inspection was conducted using the smart devices.
Figure 13a shows the appearance of the individual thermal image of tile work. The color representation of the API system is provided in
Figure 13b. To perform the corrective action, red is assigned to the BIM object. Yellow is assigned where no further action is required.
6.2. System Validation with an Expert Survey
In Phase III of this study, project participants investigated the proposed system in terms of its practical applicability. To verify the effectiveness of the new process, the case study was established using an API system. An expert survey was conducted to validate the system. The survey was administered to industry practitioners using a 5-point Likert scale (1: strongly disagree, 2: disagree, 3: moderate, 4: agree, 5: strongly agree) from 26 September 2022 to 5 October 2022. Ten experts responded to the survey.
The survey results with the questionnaire items are provided in
Table 3. The scores indicate an average score of ten responses. The results reveal that the respondents strongly agreed that the system is advantageous in terms of functionality, efficiency, applicability and usability, with an average score of 4.45. It is expected that the new quality inspection model using the API system has a significant positive effect when applied practically. In their feedback, the experts pointed out that the “quality tracking” menu needed to be relocated because of its low hierarchy in the system. In addition, they requested the provision of motivation for the worker’s participation in the system.
Based on the survey results, the authors verified that the proposed process and the API system can improve the conventional quality inspection practice using smart devices. However, to maximize the benefit, the industry needs to train and educate construction workers on smart technologies. In addition, the system can be more powerful when it is linked with the existing software to expedite the user’s convenience.
7. Conclusions
This study provides a new method for the construction inspection process with the help of innovative technologies. The proposed method was further developed using a computerized system embedded in the BIM software. By identifying the issues with the current quality inspection process and providing an alternative solution method, this study proposed a new quality inspection process model that evolves as a result of the application of smart technologies. Compared to the conventional method, the new process can reduce simple and repetitive inspection work that causes low efficiency in the construction process. By proactively converting the quality inspection process with the application of smart technologies, both quality and productivity can be improved due to a digitalized inspection process. To effectively apply the proposed process, a BIM-based quality inspection API system was programmed. The step-by-step inspection process was analyzed and incorporated into the system via a new control panel of RevitTM. The case study was applied and the expert survey effectively verified the applicability of the new API system. According to the survey results, the answerers strongly agreed that the system proposed in this study has advantages, with an average score of 4.45. Checking the feedback on the items with lower scores than other survey items, it is not because of factors that directly affect the inspection task, which is the focus of this study.
In this research, the usefulness and industrial applicability of the construction quality inspection system were proven. From an academic perspective, this research proposed a new quality inspection process with smart technologies. The API system contributes to filling the lack of knowledge about smart construction management, which is one of the important factors hindering the application of other innovative technologies in the construction domain. From the industry side, the authors solved a number of problems in manual inspection practice in terms of accuracy and productivity. The proposed system can facilitate the adoption of smart technologies for quality inspection. This study, ultimately, transforms the conventional quality inspection process into a more reliable and productive practice through auto-detection and accuracy enhancement in quality measurement. In addition, the case study is significant in that it demonstrates the practical viability of the system.
Although this research proposes a smart quality inspection process, the construction type is limited to tile work and the smart technology is limited to a laser scanner. The case study of the proposed system is also limited to a particular process of tile work. In addition, the use of the smart device is restricted to obtaining a thermal image. In future research, a variety of data, i.e., 3D point cloud, RGB image and multi-spectral images, needs to be used in maximizing the benefit of new technologies. In addition, as in various studies investigated through the literature review, other smart technologies, i.e., augmented reality (AR), unmanned aerial system (UAS) and internet of things (IoT) sensors, are also applicable in current construction quality inspection practice [
35,
36,
37,
38]. Expansion to the overall construction industry can be expected by conducting additional research on effectively processing the data acquired through each advanced technology and applying it to the system developed in this study.
The system proposed in this study contributes to improvements in work efficiency of inspectors and supervisors, who are the main subjects in the existing inspection. However, this research has a limitation in that the additional work load is not fully analyzed. Second, as mentioned in the previous section, it is necessary to pre-educate workers, who are the main subjects in the system in terms of how to use the smart devices in the proposed system. Furthermore, it is required to propose an improved smart quality inspection system in consideration of the level of workers’ capability. In conclusion, however, this study contributes to expediting the paradigm shift in traditional practice by proposing a novel inspection process in the construction industry.
Author Contributions
Conceptualization, H.-J.S. and H.-S.C.; methodology, H.-J.S. and H.-S.C.; software, H.-J.S.; validation, H.-J.S. and H.-S.C.; formal analysis, H.-S.C.; investigation, H.-J.S.; resources, H.-J.S.; data curation, H.-J.S.; writing—original draft preparation, H.-J.S.; writing—review and editing, H.-S.C.; visualization, H.-J.S. and H.-S.C.; supervision, H.-S.C.; project administration, H.-J.S.; funding acquisition, H.-S.C. All authors have read and agreed to the published version of the manuscript.
Funding
This research was supported by the Korea Agency for Infrastructure Technology Advancement (KAIA), grant funded by the Ministry of Land, Infrastructure and Transport (Grant 22ORPS-B158109-03).
Institutional Review Board Statement
Not applicable.
Informed Consent Statement
Not applicable.
Data Availability Statement
Not applicable.
Conflicts of Interest
The authors declare no conflict of interest.
References
- Xu, L.D.; Xu, E.L.; Li, L. Industry 4.0: State of the art and future trends. Int. J. Prod. Res. 2018, 56, 2941–2962. [Google Scholar] [CrossRef]
- Hofmann, E.; Rüsch, M. Industry 4.0 and the current status as well as future prospects on logistics. Comput. Ind. 2017, 89, 23–34. [Google Scholar] [CrossRef]
- Cohen, Y.; Naseraldin, H.; Chaudhuri, A.; Pilati, F. Assembly systems in Industry 4.0 era: A road map to understand Assembly 4.0. Int. J. Adv. Manuf. Technol. 2019, 105, 4037–4054. [Google Scholar] [CrossRef]
- Lasi, H.; Fettke, P.; Kemper, H.-G.; Feld, T.; Hoffmann, M. Industry 4.0. Bus. Inf. Syst. Eng. 2014, 6, 239–242. [Google Scholar] [CrossRef]
- Bilal, M.; Oyedele, L.O.; Qadir, J.; Munir, K.; Ajayi, S.O.; Akinade, O.O.; Owolabi, H.A.; Alaka, H.A.; Pasha, M. Big Data in the construction industry: A review of present status, opportunities, and future trends. Adv. Eng. Inform. 2016, 30, 500–521. [Google Scholar] [CrossRef]
- Marino, E.; Barbieri, L.; Colacino, B.; Fleri, A.K.; Bruno, F. An Augmented Reality inspection tool to support workers in Industry 4.0 environments. Comput. Ind. 2021, 127, 103412. [Google Scholar] [CrossRef]
- Kim, M.-K.; Cheng, J.C.; Sohn, H.; Chang, C.-C. A framework for dimensional and surface quality assessment of precast concrete elements using BIM and 3D laser scanning. Autom. Constr. 2015, 49, 225–238. [Google Scholar] [CrossRef]
- Chen, L.; Luo, H. A BIM-based construction quality management model and its applications. Autom. Constr. 2014, 46, 64–73. [Google Scholar] [CrossRef]
- Sawhney, A.; Riley, M.; Irizarry, J.; Riley, M. Construction 4.0; Sawhney, A., Riley, M., Irizarry, J., Eds.; Routledge: Oxfordshire, UK, 2020. [Google Scholar]
- Ma, X.; Xiong, F.; Olawumi, T.O.; Dong, N.; Chan, A.P.C. Conceptual Framework and Roadmap Approach for Integrating BIM into Lifecycle Project Management. J. Manag. Eng. 2018, 34, 05018011. [Google Scholar] [CrossRef]
- Azhar, S.; Brown, J. BIM for Sustainability Analyses. Int. J. Constr. Educ. Res. 2009, 5, 276–292. [Google Scholar] [CrossRef]
- Eadie, R.; Browne, M.; Odeyinka, H.; McKeown, C.; McNiff, S. BIM implementation throughout the UK construction project lifecycle: An analysis. Autom. Constr. 2013, 36, 145–151. [Google Scholar] [CrossRef]
- Romero, D.; Stahre, J.; Wuest, T.; Noran, O.; Bernus, P.; Fast-Berglund, Å.; Gorecky, D. Towards an operator 4.0 typology: A human-centric perspective on the fourth industrial revolution technologies. In Proceedings of the International Conference on Computers and Industrial Engineering (CIE46), Tianjin, China, 29–31 October 2016; pp. 29–31. [Google Scholar]
- May, K.W.; Kc, C.; Ochoa, J.J.; Gu, N.; Walsh, J.; Smith, R.T.; Thomas, B.H. The Identification, Development, and Evaluation of BIM-ARDM: A BIM-Based AR Defect Management System for Construction Inspections. Buildings 2022, 12, 140. [Google Scholar] [CrossRef]
- Manzoor, B.; Othman, I.; Gardezi, S.; Altan, H.; Abdalla, S. BIM-Based Research Framework for Sustainable Building Projects: A Strategy for Mitigating BIM Implementation Barriers. Appl. Sci. 2021, 11, 5397. [Google Scholar] [CrossRef]
- Liu, S.; Xie, B.; Tivendale, L.; Liu, C. Critical Barriers to BIM Implementation in the AEC Industry. Int. J. Mark. Stud. 2015, 7, 162. [Google Scholar] [CrossRef]
- Sun, C.; Jiang, S.; Skibniewski, M.J.; Man, Q.; Shen, L. A literature review of the factors limiting the application of BIM in the construction industry. Technol. Econ. Dev. Econ. 2017, 23, 764–779. [Google Scholar] [CrossRef]
- Jin, K.H.; Lee, K.S.; Park, H.P.; Lee, D.H.; Ko, H.A.; Kang, G.W. A Study on the Direction of Monitoring and Regulation Improvement to Activate Smart Construction Technology; KICT 2019-203; Korea Institute of Construction Technology: Goyang, Republic of Korea, 2019; p. 17. [Google Scholar]
- Ratajczak, J.; Schweigkofler, A.; Riedl, M.; Matt, D.T. Augmented reality combined with location-based management system to improve the construction process, quality control and information flow. In Advances in Informatics and Computing in Civil and Construction Engineering; Springer: Cham, Switzerland, 2019; pp. 289–296. [Google Scholar] [CrossRef]
- Sheng, D.; Ding, L.; Zhong, B.; Love, P.E.; Luo, H.; Chen, J. Construction quality information management with blockchains. Autom. Constr. 2020, 120, 103373. [Google Scholar] [CrossRef]
- Tan, Y.; Li, G.; Cai, R.; Ma, J.; Wang, M. Mapping and modelling defect data from UAV captured images to BIM for building external wall inspection. Autom. Constr. 2022, 139, 104284. [Google Scholar] [CrossRef]
- Wójcik, B.; Żarski, M. The measurements of surface defect area with an RGB-D camera for a BIM-backed bridge inspection. Bull. Pol. Acad. Sci. Tech. Sci. 2021, 69, e137123. [Google Scholar] [CrossRef]
- Eiris, R.; Gheisari, M.; Esmaeili, B. PARS: Using Augmented 360-Degree Panoramas of Reality for Construction Safety Training. Int. J. Environ. Res. Public Health 2018, 15, 2452. [Google Scholar] [CrossRef]
- Carrasco, M.D.O.; Chen, P.-H. Application of mixed reality for improving architectural design comprehension effectiveness. Autom. Constr. 2021, 126, 103677. [Google Scholar] [CrossRef]
- Aryan, A.; Bosché, F.; Tang, P. Planning for terrestrial laser scanning in construction: A review. Autom. Constr. 2021, 125, 103551. [Google Scholar] [CrossRef]
- Sigalov, K.; König, M. Recognition of process patterns for BIM-based construction schedules. Adv. Eng. Informatics 2017, 33, 456–472. [Google Scholar] [CrossRef]
- Zou, Y.; Kiviniemi, A.; Jones, S.W. A review of risk management through BIM and BIM-related technologies. Saf. Sci. 2017, 97, 88–98. [Google Scholar] [CrossRef]
- Ratajczak, J.; Riedl, M.; Matt, D.T. BIM-based and AR Application Combined with Location-Based Management System for the Improvement of the Construction Performance. Buildings 2019, 9, 118. [Google Scholar] [CrossRef]
- Tran, H.; Nguyen, T.N.; Christopher, P.; Bui, D.-K.; Khoshelham, K.; Ngo, T.D. A digital twin approach for geometric quality assessment of as-built prefabricated façades. J. Build. Eng. 2021, 41, 102377. [Google Scholar] [CrossRef]
- Hamledari, H.; Sajedi, S.; McCabe, B.; Fischer, M. Automation of Inspection Mission Planning Using 4D BIMs and in Support of Unmanned Aerial Vehicle–Based Data Collection. J. Constr. Eng. Manag. 2021, 147, 04020179. [Google Scholar] [CrossRef]
- Zhang, S.; Teizer, J.; Pradhananga, N.; Eastman, C.M. Workforce location tracking to model, visualize and analyze workspace requirements in building information models for construction safety planning. Autom. Constr. 2015, 60, 74–86. [Google Scholar] [CrossRef]
- Wang, Z.; Hu, H.; Zhou, W. RFID Enabled Knowledge-Based Precast Construction Supply Chain. Comput. Aided Civ. Infrastruct. Eng. 2017, 32, 499–514. [Google Scholar] [CrossRef]
- Du, J.; Shi, Y.; Zou, Z.; Zhao, D. CoVR: Cloud-Based Multiuser Virtual Reality Headset System for Project Communication of Remote Users. J. Constr. Eng. Manag. 2018, 144, 04017109. [Google Scholar] [CrossRef]
- Kim, M.-K.; Wang, Q.; Park, J.-W.; Cheng, J.C.; Sohn, H.; Chang, C.-C. Automated dimensional quality assurance of full-scale precast concrete elements using laser scanning and BIM. Autom. Constr. 2016, 72, 102–114. [Google Scholar] [CrossRef]
- Golparvar-Fard, M.; Peña-Mora, F.; Savarese, S. Automated Progress Monitoring Using Unordered Daily Construction Photographs and IFC-Based Building Information Models. J. Comput. Civ. Eng. 2015, 29, 04014025. [Google Scholar] [CrossRef]
- Kim, S.; Kim, S.; Lee, D.-E. Sustainable Application of Hybrid Point Cloud and BIM Method for Tracking Construction Progress. Sustainability 2020, 12, 4106. [Google Scholar] [CrossRef]
- Kwon, O.-S.; Park, C.-S.; Lim, C.-R. A defect management system for reinforced concrete work utilizing BIM, image-matching and augmented reality. Autom. Constr. 2014, 46, 74–81. [Google Scholar] [CrossRef]
- Ma, Z.; Cai, S.; Mao, N.; Yang, Q.; Feng, J.; Wang, P. Construction quality management based on a collaborative system using BIM and indoor positioning. Autom. Constr. 2018, 92, 35–45. [Google Scholar] [CrossRef]
- Park, C.-S.; Lee, D.-Y.; Kwon, O.-S.; Wang, X. A framework for proactive construction defect management using BIM, augmented reality and ontology-based data collection template. Autom. Constr. 2013, 33, 61–71. [Google Scholar] [CrossRef]
- Faraji, A.; Rashidi, M.; Agha, T.M.H.; Rahnamayiezekavat, P.; Samali, B. Quality Management Framework for Housing Construction in a Design-Build Project Delivery System: A BIM-UAV Approach. Buildings 2022, 12, 554. [Google Scholar] [CrossRef]
- Kim, Y.S.; Oh, S.W.; Cho, Y.K.; Seo, J.W. A PDA and wireless web-integrated system for quality inspection and defect management of apartment housing projects. Autom. Constr. 2008, 17, 163–179. [Google Scholar] [CrossRef]
- Feng, C.W.; Chen, C.W. Using BIM and MR to improve the process of job site construction and inspection. WIT Trans. Built Environ. 2019, 192, 21–32. [Google Scholar] [CrossRef]
- Hernández, J.L.; Lerones, P.M.; Bonsma, P.; van Delft, A.; Deighton, R.; Braun, J.-D. An IFC Interoperability Framework for Self-Inspection Process in Buildings. Buildings 2018, 8, 32. [Google Scholar] [CrossRef]
- Kim, D.H.; Lee, D.Y.; Lee, H.J.; Min, Y.G.; Park, I.S.; Cho, H.H. Analysis of Importance by Defect Type in Apartment Construction. J. Korea Inst. Build. Constr. (JKIBC) 2020, 20, 357–365. [Google Scholar] [CrossRef]
| Disclaimer/Publisher’s Note: The statements, opinions and data contained in all publications are solely those of the individual author(s) and contributor(s) and not of MDPI and/or the editor(s). MDPI and/or the editor(s) disclaim responsibility for any injury to people or property resulting from any ideas, methods, instructions or products referred to in the content. |
© 2023 by the authors. Licensee MDPI, Basel, Switzerland. This article is an open access article distributed under the terms and conditions of the Creative Commons Attribution (CC BY) license (https://creativecommons.org/licenses/by/4.0/).
