
All-Atom MD Simulations of the HBV Capsid Complexed with AT130 Reveal Secondary and Tertiary Structural Changes and Mechanisms of Allostery


Abstract
1. Introduction
2. Materials and Methods
2.1. Computational Modeling
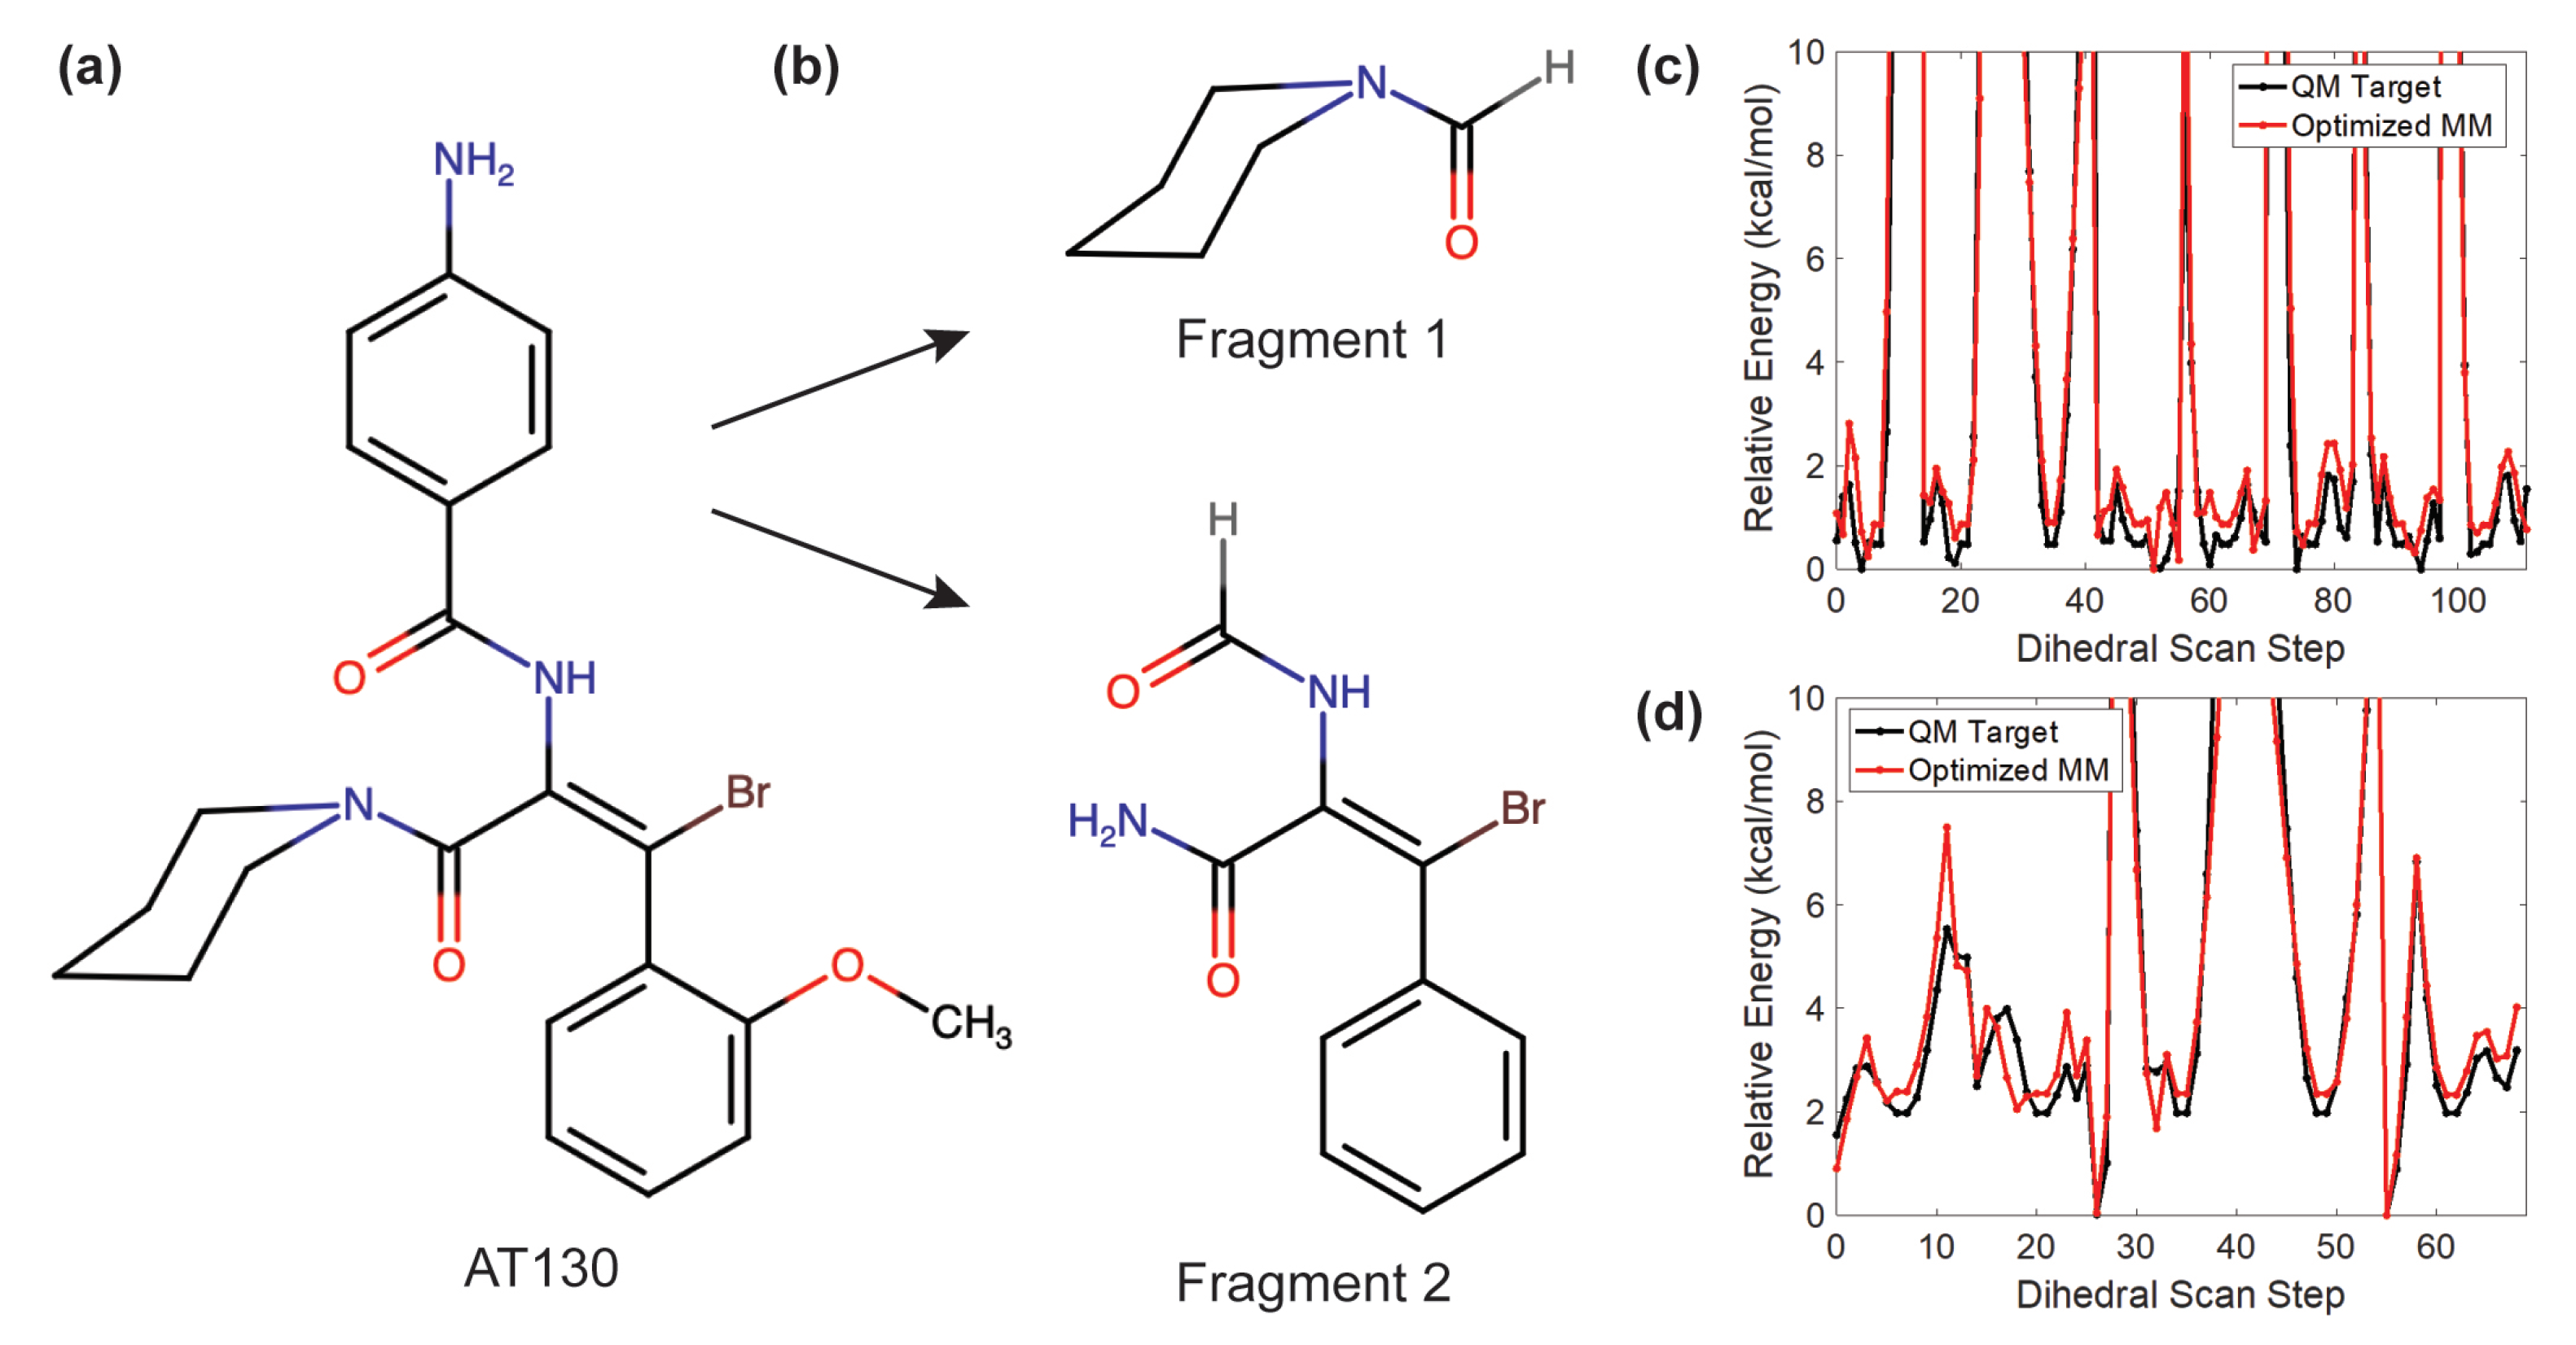
2.2. AT130 Parameterization
2.3. Molecular Dynamics Simulations
2.4. Trajectory Analysis
3. Results
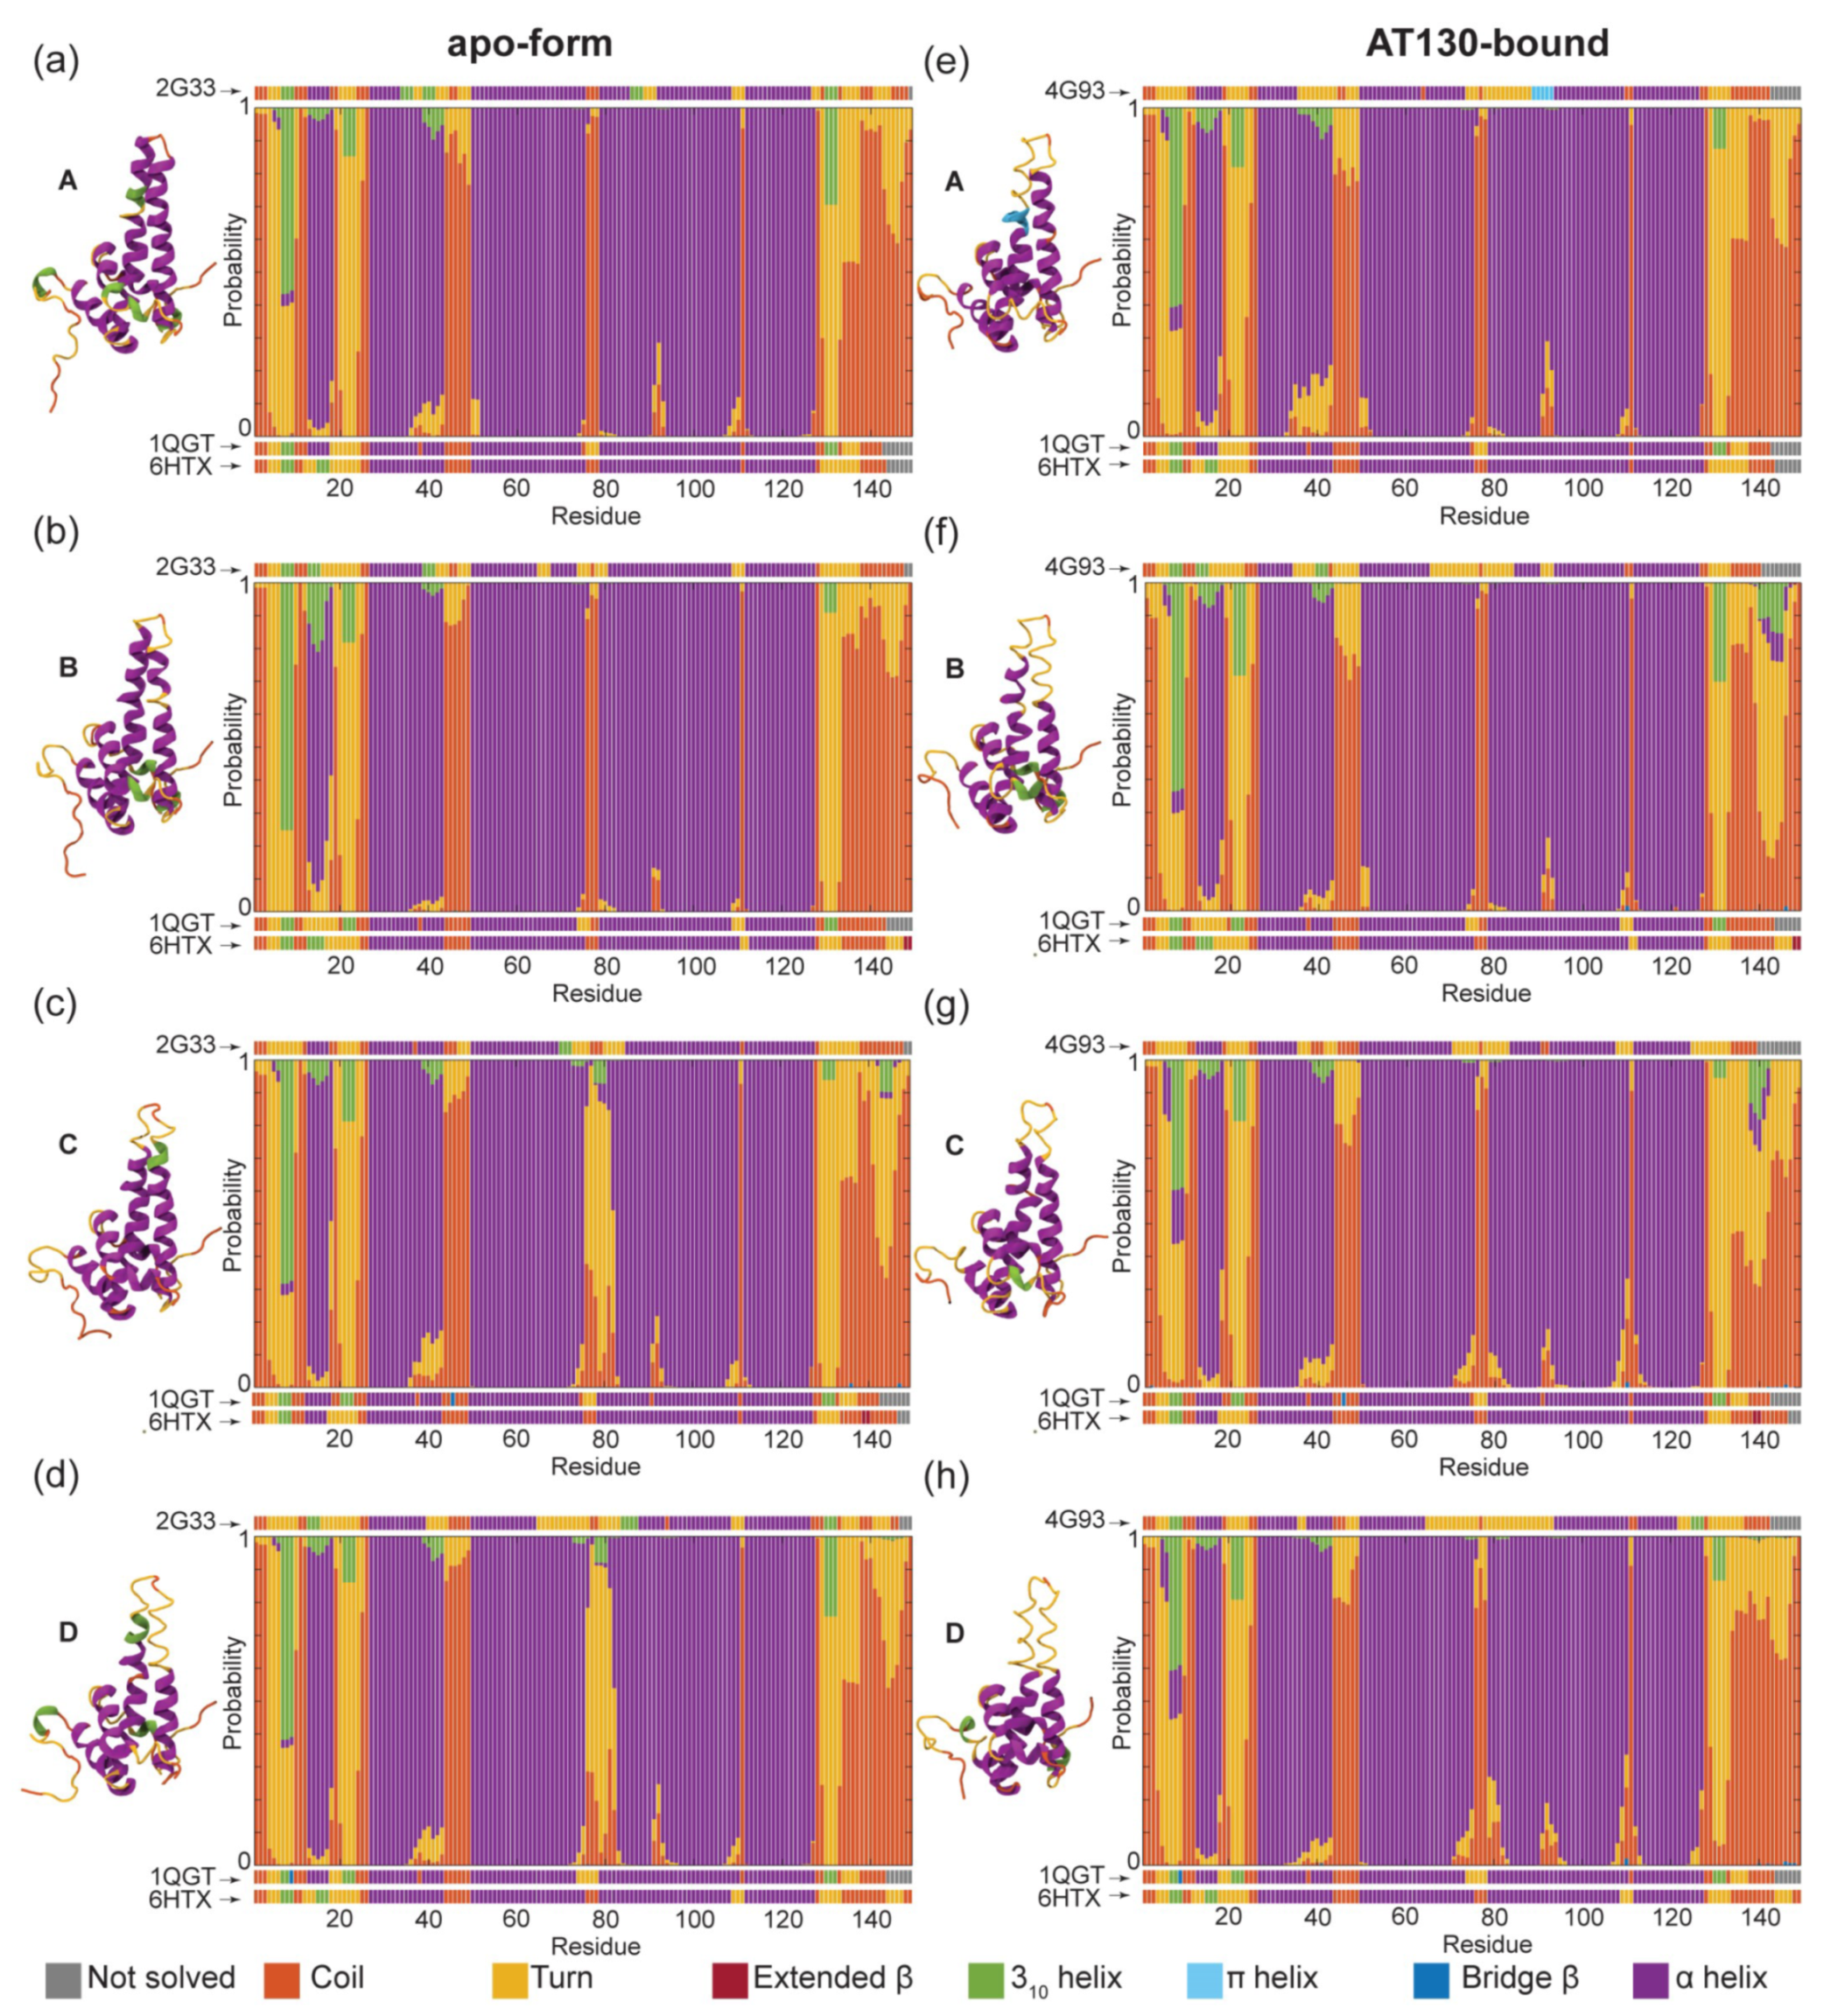
3.1. Secondary Structure Analysis
3.2. Dynamical Network Analysis
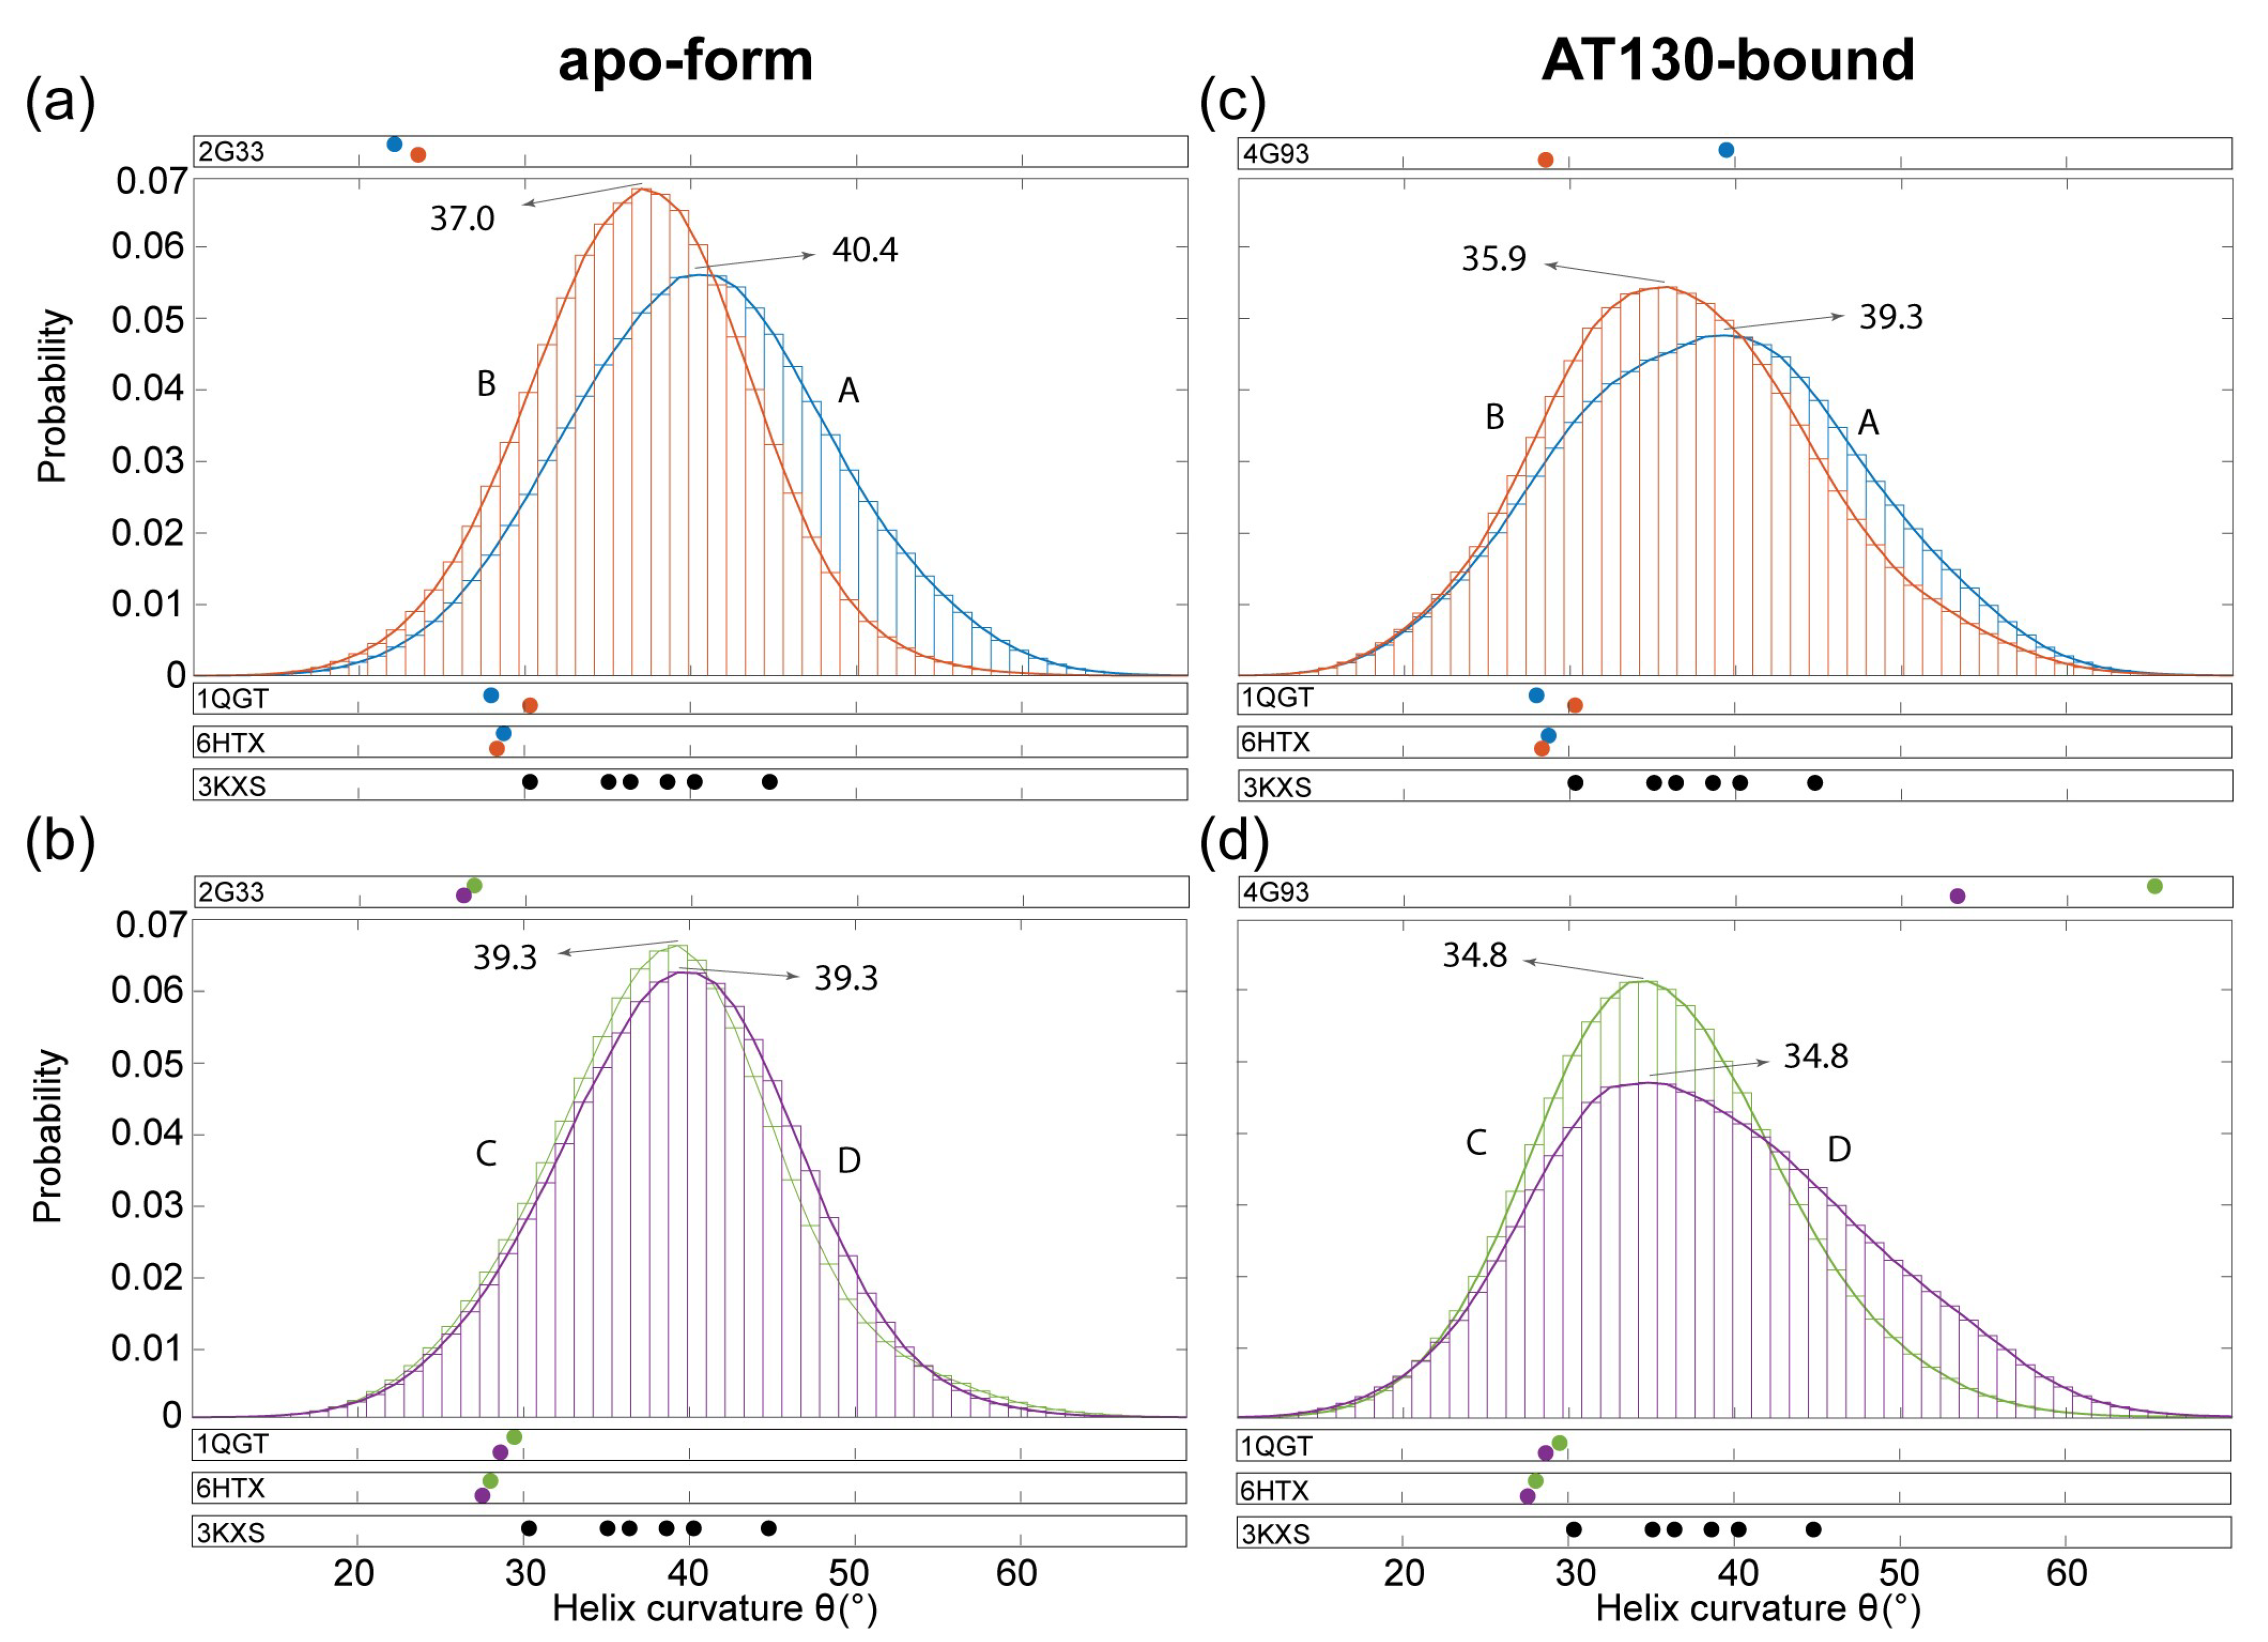
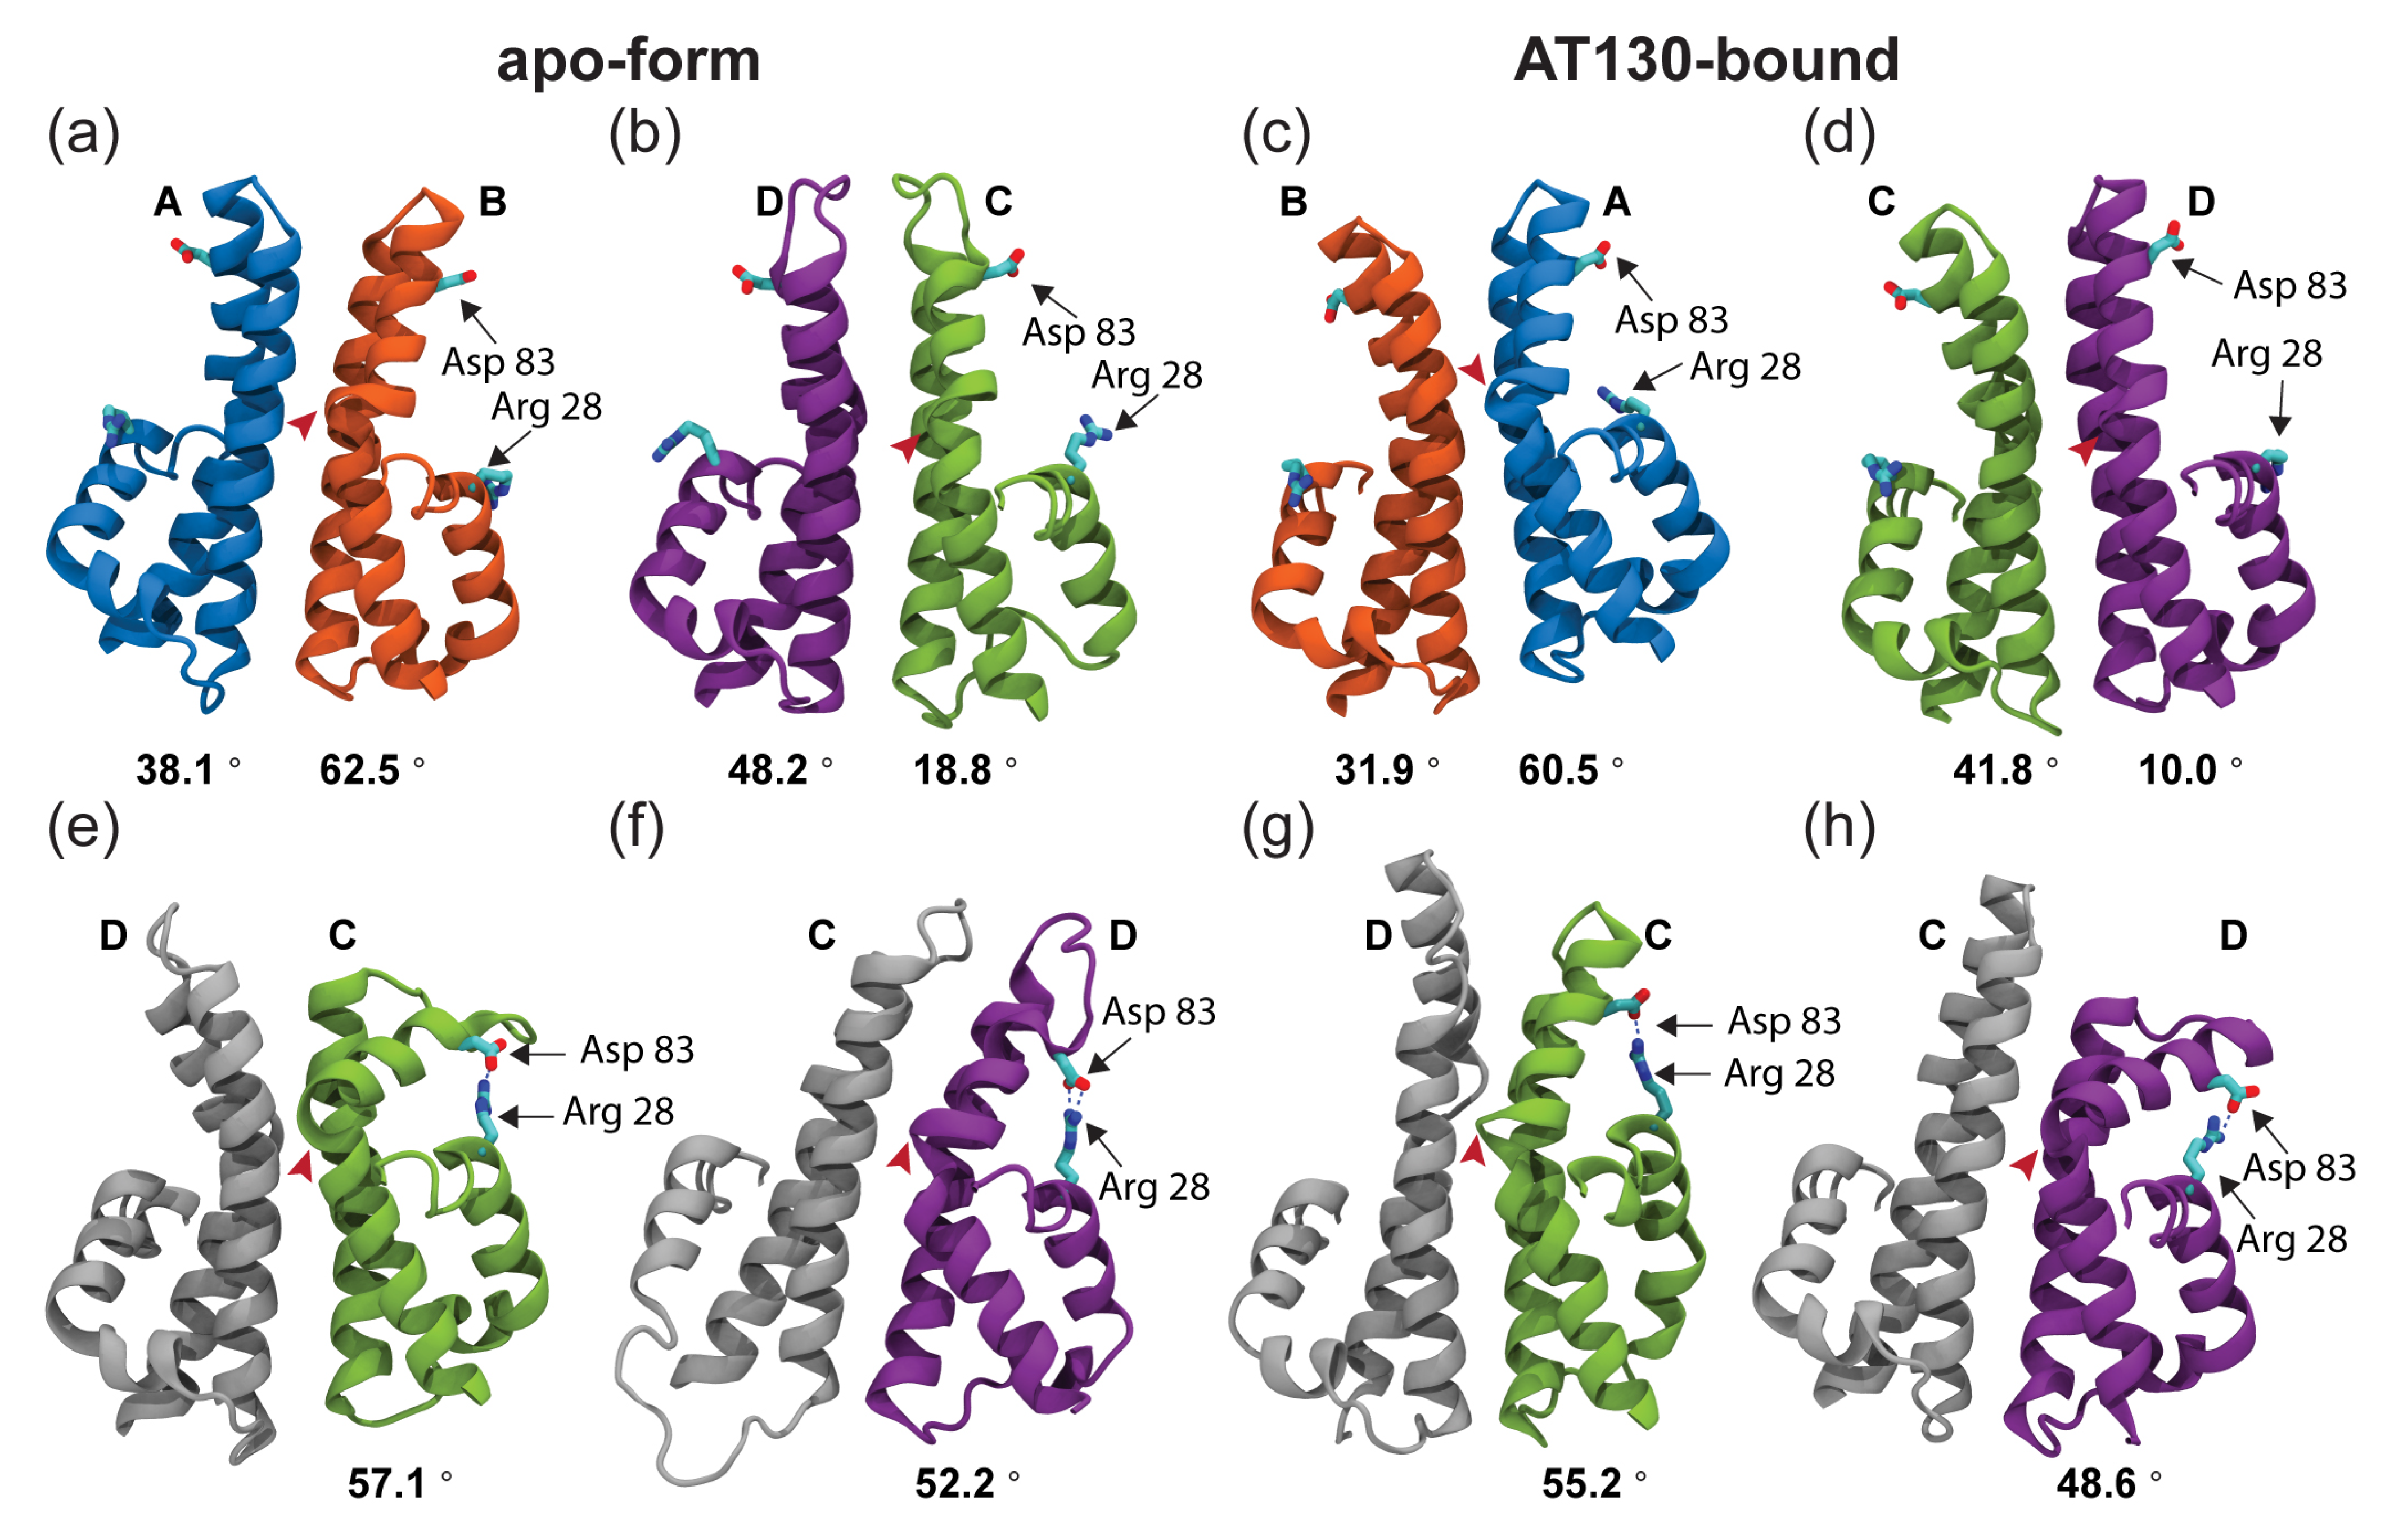
3.3. Hinge Curvature Analysis
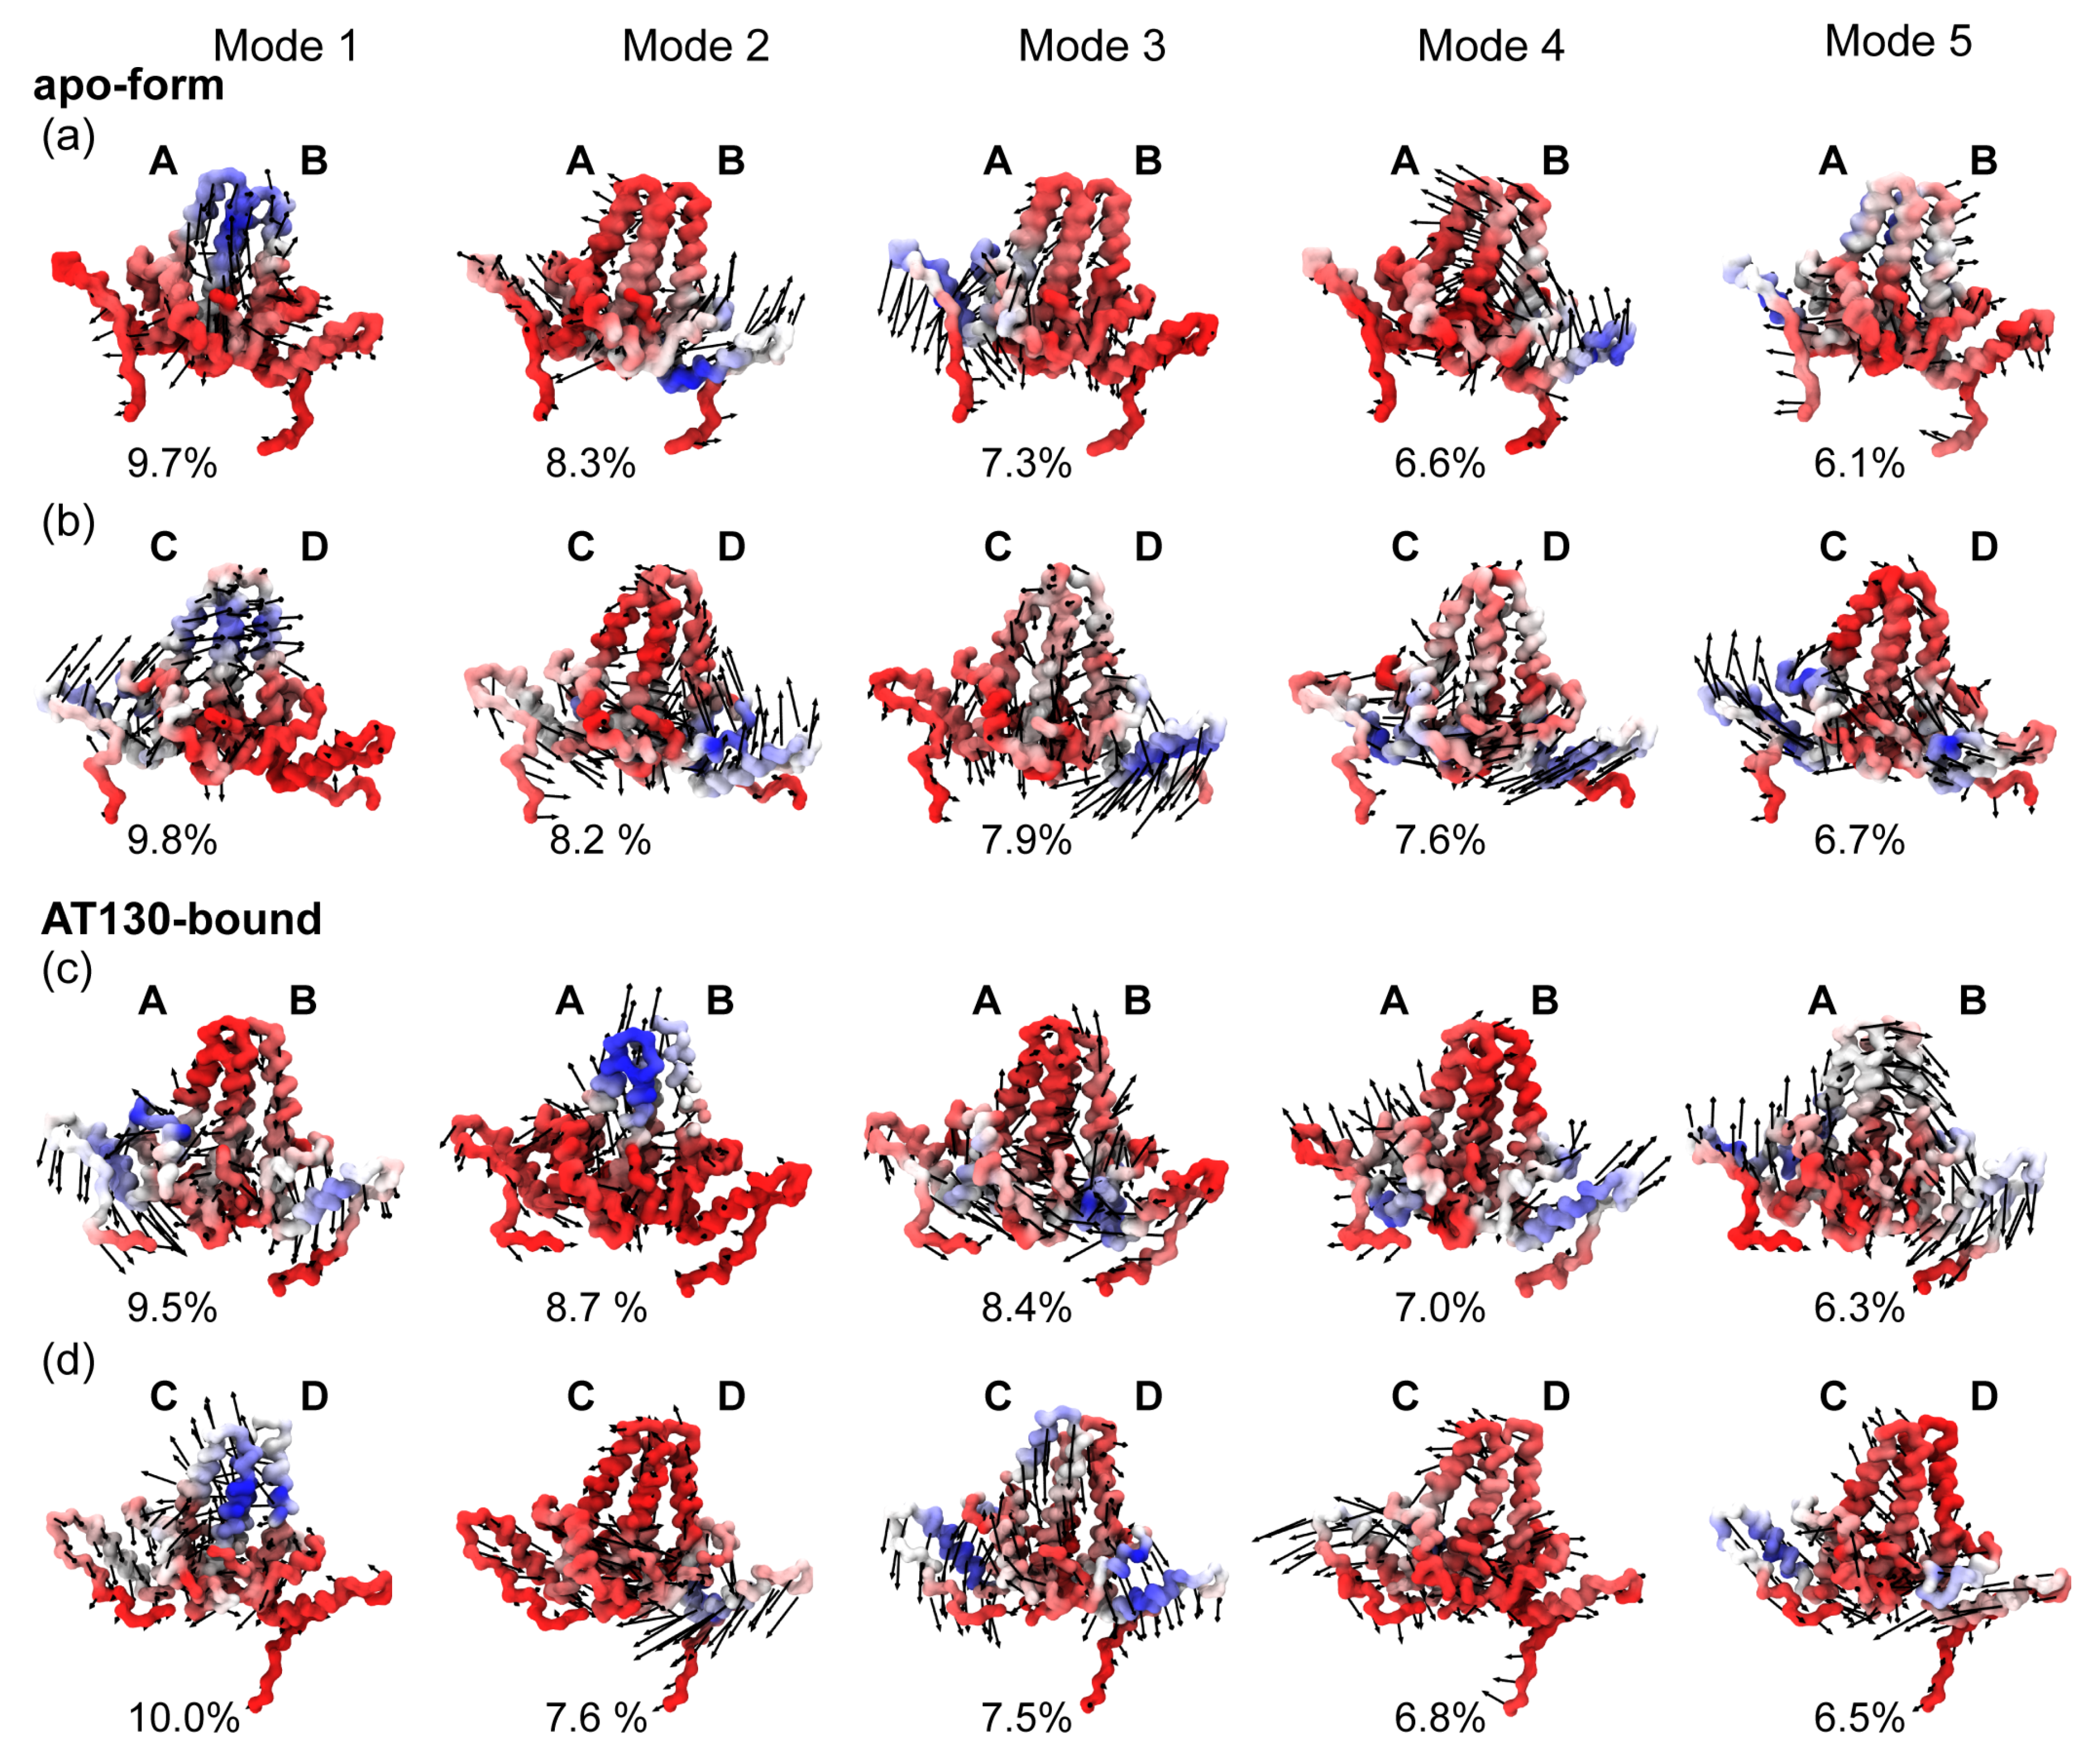
3.4. Principal Component Analysis
4. Discussion
Supplementary Materials
Author Contributions
Funding
Institutional Review Board Statement
Informed Consent Statement
Data Availability Statement
Conflicts of Interest
Abbreviations
| Cp | Core protein |
| Cp149 | Core protein assembly domain, residues 1 to 149 |
| Cp183 | Full-length core protein, residues 1 to 183 |
| CpAM | Core protein allosteric modulator |
| CTD | C-terminal domain |
| HBV | Hepatitis B virus |
| MD | Molecular dynamics |
| PPA | Phenylpropenamide |
| PDB | Protein Data Bank |
| QM | Quantum mechanics |
| RMSIP | Root mean square inner product |
References
- Venkatakrishnan, B.; Zlotnick, A. The structural biology of hepatitis B virus: Form and function. Annu. Rev. Virol. 2016, 3, 429–451. [Google Scholar] [CrossRef]
- Razavi-Shearer, D.; Gamkrelidze, I.; Nguyen, M.H.; Chen, D.S.; Van Damme, P.; Abbas, Z.; Abdulla, M.; Abou Rached, A.; Adda, D.; Aho, I.; et al. Global prevalence, treatment, and prevention of hepatitis B virus infection in 2016: A modelling study. Lancet Gastroenterol. Hepatol. 2018, 3, 383–403. [Google Scholar] [CrossRef]
- World Health Organization. Global Health Sector Strategy on Viral Hepatitis 2016–2021. Towards Ending Viral Hepatitis; Technical Report; World Health Organization: Geneva, Switzerland, 2016. [Google Scholar]
- Wynne, S.; Crowther, R.; Leslie, A. The crystal structure of the human hepatitis B virus capsid. Mol. Cell 1999, 3, 771–780. [Google Scholar] [CrossRef]
- Schlicksup, C.J.; Zlotnick, A. Viral structural proteins as targets for antivirals. Curr. Opin. Virol. 2020, 45, 43–50. [Google Scholar] [CrossRef] [PubMed]
- Perni, R.B.; Conway, S.C.; Ladner, S.K.; Zaifert, K.; Otto, M.J.; King, R.W. Phenylpropenamide derivatives as inhibitors of hepatitis B virus replication. Bioorganic Med. Chem. Lett. 2000, 10, 2687–2690. [Google Scholar] [CrossRef]
- Feld, J.; Colledge, D.; Sozzi, V.; Edwards, R.; Littlejohn, M.; Locarnini, S. The phenylpropenamide derivative AT-130 blocks HBV replication at the level of viral RNA packaging. Antivir. Res. 2007, 76, 168–177. [Google Scholar] [CrossRef]
- Katen, S.P.; Chirapu, S.R.; Finn, M.; Zlotnick, A. Trapping of hepatitis B virus capsid assembly intermediates by phenylpropenamide assembly accelerators. ACS Chem. Biol. 2010, 5, 1125–1136. [Google Scholar] [CrossRef]
- Kondylis, P.; Schlicksup, C.J.; Katen, S.P.; Lee, L.S.; Zlotnick, A.; Jacobson, S.C. Evolution of intermediates during capsid assembly of hepatitis B virus with phenylpropenamide-based antivirals. ACS Infect. Dis. 2019, 5, 769–777. [Google Scholar] [CrossRef]
- Katen, S.P.; Tan, Z.; Chirapu, S.R.; Finn, M.; Zlotnick, A. Assembly-directed antivirals differentially bind quasiequivalent pockets to modify hepatitis B virus capsid tertiary and quaternary structure. Structure 2013, 21, 1406–1416. [Google Scholar] [CrossRef] [PubMed]
- Packianathan, C.; Katen, S.P.; Dann, C.E.; Zlotnick, A. Conformational changes in the hepatitis B virus core protein are consistent with a role for allostery in virus assembly. J. Virol. 2010, 84, 1607–1615. [Google Scholar] [CrossRef]
- Hadden, J.A.; Perilla, J.R.; Schlicksup, C.J.; Venkatakrishnan, B.; Zlotnick, A.; Schulten, K. All-atom molecular dynamics of the HBV capsid reveals insights into biological function and cryo-EM resolution limits. eLife 2018, 7, e32478. [Google Scholar] [CrossRef]
- Hadden, J.A.; Perilla, J.R. All-atom virus simulations. Curr. Opin. Virol. 2018, 31, 82–91. [Google Scholar] [CrossRef]
- Ruan, L.; Hadden, J.A.; Zlotnick, A. Assembly properties of hepatitis B virus core protein mutants correlate with their resistance to assembly-directed antivirals. J. Virol. 2018, 92. [Google Scholar] [CrossRef]
- Perilla, J.R.; Hadden, J.A.; Goh, B.C.; Mayne, C.G.; Schulten, K. All-atom molecular dynamics of virus capsids as drug targets. J. Phys. Chem. Lett. 2016, 7, 1836–1844. [Google Scholar] [CrossRef]
- Zhao, Z.; Wang, J.C.Y.; Segura, C.P.; Hadden-Perilla, J.A.; Zlotnick, A. The integrity of the intradimer interface of the Hepatitis B Virus capsid protein dimer regulates capsid self-assembly. ACS Chem. Biol. 2020, 15, 3124–3132. [Google Scholar] [CrossRef]
- Watanabe, G.; Sato, S.; Iwadate, M.; Umeyama, H.; Hayakawa, M.; Murakami, Y.; Yoneda, S. Molecular dynamics simulations to determine the structure and dynamics of hepatitis B virus capsid bound to a novel anti-viral drug. Chem. Pharm. Bull. 2016, 64, 1393–1396. [Google Scholar] [CrossRef] [PubMed]
- Tu, J.; Li, J.J.; Shan, Z.J.; Zhai, H.L. Exploring the binding mechanism of Heteroaryldihydropyrimidines and Hepatitis B Virus capsid combined 3D-QSAR and molecular dynamics. Antivir. Res. 2017, 137, 151–164. [Google Scholar] [CrossRef] [PubMed]
- Liu, H.; Okazaki, S.; Shinoda, W. Heteroaryldihydropyrimidines alter capsid assembly by adjusting the binding affinity and pattern of the hepatitis B virus core protein. J. Chem. Inf. Model. 2019, 59, 5104–5110. [Google Scholar] [CrossRef]
- Pavlova, A.; Bassit, L.; Cox, B.D.; Korablyov, M.; Chipot, C.; Verma, K.; Russell, O.O.; Schinazi, R.F.; Gumbart, J.C. Mechanism of action of HBV capsid assembly modulators predicted from binding to early assembly intermediates. bioRxiv 2020. [Google Scholar] [CrossRef]
- Qazi, S.; Schlicksup, C.J.; Rittichier, J.; VanNieuwenhze, M.S.; Zlotnick, A. An assembly-activating site in the hepatitis B virus capsid protein can also trigger disassembly. ACS Chem. Biol. 2018, 13, 2114–2120. [Google Scholar] [CrossRef] [PubMed]
- Leaver-Fay, A.; Tyka, M.; Lewis, S.M.; Lange, O.F.; Thompson, J.; Jacak, R.; Kaufman, K.W.; Renfrew, P.D.; Smith, C.A.; Sheffler, W.; et al. ROSETTA3: An object-oriented software suite for the simulation and design of macromolecules. In Methods in Enzymology; Elsevier: Amsterdam, The Netherlands, 2011; Volume 487, pp. 545–574. [Google Scholar]
- Goh, B.C.; Perilla, J.R.; England, M.R.; Heyrana, K.J.; Craven, R.C.; Schulten, K. Atomic modeling of an immature retroviral lattice using molecular dynamics and mutagenesis. Structure 2015, 23, 1414–1425. [Google Scholar] [CrossRef]
- Dolinsky, T.J.; Czodrowski, P.; Li, H.; Nielsen, J.E.; Jensen, J.H.; Klebe, G.; Baker, N.A. PDB2PQR: Expanding and upgrading automated preparation of biomolecular structures for molecular simulations. Nucleic Acids Res. 2007, 35, W522–W525. [Google Scholar] [CrossRef]
- Humphrey, W.; Dalke, A.; Schulten, K. VMD: Visual Molecular Dynamics. J. Mol. Graph. 1996, 14, 33–38. [Google Scholar] [CrossRef]
- Jorgensen, W.L.; Chandrasekhar, J.; Madura, J.D.; Impey, R.W.; Klein, M.L. Comparison of simple potential functions for simulating liquid water. J. Chem. Phys. 1983, 79, 926–935. [Google Scholar] [CrossRef]
- Best, R.B.; Zhu, X.; Shim, J.; Lopes, P.E.; Mittal, J.; Feig, M.; MacKerell, A.D., Jr. Optimization of the additive CHARMM all-atom protein force field targeting improved sampling of the backbone ϕ, ψ and side-chain χ1 and χ2 dihedral angles. J. Chem. Theory Comput. 2012, 8, 3257–3273. [Google Scholar] [CrossRef]
- Vanommeslaeghe, K.; Hatcher, E.; Acharya, C.; Kundu, S.; Zhong, S.; Shim, J.; Darian, E.; Guvench, O.; Lopes, P.; Vorobyov, I.; et al. CHARMM general force field: A force field for drug-like molecules compatible with the CHARMM all-atom additive biological force fields. J. Comput. Chem. 2010, 31, 671–690. [Google Scholar] [CrossRef] [PubMed]
- Mayne, C.G.; Saam, J.; Schulten, K.; Tajkhorshid, E.; Gumbart, J.C. Rapid parameterization of small molecules using the force field toolkit. J. Comput. Chem. 2013, 34, 2757–2770. [Google Scholar] [CrossRef]
- Frisch, M.; Trucks, G.; Schlegel, H.; Scuseria, G.; Robb, M.; Cheeseman, J.; Scalmani, G.; Barone, V.; Mennucci, B.; Petersson, G.; et al. Gaussian09; Gaussian, Inc.: Wallingford, CT, USA, 2009. [Google Scholar]
- Pang, Y.T.; Pavlova, A.; Tajkhorshid, E.; Gumbart, J.C. Parameterization of a drug molecule with a halogen σ-hole particle using ffTK: Implementation, testing, and comparison. J. Chem. Phys. 2020, 153, 164104. [Google Scholar] [CrossRef] [PubMed]
- Phillips, J.C.; Braun, R.; Wang, W.; Gumbart, J.; Tajkhorshid, E.; Villa, E.; Chipot, C.; Skeel, R.D.; Kale, L.; Schulten, K. Scalable molecular dynamics with NAMD. J. Comput. Chem. 2005, 26, 1781–1802. [Google Scholar] [CrossRef] [PubMed]
- Bourne, C.R.; Finn, M.; Zlotnick, A. Global structural changes in hepatitis B virus capsids induced by the assembly effector HAP1. J. Virol. 2006, 80, 11055–11061. [Google Scholar] [CrossRef]
- Frishman, D.; Argos, P. Knowledge-based protein secondary structure assignment. Proteins Struct. Funct. Bioinform. 1995, 23, 566–579. [Google Scholar] [CrossRef] [PubMed]
- Eargle, J.; Luthey-Schulten, Z. NetworkView: 3D display and analysis of protein· RNA interaction networks. Bioinformatics 2012, 28, 3000–3001. [Google Scholar] [CrossRef] [PubMed]
- Girvan, M.; Newman, M.E. Community structure in social and biological networks. Proc. Natl. Acad. Sci. USA 2002, 99, 7821–7826. [Google Scholar] [CrossRef]
- Dahl, A.C.E.; Chavent, M.; Sansom, M.S. Bendix: Intuitive helix geometry analysis and abstraction. Bioinformatics 2012, 28, 2193–2194. [Google Scholar] [CrossRef] [PubMed]
- Perilla, J.R.; Schulten, K. Physical properties of the HIV-1 capsid from all-atom molecular dynamics simulations. Nat. Commun. 2017, 8, 1–10. [Google Scholar] [CrossRef]
- Bakan, A.; Meireles, L.M.; Bahar, I. ProDy: Protein dynamics inferred from theory and experiments. Bioinformatics 2011, 27, 1575–1577. [Google Scholar] [CrossRef]
- David, C.C.; Jacobs, D.J. Characterizing protein motions from structure. J. Mol. Graph. Model. 2011, 31, 41–56. [Google Scholar] [CrossRef]
- Martín-García, F.; Papaleo, E.; Gomez-Puertas, P.; Boomsma, W.; Lindorff-Larsen, K. Comparing molecular dynamics force fields in the essential subspace. PLoS ONE 2015, 10, e0121114. [Google Scholar] [CrossRef]
- Böttcher, B.; Nassal, M. Structure of mutant hepatitis B core protein capsids with premature secretion phenotype. J. Mol. Biol. 2018, 430, 4941–4954. [Google Scholar] [CrossRef] [PubMed]
- Feher, V.A.; Durrant, J.D.; Van Wart, A.T.; Amaro, R.E. Computational approaches to mapping allosteric pathways. Curr. Opin. Struct. Biol. 2014, 25, 98–103. [Google Scholar] [CrossRef]
- Zhao, Z.; Wang, J.C.Y.; Gonzalez-Gutierrez, G.; Venkatakrishnan, B.; Asor, R.; Khaykelson, D.; Raviv, U.; Zlotnick, A. Structural differences between the woodchuck hepatitis virus core protein in the dimer and capsid states are consistent with entropic and conformational regulation of assembly. J. Virol. 2019, 93. [Google Scholar] [CrossRef]
- Watts, N.R.; Conway, J.F.; Cheng, N.; Stahl, S.J.; Belnap, D.M.; Steven, A.C.; Wingfield, P.T. The morphogenic linker peptide of HBV capsid protein forms a mobile array on the interior surface. EMBO J. 2002, 21, 876–884. [Google Scholar] [CrossRef]
- Hilmer, J.K.; Zlotnick, A.; Bothner, B. Conformational equilibria and rates of localized motion within hepatitis B virus capsids. J. Mol. Biol. 2008, 375, 581–594. [Google Scholar] [CrossRef]
- Hess, B. Convergence of sampling in protein simulations. Phys. Rev. E 2002, 65, 031910. [Google Scholar] [CrossRef]
- Amadei, A.; Ceruso, M.A.; Di Nola, A. On the convergence of the conformational coordinates basis set obtained by the essential dynamics analysis of proteins’ molecular dynamics simulations. Proteins Struct. Funct. Bioinform. 1999, 36, 419–424. [Google Scholar] [CrossRef]
- Venkatakrishnan, B.; Katen, S.P.; Francis, S.; Chirapu, S.; Finn, M.; Zlotnick, A. Hepatitis B virus capsids have diverse structural responses to small-molecule ligands bound to the heteroaryldihydropyrimidine pocket. J. Virol. 2016, 90, 3994–4004. [Google Scholar] [CrossRef] [PubMed]
- Patterson, A.; Zhao, Z.; Waymire, E.; Zlotnick, A.; Bothner, B. Dynamics of Hepatitis B virus capsid protein dimer regulate assembly through an allosteric network. ACS Chem. Biol. 2020, 15, 2273–2280. [Google Scholar] [CrossRef] [PubMed]
- Bereszczak, J.Z.; Watts, N.R.; Wingfield, P.T.; Steven, A.C.; Heck, A.J. Assessment of differences in the conformational flexibility of hepatitis B virus core-antigen and e-antigen by hydrogen deuterium exchange-mass spectrometry. Protein Sci. 2014, 23, 884–896. [Google Scholar] [CrossRef] [PubMed]
- Altschul, S.F.; Gish, W.; Miller, W.; Myers, E.W.; Lipman, D.J. Basic local alignment search tool. J. Mol. Biol. 1990, 215, 403–410. [Google Scholar] [CrossRef]
- Selzer, L.; Katen, S.P.; Zlotnick, A. The hepatitis B virus core protein intradimer interface modulates capsid assembly and stability. Biochemistry 2014, 53, 5496–5504. [Google Scholar] [CrossRef]
- Ceres, P.; Stray, S.J.; Zlotnick, A. Hepatitis B virus capsid assembly is enhanced by naturally occurring mutation F97L. J. Virol. 2004, 78, 9538–9543. [Google Scholar] [CrossRef] [PubMed]


| Apo-Form Capsid | AT130-Bound Capsid |
|---|---|
| AB capsid-incorporated dimer | AB capsid-incorporated dimer |
| CD capsid-incorporated dimer | CD capsid-incorporated dimer |
| Observed Community | Associated Sub-Domains |
|---|---|
| Helix 1,5 | interdimer interface, all or part of fulcrum or helix 4b |
| Helix 2–3a | chassis, all or part of fulcrum or helix 4b |
| Helix 3b-4a | intradimer interface, spike tip |
Publisher’s Note: MDPI stays neutral with regard to jurisdictional claims in published maps and institutional affiliations. |
© 2021 by the authors. Licensee MDPI, Basel, Switzerland. This article is an open access article distributed under the terms and conditions of the Creative Commons Attribution (CC BY) license (http://creativecommons.org/licenses/by/4.0/).
Share and Cite
Pérez-Segura, C.; Goh, B.C.; Hadden-Perilla, J.A. All-Atom MD Simulations of the HBV Capsid Complexed with AT130 Reveal Secondary and Tertiary Structural Changes and Mechanisms of Allostery. Viruses 2021, 13, 564. https://doi.org/10.3390/v13040564
Pérez-Segura C, Goh BC, Hadden-Perilla JA. All-Atom MD Simulations of the HBV Capsid Complexed with AT130 Reveal Secondary and Tertiary Structural Changes and Mechanisms of Allostery. Viruses. 2021; 13(4):564. https://doi.org/10.3390/v13040564
Chicago/Turabian StylePérez-Segura, Carolina, Boon Chong Goh, and Jodi A. Hadden-Perilla. 2021. "All-Atom MD Simulations of the HBV Capsid Complexed with AT130 Reveal Secondary and Tertiary Structural Changes and Mechanisms of Allostery" Viruses 13, no. 4: 564. https://doi.org/10.3390/v13040564
APA StylePérez-Segura, C., Goh, B. C., & Hadden-Perilla, J. A. (2021). All-Atom MD Simulations of the HBV Capsid Complexed with AT130 Reveal Secondary and Tertiary Structural Changes and Mechanisms of Allostery. Viruses, 13(4), 564. https://doi.org/10.3390/v13040564