Characterising Through-Thickness Shear Anisotropy Using the Double-Bridge Shear Test and Finite Element Model Updating
Abstract
1. Introduction
2. Materials and Methods
2.1. Yld2004-18p Model
2.2. Chemical Composition and Microstructure of AW5754-H22
2.3. Out-of-Plane Shear Test Specimens
2.4. Measurement of Shear Response
2.4.1. Test Setup and Loading Procedure
2.4.2. Optical Setup and DIC System
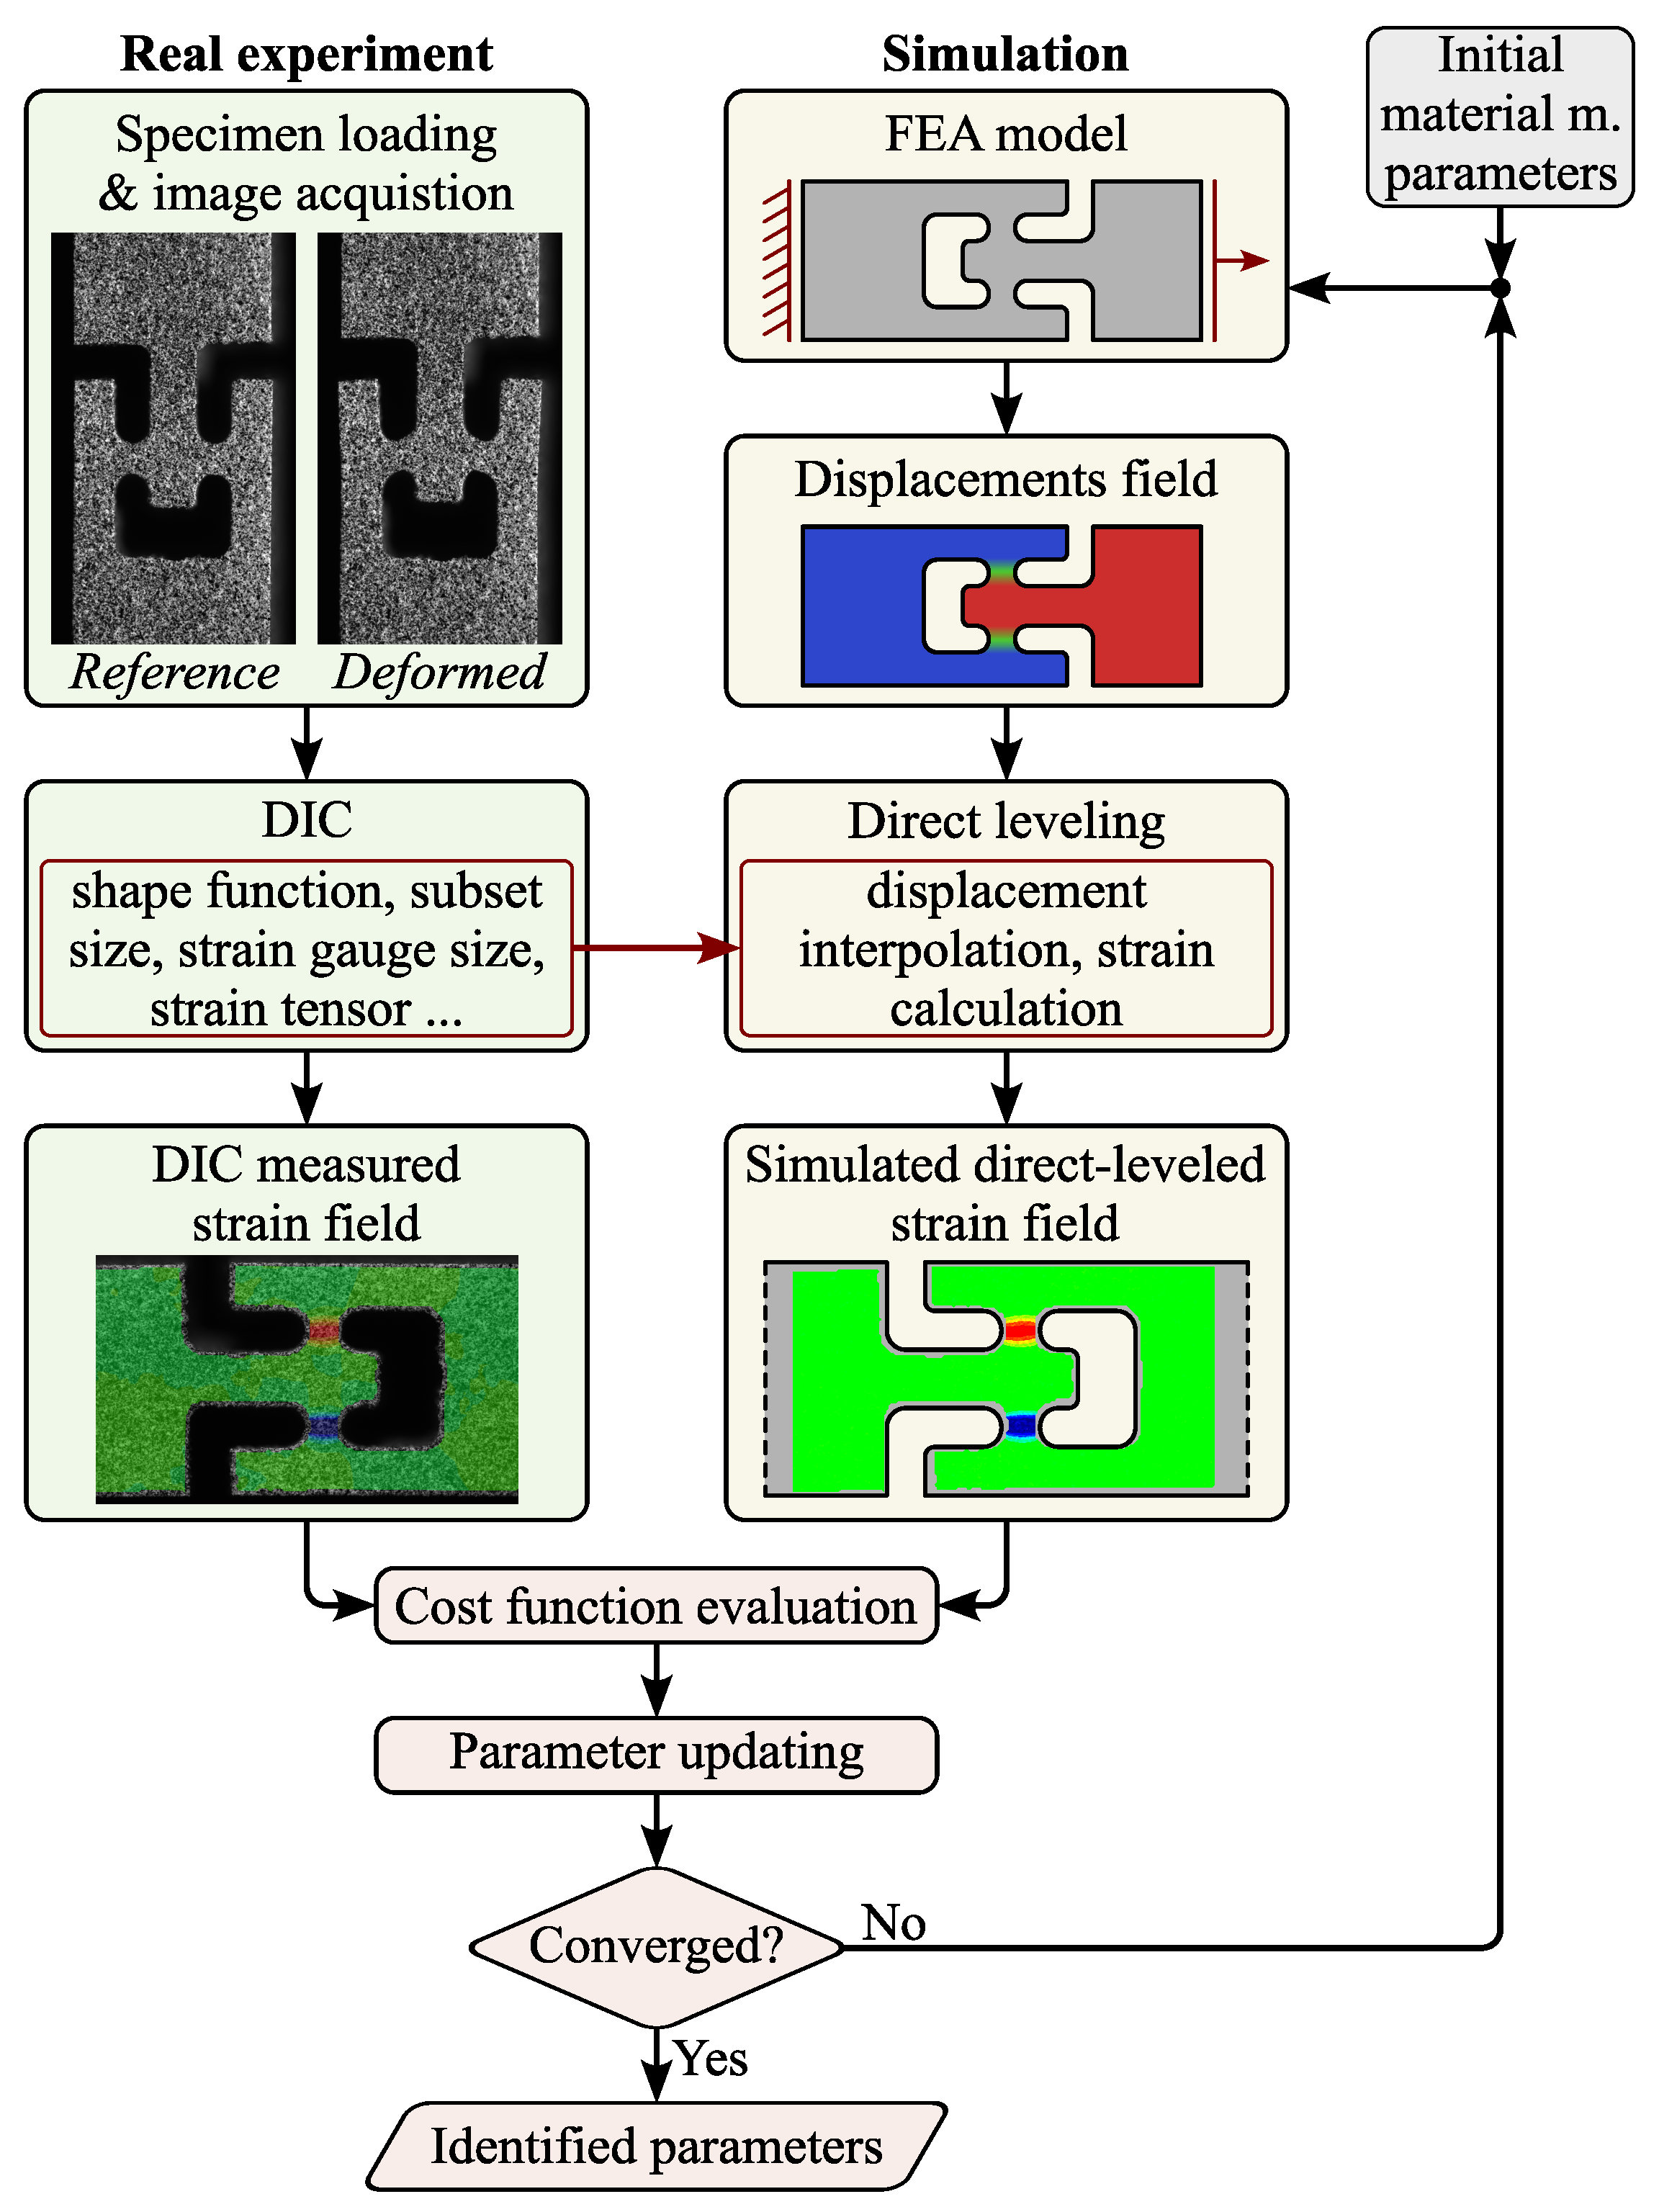
2.5. Direct-Levelling-Based Finite Element Model Updating
Cost Function and Parameter Updating
3. Results
3.1. Virtual Experimentation
3.2. The Measured Shear Response
3.3. Calibration of Out-of-Plane Anisotropy
4. Discussion
5. Conclusions
- Compared to existing specimen designs, the proposed shape leverages the advantages of double-bridge shear testing, increasing the sensitivity of the measured response to perturbations in out-of-plane shear parameters.
- The consistent geometry of the shear detail across all sheet orientations allows for direct comparison of shear responses in different material planes.
- The influence of specimen manufacturing precision on measurement accuracy was thoroughly investigated. Wire electrical discharge machined specimens were analysed for key dimensional features, and the actual geometry was incorporated into the identification process. Among the evaluated error sources, eccentric loading—inducing front-to-back bending—was found to have the most significant impact, leading to distorted surface strain measurements.
- The testing procedure employs a high-resolution 2D-DIC setup, incorporating a 5 MPx camera with a telecentric lens and annular light source. The strain field is measured and subsequently processed using subset-based DIC.
- The FEMU inverse identification scheme integrates full-field strain data, enabling independent parameter identification across different material planes.
- –
- A key feature of the identification scheme is the intrinsic consideration of local strain gradients from the FEM analysis, which are directly accounted and levelled using the strain window method. This ensures that the FEM-computed and DIC-processed strains undergo the same DIC post-processing procedure, effectively eliminating systematic error. In contrast, other methods, such as VFM, require spatially converged strain fields.
- –
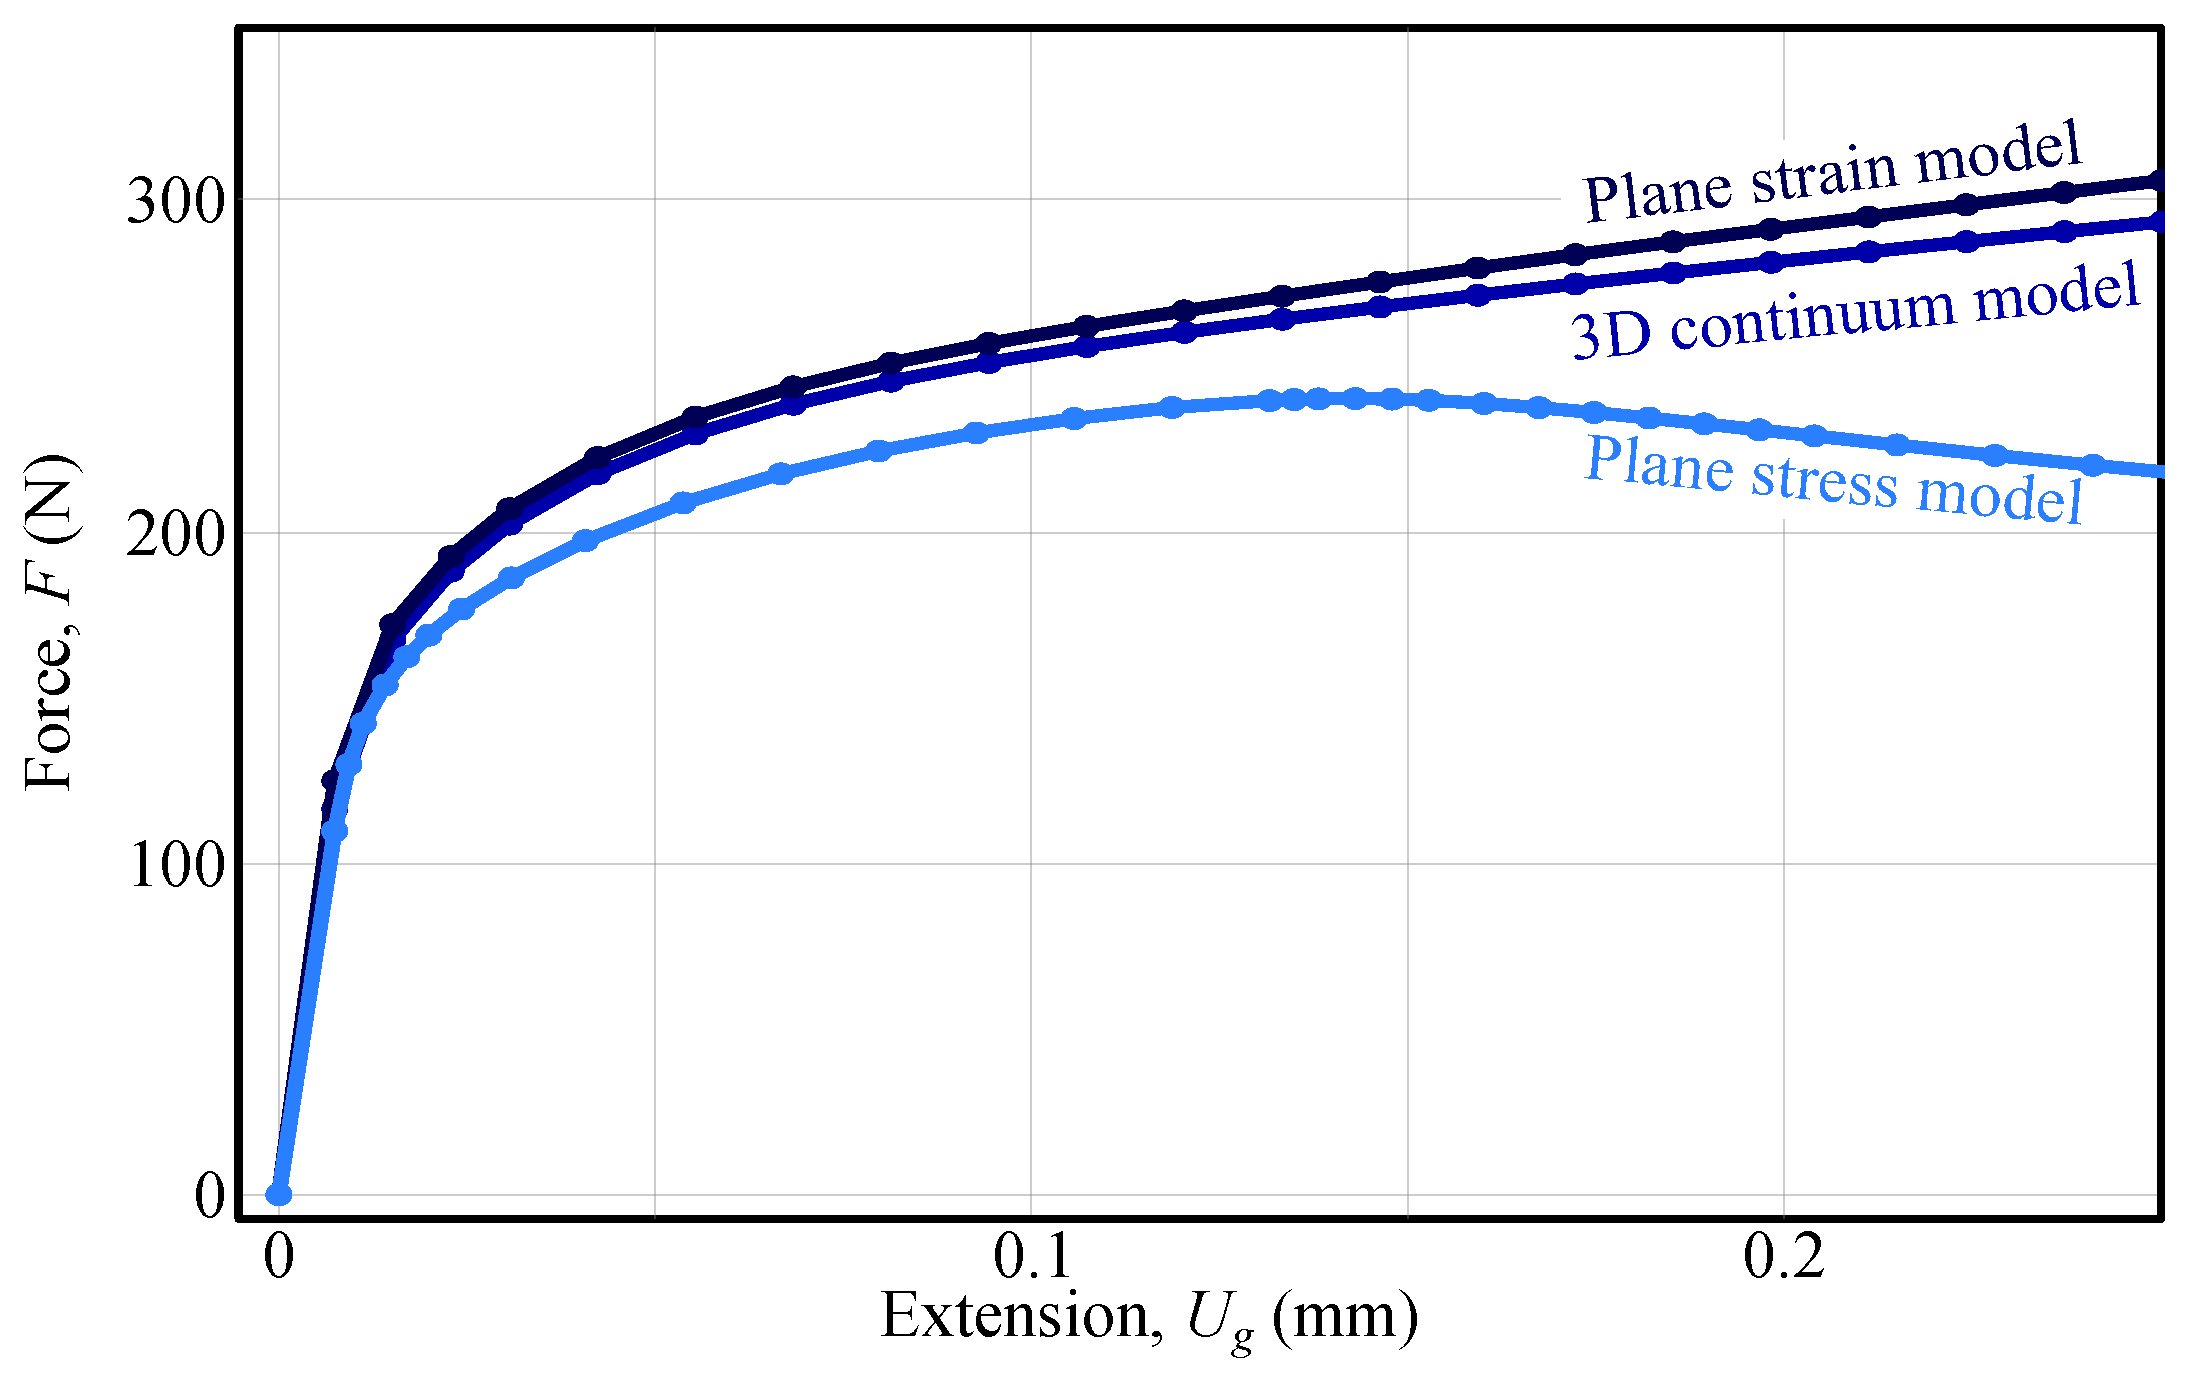
- The FEM model inherently captures critical multiaxial stress–strain behaviour, which is essential for accurate inverse identification. This confirms that the mechanical response cannot be adequately described by either plane stress or plane strain assumptions.
- –
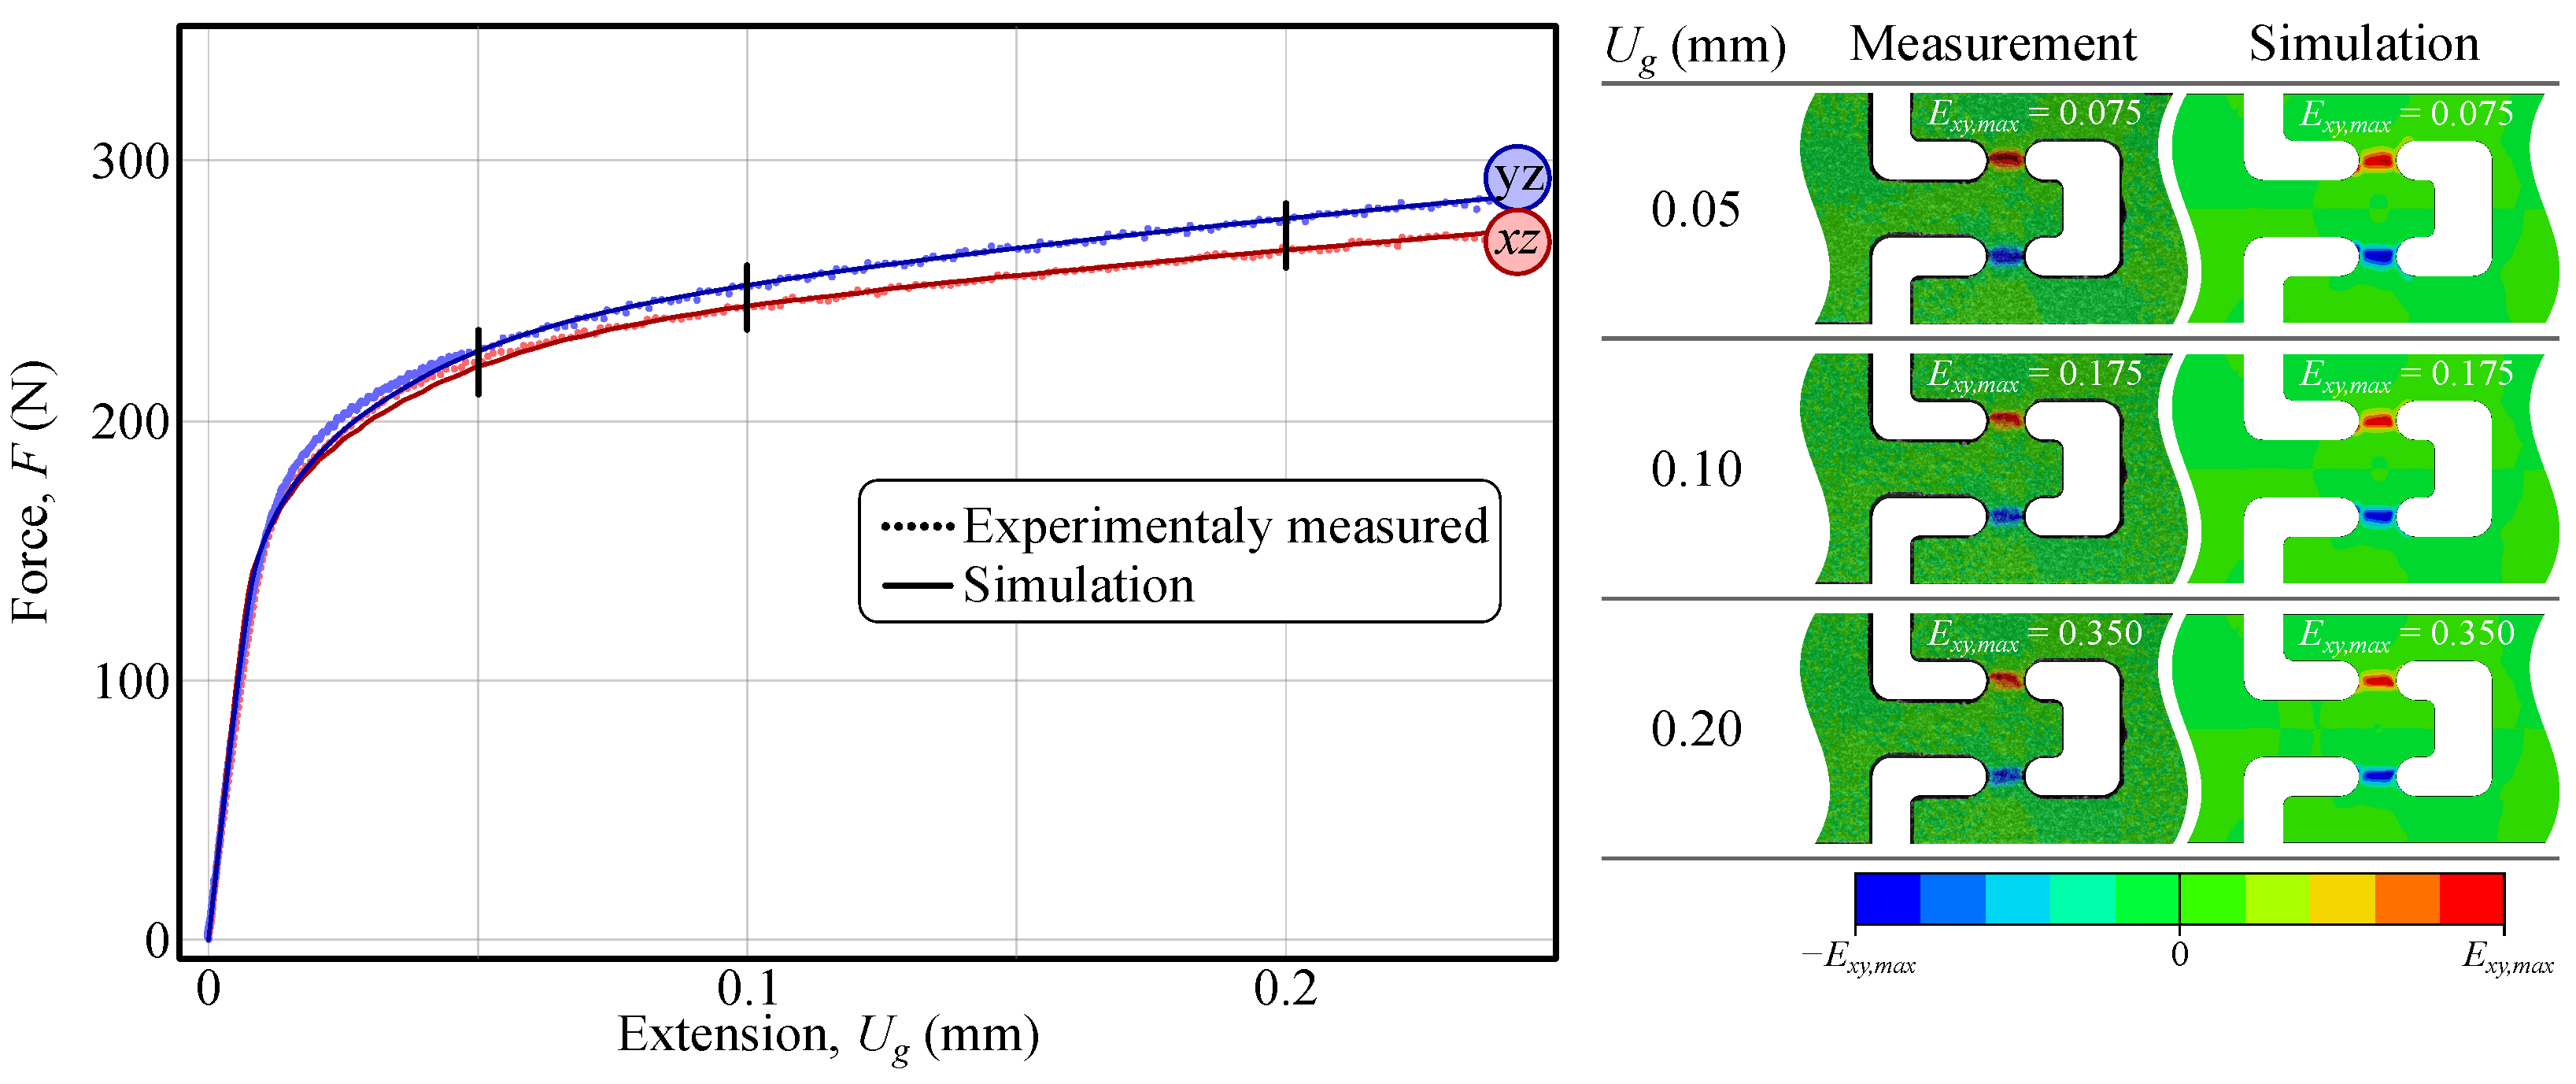
- Incorporating measured strain fields into the FEMU identification framework disproves the hypothesis that the surface strain responses are not representative of the specimen’s global behaviour.
- –
- Parameter values identified using the proposed method are in close agreement with those obtained from traditional force–extension curve-based identification, as demonstrated in Starman et al. [37].
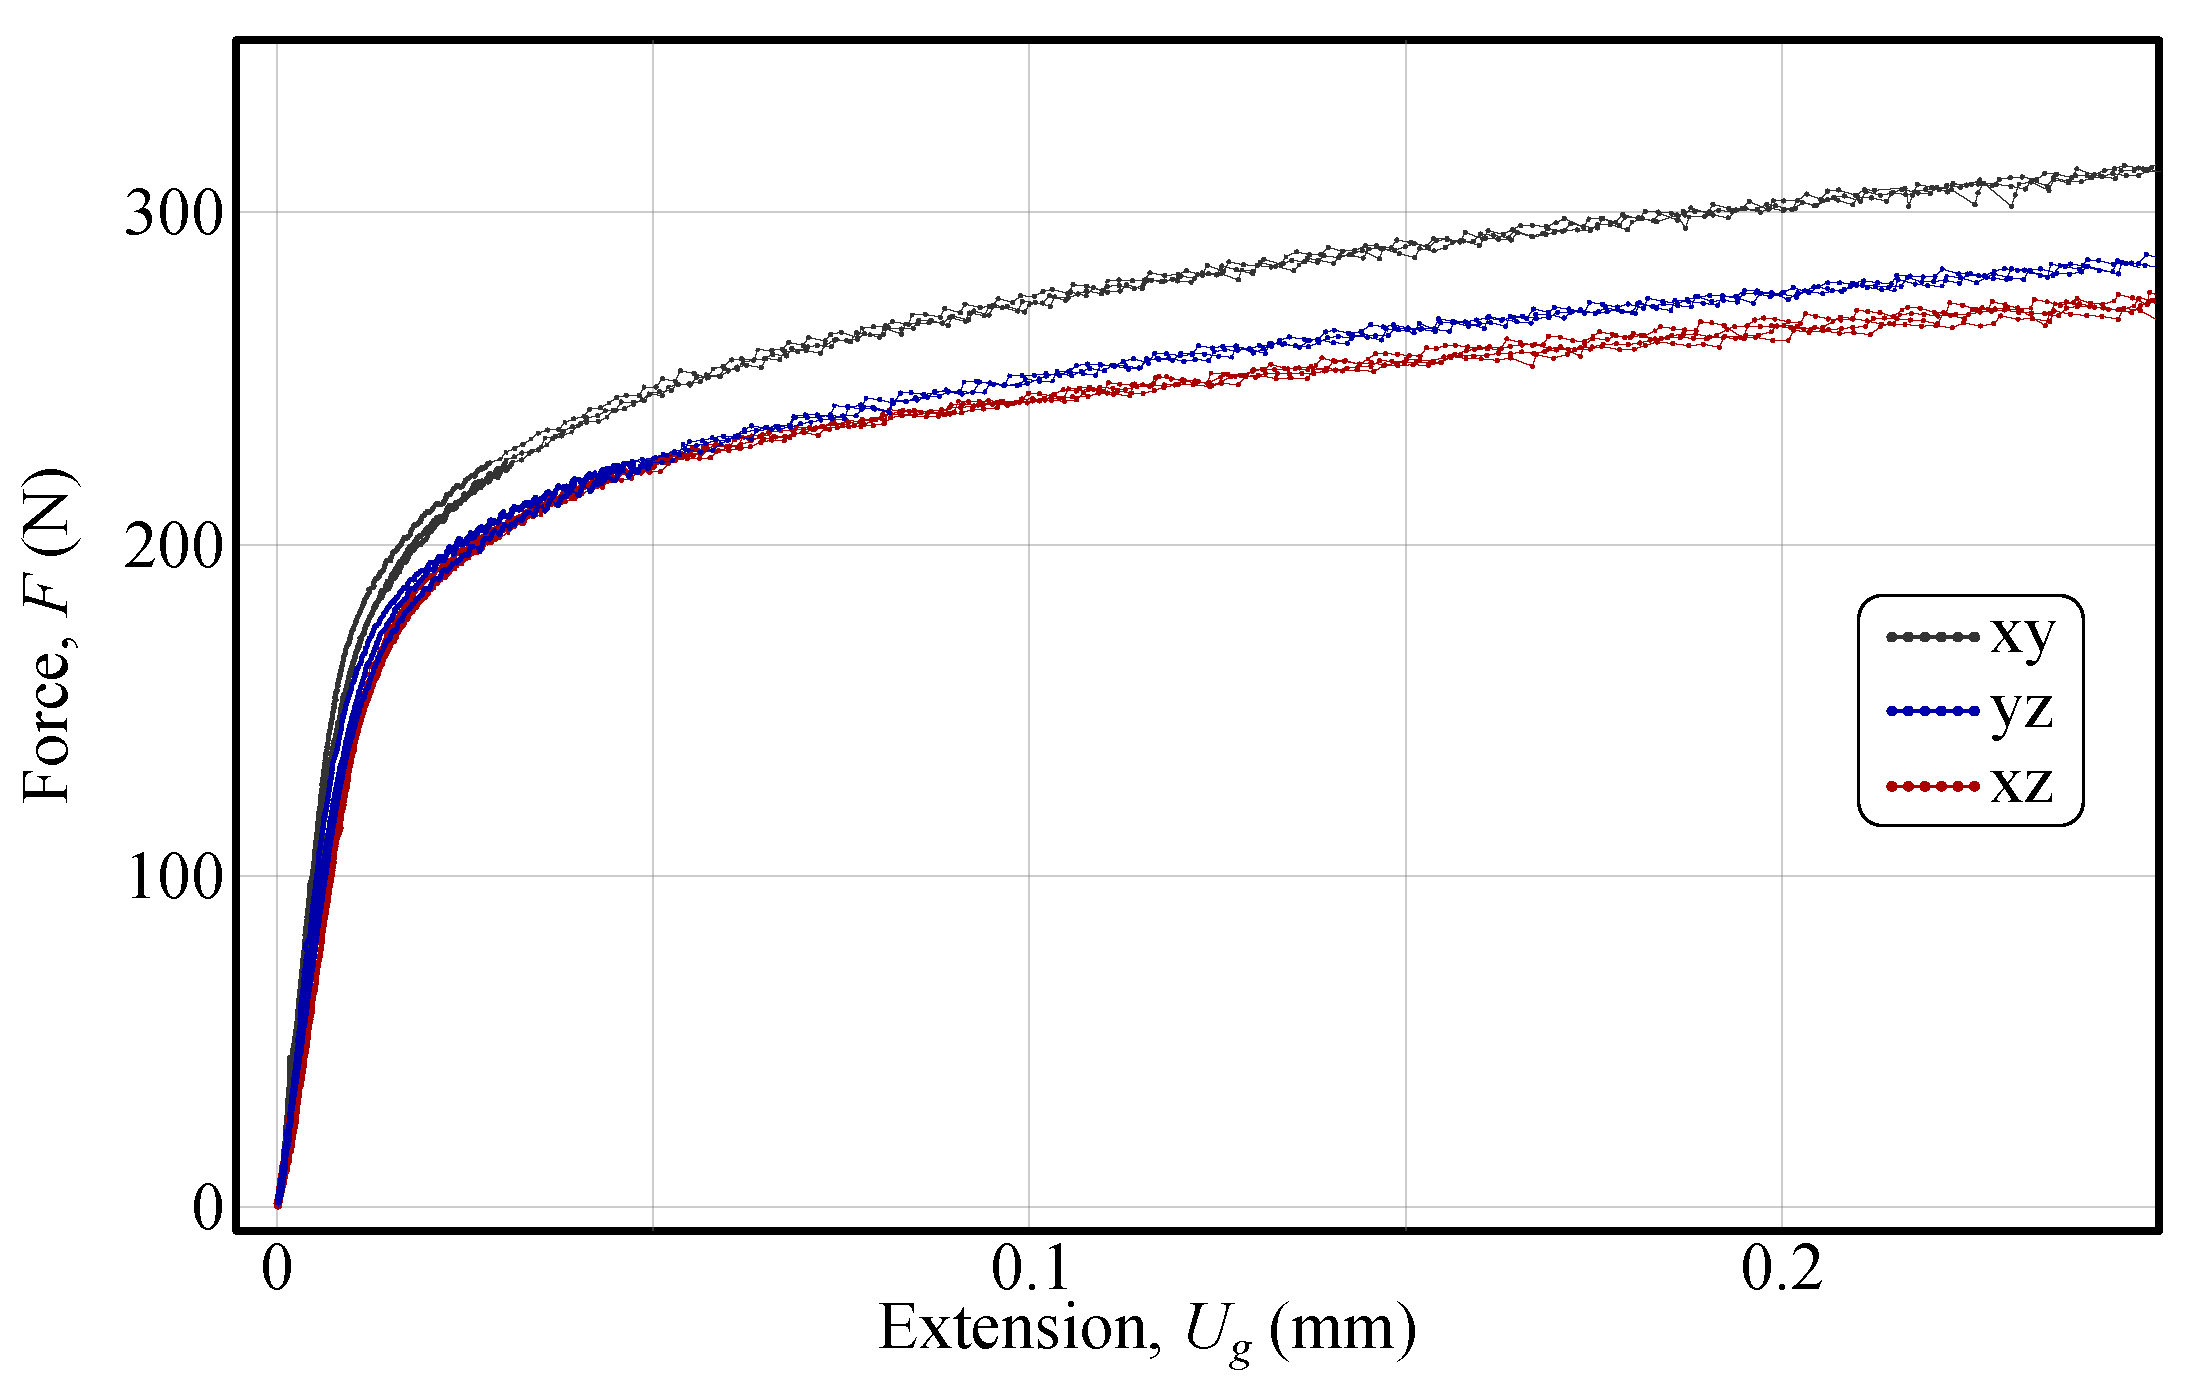
- For a 2.42 mm thick cold-rolled AW5754-H22 aluminium alloy sheet, force–extension responses measured in the and planes were found to be 8% and 12% lower, respectively, compared to those in the plane, indicating the presence of through-thickness shear anisotropy.
Author Contributions
Funding
Institutional Review Board Statement
Informed Consent Statement
Data Availability Statement
Acknowledgments
Conflicts of Interest
References
- Banabic, D.; Carleer, B.; Comsa, D.; Kam, E.; Krasivskyv, A.; Mattiasson, K.; Sester, M.; Sigvant, M.; Zhang, X. Constitutive Modelling and Numerical Simulation; Springer: Berlin/Heidelberg, Germany, 2010. [Google Scholar] [CrossRef]
- Zhao, H.; Han, L.; Liu, Y.; Liu, X. Modelling and interaction analysis of the self-pierce riveting process using regression analysis and FEA. Int. J. Adv. Manuf. Technol. 2021, 113, 159–176. [Google Scholar] [CrossRef]
- Hoang, N.H.; Hanssen, A.G.; Langseth, M.; Porcaro, R. Structural behaviour of aluminium self-piercing riveted joints: An experimental and numerical investigation. Int. J. Solids Struct. 2012, 49, 3211–3223. [Google Scholar] [CrossRef]
- Merklein, M.; Allwood, J.; Behrens, B.A.; Brosius, A.; Hagenah, H.; Kuzman, K.; Mori, K.; Tekkaya, A.; Weckenmann, A. Bulk forming of sheet metal. CIRP Ann. 2012, 61, 725–745. [Google Scholar] [CrossRef]
- Duflou, J.R.; Habraken, A.M.; Cao, J.; Malhotra, R.; Bambach, M.; Adams, D.; Vanhove, H.; Mohammadi, A.; Jeswiet, J. Single point incremental forming: State-of-the-art and prospects. Int. J. Mater. Form. 2018, 11, 743–773. [Google Scholar] [CrossRef]
- Pepelnjak, T.; Sevšek, L.; Lužanin, O.; Milutinović, M. Finite element simplifications and simulation reliability in single point incremental forming. Materials 2022, 15, 3707. [Google Scholar] [CrossRef] [PubMed]
- Dixit, U.; Dixit, P. Finite-element analysis of flat rolling with inclusion of anisotropy. Int. J. Mech. Sci. 1997, 39, 1237–1255. [Google Scholar] [CrossRef]
- Wang, K.; Wierzbicki, T. Experimental and numerical study on the plane-strain blanking process on an AHSS sheet. Int. J. Fract. 2015, 194, 19–36. [Google Scholar] [CrossRef]
- Hill, R. A theory of the yielding and plastic flow of anisotropic metals. Proc. R. Soc. Lond. Ser. A Math. Phys. Sci. 1948, 193, 281–297. [Google Scholar] [CrossRef]
- Barlat, F.; Aretz, H.; Yoon, J.W.; Karabin, M.; Brem, J.; Dick, R. Linear transfomation-based anisotropic yield functions. Int. J. Plast. 2005, 21, 1009–1039. [Google Scholar] [CrossRef]
- Esmaeilpour, R.; Kim, H.; Park, T.; Pourboghrat, F.; Mohammed, B. Comparison of 3D yield functions for finite element simulation of single point incremental forming (SPIF) of aluminum 7075. Int. J. Mech. Sci. 2017, 133, 544–554. [Google Scholar] [CrossRef]
- Esmaeilpour, R.; Kim, H.; Park, T.; Pourboghrat, F.; Xu, Z.; Mohammed, B.; Abu-Farha, F. Calibration of Barlat Yld2004-18P yield function using CPFEM and 3D RVE for the simulation of single point incremental forming (SPIF) of 7075-O aluminum sheet. Int. J. Mech. Sci. 2018, 145, 24–41. [Google Scholar] [CrossRef]
- Esmaeilpour, R.; Kim, H.; Asgharzadeh, A.; Nazari Tiji, S.A.; Pourboghrat, F.; Banu, M.; Bansal, A.; Taub, A. Experimental validation of the simulation of single-point incremental forming of AA7075 sheet with Yld2004-18P yield function calibrated with crystal plasticity model. Int. J. Adv. Manuf. Technol. 2021, 113, 2031–2047. [Google Scholar] [CrossRef]
- Starman, B.; Vrh, M.; Koc, P.; Halilovič, M. Shear test-based identification of hardening behaviour of stainless steel sheet after onset of necking. J. Mater. Process. Technol. 2019, 270, 335–344. [Google Scholar] [CrossRef]
- Yin, Q.; Tekkaya, A.E.; Traphöner, H. Determining cyclic flow curves using the in-plane torsion test. CIRP Ann. 2015, 64, 261–264. [Google Scholar] [CrossRef]
- Miyauchi, K. A proposal for a planar simple shear test in sheet metals. Sci. Pap. Inst. Phys. Chem. Res. (Jpn.) 1984, 78, 27–40. [Google Scholar]
- Bouvier, S.; Haddadi, H.; Levée, P.; Teodosiu, C. Simple shear tests: Experimental techniques and characterization of the plastic anisotropy of rolled sheets at large strains. J. Mater. Process. Technol. 2006, 172, 96–103. [Google Scholar] [CrossRef]
- Carbonniere, J.; Thuillier, S.; Sabourin, F.; Brunet, M.; Manach, P.Y. Comparison of the work hardening of metallic sheets in bending–unbending and simple shear. Int. J. Mech. Sci. 2009, 51, 122–130. [Google Scholar] [CrossRef]
- An, Y.; Vegter, H.; Heijne, J. Development of simple shear test for the measurement of work hardening. J. Mater. Process. Technol. 2009, 209, 4248–4254. [Google Scholar] [CrossRef]
- Thuillier, S.; Manach, P.Y. Comparison of the work-hardening of metallic sheets using tensile and shear strain paths. Int. J. Plast. 2009, 25, 733–751. [Google Scholar] [CrossRef]
- Yin, Q.; Zillmann, B.; Suttner, S.; Gerstein, G.; Biasutti, M.; Tekkaya, A.E.; Wagner, M.F.X.; Merklein, M.; Schaper, M.; Halle, T.; et al. An experimental and numerical investigation of different shear test configurations for sheet metal characterization. Int. J. Solids Struct. 2014, 51, 1066–1074. [Google Scholar] [CrossRef]
- Zillmann, B.; Clausmeyer, T.; Bargmann, S.; Lampke, T.; Wagner, M.X.; Halle, T. Validation of simple shear tests for parameter identification considering the evolution of plastic anisotropy. Tech. Mech.-Eur. J. Eng. Mech. 2012, 32, 622–630. [Google Scholar]
- Yin, Q.; Soyarslan, C.; Güner, A.; Brosius, A.; Tekkaya, A. A cyclic twin bridge shear test for the identification of kinematic hardening parameters. Int. J. Mech. Sci. 2012, 59, 31–43. [Google Scholar] [CrossRef]
- ASTM Standard. Standard Test Method for Shear Testing of Thin Aluminum Alloy Products; Technical report; ASTM International: West Conshohocken, PA, USA, 2005. [Google Scholar] [CrossRef]
- Iosipescu, N. New accurate procedure for single shear testing of metals. J. Mater. 1967, 2, 537–566. [Google Scholar]
- Merklein, M.; Biasutti, M. Forward and reverse simple shear test experiments for material modeling in forming simulations. In Proceedings of the 10th International Conference on Technology of Plasticity, ICTP, Aachen, Germany, 25–30 September 2011; pp. 702–707. [Google Scholar]
- Tarigopula, V.; Hopperstad, O.; Langseth, M.; Clausen, A. An evaluation of a combined isotropic-kinematic hardening model for representation of complex strain-path changes in dual-phase steel. Eur. J. Mech.-A/Solids 2009, 28, 792–805. [Google Scholar] [CrossRef]
- Ma, L.; Wang, Z. The effects of through-thickness shear stress on the formability of sheet metal—A review. J. Manuf. Processes 2021, 71, 269–289. [Google Scholar] [CrossRef]
- Li, S.; He, J.; Gu, B.; Zeng, D.; Xia, Z.C.; Zhao, Y.; Lin, Z. Anisotropic fracture of advanced high strength steel sheets: Experiment and theory. Int. J. Plast. 2018, 103, 95–118. [Google Scholar] [CrossRef]
- Han, G.; He, J.; Li, S. Simple shear deformation of sheet metals: Finite strain perturbation analysis and high-resolution quasi-in-situ strain measurement. Int. J. Plast. 2022, 150, 103194. [Google Scholar] [CrossRef]
- Lattanzi, A.; Rossi, M.; Baldi, A.; Amodio, D. Development of new experimental test for sheet metals through-thickness behaviour characterization. Proc. J. Phys. Conf. Ser. 2018, 1063, 012040. [Google Scholar] [CrossRef]
- Chen, B.; Starman, B.; Halilovič, M.; Berglund, L.A.; Coppieters, S. Finite Element Model Updating for Material Model Calibration: A Review and Guide to Practice. Arch. Comput. Methods Eng. 2024, 1–78. [Google Scholar] [CrossRef]
- Lattanzi, A.; Amodio, D.; Rossi, M. A hybrid VFM-FEMU approach to calibrate 3D anisotropic plasticity models for sheet metal forming. Mater. Res. Proc. 2023, 28, 1203–1210. [Google Scholar] [CrossRef]
- Hakoyama, T.; Hakoyama, C.; Furusato, D. Measurement of shear deformation behavior in thickness direction for a mild steel sheet. Mater. Res. Proc. 2022, 41, 1144–1149. [Google Scholar] [CrossRef]
- Han, G.; He, J.; Li, S.; Lin, Z. Simple shear methodology for local structure–property relationships of sheet metals: State-of-the-art and open issues. Prog. Mater. Sci. 2024, 143, 101266. [Google Scholar] [CrossRef]
- Satošek, R.; Pepelnjak, T.; Starman, B. Characterisation of out-of-plane shear behaviour of anisotropic sheet materials based on indentation plastometry. Int. J. Mech. Sci. 2023, 253, 108403. [Google Scholar] [CrossRef]
- Starman, B.; Pepelnjak, T.; Maček, A.; Halilovič, M.; Coppieters, S. Inverse calibration of out-of-plane shear anisotropy parameters of sheet metal. Int. J. Solids Struct. 2025, 313, 113313. [Google Scholar] [CrossRef]
- Fayad, S.; Jones, E.; Seidl, D.; Reu, P.; Lambros, J. On the importance of direct-levelling for constitutive material model calibration using digital image correlation and finite element model updating. Exp. Mech. 2023, 63, 467–484. [Google Scholar] [CrossRef]
- Van den Boogaard, T.; Havinga, J.; Belin, A.; Barlat, F. Parameter reduction for the Yld2004-18p yield criterion. Int. J. Mater. Form. 2016, 9, 175–178. [Google Scholar] [CrossRef]
- Barlat, F.; Lege, D.J.; Brem, J.C. A six-component yield function for anisotropic materials. Int. J. Plast. 1991, 7, 693–712. [Google Scholar] [CrossRef]
- EN 573-3:2019; Aluminium and Aluminium Alloys—Chemical Composition and Form of Wrought Products—Part 3: Chemical Composition and Form of Products. European Standard: Brussels, Belgium, 2019.
- Lava, P.; Jones, E.M.; Wittevrongel, L.; Pierron, F. Validation of finite-element models using full-field experimental data: Levelling finite-element analysis data through a digital image correlation engine. Strain 2020, 56, e12350. [Google Scholar] [CrossRef]
- Conde, M.; Zhang, Y.; Henriques, J.; Coppieters, S.; Andrade-Campos, A. Design and validation of a heterogeneous interior notched specimen for inverse material parameter identification. Finite Elem. Anal. Des. 2023, 214, 103866. [Google Scholar] [CrossRef]
- Zhang, Y.; Van Bael, A.; Andrade-Campos, A.; Coppieters, S. Parameter identifiability analysis: Mitigating the non-uniqueness issue in the inverse identification of an anisotropic yield function. Int. J. Solids Struct. 2022, 243, 111543. [Google Scholar] [CrossRef]
- Halilovic, M.; Starman, B.; Vrh, M.; Stok, B. A robust explicit integration of elasto-plastic constitutive models, based on simple subincrement size estimation. Eng. Comput. 2017, 34, 1774–1806. [Google Scholar] [CrossRef]
- Halilovič, M.; Starman, B.; Coppieters, S. Computationally efficient stress reconstruction from full-field strain measurements. Comput. Mech. 2024, 74, 849–872. [Google Scholar] [CrossRef]
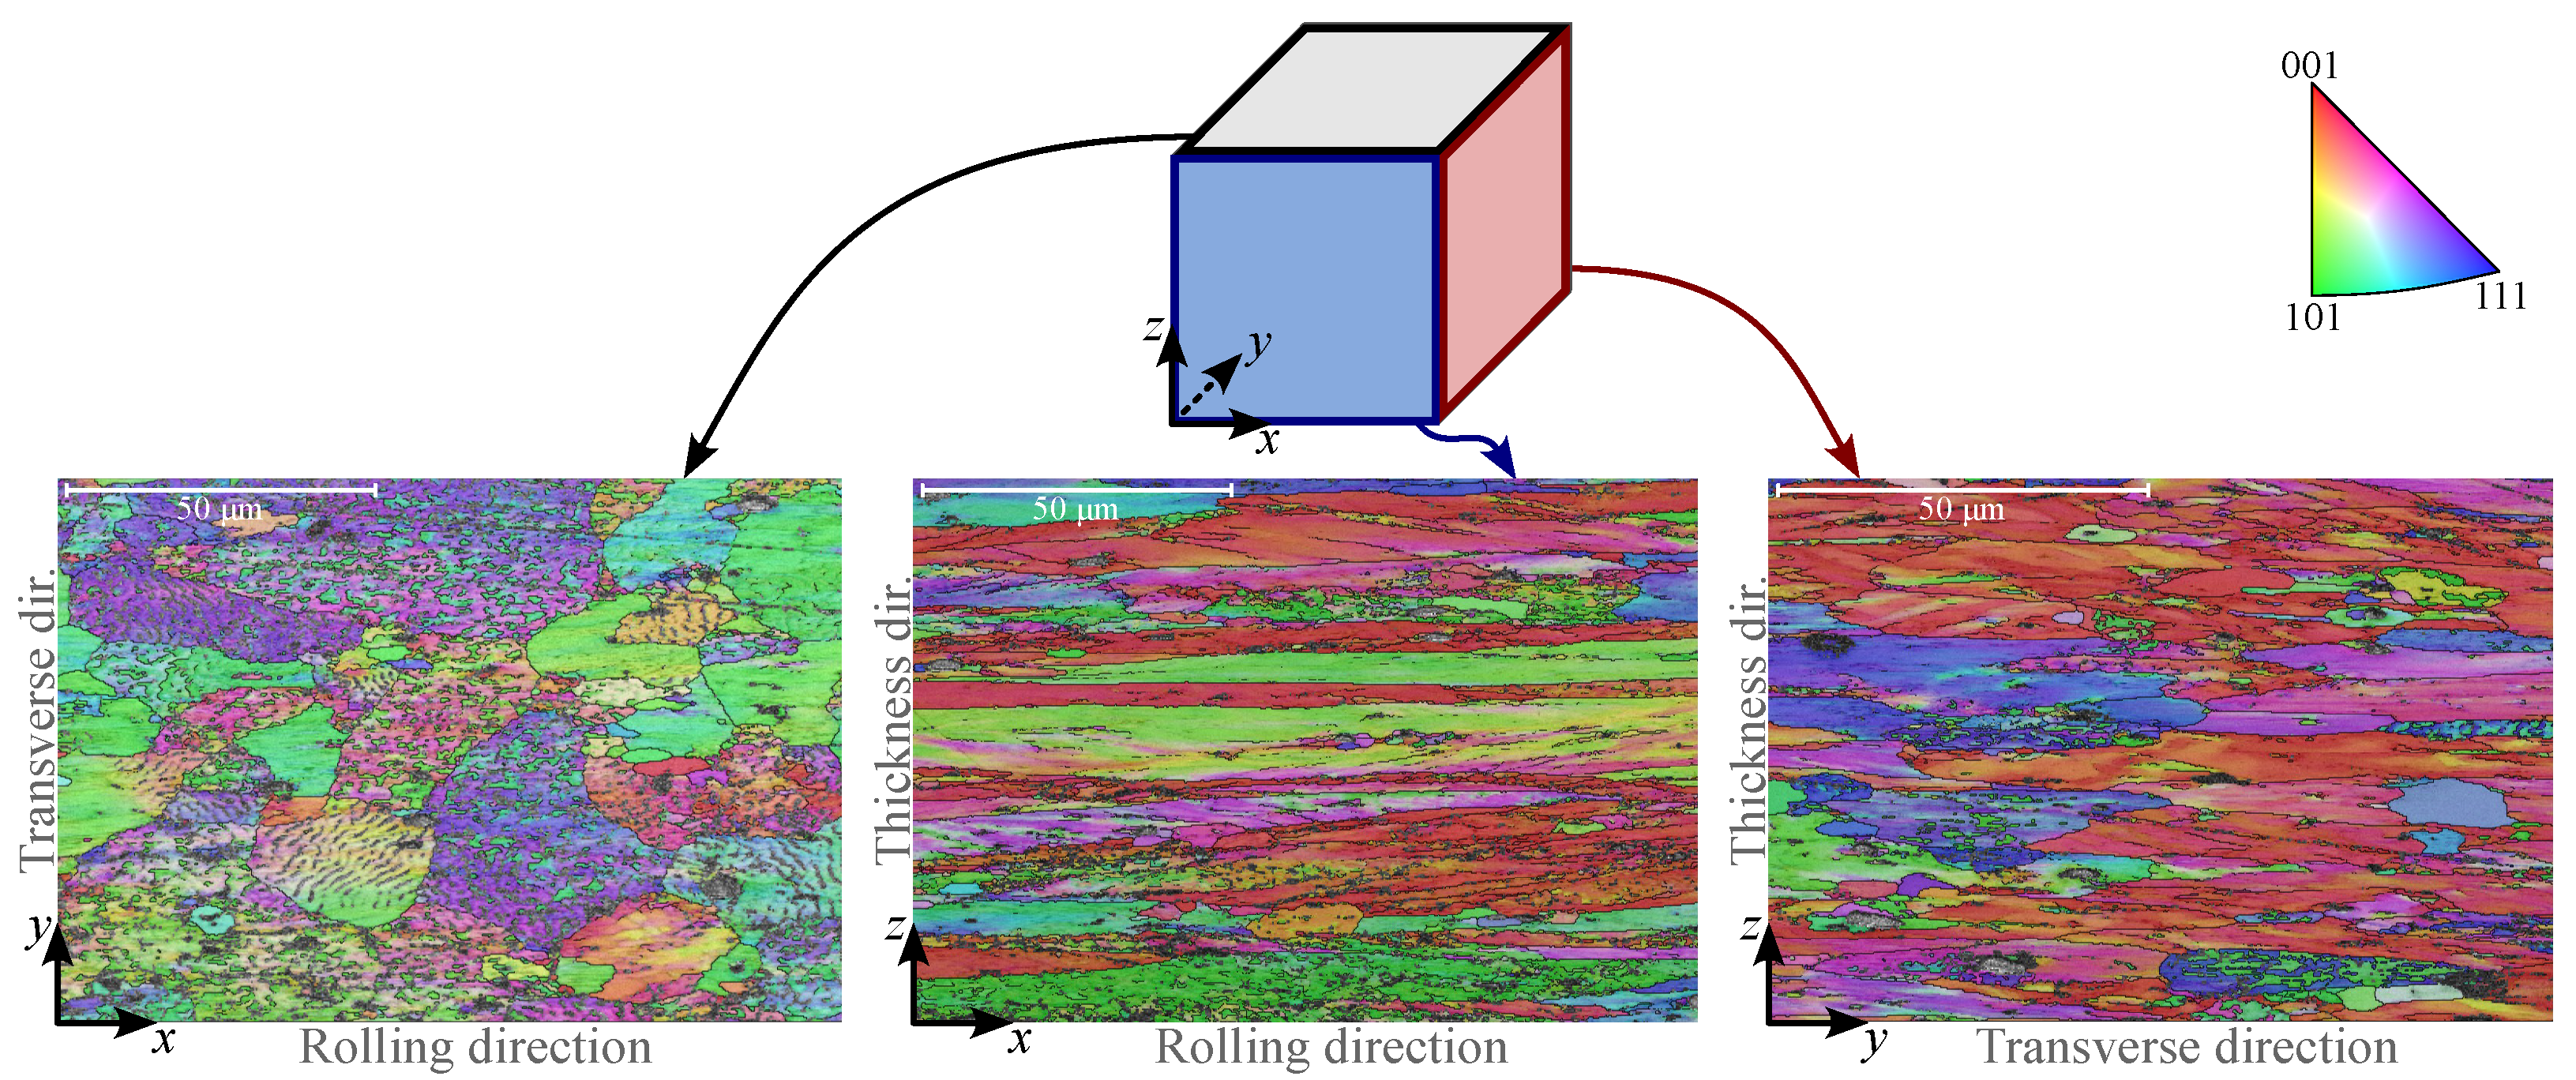
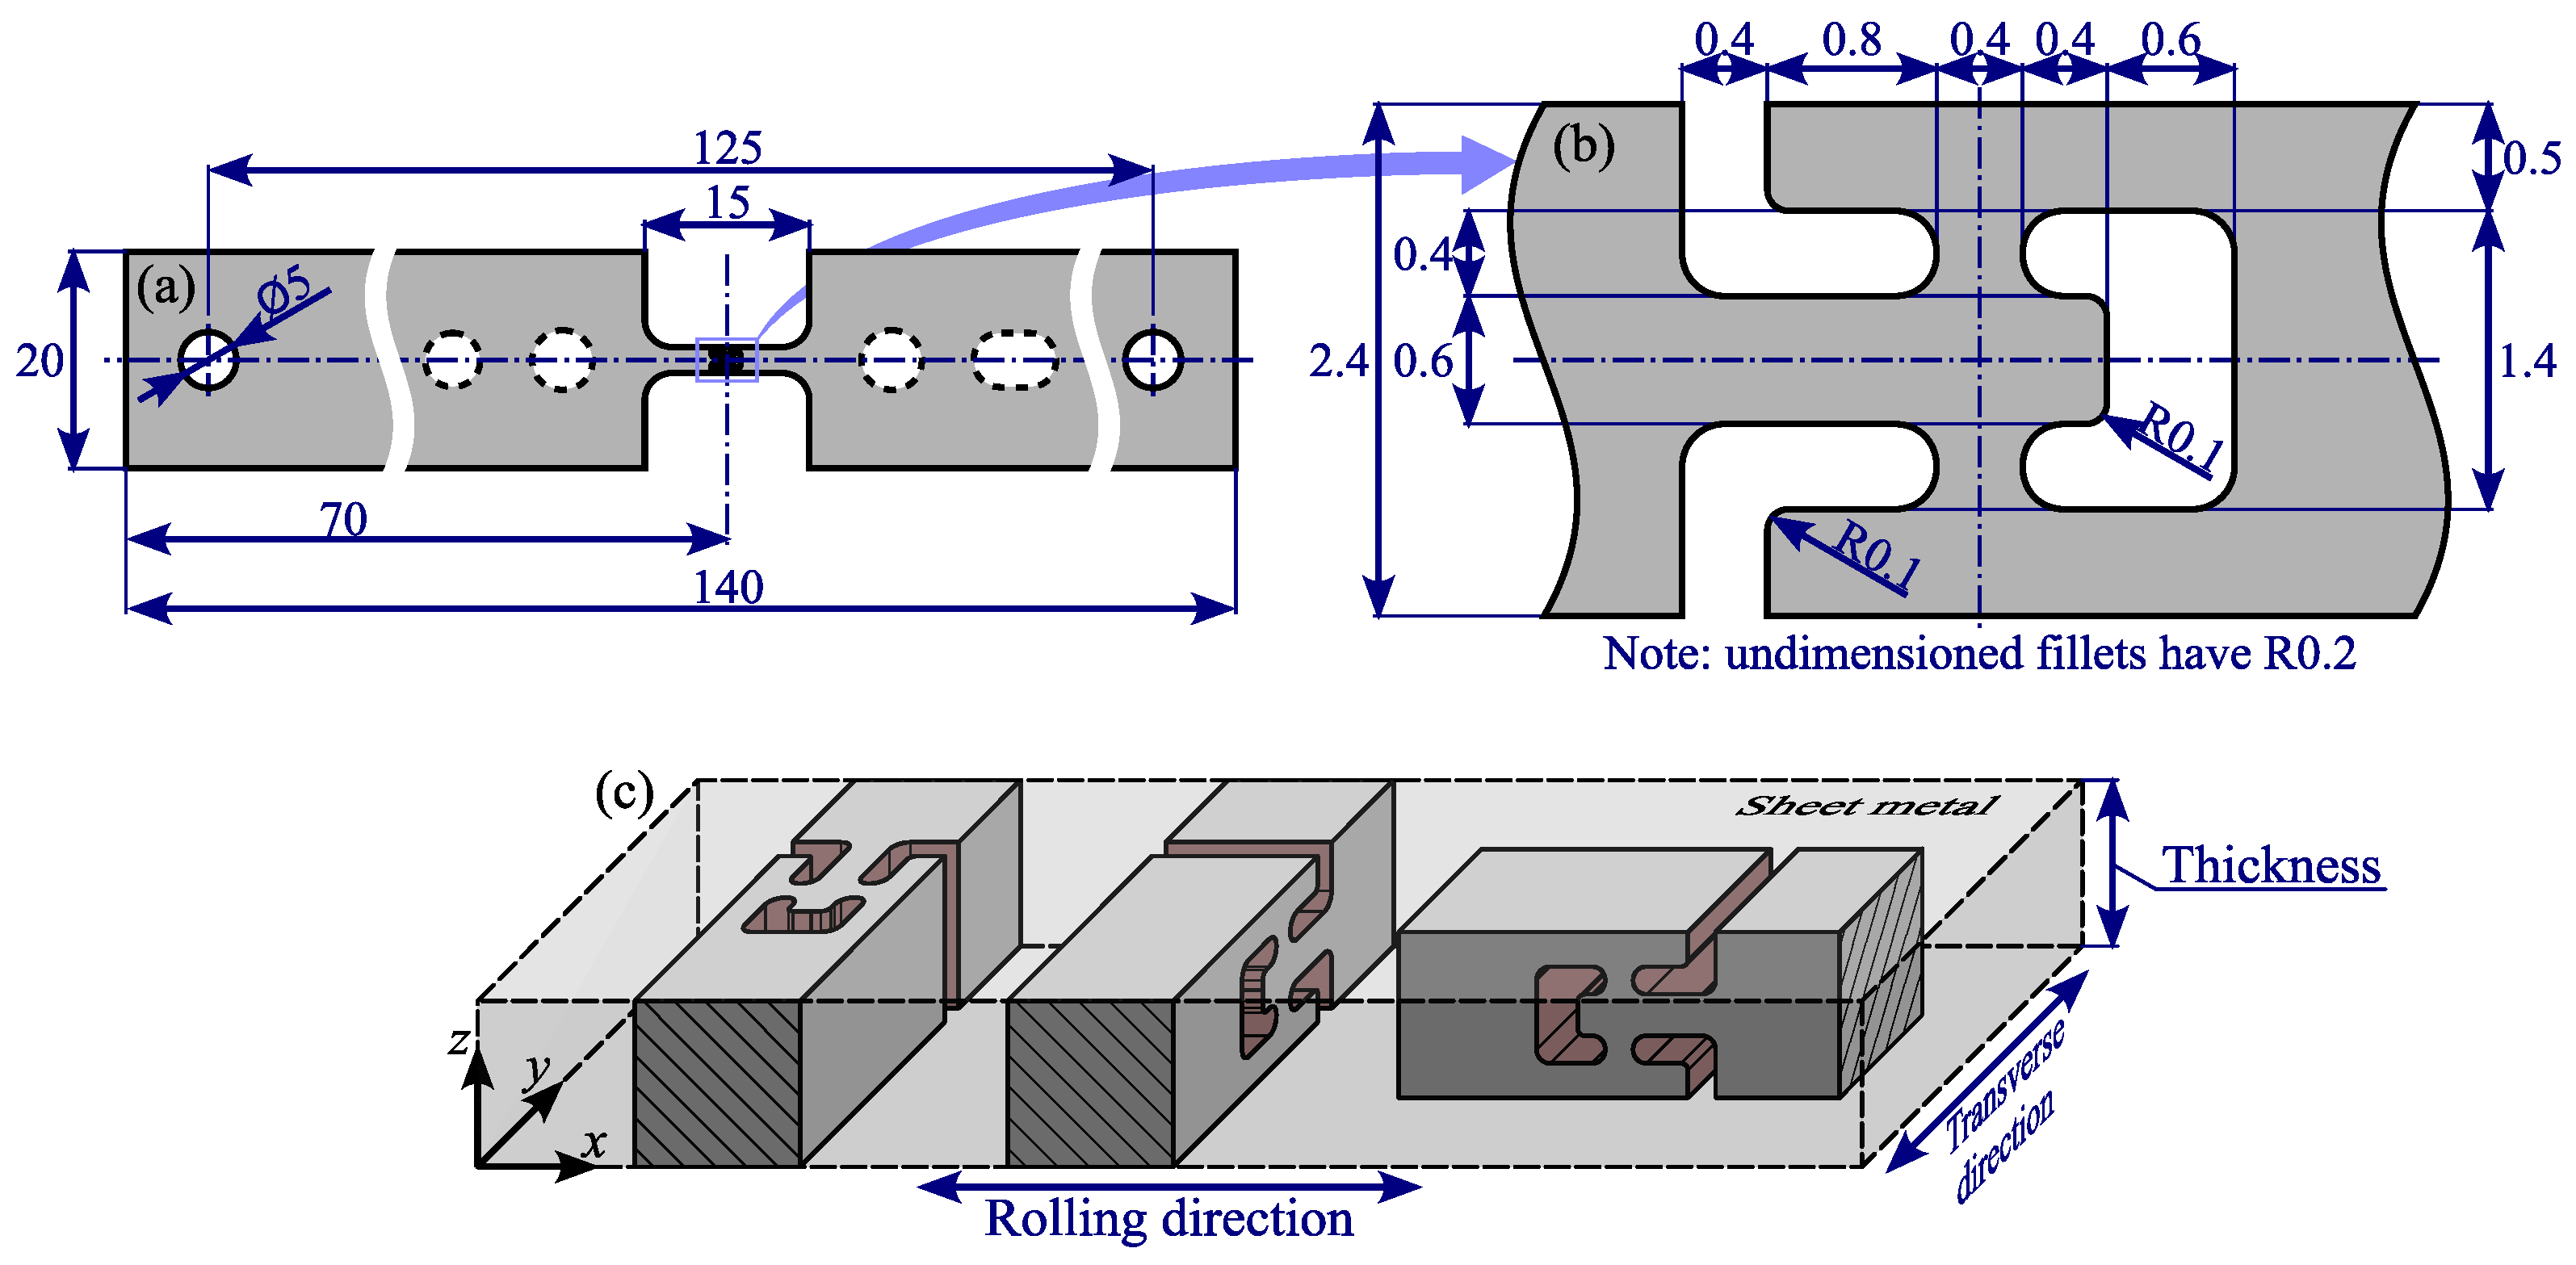
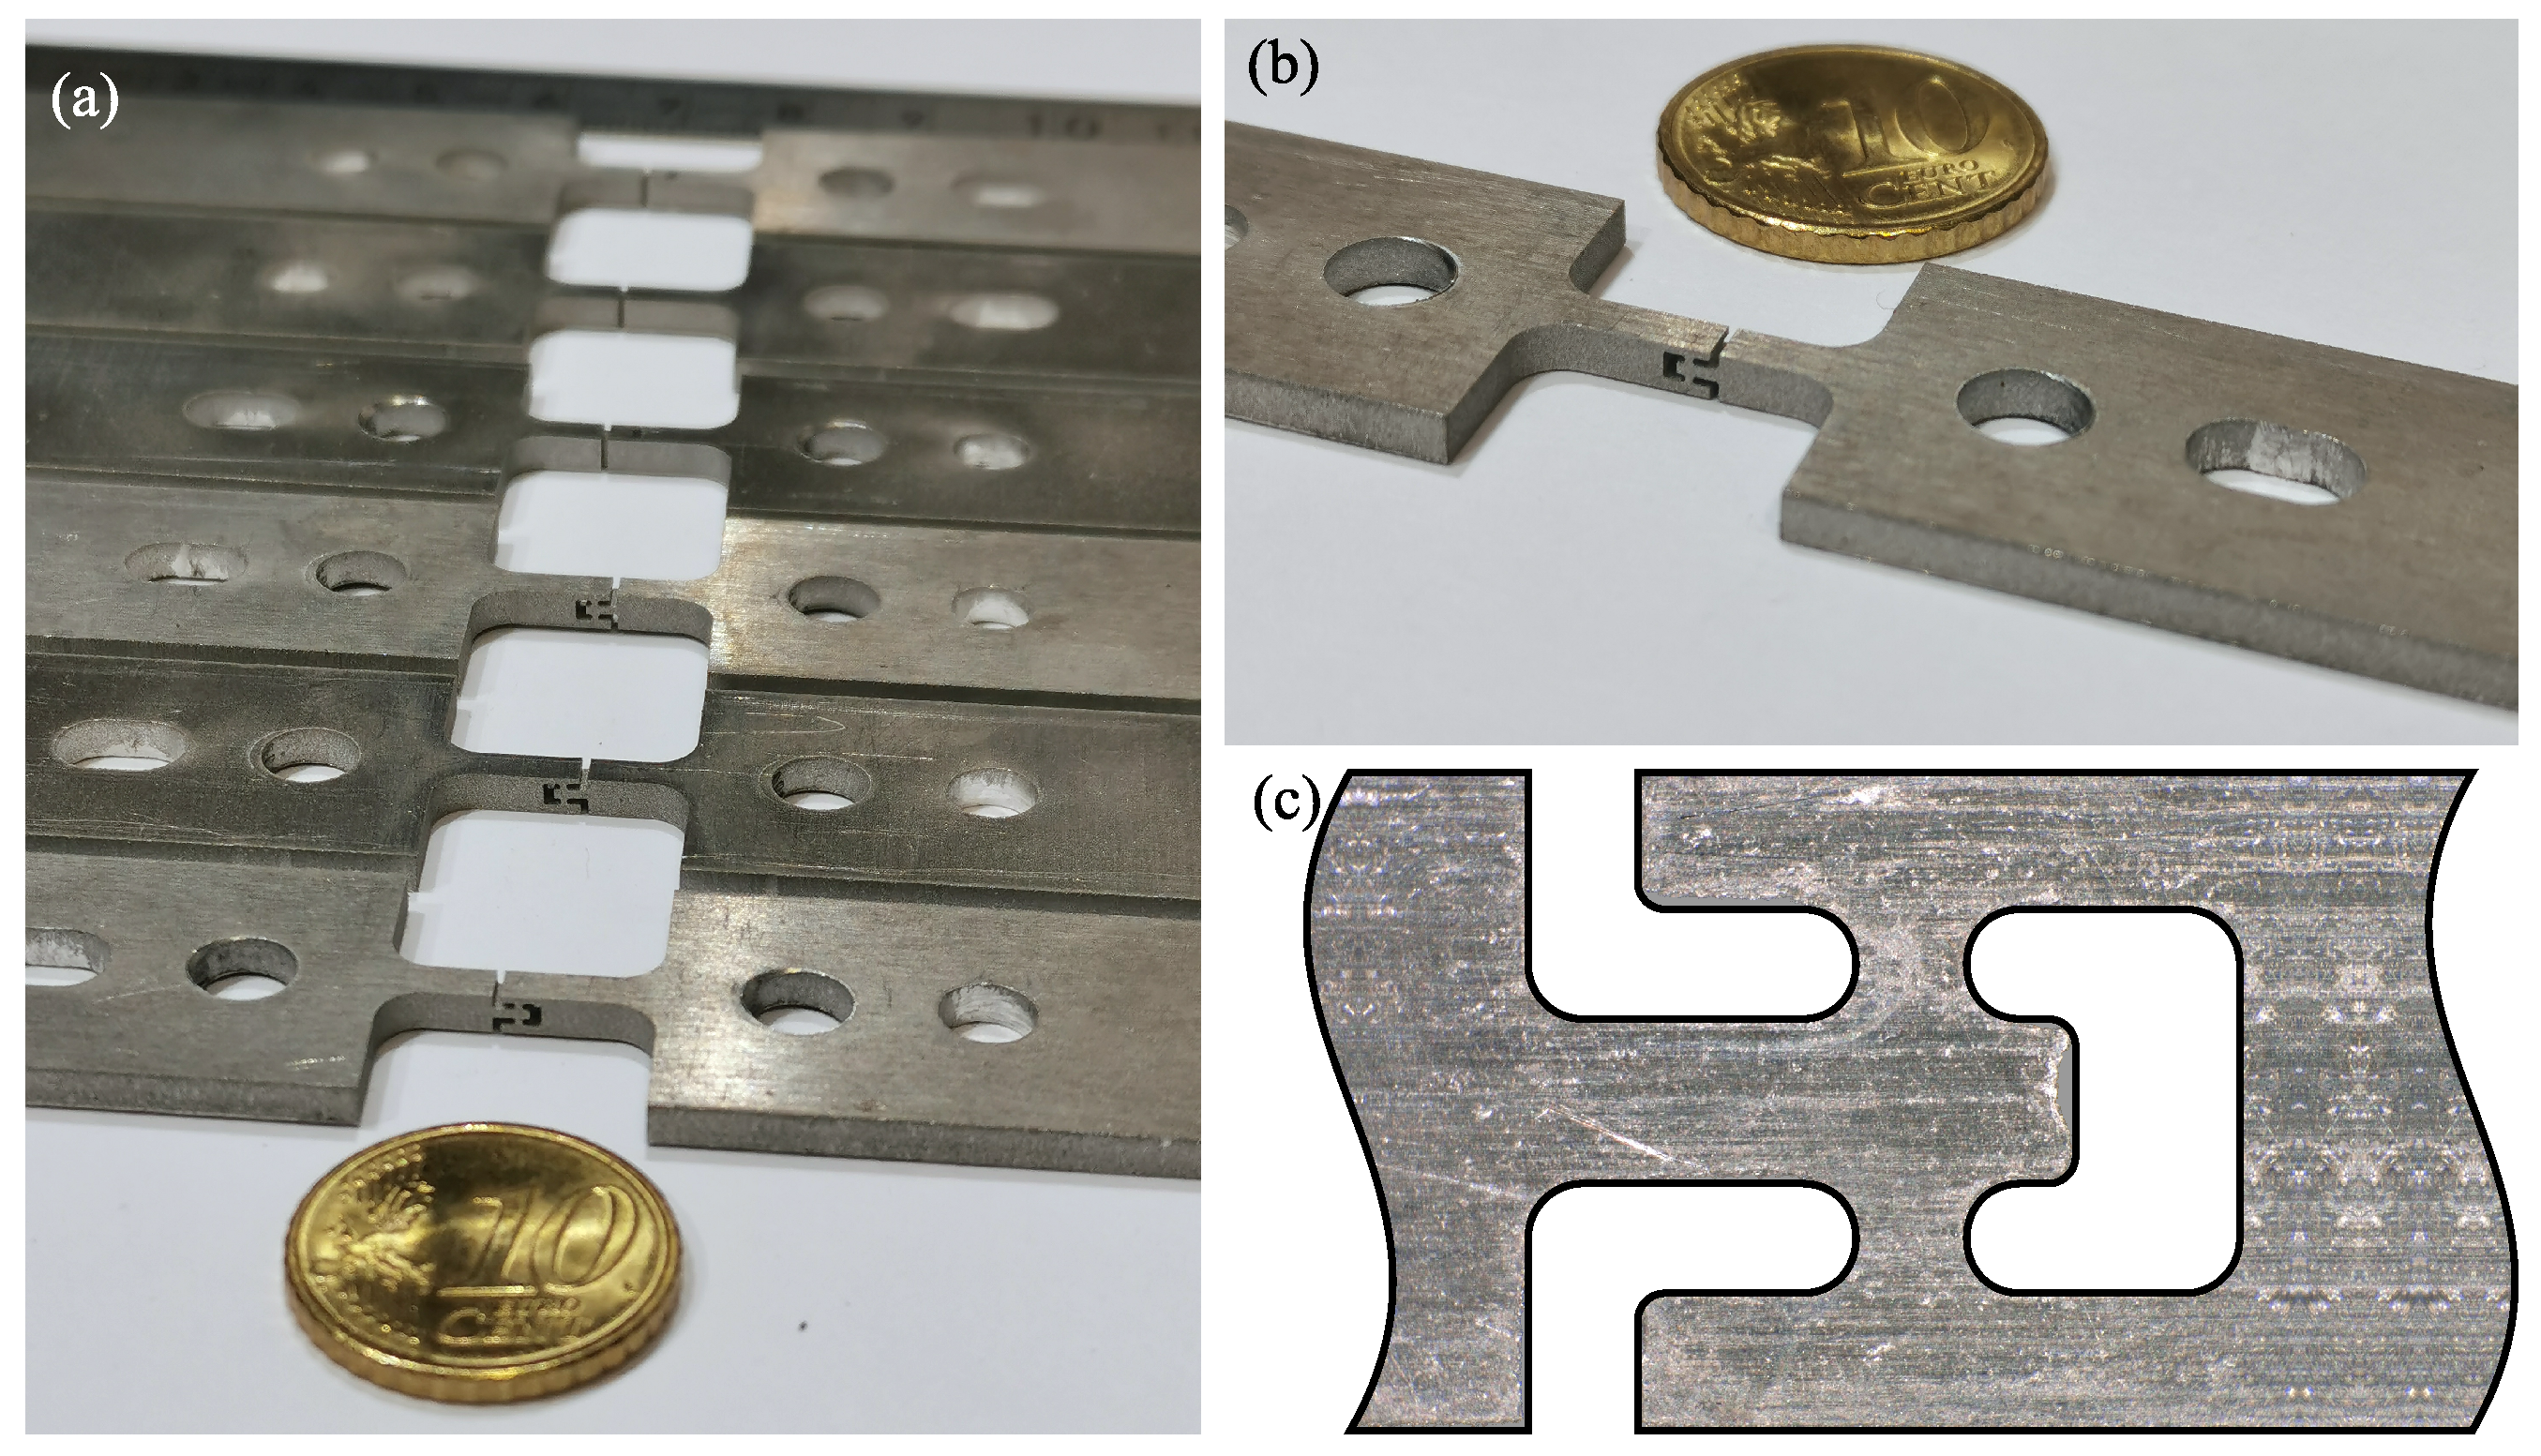
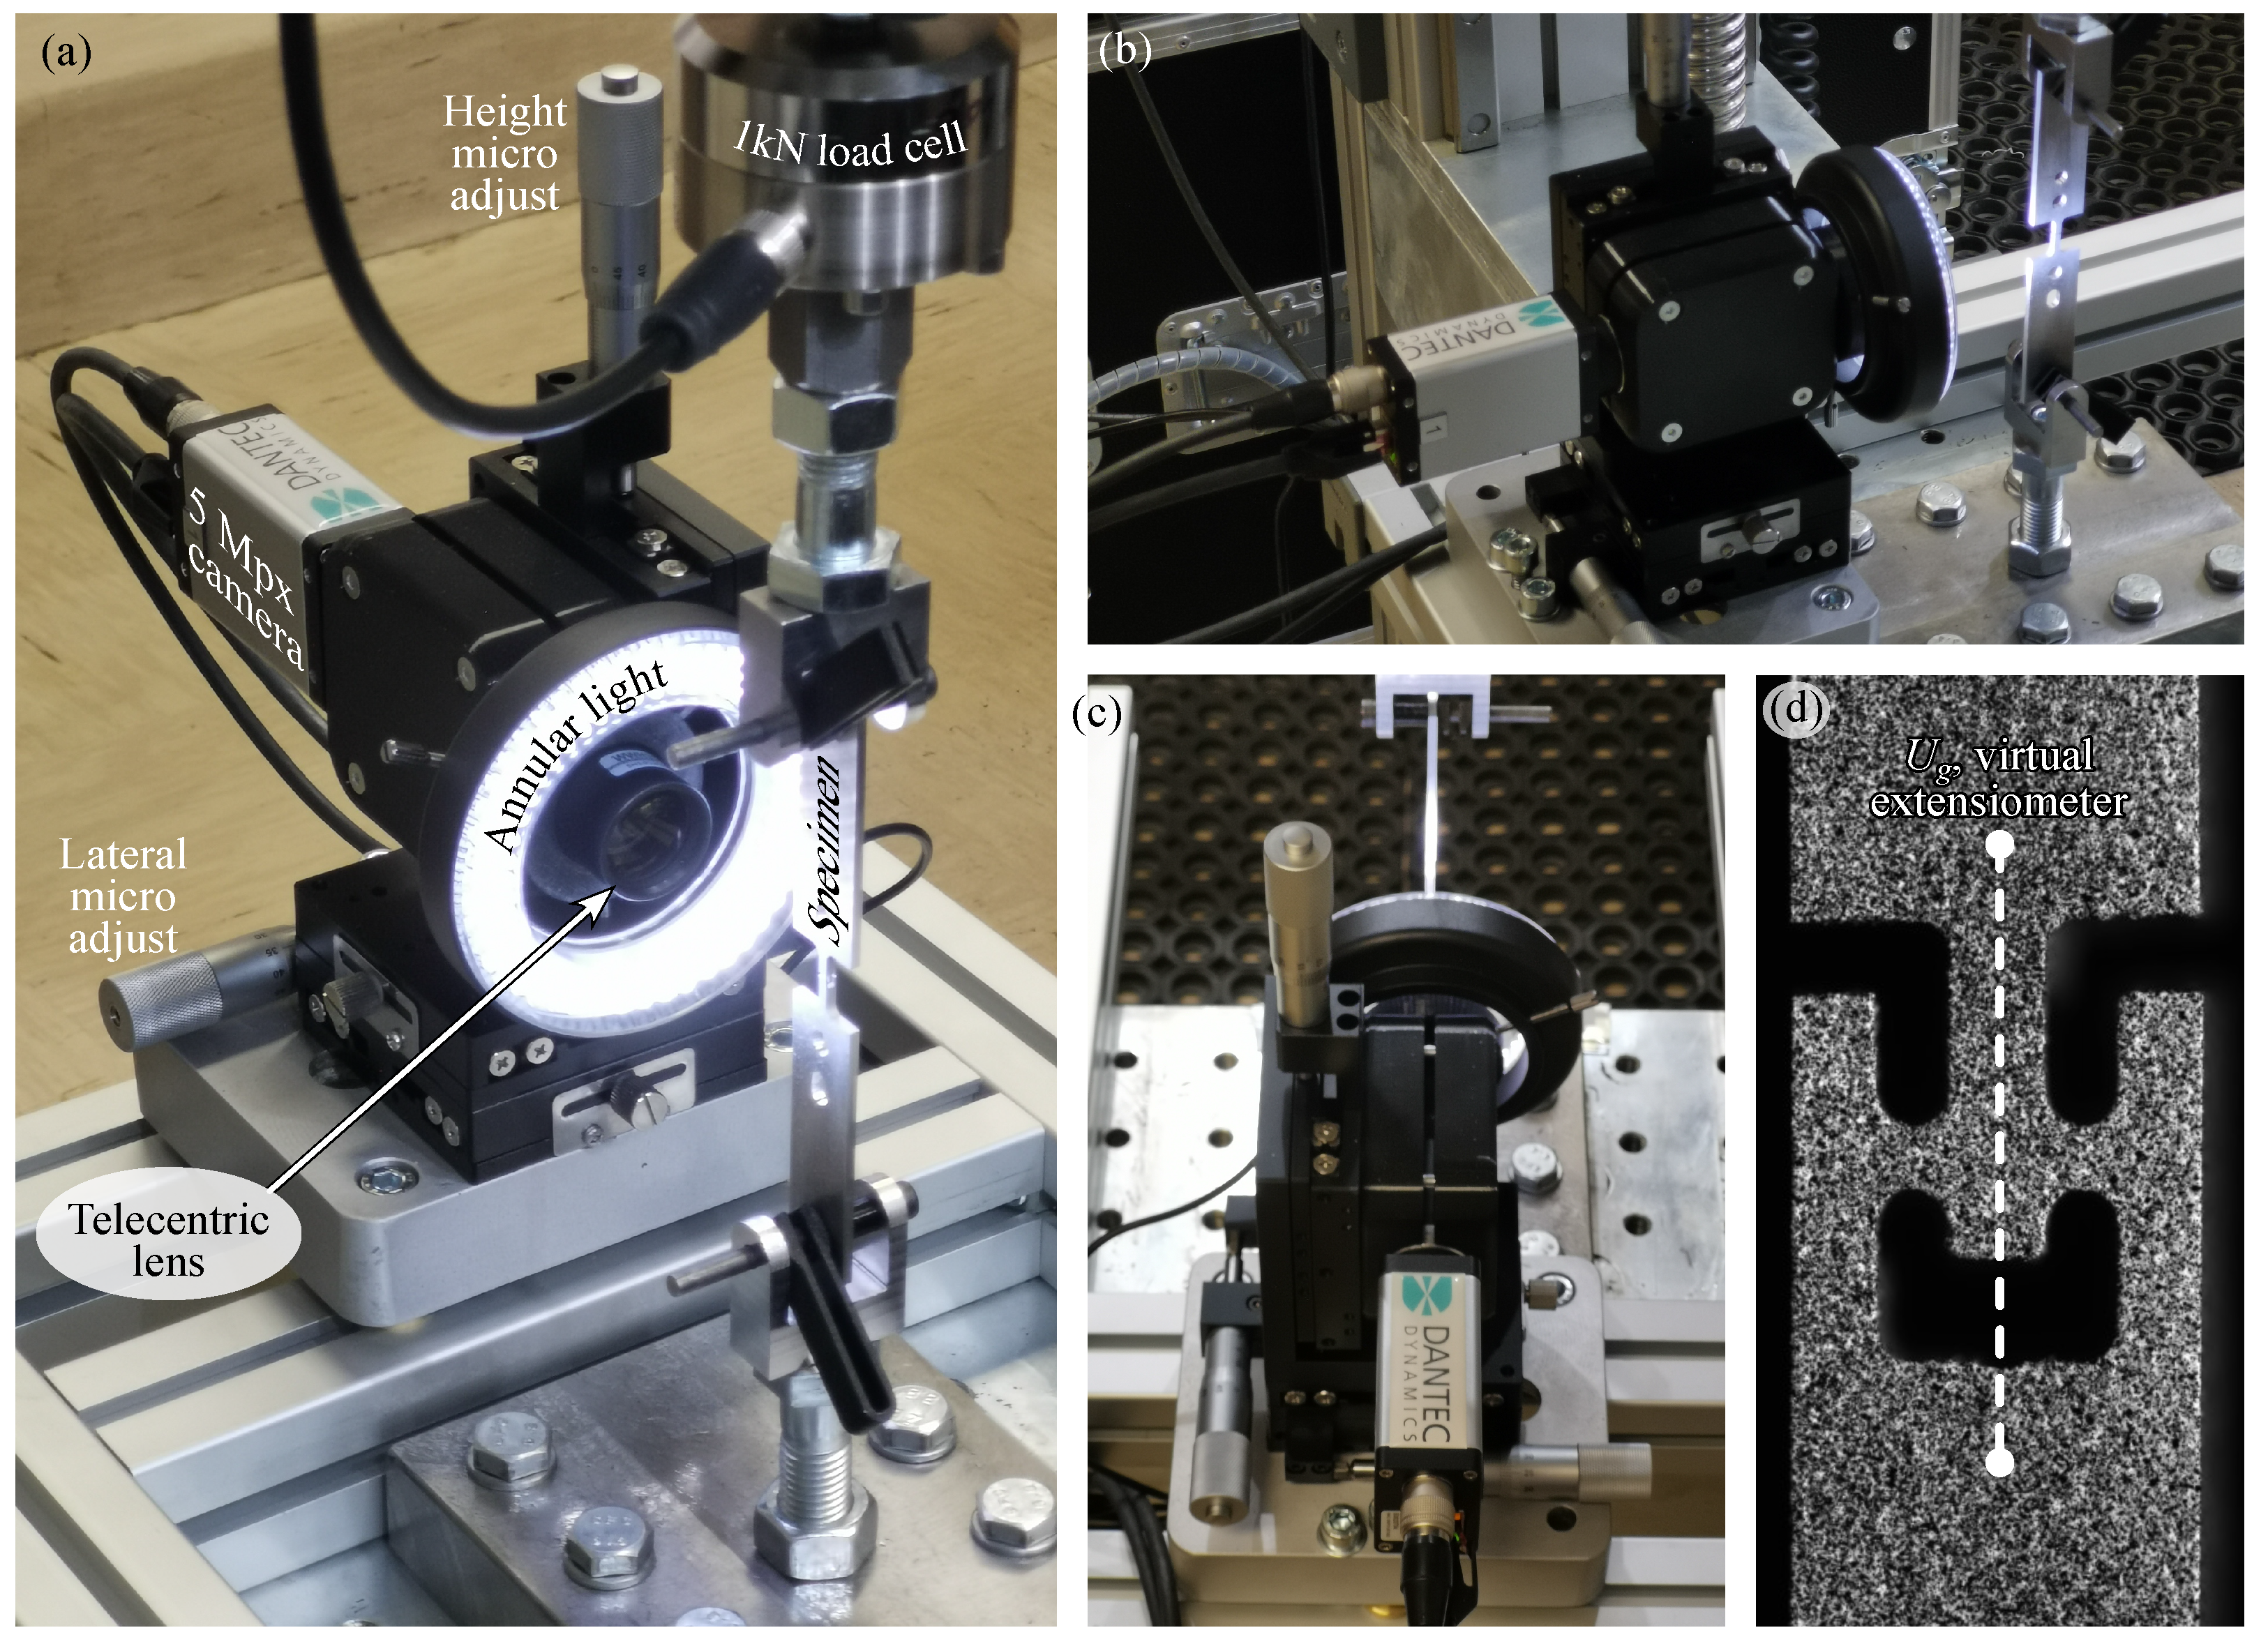


| Equipment, Settings | Specifications |
|---|---|
| Camera | Manta G-507B, Allied Vision, (Exton, PA, USA) |
| Telecentric lens | Coolens WWH15-63ATV3 |
| Image resolution | 2464 × 2056 px |
| Telecentric lens working distance | 63 mm |
| Telecentric lens depth of field | 0.3 mm |
| DIC technique | 2D DIC |
| DIC software | MatchID 2024.2.3, DantecDynamics Istra 4D (ver 4.6.) |
| Illumination colour temp. | 5600 K |
| Patterning technique | white surface with black speckles (airbrush) |
| Region of Interest (ROI) | 2.5 × 5 mm |
| Pixel to mm conversion | 1 px = 2.3 m |
| Average speckle size | 12.8 px |
| Image filtering | gaussian, 5 × 5 px |
| Subset size | 21 × 21 px |
| Step size | 5 px |
| Subset weight | uniform |
| Subset shape function | affine |
| Matching criterion | approximated sum of squared differences |
| Interpolant | local bicubic spline interpolation |
| Reference image | fixed |
| Data points | 11,700 |
| Deformation gradient | strain window size: 7 × 7 data points interpolation: Bilinear Quadrilateral (Q4) |
| Temporal smoothing | none |
| Acquisition frequency | 10 Hz |
| Cross-head speed | 0.1 mm/min |
| Virtual strain gauge size | 0.232 × 0.232 mm |
| Parameter | Value [-] | Parameter | Value [-] | Parameter | Value [-] | Parameter | Value [-] |
|---|---|---|---|---|---|---|---|
| 1 | 0.47 | 1 | 1.166 | ||||
| 0.990 | 0.46 | 1 | 1.117 | ||||
| 0.980 | 0.49 | 0.090 | 0.881 | ||||
| 0.952 | 0.64 | 0.507 | 1.024 | ||||
| 0.932 | 0.75 | 1.069 | −0.491 | ||||
| 0.951 | 0.80 | 1.127 | 1.144 | ||||
| 0.964 | 0.72 | −0.779 | 1.295 | ||||
| 0.977 | 0.75 | ||||||
| 0.984 | 0.77 | E [GPa] | 70.3 | [–] | 0.33 |
| [-] | [-] | [-] | [-] | [-] | |
|---|---|---|---|---|---|
| 1 | 1 | 1 | 1 | 1 | 1 |
| 0.7827 | 1.4913 | 0.8836 | 0.9442 | 1.3983 | 0.8271 |
| 0.4484 | 1.7208 | 0.3817 | 1.0357 | 1.2678 | 0.5259 |
| 0.4626 | 1.6743 | 0.2880 | 1.1932 | 1.0801 | 0.3396 |
| 0.4651 | 1.6736 | 0.2878 | 1.0411 | 1.2223 | 0.2442 |
| 0.4678 | 1.6724 | 0.2872 | 1.0779 | 1.1841 | 0.2377 |
| 0.4705 | 1.6712 | 0.2868 | |||
| 0.4748 | 1.6635 | 0.2711 | |||
| 0.4748 | 1.6635 | 0.2711 | 1.0779 | 1.1841 | 0.2377 |
| [-] | [-] | [-] | [-] | |
|---|---|---|---|---|
| FEMU identification | 0.475 | 1.664 | 1.078 | 1.184 |
| Force–extension-based [37] | 0.494 | 1.661 | 1.060 | 1.168 |
| Relative difference [%] | 3.89 | 0.15 | 1.69 | 1.38 |
Disclaimer/Publisher’s Note: The statements, opinions and data contained in all publications are solely those of the individual author(s) and contributor(s) and not of MDPI and/or the editor(s). MDPI and/or the editor(s) disclaim responsibility for any injury to people or property resulting from any ideas, methods, instructions or products referred to in the content. |
© 2025 by the authors. Licensee MDPI, Basel, Switzerland. This article is an open access article distributed under the terms and conditions of the Creative Commons Attribution (CC BY) license (https://creativecommons.org/licenses/by/4.0/).
Share and Cite
Starman, B.; Chen, B.; Maček, A.; Zhang, Y.; Halilovič, M.; Coppieters, S. Characterising Through-Thickness Shear Anisotropy Using the Double-Bridge Shear Test and Finite Element Model Updating. Materials 2025, 18, 2220. https://doi.org/10.3390/ma18102220
Starman B, Chen B, Maček A, Zhang Y, Halilovič M, Coppieters S. Characterising Through-Thickness Shear Anisotropy Using the Double-Bridge Shear Test and Finite Element Model Updating. Materials. 2025; 18(10):2220. https://doi.org/10.3390/ma18102220
Chicago/Turabian StyleStarman, Bojan, Bin Chen, Andraž Maček, Yi Zhang, Miroslav Halilovič, and Sam Coppieters. 2025. "Characterising Through-Thickness Shear Anisotropy Using the Double-Bridge Shear Test and Finite Element Model Updating" Materials 18, no. 10: 2220. https://doi.org/10.3390/ma18102220
APA StyleStarman, B., Chen, B., Maček, A., Zhang, Y., Halilovič, M., & Coppieters, S. (2025). Characterising Through-Thickness Shear Anisotropy Using the Double-Bridge Shear Test and Finite Element Model Updating. Materials, 18(10), 2220. https://doi.org/10.3390/ma18102220


