Experimental and Numerical Study of Surface Roughness of Thin Brass Wire Processed by Different Dieless Drawing Processes
Abstract
1. Introduction
- Significant difficulties during the methodology calibration, especially for hot deformation.
- Inhomogeneity in the mechanical properties of the material are not only related to differences in the crystal lattice orientation, as was assumed in this approach. Some differences in the microstructure, the presence of non-metallic inclusions, or the second phase of the material can also be important.
- (i)
- Develop a theoretical model of the roughness changes during DD and the model calibration based on the experimental results for thin brass wire;
- (ii)
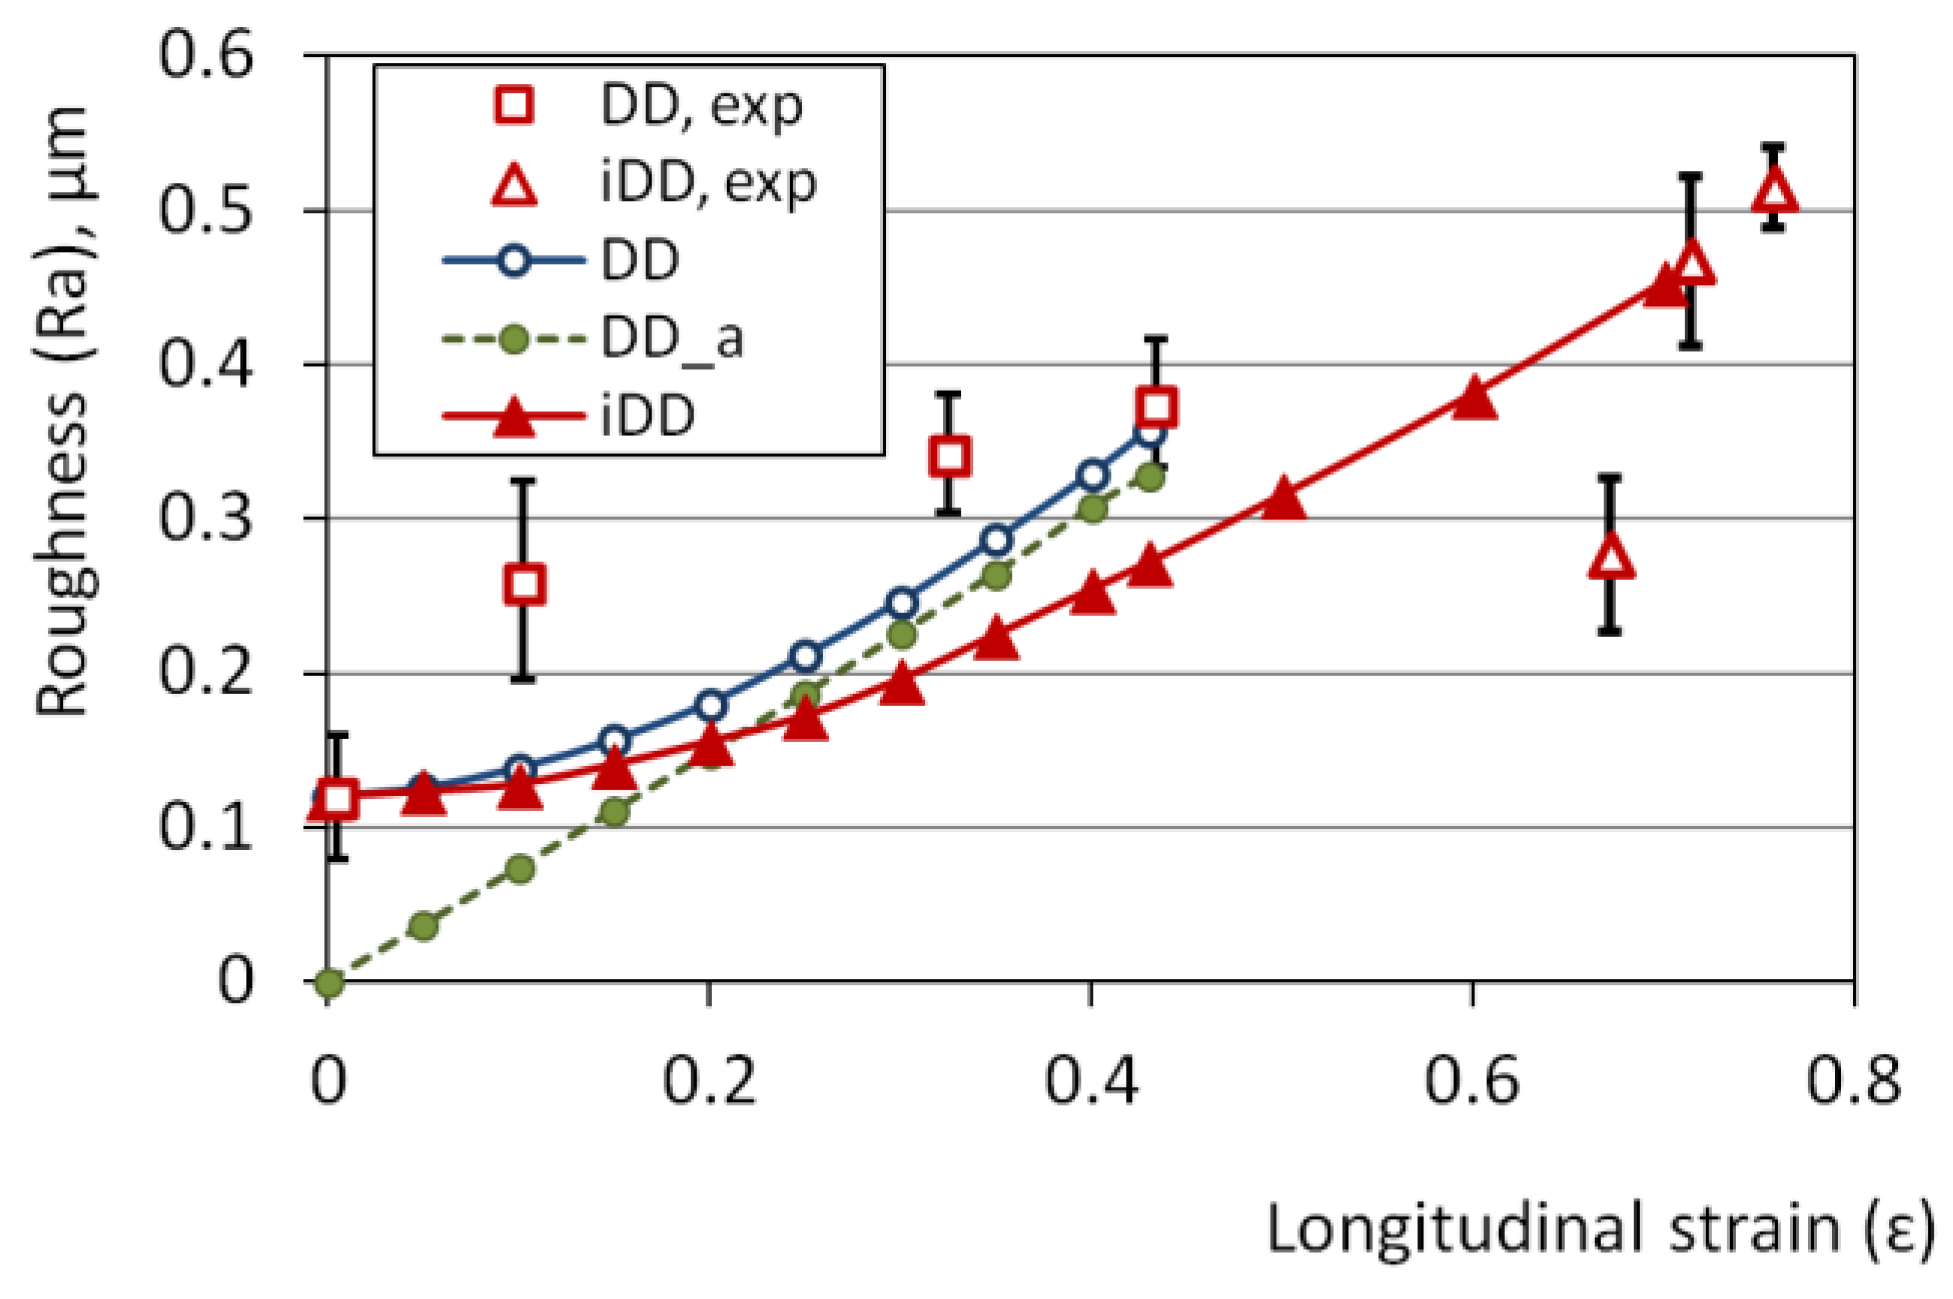
- Comparative analysis of roughness development during the CDD and IDD processes and explanation of the reasons for any possible differences.
2. Materials
3. Methods
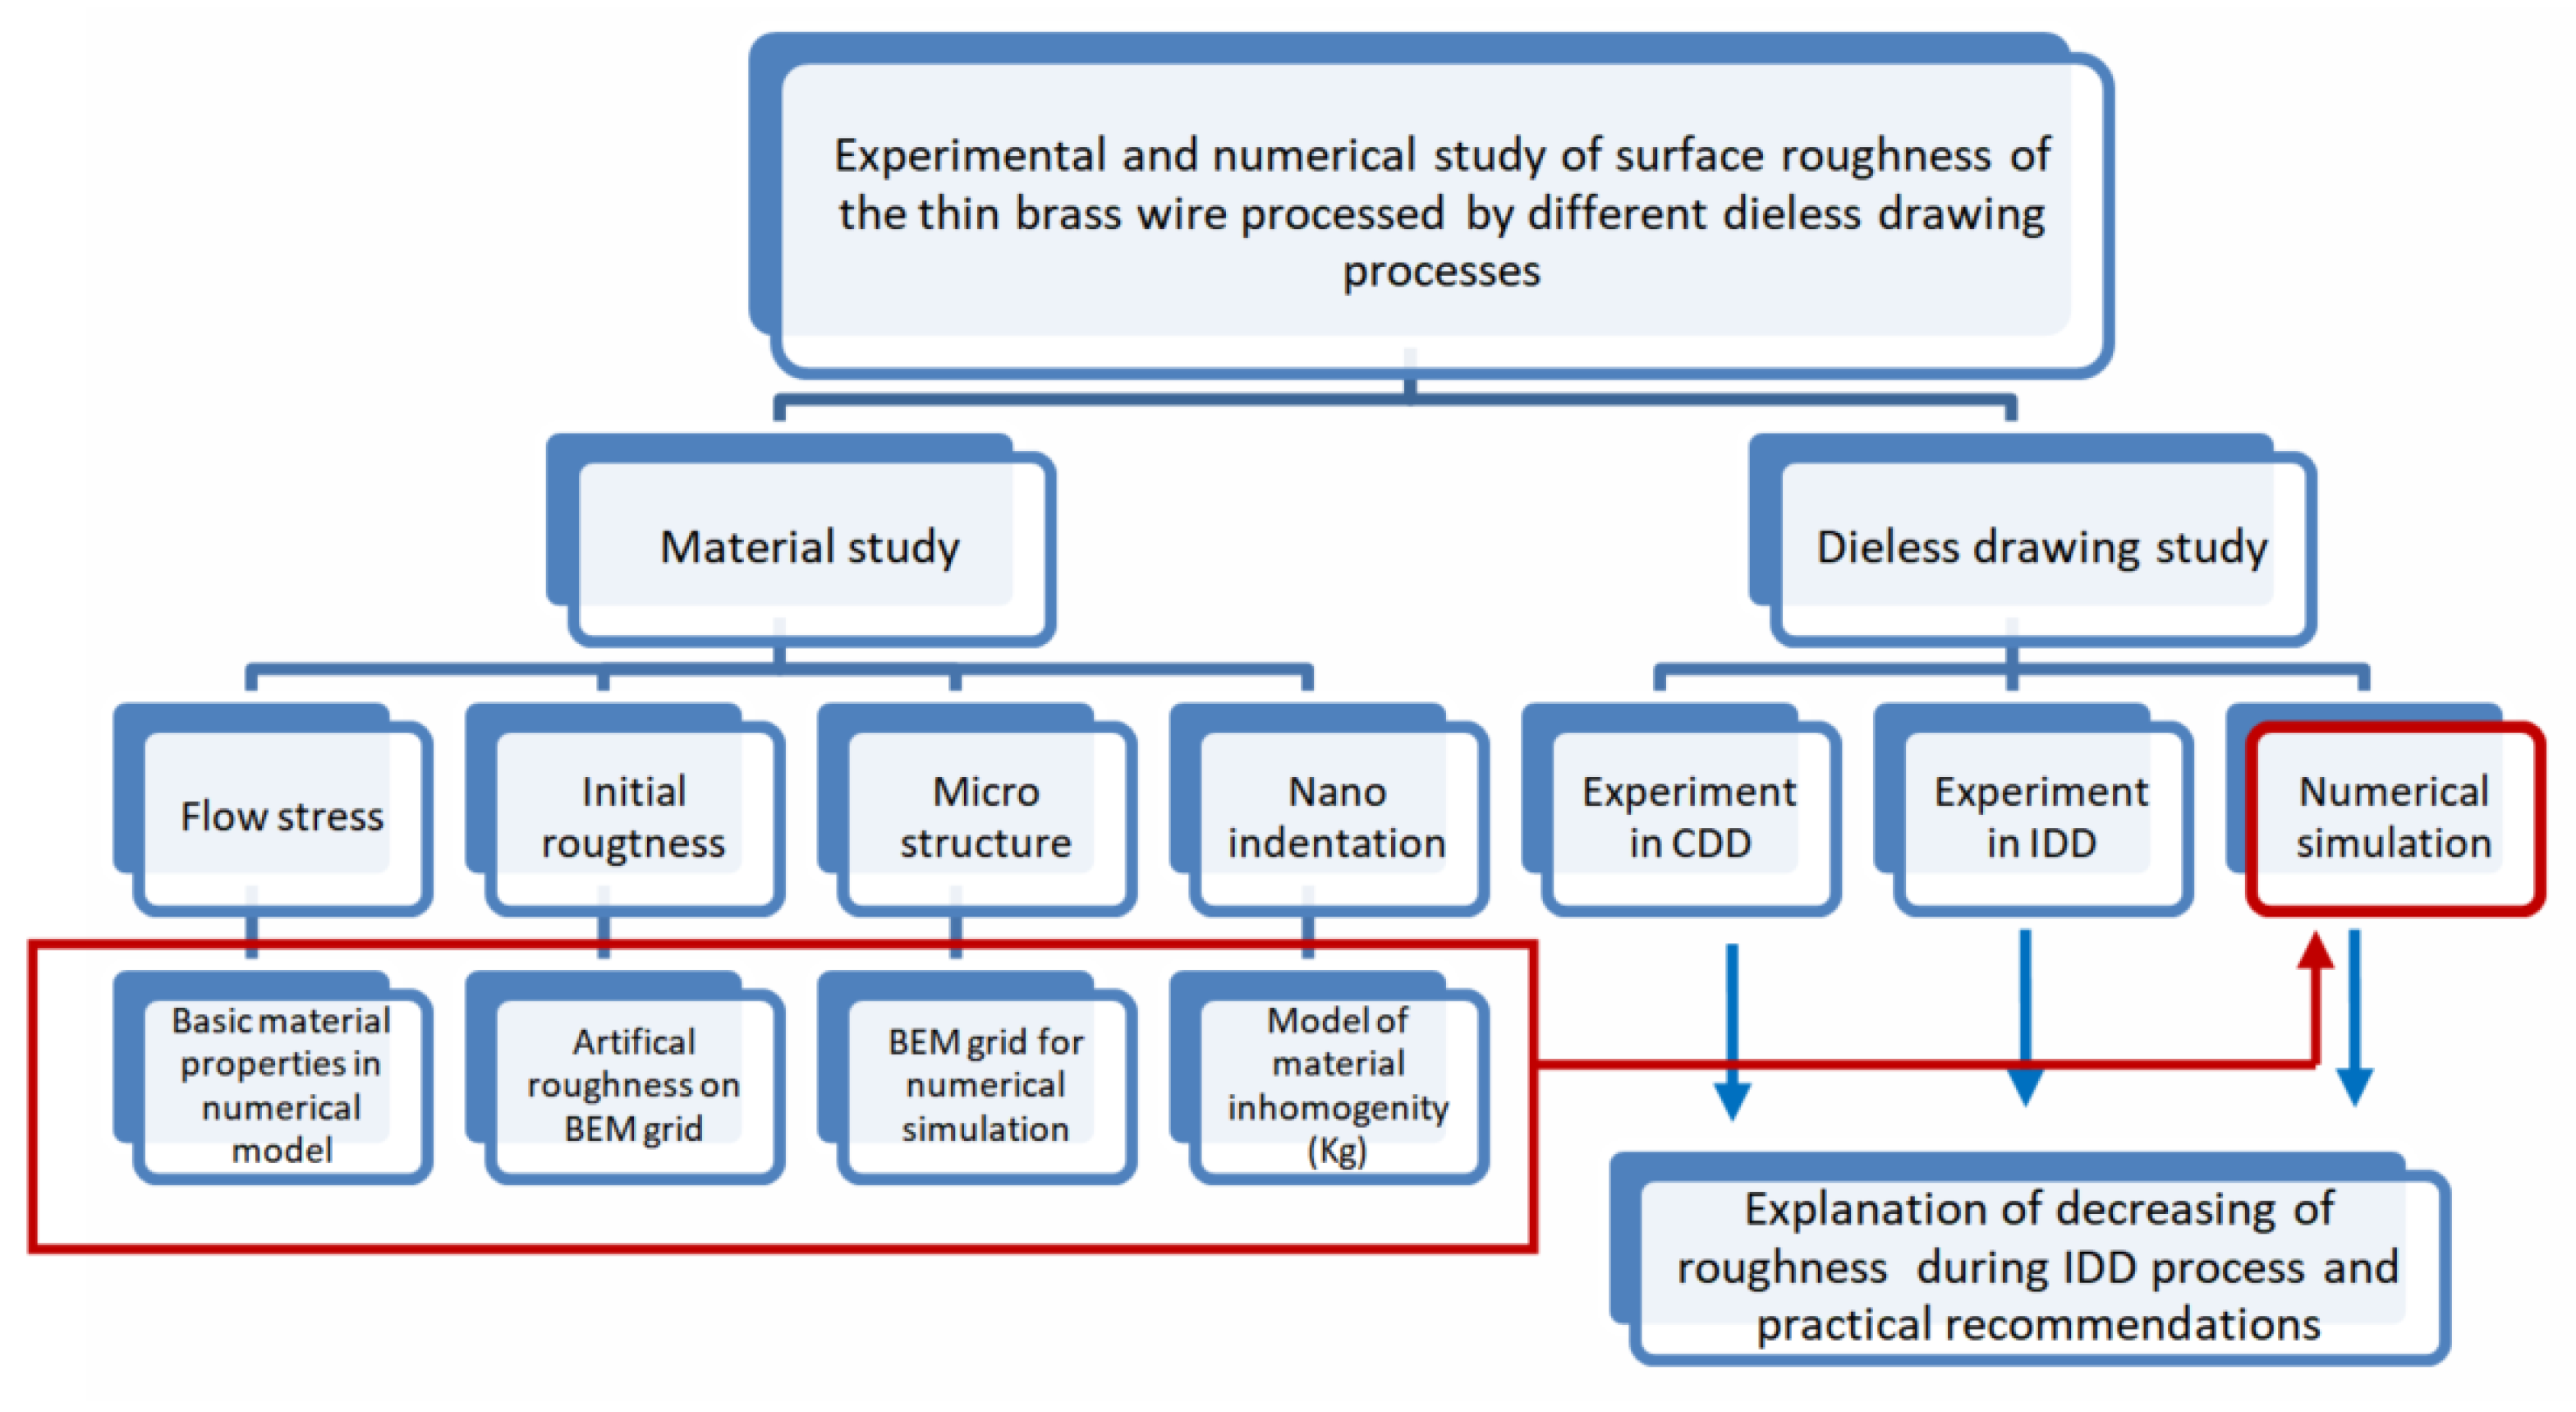
3.1. Overall Research Approach
3.2. Dieless Drawing Processes
3.3. Roughness Measurement
3.4. Boundary Element Method Based on the Numerical Model of Roughness
- -
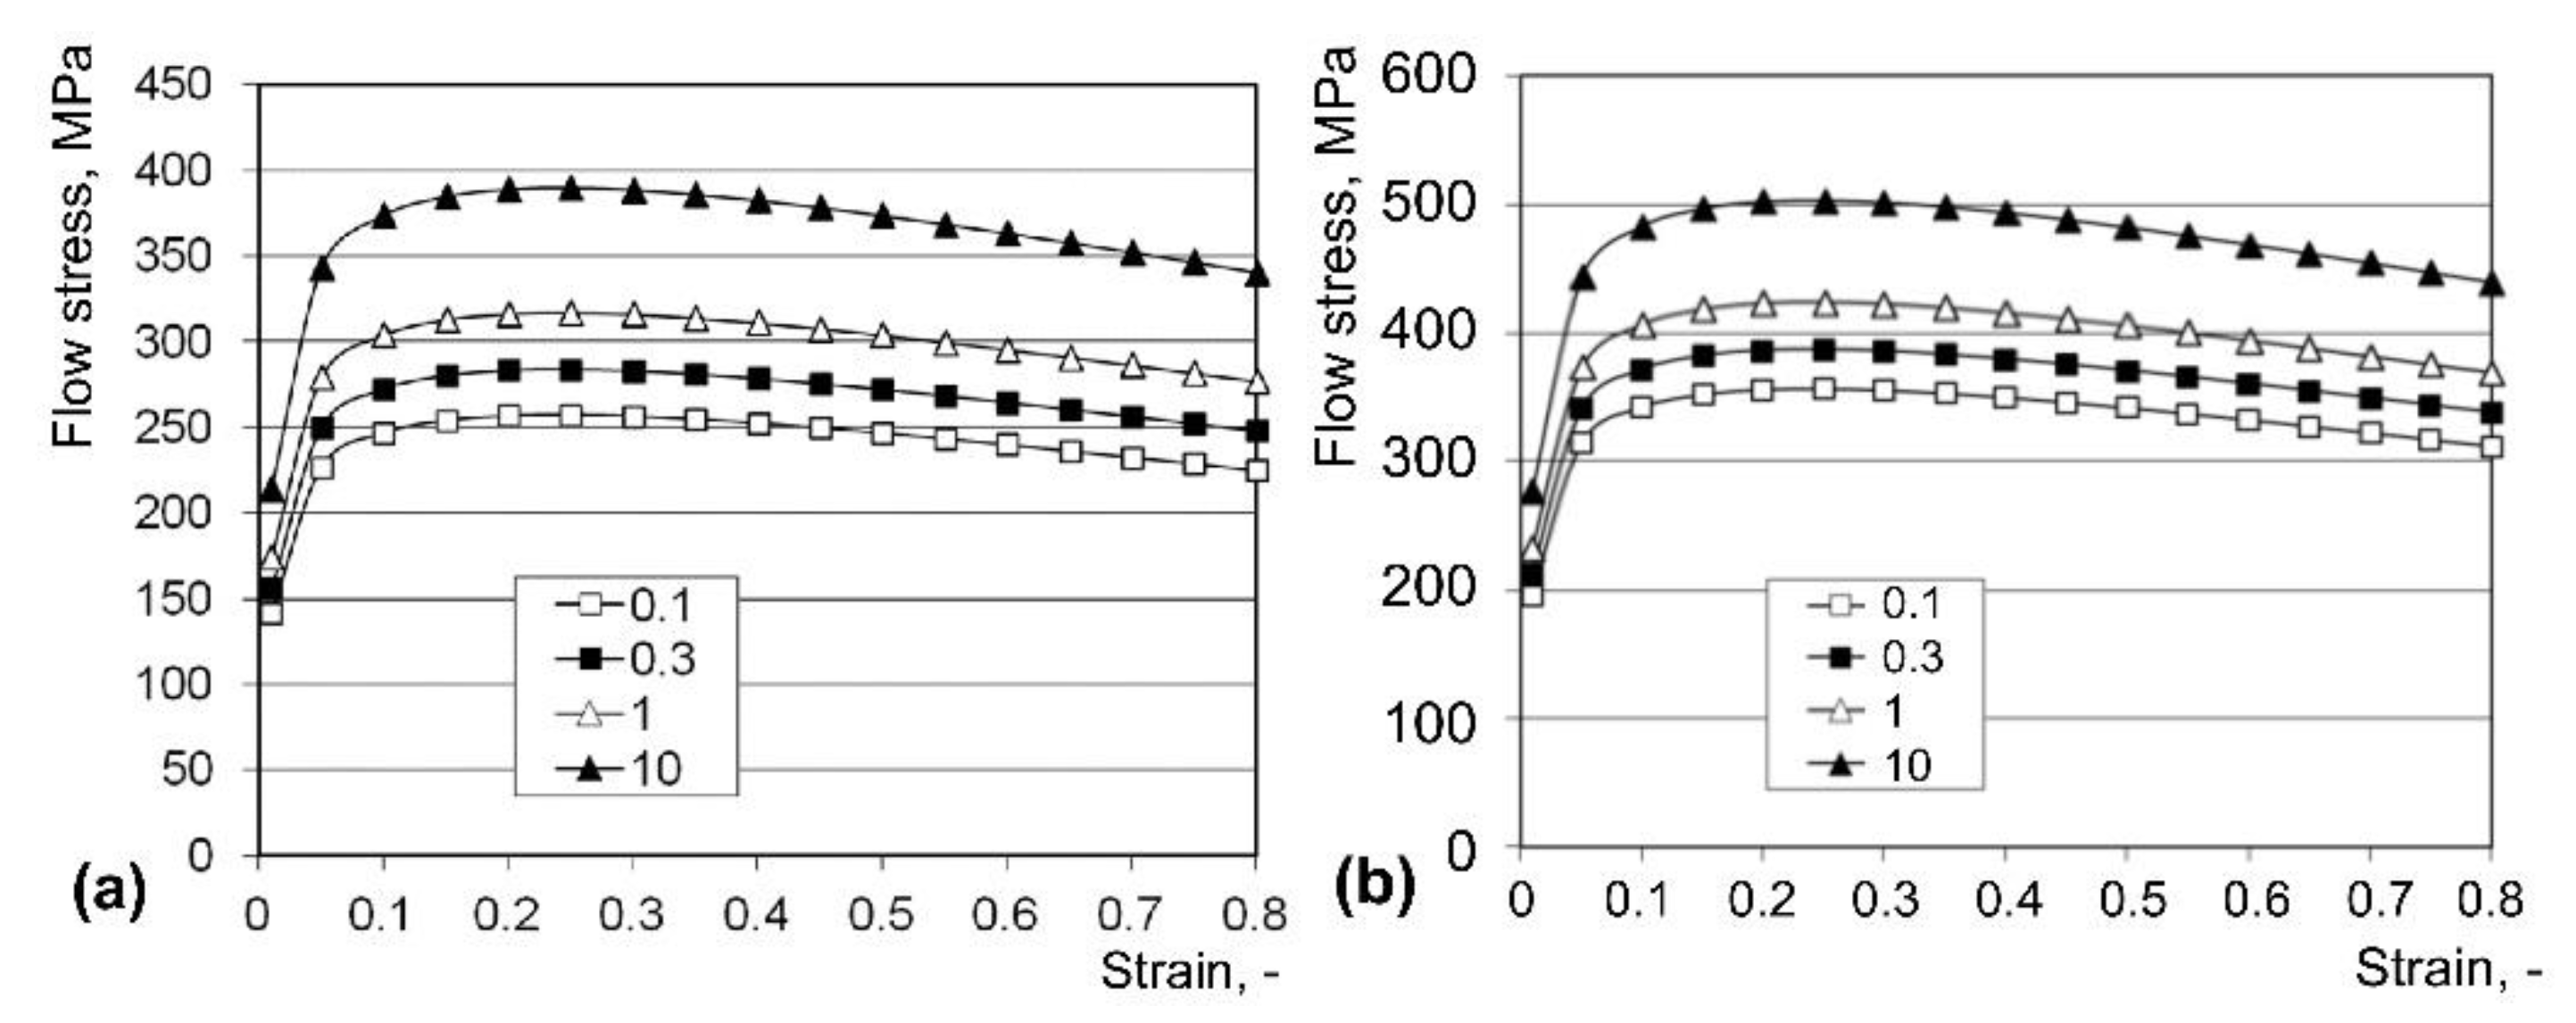
- The flow stress model determination (Equation (2));
- -
- Generation of the boundary elements (BEM) grid based on experimental data (i.e., microstructure, Figure 5a);
- -
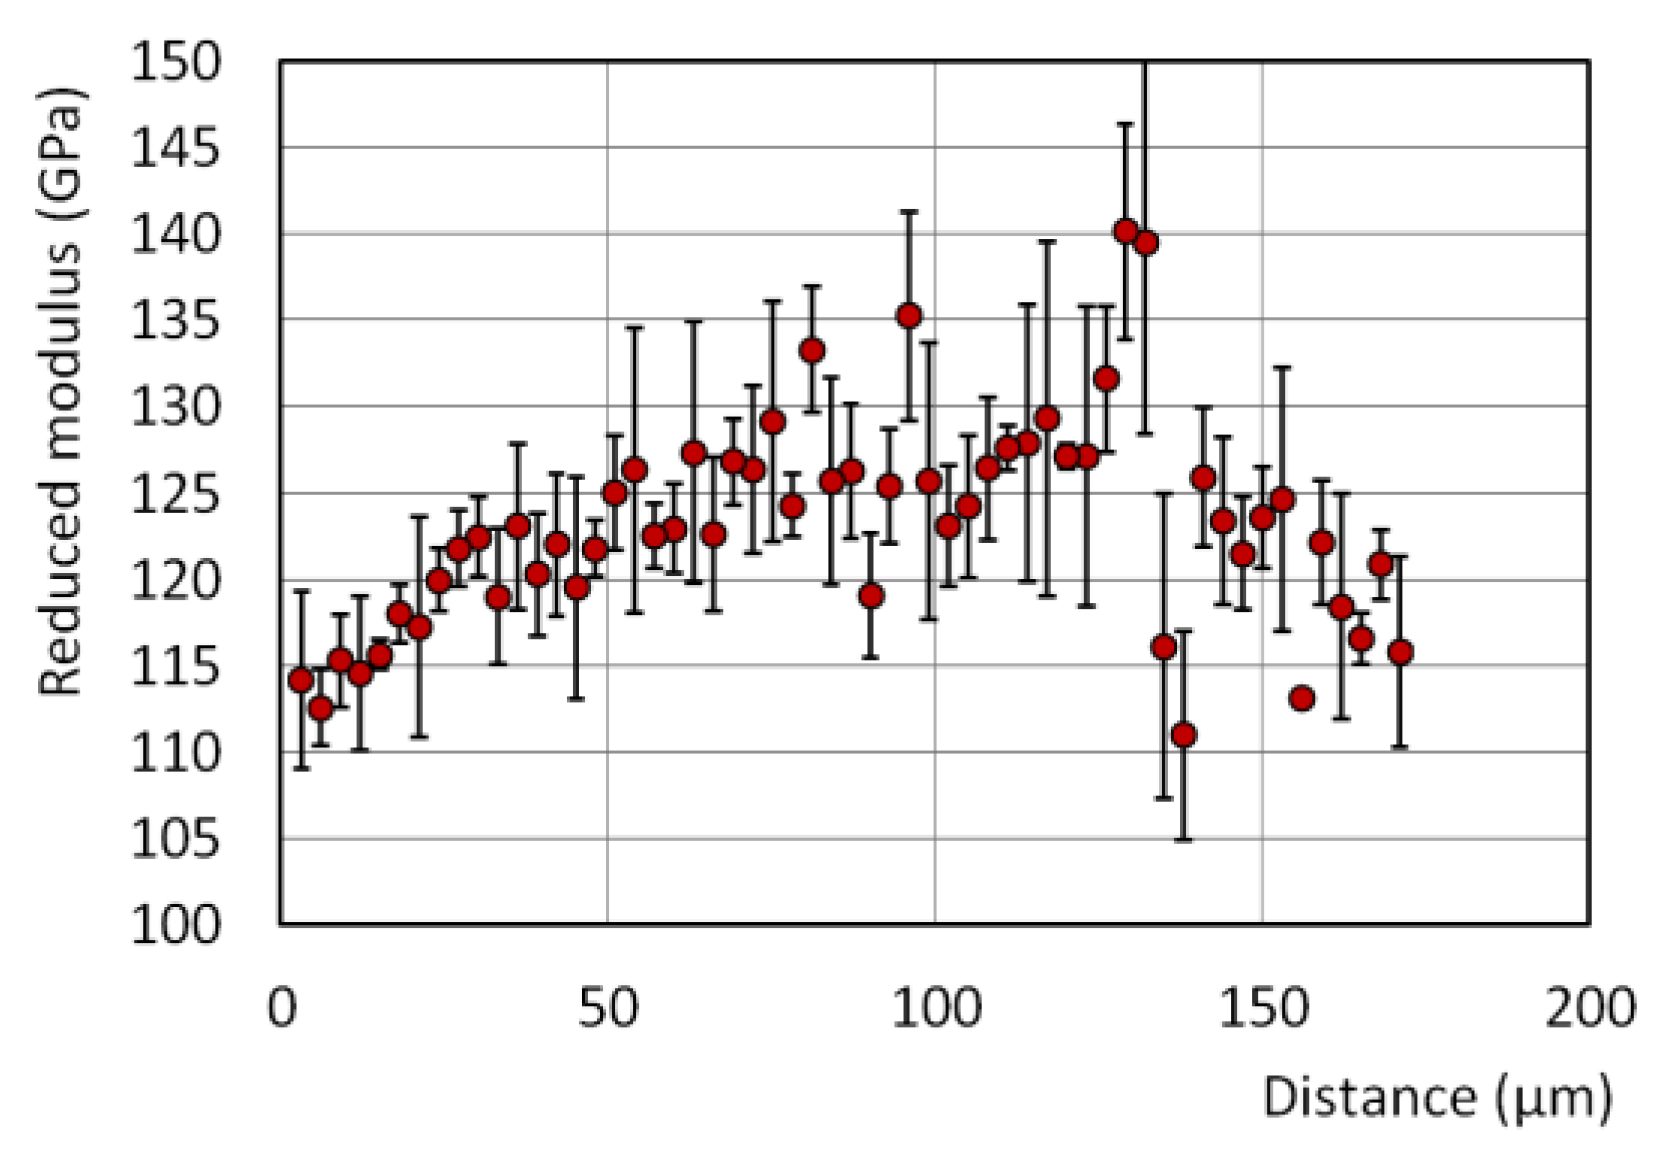
- Determination of the mechanical inhomogeneity parameter values (Equation (11)), based on the nanoindentation test results;
- -
- Generation of the surface relief in BEM grid based on experimental data (i.e., initial surface profile modeling) (Figure 5c).
3.5. Nanoindentation Tests for Calibration of Numerical Model
4. Results and Discussion
4.1. Results of the Nanoindentation Test and Calibration of the BEM Model
4.2. Experimental Study of the DD and IDD Processes
4.3. Strain Effect on Roughness Modeling
5. Summary
Author Contributions
Funding
Institutional Review Board Statement
Informed Consent Statement
Data Availability Statement
Conflicts of Interest
References
- Weiss, V.; Kot, R.A. Dieless wire drawing with transformation plasticity. Wire J. 1969, 9, 182–189. [Google Scholar]
- Furushima, T.; Manabe, K. Dieless drawing process of extruded non-circular aluminum alloy tubes with double hollow section. J. Japan Inst. Light Met. 2007, 57, 351–356. [Google Scholar] [CrossRef][Green Version]
- Tiernan, P.; Carolan, R.; Twohig, E.; Tofail, S.A.M. Design and development of a novel load-control dieless rod drawing system. CIRP J. Manuf. Sci. Technol. 2011, 4, 110–117. [Google Scholar] [CrossRef]
- Tiernan, P.; Hillery, M.T. Dieless wire drawing—An experimental and numerical analysis. J. Mater. Process. Technol. 2004, 155–156, 1178–1183. [Google Scholar] [CrossRef]
- Kraft, F.B. Three fine wire drawing systems—an economic comparison. Wire J. 1980, 19, 103–105. [Google Scholar]
- Sekiguchi, H.; Kobatake, K.; Osakada, K. A Fundamental Study on Dieless Drawing BT. In Proceedings of the Fifteenth International Machine Tool Design and Research Conference; Tobias, S.A., Koenigsberger, F., Eds.; Palgrave Macmillan: London, UK, 1975; pp. 539–544. [Google Scholar]
- Furushima, T.; Manabe, K. Experimental and numerical study on deformation behavior in dieless drawing process of superplastic microtubes. J. Mater. Process. Technol. 2007, 191, 59–63. [Google Scholar] [CrossRef]
- Furushima, T.; Imagawa, Y.; Furusawa, S.; Manabe, K.I. Deformation profile in rotary laser dieless drawing process for metal microtubes. Procedia Eng. 2014, 81, 700–705. [Google Scholar] [CrossRef]
- Carolan, R.; Tiernan, P. Computer controlled system for dieless drawing of tool steel bar. J. Mater. Process. Technol. 2009, 209, 3335–3342. [Google Scholar] [CrossRef]
- Furushima, T.; Hung, N.Q.; Manabe, K.I.; Sasaki, O. Development of semi-dieless metal bellows forming process. J. Mater. Process. Technol. 2013, 213, 1406–1411. [Google Scholar] [CrossRef]
- Furushima, T.; Manabe, K. Experimental study on multi-pass dieless drawing process of superplastic Zn-22% Al alloy microtubes. J. Mater. Process. Technol. 2007, 187–188, 236–240. [Google Scholar] [CrossRef]
- Milenin, A. Rheology-based approach of design the dieless drawing processes. Arch. Civ. Mech. Eng. 2018, 18, 1309–1317. [Google Scholar] [CrossRef]
- Considère, A. Mémoire sur l’emploi du fer et de l’acier dans les constructions. Ann. Ponts Chaussées 1885, 34, 574–595. [Google Scholar]
- Soboyejo, W.O. Mechanical Properties of Engineered Materials; Marcel Dekker: New York, NY, USA, 2003. [Google Scholar]
- Wróbel, M.; Pieła, K. Basal slip localization in zinc single crystals. The Considère analyses. Philos. Mag. 2010, 90, 1873–1891. [Google Scholar] [CrossRef]
- Bylya, O.I.; Khismatullin, T.; Blackwell, P.; Vasin, R.A. The effect of elasto-plastic properties of materials on their formability by flow forming. J. Mater. Process. Technol. 2018, 252, 34–44. [Google Scholar] [CrossRef]
- Milenin, A.; Furushima, T.; Du, P.; Pidvysots’kyy, V. Improving the workability of materials during the dieless drawing processes by multi-pass incremental deformation. Arch. Civ. Mech. Eng. 2020, 20, 86. [Google Scholar] [CrossRef]
- Sundaram, P.A. Deformation-induced surface roughening studies in an AISI 1090 spheroidized steel. Scr. Metall. Mater. 1995, 33, 1093–1099. [Google Scholar] [CrossRef]
- Turner, T.J.; Miller, M.P. Modeling the influence of material structure on deformation induced surface roughening in AA7050 thick plate. J. Eng. Mater. Technol. 2006, 129, 367–379. [Google Scholar] [CrossRef]
- Romanova, V.A.; Balokhonov, R.R.; Panin, A.V.; Batukhtina, E.E.; Kazachenok, M.S.; Shakhijanov, V.S. Micromechanical model of deformation-induced surface roughening in polycrystalline materials. Phys. Mesomech. 2017, 20, 324–333. [Google Scholar] [CrossRef]
- Dai, Y.Z.; Chiang, F.P. On the mechanism of plastic deformation induced surface roughness. J. Eng. Mater. Technol. 1992, 114, 432–438. [Google Scholar] [CrossRef]
- Stoudt, M.R.; Hubbard, J.B.; Leigh, S.D. On the relationship between deformation-induced surface roughness and plastic strain in AA5052—Is it really linear? Metall. Mater. Trans. A 2011, 42, 2668–2679. [Google Scholar] [CrossRef]
- Osakada, K.; Oyane, M. On the roughening phenomenon of free surface in deformation process. Trans. Japan Soc. Mech. Eng. 1970, 36, 1017–1022. [Google Scholar] [CrossRef][Green Version]
- Knysh, P.; Sasaki, K.; Furushima, T.; Knezevic, M.; Korkolis, Y.P. Deformation-induced surface roughening of an Al-Mg alloy. J. Phys. Conf. Ser. 2018, 1063, 12132. [Google Scholar] [CrossRef]
- Furushima, T.; Masuda, T.; Manabe, K.; Alexandrov, S. Prediction of free surface roughening by 2D and 3D model con-sidering material inhomogeneity. J. Solid Mech. Mater. Eng. 2011, 5, 978–990. [Google Scholar] [CrossRef][Green Version]
- Milenin, A.; Furushima, T.; Němeček, J. Transformation of surface roughness of mg alloy tubes during laser dieless drawing. J. Mater. Eng. Perform. 2020, 29, 7736–7743. [Google Scholar] [CrossRef]
- Nur, R.; Muas, M.; Apollo; Risal, S. Effect of current and wire speed on surface roughness in the manufacturing of straight gear using wire-cut EDM process. IOP Conf. Ser. Mater. Sci. Eng. 2019, 619, 12002. [Google Scholar] [CrossRef]
- Jewelry Wire: Everything You Need to Know. Available online: https://door44studios.com/jewelry-wire-everything-you-need-to-know-to-make-the-best-choice/ (accessed on 8 May 2021).
- LaboTex, the Texture Analysis Software for Windows. Available online: http://www.labosoft.com.pl/ (accessed on 10 November 2021).
- Schulz, L.G. A direct method of determining preferred orientation of a flat reflection sample using a geiger counter X-ray spectrometer. J. Appl. Phys. 1949, 20, 1030–1033. [Google Scholar] [CrossRef]
- Milenin, A.; Kustra, P.; Wróbel, M.; Pidvysots’kyy, V.; Packo, M. The dieless drawing process for the elongation of ultrafine copper and brass wire. In Forming the Future—Proceedings of the 13th International Conference on the Technology of Plasticity; Daehn, G., Cao, J., Kinsey, B., Tekkaya, E., Vivek, A., Yoshida, Y., Eds.; Springer International Publishing: Cham, Switzerland, 2021; pp. 467–478. [Google Scholar]
- Li, K.; Wang, Z.; Liu, X. Study of deformation stability during semi-dieless drawing of Ti-6Al-4V alloy wire. Materials 2019, 12, 1320. [Google Scholar] [CrossRef]
- DeGarmo, E.P.; Black, J.T.; Kohser, R.A. Materials and Processes in Manufacturing, 9th ed.; Wiley: New York, NY, USA, 2003. [Google Scholar]
- Crouch, S.L.; Starfield, A.M. Boundary Element Methods in Solid Mechanics; George Allen & Unwin Ltd.: London, UK, 1983. [Google Scholar]
- Milenin, A.; Byrska, D.J.; Grydin, O. The multi-scale physical and numerical modeling of fracture phenomena in the MgCa0.8 alloy. Comput. Struct. 2011, 89, 1038–1049. [Google Scholar] [CrossRef]
- Muskhelishvili, N.I. Some Basic Problems of the Mathematical Theory of Elasticity; Springer Science & Business Media: Berlin, Germany, 2013. [Google Scholar]
- Rauch, Ł.; Bzowski, K. Image processing methods for segmentation of microscopic pictures of the MgCa alloys. Comput. Methods Mater. Sci. 2011, 11, 350–356. [Google Scholar]
- Oliver, W.C.; Pharr, G.M. An improved technique for determining hardness and elastic modulus using load and displace-ment sensing indentation experiments. J. Mater. Res. 1992, 7, 1564–1583. [Google Scholar] [CrossRef]
- Němeček, J.; Králík, V.; Vondřejc, J. Micromechanical analysis of heterogeneous structural materials. Cem. Concr. Compos. 2013, 36, 85–92. [Google Scholar] [CrossRef]
- Gupta, S.; Koudelková, V.; Hrbek, V.; Němeček, J. Micromechanical characteristics of hardly deformable Mg alloys. Defect Diffus. Forum 2016, 368, 33–36. [Google Scholar] [CrossRef]


| Process | V0, mm/s | V1, mm/s | εpass | n | td, °C |
|---|---|---|---|---|---|
| CDD | 12.16 | 12.16–18.1 | 0–0.328 | 1 | 400 |
| IDD | 12.16 | 13.38 | 0.091 | 8 | 400 |
Publisher’s Note: MDPI stays neutral with regard to jurisdictional claims in published maps and institutional affiliations. |
© 2021 by the authors. Licensee MDPI, Basel, Switzerland. This article is an open access article distributed under the terms and conditions of the Creative Commons Attribution (CC BY) license (https://creativecommons.org/licenses/by/4.0/).
Share and Cite
Milenin, A.; Wróbel, M.; Kustra, P.; Němeček, J. Experimental and Numerical Study of Surface Roughness of Thin Brass Wire Processed by Different Dieless Drawing Processes. Materials 2022, 15, 35. https://doi.org/10.3390/ma15010035
Milenin A, Wróbel M, Kustra P, Němeček J. Experimental and Numerical Study of Surface Roughness of Thin Brass Wire Processed by Different Dieless Drawing Processes. Materials. 2022; 15(1):35. https://doi.org/10.3390/ma15010035
Chicago/Turabian StyleMilenin, Andrij, Mirosław Wróbel, Piotr Kustra, and Jiří Němeček. 2022. "Experimental and Numerical Study of Surface Roughness of Thin Brass Wire Processed by Different Dieless Drawing Processes" Materials 15, no. 1: 35. https://doi.org/10.3390/ma15010035
APA StyleMilenin, A., Wróbel, M., Kustra, P., & Němeček, J. (2022). Experimental and Numerical Study of Surface Roughness of Thin Brass Wire Processed by Different Dieless Drawing Processes. Materials, 15(1), 35. https://doi.org/10.3390/ma15010035


