Article

Determination of Geometrical Deviations of Large-Size Crankshafts with Limited Detection Possibilities Resulting from the Assumed Measuring Conditions

by
Krzysztof Nozdrzykowski
1,*,
Zenon Grządziel
1,
Rafał Grzejda
2 and
Mateusz Stępień
3
1
Faculty of Marine Engineering, Maritime University of Szczecin, 2 Willowa Str., 71-560 Szczecin, Poland
2
Faculty of Mechanical Engineering and Mechatronics, West Pomeranian University of Technology in Szczecin, 19 Piastow Ave., 70-310 Szczecin, Poland
3
Piping Company ‘Chemar Rurociągi’ Sp. z o. o., 6 Olszewskiego St., 25-663 Kielce, Poland
*
Author to whom correspondence should be addressed.
Energies 2023, 16(11), 4463; https://doi.org/10.3390/en16114463
Submission received: 6 May 2023 / Revised: 22 May 2023 / Accepted: 29 May 2023 / Published: 31 May 2023

Abstract

:
This article deals with the geometrical deviation measurements of crankshafts of large marine engines fuelled with conventional or alternative fuels, taking into account the problem of their deformability. Since the detectability of geometrical deviations of a crankshaft supported by prisms depends largely on the support conditions assumed and the parameters of the method, the study was carried out for two cases of crankshaft support. The first case concerned measurements of the main journals of a crankshaft seated on a set of supports pre-positioned at an equal height. In contrast, the second case involved measurements of the main journals of a crankshaft seated on supports pre-positioned at various heights. In particular, the research focused on evaluating the effect of sensor location angle on the results of measurements of deviations and contour profiles of the crankshaft main journal system. The results of the research are the developed procedures, the application of which in practical measurements under workshop conditions, where there is no access to coordinate measuring machines, enables correct interpretation of the measurement results and evaluation of the geometrical state of the measured crankshaft.

1. Introduction

A characteristic feature of marine power plant machinery and equipment is the prevalence of large-size components. Among such machine elements, a specific group of parts characterised by low and variable stiffness and, consequently, high susceptibility to bending deformations can be distinguished. This group includes crankshafts of power engines of a ship’s main propulsion machinery as well as auxiliary engines and generator sets. The accuracy of crankshafts [1,2,3,4,5] largely determines the correct functioning of the crank-piston system and, as a result, of the whole working machine [6,7,8,9].
With regard to crankshafts, high criteria are imposed in terms of geometrical execution, given in the product specifications. For this reason, the modern technological process of crankshafts requires constant quality control of the manufactured surfaces [10]. A full and consistent assessment of the geometrical state of the product [11] can be guaranteed only if measurement methods and techniques are used that allow their correct implementation from a metrological point of view, as well as instrumentation whose accuracy is adapted to the tolerances specified in the product specification.
Various methods for measuring and evaluating the circularity profiles of cylindrical machine components have been described in the literature. Mostly, however, they cannot be directly applied to the case of assessing the geometrical state of large-sized crankshafts. Generally, there are two methods of measuring circularity using either a rotary sensor instrument or a rotary table instrument [2]. In the first method, the measured cylindrical element is stationary, and a sensor mounted in a special holder is rotated. In the second method, the measured cylindrical element turns (for example, on a rotary table), while the sensor remains stationary. The second method is simpler to implement. Examples of its use were described by Mekid and Vacharanukul [12], who used a special probe with two laser beams to measure circularity, and by Liu et al. [13], who applied an inductive sensor probe for the same purpose. The studies described in our paper were also carried out according to the second method but were performed for a full-scale large-size crankshaft.
The aforementioned papers deal with measuring the circularity of cylindrical surfaces. In contrast, in a paper published by Li et al. [9] on measuring the diameter of the crankshaft of a 6-cylinder heavy-duty truck engine, a precise measurement method based on a dual-camera system is described. This system consists of two double telecentric lenses, two high-resolution cameras, and two telecentric back light sources. On the other hand, Pavlenko et al. [14] presented a bench to determine the contour errors in the axial direction (such as obliquity, crowning and saddle shape) in the case of an agricultural tractor crankshaft. In a subsequent paper by Wang et al. [15], a method of measuring and evaluating cylindricity error based on a step acceleration algorithm using a machine adapted to small crankshafts is described. The methods described in this paragraph refer to crankshafts fixed and unmoved on external journals [9] or fixed in tusks on a measuring machine [14,15]. They therefore do not take into account the case of a crankshaft seated on supports, which is the subject of our paper.
One of the key issues during the machining of large-size crankshafts is the change in distance between adjacent crank arms. This phenomenon involves opening up the arms that connect two adjacent main journals to the corresponding connecting rod journal and is related to the flexibility of the shaft, its weight, and the fact that the axis of rotation does not correspond to the axis of the shaft. A prototype control support system for straightening elastic deformations of a bent crankshaft occurring due to this phenomenon during machining operations was described by Jeřábek et al. [10]. An automatic alignment system integrated with a non-circular grinding machine for large-size crankshafts presented by Shen et al. [7] operates on a similar principle. These methods concern the measurement of crankshafts during their machining. The method presented in our paper for evaluating the geometrical state of a crankshaft can be carried out under workshop conditions for a shaft after machining has been completed.
Taking into account the imposed accuracy requirements, it should be stated that a comprehensive description of the geometrical state of a crankshaft requires the determination of contour deviations and the no less important deviations of axis position. Due to unavoidable errors resulting from the technological process of machining, misalignment is an inherent element accompanying crankshaft measurement procedures [15,16,17,18,19]. However, the resulting eccentric displacement of the main journals’ axes during the rotation of a measured crankshaft mounted on an assembly of rigid prism supports makes the evaluation of its geometrical state unreliable. This applies to both contour deviations and axis position deviations, as there are limits to the ability to detect geometrical deviations during measurements due to the support conditions adopted [20,21,22], as demonstrated in the authors’ earlier papers [23,24,25,26].
The studies presented in the papers cited above did not take into account the influence of all the parameters of the measurement system on the results of measurements of geometrical magnitudes. In the case of crankshaft measurements based in prisms, the parameters of the measuring system include not only the adopted support conditions but also the parameters of the method.
The parameters of the method (characteristic for reference measurements of deviations and circularity profiles of cylindrical machine elements based in prisms) are defined as the angular magnitudes of the location of support points and measurement points in the adopted coordinate system [27]. From a practical point of view, these magnitudes correspond successively to the opening angle of the fixing prisms 2γ and the angle α determining the direction of movement of the sensor stylus. Observations made during the implementation of previous studies suggested that changes in these parameters could significantly affect the final evaluation of crankshaft geometry. These suggestions have guided the direction of further work undertaken and implemented by our research team.
Taking into account that different method parameters may be used in practical measurements, the research problem required linking the change of method parameters to the developed procedures for determining geometrical deviations of the crankshaft with limited possibilities of their detection caused by the assumed conditions of its support. In particular, the research described here focused on evaluating the effect of the angle of sensor location on the results of measurements of geometrical magnitudes, changing the support conditions of the crankshaft. Two ways of supporting the shaft were adopted: on supports pre-positioned at an equal height and on supports pre-positioned at various heights. Details of the adopted assumptions, the research material, and the results of analysis in this regard are presented in this paper.

2. Materials and Methods

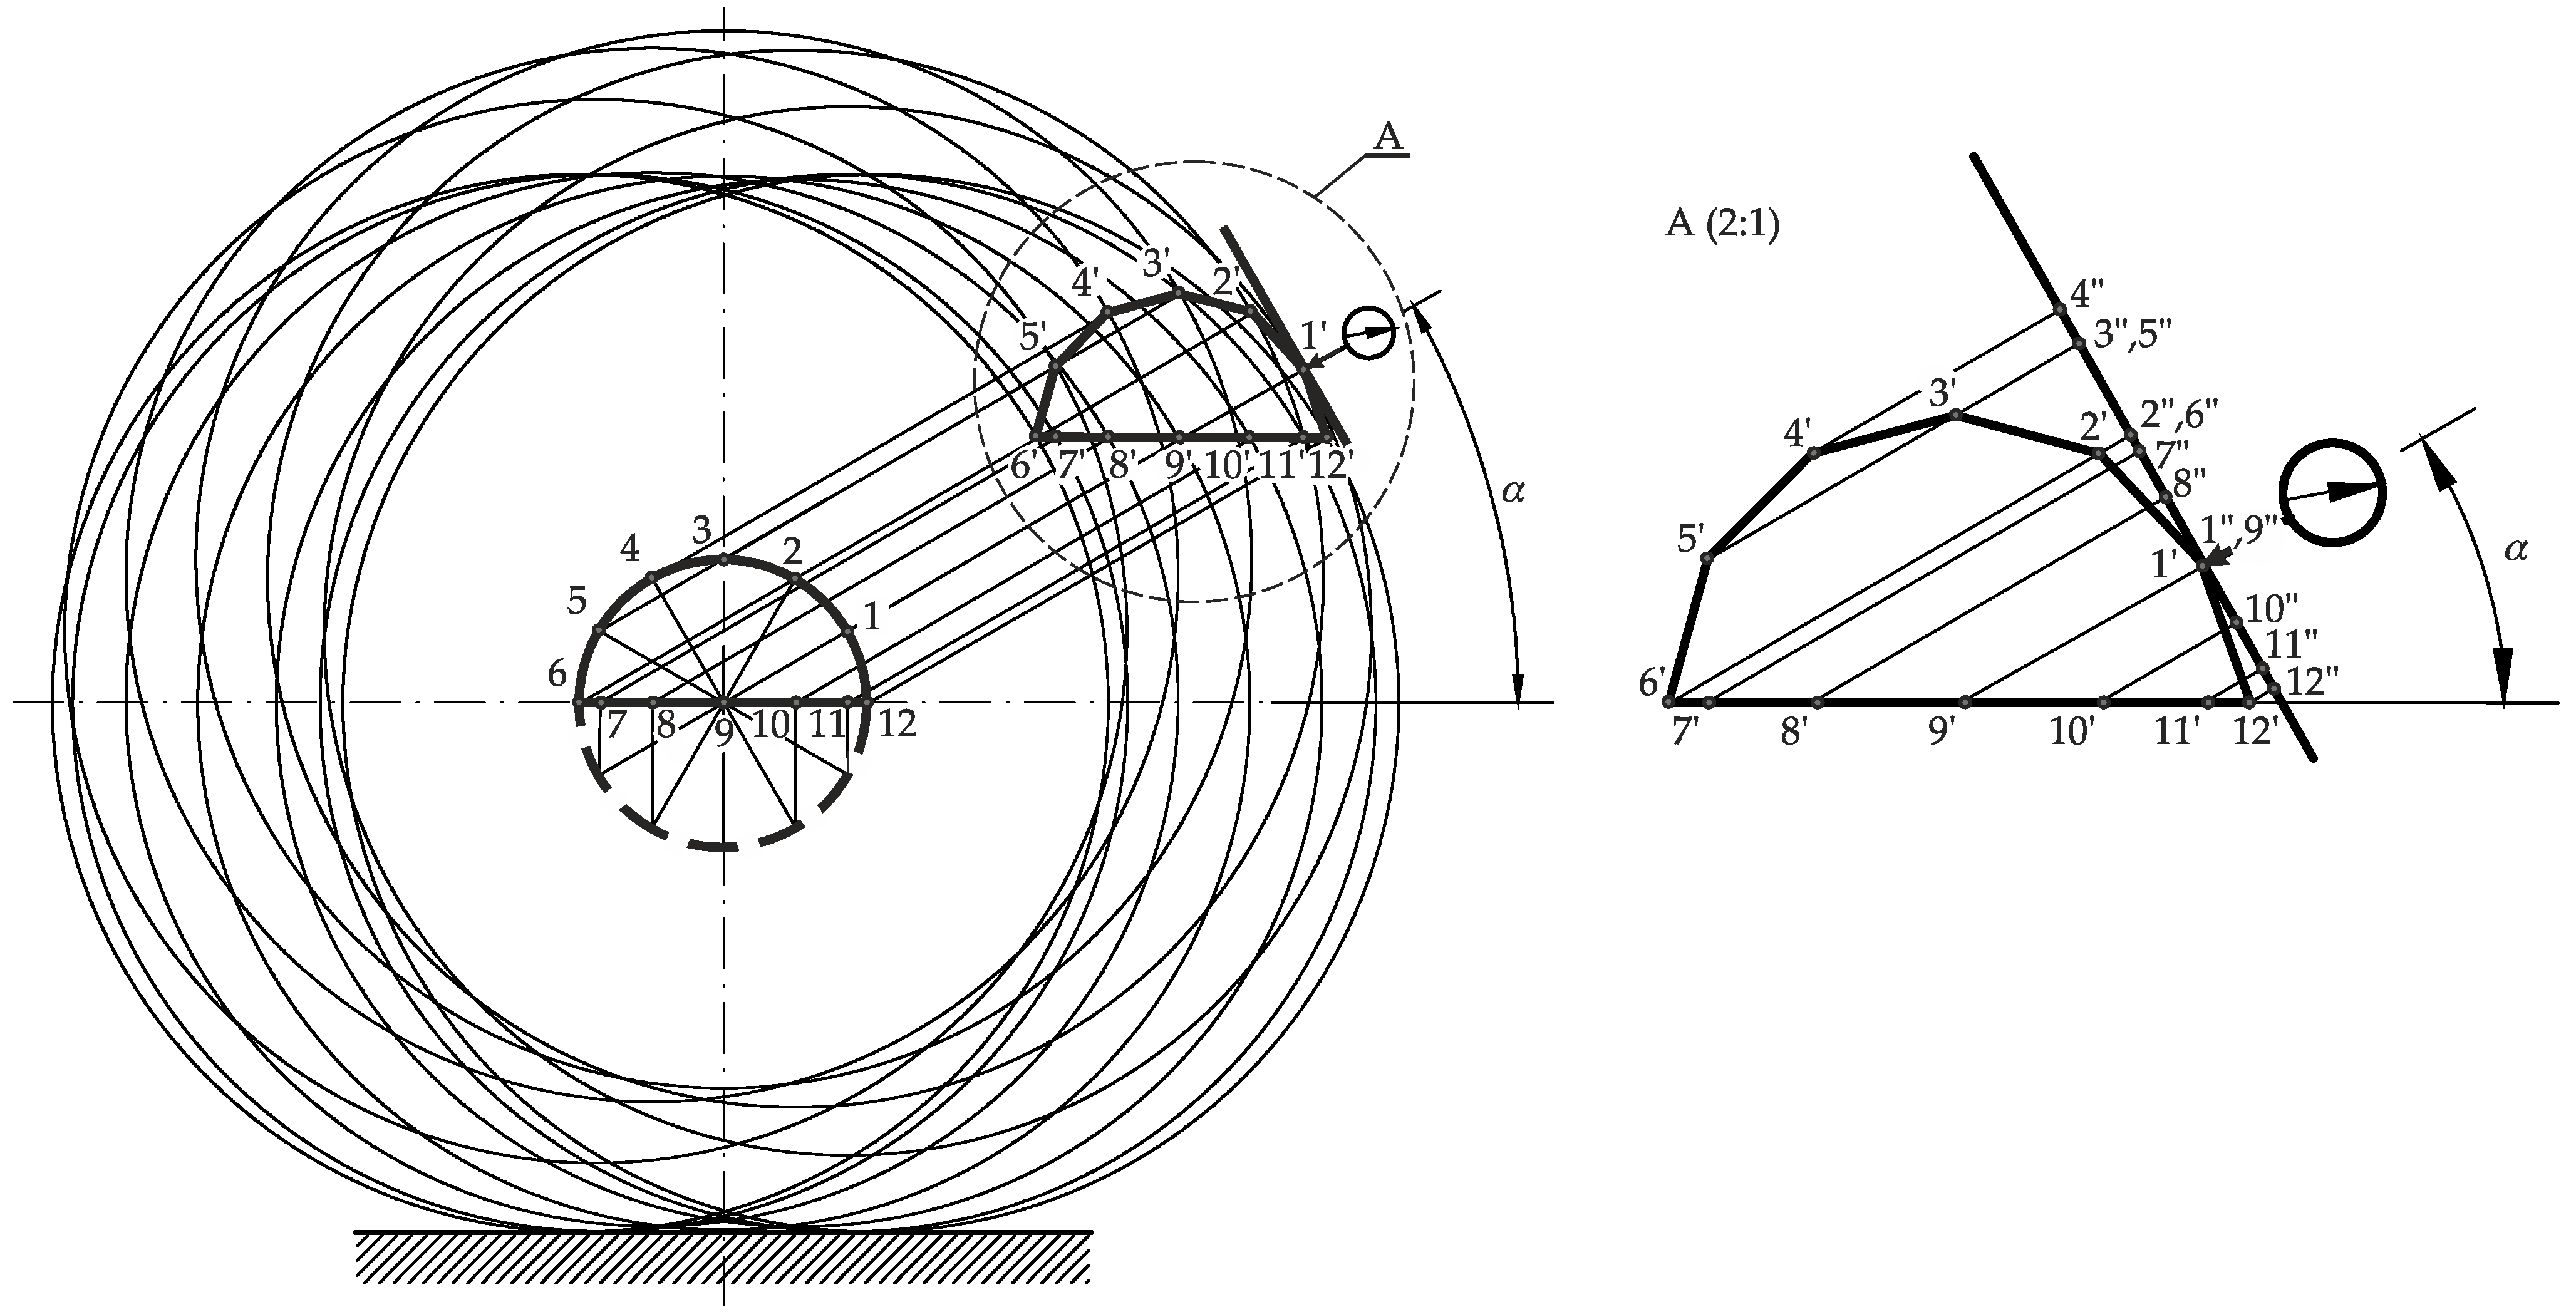
The case of measuring crankshaft main journals seated on supports pre-positioned at an equal height was considered first. The diagram shown in Figure 1 was used to solve the problem adopted.
Figure 1 shows the characteristic points corresponding to the displacement of the tip of a sensor stylus measuring the eccentric displacement of a journal profile loaded with axial position deviation, during crankshaft rotation in 30° steps from 0° to 360°. The positioning of the direction of displacement of the sensor stylus relative to the measured profile is determined by the angle α. The angle of crankshaft rotation is indicated by the parameter φ, while the segment e corresponds to the eccentricity (see Figure 2). As shown, the displacement path of the sensor stylus tip is described by two segments. The first segment is described by an arc contained between points 1′ to 6′ and 12′ to 1′. The second is a rectilinear segment contained between points 6′ to 12′. The curved part of the displacement path corresponds to the measurement of the eccentric displacement of the journal when the journal was not in contact with the formers of the locating prism, where the measurements were not limited by the support of the journal. The rectilinear part of the displacement path corresponds to measurements limited by the journal support.
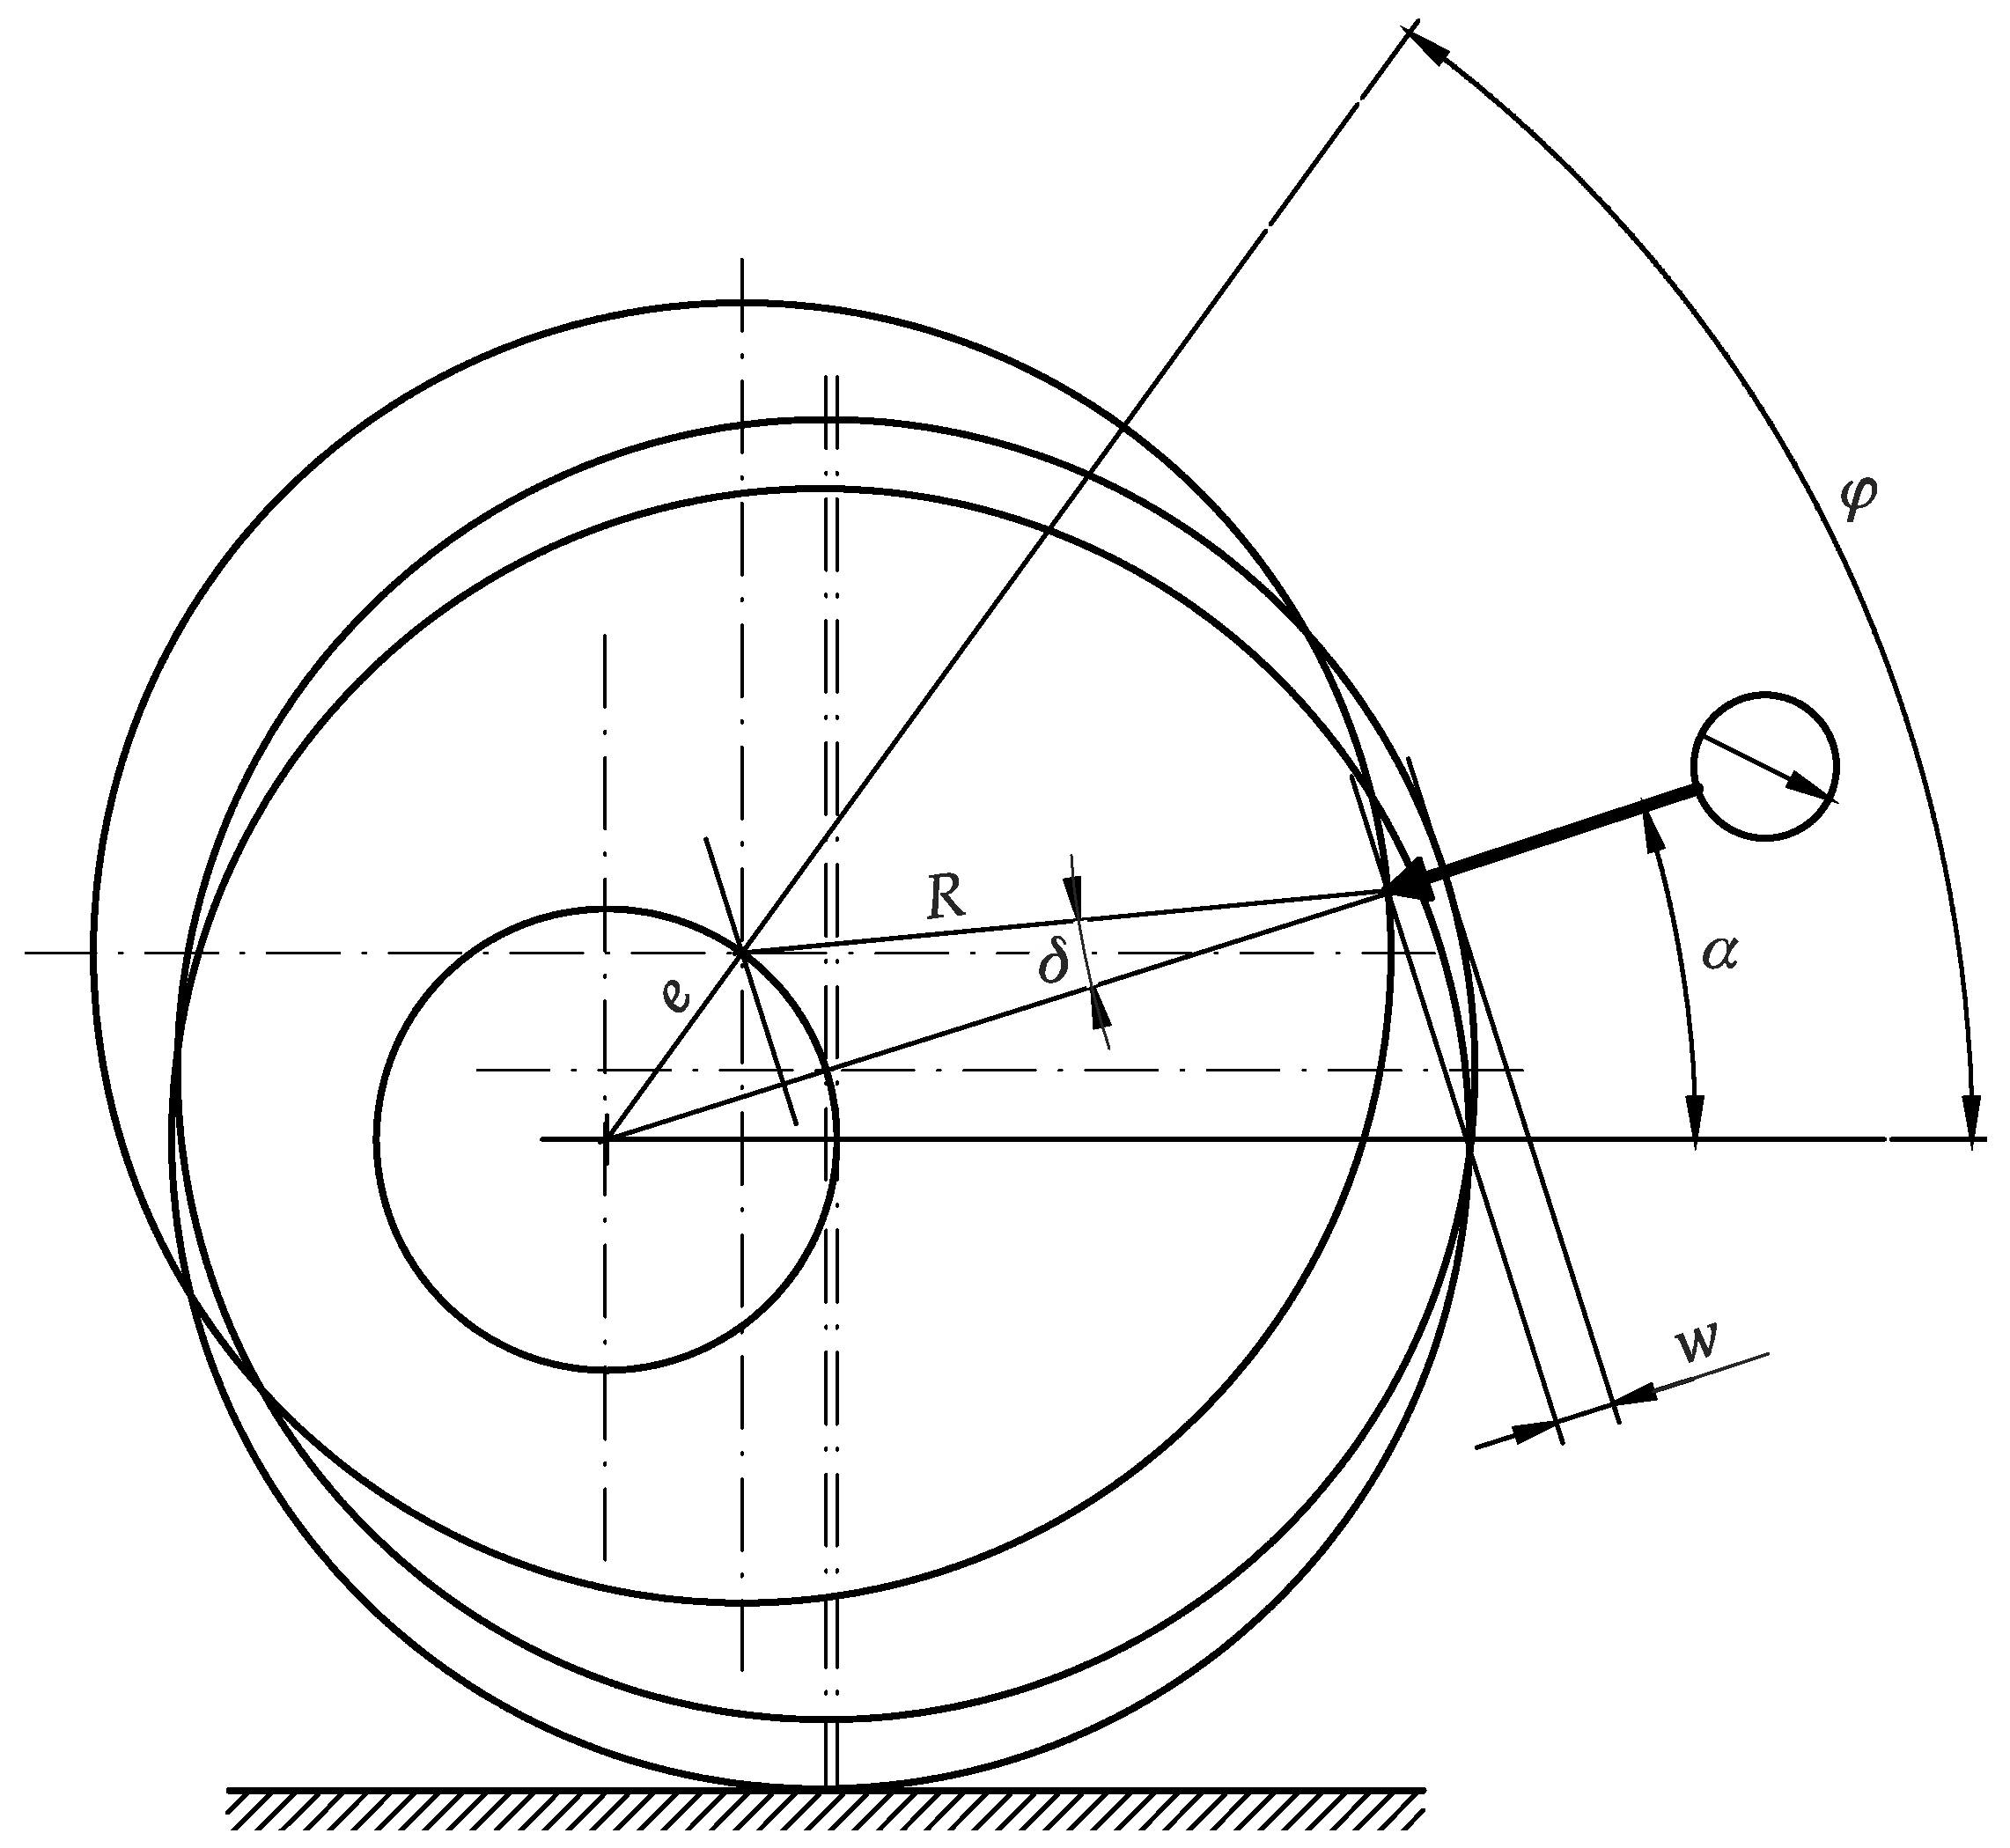
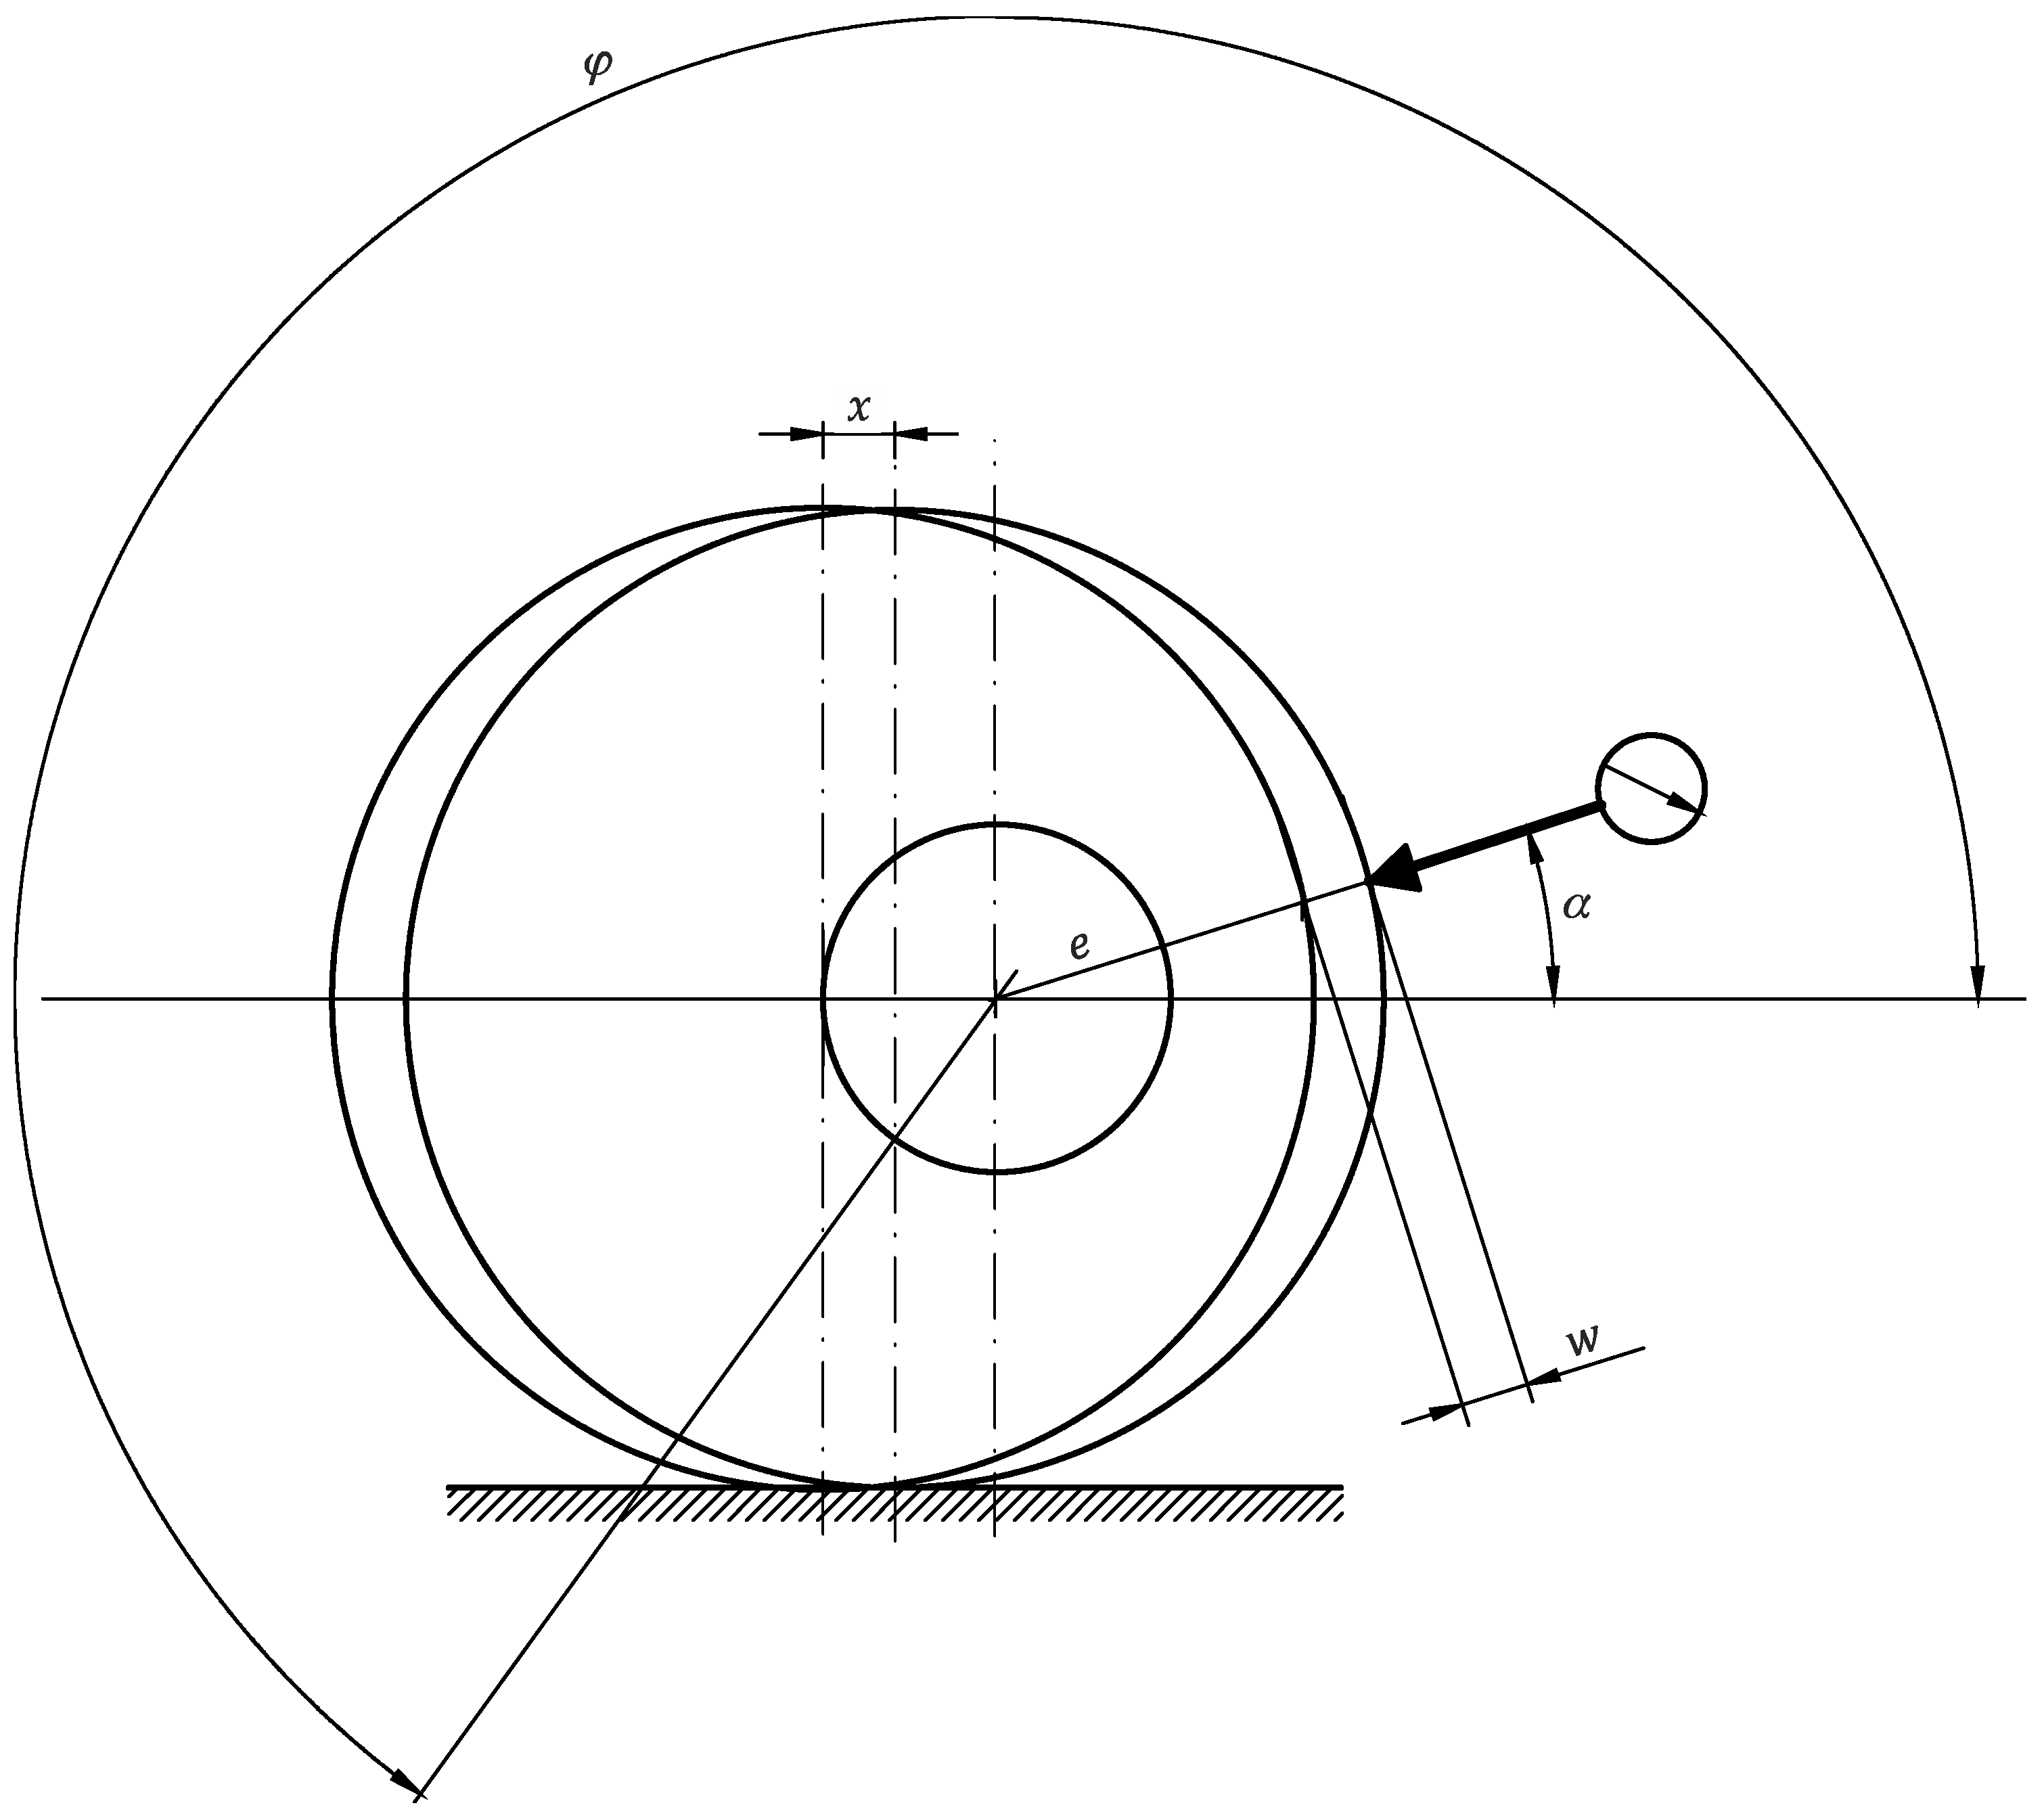
Based on the auxiliary diagrams shown successively in Figure 2 and Figure 3, mathematical relationships were then established linking the angular magnitude α, which is one of the parameters of the method, with the record of the measured profile of the eccentric displacement of the journal loaded with axial position deviation. These relationships can be expressed by the following equations:
  • On the curved segment between points 1′ to 6′ and 12′ to 1′ (Figure 2)
The measured parameter corresponding to the segment w (shown in Figure 2) can be described by the relation
w = e + R e × cos φ α R   × cos δ
Since
R e δ 0
Then
w = e + R e × cos φ α R = e e × cos φ α
  • On a straight segment between points 6′ and 12′ (Figure 3)
Since
x = e × 1 cos φ
Then
w = x × cos α = e × 1 cos φ × cos α
Figure 3. Auxiliary diagram adopted to determine the mathematical relationships linking the method parameter α with the record of the measured eccentric displacement profile of the journal subjected to axial position deviation on the rectilinear segment, contained between the points 6′ to 12′ (illustrated in Figure 1).
Energies 16 04463 g003
Equations (1)–(5) are functional relationships enabling the measured eccentricity profile to be represented as a dependence of the change in angular position of the sensor stylus during crankshaft rotation. In accordance with the assumed interpretation of the geometrical features of the measured circularity profiles based on harmonic analysis, each profile can be represented as the sum of expressions of a trigonometric Fourier series, most commonly in the form of the so-called finite Fourier transform. The first expression of the Fourier series expansion of the function describing the measured profile corresponds to the axis position deviation, i.e., the eccentricity [28,29,30,31,32,33,34,35,36]. Eliminating this component from the measured total profile allows the sum of the other components to be treated as theoretically corresponding to a record of the measured circularity profile.
However, the demonstrated limitation in the ability to detect geometrical deviations due to the support conditions adopted means that taking the first harmonic component as corresponding to eccentricity is a major simplification. Indeed, the eccentricity profile is in this case described by the sum of the harmonics. Characteristically, these are harmonics with even numbers. By eliminating the harmonics associated with the eccentricity profile from the discrete amplitude spectrum of the measured total profile, the harmonics associated with the real circularity profile of the examined journal can be selected.
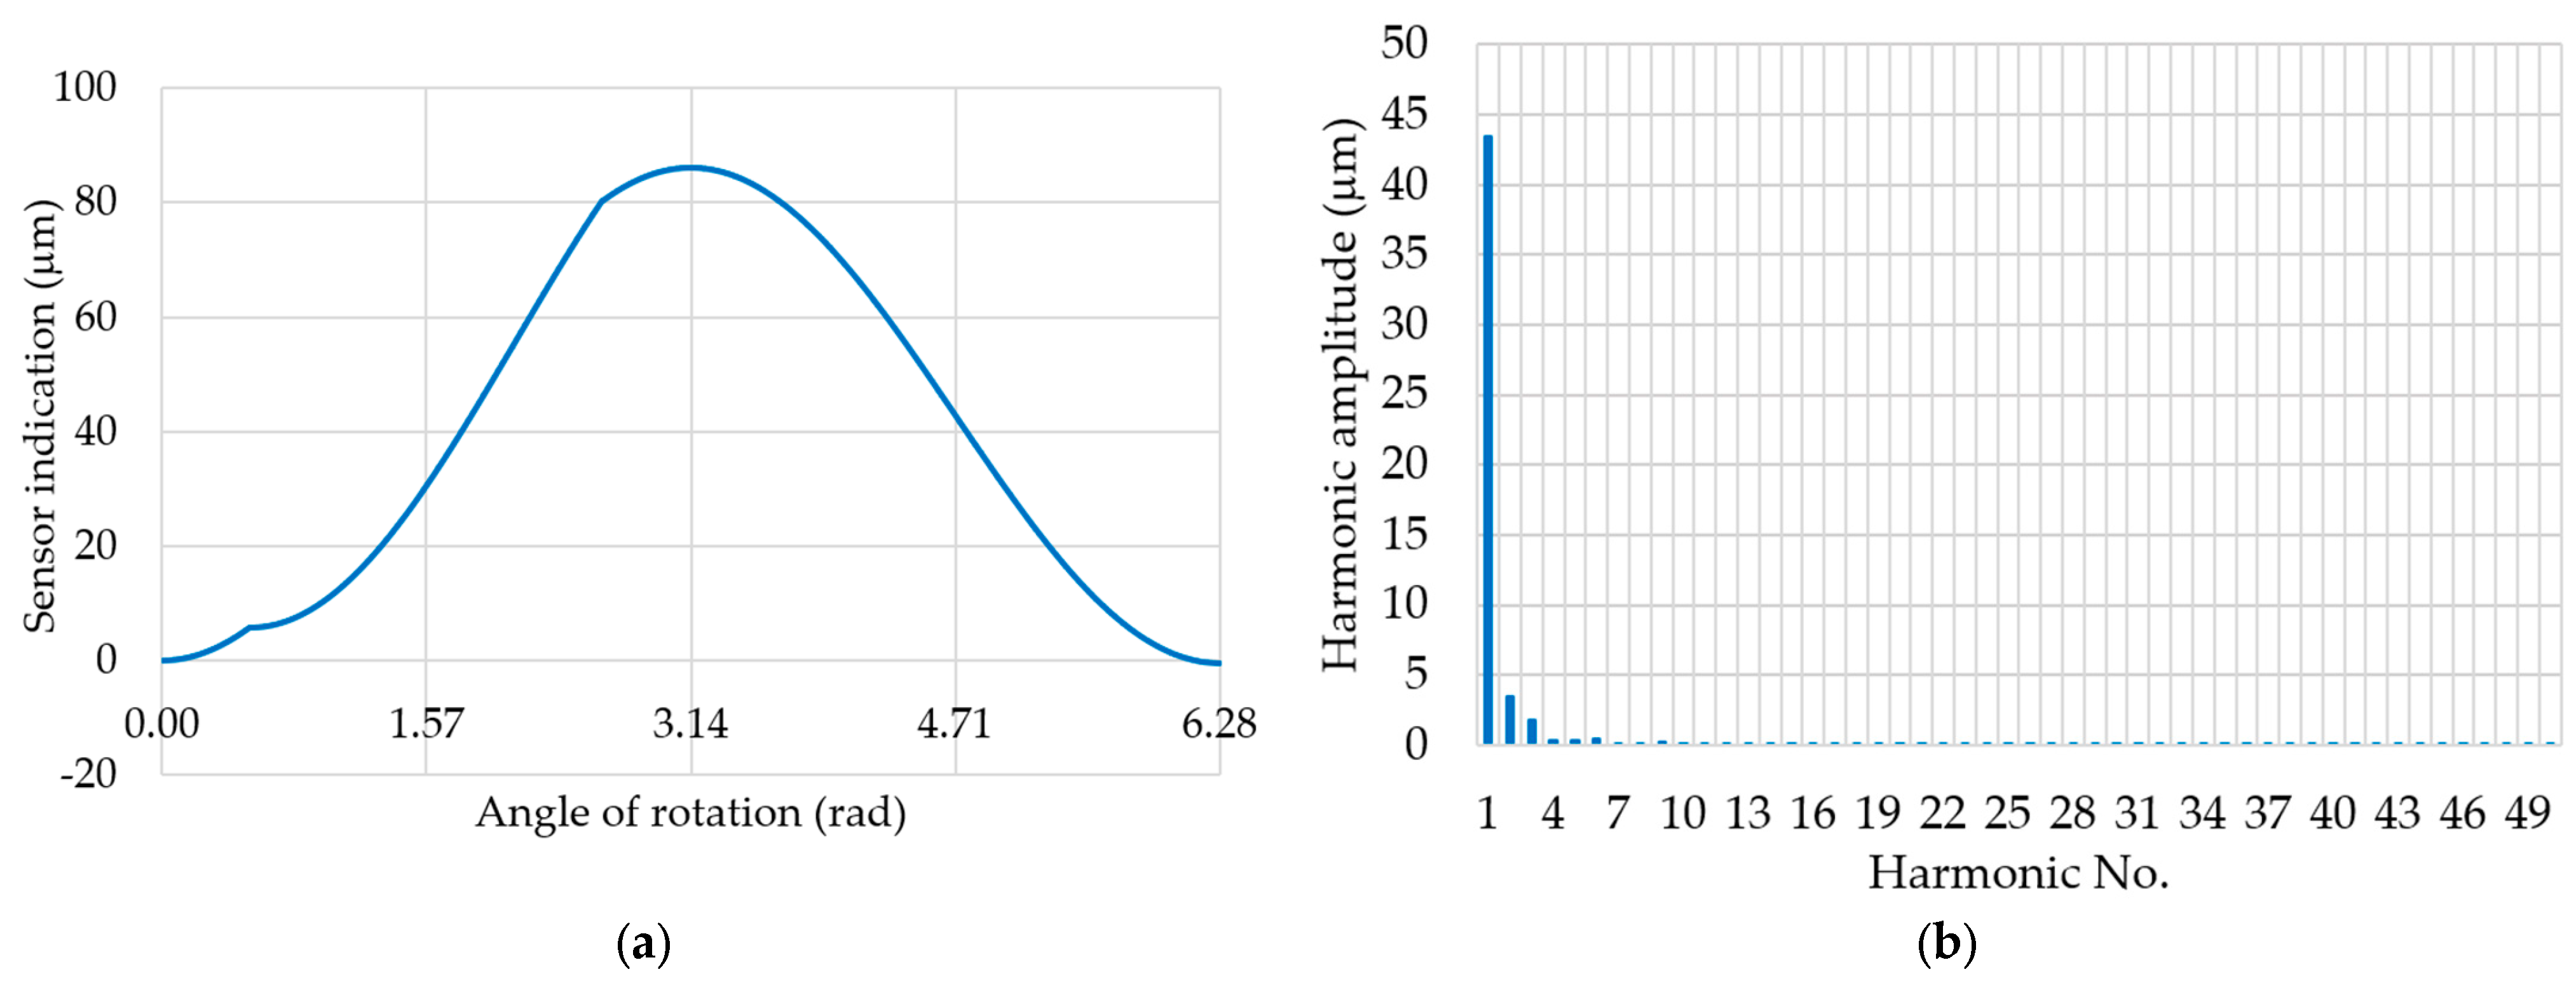
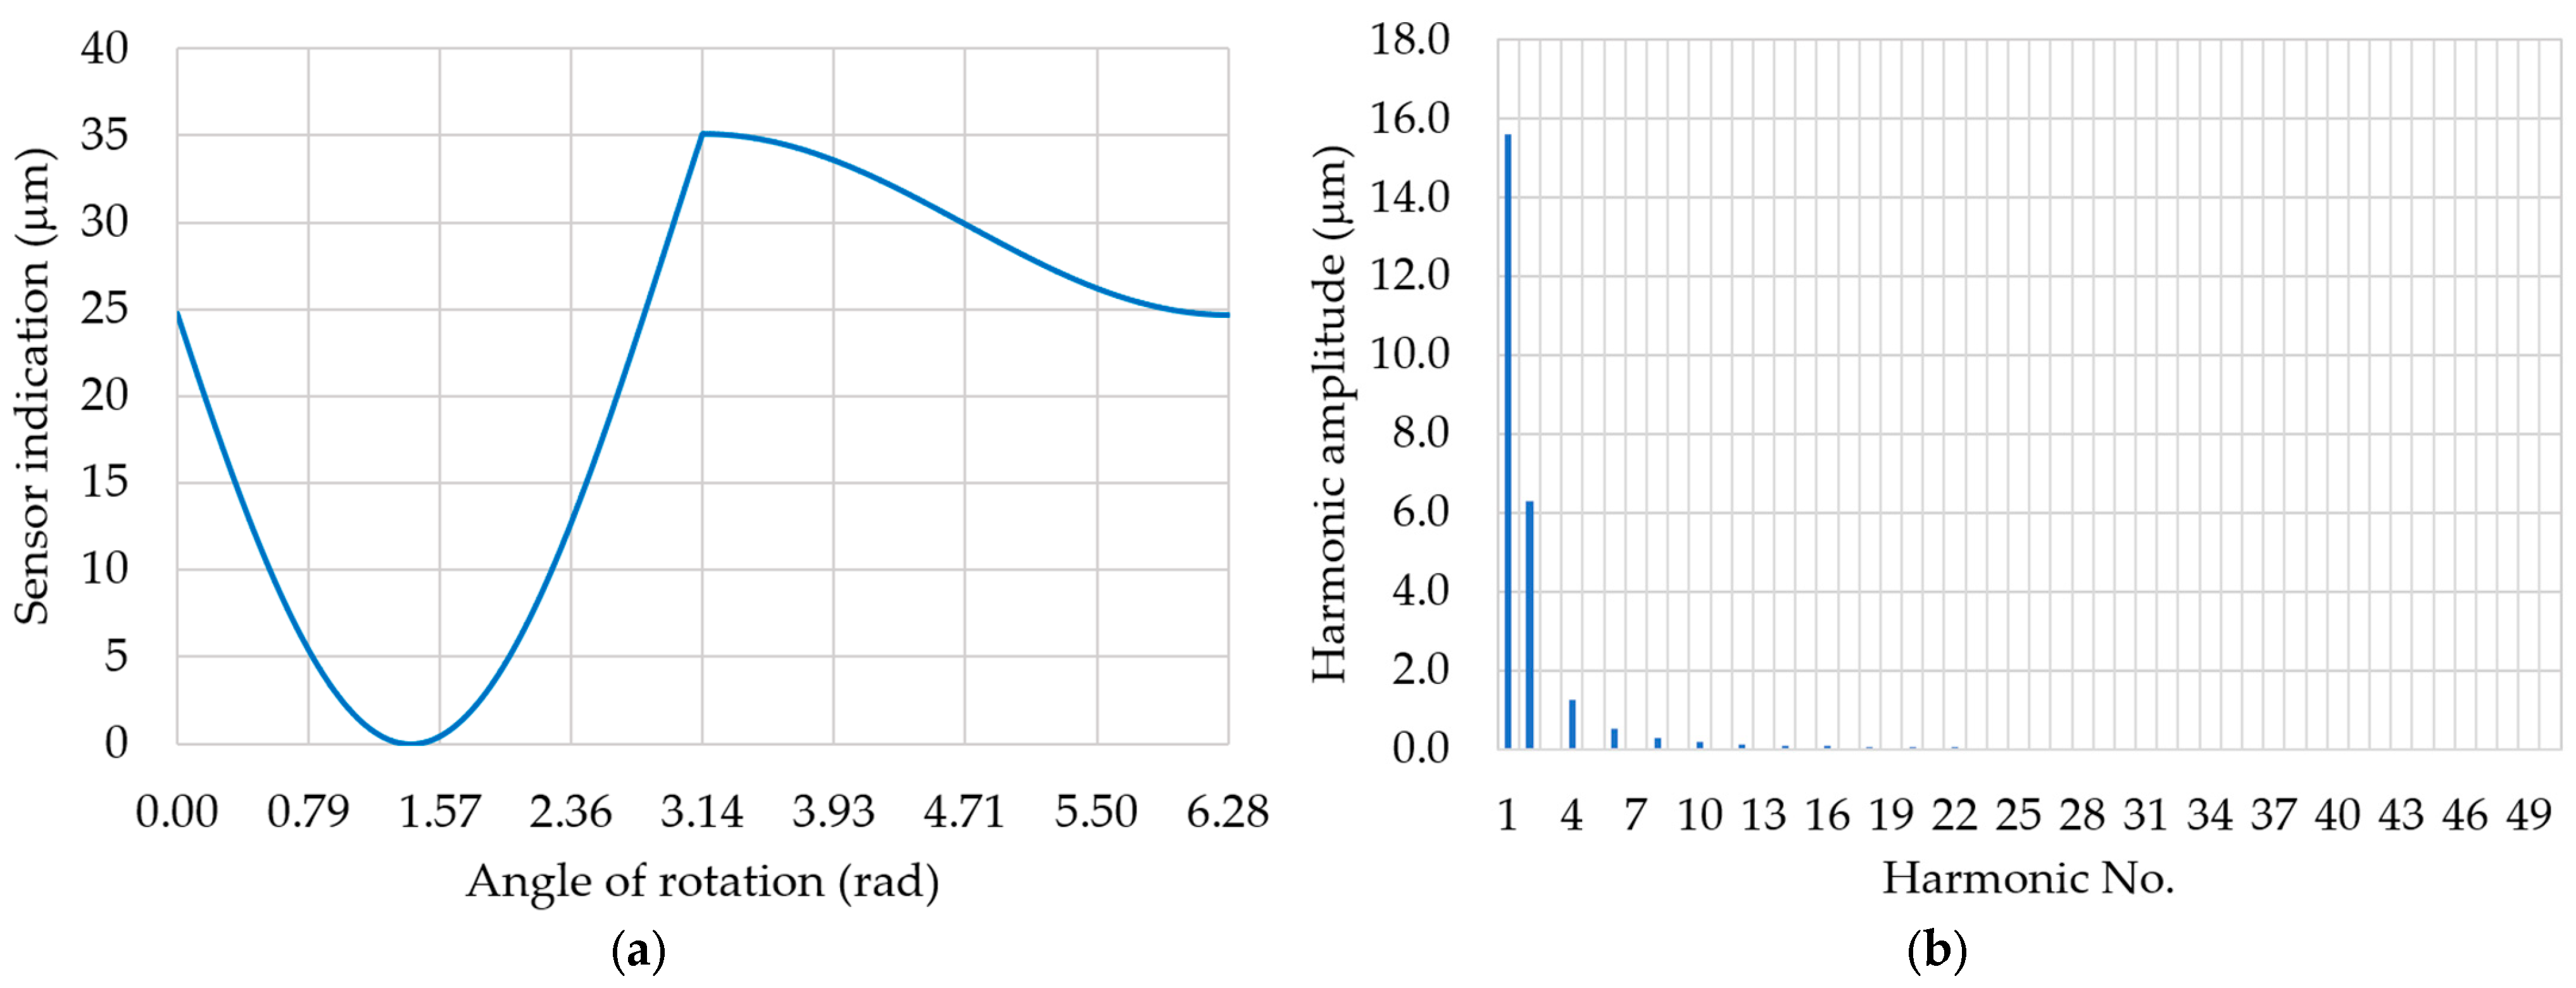
Graphical interpretation of the formulated relationships allows the measured eccentric profile of the journal displacement to be represented over the full angle of rotation of the shaft from 0° to 360°. An example of such an interpretation for an assumed eccentricity of e = 30 μm and a sensor stylus location angle of α = 60° is shown in Figure 4a. A discrete amplitude spectrum image corresponding to the presented eccentric journal displacement profile is shown in Figure 4b. Changing the location angle of the sensor α obviously varies the measured eccentric journal displacement profiles and, thus, the images of the amplitude spectrums.
Table 1 shows the values of the first harmonic amplitude spectra for an assumed eccentricity e = 30 μm, with a change in 10° increments of the sensor location angle α, within its practical application range of ±90°.
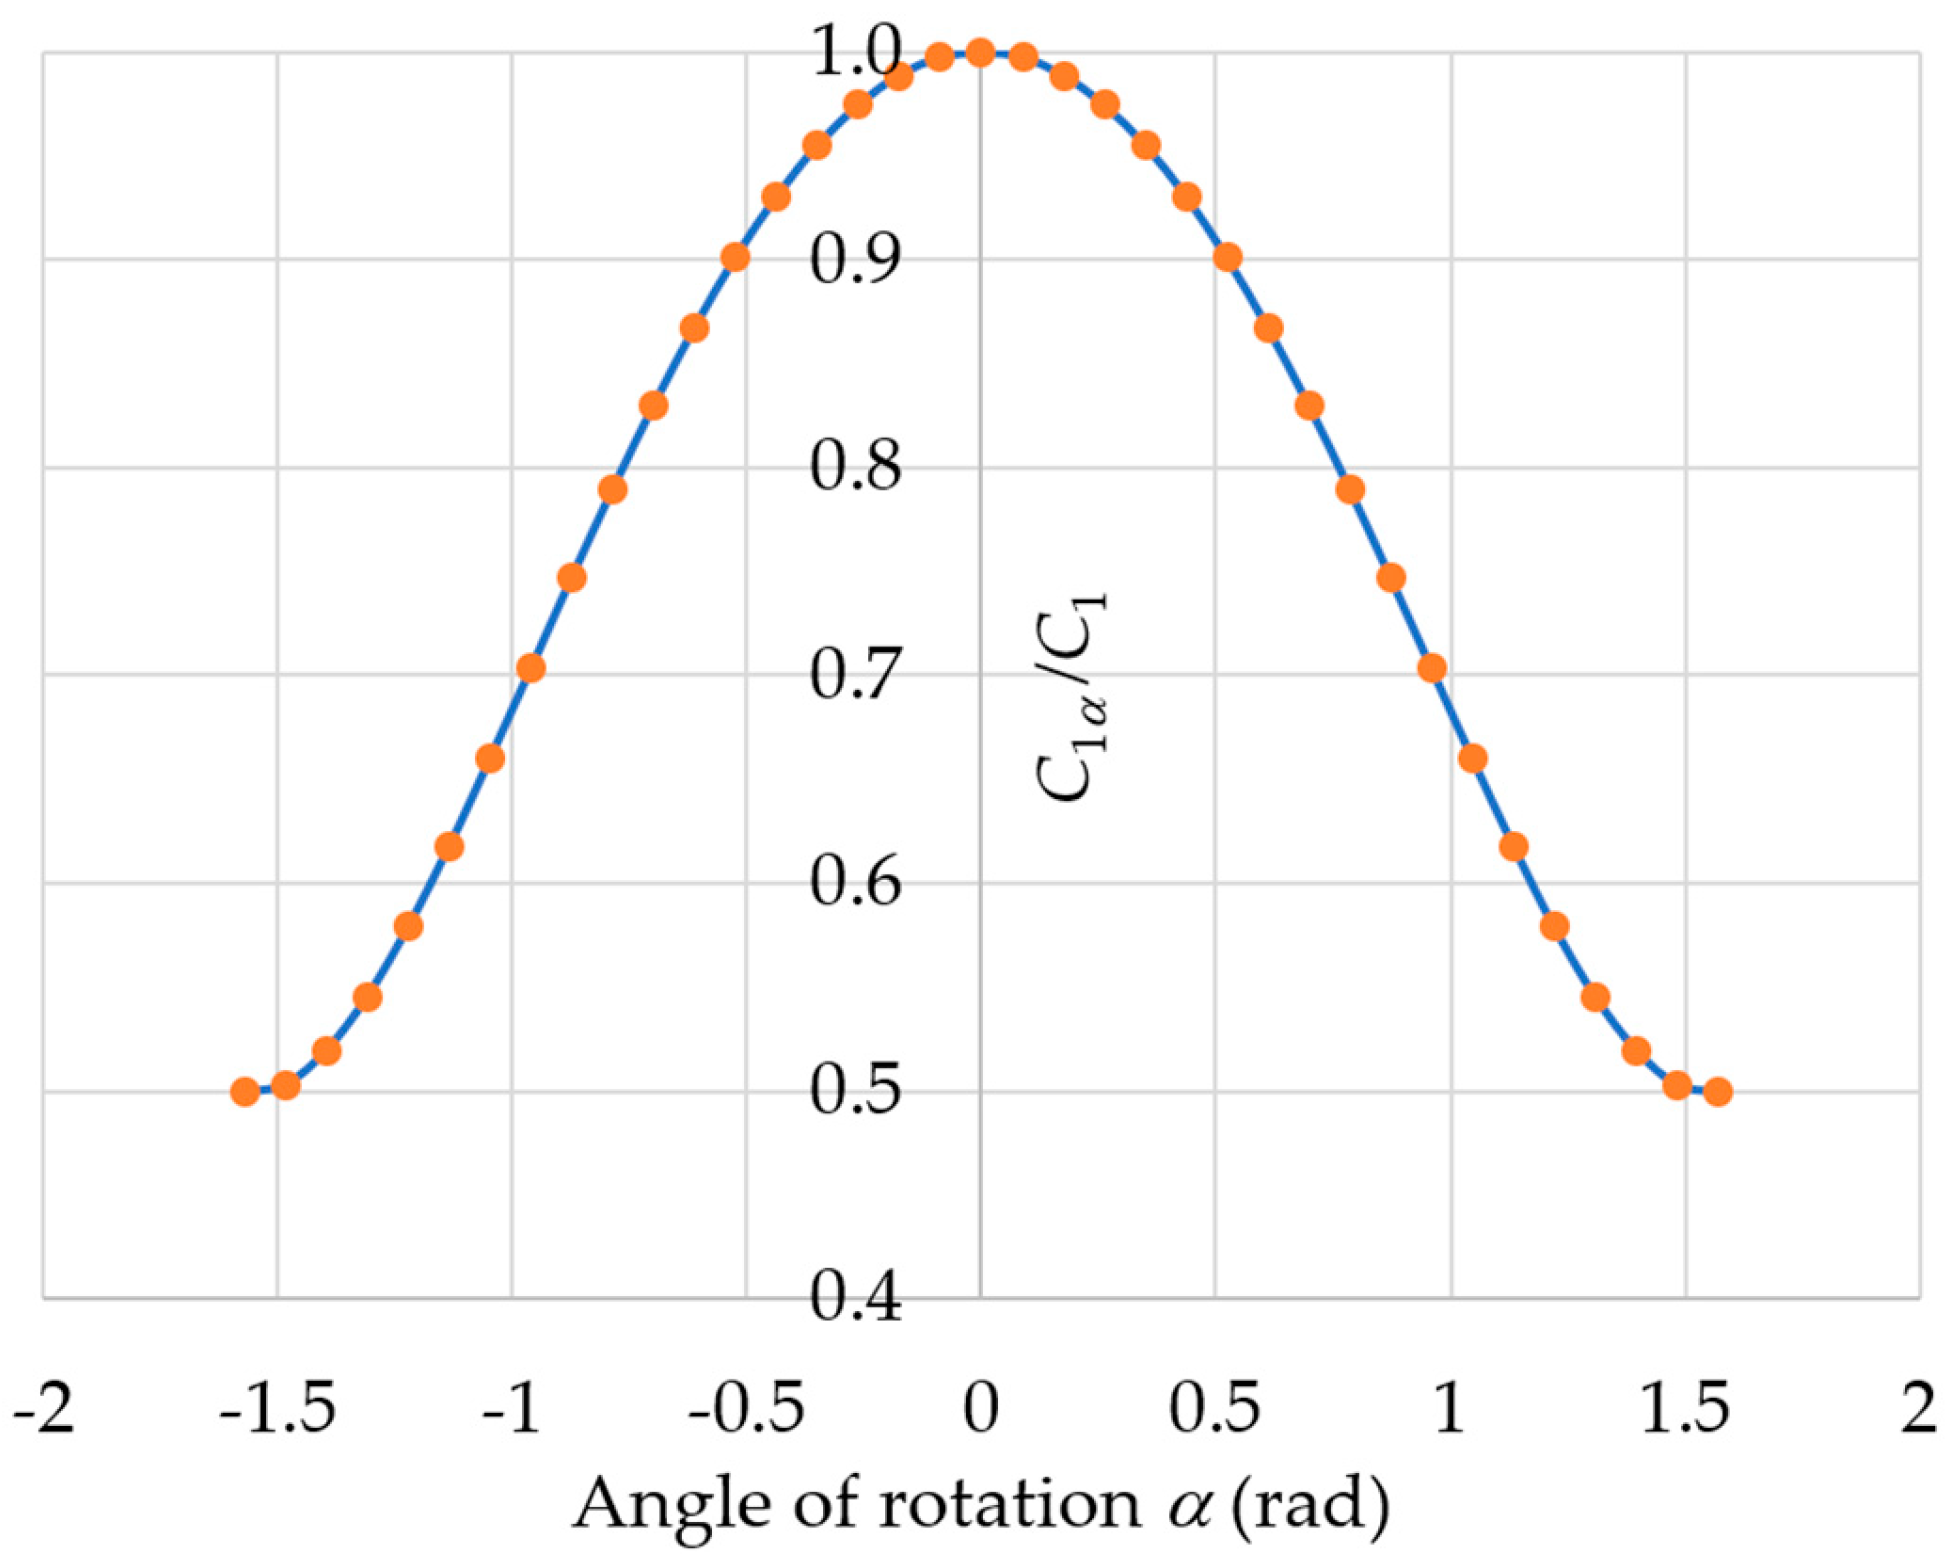
This table also lists the ratio between the successive values of the amplitudes of the first harmonics C1α when changing the angle α and the value of the amplitude of the harmonic component C1 = 30 μm, corresponding to the regular eccentricity profile e.
For any eccentricity e, the proportions between the successive values of the harmonics C1α and the value of C1 equal to the full eccentricity e remain constant. By expressing the successive harmonics C1α in relative form, it is possible to make them independent of the specific value of eccentricity e and to apply this interpretation in general form. Such an interpretation of the test results is shown in Figure 5.
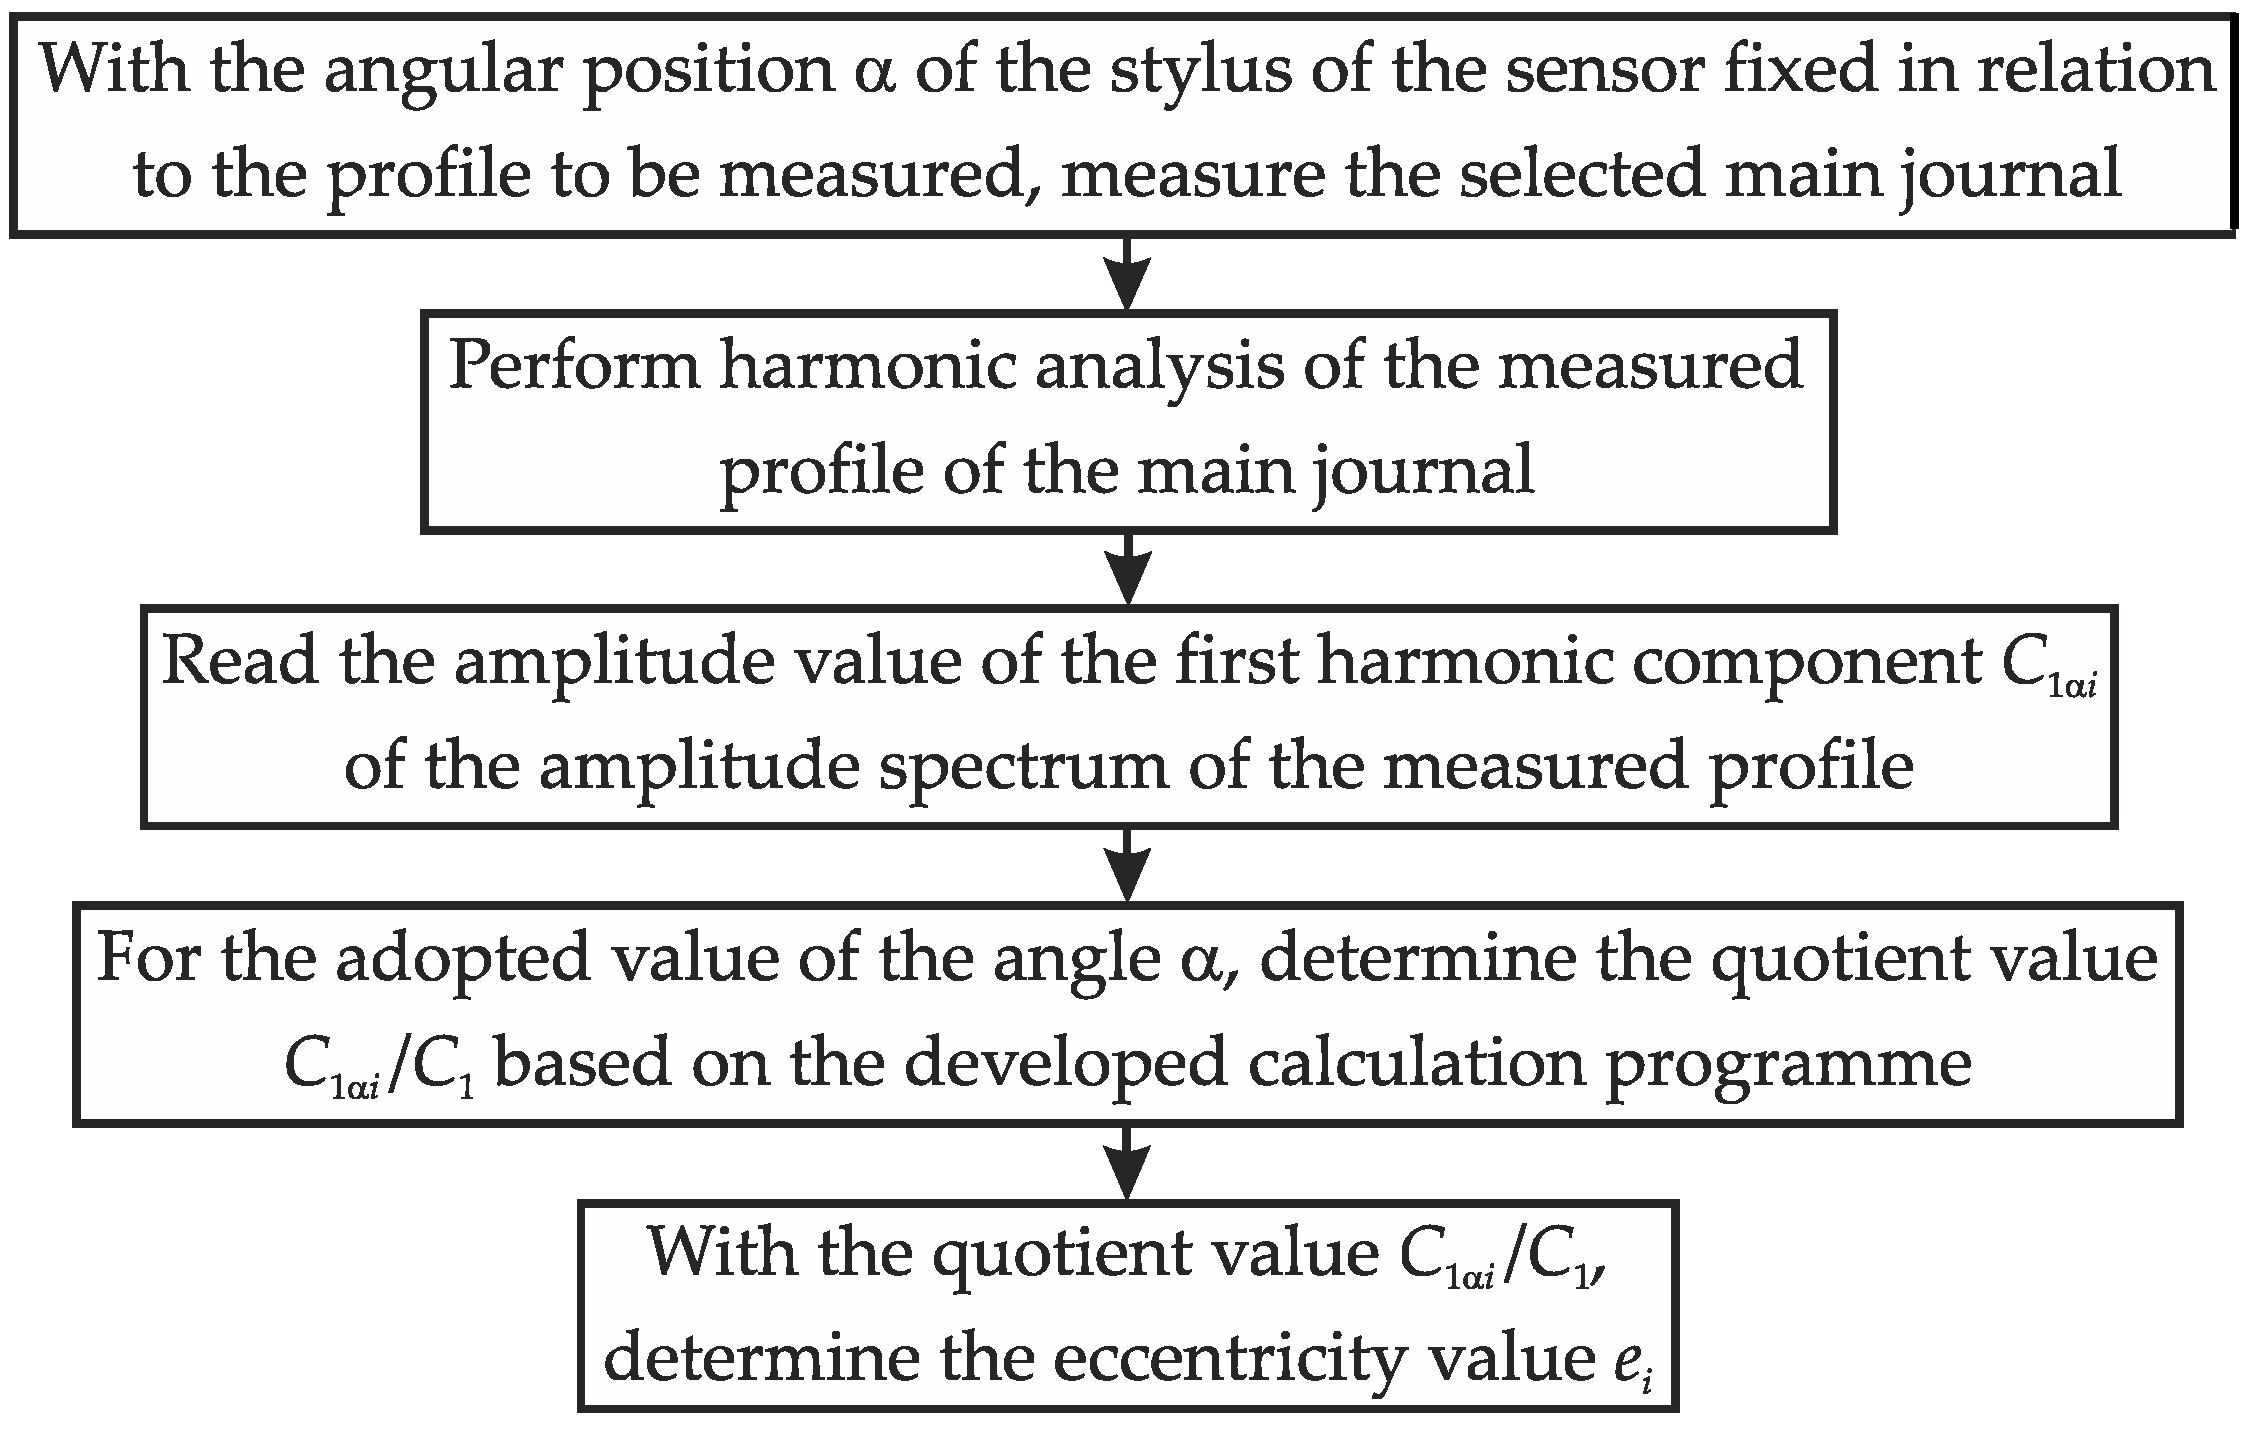
In order to determine the eccentricity e, in the case of a deviated journal profile measurement, with the sensor stylus angled at α to the profile to be measured and the supports positioned at an equal height, the algorithm presented in Figure 6 can be used.
Figure 5. Change in quotient C1α/C1 as a function of angle of rotation α.
Energies 16 04463 g005
Figure 6. Algorithm to determine the real eccentricity value ei from the known value of the amplitude of the first harmonic of the spectrum of the measured total journal profile C1αI and the angle α, for the case in which the supports are positioned at an equal height.
Energies 16 04463 g006
In the second case adopted for consideration, it was assumed that the supports to provide contact with the main journals were pre-positioned at various heights.
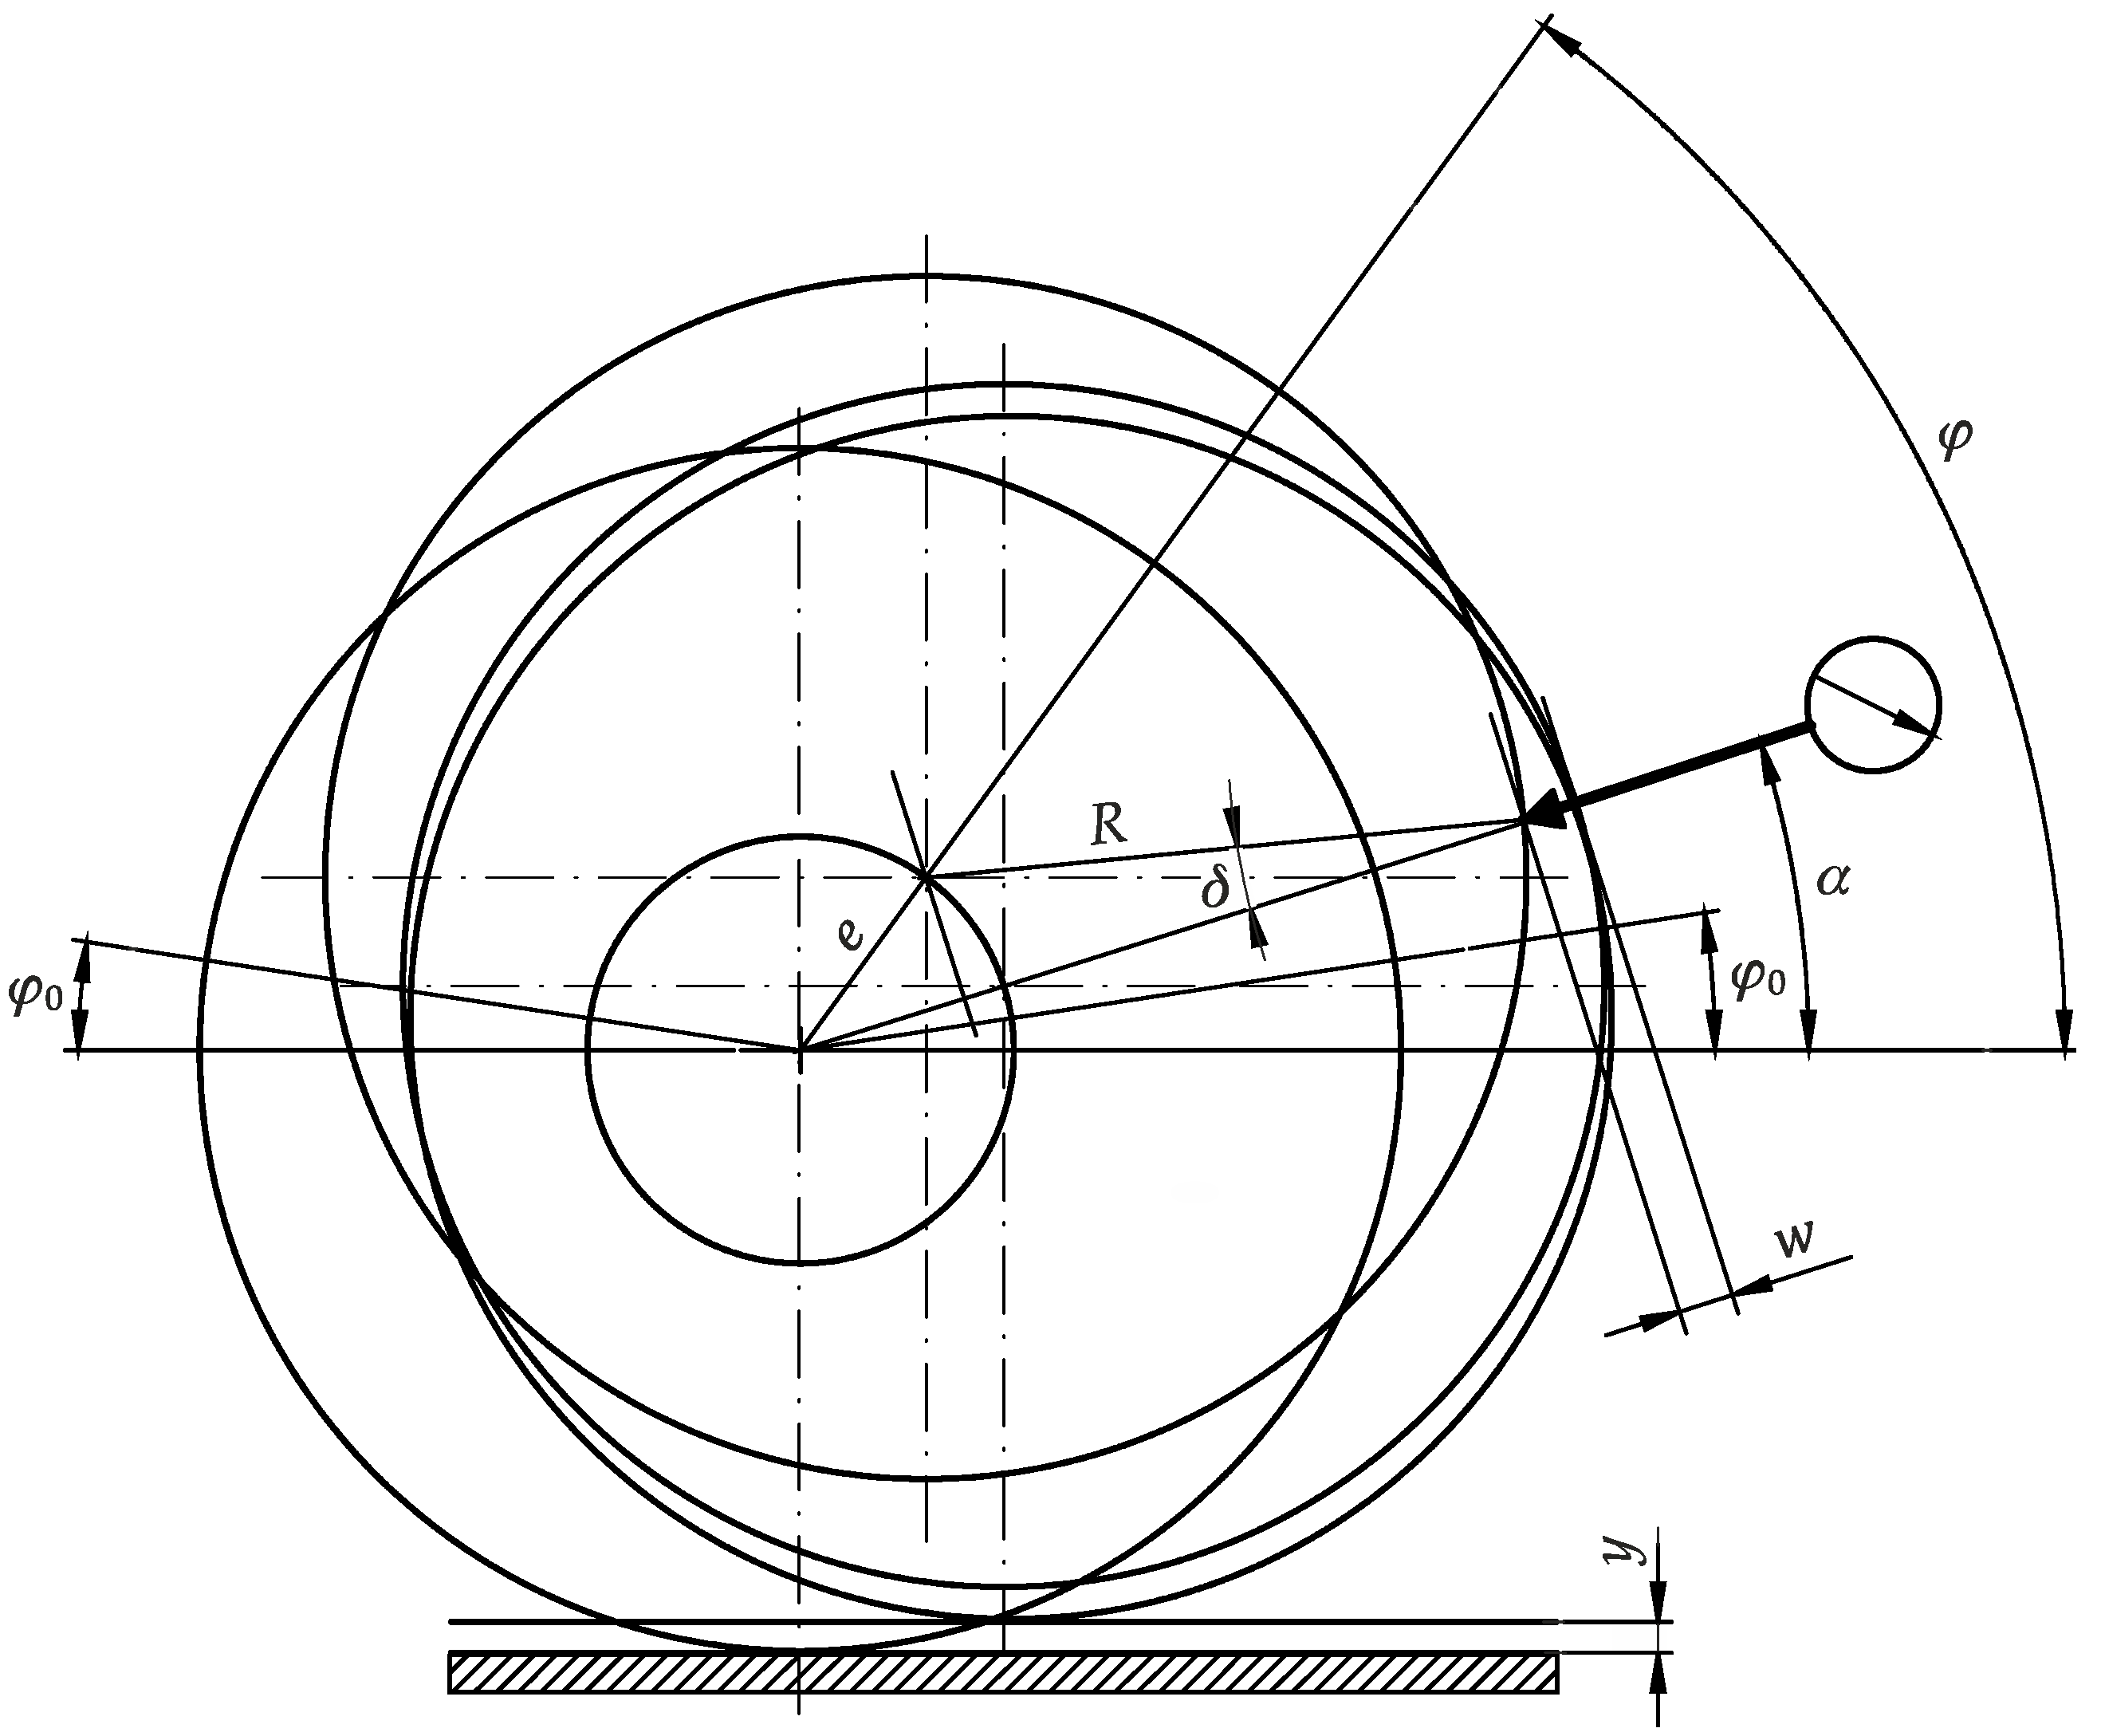
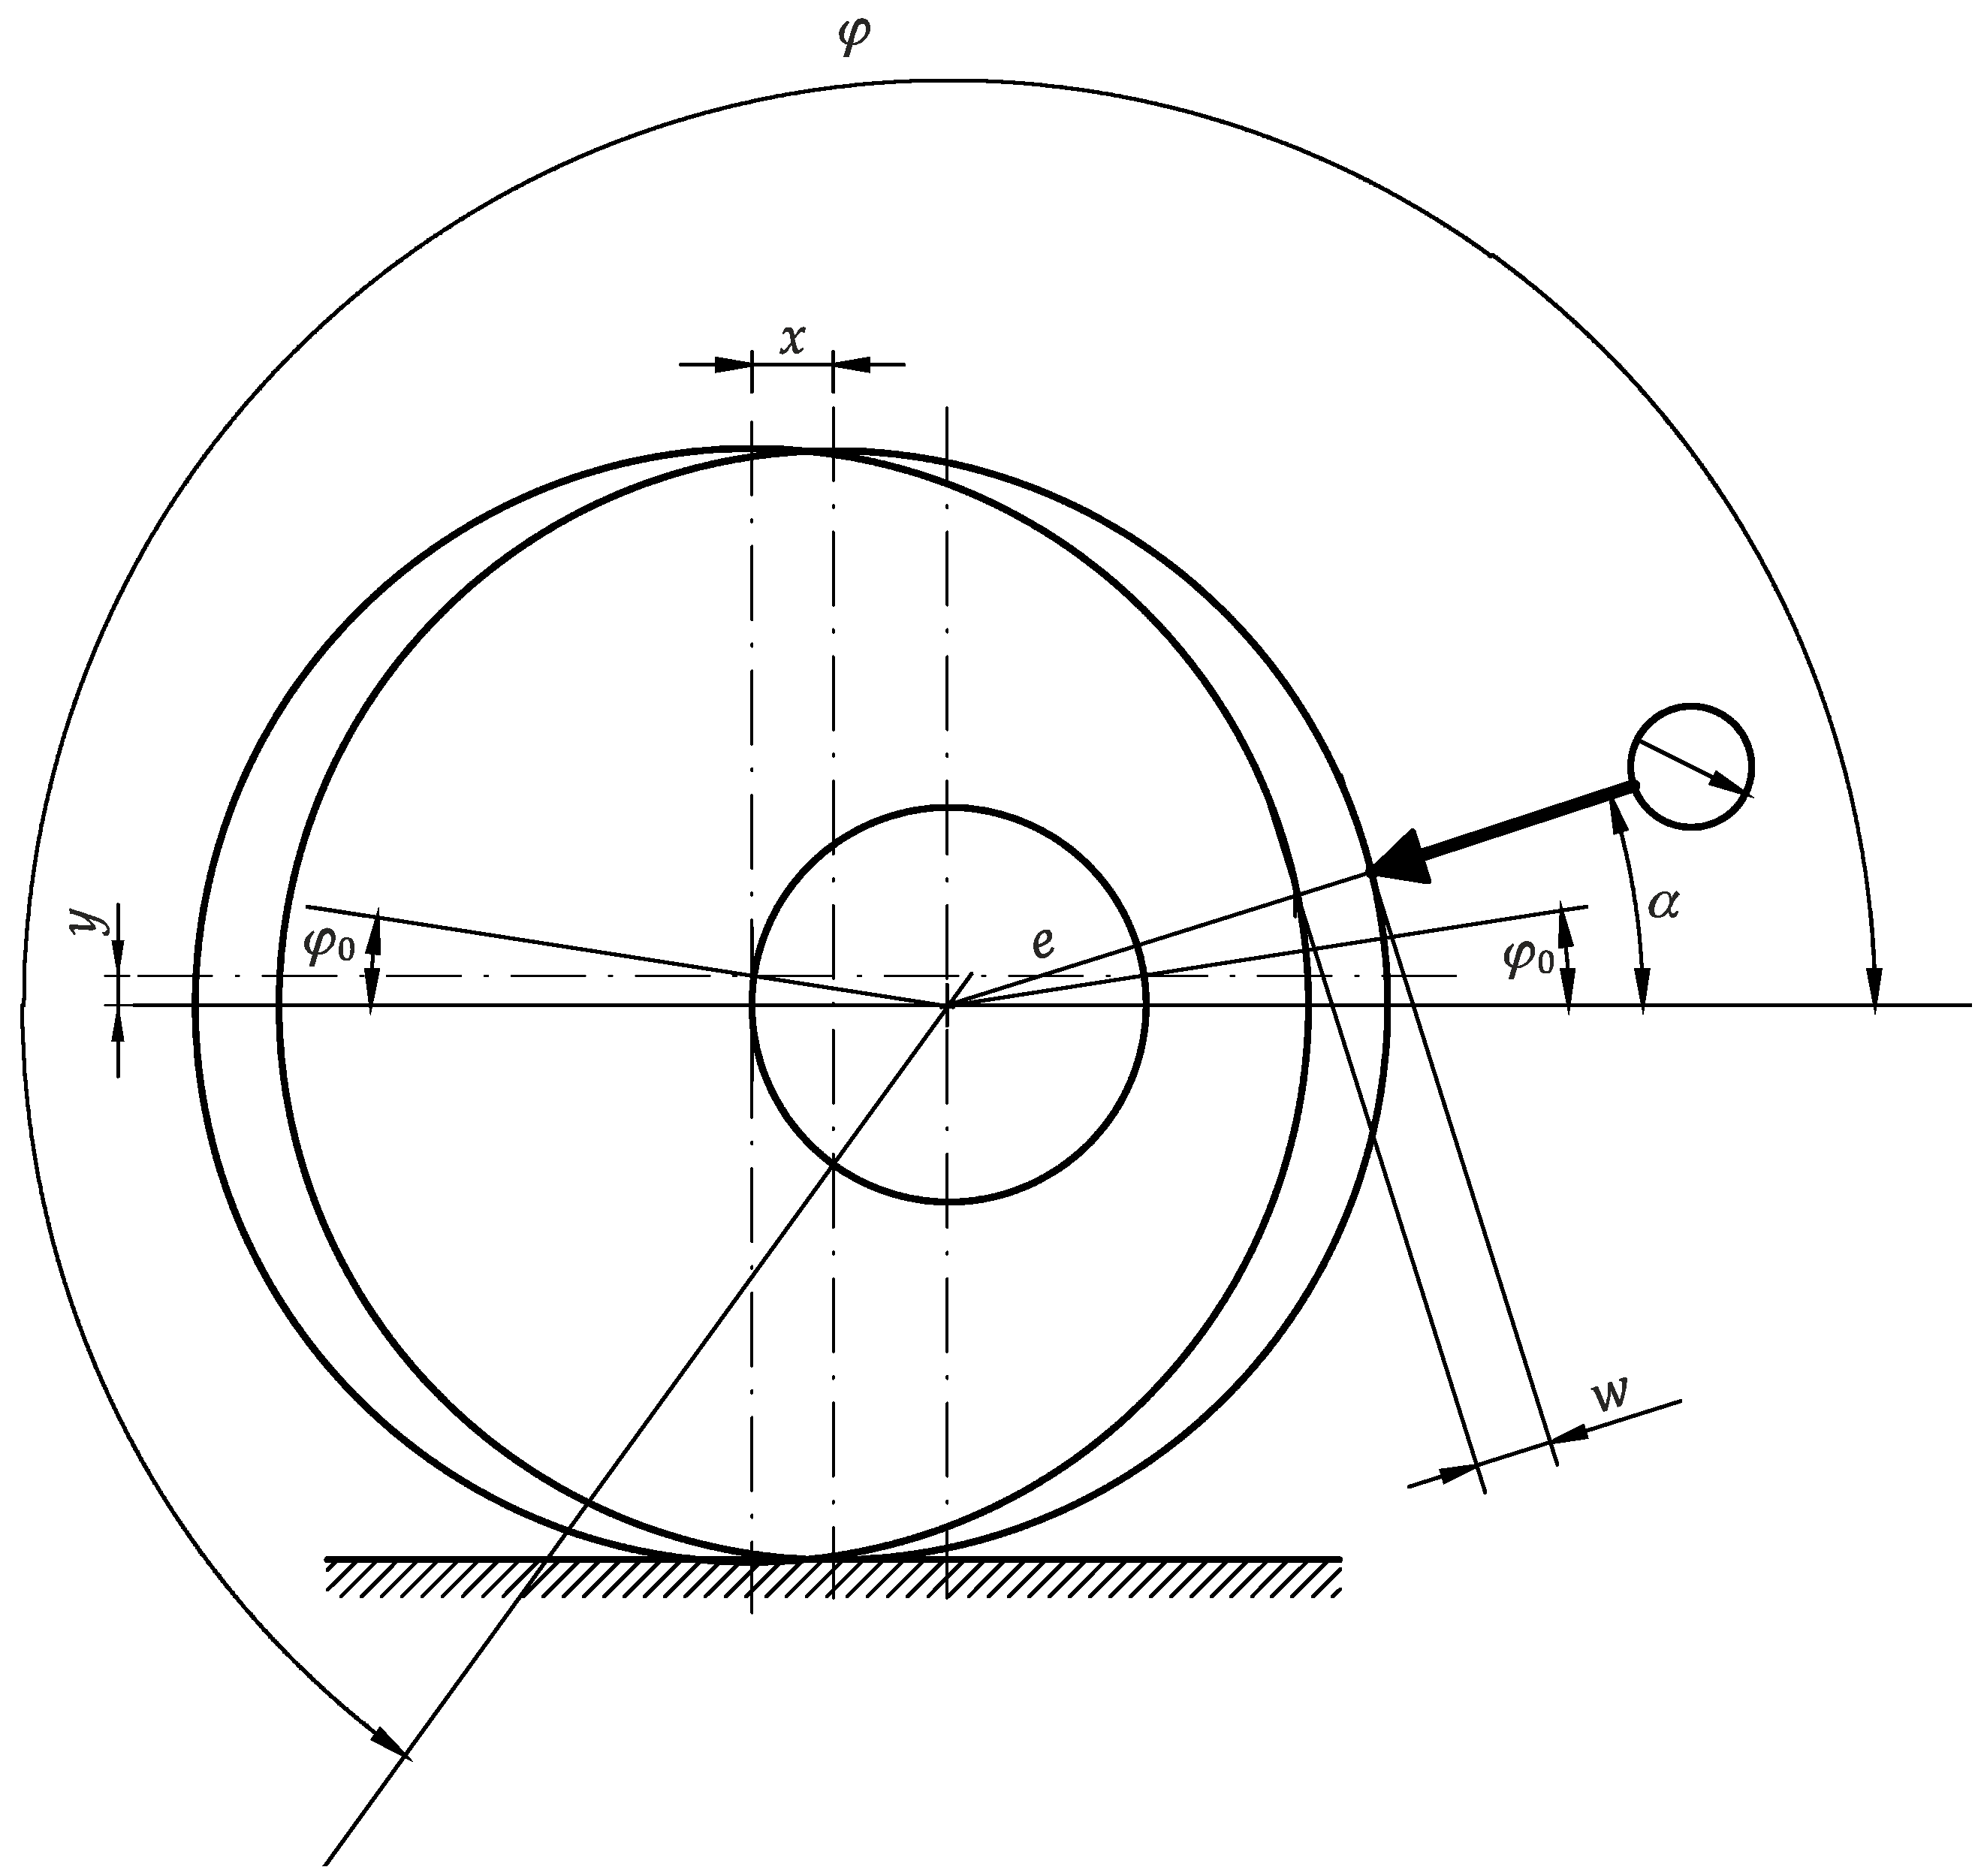
Based on the auxiliary diagrams shown in Figure 7 and Figure 8, mathematical relationships were determined for this case, linking the method parameter α and the parameter y representing the displacement of the support relative to the other supports maintaining the same height position, with the parameter w representing the measured profile of the eccentric displacement of the journal subjected to the axial position deviation. These relationships can be expressed by the following formulas:
  • In the angle range φ 0 < φ < 180 φ 0 (Figure 7)
The measured parameter w can be described with the relation:
w = e + R e × cos φ α R   × cos δ
Since
R e δ 0
Then,
w = e + R e × cos φ α R = e e × cos φ α
Figure 7. Auxiliary diagram adopted to determine the mathematical relationships linking the method parameter α and the parameter y representing the offset of the support with respect to the other supports maintaining the same height position, with the parameter w representing the measured profile of the eccentric displacement of the journal subjected to the axial position deviation, within the angle range φ 0 < φ < 180 φ 0 .
Energies 16 04463 g007
  • In the angle range 180 φ 0 < φ < 360 + φ 0 (Figure 8)
The measured parameter w can be described by the relation
w = x × cos α
Since
x = e × cos φ 0 cos φ
And
cos φ 0 = 1 sin 2 φ 0 = 1 y e 2
Then,
w = x × cos α = e × 1 y e 2 cos φ × cos α
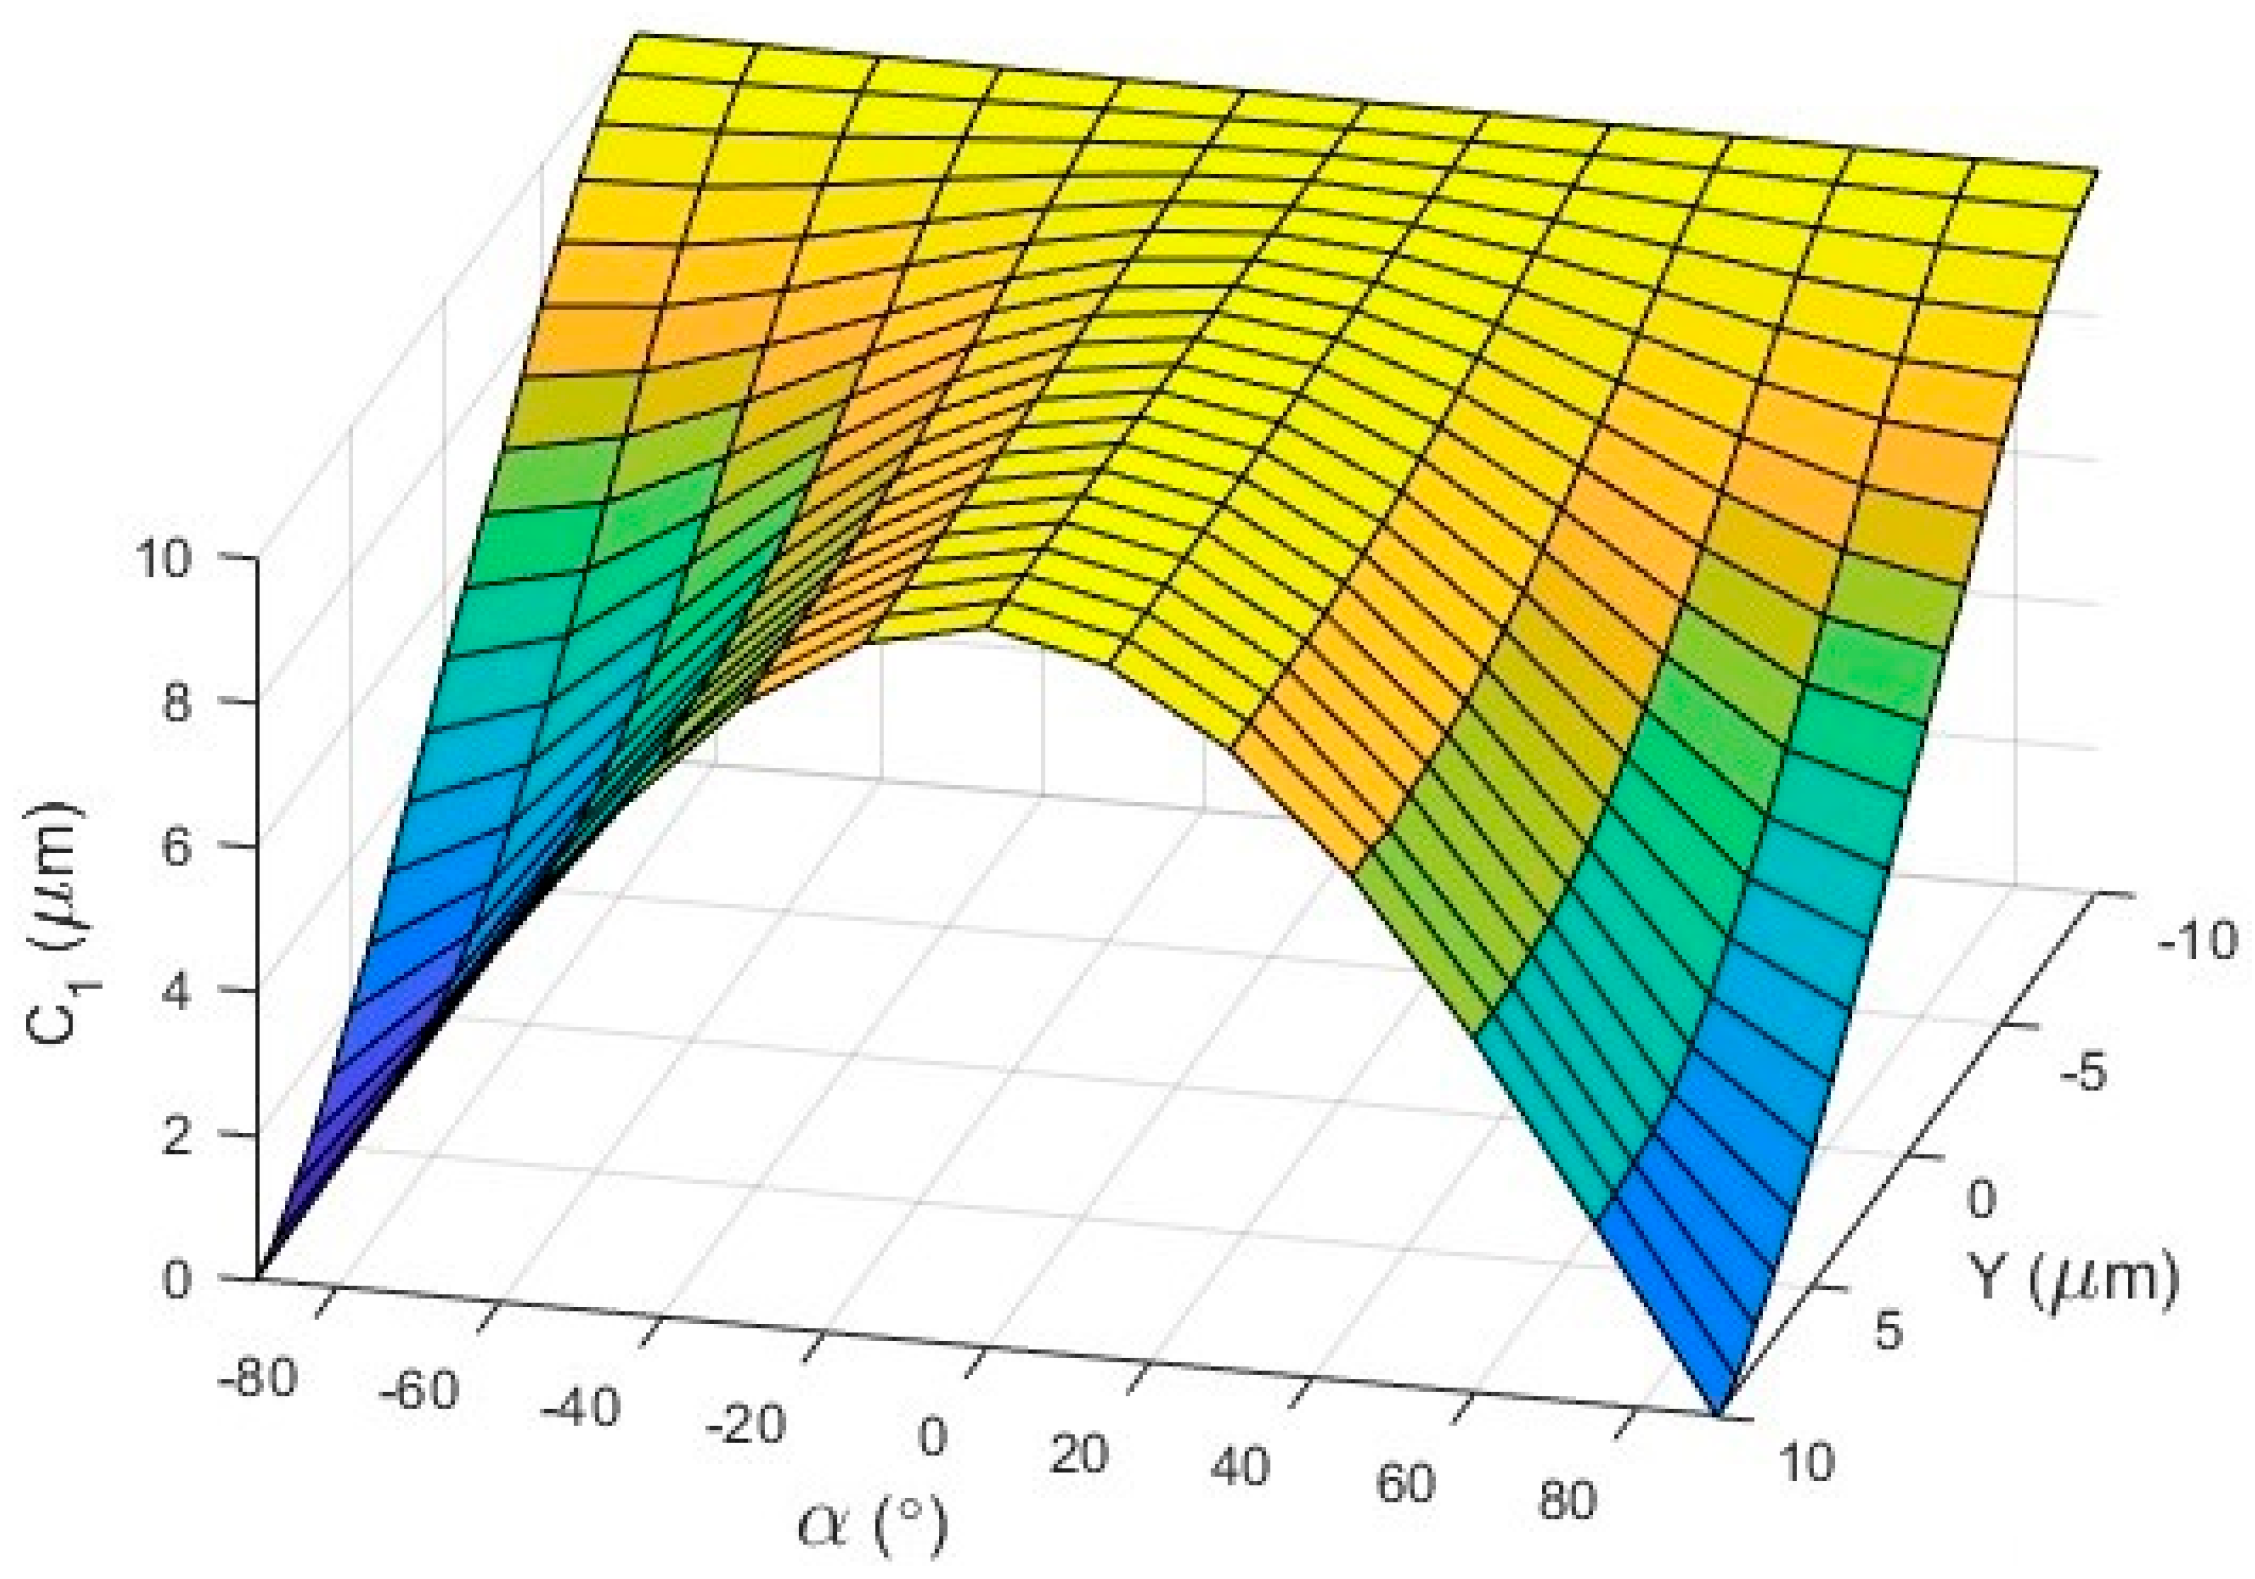
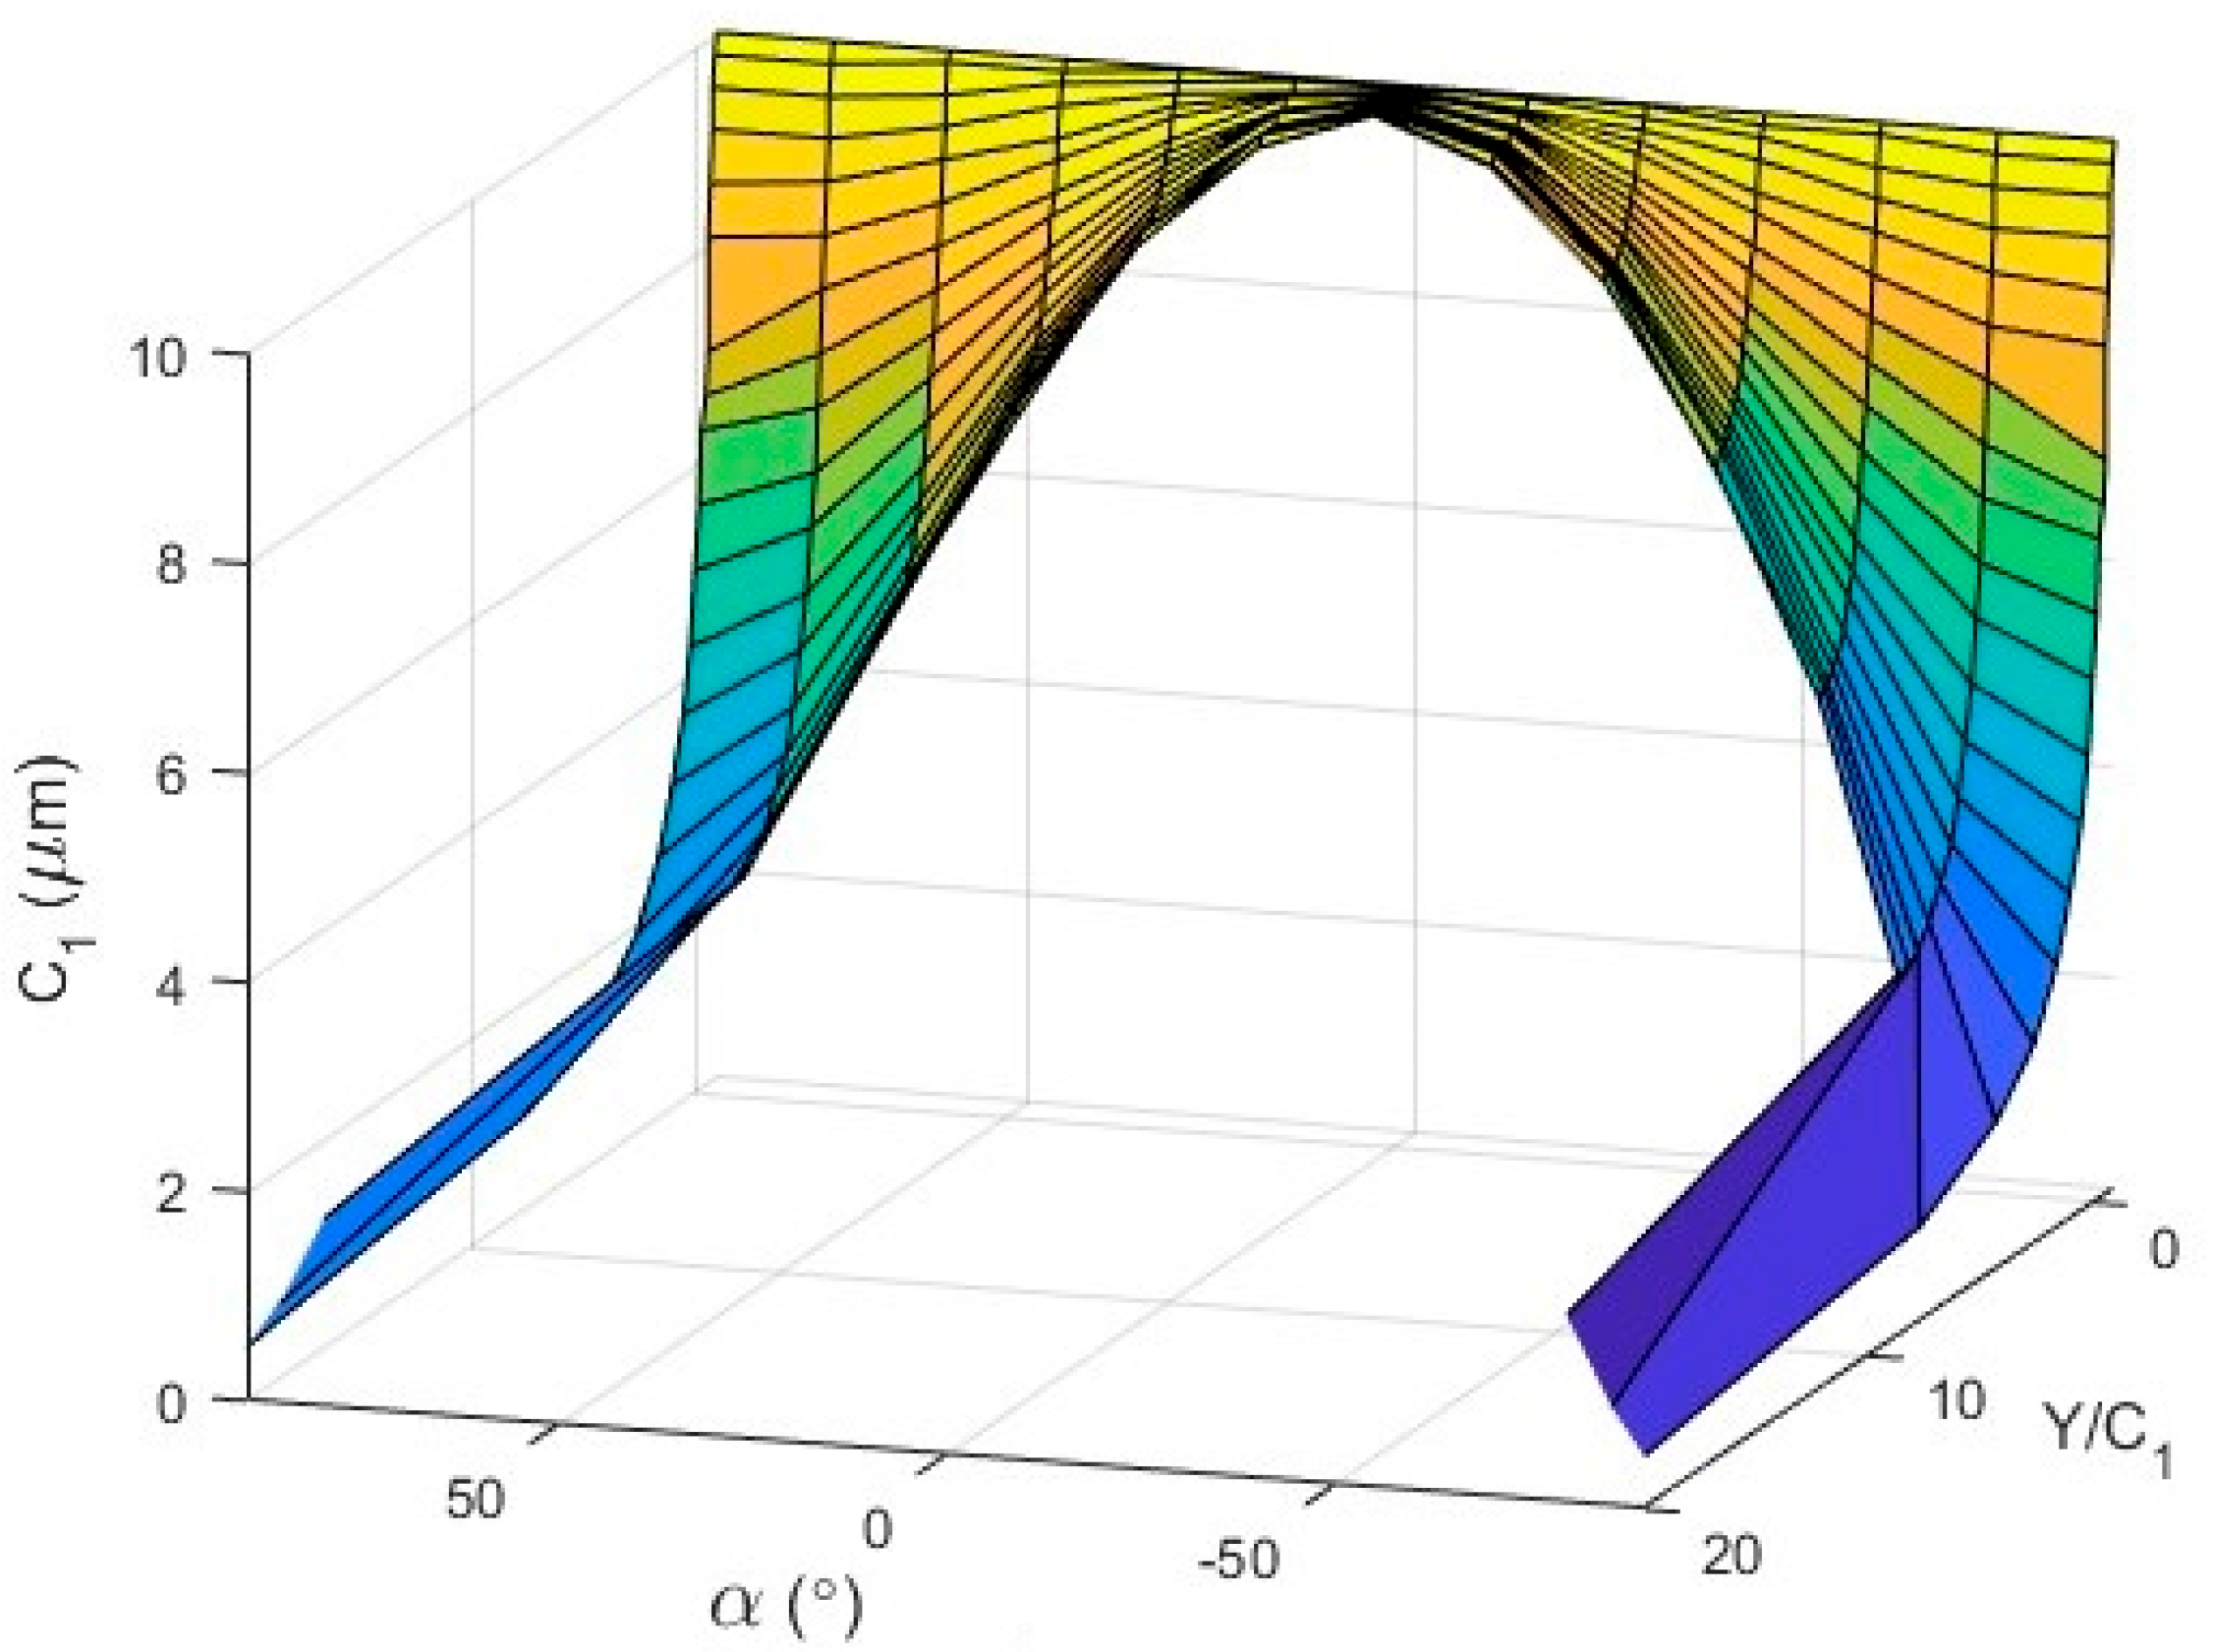
The case adopted for consideration can be treated as a general one. A special version of this case is the case considered earlier, in which it was assumed that the supports were located at an equal height (y = 0). For a given eccentricity e and the support offset y, which can be defined by measurements, the value of the amplitude of the first harmonic component C1α, determined by harmonic analysis of the measured profile, is assigned. The course of the C1α changes for eccentricity e = 10 μm, with a change in support offset y within ±10 μm and angle α of ±90°, is shown in Figure 9.
Figure 8. Auxiliary diagram adopted to determine the mathematical relationships linking the method parameter α and the parameter y representing the offset of the support with respect to the other supports maintaining the same height position, with the parameter w representing the measured profile of the eccentric displacement of the journal subjected to the axial position deviation, within the angle range 180 φ 0 < φ < 360 + φ 0 .
Energies 16 04463 g008
Additionally in this case, independently of the value of the full eccentricity e, the ratio of the value of the support offset y to the value of the amplitude of the first harmonic component of the measured circularity profile C1α assumes a constant value. The course of the variation of the quotient y/C1α for eccentricity e = 10 μm, with a change in support offset y within ±10 μm and angle α of ±90°, is shown in Figure 10.
The quotient y/C1α has the property of being a universal parameter, enabling the true circularity profile to be determined from the total profile, measured in the direction of the sensor stylus displacement relative to the profile measured at an angle of α and the position of the support on which the eccentrically loaded journal under test is seated, with the displacement relative to the other journals by the magnitude of the parameter y.
Figure 9. Change in C1α for eccentricity e = 10 μm, with a change in support offset y within ±10 μm and angle α of ±90°.
Energies 16 04463 g009
Figure 10. Change in quotient y/C1α for eccentricity e = 10 μm, with a change in support offset y within ±10 μm and angle α of ±90°.
Energies 16 04463 g010
The desired value of the eccentricity e of the analysed profile can be determined taking into account that, when comparing the parameters of this profile with those of a profile with eccentricity e10 = 10 μm, the following relation is valid:
e e 10 = C 1 α C 1 ( 10 ) α
Thus,
e = e 10 × C 1 α C 1 ( 10 ) α
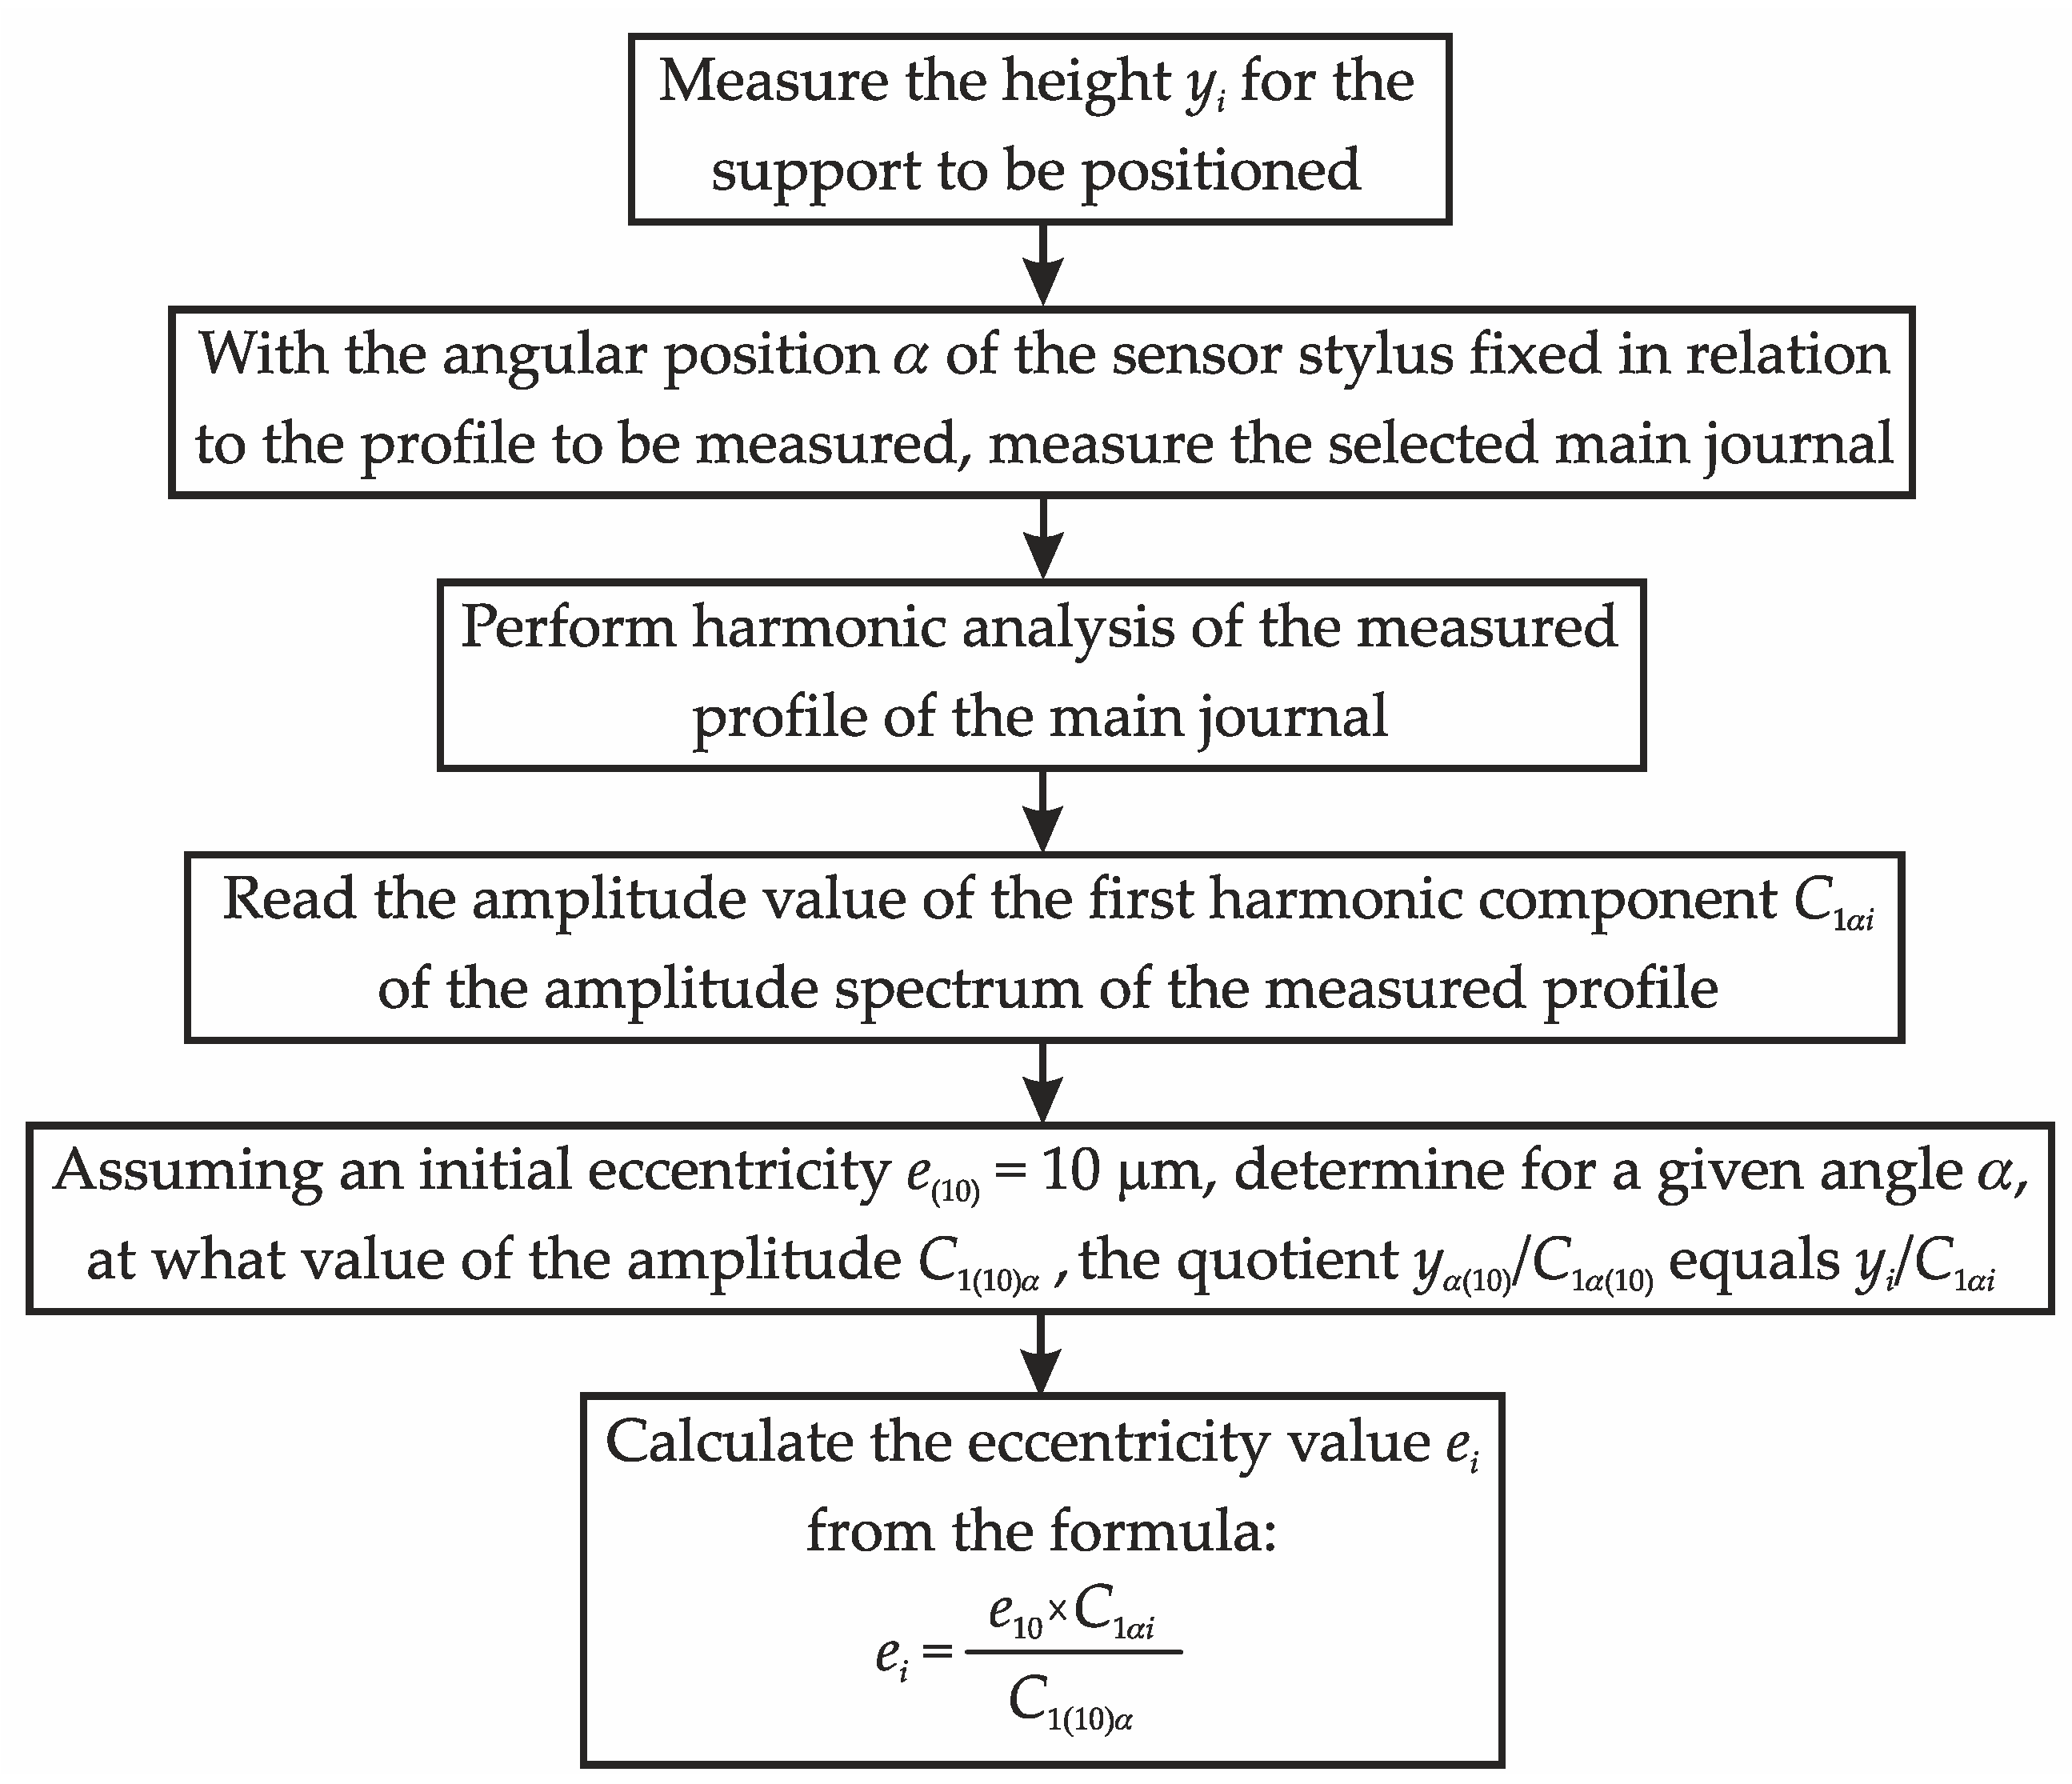
In order to determine the eccentricity e, in the case of measuring a journal profile subject to an axial deviation, with the sensor stylus at an angle α to the profile to be measured and the support positioned at a height offset from the other supports by a value y, a helpful calculation program was developed in the MATLAB environment. The algorithm of this program is shown in Figure 11.
The calculation program developed can also be applied when the supports are positioned at an equal height, i.e., when y = 0.
3. Procedures for Determining the Real Circularity Profile

As a result of the research, procedures have been proposed to determine the real circularity profile of the journal based on the total profile of the journal, measured in the direction of displacement of the sensor stylus relative to the profile measured at an angle α. These procedures have been developed both for the case where the supports are positioned at an equal height and for the case where, to ensure contact with the main journals, they are pre-positioned at various heights. The procedures were used to measure the crankshaft of a medium-speed main propulsion engine of a ship treated as an energy machine. This shaft was 3630 mm long, weighed 9280 N, and had ten 149 mm diameter main journals and eight 144 mm diameter crank journals.

3.1. Example Procedures for Determining the Real Circularity Profile from the Measured Total Profile for the Case of Supports Located at an Equal Height

Example procedures for determining the real circularity profile of a journal showing eccentric displacement based on the measured total profile for the case where the sensor stylus was positioned relative to the measured profile at angle α = 30° are presented in Figure 12, Figure 13 and Figure 14 as well as in Table 2, Table 3 and Table 4.
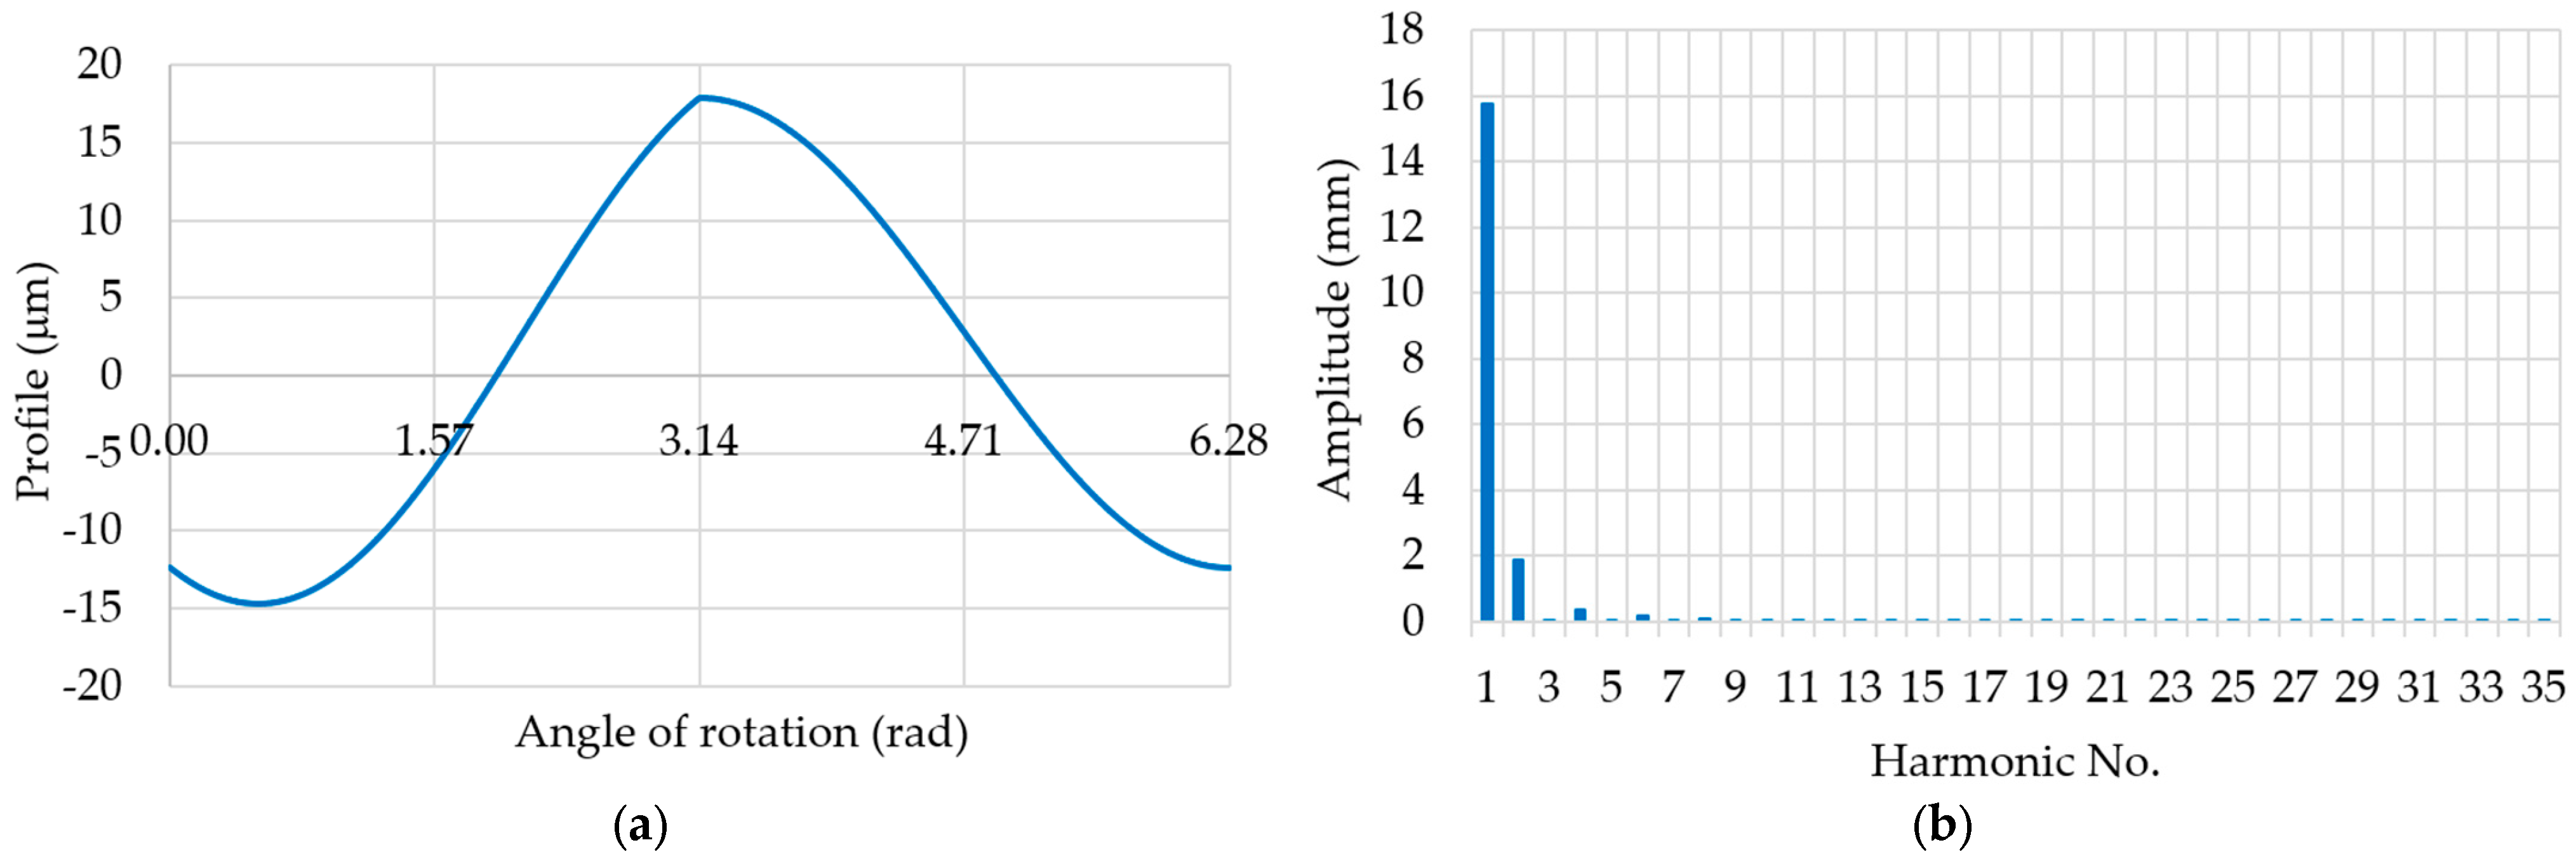
Figure 12a illustrates the measured total profile, which includes the profile of journal marked with number 4 burdened by an unknown eccentricity value e. The amplitude spectrum produced for the total profile, with the amplitudes of the separated harmonics corresponding to the values given in Table 2, is shown in Figure 12b.
Figure 12. Measured total profile of journal marked with number 4 when the sensor stylus was at angle α = 30° to the measured profile (a) and the amplitude spectrum of the measured total profile of this journal (b).
Energies 16 04463 g012
Table 2. Separated harmonic values of the amplitude spectrum of the measured total profile of journal marked with number 4 when the sensor stylus was at angle α = 30° to the measured profile.
i-Harmonic Amplitude (μm)
i010203040
i + 01.5490.0730.0470.142
i + 115.7700.9620.1670.1310.207
i + 210.8990.9160.4310.0940.258
i + 38.5020.2030.4470.2670.359
i + 42.8990.4630.3770.0130.053
i + 54.5070.2800.6130.2780.142
i + 62.0290.1190.4790.1980.087
i + 71.7800.2150.5240.1700.071
i + 82.5420.0250.2820.1320.117
i + 91.7770.4070.1560.0980.282
According to the previously presented Table 1, the quotient of the value of the first harmonic component C1(30) and its full value for the angle α = 30° is C1(30)/C1 = 0.901. Considering that for the measured profile C1(30) = 15.77 μm, the value of the first harmonic component C1 corresponding to the real eccentricity e, calculated based on the quotient given, is equal to 17.5 μm. For this amplitude value, the eccentricity profile determined from the total profile when the sensor stylus is located at an angle of α = 30° is illustrated in Figure 13a. The amplitude spectrum of this profile and the corresponding values of the separated harmonics are shown in Figure 13b and Table 3.
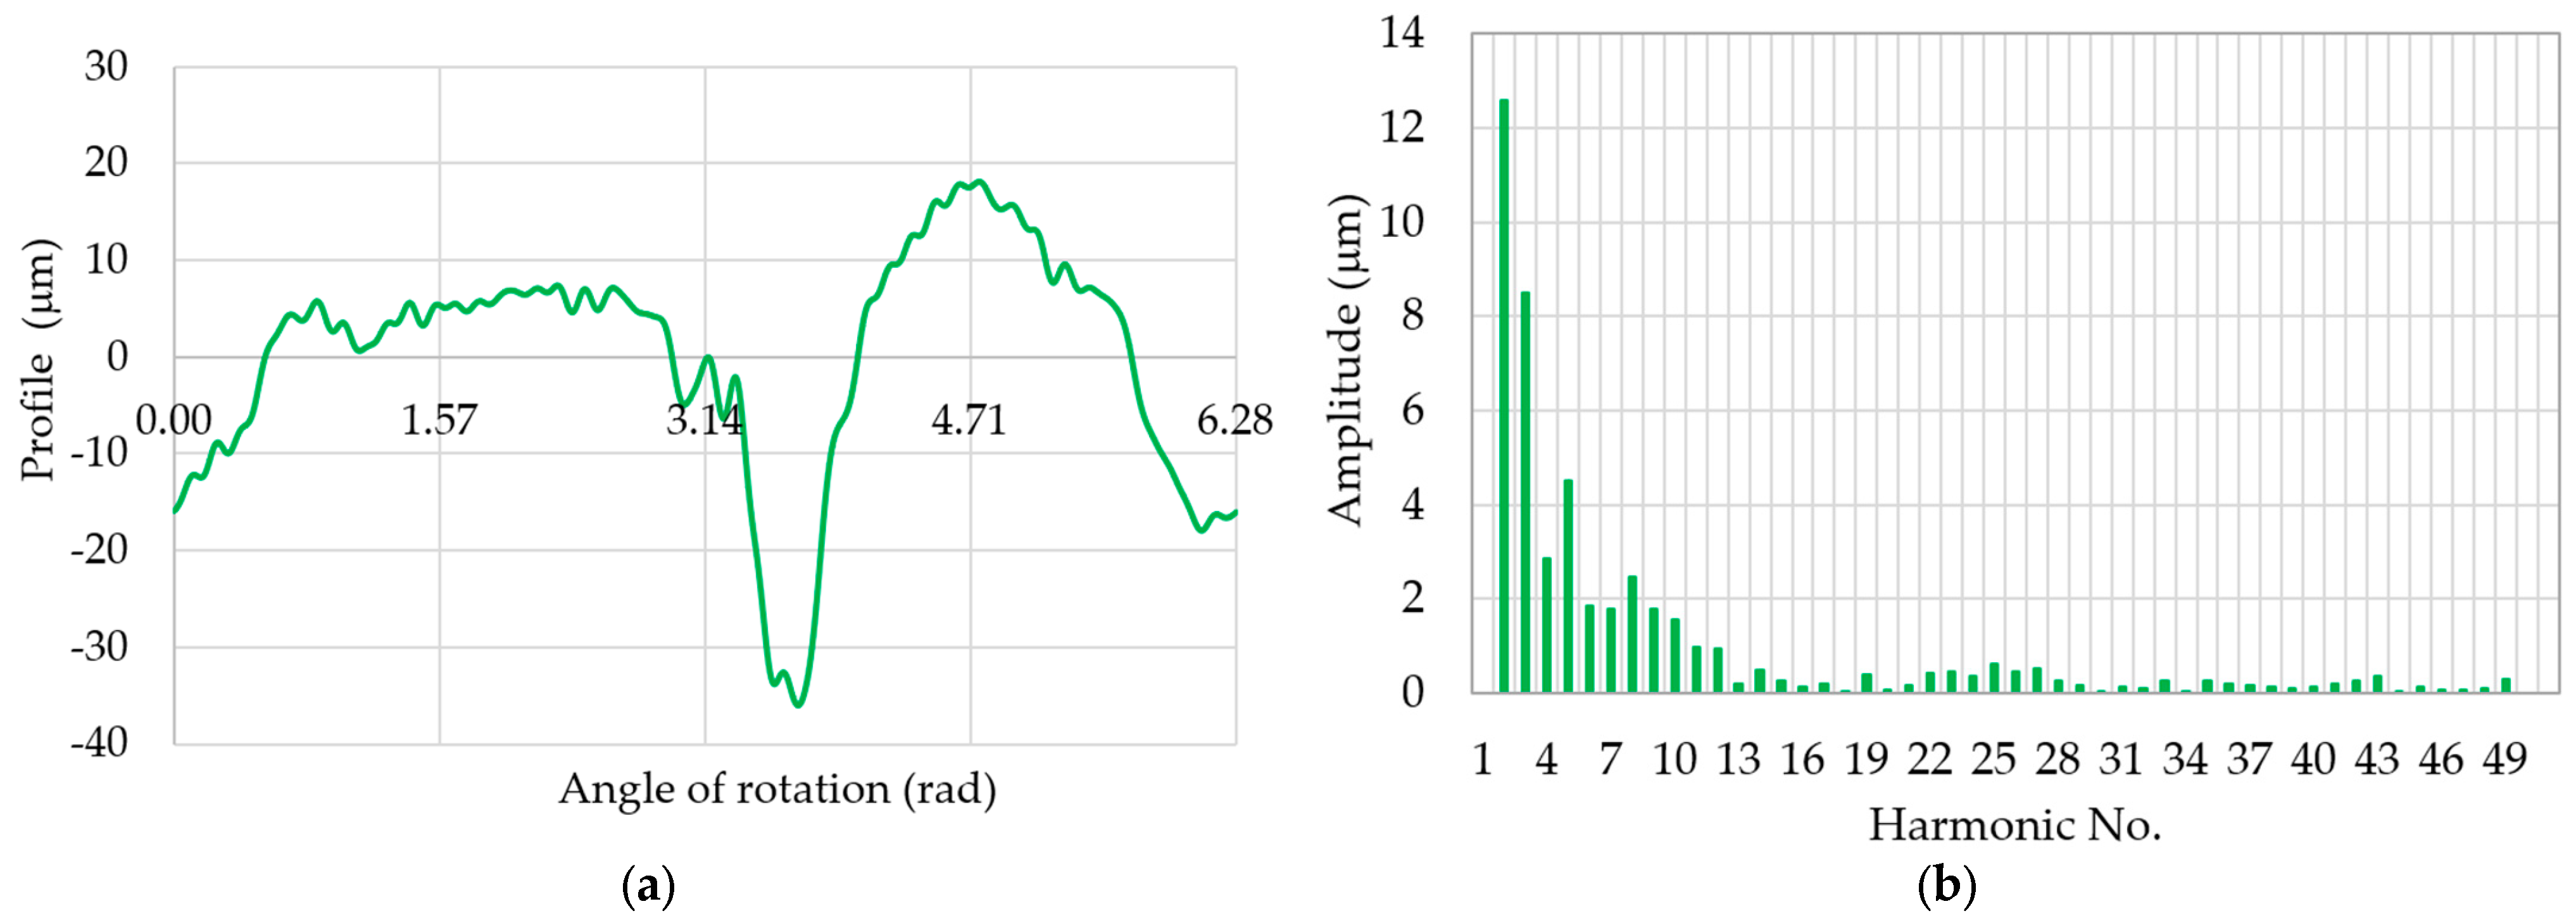
By knowing the amplitude values of the harmonics of the eccentricity profile, it is possible to select, from the amplitude spectrum of the total profile, the harmonics associated with the profile of the examined journal. The theoretical profile of the examined journal obtained using the proposed procedures is presented in Figure 14a, and its discrete amplitude spectrum is shown in Figure 14b. The separated harmonic values of the amplitude spectrum are listed in Table 4.
Figure 13. Eccentricity profile determined from the measured total profile of journal marked with number 4 (a) and the amplitude spectrum of the determined eccentricity profile of this journal (b).
Energies 16 04463 g013
Table 3. Separated harmonic values of the amplitude spectrum of the eccentricity profile determined from the measured total profile of journal marked with number 4.
i-Harmonic Amplitude (μm)
i010203040
i + 00.0570.0140.0060.004
i + 115.7700.0020.0010.0010.002
i + 21.8700.0390.0120.0050.001
i + 30.0100.0020.0010.0010.003
i + 40.3740.0290.0100.0050.001
i + 50.0050.0020.0010.0010.002
i + 60.1600.0220.0080.0030.000
i + 70.0040.0020.0010.0010.001
i + 80.0890.0170.0070.0050.000
i + 90.0030.0010.0010.0020.000
Figure 14. Circularity profile determined from the measured total profile of journal marked with number 4 (a) and the amplitude spectrum of the determined circularity profile of this journal (b).
Energies 16 04463 g014
Table 4. Separated harmonic values of the amplitude spectrum of the circularity profile determined from the measured total profile of journal marked with number 4.
i-Harmonic Amplitude (μm)
i010203040
i + 01.5540.0590.0520.146
i + 10.9640.1680.1310.207
i + 212.5870.9480.4360.0880.257
i + 38.4940.2040.4460.2670.360
i + 42.8480.4850.3690.0180.050
i + 54.5050.2790.6120.2780.142
i + 61.8690.1330.4710.1940.087
i + 71.7830.2170.5250.1700.071
i + 82.4780.0080.2760.1280.119
i + 91.7800.4090.1560.0980.000

3.2. Example Procedures for Determining the Real Circularity Profile from the Measured Total Profile for the Case of Supports Located at Various Heights

In the case under consideration, the support, according to the assumption made to enable contact with the eccentrically loaded journal, is pre-positioned with an offset relative to the other supports by a value y.
Example procedures for determining the real circularity profile of a journal showing eccentric displacement based on the measured total profile for the case where the sensor stylus was positioned relative to the measured profile at angle α = 30° and with support offset y = 25 μm are shown in Figure 15, Figure 16 and Figure 17 as well as in Table 5, Table 6 and Table 7.
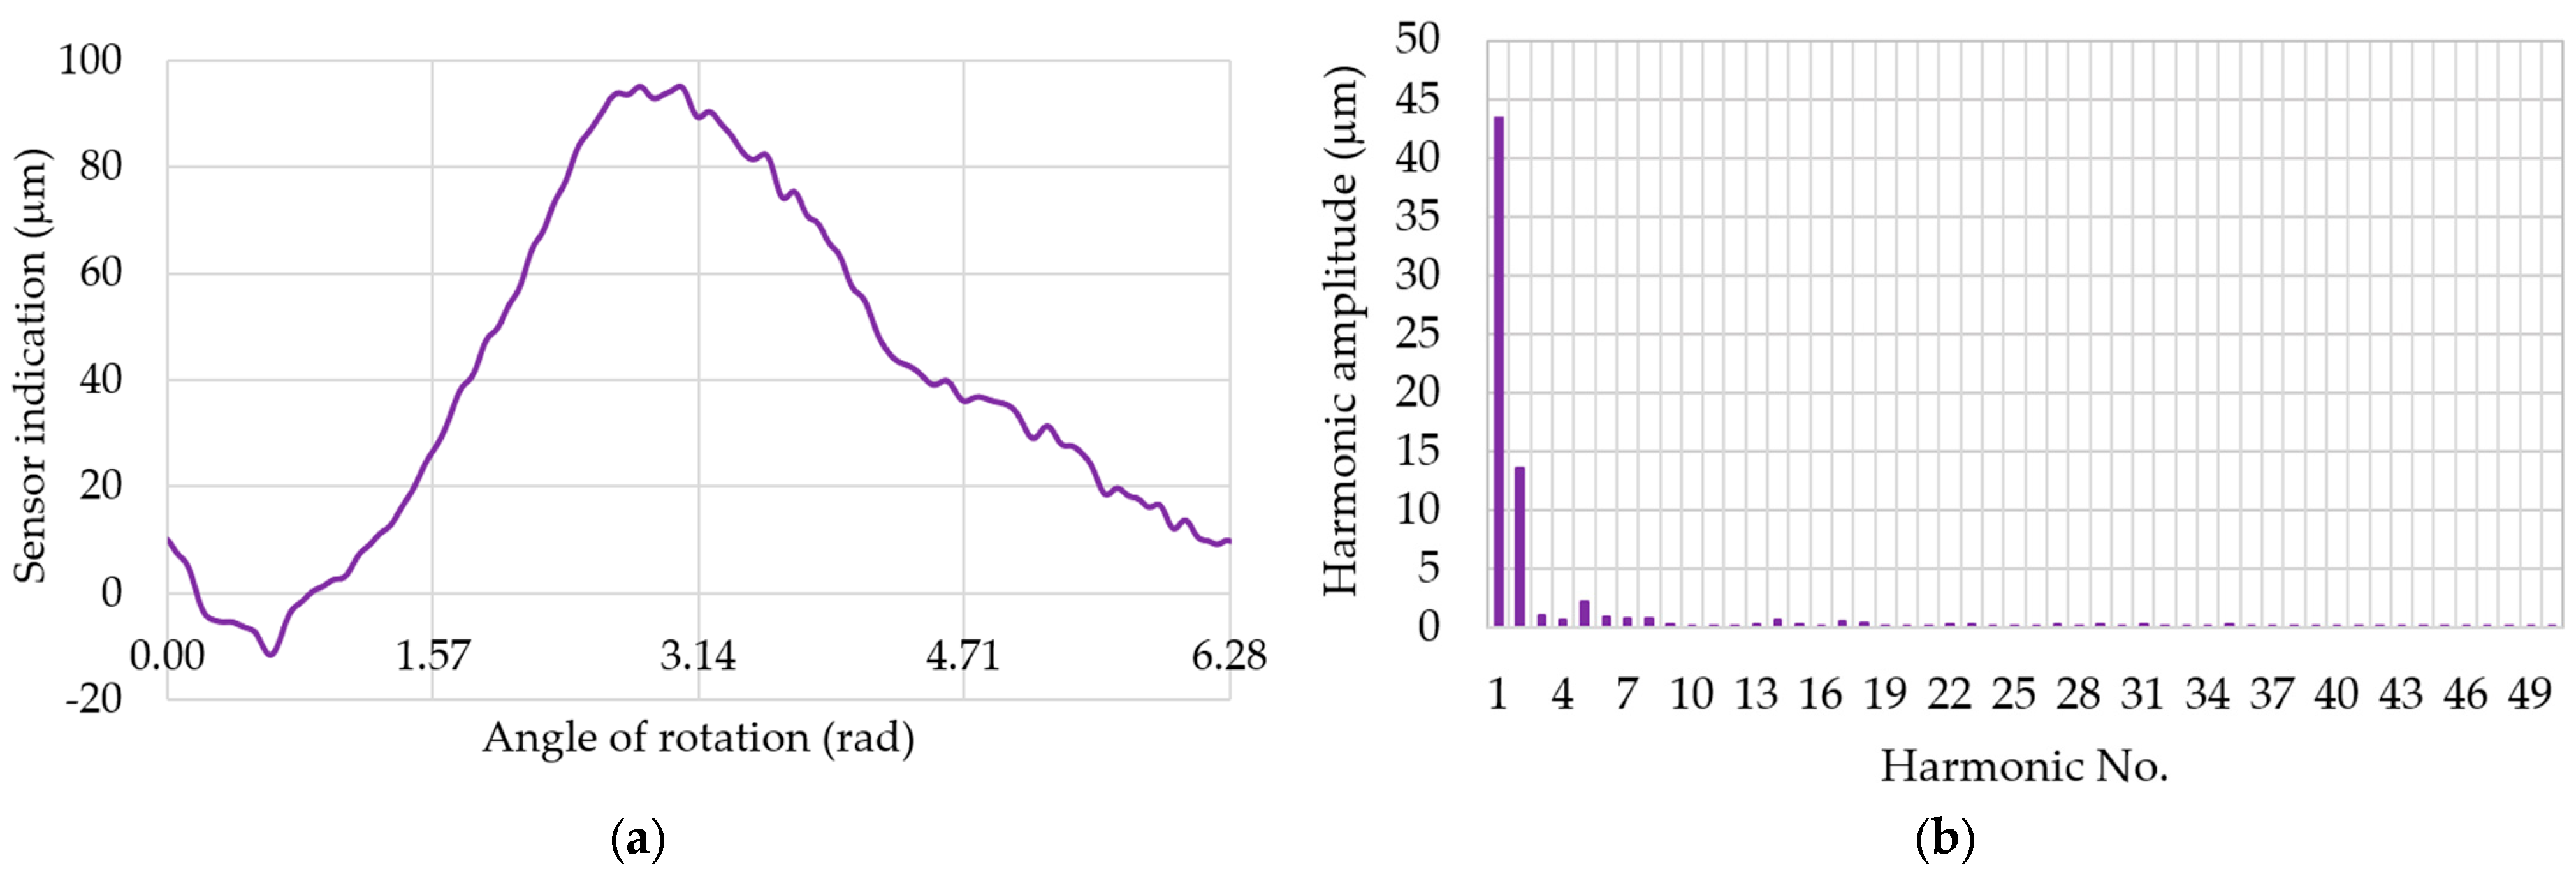
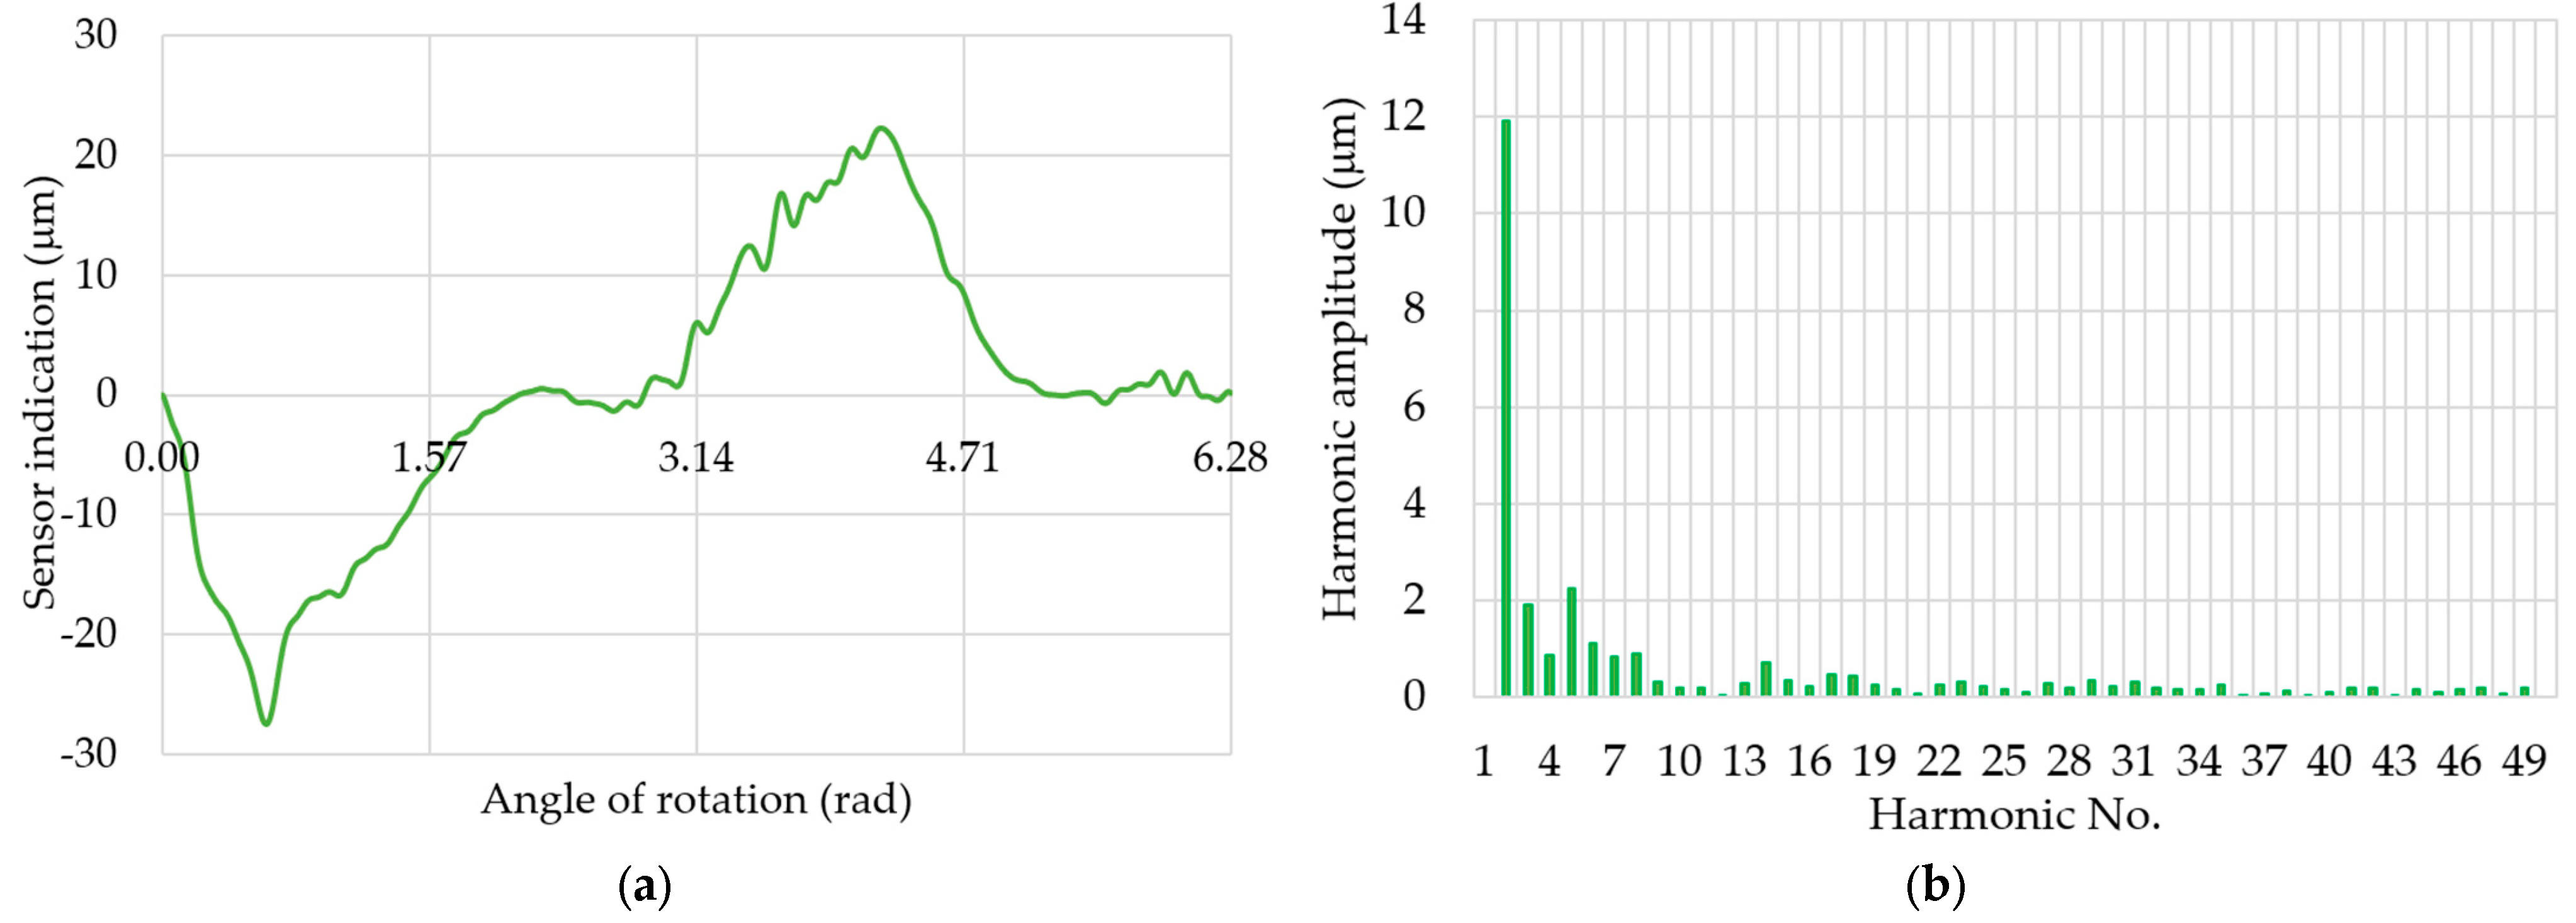
Figure 15a shows the measured total profile of journal marked with number 3 for the previously stated measurement conditions. An image of the discrete amplitude spectrum of this profile is presented in Figure 15b.
Figure 15. Measured total profile of journal marked with number 3 (a) and the discrete amplitude spectrum of the measured total profile of this journal (b) (α = 30°, y = 25 μm).
Energies 16 04463 g015
The separated harmonic values of the amplitude spectrum of the measured total profile of journal marked with number 3 are shown in Table 5.
Considering that the first harmonic amplitude C1α of the measured total profile of the journal marked with number 3 takes the value equal to 43.471 μm, then for support offset y = 25 μm, the quotient y/C1α = 0.575. The value of the amplitude of the first harmonic component of the eccentricity profile with the eccentricity value e10 = 10 μm, determined for this value of the quotient, is C1(10)α = 8.694 μm. The eccentricity value for the analysed profile, determined based on Equation (14), is therefore e = 50 μm.
Table 5. Separated harmonic values of the amplitude spectrum of the measured total profile of journal marked with number 3 (α = 30°, y = 25 μm).
i-Harmonic Amplitude (μm)
i010203040
i + 00.2140.1770.2040.103
i + 143.4710.1520.0310.3210.192
i + 213.6690.1110.2560.1950.185
i + 31.0990.2980.3050.1770.018
i + 40.6920.7440.2130.1530.146
i + 52.1970.3320.1490.2610.097
i + 60.9580.1930.0890.0460.165
i + 70.8210.5070.2980.0480.180
i + 80.7960.4520.2030.1170.075
i + 90.3030.2330.3410.0130.191
The eccentricity profile subsequently determined from the measured total profile is illustrated in Figure 16a, while its amplitude spectrum is presented in Figure 16b.
The values of the amplitudes of the separated harmonics of the eccentricity profile determined from the measured total profile of journal marked with number 3 are summarised in Table 6.
Figure 16. Eccentricity profile determined from the measured total profile of journal marked with number 3 (a) and the discrete amplitude spectrum of the determined eccentricity profile of this journal (b).
Energies 16 04463 g016
The final profile of journal marked with number 3 obtained from the measured total profile and its discrete amplitude spectrum, as a result of the developed procedures, are presented in Figure 17a,b, successively.
The values of the amplitudes of the separated harmonics of the amplitude spectrum obtained by applying the developed procedures for profile of journal marked with number 3, obtained from the measured total profile, are summarised in Table 7.
Table 6. Values of the amplitudes of the separated harmonics of the eccentricity profile determined from the measured total profile of journal marked with number 3.
i-Harmonic Amplitude (μm)
i010203040
i + 00.0700.0230.0130.007
i + 143.4710.0460.0410.0230.016
i + 23.4930.0990.0160.0160.012
i + 31.7940.0540.0370.0100.013
i + 40.3590.0370.0350.0160.017
i + 50.3690.0720.0210.0040.010
i + 60.3980.0320.0380.0130.016
i + 70.1110.0140.0240.0080.014
i + 80.1190.0330.0240.0100.010
i + 90.1580.0210.0290.0140.015
Figure 17. Circularity profile determined from the measured total profile of journal marked with number 3 (a) and the discrete amplitude spectrum of the determined circularity profile of this journal (b).
Energies 16 04463 g017
Table 7. Separated harmonic values of the amplitude spectrum of the circularity profile determined from the measured total profile of journal marked with number 3.
i-Harmonic Amplitude (μm)
i010203040
i + 00.1930.1600.2150.098
i + 10.1960.0540.3170.188
i + 211.9200.0320.2660.1960.181
i + 31.9070.2910.3050.1690.020
i + 40.8670.7160.2360.1460.147
i + 52.2580.3520.1600.2610.101
i + 61.1220.2110.0900.0520.160
i + 70.8470.4760.2780.0540.181
i + 80.8850.4440.1910.1170.078
i + 90.3230.2450.3330.0180.196
The procedures for finding the auxiliary values of y/C1α and C1(10)α to determine the eccentricity e for the profile under consideration are presented in tabular form in Appendix A.

3.3. Comparative Evaluation of Test Results and Their Validation

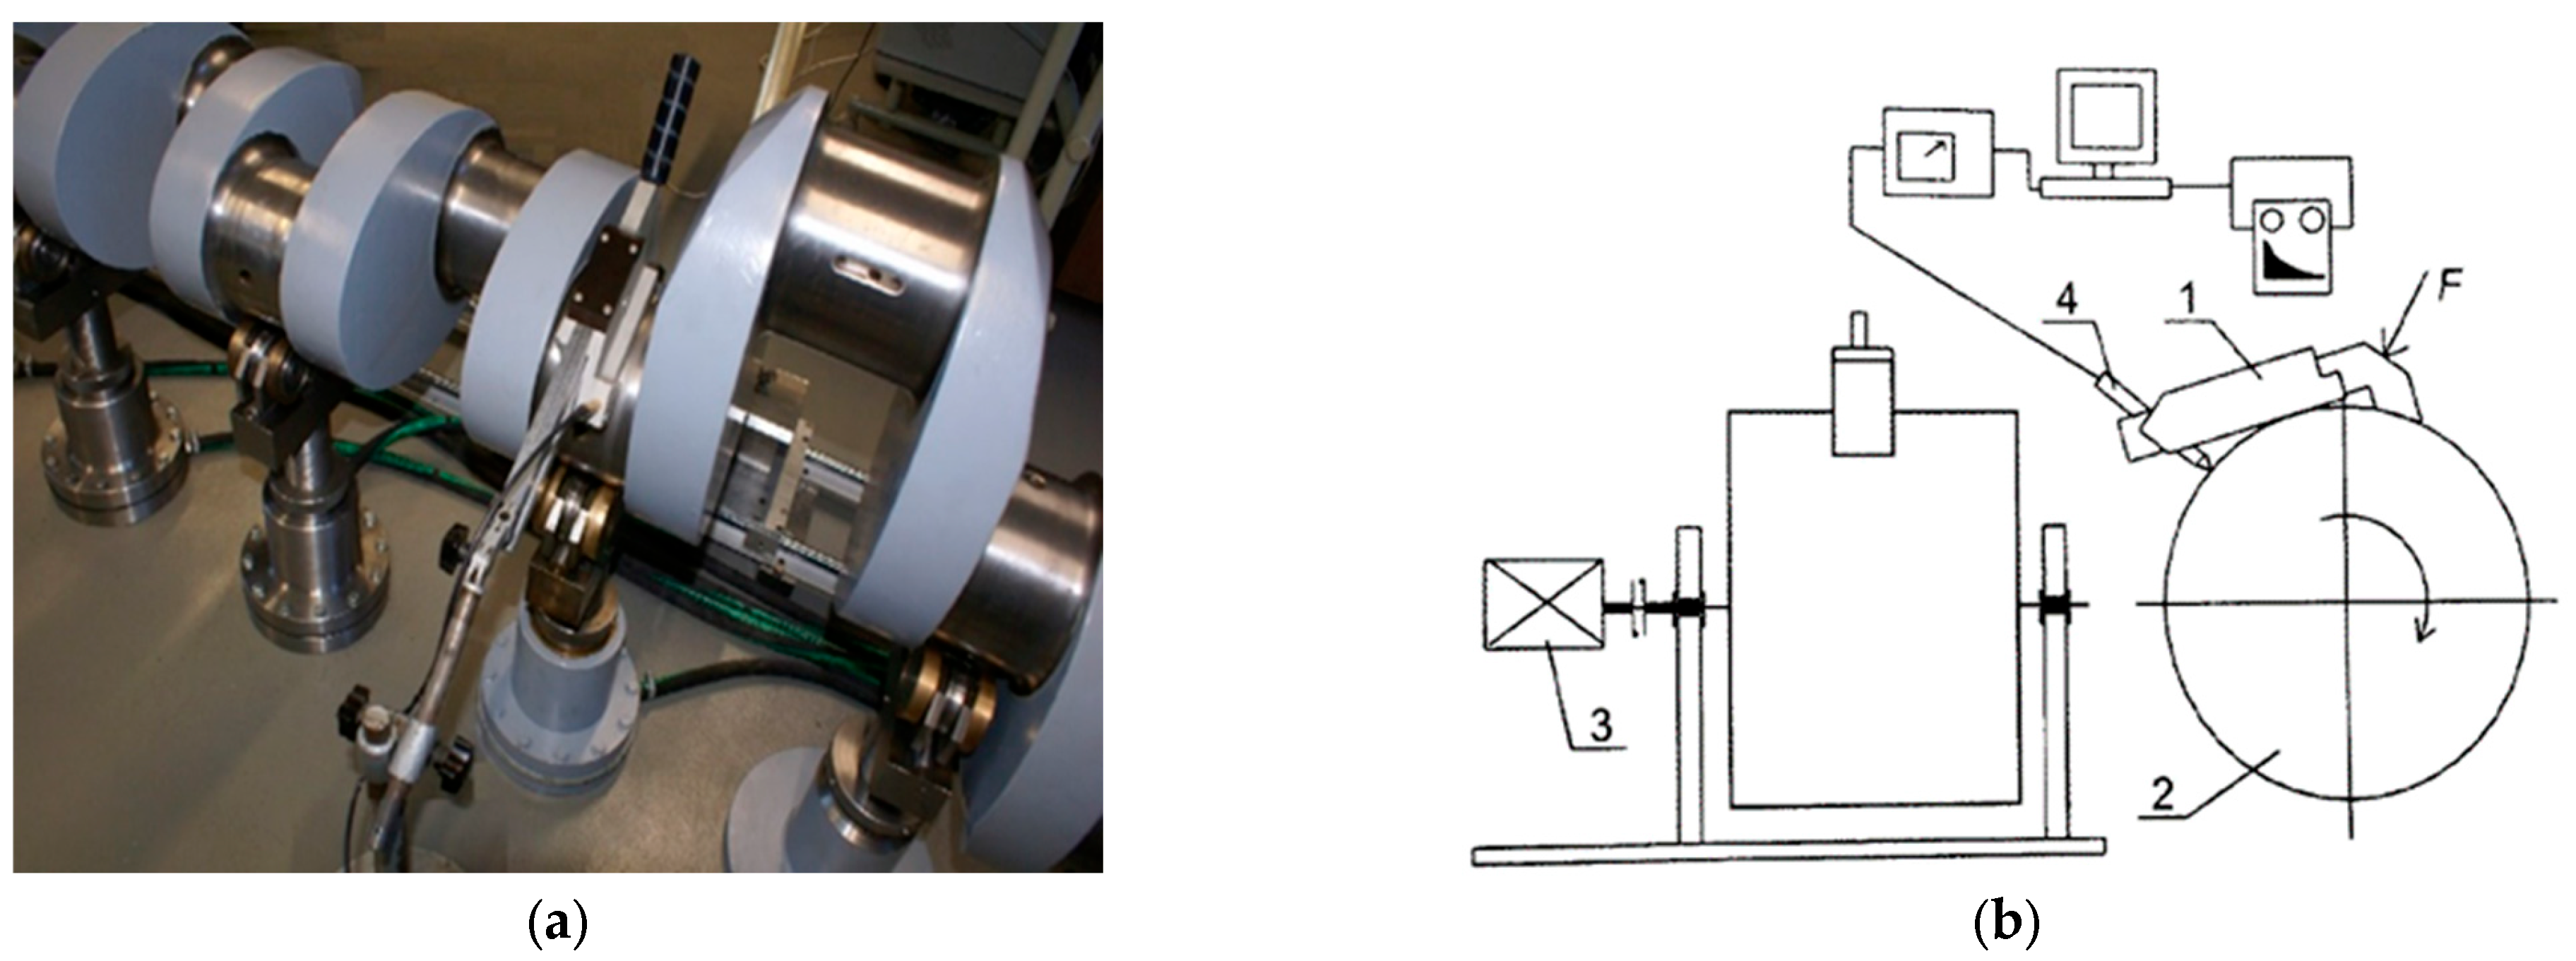
To allow a comparative evaluation of the accuracy of the theoretical circularity profiles achieved using the procedures recommended in Section 3.2, reference measurements were made of the deviations and contours of the main journals of the object accepted for investigation. These reference measurements were conducted by means of a system with the MUK 25-600 measuring head and the SAJD software, providing a full qualitative evaluation of the measured circularity contours by the reference method [1,4,28]. The MUK 25-600 measuring head was seated directly on the surface of the tested journal during the measurements. As a result, the evaluation of the shape contours was independent of the support conditions of the crankshaft being measured (see Figure 18).
The circularity contours measured in this way were analysed harmonically and evaluated comparatively with the results of measurements of deviations and contours of the shape of journals, conducted on a test bench adapted to measure geometric deviations of crankshafts supported by a set of prisms with the possibility of their height positioning, as well as the possibility of changing the angular position of the sensor in relation to the measured profile.
Based on the measurement results achieved, the circularity deviation values of the measured journals were determined. The calculation of the circularity deviation RONt follows the traditional way of interpreting it, in which it is assumed that, when it is determined relative to the mean circle, it is equal to the sum of the absolute values of the maximum elevation of the recorded profile RONp and the maximum cavity depth of the recorded profile RONv [4,11,31]:
R O N t = R O N p + R O N v
Example results of the application of the proposed procedures and reference measurements realised for one of the selected main journals showing eccentric displacements during the rotation of the crankshaft under test are shown in Table 8. The table shows the results of the comparative evaluation between the theoretical profiles and the reference profile of the tested journal. The indicator for the evaluation was the value of the coefficient of determination R2. The resulting values for the coefficient R2 are greater than 0.93, indicating that the developed procedures are highly effective.

4. Conclusions

The article discusses the results of studies focused on the improvement of applied measurement techniques for large-size crankshafts of marine engines treated as energy machines. Based on the analysis of these results, the following conclusions have been drawn:
  • It has been demonstrated that, in the case of crankshaft measurements subjected to deviations in the position of the main journals’ axes and with limited possibilities of detecting its geometrical deviations resulting from the adopted support conditions, knowledge of the initial positioning of the supports and the parameters of the method makes it possible to correctly determine the actual values of the geometrical deviations of the crankshaft on the basis of the measured total profile;
  • The application of the conventional method of supporting the crankshaft with a set of fixed stiff supports results in limitations in the ability to detect their geometrical deviations;
  • The recommended procedures make it possible to select the eccentricity profile and the real circularity profile from the total profile of the examined main journal. In parallel, they eliminate the effect of support conditions on the deviation and contour profile measurements of the examined crankshaft main journal system;
  • By applying the prepared procedures to practical measurements, it is feasible to perfect the applied measurement techniques and thus increase the effectiveness and reliability of the evaluation of the geometrical state of the crankshaft.

Author Contributions

Conceptualization, K.N. and Z.G.; methodology, K.N. and Z.G.; software, K.N. and Z.G.; validation, M.S.; formal analysis, K.N. and R.G.; investigation, K.N. and Z.G.; resources, K.N. and Z.G.; data curation, K.N. and Z.G.; writing—original draft preparation, K.N. and Z.G.; writing—review and editing, M.S. and R.G.; visualization, K.N., R.G. and Z.G.; supervision, K.N.; project administration, R.G.; funding acquisition, K.N. All authors have read and agreed to the published version of the manuscript.

Funding

This research received no external funding.

Data Availability Statement

Not applicable.

Conflicts of Interest

The authors declare no conflict of interest.

Appendix A

The determination of the amplitude of C1(10)α from the angle α and the quotient y/C1α can be carried out using the data in Table A1. An example reading is indicated by bolding the fonts in the relevant cells in the table. For an angle of α = 30° and a value of y/C1α = 0.575, the amplitude value of C1(10)α = 8.69.
Table A1. Determination of the amplitude of C1(10)α from the angle α and the quotient y/C1α.
y (μm)
−10−9−8−7−6−5−4−3−2−1012345678910
C1 (μm)
α (°)−9010.09.829.499.078.578.057.016.566.255.604.984.323.713.092.471.911.380.910.300.170
−7510.09.839.539.138.688.207.667.126.576.005.464.894.413.933.503.162.882.712.642.572.50
−6010.09.879.629.318.958.588.187.777.376.976.616.235.935.655.415.245.115.044.954.944.93
−4510.09.919.759.559.329.088.788.588.348.117.917.697.537.387.267.187.117.086.947.047.02
−3010.09.959.879.779.679.559.429.329.219.109.028.928.858.798.748.698.678.668.658.638.61
−1510.09.989.969.939.919.889.859.829.809.779.759.729.709.699.689.679.669.659.649.639.62
010.010.010.010.010.010.010.010.010.010.010.010.010.010.010.010.010.010.010.010.010.0
1510.09.989.969.939.919.889.859.829.809.779.759.729.709.699.689.679.669.659.649.639.62
3010.09.959.879.779.679.559.429.329.219.109.028.928.858.798.748.698.678.668.658.638.61
4510.09.919.759.559.329.088.788.588.348.117.917.697.537.387.267.187.117.086.947.047.02
6010.09.879.629.318.958.588.187.777.376.976.616.235.935.655.415.245.115.044.954.944.93
7510.09.839.539.138.688.207.667.126.576.005.464.894.413.933.503.162.882.712.642.572.50
9010.09.829.499.078.578.057.016.566.255.604.984.323.713.092.471.911.380.910.300.170
y/C1
α (°)−90−1.0−0.916−0.843−0.772−0.700−0.621−0.571−0.457−0.320−0.17900.2310.5390.9711.6192.6184.3487.69226.6752.94
−75−1.0−0.916−0.839−0.767−0.691−0.610−0.522−0.421−0.304−0.16700.2040.4540.7631.1431.5822.0832.5833.0303.5024.0
−60−1.0−0.912−0.832−0.752−0.670−0.583−0.489−0.386−0.271−0.14300.1610.3370.5310.7390.9541.1741.3891.6161.8222.028
−45−1.0−0.908−0.821−0.733−0.644−0.551−0.456−0.350−0.240−0.12300.1300.2660.4070.5510.6960.8440.9891.1531.2781.425
−30−1.0−0.905−0.811−0.716−0.620−0.524−0.425−0.322−0.217−0.11000.1120.2260.3410.4580.5750.6920.8080.9251.0431.161
−15−1.0−0.902−0.803−0.705−0.605−0.506−0.406−0.305−0.204−0.10200.1030.2060.3100.4130.5170.6210.7250.8300.9351.040
0−1.0−0.900−0.800−0.700−0.600−0.500−0.400−0.300−0.200−0.10000.1000.2000.3000.4000.5000.6000.7000.8000.9001.0
15−1.0−0.902−0.803−0.705−0.605−0.506−0.406−0.305−0.204−0.10200.1030.2060.3100.4130.5170.6210.7250.8300.9351.040
30−1.0−0.905−0.811−0.716−0.620−0.524−0.425−0.322−0.217−0.11000.1120.2260.3410.4580.5750.6920.8080.9251.0431.161
45−1.0−0.908−0.821−0.733−0.644−0.551−0.456−0.350−0.240−0.12300.1300.2660.4070.5510.6960.8440.9891.1531.2781.425
60−1.0−0.912−0.832−0.752−0.670−0.583−0.489−0.386−0.271−0.14300.1610.3370.5310.7390.9541.1741.3891.6161.8222.028
75−1.0−0.916−0.839−0.767−0.691−0.610−0.522−0.421−0.304−0.16700.2040.4540.7631.1431.5822.0832.5833.0303.5024.0
90−1.0−0.916−0.843−0.772−0.700−0.621−0.571−0.457−0.320−0.17900.2310.5390.9711.6192.6184.3487.69226.6752.94

References

  1. Adamczak, S. Measurements of Geometrical Surfaces, Outlines of Shape, Waviness, and Roughness; WNT: Warsaw, Poland, 2008. (In Polish) [Google Scholar]
  2. Janusiewicz, A.; Adamczak, S.; Makieła, W.; Stępień, K. Determining the theoretical method error during an on-machine roundness measurement. Measurement 2011, 44, 1761–1767. [Google Scholar] [CrossRef]
  3. Fang, X.; Sheng, X.; Sun, Y.; Xu, Y. Profile error analysis of following ground crankshaft using robust gaussian regression filter. In Proceedings of the 2015 Fifth International Conference on Instrumentation and Measurement, Computer, Communication and Control, Qinhuangdao, China, 18–20 September 2015; pp. 1875–1878. [Google Scholar] [CrossRef]
  4. Stępień, K.; Janecki, D.; Adamczak, S. Fundamentals of adaptive strategy of cylindricity measurements with the use of longitudinal measurements. Meas. Sens. 2021, 18, 100146. [Google Scholar] [CrossRef]
  5. Yao, Y.; Zhang, K. An improved self-born weighted least square method for cylindricity error evaluation. Appl. Sci. 2022, 12, 12319. [Google Scholar] [CrossRef]
  6. Clader, N. Marine Diesel Engines: Maintenance, Troubleshooting, and Repair, 3rd ed.; International Marine/Ragged Mountain Press: Camden, UK, 2006. [Google Scholar]
  7. Shen, N.; Li, J.; Ye, J.; Qian, X.; Huang, H. Precise alignment method of the large-scale crankshaft during non-circular grinding. Int. J. Adv. Manuf. Technol. 2015, 80, 921–930. [Google Scholar] [CrossRef]
  8. Nguyen, D.V.; Duy, V.N. Numerical analysis of the forces on the components of a direct diesel engine. Appl. Sci. 2018, 8, 761. [Google Scholar] [CrossRef]
  9. Li, X.; Xu, K.; Wang, S. Precision measurement method of large shaft diameter based on dual camera system. Sensors 2022, 22, 3982. [Google Scholar] [CrossRef]
  10. Jeřábek, K.; Vondráčková, T.; Voštová, V. Increase of the effective production of crankshafts for ship engines. NASE MORE Int. J. Marit. Sci. Technol. 2016, 63, 283–288. [Google Scholar] [CrossRef]
  11. PN-EN ISO 12181-2; Geometrical Product Specifications (GPS), Roundness, Part 2: Specification Operators. Polish Committee for Standardization: Warsaw, Poland, 2012.
  12. Mekid, S.; Vacharanukul, K. In-process out-of-roundness measurement probe for turned workpieces. Measurement 2011, 44, 762–766. [Google Scholar] [CrossRef]
  13. Liu, Y.; Mei, Y.; Sun, C.; Li, R.; Wang, X.; Wang, H.; Tan, J.; Lu, Q. A novel cylindrical profile measurement model and errors separation method applied to stepped shafts precision model engineering. Measurement 2022, 188, 110486. [Google Scholar] [CrossRef]
  14. Pavlenko, I.; Kuric, I.; Basova, Y.; Saga, M.; Ivanov, V.; Kotliar, A.; Trojanowska, J. Parameter identification of a discrete-mass mathematical model of crankshaft oscillations. J. Braz. Soc. Mech. Sci. Eng. 2022, 44, 601. [Google Scholar] [CrossRef]
  15. Wang, Y.-X.; Wang, H.-X.; Tian, H.-H. Cylindricity error measurement and evaluation based on step acceleration algorithm in crankshaft measuring machine. MAPAN—J. Metrol. Soc. India 2022, 37, 823–832. [Google Scholar] [CrossRef]
  16. Shape and Position Tolerances of Crankshafts—Engine Technology Specification MAN B&W; Cegielski S.A.: Poznan, Poland, 2010. (In Polish)
  17. IMO. Marine Engine IMO Tier II Programme; IMO: London, UK, 2013. [Google Scholar]
  18. MAN B&W 50–90 MC/MCE Engines Instruction Manual; MAN B&W Diesel A/S: Copenhagen, Denmark, 2013.
  19. Chen, M.; Takahashi, S.; Takamasu, K. Development of high-precision micro-roundness measuring machine using a high-sensitivity and compact multi-beam angle sensor. Precis. Eng. 2015, 42, 276–282. [Google Scholar] [CrossRef]
  20. Kamiński, W. Marine slow-speed engines’ cylinder oil lubrication feed rate optimization in real operational conditions. Energies 2022, 15, 8378. [Google Scholar] [CrossRef]
  21. Nozdrzykowski, K. Prevention of elastic strains in flexible large size machine parts with the use of elastic support. Mach. Dyn. Res. 2015, 39, 111–122. [Google Scholar]
  22. Chybowski, L.; Nozdrzykowski, K.; Grządziel, Z.; Jakubowski, A.; Przetakiewicz, W. Method to increase the accuracy of large crankshaft geometry measurements using counterweights to minimize elastic deformations. Appl. Sci. 2020, 10, 4722. [Google Scholar] [CrossRef]
  23. Nozdrzykowski, K.; Grządziel, Z.; Grzejda, R.; Warzecha, M.; Stępień, M. An analysis of reaction forces in crankshaft support systems. Lubricants 2022, 10, 151. [Google Scholar] [CrossRef]
  24. Nozdrzykowski, K.; Adamczak, S.; Grządziel, Z.; Dunaj, P. The effect of deflections and elastic deformations on geometrical deviation and shape profile measurements of large crankshafts with uncontrolled supports. Sensors 2020, 20, 5714. [Google Scholar] [CrossRef] [PubMed]
  25. Nozdrzykowski, K.; Grządziel, Z.; Dunaj, P. Determining geometrical deviations of crankshafts with limited detection pos-sibilities due to support conditions. Measurement 2022, 189, 110430. [Google Scholar] [CrossRef]
  26. Nozdrzykowski, K. Conditions and Criteria of the Correct Assessment of the Geometric Condition of Large Crankshaft; Maritime University of Szczecin Press: Szczecin, Poland, 2022. (In Polish) [Google Scholar]
  27. Nozdrzykowski, K.; Grządziel, Z.; Nozdrzykowska, M.; Grzejda, R.; Stępień, M. Eliminating the influence of support conditions on geometric shape measurements of large crankshafts of marine engines. Energies 2023, 16, 16. [Google Scholar] [CrossRef]
  28. Adamczak, S.; Janecki, D.; Świderski, J.; Dobrowolski, T. Verification of Outlines of Crankshaft Pins Roundness Based on the MUK 25-600 Measuring System with SAJD Software, Research Commissioned by the Maritime University of Szczecin; Kielce University of Technology: Kielce, Poland, 2011. (In Polish) [Google Scholar]
  29. Capello, E.; Semeraro, Q. The harmonic fitting method for the assessment of the substitute geometry estimate error. Part I: 2D and 3D theory. Int. J. Mach. Tools Manuf. 2001, 41, 1071–1102. [Google Scholar] [CrossRef]
  30. Kunis, S.; Potts, D. Fast spherical Fourier algorithms. J. Comput. Appl. Math. 2003, 161, 75–98. [Google Scholar] [CrossRef]
  31. Whitehouse, D.J. Handbook of Surface and Nanometrology, 2nd ed.; CRC Press: Boca Raton, FL, USA, 2010. [Google Scholar]
  32. Nozdrzykowski, K. Methodology of Geometric Measurements of Deviations of Cylindrical Surfaces of Large-Size Machine Elements Based on the Example of Ship Engine Crankshafts; Maritime University of Szczecin Press: Szczecin, Poland, 2013. (In Polish) [Google Scholar]
  33. Nozdrzykowski, K. Applying harmonic analysis in the measurements of geometrical deviations of crankshafts—Roundness shapes analysis. Multidiscip. Asp. Prod. Eng. 2018, 1, 185–189. [Google Scholar] [CrossRef]
  34. Vizentin, G.; Vukelic, G.; Murawski, L.; Recho, N.; Orovic, J. Marine propulsion system failures—A review. J. Mar. Sci. Eng. 2020, 8, 662. [Google Scholar] [CrossRef]
  35. Muhammad, A.; Ali, M.A.H.; Shanono, I.H. Fatigue and harmonic analysis of a diesel engine crankshaft using ANSYS. In iMEC-APCOMS 2019; Osman Zahid, M.N., Abdul Aziz, R., Yusoff, A.R., Mat Yahya, N., Abdul Aziz, F., Yazid Abu, M., Eds.; Lecture Notes in Mechanical Engineering; Springer: Singapore, 2020; pp. 371–376. [Google Scholar] [CrossRef]
  36. Chen, L.; Xue, D.; Song, X.; He, Z.; Huang, D. A study on anti-shock performance of marine diesel engine based on multi-body dynamics and elastohydrodynamic lubrication. Appl. Sci. 2021, 11, 11259. [Google Scholar] [CrossRef]
Figure 1. Diagram showing the path of movement of the tip of the stylus of the sensor, positioned in relation to the profile to be measured at an angle of α, for the case where the supports of the main journals of the crankshaft are pre-positioned at an equal height.
Energies 16 04463 g001
Figure 2. Auxiliary diagram adopted to determine the mathematical relationships linking the method parameter α with the record of the measured eccentric displacement profile of the journal subjected to axial position deviation on the curved segment contained between the points 1′ to 6′ and 12′ to 1′ (illustrated in Figure 1).
Energies 16 04463 g002
Figure 4. Eccentricity profile for an assumed value of e = 30 μm and α = 60° (a) and the discrete amplitude spectrum of the eccentricity profile (b).
Energies 16 04463 g004
Figure 11. Algorithm to determine the real eccentricity value ei from the known value of the amplitude of the first harmonic of the spectrum of the measured total journal profile C1αI and the angle α, for the case when the support is offset in height from the others by the value yi.
Energies 16 04463 g011
Figure 18. General view of the crankshaft measuring bench (a) and diagram of the measuring system (b) (designations: 1—MUK 25-600 measuring head, 2—crankshaft journal, 3—drive motor, 4—displacement sensor, F—measuring head processing force [28]).
Energies 16 04463 g018
Table 1. Values of the first harmonic amplitude spectra for an assumed eccentricity e = 30 μm, with a change in 10° increments of the sensor location angle α, within its practical application range of ±90°.
α (°)C1α (μm)C1α/C1
030.001.0000
1029.670.9890
2028.660.9553
3027.030.9010
4024.900.8300
5022.410.7470
6019.800.6600
7017.370.5790
8015.600.5200
9015.000.5000
Table 8. Theoretical circularity deviations of a journal showing eccentric displacements during crankshaft rotation determined for the measured total profiles and the value obtained during reference measurements, depending on changes in the angular position of the sensor in relation to the measured profile.
Eccentricity e = 53 μm
α
(°)
Theoretical ProfileReference ProfileR2
(-)
RONptRONvtRONttRONtr
(μm)(μm)(μm)(μm)
022.52−22.2144.7348.030.932
3022.76−23.2946.050.953
6023.86−23.1647.020.972
9024.07−23.3047.370.986
Disclaimer/Publisher’s Note: The statements, opinions and data contained in all publications are solely those of the individual author(s) and contributor(s) and not of MDPI and/or the editor(s). MDPI and/or the editor(s) disclaim responsibility for any injury to people or property resulting from any ideas, methods, instructions or products referred to in the content.