Next Article in Journal
Treatment of Pseudoaneurysm of Internal Maxillary Artery: A Case Report
Previous Article in Journal
The Use of MMF Screws: Surgical Technique, Indications, Contraindications, and Common Problems in Review of the Literature
 
 
Craniomaxillofacial Trauma & Reconstruction is published by MDPI from Volume 18 Issue 1 (2025). Previous articles were published by another publisher in Open Access under a CC-BY (or CC-BY-NC-ND) licence, and they are hosted by MDPI on mdpi.com as a courtesy and upon agreement with Sage.
Article

Cleft Lip Repair: Technical Refinements for the Wide Cleft

by
Eric Meyer
1,2 and
Alan Seyfer
1,2,3,*
1
Anatomy, Physiology, and Genetics, 4301 Jones Bridge Road, Bethesda, MD 20814, USA
2
Uniformed Services University for Health Sciences, Bethesda, MD, USA
3
Plastic Surgery Service, Walter Reed National Military Medical Center and Department of Surgery, Bethesda, MD, USA
*
Author to whom correspondence should be addressed.
Craniomaxillofac. Trauma Reconstr. 2010, 3(2), 81-86; https://doi.org/10.1055/s-0030-1254377
Submission received: 9 August 2009 / Revised: 1 January 2010 / Accepted: 30 January 2010 / Published: 31 May 2010

Abstract

:
Clefts of the lip and palate are among the most common congenital malformations. A unilateral deformity is the most common type of cleft, but even within this subgroup there is a great deal of variety due to the accompanying severe distortion of the upper lip, cheek, nose, and maxilla. To repair such a variety of clefts with good aesthetic results, several general incisional approaches should be mastered along with a variety of subtle techniques that improve the end product. The most common repair utilized in America is the Millard rotation-advancement technique. This is partly due to the perceived superiority in results compared with other repairs and the ease with which this repair can be taught to residents. This repair places the scar along an artificial philtral column and is often quite sufficient in small clefts. Unfortunately, adoption of this ‘‘one size fits all’’ approach can limit the arsenal of the surgeon facing the vast array of differing cleft lip deformities. For example, the modified triangular flap, or Tennison-Randall repair, can be of value when presented with the wider unilateral cleft lip. In an effort to not only demonstrate that excellent results can be achieved when incisional patterns (Millard and Tennison) are used appropriately (small versus large clefts), we compared the results of two types of repairs, performed by a single surgeon over a period of 30 years. In addition, a variety of subtle techniques are reviewed to assist in obtaining excellent aesthetic results for any size repair.

Materials and Methods

One hundred consecutive primary repairs were performed on children with a unilateral cleft lip. All patients were under the age of 24 months, were referred from within the United States, and no selection was made on the basis of gender, ethnicity, or race. All repairs were performed by the senior author (AES) over a period of 30 years. Twenty-six patients received the Tennison-Randall technique and 74 received the Millard technique. The Tennison-Randall technique was selected by many factors, including the presence of a wide intra-cleft distance, significant distortion of the cleft nasal base, a relatively wide separation of the maxillary components, and significant crimping of the soft tissues of the lip and alar base on the cleft side.
Technical refinements of both repairs were used to correct minor tissue aberrations and tightness as dictated by the findings during each operation. These modifications are included in Figure 1 and were extremely useful in correcting the anatomy, gaining symmetry, and attaining favorable aesthetics for both repair types.
However, along with these specific steps, several general considerations were critical for success:
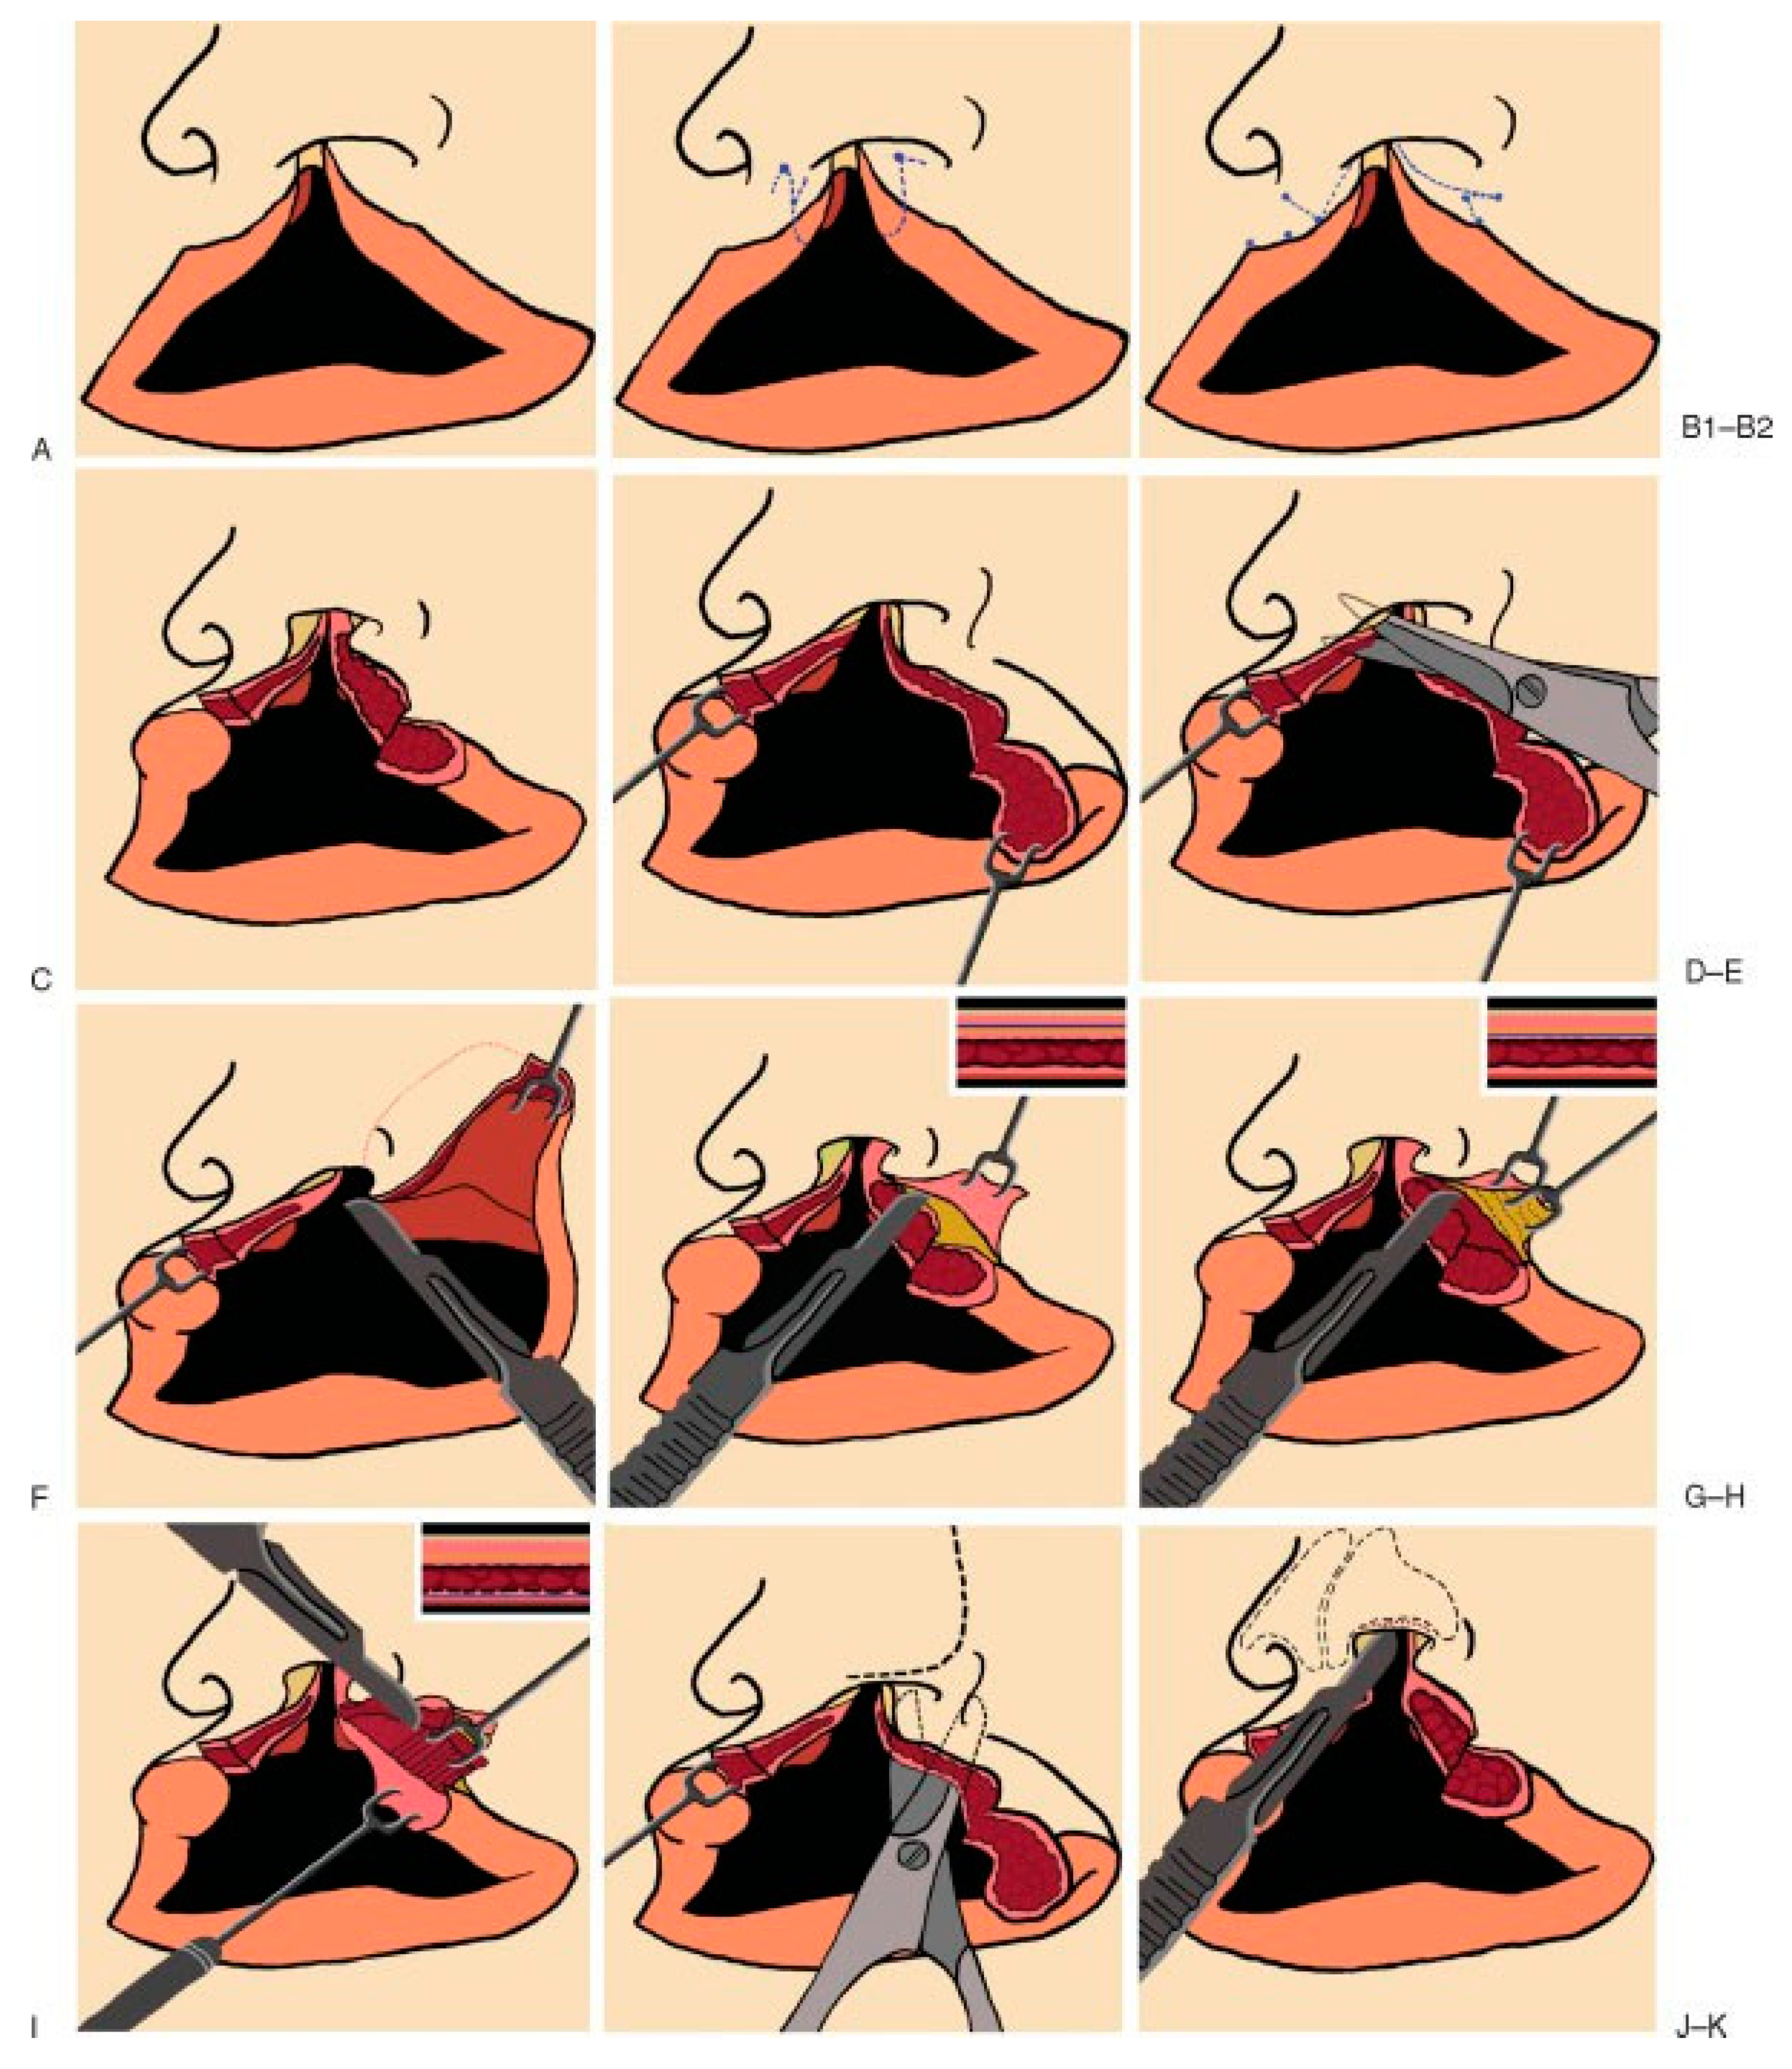
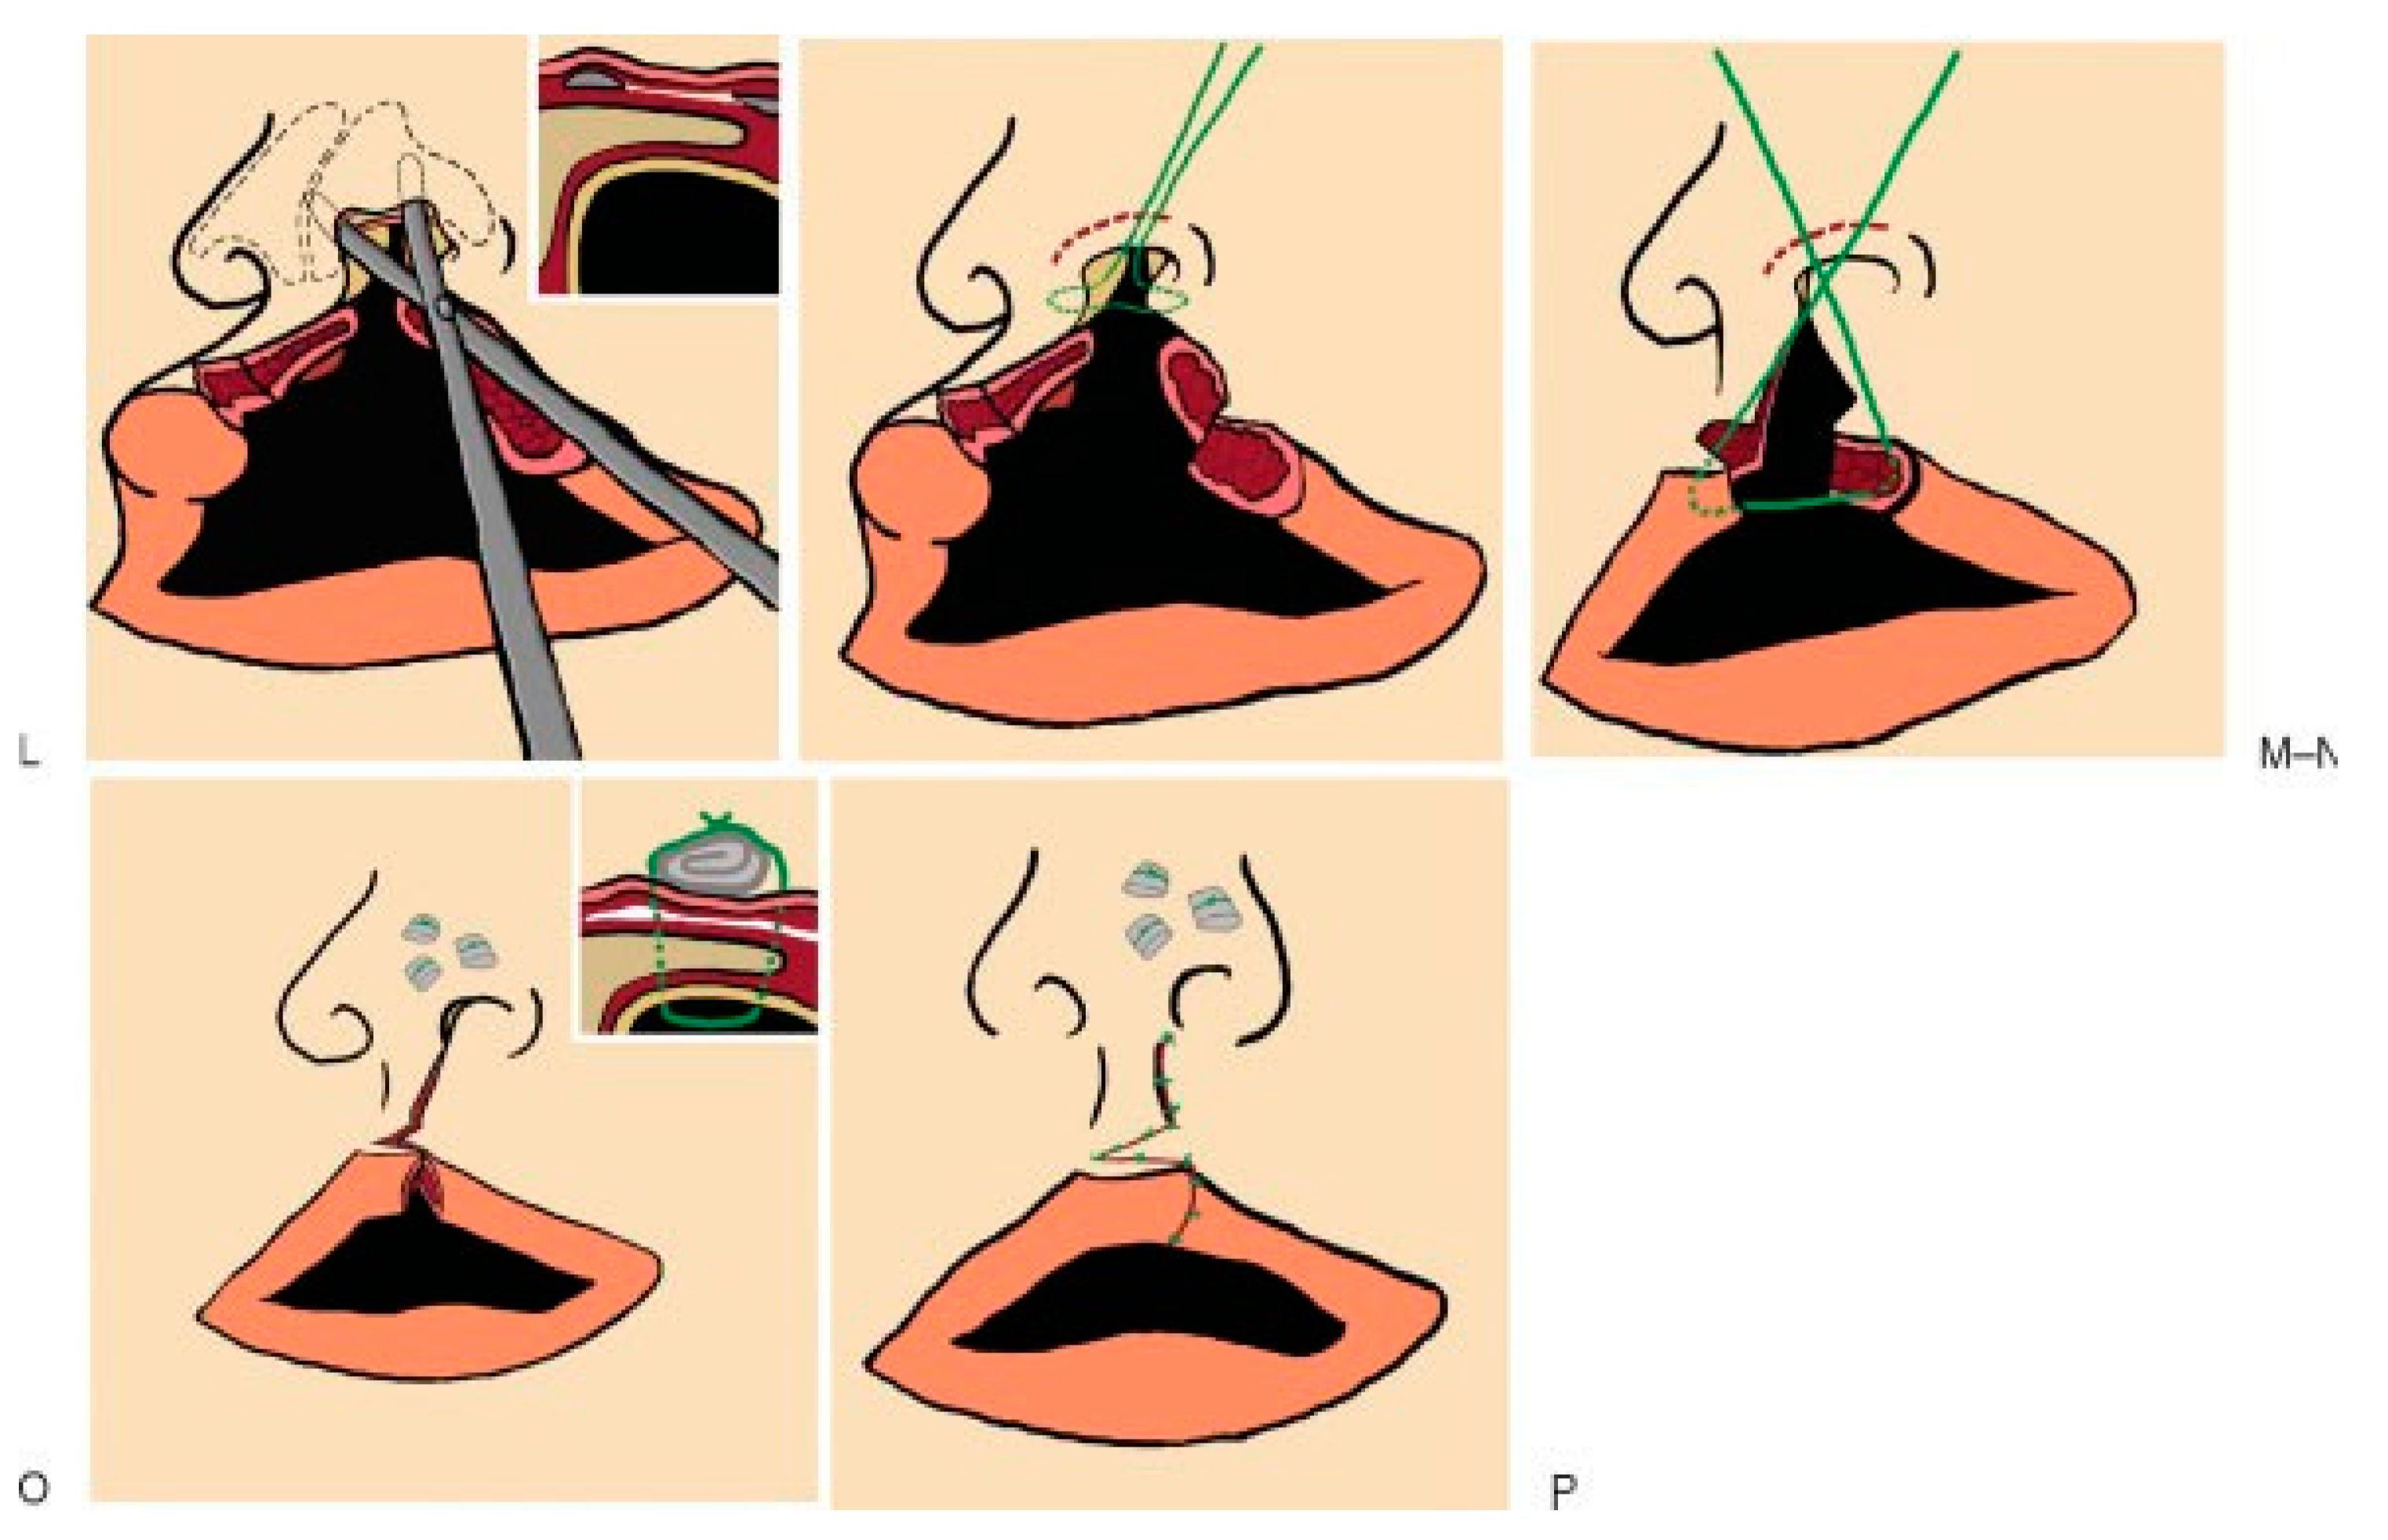
  • In making the incisions, loupe magnification and incising the skin at a 90-degree angle to the skin surface to prevent dermal beveling and reduce obliquity was helpful in preventing scarring. Continually fresh 15 blade scalpels and maintenance of skin tautness were also of value during the skin incisions. Once through the dermis, beveling toward the cleft margin preserved useful tissue volume. Care was taken to avoid removing any mass from within the lip margin itself until final closure and trimming could be serially assessed. Once the incisions were made, undermining and scoring of the deep tissues to unfurl the congenital crimping was done in all cases.
  • During the closure, and once the tissue layers were approximated, temporary ‘‘check sutures’’ were em-ployed so that tiny increments of tissue could be serially trimmed from both sides of the cleft, as dictated by symmetry and aesthetics. The previous undermining allowed any tension to be dissipated, leaving the dermis to heal with minimal tension, further improving results.
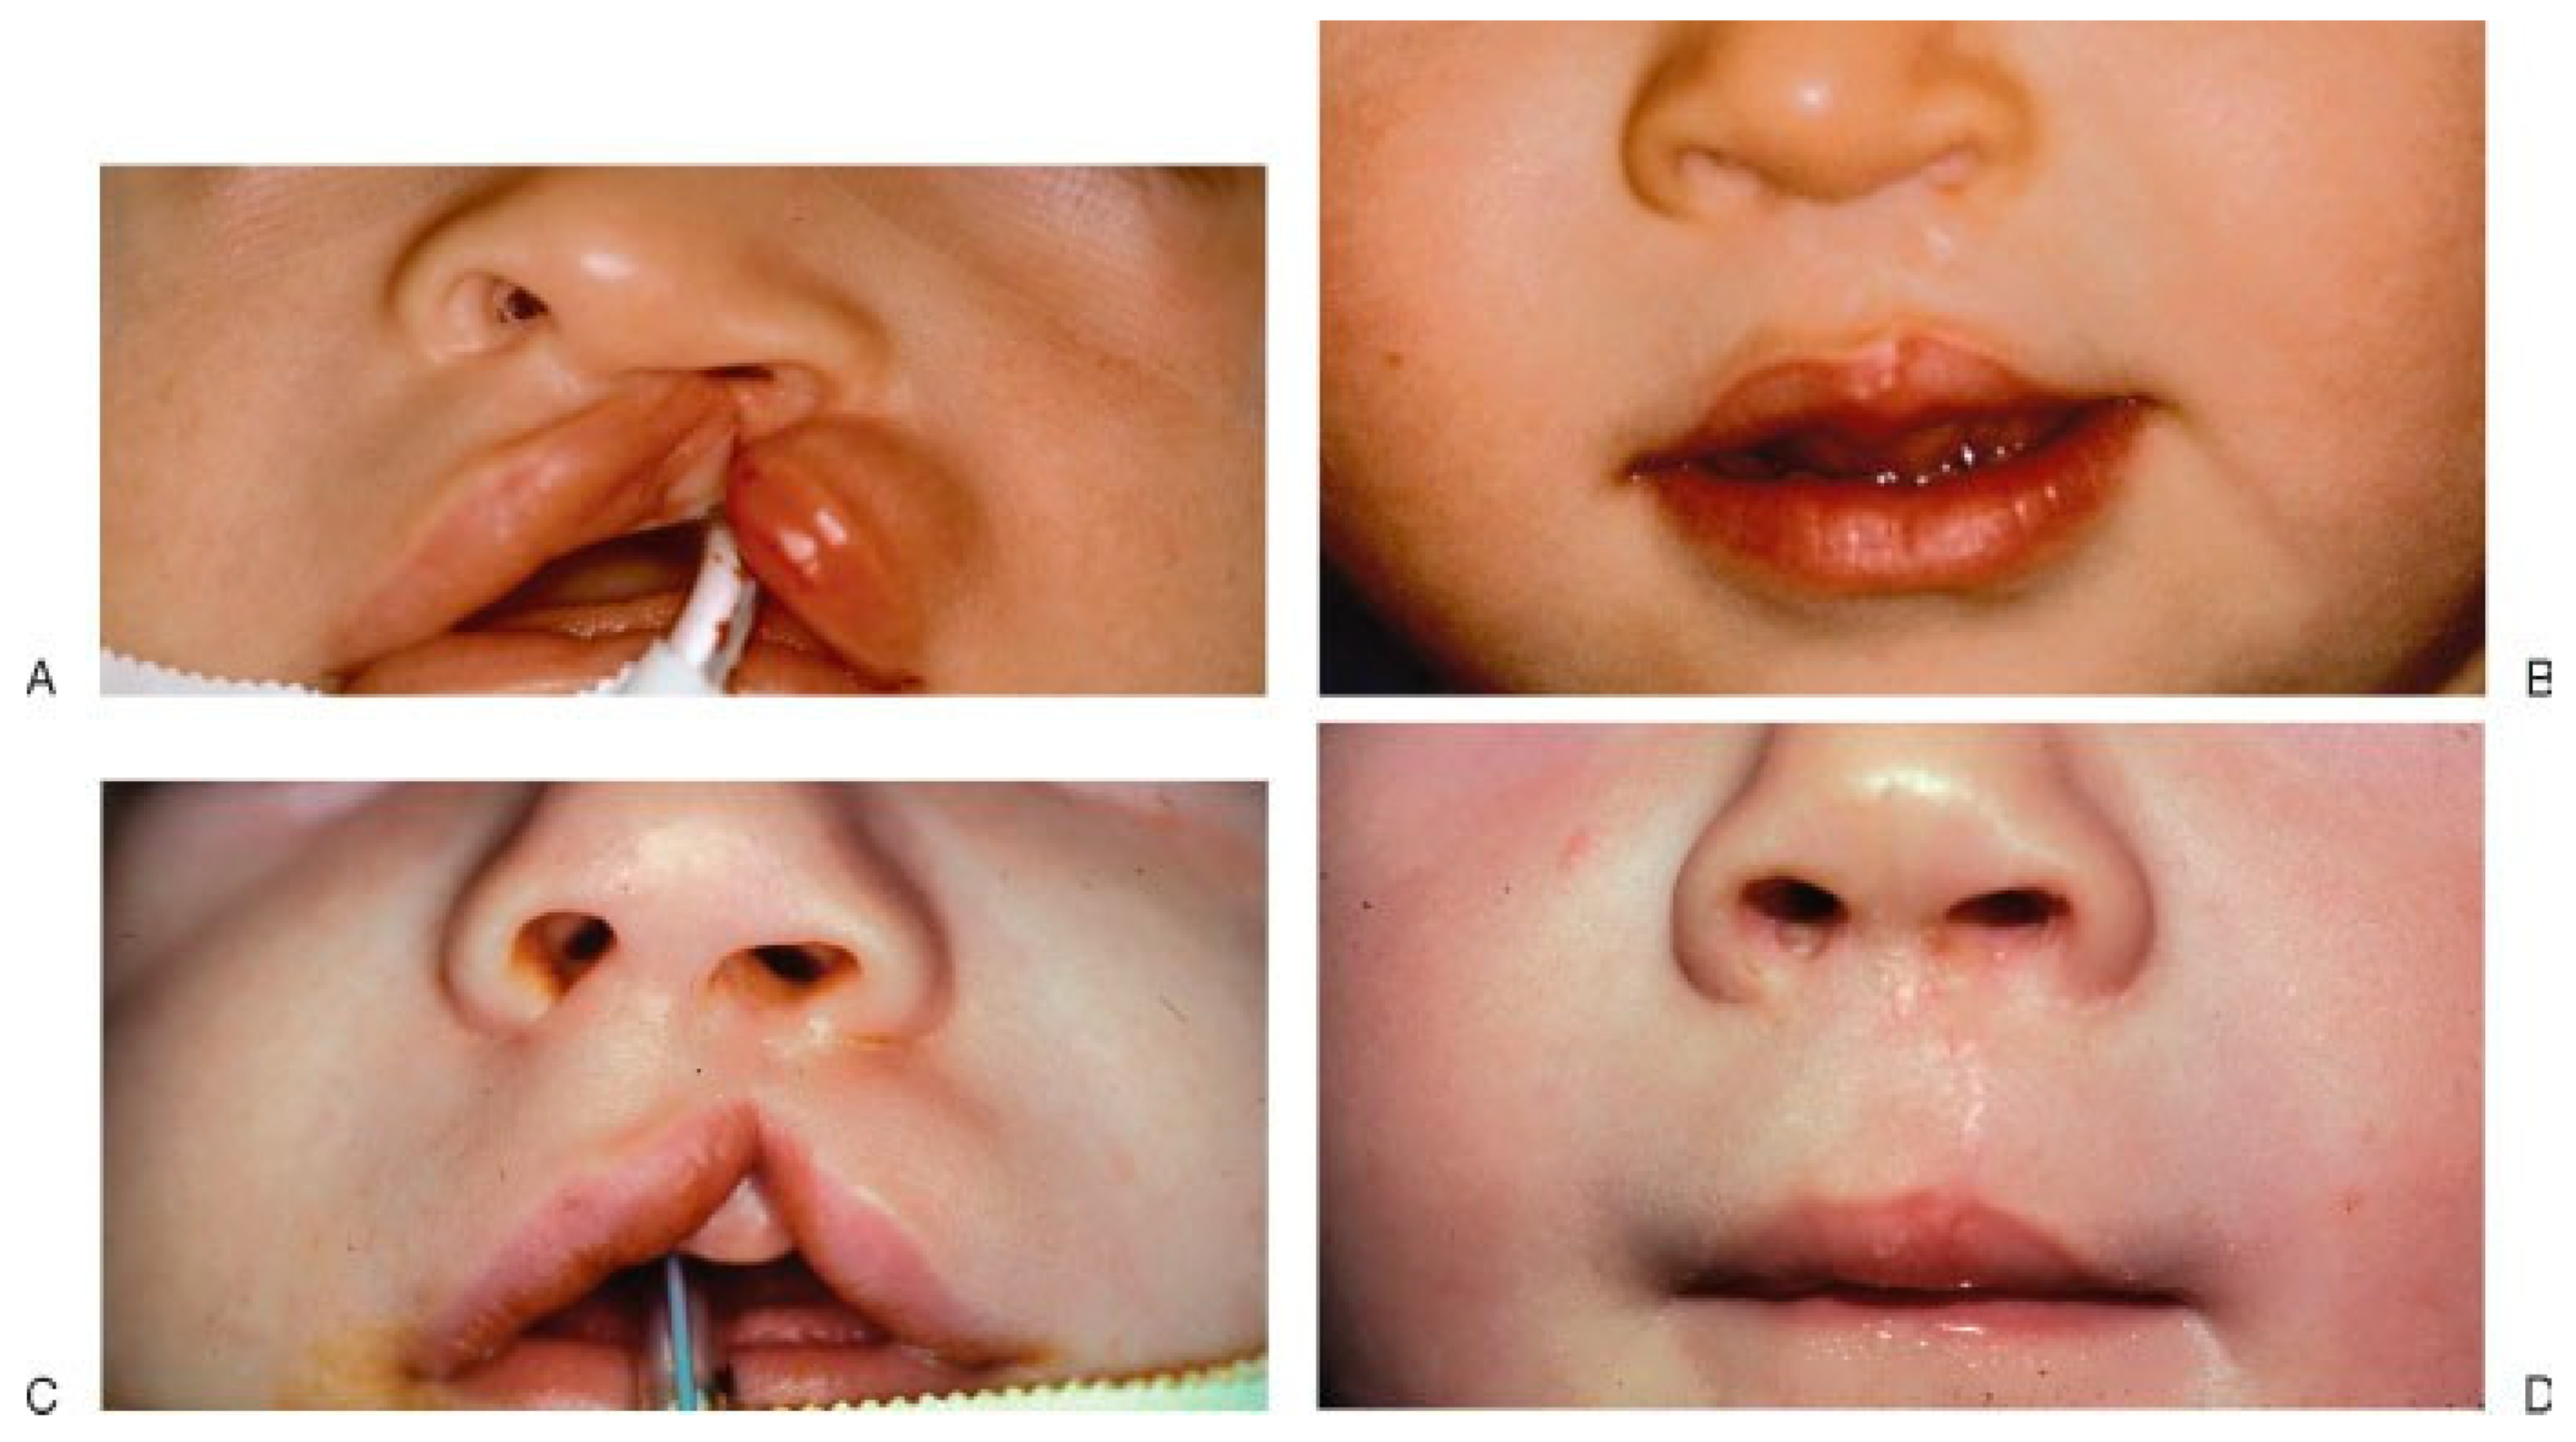
  • Maintaining a ‘‘global view’’ of the face during and after each suture was critical to creating a natural appearing end result with good symmetry. Adjustments during closure, with undermining of distant tissues, may be necessary to achieve a natural philtral dimple, an aesthetic ‘‘pout’’, and symmetrical vermillion borders (Figure 1).
Follow-up was from 12 months to 8 years and consisted of serial visits to the multidisciplinary craniofacial deformities clinic (plastic surgery, orthodontics, pedodontics, speech pathology, audiology, and otolaryngology). The repairs were serially studied by physical examination, photographs, measurements, and subjective assessments of the repair results and changes wrought by growth and development.

Results

When properly selected, both techniques were effective in achieving a functional, natural appearing lip. As seen in the following images (Figure 2), the Tennison method has the ability to close a wide cleft while maintaining a relatively natural appearance of the surrounding tissues, especially the nose. The Millard method, too, gave excellent results in the narrower clefts. Further delineation between the two techniques is described in Table 1.
In the following images (Figure 3) a more drastic cleft repair can be seen.
The Tennison technique is utilized because of the width of the cleft; however, the success achieved in creating a natural appearance is due to the specific steps taken to mobilize the surrounding tissues as outlined in Figure 1.

Discussion

With an incidence of 1/1000 to 3/1000, clefts are one of the most common repaired congental malformation [1]. Most clefts are believed to manifest as an incomplete fusion of the mesenchyme between the sixth and 10th week of gestation [2] and can eventuate in considerable deformity and speech aberrations [3]. The etiology of clefts appears to be multifactorial, and some cases demonstrate a strong hereditary component [4]. Recent research has focused on the role of cellular messengers in the gestational fusion of facial structures [5,6]. However, application of these findings to alter facial growth and development is not yet a clinical reality, and surgical repair remains the treatment of choice.
Repair of the unilateral cleft lip advanced considerably during the past century [7,8], with two methods being popular among clinicians: Millard rotationadvancement repair and Tennison-Randall triangular flap technique [9]. Choosing which method to use has been the source of considerable debate. In 1983, Holtmann and Wray tabulated differences in outcomes based on repair type [10]. They noted unfavorable scars with the Millard technique and, with later growth, lip shortening has continued to be frustrating. On the other hand, the Tennison (or Tennison-Randall) repair can result in an elongated lip owing to the natural growth of the inserted triangle on the cleft side. Some issues associated with the Tennison-Randall repair may be ameliorated if the primary repair is performed after the age of 2 years, when labial growth is relatively advanced [11]. However, since these differences are aesthetic and difficult to quantitate or predict in each case, the choice is left to the individual surgeon [12].
In this study, the one mode or other of selecting a repair involved a careful assessment of the cleft after the patient was asleep on the operating table. Such an assessment is impossible in the clinic. The width of the lip and maxilla are assessed, the lip is felt and elevated away from the maxilla to gauge its elasticity, and the nasal anatomy is inspected and palpated. With all of these assessments, a general appreciation can be made, and the type of repair can be selected to fit what the anatomy dictates. In the surgeon’s ‘‘crystal ball,’’ he/she should try to picture the repair as the anatomy is being felt and assessed. A picture gradually forms as to how far the tissues will reach and how much the tissues can be stretched to make the repair as natural as possible. Likewise, if the cleft is extremely short (short philtral length), this may push one to select the Tennison repair, since it provides a triangle of tissue that can relieve this shortening. On the other hand, if there is a reasonable length of tissue, one may wish to select the Millard repair.
The final sculpturing and trimming of the vermilion is much the same with either technique and can be very time consuming. It is, however, quite rewarding, as this is where the fullness of the philtrum and natural pout of the lip are restored.
For minor and narrow clefts, the Millard can be selected. For the wide, complete clefts, the Tennison-Randall repair can be selected, since it adds the valuable triangle of tissue. Both repairs should incorporate a generous release of the orbicularis oris muscle and its associated soft tissues from the maxilla and nasal septal regions so that the natural direction of the muscle fibers is anatomically restored.

Conclusions

It is now possible to select a unilateral cleft lip repair based on physical examination of the patient’s cleft anatomy while the patient is under initial general anesthetic. When combined with the above anatomical considerations and technical modifications, the appropriately selected Millard and Tennison techniques provide excellent results. As many readers will surely note, there are a plethora of additional technical refinements that were not mentioned here. It is our hope that this sparks excitement in the field and these additional techniques are compiled and shared.

References

  1. McLeod, N.M.; Urioste, M.L.; Saeed, N.R. Birth prevalence of cleft lip and palate in Sucre, Bolivia. Cleft Palate Craniofac J. 2004, 41, 195–198. [Google Scholar] [CrossRef] [PubMed]
  2. Forrester, M.B.; Merz, R.D. Structural birth defects associated with oral clefts in Hawaii, 1986 to 2001. Cleft Palate Craniofac J 2006, 43, 356–362. [Google Scholar] [CrossRef] [PubMed]
  3. Hirschberg, J. Functional consequences of cleft palate and its management. Orv. Hetil. 2001, 142, 1259–1263. [Google Scholar] [PubMed]
  4. Knecht, A.K.; Bronner-Fraser, M. Induction of the neural crest: A multigene process. Nat. Rev. Genet. 2002, 3, 453–461. [Google Scholar] [CrossRef] [PubMed]
  5. Nie, X.; Luukko, K.; Kettunen, P. FGF signalling in craniofacial development and developmental disorders. Oral. Dis. 2006, 12, 102–111. [Google Scholar] [CrossRef] [PubMed]
  6. Jiang, R.; Bush, J.O.; Lidral, A.C. Development of the upper lip: Morphogenetic and molecular mechanisms. Dev. Dyn. 2006, 235, 1152–1166. [Google Scholar] [CrossRef] [PubMed]
  7. Koh, K.S.; Hong, J.P. Unilateral complete cleft lip repair: Orthotopic positioning of skin flaps. Br. J. Plast. Surg. 2005, 58, 147–152. [Google Scholar] [PubMed]
  8. Ritchie, H.P. Congenital cleft lip and plate: A muscle theory repair of the cleft lip. Ann. Surg. 1926, 84, 211–222. [Google Scholar] [CrossRef] [PubMed]
  9. Heycock, M.H. A field guide to cleft-lip repair. Br. J. Surg. 1971, 58, 567–570. [Google Scholar] [CrossRef] [PubMed]
  10. Holtmann, B.; Wray, R.C. A randomized comparison of triangular and rotation-advancement unilateral cleft lip repairs. Plast. Reconstr. Surg. 1983, 71, 172–179. [Google Scholar] [CrossRef] [PubMed]
  11. Farkas, L.G.; Posnick, J.C.; Hreczko, T.M.; Pron, G.E. Growth patterns of the nasolabial region: A morphometric study. Cleft Palate Craniofac J. 1992, 29, 318–324. [Google Scholar] [CrossRef] [PubMed]
  12. Norton, J.A.; Bollinger, R.R. Surgery: Basic Science and Clinical Evidence; Springer: Berlin/Heidelberg, Germany, 2001. [Google Scholar]
Figure 1. (A) Step 1: A wide left unilateral complete cleft lip. (B) Step 2: The white roll is marked accurately on both sides of the cleft, incorporating the last, good white roll on each side of the cleft and marking it with a 30-gauge needle dipped in methylene blue. The needle should only penetrate the epidermis to avoid bleeding. The areas are then injected with the appropriate anesthetic solution containing dilute epinephrine as indicated by the weight of the patient. Simple incision lines are planned for either a Tennison or a Millard repair: Although the following techniques enhance both repair types, the remaining images will show a Tennison repair only for the sake of clarity. (C) Step 3: The incisions are opened and the muscle layer is seen. (D) Step 4: The incisions are extended sublabially at the level of the gingivobuccal sulcus to widely mobilize the soft tissues from their abnormal attachments. (E) Step 5: The upper orbicularis oris borders are generously released from their abnormal (oblique) attachments on both sides of the cleft to gain a normal, horizontal direction of their fibers. (F) Step 6: The lateral elements are liberated from the gingivobuccal sulcus and from the maxillary periosteum—from the border of the nasal aperture to the mid-lateral maxilla region, taking care to avoid injury to the infraorbital nerve. (G) Step 7: To ensure unfettered draping of the skin when the closure is performed, the underside of the thin subcutaneous fat is delicately scored so that any residual crimping is eliminated. This step helps to efface any residual convexity of these tissues (i.e., the postoperative ‘‘domed’’ shape of the lip). (H) Step 8: The skin and thin layer of  fat are then meticulously and sharply elevated as a unit from the superficial surface of the orbicularis oris muscle. This is carried back ~5 to 7 mm from the cleft margin. (I) Step 9: The orbicularis oris is carefully assessed and mobilized both superficially and deep to the muscle fibers so that it can be restored to its natural orbital position. Care is taken to preserve the full thickness of the muscle and to ensure that the direction of its fibers is normal, but to free it from any abnormal attachments so that it can be easily approximated to the nasal side of the cleft. If there is any residual crimping of the fascial layer due to the cleft, this, too, is gently and superficially scored with the scalpel to release it. (J) Step 10: The thin attachment of the maxillary soft tissues to the nasal aperture border is sharply separated with the scissors, taking care to stay immediately against the maxilla and the border of the nasal aperture. This detachment is critical in ‘‘unfurling’’ the tissues that have been ‘‘crimped’’ by the abnormal attachments of the cleft. Any residual crimping is scored to release the tissues and avert the ‘‘tissue memory’’. (K) Step 11: An internal nasal incision is made, paralleling the lower, distal border of the lower lateral (alar) cartilage. (L) Step 12: The skin is meticulously elevated superficial to the alar cartilages and deep to the dermis to free up the attachments for later repositioning. This is carried past the midline and over the upper lateral cartilage on the cleft side. (M) Step 13: With the cleft ‘‘tissue memory’’ neutralized, the closure can begin. A key suture of buried 5–0 clear nylon is employed to anchor the lateral alar base to the base of the nasal septum. This suture is planned so that it aligns the entire cleft nostril sill with that of the opposite (normal) side. In fact, as the first throw of the suture is slowly tied, the two nostrils are constantly observed for symmetry. If they do not match, the suture is removed and another is inserted until symmetry is as perfect as possible. (N) Step 14: A single, untied, 6–0 monofilament suture through the medial and lateral marginal points of the white roll of the vermilion border are used to align the soft tissues and to check for accurate placement of the other sutures. After assessing alignment, 5–0 absorbable monofilament sutures are serially placed at the upper and lower margins of the orbicularis oris and left untied until several interrupted sutures are in place. They are then serially tied, ensuring all the while that the orbicularis is in a natural alignment. (O) Step 15: Attention is turned to the nasal tip and the lower lateral cartilage on the cleft side. Using through-and-through monofilament absorbable sutures, the nasal tip is elevated with several sutures to realign the mucosa—cartilage and the skin. These are tied over a temporary soft Xeroform or petrolatum gauze bolster to protect the underlying skin. Symmetry and a favorable realignment are constantly assessed as these sutures are tied. (P) Step 16: After the tissue on the nose has been realigned, the vermilion of the lip is carefully assessed and trimmed as needed to give a natural fullness to each side and to achieve a natural pout. This cannot be hurried and several check sutures are used before any trimming is done. After the vermilion is optimized, the skin is closed. The deep dermis is meticulously closed with interrupted, buried subcutaneous 5–0 absorbable monofilament sutures. The skin surface is finally reapproximated with interrupted 6–0 absorbable monofilament sutures. A petrolatum-based ointment is applied as a dressing.
Cmtr 03 9i g001aCmtr 03 9i g001b
Figure 2. (A) A straight-on preoperative view of a large unilateral left cleft. (B) A postoperative front-on view of a Tennison repair. (C) A straight-on preoperative view of a small unilateral left cleft. (D) A straight-on postoperative view of a Millard repair.
Cmtr 03 9i g002
Figure 3. (A) A preoperative front-on view of a large unilateral left cleft lip. (B) A postoperative front-on view of a large Tennison repair.
Cmtr 03 9i g003
Table 1. General Comparison of Modified Triangular Flap (Tennison) and Rotation-Advancement (Millard) Cleft Lip Repairs in This Series.
Tennison Repair (N ¼ 26)Millard Repair (N ¼ 74)
Potential Advantages
Offered more flexibility with wide clefts,
but less with narrower clefts. This related to excellent adjustability of the volume and length of the triangular flap that can be inserted into the deficient philtrum and philtral column respectively. This allowed a less ‘‘tethered’’ appearance. Benefitted from the technical modifications (sculpturing and trimming) described in this article.
Potential Problems:
With growth, the repaired side sometimes lengthened.
Potential Advantages:
Offered excellent results with narrow clefts,
but less with wide ones. This related to the cut-as-you-go flexibility and superb aesthetics provided. With the wide cleft, however, the radian of rotation, philtral length, and volume of the advancement flap was progressively limited. Benefitted from the technical modifications (sculpturing and trimming) described in this article.
Potential Problems:
With growth, the repaired side and scar sometimes shortened.
Disclaimer/Publisher’s Note: The statements, opinions and data contained in all publications are solely those of the individual author(s) and contributor(s) and not of MDPI and/or the editor(s). MDPI and/or the editor(s) disclaim responsibility for any injury to people or property resulting from any ideas, methods, instructions or products referred to in the content.

