Abstract
The study is motivated by the application of dry finish milling for post-build processing of additive Ti6Al4V blanks, since the use of neither lubricant nor coolants has been attracting increasing attention due to its environmental benefits, non-toxicity, and the elimination of the need for additional cleaning processes. For end mills, wear patterns were investigated upon finish milling of the SLM Ti6Al4V samples under various machining conditions (by varying the values of radial depth of cut and feed values at a constant level of axial depth of cut and cutting speed). When using all the applied milling modes, the identical tool wear mechanism was revealed. Built-up edges mainly developed on the leading surfaces, increasing the surface roughness on the SLM Ti6Al4V samples but protecting the cutting edges. However, abrasive wear was mainly characteristic of the flank surfaces that accelerated peeling of the protective coatings and increased wear of the end mills. The following milling parameters have been established as being close to rational ones: Vc = 60 m/min, Vf = 400 mm/min, ap = 4 mm, and ae = 0.4 mm. They affected the surface roughness of the SLM Ti6Al4V samples in the following way: max cutting thickness—8 μm; built-up edge at rake surface—50 ± 3 μm; max wear of flank surface—15 ± 1 μm; maximum adherence of workpiece. Mode III provided the maximum MRR value and negligible wear of the end mill, but its main disadvantage was the high average surface roughness on the SLM Ti6Al4V sample. Mode II was characterized by both the lowest average surface roughness and the lowest wear of the end mill, as well as an insufficient MRR value. Since these two modes differed only in their feed rates, their values should be optimized in the range from 200 to 400 mm/min.
Keywords:
SLM; Ti6Al4V; cutting tool; wear; dry finish milling; metal removing rate; surface roughness; AlCrN coatings 1. Introduction
Currently, additive manufacturing (AM) is increasingly being implemented for numerous industrial applications. Its use opens up new possibilities to produce metal parts, especially from difficult-to-machine materials [1,2,3,4,5,6,7].
The Ti6Al4V alloy is widely applied in the aerospace, marine, and medical industries, as well as civil engineering [3,4,5,6], due to its high specific strength, corrosion resistance, and biocompatibility. Even though most AM methods, especially laser-based techniques, are focused on building products with shapes close to the final ones, some aspects of the application of mechanical post-processing via turning/milling remain relevant [8,9,10,11,12,13,14,15,16,17,18,19,20]. In this way, the Ti6Al4V alloy is a difficult-to-machine material due to both its low thermal conductivity and its low elastic modulus; however, it has high chemical activity. Thus, vibrations may occur upon mechanical post-processing because of the low elastic modulus, deteriorating both the processing accuracy and the surface quality. Surface roughness is a critical parameter in machining processes, significantly affecting the functional performance, fatigue life, corrosion resistance, and assembly precision of workpieces [7,8,9,10,11,12,13,14]. Therefore, when machining titanium alloys, it is necessary to balance processing efficiency and surface quality [21,22,23].
In recent years, various AM technologies have been implemented for the fabrication of products from the Ti6Al4V alloy, including laser engineered net shaping (LENS), selective laser melting (SLM), wire-laser AM (WLAM), electron beam selective melting (EBSM), electron beam melting (EBM), and wire-arc AM (WAAM) [1,2,3,4,5]. Such specific procedures have a decisive influence on their functional characteristics [3,4,5,6]. In particular, higher hardness and strength properties of the SLM Ti6Al4V products make it difficult to form chips upon mechanical post-processing. As a result, it requires more specific energy for plastic strains, reducing the machinability.
As advanced powder-based AM methods, LENS, SLM, and EBSM allow the fabrication of complex-shaped parts (nozzles, mesh structures, prostheses, etc.), which are difficult or even impossible to manufacture via conventional production routes [1,2,3]. However, one of their main drawbacks is the low surface quality due to the particle sizes of sintered powders as well as the ‘staircase effect’ [3,7]. On the other hand, the wire-based AM techniques (WLAM, WAAM, and EBM) are intended primarily for building large-scale parts (up to several dozen centimeters in size). The specificity of the layer-by-layer deposition determines the low complexity/accuracy, limiting the application of these AM techniques [8,9]. At the same time, mechanical post-processing is required not only to improve the surface quality but also to tune both shapes and dimensions. So, mechanical post-processing should ensure low surface roughness values with required tolerance levels [10,11].
Dry milling has been attracting increasing attention due to its environmental benefits, non-toxicity, and the elimination of the need for additional cleaning processes.
In [12], the effect of HT procedures applied to the Ti6Al4V samples on their machinability with polycrystalline diamond (PCD) milling cutters was shown. Samples with three different microstructures were tested: (i) as-cast; (ii) after heating up to 1050 °C for 1 h + water quenching + aging at 550 °C for 4 h; and (iii) after heating up to 1050 °C for 1 h + air-cooling + aging at 550 °C for 4 h. In the third case, the sample was characterized by the greatest machinability, while the second one was the most difficult to process.
Upon dry milling of the EBSM Ti6Al4V sample, the service life of the cutter was shorter than that for the rolled (wrought) one [13]. According to [15], cryogenic treatment prevented both adhesive wear and the formation of craters on the rake face upon turning of the EBM Ti6Al4V samples. In high-speed milling (v = 250 m/min) of the LENS Ti6Al4V ones, both adhesive and diffusion wear mechanisms were the main challenges for using the Al2O3/Si3N4 cutters [17]. It was shown in [18] that grain refinement gave rise to greater abrasive wear and chipping of the leading edges upon turning of the SLM Ti6Al4V samples.
In ultrasonic-assisted milling (UAM), the cutting forces, surface roughness, and wear were lower than those in conventional machining of the Ti6Al4V samples [19,20,24]. However, the use of UAM accelerated the wear of cutters without CLs, especially the worn tool nose [20]. In addition, a tool life prediction model for UAM titanium and nickel-based alloys was developed by extending Taylor’s tool life equation [24]. Based on the proposed model, the machining parameters can be optimized to enhance tool life and process efficiency. Upon dry drilling, the abrasive wear on the tool flank was significantly greater for the as-built LENS Ti6Al4V samples than for both heat-treated and as-cast ones [25]. The use of CLs significantly reduced the tool wear and improved the surface quality [26].
Nevertheless, all cited researchers have not considered the aspects of the applied milling parameters, as well as both tool shapes and deposited coatings, affecting the wear dynamics.
The above literature survey has shown that it is important to preset optimal conditions for dry finish milling of AM Ti6Al4V samples, including the cutter type and the process parameters. In this study, the end mills with deposited coatings were the same, while the milling parameters were varied in order to assess their relationship with the observed wear mechanisms. The rationale for this choice is given below.
The use of end mills with the non-uniform pitch and unequal helix angle. Each cutting edge of conventional end mills is characterized by the same shape and size (the ω helix, rake, and clearance angles). Unlike turning and drilling, milling is a “discontinuous” process, since the end mill surface is subjected to impact loads when moving along a workpiece, causing its vibrations. If the oscillation frequency of the end mill coincides with that of the workpiece, resonance occurs, seriously affecting both the service life and the surface quality [patent US20130170916A1]. At the same time, end mills with an uneven helix angle effectively suppress vibrations, improving the surface quality [patent CN101983811A]. For this reason, they were used in this study.
Deposition of the AlCrN coating. During milling of Ti6Al4V parts, coated tools (e.g., AlCrN, TiAlN, TiN) exhibited significantly lower wear compared to uncoated ones [14,18,26,27]. The TiAlN coatings are widely deposited to protect cutting tools in milling, drilling, and turning of titanium alloys [11,13,15,20,25]. Their high wear resistance is typical for tribological tests according to the ball-on-disk scheme, in addition to lower friction coefficients compared to those for the TiAlN coatings [28]. In addition, they possess much higher resistance to friction in air than the TiAlN and TiN ones [28,29], including for the protection of cutting tools. When tested at a velocity of 10 m/min under sliding conditions in ambient air, AlCrN exhibited the lowest coefficient of friction (~0.45), followed by TiN (~0.54) and TiAlN (~0.6) [28]. On the other hand, both CrN and TiN coatings are not sufficiently resistant to oxidation and wear [29]. According to [27], the AlCrN-coated cutters provide better surface quality than the TiAlN ones in dry milling of the Ti6Al4V samples. Upon the same milling parameters, the wear of AlCrN and TiAlN coated tools (~0.1 mm) was much smaller under dry conditions than that of uncoated tools under wet conditions (~0.18 mm) [27]. Compared with the TiAlN coatings, the AlCrN ones are characterized by higher microhardness (HV 3200) and operating temperature (1100 °C) [30]. In addition, the AlCrN coatings possess both high oxidation and high wear resistance at elevated temperatures, so they are appropriate for dry milling of titanium alloys. Due to a combination of the above reasons, the end mills with such coatings were used in this study.
Selection of the milling parameters. The main milling parameters include the c cutting and s feed speeds, as well as both ae radial depth of cut (RDOC) and ap axial depth of cut (ADOC). To ensure a long service life of a tool, the cutting speed is typically limited to 60 m/min upon milling of the Ti6Al4V alloy [11,13,18,30]. In [31], high efficiency milling (HEM) was implemented to increase material removal rates and reduce wear of tools. HEM is a milling technique for roughing that utilizes a lower RDOC and a higher ADOC, spreading wear evenly across the leading edge, dissipating heat, and diminishing the possibility of preliminary failure of tools [32].
In a previous study by the authors [33], it was shown, using the EBM AISI 420 steel as an example, that increasing the cutting path width leads to a gradual decrease in the specific cutting force. In addition, it reduces the bending moment acting on a cutter. At ap ≥ Dπ/z tan ω [mm] (where D is the cutter diameter, z is the number of cutter teeth, and ω is the cutter helix angle), the cutter teeth are always in contact with a workpiece (participate in the cutting process), lowering both the cutting process unevenness and the impact load [34]. In addition, shortening the length of a suspended tool enables a reduction in the bending moment and an increase in its stiffness [35].
Two other options can be both up and down milling. Down milling is typically used for finishing, while up milling is more suitable for roughing. Down milling improved the surface quality and reduced the chip adhesion behavior upon machining of the Ti6Al4V alloy compared to those for up milling [14]. All of the described patterns have been considered when selecting the milling parameters.
However, there is very limited literature on studying the influence of cutting parameters on the tool wear mechanism and blank roughness at dry finish milling of SLM Ti6Al4V. Based on the above, the aim of this study was to investigate the wear mechanisms of end mills upon dry finish milling of the SLM Ti6Al4V samples under different conditions, including varying the radial depth of cut (ae) and feed (Vf).
2. Materials and Methods
2.1. SLM Parameters
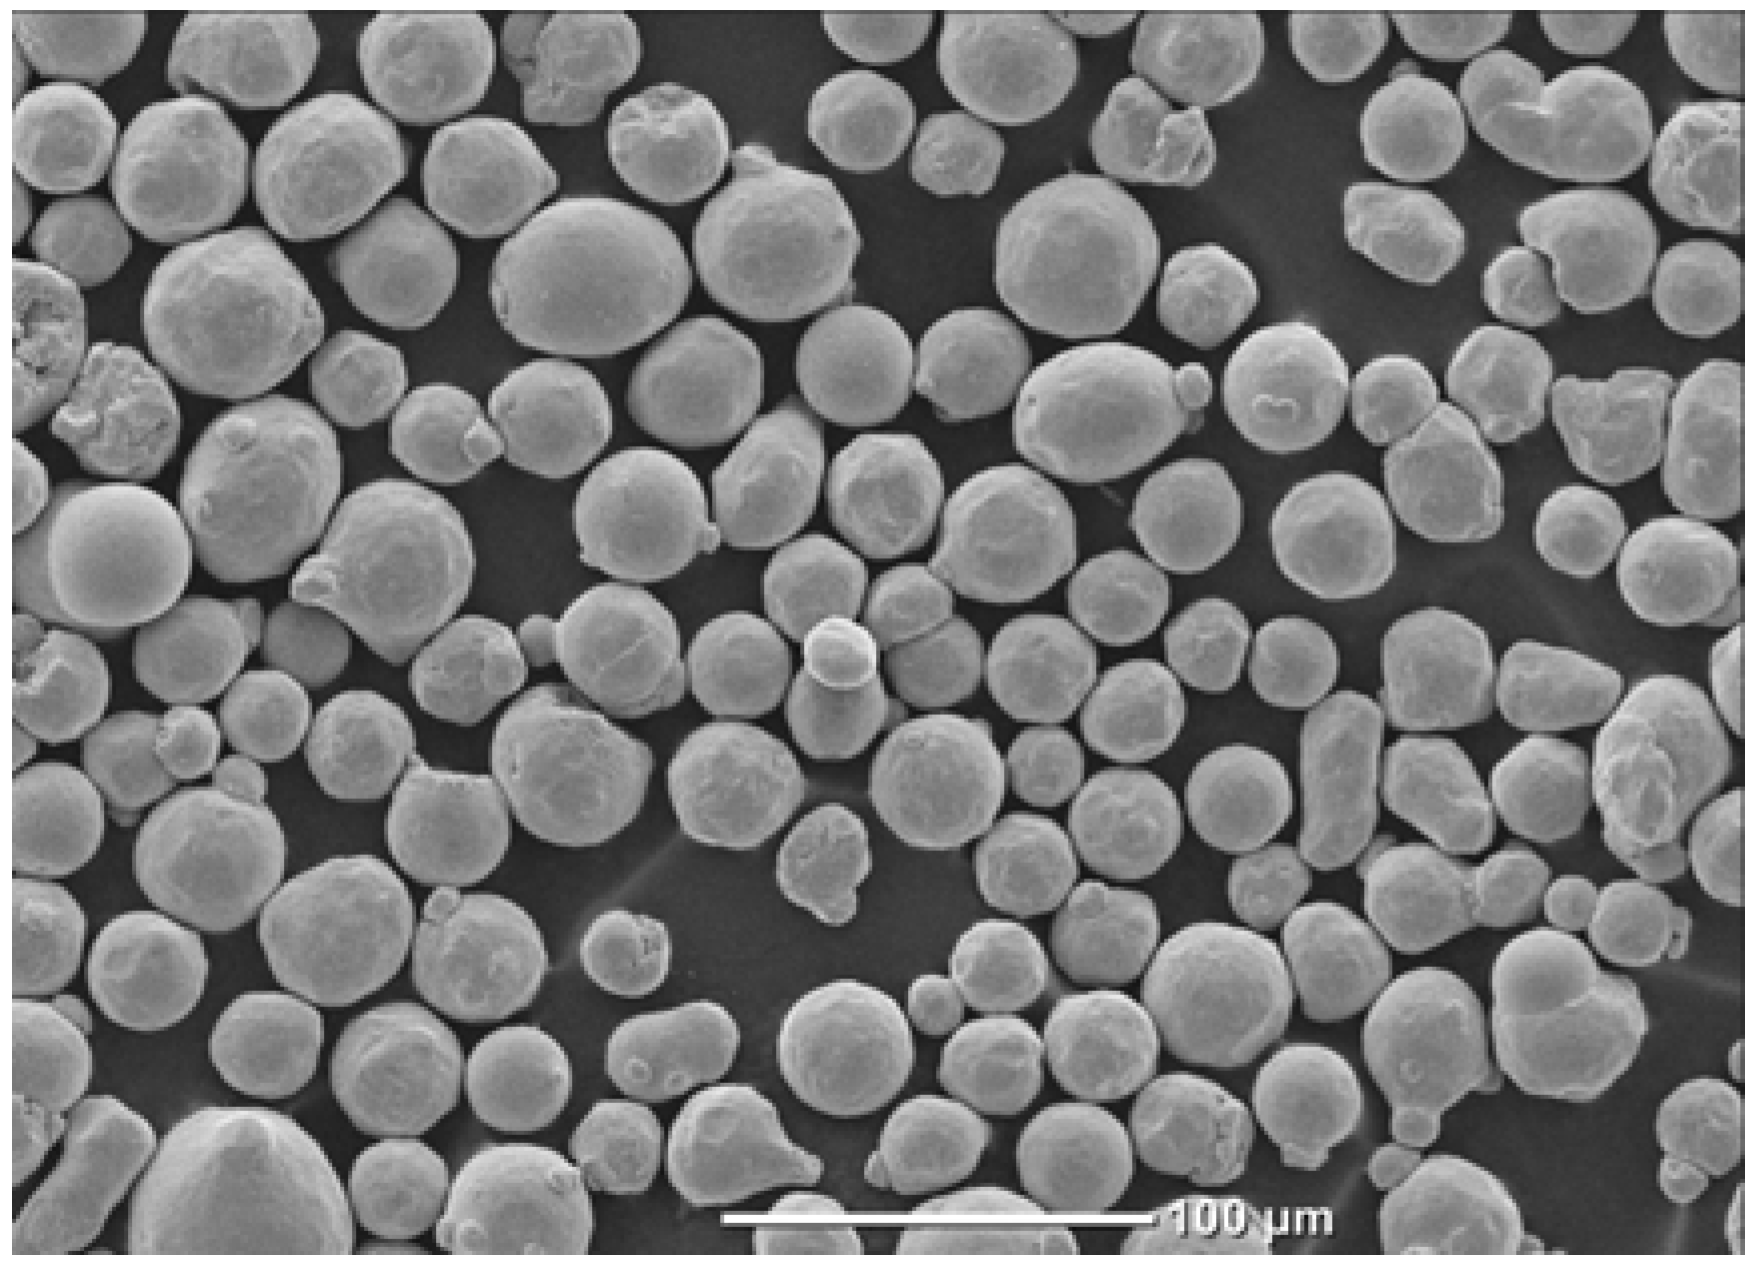
The SLM Ti6Al4V samples were built with a ‘iSLM 150’ setup (ZRapid tech, Suzhou, China) from the powders with fractions of 15–53 μm (Figure 1) produced by Aerospace Hiwing and Titanium Industry Co., Ltd. (Harbin, China). Their chemical composition is given in Table 1.
Figure 1.
An SEM micrograph of the Ti6Al4V powders.
Table 1.
The chemical composition of the Ti6Al4V powders.
The following parameters were applied for building the SLM Ti6Al4V samples in a protective argon atmosphere: a laser power of 350 W, a layer thickness of 35 μm, a scanning speed of 1800 mm/s, a track spacing of 90 μm, and a beam diameter of 80 μm. The ‘chessboard’ scanning strategy was implemented (Figure 2). The samples had the shape of a parallelepiped with the following dimensions: 100 (length X) mm × 50 (width Y) mm× 10 (height Z) mm. The Ra roughness values were measured with a ‘TR200’ stylus profilometer (JITAI, Beijing, China) according to the Russian state standard GOST 2789-73. Measurements were conducted with a minimum of five replicates for each direction. For the as-built SLM Ti6Al4V samples, the Ra surface roughness values are given in Table 2.
Figure 2.
The chessboard scanning strategy upon building the SLM Ti6Al4V samples.
Table 2.
The Ra roughness values for the as-built SLM Ti6Al4V samples.
2.2. Microstructure and Phase Composition
For both microstructure examinations and tensile tests, specimens were cut from the SLM Ti6Al4V samples using an electrical discharge machine (EDM). To investigate the microstructure, the XZ orientation was selected. They were consistently manually ground with P300, P600, P800, and P1000 SiC sandpapers, and then polished using diamond pastes with inclusion dispersions of 6, 3, and 1 μm.
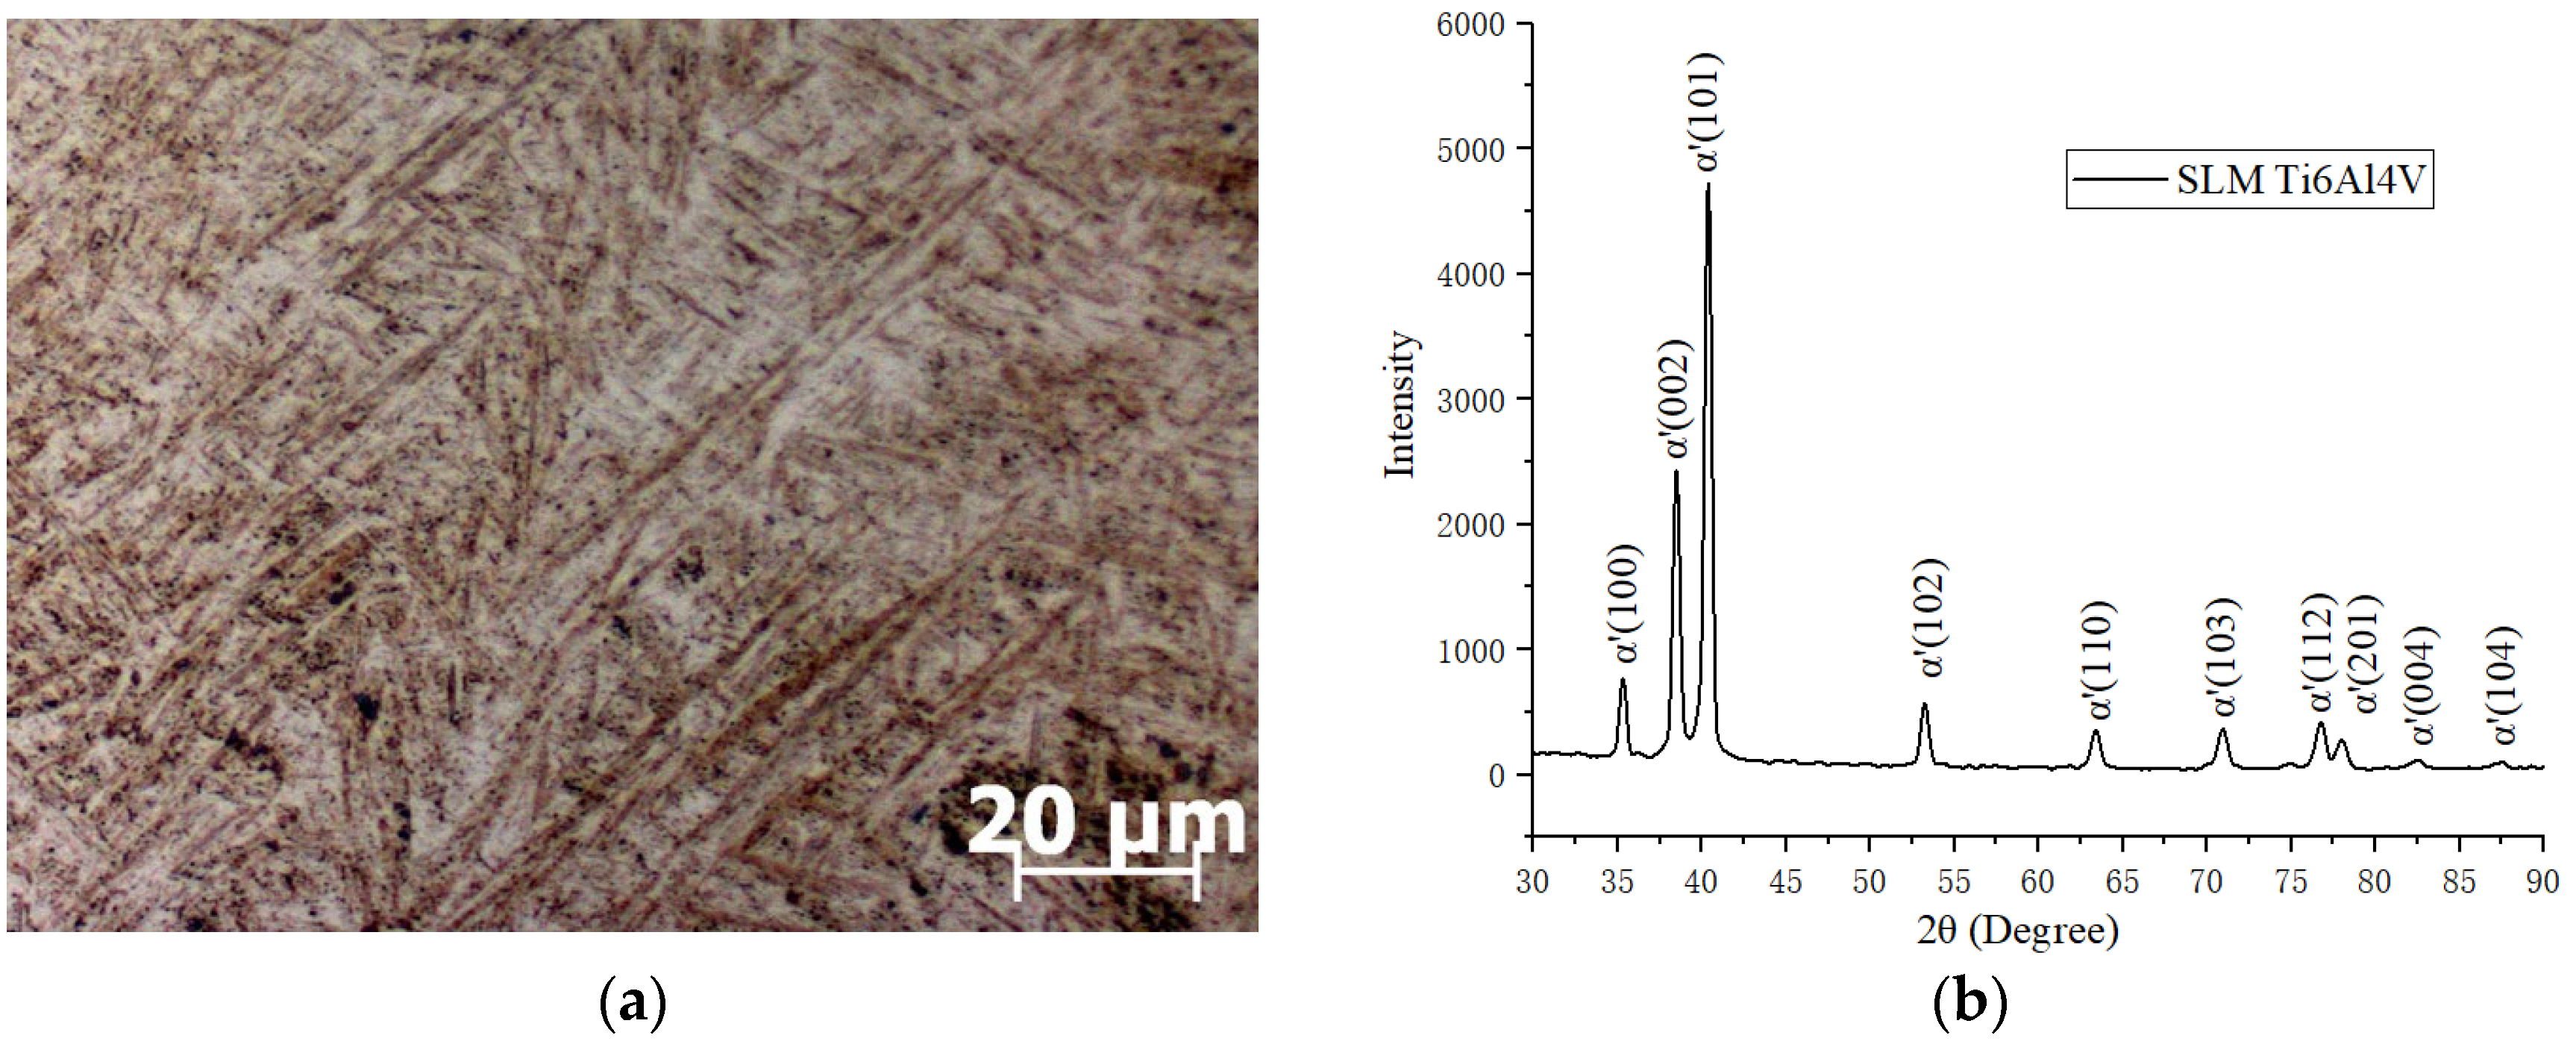
Before optical microscopy (OM) examination, the specimen surface was etched with Kroll reagent, which consisted of a mixture of both concentrated hydrofluoric HF (10 mL) and nitric HNO3 (5 mL) acid in distilled water H2O (85 mL). The microstructural studies were performed using an ‘Axio Observer’ optical microscope (Carl Zeiss, Germany) with magnifications of up to ×1000. The corresponding OM image is shown in Figure 3a, according to which the microstructure of the SLM Ti6Al4V samples predominantly consisted of the acicular martensite α′ phase with grain sizes in the submicron range.
Figure 3.
The OM image of the microstructure of the SLM Ti6Al4V samples (a) and their XRD pattern (b).
X-ray diffraction analysis was carried out with the use of a ‘D8 Advance Bruker’ X-ray diffractometer with the characteristic radiation of copper (λ = 0.154051 nm). Figure 3b shows the X-ray diffraction pattern of the SLM Ti6Al4V sample, which also confirms the fact that the content of the α′ phase was almost 100%. Both heating and cooling of the power feedstock were very fast during the SLM process (compared, for example, to the wire-based methods), which was the reason for thinning the α plates [6] and increasing the tensile strength according to the Hall–Petch law. In addition, great dislocation densities were observed in the α′ phase areas, also contributing to strengthening [3].
2.3. Microhardness and Tensile Tests
The hardness was measured with the use of an ‘EMCO-TEST DuraScan-10’ hardness tester at a load of 0.1 kgf and an exposure time of 10 s. Their final levels were determined by averaging the values measured at ten different locations. The data obtained showed an average level of 400 ± 5 HV 0.1 for the SLM Ti6Al4V samples.
Tensile tests were performed with a ‘UTS-110M-100’ testing machine according to the Russian state standard GOST 1497-84. The specimens were characterized by the ultimate tensile strength (UTS) of 1180 ± 10 MPa, the yield strength (YS) of 1035 ± 10 MPa, and elongation at break (El) of 5 ± 1%. When comparing the obtained results with previously published data for other AM methods (Table 3), it was concluded that the SLM Ti6Al4V samples possessed the highest strength (it was not inferior to the wrought alloy), while their ductility was expectedly lower [3].
Table 3.
The mechanical properties of the AM Ti6AL4V samples built by different methods.
2.4. Milling
The SLM Ti6Al4V samples were milled with a ‘VDL1200’ CNC machine (DMTG, Dalian, China) without CLs (Figure 4a). Considering their potential application, the small-scale cemented carbide ST210-R4-04005 end mills (GESAC, Xiamen, China) with different helical flute angles (ω = 38/40°) and the deposited AlCrN coating were used. The radial rake angle was 7°, the primary clearance angle was 10°, the cut length was 11 mm, and the overall length was 50 mm. The cemented carbide mainly consisted of tungsten carbides (~92%) and a cobalt binder (~8%). The appearance of the cutting tool is shown in Figure 4b. The length of the suspended tool was 15 mm. To improve the reliability of the results, three repetitions were made for each milling condition.
Figure 4.
General view of the ‘VDL1200’ CNC machine with fixed SLM Ti6Al4V sample (a) and the structural elements of an end mill (b).
The milling parameters are presented in Table 4. The cutting speed was selected based on data from the literature [11,13,18,30]. In this study, it is recommended to use a smaller RDOC combined with a larger ADOC for two principal reasons. First, this configuration enables high-efficiency milling by achieving greater material removal rates (MRRs) while reducing tool wear [30,31,32,33]. Second, surface roughness shows lower sensitivity to ADOC variations, allowing higher MRR without significantly compromising surface quality [36]. The feed rates were selected based on the recommendations in the tool manufacturer’s handbook [30]. Considering the cooling condition used (without CLs), the feed rates were reduced. So, three different milling modes were applied.
Table 4.
The milling parameters upon processing the SLM Ti6Al4V samples.
2.5. Methodology for Estimating Wear Mechanisms for Milling Cutters
Wear mechanisms of the end mills. Investigations of the wear mechanisms of the end mills were performed by energy-dispersive spectroscopy (EDS) using a ‘Gemini 300 Zeiss’ scanning electron microscope (Carl Zeiss, Oberkochen, Germany) equipped with an ‘Oxford INCA X-Act’ set up. The SLM Ti6Al4V samples, the AlCrN coating, and the (WC + Co) end mills were examined.
2.6. Evaluation of the Quality of the Machined Surface
To determine the quality of milling, the surface relief regions were evaluated using an Olympus OLS 4100 confocal laser scanning microscope (Olympus, Tokyo, Japan). The results were processed using the Olympus LEXT software v3.1.1.
3. Results
3.1. Analysis of the Cutting Edges (Leading Surfaces) of the End Mills
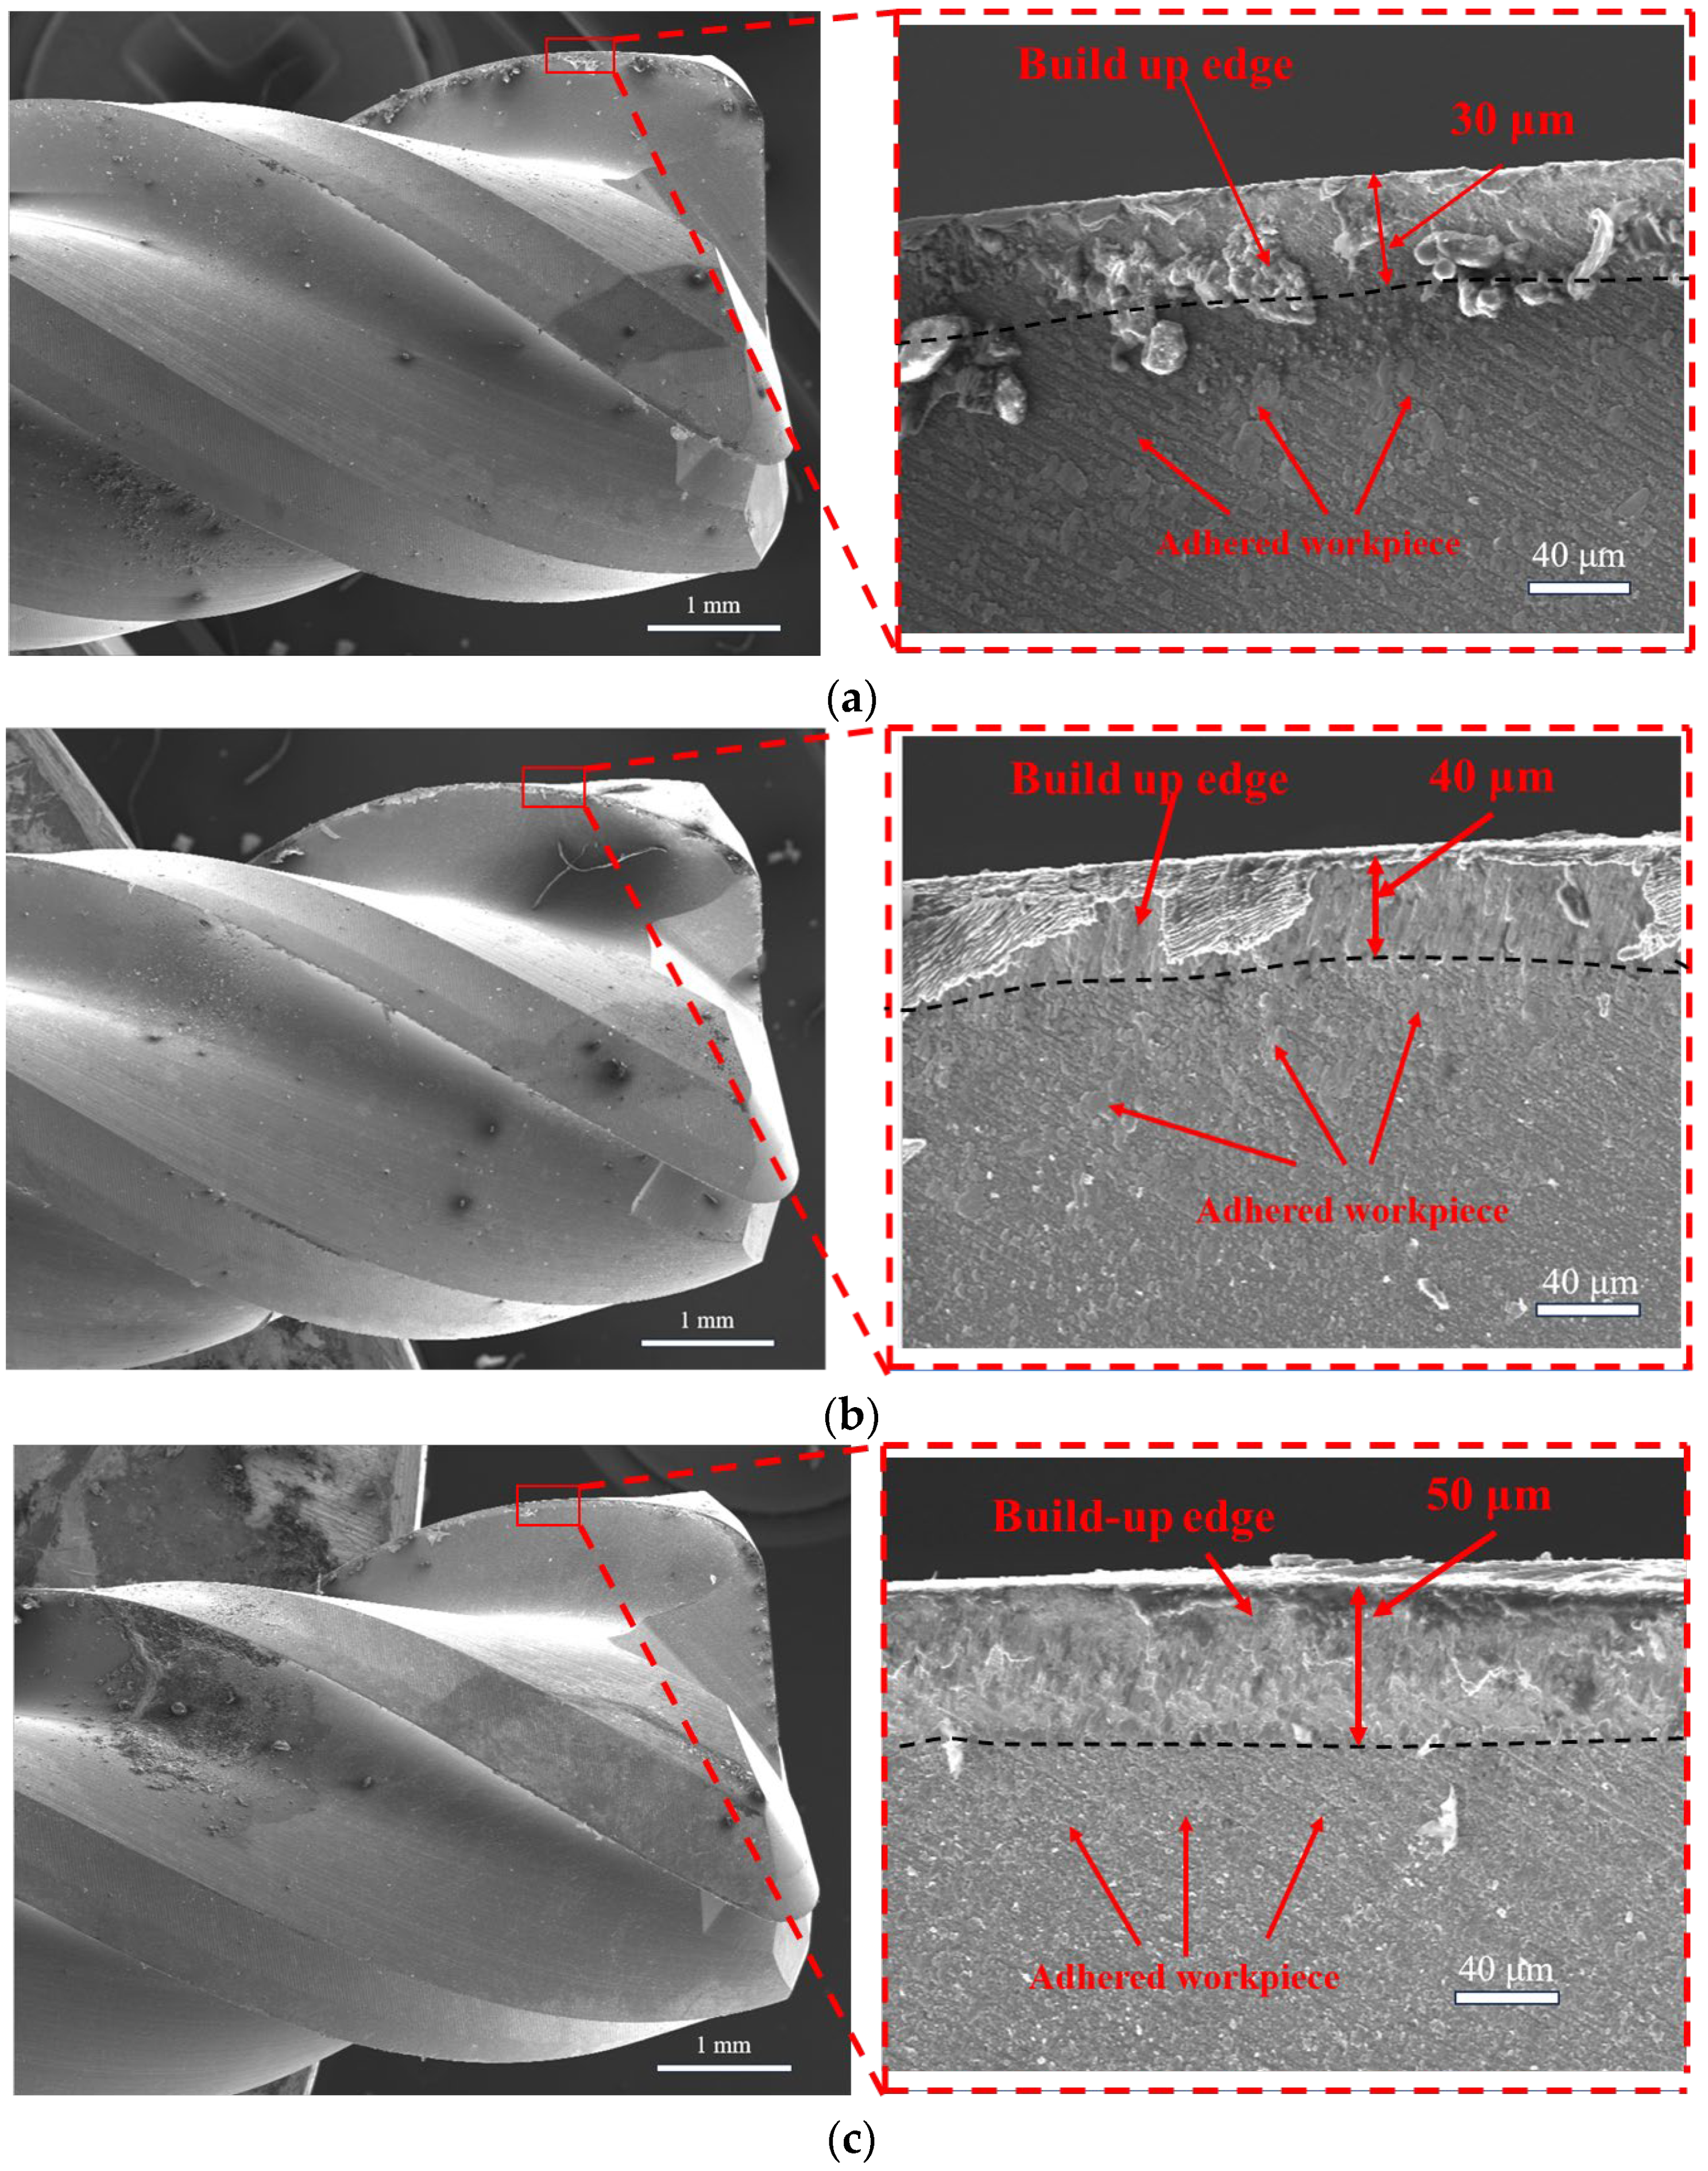
Figure 5 (at a low magnification) shows that adhesion of the removed material to the end mill developed mainly on the leading surface near the cutting edge for all three applied milling modes. However, this effect was practically not observed near the minor cutting edge, where no chipping traces were found either.
Figure 5.
The SEM micrographs of the end mills and the rake faces after the same volume of the removed material (3200 mm3) and different MRR: (a) mode I, (b) mode II, (c) mode III.
At a higher magnification (right SEM micrographs in Figure 5), welding of chips to the end mills was revealed by comparing their final thicknesses with the initial values. This phenomenon could develop on the surfaces of both the end mills and the SLM Ti6Al4V samples [14]. Its effect gradually increased for modes II and III when the RDOC and feed values were greater in comparison with those for mode I. It is suggested that the main reason was higher temperatures of the end mills, rising in the milling process [11,13,17]. The pattern of adhered workpiece to the leading surfaces of the end mills could be clearly observed in Figure 5a. In these regions, very thin adhesive layers were formed, covering almost all of the underlying texture (Figure 5c).
In Figure 5a, the size of the built-up edge (BUE) (from the cutting edge to the dotted line) is 30 μm, while it gradually increases up to 40 and 50 μm in Figure 5b,c, respectively, as the RDOC and feed values increase. However, the adhesion zone sizes were negligible for all three applied modes.
Both low thermal conductivity and high chemical activity of the SLM Ti6Al4V samples gave rise to intense heat generation under the dry milling conditions. Slow heat dissipation could increase both pressure and temperature in the secondary deformation zone (between the cutting surface and chips), corresponding to the formation of BUEs. Thus, an improvement of the MRR parameter had to be accompanied by raising the cutting zone temperature. In turn, this phenomenon had to stimulate the development of adhesive processes, contributing to the gradual enlargement of the BUEs with increasing RDOC and feed values.
Thus, with the type of tool used, including the presence of the protective coating and the milling modes, no wear of the leading edge was detected. Previously, many researchers analyzed various methods for improving machinability and reducing wear of cutting tools, but its adhesive pattern was not revealed in all cases. For example, adhesive wear was reduced by cooling with liquid nitrogen [15]. It is suggested that the thicker adhesion zone reflected an increase in the ‘severity’ of the milling conditions, which had to be accompanied by rising temperature. The influence of this effect on the milling process as a whole is discussed below.
Correct selection of the milling parameters allowed to avoid the presence of chipping traces on the cutting edge. Chipping could accelerate wear of the end mills and exposure of their (WC + Co) base [17]. In this study, no chipping traces were found, i.e., the safe milling parameters were selected from the point of view of extending the service life of the end mills.
It was also reported [13] that tungsten carbide (WC) could react with titanium (Ti), forming titanium carbide (TiC) and tungsten (W), accelerating diffusion wear, and reducing the strength of tools upon milling of titanium alloys. In this study, the development of diffusion wear was not revealed, i.e., the applied milling modes excluded the development of the above reactions between the end mills and the SLM Ti6Al4V samples.
3.2. Wear of the Flank Surface of the End Mills
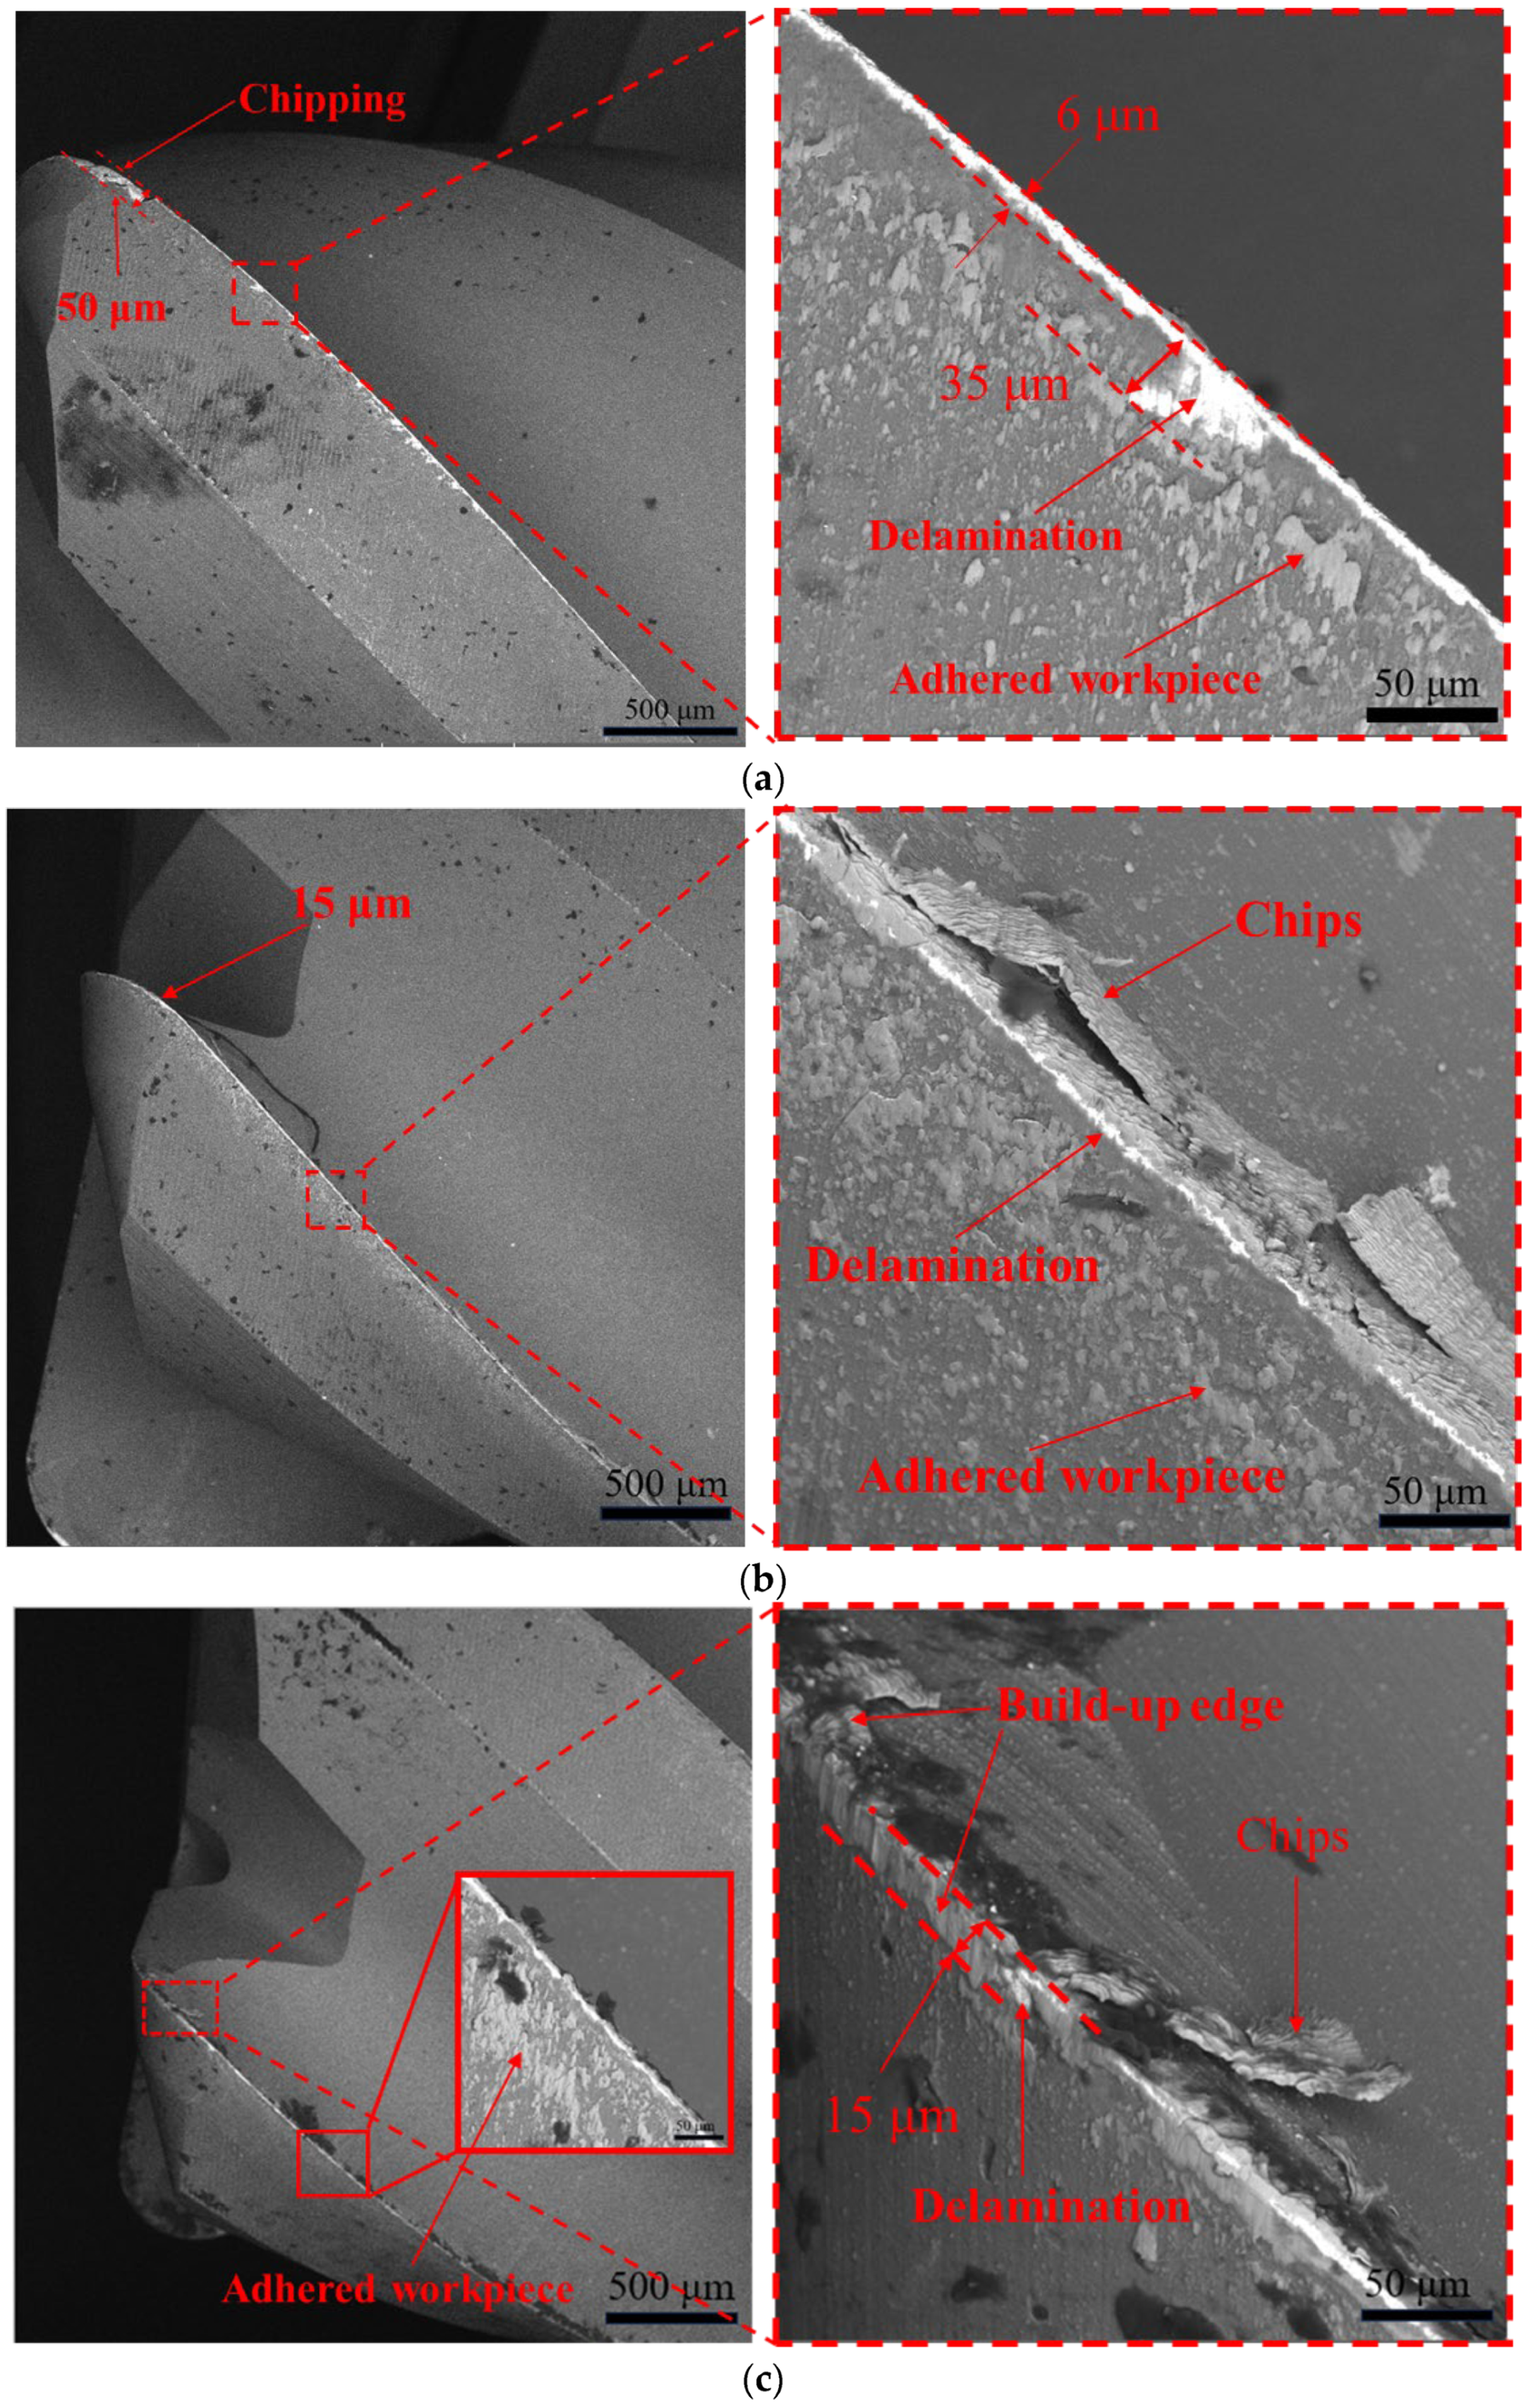
In this study, the maximum wear of the flank surface was preset as the durability criterion for the end mills [16]. Figure 6 shows SEM micrographs of the general views of the end mills and the flank faces after the same volume of the removed material under different MRR.
Figure 6.
SEM micrographs of the tool and the flank face during the same volume of removed material (3200 mm3) and different MRR. (a) mode Ⅰ, (b) mode Ⅱ, and (c) mode Ⅲ.
For modes I and II, no built-up edges were found on the flank surfaces (Figure 6a,b), while their height did not exceed ~15 μm for mode III (Figure 6c). Upon the milling process, the BUEs were enlarged first, fractured when their volumes reached some critical levels, and then detached from the cutting surfaces. Formation of such BUEs is treated to affect the milling process, protecting the end mills on the one hand, but enhancing the surface roughness on the SLM Ti6Al4V samples on the other. The formation of BUE is conventionally regarded as detrimental to surface roughness in machining processes due to its inherent instability and dynamic behavior [14].
For mode I, chipping with a characteristic size of ~50 μm was observed along the outer radius on the leading surface of the end mill (Figure 6a). Nevertheless, they were not found for more ‘severe’ modes II and III, when abrasive wear of the end mills of ~15 μm developed on the rear surfaces (Figure 6b,c). It is suggested that the localized peeling of the coating should cause the core of the tungsten carbide tool to come into direct contact with the workpiece. This is to stimulate and promote the reaction of tungsten carbide and titanium [13], promoting diffusion wear, and accelerating the wear of the tool.
The reason for the development of abrasive wear should be considered through the development of elastic-plastic deformation of the material in the area between the flank surface of the tool and the machined surface of the workpiece. According to [37], it is exactly the low modulus of elasticity of the workpiece being processed that causes an increase in the elastic recovery of the material on the cutting surface. This stimulates the development of abrasive wear on the back surface of the milling cutter [37].
Figure 6 shows that as the MRR increased, adhered material on the flank surface gradually increased. The development of this process is of a similar nature to the rake surface described above and is also mainly due to the temperature increase in the cutting zone.
Based on the results of the EDS analysis (the tungsten, cobalt, and carbon distributions), it could be stated that delamination of the coatings took place on the flank surfaces near the leading edges of the end mills upon milling under all the applied conditions (light area in Figure 7).
Figure 7.
Element distribution on flank rake surface of milling cutter during mode III, t = 5 min.
Figure 8a shows that as the feed per tooth and the RDOC increased, the maximum cutting thickness amax increased as well. Figure 8b shows the surface roughness on the SLM Ti6Al4V samples for all the applied milling modes. As reported in [36,38], the feed rate was the most important parameter affecting it, with a lower effect of the RDOC parameter. According to these data, the kinetics of their increase was the greatest for mode III, while the surface roughness was minimal for mode I at t = 1 min. As the maximum cutting thickness amax increases, the surface roughness increases (Figure 8b).
Figure 8.
(a) Milling scheme and (b) changes in the surface roughness on the SLM Ti6Al4V samples with time under different milling conditions.
As shown in Figure 8b, different milling modes resulted in various kinetics of the surface roughness variation, which was typically associated with wear of tools. In the present study, the surface roughness on the milled SLM Ti6Al4V samples was affected by (i) gradual wear of the end mills, (ii) the formation of built-up edges, and (iii) adhered workpiece.
Table 5.
Milling parameters affecting the surface roughness on the SLM Ti6Al4V samples.
Figure 9.
The average surface roughness on the SLM Ti6Al4V samples, as well as the MRR and wear values for all the applied milling modes (with the same volume of the removed material).
Despite the ‘mild’ milling conditions, mode I caused the greatest wear of the end mills, increasing the average surface roughness at the minimum MRR value. Obviously, it could not be recommended for implementation. This may be due to the following reasons. Because of the low elastic modulus of titanium alloys, severe abrasive wear tends to occur on the flank face during milling processes [37]. Therefore, in the milling of titanium alloys, a machining strategy employing lower cutting speeds and higher feed rates is generally recommended [11,13,18,30]. This approach effectively reduces both the frictional frequency and heat accumulation at the tool–workpiece interface [38], thereby reducing flank wear and enhancing tool life performance;
Mode II provided both low wear of the end mills and low average surface roughness (Figure 9), but it was not characterized by the maximum MRR level (since the feed rate was only 200 mm/min).
Mode III contributed to low wear of the end mills at the highest MRR value, but also the greatest BUEs and the appearance of adhered chips on both rake and flank surfaces (Table 5).
Since the performed experiments revealed that the surface roughness on the SLM Ti6Al4V sample remained relatively low (Ra = 0.1–0.6 µm) for 10 min, and the MRR value was maximal for mode III, the causes of wear of the end mill over time under such conditions were analyzed.
3.3. Wear of the End Mills with Time
Figure 10a shows an SEM micrograph of the flank surface of the end mill after milling for 10 min using mode III (at the wear value of 40 μm).
Figure 10.
(a) SEM micrograph flank surface during mode III after 10 min of milling and (b) wear of the end mill with time.
Thus, prolonging the milling process by two times was accompanied by an increase in wear by almost three times (Figure 10b). This, in turn, had to be accompanied by an increase in the roughness on the SLM Ti6Al4V sample (Figure 8b), i.e., deteriorating its quality.
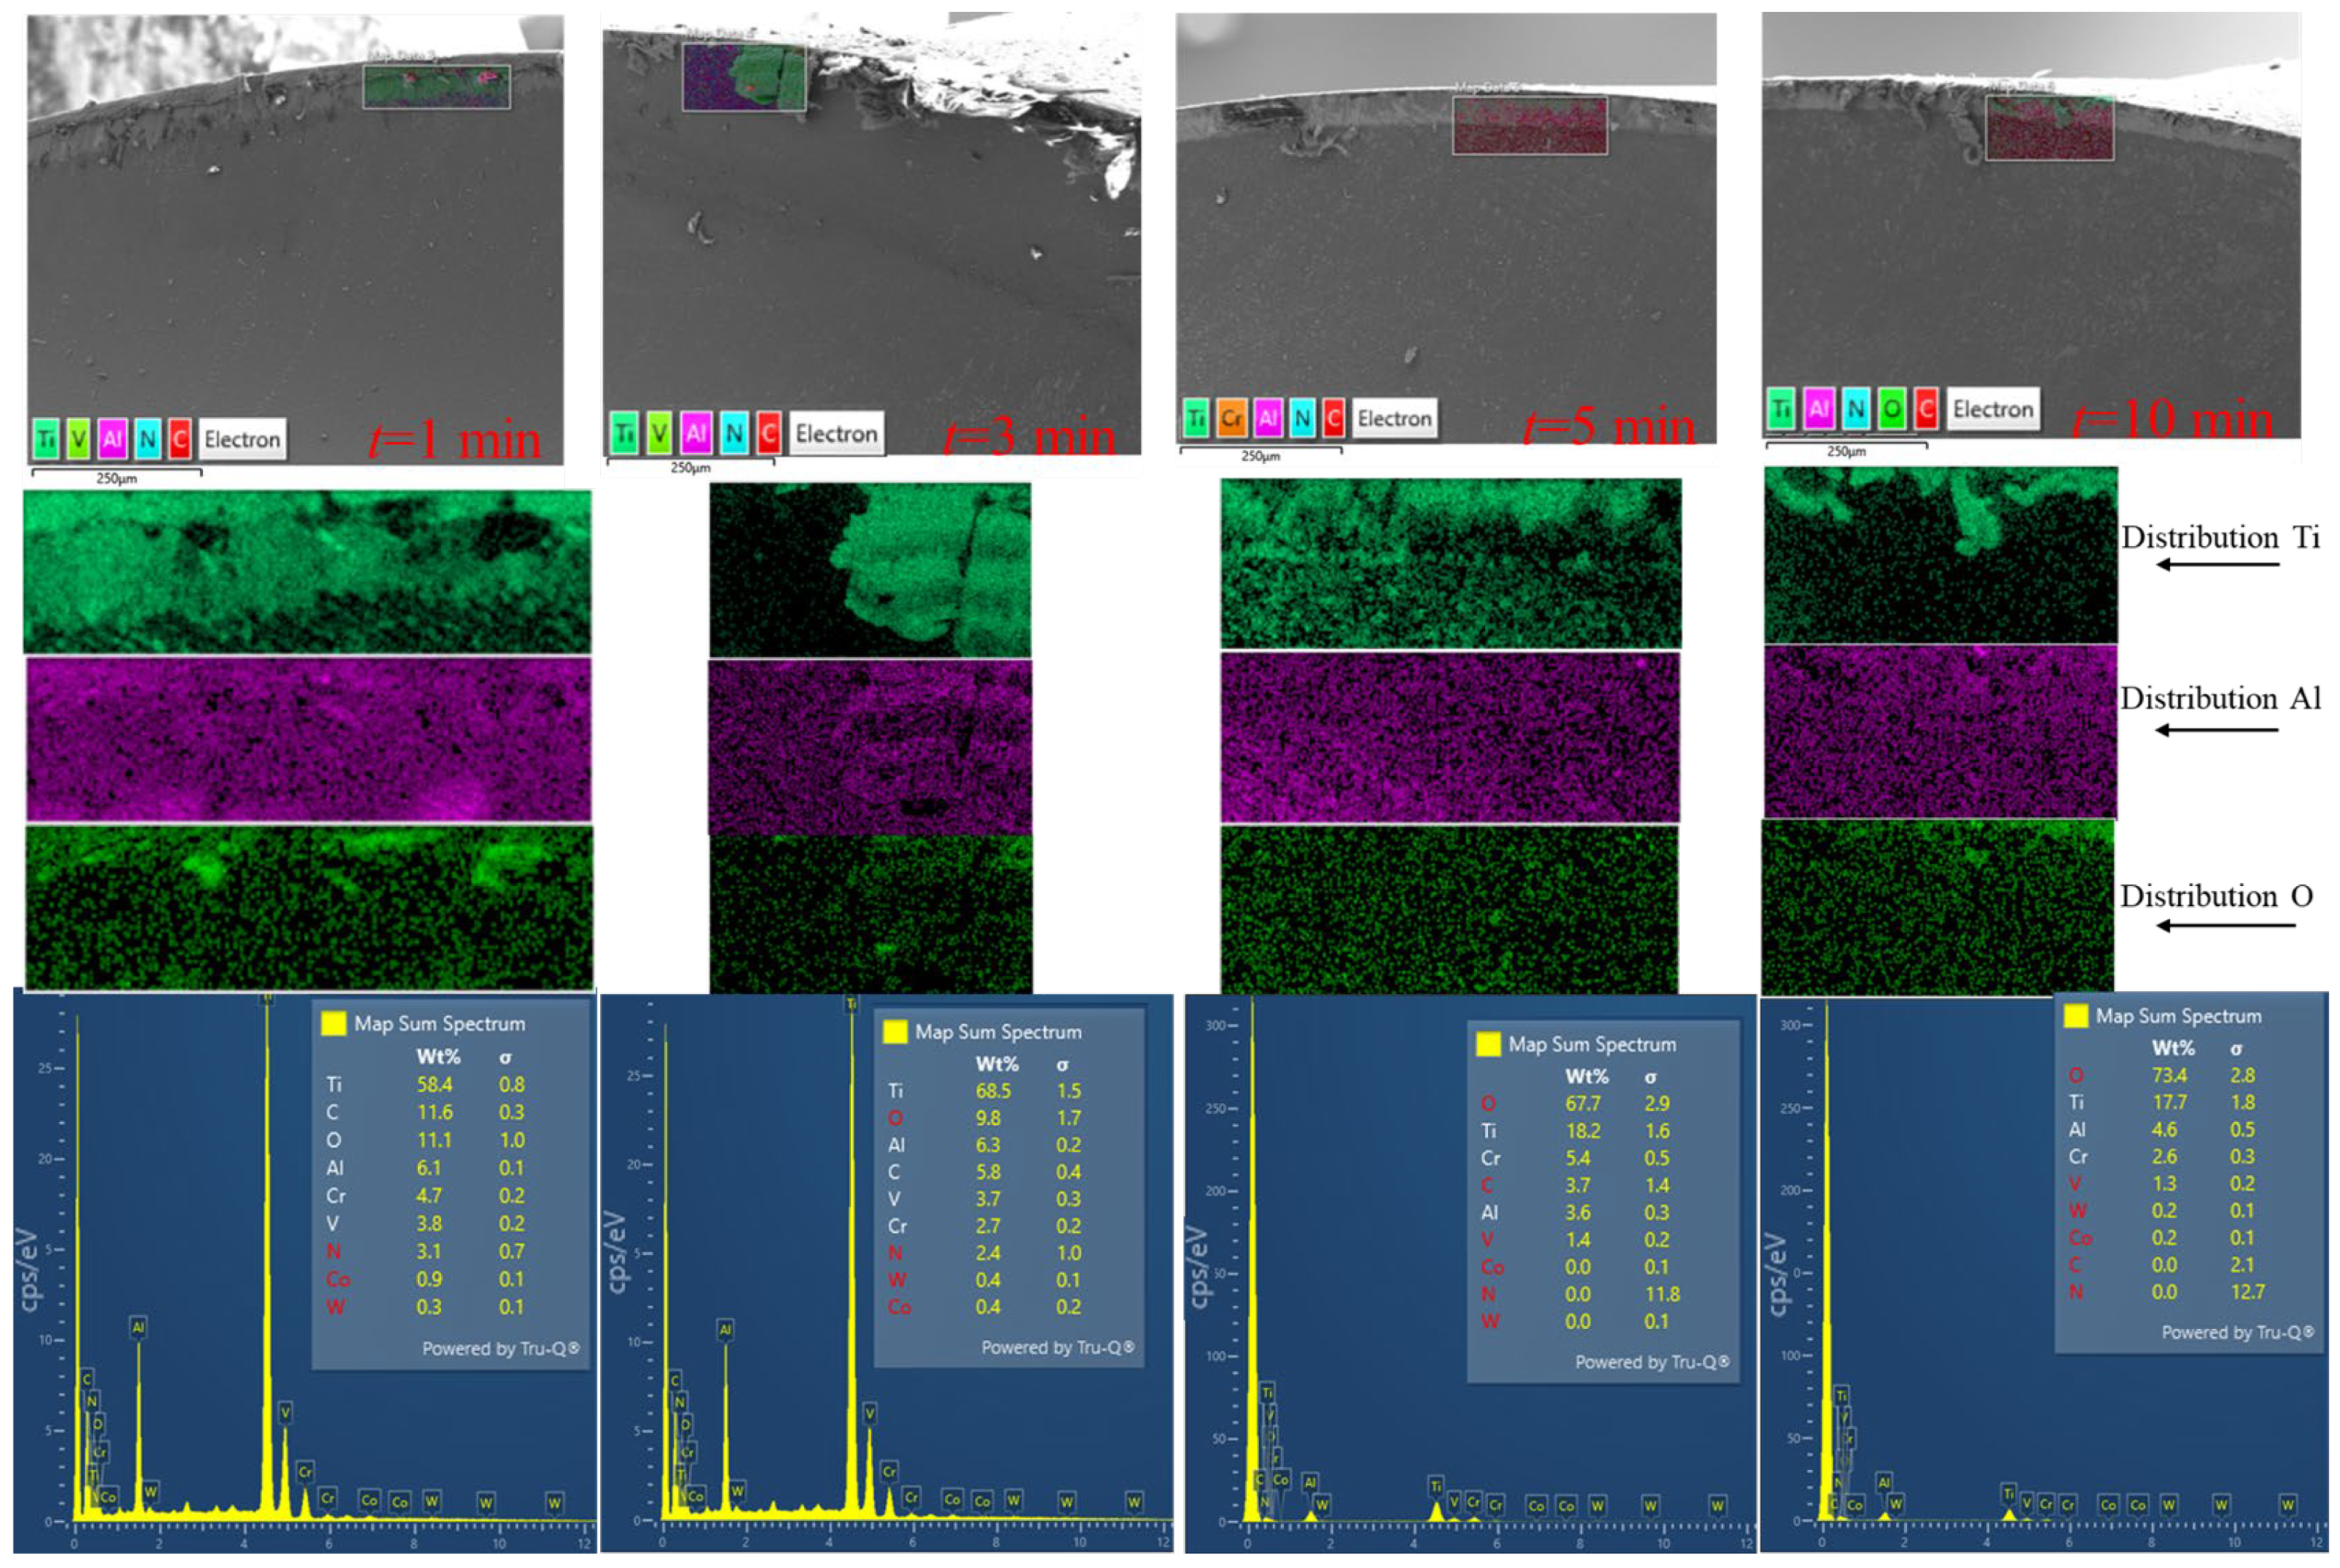
To determine the cause of rapid wear of the end mill, the chemical compositions of the flank surface near the cutting edge were analyzed at different wear degrees (Figure 11). According to the data obtained, aluminum was uniformly distributed in the BUEs in all the cases studied. Both tungsten and cobalt contents, as the end mill materials, were extremely low due to the presence of the protective coating on the flank surface. As a result, both chipping and abrasive wear did not develop practically.
Figure 11.
The element distributions on the rake surface of the end mill at different milling periods for mode III.
According to Figure 11, the oxygen content gradually increased on the flank surface of the end mill. In addition, the BUEs occurred due to the development of the oxidation process. As the BUE enlarged with time, the quality of the surface on the SLM Ti6Al4V sample decreased.
At 3 min < t < 5 min, the oxygen content increased sharply (Figure 11) because of the interaction of titanium from the SLM Ti6Al4V sample and/or both aluminum and chromium from the protective coating with oxygen from the air via the following reactions:
Ti + O2→Ti2O (TiO or TiO2)
O2 + Al→Al2O3
O2 + Cr→Cr2O3
It was shown above (according to the analysis of the EDS spectra) that the peaks of titanium and oxygen did not overlap much at t = 1 and 3 min. This fact could indicate that oxygen, contained in the air at the initial period of milling, did not react with titanium, even considering its high chemical activity at elevated temperatures.
Based on the results obtained, the following conclusions could be drawn. Upon milling, oxygen contained in the air interacted with aluminum and chromium in the protective coating first, but with titanium only. Thus, the presence of the AlCrN coating on the flank surface was effective for high-performance milling of the SLM Ti6Al4V sample due to the formation of both aluminum and chromium oxides. This conclusion was consistent with the previously reported data. In particular [34,39], high oxidation resistance of the AlCrN coating was caused by the formation of dense surface layers of the Cr2O3 and Al2O3 mixture, preventing further oxidation that could decompose the cubic AlCrN phase. At the same time, both aluminum and chromium oxides possessed ultra-high hardness and excellent wear resistance.
3.4. The Quality of the Machined Surface
The data of laser scanning microscopy (Figure 12) showed that changing the milling mode gave rise to a noticeable increase in the pitch of the formed microscopic roughness, which is due to an increase in the value of tool feed. In addition, it was found that the increase in the milling intensity resulted in an increase in the surface roughness over the parameter Sa and a decrease in the parameter Sz (see Table 6). According to the definition, Sz is the total peak-to-valley height of the surface (it quantifies the difference between the highest peak and the lowest valley within a defined surface region). It is suggested that the lower value of Sz in mode III is related to more uniform milling at higher rotation speed, with a more accurate pattern of material removal in general.
Figure 12.
Optical micrographs of workpiece surface after milling at modes I (a), II (b), and III (c).
Table 6.
Surface microscopic relief parameters and volume parameters of areal material ratio (with averaging over 3 milling tests and 5 repeated roughness measurements).
This is due to the non-uniformity of the microscopic relief of the milled surface. As can be seen from the registered images (Figure 12) and three-dimensional profile of the surface (Figure 13), part of the surface is smoother when the mill was rotating. This area is formed when the tool teeth cut into the surface of the workpiece, while the processed material is smoothed due to the kinematic features of the selected milling scheme. As a result, a microscopic relief with a lower height of irregularities was formed in this area.
Figure 13.
Three-dimensional patterns of workpiece surface profile after milling at models I (a), II (b) and III (c).
At the same time, at the exit of the cutter from the processed material, the material is cut in less restricted conditions, and distinct traces corresponding to the trajectory of its movement remain after the cutter. As a result, a microscopic relief with a higher height of irregularities was formed in this area.
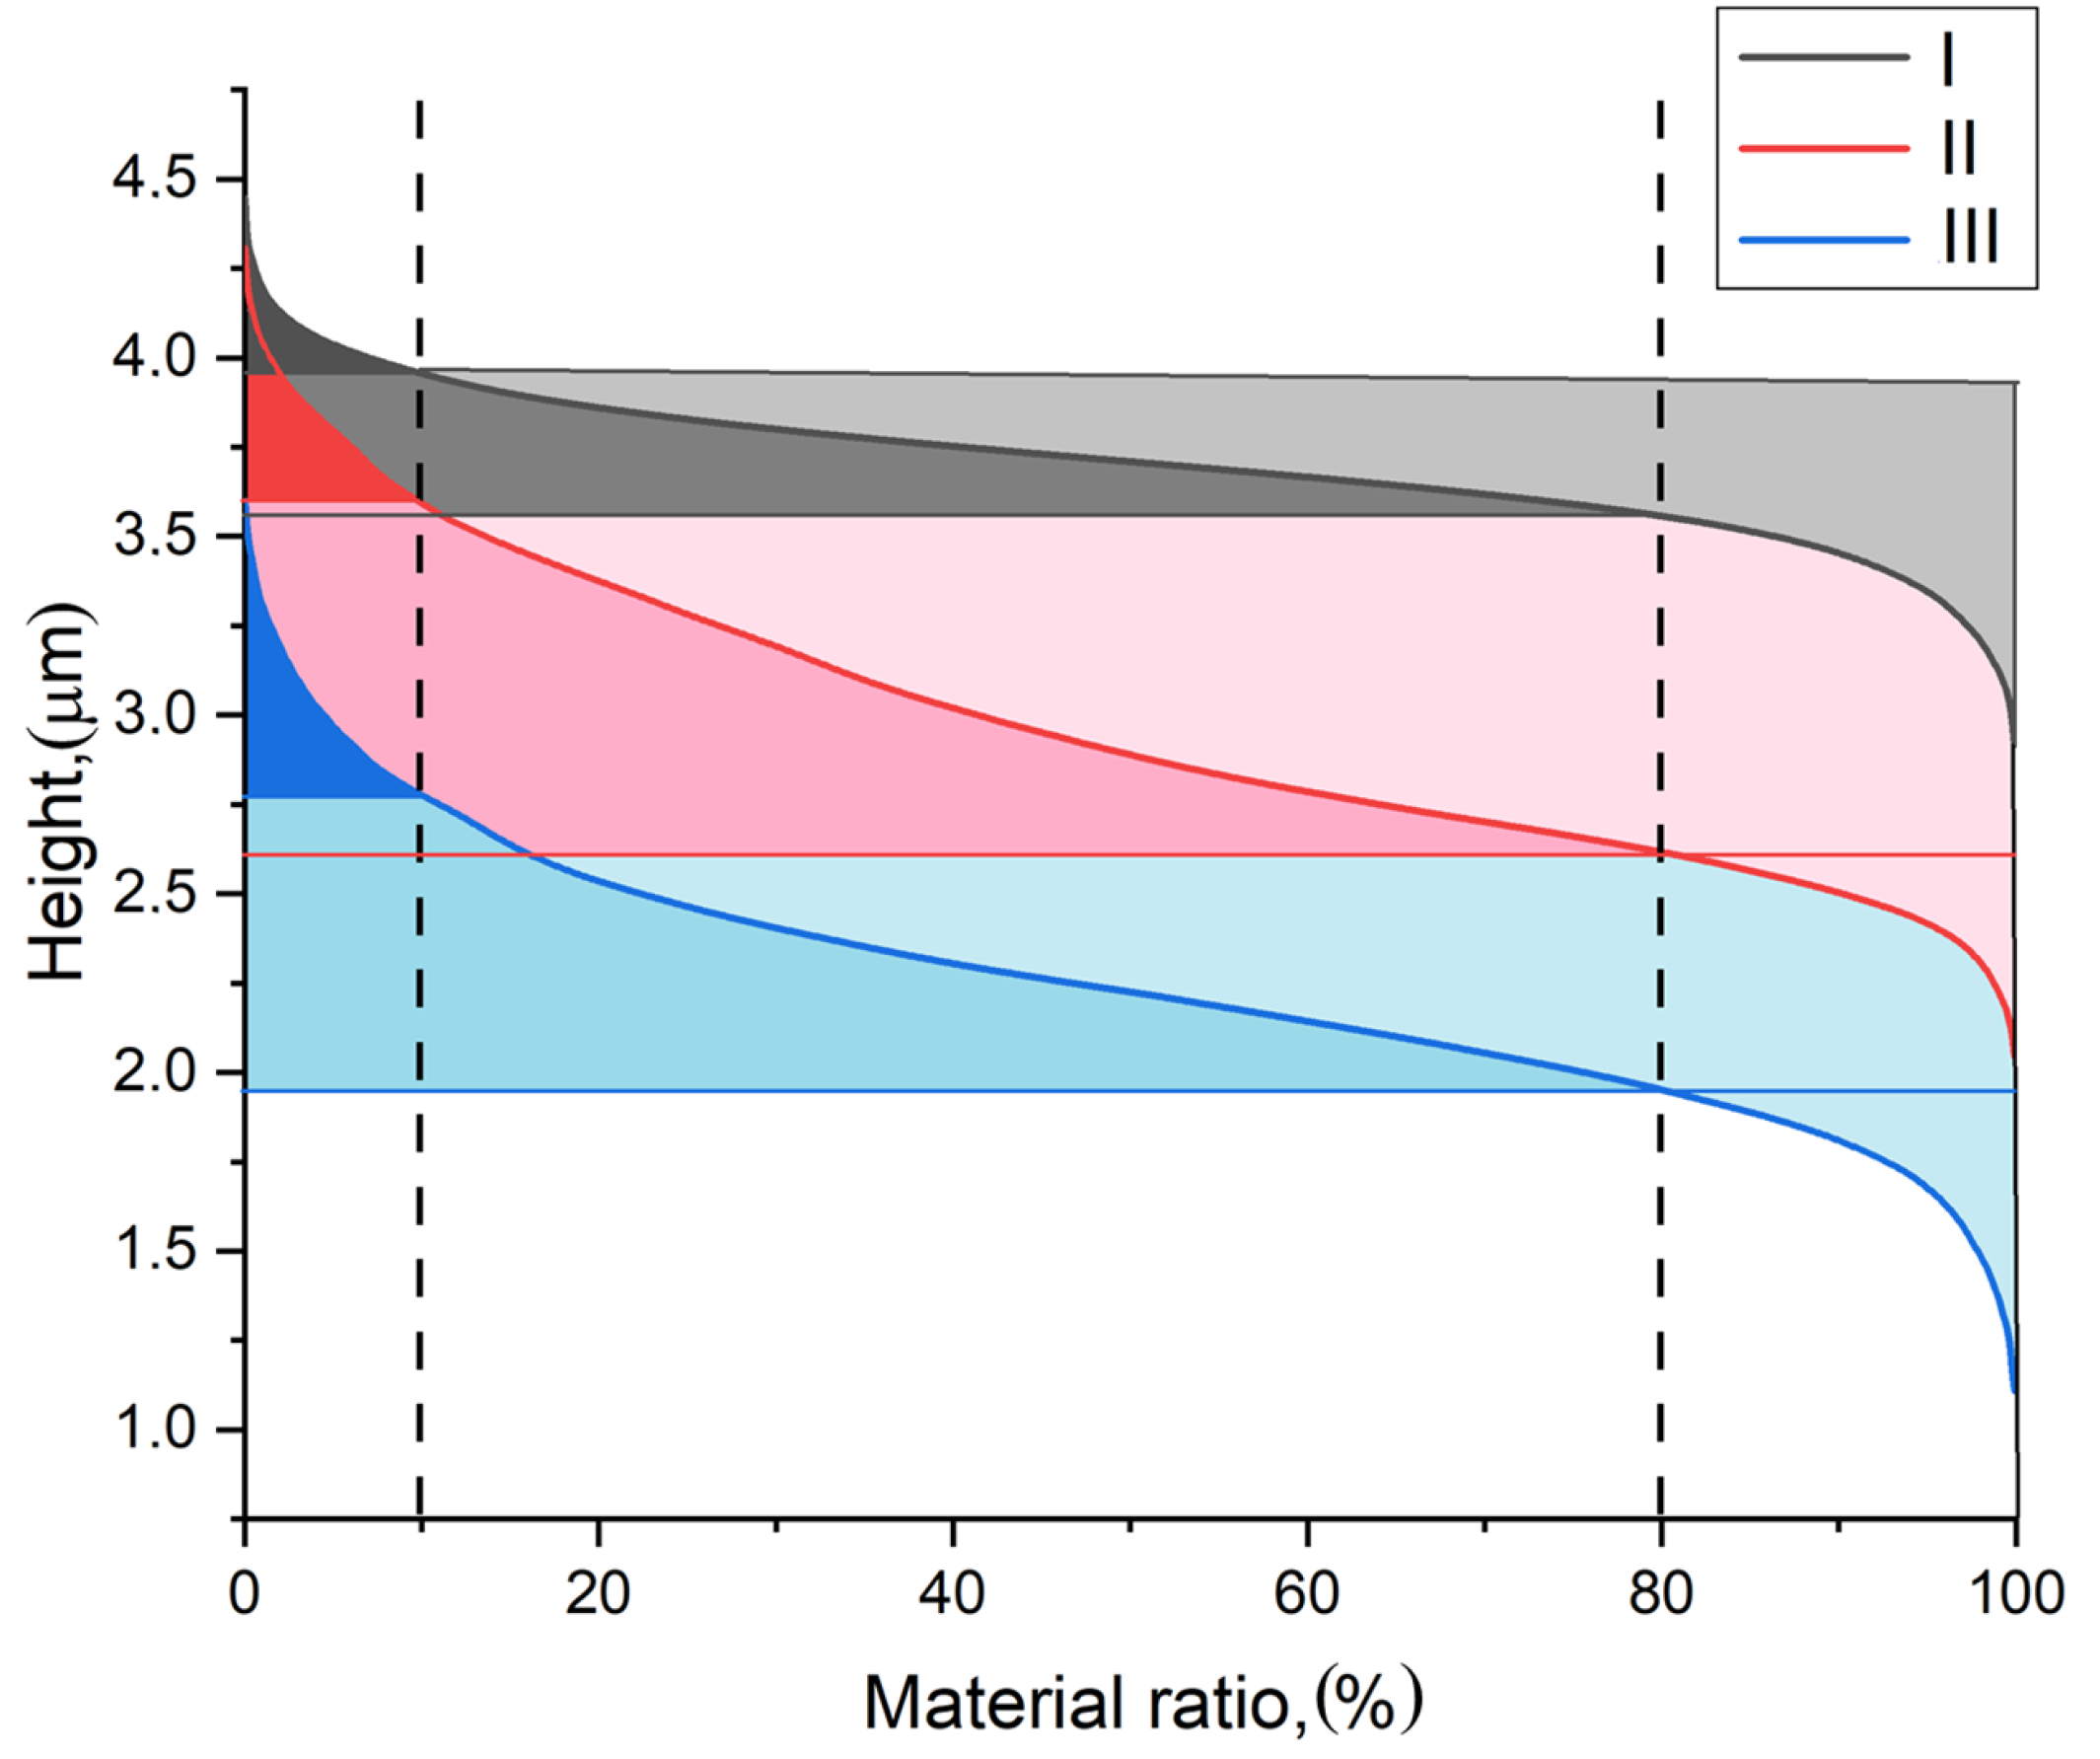
In addition, according to the analysis of the 3D profile of the surface, it was established that the microscopic relief after milling with more efficient modes was characterized by an increase in the volume of material related to voids, peaks, and the base part of the surface (Figure 14, Table 6). It is worth noting that changing the milling mode exerted a greater effect on the void volume in the base part of the machined surface (Vvc) than in the valley (Vvv). The parameters Vvc, Vmp, and Vmc are doubled when moving from mode I towards mode II; however, in mode III, they were practically the same as in mode II.
Figure 14.
Areal material ratio curve of the workpiece surface after milling at modes I–III.
The results of surface microscopic relief evaluation indicated that mode III is preferential over mode II because it ensured less surface roughness, while the production rate is significantly higher.
4. Discussion
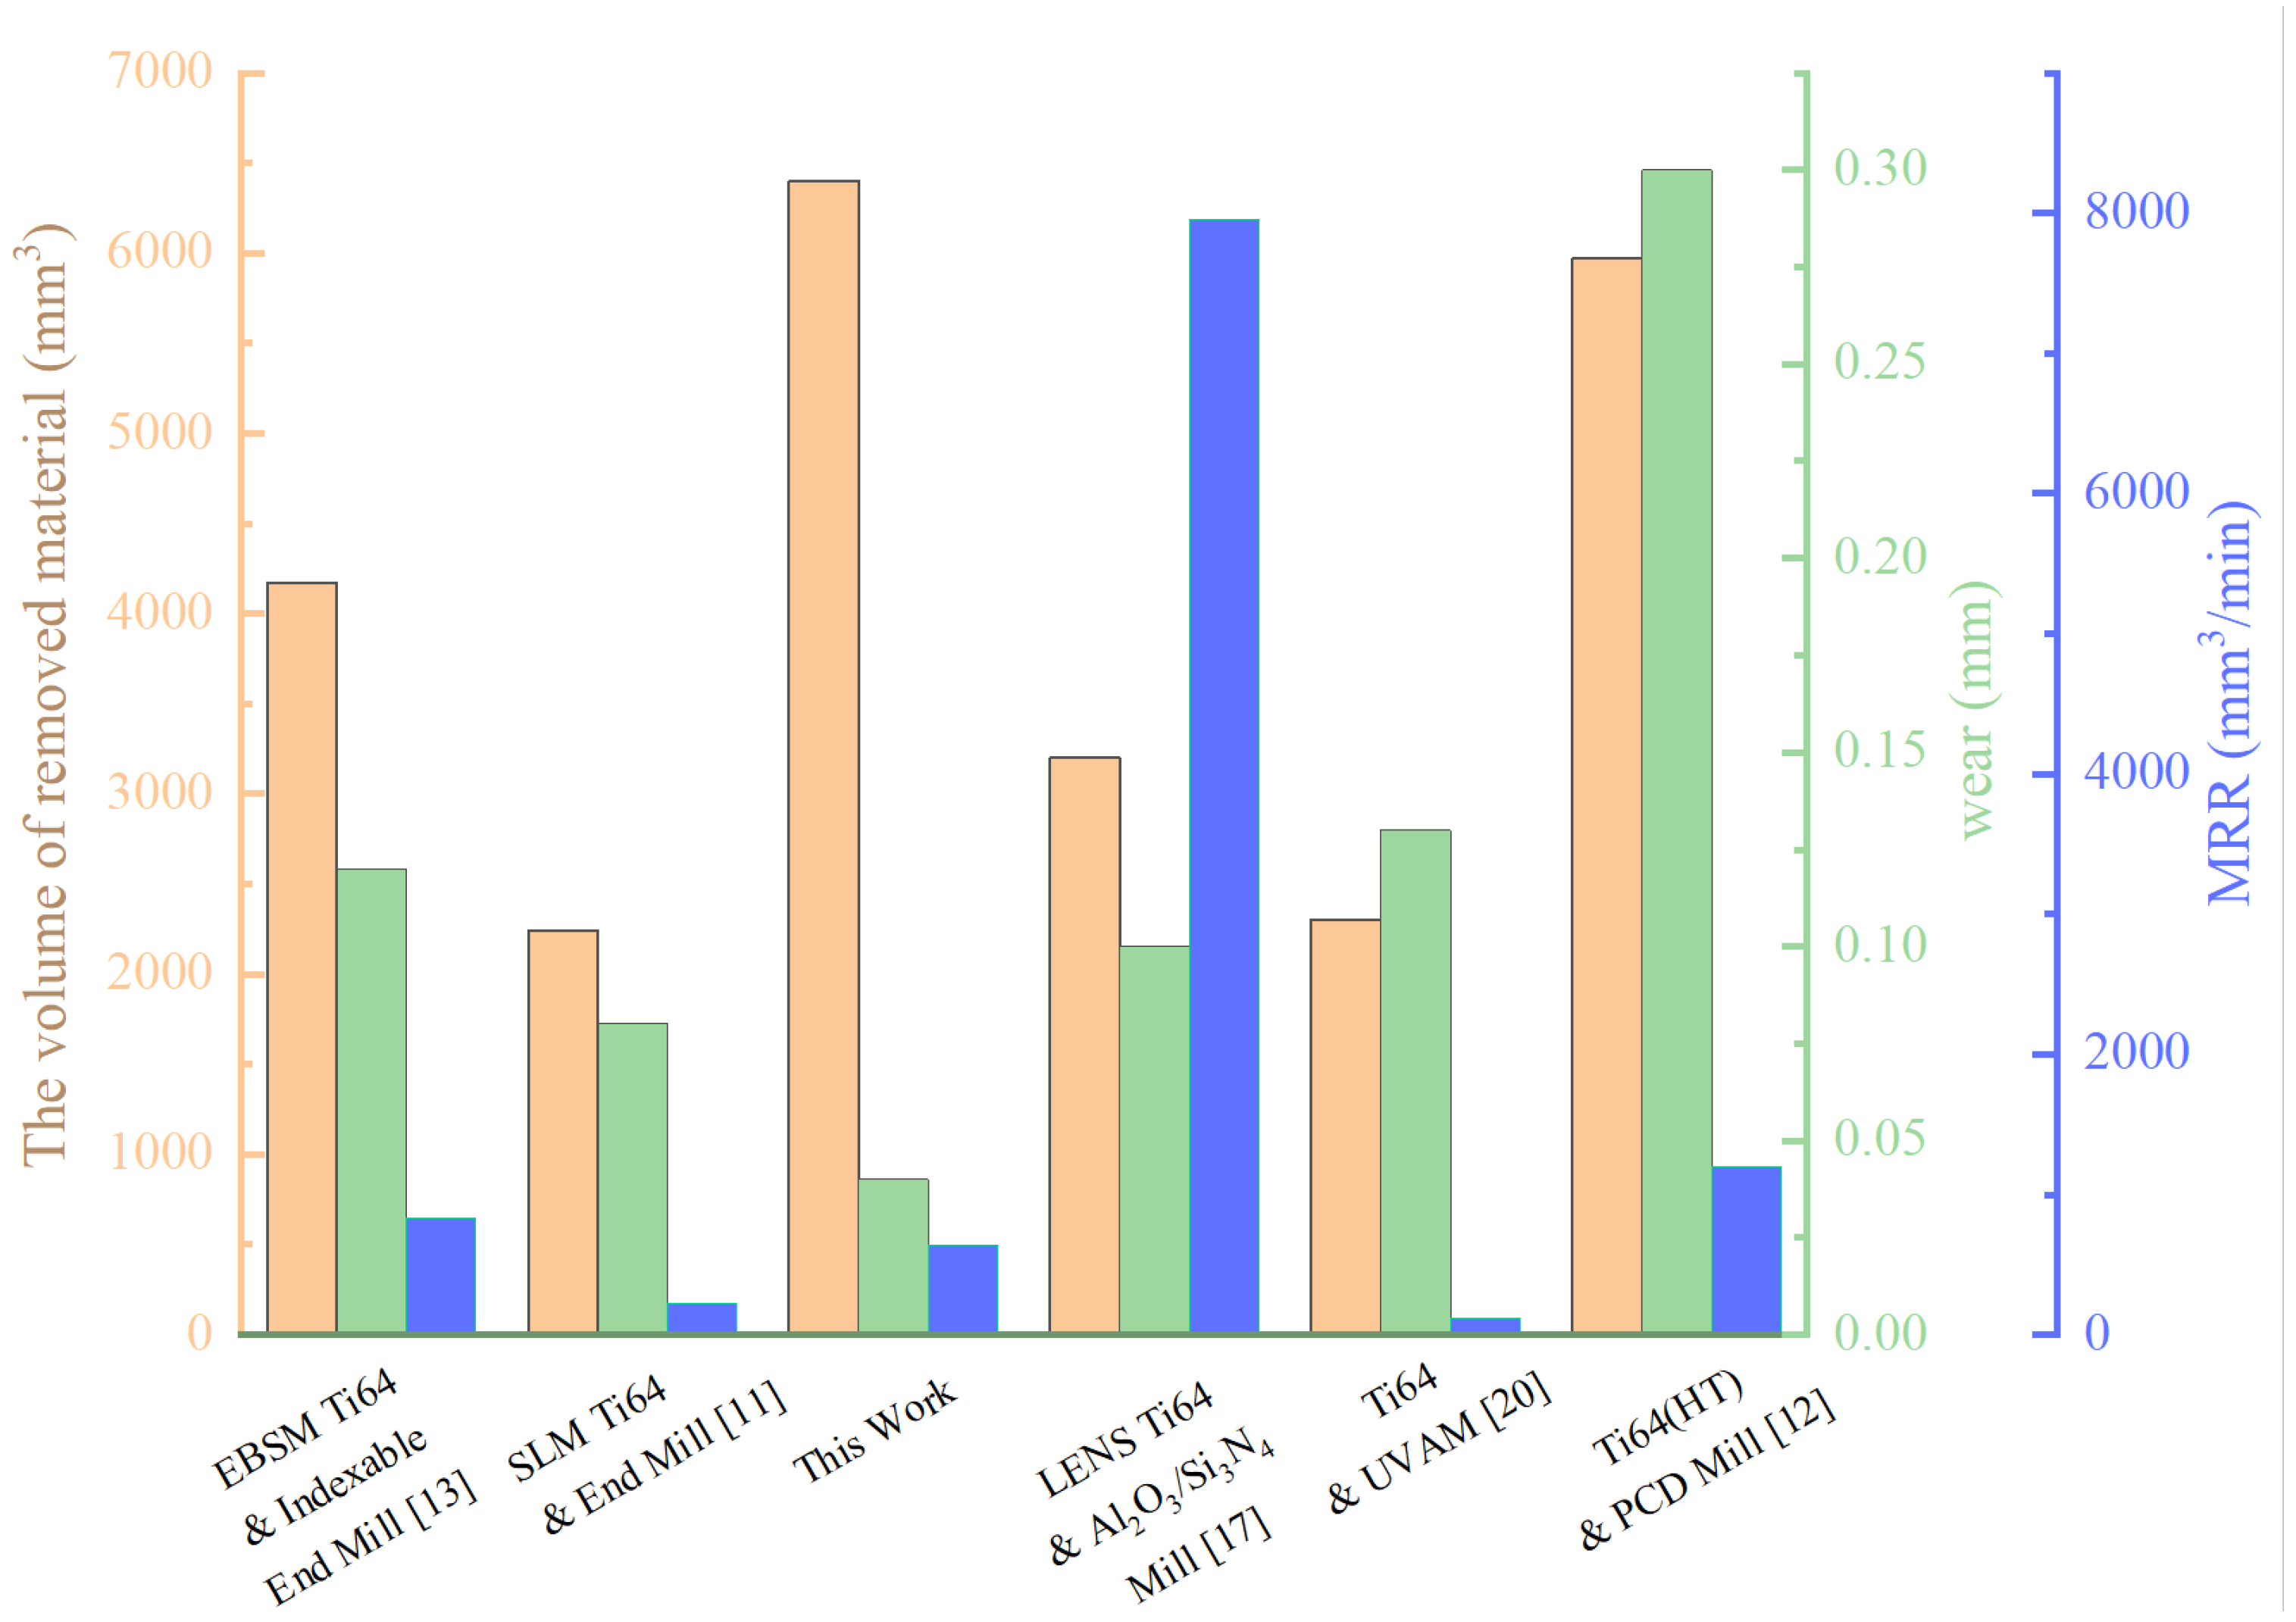
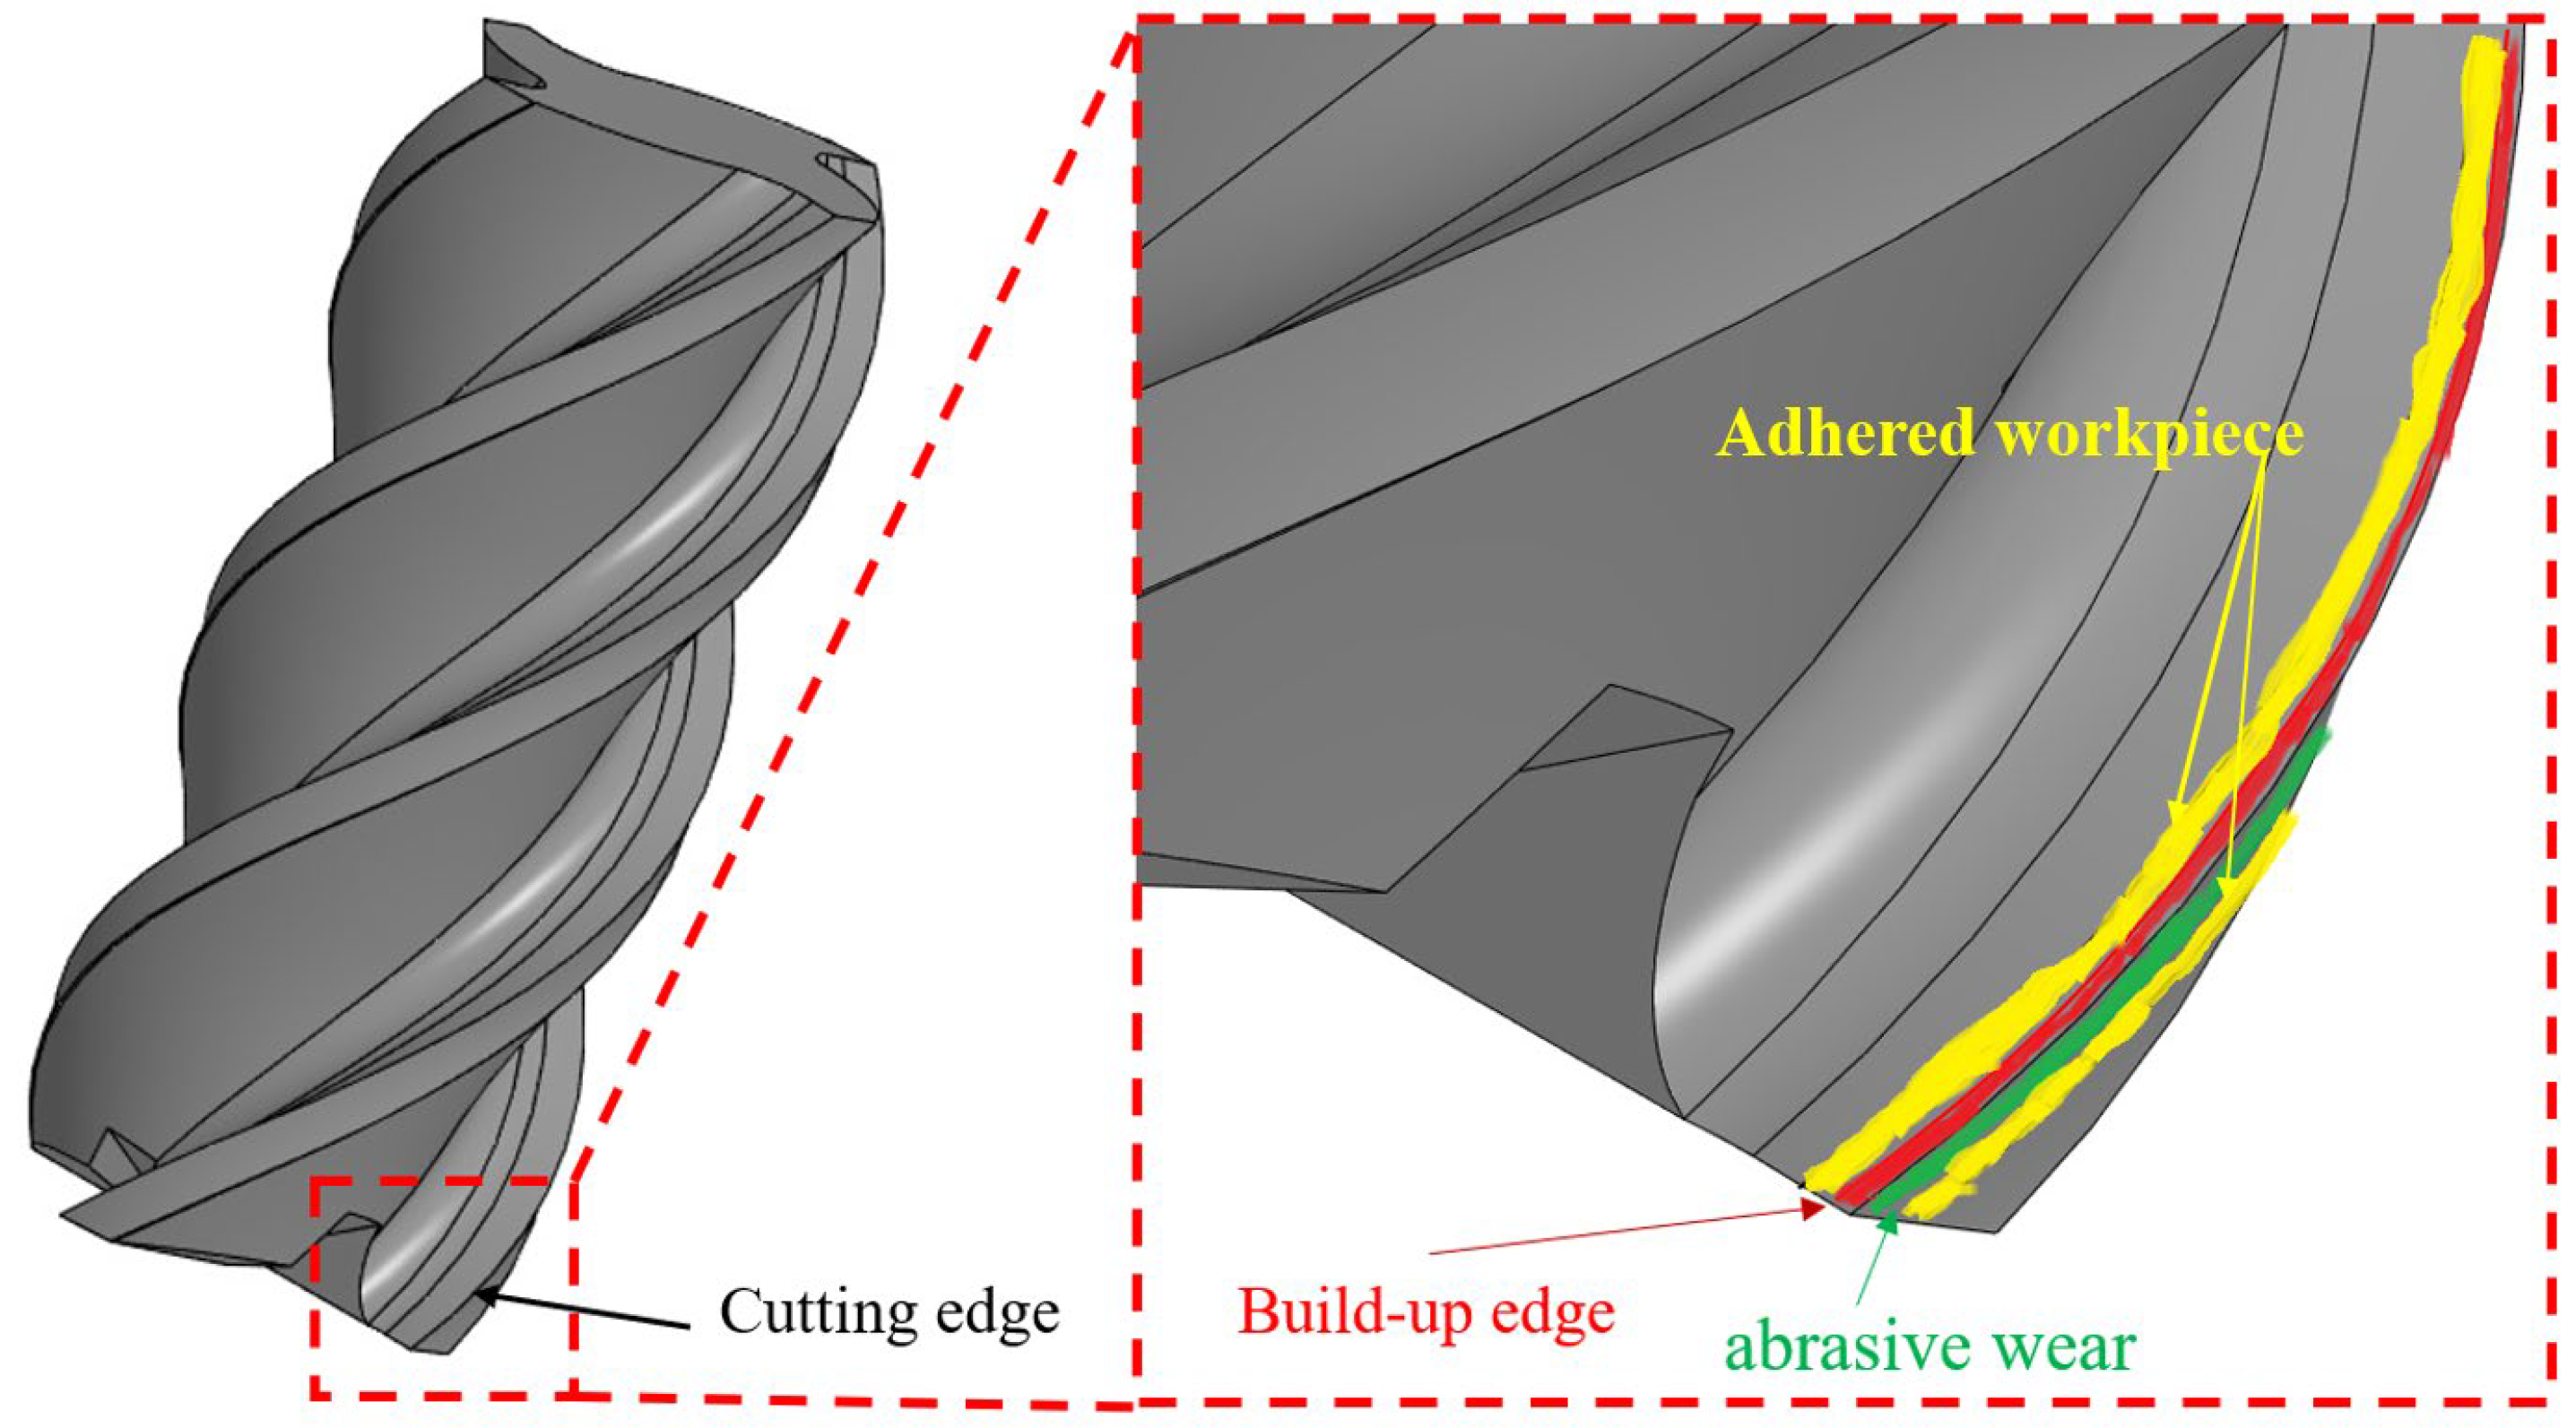
Compared with previously published data, less wear of the end mill was observed after removing more material using mode III (Figure 15). This fact was inconsistent with the results reported in [11], whose authors machined SLM Ti6Al4V samples with similar mills using the same side milling principle. In doing so, tool wear was significantly less at both greater RDOC and greater feed values in the present study. Kumar K. et al. [27] have shown that tool wear upon milling of wrought Ti6Al4V samples occurred in three different stages, namely the initial, middle, and final ones. At the low cutting speed of 60 m/min (as was applied in this study), adhesive and abrasive wear predominated in the machining of the wrought Ti6Al4V samples using a hard alloy tool with a protective coating [39]. According to [27], delamination occurred from the flank surface already at the initial stage (within the first 5 min), much like was also observed in this study for all the applied milling modes. Figure 16 shows the typical wear mechanisms of the front and flank surfaces. It should be noted that different MRR leads to a change in the area of accretion and the size of the abrasion. Chipping, abrasion, and BUE may be causes of concern for tooling wear.
Figure 15.
The material removal rates and wear of tools when milling different Ti6Al4V samples. The results obtained are compared with the data reported in [11,12,13,17,20].
Figure 16.
The typical wear mechanisms of the front and flank surfaces during different MRR.
In the present study, during the first milling stage (with negligible tool wear), the surface roughness of the processed SLM Ti6Al4V samples was primarily influenced by cutting parameters, where greater max cutting thickness resulted in higher roughness values (Figure 8). However, as milling time increased, the surface roughness of the processed SLM Ti6Al4V samples was affected by (i) gradual wear of the end mills, (ii) the formation of built-up edges, and (iii) adhered workpiece (Table 5). Therefore, surface roughness of the milled SLM Ti6Al4V can be effectively improved through two primary approaches: (i) cutting parameters optimization and (ii) suppression of tool wear as well as built-up edge formation.
As a rule, both initial and final stages were characterized by rapid wear of tools. In this study, the initial stage with intense wear was not observed when milling the SLM Ti6Al4V samples (Figure 15). This fact could be caused by the following four reasons.
- -
- Firstly, the milling parameters in mode III were selected in such a way as to avoid premature formation of chipping on the cutting edge. Chipping was formed on the flank surface only in long-term milling (above 20 min), when using mode I (as opposed to modes II and III);
- -
- Secondly, using mode III at the low RDOC value of 60 m/min and the high feed level of 400 mm/min allowed an increase in the volume of the removed material per tooth, improving the milling speed. These parameters also enabled a decrease in the contact time (friction) between the flank surface and the SLM Ti6Al4V sample, reducing its wear. However, it should not be overlooked that excessive feed per tooth may lead to both failures of teeth and accelerated wear of end mills;
- -
- -
- Fourthly, the AlCrN coating possessed high wear resistance (as described above). In this study, oxygen contained in the air interacted with both aluminum and chromium in the protective coating first, but with titanium only (Figure 11). Since both Cr2O3 and Al2O3 particles were characterized by greater wear resistance, they had to suppress the development of diffusion wear.
Regardless, mode III provided the highest productivity, but it could not be considered the optimal one. The same could be stated for mode II, whose main drawback was the insufficient MRR level. Since they differed in the feed values only, these parameters should be optimized by the trade-off principle. In fact, the optimal feed value should be between 200 and 400 mm/min, so such a parametric investigation will be carried out by the authors in the future. In addition, as a prospective development of this study, the authors aim to evaluate other milling factors that affect the surface roughness on the AM Ti6Al4V samples, including the search for conditions that reduce wear on the flank surfaces while ensuring acceptable MRR levels.
5. Conclusions
For the end mills, the wear patterns were investigated upon finish milling of the SLM Ti6Al4V samples under different MRR. The SLM Ti6Al4V samples with negligible numbers of discontinuities were characterized by both high strength and a hardness of 400 HV but low elongation due to the formed microstructure of acicular α’-martensite and the absence of β-phase. Generalization of the obtained results allowed the authors to draw the following conclusions.
- When using all the applied milling modes, the identical tool wear mechanism was observed. Built-up edges mainly developed on the leading surfaces, increasing the surface roughness on the SLM Ti6Al4V samples but protecting the cutting edges. However, abrasive wear was mainly characteristic of the flank surfaces that accelerated peeling of the protective coatings and increased wear of the end mills. Therefore, if the dry milling is to be used, it is recommended to apply a more wear-resistant coating to protect the tool’s flank surface. This will improve the machinability of additive titanium alloys under dry finish milling conditions.
- Compared to the literature data, when mode III is selected, the end mill provided both the highest MRR value of 640 mm3/min and the highest volume of the removed material of 6400 mm3 at the negligible wear of 40 μm. The most likely reasons were (i) the selected parameters enabled to avoid premature chipping; (ii) the AlCrN coating had high wear resistance, including under the implemented conditions; (iii) since a built-up edge mainly occurs on the rake surface close to the cutting edge, its formation can hinder the direct contact between the tool and the workpiece to a certain extent, thereby slowing down the tool wear.
- Upon milling under the dry finish conditions, oxygen contained in the air interacted with both aluminum and chromium in the protective coatings first, but with titanium in the SLM Ti6Al4V samples only. This phenomenon prevented the development of diffusion and abrasive wear, and generally slowed down the process of wear of the protective coatings.
- Mode III provided the maximum MRR value and negligible wear of the end mill, but its main disadvantage was the high average surface roughness on the SLM Ti6Al4V sample. Mode II was characterized by both the lowest average surface roughness and the lowest wear of the end mill, but an insufficient MRR value as well. Since these two modes differed only in the feed rates, their values should be optimized in the range from 200 to 400 mm/min.
- The prospects of the study are related to estimating the long-term performance of cutting tools under established milling parameters in order to deeper reveal the regularities of their wear and failure. In addition, it is perspective to evaluate other milling factors that affect the surface roughness on the AM Ti6Al4V samples, including the search for conditions that reduce wear on the flank surfaces, while ensuring acceptable MRR levels. Of practical relevance is a comparative study of the performance of cutting tools of different manufacturers when the identical milling modes are employed.
Author Contributions
Conceptualization, Z.D. and M.Q.; methodology, S.V.P. and A.V.F.; software, Q.Z.; validation, Z.D., M.Q. and S.V.P.; formal analysis, Z.D. and A.V.F.; investigation, M.Q.; resources, S.V.P.; data curation, Z.H.; writing—original draft preparation, M.Q., and S.V.P.; writing—review and editing, M.Q., A.V.F., and S.V.P.; visualization, Q.Z.; supervision, M.Q., and S.V.P.; project administration, S.V.P.; funding acquisition, S.V.P. All authors have read and agreed to the published version of the manuscript.
Funding
The work was performed according to the Government research assignment for ISPMS SB RAS, Project NO FWRW-2021-0010.
Data Availability Statement
The data presented in this study are available from the corresponding authors upon reasonable request.
Conflicts of Interest
The authors declare no conflicts of interest.
References
- Nikon-slm-Solutions. Available online: https://nikon-slm-solutions.com/ (accessed on 10 October 2024).
- Antolak-Dudka, A.; Czujko, T.; Durejko, T.; Stępniowski, W.J.; Ziętala, M.; Łukasiewicz, J. Comparison of the Microstructural, Mechanical and Corrosion Resistance Properties of Ti6Al4V Samples Manufactured by LENS and Subjected to Various Heat Treatments. Materials 2024, 17, 1166. [Google Scholar] [CrossRef]
- Liu, S.; Shin, Y.C. Additive manufacturing of Ti6Al4V alloy: A review. Mater. Des. 2019, 164, 107552. [Google Scholar] [CrossRef]
- Zhang, J.; Yang, Y.; Cao, S.; Cao, Z.; Kovalchuk, D.; Wu, S.; Liang, E.; Zhang, X.; Chen, W.; Wu, F.; et al. Fine equiaxed β grains and superior tensile property in Ti–6Al–4V alloy deposited by coaxial electron beam wire feeding additive manufacturing. Acta Metall. Sin. 2020, 33, 1311–1320. [Google Scholar] [CrossRef]
- Baufeld, B.; Brandl, E.; Van der Biest, O. Wire based additive layer manufacturing: Comparison of microstructure and mechanical properties of Ti–6Al–4V components fabricated by laser-beam deposition and shaped metal deposition. J. Mater. Process. Technol. 2011, 211, 1146–1158. [Google Scholar] [CrossRef]
- Keist, J.S.; Palmer, T.A. Development of strength-hardness relationships in additively manufactured titanium alloys. Mater. Sci. Eng. A 2017, 693, 214–224. [Google Scholar] [CrossRef]
- Grzesik, W. Hybrid additive and subtractive manufacturing processes and systems: A review. J. Mach. Eng. 2018, 18, 5–24. [Google Scholar] [CrossRef]
- Wu, X.; Zhu, W.; He, Y. Deformation prediction and experimental study of 316l stainless steel thin-walled parts processed by additive-subtractive hybrid manufacturing. Materials 2021, 14, 5582. [Google Scholar] [CrossRef]
- Ye, Z.-P.; Zhang, Z.-J.; Jin, X.; Xiao, M.-Z.; Su, J.-Z. Study of hybrid additive manufacturing based on pulse laser wire depositing and milling. Int. J. Adv. Manuf. Technol. 2017, 88, 2237–2248. [Google Scholar] [CrossRef]
- Milton, S.; Morandeau, A.; Chalon, F.; Leroy, R. Influence of finish machining on the surface integrity of Ti6Al4V produced by selective laser melting. Procedia Cirp 2016, 45, 127–130. [Google Scholar] [CrossRef]
- Al-Rubaie, K.S.; Melotti, S.; Rabelo, A.; Paiva, J.M.; Elbestawi, M.A.; Veldhuis, S.C. Machinability of SLM-produced Ti6Al4V titanium alloy parts. J. Manuf. Process. 2020, 57, 768–786. [Google Scholar] [CrossRef]
- Abbasi, S.A.; Feng, P.; Ma, Y.; Zhang, J.; Yu, D.; Wu, Z. Influence of microstructure and hardness on machinability of heat-treated titanium alloy Ti-6Al-4V in end milling with polycrystalline diamond tools. Int. J. Adv. Manuf. Technol. 2016, 86, 1393–1405. [Google Scholar] [CrossRef]
- Milton, S.; Duchosal, A.; Chalon, F.; Leroy, R.; Morandeau, A. Thermal study during milling of Ti6Al4V produced by Electron Beam Melting (EBM) process. J. Manuf. Process. 2019, 38, 256–265. [Google Scholar] [CrossRef]
- Li, C.; Chen, J.; Li, S.; Xu, M.; Liu, X.; Wei, R.; Li, C.; Ko, T.J. Study of chip adhesion behavior in titanium alloy dry milling process based on image extraction technology. Int. J. Adv. Manuf. Technol. 2023, 126, 2633–2645. [Google Scholar] [CrossRef]
- Bordin, A.; Bruschi, S.; Ghiotti, A.; Bariani, P. Analysis of tool wear in cryogenic machining of additive manufactured Ti6Al4V alloy. Wear 2015, 328, 89–99. [Google Scholar] [CrossRef]
- Astakhov, V.P. The assessment of cutting tool wear. Int. J. Mach. Tools Manuf. 2004, 44, 637–647. [Google Scholar] [CrossRef]
- Dang, J.; Zhang, H.; Ming, W.; An, Q.; Chen, M. New observations on wear characteristics of solid Al2O3/Si3N4 ceramic tool in high speed milling of additive manufactured Ti6Al4V. Ceram. Int. 2020, 46, 5876–5886. [Google Scholar] [CrossRef]
- Airao, J.; Kishore, H.; Nirala, C.K. Measurement and analysis of tool wear and surface characteristics in micro turning of SLM Ti6Al4V and wrought Ti6Al4V. Measurement 2023, 206, 112281. [Google Scholar] [CrossRef]
- Liu, Q.; Xu, J.; Yu, H. Experimental study of tool wear and its effects on cutting process of ultrasonic-assisted milling of Ti6Al4V. Int. J. Adv. Manuf. Technol. 2020, 108, 2917–2928. [Google Scholar] [CrossRef]
- Ni, C.; Zhu, L.; Yang, Z. Comparative investigation of tool wear mechanism and corresponding machined surface characterization in feed-direction ultrasonic vibration assisted milling of Ti–6Al–4V from dynamic view. Wear 2019, 436, 203006. [Google Scholar] [CrossRef]
- Whitehouse, D.J. The parameter rash—Is there a cure? Wear 1982, 83, 75–78. [Google Scholar] [CrossRef]
- Whitehouse, D.J. Handbook of Surface and Nanometrology; Taylor & Francis: New York, NY, USA, 2002. [Google Scholar]
- Leach, R.K.; De Groot, P. The standards rash—Is there a cure? Int. J. Metrol. Qual. Eng. 2015, 6, 101. [Google Scholar] [CrossRef][Green Version]
- Zhang, X.; Peng, Z.; Liu, L.; Zhang, X. A tool life prediction model based on Taylor’s equation for high-speed ultrasonic vibration cutting Ti and Ni alloys. Coatings 2022, 12, 1553. [Google Scholar] [CrossRef]
- Dang, J.; Cai, X.; Yu, D.; An, Q.; Ming, W.; Chen, M. Effect of material microstructure on tool wear behavior during machining additively manufactured Ti6Al4V. Arch. Civ. Mech. Eng. 2019, 20, 4. [Google Scholar] [CrossRef]
- Khaliq, W.; Zhang, C.; Jamil, M.; Khan, A.M. Tool wear, surface quality, and residual stresses analysis of micro-machined additive manufactured Ti–6Al–4V under dry and MQL conditions. Tribol. Int. 2020, 151, 106408. [Google Scholar] [CrossRef]
- Gant, A.J.; Gee, M.G.; Orkney, L.P. The wear and friction behaviour of engineering coatings in ambient air and dry nitrogen. Wear 2011, 271, 2164–2175. [Google Scholar] [CrossRef]
- Kumar, K.M.; Mathew, N.T.; Baburaj, M. Sustainable milling of Ti-6Al-4 V super alloy using AlCrN and TiAlN coated tools. Mater. Today Proc. 2022, 50, 1732–1738. [Google Scholar] [CrossRef]
- Liew, W.Y.; Jie, J.L.L.; Yan, L.Y.; Dayou, J.; Sipaut, C.; Bin Madlan, M.F. Frictional and wear behaviour of AlCrN, TiN, TiAlN single-layer coatings, and TiAlN/AlCrN, AlN/TiN nano-multilayer coatings in dry sliding. Procedia Eng. 2013, 68, 512–517. [Google Scholar] [CrossRef]
- Cutting Tools. Available online: https://globalmall.cxtc.com/#/product/productSecond?catalogueCode=21 (accessed on 10 January 2024).
- Arlyapov, A.; Volkov, S.; Promakhov, V.; Matveev, A.; Babaev, A.; Vorozhtsov, A.; Zhukov, A. Study of the machinability of an Inconel 625 composite with added NiTi-TiB2 fabricated by direct laser deposition. Metals 2022, 12, 1956. [Google Scholar] [CrossRef]
- Liu, Y.; Liu, W.; Zhang, Y.; Guan, F.; Xue, X.; Zheng, Y.; Bai, Q. Study on the Surface Quality of Overhanging Holes Fabricated by Additive/Subtractive Hybrid Manufacturing for Ti6Al4V Alloy. Metals 2024, 14, 979. [Google Scholar] [CrossRef]
- Martyushev, N.V.; Kozlov, V.N.; Qi, M.; Tynchenko, V.S.; Kononenko, R.V.; Konyukhov, V.Y.; Valuev, D.V. Production of workpieces from martensitic stainless steel using electron-beam surfacing and investigation of cutting forces when milling workpieces. Materials 2023, 16, 4529. [Google Scholar] [CrossRef]
- De Lacalle, L.N.L.; Campa, F.J.; Lamikiz, A. Milling. In Modern Machining Technology; Woodhead Publishing: Sawston, UK, 2011; pp. 213–303. [Google Scholar]
- Luo, Y.; Zhao, B.; Long, H.; Yu, N. Research on Efficient and Stable Milling Using CNC Small Size Tool. In Proceedings of the Fourth International Seminar on Modern Cutting and Measurement Engineering, Beijing, China, 10–12 December 2010; SPIE: Bellingham, WA, USA, 2011; Volume 7997, pp. 35–42. [Google Scholar]
- Zhang, J.Z.; Chen, J.C.; Kirby, E.D. Surface roughness optimization in an end-milling operation using the Taguchi design method. J. Mater. Process. Technol. 2007, 184, 233–239. [Google Scholar] [CrossRef]
- Kozlov, V.; Gerasimov, A.; Kim, A. Distribution of Contact Loads Over the Flank-Land of the Cutter with a Rounded Cutting Edge. In IOP Conference Series: Materials Science and Engineering, Proceedings of the International Conference on Mechanical Engineering, Automation and Control Systems 2015 (MEACS2015), Tomsk, Russia, 1–4 December 2015; IOP Publishing: Bristol, UK, 2016; Volume 124, p. 012173. [Google Scholar]
- Yang, X.; Richard Liu, C. Machining titanium and its alloys. Mach. Sci. Technol. 1999, 3, 107–139. [Google Scholar] [CrossRef]
- Gilewicz, A.; Jedrzejewski, R.; Myslinski, P.; Warcholinski, B. Structure, morphology, and mechanical properties of AlCrN coatings deposited by cathodic arc evaporation. J. Mater. Eng. Perform. 2019, 28, 1522–1531. [Google Scholar] [CrossRef]
Disclaimer/Publisher’s Note: The statements, opinions and data contained in all publications are solely those of the individual author(s) and contributor(s) and not of MDPI and/or the editor(s). MDPI and/or the editor(s) disclaim responsibility for any injury to people or property resulting from any ideas, methods, instructions or products referred to in the content. |
© 2025 by the authors. Licensee MDPI, Basel, Switzerland. This article is an open access article distributed under the terms and conditions of the Creative Commons Attribution (CC BY) license (https://creativecommons.org/licenses/by/4.0/).