1. Introduction
Additive manufacturing (AM), including Selective Laser Melting (SLM), has become a crucial technology for producing load-carrying engineering components due to its advantages like design flexibility, the ability to create complex geometries and lightweight structures, and suitability for rapid, low-volume manufacturing. However, the unique microstructures, anisotropy, residual stresses, and defects inherent to AM parts can significantly impact their mechanical performance, particularly fatigue properties [
1,
2,
3].
18Ni300 maraging steel is a high-strength, low-carbon iron-nickel alloy used in demanding industries like aerospace and tooling, known for its exceptional strength and toughness. Its properties are typically achieved through a specific heat treatment process of solution annealing and aging. This characteristic of maraging steel is a fundamental aspect covered by multiple sources [
1,
2,
3,
4,
5]. While the combination of AM’s design freedom with this steel’s properties is promising, a significant gap exists in published fatigue data for AM-produced 18Ni300 maraging steel, especially regarding the effects of post-build heat treatments.
The research involves determining static and fatigue properties, including S-N curves, and examining how a specific thermal process affects the material’s microstructure. The experimentally verified data from this study will be valuable for fatigue-based design and analysis of AM components in various sectors.
Despite the significant advantages offered by additive manufacturing, the widespread adoption of AM components, particularly for fatigue-critical applications, is hindered by several challenges and a notable lack of comprehensive material data [
1,
5]. The unique layer-by-layer fabrication process inherent to AM can introduce specific microstructural features and defects that are less common or absent in conventionally manufactured materials. These include, but are not limited to, internal porosity (due to gas entrapment or incomplete fusion), surface roughness, residual stresses, and anisotropic material properties resulting from directional solidification and heat flow during the build process. Each of these factors can significantly impact the fatigue life of the component [
1].
Specifically for additively manufactured 18Ni300 maraging steel, there is a scarcity of published fatigue data concerning the influence of various post-build heat treatments. Existing literature often presents limited data sets, which may not cover the full range of technological interest (e.g., from low-cycle fatigue to the engineering endurance limit) or may not account for the variability introduced by different AM machines, process parameters, and post-processing protocols.
2. Materials and Methods
2.1. Material Specification and Additive Manufacturing
The material investigated in this study is 18Ni300 maraging steel, also known by designations such as 1.2709, X3NiCoMoTi 18-9-5, MS300, or MS1 [
6,
7,
8,
9]. Its nominal chemical composition (in weight percent) is detailed in
Table 1. This alloy is characterized by its high strength and toughness, primarily achieved through a precipitation hardening mechanism.
The mechanical properties of the heat-treated material, as per ISO 6892-1, are presented in
Table 2 [
6], showing typical yield strength (
Rp0.2), tensile strength (
Rm), and elongation at break (
A) for both vertical and horizontal build directions. The heat-treated fatigue strength state is approximately 650 MPa [
6]. These typical mechanical properties after heat treatment are in agreement with data published elsewhere [
1,
4,
8].
The specimens investigated in the present study were manufactured using the Selective Laser Melting (SLM) process, a powder bed fusion technique. An EOS EOSINT M280 (DMLS
®) machine (EOS GmbH, Krailling, Germany), equipped with a 200 W laser, was utilized for the fabrication. The layer height for the build process was set at 40 µm, and the MS1_Performance 2.0 (40 µm) profile was employed [
1,
2,
3,
4,
5,
8].
2.2. Specimen Preparation and Geometry
Thin-walled flat material specimens (thickness
t = 2 mm) were designed and manufactured for both monotonic and cyclic testing. Tensile specimens conformed to the specifications of ISO 6892-1 [
10], while fatigue specimens were designed in accordance with ASTM E466-21 [
11]. The specific geometries and dimensions of both tensile and fatigue specimens are illustrated on the left- and right-hand side in
Figure 1, respectively. All specimens were built with a consistent build orientation relative to the recoater direction, to ensure uniformity in manufacturing conditions.
2.3. Thermal Processing
Following the additive manufacturing process, all specimens underwent a specific two-step thermal treatment protocol. The first step involved annealing at 940 °C for 1 h, followed by air cooling to room temperature. Subsequently, an aging treatment was performed at 490 °C for 6 h, also followed by air cooling. This specific thermal process was conducted in air.
The applied thermal treatment protocol serves several critical purposes for the additively manufactured 18Ni300 maraging steel. Annealing is primarily aimed at relieving residual stresses induced during the SLM process and homogenizing the as-built microstructure. The subsequent aging step is crucial for optimizing the material’s microstructure through the precipitation of intermetallic phases, which significantly enhances its mechanical properties, particularly hardness and tensile strength. This chosen heat treatment is considered a simple and cost-effective process, making it attractive for industrial applications. Its main advantage is that it avoids the need for vacuum or inert gas environments, making it scalable and easy to integrate into existing manufacturing workflows equipped with standard furnaces, operating under normal atmospheric conditions. The purpose and benefits of such heat treatments are well-established in the literature [
1,
2,
3,
4,
5,
8].
2.4. Experimental Characterization
2.4.1. Monotonic (Tensile) Testing
Monotonic tensile tests were conducted to determine fundamental monotonic material properties. A Universal Testing Machine (UTM) with a 50 kN capacity was utilized. An extensometer with a gauge length of 50 mm and a travel of 10 mm was employed to accurately measure strain. The determined properties included the 0.2% offset yield strength (Rp0.2), ultimate tensile strength (Rm), and elongation at breakage (A). A total of eight tensile specimens were tested: two in the as-built condition (MN3, MN4) and six after the specified heat treatment (MN1, MN2, MN5, MN6, MN7, MN8).
2.4.2. Cyclic (Fatigue) Testing
Cyclic fatigue tests were performed to characterize the fatigue behavior of the heat-treated AM 18Ni300 maraging steel. A servo-hydraulic Schenck S59 HYDROPULS (Carl Schenck AG, Darmstadt, Germany)testing machine was used for these experiments. Strain measurements were taken using an extensometer with a gauge length of 10 mm and a travel of 10 mm. Seven heat-treated fatigue specimens (UN1, UN2, UN3, UN4, UN5, UN7, UN8) were subjected to cyclic loading at a stress ratio of R = 0.1, covering both Low-Cycle Fatigue (LCF) and High-Cycle Fatigue (HCF) regimes. Prior to testing, all fatigue specimens were carefully hand-polished along their curvature to minimize surface roughness effects on crack initiation.
2.4.3. Microstructural Analysis
Microstructural investigations were conducted using a Leica MS5 Optical Stereoscope to examine the effects of the thermal process on the material’s microstructure and to identify any inherent manufacturing defects. Both monotonic and fatigue specimens’ fracture surfaces were optically examined. For detailed micrographic analysis, samples were cut, polished, and then etched with a 5% vol. Nital solution. Micrographs were taken from the base material and the fracture regions to provide comprehensive insights into the material’s internal structure and failure mechanisms.
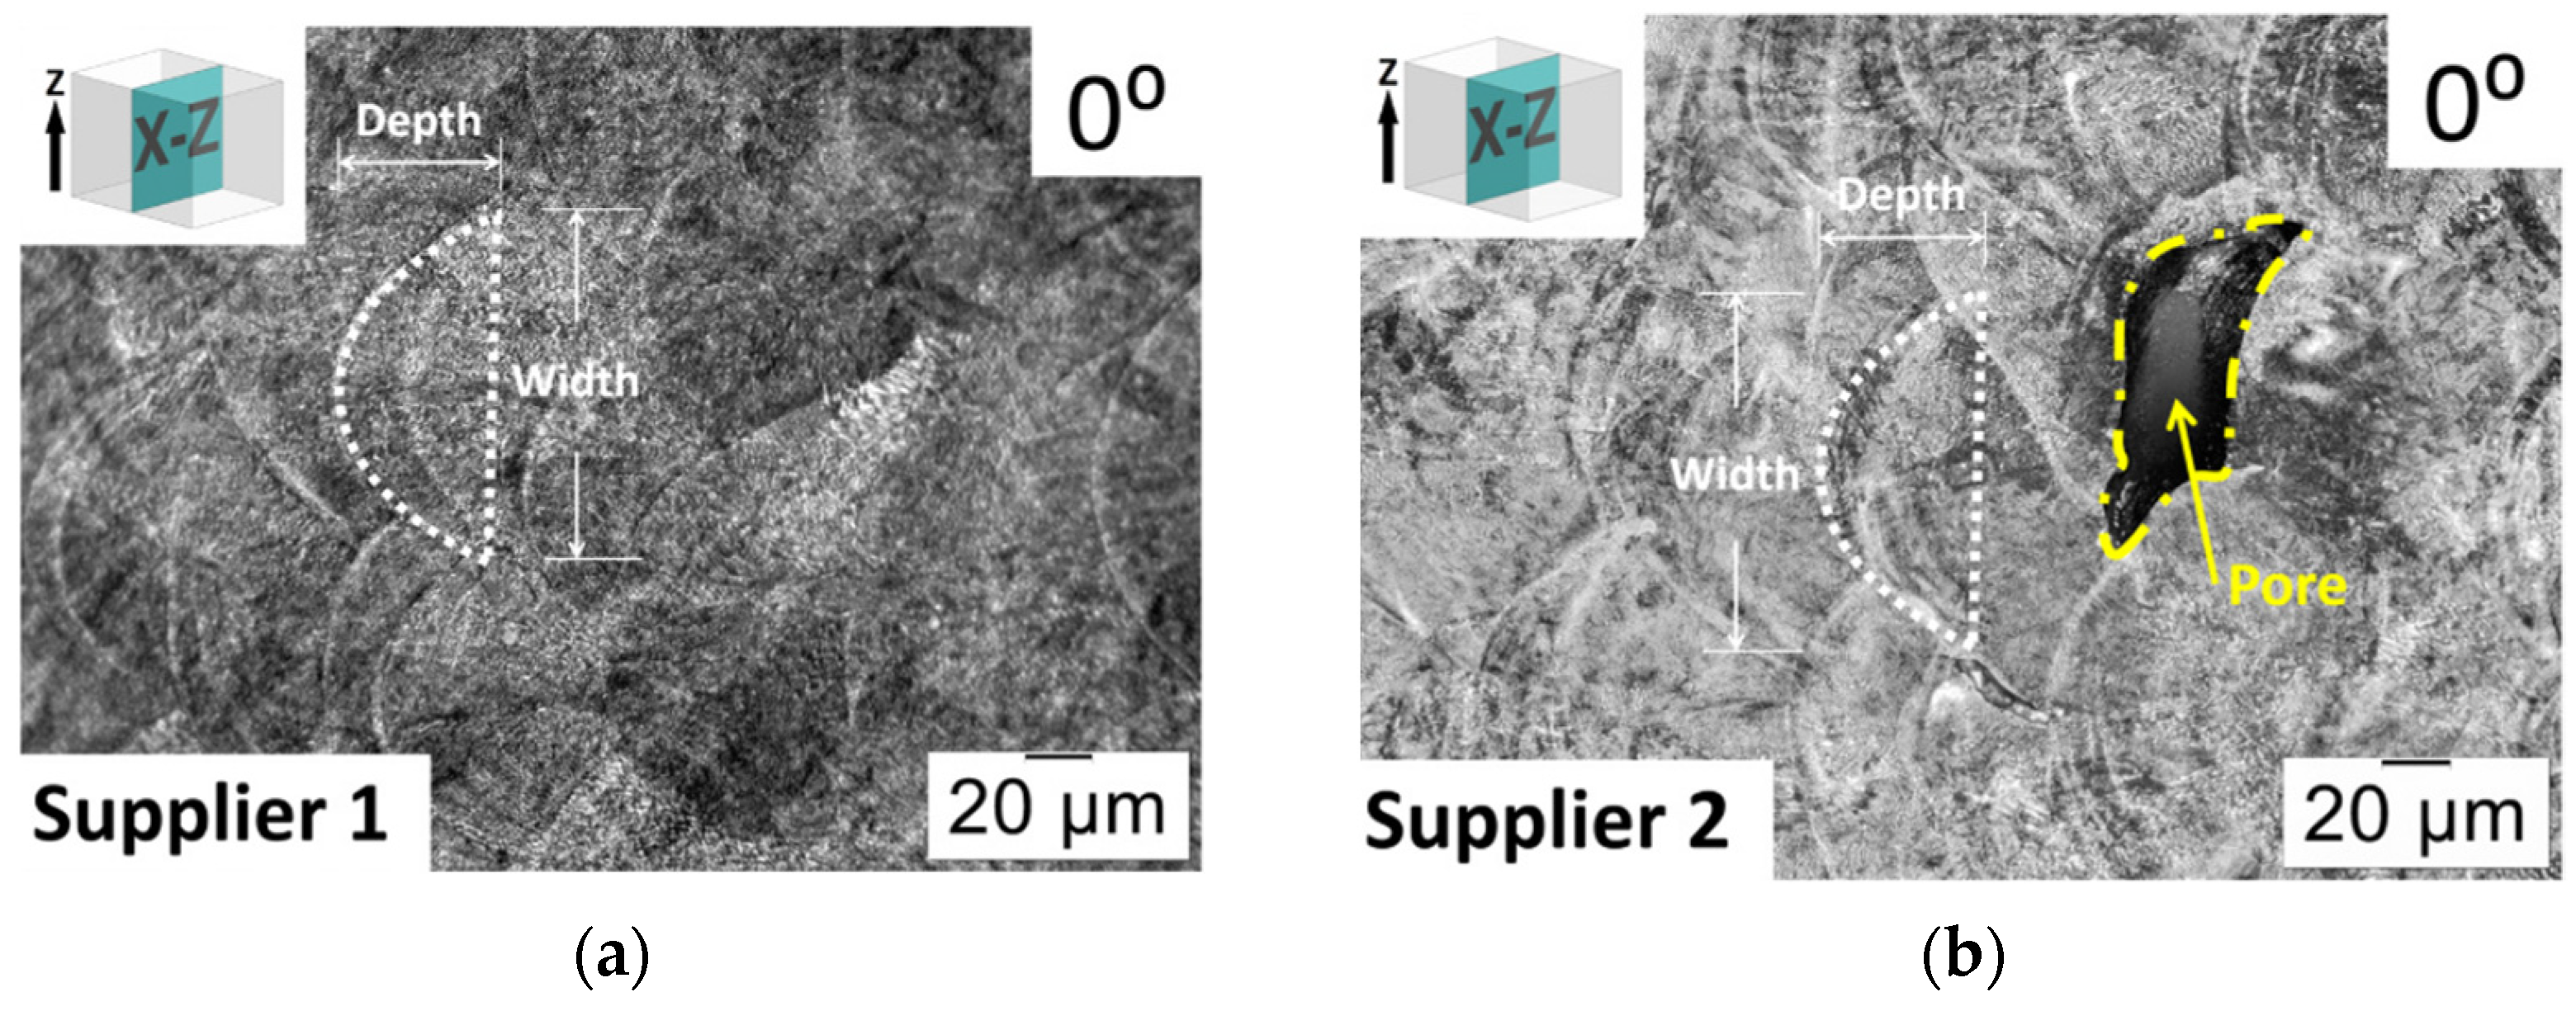
As-built micrographs [
1] (
Figure 2a,b) showed characteristic melt pools and some inherent porosity. Suppliers 1 and 2 denote different vendors, both using EOS EOSINT M280 systems for specimen fabrication.
3. Results
3.1. Microstructural and Fracture Observations
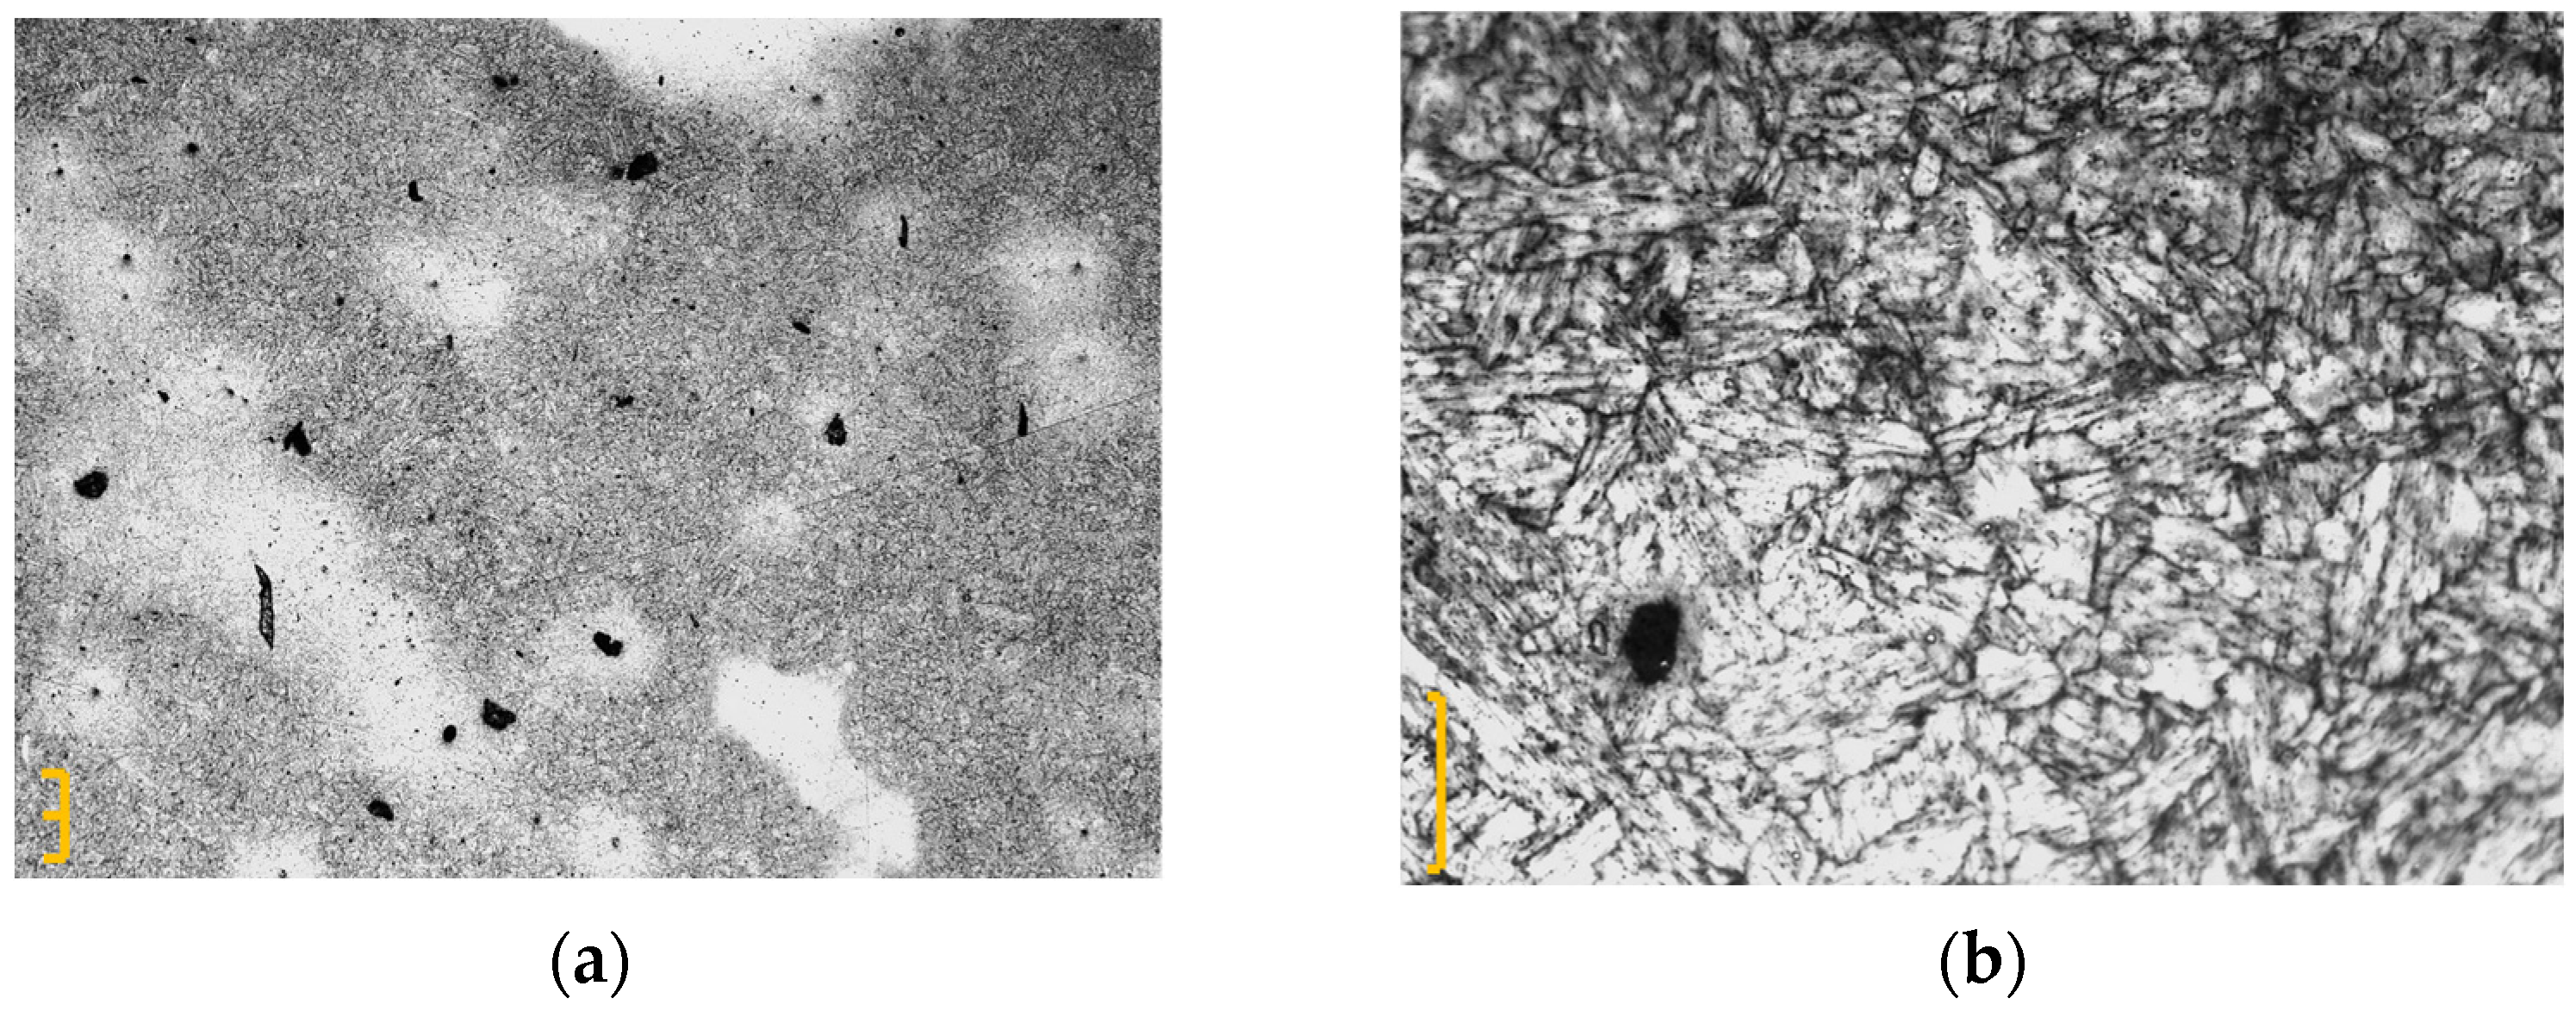
Optical microscopy revealed distinct microstructural features in heat-treated specimens. Following the thermal treatment, micrographs (
Figure 3a,b) indicated the presence of martensitic structures and an abundance of pores, confirming the effect of the heat treatment on the material’s microstructure. Microstructural characteristics of AM maraging steel, including melt pools, porosity, and the effects of heat treatment, are observed in [
1,
3,
4,
5]. Examination of the fracture surfaces of the fatigue specimens (
Figure 4) revealed that crack initiation often originated from internal defects such as pores, highlighting their critical role in influencing fatigue life [
1].
3.2. Monotonic Mechanical Properties
The results from all monotonic tensile tests are summarized in
Table 3.
The heat treatment significantly increased the tensile strength of the AM 18Ni300 steel by approx. 72%, from 1095 to 1880 MPa on average, demonstrating the effectiveness of the annealing and aging protocol in enhancing the material’s strength [
1,
2].
3.3. Fatigue Life Data and S-N Curves
The fatigue behavior at a stress ratio of
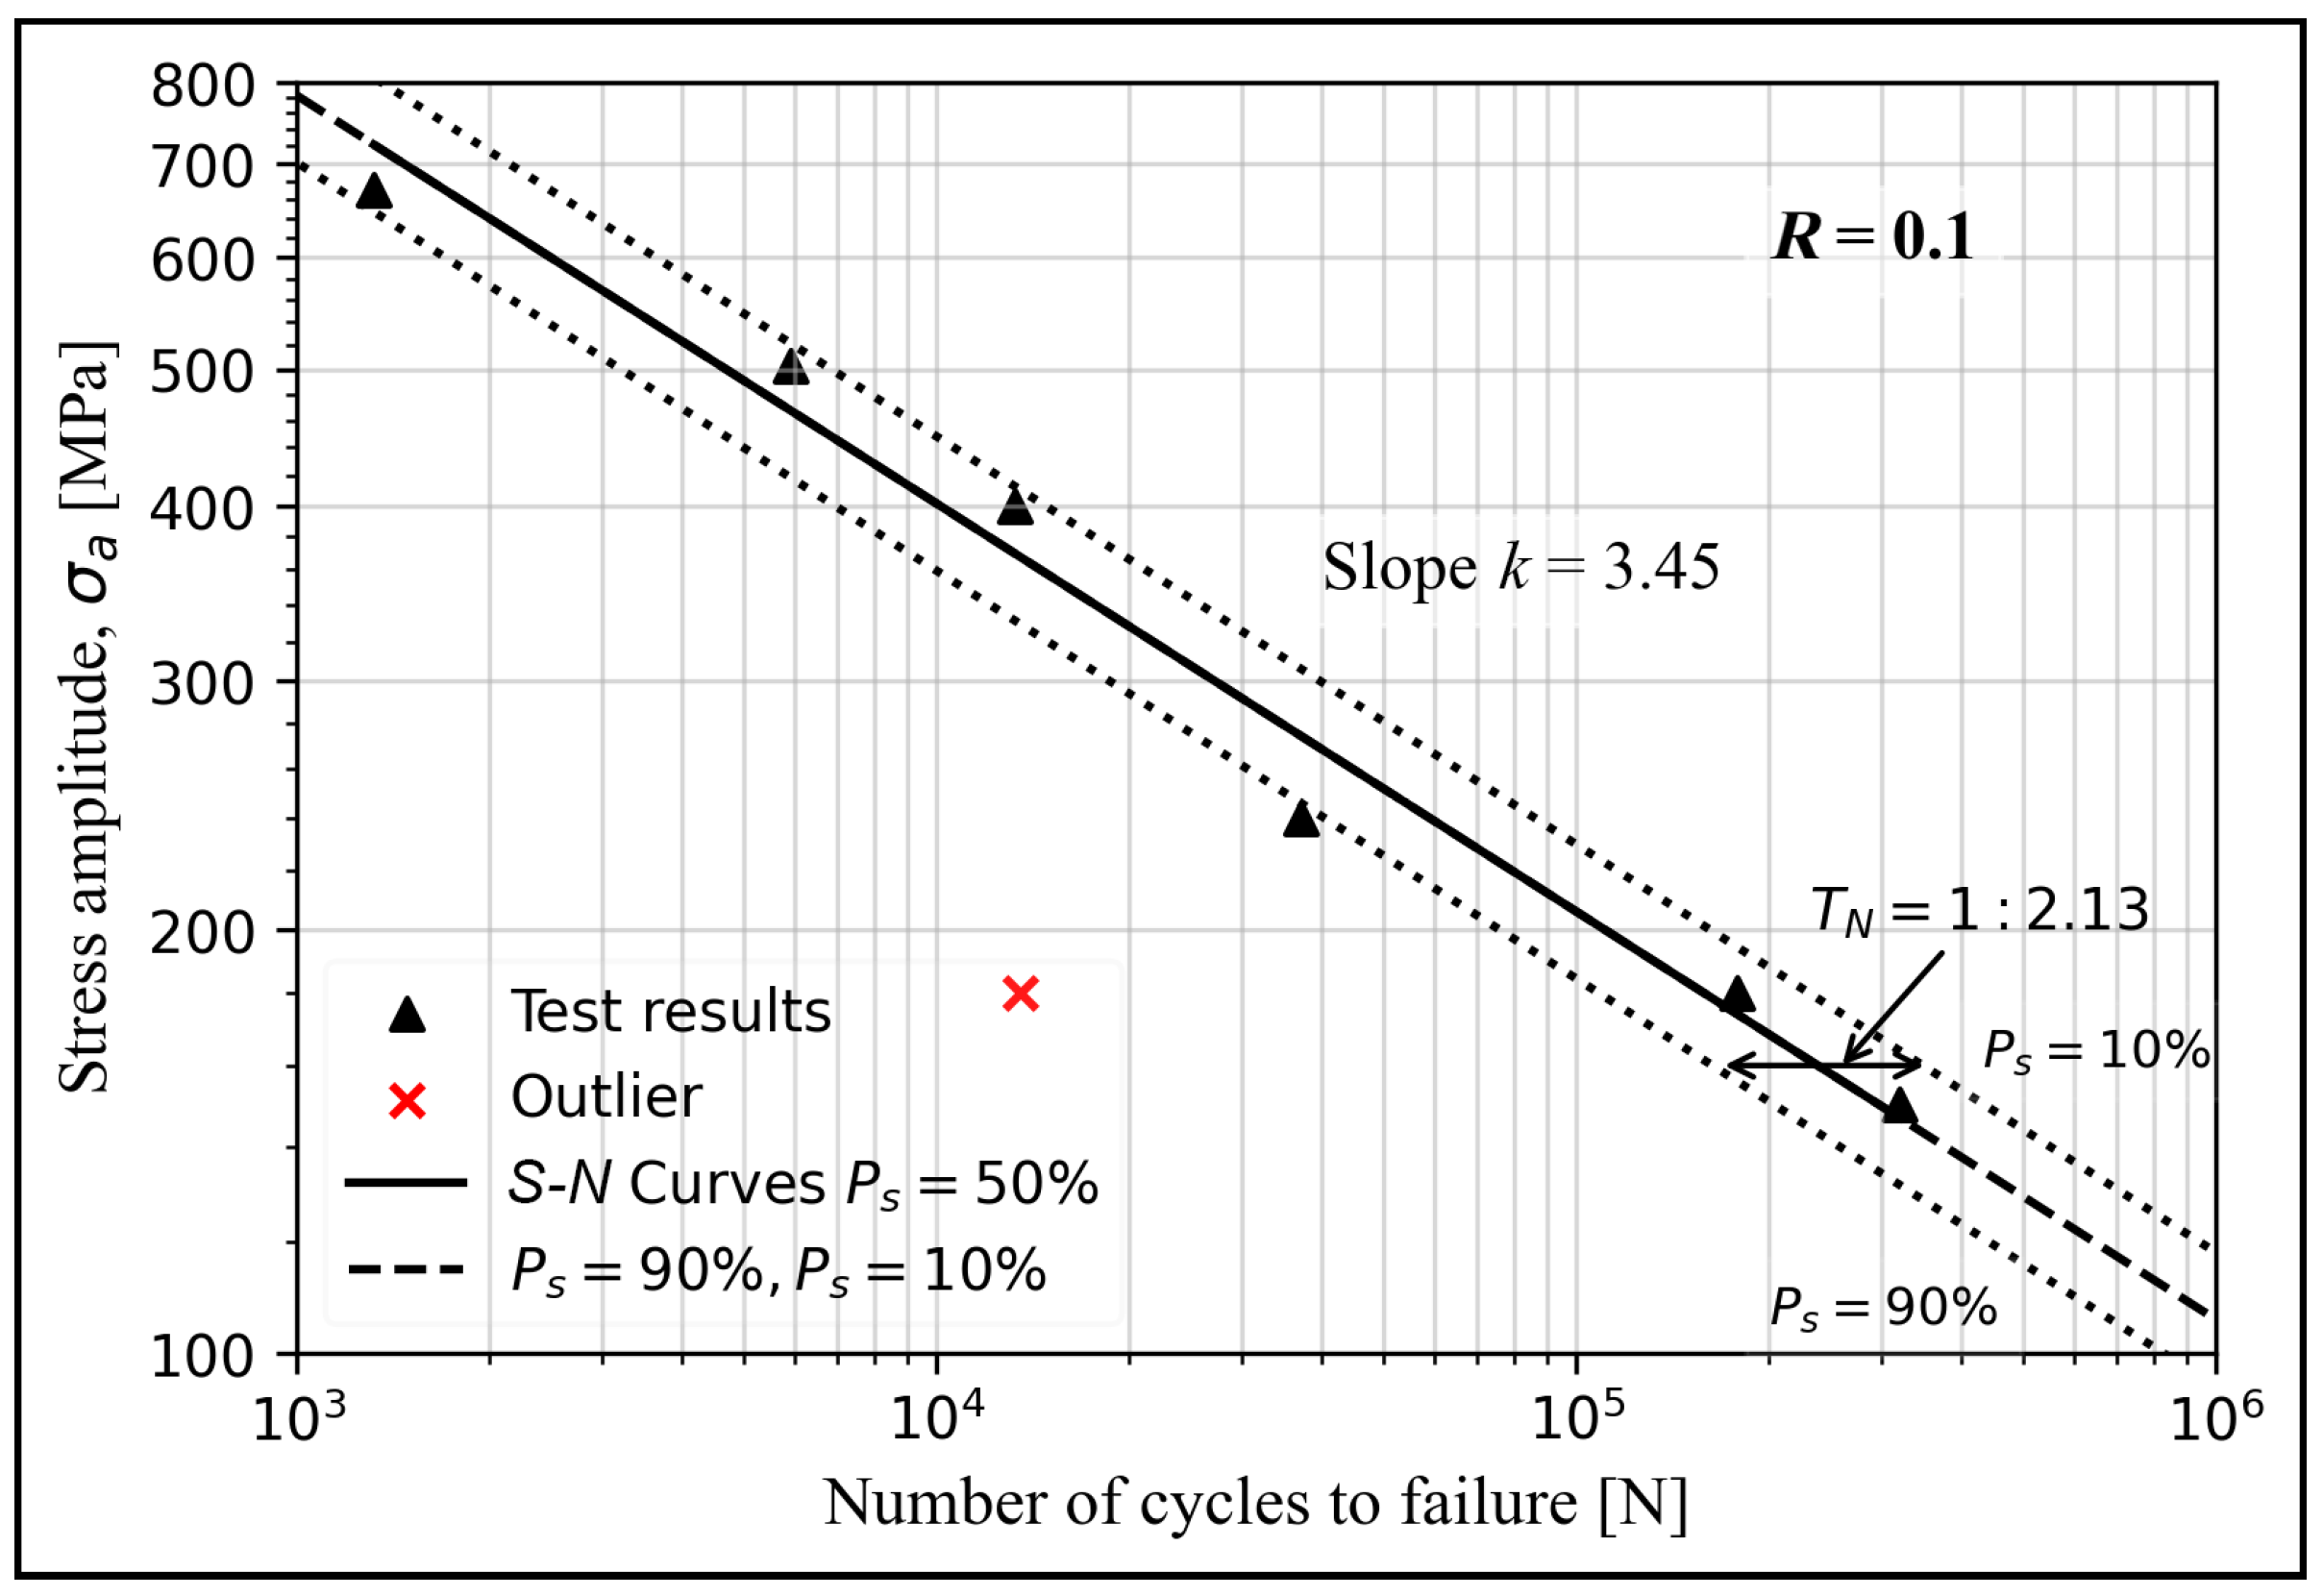
R = 0.1 was characterized. The experimental data set comprises seven test results covering the entire area of technological interest, from the Low-Cycle Fatigue (LCF) regime to the so-called “engineering” endurance limit. They are presented in
Table 4 and plotted in
Figure 5 as triangles.
Assuming a Gaussian distribution, linear regression of the test results yields the
S-N curve for 50% probability of survival (
PS = 50%, solid line in
Figure 5). It is described by means of Equation (1) in a log-log representation
with
σa being the stress amplitude,
N the number of cycles to failure, and
B and
k expressing the fatigue strength coefficient and exponent, respectively. The slope
k was determined to be 3.45. The curves for 10% and 90% probability of survival (
PS = 10% and
PS = 90%) are shown in
Figure 5 as dashed lines. The analysis yields a quite low scatter band
TN = 1:2.13. It should be noticed that the available number of test results is quite small; therefore, the values given in
Figure 5 and the above text should be treated with special care, since they represent the most significant input for engineering calculations and fatigue-based design. The experimental database should be extended with more test results to increase the statistical reliability of the
S-N curves for various
PS-values.
A notable outlier, specimen UN5 marked with a red “x” symbol, failed significantly earlier than predicted by the general trend. The fracture surface suggests that the specimen failed due to specimen misalignment during the experiment.
3.4. Comparison with Literature Data
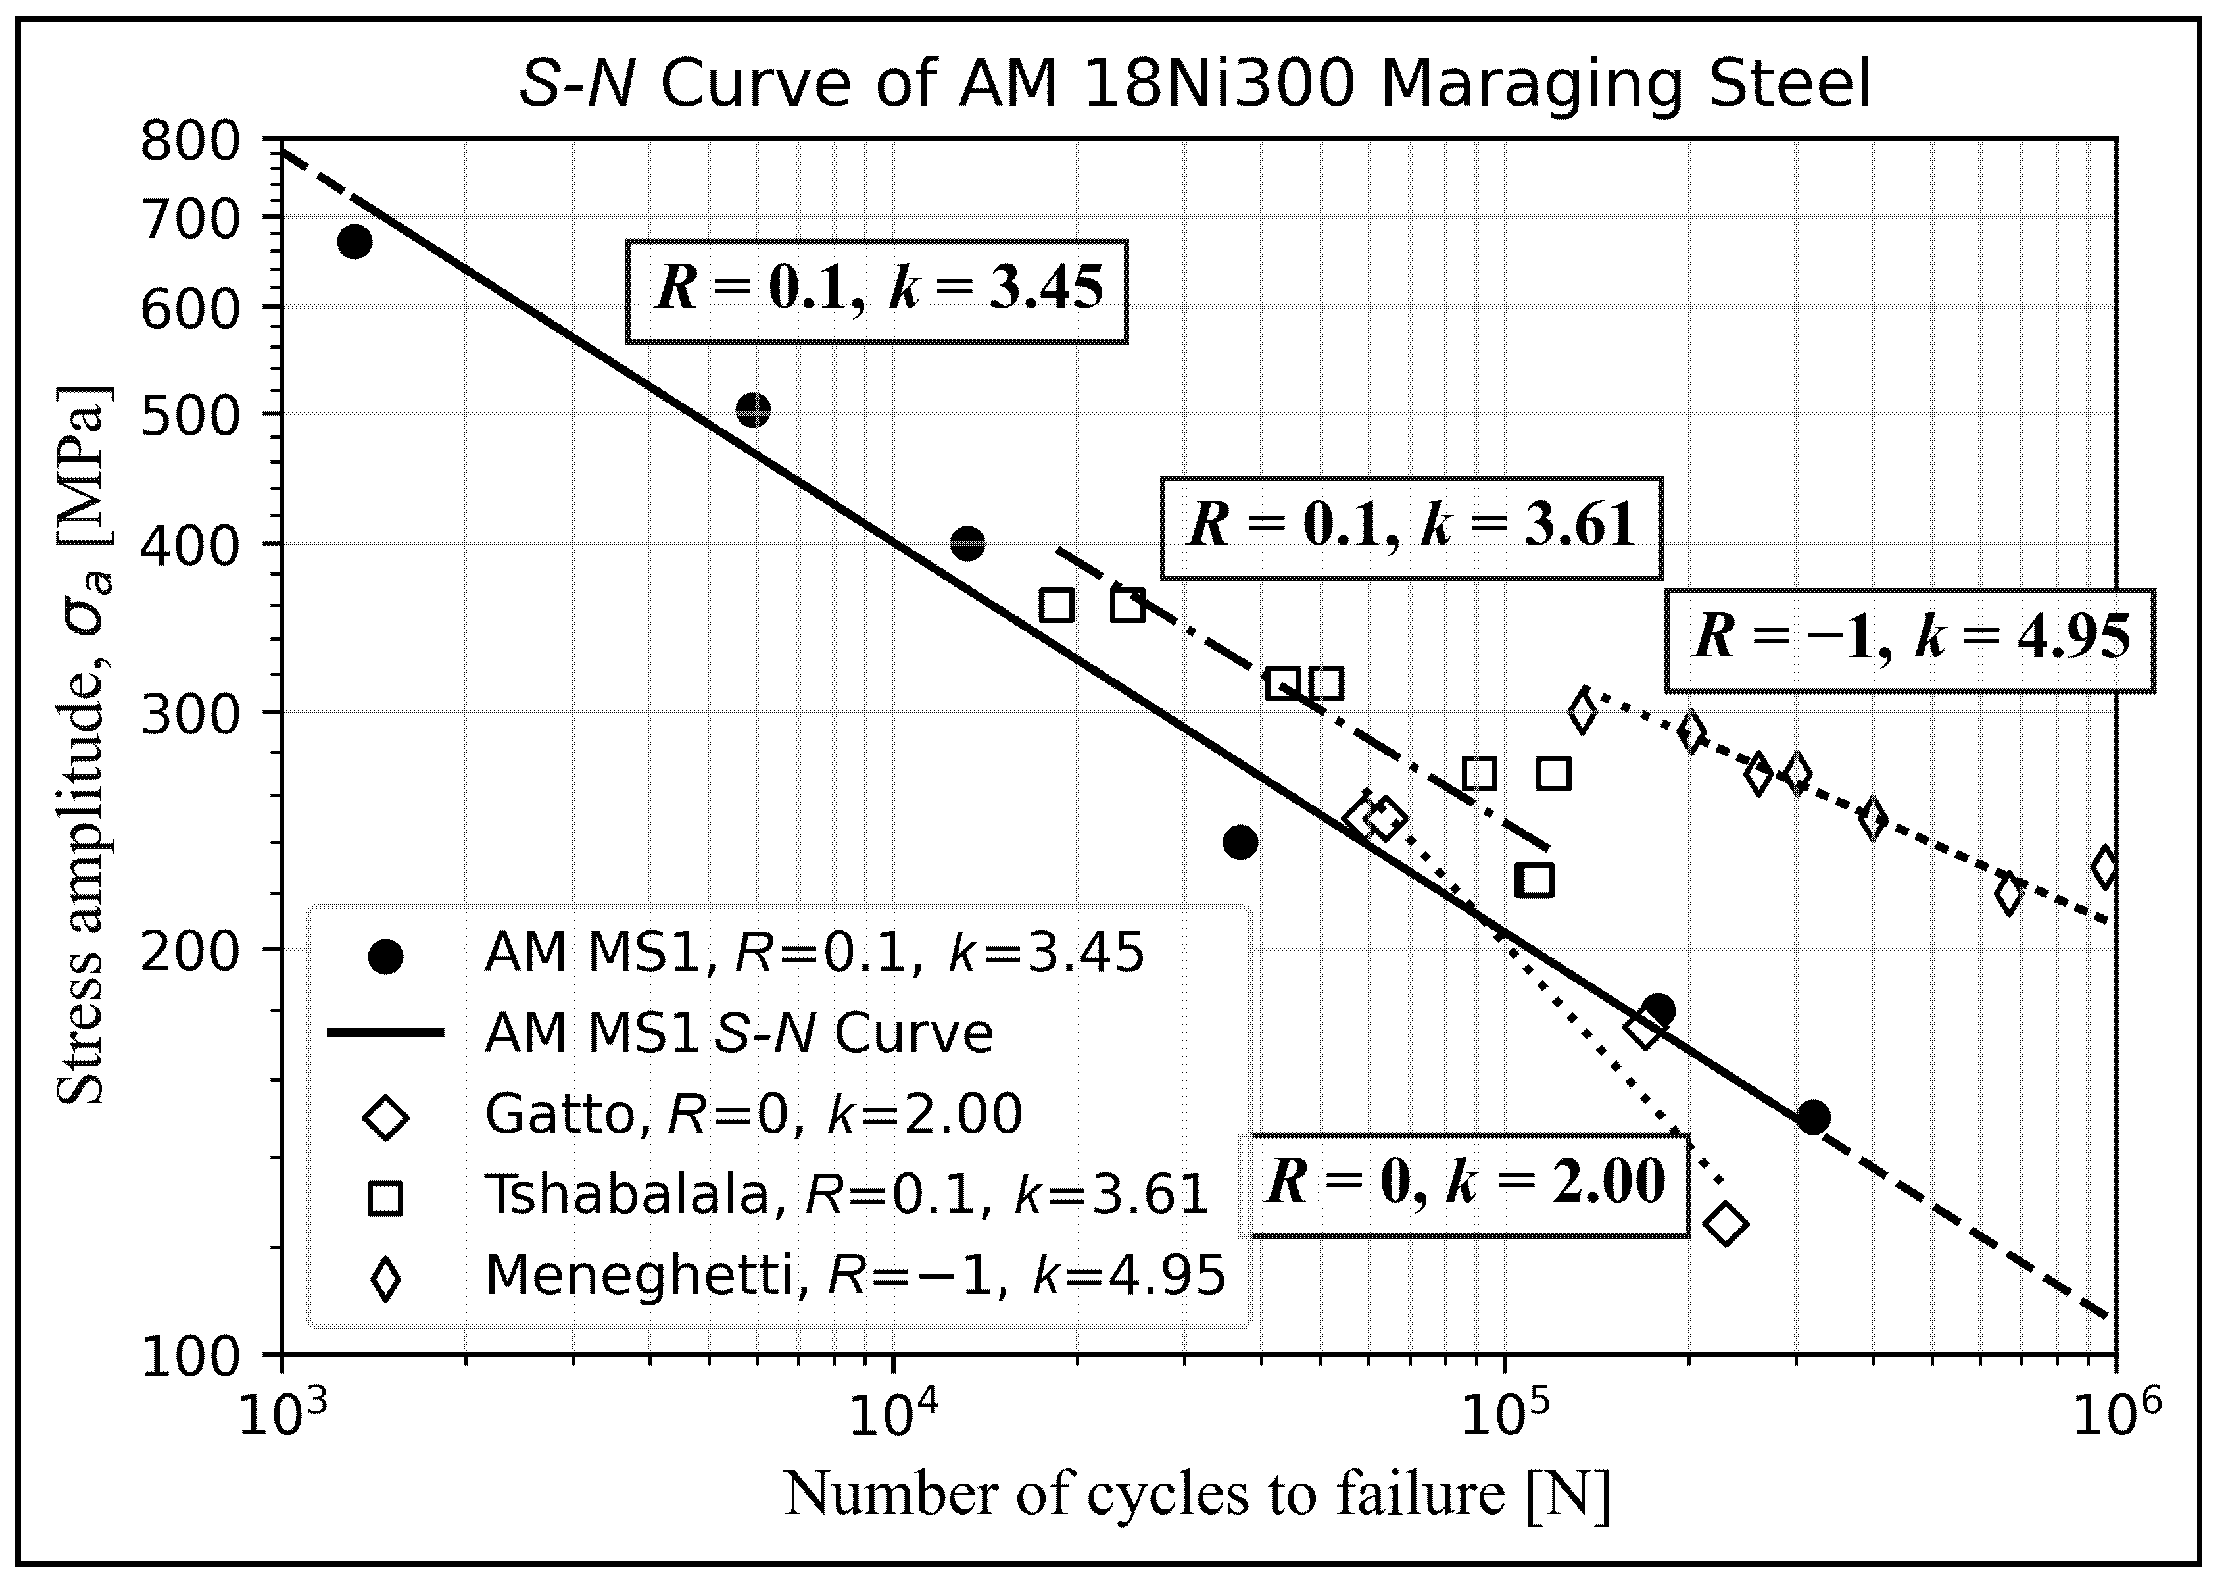
A comparison of the obtained fatigue lives and
S-N curve with existing literature data for 18Ni300 maraging steel is presented in
Figure 6.
As in the previous Figure, the obtained fatigue lives for the heat-treated material at
R = 0.1 are shown with full symbols and the corresponding
S-N curve (
k = 3.45) with a solid line. Gatto et al. [
3] reported very few (four) fatigue data for aged material with almost equal ultimate tensile strength
Rm = 1910 MPa at a similar ratio
R = 0. Due to the very low number of Gatto’s results, a statistical analysis has been excluded, since it would yield non-realistic material fatigue constants. Tshabalala et al. [
4] provided eight results for as-built material with
Rm = 1207 MPa at
R = 0.1. They are plotted with square symbols. The corresponding
S-N curve is plotted with a dashed-dotted line yielding a
k-value of 3.61. Meneghetti et al. [
5] presented a dataset for as-built horizontal specimens at
R = −1. The results are plotted with rhombs. The corresponding
S-N curve is plotted with a dashed line yielding a
k-value of 4.95. These comparisons underscore the significant influence of heat treatment parameters, build conditions, and stress ratio on the fatigue performance of AM 18Ni300 maraging steel, and highlight the need for standardized testing and reporting to facilitate direct comparisons.
4. Discussion and Interpretation of Results
The S-N curve for heat-treated AM 18Ni300 maraging steel at R = 0.1 provides key insights into its fatigue behavior. The data exhibits a fatigue strength exponent k = 3.45. The estimated engineering endurance limit is about 100 MPa.
The specific thermal process of annealing at 940 °C for 1 h and aging at 490 °C for 6 h was effective in increasing the tensile strength. The complex and sometimes detrimental effects of heat treatment on fatigue properties, particularly due to factors like notch sensitivity or coarsened precipitates, are discussed in [
1,
2].
For the most demanding, safety-critical applications, a multi-step approach combining the proposed process with additional treatments, like shot peening or even Hot Isostatic Pressing, could be warranted to achieve optimal performance, but this should be the subject of future research activities.
Comparing the results with other studies reported in the literature at no or similar heat treatment highlights the complexity and variability in the fatigue behavior of AM 18Ni300 maraging steel. Differences in fatigue life and
k-values from other research can be attributed to variations in post-build heat treatments, as well as differences in stress ratios (e.g.,
R = 0,
R = −1) and process-specific defects [
3,
9]. There is a strong need for comprehensive reporting of process parameters and defect characteristics to enable more accurate comparisons and for the development of standardized testing protocols for AM materials [
3,
9].
5. Conclusions
This study characterized the fatigue behavior of additively manufactured 18Ni300 maraging steel. The key conclusions drawn from this research are as follows.
The investigated thermal process, involving annealing at 940 °C for 1 h followed by air cooling and subsequent aging at 490 °C for 6 h, proved effective in significantly increasing the tensile strength of AM 18Ni300 steel to approximately 1880 MPa. While beneficial for static strength, further investigation is needed to fully understand its impact on fatigue strength. The main goal of this approach is to have a more versatile thermal process that can be easily integrated into manufacturing practices.
The fatigue behavior for a stress ratio of R = 0.1 has been characterized, yielding design S-N curves that span the Low-Cycle Fatigue (LCF) to the “engineering” endurance limit regime for survival probabilities 10%, 50% and 90%. The statistical analysis yields S-N curves’ slope k≈3.45 and life scatter band TN = 1:2.13, whereby these numbers should be treated with care due to the narrow number of results used to derive them.
The presence of inherent manufacturing defects, particularly porosity, was identified as a critical factor influencing the fatigue life of the material. Microstructural observations and fracture analysis consistently showed that these defects served as crack initiation sites. This reiterates a key finding also noted in [
1,
2,
3,
4,
5]. The characteristics of these defects are highly dependent on the specific additive manufacturing process, machine, and print job parameters. Further detailed work should focus on quantitative defect characterization to reveal correlations between defect metrics (size, distribution, density) and fatigue performance of AM 18Ni300 maraging steel.
Author Contributions
Conceptualization, A.T. and G.S.; methodology, A.T. and G.S.; software, A.T. and G.S.; validation, G.S.; formal analysis, G.S. and A.T.; investigation, A.T., I.F. and P.A.; resources, G.S.; data curation, A.T.; writing—original draft preparation, A.T.; writing—review and editing, G.S.; visualization, A.T.; supervision, G.S.; project administration, A.T.; funding acquisition, G.S. All authors have read and agreed to the published version of the manuscript.
Funding
This research received no external funding.
Institutional Review Board Statement
Not applicable.
Informed Consent Statement
Not applicable.
Data Availability Statement
Dataset available on request from the authors.
Acknowledgments
The Center for Interdisciplinary Research and Innovation (CIRI AUTH—ΚΕDΕΚ, DRAM Group) is gratefully acknowledged.
Conflicts of Interest
The authors declare no conflicts of interest.
References
- Mooney, B.; Kourousis, K.I.; Raghavendra, R.; Agius, D. Process Phenomena Influencing the Tensile and Anisotropic Characteristics of Additively Manufactured Maraging Steel. Mater. Sci. Eng. A 2019, 745, 115–125. [Google Scholar] [CrossRef]
- Croccolo, D.; De Agostinis, M.; Fini, S.; Olmi, G.; Robusto, F.; Ćirić Kostić, S.; Vranić, A.; Bogojević, N. Fatigue Response of As-Built DMLS Maraging Steel and Effects of Aging, Machining, and Peening Treatments. Metals 2018, 8, 505. [Google Scholar] [CrossRef]
- Gatto, A.; Bassoli, E.; Denti, L. Repercussions of Powder Contamination on the Fatigue Life of Additive Manufactured Maraging Steel. Addit. Manuf. 2018, 24, 13–19. [Google Scholar] [CrossRef]
- Tshabalala, L.; Sono, O.; Makoana, W.; Masindi, J.; Maluleke, O.; Johnston, C.; Masete, S. Axial Fatigue Behaviour of Additively Manufactured Tool Steels. Mater. Today Proc. 2021, 38, 789–792. [Google Scholar] [CrossRef]
- Meneghetti, G.; Rigon, D.; Gennari, C. An Analysis of Defects Influence on Axial Fatigue Strength of Maraging Steel Specimens Produced by Additive Manufacturing. Int. J. Fatigue 2019, 118, 54–64. [Google Scholar] [CrossRef]
- EOS GmbH. EOS Maraging Steel MS1. 2025. Available online: https://www.eos.info/var/assets/05-datasheet-images/Assets_MDS_Metal/EOS_MargingSteel_MS1/Material_DataSheet_EOS_MaragingSteel_MS1_en.pdf?v=6 (accessed on 1 May 2025).
- SANDVIK. Datasheet Maraging Steel, OSPREY 18Ni300. 2024. Available online: https://www.metalpowder.sandvik/siteassets/metal-powder/datasheets/osprey-18ni300-am-maraging-steel.pdf (accessed on 1 May 2025).
- EOS GmbH. EOS Maraging Steel MS1; Material Data Sheet; EOS GmbH Electro Optical Systems: Krailling, Germany, 2011; (offline product brochure). [Google Scholar]
- Frey, M.; Shellabear, M.; Thorsson, L. Mechanical Testing of DMLS Parts; Whitepaper; EOS GmbH Optical Systems: Krailing, Germany, 2009. [Google Scholar]
- ISO 6892-1:2009; Metallic Materials—Tensile Testing—Part 1: Method of Test at Room Temperature. ISO: Geneva, Switzerland, 2009.
- ASTM E466-21; Standard Practice for Conducting Force Controlled Constant Amplitude Axial Fatigue Tests of Metallic Materials. ASTM International: West Conshohocken, PA, USA, 2021.
| Disclaimer/Publisher’s Note: The statements, opinions and data contained in all publications are solely those of the individual author(s) and contributor(s) and not of MDPI and/or the editor(s). MDPI and/or the editor(s) disclaim responsibility for any injury to people or property resulting from any ideas, methods, instructions or products referred to in the content. |


