1. Introduction
To develop new, increasingly efficient, and lightweight materials, while also reducing emissions and environmental impacts [
1], industries and researchers are increasingly investing in high-performance composite materials [
2]. One example is carbon fiber-reinforced polymer (CFRP). This structure offers characteristics such as low density, high strength, stress resistance, fatigue resistance, corrosion resistance, low thermal expansion, and high flexibility [
1,
2,
3]. These properties make CFRP an ideal material for a variety of applications that require strength and lightness, and it is gradually replacing metallic materials in industries such as aeronautics, naval engineering, automotive, construction, biomedical, and energy [
1].
While composite materials have excellent mechanical characteristics and can be molded to their final design, they also present several challenges in their use, as they can suffer structural damage during the assembly and joining processes. Machining processes such as drilling, milling, turning, and grinding are still essential to ensure quality and precision [
1,
2,
3]. Therefore, the main damage to the material is delamination, fiber fragmentation, fiber pullout, and fiber–matrix debonding. All these defects are caused by the machining process [
3], which reduces quality and generates material erosion. Carbon fiber is quite resistant, and a commercial example is PAN (polyacrylonitrile fibers), with tensile moduli between 230 and 588 GPa [
4]. Abrasiveness, tension, and low thermal conductivity increase friction with the tool and its wear [
3]. Furthermore, according to [
1], the temperature at the tool contact point accelerates the protection of the material’s surface. Delamination and other types of failures, in addition to tool wear, lead to failures, reworks, premature wear, and unnecessary tool and part replacements, all of which lead to reduced efficiency and increased production costs for composite materials. Therefore, it is crucial to ensure both the integrity of the CFRP structures and the condition of the tools used in this process to ensure the quality of the final product, avoiding reduced strength or part failure.
The major problem is that this type of damage occurs internally and, because it is not evident or visible to the naked eye, must be regularly inspected using non-destructive testing to ensure the integrity of the equipment [
5]. Among the tests, thermography can be used either directly or through microwave-induced propagation techniques, ultrasound [
5], or acoustic emission (AE) [
6]. Deep-learning approaches have also been explored for internal damage detection in CFRP; for example, Monson et al. [
7] employed Wigner–Ville Distribution (WVD) representations combined with Convolutional Neural Networks to accurately distinguish delamination and microcracks in CFRP.
Since machining is a stage of the manufacturing process where a part can develop flaws, a tool that is not in good condition, worn, or damaged can produce defects in the composite material, compromising its integrity. On the other hand, the machining process itself, even with the tool in good condition, over time, due to the process dynamics, execution configuration, friction, and abrasiveness of the composite, causes the tool to wear out over time, and the cycle repeats itself. Therefore, it is beneficial to perform a non-destructive test during milling. This allows us to indirectly monitor the condition of the tool and the integrity of the part being monitored [
8].
Tool condition monitoring (TCM) is essential for achieving higher-quality, more efficient, economical, and safer machining [
8,
9]. This monitoring can occur occasionally through routine inspections or through the integration of a system into the equipment. According to [
8], online TCM responds quickly to failures predictively, with real-time feedback allowing for adjustments to cutting parameters during the process.
In the case of acoustic emission (AE), transient elastic waves travel through the material, being affected by microstructural changes, such as fractures. These changes are detected by piezoelectric transducers, which convert vibrations into electrical signals, enabling early detection of material failures [
6,
7,
8]. After the signal is detected by the AE sensor, the data is consolidated in the computer through an acquisition system. The next step is signal processing to extract relevant information about the state of the monitored structure. This processing is performed using mathematical and statistical tools, or even by applying artificial intelligence, machine learning, and deep learning techniques [
10]. Refs. [
11,
12] evaluated CIRP publications on sensor-based machining monitoring and proposed a workflow that begins with sensor signal detection, followed by data processing, extraction of relevant features from the signals, and decision-making based on the information obtained. Finally, it culminates in the execution of corrective actions or process adjustments. Refs. [
5,
6] proposed AE signal processing with continuous emission in organic composite matrices in a noisy environment with a high hit rate, that is, filtering the signal before extracting the features, where the hit rate is the number of times the signal exceeds the threshold. Ref. [
5] systematically analyzed the CFRP drilling process, characterizing the damage—including exit delamination by push-out, entry delamination by peel-up, burr, and fiber removal—through damage suppression techniques based on damage control strategies, contributing to an optimization based on the process, drilling conditions, tool design optimization, and the integrated application of multiple techniques.
Given these challenges, there is a growing need for practical and reliable signal-processing strategies capable of monitoring both tool wear progression and the onset of delamination during CFRP machining. In this context, the present work presents a feasibility study focused on the application of data-driven methods for delamination detection and tool wear monitoring in composite machining. A setup for a helical interpolation end milling drilling process was performed on CFRP composite plates under varying machining conditions, from mild to severe, with Acoustic Emission (AE) signals being acquired at each machining pass. The methodology involved selecting an optimal frequency band and analyzing Root Mean Square (RMS), AE Counts, and Root Mean Square Deviation (RMSD), followed by using correlation indices to characterize the tool wear progression. The proposed approach aims to offer a simple, computationally efficient, and data-driven alternative that can enhance decision-making in composite manufacturing environments, serving as a foundation for future advancements in intelligent monitoring systems.
2. Materials and Methods
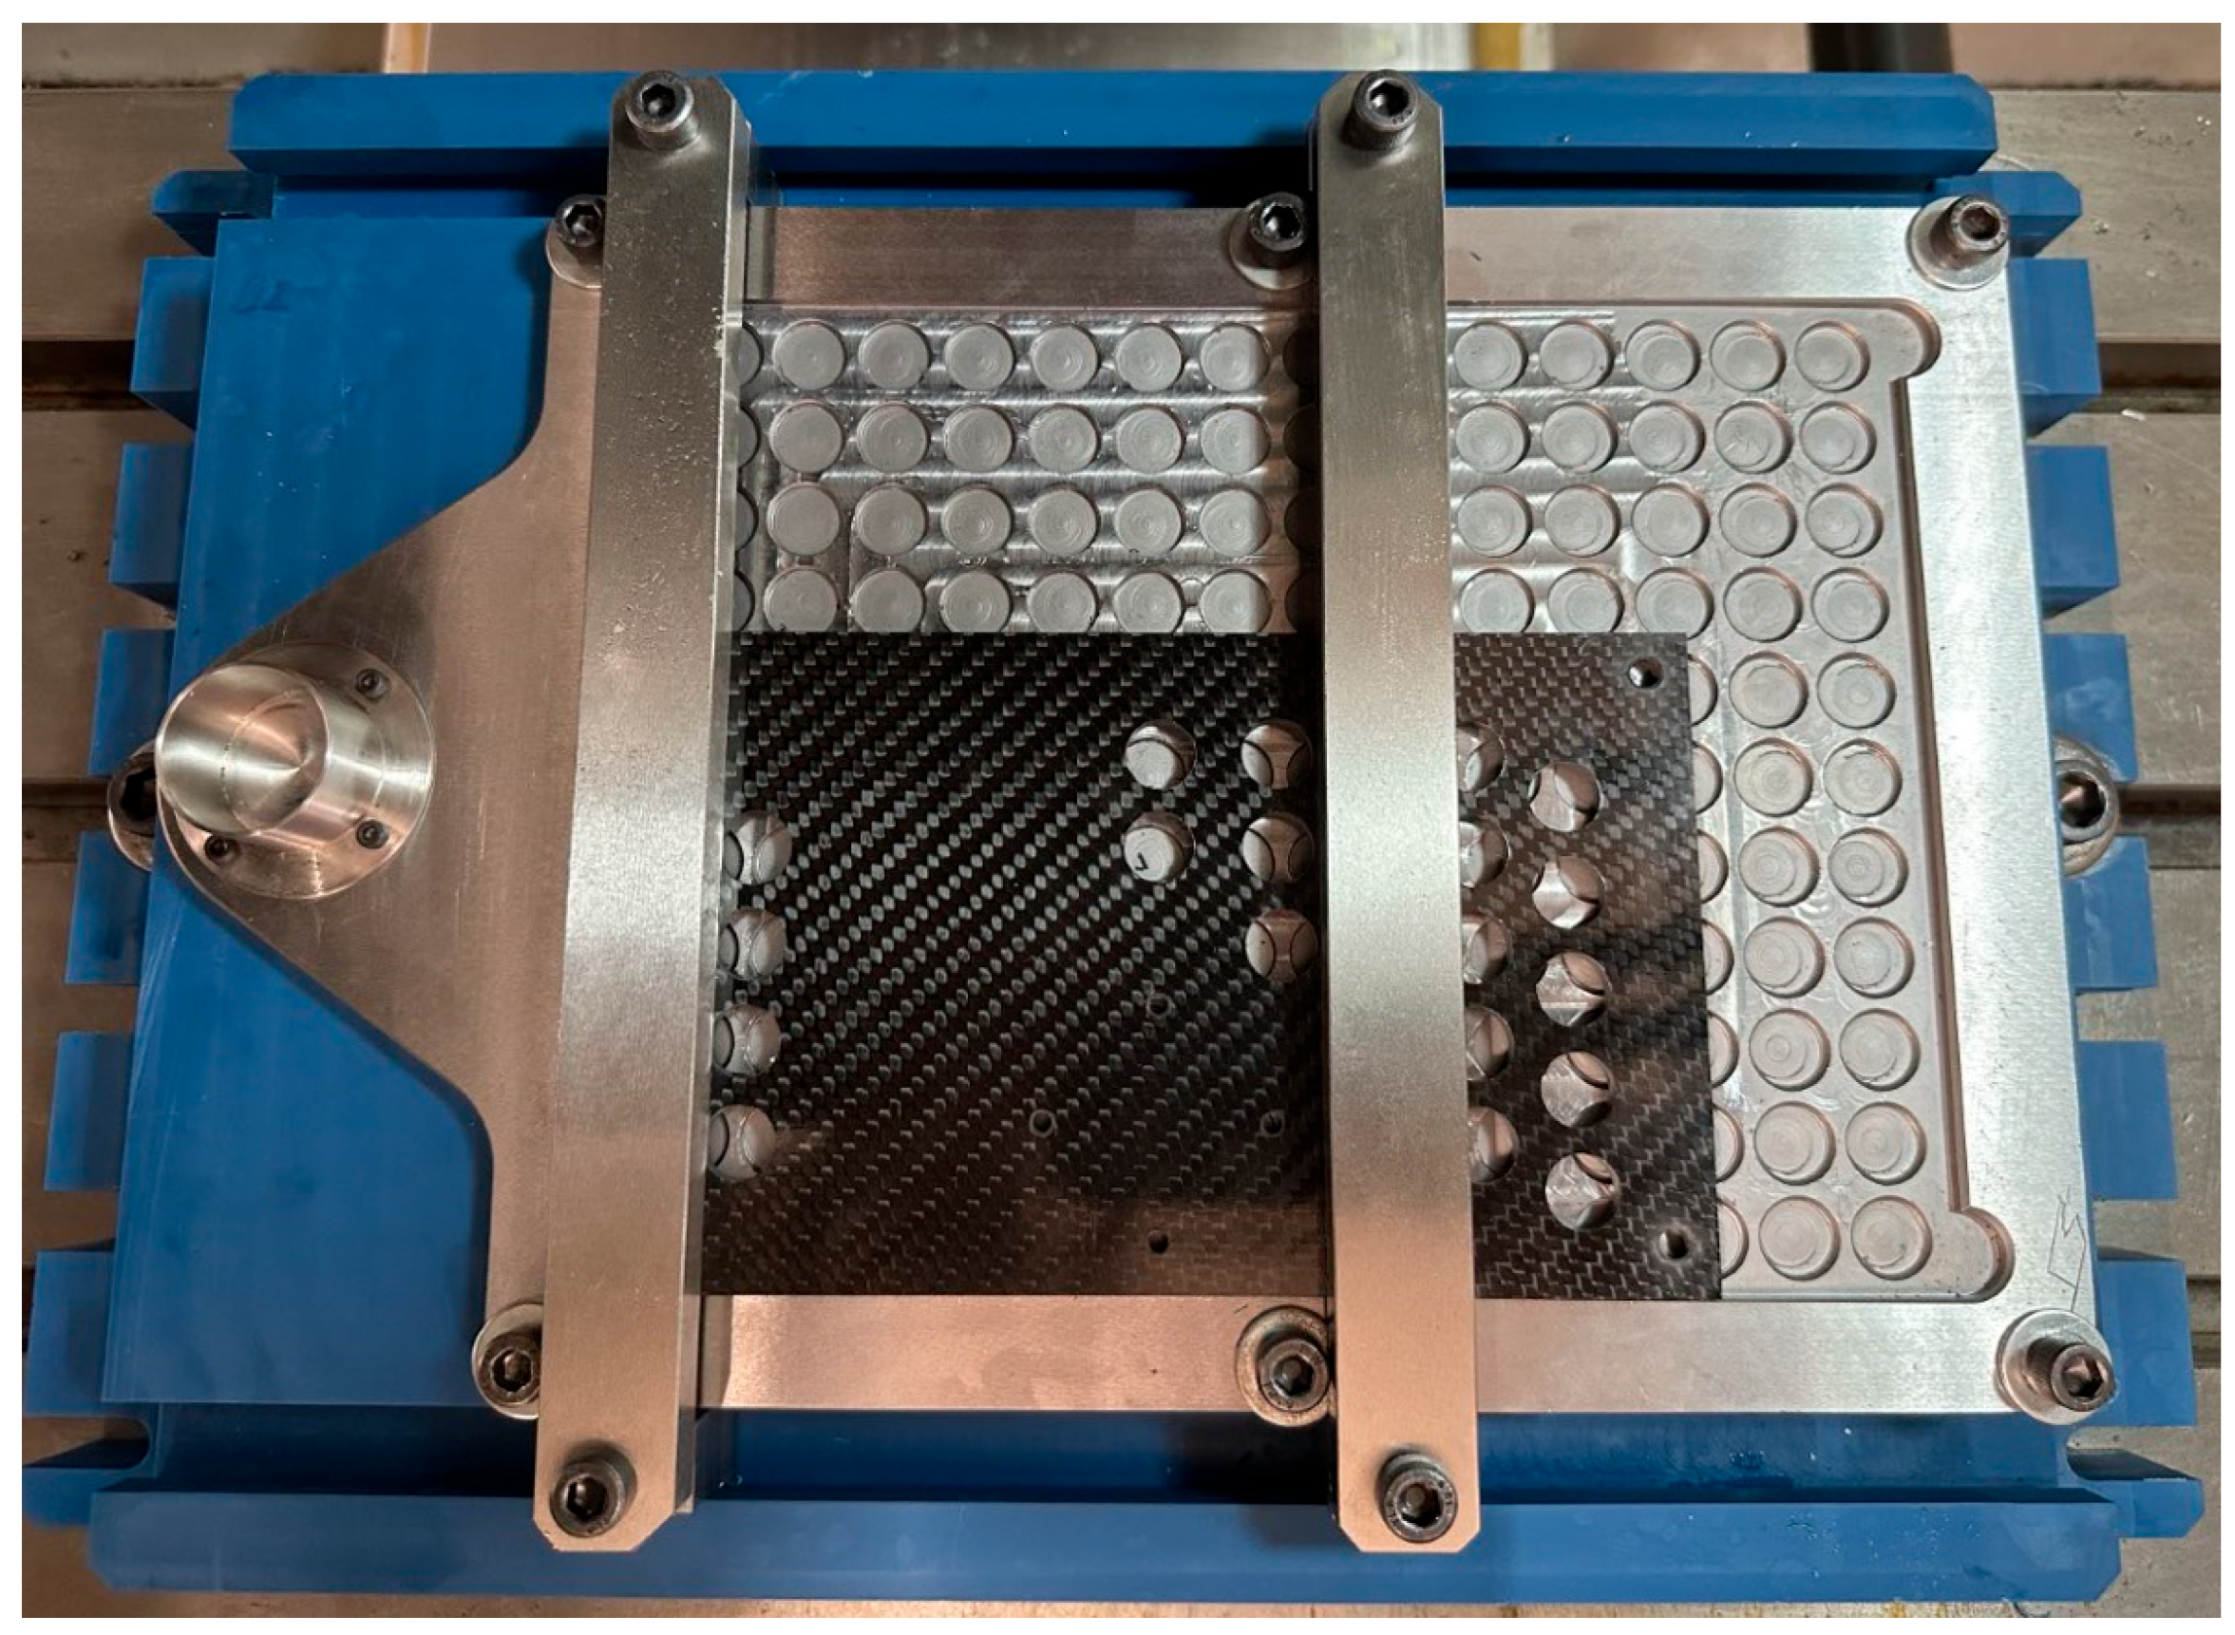
This work is based on a matrix of composite plate machining experiments whose data were collected by an AE sensor. For this study, a PU resin device was initially fabricated to allow the clamping and collection device to be attached to the machining center (the blue item seen in
Figure 1).
Next, to ensure the CFRP plate remained fixed during machining, a steel plate was developed to accommodate the material, lock it so it would not move during milling, and allow for the coupling of the AE measurement sensor, identified as the metal part in
Figure 1. A rectangular cavity was machined in the steel plate with several holes larger than the holes that would be drilled in the carbon plates. These holes served as relief for the tools to exit without coming into contact with the steel plate, which would hinder the machining test with the composites.
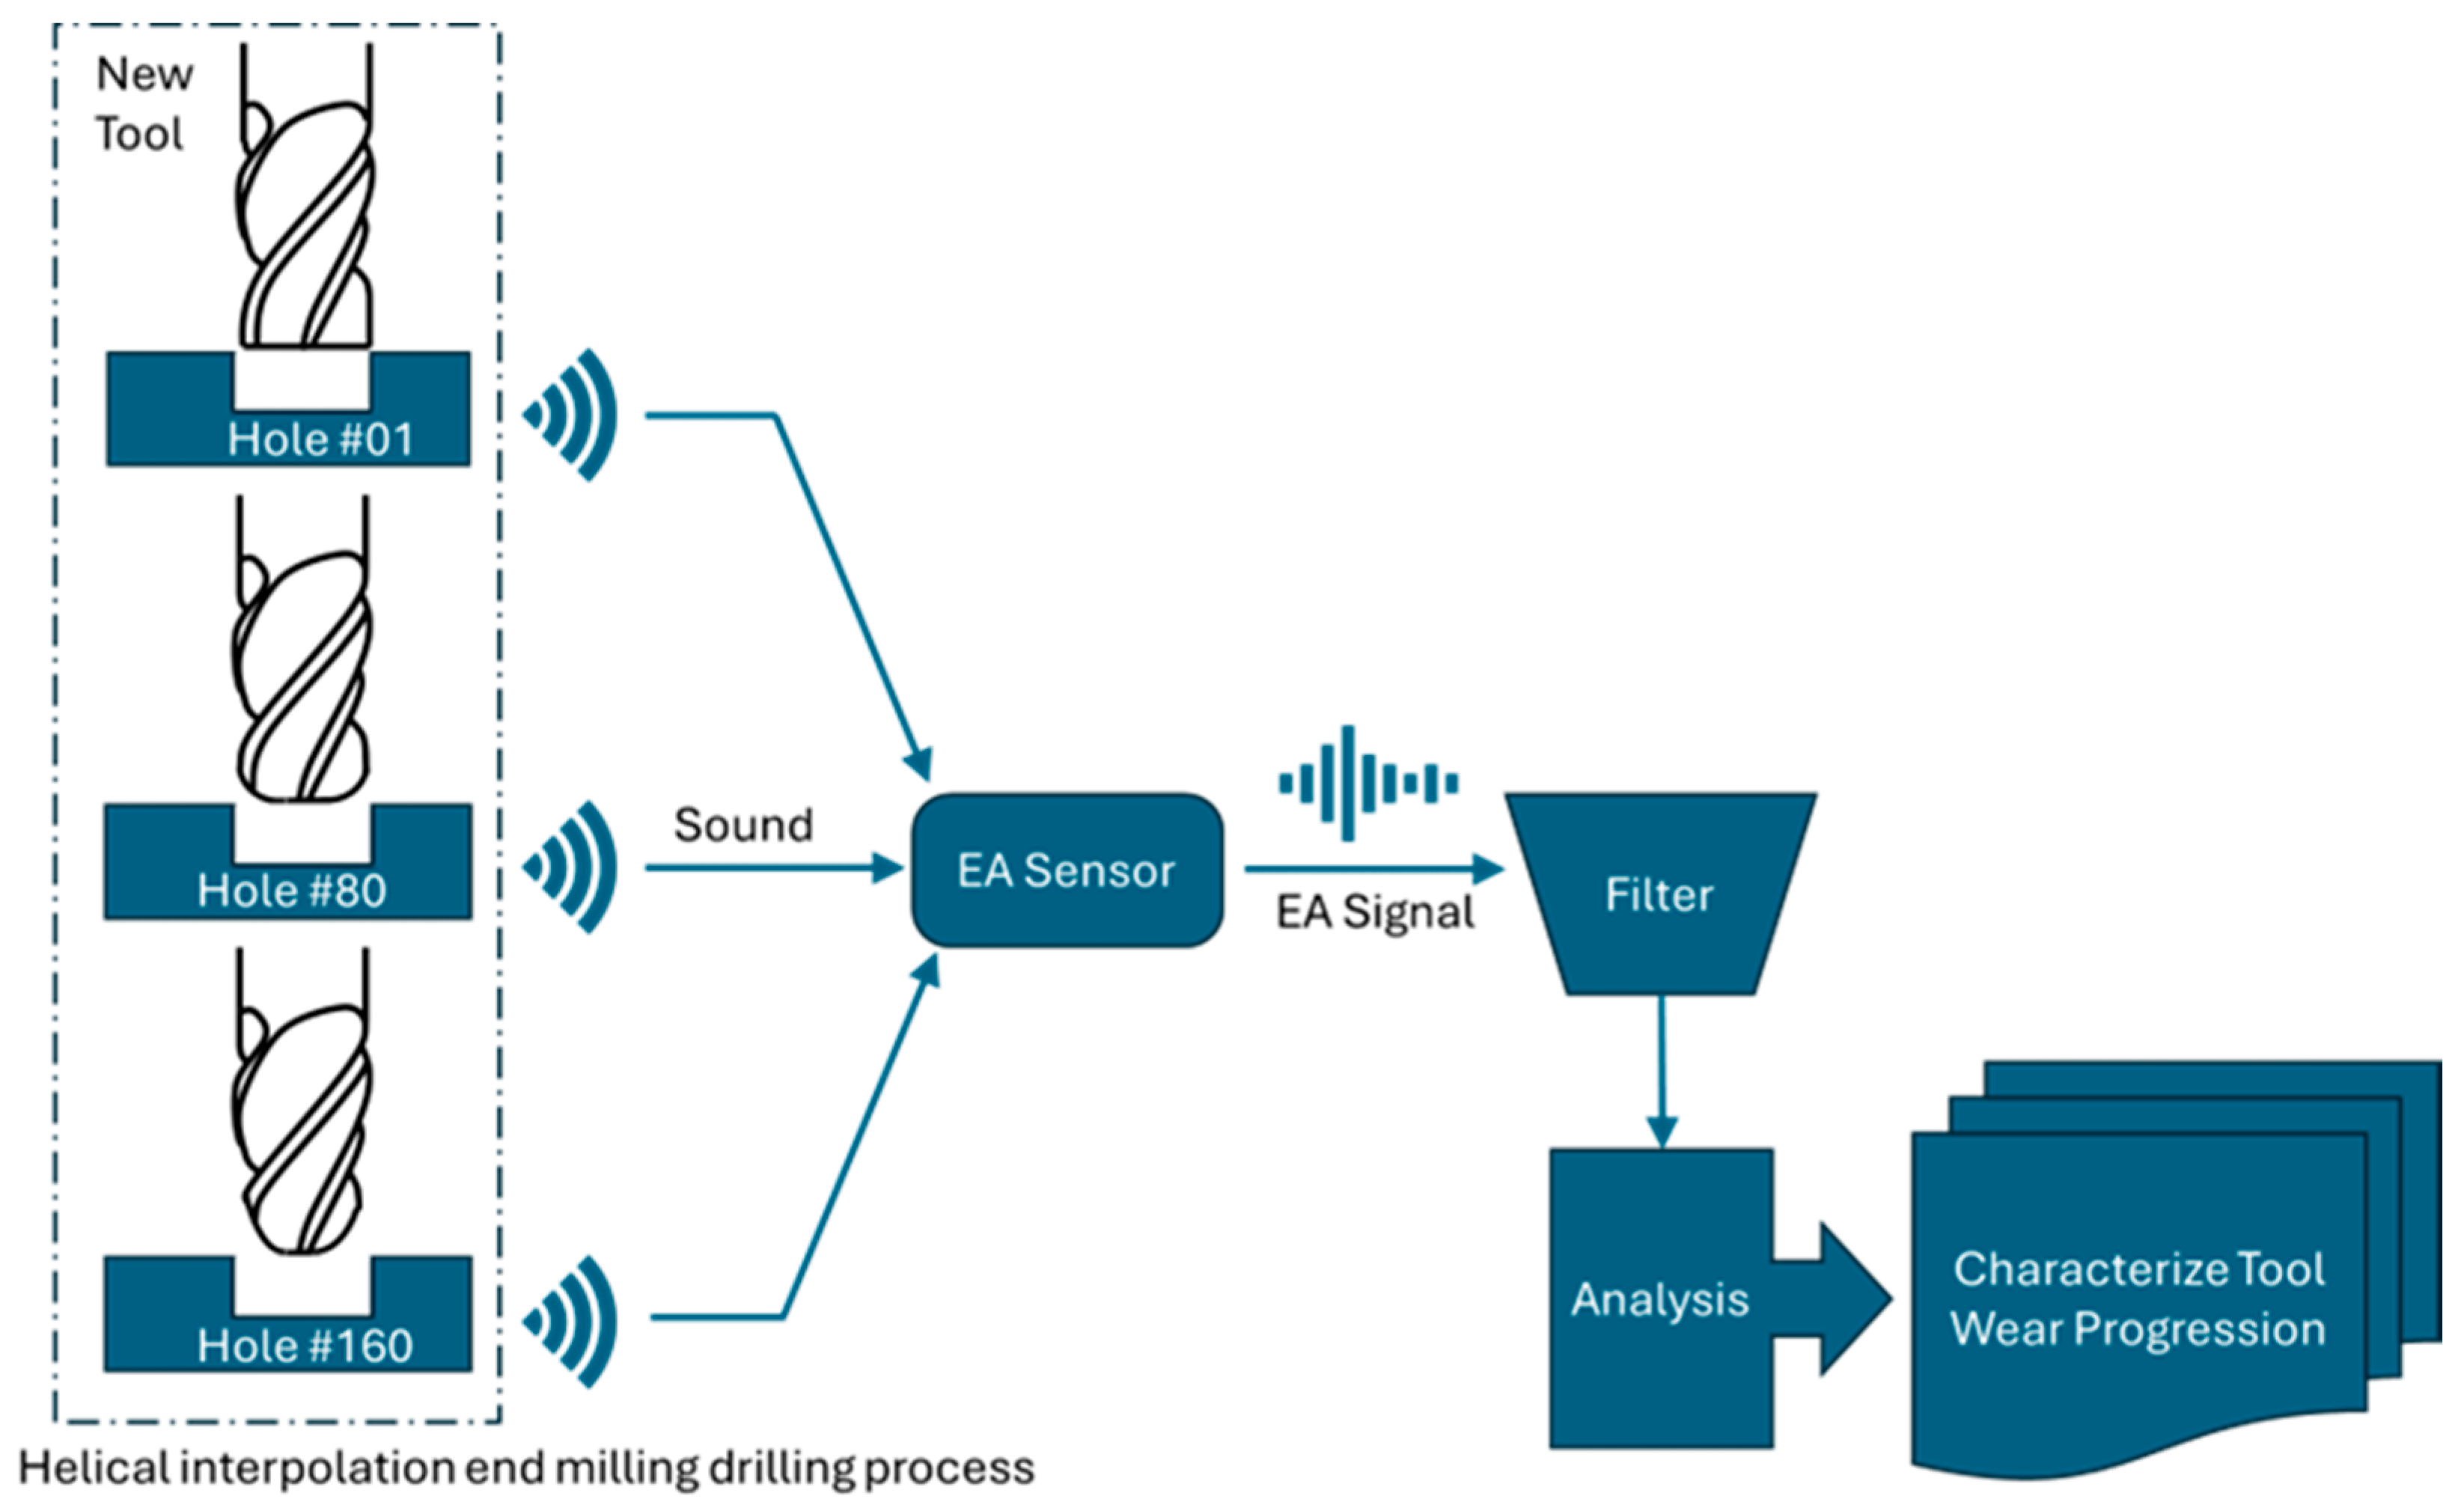
For this work, a setup for a helical interpolation end milling drilling process was performed using a carbide helical milling cutter with a diameter of 10 mm, a length of 100 mm, a helix angle of 35°, 4 flutes, coated with titanium carbide nitride, and a hardness of 50HRC on a CFRP composite plate. It was decided to measure the tools every 80 holes, with 77 wear holes on the designated plate, 3 holes for acoustic signal collection on a designated plate, and two plates per tool. This is the machining and measurement cycle adopted. Three initial holes were drilled with each tool to serve as a reference. After data collection using the acoustic sensor, holes were machined in five carbon plates was used to characterize tool wear progression, as shown in
Figure 2. The tools were analyzed using a Olympus OLS 4100 confocal laser microscope (Olympus, Tokyo, Japan).
The AE sensor used to measure the frequency emitted by the tools during machining was a patented piezoelectric broadband sensor. The signal was captured during machining on a dedicated plate. The data was collected and natively stored in binary format, which includes all relevant acquisition metadata: a sampling frequency of 1.11 MHz, gain of 45, ambient temperature between 25 and 30 °C, trigger value of 0.0993, and a total signal duration of 4.5 s. This binary data was converted into a MATLAB R2025a table for processing through the proposed methodology which applies digital Infinite Impulse Response (IIR) Butterworth filters, Fast Fourier Transform (FFT) with a Hanning window, statistical analysis based on Root Mean Square (RMS) computed in blocks of 2048 samples, EA counting, and Root Mean Square Deviation (RMSD), whose results are presented in the following chapter.
3. Results
The signal-processing workflow described in the previous section was applied to the AE data collected during the machining tests. The MATLAB routines were previously validated using a benchmark tool-wear dataset, ensuring that the methodology was reliable before being applied to the experimental signals of this study. Once the procedures were established, the collected AE signals were processed to extract the relevant characteristics associated with energy variation and the early stages of tool wear.
Figure 3 shows the raw AE signals collected over time (in seconds) for machining passes under three distinct tool-life conditions: (i) the initial stage, represented by the first three holes (1, 2, and 3, collected to assess repeatability and baseline consistency); (ii) after 80 holes; and (iii) after 160 holes, to illustrate the progressive influence of tool wear on AE activity. The waveforms show evolution and increased amplitude across the conditions, reflecting the material-tool interaction, with a clear drop-off marking the moment the tool exits the CFRP plate.
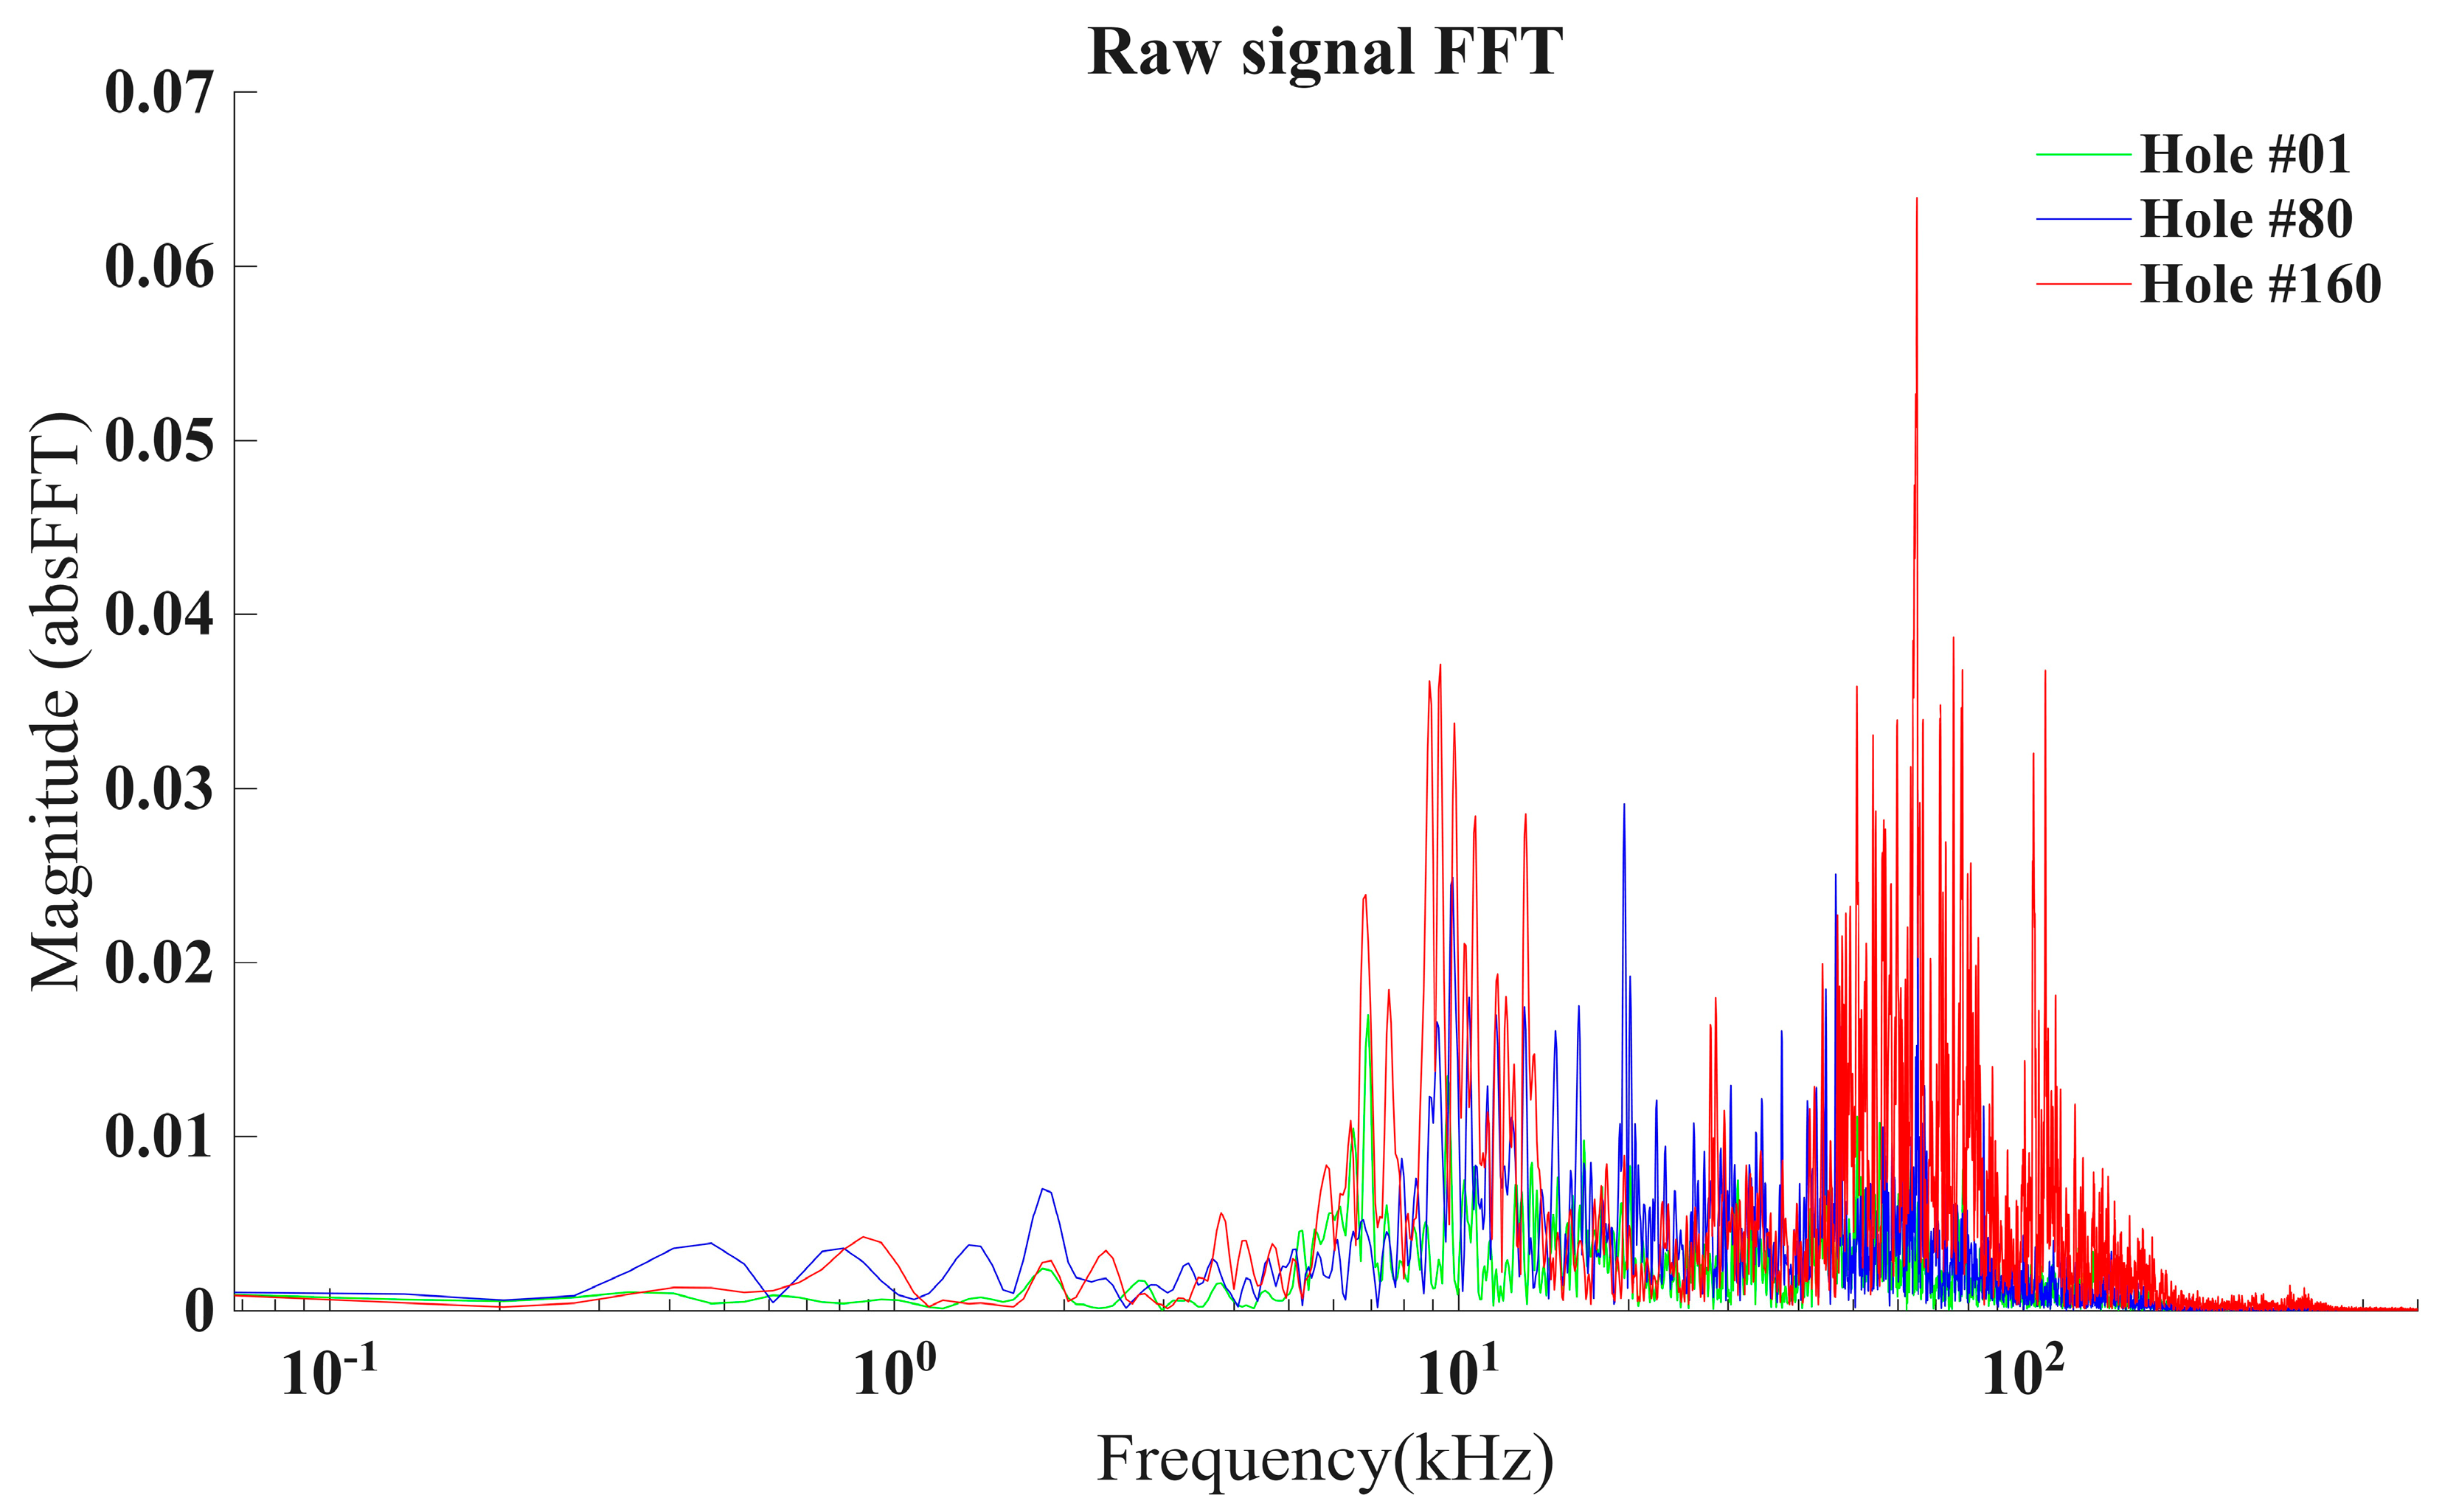
Interpreting the raw time-domain AE signals is challenging, as their high dimensionality and strongly aperiodic behavior hinder the direct identification of patterns related to tool wear. To better understand how the signal energy is distributed and to search for regions more sensitive to wear progression, the raw time-domain signals were transformed into the frequency domain using the FFT as shown in
Figure 4. This frequency-spectrum analysis enabled the identification of specific bands where changes in signal intensity appeared more pronounced for different tool-life stages.
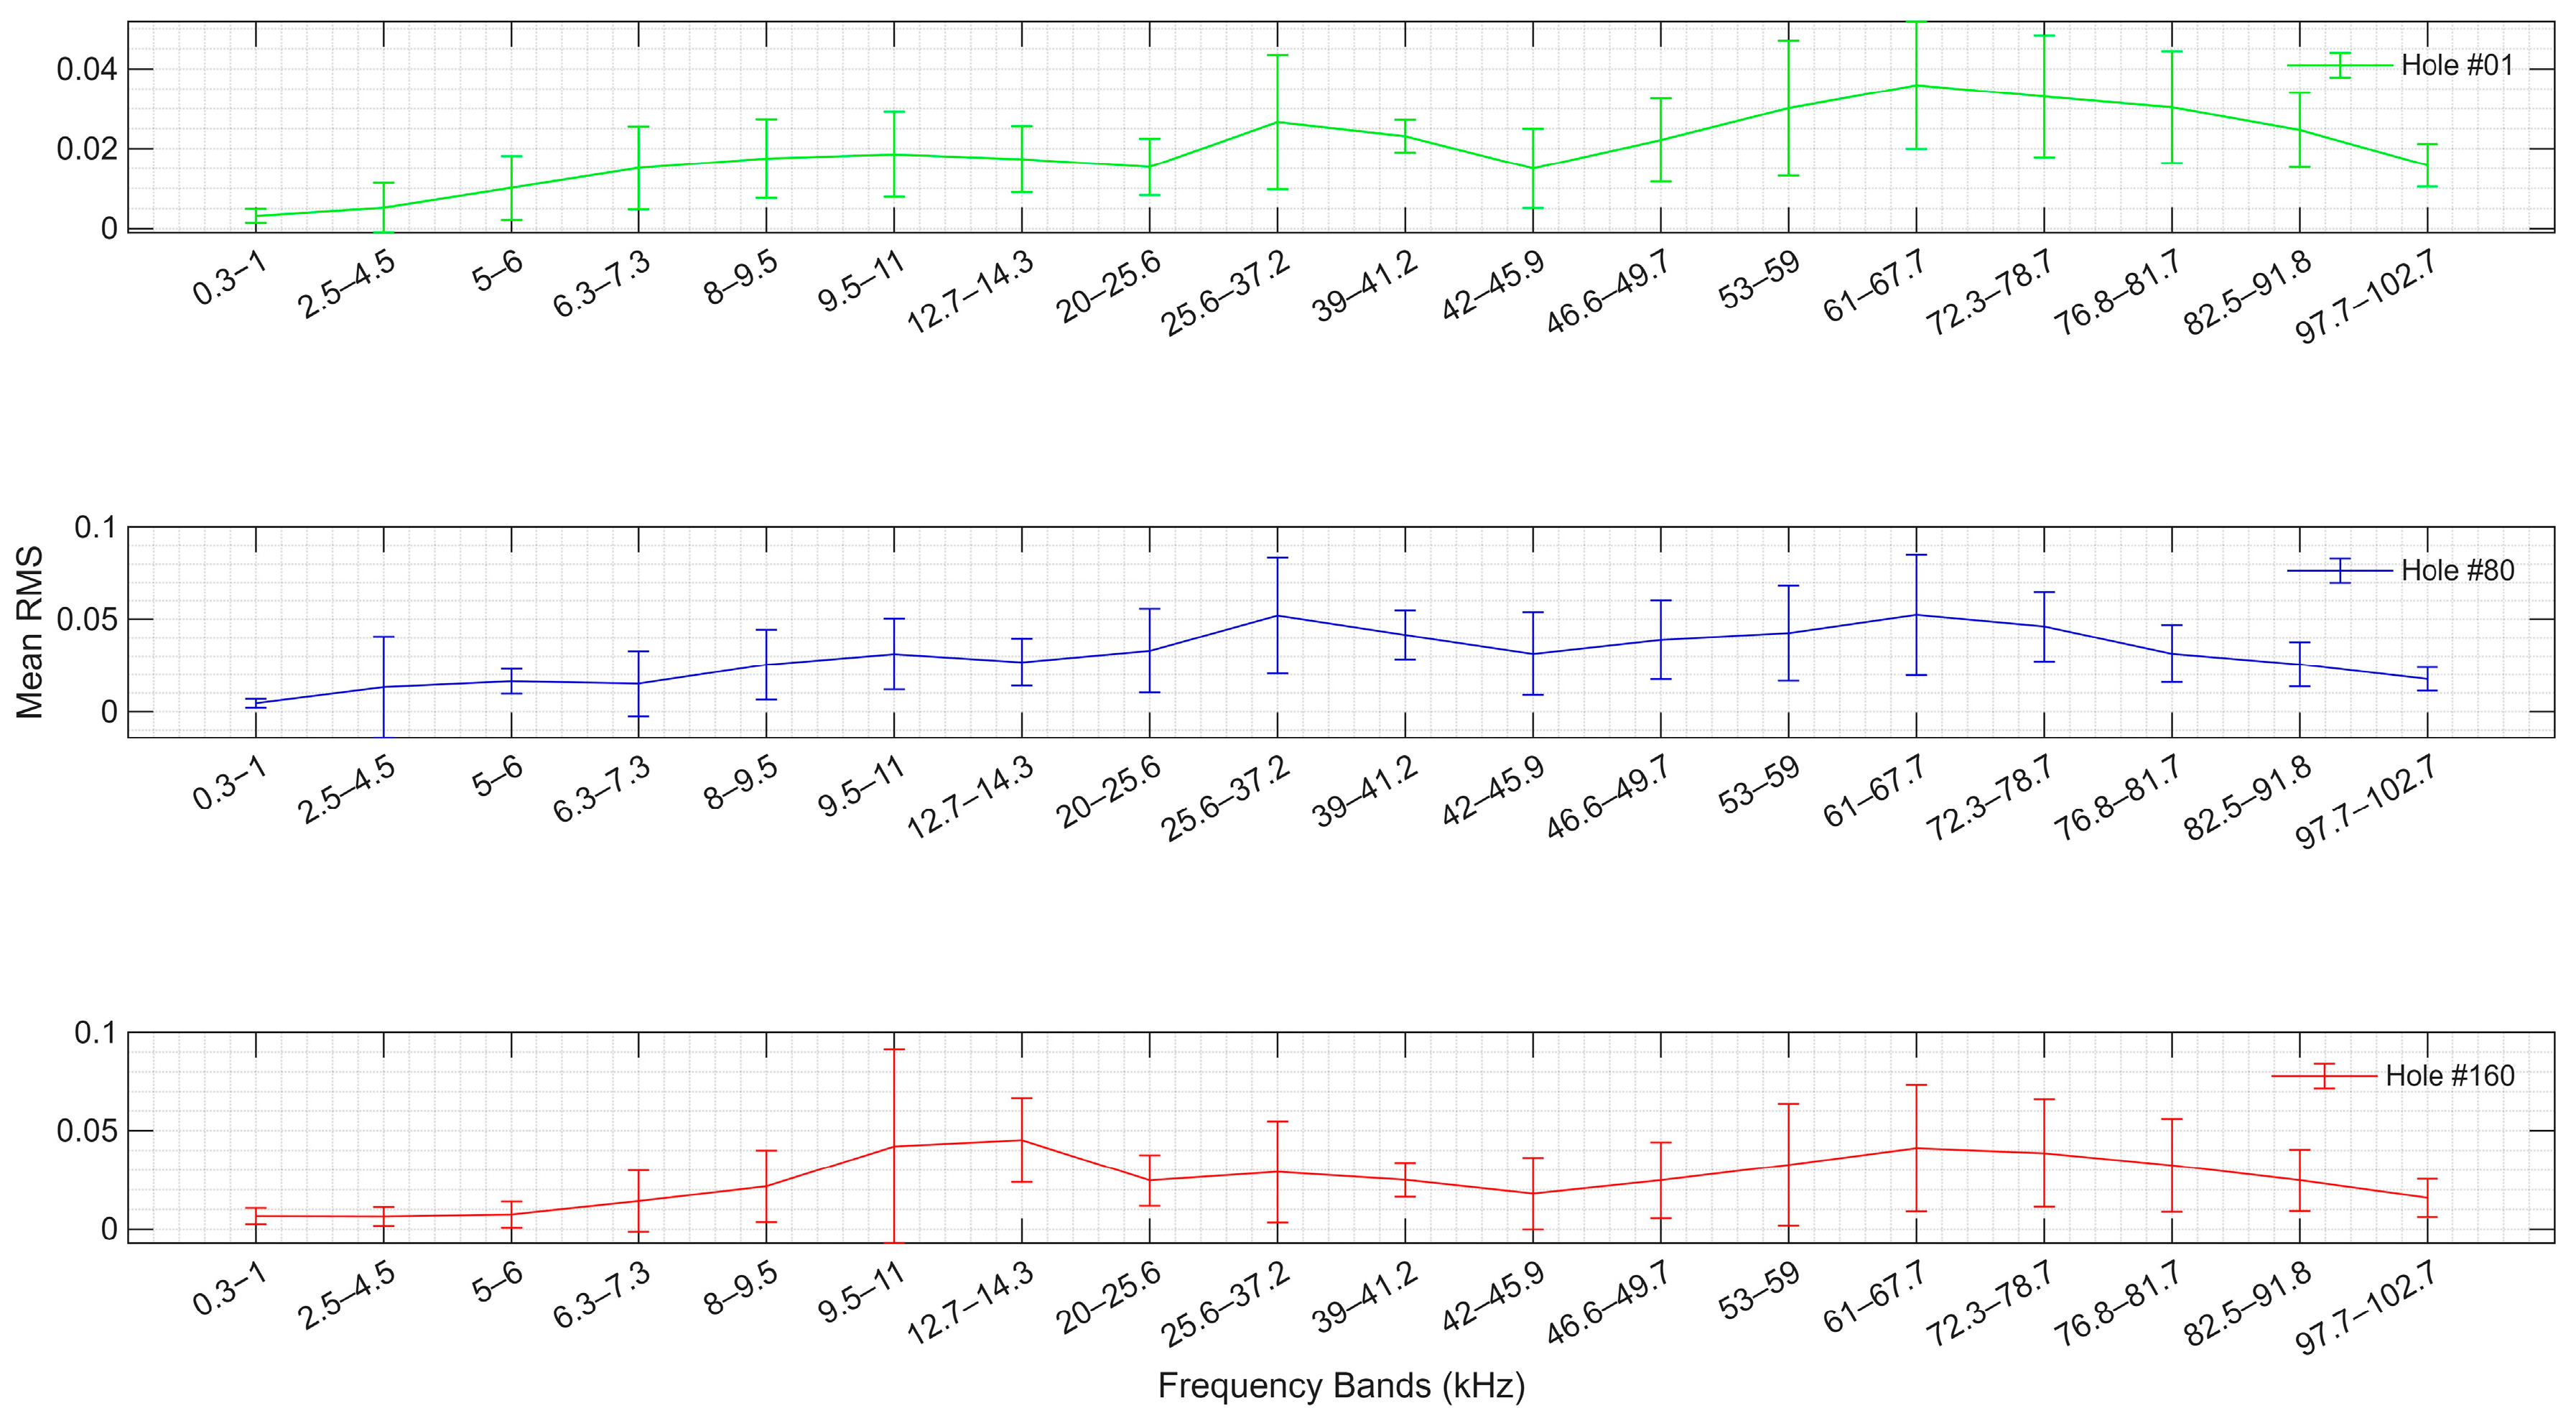
The FFT of the raw signals reveals a clear increase in energy within the intermediate and high-frequency bands as the machining evolution, with Hole #160 exhibiting higher amplitudes than the initial holes, indicating acoustic emission associated with tool wear. Even though the random and broadband nature of AE still prevents clear isolation of wear-related spectral peaks, the FFT results provide a meaningful basis for structuring the subsequent analysis on the most sensitivity frequency band for tool wear. Using the identified bands, the RMS energy was stratified across the frequency spectrum, allowing the evaluation of how energy distribution evolves throughout the machining process and offering an indirect but effective indication of tool–wear progression.
Figure 5 illustrates how the RMS energy varies with machining evolution, enabling the identification of frequency bands that best distinguish between the three conditions. Again, the Hole #160 exhibiting higher amplitudes, highlighting the activity associated with tool wear.
To verify the effectiveness of the frequency bands selected by the previous method, we performed event counting to analyze acoustic emission activity. For comparison, we used the raw signal and the filtered signal using one of the relevant frequencies in
Figure 5, which better distinguishes the tool’s wear status. For event counting, we used a threshold based on the crest factor value for a sample of 2048 events, the same one used to calculate the RMS.
In
Figure 6a, we can see that the signal has a very distinct acoustic emission count for the three signals, from a certain machining time, allowing the characterization of each of the tool wear. However, when filtering the signal to the frequency band from 9.5 to 11 kHz, we can see in
Figure 6b that the most worn hole (#160) has a high count index, but in the previous holes #1 and #80, it was not possible to identify any count, which would make it difficult to separate them. Moreover, the effect could characterize an initial wear, only after 80 holes, not showing AE counts before that.
As this is a preliminary study limited to 160 holes, with the presented setup, it was not possible to identify when the separation of acoustic emission counts occurs, that is, when the counts stopped being zero and started to appear until they reached the condition of hole #160.
Finally, another analysis technique was performed: the RMSD. This technique compares the RMS of the FFT of two signals, allowing us to have another technique that validates the filtered signal, comparing the RMSD values of holes 1 and 80, and then comparing signals 1 and 160, for the selected frequency band. With this, we verified that the selected band has an interesting distinction between the holes analyzed, increasing the activity with the tool wear evolution. Observed in
Figure 7a, we can see the FFT filtered on the selected frequency band, and in
Figure 7b the presented comparison.


