Article

Wear Features of Nickel-Based Superalloy ZhS6U and Commercial Pure Titanium During Dry Friction in a Pin-on-Disc Scheme

Institute of Strength Physics and Materials Science, Siberian Branch Russian Academy of Sciences, 2/4, pr. Akademicheskii, 634055 Tomsk, Russia
*
Author to whom correspondence should be addressed.
Eng 2025, 6(11), 327; https://doi.org/10.3390/eng6110327
Submission received: 2 October 2025 / Revised: 1 November 2025 / Accepted: 11 November 2025 / Published: 12 November 2025
(This article belongs to the Section Materials Engineering)

Abstract

Extreme working conditions place high demands on material properties. For example, tools for friction stir welding of titanium alloys must be highly wear-resistant, have high strength at high temperatures, and also have high adhesion properties. These requirements complicate the selection of materials for tool manufacturing. One of the possible solutions is heat-resistant nickel superalloys, such as the ZhS6U alloy. However, since these alloys have not been commonly used in friction pairs, they have hardly been studied in the context of friction. This work experimentally investigates the friction and wear characteristics of the nickel alloy ZhS6U and commercial pure titanium under dry friction in a pin-on-disc scheme. The research found that during friction, an oxidized mechanically mixed transfer layer is composed of wear products, and it can reduce the friction coefficient. Only adhesive wear was observed in the selected range of sliding speeds (0.46 m/s–1.84 m/s). It was found that the values of the friction coefficient, the mass loss of the titanium disc, and the width and depth of the friction track correlate with each other—as the speed increases, they first increase to a maximum value and then decrease. Minimal disc wear was observed at a speed of 0.46 m/s. The maximum friction coefficient was 0.79 and was observed at a sliding speed of 0.92 m/s. It was also found that the friction surface area is linearly dependent on the sliding speed, and the wear rate of the pins increases with increasing sliding speed according to an exponential law.

1. Introduction

The selection of materials capable of operating under frictional conditions represents a complex technological and scientific challenge. Depending on the specific working conditions, diverse requirements are imposed on materials. In response to these requirements, new materials are developed to ensure reliability and durability. However, these requirements can sometimes be conflicting. For instance, friction stir welding demands high wear resistance of the tool; otherwise, critical wear may alter its geometric parameters, compromising the welding process. Additionally, wear particles from the tool adversely affect the quality of the weld. This issue cannot be resolved by simply employing anti-friction materials, since during friction stir welding, the tool generates heat through friction with the workpiece material, leading to adhesive mass transfer. Therefore, a balance between adhesion and wear resistance is required. In the case of welding aluminum alloys, such materials are known and widely used, for example, H13 tool steel or high-speed steels [1]. Tungsten carbide has proven itself for FSW of steels [2]. However, steel tools are not suitable for welding titanium alloys due to the high welding temperature, and tungsten carbide is not suitable due to its high brittleness and rapid wear [3]. Polycrystalline cubic boron nitride has shown good results, but it is very expensive for industrial use [4].
A possible solution may be the nickel superalloy ZhS6U. This alloy is analogous to the MAR-M247 alloy and combines high heat resistance, hardness, and corrosion resistance. Its composition can be described by the following formula: Ni-10W-10Co-9Cr-6Al-2Ti-2Mo-1Fe-1Nb [5]. Nickel superalloys have previously been used for the FSW of titanium alloys and have shown good results. In particular, joints with strength at the level of the base metal were obtained [6]. However, alloys of this type were developed primarily for use in turbines, so they have hardly been studied in the context of dry friction, especially in combination with titanium alloys. For example, there is a known study on the friction of GCr15 steel and Si3N4 balls on an Inconel 625 disc [7]. The study observed fatigue wear at high friction speeds (0.525 m/s) and adhesive and abrasive wear at lower speeds. Pin-on-plate experiments were also conducted with Ni-based single crystal superalloy and Waspaloy [8], as well as ball-on-disc experiments with a GH4738 superalloy disc and a Si3N4 ball [9]. Both of these studies showed that an oxidized layer is created during friction, which reduces the friction coefficient and reduces wear. As shown in [10], during friction processing of the Ti-6Al-4V alloy, an oxidized mechanically mixed layer composed of tool wear particles and titanium alloy also forms on the ZhS6U tool. Although in the context of FSW, the formation of an oxidized layer is undesirable because it is mixed into the weld and can degrade its characteristics. Therefore, an argon atmosphere must be used for FSW of titanium. In the work [11], plasma surface co-alloying of the Ni-based superalloy CM247 was carried out to reduce the friction of hot forming tools, since the high friction coefficient when using this alloy makes stamping difficult. A high friction coefficient (up to 0.9) was also observed for Nimonic 90, Rene 77, and Udimet 520 alloys when friction on EN-31 hardened steel was measured using a pin-on-disc test method [12]. In addition, all these alloys demonstrated similar tribological properties: an increase in sliding speed led to a linear increase in wear rate and a decrease in the friction coefficient.
The most extensive study of the MAR-M247 alloy friction was conducted in [13]. In this work, self-mated wear tests were carried out using a ball-disc scheme at speeds ranging from 0.04 m/s to 1.2 m/s and over a wide temperature range (200–900 °C, as well as at room temperature). The work showed that different wear mechanisms operate at different temperatures and speeds. It was also shown that at low temperatures, the friction speed has a stronger effect on wear. This is primarily due to different wear mechanisms. A review paper about wear of nickel superalloys notes that the most common wear mechanism at low temperatures is abrasive wear [14]. At higher temperatures, oxidative and adhesive wear mechanisms dominate. However, most papers study friction on ceramics, such as Si3N4. No studies on the dry friction of nickel superalloys with titanium alloys have been found, so the wear mechanism in this friction pair is unknown.
The aim of this work is to investigate the wear characteristics of the nickel alloy ZhS6U and commercially pure titanium under dry friction using a pin-on-disc configuration. Specifically, the study examines the influence of sliding speed on wear and friction coefficient, as well as the microstructure of the friction surface and subsurface layer. The novelty of this work lies primarily in addressing the lack of research on the friction behaviour between the ZhS6U alloy and titanium. The relevance of this friction pair stems mainly from its industrial applications. In particular, nickel superalloys can be used as tools for FSW, friction drilling, and other high-temperature friction applications.

2. Materials and Methods

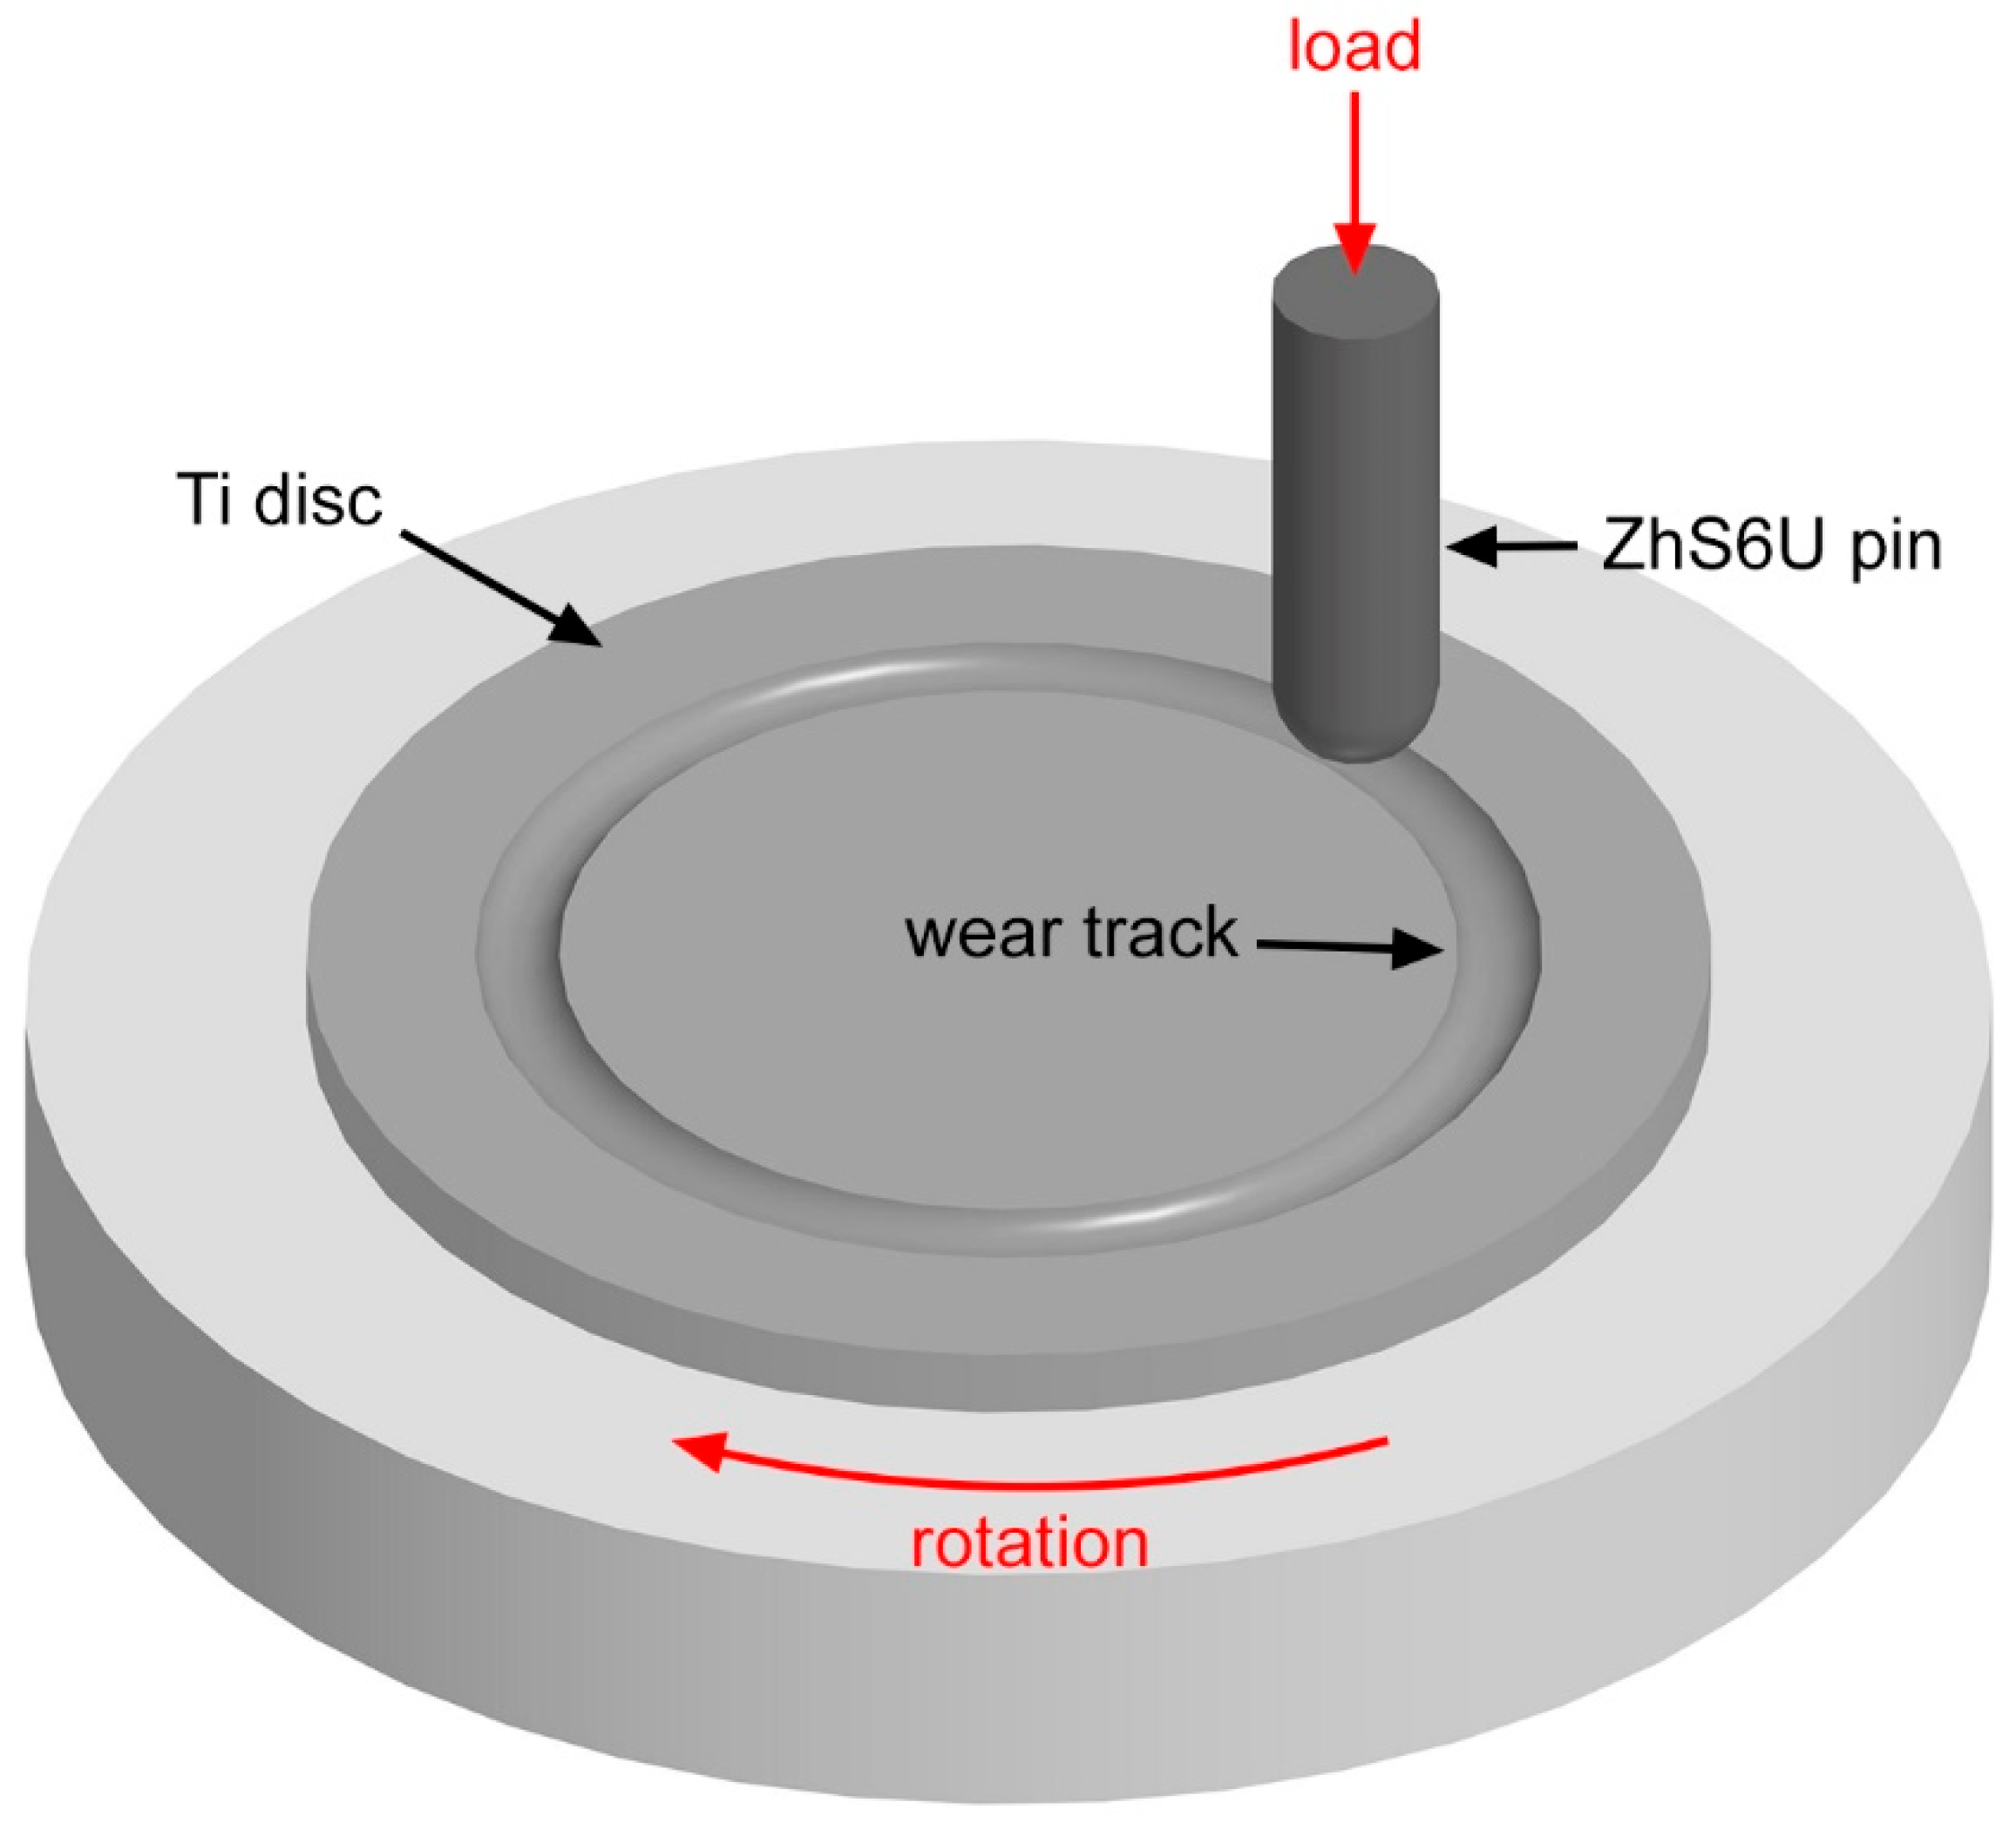
Dry friction tests were performed using a Tribotechnic high-temperature tribometer (Tribotechnic, Clichy, France). Friction was generated using a pin-on-disc test setup. Pins with hemispherical tips were made of cast nickel superalloy ZhS6U. The diameter of the pins and tips was 6 mm. Discs for tribological testing were made of 2.5 mm thick sheet of commercially pure titanium. The diameter of the discs was 50 mm. The roughness of the disc surfaces Rq before testing was 3.7 ± 0.4 μm. The roughness of the pin tips Rq before testing was 7.0 ± 0.9 μm. Friction was carried out along a circular path with a diameter of 35 mm. The axial load on the pin was 22 N. The friction path was 800 m. The sliding speed varied in the range of 0.46 m/s to 1.84 m/s. The ambient temperature during the tests was 200 °C. The tribological test setup is shown in Figure 1. The test modes are listed in Table 1. The selected friction parameters partially match the parameters in the works [7,9,13]. In addition, the selected sliding speeds are also often realized in friction stir welding [1,6,15].
During testing, the friction force was measured using a tribometer. The friction coefficient was calculated based on Coulomb’s model. To measure mass loss due to friction, the samples were weighed before and after testing. The geometric parameters of the friction tracks and friction surfaces on the pins were measured using callipers and digital images. The friction surfaces on the discs and pins were examined using an Apreo S LoVac scanning electron microscope (Thermo Fisher Scientific, Portland, OR, USA). EDS analysis and SEM imaging were performed at an accelerating voltage of 20 kV. To study the structure of the subsurface layer of the friction tracks, samples were cut from the cross section of the disc along its diameter. The pins were cut in the plane formed by the direction of sliding and the axis of the pin. The samples were cut using an electro discharge cutting method. The surfaces were then grinded with abrasive paper up to 2000 grit and polished with diamond paste. To reveal the structure of titanium, etching was performed in a 2% HF aqueous solution for 120 s and a 40% HNO3 aqueous solution for 1 s. The structure of the ZhS6U alloy was revealed by etching in a reagent consisting of 8 g CuSO4 + 40 mL HCl + 40 mL H2O. Cross-sectional studies were performed using an Altami MET-1C metallographic microscope (Altami, St. Petersburg, Russia) and SEM.

3. Results

3.1. Investigation of Titanium Discs After Friction

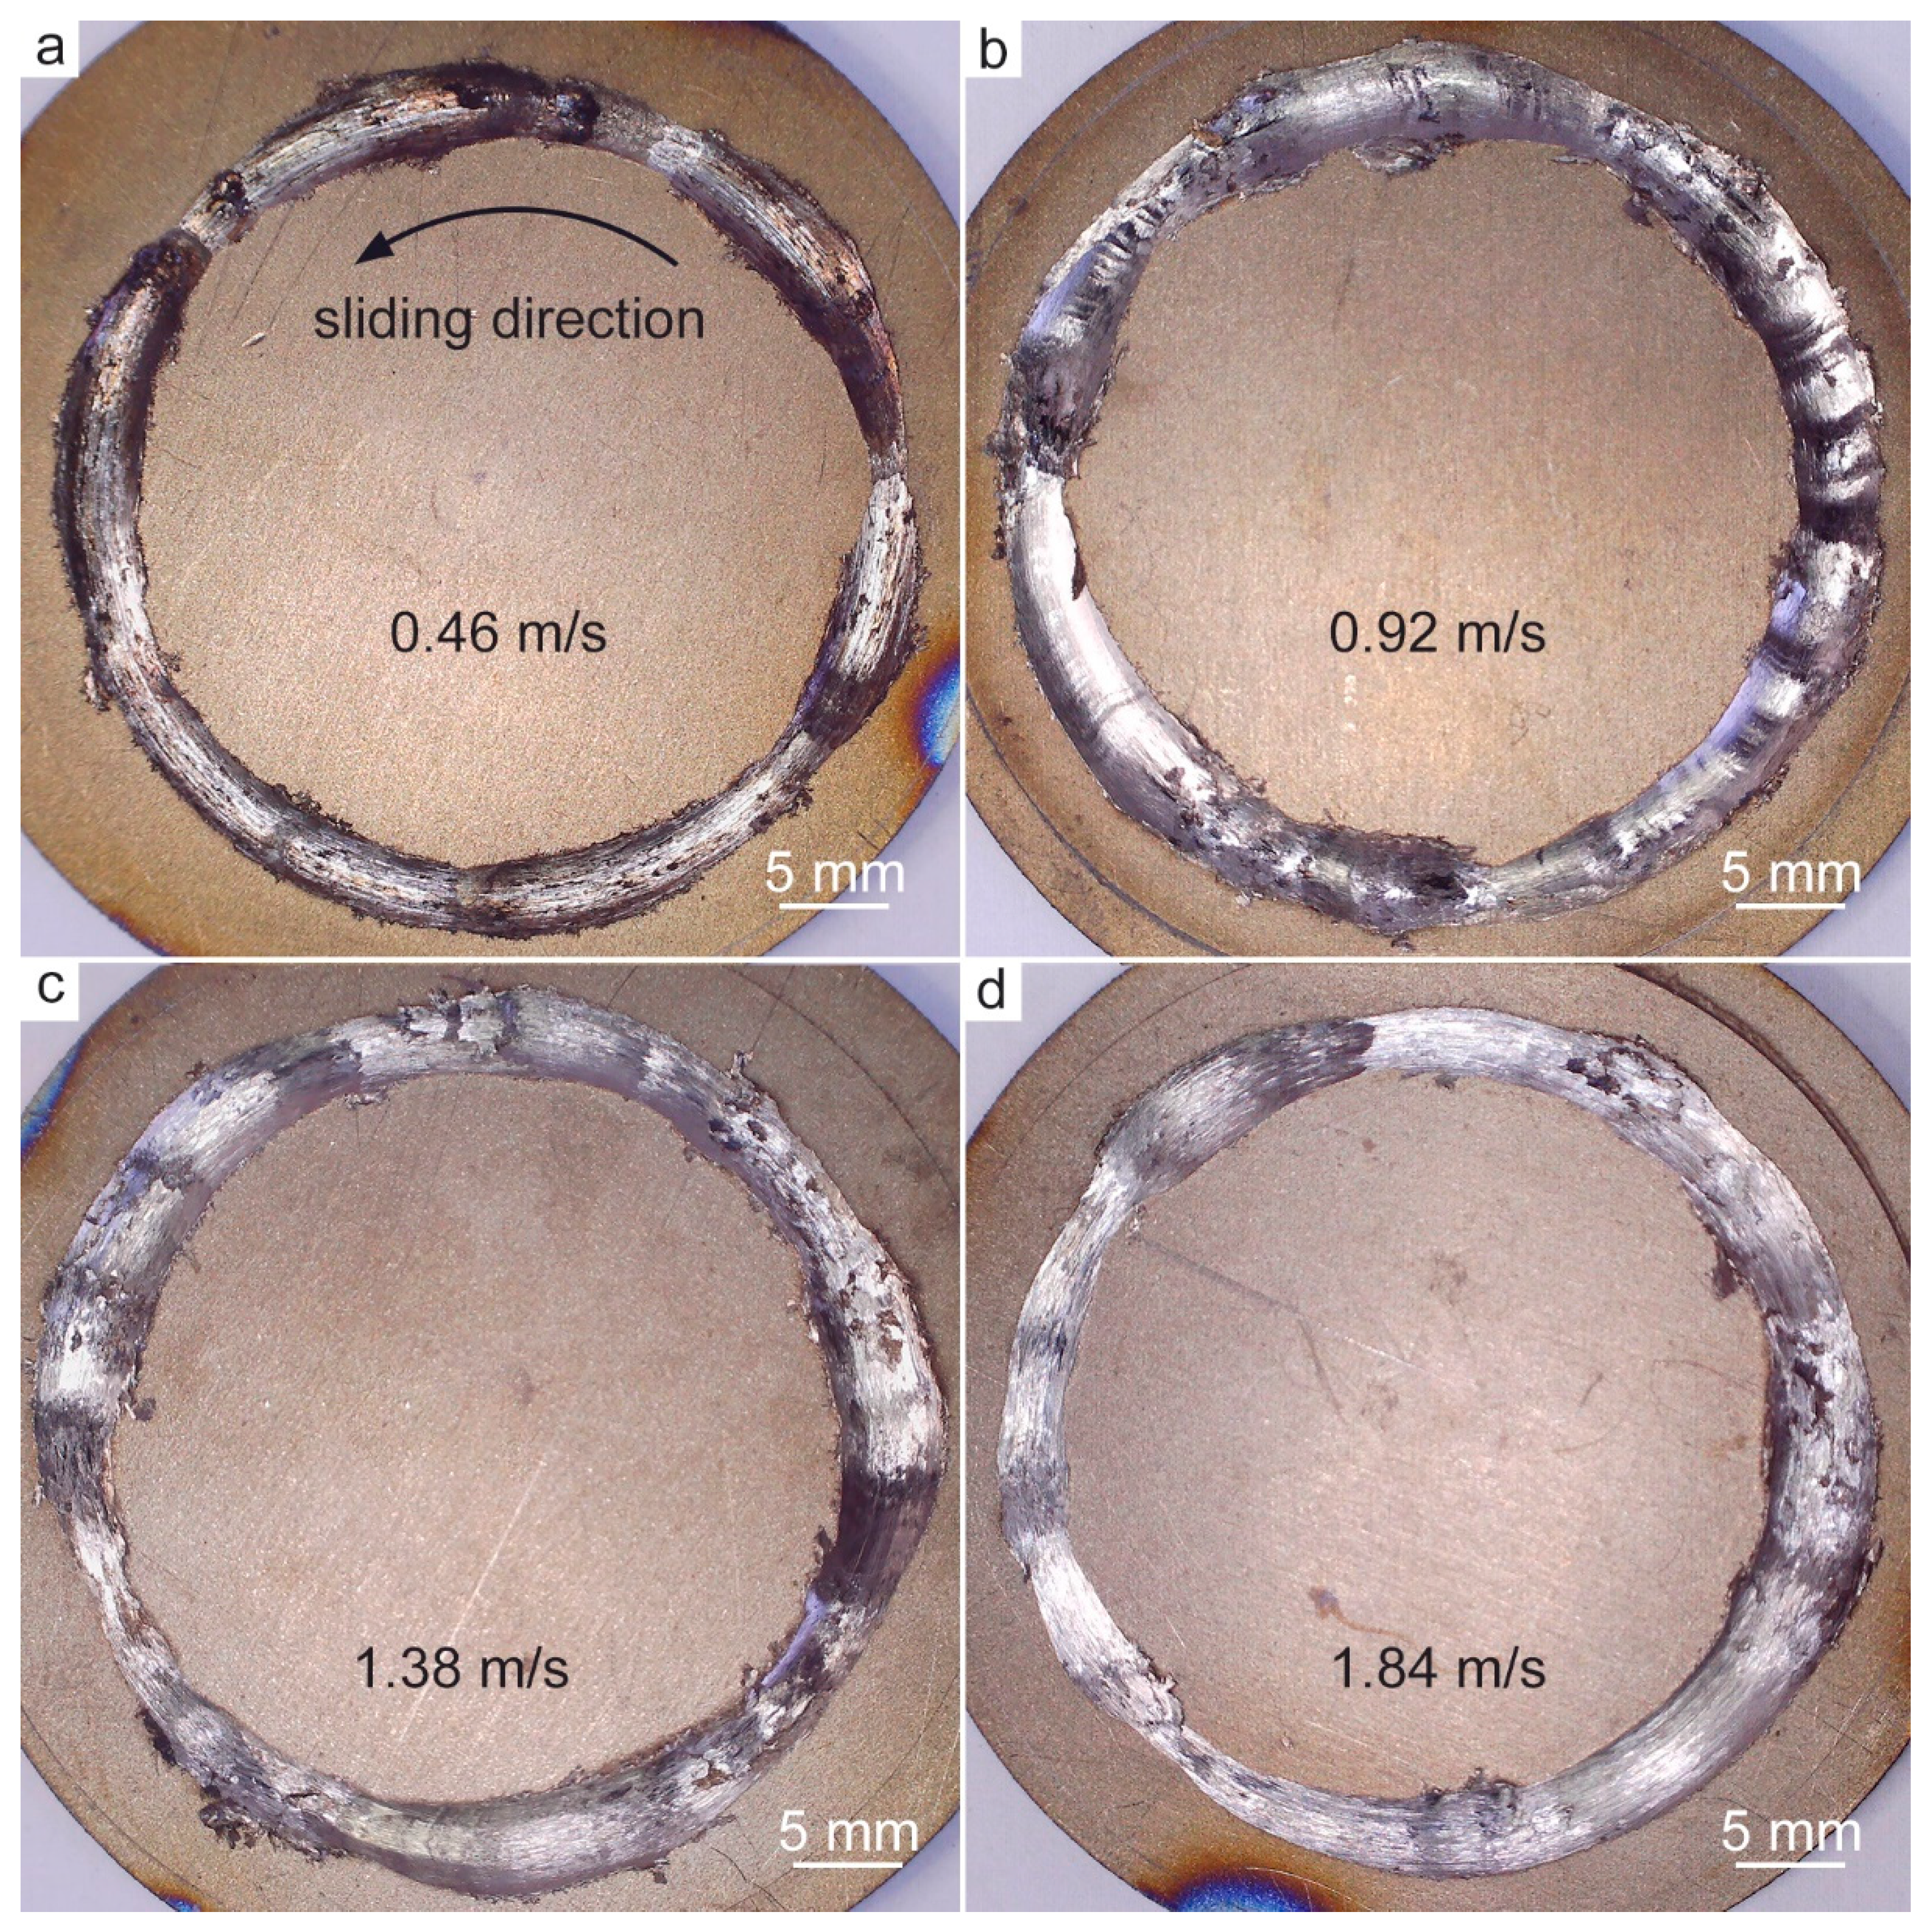
Figure 2 presents photographic images of titanium discs after friction testing. The samples exhibit visually distinguishable friction tracks characterized by circular grooves of varying width and depth. Based on these groove dimensions, three distinct section types can be identified along the friction track.
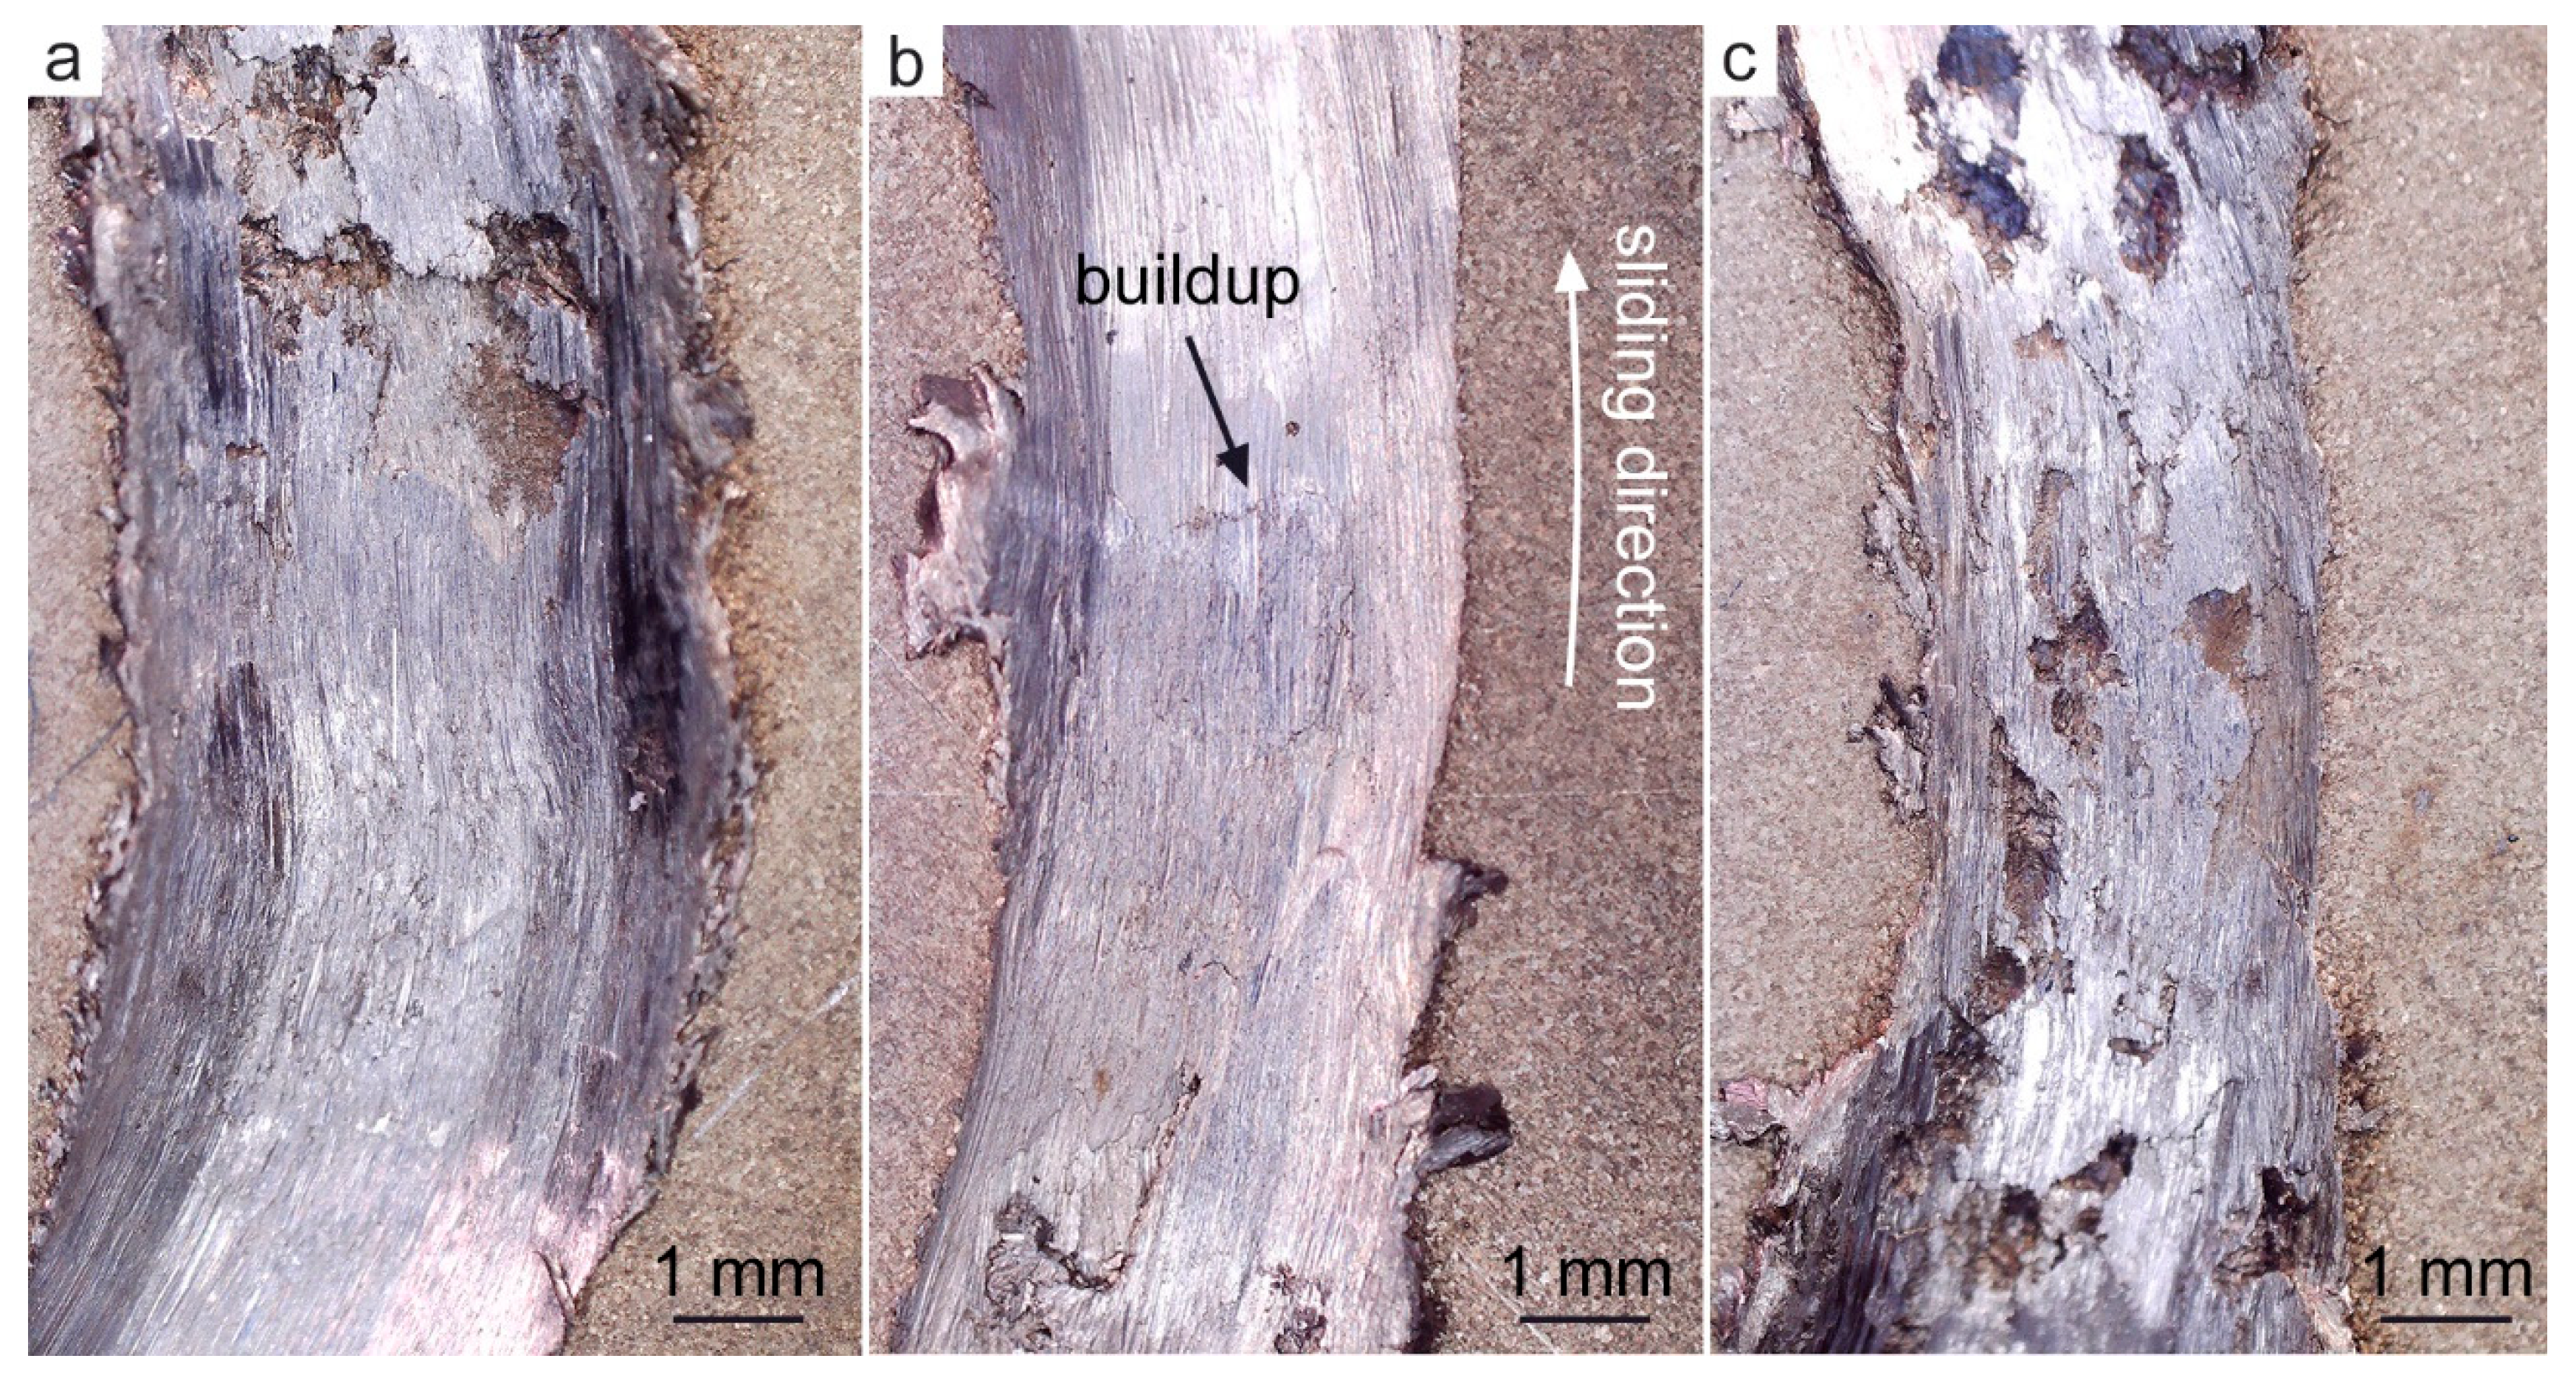
Type A corresponds to standard grooves formed by gradual wear (Figure 3a). These sections are relatively long, spanning a disc sector angle of up to 40° or a length up to 12 mm along the friction track circumference, and exhibit the greatest and most stable width and depth. Type B regions also display large groove widths, but are characterized by material buildups, resulting in groove depths that may reach zero in these areas (Figure 3b). These buildups are attributable to either plastic deformation and displacement of metal or back transfer of the tribolayer from the pin to the disc. Type C sections are characterized by the smallest groove width and depth; in some cases, the depth is negative, meaning the groove level is above the front surface of the disc (Figure 3c). Due to the formation of buildups and the occurrence of tear-outs on the track during wear, the friction process is unstable and accompanied by pronounced vibrations. After a tear-out forms in one area, the pin encounters this depression during the next pass and cannot move in a straight line due to resistance from the metal, causing it to jump. Subsequently, the pin continues its motion, but its interaction with the disc material in this area is weakened due to vertical inertia, resulting in reduced wear. This repetitive behaviour leads to the formation of a Type C region. Over time, back transfer of material or plastic displacement occurs in this zone.
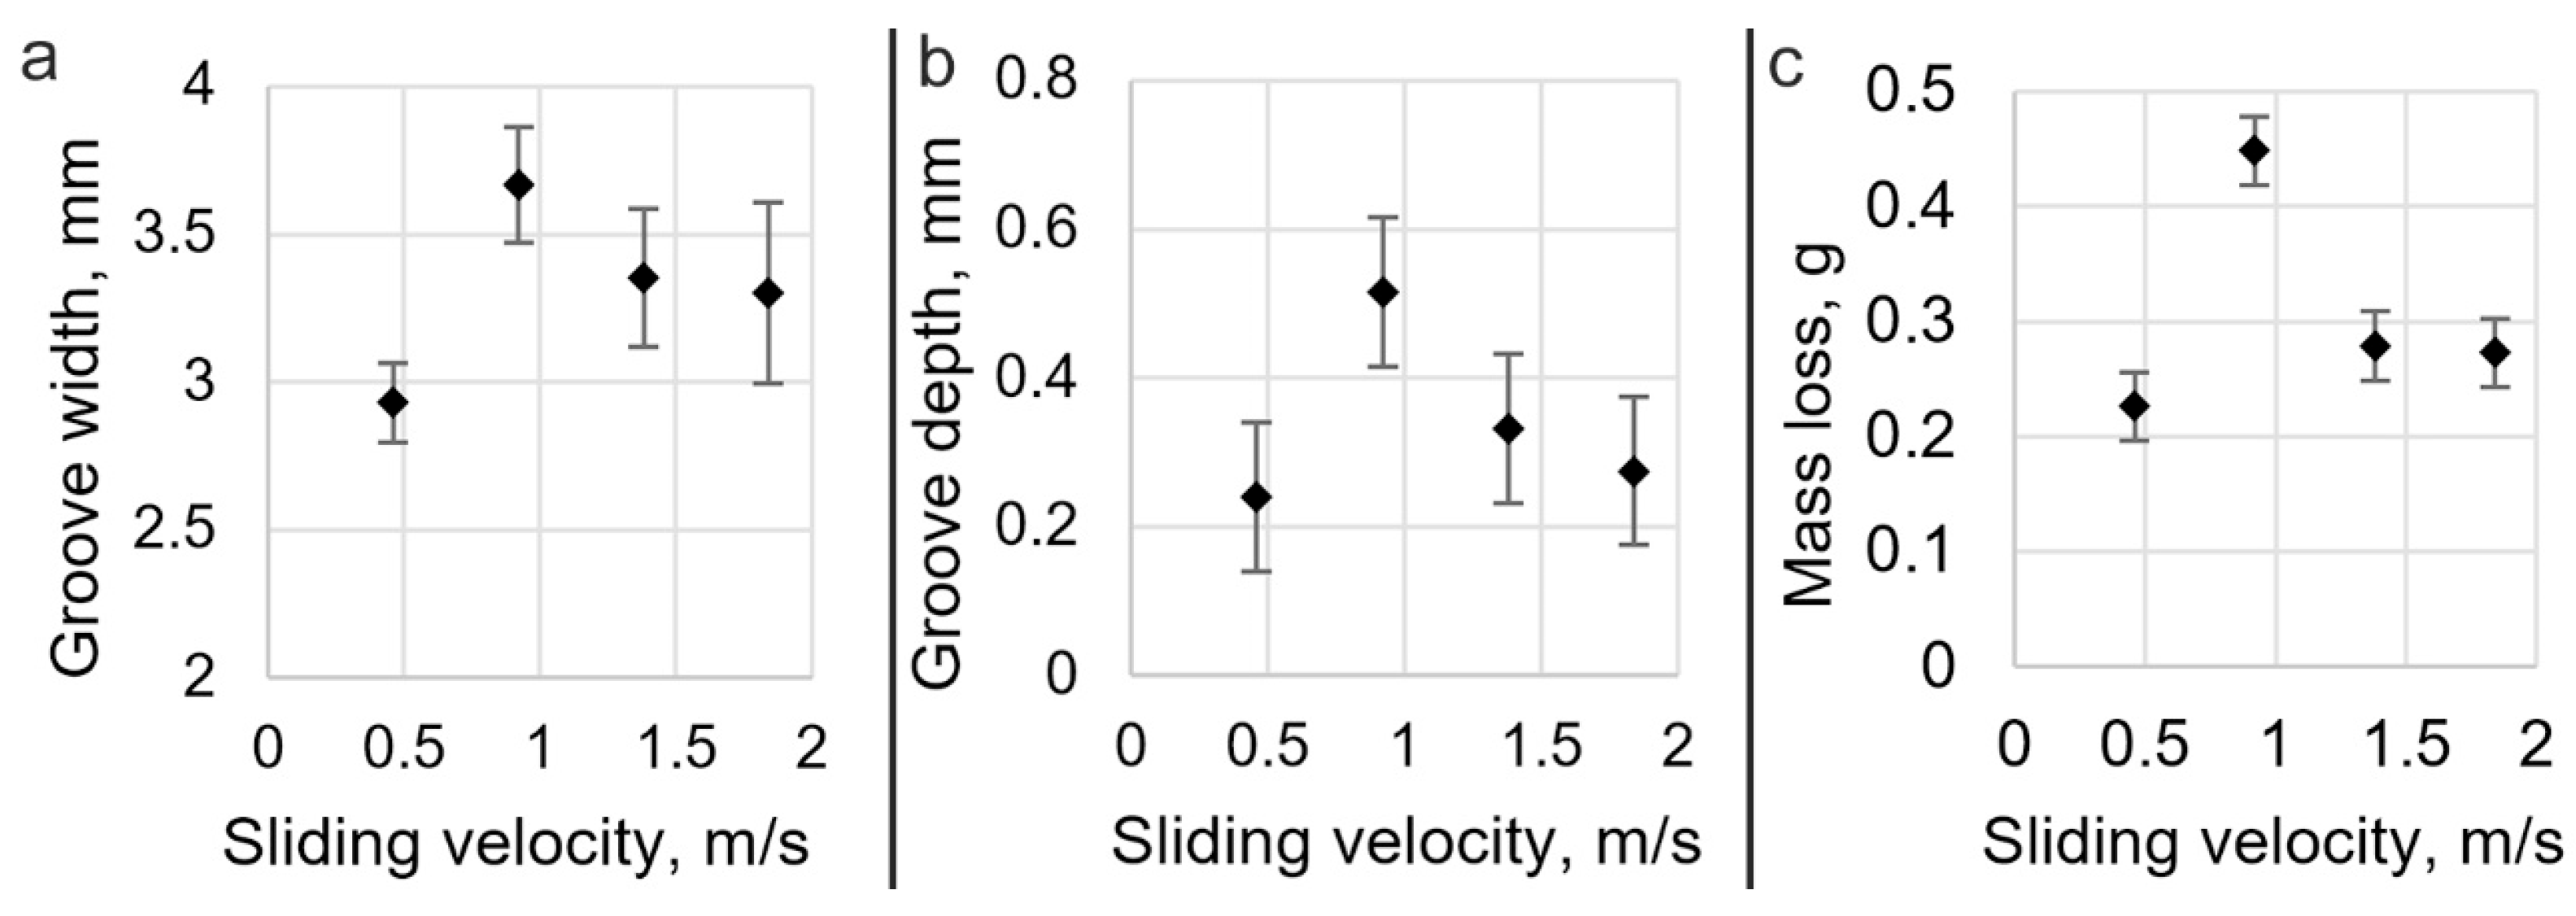
Figure 4 presents the results of measurements of the friction track width and depth, as well as the disc mass loss after friction testing. It was observed that increasing the sliding speed up to 0.92 m/s led to increased wear, while further increases in sliding speed resulted in decreased disc wear. Therefore, the maximum disc wear occurred at a sliding speed of 0.92 m/s.
Notably, the variations in all three parameters are correlated. This correlation is explained by the test geometry: since the pin has a hemispherical tip, its penetration into the disc surface leads to an increase in the friction track width, provided there is no significant wear on the pin. As shown in the following section, pin wear was relatively low; hence, disc wear caused increases in both the width and depth of the friction track. However, these parameters do not vary strictly proportionally.
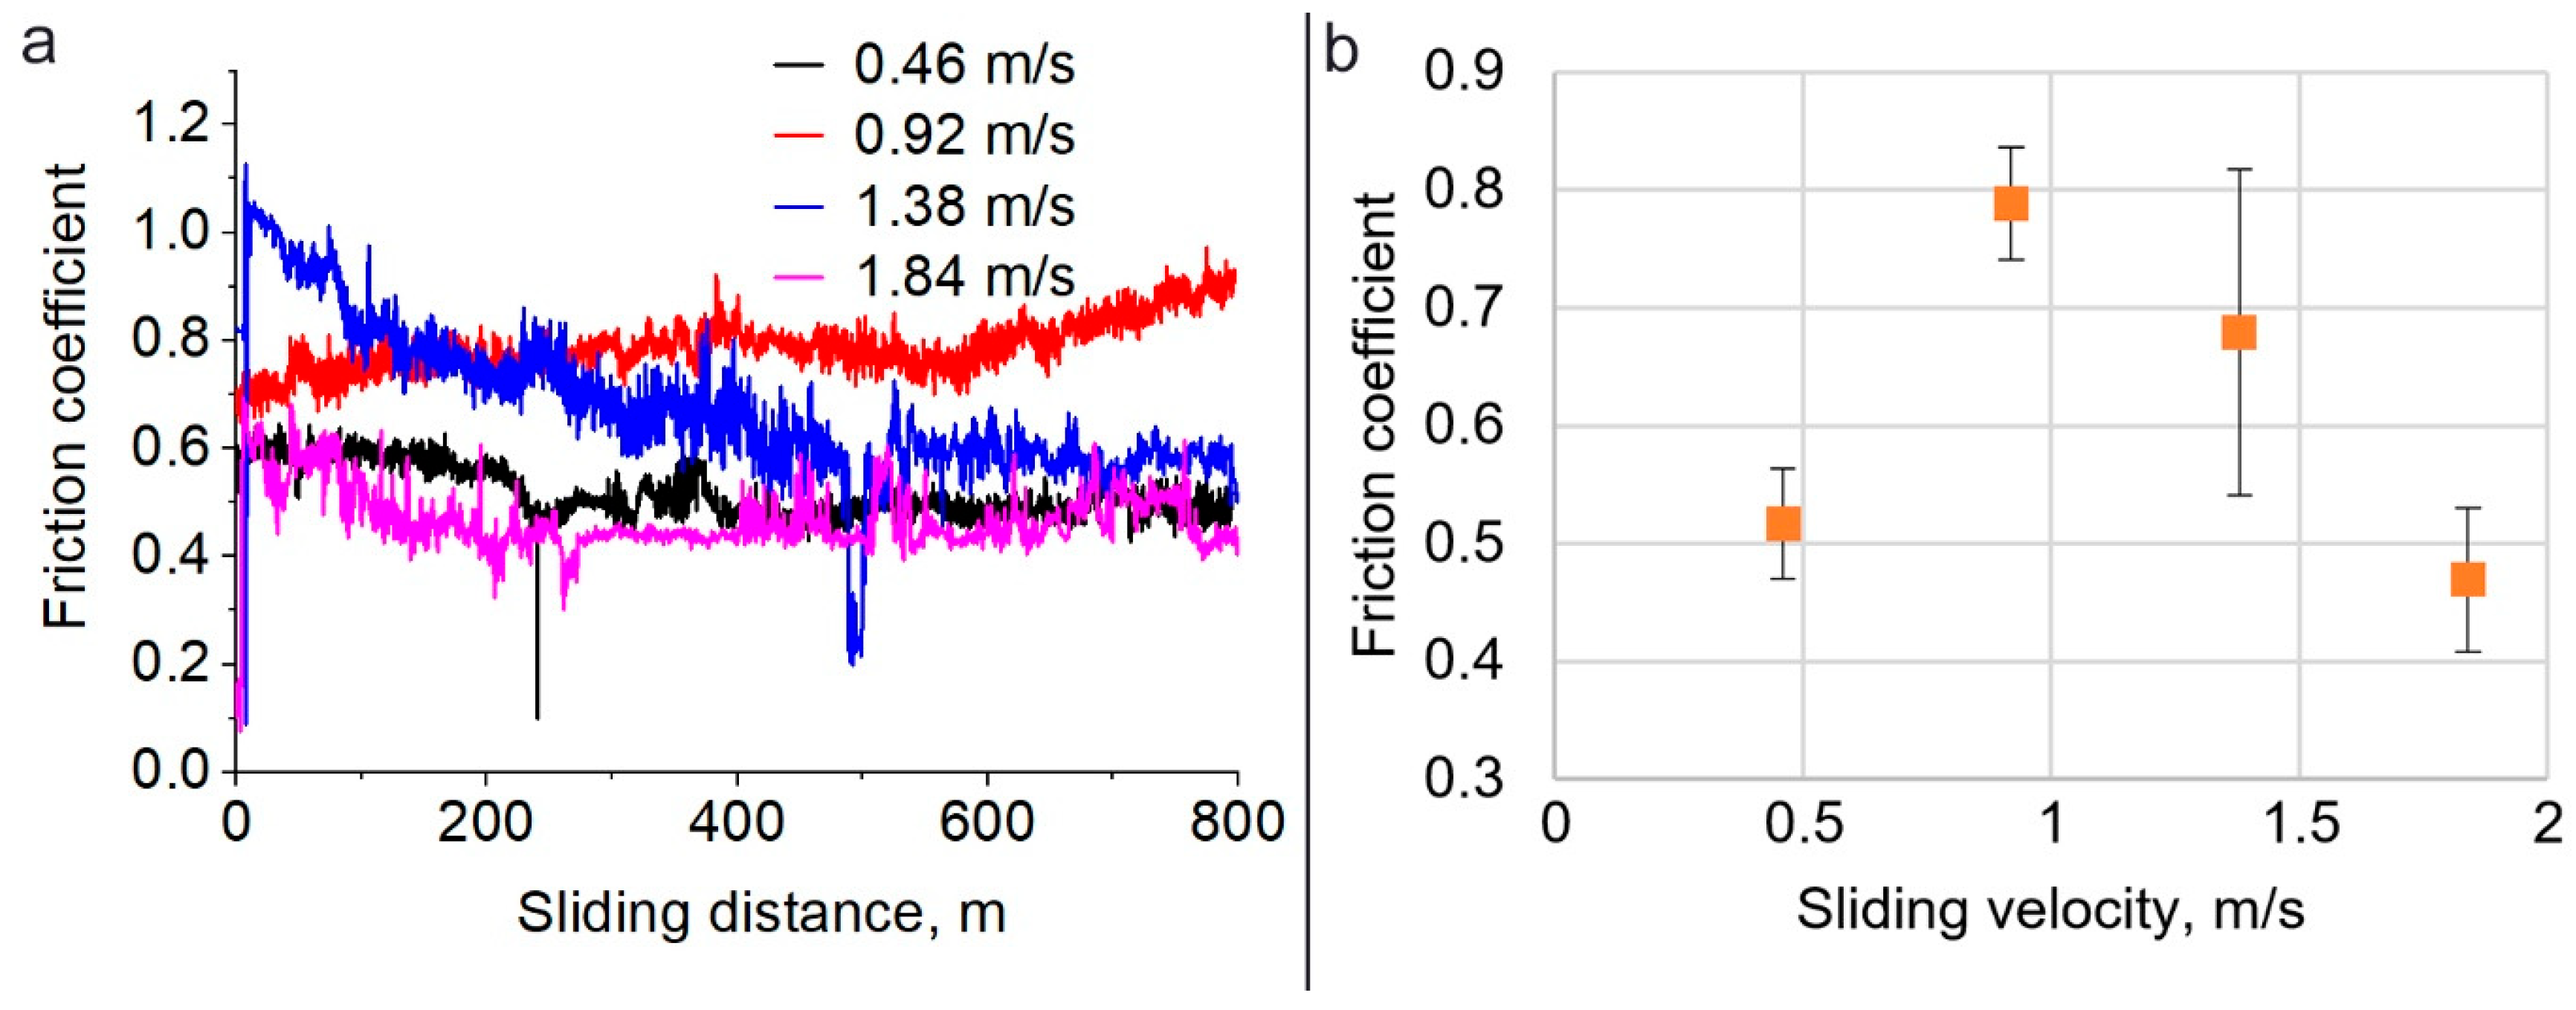
Figure 5 shows graphs of changes in the friction coefficient during the experiment, as well as the dependence of the average friction coefficient on the sliding speed. It was found that at a sliding speed of 0.92 m/s, the friction coefficient was maximum, which corresponds to maximum disc wear. Increasing the friction speed to 1.38 m/s and 1.84 m/s led to a gradual decrease in the friction coefficient. Thus, the friction coefficient correlates with disc wear. It can also be observed that the friction coefficient behaves differently with increasing speed during the experiment. At a speed of 0.46 m/s, the friction coefficient decreases from 0.6 to 0.5, and after 200 m, it remains almost unchanged within the limits of fluctuations. A similar pattern is observed at a speed of 1.84 m/s: the friction coefficient decreases from 0.6 to 0.45 during the first 250 m of travel and remains relatively stable. At a speed of 1.38 m/s, the friction coefficient decreases from a maximum value of 1 to 0.6 over 500 m and stabilizes. At a speed of 0.92 m/s, the friction coefficient monotonically increases from 0.7 to 0.9 throughout the experiment, with no stabilization observed. Thus, the running-in stage is different for each speed. In general, this running-in stage is quite long. For example, in works [7,9] running-in took place over 50 m–150 m under similar conditions. At the same time, the coefficient of friction for Inconel 625 against Si3N4 under similar conditions was lower (0.55–0.15) [7]. When friction occurred against GCr15 steel, the friction coefficient was comparable (0.5 at a speed of 0.5 m/s). And for friction of Nimonic 90, Rene 77, and Udimet 520 alloys against EN-31 hardened steel, the friction coefficient was much higher—about 0.9–0.7 [12].
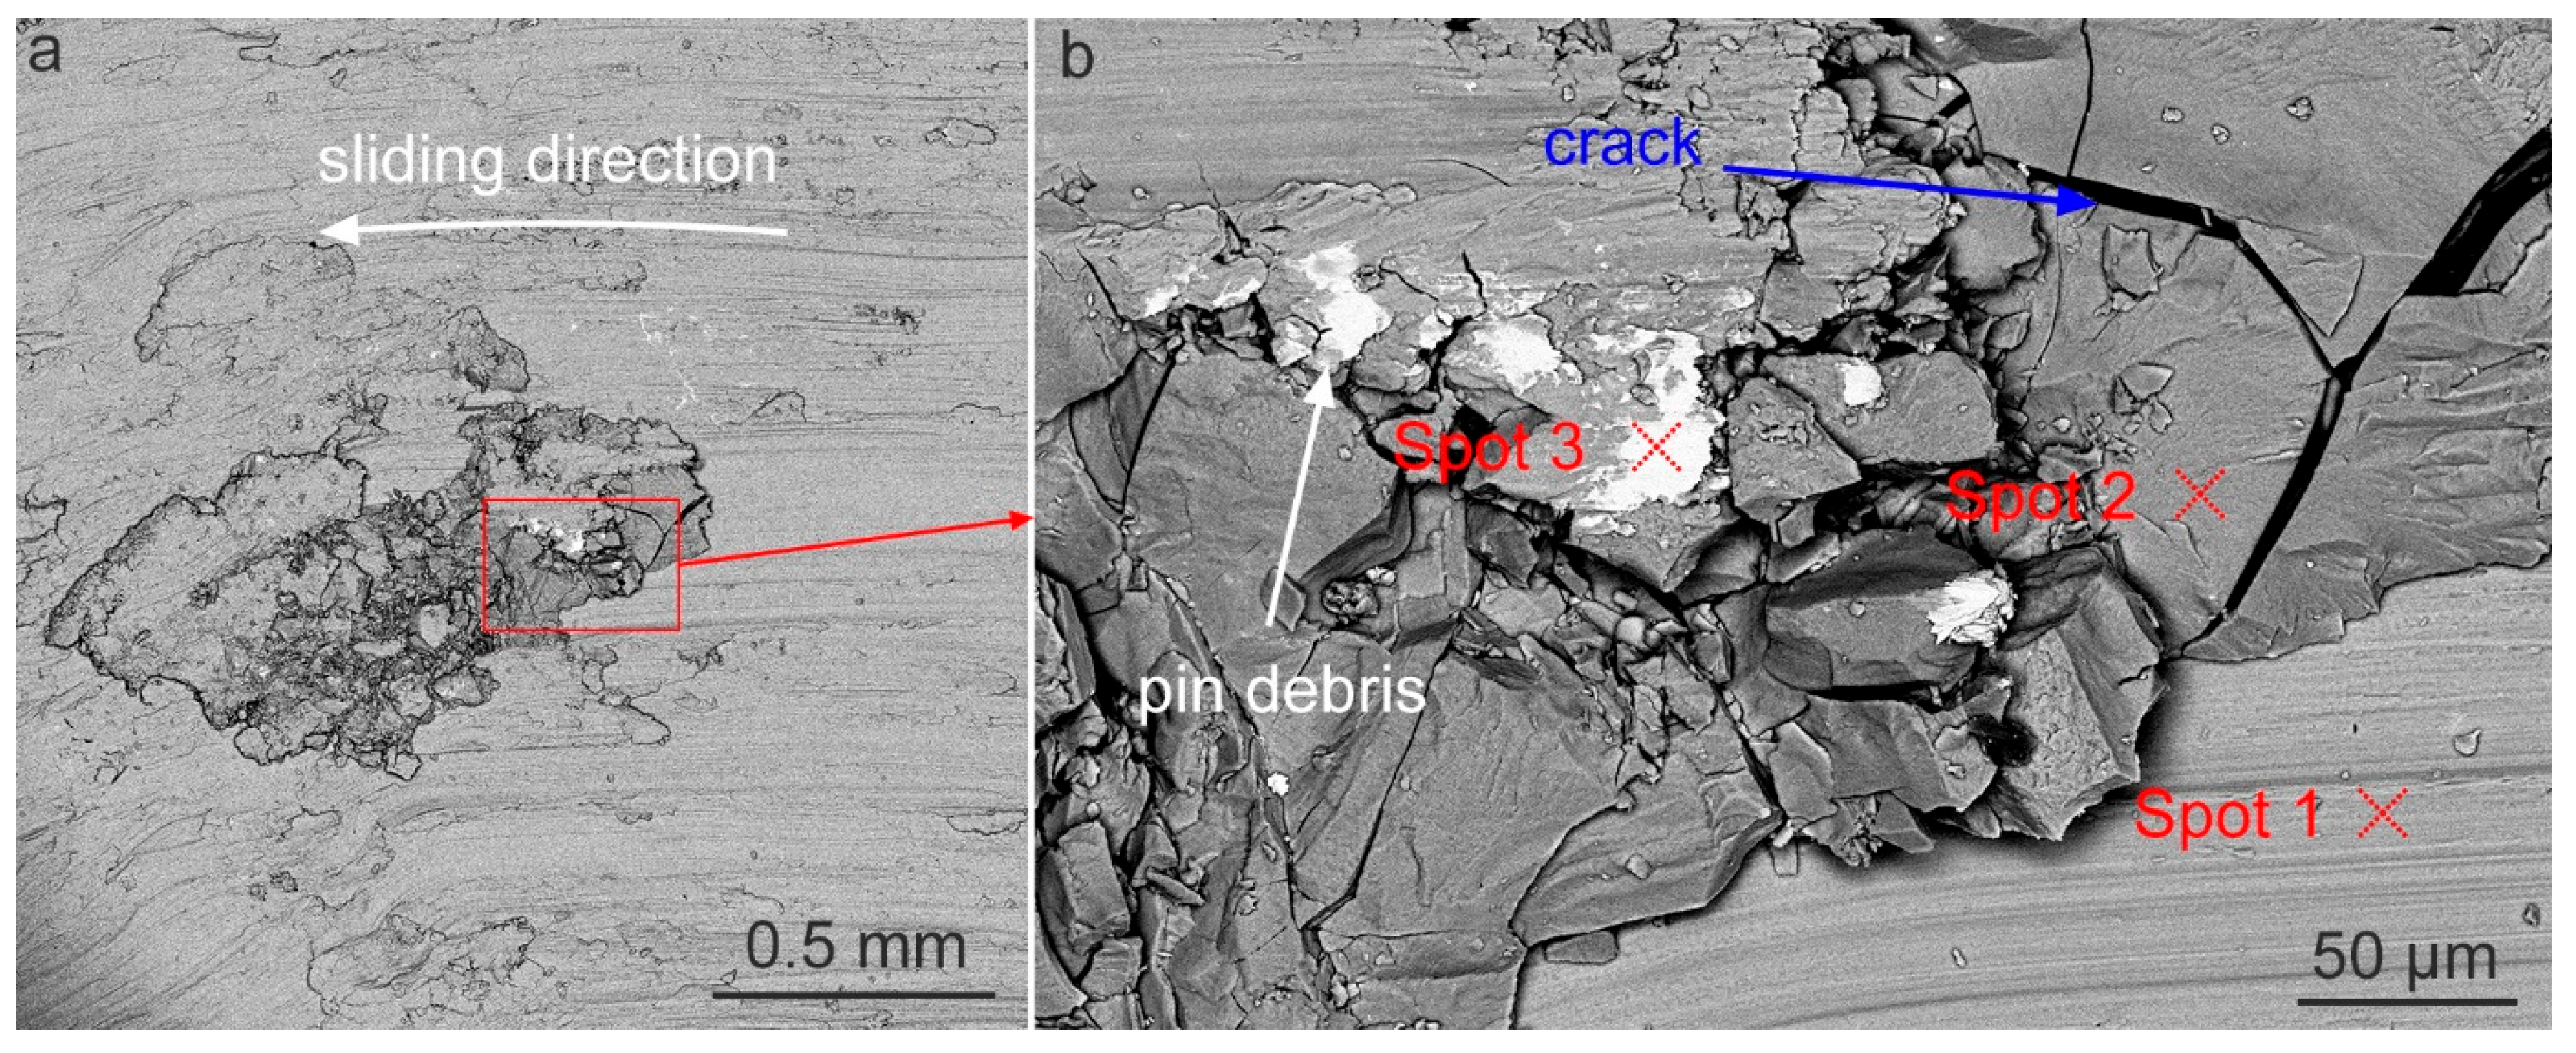
Figure 6 presents SEM images of the friction track surface of disc #3 captured in backscattered electron mode. The images reveal regions with relatively smooth surfaces exhibiting traces of plastic deformation oriented along the sliding direction. EDS analysis demonstrated that the composition of these regions closely matches that of the disc material (Table 2, spectrum 1), suggesting that these areas experienced predominantly plastic deformation during sliding friction. In contrast, other areas on the friction surface display a highly fragmented transfer layer characterized by numerous cracks. EDS analysis of this transfer layer revealed a high oxygen content, reaching up to 11% (Table 2, spectrum 2).
Thus, it can be concluded that during friction at the interface of the friction pair, a tribolayer is formed, consisting mainly of the disc material. The tribolayer is formed as a result of the micro-roughness deformation. Further friction is a process of this third body deformation with the heat energy release. Accordingly, the friction surfaces are in contact with the tribolayer (third body). This tribolayer is picked up by the pin and transferred back to the disc. During this process, mechanochemical oxidation of the transfer layer occurs, since the tests were conducted in an air atmosphere. In turn, oxidation leads to embrittlement of the transfer layer and the appearance of cracks. This hypothesis was suggested in [16]. At the same time, oxidation of the transfer layer also leads to a decrease in the friction coefficient, since after transfer, the pin continues to move over the already oxidized material of the disc, which has different tribological properties. Therefore, during friction at speeds of 0.46 m/s, 1.38 m/s, and 1.84 m/s, the friction coefficient decreased until a stable state was established. Similar results were reported in [8,9]. In the case of a speed of 0.92 m/s, the adhesion between the pin and the disc was so high that the pin constantly came into contact with the lower layer of pure titanium, which was not subject to oxidation, and continuously wears it.
Contrasting light objects were also found on the transfer layer. EDS analysis showed an increased content of nickel, iron, and tungsten in these areas, i.e., elements that compose the ZhS6U alloy (Table 2, spectrum 3). Thus, it can be concluded that the transfer layer contains particles of the pin, which also wear out during friction. Notably, tool debris was always observed only in the transfer layer and was not observed on the surface of pure titanium after friction. This is an important observation because it confirms the hypothesis put forward in [15]. This paper presents the results of a study of an FSW tool made of ZhS6U alloy after titanium welding and proposes a scheme according to which friction between ZhS6U alloys and titanium forms an adhesive bond and mutual diffusion occurs. Taking into account the formation of the tribolayer, it can be said that the surface of the ZhS6U alloy interacts precisely with the tribolayer. As a result of the tribolayer deformation between the friction surfaces with heat release, the atoms of the ZhS6U alloy diffuse into the tribolayer. As a result, the surface layer of the tool is modified and then separated during friction. Wear particles form a mechanically mixed layer that remains in the weld. This scheme was partially proven because a modified layer was found on the tool, but there was no certainty that wear occurs only according to this scheme. This paper shows that this is exactly how wear occurs on the ZS6U pin. Under regular sliding friction, ZS6U pins do not wear. Apparently, the same feature is typical for friction against steel [12]. However, when friction between DD6 superalloy and Si3N4 occurred under similar conditions, no mechanically mixed layer was observed, and other wear mechanisms acting, including abrasive and oxidative wear [17].
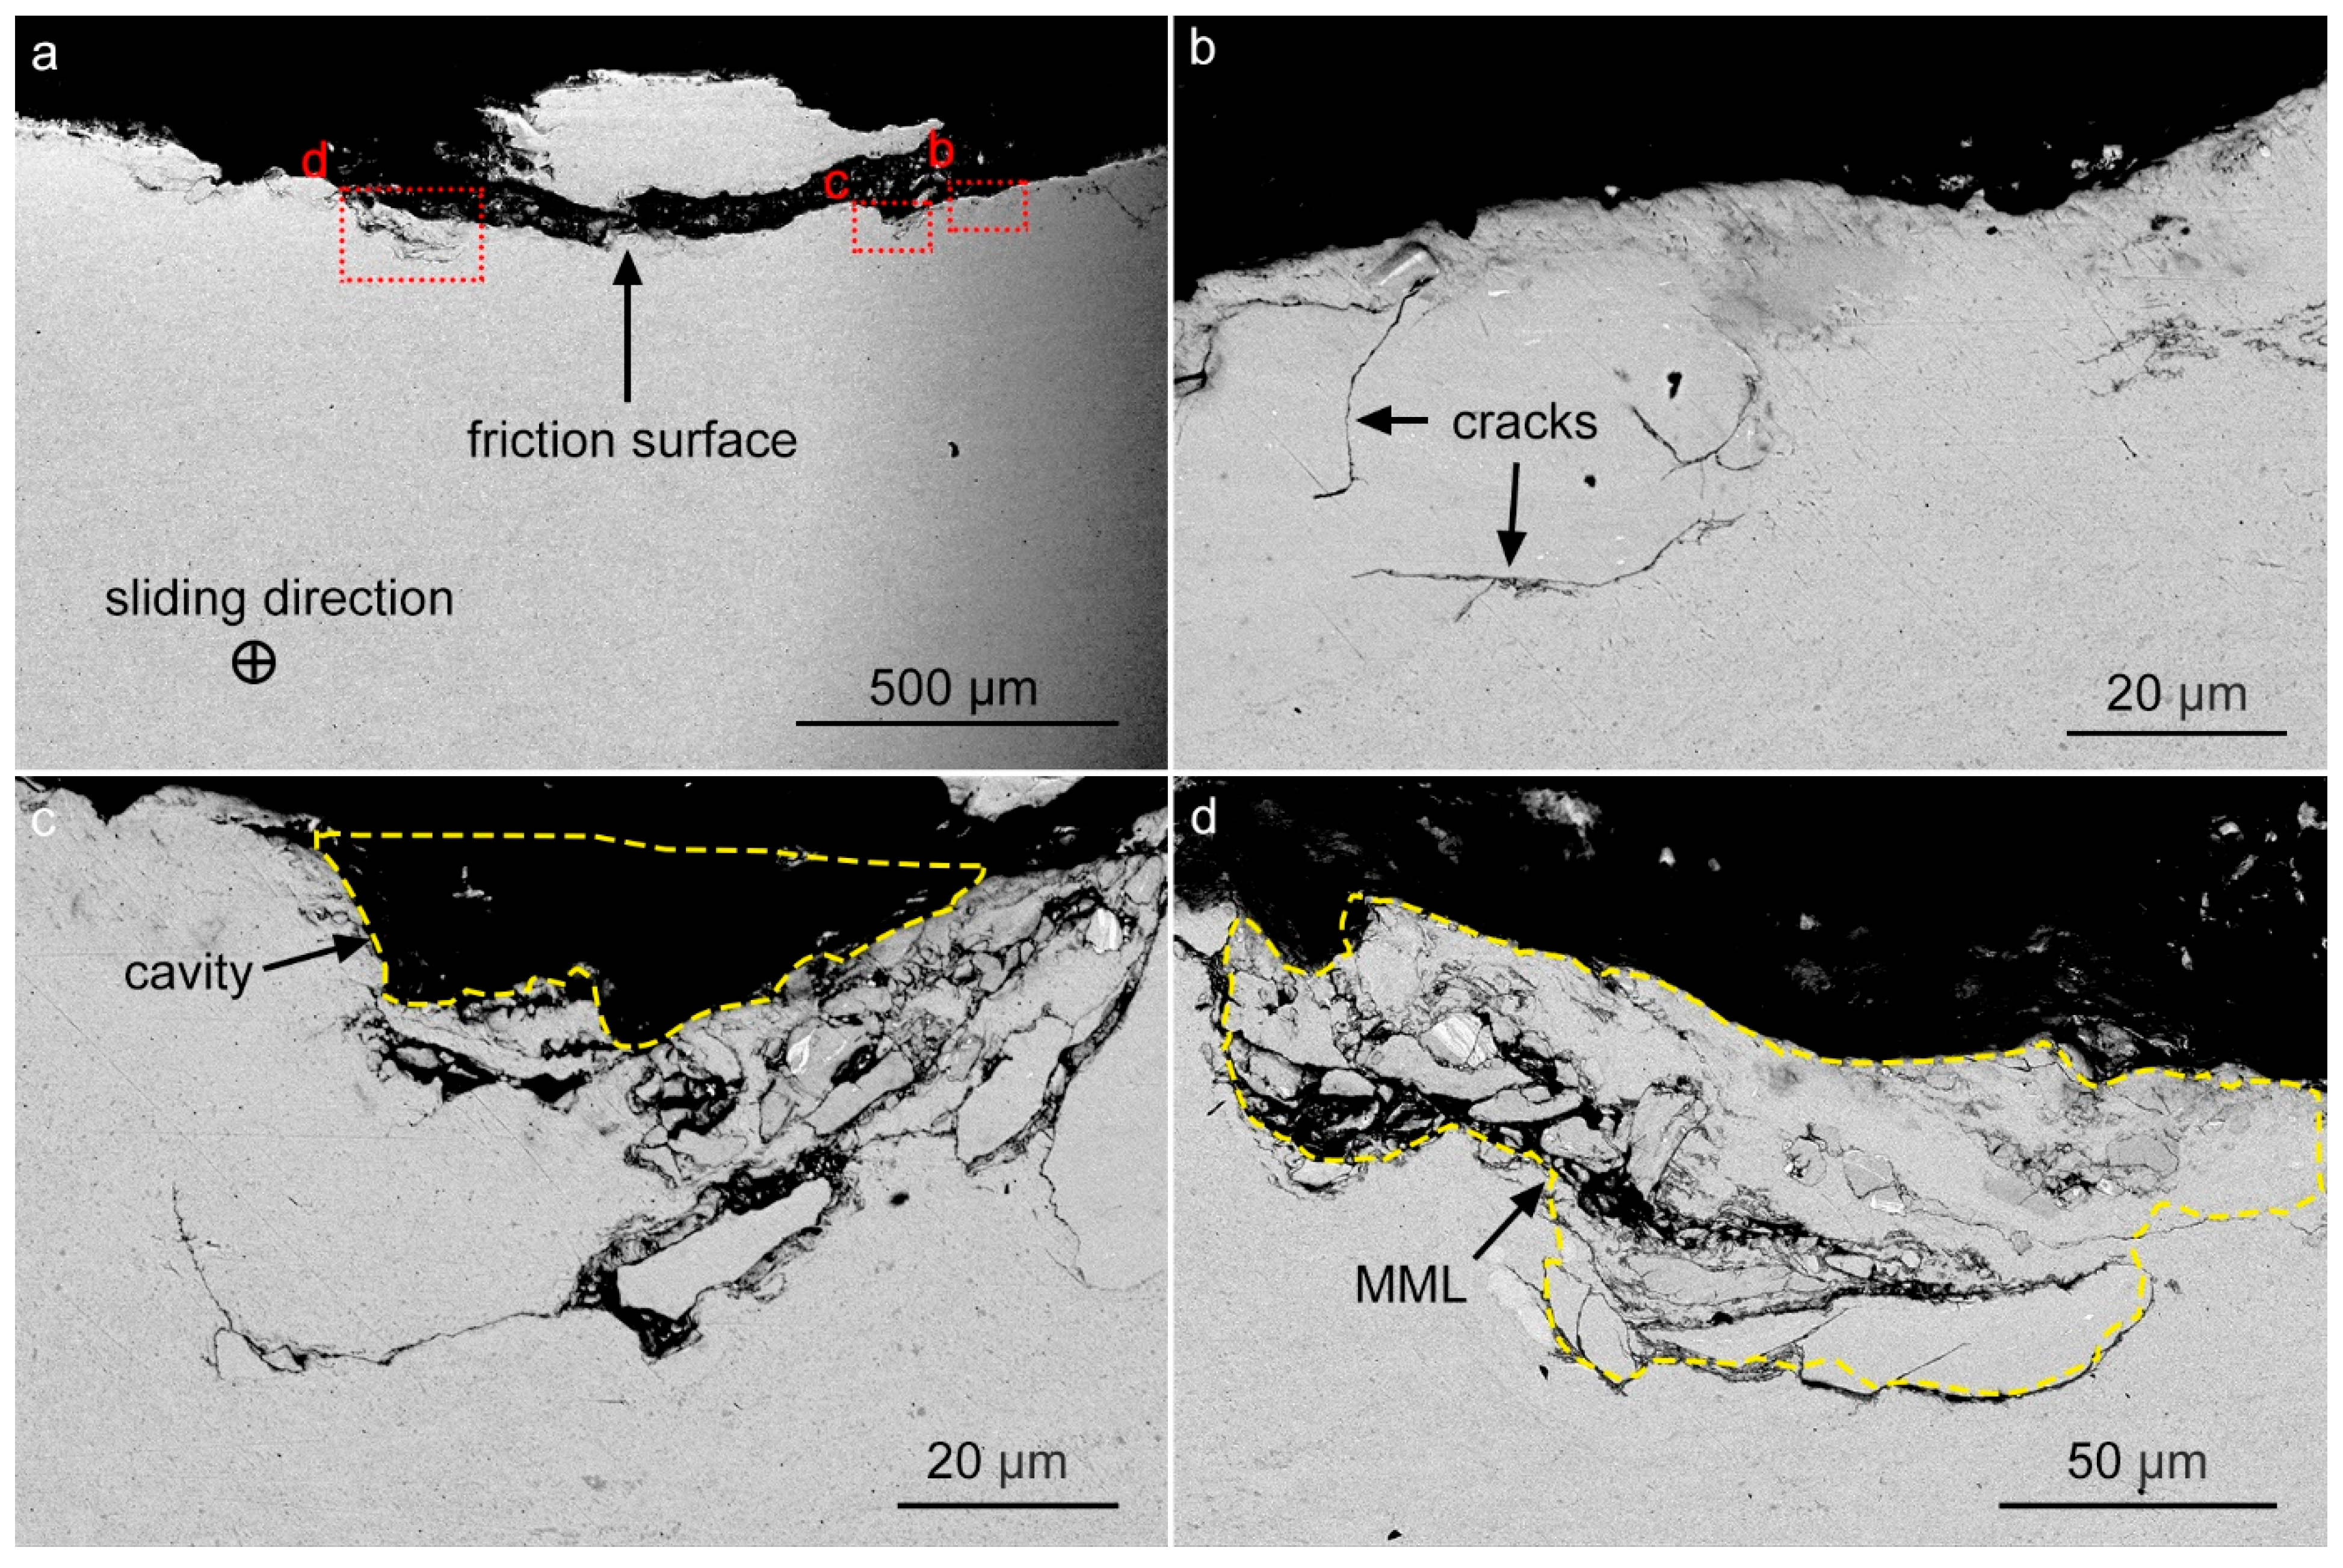
Figure 7 shows SEM images of the friction track on disc #4 in cross section. Since wear occurs cyclically, different wear stages can be conditionally distinguished on a single cross section. After the initial stage of plastic deformation of microroughnesses and the formation of a tribolayer, shear stresses lead to the formation of cracks, which can spread from the friction surface or arise under the surface (Figure 7b). Further, due to the action of stresses, cracks grow, the disc material breaks off, and a cavity forms (Figure 7c).
The disc material is transferred to the pin, forming a transfer layer. Subsequently, the transfer layer breaks away from the pin and is transferred back to the disc, covering the cavity (Figure 7d). Since the friction process also causes pin wear and oxidation, the transfer layer actually becomes a mechanically mixed layer (MML) consisting of disc and pin materials. It was found that the maximum crack propagation depth in these samples is about 60 μm. The maximum thickness of the transfer layer on the disc was also 60 μm, which appears to be critical under these conditions.
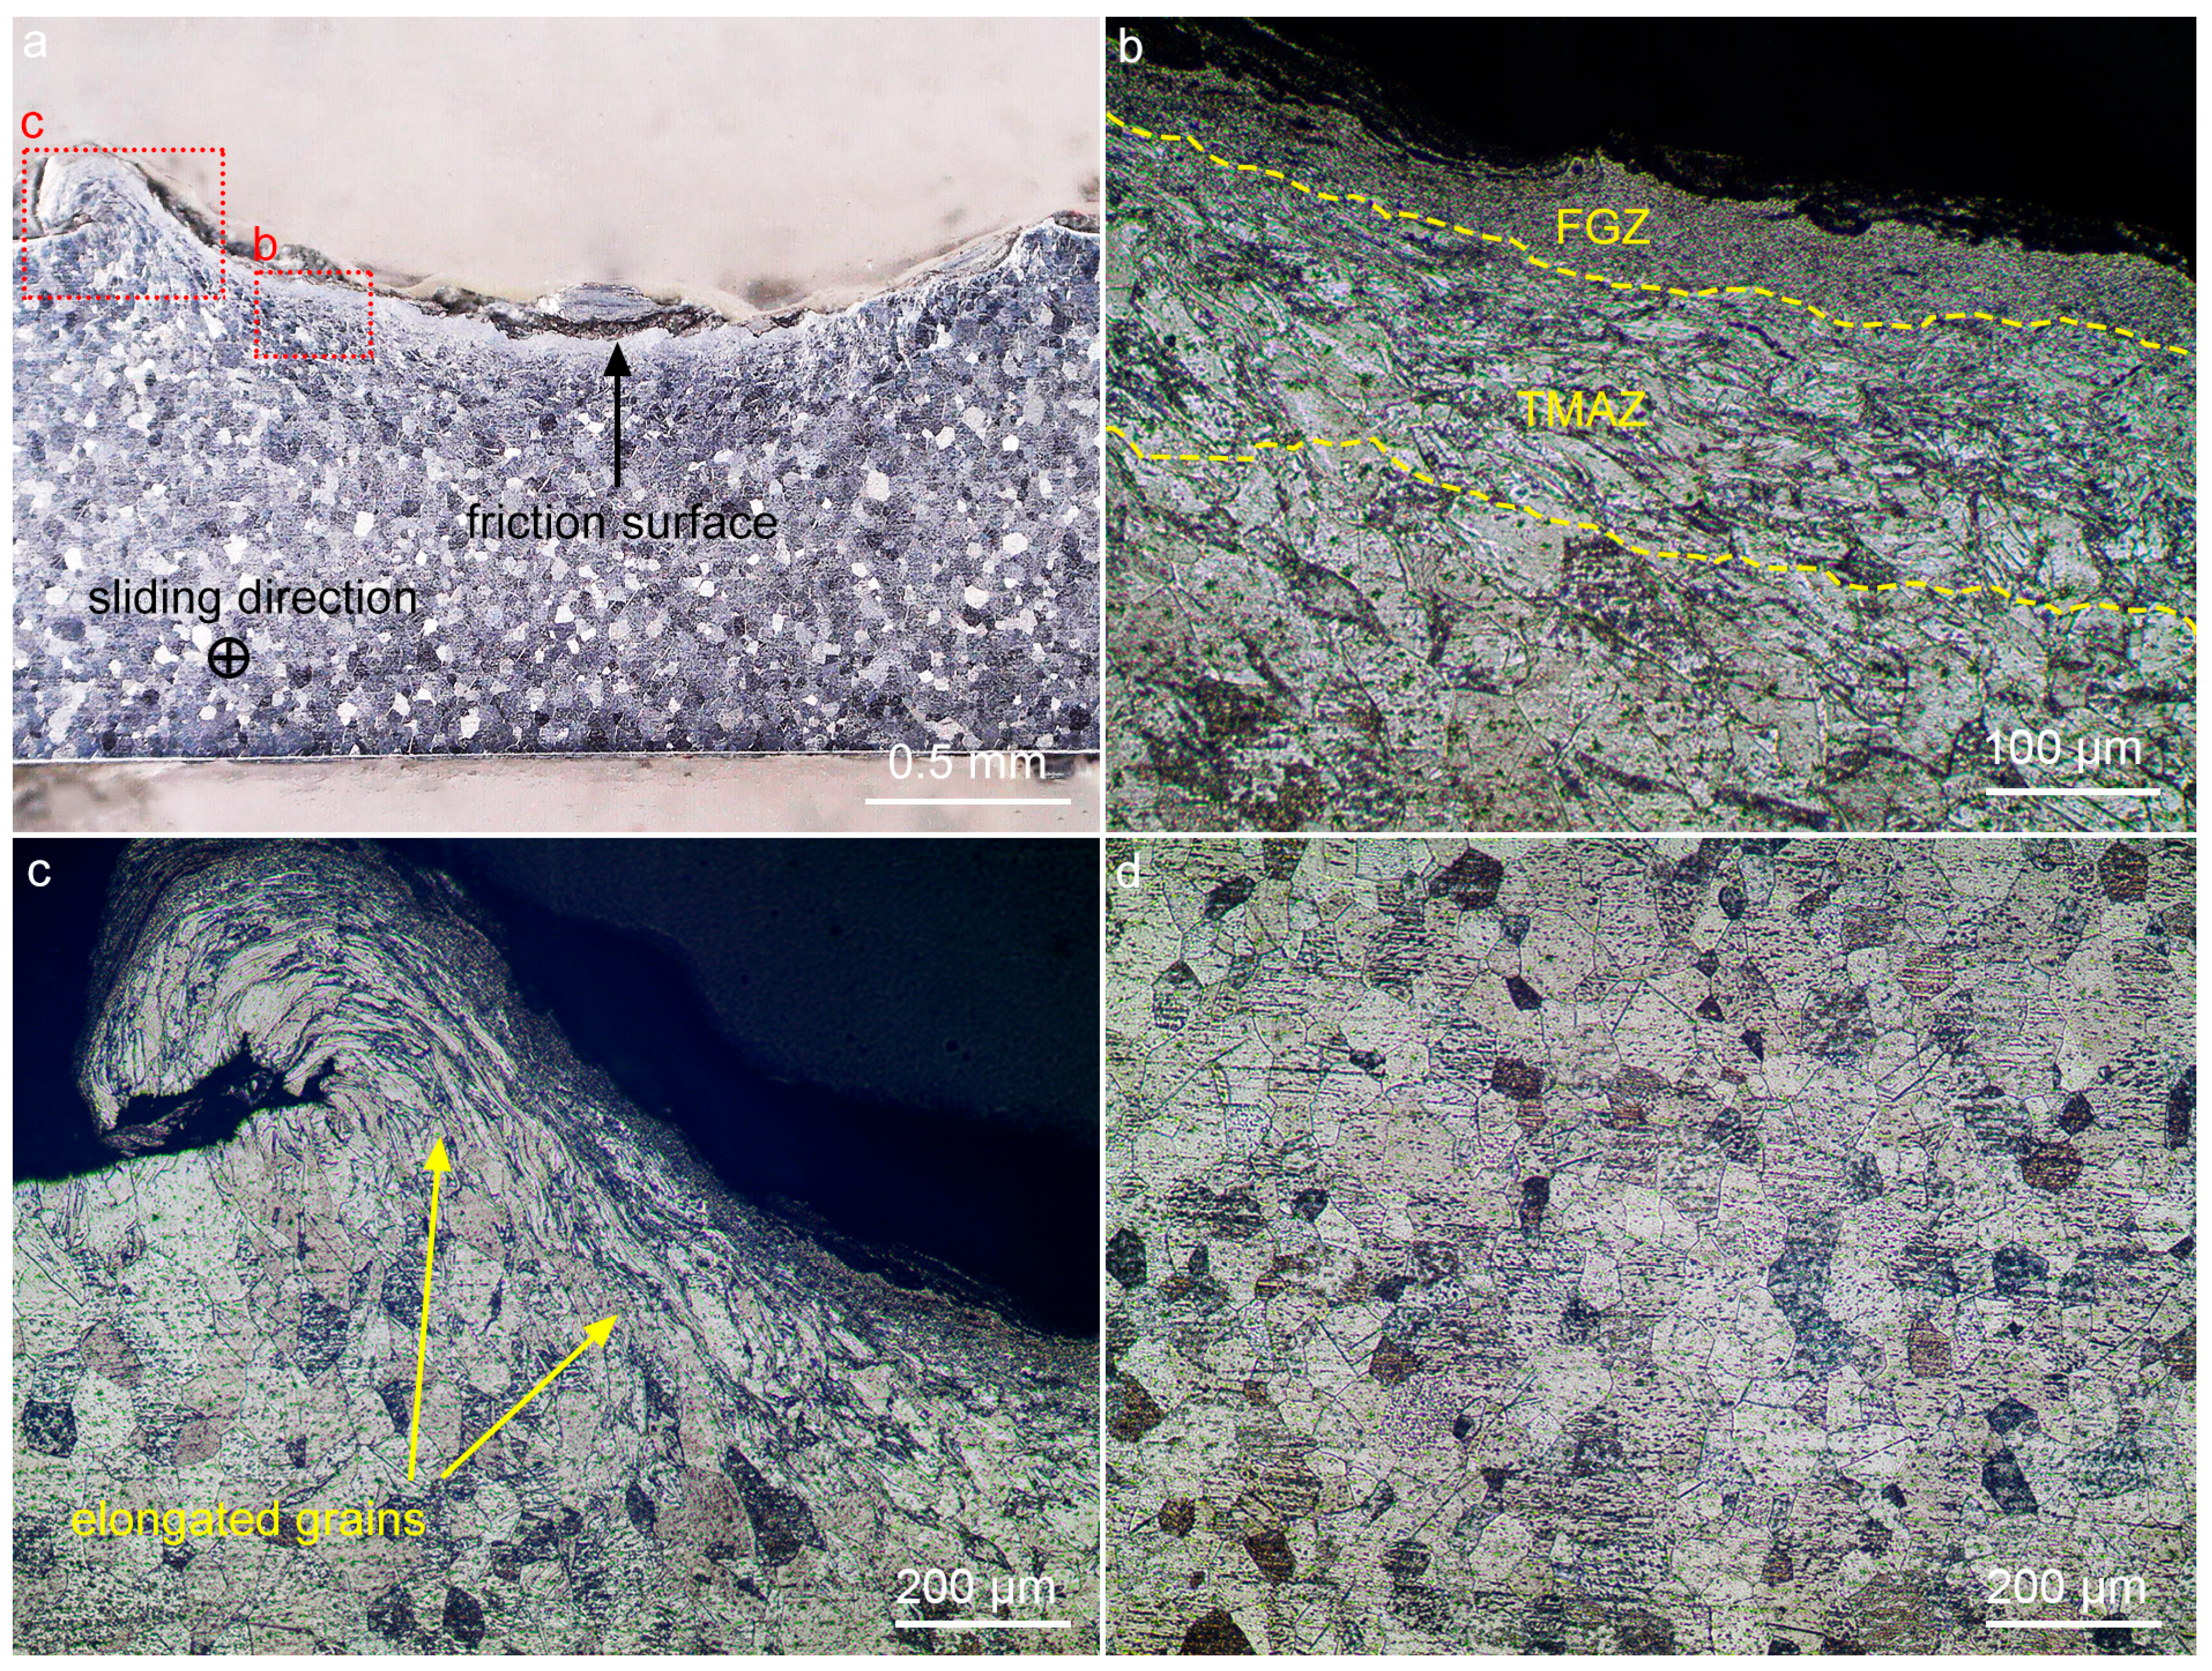
Figure 8 shows optical images of the initial microstructure of titanium and the friction track on disc #4 in cross section. The results of the microstructure analysis showed that the grain structure of the subsurface layer of the friction track was modified during friction. In its initial state, titanium has an equiaxed grain structure with a grain size of 53 ± 7 μm. As a result of friction, the grain in the subsurface layer is refined and deformed. In Figure 8b, several areas can be conditionally distinguished: the fine-grain zone (FGZ), which is located directly at the friction surface. In this area, it was not possible to determine the grain size. This area resembles the stir zone that forms during friction stir welding [18] and friction drilling [19]. The thickness of the fine-grain zone reaches 60 μm. Based on this, it can be concluded that the fine-grain zone is actually MML, which was observed in SEM images. Next, thermomechanical affected zone (TMAZ) can be distinguished, in which plastic deformation of grains and partial recrystallization occur under the influence of temperature and deformation. In this area, the minimum grain thickness was 7 μm, and the thickness of the zone reaches 200 μm. Closer to the edges of the friction track, grain elongation is most noticeable.

3.2. Investigation of Pins Made of ZhS6U Alloy After Friction

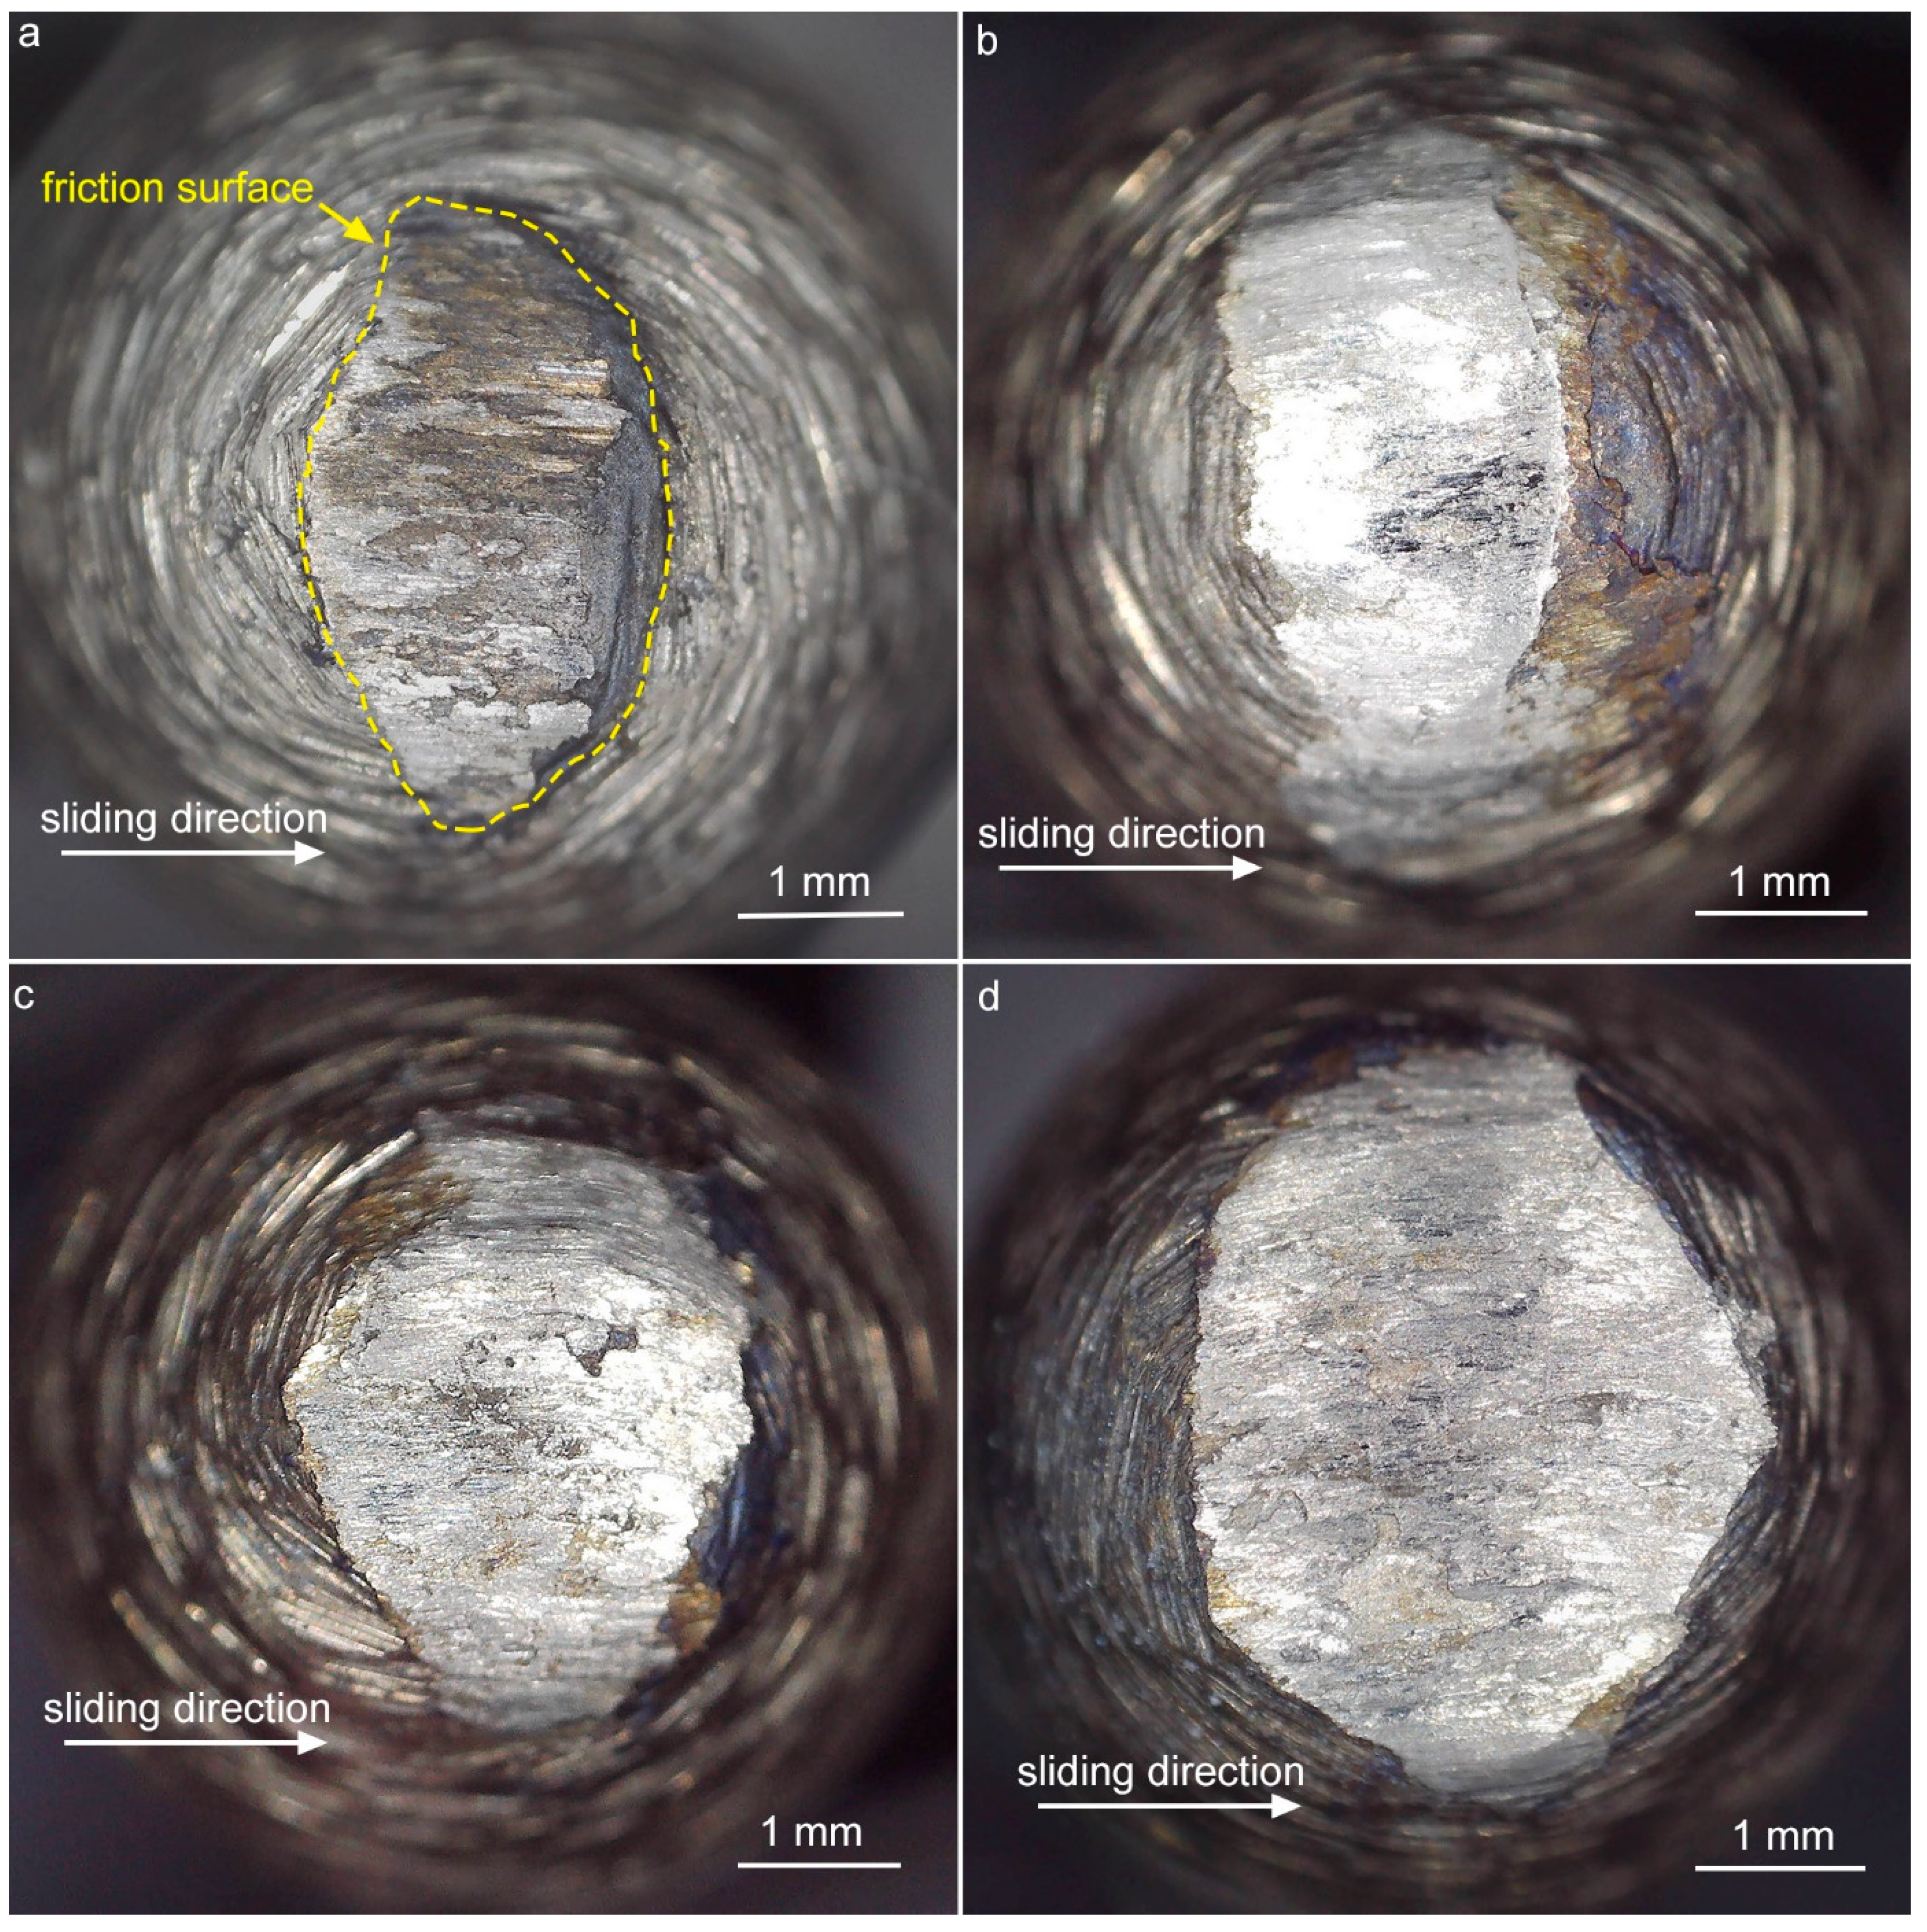
Figure 9 shows photographic images of pin surfaces after friction. The friction surface shows visible signs of oxidation and adhered titanium. At speeds of 0.46 m/s and 0.92 m/s, the friction surfaces have an elongated shape across the friction direction. As the speed increases, the friction surface becomes wider. It is remarkable that in all cases the friction surface is shifted towards the front of the pin. This is due to the drag force experienced by the pin surface when it penetrates the disc material and plastically displaces the titanium.
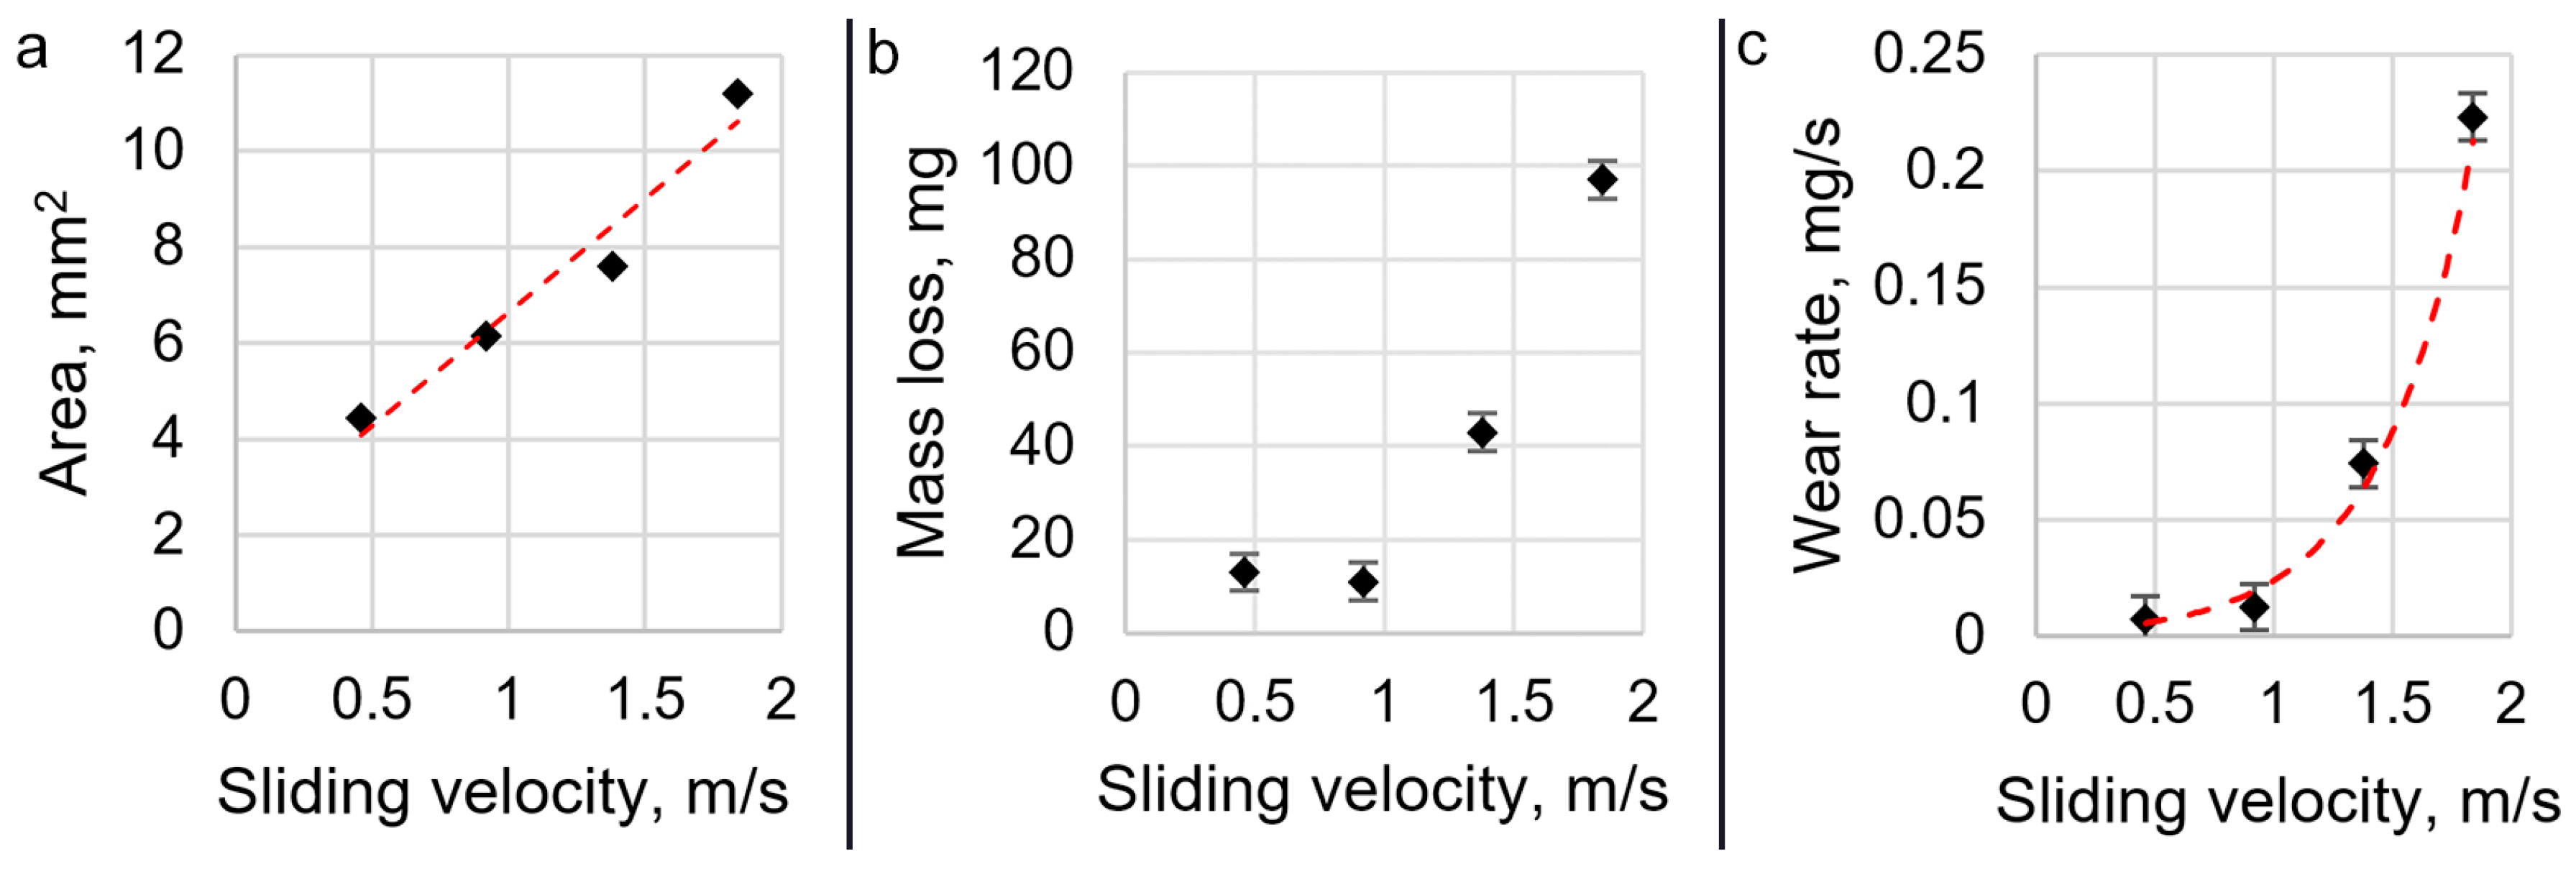
Figure 10a shows a graph of the friction surface area as a function of sliding speed. Judging by the graph, the dependence of the surface area on the friction speed is close to linear. In particular, if the graph is approximated by a straight line, the coefficient of determination R2 is 0.9539. Based on the measurements of the friction surface area, the pressure of the pin on the disc at the end of the tests ranged from 2.6 MPa to 3.3 MPa. At the beginning of the tests, the pressure was 1245 MPa. When the friction speed increased from 0.46 m/s to 1.84 m/s, the friction surface area on the pin increased by 2.5 times. Previously, it was found that the depth of the friction track on the disc varies non-linearly depending on the sliding speed, which does not fully explain this dependence. Figure 10b shows a graph of the pin wear depending on the sliding speed. It was found that at speeds of 0.46 m/s and 0.92 m/s, pin wear is 13 mg and 11 mg, respectively, which differs within the accuracy limits. The value of wear was determined as the difference in mass before and after the test. A further increase in the sliding speed to 1.38 m/s and 1.84 m/s increased the pin wear to 43 mg and 97 mg. Although the pins travelled the same distance during sliding, the duration of the test varied due to the different sliding speeds. Therefore, the wear rate was also calculated as the ratio of the wear value to the test time. Figure 10 shows the dependence of the finger wear rate on the friction speed. The function takes on an exponential form and can be expressed by the following formula:
J = 0.0018 e 2.6 V = e 2.6 V 555
where V is the friction velocity. The coefficient of determination R2 for this function is 0.9966. A similar pattern was observed in [13] at similar temperatures and speeds. However, the authors described wear under these conditions as thermal softening wear. The pattern of wear rate in friction tests of Nimonic 90, Rene 77, and Udimet 520 nickel superalloys against EN-31 hardened steel was close to linear [12]. However, the overall wear mechanism in this study appears to be similar.
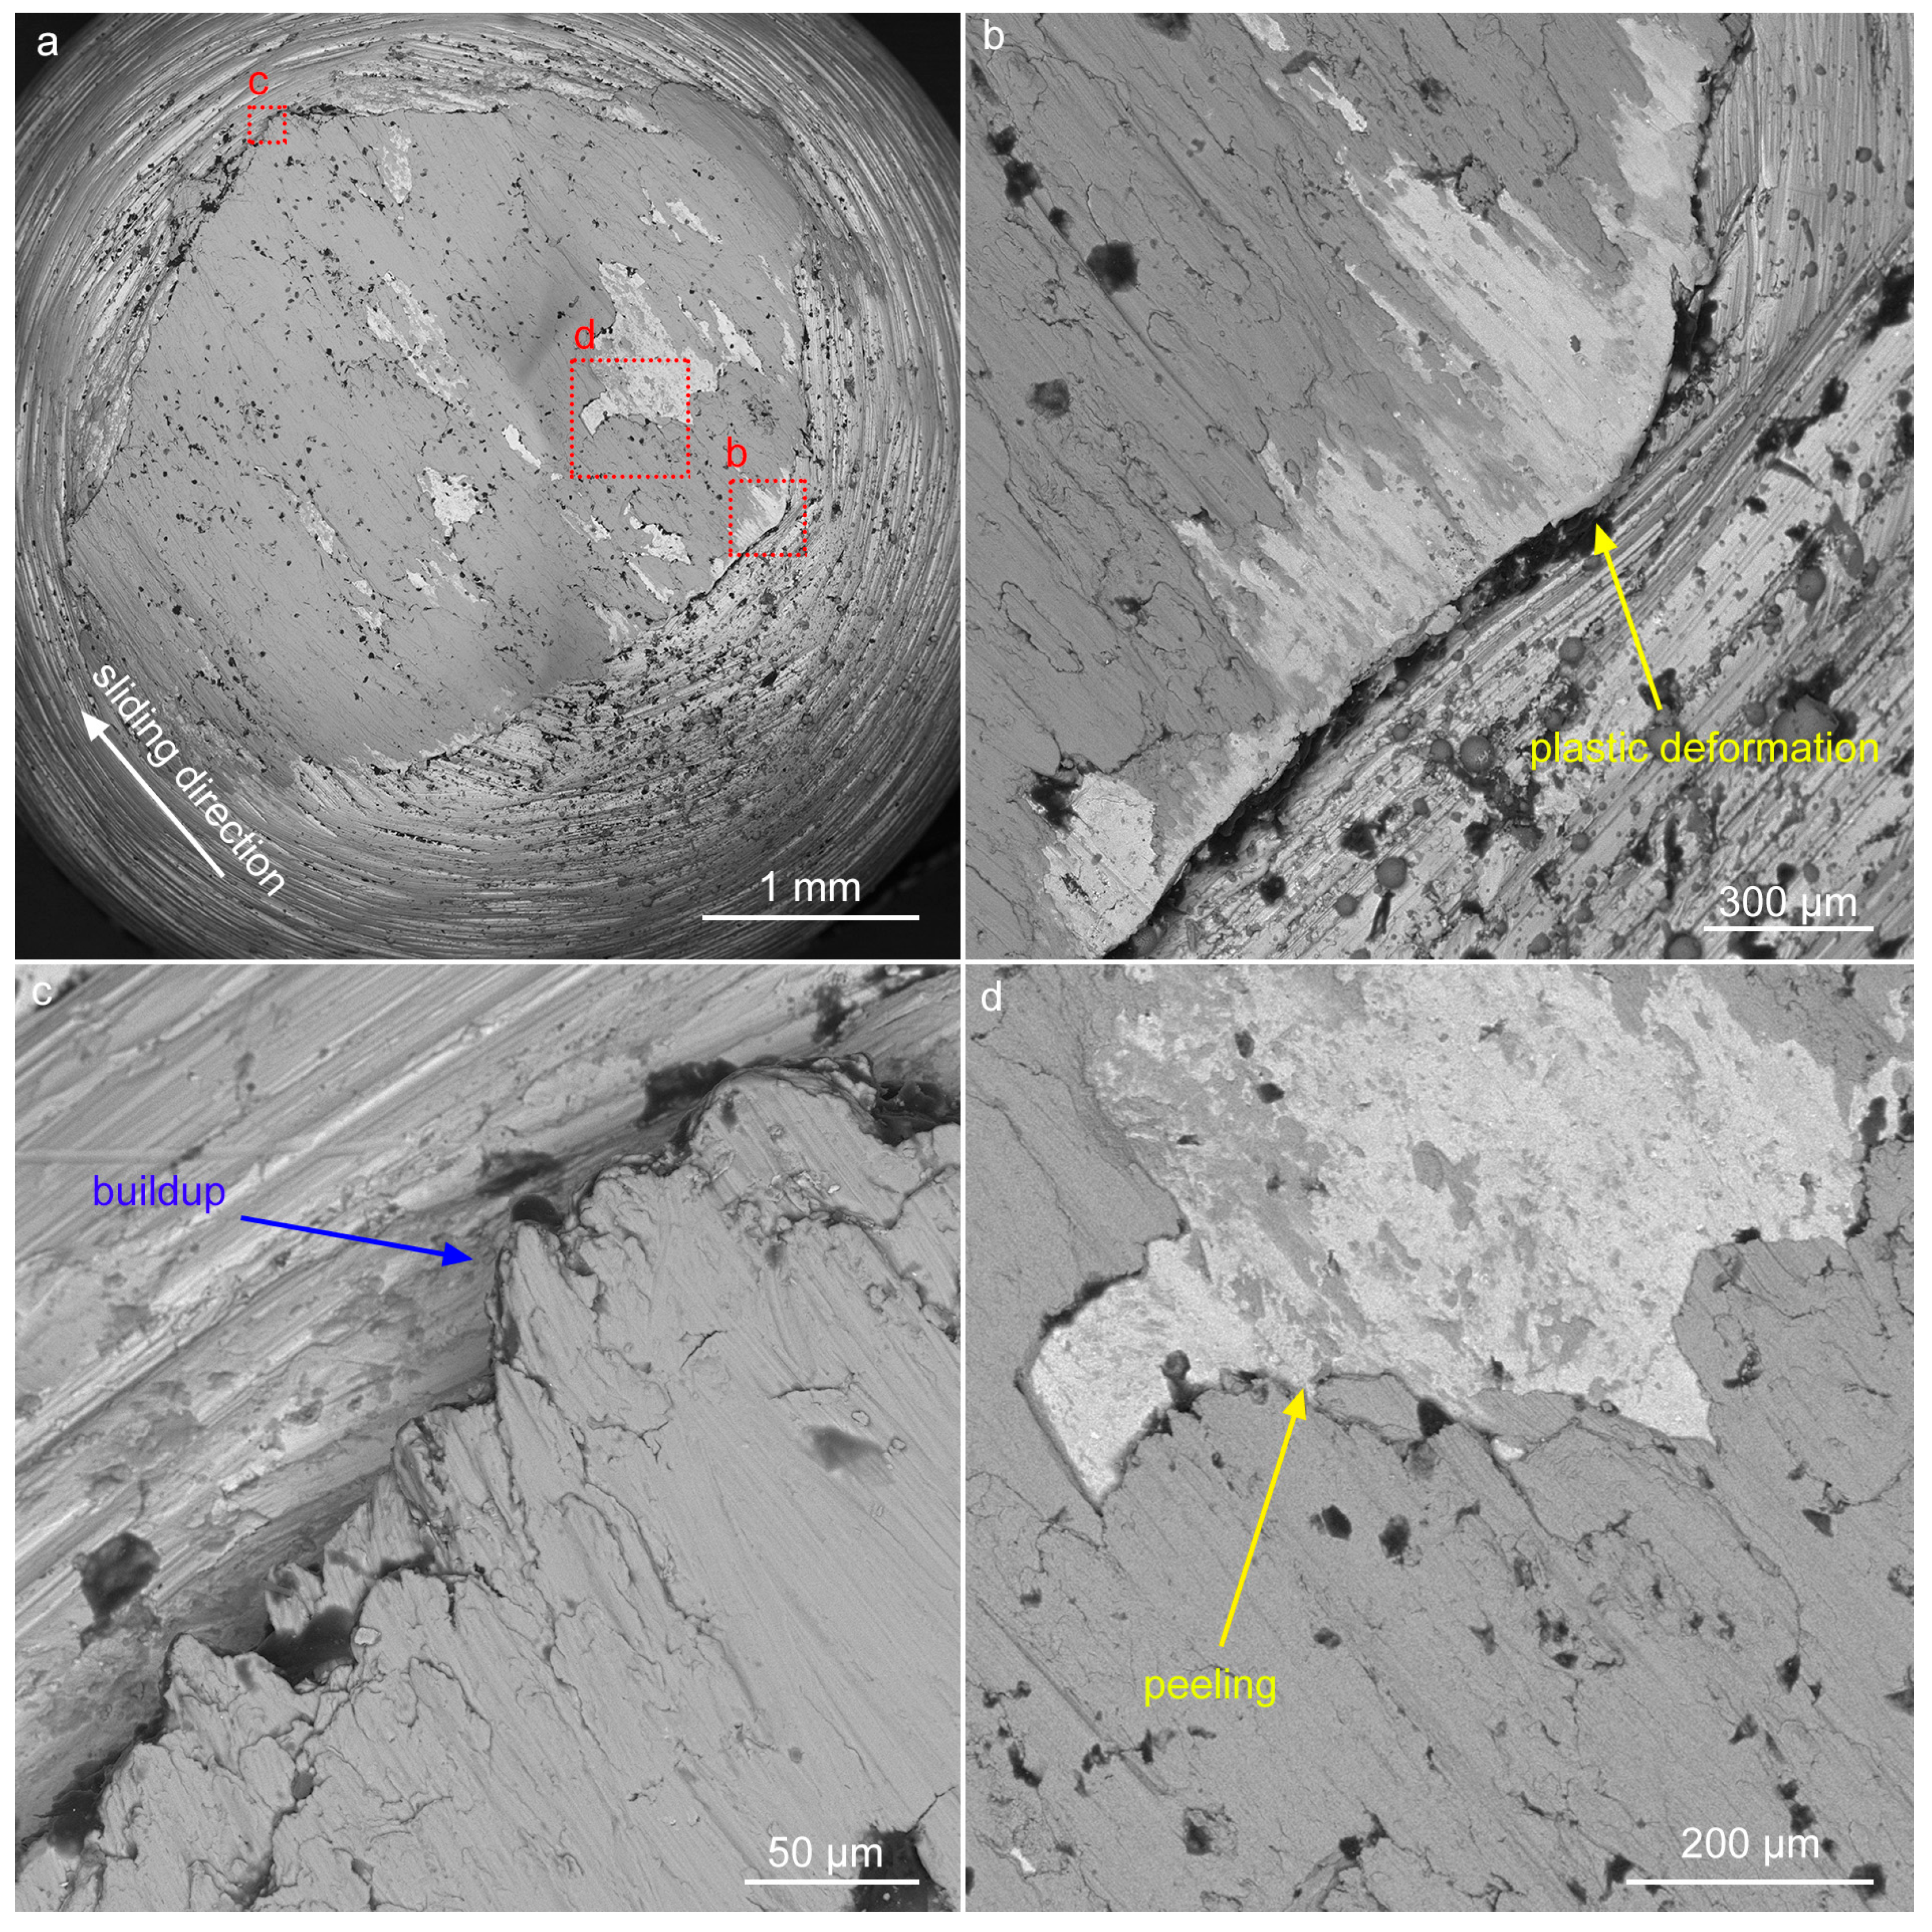
By analyzing the wear of the pin and the disc together, the linear dependence of the increase in the wear area on the pin can be explained as follows. When the sliding speed increases to 0.92 m/s, the wear of the disc increases significantly and the depth of the friction track increases. Accordingly, the pin plunges deeper into the disc and the friction area increases. A further increase in speed leads to a decrease in the depth of the friction track, but at the same time, pin wear increases significantly, as shown by mass measurements. Since the pin tip is initially hemispherical-shaped, its wear leads to an increase in the friction area. In addition to wear, plastic deformation of the pin surface occurs during friction. This also led to an increase in the friction surface area. This was most clearly observed on pin #4 (Figure 11).
At the back edge of the friction surface, there is a ridge of ZhS6U material, which has been plastically deformed during friction. At the front edge of the friction surface, there is a transfer layer consisting of disc material. Almost the entire friction surface is covered with an adhered transfer layer with a scaly surface morphology, but there are also local areas where the transfer layer has delaminated (Figure 11d). In addition to the areas where the tribological layer has delaminated from the pin surface, the thickness of the layer also varies, as can be seen in the cross section (Figure 12).
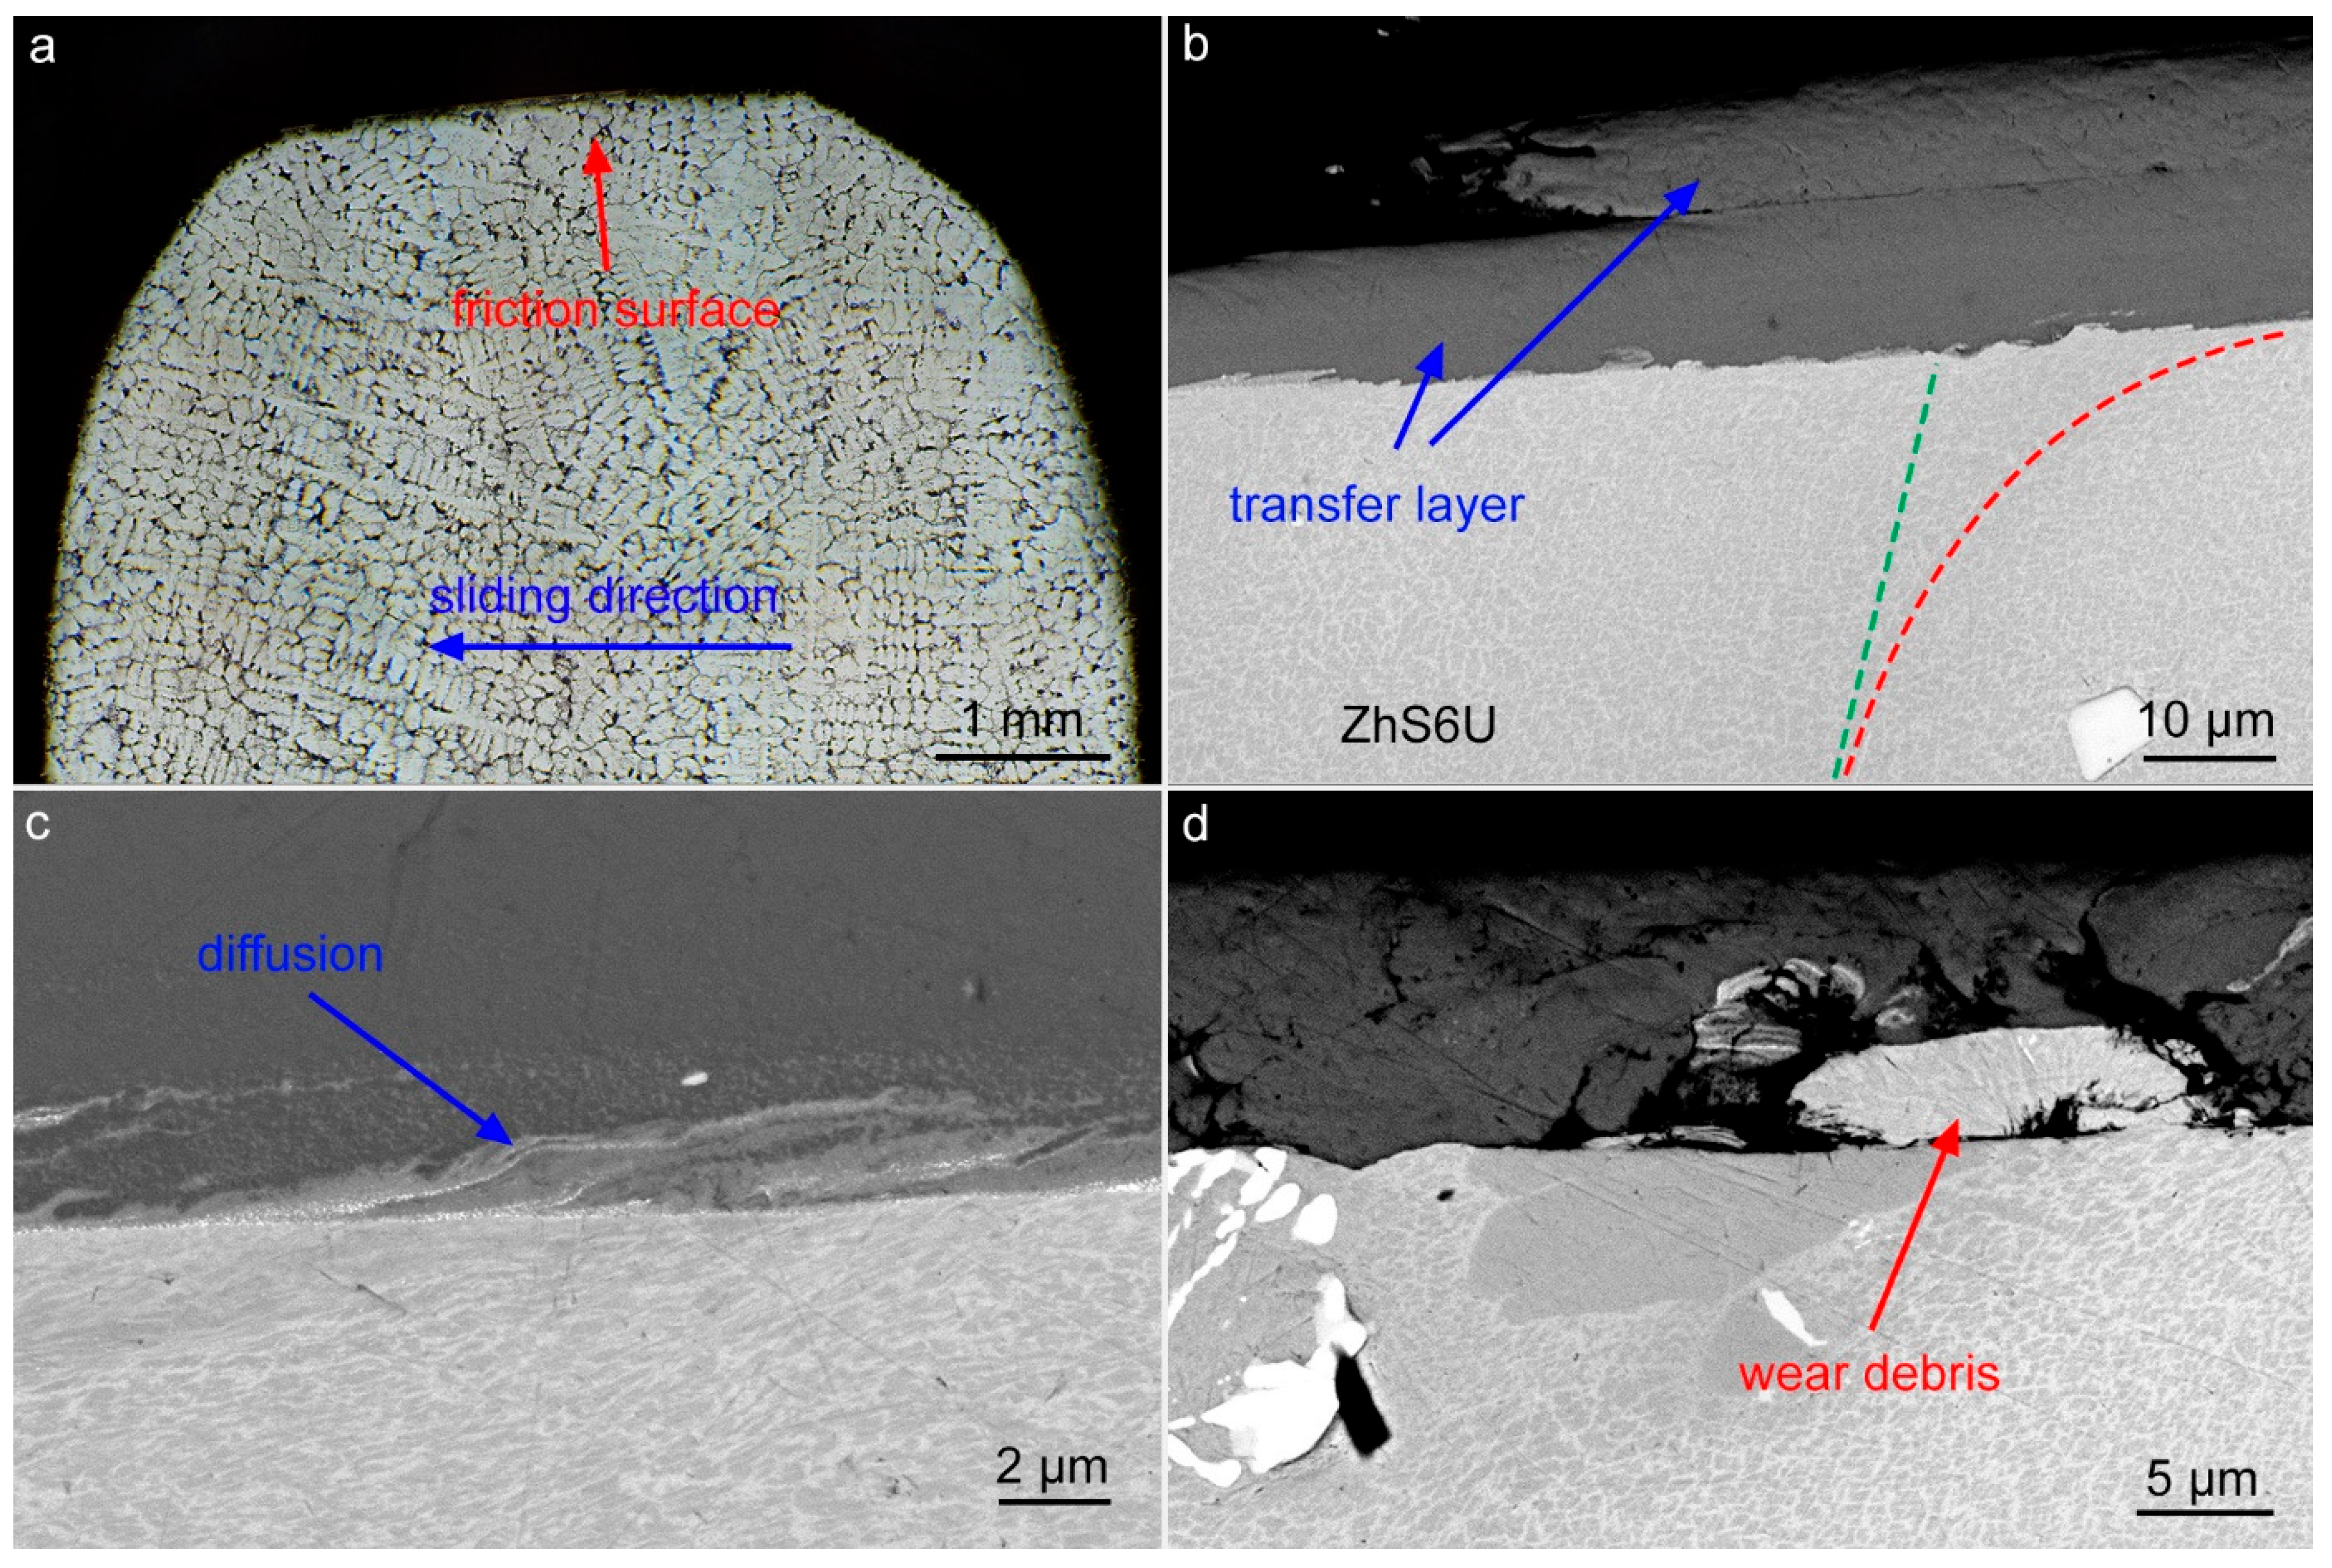
Figure 12a shows a metallographic image of the structure of pin #4 in cross section. The pin material has a dendritic macrostructure, which is characteristic of the cast alloy ZhS6U. No changes in the macrostructure of the surface layer were found after friction. At the micro level, the alloy structure is represented by γ’-phase cuboids [20]. During friction, these cuboids were plastically deformed in the surface layer in the direction of friction (Figure 12b). The depth of plastic deformation was about 30 μm.
Several stages of pin wear can also be observed in the cross section. Figure 12b shows the adhered transfer layer. In this area, it can be seen that the transfer layer has a complex structure and is divided into two sublayers. It can be concluded that titanium first adheres to the surface of the pin as a result of adhesion, and then the transfer layer grows as a result of cohesion. Figure 12c shows how the pin material diffuses into the transfer layer. As a result of diffusion, the surface layer of the ZhS6U alloy weakens and breaks down. Figure 12d shows how a particle of the ZhS6U alloy, having separated from the pin, became mixed into the transfer layer. As a result of these processes, the thickness of the transfer layer constantly changes and reaches a maximum value of 20 μm. The average thickness of the transfer layer adhering to the pin is 14 ± 4 μm.
The results obtained at this stage do not allow for the prediction of the most effective parameters for friction stir welding, as each tribosystem possesses unique properties. However, several general observations can be made. To minimize wear on the ZhS6U alloy tool, it is advisable to select a lower tool rotation speed. Increased friction speed appears to enhance the diffusion of ZhS6U atoms into the tribolayer, thereby accelerating tool wear. From the perspective of achieving high-quality welds, the friction speed should be chosen to optimize the efficient transfer of titanium to the tool and back. In this study, titanium exhibited the highest wear at a sliding speed of 0.92 m/s. Given that the wear mechanism was predominantly adhesive, this speed represents the most effective operational mode.
4. Conclusions

This study investigated the wear characteristics of the nickel alloy ZhS6U and commercially pure titanium under dry friction using a pin-on-disc configuration at sliding speeds ranging from 0.46 m/s to 1.84 m/s.
  • The friction coefficient, disc mass loss, and friction track width and depth were found to correlate, initially increasing with sliding speed to reach a maximum, then decreasing. The highest friction coefficient and disc wear occurred at a sliding speed of 0.92 m/s.
  • A transfer layer formed from wear particles during friction, undergoing mechanochemical oxidation, which reduced the friction coefficient and stabilized it. Stabilization was not observed at 0.92 m/s, likely due to elevated adhesion.
  • Wear particles from the ZhS6U pin were present exclusively in the mechanically mixed layer and did not appear on the pure titanium surface, indicating that pin wear proceeds primarily via an adhesive mechanism within this layer.
  • Pin wear analysis revealed a linear relationship between friction surface area and sliding speed, while the pin wear rate increased exponentially with sliding speed.
  • The transfer layer adhering to the pin exhibited a complex, multilayered structure. Initially, titanium adhered to the pin surface due to adhesion; subsequently, the transfer layer grew via cohesion.
  • Diffusion of the pin material into the transfer layer was observed beneath this layer, resulting in weakening and degradation of the ZhS6U alloy surface, with pin wear particles forming a mechanically mixed layer together with oxidized titanium particles.
  • The obtained results suggest that, under specific loads and temperatures relevant to FSW, a sliding speed exists at which titanium wear is maximized and pin wear minimized. This implies that in FSW of titanium with nickel superalloy tools, there are operational modes that minimize tool wear while ensuring adequate joint quality.

Author Contributions

Conceptualization, A.E. and A.F.; Methodology A.E. and A.F.; Investigation A.E., A.F., K.O. and A.A.; Writing—Original Draft Preparation, A.A.; Writing—Review & Editing, A.A. and A.F.; Visualization, A.A.; Supervision, A.A. All authors have read and agreed to the published version of the manuscript.

Funding

The work was performed according to the Government Research Assignment for the ISPMS SB RAS (Project FWRW–2021-0006).

Institutional Review Board Statement

Not applicable.

Informed Consent Statement

Not applicable.

Data Availability Statement

The original contributions presented in this study are included in the article. Further inquiries can be directed to the corresponding author.

Acknowledgments

The investigations were carried out using the equipment of the Shared Use Centre Nanotech of the ISPMS SB RAS.

Conflicts of Interest

The authors declare no conflicts of interest.

References

  1. Mishra, R.S.; De, P.S.; Kumar, N. Friction Stir Welding and Processing; Springer International Publishing: Cham, Switzerland, 2014; ISBN 978-3-319-07042-1. [Google Scholar]
  2. Kuznetsov, V.P.; Skorobogatov, A.S.; Kolubaev, E.A.; Dmitriev, A.I.; Smolin, I.Y.; Voropaev, V.V.; Vorontsov, I.A. Effect of the Tool Path on Hardness Uniformity in an Annular Zone of X20Cr13 Steel Surface-Hardened by Friction Stir Processing. Phys. Mesomech. 2023, 26, 593–607. [Google Scholar] [CrossRef]
  3. Fall, A.; Fesharaki, M.; Khodabandeh, A.; Jahazi, M. Tool Wear Characteristics and Effect on Microstructure in Ti-6Al-4V Friction Stir Welded Joints. Metals 2016, 6, 275. [Google Scholar] [CrossRef]
  4. Wu, L.H.; Wang, D.; Xiao, B.L.; Ma, Z.Y. Tool Wear and Its Effect on Microstructure and Properties of Friction Stir Processed Ti–6Al–4V. Mater. Chem. Phys. 2014, 146, 512–522. [Google Scholar] [CrossRef]
  5. Kablov, E.N.; Petrushin, N.V.; Parfenovich, P.I. Design of Castable Refractory Nickel Alloys with Polycrystalline Structure. Met. Sci. Heat Treat. 2018, 60, 106–114. [Google Scholar] [CrossRef]
  6. Eliseev, A.; Amirov, A.; Kalashnikova, T.; Vorontsov, A.; Kolubaev, E. Production of Ti–1.5Al–1Mn Titanium Alloy Butt Joints by Friction Stir Welding. Metals 2021, 11, 1566. [Google Scholar] [CrossRef]
  7. Wang, Y.; Zhao, S.; Jia, Z.; Ji, J.; Liu, D.; Guo, T.; Ding, Y. Study on Friction and Wear Behavior of Inconel 625 Superalloy during Hot Extrusion. Adv. Mater. Sci. Eng. 2020, 2020, 5453703. [Google Scholar] [CrossRef]
  8. Stoyanov, P.; Dawag, L.; Goberman, D.G.; Shah, D. Friction and Wear Characteristics of Single Crystal Ni-Based Superalloys at Elevated Temperatures. Tribol. Lett. 2018, 66, 47. [Google Scholar] [CrossRef]
  9. Zhang, J.; Zhang, K.; Chen, J.; Zhao, P.; Liu, W.; Jiang, Z.; Liu, Q.; Yang, S. Friction Surface Evolution of Ni-Based Superalloy with Addition of Revert at High Temperature. Wear 2025, 580–581, 206240. [Google Scholar] [CrossRef]
  10. Zykova, A.; Vorontsov, A.; Chumaevskii, A.; Gurianov, D.; Gusarova, A.; Kolubaev, E.; Tarasov, S. Structural Evolution of Contact Parts of the Friction Stir Processing Heat-Resistant Nickel Alloy Tool Used for Multi-Pass Processing of Ti6Al4V/(Cu+Al) System. Wear 2022, 488–489, 204138. [Google Scholar] [CrossRef]
  11. Zhang, Z.; Li, X.; Dong, H.; Sánchez, E.A.; Fuentes, G.G.; Qin, Y. Towards Low-Friction and Wear-Resistant Plasma Sintering Dies via Plasma Surface Co-Alloying CM247 Nickel Alloy with V/Ag and N. MATEC Web Conf. 2015, 21, 10005. [Google Scholar] [CrossRef]
  12. Salwan, G.K.; Subbarao, R.; Mondal, S. Investigation of Mechanical Properties and Wear Behavior of Nickel-Based Superalloys Synthesized by Powder Metallurgy. JOM 2024, 76, 6231–6239. [Google Scholar] [CrossRef]
  13. Saito, Y.; Mino, K. Elevated Temperature Wear Maps of X40 and Mar-M247 Alloys. J. Tribol. 1995, 117, 524–528. [Google Scholar] [CrossRef]
  14. Wang, Y.; Jia, Z.; Lu, W.; Cheng, Q.; Ji, J.; Liu, D. A Review of the Tribology of Nickel-Based Superalloys. Adv. Eng. Mater. 2024, 26, 2400729. [Google Scholar] [CrossRef]
  15. Amirov, A.; Eliseev, A.; Beloborodov, V. Wear of Ni-Based Superalloy Tools in Friction Stir Processing of Commercially Pure Titanium. Lubricants 2023, 11, 307. [Google Scholar] [CrossRef]
  16. Tarasov, S.Y.; Filippov, A.V.; Kolubaev, E.A.; Kalashnikova, T.A. Adhesion Transfer in Sliding a Steel Ball against an Aluminum Alloy. Tribol. Int. 2017, 115, 191–198. [Google Scholar] [CrossRef]
  17. Li, L.; He, K.; Sun, S.; Yang, W.; Yue, Z.; Wan, H. High-Temperature Friction and Wear Features of Nickel-Based Single Crystal Superalloy. Tribol. Lett. 2020, 68, 26. [Google Scholar] [CrossRef]
  18. Lunetto, V.; De Maddis, M.; Lombardi, F.; Russo Spena, P. A Review of Friction Stir Welding of Industrial Alloys: Tool Design and Process Parameters. J. Manuf. Mater. Process. 2025, 9, 36. [Google Scholar] [CrossRef]
  19. Khedr, M.; Hamzawy, N.; Hamada, A.; Jaskari, M.; Mahmoud, T.S.; El-Mahallawi, I.; Khalifa, T. Improved Mechanical Behavior of Friction Stir Drilled 6082 Aluminum Alloy via T6 Treatment. J. Mater. Res. Technol. 2024, 31, 2774–2785. [Google Scholar] [CrossRef]
  20. Jonšta, P.; Vlčková, I.; Jonšta, Z.; Podhorná, B. Materialographic Analysis of MAR M-247 Superalloy. Key Eng. Mater. 2015, 647, 66–71. [Google Scholar] [CrossRef]
Figure 1. Tribological testing diagram.
Eng 06 00327 g001
Figure 2. Photographs of titanium discs after tribological tests #1 (a), #2 (b), #3 (c), #4 (d).
Eng 06 00327 g002
Figure 3. Type A (a), B (b), C (c) areas on the friction track surface.
Eng 06 00327 g003
Figure 4. Effect of sliding speed on friction track width (a), depth (b), and disc mass loss (c).
Eng 06 00327 g004
Figure 5. Graph of friction coefficient changes during the experiment (a) and graph of average friction coefficient dependence on sliding speed (b).
Eng 06 00327 g005
Figure 6. SEM image of the friction surface of disc #3 (a) and detailed image of the transfer layer (b).
Eng 06 00327 g006
Figure 7. SEM image of the friction track on disc #4 in cross section (a), formation and growth of a crack beneath the surface (b), material detachment and cavity formation (c), cavity covering by a mechanically mixed layer (d).
Eng 06 00327 g007
Figure 8. Optical images of the cross section of disc #4 (a), the sub-surface layer of the friction track (b), the edge of the friction track (c), and the structure of the base metal (d).
Eng 06 00327 g008
Figure 9. Photographic images of the friction surface on pins #1 (a), #2 (b), #3 (c), and #4 (d).
Eng 06 00327 g009
Figure 10. Graphs showing the friction surface area on pins (a), pin wear (b), and pin wear rate depending on sliding speed (c).
Eng 06 00327 g010
Figure 11. SEM images of the friction surface on pin #4, general view (a), back edge of the friction surface (b), front edge (c), and area with delamination of the transfer layer (d).
Eng 06 00327 g011
Figure 12. Metallographic image of pin #4 in cross section (a) and SEM images of the interface between the pin and the transfer layer (bd). The green dashed line indicates the initial orientation of the cuboids. The red dashed line indicates the direction of deformation.
Eng 06 00327 g012
Table 1. Technological modes of tribological tests.
Sample NumberRotate Rate, RPMSliding Velocity, m/sLoad, N
12500.4622
25000.9222
37501.3822
410001.8422
Table 2. Results of EDS analysis of the friction surface of disc #3 in the areas shown in Figure 6.
Spot 1Spot 2Spot 3
Ti1008214
Ni-352
W-413
O-11-
Al--4
Cr--7
Mn--1
Co--9
Disclaimer/Publisher’s Note: The statements, opinions and data contained in all publications are solely those of the individual author(s) and contributor(s) and not of MDPI and/or the editor(s). MDPI and/or the editor(s) disclaim responsibility for any injury to people or property resulting from any ideas, methods, instructions or products referred to in the content.