Abstract
This research aims to study the mechanical behavior of the materials most commonly used in crankshaft manufacturing by designing a four-piston crankshaft, analyzing the stresses and displacements resulting from the applied load, and determining vibration frequencies. Additionally, this study examines the thermal behavior of the crankshaft. For this purpose, a three-dimensional model of the crankshaft was designed using CATIA V5 R18 software, and finite element analysis was subsequently performed using ANSYS 2019 R1 software under static, dynamic, and thermal conditions with four different materials in various orientations. To verify the effectiveness of the proposed design, it was compared with a reference design in terms of stresses and displacements. This study also explores improvements in crankshaft geometry and shape. The results indicate that selecting the appropriate material for the working conditions and optimizing the geometry and shape enhance engine performance and reduce the crankshaft’s weight by 20%. The findings were validated by comparing the designs, which support increased productivity and improved durability.
1. Introduction
Energy transmission systems in mechanical industries, particularly in automotive machinery, require durable materials with appropriate properties to ensure optimal performance during energy transmission. The materials used in crankshafts must have adequate bearing capacity and high yield limits, enabling them to withstand fatigue in power transmission elements [1]. The crankshaft is one of the most crucial moving parts in internal combustion engines. It converts the reciprocating movement of the piston into rotational movement. It also includes fixed central axes that rotate in place and movable eccentric axes to which the connecting rods are mounted [2]. Research has focused on increasing the yield and extending the lifespan of the crankshaft. Consequently, many studies have been conducted. One study aimed at this objective examined different modeling methods using a virtual FEV engine and discussed the variations between the results of these techniques to calculate crankshaft durability and improve efficiency [3]. The study also addressed weight and cost reduction for forged steel crankshafts, including dynamic analysis [4]. Researchers have designed and developed crankshafts capable of withstanding cyclic loads without failure, which is crucial for industrial applications. The goal is to manufacture crankshafts that are both lightweight and highly fatigue-resistant, resulting in lighter, more efficient components [5,6]. Consequently, optimal crankshaft design receives significant attention, making it vital in the manufacturing sector to ensure durability and cost-effectiveness [7]. Therefore, optimized crankshaft design is an effective approach to increase fuel efficiency and reduce overall engine costs. It has been observed that during engine operation, energy pulses occur at various points within the crankshaft, causing vibrations. If energy is not properly controlled, it may lead to crankshaft failure [8]. As a result, crankshafts are continuously designed and developed to enhance their efficiency in bearing cyclic loads without collapsing and to achieve reduced weight [9]. Lighter crankshafts offer higher efficiency and greater energy production [10].
The aim of this research is to compare the most commonly used materials for crankshafts and investigate the impact of material selection and design geometry on crankshaft performance. Specifically, this study examines the vibration and thermal characteristics to identify the optimal material and design for crankshaft applications. The research includes a static analysis to determine maximum stress and deformation, along with an exploration of natural frequencies, six mode shapes, and thermal behavior. These findings provide a theoretical foundation for improving current crankshaft designs and selecting the most suitable materials. In the ongoing effort to enhance crankshaft performance in internal combustion engines—aiming to increase efficiency, extend lifespan, and reduce weight—this study plays a crucial role. It explores the effect of different materials on stresses, displacements, thermal stresses, and vibratory conditions experienced by the crankshaft. A three-dimensional (3D) model of the crankshaft was developed to analyze the effects of varying stress types, displacements, load transfer behaviors, dynamic and thermal responses, and the implications of weight reduction on crankshaft performance. The significance of this research lies in its potential to guide the optimization of crankshaft design, contributing to advancements in engine performance by providing a clearer understanding of how material properties and design choices influence crankshaft durability, efficiency, and overall functionality.
2. Materials and Methods
2.1. Crankshaft Manufacturing Material
Based on the above studies and research, the most prominent challenge in selecting a three-dimensional model of the crankshaft lies in choosing a material that exhibits the lowest stresses and high resistance to deformation. The goal is to achieve the desired mechanical properties, such as high rigidity and durability, while also evaluating the forces resulting from the loads distributed along the length of the crankshaft. To address this, the performance of four different materials used in crankshaft manufacturing will be compared:
- Structural Steel: Chemically, structural steel consists of iron, carbon, and other elements such as manganese, phosphorus, sulfur, and silicon in varying amounts depending on the grade. The carbon content typically ranges from 0.15% to 0.30%;
- Aluminum Alloy 7475: This is a wrought alloy with a high zinc content. It also contains magnesium, silicon, and chromium. The 7475 alloy cannot be welded and has more spring back due to its strength;
- Cast Iron: Most cast irons have a chemical composition of 2.5–4.0% carbon, 1–3% silicon, with the remainder being iron;
- Stainless Steel EN308: This alloy contains 20% chromium, 66% iron, 2% manganese, and 11% nickel. It is a stainless steel with high resistance.

Table 1.
Mechanical and thermal properties (Aluminum Alloy 7475, Cast Iron, Stainless steel EN 308, Structural Steel).
2.2. The Three-Dimensional Model Generation
The three-part assembly model of the crankshaft was created using CATIA V5 R18, an integrated design software developed by Dassault Systèmes. CATIA is part of a comprehensive product life cycle management (PLM) system that supports multiple stages of product development, from design (CAD) to manufacturing (CAM). It also facilitates collaborative engineering across various disciplines, including shape design, mechanical engineering, and systems engineering. Figure 1 illustrates the three-dimensional model of the crankshaft, while Table 2 presents the dimensions of the crankshaft, as referenced in the study [11].

Figure 1.
A three-dimensional model of the crankshaft.

Table 2.
Dimensions of the crankshaft.
2.3. Finite Element Analysis
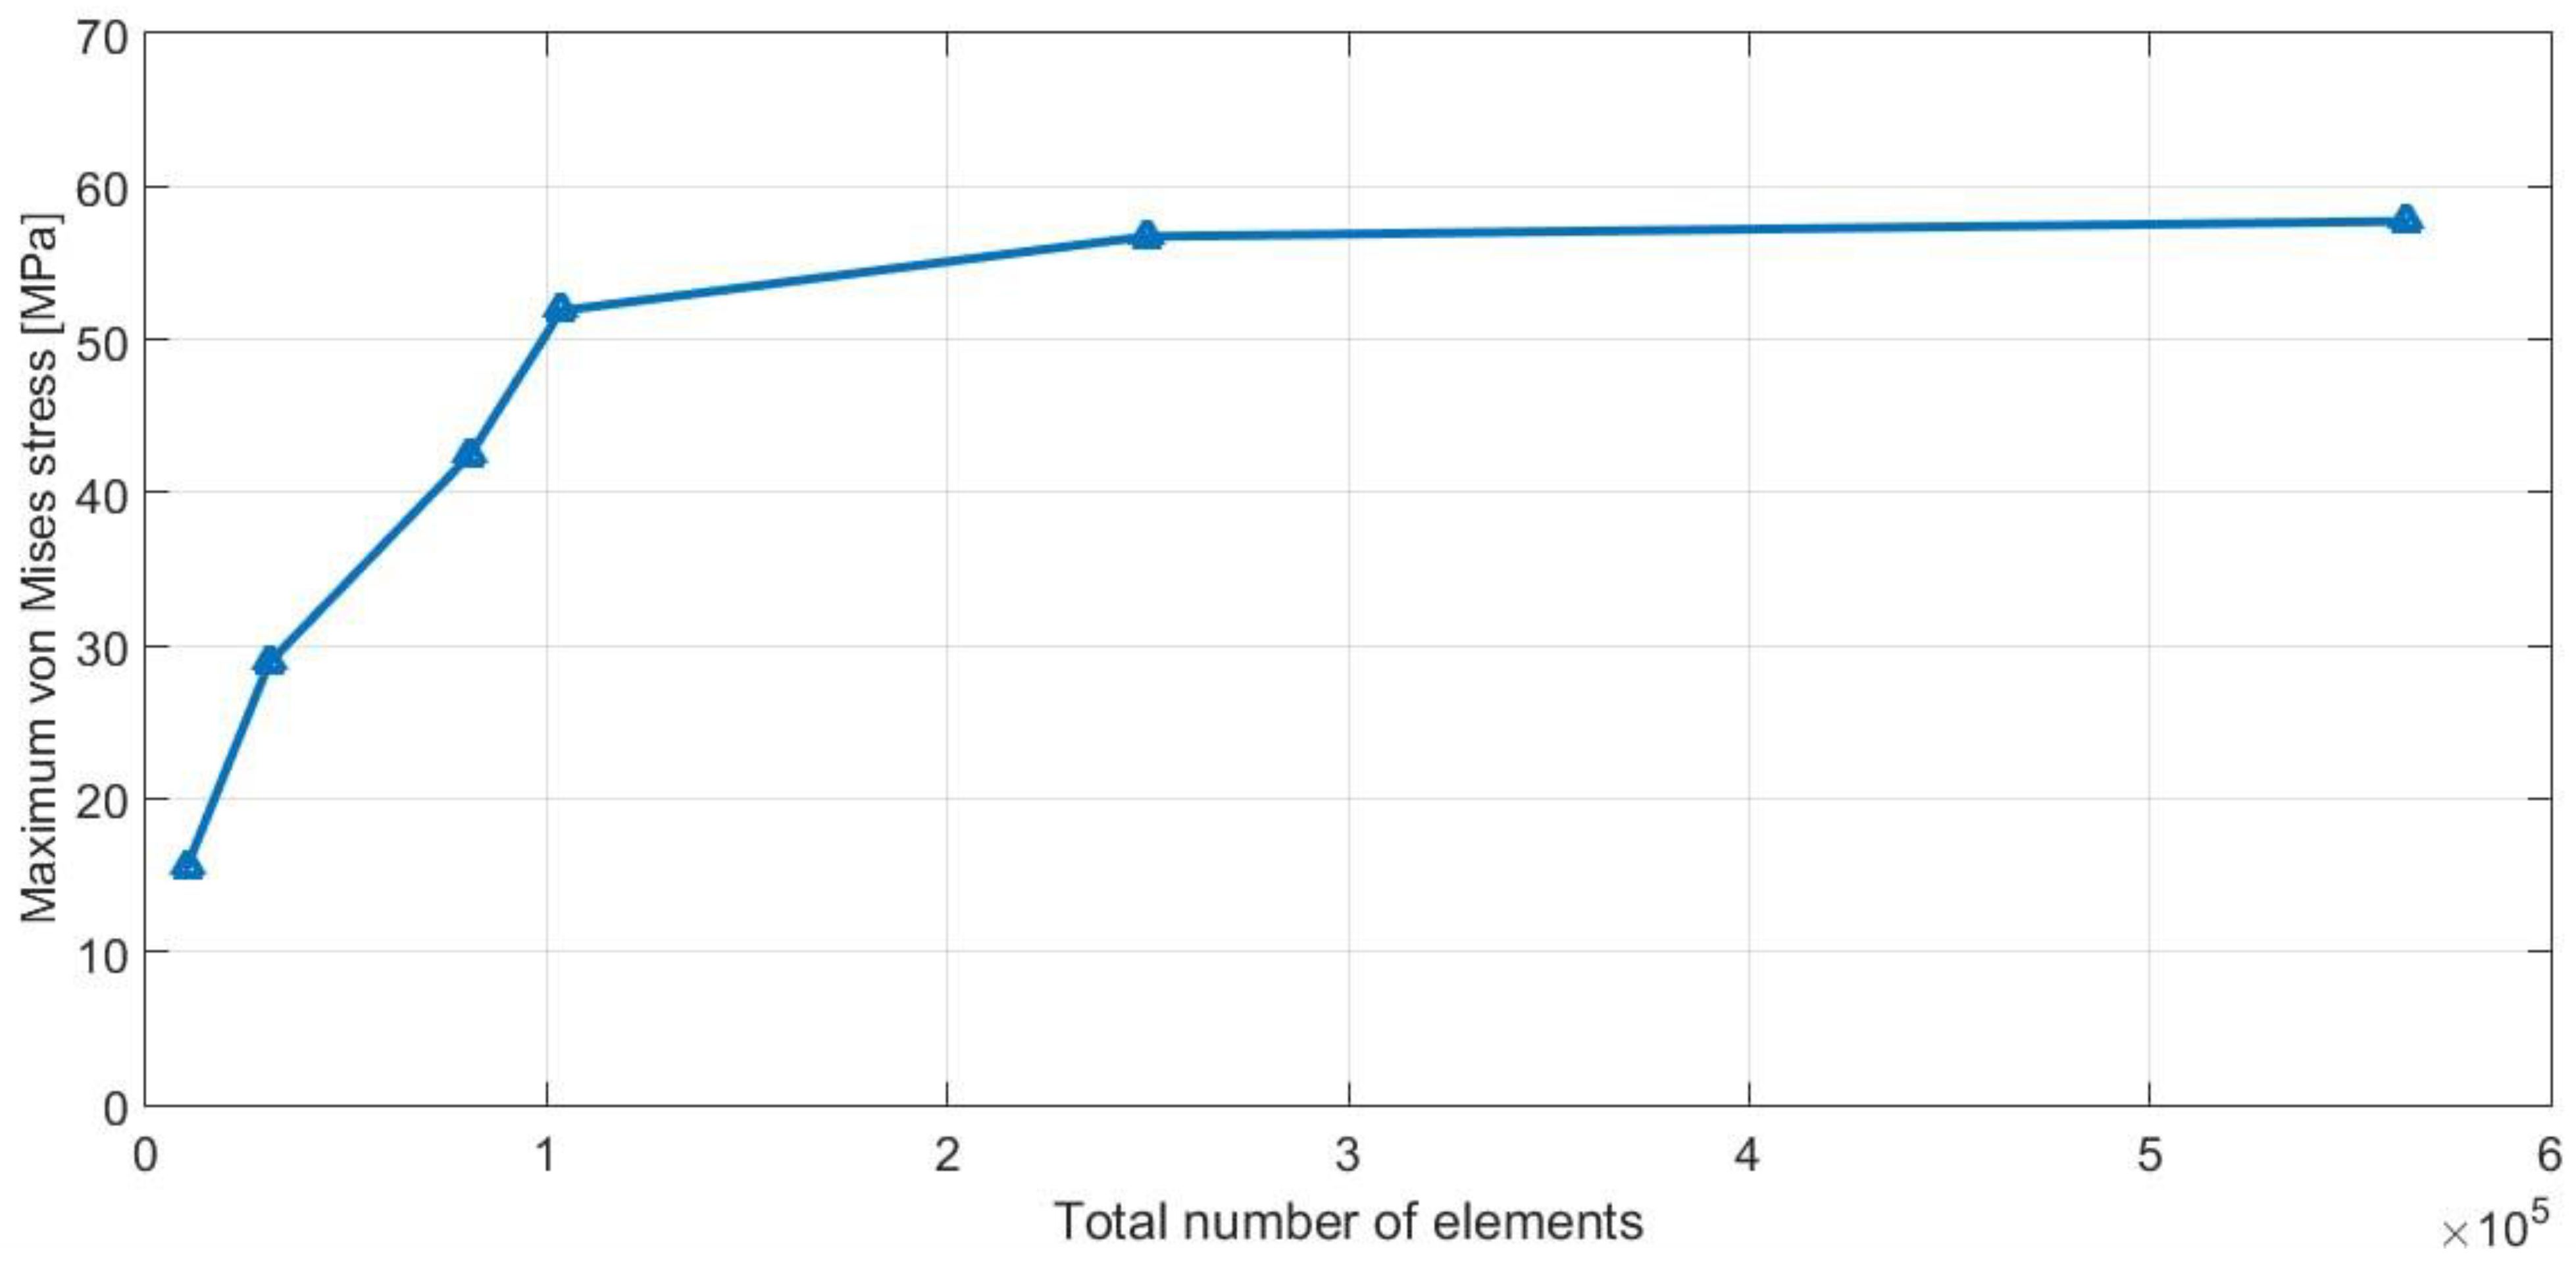
Each part of the crankshaft must withstand both tensile and compressive loads, with stresses and deflections kept within permissible limits. An ideal contact pair must be defined, and the component parts must be properly connected to each other. The model is then exported as an IGS file, which is imported into the ANSYS 19 R1 environment for finite element analysis (FEA) to verify the validity of the model. For the volumetric mesh of the component under study, a tetrahedral mesh was chosen as the most suitable for the design, and the model was subsequently prepared for analysis. To ensure the accuracy of the results, the convergence analysis was carried out as shown in Figure 2 and Table 3, where the number of elements obtained became the change in the value of the von Mises stress less than 1% and, accordingly, the selection was made so that total number of mesh elements reached 249,630, with 427,888 nodes.
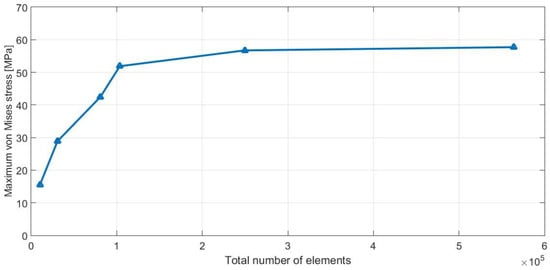
Figure 2.
Mesh sensitivity.

Table 3.
Convergence and grid independence.
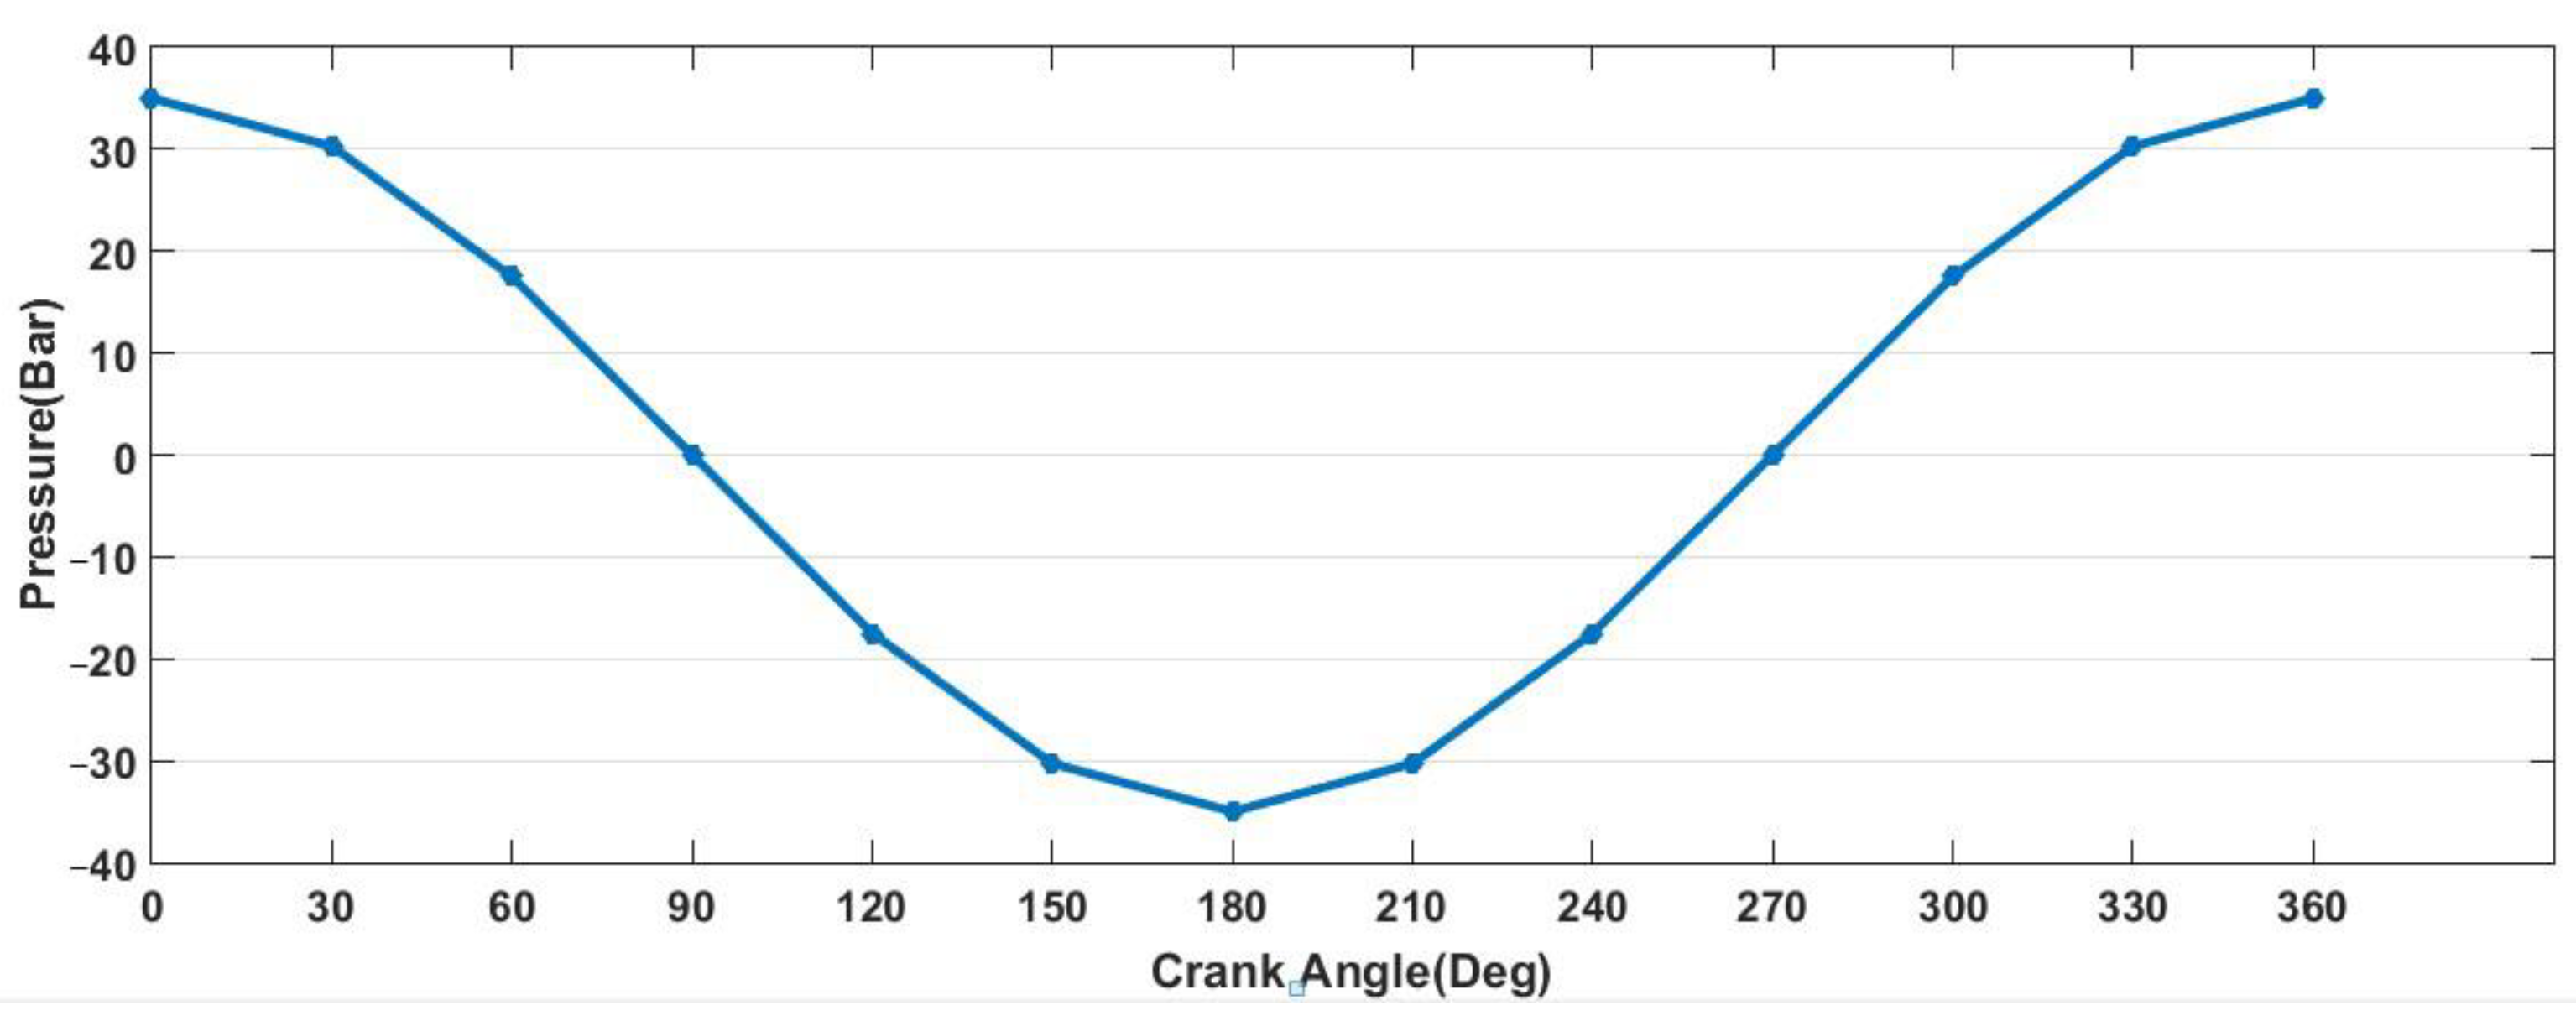
In addition, two different sources of load are acting on the crankshaft. The inertia of the rotating components (such as the connecting rod) applies forces to the crankshaft, and this force increases with increasing engine speed, as this force is directly related to the speed Rotation and acceleration of rotating components. The second source of load is the force applied to the crankshaft due to the combustion of gas in the cylinder [15]. Determining the boundary conditions has an important role in finite element analysis, as the crankshaft was installed and pressure was applied to the upper part of the crankshaft at 3.5 MPa, and pressure was applied in all angles, as in Table 4 and Figure 3 [11]. Figure 4 shows the finite element model of the crankshaft and the boundary conditions given to the model for analysis.

Table 4.
Comparison of displacement values, maximum stress, and safety factor for the crankshaft under pressure 35 bar.
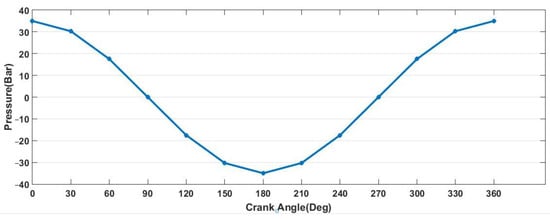
Figure 3.
Variation of pressure with crank angle.

Figure 4.
Finite element model of the crankshaft.
3. Results
3.1. Design Evaluation
To achieve the optimal crankshaft design, this design was compared with the one in the reference study [11], focusing on stresses and displacements, as well as the material used in manufacturing. The goal was to evaluate the design in terms of quality and efficiency, ensuring the use of a crankshaft with safe specifications and high production standards. The measurements and design results from the reference study were applied to our design, as illustrated in Figure 5. Table 4 provides a comparison between the two crankshaft designs.

Figure 5.
Comparison between crankshaft designs: (a) design within the reference study [11], Solidworks (b) design within this study CATIA V5 R18.
The stress and displacement analysis of structural steel showed that our design outperformed the design in the reference study. Furthermore, the design was validated through stress calculations using both the theoretical method found in the reference study [11,17,18,19] and the finite element method in both the reference study and our analysis. Table 5 presents the theoretical and practical results using the finite element method.

Table 5.
Comparison between the Theoretical and practical results.
3.2. Static Analysis
3.2.1. Von Mises Stress
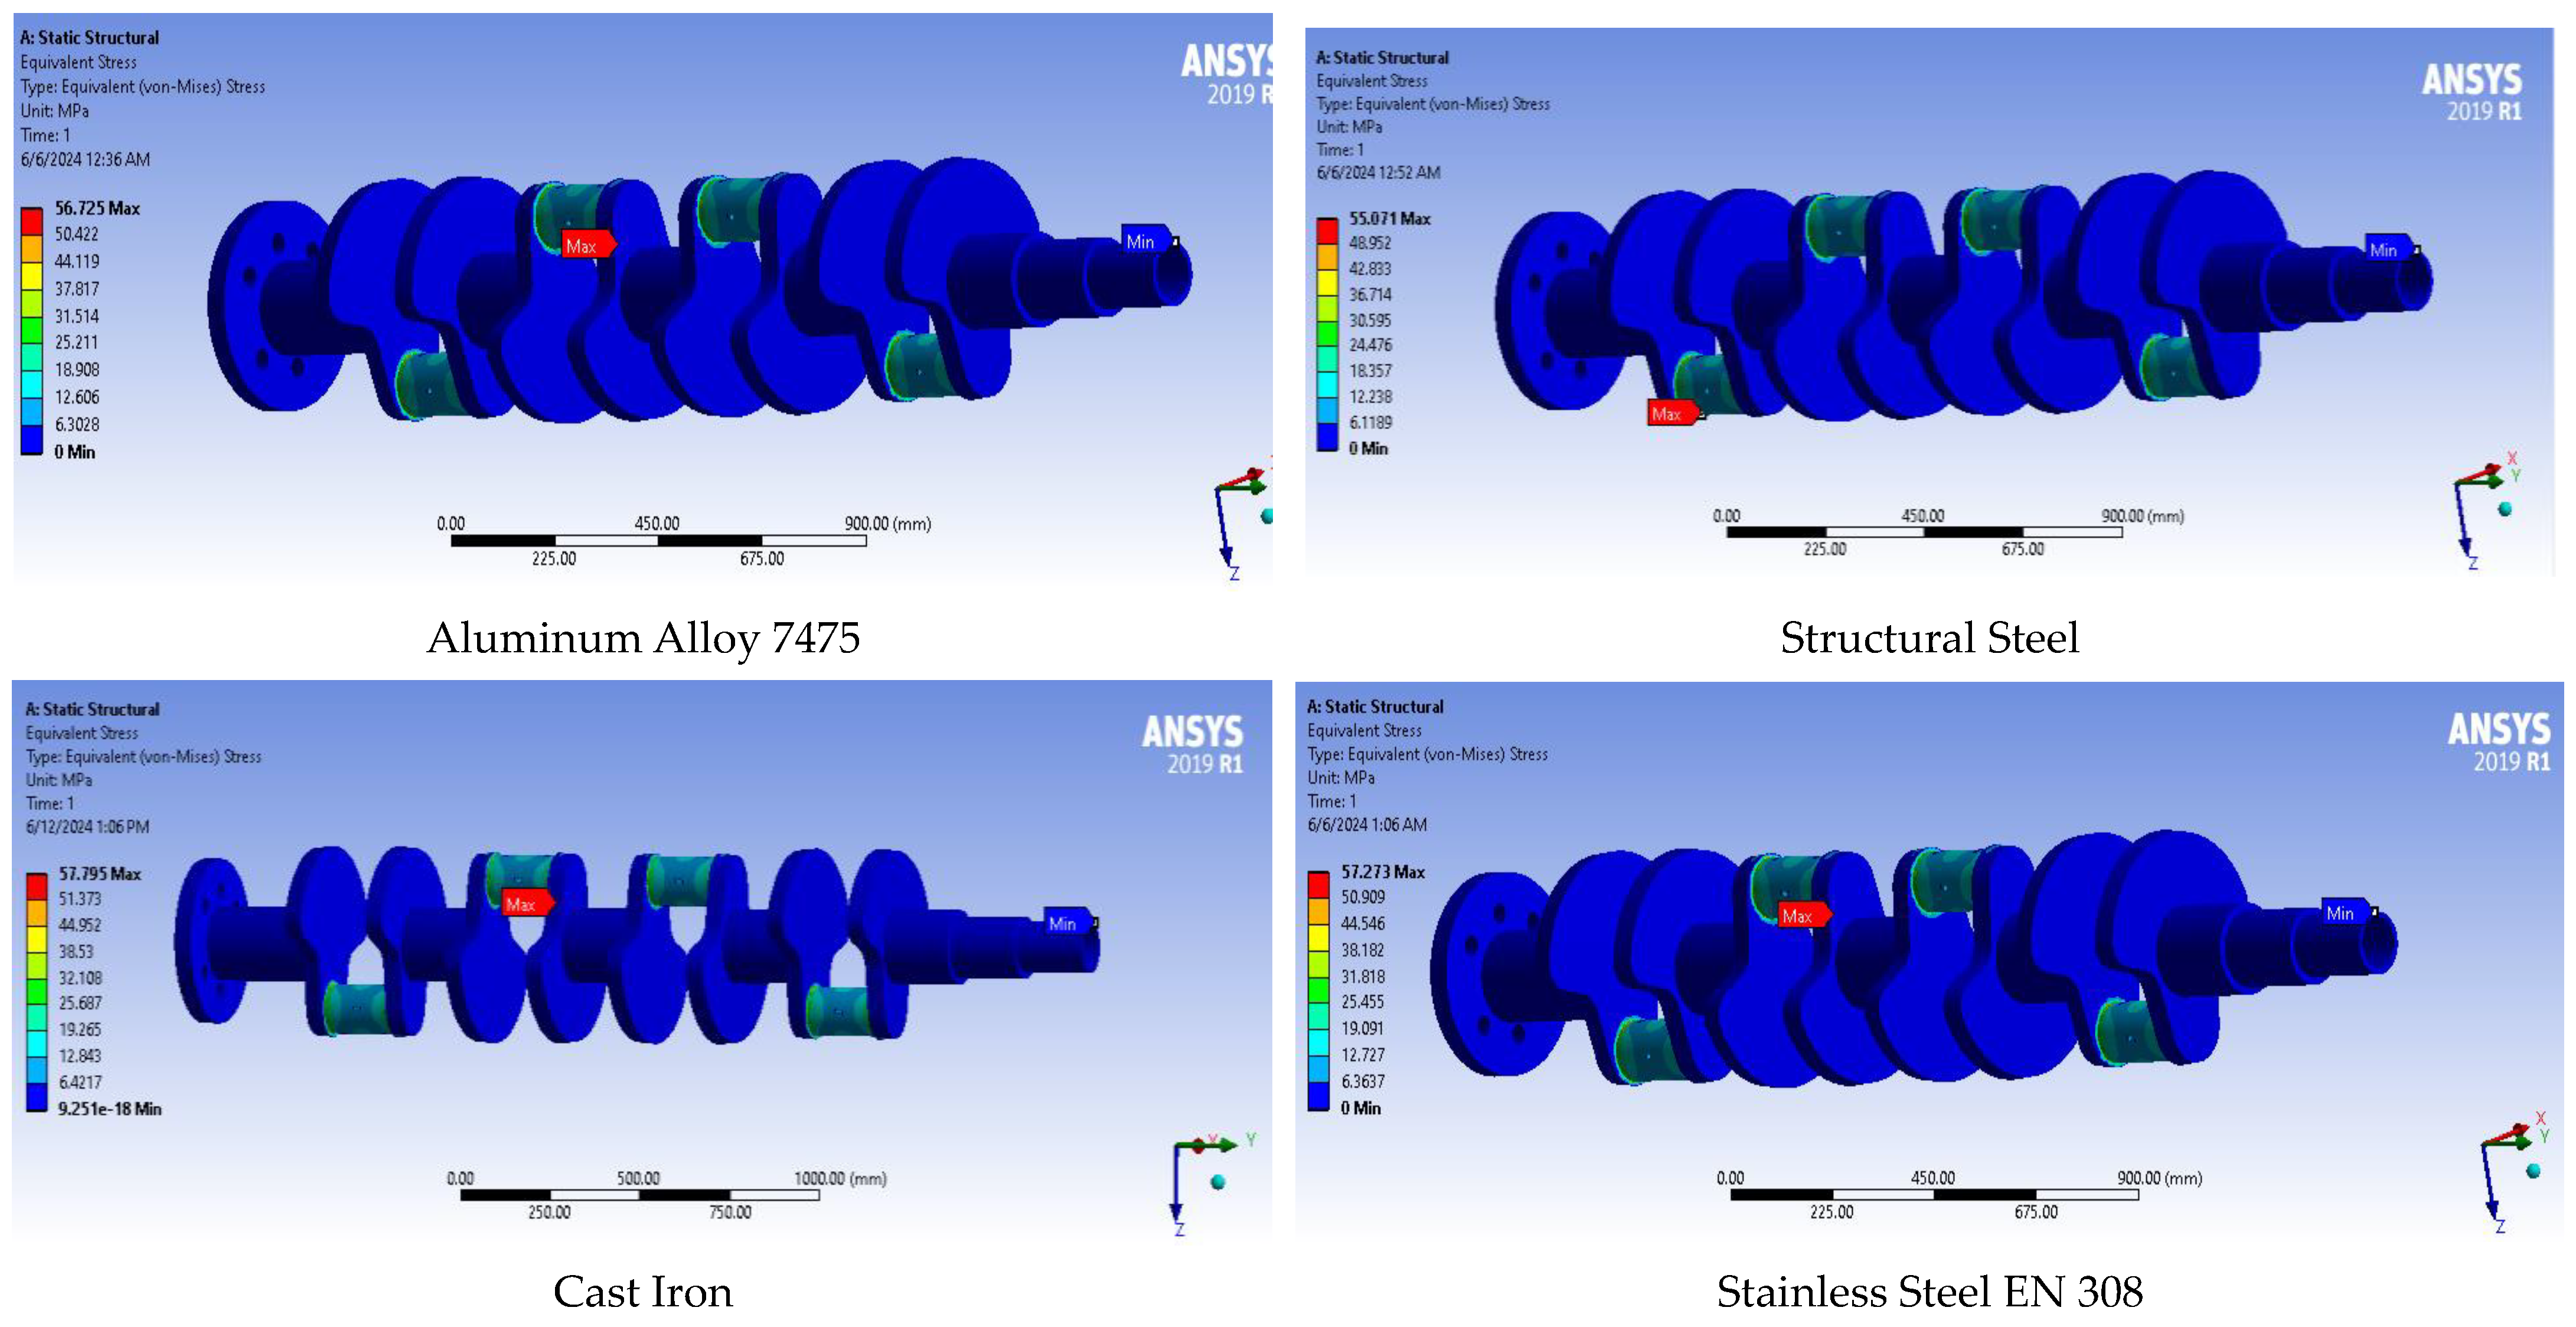
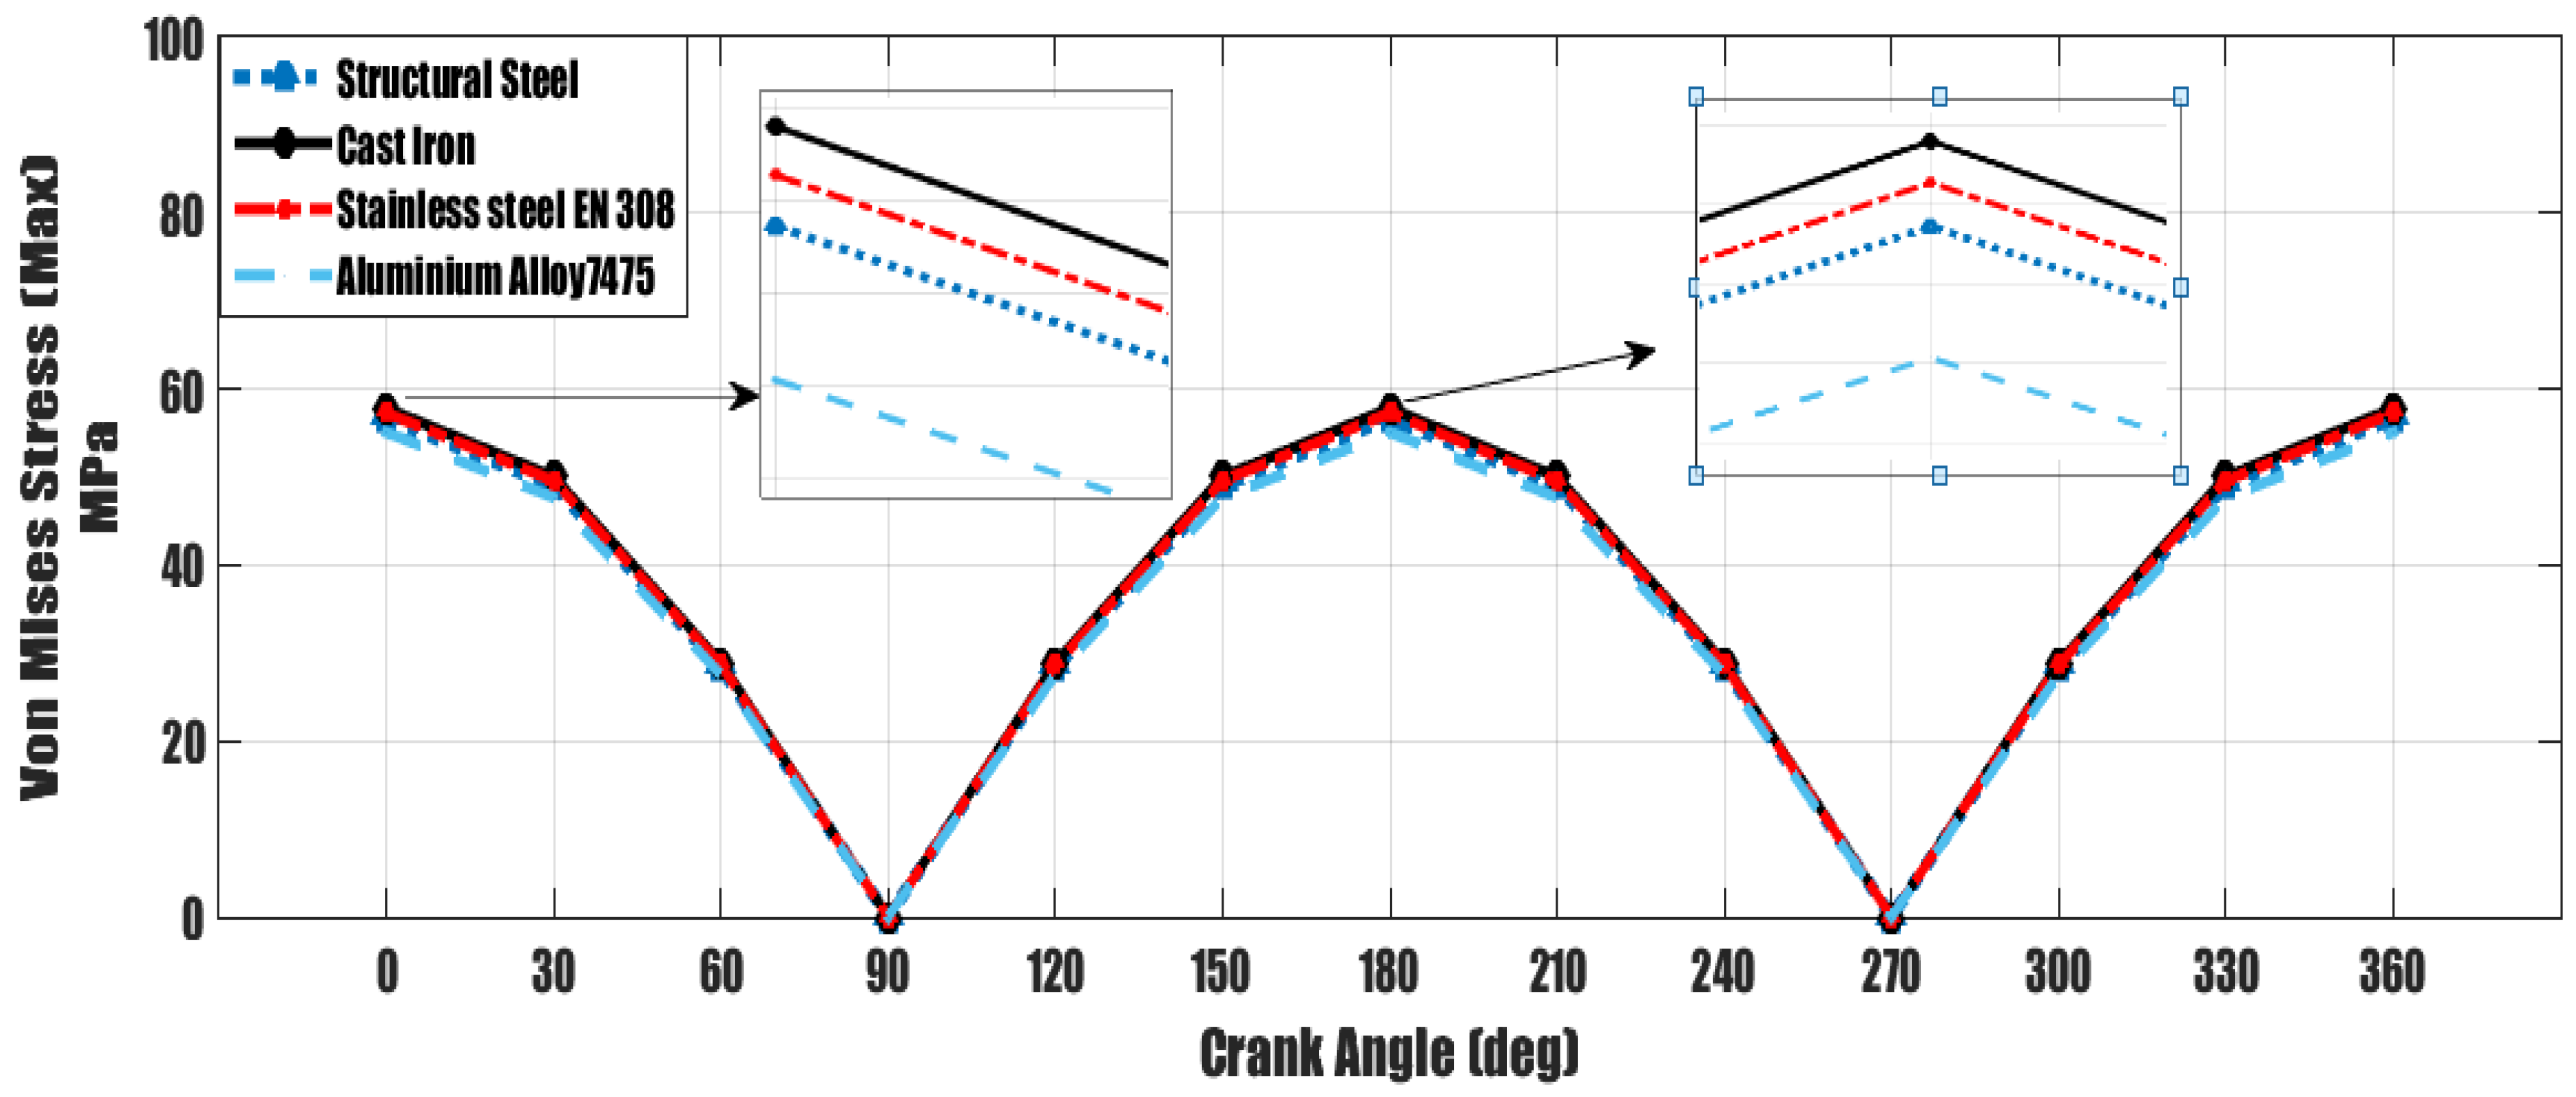
Figure 6 and Figure 7 present the results of the equivalent Von Mises stress analysis under loading conditions for the four materials used in this research, conducted using ANSYS (2019 R1) software. The applied pressure was set at 3.5 MPa. The study, which modeled the mechanical behavior of the crankshaft using the finite element (FE) method, shows that the crankshaft made from Aluminium Alloy 7475 exhibits the lowest equivalent Von Mises stress compared to the other materials, with a maximum stress of 55.071 MPa. As a result, Aluminium Alloy 7475 emerges as the best material in terms of stress reduction in the crankshaft, with the maximum stress occurring between the crankshaft bearing and the balance weight. Structural Steel follows closely as the second-best material, with a maximum stress of 56.725 MPa. The stress value for Structural Steel increased by 1.654 MPa compared to Aluminium Alloy 7475, a 3% increase. Stainless Steel EN 308 showed a maximum stress value of 57.273 MPa, representing an increase of 2.202 MPa or 4% compared to Aluminium Alloy 7475. Finally, Cast Iron exhibited the highest stress value among the materials, at 57.795 MPa, an increase of 2.724 MPa or 5% over Aluminium Alloy 7475. These comparisons are summarized in Table 6.

Figure 6.
Von-Mises stress analysis results for the crankshaft.
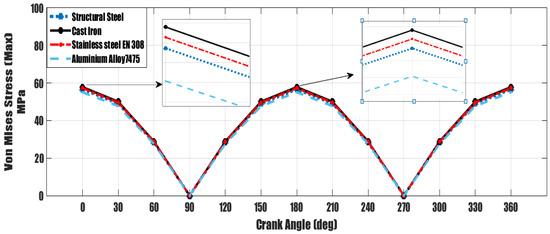
Figure 7.
Von Mises stress of the studied materials.

Table 6.
The effect of the type of crankshaft material on the maximum values of stresses and displacements.
3.2.2. Displacement Analysis
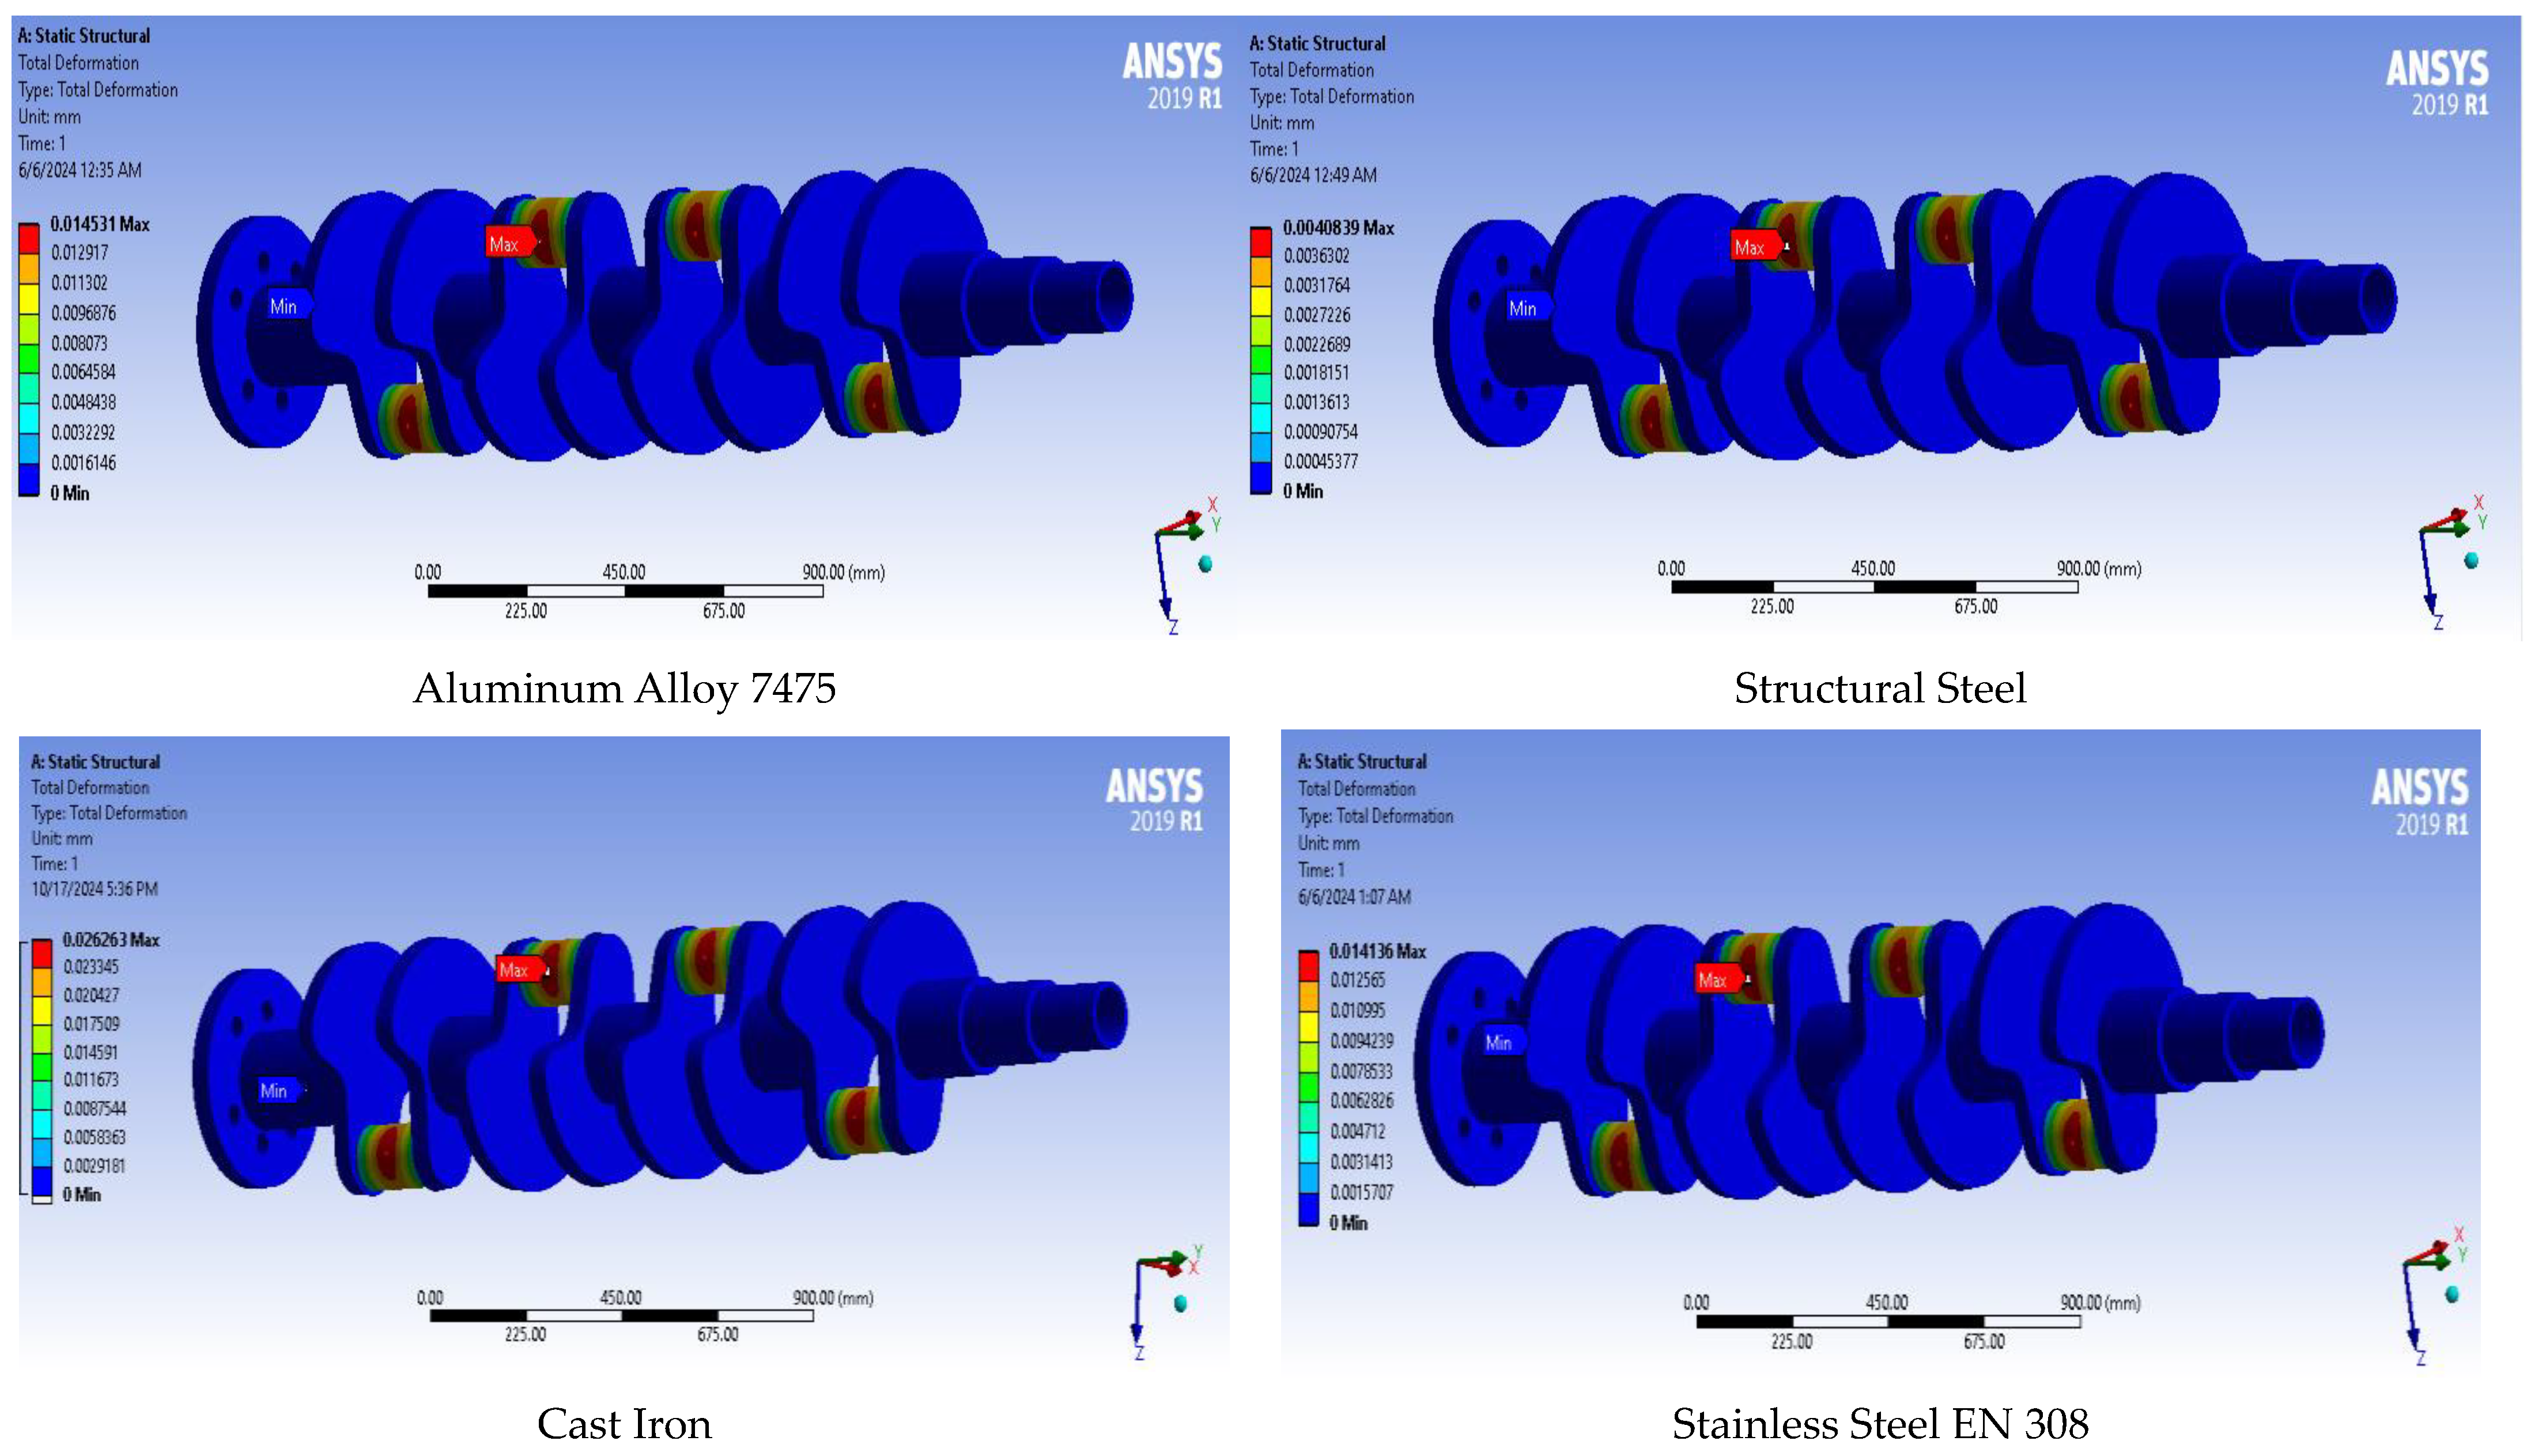
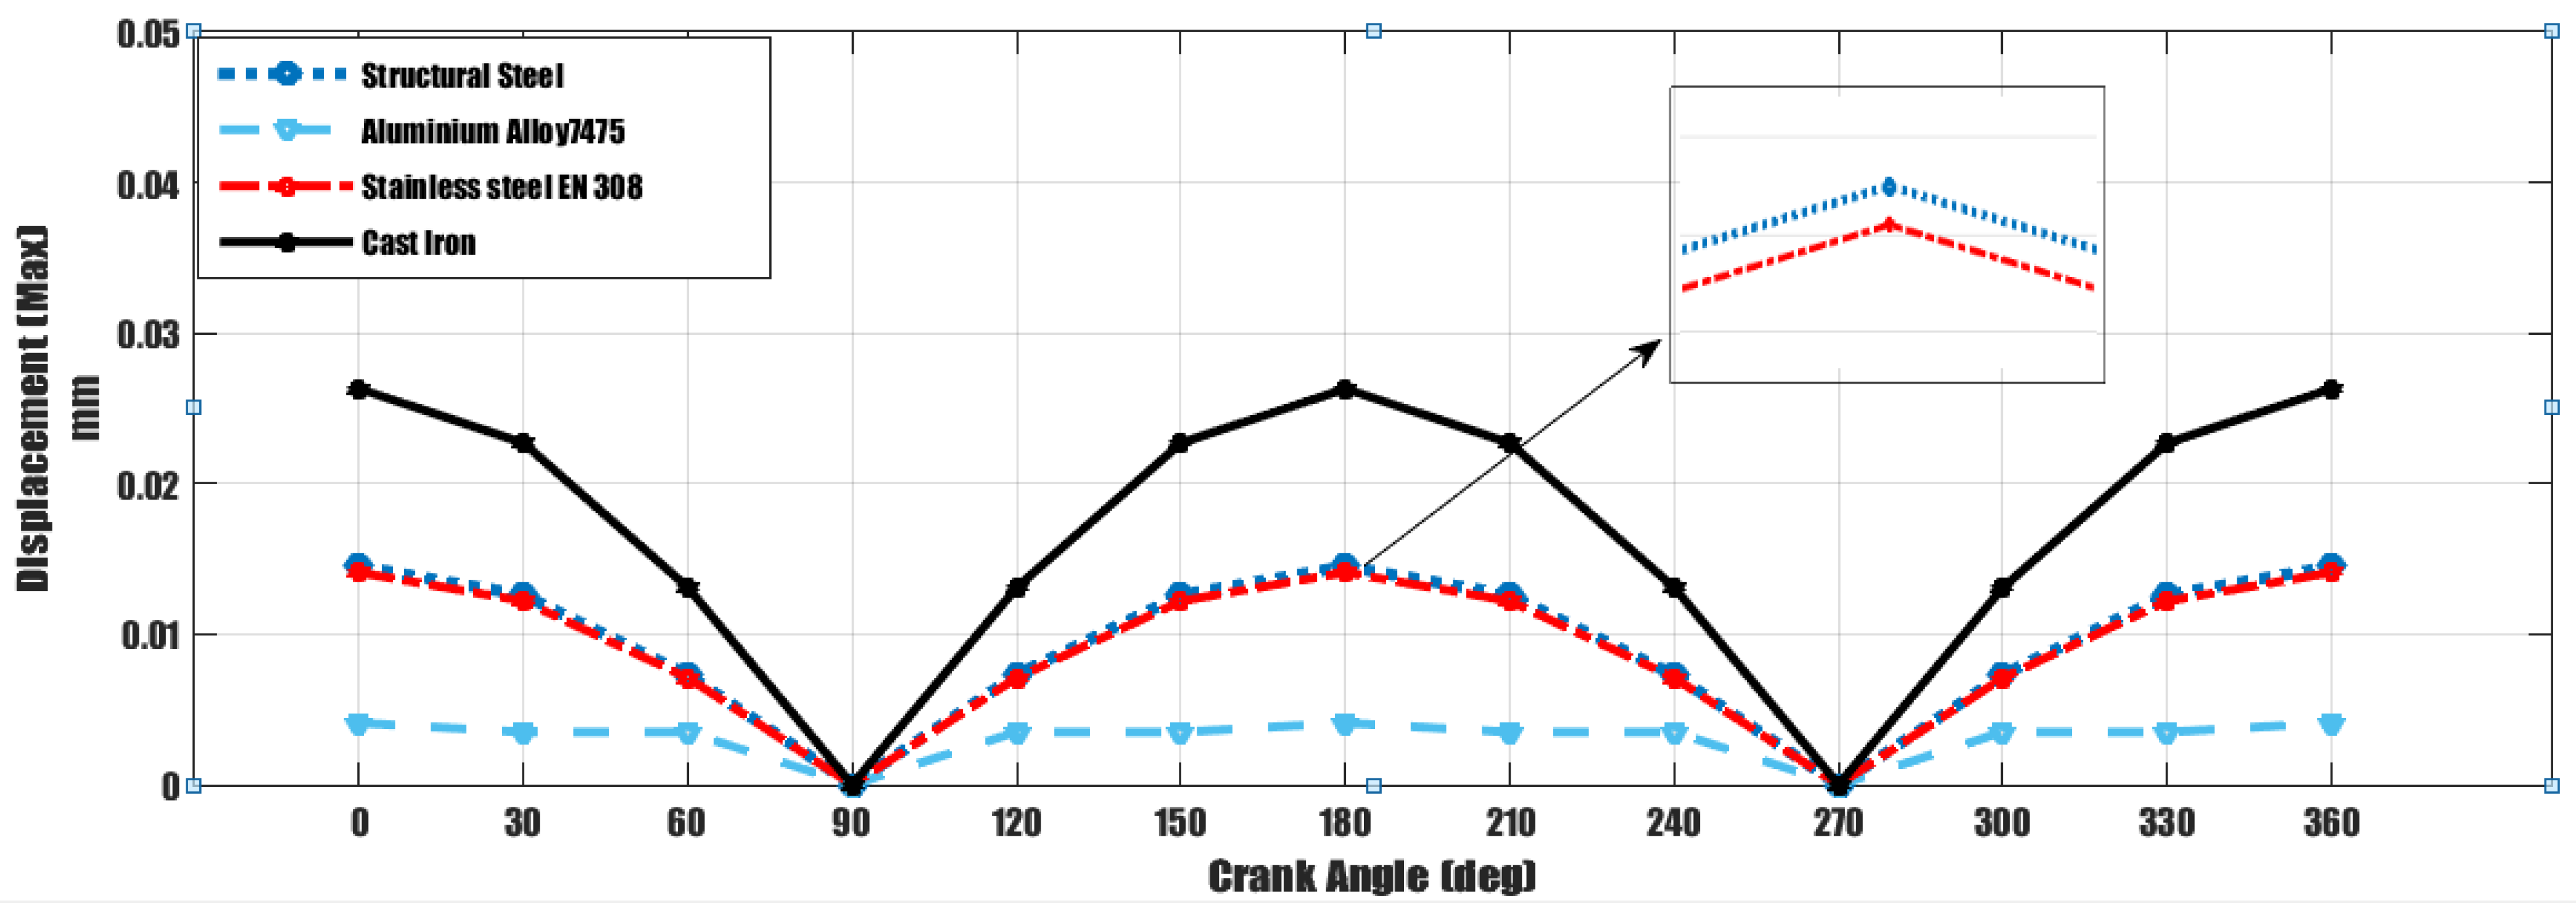
Figure 8 and Figure 9 present the results of the displacement analysis under loading conditions for the four materials using ANSYS software. The applied force was set at 3.5 MPa. The analysis shows that Aluminum Alloy 7475 exhibits the lowest displacement compared to the other materials, with a maximum displacement of 0.0041 mm. The maximum displacement occurs in the area between the counterweight and the middle of the piston rod bearing. Therefore, Aluminum Alloy 7475 proves to be the most effective material in terms of minimizing displacement. Stainless Steel EN 308 follows as the second-best material, with a maximum displacement of 0.0141 mm, which is 0.01 mm (2.43%) higher than that of Aluminum Alloy 7475. Structural Steel exhibits a displacement value of 0.0145 mm, showing an increase of 0.0104 mm (2.53%) compared to Aluminum Alloy 7475. Cast Iron has the highest displacement value, at 0.0263 mm, representing an increase of 0.0222 mm (5.414%) over Aluminum Alloy 7475. These comparisons are summarized in Table 6. Table 7 shows the safety factor values for the studied materials, where the safety factor is calculated as the ratio of yield stress to von Mises stress.
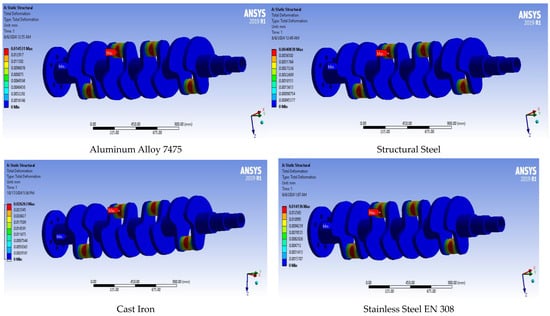
Figure 8.
Results of displacement analysis of the crankshaft.
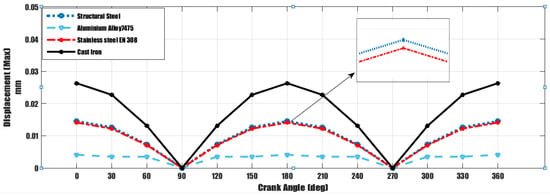
Figure 9.
Displacement analysis results for the studied crankshaft materials.

Table 7.
Safety factor for the studied materials.
3.3. Vibration Behavior Analysis
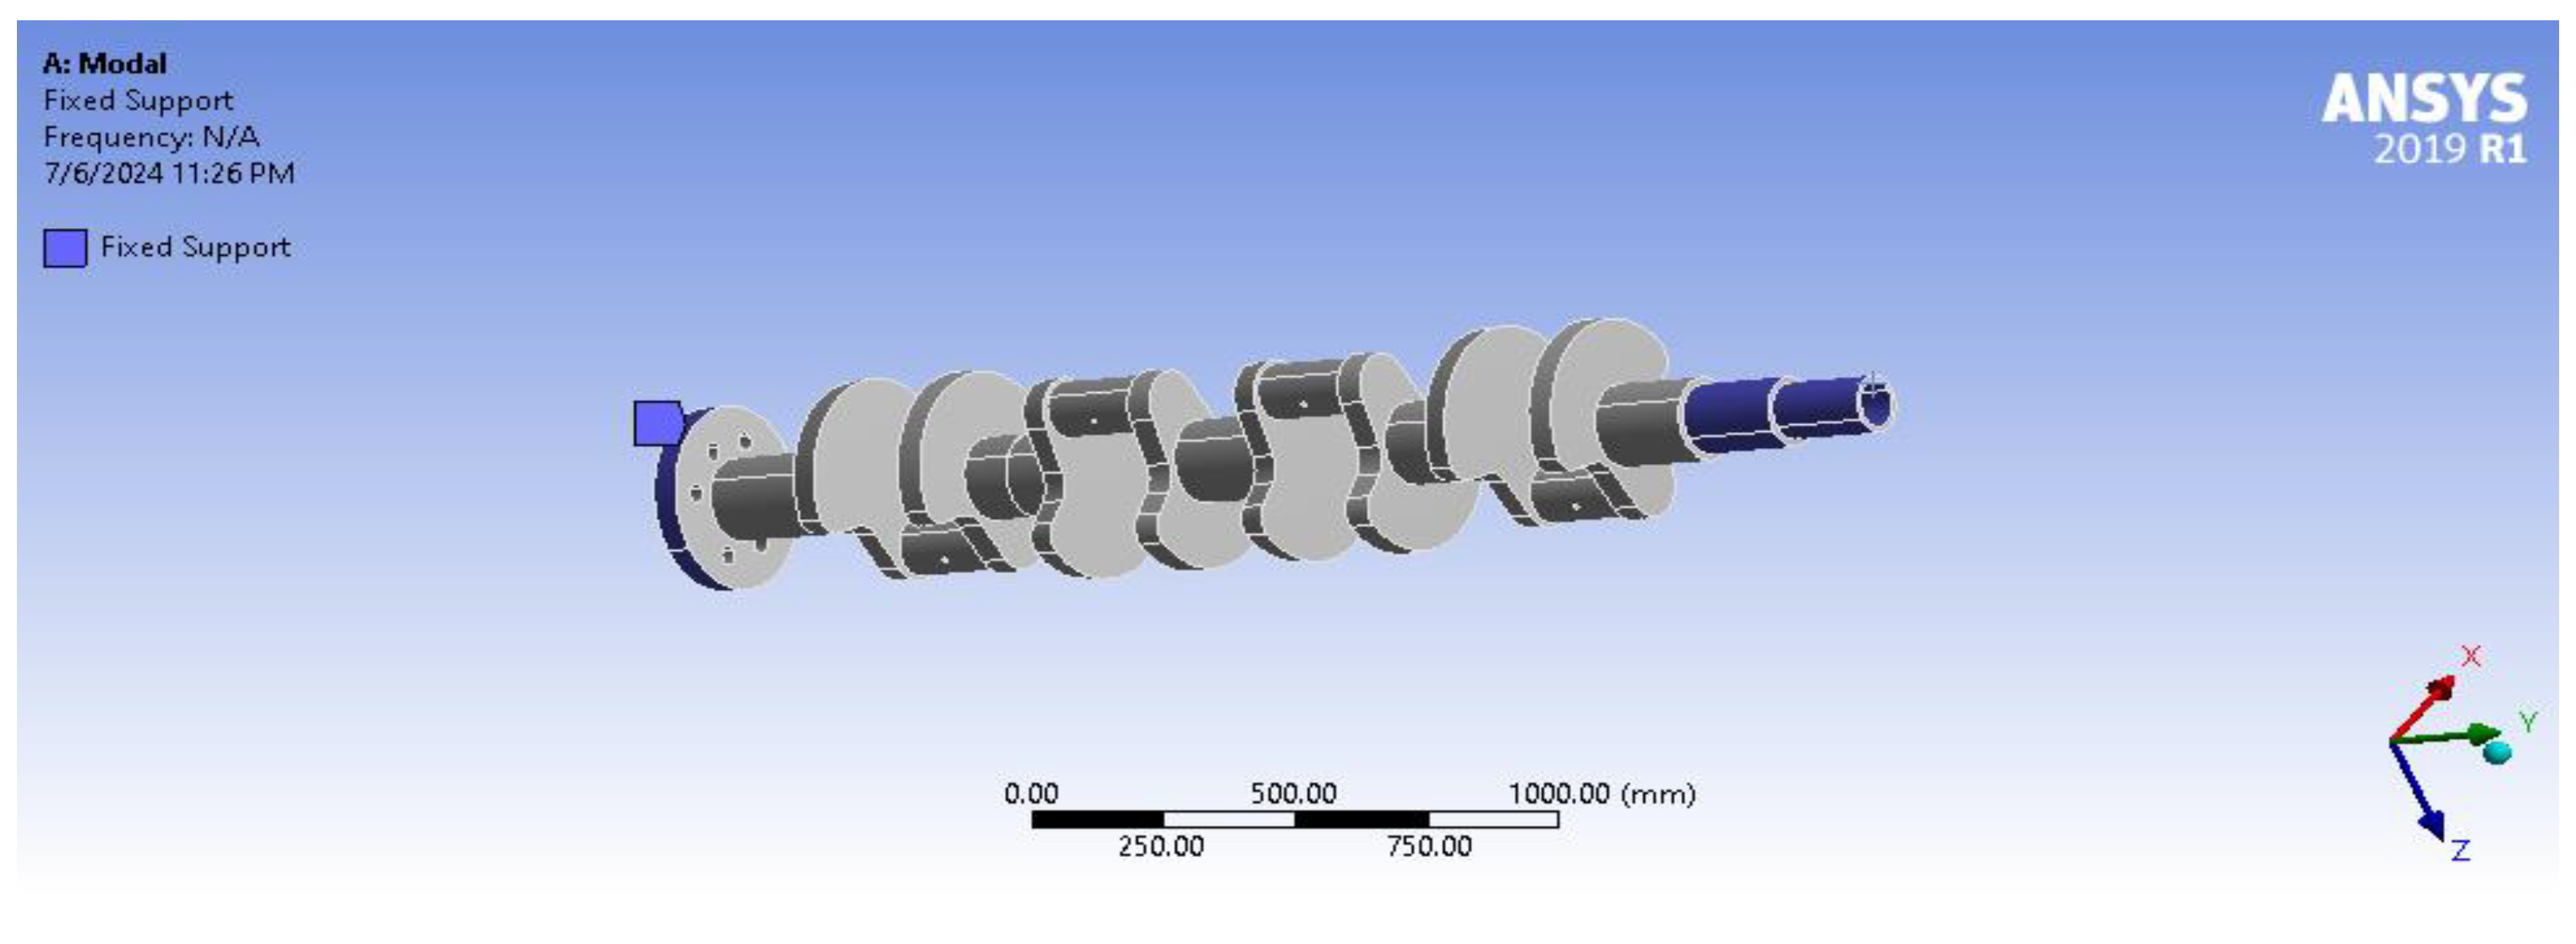
Vibration analysis involves studying the dynamic characteristics of structures under the influence of induced vibrations in the crankshaft, which is supported at two fixed points, as shown in Figure 10. The dynamic interaction between a component and its supporting structure is crucial, as structural damage or failure can occur if the operating frequency of the component coincides with one of the structure’s natural frequencies. A modal analysis was performed using ANSYS software to determine the vibration characteristics of the crankshaft. Notably, low-frequency vibrations are the primary source of engine vibration. This indicates that low frequencies have a greater impact on the system’s response, making them more significant for the crankshaft.

Figure 10.
Boundary conditions for vibratory behavior.
Accordingly, vibration analysis was conducted to measure the total deformation under six different conditions. The results for frequency values and total deformations are presented in Figure 11, as well as in Table 8, Table 9, Table 10 and Table 11. For the materials used in the study, Cast Iron exhibited lower frequency values compared to the other materials, with a frequency of 165.52 Hz. On the other hand, Structural Steel demonstrated the lowest total deformation, with a value of 2.453 mm.


Figure 11.
Vibrational analysis of the four materials.

Table 8.
Frequency and total distortion values Structural Steel.

Table 9.
Frequency and total distortion values Aluminum Alloy 7475.

Table 10.
Frequency and total distortion values cast iron.

Table 11.
Frequency and total distortion values Stainless Steel EN 308.
3.4. Thermal Behavior Analysis
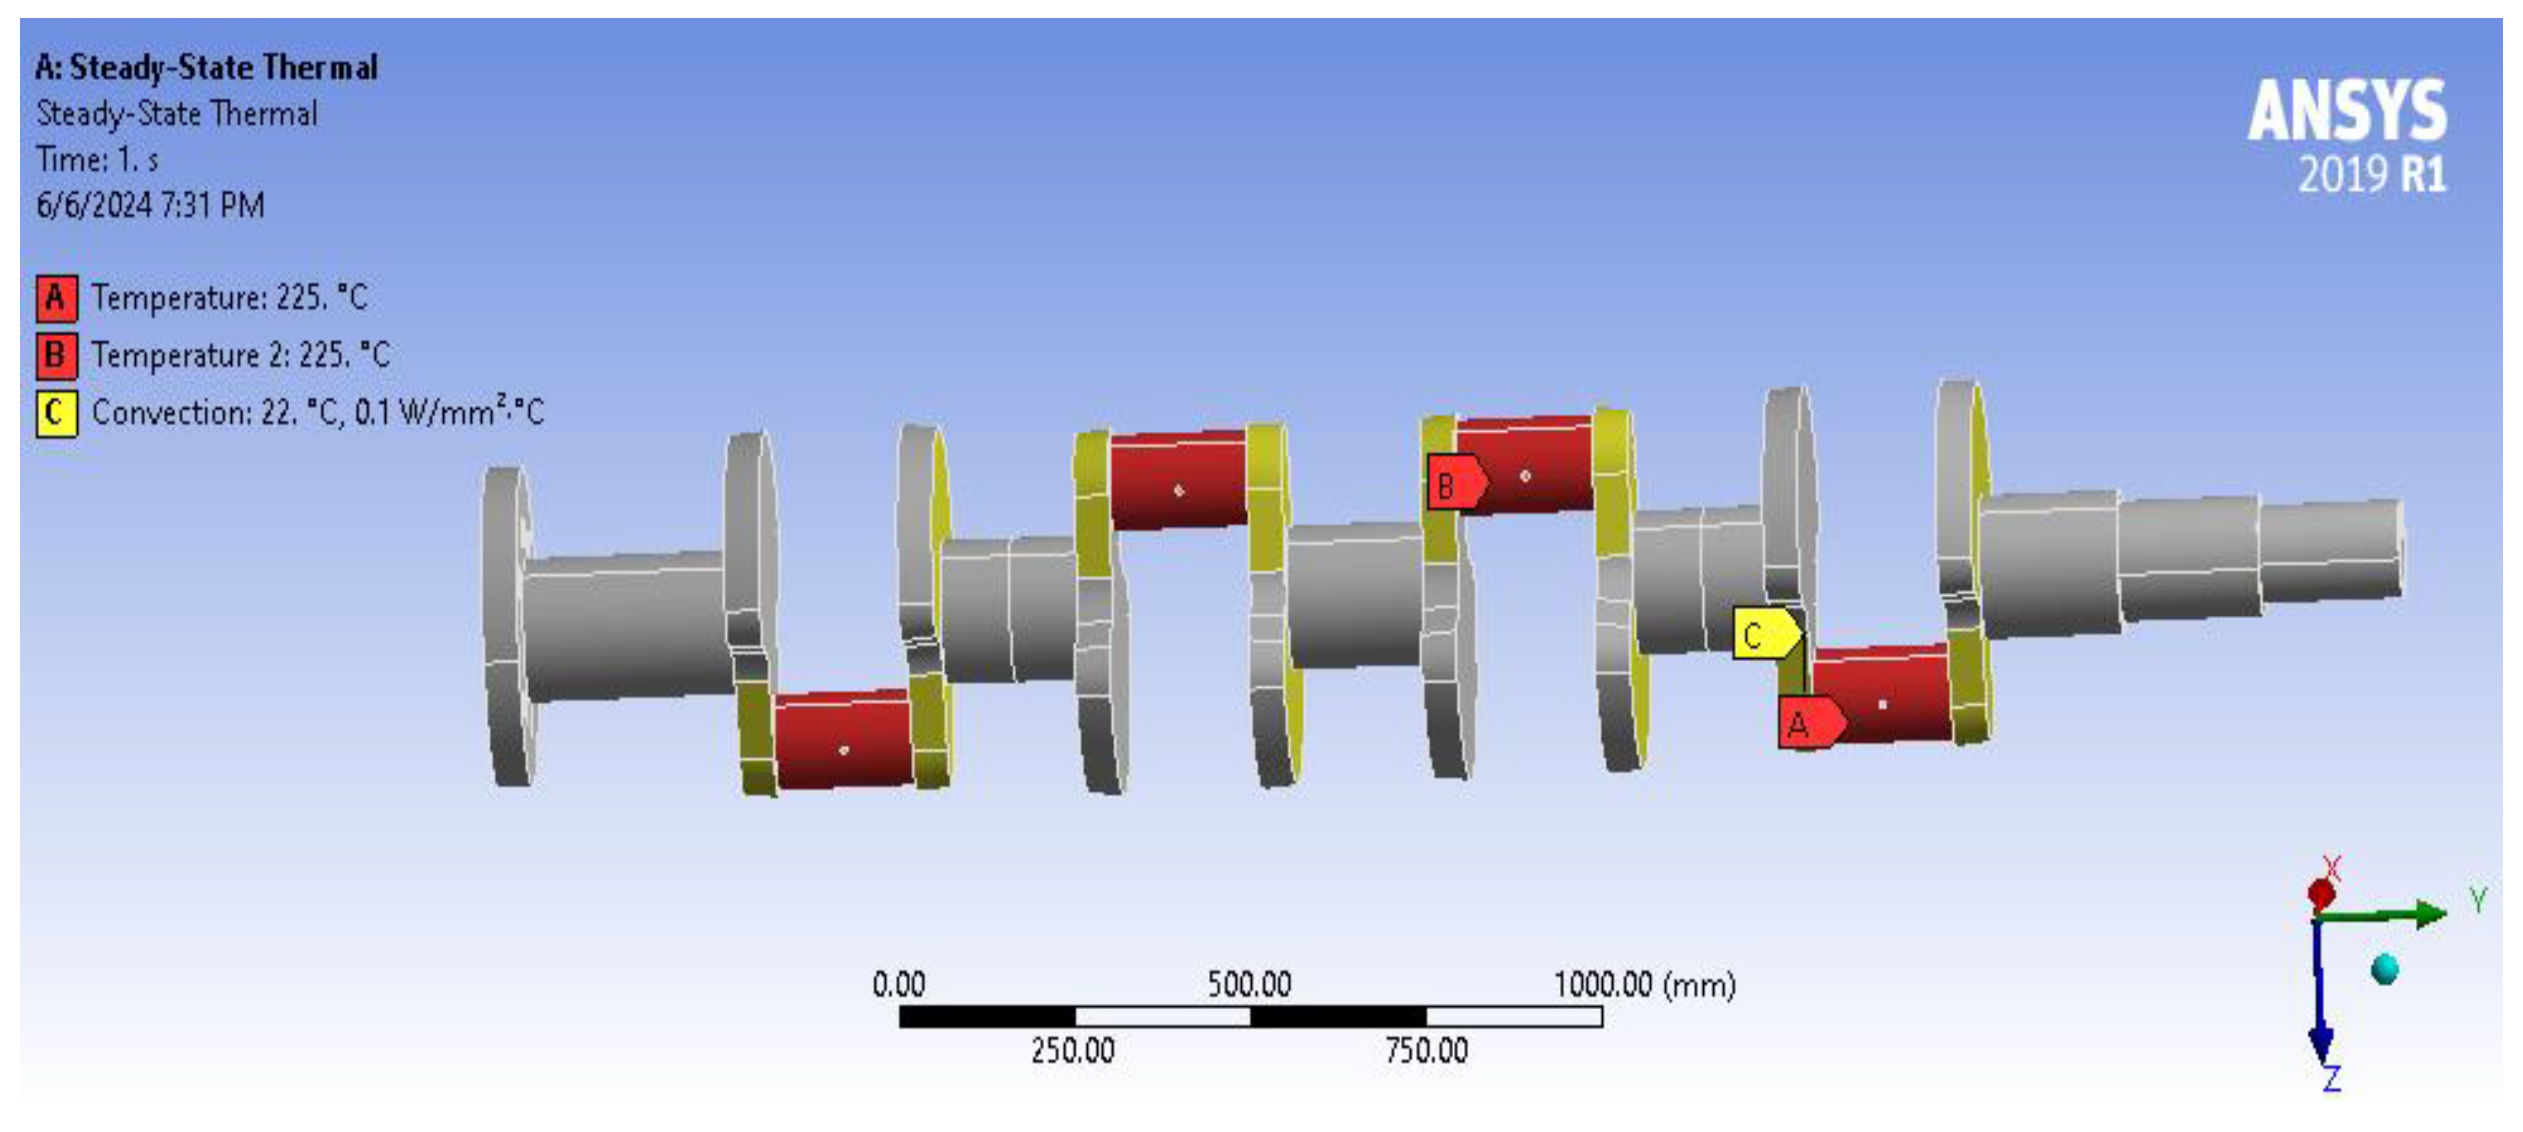
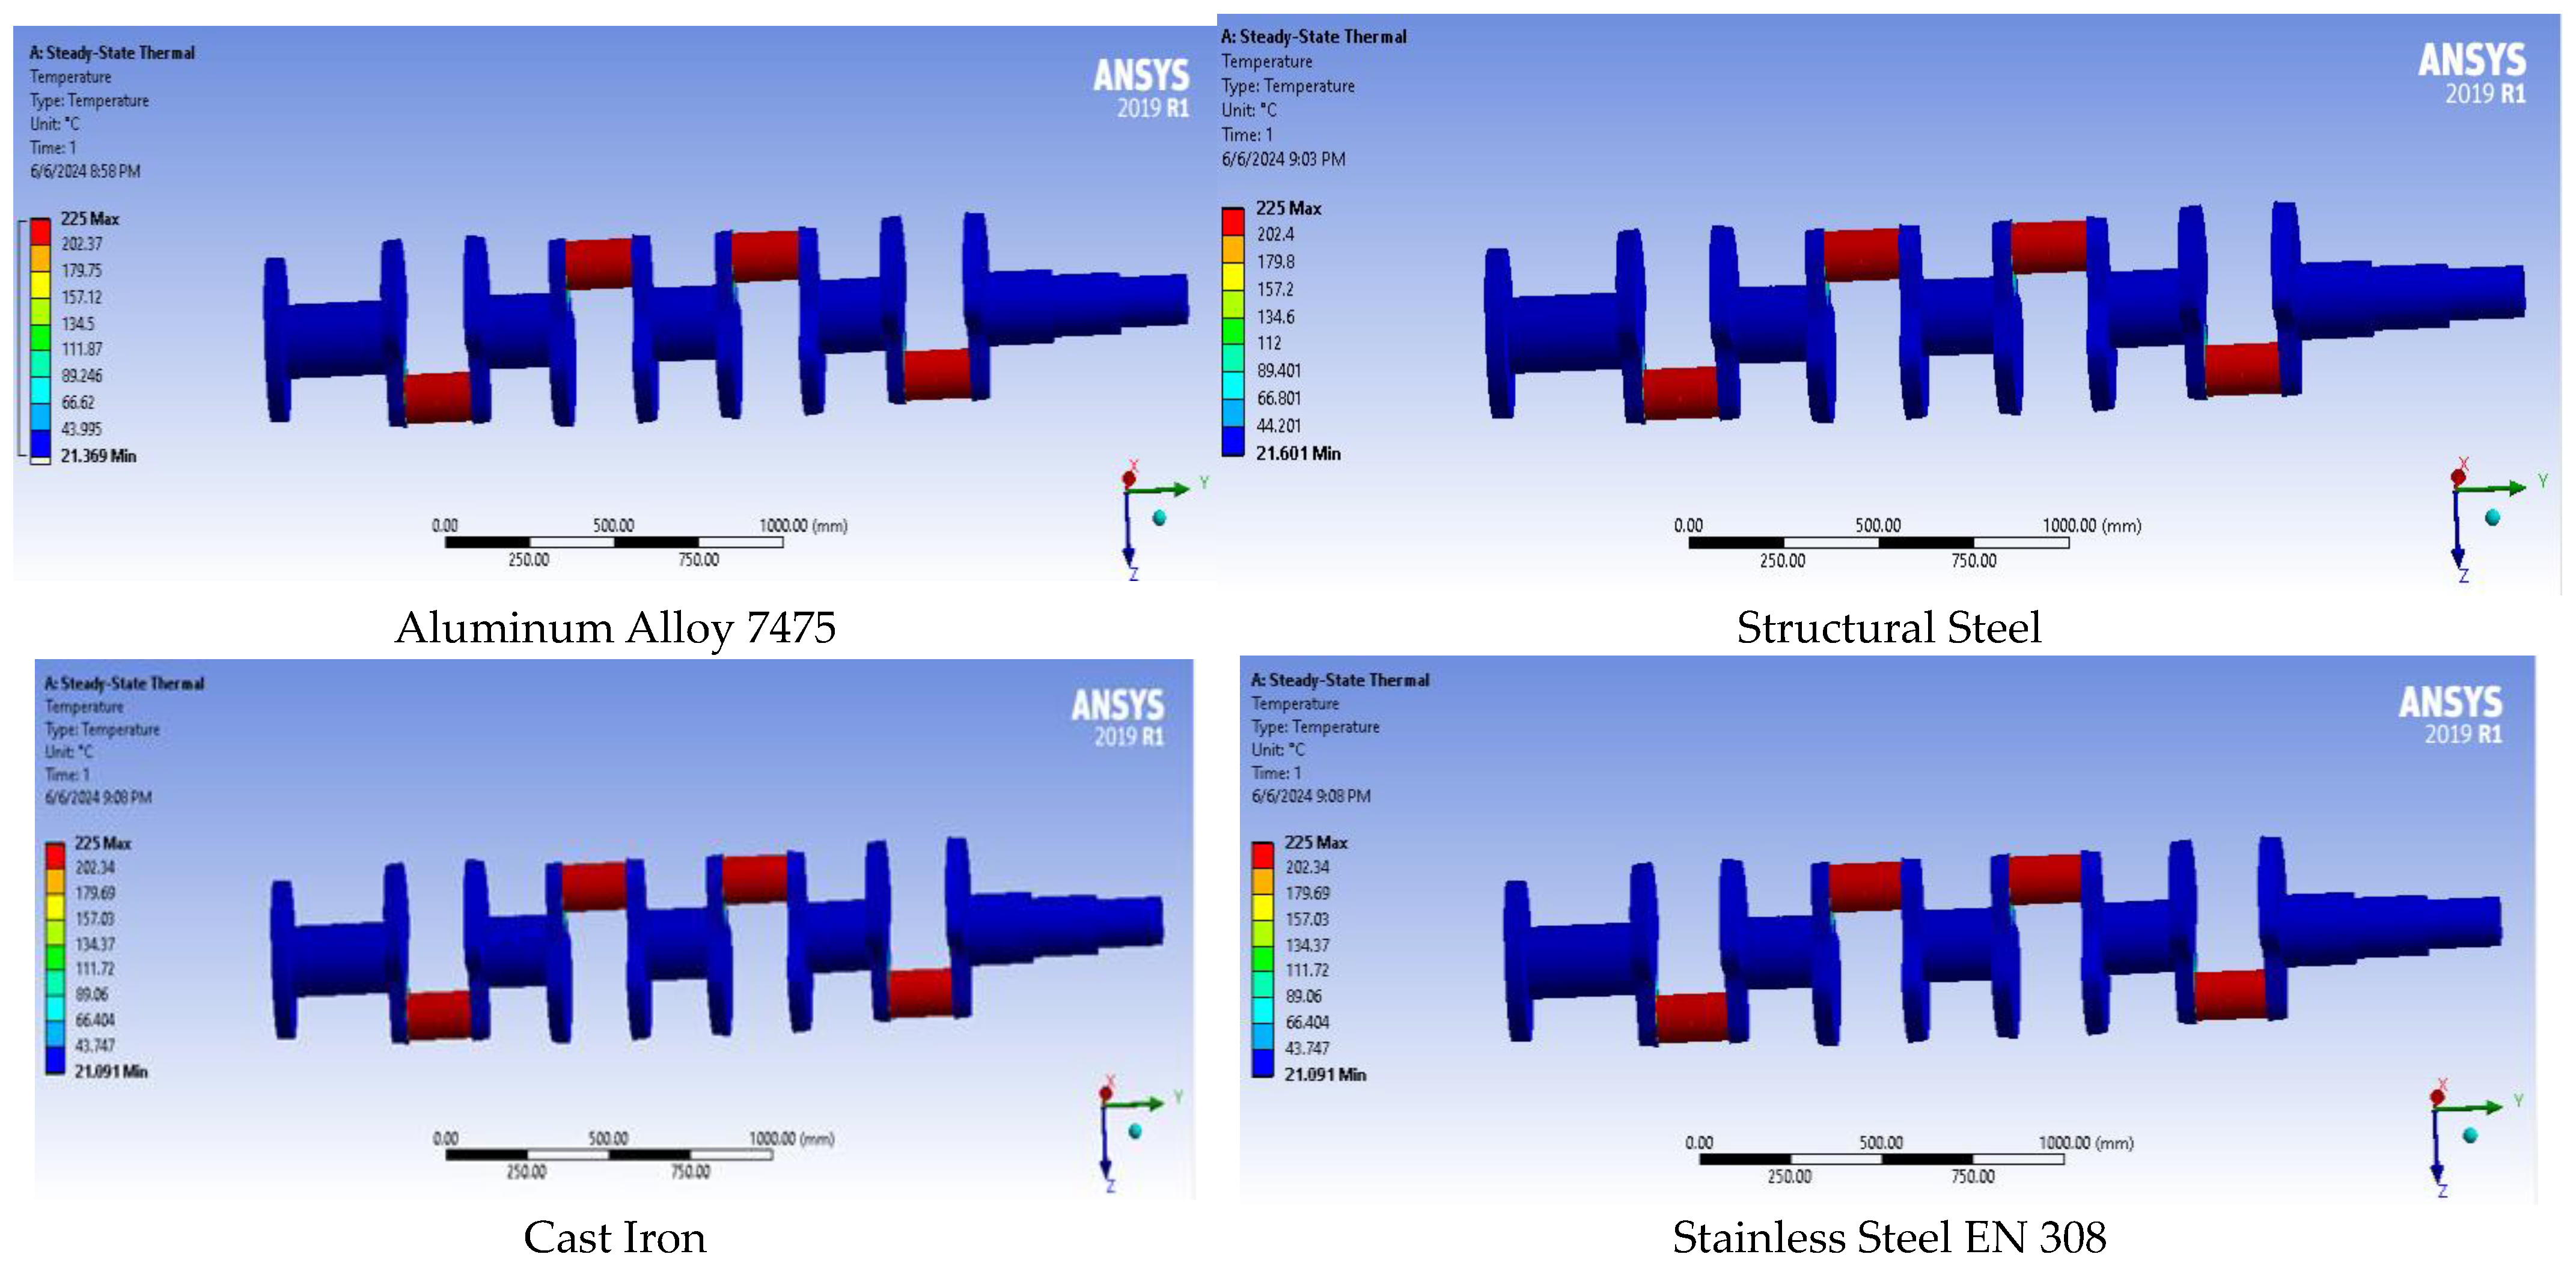
Figure 12 illustrates the boundary conditions for the thermal behavior analysis, which involves measuring changes in thermal properties when the material is exposed to varying temperatures. The results indicate that the maximum temperature output of 225 W/m2 for all materials is observed at the rod axis, as shown in Figure 13. Table 10 presents the results of the thermal behavior analysis for the materials studied, focusing on the specified column.
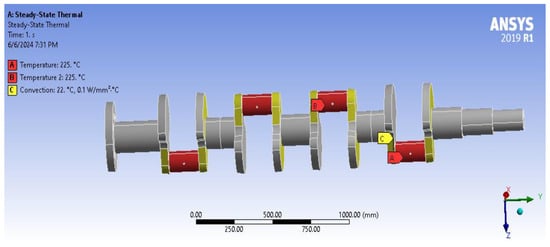
Figure 12.
Boundary conditions for thermal behavior.
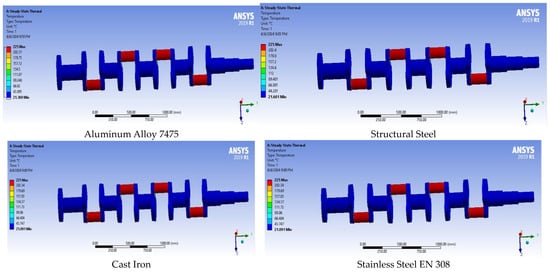
Figure 13.
Output temperature of the studied materials.
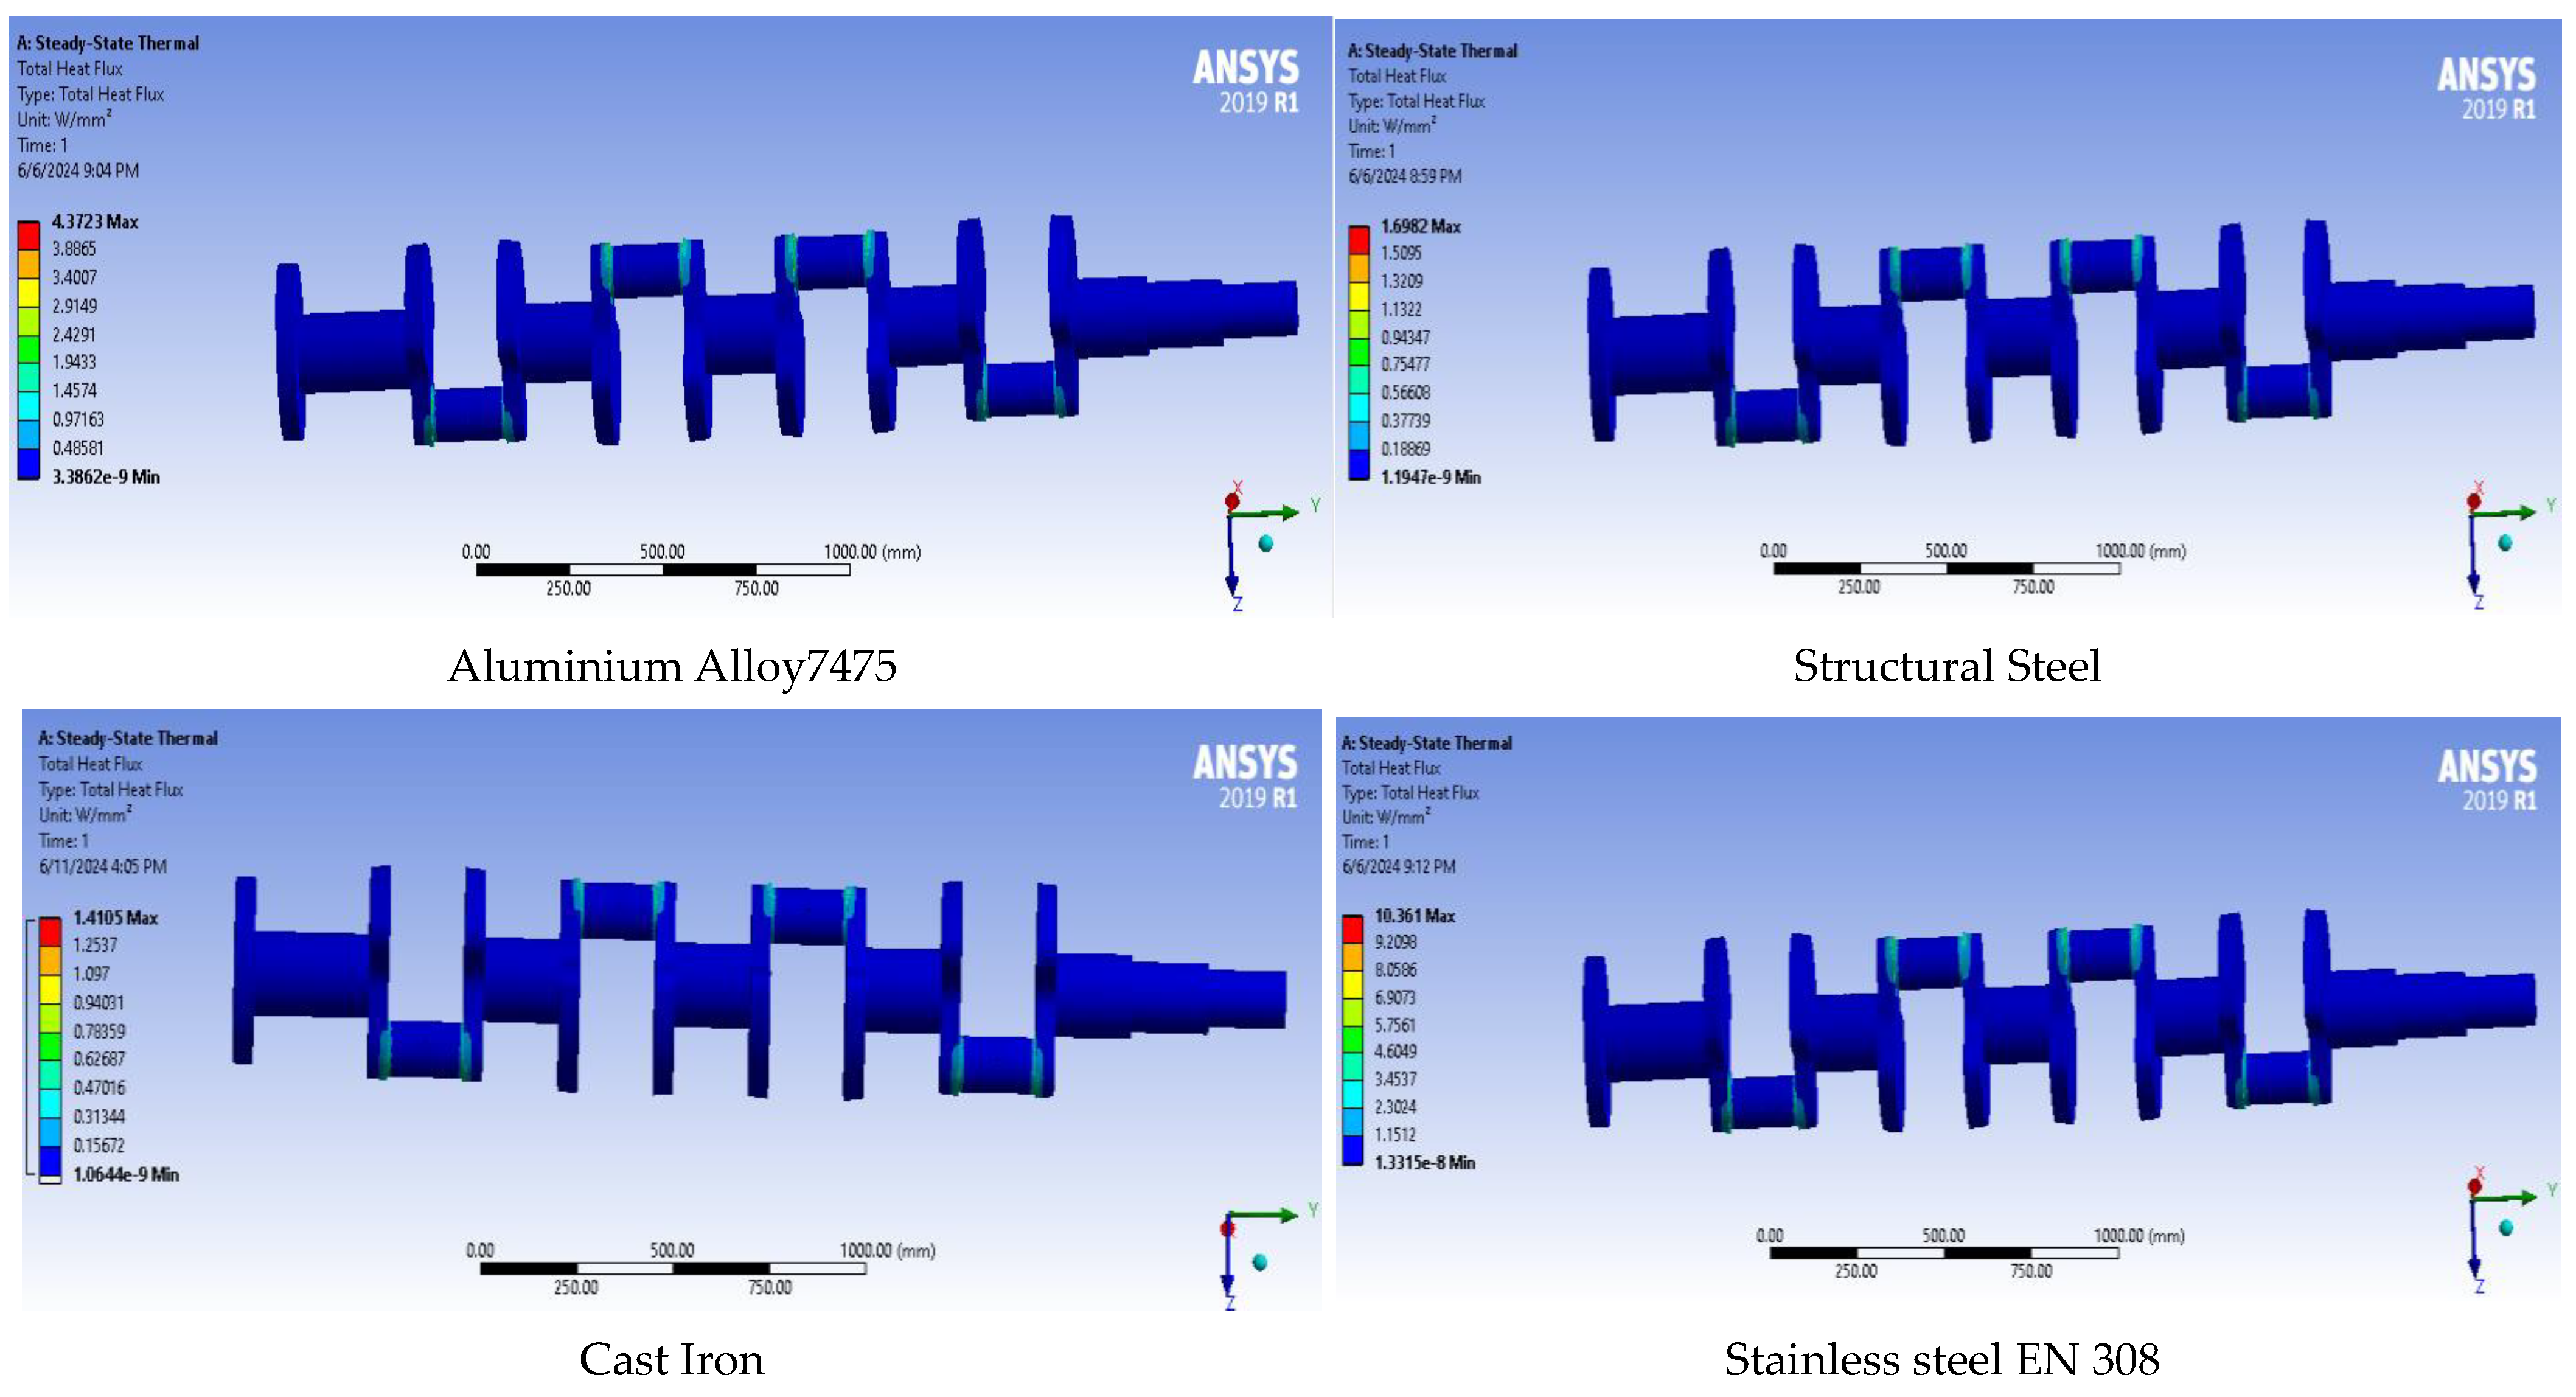
The results indicate that Cast Iron had the lowest maximum heat flow, with a value of 1.4105 W/mm2 compared to the other materials studied. Structural Steel followed with a heat flow of 1.6982 W/mm2, while Aluminium Alloy 7475 ranked third with 4.3723 W/mm2. Stainless Steel EN 308 exhibited the highest heat flux at 10.361 W/mm2, which was recorded on both sides of the crankshaft (around the connecting rod axis). The remaining areas showed normal low temperatures, as illustrated in Figure 14 and summarized in Table 12.
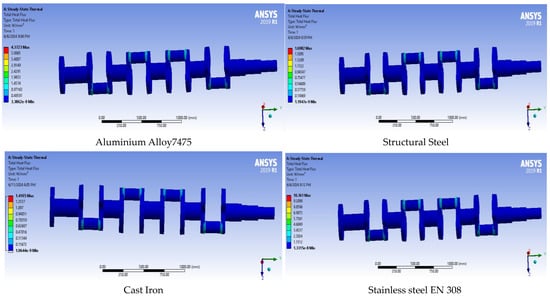
Figure 14.
Heat flow of materials used for the crankshaft.

Table 12.
Materials comparison table for thermal analysis.
3.5. Advanced Weight Loss Concepts
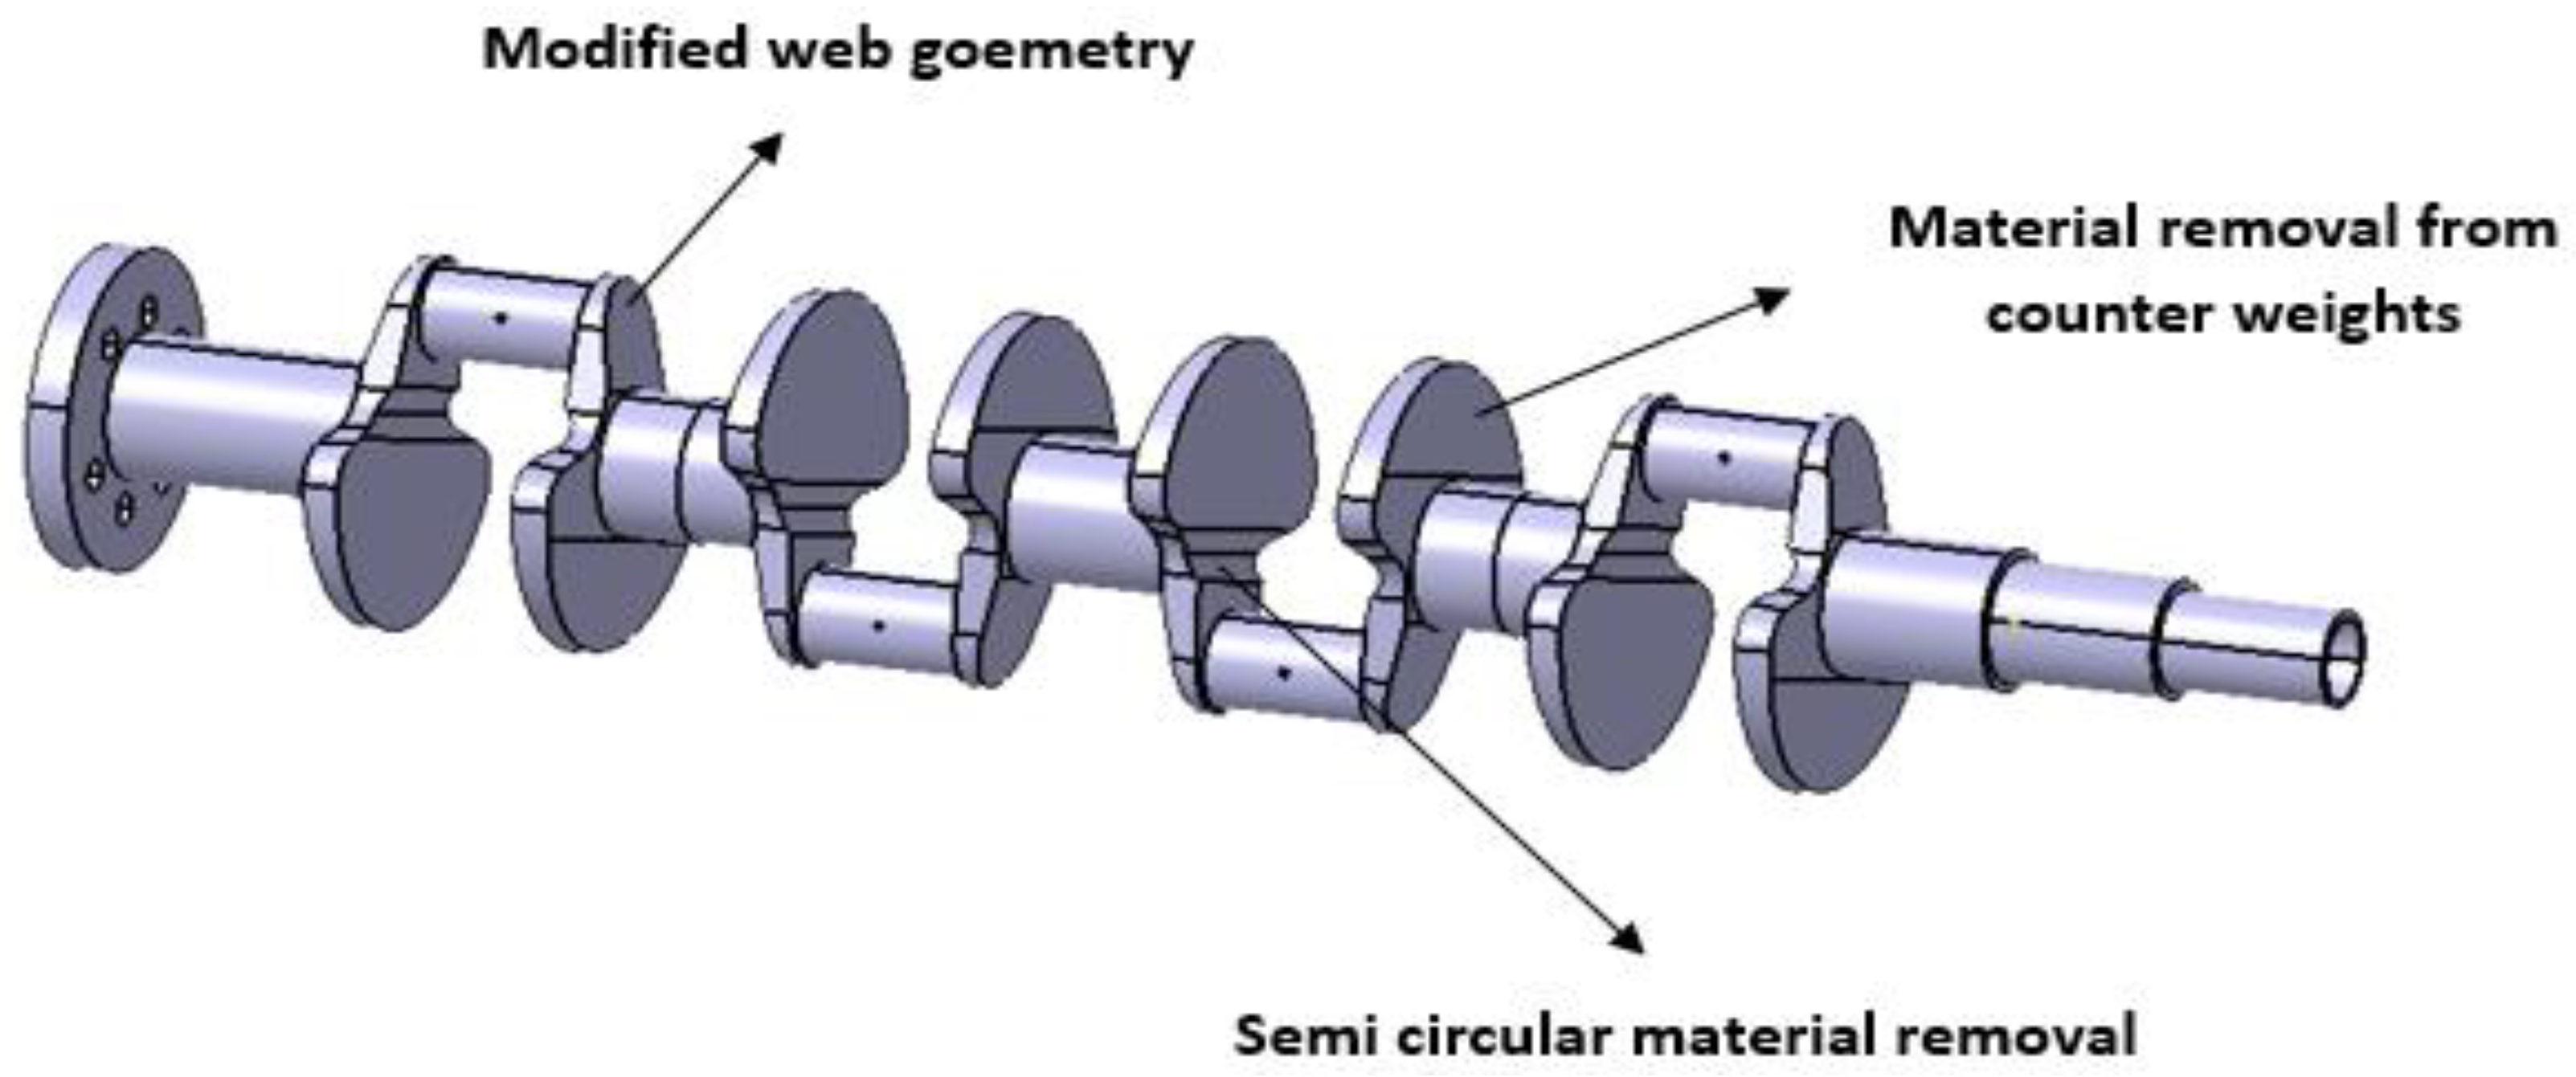
To reduce weight through crankshaft geometry redesign, it has been observed that certain areas of the crankshaft, such as the counterweight blocks and the crankshaft webs, experience minimal pressure. However, dynamic balancing of the crankshaft remains crucial, as counterweight blocks play a significant role in maintaining balance. Shape optimization techniques were applied to various locations of the crankshaft to achieve weight reduction. Material was removed from the counterweights and external geometric shape of the crankshaft, as illustrated in Figure 15. This redesign, based on the first concept, resulted in a reduced crankshaft weight.

Figure 15.
Advanced concepts for weight loss.
The second concept, from the reference study [20], showed that the von Mises stress for Structural Steel was 67.298 MPa, and the maximum displacement was 0.0149 mm. The results for stresses and displacements of the improved crankshaft are presented in Figure 16 and Table 13.

Figure 16.
Crankshaft analysis results (a) von Misses stress and (b) displacement.

Table 13.
Summary of results for stresses and displacements of the crankshaft.
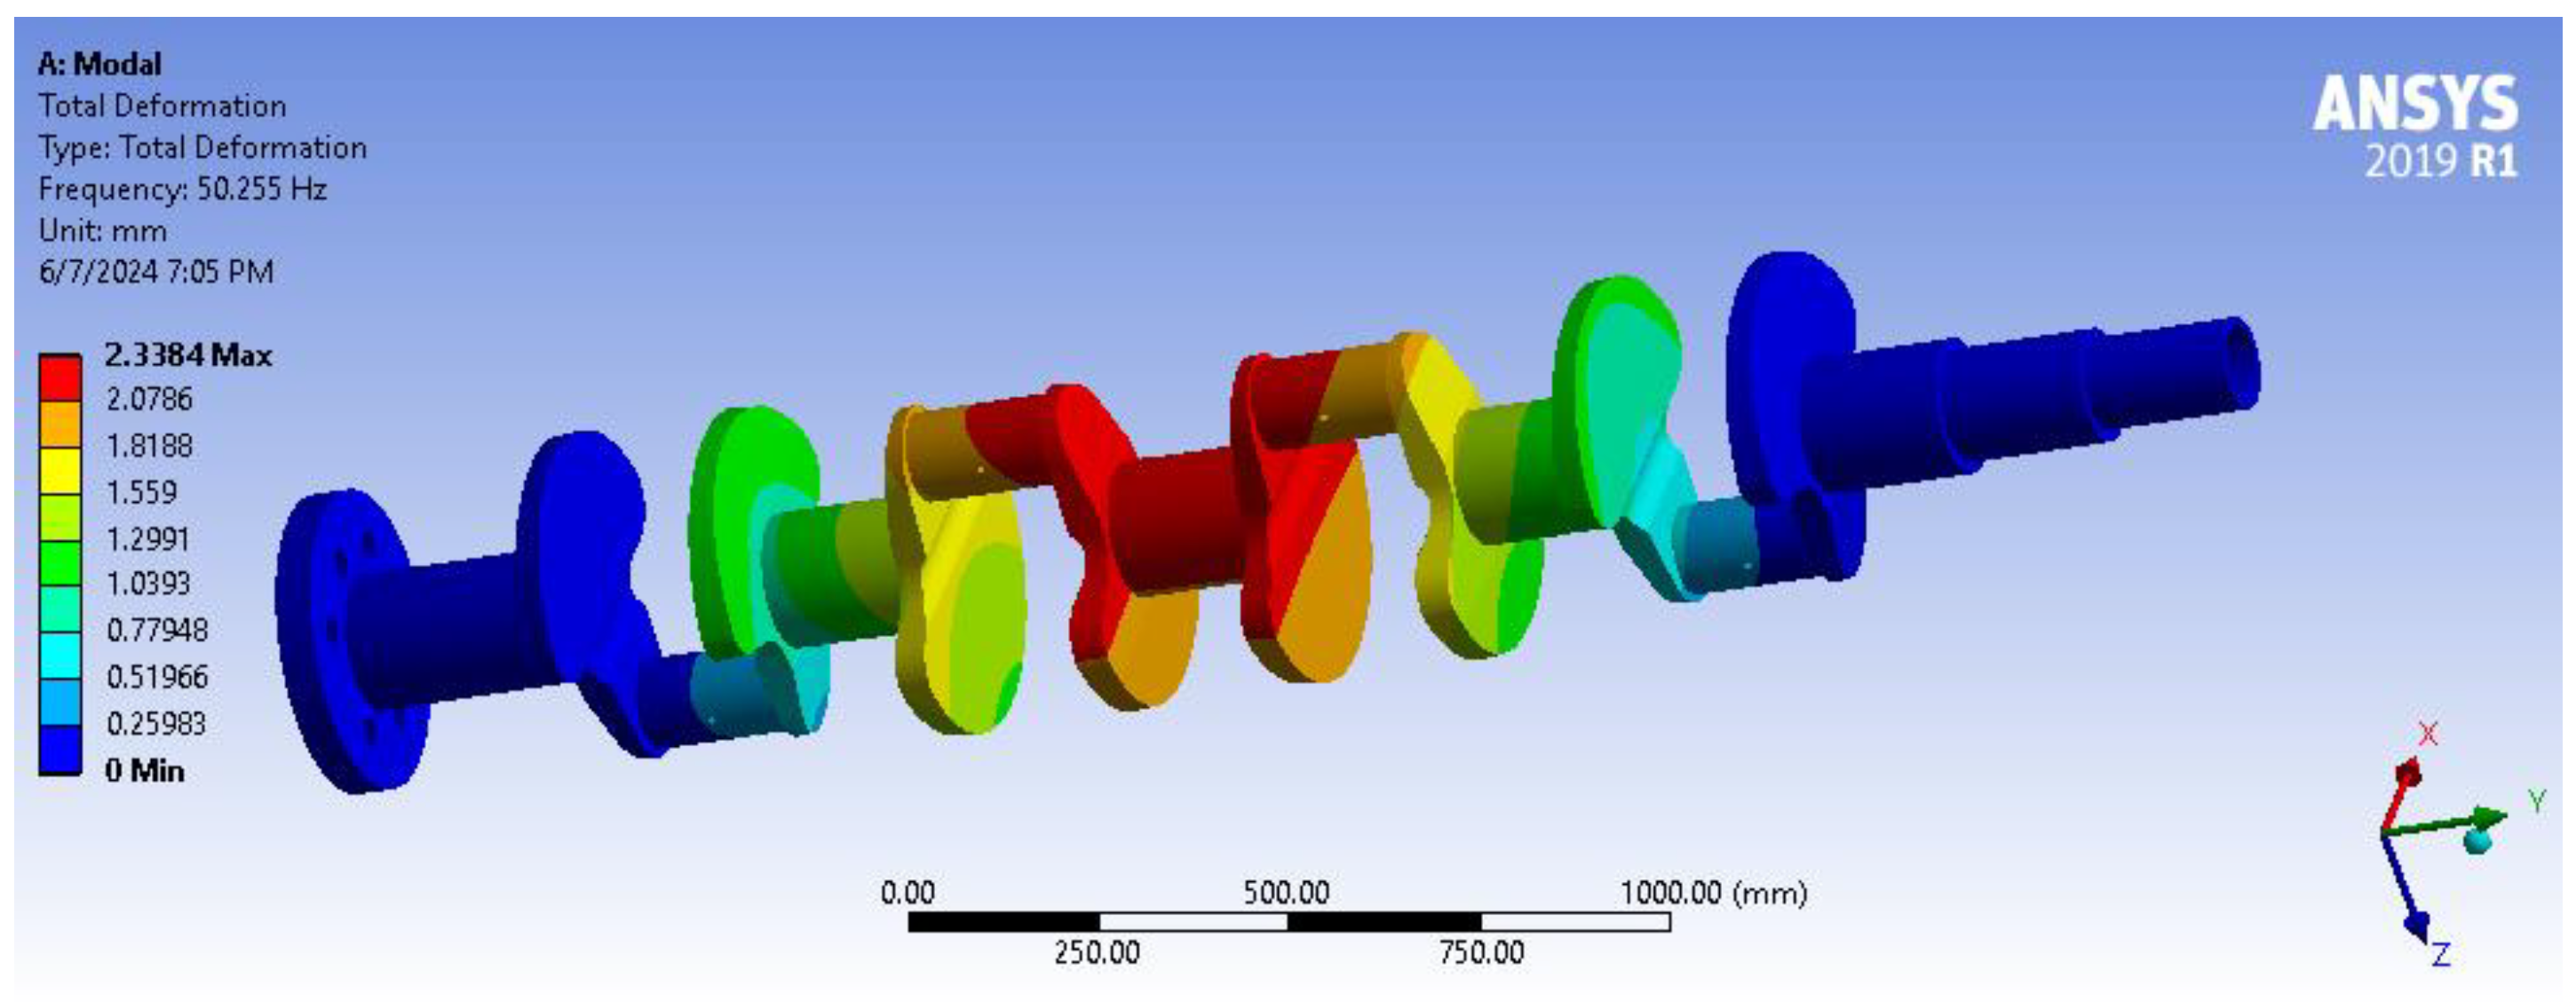
Figure 17 presents the vibration analysis of the improved crankshaft across six modes. In the first mode, the peak vibration frequency was 50.255 Hz, with a total deformation value of 2.3384 mm. Table 14 summarizes the frequency and total deformation results for Structural Steel.
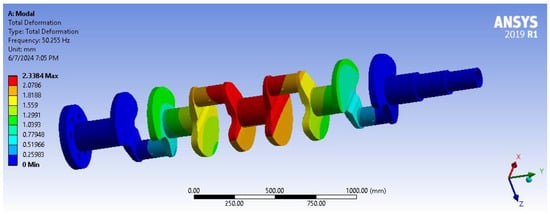
Figure 17.
Vibration analysis of Structural Steel.

Table 14.
Frequency and total distortion values of Structural Steel.
Figure 18 presents the thermal analysis of the improved crankshaft. The results indicate that the maximum output temperature for Structural Steel, measured at 225 W/m2, is observed at the connecting rod axis (a). Additionally, the maximum heat flow (b) was 2.5969 W/mm2.

Figure 18.
Thermal behavior analysis (a) Output temperature, and (b) Heat flow.
4. Discussion
The Finite Element Method (FEM) is a powerful numerical technique effectively used in complex analyses. In the context of ongoing research, FEM has been employed to develop and optimize facility mechanisms, improve performance, and enhance productivity while reducing weight, as demonstrated by Sandya et al. [11]. Their study, which involved analyzing the crankshaft with varying pressure angles, confirmed the validity of the design. The research found that the stress and displacement values were optimal, showing a 17.7% reduction in stress and a 0.6% reduction in displacement compared to commonly used materials. This improvement is attributed to the design shape and the incorporation of lubrication holes. Furthermore, the safety factor of the design was validated, confirming its superiority over previous reference designs in terms of quality and yield stress values.
Mechanical studies aim to improve materials that offer high productivity and effective energy transmission, as durable materials are necessary to ensure appropriate operating conditions. Sandeep et al. [9] compared various aluminum alloys and found that Aluminum Alloy 7475 was the best among those studied. Additionally, Gopal et al. [21] compared Aluminum Alloy with Stainless Steel EN 308 and concluded that Aluminum Alloy was superior in terms of stress values. In terms of displacement, this research also showed that Aluminum Alloy 7475 is the best compared to the other materials studied regarding both stress and displacement values. This superiority can be attributed to its structural composition, which includes a high weight percentage of zinc, as well as magnesium, silicon, and chromium, all contributing to its strength.
In terms of the vibration study, we observed that Cast Iron exhibits low-frequency values, making it the best material among those studied due to its properties. Additionally, the total distortion values for Structural Steel are the lowest, which is consistent with the results reported by Chaitanya Ravivarma et al. [1]. This allows for the selection of the most suitable material, which enhances the lifespan of the crankshaft and improves engine performance under various conditions. Ram et al. [2] conducted a study on the thermal behavior and performance evaluation of the crankshaft for two materials: forged steel and composite material. The study found that the output temperature was 225 W/m2, and the heat flow was 59.131 W/m2 for a single cylinder. In contrast, our research showed an output temperature of 225 W/m2 and a heat flow of 1.4105 W/mm² for four cylinders. Cast Iron, which exhibited the lowest heat flow among the materials studied, supports the selection of appropriate materials under thermal conditions. Shahane et al. [8] investigated crankshaft improvement by reducing weight through material removal from the web area and balancing blocks. Their results indicated higher stress values in the first case, with reduced frequency values and increased total deformation, despite a 2.9% reduction in weight. In contrast, Thejasree et al. [20] studied three basic concepts for reducing the weight of the crankshaft. The results indicated an increase in stress values, while the weight percentage was reduced by 12.8%. In this research, both the first and second concepts were applied together. As a result, stress values increased, but the weight percentage was reduced by 20%, and frequency values decreased. This can be explained by the fact that a decrease in mass leads to reduced stiffness, which in turn results in lower frequency values. Additionally, the results showed a decrease in total deformation and heat flow compared to the original design.
5. Conclusions
In this research, an analytical study was conducted to examine the effect of the material type used for the crankshaft on its static and dynamic behavior. This study included an analysis of the stresses and displacements in the crankshaft, as well as its vibrational and thermal behavior, using the finite element method under various loading conditions. Based on the results obtained, the following conclusions can be drawn:
- The current design was compared with designs from reference studies regarding stresses and displacements. The comparison with the most commonly used material in manufacturing revealed that the current design is optimal, showing a 17.7% reduction in stress values and confirming an adequate safety factor;
- Aluminum Alloy 7475 is identified as the best material for stress and displacement values, demonstrating lower values compared to other materials used in manufacturing;
- Cast Iron excels in terms of heat flow to the crankshaft compared to other materials used in manufacturing;
- Cast Iron also shows the best performance in terms of low vibration frequencies, while Structural Steel exhibited very low total deformation values under applied loads;
- Improvements made through geometric and shape optimization resulted in a 20% reduction in crankshaft weight. Although this modification led to increased stress and displacement values, it also contributed to a reduction in frequency values compared to the current design.
Based on the results obtained in this research and the observed differences in the mechanical behavior of each material, it is recommended that a new material characterized by low density and excellent mechanical properties be developed. This would enhance productivity, improve energy efficiency, and reduce torsion and bending. Additionally, further research should focus on optimizing the crankshaft design to ensure the highest engine performance and efficiency.
Author Contributions
Software, formal analysis, data curation validation, and writing—original draft: H.M.N. and M.A.; conceptualization, methodology, and supervision: T.O.; conceptualization, data curation, and visualization: M.S.; resources, supervision, and writing—review and editing: D.J. All authors have read and agreed to the published version of the manuscript.
Funding
This research received no external funding.
Institutional Review Board Statement
Not applicable.
Informed Consent Statement
Not applicable.
Data Availability Statement
The data that support the findings of this study are available upon reasonable request from the authors.
Conflicts of Interest
The authors declare no conflicts of interest.
References
- Ravivarma, N.; Badrakali, C.; Reddy, S. Design and Analysis of Four Stroke Six Cylinder Diesel Engine Crankshaft with Geometric Optimization. Int. J. Mod. Trends Sci. Technol. 2016, 2, 124–133. [Google Scholar]
- Naveen, R. Crank Shaft Design and Thermal Analysis of Forged Steel And Metal Matrix Composite Materials Using ANSYS. J. Mag. Eng. 2015, 2, 132–138. [Google Scholar]
- Pravardhan, S. Dynamic Load Analysis and Optimization of Connecting Rod. Ph.D. Thesis, University of Toledo, Toledo, OH, USA, 2004. Volume 4. pp. 56–60. [Google Scholar]
- Fatemi, A.; Williams, J.; Montazersadgh, F. -Fatigue Performance Evaluation of Forged Steel versus Ductile Cast Iron Crankshaft: A Comparative Study. Eng. Mater. Sci. Univ. Toledo 2007, 5. [Google Scholar] [CrossRef]
- Yingkui, G.; Zhibo, Z. Strength Analysis of Diesel Engine Crankshaft Based on PRO/E and ANSYS. In Proceedings of the 2011 Third International Conference on Measuring Technology and Mechatronics Automation, Shanghai, China, 6–7 January 2011; IEEE: Piscataway, NJ, USA, 2011. [Google Scholar]
- Ramani, H.B.; Kumar, N.; Kasundra, P. Analysis of Connecting Rod below Different Loading Condition Using Software. Int. J. Eng. Res. Technol. IJERT 2005, 1, 1–5. [Google Scholar]
- Patel, K. Fatigue and Modal Analysis of Crankshaft Using ANSYS Software. ISME 2019, 214, 413–430. [Google Scholar]
- Shahan, V. Optimization of the Crankshaft Using Finite Element Analysis Approach; Springer International Publishing: Cham, Switzerland, 2017; Volume 2. [Google Scholar]
- Sandeep, A.; Vijay John, M.; Jani, S.P. Theoretical Modelling and Analysis of a Four-Wheeler Crank Shaft by Different Aluminum Alloys. Mater. Today 2021, 45, 1679–1683. [Google Scholar] [CrossRef]
- Witek, L.; Stachowicz, F.; Załęski, A. Failure Investigation of the Crankshaft of Diesel Engine. Procedia Struct. Integr. 2017, 5, 369–376. [Google Scholar] [CrossRef]
- Sandya, K.; Keerthi, M.; Srinivas, K. Modeling and Stress Analysis of Crankshaft Using FEM Package ANSYS. IRJET P 2016, 3, 687–693. [Google Scholar]
- Kurbet, S.N.; Kuppast, V.V.; Talikoti, B. Material Testing and Evaluation of Crankshafts for Structural Analysis. Mater. Today 2021, 34, 556–562. [Google Scholar] [CrossRef]
- Magryta, P.; Pietrykowski, K.; Skiba, K. FEM Simulation Research of Natural Frequency Vibration of Crankshaft from Internal Combustion Engine. ITM Web Conf. 2017, 15, 07004. [Google Scholar] [CrossRef][Green Version]
- Shariffudin, K.A.; Karuppanan, S.; Patil, S.S. Finite Element Analysis of Residual Stress in Cold Expanded Plate with Different Thickness and Expansion Ratio. IOP Conf. Ser. Mater. Sci. Eng. 2017, 257, 012019. [Google Scholar] [CrossRef]
- Reddy, A.; Sreenivasulu, B. Design and Vibration Mode Analysis of Crank Shaft for Four Stroke Single Cylinder Petrol Engine. Akgec Int. J. Technol. 2016, 6, 50–61. [Google Scholar]
- Vinay, A.V.; Shankar, M.U.; Satya, L.P.; Kumar, Y.S.; Srikanth, M. Modelling and analysis of crankshaft for four stroke diesel engine by using composite materials. Anil Neerukonda Inst. Technol. Sci. 2021, 9, 354–360. [Google Scholar]
- Pandiyan, K.; Tiwari, A. Crankshaft Design Methodology for Diesel Engines. Int. J. Innov. Res. Sci. Eng. Technol. 2015, 4, 7580–7586. [Google Scholar]
- Shenkar, S.S.; Biradar, N. Design and Static Structural Analysis of Crank Shaft. IJSETR 2015, 4, 1393–1398. [Google Scholar]
- Rui, L.I.; Meng, X.; Wenda, L.I. Transient tribo-dynamic analysis of crosshead slipper in lowspeed marine diesel engines during engine startup. Friction 2021, 9, 1504–1527. [Google Scholar]
- Thejasree, P.; Dileep Kumar, G.; Leela Prasanna Lakshmi, S. Modelling and Analysis of Crankshaft for Passenger Car Using ANSYS. Mater. Today 2017, 4, 11292–11299. [Google Scholar] [CrossRef]
- Gopala, G.; Suresh Kumarb, L.; Reddyc; Raod, B.; Srinivasulue, M. Analysis of Piston Connecting rod and Crank shaft assembly. Mater. Today Proc. 2017, 4, 7810–7819. [Google Scholar] [CrossRef]
Disclaimer/Publisher’s Note: The statements, opinions and data contained in all publications are solely those of the individual author(s) and contributor(s) and not of MDPI and/or the editor(s). MDPI and/or the editor(s) disclaim responsibility for any injury to people or property resulting from any ideas, methods, instructions or products referred to in the content. |
© 2024 by the authors. Licensee MDPI, Basel, Switzerland. This article is an open access article distributed under the terms and conditions of the Creative Commons Attribution (CC BY) license (https://creativecommons.org/licenses/by/4.0/).


