Article

Structural Design and Numerical Analysis of Hoisting Device of Test Bed for Aircraft Engine

Department of Mechanical Engineering, Kunsan National University, 558 Daehak-ro, Miryong-dong, Gunsan 54150, Jeollabuk-do, Republic of Korea
Appl. Mech. 2023, 4(2), 407-420; https://doi.org/10.3390/applmech4020023
Submission received: 4 March 2023 / Revised: 6 April 2023 / Accepted: 8 April 2023 / Published: 12 April 2023
(This article belongs to the Topic Advances on Structural Engineering, 2nd Volume)

Abstract

:
In this work, a test bed and stand structure were designed for the thrust test of an aircraft. The engine test rig consists of a thrust stand, test bed, transport system, and hoisting device. In this study, structural design and analysis of the stand and bed for engine thrust test equipment were performed. The stand structure supported the engine, and the test bed moved the thrust test equipment and the engine. Structural design loads were defined by analyzing the operating conditions. Structural analysis was performed based on the structural design results. As a result of analyzing the structural safety against thrust, which is the main design load, it was considered to be sufficiently safe. Finally, the target structure was manufactured to verify the design result.

1. Introduction

If an aircraft engine is developed, the engine performance has to be tested. The engine developed is mounted to be aligned with the applicable aircraft. Therefore, the thrust test for the engine itself is essential. In this study, the test stand and bed were designed to perform the thrust test for the F404-GE-102 engine developed by GE. The thrust of the engine is 48.9 kN. The weight of the engine is 1035 kg [1].
In this work, previous research on thrust stands was investigated first. T. W. Haag designed a thrust stand for high power electric propulsion devices. The paper gives a detailed description of the thrust stand design and operation with a 0.1 MW class magneto plasma dynamic device [2]. T. W. Haag performed a study on the thrust stand for high-power electric propulsion devices. In their study, a thrust stand for use with magneto plasma dynamic thrusters operated at powers up to 250 kW in a steady state was built and tested [3]. J. M. Mondragon designed, built, and tested a thrust test stand. In this work, the analysis of the dynamic performance of the test stand was performed [4]. R. E. Smith et al. carried out research on the measurement of engine thrust in altitude ground test facilities. In their study, the typical value of measurement uncertainty for thrust and thrust-related parameters and identification of factors are presented [5]. R. Runyan et al. studied the research on thrust stand design principles. In their study, a discussion on a variety of thrust stand designs is presented with the intention of consolidating much of the experience accumulated in the engine test facility into one document [6]. G. R. Seeman performed a study on the design of an experimental thrust nozzle test stand [7]. V. R. C. performed a study on thrust measurements on a rocket nozzle using flow-field diagnostic [8]. F. Ma et al. performed a study on the influence caused by temperature on a pulsed thrust test stand for an attitude control rocket engine. In their work, the influence caused by the temperature on the pulsed thrust test stand (PTTS) for the attitude control rocket engine is analyzed [9]. M. S. Yusoof et al. conducted a study on a strip distortion generator for simulating inlet flow distortion in gas turbine engine ground test facilities. In their study, a methodology was developed to generate a non-uniform/distorted inlet flow field to test a gas turbine engine in ground test facilities [10]. W. Li et al. designed a simplified removable ground test bed to test a certain turbofan engine [11].
In South Korea, J. Jin et al. studied the design of a thrust stand using flexure [12]. In their study, two types of thrust stand models were proposed for the design of a thrust stand using flexure. J. Kim et al. performed a study on the functional analysis of flexure in a captive thrust stand [13]. Most of the research on flexure structures has been conducted in Korea.
As a result of analyzing precedent studies, most of the research on engine test rigs was investigated. In their study, a novel hoisting device and transport system were designed for the test bed of an aircraft engine. In this study, a test stand for the T-50 engine of a Korean fighter jet was developed. The operating conditions were analyzed to calculate the design load. Structural analysis was performed based on the structural design results. As a result of analyzing the structural safety against thrust, which is the main design load, it was considered to be sufficiently safe. Finally, the hoisting device and transport system was manufactured to verify the design result.

2. Design of the Test Stand and Bed

2.1. Operating Conditions

The operating conditions were investigated to calculate the design load. In a default environment, it supports a load of 49 kN or more, such as the self-load of the engine, thrust stand, and test bed. The transport and hoisting system under this load should be operated safely. The default environment is one in which the engine thrust is not working. Normal engine operation should be possible while supporting the thrust of 79 kN generated by the engine. Therefore, a thrust load of 79 kN was added to the base load of 49 kN. The thrust stand is connected to the test bed with bolts. The entire engine thrust was transmitted through these bolts during the test. The bottom was fixed on a concrete floor.

2.2. Load Definition and Structural Design

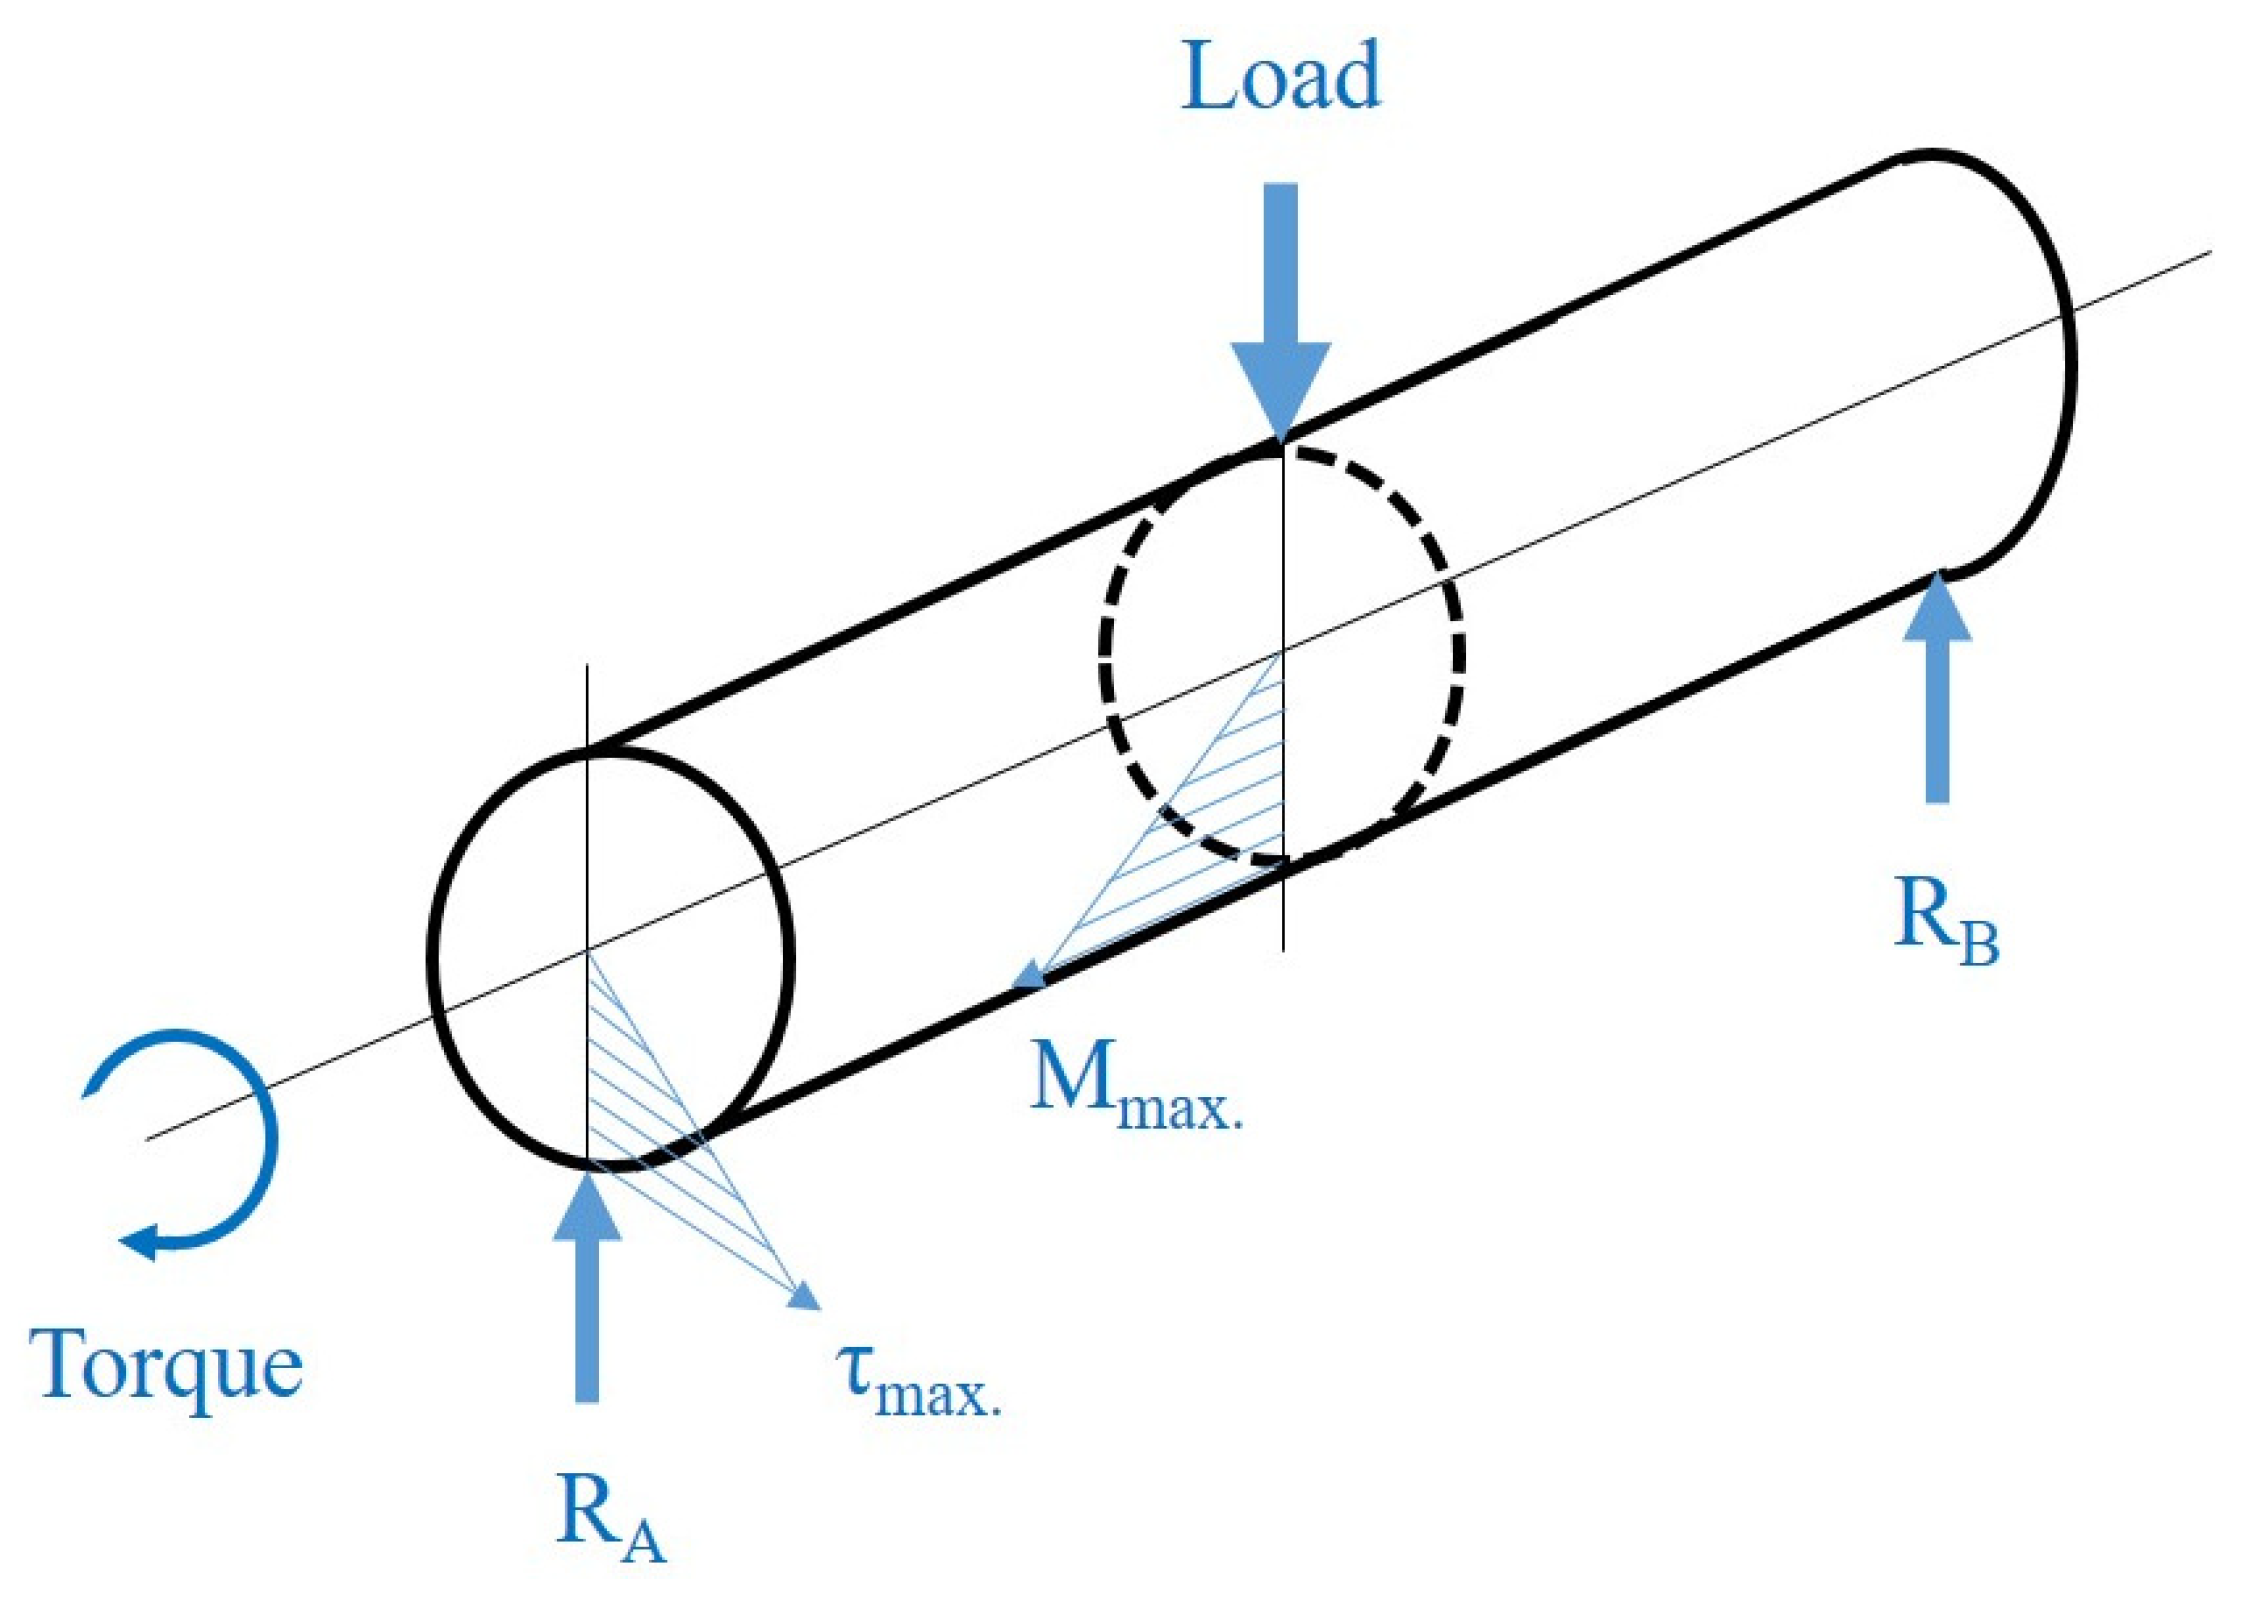
The test bed was located in the normal test position to support the thrust stand during the engine test. It is a device that could test other engine stands by moving to the normal position together with the thrust stand when completing the test. It is made up of the test bed hoisting device and the moving wheel drive unit. Four moving wheels were installed, which can be rotated with respective drive motors. It can move a distance of 20 m back and forth. It is operated up to 2~3 times a day. The most extreme condition is one in which 24.5 kN (half of 49 kN, which is the entire load) acts as a vertical load to the drive shaft because two-point support transport is performed. Regarding the design regulations, it is designed to take into consideration the situation where two-point supports receive all of the load under extreme conditions. The moving wheel drive shaft receives 400 W of power from the drive motor through a reducer. It rotates at constant-speed revolutions of 33.3 rpm and delivers the maximum torque of 229 N·m to the drive shaft to move the bed. The power and speed were determined by the selected drive motor. Table 1 shows the load of each component. Figure 1 shows the concept of the moving wheel drive shaft.
The transport weight was considered in this study to calculate the required number of revolutions of the moving wheel. If considering the inertial force, the test bed’s transport speed, Vtr, is 12 m/s. The required number of revolutions can be obtained through the following equation. The number of revolutions calculated is 32.1 rpm.
N r e q = V t r π D w h
where N r e q is the required number of revolutions of the moving wheel. V t r is the moving speed of the test bed. D w h is the rail contact diameter of the moving wheel.
For the drive motor, the maximum suspension torque considering the total inertia moment should be calculated. This study referred to the motor specifications of similar transport systems to determine it. In the case of over-head hoists, 400 W is applied for the motor of a 2.5-ton transport system. Therefore, the same motor specifications were used. The number of revolutions of the relevant motor is 2000 rpm, and the number of revolutions is 32.1 rpm. Therefore, the required reduction gear ratio is 62.3. Consequently, 60 was applied to the reduction gear ratio to simplify this design. The calculation process is shown by the equation below.
R r e d = 2000   rpm 32.1   rpm = 62.3
In this study, the diameter of the moving wheel’s drive shaft was newly designed. The first design method calculated the diameter of the shaft based on strength. The relations among the torsional shear stress, torsional moment, and diameter of the power transmission shaft are shown in the following equations. The relations among the transmission power, the number of revolutions, transmission torque and angular speed were analyzed through the following equations to determine the diameter of the drive shaft [14].
T = τ π 16 d 3   [ N · m ]
H w = T × ω = π 2 N τ d 3 480 [ W ]
where T is torque. T is 229 N·m. τ is torsional shear stress. d is the diameter of the shaft. The material of the driving shaft is SCM440. Therefore, the diameter of the driving shaft was defined as 19 mm. H w is power. N is rpm.
The second design method is based on stiffness. The relation the among total torsional angle, angle of twist per unit length and torque was considered in the design. The relation between torsional angles is as follows
θ = Φ l = 32 T π G d 4   [ rad / m ]
where θ is the angle of twist per unit length. Φ is the total twist angle. T is torque, G is shear modulus, and d is the diameter of the shaft. The limit angle of twist of the shaft is 0.0044 rad/m. The shear modulus G of SCM440 is 8.33 × 10¹⁰ N/m2. Therefore, the diameter of the driving shaft was defined as 42.2 mm.
The third design method is to combine the bending stress and torsional stress. In general, the following three stresses are considered for the shaft. The shear stress by torsional moment depending on power transmission is considered. It reaches the maximum on the surface of the shaft. The bending stress by the vertical load is considered, and the shear stress by the vertical load is considered. This shear stress is not generally considered because it has less of an effect on the rotating shaft compared to other stresses. Figure 1 shows the load distribution of the driving shaft for the structural design. The relation between the maximum torsional shear stress and transmission torque of the power transmission shaft is understood in the same way as above. It is assumed that the load is concentrated on the shaft center. The relation between the shaft length and the maximum stress is shown in Equation (6).
σ m a x = F L 4   [ N · m ]
where σ m a x is maximum stress. F is the concentrated load on the center of the shaft. L is the length of the shaft. Therefore, σ m a x is 735 N·m. The maximum torsional torque that drives the moving wheels is 229 N·m. Therefore, the diameter of the shaft was designed as 36 mm. In this design result, the maximum shear stress was considered.
In this study, the diameter of the shaft was decided by three design methods. First, the design was performed based on strength. Second, the design was carried out based on stiffness. Finally, it was designed by combining the bending and torsional stresses. The operating environment is very comfortable, and its frequency of use is low. Because it is mostly in a stationary state, the result of calculating the stiff shaft was ignored. In the design stage, clearance was considered to determine the final diameter of the shaft as 32 mm. Table 2 shows the structural design requirements and results of the driving shaft.
In the existing facility, every load was concentrated on a separate floor support structure during the actual engine test. Slight movement is allowed at regular test intervals. Therefore, it was decided that the newly designed motor brake of the test bed in this study was not required. On the contrary, the shaft received no shock in the case of an emergency stop. Therefore, it was analyzed to be more advantageous to a safe operation. Figure 2 shows the distribution of the torsional moment and shear stress caused by the load and torque.
The operating environment of the hoisting device was analyzed to design the hoisting device. The total ascending distance is 200 mm. It is operated 3~4 times or less a day, and every hoist is driven at a constant speed of 20 mm/s. Loads of up to 24.5 kN per shaft act as resistance while ascending and act as an accelerating force while descending. The material of Steel S45C was applied to the drive shaft. The material inside the drive part was designed with brass. The inertia moments for the total mass and the screw axis were analyzed. Therefore, the torque necessary for acceleration is 6.944 × 10⁻³ N·m. The friction torque for load resistance is 21.7 N·m. The hoisting device was designed based on the load condition analyzed.

3. Structural Analysis

3.1. Structural Analysis of Driving Shaft

In this study, a structural analysis of design results was performed. The diameter of the final design is 32 mm. A structural analysis was performed to evaluate the structural safety of the design result. The finite element analysis method was applied to the structural analysis. The ANSYS 2020 R2 software was used as commercial software for structural analysis. The number of elements is 37,200 elements. The solid hexagonal element was applied [15]. The fixed boundary condition of the edge was applied. A load of 24.5 kN was applied to the center of the shaft. The maximum torsional torque that drives the moving wheels is 229 N·m. Therefore, the maximum torsional torque was applied to the shaft.
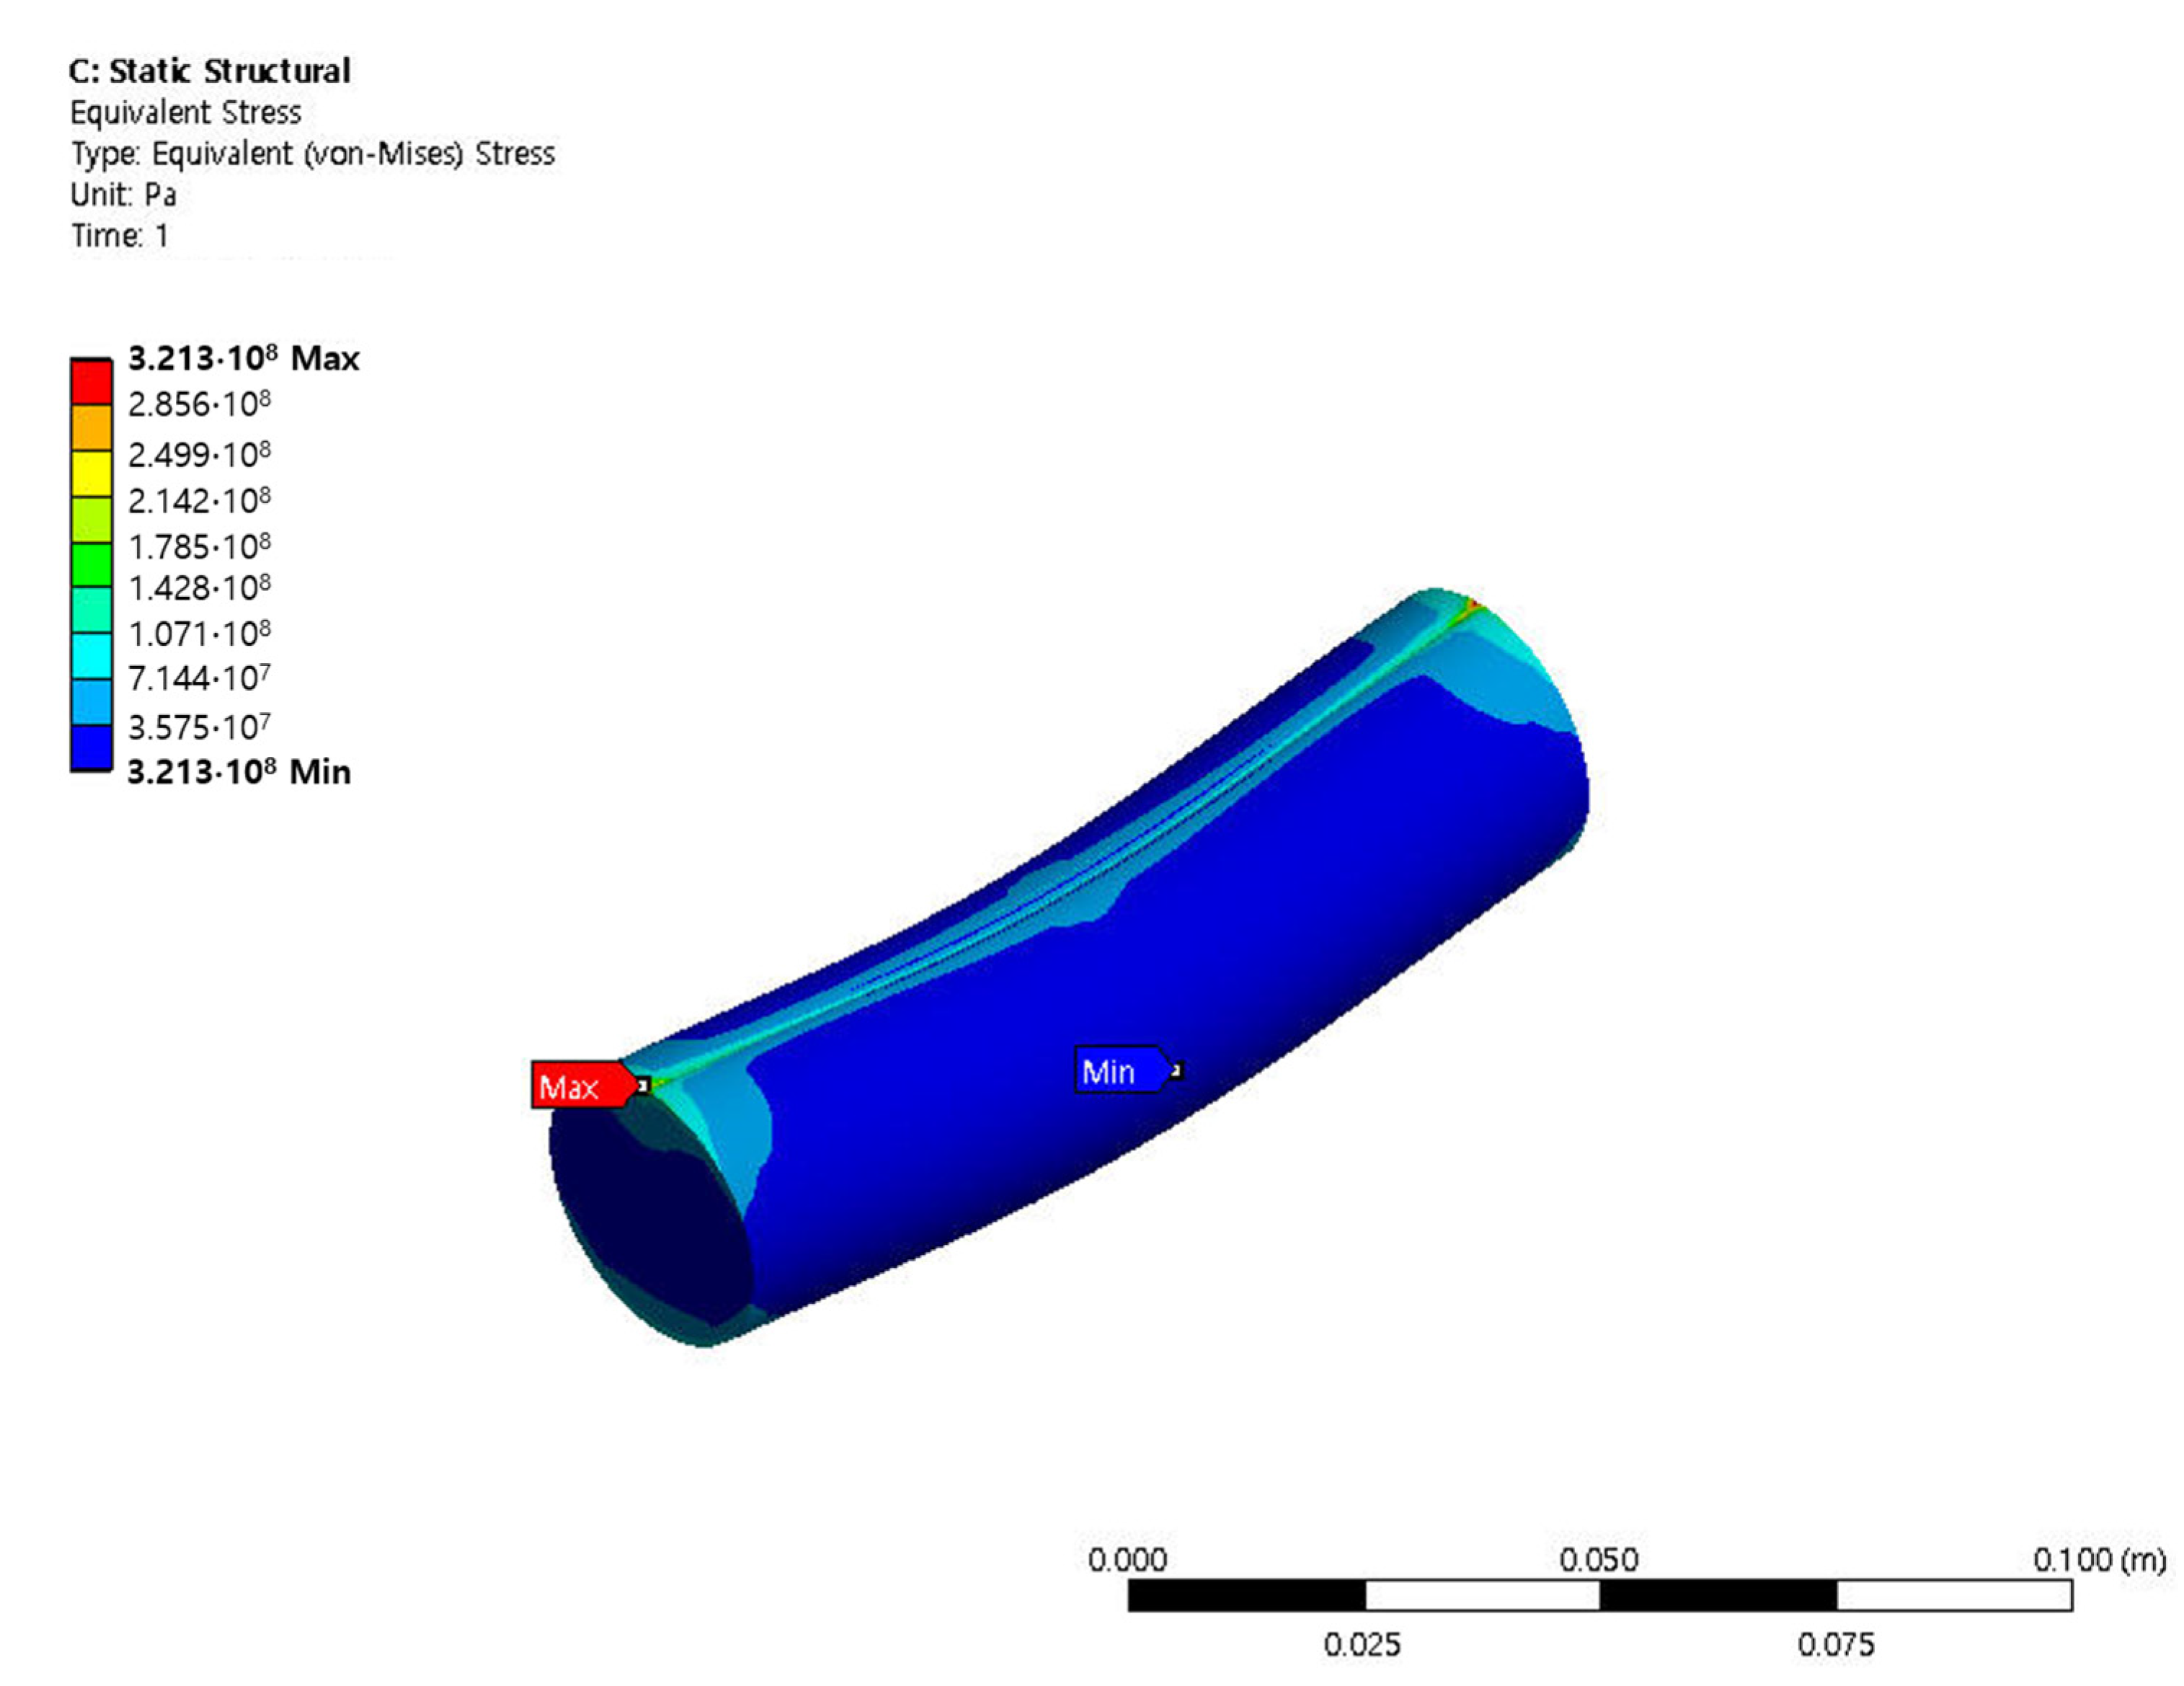
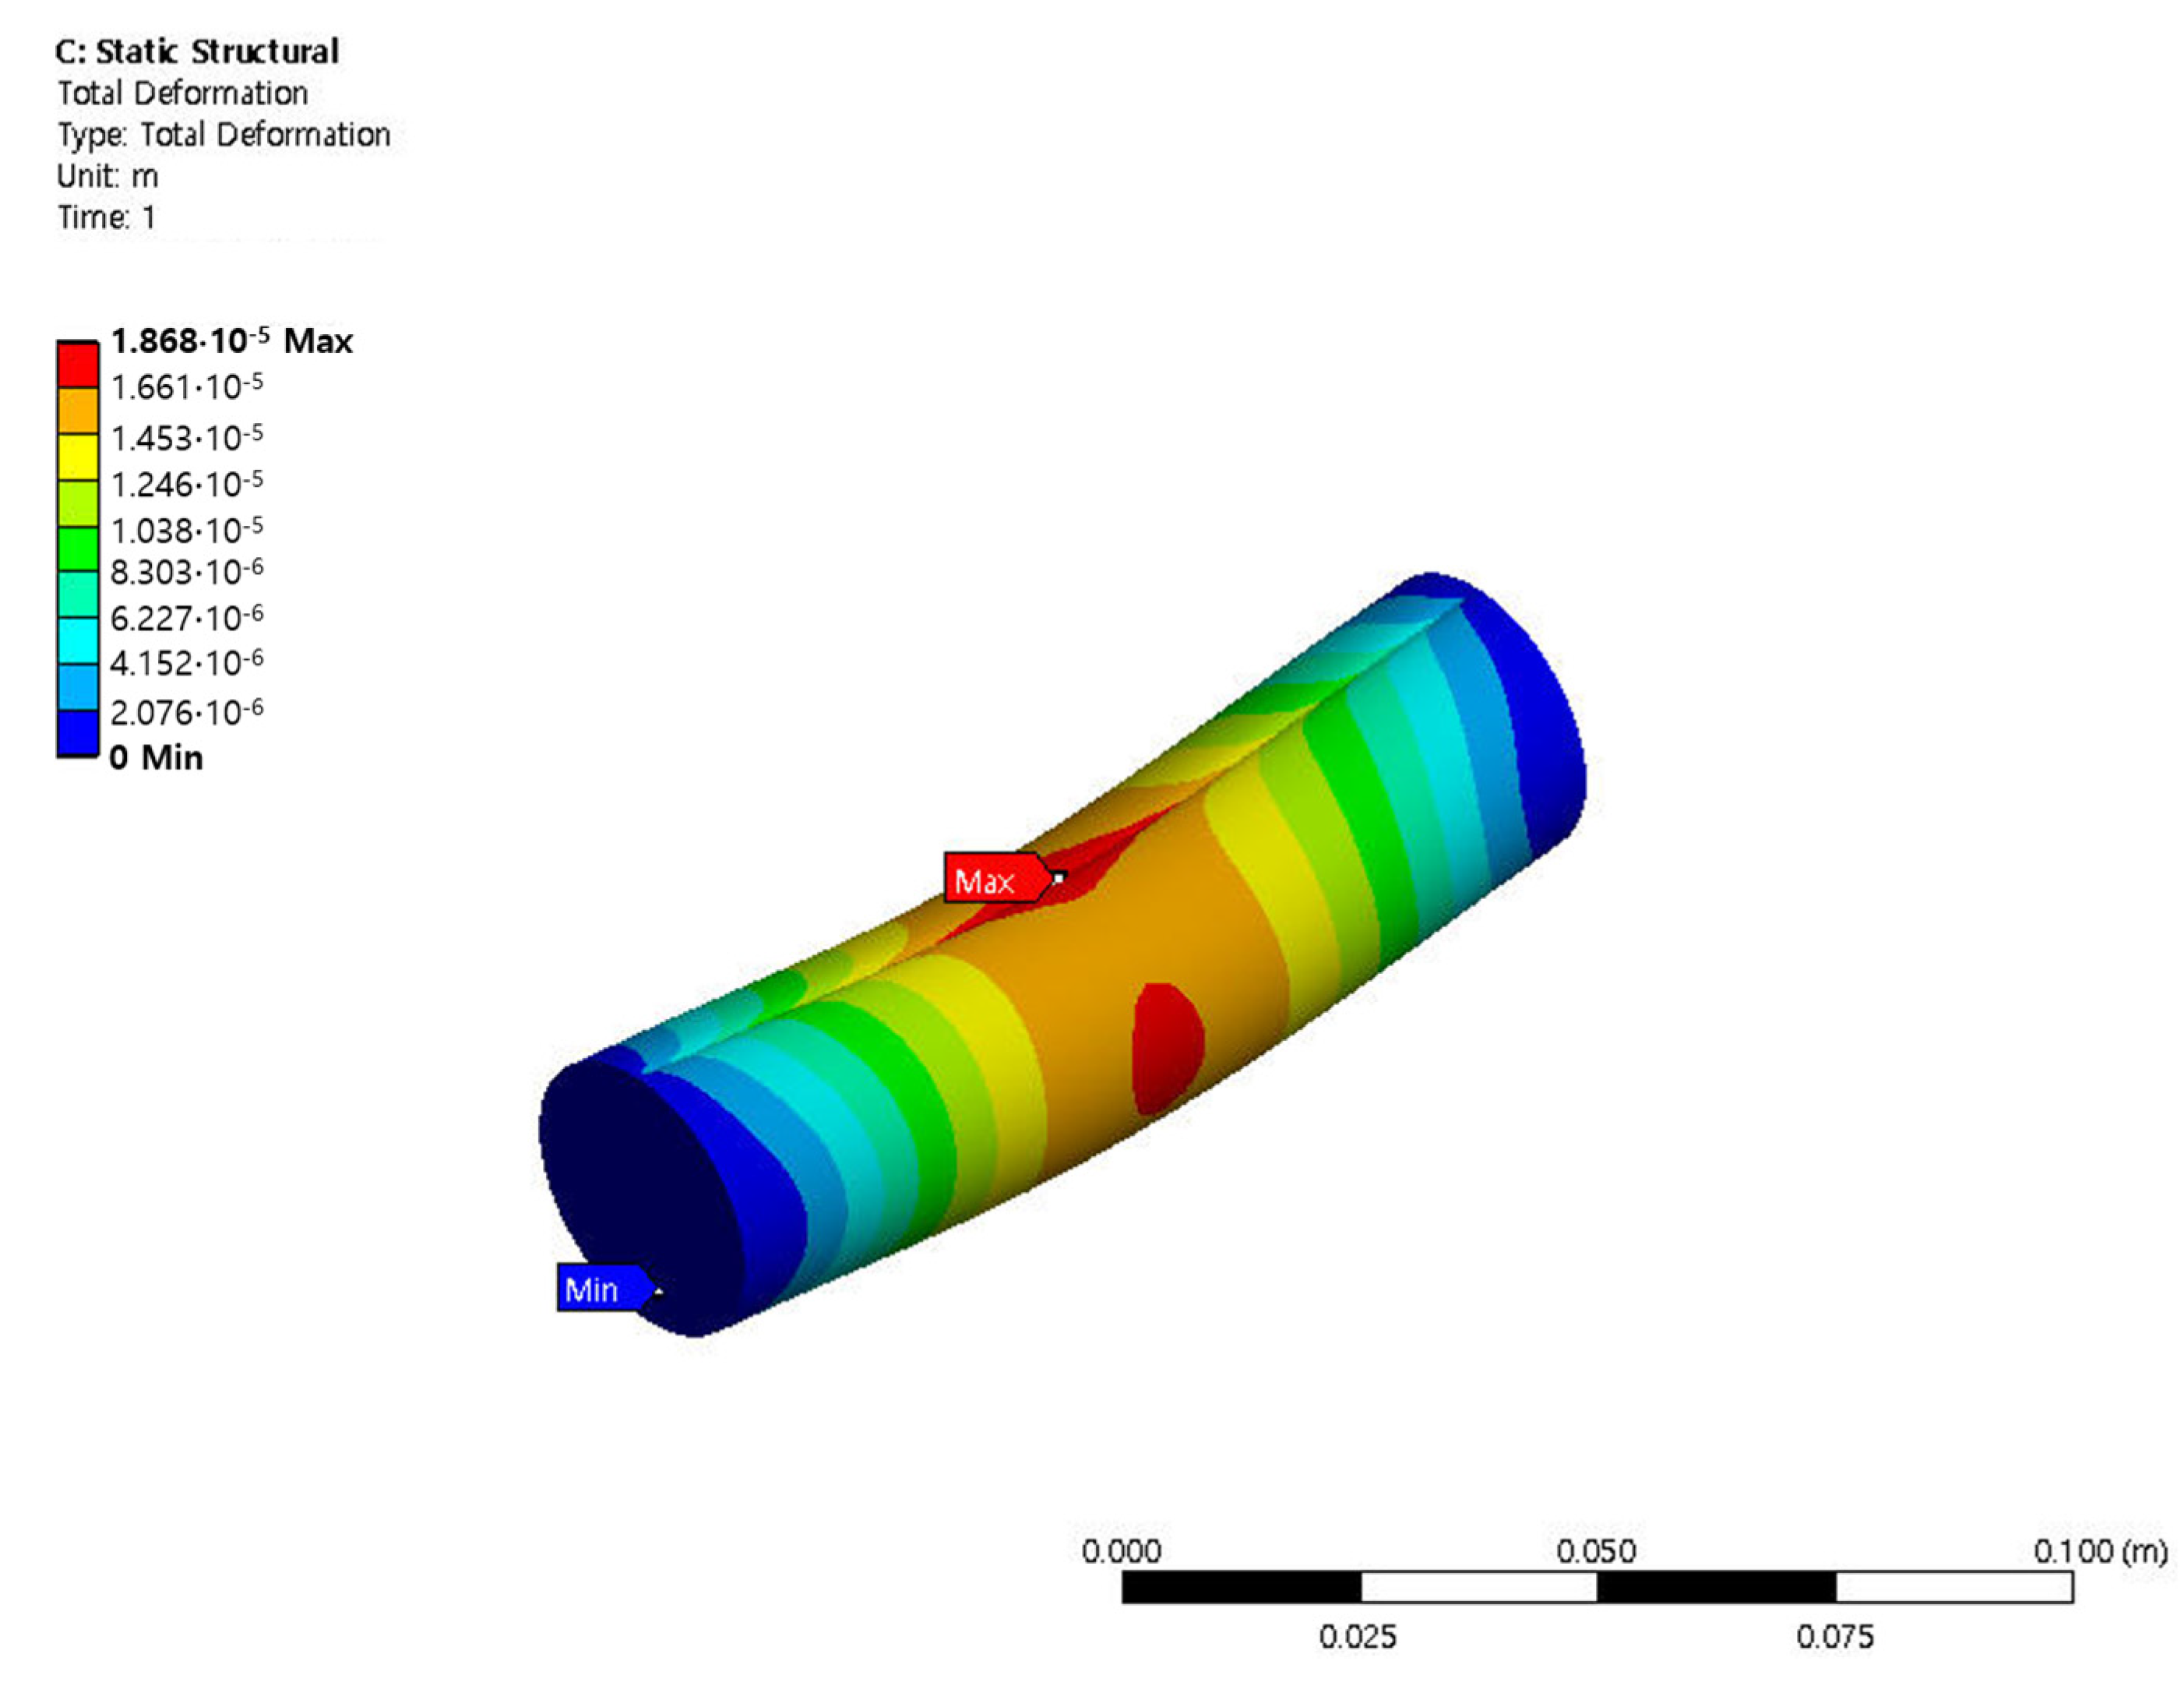
Structural analysis was performed by applying the structural design requirements. The maximum stress is 321 MPa. The location of the maximum stress is at the edge of the shaft. As a result of the stress analysis, the structure was confirmed to be safe. Figure 3 shows the maximum stress analysis result. The displacement of the shaft was 0.0186 mm. The displacement analysis results were also sufficiently safe. Figure 4 shows displacement analysis results. Therefore, the structural design results presented in this study are reasonable.

3.2. Structural Analysis of Hoisting Device

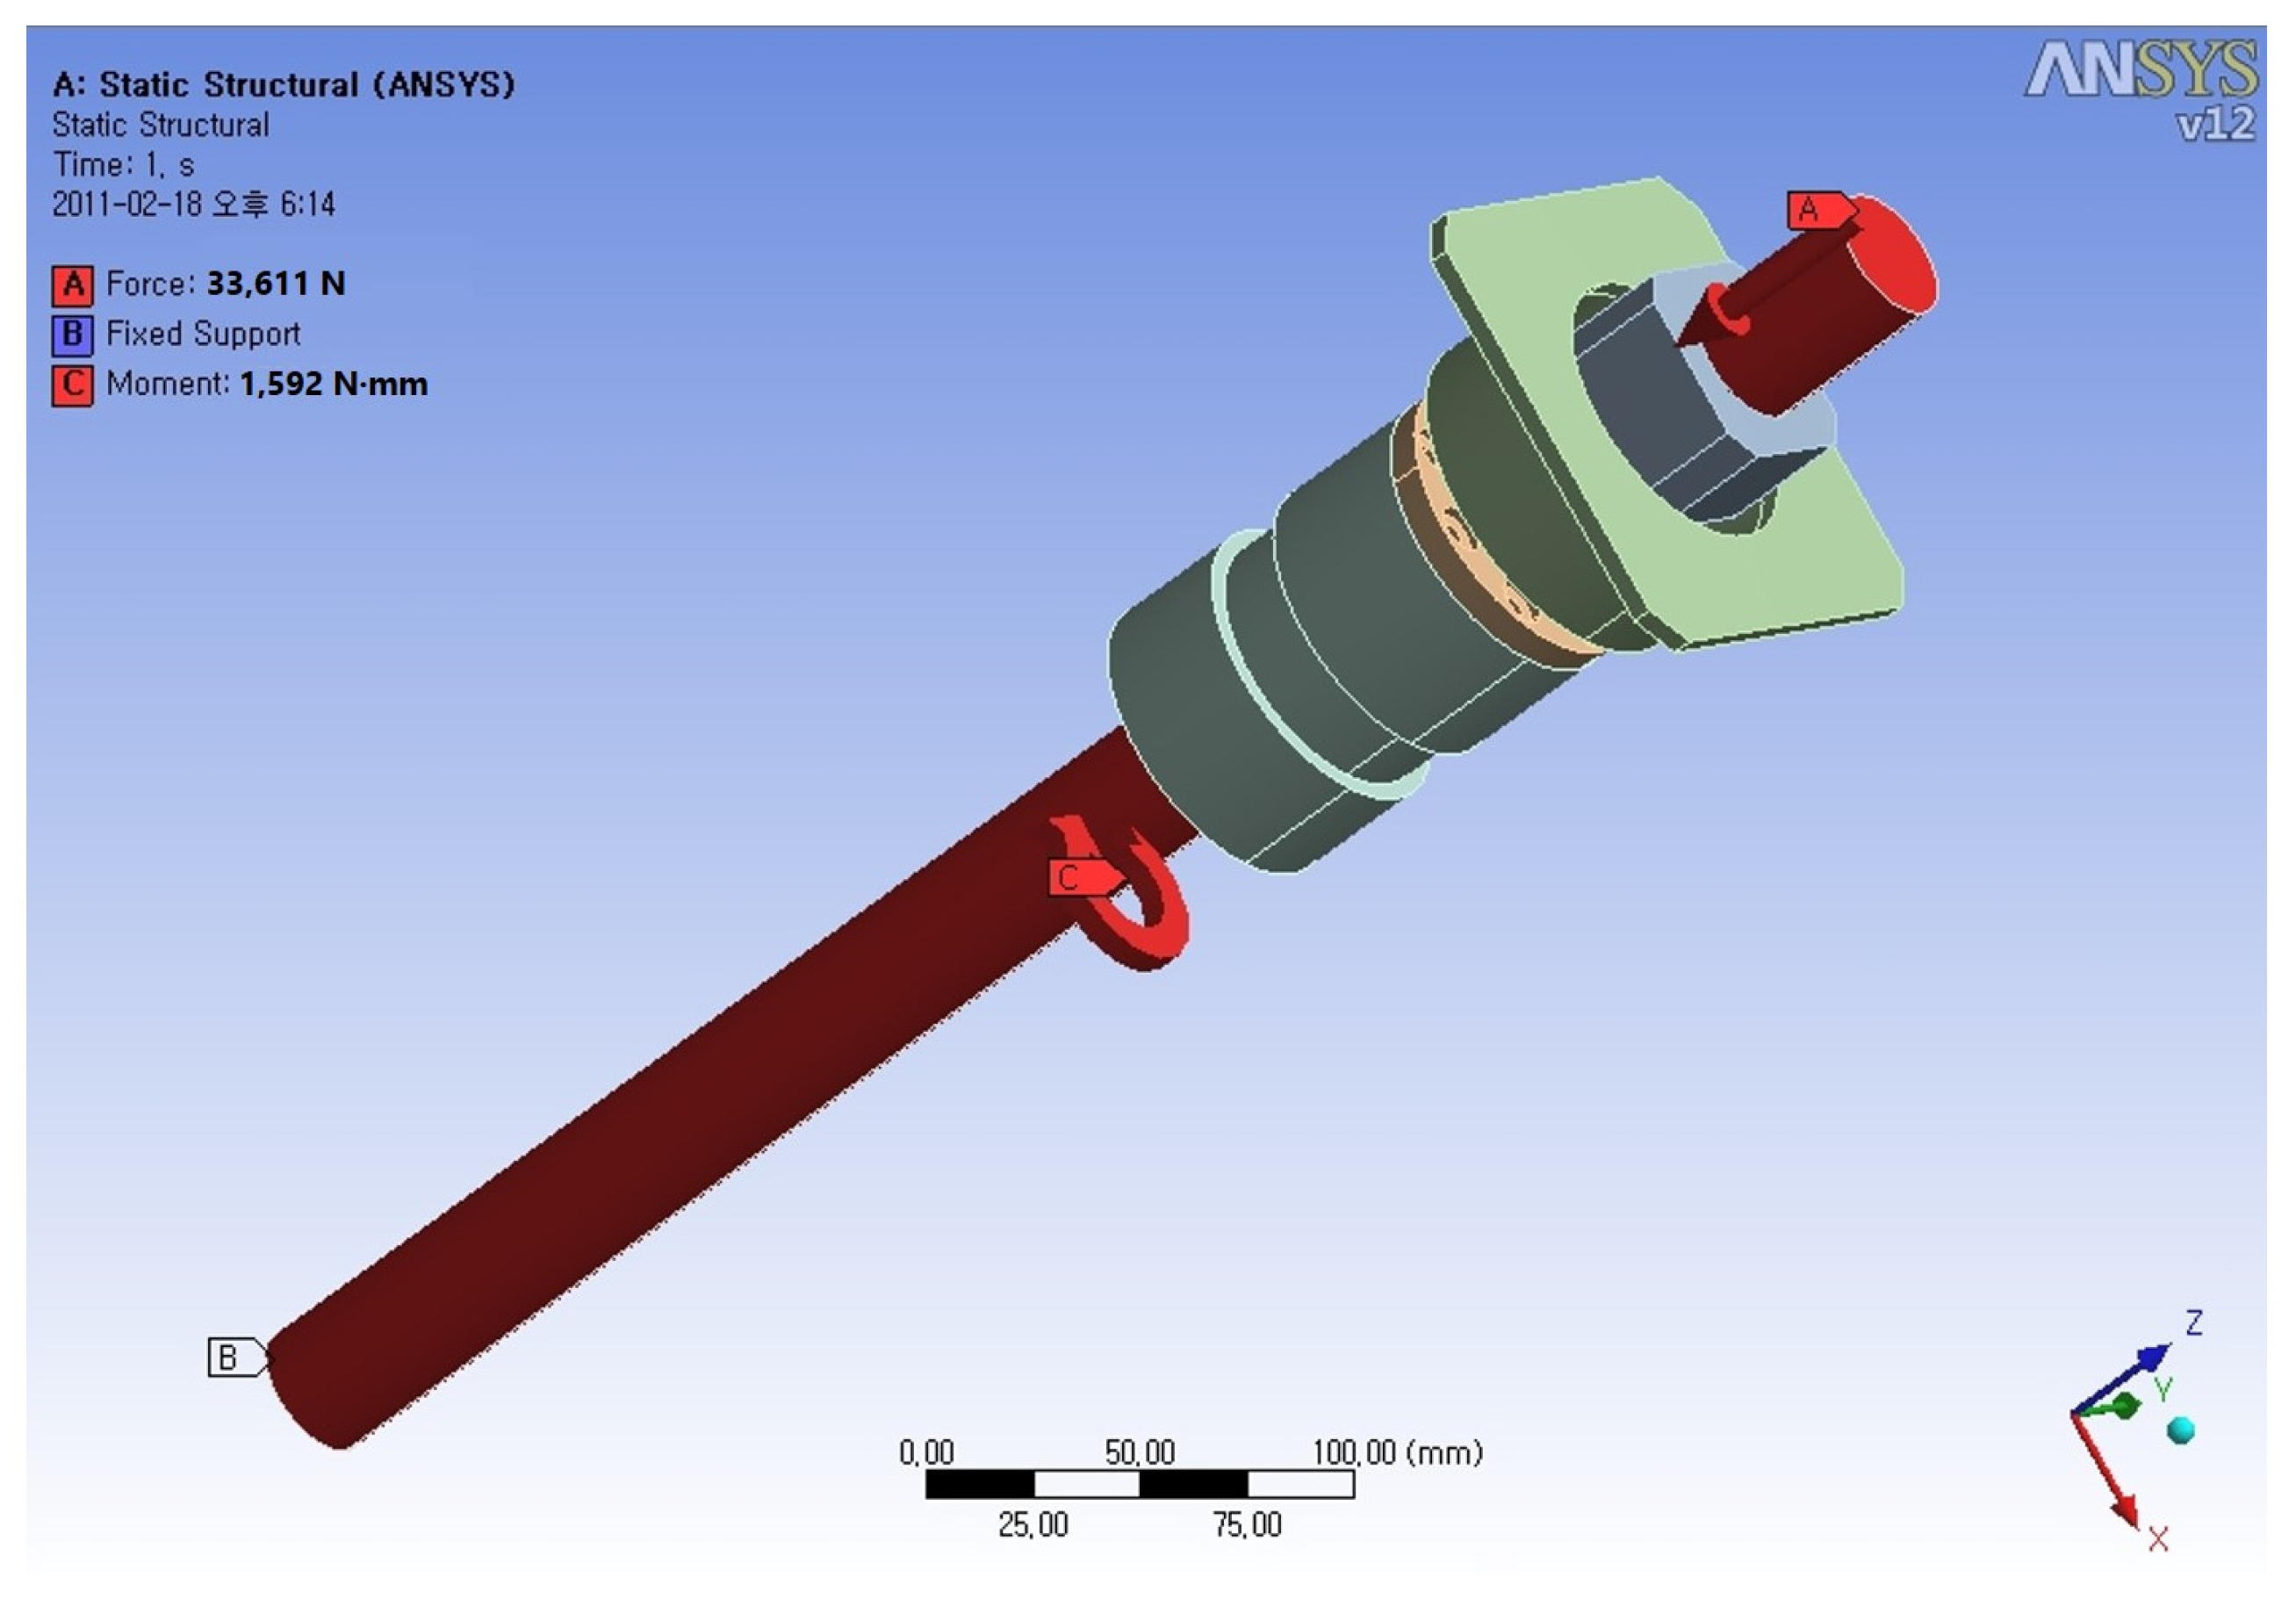
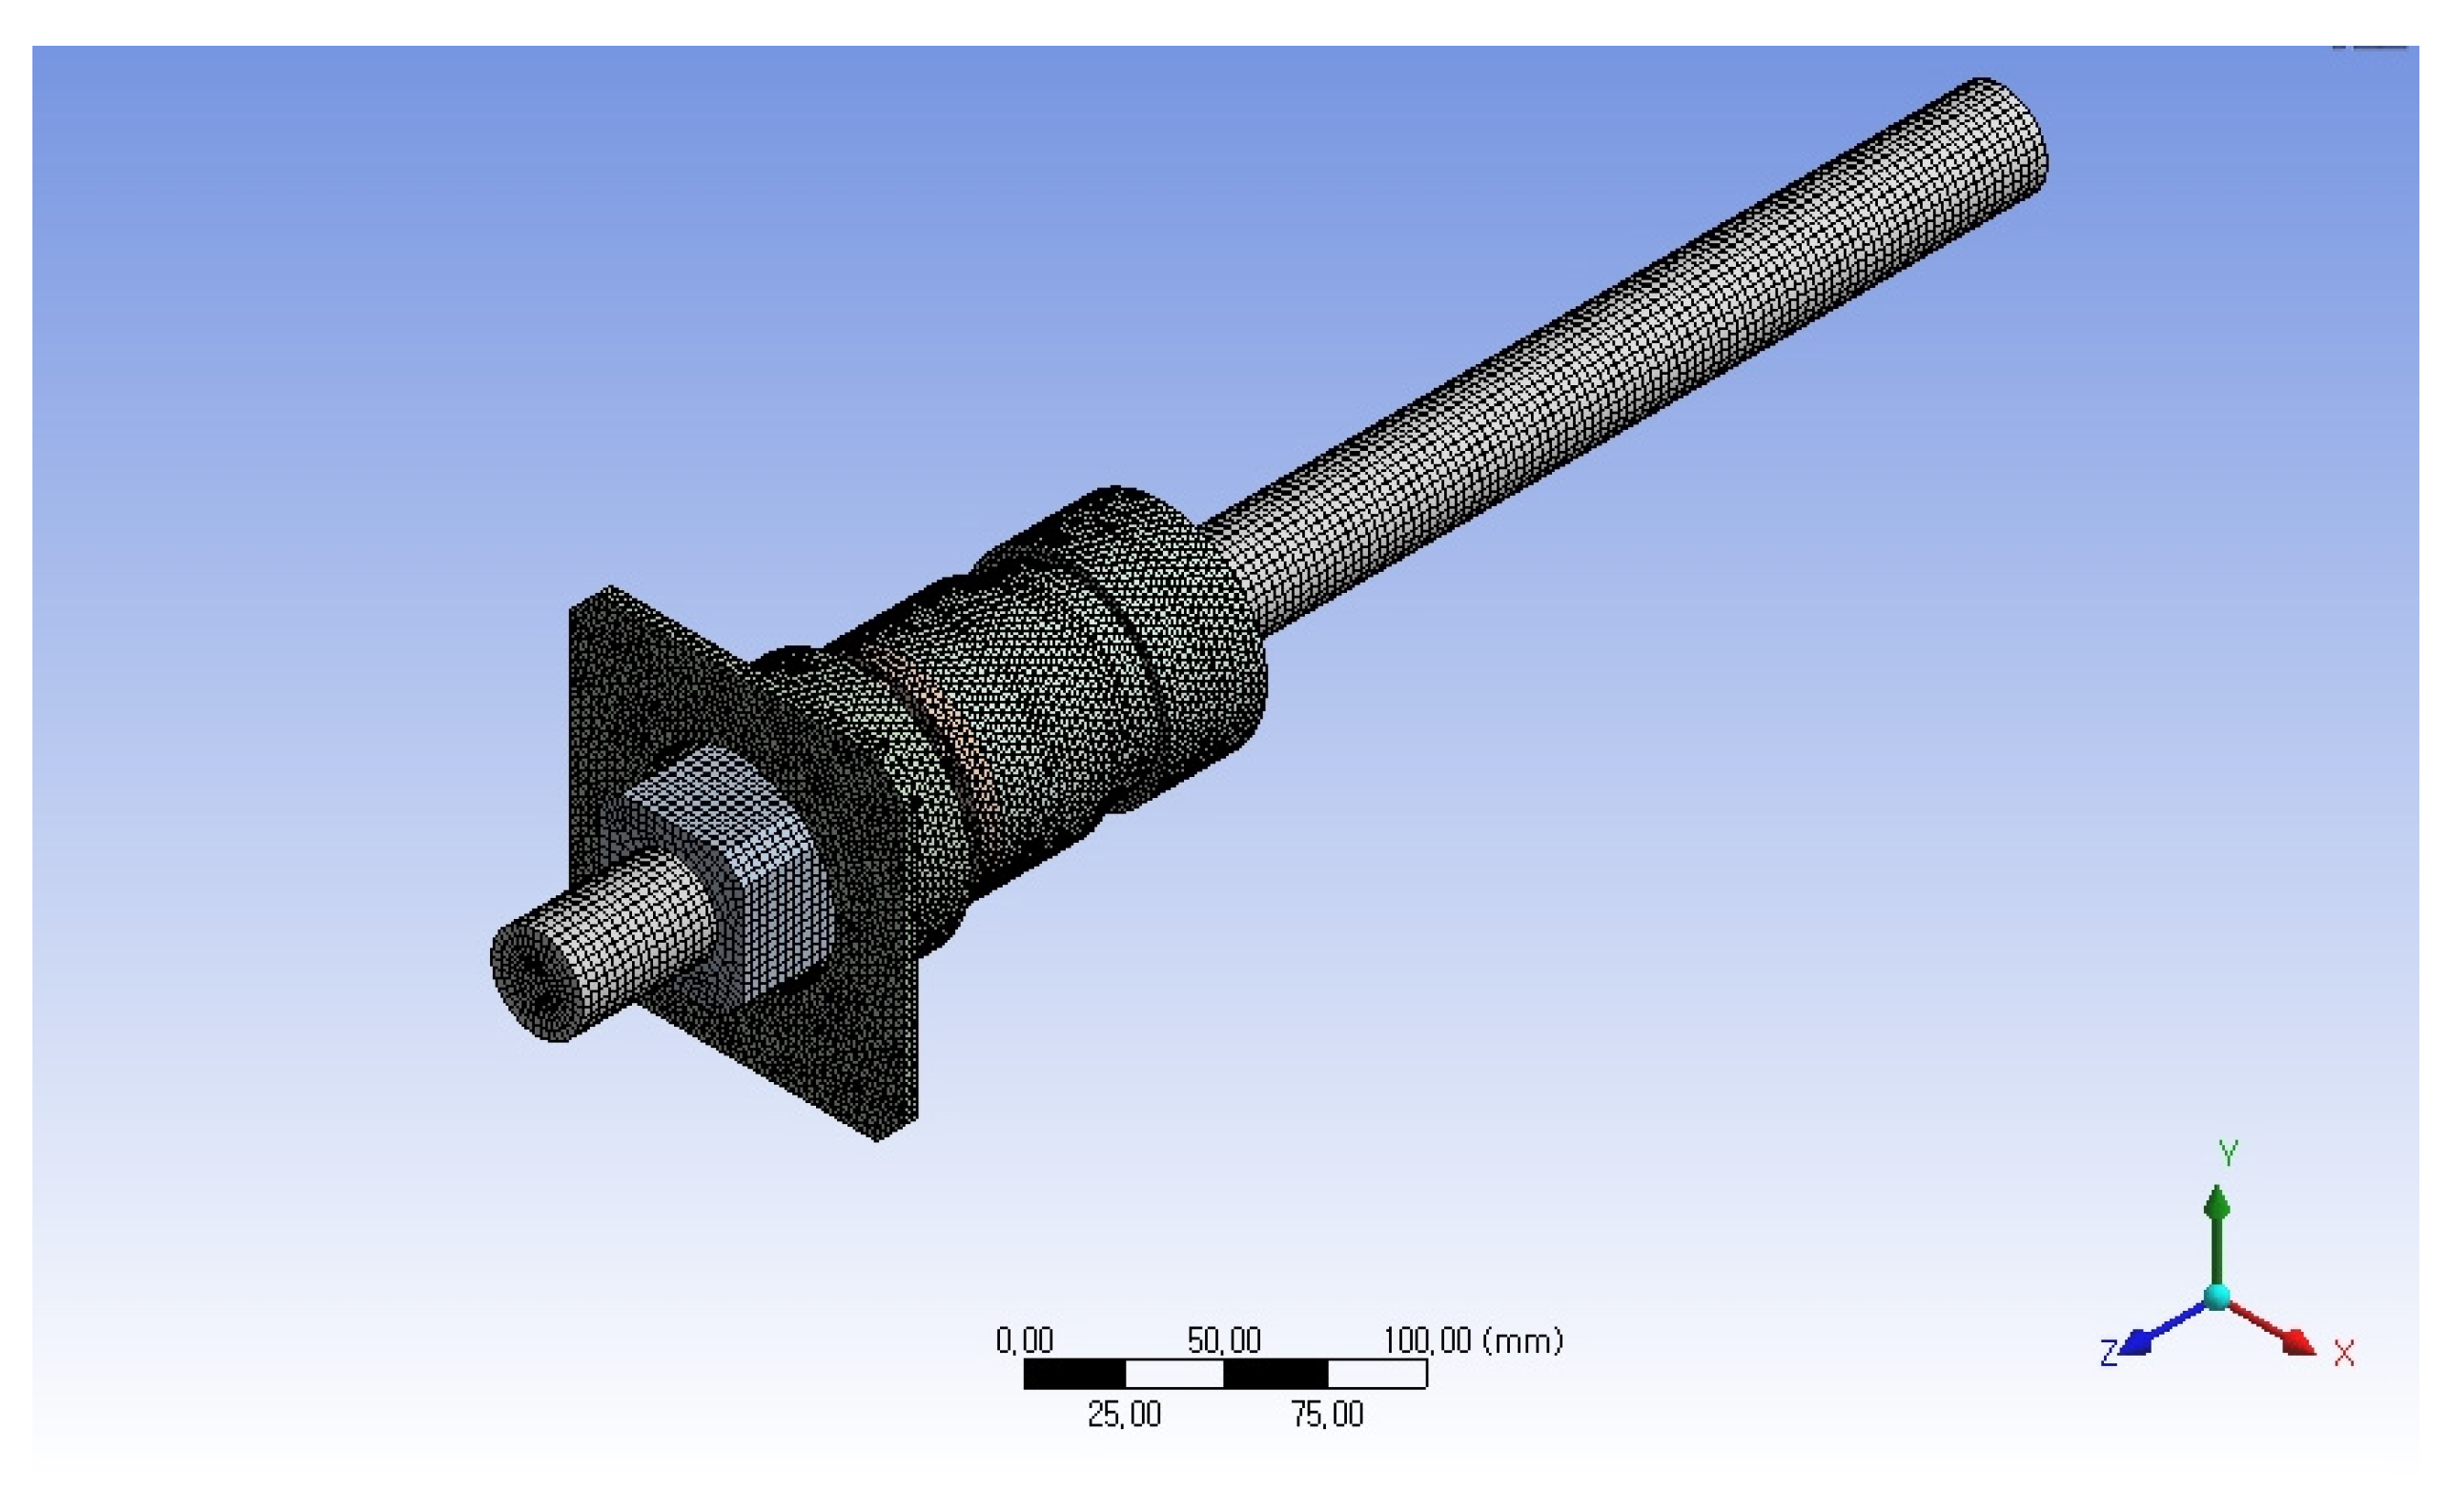
In this work, the novel hoisting device and transport system for the test bed was designed. In this study, the test stand suitable for the T-50 engine, a Korean fighter jet, was developed. Structural analysis was performed to evaluate the structural safety of the structural design result. First, structural analysis was carried out for the hoisting device. For structural analysis, SolidWorks 2011 software was used, and 3D modeling was performed. The ANSYS 2020 R2 software for structural analysis was used. The solid tetra element was applied [15]. The number of elements is 162,465 elements. The fixed boundary condition was applied. The lower part of the shaft is fixed. Figure 5 shows the 3D modeling result and boundary conditions. Figure 6 shows the FEM modeling results. Four devices with the same structure are installed on the hoisting device. The actual center of gravity is biased to the rear, and during operation, the load acts diagonally only on two devices. Therefore, the analysis was performed under the assumption that half the entire load acts on one device. The load of the engine is 1051 kg. The load of the other equipment is 3522 kg. The safety factor of the material applied to the aircraft is 1.5. Therefore, the safety factor of the target structure applied in this work was 1.5. The torque of the motor was applied. The maximum power is 400 W. The rotational speed is 3600 rpm. The fixed boundary condition of the lower part was applied.
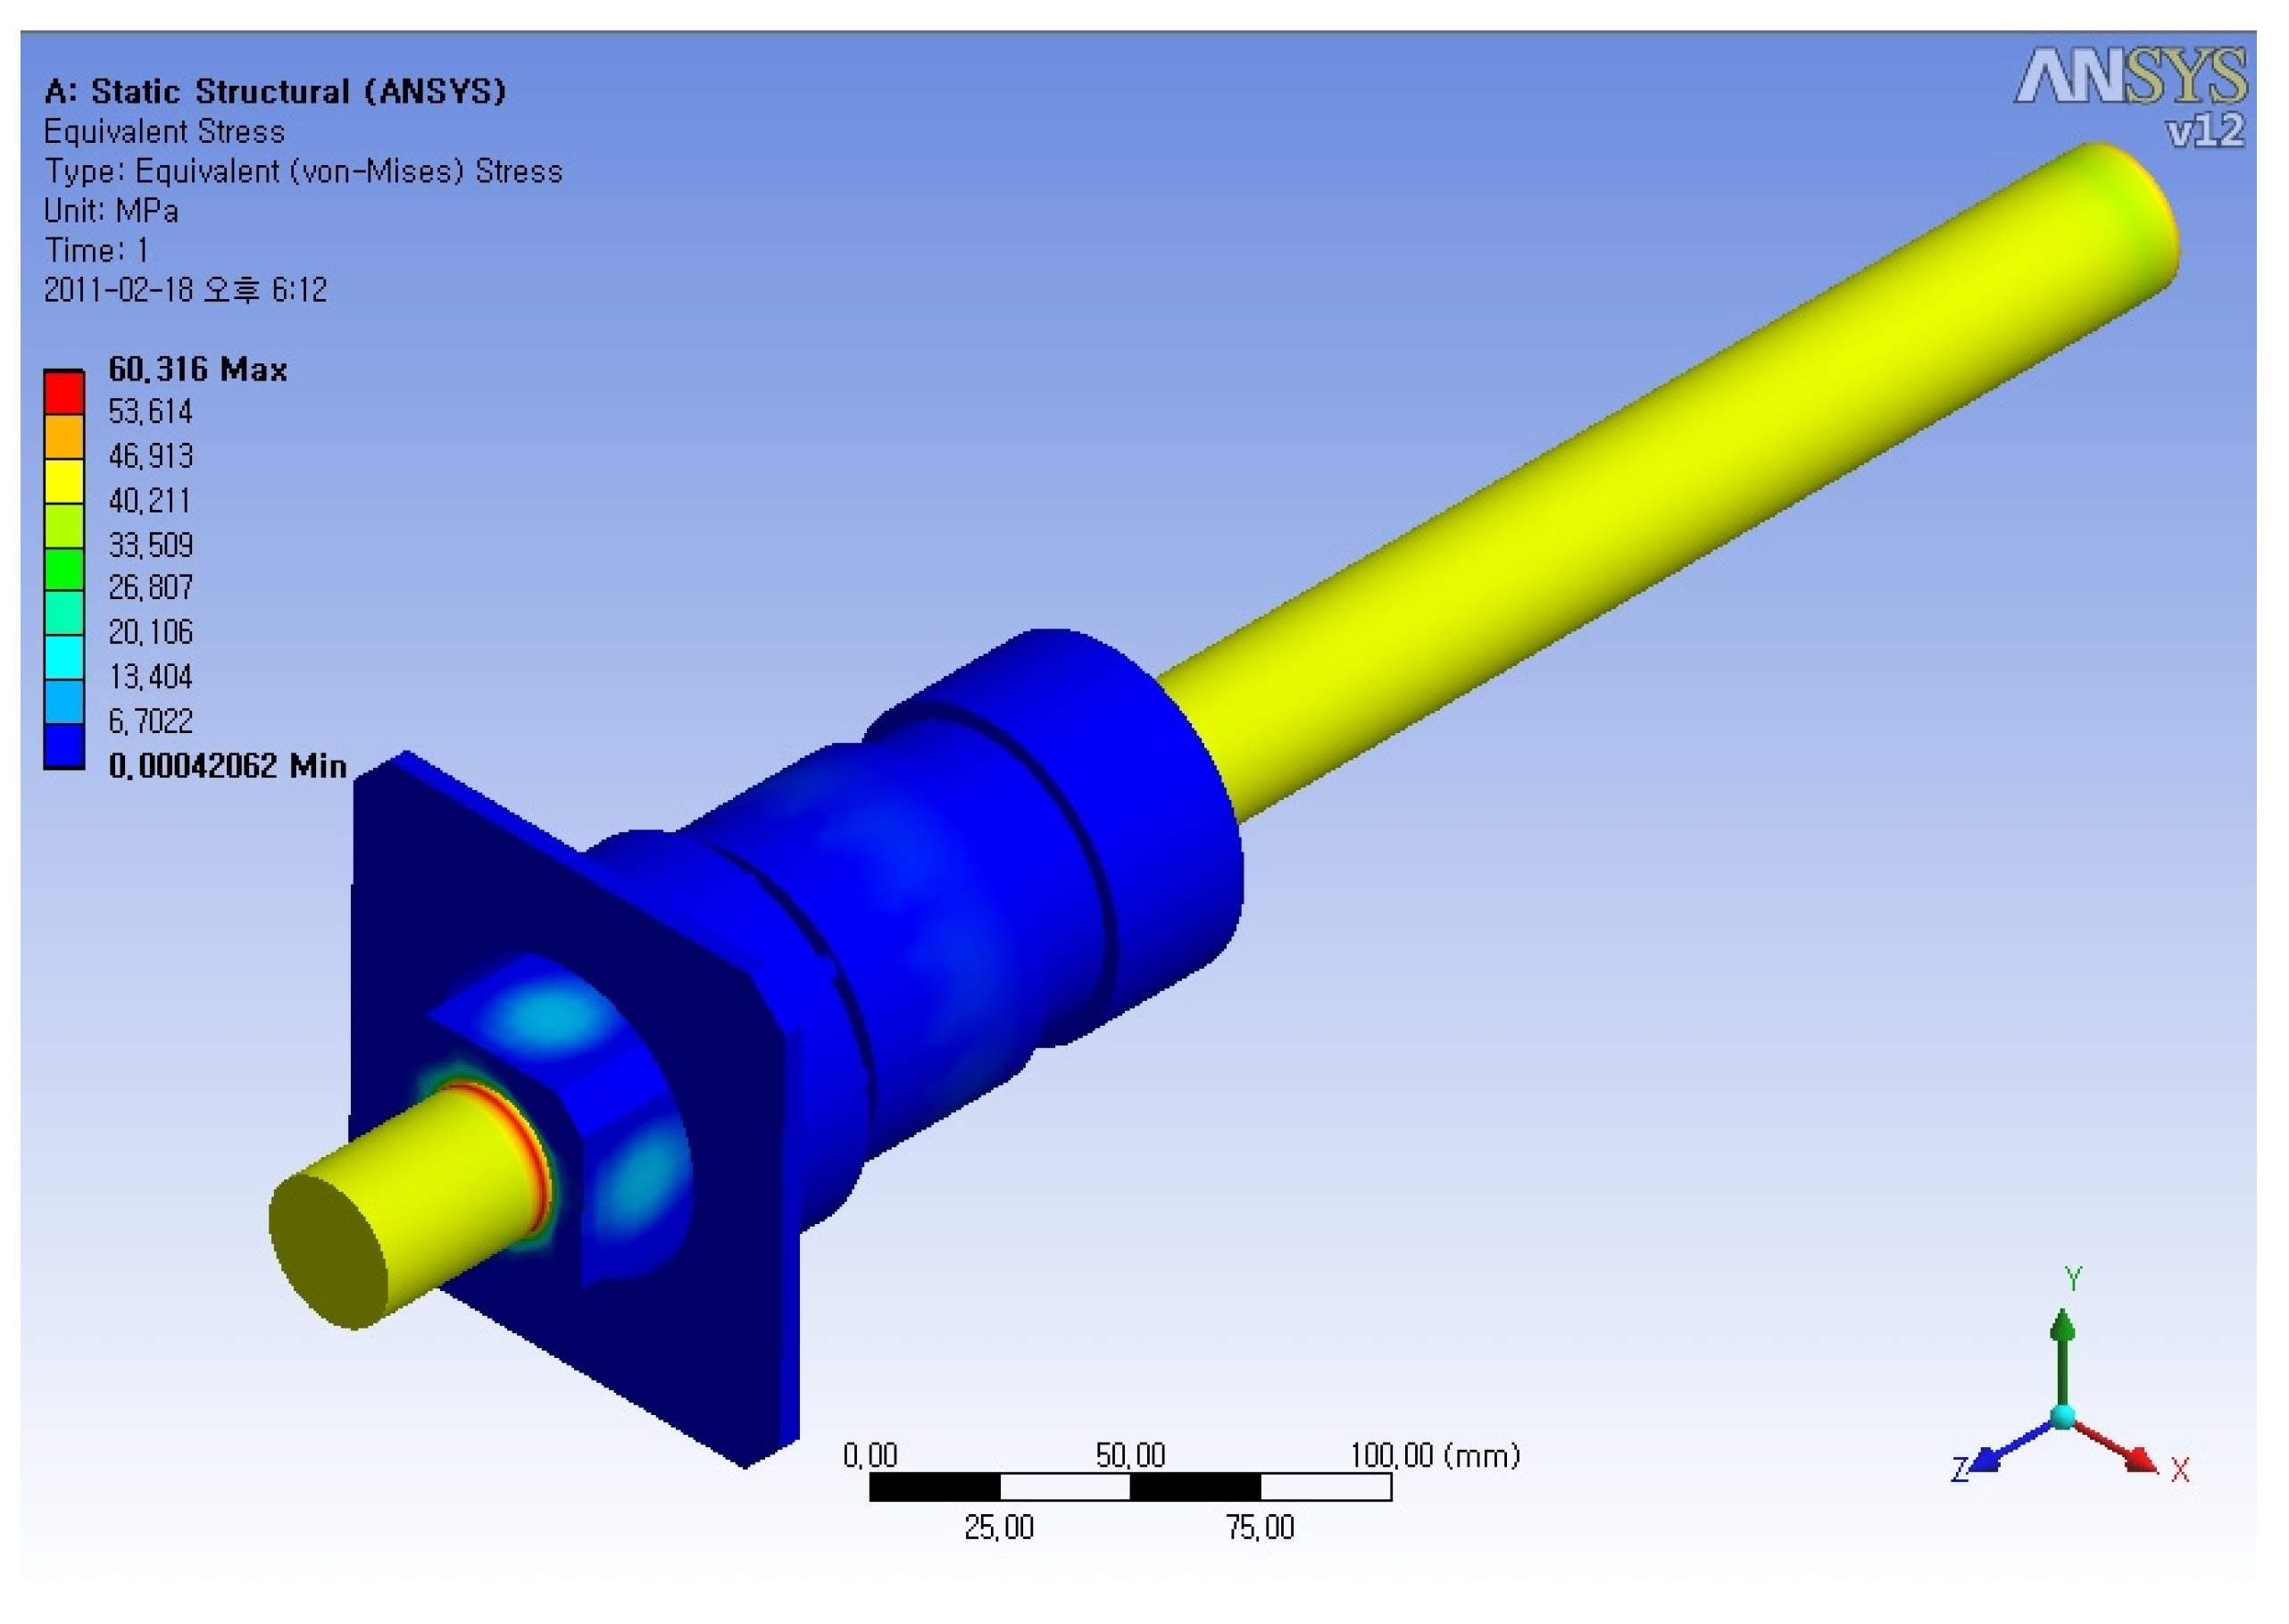
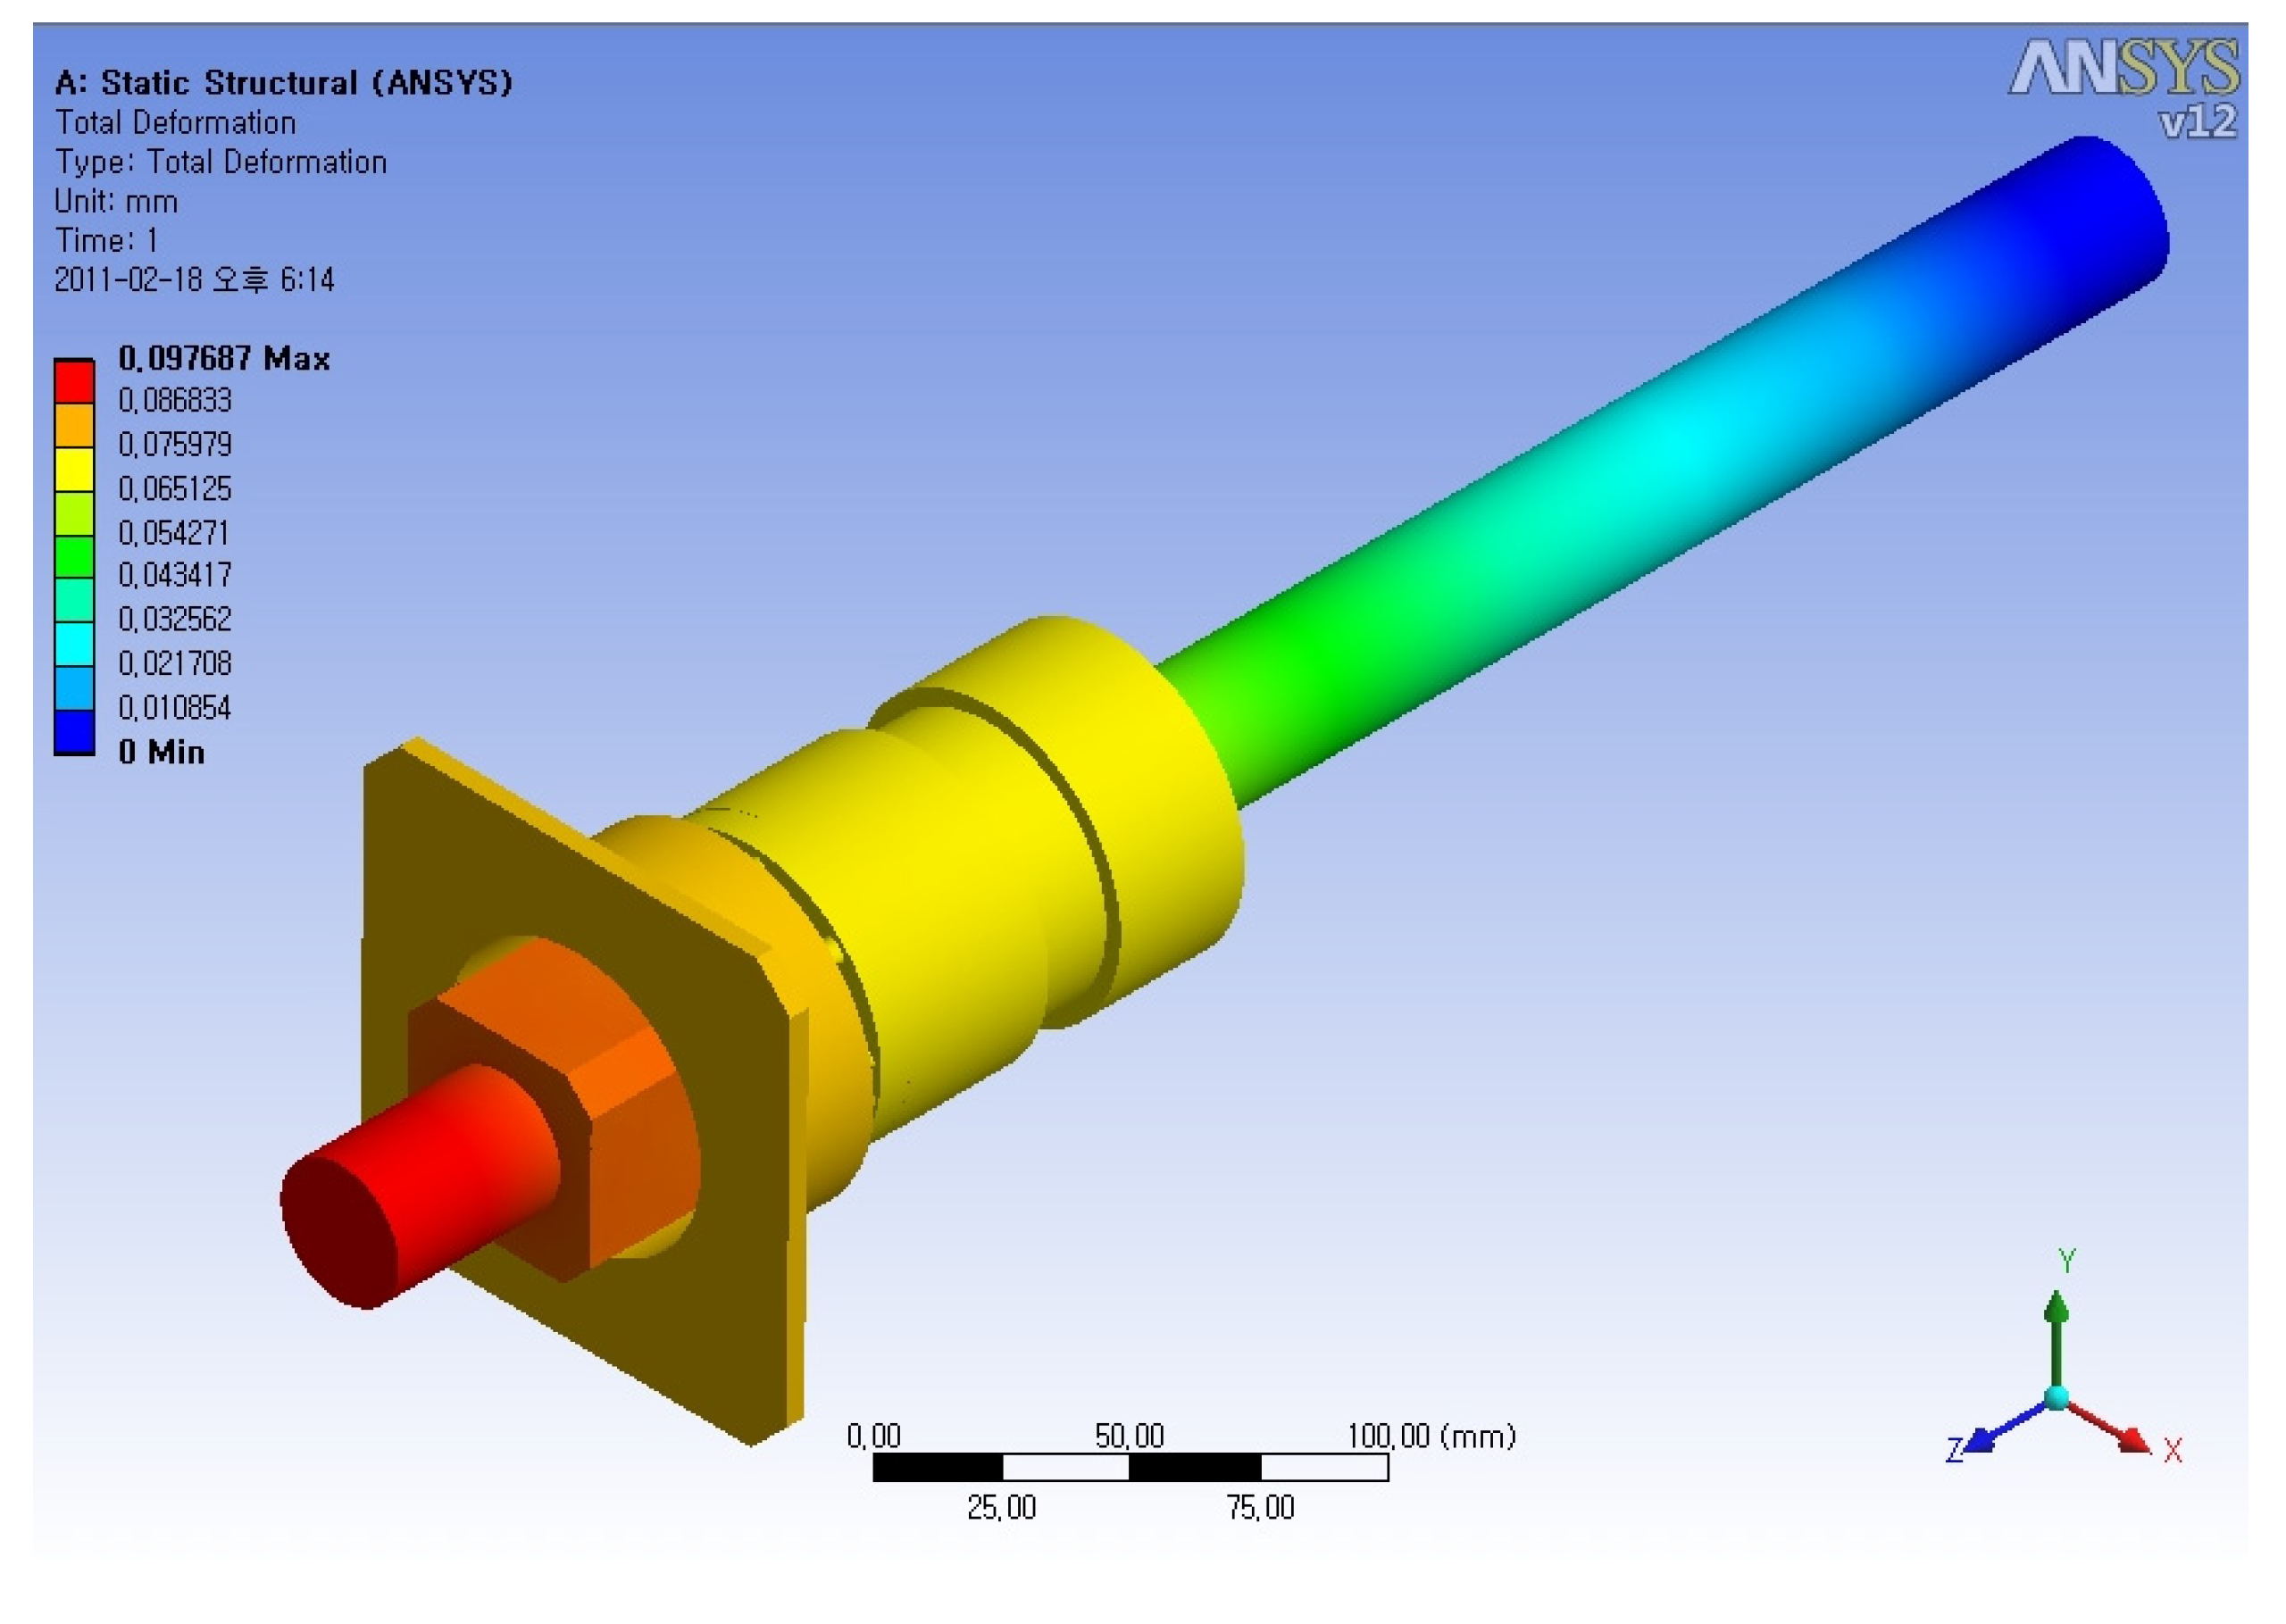
In this study, the stress analysis result, displacement analysis result, and buckling analysis result were examined. As a result of the stress analysis on the entire drive unit and driving nuts, the safety factor was identified as 5.6. Therefore, it was examined to be safe enough. The location of maximum stress is the inner part of the shaft. The displacement of the entire drive unit was 0.098 mm. Consequently, it is safe enough. The location of maximum displacement is at the top of the shaft. As the buckling analysis result was up to 1.2, and it was confirmed to also be stable for buckling. Figure 7 shows the stress analysis result of the structural design result. Figure 8 shows the displacement analysis result. Figure 9 shows the buckling analysis result of the target structure.

3.3. Structural Analysis of Test Bed and Stand

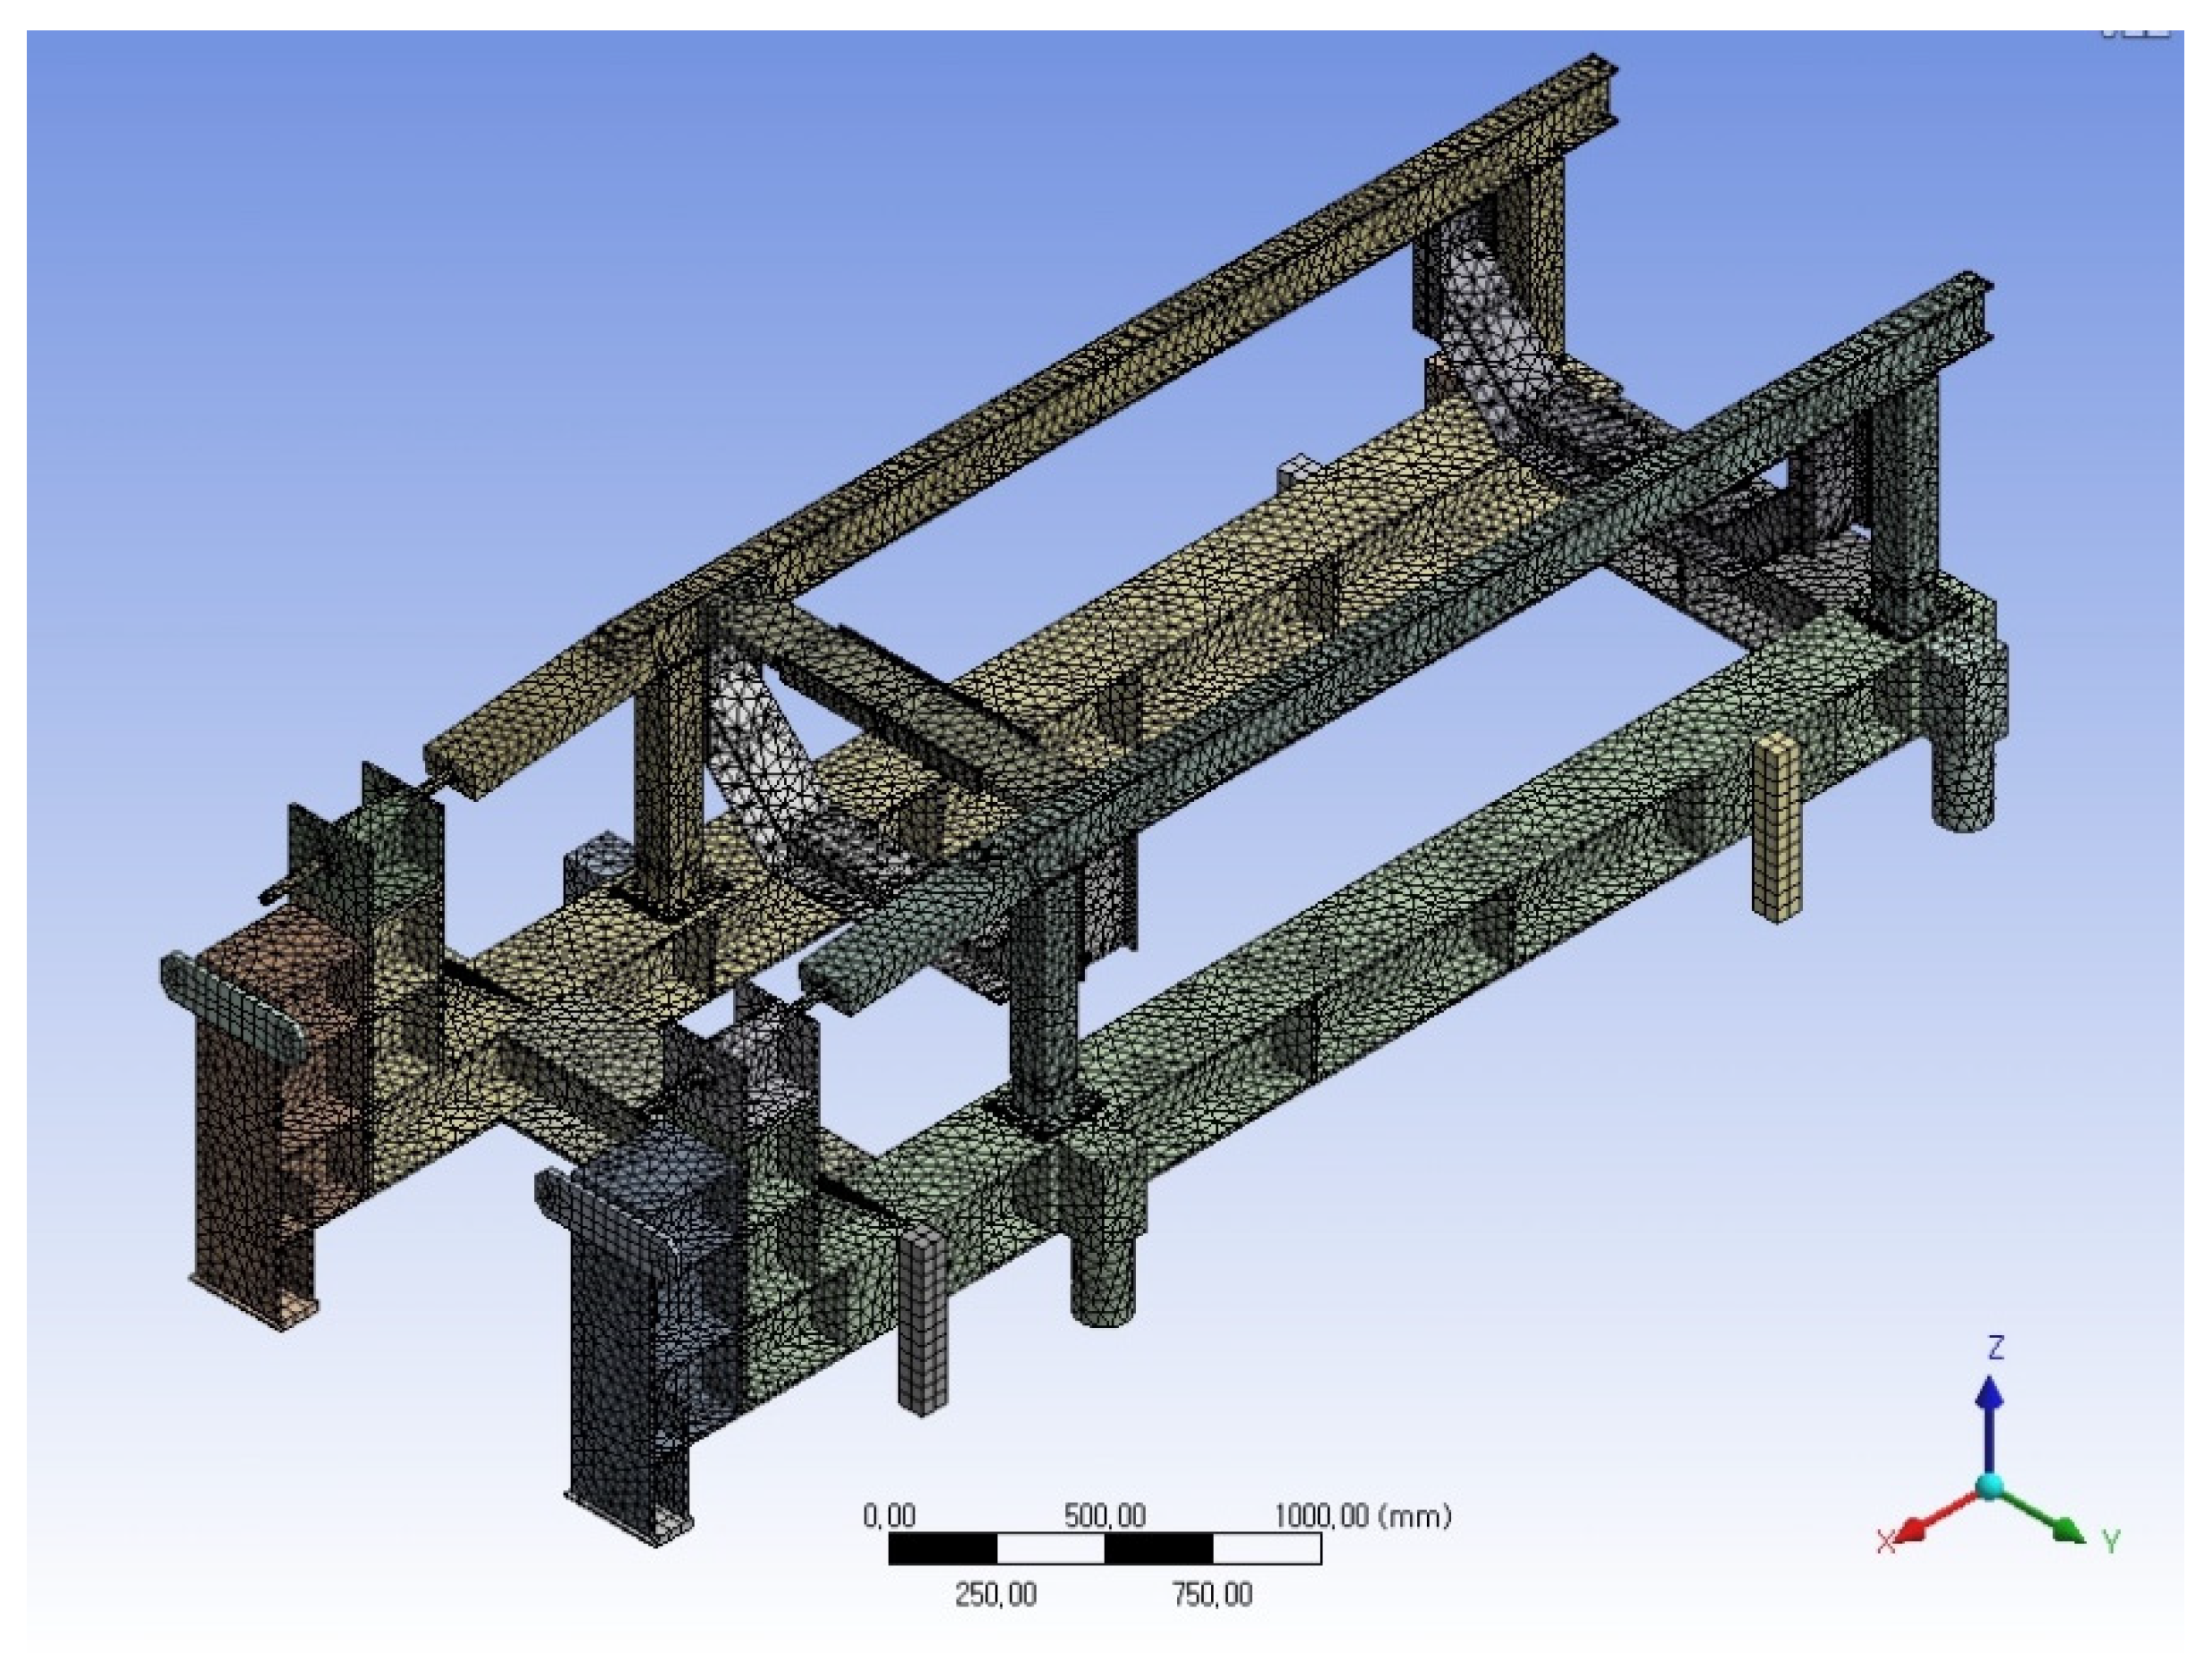
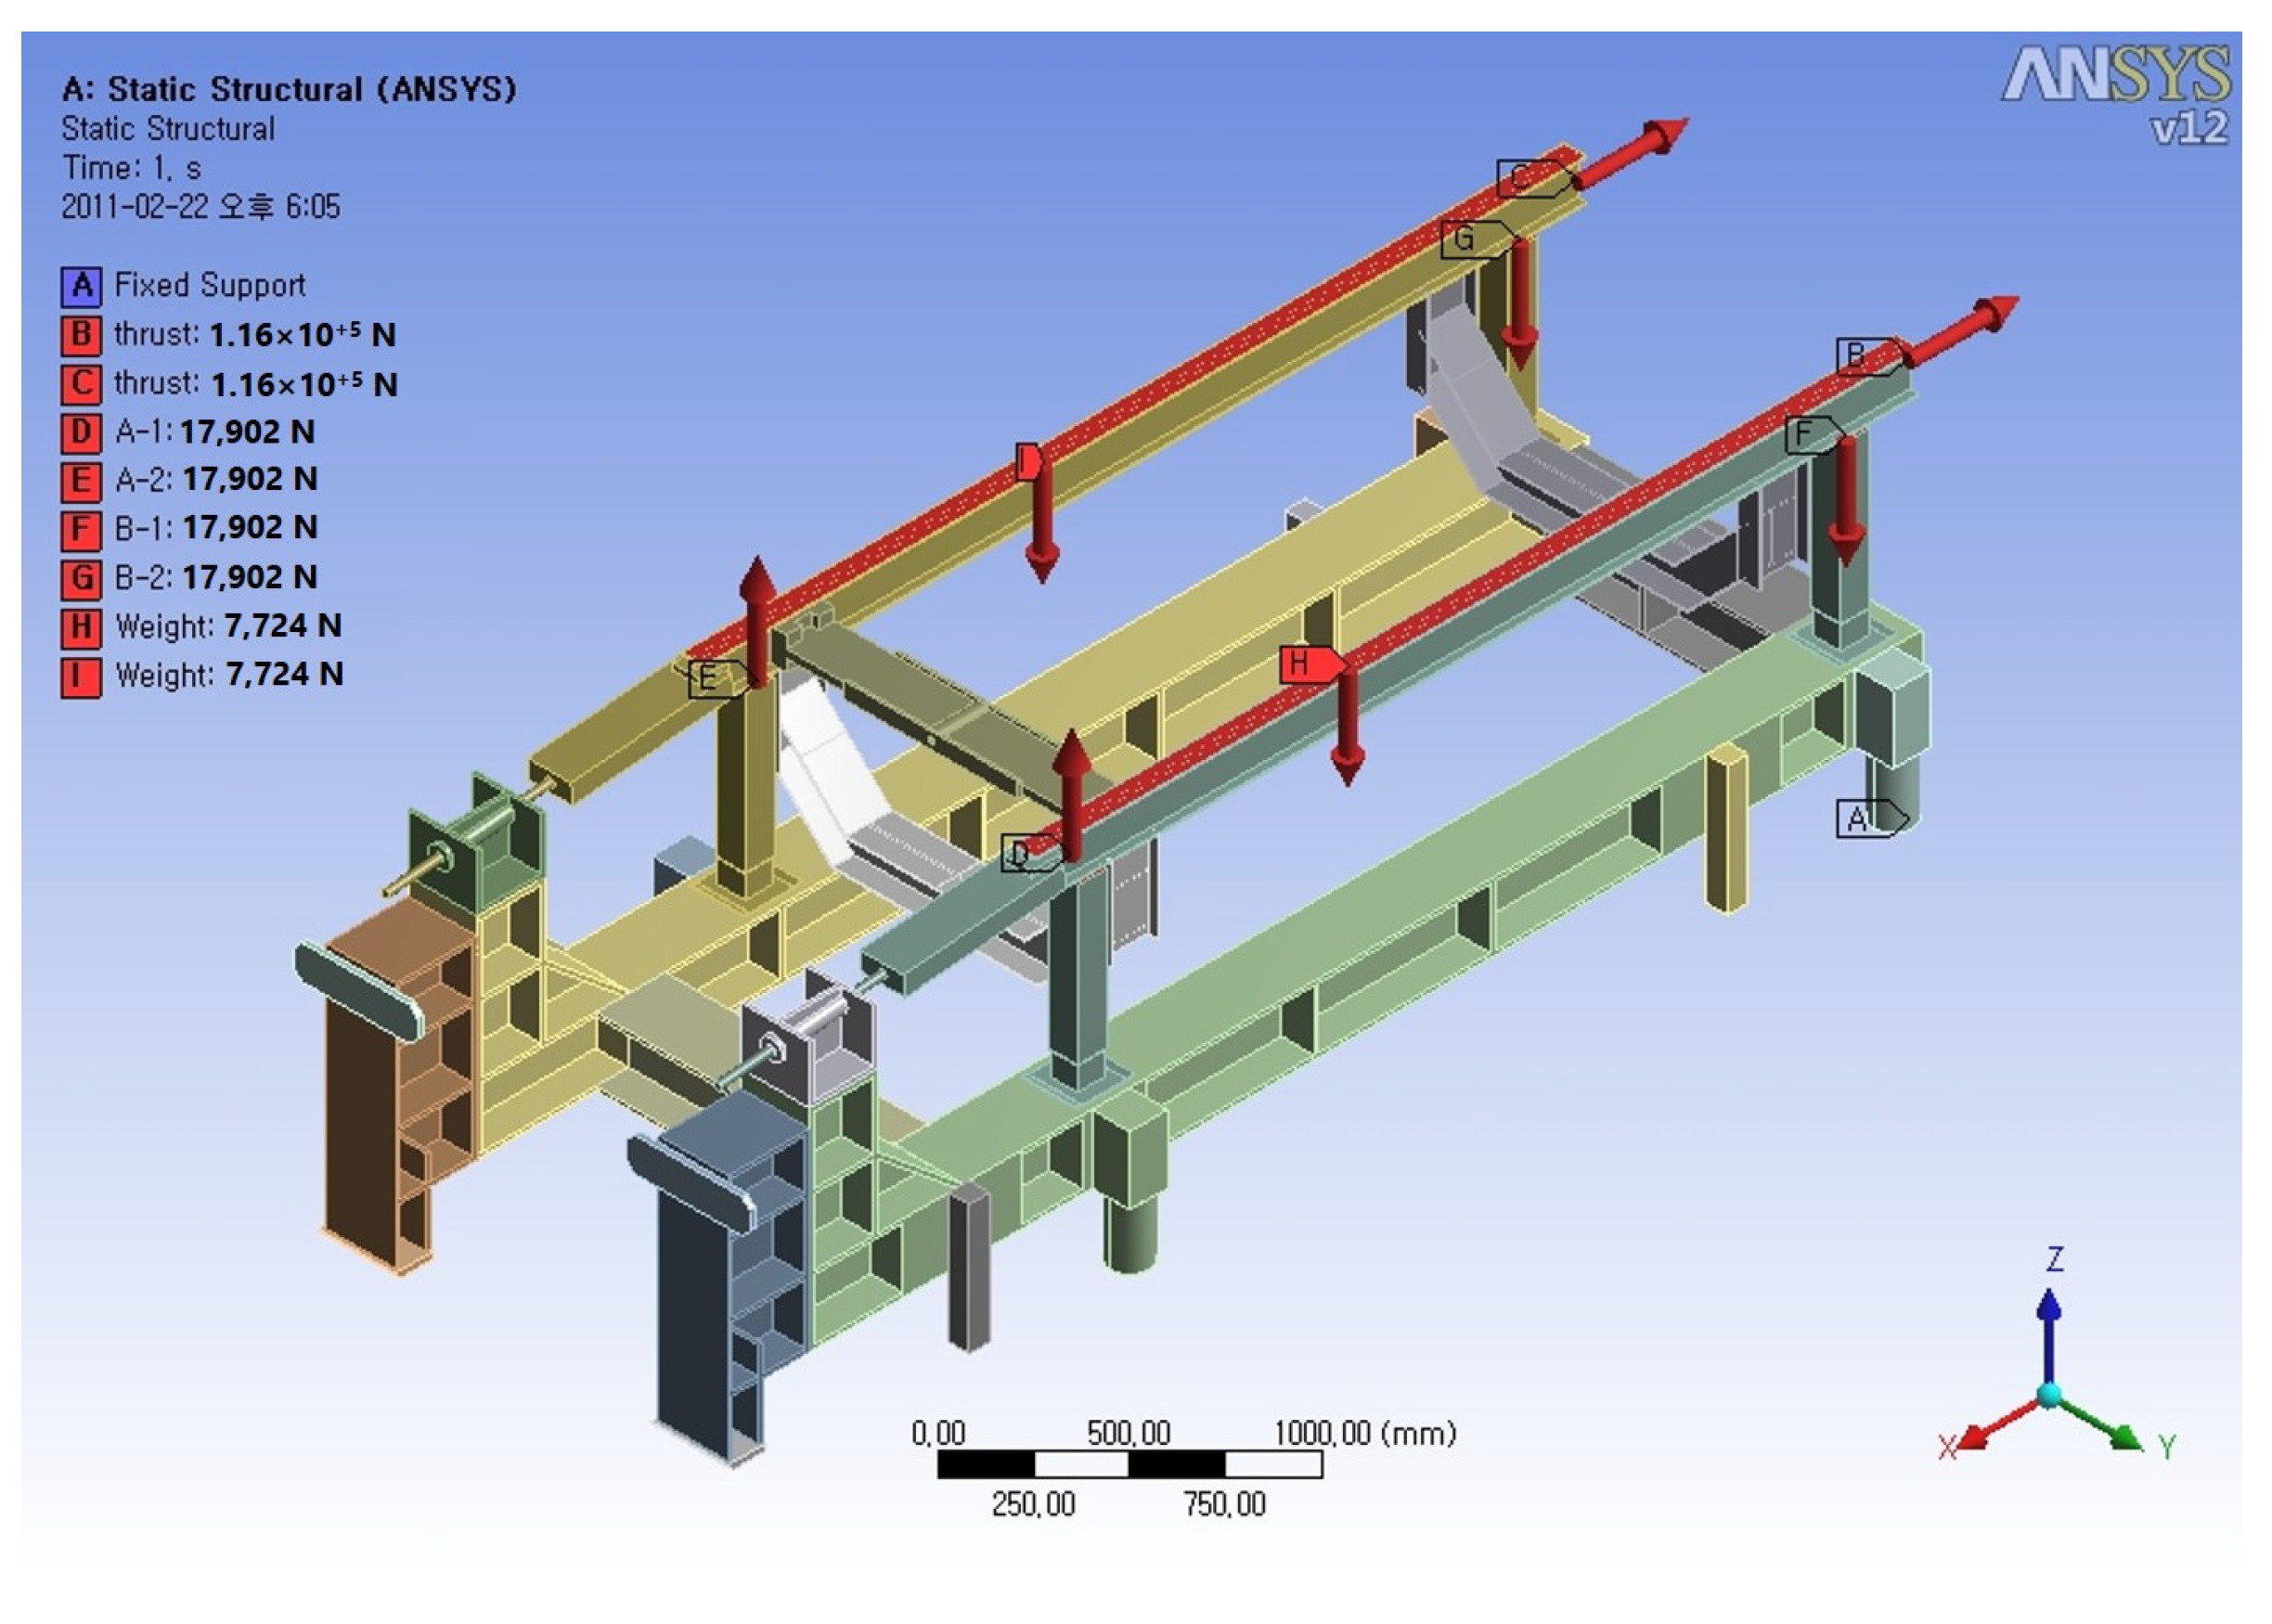
After performing the structural analysis on the hoisting device, the structural safety for the test bed and thrust stand was evaluated. In the same way as the existing analysis, 3D modeling was performed. The finite element modeling was carried out for structural analysis. The solid tetra element was applied similarly. The number of elements is 103,902 elements. The fixed boundary condition of the lower part was applied. Figure 10 shows the FEM modeling results. Figure 11 shows the load and boundary conditions. The maximum thrust generated from the actual engine is 79 kN. Based on the related regulation, however, 155 kN was considered. The final thrust load of the engine applied considering the safety factor of 1.5 was 233.55 kN. Considering the safety factor of 1.5, 15.44 kN was applied to the engine load. The load that induces a moment by thrust is 71.6 kN.
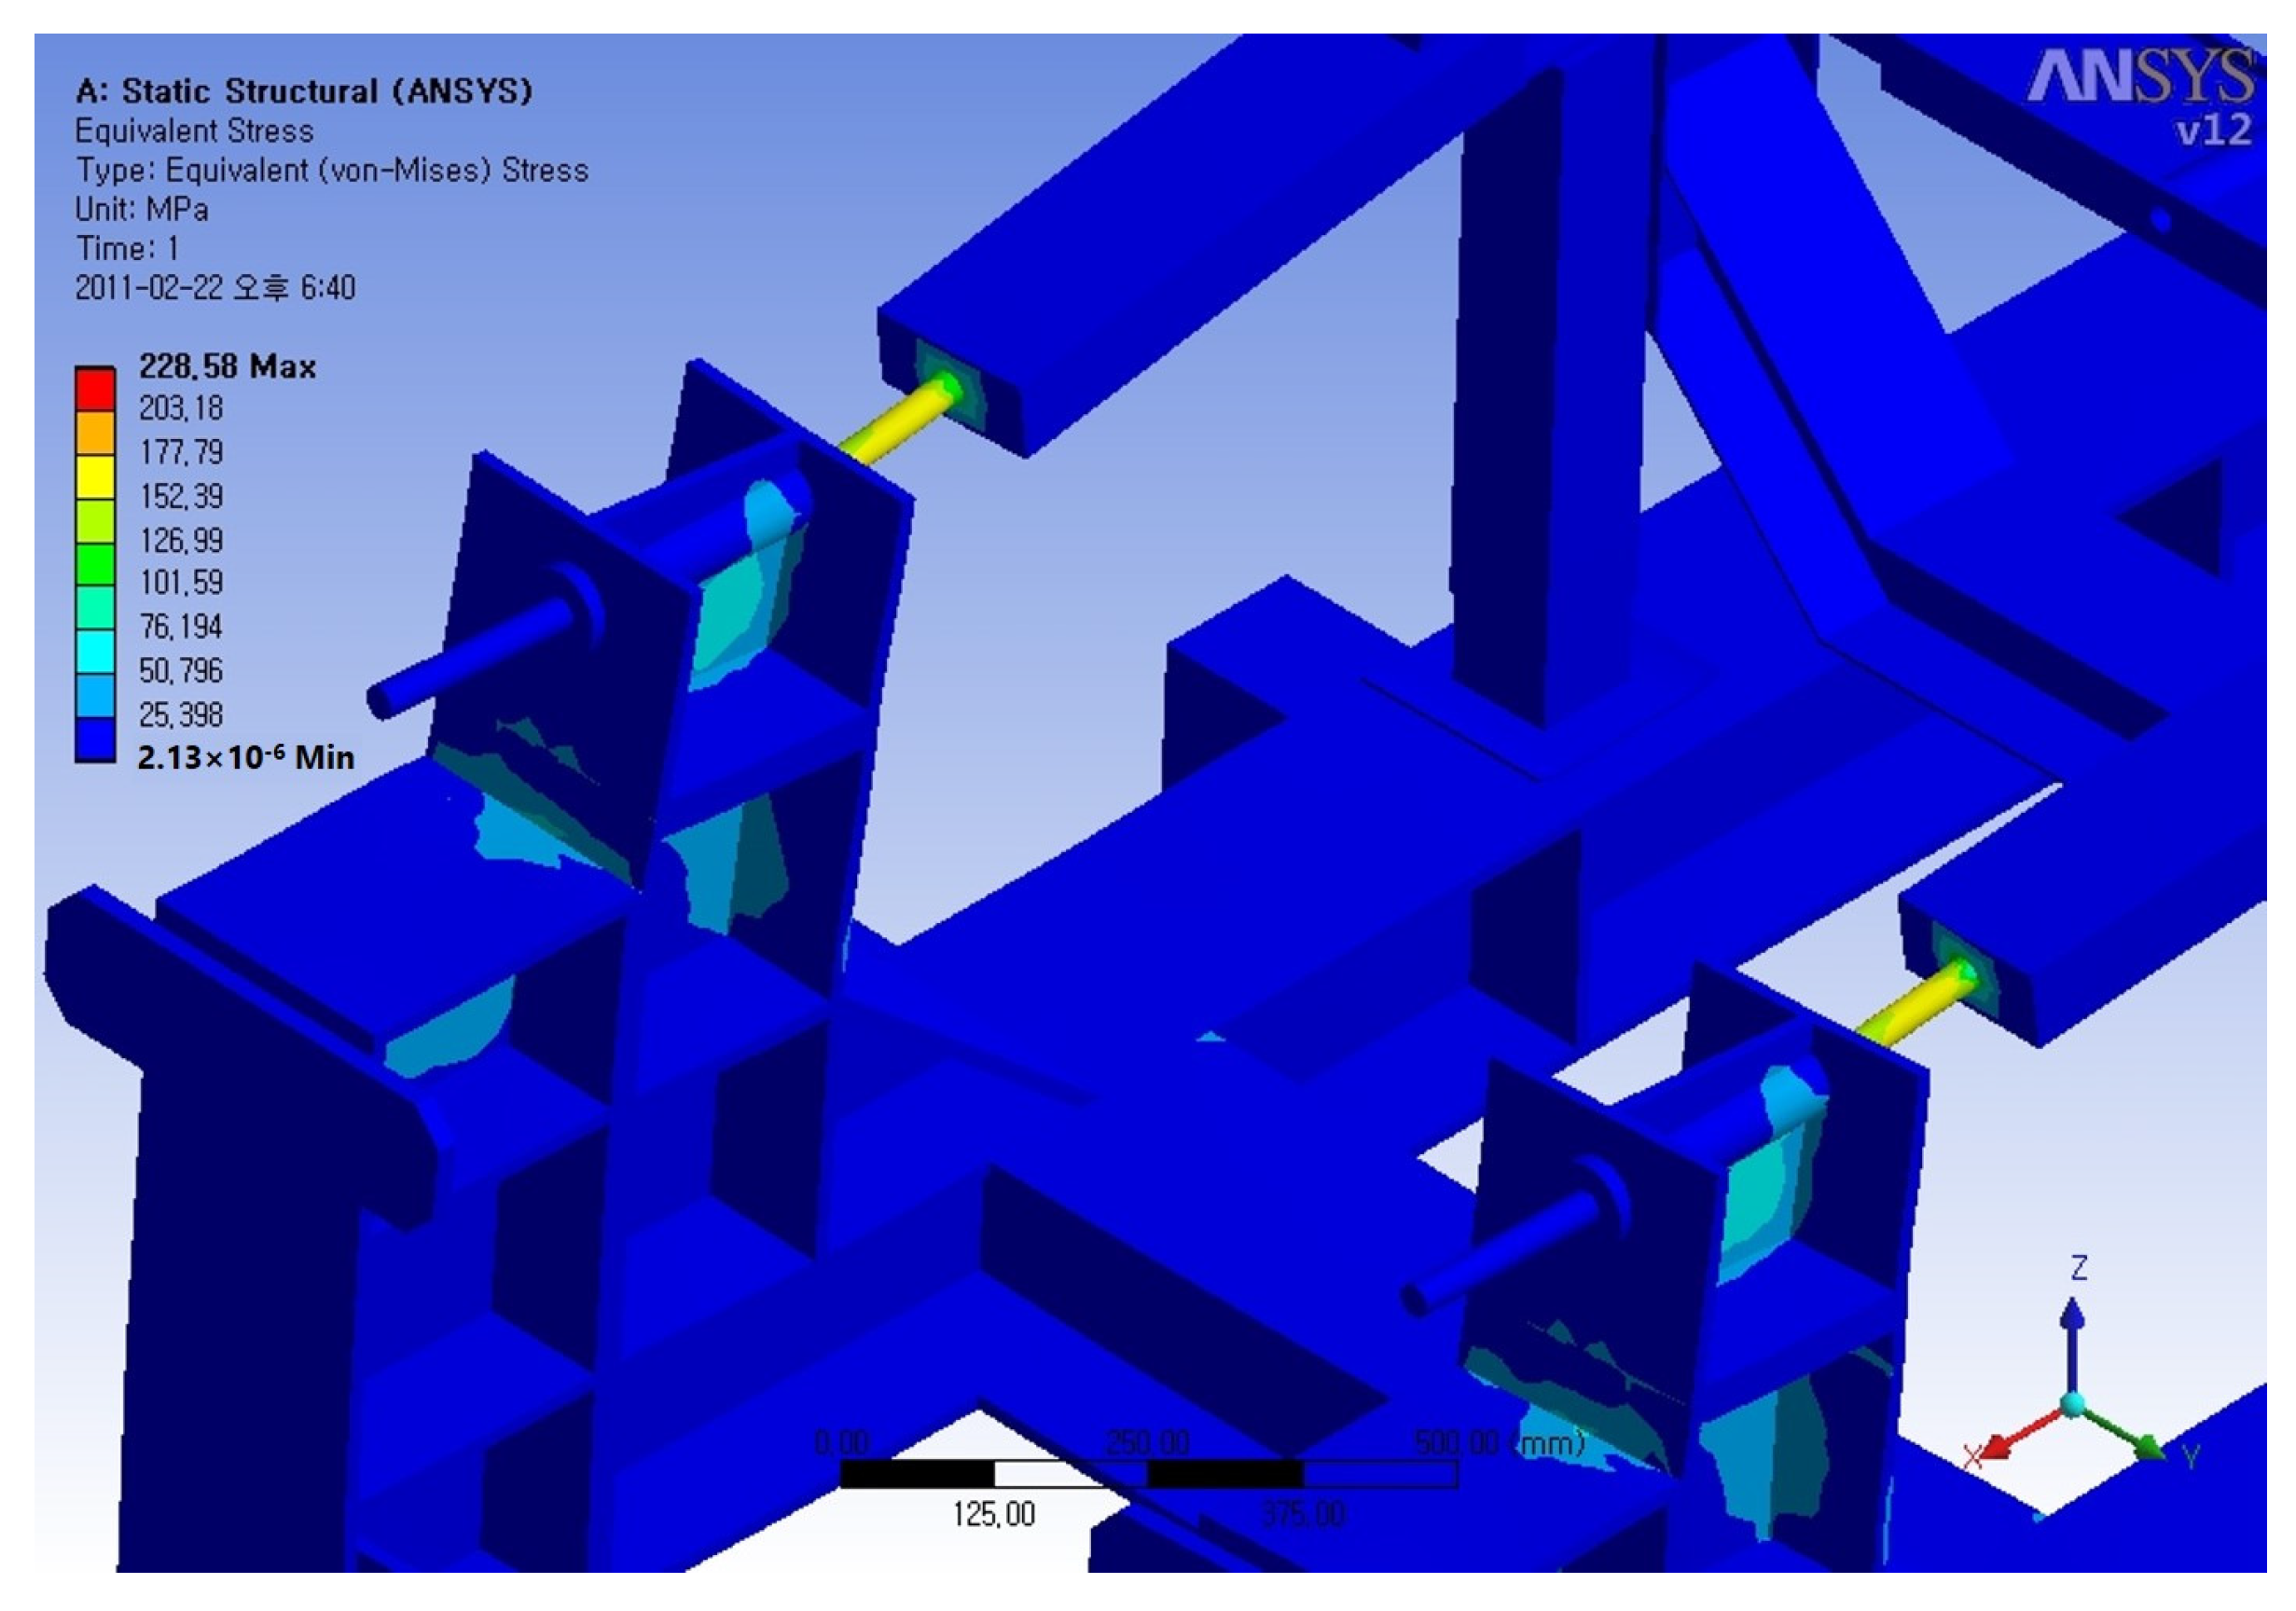
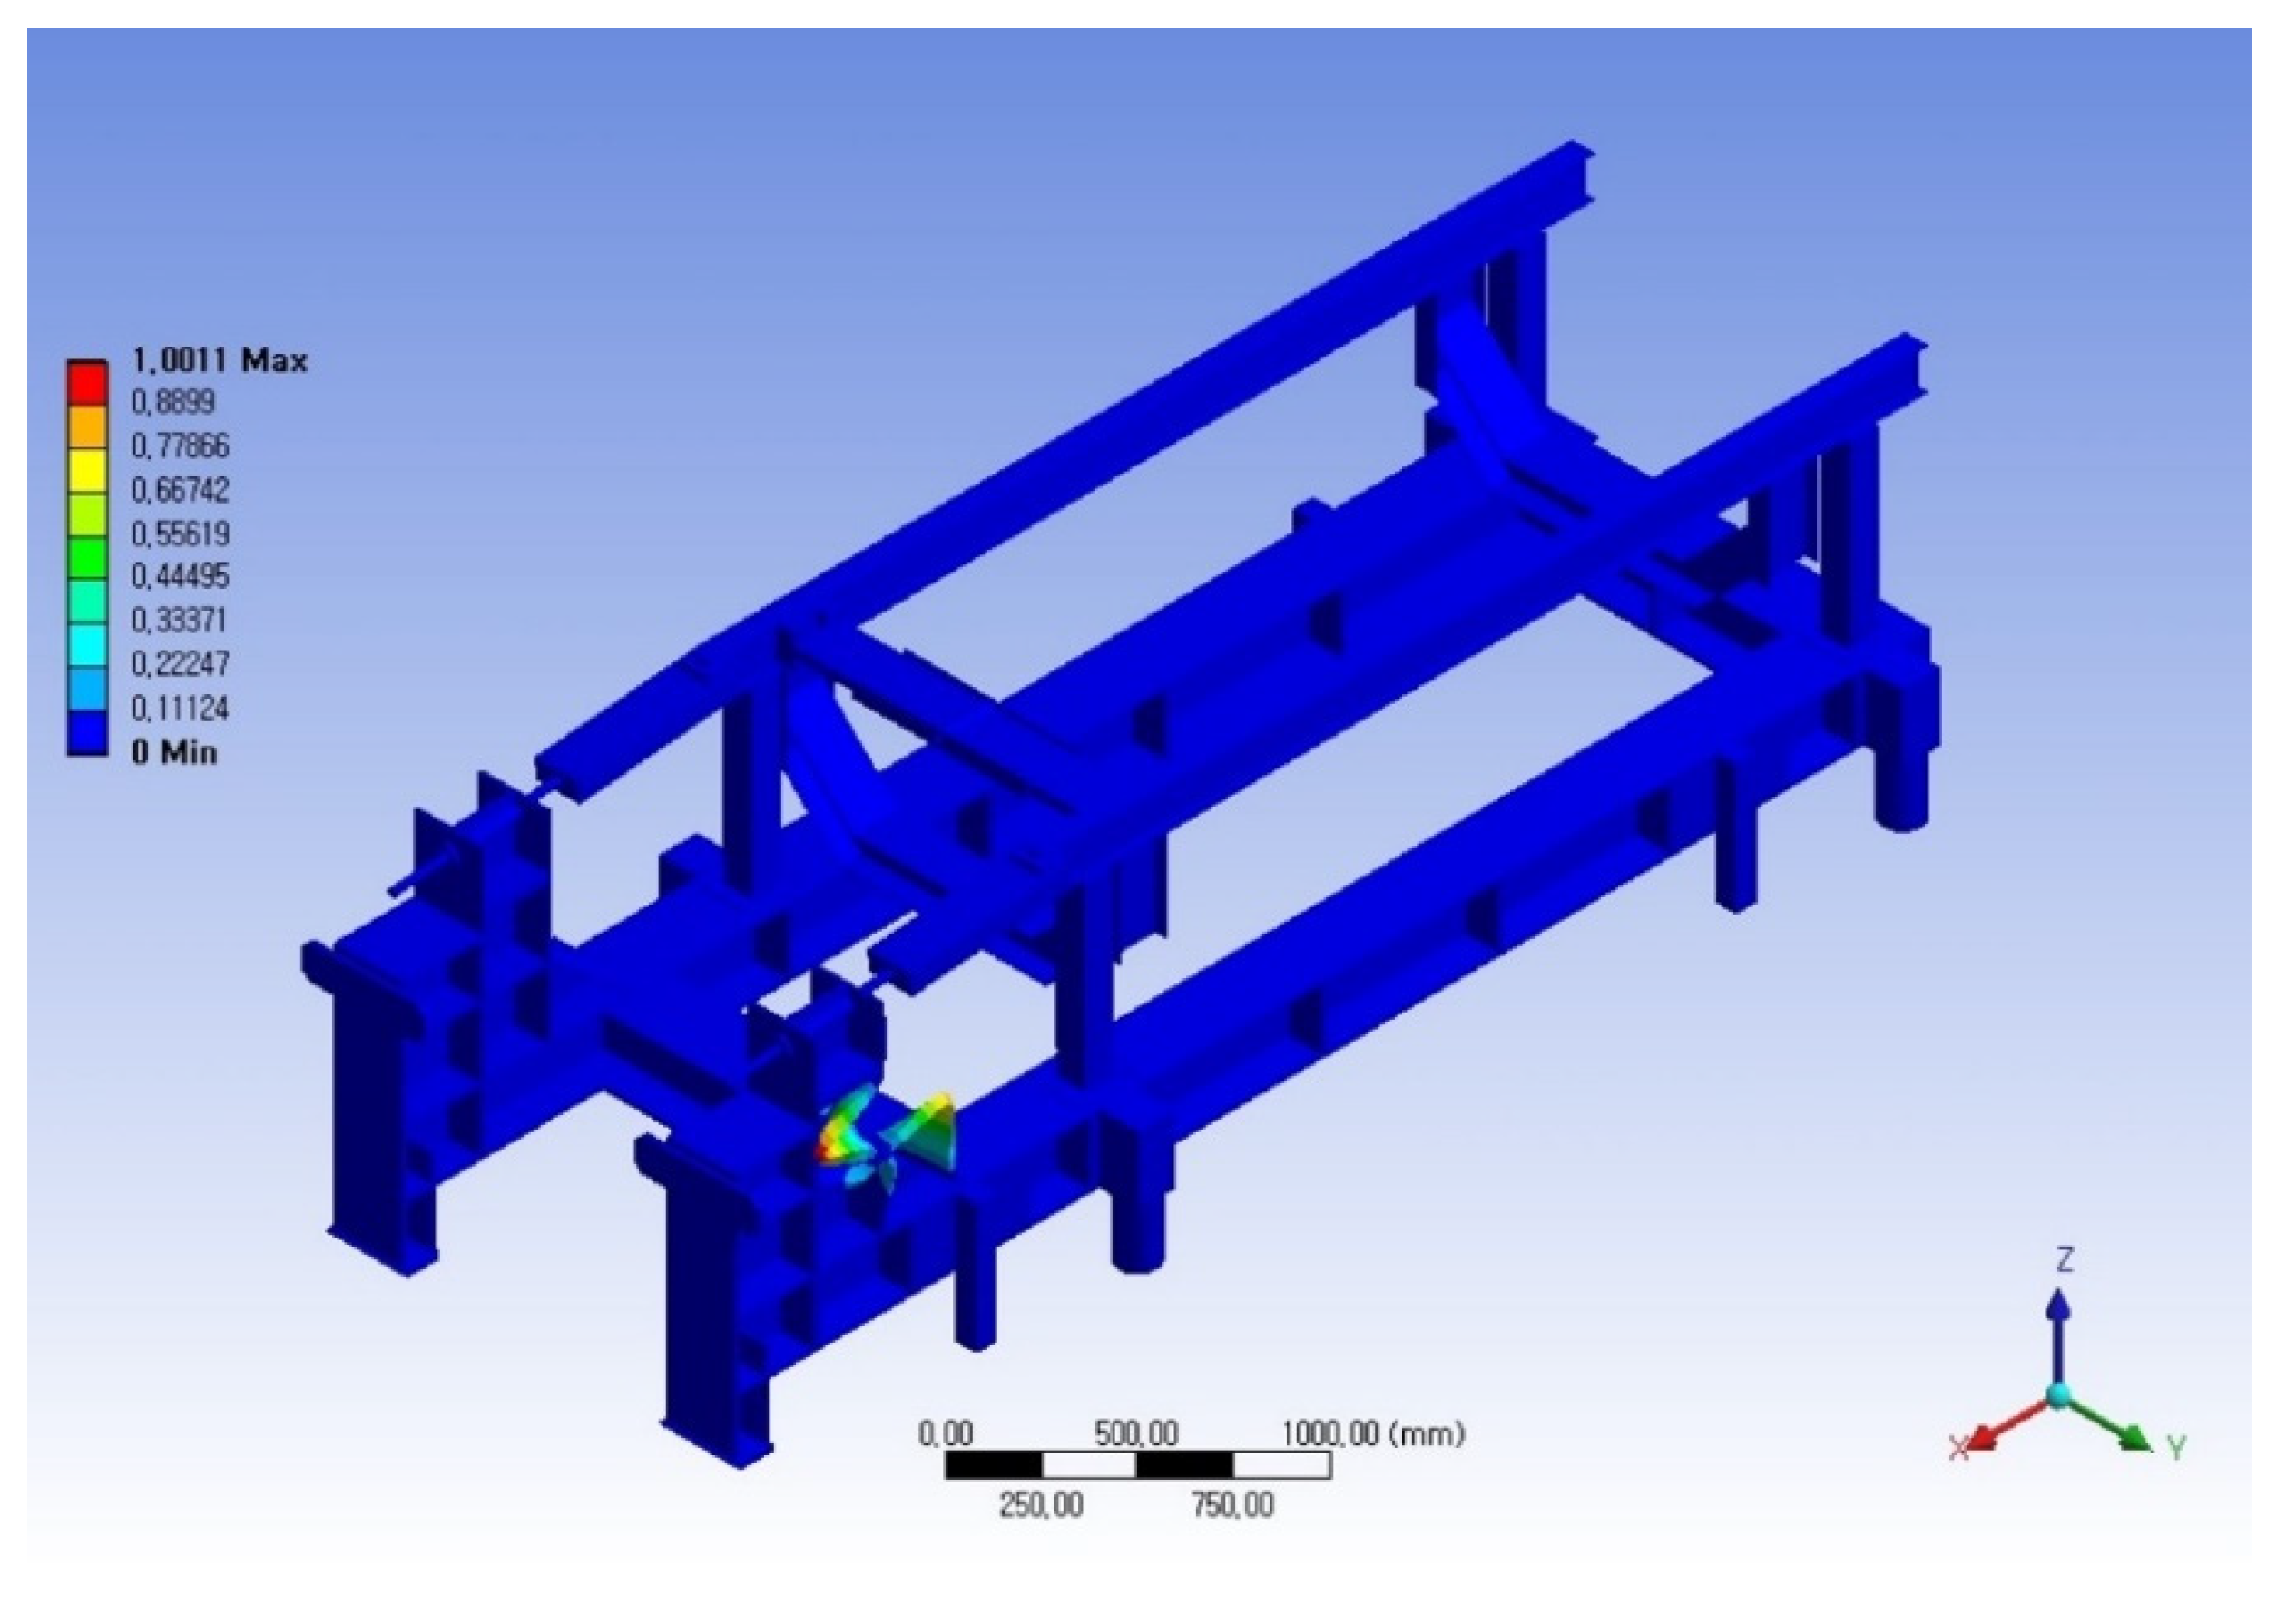
For structural analysis, the stress analysis result, displacement analysis result and buckling analysis result were examined. The test bed is safe, as the safety factor is 4.5. Under the corresponding load, however, the connection shaft is slightly unsafe as the safety factor is 1.0. However, a higher safety factor was already applied to the application load than the actual engine load. The actual engine thrust corresponds to 33.8% of the analyzed thrust. Consequently, it was considered to be structurally safe enough. As a result of the displacement analysis, it was predicted to be a displacement of up to 1.28 mm. As the displacement analysis result was also less than 0.4 mm if considering actual thrust, it was identified to be safe enough. As a result of the buckling analysis, it was examined that the buckling stability was also secured enough. Figure 12 shows the stress analysis result of the test bed and stand. Figure 13 shows the displacement analysis result. Figure 14 shows the buckling analysis result of the test bed and stand.

4. Manufacturing and Test

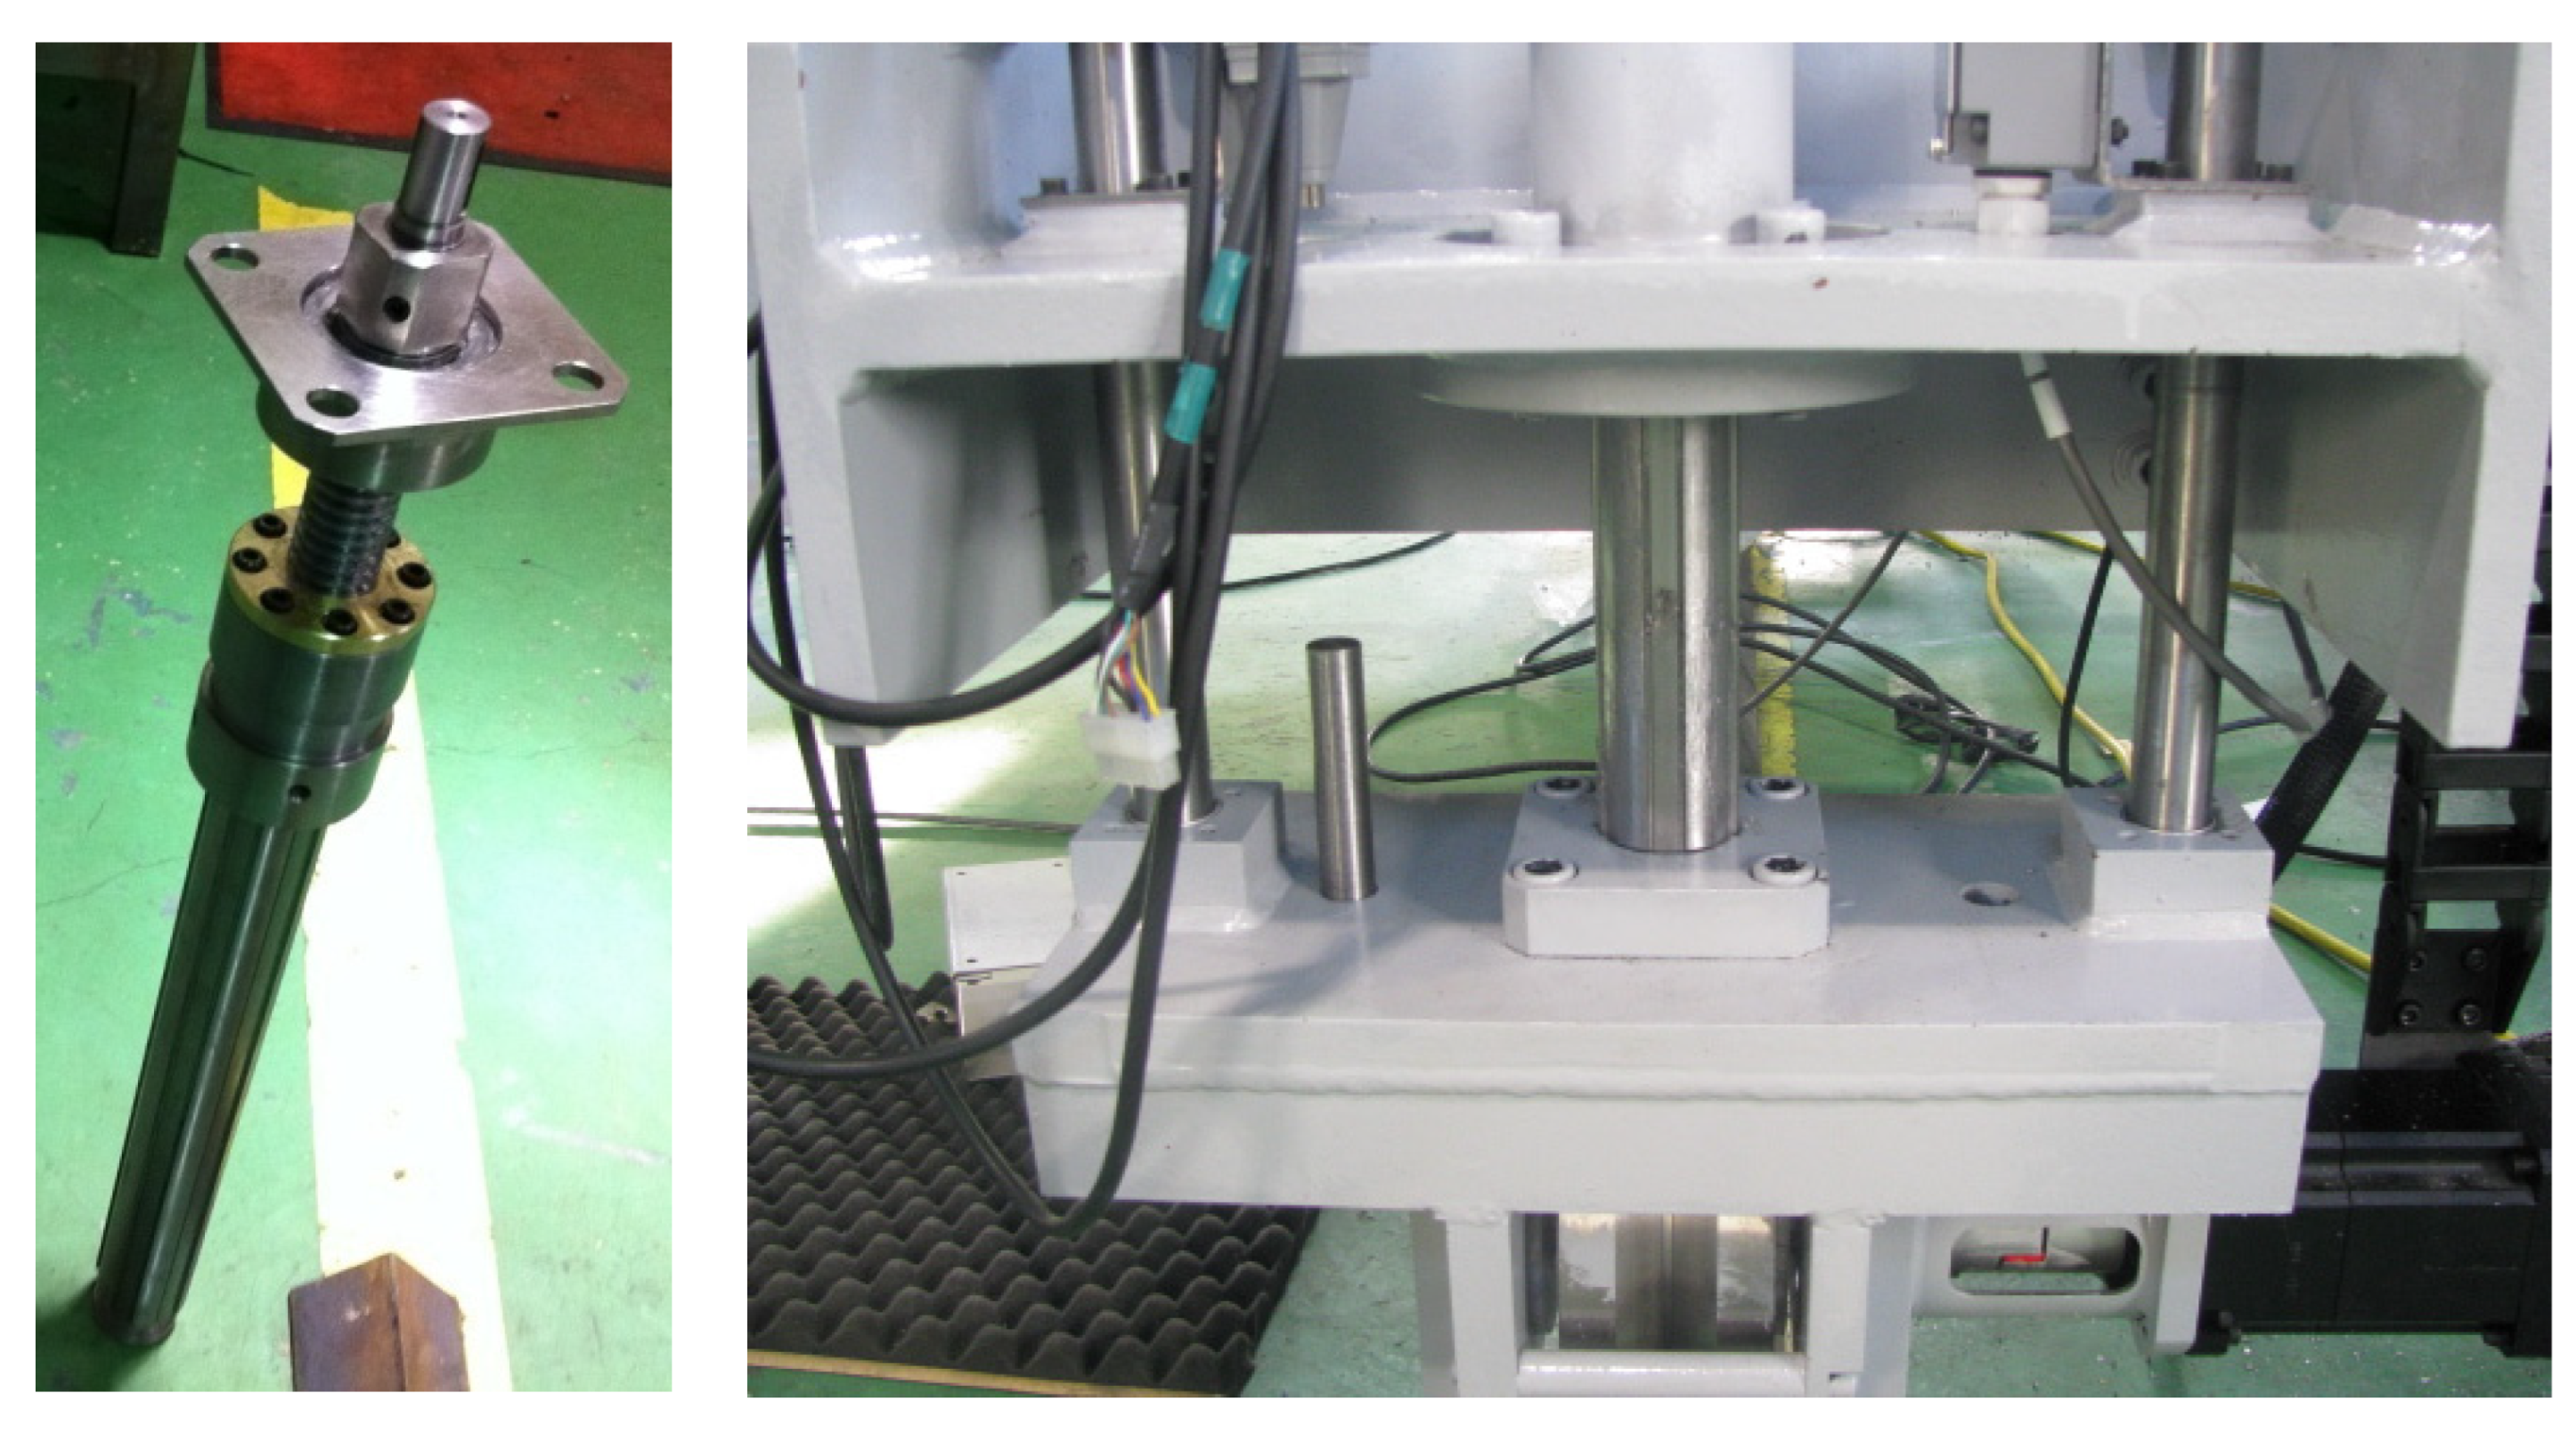
In this study, a hoisting device and transport system for the thrust test bed were designed, and the design results were investigated. For the design result, structural safety was evaluated through structural analysis. Examining the structural analysis result, the final design result was determined. Based on the design and structural analysis, the final thrust test bed was manufactured. The operating environment of the hoisting device was analyzed to design the hoisting device. The total ascending distance is 200 mm. It is operated 3~4 times or less a day, and every hoist is driven at a constant speed of 20 mm/s. A load of up to 24.5 kN per shaft is used as resistance while ascending. As a result of operating under the design requirements, it was identified to support and work well. Consequently, this design result is considered valid and safe enough. Figure 15 shows the result of fabricating the hoisting device and the scene that performs the test of whether to withstand the corresponding load. The displacement was measured through structural tests. Table 3 shows a comparison of the test result and numerical analysis. The displacement was measured using a strain gauge. The accuracy was confirmed to be 3%.

5. Conclusions

In this work, a test bed and stand structure were designed for the thrust test of an aircraft. In this study, the final thrust test bed was manufactured based on the design and structural analysis. The design was developed considering sufficient safety factors. Structural design loads were defined by analyzing the operating conditions. The structural design load was first considered when the engine was not running. The thrust load at which the engine operates was then taken into account. Structural analysis was performed based on the structural design results. For the structural analysis, finite element modeling was carried out. As a result of analyzing the structural safety against thrust, which is the main design load, it was considered to be sufficiently safe. Finally, the target structure was manufactured to verify the design result. In the future, the developed test bed and stand are planned to be used for engine thrust testing.

Funding

This research was supported by the Korea Institute for Advancement of Technology (KIAT) grant funded by the Korea Government (MOTIE) (P0012769, The Competency Development Program for Industry Specialist). This research was supported by the Basic Science Research Program through the National Research Foundation of Korea (NRF) funded by the Ministry of Education (No. 2018R1D1A1B07043553).

Data Availability Statement

The data presented in this study are available on reasonable request from the corresponding author.

Acknowledgments

The author would like to thank Changduk Kong.

Conflicts of Interest

The author declares no conflict of interest.

Abbreviations

Nreqnumber of revolutions of the moving wheel
Vtrmoving speed of the test bed
Dwhrail contact diameter of the moving wheel
Rredreduction gear ratio
Ttorque
τtorsional shear stress
ddiameter of shaft
Nrpm
θangle of twist per unit length
Φtotal torsional angle
Gshear modulus
σrmaxmaximum stress
Fconcentrated load on the center of the shaft
Llength of shaft
Ceffective characteristic coefficient
vfvolume fraction of fiber
vmvolume fraction of matrix

References

  1. GE Aerospace. Available online: https://www.geaviation.com/propulsion/military/f404 (accessed on 1 February 2023).
  2. Haag, T.W. Design of a thrust stand for high power electric propulsion devices. In Proceedings of the 25th Joint Propulsion Conference, Monterey, CA, USA, 12–16 July 1989. [Google Scholar] [CrossRef] [Green Version]
  3. Haag, T.W. Thrust stand for high-power electric propulsion devices. Rev. Sci. Instrum. 1991, 62, 1186. [Google Scholar] [CrossRef]
  4. Mondragon, J.M.; Hubbard, J.E. Design, build, and test of a thrust test stand. In Proceedings of the 55th AIAA Aerospace Sciences Meeting, Grapevine, TX, USA, 9–13 January 2017. [Google Scholar] [CrossRef]
  5. Smith, R.E.; Wehofer, S. Measurement of engine thrust in altitude ground test facilities. In Proceedings of the 12th Aerodynamic Testing Conference Sciences Meeting, Williamsburg, VA, USA, 22–24 March 1982. [Google Scholar] [CrossRef]
  6. Runyan, R.; Rynd, J.; Seely, J. Thrust stand design principle. In Proceedings of the 17th Aerospace Ground Testing Conference, Nashvllle, TN, USA, 6–8 July 1992. [Google Scholar] [CrossRef]
  7. Seemann, G.R. Design of and Experimental Thrust Nozzle Test Stand. Master’s Thesis, Oklahoma State University, Stillwater, OK, USA, 1960. [Google Scholar]
  8. Vermula, R.C. Thrust Measurements on a Rocket Nozzle Using Flow-Field Diagnostics. Master’s Thesis, Florida State University, Tallahassee, FL, USA, 2018. [Google Scholar]
  9. Ma, F.; Zhang, J.; Qian, M.; Xing, Q. Study on the influence caused by temperature to a pulsed thrust test stand for the attitude control rocket engine. Procedia Eng. 2012, 29, 194–200. [Google Scholar] [CrossRef]
  10. Yusoof, M.S.; Sivapragasam, M.; Deshpande, M.D. Strip distortion generator for simulating inlet flow distortion in gas turbine engine ground test facilities. Propuls. Power Res. 2016, 5, 287–301. [Google Scholar] [CrossRef]
  11. Li, W.-F.; Wang, Y.-S. Simplified removable ground test-bed for testing turbofan engine. Chin. J. Aeronaut. 2003, 16, 138–141. [Google Scholar] [CrossRef] [Green Version]
  12. Jin, J.; Park, Y.; Lee, C.; Jeong, S.; Lee, J.; Baek, C. Design of a Thrust stand using flexure. J. Korean Soc. Aeronaut. Space Sci. 2021, 49, 205–212. [Google Scholar]
  13. Joung-Keun, K.; Il-Sun, Y. Functional analysis of flexure in a captive thrust stand. Korean Soc. Propuls. Eng. 2006, 10, 73–81. [Google Scholar]
  14. Crandall, S.H.; Dahl, N.C.; Lardner, T.J.; Slvakumar, M.S. An Introduction to Mechanics of Solids, 3rd ed.; McGraw-Hill: Seoul, Republic of Korea, 2015; pp. 321–337. [Google Scholar]
  15. Fish, J.; Belytschko, T. A First Course in Finite Elements; John Wiley & Sons, Ltd.: West Sussex, UK, 2007; pp. 11–40. [Google Scholar]
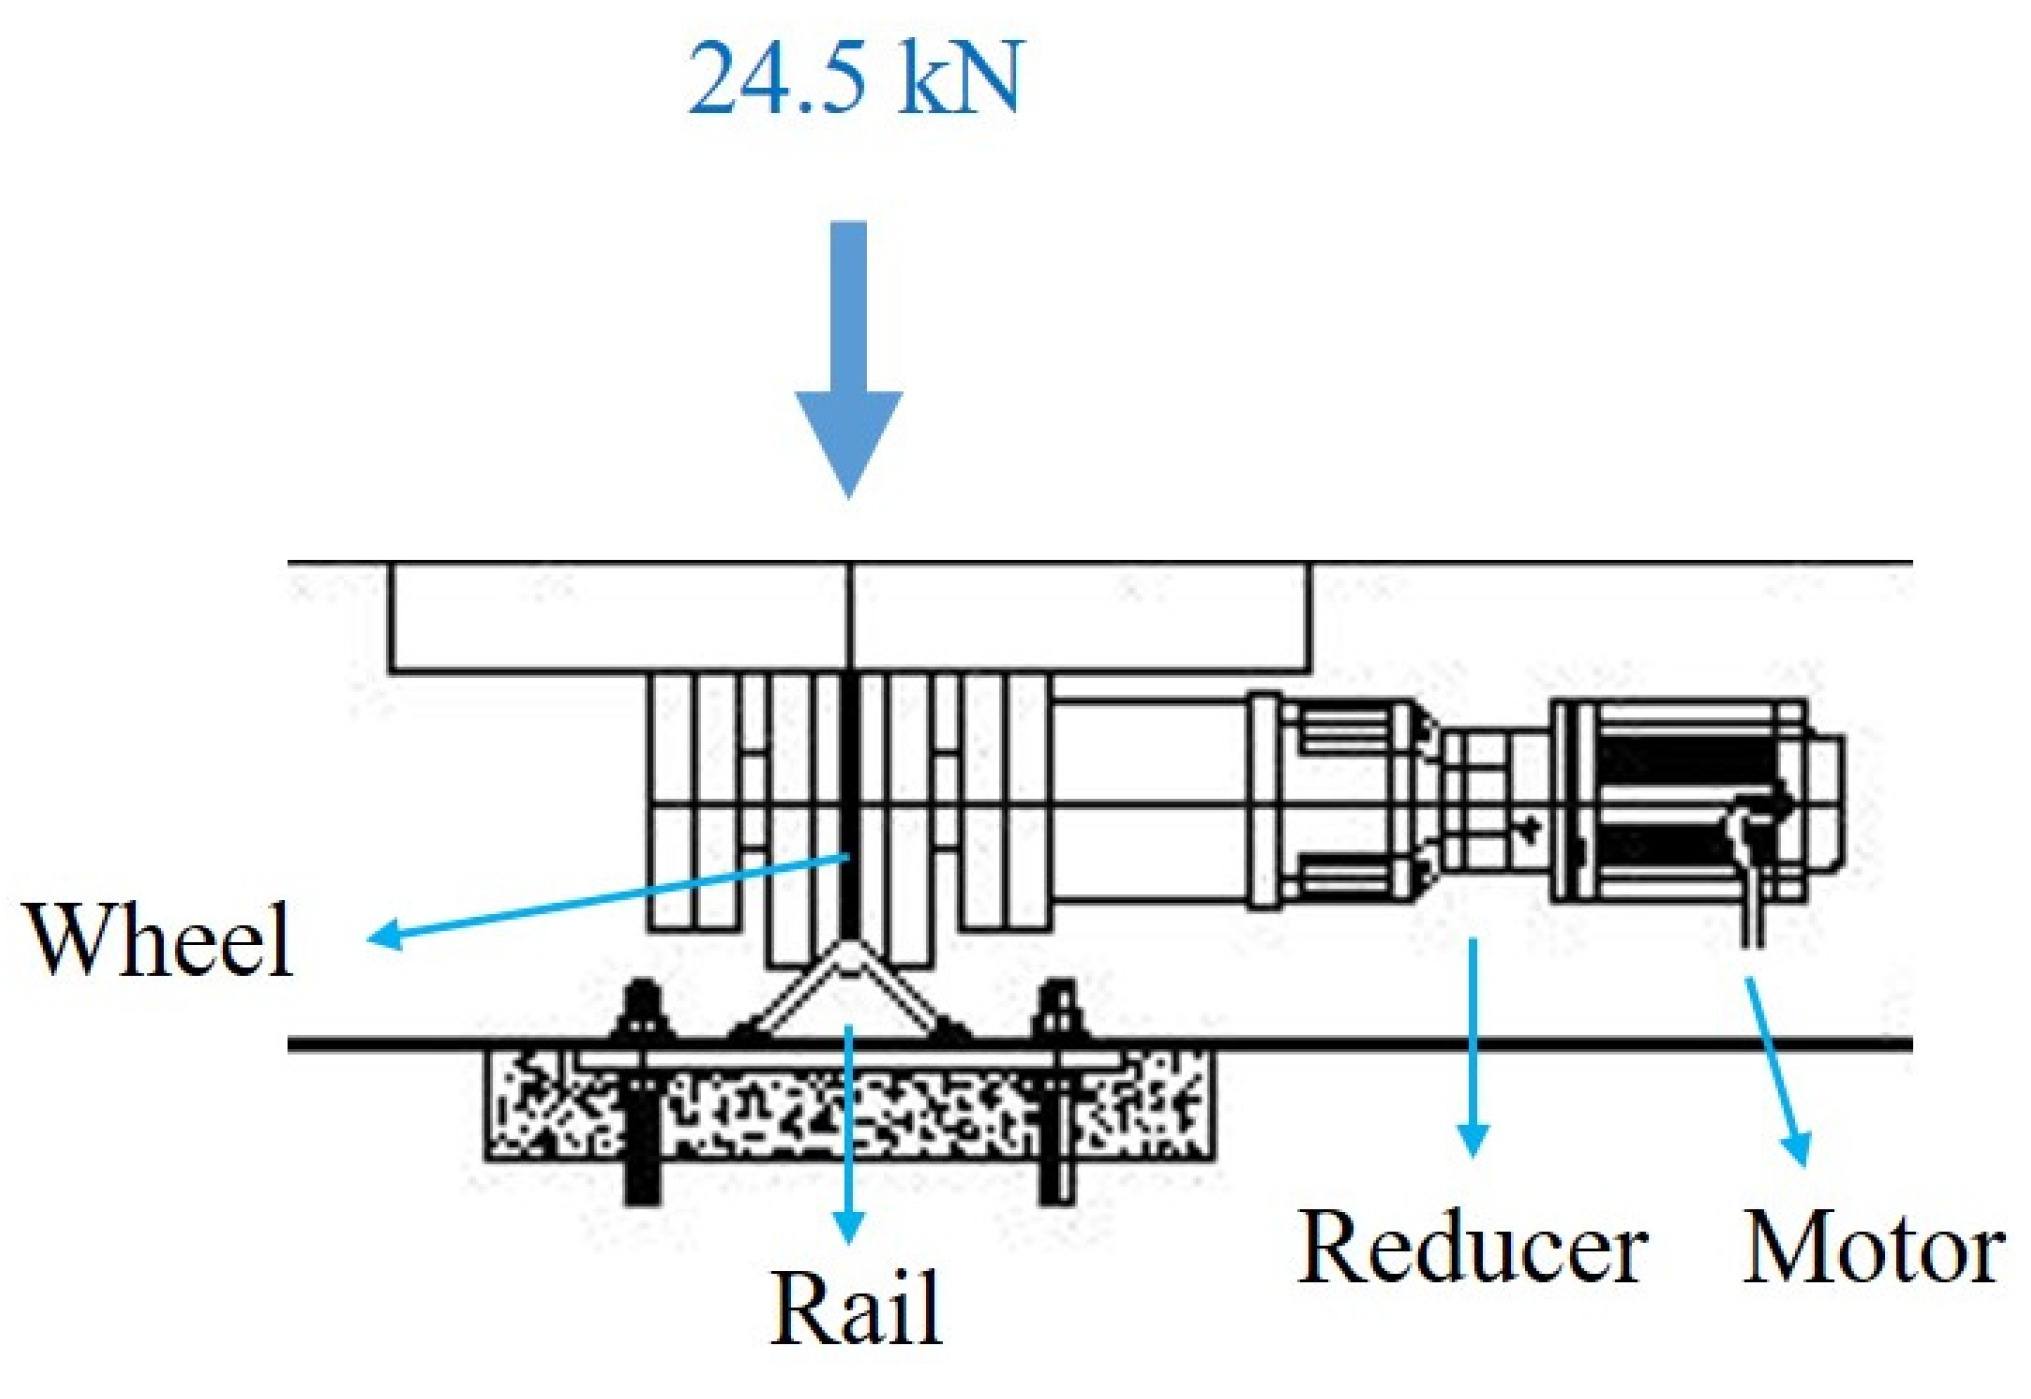
Figure 1. The concept of the moving wheel drive shaft.
Applmech 04 00023 g001
Figure 2. Distribution of torsional moment and shear stress caused by load and torque.
Applmech 04 00023 g002
Figure 3. Stress analysis result of the shaft structure.
Applmech 04 00023 g003
Figure 4. Displacement analysis result of the shaft structure.
Applmech 04 00023 g004
Figure 5. The 3D modeling result and boundary conditions of the hoisting device.
Applmech 04 00023 g005
Figure 6. Finite element method modeling result.
Applmech 04 00023 g006
Figure 7. Stress analysis result of the structural design result.
Applmech 04 00023 g007
Figure 8. Displacement analysis result of the structural design result.
Applmech 04 00023 g008
Figure 9. Buckling analysis result of the structural design result.
Applmech 04 00023 g009
Figure 10. FEM modeling result of the test bed and stand.
Applmech 04 00023 g010
Figure 11. Load and boundary conditions of the test bed and stand.
Applmech 04 00023 g011
Figure 12. Stress analysis result of the structural design result.
Applmech 04 00023 g012
Figure 13. Displacement analysis result of the structural design result.
Applmech 04 00023 g013
Figure 14. Buckling analysis result of the structural design result.
Applmech 04 00023 g014
Figure 15. Manufacturing and test of structural design result.
Applmech 04 00023 g015
Table 1. Specifications of the target engine.
SpecificationsLoad
engine10.2 kN
thrust stand9.7 kN
test bed9.7 kN
other components19.4 kN
total49.0 kN
Table 2. Structural design requirements and design results of the driving shaft.
MaterialSCM 440
safety factor8
allowable stress85.7 MPa
design resultdesign based on strength19 mm
design based on stiffness42.2 mm
design based on combination method36 mm
final design result32 mm
Table 3. Comparison of test and numerical analysis results.
TestAnalysis
displacement0.095 mm0.098 mm
Disclaimer/Publisher’s Note: The statements, opinions and data contained in all publications are solely those of the individual author(s) and contributor(s) and not of MDPI and/or the editor(s). MDPI and/or the editor(s) disclaim responsibility for any injury to people or property resulting from any ideas, methods, instructions or products referred to in the content.