Abstract
The paper studies the influence of diamond grinding, lapping, and polishing on the surface layer and defectiveness of the Al2O3/TiC and SiAlON ceramic samples. The index of defectiveness ID, which is the product of the defect density and the defective layer’s thickness (Rt), and a method for its evaluation are proposed to quantify the defectiveness of the ceramic surfaces. Lapping reduces the Rt parameter by 2.6–2.7 times when the density of defects was decreased by 2 times. After polishing, the Rt parameter decreases to 0.42 μm for Al2O3/TiC and 0.37 μm for SiAlON samples. The density of defects decreases many times after polishing: up to 0.005 and 0.004, respectively. The crack resistance of the polished samples increased by 5–7%. The volumetric wear of polished samples decreased by 1.5–1.9 times compared to the ground ones after 20 min of abrasion wear. The polished samples show a decrease in the coefficient of friction at 800 °C and a decrease in the volumetric wear by 1.5 and 1.3 times, respectively, compared to the ground ones after 200 m of friction distance. The volumetric wear at high-temperature friction of sliding for polished specimens was 55% and 42% less than for the ground ones, respectively.
1. Introduction
Modern world trends demonstrate the fundamental modernization of the machine-building industry and the spread of the latest technologies, materials, and equipment to improve the efficiency of production processes. A key role in developing various areas of mechanical engineering today is the use of structural and tool materials with improved properties when exposed to intense operating loads [1,2,3]. No metal alloy can compete with ceramics in terms of heat resistance, hardness, and chemical inertness. These irreplaceable materials are actively used today or have immediate prospects for use in various industries when parts operate in extreme conditions at high temperatures and aggressive environments. For example, bearing rings, turbine blades of aircraft engines, elements of combustion chambers of rocket engines, nozzles of various reactors, mud pump bushings, cutting tools for processing parts made of hard-to-cut materials, and dies for producing wires and tubes [4,5,6,7,8,9,10]. However, the risks associated with premature destruction of the contact surfaces of ceramic products have long been the main problem hindering the expansion of these materials’ scope. Many years of technological research by leading scientific groups in the fields of obtaining high-quality initial powders, developing new approaches to the selection of optimal powder compositions, the emergence of new sintering technologies, and optimizing their key parameters, today make it possible to obtain high-density ceramic blanks with improved strength and crack resistance [11,12,13,14,15]. This progress in the field of ceramics contributes to an increase in the share of their industrial application for the manufacture of products of a wide range.
Sintered ceramic blanks in industrial manufacturing of various parts and tools are subjected to diamond grinding. Large thermal and mechanical loads acting during the destruction of the allowance in diamond grinding have a negative effect on the surface layer state of ground ceramic products [16,17,18,19,20]. The process of formation of the surface morphology of a ceramic product during grinding is complicated given the random nature of the shape and arrangement of grains in a diamond wheel. An additional effect is exerted by friction between the surface to be processed and the bond of the wheel, as well as multiple cycles of heating and cooling of local volumes of ceramics. Consequently, after grinding, the surface layer has a specific morphology, including a set of defects such as microprotrusions, deep grooves, microcracks, craters in the place of torn grains, etc. [21,22,23,24,25]. The noted defects are common features of a ground surface layer and are characteristic of all types of commercially available structural and tool ceramics based on Al2O3, SiAlON, Si3N4, SiC, ZrO2, etc. [26,27,28,29,30]. At the same time, specific features are traced along with common features in the surface layer of polished ceramics. These features are associated with different initial structures and chemical compositions of ceramics, and an unequal perception of impact force and cyclic thermal loads accompanying the grinding by structural elements of ceramics. For example, Al2O3/TiC ceramics are characterized by numerous deep grooves with cracks along their boundaries, while the predominant defects of SiAlON and Si3N4 ceramics are numerous craters formed at the site of torn out grains and their conglomerates [31,32]. Unfortunately, it is impossible to reliably determine the relationship between the state of the ground surface and the physical and mechanical characteristics of the ceramic product, due to the variety of morphological patterns and heterogeneity of surface defects as well as the very complex physical nature of this relationship. The use of mathematical modeling for these purposes involves numerous assumptions [33,34,35]. Defects in the surface layer significantly contribute to the processes of contact interaction between the ceramic product and counter body, and affect the performance. For example, the operation of ceramic cutting inserts involves high thermal loads and cutting forces, often failing due to premature destruction of the contact surfaces of the tool [36,37,38]. It has been proven that defects in the ground surface layer are additional stress concentrators that contribute to the accelerated destruction of the contact surfaces of ceramic tools and other products under external thermal and mechanical loads [39,40,41,42]. At the same time, international standards for the manufacture of ceramic products strictly regulate the requirements for design and geometric parameters but do not standardize the issues of surface layer defects. For example, certification of the surface layer state of ceramic inserts under standard conditions of tool production provides only an assessment of the roughness by the Ra parameter and optical control of the absence of chips on the cutting edges [43,44].
A separate direction has been developed, such as surface engineering of ceramic products, to improve the surface layer state after grinding. Various scientific groups conduct research in the field of purposeful influence on the surface layer state by mechanical, ion plasma, beam, and combined methods to improve its characteristics [45,46,47,48,49,50,51,52,53,54]. Evaluation of the effectiveness of the application of surface action technologies on ceramic products is greatly hampered by the lack of techniques for quantitative assessment of the surface layer’s defectiveness level. Considering that a combination of various defects characterizes the surface layer of ceramic products after diamond grinding, the measurement of individual characteristics of the surface layer (roughness, crack resistance, etc.) used in practice, and the establishment of relationships between these parameters and the wear resistance of ceramic products, in most cases, is not informative and requires the development of new approaches.
The main purpose of this work was to develop an informative criterion that allows the assessment of the defectiveness level of the ceramic products’ surface layer, to create a methodology for its quantitative assessment and to test the sensitivity of the proposed criterion to a change in the surface layer state. The research objects were cutting inserts made of tool ceramics widely used in industry, such as Al2O3/TiC and SiAlON. The ceramic samples with a different surface layer state were produced by three types of technological operations: diamond grinding, diamond grinding and lapping, diamond grinding, lapping, and polishing. The problem of establishing relationships between the criterion characterizing the defectiveness level of the surface layer and the physical and mechanical characteristics of ceramic samples was solved based on a conducted set of experimental studies.
2. Materials and Methods
2.1. Theoretical and Experimental Background
Diamond grinding of ceramics is a highly energy-intensive process in which the removal of a ceramic workpiece’s surface layer (allowance) to the required depth occurs due to creating stresses in it; the level of which, exceeds the fracture stress of tool ceramics [55,56]. Figure 1 shows diagrams of diamond grinding of ceramic cutting inserts and the impact of diamond grains on the surface layer of a ceramic workpiece when removing the allowance in grinding. The scheme proposed by the authors clearly illustrates that the sintered ceramic workpiece is subjected to a combined thermomechanical action during grinding, which destroys and removes the specified allowance. In this case, the thermal and mechanical impact area extends deeper than the cut allowance’s value.
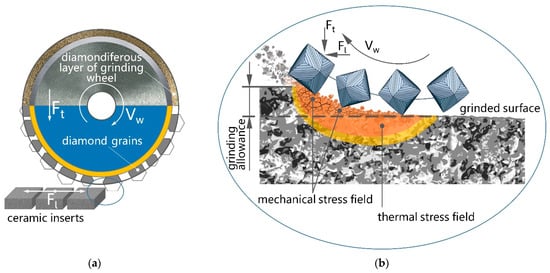
Figure 1.
Schemes of diamond grinding of ceramic cutting inserts (a) and the diamond grains’ impact on the surface layer of a ceramic workpiece when removing the allowance in grinding (b).
The mechanisms that underlie diamond grinding during the formation of the surface layer of ceramics differ significantly from the processes observed during the grinding of metals and alloys. Various studies have shown [57,58,59,60] that the surface layer formed during diamond grinding of ceramic blanks at cutting depths of 0.02–0.04 mm represents characteristic areas (as a rule, their combination) of predominant elastoplastic deformation with a relatively small number of micro-fractures, predominantly brittle fractures with pronounced micro-chips and cracks, as well as zones of brittle–plastic (mixed) fracture.
As a result of increased thermal and mechanical loads acting on the surface layer of the ceramic workpiece during diamond grinding, the formed layer is characterized by increased defectiveness. Figure 2 shows a 3D profilogram and SEM image of the typical surface layer of a SiAlON ceramic sample after diamond grinding, obtained by the authors during the research. The impact action of diamond grains, the friction of the grinding wheel bond over the workpiece surface, and the local plastic deformation that occurs during high-speed heating of the ceramic surface areas and their rapid cooling, lead to the formation of a surface layer with a high level of imperfection. It reveals deep grooves profiled with diamond grains, microcracks along the grooves’ boundaries, furrows formed due to the slipping of “passive” diamond grains over the ceramic surface, and numerous craters due to grain eruptions under the action of force loads (Figure 2). The described morphology of the surface layer is typical for manufacturing ceramic products in mass production (in particular, ceramic cutting inserts) when diamond grinding is performed at high-performance modes.
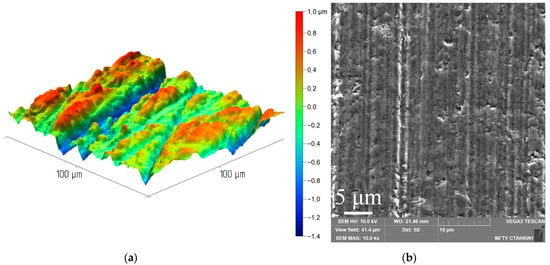
Figure 2.
3D profilogram (a) and SEM image (b) of the typical surface layer of a SiAlON ceramic sample after diamond grinding.
An objective quantitative assessment of the level of defectiveness of the surface layer of ceramic products after diamond grinding is complicated, due to the diverse surface microrelief, the lack of informative parameters, and available methods. The analysis of the presented profilogram of polished ceramics (Figure 2) allows us to conclude that the Ra roughness parameter, controlled by various researchers and technologists of enterprises, is practically uninformative for assessing the level of defectiveness of the surface layer. According to the ISO 21920-2-2021 standard, the arithmetic average of the absolute values of the Z(x) ordinate within the sample length in the X-axis direction is calculated in determining the Ra parameter (Figure 3). The value of Ra is not affected by numerous grooves, craters from torn out grains, and many other defects present on the surface of ceramic samples after diamond grinding. In practice, having the same Ra value for significantly different profiles is common. If the subject of assessment is the surface layer’s defectiveness level, then a significant decrease in the Ra parameter will not always indicate a significant decrease in defectiveness.

Figure 3.
Schemes for various parameters estimating the state of the surface layer of ceramic samples after diamond grinding: arithmetic mean deviation of the profile, Ra (a); total profile height, Rt (b).
As confirmation that the use of the Ra parameter in a number of cases is not informative for assessing the level of defectiveness of the surface layer, let us consider the SEM images and 3D profilograms of the surface layer of samples made of Si3N4 tool ceramics after diamond grinding and polishing (Figure 4). After grinding, the value of the Ra parameter was 0.29 µm, and after polishing, the parameter decreased by 9.6 (to 0.03 µm). However, the result does not indicate a significant reduction in defectiveness, which is clearly seen in the presented SEM images. Polishing minimized external micro-irregularities (microprotrusions) but exposed the many existing craters in place of torn grains or their particles, which are not detected in evaluating the Ra parameter. At the same time, they negatively affect the physical and mechanical characteristics of the material. Therefore, it is necessary to search for alternative parameters for structurally inhomogeneous materials, which include ceramics and are characterized by the formation of numerous grooves, craters, and cracks during abrasive processing.
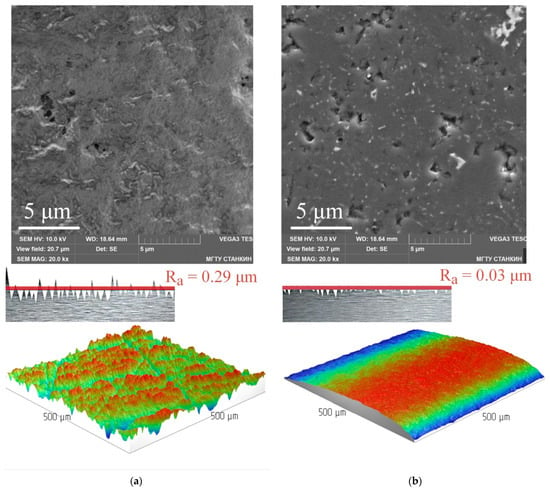
Figure 4.
Typical SEM images (top) and 3D profilograms (bottom) of the surface layer of Si3N4 tool ceramic samples after diamond grinding (a) and polishing (b).
In practice, the most informative parameter that could be used to study the defectiveness of the surface layer of ceramic products is the Rt parameter which is the total height of the profile (Figure 3), estimated as the sum of the highest peak height of the profile (Zp) and the most significant depth of the profile trough (Zv) within the evaluation length, which contains several values of the length of the sample in the X-axis direction. The value of the Rt parameter allows us to take into account all possible grooves, furrows, cracks, and craters present in the surface layer and, in fact, the thickness of the defective layer. Considering that only one parameter (Rt) is insufficient for an objective assessment of the surface layer state, the authors of this work propose to evaluate the density ρ of defects (total area per unit area) on the surface of a ceramic sample in addition to it. It is proposed to use a technique based on contrasting surface defects with oblique illumination of the surface during the analysis of a stereoscopic image to assess the density of defects. Figure 5 shows an example of contrasting defects in the surface layer of a sample made of SiAlON tool ceramics when the axis of the illuminating beam is located at an angle of 75° concerning the microscope’s optical axis. Thus, the defects contrast with the main plane of the ceramic sample, where a dark color is the main plane and a light one is the surface layer defects. With the help of specialized software for image analysis (Thixomet Pro software, version 5.3.1, Saint Petersburg, Russia), the number of light pixels on the test sample is calculated. The ρ parameter value is calculated based on the data obtained for ceramic samples as the ratio of the total area of defects to the unit area of the ceramic sample under consideration. In the study, the calculation was performed for an area of 250,000 μm2.
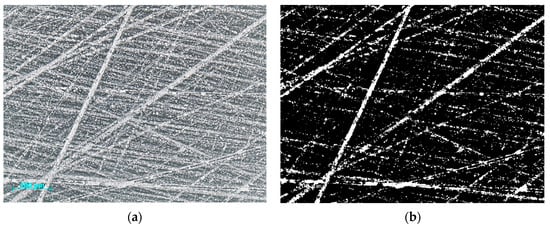
Figure 5.
Optical image of a sample of SiAlON ceramics after diamond grinding (a) and contrasting the surface with oblique illumination to assess the density of defects (b).
Thus, the authors of the work propose a new generalized criterion, “index of defectiveness” (μm), for a quantitative assessment of the defectiveness level of the ceramic product surface layer formed after various technological operations, which is determined according to the following relationship:
where ρ is the density of defects (total area) per unit area of the ceramic sample surface (dimensionless); Rt is the maximum profile height (thickness) of the defective layer (µm) in the considered area of the ceramic sample.
2.2. Preparation of Samples Made of Al2O3/TiC and SiAlON Ceramics
Two types of cutting inserts made of Al2O3/TiC ceramics (round shaped) and SiAlON ceramics (square shaped) were used (Figure 6) in conducting experimental studies. X-ray diffraction patterns of samples made of Al2O3/TiC and SiAlON ceramics are shown in Figure 7. The analysis was performed on a Bruker D8 Advance diffractometer with monochromatic CuKα radiation and shooting in the angle range 20–90° 2Θ. Main parameters used in experiments of ceramic inserts are presented as follows:
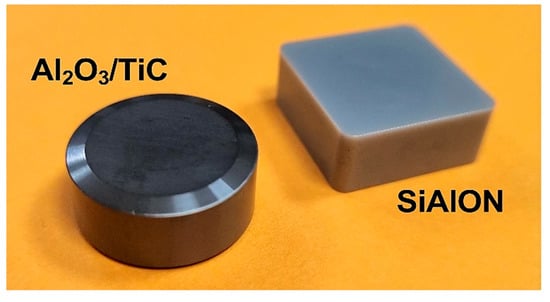
Figure 6.
Al2O3/TiC and SiAlON ceramic inserts used in experiments.
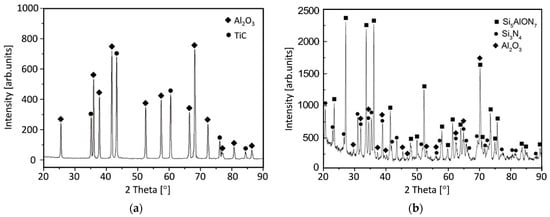
Figure 7.
X-ray diffraction patterns of ceramic specimens: Al2O3/TiC (a); SiAlON (b).
- The round Al2O3/TiC ceramic inserts were 19.05 mm in diameter and 7.94 mm in thickness. Characteristics of the ceramic: microhardness of 19.0 GPa; density of 4.15 g/cm3; fracture toughness K1c (volumetric material) of 4.1 MPa·m1/2.
- The square SiAlON ceramic inserts were 19.05 mm in inscribed circle diameter and 7.94 mm in thickness. Characteristics of the ceramic: microhardness of 16.5 GPa; density of 4.6 g/cm3; fracture toughness K1c (volumetric material) of 6.4 MPa·m1/2.
The ground (initial) ceramic inserts were subjected to additional technological operations of abrasive processing, such as lapping and polishing, to produce ceramic samples made of Al2O3/TiC and SiAlON ceramics with different surface layer states. The ceramic inserts were processed additionally on a Lapmaster Wolters lapping and polishing machine with special lapping and polishing wheels using various diamond suspensions (grit 50/40, 40/28 for lapping and 10/7, 5/3 for polishing) at a cutting speed 3 m/s.
Thus, three groups of samples were produced for study for each type of Al2O3/TiC and SiAlON tool ceramics:
- ▪
- after diamond grinding (G);
- ▪
- after grinding and lapping (L);
- ▪
- after grinding, lapping, and polishing (P).
2.3. Estimation of the Surface Layer State and the Microstructure of Samples Made of Al2O3/TiC and SiAlON Ceramics
A quantitative assessment of the defectiveness level was performed for each group of samples (G, L, P samples) made of Al2O3/TiC and SiAlON ceramics according to the method for determining the index of defectiveness described above.
The microstructure of fractures and a surface layer of ceramic samples was studied on a Tescan Vega 3LMH scanning electron microscope with a thermionic tungsten cathode. A Meiji Techno RZ optical stereomicroscope was used to obtain a stereoscopic image of the surface and to contrast it to assess the density of defects on the surface of ceramic samples.
The plotting of surface-layer 3D profilograms and the measurement of the Rt parameter were carried out on a highly sensitive Dektak XT stylus profilometer, which performs a set of electromechanical measurements by contact scanning a selected area of the ceramic sample surface with a diamond tip. A specialized software performed visualization and plotting of the necessary profilograms based on the results of measurements.
2.4. Estimation of the Physical and Mechanical Characteristics of Samples Made of Al2O3/TiC and SiAlON Ceramics
The crack resistance of the surface layer of ceramic samples was determined on a QnessQ10A universal microhardness tester by indentation with a Vickers diamond pyramid according to the ISO 21618:2019 standard and with a load of 50 N. After indentation, the values of the diagonals of the indentations and the lengths of cracks propagating from the corners of the indentations were measured, based on which the stress intensity factor K1c was determined from the known dependences [61,62].
The original technique of the authors of this work [63] was used to assess the ability of the edges of ceramic samples with different states of the surface layer to resist chipping. The tests were performed by exposing the samples to a Vickers diamond pyramid with a smoothly increasing load from 20 to 40 N on a Revetest scratch tester equipped with an acoustic emission (AE) signal-recording sensor. The system recorded the force at which the chip occurred. The author’s technique is based on works [64,65], where the possibility of obtaining reliable information on the mechanical behavior of ceramics is substantiated from the standpoint of the theory of brittle fracture when their edges are chipped by an indenter.
The study of the influence of the surface layer state of ceramic samples on the resistance to abrasion was carried out by tests on a Calowear CSM Instruments instrument. A rotating sphere of hardened steel was pressed against the ceramic samples with a force of 0.2 N, and an abrasive water-based suspension was fed into the contact zone. The measurement of the parameters of wear holes on an Olympus BX51M optical microscope (Ryf AG, Grenchen, Switzerland) and a Dektak XT stylus profilometer made it possible to quantitatively and qualitatively estimate the volumetric wear of ceramic samples [66].
The coefficient of friction and wear resistance of ceramic samples with different surface layer states during high-temperature heating up to 800 °C in the friction–sliding was evaluated using the ball–disk method following ISO 20808:2016. The tests were performed with the rotation of ceramic samples relative to a fixed counter body, when a ceramic ball with a diameter of 6 mm at a load of 1 N was rotated at a sliding speed of 10 cm/s and a displacement radius of 2 mm on a tribometer TNT TNT-S-AX0000 Anton Paar TriTec. Volumetric wear of ceramic samples was determined using the average value of the cross-sectional area of the wear track, which was estimated from the results of measuring 5 transverse profiles on a Dektak profilometer [67,68].
3. Results and Discussion
3.1. State of the Surface Layer of Samples Made of Al2O3/TiC and SiAlON Ceramics and the Index of Defectiveness
Figure 8 shows the SEM images that illustrate the transformation in the microstructure of the surface layer of sintered Al2O3/TiC and SiAlON ceramic samples, which occurs after grinding as a result of the impact of diamond grains of the grinding wheel and local plastic deformation during high-speed heating and subsequent cooling of the subsurface layers. It can be seen that diamond grinding significantly changes the surface microstructure of the ceramics that were formed at the stage of their sintering. It should be noted that the initial microstructure is shown on the sample’s fractures. The structurally transformed surface layers of Al2O3/TiC and SiAlON ceramic specimens contain numerous defects, such as deep grooves, microcracks, and craters in the place of torn grains. The defective surface layer perceives the entire complex of operational loads, and its condition is paramount for the friction and wear processes of the ceramic sample contact surfaces.
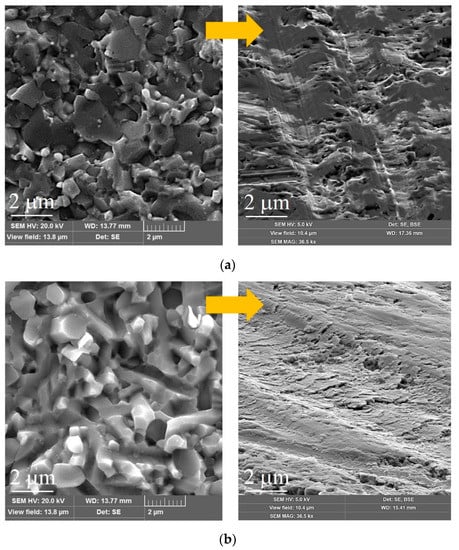
Figure 8.
Structural transformation of the surface layer of samples made of Al2O3/TiC (a) and SiAlON (b) sintered ceramics occurred under the exposition of a diamond wheel in grinding: SEM images of fractures of sintered ceramic samples on the left; SEM images of the ground surface layer on the right.
The use of additional processing, such as lapping and polishing for the ground ceramic samples, leads to pronounced changes in the surface layer state. Typical 3D profilograms and SEM images of the microstructure of ceramic samples after various processing options are shown for Al2O3/TiC (Figure 9) and SiAlON ceramic samples (Figure 10). The use of additional lapping significantly reduces the depth of the defective layer in terms of the Rt parameter (by a factor of 2.6–2.7):
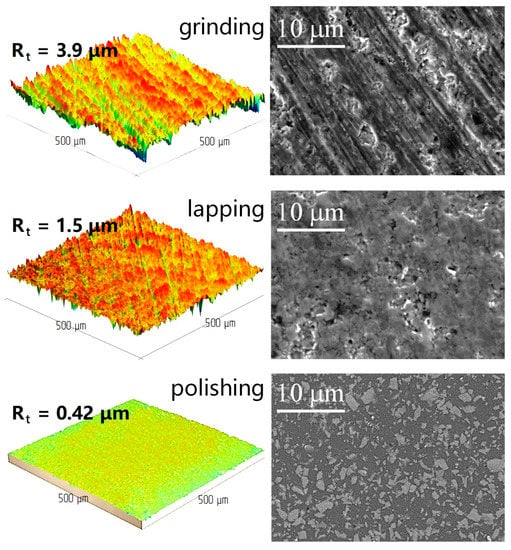
Figure 9.
3D profilograms and SEM images of the microstructure of the surface layer of Al2O3/TiC ceramic samples after various types of abrasive processing: grinding; grinding and lapping; grinding, lapping, and polishing (top-down).
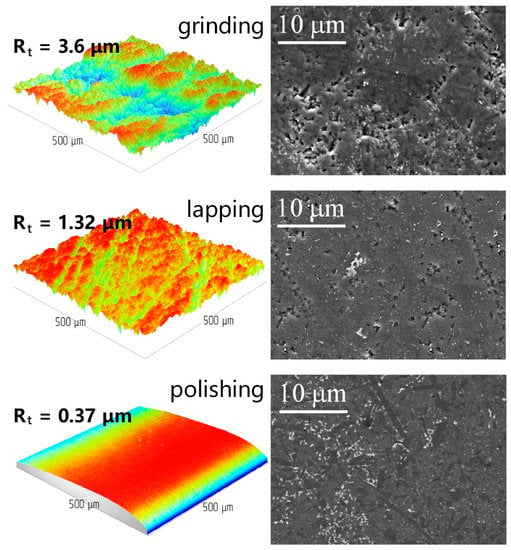
Figure 10.
3D profilograms and SEM images of the microstructure of the surface layer of SiAlON ceramic samples after various types of abrasive processing: grinding; grinding and lapping; grinding, lapping, and polishing (top-down).
- ▪
- from 3.9 μm to 1.5 μm for Al2O3/TiC;
- ▪
- from 3.6 μm to 1.5 μm for SiAlON.
A decrease in the depth of furrows and craters is observed, but there remains a significant amount of defects on the surface. The density of defects after lapping decreases by about 2 times following experimental data provided in Table 1 for Al2O3/TiC samples and in Table 2 for SiAlON samples: from 0.4 to 0.206 and from 0.354 to 0.153, respectively. The value of the Rt parameter decreases to 0.42 μm for Al2O3/TiC and to 0.37 μm for SiAlON after lapping and polishing: pronounced defects on the surface of ceramic samples were not detected visually. In addition, the density of defects on the surface of ceramics decreases many times after polishing:

Table 1.
Surface layer imperfection index and its components for Al2O3/TiC ceramic specimens subjected to various processing options.

Table 2.
Surface layer imperfection index and its components for SiAlON ceramic specimens subjected to various processing options.
- ▪
- up to 0.005 for Al2O3/TiC;
- ▪
- up to 0.004 for SiAlON.
Table 1 and Table 2 show the values of the index of defectiveness, which were determined based on the measured data and calculations. It should be noted that the tables show the average values of the index of defectiveness and its components based on the results of evaluating 10 cutting inserts for each group of the samples under study. The presented data allow us to conclude that the proposed index of defectiveness is an informative parameter sensitive to changes in the surface layer state of ceramics.
3.2. Physical and Mechanical Characteristics of Samples Made of Al2O3/TiC and SiAlON Ceramics Depending on the Index of Defectiveness of the Surface Layer
Figure 11 shows the correlation between the state of the surface layer of Al2O3/TiC and SiAlON ceramic samples, characterized by the index of defectiveness, and the value of breaking loads at the moment of edge chipping identified by the spectrum of the acoustic emission (AE) signal. It can be seen that with an increase in the index of defectiveness (from P to G samples), the ability of the cutting inserts to resist chipping decreases sharply. The average breaking load was 29.1 and 37.6 N for the P group of specimens with minimum ID of 0.002 µm for Al2O3/TiC and 0.0015 µm for SiAlON. A decrease in the magnitude of the breaking load by 20 and 30% was recorded for the G group of specimens with maximum ID of 1.56 and 1.27 µm, respectively. At the same time, the differences in the magnitudes of loads at which chipping of the edges occurs for G and L samples were insignificant.
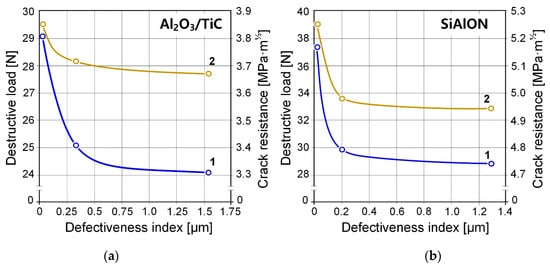
Figure 11.
Dependences of the breaking load during edge chipping (1) and crack resistance (2) on the state of the surface layer of ceramic samples, characterized by the index of defectiveness: Al2O3/TiC (a) and SiAlON (b).
A similar trend was revealed when assessing the relationship between the index of defectiveness of the surface layer of ceramic samples and crack resistance measured by indentation (Figure 11). However, the change in the crack resistance with a change in the surface layer state (ID) was insignificant and amounted to about 5–7% compared to the experimental data for G and P groups. At the same time, the differences in crack resistance values for G and L samples were minimal for both ceramics under study.
Figure 12 and Figure 13 show the dependences of the volumetric wear of Al2O3/TiC and SiAlON ceramic specimens on time of abrasive exposure and 3D profilograms of specimen wear holes after 20 min of testing. The presented dependences show the wear kinetics of ceramics with a different state of the surface layer (the index of defectiveness) and their resistance to abrasive wear. It is noticeable that the high defectiveness of the surface layer (G samples) significantly reduces the ability of ceramics to resist abrasive wear. The P samples with a minimum index of defectiveness, which underwent additional lapping and polishing compared with other groups of the ceramic inserts under study, showed significantly lower volumetric wear values throughout the tests. The values of volumetric wear of the P samples made of Al2O3/TiC and SiAlON, which have a minimum index of defectiveness, were by about 1.5–1.9 times less than for samples from other control groups (G and L samples) after 20 min of abrasive action. Thus, additional lapping and polishing of ceramic cutting inserts significantly improve their resistance to abrasion wear under normal conditions (20 °C).
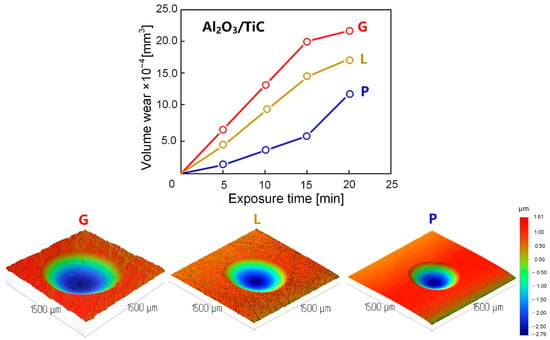
Figure 12.
Dependences of the volumetric wear of Al2O3/TiC ceramic specimens with a different state of the surface layer on the time of abrasive exposure for ground samples (G), ground and lapped samples (L), and ground, lapped, and polished samples (P).
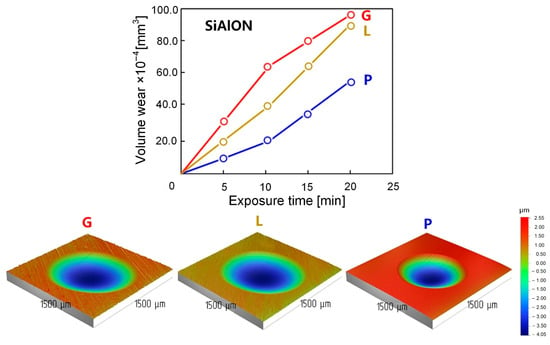
Figure 13.
Dependences of the volumetric wear of SiAlON ceramic specimens with a different state of the surface layer on the time of abrasive exposure for ground samples (G), ground and lapped samples (L), and ground, lapped, and polished samples (P).
The experimental curves presented in Figure 14 and Figure 15 show that the samples with the lowest index of defectiveness (P samples) compared to other groups (G and L) of the samples under study show a slight decrease in both the average value of the coefficient of friction when heated to a temperature of 800 °C and also the nature of the change in the coefficient of friction over time. The coefficient of friction changes abruptly for samples with the highest index of defectiveness (G samples). Especially, for the samples made of Al2O3/TiC: first, the coefficient of friction increases, reaching maximum values, then sharply decreases, increases again, and only stabilizes with time. Such a nonmonotonic change is the result of the alternation of the processes of the adhesion of contact surfaces and the destruction of the “bridges” of adhesive bonds. The change in the coefficient of friction over the entire friction path is monotonic for Al2O3/TiC and SiAlON ceramic samples that underwent additional lapping and polishing (P samples), which indicates more favorable conditions for frictional interaction with the counter body. It can be assumed that the noted changes in the nature of the contact interaction under the friction of sliding conditions are also associated with a significant decrease in the roughness of the surface layer of ceramic samples, which occurs after polishing [69,70].
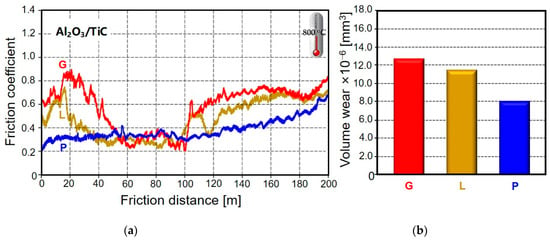
Figure 14.
Change in the coefficient of friction depending on the friction distance of Al2O3/TiC ceramic samples with a different state of the surface layer (a) and volumetric wear of the samples (b) after passing a distance of 200 m at high-temperature friction of sliding.
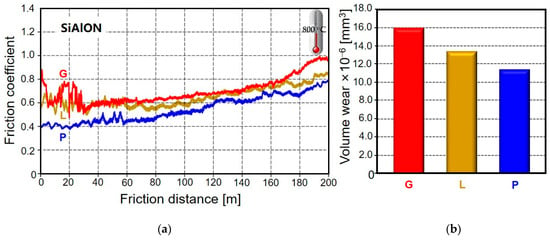
Figure 15.
Change in the coefficient of friction depending on the friction distance of SiAlON ceramic samples with a different state of the surface layer (a) and volumetric wear of the samples (b) after passing a distance of 200 m at high-temperature friction of sliding.
Data on the volumetric wear of ceramic samples of Al2O3/TiC and SiAlON with different surface layer states at high-temperature friction of sliding (800 °C) are provided together with the data on the change in the coefficient of friction (Figure 14 and Figure 15). As in the case of abrasive wear, the high index of defectiveness of the surface layer (G samples) significantly reduces the ability of ceramics to resist abrasion wear when interacting with a counter body under thermal heating conditions. The samples with the minimum index of defectiveness that underwent additional lapping and polishing (P samples), compared to the samples of ground ceramic inserts (G samples), showed a decrease in the value of volumetric wear after 200 m of friction distance: by 1.5 times for Al2O3/TiC samples and 1.3 times for SiAlON samples, respectively. In addition, additional lapping and polishing (P samples) demonstrated a more negligible effect than the ground and lapped samples (L samples): the volume of wear decreased by 1.3 and 1.1 times for Al2O3/TiC and SiAlON samples, respectively. Thus, additional lapping and polishing of ceramic cutting inserts slightly improve their resistance to abrasion wear under the conditions of the thermal loads (800 °C). The effect is more noticeable for Al2O3/TiC ceramics.
Figure 16 shows the correlation between the state of the surface layer of Al2O3/TiC and SiAlON ceramic samples, characterized by the index of defectiveness, and the value of volumetric wear during abrasive action and high-temperature friction at 800 °C. It can be seen that the intensity of wear of inserts made of the two ceramics under study significantly increases under various conditions of external influence, with an increase in the index of defectiveness (from P to G samples). The amounts of volumetric wear during abrasive action were about 12.1 and 55.1 × 10⁻⁴ mm3 for specimens of the P group with the minimums ID of 0.002 µm for Al2O3/TiC and 0.0015 µm for SiAlON, respectively. Increases in volumetric wear by 85 and 80% were recorded for specimens of the G group with the maximums ID of 1.56 and 1.27 µm. A similar trend was revealed in assessing the relationship between the index of defectiveness of the surface layer of ceramic samples and volumetric wear at high-temperature friction of sliding. The volumetric wears for Al2O3/TiC and SiAlON ceramics corresponded to the values of 8.0 and 11.2 × 10⁻⁶ mm3 for specimens of group P (ID of 0.002 µm for Al2O3/TiC and 0.0015 µm for SiAlON), and the volumetric wears increased by 55 and 42%, respectively, for specimens of group G (ID of 1.56 µm for Al2O3/TiC and 1.27 µm for SiAlON). The nature of the dependences is the inversely proportional exponential of (a–e−bx) type, where a and b are empirical constants and can be interpolated.
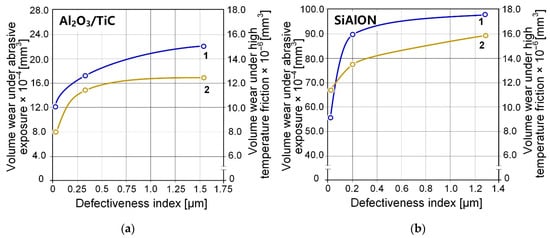
Figure 16.
Dependences of volumetric wear under abrasive action (1) and high-temperature friction (2) of ceramic samples with a different state of the surface layer, characterized by the index of defectiveness: Al2O3/TiC (a) and SiAlON (b).
4. Conclusions
A new criterion, the “index of defectiveness,” was proposed to quantify the surface layer defectiveness levels of ceramic products made of Al2O3/TiC and SiAlON subjected to various processing. The developed technique for performing a quantitative assessment of the index of defectiveness includes determining the density of defects by contrasting the surface with oblique illumination and the depth of the defective layer according to the Rt parameter through profilometry. The proposed index is an informative indicator, highly sensitive to changes in the state of the surface layer by oxide–carbide and oxide–nitride ceramics subjected to diamond grinding, additional lapping, and polishing.
The experimental studies of the influence of the state of the surface layer of cutting inserts, characterized by the index of defectiveness, on the complex of physical, mechanical, and tribological characteristics allowed the establishing that minimizing the proposed index:
- significantly increases the wear resistance of the ceramic inserts’ edges to chipping and the resistance of the surface layer to abrasive wear;
- stabilizes the conditions of frictional interaction with the counter body in high-temperature heating, and reduces the amount of volumetric wear of ceramic samples.
Author Contributions
Conceptualization, S.N.G.; methodology, S.N.G. and M.A.V.; software, M.A.V. and A.A.O.; validation, S.V.F. and A.A.O.; formal analysis, M.A.V. and A.A.O.; investigation, M.A.V. and S.V.F.; resources, S.V.F.; data curation, A.A.O. and S.V.F.; writing—original draft preparation, M.A.V.; writing—review and editing, M.A.V.; visualization, M.A.V.; supervision, M.A.V.; project administration, S.N.G.; funding acquisition, S.N.G. All authors have read and agreed to the published version of the manuscript.
Funding
This work is funding by the state assignment of the Ministry of Science and Higher Education of the Russian Federation, Project No. FSFS-2023-0003.
Institutional Review Board Statement
Not applicable.
Informed Consent Statement
Not applicable.
Data Availability Statement
Data are available in a publicly accessible repository.
Acknowledgments
The study was carried out on the equipment of the Center of Collective Use “State Engineering Center” of MSUT “STANKIN” supported by the Ministry of Higher Education of the Russian Federation (Project No. 075-15-2021-695 from 26 July 2021, unique identifier RF 2296.61321 × 0013).
Conflicts of Interest
The authors declare no conflict of interest.
References
- Karadimas, G.; Salonitis, K. Ceramic Matrix Composites for Aero Engine Applications—A Review. Appl. Sci. 2023, 13, 3017. [Google Scholar] [CrossRef]
- Paladugu, S.R.M.; Sreekanth, P.S.R.; Sahu, S.K.; Naresh, K.; Karthick, S.A.; Venkateshwaran, N.; Ramoni, M.; Mensah, R.A.; Das, O.; Shanmugam, R. A Comprehensive Review of Self-Healing Polymer, Metal, and Ceramic Matrix Composites and Their Modeling Aspects for Aerospace Applications. Materials 2022, 15, 8521. [Google Scholar] [CrossRef] [PubMed]
- Davim, J.P. Machining of Titanium Alloys; Springer: Berlin/Heidelberg, Germany, 2014. [Google Scholar]
- Hsu, S.M.; Shen, M. Wear prediction of ceramics. Wear 2004, 256, 867–878. [Google Scholar] [CrossRef]
- Zhao, B.; Liu, H.; Huang, C.; Wang, J.; Cheng, M. Fabrication and mechanical properties of Al2O3-SiCw-TiCnp ceramic tool material. Ceram. Int. 2017, 43, 10224–10230. [Google Scholar] [CrossRef]
- Qadir, A.; Fogarassy, Z.; Horváth, Z.E.; Balazsi, K.; Balazsi, C. Effect of the oxidization of Si3N4 powder on the microstructural and mechanical properties of hot isostatic pressed silicon nitride. Ceram. Int. 2018, 44, 14601–14609. [Google Scholar] [CrossRef]
- Gong, X.R.; Shen, S.S.; Wu, J. Research on rheological behavior of Si3N4-SiC composites by gelcasting. Adv. Mater. Res. 2014, 1004–1005, 488–491. [Google Scholar] [CrossRef]
- Sirota, V.; Lukianova, O.; Krasilnikov, V.; Selemenev, V.; Dokalov, V. Microstructural and physical properties of magnesium oxide-doped silicon nitride ceramics. Results Phys. 2016, 6, 82–83. [Google Scholar] [CrossRef]
- Zhao, B.; Khader, I.; Raga, R.; Degenhardt, U.; Kailer, A. Tribological behavior of three silicon nitride ceramics in dry sliding contact against Inconel 718 over a wide range of velocities. Wear 2020, 448–449, 203206. [Google Scholar] [CrossRef]
- Grigoriev, S.; Volosova, M.; Fyodorov, S.; Lyakhovetskiy, M.; Seleznev, A. DLC-coating Application to Improve the Durability of Ceramic Tools. J. Mater. Eng Perform 2019, 28, 4415–4426. [Google Scholar] [CrossRef]
- Eser, O.; Kurama, S. The effect of the wet-milling process on sintering temperature and the amount of additive of SiAlON ceramics. Ceram. Int. 2010, 36, 1283–1288. [Google Scholar] [CrossRef]
- Lukianova, O.A.; Novikov, V.Y.; Parkhomenko, A.A.; Sirota, V.V.; Krasilnikov, V.V. Microstructure of spark plasma-sintered silicon nitride ceramics. Nanoscale Res. Lett. 2017, 12, 293. [Google Scholar] [CrossRef] [PubMed]
- Grigoriev, S.N.; Volosova, M.A.; Fedorov, S.V.; Okunkova, A.A.; Pivkin, P.M.; Peretyagin, P.Y.; Ershov, A. Development of DLC-Coated Solid SiAlON/TiN Ceramic End Mills for Nickel Alloy Machining: Problems and Prospects. Coatings 2021, 11, 532. [Google Scholar] [CrossRef]
- Jojo, N.; Shongwe, M.B.; Tshabalala, L.C.; Olubambi, P.A. Effect of sintering temperature and yttrium composition on the densification, microstructure and mechanical properties of spark plasma sintered silicon nitride ceramics with Al2O3 and Y2O3 additives. Silicon 2019, 11, 2689–2699. [Google Scholar] [CrossRef]
- Grigoriev, S.N.; Volosova, M.A.; Peretyagin, P.Y.; Seleznev, A.E.; Okunkova, A.A.; Smirnov, A. The Effect of TiC Additive on Mechanical and Electrical Properties of Al2O3 Ceramic. Appl. Sci. 2018, 8, 2385. [Google Scholar] [CrossRef]
- Wachtman, J.B.; Cannon, W.R.; Matthewson, M.J. Mechanical Properties of Ceramics, 2nd ed.; Wiley: Hoboken, NJ, USA, 2009; p. 479. ISBN 978-0-471-73581-6. [Google Scholar]
- Uhlmann, E.; Hübert, C. Tool grinding of end mill cutting tools made from high performance ceramics and cemented carbides. CIRP Ann. 2011, 60, 359–362. [Google Scholar] [CrossRef]
- Zheng, G.; Zhao, J.; Gao, Z.; Cao, Q. Cutting performance and wear mechanisms of Sialon–Si3N4 graded nano-composite ceramic cutting tools. Int. J. Adv. Manuf. Technol. 2011, 58, 19–28. [Google Scholar] [CrossRef]
- Arai, S.A.; Wilson, S.A.; Corbett, J.; Whatmore, R.W. Ultra-precision grinding of PZT ceramics—Surface integrity control and tooling design. Int. J. Mach. Tools Manuf. 2009, 49, 998–1007. [Google Scholar] [CrossRef]
- Canneto, J.J.; Cattani-Lorente, M.; Durual, S.; Wiskott, A.H.W.; Scherrer, S.S. Grinding damage assessment on four high-strength ceramics. Dent. Mater. 2016, 32, 171–182. [Google Scholar] [CrossRef]
- Zhang, C.; Liu, H.; Zhao, Q.; Guo, B.; Wang, J.; Zhang, J. Mechanisms of ductile mode machining for AlON ceramics. Ceram. Int. 2020, 46, 1844–1853. [Google Scholar] [CrossRef]
- Available online: https://www.ctemag.com/news/articles/grinding-ceramic-medical-parts-requires-diamond-grit-patience (accessed on 28 February 2023).
- Kuzin, V.V.; Grigor’ev, S.N.; Volosova, M.A. Effect of a TiC Coating on the Stress-Strain State of a Plate of a High-Density Nitride Ceramic Under Nonsteady Thermoelastic Conditions. Refract. Ind. Ceram. 2014, 54, 376–380. [Google Scholar] [CrossRef]
- Volosova, M.A.; Grigor’ev, S.N.; Kuzin, V.V. Effect of Titanium Nitride Coating on Stress Structural Inhomogeneity in Oxide-Carbide Ceramic. Part 4. Action of Heat Flow. Refract. Ind. Ceram. 2015, 56, 91–96. [Google Scholar] [CrossRef]
- Xing, Y.; Deng, J.; Zhao, J.; Zhang, G.; Zhang, K. Cutting performance and wear mechanism of nanoscale and microscale textured Al2O3/TiC ceramic tools in dry cutting of hardened steel. Int. J. Refract. Met. Hard Mater. 2014, 43, 46–58. [Google Scholar] [CrossRef]
- Wu, S.; Zhang, F.; Ni, Y.; Chen, F.; Yan, Z. Grinding of alumina ceramic with microtextured brazed diamond end grinding wheels. Ceram. Int. 2020, 46, 19767–19784. [Google Scholar] [CrossRef]
- Kuzin, V.V.; Grigoriev, S. Method of Investigation of the Stress-Strain State of Surface Layer of Machine Elements from a Sintered Nonuniform Material. Appl. Mech. Mater. 2013, 486, 32–35. [Google Scholar] [CrossRef]
- Zhang, X.; Kang, Z.; Li, S.; Shi, Z.; Wen, D.; Jiang, J.; Zhang, Z. Grinding force modelling for ductile-brittle transition in laser macro-micro-structured grinding of zirconia ceramics. Ceram. Int. 2019, 45, 18487–18500. [Google Scholar] [CrossRef]
- Pawar, P.; Ballav, R.; Kumar, A. Machining Processes of Silicon Carbide: A Review. Adv. Mater. Sci. 2017, 51, 62–76. [Google Scholar]
- Liu, M.H.; Zhang, F.H.; Lu, G.D. Experimental Study of SiC Ceramic Grinding Subsurface Cracks. Adv. Mater. Res. 2014, 1027, 146–149. [Google Scholar] [CrossRef]
- Zhang, B.; Fu, Y. Grinding of brittle materials with brazed diamond grinding wheel. Int. J. Adv. Manuf. Technol. 2013, 67, 2845–2852. [Google Scholar] [CrossRef]
- Kuzin, V.V.; Grigoriev, S.N.; Volosova, M.A. The role of the thermal factor in the wear mechanism of ceramic tools: Part 1. Macrolevel. J. Frict. Wear 2014, 35, 505–510. [Google Scholar] [CrossRef]
- Fedorov, A.Y.; Skripnyak, E.G.; Skripnyak, V.V.; Vaganova, I.K. Simulation of the dynamic fracture of ceramic materials based on ZrB2 in a wide temperature range. AIP Conf. Proc. 2017, 1909, 020048. [Google Scholar]
- Gilabert, F.A.; Cantavella, V.; Sánchez, E.; Mallol, G. Modelling fracture process in ceramic materials using the Material Point Method. EPL 2011, 96, 24002. [Google Scholar] [CrossRef]
- Kou, W.; Qiao, J.; Chen, L.; Ding, Y.; Sjögren, G. Numerical simulation of the fracture process in ceramic FPD frameworks caused by oblique loading. J. Mech. Behav. Biomed. Mater. 2015, 50, 206–214. [Google Scholar] [CrossRef] [PubMed]
- Gong, F.; Zhao, J.; Pang, J. Evolution of cutting forces and tool failure mechanisms in intermittent turning of hardened steel with ceramic tool. Int. J. Adv. Manuf. Technol. 2017, 89, 1603–1613. [Google Scholar] [CrossRef]
- Bian, R.; Ding, W.; Liu, S.; He, N. Research on High Performance Milling of Engineering Ceramics from the Perspective of Cutting Variables Setting. Materials 2019, 12, 122. [Google Scholar] [CrossRef] [PubMed]
- Molaiekiya, F.; Stolf, P.; Paiva, J.M.; Bose, B.; Goldsmith, J.; Gey, C.; Engin, S.; Fox-Rabinovich, G.; Veldhuis, S.C. Influence of process parameters on the cutting performance of SiAlON ceramic tools during high-speed dry face milling of hardened Inconel 718. Int. J. Adv. Manuf. Technol. 2019, 105, 1083–1098. [Google Scholar] [CrossRef]
- Zheng, G.; Zhao, J.; Zhou, Y.; Li, A.; Cui, X.; Tian, X. Performance of graded nano-composite ceramic tools in ultra-high-speed milling of Inconel 718. Int. J. Adv. Manuf. Technol. 2013, 67, 2799–2810. [Google Scholar] [CrossRef]
- Grigoriev, S.N.; Vereschaka, A.A.; Vereschaka, A.S.; Kutin, A.A. Cutting tools made of layered composite ceramics with nano-scale multilayered coatings. Procedia CIRP 2012, 1, 301–306. [Google Scholar] [CrossRef]
- Sharman, A.R.C.; Hughes, J.J.; Ridgway, K. Workpiece surface integrity and tool life issues when turning Inconel 718 nickel-based superalloy. Mach. Sci. Technol. 2004, 8, 399–414. [Google Scholar] [CrossRef]
- Vereschaka, A.A.; Grigoriev, S.N.; Volosova, M.A.; Batako, A.; Vereschaka, A.S.; Sitnikov, N.N.; Seleznev, A.E. Nano-scale multi-layered coatings for improved efficiency of ceramic cutting tools. Int. J. Adv. Manuf. Technol. 2017, 90, 27–43. [Google Scholar] [CrossRef]
- Ferreira, R.; Řehoř, J.; Lauro, C.H.; Carou, D.; Davim, J.P. Analysis of the hard turning of AISI H13 steel with ceramic tools based on tool geometry: Surface roughness, tool wear and their relation. J Braz. Soc. Mech. Sci. Eng. 2016, 38, 2413–2420. [Google Scholar] [CrossRef]
- Volosova, M.A.; Stebulyanin, M.M.; Gurin, V.D.; Melnik, Y.A. Influence of Surface Layer Condition of Al2O3+TiC Ceramic Inserts on Quality of Deposited Coatings and Reliability during Hardened Steel Milling. Coatings 2022, 12, 1801. [Google Scholar] [CrossRef]
- Liu, W.; Chu, Q.; Zeng, J.; He, R.; Wu, H.; Wu, Z.; Wu, S. PVD-CrAlN and TiAlN coated Si3N4 ceramic cutting tools –1. Microstructure, turning performance and wear mechanism. Ceram. Int. 2017, 43, 8999–9004. [Google Scholar] [CrossRef]
- Long, Y.; Zeng, J.; Wu, S. Cutting performance and wear mechanism of Ti–Al–N/Al–Cr–O coated silicon nitride ceramic cutting inserts. Ceram. Int. 2014, 40, 9615–9620. [Google Scholar] [CrossRef]
- Das, S.R.; Dhupal, D.; Kumar, A. Experimental investigation into machinability of hardened AISI 4140 steel using TiN coated ceramic tool. Measurement 2015, 62, 108–126. [Google Scholar] [CrossRef]
- Volosova, M.; Grigoriev, S.; Metel, A.; Shein, A. The role of thin-film vacuum-plasma coatings and their influence on the efficiency of ceramic cutting inserts. Coatings 2018, 8, 287. [Google Scholar] [CrossRef]
- Aslantas, K.; Ucun, İ.; Çicek, A. Tool life and wear mechanism of coated and uncoated Al2O3/TiCN mixed ceramic tools in turning hardened alloy steel. Wear 2012, 274–275, 442–451. [Google Scholar] [CrossRef]
- Bensouilah, H.; Aouici, H.; Meddour, I.; Yallese, M.A.; Mabrouki, T.; Girardin, F. Performance of coated and uncoated mixed ceramic tools in hard turning process. Measurement 2016, 82, 1–18. [Google Scholar] [CrossRef]
- Grigoriev, S.N.; Volosova, M.A.; Vereschaka, A.A.; Sitnikov, N.N.; Milovich, F.; Bublikov, J.I.; Fyodorov, S.V.; Seleznev, A.E. Properties of (Cr,Al,Si)N-(DLC-Si) composite coatings deposited on a cutting ceramic substrate. Ceram. Int. 2020, 46, 18241–18255. [Google Scholar] [CrossRef]
- Dobranski, L.A.; Mikula, J. Structure and properties of PVD and CVD coated Al2O3+TiC mixed oxide tool ceramics for dry on high speed cutting processes. J. Mater. Process. Technol. 2005, 164–165, 822–831. [Google Scholar] [CrossRef]
- Vereschaka, A.; Grigoriev, S.; Tabakov, V.; Migranov, M.; Sitnikov, N.; Milovich, F.; Andreev, N. Influence of the Nanostructure of Ti-TiN-(Ti,Al,Cr)N Multilayer Composite Coating on Tribological Properties and Cutting Tool Life. Tribol. Int. 2020, 150, 106388. [Google Scholar] [CrossRef]
- Kumar, C.S.; Patel, S.K. Experimental and numerical investigations on the effect of varying AlTiN coating thickness on hard machining performance of Al2O3-TiCN mixed ceramic inserts. Surf. Coat. Technol. 2017, 309, 266–281. [Google Scholar] [CrossRef]
- Kuzin, V.V.; Grigoriev, S.N.; Fedorov, M.Y. Role of the thermal factor in the wear mechanism of ceramic tools. Part 2: Microlevel. J. Frict. Wear 2015, 36, 40–44. [Google Scholar] [CrossRef]
- Zainuddin, M.I.; Tanaka, S.; Furushima, R.; Uematsu, K. Correlation between slurry properties and structures and properties of granules. J. Eur. Ceram. Soc. 2010, 30, 3291–3296. [Google Scholar] [CrossRef]
- Souza, J.V.C.; Macedo, O.M.; Nono, M.C.A.; Machado, J.P.B.; Pimenta, M.; Ribeiro, M.V. Si3N4 ceramic cutting tool sintered with CeO2 and Al2O3 additives with AlCrN coating. Mat. Res. 2011, 14, 514–518. [Google Scholar] [CrossRef]
- Staszuk, M.; Pakuła, D.; Chladek, G.; Pawlyta, M.; Pancielejko, M.; Czaja, P. Investigation of the structure and properties of PVD coatings and ALD + PVD hybrid coatings deposited on sialon tool ceramics. Vacuum 2018, 154, 272–284. [Google Scholar] [CrossRef]
- Vereschaka, A.S.; Grigoriev, S.N.; Sotova, E.S.; Vereschaka, A.A. Improving the efficiency of the cutting tools made of mixed ceramics by applying modifying nano-scale multilayered coatings. Adv. Mat. Res. 2013, 712, 391–394. [Google Scholar]
- Sobol, O.V.; Andreev, A.A.; Grigoriev, S.N.; Gorban, V.F.; Volosova, M.A.; Aleshin, S.V.; Stolbovoi, V.A. Effect of high-voltage pulses on the structure and properties of titanium nitride vacuum-arc coatings. Met. Sci. Heat Treat. 2012, 54, 195–203. [Google Scholar] [CrossRef]
- Sedlák, R.; Ivor, M.; Klimczyk, P.; Wyzga, P.; Podsiadlo, M.; Vojtko, M.; Dusza, J. Micro/Nano Indentation Testing of Spark Plasma Sintered Al2O3 + ZrO2 + cBN Ceramics. Ceramics 2021, 4, 40–53. [Google Scholar] [CrossRef]
- Chen, X.; Luo, L.; Liu, L.; Li, J.; Yu, H.; Li, W.; Chen, Y. Microstructure and mechanical properties of hot-pressed Al2O3-mullite-ZrO2-SiC composites. Mater. Sci. Eng. A 2019, 740, s390–s397. [Google Scholar] [CrossRef]
- Grigoriev, S.N.; Volosova, M.A.; Okunkova, A.A. Investigation of Surface Layer Condition of SiAlON Ceramic Inserts and Its Influence on Tool Durability When Turning Nickel-Based Superalloy. Technologies 2023, 11, 11. [Google Scholar] [CrossRef]
- Gogotsi, G.A. Edge chipping resistance of ceramics: Problems of test method. J. Adv. Ceram. 2013, 2, 370–377. [Google Scholar] [CrossRef]
- Gogotsi, G.A.; Galenko, V.Y. Sensitivity of Brittle Materials to Local Stress Concentrations on Their Fracture. Strength Mater. 2022, 54, 250–255. [Google Scholar] [CrossRef]
- Shulepov, I.A.; Kashkarov, E.B.; Stepanov, I.B.; Syrtanov, M.S.; Sutygina, A.N.; Shanenkov, I.; Obrosov, A.; Weiß, S. The Formation of Composite Ti-Al-N Coatings Using Filtered Vacuum Arc Deposition with Separate Cathodes. Metals 2017, 7, 497. [Google Scholar] [CrossRef]
- Vereschaka, A.A.; Volosova, M.A.; Grigoriev, S.N.; Vereschaka, A.S. Development of wear-resistant complex for high-speed steel tool when using process of combined cathodic vacuum arc deposition. Procedia CIRP 2013, 9, 8–12. [Google Scholar] [CrossRef]
- Kazlauskas, D.; Jankauskas, V.; Tučkutė, S. Research on Tribological Characteristics of Hard Metal WC-Co Tools with TiAlN and CrN PVD Coatings for Processing Solid Oak Wood. Coatings 2020, 10, 632. [Google Scholar] [CrossRef]
- Shao, L.; Zhou, Y.; Fang, W.; Wang, J.; Wang, X.; Deng, Q.; Lyu, B. Preparation of Cemented Carbide Insert Cutting Edge by Flexible Fiber-Assisted Shear Thickening Polishing Method. Micromachines 2022, 13, 1631. [Google Scholar] [CrossRef]
- Vereschaka, A.A.; Vereschaka, A.S.; Grigoriev, S.N.; Kirillov, A.K.; Khaustova, O.U. Development and research of environmentally friendly dry technological machining system with compensation of physical function of cutting fluids. Procedia CIRP 2013, 7, 311–316. [Google Scholar] [CrossRef]
Disclaimer/Publisher’s Note: The statements, opinions and data contained in all publications are solely those of the individual author(s) and contributor(s) and not of MDPI and/or the editor(s). MDPI and/or the editor(s) disclaim responsibility for any injury to people or property resulting from any ideas, methods, instructions or products referred to in the content. |
© 2023 by the authors. Licensee MDPI, Basel, Switzerland. This article is an open access article distributed under the terms and conditions of the Creative Commons Attribution (CC BY) license (https://creativecommons.org/licenses/by/4.0/).