Article

Thermally Assisted Machine Hammer Peening of Arc-Sprayed ZnAl-Based Corrosion Protective Coatings

1
Institute of Machining Technology, TU Dortmund University, Baroper Str. 303, 44227 Dortmund, Germany
2
Institute of Materials Engineering, TU Dortmund University, Leonhard-Euler-Str. 2, 44227 Dortmund, Germany
3
Department of Materials Test Engineering (WPT), TU Dortmund University, Baroper Str. 303, 44227 Dortmund, Germany
*
Author to whom correspondence should be addressed.
J. Manuf. Mater. Process. 2021, 5(4), 109; https://doi.org/10.3390/jmmp5040109
Submission received: 15 September 2021 / Revised: 9 October 2021 / Accepted: 12 October 2021 / Published: 14 October 2021

Abstract

:
Structural elements of offshore facilities, e.g., offshore wind turbines, are subject to static and dynamic mechanical and environmental loads, for example, from wind, waves, and corrosive media. Protective coatings such as thermal sprayed ZnAl coatings are often used for protection, mainly against corrosive stresses. The Machine Hammer Peening (MHP) process is an innovative and promising technique for the post-treatment of ZnAl coating systems that helps reducing roughness and porosity and inducing compressive residual stresses. This should lead to an enhancement of the corrosion fatigue behavior. In this paper, the effect of a thermally assisted MHP process was investigated. The softening of the coating materials will have a direct effect on the densification, residual porosity and the distribution of cracks. The investigation results showed the influence of thermally assisted MHP on the surface properties, porosity, residual stresses, and hardness of the post-treated coatings. The best densification of the coating, i.e., the lowest porosity and roughness and the highest compressive residual stresses, were achieved at a process temperature of 300 °C. A further increase in temperature on the other hand caused a higher porosity and, in some cases, locally restricted melting of the coating and consequently poorer coating properties.

1. Introduction

Structural elements used for offshore facilities, e.g., wind turbines and oil rigs, are exposed to various loads such as mechanical stresses and corrosive environments. Nevertheless, the components, which are mostly built from structural steel due to the conditions of use, weldability, and relatively low costs, must endure these loads over decades, as replacement or maintenance is difficult and costly in most cases. A combination of static and dynamic mechanical stresses generated by wind, waves, tide, biofouling, and floating ice, as well as corrosive stress from seawater, mist, and weather, acts on the components and leads, e.g., to crack formation and crack corrosion [1]. Thus, suitable protection of the components is necessary, and this can be achieved by, e.g., cathodic protection, coatings, and post-treatment of the components [2,3].
For corrosion protection, combinations of anti-corrosion coatings with additional organic coatings such as paintings as well as sacrificial anode protection and impressed current cathodic protection are mainly used [4]. Especially in the atmospheric and splash zones, where the materials are exposed to both maritime atmosphere and seawater, protective coatings are generally applied [5]. For this, ZnAl-based coatings are often used [6]. This kind of coating counteracts surface corrosion in two ways. First, the electropositive zinc acts as a sacrificial anode. Second, the formation of aluminum oxide effectuates passivation of the workpiece surface [7].
ZnAl-based corrosion protection can be applied by either galvanization or thermal-spraying processes. The electroplating bath used for galvanization processes limits the size of components. In addition, the intense heating during this process can lead to the formation of brittle Fe-Zn intermetallic phases [8], which can negatively influence the corrosion fatigue behavior of the components. Thermal spraying such as Twin Wire Arc Spraying (TWAS), on the other hand, introduces significantly less heat into the components, imposes minor restrictions on the dimensions of components, and can be applied on-site [9]. Compared to other spraying techniques like cold spraying, flame spraying or plasma spraying, TWAS allows the highest deposition rates and, therefore, the lowest process times and costs [10].
Disadvantages of thermally sprayed coatings compared to galvanic coatings include often-higher porosities [11], heterogeneous compositions, lamellar layered microstructures, and thermally or kinetically induced residual stresses. Depending on the inherent process characteristics, the induced residual stresses include tensile residual stresses [12] in the case of higher temperatures, and compressive residual stresses [13] in case of higher kinetic energy process types. Especially for ZnAl coatings, due to their low melting point, compressive residual stresses have been observed. The reason for this is that the kinetic energy effect, caused by the larger and not completely melted particles at impact during the TWAS process, is higher than the thermal effect [14]. Pores as well as tensile residual stresses in coatings can facilitate the formation and propagation of fatigue cracks [15] and cause the coating to delaminate and flake, which can lead to local corrosion attacks. Thus, ZnAl-based coatings used in maritime environments often require additional protection like organic coatings [16]. These multi-layer coatings are difficult to apply and restore. Additionally, these protective systems have a non-negligible environmental impact. The degradation of the sacrificial anodes [17,18] or organic compounds from paints [19], for example, could have toxic effects that have not yet been sufficiently investigated [20].
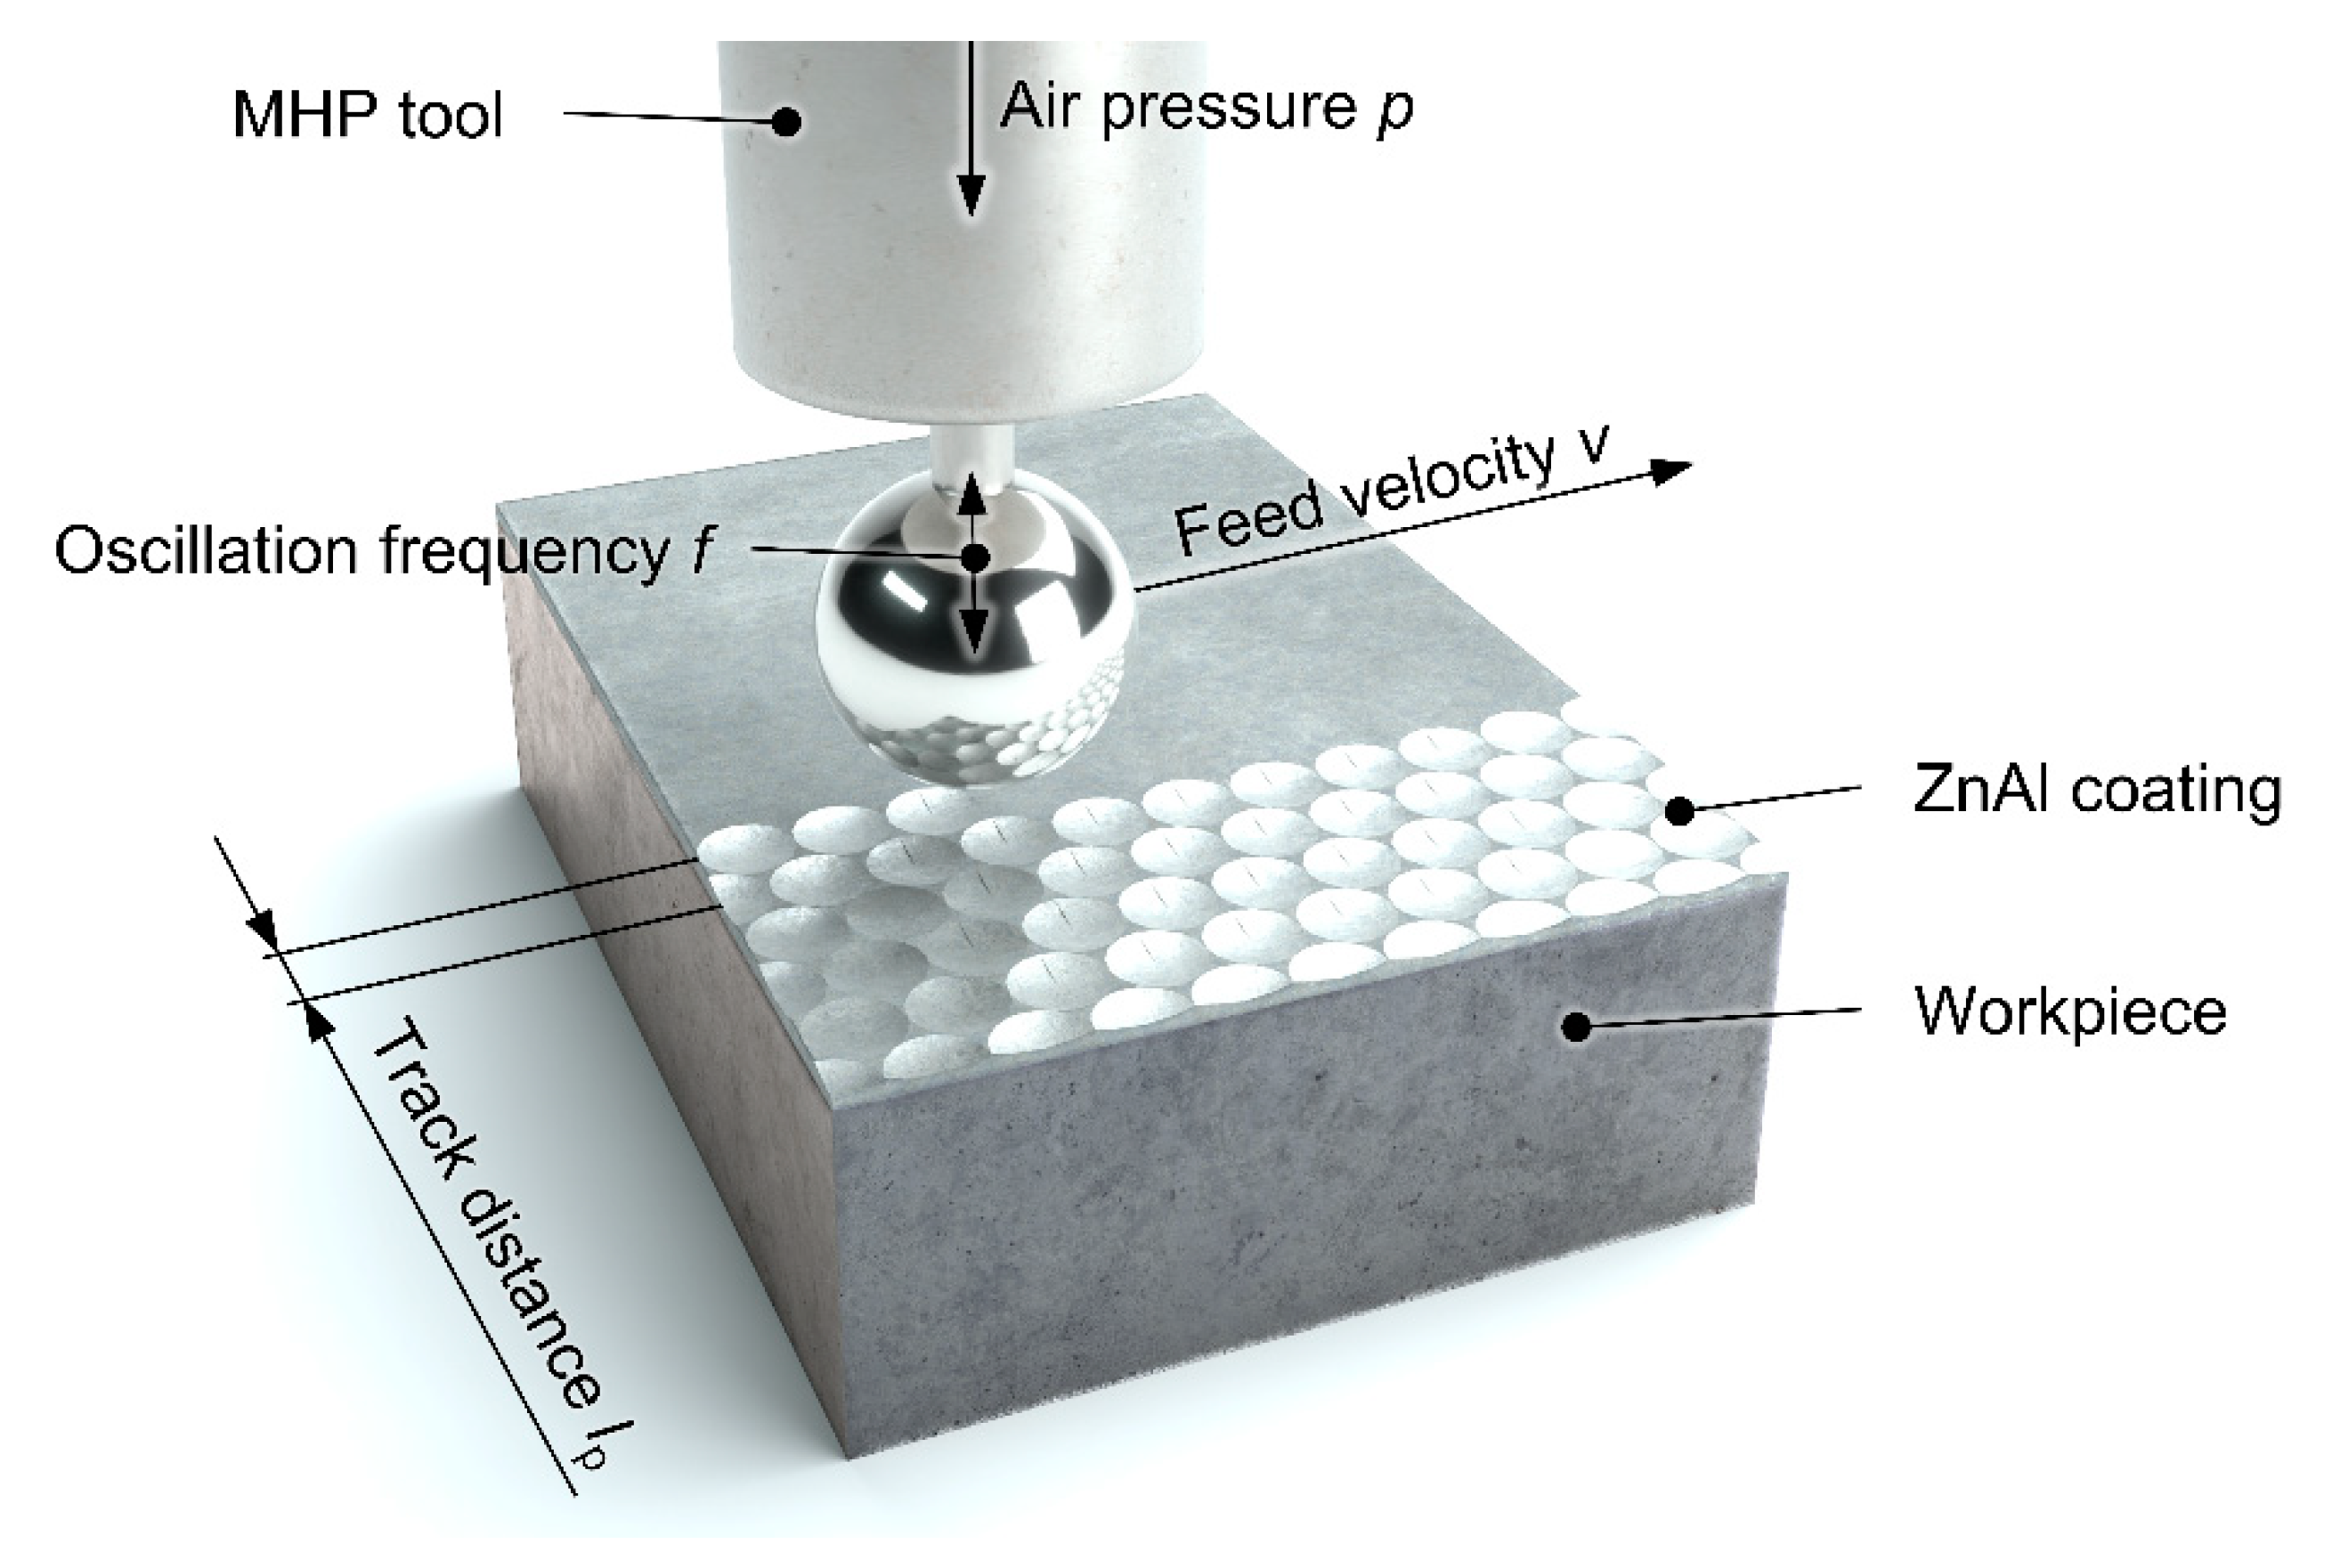
A different method of adapting the properties of functional surfaces, such as thermally sprayed coating systems, to the requirements involves mechanical compacting post-treatment by means of machine hammer peening (MHP) (Figure 1).
Machine hammer peening processes are used to improve the tribological characteristics of surfaces [21,22,23], or the microstructure or mechanical properties of additively manufactured workpieces [24], e.g., in the mold making industry. It has been shown that MHP results in the introduction of compressive residual stresses as well as a smoothening of the surface, which can replace or reduce manual polishing processes [14,21]. An analysis of the peening of low-alloy tempered steel at temperatures between T = −180 °C and T = 200 °C by both simulation and measurement indicated higher compressive residual stresses at the surface for high temperatures and a shift of the maxima below the surface for low, cryogenic temperatures [25]. Prevéy and Cammett analyzed the influence of the mechanical post-treatment on the corrosion fatigue of aluminum EN AW-7075 by means of low plasticity burnishing [26]. In their studies, the introduction of compressive residual stresses led to a shift of the fatigue origin from the surface to the sub-surface area and a significant increase of the fatigue strength of both the uncorroded, machined surface and the corroded state.
Mechanical compacting has also been applied to influence the microstructure and surface of coatings or functional surfaces to reduce the roughness and porosity, induce compressive residual stresses and increase the surface hardness of ZnAl-based corrosion protection coatings [2,27]. Consequently, the disadvantageous properties of TWAS coatings in view of corrosion protection, i.e., high porosity, rough surface, and tensile residual stresses in the surface-near zone, can be reduced or eliminated. Thus, mechanical post-treatment methods such as MHP could improve the corrosion fatigue behavior of thermally sprayed coatings.
In this study, a thermally assisted MHP-process (TaMHP) is presented and analyzed by means of experimental investigation of the influence on a TWAS sprayed ZnAl4-coating. Thermal support of the MHP process can cause a softening of the coating and, thus, incease the densification effect. Additionally, at a temperature of Tpt = 77 °C, a thermally induced phase transformation from α + η to β + η of the ZnAl4 coating occurs [28], which can lead to an embrittlement of the layer system, but could also allow deeper compaction of the coating. In the analyses, the MHP process is conducted in a temperature range between room temperature and melting temperature to find an optimum for high compaction and to generate a uniform, dense and non-porous coating. Additionally, the influence of a TaMHP treatment on the residual stresses, surface hardness, and structural composition of the coating is investigated.

2. Materials and Methods

In this section, the experimental setup and procedure for investigating the effect of thermally assisted MHP processes on TWAS ZnAl4 coatings is described. Afterward, the measurement setup is presented.

2.1. Experimental Setup and Procedure

Rectangular specimens of unalloyed structural steel 1.0577 (S355 J2 + N) with the dimensions 70 mm × 50 mm × 10 mm were used. Before coating, the surfaces were sandblasted with corundum EKF 24 (−850 µm + 600 µm) using compressed air at a p = 4 bar pressure at a blasting angle of approximately 45° to ensure sufficient coating adhesion. Cleaning of sandblasted surfaces was conducted in an ultrasonic ethanol bath to remove residues of oil and dust. The surfaces were coated by TWAS using a Durum Duraspray 450 wire arc spraying system with ZnAl4 wires with the chemical composition given in Table 1. For the coating process dry and compressed air was used as an atomization gas in all experiments. The process parameters wire federate, arc voltage, and atomization gas pressure were varied according to a full-factorial plan in three stages each. The center point was repeated twice (CA3 and CA6), see Table 2. The coating process was carried out with a spray distance between gun and substrate surface of d = 120 mm with an axial gun velocity vs. = 18,000 mm/min and meander spacing of s = 4 mm in two passes using an industrial robot ABB IRB 4600.
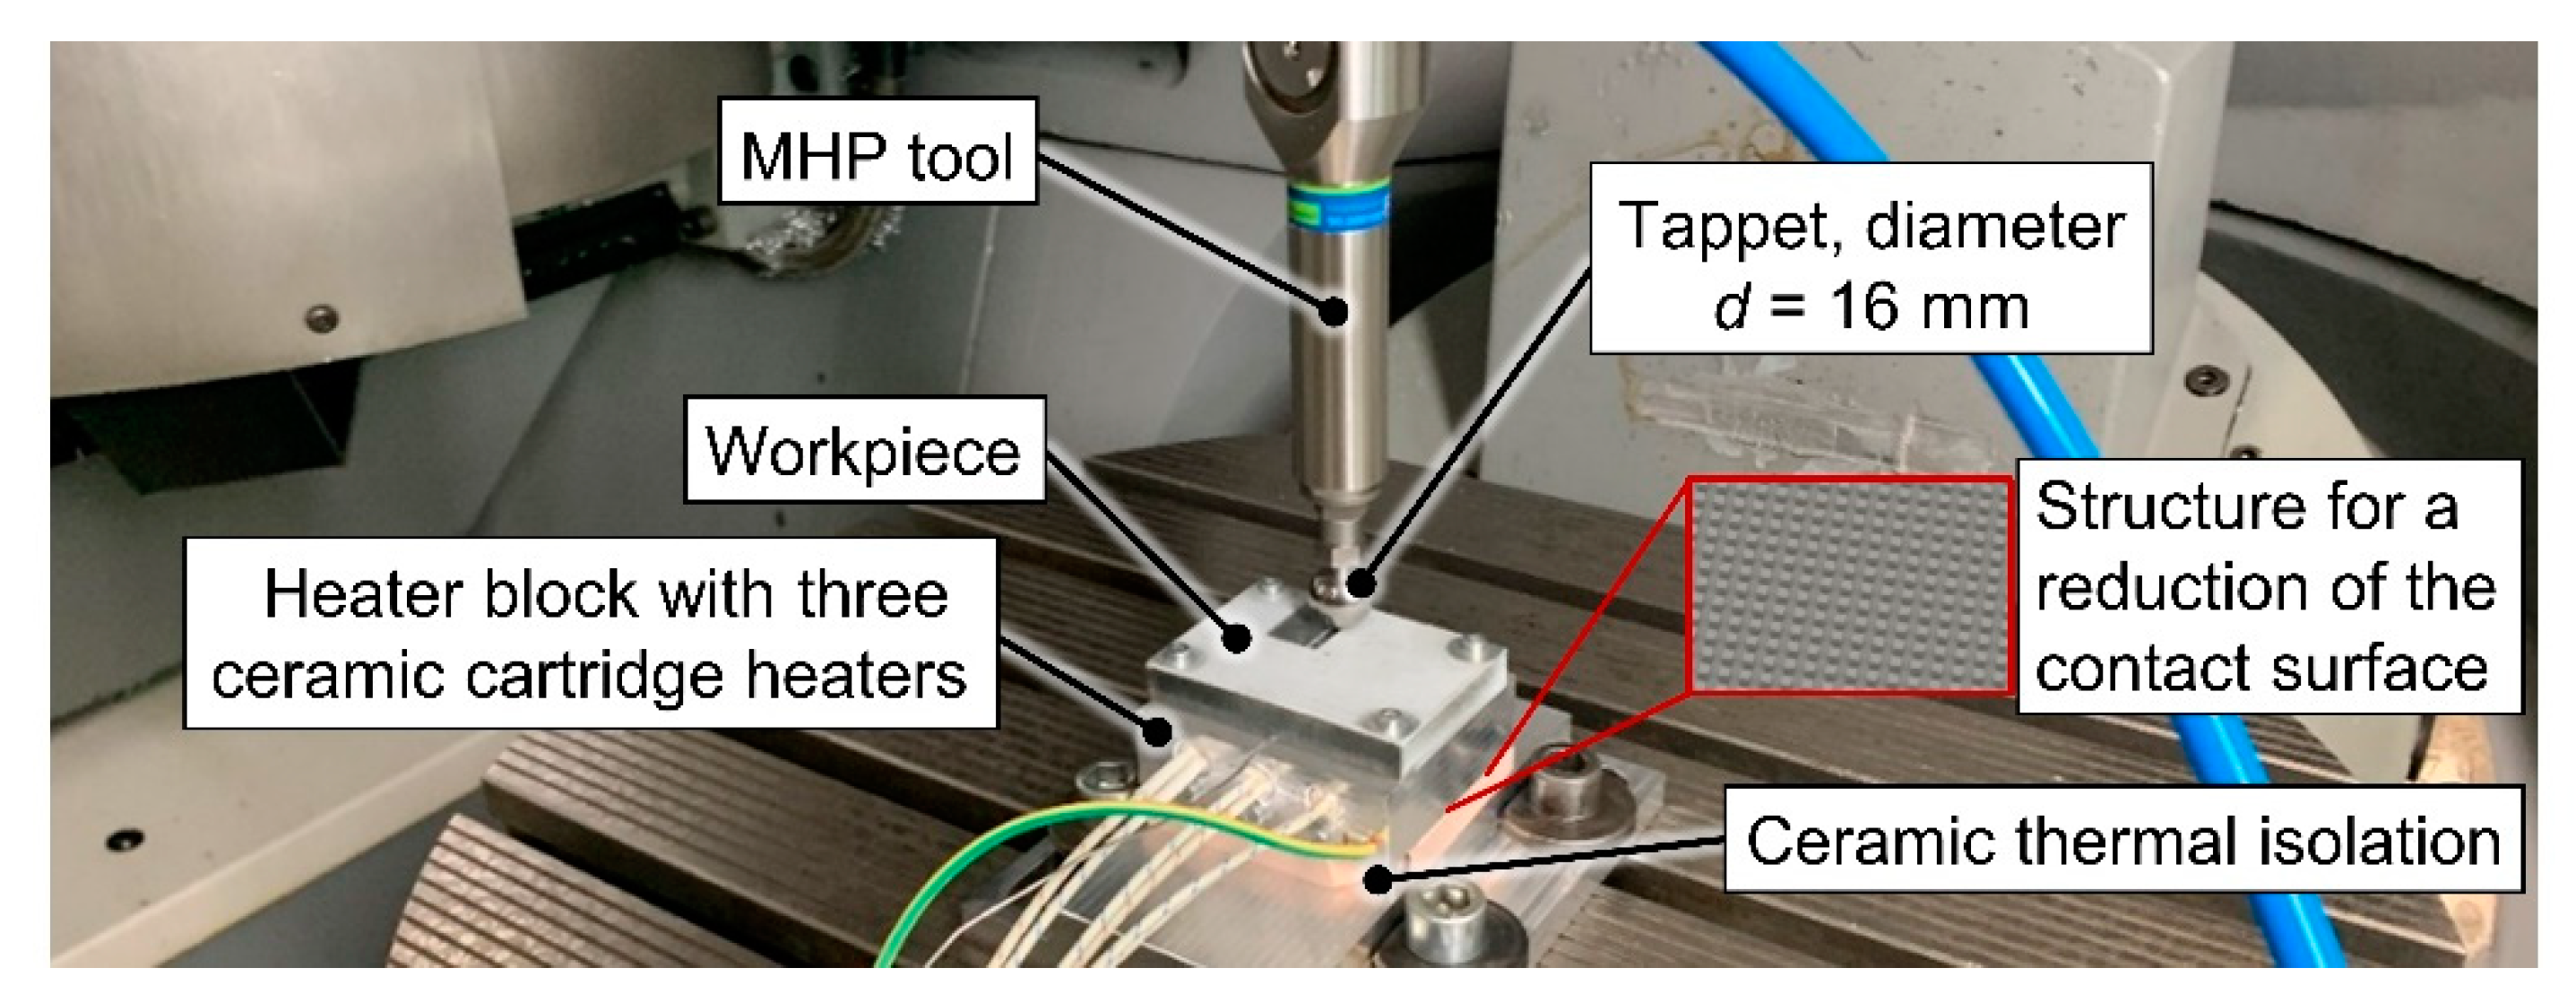
For the MHP process, the specimens were mounted on a setup designed for heating and insulation to adjust the temperature of the specimen in a range of T = 20–365 °C, see Figure 2. Heating was carried out using three ceramic cartridge heaters Hewid G13M with a rated power P = 180 W each, mounted in an aluminum EN AW-7075 block used for spreading the thermal energy and distributing it to the specimen. The temperature was controlled by a temperature controller Hillesheim HT41 using a thermocouple mounted directly under the specimen as a reference signal. Additionally, temperature measurements were conducted on the coating surface with a temperature meter Testo 925 and a hand-held thermocouple temperature probe type K in order to accomplish a maximum temperature deviation of ΔT = 2 K during the experiments. For the insulation of the heated specimen and heater block against the base and clamping device, a block of fired industrial ceramics type 9020 (aluminum silicate) by Kager with a thickness s = 10 mm was used. Heating and cooling of the specimens was performed on the device. To reduce the introduction of tensile residual stresses during cooling, this process was carried out slowly in open air.
The thermally assisted MHP processes were carried out with five process parameter settings for the center point ZnAl4 coating (A6), varying the maximal indentation depth ai,max, feed velocity v, and track distance lp according to Table 3. For the other coatings, the process parameter set MHP1 was used, which was identified as the best parameter set for generating a low-roughness surface in previous studies. The processing temperature TMHP was varied in steps of 70 K between room temperature, Tmin = 20 °C and Tmax = 300 °C. Each MHP process was carried out in a rectangular area with dimensions between 16 mm × 26 mm and 18 mm × 30 mm. For the center point coating CA6, the MHP process was additionally carried out for a temperature TMHP = 365 °C, slightly below the melting temperature of ZnAl4, Tmelt = 381 °C [28].
The MHP processes were carried out with a FORGEFix Air Tool by 3S engineering equipped with a carbide ball tip with a diameter of dp = 16 mm mounted in a 5-axis CNC machining center Deckel Maho DMU 50 eVolution. The compressed air pressure used to power the MHP tool was kept constant at p = 6 bar during all experiments to achieve the maximum possible impact energy and, thus, maximum coating compaction.

2.2. Process Force Measurements

The process forces applied to the workpiece surface and coating system were measured by MHP trials conducted on uncoated specimens of S235 JR structural steel (1.0037). This allowed a measurement of the process forces without being affected by the high plastic compliance of the coating. The process parameters were individually varied in a range suitable for the process according to past studies [27]: the compressed air pressure was varied between p = 4 bar and p = 6 bar, the feed velocity between v = 500 mm/min and v = 4000 mm/min, and the maximal indentation depth between ai,max = 0.1 mm and ai,max = 0.4 mm. For the force measurements, a multicomponent dynamometer Kistler type 9255C with charge amplifier Kistler 5070A was used in a 5-axis machining center Deckel Maho DMU 50 eVolution. The process forces were measured with a measuring frequency of fmeas = 10 kHz and filtered with a fourth-order Bessel low-pass filter with a cut-off frequency of fcut-off = 2 kHz. Afterward, arithmetic mean force amplitudes were calculated from 500 automatically detected peak values for each process configuration.

2.3. Coating Specification Measurements

To evaluate the effect of thermally assisted MHP on the ZnAl4 layer system, the coating thickness, porosity, averaged roughness depth Rz, mean roughness Ra, residual stress, and the coating hardness were evaluated before and after the MHP treatment. The roughness values, Rz and Ra, were determined by measuring the surface using a confocal white light microscope Nanofocus µsurf with a 20× short objective and calculation with a robust Gaussian filter with a cutoff wavelength of λc = 2.5 mm. Cross-sections were metallurgically prepared to determine the layer morphology. The layer thickness and porosity were determined as an average of ten traverse micrographs of the layers imaged with an Olympus BX51 optical microscope and analyzed using an Olympus stream motion software. The residual stresses in the sprayed and machine hammer peened coatings were measured by X-ray diffraction (XRD) using Cu-Kα1 with a Lynxeye XE detector Bruker Advanced D8 diffractometer.
The measurements were conducted for 2θ 86.56° (Zn (201)) in an investigated range of high diffraction angle 2θ of between 85.7° and 87.5° at a step size of 0.1° and a measurement time of t = 3.5 s. Diffracted beams were measured for a Phi angle between 0° and 180°, while Chi was varied between 0° and 60° in 8 steps. The residual stresses were calculated using the software LEPTOS 7.03 by Bruker based on the sin2ψ method according to [18,19]. The material constants were assumed to be as follows: Young’s modulus E = 96 GPa, Poisson’s ratio ν = 0.29, and elastic constants S1 = −3.021 × 10⁻⁶ and ½ S2 = 1.344 × 10⁻⁶.
To examine the metallographic layer structure of the TaMHP samples in more detail, selected samples were examined by scanning electron microscopy (SEM). The cross-sections of the samples made for this purpose were polished using ethanol to prevent possible oxidation. The images were taken using a TESCAN Mira 3 scanning electron microscope, whereby the secondary electrons (SE) and backscattered electrons (BSE) were detected to visualize a topographic contrast and a material contrast, respectively. SEM imaging was focused on the near-surface boundary zone, where the TaMHP treatment was expected to have the most significant impact.

3. Results

3.1. MHP Process Forces

For the determination of suitable process parameter values, the process forces were measured before the MHP experiments. Due to the dynamic behavior of the force measurement platform, an evaluation of the absolute force amplitudes is not possible. A comparison of the forces that occurred with different parameter settings, on the other hand, is relevant since all measurements were carried out with the same measurement setup and the same clamping of tool and workpiece. The arithmetic mean values of the force amplitudes showed an apparent increase at a compressed air pressure of p = 6 bar compared to a lower pressure of p = 5 bar (Figure 3).
With increasing maximal indentation depth above ai,max = 0.2 mm, the process forces decreased. Nevertheless, according to
I = F ( t ) · d t ,  
more energy could be transferred into the coating, as the contact time t between the tappet and the workpiece surface increased with increasing maximum indentation depth ai,max. Thus, higher compaction of the coating could be achieved, although the maximal force amplitudes at higher maximal indentation depth ai,max were lower.
For low feed rates v, the measured process forces FMHP were significantly higher for all compressed air pressures p anindentation depths ai,max. The feed rate v influences the impact density reciprocally proportionally. Thus, at a higher feed rate, higher compaction could be achieved with each impact, which in turn reduced the measured maximal force amplitudes.
According to the presented force measurements, the MHP processes were carried out with a maximal indentation depth ai,max = 0.2–0.4 mm, feed rate v = 1000–3000 mm/min and compressed air pressure p = 6 bar, compare Table 3.

3.2. Influence of the Temperature during the TaMHP Process

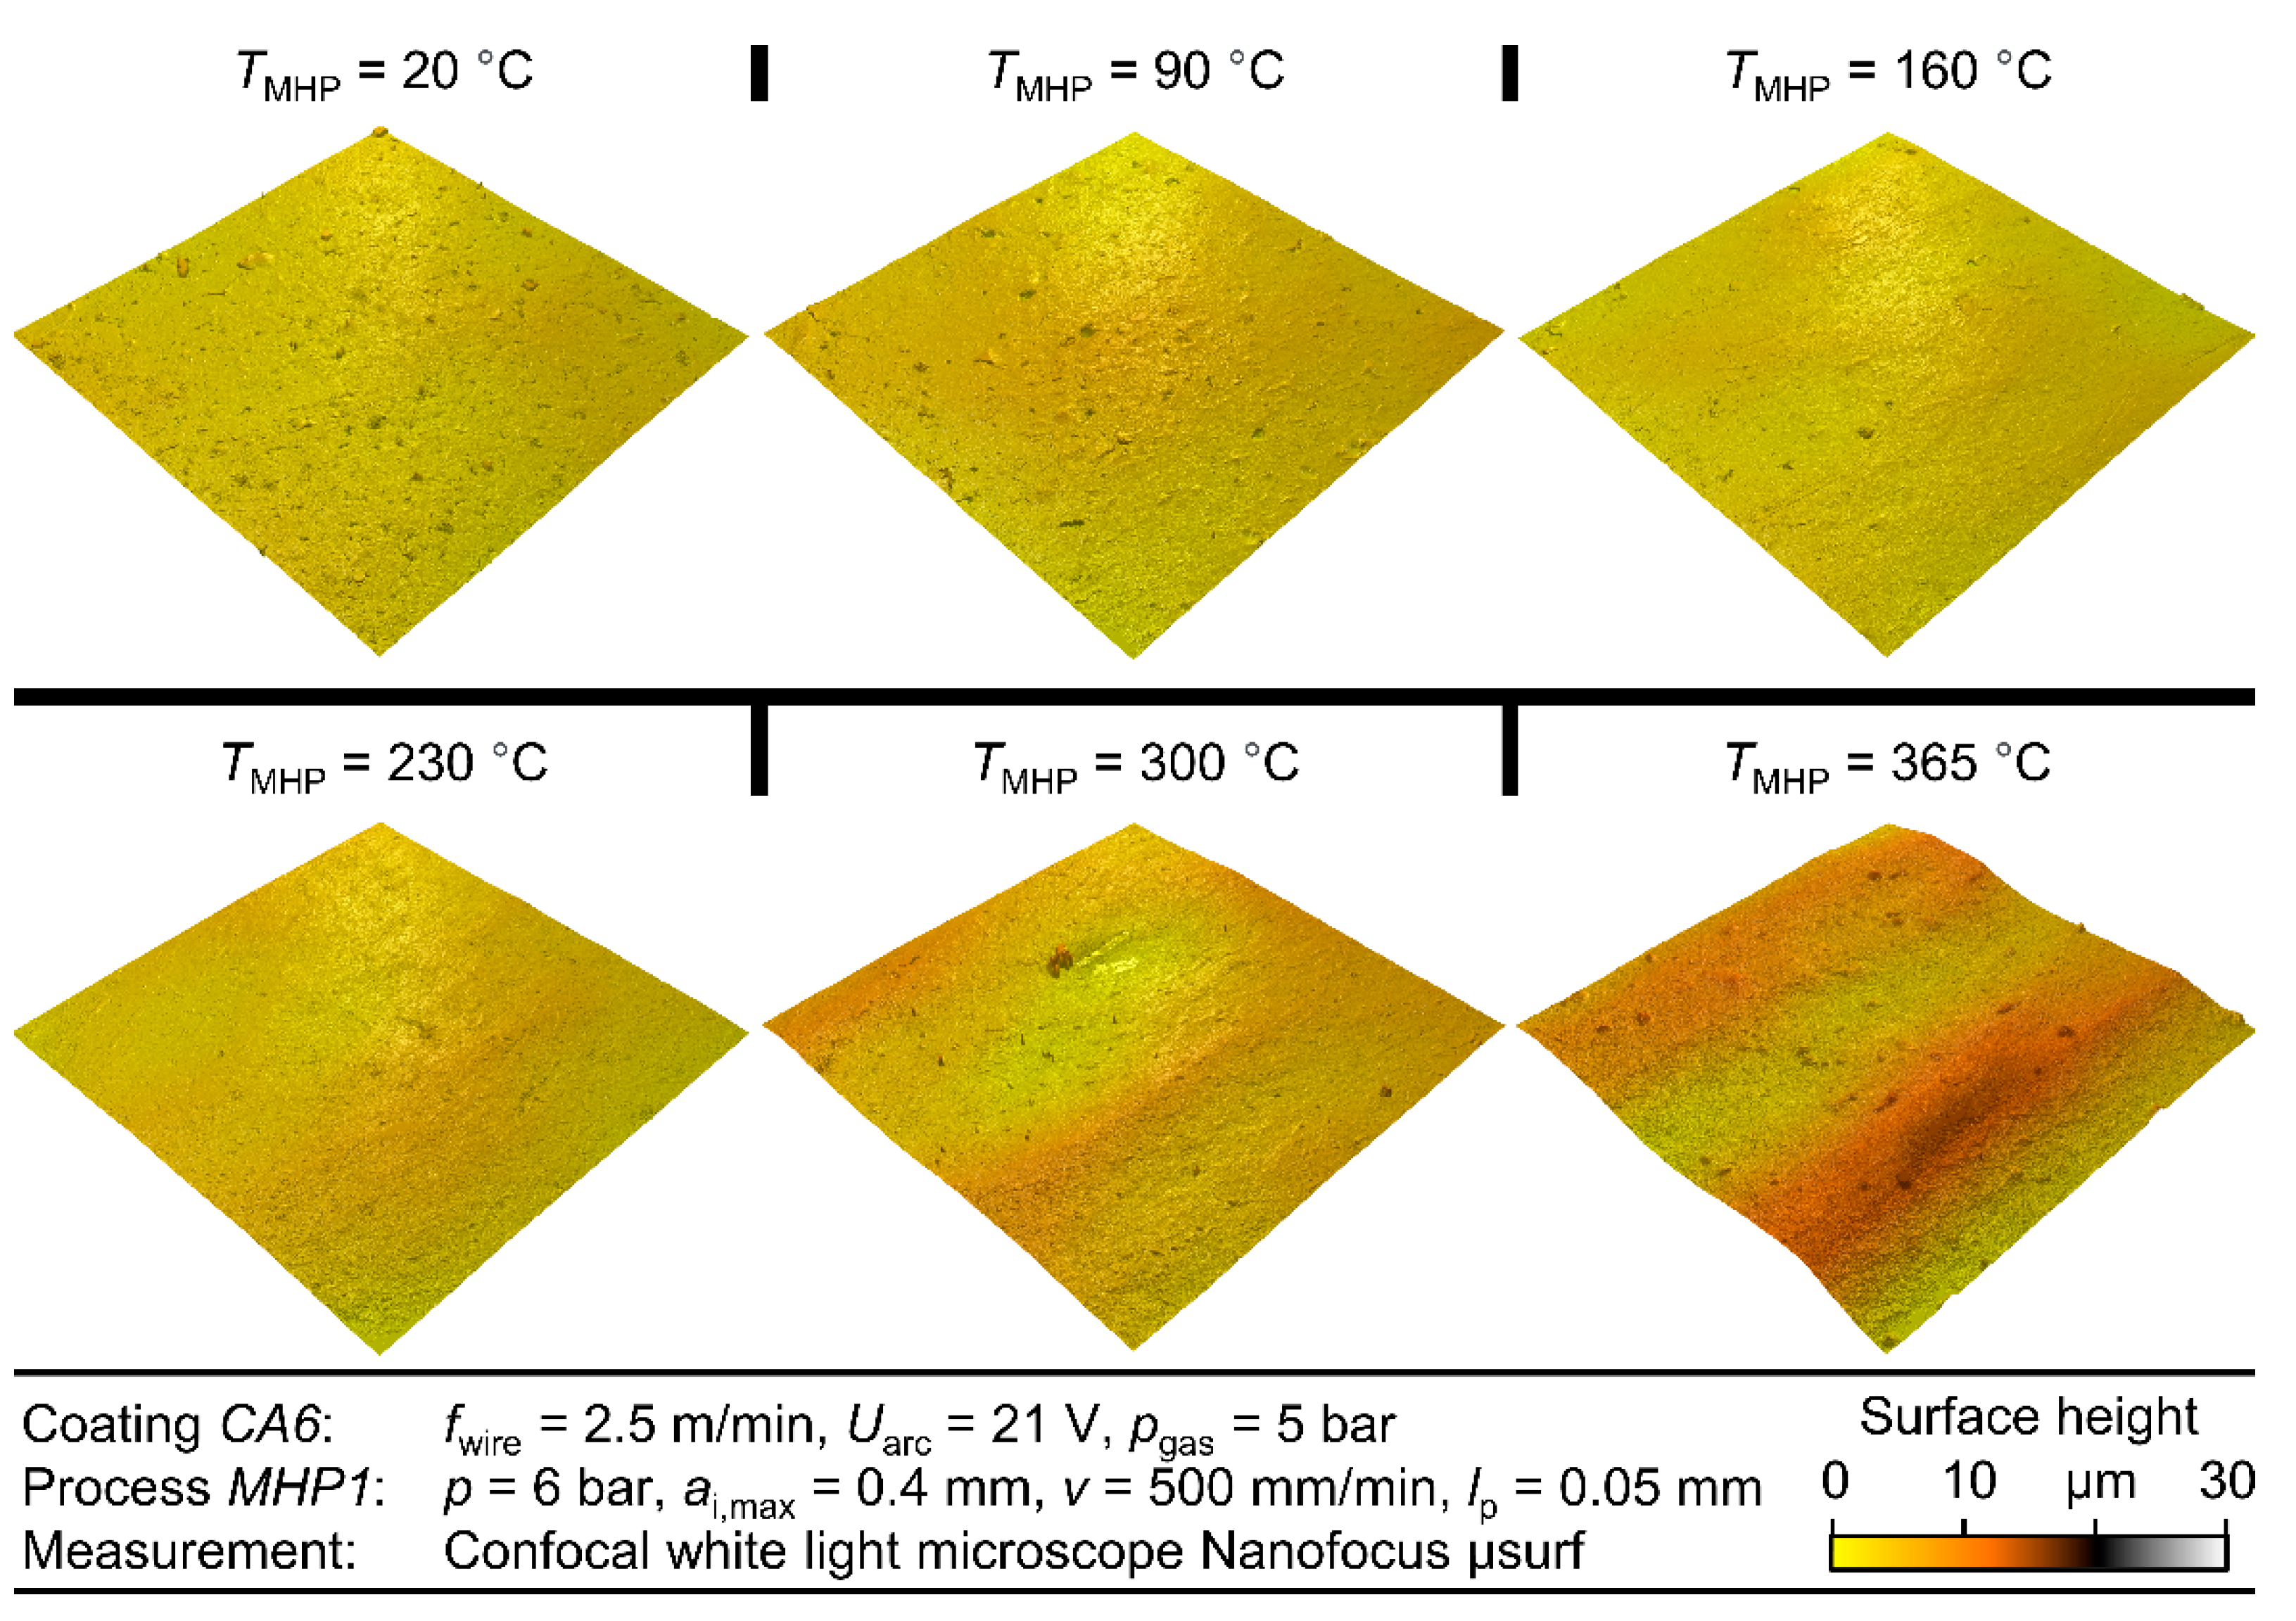
To analyze the effect of the temperature by thermally assisted MHP post-treatment on the surface characteristics of the ZnAl4 coating, the coating CA6 was peened with five different MHP parameter settings at temperatures between TMHP = 20 °C and TMHP = 365°C (Figure 4). The confocal white light microscopic images of the peened coating surfaces indicated a better flattening of the coating at temperatures between TMHP = 160 °C and TMHP = 300 °C (cf. Figure 5). At lower temperatures, particles that had apparently hit the surface in a solid or doughy state during arc spraying, and therefore protruded from the surface, were visible. At TMHP = 300–365 °C, the individual MHP pathways became more visible, with the surface being indented about 10–15 µm deeper in the center. In the layer compacted at TMHP = 365 °C, which is close to the melting temperature of Tmelt = 381 °C, individual particles protruding from the surface became visible. A possible reason for this could be adhesion of the coating material to the colder MHP tool, causing the adhered particles to be pulled out of the coating, resulting in a poorer surface finish.
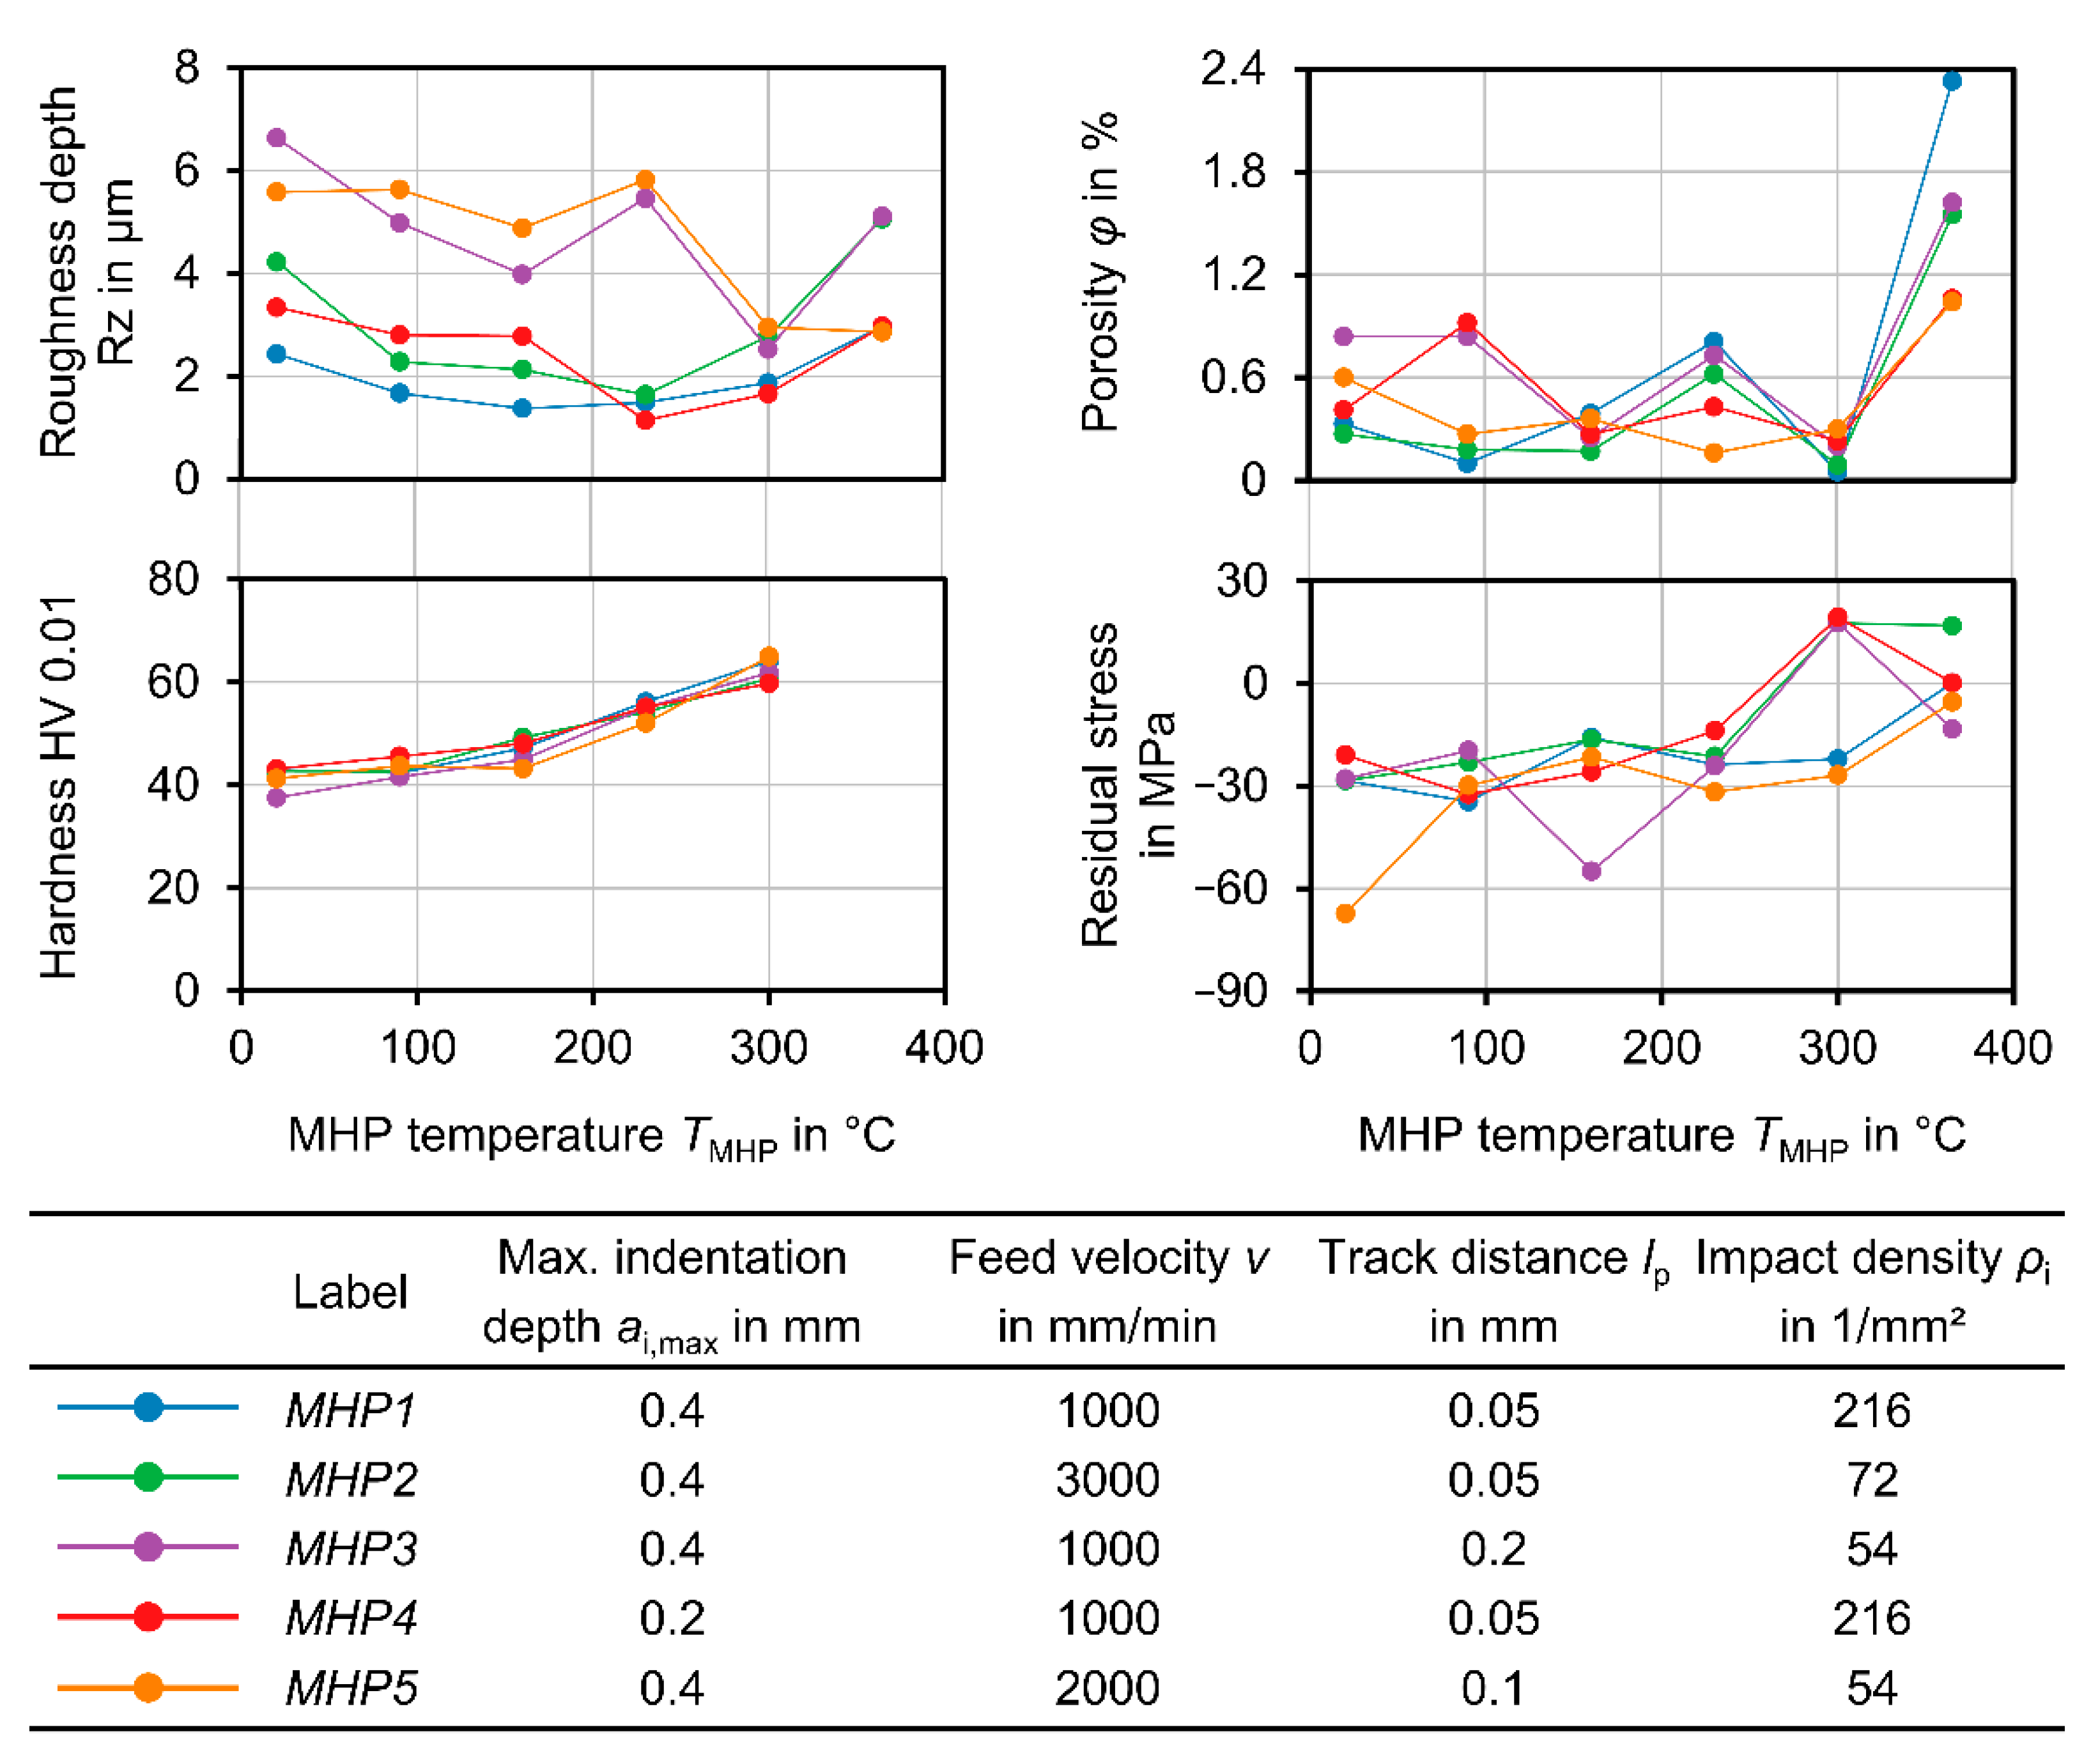
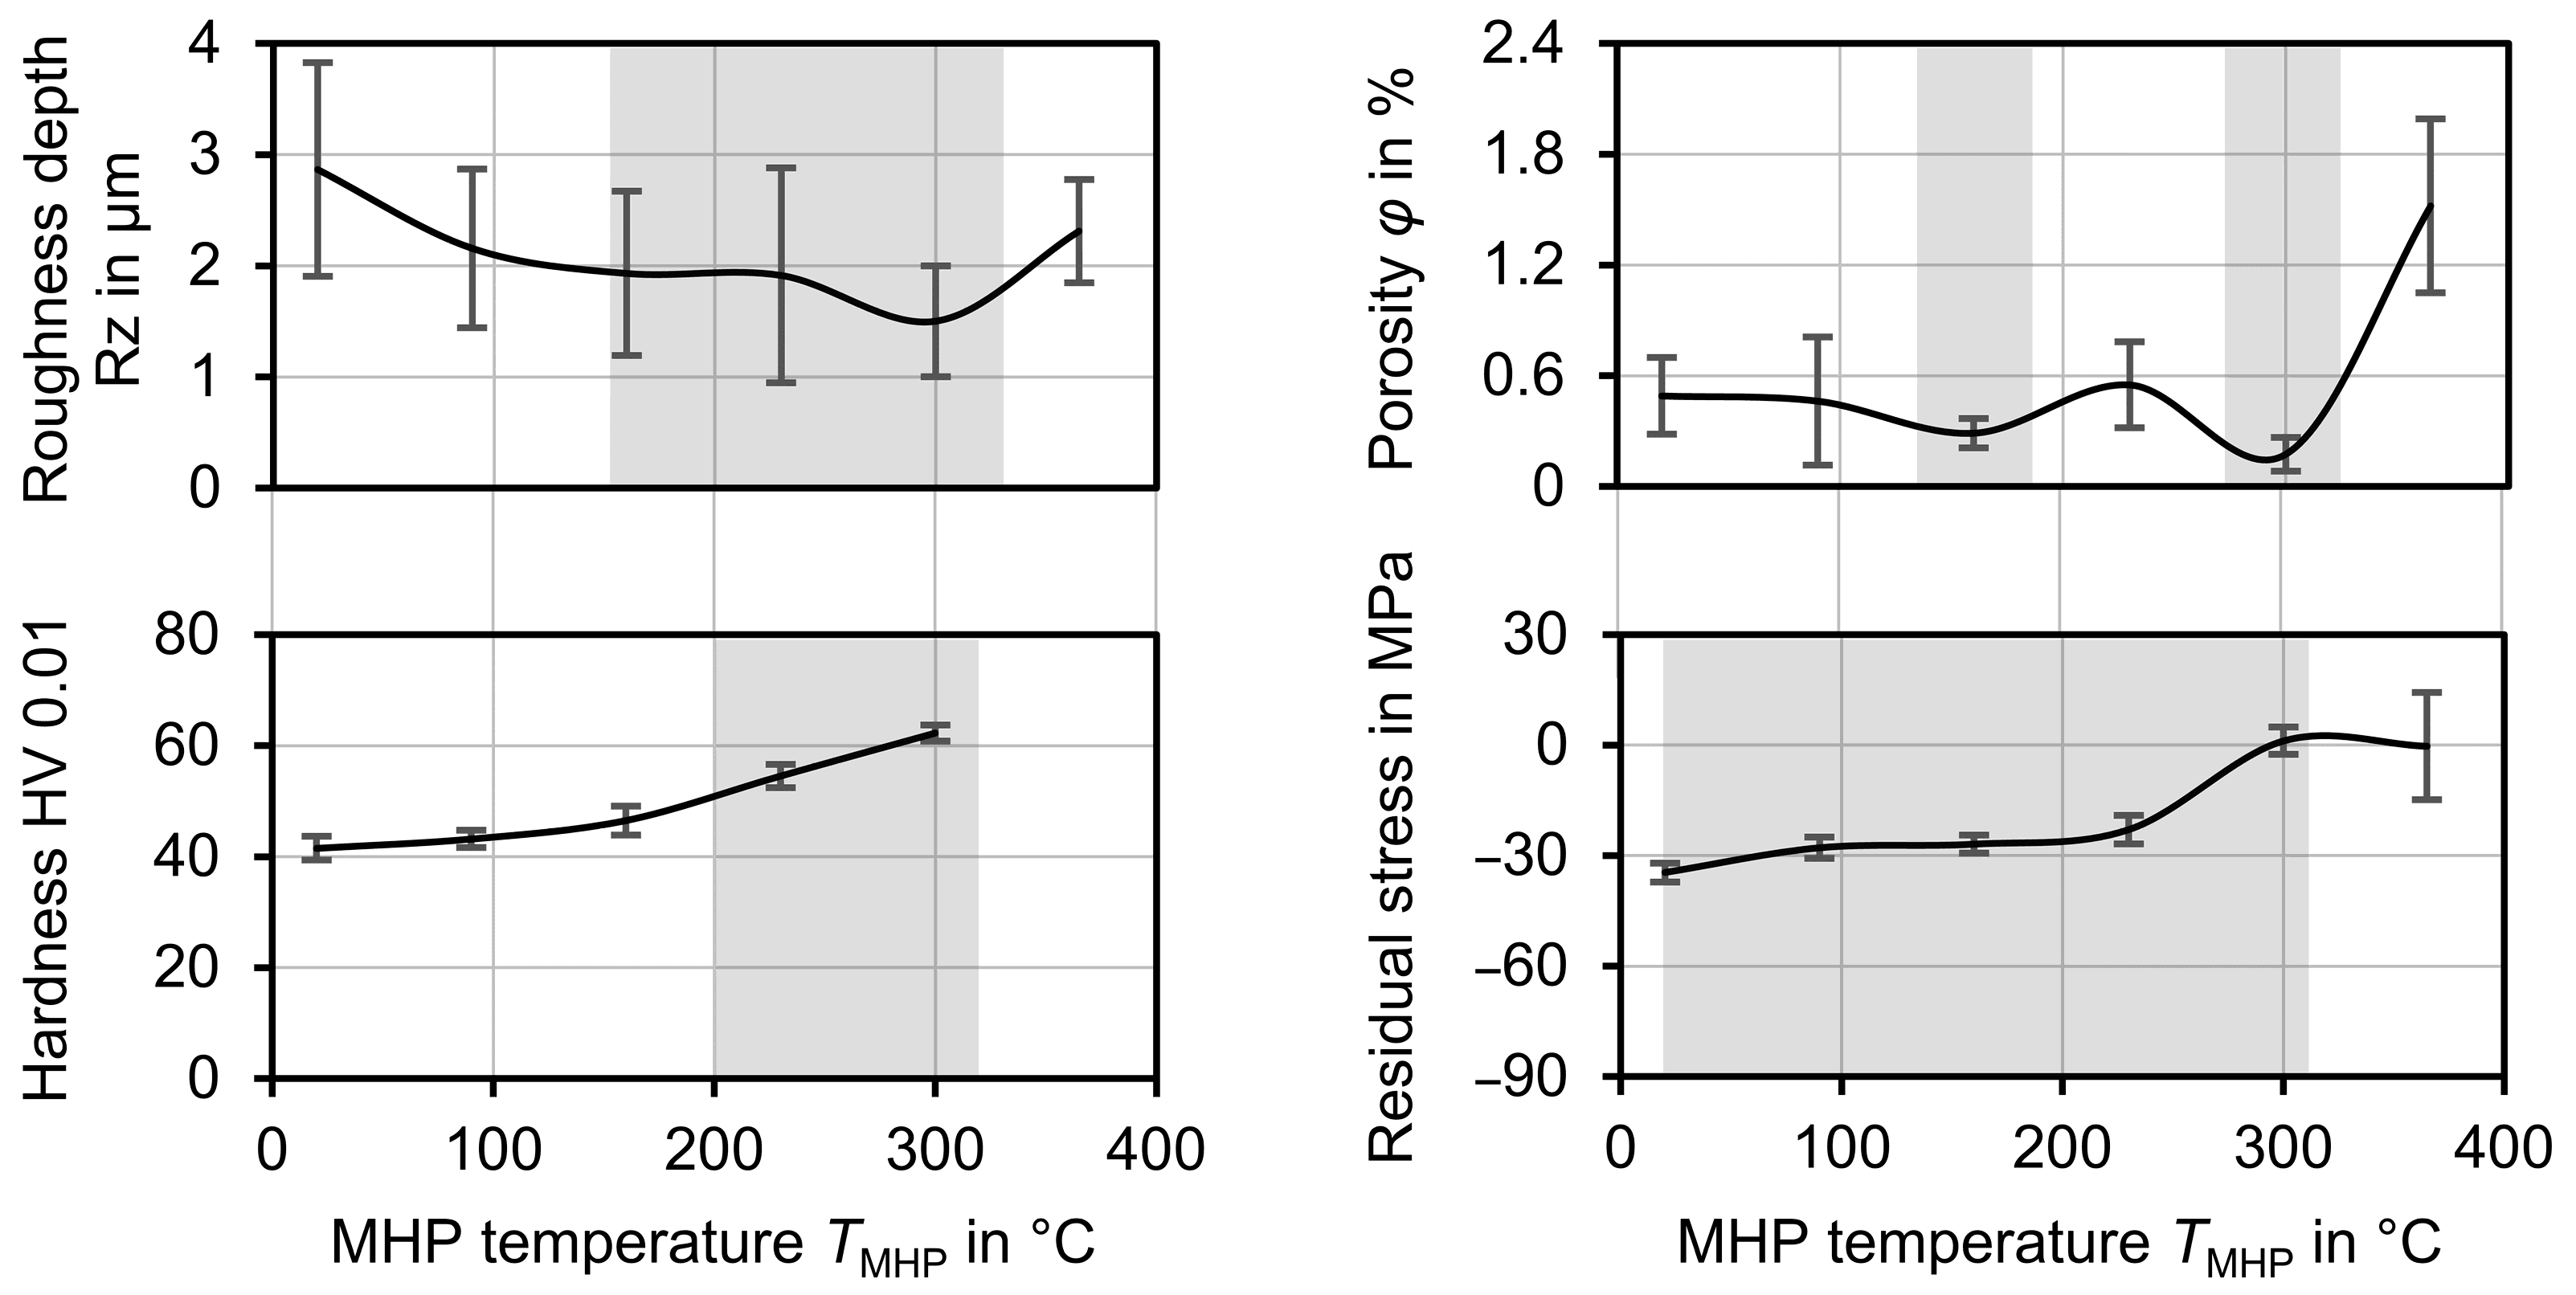
The lowest roughness depths were measured for MHP processes carried out at temperatures of TMHP = 160 °C and 300 °C (cf. Figure 6). Especially at TMHP = 300 °C, a roughness depth constantly below Rz = 3 µm could be achieved with all MHP processes with the lowest mean measurement values at Rz = 1.66 µm. Additionally, the lowest porosity values could be achieved by peening at the same temperatures, TMHP = 160 °C and TMHP = 300 °C. At TMHP = 300 °C, the measured porosity was between φ = 0.05% and φ = 0.30%, while the mean porosity of the reference coating was φ = 4.8% after thermal spraying. At a temperature of TMHP = 365 °C, both roughness depth Rz and porosity φ were significantly higher. Concerning the Vickers hardness, the heating of the workpiece during MHP treatment led to higher hardness values. These can be justified by a softening of the coating and, thus, higher compaction. At temperatures up to TMHP = 300 °C, compressive residual stresses between −20 MPa and −67 MPa were measured, which are comparable to the reference coating before the MHP treatment. At TMHP = 365 °C, lower compressive residual stresses as well as tensile residual stresses between −13 MPa and +17 MPa were found. These are probably related to the phase transformation of the ZnAl4 coating, which occurs when the coating is cooling down to room temperature.
The best results regarding the application properties of the coating were achieved at a temperature of TMHP = 300 °C in these investigations. The roughness and porosity were significantly reduced and the hardness increased. The residual stress state was not significantly influenced by the thermal support of the MHP process.
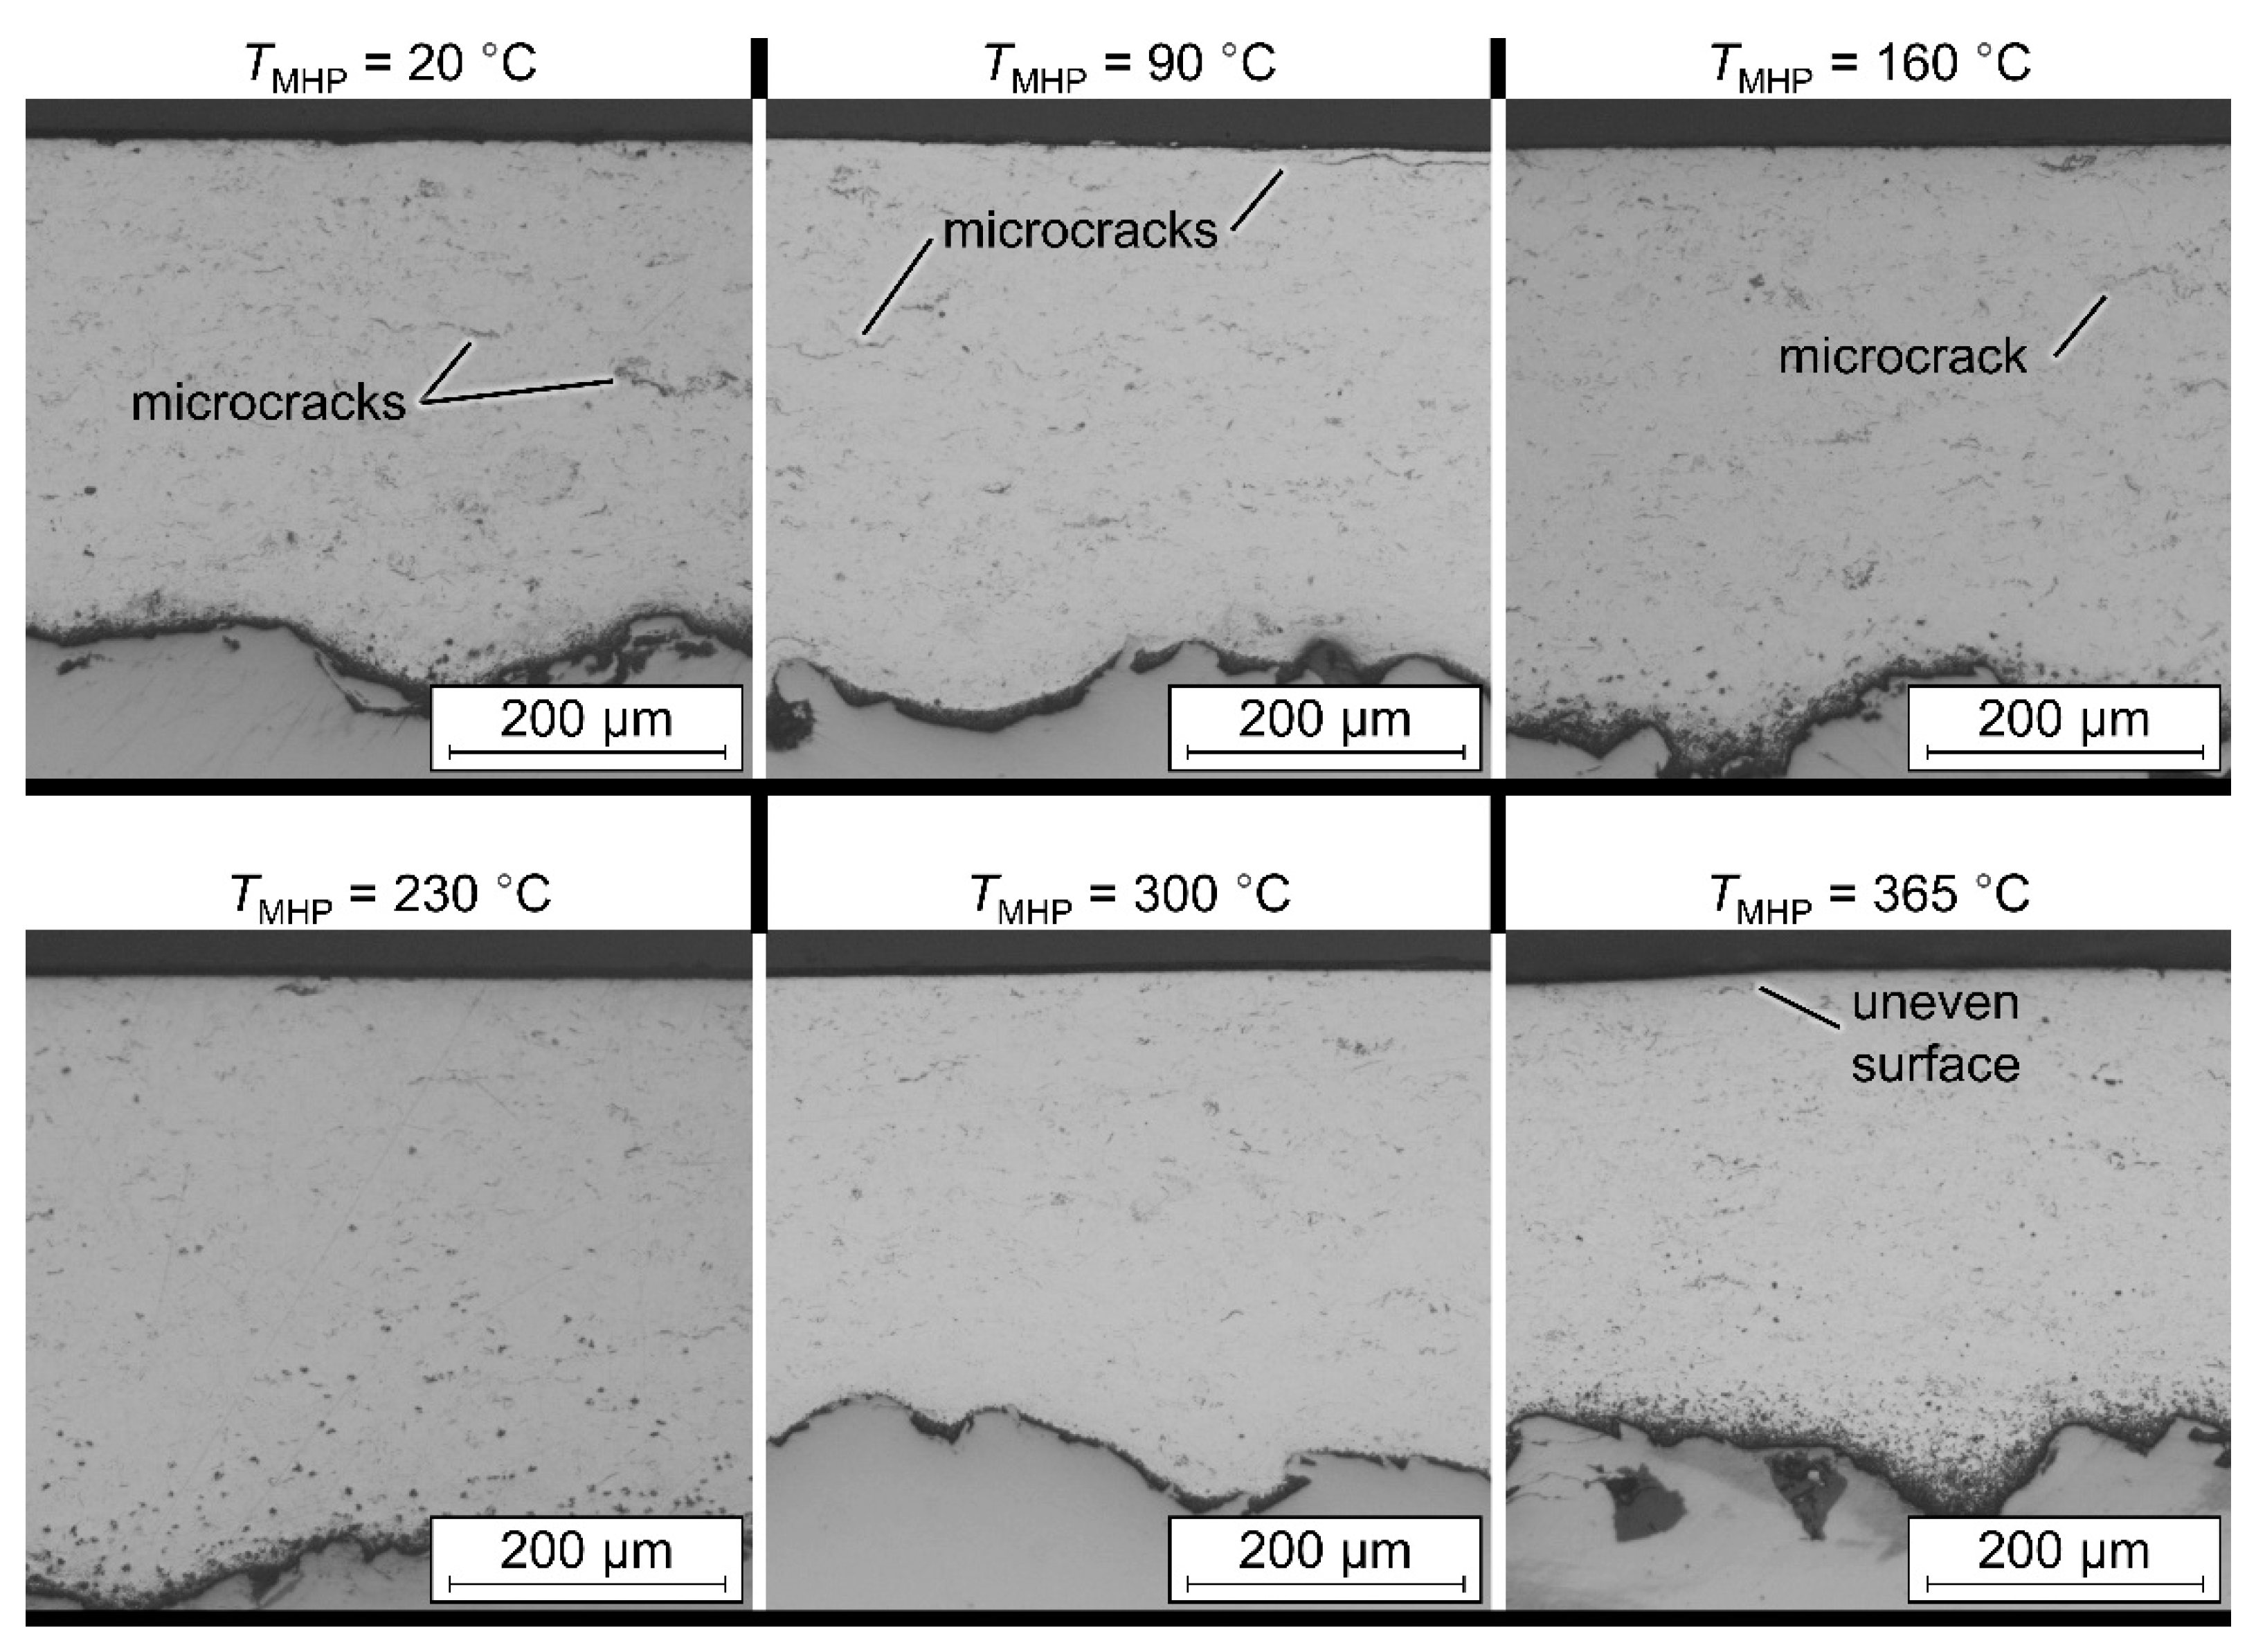
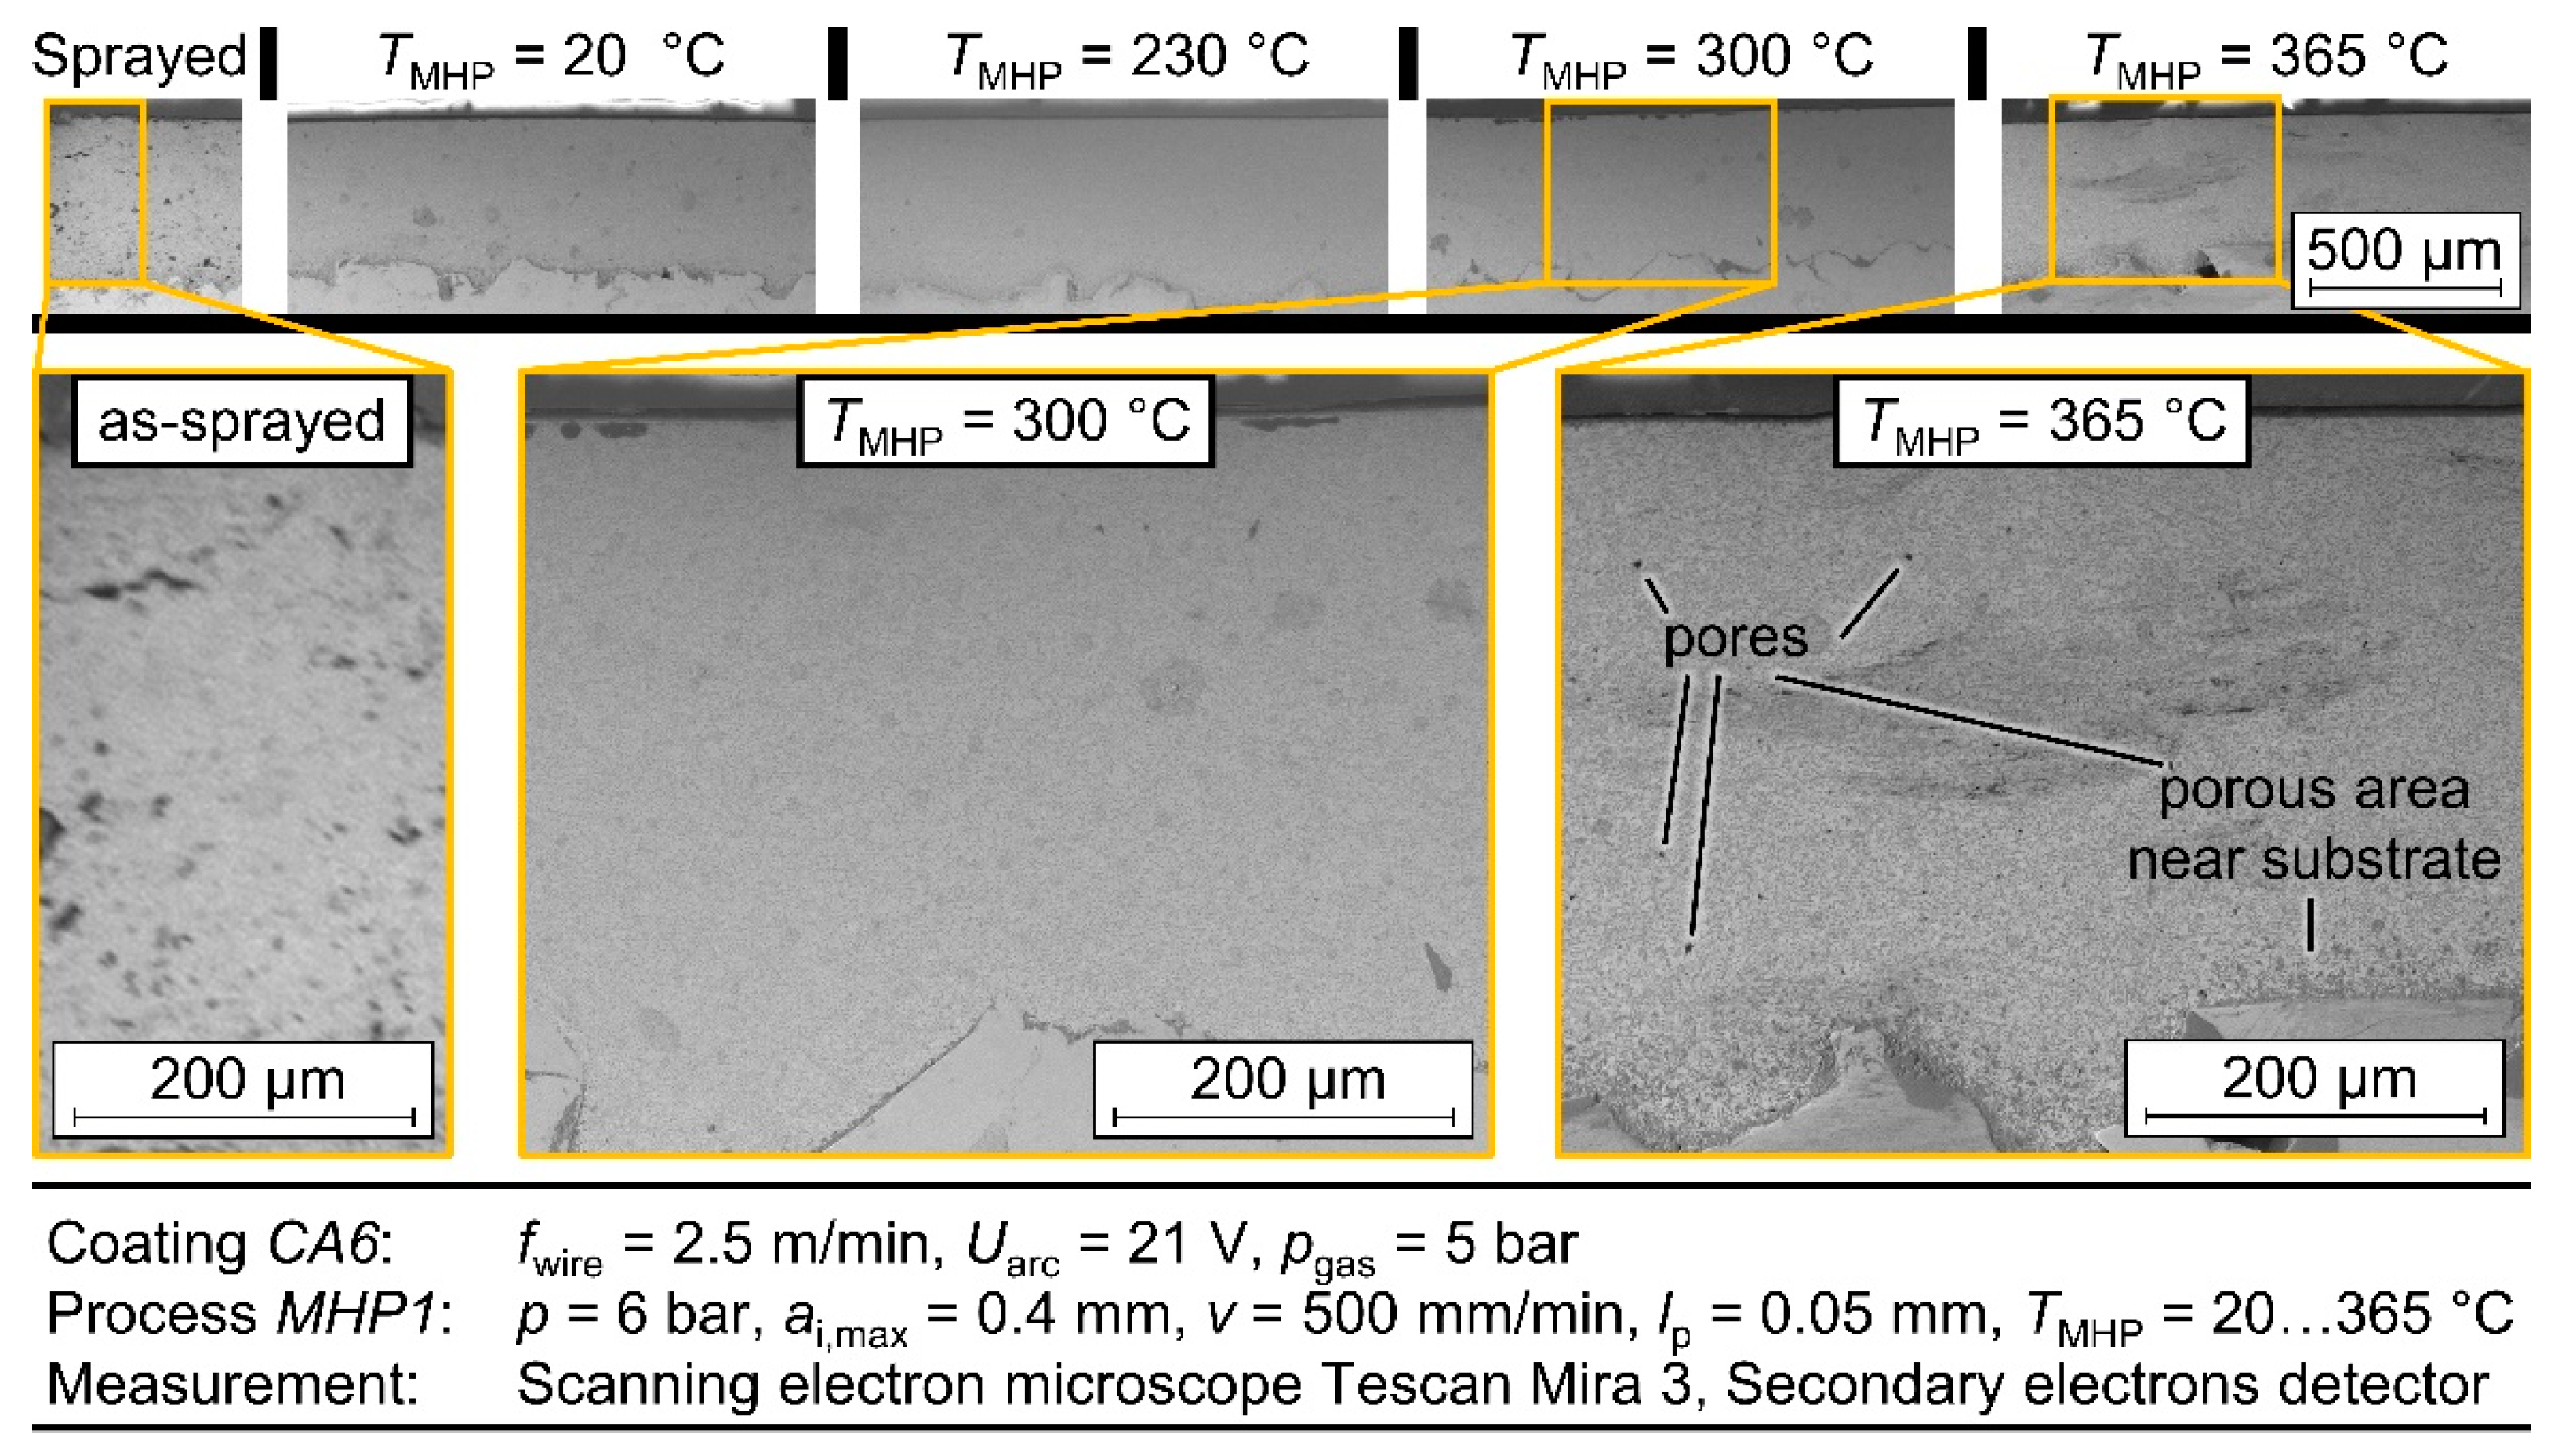
Light microscopic images of cross-sections taken after the MHP treatment showed the occurrence of a small number of microcracks in the coatings peened at temperatures in the range TMHP = 20–90 °C, and ones with even smaller size at TMHP = 160 °C (Figure 7). At temperatures of TMHP = 230–300 °C, no microcracks could be found in the coatings. At the highest temperature, TMHP = 365 °C, the partial melting of the ZnAl4 (cf. Figure 4) into a waxy state led to increased porosity and an uneven surface. Additionally, scanning electron micrographs revealed an increased porosity in the coating peened at TMHP = 365 °C compared to the coatings peened at TMHP = 20–300 °C (cf. Figure 8). A high porosity was found near the interface of coating and substrate, where the highest temperatures should have occurred due to the process design and the construction of the heating device. Additionally, pores could be detected distributed quite evenly throughout the entire cross-section of the coating.
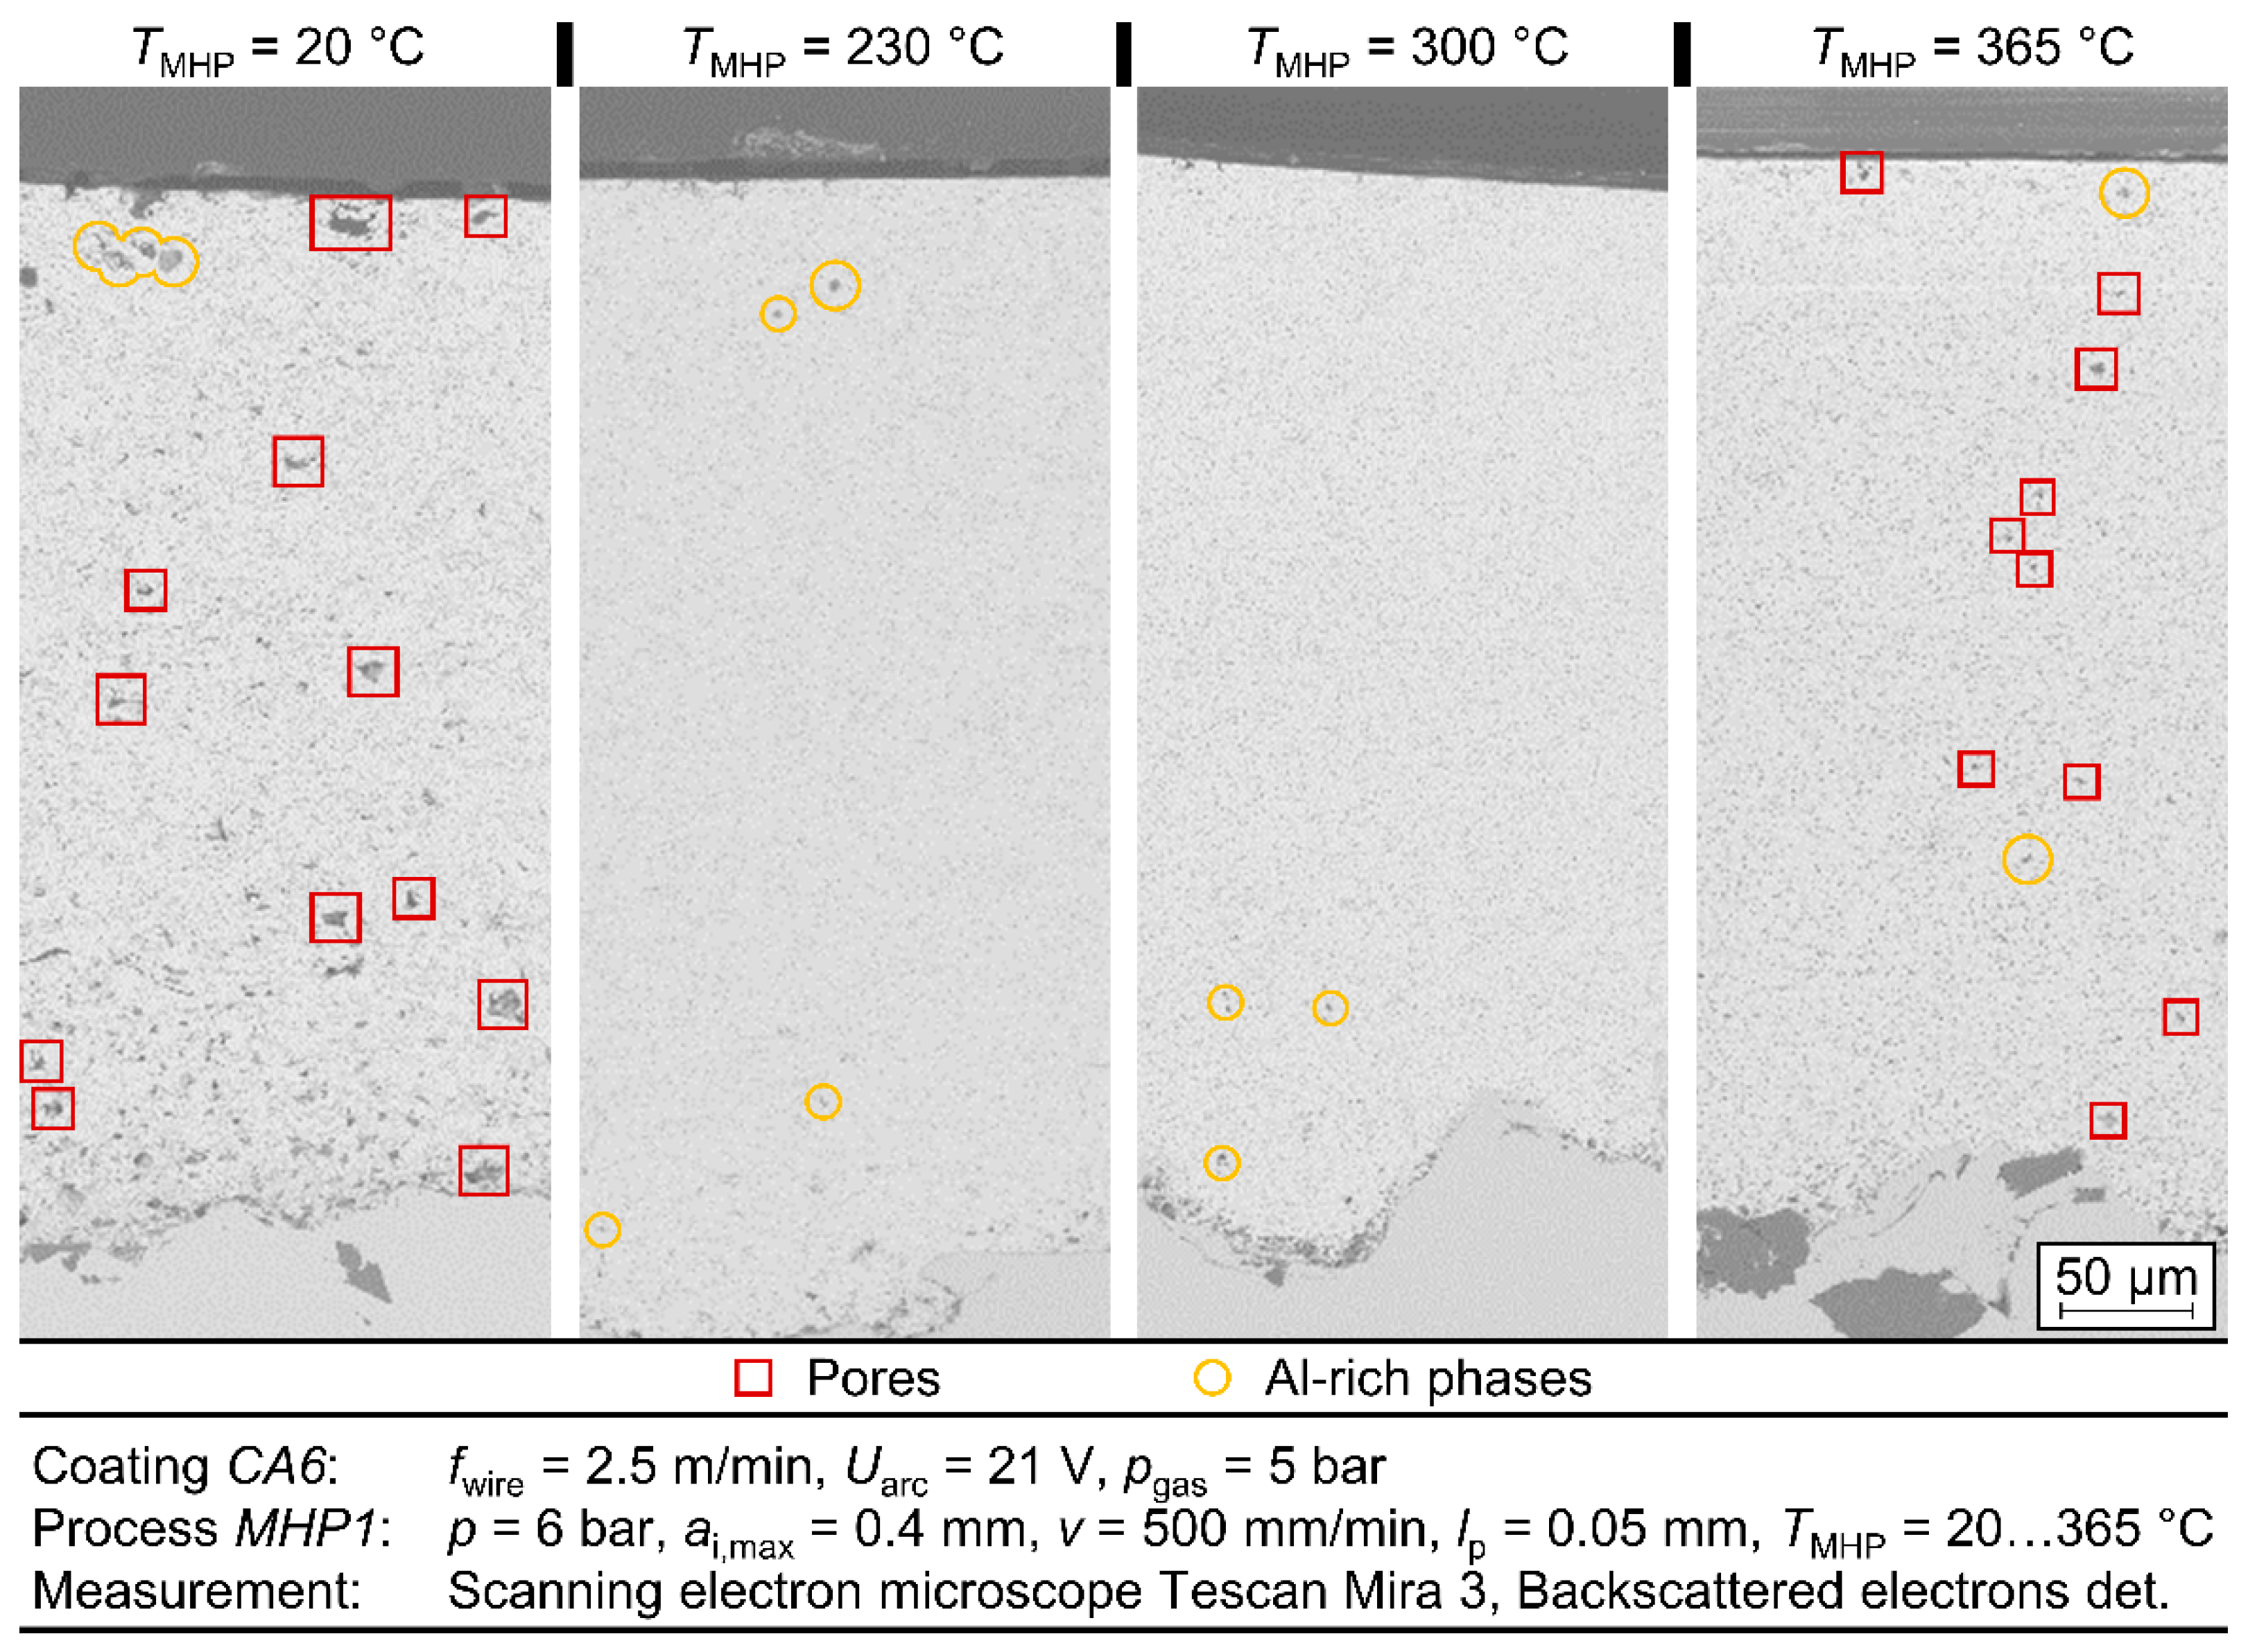
Scanning electron micrographs were taken of selected cross-sections of the coating CA6 after TaMHP at TMHP = 20 °C, 230 °C, 300 °C, and 365 °C using both a secondary electrons detector and a backscattered electrons detector to reveal a topographic contrast (Figure 8) and a material contrast (Figure 9), respectively. The images with topographic contrast, Figure 8, showed that porosity was homogeneously reduced by compaction with increasing temperature in the entire cross-section of the coatings, i.e., in the entire thickness of the coating of about 300 µm. At a process temperature of TMHP = 365 °C, on the other hand, pores appeared distributed throughout the coating, especially in the zone close to the substrate. Nevertheless, compared with the coating in as-sprayed condition, porosity was lower after MHP at all temperatures. Additionally, the pores were smaller after MHP.
The material contrast REM images (Figure 9) revealed a homogeneous material composition with a uniform spread of finely distributed aluminum-containing phases in the coating CA6 for the TaMHP temperatures TMHP = 230 °C and 300 °C. For MHP at room temperature, TMHP = 20 °C, and near the melting temperature, TMHP = 365 °C, a higher number of dark phases appeared, which indicate pores or segregation of the aluminum from the mixed phases. In addition, single larger phases with increased aluminum content, which are marked with yellow circles, were found in all cross-sections. This also indicates that no complete melting of the coating occurred at the highest temperature, TMHP = 365 °C.
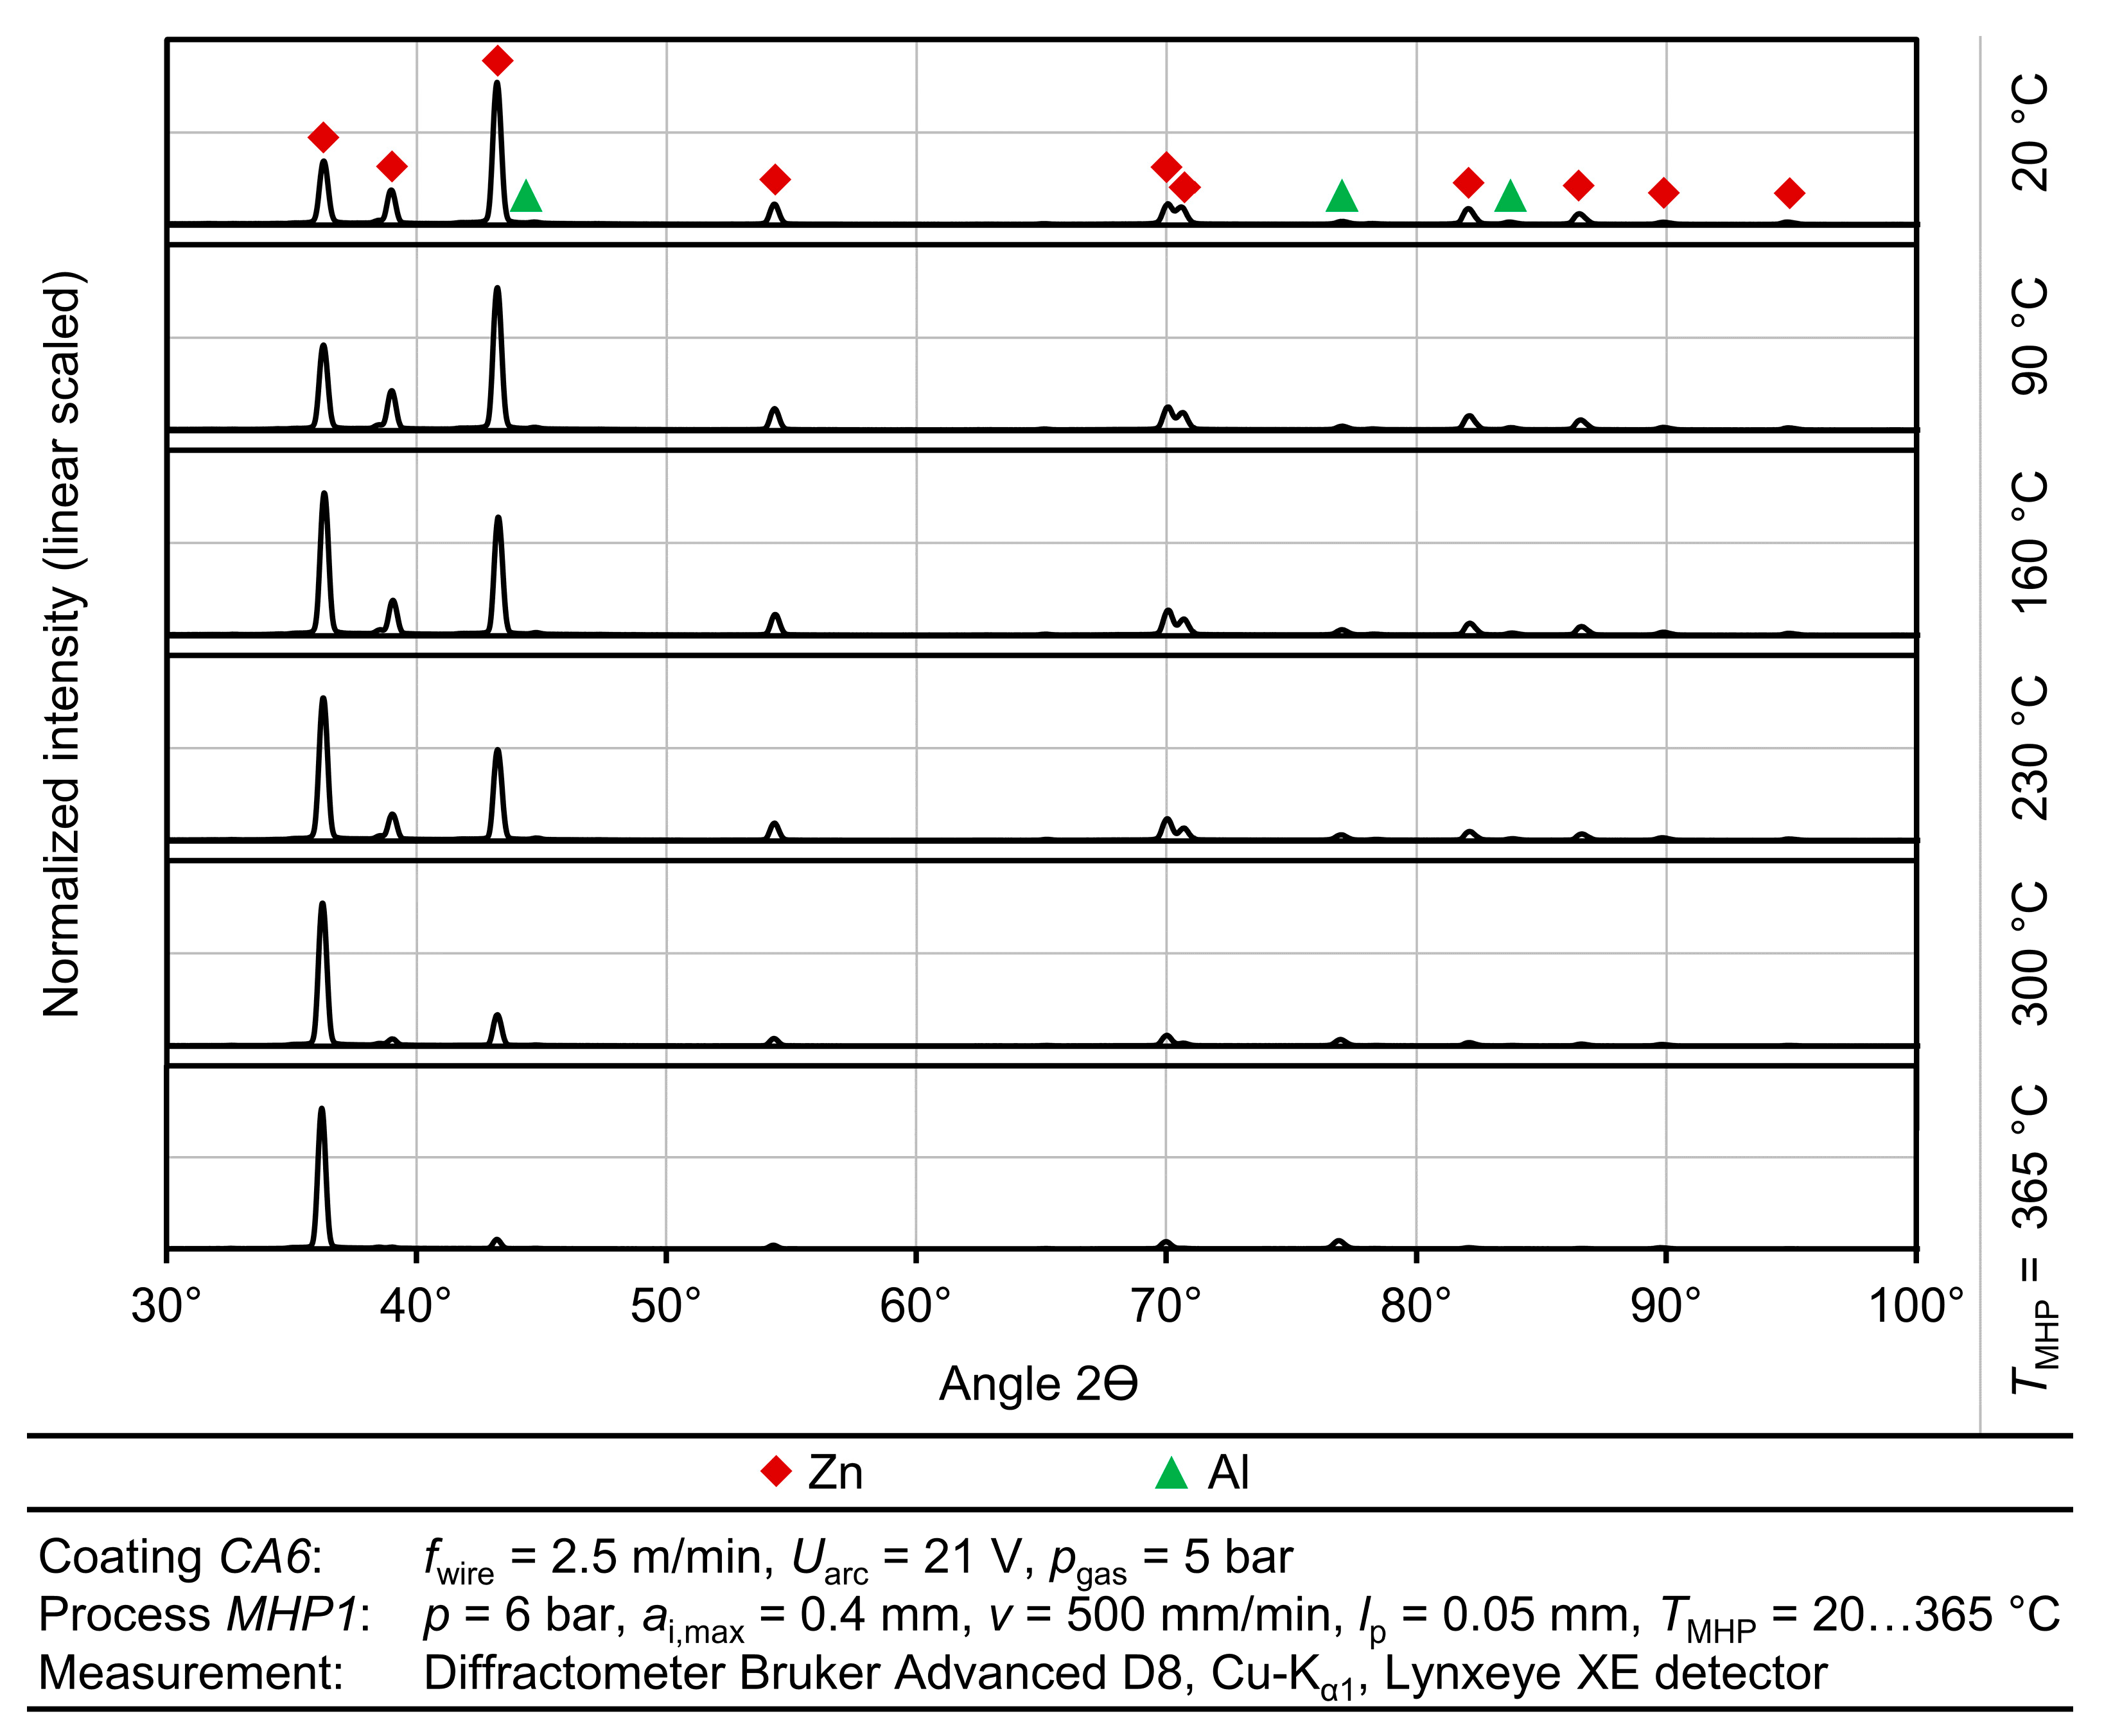
To analyze whether the coatings were oxidized during TaMHP processing, the XRD patterns of coating CA6 were also analyzed (Figure 10). These showed an increase in the relative intensity of the peak at 36.3° with increasing temperature TMHP and a simultaneous decrease in the relative intensities at 39.0° and 43.2°. These peaks all indicate the presence of Zn. The peaks at 44.7°, 78.2°, and 83.7°, indicating the presence of Al, did not show significant differences in relative amplitude and corresponded to the Al portion of ZnAl4. No significant amounts of oxides were observed in the coatings.

3.3. Influence of the Properties of the TWAS Coating before TaMHP

In order to analyze the influence of the properties of the coating before the TaMHP process and to validate the results for the coating CA6 presented above, the other coatings (cf. Table 2) were processed with the TaMHP parameter values MHP1 (cf. Table 3) at temperatures up to TMHP = 300 °C. The roughness depth and porosity of these coatings are presented in Figure 11. As for coating CA6, constantly low roughness depth values Rz < 3 µm were measured for all coatings after TaMHP at TMHP = 300 °C, independent of the as-sprayed state. At TMHP = 230 °C, in contrast, the standard deviation of the roughness depth was much higher, thus, some coatings exhibited a slightly lower roughness, but other coatings had a roughness depth of up to Rz = 5.9 µm. Additionally, the lowest porosities were generated at TMHP = 300 °C, with also the lowest standard deviation.

4. Discussion and Conclusions

A thermally assisted MHP process of a ZnAl4-based, TWAS-sprayed, corrosion protection coating was investigated in the presented work. The purpose of the compaction peening is to selectively adjust the coating properties. To improve the corrosion fatigue behavior, the objective was to achieve a pore-free coating with low roughness depth, to reduce the area for corrosion to attack. Additionally, compressive residual stresses and a high hardness should be introduced to increase the fatigue strength, suppress cracks and microcracks, and increase wear resistance. In contrast to MHP at room temperature, which already allows improvements in the aforementioned coating properties, these effects could be further enhanced by heating the samples during the processing. The results for different MHP process parameter settings and suitable temperature areas to achieve good results are summarized in Figure 12.
The best results in view of roughness and porosity could be achieved at a process temperature of TMHP = 300 °C. At this temperature, a roughness depth Rz = 1.50 µm ± 0.50 µm and a porosity φ = 0.174% ± 0.92% were achieved for different coatings and different MHP parameter values. Compared to MHP at room temperature TMHP = 20 °C, where Rz = 0.29 µm ± 0.96 µm and φ = 0.49% ± 0.21% were achieved; these values are significantly lower in terms of both arithmetic mean value and standard deviation, which indicates an improvement in the coating properties and the repeatability of the process. At temperatures above TMHP = 300 °C, the roughness depth and porosity were significantly increased, as locally limited melting effects occurred at TMHP = 365 °C. As for MHP at room temperature, the MHP setting MHP1 and coating CA6 were again identified as the best options, as a roughness depth RzMHP1 = 2.43 µm ± 0.53 µm and porosity φ = 0.33% were achieved. In comparison, the differences in roughness and porosity between the various MHP process parameter settings became lower at higher temperatures. This indicates a higher compaction with each impact, which is caused by the softening of the coating.
In terms of the generation of compressive residual stresses, the best results were achieved at room temperature and TMHP = 160 °C. At a higher temperature, tensile residual stresses counteracting the compressive residual stresses could have been generated during the cooling phase due to the different thermal expansion coefficients of the substrate (αsteel = 12.0 × 10⁻⁶ K−1) and coating (αZnAl4αzinc = 25.0 × 10⁻⁶ K−1) [29] and due to the phase transformation of the coating at T = 279 °C. By means of slow cooling of the specimens in mid-air, this effect was reduced. Nevertheless, the tensile residual stresses generated at a temperature of TMHP = 365 °C could have a strong negative effect on corrosion fatigue behavior. To avoid the negative effect of the tensile residual stresses generated at TMHP = 365 °C, a second MHP process could be carried out afterwards using a lower process temperature. The influence of the angle between the NC paths in the successive processing steps should also be taken into account here. A second machining step at a different angle or with a different machining strategy could further improve the surface finish, especially with regard to the roughness depth. The surface hardness of the coating, on the other hand, was steadily increased with rising temperature. For this reason, a subsequent MHP processing in two process steps at different temperatures could lead to a further improvement of the coating properties.
In conclusion, by TaMHP, a thermally induced softening of the coating and, consequently, a better smoothing of the layer could be achieved for the ZnAl4 coatings. In the investigations, a temperature of up to TMHP = 300 °C led to a significant improvement in the coating properties. Furthermore, no more microcracks could be found in the coating system after TaMHP at TMHP = 300 °C, which may improve the corrosion properties and corrosion fatigue behavior of the ZnAl4 coating. In contrast, at higher temperatures, the coatings were negatively affected in terms of the generation of tensile residual stresses and a higher porosity and roughness depth. Thus, a sufficiently accurate temperature control must ensure a homogeneous temperature distribution and prevent a melting of the coating during the TaMHP process. The effect of these enhancements on the corrosion and corrosion fatigue behavior of a coated system will be investigated in future research works. These will feature potentiodynamic polarization tests and corrosion fatigue testing. In the presented investigations, good results were achieved on a laboratory scale, but a sufficiently accurate temperature control could be a considerable difficulty in the post-treatment of large structural components, e.g., for offshore facilities.
Author Contributions

Conceptualization, A.W., M.A., M.P.M., W.T., F.W. and D.B.; methodology, A.W.; software, A.W.; validation, A.W.; formal analysis, A.W.; investigation, A.W., M.A. and M.P.M.; resources, W.T., F.W. and D.B.; data curation, A.W.; writing—original draft preparation, A.W.; writing—review and editing, A.W., M.A., M.P.M., W.T., F.W. and D.B.; visualization, A.W.; supervision, D.B., W.T. and F.W.; project administration, W.T., F.W. and D.B.; funding acquisition, W.T., F.W. and D.B. All authors have read and agreed to the published version of the manuscript.

Funding

Gefördert durch die Deutsche Forschungsgemeinschaft (DFG)—Projektnummer 426365081. Funded by the Deutsche Forschungsgemeinschaft (DFG, German Research Foundation)—Project number 426365081.

Data Availability Statement

The data presented in this study are available on request from the corresponding author.

Acknowledgments

We acknowledge financial support by Deutsche Forschungsgemeinschaft and Technische Universität Dortmund/TU Dortmund University within the funding programme Open Access Publishing.

Conflicts of Interest

The authors declare no conflict of interest.

References

  1. Adedipe, O.; Brennan, F.; Kolios, A. Review of corrosion fatigue in offshore structures: Present status and challenges in the offshore wind sector. Renew. Sustain. Energy Rev. 2016, 61, 141–154. [Google Scholar] [CrossRef]
  2. Price, S.; Figueira, R. Corrosion protection systems and fatigue corrosion in offshore wind structures: Current status and future perspectives. Coatings 2017, 7, 25. [Google Scholar] [CrossRef]
  3. Bjørgum, A.; Knudsen, O.Ø. Corrosion Protection of Offshore Wind Turbines; SINTEF: Trondheim, Norway, 21 January 2010. [Google Scholar]
  4. Momber, A.W.; Marquardt, T. Protective coatings for offshore wind energy devices (OWEAs): A review. J. Coat. Technol. Res. 2018, 15, 13–40. [Google Scholar] [CrossRef]
  5. Det Norske Veritas. Corrosion Protection for Wind Turbines: Recommended Practice; DNVGL-RP-0416; Det Norske Veritas: Oslo, Norway, 2006. [Google Scholar]
  6. Panossian, Z.; Mariaca, L.; Morcillo, M.; Flores, S.; Rocha, J.; Peña, J.J.; Herrera, F.; Corvo, F.; Sanchez, M.; Rincon, O.T.; et al. Steel cathodic protection afforded by zinc, aluminium and zinc/aluminium alloy coatings in the atmosphere. Surf. Coat. Technol. 2005, 190, 244–248. [Google Scholar] [CrossRef]
  7. Galedari, S.A.; Mahdavi, A.; Azarmi, F.; Huang, Y.; McDonald, A. A comprehensive review of corrosion resistance of thermally-sprayed and thermally-diffused protective coatings on steel structures. J. Therm. Spray Technol. 2019, 28, 645–677. [Google Scholar] [CrossRef]
  8. Shih, H.C.; Hsu, J.W.; Sun, C.N.; Chung, S.C. The lifetime assessment of hot-dip 5% Al-Zn coatings in chloride environments. Surf. Coat. Technol. 2002, 150, 70–75. [Google Scholar] [CrossRef]
  9. Syrek-Gerstenkorn, B.; Paul, S.; Davenport, A.J. Sacrificial thermally sprayed aluminium coatings for marine environments: A review. Coatings 2020, 10, 267. [Google Scholar] [CrossRef] [Green Version]
  10. Davis, J.R. Introduction to Thermal Spray Processing. In Handbook of Thermal Spray Technology; Davis, J.R., Ed.; ASM International: Novelty, OH, USA, 2004; pp. 3–13. ISBN 9780871707956. [Google Scholar]
  11. Wielage, B.; Lampke, T.; Grund, T. Thermal spraying of wear and corrosion resistant surfaces. Key Eng. Mater 2008, 384, 75–98. [Google Scholar] [CrossRef]
  12. Chen, Y.; Liang, X.; Liu, Y.; Xu, B. Prediction of residual stresses in thermally sprayed steel coatings considering the phase transformation effect. Mater. Des. 2010, 31, 3852–3858. [Google Scholar] [CrossRef]
  13. Matejicek, J.; Sampath, S. Intrinsic residual stresses in single splats produced by thermal spray processes. Acta Mater. 2001, 49, 1993–1999. [Google Scholar] [CrossRef]
  14. Tillmann, W.; Abdulgader, M.; Hagen, L.; Biermann, D.; Timmermann, A.; Wirtz, A.; Walther, F.; Milz, M. Mechanical and microstructural properties of post-treated Zn4Al sprayed coatings using twin wire arc spraying. In Proceedings of the Thermal Spray 2021: Proceedings from the International Thermal Spray Conference, Virtual, 24–28 May 2021; Azarmi, F., Chen, X., Cizek, J., Cojocaru, C., Jodoin, B., Koivuluoto, H., Lau, Y., Fernandez, R., Ozdemir, O., Salami Jazi, H., et al., Eds.; ASM International: Novelty, OH, USA, 2021; pp. 750–757. [Google Scholar]
  15. Ziegler, L.; Schafhirt, S.; Scheu, M.; Muskulus, M. Effect of load sequence and weather seasonality on fatigue crack growth for monopile-based offshore wind turbines. Energy Procedia 2016, 94, 115–123. [Google Scholar] [CrossRef] [Green Version]
  16. Deutsches Institut für Normung. EN ISO 2063-1:2017-Thermisches Spritzen—Zink, Aluminium und Ihre Legierungen—Teil 1: Bauteilgestaltung und Qualitätsanforderungen Für Korrosionsschutzsysteme; ICS 25.220.20; 25.220.40; Beuth Verlag: Berlin, Germany, 2017. [Google Scholar]
  17. Gabelle, C.; Baraud, F.; Biree, L.; Gouali, S.; Hamdoun, H.; Rousseau, C.; van Veen, E.; Leleyter, L. The impact of aluminium sacrificial anodes on the marine environment: A case study. Appl. Geochem. 2012, 27, 2088–2095. [Google Scholar] [CrossRef]
  18. Mottin, E.; Caplat, C.; Latire, T.; Mottier, A.; Mahaut, M.-L.; Costil, K.; Barillier, D.; Lebel, J.-M.; Serpentini, A. Effect of zinc sacrificial anode degradation on the defence system of the pacific oyster, crassostrea gigas: Chronic and acute exposures. Mar. Pollut. Bull. 2012, 64, 1911–1920. [Google Scholar] [CrossRef] [PubMed]
  19. Vermeirssen, E.L.M.; Dietschweiler, C.; Werner, I.; Burkhardt, M. Corrosion protection products as a source of bisphenol A and toxicity to the aquatic environment. Water Res. 2017, 123, 586–593. [Google Scholar] [CrossRef]
  20. Kirchgeorg, T.; Weinberg, I.; Hörnig, M.; Baier, R.; Schmid, M.J.; Brockmeyer, B. Emissions from corrosion protection systems of offshore wind farms: Evaluation of the potential impact on the marine environment. Mar. Pollut. Bull. 2018, 136, 257–268. [Google Scholar] [CrossRef] [PubMed]
  21. Bleicher, F.; Lechner, C.; Habersohn, C.; Obermair, M.; Heindl, F.; Rodriguez Ripoll, M. Improving the tribological characteristics of tool and mould surfaces by machine hammer peening. CIRP Ann. 2013, 62, 239–242. [Google Scholar] [CrossRef]
  22. Habersohn, C. Analytische und Simulative Betrachtung eines Oberflächenhämmerprozesses. Ph.D. Thesis, Technische Universität Wien, Wien, Austria, 2015. [Google Scholar]
  23. Schulze, V.; Bleicher, F.; Groche, P.; Guo, Y.B.; Pyun, Y.S. Surface modification by machine hammer peening and burnishing. CIRP Ann. 2016, 65, 809–832. [Google Scholar] [CrossRef]
  24. Hönnige, J.R.; Colegrove, P.; Williams, S. Improvement of microstructure and mechanical properties in wire + arc additively manufactured Ti-6Al-4V with machine hammer peening. Procedia Eng. 2017, 216, 8–17. [Google Scholar] [CrossRef]
  25. Klumpp, A.; Tamam, M.; Lienert, F.; Dietrich, S.; Gibmeier, J.; Schulze, V. Residual stress states after piezo treatment at cryogenic and elevated temperatures predicted by FEM using suitable material models. Mater. Res. Proc. 2017, 2, 175–189. [Google Scholar] [CrossRef] [Green Version]
  26. Prevéy, P.S.; Cammett, J.T. The influence of surface enhancement by low plasticity burnishing on the corrosion fatigue performance of AA7075-T6. Int. J. Fatigue 2004, 26, 975–982. [Google Scholar] [CrossRef]
  27. Timmermann, A.; Abdulgader, M.; Hagen, L.; Milz, M.; Wirtz, A.; Biermann, D.; Tillmann, W.; Walther, F. Characterisation of arc-sprayed corrosion protection coatings post-treated by means of “machine hammer peening”. Therm. Spray Bull. 2021, 14, 46–52. [Google Scholar]
  28. Baker, H.; Okamoto, H. (Eds.) ASM Handbook: Volume 3: Alloy. Phase Diagrams; ASM International: Novelty, OH, USA, 1992. [Google Scholar]
  29. Grote, K.-H.; Hefazi, H. (Eds.) Springer Handbook of Mechanical Engineering; Springer: Cham, Switzerland, 2021; ISBN 9783030470340. [Google Scholar]
Figure 1. Principle of the MHP process.
Jmmp 05 00109 g001
Figure 2. Device and experimental setup for thermally assisted Machine Hammer Peening.
Jmmp 05 00109 g002
Figure 3. Maximal process forces during the Machine Hammer Peening process.
Jmmp 05 00109 g003
Figure 4. Photographs of the coating surfaces after TaMHP at temperatures between TMHP = 20 °C and TMHP = 365 °C.
Jmmp 05 00109 g004
Figure 5. Confocal white light microscopic images of the coating surfaces after TaMHP at temperatures between TMHP = 20 °C and TMHP = 365 °C.
Jmmp 05 00109 g005
Figure 6. Characteristics of the coatings measured after different MHP treatments at temperatures between TMHP = 20 °C and TMHP = 365 °C: Roughness depth, porosity, Vickers hardness, and residual stresses.
Jmmp 05 00109 g006
Figure 7. Light microscopic images of the TaMHP coatings peened at TMHP = 20–365 °C.
Jmmp 05 00109 g007
Figure 8. Scanning electron micrographs of ZnAl4 coatings in as-sprayed condition and after MHP treatment at temperatures between TMHP = 20 °C and TMHP = 365 °C using a secondary electrons detector.
Jmmp 05 00109 g008
Figure 9. Scanning electrons micrographs in of ZnAl4 coatings after MHP treatment at temperatures between TMHP = 20 °C and TMHP = 365 °C with backscattered electrons detection showing a material contrast.
Jmmp 05 00109 g009
Figure 10. XRD patterns of ZnAl4 coatings after MHP treatment at temperatures between TMHP = 20 °C and TMHP = 365 °C.
Jmmp 05 00109 g010
Figure 11. Roughness depth and porosity measured for ZnAl4 coatings thermally sprayed with different process parameter settings after MHP treatment at temperatures between TMHP = 20 °C and TMHP = 365 °C.
Jmmp 05 00109 g011
Figure 12. Summary of the resulting roughness depth, porosity, hardness and residual stress for ZnAl4 coatings peened with different process parameter settings at temperatures between TMHP = 20 °C and TMHP = 365 °C with suitable temperature areas highlighted.
Jmmp 05 00109 g012
Table 1. Composition of the ZnAl4 wires used as feedstock material.
ElementZnAlSiFePbCuSn
Wt.-%Bal.3.5–4.5≤3.5–4.5≤0.005≤0.003≤0.002≤0.001
Table 2. Full-factorial plan for the TWAS process.
LabelWire Feedrate
fWire in m/min
Voltage
U in V
Atomization Gas Pressure
pSpray in Bar
CA12.5186
CA24.5244
CA33.5215
CA44.5184
CA52.5246
CA63.5215
CA72.5244
CA84.5186
CA94.5246
CA102.5184
Table 3. Process parameter values for the MHP process.
LabelMax. Indentation Depth ai,max in mmFeed Velocity v in mm/minTrack Distance lp in mm
MHP10.410000.05
MHP20.430000.05
MHP30.410000.2
MHP40.210000.05
MHP50.420000.1
Publisher’s Note: MDPI stays neutral with regard to jurisdictional claims in published maps and institutional affiliations.