Article

Surface Integrity of AISI 52100 Bearing Steel after Robot-Based Machine Hammer Peening

Laboratory for Machine Tools and Production Engineering (WZL) of RWTH Aachen University, 52074 Aachen, Germany
*
Author to whom correspondence should be addressed.
J. Manuf. Mater. Process. 2020, 4(2), 61; https://doi.org/10.3390/jmmp4020061
Submission received: 31 May 2020 / Revised: 19 June 2020 / Accepted: 22 June 2020 / Published: 25 June 2020

Abstract

:
AISI 52100 steel is often used as material for highly loaded rolling bearings in machine tools. An improved surface integrity, which can be achieved by means of mechanical surface layer finishing, can avoid premature failure. One of these finishing processes is machine hammer peening (MHP) which is a high-frequency incremental forming process and mostly used on machining centers. However, the influence of robot-guided MHP processing on the surface integrity of AISI 52100 steel is still unknown. Therefore, the objective of this work is to investigate experimentally the robot-based influences during MHP processing and the resulting surface integrity of unhardened AISI 52100 steel. The results show that the axial and lateral deviations of the robot due to process vibrations are in the lower µm range, thus enabling stable and reproducible MHP processing. By selecting suitable MHP process parameters and thus defined contact energies, even ground surfaces can be further smoothed and a hardness increase of 75% in the energy range considered can be achieved. In addition, compressive residual stress maxima of 950 MPa below the surface and a grain size reduction to a surface layer depth of 150 µm can be realized.

1. Introduction

1.1. Initial Situation and Motivation

Rolling bearings are technical elements that are used in a variety of machines to enable rotational movements. The components of rolling bearings (bearing rings and rolling elements) must withstand high cyclic loads because of over rolling [1], which consist of high contact pressures (up to 3000 MPa) [2], high speeds, and occasionally elevated temperatures [3] and occur with relatively small sliding movements [4]. The material requirements can be derived from the technical requirements for rolling bearings: high hardness, rolling strength and wear resistance, no structural changes and sufficient ductility [5]. Today, the components of a rolling bearing are often made of martensitic hardened and low-tempered AISI 52100 bearing steel, whereby some grades of this material class have tensile strengths Rm greater than 2000 MPa [6] and hardness values greater than 62 HRC [7]. Provided that rolling bearings are correctly installed, correctly loaded and lubricated during operation and kept free of foreign bodies, their main reason for failure after a large number of load cycles is material fatigue [8]. It is assumed that bearing life is limited because of the probability of fatigue micro-cracks occurring in near-surface boundary zones, typically at a depth of 200–400 μm [6]. The local stresses in bearing contacts are determined by Hertzian theory [9], neglecting the influence of lubricants. When the bearing is properly lubricated, the phenomenon of rolling contact fatigue begins as a micro-crack beneath the surface, which then spreads as a macro-crack toward the surface, and when subjected to further loading leads to shell-shaped pittings [10].
One way of increasing the wear resistance and improving the fatigue resistance of AISI 52100 bearing steel is to use surface layer machining processes such as laser peening [11] and deep rolling [12]. In addition, machine hammer peening (MHP) is an alternative process for the targeted processing of technical surface layers. MHP is mainly used in the course of modern production processes, e.g., in the tool making of deep-drawing tools for the automotive industry and in the finishing of welding seams [13]. The MHP is an incremental forming process with the aim of local plastic forming of workpiece surface layers. The electrodynamic MHP is a possible process variant in which high frequency (up to 500 Hz) impacts of a mostly spherical hammer head achieve a targeted smoothing [14] or structuring [15] of the surface as well as an increase in hardness and induction of compressive residual stresses [16] in the metallic workpiece surface layer. The carrier system for the electrodynamic MHP is usually a machining center due to its high stiffness and manufacturing accuracy. Although the MHP promises high machining flexibility on industrial robots, it is only rarely used today, mainly because of possible influences caused by machine vibrations [17]. While deep rolling [5] and laser peening [11] have already been the subject of research work to increase the fatigue strength of AISI 52100 bearing steel, the potentials of MHP in this field are still largely unknown. In addition, the effects of industrial robots as MHP carrier systems and their influences on the MHP machining result, which need to be taken into account, have not yet been fully researched. For these reasons, the present work deals with the investigation of the effects of robot-guided electrodynamic MHP on the surface integrity of unhardened AISI 52100 steel.

1.2. Objective

One objective of this paper is the quantification of the robot influences on the MHP processing result. The effects of different stiffness as well as acceleration profiles of industrial robots compared to machining centers will be considered in the context of MHP. Another objective is to analyze the cause-and-effect relationships between the energy input resulting from different MHP process parameters and the surface integrity of an unhardened AISI 52100 steel. A better understanding of the predominant interactions provides the basis for further investigations into wear and fatigue strength.

1.3. Approach

In a first step, the influences of an industrial robot as a carrier system in electrodynamic MHP processing are investigated. In addition to the velocity profiles, the axial and radial dynamic stiffness of the robot during MHP machining are also considered. By means of a qualitative correlation of the robot influences with the resulting surface topography and the energy input the suitability of the robot as a carrier system for electrodynamic MHP can be evaluated. In a second step, by selecting suitable MHP process parameters, different energy inputs are realized and their effects on the surface integrity (roughness, hardness, residual stresses, and grain size) are analyzed. In a third step, the experimental results are obtained and an energy-based recommendation for electrodynamic MHP processing of AISI 52100 steel is formulated.

2. Materials and Methods

2.1. Analysis of Robot Dynamics

Because of the lower stiffness of an industrial robot compared to a machining center, the robot dynamics and its influence on the hammering result were investigated before the MHP experiments. Acceleration studies were used to analyze in which areas the robot has a constant velocity, thus ensuring reproducible contact conditions for MHP. The vibration of the robot axis with the hammer tool was investigated to evaluate the machining influence on the workpiece topology. Furthermore, the elastic deformation of the hammer tool during MHP was investigated. This enabled a qualitative evaluation of the machine influences on the MHP processing result.
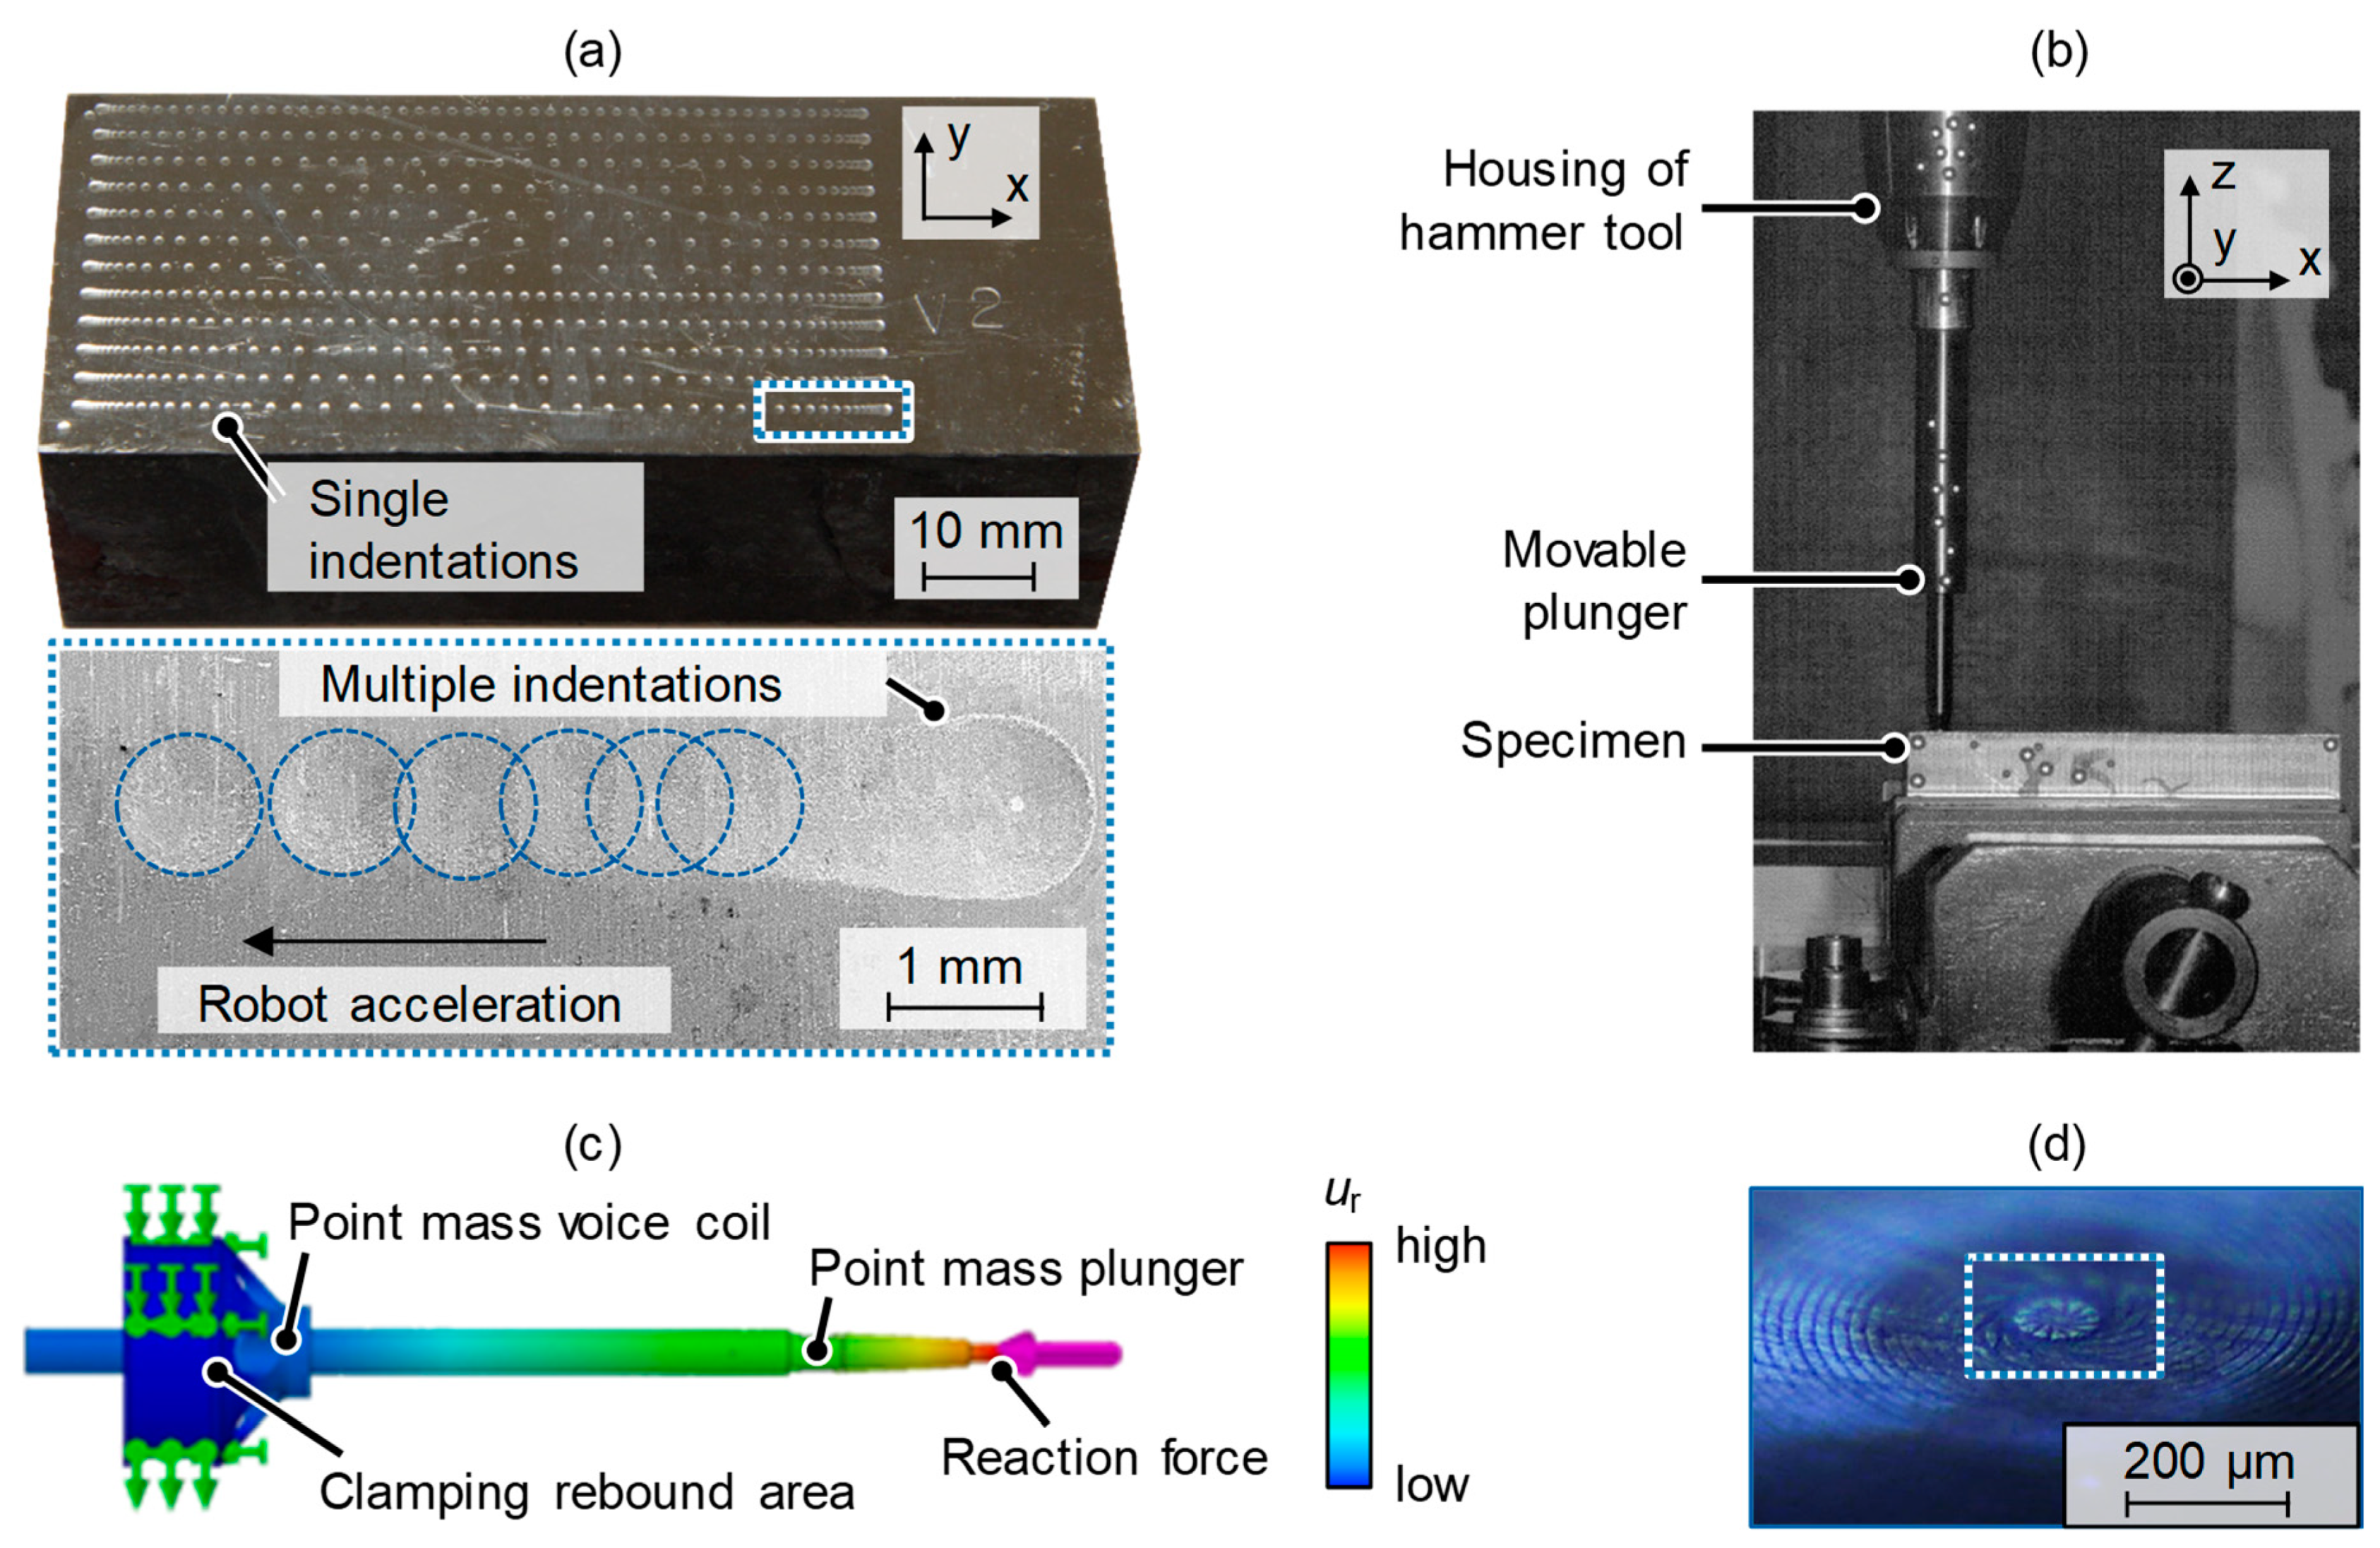
For the analysis of the robot dynamics, the electrodynamic MHP system type 2002 of accurapuls was adapted to an industrial robot ABB IRB6660-205/1.9; see Figure 1a. The structure of the electrodynamic hammer tool is shown in Figure 1b.
The operating principle and process parameters of electrodynamic MHP are described in [18]. The further development of the MHP system with a fiber-optic distance sensor for inline determination of the impact energy (kinetic energy) calculated from the measured plunger stroke is already described in [19]. A relationship between impact energy and surface integrity could be established in this way. The used six-axis robot had a working range lra = 1.9 m and a handling capacity mr = 205 kg. The total mass of the hammer tool, which is attached to the robot flange via an aluminum adapter, was determined to be mt = 12.25 kg.
For the analysis of the acceleration profiles of the robot used with adapted hammer tool, test series with feed rates vr = 120…340 mm/s were carried out at different frequencies f = 80, 120, 180 Hz with constant hammer head diameter d = 6 mm, electrical power stage Pel = 70%, and stroke h = 0.8 mm. By evaluating the distances between the resulting indentation diameters di, the feed rate of the robot vr could be calculated according to the following equation:
vr = (xdi+1xdi) · f
with xdi—position of indentation along the feed axis. For analyzing the indentation diameters a Marvision MM 320 microscope was used. The tests were carried out along a path length lx = 70 mm, see Figure 2a.
During MHP processing, vibrations can occur along the impact axis. For this purpose, MHP tests with hammering frequencies f = 120, 180 Hz, electrical power stage Pel = 70%, stroke h = 0.4 mm, and indentation distance a = 0.05 mm were also carried out. The analysis of the specimen, plunger, and hammer tool vibration in axial (z-) impact direction was done using an Aramis system from GOM, see Figure 2b. Based on triangulation, 3D displacements were optically recorded in real time for point-based measurements.
To investigate the elastic deformation of the oscillating mass in the hammer tool during MHP, finite element (FE) analyses were performed in SolidWorks 2019. Since elastic deformations of the vibrating mass can influence the detected plunger stroke and thus the contact energy, it was necessary to consider them. AISI 4140 was selected as material for the oscillating components. The reaction forces were varied between Fr = 0.5…2.5 kN. This range was chosen because the hammering forces of the inserted hammering system were determined by means of a Kistler 9257B force-measuring platform in previous works. The simulation procedure was based on the work of Habersohn [18], see Figure 2c.
Using a micro-structured plunger with a hammer head diameter d = 10 mm and a hammering frequency f = 120 Hz, the machining deviations due to vibration of the carrier system (robot) parallel and perpendicular to the hammering direction were investigated. The micro-structured area on the hammer head had a diameter dm = 100 µm and a depth tm = 2 µm, see Figure 2d.

2.2. MHP Test Bench Environment and Characterisation Methods

The MHP tests were also carried out with an industrial robot ABB IRB6660 and an electrodynamic hammer system type 2002 from accurapuls. After the preliminary tests for characterization of the dynamic robot behavior and the indentation accuracy, MHP tests were carried out. Therefore, AISI 52100 specimens with the dimension 100 × 40 × 30 mm (L × W × H) were used. When delivered, the specimens were in a forged and annealed condition according to DIN 7527. For reproducible initial conditions of the specimens, their surfaces were subsequently ground plane-parallel. The specimens were not subjected to heat treatment, since the primary objective was to investigate fundamental cause-and-effect relationships between the contact energy in robot-guided MHP and the resulting surface integrity. A further analysis with heat-treated AISI 52100 steel with regard to the transferability of the cause-effect relationships identified in this work is planned for the future. The chemical composition determined by means of spark spectroscopy meets the requirements of DIN EN ISO 683-17. The values averaged over three measurements with the corresponding standard deviations σ are given in Table 1.
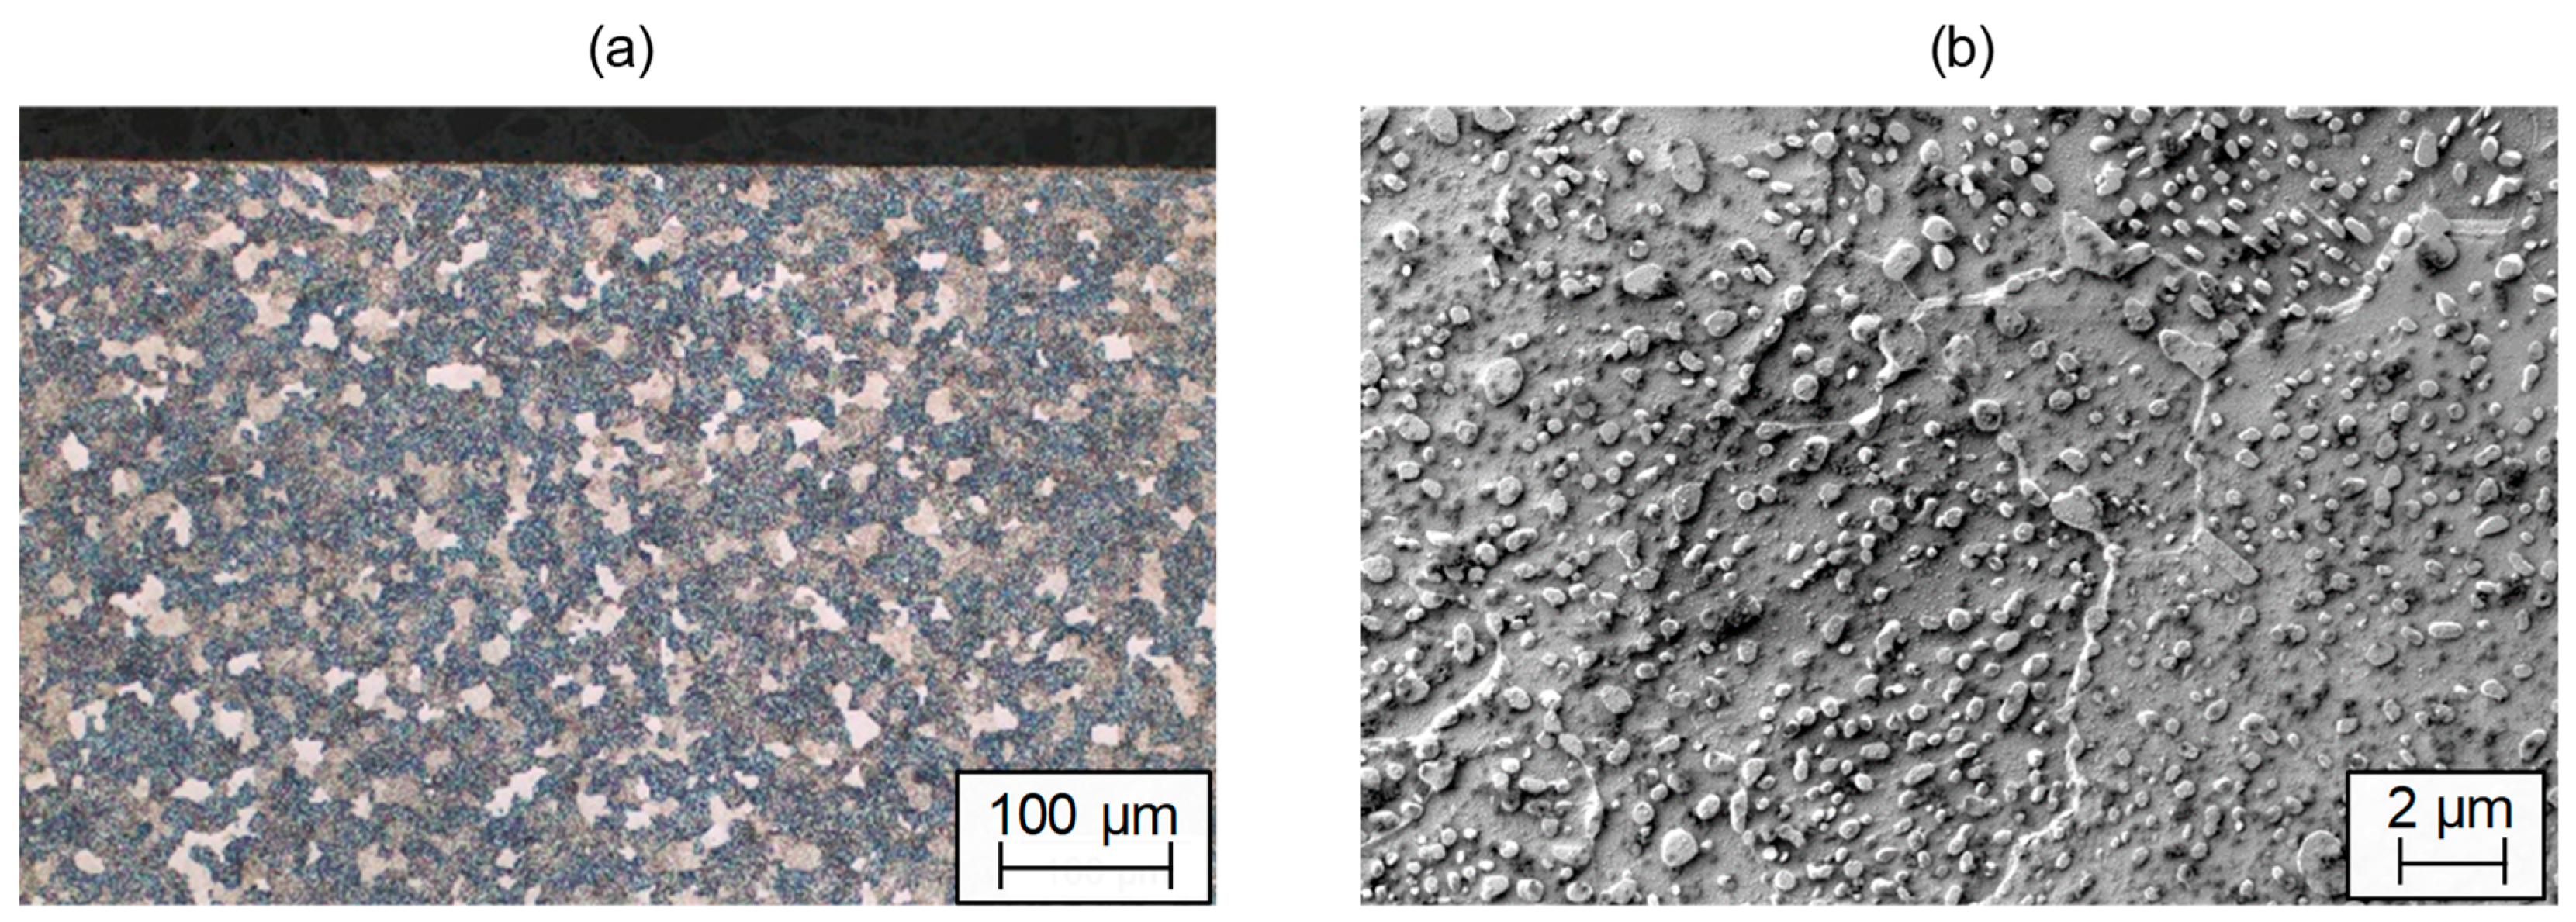
The initial microstructure of the AISI 52100 specimen was analyzed by means of light (Figure 3a) and scanning electron microscopy (Figure 3b). The homogeneous microstructure contains perlite with secondary cementite on the grain boundaries. The lamellar cementite of the perlite structure is spherically formed by the previous annealing of the steel and secondary spherical carbide inclusions are formed. For microscopic analysis, the specimens were first nickel-plated and then conductively hot-embedded. Grinding was carried out with 320…2500 grit abrasive paper (SiC). Subsequently, the specimens were mechanically polished for 10 min each step starting with 6 µm, followed by 3 µm and 1 µm ethanol-based diamond suspension. The selected contact pressure was Fprep = 10 N. Colloidal silica suspension (OP-S) was the final preparation step to achieve a deformation-free surface for high orientation contrast in EBSD analysis. For light microscopic analysis, the ground and polished specimen cross sections were etched with a 1% HNO3 solution. A Zeiss Axio Imager M2m microscope was used for light microscopic analyses and a Zeiss Sigma 500 VP field emission scanning electron microscope for SEM analyses. Furthermore, for SEM analysis a combined EDX/EBSD system (NordLys nano camera and Aztec software) from Oxford Instruments was used. The backscatter electrons (BSE) and secondary electrons (SE) SEM investigations were performed using an accelerating voltage of 10 kV with working distances WD = 5…10 mm. EBSD analysis were performed at an accelerating voltage of 20 kV and WD = 12…14 mm.
The MHP parameter setups and corresponding contact energies Ec = 7…40 mJ were defined as follows, see Table 2. Three valid repetitions were carried out for each experiment.
A symmetrical surface structure was hammered on all fields with indentation distance a = stepover distance b = 0.05 mm. All tests listed were carried out with one overrun (n = 1). Using the given indentation and path distances and the number of overruns, an energy density per mm2 (w) was calculated. The hammering frequency f, the hammer head diameter d, and the plunger stroke h were chosen according to previous works [19]. A meandering machining strategy was therefore selected. Furthermore, the lubricant Castrol Viscogen KL3 was chosen and all tests were carried out with an impact angle βi = 0°, which corresponds to an orthogonal alignment of the hammer tool to the specimen surface. The electrical power stage was set to Pel = 70% for all tests, which corresponds to an electrical power P = 470 W.
The surface roughness of the specimens was determined by means of a measuring system Hommel Etamic T8000 RC according to ISO 25178 on 1.6 × 1.6 mm measuring fields. The surface macro hardness according to Vickers was determined by four-fold repeated measurement and subsequent averaging using a Zwick Roell Indentec ZHU250 hardness tester according to DIN EN ISO 6507-1. By means of a Fischerscope HM2000 hardness tester the microhardness according to Vickers was determined. The measuring points along the surface layer depth had a distance of 75 µm. In each surface layer depth eight measurements were made for statistical verification. The depth profiles of the residual stresses were measured with the PRISM hole drilling system from Stresstech according to the principle of electronic speckle pattern interferometry (ESPI) [20].

3. Results and Discussion

In the following, the results of the surface layer analysis are presented. Besides the results of surface roughness and hardness, microhardness and residual stress curves into the surface layer depth after MHP are also shown. In addition, first results on the effect of MHP on the grain size distribution using EBSD analyses are presented.

3.1. Robot Acceleration

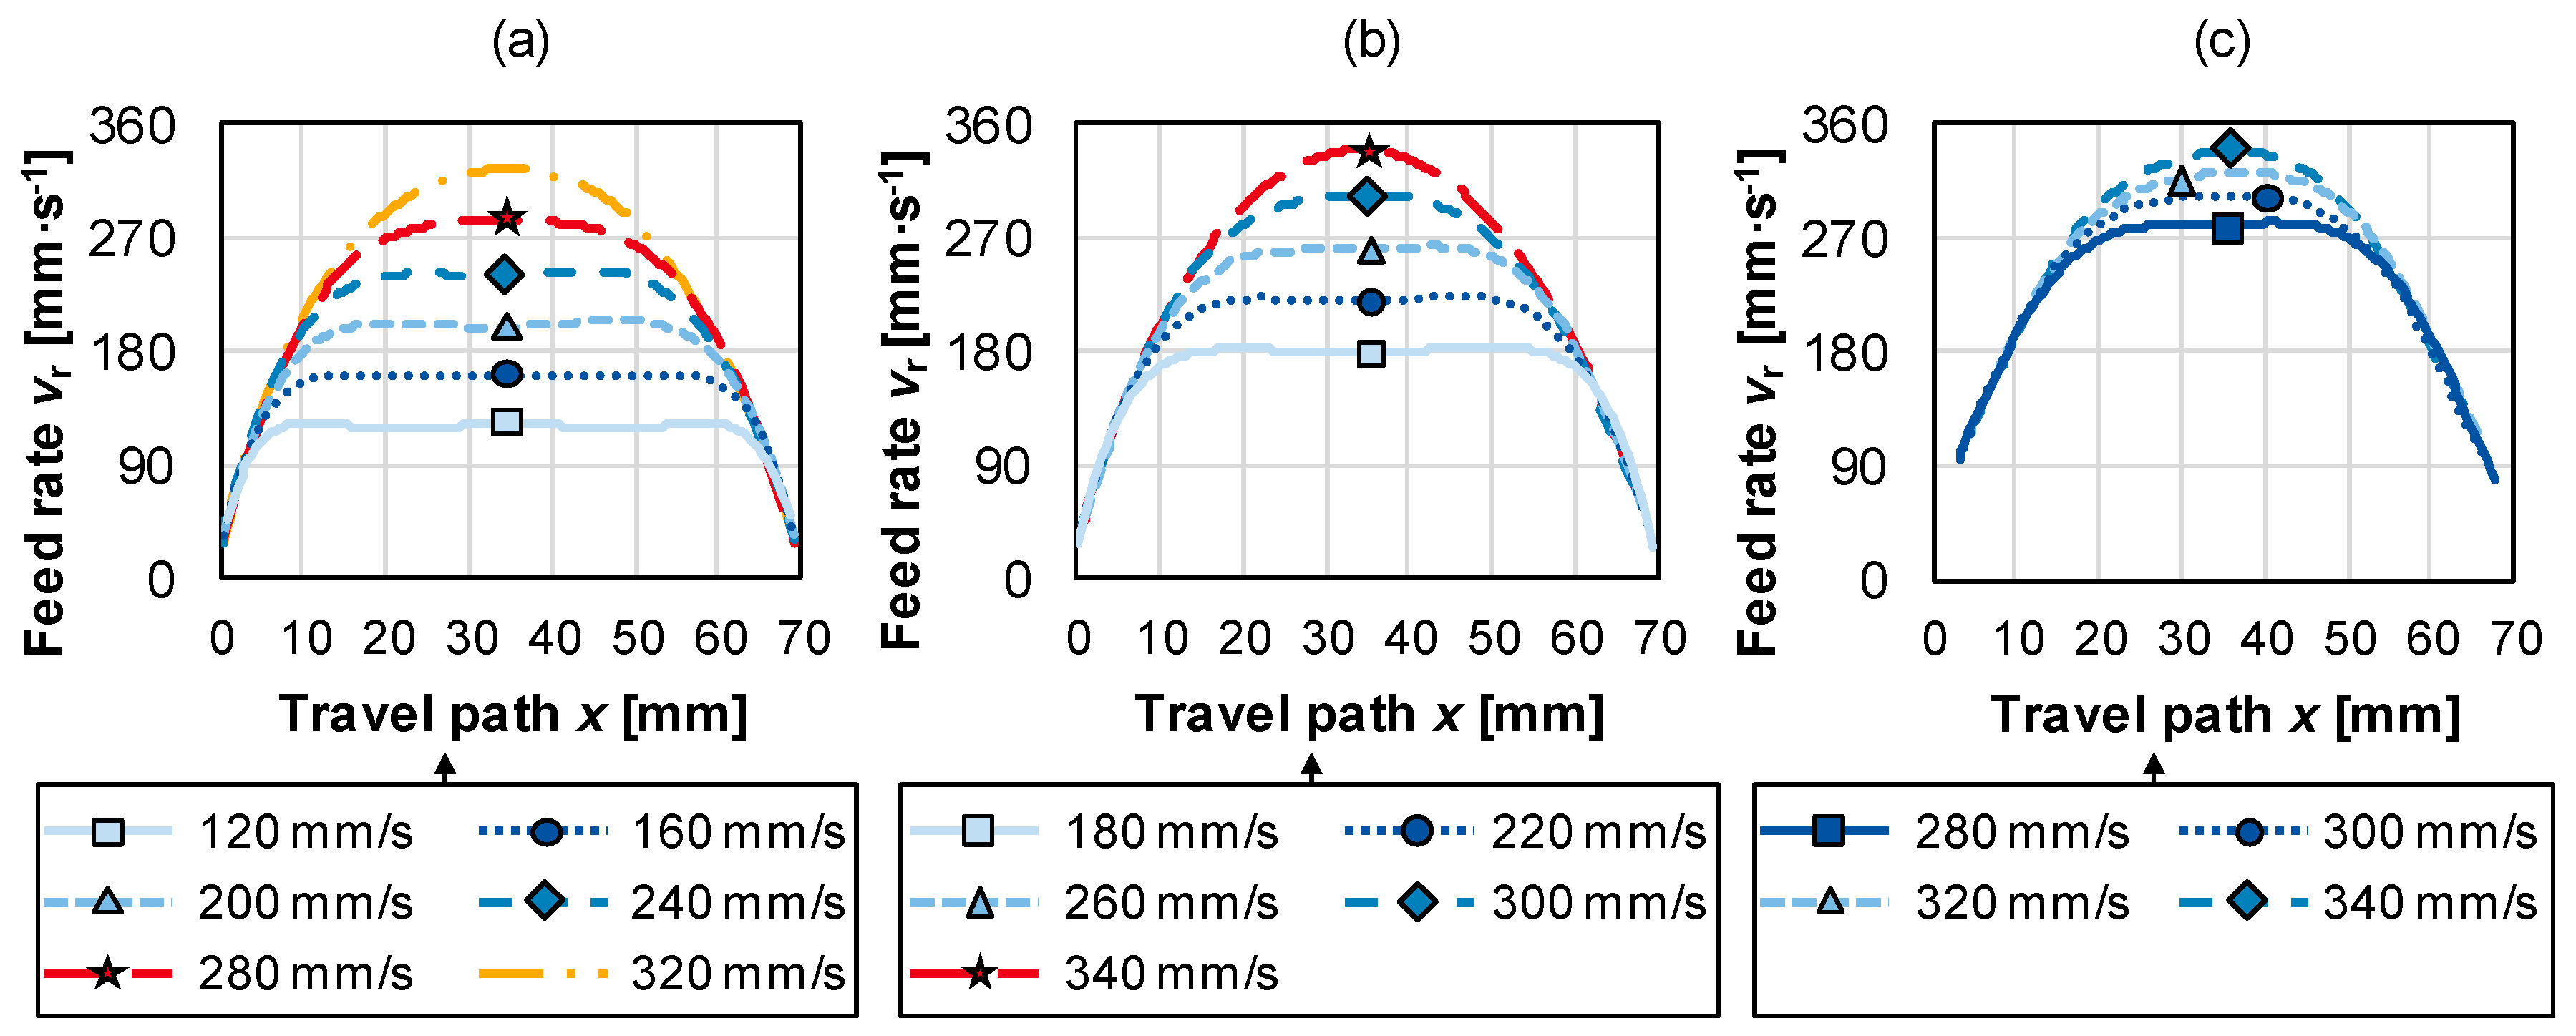
Figure 4 shows the results of the robot acceleration analyses. The indentation diameters were in the range di = 0.930…1.065 mm. It can be seen that the acceleration profiles of the robot can be divided into three areas: positive, zero, negative. As the feed rate increases, the set robot speed is reached later and the range of constant robot speed is reduced.
With MHP, an overlap of at least 50% in the feed direction as well as in the direction of the path distance is often aimed for. Assuming that an indentation distance a = 1 mm is desired at hammering frequencies f = 120...180 Hz, the feed rate is calculated as vr = 60...100 mm·s−1. Accordingly, it is expected that those lower feed rates in the case of surface machining will lead to a further increase in the range of the constant robot velocity. The topic of different velocity profiles in robot-based MHP processing and the resulting uneven energy input due to different numbers of individual impacts has already been addressed by Krall [21]. By a targeted coupling of the MHP system via a serial interface with the robot, the MHP parameters electrical power stage Pel and hammering frequency f can be specifically adapted depending on the robot feed rate vr. However, the approach presented was not taken up in this paper, as the investigation of fundamental cause-and-effect relationships between the MHP and the surface integrity of AISI52100 bearing steel should be addressed. The acceleration characteristics of the robot were therefore taken into account by selecting analysis areas of constant and reproducible boundary conditions. It could be determined that independently of the selected hammering frequency f, the positive and negative acceleration ar can be described with the following equations for the feed rate vr independently of the selected hammering frequency f:
ar > 0:   vr(x) = 7.14 · x + 100.9
ar < 0:   vr(x) = −6.22 · x + 549.5

3.2. Robot Vibration and Indentation Profiles during MHP

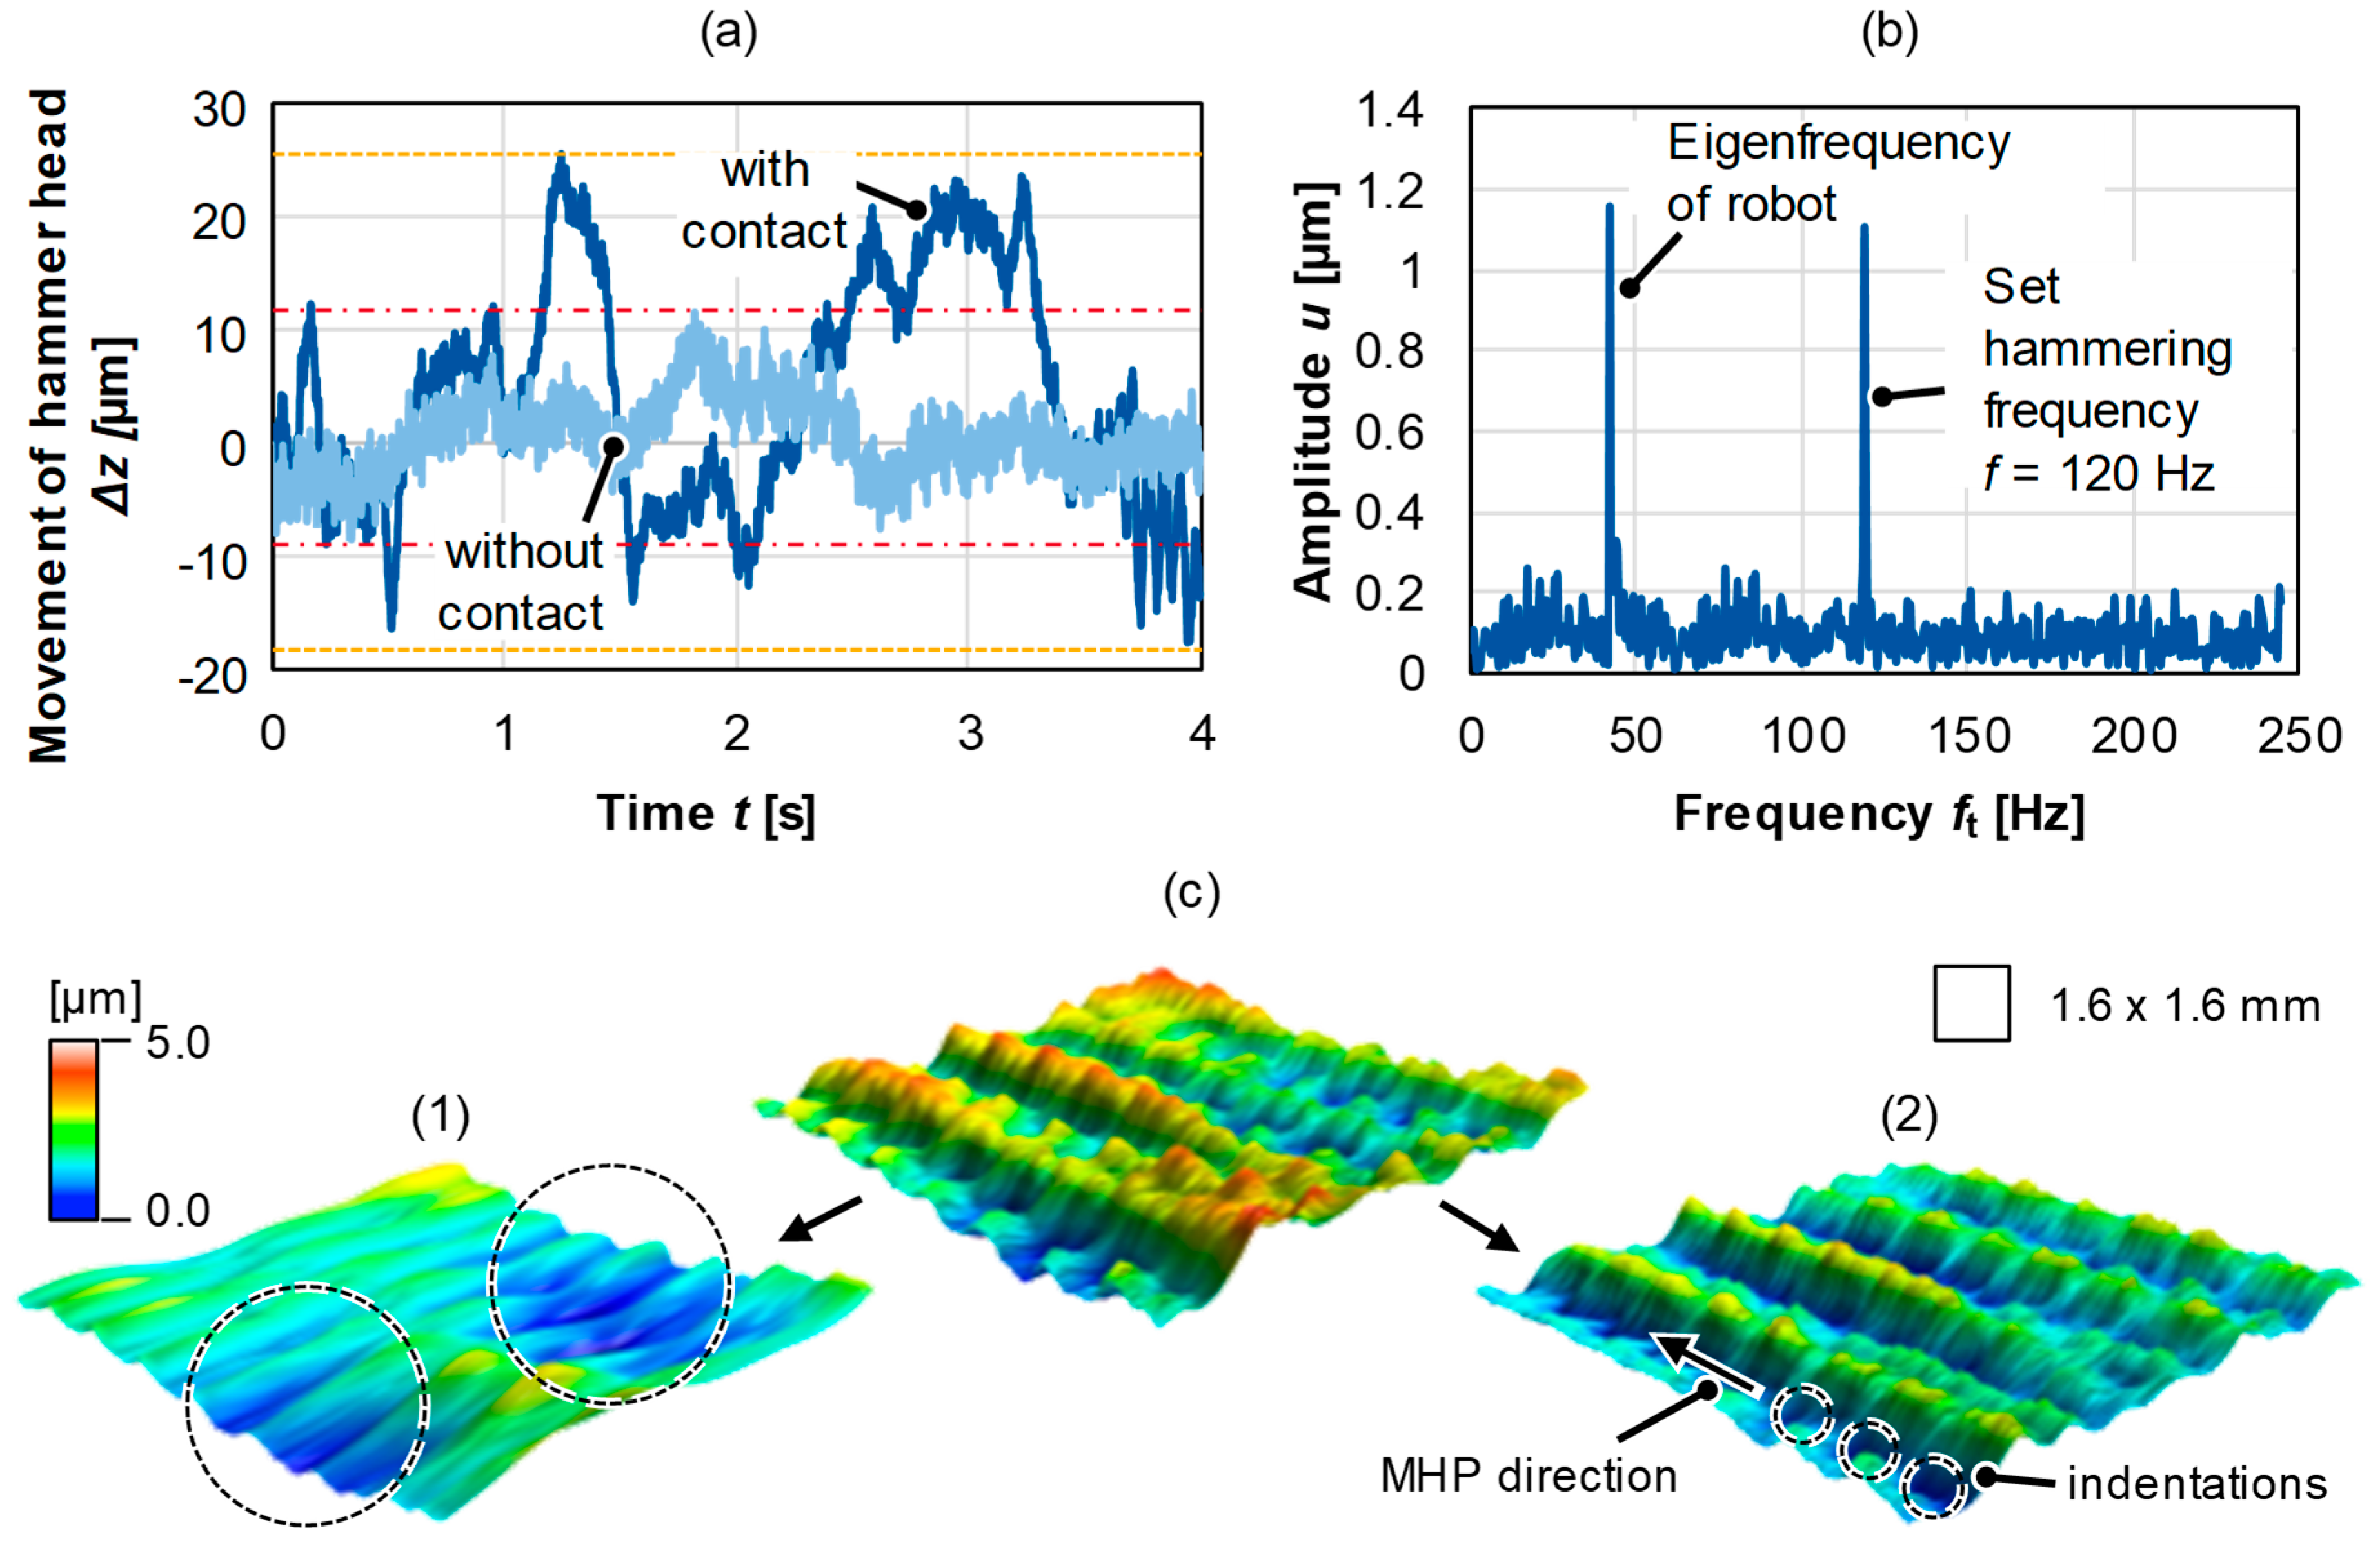
Figure 5a shows the axial movement of the hammer tool at f = 120 Hz along a hammering path. It is obvious that regarding the MHP with workpiece contact the axial movement of the hammer tool increases compared to the MHP without workpiece contact. In the parameter range considered, the maximum movement of the hammer tool was Δz ≈ 40 μm (area between dotted orange lines). This corresponds to approximately 10% of the set stroke. Because of the high stiffness of the robot, the influence of vibration on the impact energy applied is therefore negligible. Nonetheless, the comparison with a previous work on the robot-based MHP shows that the influence of different industrial robots on the processing result with the electrodynamic MHP must always be individually evaluated [17]. In this work, with activated MHP system, but without workpiece contact, the maximum movement was Δz < 20 μm.
Furthermore, it was investigated in which range the eigenfrequency of the robot lies in order to avoid a processing influence. The eigenfrequency is described as the free and undamped oscillation of the robot as carrier system for the MHP tool. The analysis of the eigenfrequency of the robot should exclude that it is in a similar range as the used hammering frequencies f of the MHP system. The hammering frequency is the frequency which is set at the beginning of the MHP process and which describes the number of impacts per second of the plunger on the workpiece surface. If the frequency ranges are superimposed, the vibration amplitudes could be amplified, thus influencing the plunger stroke and resulting in different contact energies of individual hammer impacts. Therefore, the dynamic behavior of the robot was described by transferring a defined time segment of the oscillation signal with activated MHP (with contact) into the frequency domain using fast Fourier transformation (FFT); see Figure 5b. The eigenfrequency of the robot is fR = 42.5 Hz, the used hammering frequency f = 120 Hz is also visible. Since MHP processing of the samples with hammering frequencies f = 120, 180 Hz should be executed, no influence of the eigenfrequency on surface integrity was expected.
The slight oscillation of the carrier system (robot axis with hammer tool) during MHP lead to undesired surface effects, see Figure 5c. By repeated wavelet transformations (spline; different filter levels) the output profile was decomposed to make the waviness visible. In (2) the individual hammer impacts and the machining paths resulting from MHP machining are visible. In (1), however, the waviness caused by the robot vibrations is undesired and prevents a defined surface structuring. Nevertheless, the size range of the unintentionally induced waviness due to the robot oscillation is very small. The surface morphologies determined after MHP tests support this statement. Furthermore, the analysis of the elastic deformation of the vibrating mass in the hammer tool by the impacts on the workpiece surface confirmed the results of Habersohn [18]. By varying the reaction forces Fr = 0.5...2.5 kN, maximum elastic compressions of the vibrating mass ur,max = 5...15 µm were determined. The influence of the elastic compression on the set plunger stroke and thus the resulting energy input into the workpiece surface was therefore also neglected.
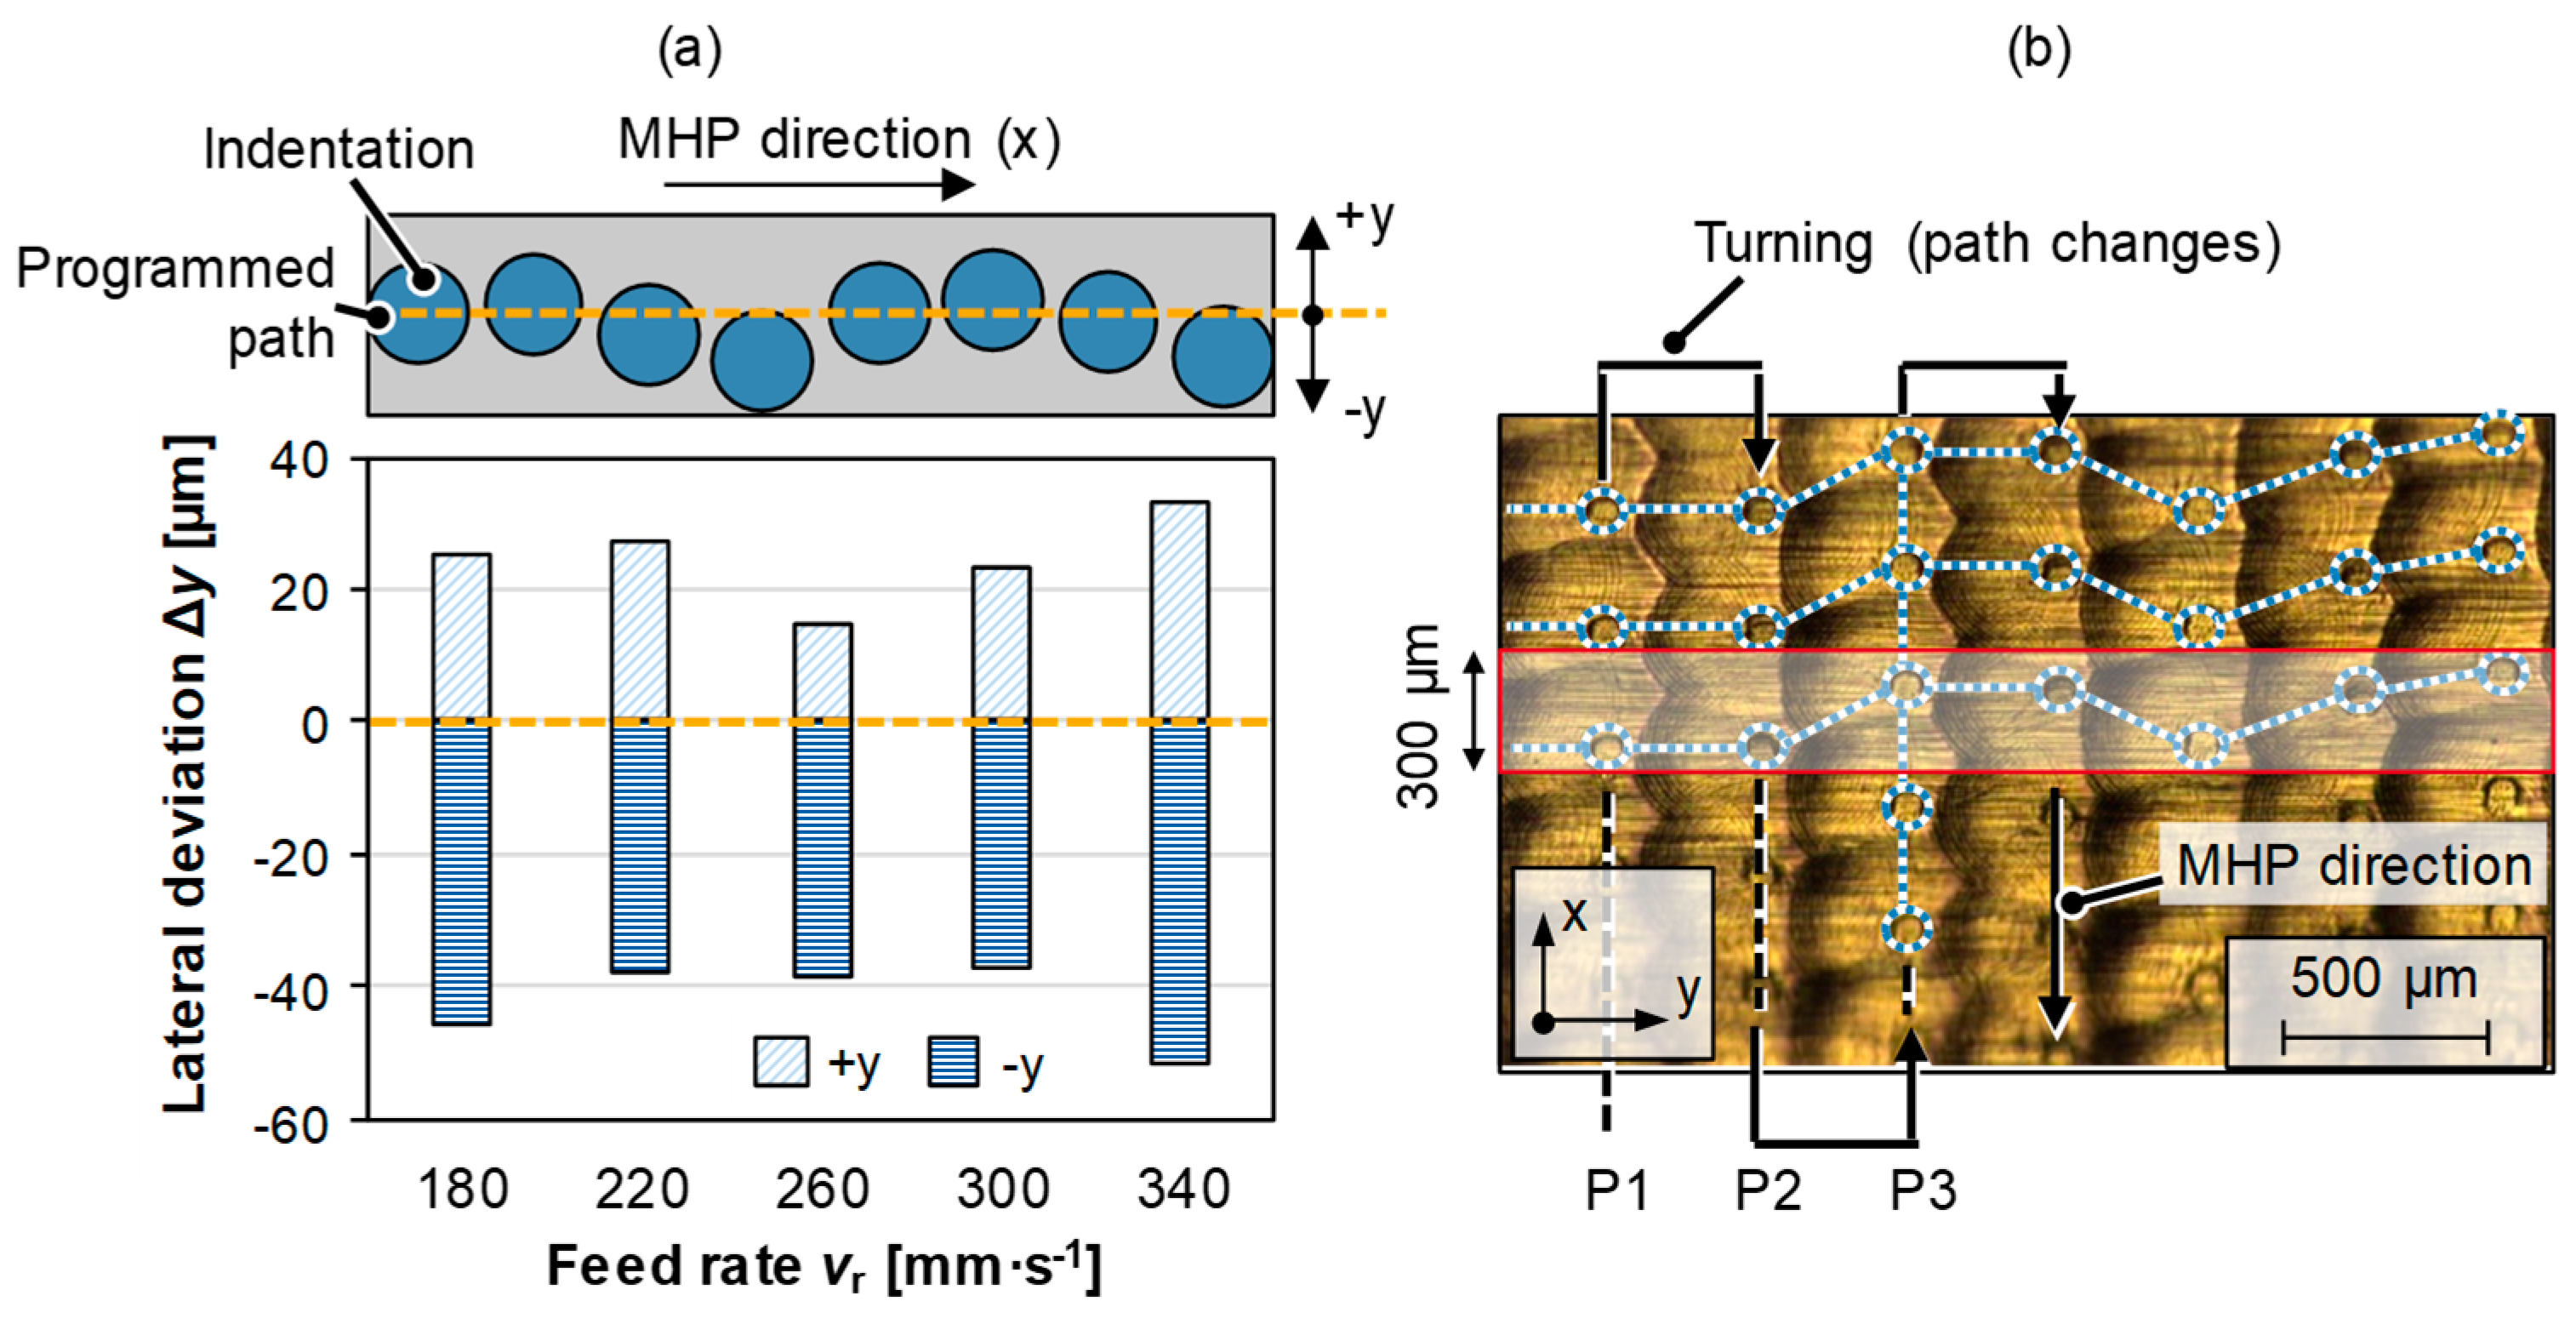
Using a hammering frequency f = 120 Hz, it was found that in the area of a constant robot velocity the indentations in feed direction (x) were equidistant and macroscopic in line, see Figure 6a. The deviation in positive (+y) and negative (−y) direction along the feed axis was at maximum Δy = 80 µm (Diff.). A high positional repeatability of the robot along the feed axis in the area of constant robot velocity is therefore given. However, adjacent paths (y-direction) show a partly significant displacement, which is due to the turning points during path changes of meandered machining. An exact positioning of the individual indentations of adjacent paths is not possible due to the process characteristics. In some cases, larger deviations can occur Δxmax ≈ 300 μm (area between red lines), whereby the deviations are still within the range of a single indentation diameter (di ≈ 1 mm).
In summary, it can be stated that vibrations on the robot model considered here in axial and radial direction during MHP treatment have a slight influence on the processing result. Thus, a basic suitability for the use of the robot model in MHP could be proven. Furthermore, it could be shown that only very small elastic deformations of the component oscillating in the hammer tool occur during electrodynamic MHP and a significant influence on the measured plunger stroke and thus on the contact energy and energy density can be excluded. However, these system influences were neglected for the following analysis of cause-and-effect relationships between MHP process parameters and surface integrity of an AISI 52100 steel.

3.3. Surface Roughness

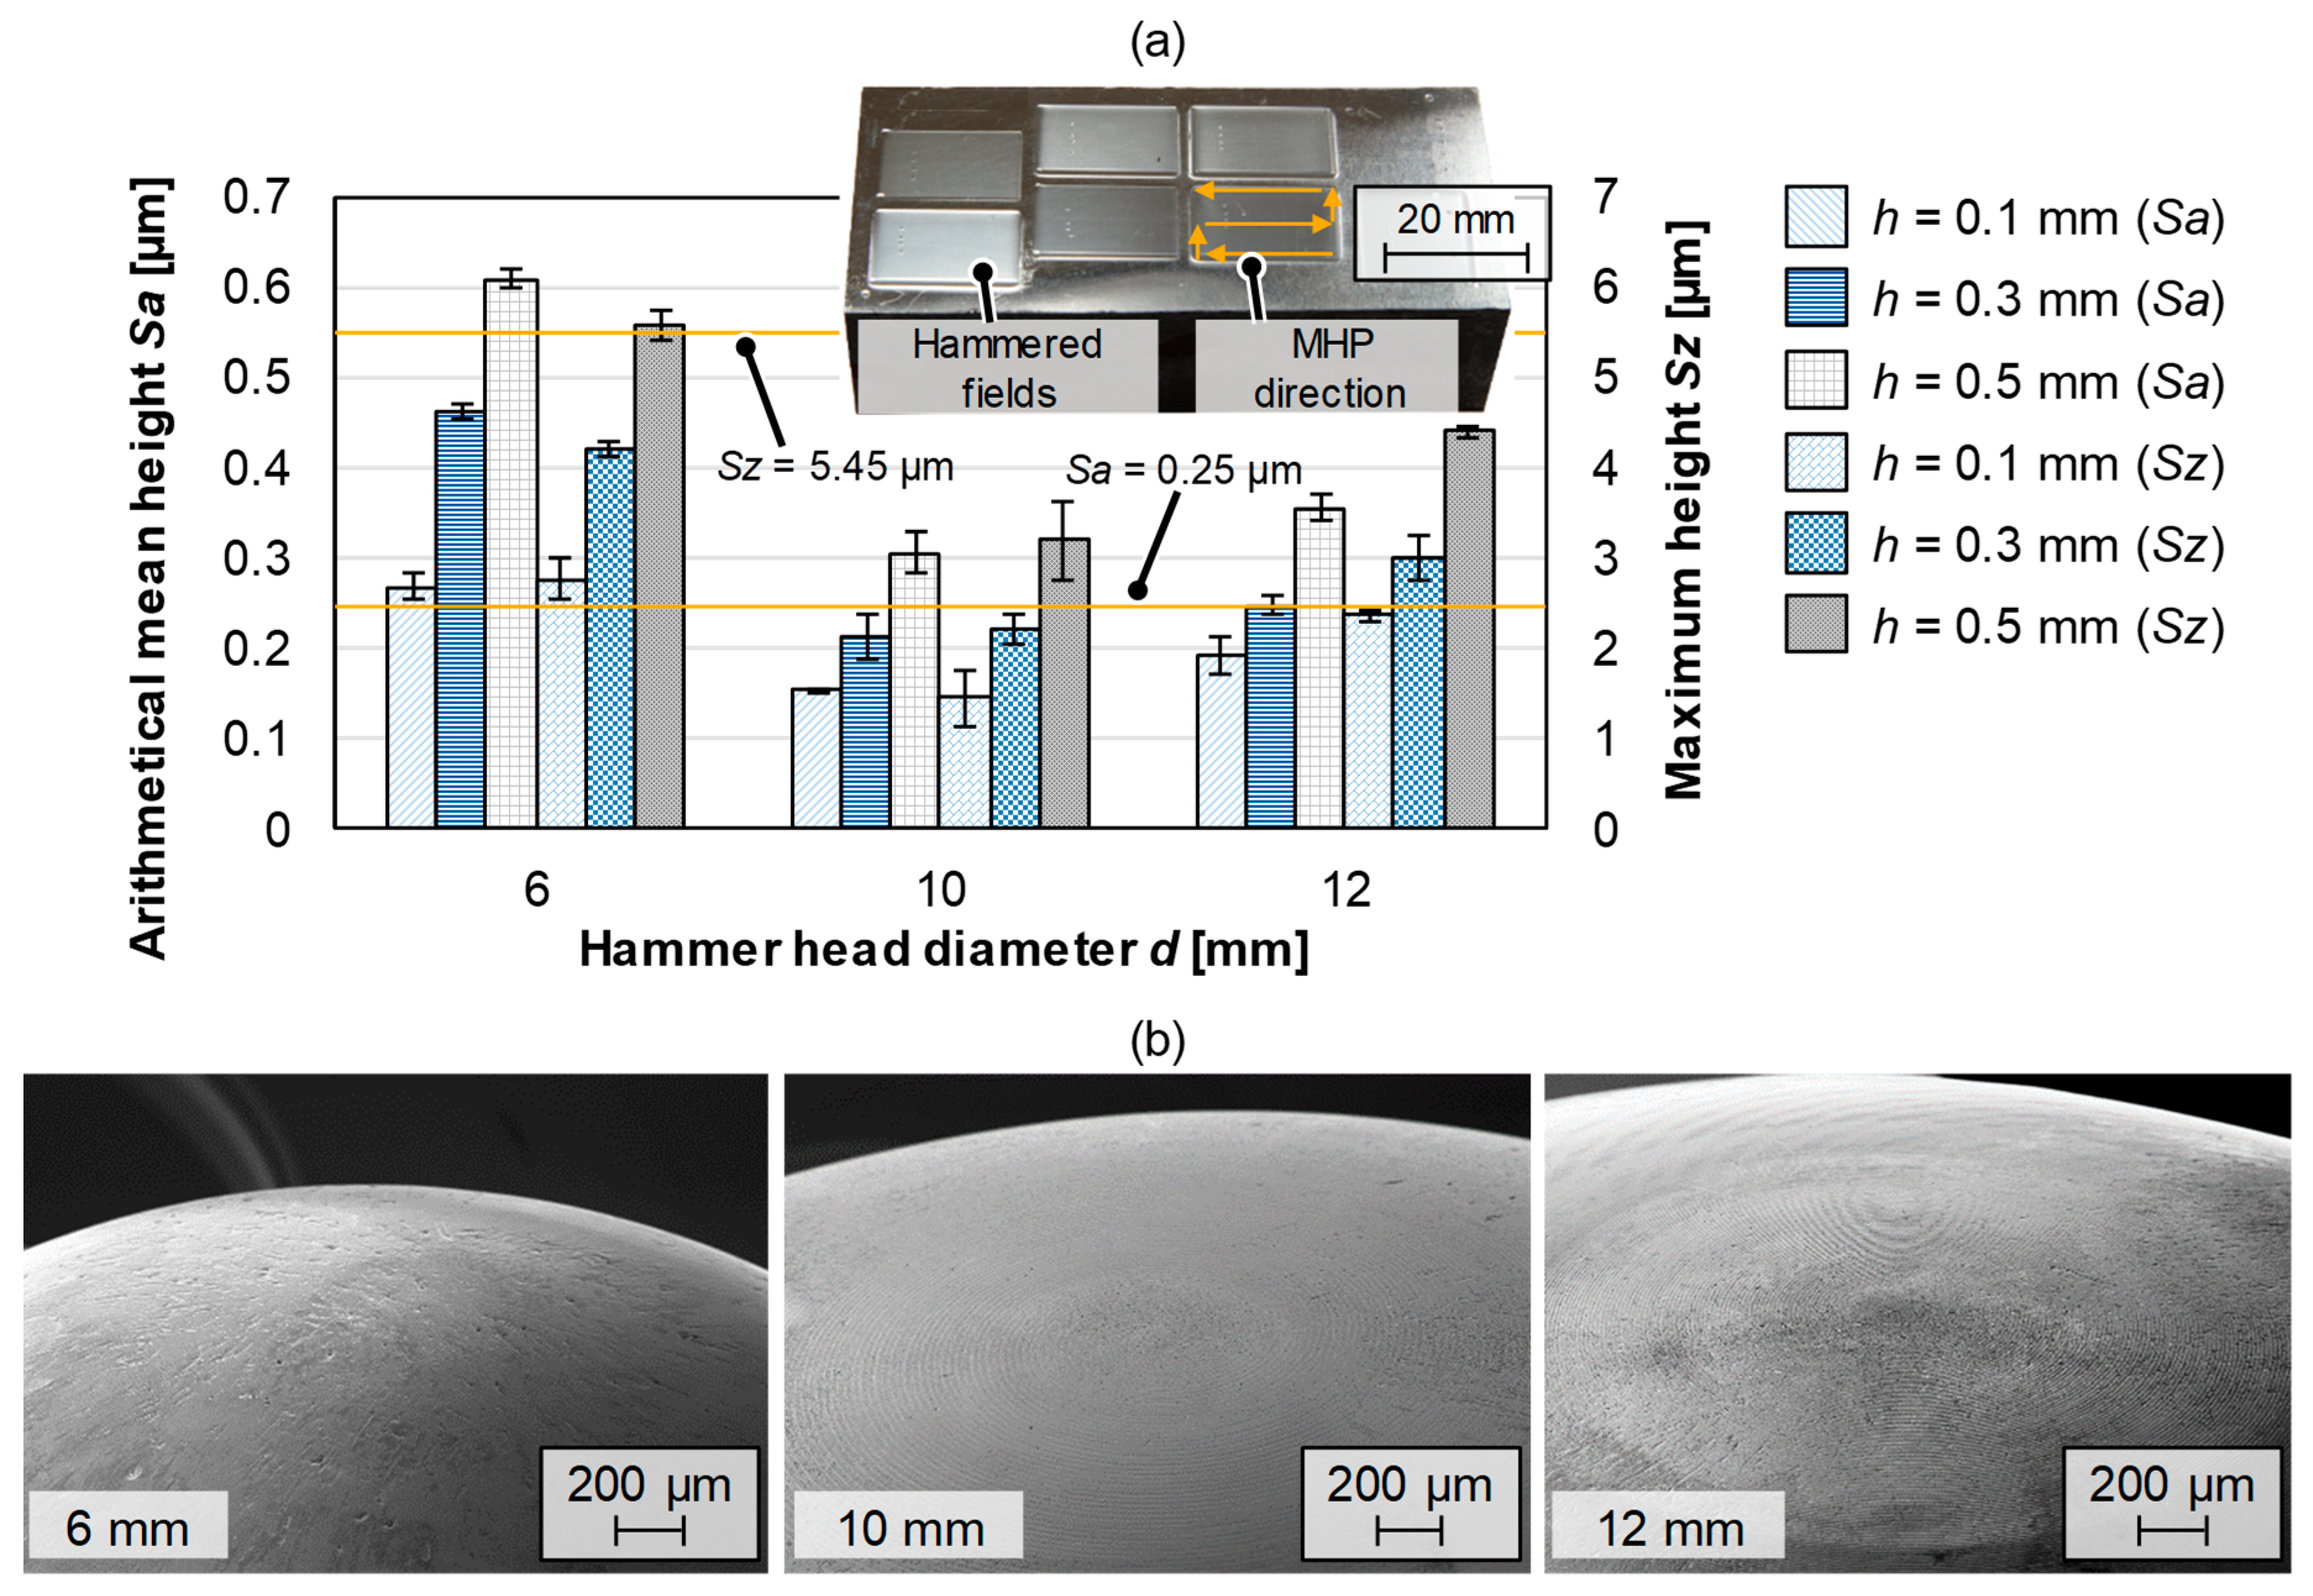
The results of roughness measurements are shown in Figure 7a. Besides the maximum height Sz the arithmetical mean height Sa was considered, since it is robust against small superficial impurities on the specimen surface. The influence of outliers is thus minimized. With increasing stroke h = 0.1…0.5 mm both roughness values increase significantly. This finding confirms the results of Krall on Al-2024-T351 [21], Bleicher et al. on unhardened DIN 1.2379 tool steel [22] and Lechner et al. on DIN 1.1191 steel [23]. The tendency in the size of the hammer head diameter is not evident. There is a preference to set a lower roughness value with larger hammer head diameters. This coincides with the investigations of Wied [24]. Nonetheless, the best results were achieved with a hammer head diameter d = 10 mm. However, a separate consideration of the influence of the hammer head diameter is insufficient. A supplementary consideration of the interaction of the hammer head diameter with the indentation and path distance would be useful in future work.
An influence, for e.g., imperfections or a flattening of the plunger surface could be excluded by profile and SEM analyses of the plunger surface before the tests were carried out, see Figure 7b. Only the plunger with d = 6 mm showed minimal signs of use. The maximum radial deviations from the idealized reference profile were Δr = 1.5 µm. No wear of the ball surface was detected on the plungers used after the MHP tests. By using a stroke h = 0.1 mm, the lowest roughness values Sa = 0.153 µm and Sz = 2.22 µm could be achieved. This corresponds to a reduced roughness of 40% (Sa) and 60% (Sz) compared to the ground initial surface.
However, it must also be mentioned that the roughness was considered in a range of constant MHP conditions without the influence of boundary areas. Lechner first described the effect of material throw-up during MHP machining [23]. This effect occurs in the transition zone between machined and unmachined surface areas. The material is advanced in the machining direction by the tangential contact between the plunger and the workpiece surface. This causes a material accumulation. In addition to lowering the machining area, this also leads to the initial level being exceeded. Furthermore, the last machining path is finally lowered in relation to the previously machined surface. In the case of MHP machining over the entire surface and the aim of achieving uniform, low surface roughness, this circumstance must be taken into account. A possible approach to avoid such material throw-ups is described by Krall [21].

3.4. Surface Layer Hardness

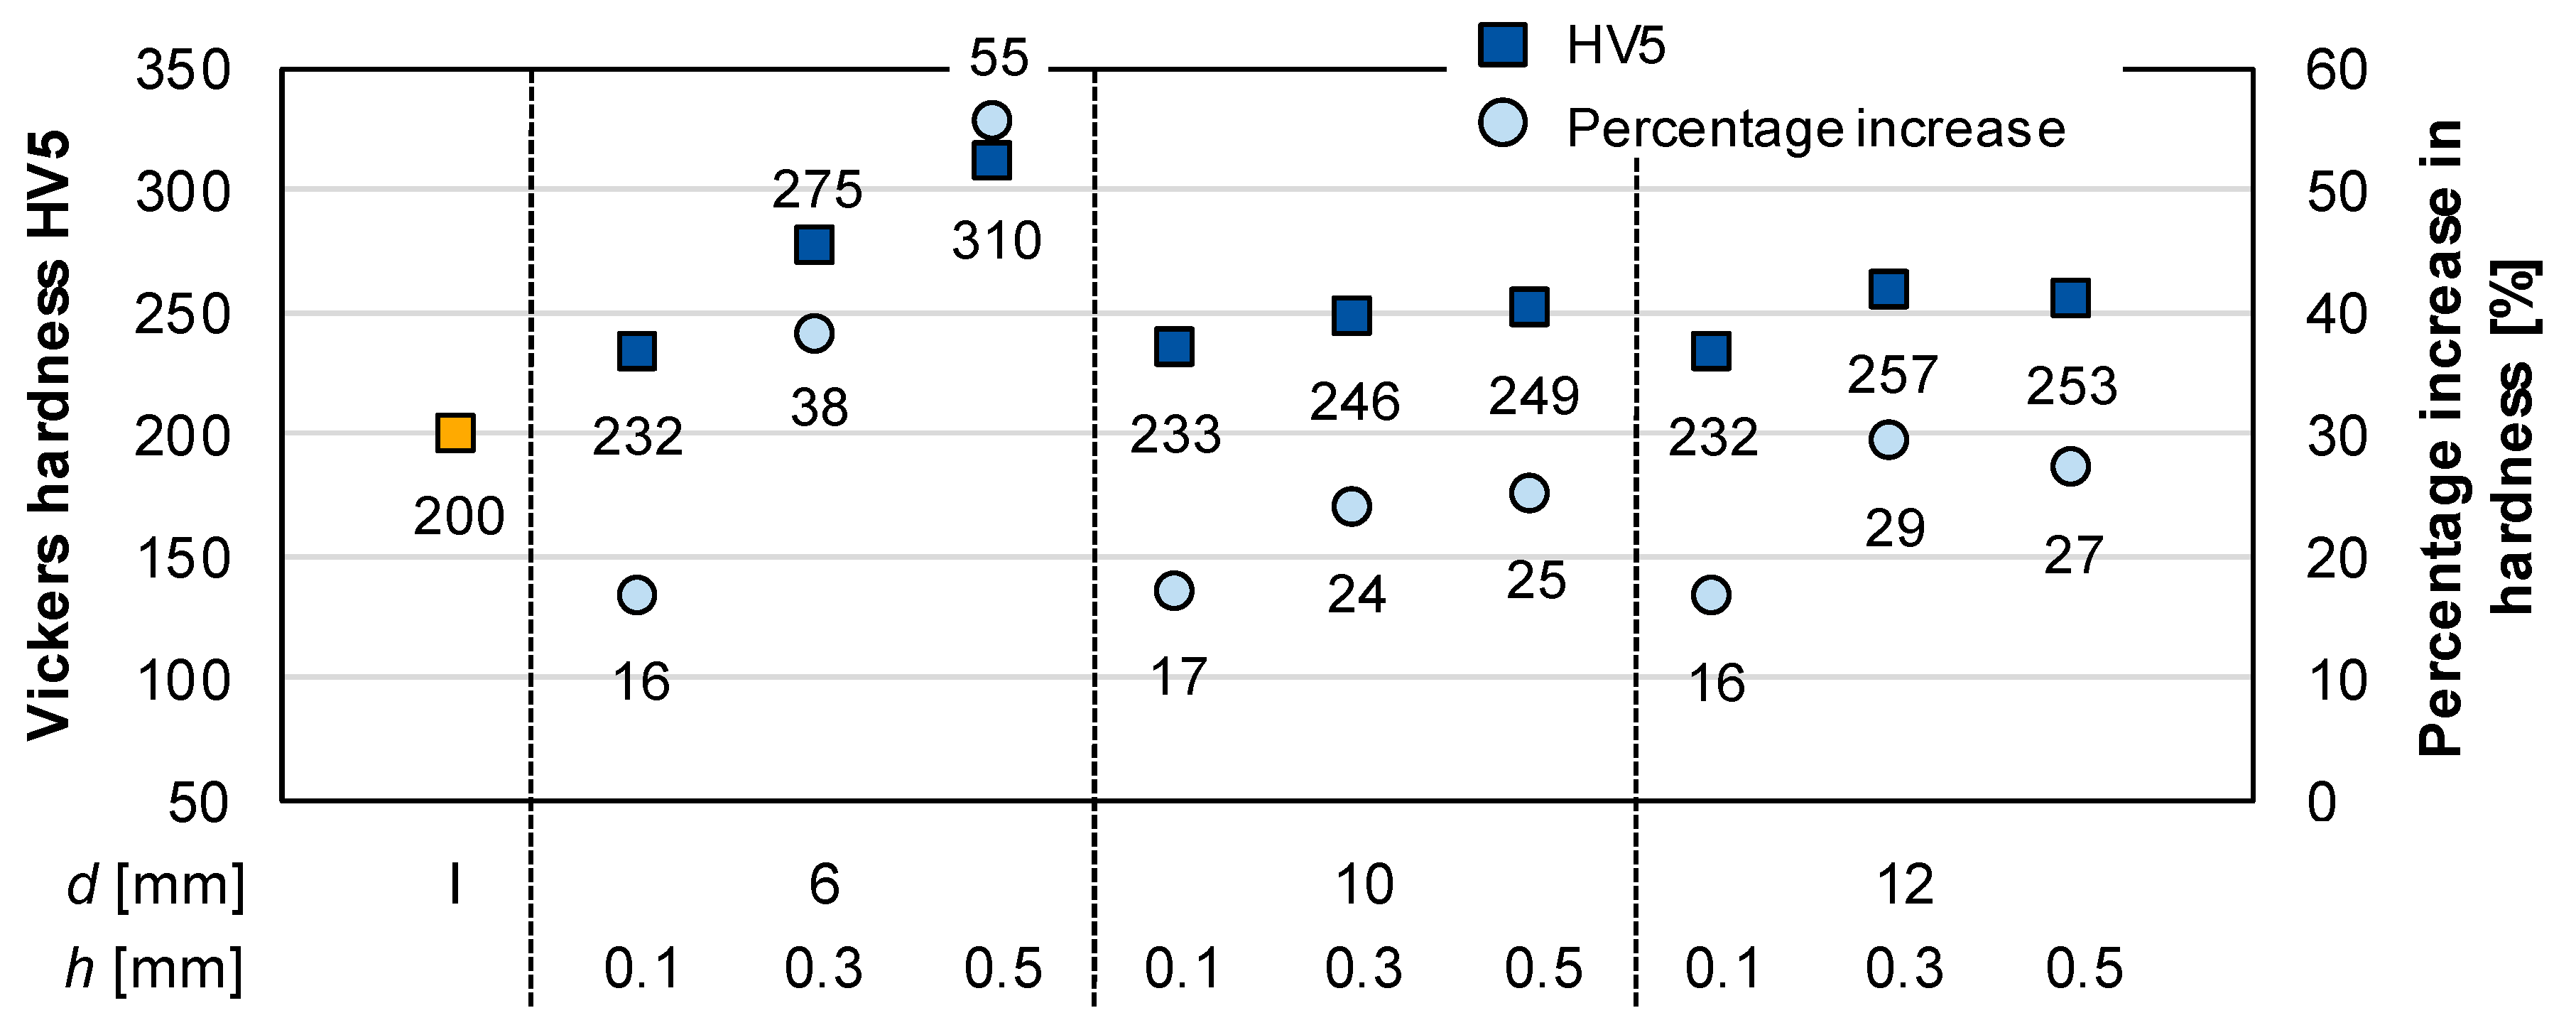
The results of surface hardness HV5 are shown in Figure 8. In all MHP setups there has been an increase in surface hardness. It can be seen that a small hammer head diameter d in combination with increasing plunger stroke h leads to higher hardness values HV5. These observations were also made by Adjassoho et al. [25], Bleicher et al. [22], and Scheil et al. [26] on materials of different initial hardness and heat treatment conditions. A higher stroke h results in a higher plunger acceleration and thus higher contact energy Ec. A smaller hammer head diameter d results in a higher Hertzian pressure. The combination of these two effects leads to a stronger plastic deformation of the surface layer and thus to an increased work hardening. The predominant mechanism for increasing hardness is dislocation hardening. In addition, the formation of sub-grain structures by increasing dislocation density could also have an influence on the increase in hardness [27]. However, too high contact energies can also lead to dislocation annihilation and thus to a reduction in strength, as shown in [21,22]. For the steel materials under consideration in the mentioned work above, the maximum increase in hardness was 20%. With a hardness increase of 55% (from 200 to 310 HV5), the AISI 52100 steel under consideration here shows pronounced hardening behavior. Individual spot tests with a hammer head diameter d = 6 mm, a stroke h = 1.1 mm, and number of overruns n = 1; 2, i.e., increased contact energy per impact Ec = 70 mJ and energy density w = 28,000 (ME-medium energy); 56,000 mJ/mm2 (HE-high energy) even showed an increase in hardness of 75% (347 HV5). It is noticeable that when using larger hammer head diameters d = 10; 12 mm, a significantly lower increase in hardness was achieved with increasing stroke.
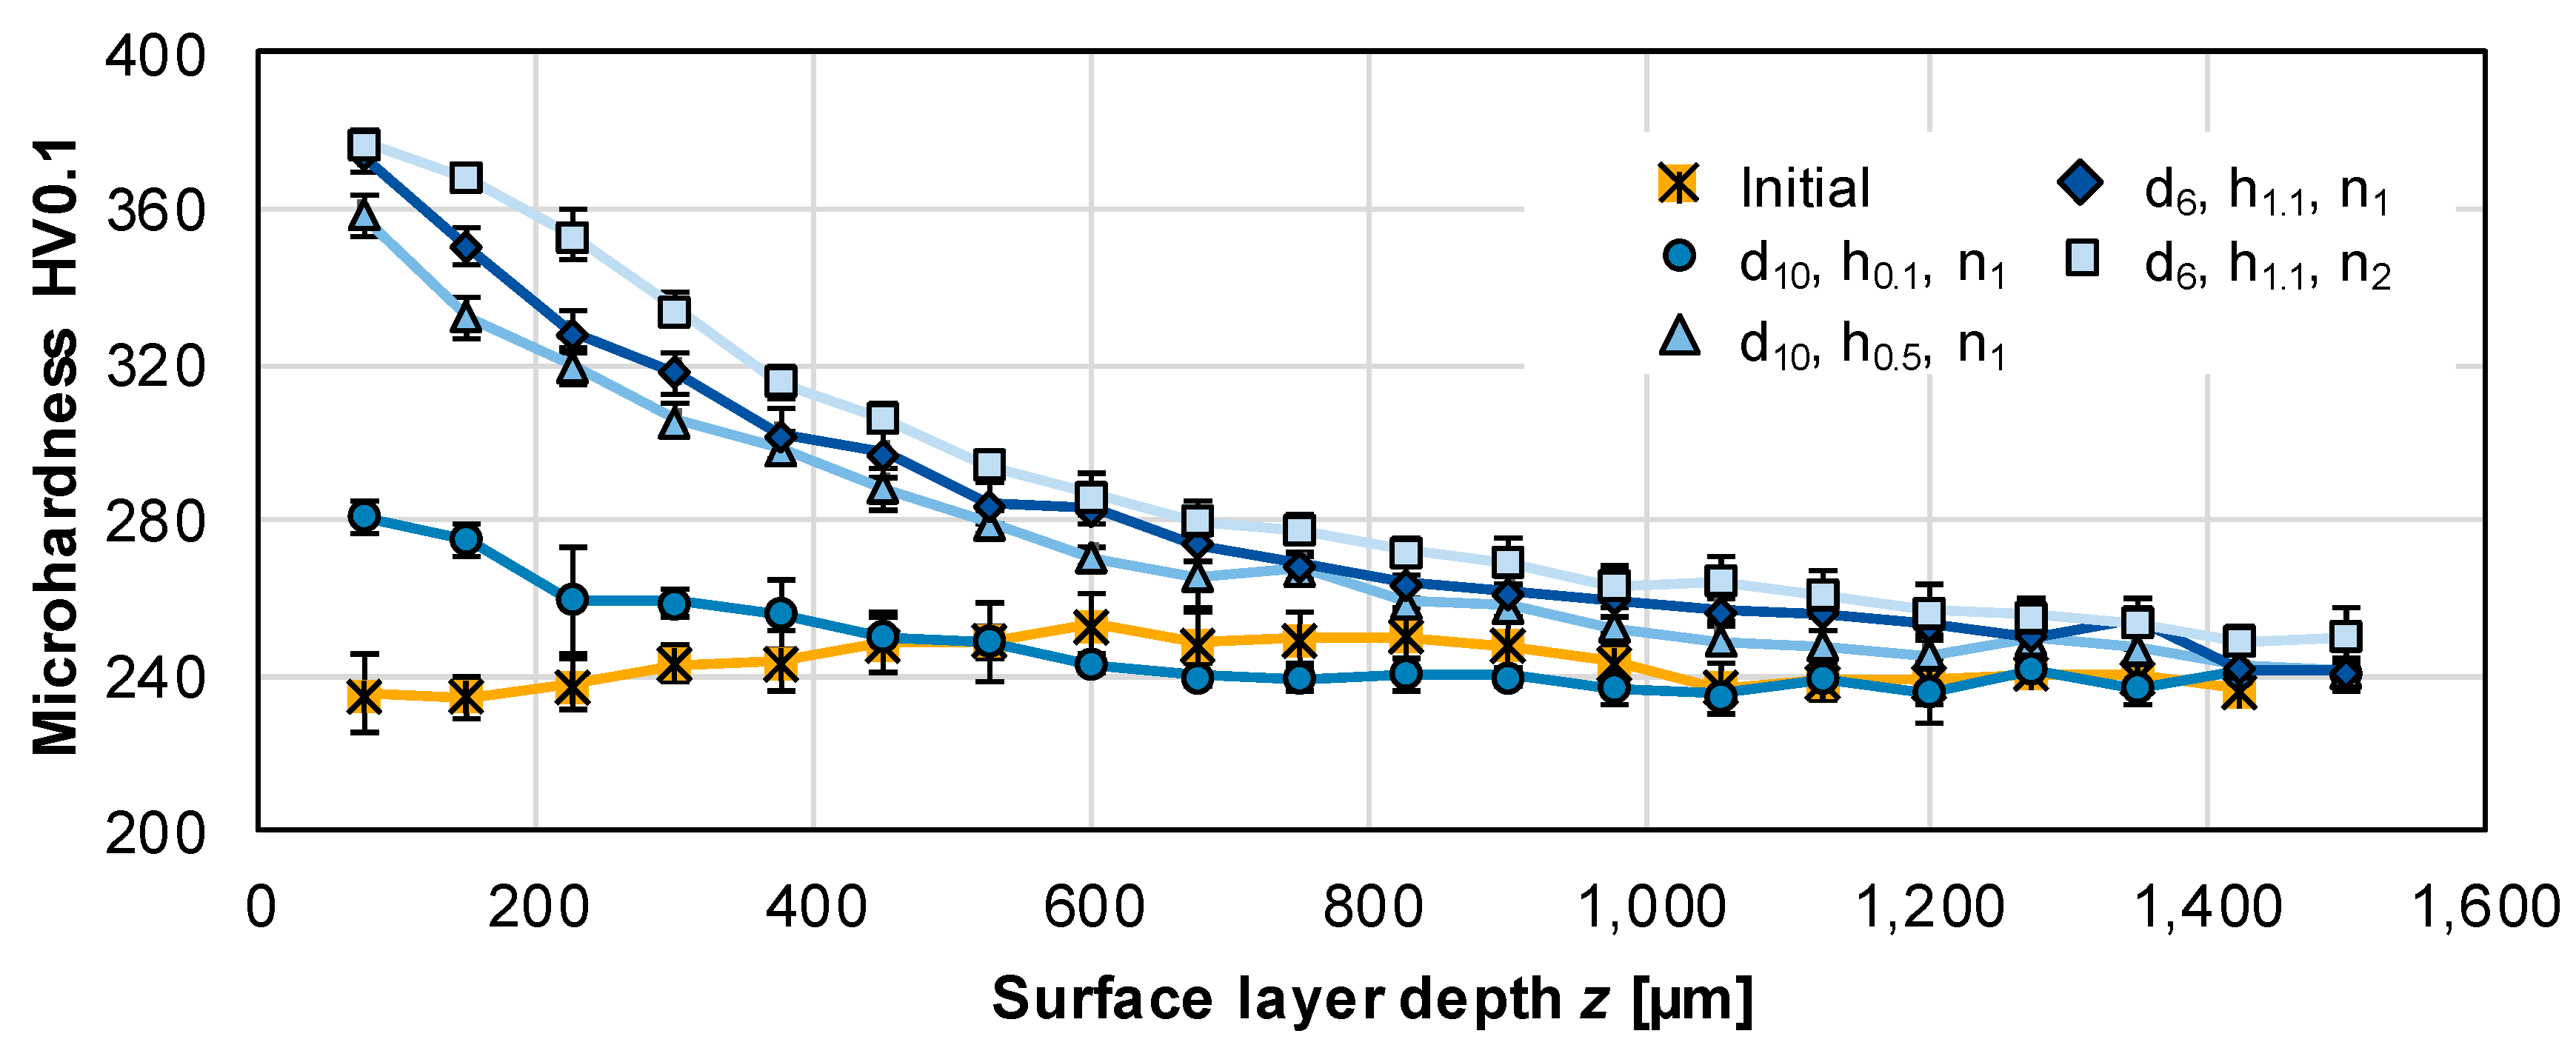
The results of the microhardness measurement are presented in Figure 9. The microhardness in the initial state was determined as an average value of 242 ± 7 HV0.1. MHP machining has led to an increase in hardness in the surface layer close to the surface between 16…55%. One reason for the high increase in hardness is the work hardening of the material brought about by MHP, which in turn is due to a sharp increase in dislocation density. Depending on the energy applied, in addition to the formation of sub-grain structures consisting of dislocation arrangements in the form of cell walls and nuclei, grain refinement can also occur, which can explain an increase in hardness according to the Hall-Petch relationship [27]. By introducing a low energy density (MOH 4: d10, h0.1, n1) only an increase in hardness up to a surface layer depth z = 500 µm could be achieved. By increasing the energy density (MOH 6: d10, h0.5, n1), the effect of the hardness increase was again significantly enhanced. This extends to a surface layer depth z = 1200 µm. The spot tests with medium (ME: d6, h1.1, n1) and a high energy density w (HE: d6, h1.1, n2) led to a further increase in hardness. By using MHP with high energy density an increase in hardness up to z = 1500 µm could be achieved. The increase in hardness thus extends further into the surface layer depth than the compressive residual stresses introduced. Klumpp et al. also reported an increase in hardness in the surface layer of a hardened AISI 52100 bearing steel hammered by means of piezoelectric MHP at room temperature and cryogenically, where hardening was achieved to a surface layer depth z > 650 µm [28].

3.5. Residual Stresses

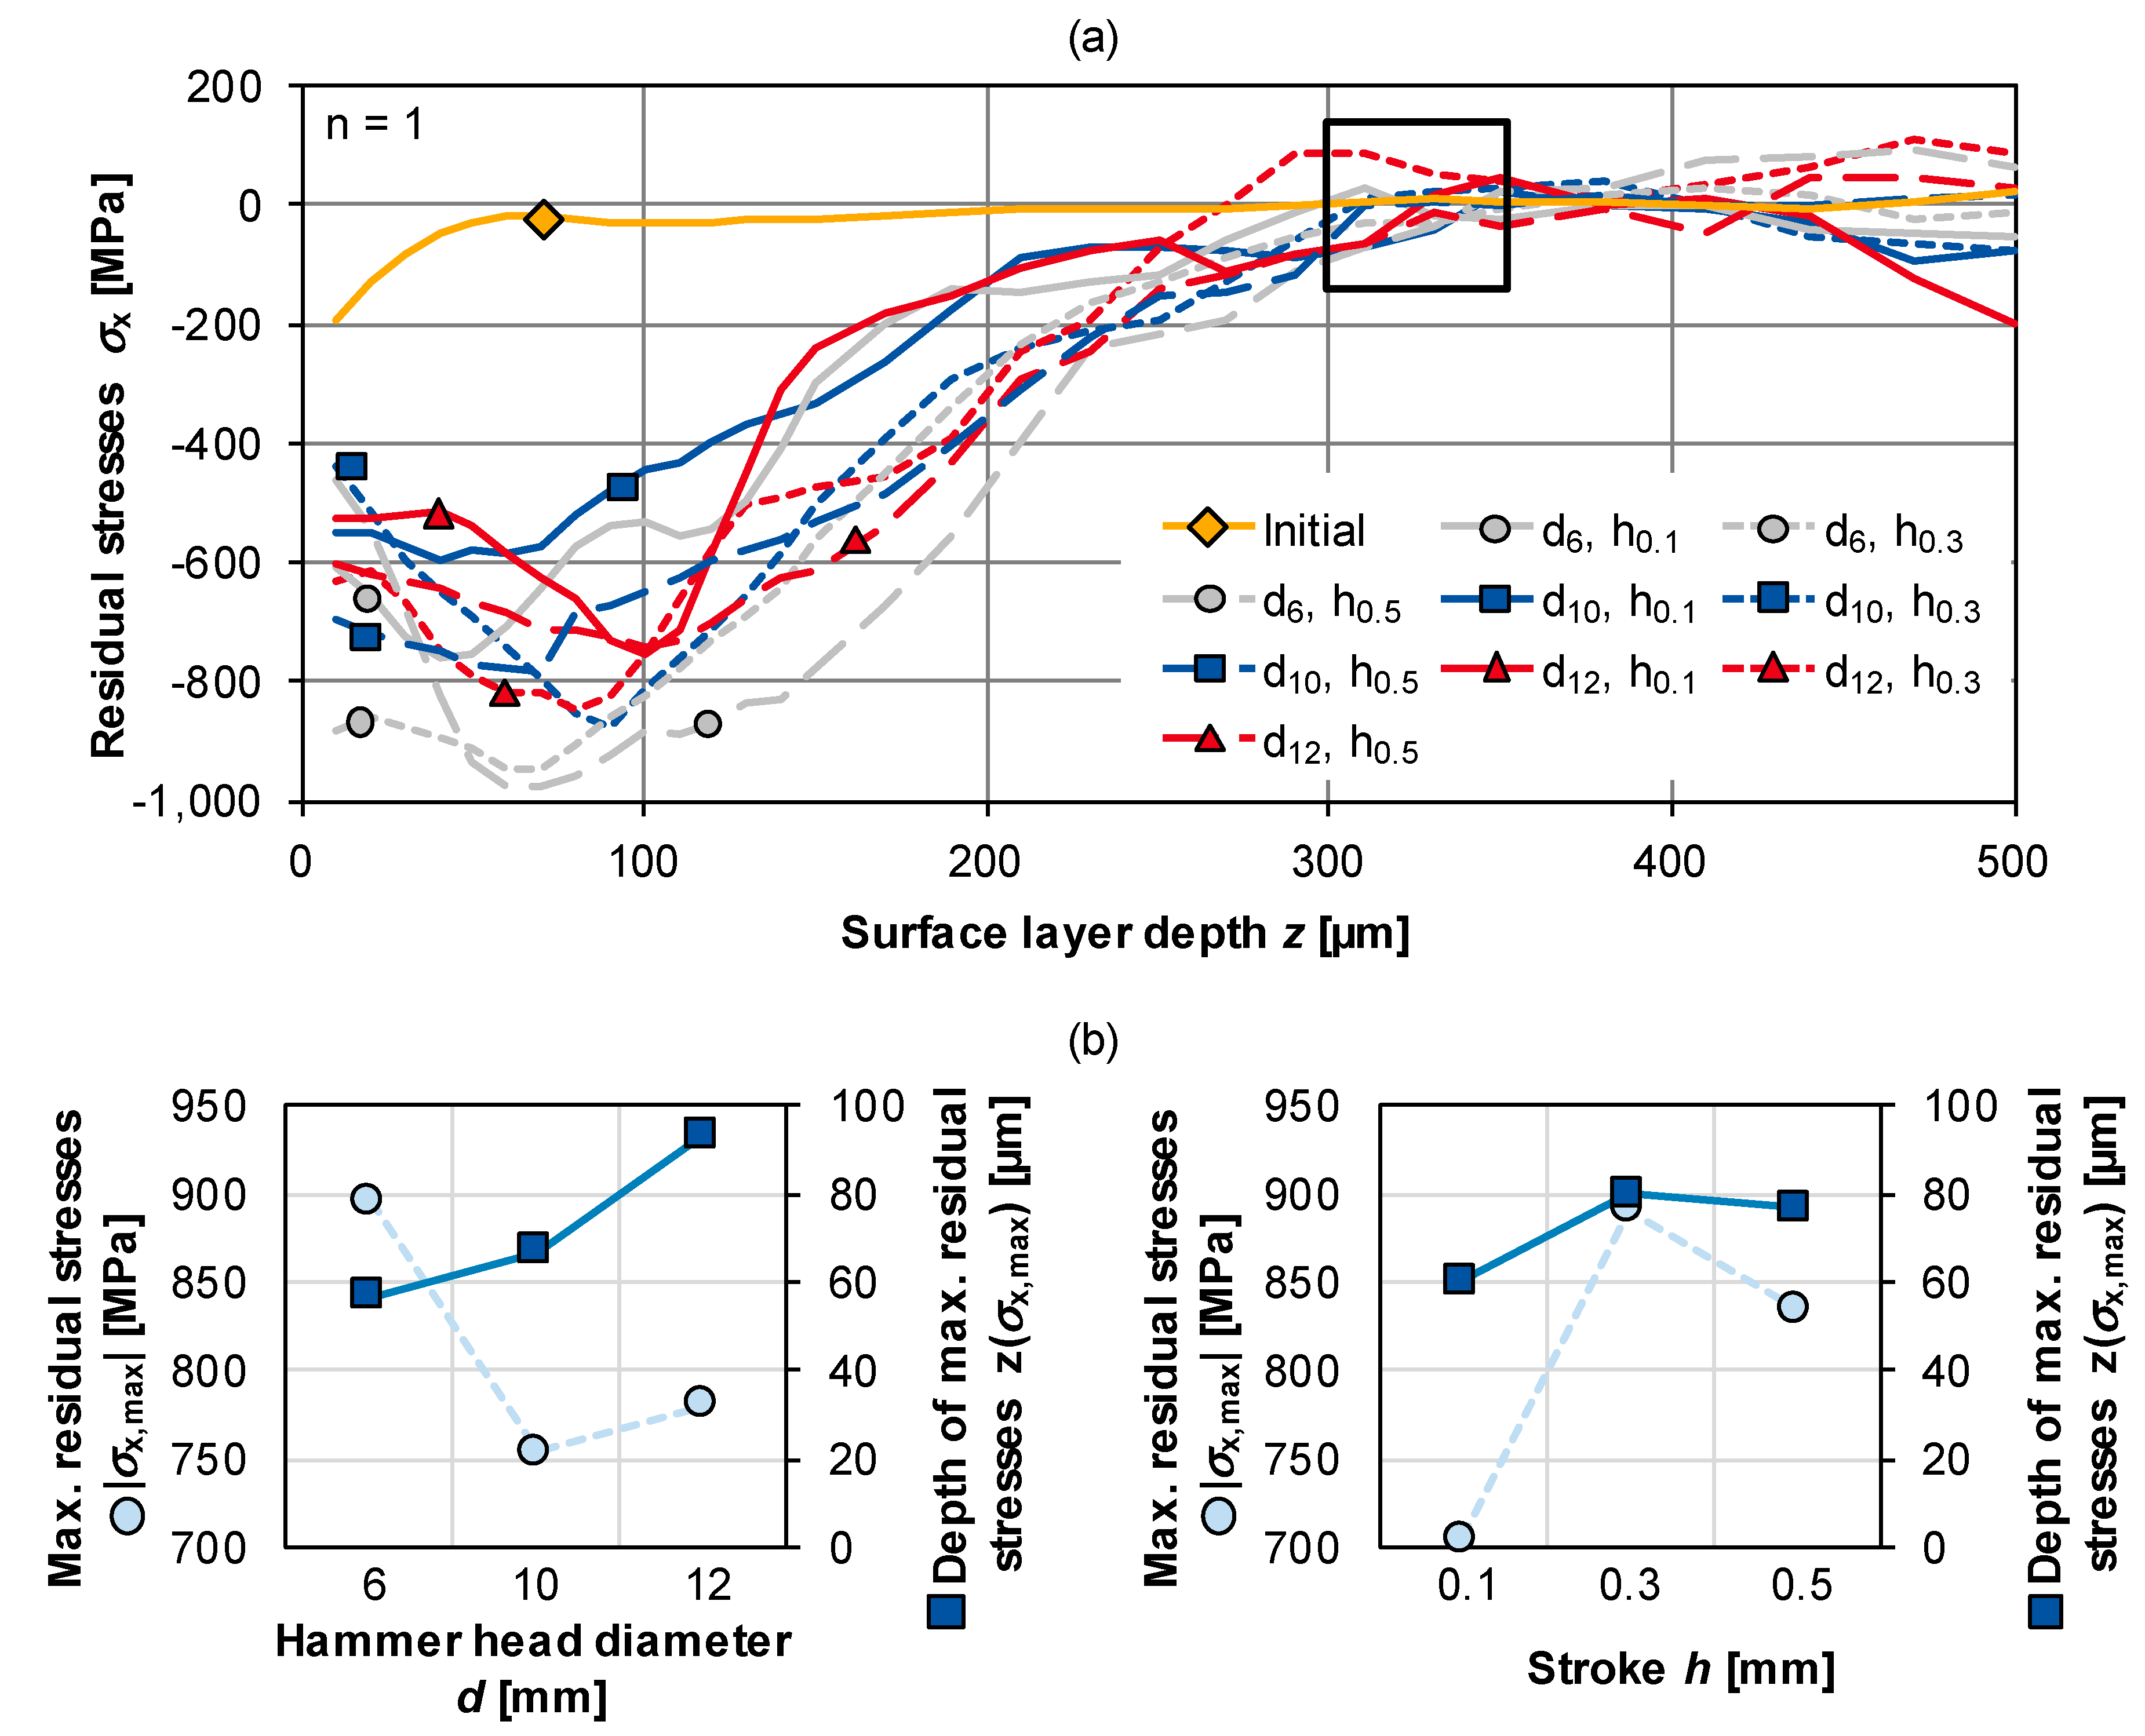
The results of the residual stress measurements are shown in Figure 10a. The measured residual stresses orthogonal to the MHP feed direction σx are greater than parallel to the feed direction σy, which was also first reported for electrodynamic MHP from Medvedeva et al. [29]. This anisotropy of residual stresses is due to MHP processing in adjacent paths. The primary material deformation is orthogonal to the MHP feed direction, resulting in higher plastic deformations and thus higher compressive residual stresses [23]. Therefore, in the following only the orthogonal residual stresses σx were considered. It can be seen that high compressive residual stress maxima σx,max were introduced by all MHP setups below the surface. The mechanism of plastic surface elongation is therefore superimposed by the Hertzian pressure. Depending on the MHP setups selected, these were between σx,max = −950…−580 MPa and in surface layer depths z = 40…100 µm. The zero crossing for almost all MHP setups was approximately at a surface layer depth z = 300…350 µm (grey area). The highest compressive residual stresses were achieved with a hammer head diameter d = 6 mm and a stroke h = 0.5 mm. As with surface hardness, this can also be justified by the combination of high contact energy and high Hertzian pressure.
The main effect diagrams shown in Figure 10b for the parameters hammer head diameter d and plunger stroke h on the compressive residual stress maximum and the surface layer depth of the compressive residual stress maximum show no clear effects. Only a shift of the maximum compressive residual stresses toward greater surface layer depths with larger hammer head diameters was observed. A clear correlation between a larger hammer head diameter and the associated lower compressive residual stress maxima, as described in [30], could not be observed.
For the same hammer head diameter, an increase in the plunger stroke tends to lead to higher compressive residual stresses. However, this effect decreases with increasing hammer head diameter. From this, it can be concluded that for a given indentation and path distance the interactions between hammer head diameter and plunger stroke must be considered. It must be mentioned that because of the measuring method of the hole drilling method, especially the residual stresses near the surface can be subject to uncertainties. A supplementary consideration by means of XRD analyses is therefore planned in the future to confirm the residual stresses. Nevertheless, by means of hole drilling method the tendencies regarding changes in residual stress curves due to changes in MHP process parameters could be shown very well.

3.6. Grain Size

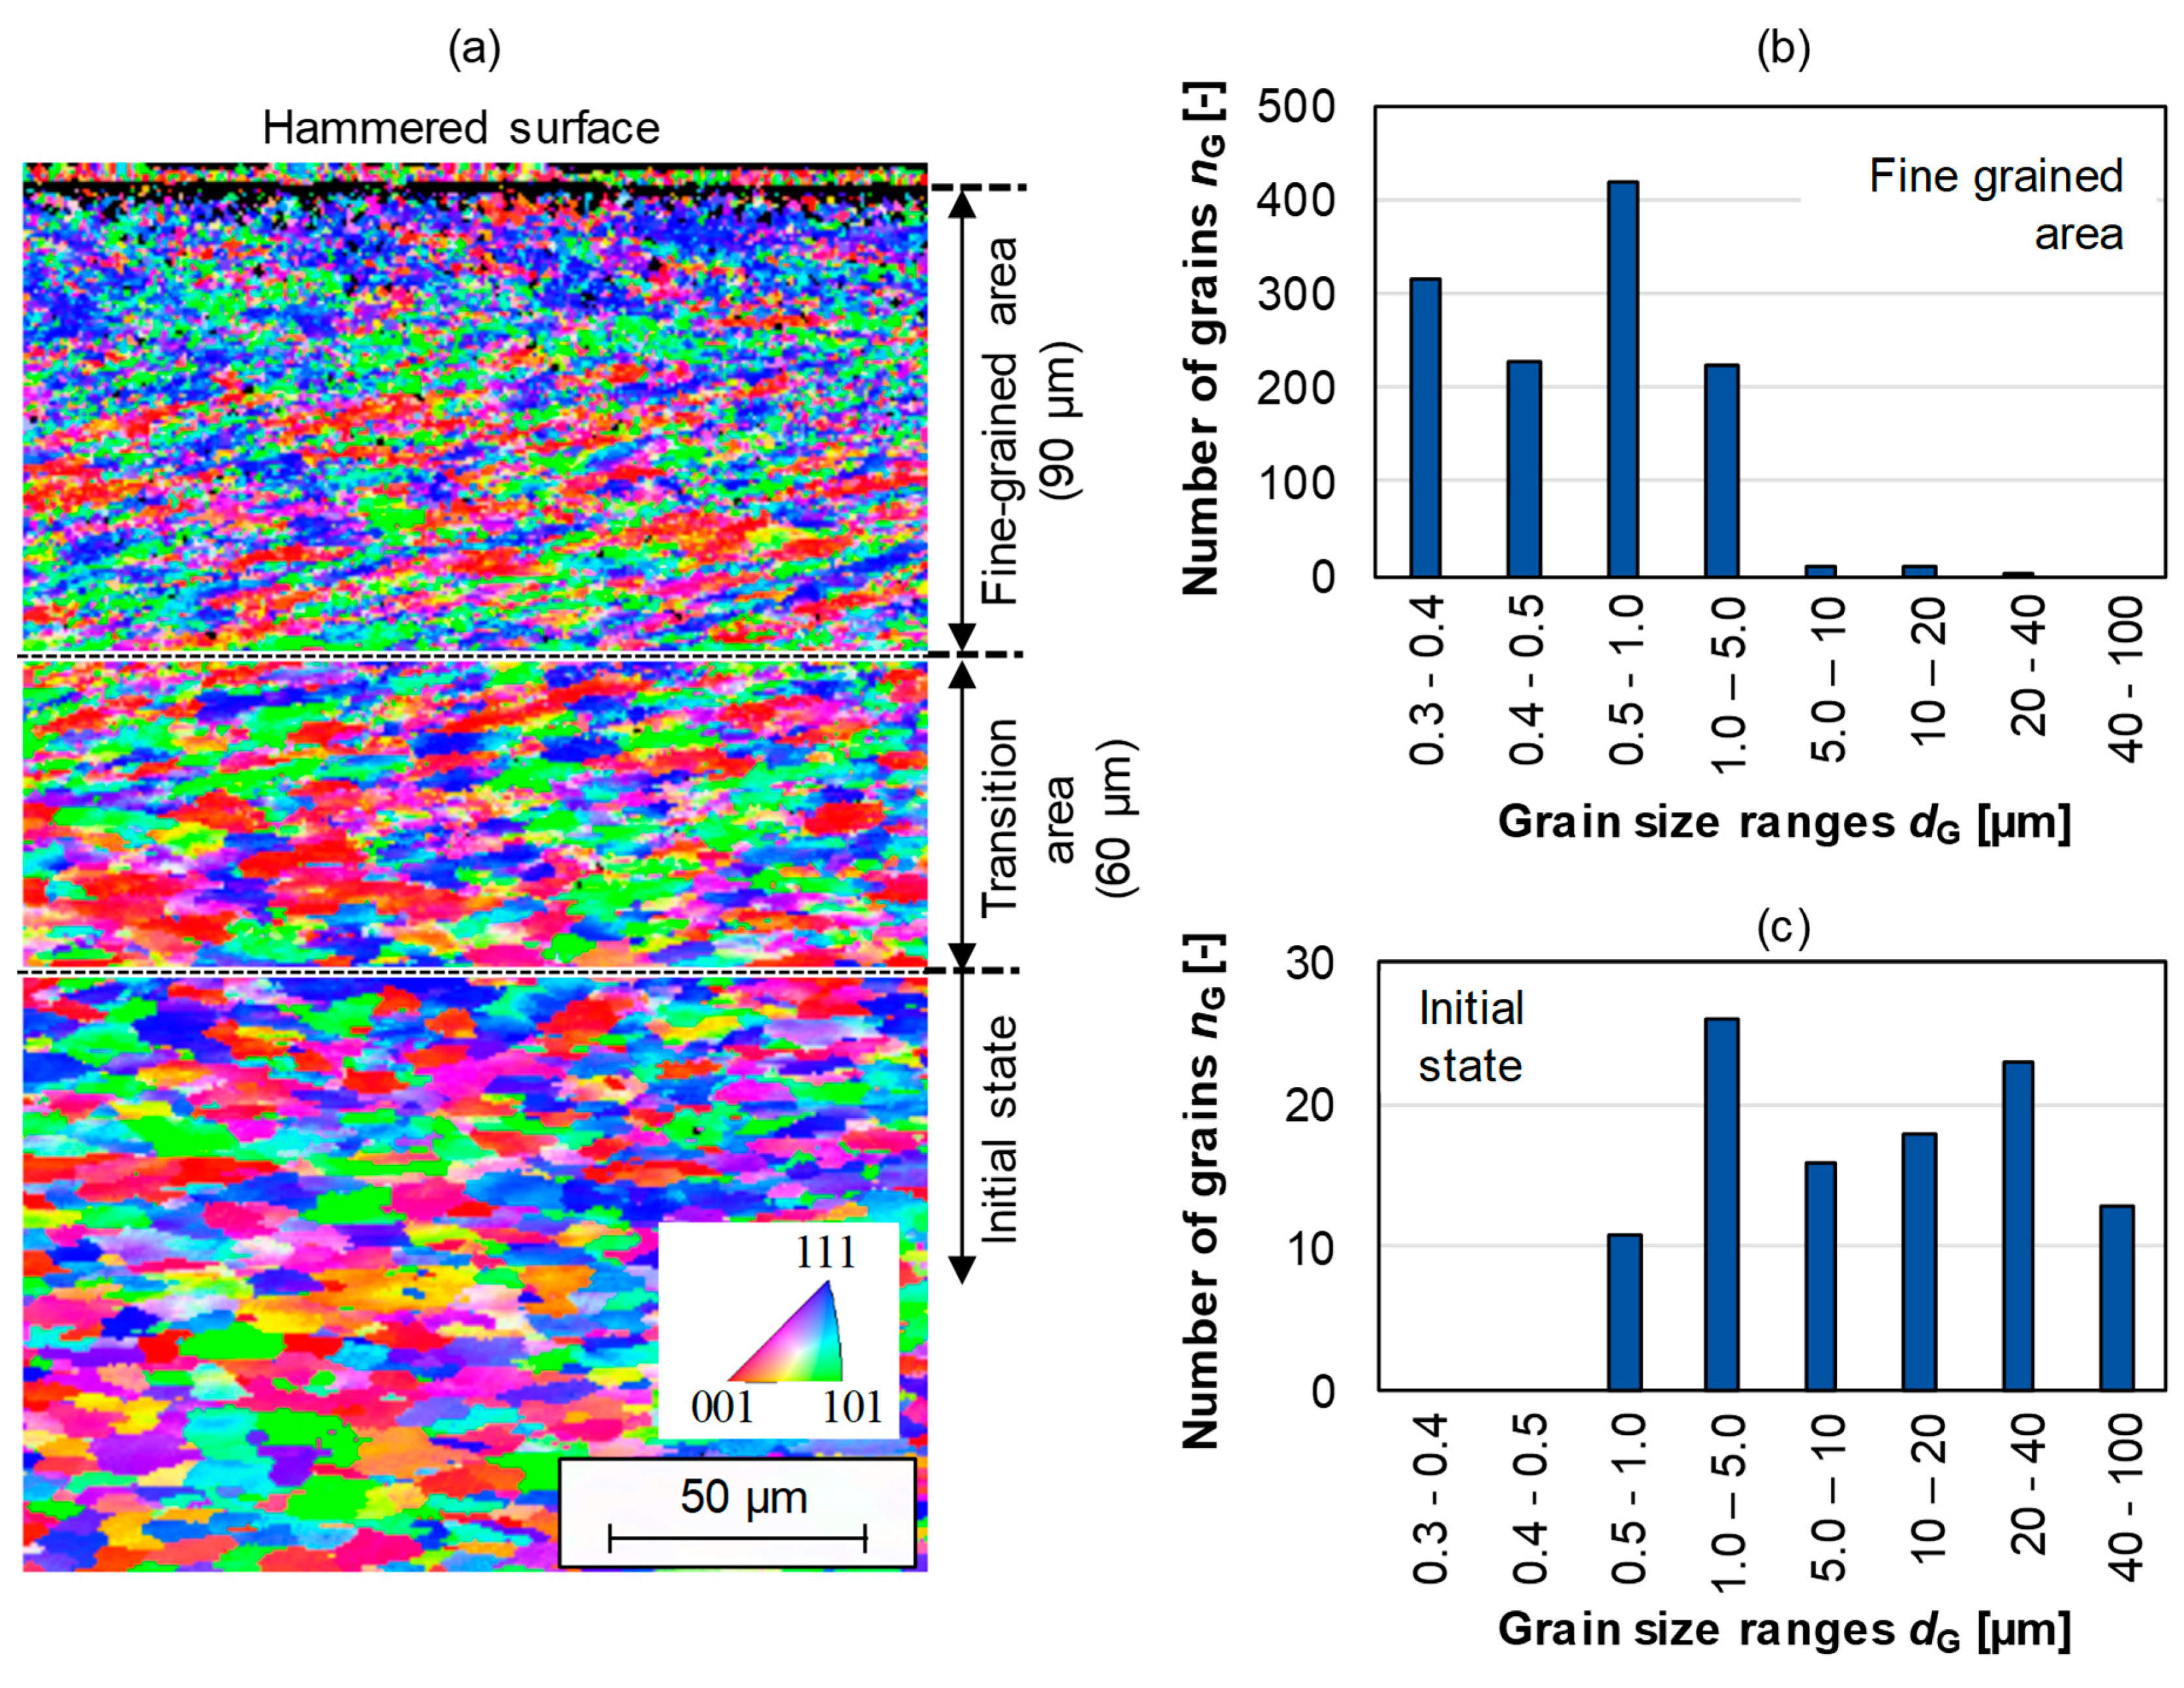
The results of grain size analysis after MHP are shown in Figure 11. For EBSD analysis the specimen hammered with high energy density w = 56,000 mJ/mm2 was chosen. Figure 11a shows the IPF map with areas of different grain sizes from the hammered surface into the surface layer. The view describes the normal direction to the sample surface. A fine-grained area was observed with a surface layer depth z = 90 µm. The corresponding distribution of grain sizes is shown in Figure 11b. Most of the grains lie in the grain size range dG < 1 µm. Below the fine-grained area a transition zone about 60 µm wide has been formed. Only after about 150 µm below the surface the initial state of the AISI 52100 sample was observed. Figure 11c shows the corresponding distribution of grain sizes of the initial state. In comparison with the fine-grained area, the significant reduction in grain size can be confirmed. Here most of the grains were in a size range dG = 1…40 µm. The results confirm the grain refining influence of MHP on the surface layer as already described by Chen et al. [31]. As these are first results of grain size analysis according to the MHP of AISI 52100 steel, further investigations must be carried out in future with regard to the forming texture and dislocation development in order to describe the mechanisms in the surface layer qualitatively.

4. Conclusions

Within the scope of this research, the influence of the dynamic behavior of an industrial robot on the machining result was analyzed for high-frequency electrodynamic MHP. Furthermore, the cause-and-effect relationships between selected process parameters in electrodynamic MHP and the resulting surface integrity of an unhardened AISI 52100 bearing steel were investigated for the first time. The results of the analysis of an industrial robot ABB IRB 6660/205-1.9 as carrier system for an electrodynamic MHP system show the basic applicability and can be summarized as follows:
  • Independent of the selected feed rate of the industrial robot, the range of constant feed rate and thus reproducible MHP conditions can be described mathematically.
  • Because of the high robot stiffness (eigenfrequency fr = 42.5 Hz), the lateral deviation during MHP processing along a hammering path and along the impact axis are very small. Therefore, this robot enables reproducible MHP processing with regard to a defined energy density.
The analysis of the surface layer properties according to the electrodynamic MHP of unhardened AISI 52100 has also shown the potential of this innovative manufacturing process. The results can be summarized as follows:
  • Depending on the contact energy and energy density, the electrodynamic MHP can not only smoothen but also roughen the surface. A reduction of the roughness Sz by 60% compared to a milled surface can be achieved. A large hammer head diameter and a small stroke tend to be advantageous.
  • The surface hardness can be increased by 75% in the considered MHP parameter range and an effective depth of hardening of z = 1500 µm can be achieved. A high plunger stroke and a small hammer head diameter are particularly advantageous.
  • High compressive residual stress maxima σx,max = −950…−580 MPa were introduced below the surface. A small hammer head diameter and high stroke tend to lead to higher compressive residual stress maxima.
  • A significant grain size reduction down to the submicron range could be achieved down to a surface layer depth z = 150 µm.
Based on the results generated in this work, which basically qualify industrial robots as carrier systems of the electrodynamic MHP and show the positive influence of the electrodynamic MHP on the surface integrity of AISI 52100, further analyses regarding grain size and orientation as well as dislocation densities can be performed in the future. In addition, after selection of suitable MHP process parameters, an analysis of the fatigue and wear resistance can be carried out in rotating bending tests and pin-on-cylinder tests in order to quantify the positive influence of MHP-treated surface layers on the component life. The conflict of interest between a surface that is as smooth as possible to avoid crack initiation points and the highest possible compressive residual stress maxima and effective depths of the hardened surface layer as well as reduced grain sizes will be a particular challenge.

Author Contributions

Conceptualization, R.M. and L.U.; methodology, R.M.; formal analysis, L.U. and A.F.; investigation, R.M. and F.L.; resources, A.F. and T.B.; data curation, R.M. and F.L.; writing—original draft preparation, R.M.; writing—review and editing, R.M. and L.U.; visualization, R.M.; supervision, A.F. and T.B.; project administration, A.F. and T.B.; funding acquisition, T.B. All authors have read and agreed to the published version of the manuscript.

Funding

This research was funded by the German Research Foundation (DFG) within the projects “Grain refinement in the surface layer of metallic components by means of machine hammer peening—FinePeening (grant number: KL500/170-1, project number: 326729428)” and “Optimization of the application behavior of spur gears by machine-hammered tooth surfaces—OptiGear (grant number: KL500/192-1, project number: 390969378)”.

Conflicts of Interest

The authors declare no conflict of interest.

References

  1. Šmelova, V.; Schwedt, A.; Wang, L.; Holweger, W.; Mayer, J. Electron microscopy investigations of microstructural alterations due to classical Rolling Contact Fatigue (RCF) in martensitic AISI 52100 bearing steel. Int. J. Fatigue 2017, 98, 142–154. [Google Scholar] [CrossRef]
  2. Kang, J.-H.; Rivera-Díaz-del-Castillo, P.E.J. Carbide dissolution in bearing steels. Comput. Mater. Sci. 2013, 67, 364–372. [Google Scholar] [CrossRef]
  3. Fu, H.; Song, W.; Galindo-Nava, E.I.; Rivera-Díaz-del-Castillo, P.E.J. Strain-induced martensite decay in bearing steels under rolling contact fatigue: Modelling and atomic-scale characterization. Acta Mater. 2017, 139, 163–173. [Google Scholar] [CrossRef]
  4. Hannes, D.; Alfredsson, B. Modelling of surface initiated rolling contact fatigue damage. Procedia Eng. 2013, 66, 766–774. [Google Scholar] [CrossRef] [Green Version]
  5. Neubauer, T. Betriebs- und Lebensdauerverhalten Hartgedrehter und Festgewalzter Zylinderrollenlager. Ph.D. Thesis, Gottfried Wilhelm Leibniz University, Hannover, Germany, 2016. [Google Scholar]
  6. Barrow, A.T.W.; Rivera-Díaz-del-Castillo, P.E.J. Nanoprecipitation in bearing steels. Acta Mater. 2011, 59, 7155–7167. [Google Scholar] [CrossRef]
  7. Kreuser, J. Konstruktion und Aufbau eines Wälzlagerprüfstands zur Untersuchung von Hybrid- und Keramikwälzlagern. Ph.D. Thesis, RWTH Aachen University, Aachen, Germany, 2007. [Google Scholar]
  8. Warhadpande, A.; Sadeghi, F.; Evans, R.D. Microstructural alterations in bearing steels under rolling contact fatigue part 1—Historical overview. Tribol. Trans. 2013, 56, 349–358. [Google Scholar] [CrossRef]
  9. Rycerz, P.; Olver, A.; Kadiric, A. Propagation of surface initiated rolling contact fatigue cracks in bearing steel. Int. J. Fatigue 2017, 97, 29–38. [Google Scholar] [CrossRef] [Green Version]
  10. Kerscher, E.; Lang, K.H.; Vöhringer, O.; Löhe, D. Increasing the fatigue limit of a bearing steel by dynamic strain aging. Int. J. Fatigue 2008, 30, 1838–1842. [Google Scholar] [CrossRef]
  11. Yakimets, I.; Richard, C.; Béranger, G.; Peyre, P. Laser peening processing effect on mechanical and tribological properties of rolling steel 100Cr6. Wear 2004, 256, 311–320. [Google Scholar] [CrossRef]
  12. Röttger, K. Walzen Hartgedrehter Oberflächen. Ph.D. Thesis, RWTH Aachen University, Aachen, Germany, 2002. [Google Scholar]
  13. Schulze, V.; Bleicher, F.; Groche, P.; Guo, Y.B.; Pyun, Y.S. Surface modification by machine hammer peening and burnishing. CIRP Ann.-Manuf. Technol. 2016, 65, 809–832. [Google Scholar] [CrossRef]
  14. Trauth, D.; Klocke, F.; Welling, D.; Terhorst, M.; Mattfeld, P.; Klink, A. Investigation of the surface integrity and fatigue strength of Inconel718 after wire EDM and machine hammer peening. Int. J. Mater. Form. 2016, 9, 635–651. [Google Scholar] [CrossRef]
  15. Trauth, D. Tribology of Machine Hammer Peened Tool Surfaces for Deep Drawing. Ph.D. Thesis, RWTH Aachen University, Aachen, Germany, 2016. [Google Scholar]
  16. Bleicher, F.; Lechner, C.; Habersohn, C.; Kozeschnik, E.; Adjassoho, B.; Kaminski, H. Mechanism of surface modification using machine hammer peening technology. CIRP Ann.-Manuf. Technol. 2012, 61, 375–378. [Google Scholar] [CrossRef]
  17. Krall, S.; Lechner, C.; Nirtl, M.; Bleicher, F. Robot based machine hammer peening using an electromagnetic driven hammering device. In Annals of DAAAM, Proceedings of 26th DAAAM International Symposium on Intelligent Manufacturing and Automation, Zadar, Croatia, 21–24 October 2015; Katalinic, B., Ed.; Curran Associates, Inc.: New York, NY, USA, 2016. [Google Scholar]
  18. Habersohn, C. Analytische und Simulative Betrachtung eines Oberflächenhämmerprozesses. Ph.D. Thesis, Vienna University of Technology, Vienna, Austria, 2015. [Google Scholar]
  19. Mannens, R.; Uhlmann, L.; Feuerhack, A.; Bergs, T. Energy-Dependent Surface Integrity of Stainless Steel AISI 304 after Robot-Based Machine Hammer Peening. In Proceedings of the 13th International Conference on the Technology of Plasticity (ICTP), Columbus, OH, USA, 25–30 July 2021. (accepted). [Google Scholar]
  20. Schajer, G.S.; Rickert, T.J. Incremental Computation Technique for Residual Stress Calculations Using the Integral Method. Exp. Mech. 2011, 51, 1217–1222. [Google Scholar] [CrossRef]
  21. Krall, S. Beeinflussung der Randschicht Durch Diskrete Mikroumformung. Ph.D. Thesis, Vienna University of Technology, Vienna, Austria, 2019. [Google Scholar]
  22. Bleicher, F.; Lechner, C.; Habersohn, C.; Obermair, M.; Heindl, F.; Rodriguez-Ripoll, M. Improving the tribological characteristics of tool and mould surfaces by machine hammer peening. CIRP Ann.-Manuf. Technol. 2013, 62, 239–242. [Google Scholar] [CrossRef]
  23. Lechner, C. Oberflächenmodifikation unter Einsatz der Technologie des Schlagverdichtens (Machine Hammer Peenings). Ph.D. Thesis, Vienna University of Technology, Vienna, Austria, 2014. [Google Scholar]
  24. Wied, J. Oberflächenbehandlung von Umformwerkzeugen Durch Festklopfen. Ph.D. Thesis, Technical University of Darmstadt, Darmstadt, Germany, 2011. [Google Scholar]
  25. Adjassoho, B.; Kozeschnik, E.; Lechner, C.; Bleicher, F.; Goessinger, S.; Bauer, C. Induction of residual stresses and increase of surface hardness by machine hammer peening. In Annals of DAAAM, Proceedings of 23rd DAAAM International Symposium on Intelligent Manufacturing and Automation, Zadar, Croatia, 24–27 October 2012; Katalinic, B., Ed.; DAAAM International: Vienna, Austria, 2012. [Google Scholar]
  26. Scheil, J.; Müller, C.; Steitz, M.; Groche, P. Influence of Process Parameters on Surface Hardening in Hammer Peening and Deep Rolling. Key Eng. Mater. 2013, 554–557, 1819–1827. [Google Scholar] [CrossRef]
  27. Lienert, F. Bauteiloptimierung Mittels Piezopeening—Auswirkungen auf den Randschichtzustand und die Schwingfestigkeit von 42CrMo4 V450. Ph.D. Thesis, Karlsruhe Institute of Technology KIT, Karlsruhe, Germany, 2017. [Google Scholar]
  28. Klumpp, A.; Tamam, M.A.; Vollert, F.; Dietrich, S.; Schulze, V. Influence of conventional and cryogenic piezo peening on bending fatigue strength of hardened bearing steel AISI 52100. In Proceedings of the 13th International Conference on Shot Peening, Montréal, QC, Canada, 18–21 September 2017; pp. 435–440. [Google Scholar]
  29. Medvedeva, A.; Berglund, J.; Wied, J.; Gunnarsson, S. Surface characteristics of different tool steels and cast iron after machine hammer peening. In Proceedings of the 4th International Swedish Production Symposium, Lund, Sweden, 3–5 May 2011; pp. 212–218. [Google Scholar]
  30. Hessert, R.; Bamberg, J.; Satzger, W.; Taxer, T. Ultrasonic Impact Treatment for Surface Hardening of the Aero-Engine Material IN718. In Proceedings of the 10th International Conference on Shot Peening, Tokyo, Japan, 15–18 September 2008. [Google Scholar]
  31. Chen, T.; John, H.; Xu, J.; Lu, Q.; Hawk, J.; Liu, X. Influence of surface modification on pitting corrosion behaviour of nickel-base alloy 718. Part 1: Effect of machine hammer peening. Corros. Sci. 2013, 77, 230–245. [Google Scholar] [CrossRef]
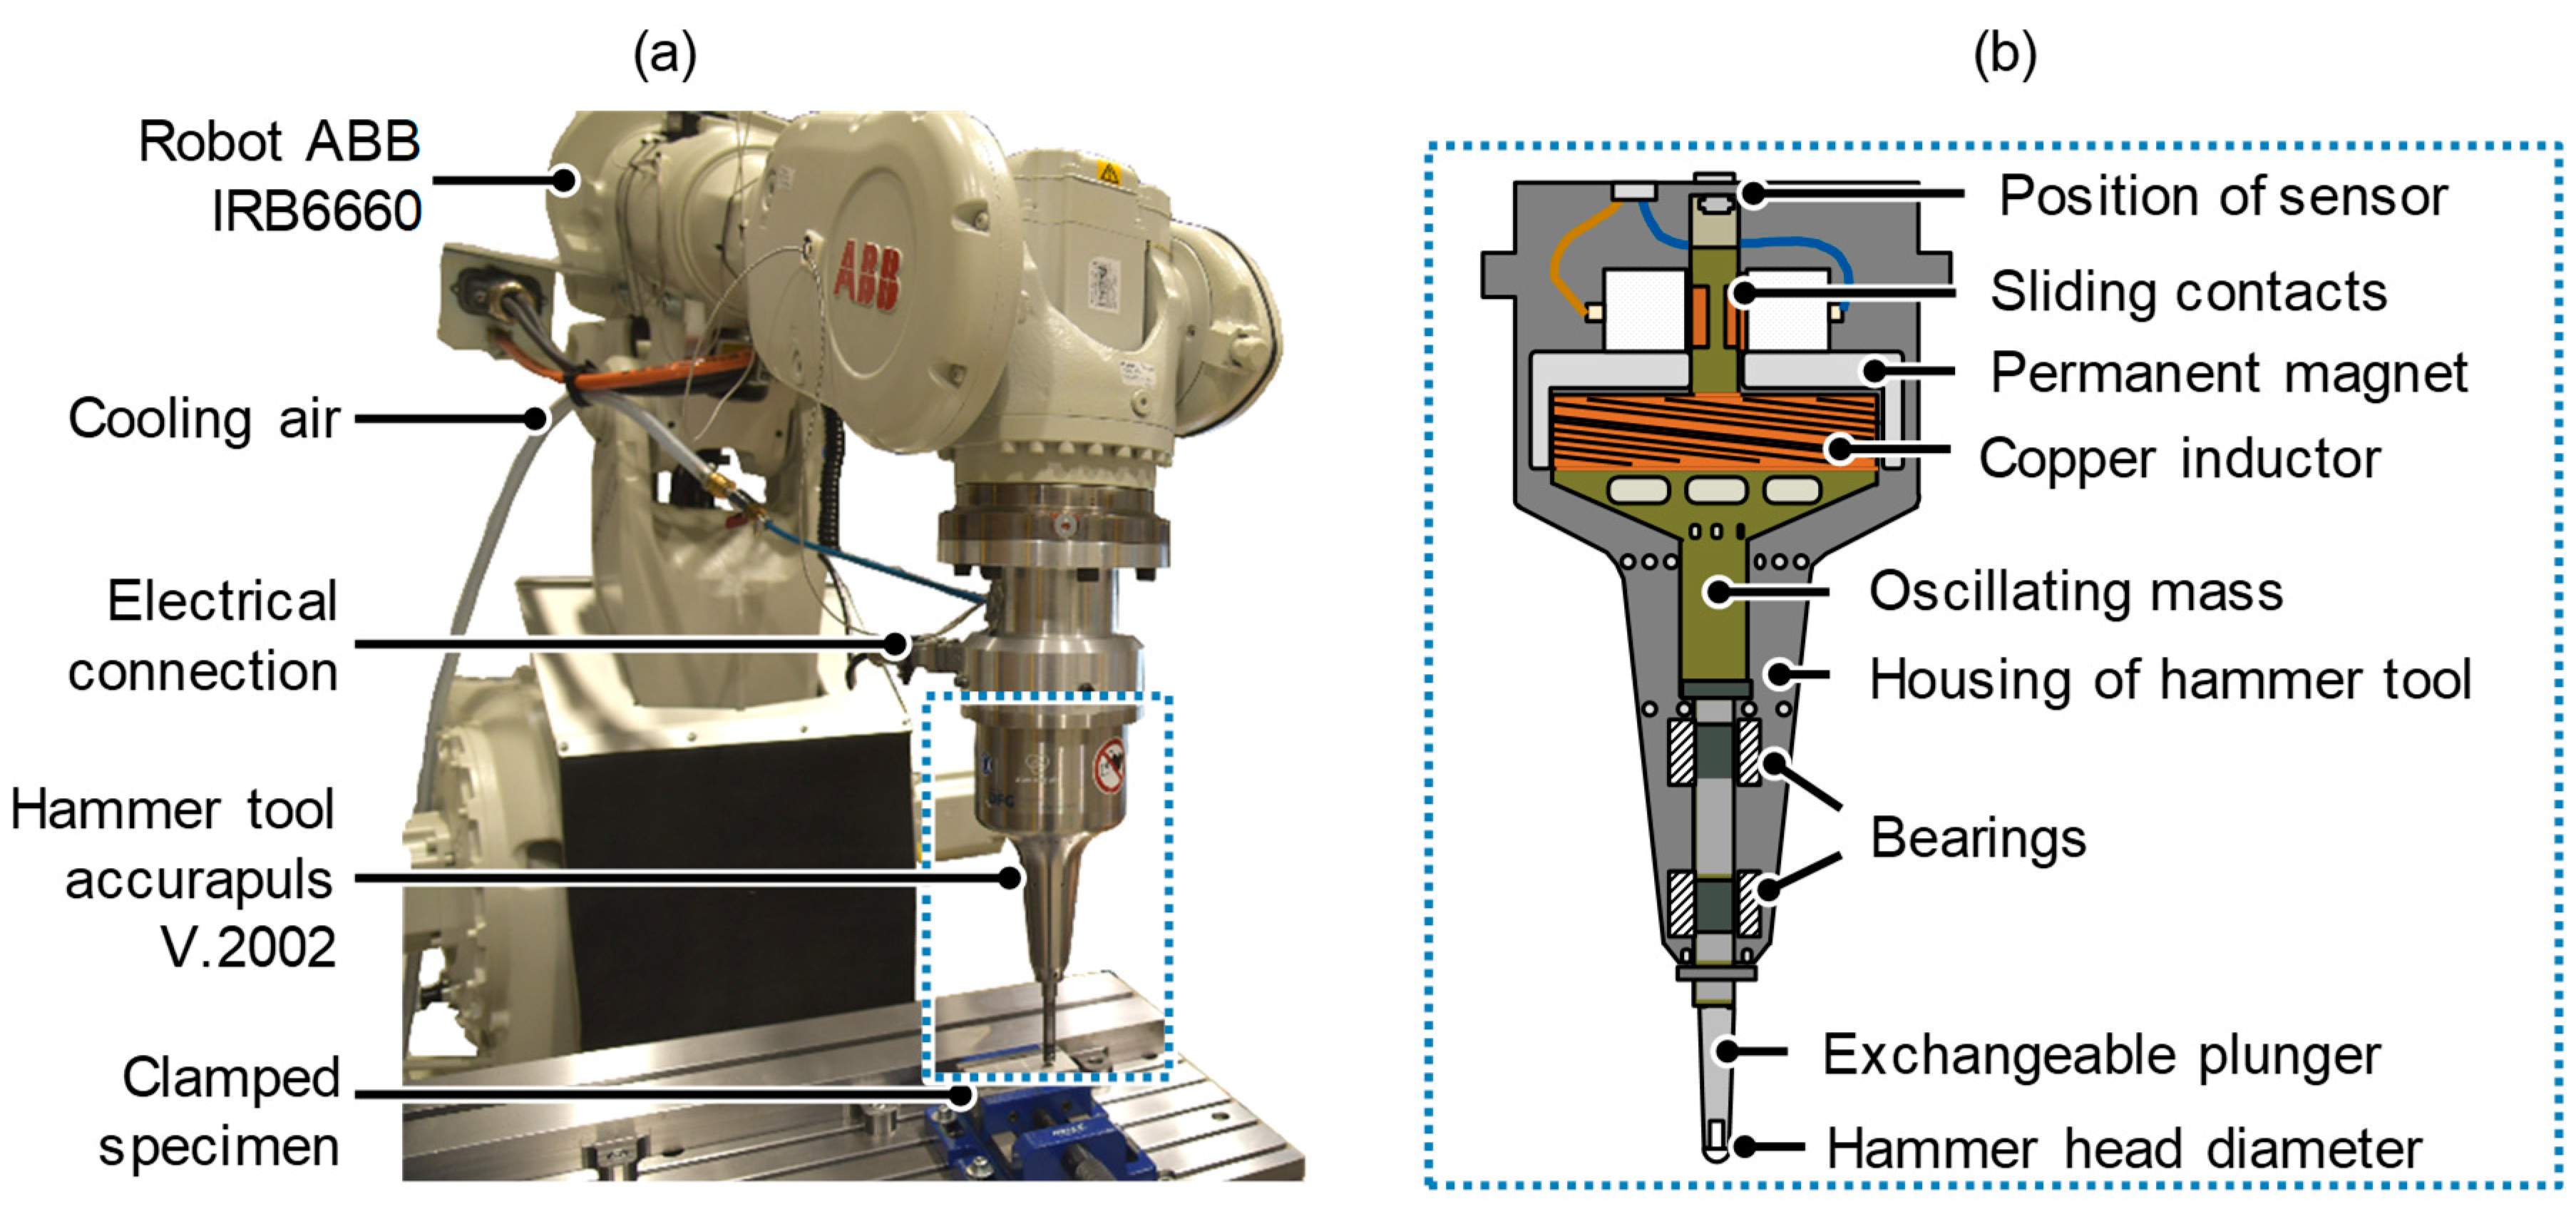
Figure 1. (a) Experimental setup for analysis of robot dynamics and machine hammer peening (MHP) tests and (b) schematic representation of the electrodynamic hammer tool.
Jmmp 04 00061 g001
Figure 2. (a) Determination of robot acceleration analyzing single indentations, (b) section of test setup with point markings using the GOM-Aramis system for analysis of axial (z) MHP vibration, (c) FE-analysis of elastic deformation of oscillating mass in SolidWorks, and (d) micro-structured area on hammer head.
Jmmp 04 00061 g002
Figure 3. (a) Light microscopic and (b) SEM analysis of initial microstructure of AISI 52100 specimen.
Jmmp 04 00061 g003
Figure 4. Evaluation of robot acceleration for different feed rates vr = 120…340 mm·s−1 for hammering frequencies (a) f = 80 Hz, (b) f = 120 Hz, and (c) f = 180 Hz.
Jmmp 04 00061 g004
Figure 5. Analysis of (a) axial hammer head movement, (b) eigenfrequency of the robot, and (c) defined waviness due to adjusted hammer paths (2) and unwanted waviness due to robot vibrations (1) on the workpiece surface for a set hammering frequency f = 120 Hz, a hammer head diameter d = 10 mm and a plunger stroke h = 0.5 mm.
Jmmp 04 00061 g005
Figure 6. (a) Deviation of indentations along feed axis (MHP direction) and (b) process-related deviation of indentations of adjacent MHP paths for a hammering frequency f = 120 Hz, a hammer head diameter d = 10 mm, and a plunger stroke h = 0.5 mm.
Jmmp 04 00061 g006
Figure 7. (a) Results of roughness measurements for different strokes h; horizontal orange lines: ground surface; (b) SEM-analysis of plunger surfaces before MHP experiments.
Jmmp 04 00061 g007
Figure 8. Analysis of surface hardness HV5. Legend: I—initial hardness (ground state); d—hammer head diameter; h—stroke.
Jmmp 04 00061 g008
Figure 9. Micro hardness distribution of untreated (initial) and MHP-treated specimen with different hammer head diameters d, stroke h, and number of overruns n.
Jmmp 04 00061 g009
Figure 10. (a) Illustration of the residual stress curves with zero crossing for almost all MHP setups and (b) main effect plots of averaged maximum compressive residual stresses σx,max and corresponding depth z.
Jmmp 04 00061 g010
Figure 11. (a) IPF map for grain size analysis for MHP-treated surface layer with d = 6 mm, h = 1.1 mm, and n = 2; histogram of the grain size distribution of (b) the fine-grained area and (c) the initial state.
Jmmp 04 00061 g011
Table 1. Extract of the spectral analysis results of the AISI 52100 specimens.
CSiMnPSCrMoAlCu
wt%0.9550.2510.3910.0120.0051.5100.0150.0280.141
σ (wt%)0.0190.0010.003<0.001<0.0010.008<0.0010.003<0.001
Table 2. MHP test setups for surface layer machining of AISI 52100 specimen.
Test Series
No.123456789
a (mm)0.05
f (Hz)120
d (mm)61012
h (mm)0.10.30.50.10.30.50.10.30.5
Ec (mJ)720407204072040
w (mJ/mm2)2800800016,0002800800016,0002800800016,000