Article

Correlations between Thermal Loads during Grind-Hardening and Material Modifications Using the Concept of Process Signatures

1
Leibniz Institute for Materials Engineering IWT, Badgasteiner Straße 3, 28359 Bremen, Germany
2
University of Bremen and MAPEX Center for Materials and Processes, Bibliothekstr. 1, 28359 Bremen, Germany
*
Author to whom correspondence should be addressed.
J. Manuf. Mater. Process. 2018, 2(1), 20; https://doi.org/10.3390/jmmp2010020
Submission received: 11 January 2018 / Revised: 5 March 2018 / Accepted: 14 March 2018 / Published: 16 March 2018
(This article belongs to the Special Issue Precision Manufacturing)

Abstract

:
During the process of grind-hardening, the dissipated heat from the process is utilized for a surface layer hardening of machined components made of steel. A martensitic phase transformation occurs within the affected subsurface regions and compressive residual stresses are induced. However, the layout of a grind-hardening process for given hardness results (material modification) is very difficult. Thus, a series of extensive experimental tests is required. To reduce this experimental effort, the newly developed concept of Process Signatures is used to describe the material modifications based on the thermal load appearing during the grind-hardening process. Based on an analytical calculation of the temperature fields during the grind-hardening process (surface- and external-cylindrical-grind-hardening), the internal thermal load was characterized by the maximum contact zone temperature and the maximum temperature gradient at the surface and was correlated with the process quantities (heat flux to the workpiece and the contact time). Metallographic investigations were used to analyze the surface hardening depth and the hardness change at the surface, which were correlated with the quantities describing the internal material loads. The results show that the surface hardening depth was mainly governed by the maximum contact zone temperature and the maximum temperature gradient at the surface, whereas the hardness change at the surface was influenced additionally by the quenching time.

1. Introduction

Manufacturing processes cause thermal and mechanical loads to affect the surface and subsurface properties of the workpiece material; for example, microstructures, residual stresses, and hardness as described by Jawahir et al. [1]. In finishing processes such as grinding, the functional performance of the machined components is dependent on the resulting changes of subsurface properties (material modifications). Therefore, the modeling and simulation of the resulting subsurface properties after machining have become more and more relevant for current research and industry needs [2,3,4,5].
Grind-hardening is a thermomechanical process for the surface hardening of heat treatable steels that utilizes the heat transfer into the workpiece by combining the heat treatment with a material removal [6,7,8]. Conventional heat treatment processes, which are often used for surface hardening of highly stressed components made of steel, lead to a break of the material flow. Thus, high logistic expenses, extended production times and increased manufacturing costs result. Grind-hardening processes, on the other hand, result in a shortened process chain leading to a reduction of production times and manufacturing costs of surface hardened components such as linear guideways with simple and complex profiles, bearing seats or hubs on shafts that are subject to wear. Thus, grind-hardening has a high potential to improve its yet still limited occurrence in industrial practice. Detailed investigations on austenitizing temperatures, heating rates, and cooling rates in grind-hardening and their effect on controlling the process were already performed 10 years ago [9]. However, the complex physical interrelationships make it difficult to describe the resulting surface hardening depth based on the process parameters. This is due to the fact that the thickness of the martensitic surface layer depends on the specific grinding power, the heat partition into the workpiece, and the duration of the material removal process as discussed by Zäh et al. [10]. Therefore, finite-element-(FE-)based simulations were developed, aiming at a deeper understanding of the thermo-metallurgical and thermo-mechanical effects on the workpiece material during the grind-hardening process and to predict the resulting surface hardening depths [11,12,13].
In most of the cases, the changes of surface and subsurface properties during the machining processes are correlated with the machining parameters and/or process quantities. Due to missing information on the internal material loads (that is, stresses, strains, temperatures, or temperature gradients), this process-oriented view does not enable a direct selection of machining parameters to achieve a desired surface integrity state [14]. The introduced concept of Process Signatures is based on a material-oriented view to describe the material modifications resulting from the manufacturing processes by taking into account the acting internal material loads [14,15]. According to Frerichs et al., Process Signatures describe correlations between the mentioned loads during a certain process and the resulting material modifications; for example, the residual stress state at the surface can be described by the maximum temperature gradient at the surface [16].
The presented research work focuses on the prediction of the surface hardening depth and the hardness change at the surface caused by grind-hardening according to the concept of Process Signatures. Straight test series for surface-grind-hardening and external-cylindrical-(OD-)grind-hardening (see Figure 1) were performed to study the influence of the contact conditions between the workpiece material and the grinding wheel (the variation of the contact length is lg) on the internal thermal load during the grind-hardening process and the resulting material modifications.
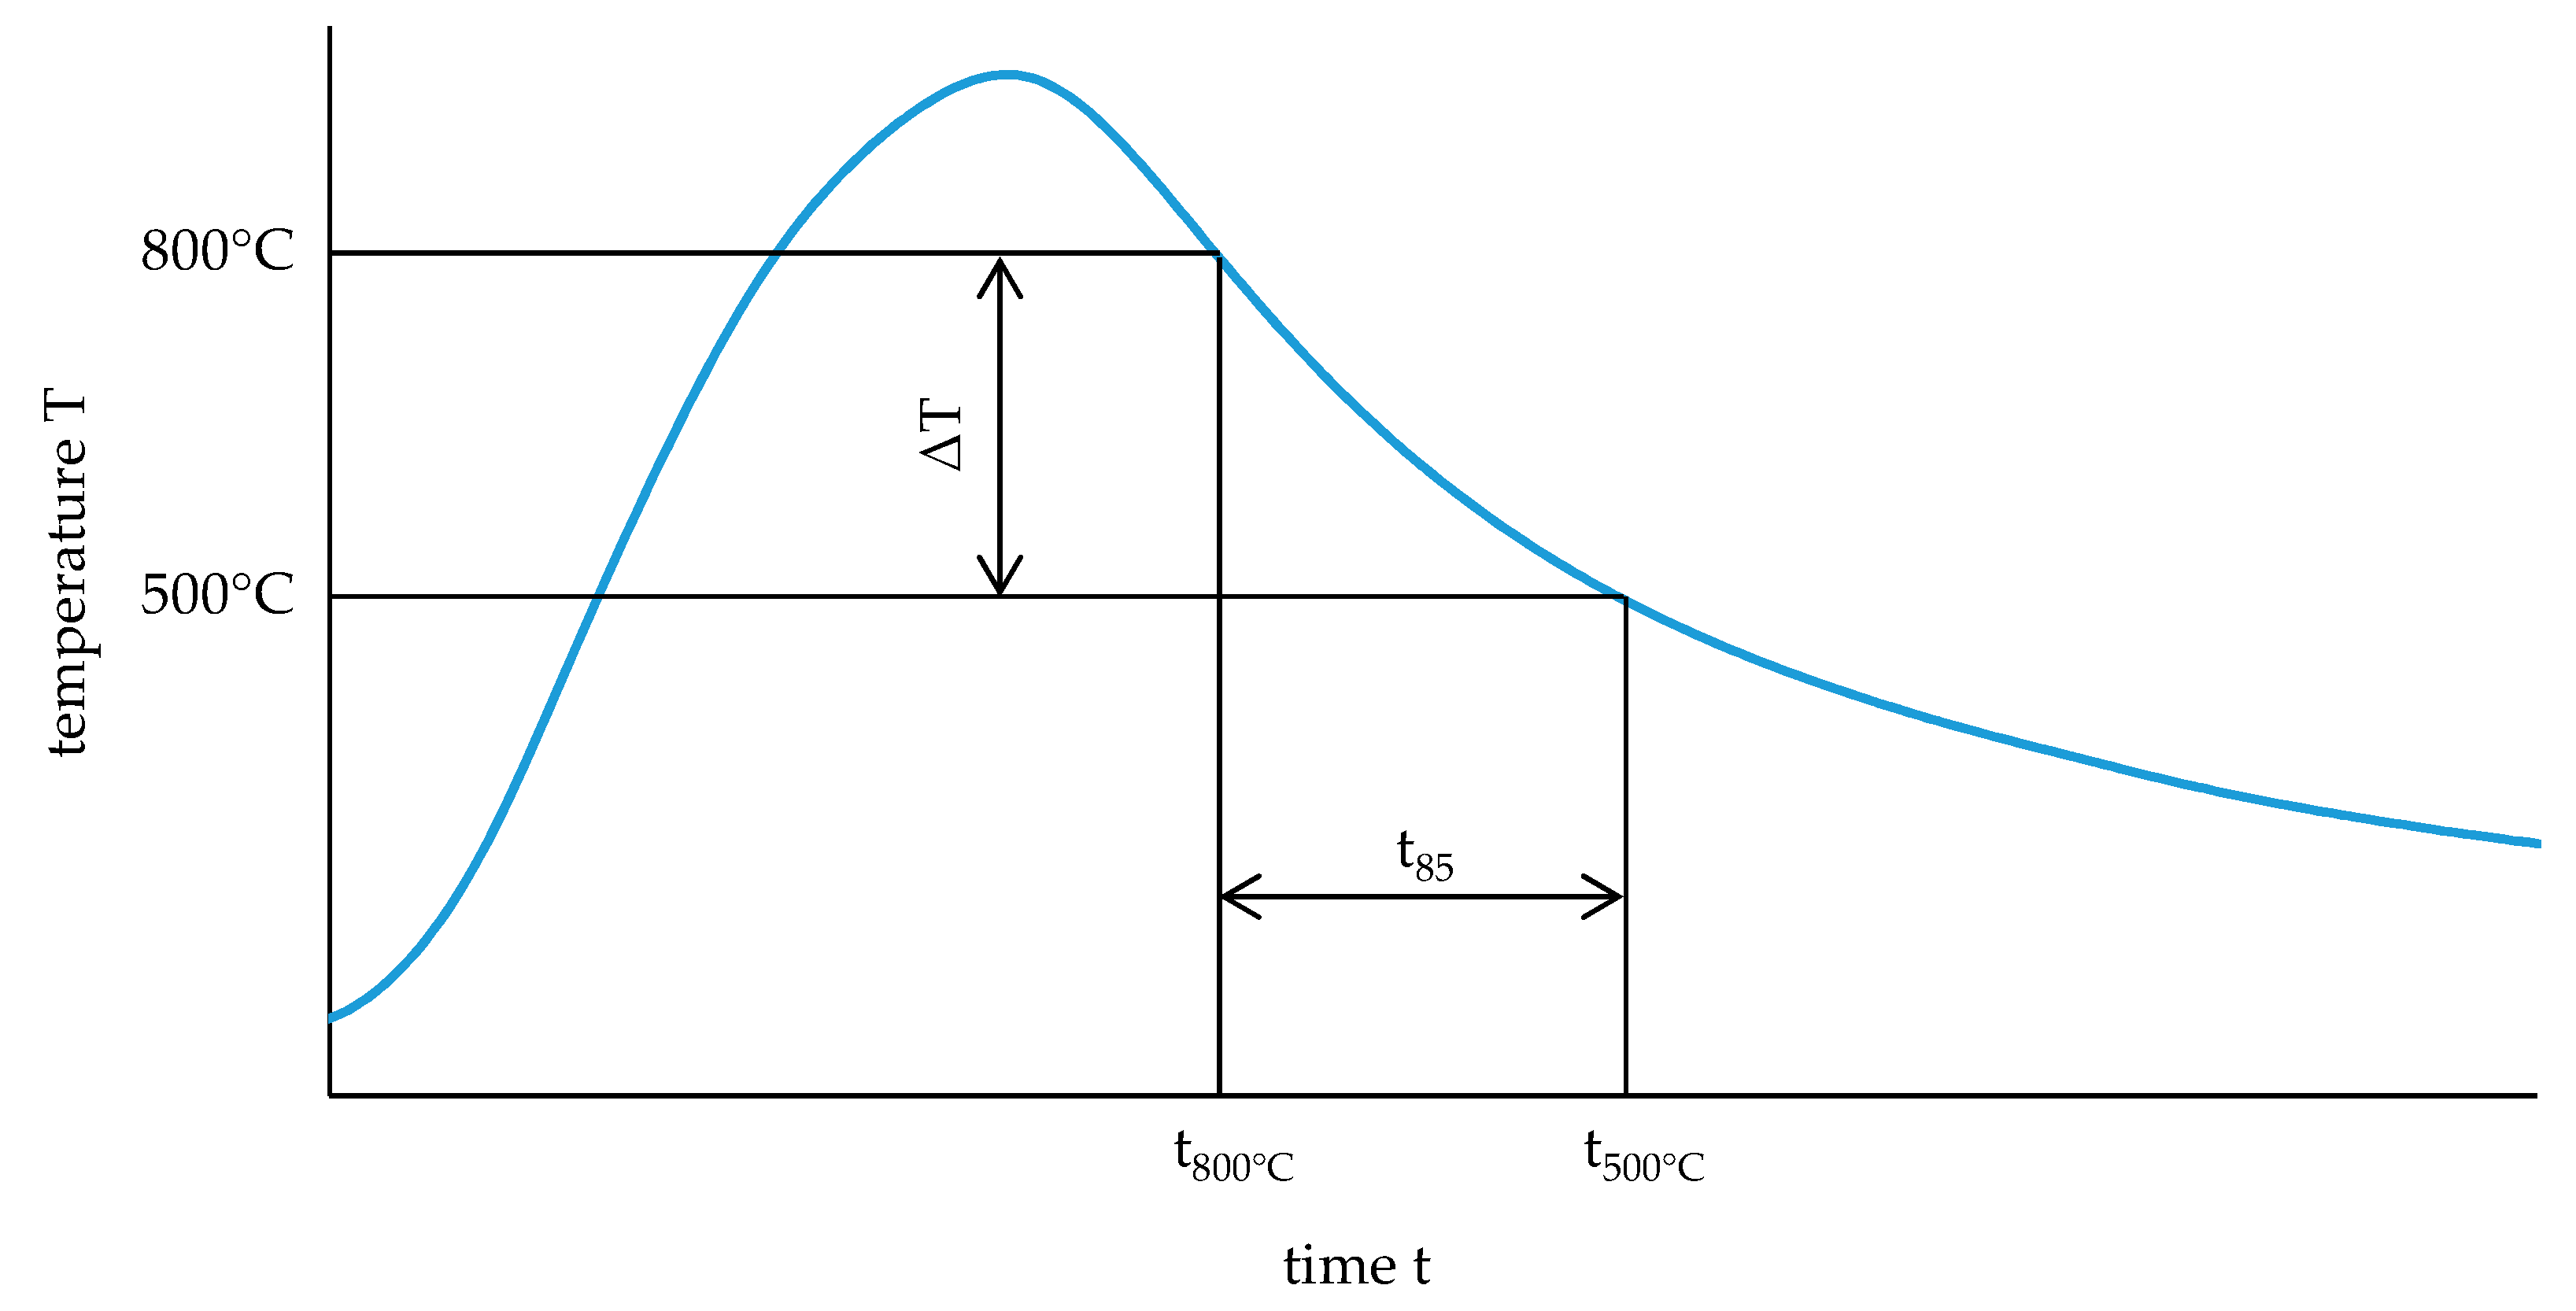
In this context, the surface hardening depths (SHD) were analyzed by metallographic investigations and by considering the hardness depth profiles (Vickers hardness). The influence of the mechanical load on the hardening depth during grind-hardening were neglected. For the characterization of the internal thermal load, an analytical model of Komanduri and Hou [17] was used to calculate the temperature fields within the subsurface regions of the workpieces according to the chosen process parameters and process conditions (compare to Section 2). Thus, the maximum contact zone temperature Tmax and the maximum temperature gradient at the surface (dT/dx)max (perpendicular to the workpiece surface) were considered as the relevant parameters to describe the internal thermal loads. It was assumed that both mentioned parameters govern the thermal material behavior. However, the results will show that further parameters such as quenching time t85 (the time for the temperature decrease ΔT from 800 °C–500 °C during cooling (compare to Appendix A)) have to be taken into account to provide an appropriate correlation between the internal material loads and the material modifications for grind-hardening processes.

2. Experimental Setup and Methods

The surface-grind-hardening tests were performed on a surface grinding machine, and a cylindrical grinder was used for the OD-grind-hardening tests. The workpieces for surface-grind-hardening (length 150 mm, width 29 mm, and height 30 mm) as well as for OD-grind-hardening (Ø 10 mm, Ø 38 mm, Ø 58 mm, and a width of 10 mm) were made of AISI 4140 (DIN 42CrMo4) in a “quenched and tempered” (QT) state at 400 °C for four hours and in a “normalized” state. All tests were done in the up-grinding mode with a grinding wheel speed vs = 35 m/s using a vitrified bonded corundum grinding wheel (surface-grind-hardening: wheel type A80HH9V, Ø 400 mm, width of 30 mm; OD-grind-hardening: wheel type A80CC5V, Ø 400 mm, width of 20 mm) at constant fluid supply conditions with a flowrate of QMWF = 25 L/min of white mineral oil. During the experiments, the depth of cut ae and the tangential feed speed vft were varied (Table 1). All test stages were performed as single stage grinding processes (for example, one 360-degree rotation of the workpiece during OD-grind-hardening). Before each grinding test, the wheel was dressed with a single point diamond dresser using an overlapping ratio of Ud = 3 (depth of cut during dressing aed = 30 µm, three times).
The parameter sets marked with a * in Table 1 represent experiments with insufficient hardening results (hardness increase ΔHV < 300 HV 0.5). The marked tests were neglected for the analysis regarding Process Signatures. The thermal internal material loads (maximum contact zone temperature Tmax, maximum temperature gradient at the surface (dT/dx)max) were determined by an analytical calculation based on the work of Komanduri and Huo (Equation (14) in [17]). With respect to the grinding processes studied here, the used equation for calculating the temperature profiles was simplified by setting the oblique angle φ = 90° to receive a situation of a band heat source moving in the direction parallel to the plane of the heat source in an infinite medium like the model used by Jaeger [18]; see Equation (1):
T m = q ˙ 2 π λ l i = 0 L e ( X l i ) · V · ρ · c p 2 · λ { 2 · K o [ V · ρ · c p 2 · λ ( X l i ) 2 + z 2 ] } dl i ,
where L describes the length of the heat source (equal to the contact length lg), X describes the position of temperature calculation relative to the position of the heat source in the direction of the velocity V of the heat source (equal to the tangential feed speed vft) and K0 the modified Bessel function of the second kind of order zero. In this regard, it is assumed that down to the depth z of surface hardening the austenitizing temperature (Tm = Ta = 840 °C) was reached during the grind-hardening process. Using this assumption, the heat flux q ˙ as a fraction (0 ≤ kw ≤ 1) of the specific grinding power Pc′′,
q ˙ = k w · P c ,
can be calculated, which leads to the mentioned austenitizing temperature at the point beneath the surface where the surface hardening depth SHD was reached. As an analytical approach was used for the Process Signature related analysis, the temperature dependency of the thermophysical properties was neglected and constant values were applied (the thermal conductivity λ = 37 W/(m∙K), the specific heat capacity cp = 446 J/(kg∙K), and the density ρ = 7834.66 kg/m3). Based on this simplification, the determined values for the heat flux q ˙ can be used to approximate the maximum contact zone temperatures as well as the temperature profiles affecting the workpiece material by solving Equation (1) within the limits li–L for varied values of X (the position of the temperature calculation in the direction of the tangential feed speed vft) and z (the depth beneath the surface). To receive a time-dependent temperature profile, the calculated values for X were transferred into the time domain by considering the tangential feed speed vft. The calculated data regarding temperatures and temperature profiles were used to evaluate the functional relationships between the thermal internal loads and process quantities ( q ˙ ,   t c ) . The maximum temperature was correlated with a function of the heat flux to the workpiece q ˙ and the contact time tc according to Malkin and Guo [19]:
T max ~ q ˙ t c   with   t c =   l g v ft .
As mentioned above, the input parameters for the heat source were derived from the experimental setup where vft represents the velocity of the moving heat source and lg represents the heat source length:
l g = a e d eq .
with deq as the equivalent grinding wheel diameter (equal to the grinding wheel diameter ds for surface-grinding operations) which is calculated for OD-grinding as follows:
d eq = d w · d s d w + d s .
It is expected that correlations between the gained internal material loads and the material modifications (surface hardening depth and change of surface hardness) can be identified following the concept of Process Signatures. For the processes of induction heating and conventional grinding such correlations were already found [16,20].

3. Results and Discussion

3.1. Correlation of Internal Material Loads with Process Quantities

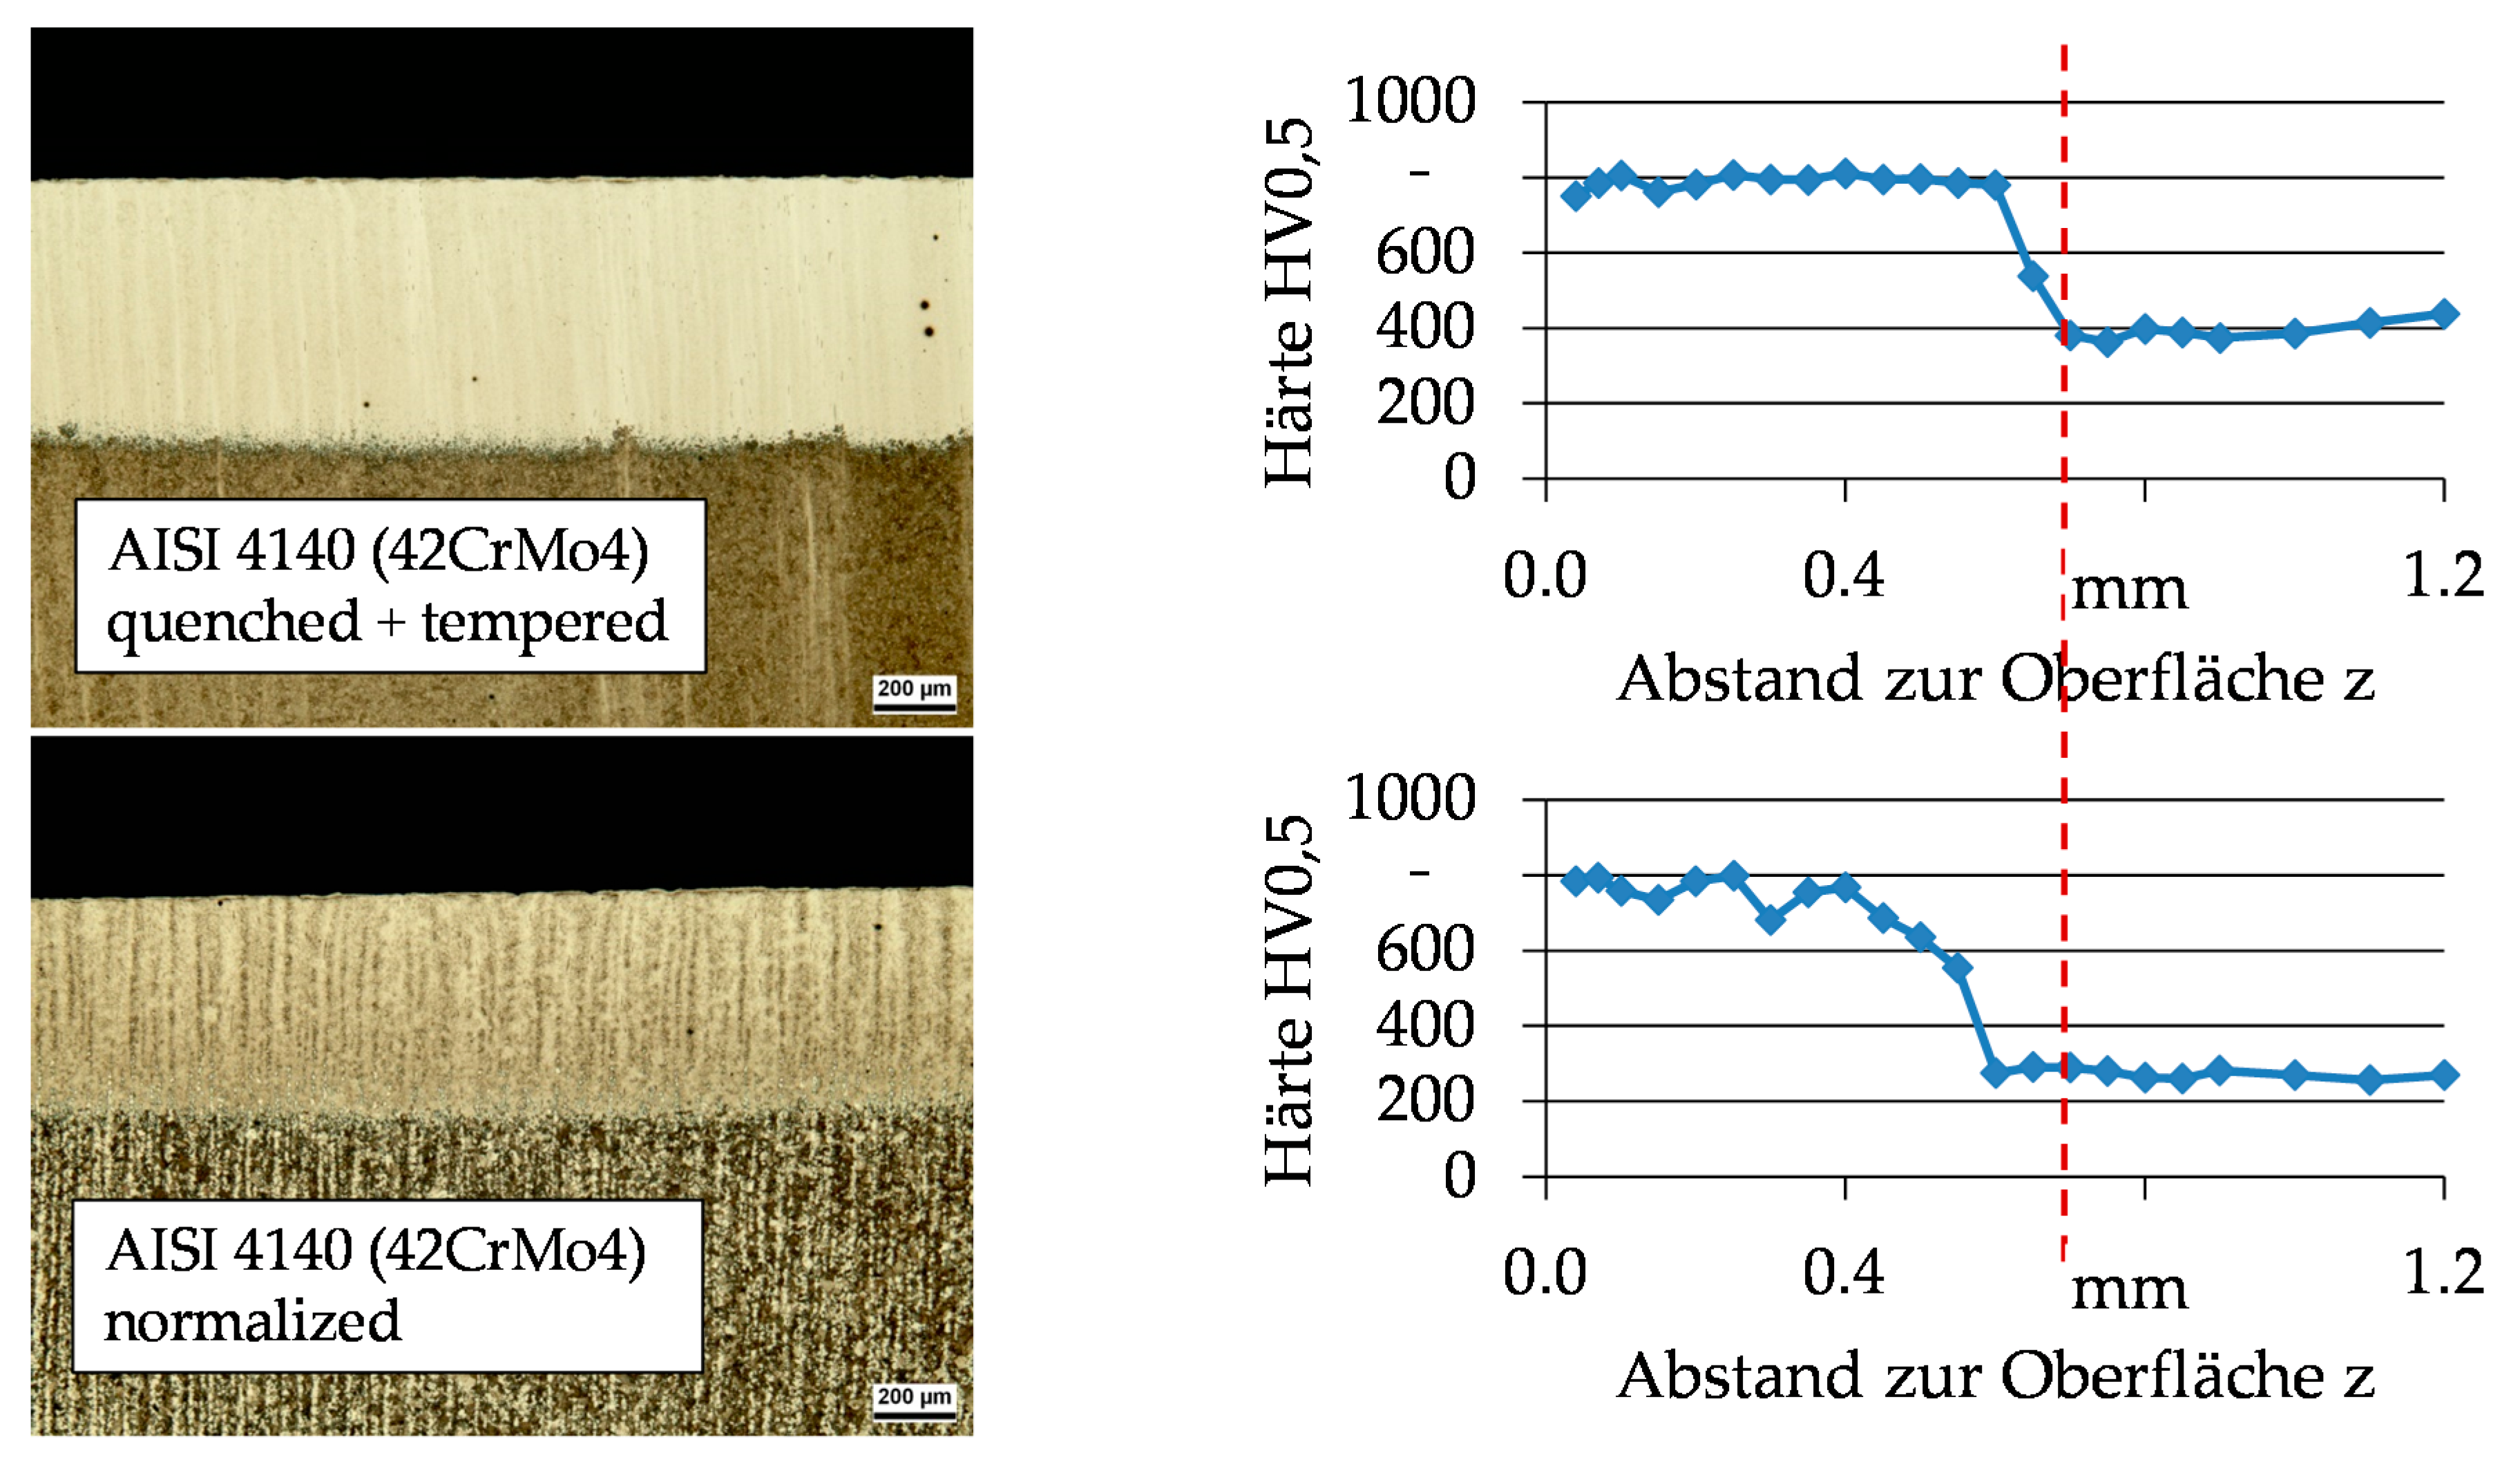
As mentioned above, the surface hardening depth SHD (depth in which a hardness increase can be observed) describes the depth beneath the surface in which the austenitizing temperature Ta = 840 °C is reached. The surface hardening depths for the described grinding tests (surface- and OD-grind-hardening) were evaluated by metallographic investigations including the measurement of hardness depth profiles (Vickers hardness, HV 0.5) as it is shown exemplarily in Figure 2. Due to the different microstructures (QT and normalized state), slight differences in the hardening depths can be observed although identical process parameters (ae = 0.5 mm, vft = 1.2 m/min) were used.
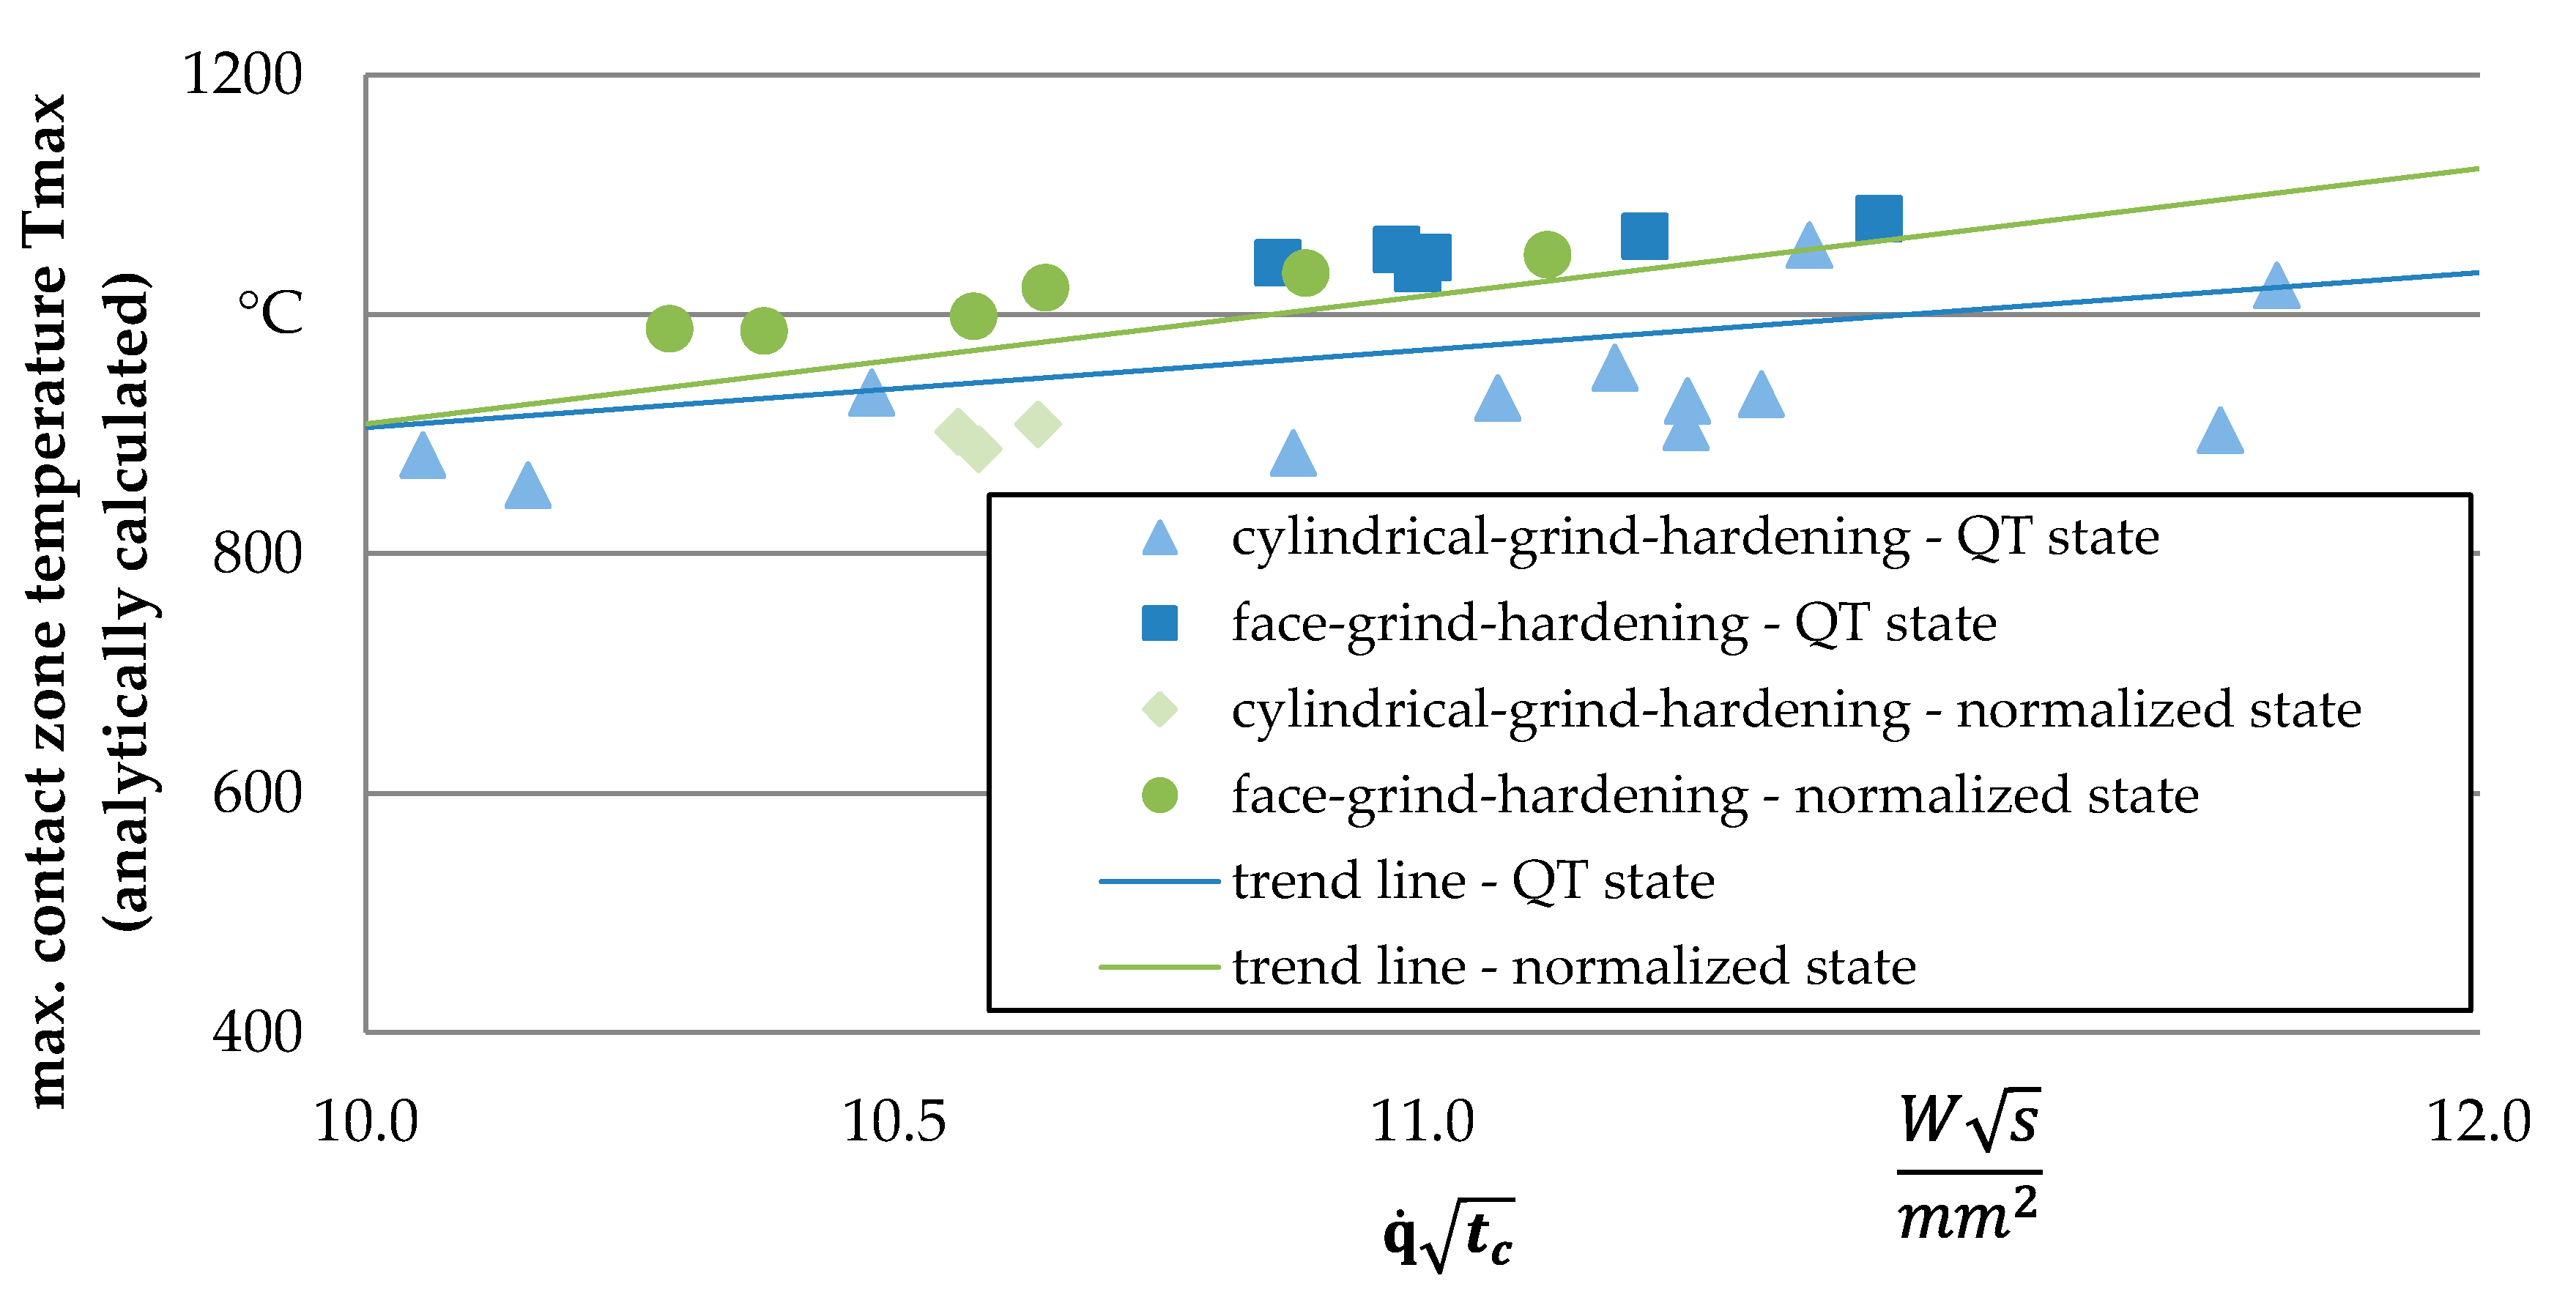
Based on these data, the temperature profiles, as well as the values regarding heat flux q ˙ , maximum contact zone temperature Tmax, and the maximum temperature gradient at the surface (dT/dx)max were analytically determined. In Figure 3, the maximum contact zone temperature Tmax is presented depending on the q ˙ t c values. Only a slightly increasing trend of the internal material load Tmax with the process quantity q ˙ t c can be assumed.
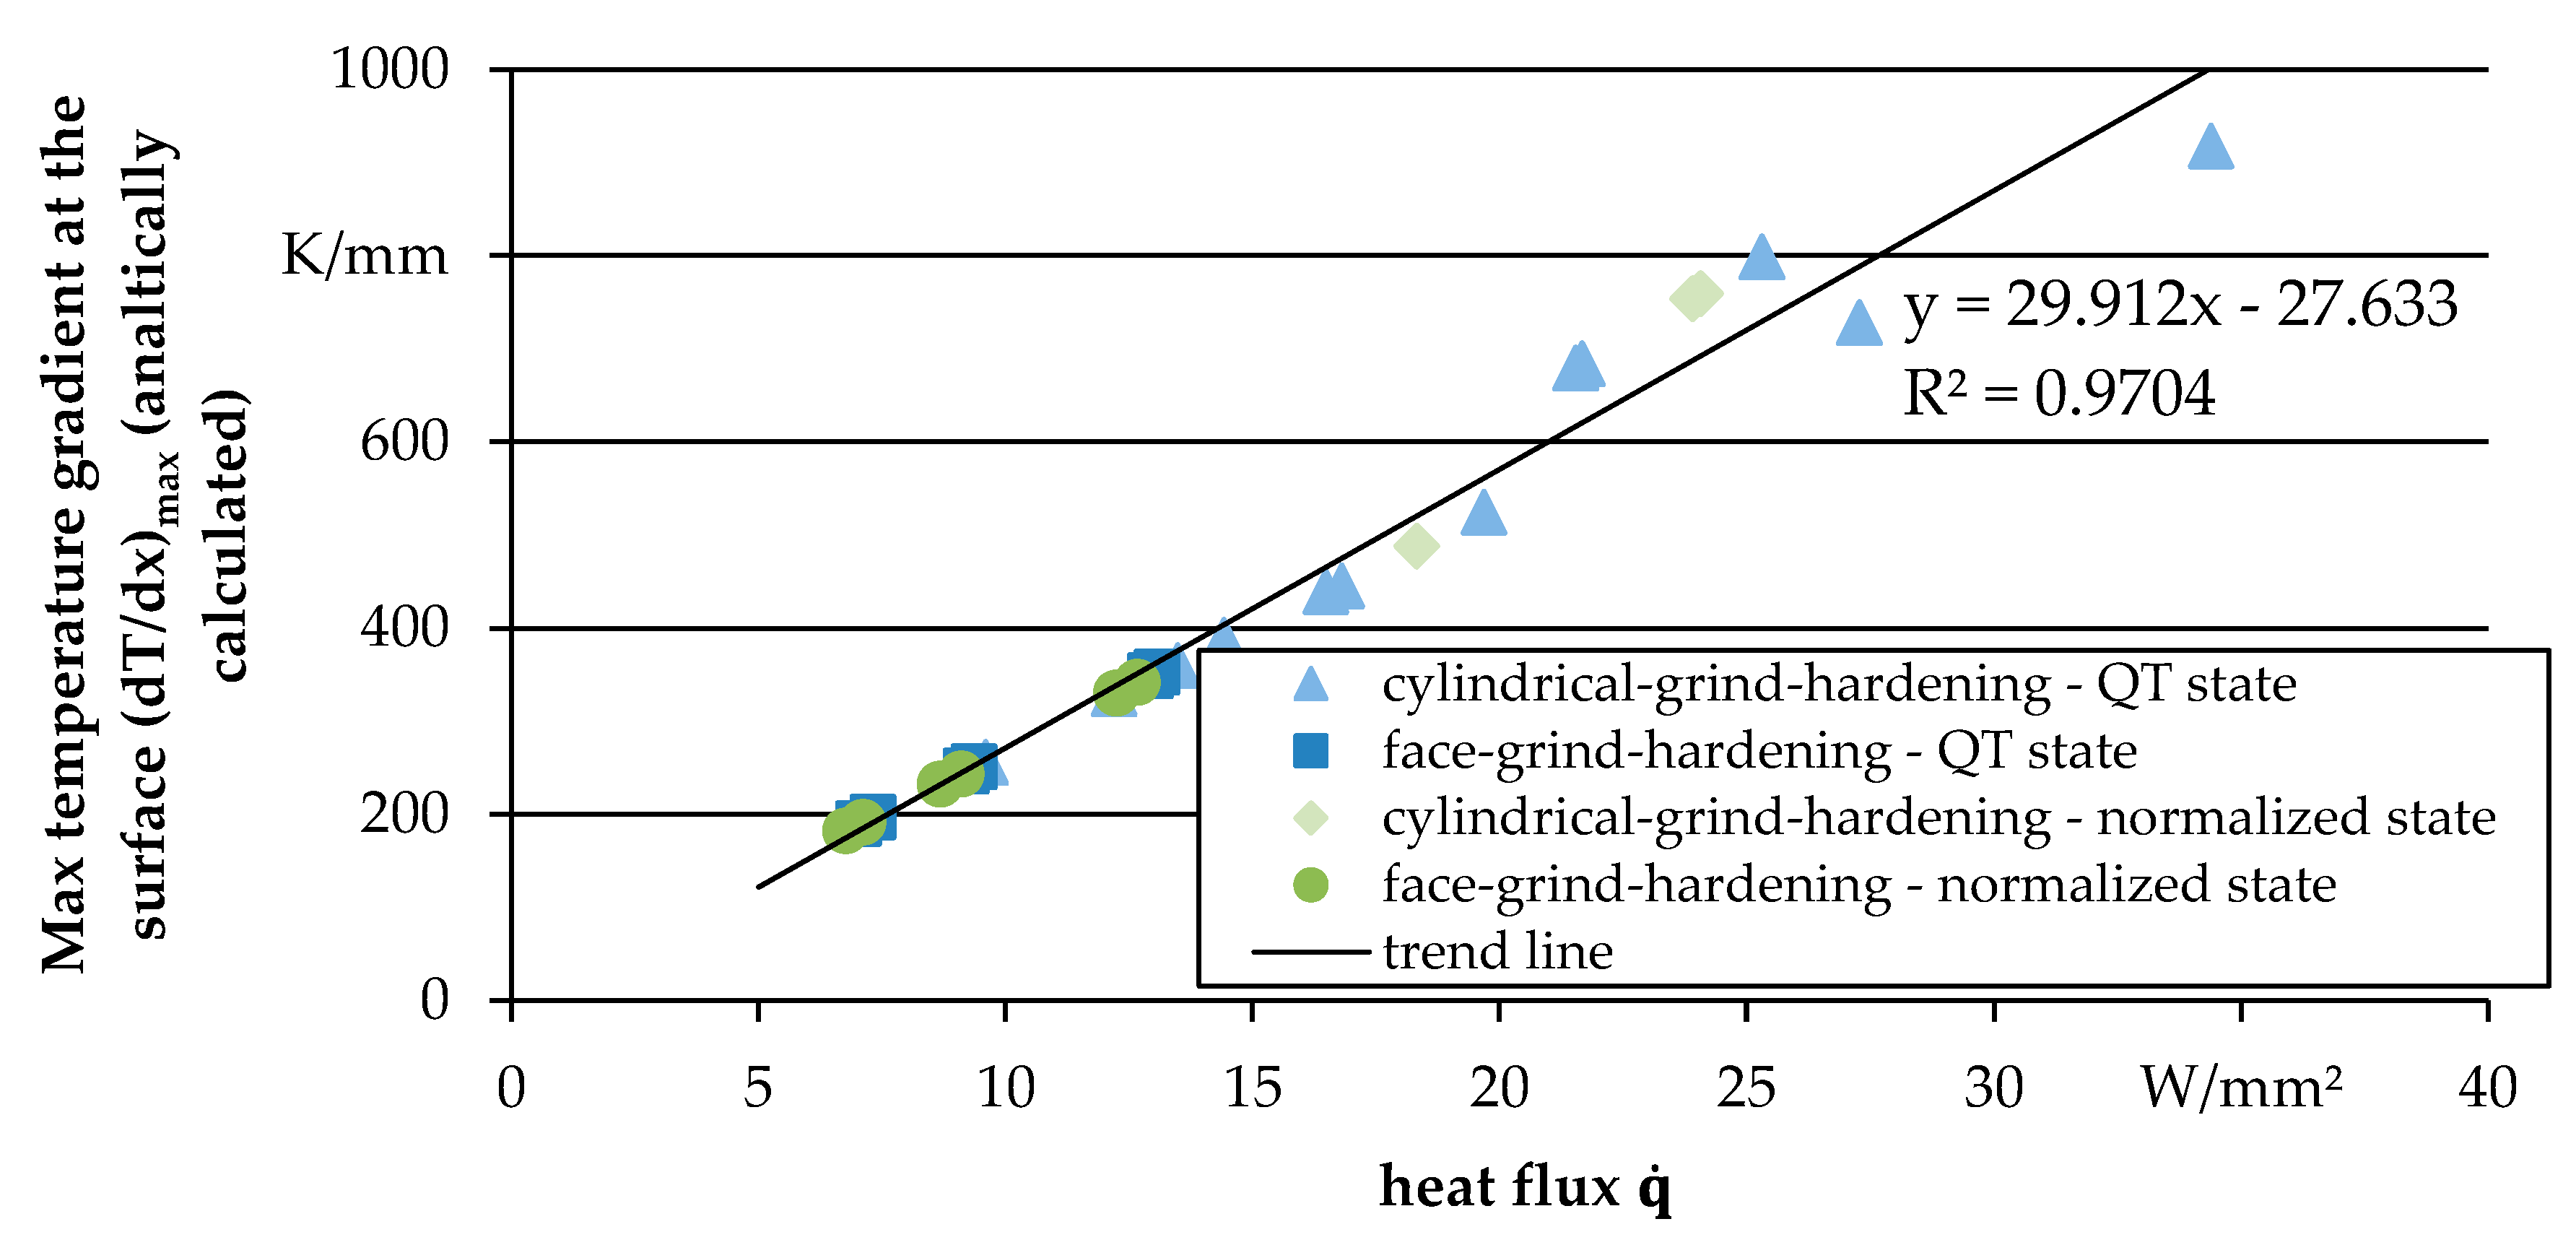
Based on the findings of Malkin and Guo [19], it can be presumed that the heat input at the surface and the temperatures beneath the workpiece surface increase with rising values of q ˙ t c . A similar result can be obtained if the maximum temperature gradient at the surface (dT/dx)max is plotted against the heat flux q ˙ (compare to Figure 4). A clearer correlation can be derived from Figure 4 between the process quantity q ˙ and the thermal internal load (dT/dx)max; that is, a linear dependency with a coefficient of determination of R2 = 0.97 can be determined between both values as the temperature gradient increases clearly with an increasing heat flux q ˙ as expected (Fourier’s law). In addition, the diagram indicates a process independent correlation between the internal material loads and the process quantities. As the thermophysical properties were assumed to be constant, no differences between both heat treatment states show up.

3.2. Correlation of Internal Material Loads with Material Modifications (the Concept of Process Signatures)

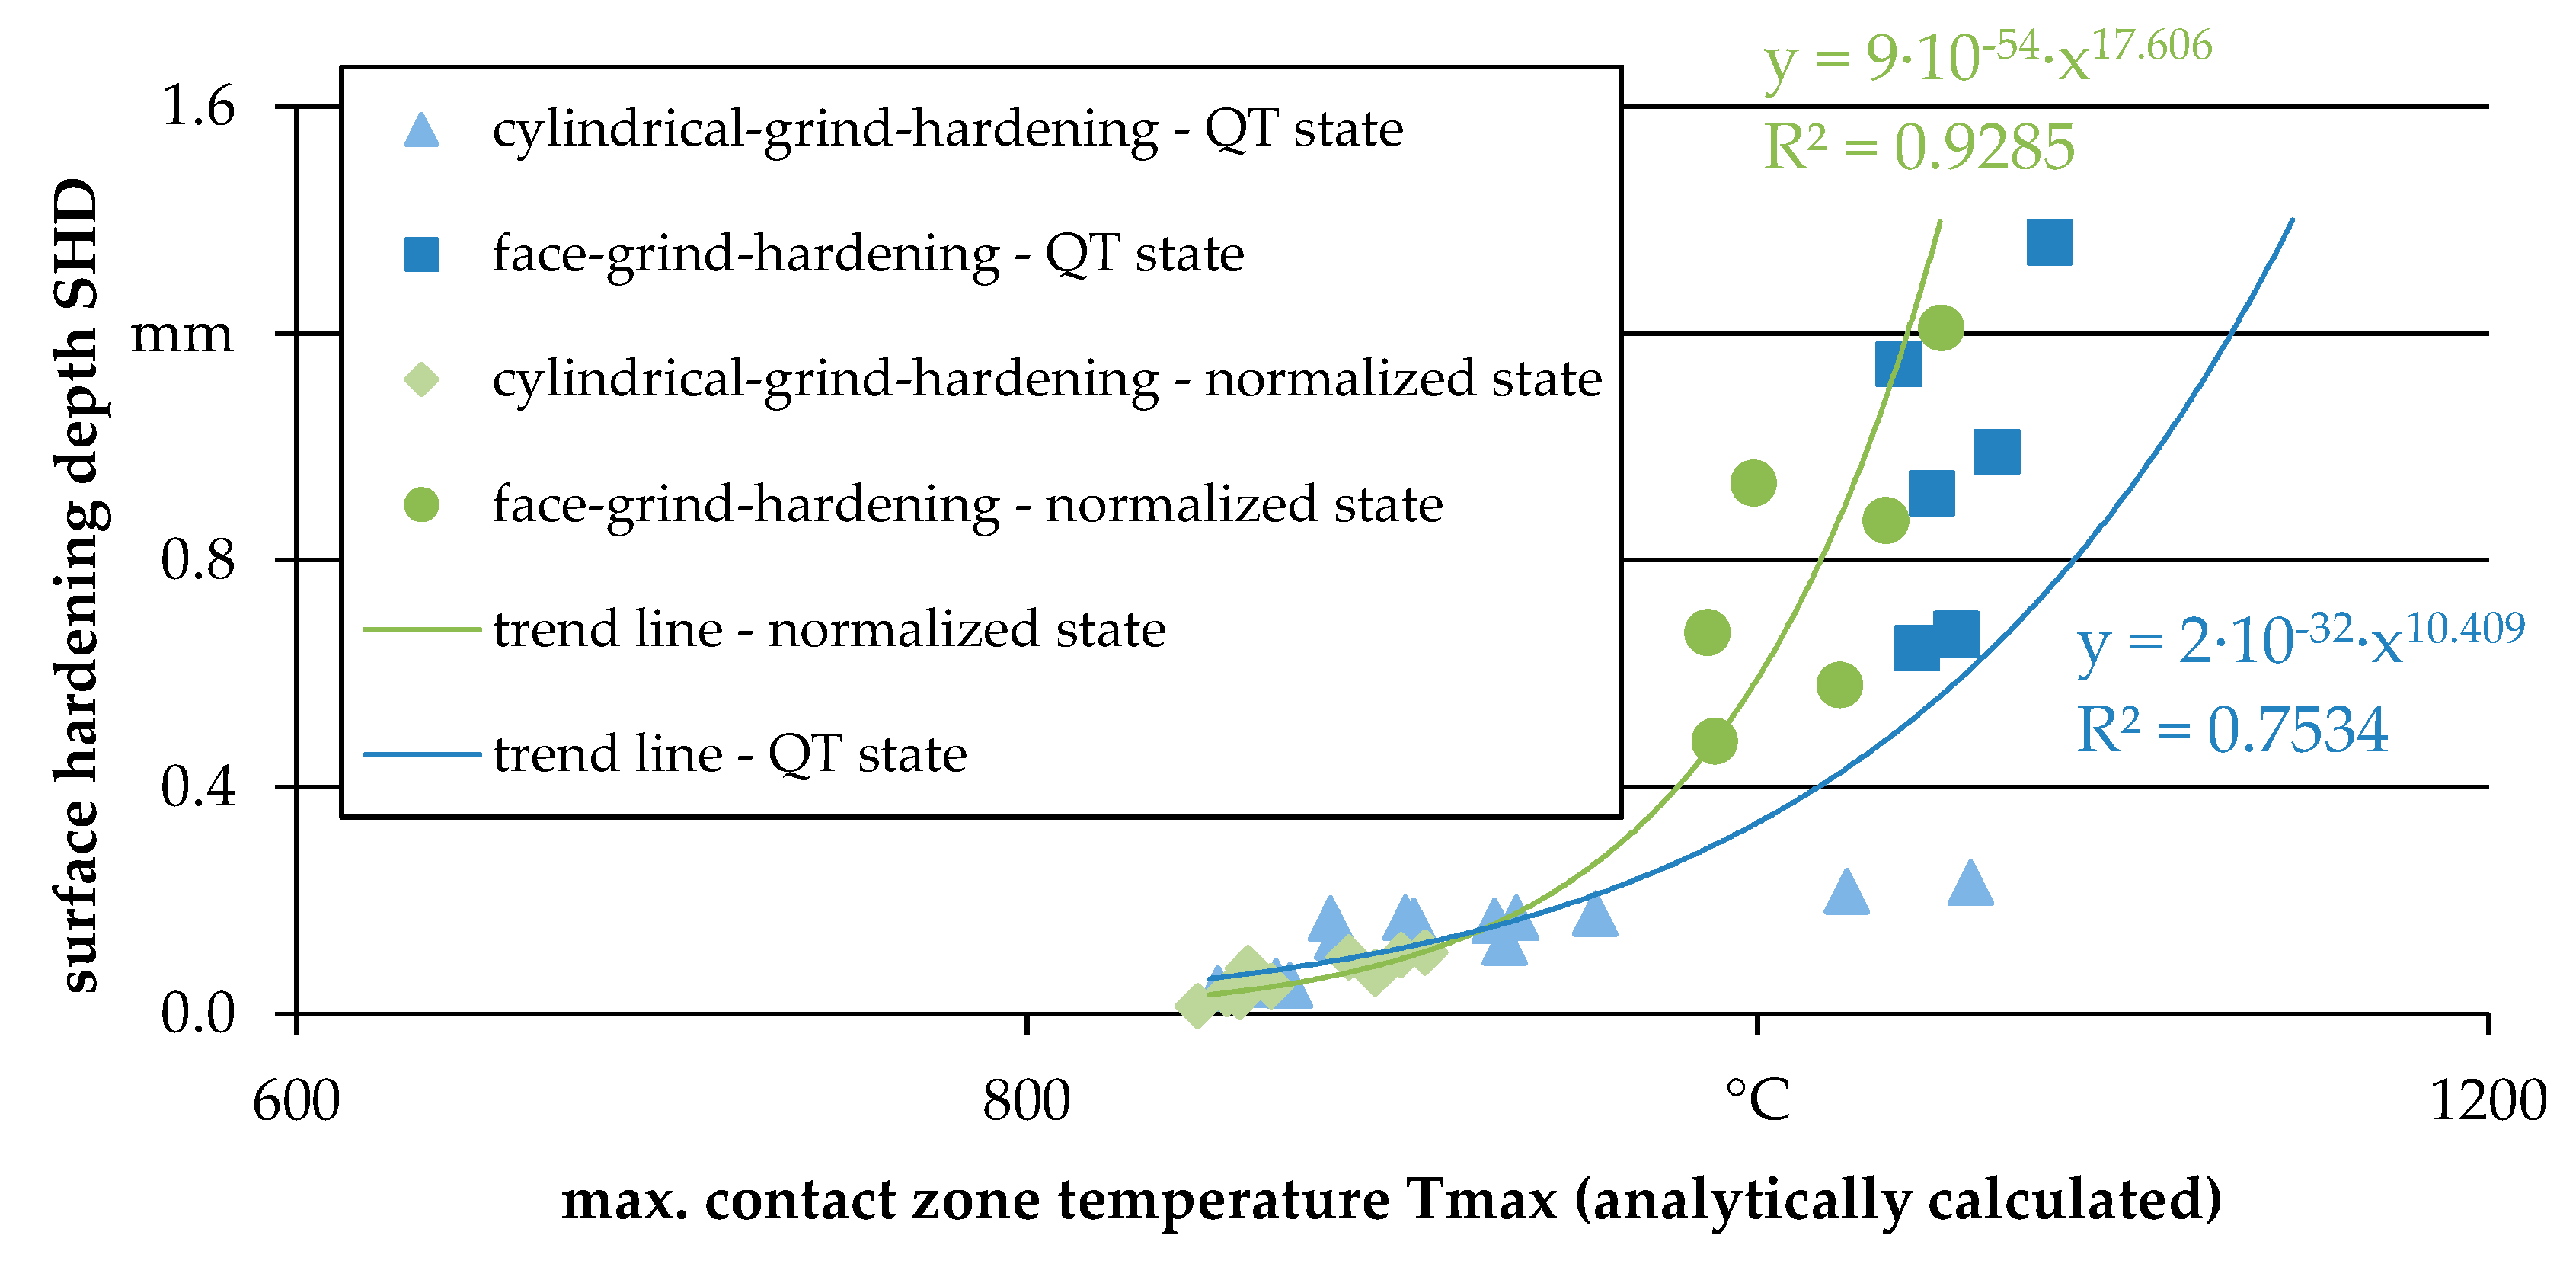
In view of revealing a deeper understanding of the process’ influence on the resulting material modifications affecting the functional performance of machined components, the concept of Process Signatures offers a material-oriented view on machining processes and aims at describing the correlations between the internal material loads and the material modifications. Figure 5 shows the measured surface hardening depths dependent on the maximum contact zone temperature Tmax. As expected, it can be derived from Figure 5 for both processes that the surface hardening depth resulting from the grind-hardening process rises with higher values of the contact zone temperature Tmax. This finding corresponds to the observation within Section 3.1 where higher temperatures at the surface, as well as an increased temperature rise beneath the workpiece surface, were accompanied by an increasing q ˙ t c value. This leads to an increased thermal internal material load and a higher affecting depth of the thermal load.
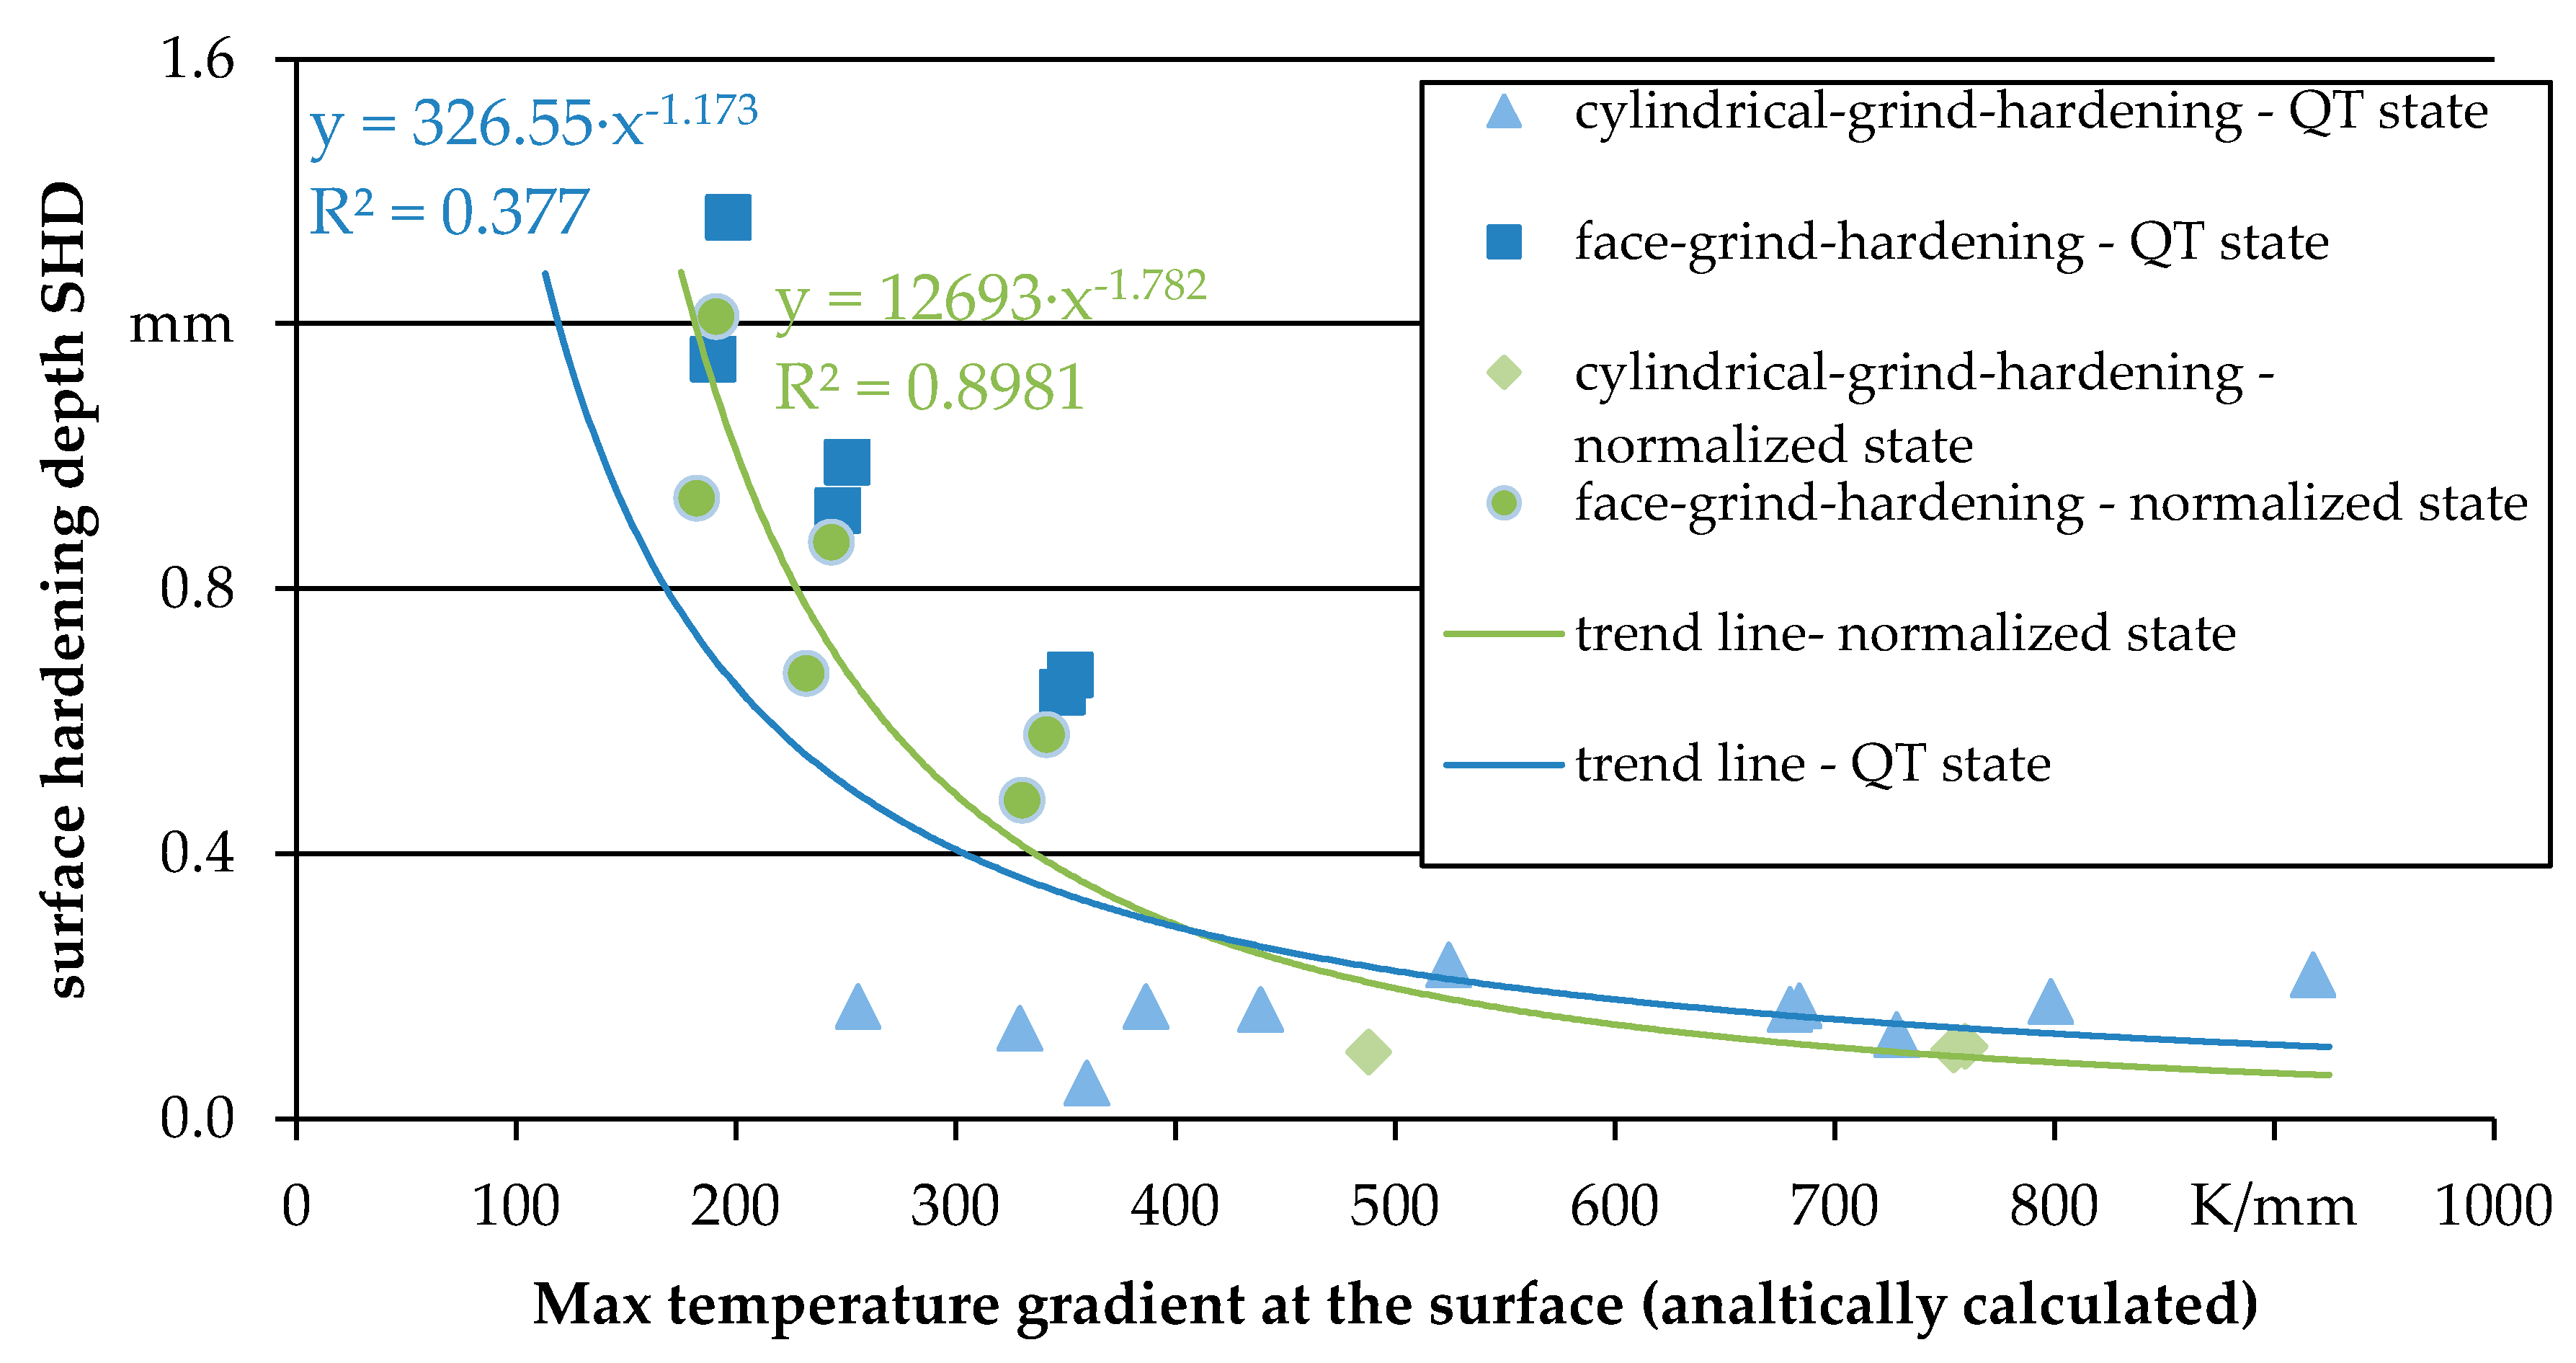
Two different functions can be derived dependent on the different microstructures which is due to the varied austenitizing behavior of the QT and normalized states. In this regard, it is surprising that the coefficient of determination for the samples with the QT state is lower compared to the normalized state as a higher inhomogeneity of the microstructure (lamellar ferrite-perlite structure) exists for the latter. This material property results in a broader scattering of the hardness values within the hardness profiles and thus, a lower value of the coefficient of determination for the normalized state would have been expected. However, the determination coefficients for both heat treatment states are relatively high (R2 = 0.75 and R2 = 0.93) which allows for the conclusion that the trend line functions can be considered reliable to describe a process independent correlation of the maximum contact zone temperature as a parameter of the internal material load and the surface hardening depth as a material modification. A similar relationship can be derived if the maximum temperature gradient and its effect on the surface hardening depth are taken into account (see Figure 6): For the normalized state, a functional dependency can be derived to describe the correlation between the internal material load and the material modification. Furthermore, the diagram in Figure 6 shows for each state of microstructure that the lower the maximum temperature gradient, the higher the SHD values for both process strategies.
In this regard, it is assumed that lower maximum temperature gradients lead to a less steep reduction of the temperatures beneath the surface for temperatures exceeding the austenitizing temperature in deeper subsurface regions. The coefficient of determination for the normalized microstructure was R2 = 0.9 which indicates that the surface hardening depth resulting from the grinding experiments of the normalized workpieces can reliably be described by the shown function of the maximum contact zone temperature. Considering the low determination coefficient of R2 = 0.38 for the QT state, a reliable correlation as for the normalized samples is only partly given. From Figure 6 it can be concluded that a power function cannot explain the functional correlation between the maximum temperature gradient and the surface hardening depth for the QT state process independently. It is assumed that this is reasoned by the fact that the temperature and time dependent material properties could not be considered within the analytical approach.
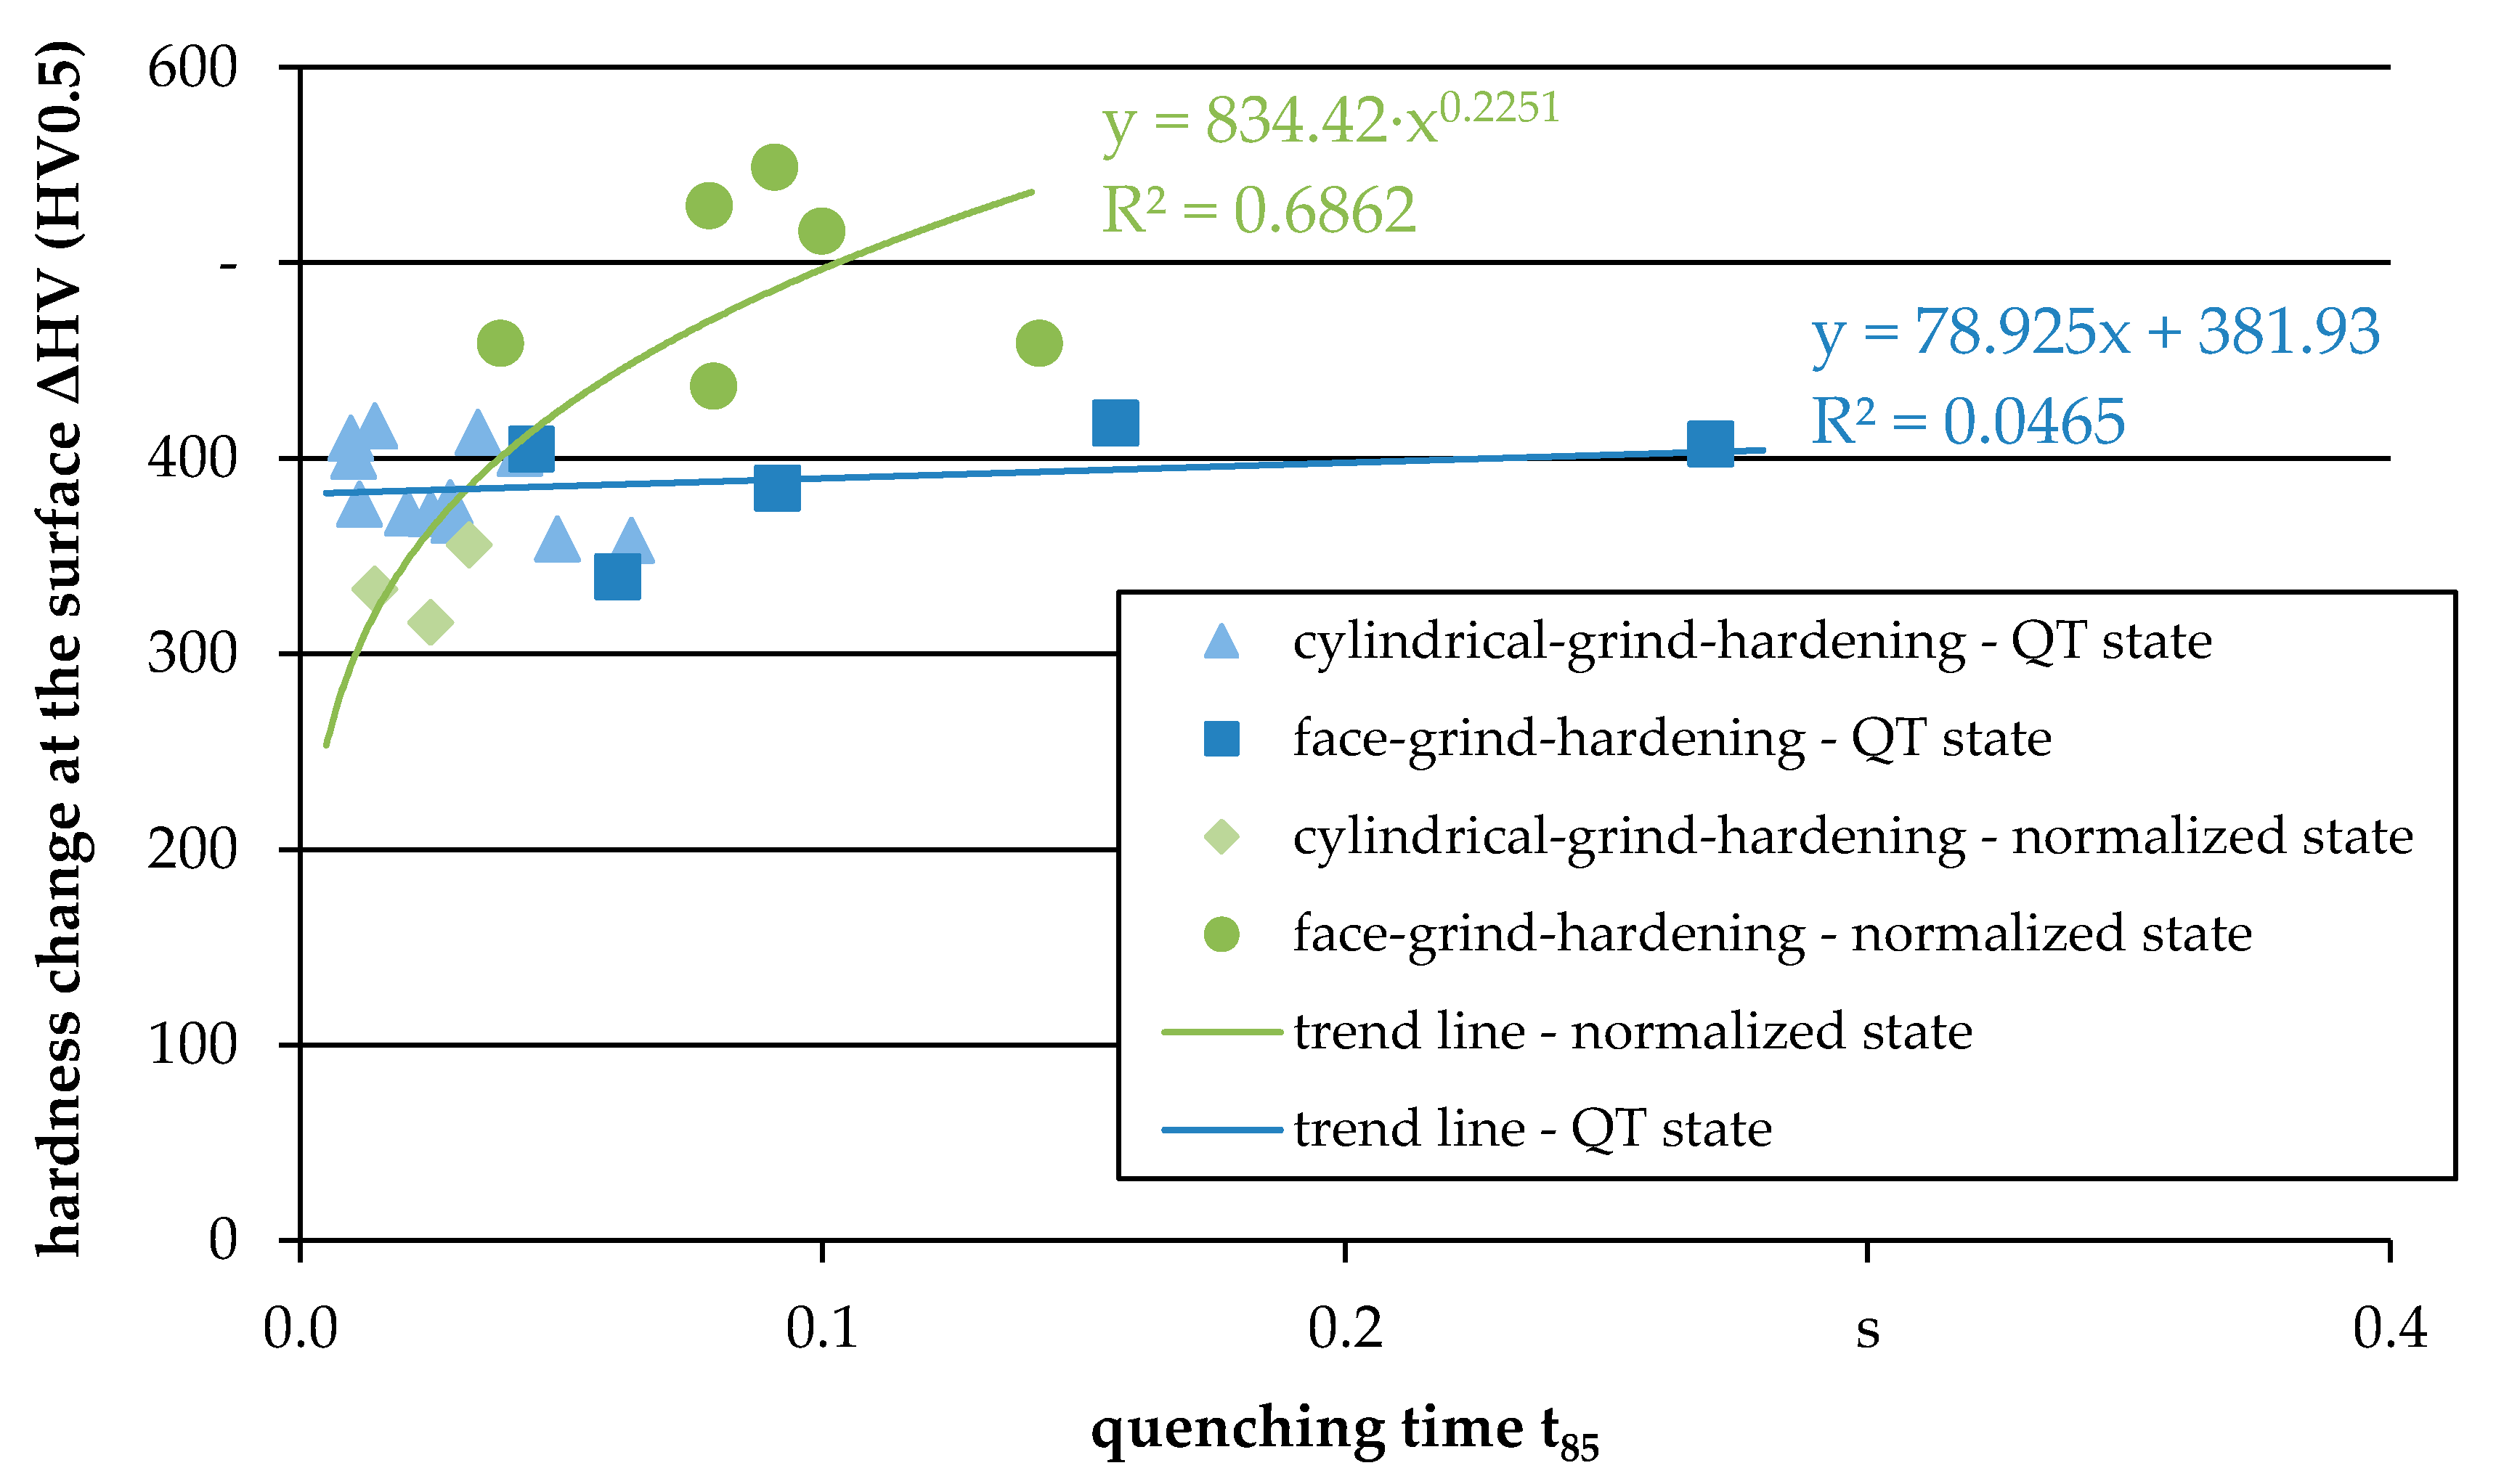
Also, the hardness change at the surface represents a further characteristic of material modifications caused by grind-hardening which is governed, besides the temperatures at the surface and the temperature gradients, by the quenching time t85 which can also be derived from the calculated temperature profiles (see Figure 7).
From a materials science point of view, the correlation for the normalized state with a coefficient of determination of R2 = 0.69 in Figure 7 shows that with an increasing quenching time t85 (decreasing quenching speed), a rise of hardness change at the surface takes place (at least for the normalized state). Thus, the critical minimum quenching speed was reached for all considered parameter sets. In addition, as for the previous correlations, one slope for each heat treatment state can be derived so that the effect of the different behavior of the microstructure shows up. Annealing or softening effects are not present within these investigations since the duration time of the thermal load is not high enough. However, the functional description for the QT state within Figure 7 (coefficient of determination of R2 = 0.05) as well as the characteristics of prevented martensitic transformation due to very low quenching times cannot be completely clarified at this point. In this regard, FE-based simulations considering the temperature and time-dependent material properties are needed to gain further data for the description of the thermal material load.

4. Conclusions

The presented experimental investigations in combination with the analytical approach allow for the description of the temperature development in the contact zone between the workpiece and the grinding wheel as well as the corresponding temperature rise beneath the workpiece surface. By considering the thermal load (described as mentioned above) affecting the workpiece material during grind-hardening, functional correlations between the internal material loads and the material modifications can be derived (part of Process Signatures). This is provided by the regression analysis shown in Section 3. In this regard, thermal material loads are described by the maximum contact zone temperature and maximum temperature gradient at the surface. These factors lead to an appropriate description of the mechanisms that govern the resulting surface hardening depth. The results show that the correlations between the internal material loads and the process quantities as well as the material modifications respectively are almost independent of the process strategy (surface- versus OD-grind-hardening). However, for each heat treatment state (QT and normalized), one functional relation can be deduced characterizing the influence of the internal material load on the material modifications.
In view of the hardness change at the surface, the correlations are more complex: The maximum contact zone temperature Tmax governs the maximum temperature gradient at the surface (dT/dx)max and consequently the temperature rise beneath the workpiece surface. In consequence, the time for heating up, austenitizing, and quenching is also dependent on the development of Tmax and (dT/dx)max and it is at least influenced by the chosen process parameters (in particular by the tangential feed speed vft). Thus, to describe the hardness change at the surface based on the internal material loads, the synergetic interrelation of the above-mentioned aspects has to be considered. To enable a holistic view on this complex interrelation, process models considering, for example, the temperature-dependent thermophysical properties have to be developed to determine the further functional dependencies between the material loads and the material modifications. Hence, future research work will be focused on the development of FE-based simulations for grind-hardening processes. This approach should ensure that—based on the Process Signature related functions—process parameters can be chosen to achieve a dedicated surface hardening depth after grind-hardening. To further develop parts of the Process Signature for grinding, different modifications such as residual stress must be considered. In order to evaluate comparable equations, residual stress measurements were and still are performed after grinding experiments. Moreover, the mechanical load will be part of future investigations as the thermal and mechanical loads act together and take effect on the material modifications during the grinding/grind-hardening process.

Acknowledgments

The authors gratefully acknowledge the financial support of the research work by the German Research Foundation (DFG) within the Transregional Collaborative Research Center SFB/TRR 136 “Process Signatures”, subproject F06.

Author Contributions

B.K., C.H. and E.B. designed the experiments and prepared the publication. B.K. performed the experiments and analyzed the data. E.K. supported the analysis of the data and revision of the manuscript.

Conflicts of Interest

The authors declare no conflict of interest.

Nomenclature

aedepth of cut (mm)
aeddepth of cut during dressing (µm)
αspecific heat capacity (J/(kg∙K))
deqequivalent grinding wheel diameter (mm)
dsgrinding wheel diameter (mm)
dwworkpiece diameter (mm)
ΔHVhardness change at the surface (N/A)
kwheat partition fraction to the workpiece (N/A)
Llength of the heat source (mm)
lggeometric contact length in grinding (mm)
λthermal conductivity (W/(m∙K))
ρdensity (kg/m3)
Pc′′specific grinding power (W/mm2)
q ˙ heat flux to the workpiece (W/mm2)
Q w specific material removal rate (mm3/(mm∙s))
SHDsurface hardening depth (mm)
t85quenching time from 800 °C–500 °C (s)
t c contact time (s)
TmaxMaximum temperature (°C)
(dT/dx)maxMaximum temperature gradient (K/mm)
Udoverlapping ratio in dressing (N/A)
Vvelocity of the heat source (mm/min)
v ft tangential feed speed (mm/min)
v s grinding wheel speed (m/s)

Appendix A

The quenching time t85 is the period of time during which the temperature decreases from 800 °C–500 °C at a specific workpiece location. During this time, the greatest changes of the material properties due to structural transformations take place.
Figure A1. The exemplary analysis temperature plot and the definition of the quenching time t85.
Jmmp 02 00020 g0a1

References

  1. Jawahir, I.S.; Brinksmeier, E.; M’Saoubi, R.; Aspinwall, D.K.; Outeiro, J.C.; Meyer, D.; Umbrello, D.; Jayal, A.D. Surface integrity in material removal processes: Recent advances. CIRP Ann. Manuf. Technol. 2011, 60, 603–626. [Google Scholar] [CrossRef]
  2. Stenberg, N.; Proudian, J. Numerical Modelling of Turning to Find Residual Stresses. Procedia CIRP 2013, 8, 258–264. [Google Scholar] [CrossRef]
  3. Dehmani, H.; Salvatore, F.; Hamdi, H. Numerical Study of Residual Stresses Induced by Multi-steps Orthogonal Cutting. Procedia CIRP 2013, 8, 299–304. [Google Scholar] [CrossRef]
  4. Budak, E.; Ozlu, E. Analytical Modeling of Chatter Stability in Turning and Boring Operations. CIRP Ann. Manuf. Technol. 2007, 56, 401–404. [Google Scholar] [CrossRef]
  5. Lazoglu, I.; Ulutan, D.; Alaca, B.E.; Engin, S. An enhanced analytical model for residual stress prediction in machining. CIRP Ann. Manuf. Technol. 2008, 57, 81–84. [Google Scholar] [CrossRef]
  6. Brockhoff, T. Grind-Hardening: A Comprehensive View. CIRP Ann. Manuf. Technol. 1999, 48, 255–260. [Google Scholar] [CrossRef]
  7. Brinksmeier, E.; Minke, E.; Wilke, T. Investigations on Surface Layer Impact and Grinding Wheel Performance for Industrial Grind-Hardening Applications. Prod. Eng. 2005, 12, 35–40. [Google Scholar]
  8. Chryssolouris, G.; Tsirbas, K.; Salonitis, K. An Analytical, Numerical, and Experimental Approach to Grind Hardening. SME J. Manuf. Processes 2005, 7, 1–9. [Google Scholar] [CrossRef]
  9. Wilke, T. Energieumsetzung und Gefügebeeinflussung beim Schleifhärten. Ph.D. Thesis, University of Bremen, Bremen, Germany, 2008. [Google Scholar]
  10. Zäh, M.F.; Brinksmeier, E.; Heinzel, C.; Huntemann, J.W.; Föckerer, T. Experimental and numerical identification of process parameters of grind-hardening and resulting part distortions. Prod. Eng. 2009, 3, 271–279. [Google Scholar] [CrossRef]
  11. Föckerer, T.; Kolkwitz, B.; Heinzel, C.; Zäh, M.F. Experimental and numerical analysis of transient behavior during grind-hardening of AISI 52100. Prod. Eng. 2012, 6, 559–568. [Google Scholar] [CrossRef]
  12. Salonitis, K.; Stavropoulos, P.; Stournaras, A.; Chryssolouris, G. Finite Element Modeling of Grind Hardening Process. In Proceedings of the 10th CIRP International Workshop on Modeling of Machining Operations, Reggio Calabria, Italy, 27–28 August 2007; pp. 117–123. [Google Scholar]
  13. Fricker, D.C.; Pearce, T.R.A.; Harrison, A.J.L. Predicting the occurrence of grind hardening in cubic boron nitride grinding of crankshaft steel. Proc. Inst. Mech. Eng. 2004, 218, 1339–1356. [Google Scholar] [CrossRef]
  14. Brinksmeier, E.; Klocke, F.; Lucca, D.A.; Sölter, J.; Meyer, D. Process signatures—A new approach to solve the inverse surface integrity problem in machining processes. Procedia CIRP 2014, 13, 429–434. [Google Scholar] [CrossRef]
  15. Kuschel, S.; Sölter, J.; Brinksmeier, E. Analysing internal material loads in manufacturing processes. Adv. Mater. Res. 2014, 1018, 83–90. [Google Scholar] [CrossRef]
  16. Frerichs, F.; Sölter, J.; Lübben, T.; Brinksmeier, E.; Zoch, H.-W. A simulation based development of Process Signatures for manufacturing processes with thermal loads. Procedia CIRP 2016, 45, 327–330. [Google Scholar] [CrossRef]
  17. Komanduri, R.; Hou, Z.B. Thermal modeling of the metal cutting process: Part I—Temperature rise distribution due to shear plane heat source. Int. J. Mech. Sci. 2000, 42, 1715–1752. [Google Scholar] [CrossRef]
  18. Jaeger, J.C. Moving sources of heat and the temperature at sliding contacts. J. Proc. R. Soc. N. S. W. 1942, 76, 203–224. [Google Scholar]
  19. Malkin, S.; Guo, C. Thermal Analysis in Grinding. CIRP Ann. Manuf. Technol. 2007, 56, 760–782. [Google Scholar] [CrossRef]
  20. Kuschel, S.; Kolkwitz, B.; Sölter, J.; Brinksmeier, E.; Heinzel, C. Experimental and Numerical Analysis of Residual Stress Change Caused by Thermal Loads During Grinding. Procedia CIRP 2016, 45, 51–54. [Google Scholar] [CrossRef]
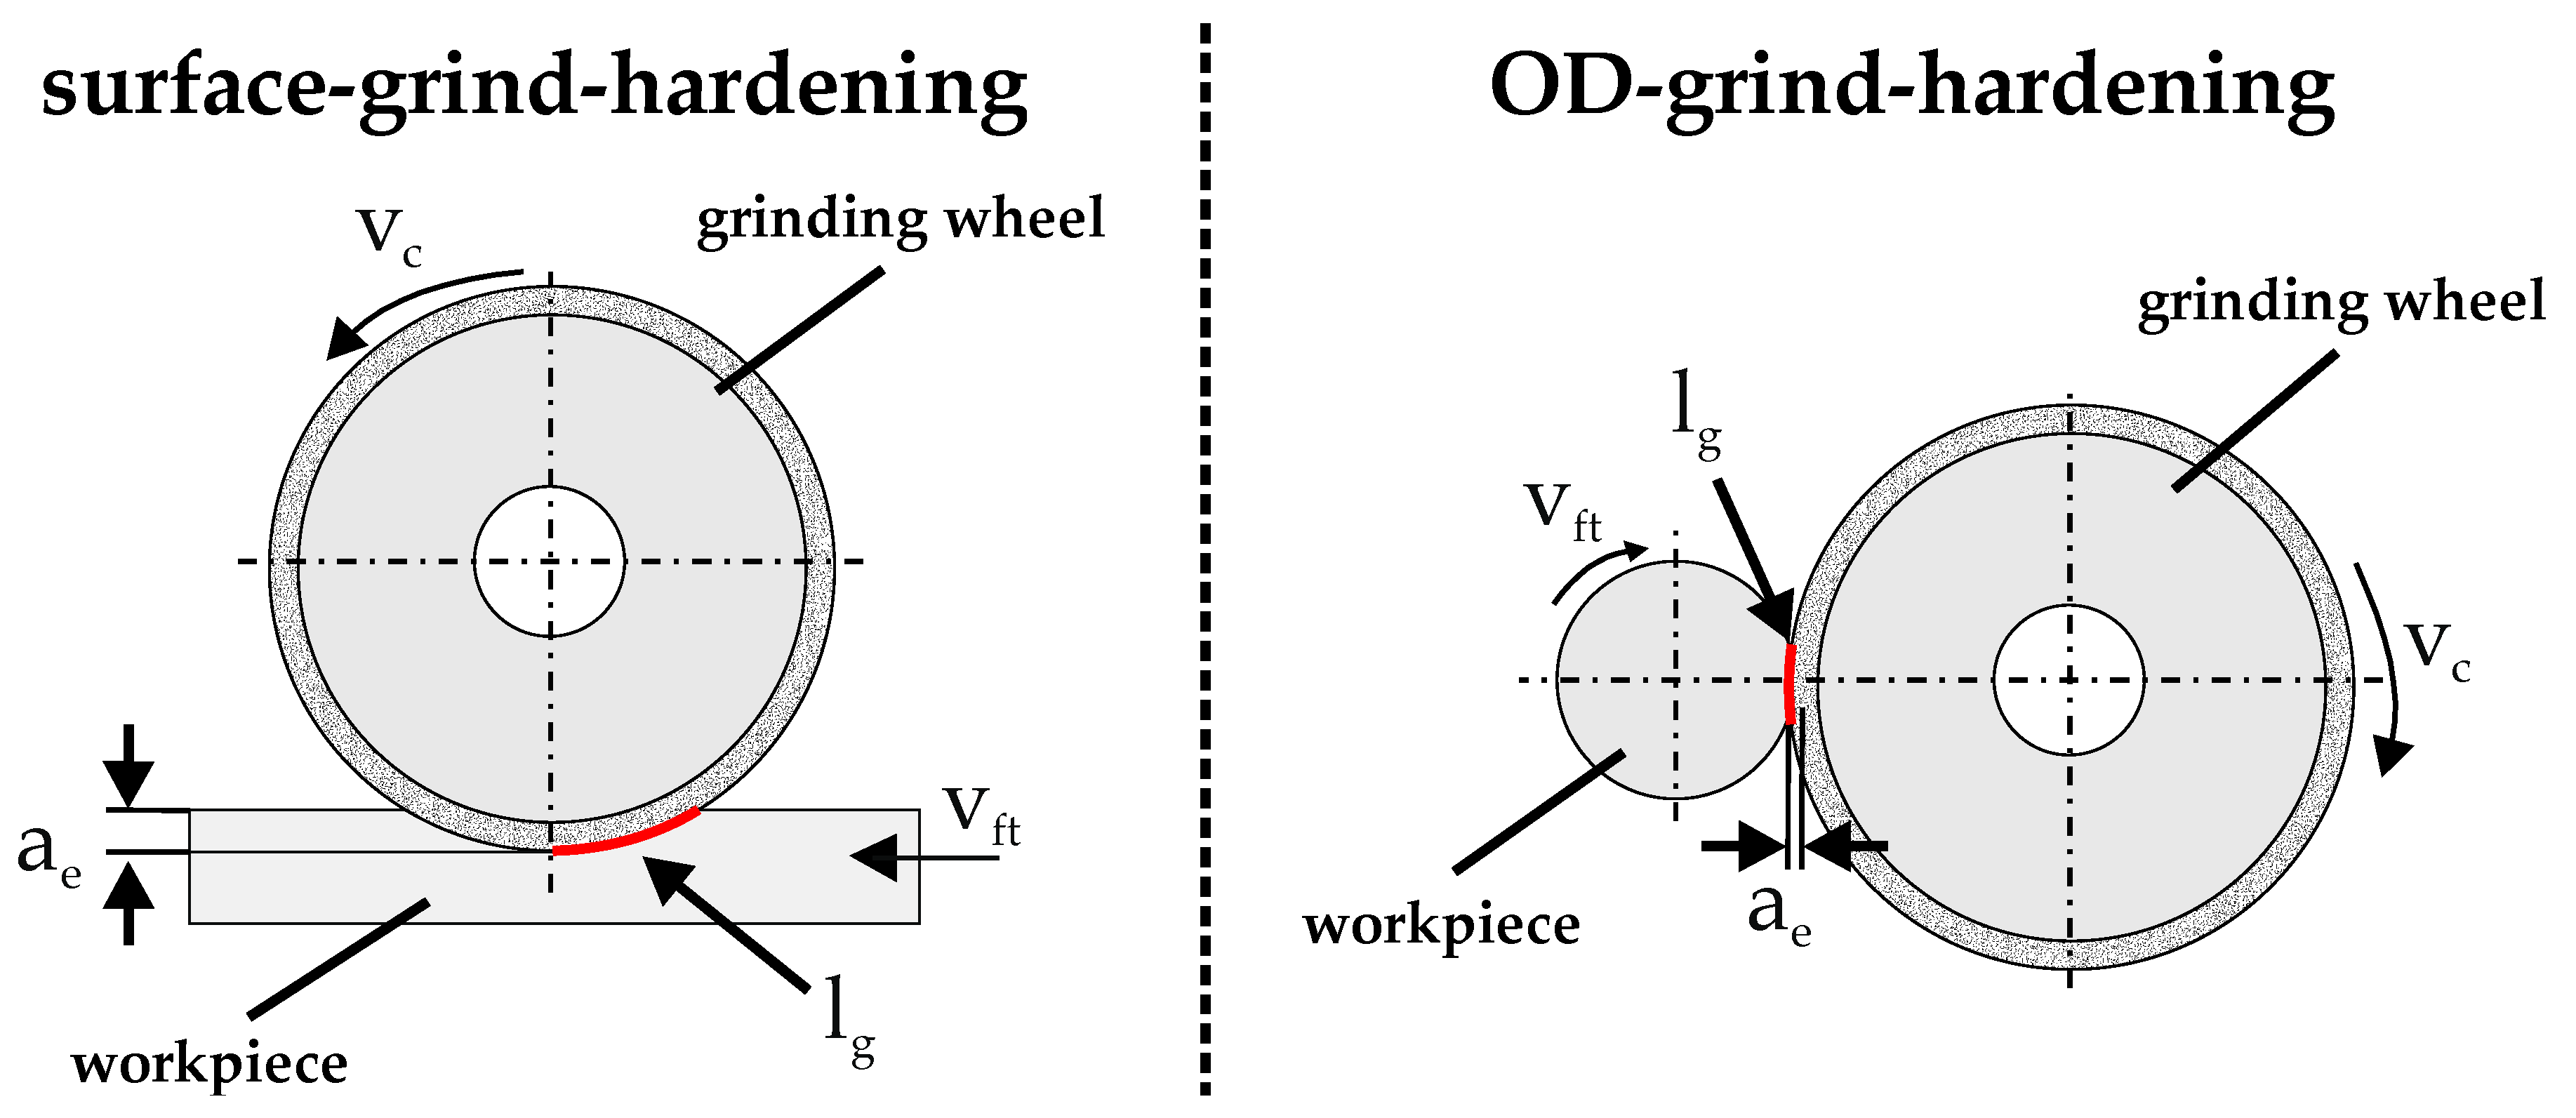
Figure 1. The schematic of the surface- and external-cylindrical-(OD-) grind-hardening process.
Jmmp 02 00020 g001
Figure 2. The microstructure of AISI 4140 for the quenched and tempered (QT) state and the normalized state after surface-grin-hardening (left), and the corresponding hardness depth profiles (right) (ae = 0.5 mm, vft = 1.2 m/min).
Jmmp 02 00020 g002
Figure 3. The maximum contact zone temperature Tmax versus the heat flux to the workpiece and the contact time q ˙ t c .
Jmmp 02 00020 g003
Figure 4. The maximum temperature gradient at the surface (dT/dx)max dependent on the heat flux q ˙ .
Jmmp 02 00020 g004
Figure 5. The surface hardening depth (SHD) due to the maximum contact zone temperature Tmax.
Jmmp 02 00020 g005
Figure 6. The surface hardening depth (SHD) due to the maximum temperature gradient at the surface (dT/dx)max.
Jmmp 02 00020 g006
Figure 7. The hardness change at the surface ΔHV as a function of the quenching time t85.
Jmmp 02 00020 g007
Table 1. The heat treatment and process parameters for grind-hardening tests.
ProcessHeat Treatmentae
(mm)
vft
(mm/min)
Q’w
{mm³/(mm∙s)}
tc
(s)
ds
(mm)
deq
(mm)
lg
(mm)
surface-grind-hardeningQT/normalized0.5120010.00.7140040014.1
QT/normalized0.77008.21.4340040016.7
QT/normalized14908.22.4540040020.0
OD-grind-hardeningQT0.53132.60.8040031.84.2
QT0.54393.70.5740031.84.2
QT0.57756.50.3940044.85.0
QT0.57946.60.164009.32.2
normalized *0.57946.60.164009.32.2
QT0.511109.30.124009.32.2
normalized *0.511109.30.124009.32.2
QT *0.72773.21.2940044.85.0
QT *0.73143.70.9440031.84.9
QT *0.73984.60.394009.32.6
QT0.75676.60.274009.32.6
normalized *0.75676.60.274009.32.6
QT/normalized0.77939.30.204009.32.6
QT *11993.30.934009.33.1
QT12784.60.664009.33.1
normalized *12784.60.664009.33.1
normalized *13135.21.1340031.85.9
QT13886.51.1040044.87.1
QT13976.60.474009.33.1
normalized *13976.60.474009.33.1
QT/normalized15559.30.334009.33.1
* represent experiments with insufficient hardening results (hardness increase ΔHV < 300 HV 0.5).