Article

Random and Systematic Errors Share in Total Error of Probes for CNC Machine Tools

Institute of Metrology and Biomedical Engineering, Faculty of Mechatronics, Warsaw University of Technology, św. A. Boboli 8 St., 02-525 Warszawa, Poland
*
Author to whom correspondence should be addressed.
J. Manuf. Mater. Process. 2018, 2(1), 17; https://doi.org/10.3390/jmmp2010017
Submission received: 9 February 2018 / Revised: 26 February 2018 / Accepted: 6 March 2018 / Published: 8 March 2018
(This article belongs to the Special Issue Precision Manufacturing)

Abstract

:
Probes for CNC machine tools, as every measurement device, have accuracy limited by random errors and by systematic errors. Random errors of these probes are described by a parameter called unidirectional repeatability. Manufacturers of probes for CNC machine tools usually specify only this parameter, while parameters describing systematic errors of the probes, such as pre-travel variation or triggering radius variation, are used rarely. Systematic errors of the probes, linked to the differences in pre-travel values for different measurement directions, can be corrected or compensated, but it is not a widely used procedure. In this paper, the share of systematic errors and random errors in total error of exemplary probes are determined. In the case of simple, kinematic probes, systematic errors are much greater than random errors, so compensation would significantly reduce the probing error. Moreover, it shows that in the case of kinematic probes commonly specified unidirectional repeatability is significantly better than 2D performance. However, in the case of more precise strain-gauge probe systematic errors are of the same order as random errors, which means that errors correction or compensation, in this case, would not yield any significant benefits.

1. Introduction

Touch-trigger probes for CNC machine tools have many applications: not only are they used for workpiece setup and its dimensional control [1,2,3], but they can also be used for determination of machine tools’ errors [4,5,6,7,8,9]. The most popular probes are simple, kinematic ones, which have significant probing errors [10,11,12]. Fortunately, systematic component of these errors can be compensated [12,13]. It can also be included in the case of analysis and modeling of machine tool [14,15,16].
In this paper, the share of systematic errors of overall probe’s errors is investigated for three different simple kinematic probes—two ultra-compact 3D touch-trigger probes and the compact touch-trigger probe. Two of the tested probes were tested in the laboratory, using a dedicated test setup, while another probe was tested on a machine tool, using a ring gauge. Additionally, results for more precise—strain gauge probe—are presented. This probe was tested in laboratory using the dedicated test setup.

2. Materials and Methods

To determine the relative share of systematic errors in overall errors of the probe itself, without taking into account errors of the machine tool, the moving master artefact method [17] was used. The test setup which is a practical realization of this method is shown in Figure 1. The tested probe (1) is fixed in the frame (9). Its stylus (2) tip is placed in the center of the master artefact (3)—an inner hemisphere master artefact or a ring gauge. The ring gauge used for measurements was verified using a Talyrond 365 manufactured by British Taylor Hobson Company. The form deviation RONt not exceed 0.18 µm. The master artefact (3) is fixed to the three-axial piezostage (4) driven by the dedicated controller (5). Displacements of the master artefact cause triggering of the probe which is detected by the probe’s interface receiver (6). The position of the master artefact and the triggering signal are synchronized thanks to a multi-channel National Instruments USB-6259 BNC DAQ card (7). After the measurements, a PC (8) determines the best-fitted element for all of the master artefact’s positions corresponding to the probe’s triggering TGi, where i is the number of tested directions. The distance between the center of the determined element, OS, and the triggering point TGi is the sum of the triggering radius in the given direction ri and the difference of radii of the master artefact and the stylus tip Δr.
Systematic errors of the tested probe are characterized by a triggering radius variation Vr, which is equal to the difference between the maximum and minimum measured triggering radii as follows:
V r = max { r ¯ i } min { r ¯ i }
Random errors of the tested probes are characterized by the uni-directional repeatability UDRi, the double standard deviation of the triggering radius values for the given direction (according to a standard test procedure, 10 measurements are performed). If the described setup is used, the expanded uncertainty of the Vr value determination is equal to 0.6 µm [18]. The setup can be used to determine probe’s triggering radius values in 3D or in 2D (a plane perpendicular to the probe’s axis). In this paper, only such 2D characteristics are presented and described: two characteristics of the simple kinematic probes—the ultra-compact touch-trigger with a 50 mm stylus and compact touch-trigger with a 50 mm stylus, both with disabled filtering of the triggering signal—and one characteristic of the precise, strain-gauge probe with a 100 mm stylus. It was decided to turn off the triggering signal filtering in the case of the simple kinematic probes, because the environment in the laboratory was sufficiently quiet to enable testing these probes without a risk of false triggers. Since triggering signal filtering causes a delay between generating triggering signal by the probe’s transducer and receiving it by the probe’s interface unit, it was assumed that testing of the probes with turned off the triggering signal filtering better shows action of the probe’s transducer. However, triggering signal filtering would only add a constant component to the probes’ pre-travel—the same in every measurement direction. In case of testing ultra-compact touch-trigger probe on machine tool, which will be described later in the paper, triggering signal filtering was turned on.
Tests of ultra-compact and compact touch-trigger probes were performed with a measurement speed equal to 50 mm/min, while test of strain gauge probe was performed with measurement speed equal to 0.5 mm/s. These tests show the share of systematic errors of overall probes’ errors, but do not enable to determine if these errors have a significant influence on accuracy of on-machine measurement (OMM) system which is composed of a probe, its receiver unit and a machine tool. Since machine tools have limited accuracy, it was necessary to confirm that the probe’s errors have a significant share in the overall errors of the measurement system—it was considered as possible that in the case of poor machine tool’s repeatability (possibly worse than a few micrometers) systematic errors of the probe would blend in with the random errors of the machine tool.
To verify if probes’ systematic errors have a significant share in errors of on-machine measurements, a ring gauge was measured on Haas VF8 machine tool using ultra-compact touch-trigger probe equipped with 100 mm stylus. The test was performed with measurement speed equal to 50 mm/min. Measurements were made for 36 directions [16]. For each of the directions the distance between a measured point and a centre of best-fitted circle, determined on the basis of all 36 points, was calculated. Measurement was repeated four more times, which is five repetitions less than in the case of measurements performed in the laboratory.
In order to check if increase of measurement speed would influence the errors of the probe, on-machine measurement of the gauge ring was repeated with a measurement speed equal to 150 mm/min.

3. Results

3.1. Tests in the Laboratory

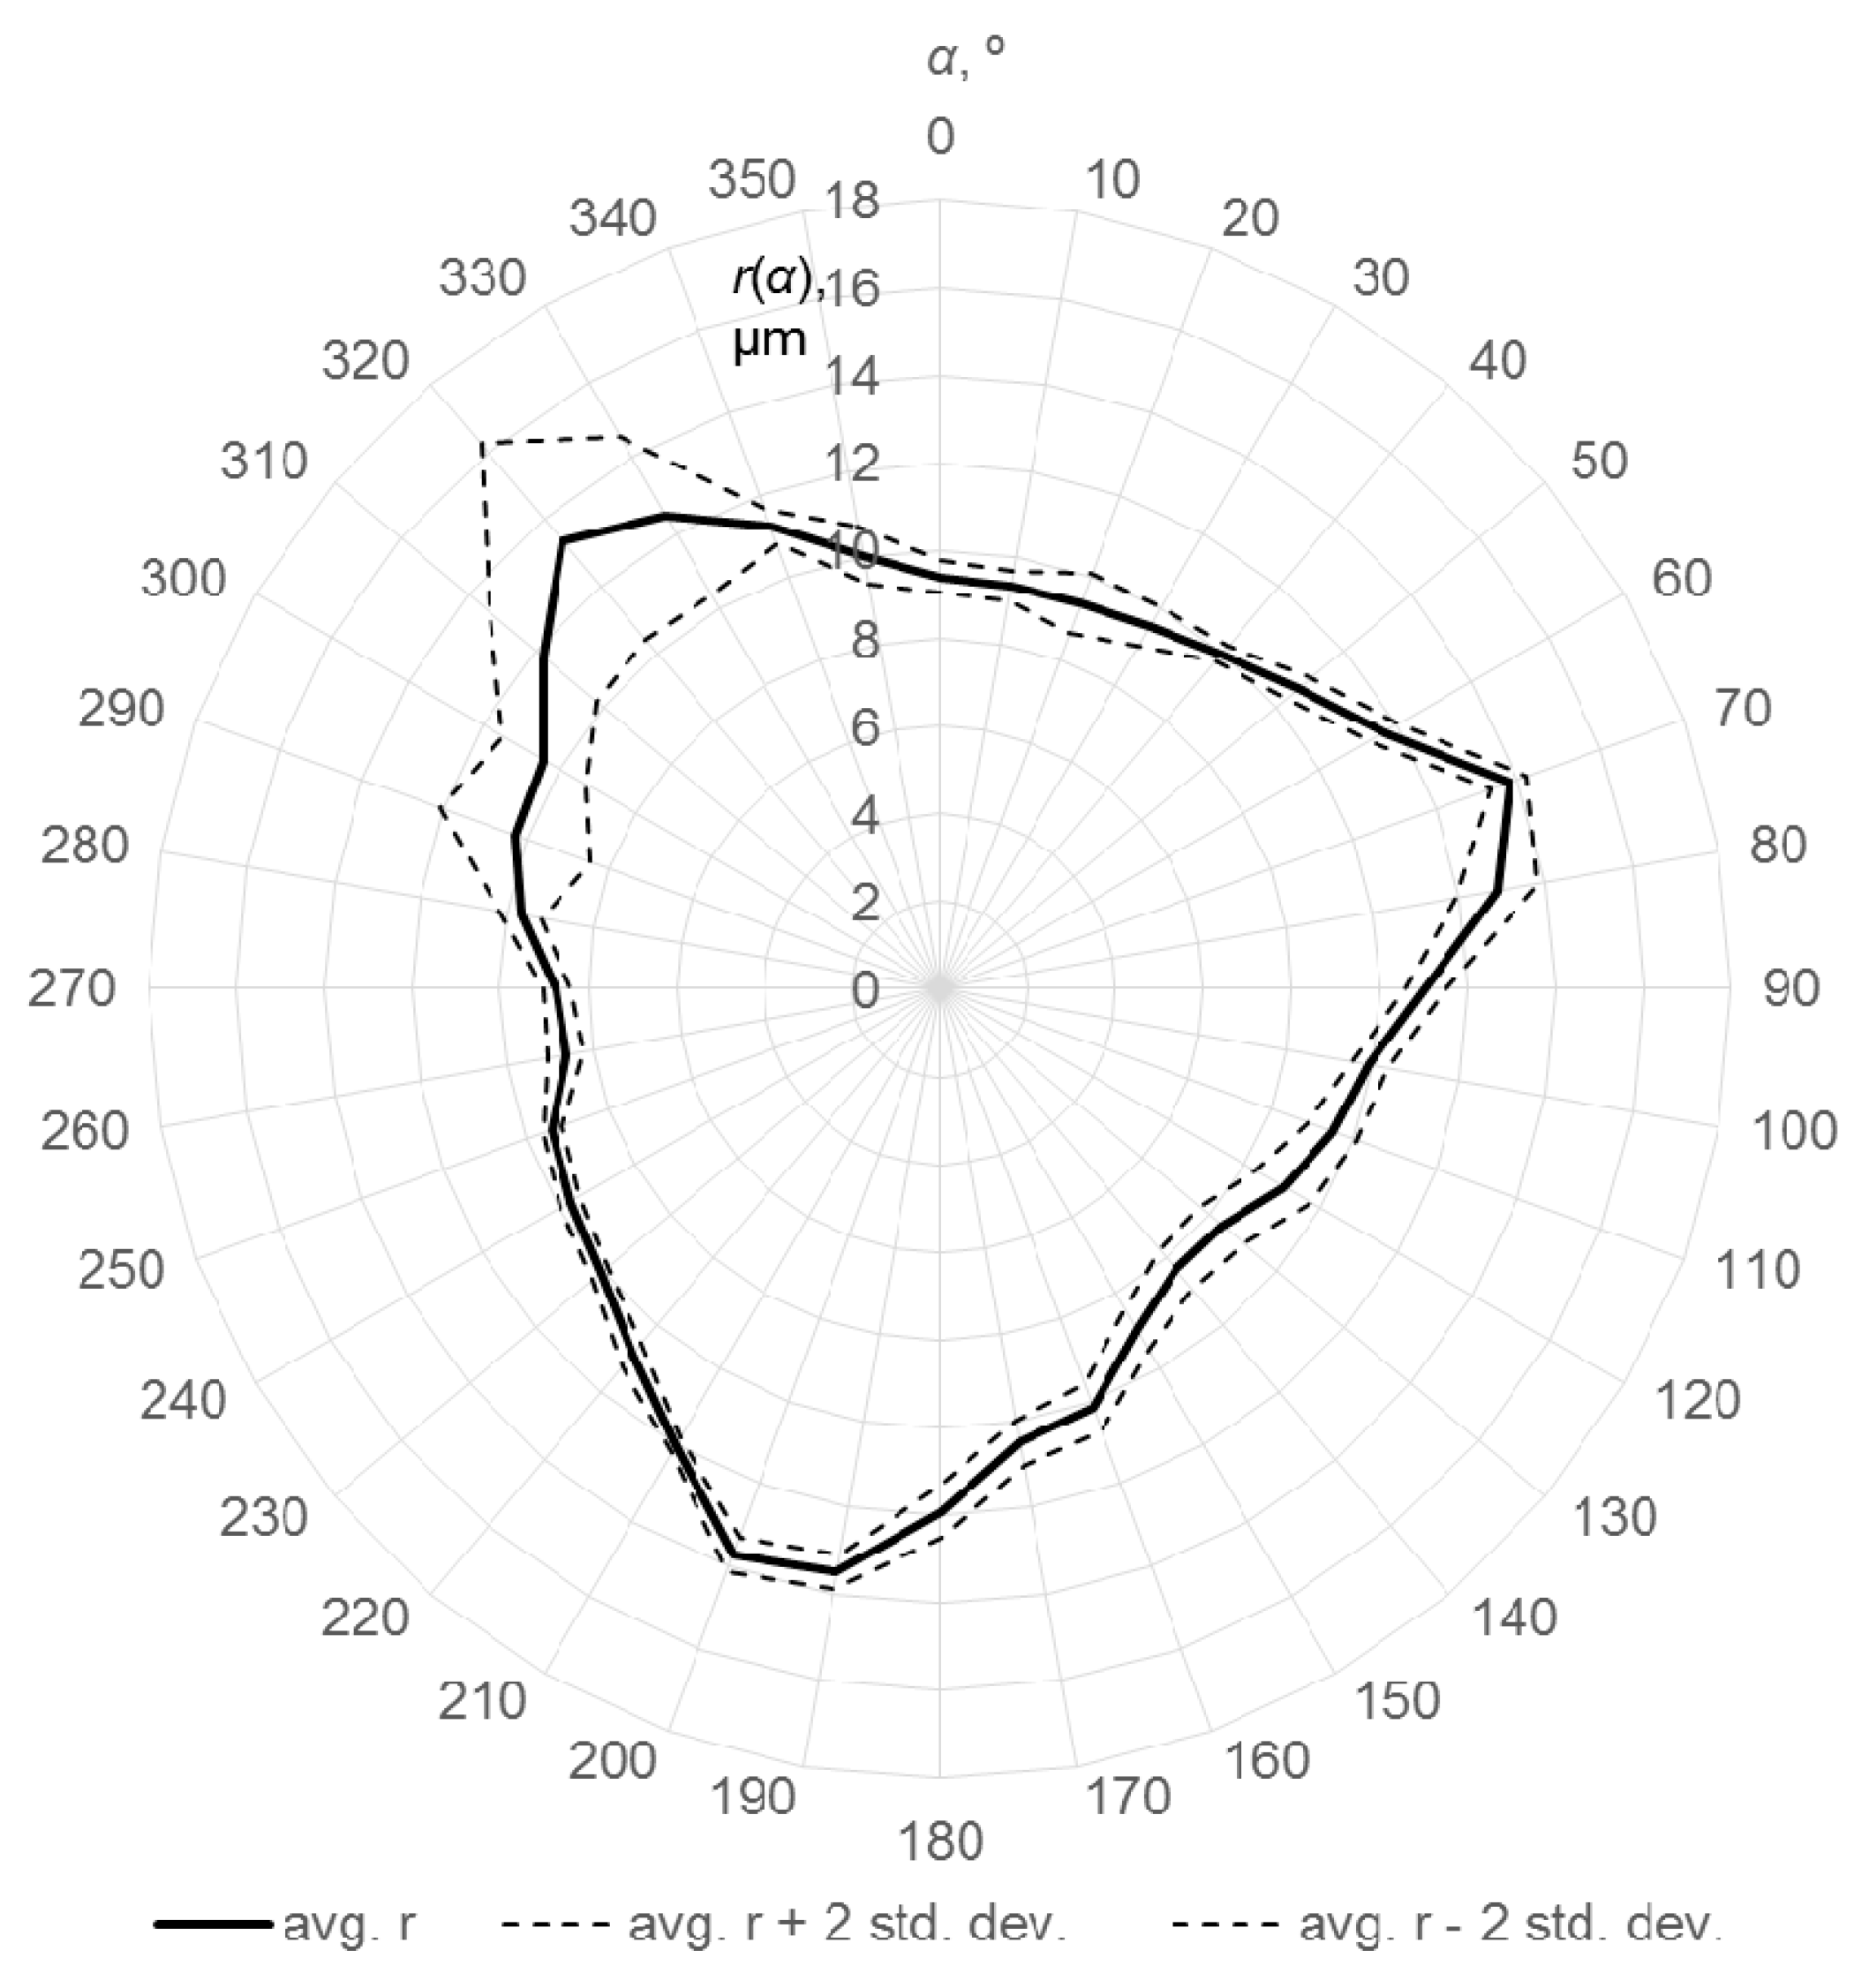
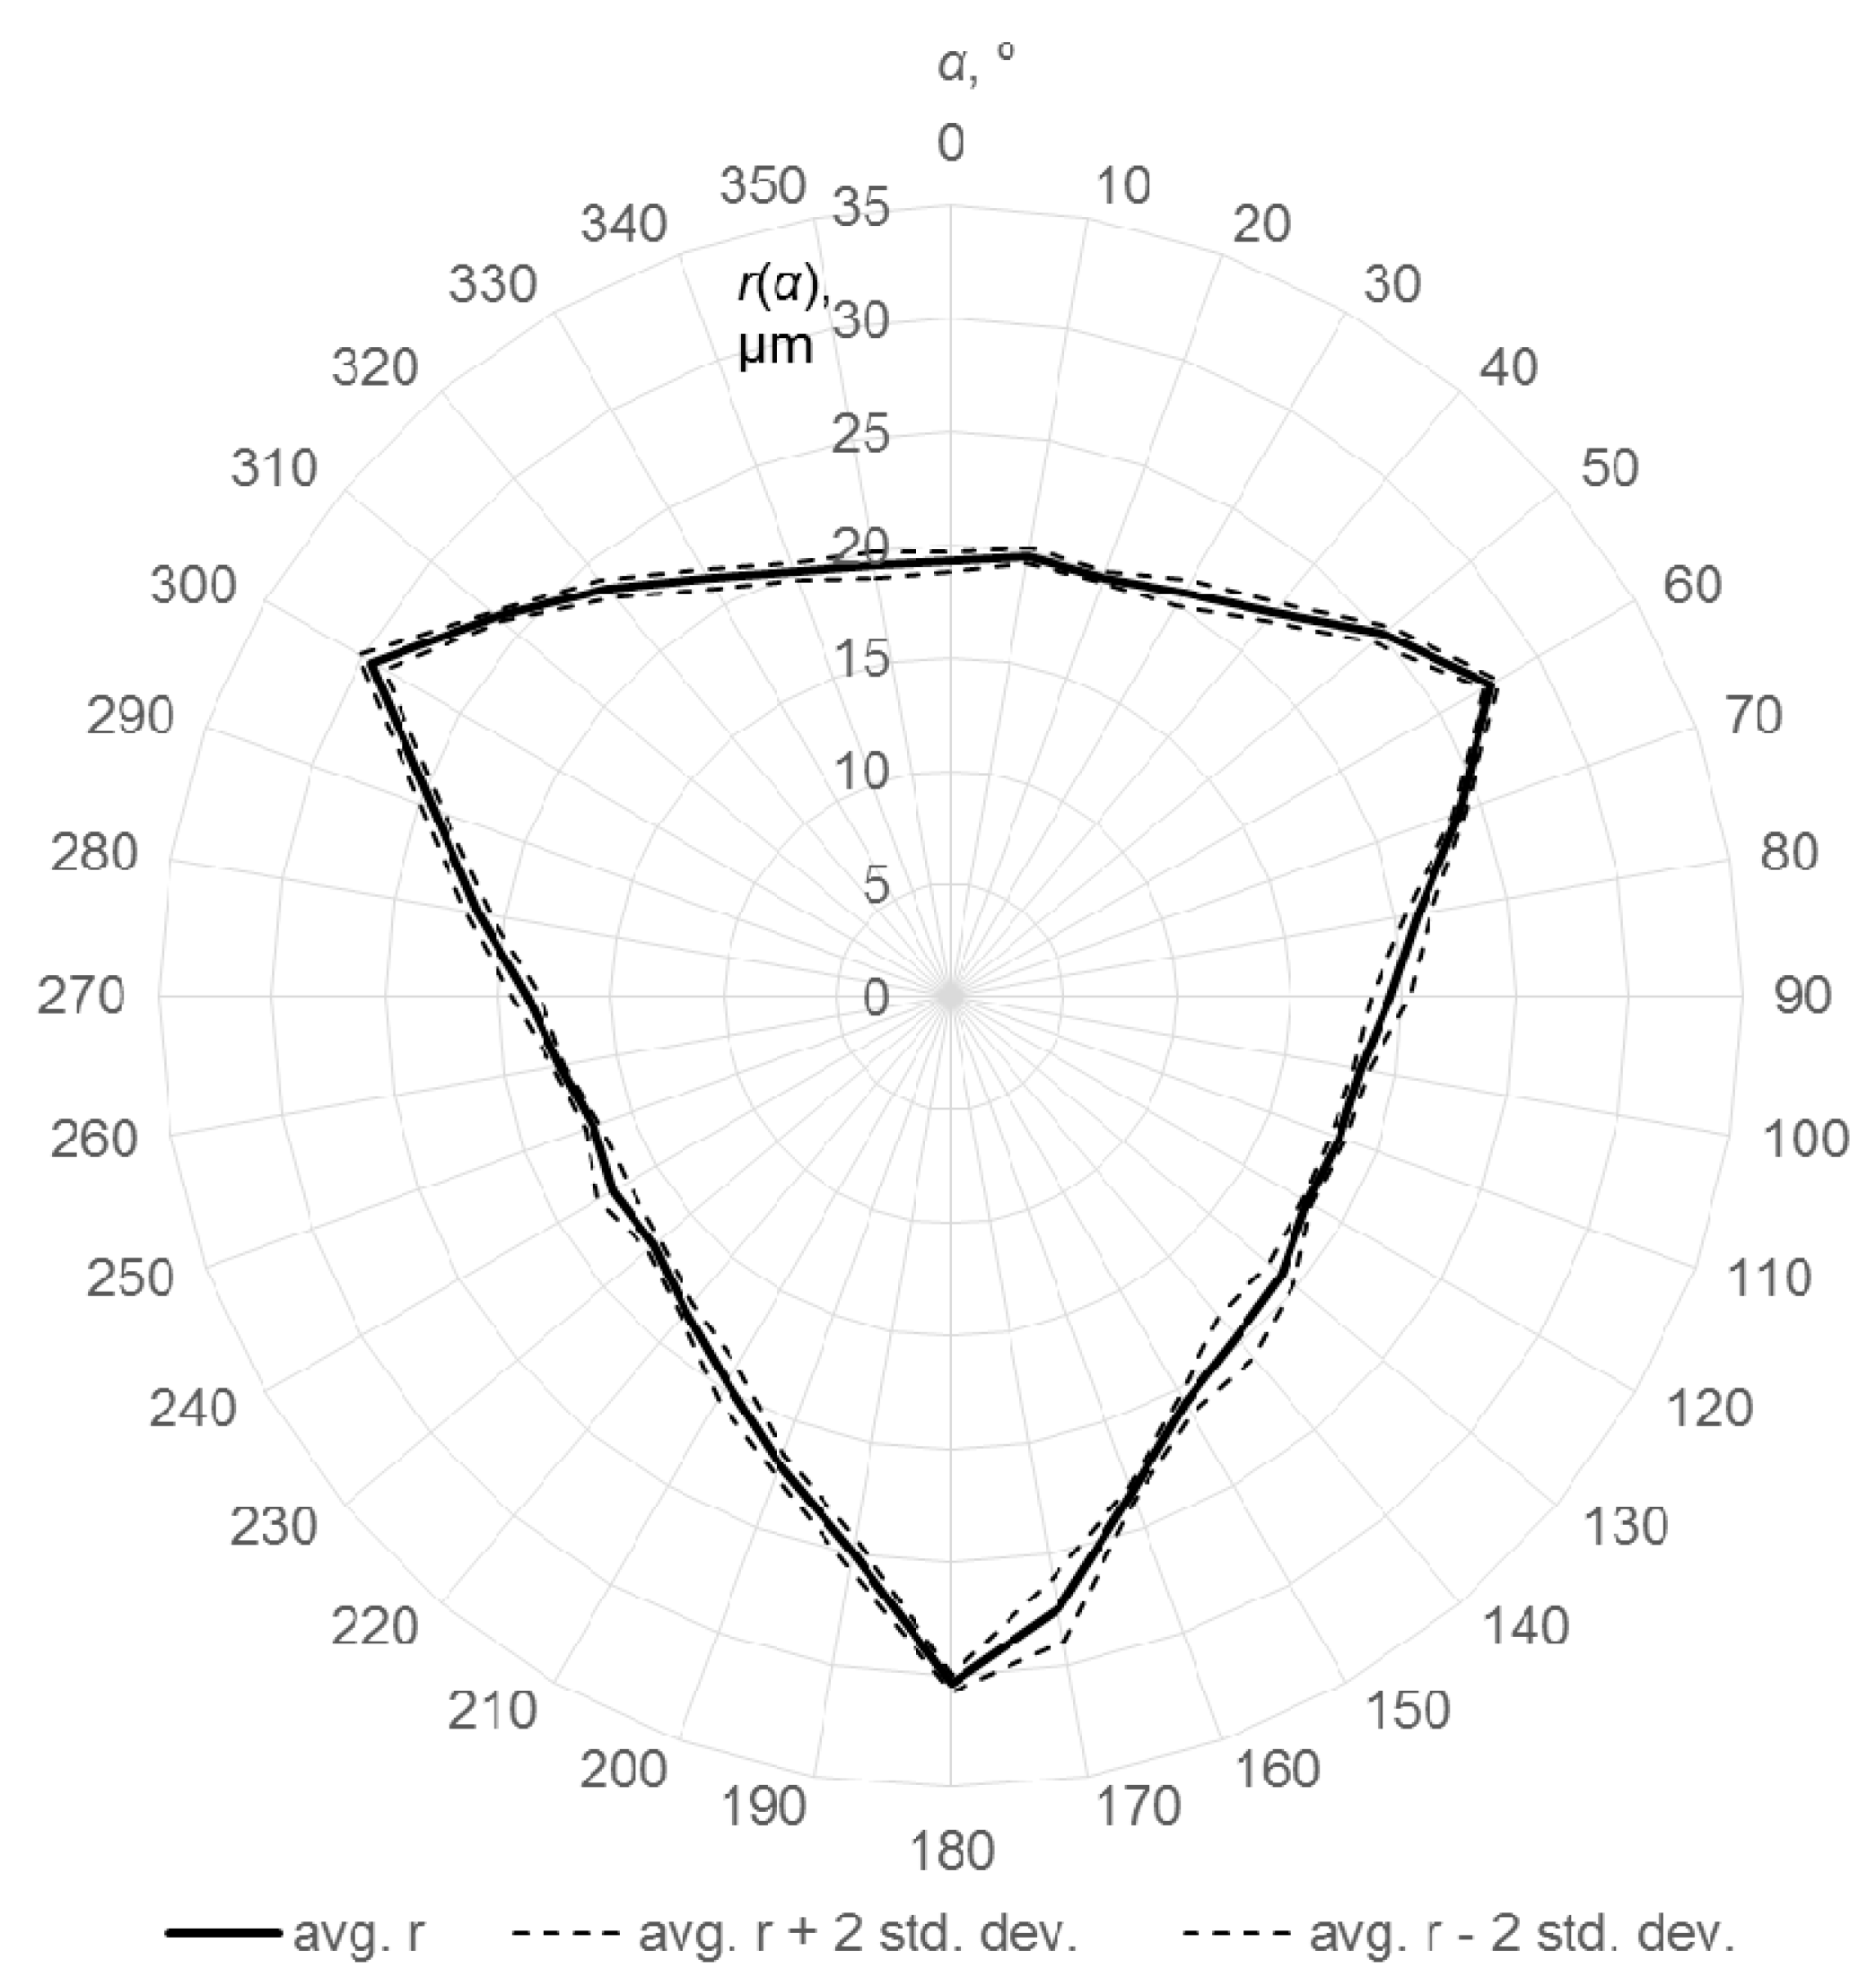
Results obtained in the laboratory, using the dedicated setup, are presented, respectively, for the ultra-compact touch-trigger probe with a 50 mm stylus in Figure 2, for compact touch-trigger with a 50 mm stylus in Figure 3, and for strain gauge probe with 100 mm stylus in Figure 4. Bold, continuous lines show average ri values, while dashed lines show average values plus/minus double standard deviation intervals.
The form analysis of 2D characteristics represented in Figure 2 and Figure 3 allows claiming that the third harmonic dominate. As expected, the characteristic of the examined probe is clearly three-lobed shape, which is caused by the construction of the kinematic transducer used in the probe. The angular position of the biggest errors is correlated with tripod structure of touch-trigger sensor of the probe.
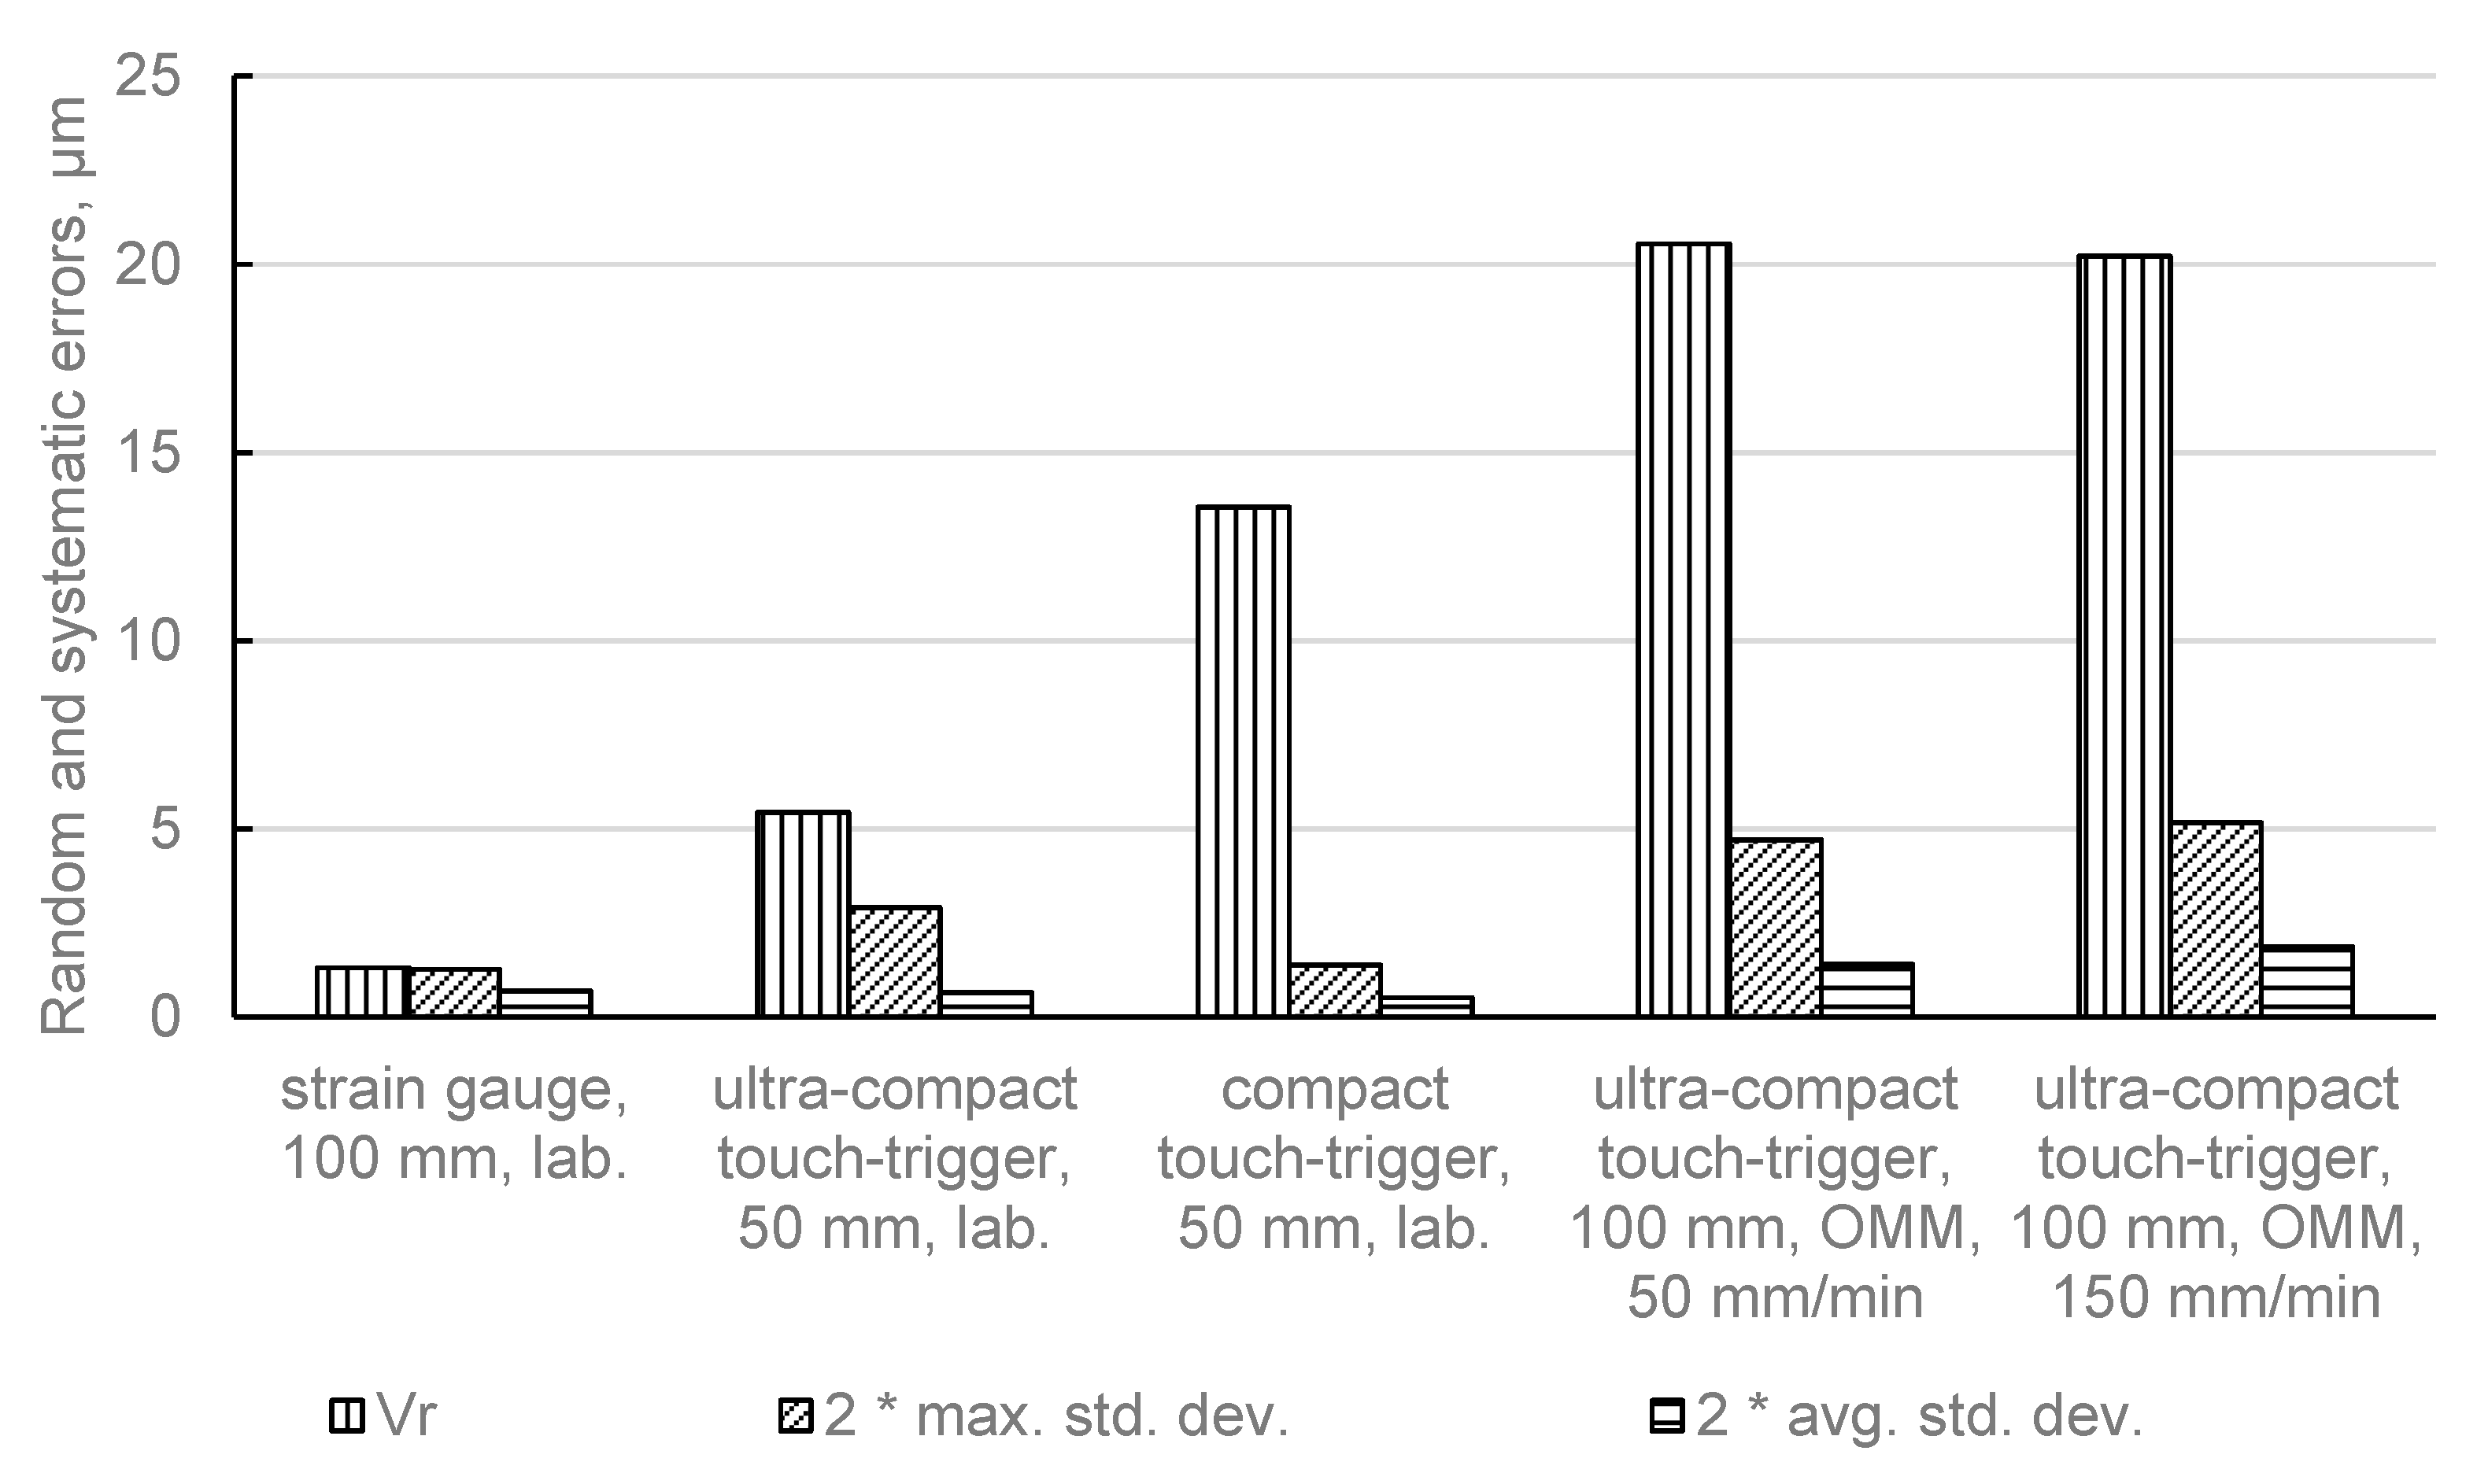
For the ultra-compact touch-trigger probe, Vr = 5.4 µm, maximum double standard deviation value for a single measurement direction is 2.9 µm and average double standard deviation value is 0.7 µm. For the compact touch-trigger probe, Vr = 13.6 µm, maximum double standard deviation value for a single measurement direction is 1.4 µm and average double standard deviation value is 0.5 µm. It means that for both of these probes systematic errors are greater than the random ones—for the compact touch-trigger probe it is about 10 times larger. In the case of ultra-compact touch-trigger probe, the most significant random errors are in one corner of the three-lobed triggering radius characteristic. In other directions they are significantly smaller. It means that tests in the laboratory clearly showed that in case of simple, kinematic probes, probes’ systematic errors are much larger than random ones.
In case of precise strain gauge probe Vr = 1.3 µm, maximum double standard deviation value for a single measurement direction is 1.3 µm and average double standard deviation value is 0.7 µm. It means that in case of precise, strain gauge, probes random errors can be of the same order as systematic errors.

3.2. Tests on the Machine Tool

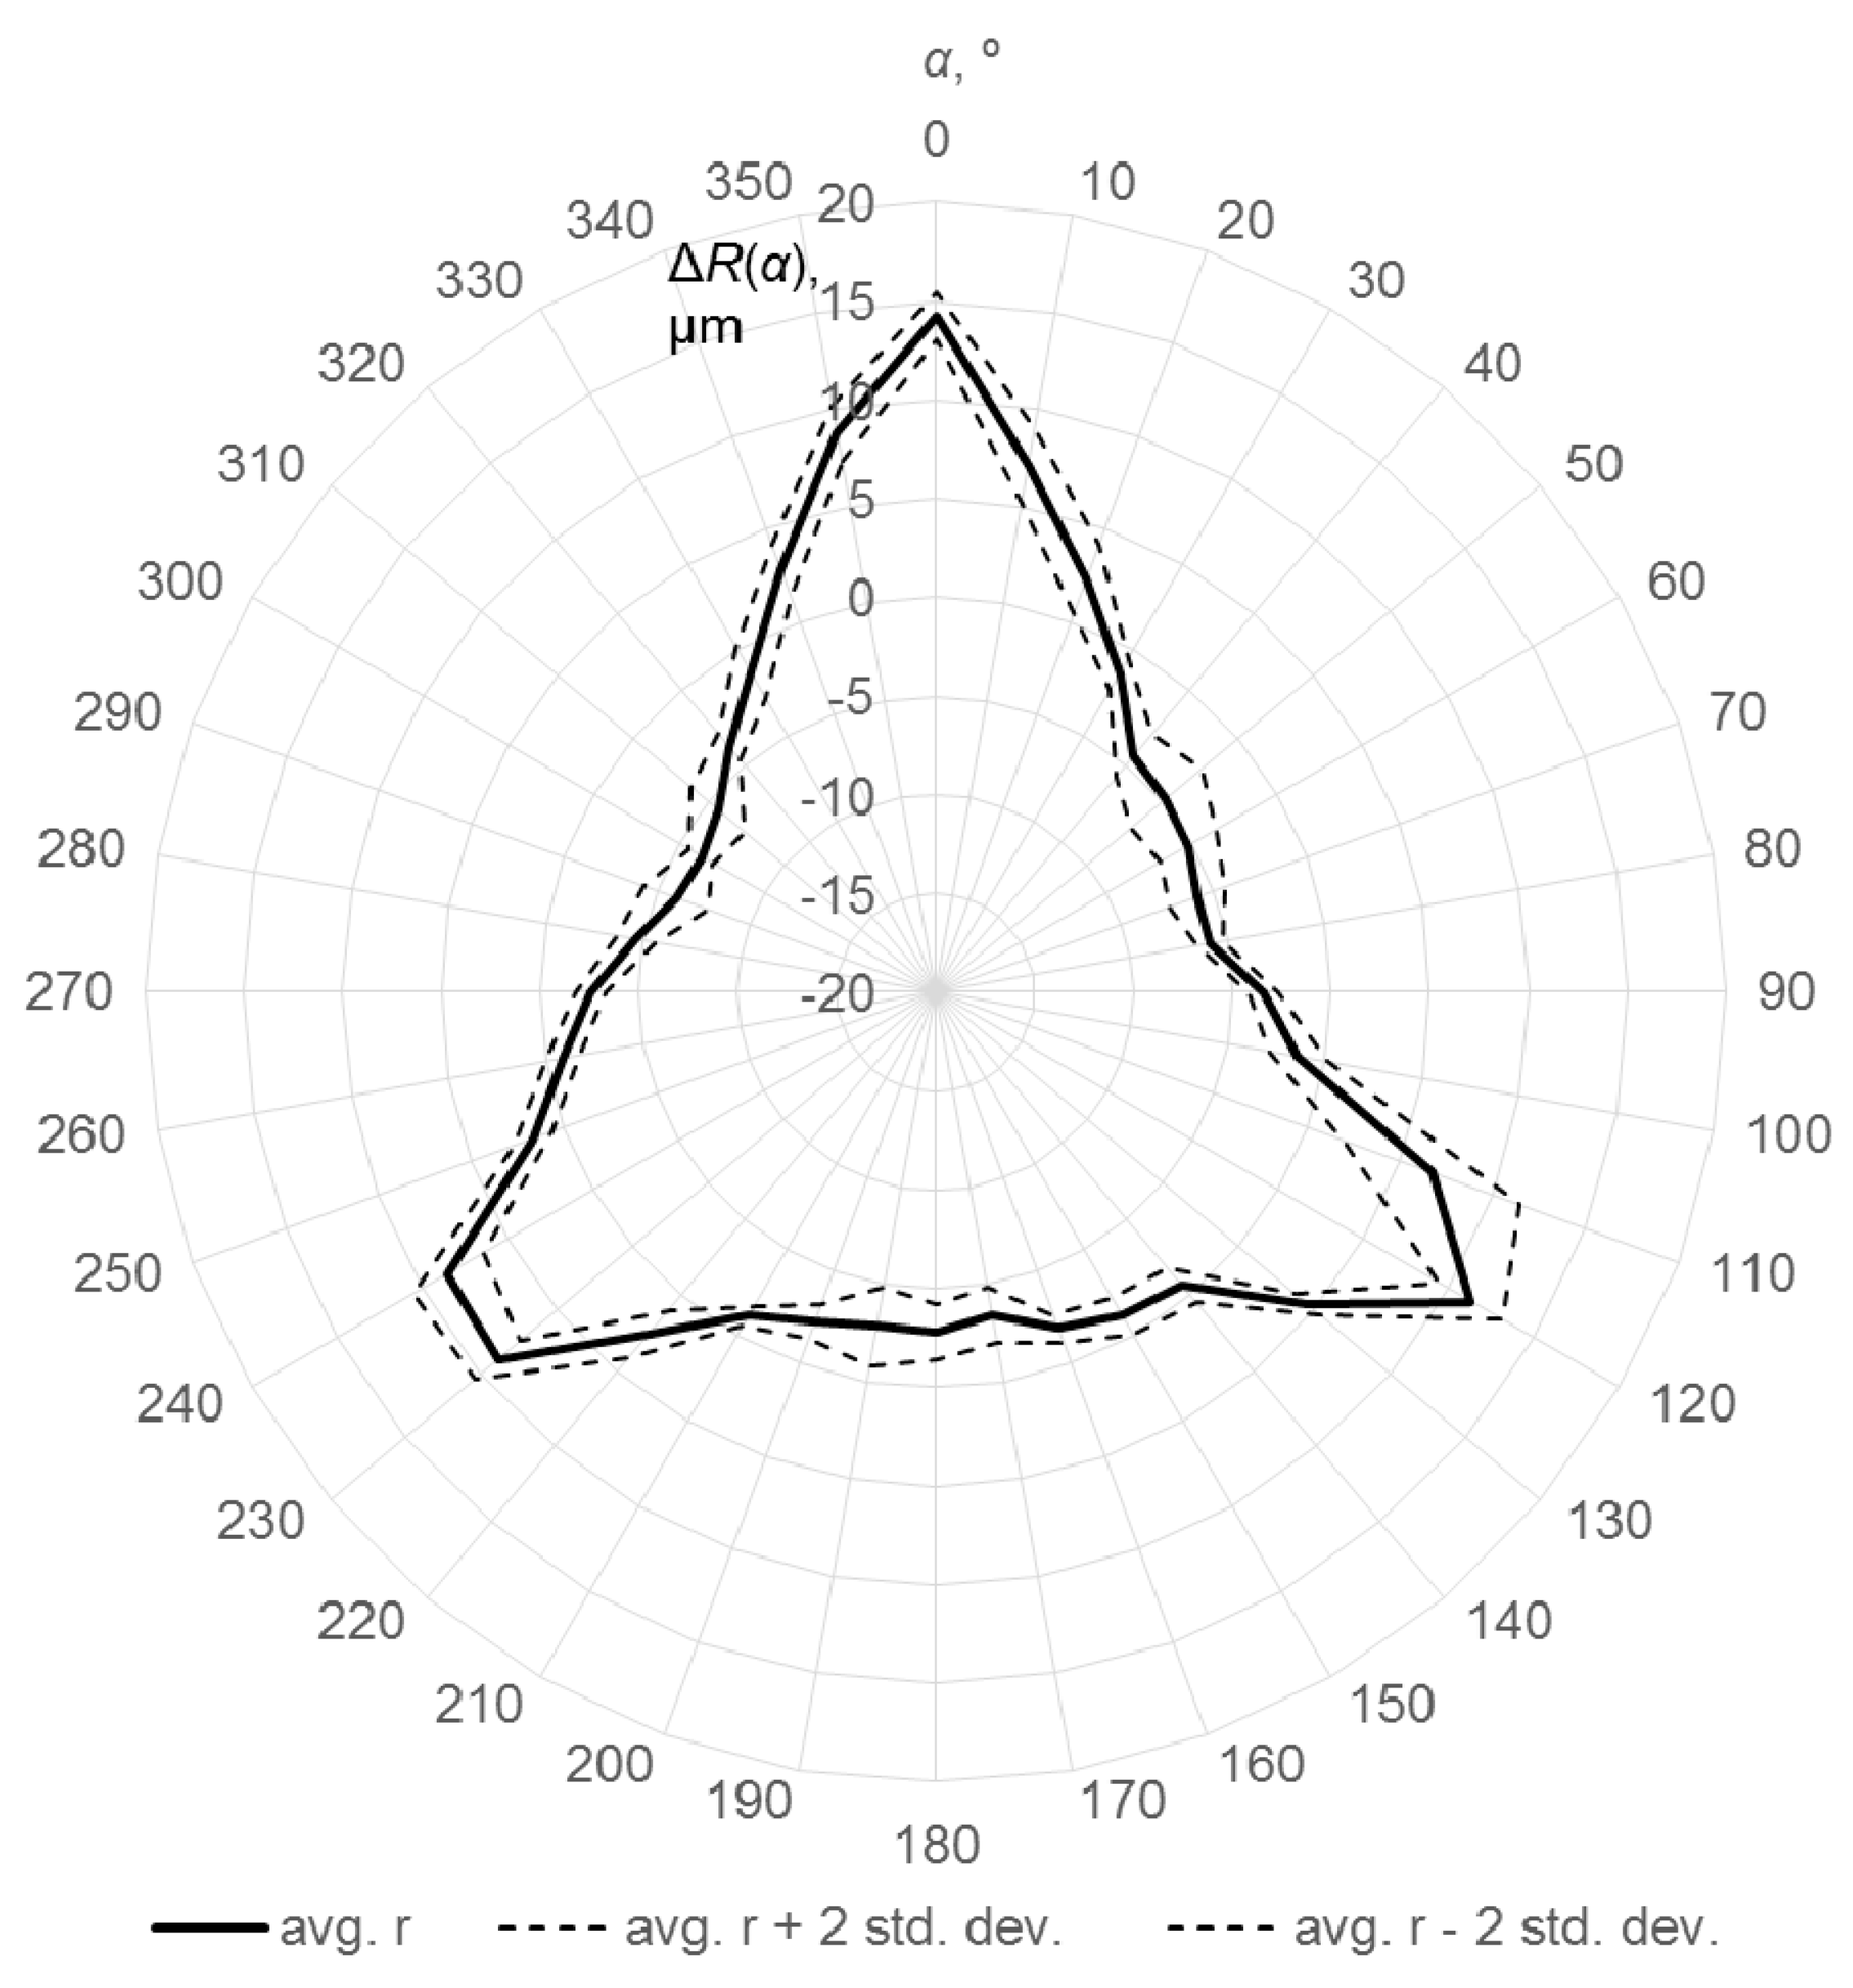
To verify if errors of the probe itself are a significant share in OMM system errors, a 52 mm gauge ring was measured on the machine tool using ultra-compact touch-trigger probe with 100 mm stylus. 36 equally distributed points were measured and a best-fitted circle was determined using a least squares method. Then the values of ΔRi—differences between:
  • the measured radial distance in a given point, for a given direction i; and
  • the radius of the best-fitted circle
were calculated. Obtained results for measurement speed equal to 50 mm/min, averaged for all five measurement repetitions are shown in Figure 5, as well as the plus/minus double standard deviation interval.
The three-lobed shape of the characteristic, typical for three-point kinematic probes, is clearly visible for the on-machine measurements.
After averaging the ΔRi values, the difference between maximum and minimum value (corresponding to the PFTU,2D parameter, as per ISO 230-10:2011 [19], except for that this parameter is determined on the basis of a single measurement) is 20.5 µm. The maximum value of a double standard deviation is equal to 4.7 µm and average value of double standard deviation is equal to 1.4 µm. It means that, regardless of the additional error components related to the machine tool’s repeatability and kinematic errors, systematic errors of the probe still has the most significant influence on the overall measurement error. However, results may vary for other machine tool.
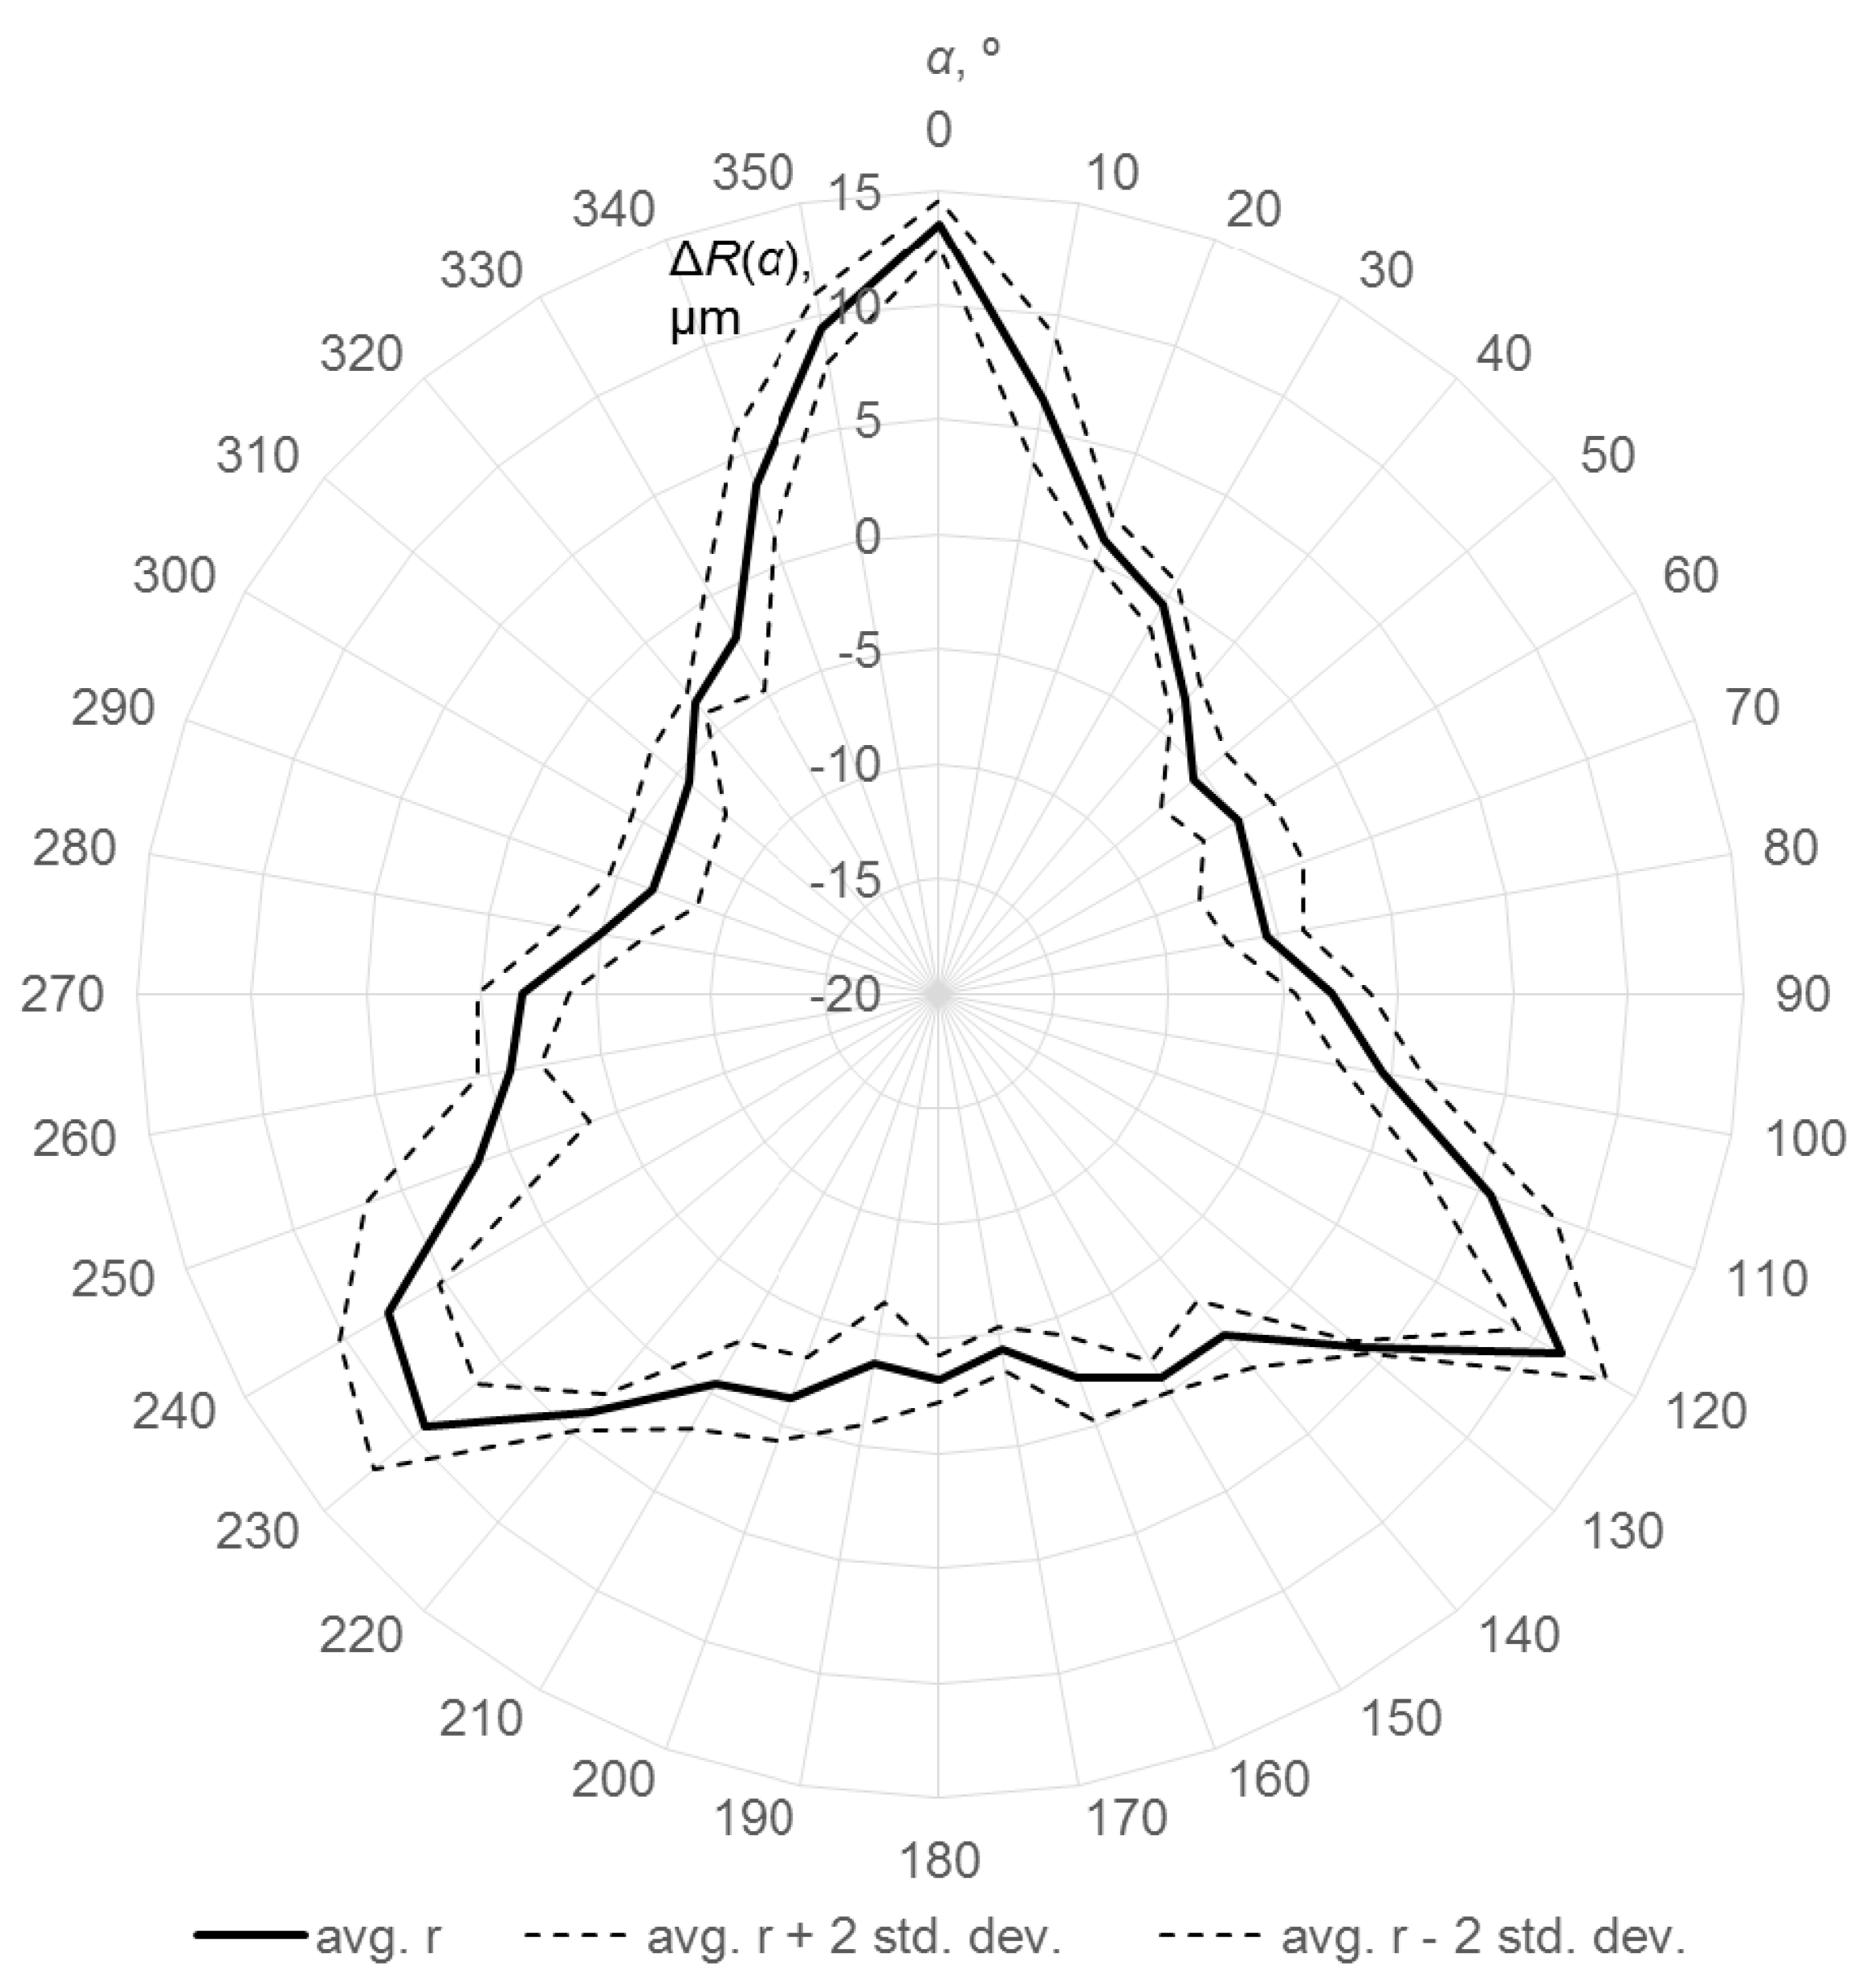
Results obtained for the same probe, the same machine tool and the same gauge ring, but for measurement speed increased to 150 mm/min, are shown in Figure 6. In this case, the difference between maximum and minimum value of averaged for five repetitions ΔRi is 20.2 µm, the maximum value of a double standard deviation is equal to 5.2 µm, and the average value of double standard deviation is equal to 1.9 µm. This means that the increase of the of the measurement speed has no or negligible influence on the OMM system’s systematic errors, but can increase its random errors. However, even for measurement speed increased three times, random errors of the tested OMM system were still a few times smaller than its systematic errors.

4. Discussion

The obtained values of triggering radius variation, maximum double standard deviation of triggering radius and average double standard deviation of triggering radius for tested probes are shown in Figure 7. For neither of the probes average standard deviation value is greater than 2 µm, while for all of the kinematic probes triggering radius variation/systematic component of the probing error is greater than 5 µm.
The large value of triggering radius variation obtained for the probe tested on the machine results from the use of a long stylus, not from machine tool’s errors. If it resulted from errors of the machine, the triggering radius characteristics shown in Figure 5 and Figure 6 would not be three-lobed, while both of them have this shape typical for three-point kinematic probes. Moreover, this shape does not change with the increase of the measurement speed.

5. Conclusions

The results show that:
  • in the case of three-point (touch-trigger) kinematic probes, systematic errors are greater than random errors. Even in the on-machine measurement, when machine tool’s errors are present, the largest part of the probing errors can be the one resulting from the probe’s systematic errors. It means that numeric correction or compensation of kinematic probes’ systematic errors can significantly reduce errors of on-machine measurements. However, to apply this solution, systematic errors of the probe have to be known—mapped or modelled.
  • in the case of the precise, strain gauge probe, systematic errors are not significantly greater than random errors. Thus, probe correction or compensation of systematic errors would not give significant benefit.
  • The unidirectional repeatability value, usually provided by the probes’ manufacturers, is not sufficient to estimate the accuracy of the probe. For the kinematic probes tested in the laboratory, the one with the largest random errors still has systematic errors at least twice as large.

Acknowledgments

The research has been funded from the statutory funds.

Author Contributions

Adam Wozniak and Michal Jankowski conceived and designed the experiments; Michal Jankowski performed the experiments; Adam Wozniak and Michal Jankowski analyzed the data; and Adam Wozniak and Michal Jankowski wrote the paper.

Conflicts of Interest

The authors declare no conflict of interest.

References

  1. Semotiuk, L.; Józwik, J.; Kuric, I. Measurement uncertainty analysis of different CNC machine tools measurement systems. Adv. Sci. Technol. Res. J. 2013, 7, 41–47. [Google Scholar] [CrossRef]
  2. Verma, M.R.; Chatzwagiannis, E.; Jones, D.; Maropoulos, P.G. Comparison of the measurement performance of high precision multi-axis metal cutting machine tools. Procedia CIRP 2014, 25, 138–145. [Google Scholar] [CrossRef] [Green Version]
  3. Bohan, Z.; Feng, G.; Yan, L. Study on Pre-travel Behaviour of Touch Trigger Probe under Actual Measuring Conditions. Procedia CIRP 2015, 27, 53–58. [Google Scholar] [CrossRef]
  4. Erkan, T.; Mayer, J.R.R.; Dupont, Y. Volumetric distortion assessment of a five-axis machine by probing a 3D reconfigurable uncalibrated master ball artefact. Precis. Eng. 2011, 35, 116–125. [Google Scholar] [CrossRef]
  5. Mayer, J.R.R. Five-axis machine tool calibration by probing a scale enriched reconfigurable uncalibrated master balls artefact. CIRP Ann. Manuf. Technol. 2012, 61, 515–518. [Google Scholar] [CrossRef]
  6. Ibaraki, S.; Iritani, T.; Matsushita, T. Error map construction for rotary axes on five-axis machine tools by on-the-machine measurement using a touch-trigger probe. Int. J. Mach. Tools Manuf. 2013, 68, 21–29. [Google Scholar] [CrossRef] [Green Version]
  7. Jiang, Z.; Bao, S.; Zhou, X.; Tang, X.; Zheng, S. Identification of location errors by a touch-trigger probe on five-axis machine tools with a tilting head. Int. J. Adv. Manuf. Technol. 2015, 81, 149–158. [Google Scholar] [CrossRef]
  8. Mayer, J.R.R.; Rahman, M.M.; Łoś, A. An uncalibrated cylindrical indigenous artefact for measuring inter-axis errors of a five-axis machine tool. CIRP Ann. Manuf. Technol. 2015, 64, 487–490. [Google Scholar] [CrossRef]
  9. Rahman, M.M.; Mayer, R. Calibration performance investigation of an uncalibrated indigenous artefact probing for five-axis machine tool. J. Mach. Eng. 2016, 16, 33–42. [Google Scholar]
  10. Cho, M.; Seo, T.I.; Kwon, H.D. Integrated error compensation method using OMM system for profile milling operation. J. Mater. Process. Technol. 2003, 136, 88–99. [Google Scholar] [CrossRef]
  11. Choi, J.P.; Min, B.K.; Lee, S.J. Reduction of machining errors of a three-axis machine tool by on-machine measurement and error compensation system. J. Mater. Process. Technol. 2004, 155–156, 2056–2064. [Google Scholar] [CrossRef]
  12. Zeleny, J.; Janda, M. Automatic on-machine measurement of complex parts. Mod. Mach. Sci. J. 2009, 1, 92–95. [Google Scholar] [CrossRef]
  13. Qian, X.M.; Ye, W.H.; Chen, X.M. On-machine measurement for touch-trigger probes and its error compensation. Key Eng. Mater. 2008, 375–376, 558–563. [Google Scholar] [CrossRef]
  14. Sung, C.K.; Lu, C.H. Modeling/analysis of four-half axis machine tool via modified denavit-hartenberg notation. J. Mech. Sci. Technol. 2014, 28, 5135–5142. [Google Scholar] [CrossRef]
  15. Olvera, D.; López de Lacalle, L.N.; Compeán, F.I.; Fz-Valdivielso, A.; Lamikiz, A.; Campa, F.J. Analysis of the tool tip radial stiffness of turn-milling centers. Int. J. Adv. Manuf. Technol. 2012, 60, 883–891. [Google Scholar] [CrossRef]
  16. Lamikiz, A.; López de Lacalle, L.N.; Ocerin, O.; Díez, D.; Maidagan, E. The Denavit and Hartenberg approach applied to evaluate the consequences in the tool tip position of geometrical errors in five-axis milling centres. Int. J. Adv. Manuf. Technol. 2008, 37, 122–139. [Google Scholar] [CrossRef]
  17. Jankowski, M.; Wozniak, A.; Byszewski, M. Machine tool probes testing using a moving inner hemispherical master artifact. Precis. Eng. 2014, 38, 421–427. [Google Scholar] [CrossRef]
  18. Woźniak, A.; Jankowski, M. Wireless communication influence on CNC machine tool probe metrological parameters. Int. J. Adv. Manuf. Technol. 2016, 82, 535–542. [Google Scholar] [CrossRef]
  19. International Organization for Standardization. ISO 230-10:2011: Test Code for Machine Tools—Part 10: Determination of the Measuring Performance of Probing Systems of Numerically Controlled Machine Tools; International Organization for Standardization: Geneva, Switzerland.
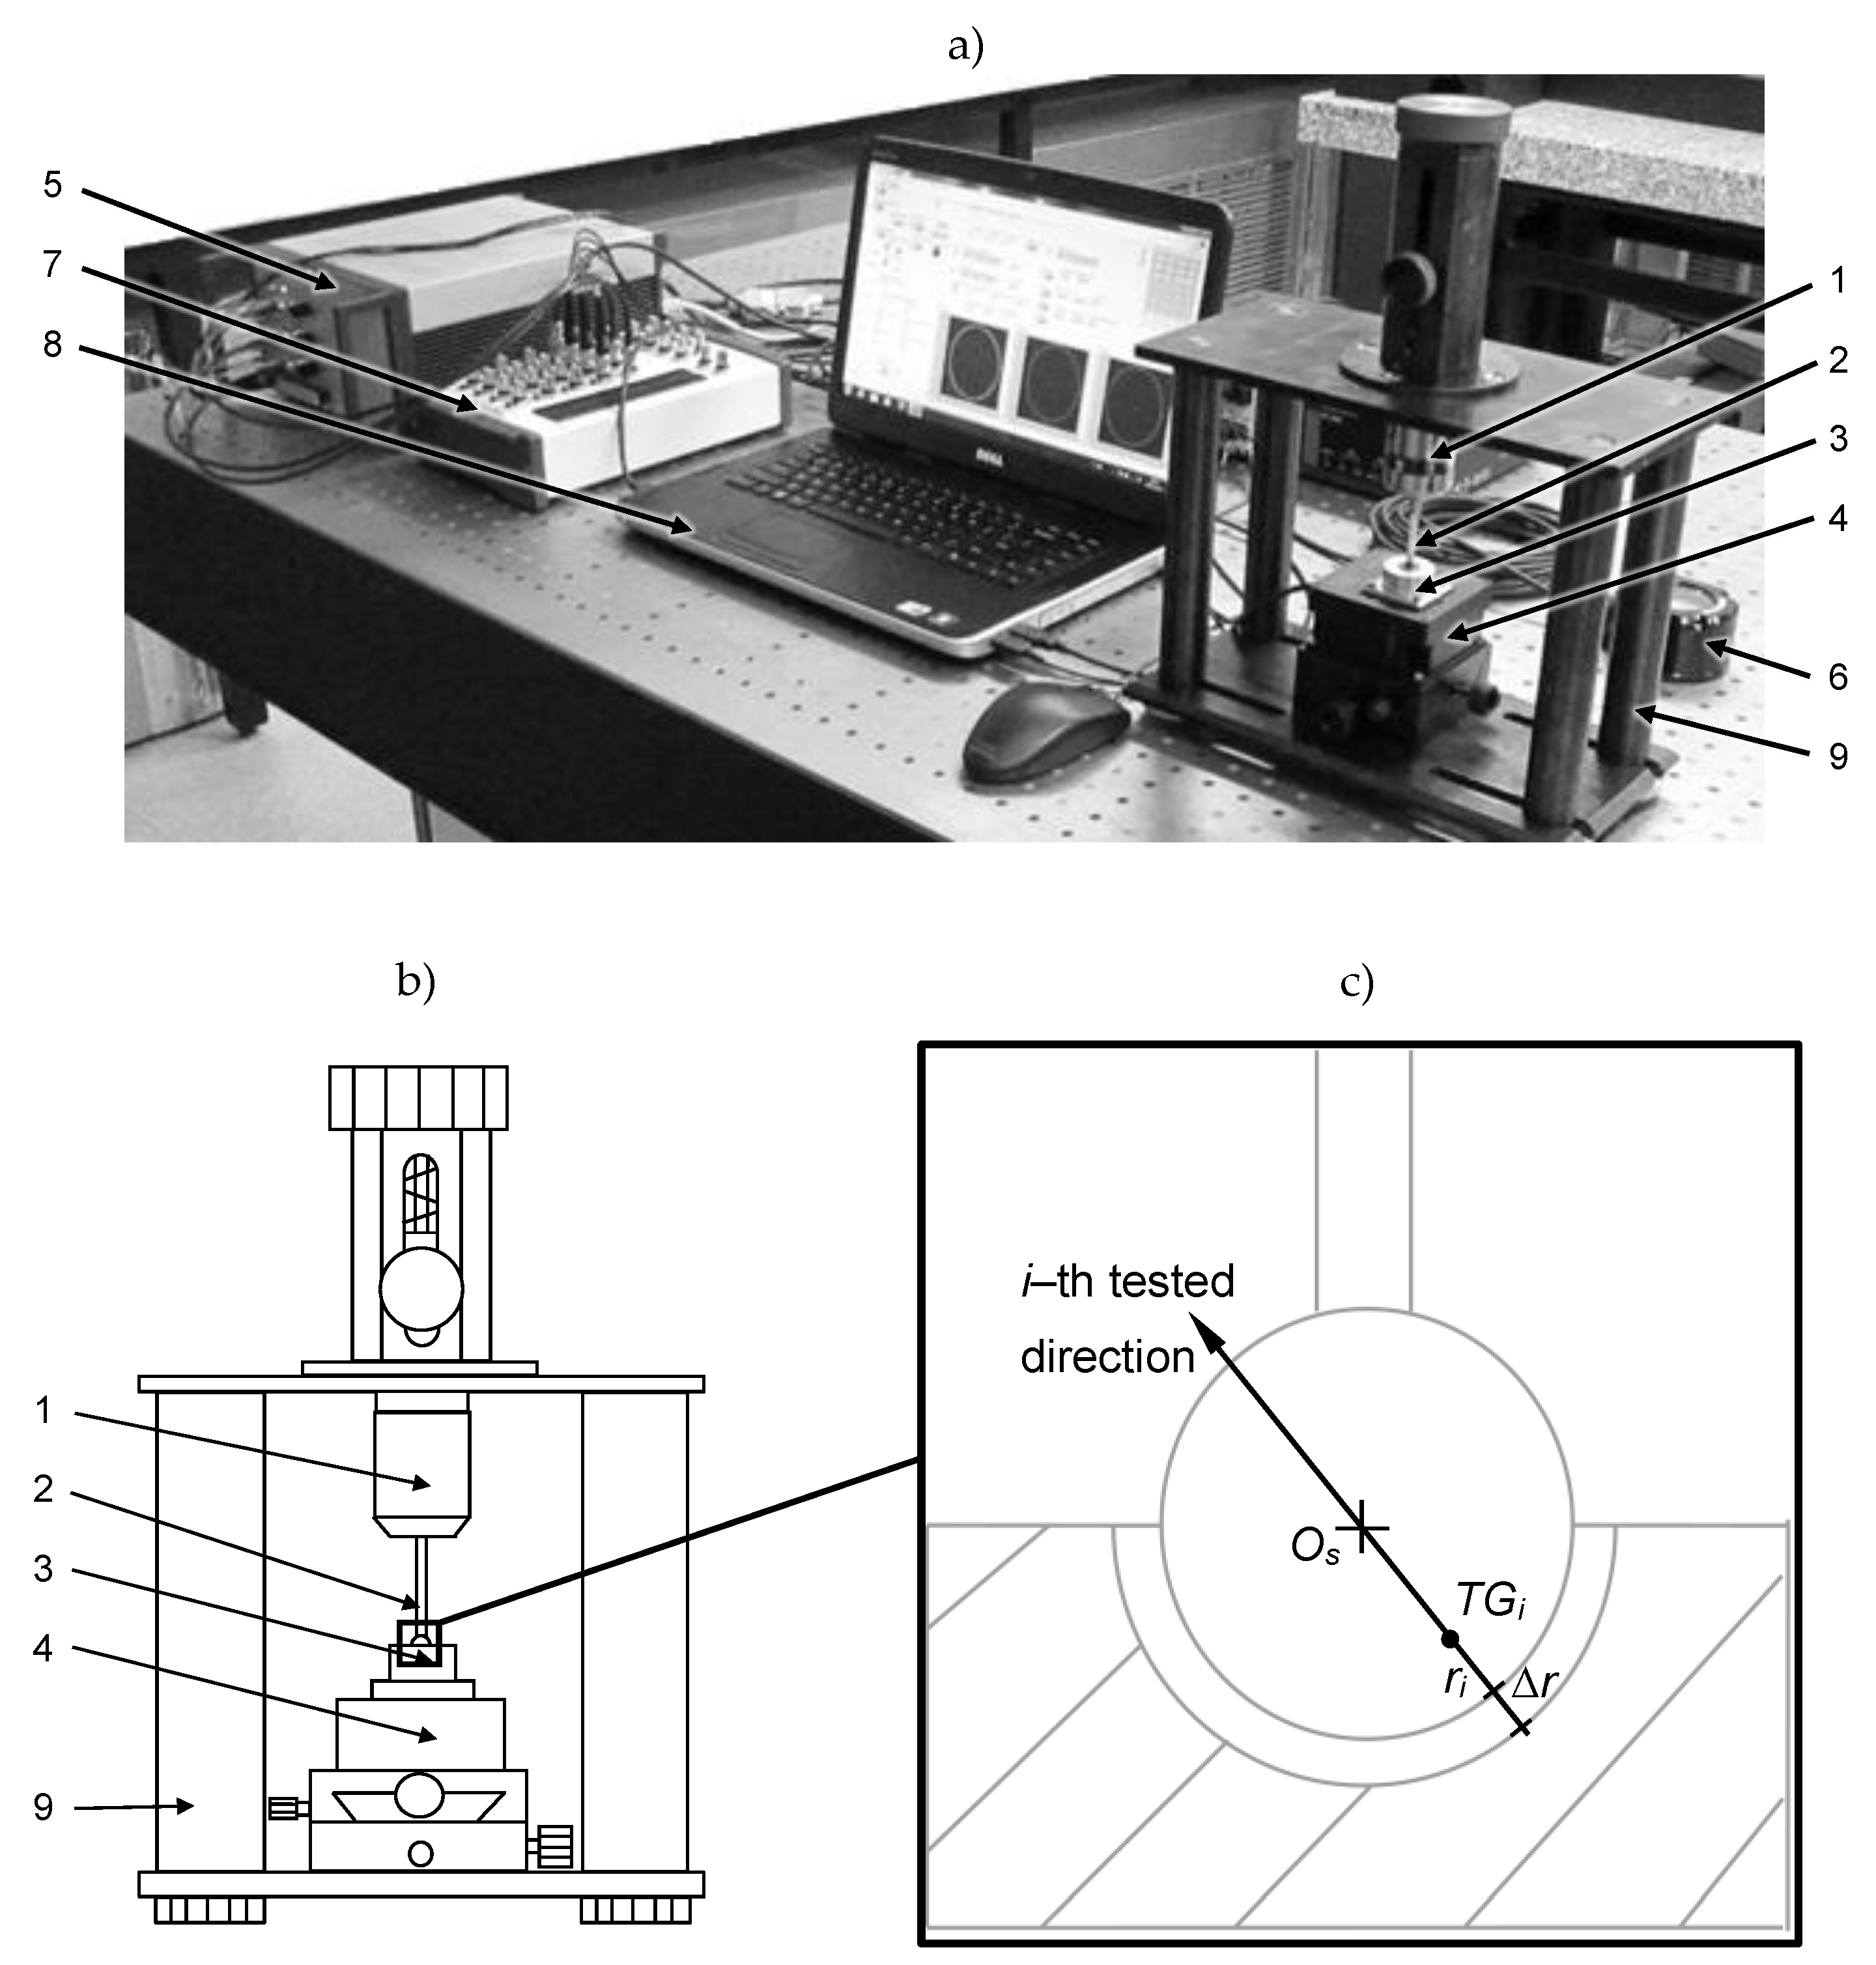
Figure 1. Setup for probe testing: (a) view, (b) scheme of the mechanical unit of the setup, and (c) detail—stylus tip placed inside of the inner hemisphere master artefact: 1—tested probe, 2—stylus tip, 3—master artefact, 4—3-axial piezostage, 5—piezostage controller, 6—probe’s interface receiver, 7—DAQ card, 8—PC, 9—frame.
Jmmp 02 00017 g001
Figure 2. Results obtained in the laboratory for ultra-compact touch-trigger probe with a 50 mm stylus.
Jmmp 02 00017 g002
Figure 3. Results obtained in the laboratory for compact touch-trigger probe with a 50 mm stylus.
Jmmp 02 00017 g003
Figure 4. Results obtained in the laboratory for strain gauge probe with a 100 mm stylus.
Jmmp 02 00017 g004
Figure 5. Results obtained on the machine tool for ultra-compact touch-trigger probe with 100 mm stylus, for measurement speed equal to 50 mm/min.
Jmmp 02 00017 g005
Figure 6. Results obtained on the machine tool for ultra-compact touch-trigger probe with 100 mm stylus, for measurement speed equal to 150 mm/min.
Jmmp 02 00017 g006
Figure 7. Random and systematic errors share vs. probe type and stylus length.
Jmmp 02 00017 g007