1. Introduction
Punching processes are widely used for producing automobile parts, metal components, and other parts. Manufacturers aim to produce parts at low cost, in less time, and with high quality. For producing high-quality products, it is important to obtain a finely-sheared surface in the punching process. The cutting surface or edge in the punching process consists of different zones such as roll-over, shear, fracture, and burr formation zones. The ratio of different zones is influenced by various parameters, such as the punch-die clearance, punch-die corner radius, material properties, tool wear, and misalignment. In the metal-forming process, a large shear surface and small fracture surface and burr are preferable.
Researchers have used different criteria with different affected parameters to predict the initiation of fracture surface formation in the metal-forming process. McClintock et al. derived a ductile fracture criterion by analyzing the growth of a cylindrical void [
1], and Cockcroft and Latham derived a fracture criterion based on the maximum principal tensile stress [
2]. The effect of spherical void growth was studied by Rice and Tracey in elastic–perfectly plastic material [
3]. Oyane derived criteria for ductile fracture prediction of pore-free materials and porous materials from the equations of plasticity theory by including a hydrostatic stress component [
4]. Gurson employed the void volume fraction, which incorporates void nucleation and growth [
5]. Tvergaard improved the model of Gurson by taking into account the effects of nucleation and coalescence of voids [
6]. The stress distribution through the thickness of sheet metal was studied by Stoughton and Yoon to identify the mode of failure [
7]. Khan and Liu established a phenomenological fracture criterion using the magnitude of the stress vector and the first invariant of the stress tensor [
8]. In that work, the results obtained from the criterion had a better agreement with experimental results than the results obtained from the maximum shear stress fracture criterion proposed by Stoughton and Yoon. Lou and Huh extended shear-controlled ductile fracture to a three-dimensional stress space to include the effects of stress triaxiality and the load parameter [
9].
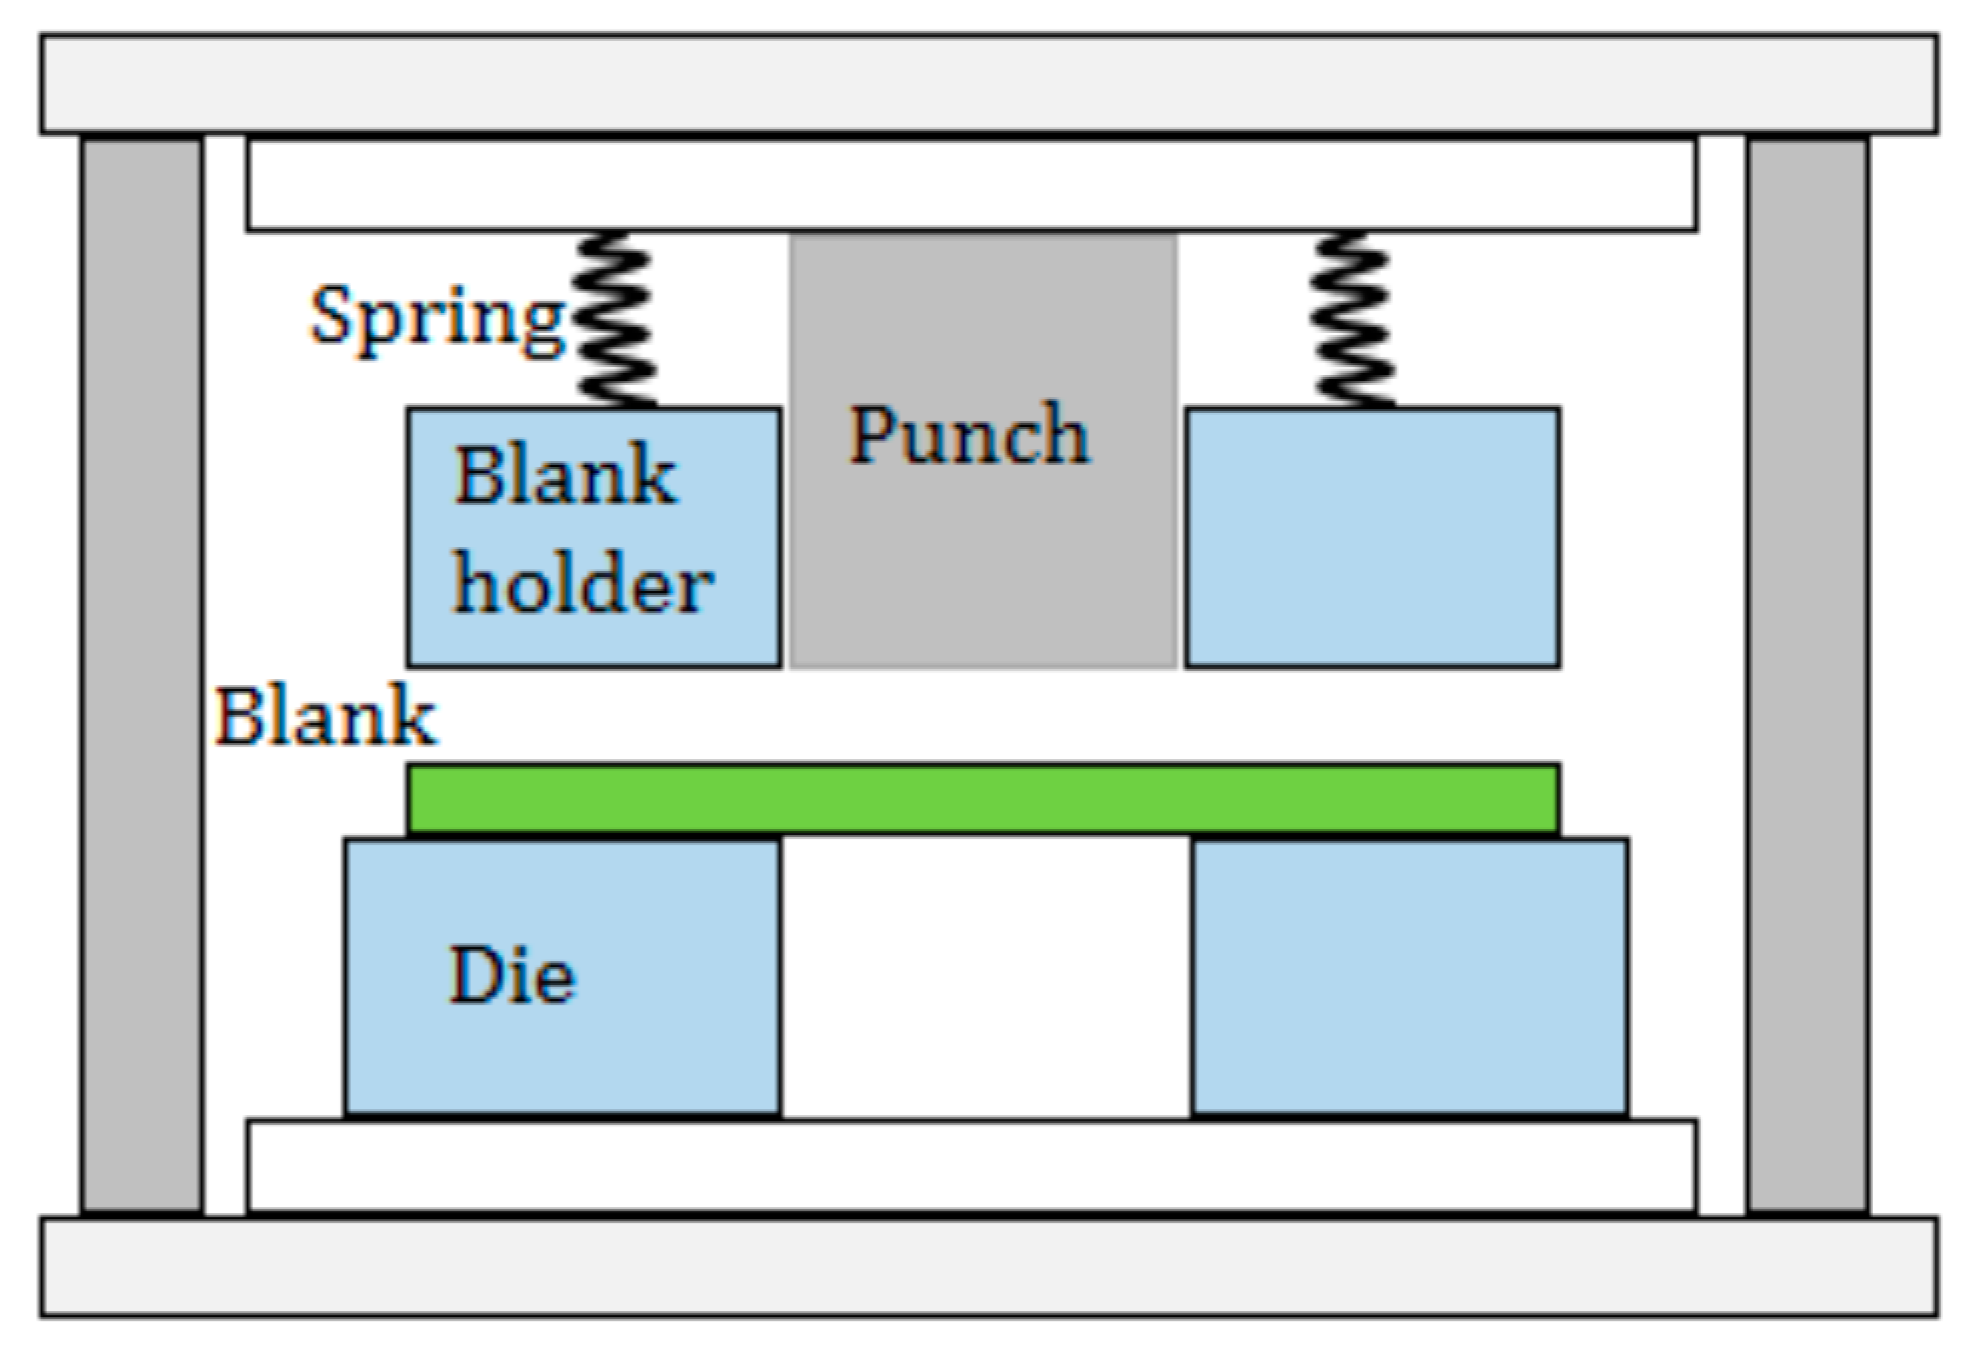
Different types of punching processes can be performed, such as by using a normal punching machine consisting of a die and punch or using a fine blanking machine consisting of a die, blank holder, punch, and counter-punch. The punching process involves complicated steps, such as the contact of the punch, elastic and plastic deformation, shearing, and crack formation. The finite-element method (FEM) has been used for predicting the ratio of different zones in the punching process. The influence of superposed hydrostatic pressure on ductile fracture initiation was studied by Goijaerts et al. and proposed a new model that is valid for both tensile tests and blanking [
10]. The split arbitrary Lagrange–Euler method combined with remeshing for large, localized deformation of an elastic–plastic finite-element analysis (FEA) model of the blanking process was studied by Brokken et al. [
11]. Their findings demonstrate the handling capability of the finite element approach based on the arbitrary Lagrange–Euler method combined with remeshing for the large, localized deformation.
Hambli and Reszka studied different phenomenological criteria to determine the critical fracture criteria and this study shows that the criteria proposed by Cockcroft and Latham, Oyane, and Ayada are good ones [
12]. The effect of punch-die clearance on the different zones of the cut surface for fine blanking can be found in [
13], and the results indicate that the increase of the clearance decreases the depth of the shear zone and increases the depth of the fracture zone. The blanking operation of very thin sheet metals by using the Cockcroft–Latham fracture criterion can be found in [
14]. Komori studied the crack initiation and propagation during shearing and tensile tests by using both phenomenological and mechanism-based fracture criteria [
15]. Tanaka et al. applied FEM to different types of punching to evaluate the fracture criteria proposed by Oyane and Cockcroft and Latham, and the conditions of cut surface obtained by both criteria were described [
16].
The effects of surface roughness on the sheared surface length and fracture height in the micro-punching process were investigated by Xu et al. The results indicate that the better sheared surface quality and length, the lower fracture height can be obtained by the ion beam-finished micro-punch and smooth surface of the micro-die finished by ion beam irradiation [
17]. Miniaturization in sheet metal working processes was studied by Kals and Eckstein. In that work, the effects of grain size and the orientation on the sheared surface length, burr formation, and drawn-in edge in the punching process were described [
18]. The size effect model of micro-blanking was established by Xu et al. to investigate the influences of mold clearance and grain size on the deformation and fracture behavior in the micro-blanking process. It was found that the blanking edge and distributions of different zones are affected by grain size and the ratio of blanking clearance to grain size [
19].
Subramonian et al. studied the effect of punch-die clearance on the tool life and edge quality of parts for the blanking process [
20]. In that work, the range of punch-die clearances which gives the minimum punch stress was identified and the relationship between the shear zone length and punch corner radius with the effect of compressive stresses in the deformation zone was described. Yu and Zhao used the ductile fracture initiation and propagation criterion to investigate the blanking of thick sheet metal [
21]. In that work, the effect of stress triaxiality on ductile fracture and the influence of blanking clearance on fracture were studied. Mohr and Marcadet used the phenomenological Hosford–Coulomb model to predict ductile fracture initiation at low stress triaxialities [
22]. Meng et al. used phenomenological ductile fracture criteria to study the deformation behavior in progressive microforming [
23]. Through the results, it was found that the Ayada criterion can predict fracture, rollover, and shearing zones in the shearing stage, and the Cockcroft and Latham criterion can predict the depth of the fracture zone, which has good agreement with the experimental result in blanking.
Based on the above review of previous studies, the value of the critical fracture criterion (C) was held constant for one material and was used to predict fracture initiation and to study the influences of process parameters on the cut surface. The effect of punch diameter is not also considered. In the present study, it is found that the value of (C) depends on the clearance between the punch and the die, which is a relationship that actual punching processes can benefit from. The phenomenological ductile fracture criteria proposed by Oyane, Cockcroft and Latham, and Ayada are used to determine the values of the critical fracture criteria (C) and to predict fracture initiation experimentally and numerically. The relationships between the clearance and the (C) value, regardless of material thickness, are described. The influence of stress triaxiality on the fracture initiation point is also presented. The effects of punch diameter on the ductile fracture criteria C and the sheared surface length are studied.
3. Ductile Fracture Criteria
If the deformation and loading reach a critical value (C), the material will start to fracture. Ductile fracture involves three different stages: void initiation, void growth, and hole coalescence. There are different types of models of ductile fracture initiation: mechanism-based models, phenomenological models, and models based on continuum damage mechanics derived from the principles of thermodynamics.
In this analysis, phenomenological ductile fracture criteria were used to predict fracture initiation. Phenomenological ductile fracture criteria can be considered as a process of damage accumulation. In these criteria, the critical value (C) can be determined by a combination of known deformation quantities, such as stress and strain. The criteria can also be easily implemented in finite-element codes.
Common phenomenological criteria chosen from the literature and previous researches are discussed below and used in this study. There are no constant values in the Cockcroft–Latham or Ayada criteria. The Cockcroft–Latham criterion considers the effect of the maximum principal stress over the plastic strain path, whereas the Ayada model is based on the stress triaxiality. Meanwhile, the Oyane criterion is derived from the plasticity theory of porous materials; in that criterion, the value of parameter
α can be varied to obtain a valid ductile fracture model:
Here, is the hydrostatic stress, is the von Mises stress, is the maximum tensile stress of the principal stress, is the equivalent strain at the initiation of fracture, and α is the constant in the Oyane criterion; because α is material-dependent, it is important to use an appropriate value. In this study, the value of α was chosen so that the same value of the Oyane criterion (C) was determined for both the punching and uniaxial tensile tests. Firstly, the distribution of (C) along the cutting length of simple punching was calculated in MSC.Marc (4675 MacArthur Court, Newport Beach, CA, USA) for different values of α. Secondly, for the uniaxial case, (C) was calculated for different values of α from experimental uniaxial tensile-test data, such as the fracture strain and , which is equal to 1/3 in the case of uniaxial loading. The appropriate value of the Oyane parameter (α = 0.55) was then selected from the best fits to the two (C) distributions.
4. Finite-Element Analysis of Punching Processes
The commercial FEM codes MSC.Marc.Mentat and MSC.Marc (4675 MacArthur Court, Newport Beach, CA, USA) were used to create an FEA model of the punching process and to analyze the punching process, respectively.
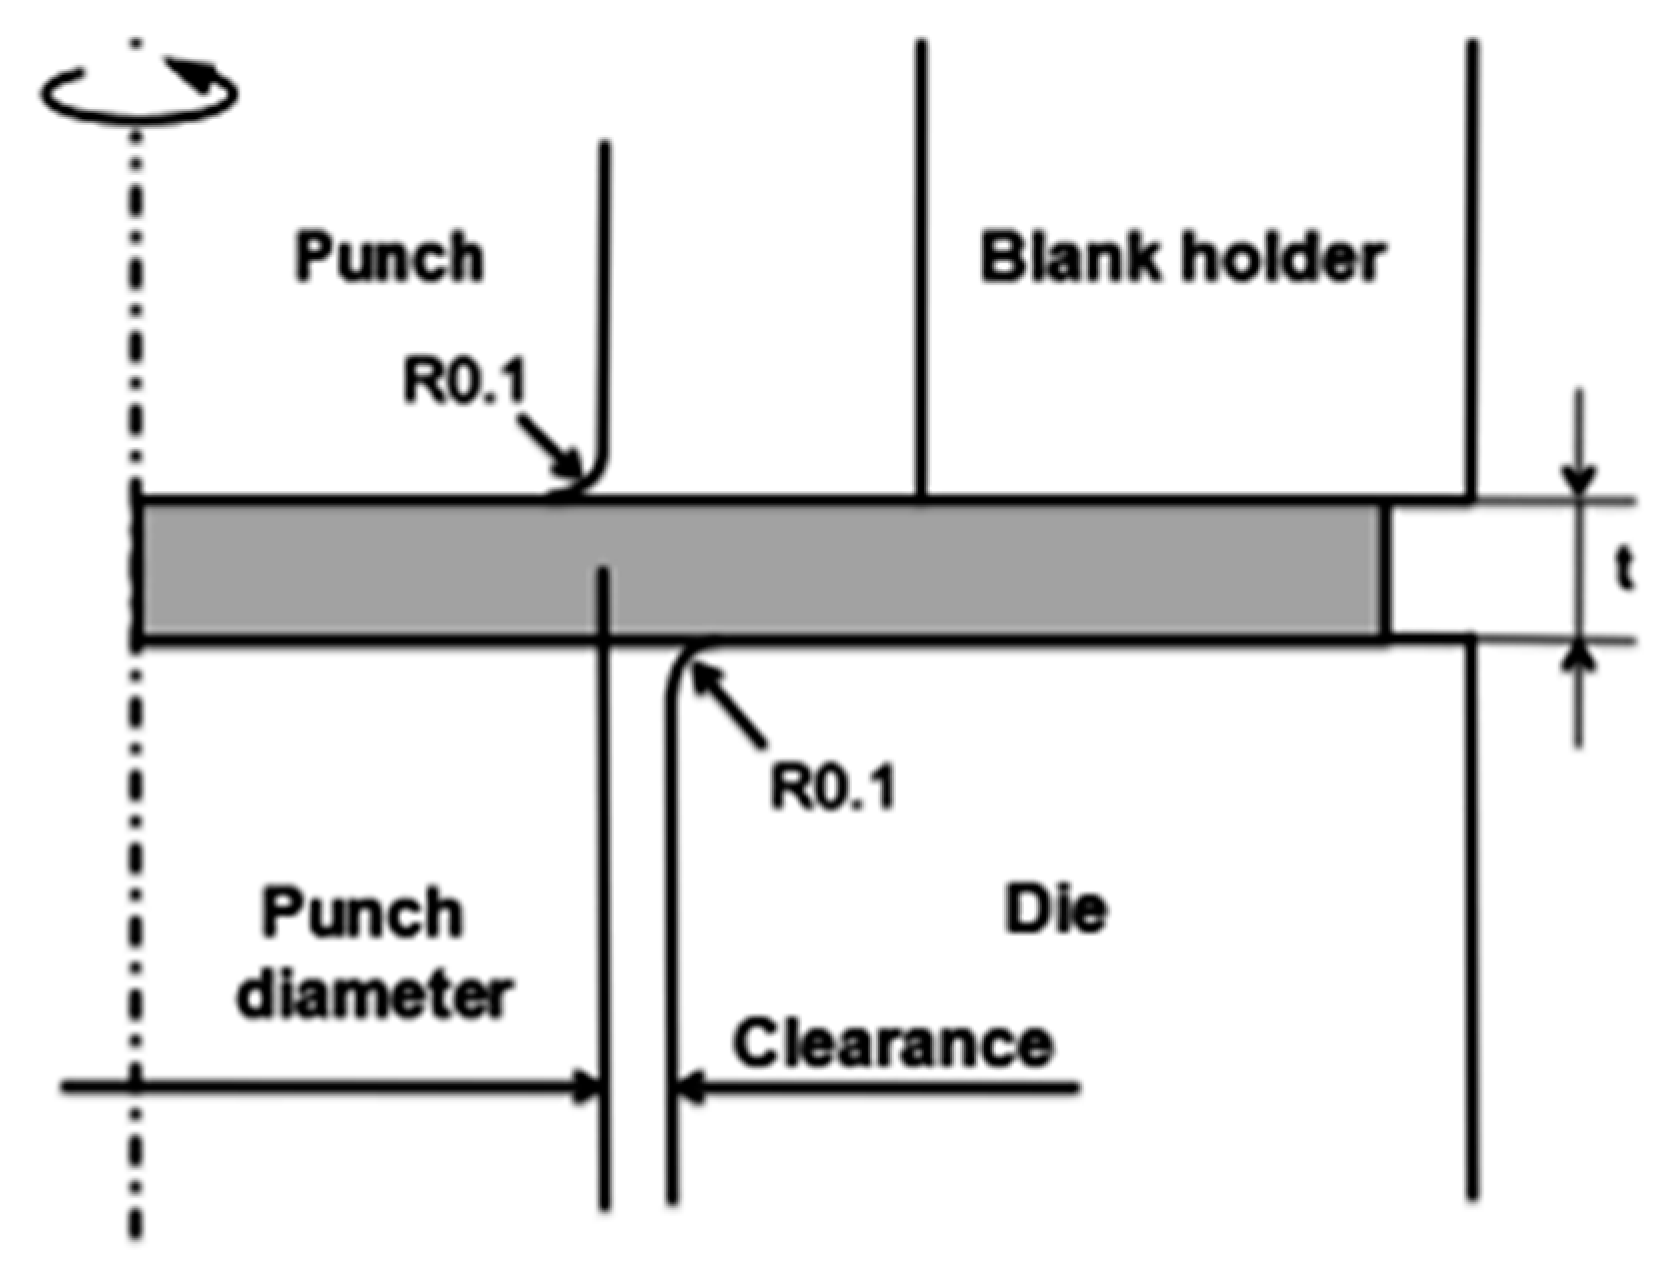
Figure 2 shows a schematic diagram of the simulation model created for the analysis. The FEA model of the test specimens is rectangular in shape, with an outside diameter of 40 mm and thicknesses of 1.6 and 3.2 mm. The radii of the cutting edges of the punch and die are 0.1 mm for this study.
Axisymmetric four-node linear elements were used in this analysis. The punch and the die are considered to be rigid bodies. The blank material was considered to be a deformable elastic–plastic body. The automatic remeshing function with advancing front-quad was used. After remeshing, the element length was changed to 0.01 mm. In this study, 5000 elements were used for both thicknesses to achieve a reasonable approximation during remeshing, especially for the Oyane criterion. The friction acting on the contact surface of the material and the tool was not considered in this analysis.
Table 2 lists the conditions of the FEA model.
The material properties used in the analysis, such as Young’s modulus, Poisson’s ratio, yield stress, flow stress, and plastic strain relation, were obtained from a tensile test by using a universal tensile and compression testing machine. The material properties of the blank are listed in
Table 3 and multi-linear stress-strain relations used for the finite element analysis of punching processes are listed in
Table 4.
The multi-linear stress-strain curves are used in the FEA for approximation by the full Newton–Raphson iteration method. The user subroutines ELEVAR (which makes element quantities available at the end of each increment) and plotv (which is used to capture the mean stress in MSC.Marc, (4675 MacArthur Court, Newport Beach, CA, USA) were used to create a program to calculate the value of the ductile fracture criterion by FEA.
5. Results and Discussions
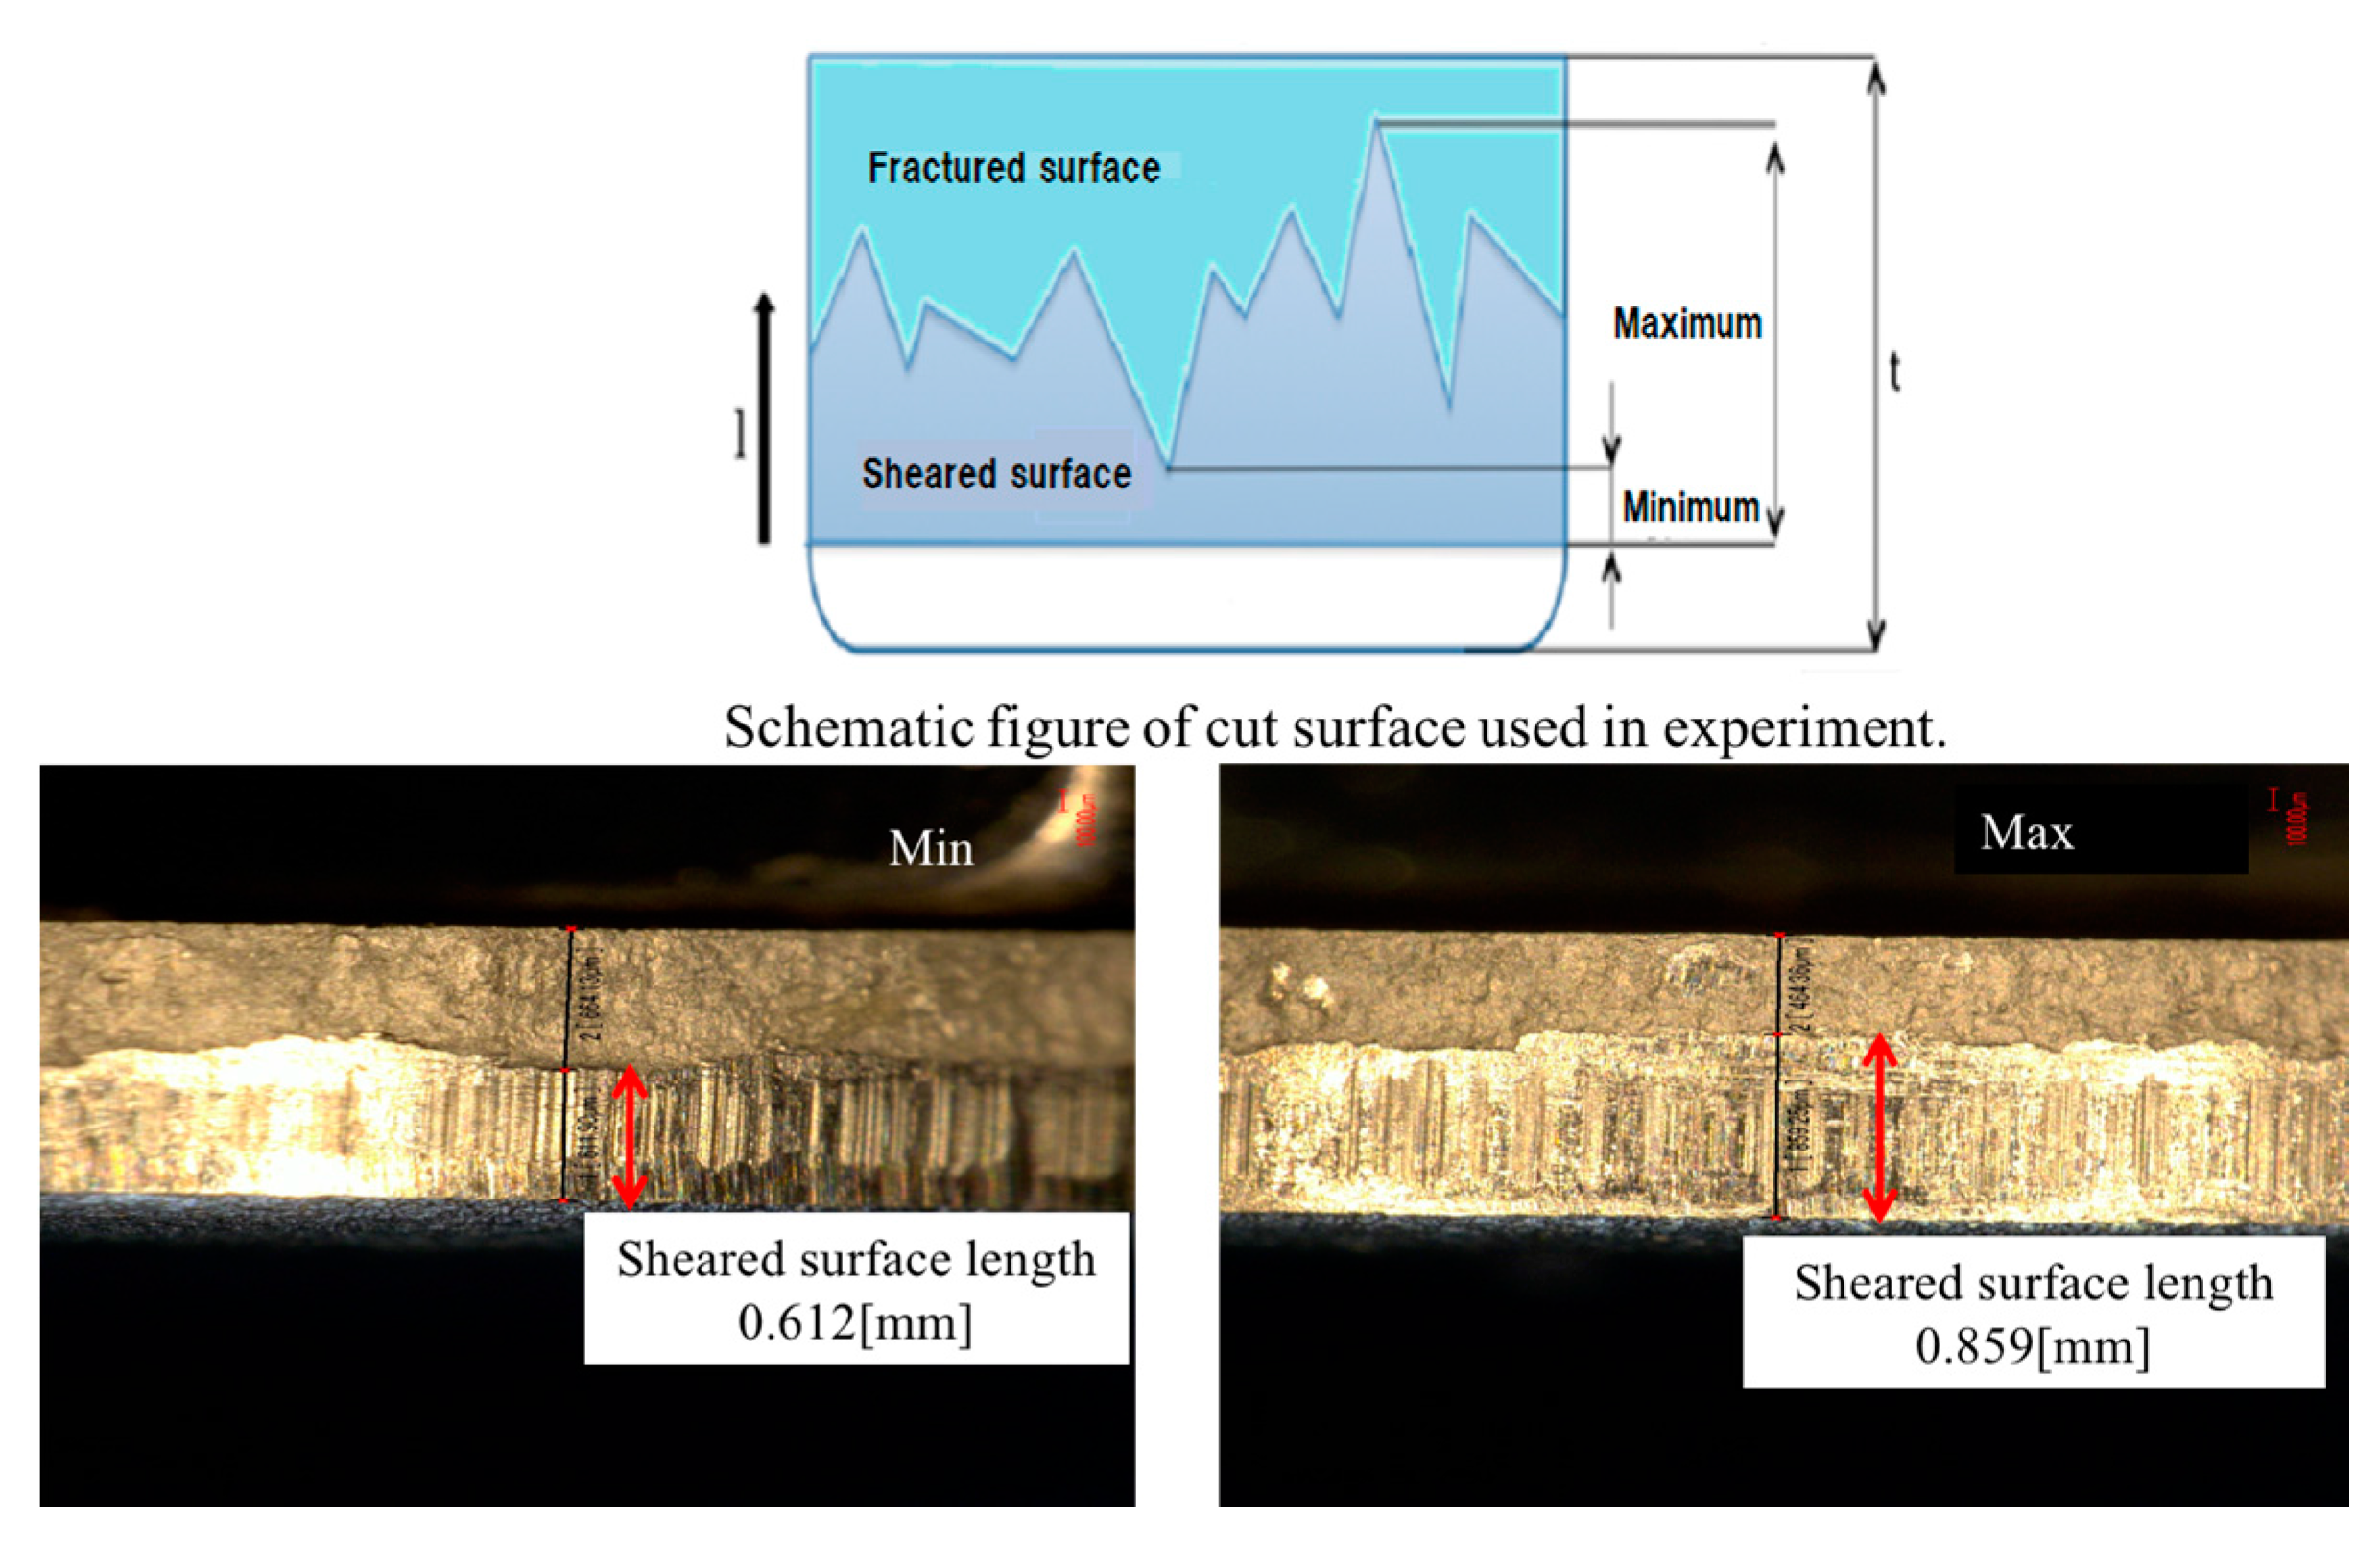
The shear limit point or boundary between the sheared surface and the fracture surface was measured on circular punched samples by using a microscope (VH-Z100, Keyence Headquarters and Lab in Osaka, Japan). The schematic of cut surface used in the experiment, the minimum and maximum sheared surface lengths, respectively, obtained in the experiments are shown in the
Figure 3.
The distributions of the fracture criteria
,
, and
along the cut surface were investigated for different clearances.
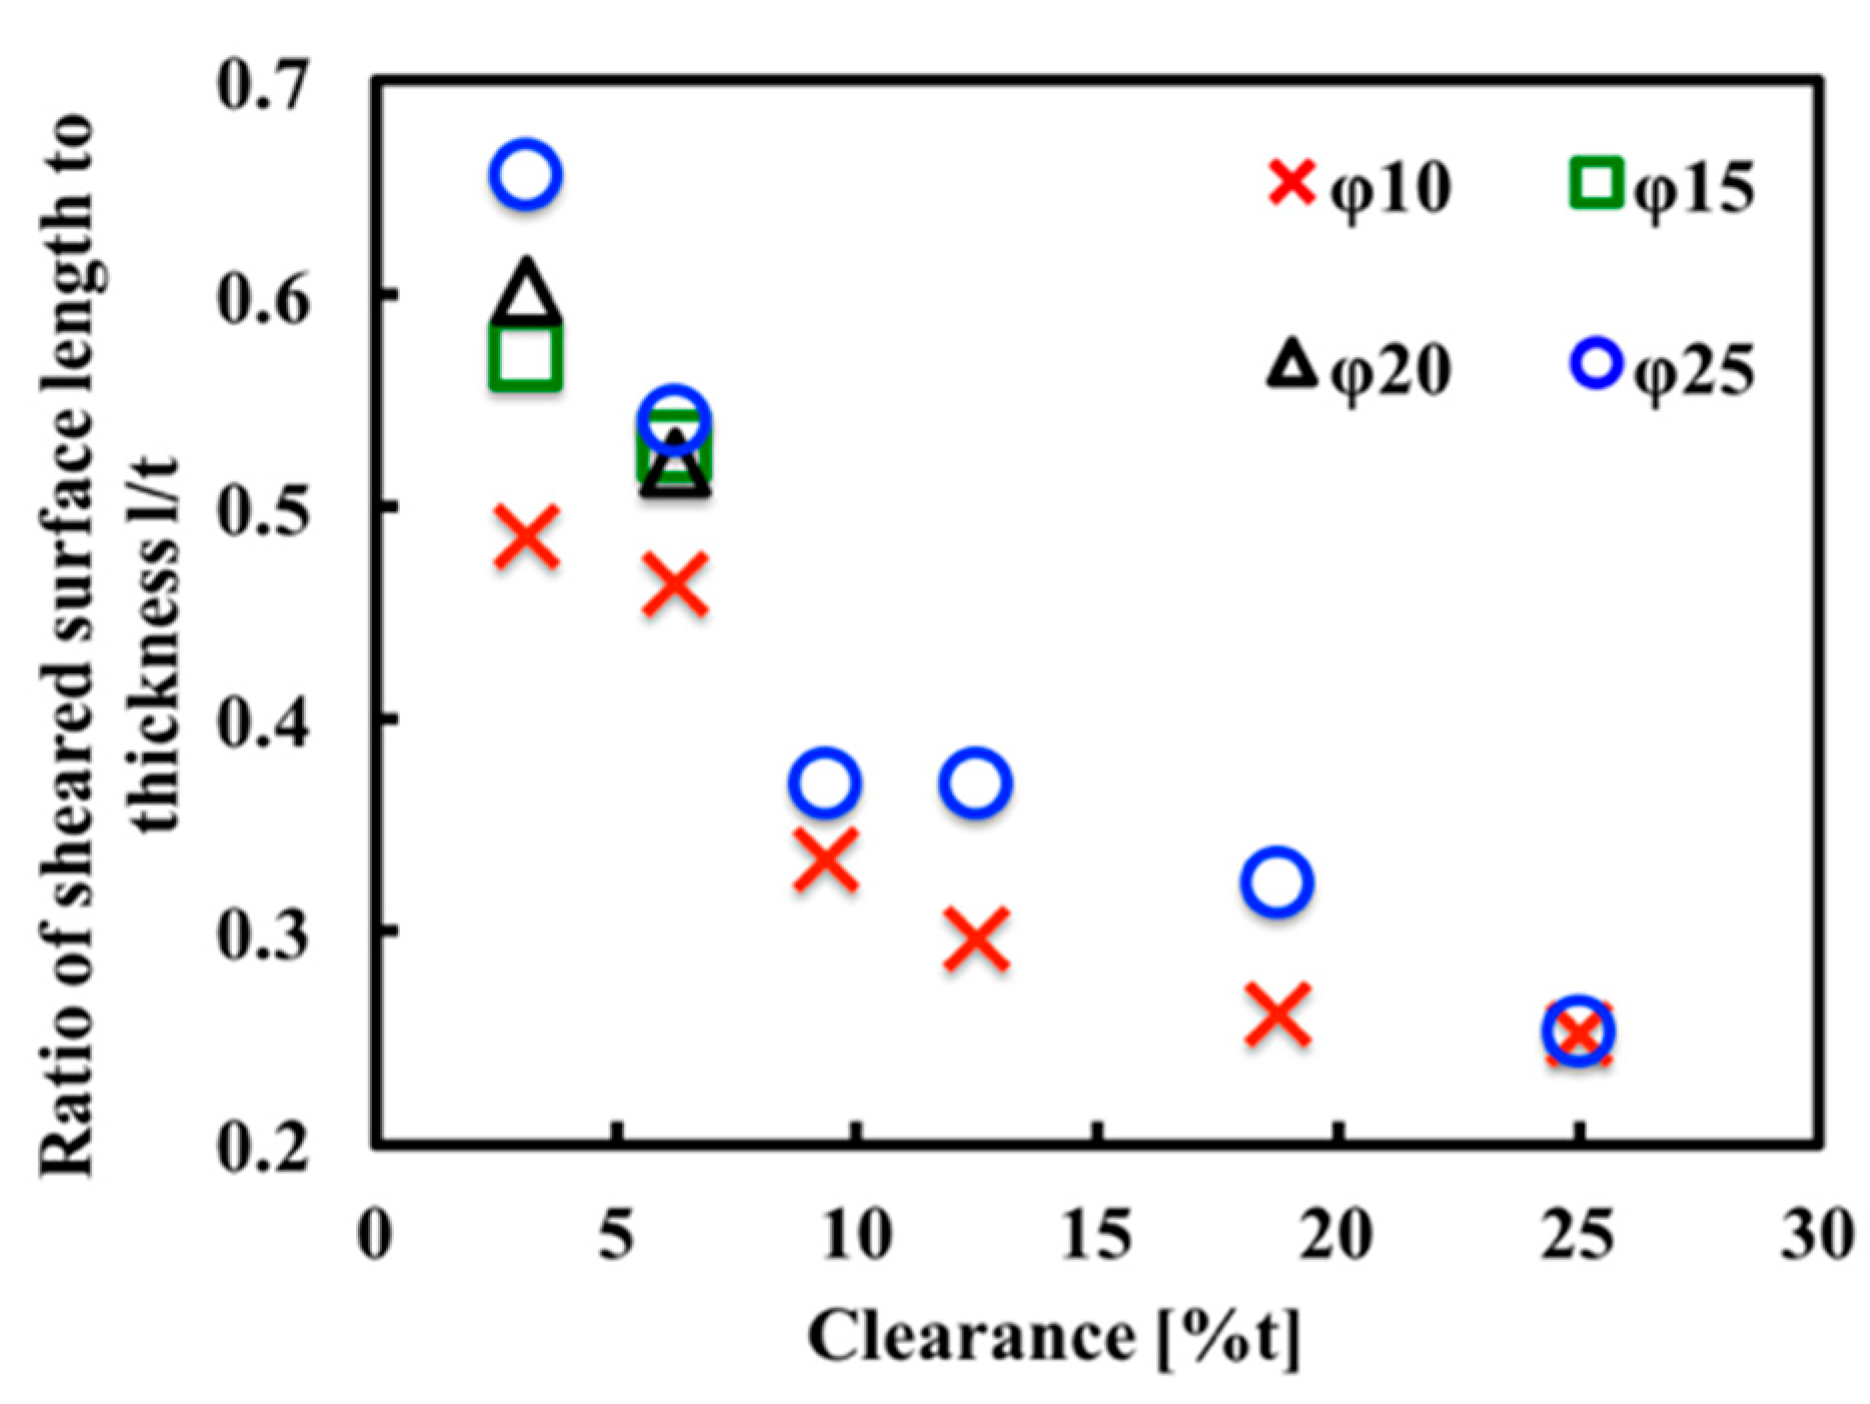
Figure 4 shows the experimental results for the ratio of sheared surface length to thickness (
l/
t) as a function of the clearance (percentage thickness (%t)) for different punch diameters. The experiment was performed five times for each clearance value and the results were averaged. With an increase in the clearance (%t), the length of the sheared plane on the cut surface decreased. Furthermore, a shear limit point (
l/
t) could be obtained at a certain clearance.
Each (
C) value along the cutting plane was investigated in the FEA.
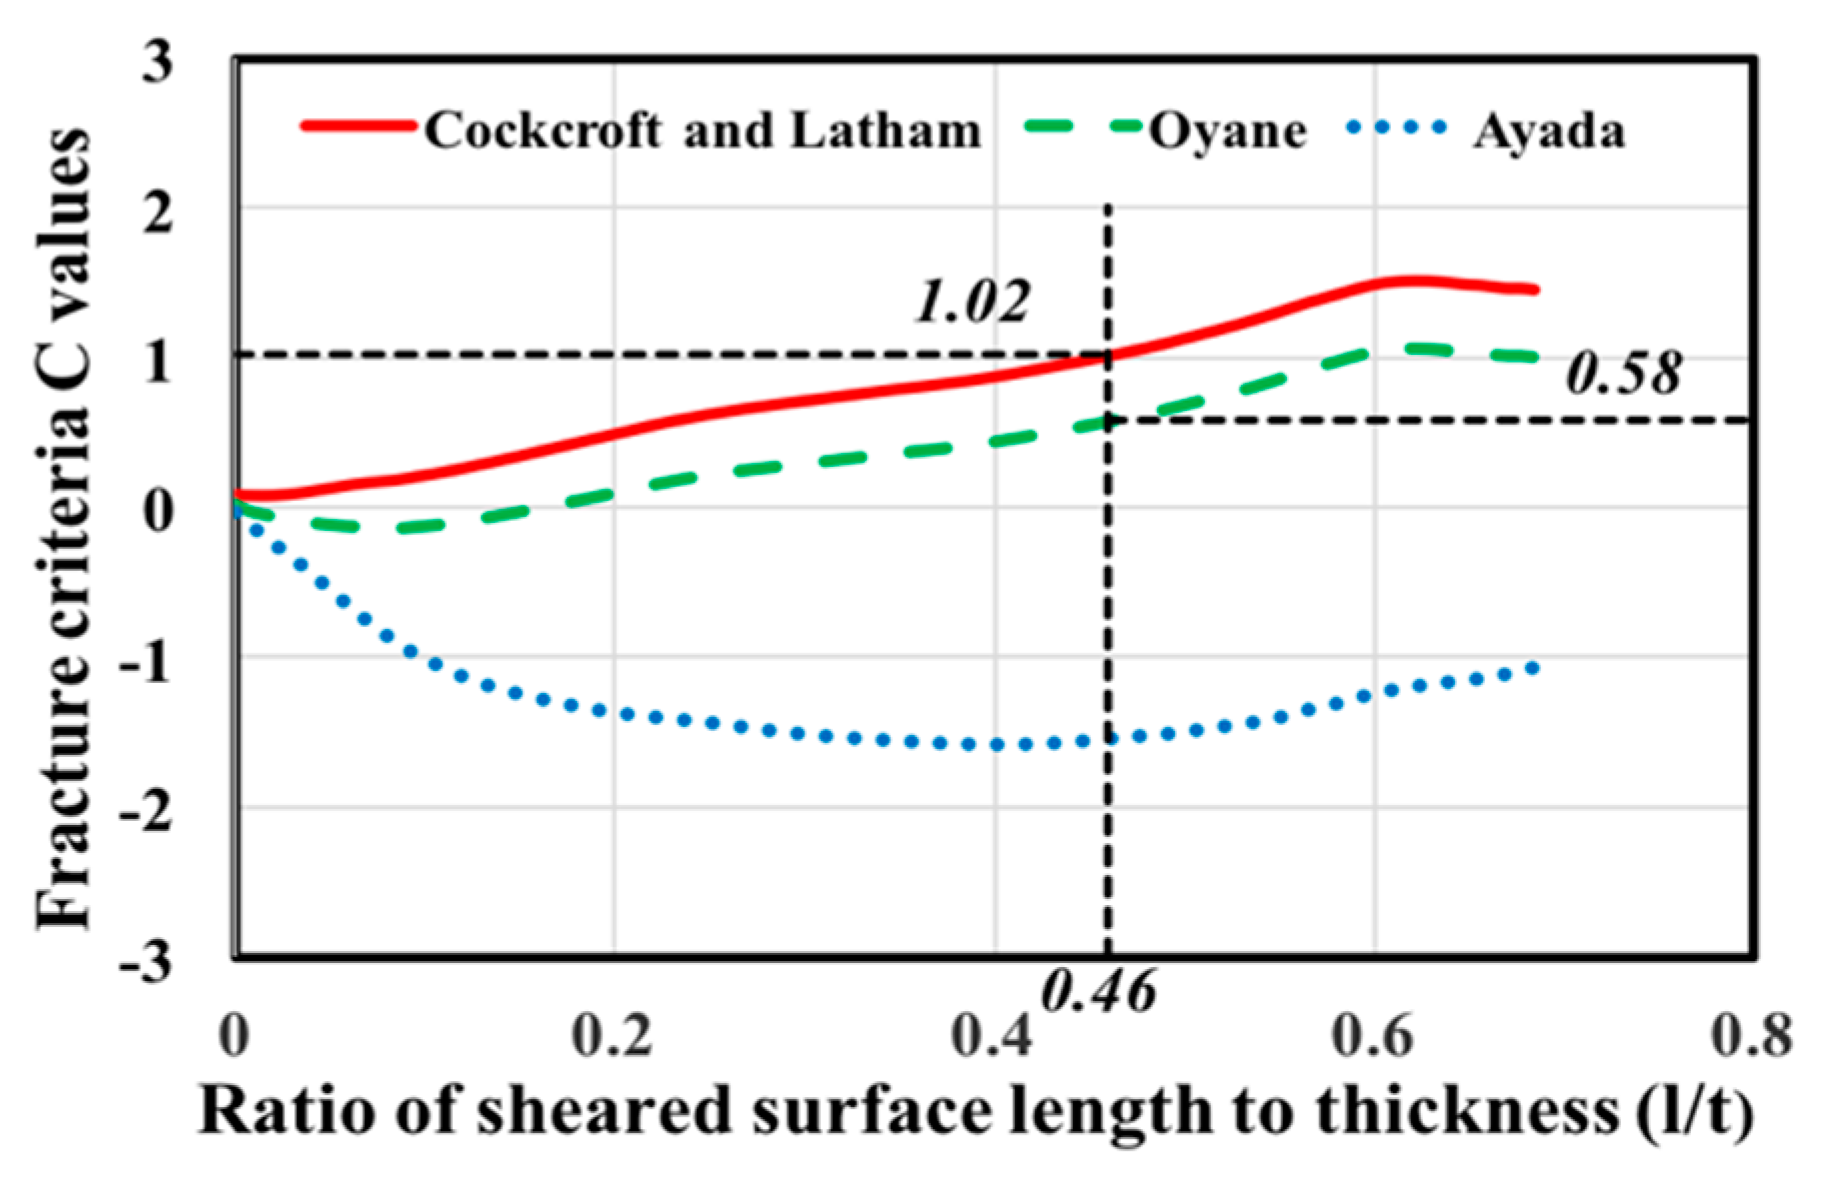
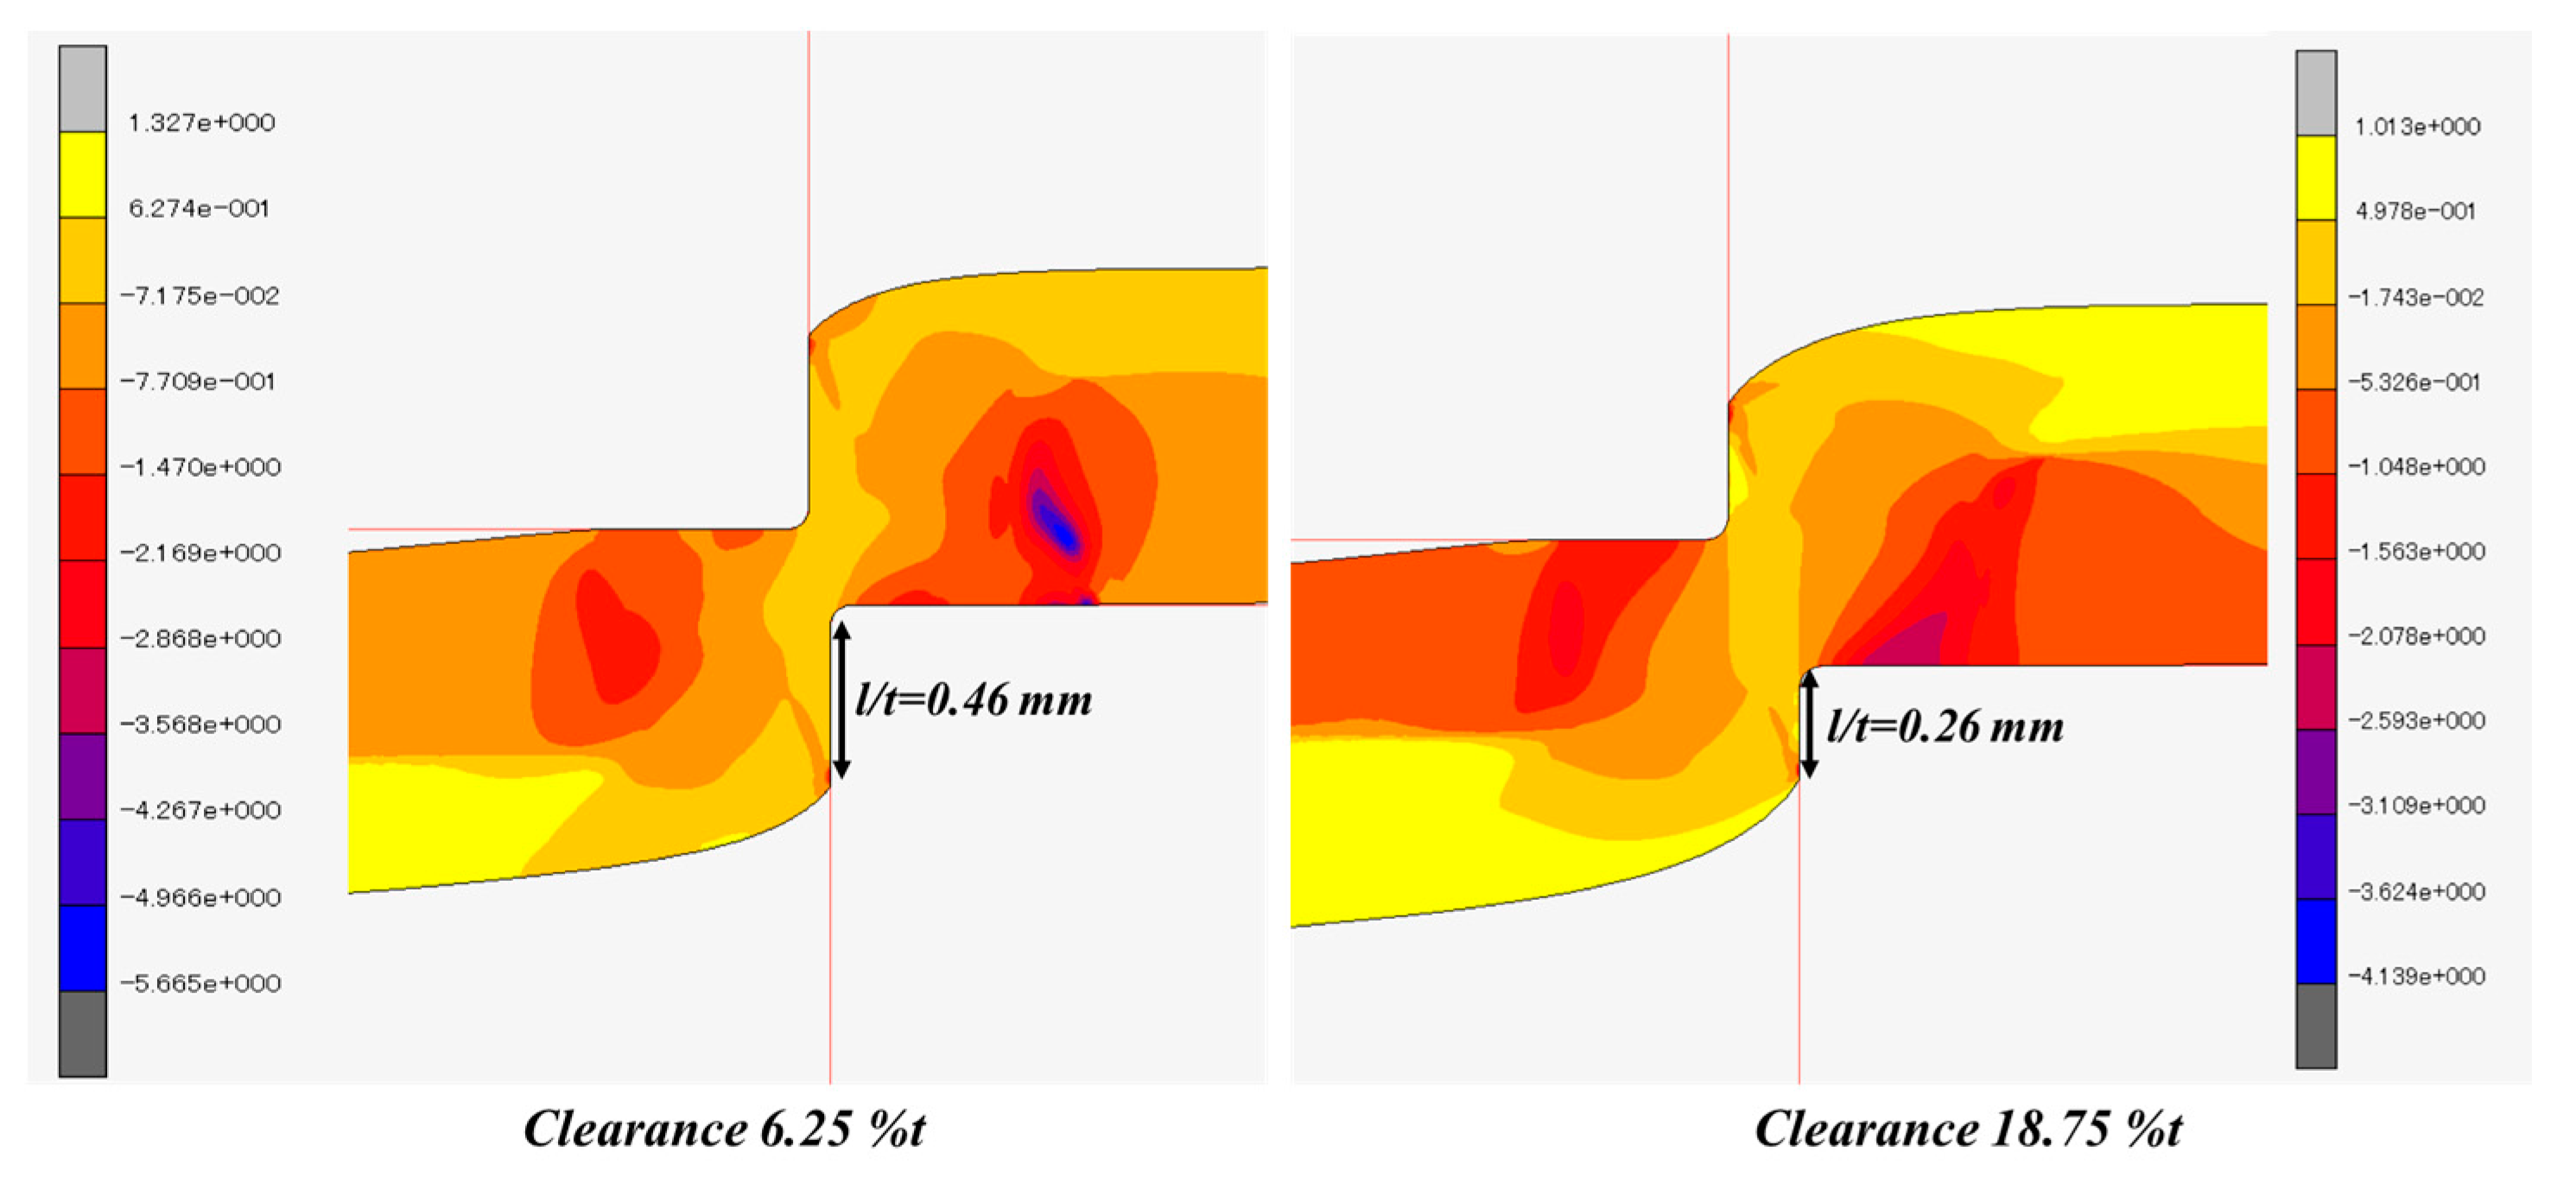
Figure 5 and
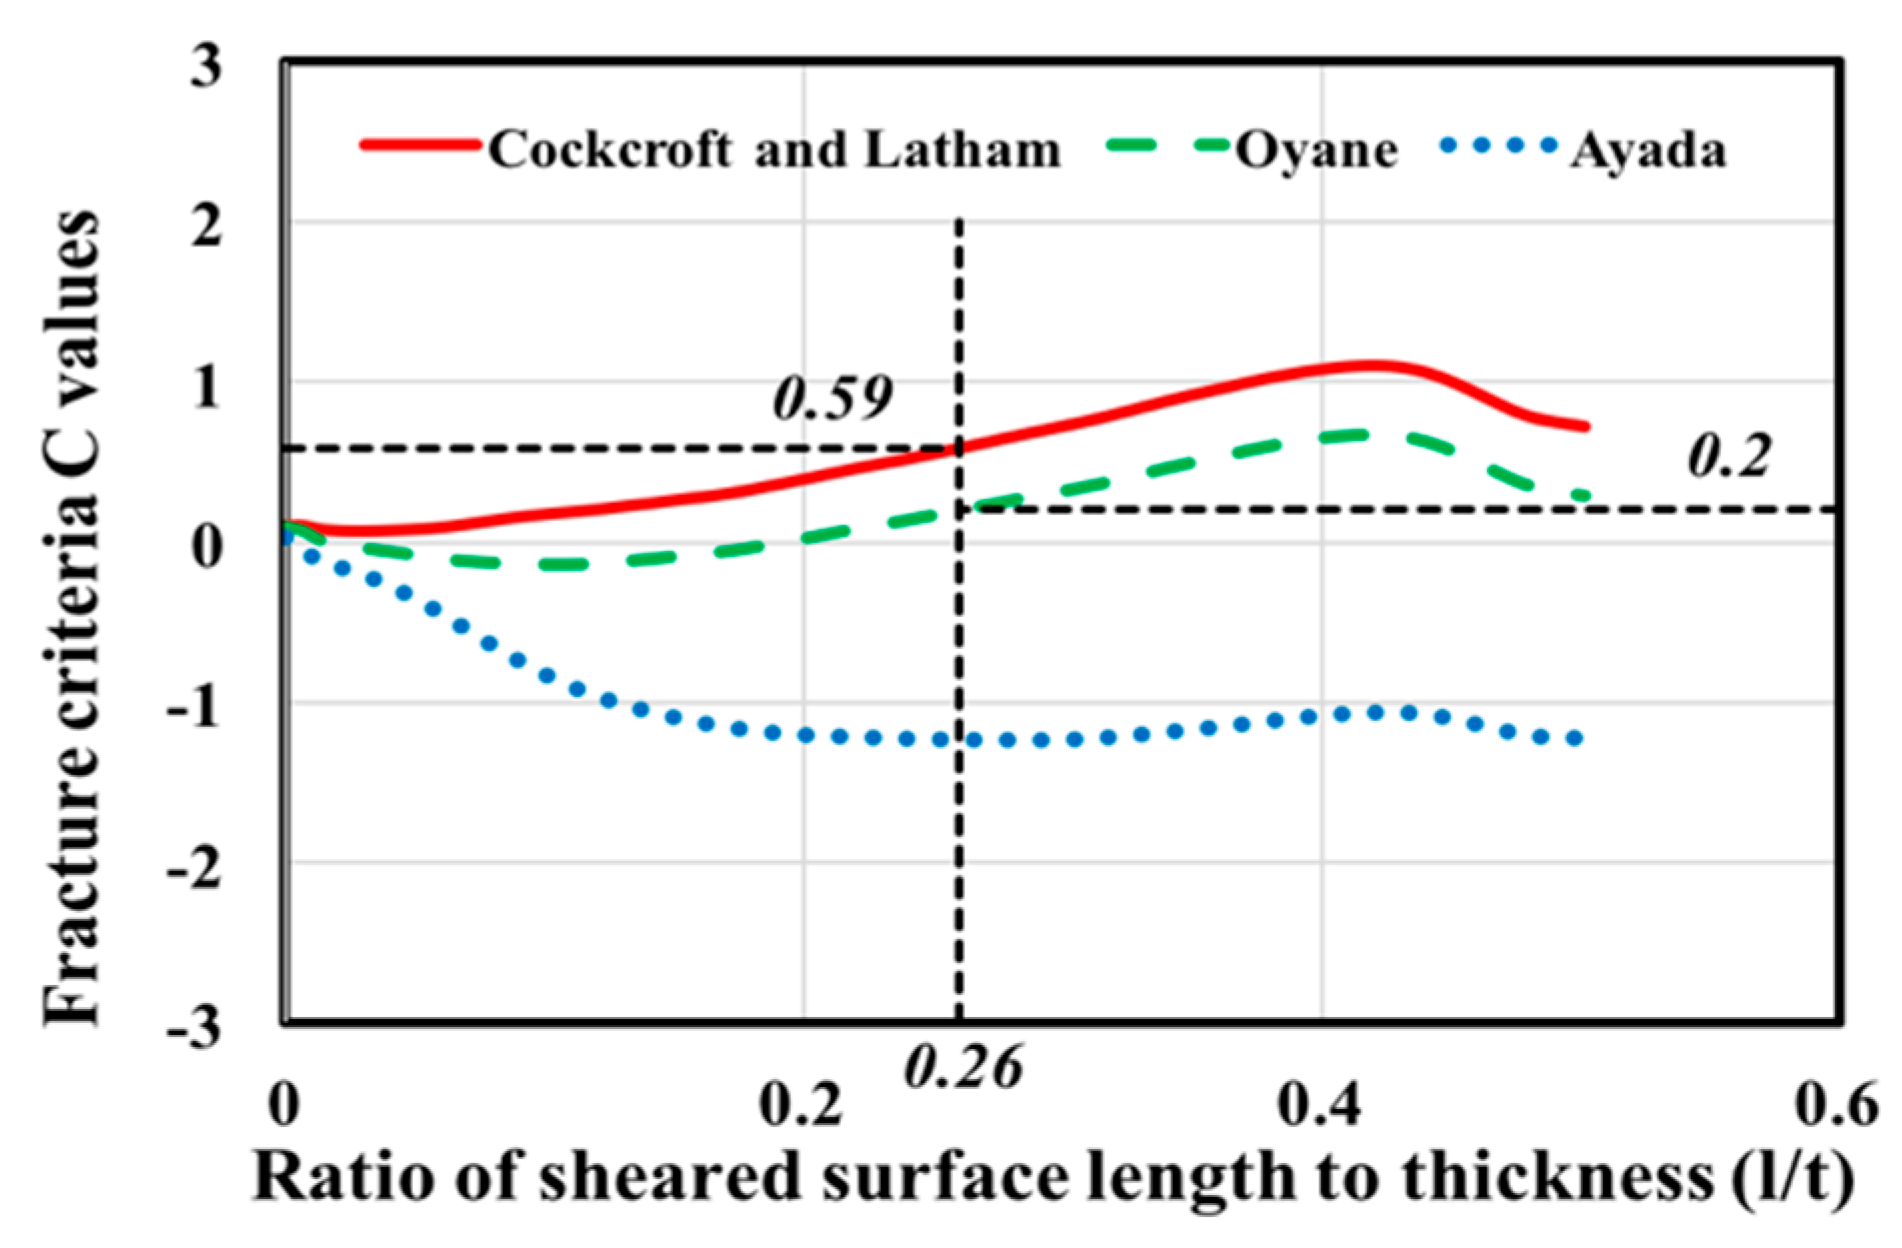
Figure 6 show the analysis results for the blank thickness of 1.6 mm, punch diameter of 10 mm, and clearances of 6.25 %t and 18.75 %t, respectively. The value of the ductile fracture criterion tended to increase monotonically during the punching process. This tendency was obtained when using the Cockcroft-Latham or Oyane criterion. The threshold value can be determined from a particular deformation path, and the threshold value for each criterion was obtained through a best fit of the experimental data. The threshold value of Cockcroft-Latham was 1.02 and Oyane was 0.58 for the sheared surface length to thickness ratio (
l/t) of 0.46 mm, with a clearance of 6.25 %t. The threshold value of Cockcroft-Latham was 0.59 and Oyane was 0.2 for the sheared surface length to thickness ratio (
l/t) of 0.26 mm, with a clearance of 18.75 %t. The increase in the value of the clearance decreases the ratio of the sheared surface length to thickness and the threshold value.
Each (
C) value was calculated by comparing the cutting surface obtained by FEA with the shear limit point (
l/
t) obtained from the punching experiments under each condition.
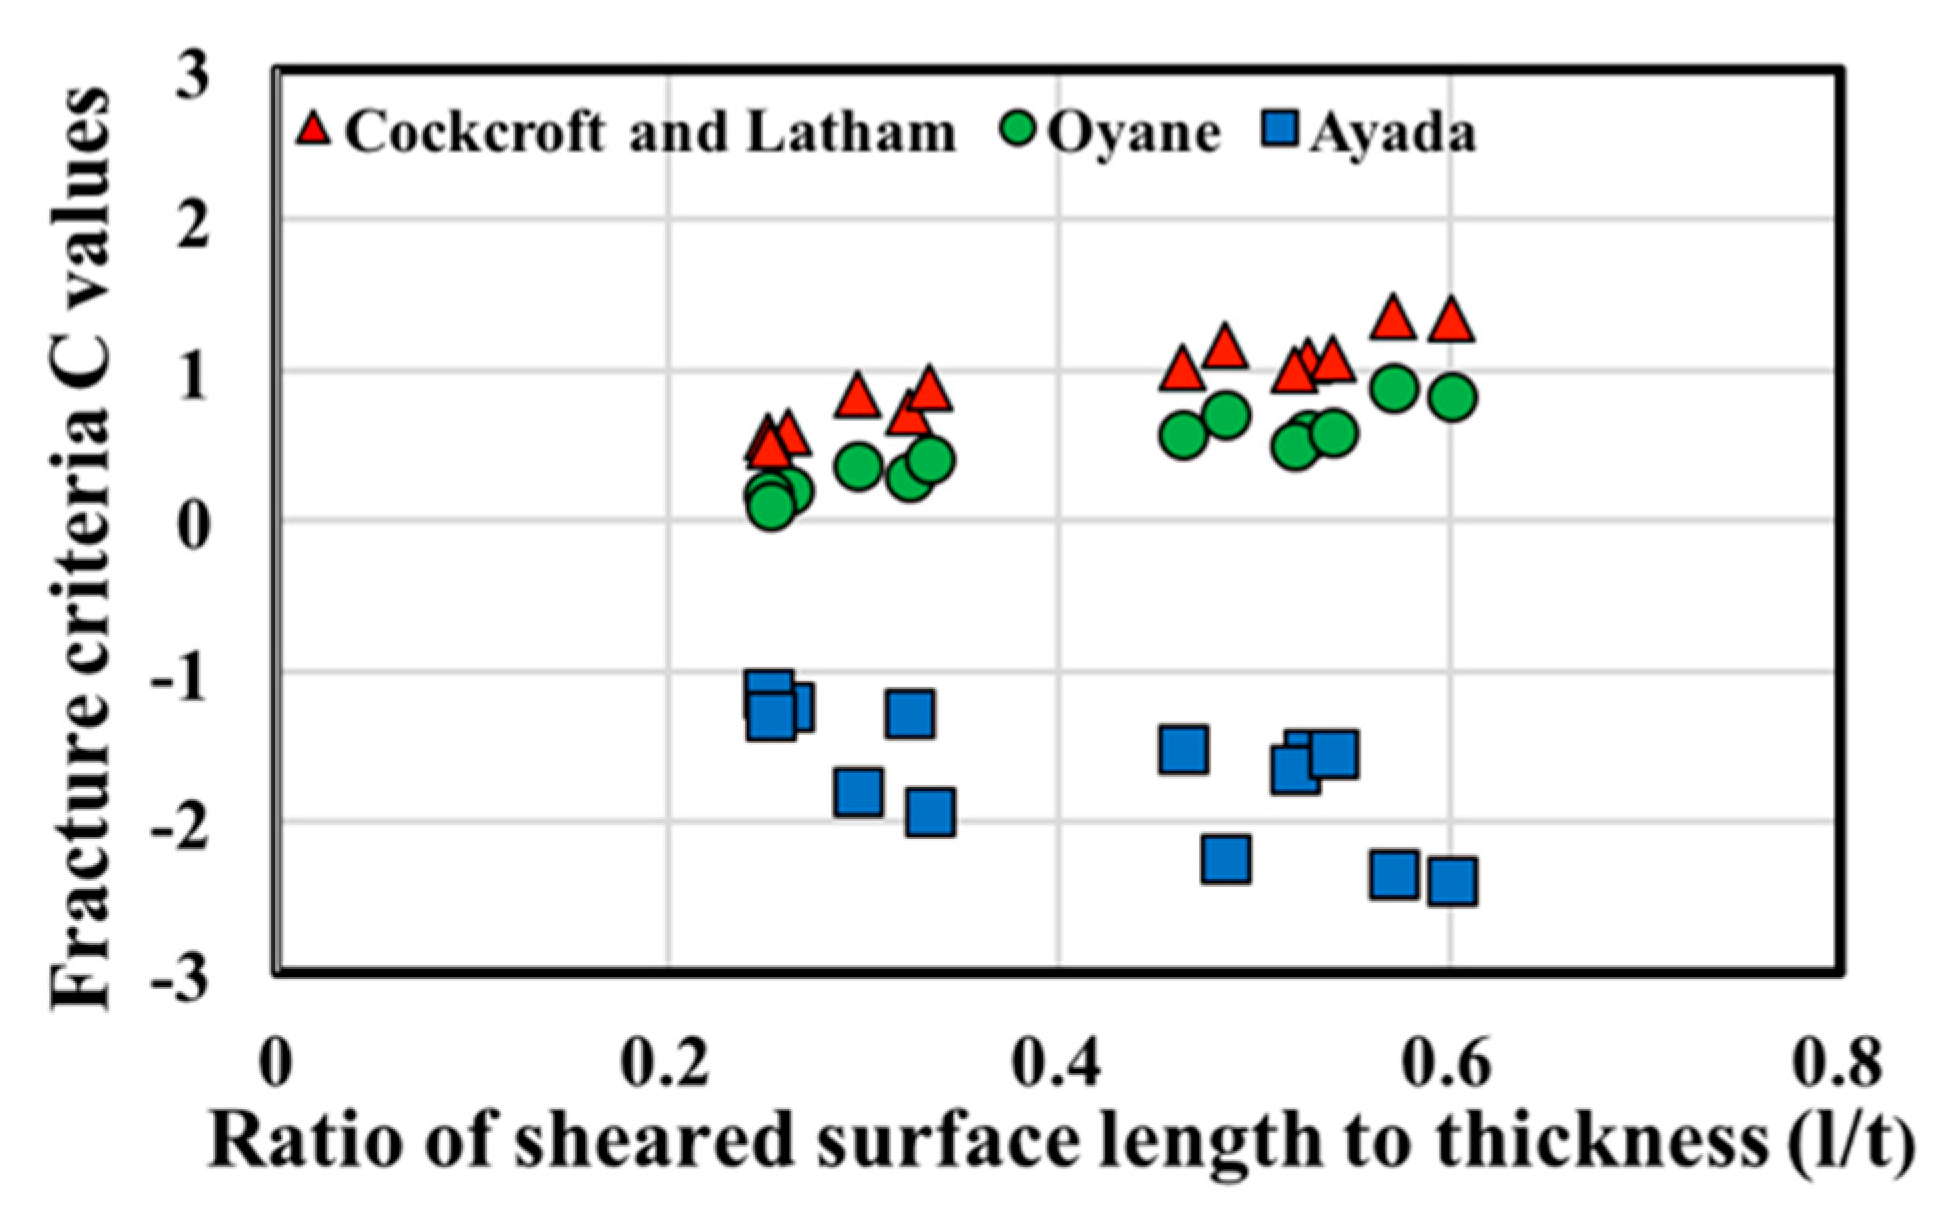
Figure 7 shows the relationships between the sheared surface length to thickness ratio and each (
C) value. The increase in the ratio of sheared surface length to thickness increases the (
C) values for the Cockcroft-Latham and Oyane models, and decreases for the Ayada model.
Figure 8 shows the relationships between the clearance (%t) and (
C) value.
The figures show that at the shear limit point (
l/
t), each ductile fracture criterion value (
C) obtained by FEA depends on the clearance (%t). When the value of clearance was increased, (
C) values of Cockcroft-Latham and Oyane decrease but the (
C) value of the Ayada criterion increases. The values of fracture criteria (
C) obtained from the Ayada model are negative values because of the compressive hydrostatic pressure. The accurate polynomial line fitting to the data (including all result data) was obtained from the Cockcroft–Latham and Oyane criteria. The polynomial line fitting to the data (including all result data) cannot be obtained from the Ayada model as it is based on the Mode 1 tensile crack opening mechanism, but the Cockcroft-Latham criterion performs well as it is the criterion based on a hidden out-of-plane shear based condition [
24].
The value of critical ductile fracture criterion that can be used in an actual punching process can be obtained by fitting a second-order polynomial to the data. The most reliable fracture criteria that can be used in a real punching process are the Cockcroft–Latham and Oyane criteria.
The ductile fracture strongly depends on the stress triaxiality [
25]. The critical damage value is largely affected by the stress state [
26]. The punching process consists of different loading conditions, such as compression, shear, and tension. The values of stress triaxiality vary from negative stress triaxiality to the large stress triaxiality during the punching process. The equivalent plastic strain at fracture is related in terms of the stress triaxiality. The fracture is controlled by the shear mode at negative stress triaxiality, void growth plays important at large stress triaxiality values, and the combination of shear and void growth modes controls the fracture process at low stress triaxialities. The equivalent strain at the fracture decreases with the stress triaxiality in the range of negative stress triaxiality (between −1/3 and 0, compression), reaches a minimum at the zero of the stress triaxiality (pure shear), increases with the low stress triaxiality in the rage of low stress triaxiality (between 0 and 1/3), it reaches its peak value at the value of stress triaxiality 1/3 (tension), and decreases with the stress triaxiality in the range of high-stress triaxiality (between 1/3 and 2/3). Hence, it was found that the fracture lines are curved if the triaxiality space was used [
24,
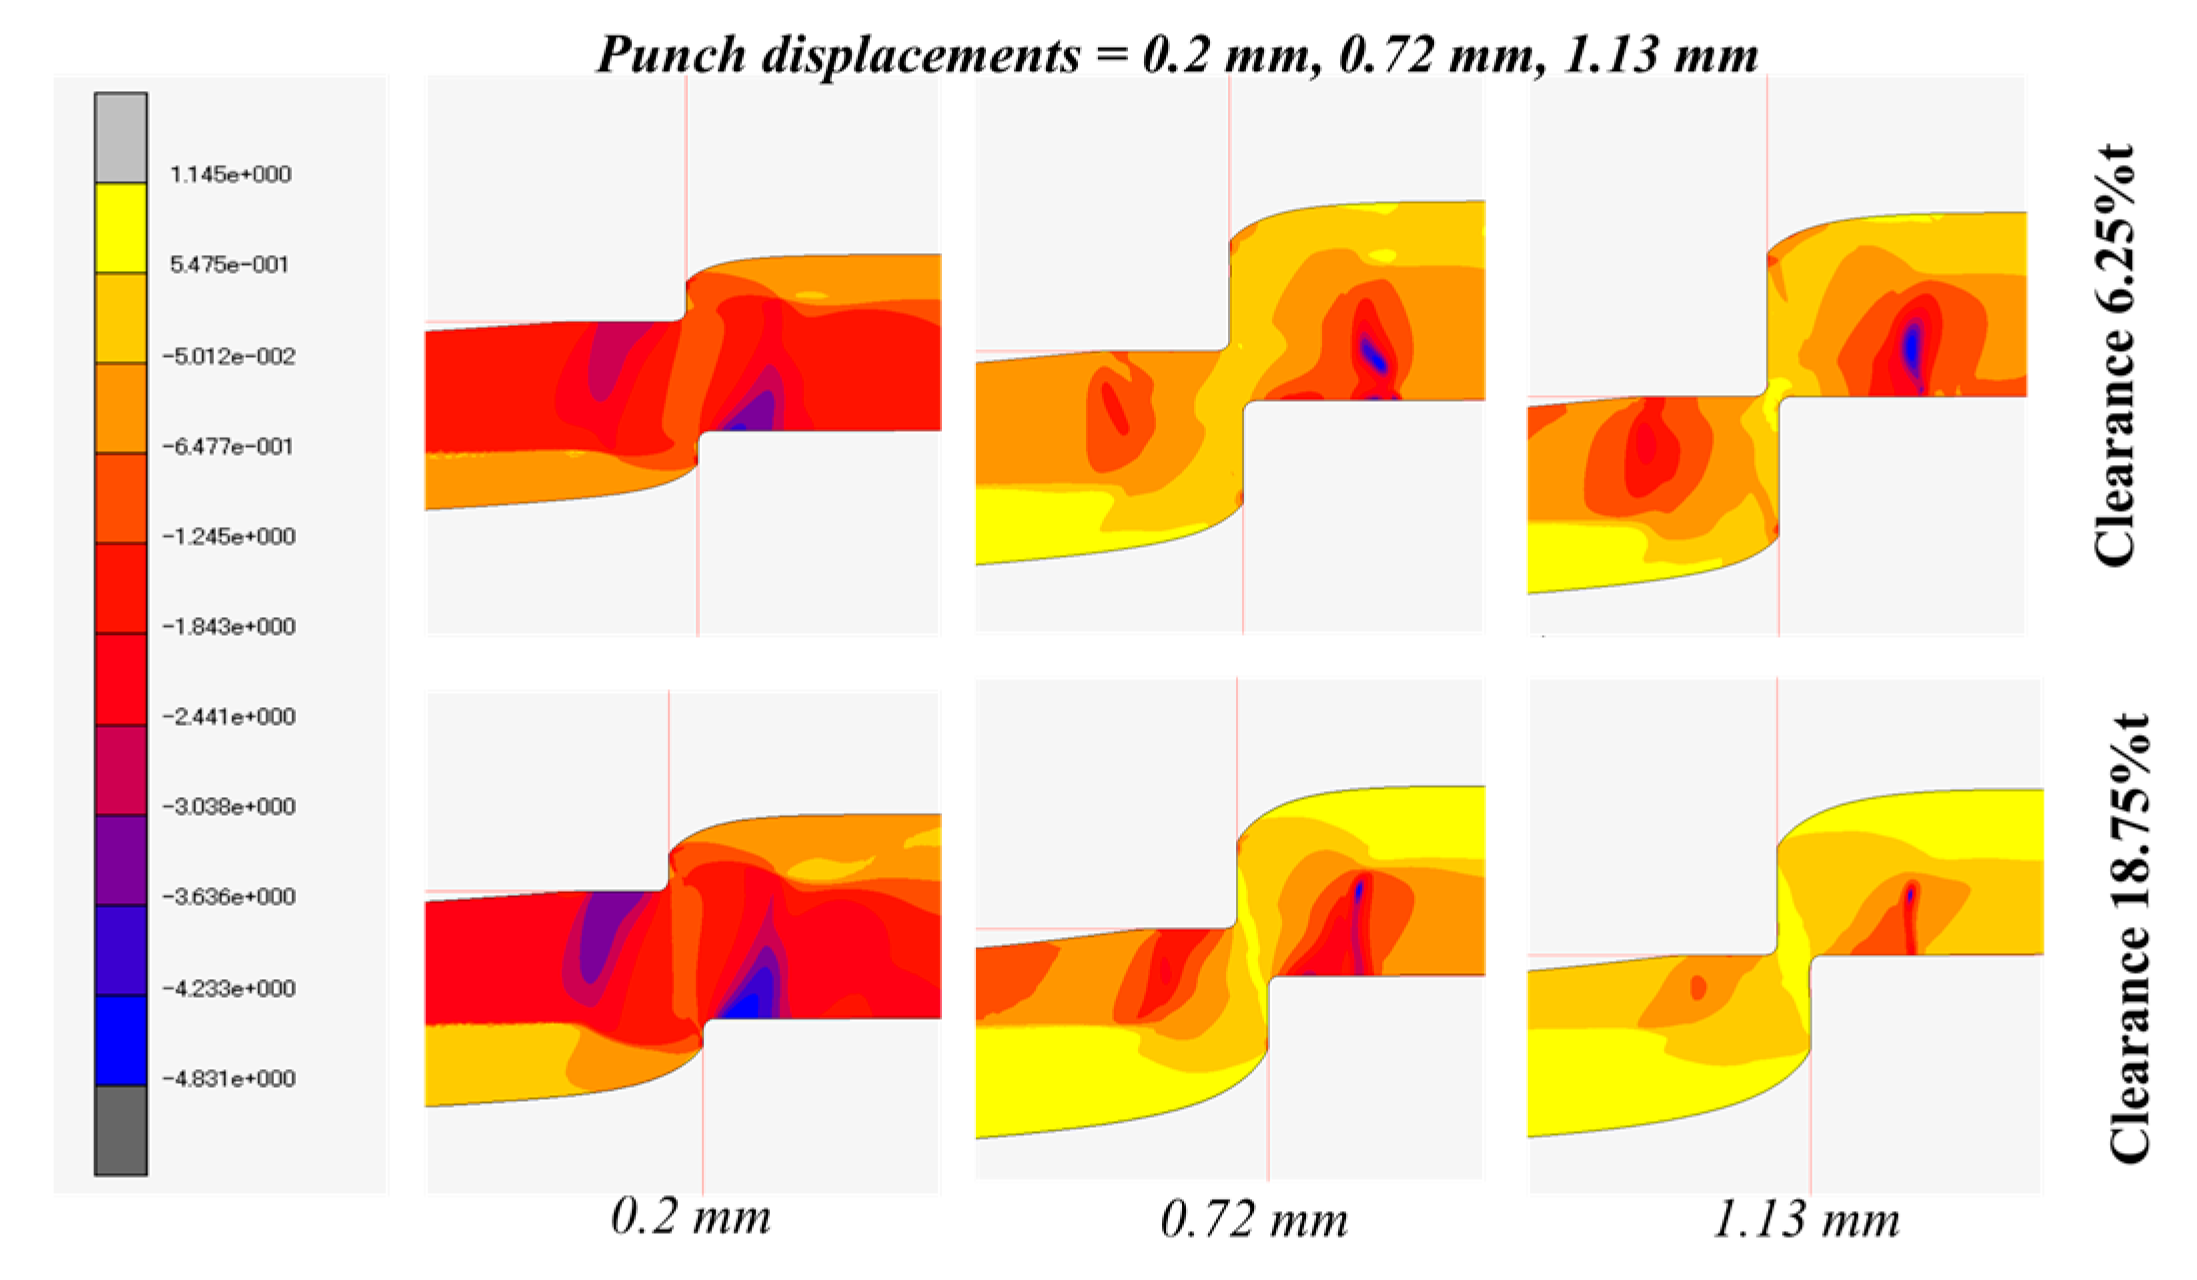
27]. The distribution of stress triaxiality during the punching process for the material thickness of 1.6 mm and punch diameter of 10 mm is shown in the
Figure 9.
The figure shows the distribution of stress triaxiality at the different punch displacements. At the early stage of punch displacement of 0.2 mm, negative stress triaxiality is generated in the clearance zone for both clearances. At the stage of punch displacement of 0.72 mm, the value of stress triaxiality in the clearance zone increases for the clearance of 18.75 %t. However, the value of stress triaxiality is still negative (compressive) for the clearance of 6.25 %t. The negative stress triaxiality, the hydrostatic compressive stress acting on the cut surface, delays the fracture initiation. The higher stress triaxiality has developed in the clearance zone at the end of punch penetration for the clearance of 18.75 %t. The lower the stress triaxiality, the higher the hydrostatic compressive stress generated in the smaller clearance case, and it postpones the formation of the fracture initiation at early stages.
The comparison of the distribution of stress triaxiality at the fracture initiation point (shear limit point) for the blank thickness of 1.6 mm, punch diameter 10 mm, and clearances of 6.25 %t and 18.75 %t is shown in
Figure 10.
With the low stress triaxiality, high compressive stress is acting on the cut surface in the clearance of 6.25 %t and a larger sheared surface (l/t = 0.46 mm) can be obtained. The higher stress triaxiality was localized near the cutting edge of the tool and acting on the cut surface in the clearance of 18.75 %t and it starts fracturing at the early stage of punch displacements. Hence, the sheared surface is smaller. The value of critical ductile fracture criteria (C) is affected by the stress triaxiality and punch-die clearance and it is not material-constant.
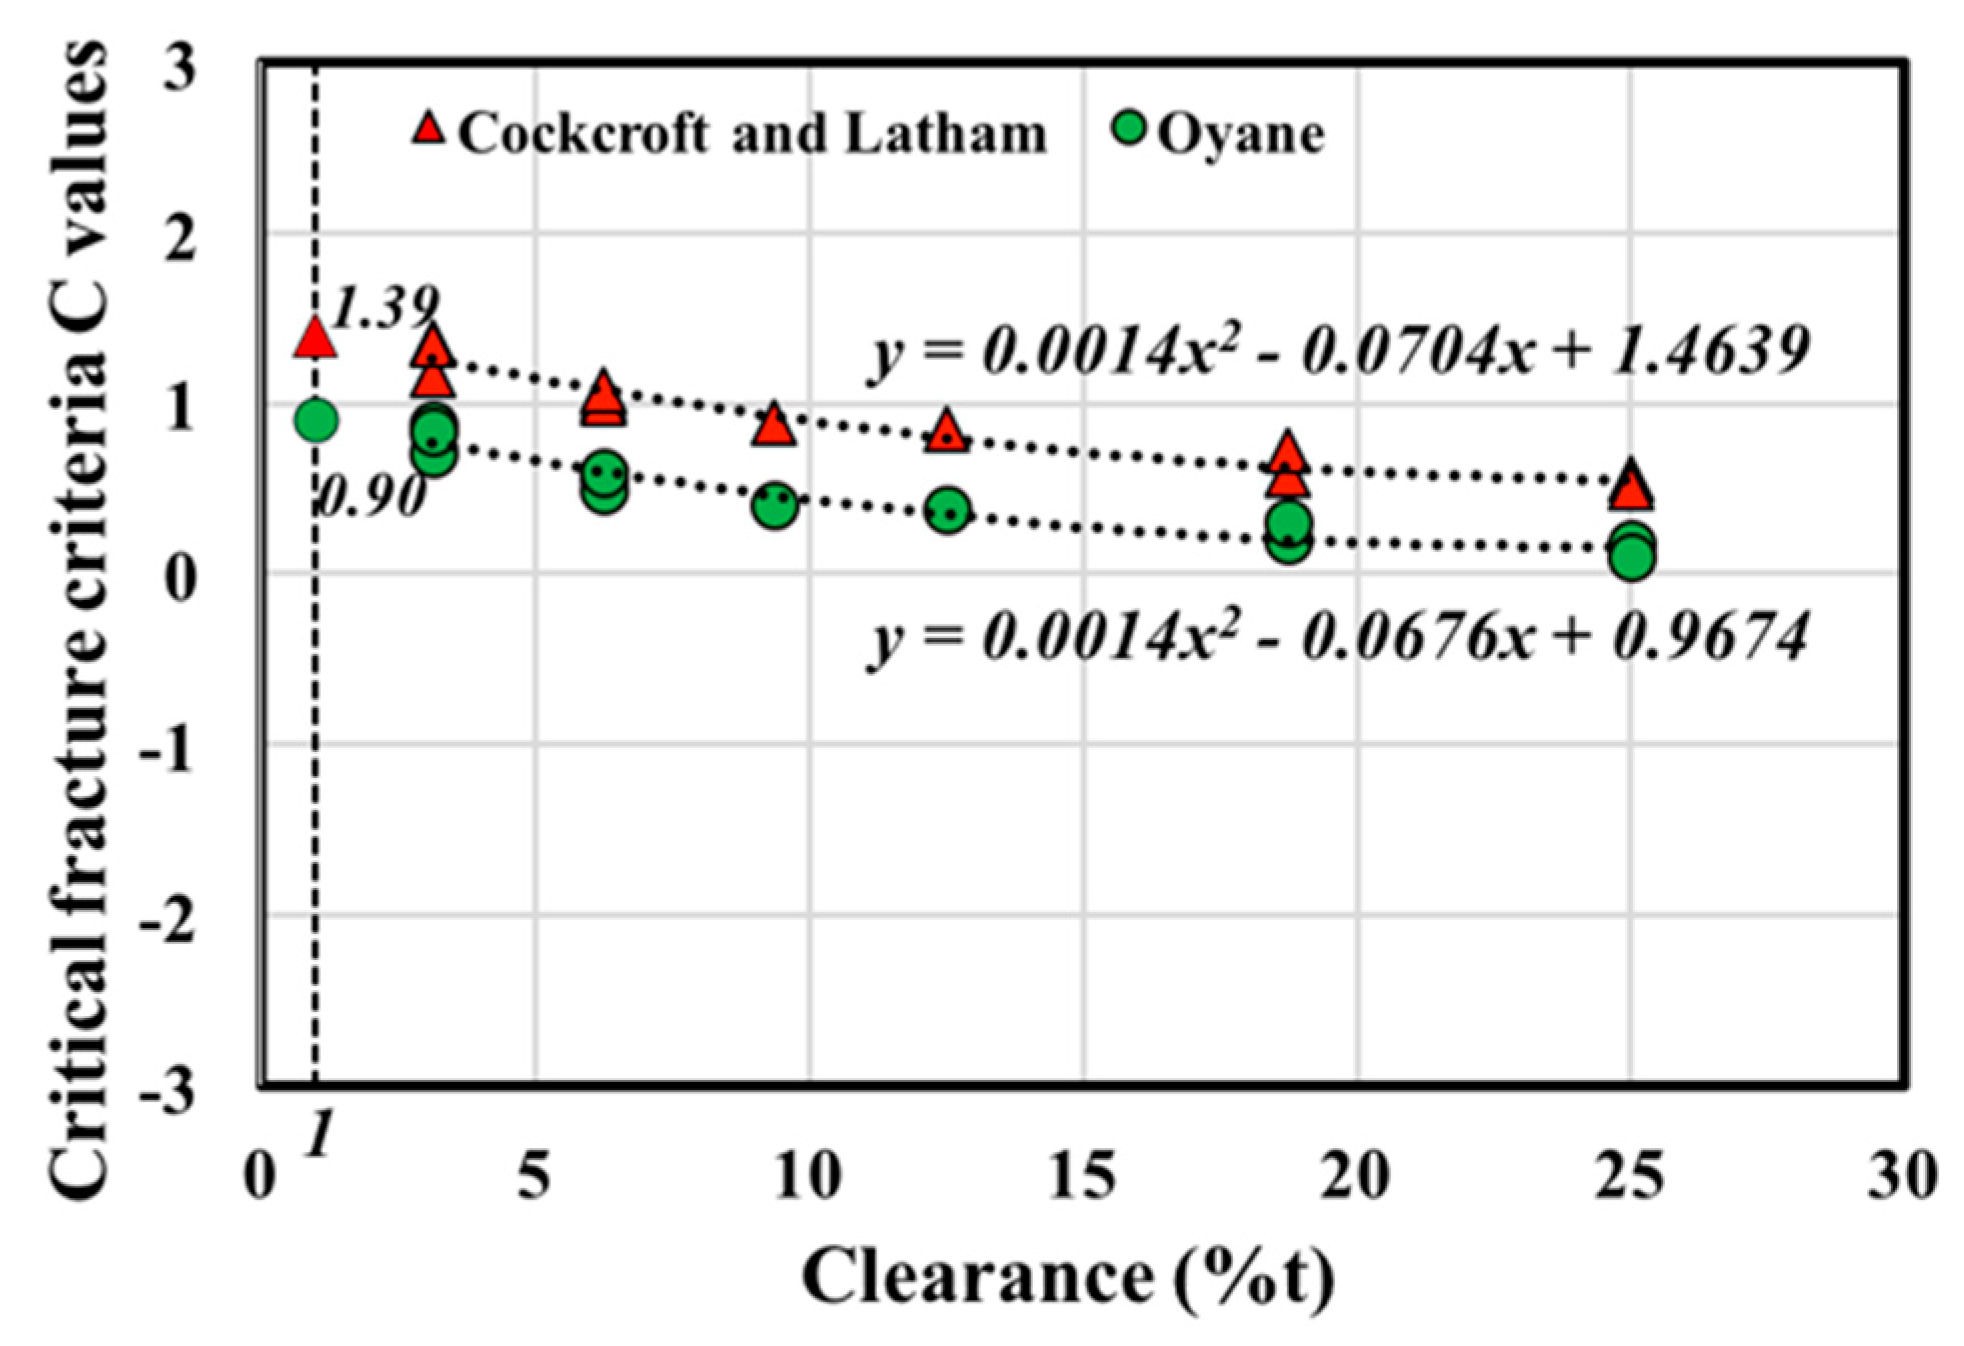
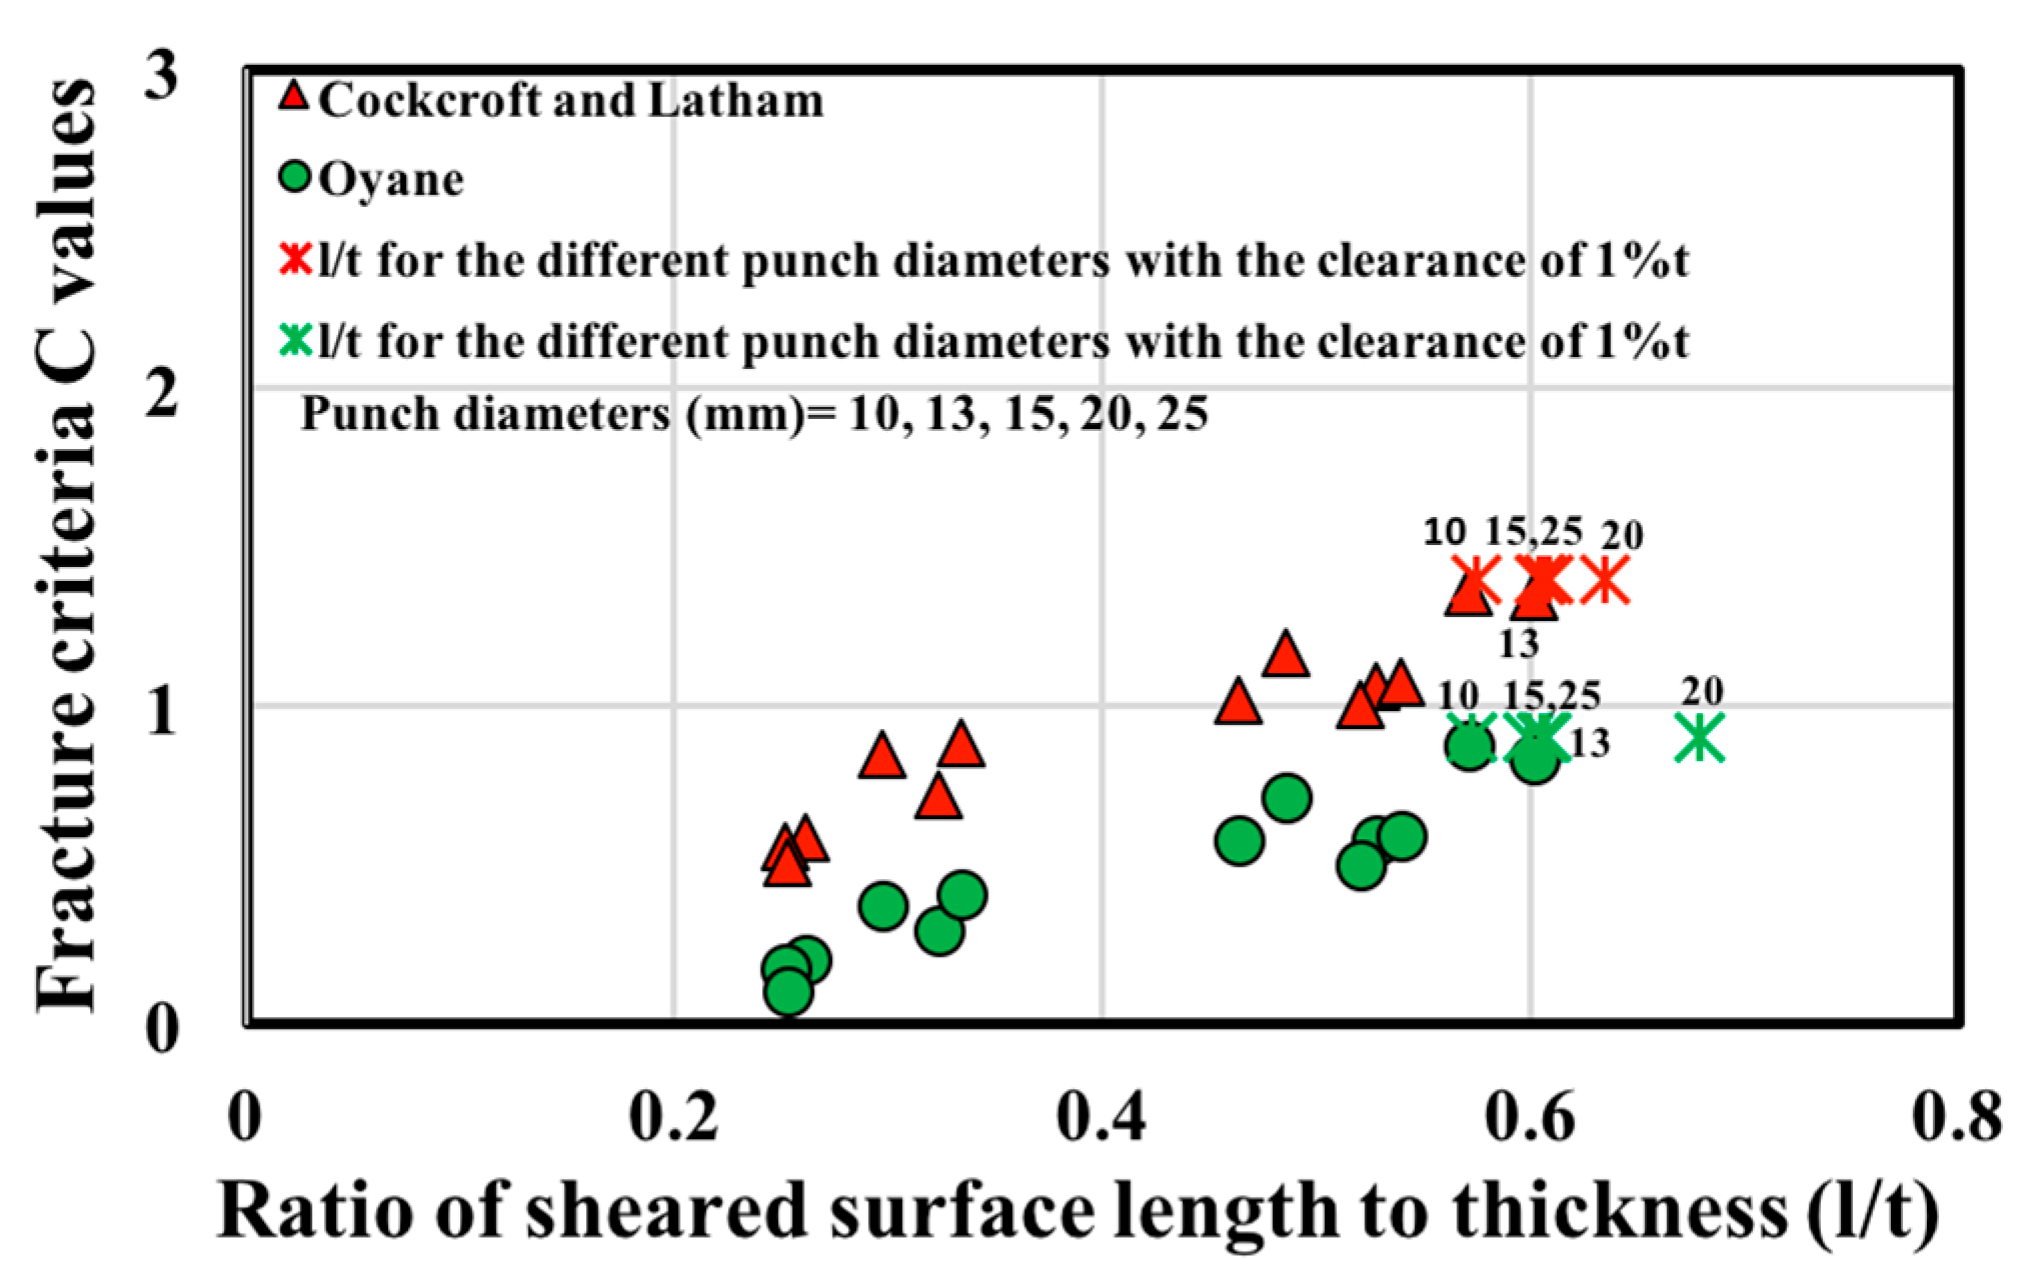
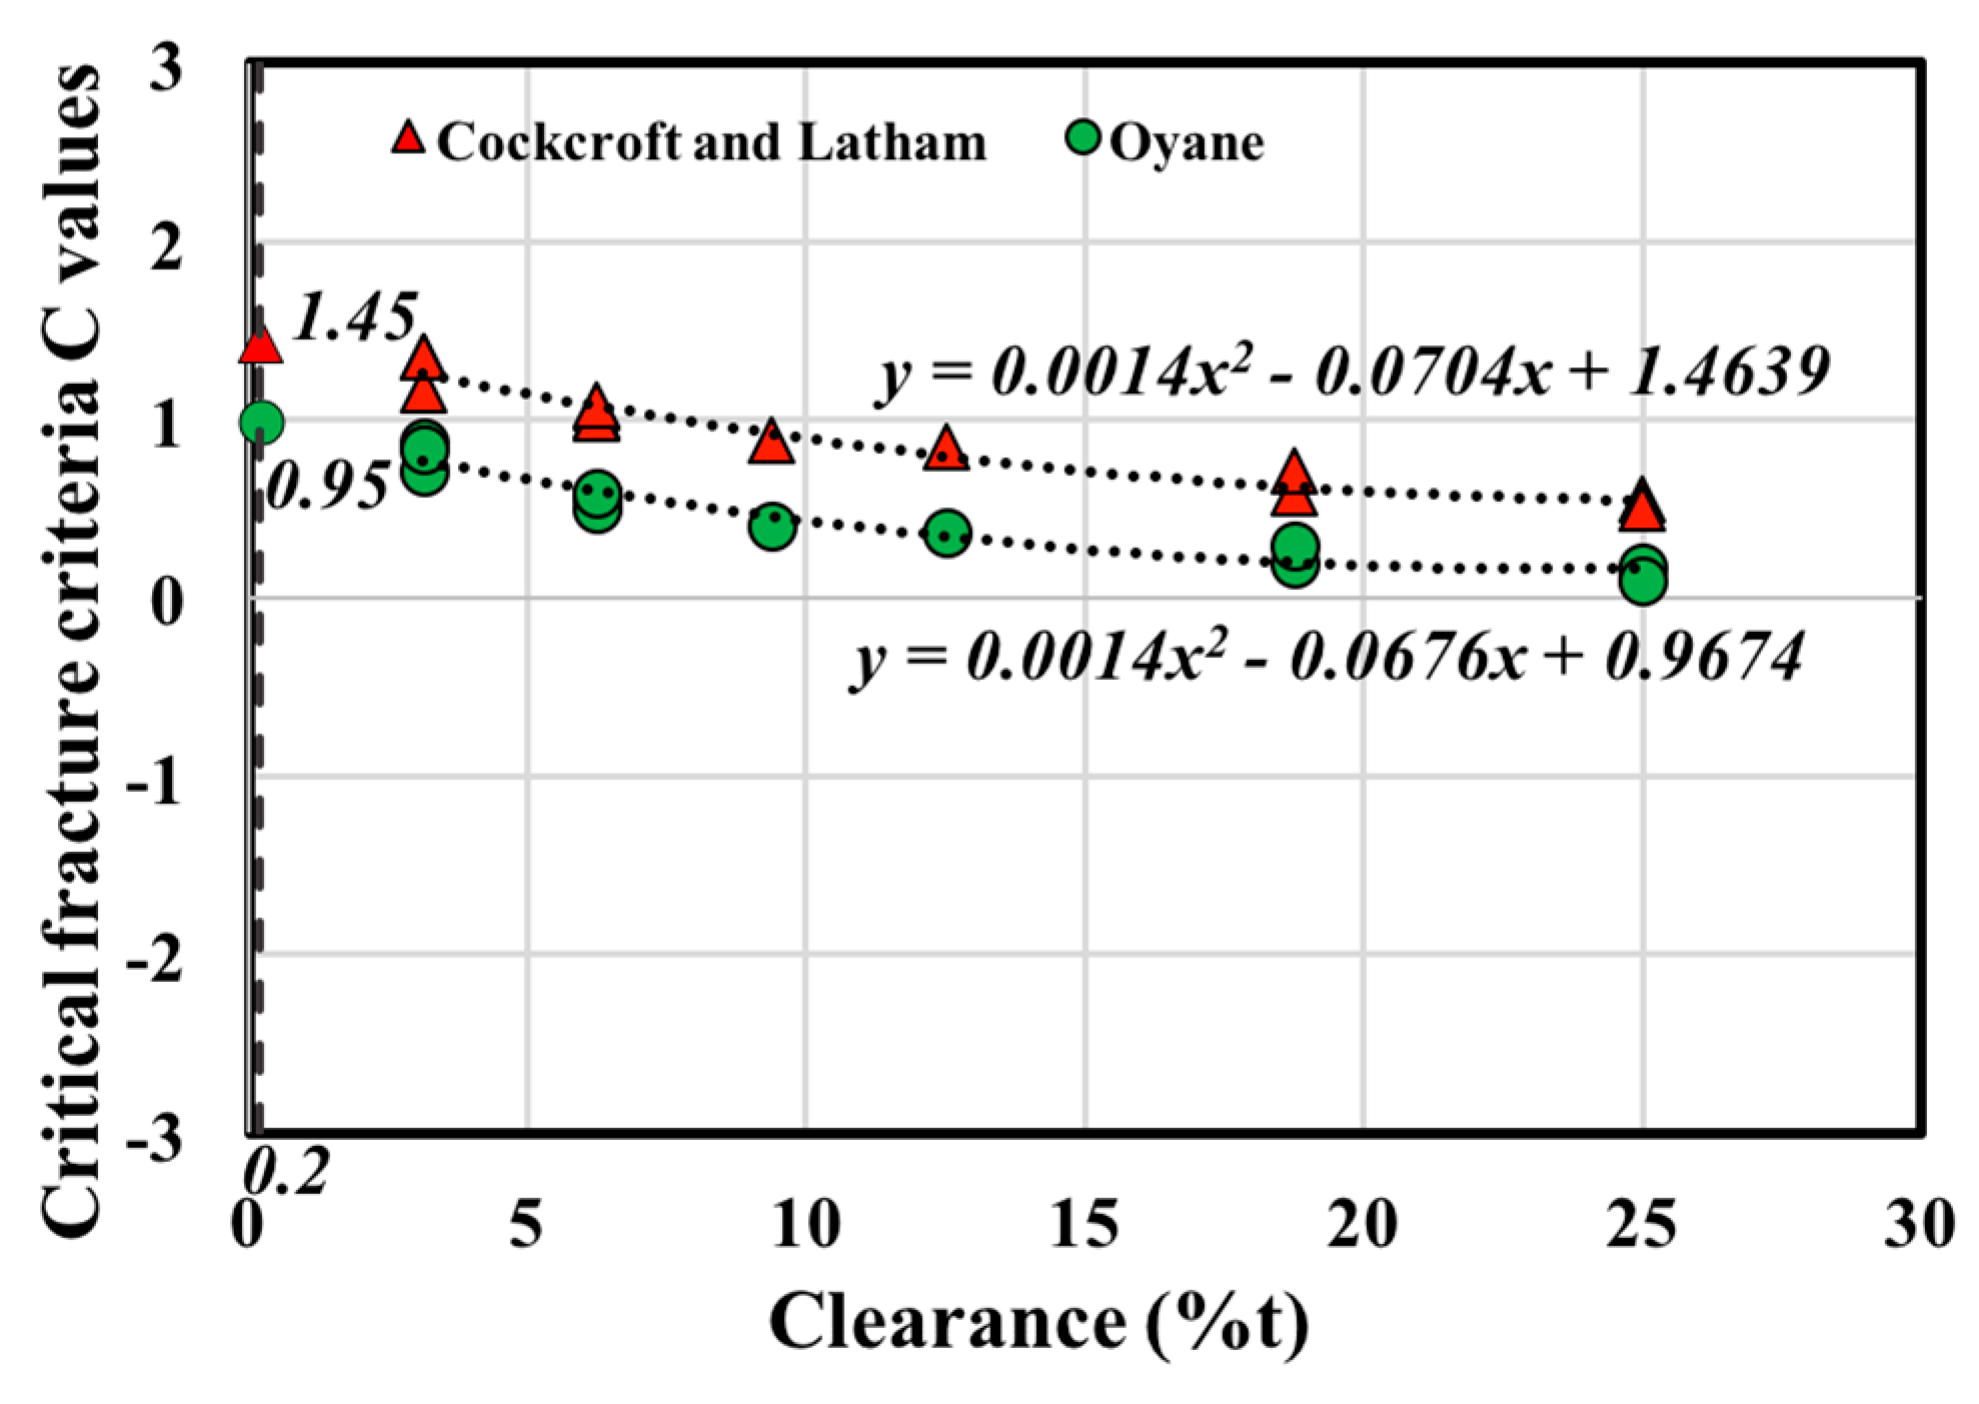
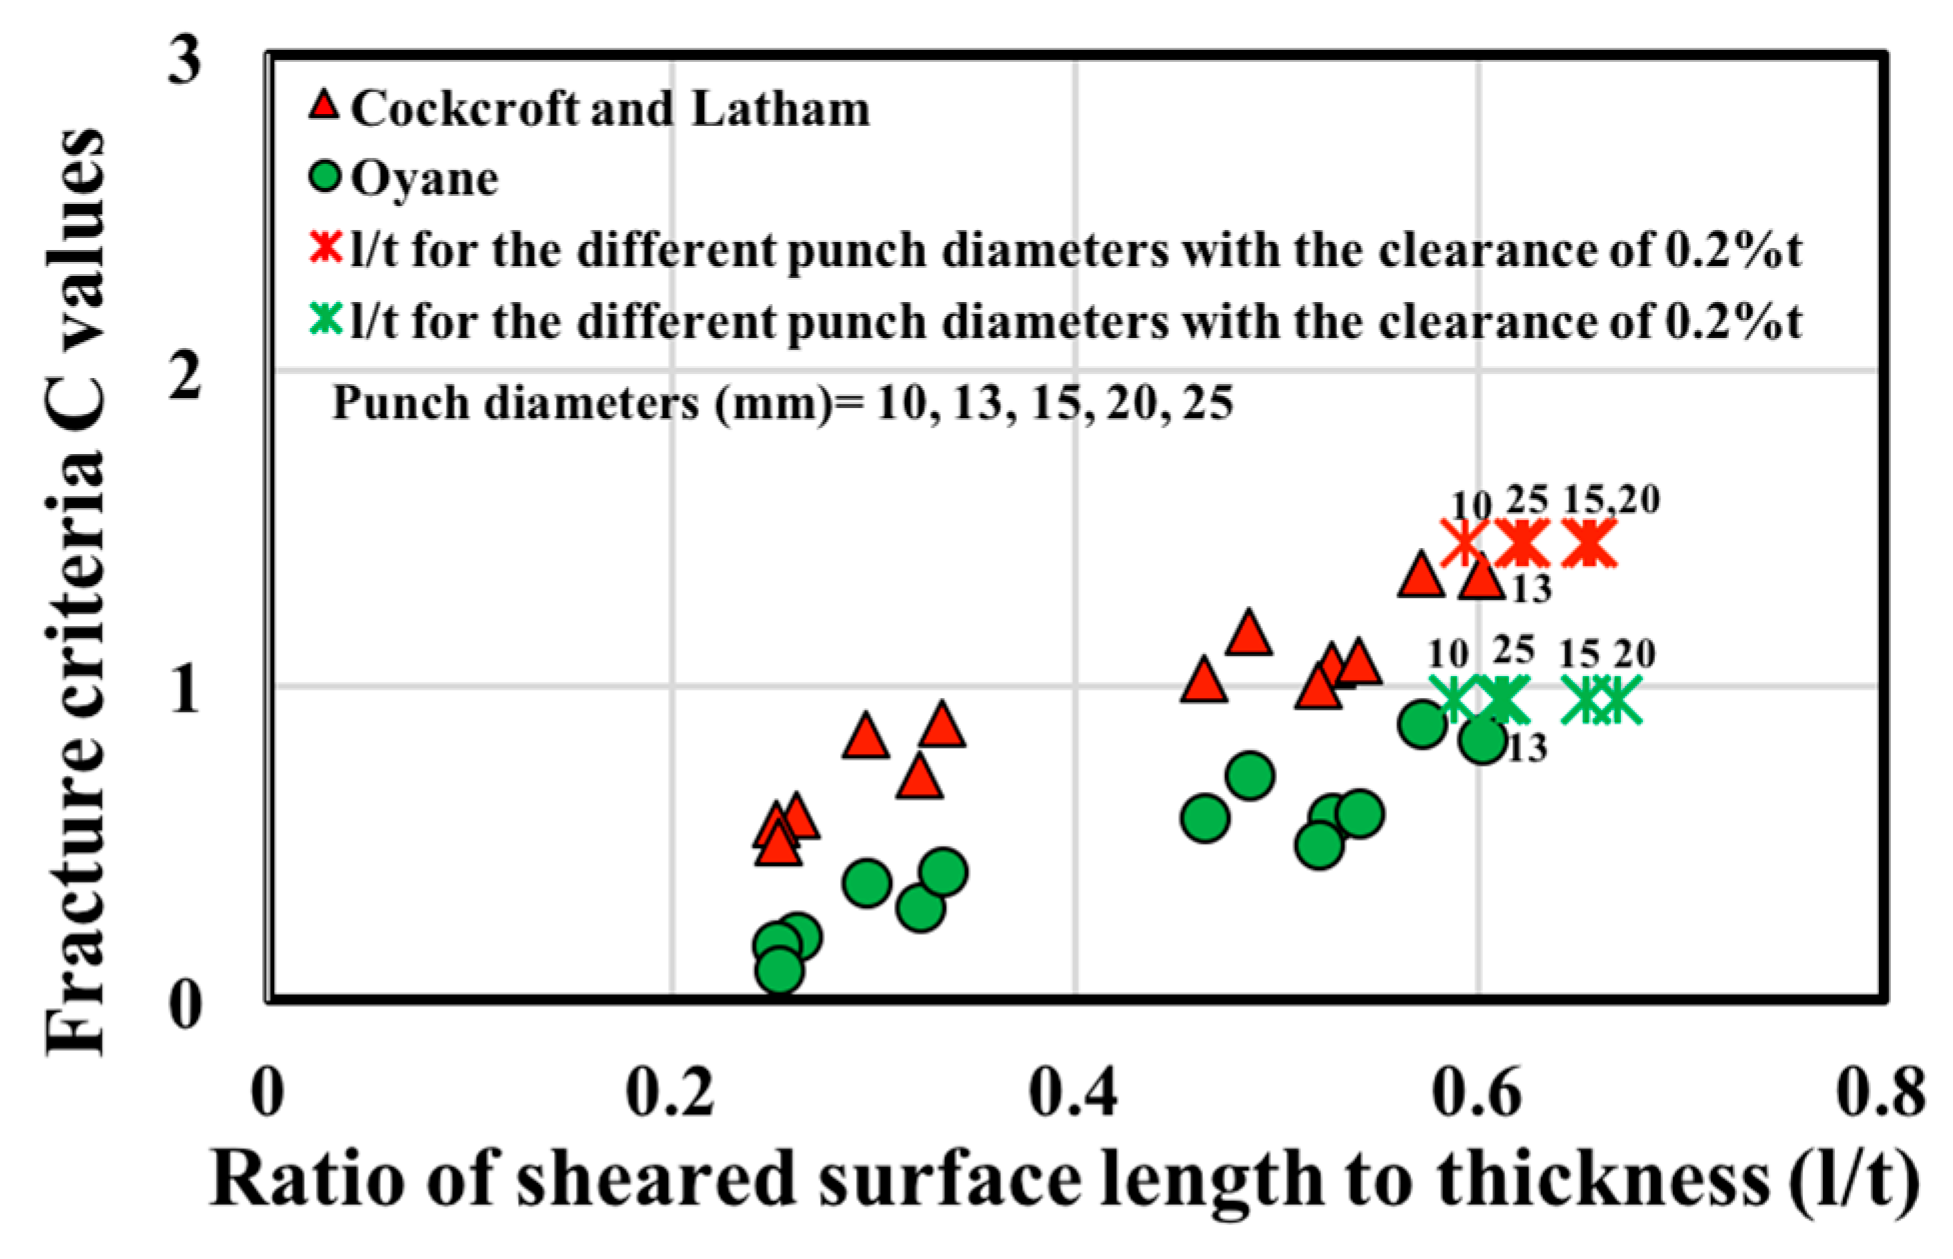
The sheared surface lengths of material thicknesses of 1.6 mm for clearances of 1 %t and 0.2 %t with the different punch diameters (10, 13, 15, 20, and 25 mm) were also predicted by using the values of the critical fracture criteria obtained from the Cockcroft–Latham and Oyane models. The values of the critical ductile fracture criteria (
C) were calculated from the polynomial equation for the clearances of 1 %t and 0.2 %t and these values were used to predict the sheared surface lengths. The results are shown in
Figure 11,
Figure 12,
Figure 13 and
Figure 14, respectively.
The figures show that the sheared surface lengths are equal for the clearances of 3.125 %t and 1 %t with different punch diameters. However, for a punch diameter of 20 mm, the sheared surface length increases. The maximum and minimum differences between the sheared surface lengths predicted by the Oyane critical fracture criterion value are higher than the differences predicted by the Cockcroft and Latham critical value. The maximum difference between the sheared surface lengths predicted by Cockcroft and Latham critical value is 0.06 mm and the minimum difference is 0.002 mm for both cases. A larger sheared surface length can be obtained for a clearance of 0.2 %t. A clearance of less than 1 %t is preferable for achieving a larger sheared surface for SPCC, and the fracture surface is very short.
The blank thickness of 1.6 mm and the punch diameter of 30 mm is also considered to clear the effect of punch diameter on the sheared surface length. The values of the critical ductile fracture criteria (
C) of Cockcroft-Latham and Oyane were calculated for different clearances and these values were used to predict the shear surface length (
l/t) with the punch diameter of 30 mm. The results are shown in
Table 5.
The results indicate that the length of sheared surfaces predicted by the punch diameter of 30 mm is smaller than the length of sheared surfaces predicted by punch diameters of 10, 13, 15, 20, and 25 mm for the same clearances of 0.2 %t and 1 %t. This is due to the fact that higher stress triaxiality has developed in the clearance zone at the early stages of punch displacement and the high stress triaxiality leads to an earlier fracture.
The values of the critical ductile fracture criteria (
C) show the fracture initiation determined by using punch diameters of 10, 15, 20, and 25 mm. Hence, the value of the critical ductile fracture criteria obtained from the
Figure 11 can be used for the prediction of fracture initiation in punching processes with punch diameters less than 25 mm. Through the results, it was found that the effect of the punch diameter on the sheared surface length also should be taken into account for the prediction of the fracture initiation point in the punching processes.
